Optima - Watch Lucien Picard - Free user manual and instructions
Find the device manual for free Optima Lucien Picard in PDF.


User questions about Optima Lucien Picard
0 question about this device. Answer the ones you know or ask your own.
Ask a new question about this device
Download the instructions for your Watch in PDF format for free! Find your manual Optima - Lucien Picard and take your electronic device back in hand. On this page are published all the documents necessary for the use of your device. Optima by Lucien Picard.
USER MANUAL Optima Lucien Picard
- Brand Story 03
- General Information 04
- Movement Instructions 06
- Quartz 2 Hands and 3 Hands Instructions 06
- Quartz Multifunction Instructions 08
- Quartz Chronograph Instructions 17
- Quartz GMT Instructions 24
• Water Resistance 27
• Automatic Instructions and Maintenance 28 - Deployment Clasp and Buckle Instructions 30
- SAPPHITEK™ Crystal Warranty 32
To serve you better please register your watch at www.witnesswatch.com/help.

natural_image
Black-and-white photo of a man in a white shirt and dark pants, seated with hands clasped (no visible text or symbols)Brand Story
LUCIEN PICCARD
Lucien Piccard, a brand enriched in heritage and classic, timeless style was founded in 1923, in Switzerland. Many generations have chosen Lucien Piccard for their superb artisanship and innovative design. For over 90 years, Lucien Piccard timepieces have been worn on the wrists of royalty, dignitaries and celebrities worldwide.
Lucien Piccard watches today reflect back on a rich watchmaking heritage, incorporating the precision craftsmanship and classic design elements of the brand's DNA with updated highly stylized contemporary aspects. From the meticulously designed dials with applied numbers and multi-layered detail to the generously appointed cases, you will prize the modern, yet classic luxury of a Lucien Piccard timepiece.
LUCIEN PICCARD
"A Modern Tale of Classic Luxury"
We congratulate you on receiving your Lucien Piccard watch and thank you for your purchase.
General Information:
• It is recommended to rinse your watch with fresh water after contact with salted water.
- It is recommended not to use the crown or pushers if the watch is wet and certainly not while it is immersed in water.
• Water resistant watches should be inspected and serviced once a year.
Helpful Watch Tips:
- A Quartz Watch is battery powered and does not require winding. Eventually the battery will need to be replaced.
-
An Automatic Watch is a mechanical watch that winds itself and does not require a battery. When worn daily, the movement of your wrist causes the mainspring to wind progressively, eliminating the need for additional winding. To start your automatic, you can hand wind it by rotating the crown clockwise a number of turns while in its normal operating position (screw down crowns will need to be unscrewed first), or by swinging it side to side for 30 seconds. We recommend housing an automatic in a watch winder box.
-
A Manual Wind Watch is a mechanical watch that does not require a battery, but can only be wound by hand. To wind it, turn the crown clockwise while it is in its normal operating position until you feel resistance. This type of watch should be wound daily.
- For Automatic and Mechanical watches, it is strongly recommended to avoid adjusting the date, month, year or any other functions between 9PM to 2AM. Also, most automatic and mechanical watches should not be worn while doing sports or golfing activity due to possible shock damage to the mechanisms inside the movements.
Important Things to Know:
- Many Lucien Piccard watches are equipped with a screw down crown to help prevent water infiltration. For watches with a screw down must first gently rotate the crown counterclockwise until it springs out. The crown must then be gently pulled out to the appropriate position for time or date setting.
• Never correct date between 9:00PM and 1:00AM. - It is very important after setting your watch that you gently push in and screw down the crown firmly to ensure water resistance.
• Not screwing down the crown will cause water damage and void warranty.
• To serve you better please register your watch at www.witnesswatch.com/help.
Operating Instructions
Not all movements may be displayed in this booklet. If you do not find operating instructions for your model, please visit www.witnesswatch.com to search your style and click on User Manual.
Quartz 2 Hands and 3 Hands Instructions
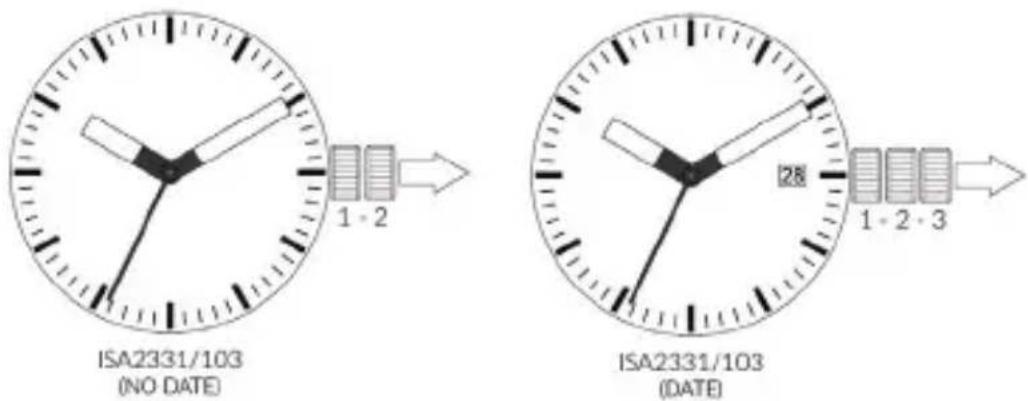
(ISA2331, Miyota 2015, 2315, 2305 or similar)
Time Setting For Models without Calendar
• Gently unscrew crown counter-clockwise and/or pull out the crown to Position 2.
- Adjust the time by turning the crown in the desired direction.
• Gently push in and/or screw down the crown clockwise back into Normal Position.
Time Setting For Models without Calendar and Crown
• To adjust time push button is located on the case back.
- Push continually for quick setting and push step by step to adjust the minute.
Time Setti ng For Model with Calendar
• Gently unscrew crown counter-clockwise and/or pull out the crown to Positi on 2.
• Turn the crown until the preview days date appears in the calendar frame.
- Pull out the crown to Positi on 3, and advance the hour and the minute hands until I the desired date appears.
(Please set ti me according to AM or PM).
- Adjust the time by turning the crown in the desired direction.
• Gently push in and/or screw down the crown clockwise back into Normal Position.
Note: For best accuracy when setting your time mepiece. If your watch has three hands, gently pull out the crown when the second hand points at the 12 o'clock or "00" seconds.
(1 = Normal Position, 2 = Calendar Position, 3 = Time Setting Position)
Important Note: It is very important after adjusting the date and setting the time on your watch that you gently push in and screw down the crown firmly to ensure water resistance. Not doing so will void warranty.
text_image
ISA2331/103 (NO DATE) ISA2331/103 (DATE)Quartz Multi functi on Instructi ons
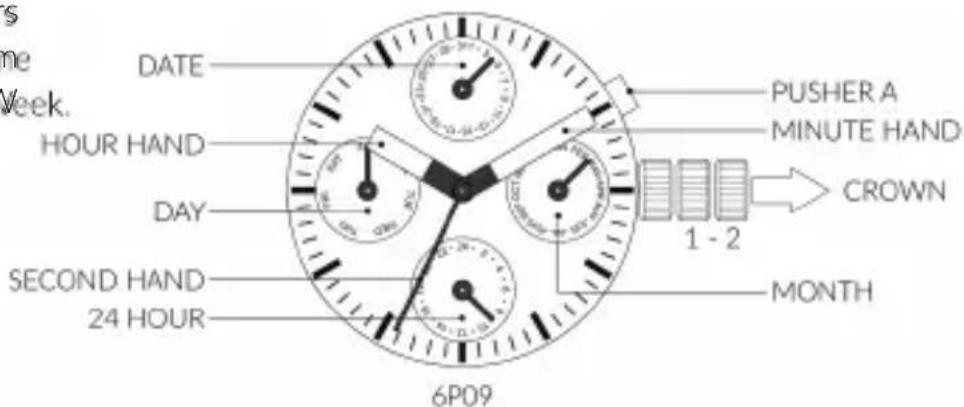
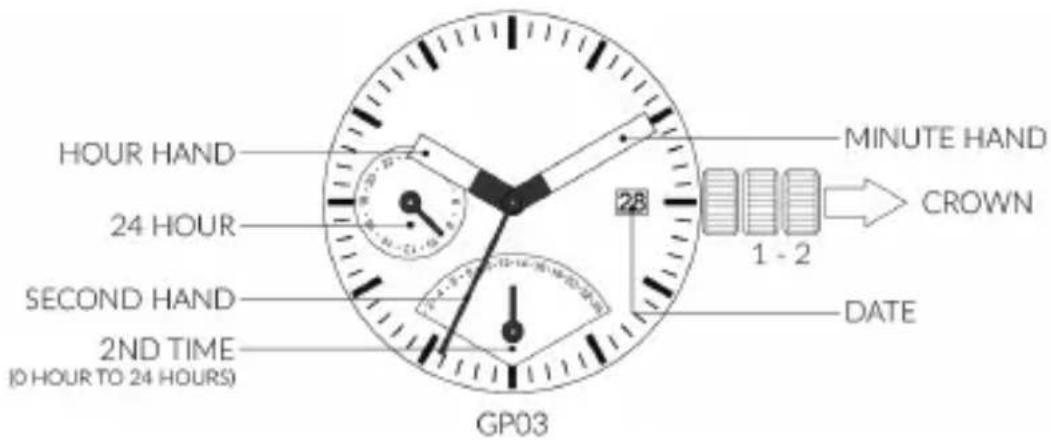
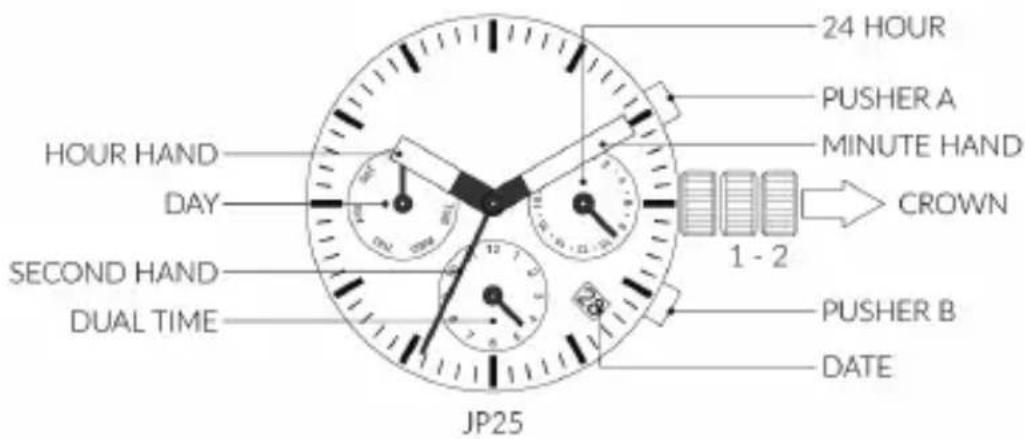
(Miyota 6P09, GP03, JP25, VD74, VX36 or similar)
Watch Functions: Hour, Minute and Second Hands. Counters Date of the Month, Dual Time 24H, Date and Day of the Week.
text_image
S ne Week. DATE HOUR HAND DAY SECOND HAND 24 HOUR 6P09 PUSHER A MINUTE HAND CROWN 1 - 2 MONTHDay Setti ng
• Gently unscrew crown counter-clockwise and/or pull out the crown to Positi on 2.
- Turn the hour/minute hands in a clockwise direction to set day. In order to set the day, you must advance the hour hand by 24 hours per day.
Note: If the day is set by turning the crown counterclockwise, there is the possibility the date will not change over.
• Do not set the day by turning the crown in counterclockwise direction.
• The day changes somewhere between 0:00am and 5:30am or a litt le later.
Time Setting
• Crown remains in Position 2.
- Press Pusher A step by step to adjust the desired date. To ensure time is set accurately, first turn the minute hand 5 minutes ahead of desired time and then turn back (in a counterclockwise) to the desired time.
- After setting the time, use a time signal to synchronize the watch by gently pushing crown to the normal position to start the second hand going.
Note: Make sure you have correctly set AM/PM before setting the time.
Month Setting
• Each time the month-adjustment button is pusher (Pusher A), the month advances one month at a time. Be sure to press firmly on Pusher A when making month changes.
Note: Do not set the month when the date hand is between the 26 ^th and 31 ^st . Move the date hand out of this period. After this operation, return the date hand to the proper setting. (When the date hand is between the 26 ^th and 31 ^st , month quick setting cannot be made or if a quick setting is attempted, the month may not advance to the next month as normal).
The month and date are synchronized such that when adjusting the date at the end of short months (less than 31 days), the month automatically adjusts to the correct month. The month hand begins changing to the next month around midnight of the 30th day. It completes the change around midnight of the 31 ^st . (On the 31st, the position of the month between the current and next month).
Day Setti ng
• Gently unscrew crown counter-clockwise and/or pull out the crown to Positi on 1.
• Turn the crown counterclockwise to set the date quickly.
Note: Do not set the date between the hours 9:00pm and 0:30am. The date may not change correctly the next day.
Watch Functions: Hour, Minute and Second Hands. Counters 24 Hour, 2nd Time (0 Hour to 24 Hours) and Date.
text_image
HOUR HAND 24 HOUR SECOND HAND 2ND TIME (0 HOUR TO 24 HOURS) 28 MINUTE HAND CROWN 1 - 2 DATE GP03Time Setting
• Gently unscrew crown counter-clockwise and/or pull out the crown to Position 2.
• Turn the crown to set hour and minute hands.
- Gently push in and/or screw down the crown clockwise back into Normal Position, second hand begins to run.
Day Setting
• Gently unscrew crown counter-clockwise and/or pull out the crown to Position 1.
• Turn the crown clockwise to set date.
If the date is between the hours of around 9:00pm and 2:00am, the date may not change on the following day.
• Gently push in and/or screw down the crown clockwise back into Normal Position.
2 ^nd Time (24 Hours) Setting
• Crown remains in Position 1.
• Turn the crown counter-clockwise to set the 2nd tine (24 Hour).
Gently push in and/or screw down the crown clockwise back into Normal Position.
Watch Functions: Hour, Minute and Second Hands. Counters 24 Hour, Dual Time, Day of the Week and Date.
text_image
24 HOUR PUSHER A MINUTE HAND CROWN 1 - 2 HOUR HAND DAY SECOND HAND DUAL TIME JP25 PUSHER B DATEDay Setti ng
• Gently unscrew crown counter-clockwise and/or pull out the crown to Positi on 2.
• Turn the crown clockwise to set the day.
• Gently push in and/or screw down the crown clockwise back into Normal Position.
The day is changed during the period from 0am to 5am.
Date Setting
• Gently unscrew crown counter-clockwise and/or pull out the crown to Position 1.
• Turn the crown clockwise to set the date.
If the date is set between the hours of around 9:00pm and 1:00am, the date may not change on the following day.
• Gently push in and/or screw down the crown clockwise back into Normal Position.
Time Setting
• Gently unscrew crown counter-clockwise and/or pull out the crown to Position 2.
• Turn the crown to set hour and minute hands.
- Gently push in and/or screw down the crown clockwise back into Normal Position, second hand begins to run.
Dual Time Setting
- Press Pusher A to set the dual time hand forward in units of 15 minutes.
- Press Pusher B to set the dual time hand back in units of 15 minutes.
The dual time hand can be put rapidly by continuously pressing Pusher A or B.
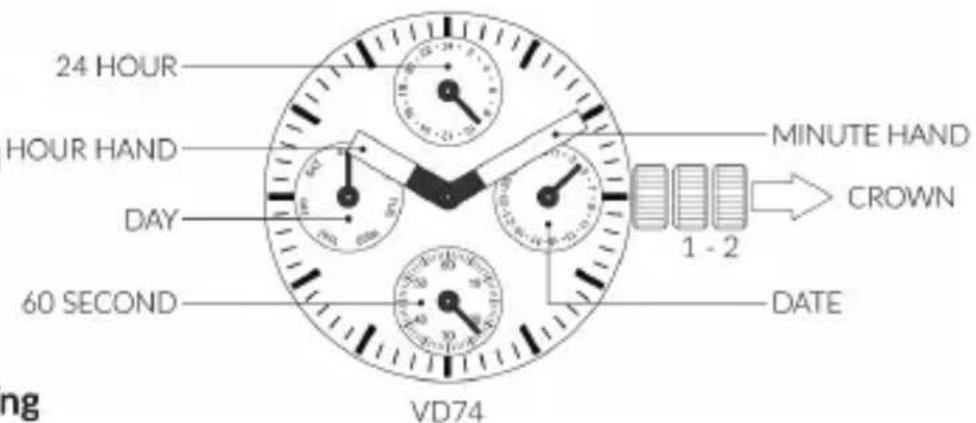
Watch Functions: Hour, Minute and Second Hands. Counters 24 Hour, Dual Time, Day of the Week and Date.
text_image
24 HOUR HOUR HAND DAY 60 SECOND VD74 MINUTE HAND CROWN 1 - 2 DATE ngTime, Day & Date Setting
- Gently unscrew crown counter-clockwise and/or pull out the crown to Positi on 2, the small second hand is at the 12 o'clock positi on. It will stop on the spot and advance the hour and minute hands by turning the crown.
- Set the day by rotating the hour and minute hands clockwise.
(Check that the 24-hour hand is set correctly)
- Gently push in and/or screw down the crown clockwise back into Normal Positi on. Gently pull out the crown to Positi on 1.
- Set the date by rotating the crown in counter-clockwise direction.
• Gently push in and/or screw down the crown clockwise back into Normal Position.
Do not set the date between 10:00pm and 1:00am. Otherwise, the day may not change properly. If it is necessary to set the date during that ti me period, fi rst change the ti me to any ti me outside it, set the date and then reset the correct ti me.
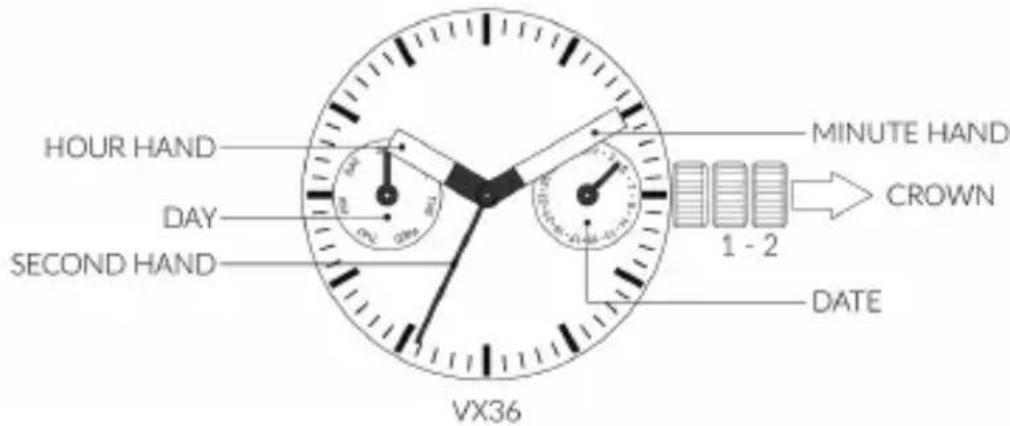
Watch Functions: Hour and Minute Hands. Counters Day of the Week and Date of the Month.
text_image
HOUR HAND DAY SECOND HAND VX36 MINUTE HAND CROWN 1 - 2 DATETime & Day Setting
- Gently unscrew crown counter-clockwise and/or pull out the crown to Positi on 2 when the second hand is at the 12 o'clock positi on.
- Turn the crown clockwise to advance the hour and minute hands until the day hand is set to the desired day of the week.
Note: The day hand will move back by turning the crown counter-clockwise.
• Turn to set the ti me taking AM or PM into consideration.
• Gently push in and/or screw down the crown clockwise back into Normal Position.
Advance Setting Technique
- To advance the day hand quickly, turn back the hour and minute hands 4 to 5 hours beyond the point of the day change (between 11:00pm and 4:00am), and then advance them again until the day hand is set to the next.
Note: The day hand will not move back by turning the crown counter-clockwise.
- When setting the minute hand, advance it 4 to 5 minutes ahead of the desired time and then turn it back to the exact time.
Date Setting
• Gently unscrew crown counter-clockwise and/or pull out the crown to Position 1.
• Turn the crown counter-clockwise to set date hand.
Note: The date hand will not move back by turning the crown clockwise.
• Gently push in and/or screw down the crown clockwise back into Normal Position.
Advance Setting Technique
• Do not set the date hand between 9:00pm and 1:00am. Otherwise, it may not turn properly.
• While settling the date hand, check that it moves properly in one-day increments.
• It is necessary to adjust the date on the first day after a 30 day month and February.
Quartz Chronograph Instructions
(Miyota OS11, 6S20, JS15, VD53, VK64 or similar)
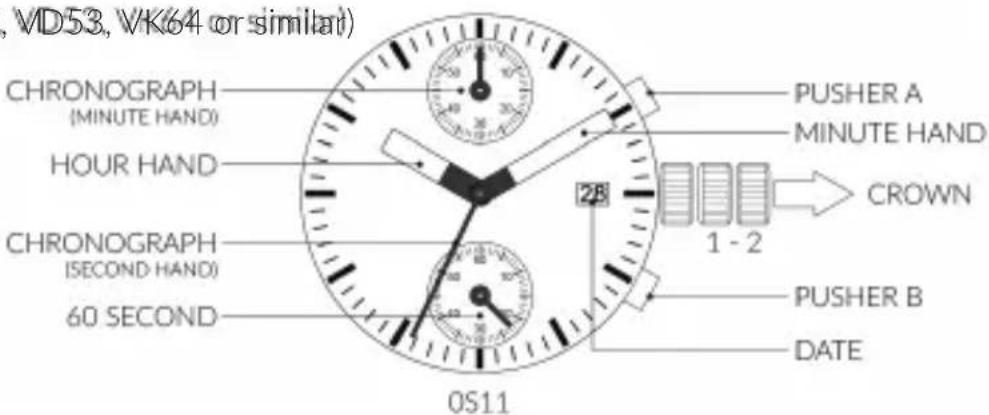
Watch Functions: Hour, Minute and Chronograph Hands with exposed date aperture on dial. Counter 30 Minutes and 60 Seconds.
text_image
, VD53, VK64 or similar) CHRONOGRAPH (MINUTE HAND) HOUR HAND CHRONOGRAPH (SECOND HAND) 60 SECOND 0511 PUSHER A MINUTE HAND CROWN 28 1 - 2 PUSHER B DATETime Setti ng
• Gently unscrew crown counter-clockwise and/or pull out the crown to Positi on 2.
• Turn the crown to set hour and minute hands.
- Gently push in and/or screw down the crown clockwise back into Normal Position, second hand begins to run.
Date Setti ng
• Gently unscrew crown counter-clockwise and/or pull out the crown to Positi on 1.
• Turn the crown counter-clockwise to set the date.
If the date is set between the hours of around 9:00pm and 1:00am, the date may not change on the following day.
• Gently push in and/or screw down the crown clockwise back into Normal Position.
Using Chronograph
This chronograph is able to measure and display time up to a maximum of 59 minutes 59 seconds. The chronograph 1/1 second hand keeps continuously for 59 minutes 59 seconds after starting.
Measuring time with the chronograph:
- The chronograph can be started and stopped each time by pressing Pusher A.
- Pressing Pusher B resets the chronograph and the chronograph second hand and chronograph minute hand return to zero position.
Resetting Chronograph
This procedure should be performed when the chronograph second hand does not return to zero position after the chronograph has been reset, and including after the battery has been replaced.
- Gently unscrew crown counter-clockwise and/or pull out the crown to Position 2.
- Press Pusher A to set the chronograph second hand to the zero position. The chronograph hand can be advanced rapidly by continuously pressing Pusher A.
- Once the hand has been zeroed, gently push in and/or screw down the crown clockwise back into Normal Position.
Do not push crown to Normal Position while the chronograph second hand returns to zero position. It stops on the way when crown has returned to Normal Position and its position is recognized as zero position.
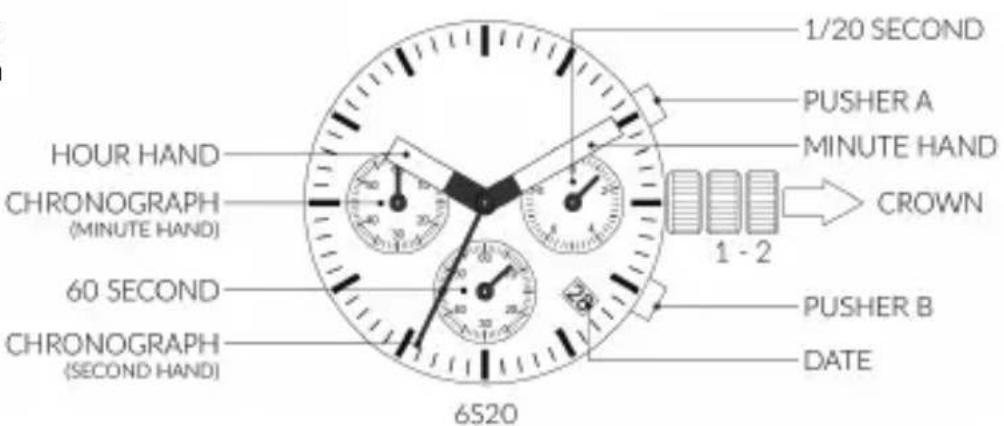
Watch Functions: Hour, Minute and Chronograph Hands with exposed date aperture on dial. Counters Small Seconds, 1/20 Seconds and 60 Minutes.
text_image
1/20 SECOND PUSHER A MINUTE HAND CROWN 1 - 2 HOUR HAND CHRONOGRAPH (MINUTE HAND) 60 SECOND CHRONOGRAPH (SECOND HAND) 6520 PUSHER B DATETime Setti ng
• Gently unscrew crown counter-clockwise and/or pull out the crown to Positi on 2.
• Turn the crown to set hour and minute hands.
- Gently push in and/or screw down the crown clockwise back into Normal Position, second hand begins to run.
Date Setti ng
• Gently unscrew crown counter-clockwise and/or pull out the crown to Positi on 1.
• Turn the crown counter-clockwise to set the date.
If the date is set between the hours of around 9:00pm and 1:00am, the date may not change on the following day.
- Aft er the date has been set, gently push in and/or screw down the crown clockwise back into Normal Position.
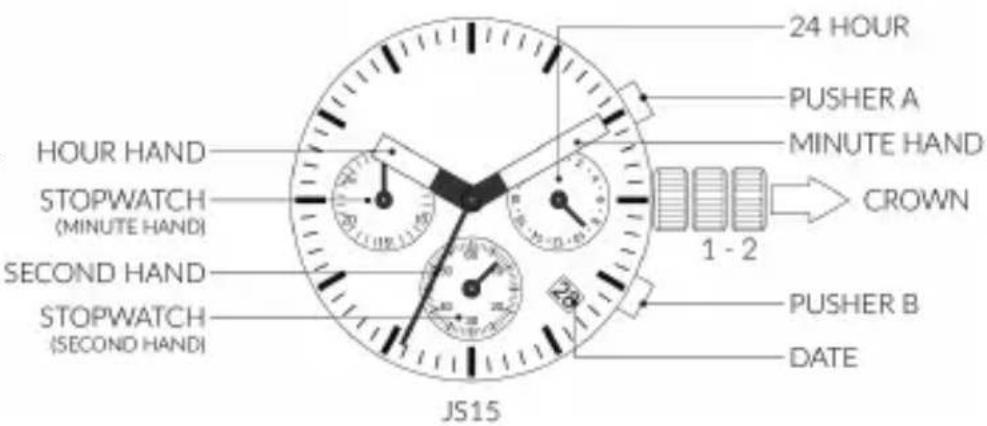
Watch Functions: Hour, Minute and Second Hands with exposed date aperture on dial. Counters 24 Hour, Stopwatch 60 Seconds and 30 Minutes.
text_image
24 HOUR PUSHER A MINUTE HAND CROWN HOUR HAND STOPWATCH (MINUTE HAND) SECOND HAND STOPWATCH (SECOND HAND) PUSHER B DATE JS15Time Setti ng
• Gently unscrew crown counter-clockwise and/or pull out the crown to Positi on 2.
• Turn the crown to set hour and minute hands.
- Gently push in and/or screw down the crown clockwise back into Normal Position, second hand begins to run.
Date Setti ng
• Gently unscrew crown counter-clockwise and/or pull out the crown to Positi on 1.
• Turn the crown counter-clockwise to set the date.
If the date is set between the hours of around 9:00pm and 1:00am, the date may not change on the following day.
- Aft er the date has been set, gently push in and/or screw down the crown clockwise back into Normal Position.
Using Stopwatch
This stopwatch is able to measure and display time up to a maximum of 30 minutes. Stopwatch will stop automatically after running continuously for 30 minutes.
- Press Pusher A to start the stopwatch.
- The stopwatch can be started and stopped each time Pusher A is pressed.
- Pressing Pusher B resets the stopwatch and stopwatch minute and second hands return to their zero positions.
Resetting Stopwatch
This procedure should be performed when the stopwatch second and minute hand does not return to zero position.
- Gently unscrew crown counter-clockwise and/or pull out the crown to Position 2.
- Press Pusher A to set the stopwatch second hand forward. Press Pusher B to set the stopwatch second hand back.
The stopwatch minute hand is synchronized with stopwatch second hand.
The stopwatch second hand can be advanced rapidly by continuously pressing Pusher A or B.
- Once both hands have been zeroed, gently push in and/or screw down the crown clockwise back into Normal Position.
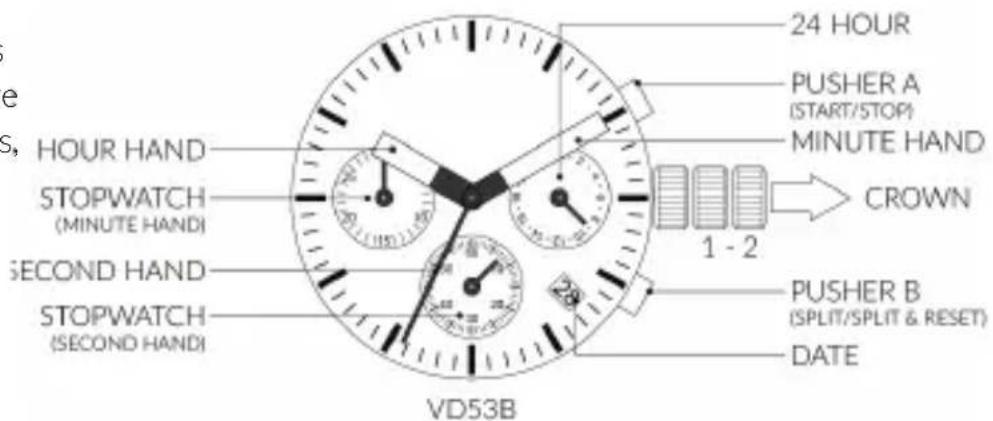
Watch Functions: Hour, Minute and Second Hands with exposed date aperture on dial. Counters 24 Hours, Small Seconds and 30 Minutes.
text_image
24 HOUR PUSHER A (START/STOP) MINUTE HAND CROWN HOUR HAND STOPWATCH (MINUTE HAND) SECOND HAND STOPWATCH (SECOND HAND) PUSHER B (SPLIT/SPLIT & RESET) DATE VD53BTime & Date Setting
• Gently unscrew crown counter-clockwise and/or pull out the crown to Positi on 1.
• Turn the crown clockwise until the preview days date appears.
- Gently pull out the crown to Positi on 2 when the second hand is at the 12 o'clock positi on. It will stop on the spot. Set the hands to the desired time of the day (make sure AM/PM is set correctly) by turning the crown. When the crown is at Positi on 2, do not press any pushers. Otherwise the chronograph hands will move.
- Gently push in and/or screw down the crown clockwise back into Normal Positi on in accordance with ti me signal.
Do not set the date between 9:00pm and 1:00am, otherwise the day may not change properly. If it is necessary to set the date during the ti me period, firstly change the ti me to any ti me outside it, set the date and then reset the correct ti me.
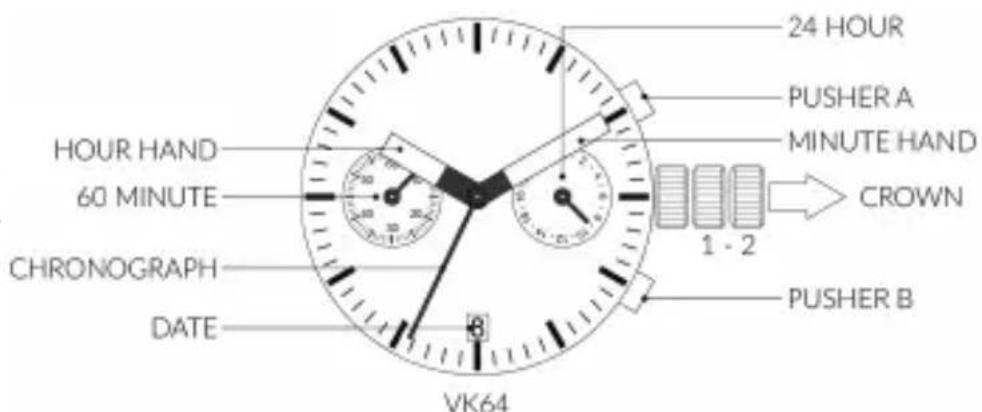
Watch Functions: Hour, Minute and Chronograph Hands with exposed date aperture on dial. Counters 24 Hours and 60 Minutes.
text_image
24 HOUR PUSHER A MINUTE HAND CROWN 1 - 2 HOUR HAND 60 MINUTE CHRONOGRAPH DATE PUSHER B VK64Time Setti ng
• Gently unscrew crown counter-clockwise and/or pull out the crown to Positi on 2.
• Turn the crown to set hour and minute hand (check that AM/PM is set correctly).
- Gently push in and/or screw down the crown clockwise back into Normal Positi on. If the crown is pulled to Positi on 2 while the chronograph is started, the chronograph hands will continue to move. This is not a malfunction.
Date Setti ng
• Gently unscrew crown counter-clockwise and/or pull out the crown to Positi on 1.
• Turn the crown clockwise for date setting.
Do not set the date between 9:00pm and 3:00am, otherwise the day may not change properly. If it is necessary to set the date during that ti me period, fi rst change the ti me to any ti me outside it, set the date and then reset the correct ti me.
• Gently push in and/or screw down the crown clockwise back into Normal Position.
Quartz GMT Instructions
(ISA8173B, ISA8176 or similar)
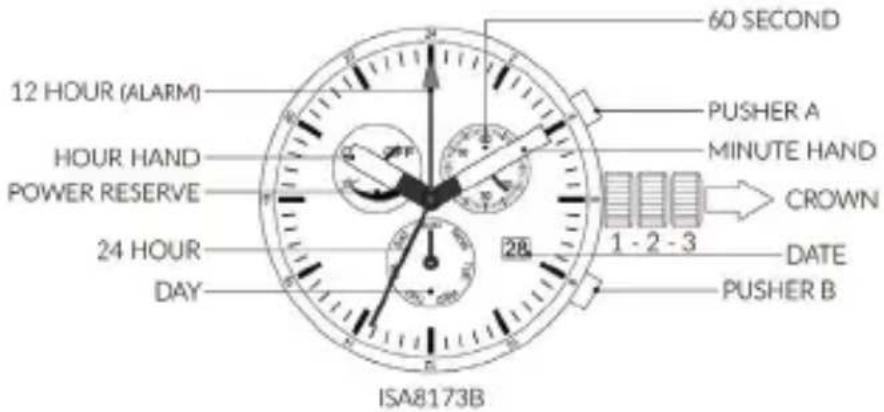
Watch Functions: Hour, Minute, 24HR GMT and 12HR Alarm Hands with exposed date aperture on dial. Counters 60 Seconds, Day of the Week and Power Reserve.
text_image
60 SECOND 12 HOUR (ALARM) PUSHER A MINUTE HAND CROWN HOUR HAND POWER RESERVE 24 HOUR DAY 1 - 2 - 3 DATE PUSHER B ISA8173BTime Setti ng
• Gently unscrew crown counter-clockwise and/or pull out the crown all the way to Positi on 3.
- Adjust the time by turning the crown in the desired direction.
• Gently push in and/or screw down the crown clockwise back into Normal Position.
Day Setting
• Gently unscrew crown counter-clockwise and/or pull out the crown all the way to Positi on 3.
- Adjust the day by turning the crown counter-clockwise the necessary revoluti ons to change the day. This should always be done before setting the date.
(Please set ti me according to AM or PM).
Date Setting
• Gently unscrew crown counter-clockwise and/or pull out the crown to Positi on 2.
- Adjust the date by turning the crown clockwise to set date.
• Gently push in and/or screw down the crown clockwise back into Normal Position.
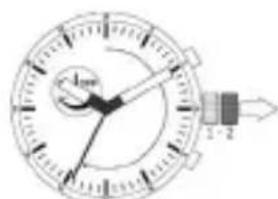
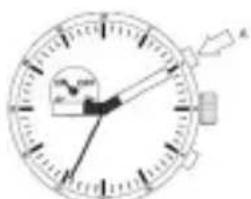
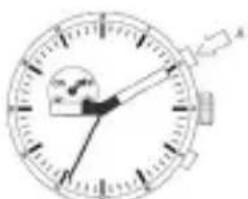
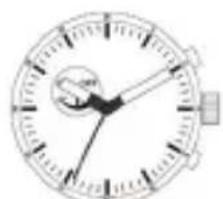
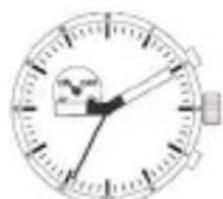
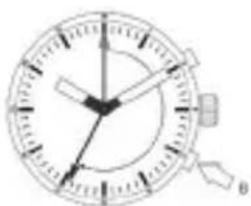
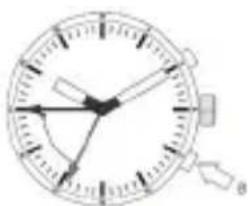
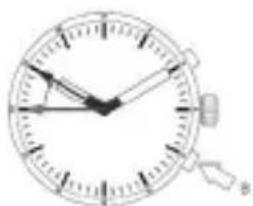
Alarm and Power Reserve Setting
Movement with Alarm Repetition: If the alarm is not switched off during the first ringing, a second alarm will occur after 2 minutes.
text_image
1.2ALARM & POWER RESERVE
text_image
Diagram of a clock face with time and duration labels, showing hand movement and measurement indicatorsALARM ON
natural_image
Close-up of a classic analog stopwatch with no visible text or markings (pure diagram)ALARM OFF
natural_image
Simple line drawing of a clock face with hour and minute hands (no numbers or text)POWER RESERVE INDICATION FOR 3 SECONDS
natural_image
Close-up of a circular mechanical dial with no visible text or markings (pure technical diagram)RESET (254)
Second Time Zone Setting
natural_image
Close-up of a analog clock face showing time, hour, minute, and second hands (no text or numbers visible)ENTER (2 SPECIMERS)
natural_image
Close-up of a circular analog clock face with hour and minute hands (no visible text or numbers)SETTING
natural_image
Analog stopwatch with analog face and minute hand (no visible text or numbers)OFF (AFTER 3 SECTIONS)
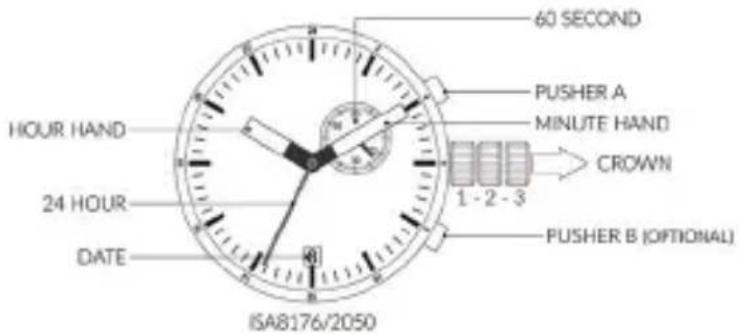
Watch Functions: Hour, Minute and 24HR GMT Hands with exposed date aperture on dial. Counters 60 Seconds.
text_image
60 SECOND PUSHER A MINUTE HAND CROWN 1 - 2 - 3 HOUR HAND 24 HOUR DATE PUSHER B (OPTIONAL) ISA8176/2050Time Setti ng
• Gently unscrew crown counter-clockwise and/or pull out the crown all the way to Positi on 3.
- Adjust the time by turning the crown in the desired direction.
• Gently push in and/or screw down the crown clockwise back into Normal Position.
Date Setting
• Gently unscrew crown counter-clockwise and/or pull out the crown to Positi on 2.
- Adjust the date by turning the crown clockwise to set date.
• Gently push in and/or screw down the crown clockwise back into Normal Positi on.
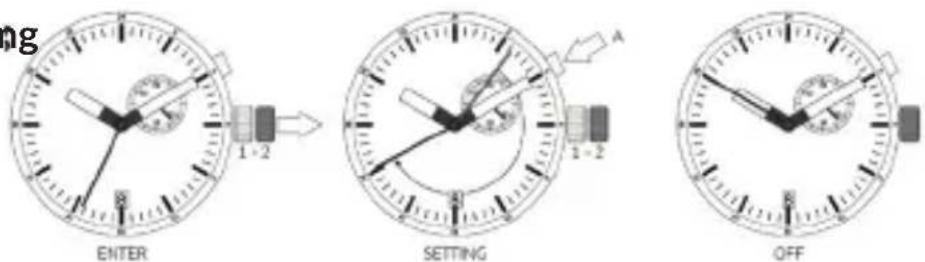
Second Time Zone Setting
text_image
ng ENTER 1-2 SETTING 1-2 OFFWater Resistance Diagram
Watches are ranked I through V for water resistance. Check the ranking of your watch in the following chart to determine proper use.
| Rank Rain etc | Case Designation car-wash Diving | Splashes, | Swim | Snorkeling | Scuba |
| I | - | NO | NO | NO | NO |
| II | 30M Water Resistant | YES | NO | NO | NO |
| III | 50M Water Resistant | YES | YES | NO | NO |
| IV | 100M Water Resistant | YES | YES | YES | NO |
| V | 200M Water Resistant or greater | YES | YES | YES | YES |
Guide
• I Note water-resistant. Avoid all moisture.
• II Do not operate buttons underwater.
• III If watch is exposed to salt water, wash thoroughly and dry.
• V Usable while scuba diving (except at depths that require helium-oxygen gas).
Automatic Instructions and Maintenance
Automatic movements contain no battery, they are powered by a coiled mainspring that is charged by either winding manually by the crown, or from the rotating pendulum (rotor) attached to the movement that rotates through the natural movements of your arm while wearing the watch. In this instance, the watch is “self-winding”, and will continue to charge at all times while being worn. When an automatic watch is not worn, and not manually wound by the crown, it will wind down and stop running. You only need to give the watch a shake, or wind the crown to revive the automatic movement again.
HOW IT WORKS: An automatic movement is also known as “self-winding” because it has the ability to wind itself through the movement of your wrist while the watch is being worn. The movement of your arm causes the rotor, a metal pendulum attached to a set of winding gears, to spin. Even the slightest action of the wrist will cause the rotor to rotate back and forth in a circular motion. As the rotor moves, it transfers the energy through the winding gears to the mainspring, which stores the energy required to power the function of the watch.
MAINTENANCE: If you select a automatic watch, you should be sure to get it serviced at regular intervals. Like any fine machine (your car, lawnmower or boat), regular maintenance and care will extend the life of this finely tuned machine, and keep everything in proper running order.
We suggest that you service and lubricate your movement every three to fi ve years to maintain the fi nest level of accuracy and reliability. If you are relying on your watch for diving purposes, or it is exposed to water and/or excessive temperature ranges oft en, you should service your watch annually to replace vital seals & gaskets to maintain the proper water resistance.
HOW TO START THE WATCH: Gently unscrew crown counter-clockwise and/or pull out the crown. Gently rotate the crown in a conti nuous clockwise rotating moti on, to add power to the mainspring and wind up your watch. It will only take a couple of turns to get the watch going, but generally it can take 30-40 rotati ons of the crown to FULLY wind the watch to its maximum potenti al power reserve.
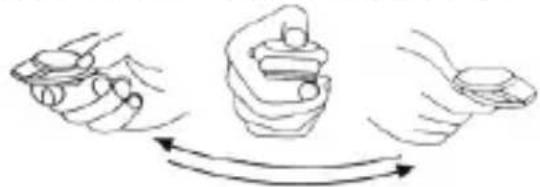
To initially start your watch: Swing it from side to side in a horizontal arc for about 30 seconds.
- If the watch is worn on the wrist, the mainspring will be wound automatically through normal wrist movement. - If the watch is used without being wound up sufficiently, gain or loss of the watch may result.
To avoid this, wear the watch for more than 8 hours a day.
natural_image
Line drawing of three hands holding a tool, with motion arrows indicating rotation (no text or symbols)Deployment Clasp and Buckle Instructions
INSTRUCTIONS FOR PUSH BUTTON DEPLOYMENT AND HIDDEN CLASP
(Bracelet and Strap)
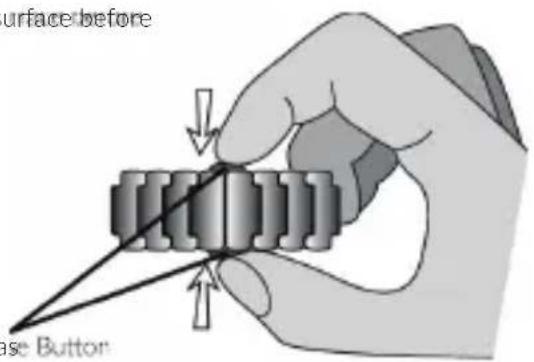
Important: Please place watch on non-abrasive surface before adjusting delopyment clasp.
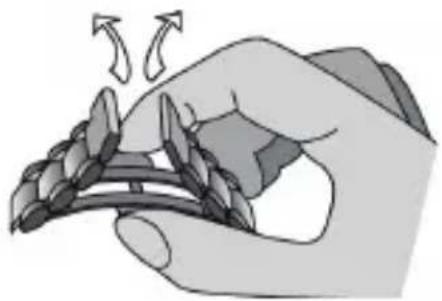
- Push the 2 Clasp Release Buttons on either side of the bracelet to release the clasp.
text_image
surface before Close ButtonClasp Release Button
natural_image
Illustration of a hand holding a bundle of grains with arrows indicating rotation (no text or symbols)- The Bracelet will release and open in an upward and outward motion as illustrated.
Note: If links need to be removed, please go to an Authorized Lucien Piccard Repair Center or reputable jeweler. Witness Watch Co. and Lucien Piccard will not be liable for damages carried out by anyone other than ourselves.
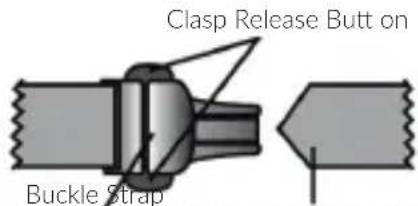
- Push the 2 Clasp Release Buttons on either side of the Buckle to release the clasp.
text_image
Clasp Release Butt on Buckle Strap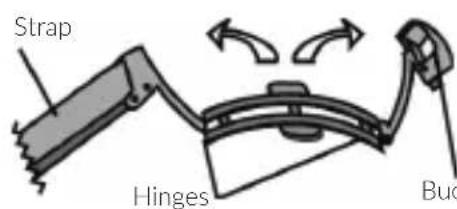
text_image
Strap Hinges Buc-
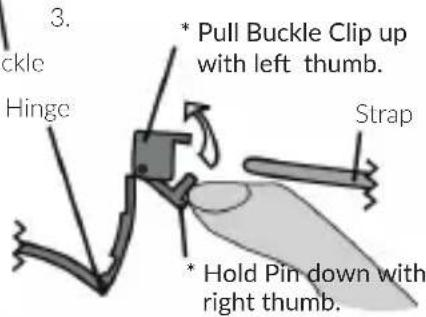
When opened, the Buckle Clip may be popped open to allow inserti on of the loose strap end to be pushed through and locked in place by the Pin.
-
The Buckle will release and open in an upward and outward motion on small hinges.
text_image
3. * Pull Buckle Clip up with left thumb. Hinge Strap * Hold Pin down with right thumb.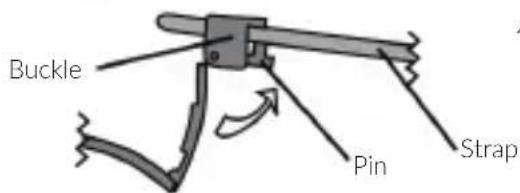
text_image
Buckle Pin Strap- Once the strap is positi oned the buckle clip may be locked in place. You may then put the watch on and fold both ends of the buckle back down until they lock into place.
*Please visit www.witnesswatch.com/help for a detailed step-by-step instruction video.
SAPPHITEK™ Crystal Warranty
LUCIEN PICCARD takes pride in manufacturing timepieces using the highest standards for material and craftsmanship.
Most LUCIEN PICCARD timepieces are equipped with a SAPPHITEK™ crystal which is protected by a 5-year limited warranty against deep scratches and cracks. LUCIEN PICCARD is the proud trademark owner and exclusive supplier of SAPPHITEK™ crystals. For warranty information on other aspects of your watch please refer to the warranty that came with your LUCIEN PICCARD timepiece.
SAPPHITEK ^™ crystals exhibit superior impact resistance to commonly used sapphire crystals, since they are manufactured utilizing a pure multi-material, high-heat process.
LUCIEN PICCARD chooses SAPPHITEK ^™ crystals because they can withstand higher pressure, water, shock, wear and heat resistance.
This warranty is only valid with watches that contain SAPPHITEK ^™ crystals.
Ip Lucien Piccard
"A Modern Tale Of Classic Luxury"
WITNESS WATCH CO. 3701 S. Flamingo Road, Suite 100, Miramar, FL 33027 Toll Free : 1-844-WWC-TIME Fax : 1-945-985-1828
In case your movement is not listed in this manual please visit www.witnesswatch.com for a full list of detailed instructions.
Ip Lucien Piccard
"A Modern Tale Of Classic Luxury"
WITNESS WATCH CO.
3701 S. Flamingo Road, Suite 100, Miramar, FL 33027
Toll Free : 1-844-WWC-TIME
Fax:1-945-985-1828
LUCIEN PICCARD IS PART OF :

text_image
QR code image containing encoded data, no visible human-readable textwww.witnesswatch.com/lucien-piccard
help@witnesswatch.com

WITNESS WATCH CO.