
TX-32LXD55F - TV PANASONIC - Free user manual and instructions
Find the device manual for free TX-32LXD55F PANASONIC in PDF.


User questions about TX-32LXD55F PANASONIC
0 question about this device. Answer the ones you know or ask your own.
Ask a new question about this device
Download the instructions for your TV in PDF format for free! Find your manual TX-32LXD55F - PANASONIC and take your electronic device back in hand. On this page are published all the documents necessary for the use of your device. TX-32LXD55F by PANASONIC.
USER MANUAL TX-32LXD55F PANASONIC
natural_image
Illustration of a Panasonic TV computer with a remote control panel beside it (no text or symbols on the device itself)Panasonic®
Operating Instructions Digital Progressive LCD TV
Model No. TX-32LXD55F
natural_image
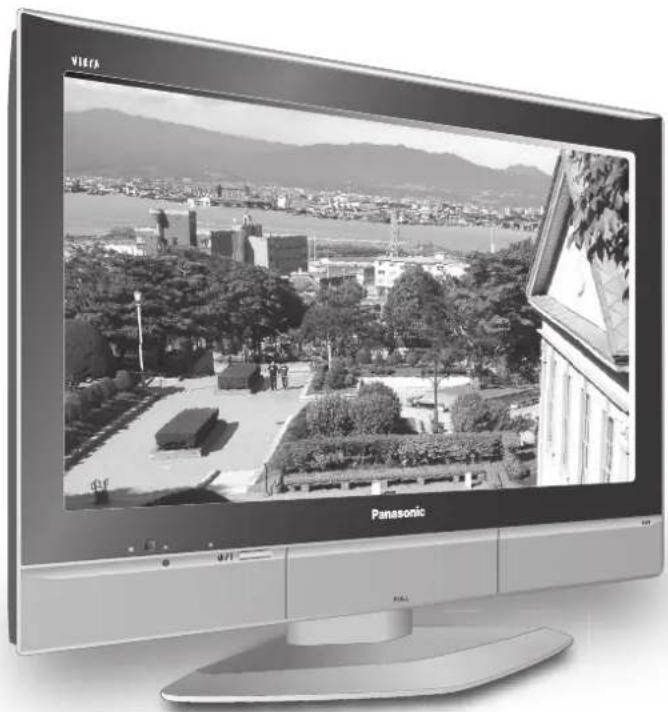
Panasonic TV displaying a cityscape with mountains and buildings, no visible text or symbols on the screen or background.The image shown is for illustration only.

DVB
HD ready
HDMI™ HIGH-DEFINITION MULTIMEDIA INTERFACE
This set is only for use in Germany.
Please read these instructions before operating your set and retain them for future reference.
English
Dear Panasonic Customer,
We hope that you have many years of enjoyment from your new TV. The Quick Start Guide section at the beginning of this instruction book will allow you to use the TV as quickly as possible. We recommend that you then read the complete instruction book, and keep it to refer to as you explore the range of advanced features that this LCD TV offers.
Analogue and Digital television – what are they?
Analogue transmission is the system that has been used for many years for broadcasting television programmes. With continuous improvements in technology it is now possible to transmit programmes in a digital format, allowing clearer pictures, more stations and other services to be displayed on screen. Digital television is provided in three different ways; it can be sent along a cable connection direct to your house, broadcast from a satellite, or broadcast using traditional land based (terrestrial) transmitters. The first two options require you to have an extra "set top box" decoder and in the case of satellite, a receiving dish mounted outdoors. While allowing you to receive traditional analogue transmissions in the usual way, this television can also receive terrestrial digital services using an integrated DV3 (Digital Video Broadcasting) decoder. This allows you to enjoy the new era of digital terrestrial television without the need for a "set top box" or satellite dish – an adequate roof or loft mounted antenna is all you need.
Contents
Accessories 2
Warnings and Precautions 3
Fitting remote control batteries 3
Cable cover removal and fitting....4
How to open the front cover 4
How to use the LCD stand 4
Quick Start Guide 5
Basic controls: front panel and remote control ..... 7
Using the On Screen Displays 8
Picture menu 9
Sound menu 10
Setup menu 11
Tuning menu – overview 12
Tuning menu – Programme edit 13
Adding / deleting a programme channel .... 13
Moving a programme channel 13
Tuning a programme channel 13
Renaming a programme channel 14
Locking a programme channel 14
Copying programme information to a recording device 14
Tuning menu – Auto setup 15
Tuning menu – Manual tuning 16
Manual tuning (via front panel) 16
DVB Setup Menu – overview 17
Profile Edit....18
DVB Tuning Menu 19
DVB Tuning Menu – DVB Auto Setup 20
DVB System Setup 21
Common Interface Module 22
DVB System Update 23
Information banner 25
Q-Link 26
Aspect Controls 27
VCR / DVD operation 29
Teletext operation 30
Still....32
Connections 33
How to connect the Headphones / AV3 terminals . 33
How to connect the Audio Output terminals ..... 34
How to connect the AV1 / 2 / 4 Scart terminals ..... 34
How to connect the Component Input terminals ... 34
How to connect the HDMI Input terminal 35
Troubleshooting....36
DVB Troubleshooting 37
Maintenance....37
Input signal that can be displayed 38
Scart and S-video terminal information 38
Specifications 39
Accessories
Check that you have the accessories and items shown

□ Operating Instructions
□ Remote Control Transmitter (EUR7651100)
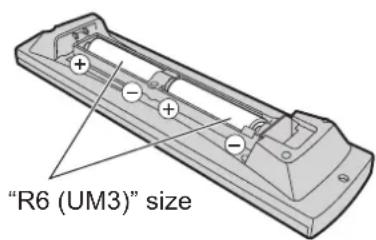
☐ Batteries for the Re mote Control Transmitter (2 × R6 (UM3) size)
□ Clamper
□ Pan European Guarantee Card
text_image
Panasonic



Warnings and Precautions
- This TV set is designed to operate on AC 220-240 V, 50 / 60 Hz.
- To prevent damage which might result in elec tric shock or fi re, do not expose this TV set to rain or excessive moisture. This TV must not be exposed to dripping or splashing water and objects filled with liquid, such as vases, must not be placed on top of or above the TV.
- Keep unneeded small parts and other objects out of the reach of small children. These objects can be accidentally swallowed. Also, be careful about packaging materials and plastic sheets.
- WARNING: HIGH VOLTAGE!!!
Do not remove the rear cover as live parts are accessible when it is removed. There are no user serviceable parts inside.
Ensure that the mains plug is easily accessible.
• TV Games / Home Computers
Extended use of TV games or home computers with any television set can cause a 'shadow' on the screen. This type of LCD panel phenomenon, can be limited by observing the following points:
- Reduce the brightness and contrast levels to a minimum viewing level.
- Do not allow a still picture to be displayed for an extended period, as this can cause an after-image to remain on the LCD TV screen.
- Examples of still pictures include logos, video games, computer images, teletext and images displayed in 4:3 mode.
- This type of LCD panel damage, is not an operating defect, and as such is not covered by the Panasonic warranty.
- The On / Off switch on this model does not fully disconnect the TV from the mains supply. Remove the mains plug from the wall socket before connecting or disconnecting any leads, or if the TV set is not used for a prolonged period of time.
Note:
If the set is not switched off when the TV station stops transmitting, it will automatically go to Standby mode after 30 minutes. This function will not operate when the TV is in AV mode.
• Cabinet and LCD panel care
Remove the mains plug from the wall socket. The cabinet and LCD panel can be cleaned with a soft cloth moistened with mild detergent and water. Do not use solutions containing benzol or petroleum.
- When ambient temperature is cool, the picture may take a short time to reach normal brightness, but this is not a malfunction. (After brief moment, the picture will have normal brightness.)
- Adequate ventilation is essential to prevent failure of electrical components, we recommend that a gap of at least 10cm is left all around this television receiver even when it is placed inside a cabinet or between shelves.
- Avoid exposing the TV set to direct sunlight and other sources of heat. To prevent fire, never place any type of candle or naked flame on top or near the TV set.
- Ventilation should not be impled by covering the ventilation openings with items such as newspapers, tablecloths and curtains.
- When ambient temperature is cool, the picture may take a short time to reach normal brightness, but this is not a malfunction. (After brief moment, the picture will have normal brightness.) - Adequate ventilation is essential to prevent failure of electrical components, we recommend that a gap of at least 10cm is left all around this television receiver even when it is placed inside a cabinet or between shelves. - Avoid exposing the TV set to direct sunlight and other sources of heat. To prevent fire, never place any type of candle or naked flame on top or near the TV set. - Ventilation should not be impeded by covering the ventilation openings with items such as newspapers, tablecloths and curtains.
Fitting remote control batteries
①
natural_image
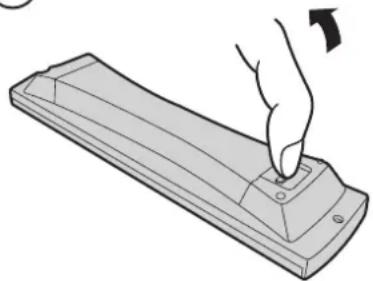
Illustration of a hand pressing down on a rectangular electronic device with a button (no text or symbols)Pull and hold the hook, then open the battery cover.
②
text_image
"R6 (UM3)" sizeInsert batteries - note correct polarity (+ and -).
③
natural_image
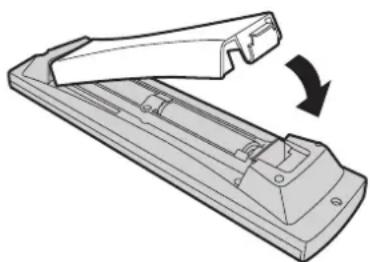
Diagram of a mechanical device with a handle and internal components, showing a rotation arrow (no text or symbols)Replace the cover.
- Make sure that the batteries are fitted the correct way round.
- Do not mix old batteries with new batteries. Remove old, exhausted batteries immediately.
- Do not mix different battery types, i.e. Alkaline and Manganese.
- Do not use rechargeable (Ni-Cad) batteries.
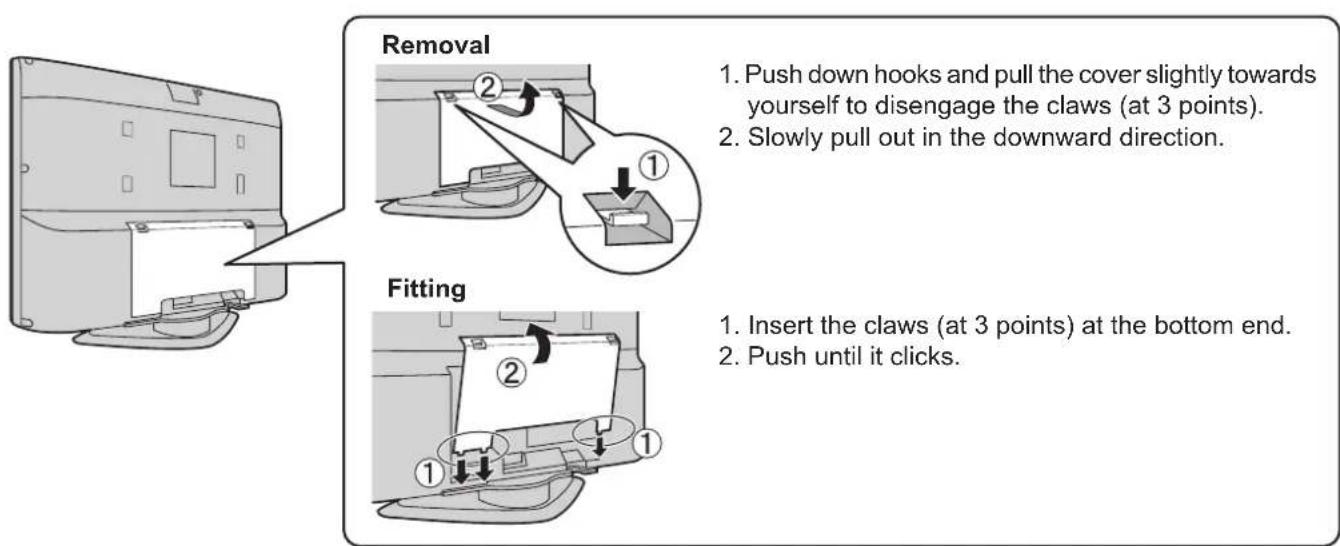
Cable cover removal and fi tting
text_image
Removal 1. Push down hooks and pull the cover slightly towards yourself to disengage the claws (at 3 points). 2. Slowly pull out in the downward direction. Fitting 1. Insert the claws (at 3 points) at the bottom end. 2. Push until it clicks.Note:
To avoid interference appearing on the screen, do not bundle the RF cable and mains lead together.
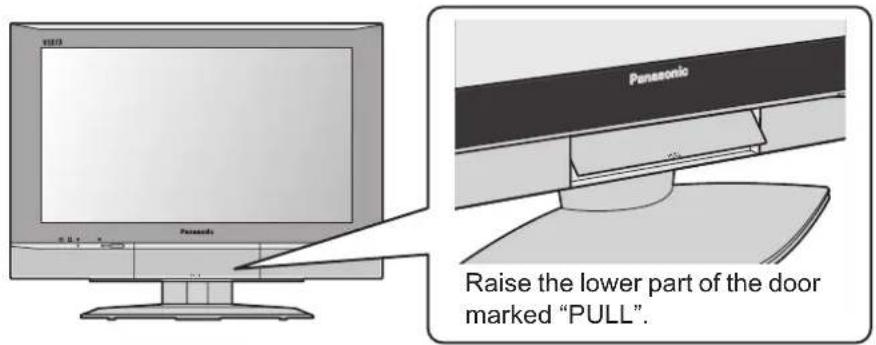
How to open the front cover
text_image
Panasonic Raise the lower part of the door marked "PULL".How to use the LCD stand
Adjust the LCD panel to your desired angle.
The LCD panel can be adjusted the following direction:
20^
Right
20^
Left
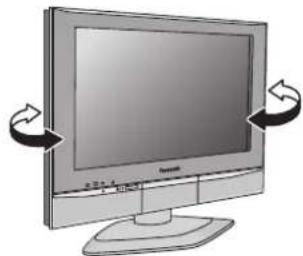
natural_image
Illustration of a computer monitor with two curved arrows indicating rotation or orientation (no text or symbols)(View from the top)
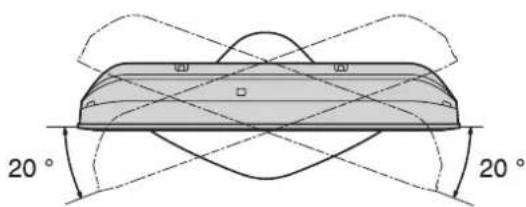
text_image
20° 20°Quick Start Guide

Connection and setting up options
Please ensure that the unit is disconnected from the mains before attaching or disconnecting any leads.
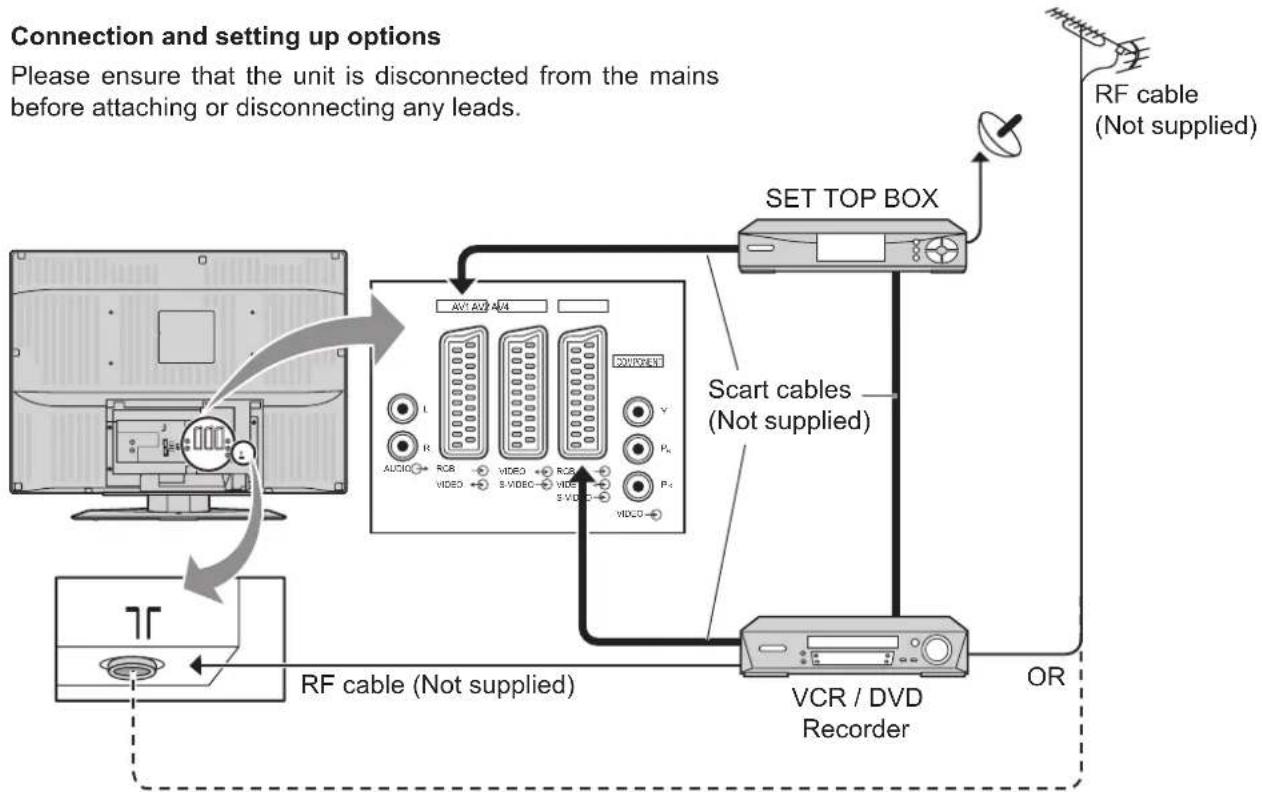
flowchart
graph TD
    A["TV Panel"] -->|Connection and setting up options| B["Audio/Video/Video/Video/Video/Video/Video/Video/Video/Video/Video/Video/Video/Video/Video/Video/Video/Video/Video/Video/Video/Video/Video/Video/Video/Video/Video/Video/Video/Video/Video/Video/Video/Video/Video/Video/Video/Video/Video/Video/Video/Video/Video/Video/Video/Video/Video/Video/Video/Video/Video/Audio"]
    B --> C["SET TOP BOX"]
    C --> D["RF cable (Not supplied)"]
    C --> E["Scart cables (Not supplied)"]
    C --> F["VCR / DVD Recorder"]
    F --> G["OR"]
    style A fill:#f9f,stroke:#333
    style G fill:#ccf,stroke:#333
Plug in aerial and connect ancillary equipment.

Connect the mains plug to the wall sock et.
Press the [↓] switch on the TV set to turn the set on.
To switch the TV set to Standby mode, press the button on the remote control.
The TV set can be switched on by pressing the button again if it was in Stand by mode.
Note:
This TV will still consume some power as long as the mains plug is still inserted into the wall socket.
C.A.T.S. sensor
LCD C.A.T.S. (Contrast Automatic Tracking System) automatically senses the ambient light conditions and adjusts the brightness and gradation accordingly, to optimize contrast. C.A.T.S. is in effect when Viewing mode is set to Auto. See page 9.
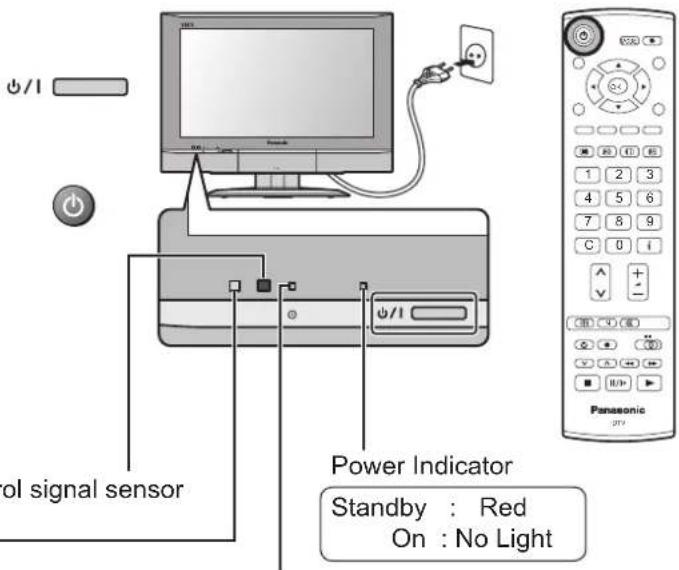
text_image
ol signal sensor Power Indicator Standby : Red On : No LightDVB Indicator
DVB system active during
Direct TV Recording (Standby) : Orange (fl ash)
Tuner Lock On (Standby) : Orange
Otherwise : No Light
Quick Start Guide

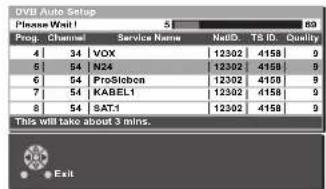
Auto setup will begin.
The TV will search for DVB stations and Analogue stations: TV stations will be located, sorted into order and stored ready for use. Stations are sorted into the following order:
- DVB Stations: Are sorted into channel order, but can be made favourites list by Profi le Edit. See page 18.
- Analogue Stations: Are sorted into channel order, but can be changed to your preference. See page 13.
text_image
OVB Auto Setup Please Wait! 5 89 Prog. Channel Service Name NetD. TS ID. Quality 4 34 VOX 12302 4158 9 5 54 N24 12302 4158 9 6 54 ProSlobon 12302 4158 9 7 54 KABEL1 12302 4158 9 8 54 SAT1 12302 4158 9 This will take about 3 mins.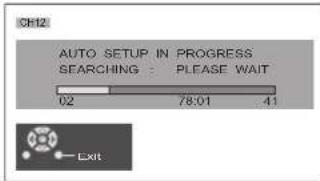
text_image
CH12 AUTO SETUP IN PROGRESS SEARCHING : PLEASE WAIT 02 78:01 41 — Exit
TV to VCR or DVD Recorder Download
If a "Q-Link", "NEXTVIEWLINK" or compatible recording device has been connected to a Scart terminal (AV2 or AV4) before starting Step 2, programme information will be downloaded to that device.
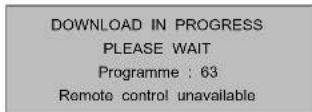
Only the analogue programme positions will be downloaded to the recording device, in the same order as stored in the TV. See page 26.
Not all VCRs / DVD Recorders support this download of programme information, some may require to be started manually.
Refer to the recording device's operating instruction book.
If a recording device other than those described above has been connected, then there will be no download operation.
Notes:
- If the recording device has not accepted download data from the TV, you may need to select the Download option from the device's menu system. Refer to the recording device's operating instruction book.
- If Q-Link is not operating correctly, check the following:
The Scart cable is connected to the TV's Scart terminal, AV2 or AV4, and correctly setup in the menu.
The Scart cable is connected to the recording device's compatible (Q-Link, NEXTVIEWLINK or similar technology) Scart terminal.
The Scart cable is a "fully wired" type. - For further information on Q-Link and connecting equipment, see page 26, 34, 38.

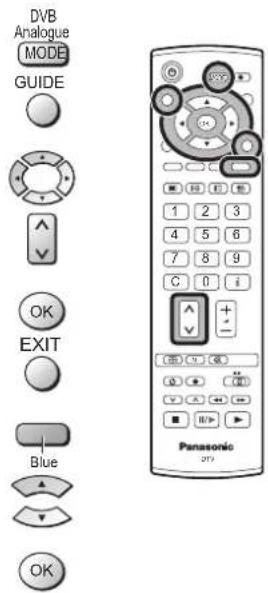
Press the MODE button to select the mode you want to view.
Press the GUIDE button.
Analogue mode: Analogue Programme Guide
Use the cursor buttons to move the cursor bar.
Use the programme change button to step through the guide page by page.
To view the selected programme, move the cursor to the programme and then press the OK button.
The guide can be cleared from the screen using the EXIT button.
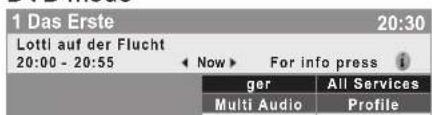
DVB mode: Information banner
Press the Blue button to scroll through available categories.
Press the up or down cursor button to step through the available programmes.
Press the OK button to view a programme.
text_image
DVB Analogue MODE GUIDE OK EXIT Blue OK Panasonic dtyAnalogue mode
| Analogue Programme Guide | |||
| Prog. | Name Chan. | Prog. | Name Chan. |
| VCR: | CH21 | 13 | - |
| 1 | Das ErsteCH44 | 14 | - |
| 2 | ZDF CH51 | 15 | - |
| 3 | RTL CH41 | 16 | - |
| 4 | 17 | - | |
| 5 | CH23 | 18 | - |
| 6 | CH26 | 19 | - |
| 7 | CH58 | 20 | - |
| 8 | - | 21 | - |
| 9 | - | 22 | - |
| 10 | - | 23 | - |
| 11 | - | 24 | - |
| 12 | - | ||
DVB mode
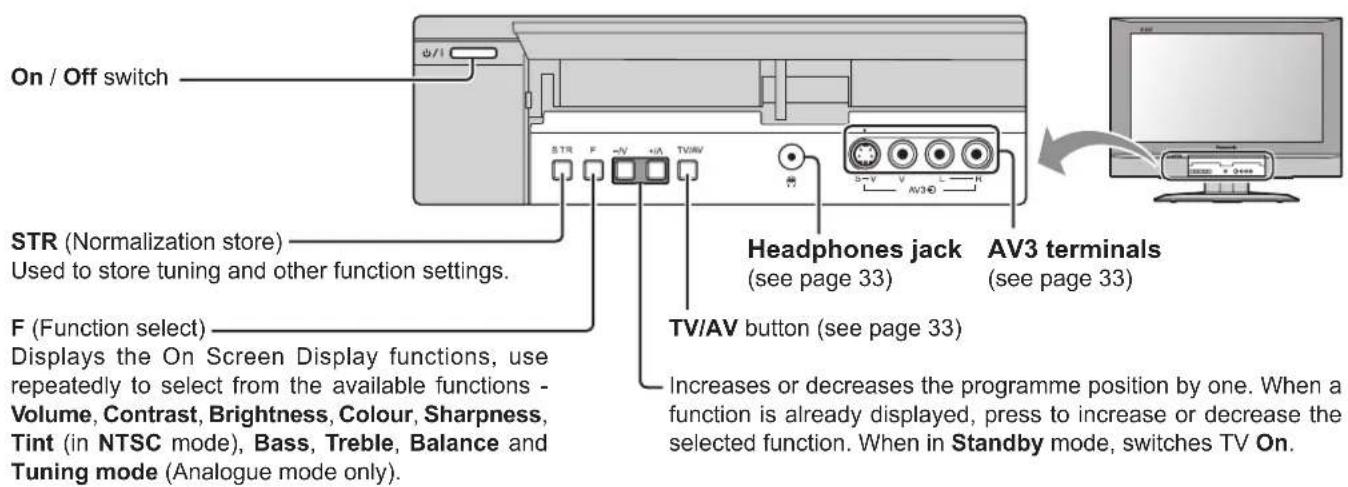
Basic controls: front panel and remote control
text_image
On / Off switch STR (Normalization store) Used to store tuning and other function settings. F (Function select) Displays the On Screen Display functions, use repeatedly to select from the available functions - Volume, Contrast, Brightness, Colour, Sharpness, Tint (in NTSC mode), Bass, Treble, Balance and Tuning mode (Analogue mode only). Headphones jack (see page 33) TV/AV button (see page 33) AV3 terminals (see page 33) Increases or decreases the programme position by one. When a function is already displayed, press to increase or decrease the selected function. When in Standby mode, switches TV On.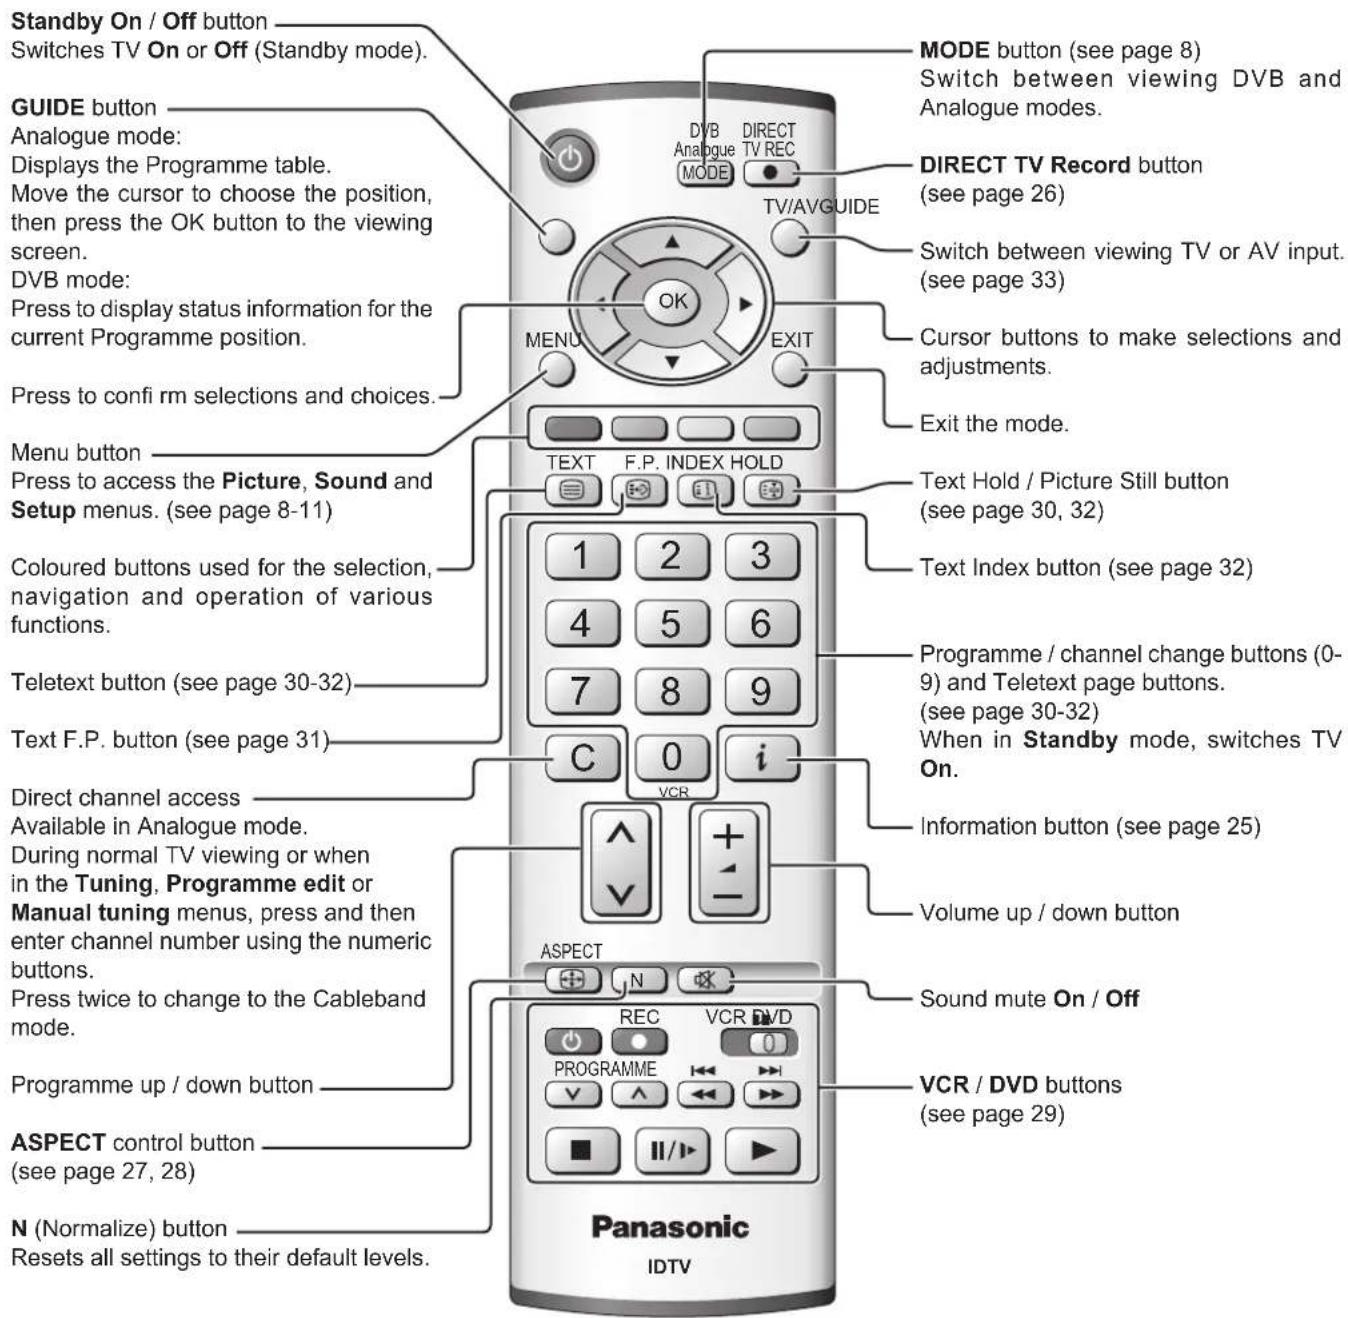
text_image
Standby On / Off button Switches TV On or Off (Standby mode). GUIDE button Analogue mode: Displays the Programme table. Move the cursor to choose the position, then press the OK button to the viewing screen. DVB mode: Press to display status information for the current Programme position. Press to confirm selections and choices. Menu button Press to access the Picture, Sound and Setup menus. (see page 8-11) Coloured buttons used for the selection, navigation and operation of various functions. Teletext button (see page 30-32) Text F.P. button (see page 31) Direct channel access Available in Analogue mode. During normal TV viewing or when in the Tuning, Programme edit or Manual tuning menus, press and then enter channel number using the numeric buttons. Press twice to change to the Cableband mode. Programme up / down button ASPECT control button (see page 27, 28) N (Normalize) button Resets all settings to their default levels. MODE button (see page 8) Switch between viewing DVB and Analogue modes. DIRECT TV Record button (see page 26) Switch between viewing TV or AV input. (see page 33) Cursor buttons to make selections and adjustments. Exit the mode. TEXT F.P. INDEX HOLD 1 2 3 4 5 6 7 8 9 C 0 i VCR ASPECT REC VCR DVD PROGRAMME V I/▶ ▶ ▶ ▶ ▶ ▶ ▶ ▶ ▶ ▶ ▶ ▶ ▶ ▶ ▶ ▶ ▶ ▶ ▶ ▶ ▶ ▶ ▶ ▶ ▶ ▶ ▶ ▶ ▶ ▶ ▶ ▶ ▶ ▶ ▶ ▶ ▶ ▶ ▶ ▶ ▶ ▶ ▶ ▶ ▶ ▶ ▶ ▶ ▶ ▶ ▶ ▸ Panasonic IDTVUsing the On Screen Displays
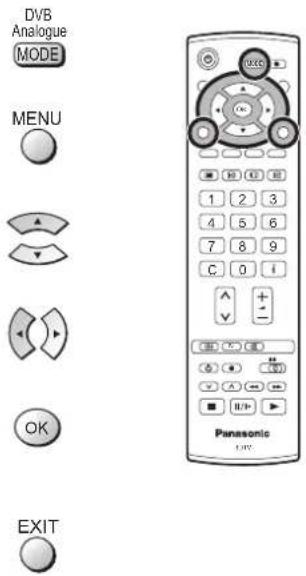
Many features available on this TV can be accessed via the On Screen Display menu system. Use the remote control as shown below to access and adjust features as desired.
Press the MODE button to select DVB or Analogue mode.
The MENU button is used to open the main menus and also to return to the previous menu.
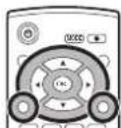
The up and down cursor buttons are used to move the cursor and select menus.
The left and right cursor buttons are used to access menus, adjust levels or to select from a range of options.
The OK button is used with a number of features to store settings after adjustments have been made or options have been set.
The EXIT button is used to exit the menu system and return to the normal viewing screen.
An On Screen Help box is displayed whenever a menu is displayed on the TV. This Help box indicates which buttons on the remote control are used to navigate the menu shown, see above for descriptions of button functions.
Note:
The Help box is not shown in the menu pictures in this in struc tion book due to space limitations.
text_image
DVB Analogue MODE MENU OK EXIT Panasonic OUTC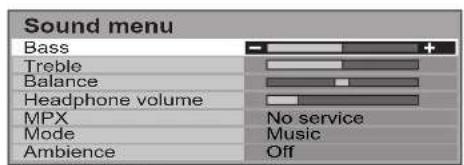
text_image
Sound menu Bass Treble Balance Headphone volume MPX Mode Ambience No service Music Off
ON SCREEN HELP 'Instructions' box
Picture menu
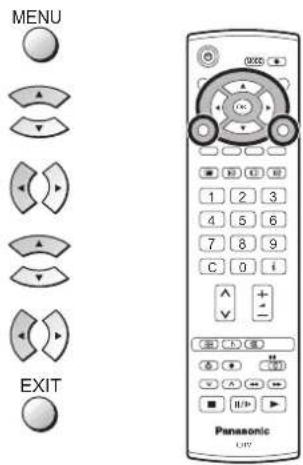
Press the MENU button.
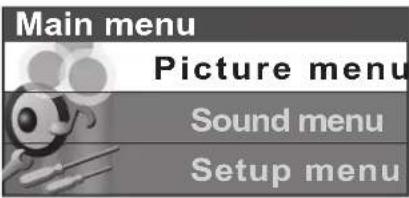
Move to choose Picture menu.
Access Picture menu.
Move to choose menu option.
Adjust chosen option or access chosen menu.
Press the EXIT button at any time to go back to watching TV.








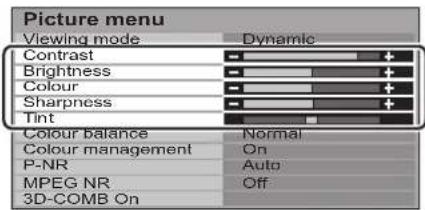
Viewing mode The Viewing mode menu allows you to select four different screen settings - Dynamic, Normal, Cinema and Auto. In each Viewing mode setting, Contrast, Brightness, Colour, Sharpness, Tint (in NTSC only), Colour balance, Colour management, P-NR, MPEG NR and 3D-COMB can be adjusted and stored to suit your particular viewing requirement. (e.g., you may require different settings for viewing sports, films, news etc.)
Viewing mode offers you up to a maximum of four separate settings for each signal source: RF, AV1, AV2, AV3, AV4 Component and HDMI. Changes will be stored automatically. By analysing and processing the incoming picture, all four modes feature automatic enhancement.
Contrast, Brightness, Colour, Sharpness
Increase or decrease the levels of these options ac cord ing to your personal preference.
text_image
Main menu Picture menu Sound menu Setup menu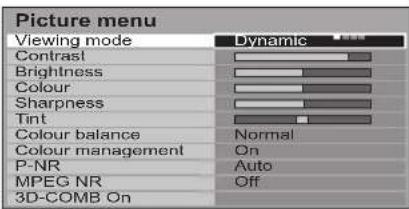
text_image
Picture menu Viewing mode Dynamic Contrastl Brightness Colour Sharpness Tint Colour balance Colour management P-NR MPEG NR 3D-COMB On Normal On Auto OffTint With an NTSC signal source connected to the TV, the picture hue can be adjusted to suit your taste.
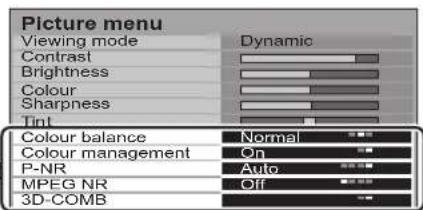
Colour balance Allows you to set the overall colour tone of the picture. Choose from Cool, Normal and Warm.
Colour management Enables vivid colour adjustment automatically.
text_image
Picture menu Viewing mode Dynamic Contrast + Brightness + Colour + Sharpness + Tint Colour balance Normal Colour management On P-NR Auto MPEG NR Off 3D-COMB OnP-NR Automatically reduces unwanted picture noise.
Not available during HDMI and HD signal input.
MPEG NR Reduces MPEG noise.
Allows you to choose from Off, Min, Mid and Max.
This function is effective in reducing the digital block noise when viewing DVD, VCD or digital broad cast ing. The effect will be changed based on the scene and image.
MPEG: Compression technology of the image signal adopted by DVD, VCD or digital broadcasting.
text_image
Picture menu Viewing mode Dynamic Contrast Brightness Colour Sharpness Tint Colour balance Normal Colour management On P-NR Auto MPEG NR Off 3D-COMB3D-COMB Not available in DVB mode.
Occasionally, whilst viewing still or slow moving pic tures, colour patterning may be seen. Set 3D-COMB to On to display sharper and more accurate colours.
Displayed only when receiving PAL or NTSC signals.
Not displayed during RGB Video, S-Video, Component and HDMI input mode.
Sound menu
Press the MENU button.
Move to choose Sound menu.
Access Sound menu.
Move to choose menu option.
Adjust chosen option or access chosen menu.
Press the EXIT button at any time to go back to watching TV.
MENU


■ 01 02 03
1 2 3
4 5 6
7 8 9
C 0 1

进入
品 1
V A ↔ ↔
■ 11/3+ ▶
Panasonic
Bass Increase or decrease level to enhance or minimise lower, deeper sound output.
Treble Increase or decrease level to enhance or minimise sharper, higher sound output.
Main menu

Picture menu
Sound menu
Setup menu
Balance
The levels of sound between the left and right speakers can be adjusted to suit your listening position.
Headphone volume
Can be adjusted independently of the TV speakers so that everyone can enjoy listening at a level com fort able for them.
| Sound menu | |
| Bass | - |
| Treble | - |
| Balance | - |
| Headphone volume | - |
| MPX | No service |
| Mode | Music |
| Ambience | Off |
| HDMI input | Auto |
MPX Not available in DVB mode.
Usually set to Stereo to provide the best reproduction, but if reception deteriorates or if the service is not available then switch to Mono. Mono (M1) and (M2) can also be selected if a mono signal is being transmitted.
Mode Sound quality can be improved when watching music scene or drama by selecting the appropriate Music or Speech mode.
| Sound menu | |
| Bass | |
| Treble | |
| Balance | |
| Headphone volume | |
| MPX | No service |
| Mode | Music |
| Ambience | Off |
| HDMI input | Auto |
Ambience Ambience provides a dynamic enhancer to simulate improved spatial effects.
| Sound menu | |
| Bass | |
| Treble | |
| Balance | |
| Headphone volume | |
| MPX | No service |
| Mode | Music |
| Ambience | Off |
| HDMI input | Auto |
HDMI input Displayed during HDMI input mode.
Allows you to choose from Auto, Digital and Analogue.
Select to fit the input signal.
Auto : Set in normal use
Digital : HDMI cable connection
Analogue : HDMI-DVI adapter cable connection
See page 35.
| Sound menu | |
| Bass | |
| Treble | |
| Balance | |
| Headphone volume | |
| MPX | No service |
| Mode | Music |
| Ambience | Off |
| HDMI input | Auto |
| Sound menu | |
| Bass | |
| Treble | |
| Balance | |
| Headphone volume | |
| MPX | No service |
| Mode | Music |
| Ambience | Off |
| HDMI input | Auto |
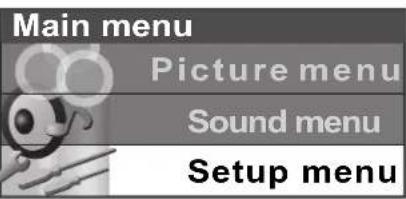
Setup menu
Press the MENU button.
Move to choose Setup menu.
Access Setup menu.
Move to choose menu option.
Adjust chosen option or access chosen menu.
Press the EXIT button at any time to go back to watching TV.
text_image
MENU EXIT PanasonicQ-Link Allows you to select which AV terminal is to be used for data
communication between this TV and a com pat i ble recording device. Choose from Off, AV2 and AV4. See page 26.
AV2 / AV4 out
Offers a choice of signals to send to the Scart terminal selected in the Q-Link option. You can choose from the current TV (Analogue, DVB) programme position, the signal entering AV1 / AV2 / AV3 / AV4 or Monitor - the picture displayed on screen.
Component signal input cannot be output to these Scart terminals.
Teletext
Allows you to choose between TOP/FLOF or List mode. See page 30-32.
Off timer
Switches the TV off within a preset time which you can choose from between 0 to 90 minutes in 15 minute intervals.
Text language
Select character set, so that all characters needed are available for text on teletext pages (e.g., cyrillic char ac ters, etc.).
Mode Languages
West: English, French, German, Greek, Italian, Spanish, Swedish, Turkish
East1: Czech, English, Estonian, Lettish, Rumanian, Russian, Ukrainian
East2: Czech, English, German, Hungarian, Lettish, Polish, Rumanian
text_image
Main menu Picture menu Sound menu Setup menuAnalogue mode
| Setup menu | |
| Q-Link | AV2 |
| AV2 out | Monitor |
| Teletext | TOP |
| Off timer | Off |
| Text language | West |
| Tuning menu | |
| System language | |
DVB mode
| Setup menu | |
| Q-Link | AV2 |
| AV2 out | Monitor |
| Teletext | TOP |
| Off timer | Off |
| DVB Setup Menu | |
| System language | |
AV mode
| Setup menu | |
| Q-Link | AV2 |
| AV2 out | Monitor |
| Teletext | TOP |
| Off timer | Off |
| Colour system | Auto |
| Volume correction | |
| Text language | West |
| System language | |
Tuning menu Provides access to many other features including Programme edit and Auto setup. See page 12-16.
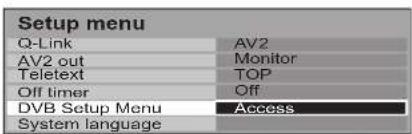
DVB Setup Menu
Provides access to setup the DVB operations. See page 17.
System language
When you first install the TV, the On Screen Display language is set to German. System language lets you change the language used for On Screen Displays.
Colour system
During AV mode, Colour system is displayed. Lets you select the correct transmission standard for the transmission signal being received.
Volume correction
During AV and HDMI mode, Volume correction is displayed.
You can adjust volume level of AV and HDMI mode. Volume level is memorised.
Tuning menu – overview (Analogue mode)
In Analogue mode
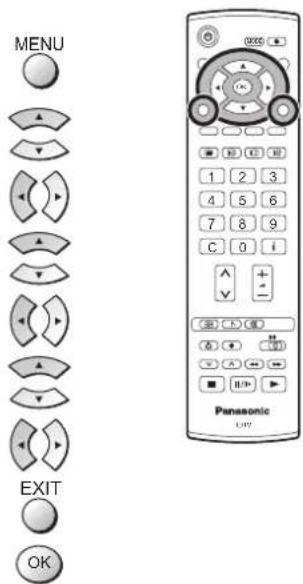
Press the MENU button.
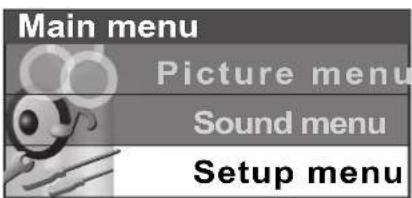
Move to choose Setup menu.
Access Setup menu.
Move to choose Tuning menu.
Access Tuning menu.
Move to choose menu option.
Adjust chosen option or access chosen menu.
Press the EXIT button at any time to go back to watching TV.
Press the OK button after having adjusted some features to store the new settings as the default (replacing the factory setting).
text_image
MENU EXIT OK Panasonic L17Programme edit Access in order to customize your programme settings (e.g., adding or deleting a programme position). See page 13, 14.
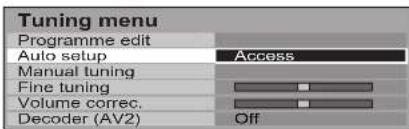
Auto setup Allows you to automatically retune the TV. Useful if you move house and wish to retune your TV to the local stations. See page 15.
Manual tuning Allows individual programme positions to be tuned manually. See page 16.
Fine tuning Use to make small adjustments to the tuning of an individual station (useful for example when weather conditions are affecting reception quality of a programme).
Volume correc. Lets you adjust the volume level of individual stations. Use this feature if the volume level varies significantly between stations. Adjusting one station's volume to bring it into line with the other stations means you can avoid having to adjust the volume each time you change channels.
Decoder (AV2 / AV4) This option is used when a decoder is connected via AV2 / AV4. Store the setting as On so that every time this programme position is selected, the TV software is set to handle the decoded information (this is important if your decoder unit is connected to AV2 / AV4 via a Q-Link device).
text_image
Main menu Picture menu Sound menu Setup menu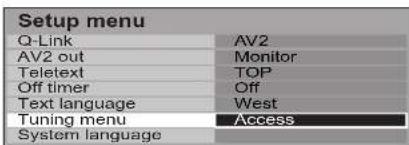
text_image
Setup menu Q-Link AV2 AV2 out Monitor Teletext TOP Off timer Off Text language West Tuning menu Access System language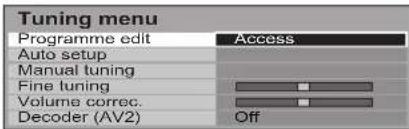
text_image
Tuning menu Programme edit Access Auto setup Manual tuning Fine tuning Volume correc. Decoder (AV2) Off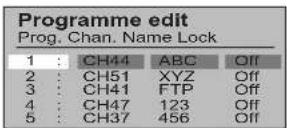

text_image
Tuning menu Programme edit Auto setup Access Manual tuning Fine tuning Volume correc. Decoder (AV2) Off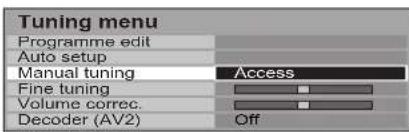
text_image
Tuning menu Programme edit Auto setup Manual tuning Access Fine tuning Volume correc. Decoder (AV2) Off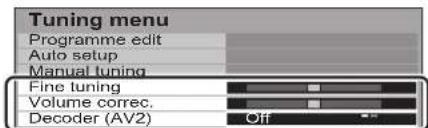
text_image
Tuning menu Programme edit Auto setup Manual tuning Fine tuning Volume correc. Decoder (AV2) OffTuning menu – Programme edit (Analogue mode)
In Analogue mode
Press the MENU button.
Move to choose Setup menu.
Access Setup menu.
Move to choose Tuning menu.
Access Tuning menu.
Move to choose Programme edit.
Access Programme edit.
Move to choose programme position (e.g., Prog. 3).
Make required change, e.g., moving a programme channel (see the relevant procedure below).
Press the EXIT button at any time to go back to watching TV.
Press the OK button after having adjusted some features to store the new settings.
MENU


EXIT


text_image
0005 C Panasonic 3.07Adding / deleting a programme channel
Move the cursor to the programme to be deleted or added.
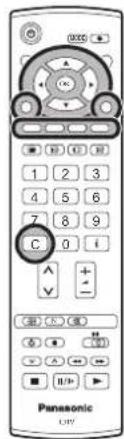
Press the Green button to add a programme channel to the programme position, or the Red button to delete one.
Press the same button again to confirm your decision.


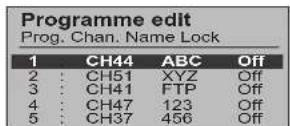
Moving a programme channel
Move the cursor to the programme to be moved.
Press the Yellow button.
Choose the new position for the programme channel.
Press the Yellow button again to confirm your decision.


Yellow



Tuning a programme channel
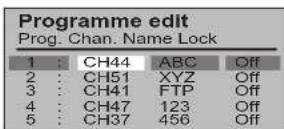
Move to the Chan. column.
Increase or decrease the programme channel number (you will see the TV retune to the new number as you change it) or use the C button for Direct Channel Access. See page 7.
Press the OK button to store this change.


Tuning menu – Programme edit (Analogue mode)
Renaming a programme channel
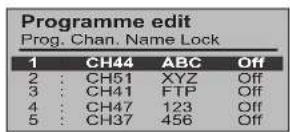
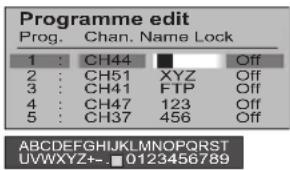
Move to the Name column.
Choose the new character. The box at the bottom of the screen shows the character currently selected.
Move to the next character position.
Continue until renaming is done.
Press the OK button to store the new name.


text_image
Programme edit Prog. Chan. Name Lock 1 : CH44 ■ Off 2 : CH51 XYZ Off 3 : CH41 FTP Off 4 : CH47 123 Off 5 : CH37 456 Off ABCDEFGHIJKLMNOPQRST UVWXYZ+ - .0123456789Locking a programme channel
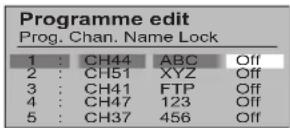
You may wish to lock a programme channel to prevent access to it.
Move to the Lock column.
Choose between Lock On or Lock Off.
Press the OK button to store the new setting.


Note:
When a programme position is locked, Direct Channel Access using the C and numeric buttons on the remote control is not available.
Copying programme information to a recording device
You can copy programme information to a compatible re cord ing device connected to AV2 / AV4. See page 34 for con nec tion information. Press the Blue button.
Programme data will now be sent to the recording device(s). This might take a few seconds, depending on the number of stations stored. If the message “Feature not available” ap pears on the screen, the television is unable to send the programme information to the recording device(s). See the device’s instruction book for further information.

Note:
This is not available when you choose Q-Link Off in Setup menu.
DOWNLOAD IN PROGRESS
PLEASE WAIT
Programme : 63
Remote control unavailable
Tuning menu – Auto setup (Analogue mode)
Auto setup automatically retunes your TV. This feature is useful if, e.g., you move house and wish to retune your TV to receive the local stations.
In Analogue mode
Press the MENU button.
Move to choose Setup menu.
Access Setup menu.
Move to choose Tuning menu.
Access Tuning menu.
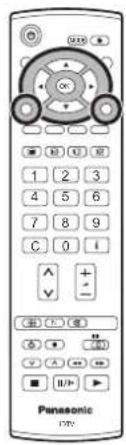
Move to choose Auto setup.
Access Auto setup.
MENU


text_image
GASO Panasonic DVDNotes:
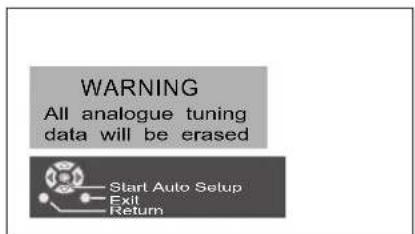
- If you proceed with the next step analogue tuning data will be erased (all analogue stations and their programme positions stored in your TV's memory will be wiped out so the new settings can be stored).
- If you exit the procedure after this point and before Auto setup is complete, no station information will be stored. Restart and complete the Auto setup procedure so that the TV is returned.
Press to start Auto setup.

The TV will search for, locate, store and then sort into order your local stations.
If compatible recording device is connected via the AV2 / AV4 terminal, programme data will be sent to the device via Q-Link. See page 26.
Once this operation is completed the TV will display the programme now stored on programme position 1.
Press the EXIT button at any time to go back to watching TV (please read the Notes in the above procedure).

text_image
WARNING All analogue tuning data will be erased Start Auto Setup Exit Return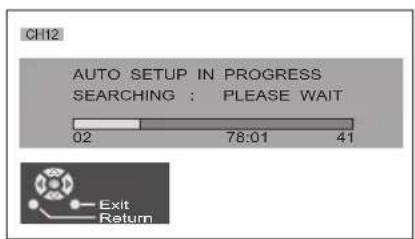
text_image
CH12 AUTO SETUP IN PROGRESS SEARCHING : PLEASE WAIT 02 78:01 41 Exit ReturnTuning menu – Manual tuning (Analogue mode)
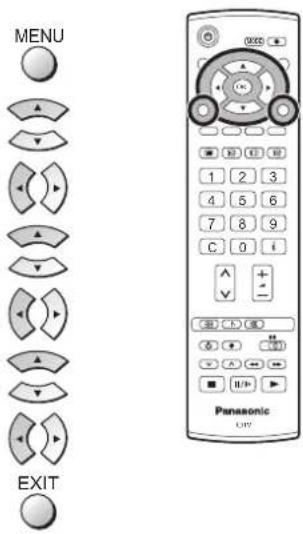
It is possible to retune individual programme positions:
In Analogue mode
Press the MENU button.
Move to choose Setup menu.
Access Setup menu.
Move to choose Tuning menu.
Access Tuning menu.
Move to choose Manual tuning.
Access Manual tuning.
Select the programme position to be tuned.
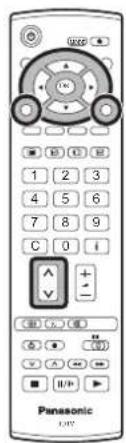
Press repeatedly until required station is found.
When the desired station is found, press the OK button to store.
The programme position will flash.
Press the EXIT button at any time to go back to watching TV.


text_image
Panasonic OFF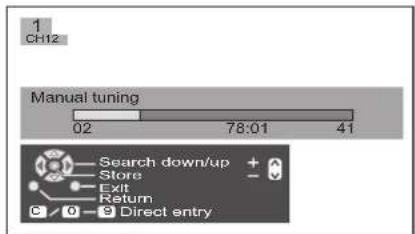
text_image
1 CH12 Manual tuning 02 78:01 41 Search down/up + Store Exit Return C/0 9 Direct entryNote:
If your VCR is connected to this TV by an RF cable only, choose programme position "0" to tune to the VCR signals.
Manual tuning (via front panel) (Analogue mode)
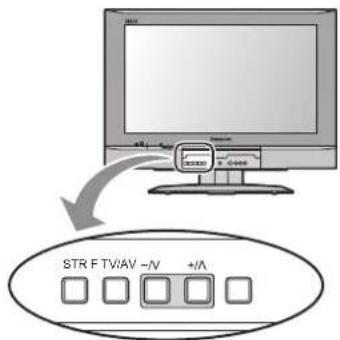
It is also possible to use the control panel buttons on the front of your TV to tune individual programme positions:
Press the F button until Tuning mode is reached.
Press the -N or +/A button to access Tuning mode.
Press the TV/AV button to move between Change programme, Search and Change TV system.
Press the -N or +/A button to change programme position or start search.
When the desired station is found, press the STR button to store.
The programme position will flash.
Repeat above procedure to tune additional programme positions.
Press the F button at any time to go back to watching TV.


text_image
STR F TV/AV -N +/A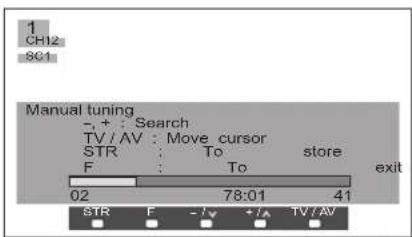
text_image
1 CH12 SC1 Manual tuning - + : Search TV/AV : Move cursor STR : To store F : To exit 02 78:01 41 STR F - /v + /A TV/AVDVB Setup Menu – overview (DVB mode)
In DVB mode
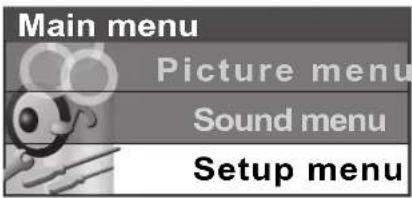
Press the MENU button.
Move to choose Setup menu.
Access Setup menu.
Move to choose DVB Setup Menu.
Access DVB Setup Menu.
Move to choose menu option.
Adjust chosen option or access chosen menu.
Press the EXIT button at any time to go back to watching TV.
text_image
MENU EXIT Panasonic OFFProfile Edit
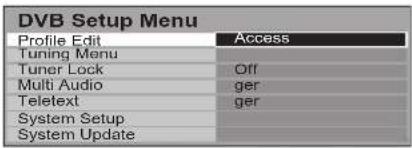
Allows you to select your favourite programme positions and display them in the Information banner. See page 18.
Tuning Menu Provides access to many other DVB tuning features.
See page 19.
text_image
Main menu Picture menu Sound menu Setup menuTuner Lock Prevents you from accidentally changing programme
position while recording a DVB broadcast. If the TV is switched into Standby mode while Tuner Lock is On, the DVB tuner will remain active to ensure recording can still take place.
Use this function for the recording without watching DVB broadcast. Do not switch the main power button on the unit Off during recording.
Even if the main power button is switched On and Off, this setting is not changed.
text_image
Setup menu Q-Link AV2 AV2 out Monitor Teletext TOP Off timer Off DVB Setup Menu Access System languageNote:
While recording a DVB programme, it is possible to change to the analogue programme positions to watch.
text_image
DVB Setup Menu Profile Edit Access Tuning Menu Tuner Lock Off Multi Audio ger Teletext ger System Setup System UpdateMulti Audio Allows you to select from several sound tracks. The number of options available depends on each broadcast.
Teletext Allows you to select the language in teletext mode. The number of options available depends on each broadcast.
System Setup Provides access to various specialized DVB options.
See page 21.
System Update Allows you to download new software to the television.
See page 23.
Profi le Edit (DVB mode)
The Profile Edit menu allows you to select your favourite programme positions and display them in the Information banner, to allow quick and easy access to the programmes you watch most often. The programme number is given sequentially.
You can make the 4 profi le lists.
In DVB mode
Press the MENU button.
Move to choose Setup menu.
Access Setup menu.
Move to choose DVB Setup Menu.
Access DVB Setup Menu.
Move to choose Profile Edit.
Access Profile Edit.


text_image
PANASONIC 127VAdd a programme to the Profi le list
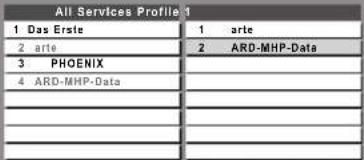
Move to the programme position in All Services which you wish to add to the profi le list.
Press the Green button repeatedly to cycle through the profiles (Profi le 1 to 4).
Press the Yellow button to add a programme to the profile list. Press the Blue button to add all the programmes to the profile list.
Press the OK button to store your Profile list.


| DVB Setup Menu | |
| Profile Edit | Access |
| Tuning Menu | |
| Tuner Lock | Off |
| Multi Audio | ger |
| Teletext | ger |
| System Setup | |
| System Update | |
| All Services Profile 1 | |
| 1 Das Erste | |
| 2 arte | |
| 3 PHOENIX | |
| 4 ARD-MHP-Data | |
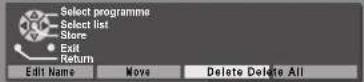
Edit the Profi le list
Move to the profi le list.
When the profi le list is highlighted
Press the Red button to edit the profile name.
Press the Green button to move the programme.
-
Move the programme to another position with the up or down cursor button.
-
Press the Green button to confirm.
-
Press the OK button to store.
Press the Yellow button to delete the programme.
Press the Blue button to delete all channels.


| Profile Editor |
 |
 |
Press the OK button to store your Profile list.
Press the MENU button to return to the DVB Setup Menu.
Press the EXIT button at any time to go back to watching TV.
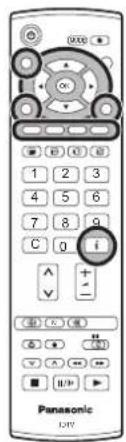
A list of profiles can be accessed by pressing the i button or the GUIDE button.
See page 25.


DVB Tuning Menu (DVB mode)
DVB Tuning Menu provides access to DVB Tuning features.
In DVB mode
Press the MENU button.
Move to choose Setup menu.
Access Setup menu.
Move to choose DVB Setup Menu.
Access DVB Setup Menu.
Move to choose Tuning Menu.
Access Tuning Menu.
Move to choose menu option.
Adjust chosen option or access chosen menu.
Press the EXIT button at any time to go back to watching TV.
Auto Setup Automatically retunes your TV. DVB stations will be located, sorted into order and stored.
The present DVB tuning data will be erased.
Add New Service You can add new DVB stations while retaining existing tuning data. When the New Services Found message appears new DVB stations are available to add to your existing DVB programme list.
The present DVB tuning data is not erased.
New Service Message
This TV continually scans for updated DVB services and notifies you of any changes. Set to On to receive notification. Set to Off if you do not wish to be informed of any updates.
Signal Quality The signal quality function displays an indication of signal quality for each DVB programme position.
The DVB system requires a good quality signal to provide the best picture. When viewing analogue pictures, interference such as signal reflection from nearby buildings or mountains causes 'ghosting', but still provides a viewable picture. For the DVB system, interference such as this can disrupt the flow of data causing the picture to appear to be made up of large blocks, or to freeze intermittently. If the picture disappears completely, this could mean that signal quality is very poor. If this happens often, you may need to improve your aerial system to provide a better signal.

text_image
MENU EXIT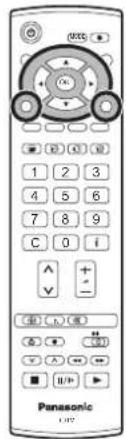
text_image
0035 Panasonic 1 2 3 4 5 6 7 8 9 C 0 i A + V - ( ) ( ) ( ) + - + - + - + - ■ H/P -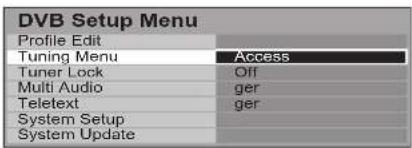
text_image
DVB Setup Menu Profile Edit Tuning Menu Access Tuner Lock Off Multi Audio ger Teletext ger System Setup System Update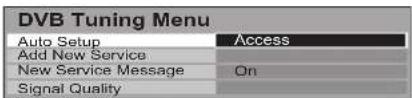
text_image
DVB Tuning Menu Auto Setup Access Add New Service New Service Message On Signal Quality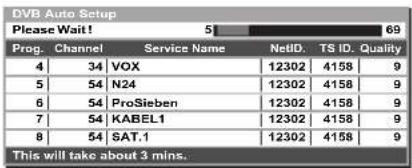
text_image
DVB Auto Setup Please Wait! 5 69 Prog. Channel Service Name NetID. TS ID. Quality 4 34 VOX 12302 4158 9 5 54 N24 12302 4158 9 6 54 ProSieben 12302 4158 9 7 54 KABEL1 12302 4158 9 8 54 SAT.1 12302 4158 9 This will take about 3 mins.
text_image
Add New Services Please Wait ! 5 69 Prog. Channel Service Name NetID. TS ID. Quality This will take about 3 mins.New Service Message On
New DVB Service Found! Press OK to add new service Press EXIT to Ignore
DVB Tuning Menu – DVB Auto Setup (DVB mode)
DVB Auto Setup automatically retunes your TV. This feature is useful if, e.g., you move house and wish to retune your TV to receive the local stations.
In DVB mode
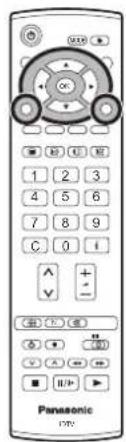
Press the MENU button.
Move to choose Setup menu.
Access Setup menu.
Move to choose DVB Setup Menu.
Access DVB Setup Menu.
Move to choose Tuning Menu.
Access Tuning Menu.
Move to choose Auto Setup.
Access Auto Setup.


text_image
SOSK Panasonic DVDNotes:
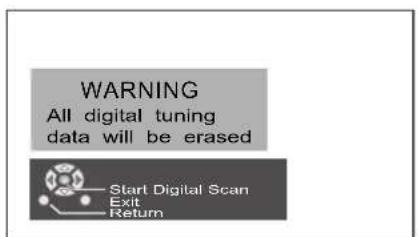
- If you proceed with the next step DVB tuning data will be erased (all DVB stations and their programme positions stored in your TV's memory will be wiped out so the new settings can be stored).
- If you exit the procedure after this point and before Auto Setup is complete, no station information will be stored. Restart and complete the Auto Setup procedure so that the TV is returned.
Press to start Auto Setup.

The TV will search for, locate, store and then sort into order your local stations.
Once this operation is completed the TV will display the programme now stored on programme position 1.
Press the EXIT button at any time to go back to watching TV (please read the Notes in the above procedure).

text_image
WARNING All digital tuning data will be erased Start Digital Scan Exit Return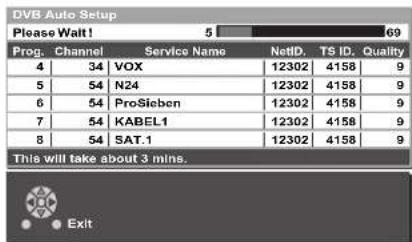
text_image
DVB Auto Setup Please Wait! 5 69 Prog. Channel Service Name NetID. TS ID. Quality 4 34 VOX 12302 4158 9 5 54 N24 12302 4158 9 6 54 ProSieben 12302 4158 9 7 54 KABEL1 12302 4158 9 8 54 SAT.1 12302 4158 9 This will take about 3 mins. ExitDVB System Setup (DVB mode)
The DVB System Setup menu provides access to DVB specific options.
In DVB mode
Press the MENU button.
Move to choose Setup menu.
Access Setup menu.
Move to choose DVB Setup Menu.
Access DVB Setup Menu.
Move to choose System Setup.
Access System Setup.
Move to choose menu option.
Adjust chosen option or access chosen menu.
Press the EXIT button at any time to go back to watching TV.
Pressing the OK button after having adjusted some features will store the new setting as the default (replacing the factory setting).

text_image
MENU EXIT OK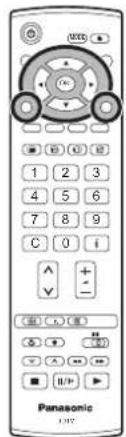
text_image
PANASONIC 137Common Interface Module
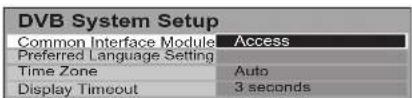
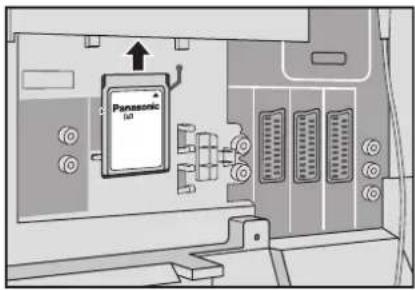
The Common Interface Module menu provides access to functions contained on a Common Interface Module inserted into the CI slot, located at the rear of the TV. See page 22.
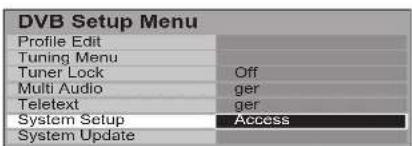
text_image
DVB Setup Menu Profile Edit Tuning Menu Tuner Lock Off Multi Audio ger Teletext ger System Setup Access System UpdatePreferred Language This option allows you to select the initial language for Setting Audio and Teletext.
text_image
DVB System Setup Common Interface Module Access Preferred Language Setting Time Zone Auto Display Timeout 3 secondsTime Zone This function will adjust the time data automatically.
Auto : The time data will be adjusted according to your area automatically.
Others : The time data will be corrected based on GMT.
Display Timeout This option allows you to set how long the information banner stays on screen. Select from 0 (No display) to 10 seconds in 1 second increments. See page 25.
Common Interface Module (DVB mode)
The Common Interface Module menu provides access to software contained on Common Interface (CI) Modules. These can be inserted in the "CI" slot located at the rear of the TV.
IMPORTANT NOTES:
- Switch off the TV using the front panel switch before inserting or removing a module.
- If you are installing a TV software update, please follow the dedicated instructions supplied with the module.
- Insert / remove a module straightly to the CI slot.
Insert the CI module:
Some Common Interface Modules may be a two piece design consisting of a card reader together with the viewing card. When using this design of card, first insert the card reader firmly into the CI slot on the TV. Secondly, insert the viewing card into the reader.
Switch on the TV.
In DVB mode
Press the MENU button.
Move to choose Setup menu.
Access Setup menu.
Move to choose DVB Setup Menu.
Access DVB Setup Menu.
Move to choose System Setup.
Access System Setup.
Move to choose Common Interface Module.
Access Common Interface Module.
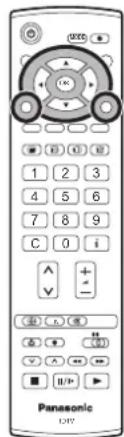
Access the module.
If no module is inserted the message "No module inserted" will be displayed.
(If you have inserted a module, check that it is fully inserted.)
The features that now appear on screen are dependent on the contents of the selected Common Interface Module.
Refer to the instructions supplied with the card or contact the vendor.
In all cases, it is possible to navigate the pages using buttons on the remote control, but because the commands available must apply to all manufacturers of DVB equipment, some on screen commands may not correspond exactly to the remote control buttons.
For example:
For the on screen command 'select' or 'go', use the OK button.
If you see the ◀▶ symbols, use the cursor buttons.
If you see a line of key words displayed in red, green, yellow and blue, use the coloured buttons to operate the functions.
The EXIT button should always allow you to exit the CI software.
text_image
Panasonic (a)
text_image
MENU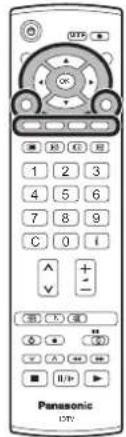
text_image
PANASONIC 10V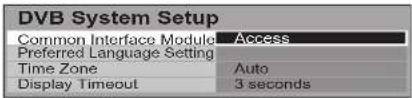
text_image
DVB System Setup Common Interface Module Access Preferred Language Setting Time Zone Auto Display Timeout 3 seconds




DVB System Update (DVB mode)
From time to time new versions of software will become available to enhance the performance and features of this TV.
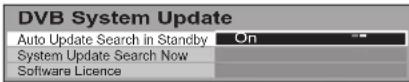
Auto Update Search in Standby (Overnight)
During the night time, this TV will automatically search for any new available software being broadcast. If a new software version is found, the unit will automatically download and install this new version. At the end of this process the unit will reset. Auto Update Search in Standby will occur at 03:00 and 05:00 every day.
In DVB mode
Press the MENU button.
Move to choose Setup menu.
Access Setup menu.
Move to choose DVB Setup Menu.
Access DVB Setup Menu.
Move to choose System Update.
Access System Update.
Move to choose Auto Update Search in Standby.
Choose between On or Off.

text_image
Panasonic 1277Set to On to search for new software and update automatically in Standby mode. This does not work when the unit is off.
If there is a new version software being broadcast, the TV will download this automatically.
Auto Update Search in Standby will only occur if:
- The unit is in Standby mode
• No recording is being made at 03:00 or 05:00
Set to Off if you do not want new software to be automatically downloaded.
In this case a new software banner will appear when the TV set is switched on, if new software is being broadcast.
The message might be the notification beforehand. In this case, the schedule information (the date that the new version can be used) will appear.
Press the OK button to download the new version.
The TV will begin download of the new software version. This can take up to about 20 minutes.
Press the EXIT button to exit without download.
| DVB Setup Menu | |
| Profile Edit | |
| Tuning Menu | |
| Tuner Lock | Off |
| Multi Audio | ger |
| Teletext | ger |
| System Setup | |
| System Update | Access |


New version 1.00 found.
Do you really want to update the software and reboot the system?
Press OK to download the new version
Press EXIT to Ignore
To ensure that your TV automatically updates when new software is available, please place the TV in Standby last thing at night when you have fi nished viewing.
DVB System Update (DVB mode)
System Update Search Now (Manual Download)
To manually check if a new software version is available, select System Update Search Now in DVB System Update menu.
In DVB mode
Press the MENU button.
Move to choose Setup menu.
Access Setup menu.
Move to choose DVB Setup Menu.
Access DVB Setup Menu.
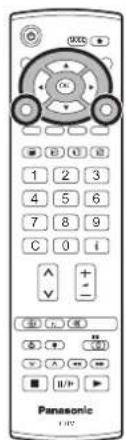
Move to choose System Update.
Access System Update.
Move to choose System Update Search Now.
Access System Update Search Now.

text_image
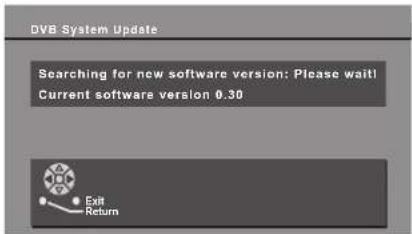
PANASONIC 102The TV will search for new versions of software and indicate whether a newer version is available or not. This search process may take a few minutes.
If a newer software version is found, an on screen message will inform the user that it is available. The user is given the chance to download this version.
The message might be the notification beforehand. In this case, the schedule information (the date that the new version can be used) will appear.
Press the OK button to download the new version.
The TV will begin download of the new software version. This can take up to about 20 minutes.
Press the EXIT button to exit without download.
text_image
DVB System Update Searching for new software version: Please wait! Current software version 0.30 Exit Return

Please do not switch off the TV or press any buttons while this download is in progress. The TV will reset after the software download is complete.
Press the MENU button to return to DVB System Update menu.
Press the EXIT button to exit from menus.


Software Licence
Access to show the information of the Software Licence.
Information banner
In DVB mode
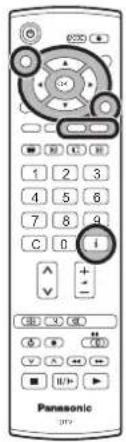
Information banner will appear when changing channel, pressing the i button or the GUIDE button. The banner gives the user information about the channel and programme currently being viewed. The banner will time out and disappear from the screen after a set time period, this time period can be set in the DVB System Setup menu. See page 21.

text_image
PANSONIC 1974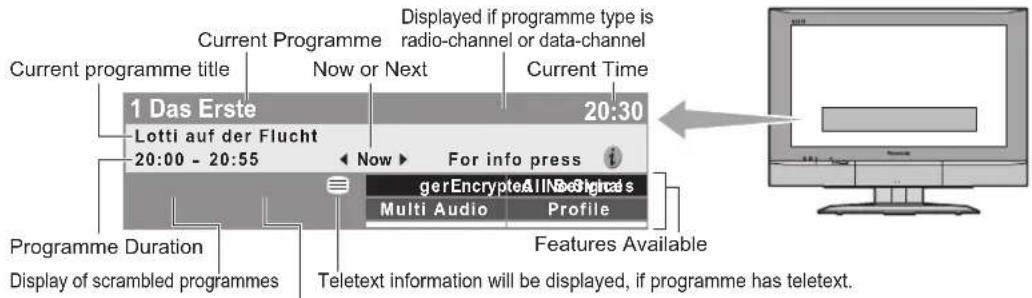
text_image
Current programme title Current Programme Now or Next Displayed if programme type is radio-channel or data-channel Current Time 1 Das Erste 20:30 Lotti auf der Flucht 20:00 - 20:55 Now For info press gerEncrypted AllNecSnglcs Multi Audio Profile Programme Duration Display of scrambled programmes Features Available Teletext information will be displayed, if programme has teletext.In case of bad signal or non correct
programme-number a message will be displayed.
Press the left or right cursor button while banner is displayed to switch between Now and Next.
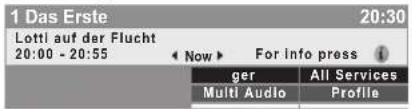
This switches between the information for the current programme title being shown (Now) and the next programme title to be shown (Next).
Press the up or down cursor button to step through the banner information for all programmes.
Press the OK button to view a programme.


While the banner appears
Press the i button or the GUIDE button to display an extended banner showing any information available on the current selected programme.
If the information is out of the screen, press the up or down cursor button to scroll through the information.
Press the i button or the GUIDE button while in extended banner mode to return to normal banner view.
To clear the banner from the screen while in extended banner mode, press the EXIT button.



Changing Category
Press the Blue button while in the banner to scroll through available categories.
For example: All Services : All available Services
All Services User Profiles User Profi les :4 individual Profi les set up by user (see page 18) (Profi le 1 to 4)
Changing Sound track
Press the Yellow button while in the banner to scroll through available sound tracks.
Press the EXIT button to exit the banner at any time.


In Analogue mode
Pressing the i button will display the analogue channel information for a few seconds. This will then be timed out to display just the programme position number near the top left corner of the screen.
To remove this programme position number, press the i button again.

Q-Link
Q-Link allows the television to communicate with a compatible VCR or DVD Recorder.
For Q-Link communication to work, the TV must be connected to a recording device with the "Q-Link", "NEXTVIEWLINK", "DATA LOGIC", "Easy Link", "Megalogic" or "SMARTLINK" logo using a "fully wired" Scart cable between the AV2 / AV4 terminal of the television and the appropriate terminal on your VCR or DVD Recorder.
For connection to the appropriate Scart terminal on the recording device, refer to the device's instruction book.
When using a "NEXTVIEWLINK" device the main features possible are the following:
Preset Download
This allows the programme order from the TV to be downloaded to the recording device, helping to ensure that correct recordings are made; there are several ways to perform this operation:
- During installation as explained in the "Quick Start Guide" on page 5, 6.
- When Auto setup is started from within the Tuning menu. See page 12.
- Preset download started from the recording device, refer to the device's instruction book.
Because a recording device cannot tune to DVB stations, only the analogue programme positions are downloaded to the device.
What You See Is What You Record (DIRECT TV RECORDING)
This will allow the immediate recording of the programme currently shown on the TV, by the recording device attached to the Scart terminal, which can be chosen using "Q-Link". See page 11.
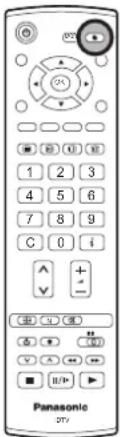
Press the DIRECT TV REC button.

If the recording device is in Standby mode with usable recording media inserted, it will automatically switch on when you press the DIRECT TV REC button.
If a “Q-Link” device is connected, a message will appear on the TV screen showing what is being recorded, or if it is not possible to record. Some “Q-Link” compatible devices will only display the message when on the VCR programme position “0” or in AV mode. Refer to the device’s instruction book.
text_image
Panasonic DTVRecording in progress No recording -Check tape or disc
The recording device is recording the programme signal from its own tuner. If you wish you can switch off the TV and leave the device recording in the normal way.
The tape or disc may have been "write protected", missing or may be damaged. The device may already be re-cord ing. Refer to the device's instruction book.
Recording DVB broadcasts
If you press the DIRECT TV REC button while watching a DVB broadcasts, the recording device will automatically switch to its AV input to record the DVB signal from the TV (via the SCART cable), and the DVB programme position will be locked. If you attempt to select another DVB programme position while recording, you will see the message "DVB Tuner Locked". Press the OK button to clear the message, or the EXIT button to unlock the programme. Beware that if you press the EXIT button, the DVB programme will be unlocked – the EXIT button stops the recording.
Additionally, when using a "Q-Link" device the main features possible are the following:
The following features are only available from the device connected to the Scart terminal selected using "Q-Link". See page 11.
TV / Recording device Auto Power On
If you insert pre-recorded media into the recording device and press the Play button whilst the TV is in Standby mode, the TV will automatically switch on and select the correct AV input so that you can view the content.
Recording device Auto Power Standby
When the TV is switched into Standby mode, the recording device will also switch into Standby mode if there is no media inserted, or if there is media inserted and the device is in Rewind or Stop mode. If a VCR is rewinding a tape, it will not switch into Standby mode until rewinding has finished.
Recording device Image View On
If the TV is in Standby mode and the recording device sends a menu to be displayed on the TV screen (e.g., Main menu), the TV will automatically switch On and the menu will be displayed.
This TV will also communicate with other recording device's that bear the following logos:
- "DATA LOGIC" (a trademark of Metz Corporation) • "Megalogic" (a trademark of Grundig Corporation)
- “Easy Link” (a trademark of Philips Corporation) • “SMARTLINK” (a trademark of Sony Corporation)
Important Note:
Some recording devices may not support all or some of the above functions. Refer to the instruction book for the device. If Q-Link functions do not work, check the connection and ensure that the scart lead is a fully-wired type.
Aspect Controls
The Widescreen TV will allow you to enjoy viewing the picture at its optimum size and aspect, including widescreen cinema format pictures.
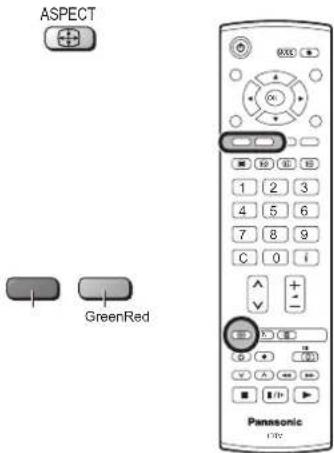
Press the ASPECT button repeatedly to move through the aspect options:
Panasonic Auto, 16:9, 14:9, Just, 4:3, Zoom1, Zoom2 and Zoom3
OR
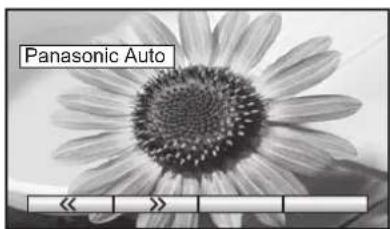
Press the ASPECT button. Whilst the on screen selector keys are displayed, use the Red or Green buttons to move in either direction through the aspect options.
Note:
This is not available for 720p and 1080i signals input. Aspect is fixed to 16:9.
text_image
ASPECT GreenRed Panasonic TVPanasonic Auto
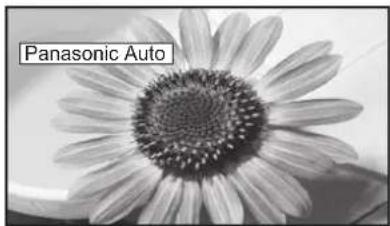
Panasonic Auto determines the best aspect ratio to use to fill your screen. It does this using a four step process to determine if the picture being viewed is a widescreen picture.
If Panasonic Auto detects a widescreen signal it switches into the appropriate widescreen mode. If Panasonic Auto does not detect a widescreen signal then this advanced TV set enhances the picture for optimum viewing pleasure.
The text shown on the screen indicates how Panasonic Auto determined which ratio to use:
Panasonic Auto switches to the appropriate widescreen ratio.
If black stripes above and below the picture are detected, aspect ratio changes automatically.
Panasonic Auto chooses the best ratio and expands the picture to fill the screen. This process can take several minutes, depending on the darkness of the picture.
You may prefer to manually select one of the other aspect options available to view the picture.
Notes:
- If, in Panasonic Auto mode, you experience problems with the screen display size when playing back widescreen format recordings from your VCR then it is possible that the tracking control of your VCR requires adjustment (your VCR instruction book will contain adjustment details).
- The widescreen aspect ratios of different films and programmes can vary. If these are wider than a standard 16:9 aspect picture then a black band may be visible at the top and bottom of the screen.
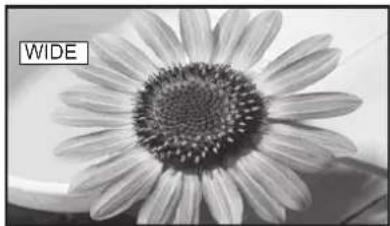
- "WIDE" will appear in the top left corner of the screen and picture aspect changes accordingly in any aspect modes, if a widescreen identification signal (WSS) is detected or a control signal is found through a Scart terminal.
- Automatic aspect ratio adjustment by WSS signal is not available for progressive and high definition component signals input.
natural_image
Black and white close-up of a sunflower with visible petals and center (no text or symbols)"WIDE" ap pears in the top left of the screen, Panasonic Auto switch es to the ap pro pri ate 16:9 or 14:9 widescreen ratio.
natural_image
Black and white close-up of a sunflower with visible petals and center (no text or symbols)"Panasonic Auto" appears in the top left of the screen. The best ratio is chosen and the picture expanded to fi ll the screen.
text_image
Panasonic Auto << >>Press the ASPECT button, then use the Red or Green buttons to move in either direction through the aspect options.
Aspect Controls
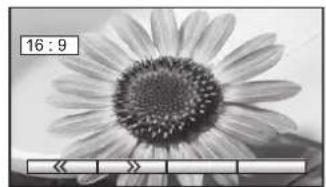
16:9
16:9 will display a true 16:9 (anamorphic) picture with no aspect distortions.
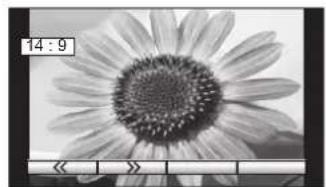
14:9
14:9 will display a 14:9 picture at its standard 14:9 size without any stretching.
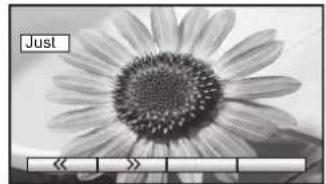
Just
Use Just when you wish to expand a 4:3 picture to fill the whole screen (rather than watching a programme with black stripes down the left and right sides of the picture).
The 4:3 picture will be stretched horizontally so that the image fills the screen, this is done in such a way that the stretching is only obvious at the left and right edges of the screen.
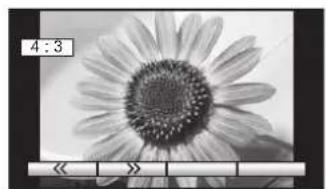
4:3
4:3 will display a 4:3 picture at its standard 4:3 size with no aspect distortions.
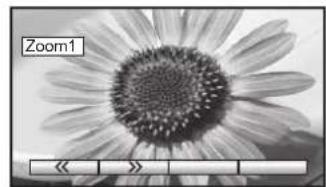
Zoom1
Zoom1 will display 16:9 letterbox or 4:3 pictures with no aspect distortions.
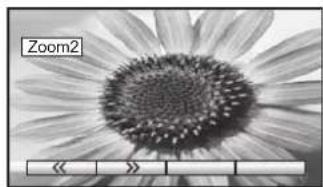
Zoom2
Zoom2 will display 16:9 anamorphic letterbox pictures as a full screen display with no aspect distortions.
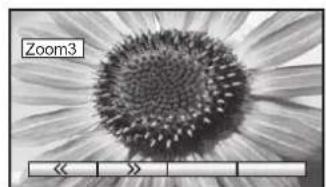
Zoom3
Zoom3 will display 21:9 letterbox pictures as a full screen display with no aspect distortions.
16:9 will display the picture at its maximum size but with slight stretching.
natural_image
Close-up black-and-white photo of a daisy flower with visible petals and center (no text or symbols)16:9
natural_image
Black and white close-up of a daisy-like flower with visible petals and center (no text or symbols)14:9
natural_image
Black and white close-up of a sunflower with visible petals and center (no text or symbols)Just
natural_image
Black and white close-up of a sunflower with visible petals and center (no text or symbols)4:3
natural_image
Close-up black-and-white photo of a daisy flower with visible petals and center (no text or symbols)Zoom1
natural_image
Close-up grayscale photo of a sunflower with visible petals and center (no text or symbols)Zoom2
natural_image
Close-up grayscale photo of a sunflower with visible petals and center (no text or symbols)Zoom3
VCR / DVD operation
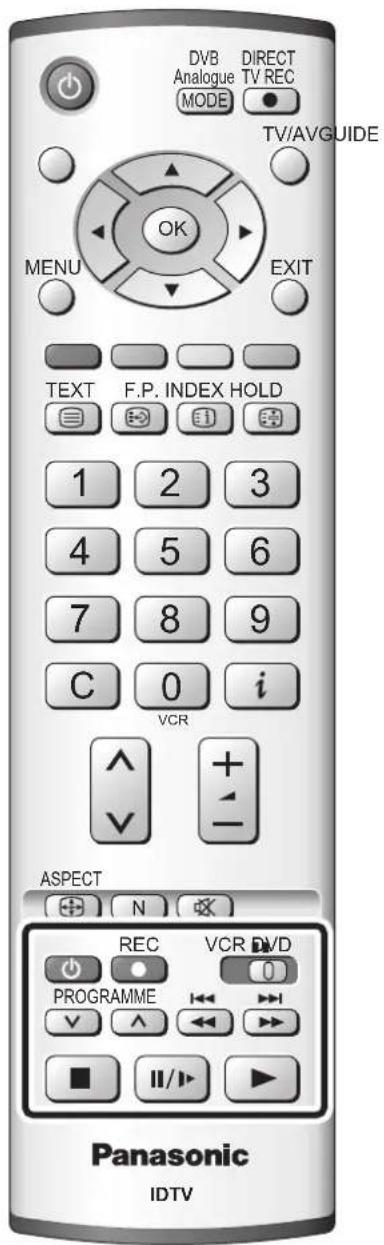
The Remote Control is capable of operating some functions of selected Panasonic VCRs and DVD (Digital Versatile Disc) equipment. Some VCR and DVD equipment have different functions, so to ensure compatibility please refer to the equipment's instruction book or consult your dealer for details.
text_image
DVB DIRECT Analogue TV REC MODE TV/AVGUIDE OK MENU EXIT TEXT F.P. INDEX HOLD 1 2 3 4 5 6 7 8 9 C 0 i VCR ^ + - ASPECT N REC VCR DVD PROGRAMME 0 V ^ <+ >> ■ II/▶ ▶ Panasonic IDTV | VCR / DVD switchUse this switch to select whether controls operate the DVD equipment or VCR. |
 | StandbyPress to switch the VCR, DVD or DVD recorder to Standby mode.Press again to switch back on. |
 | PlayPress to playback the tape or DVD. |
 | StopPress to stop the tape or DVD. |
 | Skip / Fast Forward / CueVCR: Press to fast forward the tape. In Play mode, press to view the picture rapidly forward (Cue).DVD: Press to skip to the next track or title.Press and hold to search forward. |
 | Skip / Rewind / ReviewVCR: Press to rewind the tape. In Play mode, press to view the picture rapidly in reverse (Review).DVD: Press to skip to the previous track or title.Press and hold to search backward. |
 | Pause / StillPress in Play mode, the picture will pause.Press again to restart play.DVD: Press and hold for slow-motion play. |
 | Programme Up / DownPress to increase or decrease the programme position by one. |
 | RecordPress this button to start recording. |
Teletext operation
- Teletext features may vary depending on the Broadcasting Companies and is only available if the channel selected is transmitting Teletext.
- Pressing the MENU button three times whilst in Teletext operation will display the contrast function with a cyan bar, press the left and right cursor buttons to alter the setting as required.
- Pressing the MENU button whilst in Teletext operation will display special function options at the bottom of the screen.
- Pressing the Volume up / down button whilst in Teletext operation will display the volume function with a green bar, press the volume up / down button to alter the setting as required.
What is List mode?
In List mode, four differently coloured page numbers are situated at the bottom of the screen. Each of these numbers can be altered and stored in the TV's memory.
What is TOP/FLOF mode?
In TOP/FLOF mode, four differently coloured subjects are situated at the bottom of the display. To access more information about one of these subjects, press the appropriately coloured button. This facility enables fast access to information on the subjects shown.
| TEXT | TV / Teletext modePress the TEXT button to switch between the current programme and teletext. |
| Page SelectionPages can be selected in two ways:a. Press the Up / Down cursor buttons to increase or decrease the page number by one.b. By entering the page number, using 0 - 9 on the remote control. | |
| MENU | Full / Top / BottomPress the MENU button to display special functions, followed by the Green button.Press the Green button again to expand the BOTTOM half.Press again to return to normal (FULL) size. |
| MENU | RevealPress the MENU button to display special functions, followed by the Red button to reveal hidden words e.g., quiz page answers. Press again to hide. |
| Red / Green / Yellow / Blue buttonsIn TOP/FLOF mode they correspond to the differently coloured subjects.In List mode they correspond to the differently coloured page numbers. | |
| List StoreIn List mode the four page numbers can be altered.DVB mode: any programme positions are availableAnalogue mode: programme positions 1 - 25 onlyTo do this, press one of the four coloured buttons and enter the new page number.Press and hold the OK button, the page numbers will change to white indicating that the page is stored. | |
| HOLD | HOLDTo hold the Teletext page when viewing multi-page information.Press again to return to automatic page update. |
Teletext operation
It is not possible to change the programme position when in News flash, Update or Sub Coded Page Access operation.
| Favourite Page (F.P.)Stores a favourite page in memory for instant recall. To store such a page, the TV must be in List mode, and the programme position in Analogue mode must be from 1 - 25 (any programme positions are available in DVB mode).Press theBluebutton, select the page number, then press and hold theOKbutton. The page number is now stored.Press theFP.button to recall this page. | |
| MENUYellow | Update DisplayPress theMENUbutton to display special functions, followed by theYellowbutton to view the TV picture whilst searching for a Teletext page (this is not necessary in Picture and text mode, as the picture is displayed on the left of the screen). When found, the screen will display the page number at the top left. Press theYellowbutton to view the page.Press theTEXTbutton again to return to normal TV operation.News FlashWhen a news flash page has been selected, press theMENU,Yellowbuttons, to view the TV picture. When an update is received, the page number will be displayed on screen.Press theYellowbutton to display the News Flash.Press theTEXTbutton to return to normal TV operation.UpdatePress theMENU,Yellowbuttons to see the update of information on certain pages.When an update is received, the page number will be displayed at the top left of the screen.Press theYellowbutton to view the page.Press theTEXTbutton to return to normal TV operation. |
| Accessing sub pagesWhen Teletext information exceeds one page, it may take some time for the automatic changing of the sub pages to reach the sub page you require. As each sub page is found its number is displayed at the top of the page so that you may select it; as more sub pages are picked up, the display at the top of the page changes, so that you are always offered the most recently transmitted selection of sub pages.In Teletext operation, use the following procedure to access sub pages:If the sub page you want to look at is not yet available, press theMENUbutton (to display special functions) followed by theYellowbutton to view the TV picture whilst waiting for more sub pages to be found. The sub pages found will be displayed across the top of the screen.When the sub page you are waiting for is available press theYellowbutton to return to viewing the Teletext pages, then use the left and right cursor buttons to select the sub page of your choice.The maximum number for sub page that can be entered is restricted to 79 by broadcasters.Notes:If you do not want to display the on screen selector keys on the TV picture whilst waiting for a sub page to be found, press theMENUbutton to clear the keys from the screen. Press again to redisplay the keys.If you have cleared the special function keys from the screen and then used the left and right cursor buttons to select a sub page, whilst still viewing the TV picture, you must press theMENUbutton then theYellowbutton to display the Teletext page again.If the top of the page indicates that sub pages are being transmitted but the page displayed never changes, then the 'sub page number' is there to show the page contents have been updated, there are no sub pages. |
Teletext operation
 |  | Alternatively, if you know which sub page you require, press theMENUbutton (to display special functions) followed by theBluebutton; T**** will be displayed where the page number is normally found.Enter desired sub page number before the T**** disappears.e.g., to select page 6 enter 0, 0, 0 and 6.Press theYellowbutton to view the TV picture whilst waiting for more sub pages to be found. The sub pages found will be displayed across the top of the screen.When the page is available, press theYellowbutton to view the page. Regardless of how many pages are found, pressing theYellowbutton will take you to the sub page which you requested.Press theTEXTbutton to return to normal TV operation. |
 | INDEXWhen in TOP/FLOF operationPress theINDEXbutton to return to the main index page.Depending on the way information is transmitted, this may have to be pressed more than once to return to the main index page. | |
 |  | Picture and textPress theMENUbutton twice to display special functions, followed by the left or right cursor button to select Picture and text On or Off.Picture and text mode lets you see the current programme and a page of teletext side by side. Whilst using this feature, the remote control affects the teletext page; if you wish to make changes to the programme viewed press theTEXTbutton to return to watching the programme on its own then make the desired changes. |
Still
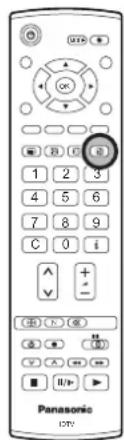
Press the HOLD button to freeze the picture.
Press again to return to watching the current programme.

text_image
GPTC 1 2 3 4 5 6 7 8 9 C 0 i A + V - (出) (出) A (出) B (出) C (出) D (出) E (出) F (出) G (出) H (出) I (出) J (出) K (出) L (出) M (出) N (出) O (出) P (出) Q (出) R (出) S (出) T (出) U (出) V (出) W (出) X (出) Y (出) Z (出) A (出) B (出) C (出) D (出) E (出) F (出) G (出) H (出) I (出) J (出) K (出) L (出) M (出) N (出) O (出) P (出) Q (出) R (出) S (出) T (出) U (出) V (出) W (出) X (出) Z (出) A (出)Connections
It is possible to connect a variety of additional equipment to this TV. The following pages detail how to connect external equipment to the front and rear of the TV.
Once your equipment is connected, use the following procedure to view the input:
While viewing a TV channel
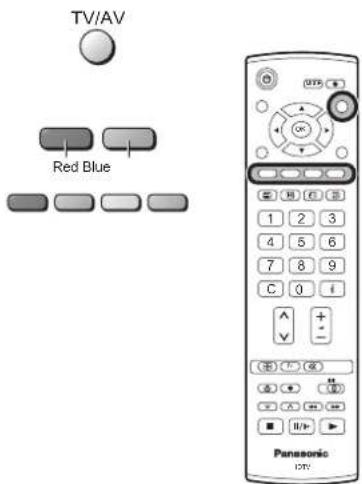
Press the TV/AV button.
Whilst the on screen selector keys are displayed, select the page by pressing the Red or Blue button and then press coloured buttons to select the AV source you wish to view.
Red button : AV1 Scart terminal / Back page
Green button : AV2 Video, S-Video Scart terminal /
AV4 Video, S-Video Scart terminal
Yellow button : AV3 Audio, Video, S-Video terminals /
Component, HDMI terminals
Blue button : Next page / -
The on screen selector keys will disappear after a few seconds. If you want to select an input when the keys are not shown, press any one of the coloured buttons and the keys will reappear.
text_image
TV/AV Red Blue Panasonic DTVNotes:
- You can also select an AV source using the TV/AV button on the front panel of the TV.
Press the TV/AV button repeatedly until you reach the AV source you wish to view.
- When in AV mode a reduced number of options are available in the Sound and Setup menus (e.g., in the Setup menu there is no Tuning menu option).
- If the external device has aspect adjustment, set it to 16:9 for correct output display on this TV.
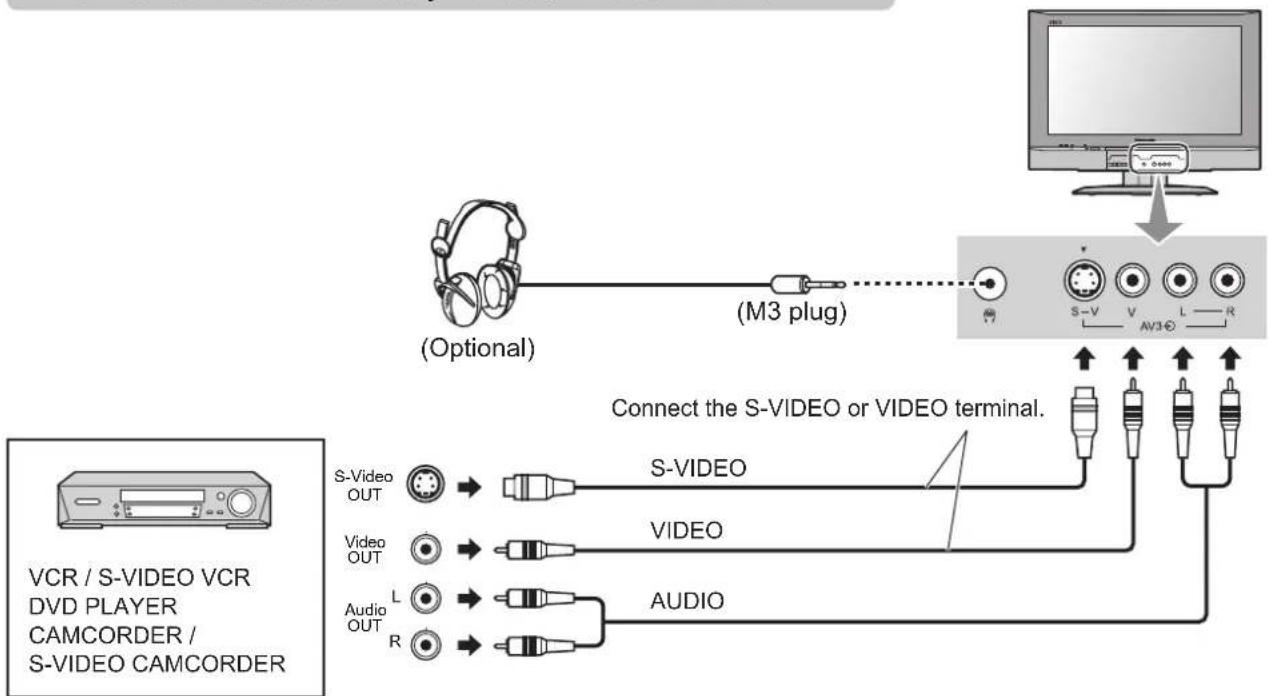
How to connect the Headphones / AV3 terminals
flowchart
graph TD
    A["VO CR / S-VIDEO VCR DVD PLAYER CAMCORDER / S-VIDEO CAMCORDER"] --> B["Audio OUT"]
    B --> C["Video OUT"]
    C --> D["S-VIDEO OUT"]
    D --> E["Connect the S-VIDEO or VIDEO terminal."]
    E --> F["Video"]
    E --> G["S-VIDEO"]
    E --> H["AVIO"]
    E --> I["AV3-O"]
    E --> J["R"]
    J --> K["Audio"]
    style A fill:#f9f,stroke:#333
    style B fill:#ccf,stroke:#333
    style C fill:#cfc,stroke:#333
    style D fill:#fcc,stroke:#333
    style E fill:#cff,stroke:#333
    style F fill:#ffc,stroke:#333
    style G fill:#ffc,stroke:#333
    style H fill:#ffc,stroke:#333
    style I fill:#ffc,stroke:#333
    style J fill:#ffc,stroke:#333
    style K fill:#ffc,stroke:#333
Notes:
- The volume level of the headphones can be adjusted by selecting "Headphone volume" from the Sound menu.
• Additional equipment and cables shown are not supplied with this TV set.
Connections
To bundle the cables with the clamper
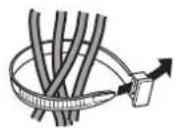
To tighten:
←Pull
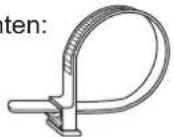
To loosen:
Keep the
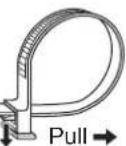
knob pressed.
Note: Do not put the RF cable and the mains lead together to avoid noise.
How to connect the Audio Output terminals
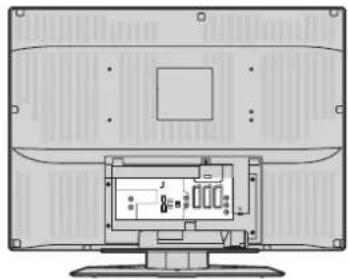
natural_image
Top-down schematic of a flat-screen TV with internal components and mounting holes (no text or symbols)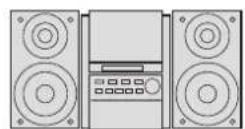
Amplifier to Speaker System

text_image
AUDIO IN L RAUDIO OUT
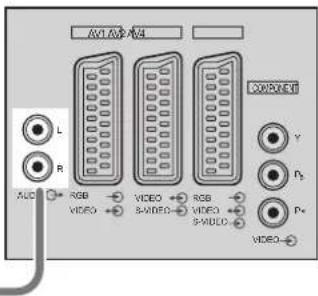
text_image
AVL/AVL/AVL L R AUDIO RGB VIDEO S-VIDEO RGB VIDEO S-MUDIO COMPONENT Y P2 P+ VIDEOHow to connect the AV1 / 2 / 4 Scart terminals
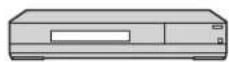
AV1:
VCR
SET TOP BOX
DVD PLAYER
DVD RECORDER
CAMCORDER
GAME CONSOLE /
COMPUTER(RGB)
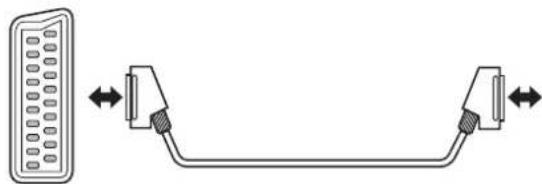
natural_image
Diagram of a cable or connector with two connectors and directional arrows indicating movement (no text or symbols)AV2:
VCR / S-VIDEO VCR
Q-Link COMPATIBLE VCR
DVD PLAYER
DVD RECORDER
Q-Link COMPATIBLE
DVD RECORDER
CAMCORDER /
S-VIDEO CAMCORDER
AV4:
VCR / S-VIDEO VCR
Q-Link COMPATIBLE VCR
SET TOP BOX
DVD PLAYER
DVD RECORDER
Q-Link COMPATIBLE
DVD RECORDER
CAMCORDER /
S-VIDEO CAMCORDER
GAME CONSOLE /
COMPUTER(RGB)
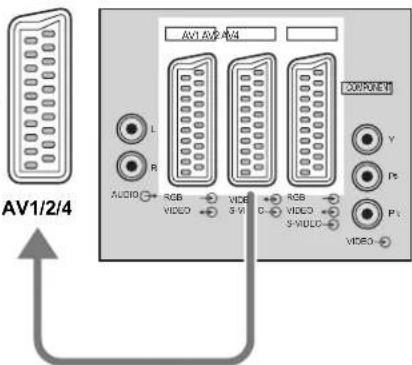
text_image
AV1/2/4 L R AUDIO RGB VIDEO 3.0 D RGB VIDEO 3-MUDIO CORPORER Y Ps Ps VIDEOHow to connect the Component Input terminals
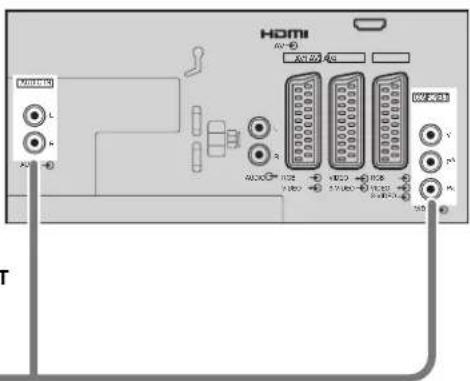
This terminal accepts progressive or non-progressive signals format, as well as high definition 750(720)/50p, 750(720)/60p, 1125(1080)/50i and 1125(1080)/60i.

DVD PLAYER
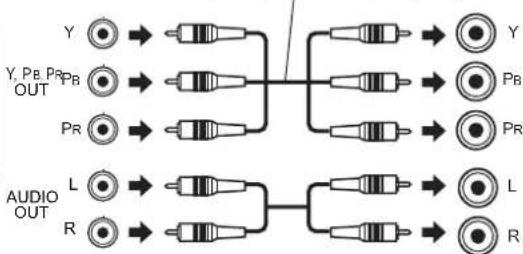
flowchart
graph TD
    A["Y"] --> B["Resistors"]
    C["Y, PB, PR OUT"] --> D["Resistors"]
    E["PR"] --> F["Resistors"]
    G["AUDIO OUT"] --> H["Resistors"]
    I["L"] --> J["Resistors"]
    K["R"] --> L["Resistors"]
    B --> M["Output to Y"]
    D --> N["Output to Y_PB"]
    F --> O["Output to Y_PR"]
    H --> P["Output to L_R"]
    J --> Q["Output to L_R"]
COMPONENT AUDIO IN
text_image
HDMI A2 R S A2 R S A2 R V P1 A2 R V P2 A2 R SNotes:
• Additional equipment and cables shown are not supplied with this TV set.
- Do not connect a computer with TTL output (5V) to this set.
- For Scart terminal wiring and applicable component signals information see page 38.
Connections
How to connect the HDMI Input terminal
HDMI (High Definition Multi media Interface) is the first all-digital consumer electronics A/V interface that supports uncompressed standard. The HDMI terminal supports both video and audio information.
An HDMI-compliant device ^*1 , such as a Set Top Box or DVD player with HDMI or DVI output terminal can be connected to the HDMI input terminal.
- If the external device has DVI output only, use a DVI to HDMI adapter cable ^*2 to connect to the HDMI terminal.
- Connect the audio cables to the AUDIO IN terminals when using a DVI to HDMI adapter cable.
- Select the audio setting in HDMI input. See page 10.
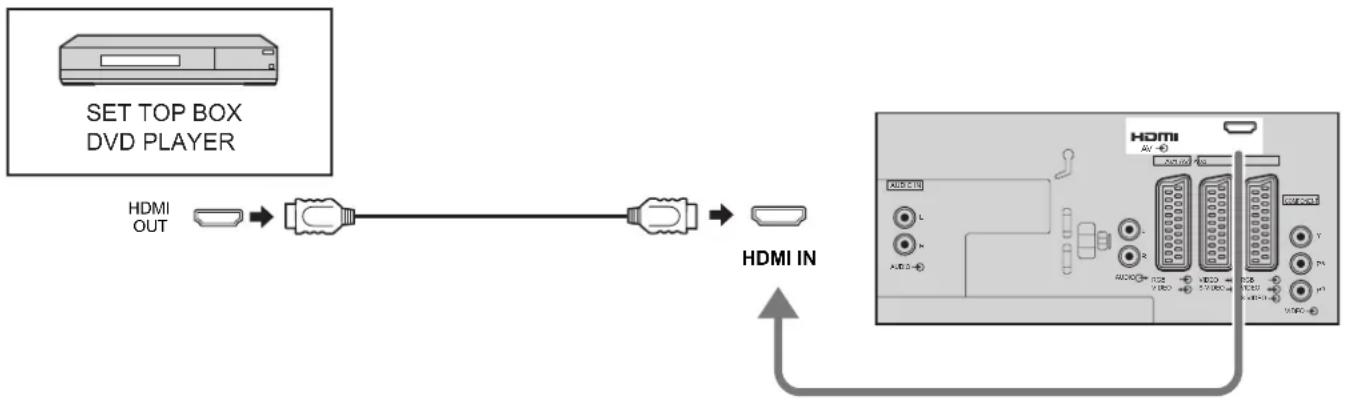
flowchart
graph LR
    A["SET TOP BOX DVD PLAYER"] --> B["HDMI OUT"]
    B --> C["HDMI IN"]
    C --> D["+"]
Notes:
- This input terminal is not intended for use with computers.
- 720p/1080i signals will be re-formatted to view on your display.
- If the external device has aspect adjustment, set it to 16:9 for correct output display on this TV.
- For applicable HDMI signals information see page 38.
■ Compatible sampling frequency of AUDIO signal through HDMI (L.PCM) : 48 kHz / 44.1 kHz / 32 kHz
Notes:
• This HDMI connector is Type A.
- If you connect equipment without a digital output terminal, connect to the COMPONENT, S-VIDEO or VIDEO input terminal on the TV so you can receive an analogue signal.
- The HDMI IN terminal can only be used with 480i, 480p, 576i, 576p, 720p or 1080i picture signals. Set the Digital Set Top Box DIGITAL OUT terminal output setting to 480i, 480p, 576i, 576p, 720p or 1080i. For detailed information, refer to the Digital Set Top Box instruction manual. If you cannot display the picture because your Digital Set Top Box does not have a DIGITAL OUT terminal output setting, use the component input (or the S-Video input or Video input). In this case the picture will be displayed as an analogue signal.
*1. HDMI-compliant device is that has the HDMI Logo on it.
*2. HDMI-DVI adapter cable: Consult your consumer electronics dealer for availability.
Troubleshooting
If there is a problem with your TV, please refer to the table below to determine the symptoms, then carry out the suggested check. If this does not solve the problem, please contact your local Panasonic dealer, quoting the model number and serial number (both found on the rear of the TV).
| Symptoms | Checks | ||
| Picture Sound | |||
 Snowy Picture Snowy Picture |  Noisy Sound Noisy Sound | Aerial location, direction or connection | |
 Multiple Images Multiple Images |  Normal Sound Normal Sound | Aerial location, direction or connection | |
 Interference Interference |  Noisy Sound Noisy Sound | Electrical appliancesCars / MotorcyclesFluorescent lightsSwitch on P-NR in Picture menu to reduce picture noise. | |
 Normal Picture Normal Picture |  No Sound No Sound | Volume levelSound mute switched on. | |
 No Picture No Picture |  No Sound No Sound | TV set to AV mode.Not plugged into AC outlet.Not switched on.Picture / Sound controls set at minimum levels.Check if in Standby mode. | |
 No Colour No Colour |  Normal Sound Normal Sound | Colour controls set at minimum levels. | |
 Poor or Distorted Picture Poor or Distorted Picture |  Weak or No Sound Weak or No Sound | Retune Channel (s).Some programmes may not be received when both Aerial and CATV signals are connected to the TV through a mixer. In this case, connect either Aerial or CATV signal directly to the TV. | |
 Normal Picture Normal Picture |  Weak or Distorted Sound Weak or Distorted Sound | Sound reception may have deteriorated.Switch MPX setting (Sound menu in Analogue mode) to Off until reception improves. | |
Ther blue spot  ^1 ^1 | |  Normal Sound Normal Sound | This is a characteristic of liquid crystal panels and is not a problem. The liquid crystal panel is built with very high precision technology giving you fi ne picture details. Occasionally, a few non-active pixels may appear on the screen as a fi xed point of blue, green, or red.Please note this does not affect the performance of your LCD. |
| HDMI | Poor Video.(Snow noise, no picture, picture runs, etc.) | HDMI cable is not connected securely.Turn the power supply of the TV and connected equipment off then turn on.Check compatibility of input signal from the connected equipment.The connected equipment must be EIA/CEA-861/861B compliant. | |
| Poor Audio. | Change the audio setting of the connected equipment to L.PCM.Check the setting of HDMI input in Sound menu.If the problem is due to the digital audio connection, change to the analogue audio connection. | ||
| The error message appears. Please consult an Authorized Service Center. | |||
DVB Troubleshooting
Some problems will only occur when viewing DVB channels. Due to the different techniques involved in digital reception, DVB signal quality can be poor even if you appear to have a strong signal when viewing analogue programmes.
The DVB system requires a good quality signal to provide the best picture. When viewing analogue pictures, interference such as signal reflection from nearby buildings or mountains causes 'ghosting', but still provides a viewable picture. For the DVB system, interference such as this can disrupt the flow of data causing the picture to appear to be made up of large blocks, or to freeze intermittently. If the picture disappears completely, this could mean that signal quality is very poor. If this happens often, you may need to improve your aerial system to provide a better signal. This TV contains a complex microprocessor which enables you to view enhanced digital services. Occasionally this device may need to be reset. This can be done by pressing the standby button on your remote control.
| Symptoms Checks | |
| No DVB channels listed after Auto Setup. | Check that DVB transmissions are available from the transmitter you are currently using. If not, try directing the aerial at another local transmitter.Check analogue transmissions. If picture quality is poor, you will need to improve or change your aerial system to receive DVB channels. Consult a local installer. |
Blocky interference.Picture freezes intermittently. | Blocky interference indicates that the signal quality is poor.You should consider improving your aerial system.To check the quality of your signal use the Signal Quality feature (see page 19).Good quality signal – indication is green.Poor quality signal – indication is red. |
| I have a good aerial system, but still cannot receive DVB stations. | If you have tried the previous solutions and are still unable to receive DVB channels, you may need to provide dedicated aerial feeds to the TV and other equipment.This can be implemented using an aerial splitter or separate aerials. |
Maintenance
To clean this set, wipe with a soft, dry cloth.
If the surfaces are extremely dirty, use a soft cloth dipped in soap-and-water solution or a weak detergent solution.
- Use eyeglass cleaner to remove stubborn dirt from the LCD.
- Never use alcohol, paint thinner or benzine to clean this set.
- Before using chemically treated cloth, read the instructions that came with the cloth carefully.
- Do not wipe the LCD with water.
Wipe the cabinet with a soft cloth.
If the cabinet is heavily soiled, wipe with a well-wrung soft cloth dipped in neutral cleanser diluted with water.
CAUTION:
If water or similar substances get inside the monitor via the liquid crystal panel surface, a malfunction may result.
Neutral detergent

text_image
ergentInput signal that can be displayed
Applicable input signal for Component (Y, PB, PR) and HDMI (* Mark)
| Signal name | Horizontal frequency (kHz) | Vertical frequency (Hz) | Component HDMI | |
| 525 (480) / 60i 15.73 59.94 | * | * | ||
| 525 (480) / 60p 31.47 59.94 | * | * | ||
| 625 (576) / 50i 15.63 50.00 | * | * | ||
| 625 (576) / 50p 31.25 50.00 | * | * | ||
| 750 (720) / 60p 45.00 60.00 | * | * | ||
| 750 (720) / 50p 37.50 50.00 | * | * | ||
| 1,125 (1,080) / 60i 33.75 60.00 | * | * | ||
| 1,125 (1,080) / 50i 28.13 50.00 | * | * | ||
Note:
Signals other than above may not be displayed properly.
Scart and S-video terminal information
AV1 Scart terminal (RGB, VIDEO)
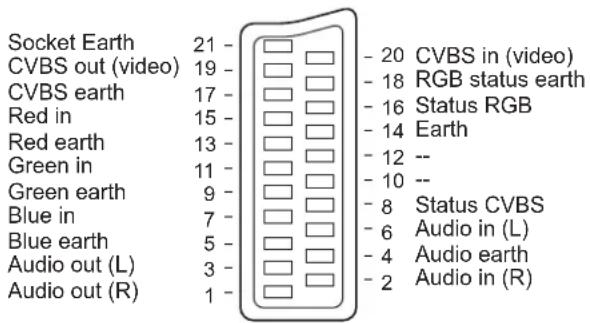
text_image
Socket Earth 21 - CVBS out (video) 19 - CVBS earth 17 - Red in 15 - Red earth 13 - Green in 11 - Green earth 9 - Blue in 7 - Blue earth 5 - Audio out (L) 3 - Audio out (R) 1 - - 20 CVBS in (video) - 18 RGB status earth - 16 Status RGB - 14 Earth - 12 -- - 10 -- - 8 Status CVBS - 6 Audio in (L) - 4 Audio earth - 2 Audio in (R)Suitable inputs for AV1 include RGB (Red / Green / Blue).
AV2 Scart terminal (VIDEO, S-VIDEO, Q-Link)
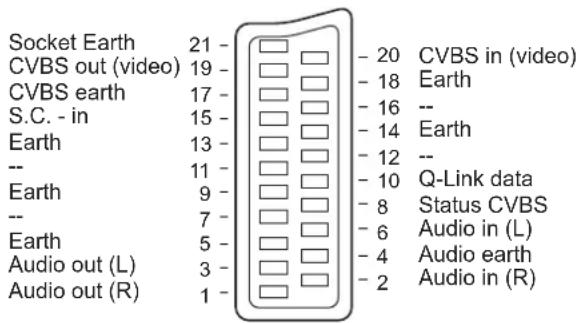
text_image
Socket Earth 21 - CVBS out (video) 19 - CVBS earth 17 - S.C. - in 15 - Earth 13 - -- 11 - Earth 9 - -- 7 - Earth 5 - Audio out (L) 3 - Audio out (R) 1 - - 20 CVBS in (video) - 18 Earth - 16 -- - 14 Earth - 12 -- - 10 Q-Link data - 8 Status CVBS - 6 Audio in (L) - 4 Audio earth - 2 Audio in (R)AV2 - Pins 15 and 20 are dependent on AV2 S-VHS / VIDEO switching.
AV3 S-VIDEO 4 pin terminal
Chrominance in Luminance in
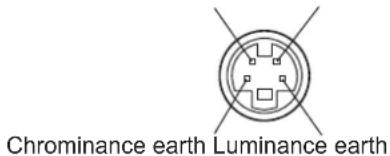
text_image
Chrominance earth Luminance earthAV4 Scart terminal (RGB, VIDEO, S-VIDEO, Q-Link)
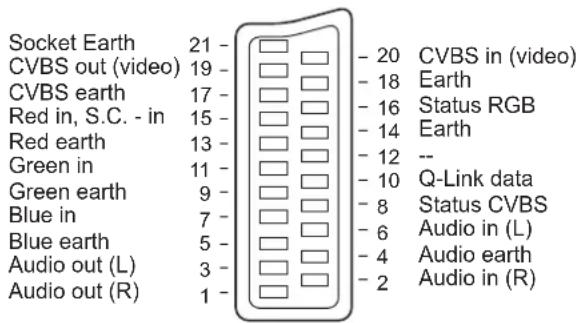
text_image
Socket Earth 21 - CVBS out (video) 19 - CVBS earth 17 - Red in, S.C. - in 15 - Red earth 13 - Green in 11 - Green earth 9 - Blue in 7 - Blue earth 5 - Audio out (L) 3 - Audio out (R) 1 - - 20 CVBS in (video) - 18 Earth - 16 Status RGB - 14 Earth - 12 -- - 10 Q-Link data - 8 Status CVBS - 6 Audio in (L) - 4 Audio earth - 2 Audio in (R)AV4 - Pins 15 and 20 are dependent on AV4 S-VHS / VIDEO switching.
Specifications
| TX-32LXD55F | ||
| Power Source AC 220-240 V, 50 / 60 Hz | ||
| Power Consumption | Average use: 168 WStandby condition: 0.4 W (Without Tuner Lock On)18 W (With Tuner Lock On) | |
| LCD | Wide XGA (1,366 × 768 pixels)16:9 aspect ratio LCD panel | |
| Visible screen size 80.0 cmV | ||
| 697 mm (W) × 392 mm (H) | ||
| Sound | ||
| Speaker | Woofer φ 8 cm × 2 pcs, Full range φ 5 cm × 2 pcs | |
| Audio Output | 20 W (5.4 W + 5.4 W, 4.6 W + 4.6 W) | |
| Headphones | M3 (3.5 mm) Jack × 1 | |
| Scanning format | 480i(60Hz), 480p(60Hz), 576i(50Hz), 576p(50Hz), 720p(50Hz), 720p(60Hz), 1080i(50Hz), 1080i(60Hz) | |
| Receiving Systems / Band name | PAL B, GVHF E2 - E12 UHF E21 - E69CATV (S01 - S05) CATV S1 - S10 (M1 - M10)CATV S11 - S20 (U1 - U10) CATV S21 - S41 (Hyperband)PAL 525/60 Playback of NTSC tape from some PAL Video re cord ers (VCR).DVB Digital terrestrial services via VHF / UHF aerial input.M.NTSC Playback from M. NTSC Video recorders (VCR).NTSC (AV input only) Playback from NTSC Video recorders (VCR).TV signals may not be received in some areas.This set is only for use in Germany. | |
| Aerial - Rear | UHF / VHF | |
| Operating Conditions | Temperature: 5 °C - 35 °CHumidity: 5 % - 90 % RH (non-condensing) | |
| Connection Terminals | ||
| AV1 (Scart connector) | 21 Pin terminal (Audio/Video in, Audio/Video out, RGB in) | |
| AV2 (Scart connector) | 21 Pin terminal (Audio/Video in, Audio/Video out, S-Video in, Q-Link) | |
| AV3 Input | VIDEO | RCA PIN Type × 1 |
| S-VIDEO | Mini DIN 4-pin | |
| AUDIO L - R | RCA PIN Type × 2 | |
| AV4 (Scart connector) | 21 Pin terminal (Audio/Video in, Audio/Video out, RGB in, S-Video in, Q-Link) | |
| Other Inputs | COMPONENT | Y, PB, PR |
| HDMI | TYPE A Connector | |
| AUDIO L - R | RCA PIN Type × 2 | |
| Output | AUDIO L - R | RCA PIN Type × 2 |
| Dimensions (W × H × D) | ||
| Including TV Stand | 795 mm × 635 mm × 300 mm | |
| TV Set Only | 795 mm × 573 mm × 141 mm | |
| Weight | 22 kg Net | |
Note:
Design and Specifications are subject to change without notice. Weight and Dimensions shown are approximate.
Trademark Credits
• DVB is a trademark of the DVB Digital Video Broadcasting Project (1991 to 1996).
- HDMI, the HDMI Logo and High-Definition Multimedia Interface are trademarks or registered trademarks of HDMI Licensing LLC.
Information on Disposal for Users of Waste Electrical & Electronic Equipment (private households)

This symbol on the products and/or accompanying documents means that used electrical and electronic products should not be mixed with general household waste.
For proper treatment, recovery and recycling, please take these products to designated collection points, where they will be accepted on a free of charge basis. Alternatively, in some countries you may be able to return your products to your local retailer upon the purchase of an equivalent new product.
Disposing of this product correctly will help to save valuable resources and prevent any potential negative effects on human health and the environment which could otherwise arise from inappropriate
waste handling. Please contact your local authority for further details of your nearest designated collection point. Penalties may be applicable for incorrect disposal of this waste, in accordance with national legislation.
For business users in the European Union
If you wish to discard electrical and electronic equipment, please contact your dealer or supplier for further information.
Information on Disposal in other Countries outside the European Union
This symbol is only valid in the European Union.
If you wish to discard this product, please contact your local authorities or dealer and ask for the correct method of disposal.

Digital Video
Broadcasting
Trade Mark of the DVB Digital Video Broadcasting Project (1991 to 1996)
TX-32LXD55F Declaration of Conformity No 3587, 31st May 2005
Customer's Record
The model number and serial number of this product can be found on its rear panel. You should note this serial number in the space provided below and retain this book, plus your purchase receipt, as a permanent record of your purchase to aid in identification in the event of theft or loss, and for Warranty Service purposes.
Model Number Serial Number
Matsushita Electric Industrial Co., Ltd.
Web Site : http://www.panasonic.co.jp/global/
© 2005 Matsushita Electric Industrial Co., Ltd. All Rights Reserved.