VT-100 - Tripod Magnus - Free user manual and instructions
Find the device manual for free VT-100 Magnus in PDF.


User questions about VT-100 Magnus
0 question about this device. Answer the ones you know or ask your own.
Ask a new question about this device
Download the instructions for your Tripod in PDF format for free! Find your manual VT-100 - Magnus and take your electronic device back in hand. On this page are published all the documents necessary for the use of your device. VT-100 by Magnus.
USER MANUAL VT-100 Magnus
natural_image
Black tripod-mounted camera with adjustable arm and base, isolated on white background (no text or symbols)VT-100/200/300/350
Owner's Manual
MAGNUS™ Video Tripod
Congratulations on your purchase of the VT-100/200/300/350 Video Tripodby Magnus.
All Magnus tripods are designed to balance features professionals want with the affordability they need, yet be durable enough to provide many years of trouble-free service and enjoyment. Please carefully read these instructions for setting up and breaking down your tripod.
Safety Warnings
- Never set up or pull down a tripod while a camera is mounted
- Do not move the tripod or adjust the legs while a camera is mounted
- Do not exceed the maximum weight capacity of the tripod
- Never leave a camera unattended on the tripod
- The camera should be securely fastened to the quick-release mounting plate before mounting it to the tripod
- Never mount a camera to the tripod until all tripod legs are locked and stabilized
- Do not stand on, rest on, or hang anything from the mid-level spreader
- Do not attempt to remove the mid-level spreader
- Do not lift or move the tripod by the head
- Keep hands clear of the inside of the legs, to avoid trapping fingers
- Safe operation of the tripod is the user's responsibility
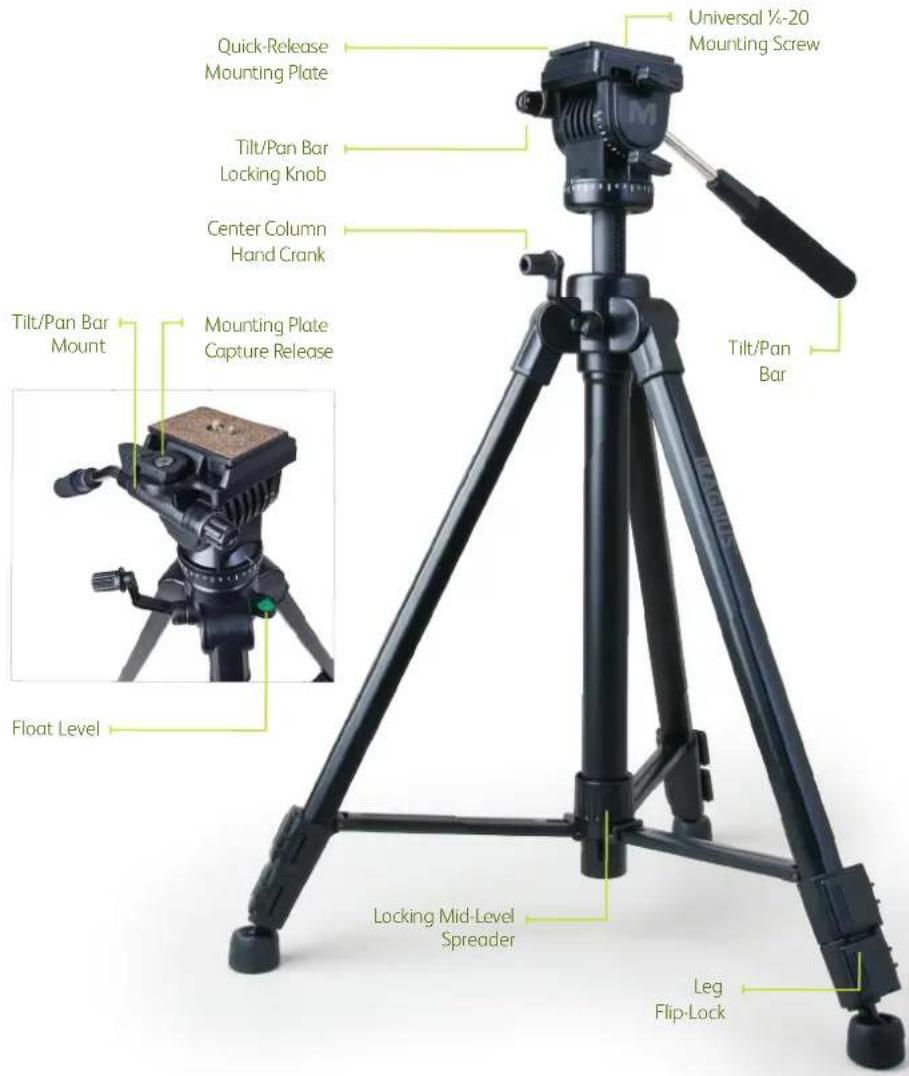
Video Tripod Components
text_image
Quick-Release Mounting Plate Tilt/Pan Bar Locking Knob Center Column Hand Crank Tilt/Pan Bar Mount Mounting Plate Capture Release Float Level Locking Mid-Level Spreader Leg Flip-Lock Universal ¼-20 Mounting Screw Tilt/Pan BarKey Features
- Two-way pan head for smooth motion
• Gear-driven center column with friction control
• Auto-lock, quick-release mounting - Separate pan and tilt locks
• Bubble level for accurate setup - Mid-level spreader for stability on uneven surfaces
• Full 360° pan range - Carry case with shoulder strap
VT-100 Specs
• 4.4 lb. (2 kg) load capacity
- 59" (150 cm) to 18.75" (47.5 cm) height range
- 20\~ (50.8 cm) folded length
• 3.15 lb. (1.4 kg) weight
VT-200 Specs
• 6.6 lb. (3 kg) load capacity
- 60" (152 cm) to 20" (50.8 cm) height range
• 21.75" (55.25 cm) folded length
• 3.45 lb. (1.5 kg) weight
VT-300 Specs
• 15 lb. (6.8 kg) load capacity
- 64.3" (163 cm) to 25" (63.5 cm) height range
- 26.5" (67.3 cm) folded length
• 4.5 lb. (2 kg) weight
VT-350 Specs
• 15 lb. (6.8 kg) load capacity
- 82" (208 cm) to 25.5" (67.8 cm) height range
- 27.5" (69.9 cm) folded length
• 5.45 lb. (2.5 kg) weight
Setting Up Your Tripod
natural_image
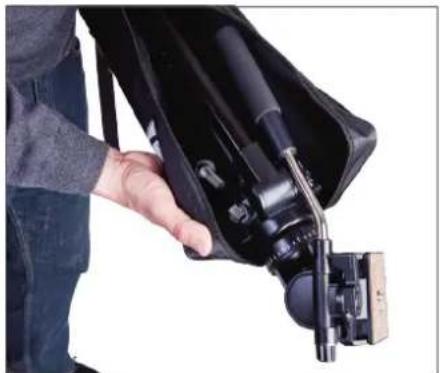
Person using a black device to lift a cable or connector (no visible text or symbols)1 Assess Shooting Area
To set up your tripod, begin by removing the tripod from the box and/or carry case. Assess your shooting area to determine a stable area to set up your camera.
natural_image
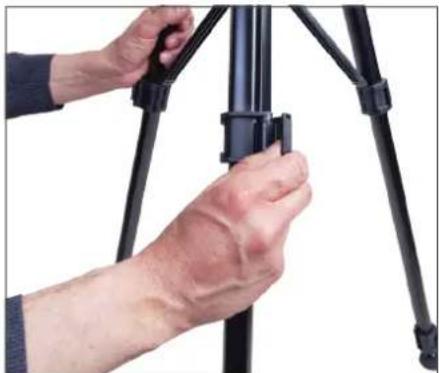
Close-up of hands adjusting a black tripod frame with adjustable legs (no text or symbols visible)2 Extend Legs
Always extend the legs from the top flip-locks first. Pull each flip-lock and extend the leg to its desired height. Match the length of the legs and relock the flip-locks.
text_image
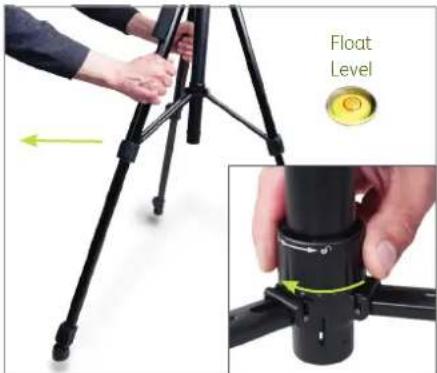
Float Level3 Spread the Tripod
Plant the front leg of the tripod. Lift the back two legs and pull back to spread the tripod to the full extension of the mid-level spreader. Check the float level to verify that the tripod is level. Readjust the legs if necessary. Lock the mid-level spreader by rotating the knob clockwise.
natural_image
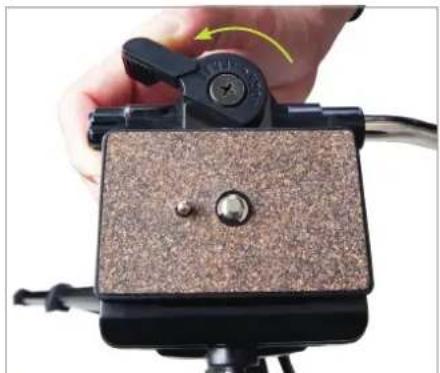
Close-up of a hand holding a camera clip with a textured base and adjustment knob (no text or symbols visible)7 Remove the Mounting Plate
Rotate the mounting plate lock so that the flat side is against the mounting plate. The mounting plate will pop free.
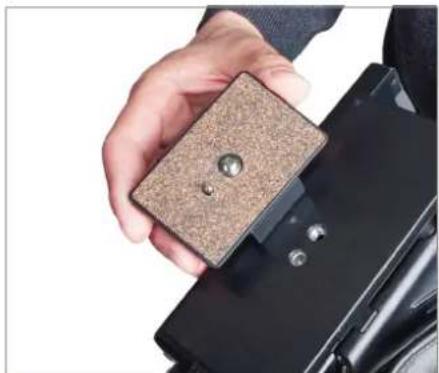
natural_image
Close-up of a hand holding a small mechanical component with a textured square base and metallic pins (no visible text or symbols)8 Mount Camera to Plate
Attach the mounting plate to your camera. Be certain that the retractable alignment pin sets into its pocket on the camera. Screw the threaded stud on the plate into the bottom of the camera.
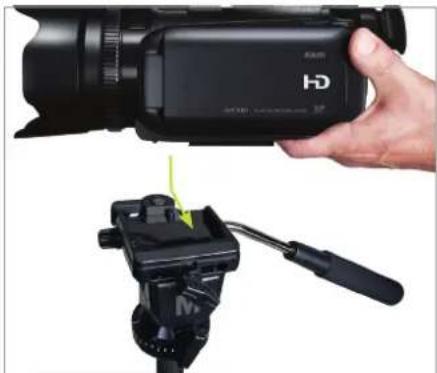
natural_image
Close-up of a hand holding a black video camera with a yellow-green adjustment knob, next to a black tripod mount (no visible text or symbols)9 Mount Camera to Tripod
Make certain that your tripod legs are locked and the tripod is stable and ready for mounting your camera. From the right side of the tripod, slide the mounting plate down and left onto the tripod head. Push down until the mounting plate clicks.
Tearing Down Your Tripod

natural_image
Black and white photo of a MAGNUS camera setup with a bipod and case (no visible text or symbols)All images are for illustrative purposes only. Your tripod may look slightly different.
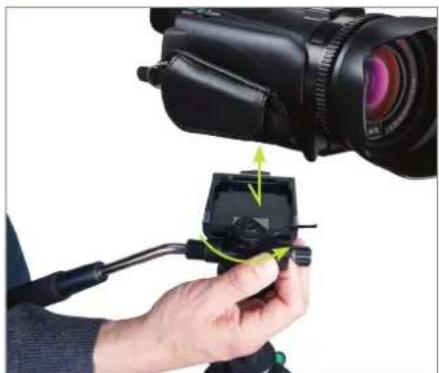
natural_image
Person using a DSLR camera to adjust a small electronic device (no visible text or symbols)1 Unmount Camera
Rotate the mounting plate lock forward until the mounting plate pops free. Lift the camera up and out until it is free of the tripod.
text_image
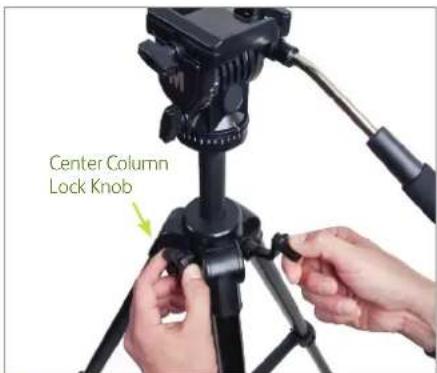
Center Column Lock Knob2 Lower Center Column (if raised)
Release the center column locking knob. Using the hand crank, lower the center column all the way down. Secure the locking knob and fold the hand crank down.
natural_image
Close-up of hands adjusting a black tripod-mounted device with a handle (no visible text or symbols)
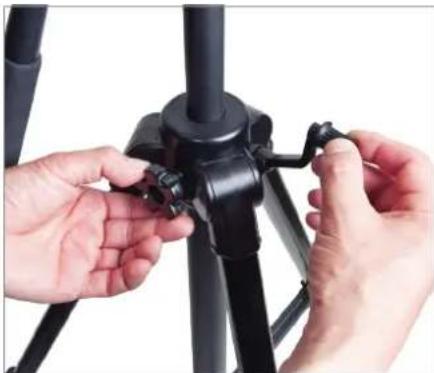
Raise Center Column
If you need to raise the center column, unlock the center column by turning the locking knob counterclockwise. Use the hand crank to raise or lower the head platform. Never raise or lower the head by pushing or pulling it.
natural_image
Person using a camera cable to connect a camera module on a tripod (no text or symbols visible)
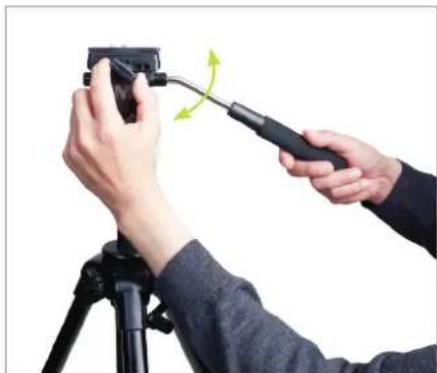
Set the Tilt
Release the tilt lock. Using the tilt/pan bar, set the tilt so that the head is level and ready for mounting your camera. Retighten the tilt lock.
natural_image
Close-up of hands using a selfie stick to lift a camera on a tripod (no text or symbols visible)
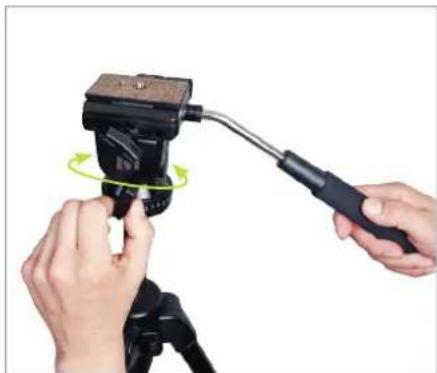
Set the Pan Angle
Release the pan lock. Using the tilt/pan bar, rotate the head to set it in the direction you will be shooting. Retighten the pan lock.
natural_image
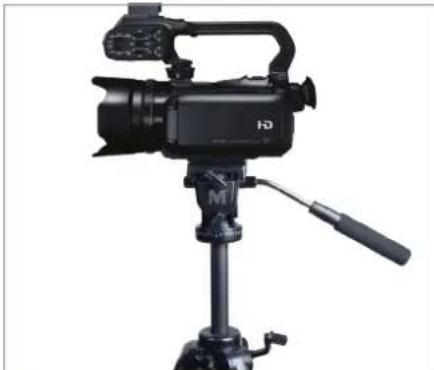
Black video camera on tripod stand with attached boom and lever (no visible text or symbols)
Start Shooting
If you do not need to pan or tilt during your shot, keep the pan and tilt knobs locked.
text_image
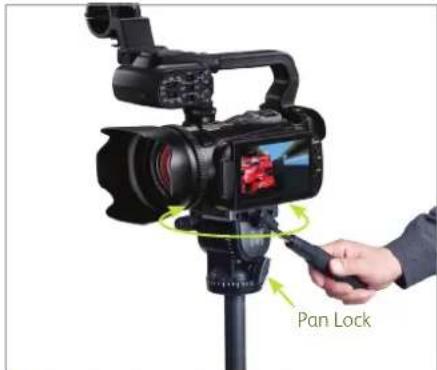
Pan Lock
Pan
Release the pan lock knob. Using the tilt/pan bar, rotate the tripod head left or right to pan.
text_image
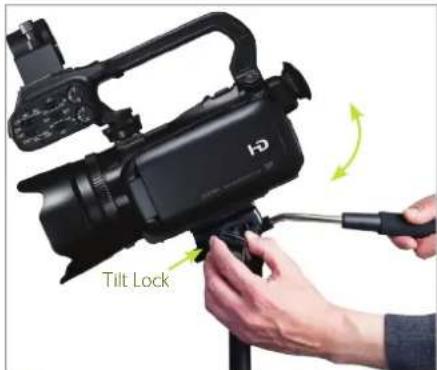
Tilt Lock
Tilt
Release the tilt-lock knob, and use the tilt/pan bar to tilt the tripod head up or down.
natural_image
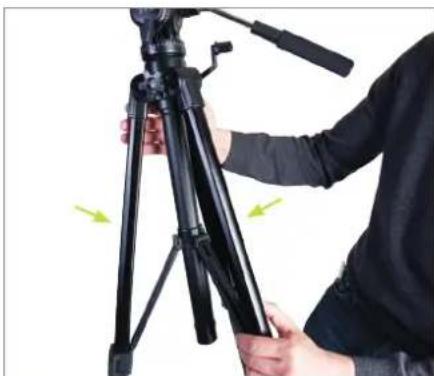
Person adjusting a black tripod with a cable, showing motion arrows (no text or symbols visible)
Collapse the Tripod
Unlock the mid-level spreader. Push the legs together, collapsing the mid-level spreader.
natural_image
Person holding a camera with adjustment lever and green arrow indicating motion (no text or symbols)
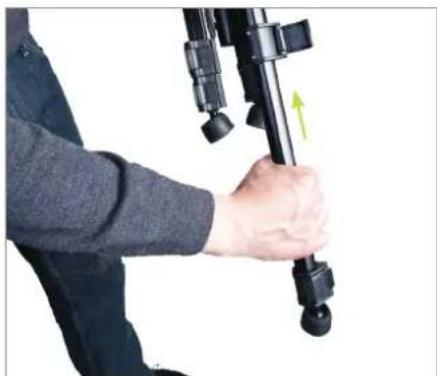
Shorten Legs
Release the flip-locks and slide each leg section to its closed position. Secure the flip-locks. Release the pan and tilt locks and fold the tilt/pan bar toward the legs.
natural_image
Person using a camera lens system to interact with a black film reel (no visible text or symbols)
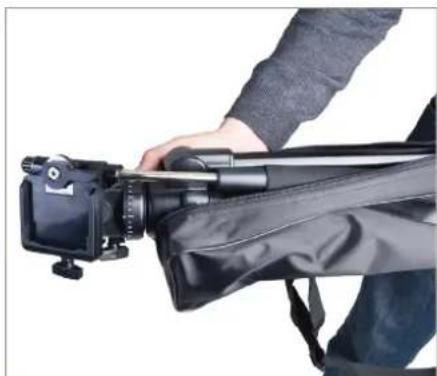
Store in Carry Case
Store your tripod in its carry case until the next shoot. You can leave the mounting plate attached to your camera for quick mounting.
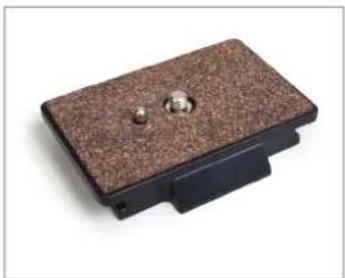
Quick-Release Plate for VT-100/200/300/350 Tripod
natural_image
Close-up of a brown textured rectangular object with two small metallic holes, placed on a black base (no text or symbols visible)Magnus offers a spare or replacement quick-release plate for the VT-100/200/300/350 tripod head. Having a quick-release plate attached to the camera's base at all times allows you to attach or remove the camera from the tripod without having to waste time fumbling with the threaded mount. Your VT-100/200/300/350 Tripod includes one quick-release plate, but you may want to have spares for other cameras. The Magnus VT-QRP10 (for VT-100/200) or QRP30 (for VT300/350) has a 1/4"-20 mounting stud and a retractable register pin for correct camera positioning. The anti-skid mounting surface stabilizes the camera.
ONE YEAR LIMITED WARRANTY
This Magnus product is warranted to the original purchaser to be free from defects in materials and workmanship under normal consumer use for a period of one (1) year from the original purchase date or thirty (30) days after replacement, whichever occurs later. The warranty provider's responsibility with respect to this limited warranty shall be limited solely to repair or replacement, at the provider's discretion, of any product that fails during normal use of this product in its intended manner and in its intended environment. Inoperability of the product or part(s) shall be determined by the warranty provider. If the product has been discontinued, the warranty provider reserves the right to replace it with a model of equivalent quality and function. This warranty does not cover damage or defect caused by misuse, neglect, accident, alteration, abuse, improper installation or maintenance. EXCEPT AS PROVIDED HEREIN, THE WARRANTY PROVIDER MAKES NEITHER ANY EXPRESS WARRANTIES NOR ANY IMPLIED WARRANTIES, INCLUDING BUT NOT LIMITED TO ANY IMPLIED WARRANTY OF MERCHANTABILITY OR FITNESS FOR A PARTICULAR PURPOSE. This warranty provides you with specific legal rights, and you may also have additional rights that vary from state to state. To obtain warranty coverage, contact the Magnus Customer Service Department to obtain a return merchandise authorization ("RMA") number, and return the defective product to Magnus along with the RMA number and proof of purchase. Shipment of the defective product is at the purchaser's own risk and expense. For more information or to arrange service, visit www.magnustripods.com or call Customer Service at 212-594-2353.

MAGNUS*
A Gradus Group Brand
Magnus is a registered trademark of the Gradus Group. © 2014 Gradus Group LLC. All rights reserved. Product warranty provided by the Gradus Group. - www.Gradusgroup.Com