
000-661 - Computer Mouse Marquant - Free user manual and instructions
Find the device manual for free 000-661 Marquant in PDF.


| Product Type | Computer Mouse |
| Connectivity | USB (USB 1.1 or 2.0) |
| Cable Length | 1.7 m |
| DPI (CPI) Speeds | 500 / 1200 / 2400 / 3200 |
| Number of Programmable Buttons | 7 |
| Adjustable Weights | 6 x 4 g (removable) |
| Polling Rates | 125 Hz, 250 Hz, 500 Hz, 1000 Hz |
| Scroll Speed Options | 1 page per scroll step |
| Double Click Time Settings | 1 ms, 65 ms, 125 ms, 150 ms, 255 ms |
| System Requirements | Windows XP / Windows Vista / Windows 7 |
| Driver Software | Standard Mouse Driver (included) |
| Macro Support | Yes (macro manager for key sequences) |
| Number of Profiles | 5 (Profile1 to Profile5) |
| Weight Adjustment Access | Panel underneath the mouse |
| Button Configuration | Assignable via software (single key, macro, multimedia, etc.) |
| LED Indicators | Unique light setting per DPI level |
Frequently Asked Questions - 000-661 Marquant
User questions about 000-661 Marquant
0 question about this device. Answer the ones you know or ask your own.
Ask a new question about this device
Download the instructions for your Computer Mouse in PDF format for free! Find your manual 000-661 - Marquant and take your electronic device back in hand. On this page are published all the documents necessary for the use of your device. 000-661 by Marquant.
USER MANUAL 000-661 Marquant
natural_image
Black computer mouse with a blue LED cable, isolated on white background (no text or symbols visible)SE GAMINGMUS
Bruksanvisning i original
Operating instructions
(Translation of the original instructions)
Important! Read the user instructions carefully before use.
Save them for future reference.
Värna om miljön!
Care for the environment!
Must not be discarded with household waste! This product contains electrical or electronic components that should be recycled. Leave the product for recycling at the designated station e.g. the local authority's recycling station.
Jula reserves the right to make changes. In the event of problems, please contact our service department.
www.jula.com
Tillverkare/ Produsent/ Producenci/ Manufacturer
Jula AB, Box 363, 532 24 SKARA
Distributör/ Distributør/ Dystrybutor/ Distributor
Jula Poland Sp. z o.o., ul.
DATE OF PRODUCTION: 2016-10-04
© Jula AB

1

natural_image
Icon of a computer with a heart symbol, no text or symbols present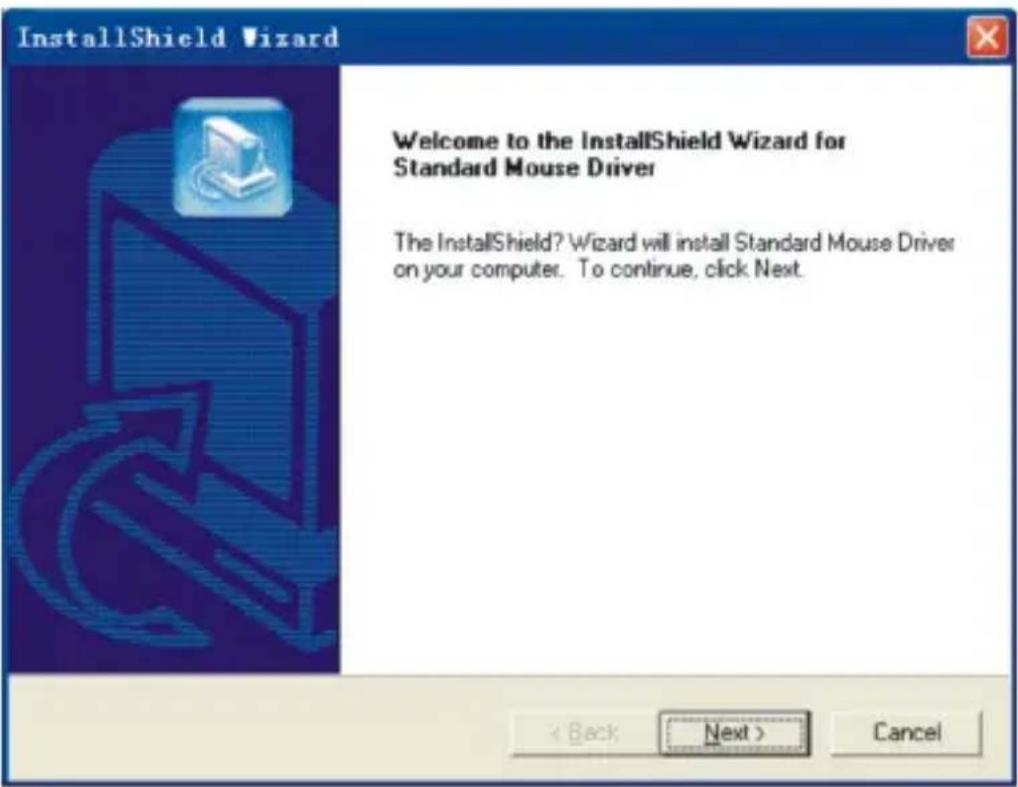
2

3

4

5
6


7
8

9

10


TEKNISKA DATA
Systemkrav
Windows XP/Windows Vista/Windows 7
USB-port (USB 1.1 eller 2.0)
Adjustable weights 6 x 4 g
DPI (CPI) speed 500/1200/2400/3200
Programmable buttons 7
Connection USB
Cable length 1.7 m
INSTALLATION
- Connect the gaming mouse to the computer and insert the installation disk with the drive routine.
- Double click on the installation icon and then click on "Next".
FIG. 1
- Select the target folder for the installation and then click on "Next". The files start installing.
FIG. 2
- When the installation is complete, select "Launch the mouse driver now" and then click on "Finish".
FIG. 3
- Right click on the programme icon and select "Configuration".
FIG. 4
SETTINGS
- The gaming mouse has 6 removable weights. Open the panel underneath the gaming mouse and remove weights to adjust the weight of the mouse.
STANDARD SETTING
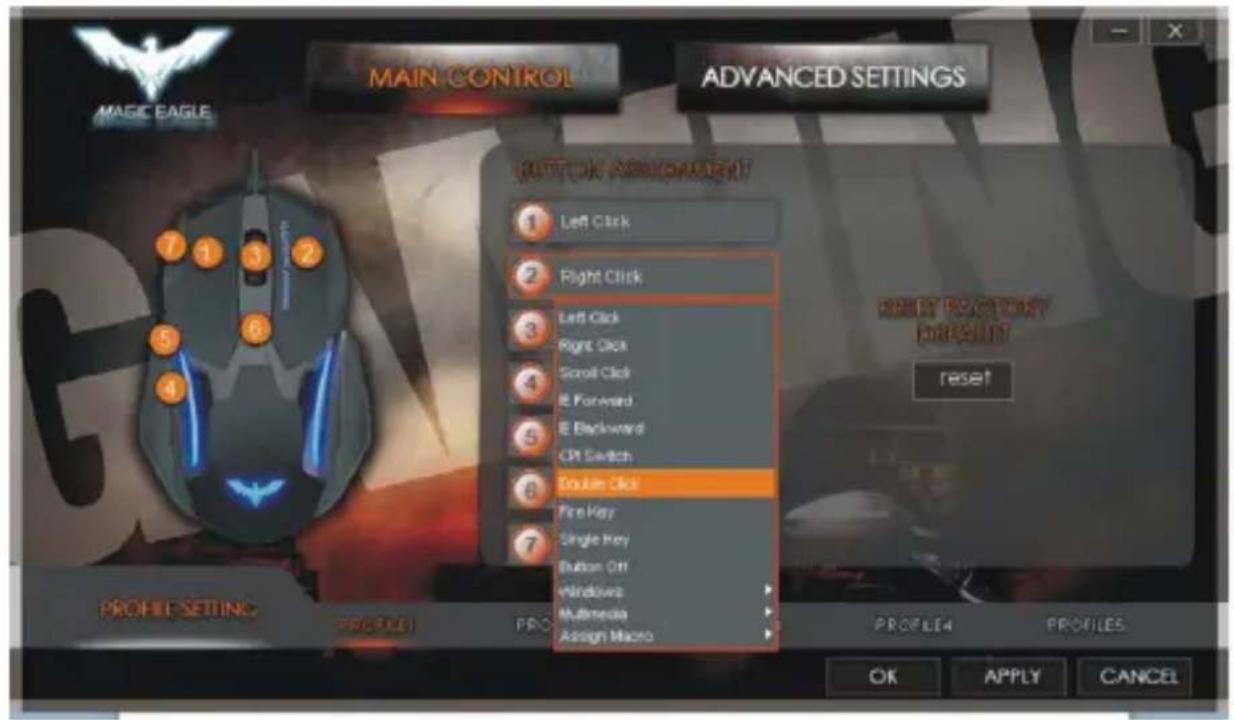
- Adjust the button functions by selecting from the menu after each number.
FIG. 5
- Click "Apply" to finish and confirm the setting.
SETTING KEYS
- If you want to set a key that corresponds to button 4, click on button 4 and then click on "Single key".
- Enter the key that button 4 is to match and click "OK" to close the window. Click "Apply" to close the window.
FIG. 6
SETTING THE MACRO
- Click on button 5, for example, and then "Assign Macro".
FIG. 7
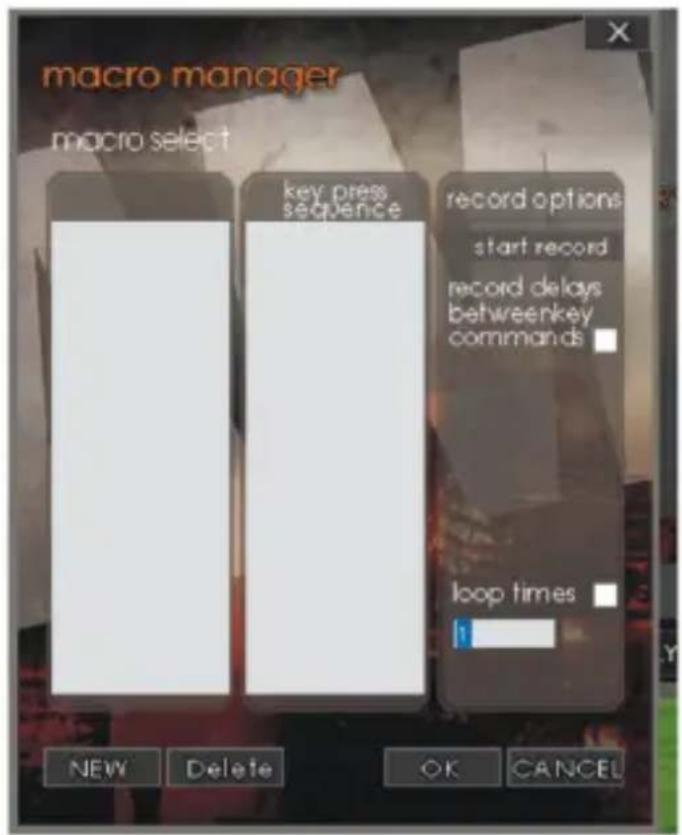
- Click on "NEW" to create a new macro and enter a name for the new macro, e.g. "Test#1".
FIG. 8
- Click on "record". Enter the sequence "WASD" for button 5, by clicking on the keys W, A, S and D. To cancel, click on "CANCEL".
- Select "loop times" and enter the number of repeats to repeat the sequence.
- Select "record delays between key commands", to register the time between the key commands.
FIG. 9
- Click on "OK" to exit the Macro manager. The setting for button 5 is now ready.
FIG. 10
- Click "Apply" to confirm and finish.
PROFILE SETTINGS
- Click on a profile, e.g. "Profile1", to change the settings.
-
Select "Advanced settings" to adjust:
-
Polling rate
- DPI (CPI) speed (each DPI has a unique light setting)
- Scroll speed and double click time
FIG. 11
- Click "Apply" to confirm and finish.
Brand : Marquant
Model : 000-661
Category : Computer Mouse