
W3000H-BNS - Screen LG - Free user manual and instructions
Find the device manual for free W3000H-BNS LG in PDF.


User questions about W3000H-BNS LG
0 question about this device. Answer the ones you know or ask your own.
Ask a new question about this device
Download the instructions for your Screen in PDF format for free! Find your manual W3000H-BNS - LG and take your electronic device back in hand. On this page are published all the documents necessary for the use of your device. W3000H-BNS by LG.
USER MANUAL W3000H-BNS LG
Make sure to read the Important Precautions before using the product. Keep the User's Guide(CD) in an accessible place for future reference.
See the label attached on the product and give the information to your dealer when you ask for service.
This unit has been engineered and manufactured to ensure your personal safety, however improper use may result in potential electrical shock or fire hazards. In order to allow the proper operation of all safeguards incorporated in this display, observe the following basic rules for its installation, use, and servicing.
On Safety
Use only the power cord supplied with the unit. In case you use another power cord, make sure that it is certified by the applicable national standards if not being provided by the supplier. If the power cable is faulty in any way, please contact the manufacturer or the nearest authorized repair service provider for a replacement.
The power supply cord is used as the main disconnection device. Ensure that the socket-outlet is easily accessible after installation.
Operate the display only from a power source indicated in the specifications of this manual or listed on the display. If you are not sure what type of power supply you have in your home, consult with your dealer.
Overloaded AC outlets and extension cords are dangerous. So are frayed power cords and broken plugs. They may result in a shock or fire hazard. Call your service technician for replacement.
Do not Open the Display.
- There are no user serviceable components inside.
- There are Dangerous High Voltages inside, even when the power is OFF.
- Contact your dealer if the display is not operating properly.
To Avoid Personal Injury :
- Do not place the display on a sloping shelf unless properly secured.
- Use only a stand recommended by the manufacturer.
- Do not drop an object on or apply impact to the product. Do not throw any toys or objects on the product screen.
It can cause injury to human, problem to product and damage the display.
To Prevent Fire or Hazards:
- Always turn the display OFF if you leave the room for more than a short period of time. Never leave the display ON when leaving the house.
- Keep children from dropping or pushing objects into the display's cabinet openings. Some internal parts carry hazardous voltages.
- Do not add accessories that have not been designed for this display.
- When the display is to be left unattended for an extended period of time, unplug it from the wall outlet.
- In the presence of thunder and lightning, never touch the power cord and signal cable because it can be very dangerous. It can cause electric shock.
On Installation
Do not allow anything to rest upon or roll over the power cord, and do not place the display where the power cord is subject to damage.
Do not use this display near water such as near a bathtub, washbowl, kitchen sink, laundry tub, in a wet basement, or near a swimming pool.
Displays are provided with ventilation openings in the cabinet to allow the release of heat generated during operation. If these openings are blocked, built-up heat can cause failures which may result in a fire hazard. Therefore, NEVER:
■ Block the bottom ventilation slots by placing the display on a bed, sofa, rug, etc.
■ Place the display in a built-in enclosure unless proper ventilation is provided.
■ Cover the openings with cloth or other material.
■ Place the display near or over a radiator or heat source.
Do not rub or strike the Active Matrix LCD with anything hard as this may scratch, mar, or damage the Active Matrix LCD permanently.
Do not press the LCD screen with your finger for a long time as this may cause some afterimages.
Some dot defects may appear as Red, Green or Blue spots on the screen. However, this will have no impact or effect on the display performance.
If possible, use the recommended resolution to obtain the best image quality for your LCD display. If used under any mode except the recommended resolution, some scaled or processed images may appear on the screen. However, this is characteristic of the fixed-resolution LCD panel.
On Cleaning
■ Unplug the display before cleaning the face of the display screen.
■ Use a slightly damp (not wet) cloth. Do not use an aerosol directly on the display screen because over-spraying may cause electrical shock.
On Repacking
- Do not throw away the carton and packing materials. They make an ideal container in which to transport the unit. When shipping the unit to another location, repack it in its original material.
On Disposal
■ The fluorescent lamp used in this product contains a small amount of mercury.
■ Do not dispose of this product with general household waste.
Disposal of this product must be carried out in accordance to the regulations of your local authority.
■ Before setting up the monitor, ensure that the power to the monitor, the computer system, and other attached devices is turned off.
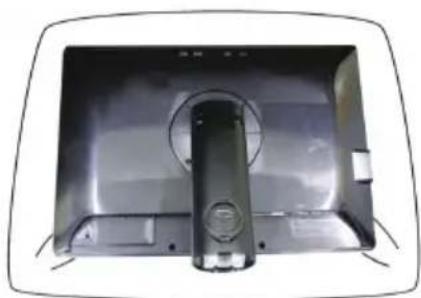
Connecting the stand base or Removing the stand base
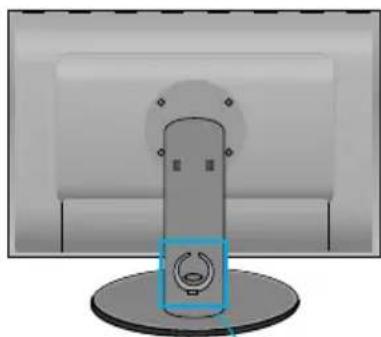
- Place the monitor with its front facing downward on a cushion or soft cloth.
natural_image
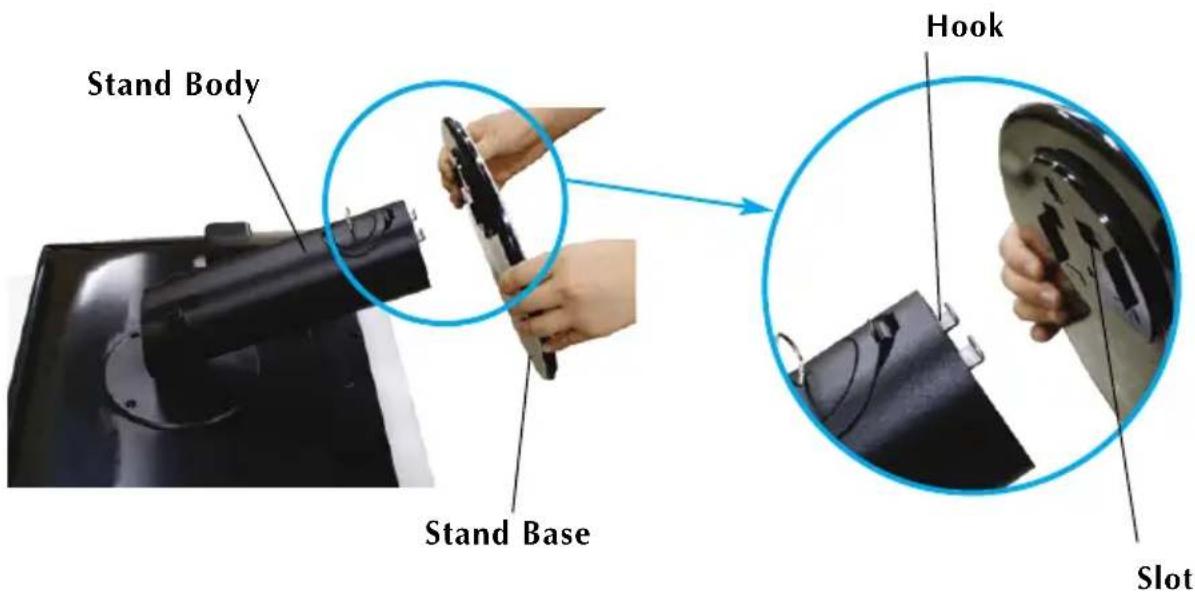
Top-down view of a computer monitor with a circular button and control panel (no visible text or symbols)- Align the hooks on the Stand Body with the matching slots in the Stand Base.
- Insert the hooks into slots.
text_image
Stand Body Stand Base Hook SlotWarning
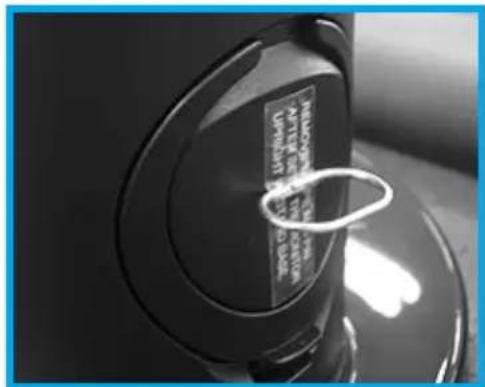
■ The tape and locking pin may only be removed from those monitors equipped with a standing base when the base is pulled up.
Otherwise, you may be injured by the protruding sections of the stand.
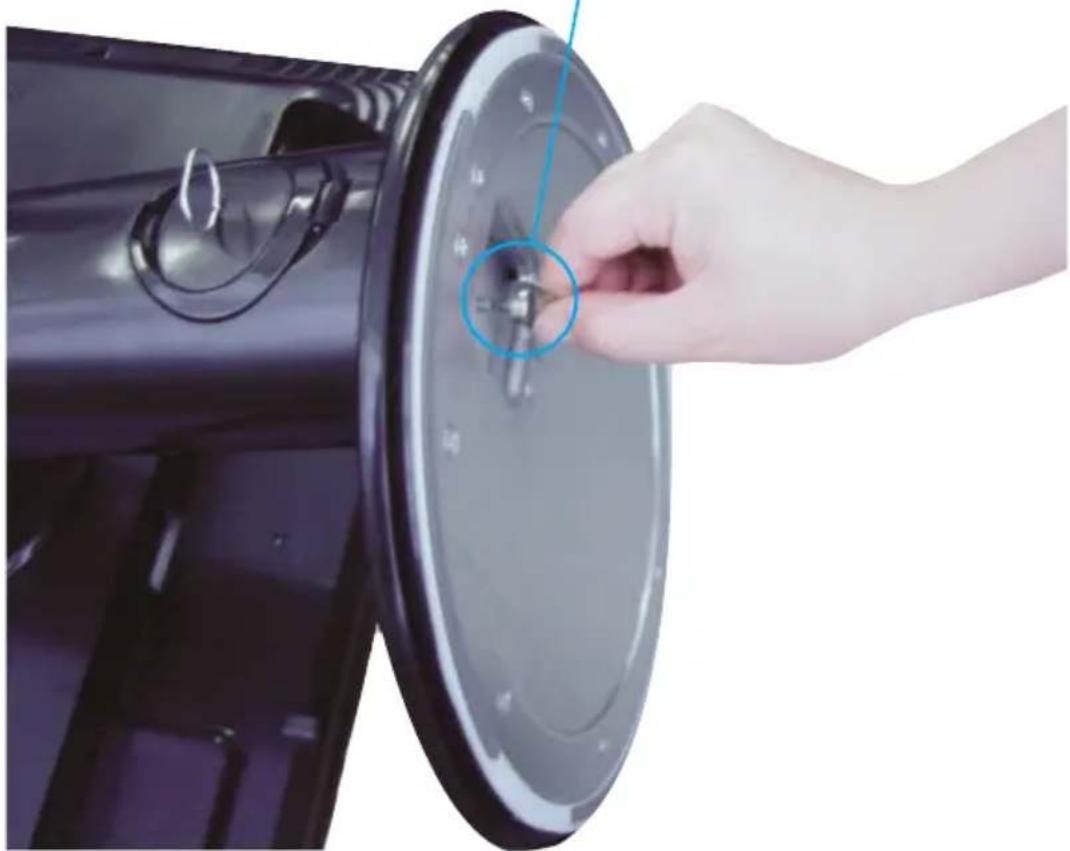
- Attach the monitor to the Stand Base by turning the screw to the right.
Screw : Turn the screw by using the screw handle.
natural_image
Close-up of a hand adjusting a circular mechanical component with a blue circle highlighting a small feature (no text or symbols visible)-
Lift and turn the monitor to face towards the front after the connection is made to the female part of the cable you're attaching.
-
Take the screw out by turning to the left to separate the monitor and Stand Base.
Important
■ This illustration depicts the general model of connection. Your monitor may differ from the items shown in the picture.
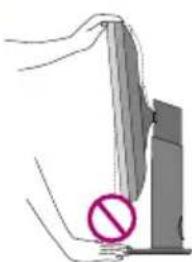
- Do not carry the product upside down holding only the stand base. The product may fall and get damaged or injure your foot.
■ Before setting up the monitor, ensure that the power to the monitor, the computer system, and other attached devices is turned off.
Positioning your display
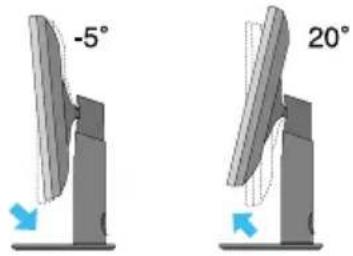
- Adjust the position of the panel in various ways for maximum comfort.
- Tilt Range: -5^ 20^
Swivel Range: 350^
text_image
-5° 20°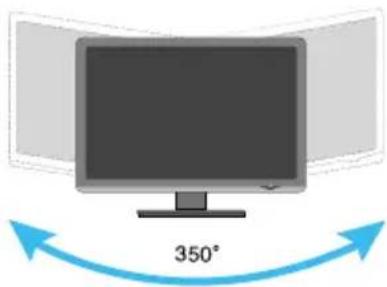
text_image
350°■ Height Range : maximum 3.94 inch (100.0mm)
natural_image
Computer monitor with a mounted device and a circular icon on the front panel (no text or symbols visible)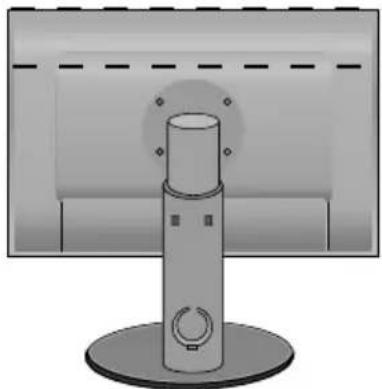
natural_image
Illustration of a computer monitor with a cylindrical device mounted on a circular base (no text or symbols visible)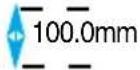
text_image
NATIONAL MOUNTING IN IN IN* Please be sure to remove the Locking pin to adjust the height.
Ergonomic
- You do not need to replace the Locking pin after it is removed, to adjust its height.
- It is recommended that in order to maintain an ergonomic and comfortable viewing position, the forward tilt angle of the monitor should not exceed 5 degrees.
- When adjusting the angle of the screen, do not put your finger(s) in between the head of the monitor and the stand body. You can hurt your finger(s).
natural_image
Diagram showing a hand holding a vertical object with a prohibition symbol (no text or labels present)Using the Computer
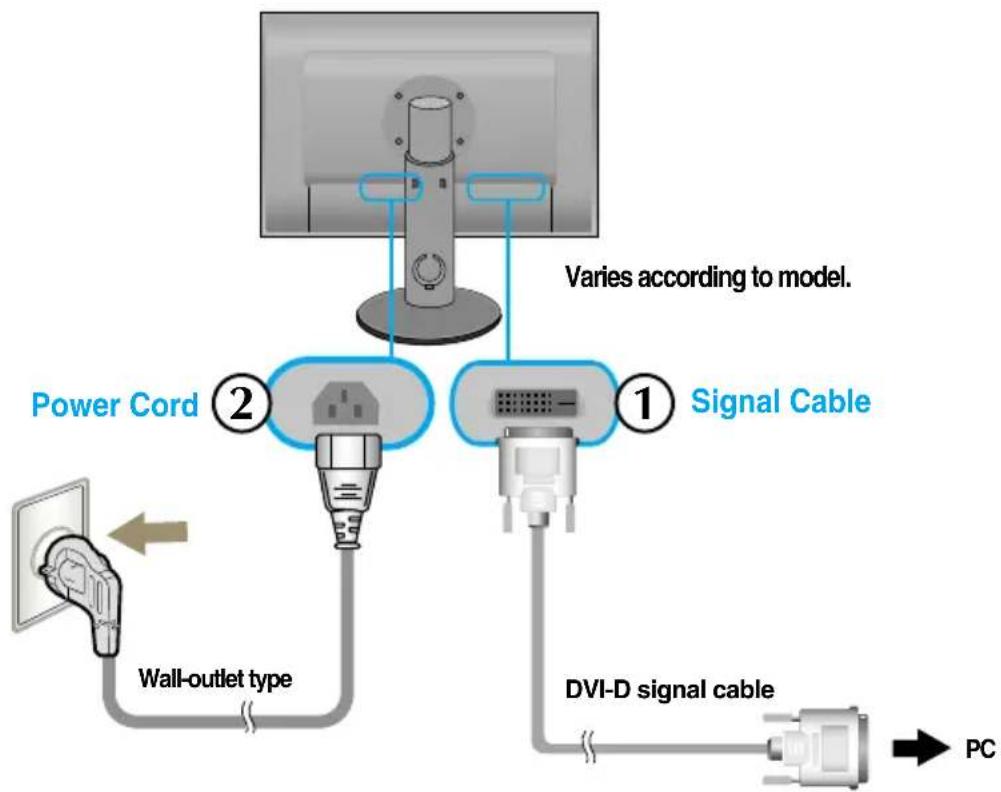
- First, make sure that the power on the PC, monitor and peripheral equipment are off and then, connect as follows.
- Connect DVI-D signal cable ①. When attached, tighten the thumbscrews to secure the connection.
- Insert the power cord ② into the outlet.
flowchart
graph TD
    A["Power Cord"] -->|Wall-outlet type| B["Signal Cable"]
    B --> C["DVI-D signal cable"]
    C --> D["PC"]
    style A fill:#f9f,stroke:#333
    style B fill:#ccf,stroke:#333
    style C fill:#cfc,stroke:#333
    note right of A: Varies according to model.
    note right of B: Signal Cable
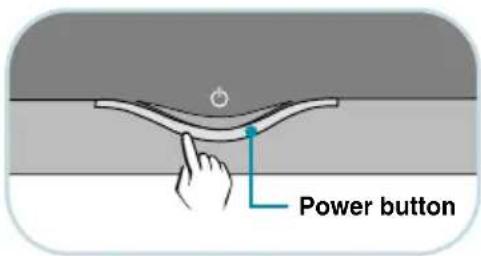
- Touch the power button on the front of the monitor to turn on the monitor.
text_image
Power buttonConnecting the USB(Universal Serial Bus) Cable
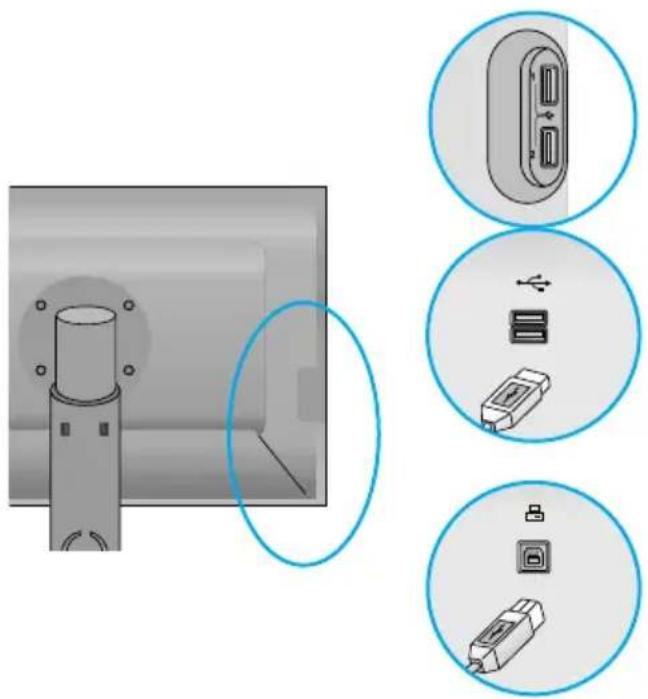
"USB (Universal Serial Bus)" is an innovation in connecting your different desktop peripherals conveniently to your computer. By using the USB, you will be able to connect your mouse, keyboard, and other peripherals to your display instead of having to connect them to your computer. This will give you greater flexibility in setting up your system. USB allows you to connect a chain of up to 120 devices on a single USB port; and you can "hot" plug (attach them while the computer is running) or unplug them while maintaining the Plug and the Plug auto detection and configuration. This display has an integrated BUS-powered USB hub, allowing up to 2 other USB devices to be attached it.
- Connect the upstream port of the display to the downstream port of the USB compliant PC or another hub using the USB cable. (Computer must have a USB port)
- Connect the USB compliant peripherals to the downstream ports of the display.
natural_image
Diagram showing a computer monitor with labeled ports and connectors, alongside three circular insets illustrating different device configurations (no text or symbols present)USB downstream Port x (4)
Connect the cables from USB compliant peripherals-such as mouse, memory stick or USB hard disk, etc.
USB upstream Port x (1)
Connect to downstream connectors of desktop or laptop computers. (However, the computer must support USB and have the USB port.)
- The monitor's USB terminal supports USB 2.0 and High Speed cables.
| High Speed | Full Speed | Low Speed | |
| Data Rate | 480Mbps | 12Mbps | 1.5Mbps |
| Power Consumption | 2.5W(Max,each Port) | 2.5W(Max,each Port) | 2.5W(Max,each Port) |
NOTE
■ To activate the USB hub function, the display must be connected to a USB compliant PC(OS) or another hub with the USB cable(enclosed).
- When connecting the USB cable, check that the shape of the connector at the cable side matches the shape at the connecting side.
■ Even if the display is in a power saving mode, USB compliant devices will function when they are connected the USB ports(both the upstream and downstream) of the display.
To arrange the cables
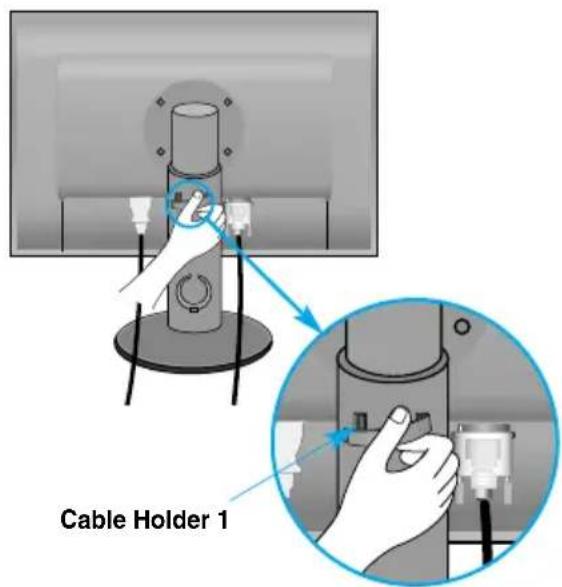
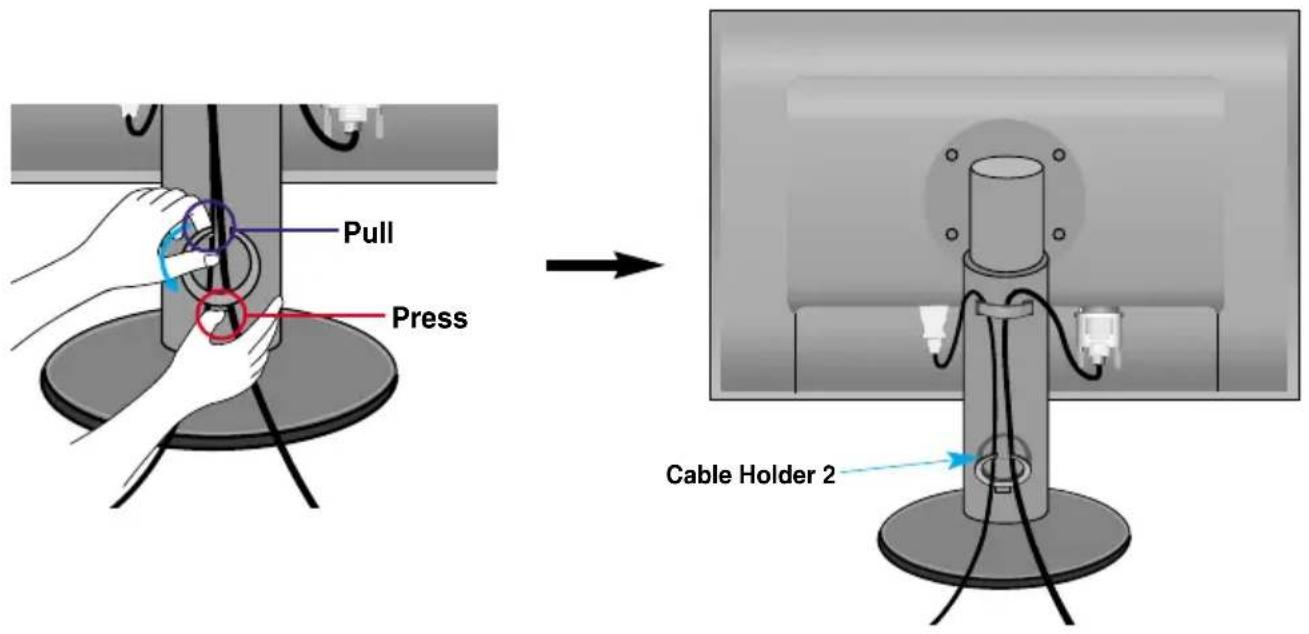
Connect the power cord and the signal cable as shown in the figure and then fix them to the cable holders 1 and 2.
-
Please insert the cable holder1 into a hole.
-
Please put the power cord and the signal cable in the cable holder 1.
text_image
Cable Holder 1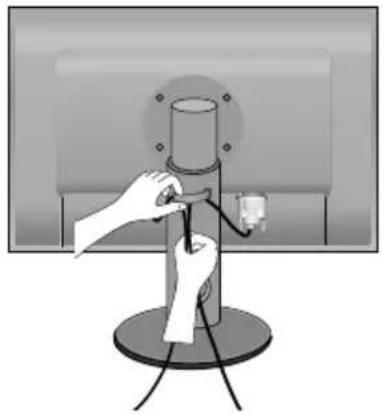
natural_image
Illustration of a hand holding a cylindrical object mounted on a stand, with wires and a small plug attached (no text or symbols)- Please put the power cord and the signal cable in the cable holder 2. While pressing the bottom of cable holder 2 with one hand, pull the top of it with the other hand as shown in the picture.
text_image
Pull Press Cable Holder 2Front Panel Controls

natural_image
Front view of a computer monitor with control buttons and a blank screen (no text or symbols visible)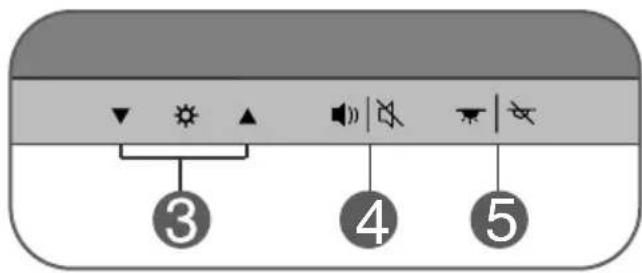
text_image
③ ④ ⑤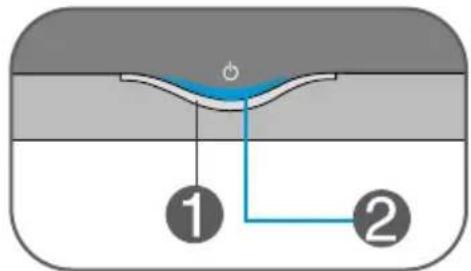
text_image
Diagram showing a mechanical or fluid system with labeled components 1 and 2, likely illustrating a fluid flow or pressure measurement setup.
Power Button
Touching the button to turn the power on and touch the button again to turn it off.

Power Indicator
This Indicator lights up blue when the display operates normally(On Mode). If the display is in Sleep Mode (Energy Saving), this indicator color changes to amber.


▲ Buttons
■ You can adjust monitor brightness to be lighter (▲) or darker (▼). When adjusting brightness, it will beep once when you reach the maximum or minimum level.
- You can turn DFC function on or off by pressing two buttons at the same time for longer than three seconds. When DFC is turned on, the power indicator (blue light) flickers once after the beep. When DFC is turned off, the indicator flickers three times after the beep.
When DFC is on, if the ▼ / ▲ buttons are not pressed at the same time, the brightness control function might be turned on.
*What is DFC (Digital Fine Contrast) Function? After analyzing input signals, this product makes dark areas on the screen darker, providing greater contrast ratio to viewers.


Buttons
You can turn on or off the alarm ringing when adjusting buttons while the power is on.
Touch any button to check if the sound is on or off. If sound is heard, it means the sound is on. If not, it means the sound is off.


Buttons
You can turn Power Indicator on or off by touching the button lightly while the power is on.
Check the following before calling for service.
| No image appears | |
| ●Is the power cord of the display connected? | ·Check and see if the power cord is connected properly to the power outlet. |
| ●Is the power on and the power indicator blue or green? | ·Adjust the brightness and the contrast. |
| ●Is the power indicator amber? | ·If the display is in power saving mode, try moving the mouse or pressing any key on the keyboard to bring up the screen.·Try to turn on the PC. |
Important
- Check Control Panel --> Display --> Settings and see if the frequency or the resolution were changed. If yes, readjust the video card to the recommend resolution.
- Reasons for Recommending Optimal Resolution : The aspect ratio is 16:10. If the input resolution is not 16:10 (for instance, 16:9, 5:4, 4:3), you might encounter problems such as blurred letters, blurry screen, cut-off screen display or tilted screen.
- The setting method can differ by computer and O/S (Operation System), and resolution mentioned above may not be supported by the video card performance. In this case, please ask to the computer or the video card manufacturer.
| Display image is incorrect | |
| ●The screen color is mono or abnormal. | ●Check if the signal cable is properly connected and use a screwdriver to fasten if necessary.●Make sure the video card is properly inserted in the slot.●Set the color setting higher than 24 bits (true color) at Control Panel - Settings. |
| ●The screen blinks. | ●Check if the screen is set to interlace mode and if yes, change it to the recommend resolution. |
| Have you installed the display driver? | ||
| ● Have you installed the display driver? | ● Be sure to install the display driver from the display driver CD (or diskette) that comes with your display. Or, you can also download the driver from our web site: http://www.lge.com. | |
| ● Do you see an "Unrecognized monitor, Plug&Play (VESA DDC) monitor found" message? | ● Make sure to check if the video card supports Plug&Play function. | |
| Display | 30 inches (75.6228cm) Flat Panel Active matrix-TFT LCD Anti-Glare coatingVisible diagonal size : 75.6228 cm0.2505 mm pixel pitch | |
| Sync Input | Horizontal Freq. 98.71kHz (Automatic)Vertical Freq. 59.97 Hz (Automatic) | |
| Input Form Digital(HDCP) | ||
| Video Input | Signal Input DVI - D connector (Digital) | |
| Input Form Digital | ||
| Resolution | Max VESA 2560 x 1600 @ 60 Hz | |
| Recommend VESA 2560 x 1600 @ 60 Hz | ||
| Plug&Play | DDC 2B | |
| Power Consumption | On Mode : 130W(Typ.),140W(USB Full load)Sleep Mode ≤2 WOff Mode ≤1 W | |
| Dimensions &Weight | With Stand Without Stand | |
| Width 70.27 cm / 27.67 inches 70.27 cm / 27.67 inchesHeight 52.54 cm / 20.69 inches(Min) 47.65 cm / 18.76 inches62.54 cm / 24.62 inches(Max)Depth 27.02 cm / 10.64 inches 8.30 cm / 3.27 inches | ||
| Net 12.3kg (27.12 lbs) | ||
| Range | Tilt -5°~20°Swivel 350°Height 100 mm / 3.94 inches | |
| Power Input | AC 100-240V~ 50/60Hz 1.5A | |
| Environmental Conditions | Operating ConditionsTemperature 10°C to 35 °CHumidity 10 % to 80 % non-Condensing | |
| Storage ConditionsTemperature -20°C to 60 °CHumidity 5 % to 90 % non-Condensing | ||
| Stand Base | Attached ( ), Detached ( O ) | |
| Power cord | Wall-outlet type or PC-outlet type | |
| USB | Standard USB 2.0, Self-PowerData Rate Max 480 MbpsPower Consumption Max 2.5W x 4 | |
NOTE
■ Information in this document is subject to change without notice.
Preset Modes (Resolution)
| Display Modes (Resolution) | Horizontal Freq. (kHz) Vertical Freq. (Hz) | ||
| 1 | 1280 x 800 | 49.310 | 60 |
| *2 | 2560 x 1600 | 98.713 | 60 |
*Recommend Mode
Indicator
| MODE | LED Color |
| On Mode | Blue |
| Sleep Mode | Amber |
| Off Mode | Off |
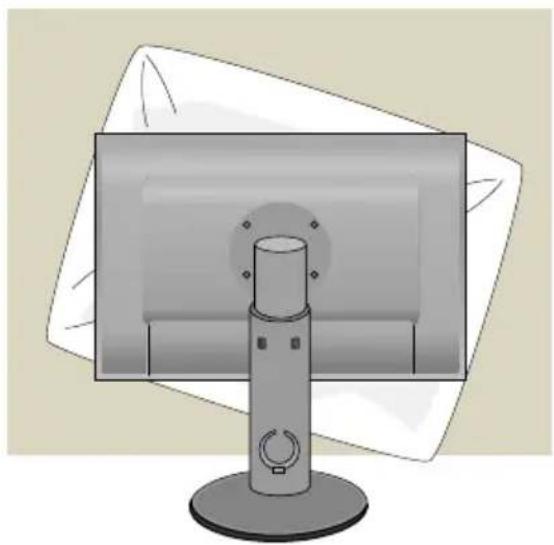
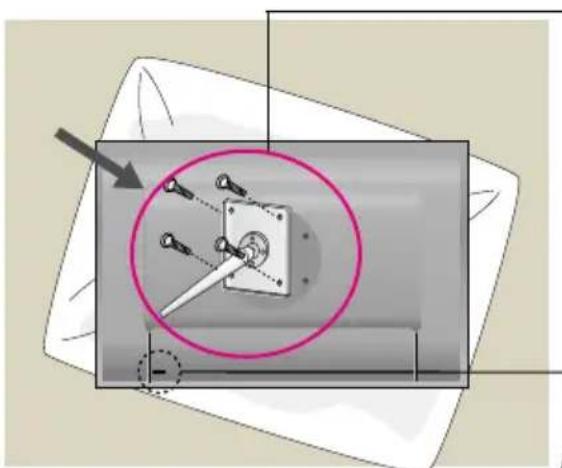
This monitor satisfies the specifications of the Wall mount plate or the interchange device.
natural_image
Illustration of a desktop computer monitor with a stand and cable (no text or symbols visible)- After moving the product to face downward, make sure to place it on a soft cloth or a cushion to avoid surface damage.
natural_image
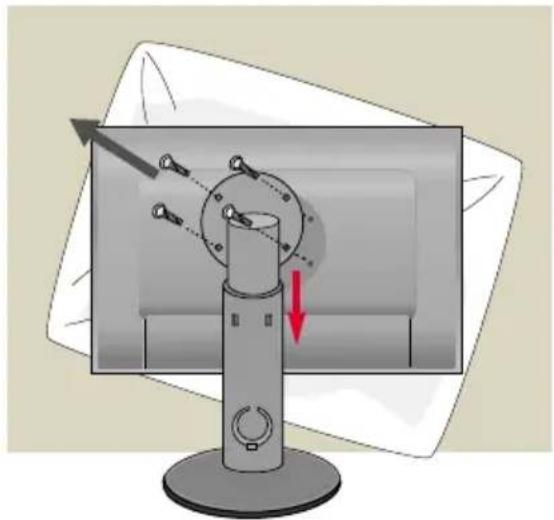
Illustration of a computer monitor with a cable and directional arrows indicating motion (no text or symbols)-
Remove the screw by using a screwdriver, and pull the Stand part in the arrow direction. Then the Head and Stand parts are separated.
-
Install the Wall mount plate.
natural_image
Technical diagram showing a mechanical assembly with a central component and directional arrows (no text or symbols)Wall mount plate(Separate purchase)
This is stand-type or wall mount type and is connectable with Wall mount plate.
Please refer to the installation guide for more details, which is provided when Wall mount plate is purchased.
natural_image
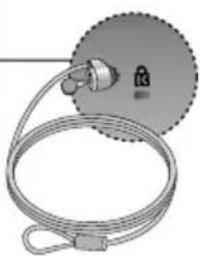
Diagram of a cable with a lock and connector, no text or symbols presentKensington Security Slot
Connected to a locking cable that can be purchased separately at most computer stores.
Digitally yours


LG