
App (Android) - Photo/Video Software DoorBird - Free user manual and instructions
Find the device manual for free App (Android) DoorBird in PDF.


| Product Type | Photo/Video Software |
| Platform | Android |
| App Name | DoorBird |
| File Size | Approx. 50 MB |
| Languages | English, German, French, and many more (selectable in app) |
| Main Functions | Live video, two-way audio, visitor history, push notifications, geofencing, cloud recording, motion detection, multi-device support (up to 10 devices) |
| Security | End-to-end encryption (banking-grade), no port forwarding required, secure cloud server |
| Installation | Download from Google Play Store; no manual installation needed |
| Maintenance | App updates via Google Play; device firmware updates automatically |
| Connectivity | Wi-Fi, LAN, Internet (cloud) |
| Compatibility | DoorBird video door stations and BirdGuard products |
| Battery Consumption | Depends on usage; typical use has moderate impact |
| User Support | Online manual, FAQs, email support via app |
Frequently Asked Questions - App (Android) DoorBird
User questions about App (Android) DoorBird
0 question about this device. Answer the ones you know or ask your own.
Ask a new question about this device
Download the instructions for your Photo/Video Software in PDF format for free! Find your manual App (Android) - DoorBird and take your electronic device back in hand. On this page are published all the documents necessary for the use of your device. App (Android) by DoorBird.
USER MANUAL App (Android) DoorBird
natural_image
Blue cartoon bird head illustration with white outline and black eyes (no text or symbols)DoorBird
Technology meets Design.
App
For iOS and Android

App user manual
Pages 1-20

The user manual for the App is not provided in printed form since it is constantly updated to match additional updates of features made to the App. You can always access the latest version of this user manual by downloading it from: www.doorbird.com/support
Additional notes such as the QUICKSTART guides, installation guides for the device and much more can also be downloaded from: www.doorbird.com/support
For reasons of brevity, we use the term "device" to refer to our "DoorBird Video Door Station" and "BirdGuard" products, and use the term "mobile device" to refer to a smartphone or tablet.
Download
Download and open the App "DoorBird" by Bird Home Automation from the Apple App Store or Google Play Store.
Screens
We have worked towards making the App's interface as simple and intuitive as possible. Thus, we've done away with many of configurable settings and buttons and have only made the most important functions configurable, as is the case with most common door entry phones. All of our products are pre-configured to use the optimal settings for video, network transport protocols, compression, encryption, ports and much more. There's also no need to enter IP addresses or setup port forwarding etc., which not only makes our products simple to set up but also reliable to use.
The screenshots are based on how our App is displayed on an iPhone running Apple's iOS. There may be minor differences as to how this appears on iPad and Android smartphones or tablets.
Nevertheless, the descriptions and functions are identical across those platforms.
Content
Live-Screen....3
History 4
Settings 5
Add Device....6
Edit Device....7
Administration – Login......8
Administration – Settings 9
Administration – Validation type/-schedule 13
Administration – Edit User....14
Administration – SIP Settings....15
Administration – Add Peripherals....16
Administration – IP Door Chime....17
Administration – IP I/O Door Controller 18
D301 – Settings....19
Legal Notes....20
Live-Screen
This screen allows you to speak to your visitors.
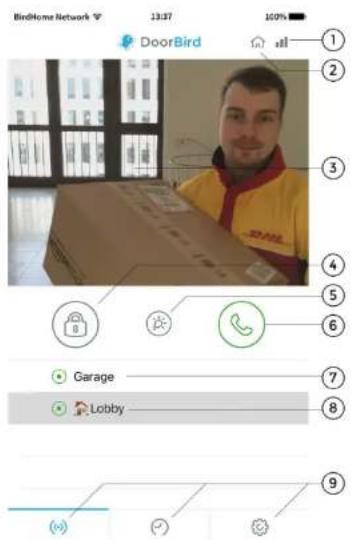
1) Connection strength
These bars show the connection strength across the entire network route from the App right up to the device across all access points, routers, cables, etc. At the same time, the strength indicator also indicates data throughput and the latency of transferred data packets.
2) Connection method
Shows how the App is connected to the video door station. The house symbol indicates that the App is connected to your device directly through your LAN. The cloud symbol indicates that the App is connected to your device through our highly secure cloud server via the internet.
3) Live picture
The resolution, compression and number of frames per second depend on the strength of the connection as well as on the connection method.
4) Door opening button
Tap this button to open the door. You'll need to ensure that you've connected a door opener to the device first.
5) Light button
Tap this button to activate the infrared LED ring on the device. Once the infrared LED ring has been activated, the device switches into night-vision mode, and then the image sensor will only detect infrared light. This light switches itself off automatically after a short time.
6) Answering/hanging-up button
Tap this button to start or end voice communications.
7) Connection status
A green dot indicates that the App is able to connect to the device, either via LAN or through the internet. A red dot indicates that the App cannot connect to the device. It can sometimes take a number of seconds before the current status is displayed on screen.
8) Device list
You can add up to 10 compatible devices to the App. Furthermore, if an event was triggered recently, because i.e. someone had rung the device, this will be shown next to the description of the device on the right-hand side.
9) Main menu
These three items will take you to the following screens.
Live-Screen
History (page 4)
Settings (page 5)
History
This screen allows you navigate through your visitor history. A maximum of 50 visitors each can be stored in the doorbell and motion event navigation. A 51st visitor would then cause the details of the first visitor to be overwritten according to the circular buffer method. An image is stored in the visitor history once a visitor presses the doorbell. Images cannot be deleted manually for reasons of data integrity and security. In the event that you need to comply with any data protection laws, you can fully deactivate the history function within the administrative section in the App.
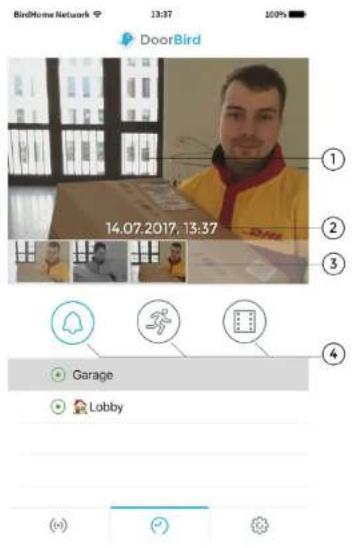
1) Visitor history images
If you hold your finger over an image in the visitor history for a while, you will be able to save the image to your mobile device and also forward the image by email. For that, you need to give the App access to your photos.
2) Event date and time
This shows the event date with a timestamp. In case that these details are incorrect, please double check the details and accessibility of the NTP server which you can setup in the administrative section.
3) Navigation controls (left, right)
Tab and swipe the small images to switch between events in visitor history.
4) Navigation switch
Tap on this icon to switch between doorbell and motion event. A history of video recordings is also available, if cloud recording pro is enabled.
For more information about cloud recording, please visit our website: www.doorbird.com/cloud-recording
Settings
You can manage all the relevant settings from this screen.
![Birchloms Network Settings DEVICES Add ① Garage [g 10001] Lobby [g 1001] APP SETTINGS Hands-free mode LAN only mode FURTHER FUNCTIONALITY Administration WIFI Setup Manual & Videos Reset to factory defaults News Blog Information](/content/2026/05/803376/images/b9d5d89646725c48f89fbc2436708a6653d86137b32b0ca309968d2f4f0e8390.jpg)
1) Device - Add
Tap this button to add a device to the App.
2) Device - Edit
Tap on an entry in order to edit a device that you've already added to the App.
3) Hands-free Mode
Use this option to activate or deactivate the hands-free mode in the App. Hands-free mode is useful if you want to be able to see your visitor whilst you talk to them. Also, we recommend that you activate it, if you are using Bluetooth devices such as speakers or headphones with your mobile device.
4) LAN only mode
In LAN only mode, the video & audio connection of the Live-Screen will only be established, if your device is connected to the local network / WiFi. This mode is particularly good for fixed devices, e.g. indoor door station.
5) Administration
Tap this function to access the administrative section for your device.
6) WiFi Setup
Tap this function to edit the WiFi settings of your device, if you want to connect your device with your local WiFi. In this case, please note the step-by-step instructions for your device and carry it through to the last step.
7) Manual & Videos
Tap this function to open the browser and read the user manuals or view installation videos for your device from our website on your mobile device.

DoorBird
8) Reset to factory defaults
Press here to reset any DoorBird device within your local network and completely delete the image history. You will receive new access data after the reset to the provided owner email of the device. Note that your device must be connected by network cable. In addition, this function requires both the device and mobile device to be connected to the internet and on the same network. Please follow the steps described in the App for the chosen device in this section in order to reset it.
9) News Blog
Here you will find the latest news from DoorBird and all information about new product releases.
10) Information
Tap this controller to view general information about the App. There you have the possibility to send us feedback via email, too. Moreover, you can send diagnostic information of your DoorBird device along with your email.

DoorBird
Add Device
You can manage all the relevant settings for adding a device from this screen. More advanced settings are available afterwards by editing the added device.
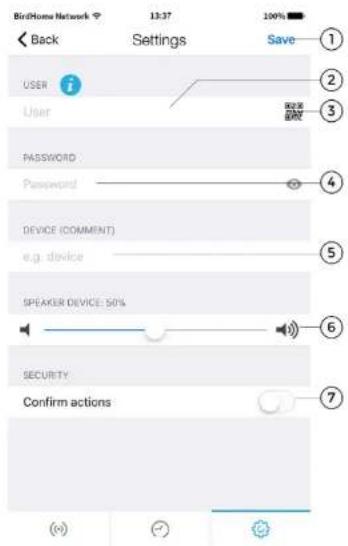
1) Save
Tap this button to save your settings.
2) User
Enter your device's username as given in the "DIGITAL PASSPORT" document in the QUICKSTART guide on the left side.
3) QR-Code Scanner
If you have a QR-Code available you can set the information (username, password) by tapping on this symbol in order to scan the QR-code of the "DIGITAL PASSPORT". This way, you don't have to type it in. (For that only) the App requires the camera permission of your mobile device.
4) Password
Here you'll need to enter your device's password.
5) Device (Comment)
Here you can enter any textual descriptions for your device, which will appear next to it in the device overview. Simply type a name alias you want, for instance, "lobby" or "garden gate". However, umlauts and special characters cannot be entered for compatibility reasons.
6) Speaker Device
Using this slider you can control how loud your voice will be played back via the device. The default setting is 50%. This default value of 50% fits almost any installation. Changing this value may quickly lead to over-modulating and / or non-understandable speech.
7) Security – Confirm action
Activate this option so that every action on the Live-Screen has to be reconfirmed by an additional tap on the screen to confirm your actions. This function helps prevent accidental key presses which could lead to issues such as inadvertently opening the door etc.
Edit Device
Tap on a device in the Setting-Screen. Then you can manage all the relevant settings of your device and adapt these to your personal taste within the App. These options are more advanced than those presented to you when adding the device. To be able to use these functions, your device must either be online or be on the same network
(LAN) as your mobile device.
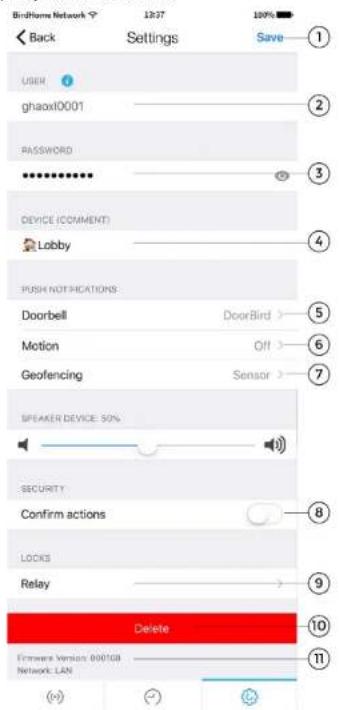
© by Bird Home Automation GmbH | www.doorbird.com
1) Save
Tap this button to save your settings.
2) User
This is your device's username.
3) Password
This is your device's password.
4) Device (Comment)
Tap here to edit the comment field of your device. This will be visible i.e., when you receive a push notification.
5) Push Notifications - Doorbell
Activate this option to receive push-notifications when someone rings your doorbell and/or to change the tone of the push-notification. Please ensure that you've enabled the App to use push-notifications (check the global settings in the operating system or the notification center).
6) Push Notifications - Motion
Activate this option to receive push-notifications when the motion detector is triggered and/or to change the tone of the push-notification. Use the administrative section of the App to check whether the motion detector is activated on the device. Please ensure that push-notifications are enabled for the App (check the global settings in the operating system or the notification center).
7) Geofencing
Enable this option if you want to receive push-notifications when you are inside a certain area. For instance, you can set the location so that you receive notifications only when you are at home. You can set a distance radius between 100m and 500m.
8) Confirm actions
Activate this option to enable function "Confirm actions". Then, each action on the Live-Screen will have to be confirmed before execution (turn on IR-Light, open doors etc.).
9) Locks - Relay (and other)
In this subsection, you can activate supported smart locks to use in combination with the device next to the standard relay. A list of compatible smart locks can be viewed here: http://www.doorbird.com/connect
10) Delete
Tap this button and confirm in order to remove this device from the App.
11) Firmware information and connection
Here you can find the firmware version and connection method (LAN/WiFi) that is currently active on your DoorBird. Please note that all devices are automatically updated to the latest version of the firmware if they are online. You can find current firmware information at www.doorbird.com/changelog.
Administration – Login
You can manage device settings from this administrative section, which can be applied to users of a device as well as to users on this mobile device. To be able to use these functions, your device must either be online or be in the same network (LAN) as your mobile device.
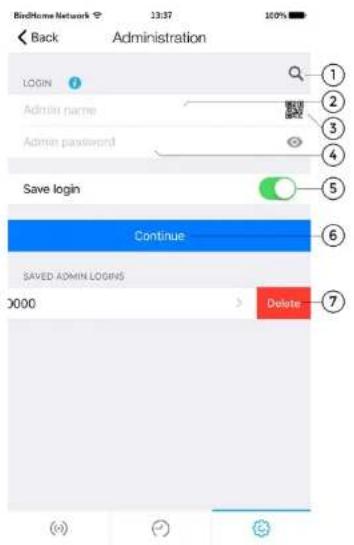
1) Search
Tap this button to search for all devices in your local network (LAN) that are linked to your mobile device. The devices are detected via Bonjour technology. This function is helpful for support purposes but not required for regular use of the App.
2) Admin name
Enter the App Administrator username for your device, which can be found in the "DIGITAL PASSPORT" in the "QUICKSTART Guide" document, which is being found in the box of your device.
3) QR-Code scanner
If you have a QR-Code available (also see the "DIGITAL PASSPORT" document) you can set this information (Admin username, Admin password) by tapping to scan the QR-Code symbol and don't have to type this in.
4) Admin password
Enter the Admin password for your device, which is found in the "DIGITAL PASSPORT". You can generate new passwords for the Admin and users in later sections.
5) Save login
If you enable this feature, the Admin login of a certain device will be listed the next time you visit the page. This way, simply click on the saved login to continue.
6) Continue
Tap this button to enter the administrative section with valid Admin credentials.
7) Delete saved Admin logins
Swipe left to delete formerly saved Admin login credentials.
Administration – Settings
© by Bird Home Automation GmbH | www.doorbird.com
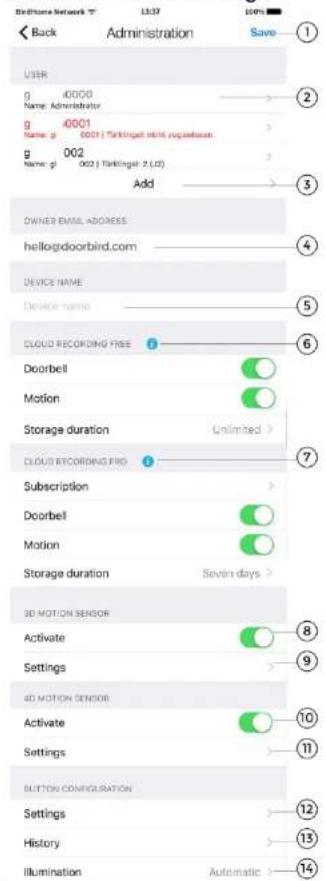
The possible settings vary depending on the device configuration and its model. For example, there are advanced settings e.g. for the display or keypad module. Settings that do not apply to a device are automatically hidden, so this display may differ.
1) Save
Tap this button to save your settings.
2) User
Shows a list of all users registered to the particular device. The "devicename"0000 user is the Administrator of your device. Added Usernames to the App start with "...0001. You can edit a user account by tapping on it. In the case of systems with more than one bell or respectively with a keypad, corresponding keys/codes must be assigned to the user. Users without assignment appear in red (you can assign those under "Edit user").
3) Add Users
Tap on this controller to be able to add a user on the device. You can add as many users as you require, i.e. for your family and co-workers. You can also delete a user at any time, i.e. if a co-worker's term of employment ends and they should no longer have access to that device.
4) Owner Email Address
Enter the email address of the device's owner. This is strongly advised. With the aid of this email address it is possible to restore the device to its factory settings in the event that you lose your Administrator username and Administrator password details. In order for this email to be sent, your mobile device must have an email account already configured. The App will ask you to confirm the email address.

DoorBird
5) Device name
Enter a device name alias that will then be displayed in the list of saved Admin Logins.
6) Cloud Recording Free
In this section you can enable/disable the image history for Doorbell and Motion event that will be securely stored on our servers – under Storage duration it is possible to set when the data will be deleted automatically. Pressing the information button will redirect you to http://www.doorbird.com/cloud-recording
7) Cloud Recording Pro
You can enable/disable the optional video history for Doorbell and Motion event – under Storage duration it is possible to set when the data will be deleted automatically. More information at http://www.doorbird.com/cloud-recording
Tab "Subscription" to see the actual subscription status of your Cloud Recording pro, you can request a trial version, too (can only be done once).
8) 3D Motion Sensor – Activate
Here, you can activate the Motion sensor which will trigger notifications if motion is detected. If the motion sensor is disabled, e. g. when it is required by local privacy regulations, no user of the device can be notified by a push message when movement is detected. (Models: D10x und D20x)
9) 3D Motion Sensor – Settings
Tap here to enter the setting menu for the 3D motion sensor, where you can i.e. schedule at which times the sensor shall be active or in which particular zones motions shall be detected. (Models: D10x und D20x)
© by Bird Home Automation GmbH | www.doorbird.com

DoorBird
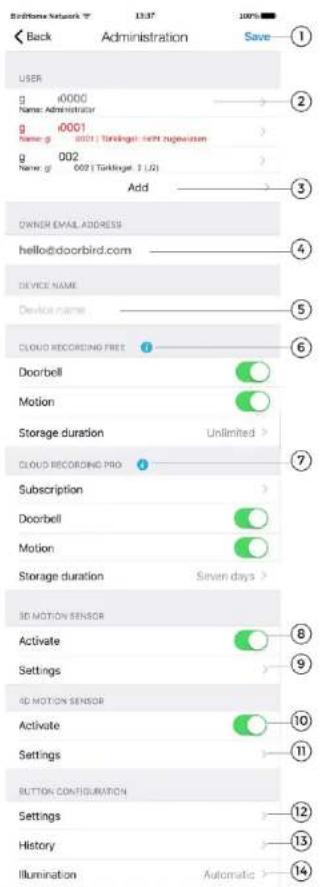
10) 4D Motion Sensor - Activate
Enable this option to enable the 4D motion sensor of your device. On models with display, this function is preset by default, as the area detection runs through this sensor to activate the display when someone approaches.
If the motion sensor is disabled, e. g. when it is required by local privacy regulations, no user of the device can be notified by a push message when movement is detected. (Models: D21x)
11) 4D Motion - Settings
Here you have the possibility to set a pause between the alarms (30s to 5min), a distance (\~1 to \~10m), the direction of movement, which shall be detected (coming, leaving, both), and a schedule for actions. The schedule allows you, for example, to specify that you want to receive Push-messages only during daytime.
For more information on the schedule, see the menu option „Validation types/-schedules“ on page 13. (Models: D21x)
In the "Button Configuration" area, which only appears on D21x models with multiple bell buttons, you can assign the respective buttons to the corresponding users. You can assign up to 18 buttons.
12) Button Configuration – Settings
Tap here to get a list of all the bell connections. The bells in the system are usually connected from top to bottom. For each button in the list, you can give a name Alias, create schedules for actions and set the "Validation type". For more information on the Validation types, see the menu option „Validation types/-schedules" on page 13. (Models: D21x with multiple buttons)
13) Button Configuration – History
Here you will find an overview of the last 30 bell activities with date and time. (Models: D21x with multiple buttons)
14) Button Configuration – Illumination
Tap here in order to change the illumination of the bell buttons between „Automatic“, „Always on“ and „off“. (Models: D21x with multiple buttons)

DoorBird
| KEYPAD | |
| Settings | 15 |
| History | 16 |
| Illumination | 17 |
| Button sound | 18 |
| RFID TRANSPONDER | |
| Settings | 19 |
| History | 20 |
| FAVORITES | |
| HTTP Calls | 21 |
| SIP Calls | 22 |
| PERIPHERALS | |
| Settings | 23 |
| EXPERT SETTINGS | |
| NTP-Server | pool.ntp.org |
| Relays | 24 |
| Button LED | Always on |
| Button Sound | None |
| IR Light | Automatic |
| Image Sensor | 25 |
| Schedule for doorbell | 26 |
| System diagnostic volume | Standard |
| SIP Settings | 31 |
| Restart device | 32 |
| 33 | |
The Keypad settings can be found on the D21x models with a fixed hardware keypad.
Tap here to assign codes to ring or access the gate to the device. You can assign a name and a "Validation type" ("Weekly schedule", "Date range" and "once") with the corresponding actions. For more information, see the menu option, Validation types/-schedules" to each code. It is not possible to assign the same code twice, but several actions can be performed for each code. (Models: D21x with keypad)
Here you will find an overview of the last 30 codes entered with date and time. (Models: D21x with keypad)
17) Keypad - Illumination
Tap here to toggle the illumination of the keypad between "Automatic", "Always on" and "off". (Models: D21x with keypad)
Activate or deactivate the sound tone, when the button is pressed, here. (Models: D21x with keypad)
The RFID Transponder is available for all devices of the D21x series
19) RFID - Settings
Tap here to assign your RFID transponder to the device. To do this, hold the transponder in front of the small black window underneath the loudspeaker to store the - still unknown - ID in the device. Then you can add it by tapping "Add" and choose it from the list of read IDs. You can assign a name and a valid time category ("weekly plan", "date range" and "once-only") to the transponder with the corresponding actions. For more information, see the menu option "Validation types/-schedules". Also, you can remove a transponder here. (Models: D21x)
20) RFID - History
Here you will find an overview of the last 30 access attempts using RFID. (Models: D21x)

DoorBird
| KEYPAD | |
| Settings | 15 |
| History | 16 |
| Illumination | Automatic 17 |
| Button sound | 18 |
| RND TRANSPONDER | |
| Settings | 19 |
| History | 20 |
| FAVORITES | |
| HTTP Calls | 21 |
| SIP Calls | 22 |
| PERIPHERALS | |
| Settings | 23 |
| EXPERT SETTINGS | |
| NTP-Server | pool.ntp.org 24 |
| Relays | 25 |
| Button LED | Always on 26 |
| Button Sound | None 27 |
| IR Light | Automatic 28 |
| Image Sensor | 29 |
| Schedule for doorbell | 30 |
| System diagnostic volume | Standard 31 |
| SIP Settings | 32 |
| Restart device | 33 |
© by Bird Home Automation GmbH | www.doorbird.com
In the Favorites area, you can define settings for SIP and HTTP calls that start a call-in/call-up in combination with actions (Ringing, button press, RFID, or Keypad-Code). The favorites can then be assigned to individual users or actions in the corresponding menu items or actions according to the "Validation type".
21) HTTP Calls
Type here to configure HTTP Calls
22) SIP Calls
Type here to enter a SIP address and the corresponding name for it.
23) Peripheral – Settings
Tap here to add peripheral devices such as our DoorChime or DoorController (see page 16).
24) NTP-Server
Enter the details of an NTP-Server (time server) that the device should use to sync the current time. The default server used is: "pool.ntp.org".
25) Relays
Tap here to get a list of available relays. For each relay, you can set name, mode and the duration that the relay contact triggers when pressed in the Live-Screen (in default mode). Please Note: When the relay is in toggle mode, you have to press the "Door Opening" button in the Live-Screen a second time in order to lock the door again.
26) Info module LED (Models with Info Module)
Touch to toggle the illumination of the Info Module between "Automatic", "Always on" and "off". You can also turn the LEDs on/off in the "Live" screen.
27) Button Sound
Tap here to select the button sound of the device itself.
28) IR Light
Tap here to turn off IR Light or to leave it on automatic (will turn itself on when a motion or ring event is detected).
29) Image Sensor
Tap here to change contrast and brightness of your DoorBird if necessary.
30) Schedule for doorbell (single bell/code)
Here you can schedule the device for actions which apply to all users. If you don't want a user i.e. to have access to scheduled relays, you can set this in user permissions (more on that on page 14).
31) System diagnostic volume
Tap to change the volume of the system messages. If silent, the voice will be quite quiet.
32) SIP Settings
Tap here to enter the SIP Settings menu (see page 14).
33) Restart device
Tab here to restart your DoorBird. The restart can take about 120 seconds.
DOORBIRD CONNECT
Onvif

New: DoorBird Connect
Using the ONVIF protocol, the DoorBird can communicate or be integrated with 3 ^rd party applications. For more information visit http://www.doorbird.com/connect
New: Module Ports (Models: D21x)
Here you have an overview over the modules, which are installed on your DoorBird like i.e. our Info Panel, display or the keypad.
Administration –
Validation type/-schedule
In different areas you can choose whether you want to use a button, a code or an RFID transponder once only, in a certain date range or with a weekly schedule. All three settings are explained below.
Once
| Validation type | Once > |
| Is valid | |
| Actions |
If Actions are set, they get performed only once after being triggered. Afterwards, they won't be triggered again and have to be manually reactivated (i.e. for One-Time-Codes for the KeyPad).
1) Is valid
Here you can activate the validity of your button, code or transponder or want to do so later.
2) Actions
Select here whether an action is to be executed via a favorite and/or a relay.
Date range
| Validation type | Date range > |
| Valid from | 06.10.17, 11:28—1 |
| Valid to | 13.10.17, 11:28 |
| Actions | >—2 |
© by Bird Home Automation GmbH | www.doorbird.com
1) Date range
Specify a time period in which actions for a specific code, transponder or button will be performed.
2) Actions
Select here whether a notification shall be sent or an action is to be executed with the help of previously created favorites and/or available relays.
Weekly schedule
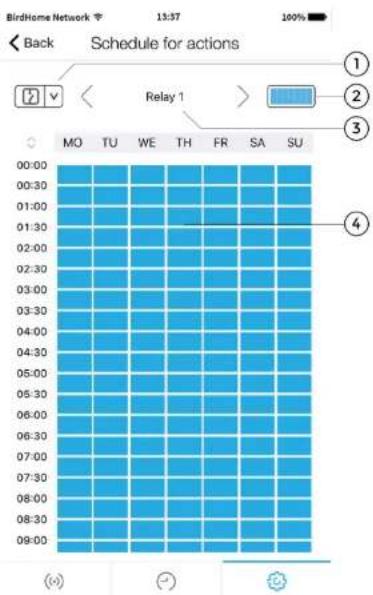
1) Select a category
Tap here to display and navigate to the schedules for notifications, relays, HTTP or SIP call. HTTP and SIP must first be entered in the favorites and - currently - only one HTTP and one SIP call can be scheduled.
2) Range selection
Activate or deactivate the entire area.
3) Actions
Tap here in order to navigate through the relays or favorites in order to set a schedule.
4) Weekly schedule
Here you can activate (blue) or deactivate (white) the desired area by tapping and/or dragging the fields. Scroll the table down by swiping vertically on the times on the left side.
Administration – Edit User
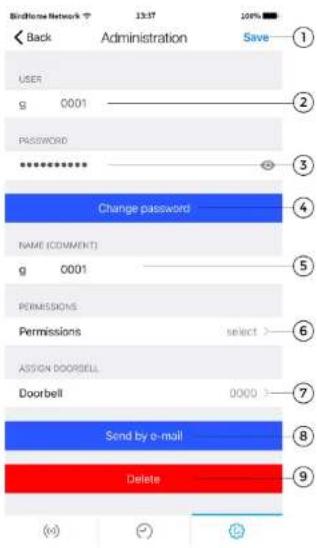

DoorBird
1) Save
Tap this button to save your settings.
2) User
This shows the username. As we place great value on creating secure products, user accounts cannot be edited by hand as these are generated by the product automatically.
3) Password
This shows the password.
4) Change password
Tap this button to generate a new password. As we place great value on creating secure products, it is not possible to set a new password by hand as these are generated by the product automatically.
5) Name (comment)
You can enter a name Alias for the user account. You can choose any name you like, for instance "David". However, umlauts and special characters cannot be entered for compatibility reasons.
6) Permissions
In this menu you can assign Permissions and Access to the user. Deactivate "Watch always" to prevent live images to be transmitted unless someone recently rang your doorbell. Also, you can allow the to see a history. You should deactivate those options if required to do so by local data protection laws. Next to that, you can allow access to only certain relays (i.e. "Garden door" but not "House door").
Furthermore, permissions for our peripheral devices can be assigned here, too.
7) Assign Doorbell
In the case of a bell system with multiple bell buttons or access codes, the associated buttons/codes must be assigned to the individual users here.
8) Send by e-mail
Tap this button to send the above listed data to you by email. Moreover, a QR code is generated as email attachment so that the user is easily able to scan the data after modification.
9) Delete
Tap this button to remove the user shown from your device. However, the “...0000” user is the administrator username and therefore cannot be deleted.
Administration – SIP Settings
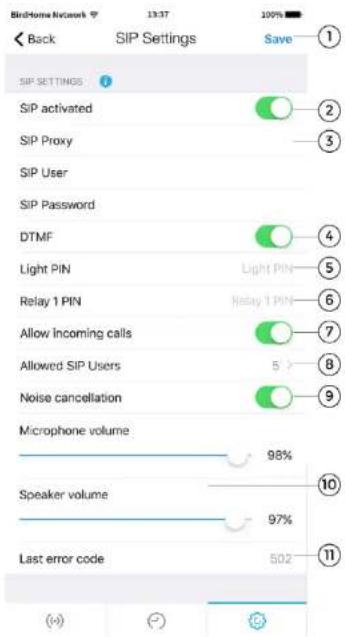

DoorBird
1) Save
This saves your settings.
2) SIP activated
Tap this button to activate SIP functionality.
3) SIP Proxy, User and Password
Use these fields to enter information from your SIP server (Proxy-domain/ip, user and password)
4) DTMF
Activate this function to be able to enter PIN codes for your SIP device. Then, you will be able to turn on the LED lights and trigger the relays of the device via SIP communication.
5) Light PIN
Switch on the LED lights on the DoorBird via PIN on the telephone. Always confirm the code on the phone with #.
6) Relays PIN
Switch the relays on the DoorBird via PIN on the telephone. Always confirm the code on the phone with #. Please note that you have to re-enter the PIN, if the relay is in toggle mode and you want to switch it back.
7) Allow incoming calls
Activate this function to be able to call the device.
8) Allowed SIP Users
Here you can specify which SIP users are able to call the device. You can enter multiple SIP users.
9) Noise cancellation
Activate/deactivate the out suppression here. Try the quality of the connection during setup, and check which setting is best for you.
10) Microphone and Speaker volume
You can set microphone and speaker volume during the SIP call.
11) Last error code
You can use the error code to resolve problems with the SIP installation. For this purpose, the output is formatted to the standard SIP response codes.

DoorBird
Administration – Add Peripherals
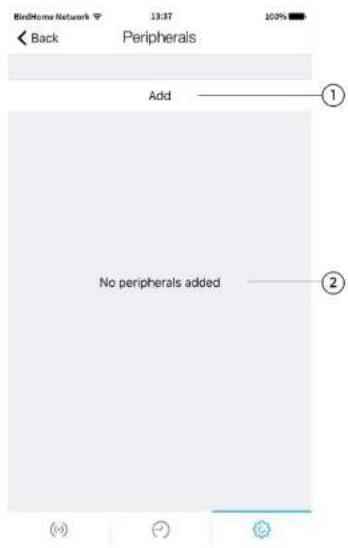
1) Add
Tap here to add new devices. Select between the appropriate devices and follow the instructions. You will need the credentials of the peripheral device.
2) Peripherals list
All added additional devices (e.g., the DoorBird IP Door Chime) associated with the current device are displayed here.
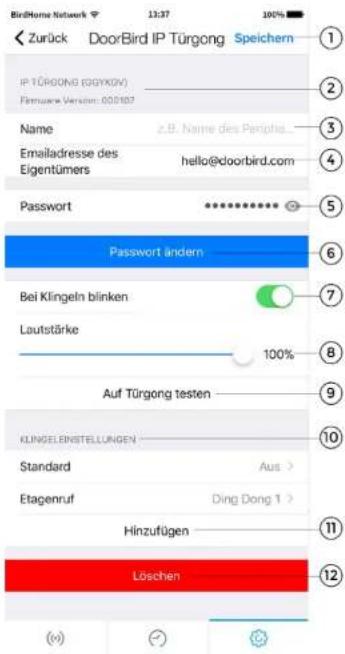
Administration – IP Door Chime
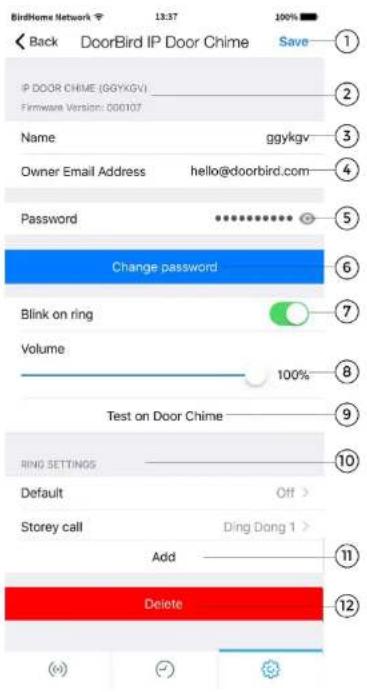
1) Save
This saves your settings.
2) Device properties
This is where the firmware version is listed.
3) Name
This is the name of the peripheral device.
3) Owner Email Address
Enter your current email address here.
5) Password
This is the password of the peripheral device.
6) Change password
Click here to generate a new password for the device.
7) Flash LED on ring
Use the slider to activate or deactivate the flashing of the LED on your DoorChime.
8) Volume
Use the slider to adjust the volume of your Door Chime sound.
9) Test on Door Chime
Test the bell volume on the linked Door Chime.

DoorBird
10) Ring Settings
Configure the signal settings of your Door Chime and add additional signals in this submenu.
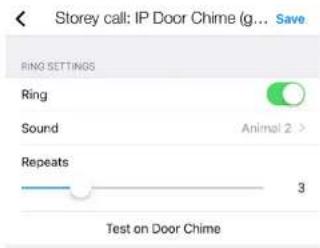
11) Add
Here you can add further signals. For systems with multiple ring buttons or key codes, certain ringtones can be assigned to individual users, but the "Default" signal must be deactivated.
12) Delete
Delete the connection of your DoorBird / BirdGuard to the IP Door Chime here.
| Change password | Send by e-mail |
New: Send by e-mail
You can now send the newly generated password credentials together with a QR-Code per email.
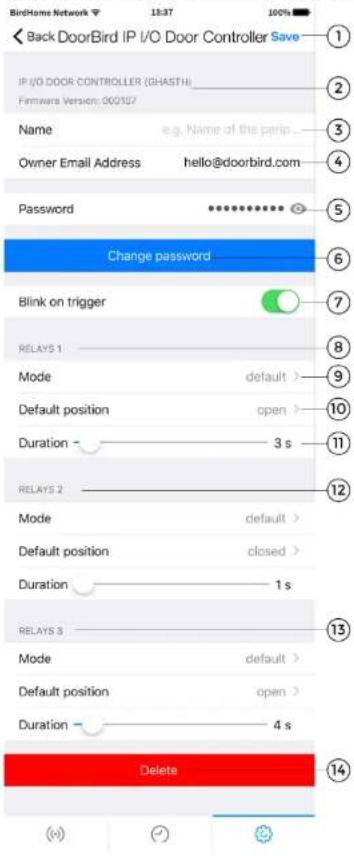
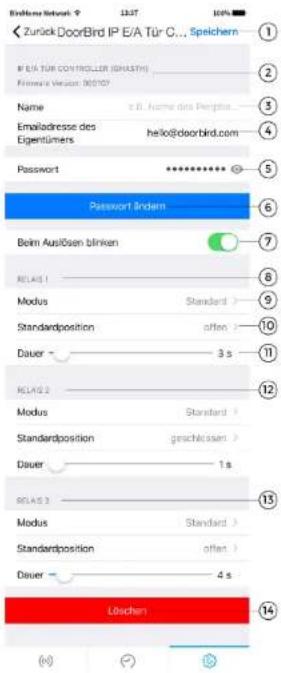
Administration – IP I/O Door Controller
© by Bird Home Automation GmbH | www.doorbird.com
1) Save
This saves your settings.
2) Device properties
This is where peripheral features are listed.
3) Name
This is the name of the peripheral device.
4) Owner Email Address
Enter your current email address here.
5) Password
This is the password of the peripheral device.
6) Change password
Click here to generate a new password for the device.
7) Flash LED on trigger
Use the slider to activate or deactivate the flashing of the LED on your IP I/O Door Controller.
8) Relays – Settings
Section of the setting options for connected relays. Individual setting options are described in points 10) to 12).
9) Mode
Change the switching modes of your controller here. default mode will apply the duration setting. In toggle mode, you have to manually trigger the relay a second time in order to switch it back again.
10) Default position
Indicate whether the relay is open or closed when not triggered yet.

DoorBird
11) Duration
Use the slider to set the switching time of the relay in default mode.
12) Relays 2 – Settings
The settings for relay 2 are equivalent to relay 1 and points 10) to 12).
13) Relays 3 – Settings
The settings for relay 3 are equivalent to relay 1 and points 10) to 12).
14) Delete
Delete the connection of your DoorBird / BirdGuard to the IP I/O Door Controller here.
Change password
Send by e-mail
New: Send by email
You can now send the newly generated password credentials together with a QR-Code per email.
Final remark:
An added Door Controller will now appear in the "Edit device" menu, in which you can activate push-notifications for it.

DoorBird
D301 – Settings
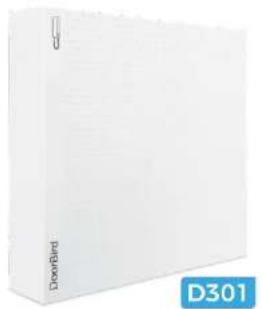
natural_image
White rectangular object with 'DoorBird' label and blue D301 logo (no other text or symbols)The D301 can be added as user (page 5) like the DoorBird.
The login to the administration area also works as with DoorBird (page 8).
Instead of the video a placeholder appears on the Live View page.
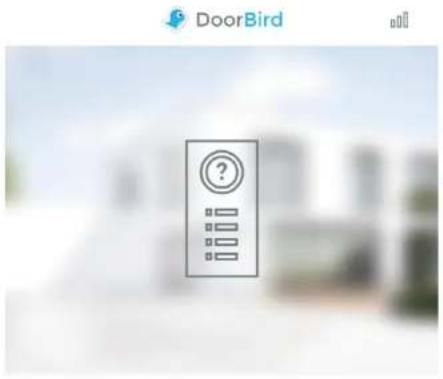
The user interface is the same as the DoorBird settings (page 7).
The setting options of the administration area are described on pages 9-18.
The menu for setting up the D301 on your external intercom is also available, showing which system is connected to the D301.
| EXTERNAL INTERCOM | |
| Manufacturer | Ritto |
| Model | 17680/xx |
| Reconfigure | > |
During the first installation of the D301 you will be guided through these settings and further you can later change and reconfigure them via the "Reconfigure" item.
Legal Notes
General remarks
- DoorBird is a registered trademark of Bird Home Automation GmbH.
- Apple, the Apple logo, Mac, Mac OS, Macintosh, iPad, Multi-Touch, iOS, iPhone and iPod touch are trademarks of Apple Inc.
- Google, Android and Google Play are trademarks of Google, Inc.
- The Bluetooth® word mark and logos are registered trademarks of Bluetooth SIG, Inc.
- All other company and product names may be trademarks of the respective companies with which they are associated.
- We reserve the right to make changes to our products in the interests of technical advancement. The products shown may also look different from the products supplied based on ongoing enhancement.
- Reproducing or using texts, illustrations and photos from this instruction manual in any media – even if only in the form of excerpts – shall only be permitted with our express written consent.
- The design of this manual is subject to copyright protection. We do not accept any liability for any errors or any erroneous content or printing errors (even in the case of technical specifications or within graphics and technical sketches).
- Our products are in compliance with all technical guidelines, electrical and telecommunications regulations applicable in Germany, the EU and the USA.
Data privacy and data security
- For maximum security, the device uses the same encryption technologies as are used in online banking. For your security, no port forwarding or DynDNS is used either.
- The data center location for remote access over the Internet by means of an App is obligatory in the EU if the determined Internet IP-Address location of the device is within the EU. The data center is operated in line with the most stringent security standards.
- Video, audio and any other surveillance methods can be regulated by laws that vary from country to country. Check the laws in your local region before installing and using this device for surveillance purposes.
If the device is a door-, indoor station or camera:
- In many countries video and voice signal may only be transmitted once a visitor has rung the bell (data privacy, configurable in the App).
- Please carry out the mounting in such a way that the detection range of the camera limits the device exclusively to the immediate entrance area.
- The device may come with a visitor history and motion sensor. You can activate/deactivate this function if required.
If necessary, indicate the presence of the device in a suitable place and in a suitable form.
Please observe any relevant country-specific statutory regulations concerning the use of surveillance components and surveillance cameras applicable at the installation site.
Instructions for disposal
Do not dispose of the device with regular domestic waste. Electronic equipment must be disposed e.g. at local collection points for waste electronic equipment in compliance with the Waste Electrical and Electronic Equipment Directive.
Publisher
natural_image
Blue cartoon bird logo with white outline and black eyes (no text or symbols)DoorBird
Technology meets Design.
App
Für iOS und Android

App user manual
Pages 1-20

Administration – IP E/A Tür Controller 38
© by Bird Home Automation GmbH | www.doorbird.com
1) Speichern
© by Bird Home Automation GmbH | www.doorbird.com
© by Bird Home Automation GmbH | www.doorbird.com

DoorBird
9) 3D Motion - Einstellungen
© by Bird Home Automation GmbH | www.doorbird.com
© by Bird Home Automation GmbH | www.doorbird.com
1) Datumsbereich
Administration – IP Türgong
Administration – IP E/A Tür Controller
1) Speichern
natural_image
White rectangular object with grid pattern and 'DoorBird' label, no readable text or symbols on the body© by Bird Home Automation GmbH | www.doorbird.com
- DoorBird
- Technology meets Design.
- App
- For iOS and Android
- Download
- Screens
- Content
- Live-Screen
- 1) Connection strength
- 2) Connection method
- 3) Live picture
- 4) Door opening button
- 5) Light button
- 6) Answering/hanging-up button
- 7) Connection status
- 8) Device list
- 9) Main menu
- History
- 1) Visitor history images
- 2) Event date and time
- 3) Navigation controls (left, right)
- 4) Navigation switch
- Settings
- 1) Device - Add
- 2) Device - Edit
- 3) Hands-free Mode
- 4) LAN only mode
- 5) Administration
- 6) WiFi Setup
- 7) Manual & Videos
- 8) Reset to factory defaults
- 9) News Blog
- 10) Information
- Add Device
- 1) Save
- 2) User
- 3) QR-Code Scanner
- 4) Password
- 5) Device (Comment)
- 6) Speaker Device
- 7) Security – Confirm action
- Edit Device
- Administration – Login
- 1) Search
- 2) Admin name
- 4) Admin password
- 5) Save login
- 6) Continue
- 7) Delete saved Admin logins
- 3) Add Users
- 4) Owner Email Address
- 5) Device name
- 6) Cloud Recording Free
- 7) Cloud Recording Pro
- 8) 3D Motion Sensor – Activate
- 9) 3D Motion Sensor – Settings
- 10) 4D Motion Sensor - Activate
- 11) 4D Motion - Settings
- 12) Button Configuration – Settings
- 13) Button Configuration – History
- 14) Button Configuration – Illumination
- 17) Keypad - Illumination
- 19) RFID - Settings
- 20) RFID - History
- 21) HTTP Calls
- 22) SIP Calls
- 23) Peripheral – Settings
- 24) NTP-Server
- 25) Relays
- 26) Info module LED (Models with Info Module)
- 27) Button Sound
- 28) IR Light
- 29) Image Sensor
- 30) Schedule for doorbell (single bell/code)
- 31) System diagnostic volume
- 32) SIP Settings
- 33) Restart device
- DOORBIRD CONNECT
- New: DoorBird Connect
- New: Module Ports (Models: D21x)
- Administration –
- Validation type/-schedule
- 1) Is valid
- 2) Actions
- 1) Date range
- 1) Select a category
- 2) Range selection
- 3) Actions
- 4) Weekly schedule
- 3) Password
- 4) Change password
- 5) Name (comment)
- 6) Permissions
- 7) Assign Doorbell
- 8) Send by e-mail
- 9) Delete
- 2) SIP activated
- 3) SIP Proxy, User and Password
- 4) DTMF
- 5) Light PIN
- 6) Relays PIN
- 7) Allow incoming calls
- 8) Allowed SIP Users
- 9) Noise cancellation
- 10) Microphone and Speaker volume
- 11) Last error code
- 1) Add
- 2) Peripherals list
- D301 – Settings
- Legal Notes
- General remarks
- Data privacy and data security
- Instructions for disposal
- Publisher
- Für iOS und Android
- 1) Speichern
- 9) 3D Motion - Einstellungen
- 1) Datumsbereich
- Administration – IP E/A Tür Controller
Brand : DoorBird
Model : App (Android)
Category : Photo/Video Software