ELM-1030 - Lawn mower Ozito - Free user manual and instructions
Find the device manual for free ELM-1030 Ozito in PDF.


User questions about ELM-1030 Ozito
0 question about this device. Answer the ones you know or ask your own.
Ask a new question about this device
Download the instructions for your Lawn mower in PDF format for free! Find your manual ELM-1030 - Ozito and take your electronic device back in hand. On this page are published all the documents necessary for the use of your device. ELM-1030 by Ozito.
USER MANUAL ELM-1030 Ozito
Cutting Width: 305mm
Cutting Heights: 3 levels, 30-70mm
Catcher Capacity: 25 litre
Weight: 7.97kg
ozito.com.au
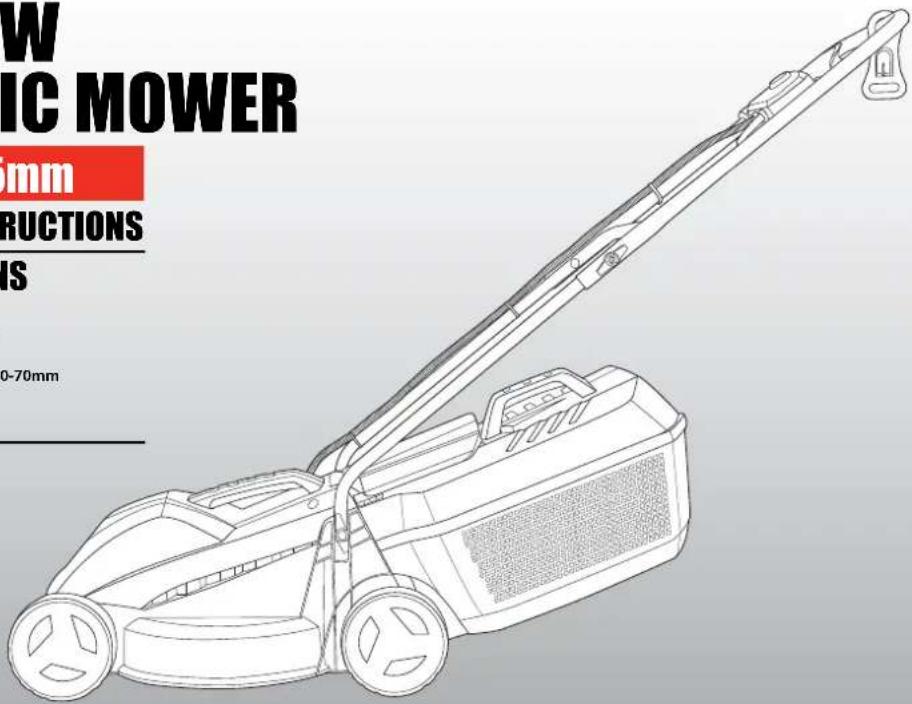
text_image
W IC MOWER mm STRUCTIONS IS 0-70mmWHAT'S IN THE BOX
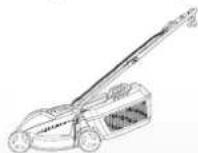
Electric Lawn Mower
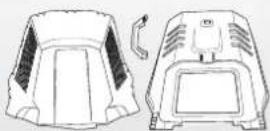
Grass Catcher
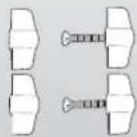
Handle Fasteners
3
YEAR REPLACEMENT WARRANTY
ELM-1030
WARRANTY
IN ORDER TO MAKE A CLAIM UNDER THIS WARRANTY YOU MUST RETURN THE PRODUCT TO YOUR NEAREST BUNNINGS WAREHOUSE WITH YOUR BUNNINGS REGISTER RECEIPT. PRIOR TO RETURNING YOUR PRODUCT FOR WARRANTY PLEASE TELEPHONE OUR CUSTOMER SERVICE HELPLINE:
Australia 1800 069 486
New Zealand 0508 069 486
TO ENSURE A SPEEDY RESPONSE PLEASE HAVE THE MODEL NUMBER AND DATE OF PURCHASE AVAILABLE. A CUSTOMER SERVICE REPRESENTATIVE WILL TAKE YOUR CALL AND ANSWER ANY QUESTIONS YOU MAY HAVE RELATING TO THE WARRANTY POLICY OR PROCEDURE.
The benefits provided under this warranty are in addition to other rights and remedies which are available to you at law.
Our goods come with guarantees that cannot be excluded at law. You are entitled to a replacement or refund for a major failure and for compensation for any other reasonably foreseeable loss or damage. You are also entitled to have the goods repaired or replaced if the goods fail to be of acceptable quality and the failure does not amount to a major failure.
Generally you will be responsible for all costs associated with a claim under this warranty, however, where you have suffered any additional direct loss as a result of a defective product you may be able to claim such expenses by contacting our customer service helpline above.
3 YEAR REPLACEMENT WARRANTY
Your product is guaranteed for a period of 36 months from the original date of purchase and is intended for DIY (Do It Yourself) use only. If a product is defective it will be replaced in accordance with the terms of this warranty. Warranty excludes consumable parts, for example: blade, cord clips, bearings, carbon brushes etc.
WARNING
The following actions will result in the warranty being void.
- If the tool has been operated on a supply voltage other than that specified on the tool.
- If the tool shows signs of damage or defects caused by or resulting from abuse, accidents or alterations.
- Failure to perform maintenance as set out within the instruction manual.
• If the tool is disassembled or tampered with in any way.
• Professional, industrial or high frequency use.
KNOW YOUR PRODUCT
- Motor cover
- Grass catcher flap
- Lifting handle
- Grass catcher
- Lower handle
- Handle securing set
- Safety switch
- Upper handle
- Start/stop lever
- Cord retainer
- Handle knobs
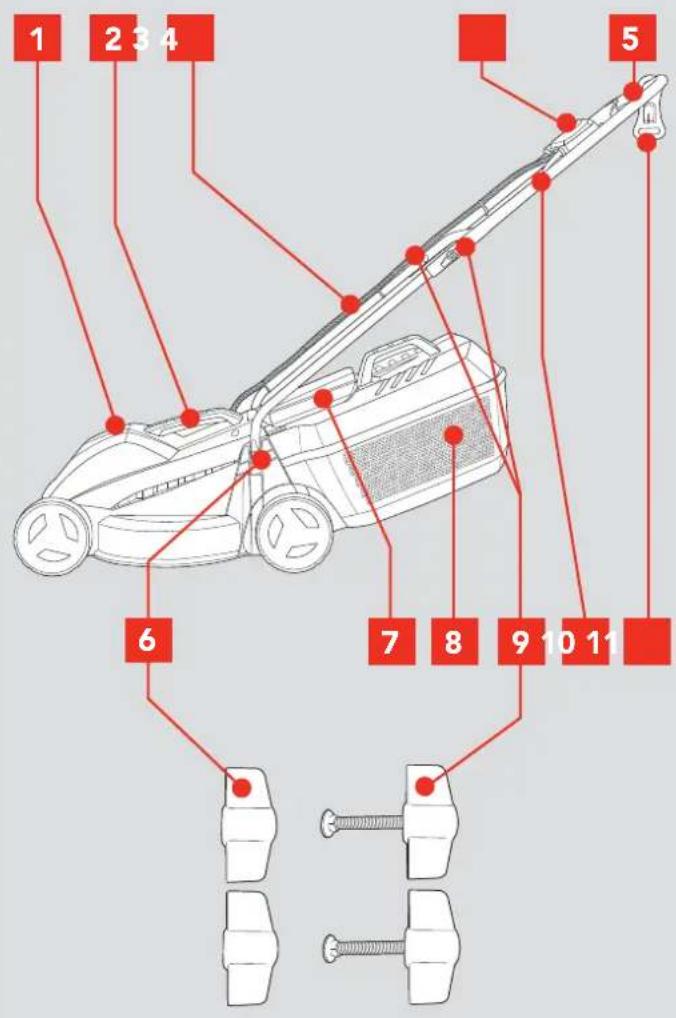
text_image
1 2 3 4 5 6 7 8 9 10 11ONLINE MANUAL
Scan this QR Code with your mobile device to take you to the online manual.

SETUP & PREPARATION
1. ASSEMBLY

WARNING: ENSURE THE TOOL IS DISCONNECTED FROM THE POWER SUPPLY BEFORE ASSEMBLY.
Fitting the Lower Handle to Mower Body
-
Fit the lower handle onto the threaded ends.
-
Fit and secure in place with the lower handle knobs.
natural_image
Technical line drawing of a mechanical component with a coiled spring and tire (no text or symbols)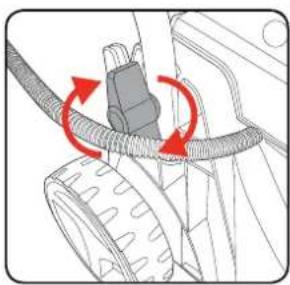
natural_image
Mechanical diagram showing a cable being inserted into a vehicle's wheel (no text or symbols)Fitting the Upper Handle to the Lower Handle
- First fit the cord retainer, slide it over the upper handle end before fixing the upper handle to the lower handles.
natural_image
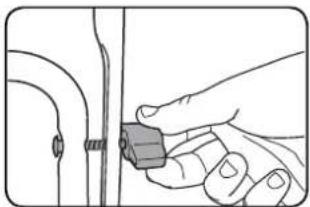
Illustration of a hand holding a pair of scissors (no text or symbols present)- Place the upper handle over the upper ends of the lower handle. From the handle securing set, fit the bolts through the inner side of the lower handle and then through the holes in the upper handle. Secure in place by screwing the handle securing knobs over the protruding ends of the bolts.
natural_image
Illustration of a hand holding a small mechanical component (no text or symbols visible)Securing the Power Cord to the Handles
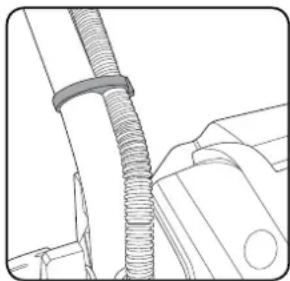
- Secure the power cord from the switch housing to the mower using cable ties (supplied).
natural_image
Technical line drawing of a mechanical component with threaded spring and clamped parts (no text or symbols)Assembling the Grass Catcher
-
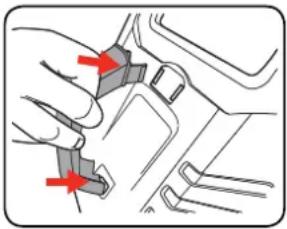
Assemble the grass catcher handle onto the opening on the top half of the grass catcher. The handle will click into position when aligned and fitted correctly.
-
To assemble the grass catcher align the two halves and push them together, one side at a time. Ensure the two halves click together around the entire middle section.
natural_image
Diagram of a car interior showing hand positioning and red arrows indicating movement or force (no text or symbols present)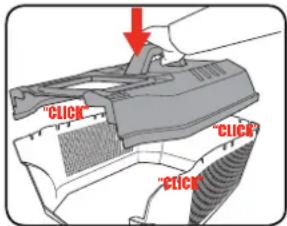
text_image
click click clickFitting and Removing Grass Catcher
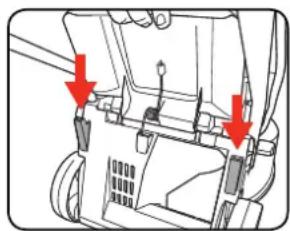
The catcher must be attached to the two raised hooks on the mower.
-
Lift up the catcher flap with one hand and guide the catcher over the two hooks on the mower housing.
-
Lower the grass catcher in place and lower the catcher flap. The catcher flap is held against the gass catcher by a spring
-
To empty the grass catcher, lift the catcher flap with one hand then lift the grass catcher with the other hand up off the two raised housing clips.
natural_image
Mechanical assembly diagram showing red arrows pointing to components (no text or symbols)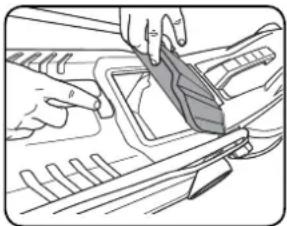
natural_image
Line drawing of hands installing or adjusting a component on a vehicle (no text or symbols visible)WARNING: WHEN ASSEMBLING THE GRASS CATCHER BACK TO THE MOWER AFTER EMPTYING, ALWAYS ENSURE THERE IS NO BUILD UP OF GRASS IN THE GRASS CHUTE. IF NEEDING TO CLEAR THE GRASS, ALWAYS ENSURE THE MOWER IS DISCONNECTED FROM THE POWER SUPPLY PRIOR TO CLEARING. A BUILD UP OF GRASS IN THE GRASS CHUTE MAY PREVENT GRASS FROM MOVING INTO THE GRASS CATCHER EFFECTIVELY.
2. PREPARATION
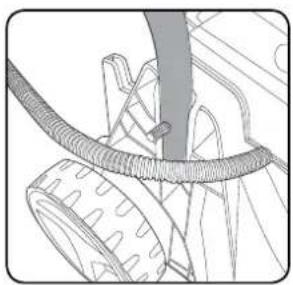
Using the Cord Retainer
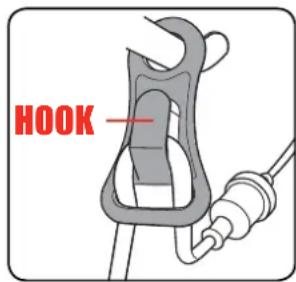
The cord retainer prevents the extension lead (not included) from being disconnected during use. Only use Heavy Duty extension lead suitable for outdoor use with electric garden tools, no longer than 25 meters.
-
Make a loop with the extension lead (socket end of lead) through the loop and secure over the hook.
-
Once fitted, connect the lawn mower power plug into the extension lead socket.
text_image
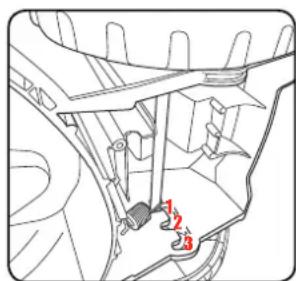
HOOKCutting Height Adjustment
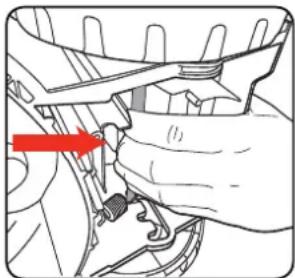
To obtain the desired cutting height, the front and rear axles are repositioned on the underside of the mower housing.
WARNING: DISCONNECT THE MOWER FROM THE POWER SUPPLY AND ENSURE THE BLADE HAS STOPPED COASTING BEFORE ADJUSTING THE HEIGHT.
- Place the mower on its side.
- Pull the wheel axle towards the front of the mower.
- Locate the wheel axle into the desired cutting height adjustment position.
Note: Make sure that front, back, left & right wheels are located in the same cutting height adjustment position.
natural_image
Mechanical assembly diagram showing a hand adjusting a component with a red arrow indicating direction (no text or symbols present)Cutting Height Positions
1 - 30mm (lowest).
2 - 50mm.
3 - 70mm (highest).
text_image
Technical diagram of a vehicle's internal components with numbered parts labeled 1, 2, and 3
CAUTION: TO REDUCE THE RISK OF ELECTRICAL SHOCK, WE RECOMMEND THE USE OF A RESIDUAL CURRENT DEVICE (RATED 30mA OR LESS).
Switching On/Off
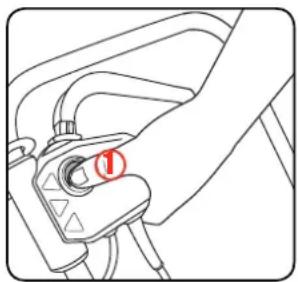
To prevent accidental start up of the motor the mower is fitted with a dual action switch
- Press and hold the lock-off button.
natural_image
Mechanical component diagram showing a lever mechanism with a numbered marker (1) and no visible text or symbols-
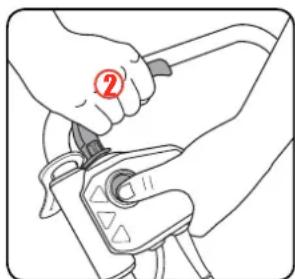
Pull the Start/stop lever towards the handle and hold in position, the motor will now start.
-
Release the lock-off button
-
Release the Start/stop lever to stop the mower.
natural_image
Illustration of hands using a tool to adjust or install a mechanical component (no text or symbols visible)
WARNING! THE BLADE WILL STOP A FEW
SECONDS AFTER THE SWITCH HAS BEEN
RELEASED. BE AWARE OF THE NECESSARY TIME IT TAKES FOR THE BLADE TO STOP. DO NOT ATTEMPT TO STOP THE BLADE.
Overload Protection
The mower has an internal cut off switch which will stop the operation of the motor temporarily if too high in temperature. This cut off switch will suddenly stop the motor from operating should the motor become too hot during the operation of the mower.
First disconnect the mower from the power supply and inspect blade for any obstructions.
A wait of 10 minutes in cooling time, or longer depending on ambient temperature and the operation being performed, before switching On the mower and resuming normal operation.
3. HOW TO MOW
- Always use an approved extension lead suitable for power input of this tool.
- Heavy duty power leads recommended not exceeding 25m.
- While using your lawn mower always wear substantial footwear and long trousers.
- Make sure the lawn is clear of sticks, stones, wire and debris; they could be thrown by the blade.
- Before using the lawn mower and after any impact, check for signs of wear or damage and repair as necessary.
- Replace a worn or damaged blade together with the blade bolt to preserve balance.

WARNING! KEEP
POWER CORD AWAY
FROM BLADES.
text_image
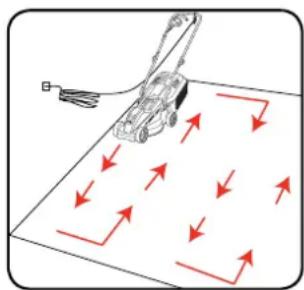
Prohibition sign showing a crane lifting equipment, with red prohibition symbolStart mowing the edge of the lawn nearest to the power point so the lead is laid out on the lawn you have already cut.
natural_image
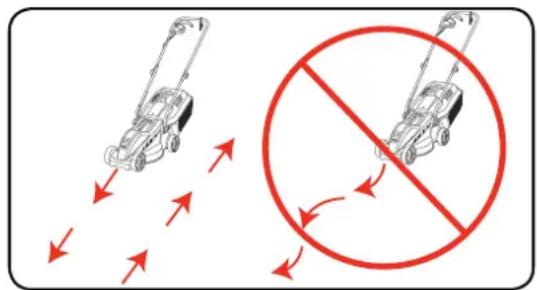
Diagram showing a lawn mower on a tiled floor with red arrows indicating direction (no text or symbols)For optimum grass collection, always mow in a straight line; do not swing the lawn mower from side to side.
text_image
Diagram showing two vehicles with arrows indicating motion, one marked with a red prohibition sign and arrows, the other with a circle.Do Not Overload the Mower
Mowing long thick grass may cause the motor speed to drop; you will hear a change in the motor sound. If the motor speed drops you may overload your lawn mower, which may cause damage. When mowing in long thick grass first cut with the cutting height set in the highest position, this will help reduce the load.
MAINTENANCE
WARNING!: BEFORE CLEANING YOUR ECOMOW ELECTRIC MOWER OR CARRYING OUT ANY MAINTENANCE PROCEDURE, MAKE SURE THAT THE MOTOR IS OFF AND THE TOOL DISCONNECTED FROM THE POWER SUPPLY TO PREVENT ACCIDENTAL STARTING.
Removing the Blade
CAUTION!: DO NOT TOUCH ROTATING BLADES.
CAUTIONI: ALWAYS HANDLE THE BLADE WITH CARE – SHARP EDGES COULD CAUSE SERIOUS INJURY. USE GLOVES.
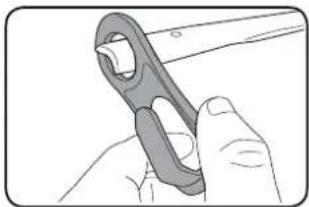
- To remove the blade bolt, hold the blade firmly and with a 13mm sock (not supplied) loosen the blade bolt by turning it anti-clockwise.
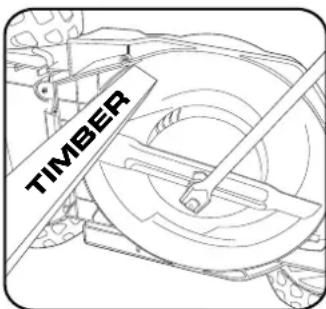
Note: A piece of timber will assist in holding the blade while removing or tightening the blade bolt.
-
Remove the blade bolt and blade.
-
Inspect for damage and clean as necessary.
text_image
TIMBERReplace the metal blade after 50 hours mowing or 2 years whichever is the sooner – regardless of condition. If the blade is cracked or damaged replace it with a new one. Never use a blade bolt if the insulated head is damaged, cracked or missing.
Fitting the Blade
- Fit the blade to the fan with the tilt edges of the blade facing towards the mower, ensuring the blade is located onto the fan location lugs correctly.
- Re-assemble blade bolt through blade and fan.
- Hold the blade firmly and tighten blade bolt with a (not supplied), by turning in a clockwise direction. Do not over tighten.
Ozito Industries will not be responsible for any damage or injuries caused by repair of the tool by an unauthorised person or mishandling or mistreatment of the tool. This tool is designed for Domestic Home Use only. Use in commercial or industrial environments will void the warranty.
- Keep all nuts, bolts and screws tight to be sure the lawn mower is in a safe working condition.
- Check the catcher frequently for wear or deterioration.
- Replace worn or damaged parts for safety.
- Only use the replacement blade, blade bolt, and impeller specified for this product.
- Be careful during adjustments of the lawn mower to prevent entrapment of the fingers between moving blade and fixed parts of the machine.
- Oil the wheel pins.
- When not in use, the mower should be stored in a dry, frost-free location, out of reach of children. If the housing of the mower requires cleaning, do not use solvents but a moist soft cloth and brush only.
- Frequently check the wheel threads are firm and tight.
DESCRIPTION OF SYMBOLS
| V Vo | ts | Hz | Hertz | |
| ~ | Alternating current | W | Watts | |
| /min recip | Revolutions orlocation per minute | No | No load speed | |
| [4204] | Double insulated | Keep extension cordaway from cutting blades. | ||
| [KZW7] | Read instruction manual | Warning | ||
| [6005] | Disconnect the mains plugif the cord is damagedor entangled | Regulator compliance mark | ||
 | Donit use on steep slopes. | Donit use with rear flap open. | ||
 | Switch Off! Remove plug from mains before adjusting, cleaning or ifcable is entangled or damaged. Keep the cable away from the blade. | |||
| [6244] | Beware of severing toes or hands. Do not put hands or feet neara rotating blade. | |||
| [6569] | Keep bystanders away. Do not mow whilst people especially childrenor pets are in the mowing area. | |||
| [3331] | Always keep the lawnmower on the ground when mowing.Tilting or lifting the lawnmower may cause stones to be thrown out. | |||
 | Blades continue to rotate after machine is switched off | |||
CARING FOR THE ENVIRONMENT
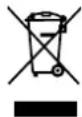
Power tools that are no longer usable should not be disposed of with household waste but in an environmentally friendly way. Please recycle where facilities exist. Check with your local council authority for recycling advice.

Recycling packaging reduces the need for landfill and raw materials. Reuse of recycled material decreases pollution in the environment. Please recycle packaging where facilities exist. Check with your local council authority for recycling advice.
SPARE PARTS
Limited spare parts are available subject to availability. Please contact your local Bunnings Special Orders Desk to order the required spare parts.
For further information, or any parts not listed here, visit www.ozito.com.au or contact Ozito Customer Service:
Australia 1800 069 486
New Zealand 0508 069 486
E-mail: enquiries@ozito.com.au

ELECTRICAL SAFETY

WARNING! When using mains-powered tools, basic safety precautions, including the following, should always be followed to reduce risk of fire, electric shock, personal injury and material damage.
Read the whole manual carefully and make sure you know how to switch the tool off in an emergency, before operating the tool.
Save these instructions and other documents supplied with this tool for future reference.
The electric motor has been designed for 230V and 240V only. Always check that the power supply corresponds to the voltage on the rating plate.
Note: The supply of 230V and 240V on Ozito tools are interchangeable for Australia and New
Zealand.

This tool is double insulated therefore no earth wire is required.
If the supply cord is damaged, it must be replaced by an electrician or a power tool repairer in order to avoid a hazard.
Note: Double insulation does not take the place of normal safety precautions when operating this tool. The insulation system is for added protection against injury resulting from a possible electrical insulation failure within the tool.
-
Before use, examine cord for damage; replace it if there are signs of damage or ageing.
-
Do not use the lawn mower if the electric cables are damaged or worn.
-
Immediately disconnect from the mains electricity supply if the cord is cut, or the insulation is damaged. Do not touch the electric cord until the electricity supply has been disconnected. Do not repair a cut or damaged cord; replace it with a new one.
-
Your extension lead must be unwound, coiled leads can overheat and reduce the efficiency of your mower.
-
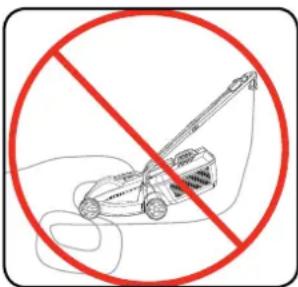
Keep lead away from lawn mower; always work away from the power point mowing up and down never in circles.
-
Do not pull lead around sharp objects.
-
Always switch off at the mains before disconnecting any plug, cord or extension lead.
-
Never carry the product by the cord.
-
Never pull on the cord to disconnect any of the plugs.
-
Use only AC mains supply voltage shown on the product rating label.
-
It is recommended that the appliance should be supplied via a residual current device (RCD) with a tripping current of not more than 30 mA.
-
Use at least a 10 Amp rated 1.0 mm2 extension cord with a maximum of 25 meters and the cord shall be not lighter than:
- If rubber insulated, ordinary tough rubber sheathed flexible cord (code designation 60245 IEC 53);
- If polyvinyl chloride insulated, ordinary polyvinyl chloride sheathed flexible cord (code designation 60227 IEC 53).

GENERAL POWER TOOL SAFETY WARNINGS

WARNING! Read all safety warnings and all instructions. Failure to follow the warnings and instructions may result in electric shock, fire and/or serious injury. Save all warnings and instructions for future reference.
The term "power tool" in the warnings refers to your mains-operated (corded) power tool or
battery-operated (cordless) power tool.
- Work area safety
a. Keep work area clean and well lit. Cluttered or dark areas invite accidents.
b. Do not operate power tools in explosive atmospheres, such as in the presence of flammable liquids, gases or dust. Power tools create sparks which may ignite the dust or fumes.
c. Keep children and bystanders away while operating a power tool. Distractions can cause you to lose control.
- Electrical safety
a. Power tool plugs must match the outlet. Never modify the plug in any way. Do not use any adapter plugs with earthed (grounded) power tools. Unmodified plugs and matching outlets will reduce risk of electric shock.
b. Avoid body contact with earthed or grounded surfaces, such as pipes, radiators, ranges and refrigerators. There is an increased risk of electric shock if your body is earthed or grounded.
c. Do not expose power tools to rain or wet conditions. Water entering a power tool will increase the risk of electric shock.
d. Do not abuse the cord. Never use the cord for carrying, pulling or unplugging the power tool. Keep cord away from heat, oil, sharp edges or moving parts. Damaged or entangled cords increase the risk of electric shock.
e. When operating a power tool outdoors, use an extension cord suitable for outdoor use. Use of a cord suitable for outdoor use reduces the risk of electric shock.
f. If operating a power tool in a damp location is unavoidable, use a residual current device (RCD) protected supply. Use of an RCD reduces the risk of electric shock.
- Personal safety
a. Stay alert, watch what you are doing and use common sense when operating a power tool. Do not use a power tool while you are tired or under the influence of drugs, alcohol or medication. A moment of inattention while operating power tools may result in serious personal injury.
b. Use personal protective equipment. Always wear eye protection. Protective equipment such as dust mask, non-skid safety shoes, hard hat, or hearing protection used for appropriate conditions will reduce personal injuries.
c. Prevent unintentional starting. Ensure the switch is in the off-position before connecting to power source and/or battery pack, picking up or carrying the tool. Carrying power tools with
your finger on the switch or energising power tools that have the switch on invites accidents.
d. Remove any adjusting key or wrench before turning the power tool on. A wrench or a key left attached to a rotating part of the power tool may result in personal injury.
e. Do not overreach. Keep proper footing and balance at all times. This enables better control of the power tool in unexpected situations.
- Dress properly. Do not wear loose clothing or jewellery. Keep your hair, clothing and gloves away from moving parts. Loose clothes, jewellery or long hair can be caught in moving parts.
g. If devices are provided for the connection of dust extraction and collection facilities, ensure these are connected and properly used. Use of dust collection can reduce dust-related hazards.
- Power tool use and care
a. Do not force the power tool. Use the correct power tool for your application. The correct power tool will do the job better and safer at the rate for which it was designed.
b. Do not use the power tool if the switch does not turn it on and off. Any power tool that cannot be controlled with the switch is dangerous and must be repaired.
c. Disconnect the plug from the power source and/or the battery pack from the power tool before making any adjustments, changing accessories, or storing power tools. Such preventive safety measures reduce the risk of starting the power tool accidentally.
d. Store idle power tools out of the reach of children and do not allow persons unfamiliar with the power tool or these instructions to operate the power tool. Power tools are dangerous in the hands of untrained users.
e. Maintain power tools. Check for misalignment or binding of moving parts, breakage of parts and any other condition that may affect the power tool's operation. If damaged, have the power tool repaired before use. Many accidents are caused by poorly maintained power tools.
f. Keep cutting tools sharp and clean. Properly maintained cutting tools with sharp cutting edges are less likely to bind and are easier to control.
g. Use the power tool, accessories and tool bits etc. in accordance with these instructions, taking into account the working conditions and the work to be performed. Use of the power tool for operations different from those intended could result in a hazardous situation.
- Service
a. Have your power tool serviced by a qualified repair person using only identical replacement parts. This will ensure that the safety of the power tool is maintained.
b. If the supply cord is damaged, it must be replaced by the manufacturer, its service agent or similarly qualified persons in order to avoid a hazard.

ADDITIONAL SAFETY INSTRUCTIONS FOR LAWN MOWERS

WARNING! If not used properly this lawn mower can be dangerous!
This lawn mower can cause serious injury to the operator and others, the warnings and safety instructions must be followed to ensure reasonable safety and efficiency in using this own mower. The operator is responsible for following the warning and safety and instructions in its manual and on the lawn mower. Never use the mower unless the catcher or guards provided the manufacturer are in the correct position.
1) Training
- Read the instructions carefully. Be familiar with the controls and the proper use of the appliance.
- Never allow children or people unfamiliar with these instructions to use the appliance. Local regulations may restrict the age of the operator.
• Never mow while people, especially children, or pets are nearby.
- The operator or user is responsible for accidents or hazards occurring to other people or their property.
2) Preparation
• While mowing, always wear substantial footwear and long trousers.
- Do not operate the appliance when barefoot or wearing open sandals.
- Thoroughly inspect the area where the appliance is to be used and remove all stones, sticks, wires, bones, and other foreign objects.
- Before using, always visually inspect to see that the blades, blade bolts and cutter assembly are not worn or damaged. Replace worn or damaged blades and bolts in sets to preserve balance.
• On multi-bladed appliances, take care as rotating one blade can cause other blades to rotate.
3) Operation
• Mow only in daylight or in good artificial light.
- Avoid operating the appliance in wet grass, where feasible.
• Always be sure of your footing on slopes.
- Walk, never run.
- For wheeled rotary mowers, mow across the face of slopes, never up and down.
• Exercise extreme caution when changing direction on slopes.
• Do not mow excessively steep slopes.
• Use extreme caution when reversing or pulling the appliance towards you.
- Stop the blade(s) if the appliance has to be tilted for transportation when crossing surfaces other than grass, and when transporting the appliance to and from the area to be mowed.
- Never operate the appliance with defective guards or shields, or without safety devices, for example deflectors and/or grass catchers, in place.
- Switch on the motor according to instructions and with feet well away from the blade(s).
- Do not tilt the appliance when switching on the motor, except if the appliance has to be tilted for starting. In this case, do not tilt it more than absolutely necessary and lift only the part which is away from the operator. Always ensure that both hands are in the operating position before returning the appliance to the ground.
- Do not put hands or feet near or under rotating parts. For rotary mowers, keep clear of the discharge opening at all times.
- Never pick up or carry an appliance while the motor is running.
• Pull the plug from the socket:
- whenever you leave the machine;
- before clearing a blockage;
- before checking, cleaning or working on the appliance;
- after striking a foreign object. Inspect the appliance for damage and make repairs as necessary;
- if the appliance starts to vibrate abnormally (check immediately).
4) Maintenance and storage
- Keep all nuts, bolts, and screws tight to be sure the appliance is in safe working condition.
- Check the grass catcher frequently for wear or deterioration.
- Replace worn or damaged parts for safety.
- For cylinder mowers, be careful during adjustment of the appliance to prevent entrapment of the fingers between moving blades and fixed parts of the appliance.