5022CE3.313eEDW - Cooker Hanseatic - Free user manual and instructions
Find the device manual for free 5022CE3.313eEDW Hanseatic in PDF.


| Product Type | Electric cooker with glass ceramic hob and multifunctional oven |
| Brand | Hanseatic |
| Model | 5022CE3.313eEDW |
| Color | White |
| Energy Efficiency Class (oven) | A |
| Oven Energy Consumption (conventional) | 0.99 kWh/cycle |
| Oven Energy Consumption (fan-forced) | 0.78 kWh/cycle |
| Oven Volume | 65 L |
| Number of Oven Cavities | 1 |
| Heating Methods (oven) | Top/bottom heat, hot air, convection, grill, intensive grill, defrost |
| Hob Type | Glass ceramic with radiant cooking zones |
| Number of Cooking Zones | 4 |
| Cooking Zone Sizes (front left / back left / front right / back right) | ∅12.0/18.5 cm (double) / ∅15.0 cm / ∅15.0 cm / 15.0×25.0 cm (roasting pan) |
| Hob Energy Consumption | 184.6 Wh per kg |
| Rated Voltage | 230 V ~ / 400 V 3N ~ |
| Frequency | 50 Hz |
| Total Rated Power | 9700 W |
| Oven Rated Power | 3600 W |
| Hob Rated Power | 6100 W |
| Dimensions (H × W × D) | 850 mm × 500 mm × 600 mm |
| Weight | 39.0 kg |
| Tilt Protection Included | Yes |
| Oven Light Type | 230-240 V, 25 W, E14, T 300 °C |
| Oven Maximum Temperature | 275 °C |
| Oven Door Glass Panes | 3 |
Frequently Asked Questions - 5022CE3.313eEDW Hanseatic
User questions about 5022CE3.313eEDW Hanseatic
0 question about this device. Answer the ones you know or ask your own.
Ask a new question about this device
Download the instructions for your Cooker in PDF format for free! Find your manual 5022CE3.313eEDW - Hanseatic and take your electronic device back in hand. On this page are published all the documents necessary for the use of your device. 5022CE3.313eEDW by Hanseatic.
USER MANUAL 5022CE3.313eEDW Hanseatic
natural_image
Line drawing of an open oven with multiple tiered dish units and control knobs (no text or symbols)Gebrauchsanleitung
Standherd mit
natural_image
Three identical cooking pots with handles placed horizontally on a surface, no text or symbols present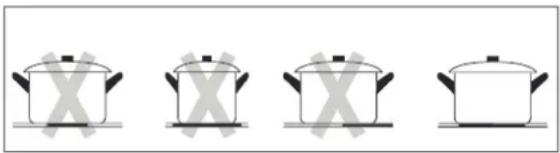
natural_image
Four identical cooking pots with handles, each marked with a 'X' symbol (no text or labels)natural_image
Simple line drawing of a cooking pot on a base with labeled dimensions d1 and d2 (no text or symbols beyond labels)natural_image
Line drawing of a hand using a power tool to cut circular patterns on a flat surface (no text or symbols)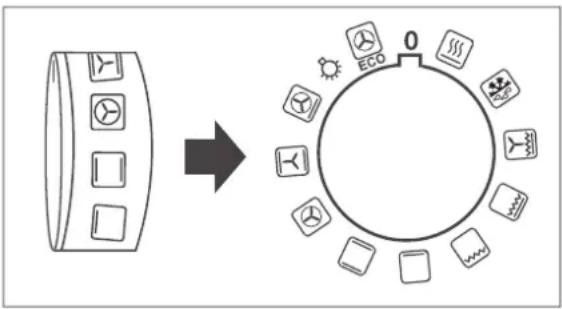
flowchart
graph LR
    A["Device with circular components"] --> B((Circular Layout with icons for eco, water, etc.))
    style A fill:#f9f,stroke:#333
    style B fill:#ccf,stroke:#333
natural_image
Technical line drawing of a microwave oven with cooling fins and ventilation slots (no text or symbols)natural_image
Line drawing of a hand holding a tool interacting with a device panel (no text or symbols)natural_image
Diagram showing a device with a rectangular panel and a separate rectangular tray, no text or symbols present.natural_image
Abstract geometric diagram with intersecting lines and shaded regions (no text or symbols)L1 an ①, L2 an ②, L3 an ③
N an 4 5 (gebrückt)
natural_image
Technical line drawing of a computer case with ventilation slots and mounting brackets (no text or symbols)natural_image
Line drawing of an open oven with three-tiered dish units and control knobs (no text or symbols)User manual
Cooker with glass ceramic hob and multifunctional oven
Table of contents
Delivery ...... EN-3
Package contents ..... EN-3
Check the delivery ..... EN-3
Packaging tips ..... EN-3
Controls and appliance parts ..... EN-4
Safety EN-5
Intended use..... EN-5
Definition of terms/symbols ..... EN-5
Safety notices ..... EN-5
The hob EN-9
Glass ceramic hob ..... EN-9
The right cookware ..... EN-9
Cooking zones + temperature controller.... EN-10
Power indicator light .....EN-11
Cooking and energy-saving tips . . .EN-11
Cleaning the hob ..... EN-12
The oven.... EN-13
Preparation.... EN-13
The right oven cookware ..... EN-13
Proper handling of the oven ..... EN-13
Baking trays and dripping pan . . . . EN-13
Function switch EN-14
Temperature controller ..... EN-14
Oven light EN-15
Extraction hood and cross-flow fan EN-15
Oven lighting EN-15
Switching off the oven ..... EN-16
Special defrosting information . . . . EN-16
Special preparation information
for yeast dough EN-16
Cleaning the oven EN-16
Basic cleaning EN-17
Cleaning the housing surface .... EN-17
Cleaning the cooking compartment EN-17
Steam cleaning EN-17
Cleaning the baking tray guides . . EN-18
Cleaning the oven door ..... EN-18
Cleaning the glass panes ..... EN-19
Changing oven lighting ..... EN-20
Connection to the power supply –
notes for the installer ..... EN-22
Connection conditions ..... EN-22
Connecting to the mains ..... EN-22
Positioning.... EN-23
Requirements......EN-23
Setting up the cooker ..... EN-23
Mounting the tilt protection ..... EN-23
Removing transport locks ..... EN-24
Troubleshooting table ..... EN-25
Our Service Centre ..... EN-26
Advice, order and complaint ..... EN-26
Repairs and spare parts ..... EN-26
Environmental protection ..... EN-27
Disposing of old electrical devices in an environmentally friendly manner.... EN-27
Packaging......EN-27
Tips for saving energy ..... EN-27
'Test report' table ..... EN-28
Product fiche concerning
Regulation (EU) No 65/2014 ..... EN-29
Product information concerning
Regulation (EU) No 66/2014 ..... EN-30
Technical specifications ..... EN-32
Please read through the safety instructions and user manual carefully before using the appliance.
This is the only way you can use all the functions safely and reliably. Be absolutely sure to also observe the national regulations in your country, which are also valid in
addition to the regulations specified in this user manual.
Keep all safety notices and instructions for future reference. Pass all safety notices and instructions on to the subsequent user of the product.
Delivery
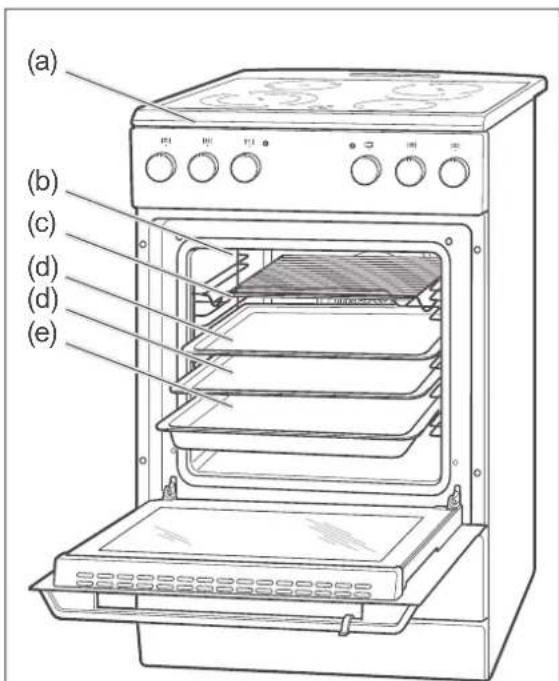
Electric cooker with
(a) 1× glass ceramic hob
(b) 1× oven
(c) 1× grilling rack
(d) 2× baking trays
(e) 1× dripping pan
1× tilt protection, see page EN-23
1× user manual
1× "Baking, roasting and cooking" brochure
Check the delivery
- Transport the appliance to a suitable location and unpack it.
- Check that the delivery is complete.
- Check whether the appliance was damaged during transit.
- If the delivery is incomplete or the appliance has been damaged during transport, please contact our Service team, see page EN-26.
WARNING!
Risk of electric shock! Never use a damaged appliance.
Packaging tips

If you have sufficient space, we recommend keeping the packaging, at least during the warranty period. If
the appliance needs to be sent out for repairs, only the original packaging will provide sufficient protection.
If you would like to dispose of the packaging, please dispose of it in an environmentally friendly way.
Controls and appliance parts
flowchart
graph TD
    A["Top Left"] --> B["Top Right"]
    C["Top Left"] --> D["Top Right"]
    E["Top Right"] --> F["Top Left"]
    G["Bottom Center"] --> H["Bottom Right"]
    I["Bottom Left"] --> J["Bottom Right"]
    K["Bottom Right"] --> L["Bottom Left"]
    M["Bottom Left"] --> N["Bottom Right"]
    O["Bottom Right"] --> P["Bottom Left"]
    Q["Bottom Left"] --> R["Bottom Right"]
    S["Bottom Right"] --> T["Bottom Left"]
    U["Bottom Left"] --> V["Bottom Right"]
    W["Bottom Right"] --> X["Bottom Left"]
    Y["Bottom Left"] --> Z["Bottom Right"]
    AA["Bottom Right"] --> AB["Bottom Left"]
    AC["Bottom Left"] --> AD["Bottom Right"]
    AE["Bottom Right"] --> AF["Bottom Left"]
    AG["Bottom Left"] --> AH["Bottom Right"]
    AI["Bottom Right"] --> AJ["Bottom Left"]
    AK["Bottom Right"] --> AL["Bottom Right"]
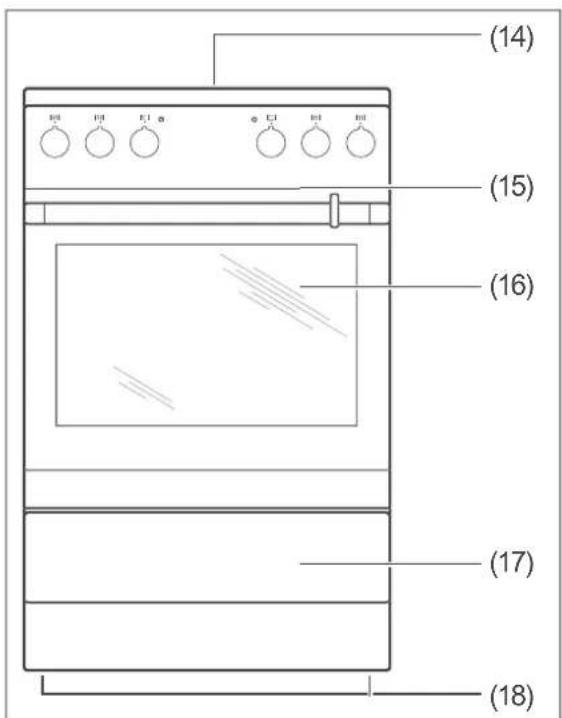
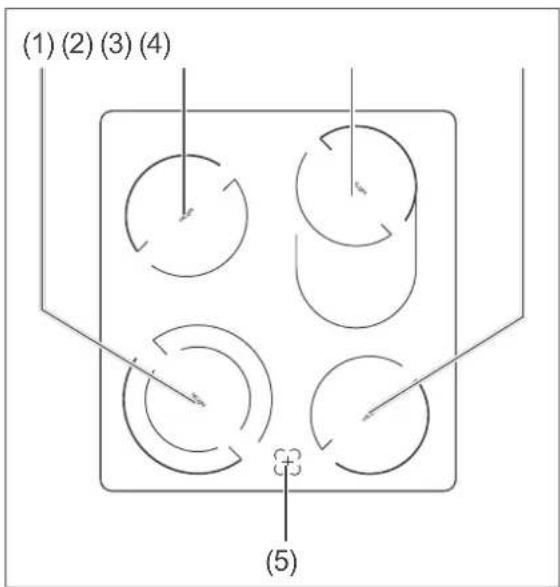
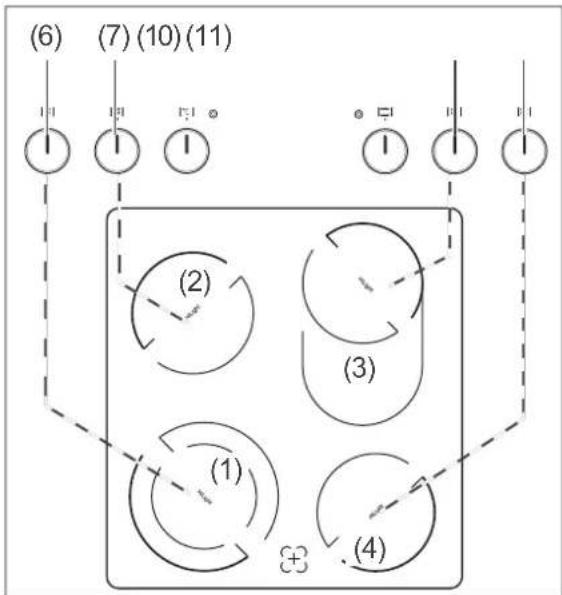
(1) Front left cooking zone, ∅ 18.5 / 12.0 cm
(2) Back left cooking zone, ∅ 15.0 cm
(3) Back right cooking zone, 15.0 × 25.0 cm
(4) Front right cooking zone, ∅ 15.0 cm
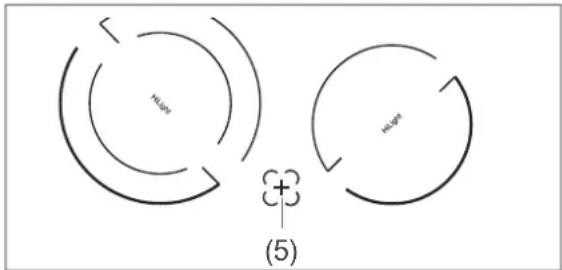
(5) Residual heat display
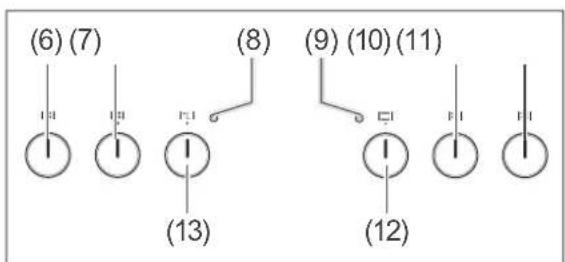
(6) | Temperature controller for cooking zone (1)
(7) | Temperature controller for cooking g zone (2)
(8) Red oven light
(9) Yellow power indicator light
(10) | ◦ ◦ | Temperature controller for cookin g zone (3)
(11) | ◦ ◦ | Temperature controller for cookin g zone (4)
(12) ☐ Function switch for oven heating type
(14) Extraction hood
(15) Cross-flow fan (stainless steel model only 5022CE3.313eEDJXv)
(16) Oven door with viewing window and door handle
(17) Cookware trolleys
(18) Screw feet (not seen here)
(19) Baking tray guides (page EN-18)
(13) |°C | Temperature controller for the over
Safety
Intended use
This cooker is designed for cooking, frying, baking, grilling and keeping food warm.
The oven should not be used to defrost raw meat, poultry or fish.
The appliance is designed for use in private households and is not designed for commercial use or multiple use (e.g.: use by several families in an apartment building).
Use the appliance exclusively as described in this user manual. Any other use will be deemed to be improper and may lead to damage to property or even injury to persons. The manufacturer accepts no liability for damage caused by improper use.
The oven is not suitable for heating a room. The oven light is exclusively used for lighting the cooking compartment and not for lighting a room.
The oven door must not be used as a support prop, seat or step.
Definition of terms/symbols
The following symbols can be found in this user manual.

WARNING
This symbol indicates a hazard with a medium level of risk which, if not avoided, could result in death or serious injury.

CAUTION
This symbol indicates a hazard with a low level of risk which, if not avoided, could result in minor or moderate injury.

NOTICE
This symbol warns against possible damage to property.

This symbol refers to useful additional information.
Safety notices
In this chapter you will find general safety instructions which you must always observe for your own protection and that of third parties. Please also observe the warning notices in the individual chapters on operation, set-up, installation, etc.

WARNING
Risks in handling household electrical appliances
Risk of electric shock!
Touching live parts may result in severe injury or death.
■ Only use the appliance indoors. Do not use in wet rooms or in the rain.
■ If the surface is cracked, switch off the appliance to avoid the possibility of electric shock.
■ Do not operate or continue to operate the appliance if
- it shows visible signs of damage, for example, the connection cable is defective;
- starts smoking or there is a burning smell;
– it makes unusual sounds.
In such cases, remove the mains plug and contact our Service department (see page EN-26).
■ Mains cord / mains plug
– Lay the mains cord so that it does not pose a tripping hazard.
- Do not kink or pinch the mains cord or lay it over sharp edges.
- If the mains cord of the appliance is damaged, it must be replaced by the manufacturer, through customer service or by a qualified specialist.
- Do not extend or modify the mains connection.
- Keep the mains plug and cord away from naked flames and hot surfaces.
■ Connection to the mains supply may only be made by an authorised electrician approved by the local energy supply com-
pany (see „Our Service Centre“ on page EN-26). Only then will you benefit from our warranty and a sufficient level of safety. Unauthorised persons may not connect the appliance to the mains supply. You can endanger your life and that of subsequent users! This also applies to disconnection from the power supply and dismantling the old appliance.
■ Since all poles of the appliance cannot be disconnected from the mains via an accessible disconnecting device, an all-pole disconnecting device in accordance with overvoltage category III must be connected within the house installation with at least 3 mm contact clearance; this includes fuses, miniature circuit breakers and protective devices.
■ Before connecting the device, switch off the relevant electric circuit(s) (switch off circuit breakers or unscrew fuses).
■ Never open the housing.
- Never try to repair a defective or suspected defective appliance yourself. You can put your own and future users' lives in danger. Only authorised specialists are allowed to carry out this repair work.
■ The appliance is not intended to be operated by means of an external timer or separate remote-control system.
■ Do not put any objects in or through the housing openings and also make sure that children cannot insert any objects through them.
■ oven illumination light:
- Ensure that the appliance is switched off before replacing the lamp to avoid the possibility of electric shock.
- To replace the oven lighting, first switch off the oven then unscrew and/or switch off the fuses.
- Replace the light bulb only when the oven is no longer hot.
Risks to children
Risk of suffocation!
■ Do not allow children to play with the packaging fi lm. They may get caught up in this or suff ocate.
■ Prevent children from pulling small parts from the device or taking them out of the accessory bag and putting them in their mouths.
Risks for certain groups of people
Danger to children and persons with reduced physical, sensory or mental abilities (e.g. people with disabilities to some extent, older persons with impaired physical and mental abilities) or who lack experience and knowledge (e.g. older children).
■ This appliance can be used by children aged eight years and up, and by persons with reduced physical, sensory or mental abilities, or who lack experience and/or knowledge, if they are supervised or have been instructed in the safe use and understand the risks associated with its use.
■ Children should not be allowed to play with the appliance nor should they have access to the appliance when left unattended.
■ Cleaning and user maintenance must not be carried out by children unless they are supervised.
- Keep children away from the door glass! The glass door can become very hot during operation and pose a risk of burning!
CAUTION
Risks when handling the appliance
Risk of burns!
The appliance and its accessible parts become hot during use.
■ Care should be taken to avoid touching heating elements inside the oven.
■ Children less than 8 years of age shall be kept away unless continuously supervised.
■ Hob
– The solid plates get very hot during operation and will remain hot after they are switched off.
- Hot steam can flow from the exhaust hood (ventilation) when the oven is in use.
■ Oven
- Never pour water directly into the hot oven. The steam can cause scalding and damage the enamel.
- Allow hot water from the oven to cool before pouring it out.
– Never leave the oven unattended while grilling. Keep children away!
- Allow the solid plates and oven to cool completely before cleaning.
Fire hazard!
■ Hob
Unattended cooking on a hob with fat and oil can be dangerous and may result in fire.
- NEVER try to extinguish a fire with water, but switch off the appliance and then cover flame e.g. with a lid or a fire blanket.
– If you are preparing foods using alcohol, do not leave the cooker unattended! Food may ignite of its own accord.
- Do not store items on the cooking surfaces.
– The cooking process has to be supervised. A short term cooking process has to be supervised continuously.
– Use only hob guards designed by the manufacturer of the cooking appliance or indicated by the manufacturer of the appliance in the instructions for use as suitable or hob guards incorporated in the appliance. The use of inappropriate guards can cause accidents.
■ Oven
- Only ever operate the oven with the oven door closed.
- Do not cover cakes or roasts being cooked in the oven with baking parch-
ment. Do not allow food, baking parchment and aluminium foil to come into contact with the heating elements.
- Do not place food to be grilled too far back near the end of the heating element. It is particularly hot there. Fatty foods can catch fire.
- Do not store temperature-sensitive, combustible or flammable objects in the oven! If the appliance is switched on unintentionally they may deform or ignite.
- Do not use the oven for storage purposes.
– In case of an oven fire: Do not open the oven door!
■ Once the fire has been extinguished, have the appliance checked by our service team (see page EN-26).
Health hazard!
■ Do not defrost meat, poultry and fish in the oven. Take the frozen food out of the freezer ahead of time, cover and let it defrost in the refrigerator. The fluid from the frozen food must be able to properly drain, otherwise harmful microorganisms can form.
Acrylamide may be carcinogenic. Acrylamide is produced when starch is exposed to excessive heat, e.g. in potatoes (fries, chips), biscuits, toast, bread etc.
- Keep cooking times as short as possible.
■ Only brown the food slightly, do not allow it to brown too much.
- Cut larger-sized fries and then bake at maximum of 180°C.
■ Brushing baked goods with egg whites or egg yolks helps to reduce the formation of acrylamide.
Risk of tipping and injury!
If the oven door is loaded with a heavy weight, the appliance can tilt forwards.
There is a risk of injury from falling objects.
■ The oven door must not be used as a support prop, seat or step.
■ The supplied bracket must be attached to the wall before the oven is used to prevent the appliance tipping over.

NOTICE
Risk of damage!
■ Use the hob as a work surface or to place objects on only once it has completely cooled off. Materials which are sensitive to heat such as plastic dishes could become damaged if this is the case.
■ Do not use any aluminium foil or plastic containers when cooking on the hob as they can melt.
- Do not place baking trays or aluminium foil directly on the bottom of the cooking compartment. It may cause heat to build up inside and damage the oven's enamel. If you wish to place dishes directly on the bottom of the cooking compartment, the oven temperature must not exceed 50°C. Be careful when handling cookware – the enamel can be easily scratched.
■ Turn the temperature controller |^| clockwise to turn the oven on and counter-clockwise to turn it off. Never force it past the fi nal position.
- Cleaning: Do not use any harsh, abrasive cleaners or sharp metal scrapers to clean the oven door glass, since they can scratch the surface, which may result in shattering of the glass.
- Do not use steel wool, oven sprays, steam cleaners or high-pressure cleaners! They can damage the surface and destroy the glass.
High-pressure cleaners can cause a short circuit.
■ Do not clean baking tray guides and telescopic rails in the dishwasher.
■ The oven door is heavy and has a glass front. Do not allow the door to fall open when taking it off its hinges!
■ If a trolley is used to move the appliance, the appliance must be lifted as shown on the packaging. - Do not use the door handle to lift the oven! The handle is not designed to carry the whole weight of the appliance.
■ When preserving, place only so many jars in the dripping pan at the same time that they do not touch. The jars can burst.
The hob
Glass ceramic hob
Unlike cast-iron hobs, your cooker has a flat hob made from glass ceramic with clearly visible cooking zones. So that the glass ceramic does not become damaged and lasts for a long time, you need to care for it and maintain it and use suitable cookware.

WARNING
Risk of electric shock!
Touching live parts may result in severe injury or death.
- Do not continue to cook if you find cracks in the glass ceramic. Water that runs through cracks inside the device may be live! If there are cracks in the glass ceramic, disconnect the glass ceramic hob from the mains supply (switch off circuit breaker(s)/unscrew fuse[s]) and then Contact our Service Centre, see page EN-26.

NOTICE
Risk of damage!
Improper handling of the appliance may result in damage.
■ Do not push heavy pans across the appliance; The glass ceramic may become scratched.
■ Wipe the hob and the base of the pots prior to use to wipe away any dirt which may cause scratches.
■ Use the hob as a work surface or to place objects on only once it has completely cooled off. Materials which are sensitive to heat such as plastic dishes could become damaged if this is the case.
The right cookware

NOTICE
Risk of damage!
Glass is a poor heat conductor. Because of this, thermal stress and breakages may occur when using glass cookware on the hob.
■ If possible, only use metal cookware on the cooking zone.
natural_image
Three identical cooking pots on a stand, no text or symbols present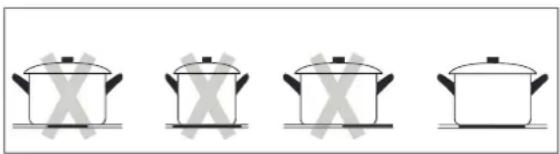
natural_image
Four identical cooking pots arranged horizontally, each with a 'X' mark on its side (no text or symbols)The best thing to use is cookware for electric hobs
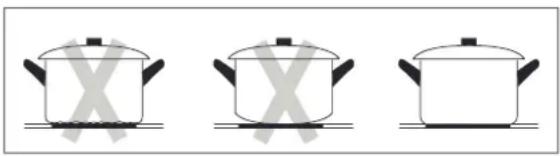
– with a completely even base, or if necessary with very little curvature towards the inside (base expands when heated!). This allows heat to be transferred better and more quickly.
– with a sufficiently thick base, for example enamelled steel pans with 2-3 mm and stainless steel pans with 4-6 mm, which can be identified with the label 'Base thickness in line with DIN 44904'.
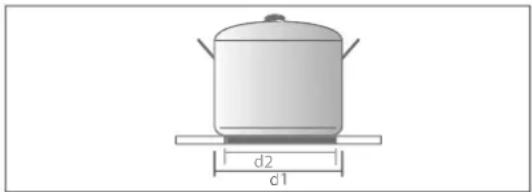
– of a size that corresponds to the size of the cooking zones.
natural_image
Simple line drawing of a cooking pot on a base with labeled dimensions d1 and d2 (no text or symbols beyond labels)The d1 diameter is always provided as a pan and pot size. d2 base diameter is always around 2 cm smaller. Pots that are too big can cause paintwork damage.
Energy and time-saving pressure
– cookers are also well-suited. The relatively high purchase costs are quickly saved again.
- Steel pots and pans as well as coated and uncoated aluminium cookware with a thick base. However, coated cookware must not be overheated or scratched.
You should not use:
- Indented or battered pans.
– Pans with a rough base.
– Pans with a curved base.
– Coated cookware that is scratched inside.
Cooking zones + temperature controller
flowchart
graph TD
    A["Component (1)"] --> B["Component (2)"]
    B --> C["Component (3)"]
    C --> D["Component (4)"]
    D --> E["Component (7) (10) (11)"]
    style A fill:#f9f,stroke:#333
    style E fill:#f9f,stroke:#333
    style B fill:#ccf,stroke:#333
    style C fill:#ccf,stroke:#333
    style D fill:#ccf,stroke:#333
    style F fill:#fff,stroke:#333
    style G fill:#fff,stroke:#333
    style H fill:#fff,stroke:#333
    style I fill:#fff,stroke:#333
    style J fill:#fff,stroke:#333
    style K fill:#fff,stroke:#333
    style L fill:#fff,stroke:#333
    style M fill:#fff,stroke:#333
    style N fill:#fff,stroke:#333
    style O fill:#fff,stroke:#333
    style P fill:#fff,stroke:#333
    style Q fill:#fff,stroke:#333
    style R fill:#fff,stroke:#333
    style S fill:#fff,stroke:#333
    style T fill:#fff,stroke:#333
    style U fill:#fff,stroke:#333
    style V fill:#fff,stroke:#333
    style W fill:#fff,stroke:#333
    style X fill:#fff,stroke:#333
    style Y fill:#fff,stroke:#333
    style Z fill:#fff,stroke:#333
| Cooking zone Controller | |
| (1) Double circle cooking zone | (6) | ◯ ◯ | |
| (2) Normal cooking zones | (7) | ◯ ◯ | |
| (3) Roasting pan cooking zone | (10) | ◯ ◯ | |
| (4) Normal cooking zones | (11) | ◯ ◯ | |
The hob has four cooking zones. Each cooking zone has its own temperature controller.
- Turn the temperature controller to the desired level of heat as needed:
from gentle simmering to rapid bubbling. The heat settings (0 - 3) can be seen on the temperature controller. - Turn the temperature controller to level "0" to switch off.
Using double circle and roasting pan cooking zones
NOTICE
Risk of damage!
Turn the temperature controllers for the double circle and roasting pan cooking zones clockwise to turn them on and counter-clockwise to turn them off. Never turn past the double zone symbol "☐" by force.
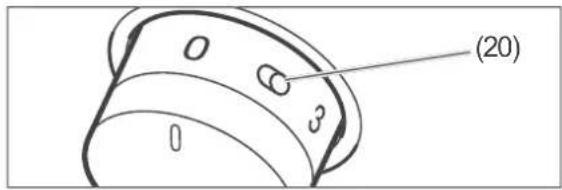
To extend the (1) or (3) cooking zone,
- turn the temperature controller briefly on the double-zone symbol (20)“○” and then release it.
- set the power as usual.
To reduce the size of the cooking zone again,
- turn the temperature controller anti-clockwise to "0" and the turn the temperature controller clockwise to the desired power.
Power indicator light
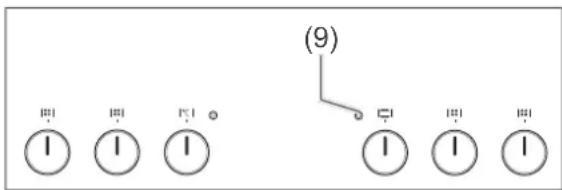
The yellow power indicator light (9) is illuminated as soon as at least one of the cooking zones or the oven is switched on. It will switch off again when all of the cooking zones and the oven are switched off.
Residual heat display
chemical
Diagram of electron spin states in a semiconductor device, showing H2O3 and H2O4 spin orientations with a positive charge symbolThe residual heat display (5) will remain illuminated for as long as a cooking zone is still warm. It warns you of any possible burning and lets you know that you can still use residual heat to cook.

CAUTION!
Risk of burns!
If a power failure occurs, the residual heat indicator will go out and may not indicate the presence of residual heat!
■ Do not touch a hot cooking zone after a power failure.
Cooking and energy-saving tips
| Settings1) | Application and Examples |
| 1 | Gentle boiling / keeping warm, for soaking rice |
| 2-3 | Boiling most dishes such as soups and vegetables |
| 4-5 | Gentle roasting / intense further cooking for breaded items |
| 6-7 | Normal roasting for roast potatoes |
| 8 Intense frying for quick stir-frying | |
| 9 | Searing and parboiling, for potatoes, braised meat |
^1) For smaller quantities 12 level lower, for larger quantities 12 level higher.
– To sear and parboil food, always select the highest setting.
– Once the pot boils and steam forms or the steak is brown on both sides, switch to a lower level; for larger pots and pans use the setting '2', otherwise setting '1' is sufficient.
- Roasts weighing more than 1 kilogram are best cooked in the oven.
– Use the right dishes and a little water/oil to cook; this helps to preserve the vitamins.
- Use the residual heat of the cooking zones. The heat is sufficient enough for 5 to 10 minutes, e.g. for soaking rice.
Cleaning the hob
CAUTION!
Risk of burns!
Improper handling may lead to burns.
■ Allow the cooking zones to cool completely before cleaning. Exception: Immediately remove sugar or starchy food particles, synthetic materials, or aluminium foil (for further information see below).
NOTICE
For cleaning purposes, do not use any harsh cleaning agents or scouring powders, steel wool, oven sprays, steam cleaners or high-pressure cleaners! They can damage the surface. High-pressure cleaners can cause a short circuit.
- Clean and maintain the hob regularly with a special care product containing a special impregnating oil for glass ceramic hobs. Such products can be found in specialist shops.
Slight soiling which is not burnt on
• After the appliance has cooled, use a damp cloth with no cleaning agent to wipe away dirt. Then use a soft cloth to dry the surfaces to prevent lime stains.
- You can easily remove light stains having a pearlescent colour (aluminium residues, such as from aluminium foil) using a commercially available detergent that is specifically available for such cleaning.
• Vinegar is good for removing lime stains.
Hard, baked-on dirt
natural_image
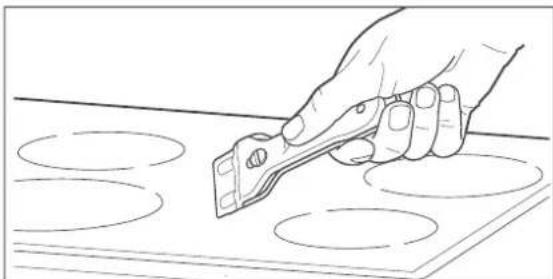
Line drawing of a hand using a power tool to cut circular patterns on a flat surface (no text or symbols)- Stubborn dirt is best removed after cooling with a scraper (not included in package contents).
- You will also find special cleaning cleaners in specialist shops.
Finally, wipe the surface with a damp cloth.
- Treat the hob with a special care product after cleaning.
Removing sugar or starchy food particles, synthetic materials, or aluminium foil
NOTICE
Immediately remove sugar or starchy food particles and residues of plastics or aluminium foil. Otherwise, these may cause permanent and irreparable damage to the hob.
- Put protection on your hands before cleaning, for example, oven mitts to protect against burns. Then remove the dirt with a scraper (not included in package contents).
- Once the hob has cooled off, you can remove residues using a specially designed cleaning product which is available from specialist shops.
- Treat the hob with a special care product after cleaning.
The oven
Preparation
- Remove any polystyrene, cardboard and plastic safety parts from the oven and baking trays.
- Remove all protective films.
- Thoroughly clean the oven before first use, see page EN-17.
The right oven cookware
-
Pots with heat-resistant handles can be recognised by the label indicating 'heat resistant up to 280^ '.
– Fire-proof dishes made of glass, porcelain, ceramic and clay or cast iron.
– In particular, ovens with top and bottom heat require dishes and trays with good heat transfer, preferably metals which have been painted black, as these allow cakes to brown nicely.
– Good results can also be achieved with coated or non-coated aluminium trays. -
Never extinguish burning oil or fat with water! To extinguish the fi re, use a suitable fi re extinguisher with the designation ‘F’ or a fi re blanket.
■ Once the fire has been extinguished, have the appliance checked by our Service team, see page EN-26.
NOTICE
Pent-up heat can damage the oven's enamel.
■ Do not place baking trays or aluminium foil directly on the bottom of the cooking compartment.
- If you wish to place dishes directly on the bottom of the cooking compartment, the oven temperature must not exceed 50°C. Be careful when handling cookware – the enamel can be easily scratched.
Proper handling of the oven
CAUTION!
Fire hazard!
■ Only ever operate the oven with the oven door closed.
■ If the cross-flow fan (stainless steel model only) is broken, switch off the oven and do not use it. Open the oven door and call our Service Centre; see page EN-26.
■ In case of an oven fire:
- Switch off the circuit breakers/unscrew fuses
- Do not open the oven door until the fire is extinguished
Baking trays and dripping pan
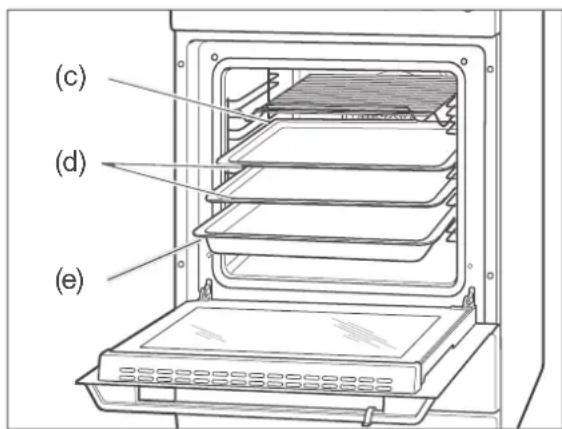
The supplied baking trays (d) and the dripping pan (e) have an angled edge. Please ensure that this edge is facing forward on being placed in the oven. The grilling rack (c) must be inserted as shown.
Function switch
flowchart
graph LR
    A["Device with icons"] --> B((Circular Layout))
    style A fill:#f9f,stroke:#333
    style B fill:#ccf,stroke:#333
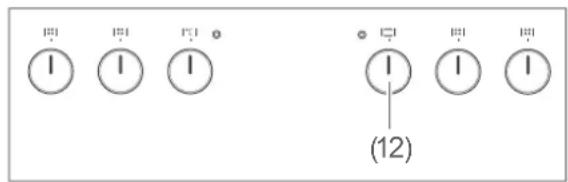
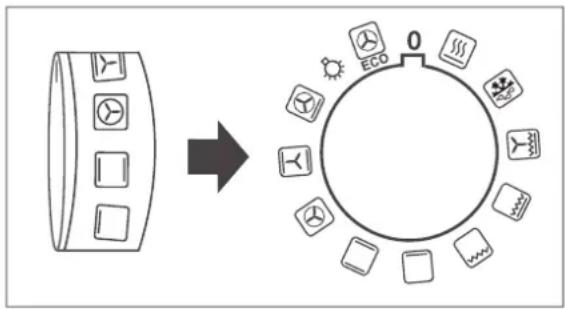
Use the oven dial to switch on the oven and select the heating method. The oven light will turn on.

Off
Optimised heating, energy-saving cooking. The oven lighting remains switched off.

Rapid heating to preheat the oven. Switches on top and bottom heat, hot air and grill.

Oven lighting

Top and bottom heat

Convection with top and bottom heat

Hot air (with ring element)

Top and bottom heat

Bottom heat

Infrared gril

Intensive grill (infra-red grill with top heat)

Intensive grill with convection

Defrosting

Detailed information and tips on each of the heating methods can be found in the enclosed brochure “Baking, roasting and cooking”.
Temperature controller

NOTICE
Risk of damage!
■ Do not force the temperature controller past the final position.

CAUTION!
Risk of burns!
Elements, sides, baking trays, etc. get very hot during operation.
■ Accessible parts may become hot during use. Keep small children away.
■ Avoid direct contact.
■ Only touch the oven door by the handle.
■ Hot steam can flow from the extraction hood when the oven is in use. Take care when opening the oven door!

AUTION!
Fire hazard!
■ Never leave the oven unattended while grilling!
■ Fatty foods can catch fi re.
■ Do not cover cakes or roasts with baking paper during cooking.
■ Do not allow food, baking parchment and aluminium foil to come into contact with the heating elements.
■ Do not store temperature-sensitive, combustible or fl ammable objects in the oven.
■ Do not leave the cooker unattended while cooking food in oil and grease or with alcohol. Food may ignite of its own accord.
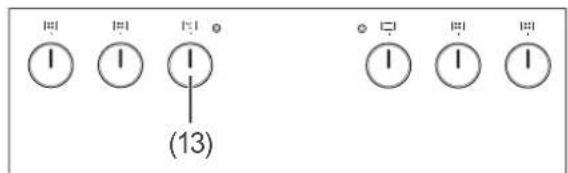
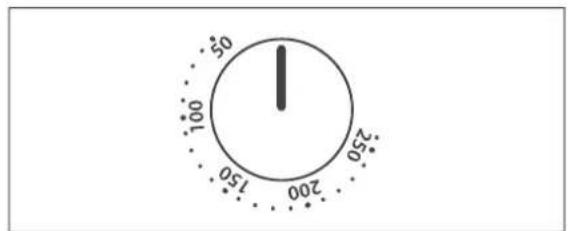
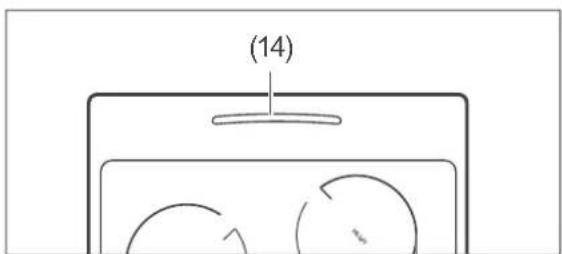
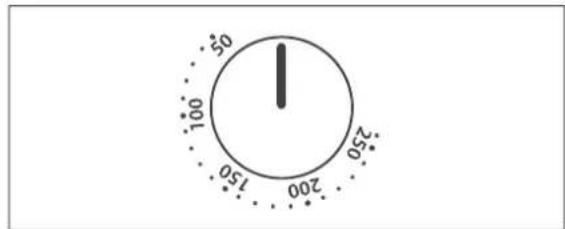
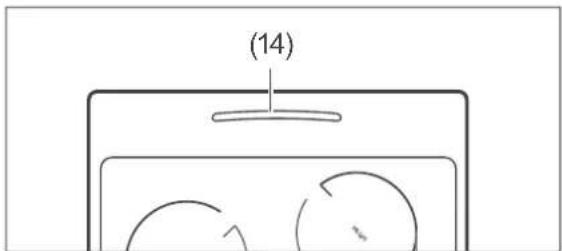
- After you have selected the heating method, set the desired oven temperature using the temperature controller (13). The oven can be set from 50 °C to 250 °C. This means that the oven is switched off. Hot steam can escape from the extraction hood (14).
Oven light
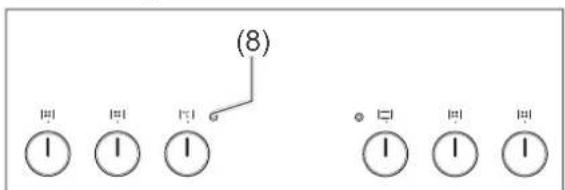
The red oven light (8) will illuminate as soon as you have selected a heating method and set the temperature. It will light up while the oven is heating up and/or re-heating. Once it goes out, the set oven temperature has been reached.
The red temperature light goes on and off repeatedly during the entire cooking time.
For power indicator light see page EN-11.
Extraction hood and cross-flow fan
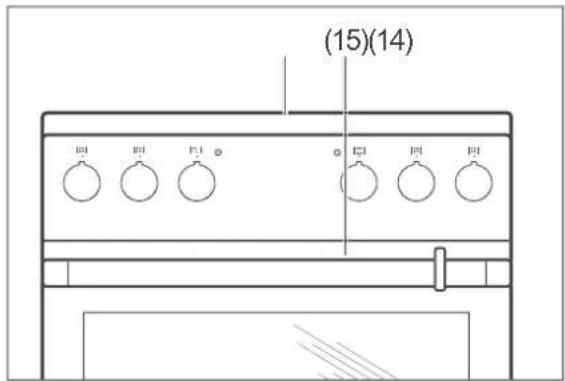
The hot steam from the oven escapes through the extraction hood (14).
The model 5022CE3.313eEDJXv also has a cross-flow fan (15), which cools the control panel and housing. The fan may run for a short time after the cooker is switched off.
Oven lighting
NOTICE
Only use the oven light to light up the cooking compartment. It is not suitable for lighting a room.
- Set the function switch to the lamp symbol to illuminate the oven.
- The lighting will also switch on as soon as you open the oven door.
Information on changing the bulb is available at page EN-20.
Switching off the oven
- Turn the temperature controller (13)
anti-clockwise to "0".
The red oven light (8) goes out.
- Turn the function switch (12) back to "0".
The oven light and the yellow power indicator light (9) switch off.
Special defrosting information

WARNING
Health hazard!
Defrosting meat, poultry or fi sh in the oven can cause dangerous microorganisms (such as salmonella) to multiply rapidly, thereby increasing the risk of food poisoning.
■ Do not defrost meat, poultry and fish in the oven.
■ Only use the defrosting function to defrost vegetables, pre-cooked food, etc.
■ Take the frozen food out of the freezer ahead of time and let it defrost in the refrigerator. The fluid from the frozen food must be able to properly drain, otherwise harmful microorganisms can form.
Defrosting merely circulates unheated air within the cooking compartment. This accelerates the defrosting process. No heat is applied during defrosting.

In order to make more room in the cooking compartment, you can remove the baking tray guides and defrost the frozen food container directly on the bottom of the oven (see page EN-18).
Special preparation information for yeast dough
- If the baking dish does not fit in the cooking compartment, you can remove the baking tray guides to increase the cooking compartment volume (see page EN-18).
- Pre-heat the oven to 50^ C.
- Switch the oven off when the temperature has been reached.
- Place the baking dish with the yeast dough in the cooking compartment. You can place the dish directly on the bottom of the oven.
- Close the oven door and leave the yeast dough in the oven for the desired time without further heating.

OTICE
Pent-up heat can damage the oven's enamel.
- If you wish to place dishes directly on the bottom of the cooking compartment, the oven temperature must not exceed 50°C. Be careful when handling cookware – the enamel can be easily scratched.
Cleaning the oven

CAUTION!
Risk of burns!
■ Allow the oven to cool completely before cleaning.
■ Never pour water directly onto the hot oven. The steam produced can cause scalding and damage to the enamel.
■ Allow hot water from the oven to cool before pouring it out.
! NOTICE
Improper cleaning may lead to damage.
■ For cleaning purposes, do not use any harsh, abrasive cleaning agents or scouring agents, steel wool, metal scrapers, oven sprays, steam cleaners or high-pressure cleaners! They can damage the surface and destroy the glass.
■ High-pressure cleaners can cause a short circuit.
Basic cleaning
The oven must be pre-cleaned to remove all grease and oil residues from the manufacturing process, as well as tough dust deposits left over from storage and transportation. This not only helps protect your health but also ensures delicious cakes and roasts.
- Operate the oven with dripping pan, oven rack and baking tray for 60 minutes at 250 °C.
- Allow the oven to fully cool down.
- Clean the cooking compartment of the oven, as well as the dripping pan, oven racks and baking trays with a little soapy water and then wipe everything dry.
Cleaning the housing surface
- After cooling, thoroughly clean the surfaces with warm rinsing water or all-purpose cleaner.
- For stainless steel surfaces, you can also use special care products.
Cleaning the cooking compartment
- Only switch on the oven lighting for cleaning.
– Clean the cooking compartment and baking tray guides after every use, if possible, and rinse with warm clean water.
– Clean the door seal in the same way, but be very careful as it is only attached in certain places, and is otherwise loose.
Steam cleaning
Steam cleaning is a wet cleaning process that uses steam to remove light stains and dirt. That's how you clean the cooking compartment in an energy-efficient manner while conserving materials.
- Remove the oven rack and baking tray.
- Slide the dripping pan into the lowest rack level and pour about 0.5 litres of water into it.
- Turn the dial to top and bottom heat and the temperature controller to 100^ C.
- After 30 minutes of operation, switch the oven off again and allow everything to cool down so that the oven walls are only lukewarm.
- Use oven gloves or something similar to remove the dripping pan from the oven and pour away the remaining water.
- Wipe the cooking compartment off with a damp cloth or sponge.
- Rinse off the oven rack, baking tray and dripping pan.
Cleaning the baking tray guides
! NOTICE
Risk of damage!
The baking tray guides can be damaged if you clean them in a dishwasher, as they are not dishwasher-safe.
■ Do not clean the baking tray guides in the dishwasher.
You can remove the baking tray guides (19) in order to clean the cooking compartment thoroughly.
Removing and cleaning baking tray guides
- Remove the grilling rack (c), the baking trays (d) and the dripping pan (e) from the oven.
natural_image
Technical line drawing of a heat exchanger or cooling unit with internal cooling fins and a side view showing internal structure (no text or symbols)-
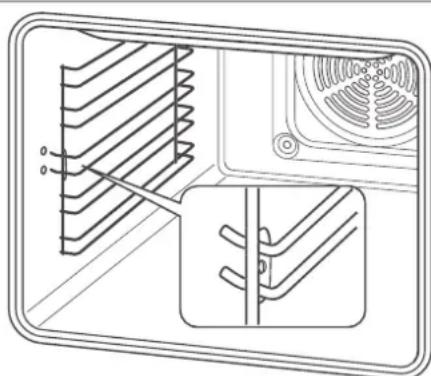
To remove the baking tray guides (19), first pull out the front holder on the front side, where the two hooks with the welded plates are. Then pull out the rear mount of the baking tray guides.
-
Clean the baking tray guides using warm water and mild dish soap or all-purpose cleaner. Then dry everything off.
i Remove the baking tray guides when you need more space in the oven, for example.
Inserting the baking tray guides
- Position the baking tray guides so that both hooks with the welded plates are at the front.
- First, push the rear hooks into the holes provided in the side walls.
- Then push the front hooks into the holes provided in the side walls.
Cleaning the oven door
! NOTICE
Risk of breakage and injury!
The oven door is equipped with heavy glass panels that can break if handled improperly. The glass shards are sharp and can cause injury.
■ Do not let the oven door or individual glass panels fall.
■ Do not hit the oven door and the individual panels of glass anywhere.
■ Do not use the oven when the glass is damaged because the oven is no longer safe. Please contact our Service Centre instead (see page EN-26).
■ If a glass pane breaks, keep children away from it and carefully collect all the pieces of glass.
Removing the oven door from its hinges
The oven door can be removed from its hinges to enable easy cleaning of all areas of the oven:
- Open the oven door completely.
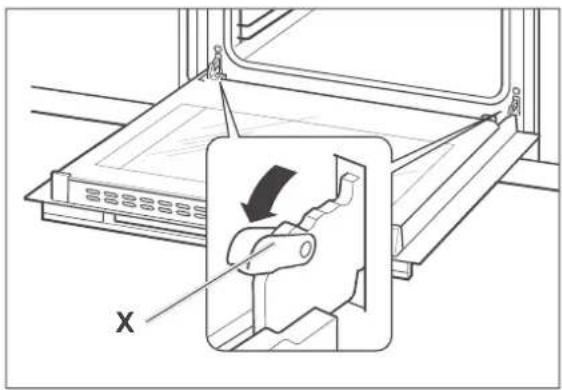
- Fold the clips X on both sides all the way forward. Use a screwdriver if necessary.
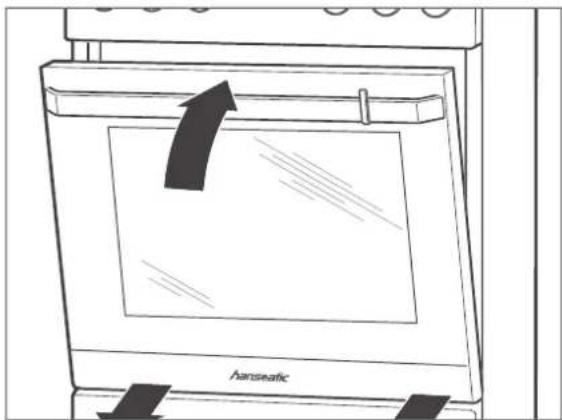
- Close the door only so far that it is still open about 10 cm.
- Lightly lift and guide the door forward out of its hinges.
Replacing the oven door on its hinges
- Hold the oven door at an angle using both hands.
- Hook the hinges into the holes in the side panels.
- Open the oven door completely.
- Fold the clips X on both sides all the way back.
- Close the door carefully. The door must sit flush when closed. If the door does not sit flush when closed or if there is a cracking sound when closing it, the door is not hung properly.
- Correct the position of the hinges and clips, if necessary, until the door opens and closes smoothly again.
Cleaning the glass panes
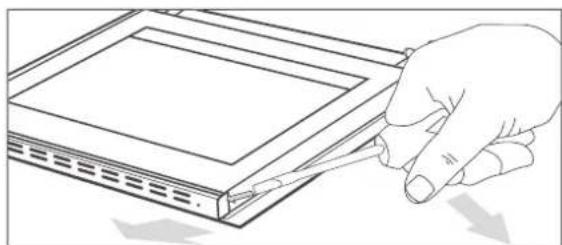
The oven door contains three glass panels that should occasionally be cleaned on both sides. To do this you'll need a PH1 flat-head screwdriver.
- Take the oven door off its hinges (see "Removing the oven door from its hinges" on page EN-19).
natural_image
Line drawing of a hand holding a tool interacting with a rectangular panel (no text or symbols)- Remove both screws that secure the top metal grid.
natural_image
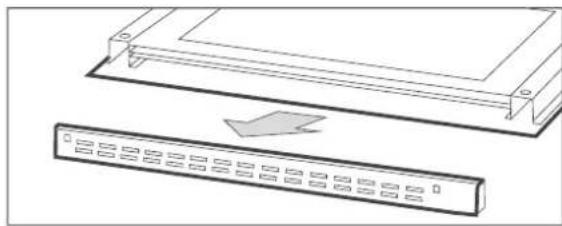
Diagram showing a device with a rectangular panel and a separate rack-mounted device (no text or symbols present)- Carefully removed the metal grid.
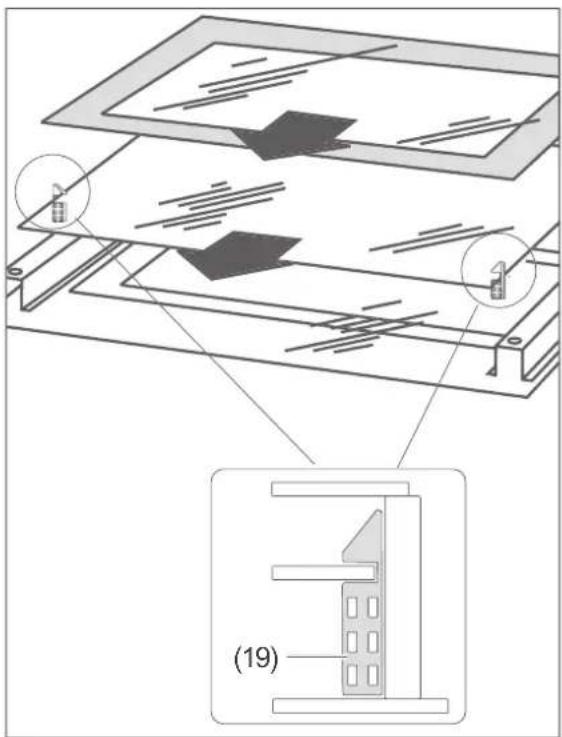
- Remove the upper pane from the mounts below the hinges and carefully set it down.
- Remove the middle pane and carefully set it down.
- Please ensure not to lose the small spacers (19).
- Clean all panes with warm, fresh water.
- Dry the panes thoroughly.
- Reposition the middle pane in the mounts at the hinges.
- Replace the spacers (19) at the sides of the middle pane.
natural_image
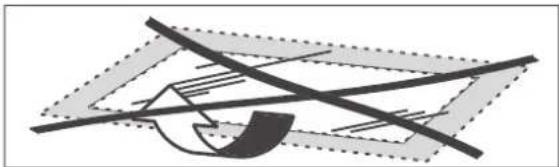
Abstract geometric diagram with intersecting lines and shaded regions (no text or symbols)- Reposition the upper pane in the mounts at the hinges. Make sure that the smooth side is facing outwards.
- Put the grid plate back on top of the door – it only fits in one direction. First insert it on the left-hand side and then press down on the right-hand-side until it clicks into place.
- Replace the oven door (see „Replacing the oven door on its hinges“ on page EN-19).
Changing oven lighting
For the oven lighting, you require a heat-resistant oven bulb of 230 V to 240 V, 25 W, E 14, T 300 °C.

WARNING
Risk of electric shock!
Improper replacement of the bulb can result in fatal electric shock or burn injuries.
■ Before changing the bulb, always disconnect the mains plug or switch off the fuses for the socket to which the oven is connected.
■ Replace the bulb only when the oven is no longer hot and there is no risk of burns.
- Switch off and/or unscrew the mains fuse.
- Place a soft cloth in the cooled oven in the event that the glass cover or bulb should fall.
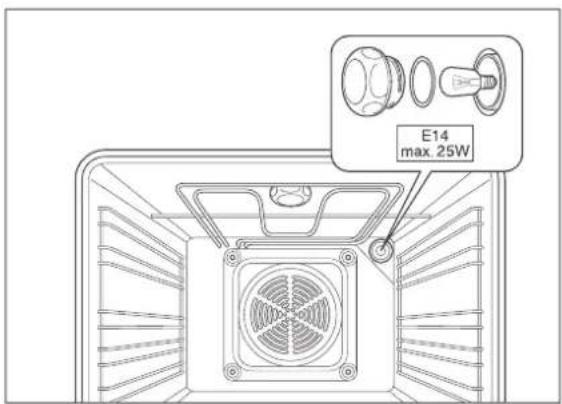
- Unscrew the glass cover anticlockwise and remove it.
- Carefully unscrew the defective bulb, anti-clockwise, and replace with a new bulb of the same type.
- Insert the glass cover back into the opening and screw it back on clockwise.
- Switch on/screw the fuse back in.
Connection to the power supply – notes for the installer

WARNING
Electric shock / fi re hazard! Improperly installed electrical connections can cause electrical shocks and/or short circuits.
■ Connection to the mains supply may only be made by an authorised electrician approved by the local energy supply company, e.g. our Service Centre (see page EN-26). Only then will you benefit from our warranty and a sufficient level of safety.
■ Since all poles of the appliance cannot be disconnected from the mains via an accessible disconnecting device, an all-pole disconnecting device in accordance with overvoltage category III must be connected within the house installation with at least 3 mm contact clearance; this includes fuses, miniature circuit breakers and protective devices.
Connection conditions
– The oven is designed for the following alternating voltages:
-230 V 1N\~ / 50 Hz, 40 A
- 400 V 2N\~ / 50 Hz, 25 A
- 400 V 3N\~ / 50 Hz, 16 A
– A separate power supply is required.
- The power cord used must comply with the requirements of DIN EN 60335-1 (e.g. H05RR-F model).
- Depending on the type of connection, the conductor cross-section must be selected and the contact bridges inserted or removed (see following figures).
- When connecting the appliance, VDE requirements and the 'Technical connection requirements' must be observed.
Contact protection must be guaranteed.
Connecting to the mains
The terminal block and connection diagrams can be found on the rear side of the oven.
- Before accessing the terminals, switch off all supply circuits and secure them against being switched on again.
- Make sure that all poles of the connection cables are disconnected and that effective earthing is possible.
- Connect the leads and, if necessary, the enclosed brass bridges to the corresponding contact terminals of the cooker power connection in accordance with the circuit diagrams shown here.
- Lay the connection cable behind the stove so that it does not touch the rear wall of the cooker. The rear cooker wall becomes hot while it is in use.
| L1 – L3: Phase(s)N: Neutral conductorPE: Protective conductor (earth wire) | |
| 230 V 1N~ / 50 Hz | |
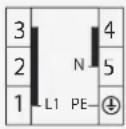 | L1 to 1 2 3 (bridged)N to 4 5 (bridged)Protective conductor (PE) to 4Conductor cross-section: 3 × 6 mm^2 |
| 400 V 2N~ / 50 Hz | |
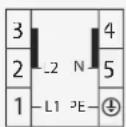 | L1 to 1L2 to 2 3 (bridged)N to 4 5 (bridged)Protective conductor (PE) to 4Conductor cross-section: 4 × 2.5 mm^2 |
| 400 V 3N~ / 50 Hz | |
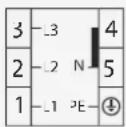 | L1 to 1, L2 to 2, L3 to 3N to 4 5 (bridged)Protective conductor (PE) to 4Conductor cross-section: 5 × 2.5 mm^2 |
Positioning
Requirements
– To ensure proper operation, the following requirements must be met:
– In terms of fire protection, the appliance conforms to Type Y (EC 335-2-6). Appliances of this type may be installed on one side only next to higher kitchen furniture, appliances or walls.
- Do not place the cooker directly next to a refrigerator or freezer. This will increase its energy consumption unnecessarily due to heat emission. The best place is next to the sink. You have an additional work surface and dirty dishes can be washed immediately.
- If the cooker is placed on a pedestal, measures must be taken to prevent the appliance slipping off.
Setting up the cooker
- Adjust the stove with a spirit level so that the cooking zone is perfectly level.
- Any unevenness can be compensated for using the screw feet on the underside of the cooker. To do this, completely pull out the dish trolley. The best way to do this is to put a coin into the slot and turn it.
Mounting the tilt protection
CAUTION!
If you do not install the tilt protection securely, the whole cooker can tip forward. You could injure yourself and the cooker could be damaged in the process.
■ Attach the supplied tilt protection to the wall before use to prevent the cooker from tipping over.
■ Do not lean, sit or stand on the oven. If the oven door is loaded with a heavy weight e.g. a large pan, the appliance can tilt forwards and fall over.
- Set up the cooker as described and align it accurately.
- Draw a horizontal line on the wall from the inside of the housing along the underside of the middle slot.
- Pull out the cooker again.
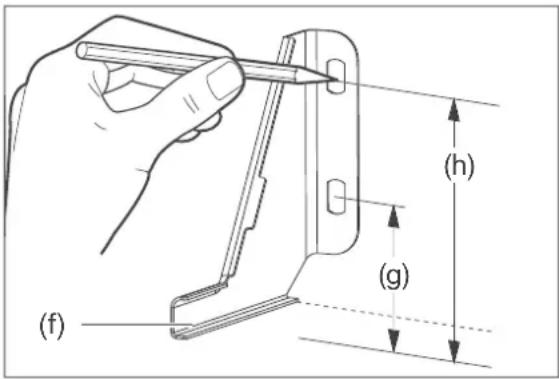
- Position the tilt protection (f) on the line on the wall such that the side with the holes lies flat against the wall and the protruding limb fits into the slot on the cooker.
- Mark both drill holes through the holes in the bracket. Note the height of the drill holes:
– (g): 6.0 cm from the floor
– (h): 10.3 cm from the floor.
-
Use a metal detector to make sure there are no cables or piping in the area to be drilled. If there are, select another location for assembly.
-
Drill a dowel hole in each marked positions using a masonry drill.
- For solid walls: Place the supplied dowels into the holes. Screw the tilt protection tight with the supplied screws.
For drywalls: Obtain suitable special dowels for the wall. If necessary, consult a professional.
Screw the tilt protection to the wall with suitable screws for the dowels.
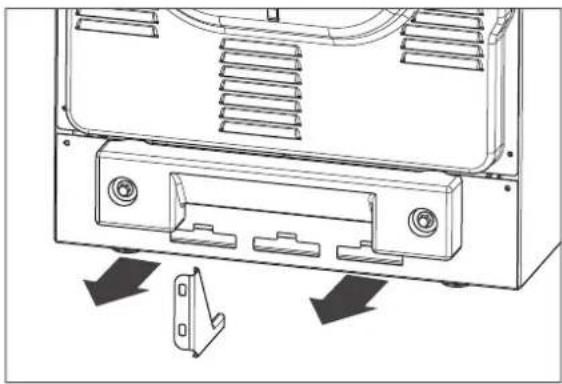
natural_image
Technical diagram of a computer case with ventilation slots and mounting brackets (no text or symbols)- Slide the cooker into place and check that the tilt protection prevents the cooker from tipping forward. Make any adjustments necessary.
Removing transport locks
- If you have not already done so, remove any plastic strips from the sides of the baking sheets.
- Remove all protective films.
Troubleshooting table
Malfunctions can occur in all electrical appliances. This does not necessarily mean there is a defect in the appliance. For this reason, please check the tables to see if you can correct the malfunction.

WARNING
Risk of electric shock in case of improper repair!
Never try to repair a defective or suspected defective appliance yourself. You can put your own and future users' lives in danger. Only authorised specialists are allowed to carry out this repair work.
| Problem Possible solutions/tips | |
| Cooking zones do not work. | The power supply has been interrupted. Check the fuse for the stove in the fuse box in the apartment. In case of doubt, connect our Service Centre (see page EN-26). |
| Fissures or cracks in the hob. | Switch all cooking zones off immediately and cease to use the appliance. Contact our Service team (see page EN-26). |
| Oven light (8) goes out. | The oven temperature has been reached. The light switches on again automatically when the temperature drops. |
| Oven light (8) does not illuminate. | First check that the appliance is still working (see above). If the light is defective, have it replaced by our Service team only; see page EN-26). |
| Oven light defective. Replace the defective bulb for the oven light; see page EN-20. Note: Defective bulbs do not fall under our warranty. | |
| The cross-flow fan is not working; no air released from under the cover. Cover is very hot. | Stainless steel model only 5022CE3.313eEDJXv: Switch on the oven lighting only – if there is no fan noise and air is being released, the fan is defective. |
| CAUTION!Risk of burns!■ Switch off the appliance, open the oven door and stop using the appliance. Contact our Service team, see page EN-26. | |
| The cross-flow fan continues to run. | No error. The cross-flow fan continues to run for a while and then switches off automatically. |
Our Service Centre
In order for us to help you quickly, please tell us:
| Name of appliance Model Colour | our Order number | ||
| hanseatic Electric cooker | 5022CE3.313eEDJXv | stainless steel 7090 | 8847 |
| 5022CE3.313eEDW | white 3211 | 8703 |
Advice, order and complaint
Please contact your mail order company's customer service centre if
– the delivery is incomplete,
– the appliance is damaged during transport,
– you have questions about your appliance,
- a malfunction cannot be rectified using the troubleshooting table,
– you would like to order further accessories.
Repairs and spare parts
Customers in Germany
– Please contact our technical service: Telephone 0 18 06 18 05 00 (landline 20 cents/call, mobile max 60 cents/call)
Customers in Austria
- Please contact your mail order company's customer service centre or product advice centre.
Please note:
You are responsible for the condition of the appliance and its proper use in the household. If you call out for customer service due to an operating error, you will incur charges, even during the guarantee/warranty period. Damage resulting from non-compliance with this manual unfortunately cannot be recognised.
Environmental protection
Disposing of old electrical devices in an environmentally friendly manner
Electrical appliances contain harmful substances as well as valuable resources.
Every consumer is therefore required by law to dispose of old electrical appliances at an authorised collection or return point. They will thus be made available for environmentally-sound, resource-saving recycling.
You can dispose of old electrical appliances free of charge at your local recycling centre.
Please contact your dealer directly for more information about this topic.
Packaging

Our packaging is made from environmentally friendly, recyclable materials:
– Outer packaging made of cardboard
– Moulded parts made of foamed, CFC-free polystyrene (PS)
– Films and bags made of polyethylene (PE)
– Tension bands made of polypropylene (PP)
- Saving energy also protects against excessive global warming. Your new appliance uses little energy due to its modern technology.
Please dispose of packaging in an environmentally friendly manner.
Tips for saving energy
- Preheat the oven only if it is called for in the recipe or stipulated in the cooking tables provided.
– Use dark-coloured baking dishes and trays when possible. They effectively absorb the heat. - Avoid frequently opening the oven door during cooking, baking or roasting.
- Bake several cakes one after the other while the oven is still warm in order to shorten the baking time for subsequent cakes. If you use loaf tins, place both of them side by side in the oven.
– In the case of longer cooking times, switch the oven off 10 minutes before the end of the cooking time. The residual heat is sufficient enough to complete the cooking. - When cooking, always leave the lid on the saucepan wherever possible. Liquids can be brought to the boil more quickly with the lid on than without.
- Only ever use high-quality, new sauce-pans and pans. They lie flat on the hob and therefore conduct energy more easily than cookware with a warped or dented base (please note in the chapter “The right cookware”).
– Turn the level down quickly and continue to cook at the lowest possible setting.
– Always use pressure cooking saucepans whenever possible. This will halve the cooking process and you will save a lot of energy. - Only use as much water as you really need to cook the food. A lot of energy is required to warm up water.
'Test report' table
These dishes were prepared in accordance with DIN 44547 and EN 60350 standards.
| Dish | Number of trays | Rack height 1) | Heating method | Tempera-ture in °C | Cooking time in min. |
| Shortbread biscuits | 1 4 Top/bottom heat | 2) | 150-160 20-30 | ||
| 1 2 Hot air | 2) | 140-150 30-35 | |||
| Water sponge cake | 1 2 Top/bottom heat | 2) | 180-190 15-25 | ||
| 1 3 Hot air | 2) | 160-165 30-40 | |||
| Leavened apple cake | 1 4 Top/bottom heat | 2) | 185-195 25-40 | ||
| 1 1 Convection 165-175 40-50 | |||||
| 20 muffins | 1 2 Top/bottom heat 160-170 15-25 | ||||
| 1 1 Convection 160-170 20-30 | |||||
| 2 | 2 (Dripping pan) 4 (Baking tray) | Convection 165-170 20-25 | |||
| Toast 1 3 Grill | 3) | 240 1-3 | |||
| 12 patties 1 4 Intensive grill | 3) | 240 15 + 6-8 4) | |||
| Chicken 1 2 | Intensive grill with convection | 180-195 50-65 | |||
| Roast pork 1 2 | Intensive grill with convection | 180-195 6) | 140-160 | ||
| Goose | 1 2 | Intensive grill with convection | 180-195 75-90 | ||
| Pizza 2) 7) | 1 3 Top/bottom heat 220-230 18-23 | ||||
| 1 3 Convection 170-175 20-25 | |||||
1) Rack height calculated from below
2) Pre-heated
3) Pre-heat for five minutes
4) 1. and 2. page
6) Depending on the height of the roast
7) Follow the manufacturer's instructions on the packaging
Product fiche concerning Regulation (EU) No 65/2014
| Trade mark | hanseatic |
| Model identifier | 3211 8703 / 5022CE3.313eEDW7090 8847 / 5022CE3.313eEDJXv |
| Energy efficiency index | 95,1 |
| energy efficiency class class on a scale from A+++ (most efficient) to D (least efficient) | A |
| Energy consumption in conventional mode | 0,99 kWh/cycle |
| Energy consumption infar-forced mode | 0,78 kWh/cycle |
| Number of cavities | 1 |
| Heat source | electricity |
| Volume | 65 l |
The values indicated above have been measured under standardised laboratory conditions pursuant to EN 60350-1.
Product information concerning Regulation (EU) No 66/2014
| Model identification | 3211 8703 / 5022CE3.313eEDW7090 8847 / 5022CE3.313eEDJXv |
| Type of oven | freestandin ζ |
| Mass of the appliance | 39,0 kΩ |
| Number of cavities | 1 |
| Heat source | electricity |
| Volume | 65 l |
| Energy consumption in conventional mode | 0,99 kWh/cycle |
| Energy consumption in fan-forced mode | 0,78 kWh/cycle |
| Energy Efficiency Index | 95,1 |
The values indicated above have been measured under standardised laboratory conditions pursuant to EN 60350-1.
Product information concerning Regulation (EU) No 66/2014
| Model identification | 3211 8703 / 5022CE3.313eEDW7090 8847 / 5022CE3.313eEDJXv |
| Type of hob | electric hob |
| Number of cooking zones and/or areas | 4 |
| Heating technology | radiant cooking zones |
| Dimension front left cooking zone | 12,0 /18,5 cm |
| Dimension back left cooking zone | 15,0 cm |
| Dimension front right cooking zone | 15,0 cm |
| Dimension b a c kg hti cooking zone | L 25,0 cmW 15,0 cm |
| Energy consumption front left cooking zone 183, | 8 Wh prc kg |
| Energy consumption back left cooking zone | 182,8 Wh prc kg |
| Energy consumption front right cooking zone 184,6 Wh | prc kg |
| Energy consumption back right cooking zone | 187,4 Wh prc kg |
| Energy consumption for the hob | 184,6 Wh prc kg |
The values indicated above have been measured under standardised laboratory conditions pursuant to EN 60350-2.
Technical specifications
| Item number | 3211 87037090 8847 |
| Name of appliance | Electric cooker with glass ceramic hob |
| Modell | 5022CE3.313eEDW5022CE3.313eEDJXv |
| Rated voltage | 230 V ~ /400 V 3N ~ |
| Frequency | 50Hz |
| Rated power input oven | 360C W |
| Oven measurements (H x W x D) | 850 mm x 500 mm x 600 mm |
| Maximum temperature | 275 °C |
| Lighting | 230 - 240 V, 25W, E14-15, T 300 °C |
| Rated power input hob | 6100 W |
| Total rated power input | 9700 W |
- Standherd mit
- Table of contents
- Delivery
- Check the delivery
- WARNING!
- Packaging tips
- Controls and appliance parts
- Safety
- Intended use
- Definition of terms/symbols
- WARNING
- CAUTION
- NOTICE
- Safety notices
- Risks in handling household electrical appliances
- Risks to children
- Risks for certain groups of people
- Risks when handling the appliance
- ■ Hob
- ■ Oven
- Fire hazard!
- Health hazard!
- Risk of damage!
- The hob
- Glass ceramic hob
- The right cookware
- Energy and time-saving pressure
- You should not use:
- Cooking zones + temperature controller
- Using double circle and roasting pan cooking zones
- To extend the (1) or (3) cooking zone,
- To reduce the size of the cooking zone again,
- Power indicator light
- Residual heat display
- CAUTION!
- Risk of burns!
- Cooking and energy-saving tips
- Cleaning the hob
- Slight soiling which is not burnt on
- Hard, baked-on dirt
- Removing sugar or starchy food particles, synthetic materials, or aluminium foil
- The oven
- Preparation
- The right oven cookware
- Proper handling of the oven
- Baking trays and dripping pan
- Temperature controller
- AUTION!
- Oven light
- Extraction hood and cross-flow fan
- Oven lighting
- Switching off the oven
- Special defrosting information
- Special preparation information for yeast dough
- OTICE
- Cleaning the oven
- ! NOTICE
- Basic cleaning
- Cleaning the housing surface
- Cleaning the cooking compartment
- Steam cleaning
- Cleaning the baking tray guides
- Removing and cleaning baking tray guides
- Inserting the baking tray guides
- Cleaning the oven door
- Removing the oven door from its hinges
- Replacing the oven door on its hinges
- Cleaning the glass panes
- Changing oven lighting
- Risk of electric shock!
- Connection to the power supply – notes for the installer
- Connection conditions
- Connecting to the mains
- Positioning
- Requirements
- Setting up the cooker
- Mounting the tilt protection
- Removing transport locks
- Troubleshooting table
- Our Service Centre
- Advice, order and complaint
- Repairs and spare parts
- Customers in Germany
- Customers in Austria
- Please note:
- Environmental protection
- Disposing of old electrical devices in an environmentally friendly manner
- Packaging
- Tips for saving energy
- 'Test report' table
- Product fiche concerning Regulation (EU) No 65/2014
- Product information concerning Regulation (EU) No 66/2014
Brand : Hanseatic
Model : 5022CE3.313eEDW
Category : Cooker