
65M40M1-E1131A - Oven Hanseatic - Free user manual and instructions
Find the device manual for free 65M40M1-E1131A Hanseatic in PDF.


| Brand | Hanseatic |
| Model | 65M40M1-E1131A |
| Product Type | Built-in Electric Oven |
| Energy Source | Electric |
| Energy Efficiency Class | A+ |
| Oven Capacity | 65 L |
| Dimensions (H x W x D) | 595 x 595 x 548 mm |
| Cutout Dimensions (H x W x D) | 590 x 560 x 550 mm |
| Net Weight | 31.5 kg |
| Maximum Power Consumption | 3400 W |
| Heating Functions | 8 functions: Conventional, Fan-Forced, Grill, Pizza, Bottom Heat, Defrost, ProBake, Eco |
| Temperature Range | 50°C – 275°C |
| Control Type | Dial + Touch Display |
| Cleaning System | HydroEasy Cleaning |
| Number of Glass Panes | 3 (CoolTouch) |
| Door Hinge | Drop-down hinge |
| Child Lock | Yes |
| Timer Function | Yes, with end time programming |
| Interior Light | Yes, halogen |
| Racks Included | 1 x Wire shelf, 1 x Baking tray |
| Spare Parts Availability | At least 7 years after end of production (EU regulation) |
| Repairability Index (France) | 8.2 / 10 |
| Connectivity | No (standalone) |
| Power Supply | 220-240 V, 50/60 Hz, 16 A |
Frequently Asked Questions - 65M40M1-E1131A Hanseatic
User questions about 65M40M1-E1131A Hanseatic
0 question about this device. Answer the ones you know or ask your own.
Ask a new question about this device
Download the instructions for your Oven in PDF format for free! Find your manual 65M40M1-E1131A - Hanseatic and take your electronic device back in hand. On this page are published all the documents necessary for the use of your device. 65M40M1-E1131A by Hanseatic.
USER MANUAL 65M40M1-E1131A Hanseatic
Gebrauchsanleitung
Einbaubackofen
Inhaltsverzeichnis

(4)

Beleuchtung

natural_image
Technical diagram showing a mechanical assembly with a highlighted section (12), no visible text or symbolsnatural_image
Simple line drawing of a door frame with arrows indicating direction (no text or symbols)natural_image
Line drawings of an oven, air grating, and electrical plug (no text or symbols)Verpackungs-Tipps

natural_image
Line drawing of a kitchen interior with oven, cabinet, and cabinet (no text or symbols)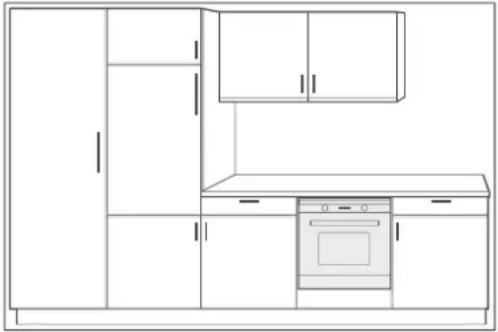
natural_image
Line drawing of a kitchen interior with cabinet, oven, and oven (no text or symbols)natural_image
Line drawing of an oven with a side table and cabin (no text or symbols)natural_image
Line drawing of an oven with a door and control panel (no text or symbols)User manual
Built-in oven
Table of contents

You can find information on as-sembly and installation from page EN-19.
Explanation of terms and symbols ... EN-3
Intended use ...... EN-4
Safety notices.... EN-4
Risks to children and certain
groups of individuals ..... EN-4
Electrical safety EN-5
Safety when handling heat-gene-
rating appliances ..... EN-6
Protecting food EN-6
Using the oven safely ..... EN-7
Specific risks when grilling ..... EN-9
Specific risks for units with a coo-
ling fan....EN-9
Controls and appliance parts ..... EN-10
Operation .....EN-11
The right oven cookware .....EN-11
Proper oven handling .....EN-11
Baking tray, dripping pan and
oven rack....EN-11
Function switch EN-12
Temperature controller ..... EN-12
Switching on the oven ..... EN-13
Temperature indicator light ..... EN-13
Cooking compartment light ..... EN-13
Switching off the oven ..... EN-13
Cleaning EN-14
Special preparation information
for yeast dough EN-14
The ECO mode ..... EN-14
Cleaning the front of the housing . . EN-15
Cleaning the cooking compartment EN-15
Cleaning the baking tray guides . . EN-15
Cleaning the oven door ..... EN-16
Replacing the light bulb in the
cooking compartment ..... EN-17
Delivery.... EN-18
Packaging tips ..... EN-18
Package contents ..... EN-18
Check the delivery ..... EN-18
Fitting and installation ..... EN-19
Moving and unpacking ..... EN-19
Installing the oven ..... EN-19
Connecting the oven ..... EN-20
Inserting the oven ..... EN-21
Pre-cleaning the oven ..... EN-21
Troubleshooting table ..... EN-22
Service EN-23
Advice, order and complaint ..... EN-23
Repairs and spare parts ..... EN-23
Waste prevention, free return and
disposal EN-24
Waste prevention EN-24
Free return of old electrical appli-
ances...... EN-24
Disposal...... EN-24
Packaging....EN-25
Table "Test report"...... EN-26
Product fiche pursuant to Regulati-
on (EU) No 65/2014 ..... EN-27
Product fiche concerning EU Direc-
tive No. 66/2014 EN-27
Technical specifications ..... EN-28
Explanation of terms and symbols

Read through the user manual and safety notices carefully before using the appliance. This is the only way you can use all the functions reliably and safely.
Be absolutely sure to also observe the national regulations in your country, which are also valid in addition to the regulations specified in this user manual.
Keep all safety notices and instructions for future reference. Pass all safety notices and instructions on to the subsequent user of the product.
The following symbols can be found in this user manual.

WARNING
This symbol indicates a hazard with a medium level of risk which, if not avoided, could result in death or serious injury.

CAUTION
This symbol indicates a hazard with a low level of risk which, if not avoided, could result in minor or moderate injury.

NOTICE
This symbol warns against possible damage to property.

This symbol refers to useful additional information.

Hot surface
Intended use
This appliance is designed for roasting, baking, grilling and keeping food warm.
The oven is not suitable for defrosting frozen food.
The oven should not be used to defrost raw meat, poultry or fish.
Prior to use, the appliance must be properly installed in a kitchen unit. Veneers or plastic coverings on the built-in furniture require heat-resistant adhesive (100 °C). If the adhesive and surfaces are not heat-resistant, the covering may warp and come loose.
This appliance must not be operated in non-stationary locations (e.g. ships).
The appliance is designed for use in private households and is not designed for commer-
cial use or multiple use (e.g.: use by several parties in a block of flats).
The appliance is not to be operated with an external timer or an external remote control system.
The oven is not suitable for heating a room. The oven door must not be used as a support prop, seat or step.
The oven light is exclusively used for lighting the cooking compartment and not for lighting a room.
Persons who are unable to operate the appliance safely due to their physical, sensory or mental abilities or lack of knowledge must be supervised during use.
Do not make any technical changes to the appliance.
Safety notices
In this chapter you will find general safety notices which you must always observe for your own protection and that of third parties. Please also observe the warning notices in the following chapters.
Risks to children and certain groups of individuals

WARNING
Risk of suffocation for children!
Children can become entangled in the packaging fi lm or swallow small parts and suffocate.
■ Do not allow children to play with the packaging fi lm.
■ Prevent children from taking small parts out of the accessory bag and putting them in their mouths.
Risk of burns for children!
The appliance and its accessible parts become hot during use. Care should be taken to avoid touching heating elements.
■ Children less than 8 years of age shall be kept away unless continuously supervised.

CAUTION
Risk of injury!
Children and certain groups of people have a higher risk of being injured when handling the appliance.
■ This appliance can be used by children aged from 8 years and above and persons with reduced physical, sensory or mental capabilities or lack of experience and knowledge if they have been given supervision or instruction concerning use of the appliance in a safe way and understand the hazards involved.
■ Children shall not play with the appliance or have access to it without supervision.
■ Do not allow children to perform cleaning and user maintenance without supervision.
Electrical safety

WARNING
Risk of electric shock!
Touching live parts may result in severe injury or death.
■ Only use the appliance indoors. Do not use in wet rooms or in the rain.
■ Connect the appliance only if the mains voltage at the socket corresponds to that indicated on the nameplate.
■ Do not operate or continue to operate the appliance if it
– shows visible signs of damage, for example, the connection cable is defective;
- starts smoking or there is a burning smell;
- makes unusual sounds.
In such events, remove the mains plug from the socket and contact our service department.
■ The appliance corresponds to protection class I and may be connected only to a plug with a protective conductor that has been properly installed. Ensure that the voltage is correct when connecting it. You can find more detailed information about this on the nameplate.
If the mains plug is no longer accessible after installation or set-up, an all-pole disconnecting device complying with overvoltage category III must be connected to the house wiring with a contact gap of at least 3 mm; consult a qualified professional if necessary (see chapter "Service").
■ Mains cable / mains plug:
– Lay out the supply cord in such a way that it does not become a trip hazard.
- Do not kink or pinch the mains cable or lay it over sharp edges.
- Do not extend or modify the mains cable.
- Keep the mains cable and mains plug away from naked flames and hot surfaces.
- If the supply cord is damaged, it must be replaced by the manufacturer, its service agent or similarly qualified persons in order to avoid a hazard.
■ The appliance is not to be operated with an external timer or an external remote control system.
■ Do not put any objects in or through the housing openings and also make sure that children cannot insert any objects through them.
- Never try to repair a defective or suspected defective appliance yourself. You can put your own and future users' lives in danger. Only authorised specialists are allowed to carry out this repair work.
■ Never open the housing.
Safety when handling heat-generating appliances

CAUTION
Risk of burns!
The appliance and its accessible parts become hot during use.
■ Please avoid touching the heating elements.
■ Children less than 8 years of age shall be kept away unless continuously supervised.
■ Do not touch hot parts. Always protect hands with oven gloves or pot holders when working on the hot appliance. Only use dry oven gloves or potholders. Wet textiles are better heat conductors and can cause steam burns.
Fire hazard!
Improper handling when operating the appliance can lead to fire.
■ Do not connect to a multi-socket extension cable or a multi-socket plug.
■ If you are preparing food with alcohol, do not leave the cooker unattended. The food may spontaneously ignite.
■ Do not cover the appliance with blankets, cloths or similar, as these objects may become hot and catch fire.
In the event of a fire, immediately turn all dials/switches buttons/sensors to "off" or "0" and switch off the automatic circuit breakers and/or unscrew the fuses. To extinguish the fire, use a suitable fire extinguisher with the designation "F" or a fire blanket.
■ Once the fire has been extinguished, have the appliance checked by our Service department.
Protecting food
Health hazard!
Improper use of this appliance can lead to damage to health.
■ Clean the appliance regularly and remove any traces of food leftovers immediately.
■ Particularly with poultry and dishes containing fresh egg, and when warming up meals, ensure that the food is fully cooked through to kill off all pathogens (e.g. salmonella).
Acrylamide may be carcinogenic. Acrylamide is produced when starch is exposed to excessive heat, e.g. in biscuits, toast, bread, potatoes (chips, crisps).
- Keep cooking times as short as possible.
■ Only brown the food slightly, do not allow it to brown too much.
■ Cut larger-sized fries and then bake at maximum of 180 °C.
■ When frying potatoes using raw potato discs or frying potato fritters in a frying pan, it is better to use margarine (with a minimum fat content of 80 %) or oil with a little margarine instead of pure oil.
■ Brushing baked goods with egg whites or egg yolks helps to reduce the formation of acrylamide.
Using the oven safely

WARNING
Risk of electric shock!
Before replacing the light, ensure that the oven is switched off to prevent the possible risk of electric shock.
■ First switch off the oven then unscrew and/or switch off the fuses.
■ Replace the light only when the oven is no longer hot.

CAUTION
Health hazard!
The water that melts during defrosting can contain harmful bacteria, especially with meat and poultry.
■ Do not defrost meat, poultry and fi sh in oven mode.
■ Pour defrost water away. Do not use it for any other purpose.
■ Thoroughly clean the crockery you have used.
Risk of burns!
The oven becomes hot during use. You can burn yourself on heating elements, the cooking compartment, the cooked food and accessories.
■ Particular care should be taken to avoid touching heating elements inside the oven.
■ Only ever operate the oven with the oven door closed. Make sure that the door seal is tight and that the oven door closes tightly.
■ When opening the oven door, stand to the side of the oven and as far away as possible.
■ Allow the oven to cool down completely before cleaning.
■ Never pour water directly into the hot oven. The steam can cause scalding and damage the enamel.
■ Allow hot water from the oven to cool before pouring it out.
Fire hazard!
Insuffi cient air circulation can lead to overheating.
■ Do not install the oven behind a decorative door or a cabinet door.
■ Never cover or obstruct fan openings.
Objects in and near the oven when it is switched on could start to burn due to the high temperatures.
■ Do not cover cakes or roasts being cooked in the oven with baking parchment.
■ If you are preparing foods in oil, fat or using alcohol, do not leave the oven unattended. The food may spontaneously ignite.
■ Do not allow food, baking parchment and aluminium foil to come into contact with the heating elements.
■ Do not store temperature-sensitive, combustible or fl ammable objects in the oven. If the appliance is switched on unintentionally they may deform or ignite.
■ Do not use the oven for storage purposes.
■ Never use the oven to heat rooms.
If a fi re breaks out in the oven, keep the oven door closed and switch off the oven. Once the fi re has been extinguished, have the oven checked by our Service department.
! NOTICE
Risk of damage!
Improper use may damage the oven or cooking utensils.
- Do not place trays or aluminium foil directly on the base of the cooking compartment. It may cause heat to build up inside and damage the oven's enamel. If you wish to place dishes directly on the bottom of the cooking compartment, the oven temperature must not exceed 50 °C. Be careful when handling cookware – the enamel can be easily scratched.
■ When preserving, place only so many preserving jars in the dripping pan that none of them touch. Otherwise, the jars can crack and burst.
If a trolley is used to move the oven, it must be lifted as shown on the packaging.
■ Do not lift the entire oven by the oven door handle. The handle is not designed to carry the whole weight of the oven.
■ The oven door is heavy and has a glass front. Do not drop the door when taking it off its hinges.
■ Take particular care to ensure that the door seals are clean. If the seal is very dirty, the appliance door will no longer close properly. Neighbouring furniture fronts may be damaged.
- The door seals are sensitive to oil and grease – making the rubber porous and brittle.
■ Do not remove the door seals.
■ Do not use any harsh, abrasive cleaners or sharp metal scrapers to clean the glass on the oven door, as they can scratch the surface and destroy the glass.
■ When cleaning the cooking compartment, do not use steel wool, oven sprays, steam cleaners or high-pressure cleaners. They can damage the surface. High-pressure cleaners can cause a short circuit.
■ Do not clean baking tray guides and telescopic rails in the dishwasher.
Specific risks when grilling

CAUTION
Risk of burns!
The oven becomes hot during grilling. You can burn yourself on heating elements, the cooking compartment, the cooked food and accessories.
■ Never leave the oven unattended while grilling. Keep children away.
Fire hazard!
Fatty foods can catch fire when they come to close to the heating elements.
■ Do not place food to be grilled at the back of the heating element where it
Specific risks for units with a cooling fan

CAUTION
Fire hazard!
A defective cooling fan can cause fl am- mable objects in the vicinity to catch fi re.
■ If this happens, switch off the appliance immediately, open the oven door and do not use the oven again until it has been repaired.
Controls and appliance parts
(1)(2)(3)
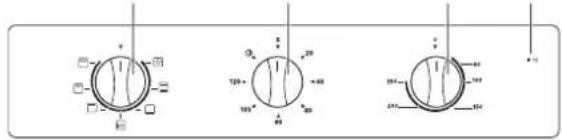
(4)

Light

Top and bottom heat

Bottom heat

Eco

Top heat

Grill

Intensive grill
Off
Control panel
(1) Function switch
(2) Timer
(3) Temperature controller
(4) Temperature indicator light (red)
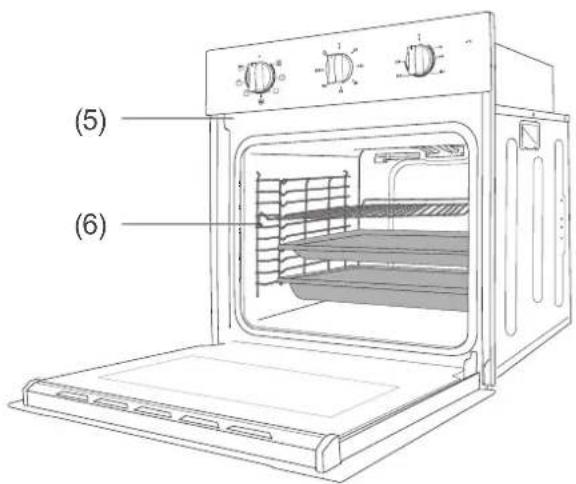
Oven
(5) Extraction hood (ventilation)
(6) Baking tray guides
Operation
The right oven cookware
- Pots with heat-resistant handles can be recognised by the label indicating "heat resistant up to 280^ ".
– Fire-proof dishes made of glass, porcelain, ceramic and clay or cast iron. - In particular, ovens with top and bottom heat require dishes and trays with good heat transfer, most preferably metals which have been painted black as they allow cakes to brown nicely.
– Good results can also be achieved with coated or non-coated aluminium trays.
Proper oven handling

CAUTION!
Fire hazard!
■ Only ever operate the oven with the oven door closed.
■ If the external cooling fan is broken, switch off the oven and do not use it. Open the oven door and call our Service (see page EN-23).
■ In case of an oven fire:
- Switch off the circuit breakers/unscrew fuses
- Do not open the oven door until the fire is extinguished
■ Never extinguish burning oil or fat with water! To extinguish the fi re, use a suitable fi re extinguisher with the designation „F“ or a fi re blanket.
■ Once the fire has been extinguished, have the appliance checked by our Service (see page EN-23).

NOTICE
Pent-up heat can damage the oven's enamel.
■ Do not place baking trays or aluminium foil directly on the bottom of the cooking compartment.
If you wish to place dishes directly on the bottom of the cooking compartment, the oven temperature must not exceed 50 °C.
Baking tray, dripping pan and oven rack
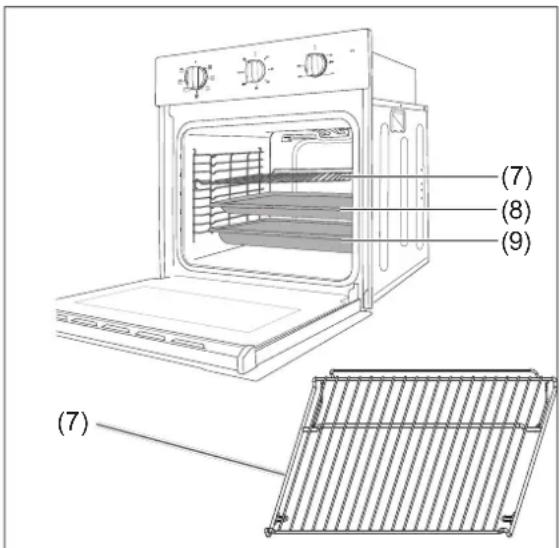
The side walls of the cooking compartment are equipped with baking tray guides (6).
- Push the supplied oven rack (7), the baking tray (8) and the dripping pan (9) onto the baking tray guides.
- Only use the oven rack together with the dripping pan to catch dripping fat.
- Slide the oven rack with the top bracket to the rear.
Function switch
flowchart
graph TD
    A["Water"] --> B["Storage"]
    B --> C["ECO"]
    D["Storage"] --> E["ECO"]
    F["Water"] --> G["ECO"]
    H["Storage"] --> I["ECO"]
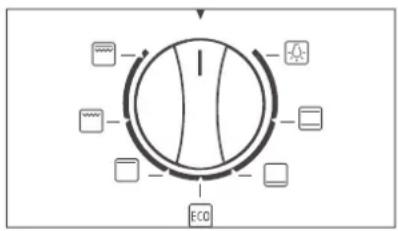
- Use the function switch (1) to select the heating method/function:

Light

Top and bottom heat*)

Bottom heat

Eco ^** )

Top heat

Grill

Intensive grill
Off
*) This type of heating is used to determine the level of energy consumption in conventional mode.
**) This type of heating is used to determine the level of energy consumption in convection mode and to determine the energy efficiency class.
Detailed information and tips on the heating methods can be found in the enclosed brochure „Baking, roasting and cooking“.
Temperature controller

CAUTION!
Risk of burns!
Elements, sides, baking trays, etc. get very hot during operation.
■ Accessible parts may become hot during use. Keep small children away.
■ Avoid direct contact.
■ Only touch the oven door by the handle.
■ Hot steam can flow from the extraction hood when the oven is in use. Take care when opening the oven door.

CAUTION!
Fire hazard!
■ Never leave the oven unattended while grilling!
■ Fatty foods can catch fi re.
■ Do not cover cakes or roasts with baking paper during cooking.
■ Do not allow food, baking parchment and aluminium foil to come into contact with the heating elements.
■ Do not store temperature-sensitive, combustible or fl ammable objects in the oven.
■ Do not leave the oven unattended while cooking food in oil and grease or with alcohol. The food may ignite.

NOTICE
Risk of damage!
■ Do not force the temperature controller past the final position.
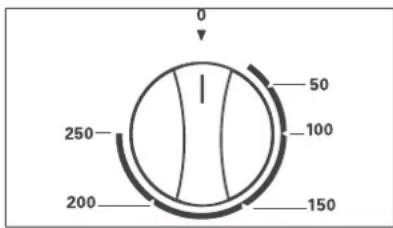
- After you have selected the heating method, set the desired oven temperature using the temperature controller (3). The oven can be set from 50 °C to 250 °C.
Switching on the oven
The oven will start working only when the timer (2) is set to a certain time or to the operating symbol ◇
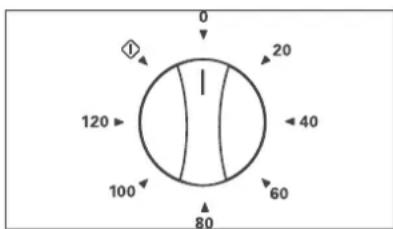
• After selecting the heating method and setting the temperature, turn the timer (2) to the desired value.
The oven will now heat up and will switch off again after the set time has elapsed.
Temperature indicator light
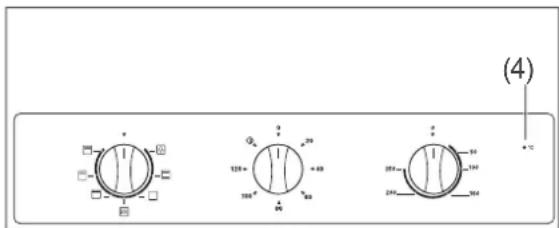
The red temperature indicator light (4) will light up as soon as you have selected a heating method and set the temperature and timer (2). It will light up while the oven is heating up and/
or re-heating. Once it goes out, the set oven temperature has been reached.
The red temperature indicator light goes on and off repeatedly during the entire cooking time.
Cooking compartment light
! NOTICE
Use the cooking compartment light only for illuminating the inside of the appliance. It is not suitable for lighting a room.
-
Set the function switch (1) to the light symbol ☐
-
Set the timer (2) to operating mode
The cooking compartment light is switched on for all types of heating except for the ECO mode.
Switching off the oven
- Turn the temperature controller (3) anticlockwise to zero.
- Turn the function switch (1) back to zero▼.
- Turn the timer (2) anticlockwise to zero.
- If using the oven in operating mode turn the timer clockwise to zero.
The red temperature indicator light (4) will disappear.
Special preparation information for yeast dough
- If the baking dish does not fit in the cooking compartment, you can remove the baking tray guides to increase the cooking compartment volume (see page EN-15).
- Pre-heat the oven to 50 °C.
- Switch the oven off when the temperature has been reached.
- Place the baking dish with the yeast dough in the cooking compartment. You can place the dish directly on the bottom of the oven.
- Close the oven door and leave the yeast dough in the oven for the desired time without further heating.
The ECO mode
ECO For energy-efficient baking.
When ECO mode is activated, the heating element is electronically controlled to make better use of residual heat and therefore reduce energy consumption. Using ECO mode will slightly extend the cooking time.
ECO mode is especially suited for cooking meat: cooking using this mode will result in juicier meat.
Cleaning

CAUTION!
Risk of burns!
■ Allow the oven to cool completely before cleaning.
■ Never pour water directly onto the hot oven. The steam can cause scalding and damage the enamel.
- Allow hot water from the oven to cool before pouring it out.
■ Only change the oven light bulb once the oven has cooled down.

NOTICE
Risk of damage!
■ For cleaning purposes, do not use any harsh, abrasive cleaning agents or scouring agents, steel wool, metal scrapers, oven sprays, steam cleaners or high-pressure cleaners! They can damage the surface and destroy the glass.
High-pressure cleaners can cause a short circuit.
Cleaning the front of the housing
- After cooling, thoroughly clean the surfaces with warm rinsing water or all-purpose cleaner.
- For stainless steel surfaces, you can also use special care products made just for stainless steel surfaces.
Cleaning the cooking compartment
- Switch on the cooking compartment light only for cleaning.
– Clean the cooking compartment and baking trays after every use, and rinse with warm water.
– Clean the door seal in the same way. But be very careful as it is only attached in certain places, and is otherwise loose.
Steam cleaning
Steam cleaning is a wet cleaning process that uses steam to remove light stains and dirt. That's how you clean the cooking compartment in an energy-efficient manner while conserving materials.
- Remove the oven rack (7) and baking tray (8) from the cooking compartment.
- Slide the dripping pan (9) into the lowest rack level and pour about 0.5 l of water into it.
- Turn the function switch (1) to top and bottom heat and the temperature controller (3) to 100 °C.
- Set the timer (2) to 30 minutes.
- After the time has elapsed, allow the oven to cool until the oven walls are only lukewarm.
- Use potholders or something similar to remove the dripping pan from the oven and pour out the remaining water.
- Wipe the cooking compartment off with a damp cloth or sponge.
- Rinse off the oven rack, baking tray and dripping pan.
Cleaning the baking tray guides
! NOTICE
Risk of damage!
The baking tray supports are not dishwasher-safe.
■ Only clean the baking tray guides by hand.
Removing and cleaning the baking tray guides
- Remove the baking tray (8), the oven rack (7) and the dripping pan (9) from the oven.
- Unscrew the screw (10) underneath the baking tray guides (6).
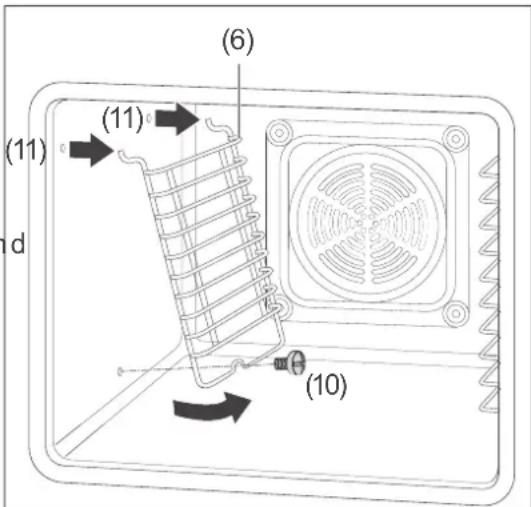
- Fold up the baking tray guide (6) from below and carefully pull the curved brackets (11) upwards from the wall.
- In this way, you can also remove the second baking tray guide (6).
- Clean the baking tray guides (6) and cooking compartment using warm water and mild dish soap or all-purpose cleaner. Then dry everything off.
Inserting the baking tray guides
- First insert the baking tray guide (6) using the curved brackets (11) into the holes in the wall and fold it down against the wall.
- Secure the baking tray guides using the screw (10).
You can then use the baking tray guides again as usual and insert the baking tray (8), the oven rack (7) and the dripping pan (9).
Cleaning the oven door

CAUTION!
Risk of breakage and injury!
The oven door is equipped with heavy glass panels that can break if handled improperly. The glass shards are sharp and can cause injury.
■ Do not let the oven door or individual glass panels fall.
■ Do not hit the oven door and the individual panels of glass anywhere.
■ Do not use the oven when the glass is damaged because the oven is no longer safe. Please contact our Service instead (see page EN-23).
■ If a glass pane breaks, keep children away from it and carefully collect all the pieces of glass.
Taking the oven door off its hinges
The oven door can be removed from its hinges to enable easy cleaning of all areas of the oven:
- Open the oven door completely.
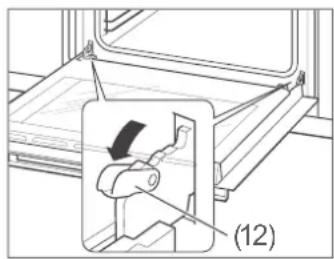
- Fold the clips (12) on both sides all the way forward. Use a screwdriver if necessary.
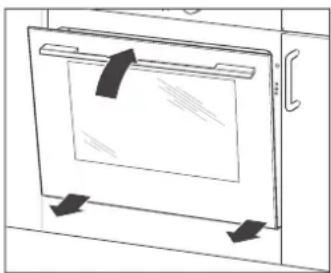
- Only close the oven door so far that there is still a gap of approx. 10 cm.
natural_image
Simple line drawing of a cabinet or storage unit with arrows indicating movement or force (no text or symbols)- Lightly lift and guide the door forward out of its hinges.
Putting the oven door back on its hinges
- Hold the door on an angle using both hands.
-
Hook the hinges into the holes in the side panels.
The oven door must be level with the oven. -
Open the oven door completely.
- Fold the clips (12) on both sides all the way back again.
- Close the door carefully.
The door must sit flush when closed. If the door does not sit flush when closed or if there is a cracking sound when closing it, the door is not hung properly.
- Correct the position of the hinges and clips, if necessary, until the door opens and closes smoothly again.
Cleaning the glass panes
The oven door contains two glass panes that should occasionally be cleaned on both sides.
- Take the oven door off its hinges (see chapter "Taking the oven door off its hinges").
- Place the oven door with the outer side (13) on a soft base.
- Take both panes with one finger on each side in the gap and on both sides push the rear clamp (14) forward so that the inner pane is released (15) from the clamp brackets.
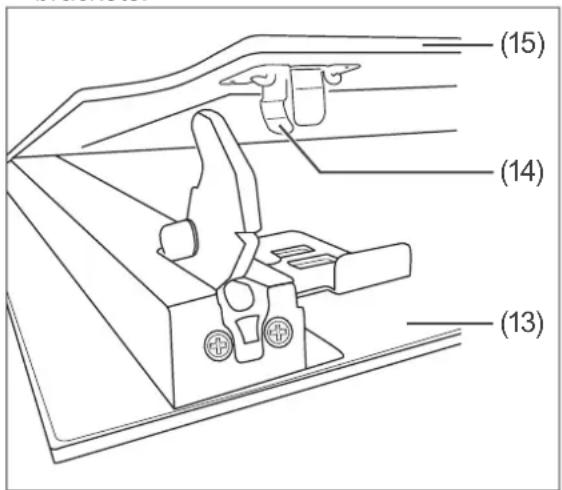
- Take the inner pane (15) out of the oven door.
- Clean both panes with warm clean water.
- Dry the panes thoroughly.
- Return the inner pane (15) back into the oven door and push it (14) firmly into the clamps.
- Replace the oven door (see chapter "Putting the oven door back on its hinges").
Replacing the light bulb in the cooking compartment
For the cooking compartment lighting, you need a heat-resistant oven bulb with the following specifications: type 230 V\~, 25 W, G9, T 300 °C.

WARNING
Risk of electric shock!
Improper replacing of the oven light bulb may cause electric shock which can lead to serious injury or even death.
■ Before replacing the oven bulb, be sure to switch off the circuit breaker or unscrew fuses.
Risk of burns!
The cooking compartment can remain hot a long time after it has been switched off. As a result, there is a risk of being burnt when touching the cooking compartment walls or heating unit.
■ Only change the oven light bulb when the oven has cooled off completely.
- Switch off the circuit breakers or unscrew fuses.
- Place a soft cloth in the cooled cooking compartment in the event that the glass cover (16) falls or the bulb (17) falls off.
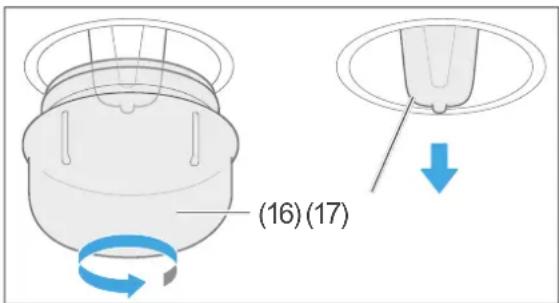
- Unscrew the glass cover (16) anticlockwise and remove it.
- Carefully pull the defective bulb (17) out of the socket and replace it with a new one of the same type.
- Insert the glass cover (16) back into the opening and screw it back on clockwise.
- Remove the cloth from the cooking compartment and switch it on again.
Delivery
natural_image
Line drawings of an oven, air grating, and electrical circuitry (no text or symbols)Packaging tips

If you have sufficient space, we recommend keeping the packaging, at least during the warranty period. If
the appliance needs to be sent out for repairs, only the original packaging will provide sufficient protection.
Should you choose not to keep the packaging, please dispose of it in an environmentally friendly way.
Package contents
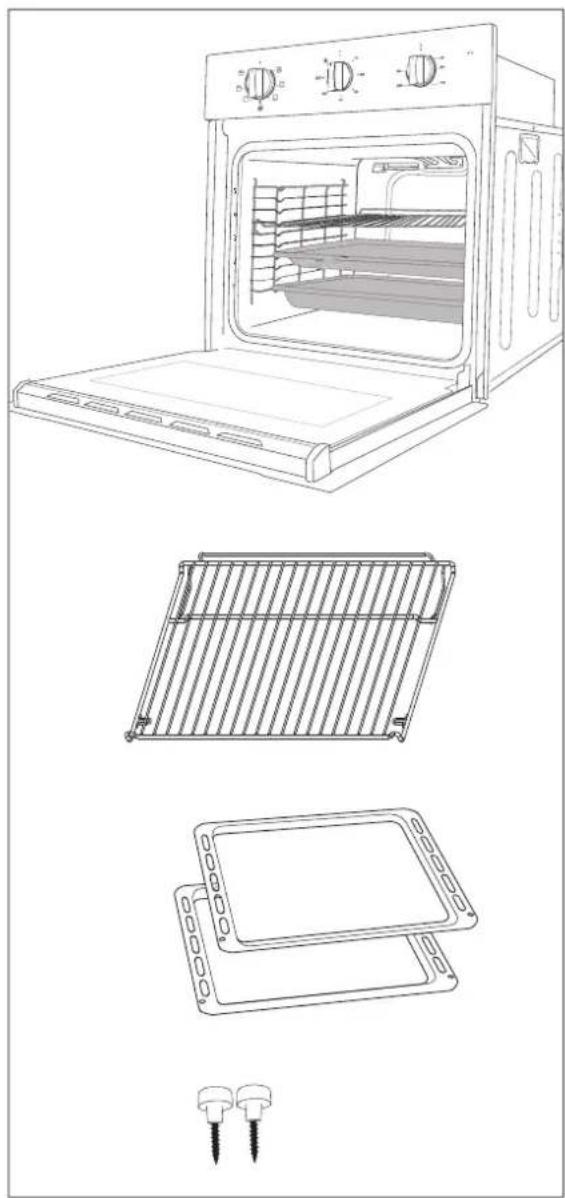
1× Built-in oven with
1× Oven
1× Oven rack
1× Baking tray
1× Dripping pan
Installation materials
2× Mounting screw
Accessories:
1× User manual
1× „Baking, roasting and cooking“ brochure
Check the delivery
-
Transport the oven to a suitable location and unpack it there (see "Fitting and installation" on page EN-19).
-
Check that the delivery is complete.
-
Check whether the oven was damaged during transit.
-
If the delivery is incomplete or the oven has been damaged during transit, contact our Service (see page EN-23).

WARNING
Never use a damaged appliance.
Fitting and installation

WARNING
Risk of injury!
■ The oven is heavy and bulky. Get another person to help with moving and installation.
■ Do not use the oven door and door handle as a step or for lifting.
Fire hazard!
Improper handling of the oven may result in damage or cause a fire. Heat trapped inside the oven may shorten its service life.
■ Ensure suffi cient ventilation. Do not cover the vents.
■ When installing the oven, follow the dimension specifications for ventilation.

NOTICE
Risk of damage!
Improper handling of the oven may result in damage.
■ Do not use sharp objects to unpack the appliance.
Moving and unpacking
- Move the oven using a trolley or with a second person.
- Carefully unpack the oven and remove all packaging items, plastic profiles, adhesive strips and foam padding from inside, outside and from the back plate of the appliance.
- Remove all protective films.
Installing the oven
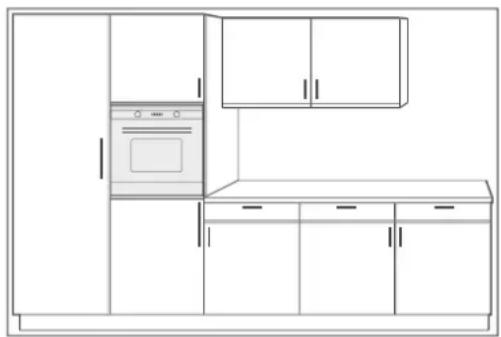
The oven is designed for installation in standard kitchen units. It can be installed at eye-level and underneath the worktop.
natural_image
Line drawing of a kitchen interior with oven, cabinet, and door (no text or symbols)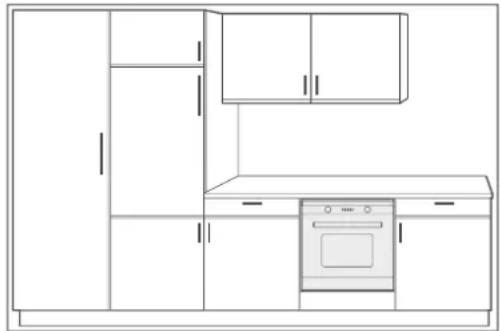
natural_image
Line drawing of a kitchen cabinet with oven and oven (no text or symbols)The following conditions must be observed:
- Do not install the oven directly next to a refrigerator or freezer. This will increase its energy consumption unnecessarily due to heat emission.
– The best place is next to the sink. You have an additional work surface and dirty dishes can be washed immediately.
– Before installation, check whether the appliance dimensions are compatible with your furniture dimensions. - In respect of fire protection, the oven conforms to Type Y (EC 335-2-6). This type of appliance may only be installed on one side of taller kitchen cabinets, appliances or walls.
- The installation recess may not have a rear panel, at the most it may have an add-on edge measuring no more than 50~mm .
-
The built-in cabinet can be equipped with either ledges/rails or an intermediate shelf with ventilation cut-out.
-
Your built-in furniture may need to be modified. If you do not have the manual skills to do this, you should hire a professional.
- Veneers or plastic coverings on the built-in furniture require heat-resistant adhesive (100 °C). If the adhesive and surfaces are not heat-resistant, the covering may warp and come loose.
- An intermediate shelf is required if a drawer is to be installed below the oven.
- The installation recess must have the following minimum dimensions:
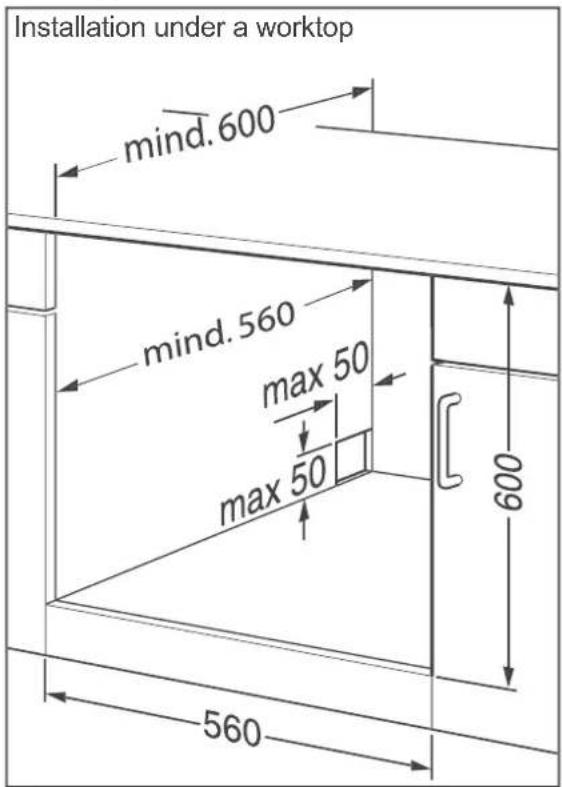
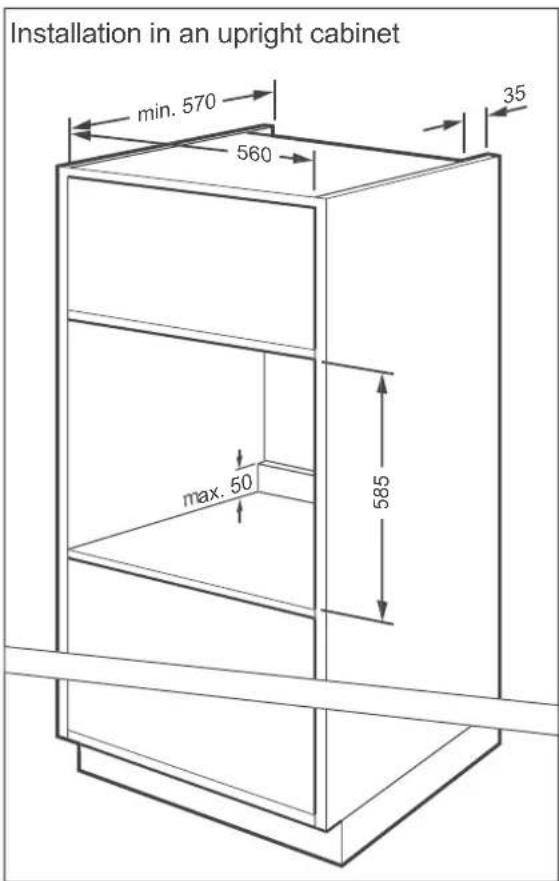
All dimensions in mm
Connecting the oven
Depending on the installation recess, the oven must be connected before or after installation.
- For the electrical connection of the oven, a professional must install an earthed power socket with a separate fuse with sufficient protection (230 V\~/50 Hz/16 A).
- The socket must be installed in way that does not affect the depth of the installation recess when the oven is plugged in.
-
Do not use multi-plugs or extension cables.
-
Switch off the socket for the Oven before installation. To do this, unscrew and/or switch off the fuse for the socket.
- Set all oven switches to zero.
- Insert the mains plug into the socket.
Inserting the oven

WARNING
Risk of electric shock!
Incorrect installation/dismantling can cause electric shock.
■ Before installing/dismantling the appliance, check that the socket to which the appliance is connected is switched off.

NOTICE
Risk of damage!
Improper handling of the appliance can result in damage.
■ Use only the side carry points to lift the oven.
■ Do not set the oven down on the edge or corner of the oven door! The glass panes can be damaged.
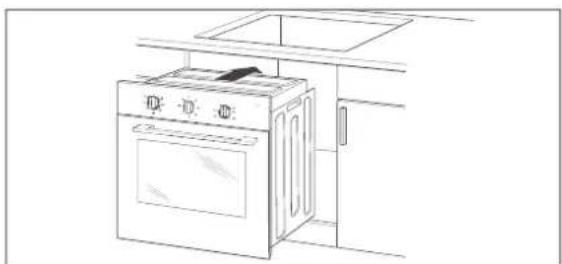
natural_image
Line drawing of a kitchen oven with open lid and side door (no text or symbols)- Push the oven into the recess until the front fascia is flush with the installation unit. The mains connection must not be kinked, pinched or otherwise damaged.
- Ensure an even gap between the oven and the unit walls on both sides. Do not seal the gap above the oven fascia.
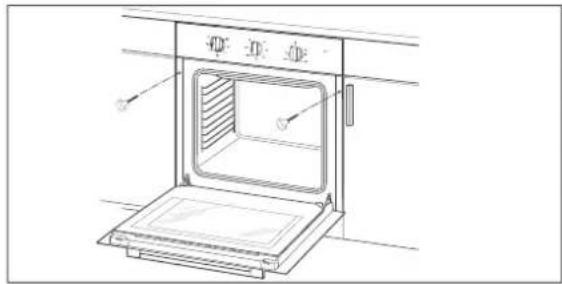
natural_image
Line drawing of an oven with a lid and tray, no text or symbols present- Once the oven is correctly positioned, open the oven door and screw into the unit using the fitting screws supplied.
- Switch the socket fuse back on.
- Check the functions as described from page EN-12.
Pre-cleaning the oven
The oven must be pre-cleaned to remove all grease and oil residues from the manufacturing process, as well as tough dust deposits leftover from storage and transportation.
- Leave the oven rack, baking tray and dripping pan in the oven.
- Pour about 0.6 l of water into the dripping pan.
- Operate the oven for 60 minutes at 50 °C, top and bottom heat —(see "Operation" on page EN-11).
- Let all parts dry completely afterwards.
- Wash the baking tray, oven rack, dripping pan and cooking compartment with clean water. Then dry everything off.
Troubleshooting table

WARNING!
Never try to repair a defective or suspected defective appliance yourself. You can put your own and future users' lives in danger. Only authorised specialists are allowed to carry out this repair work.
| Problem Possible solutions/tips | |
| Temperature indicator light disappears. | The set oven temperature has been reached. The temperature indicator light switches on again automatically when the temperature drops. |
| Temperature indicator light does not light up. | First check if the oven still works. If the temperature indicator light is defective, only have it replaced by Customer Service (see page EN-23). |
| Oven lightbulb defect. Change the oven lightbulb (see “Replacing the light bulb in the cooking compartment” on page EN-17). Notice: Defective oven lightbulbs do not fall under our warranty. | |
| The external cooling fan is not working; no air released from the air locks and they are very hot. | The external ventilation system will only switch on at a temperature of 70 °C. If the ventilation system does not make a sound and no air is emitted even when the temperature is increasing, the ventilation system is defective.[7x45] CAUTION!Risk of burns!■ Open the oven door, switch the appliance off and do no continue to use the oven. Contact our Service (see page EN-23). |
| External cooling fan keeps running. | No defect. The external cooling fan continues to run for a while and then switches itself off automatically. |
Service
Please note!
You are responsible for the condition of the appliance and its proper use in the household.
If you call out for customer service due to an operating error, you will incur charges, even during the guarantee/warranty period.
Damage resulting from non-compliance with this manual unfortunately cannot be recognised.
In order for us to help you quickly, please tell us:
| Name of appliance Model Order number | ||
| hanseatic built-in oven 65M40M1-E11314A 230 | 35010 |
Advice, order and complaint
Please contact your mail order company's customer service centre if
– the delivery is incomplete,
– the appliance is damaged during transport,
– you have questions about your appliance,
- a malfunction cannot be rectified using the troubleshooting table,
– you would like to order further accessories.
Repairs and spare parts
You can prevent waste by having your defective appliances repaired. Please contact our Service Department regarding this.
Customers in Germany
Please contact our Technical Service: Phone +49 (0) 40 36 03 31 50
Customers in Austria
Please contact your mail order company's customer service centre or product advice centre.
Waste prevention, free return and disposal
Waste prevention
According to the provisions of Directive 2008/98/EC, waste prevention measures always take priority over waste management.
For electrical and electronic devices, waste prevention measures include extending the lifespan of defective devices through repair and reselling used working appliances instead of disposing of them.
Please help us reduce waste and contact our customer service if your product is faulty.
More information can be found in the brochure "Waste Prevention Programme – of the German Government with the Involvement of the Federal Länder".
Free return of old electrical appliances
Upon purchasing a new electrical appliance of the same type with essentially the same function, consumers may return an old electrical appliance to a distributor obliged to take back old appliances, at no extra cost for the consumers. This option also exists for deliveries made to a private household. For distance selling, the option of having old electrical equipment collected for free applies only in the case of purchase of new electrical equipment with heat exchangers (e.g. refrigerators, dehumidifiers), screens and display devices with a screen surface > 100 cm ^2 , and large devices with at least one of its external dimensions measuring more than 50 cm.
In addition, consumers may return up to three old electrical appliances of the same type to a distributor's collection point for free, without having to purchase a new electrical appliance. In this case, however, the old appliances' external dimensions may not exceed 25 cm.
Disposal
Disposing of old electrical devices in an environmentally friendly manner
Electrical appliances contain harmful substances as well as valuable resources.
Every consumer is therefore required by law to dispose of old electrical appliances at an authorised collection or return point. They will thus be made available for environmentally-sound, resource-saving recycling.
You can dispose of old electrical appliances free of charge at your local recycling centre.
Please contact your dealer directly for more information about this topic.
Don't forget to erase data!
If necessary, each consumer is responsible for erasing personal data from electrical and electronic equipment.
Batteries and rechargeable batteries, lamps and bulbs
If necessary, old single-use and rechargeable batteries that are not encased by an old electrical appliance, as well as lamps/bulbs that can be removed from an old electrical appliance without being destroyed, must be removed and disposed of separately before you return the appliance.
This symbol means that batteries and rechargeable batteries must not be disposed of with other household waste.
Consumers are required by law to bring all batteries and rechargeable batteries, regardless of whether they contain harmful substances*) or not, to a collection point operated by their communal authority or borough or to a retailer, so that they can be disposed of in an environ-
mentally friendly manner and so that valuable resources (e.g. cobalt, nickel or copper) can be recovered.
Batteries and rechargeable batteries can be returned free of charge.
Some of the possible contents (e.g. mercury, cadmium and lead) are toxic and, if improperly disposed of, can have adverse effects on the environment. Heavy metals, for instance, can have detrimental health effects on humans, animals and plants and accumulate in the environment and food chain, and then enter the body indirectly through the consumption of food.
There is a high risk of fire with old lithium batteries. Special care must therefore be taken to properly dispose of old lithium batteries and rechargeable batteries. Improper disposal can also lead to internal and external short circuits due to thermal effects (heat) or mechanical damage. A short circuit can lead to a fire or an explosion and have serious consequences for people and the environment. It is therefore important to tape off the poles of lithium batteries and rechargeable batteries before disposing of them to prevent an external short circuit.
Before disposing of the appliance, batteries and rechargeable batteries which are not permanently built into the appliance must be removed and disposed of separately.
Please only dispose of batteries and rechargeable batteries in a discharged state!
If possible, use rechargeable batteries in place of disposable batteries.
*) labelled with:
Cd = Cadmium, Hg = Mercury and
Pb = Lead
Packaging

Our packaging is made of environmentally friendly, recyclable materials:
- Outer packaging made of cardboard
- Moulded parts made of foamed, CFC-free polystyrene (PS)
– Films and bags made of polyethylene (PE)
– Tension bands made of polypropylene (PP) - Saving energy also protects against excessive global warming. Your new appliance uses little energy due to its environmentally friendly insulation and technology.

If you have sufficient space, we recommend keeping the packaging, at least during the warranty period. If
the appliance needs to be sent out for repairs, only the original packaging will provide sufficient protection.
If you would like to dispose of the packaging, please dispose of it in an environmentally friendly way.
Table "Test report"
These dishes were prepared in accordance with DIN 44547 and EN 60350 standards.
| Dish | Shelf level (see below) | Heating method | Temperature in °C | Cooking duration in min. 1) |
| Shortbread biscuits 4 Top/bottom heat 150-170 20-30 | ||||
| Water sponge cake 2 Top/bottom heat 170-180 25-35 | ||||
| Apple pie with crumble | 4 Top/bottom heat 180-190 35-45 | |||
| Small cakes | 4 Top/bottom heat 180-190 | 15-25 | ||
| Toast | 3 | Intensive grill | 250 | 1-3 |
| Burgers | 4 | Intensive grill | 250 | 12+8-12^2) |
| Pizza | 3 Top/bottom heat 190-210 | 15-25 | ||
1) Always preheat the oven for 5–15 minutes regardless of the other cooking instructions.
2) First + second page
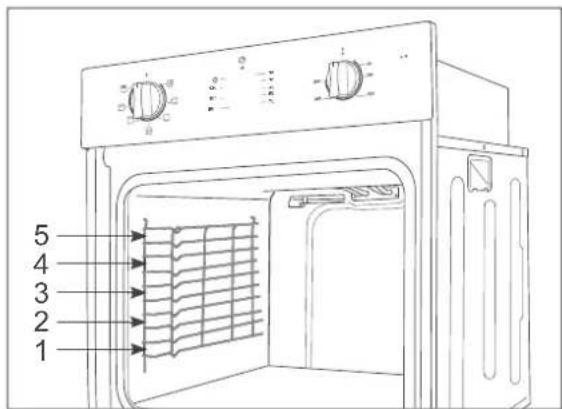
Shelf levels
Product fiche pursuant to Regulation (EU) No 65/2014
| Trade mark | hanseatic |
| Model identifier | 65M40M1-E11314A |
| Energy efficiency index | 94,3 |
| energy efficiency class class on a scale from A+++ (most efficient) to D (least efficient) | A |
| Energy consumption in conventional mode | 0,82 kWh/cycle |
| Energy consumption in fan-forced mode | - kWh/cycle |
| Number of cavities | 1 |
| Heat source | electricity |
| Volume | /5 l |
The values indicated above have been measured under standardised laboratory conditions pursuant to EN 60350-1.
Product fiche concerning EU Directive No. 66/2014
| Model identification | 55M40M1-E11314A |
| Type of oven | built-in |
| Mass of the appliance | 30,0 <g |
| Number of cavities | 1 |
| Heat source | electricity |
| Volume | 75 l |
| Energyconsumption in conventional mode | 0,82 kWh/cycle |
| Energyconsumption in fan-forced mode | -kWh/cycle |
| EnergyEfficiency Index | 94,3 |
The values indicated above have been measured under standardised laboratory conditions pursuant to EN 60350-1.
Technical specifications
| Item number | 23035010 |
| Name of appliance | Built in oven |
| Modell | 65M40M1-E11314A |
| Rated voltage | 220 - 240 V ~ |
| Frequency | 50 Hz |
| Rated power input oven | 3000 W |
| Oven measurements (H x W x D) | 595 mm x 595 mm x 575 mm |
| Oven recess dimensions (H x W x D) | 600 mm x 560 mm x 570 mm |
| Maximum temperature | 250 °C |
| Lighting | 230 V, 25 W, G9, T 300 °C |
This product contains a light source of energy efficiency class G.
- Einbaubackofen
- Inhaltsverzeichnis
- Verpackungs-Tipps
- Built-in oven
- Table of contents
- Explanation of terms and symbols
- WARNING
- CAUTION
- NOTICE
- Intended use
- Safety notices
- Risks to children and certain groups of individuals
- Risk of injury!
- Electrical safety
- Risk of electric shock!
- Safety when handling heat-generating appliances
- Protecting food
- Using the oven safely
- ! NOTICE
- Specific risks when grilling
- Specific risks for units with a cooling fan
- Controls and appliance parts
- Control panel
- Oven
- Operation
- The right oven cookware
- Proper oven handling
- CAUTION!
- Fire hazard!
- Baking tray, dripping pan and oven rack
- Function switch
- Temperature controller
- Switching on the oven
- Temperature indicator light
- Cooking compartment light
- Switching off the oven
- Special preparation information for yeast dough
- The ECO mode
- Cleaning
- Risk of burns!
- Risk of damage!
- Cleaning the front of the housing
- Cleaning the cooking compartment
- Steam cleaning
- Cleaning the baking tray guides
- Removing and cleaning the baking tray guides
- Inserting the baking tray guides
- Cleaning the oven door
- Taking the oven door off its hinges
- Putting the oven door back on its hinges
- Cleaning the glass panes
- Replacing the light bulb in the cooking compartment
- Delivery
- Packaging tips
- Package contents
- Check the delivery
- Fitting and installation
- Moving and unpacking
- Installing the oven
- Connecting the oven
- Inserting the oven
- Pre-cleaning the oven
- Troubleshooting table
- WARNING!
- Service
- Please note!
- Advice, order and complaint
- Repairs and spare parts
- Customers in Germany
- Customers in Austria
- Waste prevention, free return and disposal
- Waste prevention
- Free return of old electrical appliances
- Disposal
- Disposing of old electrical devices in an environmentally friendly manner
- Don't forget to erase data!
- Batteries and rechargeable batteries, lamps and bulbs
- Packaging
- Table "Test report"
- Product fiche pursuant to Regulation (EU) No 65/2014
- Product fiche concerning EU Directive No. 66/2014
Brand : Hanseatic
Model : 65M40M1-E1131A
Category : Oven