
DEC-664 HD/USB/REC - Digital decoder MAJESTIC - Free user manual and instructions
Find the device manual for free DEC-664 HD/USB/REC MAJESTIC in PDF.


| Product Type | HD Digital Terrestrial Receiver |
| Brand | Majestic |
| Model | DEC-664 HD/USB/REC |
| Power Supply | AC 100-240V, 50/60Hz |
| Power Consumption (Operating) | <5W |
| Standby Consumption | 0.5W |
| Tuner Input | RF IN (IEC16902 female), VHF/UHF, 75 ohm |
| Demodulation | COFDM (QPSK/QAM16/QAM64/QAM256), 2k and 8k |
| Video Decoding | MPEG-2 SD/HD, MPEG-4 H.264/AVC, H.265/HEVC, DivX 4.x-5.x |
| Audio Decoding | MPEG-1/2, HE-AAC, Dolby Digital (AC-3), E-AC-3 |
| Video Outputs | HDMI 1.4, SCART |
| USB Port | USB 2.0, 5V/300mA, FAT32 file system |
| Recording Function | Manual and scheduled recording to USB, Timeshift |
| Multimedia Playback | Music (MP3/WMA/AAC), Photo (JPEG/PNG/BMP), Video (AVI/MKV/MP4/TS) |
| Aspect Ratio | 4:3, 16:9 |
| Remote Control | Included (2× AAA batteries) |
| Safety | Class II, CE, indoor use only, do not expose to water or heat |
| Cleaning | Unplug before cleaning; use a damp cloth only |
| Environmental | WEEE compliant, separate disposal required |
| Included Accessories | Remote control, user manual, batteries |
Frequently Asked Questions - DEC-664 HD/USB/REC MAJESTIC
User questions about DEC-664 HD/USB/REC MAJESTIC
0 question about this device. Answer the ones you know or ask your own.
Ask a new question about this device
Download the instructions for your Digital decoder in PDF format for free! Find your manual DEC-664 HD/USB/REC - MAJESTIC and take your electronic device back in hand. On this page are published all the documents necessary for the use of your device. DEC-664 HD/USB/REC by MAJESTIC.
USER MANUAL DEC-664 HD/USB/REC MAJESTIC
PANNELO FRONTALE / POSTERIORE

MENU
MENU PRINCIPALE
Video decoding: MPEG-2 SD/HD (MP@ML and MP@HL),
MPEG-4 H.264/AVC H.265/HEVC SD/HS DIVX 4.X\~5.X
JPEG, BMP, PNG, MOTION JPEG
AVI, VOB, MOV, MKV
Consumo in standby: 0.5w
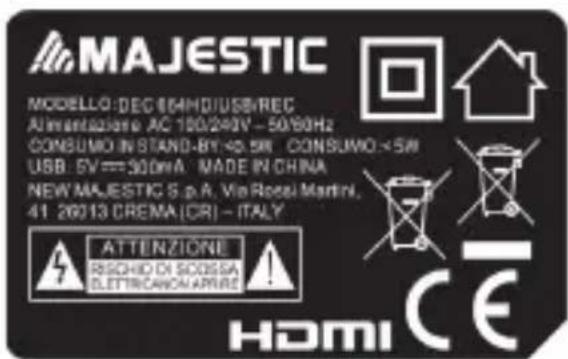
HD Digital Terrestrial Receiver
MODEL NO.: DEC 664HD/USB/REC

Imported by:
New Majestic S.p.A.
Via Rossi Martini, 41
26013 Crema (CR) - ITALY
www.newmajestic.com
MADE IN CHINA
Please read this user manual before using or connecting this product. And keep it handy for future reference.

User Manual

To reduce the risk of electric shock.
Do not remove cover.
No user-serviceable parts inside. Refer servicing to qualified service

This symbol indicates "dangerous voltage"
inside the product that presents a risk of
Electric shock or personal injury.

This symbol indicates important instructions accompanying the
- Read, follow and keep these instructions.
- Do not use this apparatus near water.
- Clean only with a damp cloth. Please unplug power prior to cleaning.
- Do not block any of the ventilation openings.
- Do not install near any heat sources such as radiators, heat registers, stoves, or other apparatus (including amplifiers) that produce heat.
- Protect the power cord from being walked on or pinched particularly at the plug, receptacles,
and the point where they exit from the apparatus. - Only use attachments/accessories included within this package.
- Unplug this apparatus during lighting storms or when unused for long periods of time.
- Refer all servicing to qualified service personnel.
User Manual
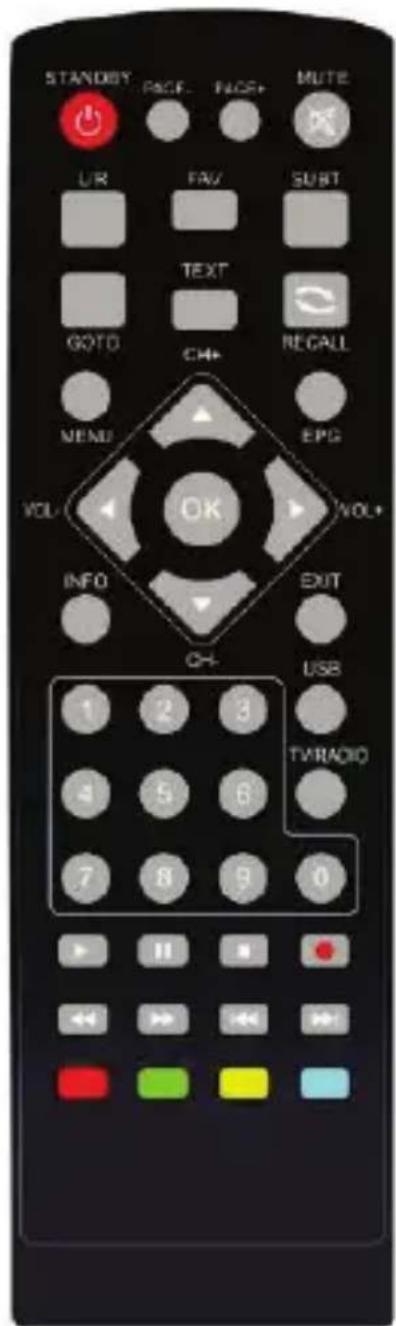
REMOTE CONTROL
STANDBY: Turn on/off
Page -: In the program list and multimedia, page down
Page +: In the program list and multimedia, page up Mute: Turn off/on voice.
L/R: Selection of available languages
FAV: Show favorites list
Subtitle: Enter/exit subtitle menu
TEXT: DVB teletext
GOTO: Go forward or backward under replaying recorded file
Recall(○): Return to previous menu EPG: Electronic
Program Guide Menu: Enter main menu
USB: Play previous USB media
EXIT: Go back directly to full screen display TV/RADIO: Switch between TV and Radio mode Number Key: <0-9>
RECORD(●): TV Program recording
Direction key: Up/down/left/right
OK: Confirm selection on operating menu
Or hot-key of "QUICK SELECT" in full-screen playing
VOL -/+: Volume adjusting
INFO: Display program information in full-screen playing
CH+/CH-: Go next/previous channel.
PLAY/PAUSE(▶): Hause/Play program playing or movie playing
Stop(■): Stop program playing or movie playing
PREV(◀◀): Previous chapter
NEXT(▶): Next chapter
FR( ) Rewind
FF( ) : Fast forward
RED KEY: quick access to recordings / context key to the menu
GREEN KEY: HDMI video resolution change / function key contextual to the menu
YELLOW KEY: change the image ratio / function key contextual to the menu
BLUE KEY: shows the menu Programming / function key contextual to the menu
User Manual
Battery Installation
Insert the batteries (included) while observing the correct (+) and (-) polarities as illustrated bellows:
- Remove the battery comer In the direction of the arrow.
2 Insert two 1.5V AAA batteries, Paying attention to the correct Polarities (+ and -) 3, Replace the battery cover. About the batteries If the remote control unit fails to work even when it is operated near the receiver, please replace the batteries. Use size UM-4 (AAA) BATTERIES.
![graph TD A["Top 1: Forward motion"] --> B["Mid-Section: Mid-reinforcement"] B --> C["Bottom Right: Rear motion"]](/content/2026/05/802727/images/d281b80be1abc7e8c0e71035fc786114a065ee84d63530610f7f95b433008c90.jpg)
Notes:
Do not use rechargeable (Ni-Cd) batteries.
Does not attempt to recharge, short circuit, disassemble or throw the batteries in the fire. Do no drop, step on or cause any impact to the remote control unit. This may damage it, resulting in malfunction.
Do not mix old and new batteries.
If the remote control unit is not going to be used for a long time, remove the batteries.
Caution
Keep batteries out of children's reach. If batteries are swallowed, contact a physician immediately.
User Manual
FRONT AND REAR PANEL

- Power on/off button
- Change channel up button
- Change channel down button
- Remote control signal sensor
5.USB jack - RF-IN: Digital Terrestrial TV Broadcast signal input
- HDMI output (version 1.4)
- Scart output
- AC input power source
User Manual
INSTALLATION
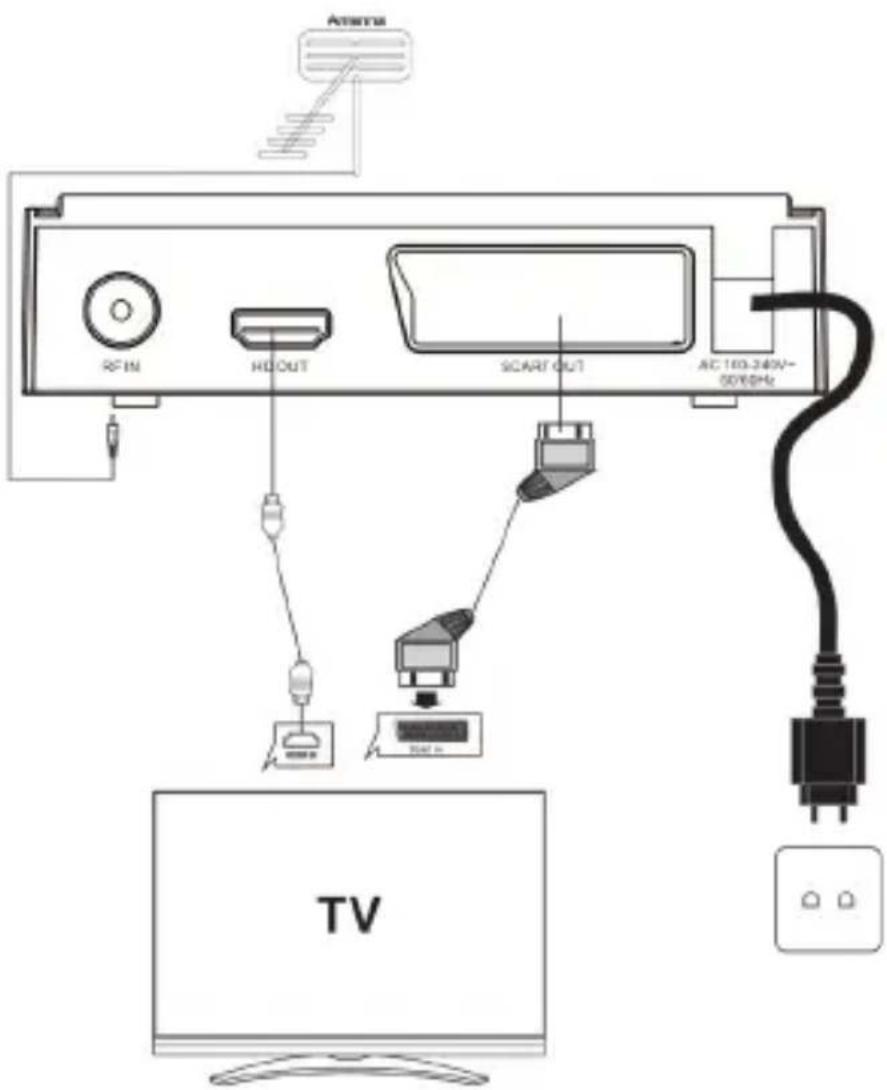
CONNECTING THE RECEIVER
Before you connect your STB to your TV please ensure that it's is placed on a flat and stable surface. Please refer to the below diagram and your TVs user manual for cable installation instructions.
User Manual
INSTALLATION GUIDE
If you are using the unit for the first time or have restored the unit to Factory Default, the installation Guide Menu will appear on you TV screen.
(1) [OSD Language] Press
RIGHT/LEFT Key to select a language.
(2) [Country] Press RIGHT/LEFT key to Select your country of residence.
(3) [Channel Search] Press RIGHT/LEFT Or OK key to begin Automatic channel Search.

If no channels is found during the channel searching process, please check your antenna connections and antenna are in working order, after the scanning process is completed the receiver with automatically save the scanned channels and display the first channel in the list. While you are using the unit, you can access the CHANNEL search menu to do the AUTO/MANUAL channel search. Press MENU key on the remote and select [Channel Search] using RIGHT/LEFT keys.
MENU
MAIN MENU
Most functions are available in main menu. A password will be required when modifying advanced options in the Menu. The Default password is "000000".
Press the menu key on the remote control; You can access the Main Menu. Use the LEFT and RIGHT Keys to navigate through the menu. Select the Desired option and press the OK key or the RIGHT key to adjust the settings. Press the EXIT key to exit the main menu.

User Manual
A. Program Settings:
In this menu you can edit program preferences, check the TV program guide (EPG), choose the type of channel sorting and change the duration of the information banner.
B. Picture Settings:
In this menu you can set the correct image ratio, depending on the TV in use, the video resolution of the HDMI output, the TV format (PAL / NTSC), the type of video signal adopted by the scart socket (CVBS / RGB) and the transparency level of the OSD menu.
C. Channel Search settings:
(a) Auto Search: This option will automatically search for TV and Radio channels and save them once the scanning is complete. All previously saved channels and settings will be deleted.
(b) Manual Search: This option allows you to scan for new channels without deleting previously saved channels and settings.
(1) Select "Manual Search" and press the "OK" or "Right" key. The Manual Channel search screen will appear.
(2) Press the "Right" or "Left" keys to select the channel frequency. (3) Press the "OK" key to start scanning for new channels.
(4) If a new channel is found, it will be saved and stored along with the rest of the channels. If no channels are found, the unit will automatically exit after finishing the scanning process.
D. Time settings:
In this menu it is possible to modify the time zone settings (GMT), activate the Sleep (programmed automatic switch-off) and set both the switch-on and switch-off automatically, setting a time for both.
E. Option:
The Menu contains the following options:
OSD Language: Change the ON Screen Display language. Subtitle language: Select the subtitle language.
Audio language: If the program has multi-languages. Set your preference here.
F. System settings:
The menu contains the following options:
a) Parental Guidance: The options for setting up the age reference starts from 4 years to 18 years. To access this function you will require inputting a code. The default password is "000000". This function can also be deactivated simply by setting it to OFF.
b) Set Password: It allows you to modify the default password, which is "000000".
c) Restore Factory Default: It allows you to restore the unit to its default factory settings.
You will be asked to enter your password "000000". Press "OK" key once done.
User Manual
Note: This function will delete all your saved channels and your personal settings. d)
Information: You can check the software version of your unit.
If corrective software updates are published on our website www.newmajestic.com this function will allow them to be executed.
G. USB Settings:
The USB menu has 4 options: (a) MULTIMEDIA:
While in TV mode, press the "USB" button to access to the Multimedia menu. The menu contains 4 different icons: Music, Photo, Movie, and PVR.
The MUSIC option is used to play audio files, IMAGES is used to play image files, VIDEO is used to play video files and REC contains recordings made with the product. Below is a list of playable video files:
Video codec: MPEG-2/4 (H.264) / VC-1 / HEVC (H.265)
Audio codec: MPEG-1 / MPEG-2 layerl / 11 / MP3 / AAC-LC / WMA / HE-AAC / WMA / AC-
3 (Dolby Digitai) E-AC-3 (Dolby Digitai Plus)
Container: TS / MPG / MP4 / AVI / MKV
Resolution: 1080p | 1080i | 720p | 576p | 576i | 480p | 480i
Frames: MPEG-2/4 1080p @ 30fps / (H.264) | 1080p @ 60fps | HEVC (H.265) 1080p @ 60fps
Image file: JPEG / PNG / BMP
Audio file: MP3 / WMA / AAC
This device supports USB sticks with FAT32 system files.
(b) Photo settings:
- Interval: set the slide show interval between 1-8 seconds.
- Type: set the slide show effect between 0-59 or random.
- Image report:
[Keep]: displays the image in its original appearance. [Reject]: Display the image in full screen.
(c) Video settings:
- Subtitles:
[Small]: displays subtitles with small size characters. [Normal]: Displays subtitles in normal mode.
[Large]: Displays subtitles using large characters.
- Subtitle background:
[White]: Displays subtitles on a white background. [Transparent]: displays subtitles on a transparent background. [Gray]: Displays subtitles on a gray background. [Yellow / Green]: Displays the subtitles on a yellow / green background.
- Text color:
[Red]: displays subtitles in red character [Blue]: displays subtitles in blue character [Green]: displays subtitles in green font. [White]: Displays subtitles in white font. [Black]: displays subtitles in black font.
User Manual
d) USB device
This function is only available when a compatible USB device is connected to the receiver. Inside it you will find information on the file system, the total space, the free space and the space for the Timeshift.
REC function (recording on USB stick)
The REC function of the receiver allows you to record and play your favorite programs. Both manual and programmed recordings can be performed.
NOTE: for the REC function it is necessary to have a USB 2.0 "HIGH SPEED" key.
1) Manual registration
Press the REC button. to start the instant recording of the currently displayed TV program, the recording symbol will be displayed in the upper left of the screen. Press the INFO button to view the recording information in progress. Press the STOP button to stop instant recording.
2) Scheduled recording via EPG
In DVB-T mode, press the "EPG" button to access the electronic program guide, then select the event you wish to record using the UP / DOWN arrows. Press the "OK" button to select the desired program to be recorded. A window for programming will be displayed. Set the correct parameters to schedule recording. Set the mode option to "Register". This program will be automatically registered at the scheduled time.
3) Timeshift
The TIMESHIFT function allows you to pause a TV program during the airing. Once paused, the program is "temporarily" recorded on the inserted USB stick, allowing you to continue viewing later.
While watching a program, press the PAUSE button on the remote control to activate the Timeshift function. To resume watching the program, press the PLAY button.
During Timeshift creation it is possible to move forward / backward through temporary storage, using the FR (fast return) and FF (fast forward) keys.
NOTE: for the REC function it is necessary to have a USB 2.0 "HIGH SPEED" key.
User Manual
Troubleshooting
The below table is s list of common problems that many occur with your receiver.
| fault | Possible cause | |
| Power on, but nothing display red on screen | Unit not turned on at mains switch | Ensure power plug is plugged into wall socket and switch is on |
| TV picture drops out and thru unit displayers "NO signal" | Antenna is not properly connected or you are in a bad reception area | Talk to your local TV antenna technician about reception problems in your area and whether a new antenna would |
| Receiving digital TV but missing some channels | Antenna is not properly connected or you are in a bad reception area | Talk to your local TV antenna technician about reception problems in your area and whether a new antenna would |
| Remote is not working | Batteries are flat or there is interference | Talk to your local TV antenna technician about reception problems in your area and whether a new antenna would |
User Manual
SPECIFICATIONS
TUNER
Input connector
Input Frequency range
Num of RF input Input
impedance Loop
through
IEC16902.Female
VHF&UHF
1
75ohm
177.5-866MHz
Demodulation
Standard
Guard interval models
FEC Modes rate
Carriers/constellation
Demodulation
ETSU EN300 744
1/32, 1/16, 1/8 active symbol
duration 1/2,2/3,3/4,5/6.7/8
All modes supported including non hierarchical
COFDM (QPSK/QAM16/QAM64/QAM256)2k and 8K.
Video decoder
Stand
Transport stream
Video decoding
ISO/IEC 13818-2 and ISO/IEC 14496-
10 ISO/IEC 13818-1
MPEG-2 SD/HD (MP@ML and MP@HL), MPEG-4
H.264/AVC H.265/HEVC SD/HS DIVX 4.X\~5.X
JPEG, BMP, PNG, MOTION JPEG
AVI, VOB, MOV, MKV
Aspect ratio
4: 3/16:9
AUDIO DECODER
Standard
Audio decoding
SO/IEC13818-3 TR1011154
MPEG-1 and MPEG-2 layer 1 &11, HE-AAC digital audio
Dolby digital (AC-3)
Stereo down-mixing to analog and digital audio outputs
(Including HDMI). For digital outputs, L-PCN stereo encoding
Is provided
Sample rate
32KHZ, 22.1KHZ, 44.1KHZ, 48KHZ
Subtitle
Subtitle
DVB subtitle
Power
AC input range
Power consumption
Standby consumption
AC 100 - 240V 50/60Hz
<5w
0.5w
INFORMATION TO USERS OF DOMESTIC EQUIPMENT
Pursuant to Art. 25, Paragraph 1 of the Legislative Act N. 49 14th March 2014, "Implement of the Directives 2011/65 / EU and 2012/19 / EU concerning the reduction of the use of hazardous substances in electrical and electronic equipment, as well as waste disposal".

The crossed bin symbol on the appliance or on its packaging indicates that the product at the end of its useful life must be collected separately from other waste. The user must, therefore,
dispose the equipment at the end of its life to the appropriate electronic and electro technical waste centers, or return it to the
retailer at the time of purchase of a new type of equivalent equipment, one by one.
Appropriate separate disposal for the subsequent start-up of the disused equipment for recycling, treatment and compatible environmental disposal helps to avoid possible negative effects on the environment and health and favours the re-use and / or recycling of the materials it is composed the equipment.
The illegal disposal of the product by the user involves the application of the penalties referred to in current laws.
Any rechargeable batteries or rechargeable batteries contained in the device must be disposed separately in the appropriate expired batteries bins.
Battery disposal

Disposal of expired batteries must take place at the appropriate recycling centers or according to local authority. Batteries in compliance with the 2013/56 / EC directive. Warning: the battery may explode if replaced incorrectly, if exposed to heat or water. Do not cause short circuit. Replace the battery only with an equivalent. Do not place
the battery in direct sunlight or in places excessively hot (over 40° C). use only with the adapter provided by the manufacturer. Do not hit or press the battery.

Class II, double insulation
WEEE Logo (Waste electrical and electronic equipment)
Battery disposal

Indoor use

Dangerous voltage

- PANNELO FRONTALE / POSTERIORE
- MENU
- MENU PRINCIPALE
- USER MANUAL
- REMOTE CONTROL
- BATTERY INSTALLATION
- NOTES
- CAUTION
- FRONT AND REAR PANEL
- INSTALLATION
- CONNECTING THE RECEIVER
- INSTALLATION GUIDE
- MAIN MENU
- PROGRAM SETTINGS
- PICTURE SETTINGS
- CHANNEL SEARCH SETTINGS
- TIME SETTINGS
- OPTION
- SYSTEM SETTINGS
- NOTE: THIS FUNCTION WILL DELETE ALL YOUR SAVED CHANNELS AND YOUR PERSONAL SETTINGS. D)
- USB SETTINGS
- PHOTO SETTINGS
- VIDEO SETTINGS
- USB DEVICE
- REC FUNCTION (RECORDING ON USB STICK)
- MANUAL REGISTRATION
- SCHEDULED RECORDING VIA EPG
- TIMESHIFT
- SPECIFICATIONS
- TUNER
- DEMODULATION
- VIDEO DECODER
- AUDIO DECODER
- SUBTITLE
- POWER
- INFORMATION TO USERS OF DOMESTIC EQUIPMENT
- BATTERY DISPOSAL
Brand : MAJESTIC
Model : DEC-664 HD/USB/REC
Category : Digital decoder