
AVMHH105EA0 - Air-conditioner SAMSUNG - Free user manual and instructions
Find the device manual for free AVMHH105EA0 SAMSUNG in PDF.


User questions about AVMHH105EA0 SAMSUNG
0 question about this device. Answer the ones you know or ask your own.
Ask a new question about this device
Download the instructions for your Air-conditioner in PDF format for free! Find your manual AVMHH105EA0 - SAMSUNG and take your electronic device back in hand. On this page are published all the documents necessary for the use of your device. AVMHH105EA0 by SAMSUNG.
USER MANUAL AVMHH105EA0 SAMSUNG
OWNER'S INSTRUCTIONS MANUAL DE INSTRUCCIONES MANUEL D'UTILISATION ISTRUZIONI PER L'USO MANUAL DE INSTRUÇÕES GEBRAUCHSANWEISUNG ΟΔΗΓΙΕΣ
natural_image
Abstract geometric pattern with diagonal white stripes and gray background (no text or symbols)Safety Precautions

WARNING
◆ If the power supply cord of this air conditioner is damaged, it must be replaced by the manufacturer or its authorized service personnel only in order to avoid a safety hazard.

DANGER
◆ Do not attempt to install this air conditioner by yourself.
◆ This unit contains no user-serviceable parts. Always consult authorized service personnel for repairs.
- When moving, consult authorized service personnel for disconnection and installation of the unit.
◆ Do not become over-exposed to cold air by staying in the direct path of the airflow of the air conditioner for extended periods of time.
◆ Do not insert fingers or objects into the outlet port or intake grilles.
◆ Do not start and stop air conditioner operation by disconnecting the power supply cord and so on.
◆ Take care not to damage the power supply cord.
◆ In the event of a malfunction (burning smell, etc.), immediately stop operation, turn off the electrical breaker, and consult authorized service personnel.

CAUTION
◆ Provide occasional ventilation during use.
◆ Do not direct air flow at fireplaces or heating apparatus.
◆ Do not climb on, or place objects on, the air conditioner.
◆ Do not hang objects from the indoor unit.
◆ Do not set flower vases or water containers on top of air conditioners.
◆ Do not expose the air conditioner directly to water.
◆ Do not operate the air conditioner with wet hands.
◆ Do not pull power supply cord.
◆ Turn off power source when not using the unit for extended periods.
◆ Check the condition of the installation stand for damage.
◆ Do not place animals or plants in the direct path of the air flow.
◆ Do not drink the water drained from the air conditioner.
◆ Do not use in applications involving the storage of foods, plants or animals, precision equipment, or art works.
◆ Do not apply any heavy pressure to radiator fins.
◆ Operate only with air filters installed.
◆ Do not block or cover the intake grille and outlet port.
◆ Ensure that any electronic equipment is at least one metre away from either the indoor or outdoor units.
◆ Avoid installing the air conditioner near a fireplace or other heating apparatus.
- When installing the indoor and outdoor unit, take precautions to prevent access to infants.
◆ Do not use inflammable gases near the air conditioner.
◆ Max input power & current is measured according to IEO standard and input power & current is measured according to ISO standard.
Contents
◆ PREPARING YOUR AIR CONDITIONER
■ Safety Precautions 2
■ View of the Unit 4
■ Wireless Remote Controller-Buttons and Display ..... 6
■ The Receiver & Display Unit 7
■ Wired Remote Controller-Buttons and Display 8
■ Centralized Controller 9
- Getting Start 10
- Inserting the Wireless Remote Controller Batteries ..... 11
SING/REESSER/RECEMRCOLER
◆ OPERATING YOUR AIR CONDITIONER
■ Selecting the Automatic Operating Mode ..... 13
■ Cooling Your Room 14
■ Heating Your Room (Except Cooling Only Models) ..... 15
■ Removing Excess Humidity 16
■ Airing Your Room 17
◆ PROGRAMMING YOUR AIR CONDITIONER
■ Setting the On Timer 18
■ Setting the Off Timer 19
JUMG WRED: NOPE ONHOLER
◆ OPERATING YOUR AIR CONDITIONER
■ Selecting the Automatic Operating Mode ..... 21
■ Cooling Your Room 22
■ Heating Your Room (Except Cooling Only Models) ..... 23
■ Removing Excess Humidity 24
■ Airing Your Room 25
◆ PROGRAMMING YOUR AIR CONDITIONER
■ Setting the On Timer 26
■ Setting the Off Timer 27
UNECO#WANZEDCONTROLLER
■ Using the Centralized Controller 28
◆ RECOMMENDATIONS FOR USE
■ Operating Recommendations ..... 29
■ Cleaning Your Air Conditioner 30
■ Temperature and Humidity Ranges 32
■ Solving Common Problems 33
◆ TECHNICAL SPECIFICATIONS
View of the Unit
The figures are shown in this instruction may differ from yours depending on the model.
Indoor Unit
**052/070/072**
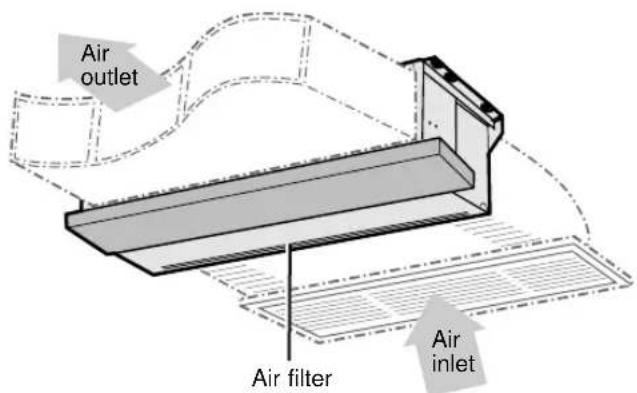
text_image
Air outlet Air filter Air inletIndoor Unit
**105/128**
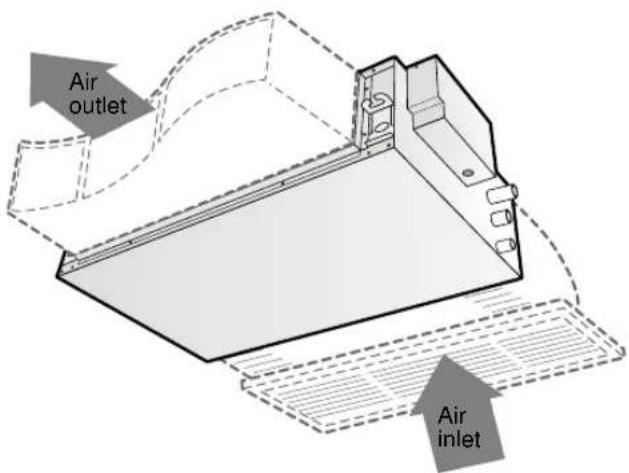
text_image
Air outlet Air inlet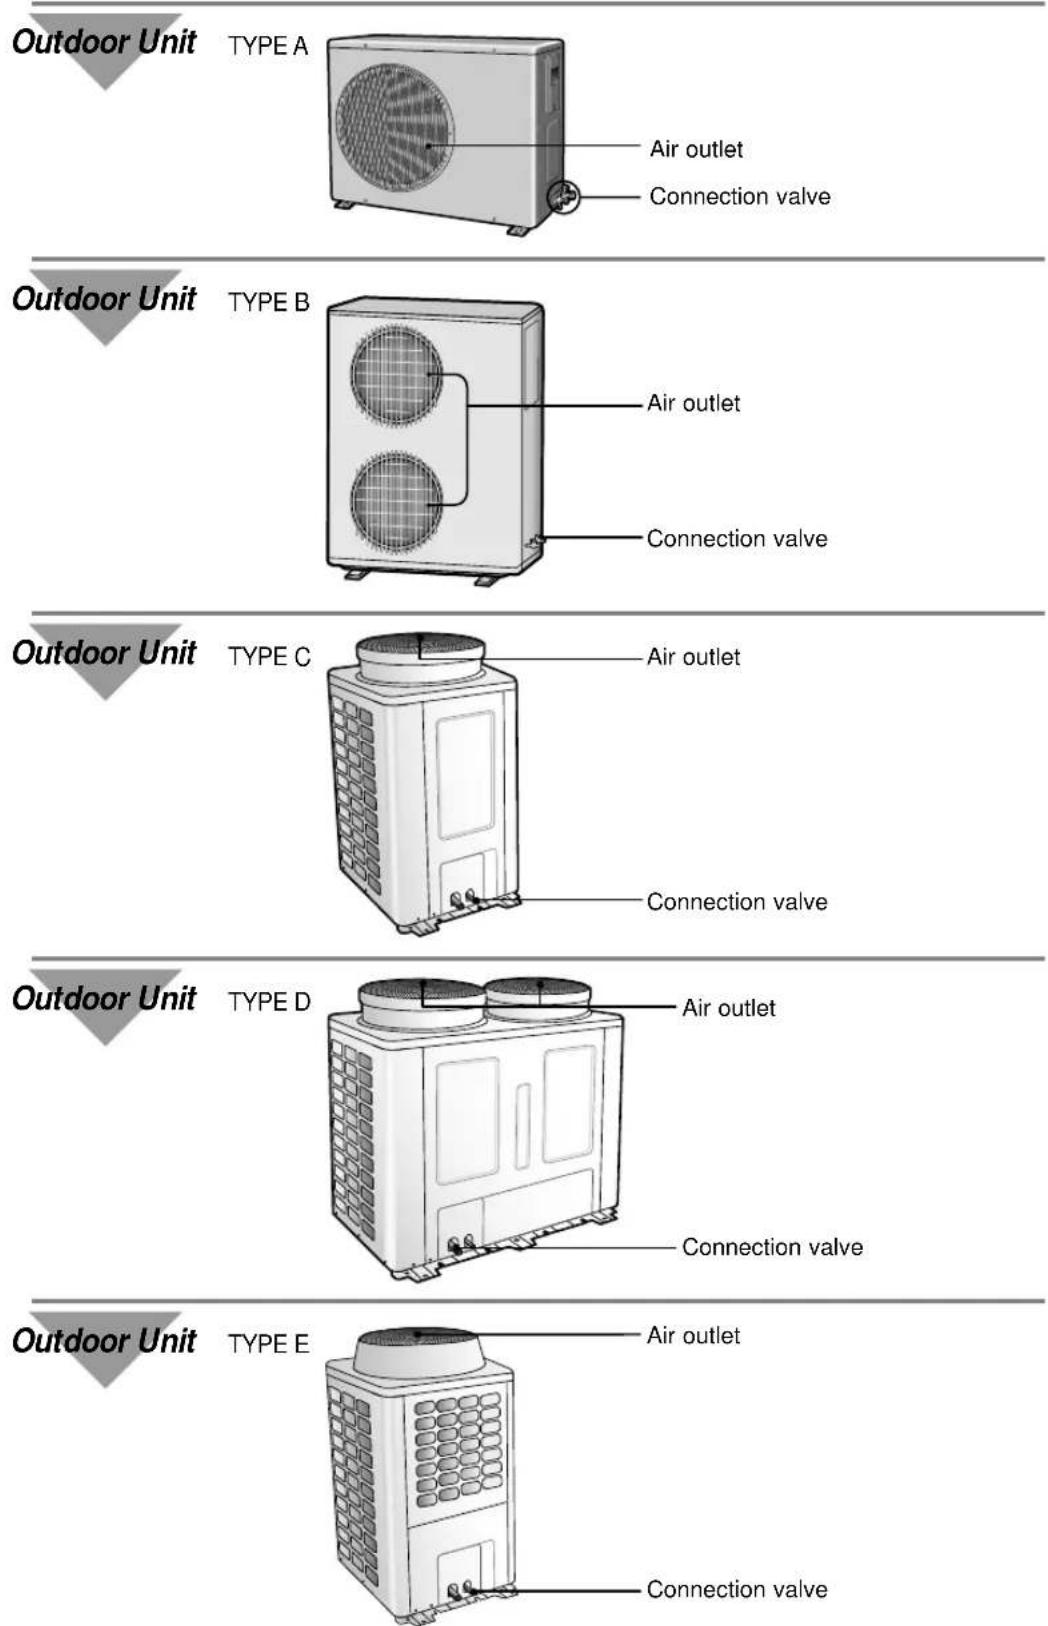

If the heat exchanger in the outdoor unit gets dusty, cooling efficiency may fall. So clean the heat exchanger with water when it becomes dirty. However, be careful when you wash the surface of the heat exchanger because it is very sharp.
Wireless Remote Controller-Buttons and Display
The wireless remote controller is an optional accessory.
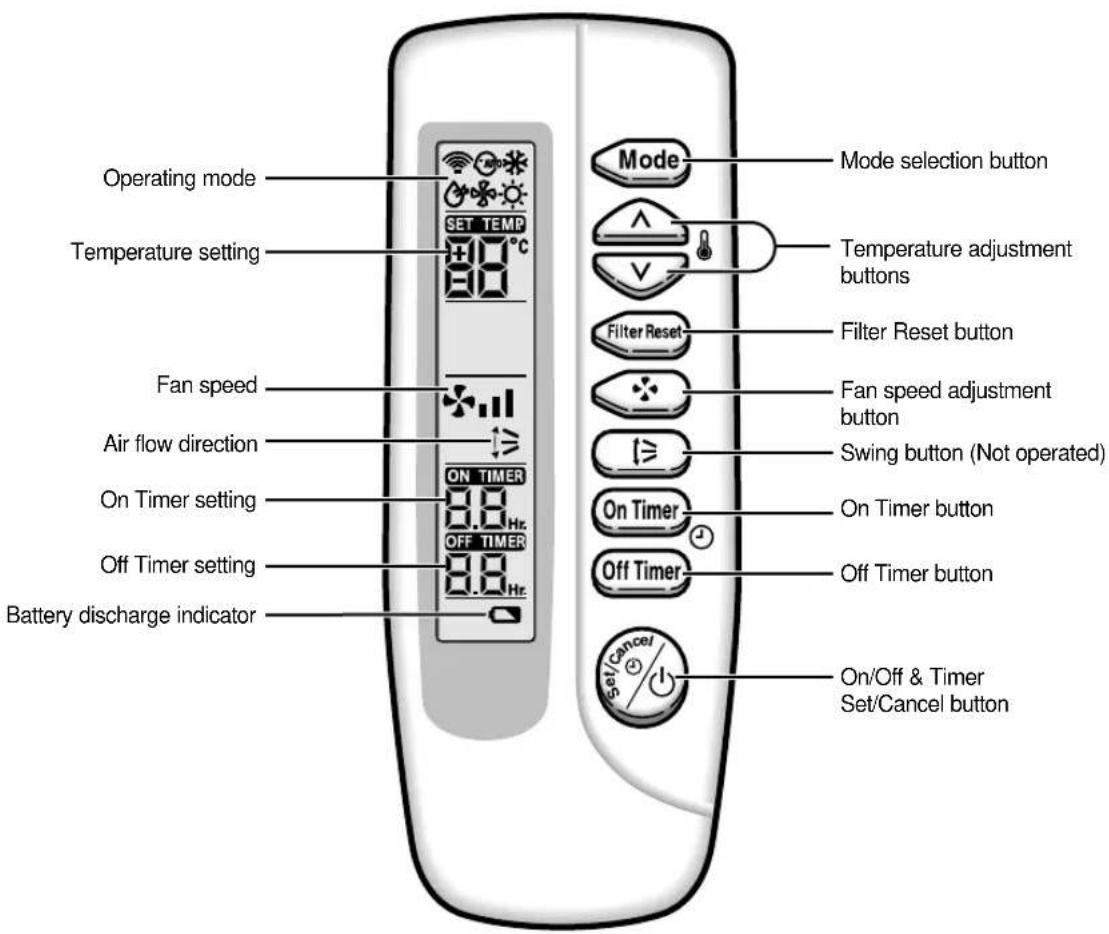
text_image
Operating mode Temperature setting Fan speed Air flow direction On Timer setting Off Timer setting Battery discharge indicator SET TEMP ON TIMER OFF TIMER Mode selection button Temperature adjustment buttons Filter Reset button Fan speed adjustment button Swing button (Not operated) On Timer button Off Timer button On/Off & Timer Set/Cancel buttonM
- After cleaning the air filter, press the filter reset button.
- Duct type air conditioner does not have function of adjusting air flow direction. Therefore, the function is not operated even if you press the swing button.
- The heating mode(✗) is not selected in cooling only models.
The Receiver & Display Unit
The Receiver & Display unit is an optional accessory and it is installed on the wall.
Concealed Type
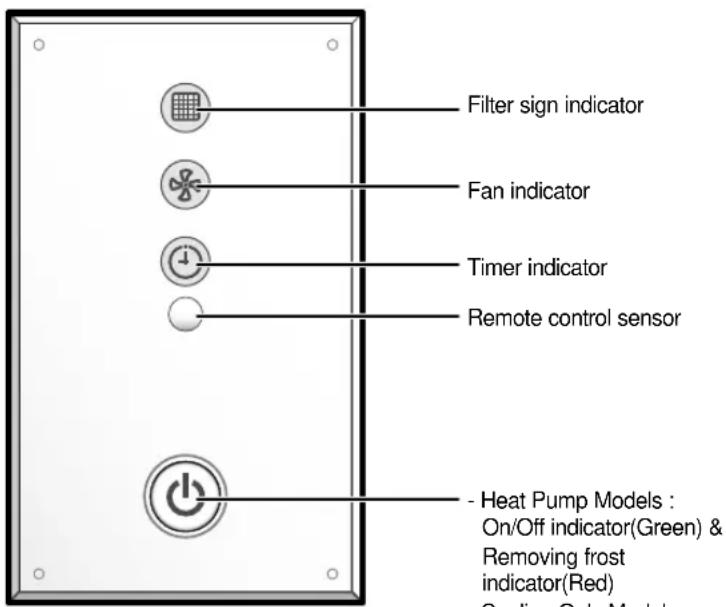
text_image
Filter sign indicator Fan indicator Timer indicator Remote control sensor - Heat Pump Models : On/Off indicator(Green) & Removing frost indicator(Red) Cooling Only Models :Standard Type
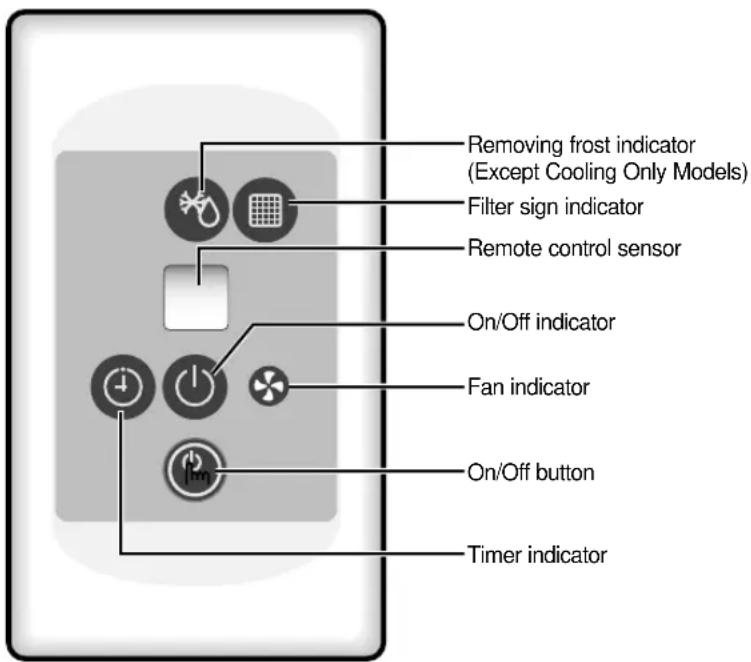
text_image
Removing frost indicator (Except Cooling Only Models) Filter sign indicator Remote control sensor On/Off indicator Fan indicator On/Off button Timer indicatorWired Remote Controller-Buttons and Display
The wired remote controller is an optional accessory and it is installed on the wall.
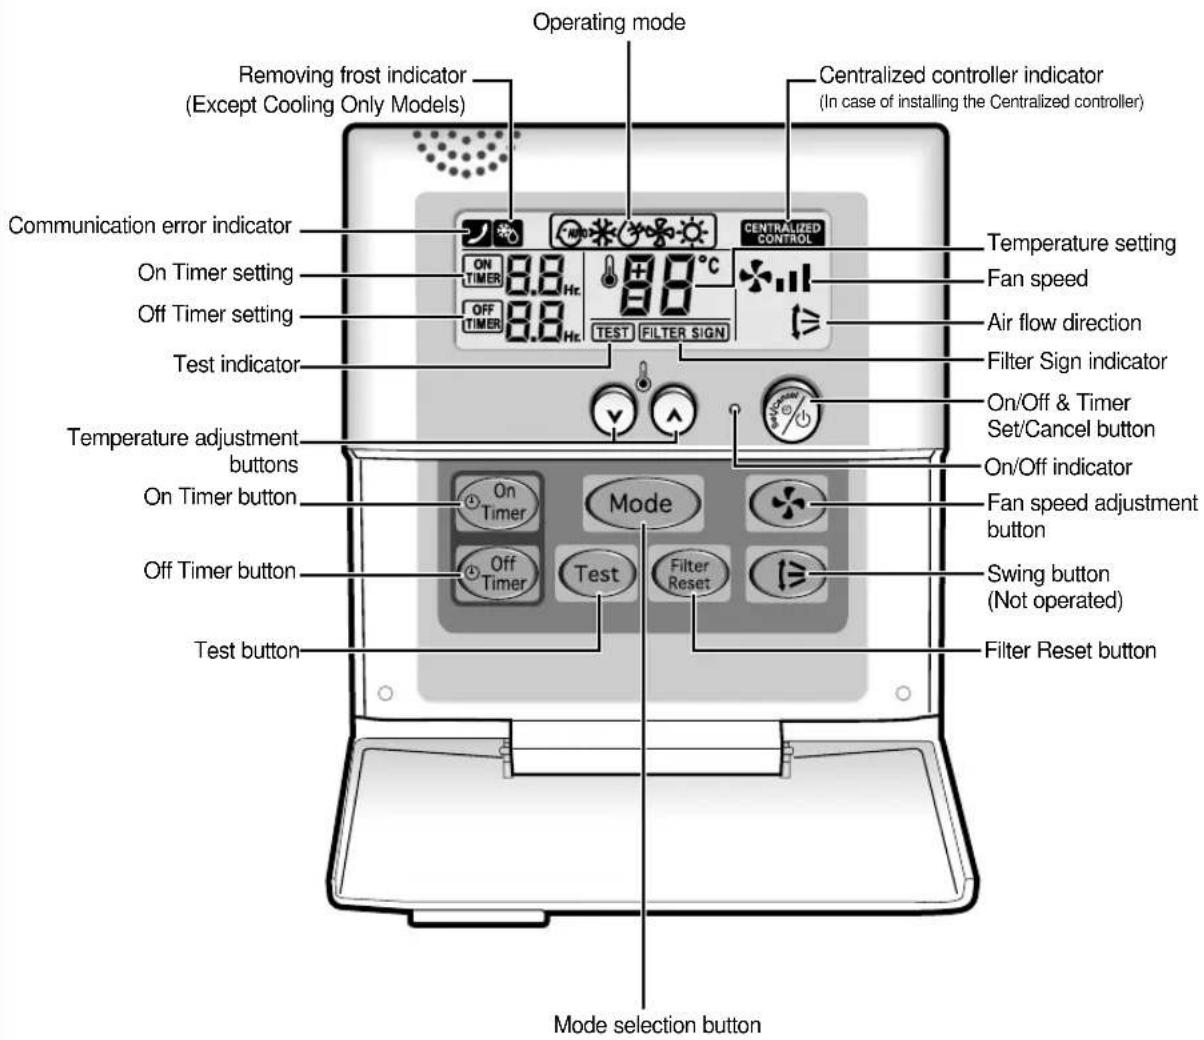
text_image
Operating mode Removing frost indicator (Except Cooling Only Models) Centralized controller indicator (In case of installing the Centralized controller) Communication error indicator On Timer setting Off Timer setting Test indicator Temperature setting Fan speed Air flow direction Filter Sign indicator On/Off & Timer Set/Cancel button On/Off indicator Temperature adjustment buttons On Timer button On Timer Test button Fan speed adjustment button Off Timer button Test Mode Switch button (Not operated) Filter Reset button Test Filter Reset Mode selection buttonB1@
- Test button is for your installation specialist. You must NOT press it.
- After cleaning the air filter, press the filter reset button. Then the wired remote controller will display the FILTER SIGN indicator when the time to clean the air filter; refer to page 30 or 31.
- Duct type air conditioner does not have function of adjusting air flow direction. Therefore, the function is not operated even if you press the swing button.
- The heating mode(☀) is not selected in cooling only models.
Centralized Controller
The centralized controller is an optional accessory and it is installed on the wall.
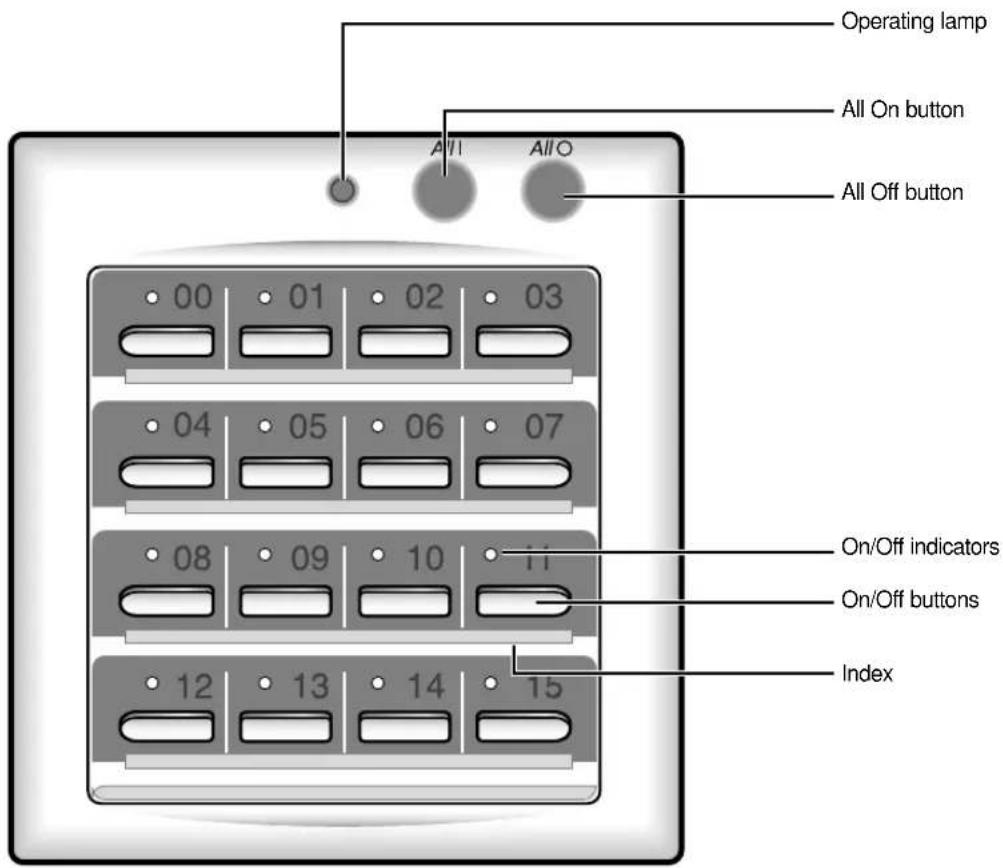
text_image
Operating lamp All On button All Off button 00 01 02 03 04 05 06 07 08 09 10 11 12 13 14 15 On/Off indicators On/Off buttons Index
Operating lamp comes on when at least one air conditioner connected to the centralized controller is operating.
Getting Start
You have just purchased a system type air conditioner and it has been installed by your installation specialist.
Your Owner's Instructions contain much valuable information on using your air conditioner. Please take the time to read them as they will help you take full advantage of the unit's features.
The booklet is organized as follows.
◆ The following figures are shown on pages from 4 to 9 :
- Indoor and outdoor units
- Wireless remote controller (buttons and display)
- The receiver & display unit
- Wired remote controller (buttons and display)
- Centralized controller
◆ In the main part of the document, you will find a series of step-by-step procedures for each function available.
The illustrations in the step-by-step procedures use three different symbols:
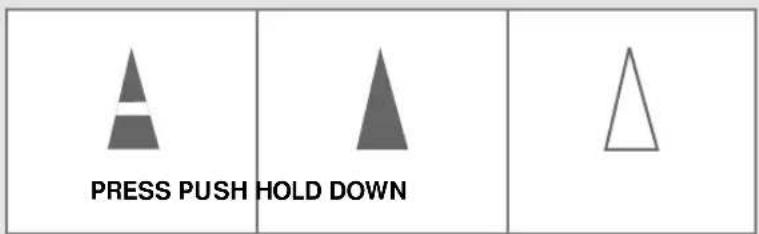
text_image
PRESS PUSH HOLD DOWNInserting the Wireless Remote Controller Batteries
You must insert or replace the remote controller batteries when :
◆ You purchase the air conditioner
◆ The remote controller does not work correctly
NO.
◆ Use two AAA, LR03 1.5V batteries.
◆ Do not use old batteries or different kinds of batteries together.
◆ Batteries may be completely discharged after 12 months, even if they have not actually been used.
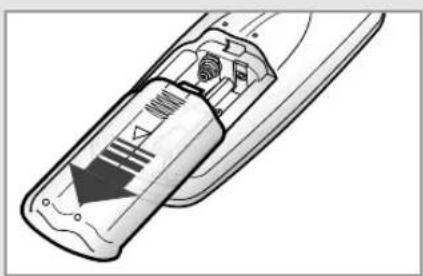
1 Push the battery cover on the rear of the remote controller with your thumb in the direction of the arrow and remove it.
2 Insert the two batteries, taking care to respect the polarities :
◆ + on the battery with + on the remote controller.
◆ - on the battery with - on the remote controller.
3 Close the cover by sliding it back until it clicks into place.
natural_image
Illustration of a remote control device with a black arrow indicating left-side motion (no text or symbols)
natural_image
Illustration of a remote control box with battery and indicator lights (no text or symbols)UsingWirelessRemoteController
text_image
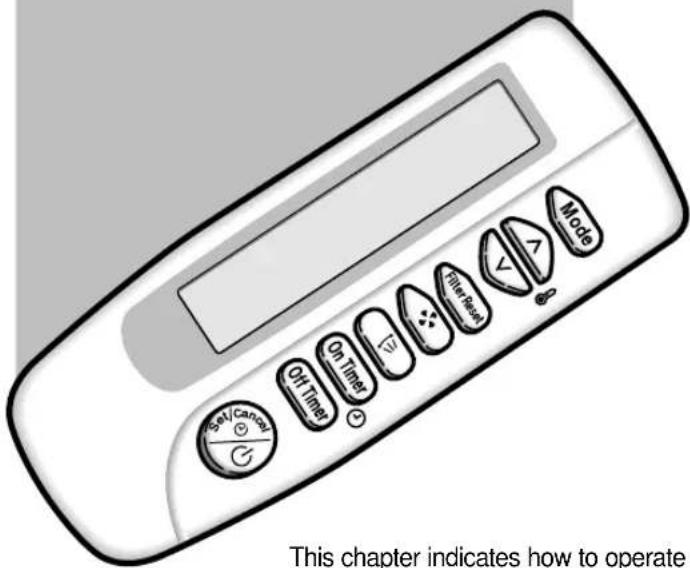
Set/Can Off Time On Time Filter Reset Mode This chapter indicates how to operateThis chapter indicates how to operate and program your air conditioner with the wireless remote controller. The wireless remote controller is an optional accessory.
Selecting the Automatic Operation Mode
In the Automatic mode, the room temperature and the fan speed are controlled automatically.
1 If necessary, press ⚡% (ON/OFF) button.
Result: ◆ The On/Off indicator on the receiver & display unit comes on.
◆ The air conditioner runs in the mode selected when the unit was last used.
◆ The receiver & display unit beeps.
IMPORTANT
The air conditioner is fitted with a protection mechanism to prevent the unit from being damaged when it is started immediately after being:
◆ Plugged in
◆ Stopped
It will start up normally after three minutes.
2 To select the AUTO mode, press the Mode button until 📄 is displayed at the top of the wireless remote controller.
Result: ◆ The receiver & display unit beeps.
◆ The air conditioner runs in AUTO mode.
Note You can change modes at any time.
3 To adjust the temperature, press the Temperature buttons one or more times until the required temperature is displayed. Possible temperatures are between 18^ C and 30^ C inclusive.
Result: ◆ Each time you press Temperature buttons:
- The temperature is adjusted by 1^ C.
◆ The air conditioner starts cooling, provided that the room temperature is higher than the selected temperature. The quantity of air is adjusted automatically.
text_image
On Timer Off Timer 0.125mm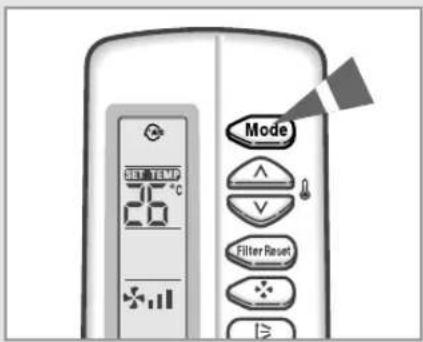
text_image
SET TEM 20°C Mode Filter Reset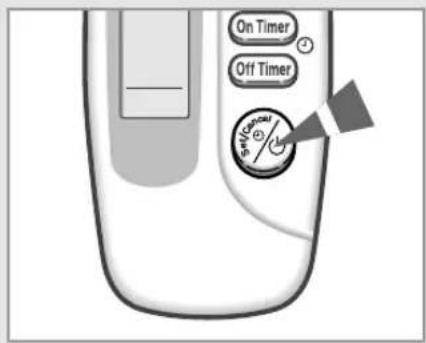
text_image
On Timer Off Timer 100% 100%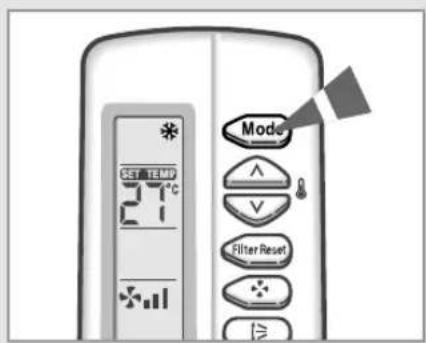
text_image
Mode SET TIMER 1°C Filter Reset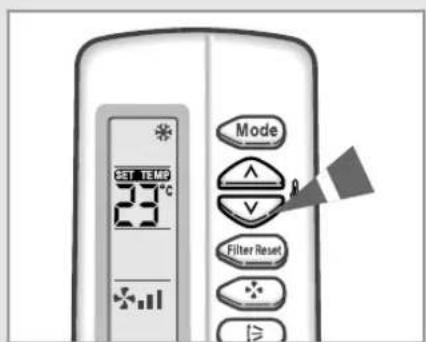
text_image
SET TEMP Mode Filter Reset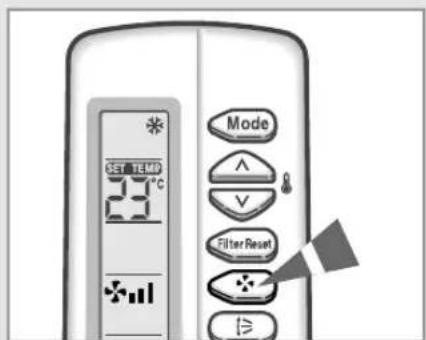
text_image
SET TEMD 23°C Mode ✓ Filter Reset ≥You must select the COOL mode if you wish to adjust the :
◆ Cooling temperature
◆ Fan speed when cooling
1 If necessary, press ⚠️ (ON/OFF) button.
Result: ◆ The On/Off indicator on the receiver & display unit comes on.
◆ The air conditioner runs in the mode selected when the unit was last used.
◆ The receiver & display unit beeps.
IMPORTANT
The air conditioner is fitted with a protection mechanism to prevent the unit from being damaged when it is started immediately after being:
◆ Plugged in
◆ Stopped
It will start up normally after three minutes.
2 To select the COOL mode, press the Mode button until ✕ is displayed at the top of the wireless remote controller.
Result: ◆ The receiver & display unit beeps.
◆ The air conditioner runs in COOL mode.

You can change modes at any time.
3 To adjust the temperature, press the Temperature buttons one or more times until the required temperature is displayed. Possible temperatures are between 18°C and 30°C inclusive.
Result: ◆ Each time you press Temperature buttons:
- The temperature is adjusted by 1^ C.
- The receiver & display unit beeps.
◆ The air conditioner starts cooling, provided that the room temperature is higher than the selected temperature; the fan will, however, operate.
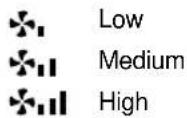
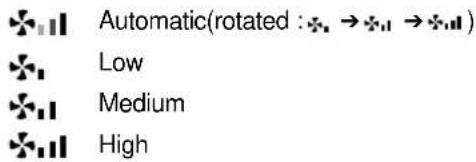
4 Select the fan speed by pressing the Fan button one or more times until the intended value is displayed :
Automatic(rotated : * → * → **)
Low
Medium
High
Heating Your Room (Except Cooling Only Models)
You can select the HEAT mode only in heat pump models.
You must select the HEAT mode if you wish to adjust the :
◆ Heating temperature
◆ Fan speed when heating
1 If necessary, press ⚠ (ON/OFF) button.
Result: ◆ The On/Off indicator on the receiver & display unit comes on.
◆ The air conditioner runs in the mode selected when the unit was last used.
◆ The receiver & display unit beeps.
IMPORTANT
The air conditioner is fitted with a protection mechanism to prevent the unit from being damaged when it is started immediately after being:
◆ Plugged in
◆ Stopped
It will start up normally after three minutes.
2 To select the HEAT mode, press the Mode button until ⚙ is displayed at the top of the wireless remote controller.
Result: ◆ The indoor unit beeps.
◆ The air conditioner runs in HEAT mode.
Note You can change modes at any time.
3 To adjust the temperature, press the Temperature buttons one or more times until the required temperature is displayed. Possible temperatures are between 16^ C and 30^ C inclusive.
Result: ◆ Each time you press Temperature buttons:
- The temperature is adjusted by 1^ C.
- The indoor unit beeps.
◆ The air conditioner starts heating, provided that the room temperature is lower than the selected temperature; the fan will, however, operate.
4 Select the fan speed by pressing the Fan button one or more times until the intended value is displayed :
Automatic(rotated : * → * → **)
Low
Medium
High
text_image
On Timer Off Timer OFF ON OFF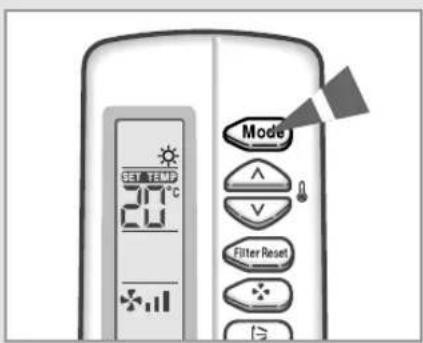
text_image
SET TEM 20℃ Mode Filter Reset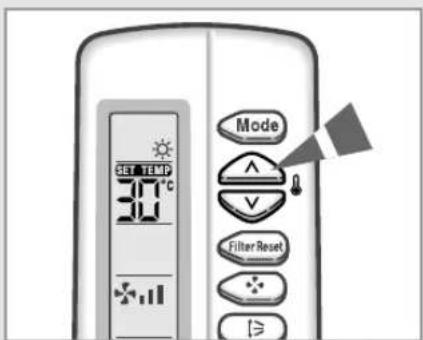
text_image
SET TEM 30°C Mode Filter Reset Ig>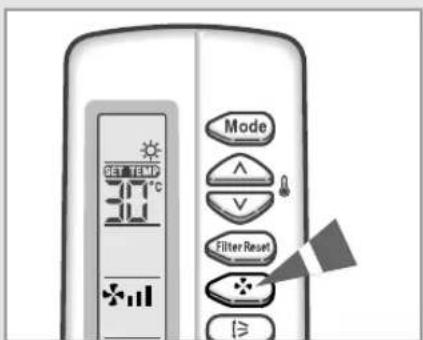
text_image
Mode ✓ ✓ Filter Reset ≥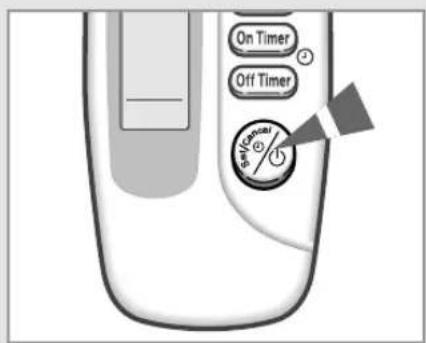
text_image
On Timer Off Timer Power Power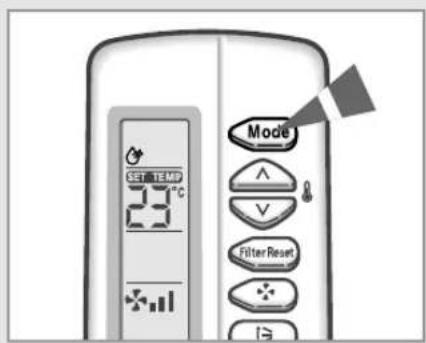
text_image
SET TEM 28°C Mode Filter Reset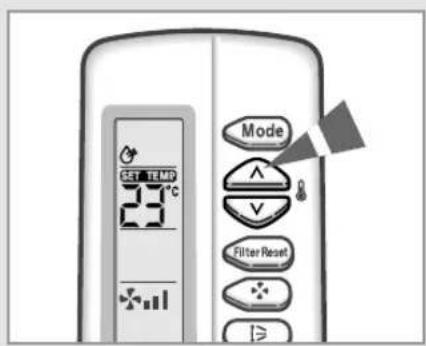
text_image
SET TMD 23°C Mode ✓ ✓ Filter Reset Ig>If the atmosphere in your room is very humid or damp, you can remove excess humidity without lowering the room temperature too much.
Result: ◆ The On/Off indicator on the receiver & display unit comes on.
◆ The air conditioner runs in the mode selected when the unit was last used.
◆ The receiver & display unit beeps.
IMPORTANT
The air conditioner is fitted with a protection mechanism to prevent the unit from being damaged when it is started immediately after being:
◆ Plugged in
◆ Stopped
It will start up normally after three minutes.
2 To select the DRY mode, press the Mode button until 🔒 is displayed at the top of the wireless remote controller.
Result: ◆ The receiver & display unit beeps.
◆ The air conditioner runs in DRY mode.

You can change modes at any time.
3 To adjust the temperature, press the Temperature buttons one or more times until the required temperature is displayed. Possible temperatures are between 18°C and 30°C inclusive.
Result: ◆ Each time you press Temperature buttons:
- The temperature is adjusted by 1°C.
- The receiver & display unit beeps.
◆ The air conditioner starts removing the excess humidity. The quantity of air is adjusted automatically.

In the dry mode, the fan speed is controlled automatically.
If the atmosphere in your room is stale, you can air it using the FAN feature.
1 If necessary, press (ON/OFF) button.
Result: ◆ The On/Off indicator on the receiver & display unit comes on.
◆ The air conditioner runs in the mode selected when the unit was last used.
◆ The receiver & display unit beeps.
2 To select the FAN mode, press the Mode button until ✿ is displayed at the top of the wireless remote controller.
Result: ◆ The receiver & display unit beeps.
◆ The air conditioner runs in FAN mode.

You can change modes at any time.
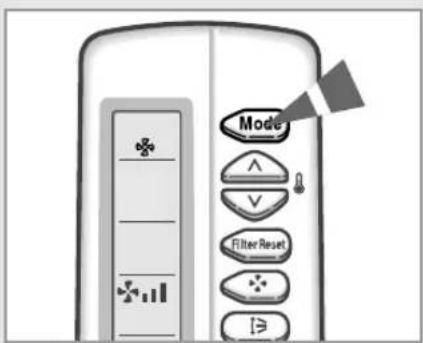
3 Select the fan speed by pressing the Fan button one or more times until the intended value is displayed:
text_image
Mode Filter Reset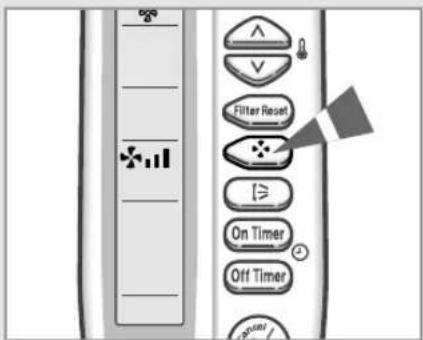
text_image
Filter Reset On Timer Off Timer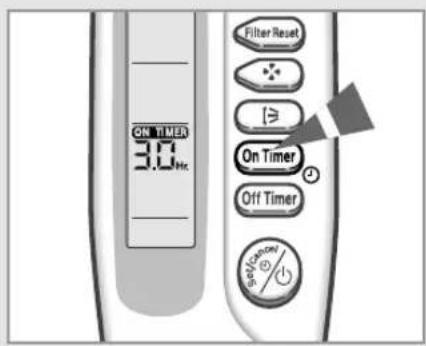
text_image
ON TIMER 3.0 Hz Filter Reset On Timer Off Timer SET ON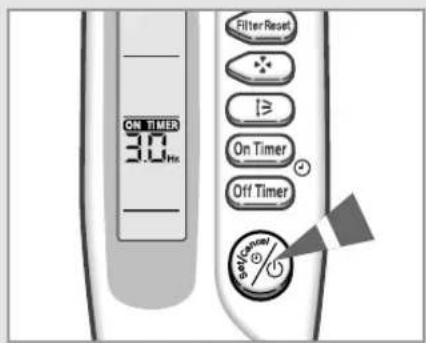
text_image
ON TIMER 3.0 Hz Filter Reset On Timer Off Timer on timer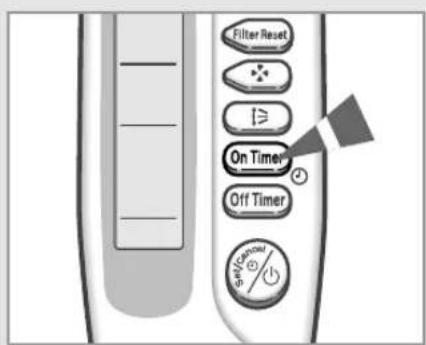
text_image
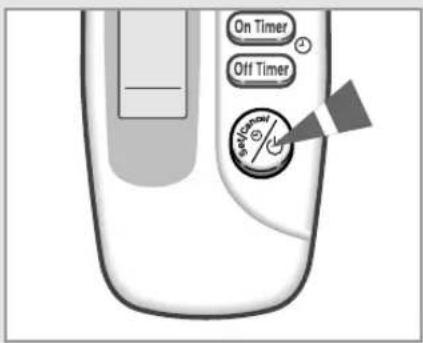
Filter Reset On Timer Off TimerThe On Timer enables you to switch on the air conditioner automatically after a given period of time. You can set the period of time from 30 minutes to 24 hours.
1 To set the operating time, press the On Timer button one or more times until the required time is displayed. Possible time is between 0.5 hour and 24 hour inclusive.
Result:
◆ Each time you press On Timer button: - The time is adjusted by 0.5 hour to 5 hours, by 1 hour from 6 hours to 24 hours.
2 Press the Result:
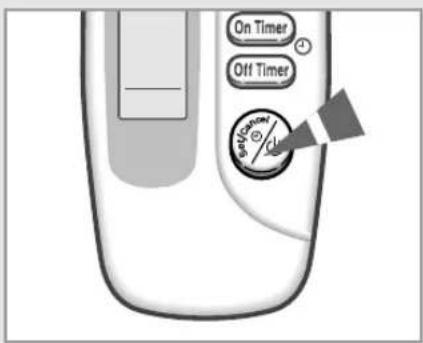
(Set/Cancel) button to complete the setting.
◆ The remaining time is displayed.
◆ Blinking of the timer indicator stops.
◆ The selected mode and the temperature disappear on the display after 5 seconds.
◆ The air conditioner will switch on automatically when the counter displayed on the remote controller reaches the setting time as disappearing the On timer setting.

You can see or change the setting mode and/or the temperature by pressing the Mode button or the Temperature buttons after setting the On timer.
To Cancel the On Timer
1 To cancel the On Timer, press the On Timer button one or more times until the timer setting disappears.
2 Press the Ⓞ (Set/Cancel) button.

If you want to turn on the air conditioner before the timer reaches the setting time, press the Ⓞ(ON/OFF) button.
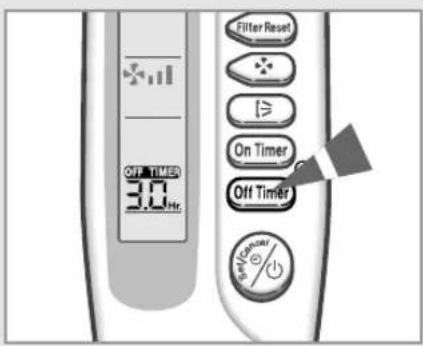
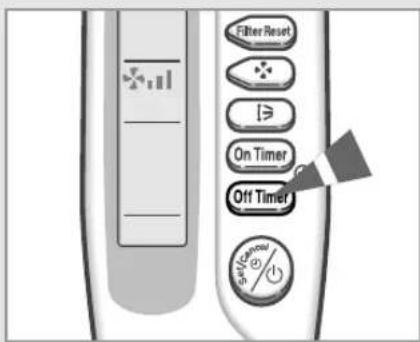
The Off Timer enables you to switch off the air conditioner automatically after a given period of time. You can set the period of time from 30 minutes to 24 hours.
1 To set the operating time, press the Off Timer button one or more times until the required time is displayed. Possible time is between 0.5 hour and 24 hour inclusive.
Result: ◆ Each time you press Off Timer button: - The time is adjusted by 0.5 hour to 5 hours, by 1 hour from 6 hours to 24 hours.
2 Press the Ⓧ (Set/Cancel) button to complete the setting.
Result: ◆ The remaining time is displayed.
◆ Blinking of the timer indicator stops.
◆ The air conditioner will switch off automatically when the counter displayed on the remote controller reaches the setting time as disappearing the Off timer setting.
If you would like to turn the air conditioner on after 2 hours and to operate it for 2 hours:
- Press the On Timer button until '2.0 Hr' is displayed.
- Press the Ⓐ (Set/Cancel) button.
- Press the Off Timer button until '4.0 Hr' is displayed.
- Press the Ⓞ (Set/Cancel) button.
Note You can see or change the setting mode and/or the temperature by pressing the Mode button or the Temperature buttons after setting the Off timer.
text_image
Filter Reset On Timer Off Timer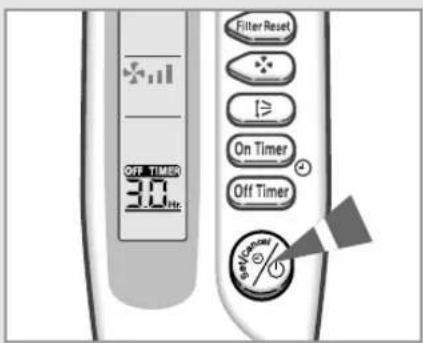
text_image
OFF TIMER 30 Hz Filter Reset On Timer Off TimerTo Cancel the Off Timer
1 To cancel the Off Timer, press the Off Timer button one or more times until the timer setting disappears.
2 Press the Ⓧ (Set/Cancel) button.
If you want to turn off the air conditioner before the timer reaches the setting time, press the Ⓞ(ON/OFF) button.
text_image
Filter Reset On Timer Off TimerUsing@Wiredd
Remote
Controllerr
natural_image
Illustration of a kitchen appliance with control buttons and a display screen (no text or symbols)This chapter indicates how to operate and program your air conditioner with the wired remote controller. The wired remote controller is an optional accessory.
Selecting the Automatic Operating Mode
In the Automatic mode, the room temperature and the fan speed are controlled automatically.
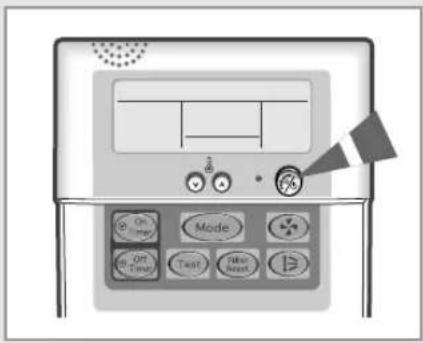
1 If necessary, press ⚡% (ON/OFF) button.
Result: ◆ The On/Off indicator on the wired remote controller comes on.
◆ The air conditioner runs in the mode selected when the unit was last used.
IMPORTANT
The air conditioner is fitted with a protection mechanism to prevent the unit from being damaged when it is started immediately after being:
◆ Plugged in
◆ Stopped
It will start up normally after three minutes.
2 To select the AUTO mode, press the Mode button until 📄 is displayed at the top of the wired remote controller.
Result: ◆ The air conditioner runs in AUTO mode.
Note You can change modes at any time.
3 To adjust the temperature, press the Temperature buttons one or more times until the required temperature is displayed. Possible temperatures are between 18°C and 30°C inclusive.
Result: ◆ Each time you press Temperature buttons: - The temperature is adjusted by 1°C. ◆ The air conditioner starts cooling, provided that the room temperature is higher than the selected temperature. The quantity of air is adjusted automatically.
text_image
Diagram of a medical or diagnostic device control panel with labeled buttons for On/Time, Mode, Test, and Non-Reset.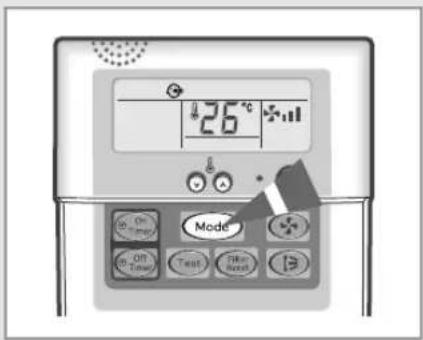
text_image
26°C Mode On Town Treat Fire Break End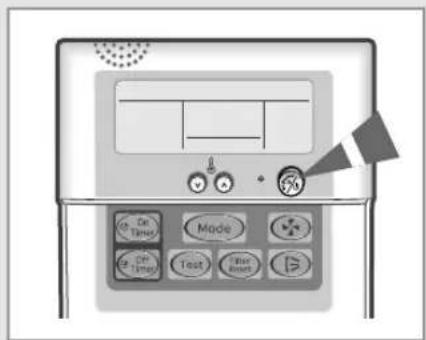
text_image
Diagram of a medical or diagnostic device with labeled buttons for timing, mode, test, and insert functions.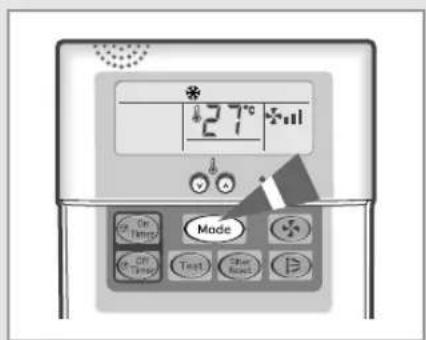
text_image
* 27°C 511 Made On Treated On Time Test Enter Reset D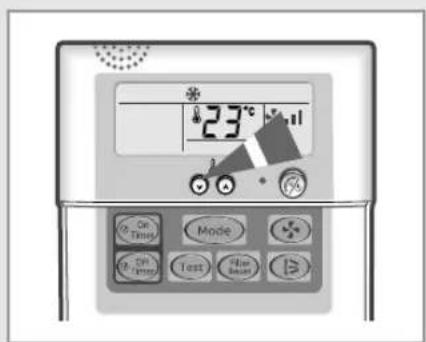
text_image
23°C On Time Mode On Time Test Air Condition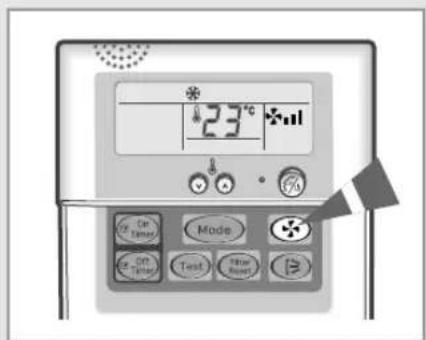
text_image
23°C On Temperature Mode On Temperature Test Filter ResetYou must select the COOL mode if you wish to adjust the :
◆ Cooling temperature
◆ Fan speed when cooling
Result: ◆ The On/Off indicator on the wired remote controller comes on.
◆ The air conditioner runs in the mode selected when the unit was last used.

PORTANT
The air conditioner is fitted with a protection mechanism to prevent the unit from being damaged when it is started immediately after being:
◆ Plugged in
◆ Stopped
It will start up normally after three minutes.
2 To select the COOL mode, press the Mode button until ✕ is displayed at the top of the wired remote controller.
Result: ◆ The air conditioner runs in COOL mode.
Note You can change modes at any time.
3 To adjust the temperature, press the Temperature buttons one or more times until the required temperature is displayed. Possible temperatures are between 18^ C and 30^ C inclusive.
Result: ◆ Each time you press Temperature buttons: - The temperature is adjusted by 1°C.
◆ The air conditioner starts cooling, provided that the room temperature is higher than the selected temperature; the fan will, however, operate.
4 Select the fan speed by pressing the Fan button one or more times until the intended value is displayed :
Automatic(rotated : *→*→**)
Low
Medium
High
Heating Your Room (Except Cooling Only Models)
You can select the HEAT mode only in heat pump models.
You must select the HEAT mode if you wish to adjust the :
◆ Heating temperature
◆ Fan speed when heating
Result: ◆ The On/Off indicator on the wired remote controller comes on.
◆ The air conditioner runs in the mode selected when the unit was last used.

PORTANT
The air conditioner is fitted with a protection mechanism to prevent the unit from being damaged when it is started immediately after being:
◆ Plugged in
◆ Stopped
It will start up normally after three minutes.
2 To select the HEAT mode, press the Mode button until ⚙ is displayed at the top of the wired remote controller.
Result: ◆ The air conditioner runs in HEAT mode.

You can change modes at any time.
3 To adjust the temperature, press the Temperature buttons one or more times until the required temperature is displayed. Possible temperatures are between 16^ C and 30^ C inclusive.
Result: ◆ Each time you press Temperature buttons: - The temperature is adjusted by 1°C.
◆ The air conditioner starts heating, provided that the room temperature is lower than the selected temperature; the fan will, however, operate.
4 Select the fan speed by pressing the Fan button one or more times until the intended value is displayed :
text_image
Automatic(rotated : + → + → + +) Low Medium High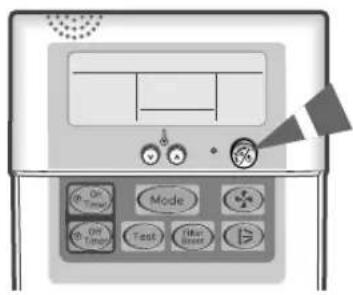
text_image
Diagram of a medical or laboratory device with labeled buttons including On, Mode, Test, and directional indicators.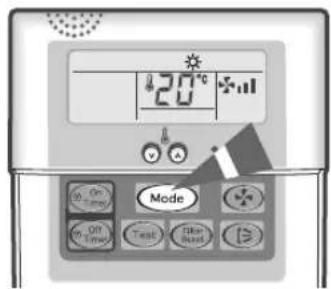
text_image
20°C Mode On Time On Time Treat The Rest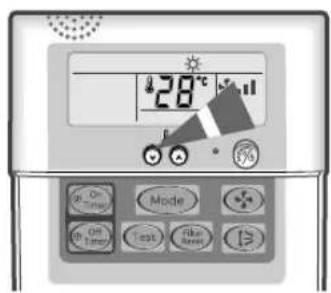
text_image
28°C On Close Mode On Timer Test Take Reset 12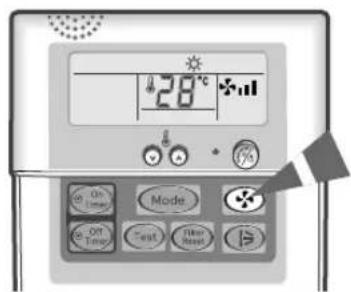
text_image
28°C On Time Mode Off Temp Test Free Reset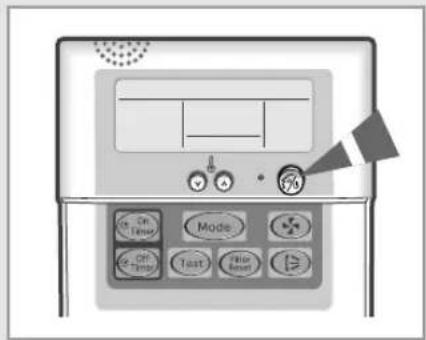
text_image
Diagram of a medical or diagnostic device with labeled buttons and control panel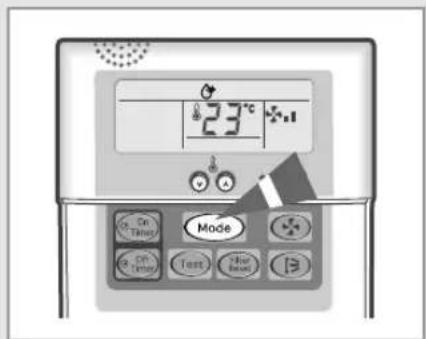
text_image
23°C On Tuning Mode On Tuning Text Heat Balance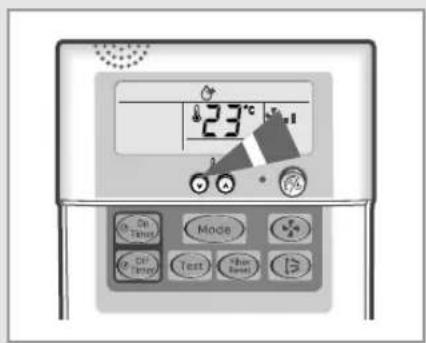
text_image
23°C On Temperature Mode On Temperature Test Fan BalanceIf the atmosphere in your room is very humid or damp, you can remove excess humidity without lowering the room temperature too much.
Result: ◆ The On/Off indicator on the wired remote controller comes on.
◆ The air conditioner runs in the mode selected when the unit was last used.
IMPORTANT
The air conditioner is fitted with a protection mechanism to prevent the unit from being damaged when it is started immediately after being:
◆ Plugged in
◆ Stopped
It will start up normally after three minutes.
2 To select the DRY mode, press the Mode button until ⚙ is displayed at the top of the wired remote controller.
Result: ◆ The air conditioner runs in DRY mode.
Note: You can change modes at any time.
3 To adjust the temperature, press the Temperature buttons one or more times until the required temperature is displayed. Possible temperatures are between 18°C and 30°C inclusive.
Result: ◆ Each time you press Temperature buttons: - The temperature is adjusted by 1°C.
◆ The air conditioner starts removing the excess humidity. The quantity of air is adjusted automatically.
Not e In the dry mode, the fan speed is controlled automatically.
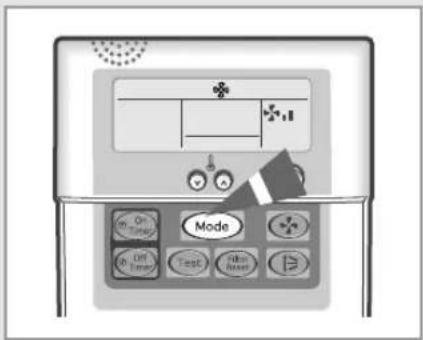
If the atmosphere in your room is stale, you can air it using the FAN feature.
◆ The On/Off indicator on the wired remote controller comes on.
◆ The air conditioner runs in the mode selected when the unit was last used.
2 To select the FAN mode, press the Mode button until ✕ is displayed at the top of the wired remote controller.
Result: ◆ The air conditioner runs in FAN mode.
3 Select the fan speed by pressing the Fan button one or more times until the intended value is displayed:

Low

Medium

High
text_image
Diagram of a medical or diagnostic device with labeled buttons and display screen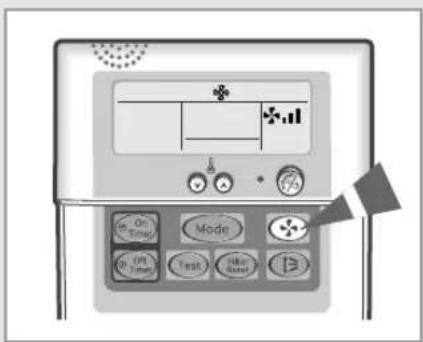
text_image
Diagram of a medical or diagnostic device with labeled buttons including On/Off, Mode, Test, and Basic.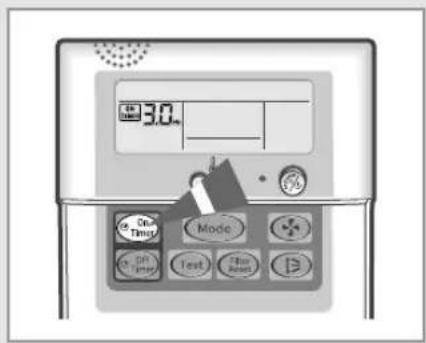
text_image
3.0 On Time On Time Mode Test Filter Reset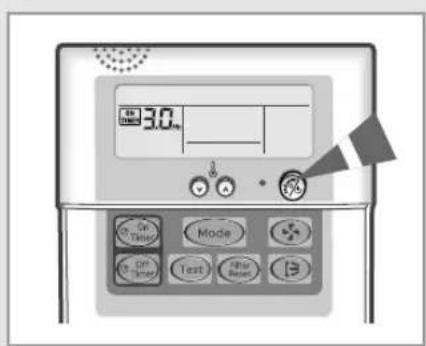
text_image
3.0 On Off Test Mode Filter B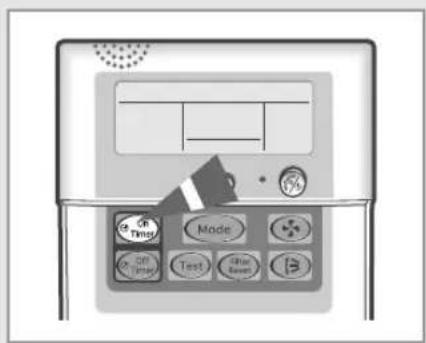
text_image
Diagram of a device control panel with labeled buttons including Time, Mode, Image, Test, and AssistThe On Timer enables you to switch on the air conditioner automatically after a given period of time. You can set the period of time from 30 minutes to 24 hours.
1 To set the operating time, press the On Timer button one or more times until the required time is displayed. Possible time is between 0.5 hour and 24 hours inclusive.
Result:
◆ Each time you press On Timer button: - The time is adjusted by 0.5 hour to 5 hours, by 1 hour from 6 hours to 24 hours.
2 Press the
Result:

(Set/Cancel) button to complete the setting.
◆ The remaining time is displayed.
◆ Blinking of the timer indicator stops.
◆ The selected mode and the temperature disappear on the display after 5 seconds.
◆ The air conditioner will switch on automatically when the counter displayed on the remote controller reaches the setting time as disappearing the On timer setting.
M
You can see or change the setting mode and/or the temperature by pressing the Mode button or the Temperature buttons after setting the On timer.
To Cancel the On Timer
1 To cancel the On Timer, press the On Timer button one or more times until the On timer setting disappears.
2 Press the Ⓧ(Set/Cancel) button.
NOISE
If you want to turn on the air conditioner before the timer reaches the setting time, press the Ⓞ(ON/OFF) button.
Setting the Off Timer
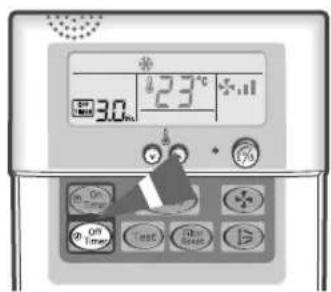
The Off Timer enables you to switch off the air conditioner automatically after a given period of time. You can set the period of time from 30 minutes to 24 hours.
1 To set the operating time, press the Off Timer button one or more times until the required time is displayed. Possible time is between 0.5 hour and 24 hour inclusive.
Result:
◆ Each time you press Off Timer button: - The time is adjusted by 0.5 hour to 5 hours, by 1 hour from 6 hours to 24 hours.
2 Press the Ⓧ (Set/Cancel) button to complete the setting.
Result:
- The remaining time is displayed. - Blinking of the timer indicator stops. - The air conditioner will switch off automatically when the counter displayed on the remote controller reaches the setting time as disappearing the Off timer setting.
If you would like to turn the air conditioner on after 2 hours and to operate it for 2 hours:
- Press the On Timer button until '2.0 Hr' is displayed.
- Press the Ⓐ (Set/Cancel) button.
- Press the Off Timer button until '4.0 Hr' is displayed.
- Press the Ⓜ (Set/Cancel) button.

You can see or change the setting mode and/or the temperature by pressing the Mode button or the Temperature buttons after setting the Off timer.
text_image
* 23°C 3.0 11 ON ON OK ON OK OK OK OK OK OK OK OK OK OK OK OK OK OK OK OK OK OK OK OK OK OK OK OK OK OK OK OK OK OK OK OK OK OK OK OK OK OK OK OK OK OK OK OK OK OK OK OK OK OK ON ON ON ON ON ON ON ON ON ON ON ON ON ON ON ON ON ON ON ON ON ON ON ON ON ON ON ON ON ON ON ON ON ON ON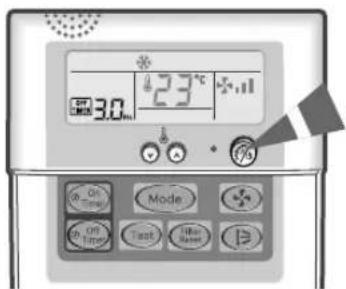
text_image
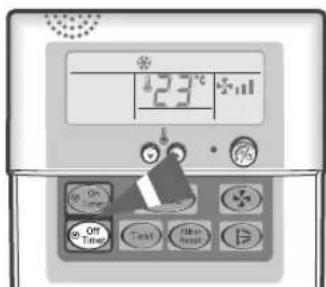
23°C 30°C On Time Mode On Time Test Air FilterTo Cancel the Off Timer
1 To cancel the Off Timer, press the Off Timer button one or more times until the timer setting disappears.
2 Press the Ⓧ(Set/Cancel) button.
Note: If you want to turn off the air conditioner before the timer reaches the setting time, press the ⏻(ON/OFF) button.
text_image
23°C On Off Timing Tint Main ResetUsing the Centralized Controller
The centralized controller is an optional accessory.
text_image
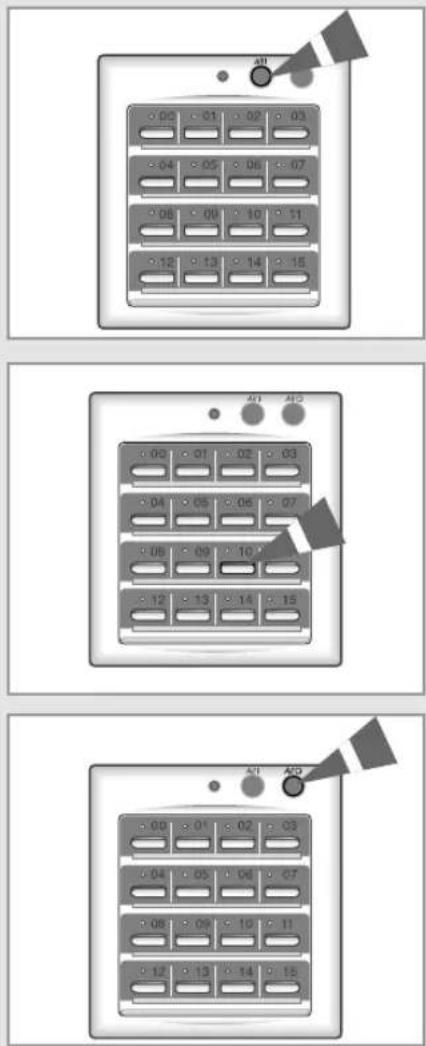
Diagram showing three variations of a device control panel with labeled buttons and numeric input fields.Up to sixteen air conditioners can be turned on or off by connecting to the centralized controller. However, you cannot adjust the cooling temperature or set the timer with it. If you also have the wired remote controller, CENTRALIZED CONTROL is displayed at the top of the remote controller.
1 To turn on the all of air conditioners connected to the centralized controller, press the ⏻ (All ON) button.
2 To turn on/off a specific air conditioner, press the (ON/OFF) button.
Result: ◆ The On/Off indicator comes on when the air conditioner is operating.
3 To turn off the all of air conditioners connected to the centralized controller, press the ⏻ (All OFF) button.
Operating Recommendations
Here are a few recommendations that you should follow when operating your air conditioner.
| Topic | Recommendation |
| Heating performances | The heat pump function of the air conditioner absorbs heat from outside air and brings it indoors. As the temperature of the outside air drops, the heating performance of air conditioner will decrease. If you find that the room is not warm enough, using an additional heating appliance is recommended. |
| Frost | When outside temperature is low but humidity is high, frost may form on the outdoor unit at HEAT mode.If this happens:◆ The heating operation stops.◆ The defrost mode will be triggered automatically for about ten minutes.No intervention is required ; after about ten minutes, the air conditioner operates again normally. |
| High indoor and outdoor temperatures | If both indoor and outdoor temperatures are high and the air conditioner is running at HEAT mode, the outdoor unit's fan and compressor may stop at times.This is normal ; simply wait until the air conditioner switches on again. |
| Power failure | If a power failure occurs while the air conditioner is operating, the unit will be switched off. When the power returns, the air conditioner starts up again automatically. |
Cleaning Your Air Conditioner
**052/070/072**
natural_image
Technical line drawing of a rectangular industrial component with internal channels and a magnified inset showing a mechanical assembly (no text or symbols)To get the best possible use out of your air conditioner, you must clean it regularly to remove the dust that accumulates on the air filter.

PORTANT
Before cleaning your air conditioner, ensure that you have switched off the electric circuit breaker used for the unit.
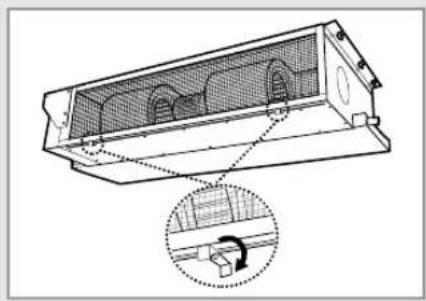
1 Turn the levers to the right or left not to prevent pulling out the air filter.
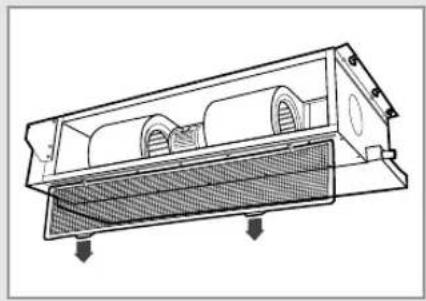
2 Pull out the air filter.
3 Remove all dust on air filter with a vacuum cleaner or a brush. In case of serious dust accumulation, put the air filter in warm detergent water and shake it vertically.
4 Dry the air filter.
5 When you have finished, insert the filter into the unit.
6 Return the levers.
natural_image
Technical line drawing of a mechanical component with internal channels and mounting holes (no text or symbols)

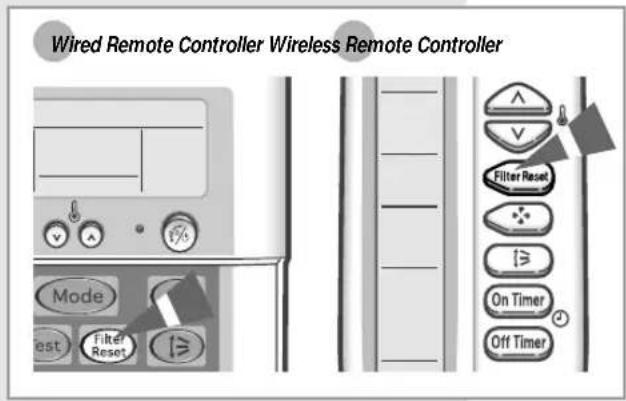
After cleaning the air conditioner, press the Filter Reset button.
text_image
Wired Remote Controller Wireless Remote Controller Mode Rest Filter Reset Filter Reset On Timer Off TimerCleaning Your Air Conditioner
**105/128**
To get the best possible use out of your air conditioner, you must clean it regularly to remove the dust that accumulates on the air filter.

PORTANT
Before cleaning your air conditioner, ensure that you have switched off the electric circuit breaker used for the unit.
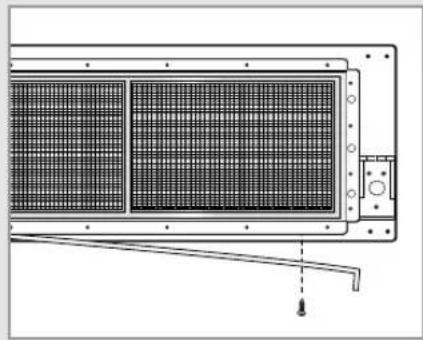
1 Remove the fixing bracket on the base of air filter kit.
2 Pull out the air filter in the direction of the arrow.
3 Remove all dust on air filter with a vacuum cleaner or a brush. In case of serious dust accumulation, put the air filter in warm detergent water and shake it vertically.
4 Dry the air filter.
5 When you have finished, insert the filter into the unit.
6 Reinstall the fixing bracket.
Note: After cleaning the air conditioner, press the Filter Reset button.
natural_image
Technical line drawing of a mechanical or electrical component with grid patterns and a lever mechanism (no text or symbols)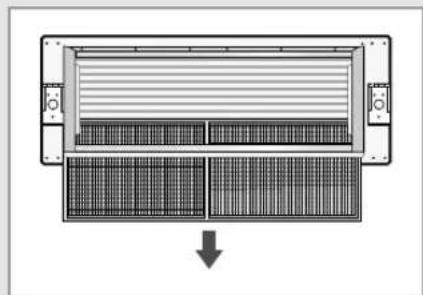
natural_image
Diagram of a server rack with two panels and a downward arrow indicating compression or disassembly (no text or symbols present)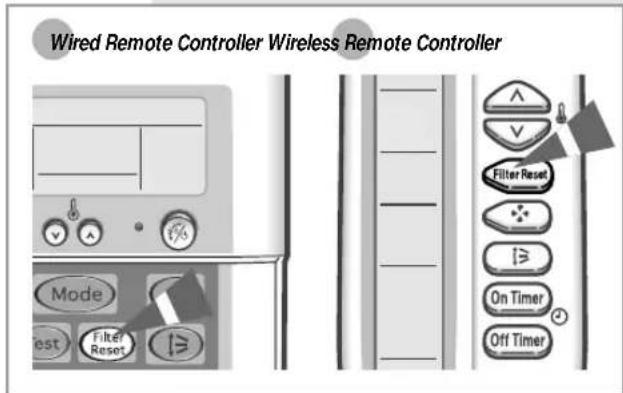
text_image
Wired Remote Controller Wireless Remote Controller Mode Rest Filter Reset Filter Reset On Timer Off TimerTemperature and Humidity Ranges
The following table indicates the temperature and humidity ranges, within which the air conditioner can be used.
| If the air conditioner is used at... | Then... |
| High temperature | The automatic protection feature may be triggered and the air conditioner stopped. |
| Low temperature | A water leakage or some other malfunction may happen if the heat exchanger freezes. |
| High humidity levels | Water may condense on and drip from the surface of the indoor unit if it is used for a long periods. |
| Mode | Outdoor Temperature Indoor Temperature | Indoor Humidity | |
| Heating | -20°C to 24°C approx. | 27°C or less | - |
| Cooling | -5°C to 43°C approx. | 21°C to 32°C approx. | 80% or less |
| Drying | -5°C to 43°C approx. | 18°C to 32°C approx. | - |
* If the heating operation is used at below 0^ C(outdoor temperature) then, it does not heat at its full capacity. If the cooling operation is used at over 33^ C(indoor temperature) then, it does not cool at its full capacity.
Solving Common Problems
Before contacting the after-sales service, perform the following simple checks. They may save your time and expense of an unnecessary call.
| Problem | Explanation/Solution |
| The air conditioner does not operate at all | ◆ Check that the breaker used for the air conditioner is switched on. |
| Wired Remote ControllerThe air conditioner does not operate with the remote controller | ◆ is displayed on the wired remote controller. In this case, turn the air conditioner off and contact your dealer. |
| Wired Remote ControllerWhen turning on/off the air conditioner, it is not turned on/off immediately. | ◆ In case of using the wired remote controller for a group, the air conditioners connected to the remote controller are turned on/off in order. Thus, it takes some time(up to 32 seconds). |
| Wireless Remote ControllerThe air conditioner does not operate with the remote controller | ◆ Check that there are no obstacles between you and the remote control sensor.◆ Check the wireless remote controller batteries (Refer to page 11).◆ Check that you are close enough to the remote control sensor. (seven metres/yards or less). |
| Wireless Remote ControllerNo beep is heard when you press (ON/OFF) on the remote controller | ◆ Check that you are pointing the remote controller at the remote control sensor on the receiver & display unit.◆ Replace the remote controller batteries if necessary.◆ If there is a strong light around the air conditioner, a three-wavelength light, a neon sign, etc., for example, the air conditioner may not be operated with a remote controller. If this happens, use the remote controller close by the remote control sensor. |
| The air conditioner does not cool or heat | ◆ Check that the correct operating mode has been selected.◆ The room temperature may be too low or too high.◆ Dust may be blocking the air filter guard; refer to page 30 or 31 for cleaning instructions.◆ Check that there is no obstacle in front of the outdoor unit. |
| When heating, the required room temperature is never reached and the air conditioner frequently stops | ◆ Check that the required temperature has been set correctly.◆ Increase the fan speed. |
Technical Specifications
| Model | Power Supply |
| AVMDH052CA0 | |
| AVMDH072CA0 | |
| AVMHH105CA0 | |
| AVMHH128CA0 | 1∅, 208-230V~, 60Hz |
| AVMDC052CA0 | |
| AVMDC072CA0 | |
| AVMHC105CA0 | |
| AVMHC128CA0 | |
| AVMDH052EA(B)0 | |
| AVMDH070EA(B)0 | |
| AVMHH105EA(B)0 | |
| AVMHH128EA(B)0 | 1∅, 220-240V~, 50Hz |
| AVMDC052EA(B)0 | |
| AVMDC070EA(B)0 | |
| AVMHC105EA(B)0 | |
| AVMHC128EA(B)0 |
Memo
THIS AIR CONDITIONER IS MANUFACTURED BY: