
M2280D-PR - Screen LG - Free user manual and instructions
Find the device manual for free M2280D-PR LG in PDF.


User questions about M2280D-PR LG
0 question about this device. Answer the ones you know or ask your own.
Ask a new question about this device
Download the instructions for your Screen in PDF format for free! Find your manual M2280D-PR - LG and take your electronic device back in hand. On this page are published all the documents necessary for the use of your device. M2280D-PR by LG.
USER MANUAL M2280D-PR LG
Please read this manual carefully before operating your set and retain it for future reference.
LED LCD MONITOR TV MODELS
| M2080D | M2080DF | M2080DB | M2080DN |
| M2280D | M2280DF | M2280DB | M2280DN |
| M2380D | M2380DF | M2380DB | M2380DN |
| M2780D | M2780DF | M2780DN |
CONTENTS
PREPARATION
FRONT PANEL CONTROLS 4
BACK PANEL INFORMATION......6
STAND INSTALLATION....8
DETACHING STAND....11
DETACHING STAND BODY....14
WALL MOUNT : HORIZONTAL INSTALLATION.15
DESKTOP PEDESTAL INSTALLATION......16
POSITIONING YOUR DISPLAY....17
SWIVEL STAND(Only M2780D / M2780DF)....17
LOCATION 17
KENSINGTON SECURITY SYSTEM ......18
EXTERNAL EQUIPMENT SETUP
ANTENNA CONNECTION ....19
HD RECEIVER SETUP 20
DVD SETUP 23
VCR SETUP 26
INSERTION OF CI MODULE 29
DIGITAL AUDIO OUT SETUP....30
USB SETUP 31
HEADPHONE SETUP ....32
OTHER A/V SOURCE SETUP ....33
PC SETUP 34
BACK COVER FOR WIRE ARRANGEMENT.....37
SUPPORTED DISPALY RESOLUTION......38
WATCHING TV / PROGRAMME CONTROL
REMOTE CONTROL KEY FUNCTIONS .....40
TURNING ON THE TV 42
PROGRAMME SELECTION....42
VOLUME ADJUSTMENT 42
QUICK MENU 43
ON SCREEN MENUS SELECTION AND
ADJUSTMENT 44
AUTO PROGRAMME TUNING 45
CABLE DTV SETTING (IN CABLE MODE.ONLY.)50
MANUAL PROGRAMME TUNING (IN DIGITAL MODE) ....51
MANUAL PROGRAMME TUING (IN ANALOGUE MODE) ....53
PROGRAMME EDIT 55
IN DTV/RADIO MODE 56
IN TV MODE 56
SOFTWARE UPDATE....58
DIAGNOSTICS 60
CI [COMMON INTERFACE] INFORMATION...61
SELECTING THE PROGRAMME LIST ......62
FAVOURITE PROGRAMME SETUP....63
INPUT LIST 64
EPG (ELECTRONIC PROGRAMME GUIDE)(IN DIGITAL MODE)
Switch on/off EPG 65
Select a programme 65
Button Function in NOW/NEXT Guide Mode ...66
Button Function in 8 Day Guide Mode ......66
Button Function in Date Change Mode ......67
Button Function in Extended Description Box ..67
Button Function in Record/Remind Setting.Mode.68
Button Function in Schedule List Mode .....68
PICTURE CONTROL
PICTURE SIZE (ASPECT RATIO) CONTROL .69
PICTURE WIZARD ....71
e∅ ENERGY SAVING 72
PRESET PICTURE SETTINGS ....73
MANUAL PICTURE ADJUSTMENT....74
PICTURE IMPROVEMENT TECHNOLOGY ....75
EXPERT PICTURE CONTROL....76
PICTURE RESET 79
SCREEN SETUP FOR PC MODE ....80
SOUND CONTROL
AUTO VOLUME LEVELER 85
CLEAR VOICE II 86
BALANCE 87
PRESET SOUND SETTINGS-SOUND MODE..88
PRESET SOUND SETTINGS-USER MODE ...89
Surround X 89
AUDIO RESET 90
DIGITAL AUDIO OUT....91
TV SPEAKERS ON / OFF SETUP .....92
DTV AUDIO SETTING (IN DIGITAL MODE ONLY) 93
I/II Stereo/Dual Reception (In Analogue Mode Only) .....94
NICAM Reception (In Analogue Mode Only) .....95
Speaker Sound Output Selection .....95
TIME SETTING
CLOCK SETUP 96
AUTO ON/OFF TIME SETTING .....97
SLEEP TIMER SETTING 98
OPTION SETTING
ON-SCREEN MENU LANGUAGE / COUNTRY SELECTION ....99
LANGUAGE SELECTION (IN DIGITAL MODE ONLY)....100
AUDIO DESCRIPTION (IN DIGITAL MODE ONLY)....101
DATA SERVICE....102
INPUT LABEL 103
POWER INDICATOR 104
DEMO MODE 105
MODE SETTING 106
INITIALIZING(RESET TO ORIGINAL FACTORY SETTINGS)....107
PARENTAL CONTROL / RATINGS
SET PASSWORD & LOCK SYSTEM ......108
BLOCK PROGRAMME 109
PARENTAL CONTROL (IN DIGITAL MODE ONLY)....110
INPUT BLOCK 111
KEY LOCK 112
TO USE A USB DEVICE
WHEN CONNECTING A USB DEVICE.....113
PHOTO LIST 115
MUSIC LIST 121
MOVIE LIST 125
DIVX REGISTRATION CODE 132
DEACTIVATION....133
TELETEXT
SWITCH ON/OFF 134
SIMPLE TEXT 134
TOP TEXT 134
FASTEXT 135
SPECIAL TELETEXT FUNCTION ....135
DIGITAL TELETEXT
TELETEXT WITHIN DIGITAL SERVICE .....136
TELETEXT IN DIGITAL SERVICE....136
APPENDIX
TROUBLESHOOTING 137
MAINTENANCE 141
PRODUCT SPECIFICATIONS....142
IR CODES 146
EXTERNAL CONTROL DEVICE SETUP
RS-232C Setup 147
Type of Connector; D-Sub 9-Pin Male ....147
RS-232C Configurations .....147
Set ID 148
Communication Parameters .....149
PREPARATION
FRONT PANEL CONTROLS
■ This is a simplified representation of the front panel. The image shown may be somewhat different from your set.
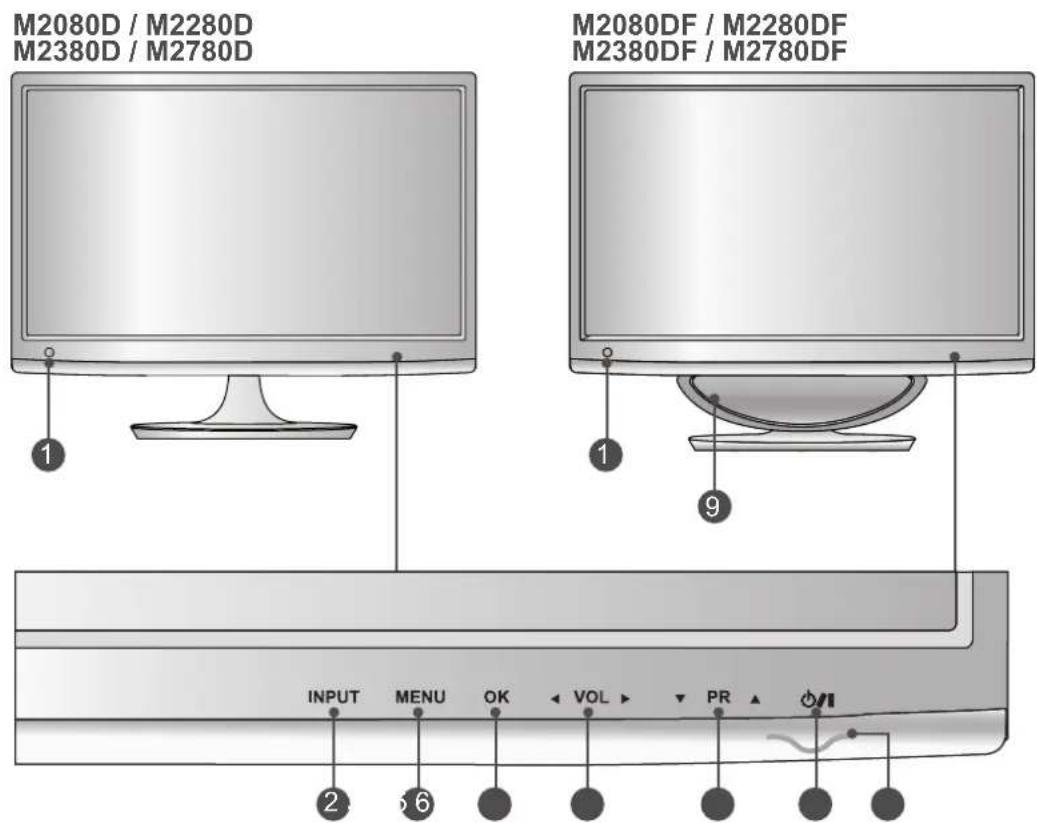
text_image
M2080D / M2280D M2380D / M2780D M2080DF / M2280DF M2380DF / M2780DF INPUT MENU OK VOL PR 2 61 IR receiver (Remote controller receiver)
② INPUT Button
3 MENU Button
4 OK Button
5 VOLUME Button
6 PROGRAMME Button
7 Power Button
8 Power Indicator
Illuminates blue when the set is switched on.
Note: You can adjust Power indicator in the OPTION menu.
9 WOOFER
FRONT PANEL CONTROLS
■ This is a simplified representation of the front panel. The image shown may be somewhat different from your set.
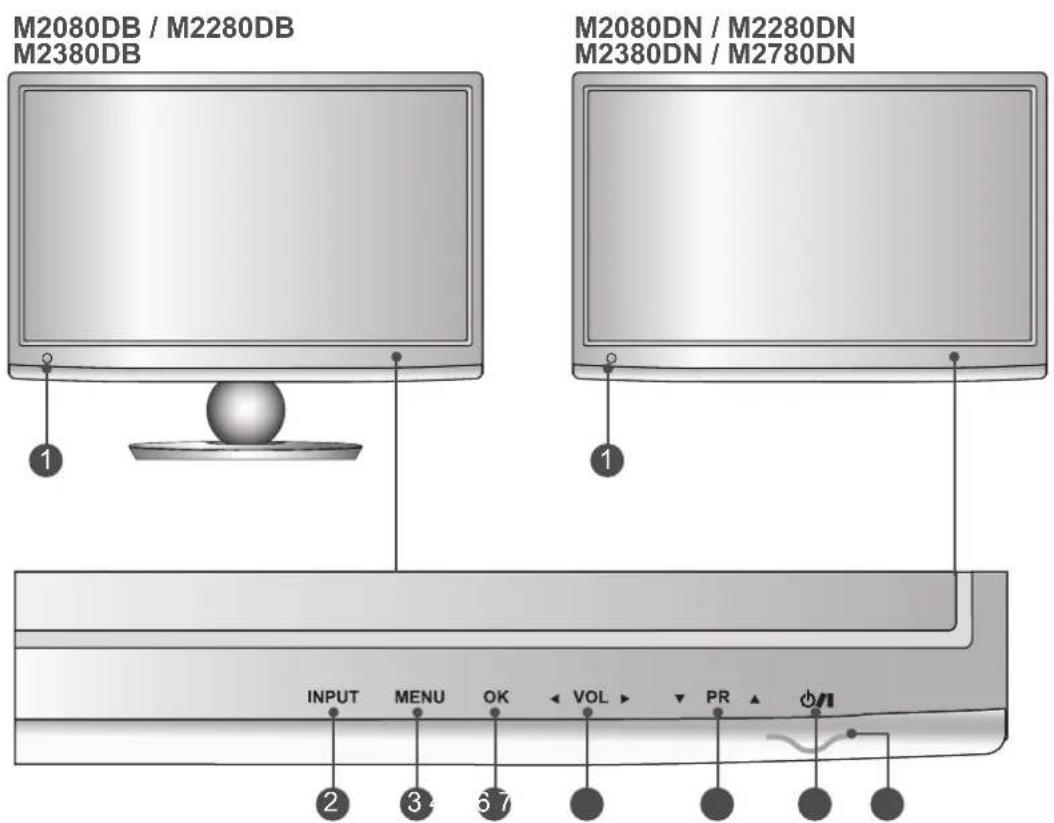
text_image
M2080DB / M2280DB M2380DB M2080DN / M2280DN M2380DN / M2780DN INPUT MENU OK VOL PR 1 2 3 5 71 IR receiver (Remote controller receiver)
2 INPUT Button
3 MENU Button
4 OK Button
5 VOLUME Button
6 PROGRAMME Button
7 Power Button
8 Power Indicator
Illuminates blue when the set is switched on.
Note: You can adjust Power indicator in the OPTION menu.
PREPARATION
BACK PANEL INFORMATION
■ This is a simplified representation of the back panel. The image shown may be somewhat different from your set.
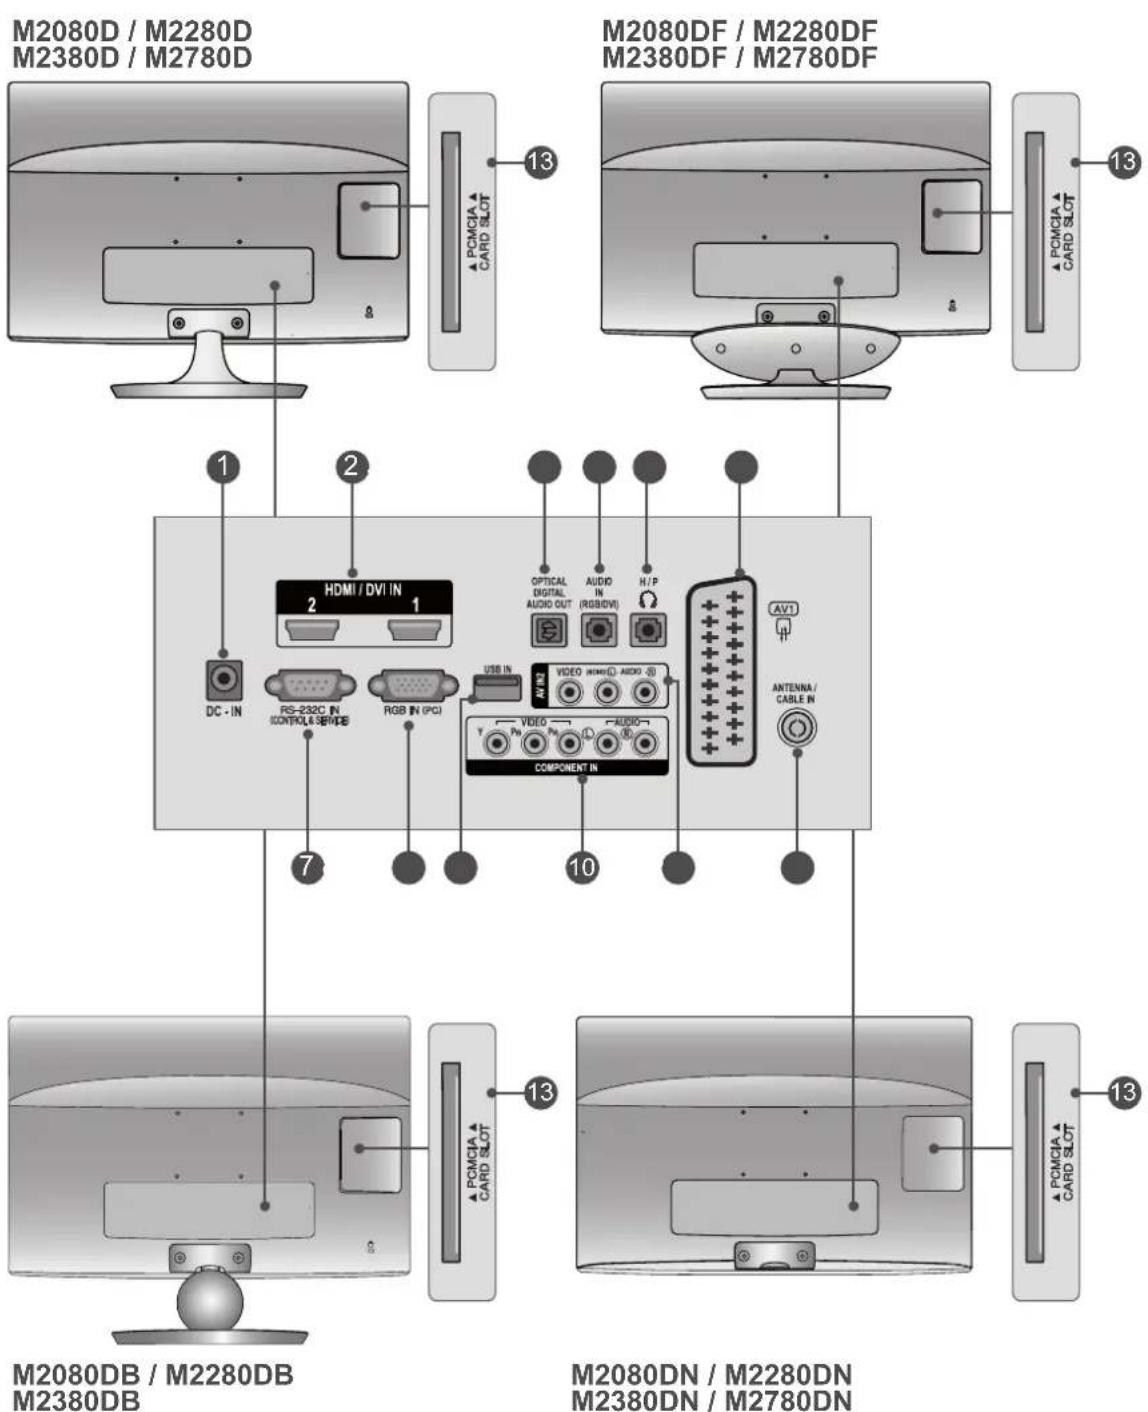
text_image
M2080D / M2280D M2380D / M2780D M2080DF / M2280DF M2380DF / M2780DF 1 2 HDMI / DVI IN 2 1 DC - IN RS-232C IN CONTROL & SPRING RGB IN (PCI) USB IN AV3 VIDEO HDMI (C) - AUDIO (S) VIDEO COMPONENT IN 7 10 ANTenna/ CABLE IN 13 M2080DB / M2280DB M2380DB 13 M2080DN / M2280DN M2380DN / M2780DNBACK PANEL INFORMATION
1 DC ADAPTER PORT
Connect to the power cord socket.
2 HDMI / DVI INPUT
Connect a HDMI signal to HDMI IN.
Or DVI (VIDEO) signal to HDMI IN with DVI to HDMI cable.
3 OPTICAL DIGITAL AUDIO OUT
Connect digital audio to various types of equipment. Connect to a Digital Audio Component.
Use an Optical audio cable.
4 RGB/DVI AUDIO INPUT
Connect the audio from a PC.
5 HEADPHONE SOCKET
Plug the headphone into the headphone socket.
6 Euro Scart Socket (AV1)
Connect scart socket input or output from an external device to these jacks.
7 RS-232C IN (CONTROL & SERVICE) PORT
Connect to the RS-232C port on a PC.
This port is used for Service or Hotel mode.
8 RGB INPUT (PC)
Connect the output from a PC.
9 USB Input
10 COMPONENT INPUT
Connect a component video/audio device to these jacks.
11 AV2 (AUDIO/VIDEO) INPUT
Connect audio/video output from an external device to these jacks.
12 ANTENNA / CABLE INPUT
Connect over-the-air signals to this jack.
13 PCMCIA (PERSONAL COMPUTER MEMORY CARD INTERNATIONAL ASSOCIATION) CARD SLOT
Insert the CI Module to PCMCIA CARD SLOT.
(This feature is not available in all countries.)
PREPARATION
M2080D/M2280D/M2380D/M2780D
STAND INSTALLATION
■ The image shown may be somewhat different from your set.
1 Carefully place the product screen side down on a cushioned surface that will protect product and screen from damage.
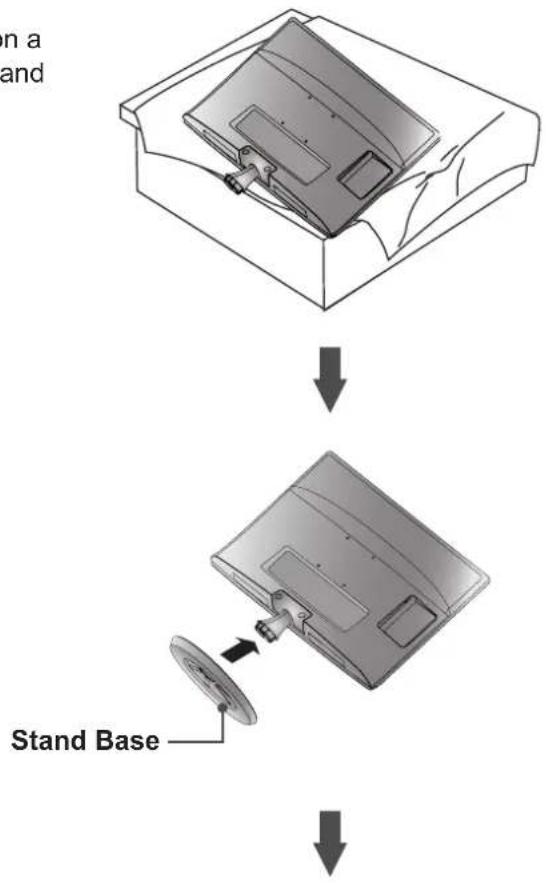
text_image
n a and Stand Base2 Insert the Stand Base into the product.
3 Use a Coin on the bottom of the stand base and turn the screw clockwise to tighten.
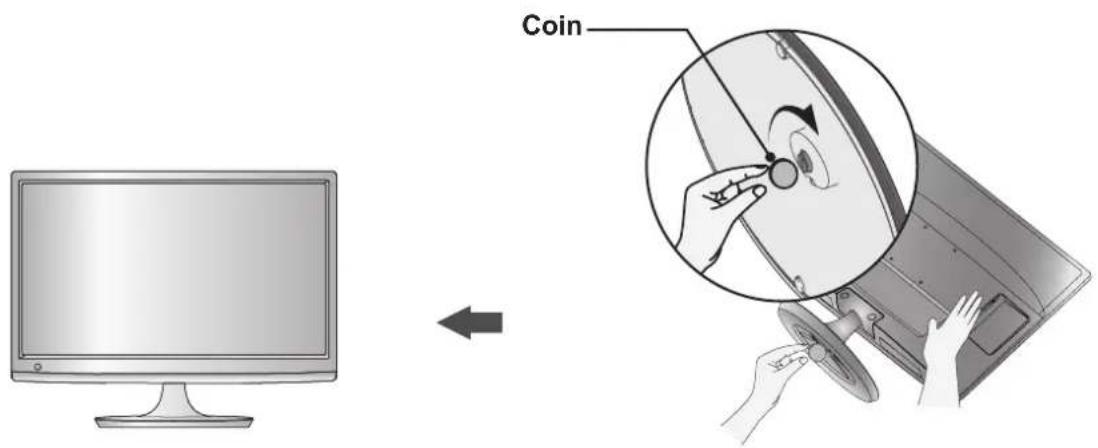
text_image
CoinM2080DF/M2280DF/M2380DF/M2780DF
STAND INSTALLATION
■ The image shown may be somewhat different from your set.
1 Carefully place the product screen side down on a cushioned surface that will protect product and screen from damage.
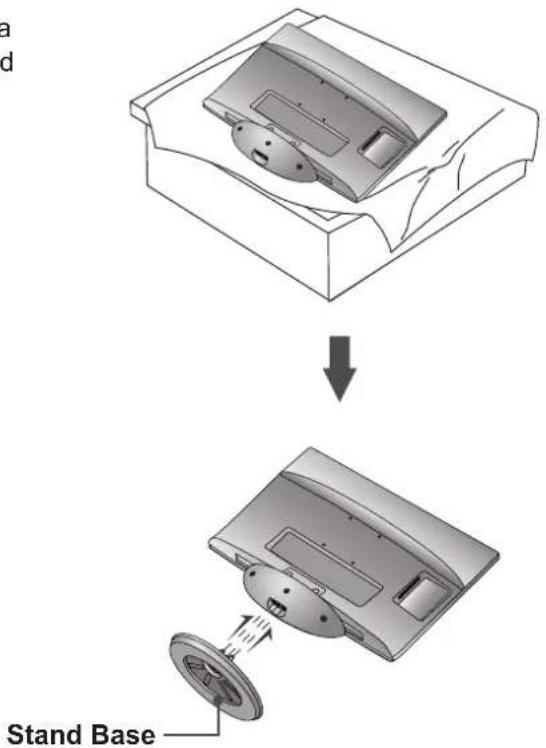
text_image
Stand Base2 Insert the Stand Base into the product.
3 Use a Coin on the bottom of the stand base and turn the screw clockwise to tighten.
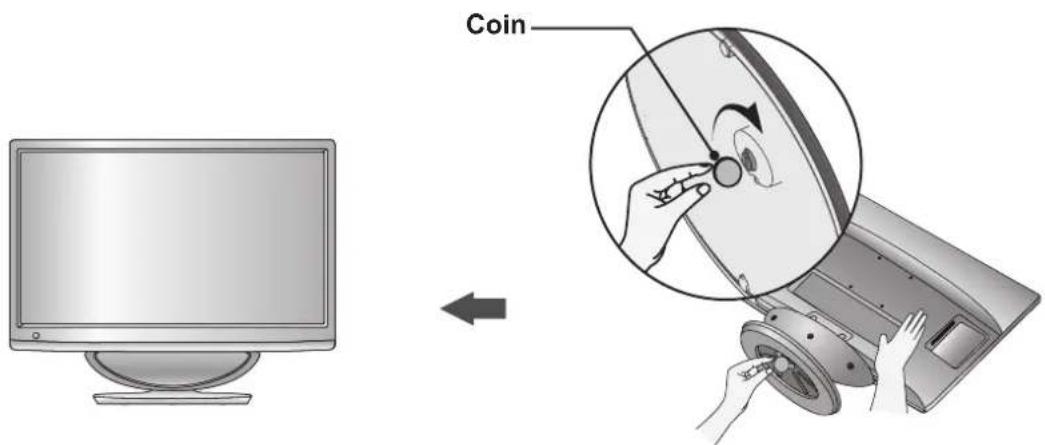
text_image
CoinPREPARATION
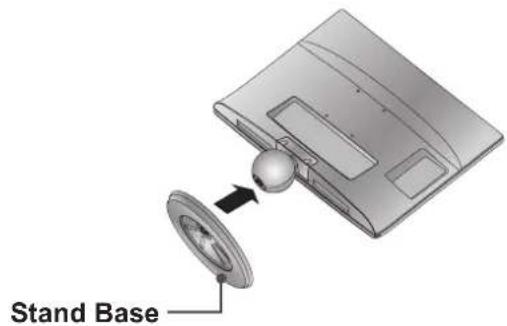
M2080DB/M2280DB/M2380DB
STAND INSTALLATION
■ The image shown may be somewhat different from your set.
1 Carefully place the product screen side down on a cushioned surface that will protect product and screen from damage.
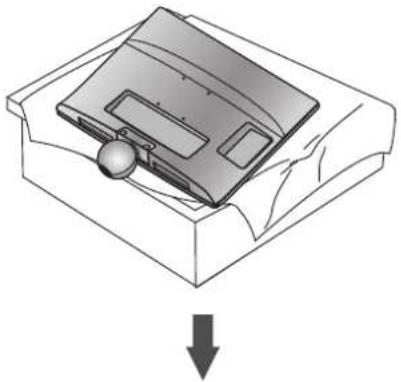
natural_image
Diagram of a device with a knob inserted into a box, showing a downward arrow (no text or symbols present)2 Insert the Stand Base into the product.
text_image
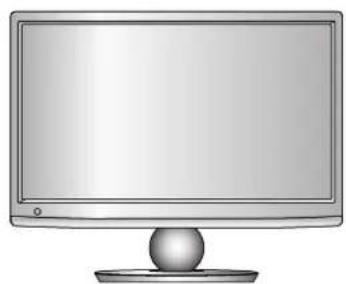
Stand Base3 Use a Coin on the bottom of the stand base and turn the screw clockwise to tighten.

natural_image
Illustration of a desktop computer monitor with a blank screen and a spherical base (no text or symbols)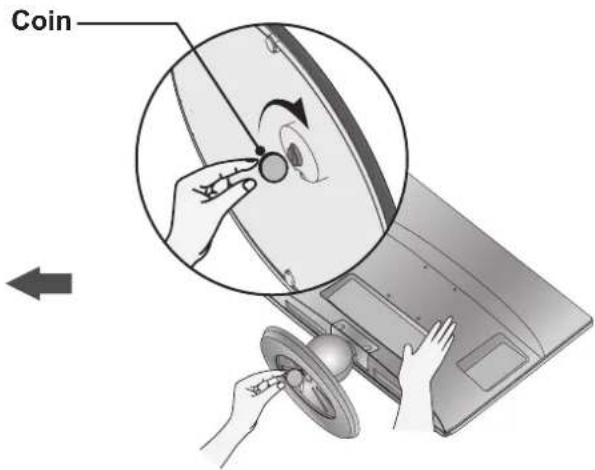
text_image
CoinDETACHING STAND
■ The image shown may be somewhat different from your set.
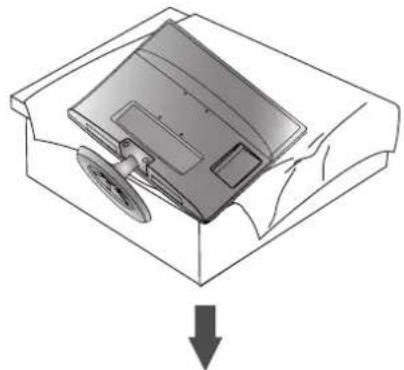
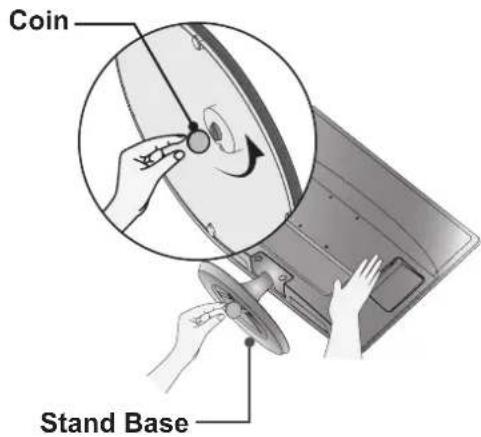
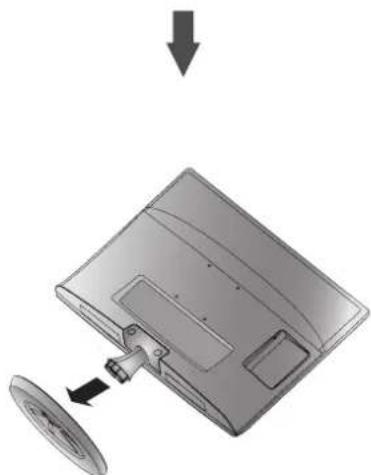
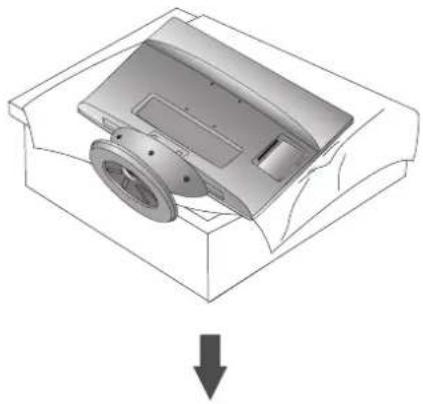
1 Place the set screen side down on a cushion or soft cloth.
natural_image
Diagram of a mechanical device with a downward arrow indicating force or direction (no text or symbols present)2 Detach the monitor to the Stand Base by turning the screw to the left. Turn the screw by using a Coin.
text_image
Coin Stand Base3 Pull the stand base.
natural_image
Diagram of a computer monitor with a disc and cable attachment, showing a downward arrow (no text or symbols present)PREPARATION
M2080DF/M2280DF/M2380DF/M2780DF
DETACHING STAND
■ The image shown may be somewhat different from your set.
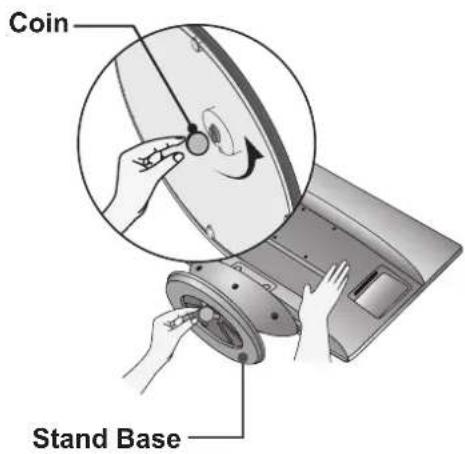
1 Place the set screen side down on a cushion or soft cloth.
natural_image
3D mechanical component diagram showing a cylindrical housing with a circular housing and a downward arrow indicating force or direction (no text or symbols)2 Detach the monitor to the Stand Base by turning the screw to the left. Turn the screw by using a Coin.
text_image
Coin Stand Base3 Pull the stand base.
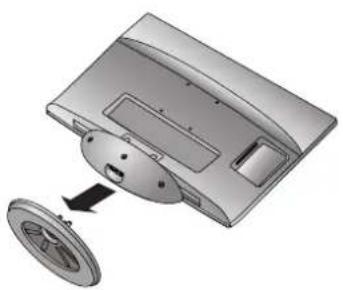
natural_image
3D illustration of a device with a circular component and a separate circular component, showing no text or symbols.DETACHING STAND
■ The image shown may be somewhat different from your set.
1 Place the set screen side down on a cushion or soft cloth.
2 Detach the monitor to the Stand Base by turning the screw to the left. Turn the screw by using a Coin.
3 Pull the stand base.
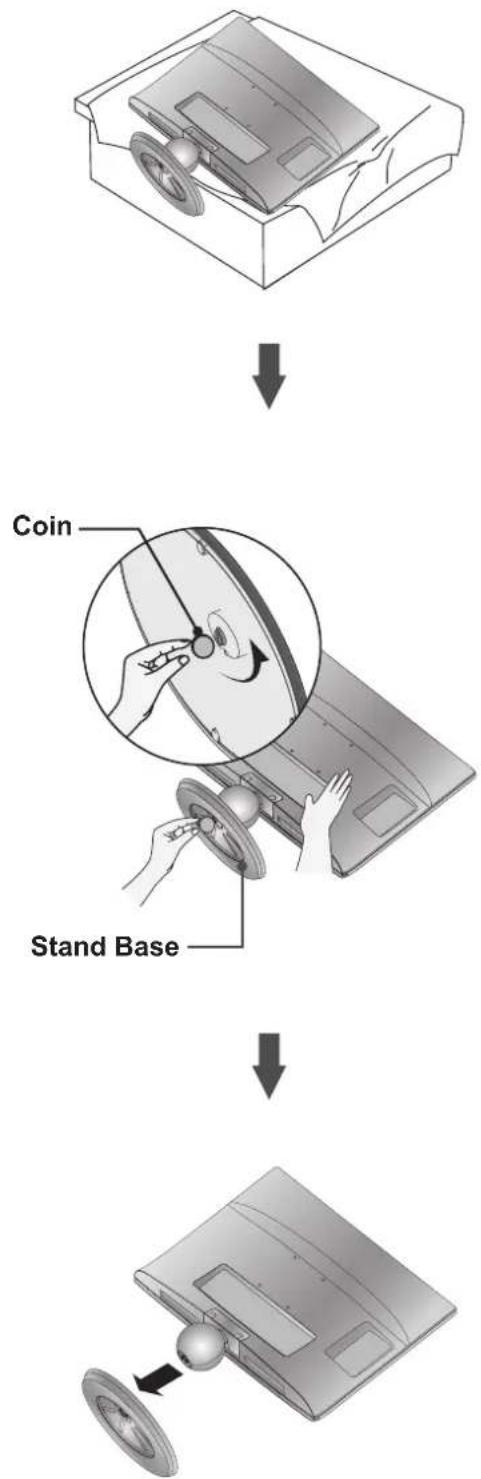
text_image
Coin Stand BasePREPARATION
DETACHING STAND BODY
■ The image shown may be somewhat different from your set.
■ Remove the Stand Body in the same way as the following when using it as a Wall Hook.
- Remove the screw 2 point.
- Pull the stand body.
M2080D / M2280D
M2380D / M2780D
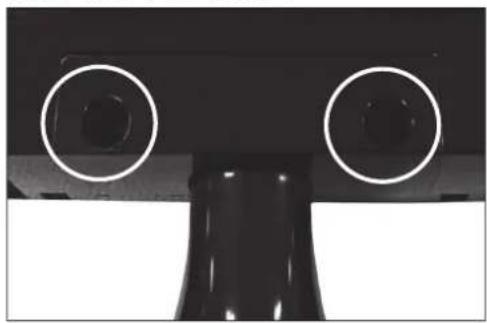
natural_image
Close-up of a mechanical component with two circular holes, no visible text or symbolsM2080DB / M2280DB
M2380DB
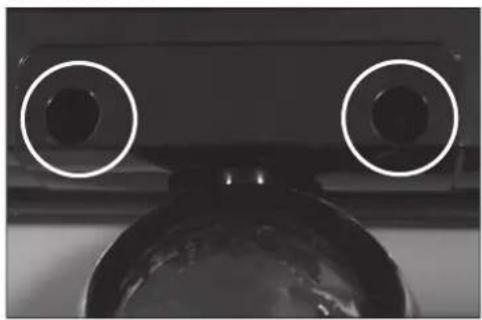
natural_image
Close-up of a black mechanical component with two white circular holes, mounted on a spherical base (no text or symbols visible)- Assemble the screw 2 point
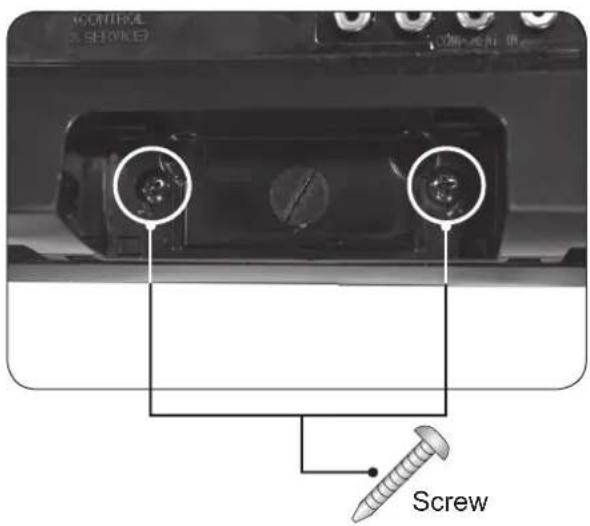
text_image
ScrewWALL MOUNT : HORIZONTAL INSTALLATION
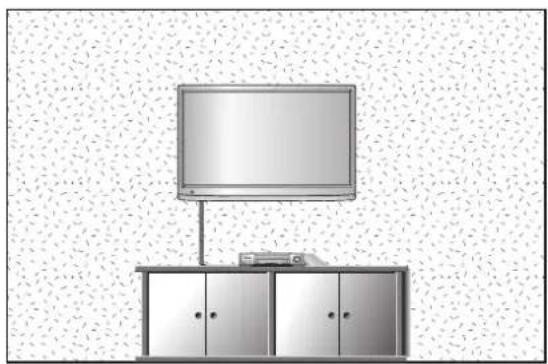
For proper ventilation, allow a clearance of 10 cm on each side and from the wall. Detailed installation instructions are available from your dealer, see the optional Tilt Wall Mounting Bracket Installation and Setup Guide.
natural_image
Interior view of a modern office or library with a monitor mounted on top, connected to a cabinet (no visible text or symbols)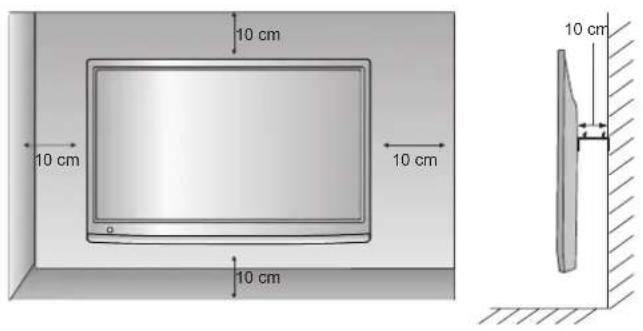
text_image
10 cm 10 cm 10 cm 10 cm 10 cmIf you intend to mount the set to a wall, attach Wall mounting interface (optional parts) to the back of the set. When you install the set using the wall mounting interface (optional parts), attach it carefully so it will not drop.
- Be sure to use screws and a wall mount that meet VESA standards.
- Using screws longer than those recommended might damage the product.
- Using screws that do not meet VESA standards might either damage the product or result in it coming away from the wall. We will not be held responsible for any damage resulting from failure to follow these instructions.
- VESA compatible only with respect to screw mounting interface dimensions and mounting screw specifications
- Please use VESA standard as below.
5-1) 784.8 mm (30.9 inch) and under
* Wall Mount Pad Thickness : 2.6 mm
* Screw : Φ 4.0 mm x Pitch 0.7 mm x Length 10 mm
5-2) 787.4 mm (31.0 inch) and above
* Please use VESA standard wall mount pad and screws.
< Screw Mounting Interface Dimensions >
| Model | M2080DM2280DM2380DM2080DFM2380DFM2380DF | M2080DBM2280DBM2380DBM2080DNM2380DNM2380DN | M2780DM2780DFM2780DN |
| VESA (A x B) 75 x 75 200 x 100 | |||
| Wall mount bracket(optional) | RW120 | RW240 | |
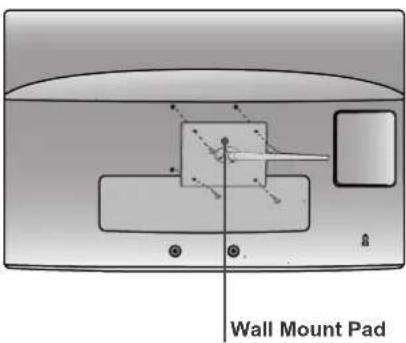
text_image
Wall Mount PadPREPARATION
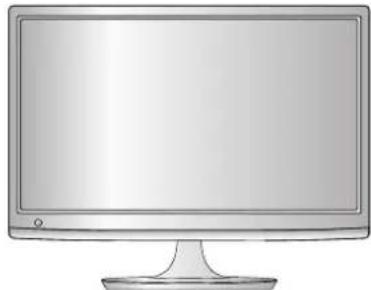
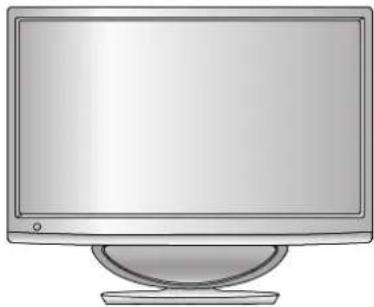
DESKTOP PEDESTAL INSTALLATION
■ The image shown may be somewhat different from your set.
For proper ventilation, allow a clearance of 10 cm on each side and from the wall.
M2080D / M2280D
M2380D / M2780D
natural_image
Illustration of a flat-screen computer monitor with a blank screen (no text or symbols)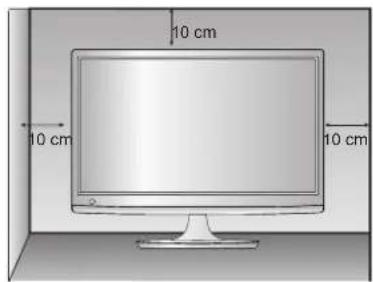
text_image
10 cm 10 cm 10 cm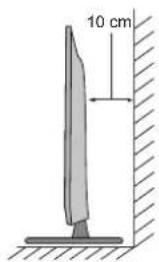
text_image
10 cmM2080DF / M2280DF
M2380DF / M2780DF
natural_image
Illustration of a flat-screen computer monitor with a curved base (no text or symbols)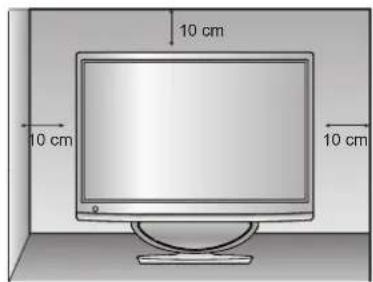
text_image
10 cm 10 cm 10 cm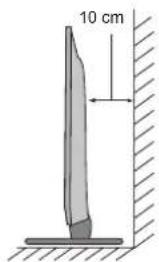
text_image
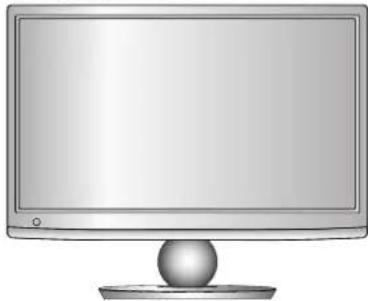
10 cmM2080DB / M2280DB
M2380DB
natural_image
Illustration of a flat-screen computer monitor with a spherical base (no text or symbols)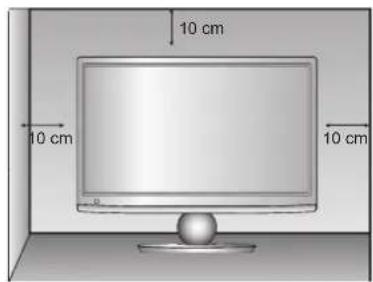
text_image
10 cm 10 cm 10 cm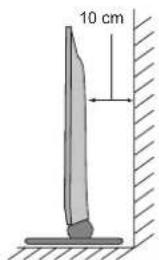
text_image
10 cmPOSITIONING YOUR DISPLAY
■ The image shown may be somewhat different from your set.
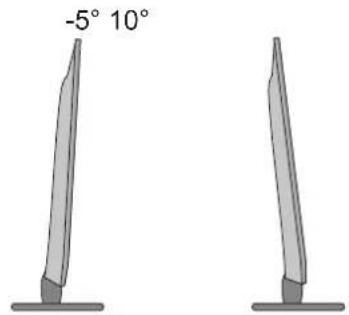
* Tilt range
text_image
-5° 10°Adjust the position of the panel in various ways for maximum comfort.
SWIVEL STAND(Only M2780D / M2780DF)
■ The image shown may be somewhat different from your set.

natural_image
Pure mechanical diagram showing a flat plate with rotational arrows and no text or symbolsAfter installing the set, you can adjust the set manually to the left or right direction by 179 degrees to suit your viewing position.
LOCATION
Position your set so that no bright light or sunlight falls directly onto the screen. Care should be taken not to expose the set to any unnecessary vibration, moisture, dust or heat. Also, ensure that the set is placed in a position to allow a free flow of air. Do not cover the ventilation openings on the back cover.

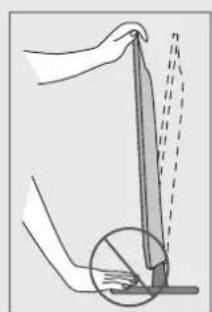
WARNING
natural_image
Diagram showing a hand holding a tool with a dashed line indicating motion or alignment, no text or symbols present.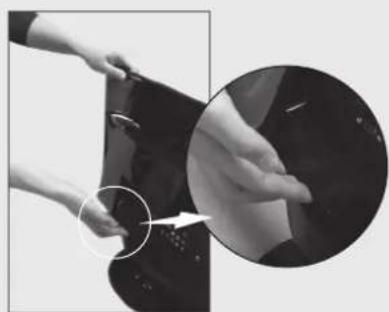
natural_image
Close-up of hands cleaning a car's seat with a magnified inset showing the detail (no text or symbols visible)■ When adjusting the angle of the screen, do not put your finger(s) in between the head of the monitor and the stand body or woofer.
You can hurt your finger(s).
M2080DF / M2280DF / M2380DF / M2780DF
PREPARATION
KENSINGTON SECURITY SYSTEM
- The product is equipped with a Kensington Security System connector on the back panel. Connect the Kensington Security System cable as shown below.
- For detailed installation and use of the Kensington Security System, refer to the user's guide provided with the Kensington Security System.
For further information, contact http://www.kensington.com, the internet homepage of the Kensington company. Kensington sells security systems for expensive electronic equipment such as notebook PCs and LCD projectors.
NOTE
- The Kensington Security System is an optional accessory.
NOTES
a. If the product feels cold to the touch, there may be a small "flicker" when it is turned on.
This is normal, there is nothing wrong with product.
b. Some minute dot defects may be visible on the screen, appearing as tiny red, green, or blue spots.
However, they have no adverse effect on the monitor's performance.
c. Avoid touching the LCD screen or holding your finger(s) against it for long periods of time.
Doing so may produce some temporary distortion effects on the screen.
M2080D / M2280D
M2380D / M2780D
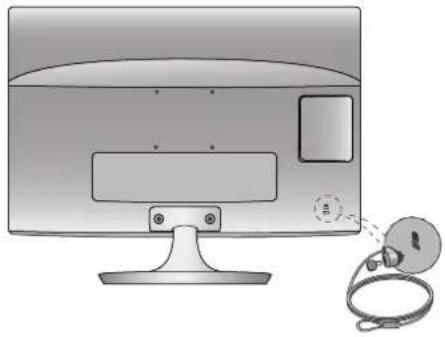
natural_image
Illustration of a computer monitor with a CD cable attached to its side (no text or symbols present)M2080DF / M2280DF
M2380DF / M2780DF

natural_image
Illustration of a computer monitor with a cable and attached cable connector (no text or symbols)M2080DB / M2280DB
M2380DB
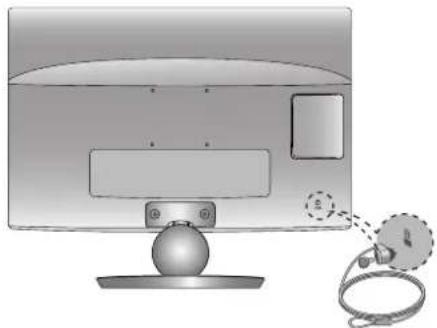
natural_image
Illustration of a computer monitor with a cable and attached cable connector (no text or symbols)M2080DN / M2280DN
M2380DN / M2780DN
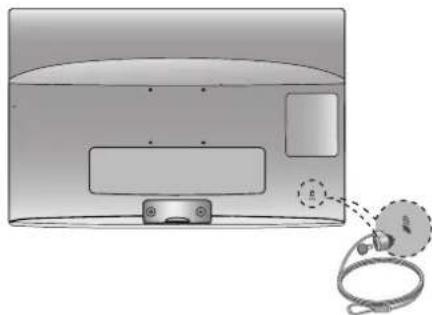
natural_image
Diagram of a microwave oven with a cable and a hanging device attached (no text or symbols)EXTERNAL EQUIPMENT SETUP
■ To prevent damage do not connect to the mains outlet until all connections are made between the devices.
ANTENNA CONNECTION
■ For optimum picture quality, adjust antenna direction.
■ An antenna cable and converter are not supplied.
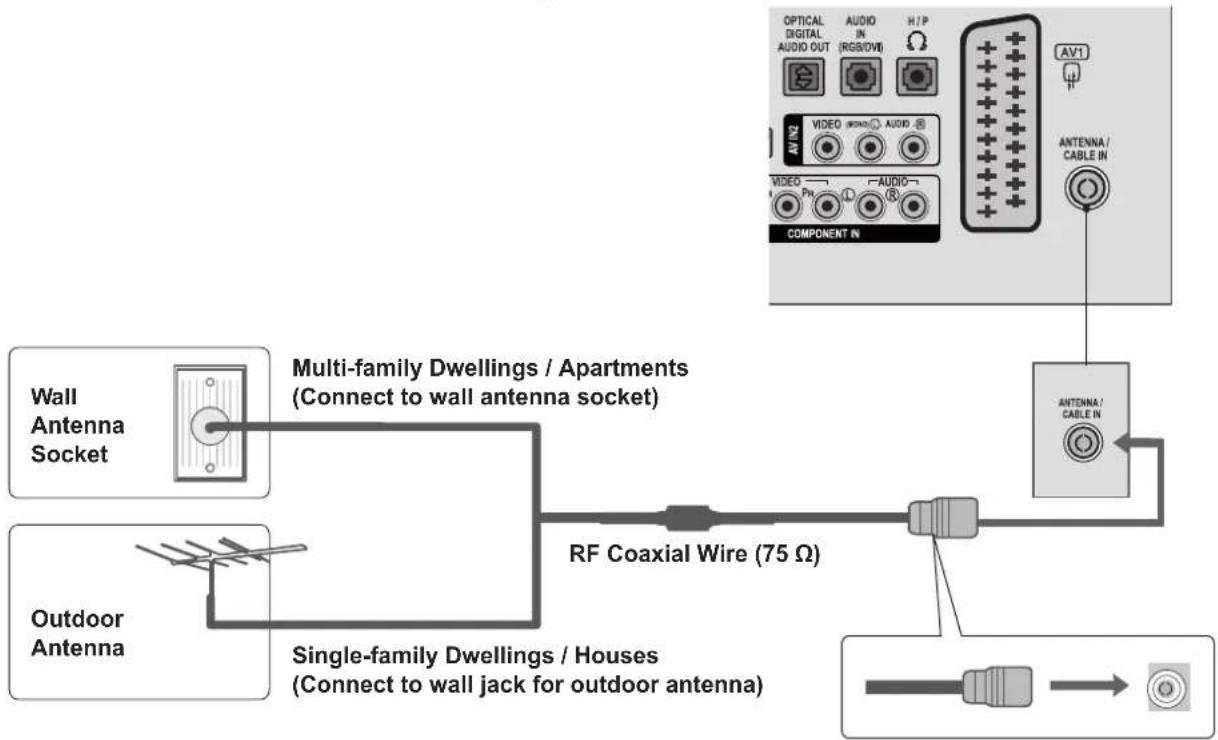
flowchart
graph TD
    A["Wall Antenna Socket"] --> B["Multi-family Dwellings / Apartments (Connect to wall antenna socket)"]
    C["Outdoor Antenna"] --> D["Single-family Dwellings / Houses (Connect to wall jack for outdoor antenna)"]
    B --> E["RF Coaxial Wire (75 Ω)"]
    D --> E
    E --> F["Antenna / Cable In"]
    G["OPTICAL DIGITAL AUDIO OUT"] --> H["AV1"]
    I["VIDEO VIDEO"] --> J["AV2"]
    K["VIDEO PHO"] --> L["AV3"]
    M["COMPONENT IN"] --> N["AV4"]
    O["AV5"] --> P["AV6"]

flowchart
graph LR
    A["Antenna"] --> B["UHF"]
    A --> C["VHF"]
    B --> D["Signal Amplifier"]
    C --> D
    D --> E["Antenna/Cable In"]
■ In poor signal areas, to get better picture quality, install a signal amplifier to the antenna as shown above.
■ If signal needs to be split for two sets, use an antenna signal splitter for connection.
EXTERNAL EQUIPMENT SETUP
■ To avoid damaging any equipment, never plug in any power cords until you have finished connecting all equip
■ The image shown may be somewhat different from your set.
HD RECEIVER SETUP
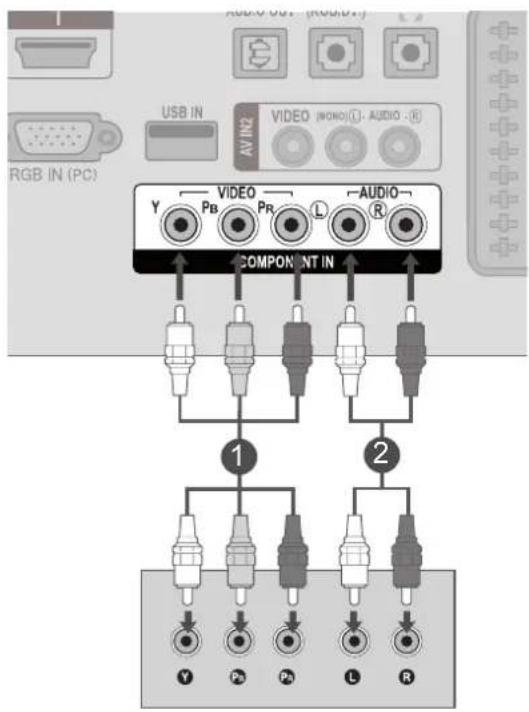
Connecting with a component cable
1 Connect the video outputs (Y, PB, PR) of the digital set-top box to the COMPONENT IN VIDEO jacks on the SET.
2 Connect the audio output of the digital set-top box to the COMPONENT IN AUDIO jacks on the SET.
3 Turn on the digital set-top box.
(Refer to the owner's manual for the digital set-top box.)
4 Select COMPONENT input source using the INPUT button on the remote control
text_image
AUDIO OUT (RGB) USB IN AVIN VIDEO (WONO) (I) - AUDIO - RGB IN (PC) Y PB PR L AUDIO COMPONENT IN 1 2 Y PB PA L R▶ HDMI Audio Supported format : Dolby Digital, PCM DTS Audio format is not supported.
| Signal Component HDMI | ||
| 480i / 576i YES No | ||
| 480p / 576p YES YES | ||
| 720p / 1080i YES YES | ||
| 1080p | YES(50 Hz / 60Hz only) | YES(24 Hz / 30 Hz / 50Hz / 60Hz) |
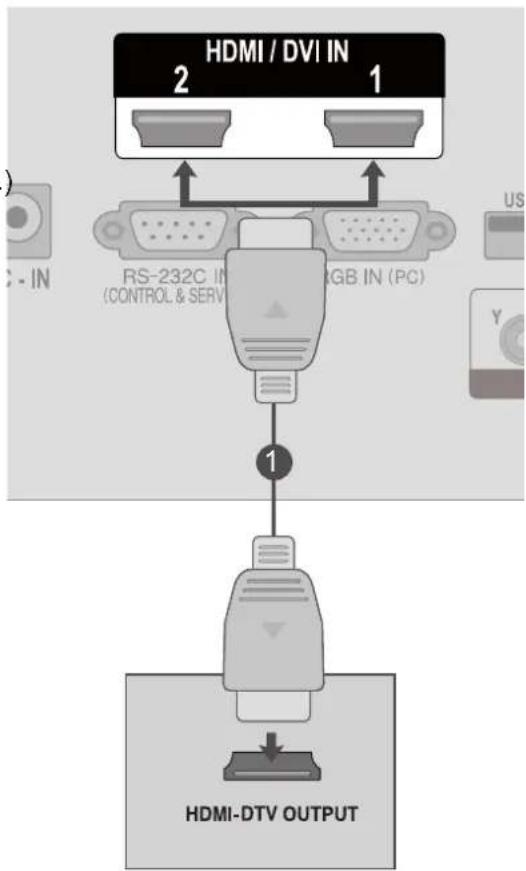
Connecting a set-top box with a HDMI cable
1 Connect the digital set-top box to HDMI/DVI IN 1 or HDMI/DVI IN 2 jack on the SET
2 Turn on the digital set-top box. (Refer to the owner's manual for the digital set-top box.)
3 Select HDMI 1 or HDMI 2 input source using the INPUT button on the remote control.
flowchart
graph TD
    A["2 HDI / DVI IN"] --> B["1"]
    C["RS-232C IN (CONTROL & SERV)"] --> D["1"]
    E["USB IN (PC)"] --> D
    F["HDMI-DTV OUTPUT"] --> D
    style A fill:#f9f,stroke:#333
    style B fill:#ccf,stroke:#333
    style C fill:#cfc,stroke:#333
    style D fill:#fcc,stroke:#333
    style E fill:#cff,stroke:#333
    style F fill:#ffc,stroke:#333
NOTE
▶ Check that your HDMI cable is High Speed HDMI Cable. If the HDMI cables are not High Speed HDMI Cable, flickering or no screen display can result. Please use the High Speed HDMI Cable.
EXTERNAL EQUIPMENT SETUP
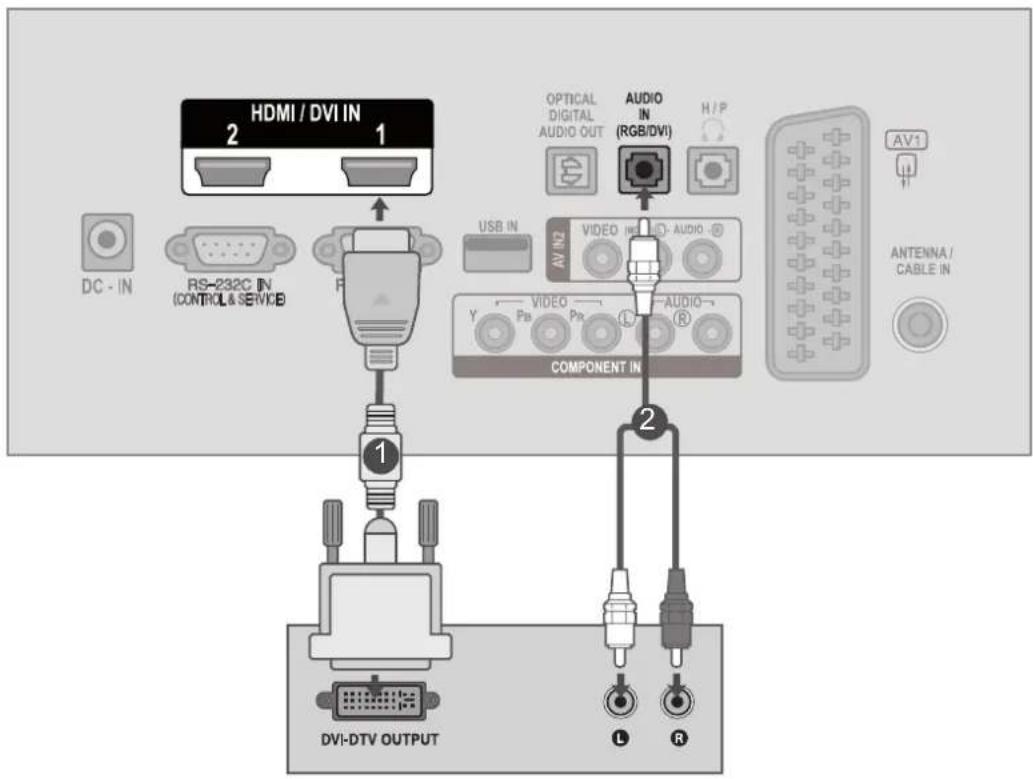
Connecting with an HDMI to DVI cable
1 Connect the digital set-top box to HDMI/DVI IN 1 or HDMI/DVI IN 2 jack on the SET.
2 Connect the audio output of the digital set-top box to the AUDIO IN (RGB/DVI) jack on the SET.
3 Turn on the digital set-top box. (Refer to the owner's manual for the digital set-top box.)
4 Select HDMI 1 or HDMI 2 input source using the INPUT button on the remote control.
text_image
HDMI / DVI IN 2 1 DC - IN RS-232C IN (CONTROL & SERVICE) COMPONENT IN OPTICAL DIGITAL AUDIO OUT AUDIO IN (RGB/DVI) H / P USB IN AV IN2 VIDEO IN AUDIO - AUDIO - Y Pb Pb L R AV1 ANTENNA / CABLE IN DVI-DTV OUTPUT L RDVD SETUP
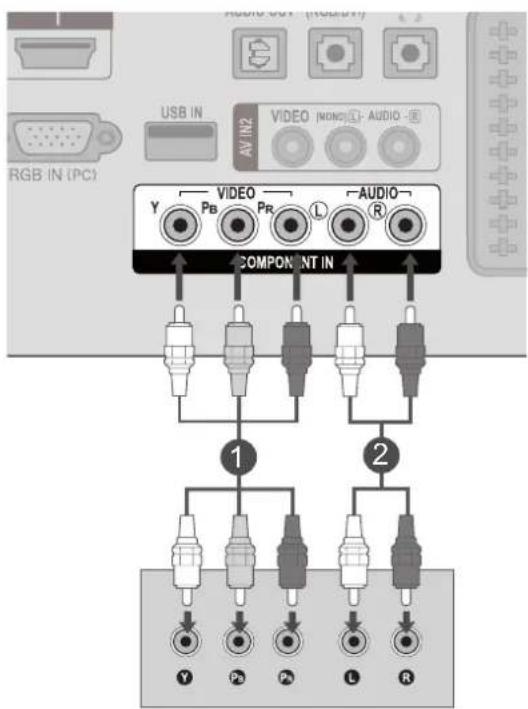
Connecting with a component cable
1 Connect the video outputs (Y, PB, PR) of the DVD to the COMPONENT IN VIDEO jacks on the SET.
2 Connect the audio outputs of the DVD to the COMPONENT IN AUDIO jacks on the SET.
3 Turn on the DVD player, insert a DVD.
4 Select Component input source using the INPUT button on the remote control.
5 Refer to the DVD player's manual for operating instructions.
text_image
AUDIO OUT (RGB/VT) USB IN AV IN2 VIDEO (MCO) Audio - RGB IN (PC) Y PB PR L R COMPONENT IN 1 2 Y Pb Pb L RComponent Input ports
To achieve better picture quality, connect a DVD player to the component input ports as shown below.
| Component ports on the SET Y P | _B | P_R | |
| Video output ports on DVD player | Y | P_B | P_R |
| Y B-Y | R-Y | ||
| Y Cb | Cr | ||
| Y Pb | Pr | ||
EXTERNAL EQUIPMENT SETUP
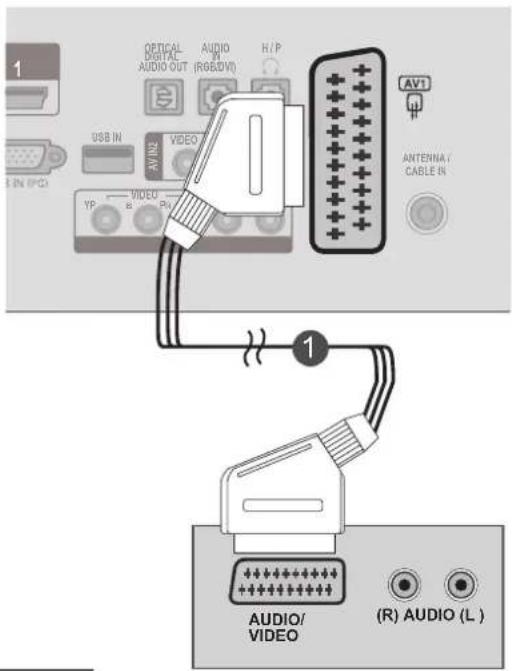
Connecting with a Euro Scart cable
1 Connect the Euro scart socket of the DVD to the AV1 Euro scart socket on the SET.
2 Tum on the DVD player, insert a DVD.
3 Select AV1 input source using the INPUT button on the remote control.
4 Refer to the DVD player's manual for operating instructions.
| Scart | Input | Output | ||
| Video | Audio | RGB | Video, Audio | |
| AV1 | O | O | O | Analogue TV, Digital TV |
| Output TypeCurrent input mode | AV1(TV Out) | AV1(When DTV scheduled recoring is in progress using recording equipment) |
| Digital TV | Digital TV | O |
| Analogue TV, AV | Analogue TV | O(The input mode is converted to DTV) |
| Component / RGB | Analogue TV | |
| HDMI | X |
text_image
OPTICAL AUDIO OUT (RGB/DV) H/P USB IN AVIN VIDEO YP 8 R/P AV1 ANTENIA/CABLE IN AUDIO/VIDEO (R) AUDIO (L)▶ TV Out : Outputs Analogue TV or Digital TV signals.
NOTE
▶ Signal type RGB, i.e. the signals red, green and blue can only be selected for the Euro scart and the AV 1 can be received. These signals are transmitted, for example, by a paid TV decoder, game machine or photo CD unit, etc.
▶ Please use shielded scart cable.
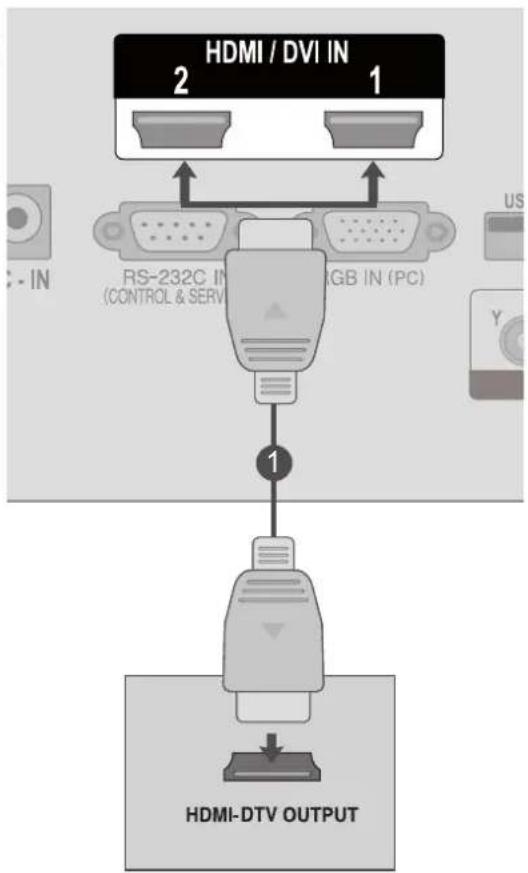
Connecting the HDMI cable
1 Connect the HDMI output of the DVD to the HDMI/DVI IN 1 or HDMI/DVI IN 2 jack on the SET
2 Select HDMI 1 or HDMI 2 input source using the INPUT button on the remote control.
3 Refer to the DVD player's manual for operating instructions.
flowchart
graph TD
    A["2 HDI / DVI IN"] --> B["1"]
    C["RS-232C IN (CONTROL & SERV) RGB IN (PC)"] --> D["1"]
    E["HDMI-DTV OUTPUT"] --> F["Output"]
NOTE
▶ Check that your HDMI cable is High Speed HDMI Cable. If the HDMI cables are not High Speed HDMI Cable, flickering or no screen display can result. Please use the High Speed HDMI Cable.
EXTERNAL EQUIPMENT SETUP
VCR SETUP
■ To avoid picture noise (interference), allow adequate distance between the VCR and SET.
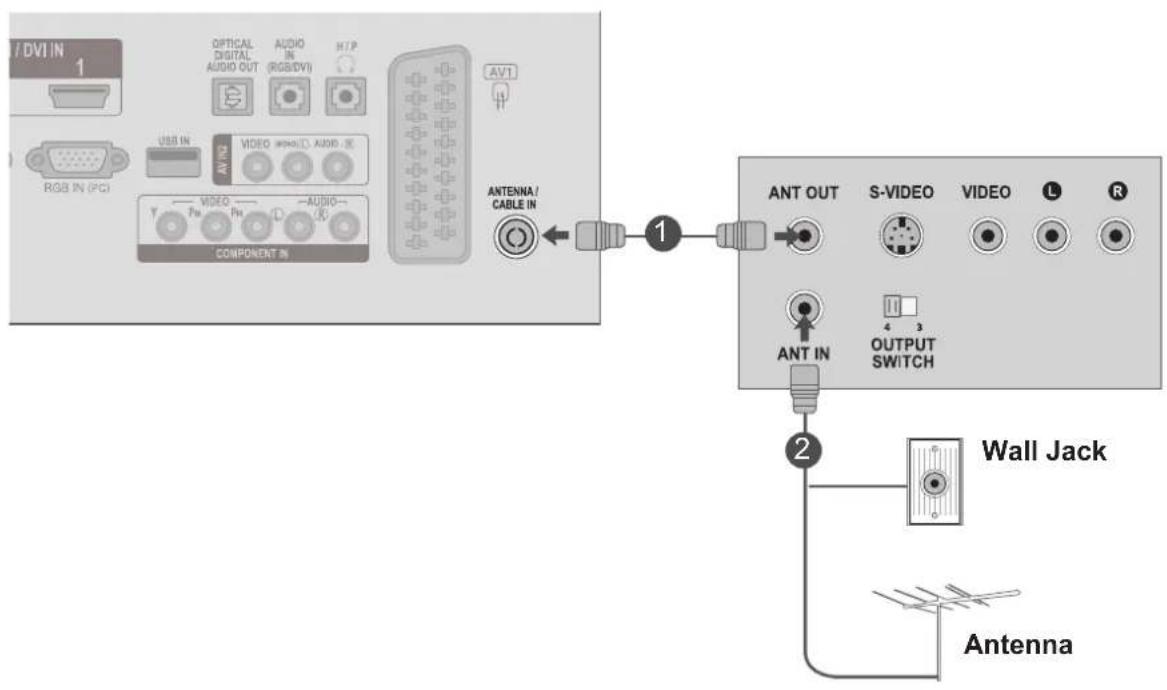
Connecting with a RF cable
text_image
1 OPTICAL DIGITAL AUDIO IN (RGB/DVI) H/P AVI USB IN VIDEO MODIFIED AUDIO SE RGB IN (PG) VIDEO Audio COMPONENT IN ANTENNA/ CABLE IN 1 ANT OUT S-VIDEO VIDEO L R ANT IN OUTPUT SWITCH 2 Wall Jack Antenna1 Connect the ANT OUT socket of the VCR to the ANTENNA / CABLE IN socket on the SET.
2 Connect the antenna cable to the ANT IN socket of the VCR.
3 Press the PLAY button on the VCR and match the appropriate channel between the SET and VCR for viewing.
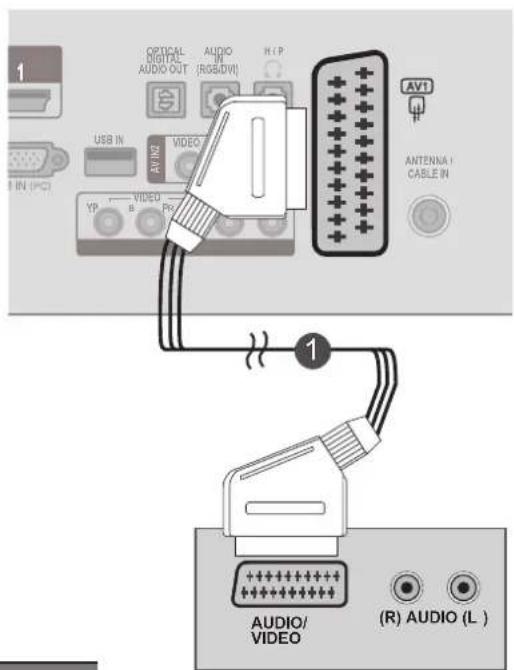
Connecting with a Euro Scart cable
1 Connect the Euro scart socket of the VCR to the AV1 Euro scart socket on the SET.
2 Insert a video tape into the VCR and press PLAY on the VCR. (Refer to the VCR owner's manual.)
3 Select AV1 input source using the INPUT button on the remote control.
4 Refer to the VCR player's manual for operating instructions.
text_image
OPTICAL AUDIO AUDIO OUT (RGB/DVI) H (P) USB IN AVING VIDEO YR VIDEO PR AV1 ANTENNA CABLE IN 1 AUDIO/ VIDEO (R) AUDIO (L)| Scart | Input | Output | ||
| Video | Audio | RGB | Video, Audio | |
| AV1 | O | O | O | Analogue TV, Digital TV |
| Output TypeCurrent input mode | AV1(TV Out) | AV1(When DTV scheduled recoring is in progress using recording equipment) |
| Digital TV | Digital TV | O |
| Analogue TV, AV | Analogue TV | O(The input mode is converted to DTV) |
| Component / RGB | Analogue TV | |
| HDMI | X |
▶ TV Out : Outputs Analogue TV or Digital TV signals.
NOTE
▶Signal type RGB, i.e. the signals red, green and blue can only be selected for the Euro scart and the AV 1 can be received. These signals are transmitted, for example, by a paid TV decoder, game machine or photo CD unit, etc.
▶ Please use shielded scart cable.
EXTERNAL EQUIPMENT SETUP
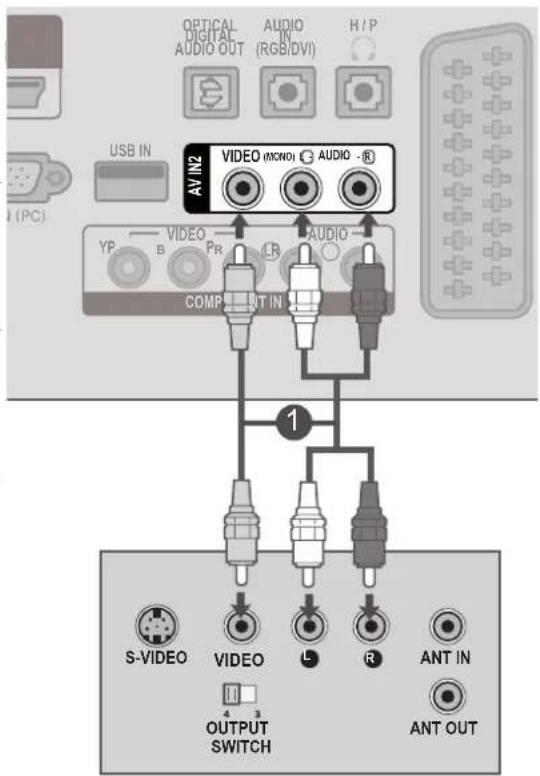
Connecting with a RCA cable
1 Connect the AUDIO/VIDEO jacks between SET and VCR. Match the jack colours (Video = yellow, Audio Left = white, and Audio Right = red)
2 Insert a video tape into the VCR and press PLAY on the VCR. (Refer to the VCR owner's manual.)
3 Select AV2 input source using the INPUT button on the remote control.
text_image
OPTICAL DIGITAL AUDIO OUT AUDIO IN (RGB/DVI) H / P USB IN AV IN2 VIDEO (MONO) AUDIO -R YP VIDEO PR Audio COMP OUT IN 1 S-VIDEO VIDEO L R ANT IN OUTPUT SWITCH ANT OUTNOTE
▶ If you have a mono VCR, connect the audio cable from the VCR to the AUDIO L / MONO jack of the SET.
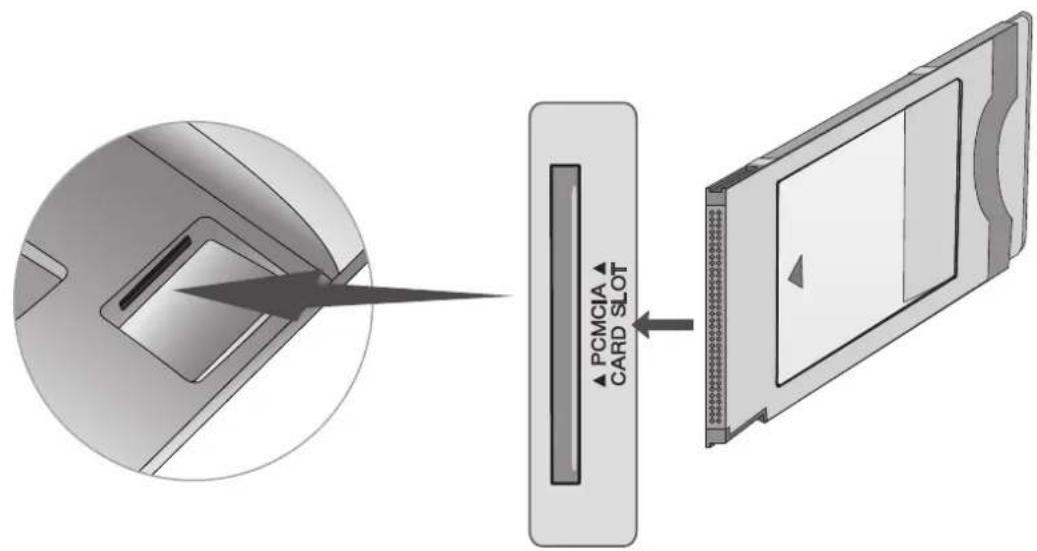
INSERTION OF CI MODULE
- To view the encrypted (pay) services in digital TV mode.
- This feature is not available in all countries.
1 Insert the CI Module to PCMCIA (Personal Computer Memory Card International Association) CARD SLOT of SET as shown.
For further information, see p.61
text_image
PCMCIA CARD SLOTNOTE
▶ Check if the CI module is inserted into the PCMCIA card slot in the right direction. If the module is not inserted properly, this can cause damage to the TV and the PCMCIA card slot.
EXTERNAL EQUIPMENT SETUP
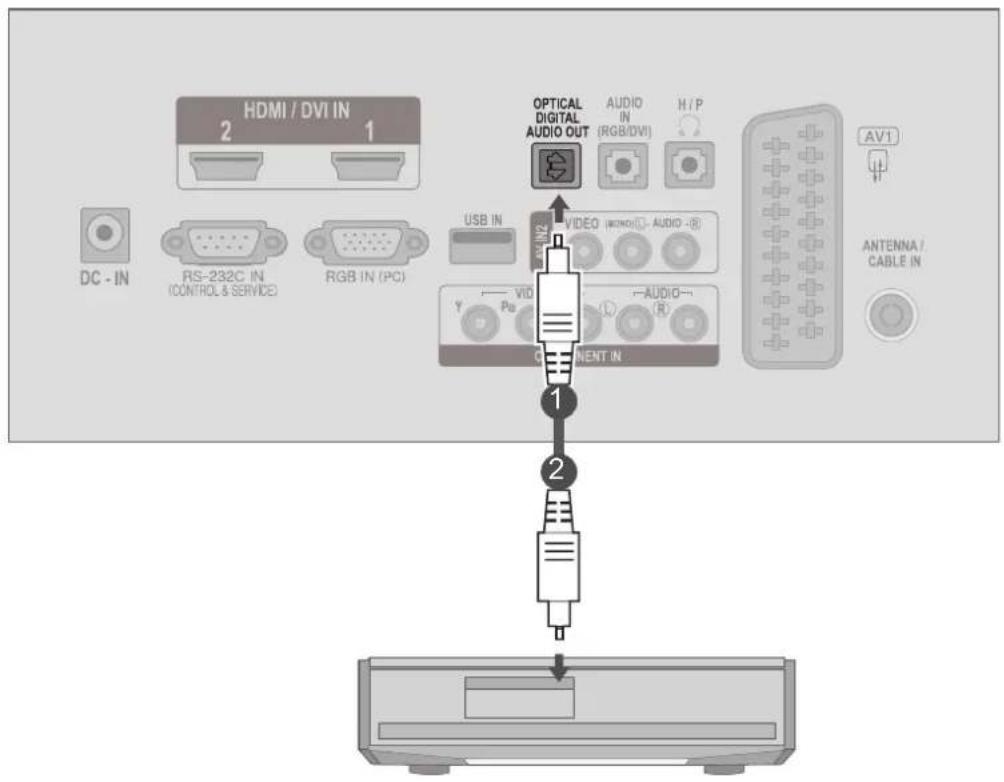
DIGITAL AUDIO OUT SETUP
Sending the TV's audio signal to external audio equipment via the Digital Audio Output (Optical) port. If you want to enjoy digital broadcasting through 5.1-channel speakers, connect the OPTICAL DIGITAL AUDIO OL terminal on the back of TV to a Home Theater (or amp).
1 Connect one end of an optical cable to the TV Digital Audio (Optical) Output port.
2 Connect the other end of the optical cable to the digital audio (Optical) input on the audio equipment.
3 Set the "TV Speaker option - Off" in the AUDIO menu. (▶ P. 92)
Refer to the external audio equipment instruction manual for operation.
text_image
HDMI / DVI IN 2 1 DC - IN RS-232C IN (CONTROL & SERVICE) RGB IN (PC) USB IN VIDEO (WOMO(L)-AUDIO-R) Y Vid Audio- Pb (R) CONTENT IN OPTICAL DIGITAL AUDIO OUT AUDIO IN (RGB/DVI) H/P AV1 ANTENNA / CABLE IN 1 2CAUTION
▶ Do not look into the optical output port. Looking at the laser beam may damage your vision.
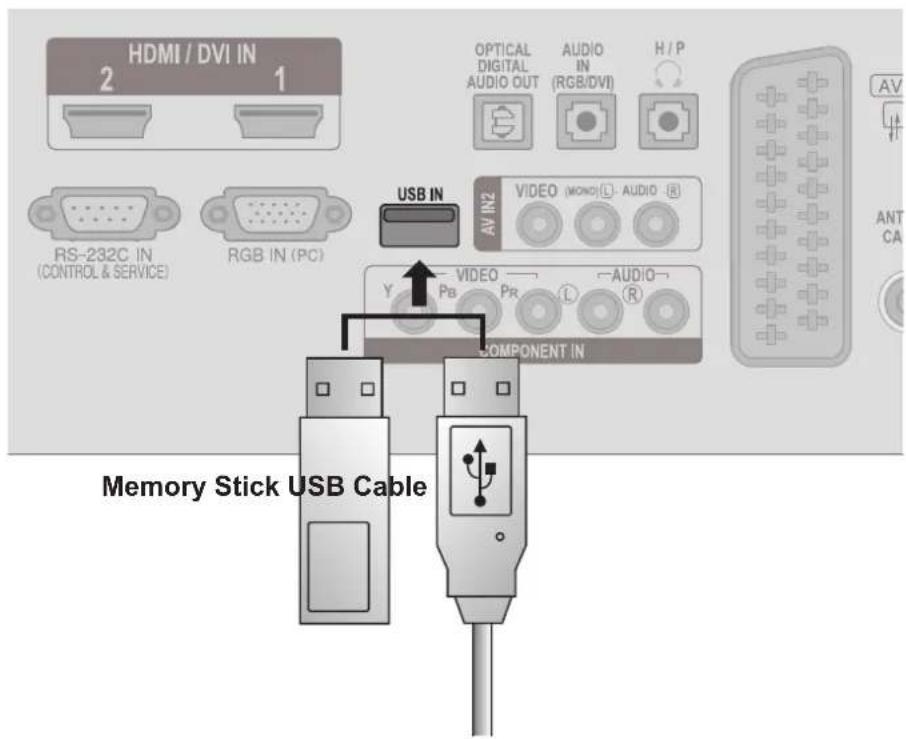
1 Connect the USB device to the USB IN jacks on the side of SET.
2 After connecting the USB IN jacks, you use the USB function. (▶ p.113)
text_image
HDMI / DVI IN 2 1 RS-232C IN (CONTROL & SERVICE) RGB IN (PC) OPTICAL DIGITAL AUDIO OUT AUDIO IN (RGB/DVI) H/P AV IN2 VIDEO (MONO) AUDIO R Y VIDEO PR AUDIO R COMPONENT IN Memory Stick USB CableEXTERNAL EQUIPMENT SETUP
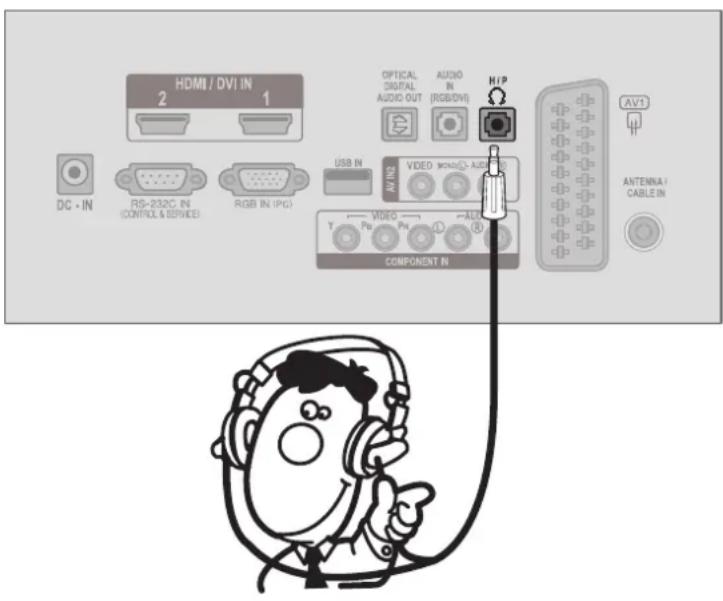
HEADPHONE SETUP
You can listen the sound through the headphone.
1 Plug the headphone into the headphone socket.
2 To adjust the headphone volume, press the + or - button. If you press the MUTE button, the sound from the headphone is switched off.
text_image
HDMI / DVI IN 2 1 DC - IN RS-232C IN (CONTROL & SERVICE) RGB IN (PC) USB IN VDDO MODELS AUDIO COMPONENT IN OPTICAL DIGITAL AUDIO OUT AUDIO IN (RGB/DVI) HIP AVS ANTENNA / CABLE INNOTE
▶ AUDIO menu items are disabled when connecting a headphone.
▶ Optical Digital Audio Out is not available when connecting a headphone.
OTHER A/V SOURCE SETUP
1 Connect the AUDIO / VIDEO jacks between SET and external equipment. Match the jack colours. (Video = yellow, Audio Left = white, and Audio Right = red)
2 Select AV2 input source with using the INPUT button on the remote control.
3 Operate the corresponding external equipment. Refer to external equipment operating guide.
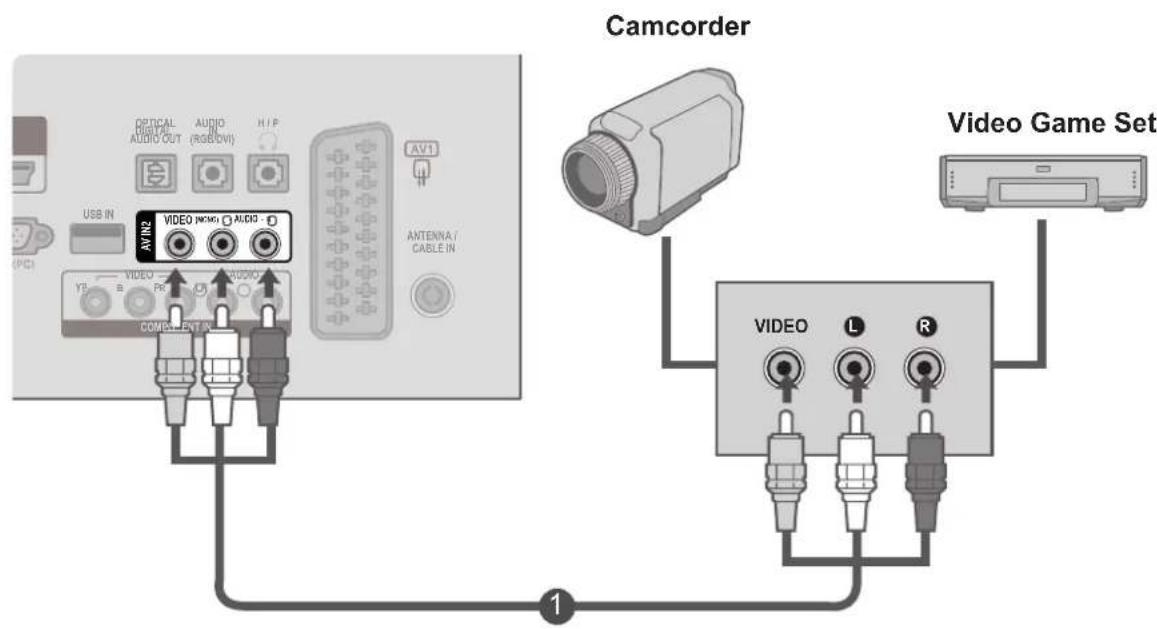
text_image
CAMCORDER VIDEO GAME SET VIDEO L R 1EXTERNAL EQUIPMENT SETUP
PC SETUP
When using the remote control, aim it at the remote control sensor on the SET.
When connecting with a D-sub 15 pin cable
1 Connect the signal cable from the monitor output socket of the PERSONAL COMPUTER to the PC input socket of the SET.
2 Connect the audio cable from the PC to the AUDIO IN (RGB/DVI) sockets of the SET.
3 Press the INPUT button to select RGB.
4 Switch on the PC, and the PC screen appears on the set. The set can be operated as a PC monitor.
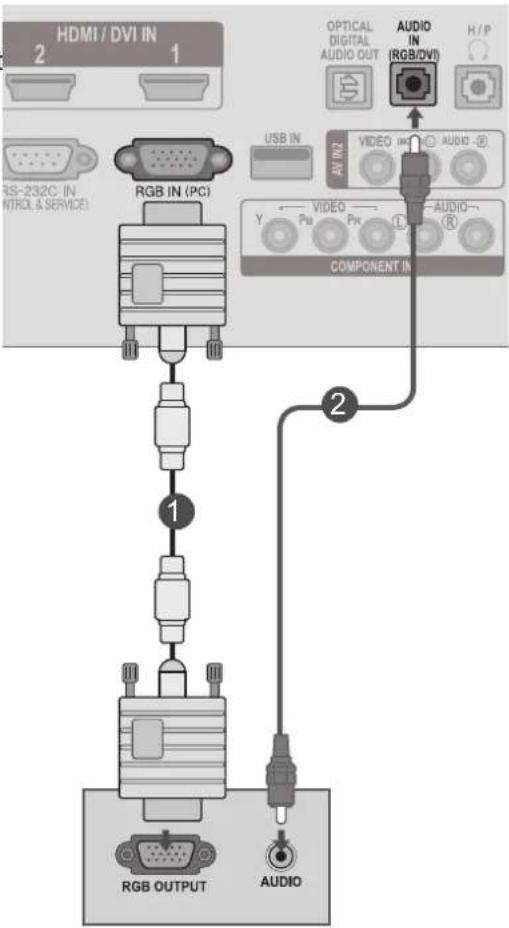
text_image
HDMI / DVI IN 2 1 RS-232C IN CONTROL & SERVICE RGB IN (PC) OPTICAL DIGITAL AUDIO OUT AUDIO IN (RGB/DVI) USB IN AV IN2 VIDEO IN AUDIO - Y Pb Pw L R COMPONENT IN 1 2 RGB OUTPUT AUDIONOTE
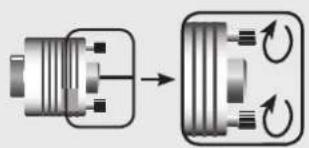
natural_image
Diagram showing a mechanical component transforming into a motor or gear assembly with rotational arrows (no text or symbols)▶ Connect the signal input cable and tighten it up by turning in the direction of the arrow as shown in the figure.
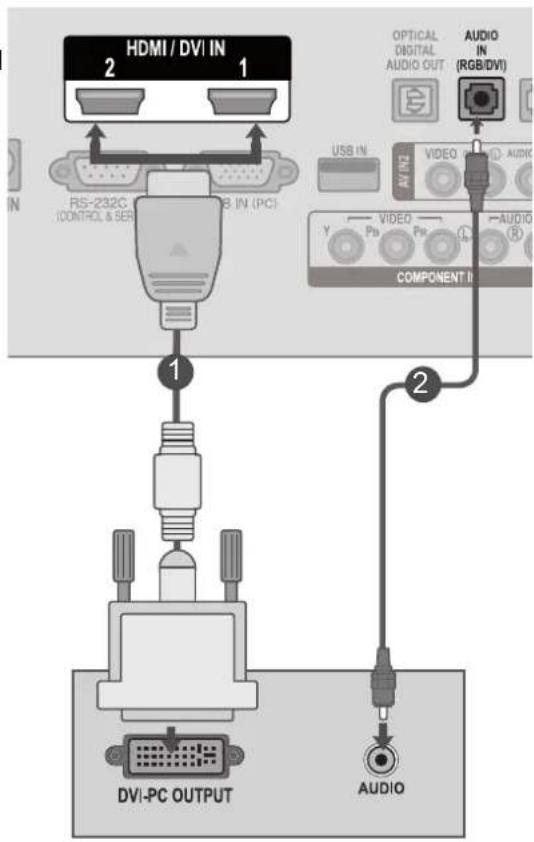
Connecting with an HDMI to DVI cable
1 Connect the DVI output of the PC to the HDMI/DVI IN1 or HDMI/DVI IN2 jack on the SET.
2 Connect the PC audio output to the AUDIO IN (RGB/DVI) jack on the SET.
3 Turn on the PC and the SET.
4 Select HDMI 1 or HDMI 2 input source using the INPUT button on the remote control.
text_image
HDMI / DVI IN RS-232C CONTROL & SER B IN (PC) OPTICAL DIGITAL AUDIO OUT AUDIO (RGB/DVI) USB IN AVIN VIDEO AUDIO COMPONENT IN Y Pb Pr A AUDIO DVI-PC OUTPUT AUDIONOTE
▶ If you want to use HDMI-PC mode, you must set the input label to PC mode.
natural_image
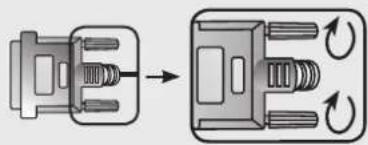
Diagram showing a mechanical component transforming into a rotating button (no text or symbols)▶ Connect the signal input cable and tighten it up by turning in the direction of the arrow as shown in the figure.
EXTERNAL EQUIPMENT SETUP
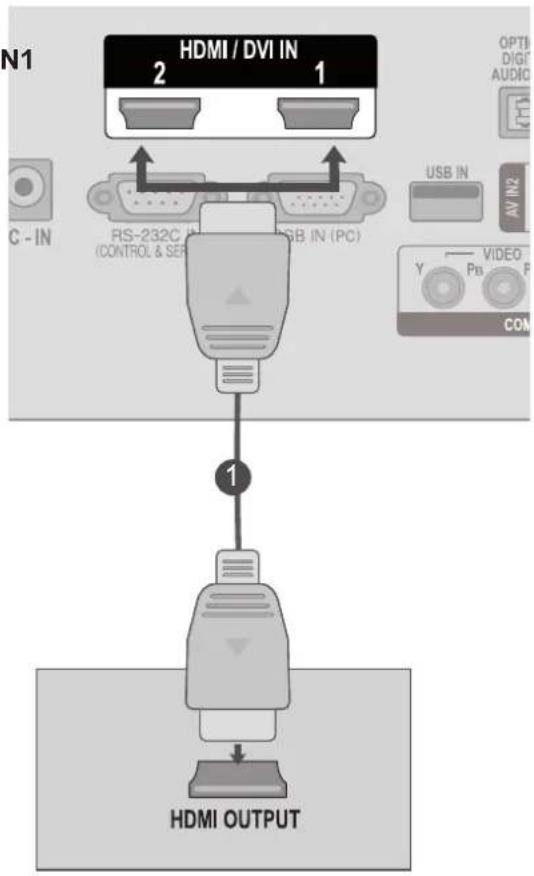
Connecting with an HDMI to HDMI cable
1 Connect the HDMI output of the PC to the HDMI/DVI IN1 or HDMI/DVI IN2 jack on the SET.
2 Turn on the PC and the SET.
3 Select HDMI 1 or HDMI 2 input source using the INPUT button on the remote control.
text_image
HDMI / DVI IN 2 1 C - IN RIS-232C (CONTROL & SER) USB IN (PC) 1 VIDEO Y Pn COM HDMI OUTPUTNOTE
▶ Check that your HDMI cable is High Speed HDMI Cable. If the HDMI cables are not High Speed HDMI Cable, flickering or no screen display can result. Please use the High Speed HDMI Cable.
▶ If you want to use HDMI-PC mode, you must set the input label to PC mode.
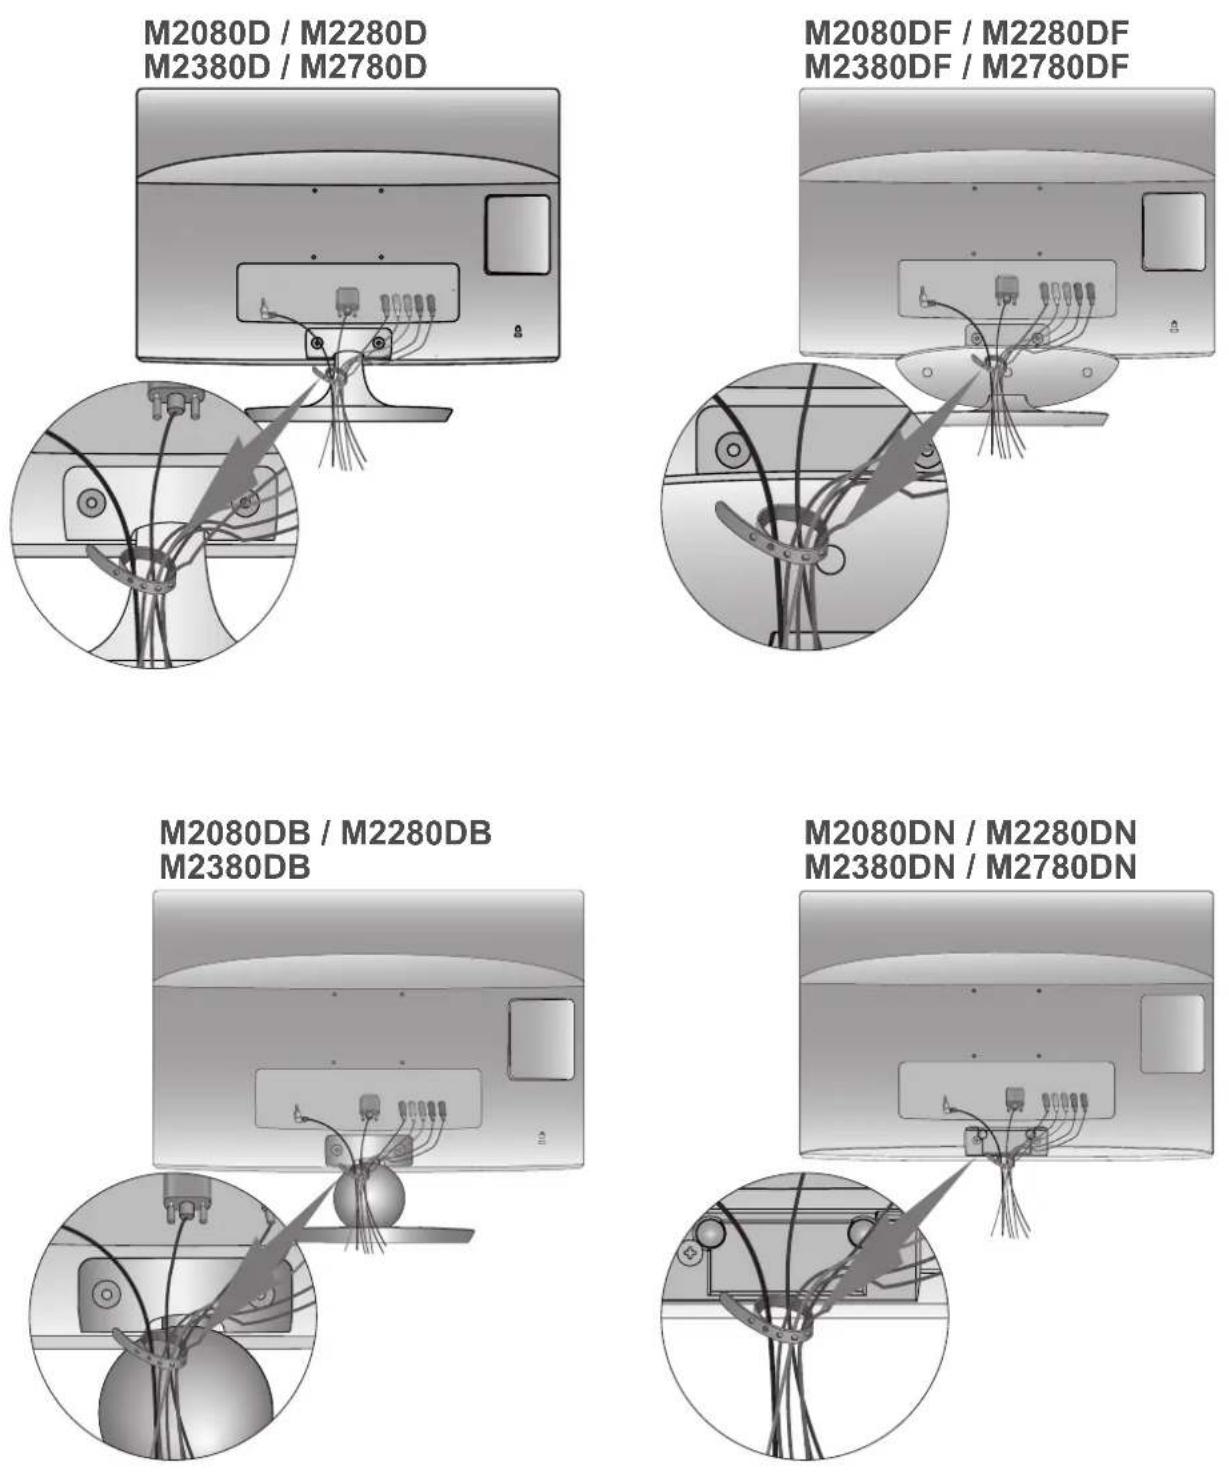
BACK COVER FOR WIRE ARRANGEMENT
Tie cables together with a cable management as shown in the illustration.
EXTERNAL EQUIPMENT SETUP
SUPPORTED DISPALY RESOLUTION
RGB[PC] mode
M2080D / M2080DF / M2080DB / M2080DN
| Resolution | Horizontal Frequency(kHz) | Vertical frequency(Hz) |
| 640 x 480 | 31.469 | 59.94 |
| 640 x 480 | 37.5 | 75 |
| 800 x 600 | 37.879 | 60.317 |
| 800 x 600 | 46.875 | 75 |
| 832 x 624 | 49.725 | 64.55 |
| 1024 x 768 | 48.363 | 60 |
| 1024 x 768 | 60.023 | 75.029 |
| 1280 x 1024 | 63.981 | 60.02 |
| 1600 x 900 | 60 | 60 |
M2280D / M2380D / M2780D / M2280DF / M2380DF / M2780DF / M2280DB / M2380DB / M2280DN / M2380DN / M2780DN
| Resolution | Horizontal Frequency(kHz) | Vertical frequency(Hz) |
| 720 x 400 31.468 | 70.08 | |
| 640 x 480 31.469 | 59.94 | |
| 640 x 480 37.5 | 75 | |
| 800 x 600 37.879 | 60.317 | |
| 800 x 600 46.875 | 75.0 | |
| 1024 x 768 48.363 | 60.0 | |
| 1024 x 768 60.023 | 75.029 | |
| 1152 x 864 | 67.500 | 75.000 |
| 1280 x 1024 63.981 | 60.02 | |
| 1280 x 1024 79.976 | 75.025 | |
| 1680 x 1050 64.674 | 59.883 | |
| 1680 x 1050 65.290 | 59.954 | |
| 1600 x 1200 75.0 | 60.0 | |
| 1920 x 1080 67.5 | 60 |
HDMI/DVI - PC mode
M2080D / M2080DF / M2080DB / M2080DN
| Resolution | Horizontal Frequency(kHz) | Vertical frequency(Hz) |
| 640 x 480 | 31.469 | 59.94 |
| 640 x 480 | 37.5 | 75 |
| 800 x 600 | 37.879 | 60.317 |
| 800 x 600 | 46.875 | 75 |
| 832 x 624 | 49.725 | 64.55 |
| 1024 x 768 | 48.363 | 60 |
| 1024 x 768 | 60.023 | 75.029 |
| 1152 x 870 | 68.681 75.062 | |
| 1280 x 1024 | 63.981 | 60.02 |
| 1600 x 900 | 60 | 60 |
M2280D / M2380D / M2780D / M2280DF / M2380DF / M2780DF / M2280DB / M2380DB / M2280DN / M2380DN / M2780DN
| Resolution | Horizontal Frequency(kHz) | Vertical frequency(Hz) |
| 720 x 400 31.468 | 70.08 | |
| 640 x 480 31.469 | 59.94 | |
| 640 x 480 37.5 | 75 | |
| 800 x 600 37.879 | 60.317 | |
| 800 x 600 46.875 | 75.0 | |
| 1024 x 768 48.363 | 60.0 | |
| 1024 x 768 60.023 | 75.029 | |
| 1152 x 864 | 67.500 | 75.000 |
| 1280 x 1024 63.981 | 60.02 | |
| 1280 x 1024 79.976 | 75.025 | |
| 1680 x 1050 64.674 | 59.883 | |
| 1680 x 1050 65.290 | 59.954 | |
| 1600 x 1200 75.0 | 60.0 | |
| 1920 x 1080 67.5 | 60 | |
| 720 x 480 | 31.469 | 59.94 |
| 31.5 | 60 | |
| 720 x 576 31.25 50 | ||
| 1280 x 720 37.500 50 | ||
| 1280 x 720 | 44.96 | 59.94 |
| 45 | 60 | |
| 1920 x 1080 | 33.72 | 59.94 |
| 33.75 | 60 | |
| 1920 x 1080 28.125 50.00 | ||
| 1920 x 1080 27 24 | ||
| 1920 x 1080 33.75 | 30.00 | |
| 1920 x 1080 56.250 50 | ||
| 1920 x 1080 | 67.43 | 59.94 |
| 67.5 | 60 | |
| Resolution | Horizontal Frequency(kHz) | Vertical frequency(Hz) |
| 720 x 480 15.73 | 59.94 | |
| 720 x 480 15.75 | 60.00 | |
| 720 x 576 | 15.625 | 50.00 |
| 720 x 480 31.47 | 59.94 | |
| 720 x 480 31.50 | 60.00 | |
| 720 x 576 31.25 | 50.00 | |
| 1280 x 720 | 44.96 | 59.94 |
| 1280 x 720 | 45.00 | 60.00 |
| 1280 x 720 | 37.50 | 50.00 |
| 1920 x 1080 33.72 | 59.94 | |
| 1920 x 1080 33.75 | 60.00 | |
| 1920 x 1080 28.125 50.00 | ||
| 1920 x 1080 56.25 50 | ||
| 1920 x 1080 67.432 59.94 | ||
| 1920 x 1080 | 67.5 | 60.00 |
NOTE
▶ Avoid keeping a fixed image on the set's screen for prolonged periods of time. The fixed image may become permanently imprinted on the screen use a screen saver when possible.
There may be interference relating to resolution, vertical pattern, contrast or brightness in PC mode. Change the PC mode to another resolution or change the refresh rate to another rate or adjust the brightness and contrast on the menu until the picture is clear. If the refresh rate of the PC graphic card can not be changed, change the PC graphic card or consult the manufacturer of the PC graphic card.
▶ The synchronization input waveform for Horizontal and Vertical frequencies are separate.
▶ Connect the signal cable from the monitor output port of the PC to the RGB (PC) port of the SET or the signal cable from the HDMI output port of the PC to the HDMI/DVI IN port on the SET.
▶ Connect the audio cable from the PC to the Audio input on the SET. (Audio cables are not included with the SET).
▶ If using a sound card, adjust PC sound as required.
▶ If the graphic card on the PC does not output analogue and digital RGB simultaneously, connect only one of either RGB or HDMI/DVI IN to display the PC output on the SET.
▶ If the graphic card on the PC does output analogue and digital RGB simultaneously, set the SET to either RGB or HDMI. (The other mode is set to Plug and Play automatically by the SET.)
▶ DOS mode may not work depending on the video card if you use an HDMI to DVI cable.
▶ If you use too long an RGB-PC cable that is too long, there may be interference on the screen. We recommend using under 5m of cable. This provides the best picture quality.
WATCHING TV / PROGRAMME CONTROL
REMOTE CONTROL KEY FUNCTIONS
When using the remote control, aim it at the remote control sensor on the set.
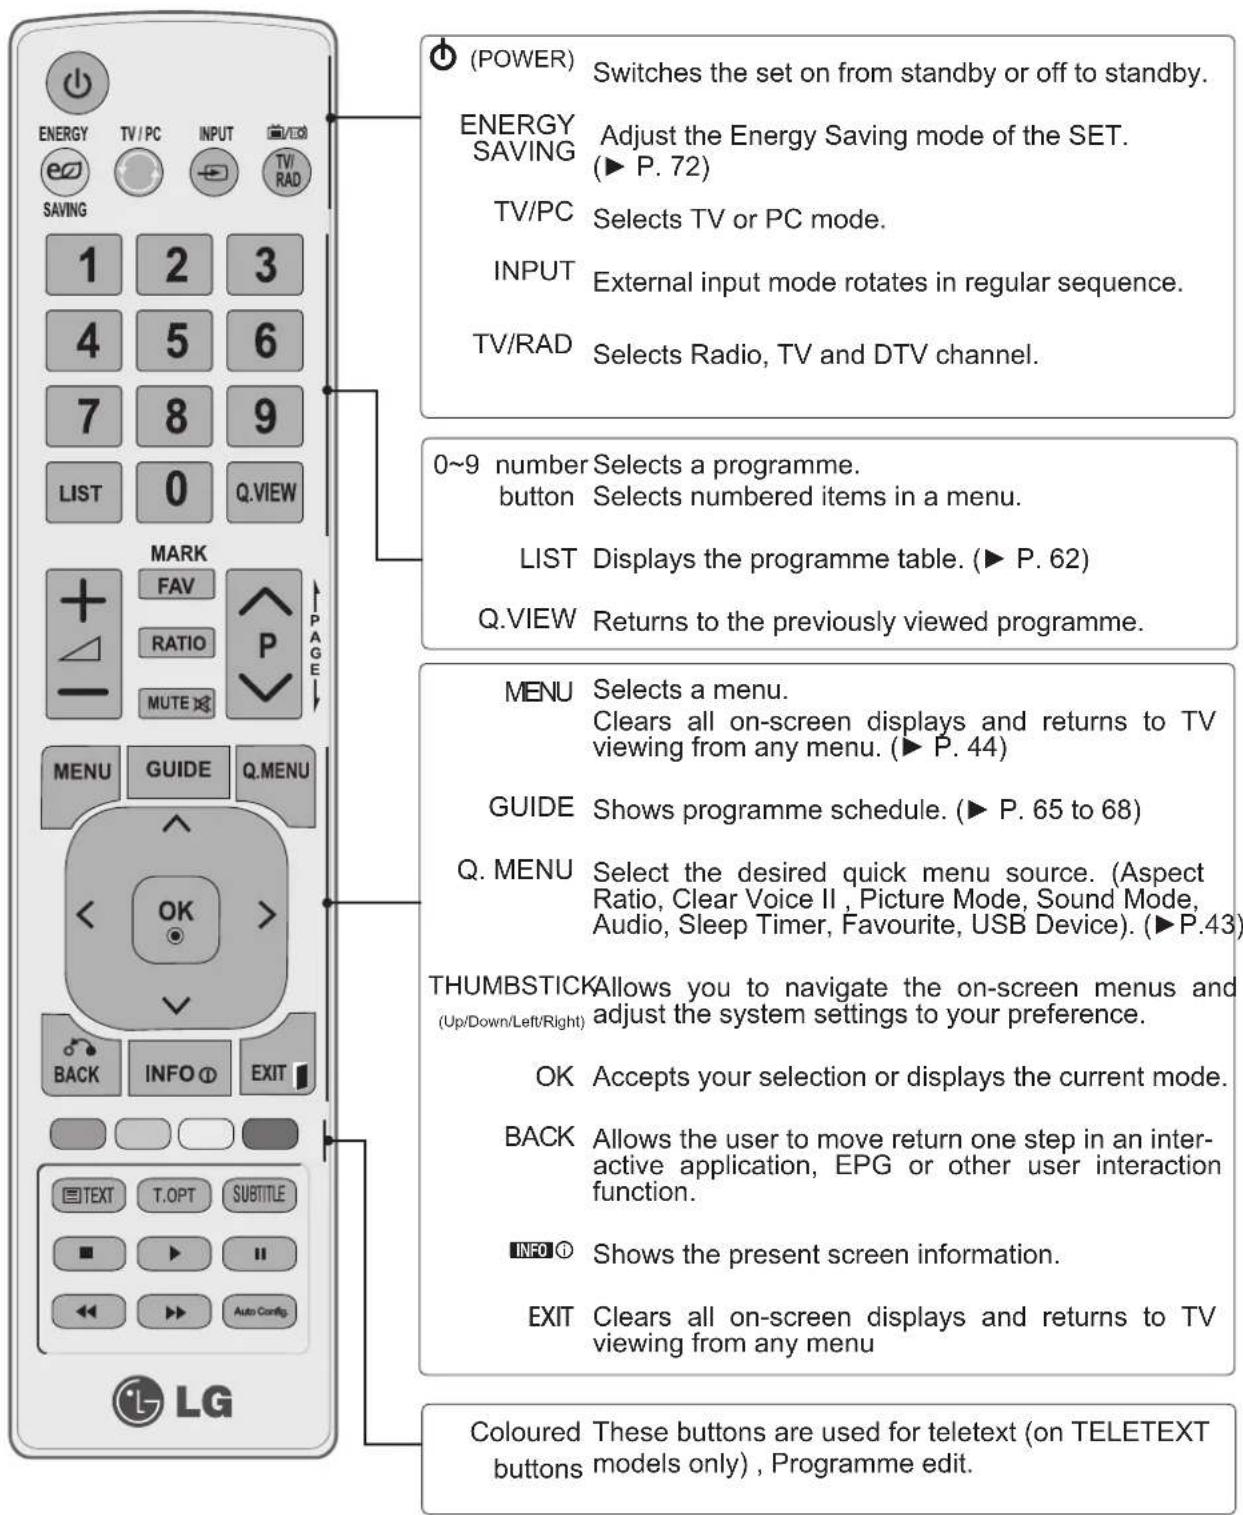
text_image
(POWER) Switches the set on from standby or off to standby. ENERGY SAVING Adjust the Energy Saving mode of the SET. (► P. 72) TV/PC Selects TV or PC mode. INPUT External input mode rotates in regular sequence. TV/RAD Selects Radio, TV and DTV channel. 0~9 number Selects a programme. button Selects numbered items in a menu. LIST Displays the programme table. (► P. 62) Q.VIEW Returns to the previously viewed programme. MENU Selects a menu. Clears all on-screen displays and returns to TV viewing from any menu. (► P. 44) GUIDE Shows programme schedule. (► P. 65 to 68) Q. MENU Select the desired quick menu source. (Aspect Ratio, Clear Voice II , Picture Mode, Sound Mode, Audio, Sleep Timer, Favourite, USB Device). (► P.43) THUMBSTICK Allows you to navigate the on-screen menus and (Up/Down/Left/Right) adjust the system settings to your preference. OK Accepts your selection or displays the current mode. BACK Allows the user to move return one step in an interactive application, EPG or other user interaction function. INFO Shows the present screen information. EXIT Clears all on-screen displays and returns to TV viewing from any menu Coloured These buttons are used for teletext (on TELETEXT buttons models only), Programme edit.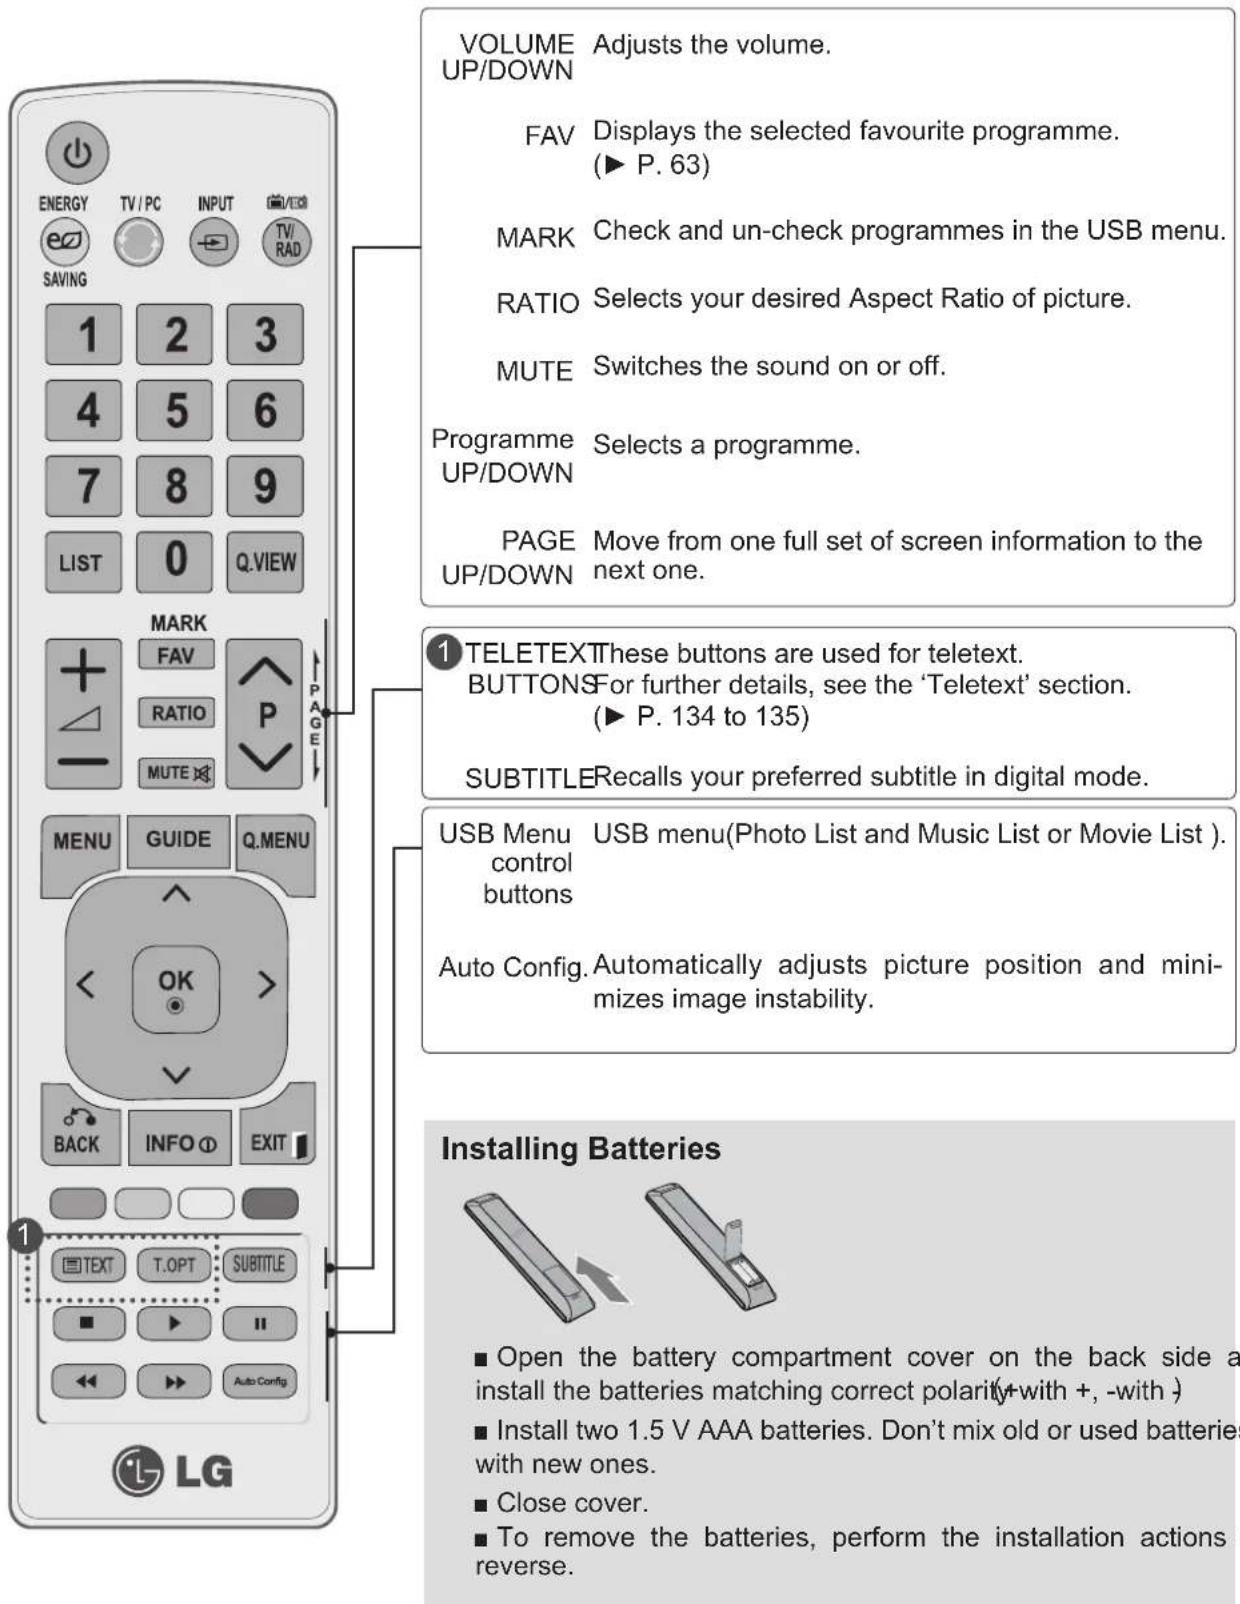
text_image
VOLUME UP/DOWN Adjusts the volume. FAV Displays the selected favourite programme. (▶ P. 63) MARK Check and un-check programmes in the USB menu. RATIO Selects your desired Aspect Ratio of picture. MUTE Switches the sound on or off. Programme Selects a programme. UP/DOWN PAGE Move from one full set of screen information to the UP/DOWN next one. 1 TELETEXTThese buttons are used for teletext. BUTTONSFor further details, see the 'Teletext' section. (▶ P. 134 to 135) SUBTITLERecalls your preferred subtitle in digital mode. USB Menu USB menu(Photo List and Music List or Movie List). control buttons Auto Config.Automatically adjusts picture position and mini- mizes image instability. 1 TEXT T.OPT SUBTITLE ■ ▶ ◀ ▶ Auto Config. Installing Batteries ■ Open the battery compartment cover on the back side a install the batteries matching correct polarity+with +, -with ) ■ Install two 1.5 V AAA batteries. Don't mix old or used batteries with new ones. ■ Close cover. ■ To remove the batteries, perform the installation actions reverse.WATCHING TV / PROGRAMME CONTROL
TURNING ON THE TV
- When your TV is turned on, you will be able to use its features.
1 Firstly, connect the power cord correctly.
At this stage, the TV switches to standby mode.
2 In standby mode to turn TV on, press the ⏻/I, INPUT or P∧∨ button on the TV or press the POWER, INPUT, P∧∨ or NUMBER button on the remote control and the TV will switch on.
Initializing setup
If the OSD (On Screen Display) is displayed on the screen after turning on the TV, you can adjust the Language, Mode Setting, Country or Set Password (When France is selected for Country), Auto Tuning.
Note:
a. If you close without completing the initial setting, the Initial Setting menu can be displayed again.
b. Press the BACK button to change the current OSD to the previous OSD.
c. For those countries without confirmed DTV broadcasting standards, some DTV features might not work, depending on the DTV broadcasting environment.
d. "Home Use" mode is the optimal setting for home environments, and is the TV's default mode.
e. "Store Demo" mode is the optimal setting for store environments. If a user modifies image quality data, "Store Demo" mode initializes the product to the image quality set by us after a certain period of time.
f. The mode (Home Use, Store Demo) can be changed by executing Mode Setting in the OPTION menu.
g. When France is selected for Country, password is not '0', '0', '0', '0' but '1', '2', '3', '4'.
PROGRAMME SELECTION
1 Press the P ∧ ∨ or NUMBER buttons to select a programme number.
VOLUME ADJUSTMENT
1 Press the ∠+ or - button to adjust the volume.
2 If you wish to switch the sound off, press the MUTE button.
You can cancel this function by pressing the MUTE + , - button.
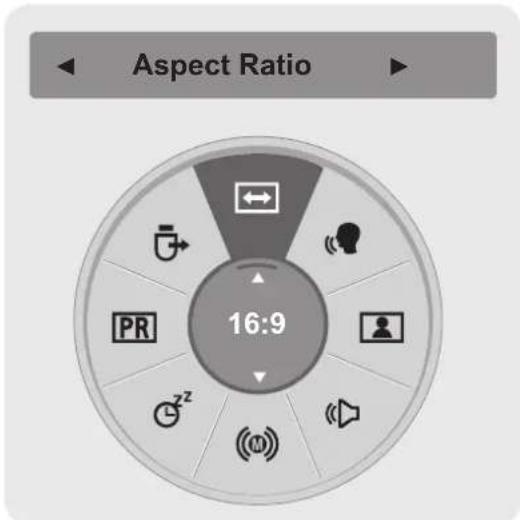
QUICK MENU
Your TV's OSD (On Screen Display) may differ slightly from that shown in this manual. Q.Menu (Quick Menu) is a menu of features which users might use frequently.
Aspect Ratio: Selects your desired picture format. For Zoom Setting, select 14:9, Zoom and Cinema Zoom in Ratio Menu. After completing Zoom Setting, the display goes back to Q.Menu.
Sound Mode: It is a feature to automatically set the sound combination which it deems the best for the images being watched. Selects your desired Sound Mode.
Clear Voice II: By differentiating the human sound range from others, it helps users listen to human voices better.
Audio: Selects the sound output. Sleep Timer: Sets the sleep timer. Favourite: Selects the favourite programme. USB Device: Selects "Eject" in order to eject USB device.
Picture Mode: Selects your desired Picture Mode.
pie
| Aspect | Aspect Ratio | | ------ | ------------ | | Left | ← | | Right | Head icon | | Top | Speaker icon | | Bottom | PR | | Bottom | SZZ | | Bottom | M | | Bottom | R |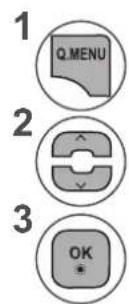

Display each menu.
Select your desired Source.


- Press the BACK button to move to the previous menu screen.
WATCHING TV / PROGRAMME CONTROL
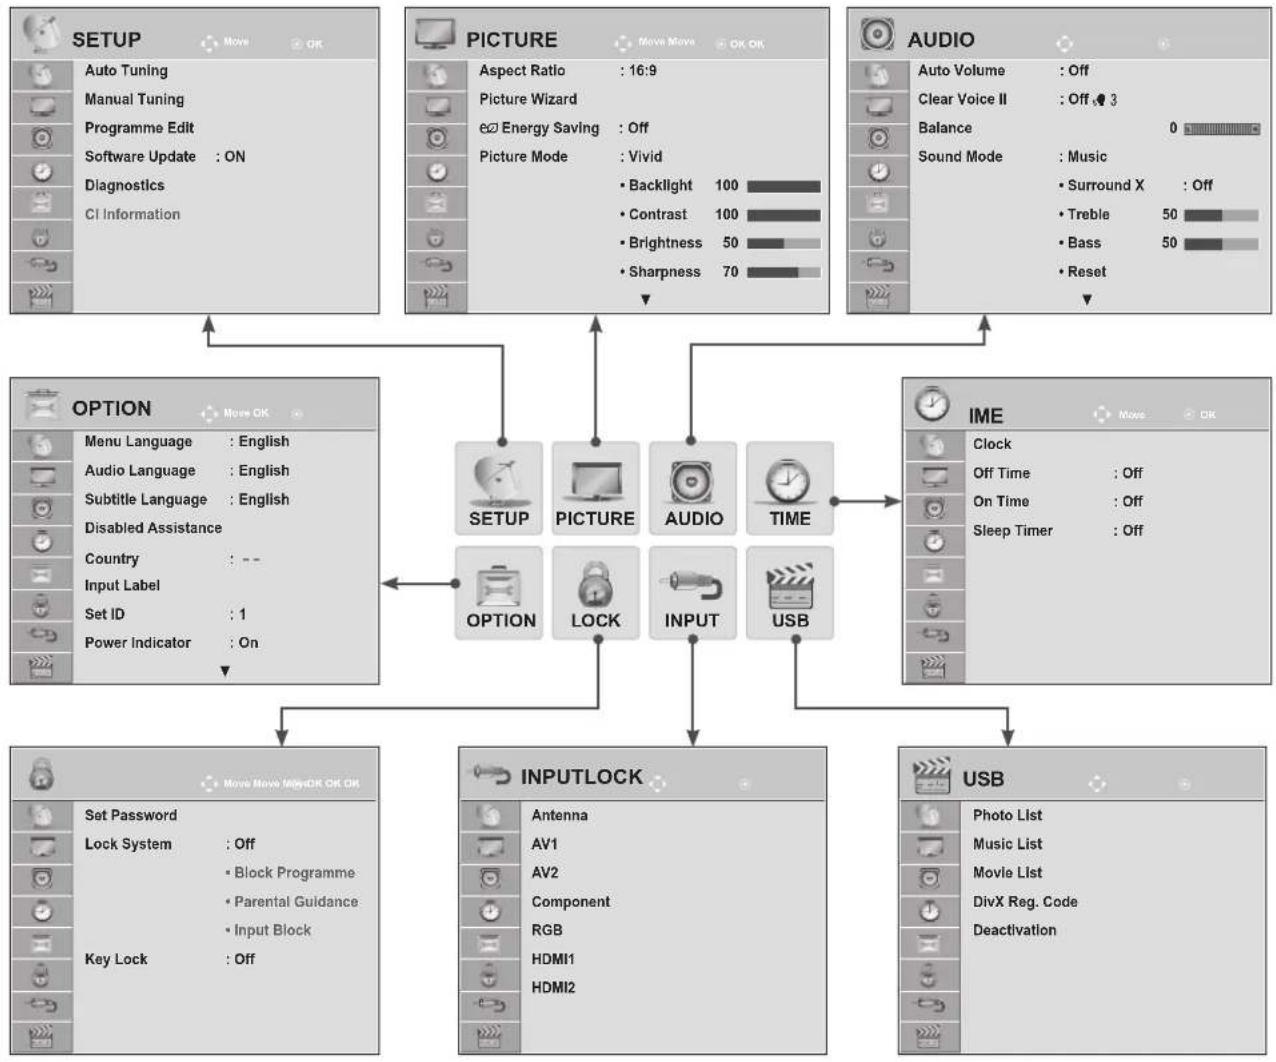
ON SCREEN MENUS SELECTION AND ADJUSTMENT
Your set's OSD (On Screen Display) may differ slightly from what is shown in this manual.
flowchart
graph TD
    A["SETUP"] --> B["Auto Tuning"]
    A --> C["Manual Tuning"]
    A --> D["Programme Edit"]
    A --> E["Software Update : ON"]
    A --> F["Diagnostics"]
    A --> G["CI Information"]

    H["PICTURE"] --> I["Aspect Ratio : 16:9"]
    H --> J["Picture Wizard"]
    H --> K["Energy Saving : Off"]
    H --> L["Picture Mode : Vivid"]
    H --> M["Backlight 100"]
    H --> N["Contrast 100"]
    H --> O["Brightness 50"]
    H --> P["Sharpness 70"]

    Q["AUDIO"] --> R["Auto Volume : Off"]
    Q --> S["Clear Voice II : Off 3"]
    Q --> T["Balance 0"]
    Q --> U["Sound Mode : Music"]
    Q --> V["Surround X : Off"]
    Q --> W["Treble 50"]
    Q --> X["Bass 50"]
    Q --> Y["Reset"]

    Z["OPTION"] --> AA["Menu Language : English"]
    Z --> AB["Audio Language : English"]
    Z --> AC["Subtitle Language : English"]
    Z --> AD["Disabled Assistance"]
    Z --> AE["Country : --"]
    Z --> AF["Input Label"]
    Z --> AG["Set ID : 1"]
    Z --> AH["Power Indicator : On"]

    AI["INPUTLOCK"] --> AJ["Set Password"]
    AI --> AK["Lock System : Off"]
    AI --> AL["Block Programme"]
    AI --> AM["Parental Guidance"]
    AI --> AN["Input Block"]
    AI --> AO["Key Lock : Off"]

    AP["IME"] --> AQ["Clock"]
    AP --> AR["Off Time : Off"]
    AP --> AS["On Time : Off"]
    AP --> AT["Sleep Timer : Off"]

    AU["USB"] --> AV["Photo List"]
    AU --> AW["Music List"]
    AU --> AX["Movie List"]
    AU --> AY["DivX Reg. Code"]
    AU --> AZ["Deactivation"]
1


Display each menu.
2


Select a menu item.
3

Move to the pop up menu.
- Press the MENU or EXIT button to close the menu window.
- Press the BACK button to move to the previous menu screen.

NOTE
▶ It is not possible to use CI Information in Analogue mode.
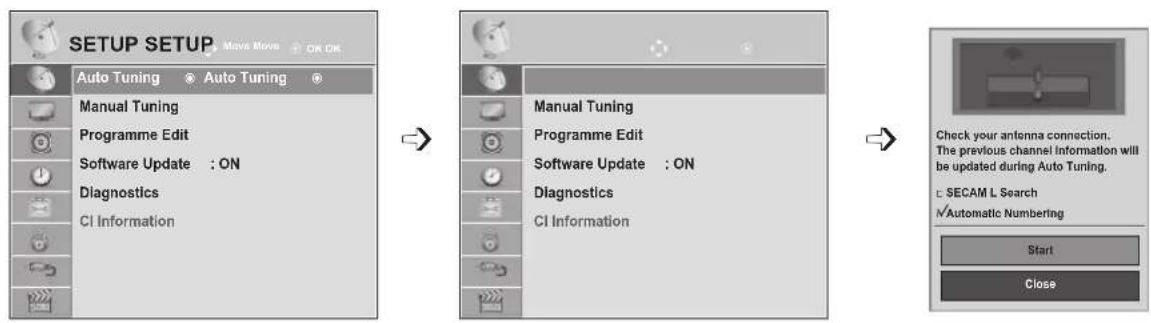
AUTO PROGRAMME TUNING
(For countries other than Finland, Sweden, Denmark and Norway)
Use this to automatically find and store all available programmes.
When you start auto programming, all previously stored service information will be deleted.
The maximum number of programmes that can be stored is 1000. But the number may differ slightly depending on broadcasting signals.
flowchart
graph LR
    A["SETUP SETUP"] --> B["Manual Tuning"]
    B --> C["Programme Edit"]
    C --> D["Software Update : ON"]
    D --> E["Diagnostics"]
    E --> F["CI Information"]
    F --> G["Manual Tuning"]
    G --> H["Programme Edit"]
    H --> I["Software Update : ON"]
    I --> J["Diagnostics"]
    J --> K["CI Information"]
    K --> L["Check your antenna connection. The previous channel information will be updated during Auto Tuning."]
    L --> M["L SECAM L Search"]
    M --> N["M Automatic Numbering"]
    N --> O["Start"]
    N --> P["Close"]
1


Select SETUP.
2


Select Auto Tuning.
3


Select Antenna.
4

Run Auto tuning.
- Use NUMBER buttons to input a 4-digit password in Lock System 'On'.
- If you wish to keep on auto tuning select Start using the ∧ ∨ button. Then, press the OK button. Otherwise select Close.
• Automatic Numbering: Decide whether to use the programme numbers as sent by broadcasting stations for tuning. - When select Italy in the County menu, if the pop up is displayed when the conflicted Programme after Auto Tuning, select a broadcaster for conflicting programme number to solve.
- Press the MENU or EXIT button to close the menu window. - Press the BACK button to move to the previous menu screen.
WATCHING TV / PROGRAMME CONTROL
AUTO PROGRAMME TUNING
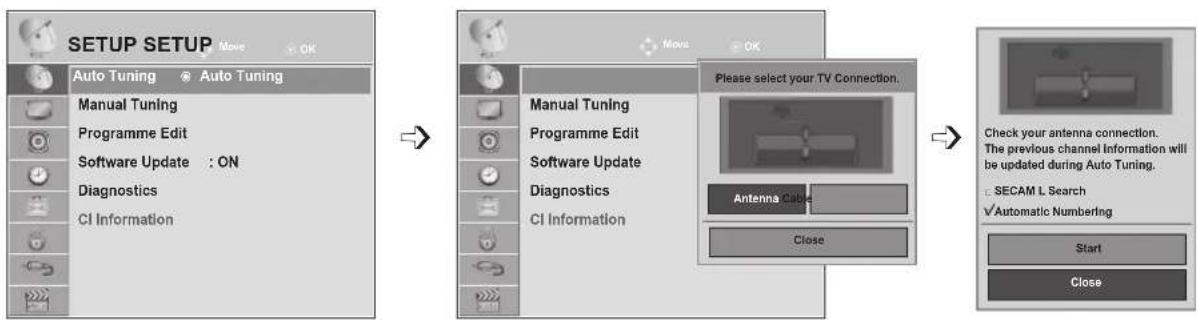
(Only for Finland, Sweden, Denmark and Norway)
DVB-C Auto Tuning is a menu for users in countries that support DVB cable.
Use this to automatically find and store all available programmes.
When you start auto programming, all previously stored service information will be deleted.
If you want to select the Antenna,
flowchart
graph LR
    A["SETUP SETUP"] --> B["Auto Tuning"]
    B --> C["Manual Tuning"]
    C --> D["Programme Edit"]
    D --> E["Software Update : ON"]
    E --> F["Diagnostics"]
    F --> G["CI Information"]

    H["Please select your TV Connection."] --> I["Manual Tuning"]
    I --> J["Programme Edit"]
    J --> K["Software Update"]
    K --> L["Diagnostics"]
    L --> M["CI Information"]

    N["Antenna Cable"] --> O["Close"]

    P["Check your antenna connection. The previous channel information will be updated during Auto Tuning. SECAM L Search √Automatic Numbering"] --> Q["Start"]
    R["Close"] --> S["End"]
text_image
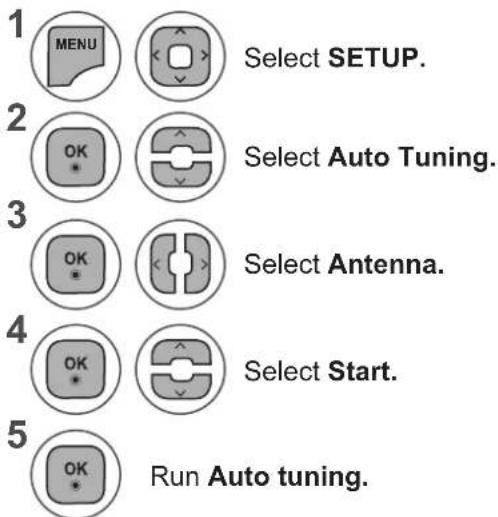
1 MENU Select SETUP. 2 OK Select Auto Tuning. 3 OK Select Antenna. 4 OK Select Start. 5 OK Run Auto tuning.- Use NUMBER buttons to input a 4-digit password in Lock System 'On'.
-
If you wish to keep on auto tuning select Start using the ∧ ∨ button. Then, press the OK button. Other wise select Close.
• Automatic Numbering: Decide whether to use the programme numbers as sent by broadcasting stations for tuning. -
Press the MENU or EXIT button to close the menu window.
- Press the BACK button to move to the previous menu screen.
If you want to select the Cable,
■ The image shown may be somewhat different from your set.
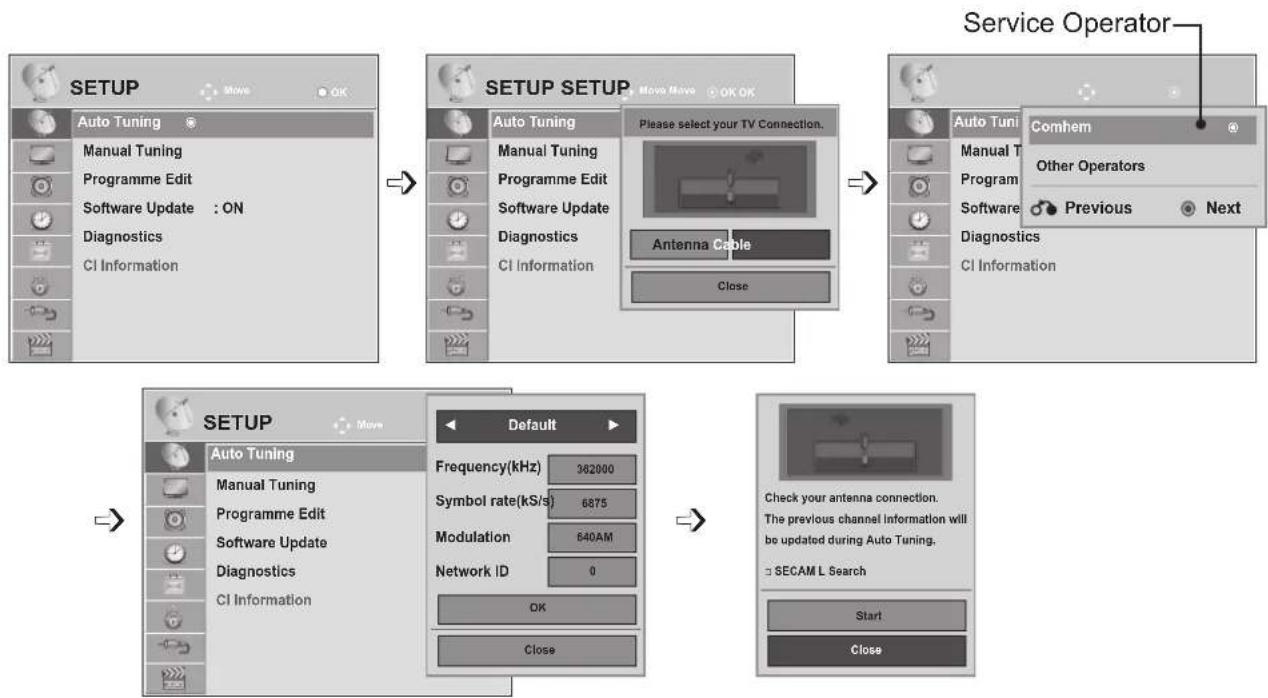
flowchart
graph TD
    A["SETUP"] --> B["Auto Tuning"]
    B --> C["Manual Tuning"]
    C --> D["Programme Edit"]
    D --> E["Software Update : ON"]
    E --> F["Diagnostics"]
    F --> G["CI Information"]

    A --> H["SETUP SETUP"]
    H --> I["Auto Tuning"]
    I --> J["Manual Tuning"]
    J --> K["Programme Edit"]
    K --> L["Software Update"]
    L --> M["Diagnostics"]
    M --> N["CI Information"]

    H --> O["Please select your TV Connection."]
    O --> P["Antenna Cable"]
    P --> Q["Close"]

    H --> R["Service Operator"]
    R --> S["Comhem"]
    S --> T["Other Operators"]
    T --> U["Previous Next"]

    A --> V["SETUP"]
    V --> W["Auto Tuning"]
    W --> X["Manual Tuning"]
    X --> Y["Programme Edit"]
    Y --> Z["Software Update"]
    Z --> AA["Diagnostics"]
    AA --> AB["CI Information"]

    V --> AC["Default"]
    AC --> AD["Frequency(kHz) 382000"]
    AC --> AE["Symbol rate(kS/s) 6875"]
    AC --> AF["Modulation 640AM"]
    AC --> AG["Network ID 0"]
    AC --> AH["OK"]
    AC --> AI["Close"]

    V --> AJ["Check your antenna connection. The previous channel information will be updated during Auto Tuning."]
    AJ --> AK["SECAM L Search"]
    AK --> AL["Start"]
    AK --> AM["Close"]
1


Select SETUP.
2


Select Auto Tuning.
3


Select Cable.
4


Select Comhem or Other Operators.
5


Select Default, Full or User
6


Make appropriate adjustments. (Except for Full mode)
7

Select Close.
8


Select Start.
9

Run Auto tuning.
- Use NUMBER buttons to input a 4-digit password in Lock System 'On'.
-
If you wish to keep on auto tuning select Start using the button. Then, press the OK button. Other wise select Close.
• Automatic Numbering: Decide whether to use the programme numbers as sent by broadcasting stations for tuning. -
Press the MENU or EXIT button to close the menu window.
- Press the BACK button to move to the previous menu screen.
WATCHING TV / PROGRAMME CONTROL
- When you select the Cable, the Cable Service Operator selection screen can differ or not exist by the Cable situation of the applicable country
- The popup window to select between Service Operator is only shown initially for the 3 cases when you accessing the Initial Setting menu, when you change from Antenna to Cable or when you access the menu after changing the Country.
- When you want to select between Service Operator aside from the above 3 cases, you can do so by selecting SETUP → Cable DTV Setting → Service Operator.
• Acquired certification SO: Sweden(Comhem), Denmark(YouSee, Stofa).
- If there are not any Service Operator that you want, select Other Operators.
- If you select "Other Operators", or the selected country supports "Other Operators" only, it may take some time to search all the channels, or it may not search some of the channels.
If some of the channels do not appear, follow the steps below.
-
SETUP → Auto Tuning → Cable
-
Input additional values such as the frequency, symbol rate, modulation, and network ID (You can ask your cable service provider for the above information
The following values are needed in order to search all available programmes quickly and correctly. The commonly used values are provided as "default".
However, for correct settings, please inquire of the cable service provider.
When running Auto Tuning in DVB cable mode, selecting Full will search through all frequencies to find available channels.
In the case when the programme is not searched by selecting the Default, perform the searching by selecting the Full.
However, in the case when the programme is searched by selecting the Full, the Auto Tuning time can be taken too much.
• Frequency: Enter a user-defined frequency range.
- Symbol rate: Enter a user-defined symbol rate (Symbol rate: Speed at which a device such as modem sends symbols to a channel).
- Modulation: Enter a user-defined modulation. (Modulation: Loading of audio or video signals onto carrier).
• Network ID: Unique identifier allocated for each user.
AUTO PROGRAMME TUNING
If you select the “- -” of Country Setting, (Except for Finland, Sweden, Denmark and Norway)
To watch DVB-C in the countries excluding Finland, Sweden, Denmark and Norway select '-' as the Country in OPTION.
You can select User mode or Full mode in Auto Tuning.
The corresponding home frequency information may need to be changed when tuning the User mode, and the corresponding information depends on the Cable Service Operator (SO) in service.
During Full mode tuning, some channel may be restricted for some Cable Service Operator (SO), and it may take a long time for tuning.
Note
▶ Your cable provider may charge for their services, or require you to agree to its items and conditions of business.
▶ DVB-C Cable may not operate correctly with some cable providers.
▶ Compatibility with DVB-C digital cable broadcasts is not guaranteed.

NOTE
▶M**80D/DF/DB/DN-PYM does not support DVB-C. (Check the model name on the label on the back of the product.)
WATCHING TV / PROGRAMME CONTROL
CABLE DTV SETTING (IN CABLE MODE ONLY)
The range that a user can select from the Service Operator menu differs depending on number of Service Operator supported by each country, and if number of supported Service Operator for each country is 1, corresponding function becomes non-activation.
After changing Service Operator, a warning window saying that channel map will be deleted when OK button is pressed or Close is selected, and a Auto-tuning pop-up window appears when 'YES' is selected.
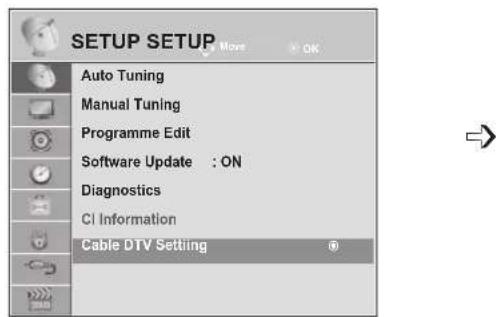
text_image
SETUP SETUP Auto Tuning Manual Tuning Programme Edit Software Update : ON Diagnostics CI Information Cable DTV Setting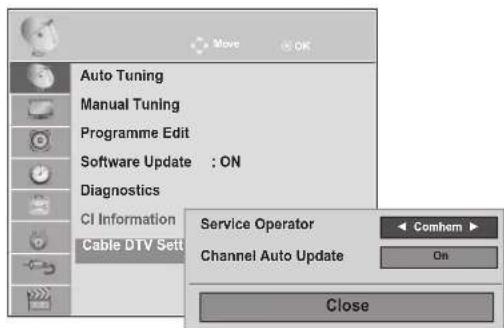
text_image
Auto Tuning Manual Tuning Programme Edit Software Update : ON Diagnostics CI Information Cable DTV Sett Service Operator Channel Auto Update Comhem On Close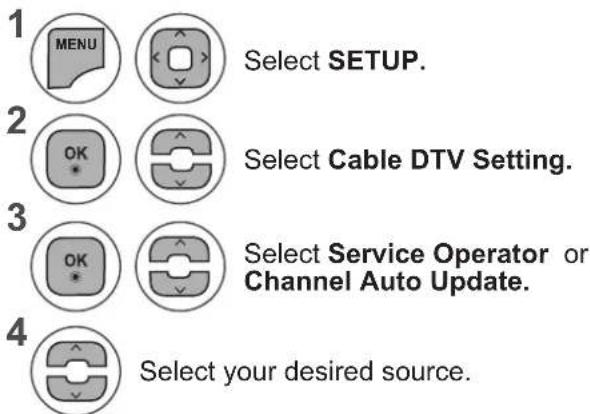
text_image
1 MENU Select SETUP. 2 OK Select Cable DTV Setting. 3 OK Select Service Operator or Channel Auto Update. 4 Select your desired source.- If you select Cable, you can see Cable DTV Setting menu.
- When Channel Auto Update in On, the channel information will be automatically updated whenever the network information changes.
-
When Channel Auto Update is Off, the channel information will not be updated.
-
Press the MENU or EXIT button to close the menu window.
- Press the BACK button to move to the previous menu screen.
MANUAL PROGRAMME TUNING (IN DIGITAL MODE)
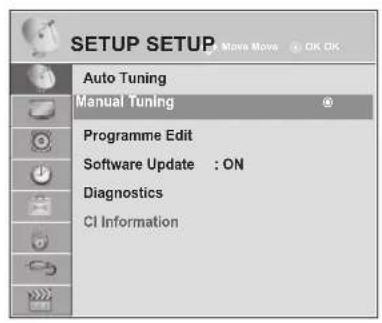
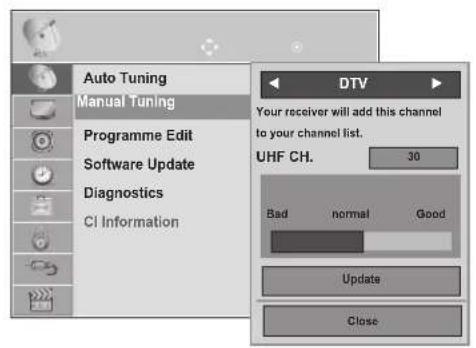
Manual Tuning lets you manually add a programme to your programme list.
(For countries other than Finland, Sweden, Denmark and Norway & When selecting Antenna if Finland, Sweden, Denmark, Norway or “--” country is chosen)
text_image
SETUP SETUP Auto Tuning Manual Tuning Programme Edit Software Update : ON Diagnostics CI Information→
text_image
Auto Tuning Manual Tuning Programme Edit Software Update Diagnostics CI Information DTV Your receiver will add this channel to your channel list. UHF CH. 30 Bad normal Good Update Close1


Select SETUP.
- Use NUMBER buttons to input a 4-digit password in Lock System 'On'.
2


Select Manual Tuning.
3


Select DTV.
4


Select the desired channel number.
- Press the MENU or EXIT button to close the menu window.
- Press the BACK button to move to the previous menu screen.
WATCHING TV / PROGRAMME CONTROL
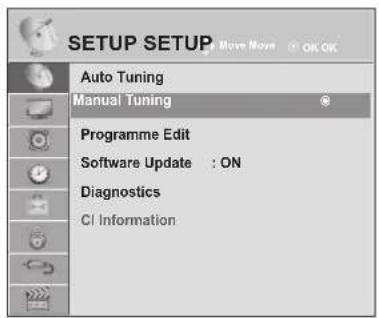
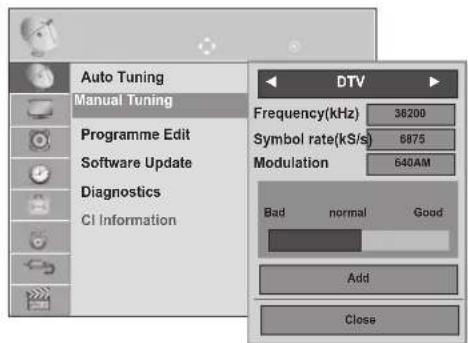
(When selecting Cable (DVB cable mode) if Finland, Sweden, Denmark, Norway or “--” country is chosen)
text_image
SETUP SETUP Auto Tuning Manual Tuning Programme Edit Software Update : ON Diagnostics CI Information→
text_image
Auto Tuning Manual Tuning Programme Edit Software Update Diagnostics CI Information DTV Frequency(kHz) 36200 Symbol rate(kS/s) 6875 Modulation 640AM Bad normal Good Add Close1


Select SETUP.
2


Select Manual Tuning.
3


Select DTV.
- Use NUMBER buttons to input a 4-digit password in Lock System 'On'.
- Symbol rate: Enter a user-defined symbol rate. (symbol rate: Speed at which a device such as modem sends symbols to a channel.)
- Modulation: Enter a user-defiend modulation. (Modulation: Loading of audio or video signals onto carrier)
4



Select the desired channel number.
- Press the MENU or EXIT button to close the menu window.
- Press the BACK button to move to the previous menu screen.

NOTE
▶ M**80D/DF/DB/DN-PYM does not support DVB-C. (Check the model name on the label on the back of the product.)
Frequency, Symbol rate, and Modulation mode are needed in order to add a programme correctly in DVB cable mode. Please inquire of the cable service provider about the correct values.
MANUAL PROGRAMME TUNING (IN ANALOGUE MODE)
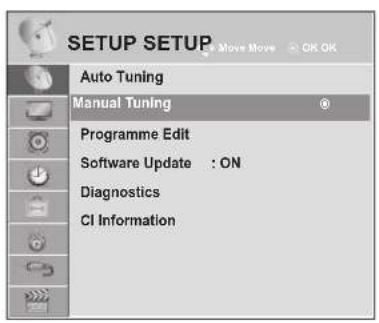
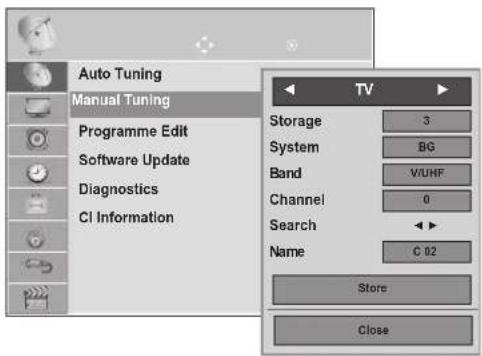
Manual Tuning lets you manually tune and arrange the stations in whatever order you desire.
text_image
SETUP SETUP Auto Tuning Manual Tuning Programme Edit Software Update : ON Diagnostics CI Information→
text_image
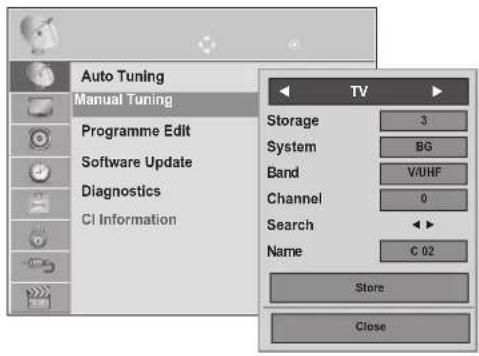
Auto Tuning Manual Tuning Programme Edit Software Update Diagnostics CI Information TV Storage 3 System BG Band WUHF Channel 0 Search ◀◀ Name C 02 Store Close1


Select SETUP.
2


Select Manual Tuning.
3


Select TV.
4


Select the desired programme number on.
5


Select a TV system.
6


Select V/UHF or Cable.
7


or

Select the desired channel number.
8

Commence searching..
9


Select Store.
- Press the MENU or EXIT button to close the menu window.
-
Press the BACK button to move to the previous menu screen.
-
Use NUMBER buttons to input a 4-digit password in Lock System 'On'.
• L: SECAM L/L (France)
BG: PAL B/G, SECAM B/G (Europe / East Europe / Asia / New Zealand / M.East / Africa / Australia)
I: PAL I/II (U.K. / Ireland / Hong Kong / South Africa)
DK: PAL D/K, SECAM D/K (East Europe / China / Africa / CIS)
• To store another channel, repeat steps 4 to 9.
WATCHING TV / PROGRAMME CONTROL
text_image
SETUP SETUP Auto Tuning Manual Tuning Programme Edit Software Update : ON Diagnostics CI Information→
text_image
Auto Tuning Manual Tuning Programme Edit Software Update Diagnostics CI Information TV Storage 3 System BG Band V/UHF Channel 0 Search Name C 02 Store Close■ Assigning a station name
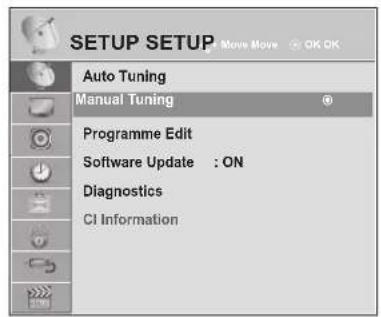
You can assign a station name with five characters to each programme number.
Select SETUP.
Select Manual Tuning.
Select TV.
Select Name.
Select the position and make your choice of the second character, and so on. You can use an the alphabet A to Z, the number 0 to 9, +/- , and blank.
Select Close.
Select Store.
- Press the MENU or EXIT button to close the menu window.
- Press the BACK button to move to the previous menu screen.
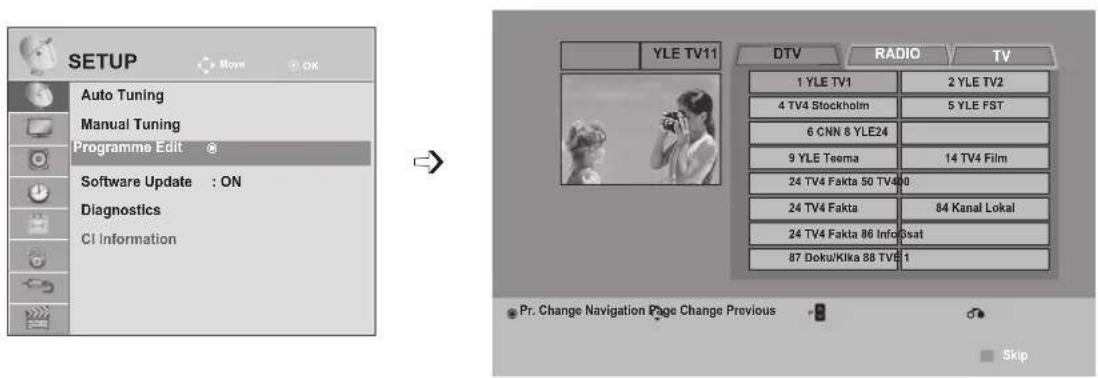
PROGRAMME EDIT
When a programme number is skipped, it means that you will be unable to select it using P ∧ ∨ button during TV viewing.
If you wish to select the skipped programme, directly enter the programme number with the NUMBER buttons or select it in the Programme edit menu.
This function enables you to skip the stored programmes.
You can change the programme number using "Move" function, if "Automatic Numbering" is unchecked when you start Auto Tuning.
text_image
SETUP Auto Tuning Manual Tuning Programme Edit Software Update : ON Diagnostics CI Information YLE TV11 DTV RADIO TV 1 YLE TV1 2 YLE TV2 4 TV4 Stockholm 5 YLE FST 6 CNN 8 YLE24 9 YLE Tsema 14 TV4 Film 24 TV4 Fakta 50 TV4 24 TV4 Fakta 84 Kanal Lokal 24 TV4 Fakta 86 Info 3sat 87 Doku/Klka 88 TVE 1 Pr. Change Navigation Page Change Previous Skip1


Select SETUP.
- Use NUMBER buttons to input a 4-digit password in Lock System "On".
2


Select Programme Edit.
3

Enter the Programme Edit.
4

Select a programme to be stored or skipped.
- Press the MENU or EXIT button to close the menu window.
- Press the BACK button to move to the previous menu screen.
WATCHING TV / PROGRAMME CONTROL
IN DTV/RADIO MODE
■ Skipping a programme number
Select a programme number to be skipped.
Turn the programme number to blue.
Release.
- When programmes are to be skipped, the skipped programme shows in blue and these programmes will not be selected by the P ∧ ∨ buttons during TV viewing.
- If you wish to select a skipped programme, directly enter the programme number with the NUMBER buttons or select it in the programme edit or EPG.
IN TV MODE
This function enables you to delete or skip the stored programmes.
You can also move some channels and use other programme numbers.
■ Deleting a programme
Select a programme number to be skipped.
- The selected programme is deleted, all the following programmes are shifted up one.
Turn the programme number to red.
Delete.

Release.
■ Moving a programme
Select a programme number to be skipped.
Turn the programme number to green.
Release.
■ Auto Sort
1 YELLOW Start Auto Sort.
• After activating Auto Sort once, you can no longer edit programmes.
■ Skipping a programme number
1 Select a programme number to be skipped.
2 BLUE Turn the programme number to blue.
3 BLUE Release.
- When a programme number is skipped it means that you will be unable to select it using the P ^ v button during normal TV viewing.
- If you wish to select a skipped programme, directly enter the programme number with the NUMBER buttons or select it in the programme edit or EPG.
WATCHING TV / PROGRAMME CONTROL
SOFTWARE UPDATE
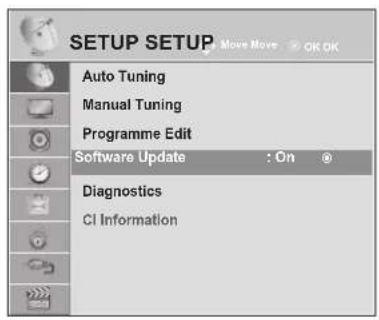
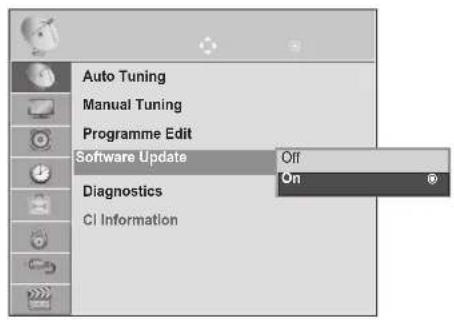
Software Update means software can be downloaded through the digital terrestrial broadcasting system.
text_image
SETUP SETUP Auto Tuning Manual Tuning Programme Edit Software Update : On ® Diagnostics CI Information
text_image
Auto Tuning Manual Tuning Programme Edit Software Update Off Diagnostics On CI Information1


Select SETUP.
2


Select Software Update.
3


Select On or Off.
- If you select On, a user confirm message box will be displayed to notify that new software is found.
4
Save.
\* When setting "Software Update"
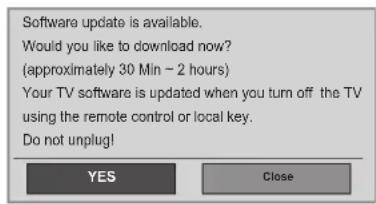
Occasionally, a transmission of updated digital software information will result in the following menu on the TV screen.
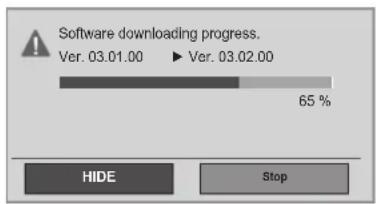
Select the Yes using the < > button and you will see the following picture.
After the Software Update is complete, the System restarts.
text_image
Software update is available. Would you like to download now? (approximately 30 Min - 2 hours) Your TV software is updated when you turn off the TV using the remote control or local key. Do not unplug! YES CloseSimple Update: for current update stream
text_image
Software downloading progress. Ver. 03.01.00 ▶ Ver. 03.02.00 65 % HIDE Stop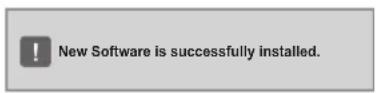
text_image
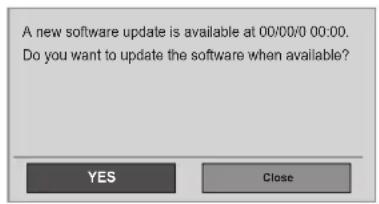
A new software update is available at 00/00/00 00:00. Do you want to update the software when available?When the power is turned off, downloading starts. When the power is turned on while updating, the progress status is displayed.
Schedule Update: for scheduled update stream When the Software Update menu is "Off", the message to change it to "On" appears.
- During Progress of a Software Update, please note the following:
- Power to the TV must not be interrupted.
- The TV must not be switched off.
- The antenna must not be disconnected.
• After Software Update, you can confirm the updated software version in Diagnostics menu. - It may take hours to download the software, so make sure that the power stays on during the download.
WATCHING TV / PROGRAMME CONTROL
DIAGNOSTICS
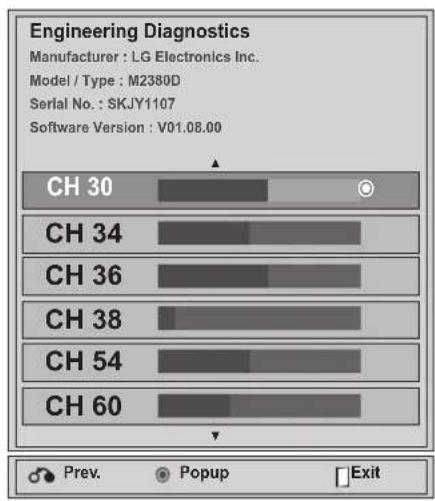
This function enables you to view information on the Manufacturer, Model/Type, Serial Number and Software Version.
This displays the information and signal strength of the tuned *MUX.
This displays the signal information and service name of the selected MUX.
(*MUX: A higher directory of channels in digital broadcasting (a single MUX contains multiple channels.))
text_image
SETUP Auto Tuning Manual Tuning Programme Edit Software Update : ON Diagnostics * CI Information
text_image
Engineering Diagnostics Manufacturer : LG Electronics Inc. Model / Type : M2380D Serial No. : SKJY1107 Software Version : V01.08.00 CH 30 CH 34 CH 36 CH 38 CH 54 CH 60 Prev. Popup Exit1


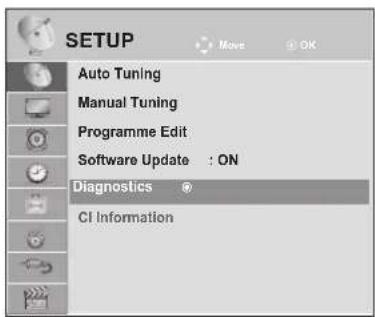
Select SETUP.
2


Select Diagnostics.
3

Display Manufacturer, Model / Type, Serial Number and Software Version.
4


Display the information of Channel.
- Press the MENU or EXIT button to close the menu window.
- Press the BACK button to move to the previous menu screen.
CI [COMMON INTERFACE] INFORMATION
This function enables you to watch some encrypted services (pay services). If you remove the CI Module, you cannot watch pay services.
When the module is inserted into the CI slot, you can access the module menu.
To purchase a module and smart card, contact your dealer. Do not repeatedly insert or remove a CI module from the TV. This may cause a malfunction. When the TV is turned on after inserting a CI Module, you may not have any sound output.
This may be incompatible with the CI module and smart card.
CI (Common Interface) functions may not be possible depending upon the country broadcasting circumstances.
When using a CAM(Conditional Access Module), please make sure it meets fully the requirements of either DVB CI or CI plus.
![LG M2280D-PR - CI [COMMON INTERFACE] INFORMATION - 1](/content/2026/05/802422/images/a150b8b2a70720f63fa6f39ea8cccf2417d1fef25fc8a3022a32d51cce895b2b.jpg)
text_image
SETUP Auto Tuning Manual Tuning Programme Edit Software Update : ON Diagnostics CI Information ®→
![LG M2280D-PR - CI [COMMON INTERFACE] INFORMATION - 2](/content/2026/05/802422/images/79f81c0f3565a1109f8a39aef1a2e83f9aa9d3cb2cc36e8d7c17db89169f708e.jpg)
text_image
Viaccess Module Consultations Authorizations Module information Select the item- This OSD is only for illustration and the menu options and screen format will vary according to the Digital pay services provider.
- It is possible for you to change CI (Common Interface) menu screen and service by consulting your dealer.
1
![LG M2280D-PR - CI [COMMON INTERFACE] INFORMATION - 3](/content/2026/05/802422/images/27f5f13bc054a33308d41fed60d3abb8bfb95a55ab4a97b7504950d422c619f3.jpg)
![LG M2280D-PR - CI [COMMON INTERFACE] INFORMATION - 4](/content/2026/05/802422/images/a0ee0ac9bdf0d47e8644f3c1b5bd461b7fb78ff17cbaccc40b322b033de6ae02.jpg)
Select SETUP.
2
![LG M2280D-PR - CI [COMMON INTERFACE] INFORMATION - 5](/content/2026/05/802422/images/19d752282b691c74c2579379d6a1c6e09bf085142cd836ddfba5fb3e80f62f5c.jpg)
![LG M2280D-PR - CI [COMMON INTERFACE] INFORMATION - 6](/content/2026/05/802422/images/c1768dec7ebc9027405457ac440ee3b0713d2247110b7d2f649cd6c76cd1217c.jpg)
Select CI Information.
3
![LG M2280D-PR - CI [COMMON INTERFACE] INFORMATION - 7](/content/2026/05/802422/images/e1351e89adf6a44d2fffba573950234c67641969e14b3bb75b86b989d0726300.jpg)
![LG M2280D-PR - CI [COMMON INTERFACE] INFORMATION - 8](/content/2026/05/802422/images/84a3fb9e94749646a2e2e6cdb10370af77a25189e0348cc62de7f663f656482f.jpg)
Select the desired item: Module information, smart card information, language, or software download etc.
4
![LG M2280D-PR - CI [COMMON INTERFACE] INFORMATION - 9](/content/2026/05/802422/images/263c76c1438ed9fb7f377b4e42eed416a2b9009e04aeb668482665b866a35d1b.jpg)
Save.
- Press the BACK button to move to the previous menu screen.
WATCHING TV / PROGRAMME CONTROL
SELECTING THE PROGRAMME LIST
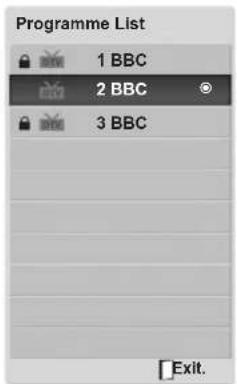
You can check which programmes are stored in the memory by displaying the programme list.
Mini Glossary

Displayed when the Locked Programme.
text_image
Programme List 1 BBC 2 BBC 3 BBC Exit.■ Displaying programme LIST
1

Display the Programme List.
- You may find some blue programmes. These have been set up to be skipped by auto programming or in the programme edit mode.
- Some programmes with the channel number shown in the programme LIST indicate there is no station name assigned.
■ Selecting a programme in the programme list
1

Select a programme.
The mode will be switched between TV, DTV, and Radio from the program you are currently watching.
2

Switch to the chosen programme number.
■ Paging through a programme list
1

Turn the pages.
2

Return to normal TV viewing.
FAVOURITE PROGRAMME SETUP
■ Selecting favourite programme
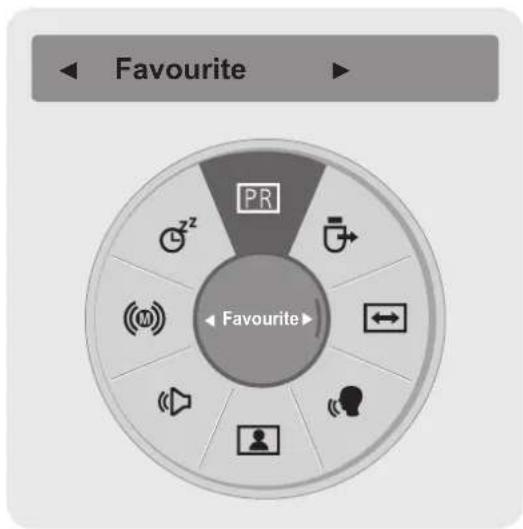
Favourite programme is a convenient feature that lets you quickly scan up to programmes of your choice without having to wait for the TV to scan through all the in-between programmes.
text_image
Favourite PR Favourite1

or
Select your desired programme.
2


Select Favourite.
3

Select Favourite.
4

Return to TV viewing.
• This will automatically include the selected programme into your favourite programme list.
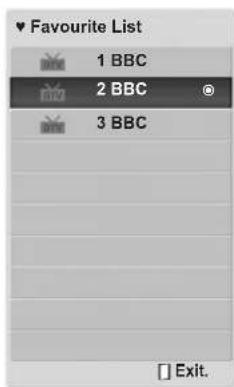
■ Displaying the favourite programme list
text_image
Favourite List 1 BBC 2 BBC 3 BBC Exit.3

Display the Favourite Programme List.
WATCHING TV / PROGRAMME CONTROL
INPUT LIST
HDMI1/2, AV1/2, COMPONENT and RGB can be recognized by a detect pin and thus enabled only when an external device approves voltage.
By using TV/RAD button, you can move from External Input to RF Input and to the last watched programme in DTV/RADIO/TV mode.
- Antenna or Cable: Select it when watching the DTV/TV. (Digital cable input is available only at Finland, Sweden and “--” country)
- AV1, AV2: Select it when watching the VCR or external equipment.
- Component: Select it when using the DVD or the Digital set-top box depends on connector.
- RGB: Select it when using PC depends on connector.
- HDMI 1, HDMI 2: Select it when using DVD, PC or Digital set-top box depend on connector.
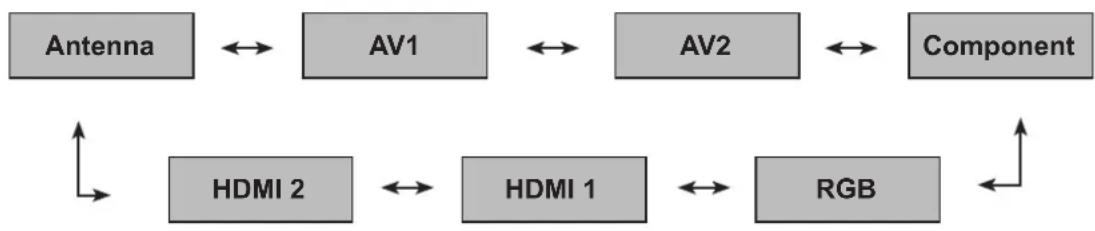
flowchart
graph LR
    A["Antenna"] <--> B["AV1"]
    B <--> C["AV2"]
    C <--> D["Component"]
    D --> E["HDMI 2"]
    E <--> F["HDMI 1"]
    F <--> G["RGB"]
    G --> H
1

Select the input source.

NOTE
▶ The OSD (On Screen Display) is displayed on the screen as shown below.
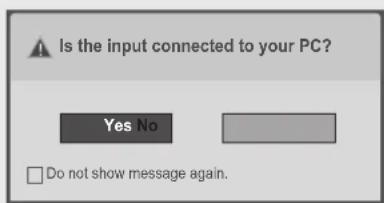
text_image
Is the input connected to your PC? Yes No Do not show message again.- When turning the product on in HDMI input.
- When switching to HDMI input.
-
When connecting an HDMI cable with no signal.
-
If you select "Yes," the size and image quality are optimised for your PC.
- If you select "No," the size and image quality are optimised for the AV device (DVD player, set-top box, gaming device).
- If you select "Do not show message again," this message does not appear until the monitor is reset. You can change the set value in MENU ▶ Option ▶Input label.
- The values set for HDMI1/HDMI2 are saved independently.
EPG (ELECTRONIC PROGRAMME GUIDE) (IN DIGITAL MODE)
This system has an Electronic Programme Guide (EPG) to help your navigation through all the possible viewing options.
The EPG supplies information such as programme listings, start and end times for all available services. In addition, detailed information about the programme is often available in the EPG (the availability and amount of these programme details will vary, depending on the particular broadcaster).
This function can be used only when the EPG information is broadcast by broadcasting companies.
The EPG displays the programme details for next 8 days.

Shows the present screen information.
☑ Displayed with a DTV Programme.
Displayed with a Radio Programme.
MHEG Displayed with a MHEG Programme.
AAC Displayed with a AAC Programme.
4:3 Aspect ratio of broadcasting programme.
16:9 Aspect ratio of broadcasting programme.
☐ Displayed with a Teletext Programme.
■ Displayed with a Subtitle Programme.
☒ Displayed with a Scramble Programme.
D D D Displayed with a Dolby Programme.
DD+ Displayed with a Dolby Digital PLUS Programme.
Broadcasted programme with the icon may not be displayed in Monitor Out depending on the information of the programme.
576i/p, 720p, 1080i/p: Resolution of broadcasting programme
Switch on/off EPG

Switch on or off EPG.
Select a programme

Select desired programme.
The EPG will disappear after moving to a selected program.
EPG (ELECTRONIC PROGRAMME GUIDE) (IN DIGITAL MODE)
Button Function in NOW/NEXT Guide Mode
You can view a program being broadcasted and one scheduled to follow.
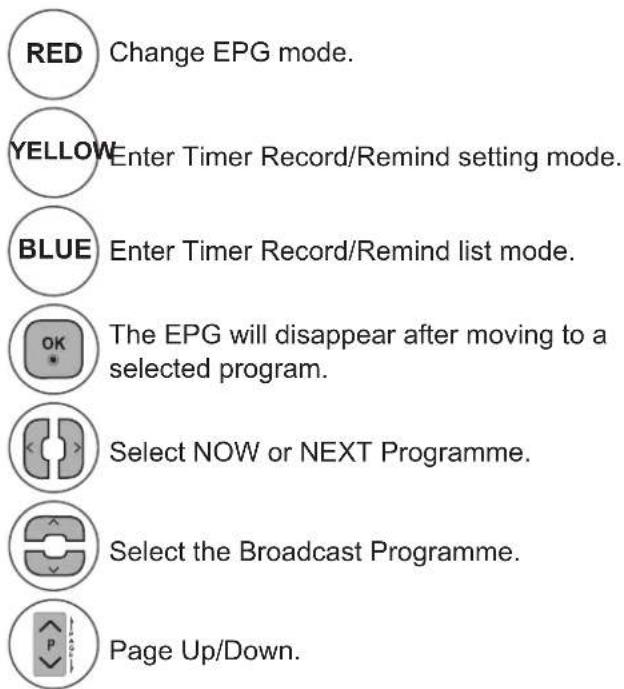
text_image
RED Change EPG mode. YELLOW Enter Timer Record/Remind setting mode. BLUE Enter Timer Record/Remind list mode. OK The EPG will disappear after moving to a selected program. Select NOW or NEXT Programme. Select the Broadcast Programme. Page Up/Down.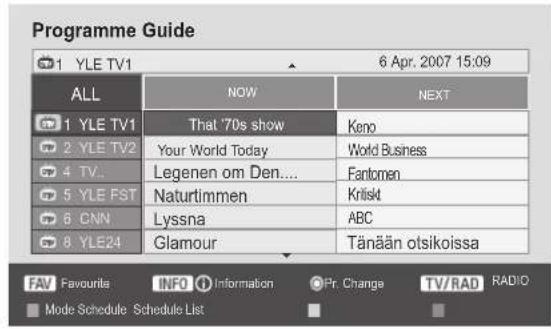
text_image
Programme Guide 1 YLE TV1 6 Apr. 2007 15:09 ALL NOW NEXT 1 YLE TV1 That '70s show Keno 2 YLE TV2 Your World Today World Business 4 TV. Legenen om Den.... Fantomen 5 YLE FST Naturtimmen Kritskt 6 CNN Lyssna ABC 8 YLE24 Glamour Tänään otsikoissa FAV Favourite INFO Information Pr Change TV/RAD RADIO Mode Schedule Schedule List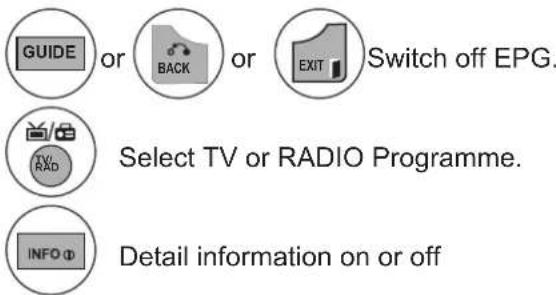
text_image
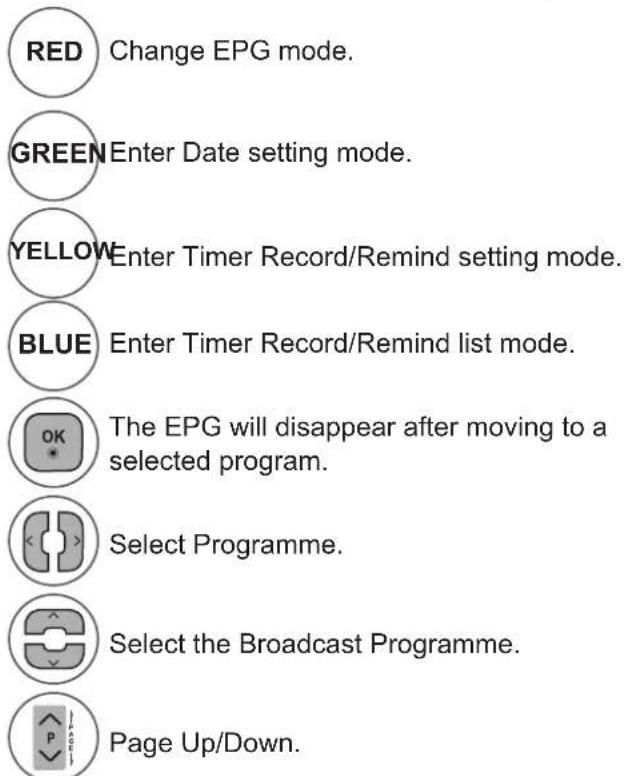
GUIDE or BACK or EXIT Switch off EPG. Select TV or RADIO Programme. INFO Φ Detail information on or offButton Function in 8 Day Guide Mode
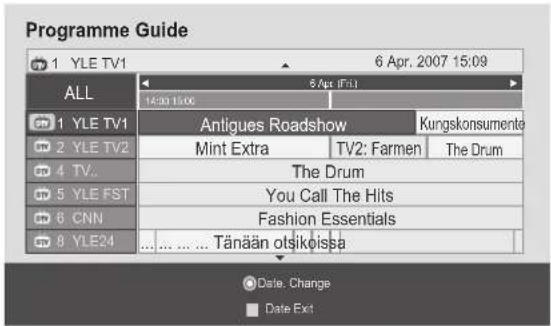
text_image
RED Change EPG mode. GREEN Enter Date setting mode. YELLOW Enter Timer Record/Remind setting mode. BLUE Enter Timer Record/Remind list mode. OK The EPG will disappear after moving to a selected program. Select Programme. Select the Broadcast Programme. Page Up/Down.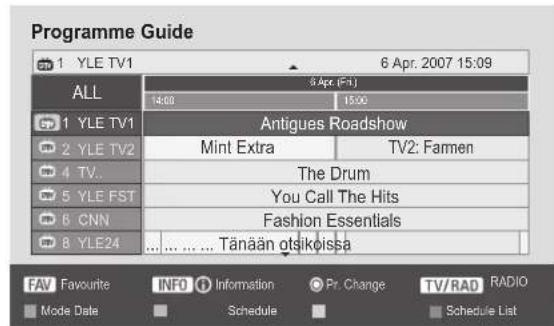
text_image
Programme Guide 1 YLE TV1 6 Apr. 2007 15:09 ALL 8 Apr (F-1) 14:00 15:00 1 YLE TV1 Antigues Roadshow 2 YLE TV2 Mint Extra TV2: Farmen 4 TV. The Drum 5 YLE FST You Call The Hits 6 CNN Fashion Essentials 8 YLE24 ... Tänään otsikoissa FAV Favourite INFO Information Pr Change TV/RAD RADIO Mode Date Schedule Schedule List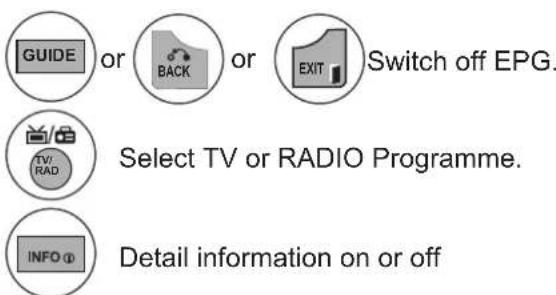
text_image
GUIDE or BACK or EXIT Switch off EPG. TV/RAD Select TV or RADIO Programme. INFO ① Detail information on or offButton Function in Date Change Mode
GREENSwitch off Date setting mode.

Change to the selected date.

Select a date.

Switch off Date setting mode.

or ( ) or

Switch off EPG.
text_image
Programme Guide 1 YLE TV1 6 Apr. 2007 15:09 ALL 14:30 15:00 1 YLE TV1 Antigues Roadshow Kungskonsumente 2 YLE TV2 Mint Extra TV2: Farmen The Drum 4 TV.. The Drum 5 YLE FST You Call The Hits 6 CNN Fashion Essentials 8 YLE24 ... ... ... ... Tänään otsikopissa Date Change Date ExtButton Function in Extended Description Box

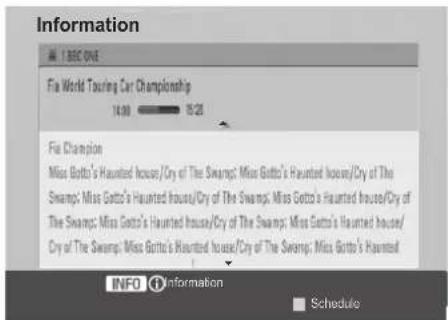
Text Up/Down.

Enter Timer Record/Remind setting mode.

or

The detail information on or off.

Switch off EPG.
text_image
Information 180 ONE Fia World Touring Car Championship 14:00 15:28 Fia Champion Miss Gotto's Haunted house/Cry of The Swamp; Miss Gotto's Haunted house/Cry of The Swamp; Miss Gotto's Haunted house/Cry of The Swamp; Miss Gotto's Haunted house/Cry of The Swamp; Miss Gotto's Haunted house/Cry of The Swamp; Miss Gotto's Haunted house/ Cry of The Swamp; Miss Gotto's Haunted house/Cry of The Swamp; Miss Gotto's Haunted INFO Information ScheduleEPG (ELECTRONIC PROGRAMME GUIDE) (IN DIGITAL MODE)
Button Function in Record/Remind Setting Mode
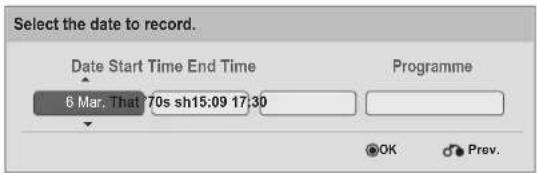
Sets a start or end time for recording, and sets only a start time for the reminder with the end time grayed out. This function is available only when recording equipment that use pin8 recording signalling has been connected to the TV-OUT(AV1) terminal, using a SCART cable.

Change to Guide or Schedule mode.

Select Record or Remind. Function setting.

Select Date, Start/End time or Programme.

Save Timer Record/Remind.
text_image
Select the date to record. Date Start Time End Time 6 Mar. That 70s sh15:09 17:30 Programme OK Prev.Button Function in Schedule List Mode
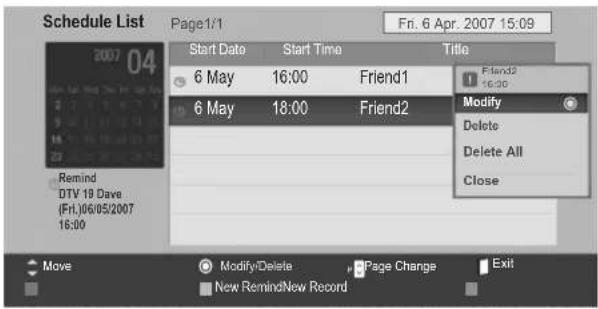
If you've created a schedule list, a scheduled program is displayed at the scheduled time even when you are watching a different program at the time.
Only the Up/Down/OK/BACK keys will work when a popup window is open.
Add new Manual Recording setting mode.

IAdd new Timer Watching setting mode.

or (GUIDE) Change to Guide mode.

or (EXIT) Switch off EPG.
Select your desired Option(Modify/Delete/Delete All).

Select Schedule List.
Page Up/Down.
text_image
Schedule List Page1/1 Fn. 6 Apr. 2007 15:09 2007 04 Start Date Start Time Victoria 6 May 16:00 Friend1 6 May 18:00 Friend2 Modify Delete Delete All Close Remind DTV 19 Dave (Fri.)06/05/2007 16:00 Move ModifyDelete Page Change Exit New RemindNew RecordPICTURE CONTROL
PICTURE SIZE (ASPECT RATIO) CONTROL
You can watch the screen in various picture formats: 16:9, Just Scan, Original, Full Wide, 4:3, 14:9, Zoom and Cinema Zoom.
If a fixed image is displayed on the screen for a long time, that fixed image may become imprinted on the screen and remain visible.
You can adjust the enlarge proportion using ∧ ∨ button.
This function works in the following signal.
1


Select Aspect Ratio.
2

Select the desired picture format.
- You can also adjust Aspect Ratio in the PICTURE menu.
- For Zoom Setting, select 14:9, Zoom and Cinema Zoom in Ratio Menu. After completing Zoom Setting, the display goes back to Q.Menu.
• 16:9
The following selection will allow you to adjust the picture horizontally, in linear proportion, to fill the entire screen(useful for viewing 4:3 formatted DVDs).
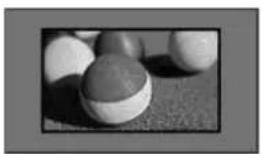
natural_image
Black and white photo of a set of round balls on a textured surface (no text or symbols visible)- Just Scan
Following Selection will lead to you view the picture of best quality without loss of original picture in high resolution image.
Note : If there is noise in original Picture, You can see the noise at the edge.
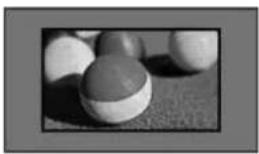
natural_image
Black and white photo of a set of round balls on a textured surface (no text or symbols visible)- Original
When your TV receives a wide screen signal it will automatically change to the picture format broadcast.
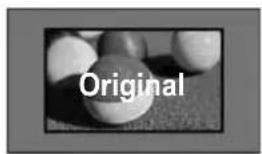
text_image
Original- Full Wide
When TV receives the wide screen signal, it will lead you to adjust the picture horizontally or vertically, in a linear proportion, to fill the entire screen fully.
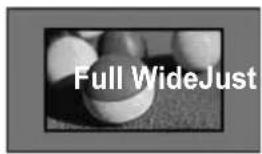
text_image
Full WideJustPICTURE CONTROL
• 4:3
The following selection will allow you to view a picture with an original 4:3 aspect ratio, gray bars will appear on both the left and right of the screen.
• 14:9
You can view a picture format of 14:9 or a general TV programme in the 14:9 mode. The 14:9 screen is viewed in the same way as in 4:3, but is magnified to the left and right.
- Zoom
The following selection will allow you to view the picture without any alteration, while filling the entire screen. However, the top and bottom of the picture will be cropped.
natural_image
Black and white photo of a ball and two balls on a sandy surface (no text or symbols visible)- Cinema Zoom
Choose Cinema Zoom when you want to enlarge the picture in correct proportion. Note: When enlarging or reducing the picture, the image may become distorted.
natural_image
Black and white photo of a pool ball on gravel (no text or symbols visible)◀ or ▶ button: Adjust enlarge proportion of Cinema Zoom. The adjustment range is 1 to 16.
▼ or ▲ button: Move the screen.
NOTE
▶ You can only select 4:3, 16:9 (Wide), 14:9, Zoom/Cinema Zoom in Component mode.
▶ You can only select 4:3, Original, 16:9 (Wide), 14:9, Zoom/Cinema Zoom in HDMI mode.
▶ You can only select 4:3, 16:9 (Wide) in RGB-PC, HDMI-PC mode only.
▶ In DTV/HDMI/Component (over 720p) mode, Just Scan is available.
▶ In Analogue/AV mode, Full Wide is available.
PICTURE WIZARD
This feature lets you adjust the picture quality of the original image.
Use this to calibrate the screen quality by adjusting the Black and White Level etc. General users can calibrate the screen quality by easily following each stage.
When you adjust the image to Low, Recommended or High, you can see the changed result as an example.
In RGB-PC / HDMI-PC mode, the changed Colour, Tint and H/V Sharpness values are not applied.
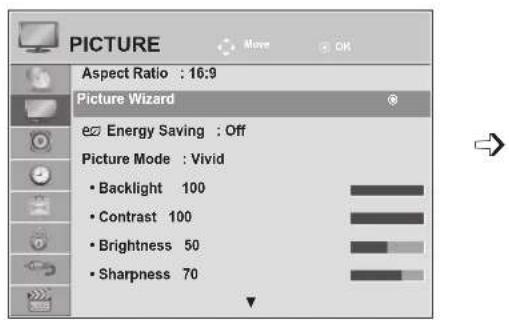
text_image
PICTURE Aspect Ratio : 16:9 Picture Wizard Energy Saving : Off Picture Mode : Vivid • Backlight 100 • Contrast 100 • Brightness 50 • Sharpness 70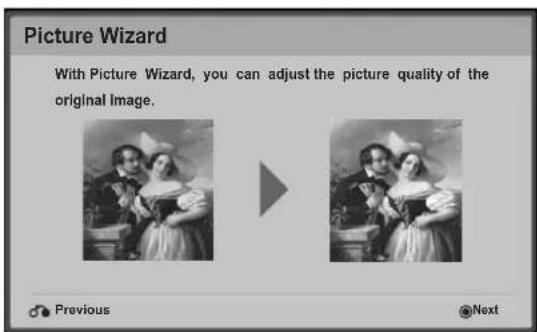
text_image
Picture Wizard With Picture Wizard, you can adjust the picture quality of the original image. Previous @Next1


Select PICTURE.
- If you stop the setting before the final stage, the changes will not be applied
• The adjustment value is saved to Expert 1.
2


Select Picture Wizard.
3


Adjust Black level, White level, Colour, Tint, Horizontal Sharpness, Vertical Sharpness, Colour Temperature, Dynamic Contrast, Colour Gain, Backlight.
4


Select input source to apply the settings.
5

- Press the MENU or EXIT button to close the menu window.
- Press the BACK button to move to the previous menu screen.
PICTURE CONTROL
e ENERGY SAVING
It reduces the TV's power consumption.
The default factory setting is adjusted to the comfortable level to be viewed at home.
You can increase the brightness of your screen by adjusting the Energy Saving level or by setting the Picture Mode.
When adjusting Energy Saving in MHEG mode, the Energy Saving setting is applied after MHEG is finished.
Selecting 'Screen Off' while tuned to a radio station channel will reduce power consumption.
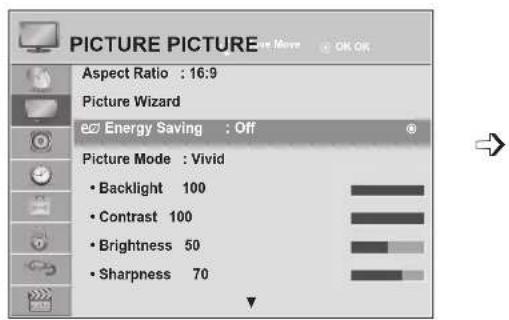
text_image
PICTURE PICTURE Aspect Ratio : 16:9 Picture Wizard Energy Saving : Off Picture Mode : Vivid • Backlight 100 • Contrast 100 • Brightness 50 • Sharpness 70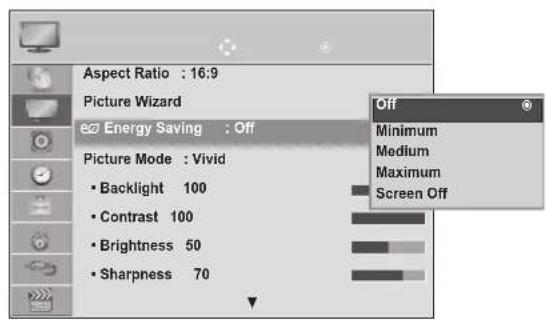
text_image
Aspect Ratio : 16:9 Picture Wizard Energy Saving : Off Picture Mode : Vivid • Backlight 100 • Contrast 100 • Brightness 50 • Sharpness 70 Off Minimum Medium Maximum Screen Off
Select PICTURE.
Select e∅ Energy Saving.
Select Off, Minimum, Medium, Maximum or Screen Off.
- Press the MENU or EXIT button to close the menu window.
-
Press the BACK button to move to the previous menu screen.
-
When you select Screen Off, the screen will be turned off in 3 seconds and Screen Off will start. And the TV is disabled to be automatically turned off.
- You can also adjust this feature by selecting Energy Saving button on the remote control.
- If you want to return from Screen off, input any key.
PRESET PICTURE SETTINGS
Picture Mode-Preset
Vivid Strengthen the contrast, brightness, colour and sharpness for vivid picture.
Standard The most general screen display status.
Cinema Optimizes video for watching movies.
Sport Optimizes video for watching sports events.
Game Optimizes video for playing games.
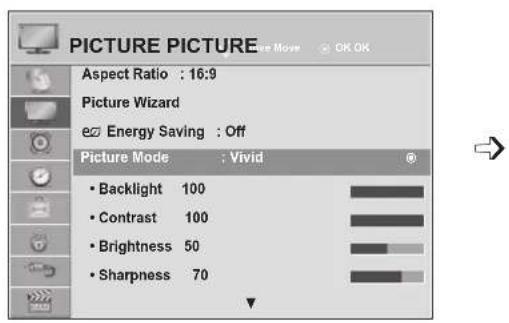
text_image
PICTURE PICTURE Aspect Ratio : 16:9 Picture Wizard Energy Saving : Off Picture Mode : Vivid • Backlight 100 • Contrast 100 • Brightness 50 • Sharpness 70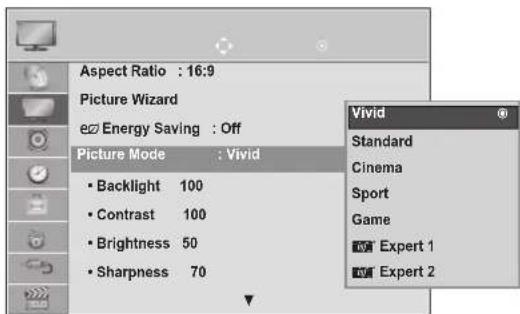
text_image
Aspect Ratio : 16:9 Picture Wizard eEnergy Saving : Off Picture Mode : Vivid • Backlight 100 • Contrast 100 • Brightness 50 • Sharpness 70 Vivid Standard Cinema Sport Game Expert 1 Expert 21


Select PICTURE.
2


Select Picture Mode.
3


Select Vivid, Standard, Cinema, Sport or Game
4

- Press the MENU or EXIT button to close the menu window.
-
Press the BACK button to move to the previous menu screen.
-
Picture Mode adjusts the TV for the best picture appearance. Select the preset value in the Picture Mode menu based on the programme category.
- You can also adjust Picture Mode in the Q. Menu.
PICTURE CONTROL
MANUAL PICTURE ADJUSTMENT
Picture Mode-User option
Backlight
To control the brightness of the screen, adjust the brightness of LCD panel.
Adjusting the backlight when setting the brightness of the set is recommended.
Contrast
Adjusts the signal level between black and white in the picture. You may use Contrast when the bright part of the picture is saturated.
Brightness
Adjusts the base level of the signal in the picture.
Sharpness
Adjusts the level of crispness in the edges between the light and dark areas of the picture.
The lower the level, the softer the image.
Colour
Adjusts intensity of all colours.
Tint
Adjusts the balance between red and green levels.
Colour Temperature
Set to warm to enhance hotter colours such as red, or set to cool to make picture bluish.
text_image
PICTURE PICTURE Aspect Ratio : 16:9 Picture Wizard Energy Saving : Off Picture Mode : Vivid • Backlight 100 • Contrast 100 • Brightness 50 • Sharpness 70
text_image
Aspect Ratio : 16:9 Picture Wizard Energy Saving : Off Picture Mode : Vivid • Backlight 100 • Contrast 100 • Brightness 50 • Sharpness 70 Vivid Standard Cinema Sport Game Expert 1 Expert 2
text_image
1 MENU 2 OK 3 OK 4 OK 5 OKSelect PICTURE.
Select Picture Mode.
Select Vivid, Standard, Cinema, Sport or Game
Select Backlight, Contrast, Brightness, Sharpness, Colour, Tint or Colour Temperature.
Make appropriate adjustments.
- Press the MENU or EXIT button to close the menu window.
- Press the BACK button to move to the previous menu screen.
NOTE
▶ You cannot adjust colour and tint in the RGB-PC / HDMI-PC mode.
▶ When the Expert 1/2 is selected, you can select Backlight, Contrast, Brightness, H Sharpness, V Sharpness, Colour or Tint.
PICTURE IMPROVEMENT TECHNOLOGY
You can calibrate the screen for each Picture Mode or set the video value according to the special video screen.
You can set the video value differently for each input.
To reset to the factory default screen after making adjustments to each video mode, execute the "Picture Reset" function for each Picture Mode.
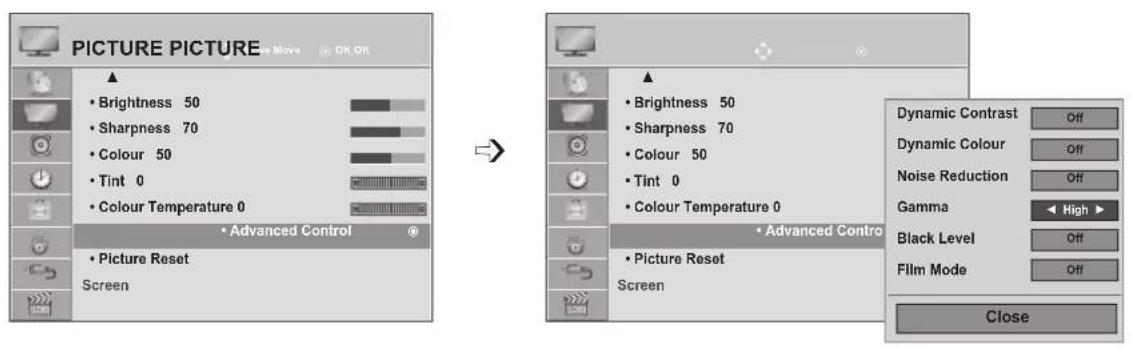
text_image
PICTURE PICTURE • Brightness 50 • Sharpness 70 • Colour 50 • Tint 0 • Colour Temperature 0 • Advanced Control • Picture Reset Screen Dynamic Contrast Off Dynamic Colour Off Noise Reduction Off Gamma High ▶ Black Level Off Film Mode Off Close1


Select PICTURE.
2


Select Advanced Control.
3


Select Dynamic Contrast, Dynamic Colour, Noise Reduction, Gamma, Black Level or Film Mode. (Refer to p. 77 to 78)
4

Select your desired Source.
- Press the MENU or EXIT button to close the menu window.
- Press the BACK button to move to the previous menu screen.
PICTURE CONTROL
EXPERT PICTURE CONTROL
By segmenting categories, Expert 1 and Expert 2 provide more categories which users can set as they see fit, offering the optimal picture quality for users.
This may also be used to help a professional optimize the TV performance using specific videos.
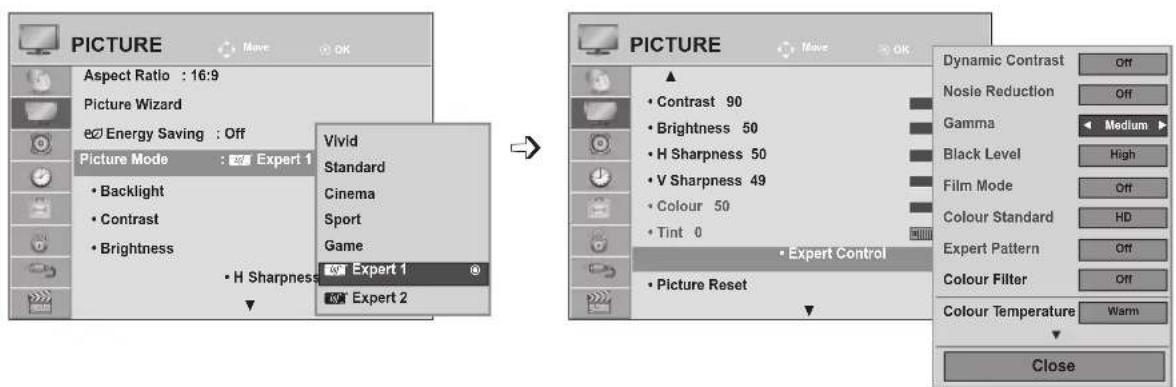
text_image
PICTURE Aspect Ratio : 16:9 Picture Wizard Energy Saving : Off Picture Mode : Expert 1 Backlight Contrast Brightness H Sharpness Vivid Standard Cinema Sport Game Expert 1 Expert 2 → PICTURE • Contrast 90 • Brightness 50 • H Sharpness 50 • V Sharpness 49 • Colour 50 • Tint 0 • Expert Control • Picture Reset Dynamic Contrast Off Nosie Reduction Off Gamma Medium Black Level High Film Mode Off Colour Standard HD Expert Pattern Off Colour Filter Off Colour Temperature Warm Close1


Select PICTURE.
2


Select Picture Mode.
3


Select isf ^TM Expert 1 or isf ^TM Expert 2.
4


Select Expert Control.
5


Select your desired Source.
6

Make appropriate adjustments.
- Press the MENU or EXIT button to close the menu window.
- Press the BACK button to move to the previous menu screen.
| Dynamic Contrast(Off/Low/High) | ■ Adjusts the contrast to keep it at the best level according to the brightness of the screen. The picture is improved by making bright parts brighter and dark parts darker. |
| Dynamic Colour(Off/Low/High ) | ■ Adjusts screen colours so that they look livelier, richer and clearer. This feature enhances hue, saturation and luminance so that red, blue, green and white look more vivid. |
| Noise Reduction(Off/Low/Medium/High) | ■ Reduces screen noise without compromising video quality. |
| Gamma(Low/Medium/High) | ■ You can adjust brightness of dark area and middle gray level area of the picture.· Low: Make dark and middle gray level area of the picture brighter.· Medium: Express original picture levels.· High: Make dark and middle gray level area of the picture darker. |
| Black Level(Low/High/Auto) | · Low: The picture of the screen gets darker.· High: The picture of the screen gets brighter.· Auto: Realizing the black level of the screen and set it to High or Low automatically.■ Set black level of the screen to proper level.■ This function enables to select 'Low' or 'High' in the following mode: AV(NTSC-M), HDMI or Component. Otherwise, 'Black level' is set to 'Auto'. |
| Film Mode(On/Off) | ■ You can watch a cinema-like video by eliminating judder effect.■ Use this function when you watch movies. |
| Colour Standard(SD/HD) | ■ Converts the colour of a different video to HD colour. This function is set for SD video (BT-601) and HD video (BT-709) colour format. |
| Expert Pattern(Off/Expert 1/Expert 2) | ■ This is the pattern necessary for expert adjustment.■ This function is enabled in "Picture Mode - Expert" when you watch DTV. |
| Colour Filter(Off/Red/Green/Blue) | ■ This is the function to filter the specific colours of the video.You can use the RGB filter to set colour saturation and hue accurately. |
| Colour Temperature(Medium/Warm/Cool) | ■ This is the function to adjust the overall colour of the screen to the feeling you want.a. • Method: 2 Points• Pattern: Inner, Outer• Red/Green/Blue Contrast, Red/Green/Blue Brightness :The adjustment range is -50 to +50.b. • Method: 10 point IRE• Pattern: Inner / Outer• IRE (Institute of Radio Engineers) is the unit to display the size of the video signal and can be set among 10, 20, 30 to 100. You can adjust Red, Green or Blue according to each setting.• Red/Green/Blue: The adjustment range is -50 to +50. |
| Colour Management System | ■ As the tool used by the experts to make adjustments by using the test patterns, this does not affect other colours but can be used to selectively adjust the 6 colour areas (Red/Green/Blue/Cyan/Magenta/Yellow).Colour difference may not be distinctive even when you make the adjustments for the general video.■ Adjusts Red/Green/Blue/Yellow/Cyan/Magenta.• Red/Green/Blue/Yellow/Cyan/Magenta Colour: The adjustment range is -30 to +30.• Red/Green/Blue/Yellow/Cyan/Magenta Tint: The adjustment range is -30 to +30.■ This feature is disable in RGB-PC and HDMI (PC) mode. |
PICTURE RESET
Settings of the selected picture modes BACK to the default factory settings.
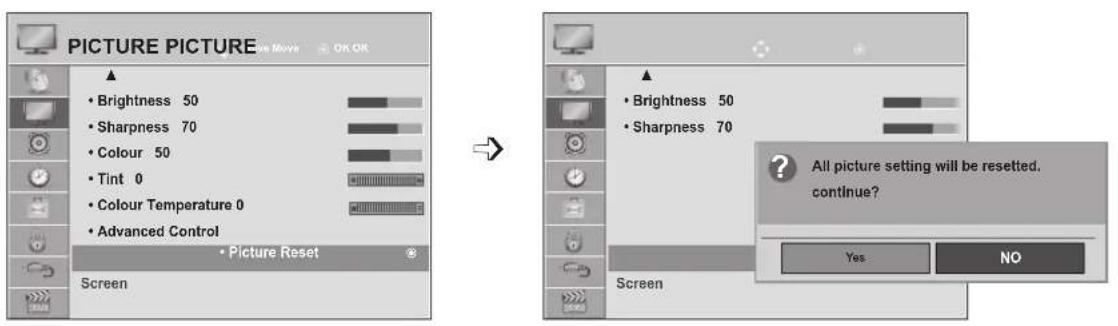
text_image
PICTURE PICTURE • Brightness 50 • Sharpness 70 • Colour 50 • Tint 0 • Colour Temperature 0 • Advanced Control • Picture Reset Screen → • Brightness 50 • Sharpness 70 All picture setting will be resetted. continue? ? Yes NO1


Select PICTURE.
2


Select Picture Reset.
3


Select Yes or No.
4

- Press the MENU or EXIT button to close the menu window.
- Press the BACK button to move to the previous menu screen.
PICTURE CONTROL
SCREEN SETUP FOR PC MODE
Selecting Resolution
To view a normal picture, match the resolution of RGB mode and selection of PC mode.
This function works in the following mode: RGB[PC] mode.
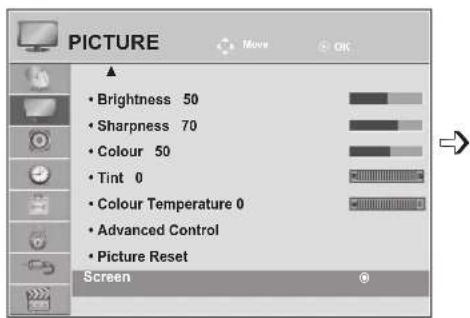
text_image
PICTURE • Brightness 50 • Sharpness 70 • Colour 50 • Tint 0 • Colour Temperature 0 • Advanced Control • Picture Reset Screen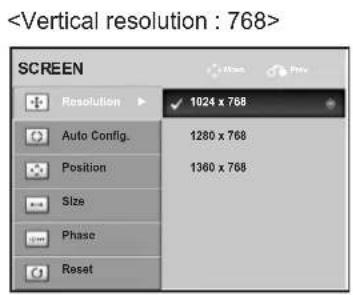
text_image
M2080D / M2080DF / M2080D / M2080DN
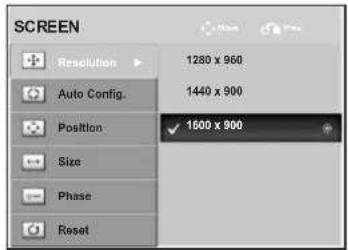
text_image
SCREEN Resolution 1280 x 960 Auto Config. 1440 x 900 Position ✓ 1500 x 900 Size Phase ResetM2280D / M2380D / M2780D
M2280DF / M2380DF / 2780DF
M2280DB / M2380DB
M2280DN / M2380DN / M2780DN
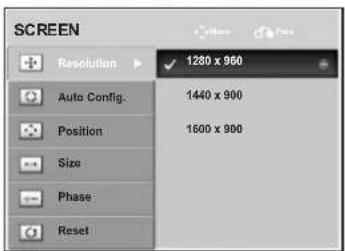
text_image
SCREEN Resolution Auto Config. Position Size Phase Reset 1280 x 960 1440 x 990 1600 x 990
text_image
1 MENU 2 OK * 3 OK * 4 OK * 5 OKSelect PICTURE.
Select Screen.
Select Resolution.
Select the desired resolution.
- Press the MENU or EXIT button to close the menu window.
- Press the BACK button to move to the previous menu screen.
Auto Configure (RGB [PC] mode only)
Automatically adjusts picture position and minimizes image instability. After adjustment, if the image is still not correct, your set is functioning properly but needs further adjustment.
Auto configure
This function is for automatic adjustment of the screen position, clock, and phase The displayed image will be unstable for a few seconds while the auto configuration is in progress.
1. Using OSD
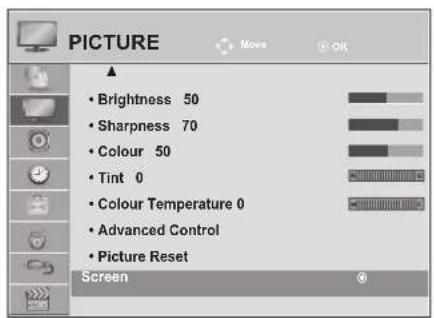
text_image
PICTURE • Brightness 50 • Sharpness 70 • Colour 50 • Tint 0 • Colour Temperature 0 • Advanced Control • Picture Reset Screen→
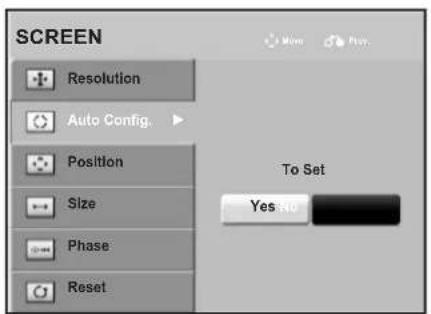
text_image
SCREEN Resolution Auto Config. Position Size Phase: Reset To Set Yes No1


Select PICTURE.
2


Select Screen.
3


Select Auto Config.
4


Select Yes.
5

Run Auto Config.
- If the position of the image is still not correct, try Auto adjustment again.
-
If picture needs to be adjusted again after Auto adjustment in RGB (PC), you can adjust the Position, Size or Phase.
-
Press the MENU or EXIT button to close the menu window.
- Press the BACK button to move to the previous menu screen.
PICTURE CONTROL
2. Using Auto Config. (Remocon)
This function is available for RGB signals only.
M2080D / M2080DF / M2080DB / M2080DN
1
Auto Config
Press Auto Config.
i
Auto in progress
<1600 x 900 Resolution>
i
Auto in progress
For optimal display change resolution 1600 x 900
M2280D / M2380D / M2780D / M2280DF / 2380DF / M2780DF M2280DB / M2380DB / M2280DN / M2380DN / M2780DN
2
Auto Config
Press Auto Config.
i
Auto in progress
<1920 x 1080 Resolution>
i
Auto in progress
For optimal display change resolution 1920 x 1080
Adjustment for screen Position, Size, Phase
If the picture is not clear after auto adjustment and especially if characters are still trembling, adjust the picture phase manually.
This function works in the following mode: RGB[PC].

text_image
PICTURE • Brightness 50 • Sharpness 70 • Colour 50 • Tint 0 • Colour Temperature 0 • Advanced Control • Picture Reset Screen
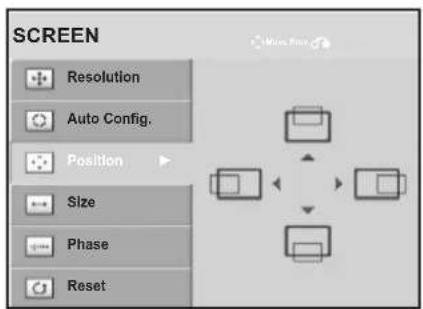
text_image
SCREEN Resolution Auto Config. Position Size Phase Reset1


Select PICTURE.
2


Select Screen.
3


Select Position, Size or Phase.
4


Make appropriate adjustments.
5
- Press the MENU or EXIT button to close the menu window.
- Press the BACK button to move to the previous menu screen.
PICTURE CONTROL
Screen Reset
Returns Position, Size and Phase to the factory default settings.
This function works in the following mode: RGB[PC].
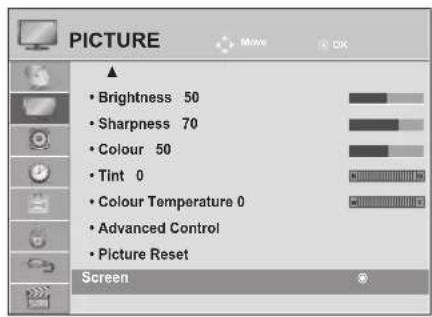
text_image
PICTURE • Brightness 50 • Sharpness 70 • Colour 50 • Tint 0 • Colour Temperature 0 • Advanced Control • Picture Reset Screen
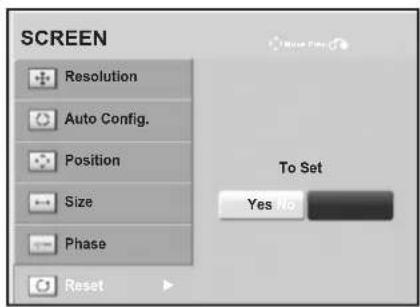
text_image
SCREEN Resolution Auto Config. Position Size Phase Reset To Set Yes to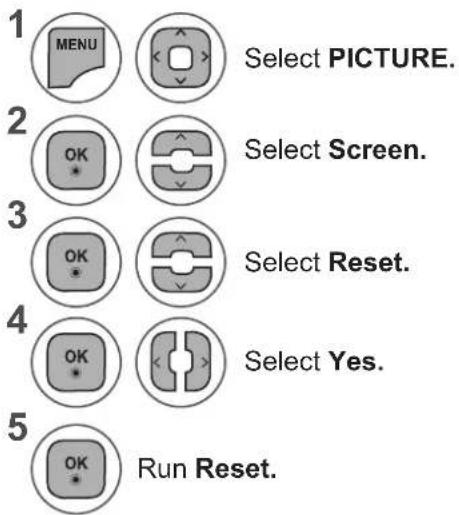
text_image
1 MENU Select PICTURE. 2 OK * Select Screen. 3 OK * Select Reset. 4 OK * Select Yes. 5 OK * Run Reset.- Press the MENU or EXIT button to close the menu window.
- Press the BACK button to move to the previous menu screen.
SOUND CONTROL
AUTO VOLUME LEVELER
AVL automatically remains on the same level of volume if you change programmes.
Because each broadcasting station has its own signal conditions, volume adjustment may be needed every time the channel is changed. This feature allows users to enjoy stable volume levels by making automatic adjustments for each program.
If sound quality or volume is not at the level you want, it is recommended to use a separate home theater system or amp to cope with different user environments.
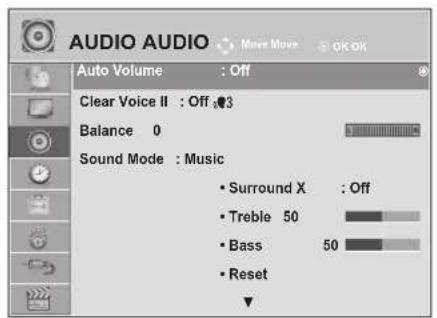
text_image
AUDIO AUDIO Auto Volume : Off Clear Voice II : Off :3 Balance 0 Sound Mode : Music • Surround X : Off • Treble 50 • Bass 50 • Reset ▼→
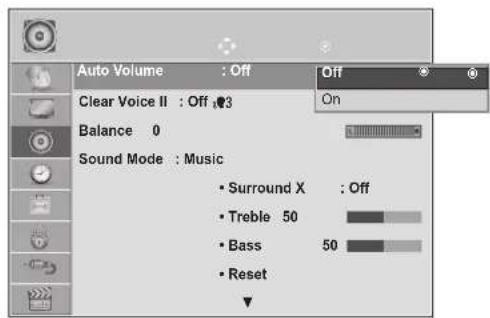
text_image
Auto Volume : Off Clear Voice II : Off 3 Balance 0 Sound Mode : Music • Surround X : Off • Treble 50 • Bass 50 • Reset ▼1


Select AUDIO.
2


Select Auto Volume.
3


Select On or Off.
4

- Press the MENU or EXIT button to close the menu window.
- Press the BACK button to move to the previous menu screen.
SOUND CONTROL
CLEAR VOICE II
By differentiating the human sound range from others, it helps users listen to human voices better.
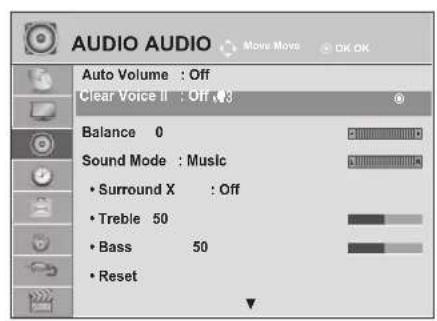
text_image
AUDIO AUDIO Auto Volume : Off Clear Voice II : Off 03 Balance 0 Sound Mode : Music • Surround X : Off • Treble 50 • Bass 50 • Reset→
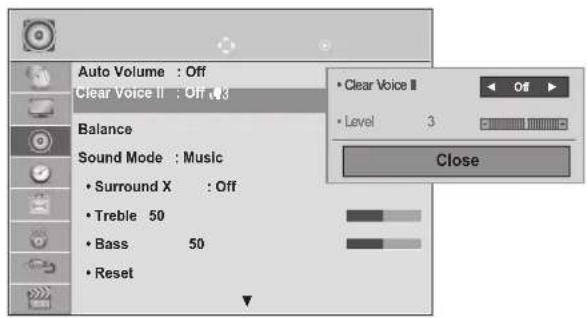
text_image
Auto Volume : Off Clear Voice II : Off 3 Balance Sound Mode : Music • Surround X : Off • Treble 50 • Bass 50 • Reset • Clear Voice II • Level 3 Close1


Select AUDIO.
2


Select Clear Voice II.
3


Select On or Off.
- If you select "On" for Clear Voice II, Surround X feature will not work.
- Select levels from '-6' to '+6'.
Adjustment for Clear Voice Level With selecting On
4


Select Level.
5


Make desired adjustment.
- Press the MENU or EXIT button to close the menu window.
- Press the BACK button to move to the previous menu screen.
BALANCE
You can adjust the sound balance of the speakers to preferred levels.
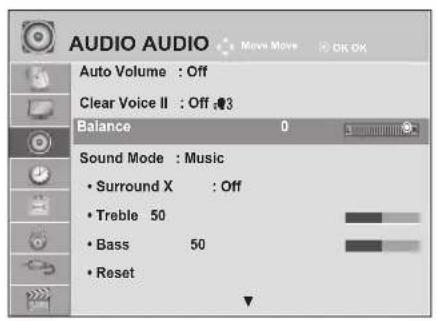
text_image
AUDIO AUDIO Auto Volume : Off Clear Voice II : Off :3 Balance 0 Sound Mode : Music • Surround X : Off • Treble 50 • Bass 50 • Reset→
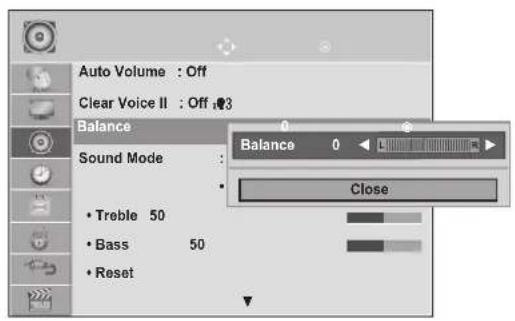
text_image
Auto Volume : Off Clear Voice II : Off 8 Balance Sound Mode Treble 50 Bass 50 Reset Balance 0 Close1


Select AUDIO.
2


Select Balance.
3


Make desired adjustment.
- Press the MENU or EXIT button to close the menu window.
- Press the BACK button to move to the previous menu screen.
SOUND CONTROL
You can select your preferred sound setting; Standard, Music, Cinema, Sport or Game and you can also adjust the Treble, Bass.
Sound Mode lets you enjoy the best sound without any Special adjustment as the TV sets the appropriate sound options based on the programme content.
Standard, Music, Cinema, Sport and Game are preset for optimum sound quality at the factory.
Standard Offers standard-quality sound.
Music Optimizes sound for listening to music.
Cinema Optimizes sound for watching movies.
Sport Optimizes sound for watching sports events.
Game Optimizes sound for playing games.
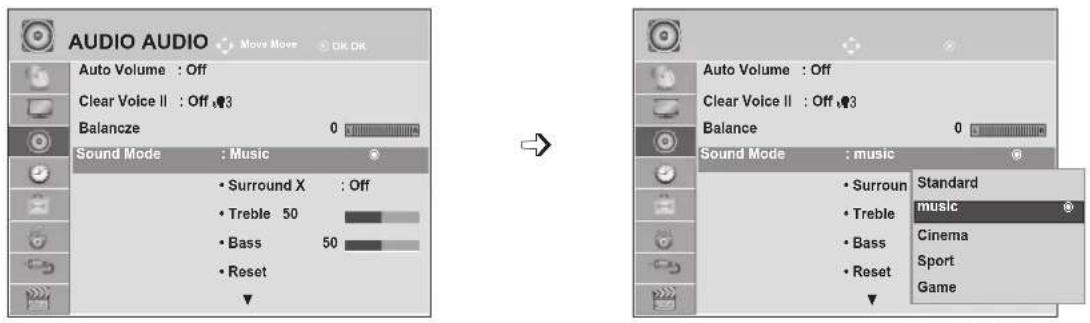
text_image
AUDIO AUDIO Auto Volume : Off Clear Voice II : Off 3 Balance 0 Sound Mode : Music • Surround X : Off • Treble 50 • Bass 50 • Reset → Sound Mode : music • Surround 50 • Treble 50 • Bass 50 • Reset • Standard music • Cinema • Sport • Game

Select AUDIO.
- You can also adjust Sound Mode in the Q. Menu.

Select Sound Mode.

Select Standard, Music, Cinema, Sport or Game.
- Press the MENU or EXIT button to close the menu window.
- Press the BACK button to move to the previous menu screen.
PRESET SOUND SETTINGS-USER MODE
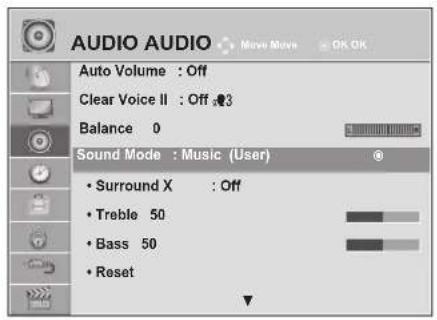
text_image
AUDIO AUDIO Auto Volume : Off Clear Voice II : Off 3 Balance 0 Sound Mode : Music (User) • Surround X : Off • Treble 50 • Bass 50 • Reset→
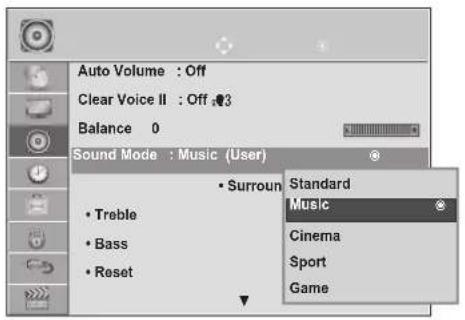
text_image
Auto Volume : Off Clear Voice II : Off 3 Balance 0 Sound Mode : Music (User) • Surround • Treble • Bass • Reset Standard Music Cinema Sport Game1


Select AUDIO.
2


Select Sound Mode.
3


Select Standard, Music, Cinema, Sport or Game.
4


Select Treble or Bass.
5


Set the desired sound level.
Surround X
Select this option to sound realistic.
Enhance sound depth and darity by maximizing Surround effect.
1


Select AUDIO.
2


Select Surround X.
3


Select On or off
4

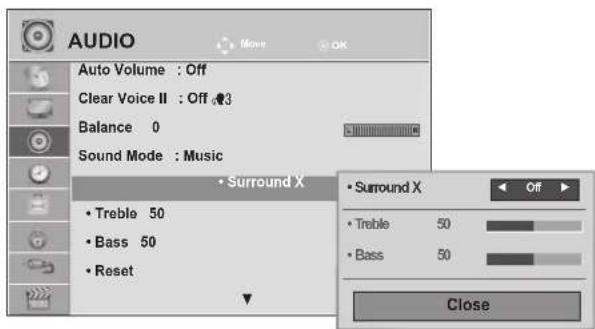
text_image
AUDIO Auto Volume : Off Clear Voice II : Off 3 Balance 0 Sound Mode : Music • Surround X • Treble 50 • Bass 50 • Reset • Surround X • Treble 50 • Bass 50 Close- Press the MENU or EXIT button to close the menu window.
- Press the BACK button to move to the previous menu screen.
SOUND CONTROL
AUDIO RESET
Settings of the selected Sound Mode return to the default factory settings.
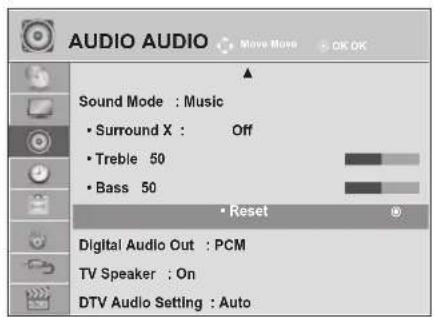
text_image
AUDIO AUDIO Sound Mode : Music • Surround X : Off • Treble 50 • Bass 50 • Reset Digital Audio Out : PCM TV Speaker : On DTV Audio Setting : Auto→
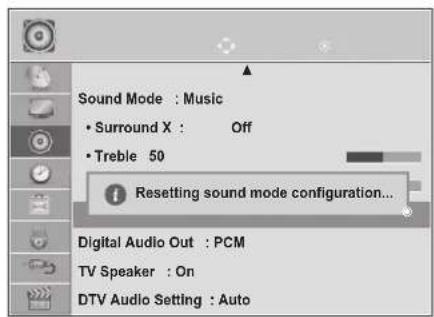
text_image
Sound Mode : Music • Surround X : Off • Treble 50 i Resetting sound mode configuration... Digital Audio Out : PCM TV Speaker : On DTV Audio Setting : Auto1


Select AUDIO.
2


Select Reset.
3

Initialize the adjusted value.
- Press the MENU or EXIT button to close the menu window.
- Press the BACK button to move to the previous menu screen.
DIGITAL AUDIO OUT
This function allows you to select your preferred Digital Audio Output.
The TV can only output DOLBY Digital if a channel is broadcast with Dolby Digital audio.
When Dolby digital is available, selecting Auto in the Digital Audio Out menu will set SPDIF (Sony Philips Digital InterFace) output to Dolby Digital.
If Auto is selected in the digital audio out menu when dolby digital is not available, SPDIF output will be PCM (Pulse-code modulation).
Even if both Dolby Digital and Audio language have been set in a channel which broadcast Dolby Digital Audio, only Dolby Digital will be played.
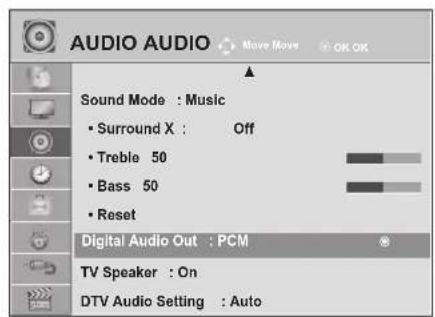
text_image
AUDIO AUDIO Sound Mode : Music • Surround X : Off • Treble 50 • Bass 50 • Reset Digital Audio Out : PCM TV Speaker : On DTV Audio Setting : Auto→
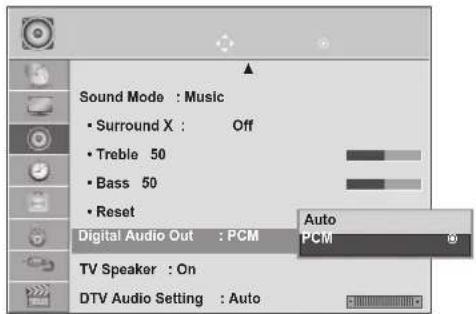
text_image
Sound Mode : Music • Surround X : Off • Treble 50 • Bass 50 • Reset Digital Audio Out : PCM TV Speaker : On DTV Audio Setting : Auto Auto PCM1


Select AUDIO.
2


Select Digital Audio Out.
3


Select Auto or PCM.

DOLBY.
DIGITAL PLUS
Manufactured under license from Dolby Laboratories. "Dolby "and the double-D symbol are trademarks of Dolby Laboratories.
- There is a possibility that when HDMI mode, some DVD players do not make SPDIF sound. At that time, set the output of the digital audio of the DVD player to PCM. (In HDMI, Dolby Digital Plus is not supported).
4

| Item | Audio Input | Digital Audio output |
| Auto (Speaker On) | MPEGDolby DigitalDolby Digital PlusHE-AAC | PCMDolby DigitalDolby DigitalPCM |
| Auto (Speaker Off) | MPEGDolby DigitalDolby Digital PlusHE-AAC | PCMDolby DigitalDolby DigitalDolby Digital |
| PCM | PCM | PCM |
- Press the MENU or EXIT button to close the menu window.
- Press the BACK button to move to the previous menu screen.
SOUND CONTROL
TV SPEAKERS ON / OFF SETUP
You can adjust the TV internal speaker status.
In AV1, AV2, COMPONENT, RGB and HDMI 1 or HDMI with HDMI to DVI cable, the TV speaker can be operational even when there is no video signal.
If you wish to use an external Hi-Fi system, turn off the TV's internal speakers.
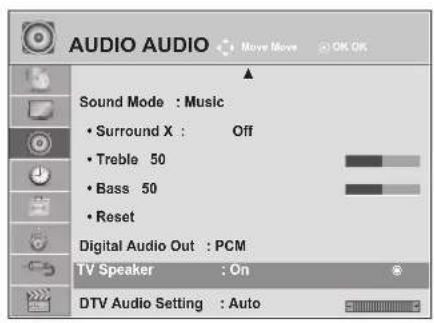
text_image
AUDIO AUDIO Sound Mode : Music • Surround X : Off • Treble 50 • Bass 50 • Reset Digital Audio Out : PCM TV Speaker : On DTV Audio Setting : Auto→
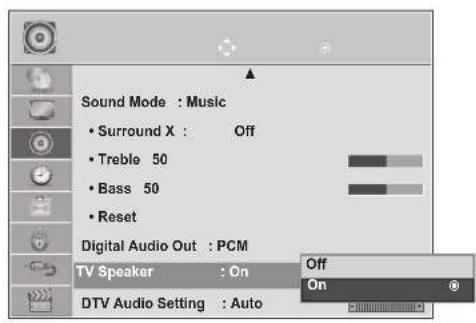
text_image
Sound Mode : Music • Surround X : Off • Treble 50 • Bass 50 • Reset Digital Audio Out : PCM TV Speaker : On DTV Audio Setting : Auto Off On1


Select AUDIO.
2


Select TV Speaker.
3


Select On or Off.
4

- Press the MENU or EXIT button to close the menu window.
- Press the BACK button to move to the previous menu screen.

NOTE
When the TV speaker is turned off while the Simplink home theater is operating, the sound output automatically switches to the Home theater speaker, but when the TV speaker is turned on, the sound output the TV speaker.
▶ Some menus in AUDIO are disabled when TV Speaker is set to Off.
DTV AUDIO SETTING (IN DIGITAL MODE ONLY)
When different audio types exist in an input signal, this function allows you to select the audio type you want.
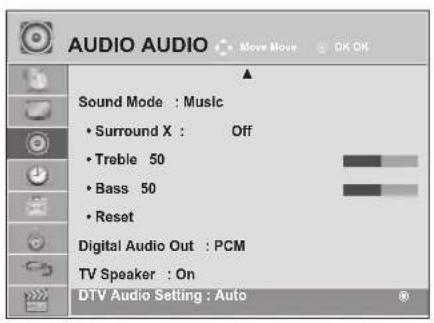
text_image
AUDIO AUDIO Sound Mode : Music • Surround X : Off • Treble 50 • Bass 50 • Reset Digital Audio Out : PCM TV Speaker : On DTV Audio Setting : Auto→
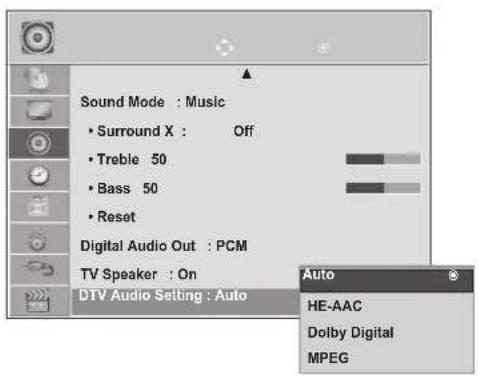
text_image
Sound Mode : Music • Surround X : Off • Treble 50 • Bass 50 • Reset Digital Audio Out : PCM TV Speaker : On DTV Audio Setting : Auto Auto HE-AAC Dolby Digital MPEG1


Select AUDIO.
2


Select DTV Audio Setting.
3


Select Auto, HE-AAC, Dolby Digital or MPEG.
4
- Press the MENU or EXIT button to close the menu window.
- Press the BACK button to move to the previous menu screen.
• Auto: Automatically outputs in the order HE - AAC ▶ Dolby Digital ▶ MPEG.
• HE - AAC, Dolby Digital, MPEG: Allows users to select the audio type they want.
If MPEG is selected, MPEG is always outputted.
If MPEG is not supported, HE - AAC and Dolby Digital are selected in that order.
• Refer to p. 100 (Audio Language Selection)
SOUND CONTROL
I/II
Stereo/Dual Reception (In Analogue Mode Only)
When a programme is selected, the sound information for the station appears with the programme number and station name.
1


Select Audio.
2


Select the sound output.
| Broadcast On Screen Display | |
| Mono | MONO |
| Stereo | STEREO |
| Dual | DUAL I, DUAL II, DUAL I + II |
■ Mono sound selection
If the stereo signal is weak in stereo reception, you can switch to mono. In mono reception, the clarity of sound is improved.
■ Language selection for dual language broadcast
If a programme can be received in two languages (dual language), you can switch to DUAL I, DUAL II or DUAL I + II.
DUAL I Sends the primary broadcast language to the loudspeakers.
DUAL II Sends the secondary broadcast language to the loudspeakers.
DUAL I+I I Sends a separate language to each loudspeaker.
NICAM Reception (In Analogue Mode Only)
If the TV is equipped with a receiver for NICAM reception, high quality NICAM (Near Instantaneous Companding Audio Multiplex) digital sound can be received.
Sound output can be selected according to the type of broadcast received.
1 When NICAM mono is received, you can select NICAM MONO or MONO.
2 When NICAM stereo is received, you can select NICAM STEREO or MONO. If the stereo signal is weak, switch to MONO.
3 When NICAM dual is received, you can select NICAM DUAL I, NICAM DUAL II or NICAM DUAL I+II or MONO.
Speaker Sound Output Selection
In AV, Component, RGB and HDMI mode, you can select output sound for the left and right loudspeakers.
Select the sound output.
L+R: Audio signal from audio L input is sent to the left loudspeaker and audio signal from audio R input is sent to the right loudspeaker.
L+L: Audio signal from audio L input is sent to left and right loudspeakers.
R+R: Audio signal from audio R input is sent to left and right loudspeakers.
TIME SETTING
CLOCK SETUP
The clock is set automatically when receiving a digital signal. (You can set the clock manually only if the TV has no DTV signal.)
You must set the time correctly before using on/off timer function.
When you select a Time Zone city, the TV time is set by the time offset information based on Time Zone and GMT (Greenwich Mean Time) which is received with the broadcast signal and the time is set automatically by a digital signal.
Once Clock is set in DTV mode, you cannot change time, but if the city name in Time Zone is changed into offset, you can change time by 1 hour.
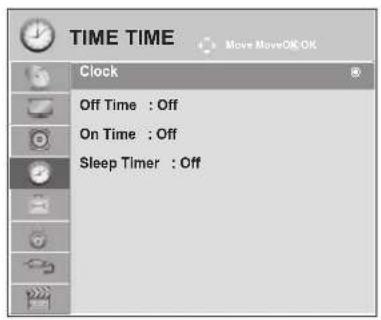
text_image
TIME TIME Clock Off Time : Off On Time : Off Sleep Timer : Off→
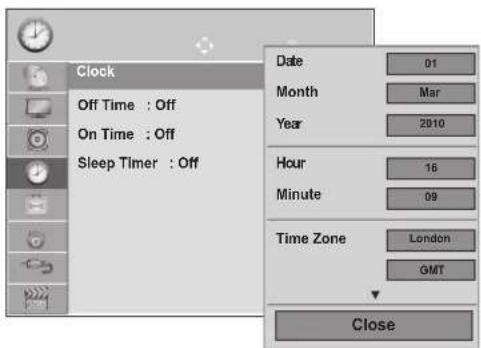
text_image
Clock Off Time : Off On Time : Off Sleep Timer : Off Date 01 Month Mar Year 2010 Hour 16 Minute 09 Time Zone London GMT Close1


Select TIME.
2


Select Clock.
3


Select either the year, month, date, time or Time Zone option.
4

Set the year, month, date, time or Time Zone option.
- Press the MENU or EXIT button to close the menu window.
- Press the BACK button to move to the previous menu screen.
AUTO ON/OFF TIME SETTING
The Off time function automatically switches the TV to standby at a preset time.
Two hours after the TV is switched on by the on time function it will automatically switch back to standby mode unless a button has been pressed.
The Off time function overrides the On time function if both are set to the same time.
The TV must be in standby mode for the On time to work.
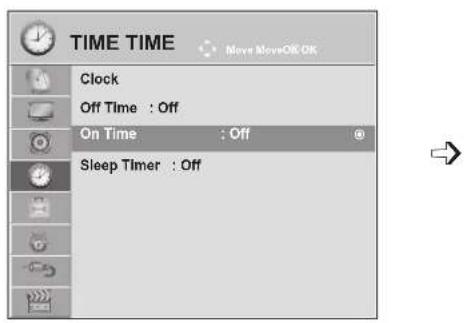
text_image
TIME TIME Clock Off Time : Off On Time : Off Sleep Timer : Off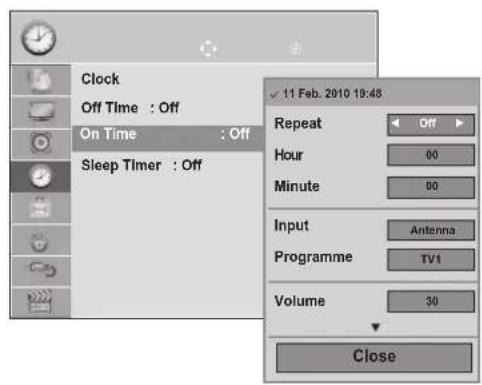
text_image
Clock Off Time : Off On Time : Off Sleep Timer : Off 11 Feb. 2010 19:48 Repeat Hour Minute Input Antenna Programme TV1 Volume 30 Close1


Select TIME.
2


Select Off Time or On Time.
3


Select Repeat.
4

Select Off, Once, Daily, Mon \~ Fri, Mon \~ Sat, Sat \~ Sun or Sun.
5


Set the hour.
6


Set the minutes.
• To cancel On/Off Time function, select Off.
- For On Time function only
1

Select Input.
2

Select the input source.
3


Set the programme.
4

Adjust volume level at switch-on.
- Press the MENU or EXIT button to close the menu window.
- Press the BACK button to move to the previous menu screen.
TIME SETTING
SLEEP TIMER SETTING
You do not have to remember to switch the TV off before you go to sleep.
The sleep timer automatically switches the TV to standby after the preset time has elapsed.
1


Select Sleep Timer.
2

Select Off, 10, 20, 30, 60, 90, 120, 180 or 240 min.
- When you switch the TV off, the preset sleep timer is cancelled.
- You can also adjust Sleep Timer in the TIME menu.
OPTION SETTING
ON-SCREEN MENU LANGUAGE / COUNTRY SELECTION
The installation guide menu appears on the TV screen when it is switched on for the first time.
1


Select your desired language.
2


Select your country.
- If you want to change Language/ Country selection
1


Select OPTION.
2


Select Menu Language or Country.
- When France is selected for Country, password is not '0', '0', '0', '0' but '1', '2', '3', '4'.
3


Select your desired language or country.
4

Save.
- Press the MENU or EXIT button to close the menu window.
- Press the BACK button to move to the previous menu screen.

NOTE
▶ If you do not finish the set-up Installation Guide by pressing RETURN or if you time out on the OSD (On Screen Display) the installation menu will continuously appear until the set up is completed whenever the TV is switched on.
▶ If you select the wrong local country, teletext may not appear correctly on the screen and some problems may occur during teletext operation.
The CI (Common Interface) function may not be applied based on country broadcasting circumstances.
▶DTV mode control buttons may not function based on country broadcasting circumstances.
In country that Digital broadcasting regulation isn't fixed, some DTV function may not work depending on digital broadcasting circumstances.
▶The Country Setting "UK" should only be activated in UK.
▶ If the country setting is set to "--", European terrestrial/cable digital standard broadcasting programmes are available, but some DTV functions may not work properly.
OPTION SETTING
LANGUAGE SELECTION (IN DIGITAL MODE ONLY)
The Audio function allows selection of a preferred language.
If audio data in a selected language is not broadcast, the default language audio will be played.
Use the Subtitle function when two or more subtitle languages are broadcast. If subtitle data in a selected language is not broadcast, the default language subtitle will be displayed.
When the languages you selected as the primary for Audio Language and Subtitle Language are not supported, you can select language in secondary category.
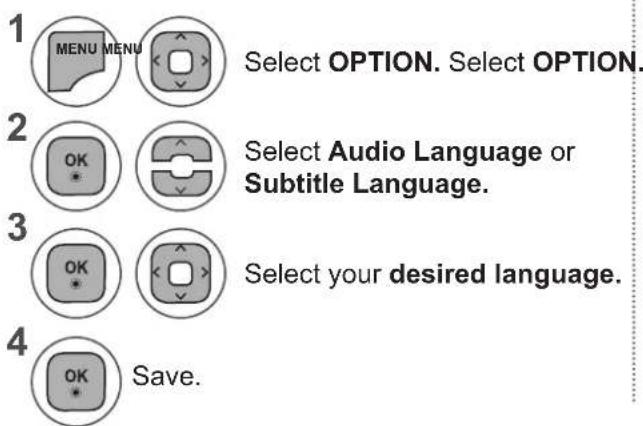
text_image
1 MENU MENU Select OPTION. Select OPTION. 2 OK Select Audio Language or Subtitle Language. 3 OK Select your desired language. 4 OK Save.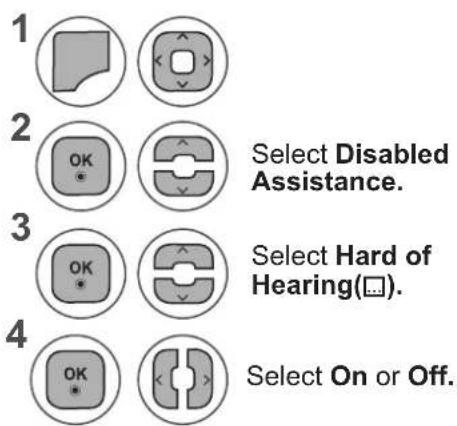
text_image
1 2 OK Select Disabled Assistance. 3 OK Select Hard of Hearing(□). 4 OK Select On or Off.- Press the BACK button to move to the previous menu screen.
< Audio Language Selection >
▶ When two or more audio languages are broadcast, you can select the audio language.
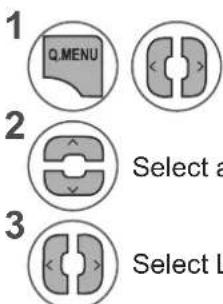
text_image
1 Q.MENU 2 Select a 3 Select LSelect Audio.
< Subtitle Language Selection >
▶ When two or more subtitle languages are broadcast, you can select the subtitle language with the SUBTITLE button on the remote control.
▶Press the ∧ ∨ button to select a subtitle language.
- The audio/subtitles can be displayed in a simpler form with 1 to 3 characters broadcast by the service provider.
- When you select supplementary Audio (Audio for "Visual/Hearing Impaired") the TV may output a part of the Main a
| Audio Language OSD Information | |
| Display | Status |
| N.A | Not Available |
| MPEG | MPEG Audio |
| DO | Dolby Digital Audio |
| → | Audio for “Visual Impaired” |
| ABC | Audio for “Hearing Impaired” |
| DD+ | Dolby Digital Plus Audio |
| AAC | AAC Audio |
| Subtitle Language OSD Information | |
| Display | Status |
| N.A | Not Available |
| Teletext Subtitle | |
| ABC | Subtitle for “Hard of Hearing” |
AUDIO DESCRIPTION (IN DIGITAL MODE ONLY)
This function is for the blind, and provides explanatory audio describing the current situation in a TV programme in addition to the basic audio.
When Audio Description On is selected, basic audio and Audio Description are provided only for those programmes that have Audio Description included.
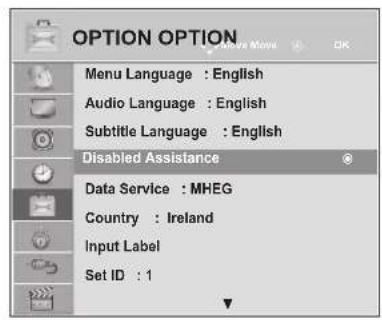
text_image
OPTION OPTION Menu Language : English Audio Language : English Subtitle Language : English Disabled Assistance Data Service : MHEG Country : Ireland Input Label Set ID : 1→
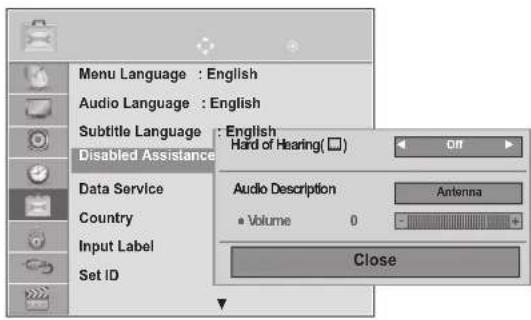
text_image
Menu Language : English Audio Language : English Subtitle Language : English Disabled Assistance Data Service Country Input Label Set ID Audio Description Volume 0 Antenna Close1


Select OPTION.
2


Select Disabled Assistance.
3


Select Audio Description.
4


Select On or Off.
Adjustment for Audio Description Volume With selecting On
5


Select Volume.
6

Make desired adjustment.
- Press the MENU or EXIT button to close the menu window.
- Press the BACK button to move to the previous menu screen.
OPTION SETTING
DATA SERVICE
(This menu is enabled only in Ireland.)
This function allows users to choose between MHEG (Digital Teletext) and Teletext if both exist at the same time.
If only one of them exists, either MHEG or Teletext is enabled regardless of which option you selected.
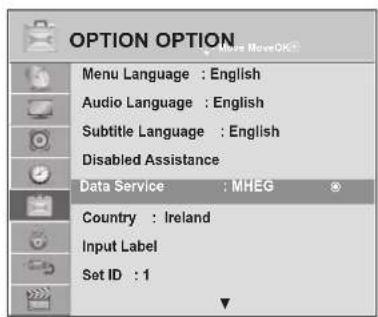
text_image
OPTION OPTION Menu Language : English Audio Language : English Subtitle Language : English Disabled Assistance Data Service : MHEG Country : Ireland Input Label Set ID : 1→
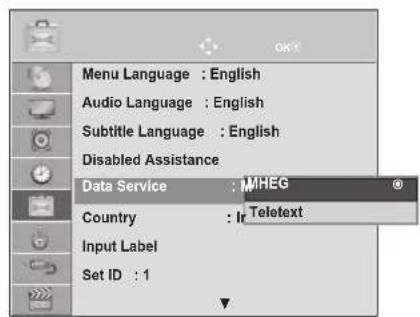
text_image
Menu Language : English Audio Language : English Subtitle Language : English Disabled Assistance Data Service : MHEG Country : Teletext Input Label Set ID : 1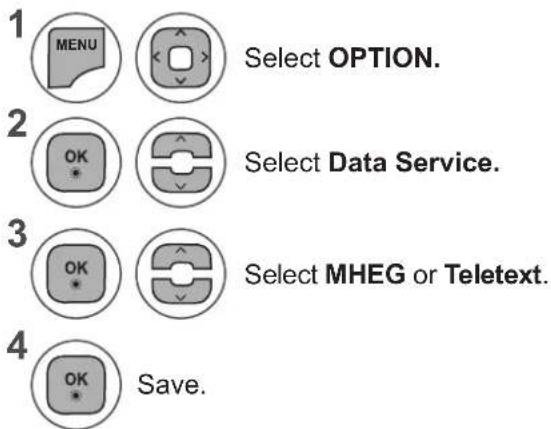
text_image
1 MENU Select OPTION. 2 OK * Select Data Service. 3 OK * Select MHEG or Teletext. 4 OK * Save.- Press the MENU or EXIT button to close the menu window.
- Press the BACK button to move to the previous menu screen.
INPUT LABEL
Selects a label for each input source.
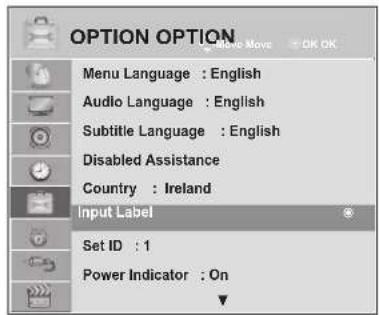
text_image
OPTION OPTION Menu Language : English Audio Language : English Subtitle Language : English Disabled Assistance Country : Ireland Input Label Set ID : 1 Power Indicator : On→
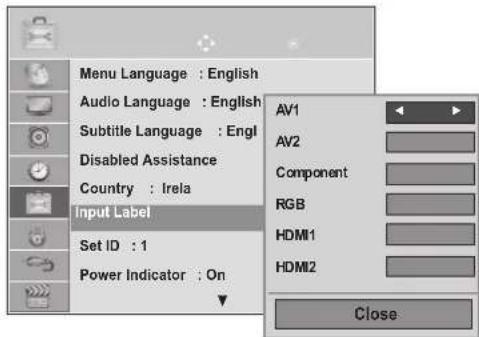
text_image
Menu Language : English Audio Language : English Subtitle Language : Engl Disabled Assistance Country : Irela Input Label Set ID : 1 Power Indicator : On AV1 AV2 Component RGB HDMI1 HDMI2 CloseIf you want to use HDMI-PC mode, you must set the input label to PC mode.
(Refer to the below figure)
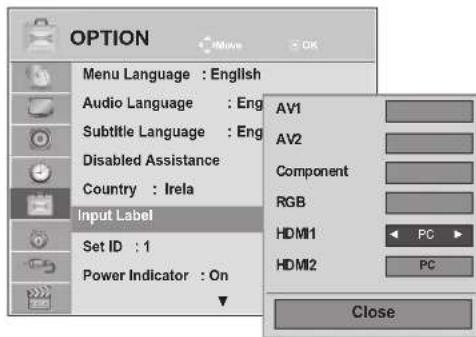
text_image
OPTION Menu Language : English Audio Language : Eng Subtitle Language : Eng Disabled Assistance Country : Irela Input Label Set ID : 1 Power Indicator : On AV1 AV2 Component RGB HDM1 PC HDM2 PC Close1


Select OPTION.
2


Select Input Label.
3


Select the source.
4

Select the label.
- Press the MENU or EXIT button to close the menu window.
- Press the BACK button to move to the previous menu screen.
OPTION SETTING
POWER INDICATOR
Select the power indicator on of off.
Power indicator On
- Normal Mode: Blue LED On.
- Off Mode: LED Off
Power indicator Off
- Normal Mode: Blue LED Off.
- Off Mode: LED Off
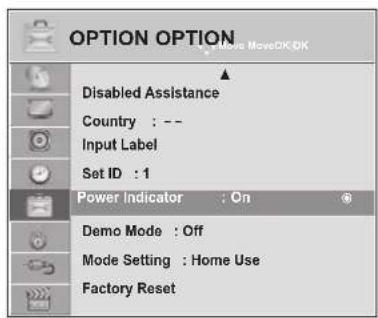
text_image
OPTION OPTION Active MoveDK-DK Disabled Assistance Country : -- Input Label Set ID : 1 Power Indicator : On Demo Mode : Off Mode Setting : Home Use Factory Reset→
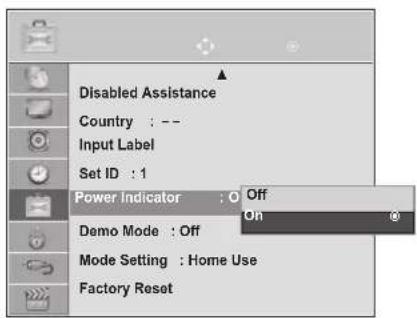
text_image
Disabled Assistance Country : -- Input Label Set ID : 1 Power Indicator : Off Demo Mode : Off Mode Setting : Home Use Factory Reset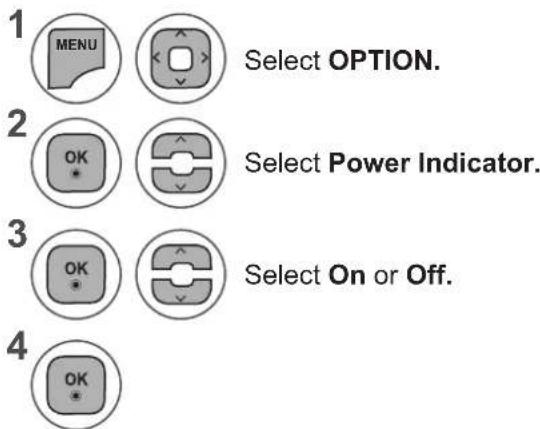
text_image
1 MENU Select OPTION. 2 OK * Select Power Indicator. 3 OK * Select On or Off. 4 OK- Press the MENU or EXIT button to close the menu window.
- Press the BACK button to move to the previous menu screen.
DEMO MODE
Display the slide show to explain the various logo of this TV.
It is not possible to use Demo Mode in Home Use mode.
In Store Demo, Demo Mode is automatically set to On.
Once Demo Mode is set to Off in Store Demo, Demo Mode does not run and only the screen is reset.
The screen is reset automatically after 5 minutes in Demo Mode.
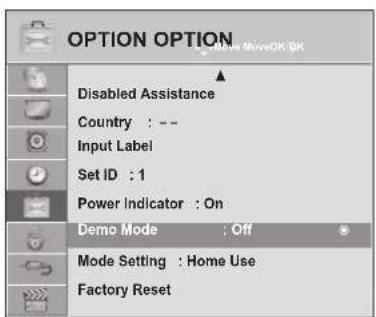
text_image
OPTION OPTION Have MoveOK OK Disabled Assistance Country : -- Input Label Set ID : 1 Power Indicator : On Demo Mode : Off Mode Setting : Home Use Factory Reset→
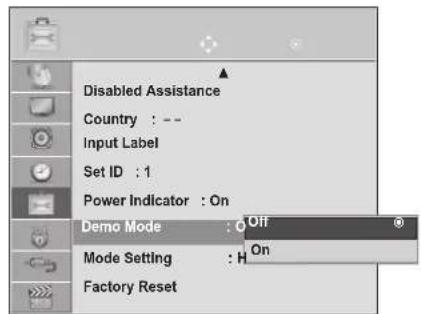
text_image
Disabled Assistance Country : -- Input Label Set ID : 1 Power Indicator : On Demo Mode : Off Mode Setting : H On Factory Reset1


Select OPTION.
2


Select Demo Mode.
3


Select On to show the various logo of TV.
4

Return to TV viewing.
If you want to stop the demo, press any button. (Except for MUTE _4 + , - button)
- Press the MENU or EXIT button to close the menu window.
- Press the BACK button to move to the previous menu screen.
OPTION SETTING
MODE SETTING
We recommend setting the TV to "Home Use" mode for the best picture in your home environment. "Store Demo" mode is an optimal setting for displaying at stores..
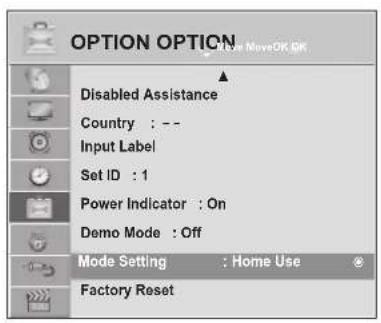
text_image
OPTION OPTION Disabled Assistance Country : -- Input Label Set ID : 1 Power Indicator : On Demo Mode : Off Mode Setting : Home Use Factory Reset
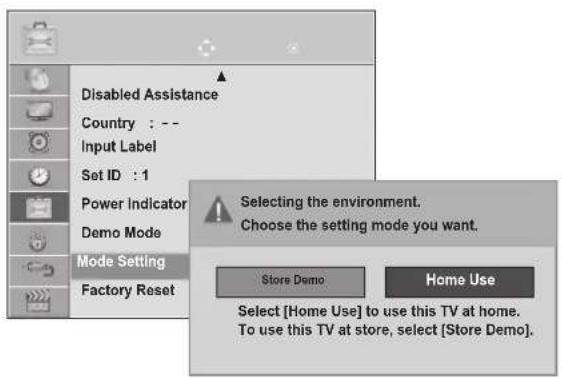
text_image
Disabled Assistance Country : -- Input Label Set ID : 1 Power Indicator Demo Mode Mode Setting Factory Reset Selecting the environment. Choose the setting mode you want. Store Demo Home Use Select [Home Use] to use this TV at home. To use this TV at store, select [Store Demo]1


Select OPTION.
2


Select Mode Setting.
3

Select Store Demo or Home Use.
4
Save.
- Press the MENU or EXIT button to close the menu window.
- Press the BACK button to move to the previous menu screen.
INITIALIZING(RESET TO ORIGINAL FACTORY SETTINGS)
This function initializes all settings.
But the settings of i_y Day and i_y Night of the Picture Mode cannot be initialized.
It is useful to initialize the product or when you move to other city or country.
When the Factory Reset is completed, you must restart the Initializing setup.
When the Lock System menu is "On", the message to enter the password appears.
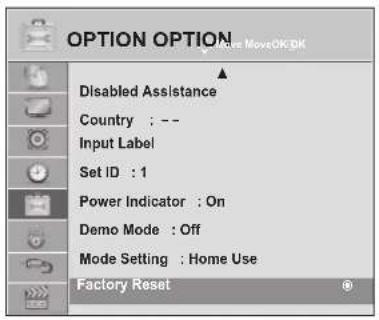
text_image
OPTION OPTION Create MoveOK/DK Disabled Assistance Country : -- Input Label Set ID : 1 Power Indicator : On Demo Mode : Off Mode Setting : Home Use Factory Reset→
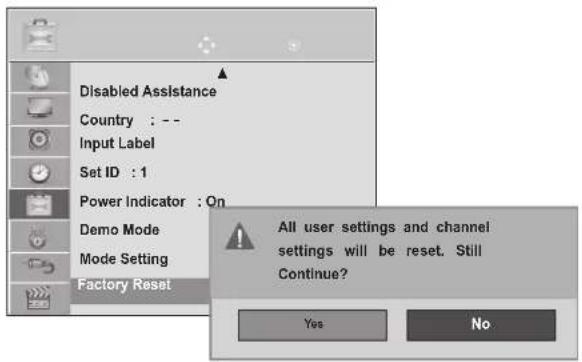
text_image
Disabled Assistance Country : -- Input Label Set ID : 1 Power Indicator : On Demo Mode Mode Setting Factory Reset All user settings and channel settings will be reset. Still Continue? Yes No1


Select OPTION.
2


Select Factory Reset.
3


Select Yes.
4

Start Factory Reset.
- In Lock System "On", if you forget your password, press '0', '3', '2', '5' on the remote control handset.
- Press the MENU or EXIT button to close the menu window.
- Press the BACK button to move to the previous menu screen.
PARENTAL CONTROL / RATINGS
SET PASSWORD & LOCK SYSTEM
Enter the password, press '0', '0', '0', '0' on the remote control handset.
When France is selected for Country, password is not '0', '0', '0', '0' but '1', '2', '3', '4'.
When France is selected for Country, password cannot be set as '0', '0', '0', '0'.
If a channel is locked, enter the password to unlock it temporarily.
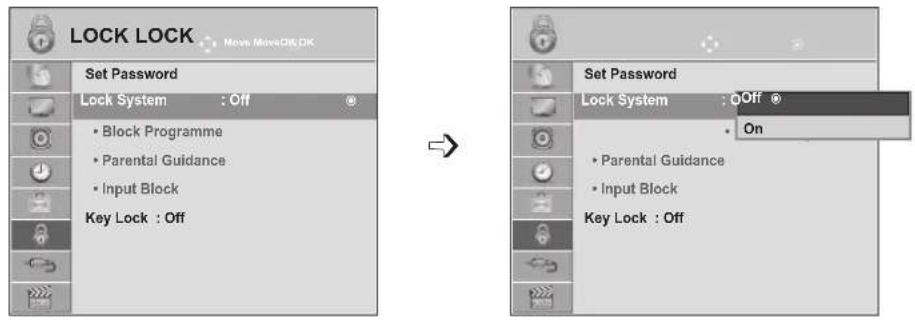
text_image
LOCK LOCK Set Password Lock System : Off • Block Programme • Parental Guidance • Input Block Key Lock : Off Set Password Lock System : QOff * • On • Parental Guidance • Input Block Key Lock : Off1


Select LOCK.
2


Select Lock System.
3


Select On.
4


Set the password.
5
Input a 4-digit password.
Be sure to remember this number!
Re-enter new password for confirm.
- If you forget your password, press '0', '3', '2', '5' on the remote control handset.
- Press the MENU or EXIT button to close the menu window.
- Press the BACK button to move to the previous menu screen.
BLOCK PROGRAMME
Blocks any programmes that you do not want to watch or that you do not want your children to watch.
This function is available in Lock System "On".
Enter a password to watch a blocked programme.
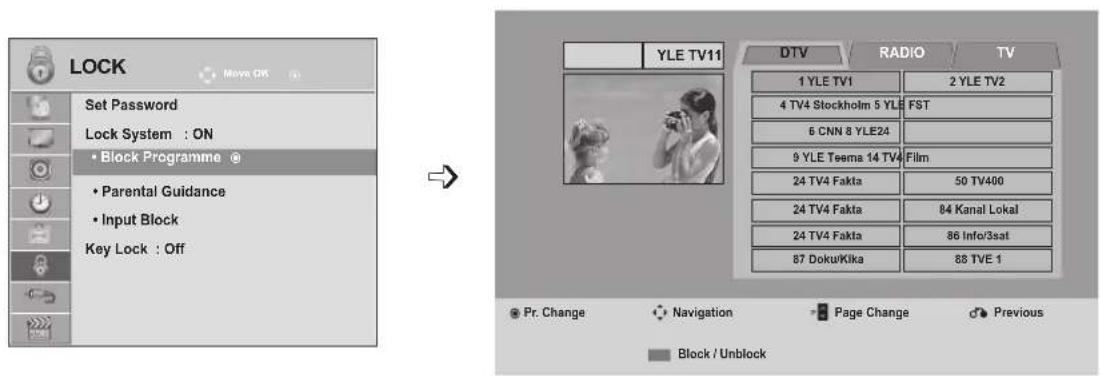
text_image
LOCK Set Password Lock System : ON • Block Programme * • Parental Guidance • Input Block Key Lock : Off YLE TV11 DTV RADIO TV 1 YLE TV1 2 YLE TV2 4 TV4 Stockholm 5 YLE FST 6 CNN 8 YLE24 9 YLE Teema 14 TV4 Film 24 TV4 Fakta 50 TV400 24 TV4 Fakta 84 Kanal Lokal 24 TV4 Fakta 86 Info/3sat 87 Doku/Kika 88 TVE 1 Pr. Change Navigation Page Change Previous Block / Unblock1


Select LOCK.
2


Select Block Programme.
3

Enter the Block Programme.
4


Select a programme to be locked.
- Press the MENU or EXIT button to close the menu window.
- Press the BACK button to move to the previous menu screen.
PARENTAL CONTROL / RATINGS
PARENTAL CONTROL (IN DIGITAL MODE ONLY)
This function operates according to information from the broadcasting station. Therefore if the signal has incorrect information, this function does not operate.
A password is required to gain access to this menu.
This set is programmed to remember which option it was last set to even if you switch the set off.
Prevents children from watching certain adult's TV programmes, according to the ratings limit set.
Enter a password to watch a blocked programme.
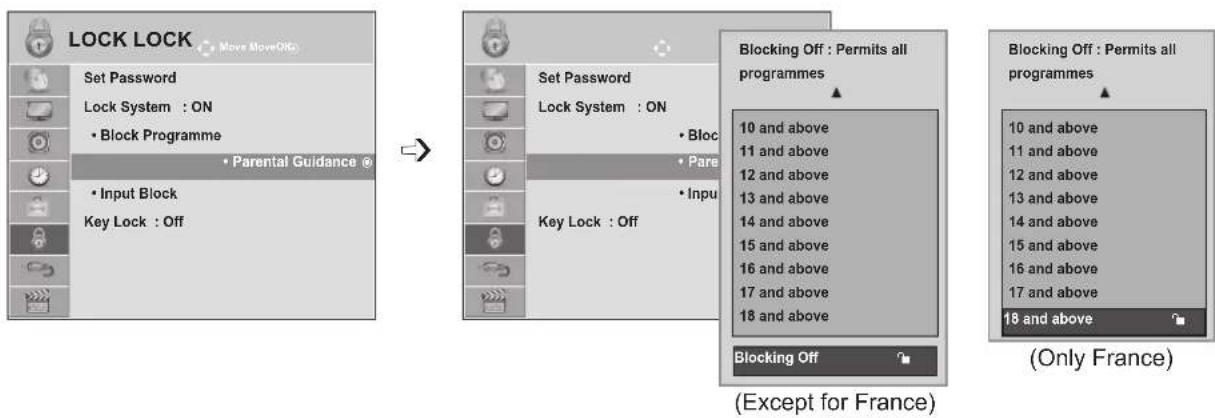
flowchart
graph LR
    A["LOCK LOCK"] --> B["Set Password"]
    B --> C["Lock System : ON"]
    C --> D["• Block Programme"]
    D --> E["• Parental Guidance ®"]
    E --> F["Input Block"]
    F --> G["Key Lock : Off"]

    H["Set Password"] --> I["Lock System : ON"]
    I --> J["• Block"]
    J --> K["• Pare"]
    K --> L["• Input"]
    L --> M["Key Lock : Off"]

    N["Blocking Off : Permits all programmes"] --> O["10 and above"]
    N --> P["11 and above"]
    N --> Q["12 and above"]
    N --> R["13 and above"]
    N --> S["14 and above"]
    N --> T["15 and above"]
    N --> U["16 and above"]
    N --> V["17 and above"]
    N --> W["18 and above"]

    X["Blocking Off : Permits all programmes"] --> Y["10 and above"]
    X --> Z["11 and above"]
    X --> AA["12 and above"]
    X --> AB["13 and above"]
    X --> AC["14 and above"]
    X --> AD["15 and above"]
    X --> AE["16 and above"]
    X --> AF["17 and above"]

    AG["(Only France)"]
1


Select LOCK.
2

Select Parental Guidance.
3

Make appropriate adjustments.
4
Save
- Press the MENU or EXIT button to close the menu window.
- Press the BACK button to move to the previous menu screen.
INPUT BLOCK
Enables you to block an input.
It is available to use this function in Lock System "On".
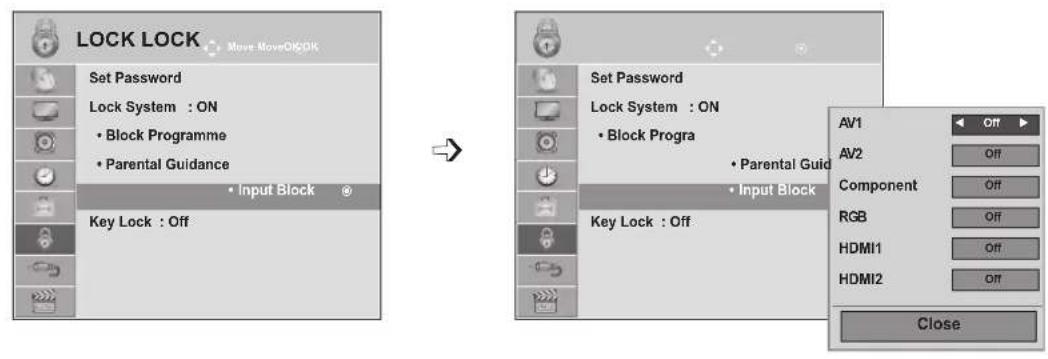
1


Select LOCK.


Select Input Block.
3


Select input source.


Select On or Off.
5

Save
- Press the MENU or EXIT button to close the menu window.
- Press the BACK button to move to the previous menu screen.
PARENTAL CONTROL / RATINGS
KEY LOCK
The TV can be set so that the remote control is required to control it. This feature can be used to prevent unauthorized viewing.

text_image
LOCK LOCK Move MoveClick Set Password Lock System : Off • Block Programme • Parental Guidance • Input Block Key Lock : Off Set Password Lock System : Off • Block Programme • Parental Guidance • Input Block Key Lock : Off Off On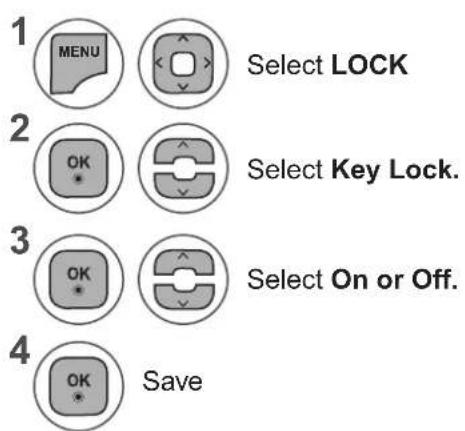
text_image
1 MENU Select LOCK 2 OK * Select Key Lock. 3 OK * Select On or Off. 4 OK * Save- In Key Lock 'On', if the TV is turned off, press the INPUT, P ∧ ∨ button on the TV or POWER, INPUT, P ∧ ∨, TV/PC or NUMBER buttons on the remote control then the set will be turned on.
-
With the Key Lock On, the display '▲Key Lock On' appears on the screen if any button on the front panel is pressed while viewing the TV.
-
Press the MENU or EXIT button to close the menu window.
- Press the BACK button to move to the previous menu screen.
TO USE A USB DEVICE
WHEN CONNECTING A USB DEVICE
When you connect a USB device, this pop up menu is displayed, automatically.
"POP UP MENU" will not be displayed while the OSD including Menu, EPG or Schedule list is activated or while the Bluetooth Headset is connected.
When the Pop Up menu does not appear, you can select Music List, Photo List or Movie List in the USB menu.
In USB device, you can not add a new folder or delete the existing folder.
1 Connect the USB device to the USB IN jack on the TV.
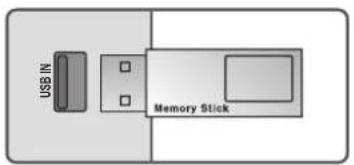
text_image
USB IN Memory Stick- Only photo(JPEG), music (MP3) and movie (DAT, MPG, MPEG, VOB, AVI, DIVX, MP4, MKV, TS, TRP, TP) are supported.
2 Select PHOTO LIST, MUSIC LIST or MOVIE LIST

text_image
PHOTO LIST MUSIC LIST MOVIE LISTWhen removing the USB device
Select the USB Device menu before removing the USB device.
1 Q.MENU Select USB Device.
2 OK Select Eject.
Precautions when using the USB device
▶ Only a USB storage device is recognizable.
▶ If the USB storage device is connected through a USB hub, the device is not recognizable.
▶ A USB storage device using an automatic recognition programme may not be recognized.
▶ A USB storage device which uses its own driver may not be recognized.
The recognition speed of a USB storage device may depend on each device.
▶ Please do not turn off the TV or unplug the USB device when the connected USB storage device is working. When such device is suddenly separated or unplugged, the stored files or the USB storage device may be damaged.
▶ Please do not connect the USB storage device which was artificially maneuvered on the PC. The device may cause the product to malfunction or fail to be played. Never forget to use only a USB storage device which has normal music files, image files or movie files.
▶ Please use only a USB storage device which was formatted as a FAT, FAT16, FAT32, NTFS file system provided with the windows operating system. In case of a storage device formatted as a different utility programme which is not supported by Windows, it may not be recognized.
▶ Please connect power to a USB storage device(over 0.5 A) which requires an external power supply. If not, the device may not be recognized.
▶ Please connect a USB storage device with the cable offered by the device maker.
▶ Some USB storage devices may not be supported or operated smoothly.
▶ File alignment method of USB storage device is similar to Window XP and filename can recognize up to 100 English characters.
▶ Be sure to back up important files since data stored in a USB memory device may be damaged. We will not be responsible for any data loss.
▶ If the USB HDD does not have an external power source, the USB device may not be detected. So be sure to connect the external power source.
- Please use a power adaptor for an external power source. We do not guarantee an USB cable for an external power source.
▶ Data in a USB storage device cannot be deleted in the NTFS file system.
▶ If your USB memory device has multiple partitions, or if you use a USB multi-card reader, you can use up to 4 partitions or USB memory devices.
▶ Only the FAT, FAT16, FAT32 file system supports the delete function.
▶ If a USB memory device is connected to a USB multi-card reader, its volume data may not be detected.
▶ If the USB memory device does not work properly, disconnect and reconnect it.
▶ How fast a USB memory device is detected differs from device to device.
▶ If the USB is connected in Standby Mode, specific hard disk will automatically be loaded when the TV is turned on.
The recommended capacity is 1 TB or less for a USB external hard disk and 32 GB or less for USB memory.
▶ Any device with more than the recommended capacity may not work properly.
▶ If a USB external hard disk with a "Energy Saving" function does not work, turn the hard disk off and on again to make it work properly.
▶ USB storage devices below USB 2.0 are supported as well. But they may not work properly in the movie list.
▶ When a broken file is played in the USB storage, the TV may turn off or work abnormally.
PHOTO LIST
You can view photo files on USB storage device.
The On Screen Display may be different from your TV. Images are an example to assist with the TV operation. When you are watching the photo by the Photo List function, you can not change the picture mode.
PHOTO(\*.JPEG) supporting file
Baseline : 64 x 64 to 15360 x 8640
Progressive : 64 x 64 to 1920 x 1440
- You can play JPEG files only.
• Non-supported files are displayed in the form of predefined icon.
Screen Components
1


Select USB.
2


Select Photo List.
1 Moves to upper level folder.
② Current page / Total pages.
3 Total number of marked photos.
4 Corresponding buttons on the remote control.
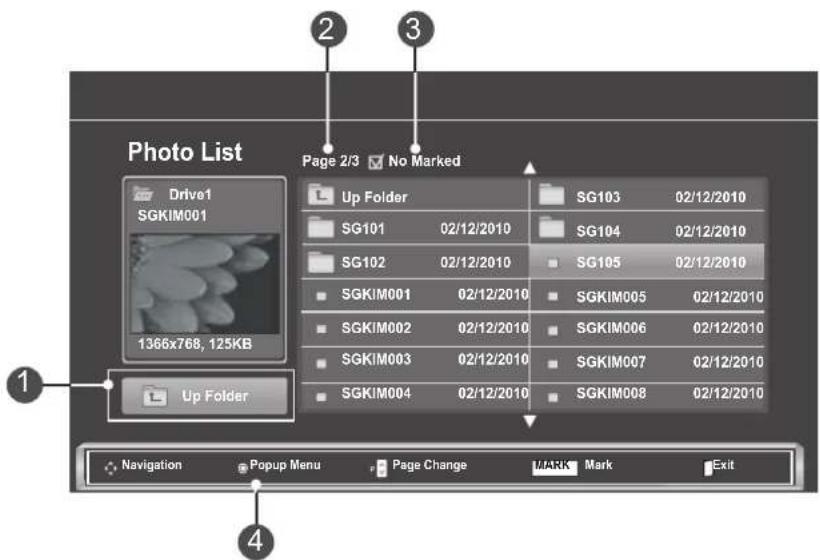
text_image
Photo List Page 2/3 No Marked Drive1 SGKIM001 1366x768, 125KB Up Folder SG101 02/12/2010 SG102 02/12/2010 SGKIM001 02/12/2010 SGKIM002 02/12/2010 SGKIM003 02/12/2010 SGKIM004 02/12/2010 SG103 02/12/2010 SG104 02/12/2010 SG105 02/12/2010 SGKIM005 02/12/2010 SGKIM006 02/12/2010 SGKIM007 02/12/2010 SGKIM008 02/12/2010 Navigation Popup Menu Page Change LARK Mark ExitTO USE A USB DEVICE
Photo Selection and PopUp Menu
text_image
Photo List Page 23 No Marked Drive1 SGKIM01 1366785.12SKB Up Folder Up Folder SG193 02/13/2010 SG184 02/13/2010 SG185 02/13/2010 SGKIM001 02/12/2010 SGKIM002 02/12/2010 SGKIM003 02/12/2010 SGKIM004 02/12/2010 SGKIM005 02/12/2010 SGKIM006 02/12/2010 SGKIM007 02/12/2010 SGKIM008 02/12/2010 Papip WmRnRgMgGlnrPage Change Help↓
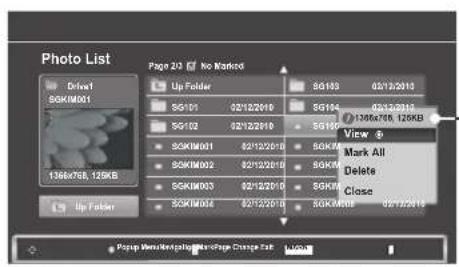
text_image
Photo List Page 23 No Marked Dred1 SGKMM01 1364768, 125KB Up Folder Up Folder SG101 02/12/2016 SG102 02/12/2016 SGKMM001 02/12/2016 SGKMM002 02/12/2016 SGKMM003 02/12/2016 SGKMM004 02/12/2016 SG193 02/12/2016 SG194 02/12/2016 SG195 1364768, 125KB View # SKM Mark All SGKM Delete SGKM Close SGKMMB 05/12/2016 Popup Menuten:#ping#version Change Bars▶ View: Display the selected item.
▶ Mark All: Mark all photos on the screen.
▶ Unmark All: Deselect all marked photos.
▶ Delete or Delete Marked: Delete the selected photo item.
▶ Close: Close the Pop-Up menu.
1

Select the target folder or drive.
2


Select the desired photos.
3

Show the Pop-Up menu.
4


- Use the P ∧ ∨ button to navigation in the photo page.
- Use the MARK button to mark or unmark a photo. When one or more photos are marked, you can view each marked photo or a slide show of the marked photos. If no photos are marked, you can view every individual photo in the folder or a slide show of all photos in the folder.
How to view photo
Detailed operations are available on full-sized photo view screen.
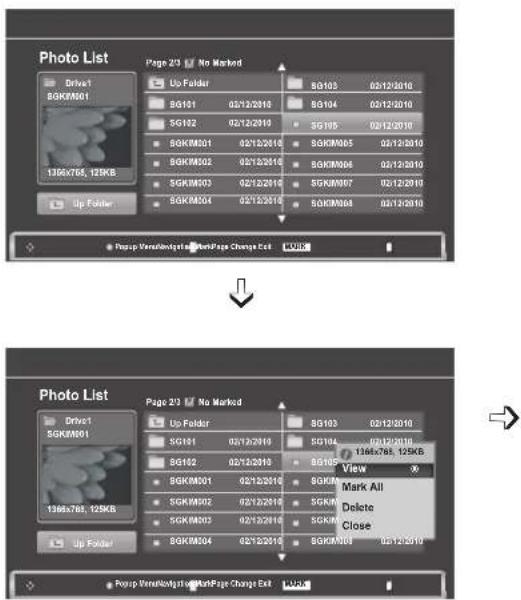
text_image
Photo List Page 203 No Marked Drive1 BGKM001 136x765, 125KB Up Folder BG101 02/12/2010 BG102 02/12/2010 BGKM001 02/12/2010 BGKM002 02/12/2010 BGKM003 02/12/2010 BGKM004 02/12/2010 BG103 02/12/2010 BG104 02/12/2010 BG105 02/12/2010 BGKM005 02/12/2010 BGKM006 02/12/2010 BGKM007 02/12/2010 BGKM008 02/12/2010 Presp-Verklongizl#e-WorkPage Change Exit MUSE Photo List Page 203 No Marked Drive1 BGKM001 136x765, 125KB Up Folder BG101 02/12/2010 BG102 02/12/2010 BGKM001 02/12/2010 BGKM002 02/12/1999 BGKM003 02/12/2010 BGKM004 02/12/2010 BG103 02/12/2010 BG104 02/12/2010 BGKM005 136x765, 125KB View Mark All Delete Close BGKM006 02/12/2010 Presp-Verklongizl#e-WorkPage Change Exit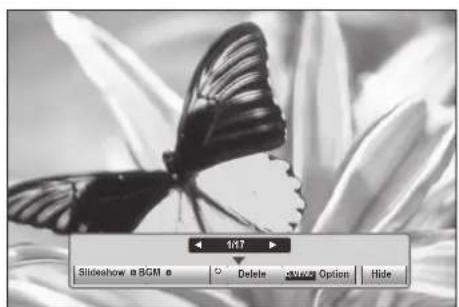
natural_image
Black and white photo of a butterfly perched on a flower, with no visible text or symbols in the main image area.The aspect ratio of a photo may change the size of the photo displayed on the screen in full size. Press the BACK button to move to the previous menu screen.
1

Select the target folder or drive.
2


Select the desired photos.
3

Show the Pop-Up menu.
4

Select View.
5

The selected photo is displayed in full size.
- Use the P ∧ ∨ button to navigation in the photo page.
- Press the BACK button to move to the previous menu screen.
TO USE A USB DEVICE
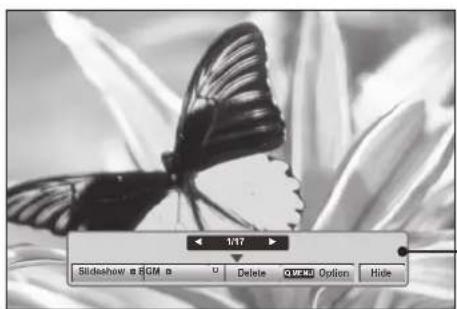
natural_image
Black and white photo of a butterfly on a flower background, no visible text or symbols in the main image area.6

Select the Slideshow, BGM, o(Rotate), Delete, Option or Hide.
- Use < > button to select the previous or next photo.
- Use < > button to select and control the menu on the full-sized screen.
▶ Slideshow : When no picture is selected, all photos in the current folder are displayed during slide show. If some photos are selected, those photos are displayed in a slide show.
■ Set the time interval of the slide show in Option.
▶ BGM (Background Music): Listen to music while viewing photos in full size.
■ Set the Music Folder for BGM in Options before using this function.
(Rotate): Rotate photos.
■ Rotates the photo 90°, 180°, 270°, 360° clockwise.
■ It can not be rotate when the width of a picture is bigger than supported height.
▶ Delete: Delete photos.
▶ Option: Set values for Slide Speed and Music Folder for BGM.
■ Use ∧ ∨ < > button and OK button to set values. Press OK to save the settings.
■ You cannot change Music Folder while BGM is playing.
▶ Hide: Hide the menu on the full-sized screen.
■ To see the menu again on the full-sized screen, press OK button to display.
Using the Photo List function
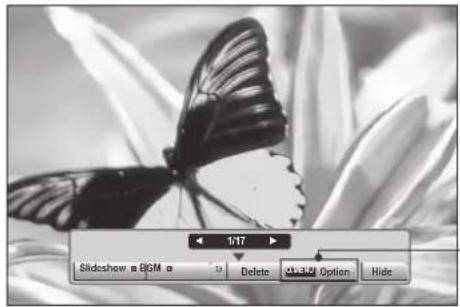
text_image
1/17 Slideshow a BISM a 30 Delete Quick & Hide| Choose Options. |
| Set Photo View |
| Set Video. |
| Set Audio. |
| Previous |
1

Show the PopUp menu.
2


Select Set Photo View, Set Video or Set Audio.
▶ When you select the Set Photo View,
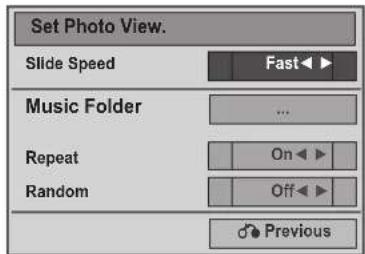
text_image
Set Photo View. Slide Speed Fast Music Folder ... Repeat On Random Off Previous1

Show the Slide Speed or Music Folder.
2


Make appropriate adjustments.
- When "Off" is selected in Repeat menu, replay will stop once the last file in the list finishes playing. But, when "▶▶" button is pressed while the last fine in the list is in the middle of replay and "Repeat" is in "Off" position, the first file in the list will be played and "Repeat" menu will be activated.
TO USE A USB DEVICE
▶ When you select the Set Video,
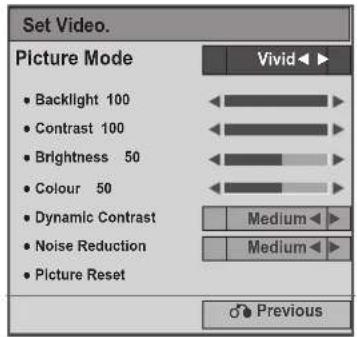
text_image
Set Video. Picture Mode • Backlight 100 • Contrast 100 • Brightness 50 • Colour 50 • Dynamic Contrast • Noise Reduction • Picture Reset Vivid ▶ Medium ▶ Medium ▶ Previous1

Make appropriate adjustments.(Refer to p. 74, 77, 78)
▶When you select the Set Audio,
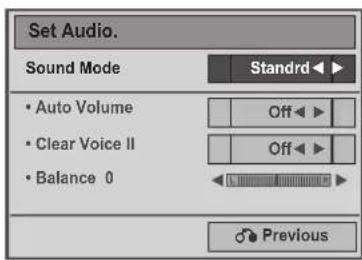
text_image
Set Audio. Sound Mode Standard • Auto Volume Off • Clear Voice II Off • Balance 0 Previous1

Show the Sound Mode, Auto Volume, Clear Voice II, Balance.
2

Make appropriate adjustments. (Refer to p. 85 to 89)
MUSIC LIST
You can play music files on USB storage device.
Purchased music files(*.MP3) may contain copyright restrictions. Playback of these files may not be supported by this model.
Music file on your USB device can be played by this unit.
The On Screen Display may be different from your TV. Images are an example to assist with the TV operation.
MUSIC (\*.MP3) supporting file Bit rate 32 to 320
- Sampling rate MPEG1 Layer3: 32 kHz, 44.1 kHz, 48 kHz
- Sampling rate MPEG2 Layer3: 16 kHz, 22.05 kHz, 24 kHz
- Sampling rate MPEG2.5 Layer3: 8 kHz, 11.025 kHz, 12 kHz
Screen Components
1


Select USB.
2


Select Music List.
1 Preview: If any album jacket for the file (Album Art Image) exists, this jacket is displayed.
2 Moves to upper level folder.
3 Current page / Total pages.
4 Total number of marked music title.
5 Corresponding buttons on the remote control.
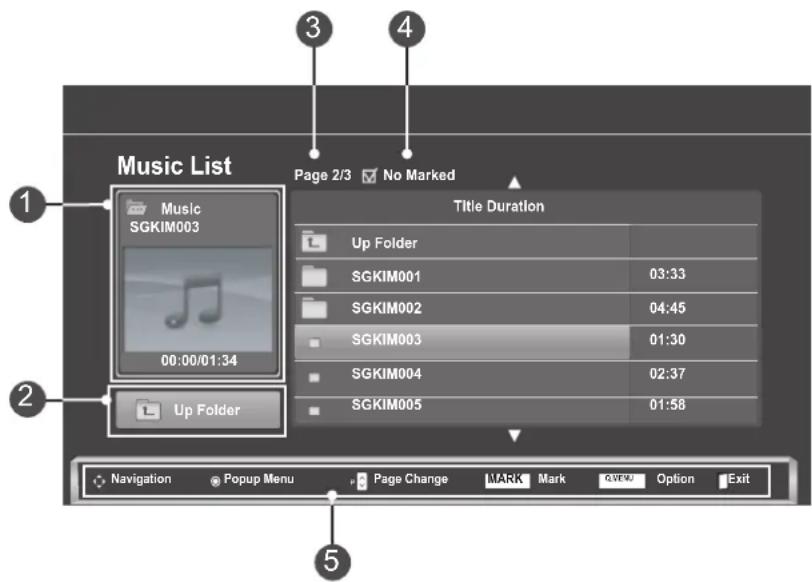
text_image
Music List Page 2/3 No Marked Title Duration Music SGKIM003 00:00/01:34 Up Folder Up Folder SGKIM001 03:33 SGKIM002 04:45 SGKIM003 01:30 SGKIM004 02:37 SGKIM005 01:58 Navigation Popup Menu Page Change MARK Mark OVIEW Option ExitTO USE A USB DEVICE
Music Selection and PopUp Menu
As shown, up to 6 music titles are listed per page.
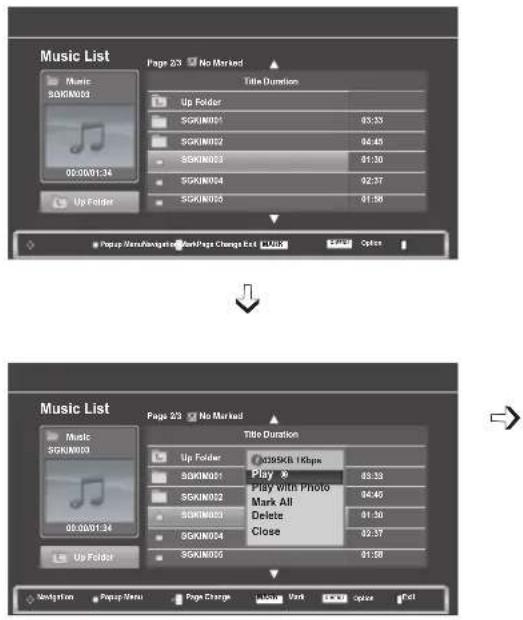
text_image
Music List Music SGKIN001 00:00:01:24 Up Folder Page 23 No Marked Title Duration Up Folder SGKIN001 85:33 SGKIN002 86:45 SGKIN003 81:30 SGKIN004 92:37 SGKIN005 91:30 Popup: Music/Navigation: WorkPage Change Ext 125.5 Play Options Music List Music SGKIN002 00:00:01:24 Up Folder Page 23 No Marked Title Duration Up Folder SGKIN001 839KB 1Kbps Play Play with Photo SGKIN002 86:45 SGKIN003 81:30 SGKIN004 92:37 SGKIN005 91:30 Play with Photo Mark All Delete Close SGKIN006 91:30 Play with Photo Mark All Delete Close▶ Play (During stop): Play the selected music titles.
One playback of a piece of music finishes, the next selected one will be played. When there are no selected music titles to play, the next one in the current folder will be played. If you go to a different folder and press the OK button, the current music in playback will stop.
▶ Play Marked: Play the selected music titles. Once a music finishes playing, the next selected one will be played automatically.
▶ Stop Play (During playback): Stop the playing music titles.
▶ Play with Photo: Start playing the selected music titles and then move to the Photo List.
▶ Mark All: Mark all music titles in the folder.
▶ Unmark All: Deselect all marked music titles.
▶ Delete or Delete Marked: Delete the selected music titles.
▶ Close: Close the Pop-Up menu.
1

Select the target folder or drive.
2


Select the desired photos.
3

Show the Pop-Up menu.
4

- Use the P ∧ ∨ button to navigate up/down in the music page.
- Use MARK button to mark or unmark a music. When one or more music files are marked, the marked music title will be played in sequence. For example, if you want to listen to only one music repeatedly, just mark the music only and play it. If no music is marked, all the music in the folder will be played in sequence.
■ If you don't press any button for a while during the playing, the play information box (as shown in the below) will float as a screen saver.
■ The 'Screen Saver'?
Screen saver is to prevent screen pixel damage due to an fixed image remaining on the screen for a extended period of time.
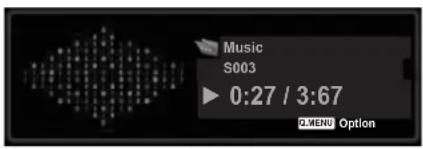
text_image
Music S003 ▶ 0:27 / 3:67 Q.MENV Option
NOTE
▶When a music file is played, ♩ is displayed behind the title.
▶A damaged or corrupted music does not play but displays 00:00 in play time.
▶A music downloaded from a paid service with copyright protection does not start but displays inappropriate information in playtime.
▶ If you press OK, ■ buttons, screen saver is stopped.
▶ The PLAY(▶), Pause(II), ■, ▶▶, ◀◀ buttons on the remote control are also available in this mode.
▶ You can use the ▶▶ button to select the next music and the ◀◀ button to select the previous music.
Using the Music List function, play
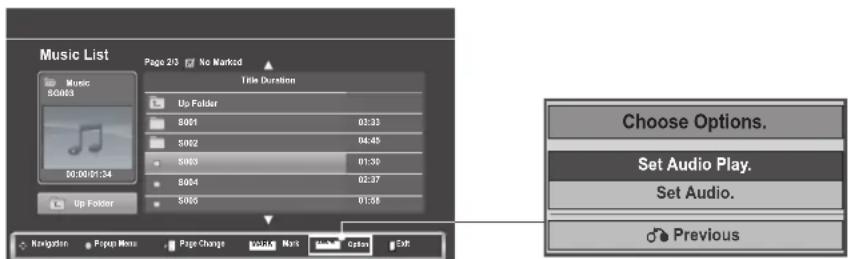
text_image
Music List Page 23 No Marked Title Duration Music 50003 Up Folder 8001 03:33 5002 04:45 5003 01:30 8004 02:37 5005 01:58 Choose Options. Set Audio Play. Set Audio. Previous1

Show the PopUp menu.
2


Select Set Audio Play or Set Audio.
TO USE A USB DEVICE
▶When you select the Set Audio Play,
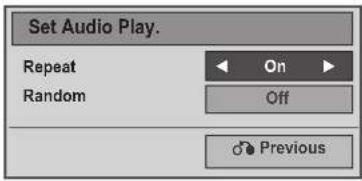
text_image
Set Audio Play. Repeat Random On Off Previous1

Show the Set Audio Play.
2

Make appropriate adjustments.
- When "Off" is selected in Repeat menu, replay will stop once the last file in the list finishes playing. But, when "▶▶" button is pressed while the last fine in the list is in the middle of replay and "Repeat" is in "Off" position, the first file in the list will be played and "Repeat" menu will be activated.
▶When you select the Set Audio,
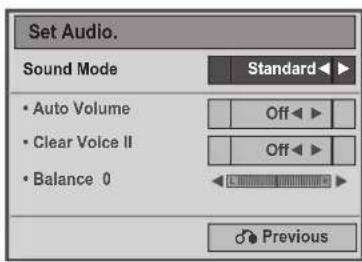
text_image
Set Audio. Sound Mode Standard • Auto Volume Off • Clear Voice II Off • Balance 0 Previous1

Show the Sound Mode, Auto Volume, Clear Voice II, Balance.
2

Make appropriate adjustments. (Refer to p. 85 to 89)
MOVIE LIST
You can play movie files on a USB storage device.
The movie list is activated once USB is detected. It is used when playing movie files on TV.
Displays the movies in the USB folder and supports Play.
Allows playback of all movies in the folder and user desired files.
It is a movie list that displays folder information and movie file.
The On Screen Display may be different from your TV. Images are an example to assist with the TV operation.
Movie(*.dat /*.mpg /*.mpeg /*.ts /*.trp /*.tp /*.vob/ *.mp4 /*.mkv /*.avi /*.divx) supporting file
Video format :DivX3.11, DivX4.12, DivX5.x, DivX6, Xvid1.00, Xvid1.01, Xvid1.02, Xvid1.03, Xvid 1.10-beta-1/beta-2, Mpeg-1, Mpeg-2, Mpeg-4, H.264/AVC
Audio format: Dolby Digital, AAC, Mpeg, MP3, LPCM, HE-AAC
Bit rate: within 32 kbps to 320 kbps (MP3)
Subtitle format:*.smi / *.srt / *.sub (MicroDVD, SubViewer1.0/2.0) *.ass / *.ssa / *.txt (TMPlayer) /.psb (PowerDivx).
- Some user-created subtitles may not work properly.
- Some special characters are not supported in subtitles.
- HTML tags are not supported in subtitles.
- Subtitles in languages other than the supported languages are not available.
- Time information in an external subtitle file should be arranged in ascending order to be played.
- The screen may suffer temporary interruptions (image stoppage, faster playback, etc.) when the audio language is changed.
- A damaged movie file may not be played correctly, or some player functions may not be usable.
- Movie files produced with some encoders may not be played correctly.
- If the video and audio structure of recorded file is not interleaved, either video or audio is outputted.
- HD videos with a maximum of 1920 x 1080 @ 25/30P or 1280 x 720 @ 50 / 60P are supported, depending on the frame.
- Videos with resolutions higher than 1920 x 1080 @ 25 / 30P or 1280 x 720 @ 50 / 60P may not work properly depending on the frame.
- Movie files other than the specified types and formats may not work properly.
- Max bitrate of playable movie file is 20 Mbps.
- We do not guarantee smooth playback of profiles encoded level 4.1 or higher in H.264 / AVC.
• DTS Audio codec is not supported. - A movie file more than 30GB in file size is not supported for playback.
- A DivX movie file and its subtitle file must be located in the same folder.
- A video file name and its subtitle file name must be identical for it to be displayed.
- Playing a video via a USB connection that doesn't support high speed may not work properly..
- Files encoded with GMC (Global Motion Compensation) may not be played.
- When you are watching the movie by Movie List function, you can adjust an image by Energy Saving key on the remote control. User setup for each image mode does not operate.
TO USE A USB DEVICE
| xtensionname\File | Video Decoder Audio Codec | MaxResolution | |
| mpeg, vob MPEG1, MPEG2 Dolby Digital, MPEG, MP3, LPCM | 1920 x 1080 @ 30p | ||
| dat MPEG1 Dolby Digital, MPEG, MP3, LPCM | |||
| ts,trp,tp MPEG2, H.264 / AVC | Dolby Digital, AAC, MPEG | ||
| mp4 | MPEG4 SP, MPEG4 ASP, Divx 3.11, Dvix 4.12, Dvix 5.xDvix 6, Xvid 1.00, Xvid 1.01, Xvid 1.02, Xvid 1.03Xvid 1.10-beta 1, Xvid 1.10-beta 2, H.264/AVC | Dolby Digital, HE-AAC,AAC, MPEG, MP3, LPCM | |
| avi | MPEG 2, MPEG 4 SP, MPEG4 ASP, Divx 3.11, Divx 4,Divx 5, Divx 6, Xvid 1.00, Xvid 1.01, Xvid 1.02, Xvid1.03, Xvid 1.10-beta 1, Xvid 1.10-beta 2, H.264/AVC | Dolby Digital, HE-AAC, AAC, MPEG,MP3, LPCM | |
| mkv | H.264 / AVC, MPEG 1, MPEG 2, MPEG 4 SP , MPEG4 ASP | Dolby Digital, HE-AAC, AAC, MPEG,MP3, LPCM | |
| divx | MPEG 2, MPEG 4 SP, MPEG4 ASP, Divx 3.11, Divx 4,Divx 5, Divx 6, Xvid 1.00, Xvid 1.01, Xvid 1.02, Xvid 1.03Xvid 1.10-beta 1, Xvid 1.10-beta 2, H.264 / AVC | Dolby Digital,HE-AAC,AAC,MPEG,MP3,LPCM | |
Screen Components
1

Select USB.
2


Select Movie List.
1 Moves to upper level folder.
② Current page/Total pages.
3 Total number of marked movie title.
4 Corresponding buttons on the remote control.
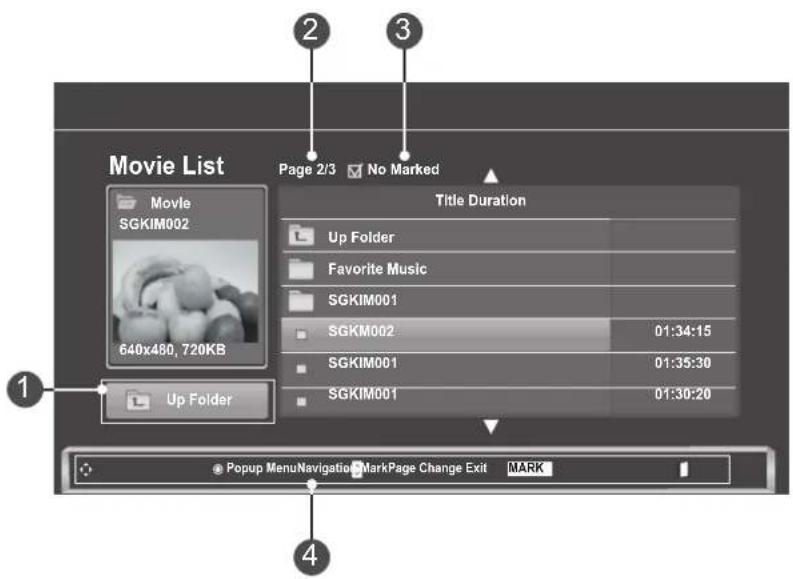
text_image
Movie List Page 2/3 No Marked Title Duration Up Folder Favorite Music SGKIM001 SGKM002 01:34:15 SGKIM001 01:35:30 SGKIM001 01:30:20 Up FolderPopup MenuNavigation MarkPage Change Exit MARK
Movie Selection and PopUp Menu
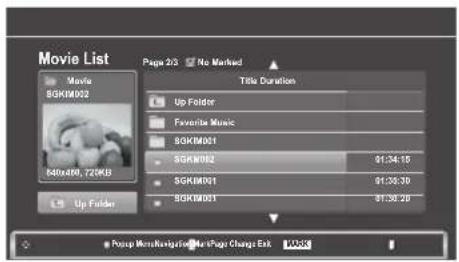
text_image
Movie List Page 23 No Marked Title Duration Up Folder Favorite Music BOKIM001 SGKIM002 $1:34.15 SGKIM001 $1:35.30 BOKIM001 $1:36.29 Up Folder BOKIM002 720KB Up Folder @ Poupu Movie/Regulative Movie Page Change Exit↓
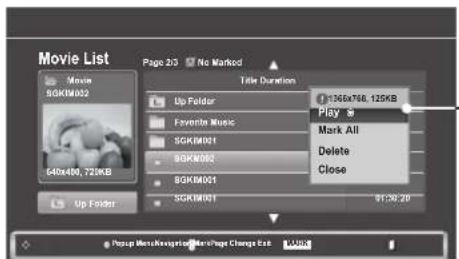
text_image
Movie List Page 2/3 No Marked Title Duration 1360x768, 125KB Play * Play All Delete Close Up Folder Favorite Music SGKIM01 BGKM002 BGKM001 SGKM001 91:30:29 Up Folder g Pop-up Menu Configuration Search Page Change Exit VDDX▶ Play: Play the selected movie. Divx Play is executed while screen changes.
▶ Mark All: Mark all Movie in the folder.
▶ Unmark All: Deselect all marked movies.
▶ Delete or Delete Marked: Delete the selected Movie item.
▶ Close: Close the pop-up menu.
1

Select the target folder or drive.
2


Select the desired movie title
3

Show the PopUp menu.
4


- Use the P ∧ ∨ button to navigation in the movie page.
- Use MARK button to mark or unmark a movie. When one or more movie files are marked, the marked movies will be played in sequence.
- Press the BACK button to move to the previous menu screen.

NOTE
In the case of files not supported, a message regarding non-supported file is displayed.
TO USE A USB DEVICE
Using the Movie List function, play
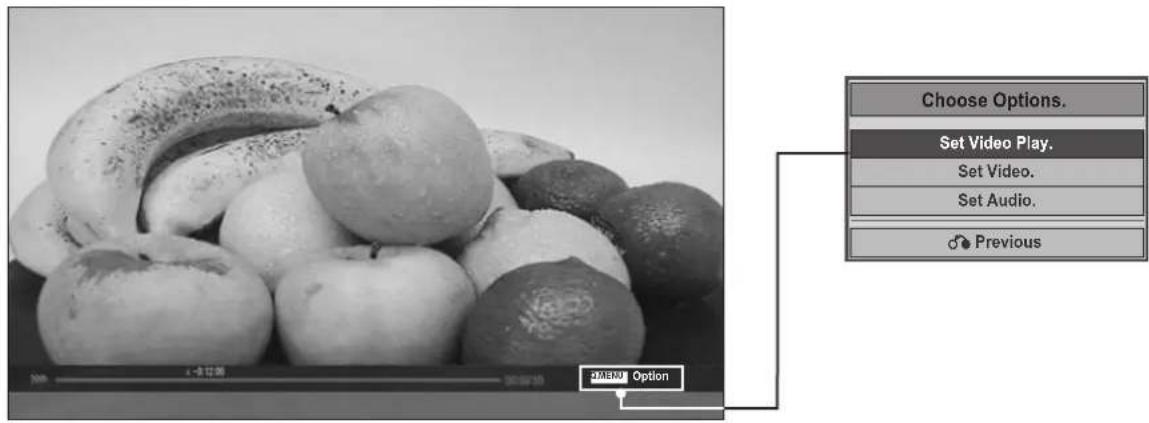
text_image
Choose Options. Set Video Play. Set Video. Set Audio. Previous 2MENU Option1

Show the PopUp menu.
2


Select Set Video Play, Set Video or Set Audio.
▶ When you select the Set Video Play,
| Picture Size | Full |
| Audio Language | 1 |
| Subtitle Language | Off |
| . Sync | 0 |
| . Position | 0 |
| . Size | Normal |
| Previous |
▶ Picture Size: Selects your desired picture format during movie play.
▶ Audio Language & Subtitle Language: Changes the Language Group of the audio/subtitle during movie play.
▶ Sync: Adjusts the time synchronisation of the subtitle from -10 secs to +10 secs by steps of 0.5 secs during movie play.
▶ Position: Changes the position of the subtitle either up or down during movie play.
▶ Size: Selects your desired Subtitle size during movie play.
1

2

Show the Picture Size, Audio Language or Subtitle Language.
Make appropriate adjustments.
Subtitle Language Support Language
| Latin1 | English, Spanish, French, German, Italian, Swedish, Finnish, Dutch, Portuguese, Danish, Romanian, Norwegian, Albanian, Gaelic, Welsh, Irish, Catalan, Valencian |
| Latin2 | Bosnian, Polish, Croatian, Czech, Slovak, Slovenian, Serbian, Hungarian |
| Latin4 | Estonian, Latvian, Lithuanian |
| Cyrillic | Bulgarian, Macedonian, Russian, Ukrainian, Kazakh |
| Greek | Greek |
| Turkish | Turkish |

NOTE
▶ Only the files saved in ASCII CODE is supported for the external subtitles of the movie.
▶ Only 500 alphabets and 500 numbers are supported for each line of the subtitle.
▶ Only 10,000 of sync blocks can be supported within the subtitle file.
TO USE A USB DEVICE
▶ When you select the Set Video,
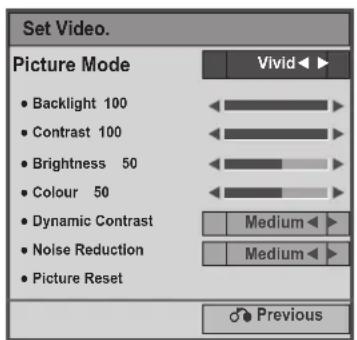
text_image
Set Video. Picture Mode • Backlight 100 • Contrast 100 • Brightness 50 • Colour 50 • Dynamic Contrast • Noise Reduction • Picture Reset Vivid ▶ Medium ▶ Medium ▶ Previous1

Make appropriate adjustments.(Refer to p. 74, 77, 78)
▶ When you select the Set Audio,
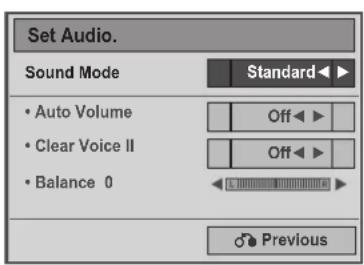
text_image
Set Audio. Sound Mode Standard • Auto Volume Off • Clear Voice II Off • Balance 0 Previous1

Show the Sound Mode, Auto Volume, Clear Voice II, Balance.
2

Make appropriate adjustments. (Refer to p. 85 to 89)
Using the remote control
◀◀  | When playing,repeatedly, press the REW(◀◀) button to speed up ◀◀(x2) → ◀◀◀ (x4)→ ◀◀◀◀(x8) → ◀◀◀◀◀(x16) → ◀◀◀◀◀◀(x32).repeatedly, press the FF(▶▶) button to speed up ▶▶(x2) → ▶▶▶ (x4) →▶▶▶▶ (x8) → ▶▶▶▶▶(x16) → ▶▶▶▶▶▶(x32).■ Pressing these buttons repeatedly increases the fast forward/reverse speed. |
| [27-4] | During playback, press the Pause (II) button.■ Still screen is displayed.■ If no buttons are pressed on the remote control for 10 minutes after pausing, the TV returns to the playback state.■ Press the Pause (II) button and then use the FF (▶▶) button for slow motion. |
 | When using the < or > button during playback a cursor indicating the position can be viewed on the screen. |
| Play(▶) Press the Play(▶) button to return to normal playback. | |
 | Press the ENERGY SAVING button repeatedly to increase the brightness of your screen. (Refer to p. 72) |
TO USE A USB DEVICE
DIVX REGISTRATION CODE
Confirm the DivX registration code number of the TV. Using the registration number, movies can be rented or purchased at www.divx.com/vod.
With a DivX registration code from other TV, playback of rented or purchased DivX file is not allowed. (Only DivX files matched with the registration code of the purchased TV are playable.)
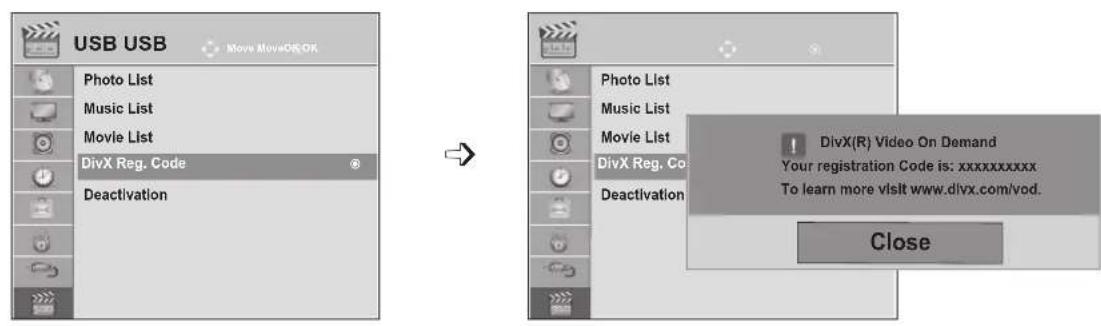
text_image
USB USB Move MoveOK OK Photo List Music List Movie List DivX Reg. Code Deactivation Photo List Music List Movie List DivX Reg. Co Deactivation DivX(R) Video On Demand Your registration Code is: xxxxxxxxxxxx To learn more visit www.divx.com/vod. Close1


Select USB.
2


Select DivX Reg. Code.
3

Display DivX Reg. Code.
- Press the MENU or EXIT button to close the menu window.
- Press the BACK button to move to the previous menu screen.
DIVX
ABOUT DIVX VIDEO: DivX® is a digital video format created by DivX, Inc. This is an official DivX Certified device that plays DivX video. Visit www.divx.com for more information and software tools to convert your files into DivX video.
HD
ABOUT DIVX VIDEO-ON-DEMAND: This DivX Certified® device must be registered in order to play DivX Video-on-Demand (VOD) content. To generate the registration code, locate the DivX VOD section in the device setup menu. Go to vod.divx.com with this code to complete the registration process and learn more about DivX VOD.
"DivX Certified® to play DivX® video up to HD 1080p, including premium content."
"DivX®, DivX Certified® and associated logos are trademarks of DivX, Inc. and are used under license."
"Pat. 7,295,673; 7,460,668; 7,515,710; 7,519,274"

NOTE
▶ Movie files are supported as follows
Resolution: under 1920x1080 WxH pixels
Frame rate: under 30 frames/sec(1920x1080), under 60 frames/sec(under 1280x720)
▶ Video Codec: MPEG 1, MPEG 2, MPEG 4, H.264/AVC, DivX 3.11, DivX 4.12, DivX 5.x, DivX 6, Xvid 1.00, Xvid 1.01, Xvid 1.02, Xvid 1.03, Xvid 1.10-beta1, Xvid 1.10-beta2
DEACTIVATION
The purpose of deactivation is to allow deactivation of devices for users who have activated all the available devices through the web server and are blocked from activating more devices. DivX VOD allowed the consumer to activate up to 6 devices under one account, but to replace or deactivate any of those devices, the consumer had to contact DivX Support and request deletion. Now with this added feature, consumers will be able to deactivate the device themselves and hence better manage their DivX VOD devices.
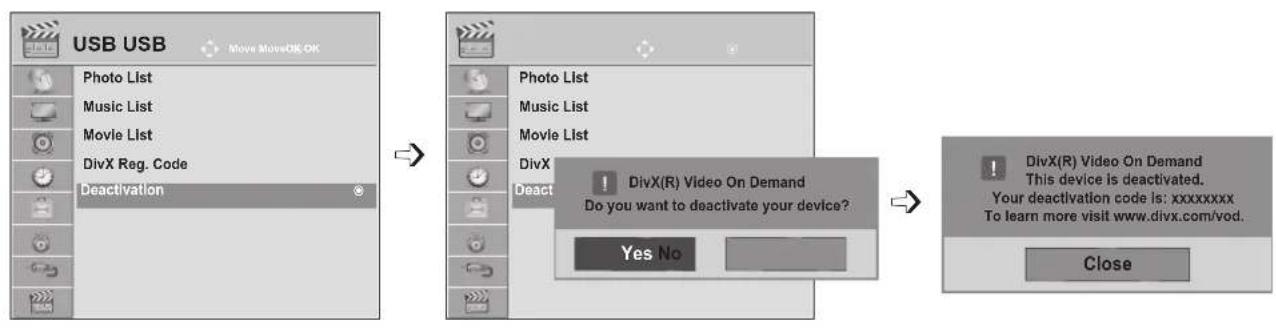
flowchart
graph LR
    A["USB USB"] --> B["Photo List"]
    B --> C["Music List"]
    C --> D["Movie List"]
    D --> E["DivX Reg. Code"]
    E --> F["Deactivation"]

    F --> G["Photo List"]
    G --> H["Music List"]
    H --> I["Movie List"]
    I --> J["DivX"]
    J --> K["Deact"]

    K --> L["DivX(R) Video On Demand\nDo you want to deactivate your device?"]
    L --> M{?}
    M -->|Yes No| N["Video On Demand\nThis device is deactivated.\nYour deactivation code is: xxxxxxxx\nTo learn more visit www.divx.com/vod."]
    M -->|No| O["Close"]
1


Select USB.
2


Select Deactivation.
3


Select Yes.
4

Display Deactivation.
- Press the MENU or EXIT button to close the menu window.
- Press the BACK button to move to the previous menu screen.
TELETEXT
This feature is not available in all countries.
Teletext is a free service broadcast by most TV stations which gives up-to-the-minute information on news, weather, television programmes, share prices and many other topics.
The teletext decoder of this TV can support the SIMPLE, TOP and FASTEXT systems. SIMPLE (standard teletext) consists of a number of pages which are selected by directly entering the corresponding page number. TOP and FASTEXT are more modern methods allowing quick and easy selection of teletext information.
SWITCH ON/OFF
Press the TEXT button to switch to teletext. The initial page or last page appears on the screen.
Two page numbers, TV station name, date and time are displayed on the screen headline. The first page number indicates your selection, while the second shows the current page displayed.
Press the TEXT or EXIT button to switch off teletext. The previous mode reappears.
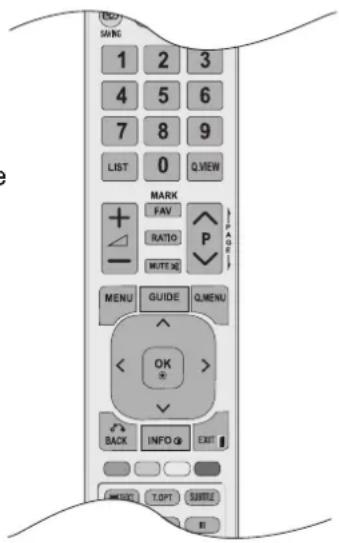
text_image
1 2 3 4 5 6 7 8 9 LIST 0 Q.WEY MARK FAV RATIO MUTE MENU GUIDE Q.MENU OK BACK INFO EXIT T.OPT SUNTLE IISIMPLE TEXT
■ Page selection
① Enter the desired page number as a three-digit number with the NUMBER buttons. If during selection you press a wrong number, you must complete the three-digit number and then re-enter the correct page number.
2 The P ∧ ∨ button can be used to select the previous or next page.
TOP TEXT
The user guide displays four fields-red, green, yellow and blue at the bottom of the screen. The yellow field denotes the next group and the blue field indicates the next block.
■ Block / group / page selection
1 With the blue button you can progress from block to block.
2 Use the yellow button to proceed to the next group with automatic overflow to the next block.
3 With the green button you can proceed to the next existing page with automatic overflow to the next group. Alternatively, the P ∧ button can be used.
4 The RED button permits you to return to previous selection. Alternatively, the P ∨ button can be used.
■ Direct page selection
As with SIMPLE teletext mode, you can select a page by entering it as a three digit number using the NUMBER buttons in TOP mode.
FASTEXT
The teletext pages are colour coded along the bottom of the screen and are selected by pressing the corresponding coloured button.
■ Page selection
1 Press the T.OPT button and then use button to select menu. Display the index page.
② You can select the pages which are colour coded along the bottom line with corresponding coloured buttons.
3 AS with SIMPLE teletext mode, you can select a page by entering its three digit page number with the NUMBER buttons in FASTEXT mode.
4 The P ∧ ∨ button can be used to select the preceding or following page.
SPECIAL TELETEXT FUNCTION
■ Press the T. OPT button and then use ∧ ∨ button to select the Text Option menu.
i Index
Select the each index page.
Time
When viewing a TV programme, select this menu to display the time at the top right hand corner of the screen. In the teletext mode, press this button to select a sub page number. The sub page number is displayed at the bottom of the screen. To hold or change the sub page, press the RED/GREEN, < > or NUMBER buttons.
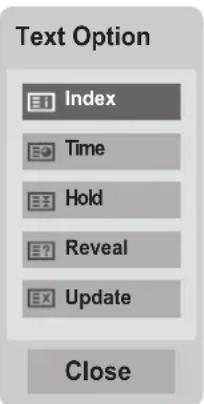
text_image
Text Option E1 Index E0 Time E3 Hold E7 Reveal E3 Update CloseHold
Stops the automatic page change which will occur if a teletext page consists of 2 or more sub pages. The number of sub pages and the sub page displayed is, usually, shown on the screen below the time. When this menu is selected the stop symbol is displayed at the top left-hand corner of the screen and the automatic page change is inactive.
≡? Reveal
Select this menu to display concealed information, such as solutions to riddles or puzzles.
Ex Update
Displays the TV picture on the screen while waiting for a new teletext page. The display will appear at the top left hand corner of the screen. When the updated page is available then display will change to the page number. Select this menu again to view the updated teletext page.
DIGITAL TELETEXT
*This function works in UK, Ireland only.
The TV gives you access to digital teletext which is greatly improved in various aspects such as text, graphics etc.
This digital teletext can access special digital teletext services and specific services which broadcast digital teletext.
You should select off in the subtitle language menu to display teletext by pressing the SUBTITLE button.
TELETEXT WITHIN DIGITAL SERVICE
1 Press the numeric or P ∧ ∨ button to select a digital service which broadcasts digital teletext.
2 Follow the indications on digital teletext and move onto the next step by pressing TEXT, OK, ^v<> , RED, GREEN, YELLOW, BLUE or NUMBER buttons and etc.
3 To change digital teletext service, select a different service by the numeric or P ∧ ∨ button.
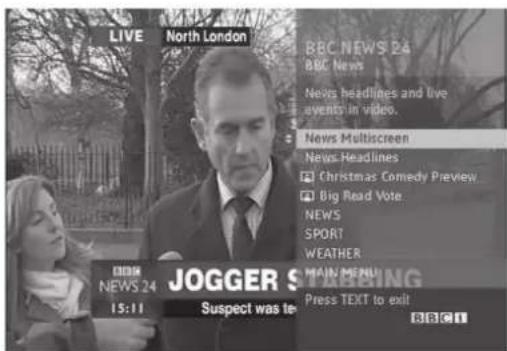
text_image
LIVE North London BBC NEWS 24 BBC News News headlines and live events in video. News Multiscreen News Headlines Christmas Comedy Preview Big Read Vote NEWS SPORT WEATHER JOGGER S MAIN MENU 15:11 Suspect was te- Press TEXT to exit BBC1TELETEXT IN DIGITAL SERVICE
1 Press the numeric or P ∧ ∨ button to select a certain service which broadcasts digital teletext.
2 Press the TEXT or coloured button to switch on tele-text.
3 Follow the indications on digital teletext and move onto the next step by pressing OK, ^v<> , RED, GREEN, YELLOW, BLUE or NUMBER buttons and so on.
4 Press the TEXT or colour button to switch off digital teletext and return to TV viewing.
Some services may allow you to access text services by pressing the RED button.
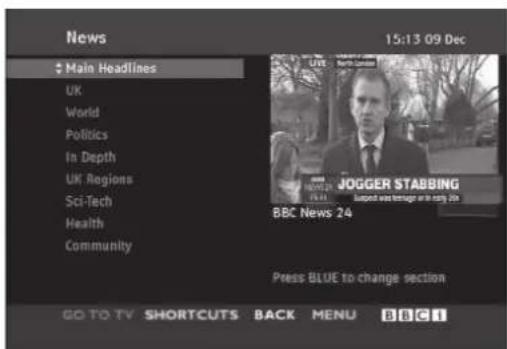
text_image
News 15:13 09 Dec Main Headlines UK World Politics In Depth UK Regions Sci-Tech Health Community Press BLUE to change section GO TO TV SHORTCUTS BACK MENU BBC ITAPPENDIX
TROUBLESHOOTING
| The operation does not work normally. | |
| The remote control doesn't work | ■ Check to see if there is any object between the product and the remote control causing obstruction. Ensure you are pointing the remote control directly at the set.■ Ensure that the batteries are installed with correct polarity (+ to +, - to -■ Ensure that the correct remote operating mode is set: TV, VCR, etc.■ Install new batteries. |
| Power is suddenly turned off | ■ Is the sleep timer set?■ Check the power control settings. Power interrupted.■ If the TV is switched on and there is no input signal, it will switch off automatically after 15 minutes to save the power consumption.■ When a broken file was played in the USB mode, the TV may turn off. Please check the file in your usb storage.■ Except the screen off mode of the energy saving menu. |
| The video function does not work. | |
| No picture &No sound | ■ Check whether the product is turned on.■ Try another channel. The problem may be with the broadcast.■ Is the power cord inserted into wall power outlet?■ Check your antenna direction and/or location.■ Test the wall power outlet, plug another product's power cord into the outlet where the product's power cord was plugged in. |
| Picture appears slowly after switching on | ■ This is normal, the image is muted during the product startup process. Please contact your service centre, if the picture has not appeared after five minutes. |
| No color, poor colour, or poor picture | ■ Adjust Colour in menu option.■ Keep a sufficient distance between the product and the VCR.■ Try another channel. The problem may be with the broadcast.■ Are the video cables installed properly?■ Activate any function to restore the brightness of the picture. |
| Horizontal / vertical bars or picture shaking | ■ Check for local interference such as an electrical appliance or power tool. |
APPENDIX
| The video function does not work. | |
| Poor reception on some channels | ■ Station or cable product experiencing problems, tune to another station.■ Station signal is weak, reorient antenna to receive weaker station.■ Check for sources of possible interference. |
| Lines or streaks in pictures | ■ Check antenna (Change the direction of the antenna). |
| No picture when connecting HDMI | ■ Check that your HDMI cable is High Speed HDMI Cable.If the HDMI cables are not High Speed HDMI Cable, flickering or no screen display can result. Please use the High Speed HDMI Cable. |
| The audio function does not work. | |
| Picture OK & No sound | ■ Press the 1+ or - button.■ Sound muted? Press MUTE button.■ Try another channel. The problem may be with the broadcast.■ Are the audio cables installed properly? |
| No output from one of the speakers | ■ Adjust Balance in menu option. |
| Unusual sound from inside the product | ■ A change in ambient humidity or temperature may result in an unusual noise when the product is turned on or off and does not indicate a problem with the product. |
| No sound when connecting HDMI or USB | ■ Check HDMI cable is High Speed HDMI Cable.■ Check USB cable over version 2.0.■ If the sound is abnormal in the HDMI, check the audio format in your external equipments▶ Audio Supported format : Dolby Digital, PCM |
There is a problem with PICTURE settings.
When the user changes the picture settings, the TV automatically converts back to the initial settings after a certain period of time.
■ It means that the TV is currently set to Store Demo mode.
To switch to Home use mode you should do the followings:
From the TV Menu, choose OPTION → Choose Mode Setting → Choose Home use. Now, you have completed switching to the Home use mode.
Only PC mode applied
| No image is displayed. | |
| Power is on, power indicator is blue but the screen appears extremely dark. | ■ Adjust brightness and contrast again. |
| Does the ‘Invalid format’ message appear? | ■ The signal from the PC (Video card) is out of the vertical or horizontal frequency range of the product.Adjust the frequency range by referring to the Specifications in this user’s guide. |
| Does the ‘Check signal cable’ message appear? | ■ The signal cable between PC and product is not connected. Check the signal cable.■ Press the ‘INPUT’ button in the remote control to check the input signal. |
'Unknown Product' message appears when the product is connected.
Did you install the driver? ■ Install the product driver, which is provided with the product, or download it from the web site. (http://www.lg.com) ■ See if the plug & play function is supported by referring to the video card user's guide.
After-image appears on the product.
After-image appears when the product is turned off.
■ If you use a fixed image for a long time, the pixels may be damaged quickly.
Use the screen saver function.
APPENDIX
| Screen color is abnormal. | |
| Screen has poor color resolution (16_colors). | ■ Set screen color resolution to more than 24 bits (true color)Select control Pane → Display → Settings → Color Table menu in Windows. |
| Screen color is unstable or mono color. | ■ Check the connection status of the signal cable. |
| Do back spots appear on the screen? | ■ Several pixels (red, green, white or black color) may appear on the screen, which can be attributable to the unique characteristics of the LCD panel.It is not a malfunction of the LCD. |
| The screen image looks abnormal. | |
| Is the screen position wrong? | ■ Adjust the Position menu in OSD.■ A See if the video card resolution and frequency are supported by the product. If the frequency is out of range, set to the recommended resolution in the Control Panel → Display → Setting menu. |
| Do thin lines appear on the background screen? | ■ Adjust theClockmenu in OSD. |
| Horizontal noise appears or the characters look blurred. | ■ Adjust thePhasemanu in OSD. |
MAINTENANCE
Early malfunctions can be prevented. Careful and regular cleaning can prolong the life of your new set.
Caution: Be sure to switch the power off and unplug the power cord before you begin any cleaning.
Cleaning the Screen
A good way to keep the dust off your screen for a while is to wet a soft cloth in a mixture of lukewarm water and a little fabric softener or dish washing detergent. Wring the cloth until it is almost dry, and then use it to wipe the screen.
2 Ensure there is no excess water on the screen. Allow any water or dampness to evaporate before switching on.
Cleaning the Cabinet
■ To remove dirt or dust, wipe the cabinet with a soft, dry, lint-free cloth.
■ Do not to use a wet cloth..
Extended Absence

WARNING
▶ If you expect to leave your TV dormant for prolonged periods (such as a holiday), unplug the power cord to protect against possible damage from lightning or power surges.
PRODUCT SPECIFICATIONS
M2080D / M2080DF / M2080DB / M2080DN
| LCD Panel | Screen Type | 508.5 mm Wide (20.0 inch) TFT (Thin Film Transistor)LCD (Liquid Crystal Display) PanelVisible diagonal size: 508.5 mm |
| Pixel Pitch | 0.2766 mm (H) x 0.2766 mm (V) | |
| Video Signal | Max. Resolution | 1600 x 900 @ 60 Hz |
| Recommended Resolution | 1600 x 900 @ 60 Hz | |
| Horizontal Frequency | 30 kHz to 65 kHz | |
| Vertical Frequency | 56 Hz to 75 Hz | |
| Synchronization Type | Separate Sync, Digital | |
| Input Connector | TV, D-Sub Analog, SCART, PC Audio In, component, HDMI*2, CVBS | |
| Power | Rated Voltage | 19 V -2.0 A |
| Power Consumption | On Mode 32 W (typ.)Off Mode ≤ 1 W | |
| AC/DC Adapter Manufacturer: LITE-ON, Model PA-1650-68 | ||
| Tilt Tilt Range | -5° to 10° | |
| Dimensions (Width x Height x Depth)Weight | M2080D | |
| 476.4 mm x 376.1 mm x 193.8 mm (18.75 inch x 14.81 inch x 7.62 inch)3.5 kg (7.12 lb) | ||
| M2080DF | ||
| 476.4 mm x 387.8 mm x 193.9 mm (18.75 inch x 15.26 inch x 7.63 inch)3.7 kg (8.16 lb) | ||
| M2080DB | ||
| 476.4 mm x 389.4 mm x 194.4 mm (18.75 inch x 15.33 inch x 7.65 inch)3.5 kg (7.12 lb) | ||
| M2080DN | ||
| 476.4 mm x 310.5 mm x 56.1 mm (18.75 inch x 12.22 inch x 2.21 inch)2.7 kg (5.95 lb) | ||
| Environmental conditions | Operating Temperature | 10 °C to 35 °C |
| Operating Humidity | 20 % to 80 % | |
| Storage Temperature | -10 °C to 60 °C | |
| Storage Humidity | 5 % to 90 % | |
■ The specifications shown above may be changed without prior notice for quality improvement.
M2280D / M2280DF / M2280DB / M2280DN
| LCD Panel | Screen Type | 546.86 mm Wide (21.53 inch) TFT (Thin Film Transistor)LCD (Liquid Crystal Display) PanelVisible diagonal size: 546.86 mm |
| Pixel Pitch | 0.248 mm (H) x 0.248 mm (V) | |
| Video Signal | Max. Resolution | 1920 x 1080 @ 60 Hz |
| Recommended Resolution | 1920 x 1080 @ 60 Hz | |
| Horizontal Frequency | 30 kHz to 83 kHz | |
| Vertical Frequency | 56 Hz to 75 Hz | |
| Synchronization Type | Separate Sync, Digital | |
| Input Connector | TV, D-Sub Analog, SCART, PC Audio In, component, HDMI*2, CVBS | |
| Power | Rated Voltage | 19 V -2.2 A |
| Power Consumption | On Mode 35 W (typ.)Off Mode ≤ 1 W | |
| AC/DC Adapter Manufacturer: LITE-ON, Model PA-1650-68 | ||
| Tilt Tilt Range | -5° to 10° | |
| Dimensions (Width x Height x Depth)Weight | M2280D | |
| 509.6 mm x 396.2 mm x 193.8 mm (20.06 inch x 15.6 inch x 7.63 inch)3.7 kg (8.16 lb) | ||
| M2280DF | ||
| 509.6 mm x 407.3 mm x 193.9 mm (20.06 inch x 16.03 inch x 7.63 inch)3.9 kg (8.6 lb) | ||
| M2280DB | ||
| 509.6 mm x 409.6 mm x 194.4 mm (20.06 inch x 16.12 inch x 7.65 inch)3.7 kg (8.16 lb) | ||
| M2280DN | ||
| 509.6 mm x 330.5 mm x 53.6 mm (20.06 inch x 13 inch x 2.11 inch)2.9 kg (6.4 lb) | ||
| Environmental conditions | Operating Temperature | 10 °C to 35 °C |
| Operating Humidity | 20 % to 80 % | |
| Storage Temperature | -10 °C to 60 °C | |
| Storage Humidity | 5 % to 90 % | |
■ The specifications shown above may be changed without prior notice for quality improvement.
M2380D / M2380DF/ M2380DB / M2380DN
| LCD Panel | Screen Type | 584.2 mm Wide (23 inch) TFT (Thin Film Transistor)LCD (Liquid Crystal Display) PanelVisible diagonal size: 584.2 mm |
| Pixel Pitch | 0.265 mm (H) x 0.265 mm (V) | |
| Video Signal | Max. Resolution | 1920 x 1080 @ 60 Hz |
| Recommended Resolution | 1920 x 1080 @ 60 Hz | |
| Horizontal Frequency | 30 kHz to 83 kHz | |
| Vertical Frequency | 56 Hz to 75 Hz | |
| Synchronization Type | Separate Sync, Digital | |
| Input Connector | TV, D-Sub Analog, SCART, PC Audio In, component, HDMI*2, CVBS | |
| Power | Rated Voltage | 19 V -24 A |
| Power Consumption | On Mode 40 W (typ.)Off Mode ≤ 1 W | |
| AC/DC Adapter Manufacturer: LITE-ON, Model PA-1650-68 | ||
| Tilt Tilt Range | -5° to 10° | |
| Dimensions (Width x Height x Depth)Weight | M2380D | |
| 547 mm x 415.7 mm x 193.8 mm (21.53 inch x 16.37 inch x 7.63 inch)4.2 kg (9.26 lb) | ||
| M2380DF | ||
| 547 mm x 427.9 mm x 193.9 mm (21.53 inch x 16.85 inch x 7.6 inch)4.4 kg (9.7 lb) | ||
| M2380DB | ||
| 547 mm x 429.1 mm x 194.4 mm (21.53 inch x 16.89 inch x 7.65 inch)4.2 kg (9.26 lb) | ||
| M2380DN | ||
| 547 mm x 349.6 mm x 57.8 mm (21.53 inch x 13.76 inch x 2.27 inch)3.4 kg (7.5 lb) | ||
| Environmental conditions | Operating Temperature | 10 °C to 35 °C |
| Operating Humidity | 20 % to 80 % | |
| Storage Temperature | -10 °C to 60 °C | |
| Storage Humidity | 5 % to 90 % | |
■ The specifications shown above may be changed without prior notice for quality improvement.
M2780D / M2780DF / M2780DN
| LCD Panel | Screen Type | 685.8 mm Wide (27 inch) TFT (Thin Film Transistor)LCD (Liquid Crystal Display) PanelVisible diagonal size: 685.8 mm |
| Pixel Pitch | 0.3114 mm (H) x 0.3114 mm (V) | |
| Video Signal | Max. Resolution | 1920 x 1080 @ 60 Hz |
| Recommended Resolution | 1920 x 1080 @ 60 Hz | |
| Horizontal Frequency | 30 kHz to 83 kHz | |
| Vertical Frequency | 56 Hz to 75 Hz | |
| Synchronization Type | Separate Sync, Digital | |
| Input Connector | TV, D-Sub Analog, SCART, PC Audio In, component, HDMI*2, CVBS | |
| Power | Rated Voltage | 19 V =2.8 A |
| Power Consumption | On Mode 47 W (typ.)Off Mode ≤ 1 W | |
| AC/DC Adapter Manufacturer: LITE-ON, Model PA-1650-68 | ||
| Tilt Tilt Range | -5° to 10° | |
| Dimensions (Width x Height x Depth)Weight | M2780D | |
| 644 mm x 480.6 mm x 222.8 mm (23.53 inch x 18.92 inch x 8.77 inch)5.8 kg (12.79 lb) | ||
| M2780DF | ||
| 644 mm x 493.6 mm x 221.7 mm (23.53 inch x 19.43 inch x 8.72 inch)6.1 kg (13.45 lb) | ||
| M2780DN | ||
| 644 mm x 407.8 mm x 57.6 mm (23.53 inch x 16.05 inch x 2.27 inch)4.8 kg (10.58 lb) | ||
| Environmentalconditions | Operating Temperature | 10 °C to 35 °C |
| Operating Humidity | 20 % to 80 % | |
| Storage Temperature | -10 °C to 60 °C | |
| Storage Humidity | 5 % to 90 % | |
■ The specifications shown above may be changed without prior notice for quality improvement.
APPENDIX
IR CODES
• This feature is not available for all models.
| Code (Hexa) Function Note | ||
| 95 Energy Saving R/C BUTTON | ||
| 08 POWER | R/C BUTTON (POWER ON/OFF) | |
| 50 TV / PC R/C BUTTON | ||
| 0B INPUT R/C BUTTON | ||
| 79 RATIO R/C BUTTON | ||
| F0 TV/RAD R/C BUTTON | ||
| 45 Q.MENU | R/C BUTTON | |
| 43 MENU | R/C BUTTON | |
| AB | GUIDE | R/C BUTTON |
| 40 Up (^) | R/C BUTTON | |
| 41 Down (√) | R/C BUTTON | |
| 07 Left (<) | R/C BUTTON | |
| 06 Right (>) | R/C BUTTON | |
| 44 OK(◎) | R/C BUTTON | |
| 28 BACK | R/C BUTTON | |
| 5B EXIT | R/C BUTTON | |
| AA | INFO 1 | R/C BUTTON |
| 02 | △(+) | R/C BUTTON |
| 03 | △(-) | R/C BUTTON |
| 1E FAV (MARK) | R/C BUTTON | |
| 09 MUTE | R/C BUTTON | |
| 00 P | (^) | R/C BUTTON |
| 01 P | (√) | R/C BUTTON |
| 10 to 19 | Number Key 0 to 9 | R/C BUTTON |
| 53 LIST | R/C BUTTON | |
| 1A Q.VIEW | R/C BUTTON | |
| 72 RED Key | R/C BUTTON | |
| 71 GREEN Key | R/C BUTTON | |
| 63 YELLOW Key | R/C BUTTON | |
| 61 BLUE Key | R/C BUTTON | |
| 20 TEXT | R/C BUTTON | |
| 21 T.OPT (T.Option) | R/C BUTTON | |
| 39 SUBTITLE | R/C BUTTON | |
| 99 Auto Config. | R/C BUTTON | |
| B1 | ■ | R/C BUTTON |
| B0 | ▶ | R/C BUTTON |
| BA | II | R/C BUTTON |
| 8F | ◀◀ | R/C BUTTON |
| 8E | ▶▶ | R/C BUTTON |
EXTERNAL CONTROL DEVICE SETUP
RS-232C Setup
Connect the RS-232C (serial port) input jack to an external control device (such as a computer or an A/V control system) to control the product's functions externally.
Connect the serial port of the control device to the RS-232C jack on the product back panel.
Note: RS-232C connection cables are not supplied with the product.
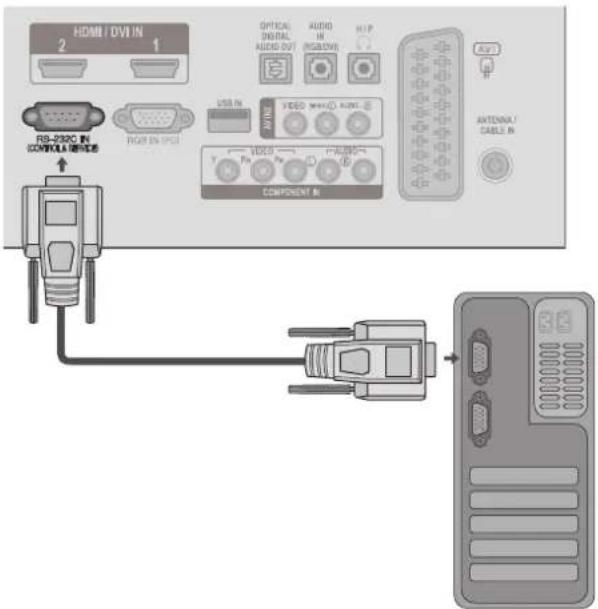
text_image
HDMI / OVI IN 2 1 OFFICIAL AUDIO DIGITAL AUDIO OUT AUDIO IN RADIO USB IN VIDEO MINI AUDIO COMPONENT IN AUY ANTenna/ CABLE IN RS-2320 IN CONTROL SERVICE RGB EN OPCIType of Connector; D-Sub 9-Pin Male
No. Pin Name
| 1 | No connection |
| 2 | RXD (Receive data) |
| 3 | TXD (Transmit data) |
| 4 | DTR (DTE side ready) |
| 5 | GND |
| 6 | DSR (DCE side ready) |
| 7 | RTS (Ready to send) |
| 8 | CTS (Clear to send) |
| 9 | No Connection |
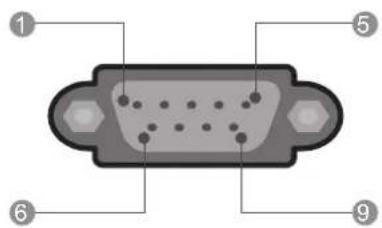
text_image
Diagram of a 12-pin D-sub connector with numbered labels pointing to specific pins.RS-232C Configurations
7-Wire Configurations (Standard RS-232C cable)
| PC TV | |||
| RXD | 2 | 3 | TXD |
| TXD | 3 2 RXD | ||
| GND | 5 5 GND | ||
| DTR | 4 6 DSR | ||
| DSR | 6 4 DTR | ||
| RTS | 7 8 CTS | ||
| CTS | 8 7 RTS | ||
D-Sub 9 D-Sub 9
3-Wire Configurations(Not standard)
| PC TV | |||
| RXD | 2 | 3 | TXD |
| TXD | 3 | 2 | |
| GND | 5 | 5 | |
| DTR | 4 | 6 | |
| DSR | 6 | 4 | |
| RTS | 7 | 7 | |
| CTS | 8 | 8 | |
D-Sub 9 D-Sub 9
APPENDIX
Set ID
Use this function to specify a set ID number.
Adjust Set ID to choose the desired TV ID number. The adjustment range of SET ID is 1 to 99.
- Press the MENU or EXIT button to close the menu window.
- Press the BACK button to move to the previous menu screen.
Communication Parameters
■ Baud rate: 9600 bp\$UART)
■ Data length: 8 bits
■ Parity : None
■ Stop bit: 1 bit
■ Communication code: ASCII code
■ Use a crossed (reverse) cable.
Command Reference List
| COMMAND1 | COMMAND2 | DATA(Hexadecimal) | |
| 01. Power | k | a | 00 to 01 |
| 02. Aspect Ratio | k | c | Refer to p. 150 |
| 03. Screen Mute | k | d | 00 to 01 |
| 04. Volume Mute | k | e | 00 to 01 |
| 05. Volume Control | k | f | 00 to 64 |
| 06. Contrast | k | g | 00 to 64 |
| 07. Brightness | k | h | 00 to 64 |
| 08. Colour | k | i | 00 to 64 |
| 09. Tint | k | j | 00 to 64 |
| 10. Sharpness | k | k | 00 to 64 |
| 11. OSD Select | k | l | 00 to 01 |
| 12. Remote control lock mode | k | m | 00 to 01 |
| 13. Treble | k | r | 00 to 64 |
| 14. Bass | k | s | 00 to 64 |
| 15. Balance | k | t | 00 to 64 |
| 16. Colour Temperature | x | u | 00 to 64 |
| 17. Energy Saving | j | q | 00 to 05 |
| 18. Auto Configuration | j | u | 01 |
| 19. Tune Command | m | a | Refer to p. 152 |
| 20. Programme Add/Skip | m | b | 00 to 01 |
| 21. Key | m | c | Key Code |
| 22. Back Light | m | g | 00 to 64 |
| 23. Input select (Main) | x | b | Refer to p. 153 |
* When setting the 17 to 24, a menu does not appear on screen.
* Note : During USB operations such as Dvix or EMF, all commands except Power(ka) and Key(mc) are not executed and treated as NG.
Transmission / Receiving Protocol Transmission
[Command1][Command2][ ][Set ID][ ][Data][Cr]
* [Command 1] : First command to control the TV.
(j, k, m or x)
* [Command 2] : Second command to control the TV.
* [Set ID] : You can adjust the set ID to choose desired monitor ID number in option menu. Adjustment range is 1 to 99. When selecting Set ID '0', every connected set is controlled.
Set ID is indicated as decimal (1 to 99) on menu and as Hexa decimal (0x0 to 0x63) on transmission/receiving protocol.
* [DATA] : To transmit command data.
Transmit 'FF' data to read status of command.
* [Cr] : Carriage Return
ASCII code '0x0D'
* [ ] : ASCII code 'space (0x20)'
OK Acknowledgement
[Command2][ ][Set ID][ ][OK][Data][x]
* The set transmits ACK (acknowledgement) based on this format when receiving normal data. At this time, if the data is data read mode, it indicates present status data. If the data is data write mode, it returns the data of the PC computer.
Error Acknowledgement
[Command2][ ][Set ID][ ][NG][Data][x]
* The set transmits ACK (acknowledgement) based on this format when receiving abnormal data from non-viable functions or communication errors.
Data 00: Illegal Code
APPENDIX
01. Power (Command: k a)
▶ To control Power On/Off of the set.
Transmission
[k][a][ ][Set ID][ ][Data][Cr]
Data 00 : Power Off 01 : Power On
Ack
[a][ ][Set ID][ ][OK/NG][Data][x]
▶ To show Power On/Off.
Transmission
[k][a][ ][Set ID][ ][FF][Cr]
Ack
[a][ ][Set ID][ ][OK/NG][Data][x]
* Similarly, if other functions transmit '0xFF' data based on this format, Acknowledgement data feed back presents status about each function.
* OK Ack., Error Ack. and other message may display on the screen when TV is power On.
02. Aspect Ratio (Command: k c) (Main Picture Size)
▶ To adjust the screen format. (Main picture format)
You can also adjust the screen format using the
Aspect Ratio in the Q.MENU. or PICTURE menu.
Transmission
[k][c][ ][Set ID][ ][Data][Cr]
Data 01 : Normal screen (4:30)7 : 14:9
02 : Wide screen (16:9) 09 : Just Scan
▶ To select screen mute on/off.
Transmission
[k][d][ ][Set ID][ ][Data][Cr]
Data 00 : Screen mute off (Picture on) Video mute off
01 : Screen mute on (Picture off)
10: Video mute on
Ack
[d][ ][Set ID][ ][OK/NG][Data][x]
* In case of video mute on only, TV will display On Screen Display(OSD). But, in case of Screen mute on, TV will not display OSD.
04. Volume Mute (Command: k e)
▶ To control volume mute on/off.
You can also adjust mute using the MUTE button on remote control.
Transmission
[k][e][ ][Set ID][ ][Data][Cr]
Data 00 : Volume mute on (Volume off)
01 : Volume mute off (Volume on)
Ack
[e][ ][Set ID][ ][OK/NG][Data][x]
05. Volume Control (Command: k f)
▶ To adjust volume.
You can also adjust volume with the VOLUME buttons on remote control.
Transmission
[k][f][ ][Set ID][ ][Data][Cr]
Data Min : 00 to Max : 64
* Refer to 'Real data mapping 1'. See page 153.
Ack
[f][ ][Set ID][ ][OK/NG][Data][x]
06. Contrast (Command: k g)
▶ To adjust screen contrast.
You can also adjust contrast in the PICTURE menu.
Transmission
[k][g][ ][Set ID][ ][Data][Cr]
Data Min : 00 to Max : 64
* Refer to 'Real data mapping 1'. See page 153.
Ack
[g][ ][Set ID][ ][OK/NG][Data][x]
07. Brightness (Command: k h)
▶ To adjust screen brightness.
You can also adjust brightness in the PICTURE menu.
Transmission
[k][h][ ][Set ID][ ][Data][Cr]
Data Min : 00 to Max : 64
* Refer to 'Real data mapping 1'. See page 153.
Ack
[h][ ][Set ID][ ][OK/NG][Data][x]
08. Colour (Command: k i)
▶ To adjust the screen colour. (Except PC mode)
You can also adjust colour in the PICTURE menu.
Transmission
[k][i][ ][Set ID][ ][Data][Cr]
Data Min : 00 to Max : 64
* Refer to 'Real data mapping 1'. See page 153.
Ack
[i][ ][Set ID][ ][OK/NG][Data][x]
09. Tint (Command: k j)
▶ To adjust the screen tint. (Except PC mode)
You can also adjust tint in the PICTURE menu.
Transmission
[k][j][ ][Set ID][ ][Data][Cr]
Data Red : 00 to Green : 64
* Refer to 'Real data mapping 1'. See page 153.
Ack
[j][ ][Set ID][ ][OK/NG][Data][x]
10. Sharpness (Command: k k)
▶ To adjust the screen sharpness.
You can also adjust sharpness in the PICTURE menu.
Transmission
[k][k][ ][Set ID][ ][Data][Cr]
Data Min : 00 to Max : 64
* Refer to 'Real data mapping 1'. See page 153.
Ack
[k][ ][Set ID][ ][OK/NG][Data][x]
11. OSD Select (Command: k l)
▶ To select OSD (On Screen Display) on/off when controlling remotely.
Transmission
[k][l][ ][Set ID][ ][Data][Cr]
Data 00 : OSD off 01 : OSD on
Ack
[I][ ][Set ID][ ][OK/NG][Data][x]
12. Remote control lock mode (Command: k m)
▶ To lock the front panel controls on the monitor and remote control.
Transmission
[k][m][ ][Set ID][ ][Data][Cr]
Data 00 : Lock off 01 : Lock on
Ack
[m][ ][Set ID][ ][OK/NG][Data][x]
* If you are not using the remote control, use this mode. When main power is on/off, external control lock is released.
* Local Power Key will work properly.
13. Treble (Command: k r)
▶ To adjust treble.
You can also adjust treble in the AUDIO menu.
Transmission
[k][r][ ][Set ID][ ][Data][Cr]
Data Min : 00 to Max : 64
* Refer to 'Real data mapping 1'. See page 153.
Ack
[r][ ][Set ID][ ][OK/NG][Data][x]
You can also adjust bass in the AUDIO menu.
Transmission
[k][s][ ][Set ID][ ][Data][Cr]
Data Min: 00 to Max: 64
* Refer to 'Real data mapping 1'. See page 153.
Ack
[s][ ][Set ID][ ][OK/NG][Data][x]
APPENDIX
15. Balance (Command: k t)
▶ To adjust balance.
You can also adjust balance in the AUDIO menu.
Transmission
[k][t][ ][Set ID][ ][Data][Cr]
Data Min : 00 to Max : 64
* Refer to 'Real data mapping 1'. See page 153.
Ack
[t][ ][Set ID][ ][OK/NG][Data][x]
18. Auto Configure(Command: j u)
▶ To adjust picture position and minimize image shaking automatically. It works only in RGB (PC) mode.
Transmission
[j][u][ ][Set ID][ ][Data][Cr]
Data 01: To set
Ack
[u][ ][Set ID][ ][OK/NG][Data][x]
16. Colour Temperature (Command: x u)
▶ To adjust colour temperature. You can also adjust Colour Temperature in the PICTURE menu.
Transmission
[x][u][ ][Set ID][ ][Data][Cr]
Data Min: 00 to Max: 64
* Refer to 'Real data mapping 1'. See page 153.
Ack
[u][ ][Set ID][ ][OK/NG][Data][x]
19. Tune Command (Command: m a)
▶ Select channel to following physical number.
Transmission
[m][a][ ][Set ID][ ][Data0][ ][Data1][ ][Data2][Cr]
Data00 : High channel data
Data01 : Low channel data
ex. No. 47 -> 00 2F (2FH)
No. 394 -> 01 8A (18AH),
DTV No. 0 -> Don't care
Analogue - Min: 00 to Max: 63 (0 to 99)
Digital - Min: 00 to Max: 3E7 (0 to 999)
(Except For Sweden, Finland, Norway, Denmark, Ireland)
Digital - Min: 00 to Max: 270F (0 to 9999)
(Only Sweden, Finland, Norway, Denmark, Ireland)
17. Energy Saving (Command: j q)
▶ To reduce the power consumption of the TV. You can also adjust Energy Saving in OPTION menu.
Transmission
[j][q][ ][Set ID][ ][Data][Cr]
| Power Saving Function | Level | Description | |||||||||
| 7 | 6 | 5 | 4 | 3 | 2 | 1 | 0 | ||||
| 0 | 0 | 0 | 0 | Low | Power | 0 | 0 | 0 | 0 | Off | |
| 0 | 0 | 0 | 0 | Low | Power | 0 | 0 | 0 | 1 | Minimum | |
| 0 | 0 | 0 | 0 | Low | Power | 0 | 0 | 1 | 0 | Medium | |
| 0 | 0 | 0 | 0 | Low | Power | 0 | 0 | 1 | 1 | Maximum | |
| 0 | 0 | 0 | 0 | Low | Power | 0 | 1 | 0 | 1 | Screen Off | |
Ack
[a][ ][Set ID][ ][OK/NG][Data][x]
Data Min: 00 to Max: 7DH
Ack
[q][ ][Set ID][ ][OK/NG][Data][x]
20. Programme Add/Skip(Command: m b)
▶ To set skip status for the current Programme.
Transmission
[m][b][ ][Set ID][ ][Data][Cr]
Data 00:Skip 01:Add
Ack
[b][ ][Set ID][ ][OK/NG][Data][x]
* Real data mapping 1
▶ To send IR remote key code.
Transmission
[m][c][ ][Set ID][ ][Data][Cr]
Data Key code - Refer to page 148.
Ack
[c][ ][Set ID][ ][OK/NG][Data][x]
22. Back Light (Command: m g)
▶ To Control the back light.
Transmission
[m][g][ ][Set ID][ ][Data][Cr]
Data : data Min: 00 to Max: 64
Ack
[g][ ][Set ID][ ][OK/NG][Data][x]
23. Input select (Command: x b) (Main Picture Input)
▶ To select input source for main picture.
Transmission
[x][b][ ][Set ID][ ][Data][Cr]
Data Structure
Data 00: DTV 40: Component
10: Analogue 60: RGB
20: AV 90: HDMI
Ack
[b][ ][Set ID][ ][OK/NG][Data][x]
UK Only
When does switchover happen?
text_image
Capeland switches on October 17, 2007 The exact date you switch depends on the transmitter you are served by. To check when you switch, go to Digital UK's postcode checker on www.digitaluk.co.uk Check your ITV news service or look at Teletext page 106 to see what TV region you're in.Visit us at digitaluk.co.uk call us on 0845 6 50 50 50 ^+
^† Calls charged at BT rate of 3p per minute daytime and 10 per minute evenings and weekends. Rates may vary for calls from non-BT lines.
Keep this important information about how to re-tune your TV during the digital TV switchover
Keep this leaflet and your instruction manual safe – you'll need them

natural_image
3D cartoon robot figure with large round eyes and a small number on the body (no text or symbols)get set for digital √
Television in the UK is going digital, bringing us all more choice and new services. Starting in late 2007 and ending in 2012, television services in the UK will go completely digital, TV region by TV region.
Please see overleaf to find out when your area switches to digital. Digital UK is the independent, non-profit organisation leading the process of digital TV switchover in the UK. Digital UK provides impartial information on what people need to do to prepare for the move to digital, and when they need to do it.
How the switchover affects your TV equipment:
Your new TV has a digital tuner built in, which means it is ready to receive the Freeview signal by simply plugging it into your aerial socket (check if you can get digital TV through your aerial now, or whether you'll have to wait until switchover, at www.digitaluk.co.uk).
When the TV switchover happens in your area, there are at least two occasions when you will need to re-tune your TV in order to continue receiving your existing TV channels, and also to pick up new ones. Digital UK, the body leading the digital TV switchover, will advise you when you need to re-tune during the switchover.
If you choose to connect your TV to satellite or cable with a digital box then it will not be affected by switchover, and you won't need to re-tune.
How to re-tune:
To find out how to re-tune your TV, check your manufacturer's instructions for details. Or see below for a typical sequence:
-
With your TV in digital TV mode, press 'Menu' on your remote control. (Some TVs will ask you for a code. If you have not already changed it, the default code is usually 0000, or check your instruction book.)
-
From the Menu options on screen, select 'SETUP'. Select 'Auto Tuning' to re-tune your digital TV (not 'add channels'). You may have to wait a couple of minutes for the re-tune to complete.
*Also sometimes referred to as 'Update', 'Rescan', 'Replace', 'Auto-Tuning', 'Channel Search', 'First Time Install', or 'Store Channels'.
- If you do not re-tune your channels when advised to do so by Digital UK, you may lose some or all of your channels until you do re-tune. You should re-tune your TV every few months to check for any new channels.
If you are missing any channels, it may be that they are not available in your area, or that your aerial needs upgrading.
If you have any questions, please contact your equipment supplier or call Digital UK on 0845 6 50 50 50 or visit www.digitaluk.co.uk

LG
Life's Good
Make sure to read the Safety Precautions before using the product.
Keep the Owner's Manual (CD) in an accessible place for future reference.
The model and serial number of the SET is located on the back and one side of the SET.
Record it below should you ever need service.
MODEL
SERIAL