
65UJ6519 - TV LG - Free user manual and instructions
Find the device manual for free 65UJ6519 LG in PDF.


User questions about 65UJ6519 LG
0 question about this device. Answer the ones you know or ask your own.
Ask a new question about this device
Download the instructions for your TV in PDF format for free! Find your manual 65UJ6519 - LG and take your electronic device back in hand. On this page are published all the documents necessary for the use of your device. 65UJ6519 by LG.
USER MANUAL 65UJ6519 LG
natural_image
Blank whiteboard with a black border (no text or symbols)

a X 4 (M4 X L16) 43/49UJ65**
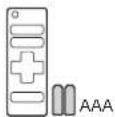
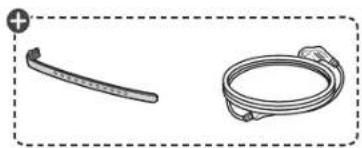
natural_image
Two types of hair accessories: a curved tool and a coiled cord, shown without any text or symbols.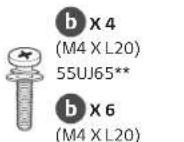
: Depending on model / Abhängig vom Modell / Selon le modèle / In base al modello / En función del modelo / Dependendo do modelo / Afhankelijk van het model / Aváloya με το μοντέλο / Odisno od modela / Típusfüggő / Zaležnie od modelu / Závisí na modelu / V závislosti od modelu / În funcție de model / В зависимости от модела / Sõltub mude list / Priklauso nuo modelo / Atkaribă no modeja / U zavisnosti od modela / Ovisno o modelu / Në varési té modelit / Ovisno o modelu / Bo зависnost od моделот / Beroende på modell / Avhengig av modell / Afhængigt af modellen / Mallin mukaan / حسب الطراز

www.lg.com
P/No: MFL69668902 (1702-REV01)
Printed in Korea

| English | ·Read Safety and Reference.·For the power supply and power consumption, refer to the label attached to the product. | Magyar | ·Lásd: Biztonsági óvintézkedések.·A tápellátásra és az áramfogyasztásra vonatkozó adatok a készülékre ragasztott címkén találhatók. |
| Deutsch | ·Sicherheitshinweise und Referenzen: Bitte lesen!·Informationen zur Stromversorgung und zum Stromverbrauch sind dem Etikett auf dem Gerät zu entnehmen. | Polski | ·Przeczytaj Zasady bezpieczeństwa i informacje dodatkowe.·Dokładne informacje o zasilaniu i zużyciu energii są umieszczone na etykiecie znajdującej się na produkcie. |
| Français | ·Lire le document Sécurité et référence.·Reportez-vous à l'étiquette apposée sur le téléviseur pour connaître l'alimentation et la consommation électriques. | Česky | ·Přečtěte si část Bezpečnost a reference.·Informace o napájení a příkonu naleznete na štítku připevněném k výrobku. |
| Italiano | ·Consultare la sezione Sicurezza e informazioni di riferimento.·Per l'alimentazione e il consumo di energia, consultare l'etichetta applicata sul prodotto. | Slovenčina | ·Prečitajte si čast Bezpečnost a odkazy.·Informácie o zdroji napájania a spotrebe elektrickej energie nájdete na štítku pripojenom k zariadeniu. |
| Español | ·Leer Seguridad y Referencias.·Para obtener información acerca de la fuente de alimentación y el consumo de energía, consulte la etiqueta del producto. | Română | ·Citiți Siguranță și referințe.·Pentru sursa de alimentare și consumul de energie, consultați eticheta ataşată pe produs. |
| Português | ·Consulte o manual de Segurança e Referência.·No que respeita à fonte de alimentação e ao consumo de energia, consulte a etiqueta mostrada no produto. | Български | ·Прочетете Безопасност и справки.·Направете справка с етикета на продукта за електрозахранването и консумацията на енергия. |
| Nederlands | ·Lees Veiligheid en referentie goed door.·Informatie over de stroomvoorziening en het stroomverbruik vindt u op het label op het product. | Eesti | ·Lugege jaotist Ohutus ja viited.·Toiteallika ja energiatarbe kohta saate teavet tootele kinnitatud märgiselt. |
| Ελληνικά | ·Ανάγνωση Ασφάλεια και Αναφορά.·Για πληροφορίες σχετικά με την τροφοδοσία και την κατανάλωση ενέργειας, δείτε την ετικέτα του προϊόντος. | Lietuvių k. | ·Perskaitykite Saugumas ir nuorodos.·Informacijos apie maitinimą ir energijos sąnaudas rasite etiketėje ant gaminio. |
| Slovenščina | ·Preberite Varnostne informacije in napotki.·Podatke o napajanju in porabi energije si oglejte na nalepki izdelka. | Latviešu | ·Izlasiet Drošibai un uzzinąl.·Informāciju par elektroenergijas padevi un patērinu skatiet izstrādājumam pievienotajā etiketė. |
| Srpski | ·Pročitajte Bezbednost i informacije.·Da biste saznali informacije u vezi sa napajanjem i |



| Hrvatski | Pročitajte Sigurnost i reference.Informacije o napajanju i potrošnji energije potražite na oznaci koja se nalazi na proizvodu. | Norsk | Les Sikkerhet og referanse.Hvis du vil ha informasjon om strømforsyning og strømforbruk, kan du se på etiketten som er festet på produktet. |
| Shqip | Lexo Siguria dhe referencat.Për ushqimin me energji dhe konsumin e energjisë, shih etiketën e ngjitur në produkt. | Dansk | Læs Sikkerhed og Reference.Du kan få oplysninger om strømforsyning og strømforbrug på mærket, der sidder på produktet. |
| Bosanski | Pročitajte Sigurnost i upućivanje.Informacije o napajanju električnom energijom i potrošnji električne energije možete pronaći na naljepnici koja se nalazi na proizvodu. | Suomi | Lue Turvatoimet ja viittaukset.Tietoja virtualähteestä ja virrankulutuksesta on laitteeseen kiinnitetyyssä tarrassa. |
| Македонски | Прочитајте во Барбадносни информации и референтни материјали.За напојувањето и потрошувачката на енергија, погледнете ја етикетата која е прикачена на производот. | . قرامةitorsان والمرجع.لめるة المряд حول مصدرا الامناد بالطاقة المطلوب ومعيار استهلاك الطاقة;ragاح للمüşق الموحد على المنتج. | |
| Svenska | Läs Säkerhet och referens.För strömförsörjning och strömförbrukning, se etiketten på produkten. |

flowchart
graph LR
    A["Hand icon: Home with red button"] --> B["Navigation Button"]
    B --> C["Next Step: Question mark"]
    C --> D["Next Step: Unknown"]

natural_image
Simple line drawing of a rectangular tray or container with a flat top and side slot (no text or symbols)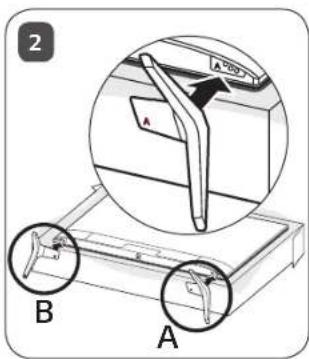
text_image
2 A A B A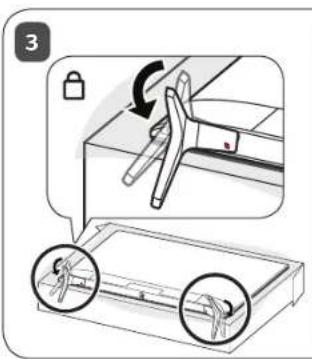
text_image
Diagram illustrating a lock mechanism and tool positioning, showing step 3 with lock and lock positions and two circular insets highlighting tool positions.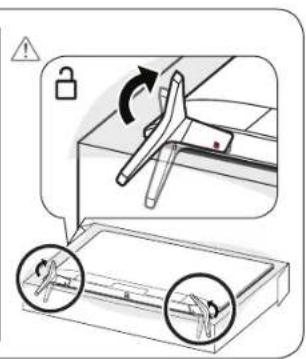
text_image
Diagram illustrating a lock mechanism with labeled components and directional arrows, including warning symbols and zoomed-in insets.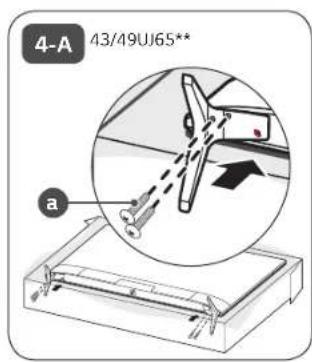
text_image
4-A 43/49UJ65** a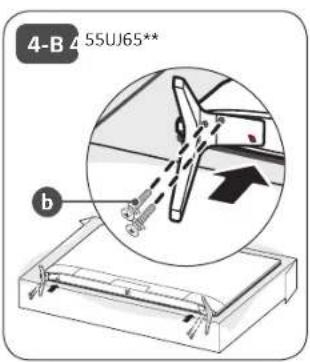
text_image
4-B 455UJ65** b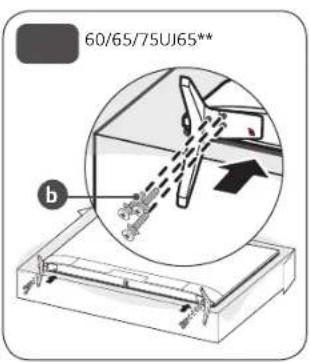
text_image
60/65/75UJ65** b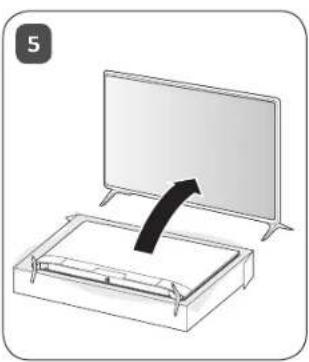
natural_image
Illustration of a device with an arrow pointing to a screen, showing a rectangular base and a flat panel (no text or symbols)

text_image
ANTENNA/ CABLE IN
text_image
HDMI IN
text_image
HDMI IN/ARC
text_image
USB IN
text_image
LAN

AUDIO OUT/ H/P OUT

natural_image
Simple line drawing of a satellite dish mounted on a long rod with a connector (no text or symbols)
natural_image
Pure electrical circuit lines without any symbols
natural_image
Simple line drawing of a rectangular device with a circular arrow and dashed outline, no text or symbols present.
text_image
COMPONENT IN AV IN VIDEO/YP B PR L/MONOAUDIOR Y PB PR L R VIDEOAUDIO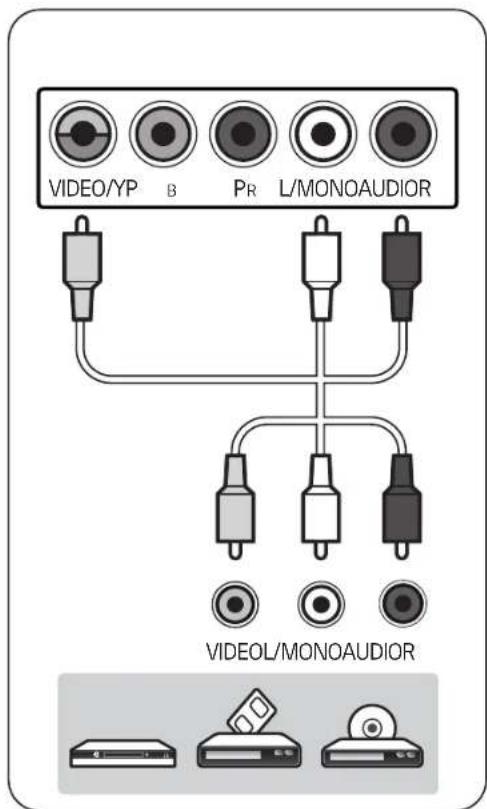
text_image
VIDEO/YP B PR L/MONOAUDIOR VIDEO/L/MONOAUDIOR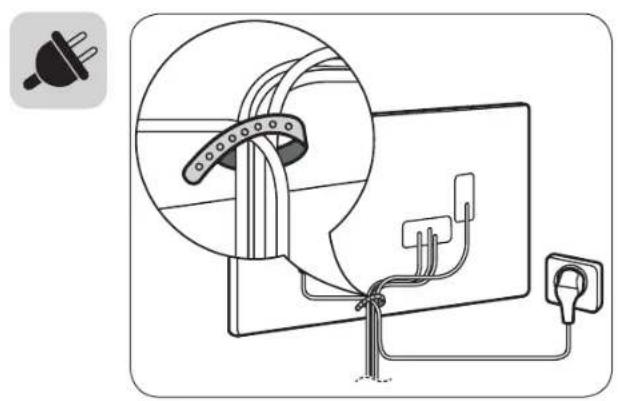
natural_image
Diagram showing cable installation with a plug and socket, no text or symbols present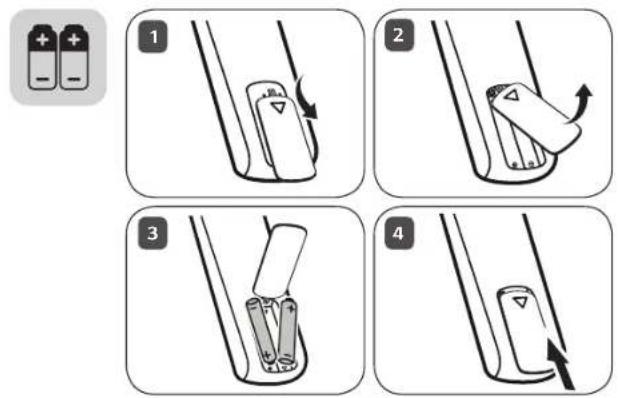
text_image
Diagram illustrating four-step battery disassembly process with labeled steps and directional arrows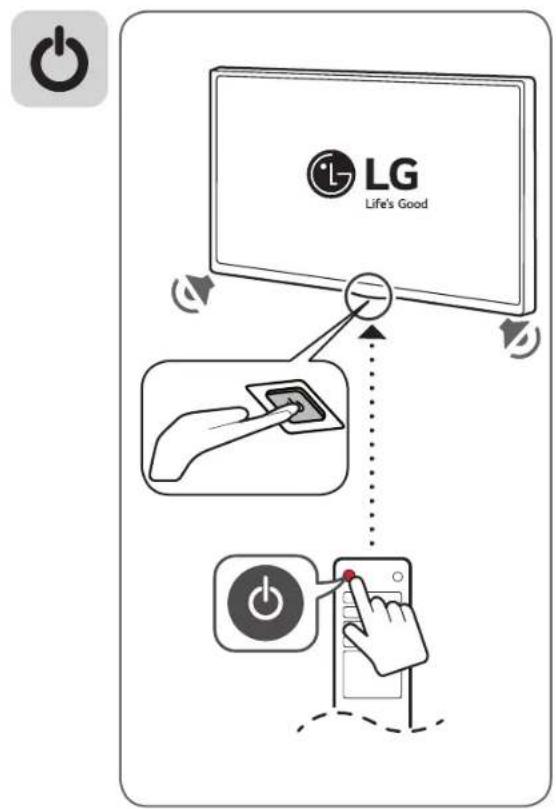
text_image
LG Life's Good
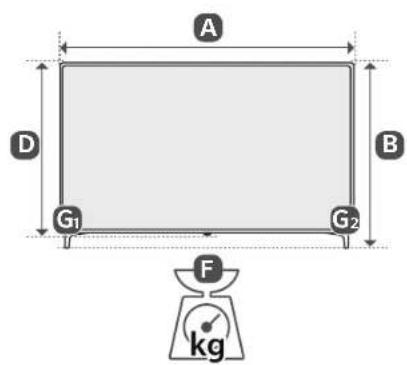
text_image
A D G₁ B G₂ F kg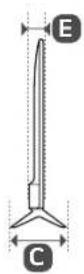
| A (mm) | B (mm) | C (mm) | D (mm) | E (mm) | F (kg) | F - (G1 + G2) (kg) | |
| 43UJ650V-ZA43UJ651V-ZA43UJ6509-ZA43UJ6519-ZA43UJ6507-ZA43UJ6517-ZA | 974 625 | 219.0 571 79.4 | 9.3 9.2 | ||||
| Power requirement | AC 100-240 V ~ 50 / 60 Hz | ||||||
| A (mm) | B (mm) | C (mm) | D (mm) | E (mm) | F (kg) | F - (G1 + G2) (kg) | |
| 49UJ650V-ZA49UJ651V-ZA49UJ6509-ZA49UJ6519-ZA49UJ6507-ZA49UJ6517-ZA | 1107 705 | 232.9 645 794 | 11.5 11.3 | ||||
| 55UJ650V-ZA55UJ651V-ZA55UJ6509-ZA55UJ6519-ZA55UJ6507-ZA55UJ6517-ZA | 1237 778 | 232.9 718 638 | 16.2 16.0 | ||||
| 60UJ650V-ZA60UJ651V-ZA60UJ6509-ZA60UJ6519-ZA60UJ6507-ZA60UJ6517-ZA | 1345 845 | 271.8 778 648 | 21.6 21.2 | ||||
| 65UJ650V-ZA65UJ651V-ZA65UJ6509-ZA65UJ6519-ZA65UJ6507-ZA65UJ6517-ZA | 1456 909 | 271.8 841 648 | 26.4 26.0 | ||||
| 75UJ651V-ZB | 1697 105 | 2 297.0 981 65 | 3 42.0 41.3 | ||||
| Power requirement | AC 100-240 V - 50 / 60 Hz | ||||||



natural_image
Empty white image with corner markers and no visible content or text


OWNER'S MANUAL
Safety and Reference
LED TV*
* LG LED TV applies LCD screen with LED backlights.
Please read this manual carefully before operating your set and retain it for future reference.
Warning! Safety instructions
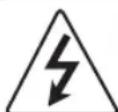
CAUTION
RISK OF ELECTRIC SHOCK DO NOT OPEN

CAUTION : TO REDUCE THE RISK OF ELECTRIC SHOCK, DO NOT REMOVE COVER (OR BACK). NO USER-SERVICEABLE PARTS INSIDE. REFER TO QUALIFIED SERVICE PERSONNEL.
This symbol is intended to alert the user to the presence of uninsulated "dangerous voltage" within the product's enclosure that may be of sufficient magnitude to constitute a risk of electric shock to persons.
This symbol is intended to alert the user to the presence of important operating and maintenance (servicing) instructions in the literature accompanying the appliance.
WARNING : TO REDUCE THE RISK OF FIRE AND ELECTRIC SHOCK, DO NOT EXPOSE THIS PRODUCT TO RAIN OR MOISTURE.

TO PREVENT THE SPREAD OF FIRE, KEEP CANDLES OR OTHER ITMES WITH OPEN FLAMES AWAY FROM THIS PRODUCT AT ALL TIMES.
- Do not place the TV and/or remote control in the following environments:
- A location exposed to direct sunlight
- An area with high humidity such as a bathroom
- Near any heat source such as stoves and other devices that produce heat
- Near kitchen counters or humidifiers where they can easily be exposed to steam or oil
- An area exposed to rain or wind
- Near containers of water such as vases
Otherwise, this may result in fire, electric shock, malfunction or product deformation.
- Do not place the product where it might be exposed to dust. This may cause a fire hazard.
- Mains Plug is the TV connecting/disconnecting device to AC mains electric supply. This plug must remain readily attached and operable when TV is in use.
-
Do not touch the power plug with wet hands. Additionally, if the cord pin is wet or covered with dust, dry the power plug completely or wipe dust off. You may be electrocuted due to excess moisture.
-
Make sure to connect Mains cable to compliant AC mains socket with Grounded earth pin. (Except for devices which are not grounded on earth.) Otherwise possibility you may be electrocuted or injured.
- Insert power cable plug completely into wall socket otherwise if not secured completely into socket, fire ignition may break out.
- Ensure the power cord does not come into contact with hot objects such as a heater. This may cause a fire or an electric shock hazard.
- Do not place a heavy object, or the product itself, on power cables. Otherwise, this may result in fire or electric shock.
- Bend antenna cable between inside and outside building to prevent rain from flowing in. This may cause water damaged inside the Product and could give an electric shock.
- When mounting TV onto wall make sure to neatly install and isolate cabling from rear of TV as to not create possibility of electric shock /fire hazard.
- Do not plug too many electrical devices into a single multiple electrical outlet. Otherwise, this may result in fire due to overheating.
- Do not drop the product or let it fall over when connecting external devices. Otherwise, this may result in injury or damage to the product.
- Keep the anti-moisture packing material or vinyl packing out of the reach of children. Anti-moisture material is harmful if swallowed. If swallowed by mistake, force the patient to vomit and visit the nearest hospital. Additionally, vinyl packing can cause suffocation. Keep it out of the reach of children.
- Do not let your children climb or cling onto the TV. Otherwise, the TV may fall over, which may cause serious injury.
- Dispose of used batteries carefully to ensure that a small child does not consume them. Please seek Doctor-Medical Attention immediately if child consumes batteries.
- Do not insert any metal objects/conductors (like a metal chopstick/cutlery/screwdriver) into the end of power cable while the power plug is plugged into wall socket. Additionally, do not touch the power plug right after unplugging from the wall socket. You may be electrocuted.
- Do not put or store inflammable substances near the product. There is a danger of combustion/explosion or fire due to careless handling of the inflammable substances.
-
Do not drop metallic objects such as coins, hair pins, chopsticks or wire into the product, or inflammable objects such as paper and matches. Children must pay particular attention. Electrical shock, fire or injury can occur. If a foreign object is dropped into the product, unplug the power cord and contact the service centre.
-
Do not spray water on the product or scrub with an inflammable substance (thinner or benzene). Fire or electric shock accident can occur.
- Do not allow any impact, shock or any objects to fall into the unit, and do not drop anything onto the screen. You may be injured or the product can be damaged.
- Never touch this product or antenna during a thunder or lighting storm.
You may be electrocuted. - Never touch the wall outlet when there is leakage of gas, open the windows and ventilate. It may cause a fire or a burn by a spark.
- Do not disassemble, repair or modify the product at your own discretion. Fire or electric shock accident can occur.
Contact the service centre for check, calibration or repair. - If any of the following occur, unplug the product immediately and contact your local service centre.
- The product has been damaged
- Foreign objects have entered the product
- The product produced smoke or a strange smell
This may result in fire or electric shock. - Unplug the TV from AC mains wall socket if you do not intend to use the TV for a long period of time. Accumulated dust can cause fire hazard and insulation deterioration can cause electric leakage/shock/fire.
- Apparatus shall not be exposed to dripping or splashing and no objects filled with liquids, such as vases, shall be placed on the apparatus.
- Do not install this product on a wall if it could be exposed to oil or oil mist. This may damage the product and cause it to fall.
- If water enters or comes into contact with TV, AC adapter or power cord please disconnect the power cord and contact service centre immediately. Otherwise, this may result in electric shock or fire.
- Only use an authorized AC adapter and power cord approved by LG Electronics. Otherwise, this may result in fire, electric shock, malfunction or product deformation.
- Never Disassemble the AC adapter or power cord. This may result in fire or electric shock.
-
Be careful in handling the adapter to prevent any external shocks to it. An external shock may cause damage to the adapter.
• Make sure the power cord is connected securely to the power plug on the TV.
• Install the product where no radio wave occurs. -
There should be enough distance between an outside antenna and power lines to keep the former from touching the latter even when the antenna falls. This may cause an electric shock.
- Do not install the product on places such as unstable shelves or inclined surfaces. Also avoid places where there is vibration or where the product cannot be fully supported. Otherwise, the product may fall or flip over, which may cause injury or damage to the product.
- If you install the TV on a stand, you need to take actions to prevent the product from overturning. Otherwise, the product may fall over, which may cause injury.
- If you intend to mount the product to a wall, attach VESA standard mounting interface (optional parts) to the back of the product. When you install the set to use the wall mounting bracket (optional parts), fix it carefully so as not to drop.
- Only use the attachments / accessories specified by the manufacturer.
- When installing the antenna, consult with a qualified service technician. If not installed by a qualified technician, this may create a fire hazard or an electric shock hazard.
• We recommend that you maintain a distance of at least 2 to 7 times the diagonal screen size when watching TV. If you watch TV for a long period of time, this may cause blurred vision. - Only use the specified type of battery. This could cause damage to the remote control.
- Do not mix new batteries with old batteries. This may cause the batteries to overheat and leak.
- Batteries should not be exposed to excessive heat. For example, keep away from direct Sunlight, open fireplace and electric heaters.
- Signal from Remote Control can be interrupted due to external/internal lighting eg Sunlight, fluorescent lighting. If this occurs turn off lighting or darken viewing area.
- When connecting external devices such as video game consoles, make sure the connecting cables are long enough. Otherwise, the product may fall over, which may cause injury or damage the product.
- Do not turn the product On/Off by plugging-in or unplugging the power plug to the wall outlet. (Do not use the power plug for switch.) It may cause mechanical failure or could give an electric shock.
- Please follow the installation instructions below to prevent the product from overheating.
- The distance between the product and the wall should be more than 10 cm.
- Do not install the product in a place with no ventilation (e.g., on a bookshelf or in a cupboard).
- Do not install the product on a carpet or cushion.
- Make sure the air vent is not blocked by a tablecloth or curtain. This may result in fire.
• Take care not to touch the ventilation openings when watching the TV for long periods as the ventilation openings may become hot. This does not affect the operation or performance of the product.
- Periodically examine the cord of your appliance, and if its appearance indicates damage or deterioration, unplug it, discontinue use of the appliance, and have the cord replaced with an exact replacement part by an authorized servicer.
- Prevent dust collecting on the power plug pins or outlet. This may cause a fire hazard.
- Protect the power cord from physical or mechanical abuse, such as being twisted, kinked, pinched, closed in a door, or walked upon. Pay particular attention to plugs, wall outlets, and the point where the cord exits the appliance.
- Do not press strongly upon the panel with a hand or sharp object such as nail, pencil or pen, or make a scratch on it, as it may cause damage to screen.
- Avoid touching the screen or holding your finger(s) against it for long periods of time. Doing so may produce some temporary or permanent distortion/damage to screen.
- As long as this unit is connected to the AC wall outlet, it is not disconnected from the AC power source even if you turn off this unit by SWITCH.
- When unplugging the cable, grab the plug and unplug it, by pulling at the plug. Don't pull at the cord to unplug the power cord from the power board, as this could be hazardous.
- When moving the product, make sure you turn the power off first. Then, unplug the power cables, antenna cables and all connecting cables.
The TV set or power cord may be damaged, which may create a fire hazard or cause electric shock.
- When moving or unpacking the product, work in pairs because the product is heavy. Otherwise, this may result in injury.
- Refer all servicing to qualified service personnel. Servicing is required when the apparatus has been damaged in any way, such as power supply cord or plug is damaged, liquid has been spilled or objects have fallen into the apparatus, the apparatus has been exposed to rain or moisture, does not operate normally, or has been dropped.
- Do not use high voltage electrical goods near the TV (e.g. electric mosquito-swatter). This may result in product malfunction.
- When cleaning the product and its components, unplug the power first and wipe it with a soft cloth. Applying excessive force may cause scratches or discolouration. Do not spray with water or wipe with a wet cloth. Never use glass cleaner, car or industrial shiner, abrasives or wax, benzene, alcohol etc., which can damage the product and its panel. Otherwise, this may result in fire, electric shock or product damage (Deformation, corrosion or breakage).
Preparing
- If the TV is turned on for the first time after it was shipped from the factory, initialization of the TV may take a few minutes.
• Image shown may differ from your TV. - Your TV's OSD (On Screen Display) may differ slightly from that shown in this manual.
- The available menus and options may differ from the input source or product model that you are using.
- New features may be added to this TV in the future.
- The items supplied with your product may vary depending on the model.
- Product specifications or contents of this manual may be changed without prior notice due to upgrade of product functions.
- For an optimal connection, HDMI cables and USB devices should have bezels less than 10 mm thick and 18 mm width. Use an extension cable that supports USB 2.0 if the USB cable or USB memory stick does not fit into your TV's USB port.
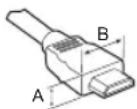
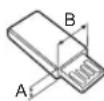
^* A ≤ 10 mm
*B ≤ 18 mm
• Use a certified cable with the HDMI logo attached.
• If you do not use a certified HDMI cable, the screen may not display or a connection error may occur. (Recommended HDMI Cable Types)
- High-Speed HDMV™ cable (3 m or less)
- High-Speed HDMV™ cable with Ethernet (3 m or less)
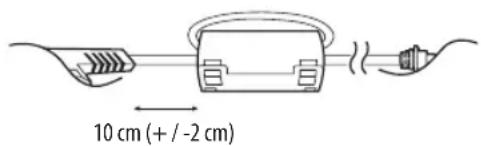
• How to use the ferrite core (Depending on model)
- Use the ferrite core to reduce the electromagnetic interference in the power cord. Wind the power cord on the ferrite core once.
[Wall side]
[TV side]
text_image
10 cm (+ / -2 cm)
- Do not use any unapproved items to ensure the safety and product life span.
- Any damage or injuries caused by using unapproved items are not covered by the warranty.
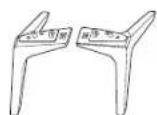
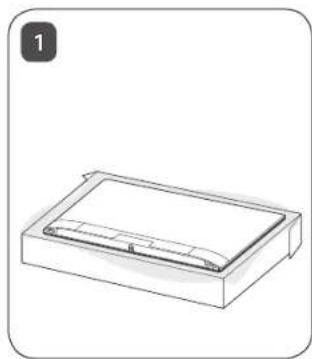
• Some models have a thin film attached on to the screen and this must not be removed. - When attaching the stand to the TV set, place the screen facing down on a cushioned table or flat surface to protect the screen from scratches.
• Make sure that the screws are inserted correctly and fastened securely. (If they are not fastened securely enough, the TV may tilt forward after being installed.) Do not use too much force and over tighten the screws; otherwise screw may be damaged and not tighten correctly.
• Make sure to wring any excess water or cleaner from the cloth.
• Do not spray water or cleaner directly onto the TV screen.
• Make sure to spray just enough of water or cleaner onto a dry cloth to wipe the screen. - When cleaning the product, be careful not to allow any liquid or foreign objects to enter the gap between the upper, left or right side of the panel and the guide panel. (Depending on model)
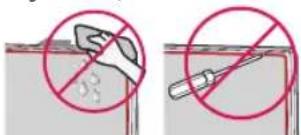
text_image
Diagram showing two methods of removing a substance, with one method marked by a prohibition symbol.Separate purchase
Separate purchase items can be changed or modified for quality improvement without any notification. Contact your dealer to buy these items. These devices only work with certain models. The model name or design may be changed depending on the upgrade of product functions, manufacturer's circumstances or policies.
(Depending on model)
AN-MR650A
Magic Remote

Lifting and moving the TV
Please note the following advice to prevent the TV from being scratched or damaged and for safe transportation regardless of its type and size.
- It is recommended to move the TV in the box or packing material that the TV originally came in.
- Before moving or lifting the TV, disconnect the power cord and all cables.
- When holding the TV, the screen should face away from you to avoid damage.

- Hold the top and bottom of the TV frame firmly. Make sure not to hold the transparent part, speaker, or speaker grill area.
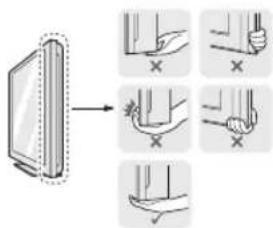
text_image
Diagram illustrating a device with a close-up view of its components, showing hand positioning and tool positioning.- When transporting a large TV, there should be at least 2 people.
- When transporting the TV by hand, hold the TV as shown in the following illustration.
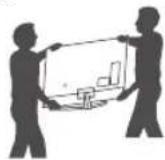
- When transporting the TV, do not expose the TV to jolts or excessive vibration.
- When transporting the TV, keep the TV upright, never turn the TV on its side or tilt towards the left or right.
- Do not apply excessive pressure to cause flexing / bending of frame chassis as it may damage screen.
- When handling the TV, be careful not to damage the protruding buttons.

- Avoid touching the screen at all times, as this may result in damage to the screen.
- Do not move the TV by holding the cable holders, as the cable holders may break, and injuries and damage to the TV may occur.
Using the button
(Depending on model)
You can simply operate the TV functions, using the button.
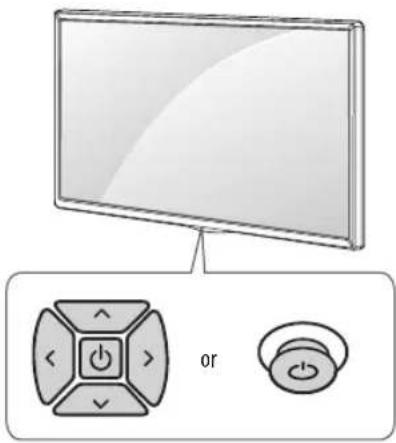
text_image
Diagram showing a monitor with a right-hand rule and a control knob labeled 'or', illustrating the concept of remote control.
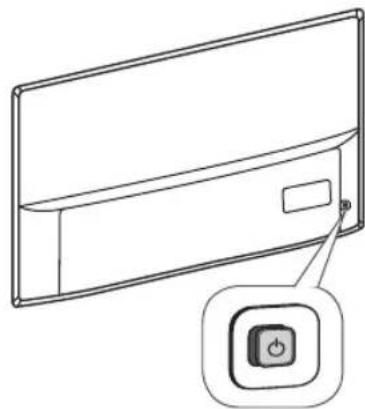
natural_image
Line drawing of a wall-mounted air conditioner unit with a button labeled 'Power' (no text or symbols on the device itself)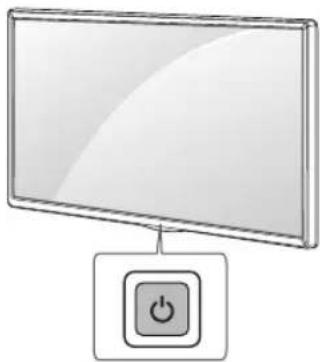
natural_image
Illustration of a flat-screen monitor with a power button icon below it (no text or symbols)Basic functions
| Power On (Press)Power Off ^1 (Press and hold) | |||
| Volume Control | |||
| Programmes Control |
| Power On (Press)Power Off ^1 (Press and Hold)Menu Control (Press ^2 )Menu Selection (Press and Hold ^3 ) |
All running apps will close, and any recording in progress will stop.
2 You can access and adjust the menu by pressing the button when TV is on.
3 You can use the function when you access menu control.
Adjusting the menu
(Depending on model)
When the TV is turned on, press the ⏻ button one time. You can adjust the Menu items using the button.
| Turns the power off. | |
| Accesses the settings menu. | |
| × | Clears on-screen displays and returns to TV viewing. |
| Changes the input source. | |
| ∧∨ | Scrolls through the saved programmes. |
| + | Adjusts the volume level. |
Mounting on a table
1 Lift and tilt the TV into its upright position on a table.
- Leave a 10 cm (minimum) space from the wall for proper ventilation.
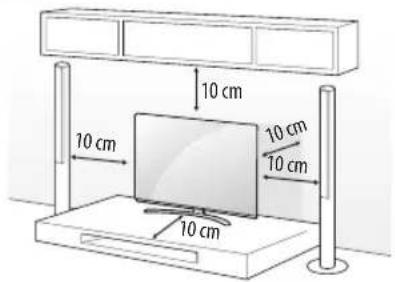
text_image
10 cm 10 cm 10 cm 10 cm 10 cm2 Connect the power cord to a wall outlet.

- Do not place the TV near or on sources of heat, as this may result in fire or other damage.
- Do not apply foreign substances (oils, lubricants, etc.) to the screw parts when assembling the product. (Doing so may damage the product.)
Securing the TV to a wall
(This feature is not available for all models.)
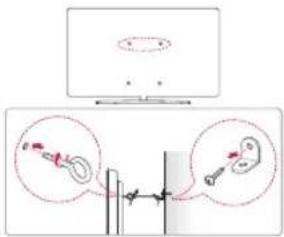
text_image
Diagram showing a device connected to a screen with two labeled components, likely illustrating a mechanical or electrical setup.1 Insert and tighten the eye-bolts, or TV brackets and bolts on the back of the TV.
- If there are bolts inserted at the eye-bolts position, remove the bolts first.
2 Mount the wall brackets with the bolts to the wall.
Match the location of the wall bracket and the eye-bolts on the rear of the TV.
3 Connect the eye-bolts and wall brackets tightly with a sturdy rope. Make sure to keep the rope horizontal with the flat surface.

• Make sure that children do not climb on or hang on the TV.
- Use a platform or cabinet that is strong and large enough to support the TV securely.
- Brackets, bolts and ropes are not provided. You can obtain additional accessories from your local dealer.
- Use a platform or cabinet that is strong and large enough to support the TV securely.
- Brackets, bolts and ropes are not provided. You can obtain additional accessories from your local dealer.
Mounting on a wall
Attach an optional wall mount bracket at the rear of the TV carefully and install the wall mount bracket on a solid wall perpendicular to the floor. When you attach the TV to other building materials, please contact qualified personnel. LG recommends that wall mounting be performed by a qualified professional installer. We recommend the use of LG's wall mount bracket. LG's wall mount bracket is easy to move with cables connected. When you do not use LG's wall mount bracket, please use a wall mount bracket where the device is adequately secured to the wall with enough space to allow connectivity to external devices. It is advised to connect all the cables before installing fixed wall mounts.
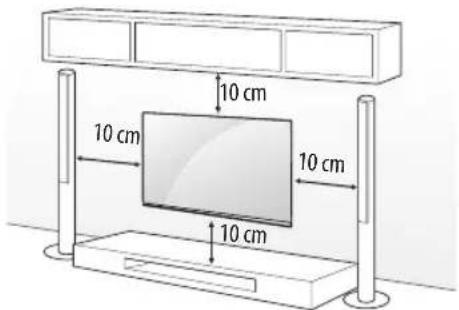
text_image
10 cm 10 cm 10 cm 10 cmMake sure to use screws and wall mount bracket that meet the VESA standard. Standard dimensions for the wall mount kits are described in the following table.
Separate purchase (Wall mounting bracket)
| Model | 55SJ93** | |
| 55SJ85** | ||
| 43UJ75** | 49/55SJ81** | |
| 43UJ74** | 49/55SJ80** | |
| 43UJ70** | 49/55UJ75** | |
| 43UJ67** | 49/55UJ74** | |
| 43UJ65** | 49/55UJ70** | |
| 43UJ63** | 49/55UJ67** | |
| 49/55UJ65** | ||
| 49/55UJ63** | ||
| VESA (A x B) (mm) 200 x 200 300 x 300 | ||
| Standard screw M6 M6 | ||
| Number of screws 4 4 | ||
| Wall mount bracket | LSW240B | LSW350B |
| MSW240 | MSW240 | |
| Model | 65SJ93**60/65SJ85**60/65SJ81**65SJ80**60/65UJ75**65UJ70**65UJ67**60/65UJ65**60/65UJ63** | 75/86SJ95**70/75UJ67**75UJ65** |
| VESA (A x B) (mm) 300 | x 300 600 x 400 | |
| Standard screw M6 M8 | ||
| Number of screws 4 4 | ||
| Wall mount bracket | LSW350B LSW640B | |
| Model 55/65SJ95** | ||
| VESA (A x B) (mm) 300 | x 200 | |
| Standard screw M6 | ||
| Number of screws 4 | ||
| Wall mount bracket | OTW420B | |
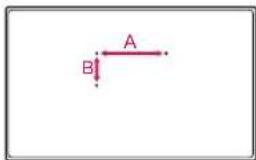
text_image
A B- When installing the wall mounting bracket, it is recommended to cover the stand hole using tape, in order to prevent the influx of dust and insects. (Depending on model)
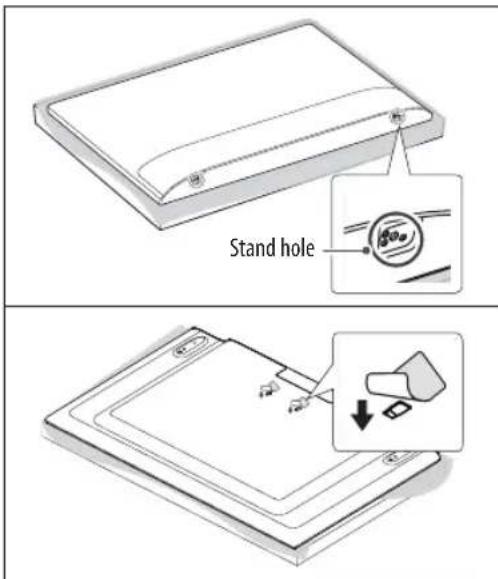
text_image
Stand hole
- Remove the stand before installing the TV on a wall mount by performing the stand attachment in reverse.
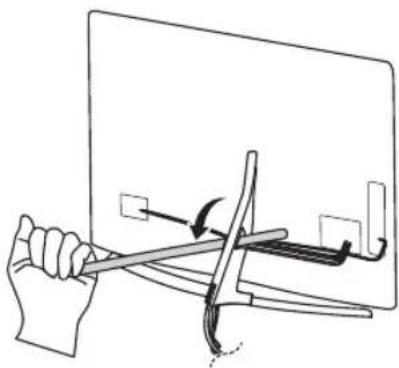
natural_image
Illustration of a hand holding a tool with a ruler, interacting with a computer monitor (no text or symbols visible)- Do not use a sharp object when you detached the cable cover. This could damage the cable or the cabinet. It may also cause personal harm. (Depending on model)
Connections (notifications)
Connect various external devices to the TV and switch input modes to select an external device. For more information of external device's connection, refer to the manual provided with each device.
Available external devices are: HD receivers, DVD players, VCRs, audio systems, USB storage devices, PC, gaming devices, and other external devices.
• The external device connection may differ from the model.
- Connect external devices to the TV regardless of the order of the TV port.
- If you record a TV program on a DVD recorder or VCR, make sure to connect the TV signal input cable to the TV through a DVD recorder or VCR. For more information of recording, refer to the manual provided with the connected device.
- Refer to the external equipment's manual for operating instructions.
- If you connect a gaming device to the TV, use the cable supplied with the gaming device.
- In PC mode, there may be noise associated with the resolution, vertical pattern, contrast or brightness. If noise is present, change the PC output to another resolution, change the refresh rate to another rate or adjust the brightness and contrast on the PICTURE menu until the picture is clear.
- In PC mode, some resolution settings may not work properly depending on the graphics card.
- If ULTRA HD content is played on your PC, video or audio may become disrupted intermittently depending on your PC's performance. (Depending on model)
- When connecting via a wired LAN, it is recommended to use a CAT 7 cable.
Antenna connection
Connect the TV to a wall antenna socket with an RF cable (75 Ω).
• Use a signal splitter to use more than 2 TVs.
- If the image quality is poor, install a signal amplifier properly to improve the image quality.
- If the image quality is poor with an antenna connected, try to realign the antenna in the correct direction.
• An antenna cable and converter are not supplied.
• Supported DTV Audio: MPEG, Dolby Digital, Dolby Digital Plus, HE-AAC
- For a location that is not supported with ULTRA HD broadcasting, this TV cannot receive ULTRA HD broadcasts directly. (Depending on model)
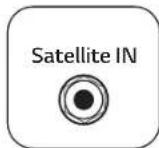
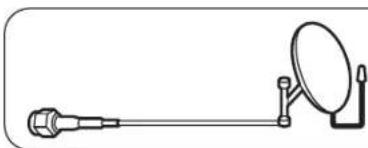
Satellite dish connection
(Only satellite models)
Connect the TV to a satellite dish to a satellite socket with a satellite RF cable (75 Ω).
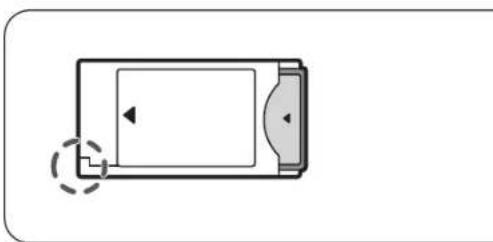
CI module connection
(Depending on model)
View the encrypted (pay) services in digital TV mode.
- Check if the CI module is inserted into the PCMCIA card slot in the right direction. If the module is not inserted properly, this can cause damage to the TV and the PCMCIA card slot.
- If the TV does not display any video and audio when CI+ CAM is connected, please contact to the Terrestrial/Cable/Satellite Service Operator.
USB connection
Some USB Hubs may not work. If a USB device connected using a USB Hub is not detected, connect it to the USB port on the TV directly.
Other connections
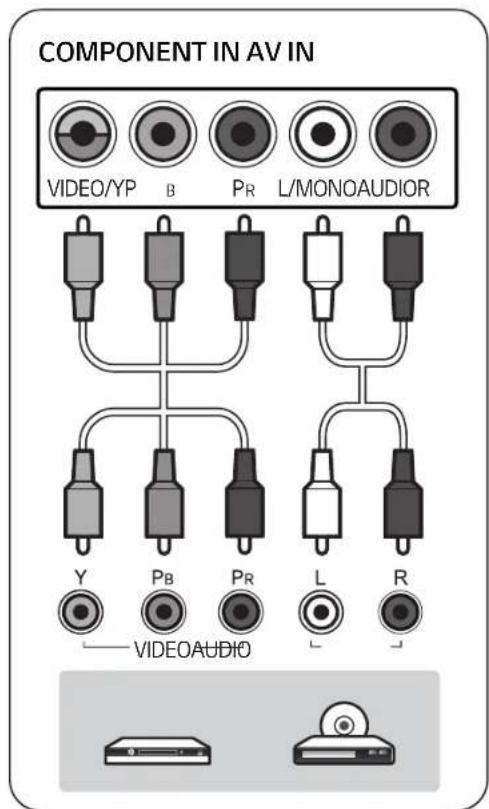
Connect your TV to external devices. For the best picture and audio quality, connect the external device and the TV with the HDMI cable. Some separate cable is not provided.
- Colour → ⚙ → ⴟ → General -HDMI ULTRA HD Deep
- On : Support 4K @ 50/60 Hz (4:4:4, 4:2:2, 4:2:0) - Off : Support 4K @ 50/60 Hz 8 bit (4:2:0)
If the device connected to Input Port also supports ULTRA HD Deep Colour, your picture may be clearer. However, if the device doesn't support it, it may not work properly. In that case, connect the device to a different HDMI port or change the TV's HDMI ULTRA HD Deep Colour setting to Off.
- Supported HDMI Audio format : Dolby Digital / Dolby Digital Plus (32 kHz, 44.1 kHz, 48 kHz), DTS (44.1 kHz, 48 kHz), PCM (32 kHz, 44.1 kHz, 48 kHz, 96 kHz, 192 kHz) (Depending on model)
Remote control
(Some buttons and services may not be provided depending on models or regions.)
The descriptions in this manual are based on the buttons on the remote control. Please read this manual carefully and use the TV correctly. To replace batteries, open the battery cover, replace batteries (1.5 V AAA) matching the and ends to the label inside the compartment, and close the battery cover. To remove the batteries, perform the installation actions in reverse.
Make sure to point the remote control toward the remote control sensor on the TV.
* To use the button, press and hold for more than 3 seconds.
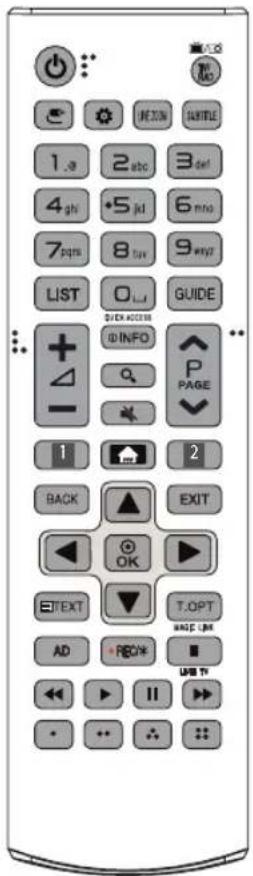
text_image
1.9 2.abc 3.del 4.ghi 5.jkl 6.mno 7.ppts 8.tux 9.wzy LIST O.LJ GUIDE + - QUICK ACCESS © INFO P PAGE 1 2 BACK EXIT OK ETEXT T.OPT HAGE LINE AD RECK USB TV II *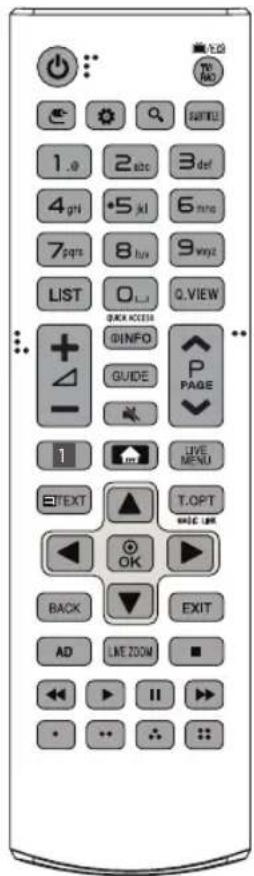
text_image
1.0 4GH 7pqs LIST BACK ACCESS @INFO GUIDE PAGE 1 LIVE MENU TEXT T.OPT OK BACK EXIT AD LIVE ZOOM ■ ■ ■ ■(POWER) Turns the TV on or off.
TV/RAD Selects Radio, TV and DTV programme.
(INPUT) Changes the input source.
(Q. Settings) Accesses the Quick Settings.
LIVE ZOOM By zooming in on the selected area, you can view it in full screen.
SUBTITLE Recalls your preferred subtitle in digital mode.
Number buttons Enters numbers.
Alphabet buttons Enters letters.
LIST Accesses the saved programmes list.
(Space) Opens an empty space on the screen keyboard.
GUIDE Shows programme guide.
Q.VIEW Returns to the previously viewed programme.
QUICK ACCESS* You can access apps or Live TV using the number buttons corresponding to the features.
+Δ-Adjusts the volume level.
①INViews the information of the current programme and screen.
Q (SEARCH) Search for content such as TV programmes, movies and other videos, or perform a web search by entering text in the search bar.
(MUTE) Mutes all sounds.
^P∨ Scrolls through the saved programmes.
^ PAGE ∨ Moves to the previous or next screen.
1, 2 Streaming Service buttons Connects to the Video Streaming Service.
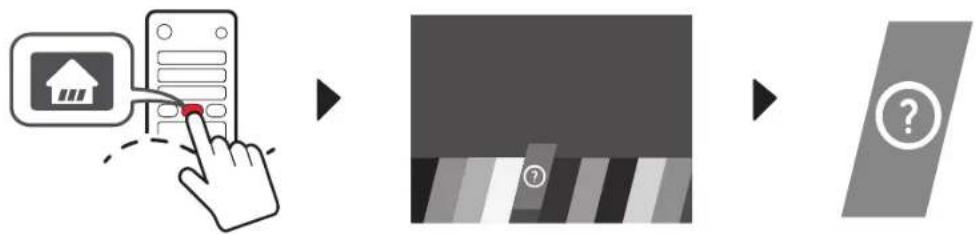
(HOME) Shows Home menu.
- Pressing and holding the button shows previous history. LIVE MENU Shows the list of Programmes and Recommended.
BACK Returns to the previous level.
EXIT Clears on-screen displays and returns to TV viewing.
Navigation buttons (up/down/left/right) Scrolls through menus or options.
○ Selects menus or options and confirms your input.
Teletext buttons (☐ TEXT, T.0) These buttons are used for teletext.
MAGIC LINK* Provides content related to the programme you are currently watching.
AD Audio descriptions function will be enabled.
- REC/* Starts to record and displays record menu.
(Only Time Machine ^Ready supported model)
LIVE TV Returns to LIVE TV.
Control buttons (■, ▶, □, ◀, ▶) Controls media contents.
These access special functions in some menus.
Magic remote functions
(Some buttons and services may not be provided depending on models or regions.)
When the message "Magic remote battery is low. Change the battery." is displayed, replace the battery.
To replace batteries, open the battery cover, replace batteries (1.5 V AA) matching the and ends to the label inside the compartment, and close the battery cover. Be sure to point the magic remote toward the remote control sensor on the TV. To remove the batteries, perform the installation actions in reverse.
* To use the button, press and hold for more than 3 seconds.
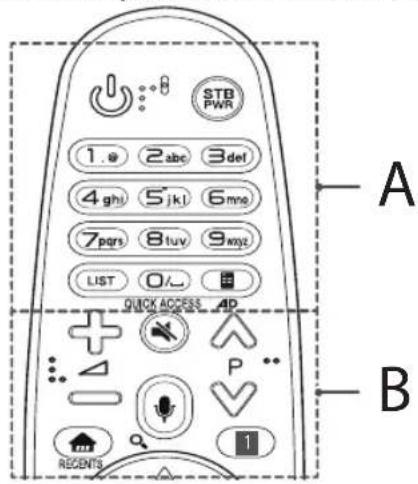
text_image
STB PWR 1. @ 2 abc 3 def 4 ghi 5 jkl 6 mno 7pqrs 8 tuv 9 wyz LIST 0/- QUICK ACCESS AP B RECENTSA
(POWER) Turns the TV on or off.
STBPWR can turn your set-top box on or off by adding the set-top box to the universal remote control for your TV.
Number buttons Enters numbers.
Alphabet buttons Enters letters.
LIST Accesses the saved programmes list.
Space) Opens an empty space on the screen keyboard.
(Screen Remote) Displays the Screen Remote.
- Accesses the Universal Control Menu.
QUICK ACCESS* You can access apps or Live TV using the number buttons corresponding to the features.
AD* Audio descriptions function will be enabled.
B
+△=Adjusts the volume level.
A P V Scrolls through the saved programmes.
(MUTE) Mutes all sounds.
(Voice recognition)
Network connection is required to use the voice recognition function.
1 Press the voice recognition button.
2 Speak when the voice display window appears on the TV screen.
Q (SEARCH)* Search for content such as TV programmes, movies and other videos, or perform a web search by entering text in the search bar.
(HOME) Shows Home menu.
RECENTS* Shows previous history
1 Settings) Accesses the Quick Settings.
- Pressing and holding the ⚙ button displays the All Settings menu.
1 SBMEN the set-top box Home menu.
- When you are not watching via a set-top box: the display changes to the set-top box screen.
text_image
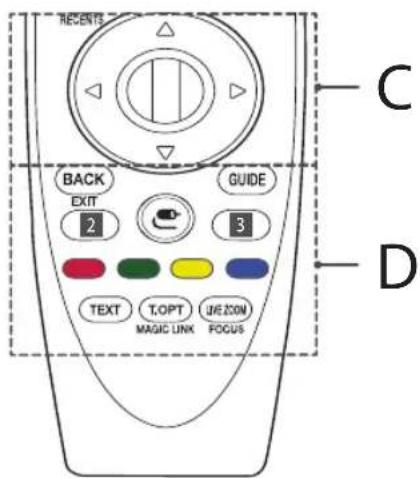
RECENTS BACK EXIT GUIDE 2 3 TEXT T.OPT JUE ZON MAGIC LINK FOCUS C DC
① Wheel (OK) Press the center of the Wheel button to select a menu. You can change programmes by using the Wheel button.
(up/down/left/right) Press the up, down, left or right button to scroll the menu. If you press buttons while the pointer is in use, the pointer will disappear from the screen and Magic Remote will operate like a general remote control. To display the pointer on the screen again, shake Magic Remote to the left and right.
D
BACK Returns to the previous level.
EXIT* Clears on-screen displays and returns to last input viewing. GUIDE Shows programme guide.
2, 3 Streaming Service buttons Connects to the Video Streaming Service.
(INPUT) Changes the input source.
- Pressing and holding the button displays all the lists of external inputs.
3 Settings) Accesses the Quick Settings.
- Pressing and holding the ⚙ button displays the All Settings menu.
These access special functions in some
menus.
Teletext buttons (TEXT T.OPT These buttons are used for teletext.
MAGIC LINK* Provides content related to the programme you are currently watching.
LIVE ZOOM By zooming in on the selected area, you can view it in full screen.
FOCUS* You can zoom in on the area where the remote control is pointed.
Registering magic remote
How to register the magic remote
To use the Magic Remote, first pair it with your TV.
1 Put batteries into the Magic Remote and turn the TV on.
2 Point the Magic Remote at your TV and press the Wheel (OK) on the remote control.
* If the TV fails to register the Magic Remote, try again after turning the TV off and back on.
How to deregister the magic remote
Press the Back (HOK) buttons at the same time, for five seconds, to unpair the Magic Remote with your TV.
* Pressing and holding the Golden will let you cancel and re-register Magic Remote at once.
Licenses
Supported licenses may differ by model. For more information about licenses, visit www.lg.com.
DOLBY AUDIO
HDMI
HIGH-DEFINITION MULTIMEDIA INTERFACE


DOLBY VISION™
(Only UJ75**, SJ80**, SJ81**, SJ85**, SJ93**, SJ95**)
Open source software notice information
To obtain the source code under GPL, LGPL, MPL and other open source licenses, that is contained in this product, please visit http://opensource.lge.com.
In addition to the source code, all referred license terms, warranty disclaimers and copyright notices are available for download.
LG Electronics will also provide open source code to you on CD-ROM for a charge covering the cost of performing such distribution (such as the cost of media, shipping, and handling) upon email request to opensource@lge.com. This offer is valid for three (3) years from the date on which you purchased the product.
External control device setup
To obtain the external control device setup information, please visit www.lg.com.
Troubleshooting
Cannot control the TV with the remote control.
- Check the remote control sensor on the product and try again.
- Check if there is any obstacle between the product and the remote control.
- Check if the batteries are still working and properly installed (to + to -).
No image display and no sound is produced.
• Check if the product is turned on.
• Check if the power cord is connected to a wall outlet.
- Check if there is a problem in the wall outlet by connecting other products.
The TV turns off suddenly.
- Check the power control settings. The power supply may be interrupted.
- Check if the Sleep Timer / Timer Power Off is activated in the Timers settings.
- Check if the Auto Power Off is activated in the General -> Eco Mode settings. (Depending on model)
- If there is no signal while the TV is on, the TV will turn off automatically after 15 minutes of inactivity.
When connecting to the PC (HDMI), 'No signal' or 'Invalid Format' is displayed.
• Turn the TV off/on using the remote control.
• Reconnect the HDMI cable.
- Restart the PC with the TV on.
Abnormal Display
- If the product feels cold to the touch, there may be a small "flicker" when it is turned on. This is normal, there is nothing wrong with product.
- This panel is an advanced product that contains millions of pixels. You may see tiny black dots and/or brightly coloured dots (red, blue or green) at a size of 1 ppm on the panel. This does not indicate a malfunction and does not affect the performance and reliability of the product.
This phenomenon also occurs in third-party products and is not subject to exchange or refund.
- You may find different brightness and color of the panel depending on your viewing position(left/right/top/down).
This phenomenon occurs due to the characteristic of the panel. It is not related with the product performance, and it is not malfunction.
- Displaying a still image for a prolonged period of time may cause image sticking. Avoid displaying a fixed image on the TV screen for a long period of time.
Generated Sound
- "Cracking" noise: A cracking noise that occurs when watching or turning off the TV is generated by plastic thermal contraction due to temperature and humidity. This noise is common for products where thermal deformation is required.
- Electrical circuit humming/panel buzzing: A low level noise is generated from a high-speed switching circuit, which supplies a large amount of current to operate a product. It varies depending on the product.
This generated sound does not affect the performance and reliability of the product.
Specifications
Wireless module specification
- As band channels can vary per country, the user cannot change or adjust the operating frequency. This product is configured for the regional frequency table.
- For consideration of the user, this device should be installed and operated with a minimum distance of 20 cm between the device and the body.
| Wireless module (LGSBWAC72) specifications | |
| Wireless LAN (IEEE 802.11a/b/g/n/ac) | |
| Frequency Range Output Power (Max.) | |
| 2400 to 2483.5 MHz5150 to 5725 MHz5725 to 5850 MHz (Not for EU) | 14 dBm16.5 dBm11.5 dBm |
| Bluetooth | |
| Frequency Range Output Power (Max.) | |
| 2400 to 2483.5 MHz 8.5 dBm | |
* "IEEE 802.11ac" is not available in all countries.
| CI Module (W x H x D) 100.0 | mm x 55.0 mm x 5.0 mm | |
| Environment condition | Operating Temperature | 0 °C to 40 °C |
| Operating Humidity | Less than 80 % | |
| Storage Temperature | -20 °C to 60 °C | |
| Storage Humidity | Less than 85 % | |
(Depending on country)
| Digital TV Analogue TV | ||||
| Television system | DVB-TDVB-T2DVB-CDVB-S/S2 | PAL/SECAM, B/G, D/K, I SECAM L | ||
| Channel coverage (Band) | DVB-S/S2 DVB-C DVB-T/T2 | 46 ~ 862 MHz | ||
| 950 ~ 2150 MHz 46 ~ 890 MHz | VHF III: 174 ~ 230 MHzUHF IV: 470 ~ 606 MHzUHF V: 606 ~ 862 MHzS Band II: 230 ~ 300 MHzS Band III: 300 ~ 470 MHz | |||
| Maximum number of storable programmes | 6,000 2,000 | |||
| External antenna impedance | 75 Ω | |||

text_image
LG Life's GoodRecord the model number and serial number of the TV. Refer to the label on the back cover and quote this information to your dealer when requiring any service.
MODEL ____
SERIAL
OWNER'S MANUAL
EXTERNAL CONTROL DEVICE SETUP
Please read this manual carefully before operating the set and retain it for future reference.
KEY CODES
• This feature is not available for all models.
| Code (Hexa) | Function Note | Code (Hexa) | Function Note | ||
| 00 CH | +, PR + R/C Button 53 List | R/C Button | |||
| 01 CH | -, PR - R/C Button 5B Exit | R/C Button | |||
| 02 Volume + R/C Button 60 PIP(AD) | |||||
| 03 Volume - R/C Button 61 Blue R/C Button | |||||
| 06 > (Arrow Key / Right Key) R/C Button 63 Yellow | R/C Button | ||||
| 07 < (Arrow Key / Left Key) R/C Button 71 Green | R/C Button | ||||
| 08 Power R/C Button 72 Red | R/C Button | ||||
| 09 | Mute | R/C Button | 79 | Ratio / Aspect Ratio | R/C Button |
| 0B Input R/C Button 91 AD (Audio Description) R/C Button | |||||
| 0E SLEEP R/C Button 7A User Guide R/C Button | |||||
| 0F | TV, TV/RAD | R/C Button | 7C | Smart / Home | R/C Button |
| 10 - 19 | * Number Key 0 - 9 | R/C Button | 7E | SIMPLINK | R/C Button |
| 1A | Q.View / Flashback | R/C Button | 8E | ►► (Forward) | R/C Button |
| 1E | FAV (Favorite Channel) | R/C Button | 8F | ◄◄ (Rewind) | R/C Button |
| 20 | Text (Teletext) | R/C Button | AA | Info | R/C Button |
| 21 | T. Opt (Teletext Option) | R/C Button | AB | Program Guide | R/C Button |
| 28 | Return (BACK) | R/C Button | B0 | ► (Play) | R/C Button |
| 30 | AV (Audio / Video) Mode | R/C Button | B1 | ■ (Stop / File List) | R/C Button |
| 39 Caption/Subtitle R/C Button BA II (Freeze / Slow Play / Pause) | R/C Button | ||||
| 40 ∧ | (Arrow Key / Cursor Up) | R/C Button | BB | Soccer | R/C Button |
| 41 | V (Arrow Key / Cursor Down) | R/C Button | BD | ● (REC) | R/C Button |
| 42 | My Apps | R/C Button | DC | 3D | R/C Button |
| 43 Menu / Settings R/C Button 99 AutoConfig R/C Button | |||||
| 44 OK / Enter R/C Button 9F App / * R/C Button | |||||
| 45 Q.Menu R/C Button 9B TV/PC R/C Button | |||||
| 4C List, - (ATSC Only) R/C Button | |||||
* Key code 4C (0x4C) is available on ATSC/ISDB models which use major/minor channel. (For South Korea, Japan, North America, Latin America except Colombia models)
EXTERNAL CONTROL DEVICE SETUP
• Image shown may differ from your TV.
Connect the USB to Serial converter/RS-232C input jack to an external control device (such as a computer or an A/V control system) to control the product's functions externally.
Note: The type of control port on the TV can be different between model series.
* Please be advised that not all models support this type of connectivity.
* Cable is not provided.
USB to Serial converter with USB Cable
USB Type

text_image
(PC) USB IN (TV)- LGTV supports PL2303 chip-based (Vendor ID : 0x0557, Product ID : 0x2008) USB to serial converter which is not made nor provided by LG.
- It can be purchased from computer stores that carry accessories for IT support professionals.
RS-232C With RS232C Cable
DE9 (D-Sub 9pin) Type
- You need to purchase the RS-232C (DE9, D-Sub 9pin female-to-female type) to RS-232C cable required for the connection between the PC and the TV, which is specified in the manual.

text_image
(PC) RS-232C IN (CONTROL & SERVICE) (TV)The connection interface may differ from your TV.

Phone jack Type
- You need to purchase the phone-jack to RS-232 cable required for the connection between the PC and the TV, which is specified in the manual.
* For other models, connect to the USB port.
* The connection interface may differ from your TV.

text_image
(PC) 3 1 2 SERVICE ONLY (TV)- or

text_image
(PC) 3 1 2 RS-232C IN (CONTROL & SERVICE) (TV)Customer Computer RS-232C configurations
3-Wire Configurations(Not standard)

text_image
RS-232C (Serial port)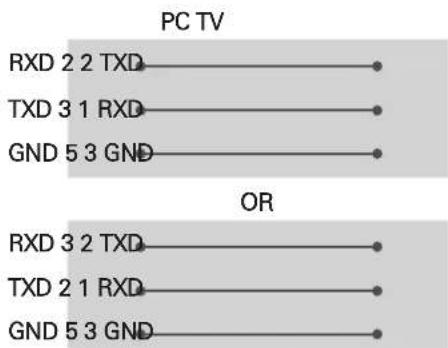
text_image
PC TV RXD 2 2 TXD TXD 3 1 RXD GND 5 3 GND OR RXD 3 2 TXD TXD 2 1 RXD GND 5 3 GNDD-Sub 9 Phone
Set ID
For Set ID number, see "Real Data Mapping" on p.6
- Press SETTINGS to access the main menus.
- Press the Navigation buttons to scroll to (*General → About this TV or OPTION) and press OK.
- Press the Navigation buttons to scroll to SET ID and press OK.
- Scroll left or right to select a set ID number and select CLOSE. The adjustment range is 1-99.
- When you are finished, press EXIT.
* (Depending on model)
Communication Parameters
• Baud rate : 9600 bps (UART)
• Data length : 8 bits
- Parity : None
- Stop bit : 1 bit
- Communication code : ASCII code
• Use a crossed (reverse) cable.
Command reference list
(Depending on model)
| COMMAND1 | COMMAND2 | DATA (Hexadecimal) | COMMAND1 | COMMAND2 | DATA (Hexadecimal) | ||
| 01. Power* k a | 00 to 01 15. | Balance k t 00 to 64 | |||||
| 02. Aspect Ratio | k c (p.7) | 16. Color (Colour) Temperature | x u 00 to 64 | ||||
| 03. Screen Mute | k d (p.7) | 17. ISM Method (Only Plasma TV) | j p (p.8) | ||||
| 04. Volume Mute | k e 00 to 01 | 18. Equalizer j v (p.8) | |||||
| 05. Volume Control | k f 00 to 64 | 19. Energy Saving | j q 00 to 05 | ||||
| 06. Contrast k | g 00 to 64 | 20. Tune Command | m a (p.9) | ||||
| 07. Brightness | k h 00 to 64 | 21. Channel (Programme) Add/Del(Skip) | m b 00 to 01 | ||||
| 08. Color/ Colour | k i 00 to 64 | 22. Key | m c Key Codes | ||||
| 09. Tint | k j 00 to 64 | 23. Control Backlight, Control Panel Light | m g 00 to 64 | ||||
| 10. Sharpness | k k 00 to 32 | 24. Input select (Main) | x b (p.11) | ||||
| 11. OSD Select | k l 00 to 01 | 25. 3D (Only 3D models) | x t (p.11) | ||||
| 12. Remote Control Lock Mode | k m 00 to 01 | 26. Extended 3D (Only 3D models) | x v (p.11) | ||||
| 13. Treble | k r | 00 to 64 | 27. Auto Configure | j u (p.12) | |||
| 14. Bass | k s 00 to 64 | ||||||
* Note: During playing or recording media, all commands except Power (ka) and Key (mc) are not executed and treated as NG. With RS232C cable, TV can communicate "ka command" in power-on or power-off status. but with USB-to-Serial converter cable, the command works only if TV is on.
Transmission / Receiving Protocol
Transmission
[Command1][Command2][ ][Set ID][ ][Data][Cr]
[Command 1] : First command to control the TV. (j, k, m or x)
[Command 2] : Second command to control the TV.
[Set ID] : You can adjust the [Set ID] to choose desired monitor ID number in option menu. Adjustment range in TV is 1 to 99. If [Set ID] value is selected to '0', every connected set can be controlled.
* [Set ID] is indicated as decimal (1 to 99) on menu and as Hexadecimal (0x00 to 0x63) on transmission/receiving protocol.
[DATA] : To transmit command data (hexadecimal). Transmit 'FF' data to read status of command.
[Cr] : Carriage Return - ASCII code '0x0D'
[ ] : Space – ASCII code '0x20'
OK Acknowledgement
[Command2][ ][Set ID][ ][OK][Data][x]
* The set transmits ACK (acknowledgement) based on this format when receiving normal data. At this time, if the data is data read mode, it indicates present status data. If the data is data write mode, it returns the data of the PC computer.
Error Acknowledgement
[Command2][ ][Set ID][ ][NG][Data][x]
* The set transmits ACK (acknowledgement) based on this format when receiving abnormal data from non-viable functions or communication errors.
Data 00: Illegal Code
Real data mapping (Hexadecimal b Decimal)
* When you enter the [data] in hexadecimal, refer to following conversion table.
* Channel Tune (ma) Command uses two-byte hexadecimal value([data]) to select channel number.
* Commands may work differently depending on model and signal.
- Power (Command: k a)
▶ To control Power *On or Off of the set. Transmission[k][a][ ][Set ID][ ][Data][Cr]
Data 00 : Power Off 01 : *Power On
Ack [a][ ][Set ID][ ][OK/NG][Data][x]
▶ To Show TV is Power On or *Off Transmission [k][a][ ][Set ID][ ][FF][Cr] Ack [a][ ][Set ID][ ][OK][Data][x]
* Similarly, if other functions transmit 'FF' data based on this format, Acknowledgement feedback presents status about each function.
- Aspect Ratio (Command: k c) (Main Picture Size)
▶ To adjust the screen format. (Main picture format) You can also adjust the screen format using the Aspect Ratio in the Q.MENU. or PICTURE menu.
Transmission [k][c][ ][Set ID][ ][Data][Cr]
Data 01: Normal screen 07:14:9 (4:3) (Europe, C
02 : Wide screen (16:9)
04 : Zoom
05: Zoom 2
(LatinAmerica except Colombia Only)
06 : Set by Program/ Original
(Europe, Colombia, Mid-East, Asia except South Korea and Japan)
09 : * Just Scan
OB : Full Wide
(Europe, Colombia, Mid-East, Asia except South Korea and Japan)
10 to 1F : Cinema Zoom 1 to 16
Ack [c][ ][Set ID][ ][OK/NG][Data][x]
* Using the PC input, you select either 16:9 or 4:3 screen aspect ratio.
* In DTV/HDMI/Component mode (high-definition), Just Scan is available.
* Full wide mode may work differently based on model and is supported for DTV fully, and ATV, AV partially.
- Screen Mute (Command: k d)
▶ To select screen mute on/off. Transmission [k][d][ ][Set ID][ ][Data][Cr]
Data 00 : Screen mute off (Picture on) Video mute off
01: Screen mute on (Picture off)
10: Video mute on
Ack [d][ ][Set ID][ ][OK/NG][Data][x]
* In case of video mute on only, TV will display On Screen Display(OSD). But, in case of Screen mute on, TV will not display OSD.
- Volume Mute (Command: k e)
▶ To control volume mute on/off. You can also adjust mute using the MUTE button on remote control.
Transmission [k][e][ ][Set ID][ ][Data][Cr]
Data 00 : Volume mute on (Volume off)
01 : Volume mute off (Volume on)
Ack [e][ ][Set ID][ ][OK/NG][Data][x]
- Volume Control (Command: k f)
▶ To adjust volume. You can also adjust volume with the volume buttons on remote control.
Transmission [k][f][ ][Set ID][ ][Data][Cr]
Data Min : 00 to Max : 64
Ack [f][ ][Set ID][ ][OK/NG][Data][x]
▶ To adjust screen contrast. You can also adjust contrast in the PICTURE menu.
Transmission [k][g][ ][Set ID][ ][Data][Cr]
Data Min : 00 to Max : 64
Ack [g][ ][Set ID][ ][OK/NG][Data][x]
- Brightness (Command: k h)
▶ To adjust screen brightness. You can also adjust brightness in the PICTURE menu.
Transmission [k][h][ ][Set ID][ ][Data][Cr]
Data Min : 00 to Max : 64
Ack [h][ ][Set ID][ ][OK/NG][Data][x]
- Color/Colour (Command: k i)
▶ To adjust the screen Color(Colour). You can also adjust colour in the PICTURE menu.
Transmission [k][i][ ][Set ID][ ][Data][Cr]
Data Min : 00 to Max : 64
Ack [i][ ][Set ID][ ][OK/NG][Data][x]
- Tint (Command: k j)
▶ To adjust the screen tint. You can also adjust tint in the PICTURE menu. Transmission [k][j][ ][Set ID][ ][Data][Cr]
Data Red : 00 to Green : 64
Ack [j][ ][Set ID][ ][OK/NG][Data][x]
- Sharpness (Command: k k)
▶ To adjust the screen sharpness. You can also adjust sharpness in the PICTURE menu. Transmission [k][k][ ][Set ID][ ][Data][Cr]
Data Min : 00 to Max : 32
Ack [k][ ][Set ID][ ][OK/NG][Data][x]
- OSD Select (Command: k l)
▶ To select OSD (On Screen Display) on/off when controlling remotely. Transmission [k][l][ ][Set ID][ ][Data][Cr]
Data 00 : OSD off 01 : OSD on
Ack [I][ ][Set ID][ ][OK/NG][Data][x]
- Remote control lock mode (Command: k m)
▶ To lock the front panel controls on the monitor and remote control. Transmission [k][m][ ][Set ID][ ][Data][Cr]
Data 00 : Lock off 01 : Lock on
Ack [m][ ][Set ID][ ][OK/NG][Data][x]
* If you are not using the remote control, use this mode.
When main power is off & on (plug-off and plug-in, after 20 - 30 seconds), external control lock is released.
* In the standby mode (DC off by off timer or 'ka', 'mc' command), and if key lock is on, TV will not turn on by power on key of IR & Local Key.
- Treble (Command: k r)
▶ To adjust treble. You can also adjust in the AUDIO menu.
Transmission [k][r][ ][Set ID][ ][Data][Cr]
Data Min : 00 to Max : 64
Ack [r][ ][Set ID][ ][OK/NG][Data][x]
* (Depending on model)
- Bass (Command: k s)
▶ To adjust Bass. You can also adjust in the AUDIO menu.
Transmission [k][s][ ][Set ID][ ][Data][Cr]
Data Min : 00 to Max : 64
Ack [s][ ][Set ID][ ][OK/NG][Data][x]
* (Depending on model)
- Balance (Command: k t)
▶ To adjust balance. You can also adjust balance in the AUDIO menu. Transmission [k][t][ ][Set ID][ ][Data][Cr]
Data Min : 00 to Max : 64
Ack [t][ ][Set ID][ ][OK/NG][Data][x]
- Color(Colour) Temperature (Command: x u)
▶ To adjust colour temperature. You can also adjust Color(Colour) Temperature in the PICTURE menu. Transmission [x][u][ ][Set ID][ ][Data][Cr]
Data Min : 00 to Max : 64
Ack [u][ ][Set ID][ ][OK/NG][Data][x]
- ISM Method (Command: j p) (Only Plasma TV)
▶ To control the ISM method. You can also adjust ISM Method in OPTION menu. Transmission [j][p][ ][Set ID][ ][Data][Cr]
Data Min : 02: Orbiter
08: Normal 20: Color(Colour) Wash
Ack [p][ ][Set ID][ ][OK/NG][Data][x]
- Equalizer (Command : j v)
Adjust EQ of the set. Transmission [j][v][ ][Set ID][ ][Data][Cr] MSB LSB Frequency Data
| 7 | 6 | 5 | Frequency | 4 | 3 | 2 | 1 | 0 | Step | |||
| 0 | 0 | 0 | 1st Band | 0 | 0 | 0 | 0 | 0 | 0(decimal) | |||
| 0 | 0 | 1 | 2nd Band | 0 | 0 | 0 | 0 | 1 | 1(decimal) | |||
| 0 | 1 | 0 | 3rd Band | ... | ... | ... | ... | ... | ... | |||
| 0 | 1 | 1 | 4th Band | 1 | 0 | 0 | 1 | 1 | 19(decimal) |
| 1 0 0 | 5th Band | 1 0 1 0 0 | 20(decimal) |
Acknowledgement [v][ ][Set ID][ ][OK/NG][Data][x]
* It depends on model, and can adjust when sound mode is EQ adjustable value.
- Energy Saving (Command: j q)
▶ To reduce the power consumption of the TV. You can also adjust Energy Saving in PICTURE menu. Transmission [j][q][ ][Set ID][ ][Data][Cr]
Data
00 : Off
01: Minimum
02 : Medium
03 : Maximum
04 : Auto (For LCD TV / LED TV) / Intelligent sensor (For PDP TV)
05 : Screen off
* (Depending on model)
Ack [q][ ][Set ID][ ][OK/NG][Data][x]
- Tune Command (Command: m a)
* This command may work differently depending on model and signal.
- For Europe, Mid-East, Colombia, Asia except South Korea and Japan Model
▶ Select channel to following physical number.
Transmission [m][a][ ][Set ID][ ][Data 00][ ]
[Data 01][ ][Data 02][Cr]
* Analog Antenna/Cable
[Data 00][Data 01] Channel Data
Data 00 : High byte channel data
Data 01 : Low byte channel data
- 00 00 \~ 00 C7 (Decimal : 0 \~ 199)
Data 02 : Input Source (Analog)
- 00 : Antenna TV (ATV)
- 80 : Cable TV (CATV)
* Digital Antenna/Cable/Satellite
[Data 00][Data 01]: Channel Data
Data 00 : High Channel data
Data 01 : Low Channel data
- 00 00 \~ 27 0F (Decimal: 0 \~ 9999)
Data 02 : Input Source (Digital)
- 10 : Antenna TV (DTV)
- 20 : Antenna Radio (Radio)
- 40 : Satellite TV (SDTV)
- 50 : Satellite Radio (S-Radio)
- 90 : Cable TV (CADTV)
- a0 : Cable Radio (CA-Radio)
* Tune Command Examples:
- Tune to the Analog antenna (PAL) Channel 10.
Set ID = All = 00
Data 00 & 01 = Channel Data is 10 = 00 0a
Data 02 = Analog Antenna TV = 00
Result = ma 00 00 0a 00
- Tune to the digital antenna (DVB-T) Channel 01.
Set ID = All = 00
Data 00 & 01 = Channel Data is 1 = 00 01
Data 02 = Digital Antenna TV = 10
Result = ma 00 00 01 10
- Tune to the satellite (DVB-S) Channel 1000.
Set ID = All = 00
Data 00 & 01 = Channel Data is 1000 = 03 E8
Data 02 = Digital Satellite TV = 40
Result = ma 00 03 E8 40
Ack [a][ ][Set ID][ ][OK][Data 00][Data 01] [Data 02][x][a][ ][Set ID][ ][NG][Data 00][x]
- For South Korea, North/Latin America except Colombia Model
▶ To tune channel to following physical/major/minor number.
Transmission [m][a][ ][0][ ][Data00][ ][Data01] [ ][Data02][ ][Data03][ ][Data04][ ][Data05][Cr]
Digital channels have a Physical, Major, and Minor channel number. The Physical number is the actual digital channel number, the Major is the number that the channel should be mapped to, and the Minor is the sub-channel. Since the ATSC tuner automatically maps the channel from the Major / Minor number, the Physical number is not required when sending a command in Digital.
* Analog Antenna/Cable
Data 00 : Physical Channel Number
- Antenna (ATV) : 02\~45 (Decimal: 2 \~ 69)
- Cable (CATV): 01, 0E\~7D (Decimal: 1, 14\~125)
[Data 01 \~ 04]: Major/Minor Channel Number
Data 01 & 02: xx (Don't care)
Data 03 & 04: xx (Don't care)
Data 05: Input Source (Analog)
- 00 : Antenna TV (ATV)
- 01 : Cable TV (CATV)
* Digital Antenna/Cable
Data 00 : xx (Don't care)
[Data 01][Data 02]: Major Channel Number
Data 01 : High byte Channel Data
Data 02 : Low byte Channel Data
- 00 01 \~ 27 0F (Decimal: 1 \~ 9999)
[Data 03][Data 04]: Minor Channel Number
Data 03 : High byte Channel Data
Data 04 : Low byte Channel Data
Data 05 : Input Source (Digital)
- 02 : Antenna TV (DTV) – Use Physical Channel Number
- 06 : Cable TV (CADTV) – Use Physical Channel
Number
- 22 : Antenna TV (DTV) – Don't Use Physical Channel Number
- 26 : Cable TV (CADTV) - Don't Use Physical Channel Number
- 46 : Cable TV (CADTV) – Use Major Channel Number Only (One Part Channel)
Two bytes are available for each major and minor channel data, but usually the low byte is used alone (high byte is 0).
* Tune Command Examples:
- Tune to the Analog cable (NTSC) channel 35. Set ID = All = 00
Data 00 = Channel Data is 35 = 23
Data 01 & 02 = No Major = 00 00
Data 03 & 04 = No Minor = 00 00
Data 05 = Analog Cable TV = 01
Total = ma 00 23 00 00 00 00 01
- Tune to the digital antenna (ATSC) channel 30-3. Set ID = All = 00
Data 00 = Don't know Physical = 00
Data 01 & 02 = Major is 30 = 00 1E
Data 03 & 04 = Minor is 3 = 00 03
Data 05 = Digital Antenna TV = 22
Total = ma 00 00 00 1E 00 03 22
Ack [a][ ][Set ID][ ][OK][Data 00][Data 01]
[Data 02][Data 03][Data 04][Data 05]
[x][a][ ][Set ID][ ][NG][Data 00][x]
- For Japan Model
▶ To tune channel to following physical/major/minor number.
Transmission [m][a][ ][0][ ][Data00][ ][Data01]
[ ][Data02][ ][Data03][ ][Data04][ ][Data05][Cr]
* Digital Antenna/Satellite
Data 00: xx (Don't care)
[Data 01][Data 02]: Major Channel Number
Data 01: High byte Channel Data
Data 02: Low byte Channel Data
- 00 01 \~ 27 0F (Decimal: 1 \~ 9999)
[Data 03][Data 04]: Minor/Branch Channel Number (Don't care in Satellite)
Data 03: High byte Channel Data
Data 04: Low byte Channel Data
Data 05 : Input Source (Digital/Satellite for Japan)
- 02 : Antenna TV (DTV)
- 07 : BS (Broadcasting Satellite)
- 08 : CS1 (Communication Satellite 1)
- 09 : CS2 (Communication Satellite 2)
* Tune Command Examples:
1 Tune to the digital antenna (ISDB-T) channel 17-1. Set ID = All = 00
Data 00 = Don't know Physical = 00
Data 01 & 02 = Major is 17 = 00 11
Data 03 & 04 = Minor/Branch is 1 = 00 01
Data 05 = Digital Antenna TV = 02
Total = ma 00 00 00 11 00 01 02
- Tune to the BS (ISDB-BS) channel 30.
Set ID = All = 00
Data 00 = Don't know Physical = 00
Data 01 & 02 = Major is 30 = 00 1E
Data 03 & 04 = Don't Care = 00 00
Data 05 = Digital BS TV = 07
Total = ma 00 00 00 1E 00 00 07
* This feature is varied based on the model.
Ack [a][ ][Set ID][ ][OK][Data 00][Data 01]
[Data 02][Data 03][Data 04][Data 05]
[x][a][ ][Set ID][ ][NG][Data 00][x]
- Channel(Programme) Add/Del(Skip) (Command: m b)
▶ To skip current channel(programme) for next time.
Transmission [m][b][ ][Set ID][ ][Data][Cr]
Data 00 : Del(ATSC, ISDB)/Skip(DVB) 01 : Add
Ack [b][ ][Set ID][ ][OK/NG][Data][x]
* Set the saved channel status to del(ATSC, ISDB)/skip(DVB) or add.
- Key (Command: m c)
▶ To send IR remote key code.
Transmission [m][c][ ][Set ID][ ][Data][Cr]
Data Key code - p.2.
Ack [c][ ][Set ID][ ][OK/NG][Data][x]
- Control Backlight (Command: m g)
• For LCD TV / LED TV
▶ To control the backlight.
Transmission [m][g][ ][Set ID][ ][Data][Cr]
Data Min : 00 to Max : 64
Ack [g][ ][Set ID][ ][OK/NG][Data][x]
Control Panel Light (Command: m g)
- For Plasma TV
▶ To control the panel light.
Transmission [m][g][ ][Set ID][ ][Data][Cr]
Data Min : 00 to Max : 64
Ack [g][ ][Set ID][ ][OK/NG][Data][x]
24. Input select (Command: x b) (Main Picture Input)
▶ To select input source for main picture. Transmission [x][b][ ][Set ID][ ][Data][Cr]
Data
00: DTV 01: CADTV
02 : Satellite DTV 10 : ATV ISDB-BS (Japan)
03: ISDB-CS1 (Japan)
04: ISDB-CS2 (Japan)
11: CATV
20:AV or AV1 21:AV2
40 : Component1 41 : Component2 60 : RGB
90:HDMI1 91:HDMI2
92:HDMI3 93:HDMI4
Ack [b][ ][Set ID][ ][OK/NG][Data][x]
* This function depends on model and signal.
25. 3D(Command: x t) (only 3D models) (Depending on model)
▶ To change 3D mode for TV.
Transmission [x][t][ ][Set ID][ ][Data 00][ ][Data 01] [ ][Data 02][ ][Data 03][Cr]
* (Depending on model) Data Structure
[Data 01] 00: Top and Bottom 01: Side by Side 02: Check Board 03: Frame Sequential 04: Column interleaving 05: Row interleaving
[Data 02] 00 : Right to Left 01 : Left to Right
[Data 03] 3D Effect(3D Depth): Min : 00 - Max : 14 (*transmit by Hexadecimal code)
* [Data 02], [Data 03] functions depend on model and signal.
* If [Data 00] is 00 (3D On), [Data 03] has no meaning.
* If [Data 00] is 01 (3D off) or 02 (3D to 2D), [Data 01], [Data 02] and [Data 03] have no meaning.
* If [Data 00] is 03 (2D to 3D), [Data 01] and [Data 02] have no meaning.
* If [Data 00] is 00 (3D On) or 03 (2D to 3D), [Data 03] works when 3D Mode (Genre) is manual only.
* All 3D pattern options ([Data 01]) may not be available according to broadcasting/video signal.
[Data 00] [Data 01] [Data 02] [Data 03]
| 00 0 0 0 | ||
| 01 X X X | ||
| 02 X X X | ||
| 03 X 0 0 |
X : don't care
Ack [t][ ][Set ID][ ][OK][Data00][Data01][Data02] [Data03][x] [t][ ][Set ID][ ][NG][Data00][x]
26. Extended 3D(Command: x v) (only 3D models) (Depending on model)
▶ To change 3D option for TV. Transmission [x][v][ ][Set ID][ ][Data 00][ ] [Data 01][Cr]
[Data 00] 3D option
00 : 3D Picture Correction
01 : 3D Depth (3D Mode is Manual Only)
02:3D Viewpoint
06:3D Color Correction
07:3D Sound Zooming
08 : Normal Image View
[Data 01] It has own range for each 3D option determined by [Data 00].
1) When [Data 00] is 00
00: Right to Left
01: Left to Right
2) When [Data 00] is 01, 02
Data Min: 0 - Max: 14 (*transmit by Hexadecimal code)
Data value range(0 - 20) converts Viewpoint range
(-10 - +10) automatically (Depending on model)
* This option works when 3D Mode (Genre) is manual only.
3) When [Data 00] is 06, 07
00:Off
01:On
4) When [Data 00] is 08
00 : Revert to 3D video from 3D-to-2D converted 2D video
01 : Change 3D video to 2D video, except 2D-to-3D video
* If conversion condition doesn't meet, command is treated as NG.
5) When [Data 00] is 09
00: Standard 01: Sport
(Depending on model) ▶ To adjust picture position and minimize image shaking automatically. It works only in RGB (PC) mode.
Transmission [j][u][ ][Set ID][ ][Data][Cr]
Data 01 : Run Auto Configure
Ack [u][ ][Set ID][ ][OK/NG][Data][x]