
SP33010CN - Food processor SWAN - Free user manual and instructions
Find the device manual for free SP33010CN SWAN in PDF.


| Swan SP33010CN Food Processor / Stand Mixer | |
| Product Type | Professional Stand Mixer with optional Meat Grinder and Vegetable Slicer |
| Model | SP33010 (all colors) |
| Input Voltage | 220-240V |
| Frequency | 50/60 Hz |
| Power Consumption | 1000-1200 Watts |
| Weight | 7 kg |
| Bowl Capacity | 4.5 Liters |
| Maximum Egg Whites | 20 eggs (whisk attachment) |
| Maximum Dough (beater) | 2000 g soft yeast dough |
| Maximum Dough (dough hook) | 1000 g flour-based dough |
| Continuous Operation Limit | 7-8 minutes, then 10 minute cool-down |
| Speed Control | Variable speed (1-9) with “O” off position |
| Main Attachments Included | Dough hook, Beater, Whisk, Splash guard |
| Optional Accessories | Meat Grinder (SP33010N001), Vegetable Slicer (SP33010N003), Glass Bowl (SP33010N004), Replacement attachments |
| Meat Grinder Functions | Mincing (coarse, medium, fine), Sausage stuffing, Meatball making |
| Vegetable Slicer Functions | Slicing and shredding (various discs) |
| Cleaning | Hand wash attachments; wipe motor housing with damp cloth; do not immerse |
| Safety Features | Motor stops when arm is lifted; double insulation; BS plug (earth not required) |
| Warranty | 2 years from original purchase (UK and Eire only) |
| Country of Origin / Brand | Swan Products Ltd., UK |
Frequently Asked Questions - SP33010CN SWAN
User questions about SP33010CN SWAN
0 question about this device. Answer the ones you know or ask your own.
Ask a new question about this device
Download the instructions for your Food processor in PDF format for free! Find your manual SP33010CN - SWAN and take your electronic device back in hand. On this page are published all the documents necessary for the use of your device. SP33010CN by SWAN.
USER MANUAL SP33010CN SWAN
1200 Watt Professional Stand Mixer
Model: SP33010 (all colours) Help line: 0333 220 6050
v1.0

IMPORTANT INFORMATION - RETAIN FOR FUTURE USE
When using any electrical appliance, basic safety precautions should always be followed including the following:
• Always ensure that the voltage on the rating label corresponds to the mains voltage in your home
- Incorrect operation and improper use can damage the appliance and cause injury to the user.
- This appliance can be used by children aged from 8 years and above if they have been given supervision or instruction concerning use of the appliance in a safe way and if they understand the hazards involved.
- Cleaning and user maintenance shall not be made by children unless they are older than 8 and supervised. Keep the appliance and its cord out of reach of children aged less than 8 years.
- Check the power cord and plug regularly for any damage. If the cord or the plug is damaged, it must be replaced by the manufacturer or qualified person in order to avoid an electrical hazard.
- Do not use the appliance if it has been dropped or damaged in any way. In case of damage, take the unit in for examination and/or repair by an authorised service agent.
- Never immerse the unit in water or any other liquid for cleaning purposes.

IMPORTANT INFORMATION - RETAIN FOR FUTURE USE
- Remove the plug from the socket by gripping the plug. Do not pull on the cord to disconnect the appliance from the mains. Always unplug the unit when not in use, before cleaning or when adding or removing parts.
- The use of accessory attachments that are not recommended or supplied by the manufacturer may result in injuries, fire or electric shock.
- Do not let the cord hang over the edge of a table or counter. Ensure that the cord is not in a position where it can be pulled on inadvertently.
- Do not allow the cord to touch hot surfaces and do not place on or near a hot gas or electric burner or in a heated oven.
- Do not use the appliance on a gas or electric cooking top or over or near an open flame.
- Use of an extension cord with this appliance is not recommended. However, if it is necessary to use an extension lead, ensure that the lead is suited to the power consumption of the appliance to avoid overheating of extension cord, appliance or plug point. Do not place the extension cord in a position where it can be pulled on by children or animals or tripped over.
- This appliance is not suitable for outdoor use. Do not use the appliance for anything other than its intended use.
- Do not carry the appliance by the power cord.
- Do not leave the appliance unattended during use. Always unplug the unit when not in use or before cleaning.
• Always operate the appliance on a smooth, even, stable

IMPORTANT INFORMATION - RETAIN FOR FUTURE USE
surface that can withstand the weight of the product. Do not place the unit on a hot surface.
- Ensure that the unit is switched off after use.
- The manufacturer does not accept responsibility for any damage or injury caused by improper or incorrect use, or for repairs carried out by unauthorised personnel.
- In case of technical problems, switch off the product and do not attempt to repair it yourself. Return the appliance to an authorised service facility for examination, adjustment or repair. Always insist on the use of original spare parts. Failure to comply with the above mentions precautions and instructions, could affect the safe operation of this product.
- Your appliance must never be switched on through an external timer or any kind of separate remote control system
- This appliance is intended to be used in household and similar applications such as: staff kitchen areas, in shops, offices and other working environments; farm houses; by clients in hotels, motels and other residential type environments; bed and breakfast type environments.
- Do not touch moving parts with fingers or any utensil during operation!

TECHNICAL DATA
Description: Professional Mixer & Bowl
Model: SP33010 [all colours]
Input Voltage: 220-240V
Frequency: 50/60Hz
Power consumption: 1000-1200 Watts
Weight: 7kg. Bowl capacity: 4.5L


PARTS OVERVIEW
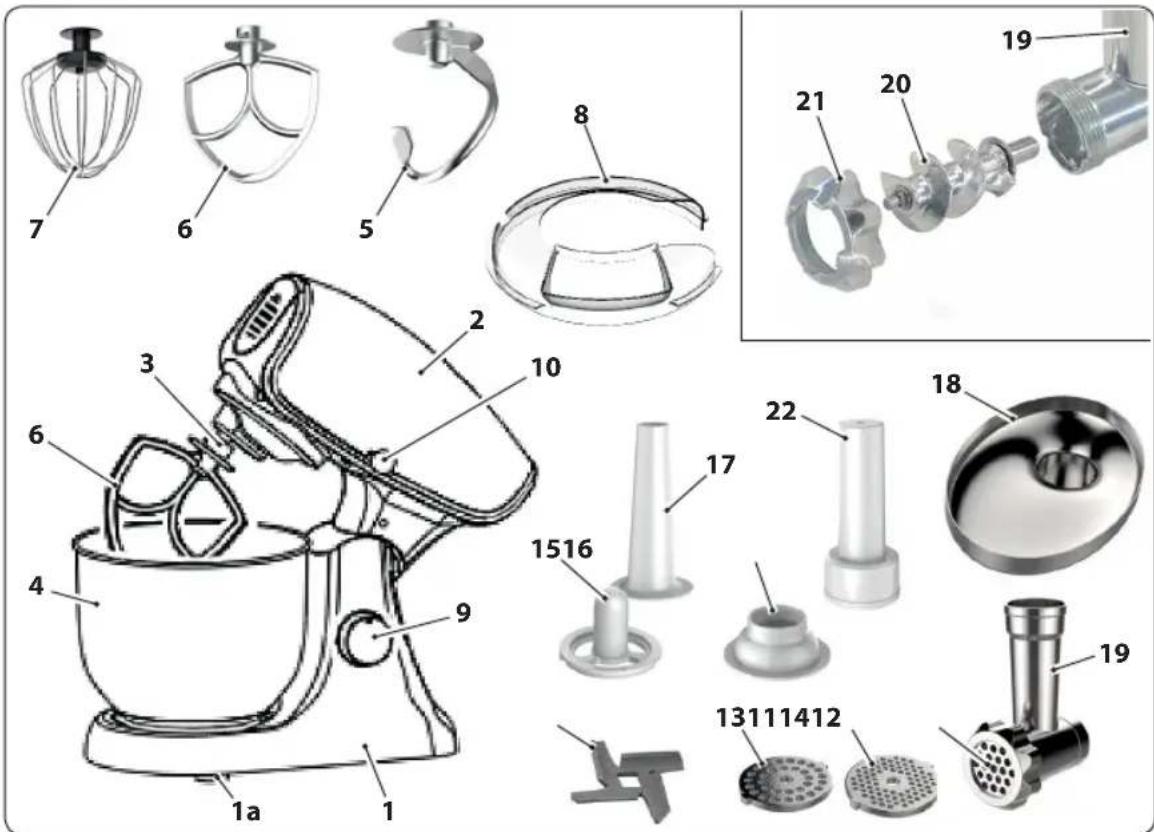
FOR MAIN MIXER
1) Motor body 1a) Suction feet
2] Arm
3) Control shaft
4] Bowl
5) Dough hook (for heavy doughs)
6) Beater (for medium doughs)
7] Whisk [for beating etc]
8) Splash protection lid
9) Speed control
10) Lift lever
FOR OPTIONAL MEAT GRINDER
11) Star blade
12) Large mincing disc
13) Medium mincing disc
14) Fine mincing disc
15) Meat balls connector
16) Meat balls cone
17) Sausage and salamis cone
18) Tray
19) Refuelling duct
20) Auger
21) Seal
22) Tamper
Swan 5


HOW TO USE
BEFORE FIRST USE
Remove all packaging. Wash the bowl and accessories in warm, soapy water. Rinse and dry thoroughly.
Cleaning the components is a good opportunity to familiarise yourself with assembling the mixer, correctly, siting the bowl/guard and fitting or removing the mixer attachments.
TAKE CARE WHEN HANDLING THE BOWL, ESPECIALLY WHEN WET. REPLACEMENTS ARE EXPENSIVE!
Pull the Lift Lever (10) backwards and lift the Arm (2). To fit the bowl, place it over the base and turn anti-clockwise to lock it into place. Mixing attachments are fitted and removed by placing them over the Control Shaft (3). Push and turn clockwise to fit. Turn anti-clockwise and pull to remove. Refer to illustrations on page 8
NOTE: THE MOTOR WILL NOT RUN WHEN THE ARM IS IN THE UP POSITION
Select the desired attachment depending on the mixing task to be performed:
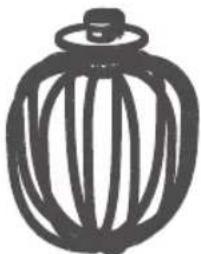
WHISK ATTACHMENT
Eggs - Maximum quantity 20 Eggs. Use this accessory for creams with low consistency, sauces, mayonnaise, to beat cream, eggs, liquids, egg whites, etc. Can be used at all speeds Be mindful that some splashing can occur. Use the Splash Protection Lid (8) where necessary. Typical use time: 3-5 minutes.

BEATER ATTACHMENT
Soft yeast dough - Maximum quantity 2000 g Use this accessory for semi-hard doughs, sauces, medium-consistency creams, chocolate based doughs, whipped pastry doughs, etc. Use speed 1-5. Typical use time 60 seconds or less.

DOUGH HOOK ATTACHMENT
Maximum quantity 1000 g. Use this accessory for flour-based doughs, such as breads and pizza's dough etc, short pastry, cookies' dough, etc. Use speeds 1-3 for up to 4 minutes

HOW TO USE
PLEASE FOLLOW THE MIXING TIMES AND INGREDIENT WEIGHTS FOR EACH ATTACHMENT ABOVE. IGNORING THEM COULD DAMAGE THE MOTOR AND INVALIDATE THE WARRANTY
- If the motor stops or struggles to start immediately turn the mixer off and inspect the dough. It is probably too heavy
- Do not use the appliance for more than 7-8 consecutive minutes
TIPS
For a good result it's necessary to respect some basic rules. Here are some tips which can be applied to most of the recipes you're going to prepare.
- Always use clean accessories; when beating egg whites, even a small grease residue could prevent a good result.
- When using eggs, make sure they're very fresh and at ambient temperature.
- Slice/dice/soften ingredients like butter or margarine to ease their processing.
- Add the ingredients to the dough delicately, in order to not unduly interrupt the performed processing.
- Start processing at speed “1” to amalgamate the ingredients, to avoid liquid splashes, then gradually increase speed according to the type of processing being done
- Do not exceed the maximum advised capacities or running times.
ALWAYS USE THE SPLASH GUARD, ESPECIALLY WHEN MIXING HOT INGREDIENTS
ENSURE THE OPTIONAL MEAT GRINDER ACCESSORY IS NOT ATTACHED TO THE APPLIANCE WHEN IT IS BEING USED AS A MIXER

HOW TO USE
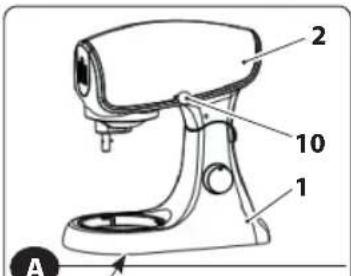
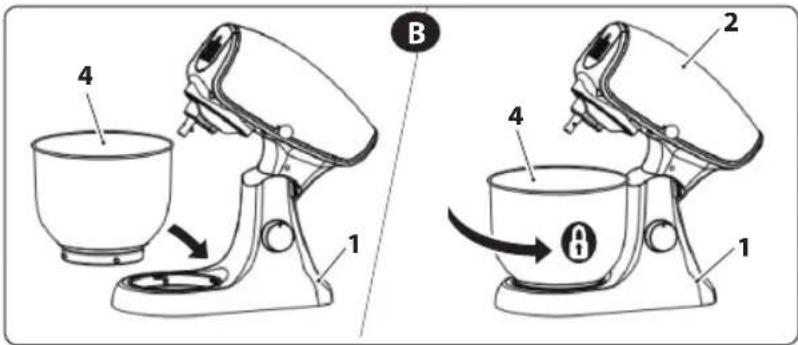
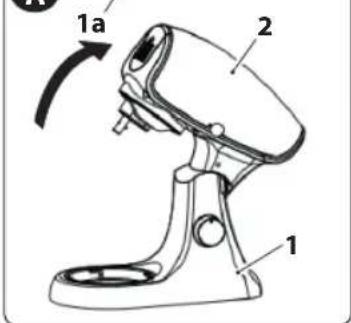
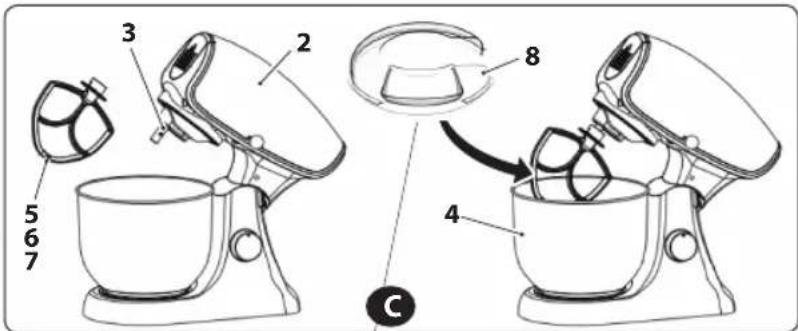
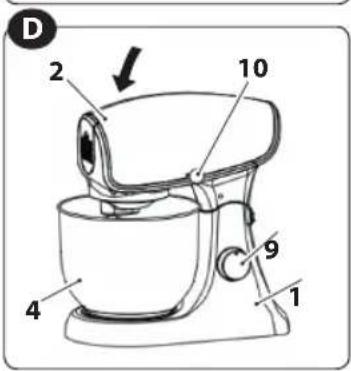
A: Lifting the arm (2) using the lift lever (10)
B: Fitting and locking the bowl
C: Fitting the attachments (5, 6, 7) and splash guard (8)
D: Lowering the arm (2)

MEAT GRINDER ACCESSORY
Please note that this is an optional accessory available from our web site at:
www.swan-brand.co.uk
Accessory model: SP33010N001
IMPORTANT SAFETY INFORMATION WHEN USING MEAT GRINDER
- Do not use Meat Grinder and Mixer at the same time
- Never insert fingers or any other utensil into Meat Grinder when in use
- Always ensure correct assembly to prevent injury or damage to the motor
- Clean the Meat Grinder components after each use. Please note that the metal parts should NOT be put in the dishwasher as the strong detergent can cause oxidation.
- Make sure NO attachments are fitted to the Control Shaft (3) before using the Meat Grinder
- Ensure the Mixer is on a stable surface and is unplugged from the mains supply.
- Refer to the drawings on the next page showing correct assembly
• Take extra care when handling or cleaning the sharp blades used on the Meat Grinder

MEAT GRINDER ACCESSORY
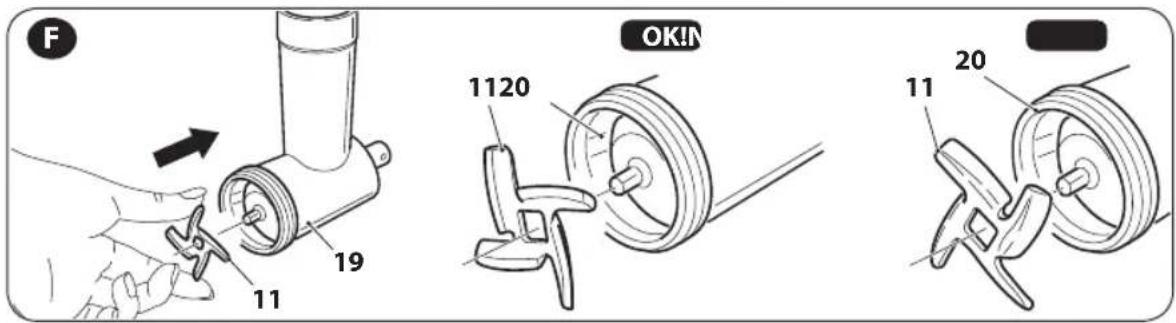

MEAT GRINDER ACCESSORY
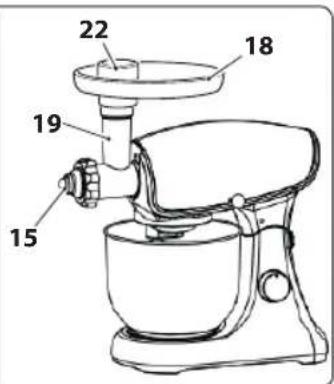

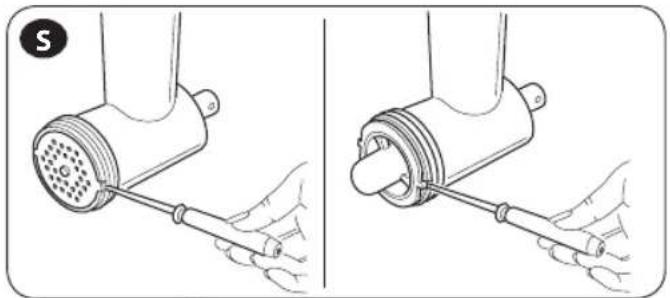
Swan 11

MEAT GRINDER ACCESSORY
USE AS MEAT GRINDER
Make sure that the suction feet (1a) are firmly fixed to the counter top.
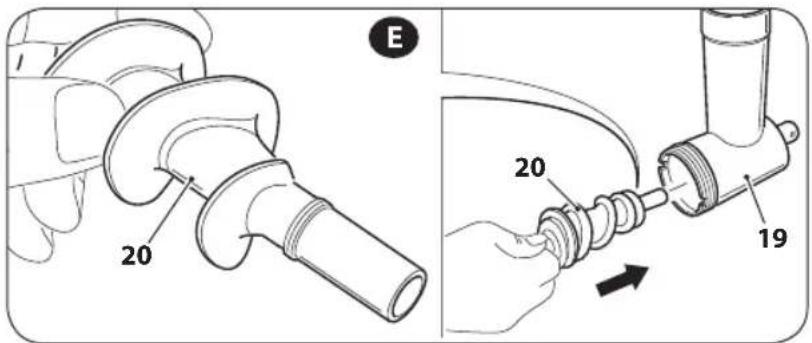
- Assemble the duct [19] as shown in the illustration:
• The auger (20) [ fig. E]; - The star blade (11) [with the sharp part facing outward]. NOTE: If the sharp part of the blade is pointing towards the endless screw the appliance doesn't work. Be careful. This blade is sharp!
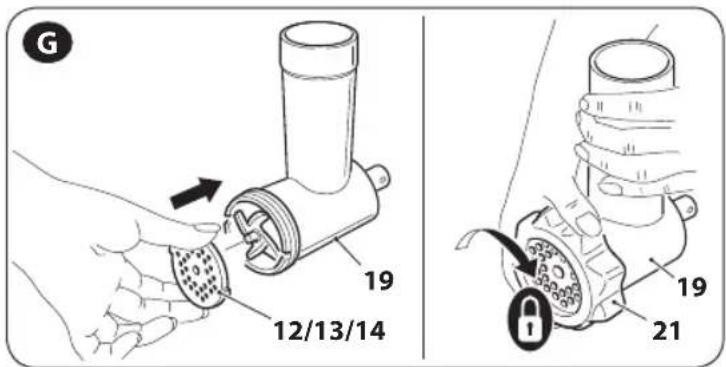
- Place the desired mincing disc in the duct [19] aligning the two disc teeth with the holes in the duct [19] (fig. G).
- Hold everything in place by fastening the seal [21] (tighten it with your hands) [fig. G].
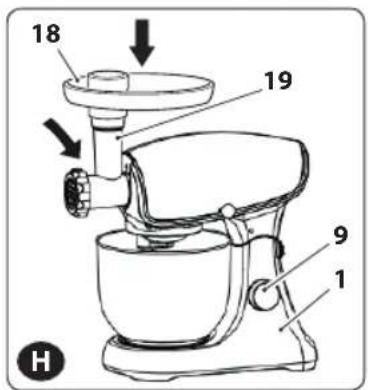
- Slightly rotate the duct [19] towards the right and insert it in the motor unit [1] facilitating the correct coupling (fig. H).
- Rotate the duct (19) towards the right until the entry pipe is in vertical position (fig. H).
- Make sure that the components are firmly stable; the duct (19) must not move or disconnect from its position.
- Insert the tray [18] in the duct [19].
- Place the minced meat collection container under the final part of the refueling duct [19].
- Make sure that the switch (9) is in "O" position.
- Connect the power plug to the power socket
- Start the appliance at minimum speed, then increase it if necessary.
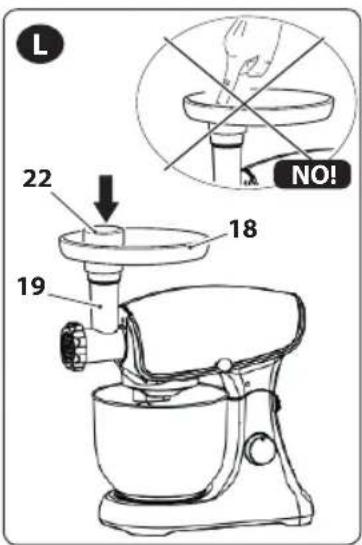
- Insert the food to be processed in the tray [18] and press it into the duct [19] with the appropriate tamper [22] (fig. L).
Useful tips
- Prepare the meat to be minced by removing bones and cartilage.
- Cut the meat into stripes of around 2 x 2 x 6 cm.
- Progressively insert the meat in the tray [18] and push it downward using the appropriate tamper [22].
- Once all of the meat has been minced, insert a few crusts of bread in the shredder to remove the small meat parts left in the appliance.
- Do not insert fingers, tools and metallic objects in the refuelling duct [19] to press foods. Use only the tamper [22] (fig. L)


MEAT GRINDER ACCESSORY
Using the accessory to "stuff" (making sausages)
The use of this accessory allows to prepare delicious sausages and salamis in general, directly at home.
- Prepare the appliance as described in the "USE AS MEAT GRINDER" (fig. G).
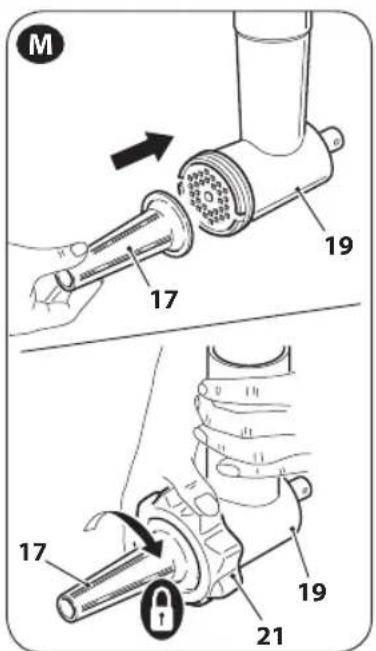
- Place the sausage and salamis cone (17) on the refuelling duct (19) [ fig. M].
- Secure everything by fastening the seal [21] (tightening it with your hands) (fig. M).
- Complete the assembly operating as described in USE AS MEAT GRINDER section
• Prepare the meat to be minced and stuffed, together with possible spices to add, removing bones and cartilage.
- Cut the meat into stripes of about 2 x 2 x 6cm.
- Wet the skin with warm water to give it more flexibility.
- Slide the skin onto the sausage and sausage cone [17], allowing it to move forward about 5 cm
- Make sure that the switch (9) is in "0" position
- Connect the power plug to the power socket
- Start the appliance at minimum speed, then increased it if necessary.
- Progressively insert the meat in the refuelling duct (19) and push it downward using the appropriate tamper (22).
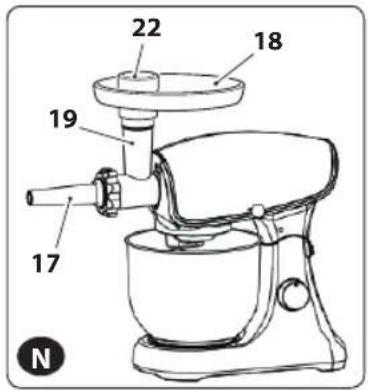
- Do not insert fingers, tools and metallic objects in the refuelling duct [19] to press foods. Use only the tamper [22] (fig. N).
- When the sausage is full, turn off the appliance.
- Tie a knot in the 5cm skin left-overs and push it downward to ensure that there's no air left.
- Restart the appliance and keep adding meat until obtaining the desired sausage.
Useful tips
- Do not let the appliance work continuously for more than 7-8 minutes and allow 10 minute cooling time between sessions
- To keep the skin from "exploding", try not to make too large sausages.
- The processing will be easier if two people perform it [one inserting the meat in the machine and the other holding the skin].
- When all of the meat has been used, turn off the machine, disconnect the plug from the socket and remove the parts left inside.
- To make sausages of the desired length, hold and twist the skin in the appropriate points.


MEAT GRINDER ACCESSORY
Using the Meat Balls accessory
The use of this accessory allows to prepare delicious meat balls and saccottini.
- Prepare the appliance as described in the "USE AS MEAT GRINDER" (fig. G).
- Assemble in sequence in the duct (19):
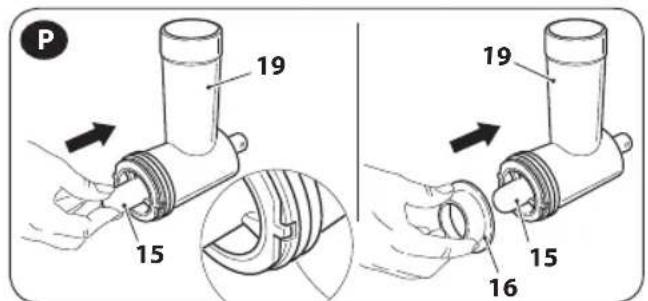
• The auger (20) (fig. E); - The meat balls connection (15) aligning the two disc teeth with the holes in the duct (19)(fig. P);
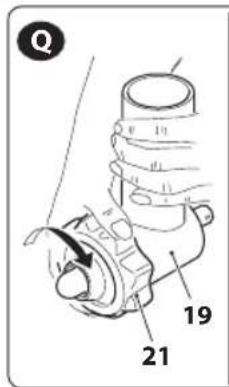
• The meat balls cone (16) (fig. P). - Secure everything by fastening the seal [21] (tightening it with your hands) (fig. Q)
- Complete the assembly operating as described in USE AS MEAT GRINDER
- Neither use the star blade (11) nor the discs to mince (12-13-14).
- Use already minced meat (even several times).
- Add other possible ingredients to the minced meat and knead everything in a bowl until amalgamating it.
- Make sure that the switch (9) is in "O" position
- Connect the power plug to the power socket
- Start the appliance at minimum speed, then increase it if necessary.
- Put the minced food in the tray [18] and press it in the duct [19] with the appropriate tamper [22]. A cylindrical casing will be formed. Cut the meat balls to the desired length (fig. R).
- Do not insert fingers, tools and metallic objects in the refuelling duct [19] to press foods. Use only the tamper [22] (fig. N).
- Do not let the appliance work continuously for more than 7-8 minutes and allow 10 minute cooling time between sessions

VEGETABLE SLICER
Please note that this is an optional accessory available from our web site at:
www.swan-brand.co.uk
Accessory model: SP33010N003
IMPORTANT SAFETY INFORMATION WHEN USING VEGETABLE SLICER
- Do not use Vegetable Slicer and Mixer at the same time
- Never insert fingers or any other utensil into Vegetable Slicer when in use
- Always ensure correct assembly to prevent injury or damage to the motor
- Clean the Vegetable Slicer components after each use. Please note that the metal parts should NOT be put in the dishwasher as the strong detergent can cause oxidation.
- Make sure NO attachments are fitted to the Control Shaft (3) before using the Vegetable Slicer
- Ensure the Mixer is on a stable surface and is unplugged from the mains supply.
- Refer to the drawings on the next page showing correct assembly
• Take extra care when handling or cleaning the sharp blades used on the Vegetable Slicer

VEGETABLE SLICER ASSEMBLY
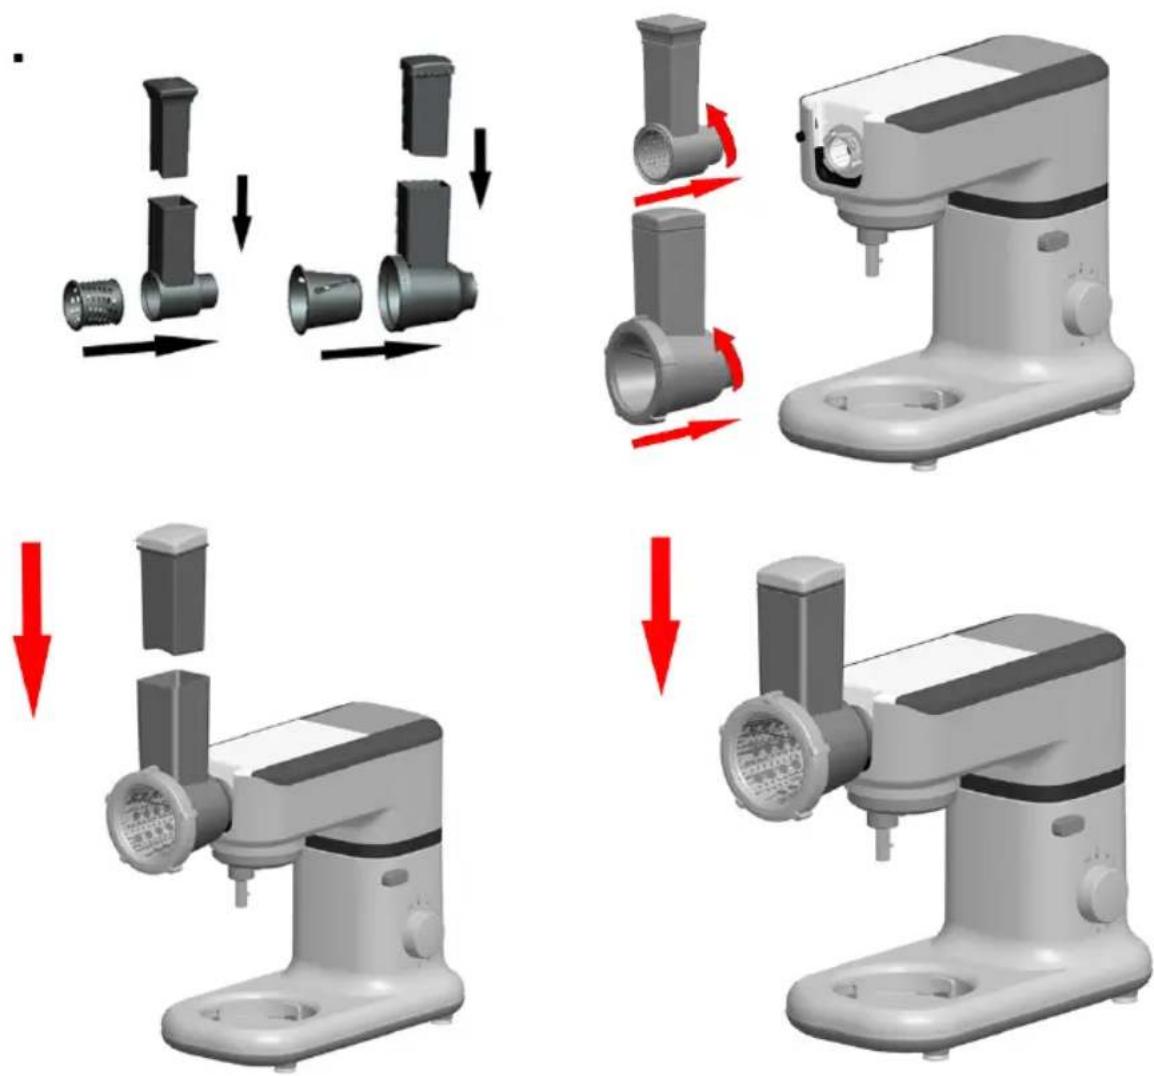
- Assemble the vegetable slicer as shown above, using desired attachment for slicing or shredding etc.
- Place vegetable items in the duct
- Use the pusher to gently press vegetables down the duct and on to blades
- Never put any utensil in to the duct
• Never insert fingers into the duct

CLEANING
- Disconnect from mains power supply before cleaning.
- Do not submerge the appliance in water. This may lead to electric shock or fire.
- Do not use a wire brush or other abrasive utensils for cleaning.
- Do not use aggressive or abrasive cleaning agents.
- Motor housing: Clean the housing only with a damp cloth and a squirt of washing-up liquid.
- Mixing bowl, kneading and mixing attachments: The attachments are not suitable for dishwasher. Heat and aggressive cleaning agents may warp or discolour the attachments.
- Parts which have come into contact with food can be rinsed out with water
- Leave the parts to dry properly before re-assembling the appliance.
TAKE EXTRA CARE WHEN HANDLING THE BLADES AS THEY ARE VERY SHARP

TAKE EXTRA CARE WHEN HANDLING THE BOWL, ESPECIALLY WHEN WET


WARRANTY
This product is guaranteed for 2 years from the date of original purchase. If any defect arises due to faulty materials of workmanship the faulty products must be returned to the place of purchase. Refunds or replacement is at the discretion of the store.
The following conditions apply:
- The product must be returned to the retailer with proof of purchase.
- The product must be installed and used in accordance with the instructions contained in this instruction guide.
- It must be used only for domestic purposes.
- It does not cover wear and tear, damage, misuse or consumable parts.
- Swan Products Ltd has limited liability for incidental or consequential loss or damage.
• This guarantee is valid in the UK and Eire Only.

BS PLUG
The wires in the mains lead are coloured in accordance with the following code:
BLUE NEUTRAL
BROWN LIVE
As the colours of the wire in the mains lead of this appliance may not correspond with the colour markings identifying the terminals on your plug, proceed as follows:
The wire which is coloured BLUE must be connected to the terminal which is marked with the letter N or coloured black. The wire which is coloured BROWN must be connected to the terminal which is marked with the letter L or coloured red.
WARNING: THIS APPLIANCE IS DOUBLE INSULATED. DO NOT CONNECT ANY WIRE TO THE EARTH TERMINAL

DISPOSAL OF UNIT
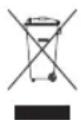
Appliances bearing the symbol shown here may not be disposed of in domestic rubbish. You are required to dispose of old electrical and electronic appliances like this separately. Please visit www.recycle-more.co.uk or www.recyclenow.co.uk for access to information about the recycling of electrical items. Please visit www.weeeireland.ie for access to information about the recycling of electrical items purchased in Ireland. The WEEE directive, introduced in August 2006, states that all electrical items must be recycled, rather than taken to landfill. Please arrange to take this appliance to your local Civic Amenity site for recycling, once it has reached the end of its life.

PARTS/ACCESSORY ORDERING
When ordering spare parts/accessories, use the references below:
SP33010N001 Meat Grinder Accessory
SP33010N003 Vegetable Slicer Accessory
SP33010N004 Glass Bowl
SP33010N005 Dough hook
SP33010N006 Beater
SP33010N007 Whisk
SP33010N008 Splash guard

www.swan-brand.co.uk

Scan this QR code to hear about our story

We love what we do

we're proud of our quality

Find us on Facebook
* on selected products
Copyright © Swan Products Ltd. PO Box 3117, Stoke-on-Trent ST4 9GD


- 1200 WATT PROFESSIONAL STAND MIXER
- IMPORTANT INFORMATION - RETAIN FOR FUTURE USE
- TECHNICAL DATA
- PARTS OVERVIEW
- FOR MAIN MIXER
- FOR OPTIONAL MEAT GRINDER
- HOW TO USE
- BEFORE FIRST USE
- TAKE CARE WHEN HANDLING THE BOWL, ESPECIALLY WHEN WET. REPLACEMENTS ARE EXPENSIVE
- NOTE: THE MOTOR WILL NOT RUN WHEN THE ARM IS IN THE UP POSITION
- WHISK ATTACHMENT
- BEATER ATTACHMENT
- DOUGH HOOK ATTACHMENT
- PLEASE FOLLOW THE MIXING TIMES AND INGREDIENT WEIGHTS FOR EACH ATTACHMENT ABOVE. IGNORING THEM COULD DAMAGE THE MOTOR AND INVALIDATE THE WARRANTY
- TIPS
- ALWAYS USE THE SPLASH GUARD, ESPECIALLY WHEN MIXING HOT INGREDIENTS
- ENSURE THE OPTIONAL MEAT GRINDER ACCESSORY IS NOT ATTACHED TO THE APPLIANCE WHEN IT IS BEING USED AS A MIXER
- MEAT GRINDER ACCESSORY
- IMPORTANT SAFETY INFORMATION WHEN USING MEAT GRINDER
- USE AS MEAT GRINDER
- USEFUL TIPS
- USING THE ACCESSORY TO "STUFF" (MAKING SAUSAGES)
- USING THE MEAT BALLS ACCESSORY
- VEGETABLE SLICER
- IMPORTANT SAFETY INFORMATION WHEN USING VEGETABLE SLICER
- VEGETABLE SLICER ASSEMBLY
- CLEANING
- TAKE EXTRA CARE WHEN HANDLING THE BLADES AS THEY ARE VERY SHARP
- TAKE EXTRA CARE WHEN HANDLING THE BOWL, ESPECIALLY WHEN WET
- WARRANTY
- THE FOLLOWING CONDITIONS APPLY
- BS PLUG
- DISPOSAL OF UNIT
- PARTS/ACCESSORY ORDERING
Brand : SWAN
Model : SP33010CN
Category : Food processor