SG205 - Cooker Tricity Bendix - Free user manual and instructions
Find the device manual for free SG205 Tricity Bendix in PDF.


| Product Type | Gas Cooker |
| Brand | Tricity Bendix |
| Model | SG205 |
| Width | 500 mm |
| Depth | 536 mm |
| Height (with lid closed) | 910 - 920 mm |
| Weight (approx.) | 55 kg |
| Energy Type | Natural Gas (convertible to LPG) |
| Gas Pressure (Natural) | 20 mbar |
| Hob Burners | 4 gas burners: 1 rapid (2.60 kW), 2 semi-rapid (2.00 kW each), 1 auxiliary (1.00 kW) |
| Oven Type | Gas oven with natural convection |
| Oven Power | 3.20 kW |
| Grill Power | 2.50 kW |
| Safety Features | Thermocouple flame failure device on oven and grill; safety device on each hob burner |
| Oven Cleaning | Enameled cavity, clean with warm soapy water; use proprietary oven cleaner for stubborn stains |
| Hob Cleaning | Removable burner caps and crowns, wash with hot soapy water |
| Accessories Included | Oven shelf, dripping pan/roasting tray with grid, grill deflector, chromed trivet |
| Installation Requirements | Must be installed by qualified personnel; stability chain required; ventilation as per BS 5440 |
| Warranty | 12 months standard guarantee (Europe-wide coverage) |
Frequently Asked Questions - SG205 Tricity Bendix
User questions about SG205 Tricity Bendix
0 question about this device. Answer the ones you know or ask your own.
Ask a new question about this device
Download the instructions for your Cooker in PDF format for free! Find your manual SG205 - Tricity Bendix and take your electronic device back in hand. On this page are published all the documents necessary for the use of your device. SG205 by Tricity Bendix.
USER MANUAL SG205 Tricity Bendix
Operating & Installation Instructions
Gas Cooker
SG205/1WL
natural_image
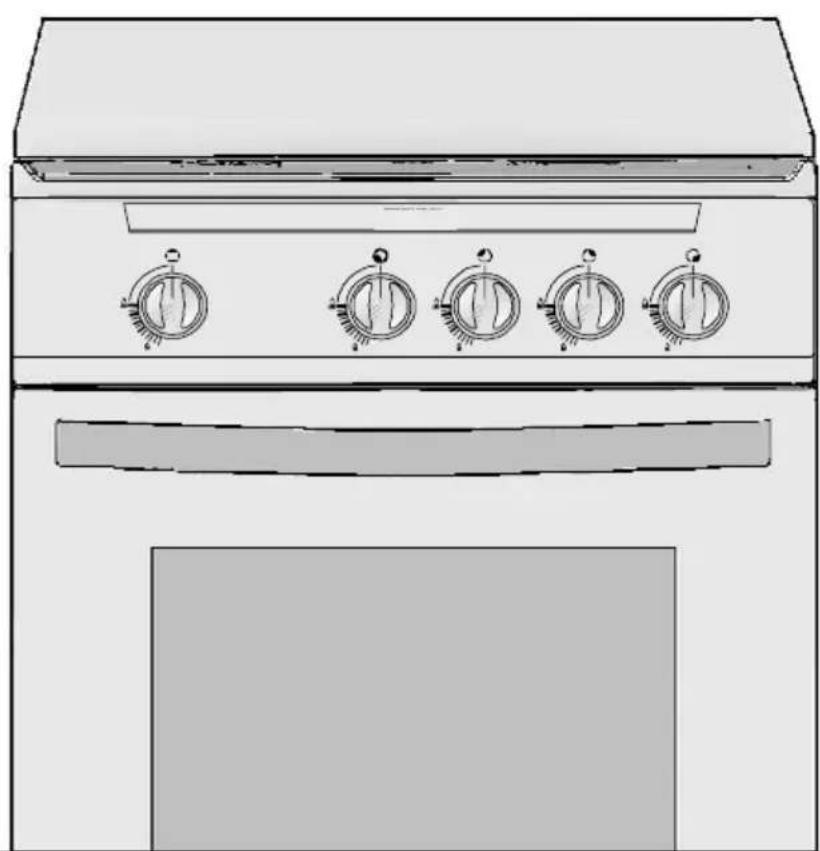
Line drawing of a vintage oven with four rotary gauges (no text or symbols)CONTENTS
Instructions for the User Instructions for the Installer
Important Safety Information 3 Technical Features 16
Description of the appliance 5 Safety Advice 17
- Gas connections 17
Using the appliance 6
- Using the oven 6
- Hints & Tips 7 Installation 18
- Using the Grill 8 - Location 18
- Cooking Chart 10 - Ventilation 18
- Using the Hob 11 - Levelling 19
Maintenance and Cleaning 13 Gas connections 20
Something Not Working 14 Conversion of gas 21
Service & Spare Parts 26
Customer Care 26
Guarantee Conditions 27
How to read the instruction book
The symbols below will guide you when reading the instruction book

Safety instructions

Step by Step Operation

Advice and recommendations

Environmental Information
IMPORTANT SAFETY INFORMATION

You MUST read these warnings carefully before installing or using the appliance. If you need assistance, contact our Customer Care Department on 08705950950
This appliance is not intended for use by persons (including children) with reduced physical, sensory or mental capabilities, or lack of experience and knowledge, unless they have been given supervision or instruction concerning use of the appliance by a person responsible for their safety.
Installation
- This cooker must be installed by qualified personnel, according to the manufacturer's instructions and to the relevant British Standards.
- This cooker is heavy. Take care when moving it.
- Any gas installation must be carried out by a registered competent installer.
- Remove all packaging before using the cooker.
- This cooker must not be connected to a combustion products evacuation device. It shall be installed and connected in accordance with current installation regulations. Particular attention shall be given to the relevant requirements regarding ventilation.
- Ensure that the gas supply complies with the type stated on the rating plate, located on the lower left corner of the front of the cavity.
- Do not attempt to modify the cooker in any way.
Child Safety
- This cooker is designed to be operated by adults. Do not allow children to play near or with the cooker.
- The cooker gets hot when it is in use. Children should be kept away until it has cooled.
Children can also injure themselves by pulling pans or pots off the cooker.
During Use
- This cooker is intended for domestic cooking only. It is not designed for commercial or industrial purposes.
- When in uses a gas cooker will produce heat and moisture in the room in which it has been installed. Ensure there is a continuous air supply, by keeping air vents in good condition or installing a cooker hood with a venting hose.
- When using the cooker for a long period time, opening a window or increasing the extractor speed should improve the ventilation.
- Do not use this cooker if it is in contact with water. Do not operate the cooker with wet hands.
- The grill pan will become hot during use, always use oven gloves when removing or replacing a hot grill pan.
- Ensure the control knobs are in the 'OFF' position when not in use.
- When using other electrical appliances, ensure the cable does not come into contact with the hot surfaces of the cooker.
- Unstable or misshapen pans should not be used on the hob burners as unstable pans can cause an accident by tipping or spillage.
-
Never leave the cooker unattended when cooking with oil and fat.
-
Never pull the appliance by the oven handle.
- This cooker should be kept clean at all times. A build-up of fat or foodstuff could result in a fire.
- Never use steam or high-pressure appliances for cleaning the oven.
- Never use plastic dishes in the oven or on the hob burners. Never line any part of the oven with aluminum foil.
- Always ensure that the oven vent, which is located at the centre back of the hob, is left unobstructed to ensure ventilation of the oven cavity.
- Perishable food, plastic items and aerosols may be affected by heat and should not be stored above the cooker.
Service
This cooker should only be repaired or serviced by an authorized Service Engineer and only genuine approved spare parts should be used.
Environmental Information
- After installation, please dispose of the packaging with due regard to safety and the environment.
- When disposing of an old appliance, make it unusable, by cutting off the cable.

The symbol 📄 on the product or on its packaging indicates that this product may not be treated as household waste. Instead it shall be handed over to the applicable collection point for the recycling of electrical and electronic equipment. By ensuring this product is disposed of correctly, you will help prevent potential negative consequences for the environment and human health, which could otherwise be caused by inappropriate waste handling of this product. For more detailed information about recycling of this product, please contact your local city office, your household waste disposal service or the shop where you purchased the product.
Keep this instruction book for future reference and ensure it is passed on to any new owner.
DESCRIPTION OF THE APPLIANCE
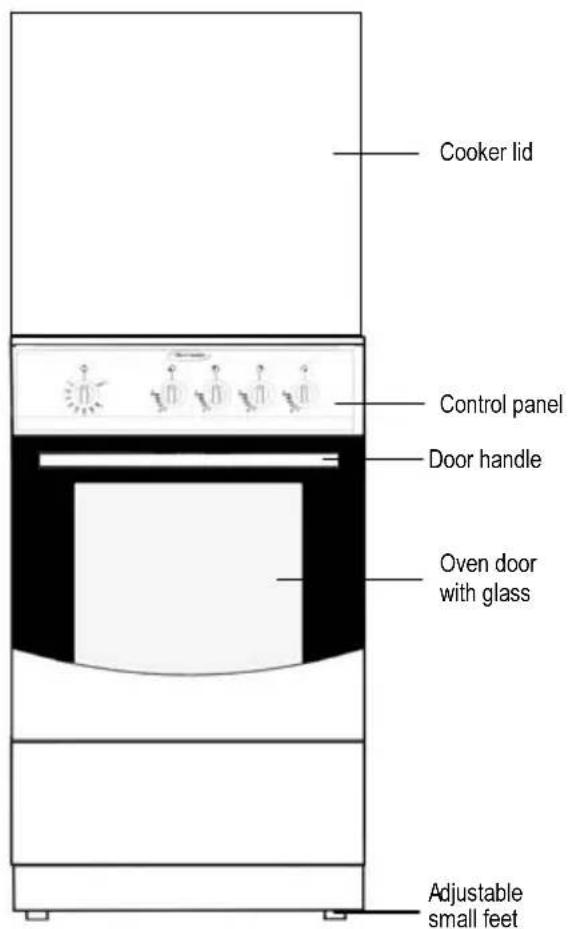
text_image
Cooker lid Control panel Door handle Oven door with glass Adjustable small feetHob
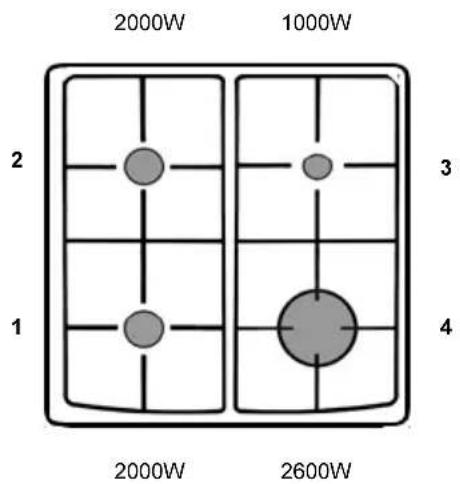
text_image
2000W 1000W 2 3 1 4 2000W 2600W- Front left burner (semi-rapid)
- Back left burner (semi-rapid)
- Back right burner (auxiliary)
- Front right burner (rapid)
Control panel
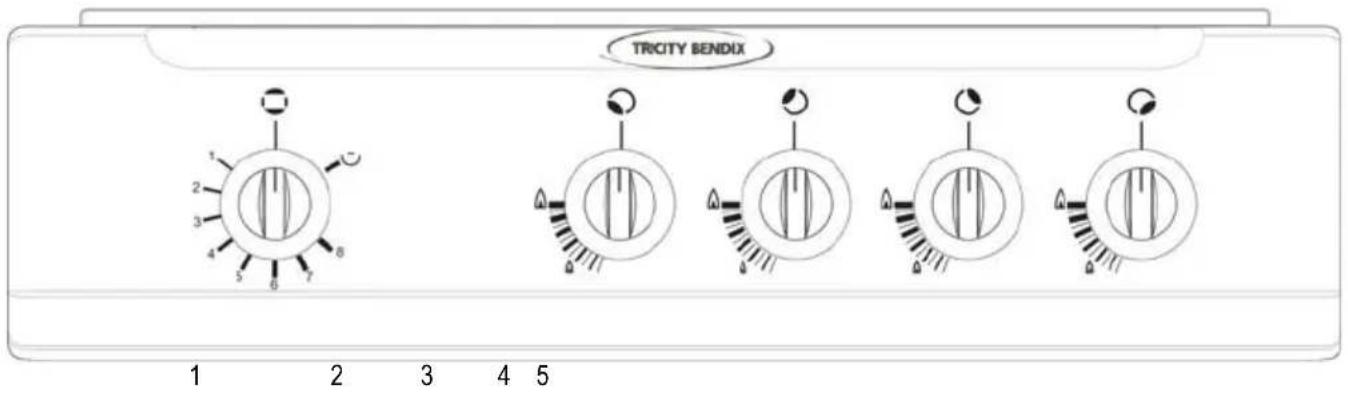
text_image
TRCITY BENDIX 1 2 3 4 5- Oven/grill knob
-
Front left burner control knob
-
Back left burner control knob
- Back right burner control knob
- Front right burner control knob
USING THE APPLIANCE
Before the First Use of the Cooker

Remove all packaging both inside and outside of the cooker, before using it.
Before first use, the oven should be heated without food. During this time, an unpleasant odor may be emitted. This is quite normal.
- Remove the oven accessories and ensure all packaging has been removed.
- Ignite the oven burner (see instructions) and turn the control knob to 8 (maxim).
- Open a window for ventilation
- Allow the oven to run empty for approximately 45 minutes.
This procedure should be repeated with the grill function for approximately 5-10 minutes.
Using the Oven

The cooker gets hot when it is in
use. Children should be kept away until it has cooled.
Stand clear when opening the drop down oven door.
Do not allow it to fall open - support the door using the door handle, until it is fully open.
Attention: when turning on the oven and grill burner the oven door has to be opened.
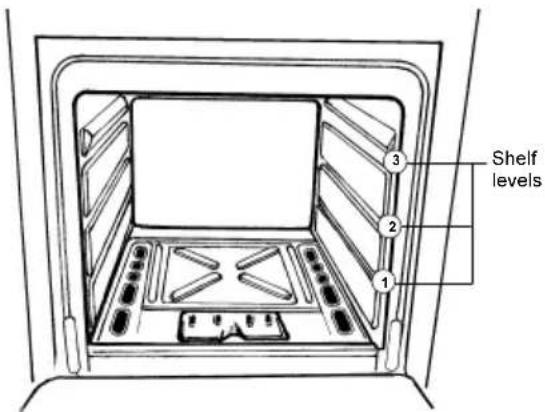
The oven has three shelf levels, and is supplied with one shelf.
The shelf positions are counted from the bottom of the oven as shown in the diagram.
text_image
Shelf levels 1 2 3
Do not place cookware or foil directly on the oven base.
Oven Safety device
The cooker features a thermocouple; if for any reason the flame should extinguish, the device will stop the gas flow.
Use
The oven can be used for traditional cooking, or for grilling, but not both functions simultaneously.
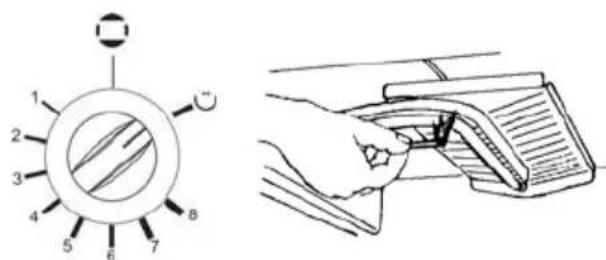
The symbol on the knob corresponds to the symbol on the control panel.
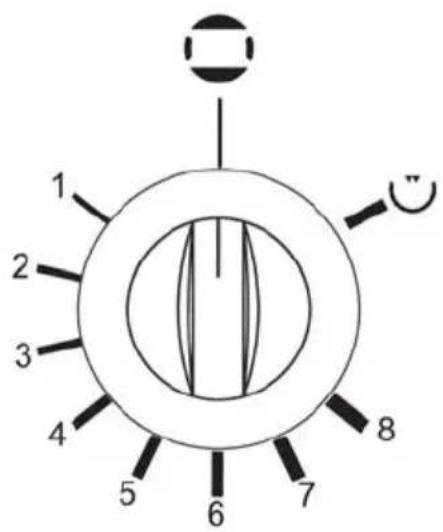
text_image
1 2 3 4 5 6 7 8| | | Off |
| “8” | Maximum |
| “1” | Minimum |
| Grill function (heat come from the top burner only. |
Ignition
- Open the oven door and lift the small lid on the bottom of the cavity, push and turn the control knob to the left to position 8, keeping the control knob pressed.
- Release the knob after 10 seconds and check that the burner is ignited through the holes in the bottom lid.
If for any reason the flame should extinguish turn control knob to the off position, after at least 1 minute, try to re-ignite the oven.
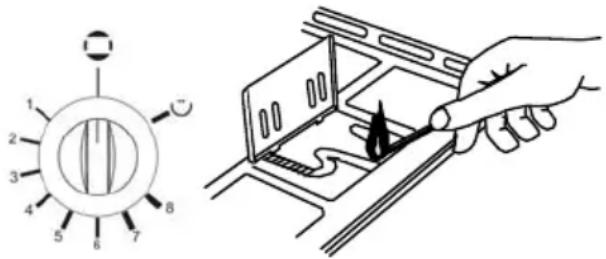
text_image
Diagram showing a rotary switch mechanism and its corresponding internal component with a hand holding a knob.Cooking in the Oven
Traditional cooking is made by natural convection; the heated air circulates on the principle of ascending and descending draughts. It is necessary to pre-heat the oven.
All cookers vary and it is important to be aware of the approximate cooking temperatures before you use the cooker.
It may be necessary to adjust the temperature to suit your individual requirements. Only experience will enable you to determine the correct setting for your personal requirements.
Hints and Tips
Condensation and steam
When food is heated it produces steam in the same way as a boiling kettle. The oven vents allow some of this steam to escape. However, always stand back from the oven when opening the oven door to allow any build up of steam or heat to release.
If the steam comes into contact with a cool surface on the outside of the oven, e.g. a trim, it will condense and produce water droplets. This is quite normal and is not a fault with the oven.
To prevent discoloration, regularly wipe away condensation and also soil age from surfaces.
Cookware
Use any ovenproof cookware, which will withstand temperatures of 250^ C.
Oven dishes, etc. should not be placed directly on the oven base.
Oven Cooking
- Turn off the oven 5 minutes before the end of cooking time, and use residual heat to complete the cooking.
- The thickness, the material and the color of the pan will influence the cooking results.
- When cooking, certain dishes increase in volume, ensure the pan is large enough.
- To prevent fat dripping when roasting use tall rim pans proportional to the item being roasted.
- Prick the skin of poultry and sausages with a fork before cooking to avoid spitting.
- Use heatproof glass dishes for soufflés.
Using the Grill
! Accessible parts may become hot when the grill is in us. Children should be kept away.
The grill pan will become hot during use, always use oven gloves when removing or replacing a hot grill pan.
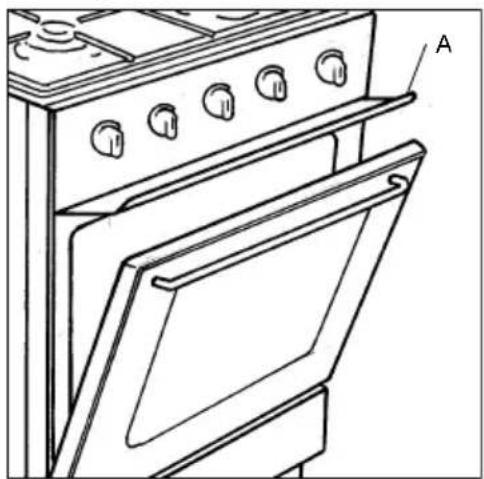
When using the grill it has to be supervised, the oven door opened and the grill deflector "A" in place.
Heat comes from the top of the oven. It is suitable for grilling meat (steak, bacon etc...) that remains tender, for toast or to brown food already cooked.
natural_image
Line drawing of an open oven with labeled parts (no text or symbols beyond label A)The effects of dishes on cooking results
Dishes and tins vary in their thickness, conductivity, color, etc. which affects the way they transmit heat to the food inside them.
A Aluminum, earthenware, oven glassware and bright shiny utensils reduce cooking and base browning.
B Enameled cast iron, anodized aluminum, aluminum with non-stick interior and colored exterior and dark, heavy utensils increase cooking and base browning.
Grill burner ignition
- Open the oven door.
- Hold a flame to the gas grill burner holes (see fig.).
- Press the oven/grill function control knob, then turn it to the "grill symbol". Upon ignition, keep the knob pressed for approximately 10 seconds (until the safety valve automatically keeps the grill burner lit).
- Ensure that you avoid contact with any flame of hot parts.
If for any reason the flame should extinguish turn the control knob to the OFF position, leave for at least 1 minute and then re-ignite.
text_image
Technical diagram showing a circular component with numbered parts and an exploded view of a mechanical assembly.Grilling

When using the grill it has to be revised, the oven door opened and still deflector "A" in place.
When grilling, only the top burner is heating. It is not necessary to preheat the grill.
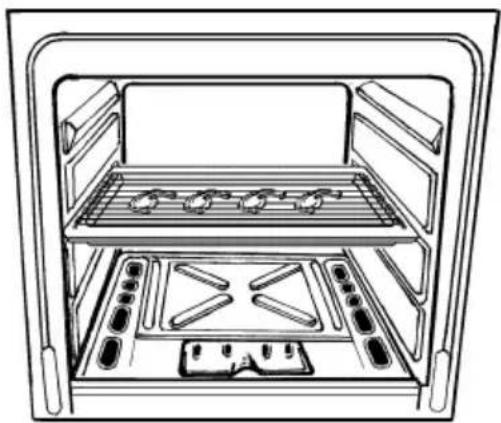
- Insert the food on the 2 ^nd level.
- Turn the knob to position "grill".
Adjust the grid and pan position to allow for different thickness of food. Position the food closer to the grill for faster cooking and further away for slower cooking.
Heat comes from the top of the oven. It is suitable for grilling meat (steak, bacon etc...) that remains tender, for toast or to brown already cooked dishes.
natural_image
Line drawing of an open oven with internal compartments and grilles (no text or symbols)Grilling meat

When using the grill it has to be supervised, the oven door opened and the grill deflector "A" in place.

Attention: when turning on the oven and grill burner the oven door has to be opened.
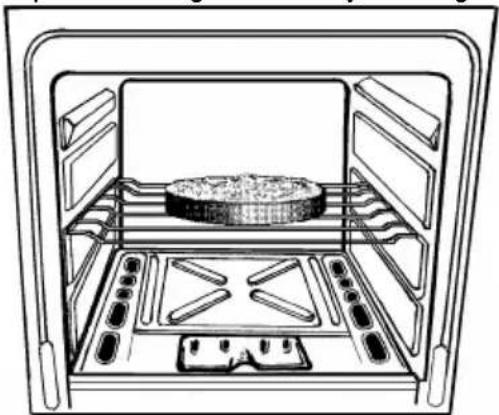
- Prepare the meat to be grilled, lightly brush it with oil on both sides.
- Place it on the roasting grid.
- Turn the oven/grill control knob to position "grill".
- Slide the roasting grid together with the roasting tray in the guide 2.
- When the first side is brown, turn the meat without pricking it in order that the juices are not lost.
- Grill the second side.
Cooking time is determined by the thickness of the piece to be grilled not by its weight.
natural_image
Line drawing of an oven with a tray holding a food item, no text or symbols presentBrowning
- Turn the oven/grill control knob to the "grill" position.
- Place the dish on the grid and slide it on shelf guide 2 or 3.
- Leave the dish under the grill for a few minutes.

When you have finished using the lease remove the grill deflector.
COOKING CHART
| Food | Tray type or dimension (dxwxh) cm | Material of the tray | No. of tray | Shelf pos. | Preheating Cooking | |||
| Thermostat pos. | Time (min) | Thermostat pos. | Time (min) | |||||
| Roasting meal | ||||||||
| - beef 1 2 5 15 5 | Roasting tray delivered with the cooker | Enameled | 20 min. for each 0.5 Kg / rare25 min. for each 0..5 Kg/medium 30min. for each 0.5 Kg/well done | |||||
| - lamb 1 2 5 15 5 | 25 min. for each 0.5 Kg/ medium 30min. for each 0.5 Kg/well done | |||||||
| - pork and veal | 1 2 5 15 5 | 30 min. for each 0.5 Kg/ medium 35min. for each 0.5 Kg/well done | ||||||
| Poultry | ||||||||
| - chicken 1 2 5 15 5 | Roasting tray delivered with the cooker | Enameled | 25-30 min. for each 0.5 Kg | |||||
| - turkey below 4.5 Kg | 25 min. for each 0.5 Kg | |||||||
| - duck | 1 2 5 15 5 | 25 min. for each 0.5 Kg | ||||||
| Grilling | ||||||||
| - half cut chicken | Roasting tray and grilling oven grid delivered with the cooker | 1 1 Grill 15 Grill | 35-45 min for one side25-35 for other side | |||||
| Cakes | ||||||||
| - scones | 33x28x0.6 Aluminum 2 | 1) | 2 and 3 | 8 | 20 | 8 | 15-20 | |
| 33x28x0.6 | Aluminum | 1 | 3 | 8 | 20 | 8 | 15-20 | |
| - fettles sponge cake | ∅ 26x5 | Aluminized | 14) | 2 | 4 | 15 | 4 | 30-35 |
| - rich fruit cake | ∅ 23x7.6 Tinned steel | 1 3) | 2 | 1 | 15 | 1 | 120-150 | |
| - small cake | 33x28x0.6 Aluminum 2 | 1) | 2 and 3 | 5 | 1 | 5 | 20-25 | |
| 33x28x0.6 Aluminum 1 | 4) | 2 | 5 | 15 | 5 | 20-25 | ||
| - Victoria sandwich | ∅ 20.5x3.5 | Aluminized | 21)3 | 2 and 3 | 5 | 15 | 5 | 25-35 |
| ∅ 20.5x3.5 | Aluminized | 13) | 2 | 5 | 15 | 5 | 25-30 | |
| - apple pie | ∅ 20x5 | Aluminized | 22)4 | 2 | 6 | 15 | 6 | 80-90 |
| ∅ 20x5 | Aluminized | 14) | 2 | 6 | 15 | 6 | 75-85 | |
| Yeast mixture | ||||||||
| - bread 1.35 Kg | 19.5x9.3x5.5 | Tinned steel | 35) | 2 | 7 | 20 | 7 | 35-45 |
| - bread 0.45 Kg | 19.5x9.3x5.5 | Tinned steel | 13) | 2 | 7 | 20 | 7 | 30-35 |
NOTE: d = deepness; w = width; h = height
Remarks: The recommended cooking conditions give the best results. The roasting tray must be on the level 1 at all cakes and yeast mixtures.
TRICITY BENDIX
1) If you should cooking more than one tray, you can take the top tray out of the oven when the cakes are finished and move the lower tray to the higher shelf to finish the cooking (about 5 min.)
2) These two pans are positioned on the same shelf, at the diagonal of the oven grid
3) Put the dishes in the center of the shelf
4) The oven grid in the position
5) The longer side of the tray must be parallel with oven door
Using the Hob
The Hob Burners
The symbol on the knob corresponds to a symbol on the control panel (See description of appliance).
Each burner has a safety device. In case the flame dies out the safety device stops the gas supply.
text_image
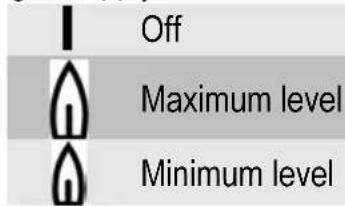
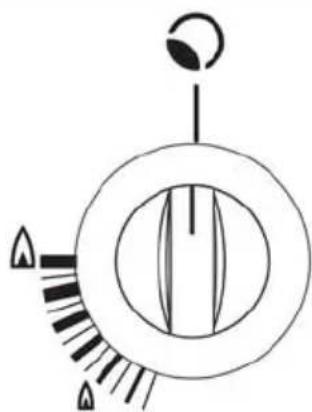
Off Maximum level Minimum levelUse the maximum level for boiling and the minimum for simmering.
Always choose positions between the minimum and maximum, never between maximum and off.

Ignition of the burners
- Push the corresponding knob in completely and turn it left to the maximum position and ignite with a match.
- Release the knob after 10 seconds and watch that the burner has ignited (until the safety valve automatically keeps the burner lit).
- Upon ignition, adjust the flame as required.
- If for any reason the flame should extinguish turn off the relevant control knob, leave for at least one minute and then re-ignite.
natural_image
Abstract diagram with concentric circles and radial lines, no text or symbols present
Extinguishing of burners
Turn the knob clockwise to mark « I » The safety device is in place..

Do not put anything on the hob that able to melt.

Before closing the lid, ensure all ol knobs are off.

Do not close the lid if the hob is hot, and could be damaged.
Selecting the Correct burner
Above every knob there is a symbol for the corresponding burner.
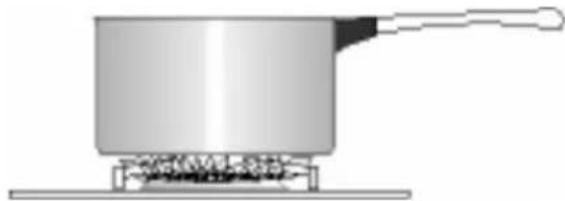
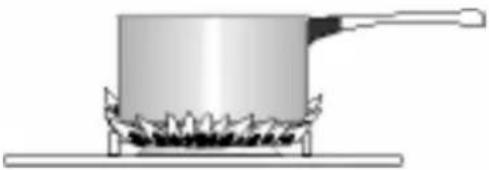
For good cooking results, always choose pans, which correctly fit to the diameter of the burner used (see figs). Choose thick, flat bottom pots.
We recommend the flame is lowered as soon as the liquid starts boiling.
For a correct ignition always keep the burner ring and the spark plugs clean.
The following diameter pans can be used:
| Burner | Power (kW) | Diameter (mm) | |
| min. max. | |||
| Rapid 2,60 165 260 | |||
| Semi-Rapid | 2,00 140 220 | ||
| Auxiliary 1,00 120 160 | |||
Good use
natural_image
Simple line drawing of a pot on a stove with a handle (no text or symbols)Bad use (Power waste)
natural_image
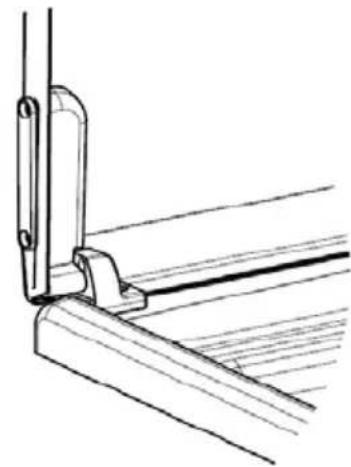
Simple line drawing of a pot on a stove with steam rising (no text or symbols)To close the lid the
natural_image
Technical line drawing of a mechanical bracket or bracket assembly (no text or symbols)first step is to trice a little the lid
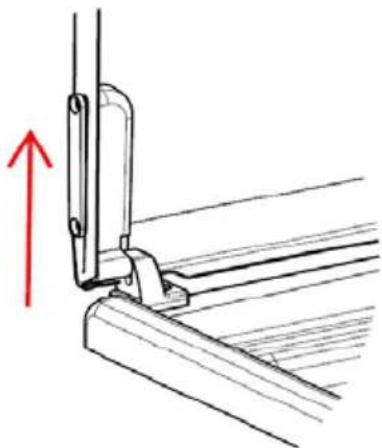
natural_image
Technical line drawing of a mechanical bracket assembly with an upward arrow indicator (no text or symbols present)and second step after that to close it.
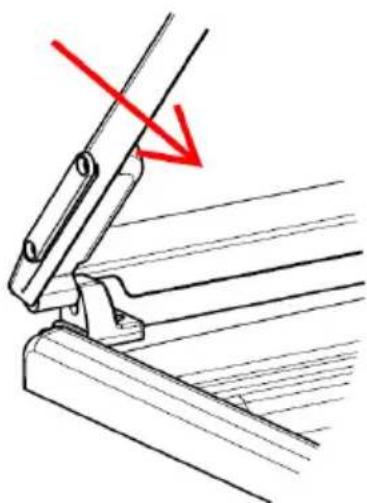
natural_image
Technical line drawing of a mechanical clamp or bracket assembly with a red arrow indicating direction (no text or symbols present)Accessories delivered with the appliance
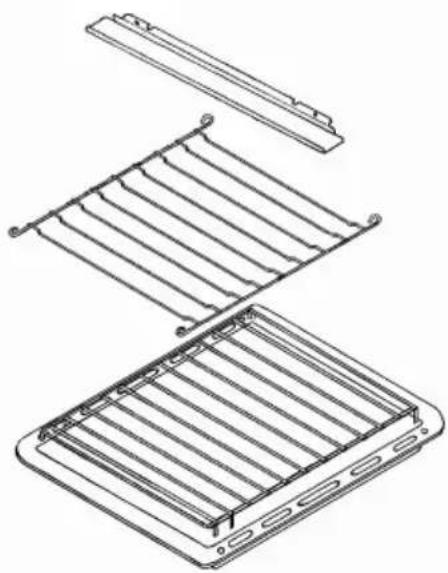
The following accessories are supplied with your appliance.
- Grill deflector - To be used when the grill is operation.
- Shelf for placing dishes on (roast, pastry mounds)
The dish should be put in the middle of the shelf to balance the weight. - Dripping pan / roasting tray with roasting grid in it.
In addition to the accessories supplied we recommend you only use heatproof dishes/pans (according to the manufacturer's instructions).
natural_image
Technical line drawing of a modular device with internal grid structure (no text or symbols)MAINTENANCE AND CLEANING

The oven should be kept clean at times. A build-up of fats or other stuffs could result in a fire, socially in the grill pan.

Before cleaning, ensure all controls are in the OFF position, and the chance has cooled completely.
Cleaning materials
Before using any cleaning materials on your oven, check that they are suitable and that the manufacturer recommends their use.

Cleaners that contain bleach should be used as they may dull the surface. Harsh abrasives should also be led.
External cleaning
Regularly wipe over the control panel, oven door and door seal using a soft cloth well wrung out in warm water to which a little
washing up liquid has been added.
In the case of stainless steel parts, you may use commercially available stainless steel cleaners with care. These also provide a protective film against finger marks.

To prevent damaging or weakening poor glass panels avoid the use of following:
• Household detergent and bleaches
- Impregnated pads unsuitable for non stick saucepans
• Chemical oven pads or aerosols
- Rust removers
- Bath/Sink stain removers
Oven Cavity
The enamelled oven cavity is best cleaned whilst the oven is still warm.
Wipe the oven over with a soft cloth soaked in warm soapy water after each use. From time to time it will be necessary to do a more thorough cleaning, using a proprietary oven cleaner.

DO NOT clean the oven door while ass panels are warm. If this ution is not observed the glass may shatter.
If the door glass panel becomes chipped or has deep scratches, the glass will be weakened and must be replaced to prevent the possibility of the panel shattering.
Contact your local Service Centre who will be pleased to advise further.
IMPORTANT: The inner door glass must be in place when using the oven.
Hob
After every use wipe with a soft cloth well wrung out in warm water to which a little washing up liquid has been added, avoiding any leakage through the holes of the hob. Rinse and dry with a soft cloth.
SOMETHING NOT WORKING
If the appliance is not working correctly, please carry out the following checks, before contacting your local Service Force Service Centre.
To remove more stubborn stains, wet and leave to dissolve, do not scratch and avoid the use of abrasive or caustic products that could damage the enamel. Burners
The burner caps and crowns can be removed for cleaning.
Wash the burners caps and crowns using hot soapy water, and remove marks with a mild paste cleaner. A well-moistened soap impregnated steel wool pad can be used with caution, if the marks are particularly difficult to remove.
After cleaning, be sure to wipe dry with a soft cloth.
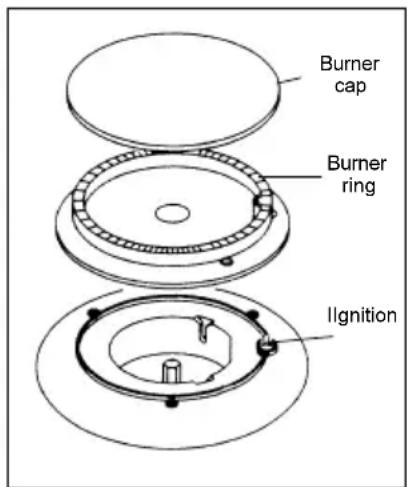
text_image
Burner cap Burner ring IgnitionIMPORTANT: If you call out an engineer to a fault listed below, or to repair a fault caused by incorrect use or installation, a charge will be made even if the appliance is under guarantee.
Symptoms Solutions
1. No burner ignition
Check that:
• Gas supply is completely open
• The position of gas pipe is correct
- The burner is not wet
- The burner cap and ring burner have been replaced correctly after cleaning
| Symptoms Solutions | |
| 2. The gas ring burns unevenly | Check that:The main jet is not blocked and the ring burner is clean of food particlesThe burner cap and ring burner have been replaced correctly after cleaning |
| 3. One of the oven or grill burners does not ignite | Check that:The burner is in its correct placeThe burner is not wetThe control knob has been pressed for 10 seconds upon ignition |
| 4. Cooking results are not satisfactory | Check that:The correct temperature has been selectedThe cooking time is adaptedThe grill is placed correctly in the oven |
| 5. The oven smokes | Check that:The oven does not need cleaningThe food does not spill overThere is no excessive fat / juice on the oven sides |
If after these checks, the appliance still does not operate correctly, contact your local Service Force Centre. When you contact the Service Force Centre you will need to give the following details:
* The rating plate can be found on the lower left hand corner of the front frame of the cavity.
Please note that valid purchase receipt or guarantee documentation is required for in-guarantee service calls.
- Your name, address and postcode.
- Your telephone number
- Clear and concise details of the fault
- The model and serial number of the appliance (found on the rating plate*)
- The purchase date
INSTRUCTIONS FOR THE INSTALLER
Technical features
Free standing
| Hob Pan support | Enamelled | ||
| Rapid | 2,60 kW | ||
| Auxiliary | 1,00 kW | ||
| Semi-rapid | 2,00 kW | ||
| Semi-rapid | 2,00 kW | ||
| Spark | |||
| Oven | Oven | Gas | |
| Oven power | 3,20 kW | ||
| Grill | Gas | ||
| Grill power | 2,50 kW | ||
| Oven ignition | Spark | ||
| Accessories | Trivet | Chromed | |
| Dripping pan / roasting tray | Enameled | ||
| Oven grid | Chromed | ||
| Grill deflector | Enameled | ||
| Legs | |||
| Dimensions Height with the lid closed | 910 - 920 mm | ||
| 880 - 890 mm | |||
| 500 mm | |||
| 536 mm | |||

This appliance complies with the following EEC Directives :
2006/95 ; 73/23 (Low Voltage Directive) and subsequent modifications,
89/336, 90/31, 93/68 (Electromagnetic Compatibility Directive) and subsequent modifications,
90/396 (Gas Appliance Directive) 93/68 (General Directives) and subsequent modifications.
ADVICE FOR SAFETY
Gas connections
- Before installation ensure gas type and pressure and the pre-setting of the appliance are consistent.
- This appliance must be installed only in a room with good ventilation.
- This appliance must not connect to a flu. It has to be installed and connected in accordance with the rules in force. Special attention should be paid to ventilation requirements.
- The adjacent furniture panels have to be heat resistant or protected by such material.
- The gas type for this appliance is stated on the rating plate.
Connection to gas supply.
Check that the gas flow and the diameter of the supply pipe are sufficient to supply all the appliances of the installation.
- Check that all connections are tight.
• Install an accessible and visible gas tap to isolate the appliance.
- Installation of flues and ventilation for gas appliances of rated input not exceeding 60 kW ( 1^st , 2^nd and 3^rd family gases) – Part 2 Specification for installation of ventilation for gas appliances – BS 5440 Current editions;
- Gas burning appliances – Part 3 Domestic cooking appliances burning gas – BS 5386 Current editions;
- Specification for installation of low pressure gas pipe work of up to 20mm (R1) in domestic premises ( 2^nd family gas) – BS 6891 Current editions; Pipe threads for tubes and fittings where pressure-tight joints are made on the threads (metric dimensions) – BS 21 Current editions;
- Flexible hoses, end fittings and sockets for gas burning appliances – BS 669 Current editions;
- Installation of domestic gas cooking appliances (1 ^st , 2 ^nd and 3 ^rd family gases) – BS 6172: 1990 Current editions; For appliances installed in the Republic of Ireland please refer to NSAI-Domestic Gas Installation IS813 Current editions.
INSTALLATION
Location of appliance
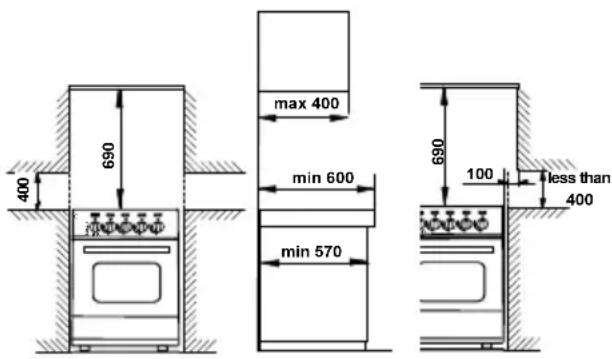
The appliance must not be installed in a bed-sitting room of volume less than 20m^3 or in a bathroom or shower room. It is essential that the appliance is positioned as in the enclosed figure i.e. shelves, wall cabinets and cooker hoods must be fitted a minimum of 690mm directly above the hob and 400mm above the hob when fitted in line with the outside of the appliance. If the units are intended to be fitted adjacent to the appliance but less than 400mm above the hob, then a minimum space of 100mm must be maintained between the sides of the unit and the appliance (see fig).
If fitted next to or between two base units a minimum space of 1mm must be left between each unit and the sides of the appliance. The levelling feet fitted to the appliance will achieve a nominal height to hob of 900mm+10mm.
The appliance must be installed in accordance with EN 1116-1995, regarding the depth of the superior furniture.
text_image
max 400 690 min 600 min 570 690 100 less than 400 400L.P.G. cookers or ovens MUST NOT be installed below ground level, i.e. in a basement, or aboard any boat, yacht or other vessel.
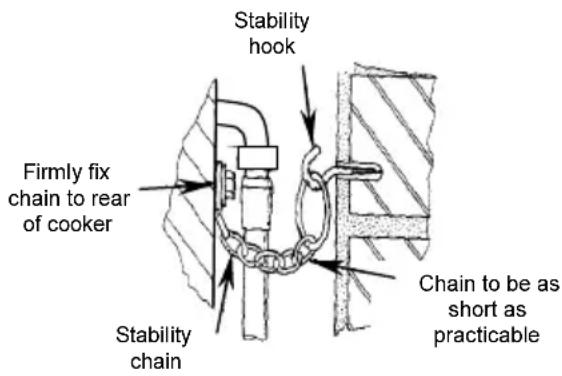
The cooking appliance must be fitted with a stability chain firmly secured to the wall.
text_image
Stability hook Firmly fix chain to rear of cooker Stability chain Chain to be as short as practicableVentilation
The room containing the cooker should have an air supply in accordance with B.S. 5440: Part 2: Current Editions.
The following requirements for ventilation must be met.
The cooker should not be installed in a bed sitting room with a volume of less than 20m^3 , if it is installed in a room of volume less 5m^3 an air vent of effective area of 110cm^2 is required; if it is installed in a room of volume between 5m^3 and 10m^3 , an air vent of effective area 50cm^2 is required, while if the volume exceeds 11m^3 no air vent is required. However, if the room has a door, which opens directly to the outside, no air vent is required even when the volume is between 5m^3 and 11m^3 .
If there are other fuels burning appliances in the same room, B.S. 5440: Part. 2: Current Editions should be consulted to determine the requisite air vent requirements.
TRICITY BENDIX
Leveling
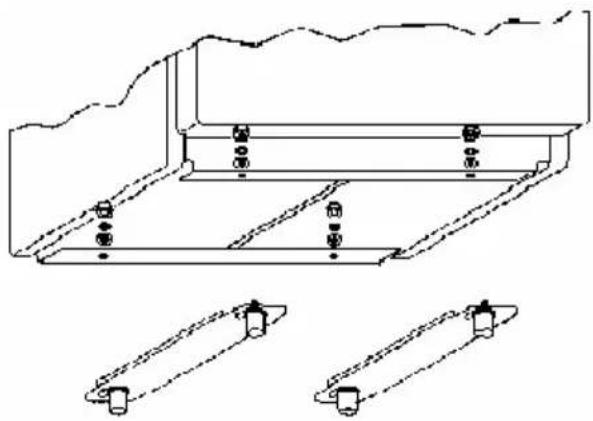
Fix the support with two legs with the washer and nuts, delivered with the cooker, see the figure.
natural_image
Technical line drawing of a mechanical assembly with mounting brackets and two separate views (no text or symbols)GAS CONNECTIONS
Your cooker is delivered adjusted for the kind of gas stated on the rating plate.
If the appliance is converted to natural gas and the pressure for natural gas is 20mbar, the following methods of connection to the gas supply must be used:
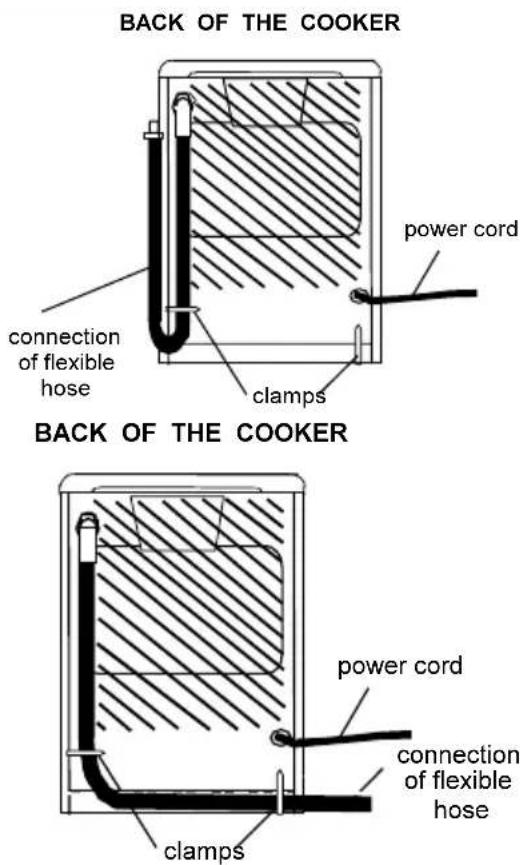
Right Hand Connection (from front)
Ensure that the rubber hose is not in contact with any part of the shaded area shown in the diagram and that the loop of the hose when connected is not in contact with the floor when the appliance is in position.
Left Hand Connection (from front)
Ensure that the rubber hose is not in contact with any part of the shaded area shown in the diagram and the hose is retained in the clamp provided, it will be necessary to fit the maximum length hose when using this method.
text_image
BACK OF THE COOKER power cord connection of flexible hose clamps BACK OF THE COOKER power cord connection of flexible hose clampsRigid Connection
Where it is not possible to make the connection using a rubber hose, a rigid pipe work connection must be used.
Recommendations when using an appliance flexible connector are as follows:
- For NATURAL the gas installation pipes to the termination point shall comply with:
Specification for installation of low-pressure gas pipe work of up to 20mm (R1) in domestic premises (2nd family gas) – BS 6891;
Connection shall be by means of an appliance flexible connector for use with a self-sealing plug-in device, complying with: Flexible hoses, end fittings and sockets for gas burning appliances – BS 669;
- The appliance flexible connector should not be subjected to undue forces either in normal use or whilst connected or disconnected; The socket which the plug of the appliance flexible connector fits should be permanently attached to a firmly fixed gas installation pipe and positioned such that the appliance flexible connector hose hangs freely downwards (see fig.);
- The appliance flexible connector should be positioned such that it will not suffer mechanical damage, e.g. abrasion from the surrounding kitchen furniture, which may be moved in use such as a drawer or door, or by being trapped by any stability device.
The plug-in-connector bayonet should be accessible for disconnection after moving the appliance.
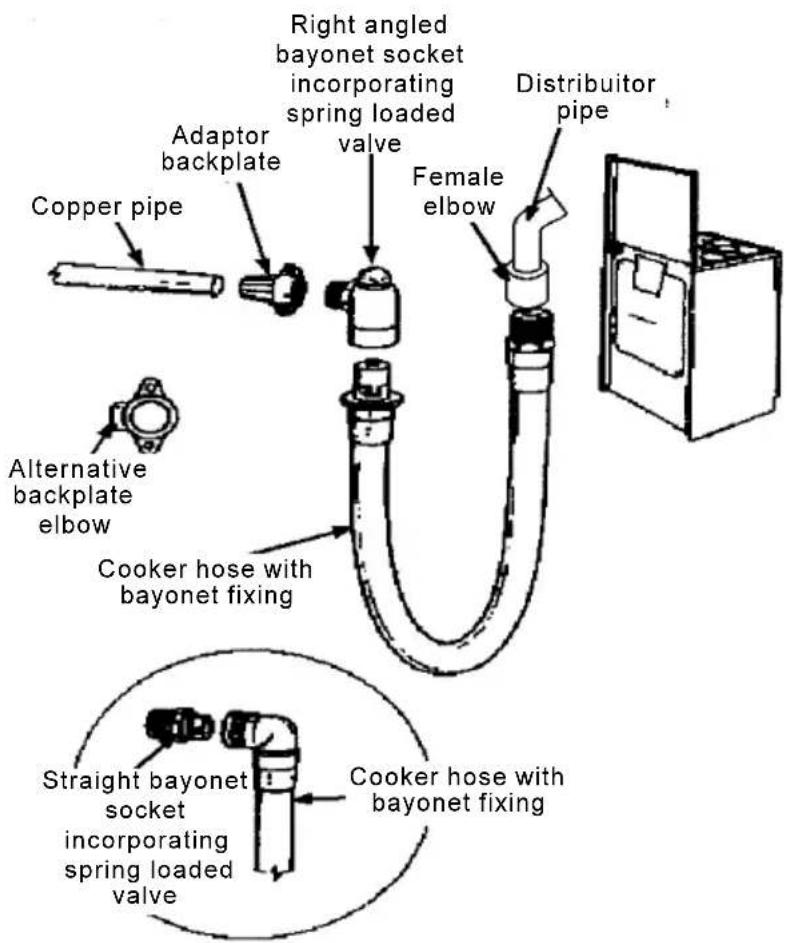
text_image
Right angled bayonet socket incorporating spring loaded valve Adaptor backplate Copper pipe Female elbow Distribuitor pipe Alternative backplate elbow Cooker hose with bayonet fixing Straight bayonet socket incorporating spring loaded valve Cooker hose with bayonet fixingCONVERSION OF GAS
Your cooker is designed to work with natural gas, and is convertible for use with propane or butane.
The LPG conversion kit is available from your Service Force Centre and must be fitted by a Registered engineer/ competent person.
For changing the gas type it is necessary to:
- replace the nozzles (hob, oven and grill);
-
adjust the minimum level (hob and oven);
-
adjust the primary air (oven and grill);
- check the gas connection;

Stick the label supplied with the cement nozzles (from the Service Centre) corresponding to the gas utilized.
SPECIFICATION NOZZLES
Table no.1
(Cat : II 2H3+)
| Burner | Normal power (kW) | Simmer power (kW) | By-pass (mm) | Gas Type | Pressure (mbar) | Nozzle diameter (mm) | Cons |
| g/h | |||||||
| RAPID | 2.60 | Natural Gas | 20 | 1.13 | - | ||
| 2.50 | 0.72 0.42 | Butane | 28-30 | 0,77 | 181,78 | ||
| 2.50 | Propane | 37 | 0,77 | 178,53 | |||
| SEMI-RAPID | 2.00 | Natural Gas | 20 | 0.96 | - | ||
| 2.00 | 0.43 0.32 | Butane | 28-30 | 0,71 | 145,43 | ||
| 2.00 | Propane | 37 | 0,71 | 142,83 | |||
| AUXILIARY | 1.00 | Natural Gas | 20 | 0.70 | - | ||
| 1.00 | 0.35 0.29 | Butane | 28-30 | 0,50 | 72,71 | ||
| 1.00 | Propane | 37 | 0,50 | 71,41 | |||
| OVEN | 3.20 | Natural Gas | 20 | 1.30 | - | ||
| 3.20 | 1.00 0.46 | Butane | 28-30 | 0,88 | 232,68 | ||
| 3.20 | Propane | 37 | 0,88 | 228,52 | |||
| GRILL | 2.50 | Natural Gas | 20 | 1,15 | - | ||
| 2.50 | -- | Butane | 28-30 | 0,80 | 181,78 | ||
| 2.50 | Propane | 37 | 0,80 | 178,53 |
Replace the nozzles of the hob burners
Every appliance has spare nozzles for every type of gas. The whole length of every nozzle is marked in millimetres on the nozzle.

Before any modifications or
conversion to a different kind of gas, you have to ensure that all control knobs are in the OFF position, and the appliance has cooled completely.

Hob burners
- Remove the pan support;
- Remove the caps and the burner crowns;
- Using a No 7 socket spanner unscrew the nozzles and replace them with those required for the type of gas in use (see table no. 1).
Reassemble the parts following the same procedure in reverse.
These burners do not need any primary air regulation.
Adjustment of minimum level for the hob burners
The burner is correctly adjusted when the flame is stable silent and goes out without any noise.
When changing the type of gas check that the minimum level is correct. The air admission is correct when the flame is about 4 mm in length.
The top burners do not need adjustment of primary air.
Check that, turning the knob quickly from the maximum position to the minimum one, the flame does not go out.
To adjust the minimum level:
- Light the burner
- Turn the knob to the position of the minimum flame;
- Remove the knob;
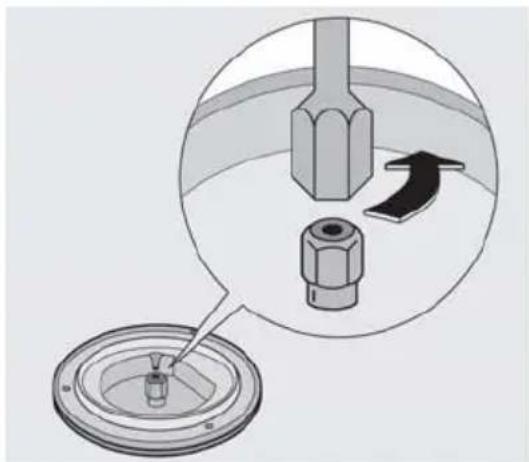
natural_image
Diagram showing a mechanical component being inserted into a circular housing, with an arrow indicating rotation (no text or symbols present)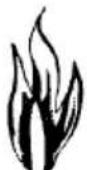
no air

correct
adjustment

excess of air
TRICITY BENDIX
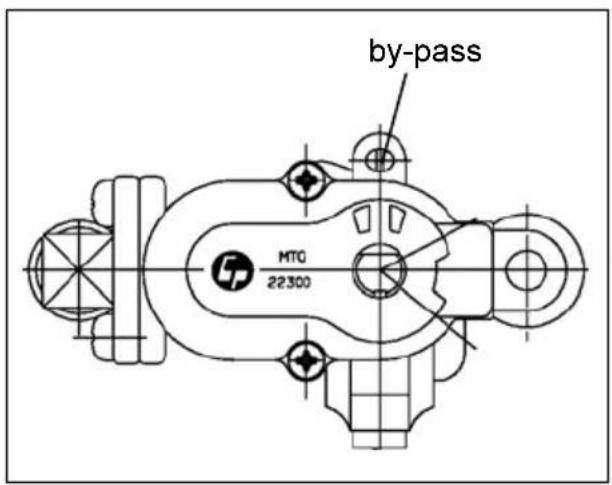
- Unscrew or screw the by-pass screw (on the right above of tap shaft) until a regular small flame is reached.
- For LPG screw completely the by-pass screw.
Reassemble the parts following the same procedure in reverse.
Check that, when turning the knob quickly from the maximum position to the minimum one, the flame does not go out.
Replace the nozzles of the oven burners

Oven burner
To replace the gas oven nozzle, follow this procedure:
- Check the table no.1 for diameter of nozzle;
- Remove the oven removable base panel;
- Remove the screw on the oven burner rod at the rear of the oven;
- Remove the oven burner by pushing it backwards.
- Replace the nozzle "C" by means of a No 10 socket spanner;
Reassemble the parts following the same procedure in reverse.

Grill burner
To replace the gas grill nozzle, follow this procedure:
- Remove the grill burner after removing the fixing screw.
- Replace the nozzle by means of a No 10 socket spanner;
Refit all parts and test.
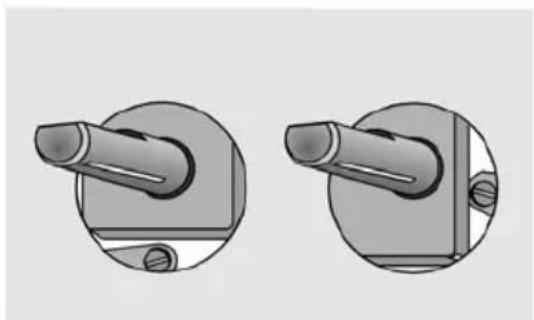
natural_image
Two identical mechanical components shown in circular views, no text or symbols present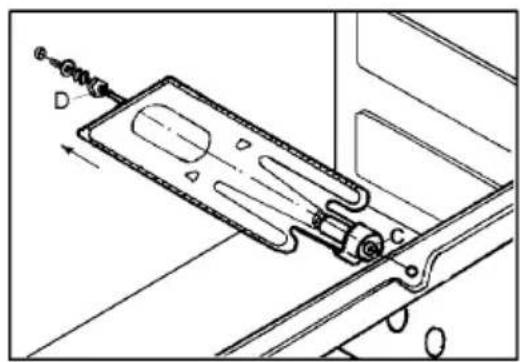
natural_image
Technical line drawing of a mechanical assembly with labeled components (no text or symbols)Flame adjustment

Oven burner
The burner is correctly adjusted when the flame is stable, silent and goes out without any noise.
- When the flames are too short, the nozzle is whistling or the flames have the tendency to detach from the burner, it means that there is too much air in the valve. If there is too much air there is a risk that the flames will extinguish.
- But, if the flames are too long, soft, lighting, there is not enough air in the valves. These flames discolor the bottom of pans.
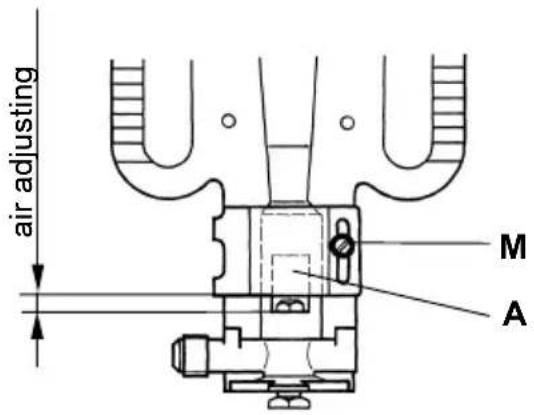
- Loosen the fixing screw M.
- Move the air adjuster A forward or backward until achieving the right mixture (see table no. 2);
- Tighten the fixing screw M.
Grill burner
- Loosen the screw fixing the Venturi.
- Move the adjusting collar left or right until achieving the correct flame picture (see table no. 2).
Tighten the fixing screw.
Adjustment of minimum level

Oven burner
- Remove the top pan support as well as the burner caps and the burner crowns.
- Unscrew and remove the 2 top plate-fixing screws and remove the top plate.
- Light the burner knob in the maximum position and leave the oven door closed for about 10 min.
- Turn the knob slowly to the minimum position.
- Pull off the knob to adjust minimum flow.
Table no.2
| Gas type | Air adjusting (mm) | |
| Oven Grill | ||
| G20 3,2 | 25 | |
| G30 3,2 | 24 | |
| G31 3,2 | 24 | |
text_image
air adjusting M A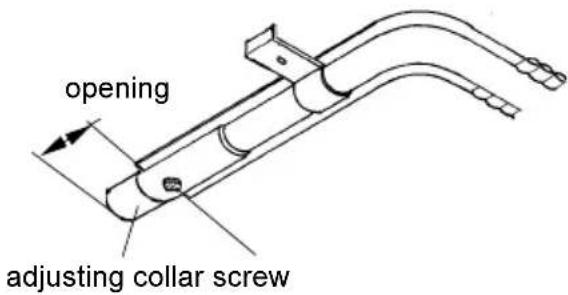
text_image
opening adjusting collar screw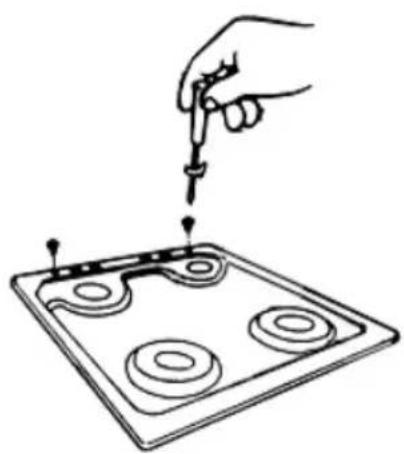
natural_image
Hand using a pipette to install a tray with four circular components (no text or symbols visible)TRICITY BENDIX
- Unscrew or screw the by-pass screw until a regular small flame is reached.
- For LPG completely tighten the by-pass screw.
The flame shouldn't extinguish when closing the oven door.
text_image
by-pass MTG 22300Grill burner
The grill temperature cannot be adjusted. To obtain a lower temperature or slower cooking time the grill pan must be lowered away from the flame.

After completion of any repairs, conversion or adjustments, the statutory safety tests must be carried out.
SERVICE AND SPARE PARTS
In the event of your appliance requiring service, or if you wish to purchase spare parts, please contact your local Service Force Centre by telephoning:-
08705 929929
Your telephone call will be automatically routed to the Service Force Centre covering your postcode area.
For the address of your local Service Force Centre and further information about Service Force, please visit the website at www.serviceforce.co.uk
In-guarantee customers should ensure that the checks under the heading "Something Not Working" have been made as the engineer will make a charge if the fault is not a mechanical or electrical breakdown. Please note that it will be necessary to provide proof of purchase for any in-guarantee service calls.
CUSTOMER CARE
For general enquiries concerning your Tricity Bendix appliance and or for further information on our products, contact our Customer Care Department by letter or telephone as follows: Customer Care Department Electrolux Major Appliances Addington Way Luton Bedfordshire, LU4 9QQ Tel: 08705 727 727 (*)
SERVICEFORCE
For Customer Service in the Republic of Ireland please contact us at the address below:
Tricity Bendix Electrolux Group (Ire) Ltd Long Mile Road Dublin 12 Republic of Ireland
Tel: +353 (0) 1 4090 752 Email: service.eid@electrolux.ie
(*) Calls to this number may be recorded for training purposes.
GUARANTEE CONDITIONS
Standard Guarantee Conditions
We Tricity Bendix undertake that if, within 12 months of the date of the purchase, this Tricity Bendix appliance or any part thereof is proved to be defective by any reason only of faulty workmanship or materials, we will, at our option, repair or replace the same FREE OF ANY CHARGE for labour, materials or carriage on condition that:
- The appliance has been correctly installed and used only on the electricity supply stated on the rating plate.
- The appliance has been used for normal domestic purposes only, and in accordance with the manufacturer's instructions.
- The appliance has not been serviced maintained, repaired, taken apart or tampered with by any person not authorized by us.
- All service work under this guarantee must be undertaken by a Tricity Bendix Service Force Centre.
- Any appliance or defective part replaced shall become the Company's property.
- This guarantee is in addition to your statutory and other legal rights.
Home visits are made between 8.30am and
5.30pm Monday to Friday. Visits may be available outside these hours, in which case a premium will be charged.
Exclusions
This guarantee does not cover:
- Damage or calls resulting from transportation, improper use or neglect, the replacement of any light bulbs or removable parts of glass or plastic.
- Costs incurred for calls to put right an appliance which is improperly installed or calls to appliance outside the United Kingdom.
- Appliances found to be in use within a commercial or similar environment, plus those, which are the subject to rental agreements.
Products of Tricity Bendix manufacture which are not marketed by Tricity Bendix.
European Guarantee
If you should move to another country within Europe then your guarantee moves with you to your new home subject to the following qualifications:
- The guarantee starts from the date you first purchased your product.
- The guarantee is for the same period and to the same extent for labour and parts as exists in the new country of use for this brand or range of products.
- This guarantee relates to you and cannot be transferred to another user.
- Your new home is within the European Community (EC) or European Free Trade Area.
- The product is installed and used in accordance with our instructions and is only used domestically, i.e. a normal household
- The electrical supply complies with the specification given in the rating label.
The product is installed taking into account regulations in your new country.
Before you move, please contact your nearest Customer Care Centre, listed below, to give them details of your new home. They will then ensure that the local Service Organization is aware of your move and able to look after you and your appliances.
France Senlis +33 (0) 3 44 62 20 13
Germany Nürnberg +49 (0) 800 234 7378
Italy Pordenone +39 (0) 800117511
Sweden Stockholm +46 (0) 20 78 77 50
UK Luton +44 (0) 08705 727 727
www.electrolux.com
| Albania +35 5 4 261 450 Rr. Pjeter Bogdani Nr. 7 Tirane | ||
| Belgique/België/Belgien | +32 2 363 04 44 | Bergensesteenweg 719, 1502Lembeek |
| Česká republika | +420 2 61 12 61 12 | Budějovická 3, Praha 4, 140 21 |
| Danmark +45 70 11 74 00 Sjællandsgade 2, 7000 Fredericia | ||
| Deutschland +49 180 32 26 622 Muggenhofer Str. 135, 90429 | Nürnberg | |
| Eesti +37 2 66 50 030 Pärnu mnt. 153, 11624 Tallinn | ||
| España +34 902 11 63 88 Carretera M-300, Km. 29,900 | Alcalá de Henares Madrid | |
| France www.electrolux.fr | ||
| Great Britain | +44 8705 929 929 | Addington Way, Luton,Bedfordshire LU4 9QQ |
| Hellas | +30 23 10 56 19 70 | 4, Limnou Str., 54627 Thessaloniki |
| Hrvatska | +385 1 63 23 338 | Slavonska avenija 3, 10000 Zagreb |
| Ireland +353 1 40 90 753 Long Mile Road Dublin 12 | ||
| Italia | +39 (0) 434 558500 | C.so Lino Zanussi, 26 - 33080Porcia (PN) |
| Latvija | +37 17 84 59 34 | Kr. Barona iela 130/2, LV-1012,Riga |
| Lietuva | +370 5 2780609 | Ozo 10A, LT 08200 Vilnius |
| Luxembourg | +352 42 431 301 | Rue de Bitbourg, 7, L-1273 Hamm |
| Magyarország | +36 1 252 1773 | H-1142 Budapest XIV, Erzsébetkirályné útja 87 |
| Nederland | +31 17 24 68 300 | Vennootsweg 1, 2404 CG - Alphenaan den Rijn |
| Norge | +47 81 5 30 222 | Risløkkvn. 2 , 0508 Oslo |
| Österreich | +43 18 66 400 | Herziggasse 9, 1230 Wien |
| Polska | +48 22 43 47 300 | ul. Kolejowa 5/7, Warszawa |
| Portugal +35 12 14 40 39 39 Quinta da Fonte - Edificio | Gonçalves Zarco - Q 35 -2774-518 Paço de Arcos | |
| Romania +40 21 451 20 30 Str. Garii Progresului 2, S4, 040671 | RO | |
| Schweiz - Suisse - Svizzera | +41 62 88 99 111 | Industriestrasse 10, CH-5506Mägenwil |
| Slovenija | +38 61 24 25 731 | Gerbičeva ulica 98, 1000 Ljubljana |
| Slovensko +421 2 43 33 43 22 Electrolux Slovakia s.r.o., | Electrolux Domáce spotrebiče SK, Seberíniho 1, 821 03 Bratislava | |
| Suomi www.electrolux.fi | ||
| Sverige +46 (0)771 76 76 76 Electrolux Service, S:t | Göransgatan 143, S-105 45 Stockholm | |
| Türkiye | +90 21 22 93 10 25 | Tarlabași caddesi no : 35 Taksimİstanbul |
| Россия | +7 495 937 7837 | 129090 Москва, Олимпийский проспект, 16, БЦ "Олимпик" |
TRICITY BENDIX
www.electrolux.com