
M1710A - Monitor LG - Free user manual and instructions
Find the device manual for free M1710A LG in PDF.


User questions about M1710A LG
0 question about this device. Answer the ones you know or ask your own.
Ask a new question about this device
Download the instructions for your Monitor in PDF format for free! Find your manual M1710A - LG and take your electronic device back in hand. On this page are published all the documents necessary for the use of your device. M1710A by LG.
USER MANUAL M1710A LG
Cover_3828TUL312B(BTB) 2005.3.16 B:21 PM 9 AM 1

LG
http://www.lge.com PNO:3828TUL312B(0508-REV0) Printed in Korea.
text_image
FLATRON™ Freedom of mind M1510A M1710A M1910A User's Guide Please read this user's guide carefully before operating your set. Retain it for future reference. Record model number and serial number of the set. See the label attached on the product and guide this information to your dealer when you require service.$$ \begin{array}{r}\left[ \begin{array}{lll}1 & & & \ & & & \ & & & \ & & & \ & & & \ & & & \ & & & \ & & & \ & & & \ & & & \ & & & \ & & & \ & & & \ & & \end{array} \right] = \frac{1}{2}\left[ \begin{array}{lll}1 & & \ & & \ & & \ & & \ & & \ & & \ & & \ & & \ & & \ & & \ & & \ & & \ & & \end{array} \right]. \end{array} $$
Table of Contents
Installation and Connection
| Safety Precautions | A1 |
| Accessories | A4 |
| Before connecting to the PC | A5 |
| To arrange cables in order | A6 |
| Name and Function of the Parts | A7 |
| Connecting to External Devices | A13 |
| When Connecting to your PC | A13 |
| When Watching VCR/DVD | A15 |
| When Watching TV | A17 |
Input Selection and Tracking
| Selecting and Adjusting the Screen | A18 |
| Name of the Buttons in the screen Adjustment Unit | A18 |
| OSD (On Screen Display) Menu | A20 |
| OSD (On Screen Display) Screen Tracking Order | A21 |
| Set/Select the channel when using the TV | A22 |
| Adjusting the picture function | A25 |
| Adjusting the sound function | A27 |
| Adjusting the time function (TV/Video only) | A28 |
| Selecting the setup function | A29 |
| Adjusting the screen function (PC only) | A30 |
Miscellaneous
| Troubleshooting | A31 |
| Specifications | A34 |
Safety Precautions
Please read these safety precautions carefully before using the product.

Warning
If you ignore the warning message, you may be seriously injured or there is a possibility of accident or death.

Caution
If you ignore the caution message, you may be slightly injured or the product may be damaged

Precautions in installing the Product
Warning
■ Keep away from heat sources like electrical heaters.
- Electrical shock, fire, malfunction or deformation may occur.
- Keep the packing anti-moisture material or vinyl packing out of the reach of children.
- Anti-moisture material is harmful if swallowed. If swallowed by mistake, force the patient to vomit and visit the nearest hospital. Additionally, vinyl packing can cause suffocation. Keep it out of the reach of children.
■ Do not put heavy objects on the product or sit upon it.
- If the product collapses or is dropped, you may be injured. Children must pay particular attention.
■ Do not leave the power or signal cable unattended on the pathway.
- The passerby can falter, which can cause electrical shock, fire, product breakdown or injury.
■ Install the product in a neat and dry place.
- Dust or moisture can cause electrical shock, fire or product damage.
■ If you can smell smoke or other odors or hear a strange sound unplug the power cord and contact the service center.
- If you continue to use without taking proper measures, electrical shock or fire can occur.
■ If you dropped the product or the case is broken, turn off the product and unplug the power cord.
- If you continue to use without taking proper measures, electrical shock or fire can occur. Contact the service center.
■ Do not drop metallic objects such as coins, hair pins, chopsticks or wire into the product, or inflammable objects such as paper and matches. Children must pay particular attention.
- Electrical shock, fire or injury can occur. If a foreign object is dropped into the product, unplug the power cord and contact the service center.
Caution
■ Make sure the product ventilation hole is not blocked. Install the product in a suitably wide place (more than 10cm from the wall)
- If you install the product too close to the wall, it may be deformed or fire can break out due to internal heat.
■ Do not block the ventilation hole of the product by a tablecloth or curtain.
- The product can be deformed or fire can break out due to overheating inside the product.
■ Install the product on a flat and stable place that has no risk of dropping the product.
- If the product is dropped, you may be injured or the product may be broken.
■ Install the product where no EMI occurs.
- Keep the product away from direct sunlight.
- The product can be damaged.

Electrical Power Related Precautions

Warning
■ Make sure to connect the power cable to the grounded current. - You may be electrocuted or injured.
■ Use the rated voltage only. - The product can be damaged, or you may be electrocuted.
■ During a thunder or lightning storm, unplug the power cable or signal cable. - You may be electrocuted or a fire can break out.
- Do not connect several extension cords, electrical appliances or electrical heaters to a single outlet. Use a power bar with a grounding terminal designed for exclusive use with the computer. - A fire can break out due to overheating.
- Do not touch the power plug with wet hands. Additionally, if the cord pin is wet or covered with dust, dry the power plug completely or wipe dust off. - You may be electrocuted due to excess moisture.
If you don't intend to use the product for a long time, unplug the power cable from the product. - Covering dust can cause a fire, or insulation deterioration can cause electric leakage, electric shock or fire.
- Fix the power cable completely. - If the power cable is not fixed completely, a fire can break out.
■ Hold the plug when pulling out the power cable. Do not bend the power cord with excessive force or put heavy objects on the power cord. - The power line can be damaged, which may cause electric shock or fire.
- Do not insert a conductor (like a metal chopstick) into one end of the power cable while the other end is connected to the input terminal on the wall. Additionally, do not touch the power cable right after plugging into the wall input terminal. - You may be electrocuted.
■ The power supply cord is used as the main disconnection device. Ensure that the socket-outlet is easily accessible after installation.

Caution
■ Do not unplug the power cord while the product is in use. - Electrical shock can damage the product.

Precautions in Moving the Product

Warning
■ Make sure to turn off the product. - You may be electrocuted or the product can be damaged.
■ Make sure to remove all cables before moving the product. - You may be electrocuted or the product can be damaged.

Safety Precautions
Caution
■ Do not shock the product when moving it.
- You may be electrocuted or the product can be damaged.
■ Do not dispose the product-packing box. Use it when you move.
■ Make the panel face forward and hold it with both hands to move.
- If you drop the product, the damaged product can cause electric shock or fire. Contact with the service center for repair.
Precautions in Using the Product
Warning
■ Do not disassemble, repair or modify the product at your own discretion.
- Fire or electric shock accident can occur.
- Contact the service center for check, calibration or repair.
■ When cleaning the brown tube surface, unplug the power cord and scrub with soft cloth to prevent scratching. Do not clean with a wet cloth.
■ Keep the product away from water.
Fire or electric shock accident can occur.
Caution
■ Do not put or store inflammable substances near the product.
- There is a danger of explosion or fire due to careless handling of the inflammable substances.
■ When cleaning the brown tube surface, unplug the power cord and scrub with soft cloth to prevent scratching. Do not clean with a wet cloth.
- The water can sink into the product, which can cause electric shock or serious malfunction.
■ Take a rest from time to time to protect your vision.
- Keep the product clean at all times.
■ Take a comfortable and natural position when working with a product to relax the muscles.
■ Take a regular break when working with a product for a long time.
■ Do not press strongly upon the panel with a hand or sharp object such as nail, pencil or pen, or make a scratch on it.
- Keep the proper distance from the product.
- Your vision may be impaired if you look at the product too closely.
■ Set the appropriate resolution and clock by referring to the User's Guide.
- Your vision can be impaired.
■ Use authorized detergent only when cleaning the product. (Do not use benzene, thinner or alcohol.)
- Product can be deformed.
On Disposal
■ The fluorescent lamp used in this product contains a small amount of mercury.
■ Do not dispose of this product with general household waste.
Disposal of this product must be carried out in accordance to the regulations of your local authority.
Accessories
Please check the accessories in the product package.
* The product and the accessories can be different from the figures shown here.
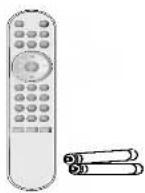
Remote Control/Batteries

User's Guide/
Driver CD/Cards
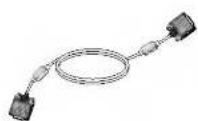
D-Sub Signal Cable
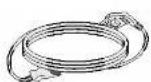
Power Cord
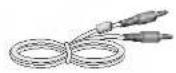
Audio Cable (PC)
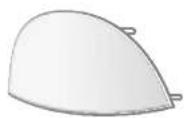
Back Cap
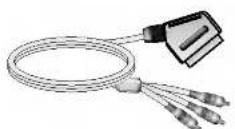
RCA to SCART Cable(Optional)
-It varies from country/region to country/region.

Inserting batteries into remote control.
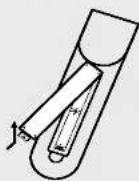
- Take out the battery cap.
- Insert the batteries with correct polarity (+/-).
- Close the battery cap.
- You can use a remote control 7 meter distance and 30 degree (left/right) within the receiving unit scope.
- Dispose of used batteries in the recycle bin to prevent environmental pollution.

Before Connecting to the PC
- Before setting up the product, ensure that the power to the product, the computer system, and other attached devices is turned off.
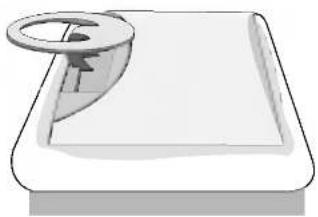
Unfolding the stand base
1 Place the product with its front facing downward on soft cloth.
natural_image
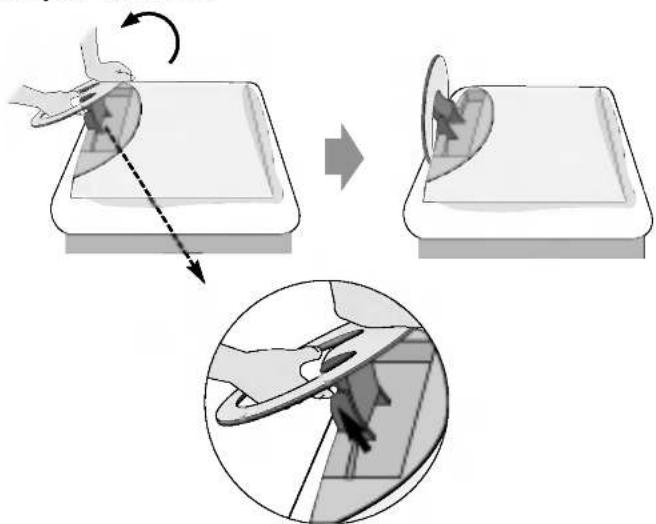
Illustration of a rolled-up document or scroll with a circular seal, no text or symbols present② Hold down the release button inside the stand and strongly pull out the stand with your two hands.
text_image
Diagram illustrating a mechanical or robotic operation with labeled steps and a magnified inset showing the step's motion.The stand won't move if you don't press release button.

To arrange cables in order
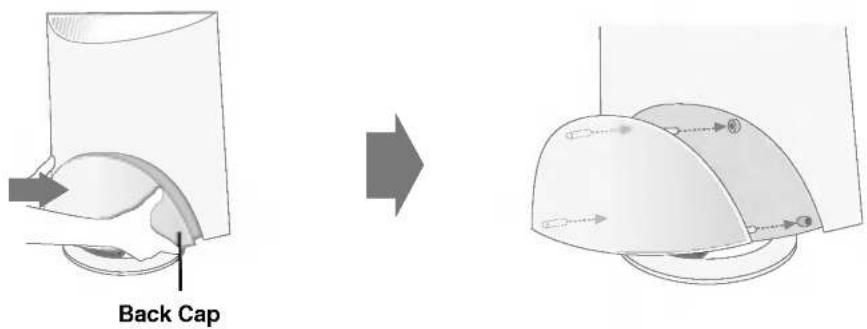
1 Connect the signal cable, power cord and the audio cable to use in order to arrange in the cable holder as shown in the following figure. (To connect the cables, refer to next pages.)

text_image
Cable Holder② Push the back cap according to the steps shown in the following figure.
text_image
Back CapName and Function of the Parts
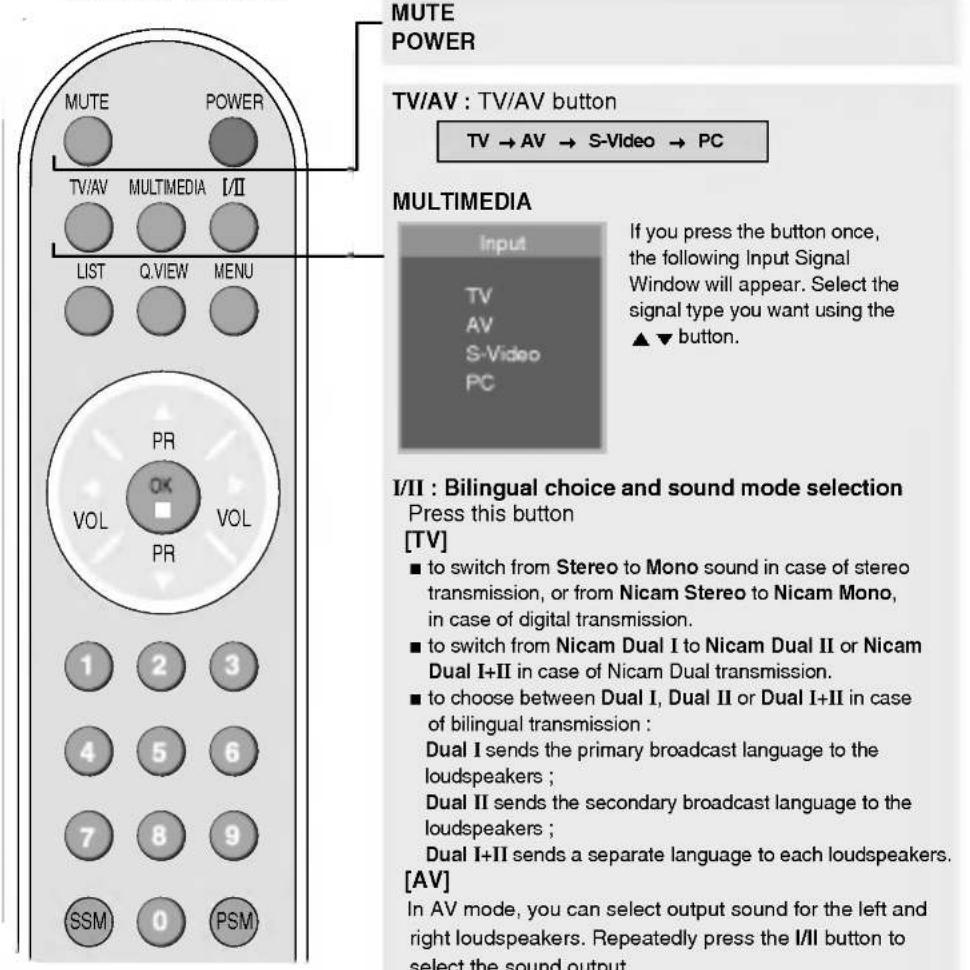
Name of the Remote Control Buttons
Remote Control
text_image
MUTE POWER TV/AV : TV/AV button TV → AV → S-Video → PC MULTIMEDIA Input TV AV S-Video PC I/II : Bilingual choice and sound mode selection Press this button [TV] ■ to switch from Stereo to Mono sound in case of stereo transmission, or from Nicam Stereo to Nicam Mono, in case of digital transmission. ■ to switch from Nicam Dual I to Nicam Dual II or Nicam Dual I+II in case of Nicam Dual transmission. ■ to choose between Dual I, Dual II or Dual I+II in case of bilingual transmission : Dual I sends the primary broadcast language to the loudspeakers ; Dual II sends the secondary broadcast language to the loudspeakers ; Dual I+II sends a separate language to each loudspeakers. [AV] In AV mode, you can select output sound for the left and right loudspeakers. Repeatedly press the I/II button to select the sound output.MUTE
POWER
TV/AV : TV/AV button
TV → AV → S-Video → PC
text_image
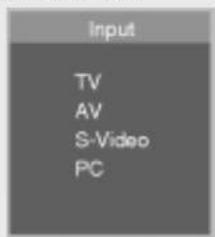
Input TV AV S-Video PCIf you press the button once, the following Input Signal Window will appear. Select the signal type you want using the ▲▼ button.
[TV]
■ to switch from Stereo to Mono sound in case of stereo transmission, or from Nicam Stereo to Nicam Mono, in case of digital transmission.
■ to switch from Nicam Dual I to Nicam Dual II or Nicam Dual I+II in case of Nicam Dual transmission.
■ to choose between Dual I, Dual II or Dual I+II in case of bilingual transmission :
Dual I sends the primary broadcast language to the loudspeakers;
Dual II sends the secondary broadcast language to the loudspeakers;
Dual I+II sends a separate language to each loudspeakers.
[AV]
In AV mode, you can select output sound for the left and right loudspeakers. Repeatedly press the I/II button to select the sound output.
■ L+L : Audio signal from audio L input is sent to left and right loud-speakers.
■ L+R : Audio signal from audio L input is sent to left loud-speaker and audio signal from audio R input is sent to right loud-speaker.
■ R+R : Audio signal from audio R input is sent to left and right loud-speakers.
■ NOTE : In case of weak stereo sound signals, with stereo or Nicam stereo transmission, select mono reception.
![LG M1710A - [AV] - 1](/content/2026/05/801240/images/4067b6b0a49f839ce531602eb5848ce5247db7849a4b24b3f1db8af093edb235.jpg)
text_image
MUTE POWER TV/AV MULTIMEDIA I/II LIST Q.VIEW MENU PR OK VOL VOL PR 1 2 3 4 5 6 7 8 9 SSM 0 PSMLIST : Programme list
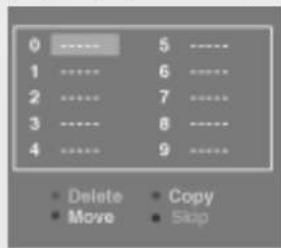
To display the programme list (0\~99).
text_image
0 ............ 5 ........... 1 ............ 6 ........... 2 ............ 7 ........... 3 ............ 8 ........... 4 ............ 9 ........... Delete Copy Move SkipNote: TV channels displayed in blue have been setup to be skipped in the Programme Edit menu
Q.VIEW : QUICK VIEW Button
* Favourite Program On : Rotate favourite channel
* Favourite Program Off : To display the previously selected TV channel
MENU
Use this button to enter the On Screen Display menu.
PR ( ▲▼ ) Buttons
Able to change channel.
VOL (◀ ▶) Buttons
Able to adjust sound.
OK Button
Use when functional adjustment is completed.
Number buttons
Able to directly select and change channel.
SSM (Sound Status Memory) Button
Use this button to select the sound tone.
Press repeatedly to select Flat, Music, Movie, Speech, User sound tone.
PSM (Picture Status Memory) Button
Press repeatedly to select Dynamic, Standard, Mild, Game or User picture mode.
Name and Function of the Parts
Name of the Remote Control Buttons
Remote Control
text_image
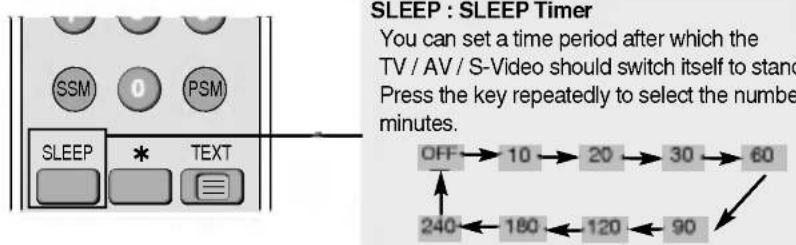
SLEEP : SLEEP Timer You can set a time period after which the TV / AV / S-Video should switch itself to stand Press the key repeatedly to select the number minutes. OFF → 10 → 20 → 30 → 60 240 ← 180 ← 120 ← 90Remote Control - Using the Teletext function (Optional)
text_image
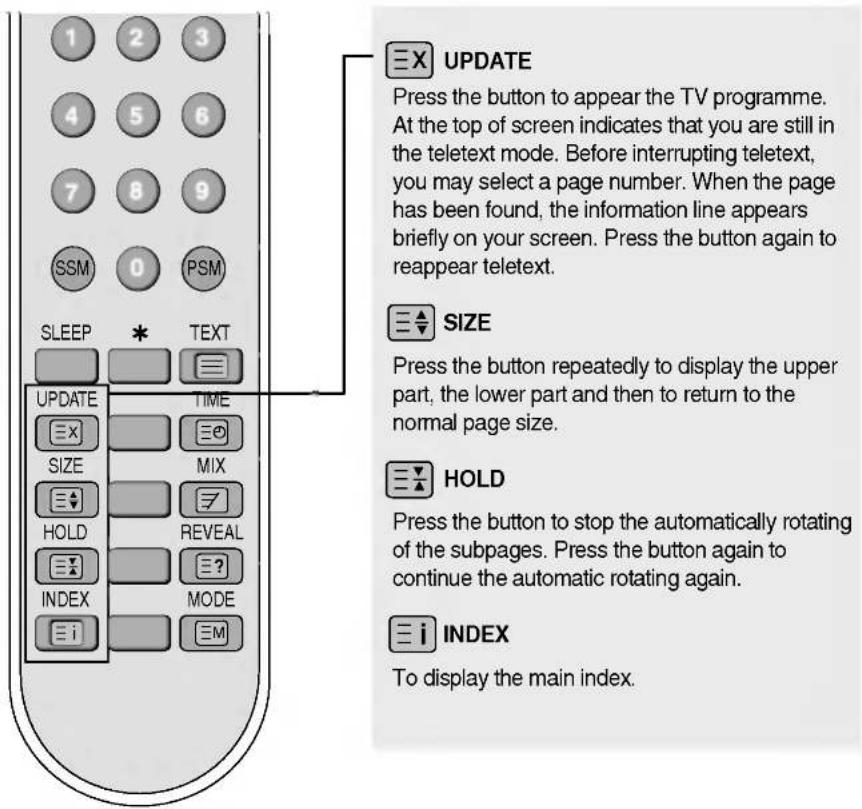
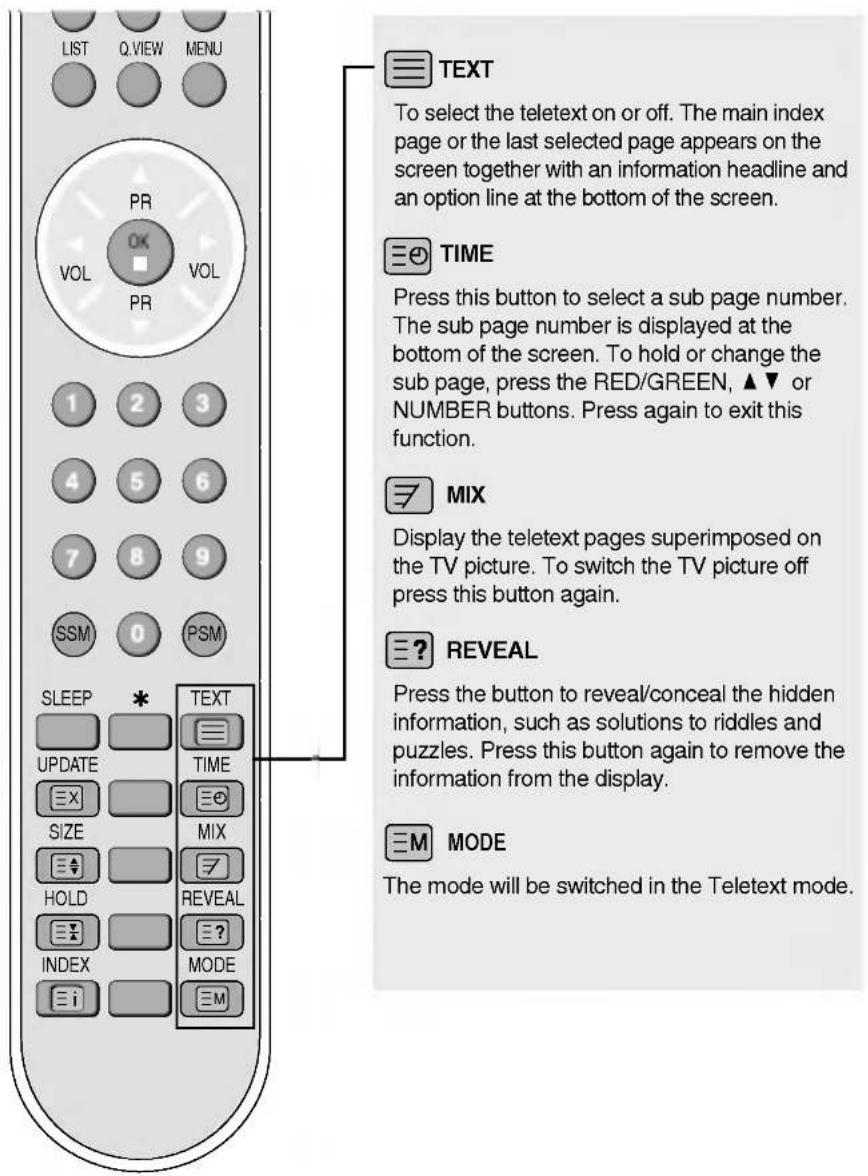
1 2 3 4 5 6 7 8 9 SSM 0 PSM SLEEP * TEXT UPDATE TIME SIZE MIX HOLD REVEAL INDEX MODE i M UPDATE PRESS the button to appear the TV programme. At the top of screen indicates that you are still in the teletext mode. Before interrupting teletext, you may select a page number. When the page has been found, the information line appears briefly on your screen. Press the button again to reappear teletext. SIZE Press the button repeatedly to display the upper part, the lower part and then to return to the normal page size. HOLD Press the button to stop the automatically rotating of the subpages. Press the button again to continue the automatic rotating again. i INDEX To display the main index.
Remote Control - Using the Teletext function (Optional)
text_image
LIST Q.VIEW MENU PR VOL OK VOL PR 1 2 3 4 5 6 7 8 9 SSM 0 PSM SLEEP * UPDATE TIME SIZE MIX HOLD REVEAL INDEX MODE TEXT To select the teletext on or off. The main index page or the last selected page appears on the screen together with an information headline and an option line at the bottom of the screen. TIME Press this button to select a sub page number. The sub page number is displayed at the bottom of the screen. To hold or change the sub page, press the RED/GREEN, ▲▼ or NUMBER buttons. Press again to exit this function. MIX Display the teletext pages superimposed on the TV picture. To switch the TV picture off press this button again. REVEAL Press the button to reveal/conceal the hidden information, such as solutions to riddles and puzzles. Press this button again to remove the information from the display. MODE The mode will be switched in the Teletext mode.Name and Function of the Parts
Rear View
natural_image
Pure geometric diagram showing a sphere inscribed in a cylinder with dashed lines indicating projection or alignment (no text or symbols)Back Cap
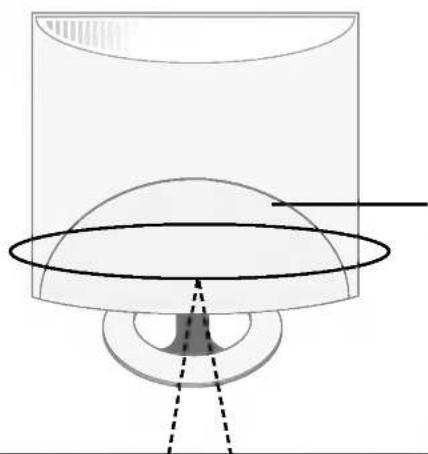
- Open the back cap before you install the product.
[15 inch]

text_image
1 2 3 S-Video Video Audio L R 4 5 ANT IN 6 AUDIO IN[17 inch / 19 inch]

text_image
1 2 3 S-Video Video Audio 4 5 6 ANT IN AUDIO IN① Power Connector : Connect the power cord.
② Headphone/Earphone Connection Terminal
③ AV Input Terminal
④ D-Sub Analog Signal Connector
⑤ TV Tuner Jack : Connect the antenna.
⑥ PC Sound Jack : Connect to the jack in the PC sound card.

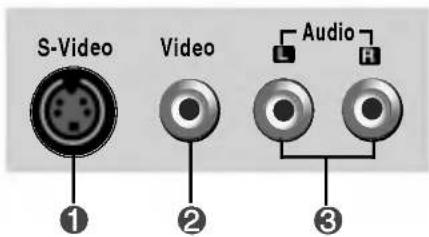
AV Input Terminal
text_image
S-Video Video Audio ① ② ③① S-Video Input Terminal
② AV(CVBS) Input Terminal(Video)
③ AV(CVBS) Input Terminal(Audio)

Connecting the sound card output terminal
- Make sure to check the sound card connection terminal in the PC before connecting to the product.
If the PC sound card supports both Speaker Out and Line Out, change it to Line Out by setting the jumper or the PC application. (For more details, refer to the sound card user's guide.) - Speaker Out : The terminal connected to the speaker that is not equipped with an amplifier.
- *Line Out : The terminal connected to the speaker equipped with an amplifier.
If Audio Out in the PC sound card has only Speaker Out, reduce the PC volume. This product is integrated with an amplifier.
Connecting to External Devices
When Connecting to your PC
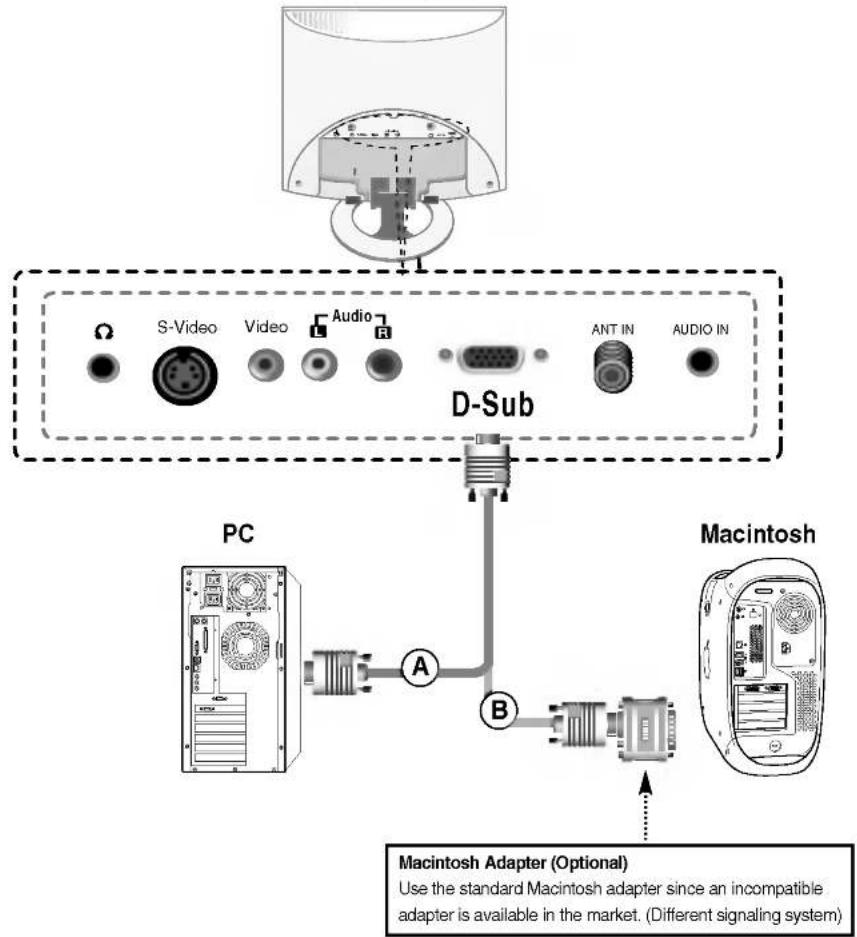
First of all, see if the computer, product and the peripherals are turned off. Then, connect the signal input cable.
(A) When connecting with the D-Sub signal input cable. (IBM compatible PC)
(B) When connecting with the D-Sub signal input cable. (Macintosh)
Rear side of the product.
text_image
S-Video Video Audio D-Sub ANT IN AUDIO IN PC A B Macintosh Macintosh Adapter (Optional) Use the standard Macintosh adapter since an incompatible adapter is available in the market. (Different signaling system)
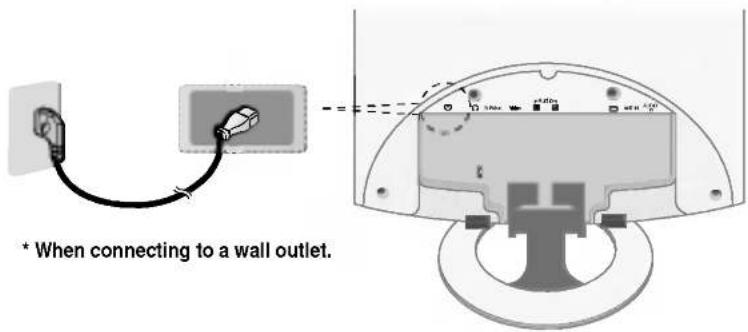
② Connect the power cord.
text_image
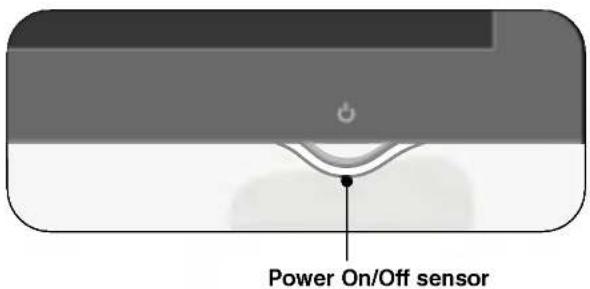
* When connecting to a wall outlet.③ A Touch the Power On/Off sensor.
text_image
Power On/Off sensor(B) Turn on the PC.
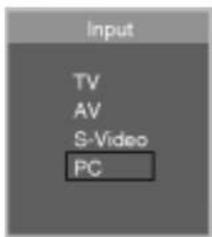
4 Select an input signal.
Press the MULTIMEDIA button on the remote control to select the input signal.
MULTIMEDIA → ▼▲ → OK
Or, press the SOURCE button at the front side of the product.
SOURCE → ▼▲ → AUTO/SELECT
- Select PC
text_image
Input TV AV S-Video PC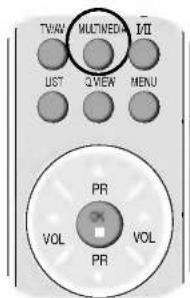
text_image
TV/W MULTINEDA I/O UST QVIEW MENU PR VOL VOL PR
- Directly connect to a grounded power outlet on the wall or a power bar with a ground wire.

Connecting to External Devices
When watching VCR/DVD
1 Connect the video/audio cable as shown in the below figure and then connect the power cord (See page A14).
(A) When connecting with an RCA cable.
- Connect the input terminal with a proper color match. (Video – Yellow, Sound (left) – White, Sound (right) – Red)
Rear side of the Product
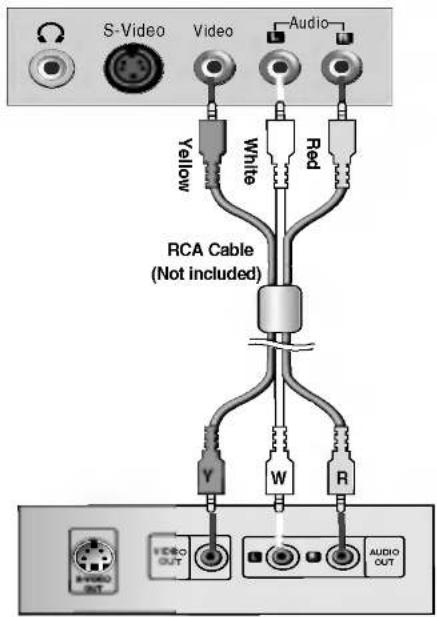
text_image
S-Video Video Audio Yellow White Red RCA Cable (Not included) Y W R VIDEO OUT AUDIO OUTVCR/DVD
(B) When connecting with an S-Video cable.
- Connect to the S-Video input terminal to watch high image quality movies.
Rear side of the Product
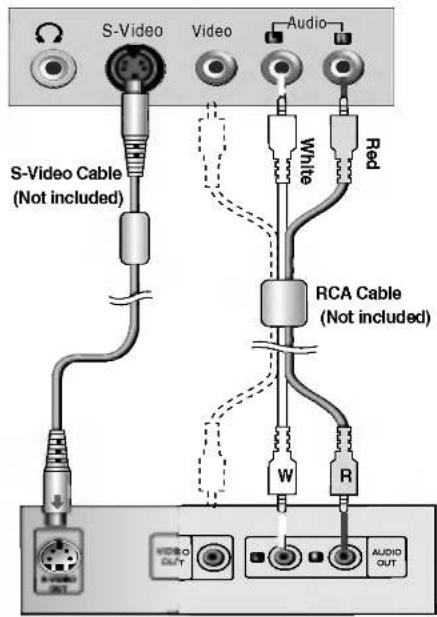
text_image
S-Video Video Audio S-Video Cable (Not included) White Red RCA Cable (Not included) W R AUDIO OUT AUDIO OUTVCR/DVD
© When connecting with an RCA to SCART cable.(Optional)
Rear side of the Product
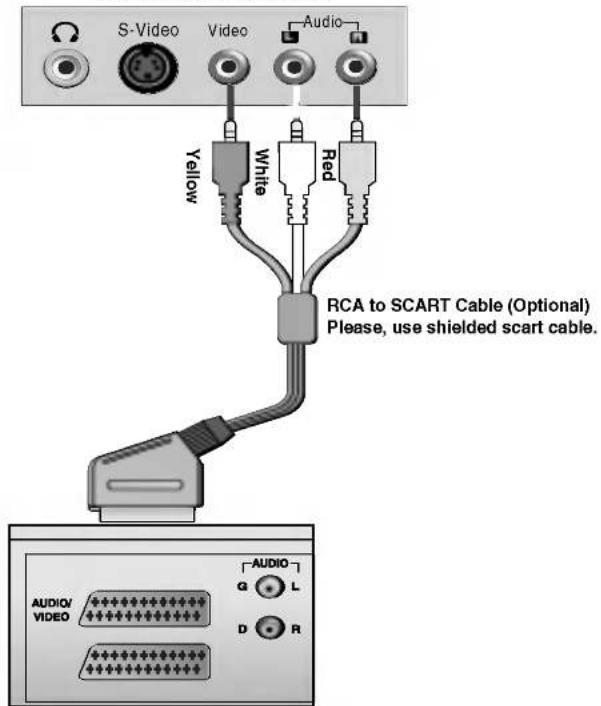
text_image
S-Video Video Audio Yellow White Red RCA to SCART Cable (Optional) Please, use shielded scart cable. AUDIO/ VIDEO AUDIO G L D RVCR / DVD
2 Select an input signal.
Press the MULTIMEDIA button on the remote control to select the input signal.
MULTIMEDIA → ▼▲ → OK
Or, press the SOURCE button at the front side of the product.
SOURCE → ▼▲ → AUTO/SELECT
(A) When connecting with a RCA cable.
- Select AV
(B) When connecting with a S-Video cable.
- Select S-Video
(C) When connecting with a RCA to SCART cable.
- Select AV
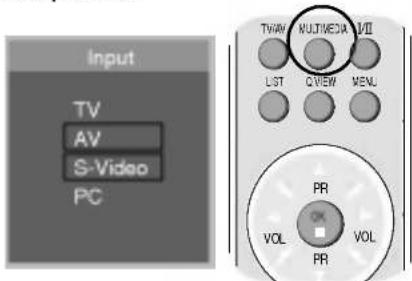
text_image
Input TV AV S-Video PC TWAV MULTIMEDIA VII LIST CVIEW MENU PR VOL OK VOL PRA16
Connecting to External Devices
When watching TV
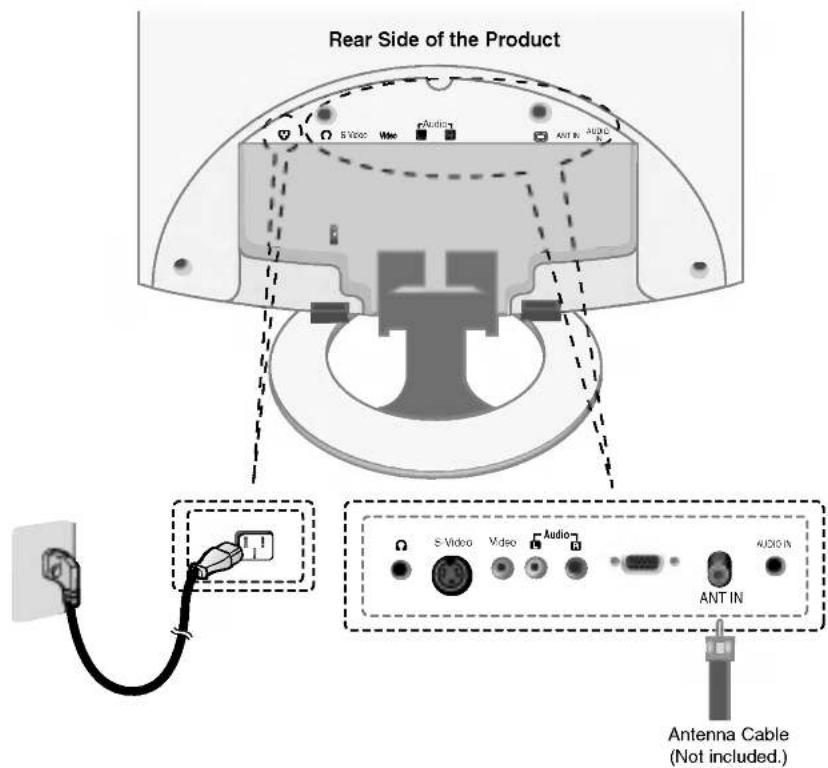
① See if the antenna cable is connected at the rear side of the product and then, connect the power cord.
text_image
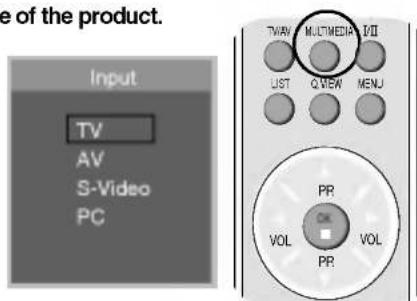
Rear Side of the Product S-Video Audio ANT IN ANTIN Antenna Cable (Not included.)② Select an input signal. Press the MULTIMEDIA button on the remote control to select the input signal.
MULTIMEDIA → ▼▲ → OK
Or, press the SOURCE button at the front side of the product.
SOURCE → ▼▲ → AUTO/SELECT
- Select TV
text_image
e of the product. Input TV AV S-Video PC TVAY MULTIMEDIA I/II UST Q VIEW MENU PR OK VOL VOL PR?
Selecting and Adjusting the Screen

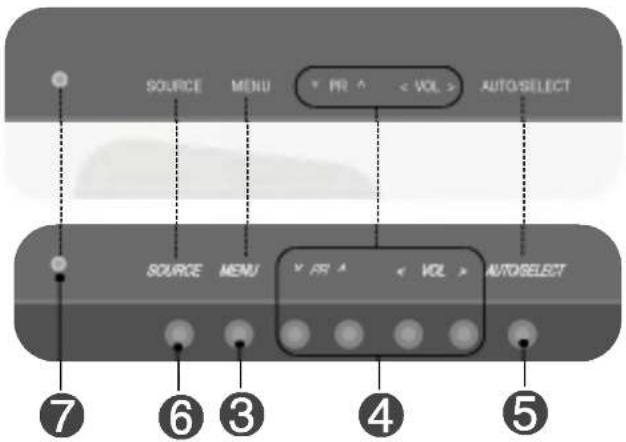
Name of the Buttons in the Screen Adjustment Unit
text_image
SOURCE MENU < VOL > AUTOSELECT SOURCE MENU < VOL > AUTOSELECT ⑦ ⑥ ③ ④ ⑤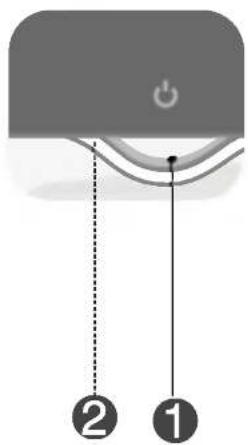
text_image
Diagram showing a device with labeled parts and connection points, including a power button icon and numbered annotations 1 and 2.
Power Indicator
- This Indicator lights up blue when the display operates normally (On Mode). If the display is in Sleep (Energy Saving) Mode, this indicator color changes to amber.

Power On/Off sensor
- Touch the Power On/Off sensor.

MENU Button
- Use this button to show/hide the OSD (On Screen Display) menu screen.

OSD Select/Adjust Button
- Use this button to select an icon or adjust the setting in the OSD screen.

- Use this button to control the channel for the TV signal.

- Adjust the volume.
Selecting and Adjusting the Screen
Name of the Buttons in the Screen Adjustment Unit

AUTO/SELECT Button
- Select the icon to adjust on the OSD screen.
[For PC Analog signal]
- If you press the [AUTO/SELECT] button, automatic screen adjustment will be started.
Processing

SOURCE Button
SOURCE → ▼ → AUTO/SELECT
- Select the input signal
TV
AV
S-Video
PC
Television
Composite video
S-Video
D-Sub analog signal
Input
TV
AV
S-Video
PC


- The unit that receives the signal from the remote control.

OSD (On Screen Display) Menu
| Icon | Function Description |
 | Set/Select the channel when using the TV |
| Station | |
 | Adjusting the picture function. |
| Picture | |
 | Adjusting the sound function. |
| Sound | |
 | Adjusting the time function. (TV/Video only) |
| Time | |
 | Selecting the setup function. |
| Setup | |
 | Adjusting the screen function. (PC only) |
| Screen |

OSD(On Screen Display)
The OSD function enables you to adjust the screen status conveniently since it provides graphical presentation.

Selecting and Adjusting the Screen

OSD (On Screen Display) Screen Tracking Order
flowchart
graph LR
    A["Menu Screen Pop"] --> B["Move where you want to adjust"]
    B --> C["Select a menu icon"]
    C --> D["Adjust the status"]
    D --> E["Save adjustment"]
    E --> F["Exit from the menu screen"]
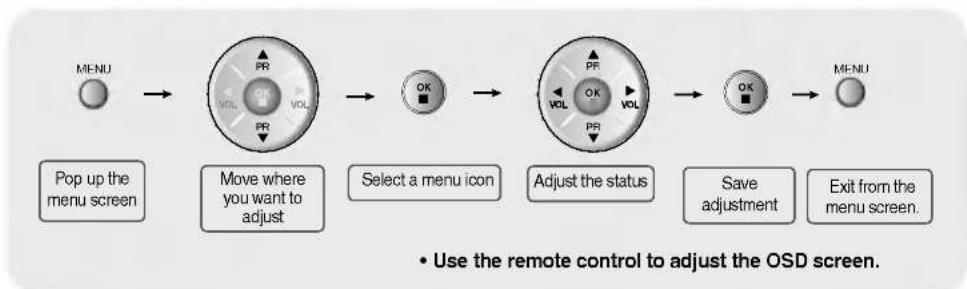
Press the MENU Button, then the main menu of the OSD appears.
2 To access a control, use the ▼▲ Buttons.
3 When the icon you want becomes highlighted, press the OK Button.
4 Use the ▼▲◀▶ Buttons to adjust the item to the desired level.
5 Accept the changes by pressing the OK Button.
6 Exit the OSD by pressing the MENU Button.

How to adjust the screen automatically.
You need to adjust the screen display when connecting the product to a new computer or changing the mode. Refer to the following section to set an optimal product screen.
Press the AUTO/SELECT button in the PC analog signal. Then, an optimal screen status will be selected that fits into the current mode.
If adjustment is not satisfactory, you need to adjust screen position, clock and phase in the OSD menu.
Processing..


Set/Select the channel when using the TV
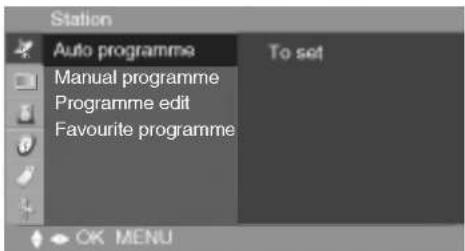
Auto programme
text_image
Station Auto programme To set Manual programme Programme edit Favourite programme OK MENUSystem
Press the ▼▲ buttons to select the TV system of the country or part of the world from where you want to receive the TV channels. If you want to receive 'SECAM L' channel, change the System menu to 'L' before launching an automatic search.
L: SECAM L/L (France)
BG : PAL B/G, SECAM B/G (Europe/East Europe)
I: PAL I/II (U.K/Ireland)
DK : PAL D/K, SECAM D/K (East Europe)
M : NTSC-Multi
Storage from
To select a programme number or enter the programme number with the number buttons from where you want to start searching for new channels. If e.g. you want to keep the channels 1 to 10 stored earlier, enter programme number 11. Your TV search for new channels from number 11 onwards.
Search
Press OK or ▶ button to start automatic programming. all available TV channels are searched for and stored automatically. To stop auto programming, press the MENU button. When auto programming is completed, the programme list menu appears.
Manual programme
text_image
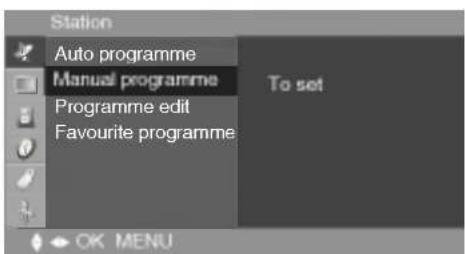
Station Auto programme Manual programme Programme edit Favourite programme To set OK MENUTo change the channel. (Change each item in Manual Program and press the "MENU" button to save the settings)
Storage
Press the ◀▶ buttons to select the channel number or enter the programme number with the number buttons in where you want to store channel.
System
Press the ▼▲ buttons to select the TV system of the country or part of the world from where you want to receive the TV channels.
L: SECAM L/L (France)
BG : PAL B/G, SECAM B/G (Europe/East Europe)
I: PAL I/II (U.K/Ireland)
DK : PAL D/K, SECAM D/K (East Europe)
M : NTSC-Multi

Selecting and Adjusting the Screen

Set/Select the channel when using the TV
Channel Press the ▼▲ buttons to select VHF/UHF for aerial channels or Cable for cable channels. If you know the channel number, enter it directly with the digit buttons 0 to 9. To select the channel reception type. : VHF/UHF / Cable
Search Use the ◀▶ buttons to search next channel backward or forward direction.
Name To see the assigned channel name. It is possible to change the name stored in the memory or to assign a name to a TV channel which has not yet been entered. A name with up 5 letters or numbers can be given to the programme numbers 0 to 99.
Press the ◀▶ buttons to move cursor to be changed. -> Press the ▼▲ buttons to select a character.(space, number 0\~9, and alphabet A\~Z, +,-) -> Press OK button or MENU button.
Programme edit
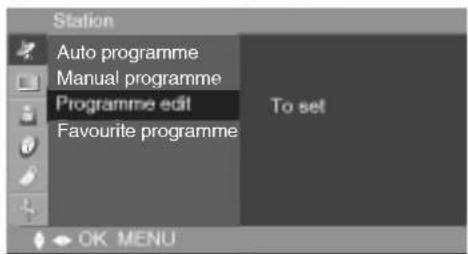
text_image
Station Auto programme Manual programme Programme edit Favourite programme To set OK MENU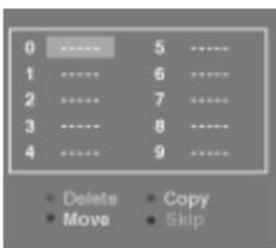
text_image
0 ...... 1 ...... 2 ...... 3 ...... 4 ...... 5 ...... 6 ...... 7 ...... 8 ...... 9 ...... Delete Copy Move SkipDelete Press the ▼▲◀▶ buttons to select a TV channel to be deleted. -> Press the red key on the remote control -> The background colour of the selected channel will change to red. Press the Delete button one more time to delete the selected channel. All the following channels are shifted up one position.
Copy Press the ▼▲◀▶ buttons to select a TV channel to be copyed. -> Press the green key on the remote control. All the following channel numbers are shifted down one position.
Move Press the ▼▲◀▶ buttons to select a channel number to be moved. -> Press the yellow key on the remote control. -> Press the ▼▲◀▶ buttons to move the TV channel to the desired channel number. -> Press the yellow key again to release this function.
Skip Press the ▼▲◀▶ buttons to select a channel number to be skipped. -> Press the blue key on the remote control. The skipped TV channel is displayed in blue.

Set/Select the channel when using the TV
Favourite programme
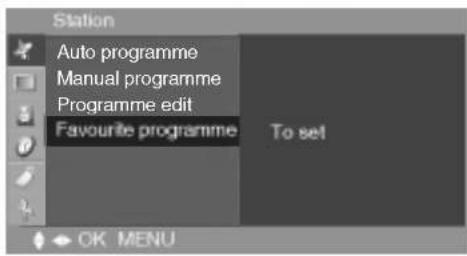
text_image
Station Auto programme Manual programme Programme edit Favourite programme To set OK MENU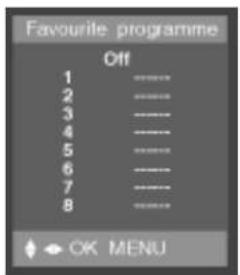
text_image
Favourite programme Off 1 ---- 2 ---- 3 ---- 4 ---- 5 ---- 6 ---- 7 ---- 8 ---- OK MENUThis function lets you select your favourite programmes directly. (8 channel) Press the ▼▲◀▶ buttons to select a channel number.
* Q.VIEW button(remote control) : Rotate Favourite channel
Selecting and Adjusting the Screen

Adjusting the picture function (PC)
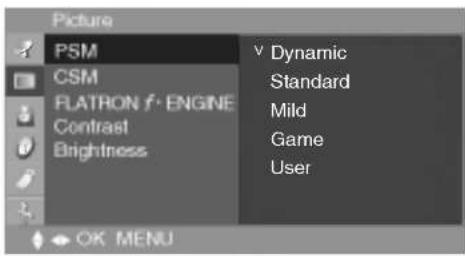
PSM
text_image
Picture PSM CSM FLATRON f· ENGINE Contrast Brightness Dynamic Standard Mild Game User OK MENUThe PSM function automatically adjusts the screen image quality.
• Dynamic
Select this option to display with a sharp image.
- Standard
The most general and natural screen display status.
• Mild
Select this option to display with a mild image.
• Game
Select this option to enjoy dynamic image when playing a game.
- User
Select this option to use the user-defined settings.
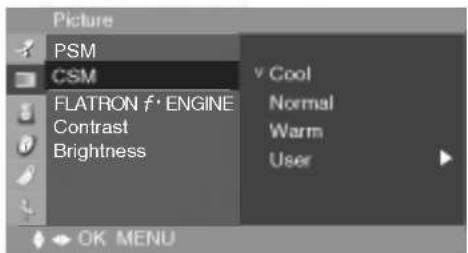
CSM
text_image
Picture PSM CSM FLATRON f·ENGINE Contrast Brightness Cool Normal Warm User OK MENUSelecting a factory setting color set.
• Cool
Slightly purplish white.
- Normal
Slightly bluish white.
• Warm
Slightly reddish white.
- User
Select this option to use the user-defined settings.
Red / Green / Blue
Set your own color levels.
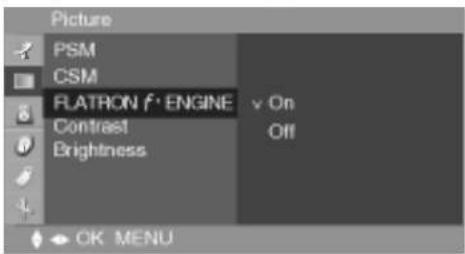
FLATRON f·ENGINE
text_image
Picture PSM CSM FLATRON F·ENGINE Contrast Brightness v On Off OK MENUThis feature lets you easily select the best desired image condition optimized to the environment
text_image
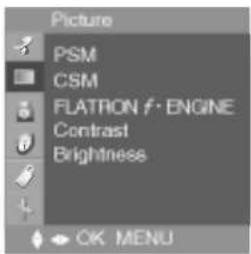
Picture PSM CSM FLATRON f· ENGINE Contrast Brightness OK MENUContrast : To adjust the contrast of the screen.
Brightness : To adjust the brightness of the screen.

Adjusting the picture function (TV/Video)
PSM
text_image
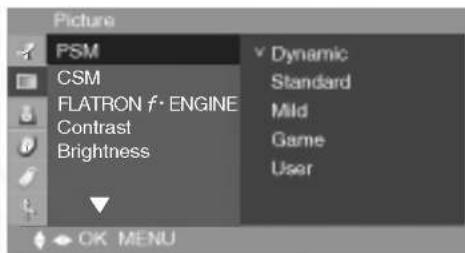
Picture PSM CSM FLATRON f· ENGINE Contrast Brightness Dynamic Standard Mild Game User OK MENUThe PSM function automatically adjusts the screen image quality.
• Dynamic
Select this option to display with a sharp image.
- Standard
The most general and natural screen display status.
• Mild
Select this option to display with a mild image.
• Game
Select this option to enjoy dynamic image when playing a game.
- User
Select this option to use the user-defined settings.
CSM
text_image
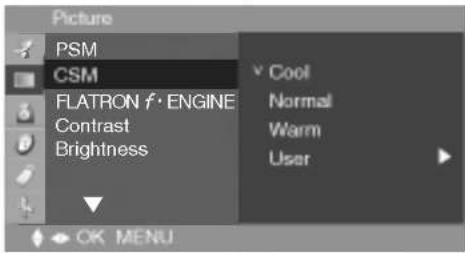
Picture PSM CSM FLATRON f·ENGINE Contrast Brightness Cool Normal Warm User OK MENUSelecting a factory setting color set.
• Cool
Slightly purplish white.
- Normal
Slightly bluish white.
- Warm
Slightly reddish white.
- User
Select this option to use the user-defined settings. Red / Green / Blue
Set your own color levels.
FLATRON f·ENGINE
text_image
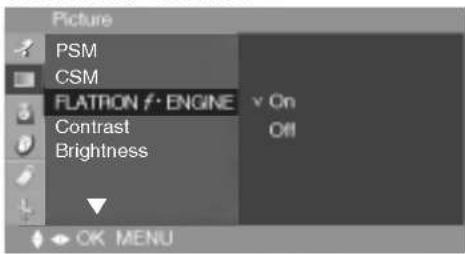
Picture PSM CSM FLATRON f·ENGINE Contrast Brightness OK MENUThis feature lets you easily select the best desired image condition optimized to the environment
text_image
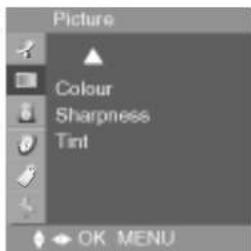
Picture Colour Sharpness Tint OK MENUContrast: To adjust the contrast of the screen.
Brightness : To adjust the brightness of the screen.
Colour : To adjust the color to desired level.
Sharpness : To adjust the clearness of the screen.
Tint : To adjust the tint to desired level.
(only 60Hz signal)
Selecting and Adjusting the Screen

Adjusting the sound function
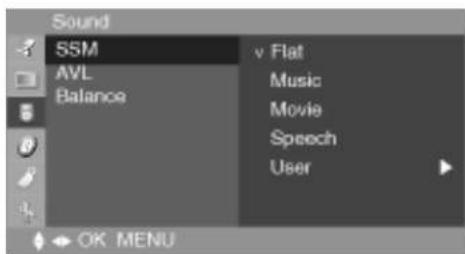
text_image
Sound SSM AVL Balance v Flat Music Movie Speech User OK MENUSSM
The best sound tone quality will be selected automatically depending on the video type that you're currently watching.
- Flat : The most commanding and natural audio.
- Music: Select this option to enjoy the original sound when listening to the music.
- Movie : Select this option to enjoy sublime sound.
- Speech : Select this option to watch sports broadcasting.
- User : Select this option to use the user-defined audio settings.
AVL
To adjust uneven sound volumes across all channels or signals automatically to the most appropriate level. To use this feature, select On.
Balance
Use this function to balance sound from the left and right speakers.

Adjusting the time function (TV/Video only)
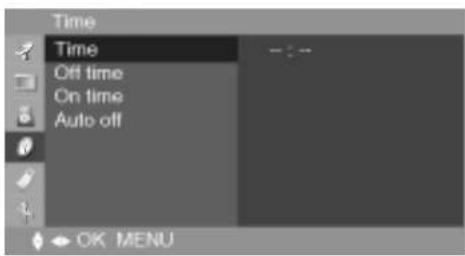
text_image
Time Off time On time Auto off OK MENUTime
This function is used to set up of current time.
You must set the time correctly before using On/Off time function.
1) Press the MENU button and then use ▼▲ button to select the Time menu.
2) Press the ▶ button and then use ▼▲ button to select the Time menu.
3) Press ▶ button and then use ▼▲ button to set the hour(01\~23).
4) Press ▶ button and then use ▼▲ button to set the minutes(00\~59).
The default value is -- : --.
Off/On time
The Off time automatically switches the set to off mode at the pre-set time.
1) Press the MENU button and then use ▼▲ button to select the Time menu.
2) Press the ▶ button and then use ▼▲button to select Off time or On time.
3) Press the ▶ button and then use ▼▲ button to set the hour(01\~23).
4) Press the ▶ button and then use ▼▲ button to set the minutes(00\~59).
5) Press the ▶ button and then use ▼▲ button to select On or Off.
6) Only On time function; Press the ▶ button and then ▼▲ button to adjust volume level and programme number.
7) Press the OK/MENU button to save.
Auto off
If Auto off is active and there is no input signal, the TV switchchs to off mode automatically after 10 minutes.
(TV input only)
1) Press the MENU button and then use ▼▲ button to select the Auto off menu.
2) Press the ▶ button and then use ▼▲ button to select On or Off.
3) Press the OK/MENU button to save.

- In the event of power interruption (disconnection or power failure), the Time must be reset.
- Two hours after the set is switched on by the On time function it will automatically switch back to off mode unless a button has been pressed.
- Once the On or Off time is set, these functions operate daily at the preset time.
- Off time function overrides On time function if they are set to the same time.
• The set must be in off mode for the On time to work.

Selecting and Adjusting the Screen

Selecting the setup function
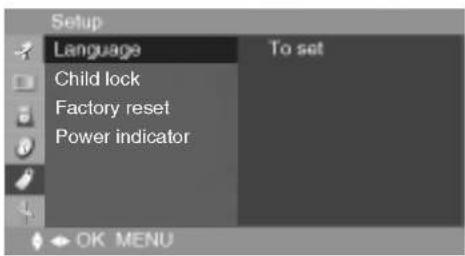
text_image
Setup Language Child lock Factory reset Power indicator To set OK MENULanguage To choose the language in which the control names are displayed.
Child lock Use the ▼▲ buttons to select On or Off. It can be set up so that it can only be used with the remote control. This feature can prevent unauthorized viewing.
In order to lock the OSD screen adjustment, set the Child lock tab to the 'On' position. In order to unlock it, do the following :
1) Push the MENU button on the remote control and set Child lock to the 'Off' position.
Factory reset Use this function to reset the product to the factory default. However, language selection will not be initialized.
Power indicator Use this function to set the power indicator on the front side of the product to On or Off. If you set On at any time, the power indicator will automatically be turned on.

Adjusting the screen function (PC only)
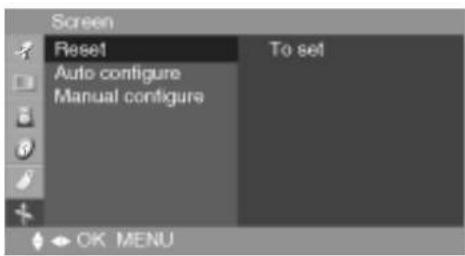
text_image
Screen Reset Auto configure Manual configure To set OK MENUReset
Use this function to reset the product to the factory default. However, language selection will not be initialized.
Auto configure
This button is for the automatic adjustment of the screen Position, Clock and Phase.
Manual configure
This button is for the manual adjustment of the screen Position, Clock and Phase.
• H-Position
To move image left or right.
• V-Position
To move image up or down.
- Clock
To minimize any vertical bars or stripes visible on the screen background.
The horizontal screen size will also change.
- Phase
To adjust the focus of the display. This item allows you to remove any horizontal noise and clear or sharpen the image of characters.
Troubleshooting
No image is displayed
● Is the product power cord connected?
- Does the power indicator is turned on?
● Power is on, power indicator is blue but the screen appears extremely dark.
- Does the power indicator look amber?
- Does the 'Out of range' message appear?
Does the 'Check signal cable' message appear?
• See if the power cord is properly connected to the outlet.
• See if the power switch is turned on.
- Adjust brightness and contrast again.
- If the product is in power saving mode, move the mouse or press any key.
- The signal from the PC (video card) is out of the vertical or horizontal frequency range of the product. Adjust the frequency range by referring to the Specifications in this user's guide.
17. 19 inch : 1280 x 1024 @75Hz
15 inch : 1024 x 768 @75Hz
- The signal cable between PC and product is not connected. Check the signal cable.
- Press the 'MULTIMEDIA' button in the remote control to check the input signal.
\* Maximum resolution
'Unknown Product' message appears when the product is connected.
Did you install the driver?
- Install the product driver, which is provided with the product, or download it from the web site. (http://www.lge.com)
- See if the plug&play function is supported by referring to the video card user's guide.
Note

* Vertical frequency: To enable the user to watch the product display, screen image should be changed tens of times every second like a fluorescent lamp. The vertical frequency or refresh rate is the times of image display per second. The unit is Hz.
* Horizontal frequency: The horizontal interval is the time to display one vertical line. When the 1 is divided by horizontal interval, the number of horizontal lines displayed every second can be tabulated as the horizontal frequency. The unit is kHz.
* Vertical frequency: To enable the user to watch the product display, screen image should be changed tens of times every second like a fluorescent lamp. The vertical frequency or refresh rate is the times of image display per second. The unit is Hz. * Horizontal frequency: The horizontal interval is the time to display one vertical line. When the 1 is divided by horizontal interval, the number of horizontal lines displayed every second can be tabulated as the horizontal frequency. The unit is kHz.
The screen image looks abnormal.
●Is the screen position wrong?
Do thin lines appear on the background screen?
● Horizontal noise appears or the characters look blurred.
- D-Sub analog signal – Press the AUTO/SELECT" button in the front side of the set to automatically select the optimal screen status that fits into the current mode. If adjustment is not satisfactory, use the Position OSD menu.
- See if the video card resolution and frequency are supported by the product. If the frequency is out of range, set to the recommended resolution in the Control Panel – Display – Setting menu.
- D-Sub analog signal – Press the AUTO/SELECT" button in the front side of the set to automatically select an optimal screen status that fits into the current mode. If adjustment is not satisfactory, use the Clock OSD menu.
- D-Sub analog signal – Press the AUTO/SELECT" button in the front side of the set to automatically select an optimal screen status that fits into the current mode. If adjustment is not satisfactory, use the Phase OSD menu.
After-image appears on the product.
- After-image appears when the product is turned off.
- If you use a fixed image for a long time, the pixels may be damaged quickly. Use the screensaver function.
Troubleshooting
The audio function does not work.
No sound?
Sound is too low.
• See if the audio cable is connected properly.
- Adjust the volume.
• See if the sound is set properly.
- Adjust the volume.
The TV function does not work.
The TV signal is not being received.
• See if you have selected the proper channel mode.
- Use the automatic channel setup function.
• See if the TV antenna is properly connected.
Screen color is abnormal.
- Screen has poor color resolution (16 colors).
- Set the number of colors to more than 24 bits (true color) Select Control Panel – Display – Settings – Color Table menu in Windows.
Screen color is unstable or monocolored.
- Check the connection status of the signal cable. Or, re-insert the PC video card.
- Do black spots appear on the screen?
- Several pixels (red, green, white or black color) may appear on the screen, which can be attributable to the unique characteristics of the LCD panel. It is not a malfunction of the LCD.
Specifications
The product specifications can change without prior notice for product improvement.
[15 inch]
| LCD Panel | Screen Type | 15 inches (38.016 cm) TFT (Thin Film Transistor)LCD (Liquid Crystal Display) PanelVisible diagonal size: 38.016 cm |
| Pixel Pitch | 0.297 mm | |
| Video Signal | Max. Resolution | 1024 X 768 @75 Hz |
| Recommended Resolution | 1024 X 768 @60 Hz | |
| Horizontal Frequency | 30 - 63 kHz | |
| Vertical Frequency | 56 - 75 Hz | |
| Synchronization Type | Separate | |
| Input Connector | S-Video, Composite video, TV, D-Sub Analog | |
| Power | Rated VoltagePower Consumption | AC 100-240V~ 50/60Hz 0.6AOn Mode : 30 WSleep Mode ≤ 4 WOff Mode ≤ 2 W |
| Tilt | Tilt RangeTilt Stand | -5 ~25°Attached |
| Dimension/Weight | Size (WxLxH)Weight (excl. package) | 375.4 mm x 221.8 mm x 373.8 mm4.4 kg (9.7 lbs) |
| Environmental Conditions | Operational ConditionStorage Condition | Temperature: 10°C ~ 35°C , Humidity: 10% ~ 80%Temperature: -20°C ~ 60°C , Humidity: 5% ~ 95% |
Specifications
The product specifications can change without prior notice for product improvement.
[17 inch]
| LCD Panel | Screen Type | 17 inches (43.27 cm) TFT (Thin Film Transistor)LCD (Liquid Crystal Display) PanelVisible diagonal size: 43.27 cm |
| Pixel Pitch | 0.264 mm | |
| Video Signal | Max. Resolution | 1280 X 1024 @75 Hz |
| Recommended Resolution | 1280 X 1024 @60 Hz | |
| Horizontal Frequency | 30 - 83 kHz | |
| Vertical Frequency | 56 - 75 Hz | |
| Synchronization Type | Separate | |
| Input Connector | S-Video, Composite video, TV, D-Sub Analog | |
| Power | Rated VoltagePower Consumption | AC 100-240V~ 50/60Hz 1.0AOn Mode : 50 WSleep Mode ≤ 4 WOff Mode ≤ 2 W |
| Tilt | Tilt RangeTilt Stand | -5 °~25°Attached |
| Dimension/Weight | Size (WxLxH)Weight (excl. package) | 419.9 mm x 221.8 mmx 423.5 mm5.9 kg (13.0 lbs) |
| Environmental Conditions | Operational ConditionStorage Condition | Temperature: 10°C ~ 35°C , Humidity: 10% ~ 80%Temperature: -20°C ~ 60°C , Humidity: 5% ~ 95% |
The product specifications can change without prior notice for product improvement.
[19 inch]
| LCD Panel | Screen Type | 19 inches (48.18 cm) TFT (Thin Film Transistor)LCD (Liquid Crystal Display) PanelVisible diagonal size: 48.18 cm |
| Pixel Pitch | 0.294 mm | |
| Video Signal | Max. Resolution | 1280 X 1024 @75 Hz |
| Recommended Resolution | 1280 X 1024 @60 Hz | |
| Horizontal Frequency | 30 - 83 kHz | |
| Vertical Frequency | 56 - 75 Hz | |
| Synchronization Type | Separate | |
| Input Connector | S-Video, Composite video, TV, D-Sub Analog | |
| Power | Rated VoltagePower Consumption | AC 100-240V~ 50/60Hz 1.0AOn Mode : 55 WSleep Mode ≤ 4 WOff Mode ≤ 2 W |
| Tilt | Tilt RangeTilt Stand | -5 ~25 ^Attached |
| Dimension/Weight | Size (WxLxH)Weight (excl. package) | 458.3 mm x 242.0 mm x 457.7 mm7.0 kg (15.4 lbs) |
| Environmental Conditions | Operational ConditionStorage Condition | Temperature: 10°C ~ 35°C , Humidity: 10% ~ 80%Temperature: -20°C ~ 60°C , Humidity: 5% ~ 95% |
Specifications

PC Mode – Preset Mode
[15 inch]
| Preset mode | Horizontal Frequency (kHz) | Vertical Frequency (Hz) | Preset mode | Horizontal Frequency (kHz) | Vertical Frequency (Hz) | ||
| 1 | VGA 640 x 350 | 31.468 | 70 | 8 | VESA 800 x 600 | 37.879 | 60 |
| 2 | VGA 720 x 400 | 31.468 | 70 | 9 | MAC 800 x 600 | 48.077 | 72 |
| 3 | VGA 640 x 480 | 31.469 | 60 | 10 | VESA 800 x 600 | 46.875 | 75 |
| 4 | VESA 640 x 480 | 35.000 | 66 | 11 | MAC 832 x 624 | 49.725 | 74 |
| 5 | VESA 640 x 480 | 37.861 | 72 | 12 | VESA 1024 x 768 | 48.363 | 60 |
| 6 | VESA 640 x 480 | 37.500 | 75 | 13 | VESA 1024 x 768 | 56.476 | 70 |
| 7 | VESA 800 x 600 | 35.156 | 56 | 14 | VESA 1024 x 768 | 60.023 | 75 |
[17 inch]
| Preset mode | Horizontal Frequency (kHz) | Vertical Frequency (Hz) | Preset mode | Horizontal Frequency (kHz) | Vertical Frequency (Hz) | ||
| 1 | VGA 640 x 350 | 31.469 | 70 | 8 | VESA 1024 x 768 | 48.363 | 60 |
| 2 | VGA 720 x 400 | 31.468 | 70 | 9 | MAC 1024 x 768 | 60.123 | 75 |
| 3 | VGA 640 x 480 | 31.469 | 60 | 10 | VESA 1152 x 870 | 68.681 | 75 |
| 4 | VESA 640 x 480 | 37.500 | 75 | 11 | VESA 1152 x 900 | 61.805 | 65 |
| 5 | VESA 800 x 600 | 37.879 | 60 | 12 | VESA1280 x 1024 | 63.981 | 60 |
| 6 | VESA 800 x 600 | 46.875 | 75 | 13 | VESA1280 x 1024 | 79.976 | 75 |
| 7 | VESA 832 x 624 | 49.725 | 74 | ||||
[19 inch]
| Preset mode | Horizontal Frequency (kHz) | Vertical Frequency (Hz) | Preset mode | Horizontal Frequency (kHz) | Vertical Frequency (Hz) | ||
| 1 | VGA 640 x 350 | 31.469 | 70 | 8 | VESA 1024 x 768 | 48.363 | 60 |
| 2 | VGA 720 x 400 | 31.468 | 70 | 9 | MAC 1024 x 768 | 60.123 | 75 |
| 3 | VGA 640 x 480 | 31.469 | 60 | 10 | VESA 1152 x 870 | 68.681 | 75 |
| 4 | VESA 640 x 480 | 37.500 | 75 | 11 | VESA 1152 x 900 | 61.805 | 65 |
| 5 | VESA 800 x 600 | 37.879 | 60 | 12 | VESA1280 x 1024 | 63.981 | 60 |
| 6 | VESA 800 x 600 | 46.875 | 75 | 13 | VESA1280 x 1024 | 79.976 | 75 |
| 7 | VESA 832 x 624 | 49.725 | 74 | ||||

Power Indicator
| Mode | Product |
| On Mode | Blue |
| Sleep Mode | Amber |
| Off Mode | Off |

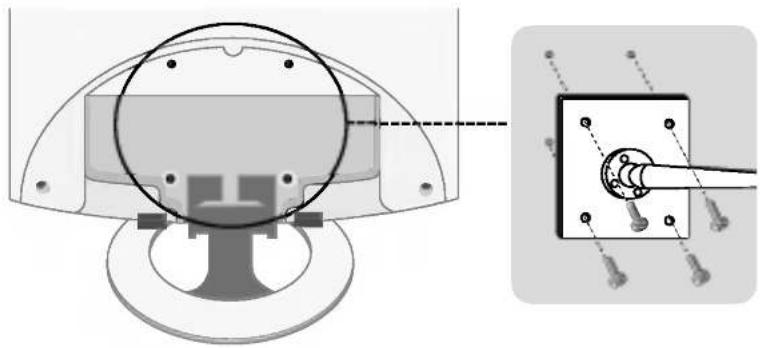
VESA wall mounting
natural_image
Technical diagram showing a mechanical assembly with a circular component and a separate close-up of a pin inserted into a socket (no text or symbols present)VESA wall mounting
Connected to another object (stand type and wall-mounted type).
This product accepts a VESA-compliant mounting interfacepad.(optional)
For further information, refer to the VESA Wall Mounting Instruction Guide.

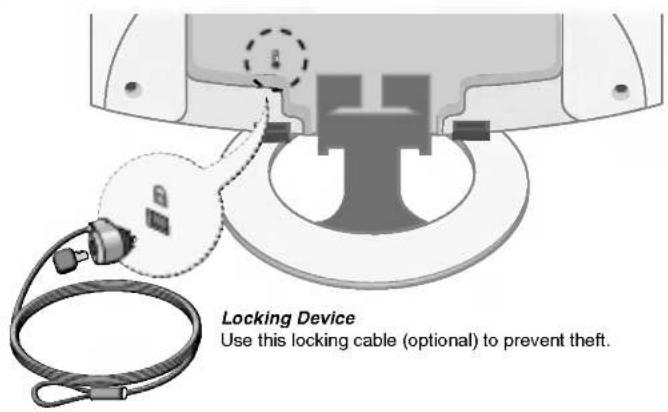
Theft prevention locking device
text_image
Locking Device Use this locking cable (optional) to prevent theft.
$$ \begin{array}{r}\left[ \begin{array}{lll}1 & & & \ & & & \ & & & \ & & & \ & & & \ & & & \ & & & \ & & & \ & & & \ & & & \ & & & \ & & & \ & & & \ & & \end{array} \right] = \frac{1}{2}\left[ \begin{array}{lll}1 & & \ & & \ & & \ & & \ & & \ & & \ & & \ & & \ & & \ & & \ & & \ & & \ & & \end{array} \right]. \end{array} $$
$$ \begin{array}{r}\left[ \begin{array}{lll}1 & & & \ & & & \ & & & \ & & & \ & & & \ & & & \ & & & \ & & & \ & & & \ & & & \ & & & \ & & & \ & & & \ & & \end{array} \right] = \frac{1}{2}\left[ \begin{array}{lll}1 & & \ & & \ & & \ & & \ & & \ & & \ & & \ & & \ & & \ & & \ & & \ & & \ & & \end{array} \right]. \end{array} $$