
LC-40FI5442KF - TV SHARP - Free user manual and instructions
Find the device manual for free LC-40FI5442KF SHARP in PDF.


User questions about LC-40FI5442KF SHARP
0 question about this device. Answer the ones you know or ask your own.
Ask a new question about this device
Download the instructions for your TV in PDF format for free! Find your manual LC-40FI5442KF - SHARP and take your electronic device back in hand. On this page are published all the documents necessary for the use of your device. LC-40FI5442KF by SHARP.
USER MANUAL LC-40FI5442KF SHARP
natural_image
Front view of a flat-screen TV with hexagonal pattern on screen (no text or symbols visible)Operating Instructions
Smart LED TV with Freeview Play
Important Safety Instructions

CAUTION
RISK OF ELECTRIC SHOCK DO NOT OPEN

Please read these instructions. All of the safety and operating instructions should be read before the appliance is operated.
Warnings
- Television sets with 40" screens or larger must be lifted and carried by at least 2 people.
- This television does not contain any parts that are serviceable by the user. In the event of a fault, contact the manufacturer or authorised service department.
- Exposing the internal parts of the TV may endanger your life. The manufacturers guarantee does not extend to faults caused by repairs carried out by unauthorised third parties.

To prevent spread of fi re, keep candles or other open fl ames away from this product at all times
- Do not use the TV set immediately after unpacking. Wait until the TV warms up to room temperature before using it.
- To reduce the risk of fi re, electric shock or damage to the TV, do not expose it to dust, rain or moisture. Never expose the TV to dripping or splashing and do not place objects fi lled with liquids on or near the TV.
- Do not connect any external devices (DVD player, games console etc) when the TV is switched on. Disconnect both the TV and device from the mains before connecting. Only switch appliances on when the connection process is complete.
- Do not place the television in a confined space and do not obstruct the ventilation openings at the rear of the television.
- When installing on a wall, ensure the TV is at least 5cm from the wall for ventilation.
- Always ensure that the TV's ventilation openings are not covered with items such as newspapers, tablecloths, curtains, etc.
- Dispose of this television and any components including batteries in an environmentally friendly manner. If in doubt, please contact your local authority for details of recycling.
- Ensure this TV is used in moderate climates only.
- In case of electrostatic discharge (ESD) the TV may operate incorrectly. If this happens, turn the set off at the mains and then turn back on again after 30 seconds. The set should now work normally.
WARNING: Never place a television set on an unstable location. The TV set may fall causing serious personal injury or death. Many injuries, particularly to children, can be avoided by taking simple precautions such as:
- Use cabinets or stands recommended by the manufacturer of the television set.
- Only use furniture that can safely support the television set.
- Ensure the television set is not overhanging the edge of the supporting furniture.
- Do not place the television set on tall furniture (for example, cupboards or bookcases) without anchoring both the furniture and the television set to a suitable support.
- Do not place the television set on cloth or other materials that may be located between the television set and supporting furniture.
- Please educate children about the dangers of climbing on furniture to reach the television set or its controls.
- If your existing television set is being retained and relocated, the same considerations as above should be applied.
Safety
- For your safety, this appliance is fitted with a fused 3 pin mains plug. Should the fuse need to be replaced, ensure that any replacement is of the same amperage and approved with the BSI mark.
- Never try and replace the mains plug unless you have adequate qualifications and are legally authorised to do so. In the event that a replacement mains cable is required, contact the manufacturer for a suitable replacement.
- Never use the television if it is damaged in any way.
- Always place the television on a fl at level surface avoiding anywhere which may be subject to strong vibration.
- The ideal distance to watch the television is approximately five times the length of the diagonal measurements of the TV screen.
- Ensure the television is not placed on top of the power cable as the weight of the television may damage the cable and cause a safety hazard.
- Never place mobile phones, speakers or any other device which may cause magnetic or radio interference, near the television. If interference is apparent, move the device causing the interference away from the television.
- To disconnect the set from the mains, remove the mains plug from the socket.
- Ensure that the mains plug is always easily accessible.
- When handling the set do not grip the LCD Panel.
- Do not pull the set when mounted on a bracket. If using a moveable bracket, adjust via the bracket and not the TV set.
- Do not place this set above a heat source.
WARNING: Excessive volume when using earphones and headphones can cause loss of hearing.
Important Safety Instructions

CAUTION
RISK OF ELECTRIC SHOCK DO NOT OPEN

Maintenance
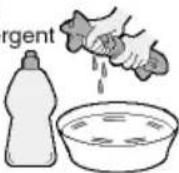
• To clean your TV, wipe with a soft, dry cloth. If the surfaces are extremely dirty, use a soft cloth dipped in a soap and water solution or a weak detergent solution.
- Never use alcohol, paint thinner or benzene to clean this unit.
- Before using a chemically treated cloth, read the instructions that came with the cloth carefully.
CAUTION: If water or other liquid enters the television through the display panel surface, a malfunction may occur.
Mild dete
Packaging
- The safest way to transport your item is in the original box/packaging - please save your packaging for this.
- You will need the original box/packaging in the event of warranty/service repair or support. We are unable to carry out warranty/service if you are unable to package the item correctly.
Important information regarding use of video games, computers, captions or other fixed image displays
The extended use of a fixed image on screen can cause permanent faded image on the LCD/LED panel, also known as "screen burn".
This "screen burn" effect can appear in the background during normal viewing.
This type of irreversible LCD/LED panel deterioration can be limited by observing the following steps:
- Reduce the brightness/contrast setting to a minimum suitable viewing level.
- Do not display the fixed image for extended periods of time.
- Turn the power off when not in use.
Examples of images that are more likely to cause "screen burn" are as follows (this is not an exhaustive list):
• TV channel logos: e.g. shopping channel logos and pricing displays - especially if they are bright and stationary. Moving or low-contrast graphics are less likely to cause ageing of the screen.
- Time displays.
- Teletext: Do not view a static page for a long period of time
• TV/DVD menus: e.g. listings of DVD disc content.
- Pause mode: Do not leave the TV in pause mode for long periods of time, e.g. when watching DVDs or videos.
Important: Once 'shadow image/screen burn' occurs, it will never disappear and is not repairable under warranty.
How do I dispose of this product?
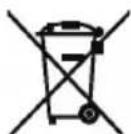
UK: Waste electrical products should not be disposed of with household waste. Please dispose of the product at a designated collection point for recycling of WEEE. For your nearest facilities, please see www.recycle-more.co.uk or in store for details.

ROI: Waste electrical products should not be disposed along with household waste. Separate disposal facilities exist. Check with your local authority or retailer for recycling advice.
Cd
Batteries
- Do not expose batteries to high temperatures, excessive heat, prolonged sunshine or fire as this may cause leakage, explosion or ignition.
Observe the correct polarity when inserting batteries. - Do not use different types of batteries together or mix old and new batteries.
- Dispose of batteries in an environmentally friendly way.
- Certain regions may regulate the disposal of batteries. Please consult your local authority.
Caution
• Appliances with built in DVD player are marked with this caution label
- THIS UNIT IS A CLASS 1 LASER PRODUCT. THIS UNIT USES A VISIBLE LASER BEAM WHICH COULD CAUSE HAZARDOUS
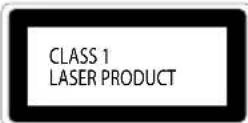
RADIATION EXPOSURE IF DIRECTED. BE SURE TO OPERATE THE PLAYER CORRECTLY AS INSTRUCTED WHEN THIS UNIT IS PLUGGED INTO THE WALL OUTLET, DO NOT PLACE YOUR EYES CLOSE TO THE OPENINGS TO LOOK INTO THE INSIDE OF THIS UNIT.
- USE OF CONTROLS OR ADJUSTMENTS OR PERFORMANCE OF PROCEDURES OTHER THAN THOSE SPECIFIED HEREIN MAY RESULT IN HAZARDOUS RADIATION EXPOSURE.
• DO NOT OPEN COVERS AND DO NOT REPAIR YOURSELF. REFER SERVICING TO QUALIFIED PERSONNEL.
CE Statement:
Hereby, UMC Poland Sp. z o.o. declares that this LED TV is in compliance with the essential requirements and other relevant provisions of RED Directive 2014/53/EU.
http://www.sharp.eu/av/documents-of-conformity
Trademarks
HDMI
The terms HDMI and HDMI High-Definition Multimedia Interface, and the HDMI Logo are trademarks or registered trademarks of HDMI Licensing, LLC in the United States and other countries.

The "HD TV" Logo is a trademark of DIGITALEUROPE.

The "HD TV 1080p" Logo is a trademark of DIGITALEUROPE.

The DVB logo is the registered trademark of the Digital Video Broadcasting (DVB) project.

FreeviewHD

FreeviewPlay
The FREEVIEW text and logos are trademarks of DTV Services LTD. © DTV Services Ltd

SAORVIEW
SAORVIEW is a registered trademark owned by RTÉ.

Manufactured under license from Dolby Laboratories. Dolby, Dolby Audio and the double-D symbol are trademarks of Dolby Laboratories.

The "CI plus" Logo is a trademark of CI Plus LLP.

YouTube
YouTube and the YouTube logo are trademarks of Google Inc.

The Wi-Fi CERTIFIED Logo and Miracast ^® are registered trademarks of Wi-Fi Alliance. Wi-Fi CERTIFIED Miracast ^™ is a trademark of Wi-Fi Alliance.

dlna
DLNA, the DLNA Logo and DLNA CERTIFIED are trademarks, service marks, or certification marks of the Digital Living Network Alliance.

dts TruSurround
For DTS patents, see http://patents.dts.com. Manufactured under license from DTS Licensing Limited. DTS, the Symbol, & DTS and the Symbol together are registered trademarks. DTS TruSurround is a trademark of DTS, Inc. © DTS, Inc. All Rights Reserved.
CONTENTS
Manufacturers Guarantee Information .... 3
Important Safety Instructions 4-5
Trademarks 6
Securing the TV to a Wall/Wall Mounting 8
TV Buttons and Input Source Menu 9
TV Control Stick and Input Source Menu....10
Connections 11-15
Connecting the TV to the Internet 17
7 Day TV Guide....18
Catch-Up Menu and Channel List....19
TV Menu Operation....20-30
Picture Menu....20-21
Sound Menu 22-23
Settings Menu. 24-30
Channel Menu 24-25
Network Menu....26
Time Menu....27
Lock Menu 28
Setup Menu 29-30
Apps Menu 31-32
Freeview Play Menu....33
Media Menu....34-35
DVD Setup Menu 36
USB Record/PVR - Freeview/Saorview Mode....38-39
General Information 40-43
Frequently Asked Questions....40-42
Compatible file types for USB/DLNA 43
SECURING THE TV TO A WALL
Securing the TV to a wall with anti-tip straps
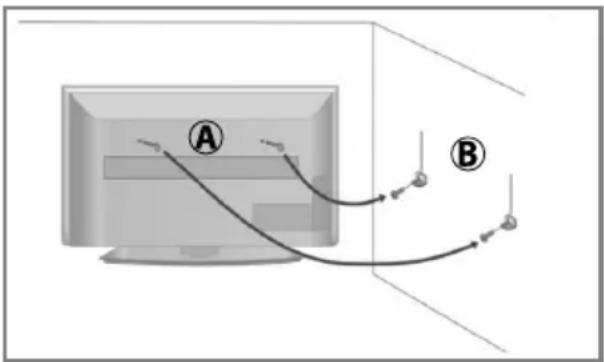
For maximum security in the home, when using a TV with its stand, anti-tip straps should be fitted. These are available from major retailers & websites and are an easy, inexpensive and effective way of ensuring your TV stays safely upright. Straps are designed to be attached to the rear of the TV and then tethered to the wall or the furniture the TV is stood on, these are fitted as follows.
A) Using one or both of the top wall-mounting holes and screws fasten one end of the fastening cord/s to the TV. (the screws are already supplied in the wall mounting holes)
B) Secure the other end of the fastening cord/s to your wall. (you will need screws/fi xings suitable for your wall type - available separately from most DIY stores).
text_image
Diagram showing two labeled points (A and B) connected by curved lines, possibly indicating a path or connection between them.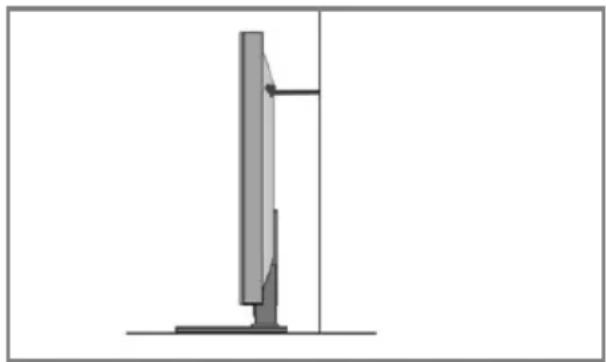
natural_image
Diagram of a vertical screen mounted on a stand, showing structural components and a vertical line (no text or symbols)Note: Please ensure that children do not climb on the TV set.
Note: When handling the set do not grip the LCD Panel.
Note: Do not pull the set when mounted on a bracket. If using a moveable bracket, adjust via the bracket and not the set.
The Royal Society for the Prevention of Accidents is urging people to take care with flat-screen televisions.
RoSPA stated in 2010 that "Toddlers are particularly at risk of pulling flat-screen televisions on to themselves. They are unsteady on their feet and are attracted by colourful television images."
The risk is increased as televisions become lighter.
Wall mounting
IMPORTANT - Before drilling any holes in the wall ensure you are not drilling where there
could be any electrical wires, water or gas pipes.
natural_image
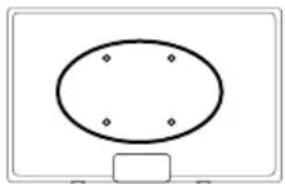
Simple diagram of an oval shape with four dots at the center, mounted on a rectangular base (no text or symbols)1) Remove the four screws located at the back of the TV set.
2) The wall mount can now be easily attached to the mounting holes, located on the back of the TV, using the same four screws removed.
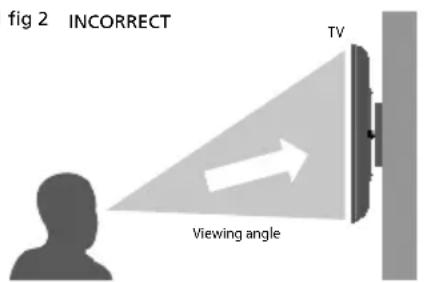
For optimum viewing, if wall mounting the TV higher than eye level, the TV should be tilted downwards so that the TV's screen is 'face on'. See fig 1 and 2.
fig 1 fig 2 INCORRECT
text_image
fig 2 INCORRECT TV Viewing angle
text_image
CORRECT TV Viewing angleImportant – If wall mounting this TV, only use the screws already provided in the wall mounting holes.
Using other screws which are longer could cause irreparable damage to internal parts. When using a wall bracket, please ensure the screws in the back of the TV set are not over tightened.
TV BUTTONS AND INPUT SOURCE MENU
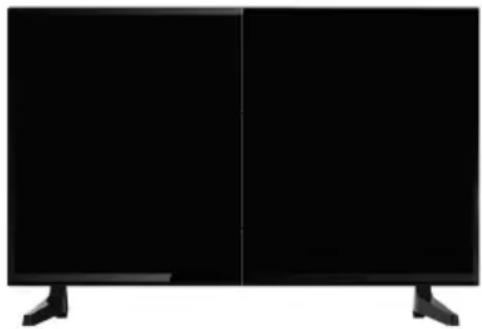
For models with buttons on the side/underside/rear of the TV
Button layout and shape may vary.
natural_image
Front view of a black rectangular TV with two side panels and three legs (no text or symbols visible)| Standby Power On/Off |
| Source Input source menu |
| Menu Menu/OSD |
| CH- Programme/Channel down and menu down |
| CH+ Programme/Channel up and menu up |
| Vol- Volume down and menu left |
| Vol+ Volume up and menu right |
Models with built in DVD players will include additional buttons:
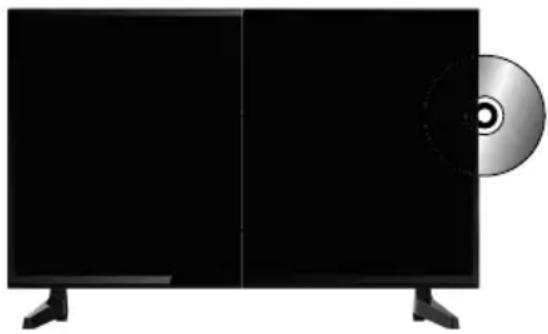
natural_image
Illustration of a flat-screen TV with a CD on the right side (no text or symbols visible)| ▶II | Play/Pause Disc |
| ▲ | Stop/Eject Disc |
Choosing Mode Input/Source
To switch between the different inputs or connections.
For further information on inputs and connections refer to the 'Connections' pages.
A) Using the buttons on the remote control:
1) Press [SOURCE] - The source menu will appear.
2) Press [<] or [>] to select the input you require.
3) Press [OK].
B) Using the buttons on the Television:
1) Press [SOURCE].
2) Scroll up/down using VOL+/VOL- buttons to the input/source you require.
3) Press [SOURCE] to change input/source to the one selected.
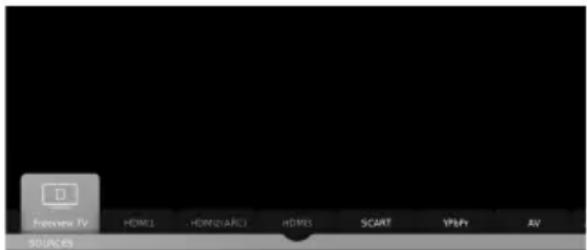
text_image
Windows Search TV HDM1 HDM2AIC1 HDMS SCART VPlay AV SOUNCAn example of the 'Input Source' menu (will vary by model)
TV CONTROL STICK AND INPUT SOURCE MENU
For models with the joystick type controller.
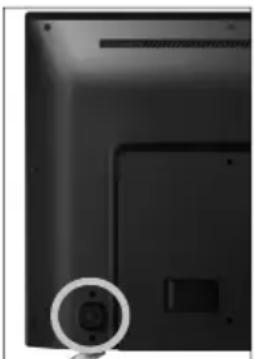
natural_image
Close-up of a black electronic device back panel with a circular button highlighting a small component (no text or symbols visible)Control Stick
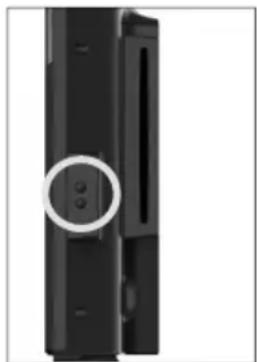
natural_image
Close-up of a black electronic device with a circular button highlighting a small component (no text or symbols visible)DVD Buttons
text_image
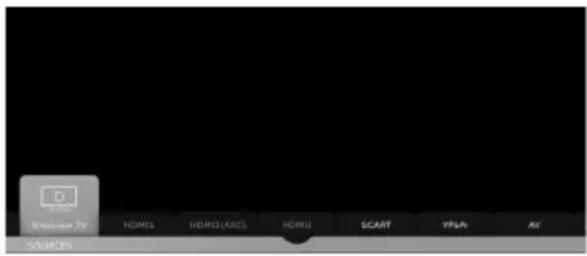
Presentation Presentation HDMI1 HDMI2 (AISC) HDMI2 SCART VPSLn AV SOURCESAn example of the 'Input Source' menu (will vary by model)
TV Control Stick
The TV control stick is located on the back of the TV. The control stick can be used to control many of the TV functions. The shape of the TV's control stick may vary by model.
While TV is in standby mode:
- Press the centre of the control stick once - Power on the TV set
While watching TV:
• RIGHT/LEFT – volume up/volume down
- UP/DOWN – changes channel up/down
- Press the centre of the control stick once – displays the menu
- Press and hold the centre of the control stick – Standby/Power Off
While in menu:
- RIGHT/LEFT/UP/DOWN – navigation of cursor in on-screen menus
- Press the centre of the control stick once – OK/Confir rm selected item
- Press and hold the centre of the control stick – back to previous menu
DVD Buttons (Only applies if the TV has an in-built DVD player)
The DVD buttons are located on the side of the TV near the DVD Slot.
- TOP BUTTON – STOP/EJECT (Hold down for 4 seconds to eject a DVD).
- BOTTOM BUTTON – PLAY/PAUSE.
Choosing Mode Input/Source
Use the source menu to switch between input/connections.
A) Using the buttons on the remote control:
- Press [SOURCE] - The source menu will appear.
- Press [<] or [>] to select the input you require.
- Press [OK].
B) Using the TV control stick:
- Press the centre of the control stick once to enter the TV menu.
- Press the control stick left/right and navigate through to SOURCE menu.
- Press the centre of the control stick to enter the SOURCE menu.
- Press the control stick left/right to scroll through and select the input/source you require.
- Press the centre of the control stick to select the chosen input/source option highlighted.
For further information on input/connections please view the 'Connections' pages
CONNECTIONS
Note: The TV input/output connections and connecting cables on these pages are shown for reference. Cables are available separately from your retailer. Not all connections are available on all TV models.
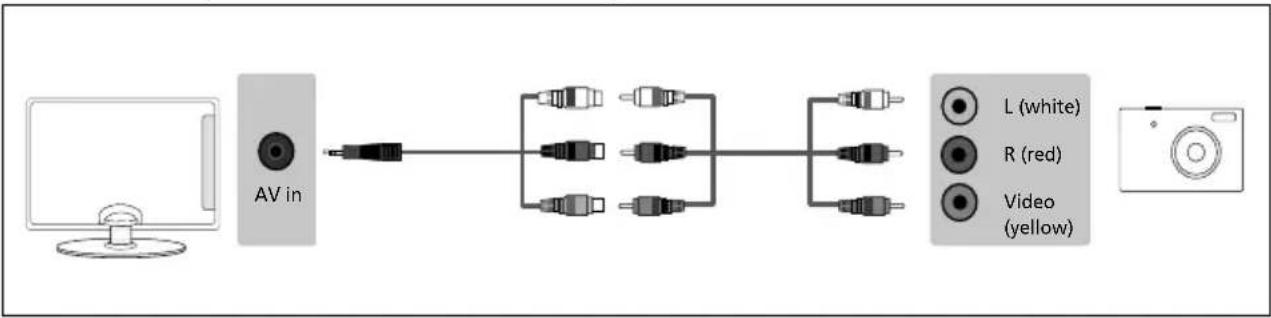
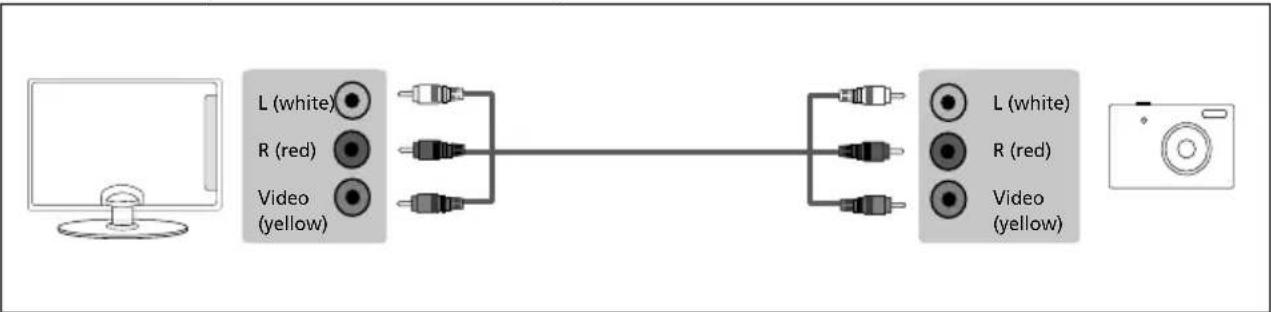
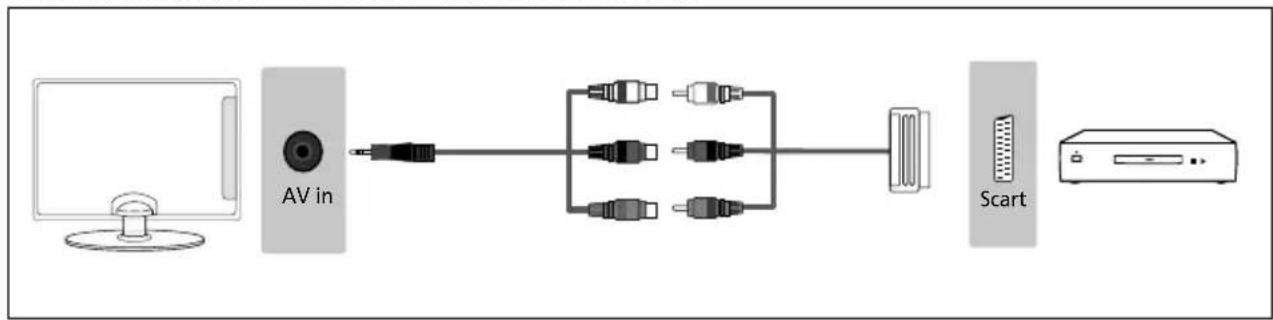
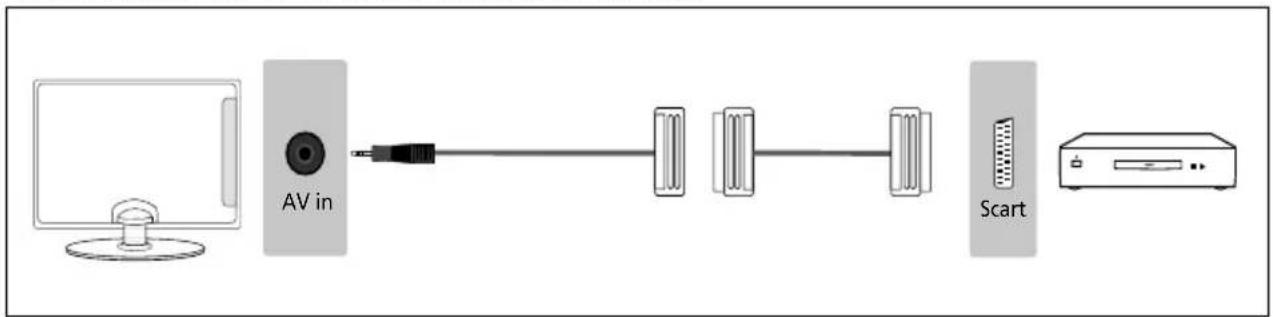
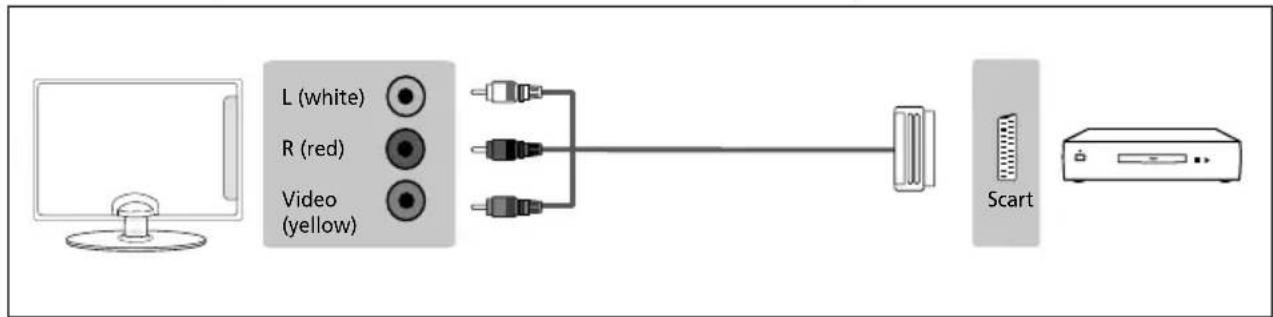
Connecting to a device with a Composite AV/Video output
TV source should be set to Composite/AV
Connection example for TV models with Mini-AV input
flowchart
graph LR
    A["Computer"] --> B["AV in"]
    B --> C["Connector"]
    C --> D["Connector"]
    D --> E["Connector"]
    E --> F["Connector"]
    F --> G["L (white)"]
    F --> H["R (red)"]
    F --> I["Video (yellow)"]
Connection example for TV models with AV input
flowchart
graph LR
    A["Computer"] --> B["L (white)"]
    A --> C["R (red)"]
    A --> D["Video (yellow)"]
    B --> E["Audio"]
    C --> F["Audio"]
    D --> G["Audio"]
    E --> H["L (white)"]
    E --> I["R (red)"]
    E --> J["Video (yellow)"]
    G --> K["L (white)"]
    G --> L["R (red)"]
    G --> M["Video (yellow)"]
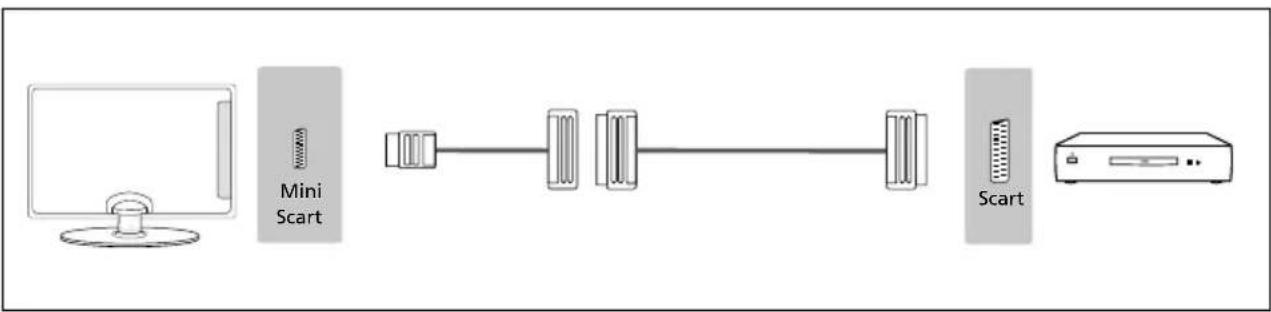
Connecting to a device with SCART output
TV source should be set to SCART
Connection example for TV models with SCART input
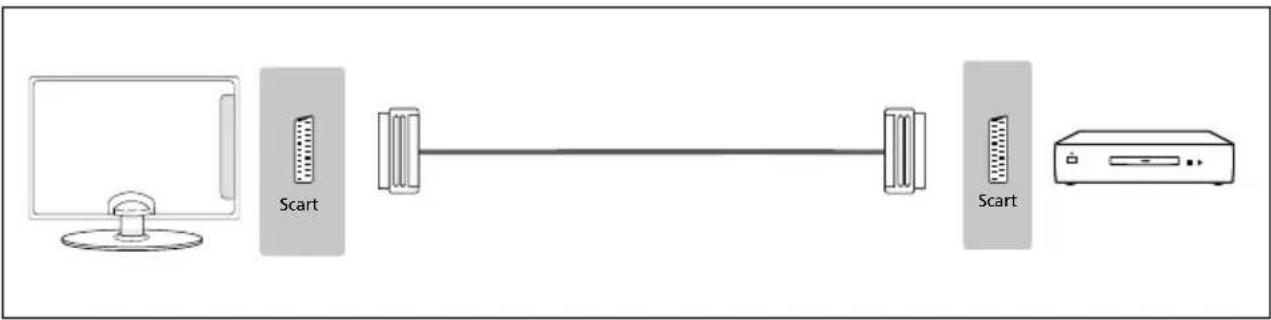
Connection example for TV models with Mini-SCART input
flowchart
graph LR
    A["Monitor"] --> B["Mini Scart"]
    B --> C["Data Bus"]
    C --> D["Server"]
    D --> E["Scart"]
CONNECTIONS
Connection example for TV models with Mini-AV input (1)
flowchart
graph LR
    A["Computer"] --> B["AV in"]
    B --> C["Switch"]
    C --> D["Scart"]
    D --> E["Output Unit"]
Connection example for TV models with Mini-AV input (2)
flowchart
graph LR
    A["Computer"] --> B["AV in"]
    B --> C["Device 1"]
    B --> D["Device 2"]
    D --> E["Scart"]
    E --> F["Server"]
Connection example below for TV models with L/R Audio and Video inputs
flowchart
graph LR
    A["Computer monitor"] --> B["L (white)"]
    A --> C["R (red)"]
    A --> D["Video (yellow)"]
    B --> E["Switch"]
    C --> E
    D --> E
    E --> F["Scart"]
Connecting to a device with Component/YPbPr output
If you are supplied with a cable from the device which has RED, GREEN, BLUE, RED & WHITE connectors you must connect via Component (for picture) and by phono cable (for sound). TV source should be set to Component/YPbPr
Connection example for TV models with Mini-YPbPr and Mini-AV inputs
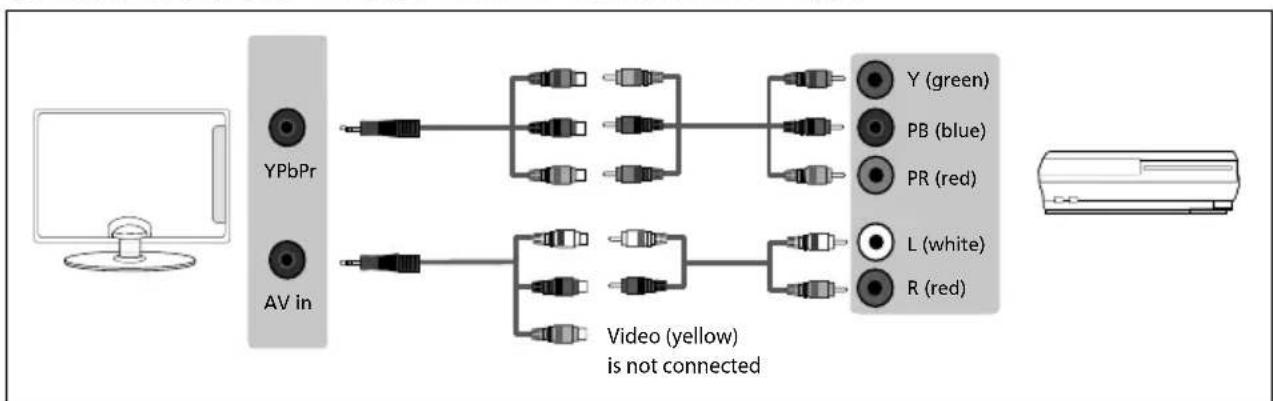
flowchart
graph LR
    A["Computer"] --> B["YPbPr"]
    A --> C["AV in"]
    B --> D["Video (yellow) is not connected"]
    C --> D
    D --> E["Y (green)"]
    D --> F["PB (blue)"]
    D --> G["PR (red)"]
    D --> H["L (white)"]
    D --> I["R (red)"]
CONNECTIONS
Connection example for TV models with Mini-YPbPr and L/R audio inputs
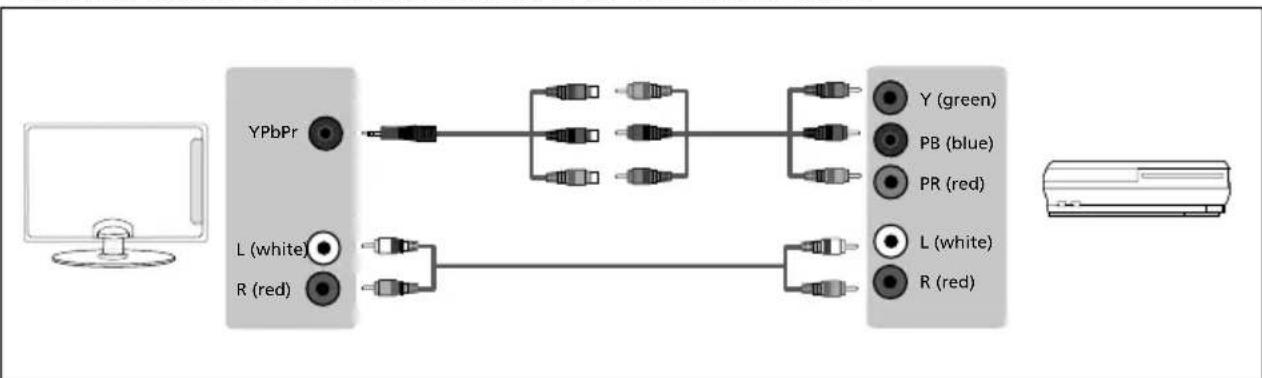
flowchart
graph LR
    A["Computer"] --> B["YPbPr"]
    B --> C["L white R red"]
    B --> D["Y (green) PB blue PR red"]
    C --> E["L white R red"]
    D --> F["L white PB red"]
    D --> G["Water Heater"]
Connection example for TV models with YPbPr and L/R Audio inputs
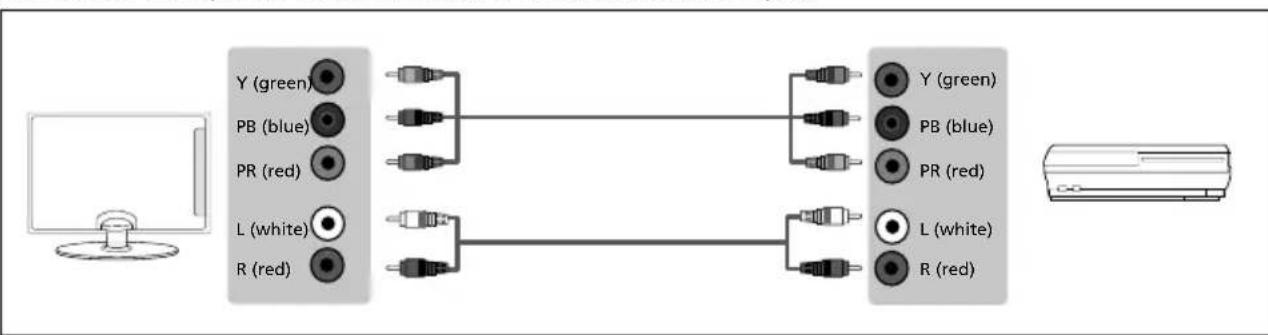
flowchart
graph LR
    A["Computer"] --> B["Y (green)"]
    A --> C["PB (blue)"]
    A --> D["PR (red)"]
    A --> E["L (white)"]
    A --> F["R (red)"]
    B --> G["Output"]
    C --> G
    D --> G
    E --> H["Output"]
    F --> H
    G --> I["Y (green)"]
    G --> J["PB (blue)"]
    G --> K["PR (red)"]
    H --> L["Output"]
    I --> M["L (white)"]
    I --> N["R (red)"]
Connection example for TV models with YPbPr and Mini-AV inputs
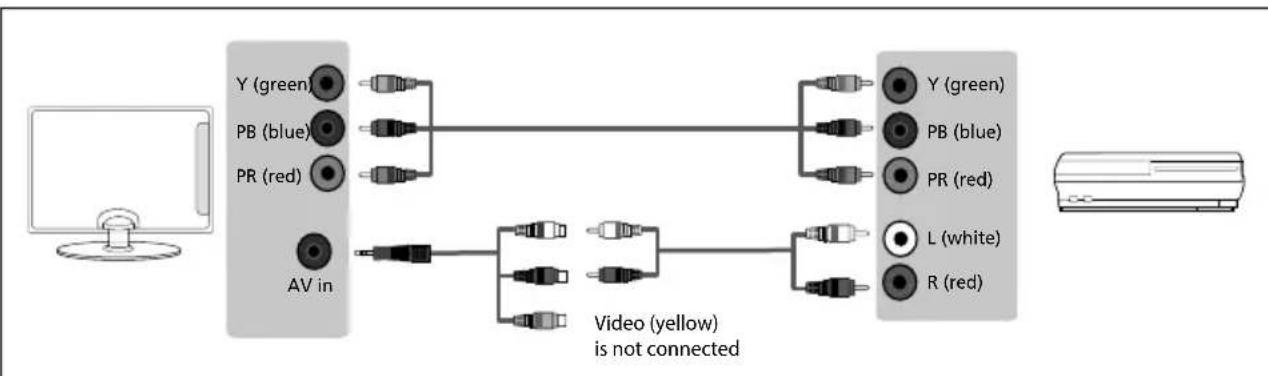
flowchart
graph LR
    A["Computer"] --> B["AV in"]
    B --> C["Video (yellow) is not connected"]
    C --> D["Image Air Conditioner"]
    B --> E["Y (green)"]
    B --> F["PB (blue)"]
    B --> G["PR (red)"]
    B --> H["AV in"]
    C --> I["Y (green)"]
    C --> J["PB (blue)"]
    C --> K["PR (red)"]
    C --> L["L (white)"]
    C --> M["R (red)"]
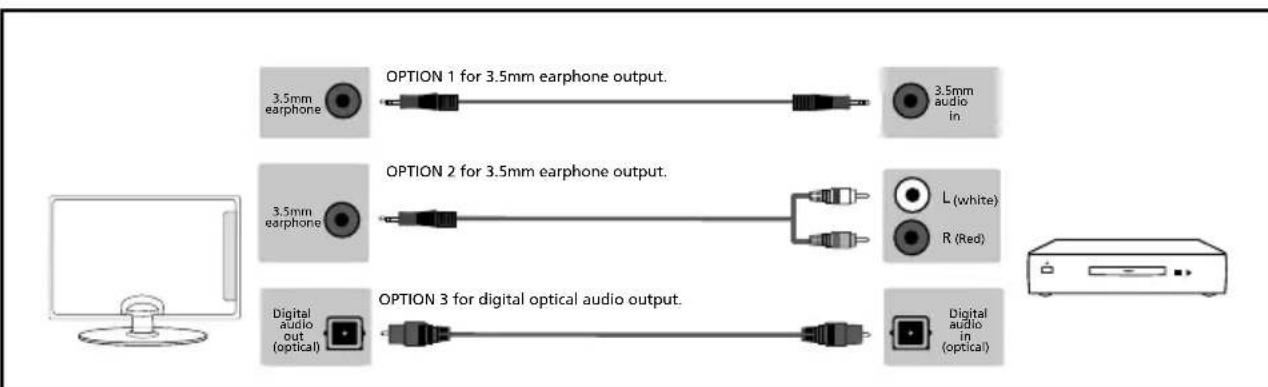
Connecting to an external audio device (Amplifi er, Surround Sound, Sound Bars etc)
When connecting via the TV's 3.5mm earphone output, this will disable the TV speakers.
flowchart
graph LR
    A["Computer"] --> B["3.5mm earphone"]
    B --> C["OPTION 1 for 3.5mm earphone output."]
    B --> D["OPTION 2 for 3.5mm earphone output."]
    B --> E["OPTION 3 for digital optical audio output."]
    E --> F["Digital audio out (optical)"]
    F --> G["Digital audio in (optical)"]
    H["L (white)"] --> I["L (white)"]
    J["R (Red)"] --> K["R (Red)"]
Note: When connecting an external audio device to the TV, set the TV volume to a higher than normal level, you will then be able to use your device remote control to adjust the volume of the connected device to suit your requirements.
CONNECTIONS
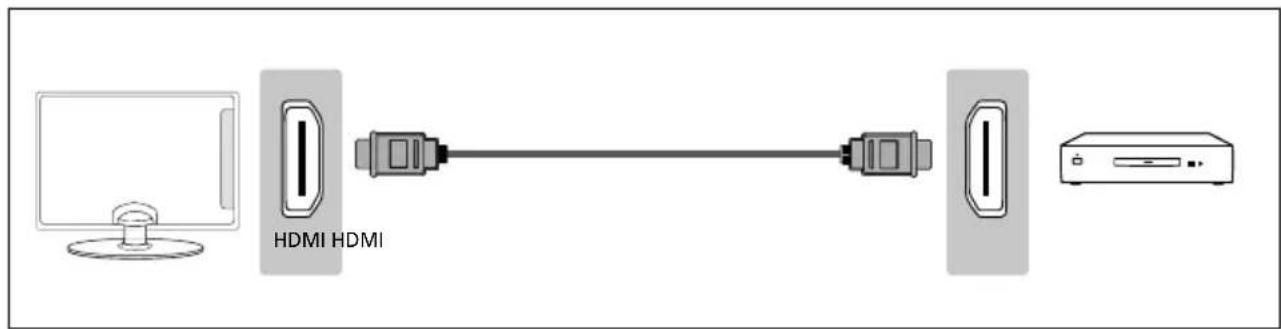
Connecting to a device with HDMI output
An HDMI cable can output both video and audio and enables you to enjoy digital-quality video and audio with minimal loss of quality.
TV source should be set to the corresponding HDMI port (HDMI 1, HDMI 2 etc)
text_image
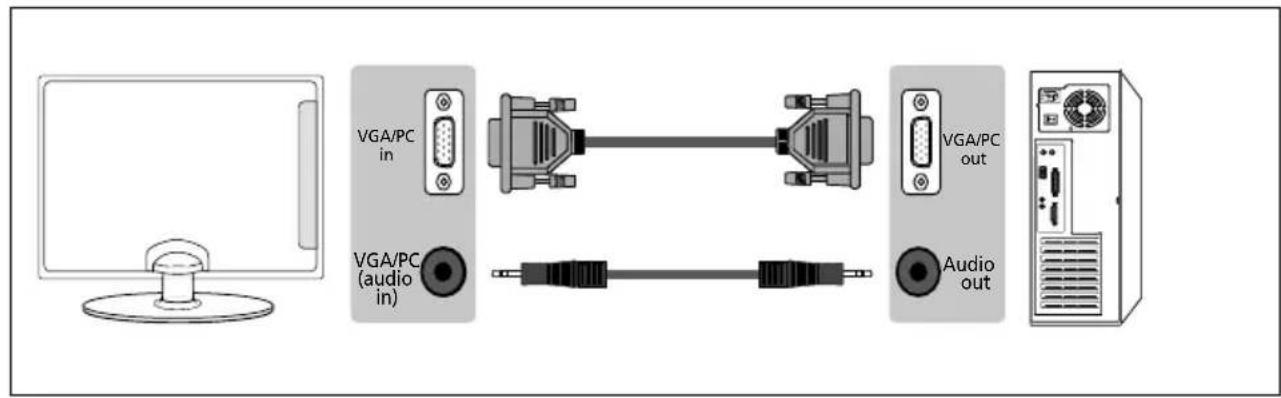
HDMI HDMIConnecting to a device with VGA/PC output (Laptop or Desktop Computer)
TV source should be set to VGA/PC
Depending on the PC/Laptop connected, you may need to configure your PC graphics card/adaptor to suit the screen resolution/Hz.
text_image
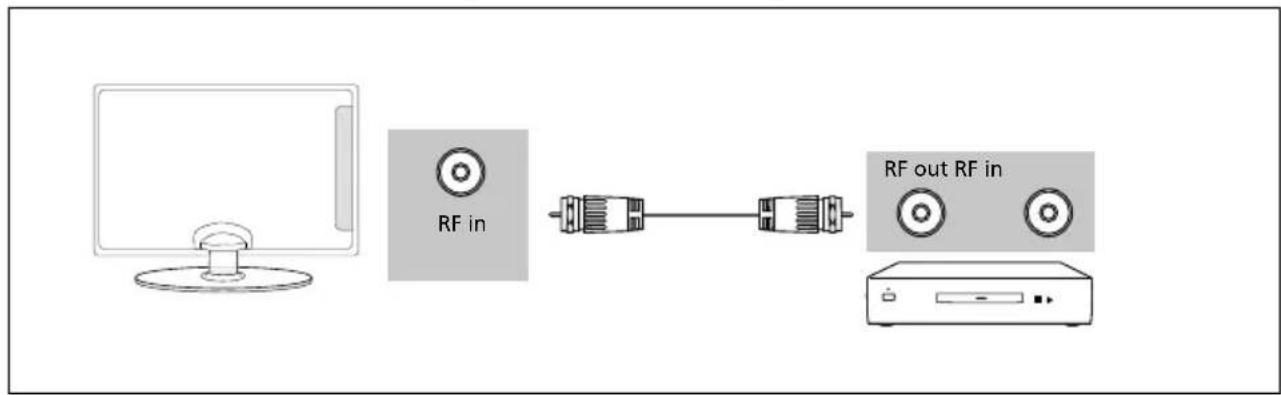
VGA/PC in VGA/PC (audio in) VGA/PC out Audio outConnecting to a device with RF output (CCTV or other Analogue devices)
TV source should be set to ATV/Analogue TV.
Note: You will need to manually tune your device into an analogue channel.
flowchart
graph LR
    A["Computer monitor"] --> B["RF in"]
    B --> C["Internal component with connector"]
    C --> D["RF out RF in"]
    D --> E["External device"]
CONNECTIONS
Connecting an Ethernet/Network cable
The Ethernet port is used for Smart connectivity, Pay TV Services and Freeview HD (Freeview services are only available in the UK).
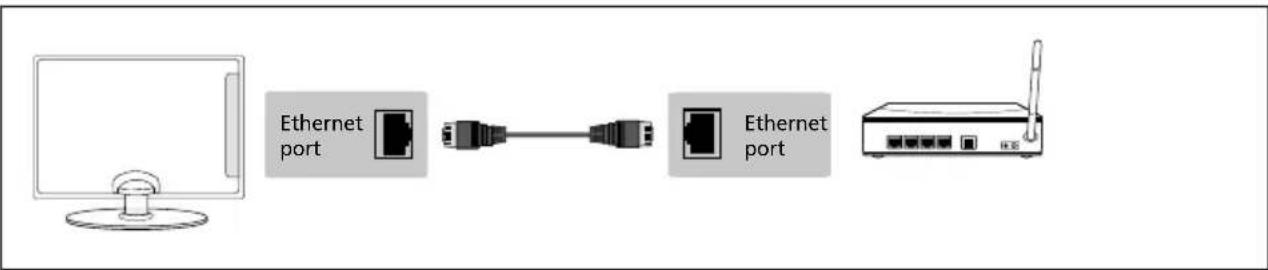
flowchart
graph LR
    A["Computer monitor"] --> B["Ethernet port"]
    B --> C["Switch"]
    C --> D["Ethernet port"]
    D --> E["Router"]
Connecting to a USB device
To use the USB input, TV source should be set to USB Media. Tablets and/or phones can be charged via the USB port but cannot be used to playback media content. TV source should be set to USB Media.
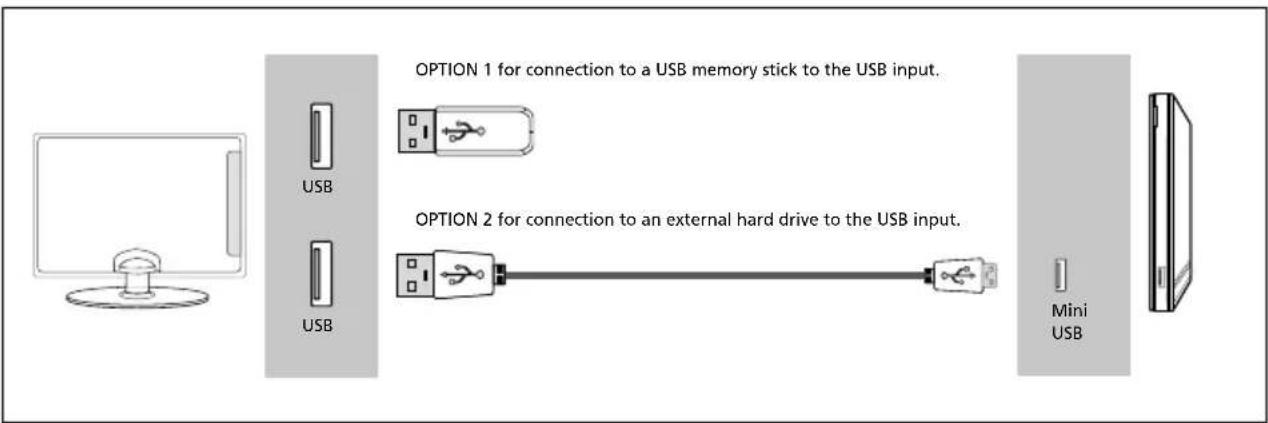
text_image
OPTION 1 for connection to a USB memory stick to the USB input. OPTION 2 for connection to an external hard drive to the USB input. Mini USBNote: Tablets and/or phones can be charged via the USB port, however, it is not possible to play back media from these devices.
Note: Some USB devices may need to be connected to an external power supply before being used with this input, i.e. powered hard drive.
Connecting the TV to Earphones
When connecting via the TV's 3.5mm earphone output, this will disable the TV speakers.
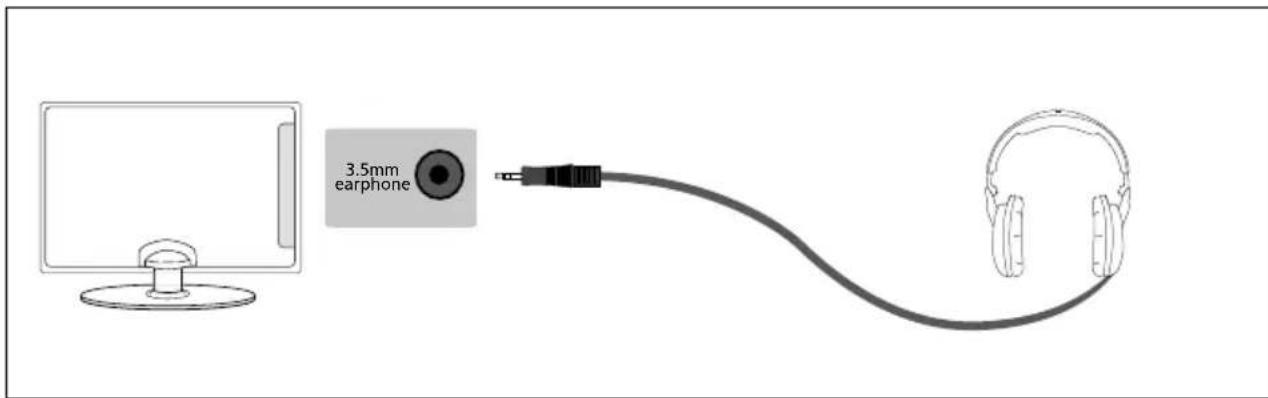
text_image
3.5mm earphoneCONNECTING THE TV TO THE INTERNET
When you first power on your new SMART TV there will be an option to follow various on-screen set up instructions. These instructions will enable you to connect to the internet via your home network.
You can connect to your home network either wirelessly or with an Ethernet cable.
If you decide not to follow the initial set up instructions and need to connect at a later date please follow these simple steps below:
Connecting your TV with a wireless connection
1) Press Menu on the remote control.
2) Scroll through the menu, select 'Settings' then enter the 'Network' menu.
3) In the 'Network' menu, example below, scroll down and select 'Wi-fi Config'
4) Within the 'Wi-Fi config' options, highlight and select 'Wi-Fi Auto Search'.
5) The TV will then automatically search for networks.
6) Select the preferred type of network connection then enter the network.
If a password is required:
- A padlock is shown next to a WiFi service, this indicates that it is a secured network and will require a password to log in.
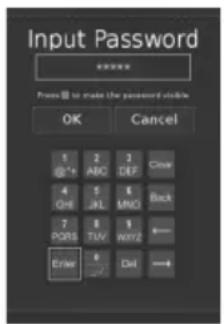
- When entering the WiFi password, we recommend using the "Password Visible" feature. To make the password visible press the green button on the remote control, the password will then be displayed in full. Refer to fig 1. Network passwords are case sensitive, please ensure the entered text matches the password exactly for a successful connection.
- Use the remote control arrow buttons to select the character required. Press the [OK] button repeatedly until the character you want is displayed. To move onto the next letter, wait for a few seconds before selecting When the password has been entered, select the "Enter" button on the on-screen keypad and press [OK] on the Remote Control.
7) The TV will then establish a connection.
Note: An icon will appear in the top right hand side of the 'Application' menu to confirm the TV is connected to the internet.
Connecting your TV with an Ethernet/LAN cable:
1) Plug in your Ethernet cable into the RJ45 (Ethernet) socket located at the rear of the television.
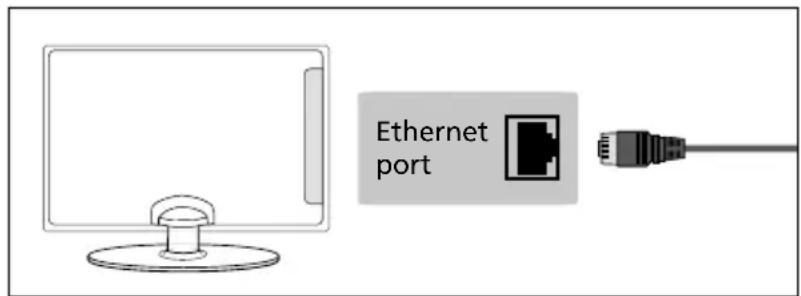
text_image
Ethernet port2) Press Menu on the remote control. Please refer to the Quick Start Guide for remote control information.
3) Scroll through the menu, select 'Settings' then enter the 'Network' menu.
4) In 'Network Configurations', select 'Cable'.(fi g.2).
5) Set will automatically confi gure itself.
6) Exit the menu by pressing [EXIT] on the remote control.
fi g.1
text_image
Input Password ****** Press to make the password visible OK Cancel 1 2 3 Clear @+t ABC DEF Clear 4 5 6 Mixed GHI JL MDI Black 7 8 9 Back PORTS TVW WHY Enter Delfi g.2
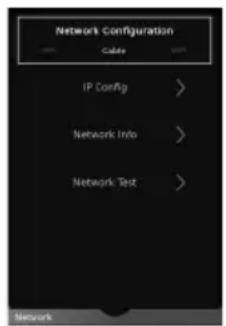
text_image
Network Configuration Cable IP Config > Network Info > Network Test >7 DAY TV GUIDE
TV Guide is available in Saorview/Freeview TV mode. It provides information about forthcoming programmes (where supported by the Saorview/Freeview channel). You can view the start and end time of all programmes, on all channels, for the next 7 days and set reminders.
1) Press the [TV GUIDE] button on the remote control, the following 7 Day TV Guide will appear.
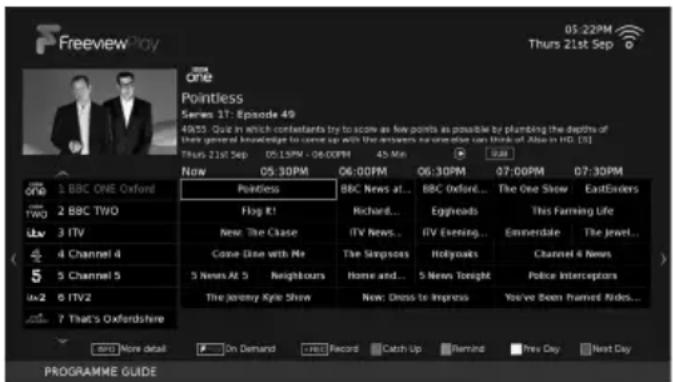
text_image
Freeview Play 05:22PM Thurs 21st Sep One Pointless Series 17: Episode 49 4/05. Quiz in which contestants try to scow as few points as possible by plumbing the depths of their general knowledge to come up with the answers so one else can think on Also in HD. [5] Thus 219 Sep 05:15PM - 06:00PM 45 Min 2:00 Now 05:30PM 06:00PM 06:30PM 07:00PM 07:30PM ONE 1 BBC ONE Oxford TWG 2 BBC TWO Liber 3 ITV 4 Channel 4 5 Channel 5 Liber2 6 ITV2 7 That's Oxfordshire Pointless BBC News at... Flag It! Richard... New The Chase ITV News... Come Here with Me The Sangsows Holyoaks Channel & News 5 News At 5 Neighbours Home and... 5 News Tonight Police Interceptors The Jeremy Kyle Show New: Dress to Impress You've Been framed Rides... SPTD More detail On Demand FREE Record Catch Up Remind Prev Day Next Day PROGRAMME GUIDE2) Navigate through the menu using ▲▼▶◀ You can now:
Press [INFO] to view further information about the programme highlighted.
Press the [FREEVIEW PLAY] button to access the Freeview play app. Refer to the catch up menu page for further information.
Press the [REC] button on a highlighted programme to use the record function. (Function for PVR models only, USB device must be connected):
- Record a programme once Ⓡ - press the [RECORD] button once.
- Set up a daily recording Ⓓ - press the [RECORD] button twice, a recording will occur every day at this time.
- Set up a weekly recording ⓦ - press the [RECORD] button three times, recording will happen every week, on this day and at this time.
Press [RED] to access the Freeview Play catch up menu.
Press [GREEN] on a highlighted programme to set a reminder:
- Select Remind Once ⏻ - reminder will only occur for this one programme at the time selected.
- Select Daily Reminder Ⓓ - reminder will occur every day at this time
- Select Weekly Reminder ⓦ - reminder will happen every week, on this day and at this time.
Press [YELLOW] to view a previous day's list of programmes.
Press [BLUE] to view the next day's list of programmes.
3) Press [EXIT] to exit the 7 day TV Guide.
Note: Record functions are only applicable to sets with a built in USB Record/PVR function. Refer to your televisions specification for more details.
Note: When the TV set is on, a reminder message will be displayed informing you that a programme is about to start. If the set is in standby, then it will turn on at the reminder time.
Note: When recording in standby mode, the set will not turn on. While recording in standby, the light on the front of the set will flash.
CATCH UP - MENU AND CHANNEL LIST
The catch up menu allows you to access available programmes from the last 7 days, that you may have missed.
The catch up menu will show programmes, by day, in the order that they were broadcast (descending in time order).
On the right there is a channel list, move through this to see the programmes applicable to that channel. View more information on the highlighted programme by pressing the INFO button.
Note: Areas receiving Saorview transmissions will not support catch up services.
1) To access the catch up menu, first you will need to access the 7 day TV guide, access this by Pressing the [TV GUIDE] button on the remote control, when the 7 day TV guide appears press the [RED] button or scroll left to access the catch up menu screen.
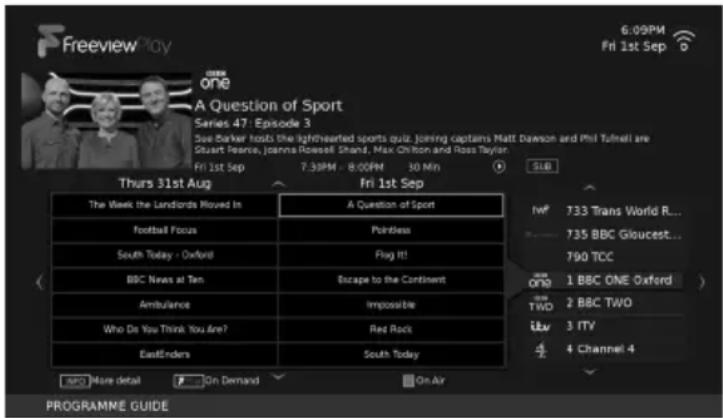
text_image
Freeview Play 6:09PM Fri 1st Sep one A Question of Sport Series 47 - Episode 3 See Barker hosts the lighthearted sports quiz. Joining captains Matt Dawson and Phil Tulnell are Stuart Pearce, Joanna Rossell Shand, Max Olton and Ross Taylor. Fri 1st Sep 7:30PM - 8:00PM 10 Min Sub Thurs 31st Aug Fri 1st Sep The Week the Landlords Moved In A Question of Sport football Focus Pointless South Today - Oxford Flug It! BBC News at Ten Escape to the Continent Ambulance Impossible Who Do You Think You Are? Red Rock EastEnders South Today NPO More detail On Demand On Air PROGRAMME GUIDE IWF 733 Trans World R... 735 BBC Gloucest... 790 TCC one 1 BBC ONE Oxford TWO 2 BBC TWO Itv 3 ITY 4 Channel 42) You can navigate through the menu using the ▲▼▶◀ buttons on the remote control.
To play a highlighted programme simply press [OK] on the remote control. By pressing [BACK] or [EXIT] on the remote control will take you back to the catch up menu. Pressing [BACK] or [EXIT] again takes you out of the programme guide and back to standard TV.
Whilst in the catch up menu you can also
- Access the Freeview play app by pressing the [FREEVIEW PLAY] button.
- Access the 7 day TV guide by pressing the [RED] button.
3) Press [EXIT] to exit the catch up menu.
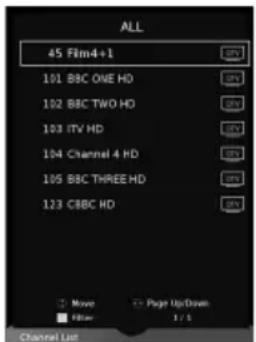
Channel List
To view the channel list, please ensure that the TV is set to either the analogue or digital source and no menus or TV notifications are displayed.
text_image
ALL 45 Film4+1 101 BBC ONE HD 102 BBC TWO HD 103 ITV HD 104 Channel 4 HD 105 BBC THREE HD 123 CBBC HD More Page Up/Down Filter 1 / 1 Channel List1) Press [OK] on the remote control and the channel list menu will appear.
2) Press [LEFT] or [RIGHT] arrow for 'page up, and 'page down'. Press the [YELLOW] button to filter desired channel types (Digital TV, HD channels, Radio, Data, All).
3) Scroll through the channel list by using ▲buttons then press [OK] to view the channel that is currently highlighted.
4) Press [EXIT] to exit the channel list.
PICTURE MENU
text_image
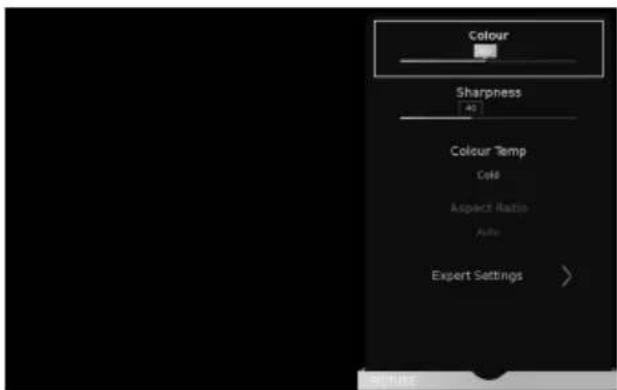
Colour Sharpness 40 Colour Temp Cold Aspect Ratio Auto Expert Settings >To access this menu, press [MENU] button on the remote control. To select a sub menu press [OK]
If you wish to make changes to any of the default settings, use the scroll buttons. To confirm any settings press [OK] button. To exit this menu at anytime, press [EXIT] button.
Picture Mode - Choose from the following presets:
| Dynamic Recommended settings for fast moving pictures | |
| Standard Standard settings | |
| Movie Picture has | less colour and is darker. |
| Personal Allows you to change the picture settings to your personal preference.These settings are saved automatically. | |
| Economy Power saving mode which reduces the energy used by up to 25% (by reducing the power to the LED/LCD panel). In Economy mode, the TV will switch itself to Standby mode after 3-5 hours in the event that the TV buttons or remote control buttons are not pressed (change the picture mode to another setting to de-activate this function) | |
You can make the following adjustments in Personal mode:
Contrast - Switch the balance between black and white.
Brightness - Increase or decrease the brightness of the picture.
Colour - Changes the picture between colour and black and white.
Sharpness - Increase or decrease the sharpness of the picture.
Colour Temperature - Choose from the following presets:
| Normal Default settings | |
| Warm Increases red within the picture | |
| Cold Increases blue within the picture |
PICTURE MENUPICTURE MENU
Aspect Ratio - Within the UK the picture format varies depending on the channel/broadcast. There are a number of different options to best meet your needs
Auto
Automatically displays the best picture format so the picture is in the correct position. Black lines may appear at the top/bottom and/or sides.
Dot by Dot
Will display the picture in its original resolution without any change, only available in HDMI input source.
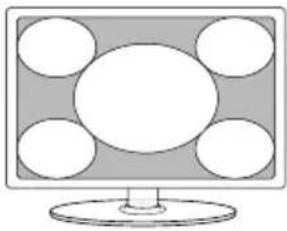
Full Screen
natural_image
Illustration of a computer monitor with five circular windows on the screen (no text or symbols)Displays a picture in the full screen mode without overscan. 16:9 signal will be displayed in original proportion. Other picture format will be stretched to fill the screen
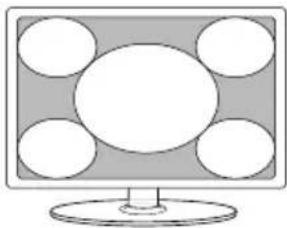
16:9
natural_image
Illustration of a computer monitor with five circular windows on the left (no text or symbols)Fills the screen with a regular 16:9 signal and 4:3 picture format will be stretched to fill the screen
4:3
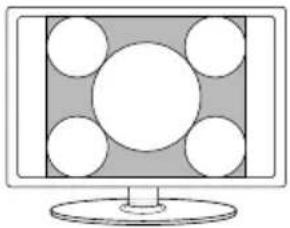
natural_image
Illustration of a computer monitor with a central screen and surrounding circular elements (no text or symbols)Displays the 4:3 picture in its original size. Side bars are shown to fill the 16:9 screen
Zoom1 and Zoom2
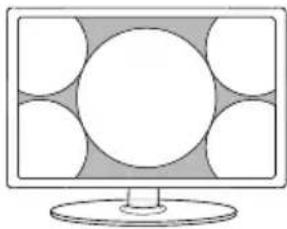
natural_image
Illustration of a computer monitor with a blank screen and abstract circular design on the sides (no text or symbols)The picture is the correct proportion but zoomed in to fill the screen
Expert settings - These will vary depending on the set. They are different for Active Motion 200 and Active Motion 400 sets as detailed below:
| Active Motion 200 Sets | ||
| Expert Setting Range Description | ||
| Noise Reduction On or Off | Reduces the noise in the picture | |
| Active Contrast On or Off | Automatically optimises the backlight and contrast of the picture according to the brightness of the screen | |
| Active Motion 400 Sets | ||
| Expert Setting Range Description | ||
| Noise Reduction Off/Middle/High/Low/Auto Reduces the noise in the picture | ||
| Active Contrast On or Off | Automatically optimises the backlight and contrast of the picture according to the brightness of the screen | |
| Gamma Medium/Low/High | Changes the contrast range of the picture depending on the input signal | |
| R/G/B Controls 0 to 100 | Controls the level of each colour in the picture | |
| Backlight Mode Scanning/Standard | Sets the processing mode of the backlight | |
| Backlight 0 to 100 | Changes the light level of the backlight | |
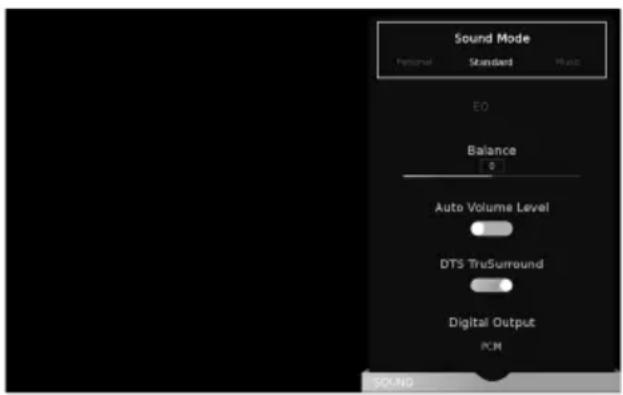
SOUND MENU
text_image
Sound Mode Personal Standard Music EO Balance 0 Auto Volume Level DTS TruSurround Digital Output PCM COM NOTo access this menu, press [MENU] button on the remote control and scroll right.
To select a sub menu press [OK]
If you wish to make changes to any of the default settings, use the scroll buttons. To confirm any settings press [OK] button. To exit this menu at anytime, press [EXIT] button.
Sound Mode - Choose from the following presets:
| Standard Default | settings |
| Music Emphasises | music over voices |
| Movie Provides live and full sound for movies | |
| Sports Emphasises | sound for sports |
| Personal Allows you to change the sound settings to your personal preference. These settings are saved automatically | |
EQ - Adjust the audio level of separate frequencies via the band equaliser.
Balance - To switch the sound between the left and right speakers.
Auto Volume Level (AVL) - When 'ON' is selected, the volume will attempt to stay at a constant level regardless of the TV programme and advertisements.
Note: Equaliser settings can only be adjusted when the sound mode 'Personal' is selected.
DTS TruSurround - Choose from the following options:
| OFF Disables the DTS TruSurround audio feature | |
| ON TruSurround | TM creates an immersive, feature-rich surround sound experience from two speakers, complete with rich bass, high frequency detail and clear dialog. |

dts®
TruSurround
For DTS patents, see http://patents.dts.com. Manufactured under license from DTS Licensing Limited. DTS, the Symbol, & DTS and the Symbol together are registered trademarks. DTS TruSurround is a trademark of DTS, Inc. © DTS, Inc. All Rights Reserved.
SOUND MENU
Digital Output - This is the digital audio output. Choose from the following options:
| Off To turn off Digital Output |
| Auto Selects the best settings automatically |
| PCM Select this option if you are connecting to a Stereo Hi-fi via a digital audio cable(Pulse-code modulation (PCM) is a digital representation of an analogue signal) |
Audio Description - Allows you to switch 'ON' or 'OFF' Audio Description. This provides a description of what is happening during the selected programme for a person who is visually impaired. This feature is not available on all programmes.
AD Volume - This allows you to increase and decrease the AD (Audio Description) volume level.
Audio Track - Allows you to choose between the audio channels being transmitted on Digital Television.
Currently for Freeview only normal sound or the Audio Description audio channels can be selected.
Audio Delay - Enables you to adjust setting to sync picture and audio.
SPDIF Delay - Enables you to adjust sound setting to sync picture and audio for external speakers connected via digital audio output.
SETTINGS - CHANNEL MENU
text_image
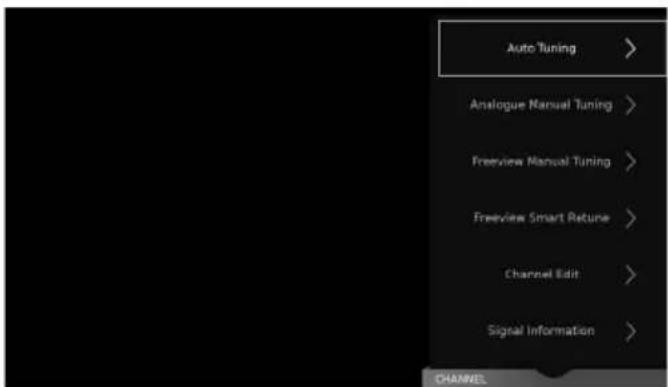
Auto Tuning > Analogue Manual Tuning > Freeview Manual Tuning > Freeview Smart Return > Channel Edit > Signal Information > CHANNELTo access this menu, press [MENU] button on the remote control and scroll right.
To select a sub menu press [OK]
If you wish to make changes to any of the default settings, use the scroll buttons. To confirm any settings press [OK] button. To exit this menu at anytime, press [EXIT] button.
Auto Tuning - Allows you to retune the television for all digital channels, digital radio stations and analogue devices.
Analogue Manual Tuning - Allows you to manually tune your analogue signal.
Freeview/Saorview Manual Tuning* - Allows you to manually tune your digital signal.
Freeview SMART Retune - This feature allows the TV to scan for Freeview channels. When new channels are found they are automatically added to your channel list without removing any channels or affecting your favourites list.
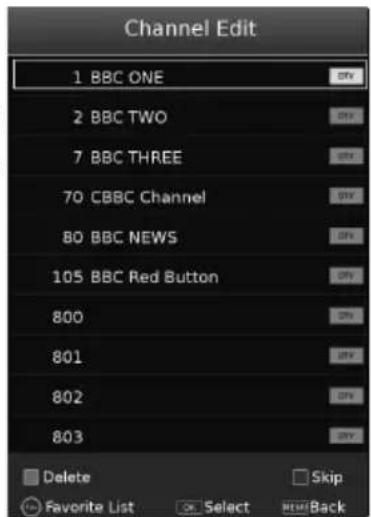
Channel Edit - Allows you to delete, skip and add programmes to a favourite channels list. You can add
a favourite channel list which can be accessed by pressing the favourite button on your remote control. This will enable you to select your preferred channels quickly and easily. To add a channel to the favourite list go to; Menu > Settings > Channel > Channel Edit. Select the channel which you would like to add to the favourite list and press the favourite button on the remote control. A heart symbol will appear next to the channel name. Repeat for another channel or press [EXIT] to leave the menu. If you now press the favourite button on the remote control your favourite channels will be listed, select your desired channel and press the [OK] button to watch.
text_image
Channel Edit 1 BBC ONE 2 BBC TWO 7 BBC THREE 70 CBBC Channel 80 BBC NEWS 105 BBC Red Button 800 801 802 803 Delete Favorite List Select Skip Hill BackImportant: To receive Freeview/Saorview channels, in particular HD channels, you will need a Digital TV aerial and be in a good Freeview/Saorview coverage area. You can check the coverage for your area at www.freeview.co.uk or www.saorview.ie
Please note that any Freeview HD channels found during tuning will be placed in channel positions above 100. For example, 101 (BBC1 HD) 102 (BBC2 HD) etc.
*Freeview channels are only available in the UK, Saorview channels are only available in the ROI.
SETTINGS - CHANNEL MENU
Signal Information - Allows you to view signal frequency, signal quality and signal strength.
CI Information - Pay per view services require a 'Smartcard' to be inserted into the TV. If you subscribe to a pay per view service the provider will issue you with a 'CAM' and a 'Smartcard'. The 'CAM' can then be inserted into the COMMON INTERFACE PORT (CI Card In).
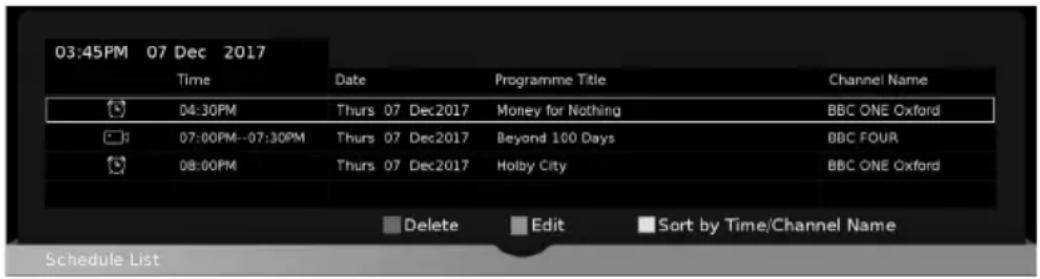
Schedule List - The schedule list allows you to view your reminders and recordings. It can be accessed by going to the 'Channel Menu' then selecting 'Schedule List' or by pressing the blue button while in the 'Record List'.
text_image
03:45PM 07 Dec 2017 Time Date Programme Title Channel Name 04:30PM Thurs 07 Dec2017 Money for Nothing BBC ONE Oxford 07:00PM--07:30PM Thurs 07 Dec2017 Beyond 100 Days BBC FOUR 08:00PM Thurs 07 Dec2017 Holby City BBC ONE Oxford Delete Edit Sort by Time/Channel Name Schedule ListThere are two icons, the clock symbol denotes a reminder, the camera indicates a recording. To select use the up and down arrow buttons.
- Press the [RED] button to delete the reminder or recording
- Press the [GREEN] button to edit the reminder or recording
- Press the [YELLOW] button to sort the reminder or recording
Note: Record functions are only applicable to sets with a built in USB Record/PVR function.
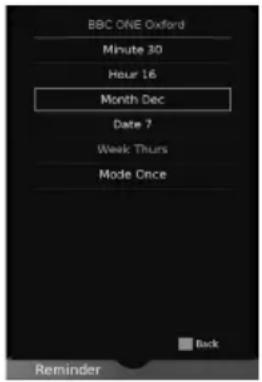
Edit Menu - To edit use the up and down buttons on the remote control to select the function, then use
text_image
BBC ONE Oxford Minute 30 Hour 16 Month Dec Date 7 Week Thurs Mode Once Back Reminderthe left and right buttons to change. Press the [OK] button to store and return to the schedule list.
Recorded List - Shows a list of recorded TV programmes via a connected USB memory stick or USB hard drive. While in the 'Recorded List', press the [BLUE] button to access the 'Schedule List'. Please see the 'USB RECORD' page for further information.
OAD Scan - Switch 'ON' or 'OFF' OAD updates.
SETTINGS - NETWORK MENU
text_image
Network Configuration IP Config > Network Info > Network Test >To access this menu, press [MENU] button on the remote control and scroll right. To select a sub menu press [OK]
If you wish to make changes to any of the default settings, use the scroll buttons. To confirm any settings press [OK] button. To exit this menu at anytime, press [EXIT] button.
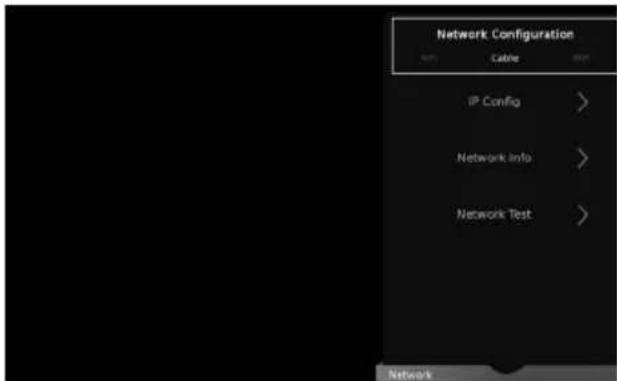
The network connection enables you to update the TV software and a number of Smart TV functions.
For the network configuration to work the TV will need to be connected to your home network via an Ethernet cable, with these requirements in place the TV will connect to the network automatically.
Network Config (Cable selected)
IP Config - Allows you to access LAN network connection settings via the TV's LAN Cable socket. Choose from the following options:
| Auto Will automatically connect the TV to your home network (this is the default setting and is highly recommended). |
| Manual Allows you to manually change the IP, Netmask, Gateway and DNS information. |
Network Config (Wi-Fi selected)
Wi-Fi Config - Allows you to access LAN network connection via the TV's built in Wi-Fi (no extra hardware required). Choose from the following option:
| Wi-FI Auto Search | Will automatically search for nearby routers. Select the desired router and enter its password, following the on screen instructions will result in a successfully connection. |
Network Info - Allows you to view Information about network settings.
Network Test - Allows you to test the network connection.
Netflix Setting - Allows you to view Netflix information required for any technical assistance.
Wi-Fi Status - Allows you to view the routers name (SSID), if the TV is connected via Wi-Fi
SETTINGS - TIME MENU
text_image
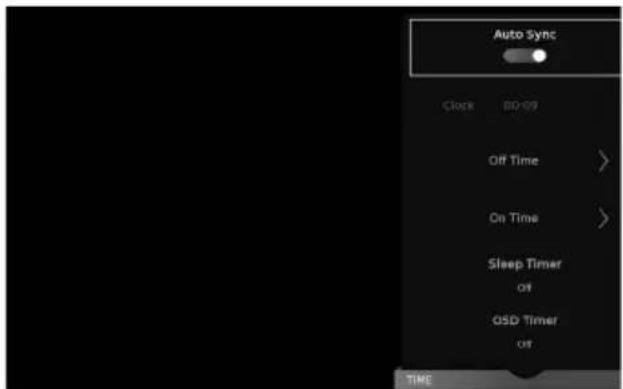
Auto Sync Clock BD-09 Off Time > On Time > Sleep Timer off QSD Timer off TIMETo access this menu, press [MENU] button on the remote control and scroll right. To select a sub menu press [OK]
If you wish to make changes to any of the default settings, use the scroll buttons. To confirm any settings press [OK] button. To exit this menu at anytime, press [EXIT] button.
Auto Sync - The time is synchronised with the Internet clock. If there is no internet connection, the time is synchronised with the Digital Television signal.
Clock - Shows the time.
Off Time - Allows you to set a specific time for your TV to turn off.
On Time - Allows you to set a specific time for your TV to turn on, the channel it will then display, the source it will be on and also the volume. This function can then be toggled to repeat every day or a certain day. If your set is in standby and the on time is reached, it will turn on.
Sleep Timer - Lets you set the sleep timer so the television automatically switches off after a set amount of time. Off -> 10min -> 20min -> 30min -> 60min -> 90min -> 120min -> 180min -> 240min.
OSD Timer - Lets you adjust the amount of time the 'On Screen Menu' stays on the screen before disappearing.
Auto standby - Set 'Auto standby' between Off, 3 hours, 4 hours and 5 hours.
Time Zone - Change your current time zone.
Note: If you do not press any buttons for 30 seconds, the menu will automatically exit. You can change the length of time before the menu exits automatically - see 'OSD Timer' in the Time Menu.
SETTINGS - LOCK MENU
text_image
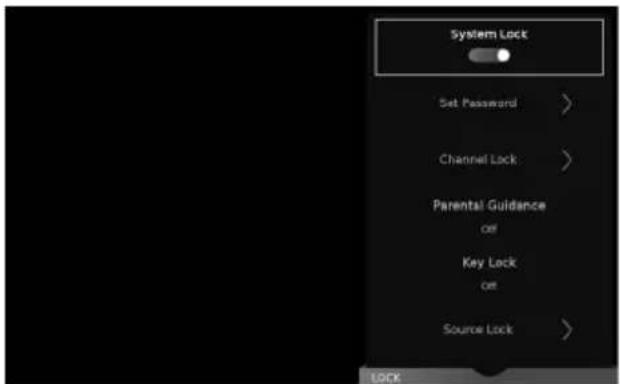
System Lock Set Password > Channel Lock > Parental Guidance of Key Lock of Source Lock > LOCKTo access this menu, press [MENU] button on the remote control and scroll right. To select a sub menu press [OK]
If you wish to make changes to any of the default settings, use the scroll buttons. To confirm any settings press [OK] button. To exit this menu at anytime, press [EXIT] button.
System Lock - Allows you to lock or unlock the menu. You will be asked to enter a 4 digit password Use the ◀ button to quit the password input or use the ▶ button to clear. Default password is 0000.
Set Password - Allows you to change the password.
Channel Lock - Allows you to lock certain channels manually.
Parental Guidance - Allows you to set the rating to block certain content based on age information.
Key Lock - Allows you to lock the buttons on the side of the TV set.
Source Lock - Allows you to lock the source menu.
Hotel Mode - Additional settings.
Note: To enable controls within the lock menu, the function needs to be enabled by entering the password and then turn the 'System Lock' on.
Note: If you change and forget the password, you will need to use the master reset password of 4711.
SETTINGS - SETUP MENU

text_image
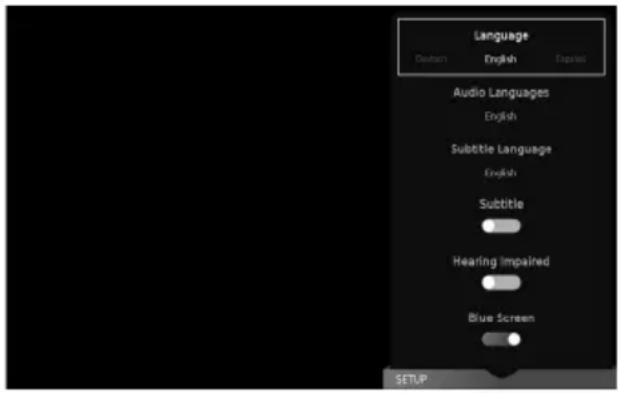
Language Deutsch English Explicit Audio Languages English Subtitle Language English Subtitle Hearing Impaired Blue Screen SETUPTo access this menu, press [MENU] button on the remote control and scroll right.
To select a sub menu press [OK]
If you wish to make changes to any of the default settings, use the scroll buttons. To confirm any settings press [OK] button. To exit this menu at anytime, press [EXIT] button.
Language - Allows you to change the language of the menu.
Audio Languages - Select your preferred audio language.
Subtitle Language - Select your preferred subtitle language.
Subtitle - Turns subtitles 'ON' or 'OFF'.
Hearing Impaired - This allows you to turn on the Hearing Impaired function, this produces subtitles on the screen which provide a description of what is happening during the selected programme.
Blue Screen - Changes the background when there is no input between clear and a blue background (only available on some sources).
PVR File System - Allows you to access 'PVR File System' settings. Choose from the following options:
| Select Disc Allows | you to select the device which is being analysed/set up should your set have more than one USB port/connected device. |
| Timeshift Size Max | imum amount of storage space allocated to time shifting on the selected USB device. Select from 512MB, 1GB, 2GB or 4GB. Maximum memory allocation is dependant upon connected memory capacity. |
| Format: Start Select this option to reformat the connected USB device. Note that all data will be lost when performing this action. | |
| Speed: Check Checks the speed of your memory device and displays the result in Kb/s | |
Note: When a USB memory device is connected to the set, this function will be active. If no USB device is connected, the function cannot be selected.
SETTINGS - SETUP MENU
text_image
Language Deutsch English English Audio Languages English Subtitle Language English Subtitle Blue Screen Hearing Impaired SETUPTo access this menu, press [MENU] button on the remote control and scroll right.
To select a sub menu press [OK]
If you wish to make changes to any of the default settings, use the scroll buttons. To confirm any settings press [OK] button. To exit this menu at anytime, press [EXIT] button.
First Time Installation - Allows you to access the 'First Time Installation' menu and retune the TV set.
Software Update (USB) - Allows you to update your TV with the newest software using a USB memory stick. Software and instructions are available on our website.
Software Update (NET) - Allows you to update your TV with the newest software via your internet connection.
Reset TV - This resets the menus to factory settings and clears all the TV channels from the television.
HDMI CEC (Consumer Electronic Control) - Allows HDMI devices to control each other and allows you to operate multiple devices with one remote control (only available with compatible devices).
LED Status - LED Status - Allows you to switch the LED power indicator light 'ON' or 'OFF' when the TV is being operated. (When this option is set to 'OFF' the LED power indicator light will fl ash when the remote control is used and will fl ash red during the normal start up process).
Standby Scan - When the TV is put into standby mode a standby scan will be performed, during this process the TV will scan for new channel information and automatically update the channel list if any changes are found, both the visual and audio functions will be off, once the scan is complete the TV will stay in standby mode.
Version Info - Allows you to view the version/information of the software installed on the TV set.
Source Edit - Allows you to edit the name of an Input Source.
APPS MENU
text_image
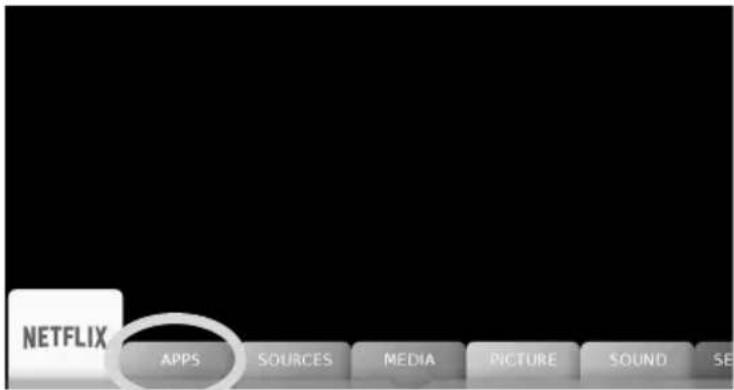
NETFLIX APPS SOURCES MEDIA PICTURE SOUND SETo access this menu, press [MENU] button on the remote control and scroll right. To select a sub menu press [OK].
If you wish to make changes to any of the default settings, use the scroll ▲▼▶◀ buttons. To confirm any settings press [OK] button.
To exit this menu at anytime, press the [MENU], [EXIT] or [BACK] button on the remote control.
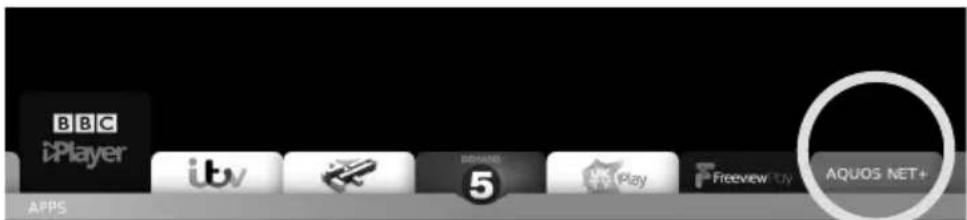
The Application Menu allows you to access the TV set's "SMART" features. In this menu you can enter various functions including Web Browser, BBC iPlayer, etc. At the bottom of the screen there are some key apps for easy and quick access.
Aquos Net+
text_image
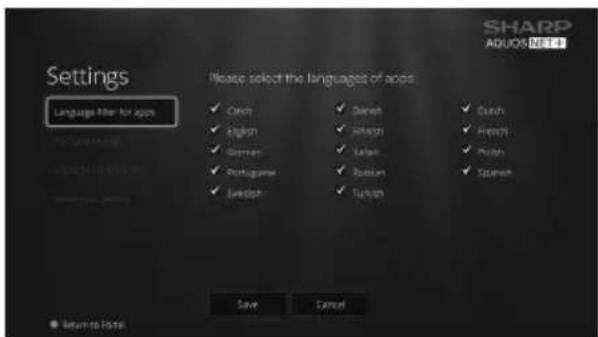
BBC iPlayer iTv Disney 5 Play Freeview (Dy) AQUOS NET+ APPSAquos Net+ is a portal which allows access to a variety of apps and multimedia services which the TV can access via the internet. To enter Aquos Net+ you will be prompted to enter a language and accept terms and conditions. Once the relevant information has been entered you will be able to use a range of features such as MUZU.TV, Viewster and Dailymotion.
Content is updated and managed from a central source, so look out for new features and updates.
text_image
SHARP ADUOS.NET Settings Language filter for apps ✓ Czech ✓ English ✓ German ✓ Portuguese ✓ Swedish Please select the languages of apps ✓ Danish ✓ Japanese ✓ Italian ✓ Russian ✓ Turkish ✓ Dutch ✓ French ✓ Polish ✓ Spanish Save Cancel Return to Host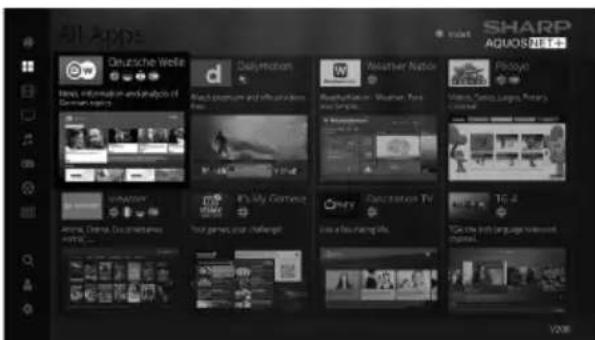
text_image
All Apps Deutsche Weiß d Qualimotion W Akaihner Nation Pikotoy Maps, information and analysis of German apps Aloch's picture and image design Aloch's video and image design Aloch's music and music design Volkswagen, Germany, France, Italy My Computer In My Computer Cinny Ducantava TV TIG Aloch's content (language relevant)... Your games your challenge! Live a Bosnia精彩店. 2008Note: If you wish to reset the settings for AQUOS NET+ Smart Portal back to the default settings, you will need to access the AQUOS NET+ Smart Portal and enter the settings menu. In the settings menu scroll down and select 'Reset your device', you will then be asked 'Yes' or 'No' to confirm your decision, highlight 'Yes' and press 'OK' on the remote control to complete the reset process.
Apps Menu
APPS MENU
Applications

text_image
BBC iPlayer itv 5 DEMAND UK Play Freeview Play APPSBBC iPlayer - Enjoy BBC iPlayer exclusives and your favourite BBC programmes from the last 30 days.
ITV Player - The ITV Hub, new home of ITV on demand. Enjoy the best telly anytime, anywhere.
Channel 4 / All 4 - The latest "catch up" plus a huge library of shows from 4, which includes complete boxsets.
Demand 5 - Watch full episodes of your favourite Channel 5 programmes when it suits you, on Demand 5. UK Play TV - "Catch - Up" on your favourite Dave, Really, Yesterday and Drama shows with UKTV Play.
Freeview Play - Access the Freeview Play app. (Please see the 'Freeview Play menu' page for further information).
Youtube - Video sharing website allows you to discover, watch and share originally-created videos.
BBC News - Access the BBC News app for up-to-the-minute and breaking news reports.
BBC Sport - The BBC Sport app offers the latest sports news, live action, scores and highlights..
Web Browser - Application for accessing websites via the internet. Use the following buttons for navigation in the browser:
| CH+ Scroll page up | |
| CH- Scroll page down | |
| Red Button Show/hide browser menu bar | |
| Yellow Button Zoom in | |
| Blue Button Zoom out |
Note: The Netflix app is included within the main menu for quicker access, they are not included in the "Apps" menu.
Note: Some Apps, such as Netflix, require a monthly subscription. This is not included with the purchase of your TV set.
FREEVIEW PLAY MENU
Freeview Play
text_image
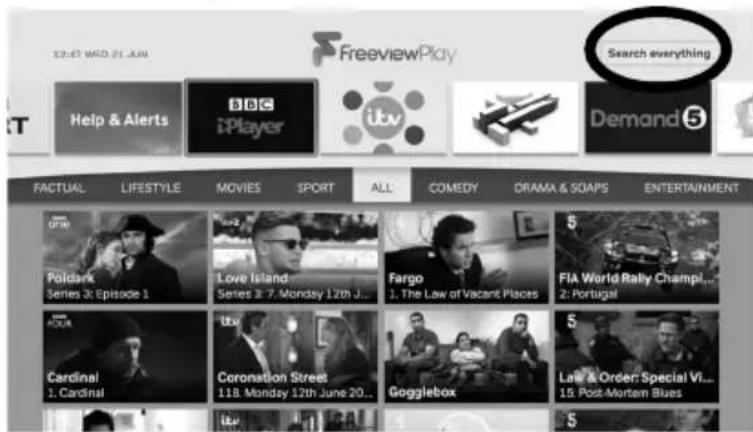
FREEVIEWPLAY Search everything Help & Alerts BBC iPlayer itv Demand 5 FACTUAL LIFESTYLE MOVIES SPORT ALL COMEDY DRAMA & SOAPS ENTERTAINMENT Poldark Series 3: Episode 1 Love Island Series 3: 7. Monday 12th J... Fargo 1. The Law of Vacant Places FIA World Rally Champion... 2: Portugal Cardinal 1. Cardinal Coronation Street 118. Monday 12th June 20... Gogglebox Law & Order: Special VI... 15 Post-Morten BluesWhen in the Freeview Play application, it is possible to search for a programme by name. Choose the "Search everything" option and then use the on-screen keyboard to type in the programme name. As you type, selections will appear. Select one of these options to start watching.
Freeview Play brings together live TV viewing with "catch up" TV services from broadcasters such as BBC, ITV, Channel 4 and Channel 5.
The Freeview Play Explore app features a carousel of genres to select from when searching for programmes, such as sport, comedy, dramas & soaps, etc. Content is made up from recommendations of the major broadcasters and offers an alternative means of searching.
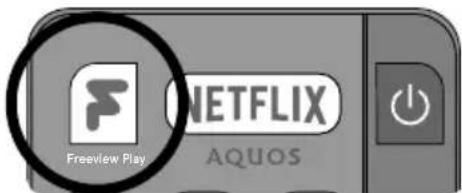
To access Freeview Play simply press the [FREEVIEW PLAY] button on your remote control (fi g1). Freeview Play can also be accessed via the '7 Day TV guide' menu and the 'Apps' menu.
When you first access Freeview Play you will need to accept the Terms of use simply select 'OK' to confirm. Once selected the Freeview Play on demand apps will appear on the screen. Use the ▲▼▶◀ buttons on the remote control to select your chosen app and press OK.
fi g1.
text_image
F NETFLIX Freeview Play AQUOSPicture is for illustration only, actual remote control may be different.
Note: Some apps require additional registration, this is a simple process and it will inform you of the correct website to visit to complete the registration.
Areas receiving Saorview transmissions will not support Freeview Play services.
MEDIA MENU
Miracast (Screen mirroring)
text_image
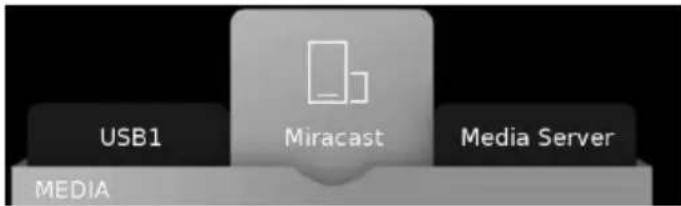
USB1 Miracast Media Server MEDIATo access this menu, press [MENU] button on the remote control and scroll right. To select a sub menu press [OK]
If you wish to make changes to any of the default settings, use the scroll buttons. To confirm any settings press [OK] button. To exit this menu at any time, press [EXIT] button.
Although the TV has many of the most popular Apps preinstalled, the Miracast function allows almost unlimited Apps to be shown on the TV screen including many on demand videos, subscription based services and your favourite applications such as Amazon TV, Emails, Facebook, etc.
The Miracast (screen mirroring) feature allows you to connect to a compatible Smartphone, Tablet, PC or Laptop wirelessly and 'mirror' what is on your device onto the TV's screen.
text_image
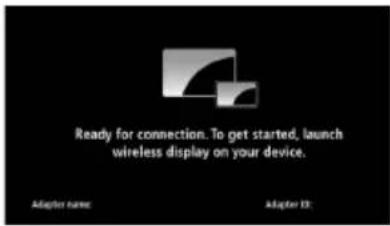
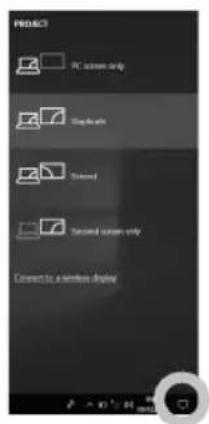
Ready for connection. To get started, launch wireless display on your device. Adapter name: Adapter 13:See below an example of a connection to a Laptop PC running Windows 10 that has built in Wireless Display.
For connection to other types of devices please refer to the instruction manual that came with your device.
Click on the monitor icon (circled below) to access this feature.
Once you're connected, you will see this screen on your Laptop/PC.
text_image
PRODUCT PC screen only Desktop Tamed Tamed screen only Connect to a network display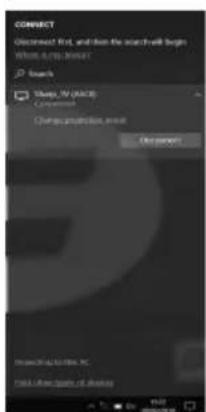
text_image
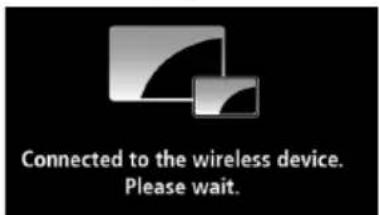
CONNECT Microsoft Not, and then the search will begin Where do this request Search Sleep JV (AVIC) Conversion Change protection error Download Microsoft Office, Inc. Add Other options of AmazonOnce a successful connection is made, your TV will display this screen.
text_image
Connected to the wireless device. Please wait.Note: Many Android and Windows devices support screen mirroring. For Apple devices, you need a separate Apple TV box to allow screen mirroring onto non Apple products.
Note: If your smartphone or tablet does not include mirroring, it may be possible to connect a suitable cable from your device directly to one of the HDMI inputs on the rear of the TV. Suitable cables for your device should be available from a local electronics retailer.
MEDIA MENU
USB mode and media server

text_image
USB1 Miracast Media Server MEDIAThe USB media and the Media Server offer the playback of various different types of content that is either saved on your USB memory stick or external media server. (USB mode allows you to view/playback fi les from an external USB device and Media Server connects to your home network and can view/playback fi les from your compatible laptop, PC, tablets and smart phones).
When accessing the USB media or media server features the below menu screen will appear. The content will be divided into Photo, Music, Movie and All.
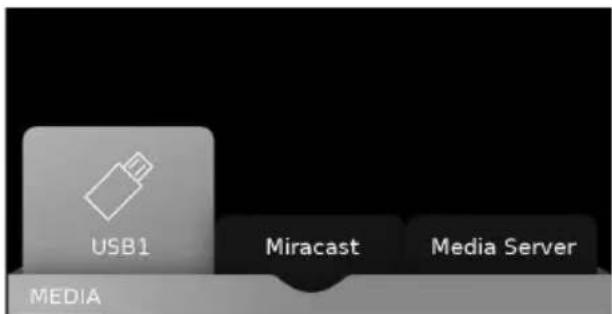
text_image
USB1 Miracast Media Server MEDIA1) You can navigate through the menus using the scroll ▲▼▶◀buttons on the remote control, to confirm the item you wish to play/view press the [OK] button (the USB1 and USB2 options will only show when a USB stick is connected).
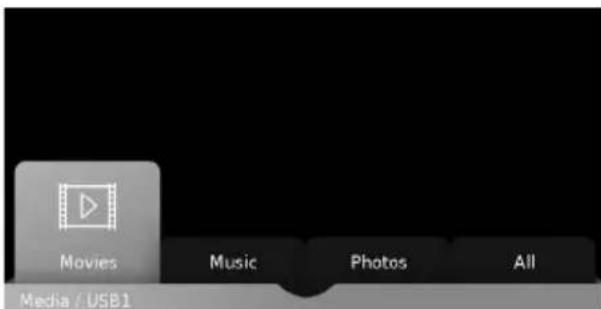
text_image
Movies Music Photos All Media / USB12) USB mode - Select the USB drive (If your drive only has 1 partition you will only see 1 item). Media Server - Select the external device that you would like to access.
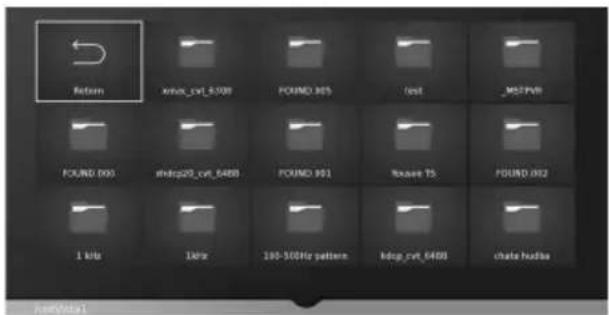
text_image
Return xmas_cvt_6508 POUND 305 test MSPWR POUND 305 shdp20_cvt_5480 POUND 301 Boxare TS POUND 302 1 kbit 1kbit 100-500Hz pattern kdog_cvt_6408 chate husiba3) You can now access the item. Press [OK] to view.
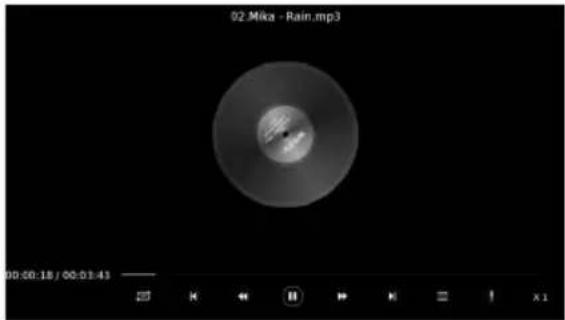
text_image
92.Mika - Rain.mp3 00:00:18 / 00:03:434) Whilst viewing your media, you can control the item by using the remote control playback buttons or by pressing [INFO] you can access the on-screen playback menu, you can now make your selection by using the ▲ and ▶[OK] buttons on the remote control.
Note: If you experience a playback issue, please ensure the files being used are the correct format (example - the picture plays but no sound) See compatible fi le types for USB/DLNA page for compatible fi le types.
Note: USB extension cables are not recommended as they can cause a reduction in picture/audio quality and stoppages during play back of USB content.
DVD SETUP (For models with built in DVD players)
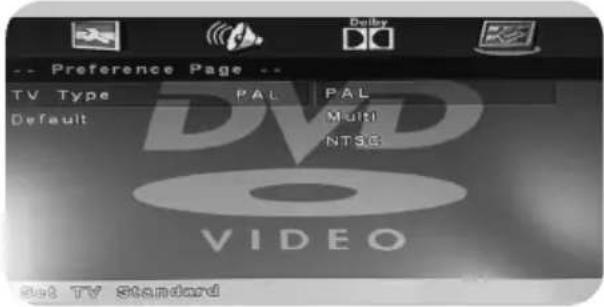
text_image
-- Preference Page -- TV Type PAL PAL Default Multi NTSC VIDEO Set TV StandardTo enter this menu please ensure the TV is in DVD source & press [DVD SETUP]
If you wish to make changes to any of the default settings, use the scroll ▲▼▶▲ buttons. To confirm any settings press [OK] button. To exit this menu at anytime, press [DVD SETUP] button.
TV Display - Choose from the following options:
| 4:3 Pan scan PS traditional picture format, this is often used with older fi lm formats |
| 4:3 Letter box LB Traditional picture which has been adapted for widescreen |
| Wide 16:9 Widescreen picture format |
Speaker Setup - Choose from the following options:
| LT/RT Converts from multi-channel sound to mono |
| Stereo Converts from multi-channel sound to stereo |
Dual Mono - Choose from the following options:
| Stereo Outputs 2 channels of sound both left and right |
| Mono L Outputs left side sound |
| Mono R Outputs right side sound |
| Mix Mono Outputs a single channel of sound but mixed between right and left |
Dynamic Range - This is the difference between the quietest and loudest sounds. This setting only works with DVD discs recorded in Dolby digital.
| Full Set | this to listen with the range recorded on the disc |
| 3/4 Set | this to listen with a range equivalent to a normal television |
| 1/2 Set | this to listen with a smaller difference between the maximum and minimum volume |
| 1/4 Set | this to listen with a smaller difference between the maximum and minimum volume |
| Off Set | dynamic range to off |
TV Type - Choose from the following options:
| PAL For TVs produced in the UK, Europe, Asia, Australia etc | |
| Multi For both NTSC and PAL | |
| NTSC | For TVs produced in North America, Japan etc |
Default - Choose from the following options:
| Reset Resets all options in the ‘DVD setup’ menu back to the default settings |
Note: This TV/DVD player is pre-set to play Region 2 DVDs. In the event you wish to use the TV/DVD in another country that uses different region discs, please visit www.umc-uk.co.uk. Select 'Product Support', 'Changing Region'.
USB RECORD - FREEVIEW/SAORVIEW MODE
The USB Record/PVR function is only available in Freeview/Saorview mode and only when used in conjunction with a compatible USB memory stick or USB hard drive. The benefits of this are as follows:
- Pause live TV and then playback, rewind and fast forward (up to live TV).
- One button record, if you decide you want to record the current programme.
- Easy recording from the 7 Day TV Guide.
Due to the nature of the product, it is necessary to use a high speed USB memory stick (as the TV reads from and writes to the memory stick at the same time, some memory sticks may not be suitable).
You can purchase high speed memory sticks from some computer stores, alternatively, we have a selection of tested and compatible memory sticks available to purchase directly from the Helpline/website.
Recommended Minimum Specification - USB Memory Stick:
| Read Speed 20 Mb/s (Megabits Per Second) | If you wish to use a USB portable hard drive larger than 32GB, please refer to the FAQ section at the rear of this user guide. | |
| Write Speed 6 Mb/s (Megabits Per Second) | ||
Pause Live TV (Time Shift)
A USB memory stick/hard drive must be connected to the TV in order to use this feature.
- Press the play/pause button and the television will pause and the live content will be recorded. To resume watching press play/pause again.
- Press fast forward to go forward in a recording.
- Press fast rewind to go back in a recording.
Note: When you switch the TV to standby or change channel the 'Time Shift' memory is wiped. To restart time shift you must press play/pause button.
Note: If channels are moved or deleted, then the USB Record/PVR will not function correctly.
Note: This television contains one TV tuner, therefore it can only record the channel you are watching or record one channel while the television is in standby mode.
Note: USB Record/PVR function is only available in Digital/Freeview TV mode. Due to copyright laws and illegal copying/recording it is not possible to record to/from any other input/output source.
Note: Recorded content can only be played back on the device that recorded it. It is not permitted (or possible) to watch content recorded on the TV from Freeview/Saorview on another device.
USB RECORD - FREEVIEW/SAORVIEW MODE
One Button Record
At any point in time you may decide to record the current programme that you are watching. To do this you need to press the red record button on the remote control.
Playback fi les from Record list
To playback recorded fi les you will be required to have the TV set to the Freeview/Saorview source mode. Once set to the correct source, access the recorded list by pressing the [REC LIST] (Recorded List) button on the remote control, the recorded list should now appear on the screen. Use the arrow buttons on the remote control to navigate to the recording you wish to playback and then press [OK] on the chosen file to start playback.
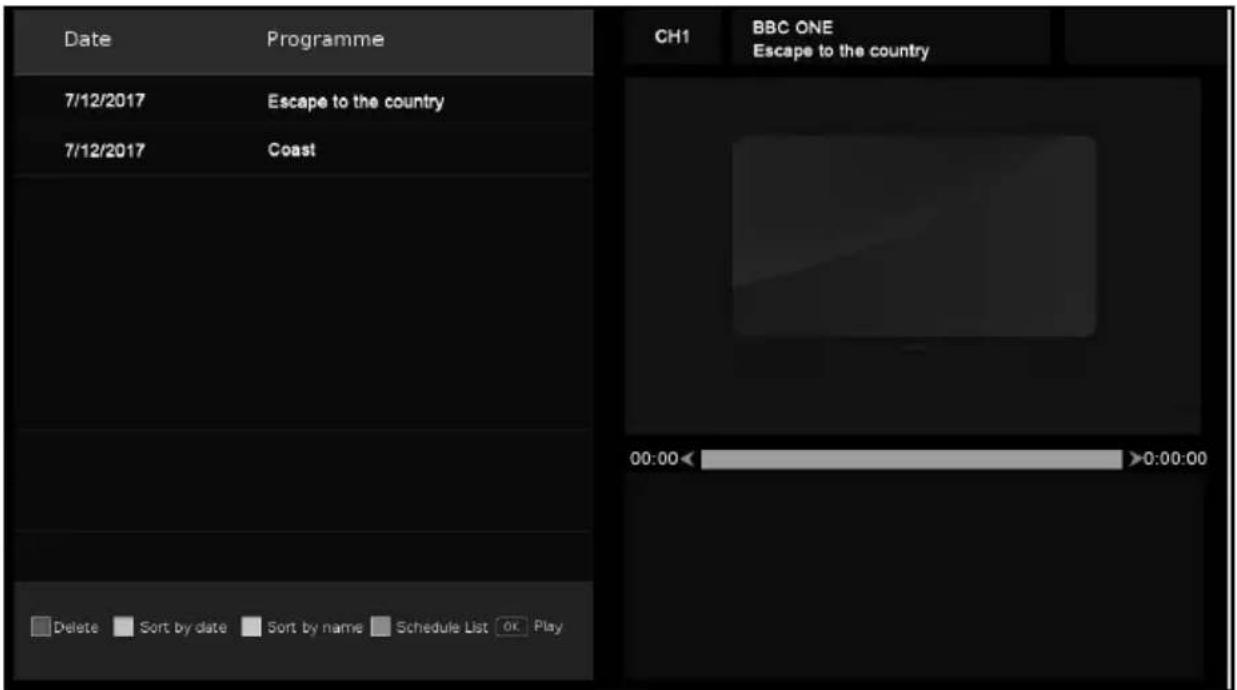
text_image
Date Programme 7/12/2017 Escape to the country 7/12/2017 Coast CH1 BBC ONE Escape to the country 00:00← >0:00:00 Delete Sort by date Sort by name Schedule List Or PlayUse the coloured buttons on the remote control for the following options:
- Press [RED] to delete a selected recording.
- Press [GREEN] to sort the items in the record list by date.
- Press [YELLOW] to sort the items in the record list by name.
- Press [BLUE] to enter the schedule list.
Note: Record functions are only applicable to sets with the built in USB Record/PVR function.
FREQUENTLY ASKED QUESTIONS
| General I would like to | have louder sound by connecting additional speakers or a Soundbar. | 1) Use either the 3.5mm headphone output on the TV and a 3.5mm to phono cable (available separately) to connect to an amplifi er/surround sound/soundbar. Please note this will deactivate the TV's built in speakers. or:2) Connect a digital optical audio cable from the TV's digital optical audio output to your amplifi er/surround sound/soundbar digital optical audio input. |
| General Why are some | options in the menu unavailable and greyed out. | Some options are only available in certain inputs/sources, i.e. HDMI. They are unavailable in the other sources where they have no effect. |
| General Can I stop my TV | automatically turning off after 4hrs? | Yes, in the 'Time' menu settings, scroll down to Auto standby and select 'OFF'. |
| TV I have tuned in Digital TV but I am not receiving any or all of the channels and/or the channels I receive are breaking up. | 1) Check you are in an area that can receive Freeview/Saorview, visit www.freeview.co.uk or www.saorview.ie2) Check you are using an aerial that is able to receive a good digital signal. In most cases, you will need an outdoor digital hi-gain/wideband aerial. In areas that have excellent digital coverage, you may be able to use a loft type aerial but it is highly likely that you will also need to connect a booster between the back of the TV and the TV aerial wall socket. Unfortunately, to receive a good enough digital signal, it is not possible to use a portable/indoor type aerial. | |
| TV I have re-tuned my television but when I switch it off it is not storing the channels. | If the TV does not save the channels when you power it off, it's likely the channel database has become corrupt.1) Turn off the TV.2) Remove the RF/Aerial cable from the rear of the TV and then turn the TV back on again.3) Using the remote control, press Menu followed by 8-8-8-8 to enter the initial setup/fi rst time installation menu.4) Press OK (let the TV run the full tuning process).5) Once completed, turn off the TV, reconnect the RF/Aerial cable then turn the TV back on again.6) Repeat steps 3 & 4. | |
| VCR/DVD Recorder | I have connected the TV to my VCR or DVD Recorder via SCART but it is not recording. | In addition to connecting via SCART, you should connect the aerial cable from the wall socket to your VCR/DVD Recorder and another aerial cable from the VCR/DVD Recorder to the TV. |
| Game Consoles I have | connected my Playstation/Xbox to the TV via HDMI, but I am not receiving any pictures or sound on my Television. | 1) Ensure the TVs' source is set to HDMI.2) Check your settings on your Playstation/Xbox are as per the Playstation/Xbox instruction manual. |
| Game Consoles I have | connected my Playstation/Xbox to the TV via Component cables (red, green & blue) but I am not receiving any sound. | Component cables only provide HD pictures. For the sound you will need to connect the red & white audio cables on the Playstation/Xbox to the red & white phono inputs (or mini AV input where fitted) on the rear of the TV. Please refer to the 'Connections' pages. |
| System Lock I have changed the password on the television and now forgotten it. | There is a master password of 4711, to gain access to the TV menu and reset the normal password. | |
| USB Mode I have inserted a USB Memory Key, but the TV does not recognise it. | Ensure the USB Memory Key is formatted to type FAT32. | |
FREQUENTLY ASKED QUESTIONS
| USB Mode Using a USB | portable hard drive/larger than 32GB. | If you wish to use a portable hard drive larger than 32GB, please note that it must be formatted to the FAT32 fi le system in order to operate on this TV. Windows XP/Vista computers are only capable of formatting up to 32GB, therefore, you will need a software programme/utility to format larger hard drives.Please refer to the website, www.umc-uk.co.uk, for more information. |
| DVD (For TV models with DVD only) | I have inserted a disc but it is not playing. | 1) Ensure you have inserted the disc facing the correct way.2) Ensure the disc is clean and is not scratched.3) Some copied discs will not play.4) Check the DVD is a region 2 disc – to change the region of the DVD player, refer to www.umc-uk.co.uk, select ‘Changing DVD Region’ in the ‘Product Support’ section |
| DVD (For TV models with DVD only) | I have pressed the eject button but the disc is not coming out. | To eject the disc hold the stop/eject button for 4 seconds. |
| USB Record/PVR(For TV models with USB record only) | I cannot change the channel, access the menu or use the red button. | During time shift you cannot change the channel, access the menu or use the red button. |
| USB Record/PVR(For TV models with USB record only) | When using the USB to record the picture ‘breaks up’ or experience loss of sound. | Check the USB memory stick meets the minimum read speed requirements. Standard definition channels require a read speed of 20 Mb/s (Megabits per second) and a write Speed of 6 Mb/s (Megabits per second) HD channels require the read speed of 80 Mb/s (Megabits per second) and a write speed of 40 Mb/s (Megabits per second). USB 3.0 sticks should be used where possible. |
| Freeview HD I cannot | access all Freeview channels. | Some data channels for Freeview can only be obtained when the TV’s ethernet port is connected to your router. |
| Freeview HD I cannot | find the Freeview HD channels. | Freeview HD channels found during tuning will be placed in channel positions above 100. For example, 101 (BBC1 HD), 102 (BBC2 HD) etc. |
| Freeview Play app | when I access the Freeview Play app there are no apps to select | Please ensure the TV has a network connection. |
| Catch Up menu There | is no channel and programme information available? | Please ensure the TV has a network connection and has been tuned in with a TV aerial connected. |
| Catch Up menu/USB Record | I cannot record programmes from the last 7 days? | The USB Record function will only allow you to record programmes currently being broadcast or being broadcast at a later date |
FREQUENTLY ASKED QUESTIONS
| Smart I cannot access Smart apps on my Smart TV | Check your TV is connected to the internet and there is suitable signal strength.You can carry out a Network Test as follows:1) Press Menu on the remote control.2) Select 'Network' Menu then 'Network Test'.3) This will show the status of the internet connection.If you have no internet connection you must re-connect your TV as follows:1) Press Menu on the remote control.2) Select 'Network' Menu then 'Wi-fi config'.3) Then 'Wifi Auto Search'.4) The TV will then automatically search for Networks.5) Select the desired network then enter the Network password.6) The TV will then connect.Note: An icon will appear in the top right hand side of the Application page to show you if the TV is connected to the internet. |
| Smart I cannot access content through the Media Server settings | Check your TV is connected to your local network and there is suitable signal strength. Check the server devices you are trying to connect with are also on the Network and are set to share content. |
| Smart I cannot access content through the Wireless Connection settings | Ensure the device you are trying to mirror onto the TV is correctly paired with the TV. Check the settings on the device, move your device closer to the TV set, check you guide of the device to ensure it is compatible with this function. |
| Smart While using Media Server, access is not possible or connection is slow | If the folder you are attempting to view contains a large amount of fi les, it may take a little while to load, this is normal, content may be blocked on the host PC. Reconfi gure the host PC to allow external access.Note: Host may not be connected to your network. |
| Smart The YouTube app does not work and/or is erratic | The Youtube app requires the TV to be set with the correct date and time, please see the 'Time Menu' page for further instructions. Ensure your network is not blocking access to YouTube and the speed of your internet connection is fast enough for viewing YouTube content. |
COMPATIBLE FILE TYPES FOR USB/DLNA
| Media | Codec | Resolution | Bit Rate | File Extension | |
| Film | MPEG1/2 1080P@60fps 40Mbps | .DAT, .VOB, .MPG, .MPEG,ts, .trp, .tp, .mp4, .mov, .3gpp, .3gp, .avi, .mkv, .asf | |||
| MPEG4 1080P@60fps 40Mbps .MPG, .MPEG, .mp4, .mov, .3gpp, .3gp, .avi, .mkv, .asf | |||||
| XviD 1080P@60fps 40Mbps .mp4, .mov, .avi, .mkv, .asf | |||||
| Sorenson H.263 1080P@60fps 40Mbps | .flv | ||||
| H.263 1080P@60fps 40Mbps .3gpp, .3gp | |||||
| H.264 1080P@60fps 80Mbps | .flv, .mp4, .mov, .3gpp, .3gp, .ts, .trp, .tp, .avi, .mkv | ||||
| HEVC/H.265 2048x1088@60fps 30Mbps .mp4, .mkv | |||||
| AVS 1080P@60fps 40Mbps .ts, .trp, .tp | |||||
| AVS+ | 1080P@60fps 50Mbps .ts, .trp, .tp | ||||
| VC1 | 1080P@60fps 40Mbps .wmv | ||||
| Motion JPEG | 640x480@30fps | 10Mbps .mov, .avi, .mkv | |||
| VP8 1080P@30fps 20Mbps .mkv, .webm | |||||
| VP9 2048x1088@60fps 30Mbps .mkv, .webm | |||||
| Media | Codec | Frequency | Bit Rate | File Extension | |
| Music | MPEG1/2 Layer1, 2, 3 | 16KHz ~ 48KHz | Layer1 32Kbps ~ 448KbpsLayer2 8Kbps ~ 384KbpsLayer3 8Kbps ~ 320Kbps | .avi, .asf, .mkv, .ts, .trp, .tp, .DAT, .VOB, .MPG,MPEG, .mp3, .wav, (Layer3 - .3gpp, .3pg, .flv,.swf, .m4a) | |
| AC3 | 32KHz, 44.1KHz, 48KHz | 32Kbps ~ 640Kbps | .ac3, .avi, .mkv, .3gpp, .3gp, .mp4, .mov,m4a, .ts, .trp, .tp, .DAT, .VOB, .MPG, .MPEG | ||
| EAC3 | 32KHz, 44.1KHz, 48KHz | 32Kbps ~ 640Mbps | .ec3, .3gpp, .3gp, .mp4, .mov, m4a, .ts, .trp, .tp,DAT, .VOB, .MPG, .MPEG | ||
| HEAAC 8KHz ~ 48KHz | .aac, .avi, .mkv, .3gpp, .3gp, .mp4, .mov, m4a, .ts,trp, .tp, .flv, .rmvb | ||||
| VORBIS | Up to 48KHz | .mkv, .webm, .3gpp, .3gp, .mp4, .mov, m4a, .ogg | |||
| LPCM 8KHz ~ 48KHz | 64Kbps ~ 1.5Mbps | .avi, mkv, .3gpp, .3pg, .mp4, .mov, .ts, .trp, .tp,DAT, .VOB, .MPG, .MPEG, .wav, .m4a | |||
| LBR(cook) | 8KHz, 11.025KHz, 22.05KHz, 44.1KHz | 64Kbps ~ 128Kbps | .rm, .rmvb | ||
| FLAC | 8KHz ~ 96KHz < 1.6Mbps | .mkv, .flac | |||
| DRA | 8KHz ~ 48KHz < 512Kbps | .ts, .trp | |||
| Media File Type Resolution | File Extension | ||||
| Photo | JPEG | 15360x8640, (1920x8 x 1080x8) | Base-line | .jpg/.jpeg | |
| 1024x768 | Progressive | ||||
| PNG | 9600x6400 | Non-interlace | .png | ||
| 1200x800 | Interlace | ||||
| BMP | 9600x6400 | .bmp | |||
| GIF | 6400x4800 (800x8 x 600x8) | .gif | |||
| Internal Subtitle | File Extension | Container | Subtitle Codec | ||
| mp4 | MP4 | DVD Subtitle, UTF-8 Plain Text | |||
| mkv | MKV | ASS, SSA, UTF-8 Plain Text, VobSub, DVD Subtitle | |||
| avi | AVI(1.0, 2.0) | XSUB, XSUB+ | |||
| External Subtitle | File Extension | Subtitle Parser | Remark | ||
| .srt | SubRip | ||||
| .ssa/.ass SubStation Alpha | |||||
| .smi | SAMI | ||||
| .sub | SubViewer, MicroDVD, DVDSubtitleSystem, Subldx(VobSub) | SubViewer 1.0 & 2.0 Only | |||
| .txt | TMPlayer | ||||