
1T-C32BC5KH2FB - TV SHARP - Free user manual and instructions
Find the device manual for free 1T-C32BC5KH2FB SHARP in PDF.


User questions about 1T-C32BC5KH2FB SHARP
0 question about this device. Answer the ones you know or ask your own.
Ask a new question about this device
Download the instructions for your TV in PDF format for free! Find your manual 1T-C32BC5KH2FB - SHARP and take your electronic device back in hand. On this page are published all the documents necessary for the use of your device. 1T-C32BC5KH2FB by SHARP.
USER MANUAL 1T-C32BC5KH2FB SHARP
natural_image
Front view of a flat-screen TV displaying a hexagonal grid pattern on the screen (no text or symbols visible)Operating Instructions
UHD SMART Television
Image for illustration purposes only. Actual product may vary.
Important Safety Instructions

CAUTION
RISK OF ELECTRIC SHOCK DO NOT OPEN

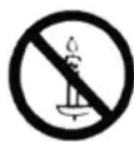
To prevent spread of fi re, keep candles or other open fl ames away from this product at all times
Please read these instructions. All of the safety and operating instructions should be read before the appliance is operated.
Warnings
- Television sets with 40" screens or larger must be lifted and carried by at least 2 people.
- This television does not contain any parts that are serviceable by the user. In the event of a fault, contact the manufacturer or authorised service department.
- Exposing the internal parts of the TV may endanger your life. The manufacturers guarantee does not extend to faults caused by repairs carried out by unauthorised third parties.
- Do not use the TV set immediately after unpacking. Wait until the TV warms up to room temperature before using it.
- To reduce the risk of fi re, electric shock or damage to the TV, do not expose it to dust, rain or moisture. Never expose the TV to dripping or splashing and do not place objects fi lled with liquids on or near the TV.
- Do not connect any external devices (DVD player, games console etc.) when the TV is switched on. Disconnect both the TV and device from the mains before connecting. Only switch appliances on when the connection process is complete.
- Do not place the television in a confined space and do not obstruct the ventilation openings at the rear of the television.
- When installing on a wall, ensure the TV is at least 5cm from the wall for ventilation.
- Always ensure that the TV's ventilation openings are not covered with items such as newspapers, tablecloths, curtains, etc.
- Dispose of this television and any components including batteries in an environmentally friendly manner. If in doubt, please contact your local authority for details of recycling.
- Ensure this TV is used in moderate climates only.
- In cases of electrostatic discharge (ESD) the TV may operate incorrectly. If this happens, turn the set off at the mains and then turn back on again after 30 seconds. The set should now work normally.
WARNING: Never place a television set on an unstable surface. The TV set may fall causing serious personal injury or death. Many injuries, particularly to children, can be avoided by taking simple precautions such as:
- Use cabinets or stands recommended by the manufacturer of the television set.
- Only use furniture that can safely support the television set.
- Ensure the television set is not overhanging the edge of the supporting furniture.
- Do not place the television set on tall furniture (for example, cupboards or bookcases) without anchoring both the furniture and the television set to a suitable support.
- Do not place the television set on cloth or other materials that may be located between the television set and supporting furniture.
- Please educate children about the dangers of climbing on furniture to reach the television set or its controls.
- If your existing television set is being retained and relocated, the same considerations as above should be applied.
Safety
- For your safety, this appliance is fitted with a fused 3 pin mains plug. Should the fuse need to be replaced, ensure that any replacement is of the same amperage and approved with the BSI mark.
- Never try and replace the mains plug unless you have adequate qualifications and are legally authorised to do so. In the event that a replacement mains cable is required, contact the manufacturer for a suitable replacement.
- Never use the television if it is damaged in any way.
- Always place the television on a fl at level surface avoiding anywhere which may be subject to strong vibration.
- The ideal distance to watch the television is from approximately 2.5-3 times the length of the diagonal measurements of the TV screen away.
- Ensure the television is not placed on top of the power cable as the weight of the television may damage the cable and cause a safety hazard.
- Never place mobile phones, speakers or any other device which may cause magnetic or radio interference, near the television. If interference is apparent, move the device causing the interference away from the television.
- To disconnect the set from the mains, remove the mains plug from the socket.
- Ensure that the mains plug is always easily accessible.
- When handling the set do not grip the LCD screen/glass.
- Do not pull the set when mounted on a bracket. If using a moveable bracket, adjust via the bracket and not the TV set.
- Do not place this set above a heat source.
WARNING: Excessive volume when using earphones and headphones can cause damage to hearing.
Important Safety Instructions

CAUTION
RISK OF ELECTRIC SHOCK DO NOT OPEN

Maintenance
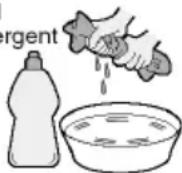
- To clean your TV, wipe with a soft, dry cloth. If the surfaces are extremely dirty, use a soft cloth dampened with a weak detergent solution.
- Never use alcohol, paint thinner or benzene to clean this unit.
- Before using a chemically treated cloth, read the instructions that came with the cloth carefully.
CAUTION: If water or other liquid enters the television through the display panel surface, a malfunction may occur.
Mild
detergent
Packaging
- The safest way to transport your item is in the original box/packaging - please save your packaging for this.
- You will need the original box/packaging in the event of warranty/service repair or support. We are unable to carry out warranty/service if you are unable to package the item correctly.
Important information regarding use of video games, computers, captions or other fixed image displays
The extended use of fi xed image program material can cause a permanent "shadow image" on the LCD/LED panel, also known as "screen burn".
This "shadow image" can appear in the background during normal viewing. This type of irreversible LCD/LED panel deterioration can be limited by observing the following steps:
- Reduce the brightness/contrast setting to a minimum suitable viewing level.
- Do not display the fixed image for extended periods of time.
- Turn the power off when not in use.
Examples of images that are more likely to cause "screen burn" are as follows (this is not an exhaustive list):
- TV channel logos: e.g. shopping channel logos and pricing displays - especially if they are bright and stationary. Moving or low-contrast graphics are less likely to cause ageing of the screen.
- Time displays.
- Teletext: Do not view a static page for a long period of time
• TV/DVD menus: e.g. listings of DVD disc content. - Pause mode: Do not leave the TV in pause mode for long periods of time, e.g. when watching DVDs or videos.
Important: Once 'shadow image/screen burn' occurs, it will never disappear and is not repairable under warranty.
How do I dispose of this product?
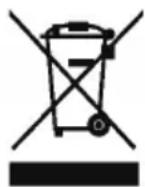
UK: Waste electrical products should not be disposed of with household waste. Please dispose of the product at a designated collection point for recycling of WEEE. For your nearest facilities, please see www.recycle-more.co.uk or ask store for details.
ROI: Waste electrical products should not be disposed of with household waste. Separate disposal facilities exist. Check with your local authority or retailer for recycling advice.
Cd
Batteries
- Do not expose batteries to high temperatures, excessive heat, prolonged sunshine or fire as this may cause leakage, explosion or ignition.
Observe the correct polarity when inserting batteries. - Do not use different types of batteries together or mix old and new batteries.
- Dispose of batteries in an environmentally friendly way.
- Certain regions may regulate the disposal of batteries. Please consult your local authority.
CE Statement:
Hereby, UMC Poland Sp. z o.o. declares that this LED TV is in compliance with the essential requirements and other relevant provisions of RED Directive 2014/53/EU.
https://www.sharpconsumer.eu/documents-of-conformity/
Trademarks
HDMI
The terms HDMI and HDMI High-Definition Multimedia Interface, and the HDMI Logo are trademarks or registered trademarks of HDMI Licensing, LLC in the United States and other countries.

The Ultra HD Display logo is registered trademark of DIGITAL-EUROPE

The DVB logo is the registered trademark of the Digital Video Broadcasting (DVB) project.

FreeviewHD

FreeviewPlay
The FREEVIEW text and logos are trademarks of DTV Services LTD. © DTV Services Ltd

SAORVIEW
SAORVIEW is a registered trademark owned by RTÉ.

Manufactured under license from Dolby Laboratories. Dolby, Dolby Audio and the double-D symbol are trademarks of Dolby Laboratories.

The "CI plus" Logo is a trademark of CI Plus LLP.

YouTube
YouTube and the YouTube logo are trademarks of Google Inc.

The Wi-Fi CERTIFIED Logo and Miracast® are registered trademarks of Wi-Fi Alliance. Wi-Fi CERTIFIED Miracast™ is a trademark of Wi-Fi Alliance.

dts
Studio Sound
For DTS patents, see http://patents.dts.com. Manufactured under license from DTS Licensing Limited. DTS, the Symbol, DTS and the Symbol together, and DTS Studio Sound are registered trademarks and/or trademarks of DTS, Inc. in the United States and/or other countries. © DTS, Inc. All Rights Reserved.

dts-hd
For DTS patents, see http://patents.dts.com. Manufactured under license from DTS Licensing Limited. DTS, the Symbol, DTS and the Symbol together, DTS-HD, and the DTS-HD logo are registered trademarks and/or trademarks of DTS, Inc. in the United States and/or other countries. © DTS, Inc. All Rights Reserved.
Note: Trademarks may vary depending on model.
Microsoft PlayReady™
This product contains technology subject to certain intellectual property rights of Microsoft. Use or distribution of this technology outside of this product is prohibited without the appropriate license(s) from Microsoft.
Content owners use Microsoft PlayReady™ content access technology to protect their intellectual property, including copyrighted content. This device uses PlayReady technology to access PlayReady-protected content and/or WMDRM-protected content. If the device fails to properly enforce restrictions on content usage, content owners may require Microsoft to revoke the device's ability to consume PlayReady-protected content. Revocation should not affect unprotected content or content protected by other content access technologies. Content owners may require you to upgrade PlayReady to access their content. If you decline an upgrade, you will not be able to access content that requires the upgrade.
CONTENTS
Safety Instructions 4-5
Trademarks 6
Notes about these Operating Instructions....8
Wall Mounting and Set Security 9
Fitting Wall Bracket Spacers 10
TV Control Stick and Input Source Menu....11
First Time Installation 12-13
Connecting to the Internet 14
Applications Menu....15
Applications Guide 16
TV Menu Operation....17-29
Settings Menu....17
Quick Settings Menu....18
Picture Menu 19-20
Sound Menu 21
Channel Menu 22-23
Network Menu 24-25
Time Menu 26
System Menu 27
About TV 28
Media Menu 29-31
USB/Media Server 29-30
Miracast 31
Seven Day Programme Guide 32-33
Freeview Play App 34
Catch UP TV 35-36
USB Recording 37
Source Menu 38
How to Connect your set....39-43
Troubleshooting Guide 44-45
Updating Software....46
Specifications – USB and DNLA Media Types 47-48
Quick Lookup 49-50
OPERATING INSTRUCTIONS ADVICE
When following the guidance on how to use the set, use the following notes. Unless otherwise stated, the remote control is used to operate the set, it will be noted when to use the buttons or control stick on the set itself.
Notes of interest are shown in boxes throughout this manual.
When a menu option is referred to, this will be in bold.
The following remote control buttons are used to navigate the menus:
[EXIT]: Exits from the menu and returns to the source
[BACK]: Takes you one step back in the menu.
[ARROW BUTTONS]: Navigate around the options on the screen.
[OK]: Selects the option highlighted.
When reference is made to a button to press on the remote control it will be contained within a square bracket like this [OK]. This would mean press the OK button on the remote control.
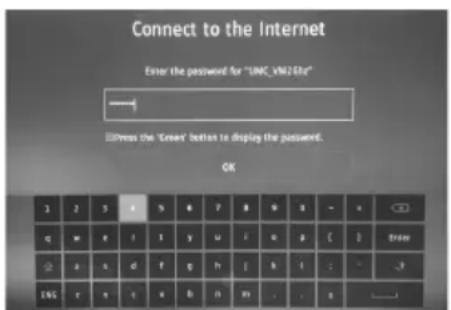
For entering Wi-Fi password information an on-screen keyboard is used. To navigate around this, use the arrow buttons on the remote control, enter the character selected by pressing [OK].
 | This button will shift the character set on the keyboard to capital letters. |
 | Allows the selection of special characters. |
 | Backspace, deletes last character inputted. |
 | Insert a space |
 | Enters password and exits keyboard mode. |
 | Type of keyboard (ENG is English). This can not be changed. |
text_image
Connect to the Internet Enter the password for "LINC_VMI20Hz" Press the 'Green' button to display the password. OKWi-Fi On Screen Password Entry Keyboard
Note: It is not recommended to connect external user interface devices, such as a keyboard or mouse, to this set.
SECURING THE TV TO A WALL
Securing the TV to a wall with anti-tip straps
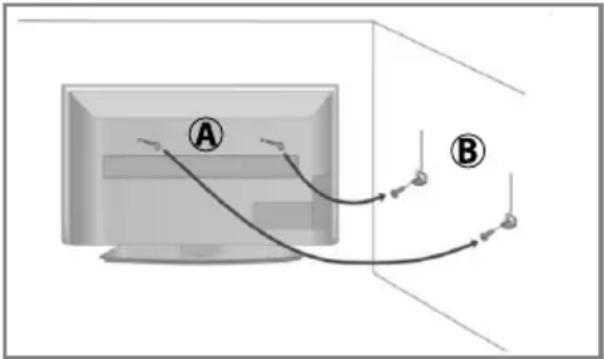
For maximum safety in the home, when using a TV with its stand, anti-tip straps should be fitted. These are available from major retailers & websites and are an easy, inexpensive and effective way of ensuring your TV stays safely upright. Straps are designed to be attached to the rear of the TV and then tethered to the wall or the furniture the TV is stood on, these are fitted as follows.
A) Using one or both of the top wall-mounting holes and screws fasten one end of the fastening cord/s to the TV. (the screws are already supplied in the wall mounting holes)
B) Secure the other end of the fastening cord/s to your wall. (you will need screws/fi xings suitable for your wall type - available separately from most DIY stores).
text_image
Diagram showing two labeled points (A and B) connected by curved lines, with arrows indicating direction of flow or signal paths.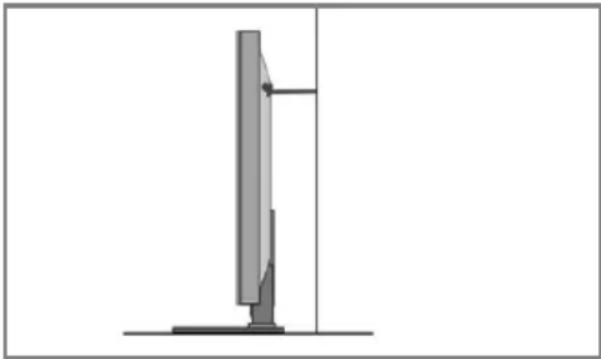
natural_image
Diagram of a vertical monitor mounted on a stand, showing front and side views (no text or symbols)Note: Please ensure that children do not climb on or near the TV set.
Note: When handling the set do not grip the LCD Panel.
Note: Do not pull the set when mounted on a bracket. If using a moveable bracket, adjust via the bracket and not the set.
The Royal Society for the Prevention of Accidents is urging people to take care with flat-screen televisions. RoSPA stated in 2010 that “Toddlers are particularly at risk of pulling flat-screen televisions on to themselves. They are unsteady on their feet and are attracted by colourful television images.” The risk has increased as televisions become lighter.
Wall mounting
IMPORTANT - Before drilling any holes in the wall ensure you are not drilling where there
could be electrical wires, water or gas pipes.
natural_image
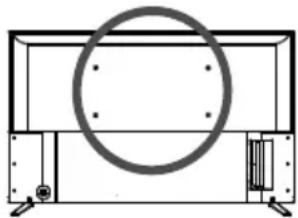
Technical line drawing of a rectangular enclosure with a circular opening and internal components (no text or symbols)1) Remove the four screws located at the back of the TV set.
2) The wall mount can now be easily attached to the mounting holes, located on the back of the TV, using the same four screws removed.
VESA mounting points are located on the rear of the set, see example above.
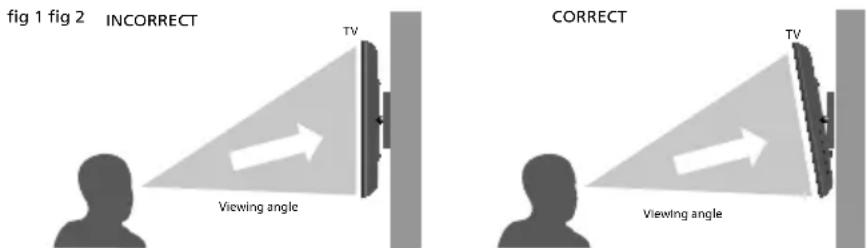
For optimum viewing, if wall mounting the TV higher than eye level, the TV should be tilted downwards so that the TV's screen is 'face on'. See fig 1 and 2.
text_image
fig 1 fig 2 INCORRECT TV Viewing angle CORRECT TV Viewing angleImportant: If wall mounting this TV, only use the screws already provided in the wall mounting holes. Using other screws which are longer could cause irreparable damage to internal parts. When using a wall bracket, please ensure the screws in the back of the TV set are not over tightened.
SECURING THE TV TO A WALL
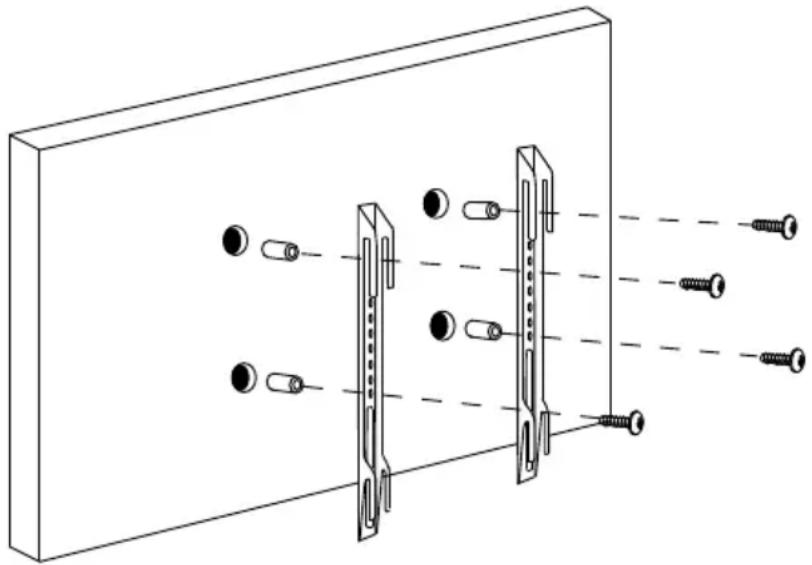
When wall mounting the TV, ensure that the mains power cable and any other cables connected to the TV from your external devices do not interfere with your wall bracket. On some models, you will find 'spacers' in the accessories pack that should be fitted in between the rear of the TV and the wall bracket in order to prevent trapping any cables. See Fig 1 below.
4 x Screw including D18 washer
4 x Spacer
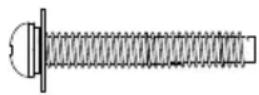

These should be used as indicated in the picture below. Ensure that the screws are not overtightened as this may cause damage to the set.
Note: the wall bracket type shown in the diagram is for illustration purposes only, other brackets may be used and it is recommended that the spacers and screws are tested to see if they fi t correctly before fi nal assembly.
Fig 1.
natural_image
Diagram of a wall-mounted optical or mechanical assembly with multiple screw-like components and light beams passing through (no text or symbols)Important: Only use the screws provided to mount the set onto a wall bracket. When using a wall bracket, please ensure the screws in the back of the TV set are not over tightened. Failure to use the correct screws may lead to damage.
Note: Spacers and screws are not supplied for all models, refer to the Quick Start Guide for more information.
Note: Due to the use of rear facing HDMI connectors, right angled HDMI adapters can be utilized to reduce the space required behind the set to allow the cable to bend safely. There are different types of HDMI angled connectors, ensure that the one being used is suitable for the cable/socket types.
TV CONTROL STICK AND INPUT SOURCE MENU
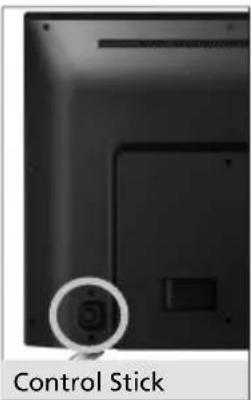
For models with the joystick type controller.
natural_image
Close-up of a black electronic device with a circular button labeled 'Control Stick' (no other text or symbols visible)TV Control Stick
The TV control stick is located on the back of the TV. The control stick can be used to control many of the TV functions. The shape of the TV's control stick may vary by model.
While TV is in standby mode:
- Press the centre of the control stick once - Power on the TV set
While watching TV:
• RIGHT/LEFT – volume up/volume down
- UP/DOWN – changes channel up/down
- Press the centre of the control stick once – displays the menu
- Press and hold the centre of the control stick – Standby/Power Off
While in menu:
- RIGHT/LEFT/UP/DOWN – navigation of cursor in on-screen menus
- Press the centre of the control stick once – OK/Confir rm selected item
- Press and hold the centre of the control stick – back to previous menu
Choosing Mode Input/Source
Use the source menu to switch between input/connections.
A) Using the buttons on the remote control:
- Press [SOURCE] - The 'source' menu will appear.
- Press [<] or [>] to select the input you require.
- Press [OK].
B) Using the TV control stick:
- Press the centre of the control stick once to enter the TV menu.
- Press the control stick RIGHT/LEFT and navigate through to 'SOURCE' menu.
- Press the centre of the control stick to enter the 'SOURCE' menu.
- Press the control stick RIGHT/LEFT to scroll through and select the input/source you require.
- Press the centre of the control stick to select the chosen input/source option highlighted.
For further information on input/connections please view the 'Connections' pages.
FIRST TIME INSTALLATION
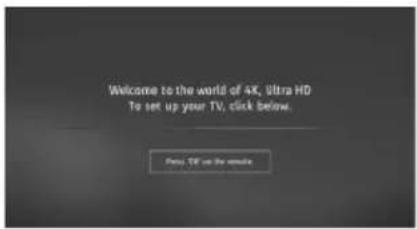
text_image
Welcome to the world of 4K Ultra HD To set up your TV, click below.Introduction
When the set first turns on, it enters the First Time Installation mode. This can be restarted by restoring the set to default settings in the 'ABOUT TV' menu
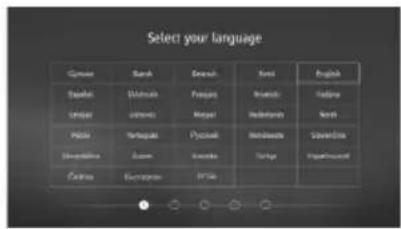
text_image
Select your language English Spanish Chinese English English English English English English English English English English English English English English English English English English English English English English English English English English English English English English English English English English English English English English English English English English English English English English English English English English 英文 English English English English English English English English English English English English English English English English English English English English English English English English English English English English English English English English English English English English English English English English English English English English English English English English English EnglishLanguages
Select your preferred on-screen display language. This will change the language in which the menus and associated information is displayed. To change this press the [MENU] button and then select Settings > System Menu > Language
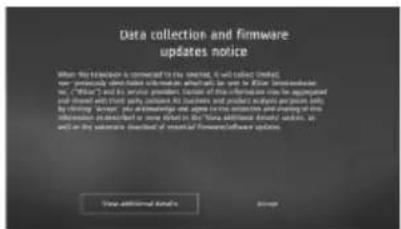
text_image
Data collection and firmware updates notice When this edition is connected to the server, it will be installed, now previously updated information which will be used in Excel as an email client or email address. It is also to access your existing software for more than 50% of users. The software has been installed with a total number of users, but it is currently available at the same level. This version will not be installed on the main page. It is also to access your existing software for more than 50% of users. It is also to access your existing software for more than 50% of users. It is also to access your existing software for more than 50% of users. It is also to access your existing software for more than 50% of users. It is also to access your existing software for more than 50% of users. It is also to access your existing software for more than 50% of users. It is also to access your existing software to other users. It is also to access your existing software to other users. It is also to access your existing software to other users. It is also to access your existing software to other users. It is also to access your existing software to other users. It is also to access your existing software to other users. It is also to access your existing software to other users. It is also to access your existing software to other users. It is also to access your existing software to other users. It includes all other user types (including one or two) that are currently available at the end of the period. The new system contains multiple data points, some data points, or specific data points, such as those with data points, some data points, or specific data points, such as those with data points, some data points, or specific data points. All other user types include one or two, each of which are currently available at the end of the period. The new system contains multiple data points, some data points, or specific data points, such as those with data points, some data points, or specific data points. The new system contains multiple data points, some data points, or specific data points, such as those with data points, some data points, or specific data points. All other user types include one or two, each of which are currently available at the end of the period. The new system contains multiple data points, some data points, or specific data points, such as those with data points, some data points, or specific data points. The new system contains multiple data points, some data points, or specific data points. The new system contains multiple data points, some data points, or specific data points, such as those with data points, some data points, or specific data points. The new system contains multiple data points, some data points, or specific data points, such as those with data points, some data points, or specific data points. The new system contains multiple data points, some data points, or specific data points, such as those with data points, some data points, or specific data points. The new system contains multiple data points, some data points, or specific data points, such as those with a data point, some data point, or specific data point. The new system contains multiple data points, some data points, or specific data points, such as those with a data point, some data point, or specific data point. The new system contains multiple data points, some data points, or specific data points, such as those with a data point, some data point, or specific data point. The new system contains multiple data points, some data points, or specific data points, such as those with a data point, some data point, or special data point. The new system contains multiple data points, some data points, or specific data points, such as those with a data point, some data point, or special data point. The new system contains multiple data points, some data points, or specific data points, such as those with a data point, some data point, or special data point. The new system contains multiple data points, some data points, or specific data points, such as those with a data point, some data point; or otherwise they are currently available at the end of the period.Agreement 1
Agree to the Data Collection and Firmware update notice.
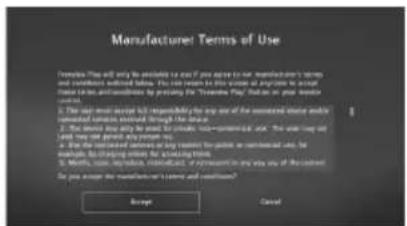
text_image
Manufacturer Terms of Use Please do you want to be available to us if you agree in the manufacturer's terms and conditions submitted below. This can return to this version of any person to account for all terms and conditions by pressing the "Thermost Play" that is on your position at the time. 1. The last month each copy is typically responsible for any use of the manufactured title and/or manufactured title, which is intended through the above. 2. The words may also be stored for private non-commercial use. The word may not include any personal or personal name. 3. Use the manufactured title is currently available as a representative use, but must be being retained in the existing time. 4. Maths, some, likely, cannot be used, or unknown in one way use of the content. Do you accept the manufacturer's terms and conditions? Approve CancelAgreement 2
Agree to the manufacturers' Terms of Use. (Only applicable to Freeview Play sets.)
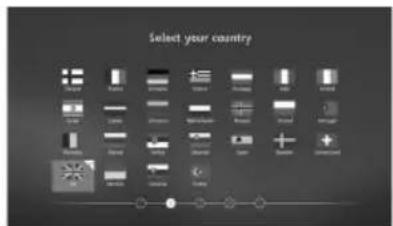
text_image
Select your countryCountry Selection
Select the correct flag for the country in which the set will be used. This will enable the set to correctly install the functions applicable to the country of use.
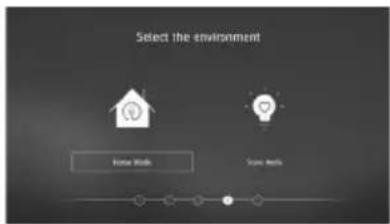
text_image
Select the environment Home Maps Scene MapsEnvironment of Use
Home Mode: For normal use, by default, it is set to a power saving mode which reduces the energy used by up to 25% (by reducing the power to the LED/LCD panel). This can be changed in the picture mode settings.
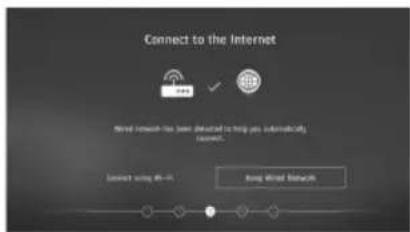
text_image
Connect to the Internet Wireless network has been installed to help you automatically connect. Status setting 06-01 Wireless NetworkNetwork setup
You can connect the TV to your broadband router or wireless network in order to take advantage of the Smart functions. If you connect the TV to your router using an Ethernet cable (recommended) this step will be skipped.
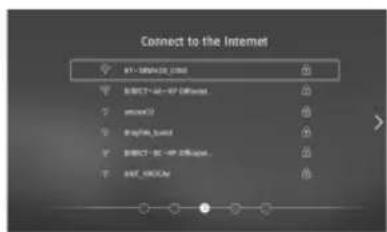
text_image
Connect to the Internet AV - 5000+32.2000 DIRECT-AC - MP-Difford mbox3 Bridgdb_1x86 DIRECT-BC - MP-Difford MST_90004Select Wi-Fi Network
Select the Wi-Fi network which you would like to be connected to. A padlock symbol next to the network indicates that it will require a password to use.
text_image
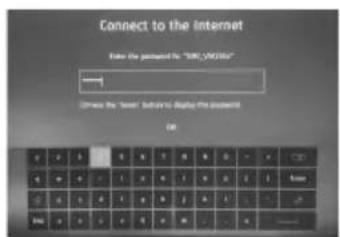
Connect to the Internet Enter the password to "SIN-VI00164" Name: Connect the "Internet" button to display the password. OKEntering Password
Use the arrow buttons on the remote control to select the correct character and then press [OK] to enter. Press the [GREEN] button to reveal the password.
FIRST TIME INSTALLATION
text_image
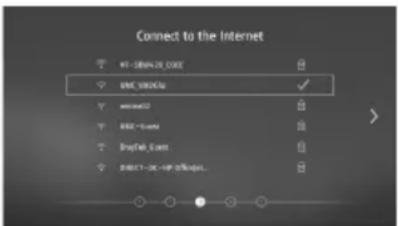
Connect to the Internet NT-089612.0000 BMC 500000 www.t2 BMC -Gwmt English -Gwmt DIRECT-DC-NP 500000...Confir rmation of Internet Connection
If the network has been correctly authorised, a tick symbol will appear next to it.
text_image
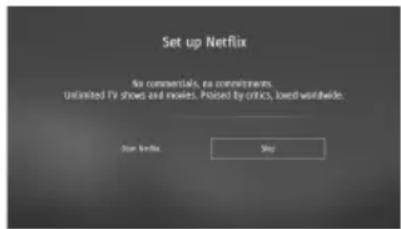
Set up Netflix No commercials, no commitments. Unlimited TV shows and movies. Praised by critics, locked worldwide. Stop Netflix StopSet Up Netflix ix
If you have a Netflix account, it can be set up on the television here. Once set up and validated, the First Time Installation continues on to the next step.
text_image
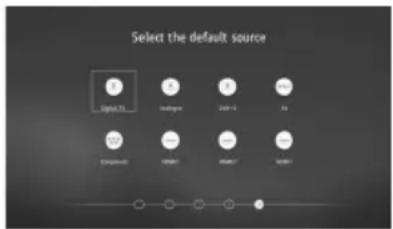
Select the default source Digit 75 Analogon 2001-16 39 Cyclohexyl DSDM1 DSDM2 DSDM3Default Source
Select the source which you use the most. If Digital TV (Freeview) is chosen, then at the next step, the set will tune in and default to Digital TV (Freeview). If one of the other sources is selected, then the set will not tune in at this stage and default to that input. To change this press the [MENU] button and then select Settings > Channel
text_image
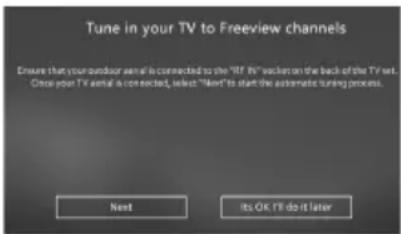
Tune in your TV to Freeview channels Ensure that your outdoor serial is connected to the "RF IV" back on the back of the TV set. Once your TV serial is connected, select "Next" to start the automatic tuning process. Next its OK IT do it laterTune in Channels
Chose to install terrestrial channels now or later.
text_image
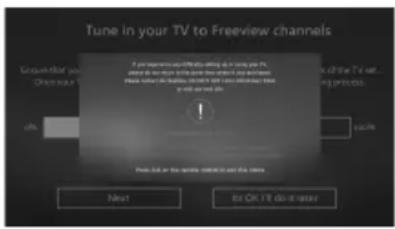
Tune in your TV to Freeview channels If you express any details, please call your TV. Please call for this information on the TV screen. Please click up the 'OK' button to access your TV. You can get your own this is a freeview program. Next Is On IT do not runSupport Advice
Information regarding support is displayed.
text_image
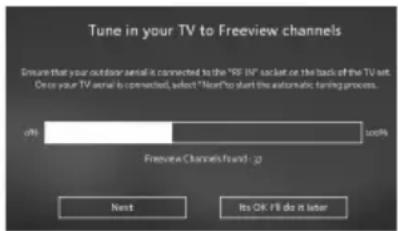
Tune in your TV to Freeview channels Ensure that your outdoor serial it connected to the "RF" packet on the back of the TV art. Once your TV serial is connected, select "Next" to start the automatic tanning process. only follow Freeview Channels found: 27 Next It's OK -F'll do it laterTuning Progress Indication
Tuning continues and a progress bar is shown with the number of channels found indicated below this.
text_image
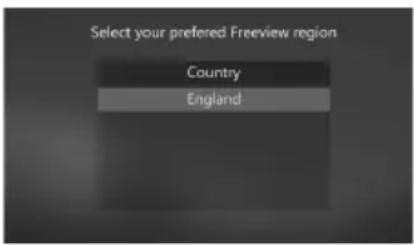
Select your preferred Freeview region Country EnglandCountry Selection
When Digital tuning is complete, select your country of use. Normally this will only show one country, unless you are receiving channels from multiple transmitters in other countries.
text_image
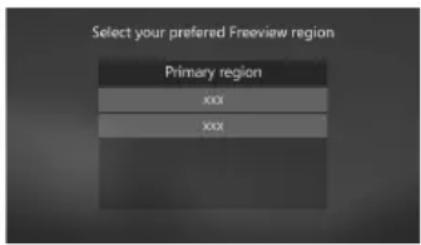
Select your preferred Freeview region Primary region xxx xxxPrimary Region Selection
Select the region that you would like to receive your local news from.
text_image
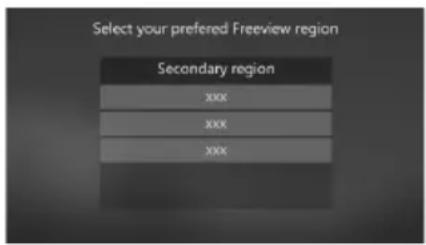
Select your preferred Freewire region Secondary region xxx xxx xxxSecondary Region Selection
Select your nearest or strongest signal transmitter.
NOTE: These screens only come up if more than one region is found. i.e. two or more transmitters are tuned in.
Note:
In Home Mode, the TV will switch itself to the standby mode after 4 hours in the event that the buttons on the remote control or TV set are not used. This can be disabled in the 'TIME' menu.
Store Mode: For store display use. The picture is adjusted to optimum settings. The store demonstration will appear on the screen automatically after two minutes.
CONNECTING TO THE INTERNET
When you first power on your new SMART TV there will be an option to follow various on-screen set up instructions. These instructions will enable you to connect to the internet via your home network. You can connect to your home network either wirelessly or with an Ethernet cable.
If you decide not to follow the initial set up instructions and need to connect at a later date please follow these simple steps below:
Connecting your TV: Wireless Connection
Enter the 'Network' menu and ensure that Wi-Fi is selected. Move to Wi-Fi and press [OK] on the remote control. This will bring up any local Wi-Fi networks, choose the desired network and connect. If a password is required a prompt and a keyboard to enter it will be displayed.
Connecting your TV: Ethernet/LAN cable
Plug your Ethernet cable into the RJ45 (Ethernet) socket located at the rear of the television.
APPLICATIONS MENU

text_image
Apps Settings Media Sources NETFLIX BBC iPlayer ibv Demand5 stv YouTubeNote: The position of apps may vary depending on your TV set.
Note: The applications available will be different depending if the set is a Freeview Play model. Refer to the application list.
The 'Application' menu allows you to access the TV set's "SMART" features. In this menu you can enter various functions including Web Browser, BBC iPlayer, etc. At the bottom of the screen there are some key apps for easy and quick access.
To view the next layer of the 'App' menu, scroll right and select:

Note: HDR is supported on apps such as Netflix and YouTube, and only works if the data being streamed contains HDR data.
Aquos Net+
SMART TV
AQUOS NET+
Aquos Net+ is a portal which allows access to a variety of apps and multimedia services which the TV can access via the internet. To enter Aquos Net+ you will be prompted to enter a language and accept terms and conditions. Once the relevant information has been entered you will be able to use a range of features such as MUZU.TV, Viewster and Dailymotion.
Content is updated and managed from a central source, so look out for new features and updates.
APPLICATIONS GUIDE
| Applications Available on Freeview Play Models | |
| Netflix Allows access to fi lms, boxsets and other streaming videos via your Netflix account. Note that you will have to set up your own Netflix account to access this application as subscription is not included with the set. | |
| BBC iPlayer Enjoy BBC | Player exclusives and your favourite BBC programmes from the last 30 days. |
| YouTube Video sharing | website allows you to discover, watch and share originally created videos. |
| BBC News Access the BBC | BC News app for up-to-the-minute and breaking news reports. |
| BBC Sport The BBC Sport | app offers the latest sports news, live action and scores. |
| Aquos Net+ Portal More | appliations. |
| ITV Player The ITV Hub | new home of ITV on demand. Enjoy the best telly anytime, anywhere. |
| Channel 4 (All 4) The latest “Catch Up” plus a huge library of shows from 4, which includes complete box sets. | |
| Demand 5 Watch full episodes of your favourite Channel 5 programmes when it suits you. | |
| UK Play TV “Catch Up” | on your favourite Dave, Really, Yesterday and Drama shows with Freeview Play Access the Freeview Play app. Please see the ‘FREEVIEW PLAY’ App page for further information. |
| Applications Available on Non-Freeview Play Models | |
| Netflix Allows access to fi lms, boxsets and other streaming videos via your Netflix account. Note that you will have to set up your own Netflix account to access this application as subscription is not included with the set. | |
| BBC iPlayer Enjoy BBC | Player exclusives and your favourite BBC programmes from the last 30 days. |
| YouTube Video sharing | website allows you to discover, watch and share originally created videos. |
| BBC News Access the BBC | BC News app for up-to-the-minute and breaking news reports. |
| BBC Sport The BBC Sport | app offers the latest sports news, live action and scores. |
| Aquos Net+ Portal More applications. | |
| Web Browser Applicat | on for accessing websites via the internet. Use the following buttons for navigation in the browser: |
| CH+ Scroll page up | |
| CH- Scroll page down | |
| Red Button | Show/hide browser menu bar |
| Yellow Button | Zoom in |
| Blue Button | Zoom out |
Note: Some Apps, such as Netflix, require a monthly subscription. This is not included with the purchase of your TV set.
Note: The appearance and functionality of apps may vary depending upon the revision of the app and the platform it is designed to be used on. On-demand players may also change depending upon the region in which the set is tuned into.
SETTINGS MENU
In this area, you can adjust your television to your preferred settings. Refer to the next pages to correctly set up your Sharp television to your preferred settings.
To enter the 'Settings' menu press the [MENU] button followed by [UP], then scroll to the settings option by using the [RIGHT] arrow key.

text_image
Apps Settings Media Sources Quick Settings Picture Sound Channel Network Time System About TV| Quick Settings Allows you to quickly access some of the most useful functions on the set. | |
| Picture |  Enables control of the picture settings to ensure optimal performance and personal preference settings to be stored. Enables control of the picture settings to ensure optimal performance and personal preference settings to be stored. |
Sound Controls  | individual sound settings on the television. |
| Channel Set up your channels and tuning. | |
Network Conne  to your Wi-Fi or Ethernet network. to your Wi-Fi or Ethernet network. | |
Time Gives co  over all the time and date functions on the set. over all the time and date functions on the set. | |
System Provide  to the overall system controls within the television. to the overall system controls within the television. | |
| About TV Shows relevant information about the set and its functions. | |
QUICK SETTINGS MENU
text_image
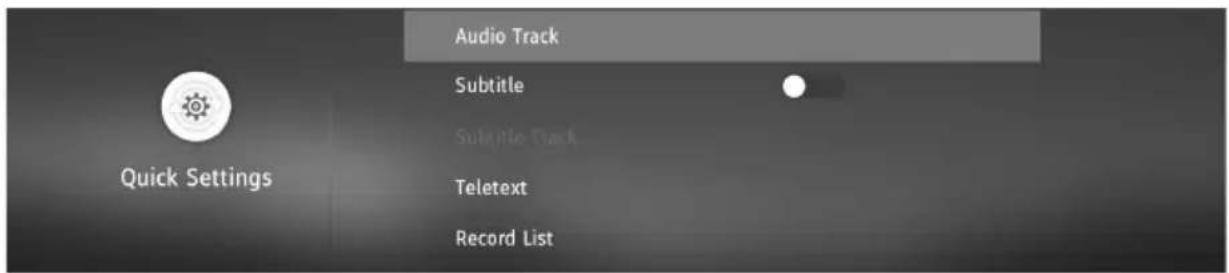
Audio Track Subtitle Subtitle Track Teletext Record List Quick SettingsThis menu allows you to quickly access the most popular functions on the set without having to navigate through the various menus.
| Audio Track Allows you to choose between the audio channels being transmitted on Digital Television. Currently for Freeview only normal sound or the Audio Description audio channels can be selected. | |
| Subtitle Turn subtitles on and off. Subtitles can also be turned on and off by using the [Subtitle] button on the remote control. | |
| Subtitle Track Appears when Subtitles (above) are turned on and allows you to select which subtitle track is to be used. There may be more than one sub-title available for use, i.e. English Subtitle or Hearing Impaired subtitle. | |
| Teletext Turn Teletext on or off. This can also be achieved by pressing the [Teletext] button on the remote control. | |
| Record List Shows a list of recorded TV programmes via a connected USB memory stick or USB hard drive. While in the ‘Recorded List’, press the [BLUE] button to access the ‘Schedule List’. Refer to the ‘USB RECORD’ page for further information. | |
| Schedule List The schedule list allows you to view your reminders and recordings.There are two icons, the clock symbol denotes a reminder, the camera indicates a recording. To select use the [UP] and [DOWN] arrow buttons. |
Playback fi les from Record list
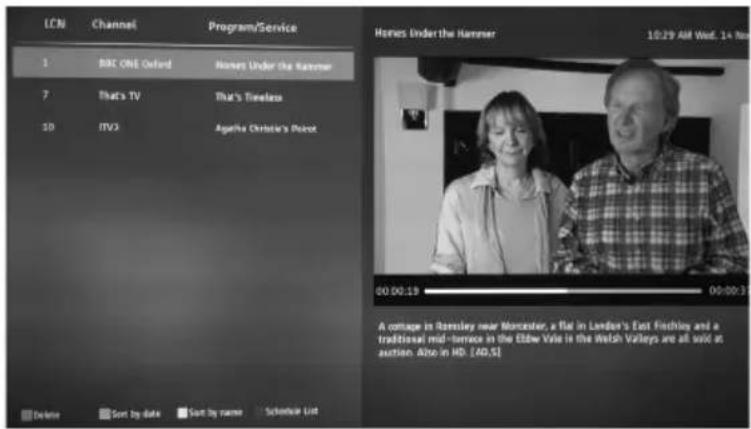
To playback recorded fi les you will be required to have the TV set to the Freeview/Saorview source mode. Once set to the correct source, access the recorded list by pressing the [REC LIST] (Recorded List) button on the remote control or select the record list from the 'Quick' menu, the Recorded List should now appear on the screen. Use the arrow buttons on the remote control to navigate to the recording you wish to playback and then press [OK] on the chosen file to start playback.
text_image
LCN Channel Program/Service 1 BBC ONE Oxford Homes Under the Newser 7 That's TV That's Timeless 10 ITV Apollo Christa's Poet Home Under the Newser 10/29 AM Wed. 14 Nov 00:00:19 00:00:3 A cottage in Ramsley near Newcastle, a flat in Lendor's East Finchley and a traditional mid-service in the Elbow Vale is the Welsh Valleys are all sold at auction. Also in HD. [AD.S] Delete Sort by date Sort by name Schedule ListUse the coloured buttons on the remote control for the following options:
- Press [RED] to delete a selected recording.
- Press [GREEN] to sort the items in the record list by date.
- Press [YELLOW] to sort the items in the record list by name.
- Press [BLUE] to enter the schedule list.
Note: Recording is only possible when a USB stick is plugged in and formatted at FAT32. Visit the 'USB RECORDING' page for more information.
PICTURE MENU

bar
| Picture Mode | Economy | |---|---| | Brightness | 50 | | Contrast | 50 | | Colour | 54 | | Sharpness | 50 |For complete control of your picture settings, enter the 'Picture' menu to set up the following adjustments. These will allow you to enhance your viewing experience and utilise the full capability of the television.
Picture Mode
To enable fast setting of the desired picture performance the following options can be selected by pressing the [PICTURE] button on the remote control:
| Economy Power saving mode which reduces the energy used by up to 25% (by reducing the power to the LED/LCD panel). In Economy mode, the TV will switch itself to Standby mode after 3-5 hours in the event that the TV buttons or remote control buttons are not pressed (change the picture mode to another setting to de-activate this function) In the economy mode the brightness of the picture may be reduced. |
| Standard Standard settings |
| Personal Allows you to change the picture settings to your personal preference. These settings are saved automatically. |
| Dynamic Recommended settings for fast moving pictures. |
| Movie Picture has less colour and is darker. |
You can make the following adjustments in Personal mode:
| Brightness Increase or decrease the brightness of the picture. Range: 0-100 | ||
| Contrast Switch the balance between black and white. Range: 0-100 | ||
| Colour Changes the picture between colour and black and white. Range: 0-100 | ||
| Sharpness Increase or decrease the sharpness of the picture. Range: 0-100 | ||
| Colour Temperature Choose from the following: | ||
| Standard Default settings. | ||
| Warm Increases red within the picture. | ||
| Personal Your own settings. | ||
| Cold Increases blue within the picture. | ||
Aspect Ratio - Within the UK the picture format varies depending on the channel/broadcast. There are a number of different options to best meet your needs;
- Auto
• 16:9
• 4:3 - Zoom 1
- Zoom 2
Auto
Automatically displays the best picture format so the picture is in the correct position. Black lines may appear at the top/bottom and/or sides.
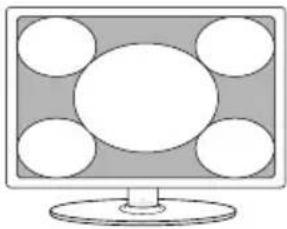
Full Screen
natural_image
Illustration of a computer monitor with five circular windows on the screen (no text or symbols)Displays a picture in the full screen mode without overscan. 16:9 signal will be displayed in original proportion. Other picture format will be stretched to fill the screen
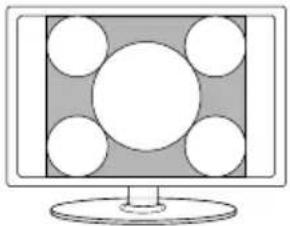
4:3
natural_image
Illustration of a computer monitor with a grid of white circles on the right side (no text or symbols)Displays the 4:3 picture in its original size. Side bars are shown to fill the 16:9 screen
Dot by Dot
Will display the picture in its original resolution without any change, only available in HDMI input source
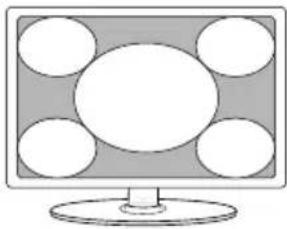
16:9
natural_image
Illustration of a computer monitor with five circular windows on the screen (no text or symbols)Fills the screen with a regular 16:9 signal and 4:3 picture format will be stretched to fill the screen
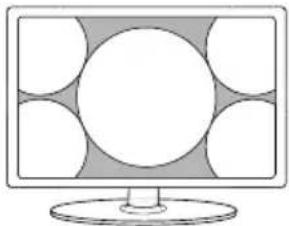
Zoom1 and Zoom2
natural_image
Illustration of a computer monitor with a blank screen and abstract geometric patterns on the sides (no text or symbols)The picture is the correct proportion but zoomed in to fill the screen
Expert Settings
Use these adjustment settings to improve the picture in more detail.
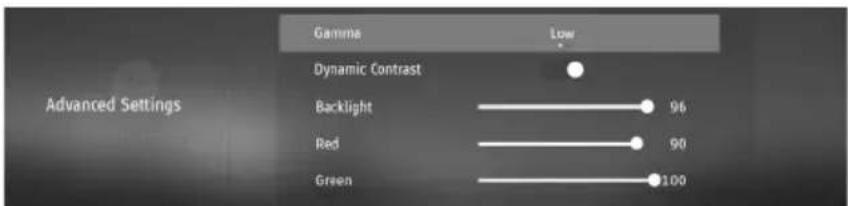
text_image
Gamma Low Dynamic Contrast Backlight 96 Red 90 Green 100 Advanced Settings| Noise Reduction Off, Low, Medium, High. | ||
| Gamma Changes the range of the colour reproduction. Low, Medium and High. | ||
| Active Contrast Allows for the contrast level to be adjusted automatically depending on picture content. 'ON' or 'OFF'. | ||
| Backlight Switches optimization of the backlight and contrast of the picture. Range: 1-100 | ||
| Red Adjust the amount of red in the picture. Range: 1-100 | ||
| Green Adjust the amount of green in the picture. Range: 1-100 | ||
| Blue Adjust the amount of blue in the picture. Range: 1-100 | ||
| CMS Hue This is a standard to adjust the colour either more reddish or more bluish in tone. R/G/B/C/M | Range: -63 to 63 | |
| CMS Value A higher value makes the image brighter. A lower value makes the image darker. R/G/B/C/M | Range: -32 to 31 | |
| CMS Saturation Increases or decreases the saturation of a selected colour. R/G/B/C/M | Range: 0 to 15 | |
SOUND MENU
text_image
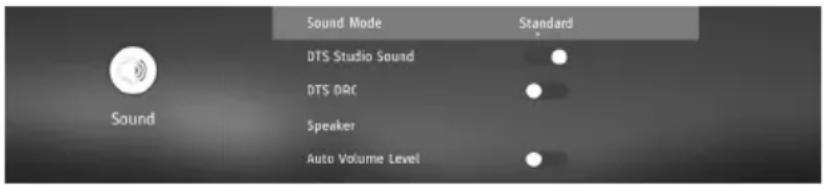
Sound Mode DTS Studio Sound DTS DRC Speaker Auto Volume LevelFor complete control of your audio settings, enter the 'Sound' menu to set up the following adjustments. These will allow you to enhance your listening experience and expand the full capability of the television.
Sound Mode - To enable fast setting of the desired sound mode one of the following options can be selected by pressing the [SOUND] button on the remote control:
| Standard Default | settings |
| Music Emphasises | music over voices |
| Movie Provides live and full sound for movies | |
| Sports Emphasises | sound for sports |
| Personal Allows you to change the sound settings to your personal preference. These settings are saved automatically. | |
DTS Studio Sound- Choose from the following options:
| Off Disables the DTS Studio Sound audio feature | |
| On Studio Sound | creates an immersive, feature-rich surround sound experience from two speakers, complete with rich bass, high frequency detail and clear dialog. |
DTS DRC (Dynamic Range Control)-
| OFF Disables the DTS DRC feature. |
| ON Adjusts the level of dynamic range for DTS movie soundtracks. Very loud sounds get quieter and quiet parts get louder. Recommended for midnight listening. |
Speaker -
| Digital Audio Output Switch between Auto, PCM or RAW. | |
| Digital Audio Delay Delay the sound in relation to the picture on the digital output. | |
| Audio Delay (ms) Delay the sound in relation to the picture on the audio output (speaker, headphone, etc.) | Range: 0 - 250. |
Auto Volume Level -
| ON When 'ON' is selected, the volume will attempt to stay at a constant level regardless of TV programme and advertisements. |
| OFF Switches Auto Volume off. |
Expert Settings -
| Balance | To switch the sound between the left and right speakers. | Range: -50 to 50. | |
| Equalizer Function | Enables you to adjust the frequency characteristic of the sound output for the following ranges: 100Hz, 500Hz, 1.5kHz, 5kHz, 10kHz. | Range: -10 to 10. | |
| Audio Description | Allows you to switch Audio Description 'ON' or 'OFF'. This provides a description of what is happening during the selected programme for a person who is visually impaired. This feature is not available on all programmes. | ||
| ON Switches | Audio description on. AD Volume Control is activated. | ||
| OFF Switches | Audio Description off. | ||
CHANNEL MENU
Use of the 'Channel' menu allows for setting the TV up to receive incoming aerial signals.
Note that this menu will change depending on which aerial source is being used. These options include:
• Terrestrial Digital Television
• Cable Digital Television
• Satellite Digital Television
- Analogue Television
text_image
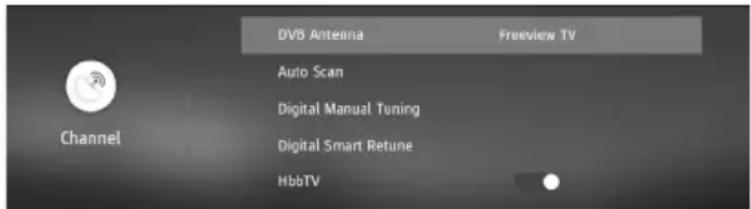
DVB Antenna Freeview TV Auto Scan Digital Manual Tuning Digital Smart Retune HbbTV Channel| DVB Antenna Selected input antenna type. | |
| Auto Scan Allows you to | retune the television for all digital channels, digital radio stations and analogue devices. |
| Tuning Mode Digital, Analogue and Digital + Analogue. | |
| Auto Tuning When selected, the set will start tuning. | |
| Digital Manual Tuning Allow you to manually tune your digital signal by selecting the channel number. Press [OK] to start. | |
| Digital Smart Retuning Enables the set to retune those channels already stored. | |
| Auto Update Channel List | Can be set to “ON” or “OFF”. |
| HbbTV Allows interactive services like BBC red button+ using Digital TV broadcasting when connected to the internet. | |
| LCN Logical Channel Number. When turned on, digital stations will be in order. | |
| Standby Scan When the TV is put into standby mode a standby scan will be performed, during this process the TV will scan for new channel information and automatically update the channel list if any changes are found, both the visual and audio functions will be off, once the scan is complete the TV will stay in standby mode. | |
| CI Information Pay per view services require a “Smartcard” to be inserted into the TV. If you subscribe to a pay per view service the provider will issue you with a ‘CAM’ and a “Smartcard”. The ‘CAM’ can then be inserted into the COMMON INTERFACE PORT (CI Card In). | |
Important: To receive Freeview/Saorview channels, in particular HD channels, you will need a Digital TV aerial and be in a good Freeview/Saorview coverage area. You can check the coverage for your area at www.freeview.co.uk or www.saorview.ie
Note: Any Freeview HD channels found during tuning will be placed in channel positions above 100. For example, 101 (BBC1 HD) 102 (BBC2 HD) etc.
Note: Freeview channels are only available in the UK, Saorview channels are only available in the ROI.
Signal Information
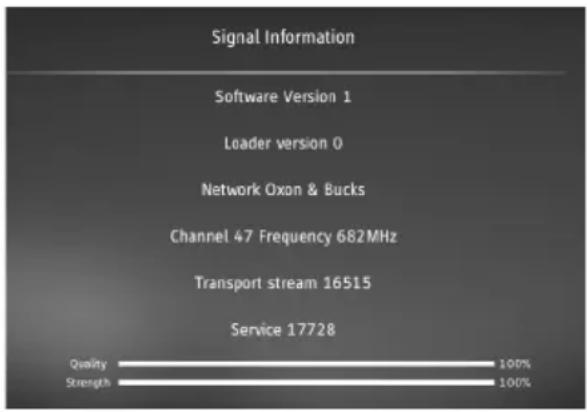
Allows you to view signal frequency, signal quality and signal strength.
Quality - How good the signal is.
Strength - How strong the signal is.
If the signal is strong, but the quality is low, there will be reception issues.
Analogue Tuning
When the source is changed to Analogue, the tuning menu will have the following options:
text_image
Signal Information Software Version 1 Loader version 0 Network Oxon & Bucks Channel 47 Frequency 682MHz Transport stream 16515 Service 17728 Quality 100% Strength 100%| Auto Scan Allow the set to | tune automatically into analogue stations. |
| Analogue Manual Tuning | Direct tuning of analogue stations. |
Satellite Tuning
When the source is changed to Satellite, the tuning menu will have the following options:
| Satellite Tuning: | |
| Antenna Setup Type of reception being received. | |
| Channel Type Allows only all channels, locked channels or free channels to be selected. Options are Free+Scramble, Scramble, Free | |
| Service Type All, Radio or DTV. | |
| Scan Mode Default, Network Scan or Blind Scan. | |
| Auto Tune Tunes the set automatically. | |
| Auto Update Channel List Enables the set to re-tune those channels already stored. | |
| HbbTV Allows interactive services using Digital TV broadcasting when connected to the internet. | |
| LCN Logical Channel Number. When turned on, digital stations will be in order. | |
| CI Information Pay per view services require a "Smartcard" to be inserted into the TV. If you subscribe to a pay per view service the provider will issue you with a 'CAM' and a "Smartcard". The 'CAM' can then be inserted into the COMMON INTERFACE PORT (CI Card In). | |
| Signal Information Will show the condition of the received satellite signal. | |
Note: If channels are tuned in on satellite, other tuning modes are not possible.
NETWORK MENU
Set up and control your network and internet access here.
There are two ways to connect to your local network, in most cases this will be the router used to connect to the internet.
text_image
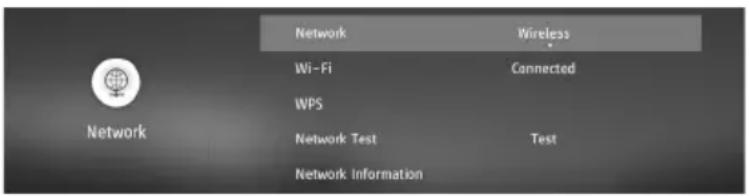
Network Wi-Fi WPS Network Test Network Information Wireless Connected TestThe following options are available for both Wi-Fi and wired connections in the 'Network' menu.
| Network Select the type of network connection – Ethernet (Cable) or Wi-Fi (Wireless). |
| Network Test Allows the network connectivity to be tested. |
| Network Information Gives information about your network. |
When Wi-Fi is selected, the options below are shown in the menu:
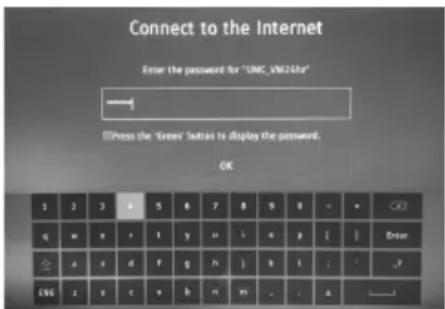
| Wi-Fi This advises the connection status of the Wi-Fi network. If [OK] ispressed, another menu opens which shows all Wi-Fi networks which the set can detect. Select the one which you want to connect to and press [OK].If the network is locked, the screen will now show a password entry screen with an on-screen keyboard.Select ‘Refresh’ to update list of available networks. |
Use the arrow buttons to select the character required.
Pressing the [GREEN] button will display the password; this is defaulted to show “*” for security.
Capitals are selected by pressing caps key

on the on-screen keyboard.
Special characters can be selected using “.,?” keyboard button.
Once password is entered, select Enter and press [OK]. Then select OK (on screen) and [OK] on remote. Tick appears next to network if connected.
text_image
Connect to the Internet Enter the password for "UNC_VN2.0ha" Press the 'Green' button to display the password. OK 1 2 3 4 5 6 7 8 9 10 - - + q w e r i y u i a p [ ] Enter a x d F g h ] k l : - .y UNC z a c v b m n . . aOn screen password entrykeyboard.
WPS: Select and press WPS button on router
| Push Button Method | Select and requests to press button on router |
| Generate Security PIN | Select and PIN generated for router. |
When Ethernet is selected, the options below are shown in the menu:
| Ethernet This advises the connection status of the wired (Ethernet) network. If [OK] is pressed, another menu opens which allows for the connection to an IPv4 or IPv6 wired network: |
NETWORK MENU
IPv4
| Auto This is also known as DHCP, use this setting to automatically set the IP address of your television via the router. |
| Manual Manually set press [OK] when on function and then use arrow keys to manually edit setting. |
| IP Set the IP address. |
| Netmask Set the Netmask address. |
| Gateway Set the Gateway address. |
| DNS Set the DNS address. |
| OK Press to enter options selected. |
| Disabled Disable IPv4. |
IPv6
| Auto This is also known as DHCP, use this setting to automatically set the IP address of your television via the router. | |
| Manual Press [OK] to edit, keypad is displayed to enter data. When fi nished select ‘enter’ and press [OK]. | |
| IP Set the IP address. | |
| Prefi x Adjust in the range 1 to 128 using the RIGHT/LEFT arrow buttons. | |
| Gateway Set the Gateway address. | |
| DNS Set the DNS address. | |
| OK Press to enter options selected. | |
| Disabled Disable IPv6. | |
TIME MENU
Any time related function can be set or seen here.
text_image
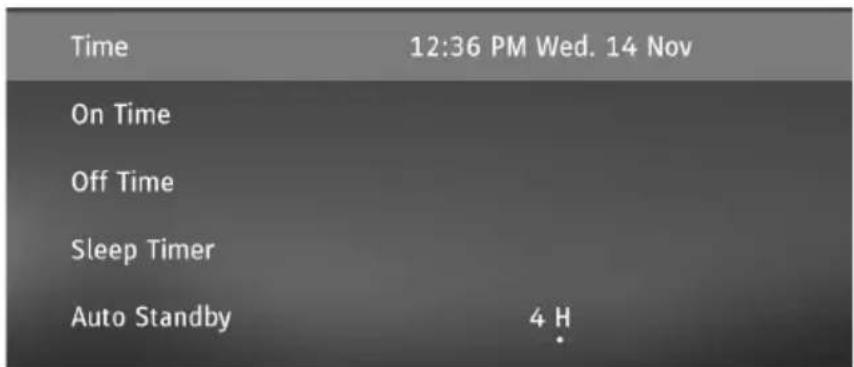
Time 12:36 PM Wed. 14 Nov On Time Off Time Sleep Timer Auto Standby 4 HWhen the time is selected using the [UP/DOWN] arrow buttons and [OK] is pressed, the following options appear:
| Time: | |
| Auto Sync Turn on to synchronise the time to the incoming digital television signal. If connected to the internet, the clock will be updated from here. Turn off to set the clock manually. | |
| Time Zone Adjustment of the time offset. Use the [UP/DOWN] arrow buttons on the remote control to change the setting. | |
| Daylight Savings Cannot be set in Freeview mode as this information is taken from the Freeview transmission. Allows 1 hour offset from GMT. | |
| On Time Allows you to set | a specifi c time for your TV to turn on, the channel it will then display, the source it will be on and also the volume. This function can then be toggled to repeat every day or a certain day. If your set is in standby and the on time is reached, it will turn on. | |
| On time Allows you to set | a specifi c time for your TV to turn on. Usearrow buttons to select the option and [OK] to set. | |
| Input Source Select the | source which the television should turn on anddisplay. | |
| Digital Channel Type Only applicable for DTV. TV, Radio or Data can be selected. | ||
| Channel Use the [RIGHT/LEFT] arrow buttons to select number. | ||
| Volume Sets volume which the set comes on at. | ||
| Off Time Allows you to set | a specifi c time for your TV to turn off. Use arrow buttonsto select the option and [OK] to set. | |
| Sleep Timer Lets you set the | sleep timer so the television automatically switches off aftera set amount of time. Options are; Off, 15min, 30min, 45min, 60min, 90min,120min or 240min. | |
| Auto standby | Controls the amount of time the set will continue to operate without anybuttons being pressed on the set or remote control before going intostandby. Options are OFF, 3 hours, 4 hours or 5 hours. | |
| OSD Timer | Lets you adjust the amount of time the on-screen Menu stays on beforedisappearing. Option are; Never, 10S, 20S, 30S or 60S. (S = Seconds.) | |
SYSTEM MENU
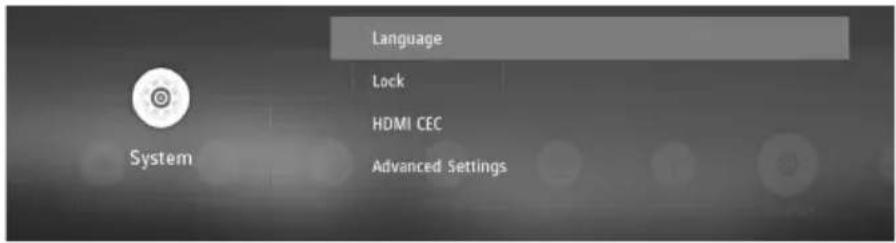
Set up system control options in this menu.
text_image
Language Lock HDMI CEC Advanced Settings SystemLanguage
Set your preferred languages.
| Menu Language Set the language used in the on-screen display, menus etc. | |
| Primary Audio Language Set | the audio track for Digital Television |
| Primary Subtitle Language Set | the on-screen subtitle language. |
Note: Only languages which are being transmitted can be selected.
Lock
| Lock Set the lock function on your set. | |
| Set Password Set the audio track for Digital Television | |
| Channel Lock Set the on-screen subtitle language. | |
| Parental Guidance Set the parental guidance level. | |
| The default password is “0000” |
HDMI CEC
Set up the HDMI functionality of the set
| CEC Control Turn on or off. | |
| Device Auto Power Off Enable | le automatic device power off when television turns off. |
| TV Auto Power On Enable te | levision turning on from standby when HDMI source powers up. |
| HDMI ARC Turn ARC function | ality on or off. ARC (Audio Return Channel) allows sound to be outputted via the HDMI connection. This can be fed into an audio device for an enhanced listening experience. |
| HDMI 2.0 Format Standard C | an only be selected when on HDMI input. |
| Detect Show list of connected | HDMI devices. |
Advanced Settings
| Source Re-name | You can re-name each source to your desired name. | |
| Expert Settings: | ||
| PVR & Time-shift Settings: | (PVR settings are only visible when USB stick is plugged in.) | |
| Disk | Displays the USB device. | |
| Select Partition Shows the partition being used. | ||
| Timeshift | Amount of memory allocated to time shifting – 512MB, 1GB, 2GB or 4GB. | |
| Format | Format the connected device. | |
| Speed Check | Check that the speed of the connected memory if okay. | |
| Hearing Impaired | Enhanced subtitles used if transmitted. | |
| Network Wake Up | Allows the set to turn on via network control. | |
| Store Mode | Turn the store mode on or off. Selecting this mode will disable the economy mode and bring up functions on specification on screen display after 30 seconds of use. | |
ABOUT TV
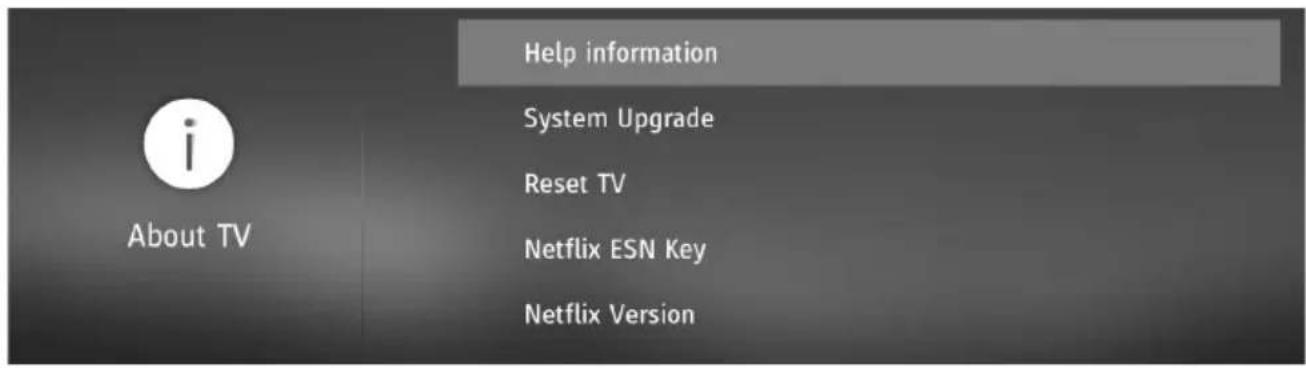
text_image
Help information System Upgrade Reset TV Netflix ESN Key Netflix Version| Help Information Shows the set name and software version. | |
| Model Model number of your set. | |
| Software Version Date of the software revision" to "Displays the software revision number and the date/time of revision. | |
| Helpline Tel. Number Your Sharp Helpline telephone number. | |
| Email Address Your Sharp Helpline email address. | |
| Website Sharp website. | |
| Online Manual View the online Operating Instructions. | |
| System Upgrade Allows you to update your set. | |
| Software Update (USB) Update the set | |
| OAD Initiate an Over Air Download | |
| OAD Scan Scan for an Over Air Download | |
| Internet Update Check Check for a network update. | |
| NetReady Information Net Ready allows control of OTA updates. | |
| Reset TV | Restore the television. |
| Netflix ESN Key | Shows the Netflix ESN Key code. |
| Netflix Version | Version of Netflix software. |
| Netflix Deactivate | Deactivate Netflix on this set. |
| Netflix Terminate | Delete Netflix login information on this set. |
| View End User Licence | Shows the End User Licence. |

MEDIA MENU
Select other input data source from this menu:

flowchart
graph TD
    A["Apps"] --> B["Settings"]
    B --> C["Media"]
    C --> D["Sources"]
    E["USB"] --> F["Miracast"]
    F --> G["Media Server"]
USB and Media Server
The USB media and the Media Server offer the playback of various different types of content that is either saved on your USB memory stick or external media server. (USB mode allows you to view/playback files from an external USB device and Media Server connects to your home network and can view/playback files from your compatible laptop, PC, tablets and smart phones).
When accessing the USB media or media server features the below menu screen will appear. The content will be divided into Photo, Music, Movie and All.
Note: If you experience a playback issue, please ensure the files being used are the correct format (example - the picture plays but no sound) See the 'Compatible fi le types for USB playback' section at the rear of these Operating Instructions.
1) You can navigate through the menus using the [ARROW BUTTONS] on the remote control, to confirm the item you wish to play/view press the [OK] button (the USB1 and USB2 options will only show when a USB stick is connected).
2) USB mode - Select the USB drive (If your drive only has 1 partition you will only see 1 item). Media Server - Select the external device that you would like to access. You can now access the item. Press [OK] to view.
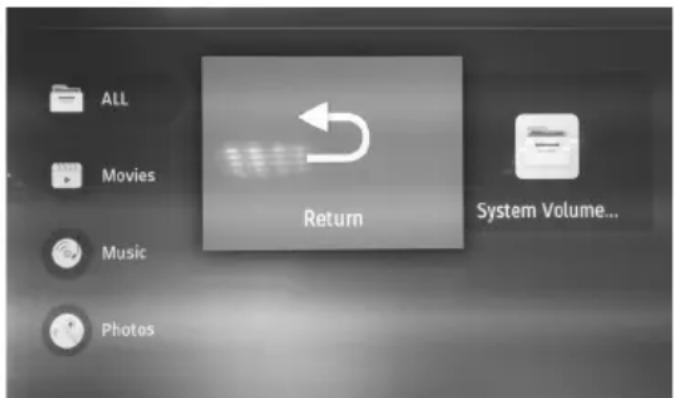
text_image
ALL Movies Music Photos Return System Volume...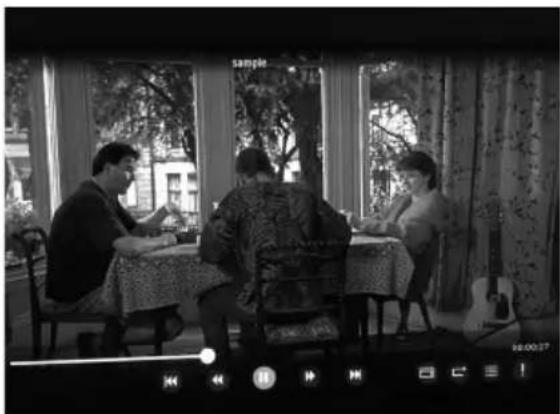
natural_image
Black-and-white photo of three people sitting at a table in a room with curtains and windows, no visible text or symbols3) Whilst viewing your media, you can control the item by using the remote control playback buttons or by pressing [INFO] you can access the on-screen playback menu, you can now make your selection by using the [ARROW BUTTONS] and [OK] buttons on the remote control.
Note: If you experience a playback issue, please ensure the files being used are the correct format (example - the picture plays but no sound). See compatible fi le types for USB/DLNA page for compatible fi le types.
Note: USB extension cables are not recommended as they can cause a reduction in picture/audio quality and stoppages during play back of USB content.
MEDIA MENU
Miracast (Screen mirroring)

text_image
Apps Settings Media Sources USB Miracast Media ServerTo access this menu, press [MENU] button on the remote control and scroll right. To select a sub menu press [OK]
If you wish to make changes to any of the default settings, use the scroll buttons. To confirm any settings press [OK] button. To exit this menu at any time, press [EXIT] button.
Although the TV has many of the most popular Apps preinstalled, the Miracast function allows almost unlimited Apps to be shown on the TV screen including many on demand videos, subscription based services and your favourite applications such as Emails and Facebook.
The Miracast (screen mirroring) feature allows you to connect to a compatible Smartphone, Tablet, PC or Laptop wirelessly and 'mirror' what is on your device onto the TV's screen.
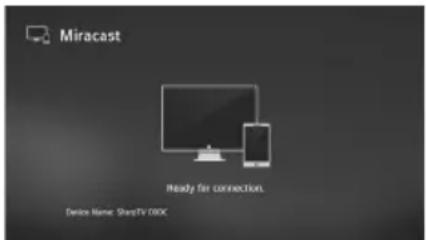
text_image
Miracast Ready for connection. Delek Name: SharpTV COOCSee below an example of a connection to a Laptop PC running Windows 10 that has built in Wireless Display.
For connection to other types of devices please refer to the instruction manual that came with your device.
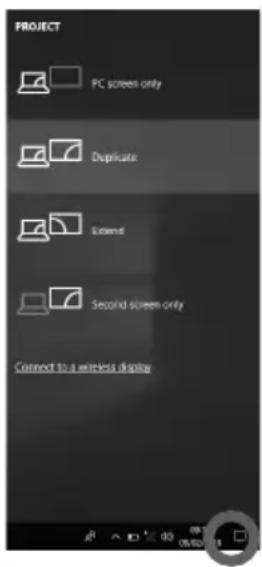
Click on the monitor icon (circled below) to access this feature.
text_image
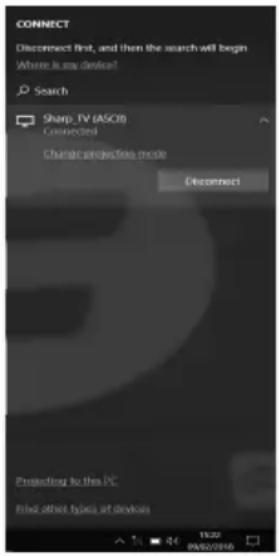
PROJECT PC screen only Duplicate Extend Second screen only Connect to a wireless displayOnce you're connected, you will see this screen on your Laptop/PC.
text_image
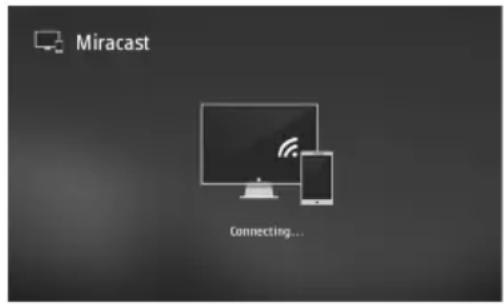
CONNECT Disconnect first, and then the search will begin Where is any device! Search Sharp. TV (ASCB) Connected Change projections mode Disconnect Projecting to the PC Filed other types of devicesOnce a successful connection is made, your TV will display this screen.
text_image
Miracast Connecting...Note: Many Android and Windows devices support screen mirroring. For Apple devices, you need a separate Apple TV box to allow screen mirroring onto non Apple products.
Note: If your smartphone or tablet does not include mirroring, it may be possible to connect a suitable cable from your device directly to one of the HDMI inputs on the rear of the TV. Suitable cables for your device should be available from a local electronics retailer.
7 DAY TV GUIDE AND CHANNEL LIST (Freeview Play)
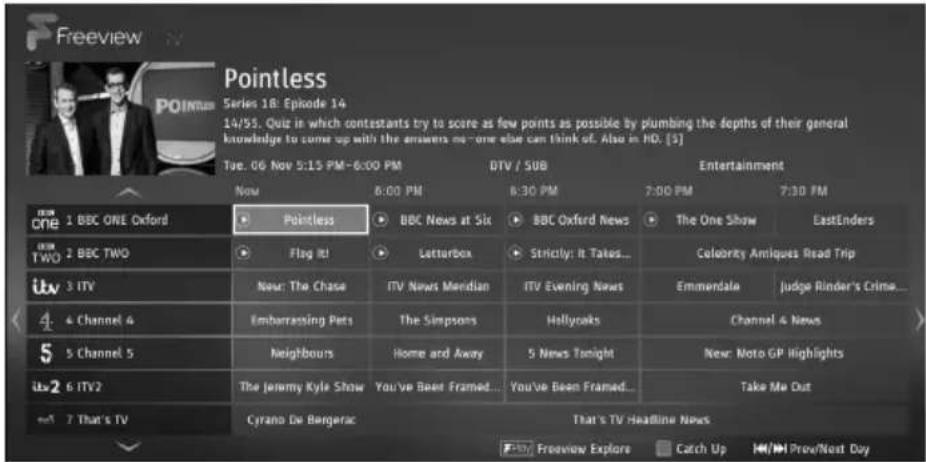
TV Guide is available in Saorview/Freeview TV mode. It provides information about forthcoming programmes (where supported by the Saorview/Freeview channel). You can view the start and end time of all programmes and on all channels for the next 7 days and set reminders.
1) Press the [TV GUIDE] button on the remote control and the following 7 Day TV Guide will appear:
text_image
Pointless Series 18: Episode 14 14/55. Quiz in which contestants try to score as few points as possible by plumbing the depths of their general knowledge to come up with the answers me-one else can think of. Also in HD: [5] Tue. 06 Nov 5:15 PM-6:00 PM DTV / SUB Entertainment Now 8:00 PM 8:30 PM 7:00 PM 7:30 PM now CME 1 BBC ONE Oxford Pointless BBC News at Six BBC Oxford News The One Show EastEnders 2 BBC TWO Flag It! Letterbox Strictly: It Takes... Coloorty Antiques Read Trip 3 ITV New: The Chase ITV News Mendian ITV Evening News Emmerdale Judge Rinder's Crime... 4 Channel 4 Embarrassing Pets The Simpsons Hollycaks Channel 4 News 5 Channel 5 Neighbours Home and Away 5 News Tonight New: Moto GP Highlights Itv2 6 ITV2 The Jeremy Kyle Show You've Been Framed... You've Been Framed... Take Me Out 7 That's ITV Cyrano De Bergerac That's TV Headline News Play Freeview Explore Catch Up HM/HP Prov/Nest Day
- To be recorded on Catch Up.

- Already recorded on Catch Up.
Catch Up is only applicable to sets with Freeview Play.
Note: Freeview HD channels found during tuning will be placed in channel positions above 100, for example, 101 - BBC 1 HD, 102 - BBC 2 HD etc.
2) Navigate through the menu using the [ARROW BUTTONS].
You can now:
Press [INFO] to view further information about the programme highlighted.
Press the [FREEVIEW PLAY] button to access the Freeview Play app. Refer to the 'Catch Up' menu page for further information.
Press the [INFO] button on a highlighted programme to use the record function. (Function for PVR models only, USB device must be connected):
3) Press [EXIT] to exit the 7 day TV Guide
Setting Recordings and Schedule Reminders
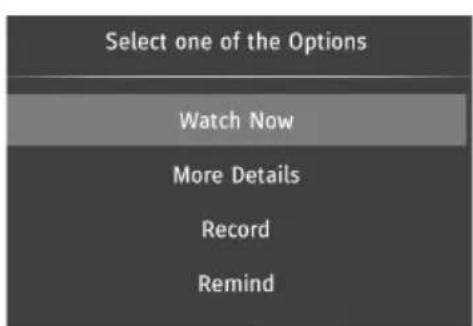
While in the Programme Guide, it is possible to Record a programme or set a reminder. Use the arrow keys on the remote control to select the programme you would like to record or set a reminder for and then press the [OK] button. This will bring up the menu as shown below:
text_image
Select one of the Options Watch Now More Details Record Remind| Watch Now Only applicable | when the play symbol shows up, will play back via the on-demand player. |
| More Details View further | information about the programme highlighted. |
| Record Will allow you to set a recording for this time. | |
| Reminder Will allow you to set a reminder for this time. | |
Watch now will only appear if the symbol

appears on the programme name. This means that it has
already been recorded by an on-demand player. When selected the programme will playback using the on-demand player for the channel.
To Record a Television Programme
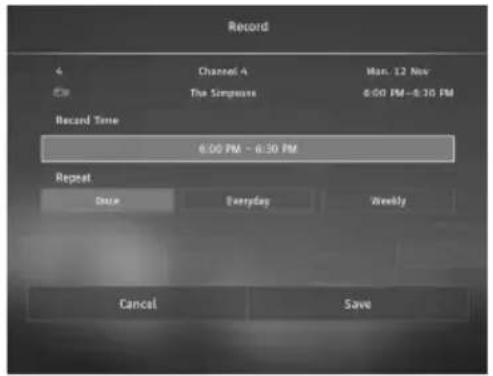
To record a programme, select 'Record' and the display will change as shown on the right. This allows for the time and frequency of the recording to be set as desired. Once adjustments to the time and frequency have been set, save the instruction. This will now appear in the schedule list as a recording to be made.
If a current programme is set for recording, the start time will be set a minute in the future to allow settings to be made and saved.
To Set a Reminder for a Television Programme
To set a reminder, select "Remind" and the display will change as shown on the right. This allows for the time and frequency of the reminder to be set as desired. Once adjustments to the time and frequency have been set, save the instruction. This will now appear in the schedule list as reminder
Reminders cannot be set for programmes currently being transmitted.
To view the list of scheduled reminders got to Quick Settings and select Schedule List, the screen to the right will be shown. This will indicate which reminders have been set and when. Press the [MENU] button to edit.
text_image
Record 4 Channel A Mon. 12 Nov 5th The Surprise 6:00 PM - 6:30 PM Record Time 6:00 PM - 6:30 PM Repeat Date Everyday Weekly Cancel Save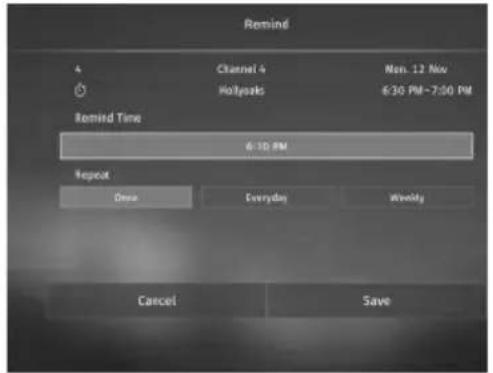
text_image
Remind A Channel 4 Mon. 12 Nov Hotspots 6:30 PM~7:30 PM Remind Time 6:10 PM Repeat Once Everyday Weekly Cancel Save
text_image
Schedule List 4 Channel 6 The Singamas Stop Wed. 14 Nov 12:30 AM 5 Channel 9 Just in Time For Christmas Everyday Wed. 14 Nov 2:15 PM 1 BBC ONE Oxford Wet. 14 Nov BBC Oxford News wperty 6:30 PM WHOD EditNon-Freeview Play 7 Day Guide
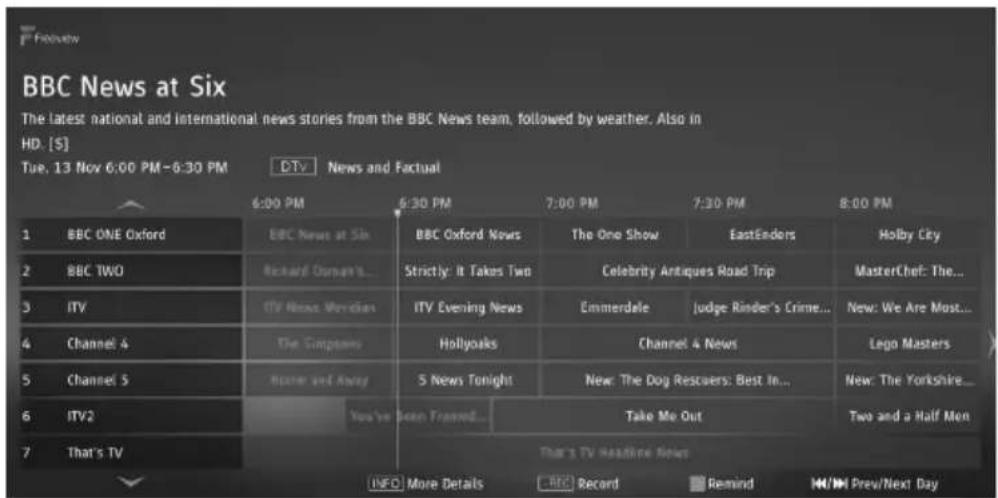
Non-Freeview Play models will display the Programme Guide as shown below.
text_image
BBC News at Six The latest national and international news stories from the BBC News team, followed by weather. Also in HD. [S] Tue, 13 Nov 6:00 PM - 6:30 PM DTV News and Factual 6:00 PM 6:30 PM 7:00 PM 7:30 PM 8:00 PM 1 BBC ONE Oxford BBC News at Six BBC Oxford News The One Show EastEnders Holly City 2 BBC TWO Richard Oursan's Strictly: It Takes Two Celebrity Antiques Road Trip MasterChef: The... 3 ITV ITV News Version ITV Evening News Emmerdale Judge Rinder's Crime... New: We Are Most... 4 Channel 4 The Companies Hollyoaks Channel & News Lego Masters 5 Channel 5 Home and Away S News Tonight New: The Dog Rescuers: Best In... New: The Yorkshire... 6 ITV2 You've Been Framed Take Me Out Two and a Half Men 7 That's TV That's TV Headline News INFO More Details BBC Record Remind HM/HP Prev/Next DayNote: Record functions are only applicable to sets with a built in USB Record/PVR function.
Note: When the TV set is on, a reminder message will be displayed informing you that a programme is about to start. If the set is in standby, then it will turn on at the reminder time.
Note: When recording in standby mode, the set will not turn on. While recording in standby, the light on the front of the set will flash.
FREEVIEW PLAY APP
Only applicable to sets with Freeview Play.
text_image
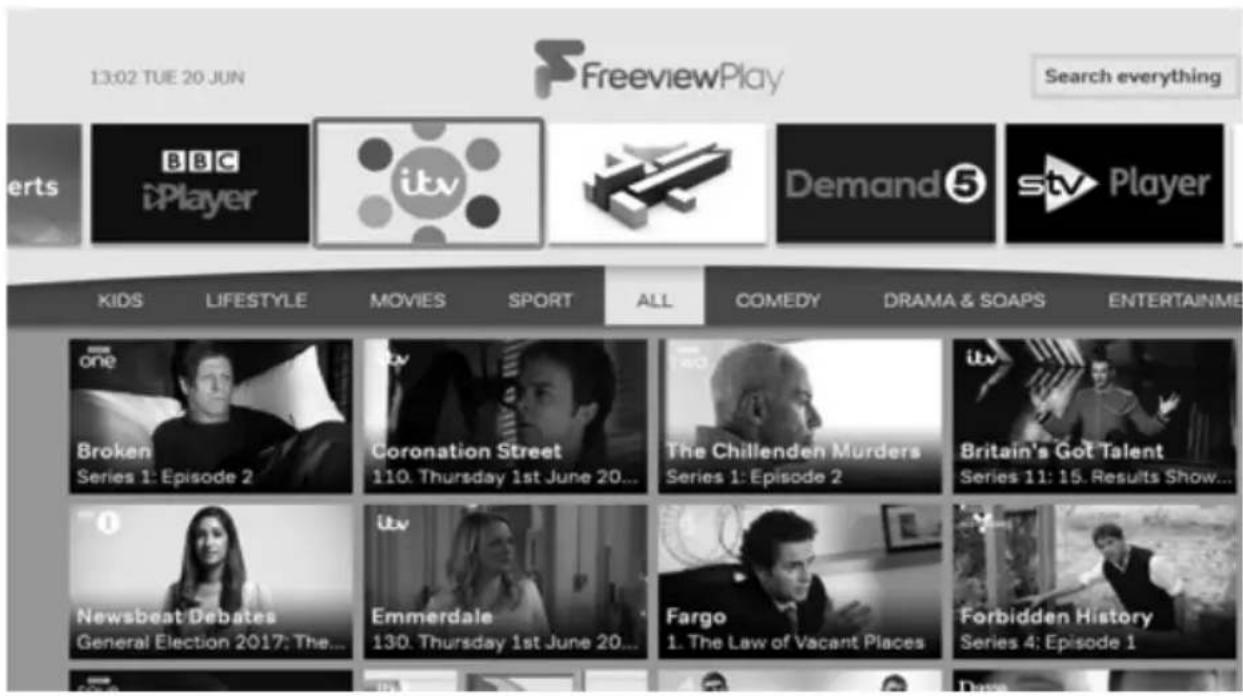
13:02 TUE 20 JUN FreeviewPlay Search everything erts BBC iPlayer itv Demand 5 stv Player KIDS LIFESTYLE MOVIES SPORT ALL COMEDY DRAMA & SOAP'S ENTERTAINME one Broken Series 1: Episode 2 Coronation Street 110. Thursday 1st June 20... The Chillenden Murders Series 1: Episode 2 Britain's Got Talent Series 11: 15. Results Show... Newsbeat Debates General Election 2017: The... Itv Emmerdale 130. Thursday 1st June 20... Fargo 1. The Law of Vacant Places Forbidden History Series 4: Episode 1When in the Freeview Play application, it is possible to search for a programme by name. Choose the "Search everything" option and then use the on-screen keyboard to type in the programme name. As you type, selections will appear. Select one of these options to start watching.
Note: To use the full functionality of Freeview Play your set must be connected to the internet.
Freeview Play brings together live TV viewing with "catch up" TV services from broadcasters such as BBC, ITV, Channel 4 and Channel 5. The Freeview Play Explore app features a carousel of genres to select from when searching for programmes, such as sport, comedy, dramas & soaps, etc. Content is made up from recommendations of the major broadcasters and offers an alternative means of searching.
To access Freeview Play simply press the [FREEVIEW PLAY] button on your remote control (fi g1). Freeview Play can also be accessed via the '7 Day TV guide' menu and the 'Apps' menu. When you first access Freeview Play you will need to accept the Terms of use simply select 'OK' to confirm. Once selected the Freeview Play on demand apps will appear on the screen. Use the buttons on the remote control to select your chosen app and press OK.
Note: Some apps require additional registration, this is a simple process and it will inform you of the correct website to visit to complete the registration.
Areas receiving Saorview transmissions will not support Freeview Play or Freeview Play services.
text_image
F AQUOS 1 2 3 NETFLIXPicture is for illustration only, actual remote control may be different.
CATCH UP TV Only applicable to sets with Freeview Play.
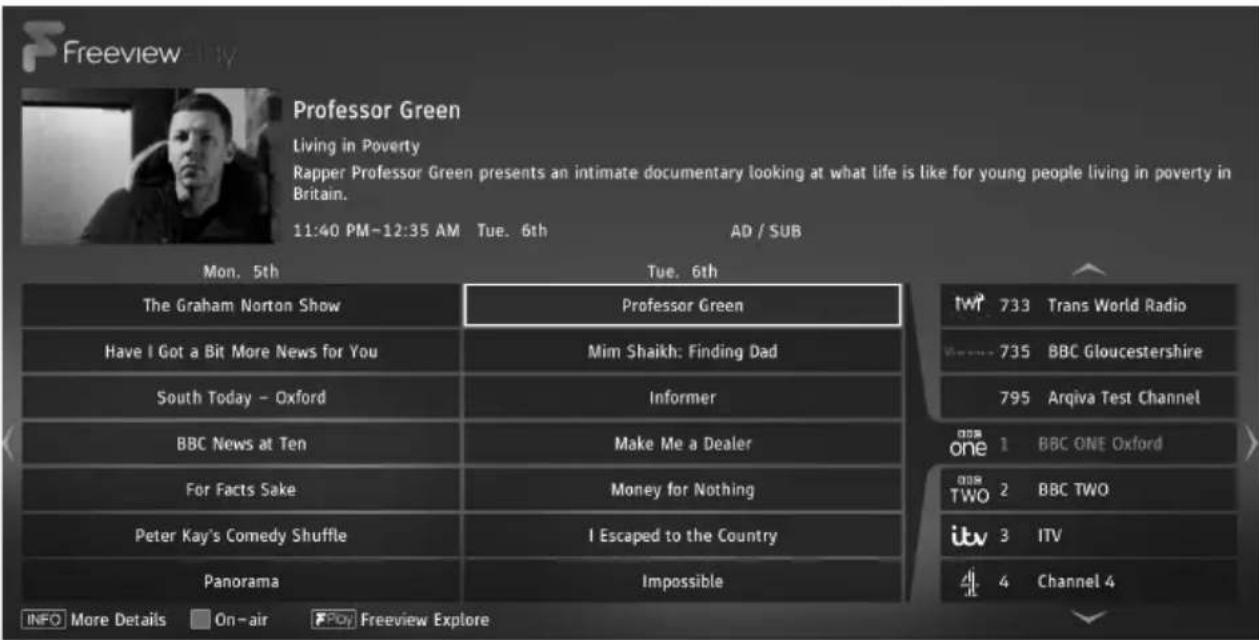
The 'Catch Up' menu allows you to access available programmes from the last 7 days, that you may have missed.
The 'Catch Up' menu will show programmes, by day, in the order that they were broadcast (descending in time order).
On the right there is a channel list, move through this to see the programmes applicable to that channel. View more information on the highlighted programme by pressing the [INFO] button.
Note: Areas receiving Saorview transmissions will not support catch up services.
1) To access the 'Catch Up' menu, first you will need to access the 7 day TV guide, access this by pressing the [TV GUIDE] button on the remote control, when the 7 day TV guide appears press the [RED] button or scroll left to access the catch up menu screen
2) You can navigate through the menu using the [ARROW BUTTONS] on the remote control.
To play a highlighted programme simply press [OK] on the remote control. By pressing [BACK] or [EXIT] on the remote control will take you back to the 'Catch Up' menu. Pressing [BACK] or [EXIT] again takes you out of the programme guide and back to standard TV.
Whilst in the 'Catch Up' menu you can also
- Access the Freeview play app by pressing the [FREEVIEW PLAY] button.
- Access the 7 day TV guide by pressing the [RED] button.
3) Press [EXIT] to exit the 'Catch Up' menu
text_image
Freeview Professor Green Living in Poverty Rapper Professor Green presents an intimate documentary looking at what life is like for young people living in poverty in Britain. 11:40 PM-12:35 AM Tue. 6th AD / SUB Mon. 5th Tue. 6th The Graham Norton Show Professor Green Have I Got a Bit More News for You Mim Shaikh: Finding Dad South Today - Oxford Informer BBC News at Ten Make Me a Dealer For Facts Sake Money for Nothing Peter Kay's Comedy Shuffle I Escaped to the Country Panorama Impossible INFO More Details On-air FPO Freeview Explore TVI 733 Trans World Radio 735 BBC Gloucestershire 795 Arqiva Test Channel one 1 BBC ONE Oxford 2 BBC TWO 3 ITV 4 Channel 4CHANNEL LIST
To activate the channel list, press the [OK] button on the remote control when on a DTV channel. This allows you to quickly select a channel to watch – select the desired channel by using the up and down arrows or the Channel +/- buttons on the remote control. Press [OK] to watch.
While in this menu the following two options can be selected.
| Filter Channels; press [INFO] This allows you to fi Iter the channels shown in the channel list by type. Select from All, Favorites TV, HD, Data or Radio | |
| Edit Channels; press [MENU] Entering this function allows you add channels to your favorite list, skip or delete channels. Use the arrow buttons to select the option. | |
| Favorite Add a channel to your favorite list by pressing [OK] when on the desired channel. Press again to remove from favorite list. Favorites can be selected in normal Digital Television mode by pressing the [FAV] button. | |
| Skip When in the Digital Television mode, and using the Channel +/- buttons, the selected channel will be skipped. Select a channel to be skipped by pressing the [OK] button, to deselect press the [OK] button again. | |
| Delete Permanently delete channel. Can only be recovered by retuning. To select a channel for deletion, press the [OK] button. | |
| Lock Will only appear when lock is enabled in lock menu. Locks the channel that you are on. |
Note: If channels are moved or deleted, any settings made to record on that channel will not work.
USB RECORDING (FREEVIEW AND SAORVIEW ONLY)
The USB Record/PVR function is only available in Freeview/Saorview mode and only when used in conjunction with a compatible USB memory stick or USB hard drive. The benefits of this are as follows:
- Pause live TV and then playback, rewind and fast forward (up to live TV).
- One button record, if you decide you want to record the current programme.
- Easy recording from the 7 Day TV Guide.
Due to the nature of the product, it is necessary to use a high-speed USB memory stick (as the TV reads from and writes to the memory stick at the same time, some memory sticks may not be suitable).
You can purchase high speed memory sticks from some computer stores, alternatively, we have a selection of tested and compatible memory sticks available to purchase directly from the Helpline/website.
Recommended Minimum Specification - USB Memory Stick
| Read Speed 20 Mb/s (Megabits Per Second) If you wish to use a USB portable hard drive larger than 32GB, please refer to the FAQ section at the rear of this user guide. | |
| Write Speed 6 Mb/s (Megabits Per Second) | |
Pause Live TV (Time Shift)
A USB memory stick/hard drive must be connected to the TV in order to use this feature.
- Press the [PLAY/PAUSE] button and the television will pause and the live content will be recorded. To resume watching press [PLAY/PAUSE] again.
- Press [FAST FORWARD] to go forward in a recording.
- Press [FAST REWIND] to go back in a recording.
Note: When you switch the TV to standby or change channel the 'Time Shift' memory is wiped. To restart time shift you must press [PLAY/PAUSE] button.
Note: If channels are moved or deleted, then the USB Record/PVR will not function correctly.
Note: This television contains one TV tuner, therefore it can only record the channel you are watching or record one channel while the television is in standby mode.
Note: USB Record/PVR record function is only available in Digital/Freeview TV mode. Due to copyright laws and illegal copying/recording it is not possible to record to/from any other input/output source.
Note: Recorded content can only be played back on the device that recorded it. It is not permitted (or possible) to watch content recorded on the TV from Freeview/Saorview on another device.
One Button Record
At any point in time you may decide to record the current programme that you are watching. To do this you need to press the red record button on the remote control.
natural_image
Close-up of a media control interface with playback buttons and a circular overlay (no readable text or symbols)Note: Record functions are only applicable to sets with the built in USB Record/PVR function.
SOURCE MENU

text_image
Apps Settings Media Sources Digital TV DVB-S HDMI1 HDMI2 HDMI3 Component AV Analogue| Digital TV Select this input to watch Digital Television from your local transmitter. The set must be tuned into watch programmes. Refer to the ‘Channel’ menu section of these Operating Instructions for information on how to tune your set into digital channels. | |
| DVB-S Satellite tuner input. If a satellite aerial is connected and the set tuned to these channels, select this input to view them. | |
| HDMI 1 First HDMI input. | |
| HDMI 2 Second HDMI input. | |
| HDMI 3 Third HDMI input. | |
| Component Y/Pb/Pr input. Audio is connected to the set via the AV input connector. | |
| SCART SCART input connectivity. | |
| AV Component input. Audio is connected to the set via the AV input connector. | |
| Analogue Analogue tuner input. |
| Note: Inputs may vary depending on your television specifi cation. |
| Note: If the inputs have been renamed, they will not appear as shown above. |
CONNECTIONS
Note: The TV input/output connections and connecting cables on these pages are shown for reference. Cables are available separately from your retailer. Not all connections are available on all TV models.
Connecting to a device with Composite AV/Video output
TV source should be set to Composite/AV
Connection example TV models with Mini-AV input
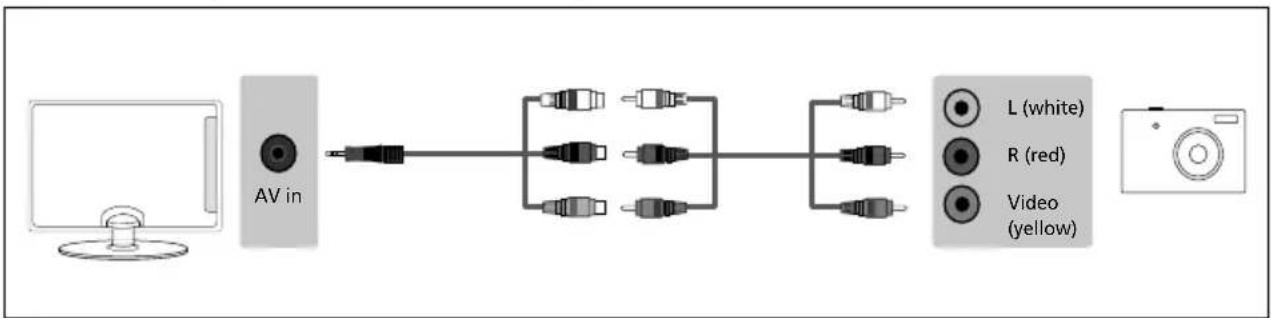
flowchart
graph LR
    A["Computer"] --> B["AV in"]
    B --> C["Connector"]
    C --> D["Connector"]
    D --> E["Connector"]
    E --> F["Connector"]
    F --> G["L (white)"]
    F --> H["R (red)"]
    F --> I["Video (yellow)"]
Connection example for TV models with AV input
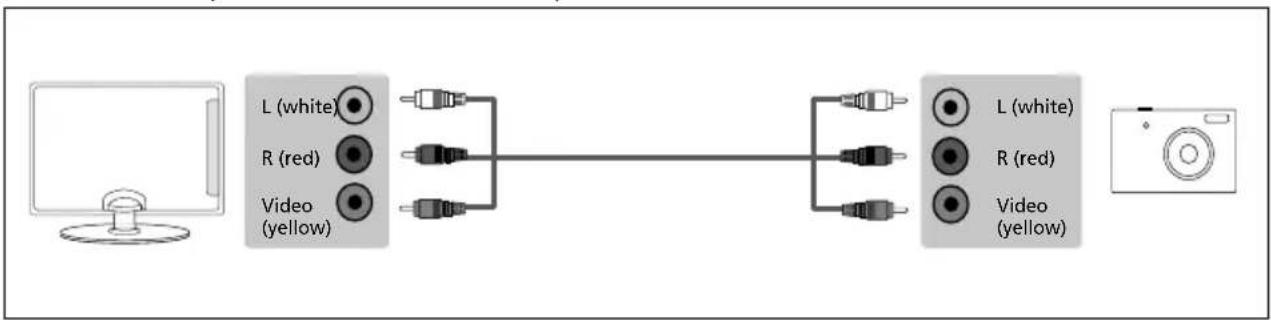
flowchart
graph LR
    A["Computer"] --> B["L (white)"]
    A --> C["R (red)"]
    A --> D["Video (yellow)"]
    B --> E["Audio"]
    C --> F["Audio"]
    D --> G["Audio"]
    E --> H["L (white)"]
    E --> I["R (red)"]
    E --> J["Video (yellow)"]
    G --> K["Audio"]
Connecting to a device with SCART output
TV source should be set to SCART
Connection example for TV models with SCART input
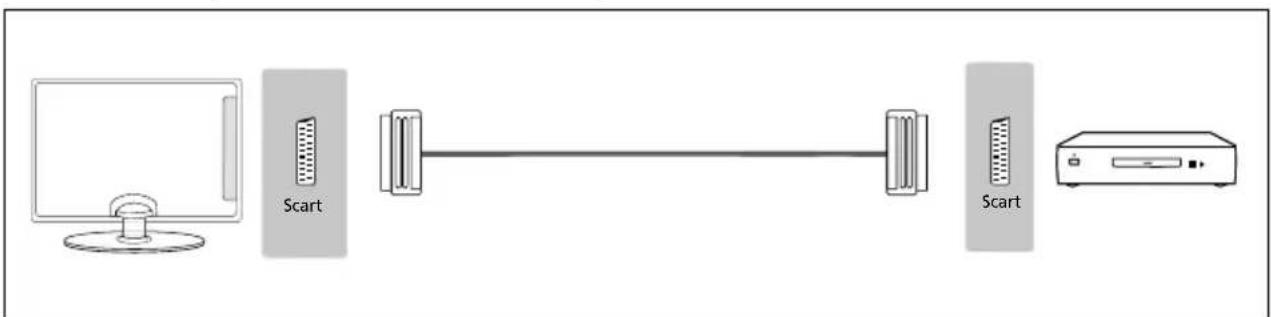
flowchart
graph LR
    A["Computer"] --> B["Scart"]
    B --> C["Switch"]
    C --> D["Scart"]
Connection example for TV models with Mini-AV input (1)
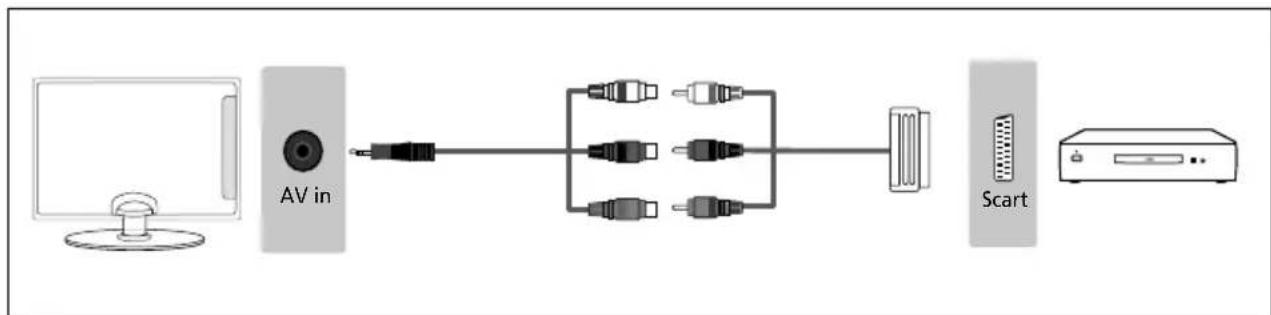
flowchart
graph LR
    A["Computer"] --> B["AV in"]
    B --> C["Switch"]
    C --> D["Scart"]
    D --> E["Output Unit"]
CONNECTIONS
Connection example for TV models with Mini-AV input (2)
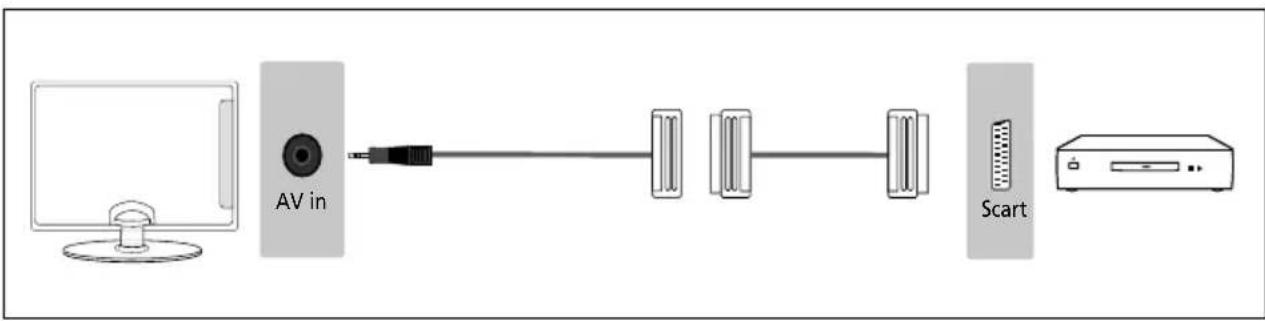
flowchart
graph LR
    A["Computer"] --> B["AV in"]
    B --> C["Server 1"]
    C --> D["Server 2"]
    D --> E["Scart"]
    E --> F["Printer"]
Connection example for TV models with L/R Audio and Video inputs
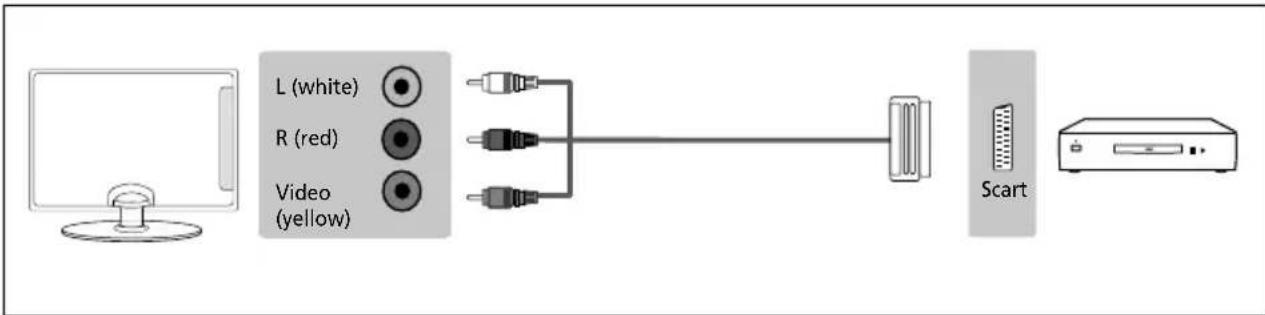
flowchart
graph LR
    A["Computer"] --> B["L (white)"]
    A --> C["R (red)"]
    A --> D["Video (yellow)"]
    B --> E["Switch"]
    C --> E
    D --> E
    E --> F["Scart"]
Connecting to a device with Component/YPbPr output
If you are supplied with a cable from the device which has RED, GREEN, BLUE, RED & WHITE connectors you must connect via Component (for picture) and by Phono cable (for sound). TV source should be set to Component/YPbPr
Connection example for TV models with Mini-YPbPr and Mini-AV inputs
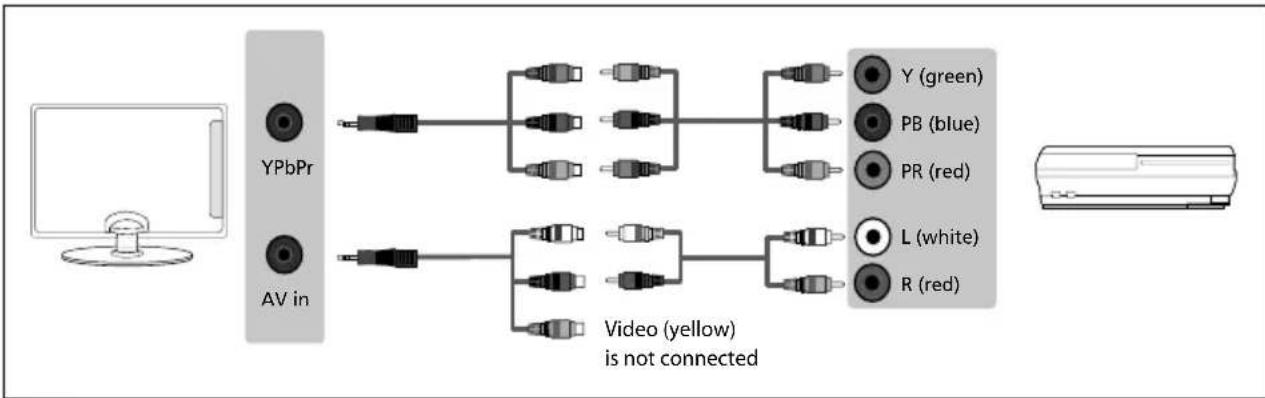
flowchart
graph LR
    A["Computer"] --> B["YPbPr"]
    A --> C["AV in"]
    B --> D["Video (yellow) is not connected"]
    C --> D
    D --> E["Y (green)"]
    D --> F["PB (blue)"]
    D --> G["PR (red)"]
    D --> H["L (white)"]
    D --> I["R (red)"]
Connection example for TV models with Mini-YPbPr and L/R audio inputs
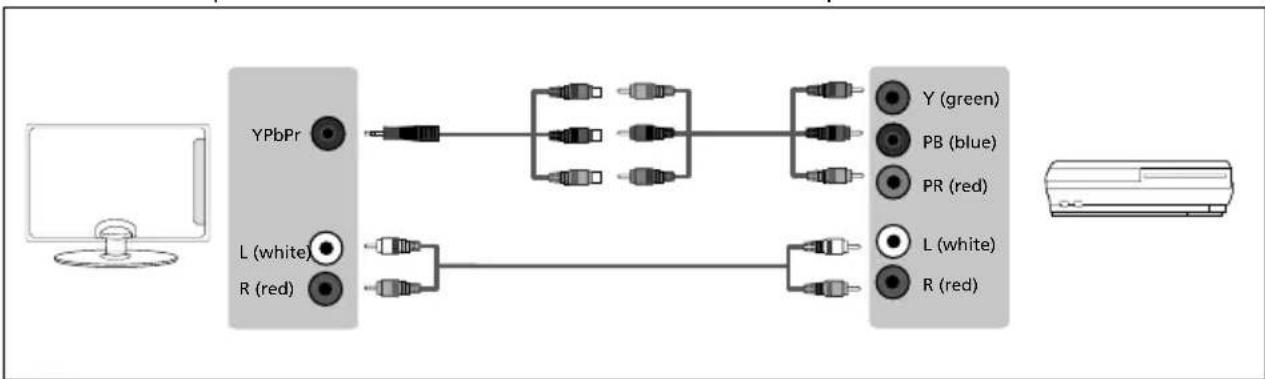
flowchart
graph LR
    A["Computer"] --> B["YPbPr"]
    A --> C["L (white)"]
    A --> D["R (red)"]
    B --> E["Switch"]
    C --> F["Switch"]
    D --> G["Switch"]
    E --> H["Resistor 1"]
    E --> I["Resistor 2"]
    E --> J["Resistor 3"]
    E --> K["Resistor 4"]
    F --> L["Resistor 5"]
    F --> M["Resistor 6"]
    F --> N["Resistor 7"]
    G --> O["Resistor 8"]
    H --> P["Y (green)"]
    I --> Q["PB (blue)"]
    J --> R["PR (red)"]
    K --> S["L (white)"]
    L --> T["R (red)"]
CONNECTIONS
Connection example for TV models with YPbPr and L/R Audio inputs
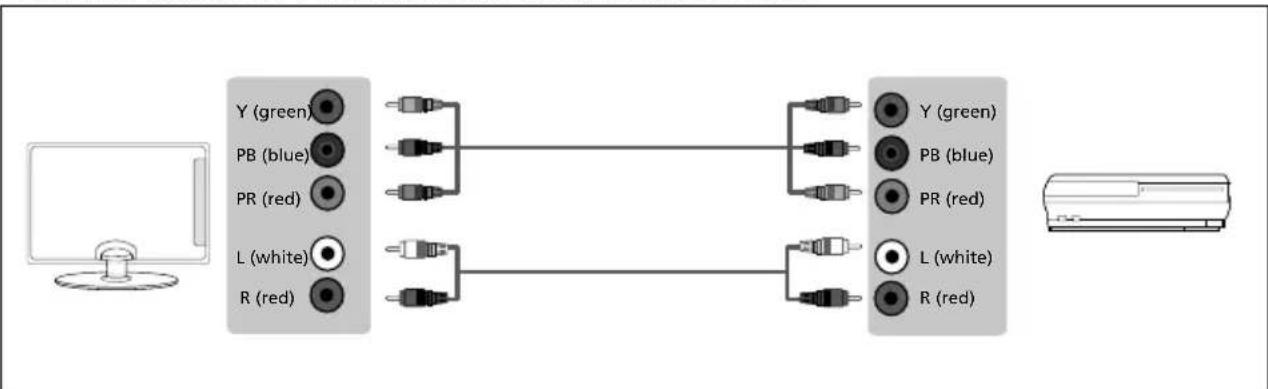
flowchart
graph LR
    A["Computer"] --> B["Y (green)"]
    A --> C["PB (blue)"]
    A --> D["PR (red)"]
    A --> E["L (white)"]
    A --> F["R (red)"]
    B --> G["Switch"]
    C --> H["Switch"]
    D --> I["Switch"]
    E --> J["Switch"]
    F --> K["Switch"]
    G --> L["Output"]
    H --> L
    I --> L
    J --> L
    K --> L
Connection example for TV models with YPbPr and Mini-AV inputs
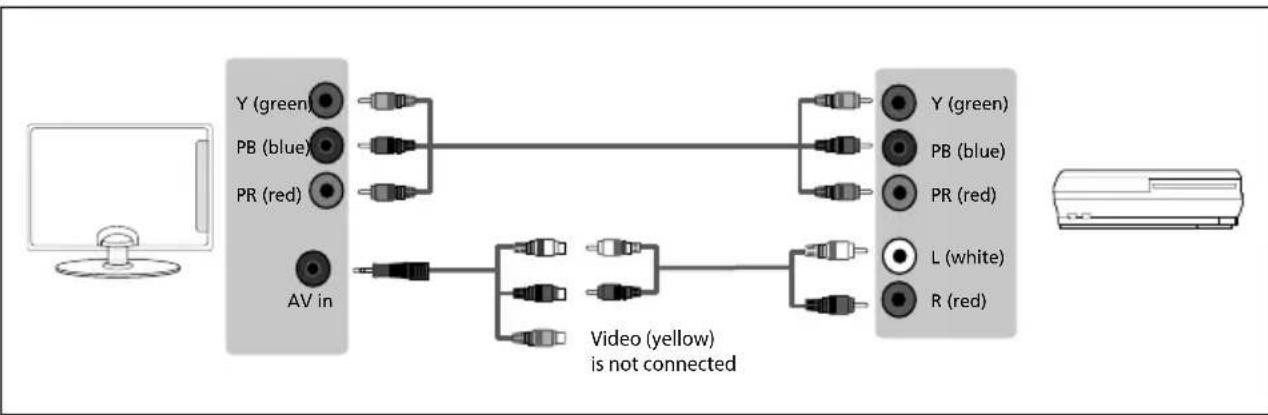
flowchart
graph LR
    A["Computer"] --> B["AV in"]
    B --> C["Video (yellow) is not connected"]
    C --> D["Radio"]
    D --> E["Y (green)"]
    D --> F["PB (blue)"]
    D --> G["PR (red)"]
    D --> H["L (white)"]
    D --> I["R (red)"]
    B --> J["Radio"]
    C --> K["Video"]
Connecting to an external audio device (Amplifi er, Surround Sound, Sound Bars etc)
When connecting via the TV's 3.5mm earphone output, this will disable the TV speakers.
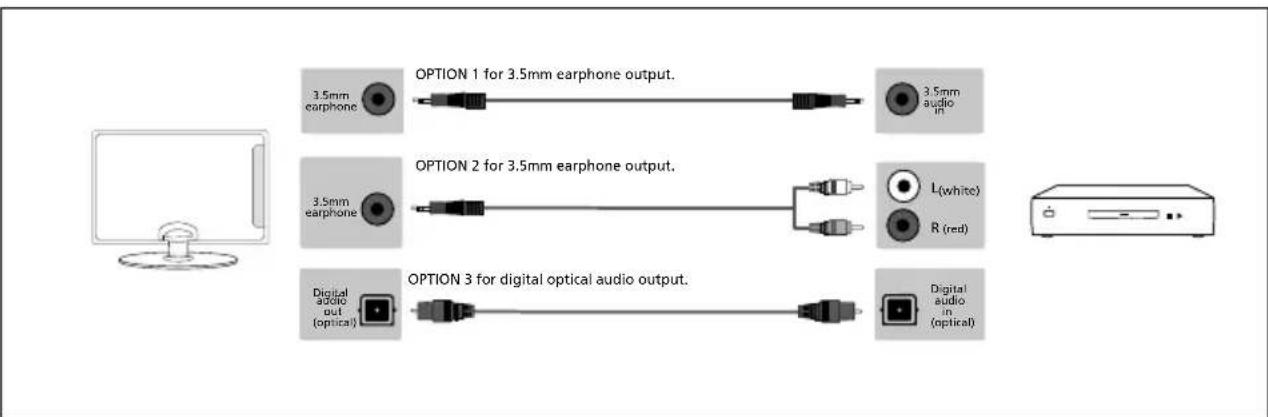
flowchart
graph LR
    A["Computer monitor"] --> B["3.5mm earphone"]
    B --> C["OPTION 1 for 3.5mm earphone output."]
    B --> D["OPTION 2 for 3.5mm earphone output."]
    B --> E["OPTION 3 for digital optical audio output."]
    E --> F["Digital audio out (optical)"]
    C --> G["3.5mm audio in"]
    D --> H["L(white)"]
    D --> I["R(red)"]
    F --> J["Digital audio in (optical)"]
Note: When connecting an external audio device to the TV, set the TV volume to a higher than normal level, you will then be able to use your device remote control to adjust the volume of the connected device to suit your requirements.
CONNECTIONS
Connecting to a device with HDMI output
A HDMI cable can output both video and audio and enables you to enjoy digital-quality video and audio with minimal loss of quality.
TV source should be set to the corresponding HDMI port (HDMI 1, HDMI 2 etc)
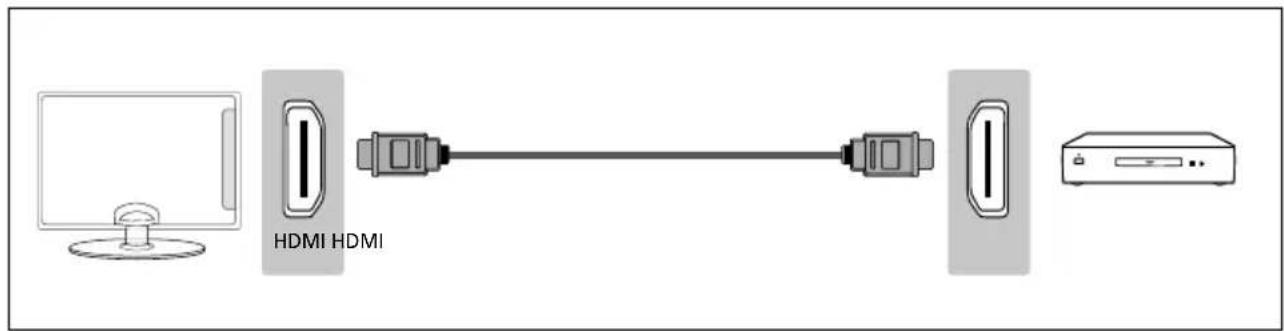
text_image
HDMI HDMIConnecting to a device with RF output (CCTV or other Analogue devices)
TV source should be set to ATV/Analogue TV.
Note: You will need to manually tune your device into an analogue channel.
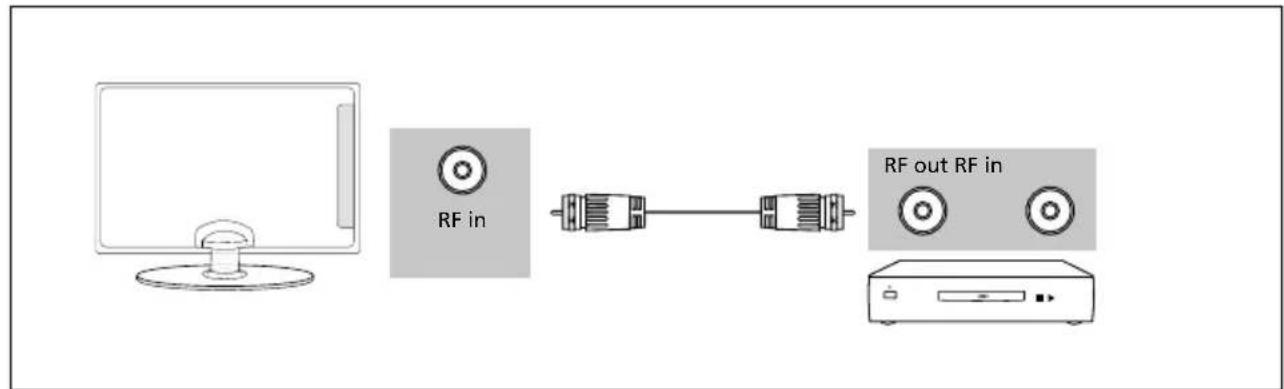
flowchart
graph LR
    A["Computer monitor"] --> B["RF in"]
    B --> C["Internal component with connector"]
    C --> D["RF out RF in"]
Connecting an Ethernet/Network cable
The Ethernet port is used only for Pay TV services and Freeview HD (Freeview services are only available in the UK). It is not intended for internet use.
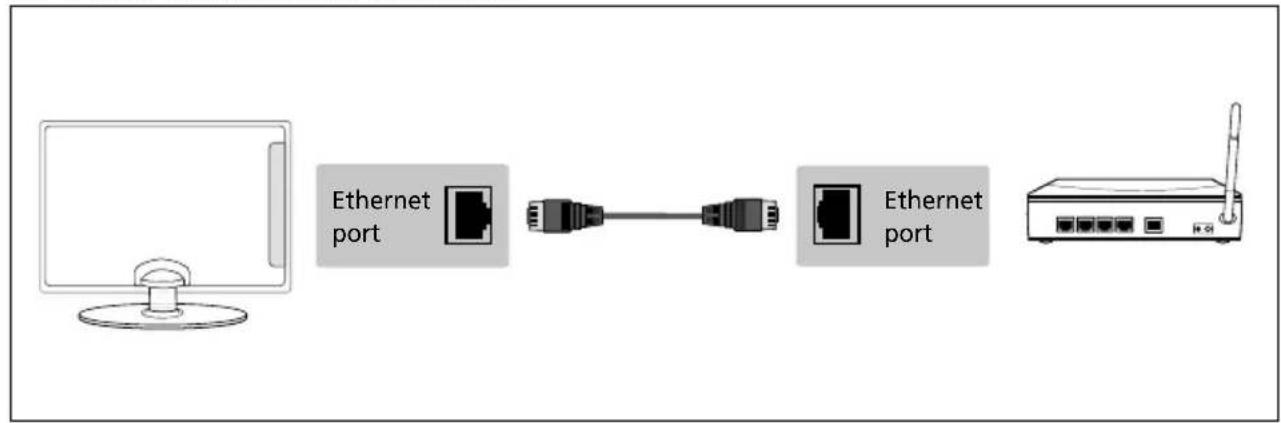
flowchart
graph LR
    A["Computer monitor"] --> B["Ethernet port"]
    B --> C["Switch"]
    C --> D["Ethernet port"]
    D --> E["Router"]
CONNECTIONS
Connecting to a USB device
To use the USB input, TV source should be set to USB Media.
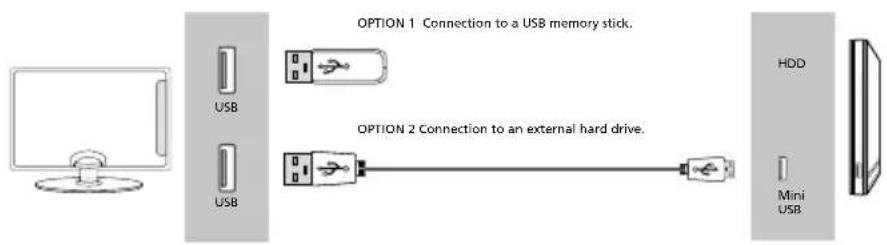
text_image
OPTION 1 Connection to a USB memory stick. OPTION 2 Connection to an external hard drive. HDD Mini USBNote: Tablets and/or phones can be charged via the USB port, however, it's not possible to play back media from these devices.
Note: Some USB devices may need to be connected to an external power supply before being used with this input, i.e. powered hard drive.
Connecting the TV to Earphones
When connecting via the TV's 3.5mm earphone output, this will disable the TV speakers.
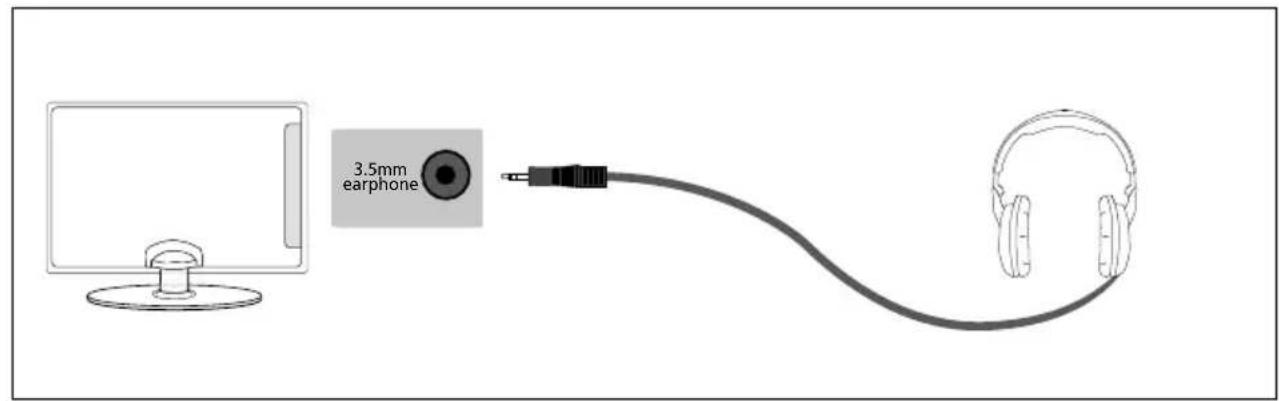
text_image
3.5mm earphoneTROUBLESHOOTING GUIDE
| General I would like to | have louder sound by connecting additional speakers or a Soundbar. | 1) Use either the 3.5mm headphone output on the TV and a 3.5mm to phono cable (available separately) to connect to an amplifi er/surround sound/soundbar. Please note this will deactivate the TV's built in speakers. or:2) Connect a digital optical audio cable from the TV's digital optical audio output to your amplifi er/surround sound/soundbar digital optical audio input. |
| General Why are some | options in the menu unavailable and greyed out. | Some options are only available in certain inputs/sources, i.e. HDMI. They are unavailable in the other sources where they have no effect. |
| General Can I stop my TV | automatically turning off after 4hrs? | Yes, in the 'Time' menu settings, scroll down to Auto Standby and select OFF. |
| TV I have tuned in Digital TV but I am not receiving any or all of the channels and/or the channels I receive are breaking up. | 1) Check you are in an area that can receive Freeview/Saorview, visit www.freeview.co.uk or www.saorview.ie2) Check you are using an aerial that is able to receive a good digital signal. In most cases, you will need an outdoor digital hi-gain/wideband aerial. In areas that have excellent digital coverage, you may be able to use a loft type aerial but it is highly likely that you will also need to connect a booster between the back of the TV and the TV aerial wall socket. Unfortunately, to receive a good enough digital signal, it is not possible to use a portable/ indoor type aerial. | |
| TV I have re-tuned my | television but when I switch it off it is not storing the channels. | If the TV does not save the channels when you power it off, it's likely the channel database has become corrupt.1) Turn off the TV.2) Remove the RF/Aerial cable from the rear of the TV and then turn the TV back on again.3) Using the remote control, press [MENU] followed by 8-8-8-8 to enter the initial setup/fi rst time installation menu.4) Press OK (let the TV run the full tuning process).5) Once completed, turn off the TV, reconnect the RF/Aerial cable then turn the TV back on again.6) Repeat steps 3 & 4. |
| VCR/DVD Recorder | I have connected the TV to my VCR or DVD Recorder via SCART but it is not recording. | In addition to connecting via SCART, you should connect the aerial cable from the wall socket to your VCR/DVD Recorder and another aerial cable from the VCR/DVD Recorder to the TV. |
| Game Consoles I have | connected my Playstation/Xbox to the TV via HDMI, but I am not receiving any pictures or sound on my Television. | 1) Ensure the TVs' source is set to HDMI.2) Check your settings on your Playstation/Xbox are as per the Playstation/ Xbox instruction manual. |
| Game Consoles I have | connected my Playstation/Xbox to the TV via Component cables (red, green & blue) but I am not receiving any sound. | Component cables only provide HD pictures. For the sound you will need to connect the red & white audio cables on the Playstation/Xbox to the red & white Phono inputs (or mini AV input where fitted) on the rear of the TV. Please refer to the 'Connections' pages. |
| System Lock I have changed the password on the television and now forgotten it. | There is a master password of 4711, to gain access to the TV menu and reset the normal password. | |
| USB Mode I have inserted a USB Memory Key, but the TV does not recognise it. | Ensure the USB Memory Key is formatted to type FAT32. | |
| USB Mode Using a USB portable hard drive / larger than 32GB. | If you wish to use a portable hard drive larger than 32GB, please note that it must be formatted to the FAT32 fi le system in order to operate on this TV. Windows XP/Vista computers are only capable of formatting up to 32GB, therefore, you will need a software programme/utility to format larger hard drives.Please refer to the website, www.umc-uk.co.uk, for more information. | |
TROUBLESHOOTING GUIDE
| DVD (For TV models with DVD only) | I have inserted a disc but it is not playing. | 1) Ensure you have inserted the disc facing the correct way.2) Ensure the disc is clean and is not scratched.3) Some copied discs will not play.4) Check the DVD is a region 2 disc – to change the region of the DVD player, refer to www.umc-uk.co.uk, select ‘Changing DVD Region’ in the ‘Product Support’ section |
| DVD (For TV models with DVD only) | I have pressed the eject button but the disc is not coming out. | To eject the disc hold the stop/eject button for 4 seconds. |
| USB Record(For TV models with USB record only) | I cannot change the channel, access the menu or use the red button. | During time shift you cannot change the channel, access the menu or use the red button. |
| USB Record(For TV models with USB record only) | When using the USB to record the picture ‘breaks up’ or experience loss of sound. | Check the USB memory stick meets the minimum read speed requirements. Standard definition channels require a read speed of 20 Mb/s (Megabits per second) and a write Speed of 6 Mb/s (Megabits per second) HD channels require the read speed of 80 Mb/s (Megabits per second) and a write speed of 40 Mb/s (Megabits per second). USB 3.0 sticks should be used where possible. |
| Freeview HD I cannot | access all Freeview channels. | Some data channels for Freeview can only be obtained when the TV’s ethernet port is connected to your router. |
| Freeview HD I cannot | find the Freeview HD channels. | Freeview HD channels found during tuning will be placed in channel positions above 100. For example, 101 (BBC1 HD), 102 (BBC2 HD) etc. |
UPDATING SOFTWARE
There are a number of ways in which the software on your set can be updated. When your set is produced, the software installed will ensure the correct operation of the set, this may need to be updated should improvements be made and this is normally carried out automatically if the set is connected to the internet. For sets which do not have internet connectivity or are not connected to the internet, updates can be made via the USB socket on the back of the set.
Note: If your set is outside of guarantee and the installation of the software causes a different issue you may be liable for a chargeable repair service. The reason for this is because you may have an inherent fault which can cause corruption on one of the boards when installing the software. This could result in your unit locking into SAFE mode whereby it is stuck in standby. This is not a fault with the software, this would be caused by an existing faulty board that would have required a repair.
If you experience issues installing your software, and you do get locked into safe mode, you may wish to try reinstalling the software on an alternate USB as sometimes if the TV cannot read the update due to the USB Format/type.
Note: For further support with software updates, contact our technical support team or refer to the 'Product Support' section of the website. If the TV is using the newest software available it will not attempt to update the software.
| OTA | Over the internet update. You will be notified when an OTA update is available for your set. When the software is downloading and then updating, do not power down the set. This will interrupt the process and may corrupt the set. |
| USB | Software can be uploaded onto your set via a USB stick. Only use software recommended by the manufacturer for this. |
| OAD | Over Air Download. Similar to OTA, but data is sent to the set via the Digital Television system. |
| Media Code Resolution Bit Rate File Extension | ||||
| Film | MPEG1/2 1080P@60fps 80Mbps | .DAT, .VOB, .MPG, .MPEG, .ts, .trp, .tp, .mp4, .mov, .3gpp, .3gp, .avi, .mkv, .asf | ||
| MPEG4 1080P@60fps 40Mbps | .MPG, .MPEG, .mp4, .mov, .3gpp, .3gp, .avi | |||
| XviD 1080P@60fps 40Mbps .divx, .mp4, .mov, .avi, .mkv, .asf | ||||
| H.263 1080P@60fps 40Mbps | .mp4, .mov, .3gpp, .3gp, .av, .mkv | |||
| H.264 | 4096x2160@30fps 1080P@60fps | 135Mbps | .fl v, .mp4, .mov, .3gpp, .3gp, .ts, .trp, .tp, .asf, .wmv, .avi, .mkv | |
| Motion JPEG 1080P@30fps 10Mbps | .avi, .3gpp, .3gp, .mp4, .mov, .mkv, .asf | |||
| VP8 1080P@60fps 20Mbps .mkv, .webm | ||||
| HEVC | 4K2K@60fps | 100Mbps | .mp4, .mov, .mkv, .ts, .trp, .tp | |
| VP9 4K2K@60fps | 100Mbps | .mkv, .webm | ||
| Media Code Frequency | Bit Rate File Extension | |||
| Music | MPEG1/2 Layer1, 2, 3 | 16KHz ~ 48KHz | 32Kbps ~ 320Kbps | .mp3, .avi, .as, .mkv, .ts, .trp, .tp, .DAT, .VOB, .MPG, .MPEG, .wav |
| AC3 | 32KHz, 44.1KHz, 48KHz | 32Kbps ~ 640Kbps | .ac3, .avi, .mkv, .divx, .3gpp, .3gp, .mp4, .mov, m4a, .ts, .trp, .tp, .DAT, .VOB, .MPG, .MPEG, .rm, .rmvb | |
| EAC3 | 32KHz, 44.1KHz, 48KHz | 32Kbps ~ 6Mbps | .ec3, .3gpp, .3gp, .mp4, .mov, m4a, .ts, .trp, .tp, .DAT, .VOB, .MPG, .MPEG, .rm, .rmvb | |
| AAC, HEAAC 8KHz ~ 48KHz | 128bps ~ 320Kbps | .aac, .avi, .mkv, .divx, .3gpp, .3gp, .mp4, .mov, m4a, .ts, .trp, .tp, .DAT, .VOB, .MPG, .MPEG, .v, .rm, .rmvb | ||
| VORBIS | Up to 48KHz | .mkv, .webm, .3gpp, .3gp, .mp4, .mov, m4a, .ogg | ||
| DTS Up to 48KHz | < 1.5Mbps | .ts, .trp, .tp, .DAT, .VOB, .MPG, .MPEG, .mkv | ||
| FLAC | 8KHz~96 KHz | < 1.6Mbps | .mkv, .ac | |
| Media File Type | Resolution | File Extension | ||
| Photo | JPEG | 15360x8640, (1920x8 x 1080x8) | Base-line | .jpg/.jpeg |
| 1024x768 | Progressive | |||
| PNG | 9600x6400 Non-interlace | .png | ||
| 1200x800 | Interlace | |||
| BMP | 9600x6400 | .bmp | ||
| MPO | 15360x8640, (1920x8 x 1080x8) | Base-line | .mpo | |
| 1024x768 | Progressive | |||
| GIF | 6400x4800 | .gif | ||
| Internal Subtitle | File Extension Container Subtitle Codec | |
| .mp4 MP4 DVD Subtitle, UTF-8 | Plain Text | |
| .mkv MKV ASS, SSA, UTF-8 Plain | Text, VobSub, DVD Subtitle | |
| .avi AVI(1.0, 2.0) XSUB, X$UB+ |
| External Subtitle | File Extension Subtitle Parser Remark | ||
| .srt SubRip | |||
| .ssa/.ass SubStation Alpha | |||
| .smi SAMI | |||
| .sub | SubViewer, Micro DVD, DVD Subtitle System, Subldx (VobSub) | SubViewer 1.0 & 2.0 Only | |
| .txt | TMPlayer |
QUICK LOOKUP
Application Menu (Only applicable to Freeview Play models.)

text_image
Apps Settings Media Sources NETFLIX BBC iPlayer itv Demand5 stv YouTube| Netflix UK Play TV Web Browser | |
| BBC iPlayer Freeview Play Aquos Net+ | |
| ITV Player YouTube | |
| Channel 4/All 4 BBC News | |
| Demand 5 BBC Sport |
Settings Menu

text_image
Apps Settings Media Sources Quick Settings Picture Sound Channel Network Time System About TV| Menu Contents Page | ||
| Quick Settings | 18 | |
| Audio Track | ||
| Subtitle | ||
| Subtitle Track | ||
| Teletext | ||
| Record List | ||
| Schedule List | ||
| Picture | 19-20 | |
| Picture Mode | ||
| Brightness | ||
| Contrast | ||
| Colour | ||
| Sharpness | ||
| Colour Temperature | ||
| Aspect Ratio | ||
| Expert Settings | ||
| Sound | 21 | |
| Sound Mode | ||
| DTS Studio Sound | ||
| DTS DRC | ||
| Speaker | ||
| Auto Volume Level | ||
| Expert Settings | ||
QUICK LOOKUP
| Menu Contents Page | ||
| Channel | DVB Antenna | 22 |
| Auto Scan | ||
| Digital Manual Tuning | ||
| Digital Smart Retuning | ||
| Auto Update Channel List | ||
| HbbTV | ||
| LCN | ||
| Standby Scan | ||
| CI Information | ||
| Network | Network | 24-25 |
| Network Test | ||
| Network Information | ||
| Wi-Fi | ||
| IPv4 | ||
| IPv6 | ||
| Time | Time | 26 |
| On Time | ||
| Off Time | ||
| Sleep Timer | ||
| Auto Standby | ||
| OSD Timer | ||
| System | Language | 27 |
| Lock | ||
| HDMI CEC | ||
| Source Re-name | ||
| Expert Settings | ||
| About TV | Help Information | 28 |
| System Upgrade | ||
| Reset TV | ||
| Netflix ESN Key | ||
| Netflix ESN Version | ||
| Netflix Deactivate | ||
| Netflix Terminate | ||
| View End User Licence | ||