
37LP1DA - TV LG - Free user manual and instructions
Find the device manual for free 37LP1DA LG in PDF.


User questions about 37LP1DA LG
0 question about this device. Answer the ones you know or ask your own.
Ask a new question about this device
Download the instructions for your TV in PDF format for free! Find your manual 37LP1DA - LG and take your electronic device back in hand. On this page are published all the documents necessary for the use of your device. 37LP1DA by LG.
USER MANUAL 37LP1DA LG
natural_image
Interior view of a modern building hallway with white walls, ceiling-mounted screens, and a person walking through the aisle (no visible text or symbols)DVB ^
Digital Video Broadcasting
Trade Mark of the DVB Digital Video
Broadcasting Project (1991 to 1996)
ID Number(s): 3549: 32LP1DA
3550: 37LP1DA
Please read Information Manual included together before reading this manual and operating your set.
Retain it for future reference.
Record model number and serial number of the set.
See the label attached on the back cover and quote
this information to your dealer when you require service.
P/NO : 3828TUL331B (0509-REV01)
Printed in Korea
Accessories
Ensure that the following accessories are included with your TV. If any accessory is missing, please contact the dealer from where you purchased the product.

Owner's Manual

Twister Holder
Arrange the wires
with the twister holder.

Polishing Cloth
Polish the screen with the cloth.
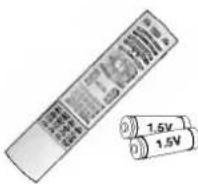
Remote Control / Batteries
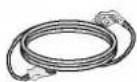
Power Cord
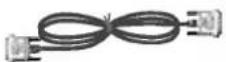
DVI-D Cable
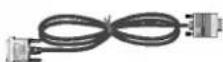
D sub to DVI Cable
PC Sound Cable
Contents
Introduction
Installation
Installation Instruction
External Equipment Connections
Operation
Basic operation
Setup Menu Options
Picture Menu Options
Sound Menu Options
2 Accessories
5 Controls
6 Connection Options
7\~10 Remote Control Key Functions
11 Various Installation
12 How to use back cover
12 Swivel Stand
13 Antenna Connection
14 How to use antenna loop through socket
14 External AV Source Setup
14 Headphone Socket
15 Digital Audio Output
15 Picture Out Setup
16\~17 VCR Setup
18\~19 DVD Setup
20 HDSTB Setup
21\~22 PC Setup
23 Turning on the TV
23 Initializing Setup
23 Volume Adjustment
23 Programme Selection
23 On Screen Language Selection
24 How to adjust the OSD screen
In Digital Mode
25 Auto Programme Tuning
25 Manual Programme Tuning
26 Programme Edit
27 5V Antenna Power
27 System Information
28 Programme List
In Analogue Mode
29 Auto Programme Tuning
30 Manual Programme Tuning
31 Fine Tuning
31 Assigning a Station Name
32 Programme Edit
33 Favourite Programme
33 Calling the Programme Table
34 PSM (Picture Status Memory)
34 Manual Picture Adjustment (PSM-User option)
35 CSM (Colour Status Memory)
35 Manual Colour Temperature Control (CSM - User option)
36 XD Function
36 Picture Out for AV2 Euro Scart
37 Picture Format
38 SSM (Sound Status Memory)
38 Sound Frequency Adjustment (SSM-User Option)
39 Balance Adjustment
39 AVL (Auto Volume Leveler)
40 SRS WOW
40 Digital Audio Out (In Digital mode only)
41 Audio Language (In Digital mode only)
42 Stereo/Dual Reception (In Analogue mode only)
42 NICAM Reception (In Analogue mode only)
42 Speaker Sound Output Selection
| Operation | Time Menu Options | 43 | Clock Setup |
| 43 | Time Zone | ||
| 44 | On/Off Time | ||
| 44 | Auto Sleep | ||
| 45 | Sleep Timer | ||
| Special Menu Options | 46 | Lock System | |
| 46 | Child Lock | ||
| 47 | Logo Light | ||
| 47 | Factory Reset | ||
| Screen Menu Options | 48 | Screen Position | |
| 48 | Manual Configure (Clock & Phase) | ||
| 49 | Auto Configure | ||
| 49 | WXGA Mode | ||
| PIP (Picture-in-Picture) / Double Window / POP | 50 | Watching PIP/Double Window/POP | |
| 50 | Sub Picture Freeze | ||
| 50 | Programme Selection for Sub Picture | ||
| 51 | Input Source Selection for Sub Picture | ||
| 51 | Sub Picture Size Adjustment (PIP mode only) | ||
| 52 | Moving the Sub Picture (PIP mode only) | ||
| 52 | Swapping between main and sub pictures | ||
| 53 | POP (Picture-out-of-Picture: Programme Scan) | ||
| TELETEXT | 54 | Switch on/off | |
| 54 | SIMPLE Text | ||
| 54 | TOP Text | ||
| 55 | FASTEXT | ||
| 55 | Special Teletext Functions | ||
| EPG (Electronic Programme Guide) | 56~57 | How to use EPG(Now/Next Guide Mode, 8Days Guide Mode, Channel Guide Mode) | |
| 58 | Button Function in Detail Information Box | ||
| 58 | Button Function in Date Change Mode | ||
 | Notes on Memory Card | ||
| 59 | Memory Card | ||
| 59 | Precaution for Using the Memory Card | ||
| XSTUDIO | |||
| 60 | Available Memory Card | ||
| 60 | Supported Files | ||
| 61 | The JPEG Decoding/Thumbnail Supplied Spec | ||
| 61 | How to insert and eject the card | ||
| 61 | Basic Operation | ||
| JPEG File Viewing Options | |||
| 62 | Photo Media OSD Display | ||
| 62 | Picture Selection and Viewing | ||
| 63 | Mark/Unmark for JPEG file | ||
| 63 | Jump Media | ||
| 64 | Image Adjustment | ||
| 65 | Slide Show | ||
| 66 | JPEG File Deletion and Cancel | ||
| 66 | File Information | ||
| 66 | Screen Saver | ||
| MP3 File Playing Operation | |||
| 67 | Music Media OSD Display | ||
| 67 | MP3 File Selection and Playback | ||
| 68 | Stop/Pause Playback | ||
| 68 | Mark/Unmark for MP3 File | ||
| 69 | Jump Media | ||
| 69 | Screen Saver | ||
| 70 | MP3 File Deletion and Cancel | ||
| 70 | File Information | ||
| Reference | 71~72 | IR Codes | |
| 73~74 | Programming the Remote control | ||
| 75~76 | Troubleshooting Checklist | ||
| 77 | Product Specifications | ||
Reference
Introduction
Controls
- This is a simplified representation of front panel.
- Here shown may be somewhat different from your TV.
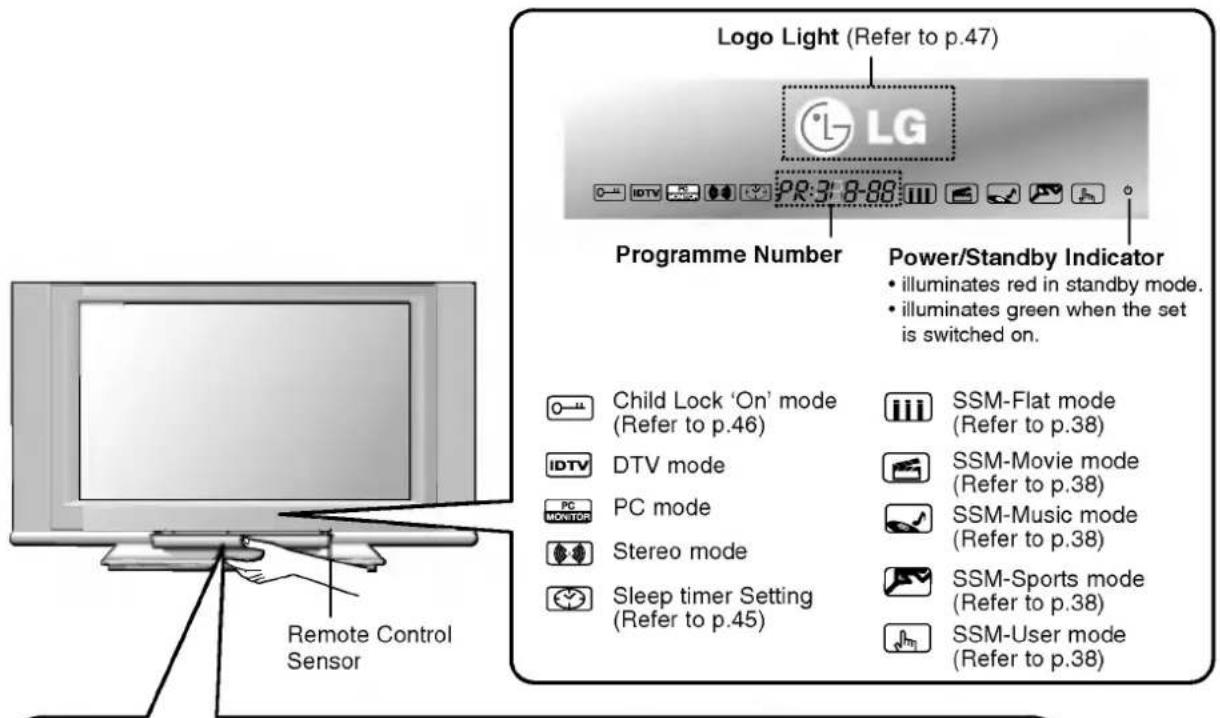
text_image
Logo Light (Refer to p.47) LG Programme Number Power/Standby Indicator • illuminates red in standby mode. • illuminates green when the set is switched on. Child Lock 'On' mode (Refer to p.46) IDTV DTV mode PC MOVITOR Stereo mode Sleep timer Setting (Refer to p.45) SSM-Flat mode (Refer to p.38) SSM-Movie mode (Refer to p.38) SSM-Music mode (Refer to p.38) SSM-Sports mode (Refer to p.38) SSM-User mode (Refer to p.38) Remote Control Sensor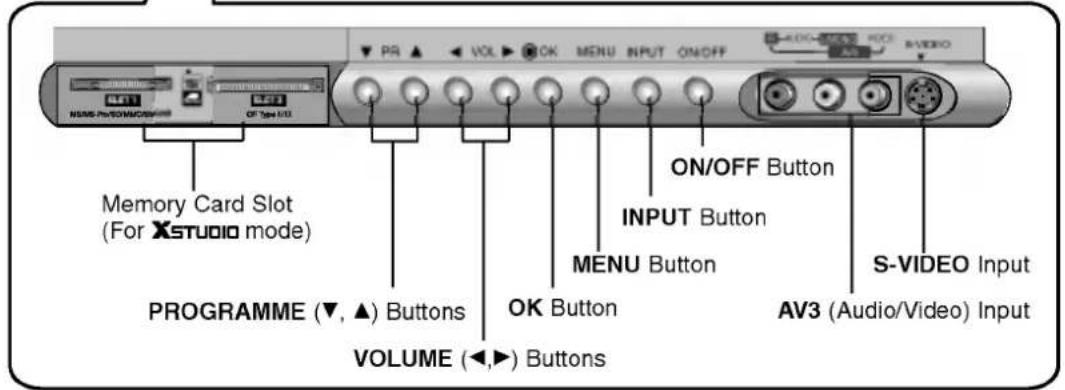
text_image
Memory Card Slot (For XSTUDIO mode) PROGRAMME (▼, ▲) Buttons VOLUME (◀,▶) Buttons ON/OFF Button INPUT Button MENU Button OK Button AV3 (Audio/Video) Input S-VIDEO InputConnection Options
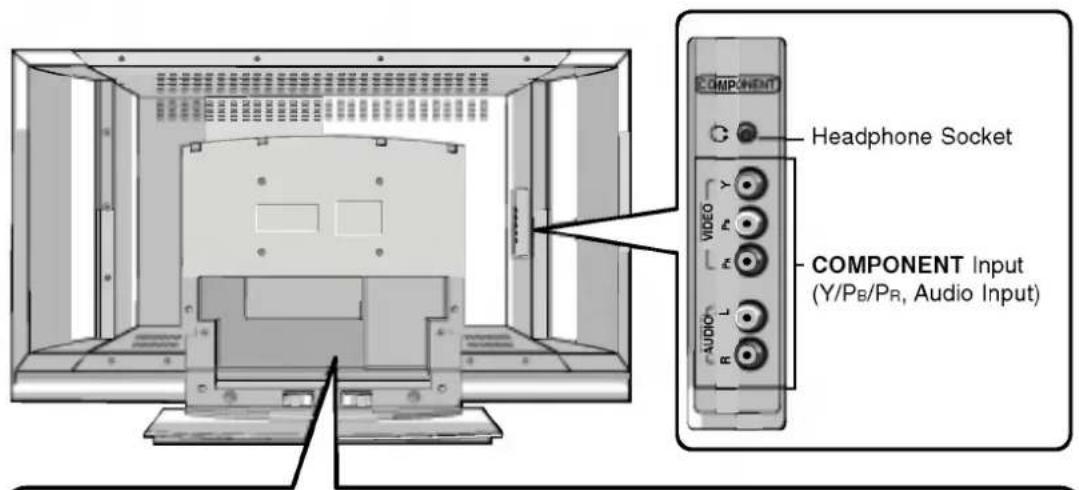
text_image
COMPONENT Headphone Socket VIDEO COMPONENT Input (Y/PB/PR, Audio Input) AUDIO R L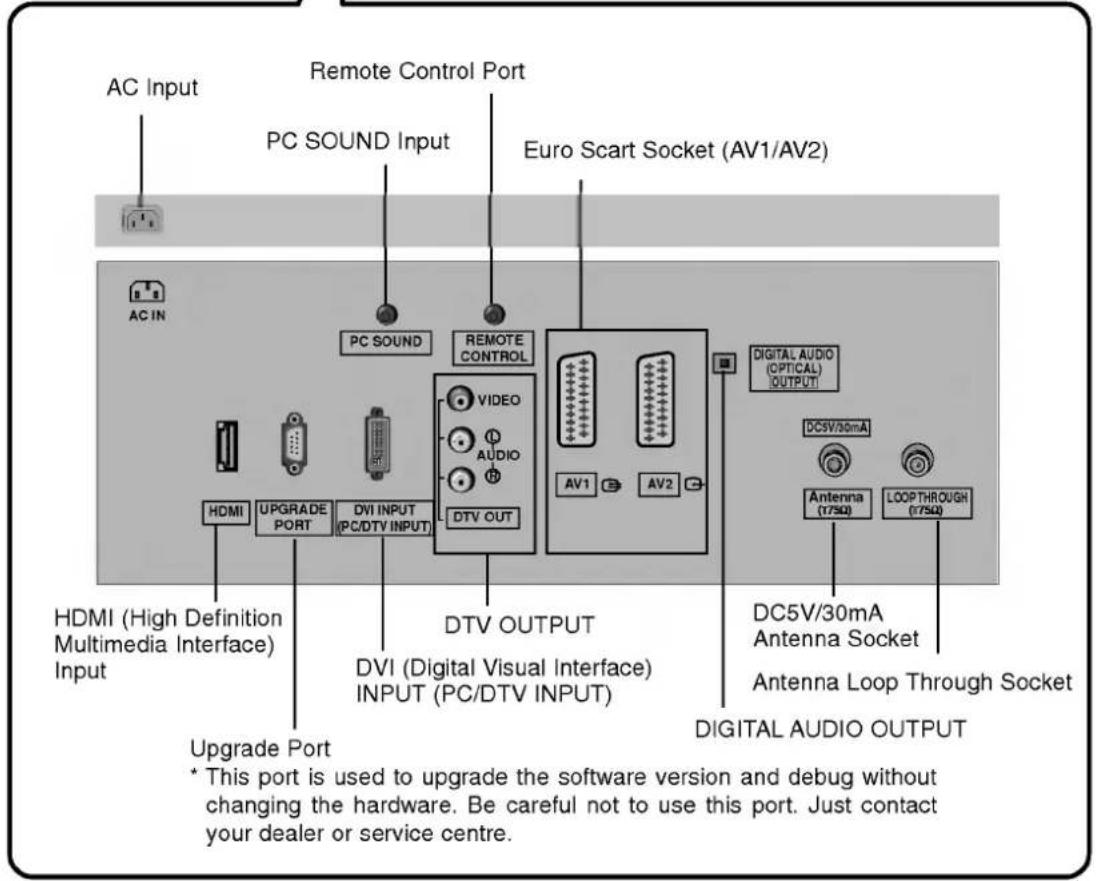
text_image
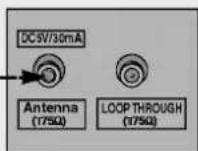
AC Input Remote Control Port PC SOUND Input Euro Scart Socket (AV1/AV2) AC IN PC SOUND REMOTE CONTROL VIDEO AUDIO DTV OUTPUT DV1 (Digital Visual Interface) INPUT (PC/DTV INPUT) DVI INPUT UPGRADE PORT HDMI Upgrade Port * This port is used to upgrade the software version and debug without changing the hardware. Be careful not to use this port. Just contact your dealer or service centre. Digital Audio OUTPUT DC5V/30mA Antenna (175Ω) LOOP THROUGH (175Ω) DC5V/30mA Antenna Socket Antenna Loop Through Socket DIGITAL AUDIO OUTPUTRemote Control Key Functions
text_image
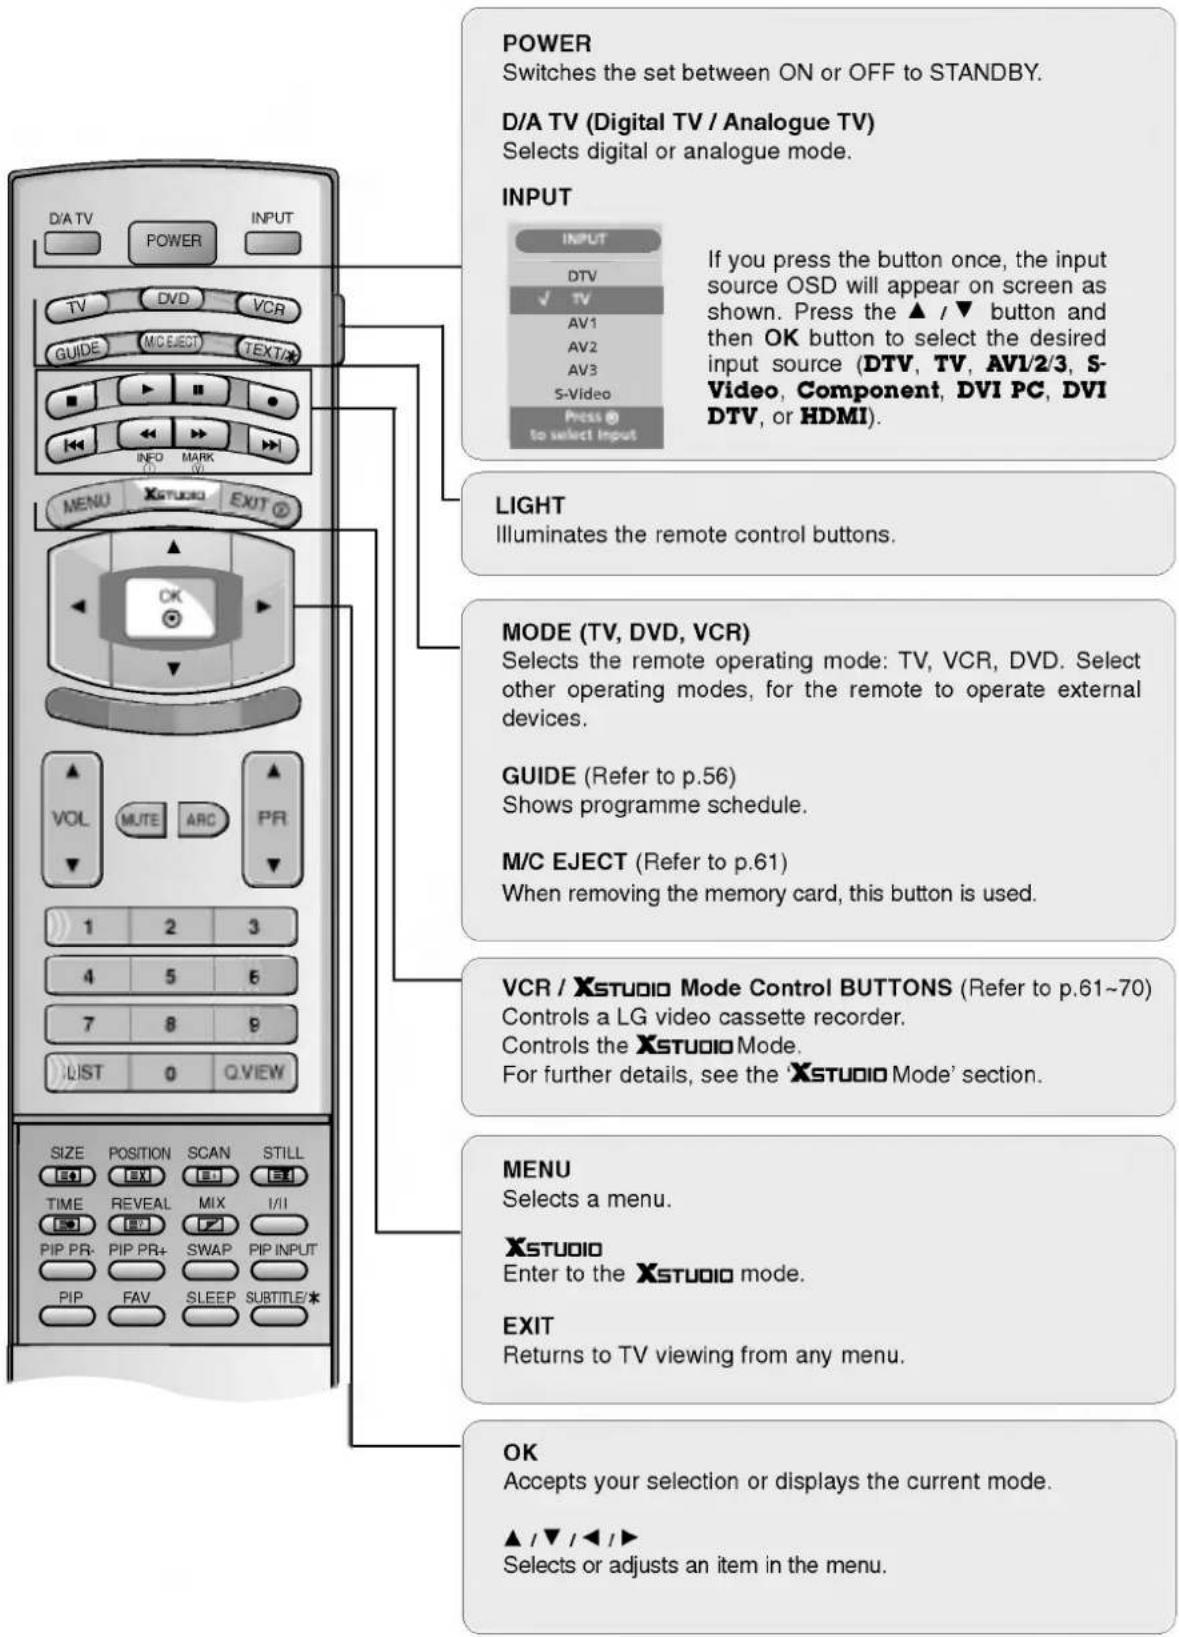
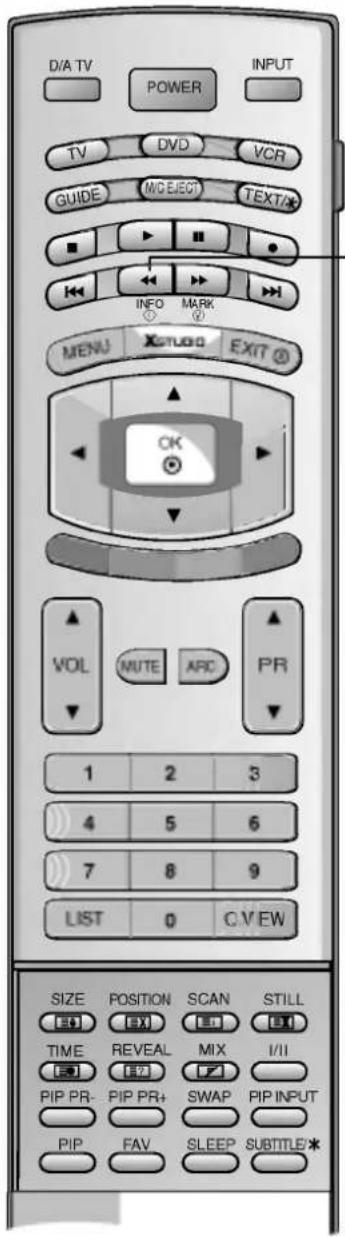
POWER Switches the set between ON or OFF to STANDBY. D/A TV (Digital TV / Analogue TV) Selects digital or analogue mode. INPUT If you press the button once, the input source OSD will appear on screen as shown. Press the ▲ / ▼ button and then OK button to select the desired input source (DTV, TV, AV1/2/3, S- Video, Component, DVI PC, DVI DTV, or HDMI). LIGHT Illuminates the remote control buttons. MODE (TV, DVD, VCR) Selects the remote operating mode: TV, VCR, DVD. Select other operating modes, for the remote to operate external devices. GUIDE (Refer to p.56) Shows programme schedule. M/C EJECT (Refer to p.61) When removing the memory card, this button is used. VCR / XSTUDIO Mode Control BUTTONS (Refer to p.61~70) Controls a LG video cassette recorder. Controls the XSTUDIO Mode. For further details, see the 'XSTUDIO Mode' section. MENU Selects a menu. XSTUDIO Enter to the XSTUDIO mode. EXIT Returns to TV viewing from any menu. OK Accepts your selection or displays the current mode. ▲ / ▼ / ◀ / ▶ Selects or adjusts an item in the menu.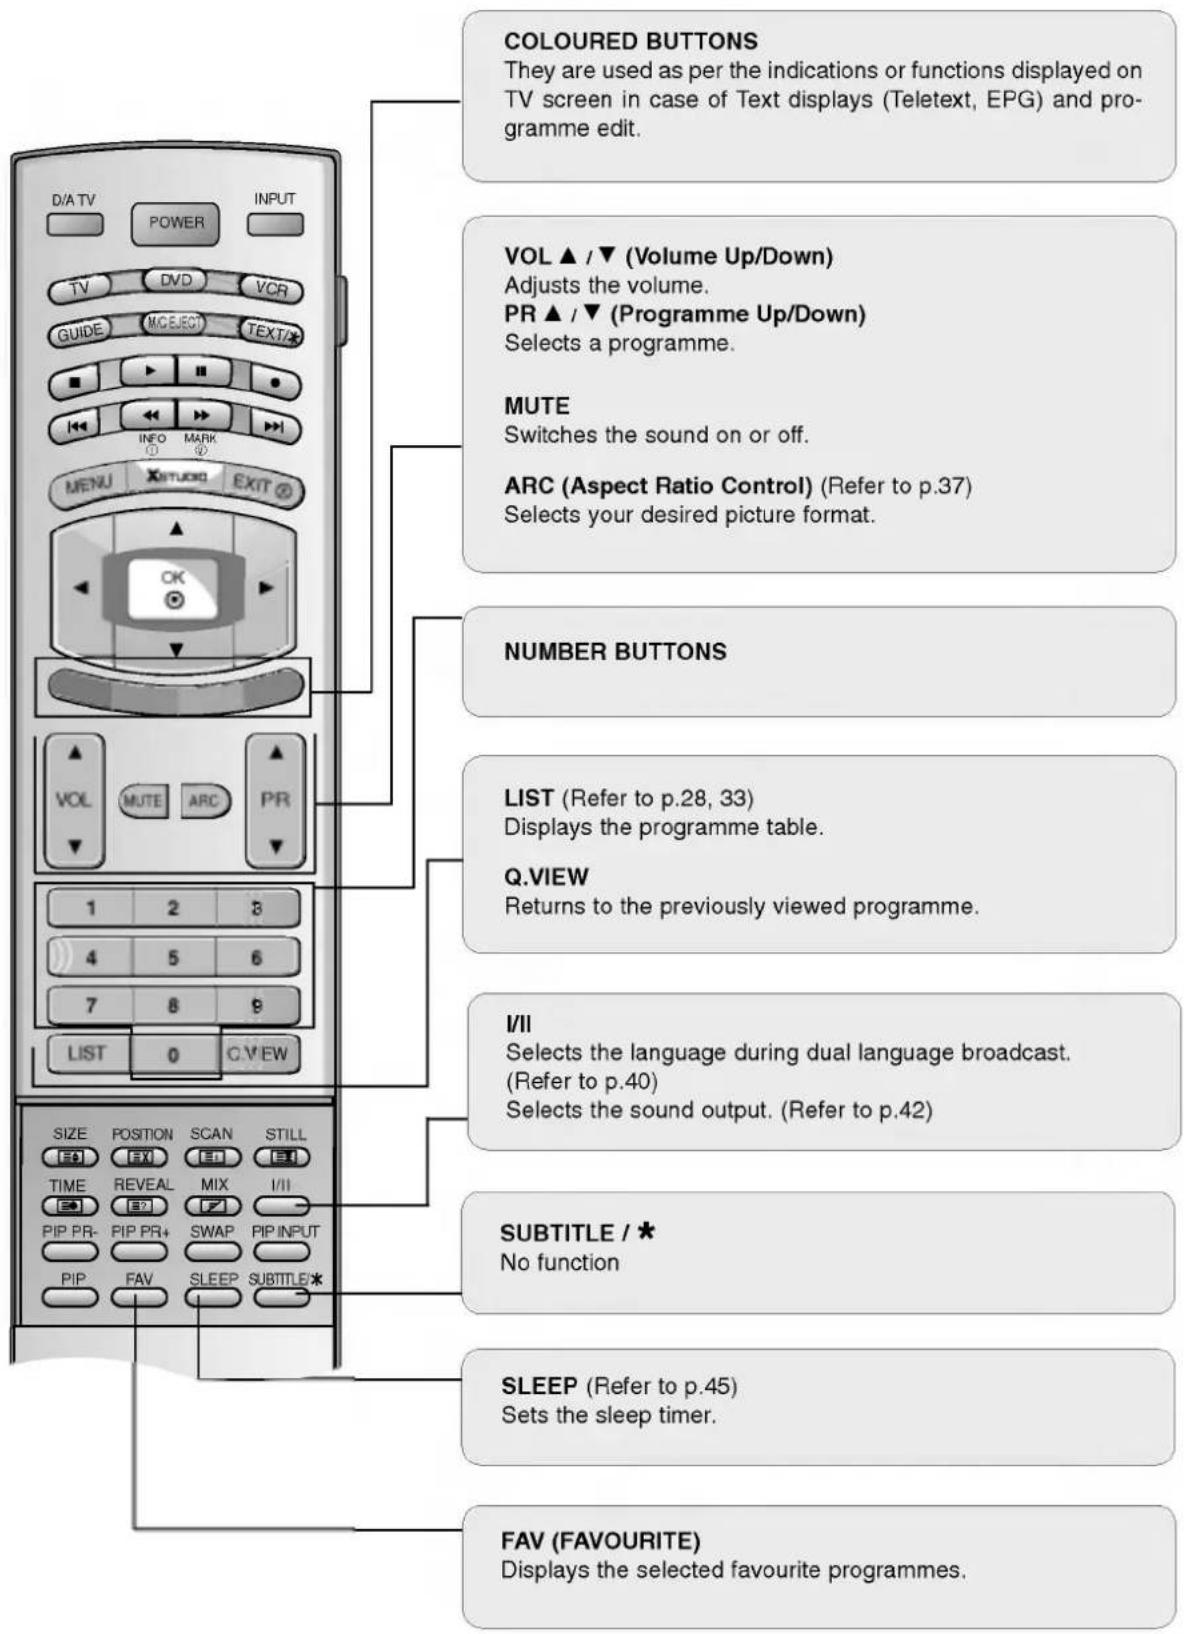
text_image
COLOURED BUTTONS They are used as per the indications or functions displayed on TV screen in case of Text displays (Teletext, EPG) and programme edit. VOL ▲ / ▼ (Volume Up/Down) Adjusts the volume. PR ▲ / ▼ (Programme Up/Down) Selects a programme. MUTE Switches the sound on or off. ARC (Aspect Ratio Control) (Refer to p.37) Selects your desired picture format. NUMBER BUTTONS LIST (Refer to p.28, 33) Displays the programme table. Q.VIEW Returns to the previously viewed programme. I/II Selects the language during dual language broadcast. (Refer to p.40) Selects the sound output. (Refer to p.42) SUBTITLE / * No function SLEEP (Refer to p.45) Sets the sleep timer. FAV (FAVOURITE) Displays the selected favourite programmes.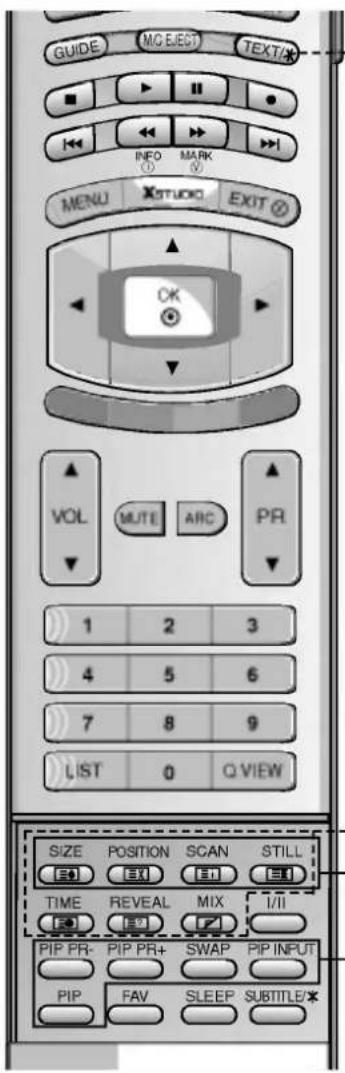
text_image
GUIDE MC ELECT TEXT/ INFO MARK MENU XSTUDIO EXIT OK VOL MUTE ARC PR 1 2 3 4 5 6 7 8 9 LIST 0 Q VIEW SIZE POSITION SCAN STILL TIME REVEAL MIX I/II PIP PR- PIP PR+ SWAP PIP INPUT PIP FAV SLEEP SUBTITLE★TELETEXT BUTTONS
These buttons are used for teletext.
* For further details, see the 'Teletext' section. (Refer to p.54\~55)
SIZE (Refer to p.51)
Adjusts the sub picture size.
POSITION (Refer to p.52)
Moves the sub picture position.
SCAN (Refer to p.53)
Switches on the programme scan mode.
STILL (Refer to p.50)
Freezes the currently-viewing picture. The sub picture is frozen in PIP/DW mode.
PIP PR +/- (Refer to p.50)
Selects a programme for the sub picture.
SWAP (Refer to p.52)
Alternates between main and sub picture.
PIP INPUT (Refer to p.51)
Selects the input mode for the sub picture.
PIP (Refer to p.50)
Switches the sub picture PIP, DW, POP or off mode.
Installing Batteries
1 Open the battery compartment cover on the back side.
2 Insert two 1.5V batteries in correct polarity (+ with +, - with -). Don't mix old or used batteries with new ones.
3 Close the cover.
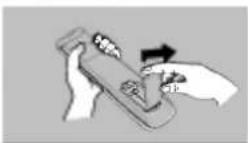
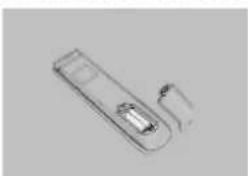
natural_image
Simple line drawing of a rectangular object with a small internal component, possibly a device or device (no text or symbols)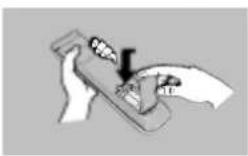
natural_image
Illustration of a hand holding a small object with a hammer and scale, no text or symbols present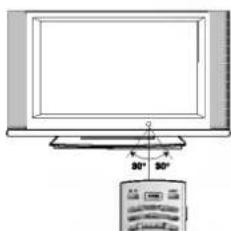
text_image
30° 30°* Use a remote control 7 meter distance and 30 degree (left/right) within the receiving unit scope.
* Dispose of used batteries in the recycle bin to prevent environment.
text_image
D/A TV POWER INPUT TV DVD VCR GUIDE MODEG TEXT/ INFO MARK MENU X:stuo EXIT OK VOL MUTE ARC PR 1 2 3 4 5 6 7 8 9 LIST 0 C:\VIEW\SIZE POSITION SCAN STILL TIME REVEAL MIX I/II PIP PR- PIP PR+ SWAP PIP INPUT PIP FAV SLEEP SUBTITLE*Brief Info. (In Digital mode only)
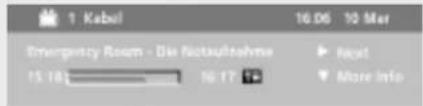
- Show the present screen information.
- Press the INFO or EXIT button to exit.
text_image
1 Kabul Emergency Room - Die Restvaltung 15:18 16:17 16.06 10 Mer Rest More info| Remote Control Buttons | Function |
| ◀ / ▶ | Select NOW or NEXT programme |
| ▲ / ▼ | The detail information on or off |
Installation
Various Installation
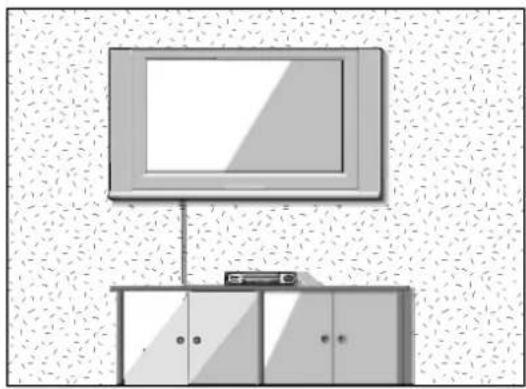
Wall Mount: Horizontal installation
natural_image
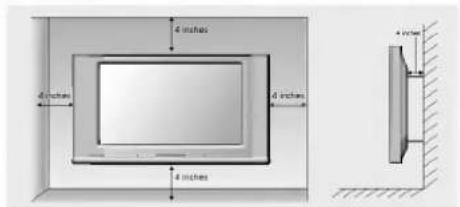
Illustration of a TV setup with a monitor, cabinet, and cable rack (no text or symbols)For proper ventilation, allow a clearance of 4" on each side and from the wall. Detailed installation instructions are available from your dealer, see the optional Tilt Wall Mounting Bracket Installation and Setup Guide.
text_image
4 inches 4 inches 4 inches 4 inchesDesktop Pedestal Installation
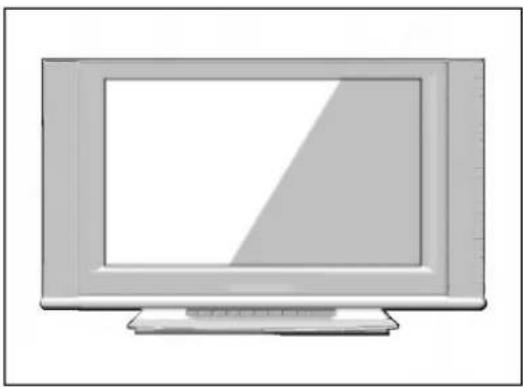
natural_image
Illustration of a flat-screen CRT television with blank screen (no text or symbols)For proper ventilation, allow a clearance of 4" on each side and from the wall.
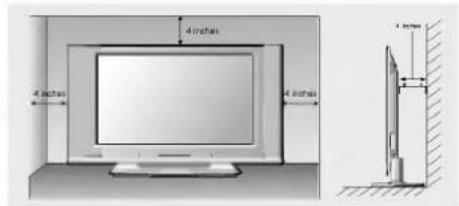
text_image
4 inches 4 inches 4 inchesHow to use back cover
1 Hold the cover with both hands and pull it backward.
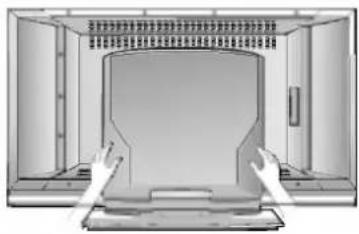
natural_image
Interior view of a room with doors open and two hands placed on the floor (no text or symbols visible)2 Install wires as necessary. (To install various wires, refer to p.13\~21.)
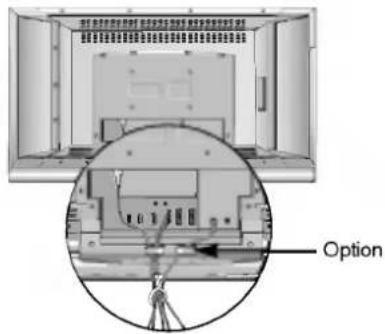
text_image
Option* Arrange the signal input cable and the power cord by holder, as shown.
3 Align the holes on the TV back panel with the four protuberance on the back cover and insert.
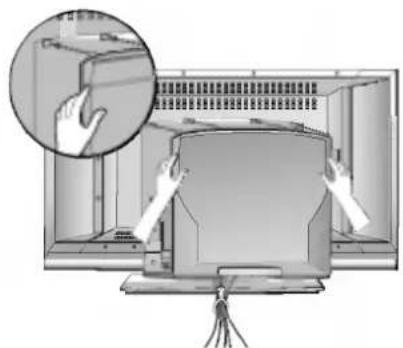
natural_image
Illustration of hands installing or adjusting a TV screen with a magnified inset showing the interior wall (no text or symbols)4 Reinstall the cover.
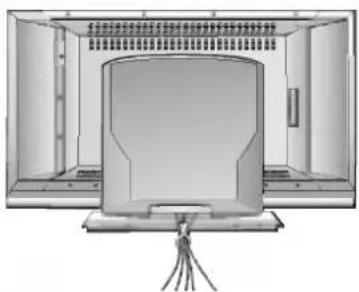
natural_image
Illustration of a flat-screen TV set with open doors and ventilation grilles (no text or symbols)Wire Arrangement
- Pull the cables through the hole on the set.
Swivel Stand
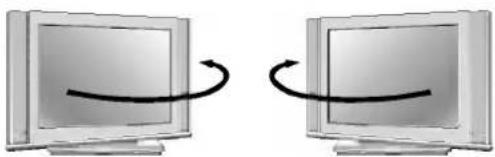
natural_image
Two identical computer monitors with curved arrows indicating rotation or synchronization (no text or symbols)- The TV can be conveniently swivelled on its stand 30° to the left or right to provide the optimum viewing angle.
External Equipment Connections
Antenna Connection
- For optimum picture quality, adjust antenna direction.
- An antenna cable and converter are not supplied.
When connecting with an antenna

Multi-family Dwellings/Apartments (Connect to wall antenna socket)

Wall Antenna Socket
VHF Antenna UHF Antenna
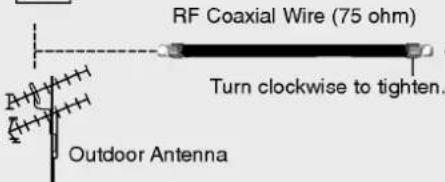
text_image
RF Coaxial Wire (75 ohm) Turn clockwise to tighten. Outdoor Antenna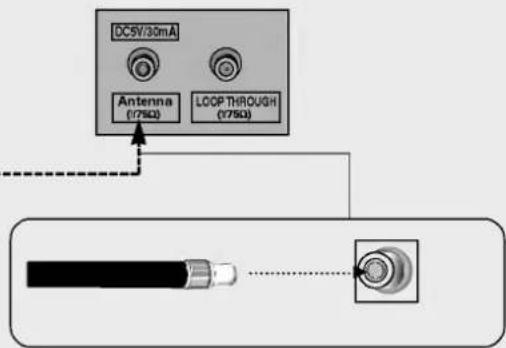
text_image
DC5V/30mA Antenna (175Ω) LOOP THROUGH (175Ω)
Single-family Dwellings /Houses (Connect to wall jack for outdoor antenna)
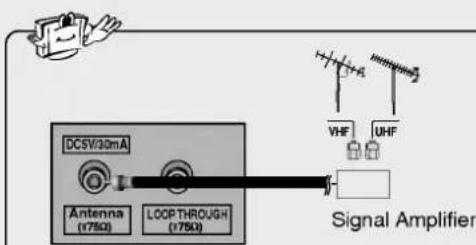
text_image
DC5V/30mA Antenna (175Ω) LOOP THROUGH (175Ω) VHF UHF Signal Amplifier- In poor signal areas, to get better picture quality, install a signal amplifier to the antenna as shown to the right.
- If signal needs to be split for two TVs, use an antenna signal splitter for connection.
When connecting with an active antenna
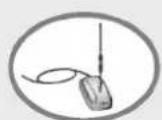
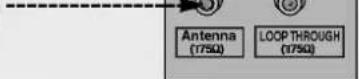
ex) 5V Active Antenna
Note
- When using the 5V active antenna, please turn the TV's 5V antenna power on to avoid a damage of set. (See page 27)
At this time, don't use 75 ohm antenna.
How to use antenna loop through socket
- The TV has a special signal output capability which allows you to hook up a second TV.
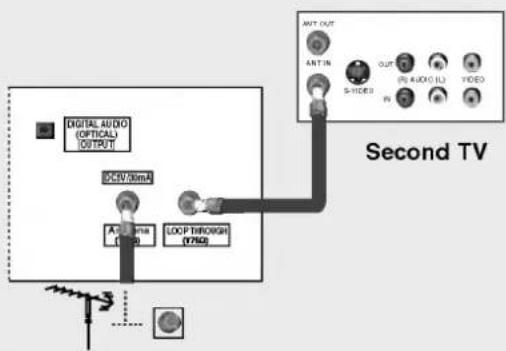
flowchart
graph TD
    A["Digital Audio (OPTICAL) OUTPUT"] --> B["Switch"]
    B --> C["Clock Through (750)"]
    C --> D["ANT OUT"]
    D --> E["OUT"]
    E --> F["NOT"]
    F --> G["NOT"]
    G --> H["S-TICKED"]
    H --> I["NOT"]
    I --> J["NOT"]
    J --> K["NOT"]
    K --> L["NOT"]
    L --> M["S-TICKED"]
    M --> N["NOT"]
    N --> O["NOT"]
    O --> P["S-TICKED"]
    P --> Q["NOT"]
    Q --> R["S-TICKED"]
    R --> S["NOT"]
    S --> T["S-TICKED"]
    T --> U["NOT"]
    U --> V["S-TICKED"]
    V --> W["NOT"]
    W --> X["S-TICKED"]
    X --> Y["NOT"]
    Y --> Z["S-TICKED"]
Connect the wall antenna socket or outdoor antenna to the TV's Antenna socket.
2 Connect a second TV's antenna socket to the TV's LOOP THROUGH socket.
External AV Source Setup
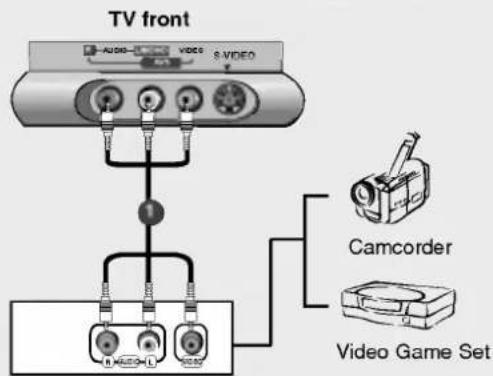
text_image
TV front AUDIO VIDEO S-VIDEO Camcorder Video Game SetConnect the AUDIO/VIDEO jacks between TV and external equipment. Match the jack colours (Video = yellow, Audio Left = white, and Audio Right = red).
2 Select AV3 input source with using the INPUT button on the remote control.
③ Operate the corresponding external equipment. Refer to external equipment operating guide.
Headphone Socket
- You can listen to the sound through the headphone.
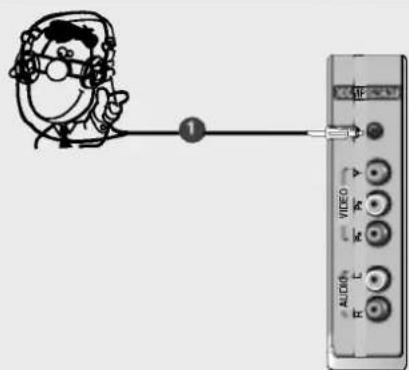
text_image
1 ALDO VIDEO A B C D E F G H I J K L M N O P1 Plug the headphone into the headphone socket.
To adjust the headphone volume, press the VOL ▲ / ▼ button. If you press the MUTE button, the sound from the headphone is switched off.

- While you are listening to sound through a headphone, TV speakers will not be heard.
Digital Audio Output
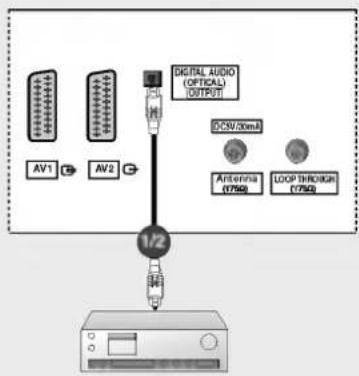
- Send the TV's audio to external audio equipment (stereo system) via the Digital Audio Output Optical port.
flowchart
graph TD
    A["AV1"] --> B["AV2"]
    B --> C["1/2"]
    C --> D["Microcontroller"]
    E["Digital Audio (OPTICAL) OUTPUT"] --> C
    F["DOSV/50mA"] --> C
    G["Antenna (7760)"] --> C
    H["LOOP THROW (7760)"] --> C
Connect one end of an optical cable to the TV Digital Audio Optical Output port.
2 Connect the other end of the optical cable to the digital audio optical input on the audio equipment.
3 See the external audio equipment instruction manual for operation. When connecting with external audio equipments, such as amplifiers or speakers, please select the Dolby Digital. (Refer to p.40)

CAUTION
Do not look into the optical output port. Looking at the laser beam may damage your vision.
Picture Out Setup
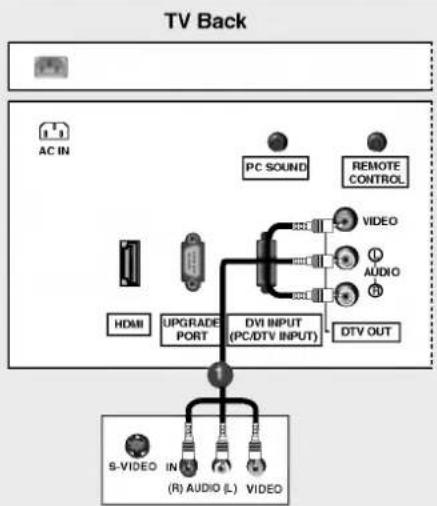
- The TV has a special signal output capability which allows you to hook up a second TV or monitor.
flowchart
graph TD
    A["AC IN"] --> B["PC SOUND"]
    A --> C["REMOTE CONTROL"]
    B --> D["VIDEO"]
    C --> E["AUDIO"]
    D --> F["DVI INPUT (PC/DTV INPUT)"]
    E --> G["DTV OUT"]
    H["HDMI"] --> I["UPGRADE PORT"]
    I --> J["S-VIDEO IN (R) AUDIO (L) VIDEO"]
Second TV
Connect the second TV or monitor to the TV's DTV OUT jacks.
2 See the Operating Manual of the second TV or monitor for further details regarding that device's input settings.

- It's possible to output other signal with Euro scart socket.
| Picture Out Jack | Available Picture Out Signal |
| DTV OUT Jacks | DTV |
| AV1 Euro Scart | TV |
| AV2 Euro Scart | Current viewing Input Source DTV(Refer to p.36) |
NOTE: All cables shown are not included with the TV.
VCR Setup
- To avoid picture noise (interference), leave an adequate distance between the VCR and TV.
- Typically a frozen still picture from a VCR appears. If the 4:3 picture format is used; the fixed images on the sides of the screen may remain visible on the screen.
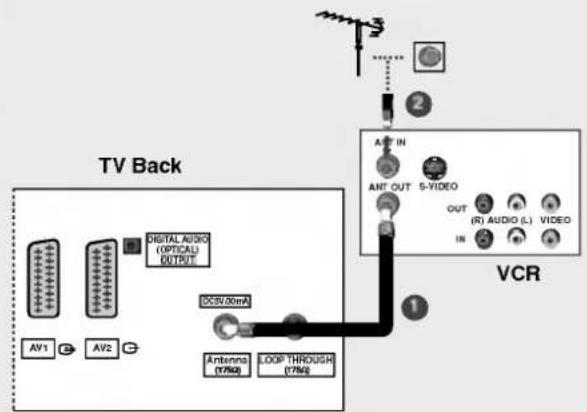
When connecting with an antenna
flowchart
graph TD
    A["TV Back"] --> B["AV1"]
    A --> C["AV2"]
    B --> D["Digital Audio (OPTICAL) OUTPUT"]
    C --> E["DC5V30mA"]
    D --> F["Antenna (7/50)"]
    E --> G["LOOP THROUGH (7/50)"]
    F --> H["VCR"]
    G --> H
    H --> I["ANT OUT 5-VIDEO"]
    I --> J["OUT (R) AUDIO (L) VIDEO IN"]
    J --> K["2"]
    K --> L["+"]
    L --> M["+"]
    M --> N["+"]
    N --> O["+"]
Connect the ANT OUT socket of the VCR to the Antenna socket on the set.
2 Connect the antenna cable to the ANT IN socket of the VCR.
3 Press the PLAY button on the VCR and match the appropriate programme between the TV and VCR for viewing.
When connecting with a Euro Scart
text_image
TV Back DIGITAL AUDIO (COPTICAL) OUTPUT ACV/30mA AV1 AV2 Antenna (V76A) LOOP THROUGH (F77A) AUDIO/ VIDEO (F) AUDIO (L) VCR* Please use the shield scart cable.
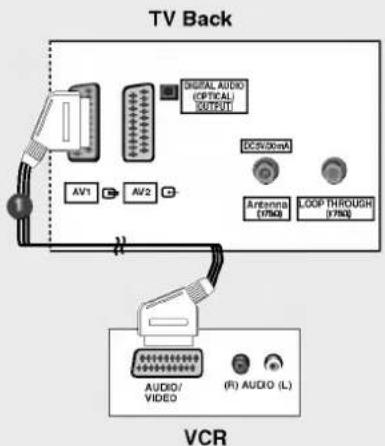
1 Connect the Euro scart socket of the VCR to the AV1 Euro scart socket on the set.
2 Insert a video tape into the VCR and press PLAY on the VCR. (Refer to the VCR owner's manual.)
3 Select AV1 input source with using the INPUT button on the remote control.
- If connected to AV2 Euro scart socket, select AV2 input source.
- If your VCR outputs an AV switching signal via the AV1 or AV2 Euro scart sockets, the set will switch to AV1 input source automatically. But if you want to keep on watching TV mode, press the PR ▲ / ▼ or number buttons.
- You can also record programmes received by the TV on video tape.
- The signal type RGB (the signals red, green and blue) can only be selected for the AV1 Euro scart socket and the AV1 input source can be received. These signals are transmitted, for example, by a pay TV decoder, game machine or photo CD unit, etc and that digital signal can be recorded via AV1 Euro scart socket.
- If the AV1, 2 Euro scart sockets have been connected to the VCRs simultaneously, only the AV2 input source can be received.
When connecting with a RCA cable
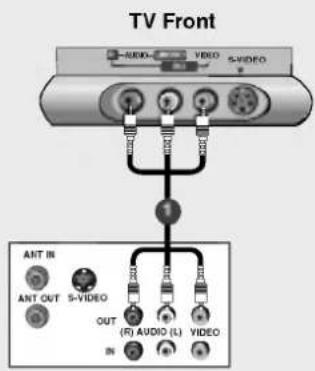
text_image
TV Front AUDIO VIDEO S-VIDEO ANT IN ANT OUT S-VIDEO OUT (R) AUDIO (L) VIDEO INVCR
Connect the AUDIO/VIDEO jacks between TV and VCR. Match the jack colours (Video = yellow, Audio Left = white, and Audio Right = red)
2 Insert a video tape into the VCR and press PLAY on the VCR. (Refer to the VCR owner's manual.)
3 Select AV3 input source with using the INPUT button on the remote control.

- If you have a mono VCR, connect the audio cable from the VCR to the AUDIO L/MONO jack of the set.
When connecting with an S-Video cable
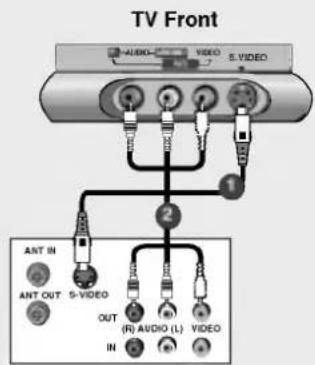
text_image
TV Front AUDIO VIDEO E.VIDEO ANT IN ANT OUT S-VIDEO OUT (R) AUDIO (L) VIDEO INVCR
Connect the S-VIDEO output of the VCR to the S-VIDEO input on the set. The picture quality is improved; compared to normal composite (RCA cable) input.
2 Connect the AUDIO jacks between TV and VCR.
3 Insert a video tape into the VCR and press PLAY on the VCR. (Refer to the VCR owner's manual.)
4 Select S-Video input source with using the INPUT button on the remote control.

Do not connect to both Video and S-Video at the same time.
NOTE: All cables shown are not included with the TV.
DVD Setup
When connecting with a S-Video cable
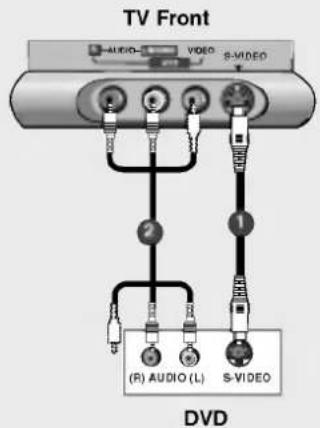
text_image
TV Front AUDIO VIDEO S-VIDEO (R) AUDIO (L) S-VIDEO DVD1 Connect the S-VIDEO output of the DVD to the S-VIDEO input on the set.
2 Connect the audio outputs of the DVD to the AUDIO input jacks on the set.
3 Turn on the DVD player, insert a DVD.
Select S-Video input source with using the INPUT button on the remote control.
5 Refer to the DVD player's manual for operating instructions.
When connecting with a component cable
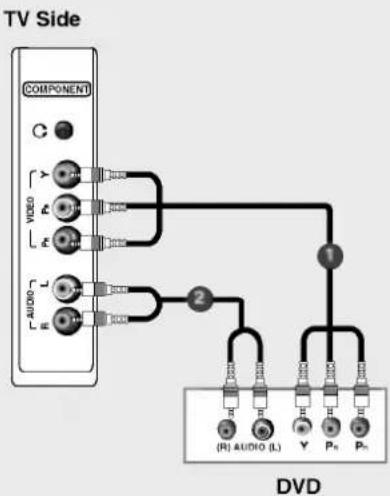
flowchart
graph TD
    A["COMPONENT"] -->|C| B["VIDEO"]
    A -->|C| C["VIDEO"]
    A -->|C| D["VIDEO"]
    A -->|C| E["VIDEO"]
    A -->|C| F["VIDEO"]
    B --> G["1"]
    C --> G
    D --> G
    E --> G
    F --> G
    G --> H["(R) AUDIO (L)"]
    G --> I["Y"]
    G --> J["P0"]
    G --> K["P0"]
Connect the video outputs (Y, PB, PR) of the DVD to the COMPONENT VIDEO (Y, PB, PR) jacks on the set.
2 Connect the audio outputs of the DVD to the COMPONENT AUDIO jacks on the set.
3 Turn on the DVD player, insert a DVD.
Select Component input source with using the INPUT button on the remote control.
5 Refer to the DVD player's manual for operating instructions.

• Component Input ports
To get better picture quality, connect a DVD player to the component input ports as shown below.
| Component ports on the TV | Y | P_B | P_R |
| Video output ports on DVD player | Y | Pb | Pr |
| Y | B-Y | R-Y | |
| Y | Cb | Cr | |
| Y | P_B | P_R |
When connecting with a HDMI cable

flowchart
graph TD
    A["AC IN"] --> B["PCI"]
    B --> C["PC SOUND"]
    B --> D["REMOTE CONTROL"]
    B --> E["VIDEO"]
    B --> F["AUDIO"]
    B --> G["DTV OUT"]
    H["HDMI-DVD OUTPUT"] --> I["DVD"]
1 Connect the HDMI output of the DVD to the HDMI jack on the set.
2 Select HDMI input source with using the INPUT button on the remote control.
Refer to the DVD player's manual for operating instructions.

• TV can receive the video and audio signal simultaneously with using a HDMI cable.
When connecting with a Euro scart
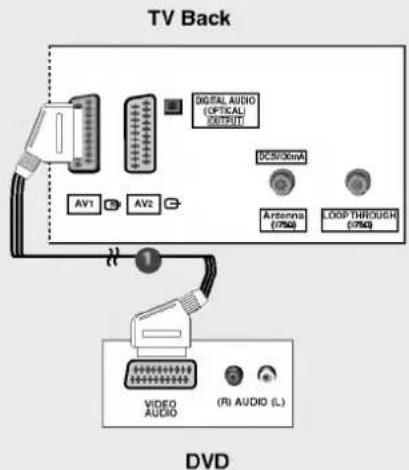
text_image
TV Back DIGITAL AUDIO (OPTICAL) DISTRUT DC5V30mA AV1 AV2 Antenna (75%) LOOP THROUGH (75%) VIDEO AUDIO (R) AUDIO (L) DVDConnect the Euro scart socket of the DVD to the AV1 Euro scart socket on the set.
② Turn on the DVD player, insert a DVD.
3 Select AV1 input source with using the INPUT button on the remote control.
- If connected to AV2 Euro scart socket, select AV2 input source.
* Please use the shield scart cable.
HDSTB Setup
- This TV can receive Digital signals without an external digital set-top box. However, if you do receive Digital signals from a digital set-top box or other digital external device, refer to the figure as shown.
When connecting with a component cable

flowchart
graph TD
    A["COMPONENT"] --> B["VIDEO"]
    A --> C["AUDIO"]
    B --> D["1"]
    C --> E["2"]
    D --> F["(R) AUDIO (L)"]
    D --> G["Y"]
    D --> H["P3"]
    D --> I["P5"]
    E --> J["Digital Set-top Box"]
    style A fill:#f9f,stroke:#333
    style B fill:#ccf,stroke:#333
    style C fill:#ccf,stroke:#333
    style D fill:#cfc,stroke:#333
    style E fill:#cfc,stroke:#333
    style F fill:#ffc,stroke:#333
    style G fill:#ffc,stroke:#333
    style H fill:#ffc,stroke:#333
    style I fill:#ffc,stroke:#333
Connect the video outputs (Y, PB, PR) of the digital set-top box to the COMPONENT VIDEO (Y, PB, PR) jacks on the set.
2 Connect the audio outputs of the digital set-top box to the COMPONENT AUDIO jacks on the set.
3 Turn on the digital set-top box. (Refer to the owner's manual for the digital set-top box.)
4 Select Component input source with using the INPUT button on the remote control.

| Signal | Component | DTV |
| 480i/576i | Yes | No |
| 480p/720p/1080i | Yes | Yes |
When connecting with a HDMI cable
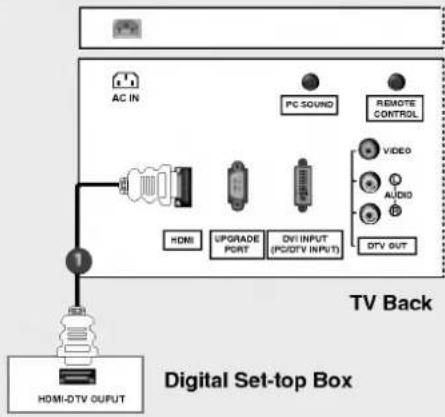
flowchart
graph TD
    A["AC IN"] --> B["+"]
    B --> C["HDMI"]
    C --> D["UPGRADE PORT"]
    D --> E["DV INPUT (PG/DTV INPUT)"]
    E --> F["PC SOUND"]
    E --> G["REMOTE CONTROL"]
    E --> H["VIDEO"]
    E --> I["AUDIO"]
    E --> J["DTV OUT"]
    K["HDMI-DTV OUTPUT"] --> L["Digital Set-top Box"]
    style A fill:#f9f,stroke:#333
    style L fill:#ccf,stroke:#333
    style K fill:#cfc,stroke:#333
    style L fill:#fcc,stroke:#333
Connect the HDMI output of the digital set-top box to the HDMI jack on the set.
2 Turn on the digital set-top box. (Refer to the owner's manual for the digital set-top box.)
3 Select HDMI input source with using the INPUT button on the remote control.
| Signal | HDMI |
| 480p/576p/720p/1080i | Yes |

• TV can receive the video and audio signal simultaneously with using a HDMI cable
When connecting with a DVI cable
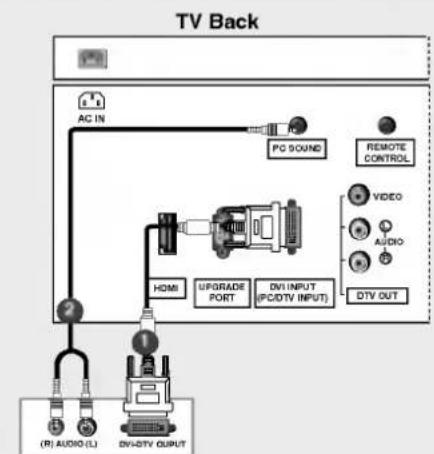
flowchart
graph TD
    A["(R) AUDIO (L)"] --> B["AC IN"]
    C["DIV-DTV OUTPUT"] --> D["1"]
    B --> E["PG SOUND"]
    D --> F["HDMI"]
    F --> G["UFRORADE PORT"]
    G --> H["DIV INPUT (PCDTV INPUT)"]
    H --> I["VIDEO"]
    I --> J["AMO"]
    J --> K["DTV OUT"]
    L["REMOTE CONTROL"] --> M["+"]
    N["+"] --> O["+"]
Digital Set-top Box
1 Connect the DVI output of the digital set-top box to the DVI INPUT (PC/DTV INPUT) jack on the set.
2 Connect the audio outputs of the set-top box to the PC SOUND jack on the set.
3 Turn on the digital set-top box. (Refer to the owner's manual for the digital set-top box.)
4 Select DVI DTV input source with using the INPUT button on the remote control.
| Signal | DVI |
| 480p/576p/720p/1080i | Yes |

- It's impossible to receive the RGB-DTV input source via DVI INPUT jack.
PC Setup
- This TV provides Plug and Play capability, meaning that the PC adjusts automatically to the TV's settings. The TV sends configuration information (EDID) to the PC using the Video Electronics Standard Association (VESA) Display Data Channel (DDC) protocol.
When connecting with a DVI cable
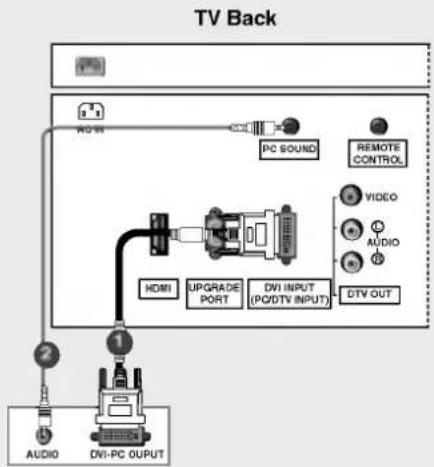
flowchart
graph TD
    A["AUDIO"] --> B["1"]
    C["2"] --> D["20+"]
    D --> E["PCI SOUND"]
    E --> F["REMOPE CONTROL"]
    F --> G["VIDEO"]
    G --> H["AUDIO"]
    I["UPGRADE PORT"] --> J["HDMI"]
    J --> K["DVI INPUT (PC/DTV INPUT)"]
    K --> L["DTV OUT"]
PC
Connect the DVI output of the PC to the DVI INPUT (PC/DTV INPUT) jack on the set.
2 Connect the PC audio outputs to the PC SOUND jack on the set.
3 Turn on the PC and the set.
Select DVI PC input source with using the INPUT button on the remote control.
When connecting with a D-sub to DVI cable
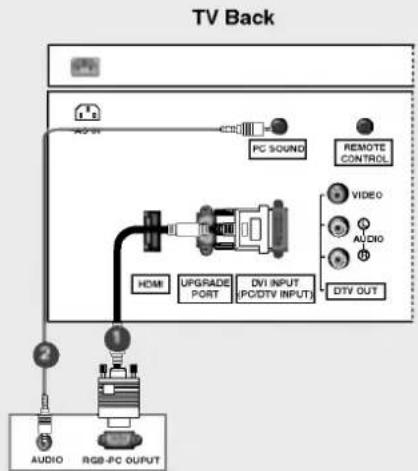
flowchart
graph TD
    A["Audio"] --> B["RGB-PC OUTPUT"]
    B --> C["UPGRADE PORT"]
    C --> D["DMI"]
    D --> E["PC SOUND"]
    E --> F["REMOTE CONTROL"]
    F --> G["VIDEO"]
    G --> H["AUDIO"]
    H --> I["DTV OUT"]
    I --> J["DVI INPUT (PC/DTV INPUT)"]
PC
Connect the RGB output of the PC to the DVI INPUT (PC/DTV INPUT) jack on the set.
2 Connect the PC audio outputs to the PC SOUND jack on the set.
3 Turn on the PC and the set.
4 Select DVI PC input source with using the INPUT button on the remote control.

- To get the best picture quality, adjust the PC graphics card to 1024x768, 60Hz.
- If using a sound card, adjust the PC sound as required.
-
Check the image on your TV. There may be noise associated with the resolution, vertical pattern, contrast or brightness in PC mode. If noise is present, change the PC mode to another resolution, change the refresh rate to another rate or adjust the brightness and contrast on the menu until the picture is clear. If the refresh rate of the PC graphic card can not be changed, change the PC graphic card or consult the manufacturer of the PC graphic card.
-
Avoid keeping a fixed image on the TV's screen for a long period of time. The fixed image may become permanently imprinted on the screen.
- The synchronization input form for Horizontal and Vertical frequencies is separate.
* DPM (Display Power Management) Mode If the PC goes to power saving mode, the monitor automatically switches to DPM mode.
* If you don't use the PC cable provided, DPM mode may not work.
Monitor Display Specifications
| Resolution | Horizontal Frequency (kHz) | Vertical Frequency (Hz) |
| 720x400 | 31.469KHz | 70.08Hz |
| 640x480 | 31.469KHz | 59.94Hz |
| 37.861KHz | 72.80Hz | |
| 37.500KHz | 75.00Hz | |
| 800x600 | 35.156KHz | 56.25Hz |
| 37.879KHz | 60.31Hz | |
| 48.077KHz | 72.18Hz | |
| 46.875KHz | 75.00Hz | |
| 1024x768 | 48.363KHz | 60.00Hz |
| 56.476KHz | 70.06Hz | |
| 60.023KHz | 75.02Hz | |
| 1280x768 | 47.693KHz | 60.00Hz |
| 1360x768 | 49.020KHz | 60.00Hz |
Power Cord Connection
- Connect the power cord correctly as shown.
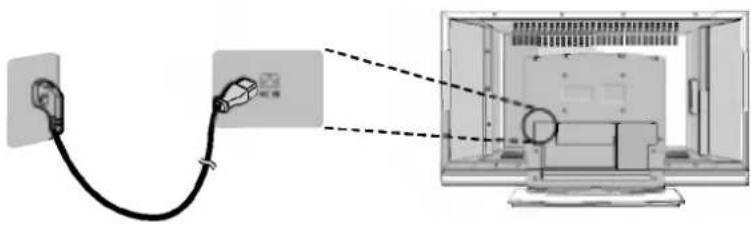
natural_image
Diagram showing cable connection to a device on a computer screen (no text or symbols present)Operation Basic operation
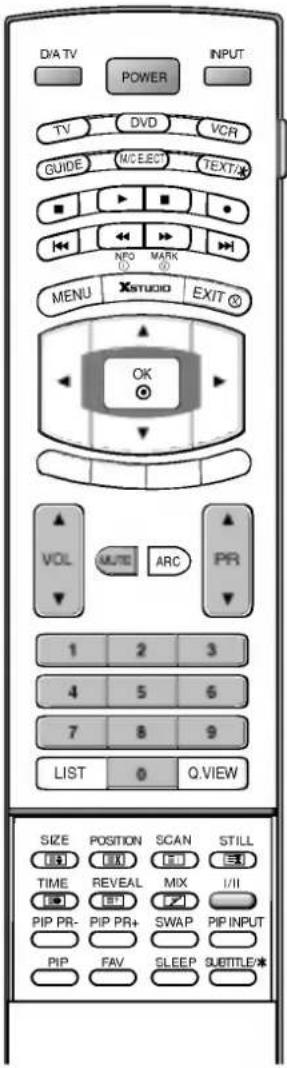
text_image
DIA TV POWER INPUT TV DVD VCR GUIDE M/CELECT TEXT/X NPO MARK MENU XSTUDIO EXIT OK VOL MUTE ARC PR 1 2 3 4 5 6 7 8 9 LIST 0 Q.VIEW SIZE POSITION SCAN STILL TIME REVEAL MIX I/II PIP PR- PIP PR+ SWAP PIP INPUT PIP FAV SLEEP SUBTITLE/Turning on the TV
1 Connect the power cord correctly. Now, the TV is switched to standby mode.
2 Press the ON/OFF, INPUT, PR ▲ /▼ button on the TV or press the POWER, INPUT, D/V TV, PR ▲ /▼, Number (0 \~ 9) button on the remote control and then the TV will switch on.
- If you intend to be away on vacation, disconnect the power plug from the wall power outlet.
Initializing Setup
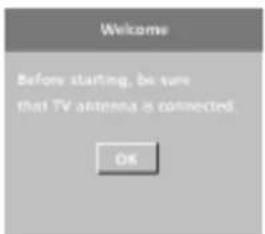
text_image
Welcome Before staffing, be sure that TV antenna is connected OK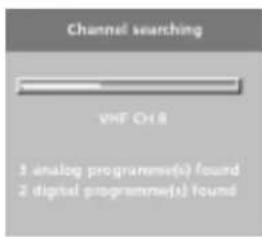
text_image
Channel searching VHF OH8 3 analog programme(s) found 2 digital programme(s) found1 You can see this OSD (On Screen Display) when turning the TV on at first after purchasing it.
2 If the OSD (On Screen Display) is displayed on the screen as figure after turning on the set, the Auto Programme for the Analog TV and Digital TV is tuned automatically.
Note: It will automatically disappear after approx. 140 seconds unless any button is pressed.
Volume Adjustment
1 Press the VOL ▲,▼ button to adjust the volume.
2 If you want to switch the sound off, press the MUTE button. You can cancel this function by pressing the MUTE, VOL ▲/▼, or I/II button.
Programme Selection
1 Press the PR ▲ /▼ or NUMBER buttons to select a programme number.
On Screen Language Selection
- The menu can be displayed on the screen in your desired language. First select your language.
1 Press the MENU button and then ▲ / ▼ button to select the SPECIAL menu.
2 Press the ▶ button and then▲ / ▼ button to select Menu language.
3 Press the ▶ button and then the ▲ / ▼ button to select your desired language. All the on screen displays will appear in the selected language.
4 Press the MENU button to save.
How to adjust the OSD screen
1 Press the MENU button and then ▲ /▼ button to select each menu.
2 Press the ▶ button and then use ▲ / ▼ / ◀ / ▶ button to display the available menus. Note: The OSD display differs from DTV mode and analog mode. Refer to below figure.
| Menu ICON | Sub Menu Function | |
| DTV mode | Analog TV mode | |
 | Auto programmeManual programmeProgramme edit5V antenna powerSystem information | Auto programmeManual programmeProgramme editFavourite programme |
| SETUP | ||
| [XCBZ] | PSMCSMXDAV2 Out | |
| PICTURE | ||
 | SSMBalanceAVLSRS WOWDigital audio outAudio language | SSMBalanceAVLSRS WOW |
| SOUND | ||
 | ClockTime zoneOff timeOn timeAuto sleepSleep timer | |
| TIME | ||
 | Menu languageLock systemChild lockLogo lightFactory reset | |
| SPECIAL | ||
 | DVI mode | |
| SCREEN | PositionClockPhaseAuto configureWXGA | |

- The OSD (On Screen Display) function enables you to adjust the screen status conveniently since it provides graphical presentation.
- In this manual, the OSD (On Screen Display) may be different from your TV's because it is just example to help the TV operation.

Setup Menu Options (In Digital Mode)
Auto Programme Tuning
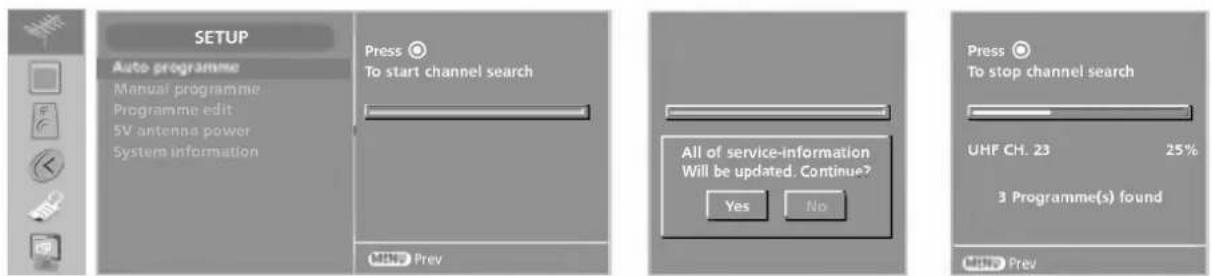
- Use it to automatically find and store all of the programmes.
- When you start auto programming in digital mode, all the stored service information will be deleted.
- A password is required to gain access to Auto programme menu if the Lock system is turned on.
1 Press the MENU button and then ▲ / ▼ button to select the SETUP menu.
2 Press the ▶ button and then ▲ / ▼ button to select Auto programme.
3 Press the ▶ button and then OK button to begin auto programming. The message "All of service-information will be updated. Continue?" will appear. If you want to keep on auto programming, select YES with using the ◀ / ▶ button. Then, press the OK button. Otherwise select NO.
To stop auto programming, press the OK button.
Press the ◀ /▶ button to select YES. Then, press the OK button.
4 Press the EXIT button to return to normal TV viewing.
Manual Programme Tuning
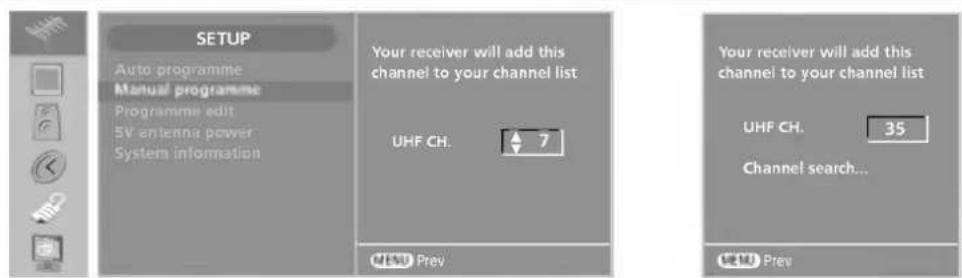
- Manual programme lets you manually add a programme to your programme list.
1 Press the MENU button and then ▲/▼ button to select the SETUP menu.
2 Press the ▶ button and then ▲ / ▼ button to select Manual programme.
3 Press the ▶ button and then ▲ / ▼ button to select the channel number you want to add.
4 Press the OK button to save.
When the channel number you want to add is already added in programme list, the message "Service-information of this channel will be updated. Continue?" will appear. If you want to keep on manual programming, select YES with using the ◀/▶ button. Then, press the OK button. Otherwise select NO.
5 Press the EXIT button to return to normal TV viewing.

Setup Menu Options continued (In Digital Mode)
Programme Edit


text_image
SETUP Auto programme Manual programme Programme edit 5V antenna power System information PrevPress to edit programme
1 Press the MENU button and then ▲/▼ button to select the SETUP menu.
2 Press the ▶ button and then ▲ / ▼ button to select Programme edit.
3 Press the ▶ button to enter the Programme edit menu.
■ Locking a programme (Only Lock system set to On)
- Select a programme to be locked with the ▲ / ▼ / ◀ / ▶ button.
- Press the GREEN button. The lock mark will appear in front of that programme number.
-
Press the GREEN button again to release this function.
-
To watch a locked programme, input a 4-digit password in Lock system. Be sure to remember this number.
- If you forgot your password, press '7', '7', '7', '7' on the remote control.
- If you select other programme after releasing a locked programme and then return to the locked programme within 1 minute, it's unnecessary to input a password to see the locked programme.
■ Moving a programme
- Select a programme to be moved with ▲ / ▼ / ◀ / ▶ button.
- Press the YELLOW button.
- Move the programme to the desired programme number with the ▲ /▼ /◄ /► button.
- Press the YELLOW button again to release this function.
■ Skipping a programme number
- Select a programme number to be skipped with ▲ /▼ /◀ /▶ button.
- Press the BLUE button. The skipped programme number turns to gray.
- Press the BLUE button again to release the skipped programme.
- When a programme number is skipped it means that you will be unable to select it using the PR ▲ /▼ button during normal TV viewing. If you want to select the skipped programme, directly enter the programme number with the NUMBER buttons or select it in the programme edit or table menu.
■ Selecting Favourite Programme
- Select your favourite programme number with ▲ /▼ /◀ /▶ button.
- Press the FAV button. The selected programme will be added to the favourite programme list and heart-mark will appear in front of that programme number.
4 Press the EXIT button to return to normal TV viewing.
5V Antenna Power
text_image
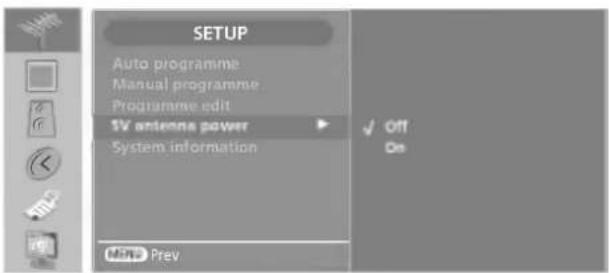
SETUP Auto programme Manual programme Programme edit 1V antenna power System information ✓ Off On Min: Prev- If the set is shorted in 5V antenna power-On, it will automatically change to Off to avoid a damage of the set.
- 5V Antenna power connection maybe occurs unexpected problem with an external equipment.
- Even if there is no a special 5V adapter power in the external antenna, this function can output 5V in the set.
1 Press the MENU button and then ▲ / ▼ button to select the SETUP menu.
2 Press the ▶ button and then ▲ / ▼ button to select 5V antenna power.
3 Press the ▶ button and then ▲ / ▼ button to select Off or On.
4 Press the EXIT button to return to normal TV viewing.
System Information
- Shows how strong your DTV signal is.
- The higher the signal strength and quality, the less likely you are to experience picture degradation.
- If signal strength and quality is weak, check the RF cable or antenna direction.
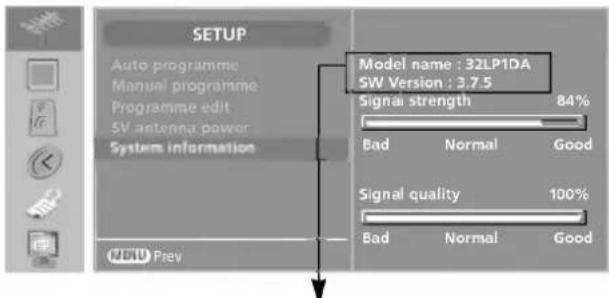
text_image
SETUP Auto programme Manual programme Programme edit 5V antenna power System information Model name : 32LP1DA SW Version : 3.7.5 Signal strength 84% Bad Normal Good Signal quality 100% Bad Normal Good MND Prev• 37 inch: 37LP1DA
* This OSD is only for illustration and the options are different according to the models.
1 Press the MENU button and then ▲ /▼ button to select the SETUP menu.
2 Press the ▶ button and then ▲ /▼ button to select System information. You can see the model name, Software version, and signal strength on screen.
3 Press the EXIT button to return to normal TV viewing.

Setup Menu Options continued (In Digital Mode)
Programme List
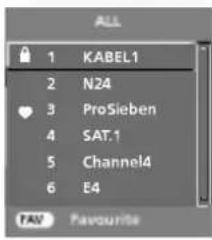
text_image
ALL 1 KABEL1 2 N24 3 ProSieben 4 SAT.1 5 Channel4 6 E4 PAN Favourite- You can check the programmes stored in the memory by displaying the programme table.
■ Displaying programme LIST
Press the LIST button to display the Programme table menu. The programme table appears on the screen.
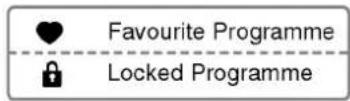
■ Selecting a programme in the programme list
Select a programme with the ▲ /▼ button. Press the OK button. The set switches to the chosen programme number.
■ Displaying favourite programme
Press the FAV button to display the favourite programme list. Press the LIST button to return to normal TV viewing.
Auto Programme Tuning
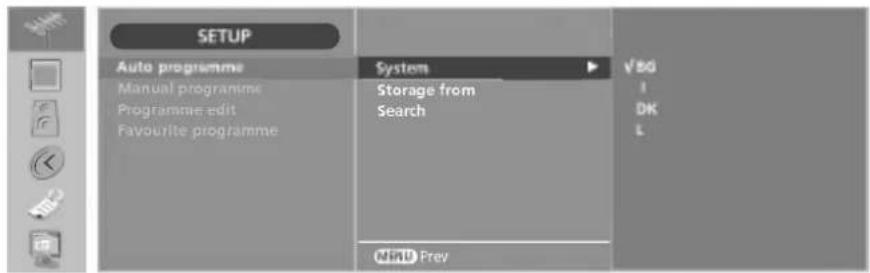
text_image
SETUP Auto programme Manual programme Programmie edit Favourite programme System Storage from Search Prey VBG I DK L- Up to 100 TV stations can be stored by programme numbers (0 to 99). Once you have preset the stations, you will be able to use the PR ▲ / ▼ or NUMBER buttons to scan the stations you have programmed. Stations can be tuned using automatic or manual modes.
- All stations that can be received are stored by this method. It is recommended that you use auto programme during installation of this set.
1 Press the MENU button and then ▲ / ▼ button to select the SETUP menu.
2 Press the ▶ button and then ▲ / ▼ button to select Auto programme.
3 Press the ▶ button and then ▲ /▼ button to select System.
4 Press the ▶ button and then ▲ /▼ button to select a TV system:
BG : PAL B/G, SECAM B/G (Europe / East Europe / Asia / New Zealand / M.East / Africa)
I : PAL I/II (U.K. / Ireland / Hong Kong / South Africa)
DK: PAL D/K, SECAM D/K (East Europe / China / Africa / CIS)
L : SECAM L/L'
5 Press the OK button and then ▲ /▼ button to select Storage from.
6 Press the ▶ button.
7 Press the ▲/▼ button or NUMBER buttons to select the beginning programme number. If you use NUMBER buttons, any number under 10 is entered with a numeric '0' in front of it, i.e.'05' for 5.
8 Press the OK button and then ▲ /▼ button to select Search.
9 Press the OK button to begin auto programming.
All receivable stations are stored. The station name is stored for stations which broadcast VPS (Video Programme Service), PDC (Programme Delivery Control) or TELETEXT data. If no station name can be assigned to a station, the channel number is assigned and stored as C (V/UHF 01-69) or S (Cable 01-47), followed by a number.
To stop auto programming, press the MENU button.
When auto programming is completed, the Programme list menu appears on the screen. See the 'Programme edit' section to edit the stored programme.
10 Press the EXIT button to return to normal TV viewing.

Setup Menu Options continued (In Analogue Mode)
Manual Programme Tuning
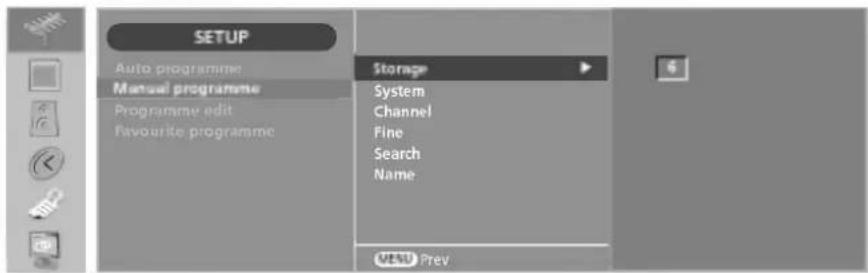
text_image
SETUP Auto programme Manual programme Programme edit Favourite programme Storage System Channel Fine Search Name MSU Prev- Manual programme lets you manually tune and arrange the stations in whatever order you desire.
1 Press the MENU button and then ▲ /▼ button to select the SETUP menu.
2 Press the ▶ button and then ▲ / ▼ button to select Manual programme.
3 Press the ▶ button and then ▲ / ▼ button to select Storage.
4 Press the ▶ button.
5 Press the ▲/▼ button or NUMBER buttons to select the beginning programme number. If you use NUMBER buttons, any number under 10 is entered with a numeric '0' in front of it, i.e. '05' for 5.
6 Press the OK button and then ▲ /▼ button to select System.
7 Press the ▶ button and then ▲ / ▼ button to select a TV system:
BG : PAL B/G, SECAM B/G (Europe / East Europe / Asia / New Zealand / M.East / Africa)
I : PAL I/II (U.K. / Ireland / Hong Kong / South Africa)
DK : PAL D/K, SECAM D/K (East Europe / China / Africa / CIS)
L : SECAM L/L'
8 Press the OK button and then ▲/▼ button to select Channel.
9 Press the ▶ button and then ▲ / ▼ button to select V/UHF or Cable.
10 Press the ▶ button and then select the channel number directly with the number buttons. If possible, select the programme number directly with the number buttons. Any number under 10 is entered with a numeric '0' in front of it, i.e. '05' for 5.
11 Press the OK button and then ▲ / ▼ button to select Search.
12 Press the ▶ button and then ◀/▶ button to commence searching. If a station is found the search will stop.
13 To store another station, repeat steps 3 to 12.
Fine Tuning
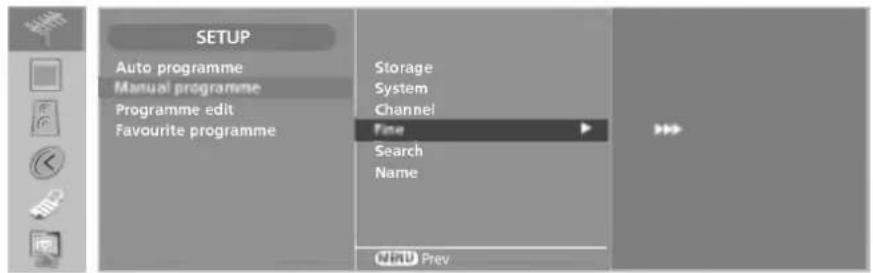
text_image
SETUP Auto programme Manual programme Programme edit Favourite programme Storage System Channel Fine Search Name WHD Prev- Normally fine tuning is only necessary if reception is poor.
- The finely tuned programme will be indicated by a yellow number during programme selection.
1 Press the MENU button and then ▲ / ▼ button to select the SETUP menu.
2 Press the ▶ button and then ▲ / ▼ button to select Manual programme.
3 Press the ▶ button and then ▲ /▼ button to select Fine.
4 Press the ▶ button and then ◀ /▶ button to fine tune for the best picture and sound.
5 Press the OK button to store it.
6 Press the EXIT button to return to normal TV viewing.
1 Press the MENU button and then ▲ /▼ button to select the SETUP menu.
2 Press the ▶ button and then ▲ /▼ button to select Manual programme.
3 Press the ▶ button and then ▲ /▼ button to select Fine.
4 Press the ▶ button and then ◀ /▶ button to fine tune for the best picture and sound.
5 Press the OK button to store it.
6 Press the EXIT button to return to normal TV viewing.
Assigning a Station Name
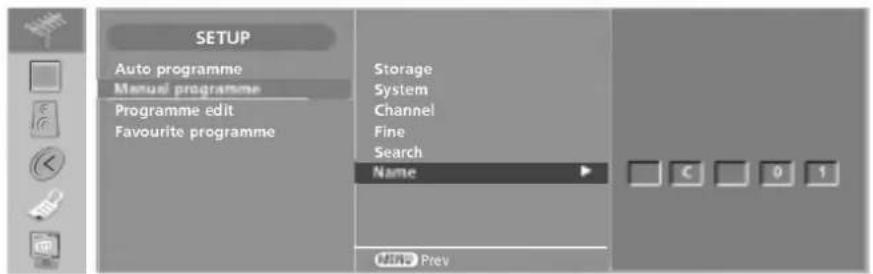
text_image
SETUP Auto programme Manual programme Programme edit Favourite programme Storage System Channel Fine Search Name MINI Prev- You can assign a station name with five characters to each programme number.
1 Press the MENU button and then ▲/▼ button to select the SETUP menu.
2 Press the ▶ button and then ▲ / ▼ button to select Manual programme.
3 Press the ▶ button and then ▲ / ▼ button to select Name.
4 Press the ▶ button and then ▲ / ▼ button. You can use a the alphabet A to Z, the number 0 to 9, +/-, and blank.
5 Press the ◀ / ▶ button to select the position and make your choice of the second character, and so on.
6 Press the OK button to store it.
7 Press the EXIT button to return to normal TV viewing.

Setup Menu Options continued (In Analogue Mode)
Programme Edit
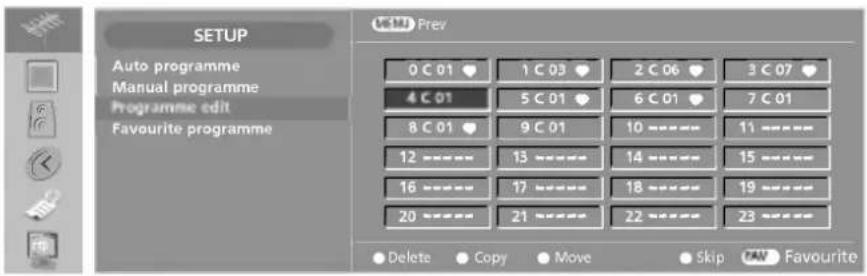
text_image
SETUP Auto programme Manual programme Programme edit Favourite programme C:\17\ Prev 0 C 01 ♥ 1 C 03 ♥ 2 C 06 ♥ 3 C 07 ♥ 4 C 01 ♥ 5 C 01 ♥ 6 C 01 ♥ 7 C 01 ♥ 8 C 01 ♥ 9 C 01 ♥ 10 ---- 11 ---- 12 ---- 13 ---- 14 ---- 15 ---- 16 ---- 17 ---- 18 ---- 19 ---- 20 ---- 21 ---- 22 ---- 23 ---- Delete Copy Move Skip Favourite- This function enables you to delete or skip the stored programmes. Also you can move some stations to other programme numbers or copy a blank station data into the selected programme number.
1 Press the MENU button and then ▲ /▼ button to select the SETUP menu.
2 Press the ▶ button and then ▲ / ▼ button to select Programme edit.
3 Press the ▶ button.
■ Deleting a programme
- Select a programme to be deleted with the ▲ /▼ /◀ /▶ button.
- Press the RED button twice.
The selected programme is deleted, all the following programmes are shifted up one position.
■ Copying a programme
- Select a programme to be copied with the ▲ / ▼ / ◀ / ▶ button.
- Press the GREEN button.
All the following programmes are shifted down one position.
■ Moving a programme
- Select a programme to be moved with ▲ / ▼ / ◀ / ▶ button.
- Press the YELLOW button.
- Move the programme to the desired programme number with the ▲ /▼ /◄ /► button.
- Press the YELLOW button again to release this function.
■ Skipping a programme number
- Select a programme number to be skipped with ▲ / ▼ / ◀ / ▶ button.
- Press the BLUE button. The skipped programme number turns to blue.
- Press the BLUE button to release the skipped programme.
When a programme number is skipped it means that you will be unable to select it using the PR ▲ /▼ button during normal TV viewing. If you want to select the skipped programme, directly enter the programme number with the NUMBER buttons or select it in the programme edit or table menu.
■ Selecting Favourite Programme
- Select your favourite programme number with ▲ /▼ /◀ /▶ button.
- Press the FAV button. The selected programme will be added to the favourite programme list and heart-mark will appear in back of that programme number.
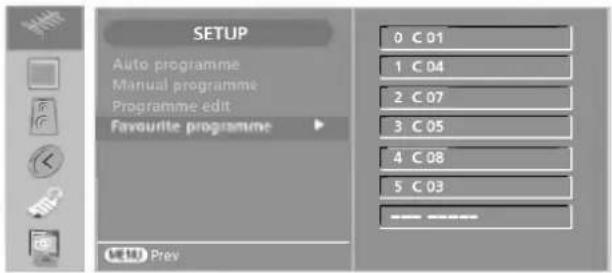
Favourite Programme
text_image
SETUP Auto programme Manual programme Programme edit: Favourite programme 0 C 01 1 C 04 2 C 07 3 C 05 4 C 08 5 C 03 Prev- This function lets you select your favourite programmes directly.
- Repeatedly press the FAV button to select stored favourite programmes.
1 Press the MENU button and then ▲ / ▼ button to select the SETUP menu.
2 Press the ▶ button and then ▲ / ▼ button to select Favourite programme.
3 Press the ▶ button and then ▲ / ▼ button to select ·····
4 Select a desired programme with the ◀/▶ button or NUMBER buttons. Any number under 10 is entered with a numeric '0' in front of it, i.e. '05' for 5.
5 To store another programme, repeat steps 3 to 4. You can store up to 7 programmes.
6 Press the EXIT button to return to normal TV viewing.
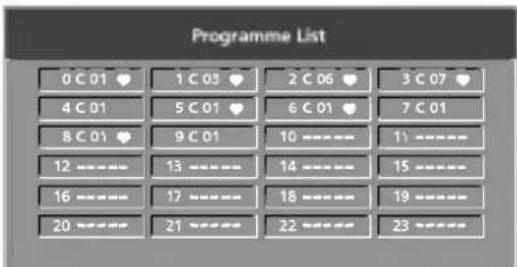
Calling the Programme Table
- You can check the programmes stored in the memory by displaying the programme table.
text_image
Programme List 0 C 01 ♥ 1 C 03 ♥ 2 C 06 ♥ 3 C 07 ♥ 4 C 01 ♥ 5 C 01 ♥ 6 C 01 ♥ 7 C 01 8 C 01 ♥ 9 C 01 10 ---- 11 ---- 12 ---- 13 ---- 14 ---- 15 ---- 16 ---- 17 ---- 18 ---- 19 ---- 20 ---- 21 ---- 22 ---- 23 ----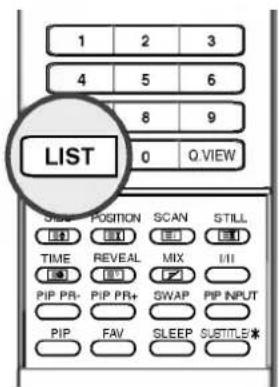
text_image
1 2 3 4 5 6 8 9 0 Q VIEW LIST START POSITION SCAN STILL TIME REVEAL MIX I/II PIP PR- PIP PR+ SWAP PIP INPUT PIP FAV SLEEP SUBTITLE*■ Displaying programme list
- Press the LIST button to display the Programme List menu.
-
The programme list appears on the screen. One programme list contains 24 programmes.
-
You may find some blue programmes. They have been set up to be skipped by auto programming or in the programme edit mode.
- Some programmes with the channel number shown in the programme List indicate there is no station name assigned.
■ Selecting a programme in the programme list
- Select a programme with the ▲ / ▼ / ◀ / ▶ button.
- Press the OK button. The set switches to the chosen programme number.
■ Paging through a programme list
There are 5 programme LIST pages which total contain 100 programmes.
- Press the ▲ / ▼ / ◀ / ▶ button repeatedly to turns the pages.
- Press the EXIT button to return to normal TV viewing.

Picture Menu Options
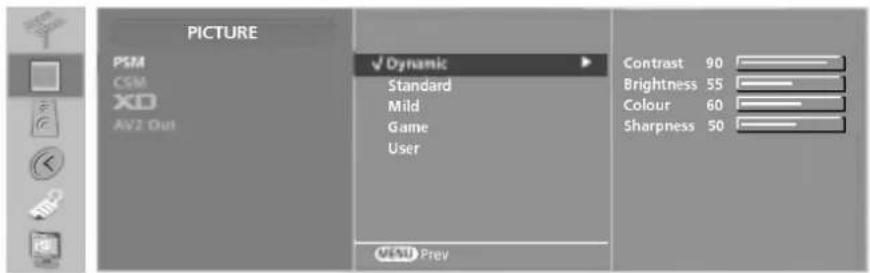
PSM (Picture Status Memory)
text_image
PICTURE PSM CSM XO AV2 Out Dynamic Standard Mild Game User Contrast 90 Brightness 55 Colour 60 Sharpness 50 MENU Prev- This function adjusts the set for the best picture appearance.
- When adjusting User options (Contrast, Brightness, Colour, and Sharpness) manually, PSM automatically changes to User.
- Dynamic, Standard, Mild, and Game are programmed for optimum picture reproduction at the factory and cannot be changed.
1 Press the MENU button and then ▲ /▼ button to select the PICTURE menu.
2 Press the ▶ button and then ▲ / ▼ button to select PSM.
3 Press the ▶ button and then ▲ / ▼ button to select Dynamic, Standard, Mild, Game, or User.
4 Press the EXIT button to return to normal TV viewing.
Manual Picture Adjustment (PSM-User option)
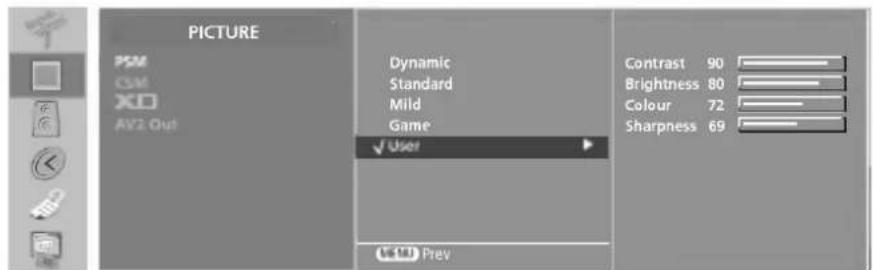
text_image
PICTURE PSM CSM XO AV2 Out Dynamic Standard Mild Game ✓ User Contrast 90 Brightness 80 Colour 72 Sharpness 69 Prev- You can adjust picture Contrast, Brightness, Colour, Sharpness and Tint (NTSC only) to the levels you prefer.
1 Press the MENU button and then ▲ /▼ button to select the PICTURE menu.
2 Press the ▶ button and then ▲ / ▼ button to select PSM.
3 Press the ▶ button and then ▲ / ▼ button to select User.
4 Press the ▶ button and then ▲ / ▼ button to select the desired picture option (Contrast, Brightness, Colour, or Sharpness).
5 Press the ◀ /▶ button to make appropriate adjustments.
6 Press the EXIT button to return to normal TV viewing.

- Only Contrast and Brightness are displayed in PC mode.
CSM (Colour Status Memory)
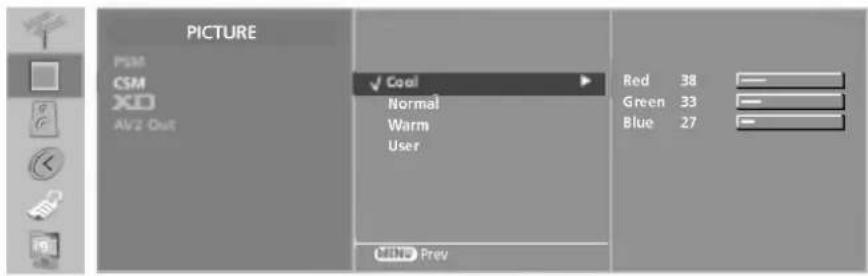
text_image
PICTURE PSM CSM XO AV2 Out ✓ Coal Normal Warm User MINI Prev Red 38 Green 33 Blue 27- To initialize values (reset to default settings), select the Normal option.
- When adjusting colour temperature options (Red, Green, or Blue) manually, CSM automatically changes to User.
1 Press the MENU button and then ▲ /▼ button to select the PICTURE menu.
2 Press the ▶ button and then ▲ / ▼ button to select CSM.
3 Press the ▶ button and then ▲ / ▼ button to select Cool, Normal, Warm, or User.
- Cool: To see less intense colors with more blue.
- Normal: To initialize values (reset to default settings).
- Warm: To enhance hotter colors such as red.
4 Press the EXIT button to return to normal TV viewing.
Manual Colour Temperature Control (CSM - User option)
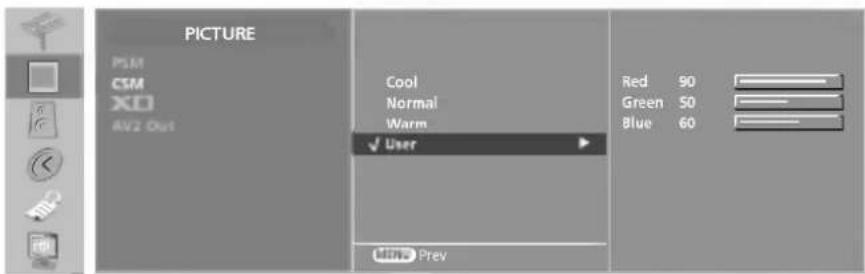
text_image
PICTURE PSM CSM XO AV2 Out Cool Normal Warm ✓ User Red 90 Green 50 Blue 60 MINI Prev- You can adjust red, green, blue to any colour temperature you prefer.
1 Press the MENU button and then ▲ /▼ button to select the PICTURE menu.
2 Press the ▶ button and then ▲ / ▼ button to select CSM.
3 Press the ▶ button and then ▲ / ▼ button to select User.
4 Press the ▶ button and then ▲ / ▼ button to select Red, Green, or Blue.
5 Press the ◀ / ▶ button to make appropriate adjustments.
6 Press the EXIT button to return to normal TV viewing.

Picture Menu Options continued
XD Function
- XD is LG electronic's unique picture improving technology to display a real HD source through an advanced digital signal processing algorithm.
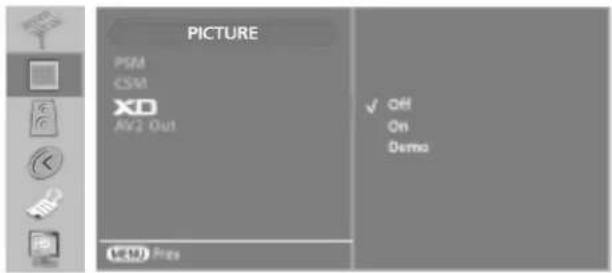
text_image
PICTURE PSM CSM XO AV2 Out ✓ Off On Demo OK PSC Photo
natural_image
Black-and-white photo of two children in a group, one holding a camera and the other looking up (no visible text or symbols)• Demo
Use it to see the difference between XD demo on and XD Demo off. To release XD Demo, press the EXIT button.
1 Press the MENU button and then ▲ /▼ button to select the PICTURE menu.
2 Press the ▶ button and then ▲ / ▼ button to select XD.
3 Press the ▶ button and then ▲ / ▼ button to select Off, On, or Demo.
4 Press the EXIT button to return to normal TV viewing.
Picture Out for AV2 Euro Scart
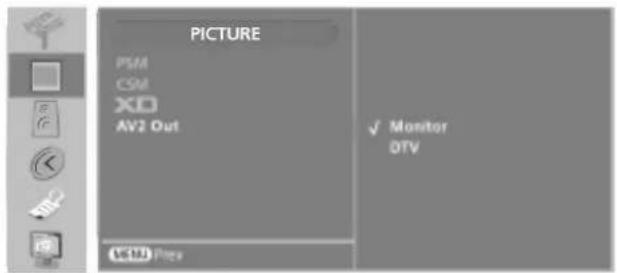
text_image
PICTURE PSM CSM XD AV2 Out ✓ Monitor DTV V6134 Files- Use it to select your desired picture out input source for AV2 Euro scart socket.
- If you select DTV while viewing the HDMI input source, the video and audio is unavailable.
1 Press the MENU button and then ▲ /▼ button to select the PICTURE menu.
2 Press the ▶ button and then ▲ / ▼ button to select AV2 Out.
3 Press the ▶ button and then ▲ / ▼ button to select Monitor or DTV.
• If you select Monitor, the current viewing input source outputs.
• If you select DTV, the DTV input source outputs.
4 Press the EXIT button to return to normal TV viewing.
Picture Format
- You can watch TV in various picture formats; Wide, 14:9, Zoom, Auto, 4:3.
- Avoid keeping a fixed image on the set's screen for a long time. The fixed image may become imprinted on the screen.
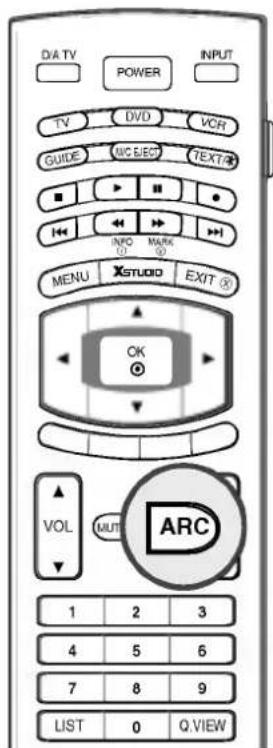
1 Repeatedly press the ARC button to select your desired picture format.
Wide
text_image
DA TV POWER INPUT TV DVD VCR GUIDE MIC BIEC TEXT® INFO MARK 0 MENU XSTUDIO EXIT OK VOL MUTI ARC 1 2 3 4 5 6 7 8 9 LIST 0 Q.VIEW
natural_image
Two people sitting on a bench with raised arms, outdoors in a natural setting (no visible text or symbols)You can enjoy the cinema (the picture format of 16:9) or general TV programme through the 16:9 mode.
The screen 16:9 is viewed just like that but the screen 4:3 is magnified to the left and right so that the screen 16:9 is full.
14:9
natural_image
Three people sitting on a platform, one raising arms with raised hands (no visible text or symbols)You can enjoy the picture format of 14:9 or general TV programme through the 14:9 mode.
The screen 14:9 is viewed just like that the screen 4:3 is magnified to the upper / lower and left / right. Press the ▲ /▼ button to see the invisible part in this picture format.
Zoom
natural_image
Two people sitting on a wooden platform, one raising arms and the other smiling (no text or symbols visible)You can enjoy the cinema in a vast screen through the Zoom mode.
The screen 4:3 is magnified to the upper / lower and left / right sides so that the screen 16:9 is full. The bottom and top of the picture may be lost.
Press the ▲ /▼ button to see the invisible part in this picture format.
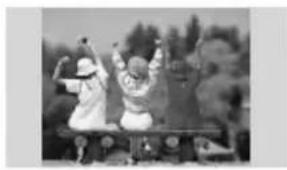
Auto
natural_image
Two people sitting on a bench outdoors, one raising arms, surrounded by trees (no visible text or symbols)When your set receives the wide screen signal, it will be automatically changed to the picture format to be sent.
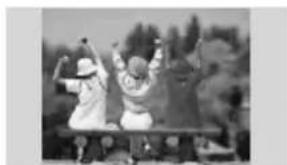
4:3
natural_image
Two people sitting on a bench outdoors, one holding up a camera (no visible text or symbols)This picture format is 4 to 3 of general TV.

- In PC mode, only Wide and 4:3 aspect ratios are available.

Sound Menu Options
SSM (Sound Status Memory)
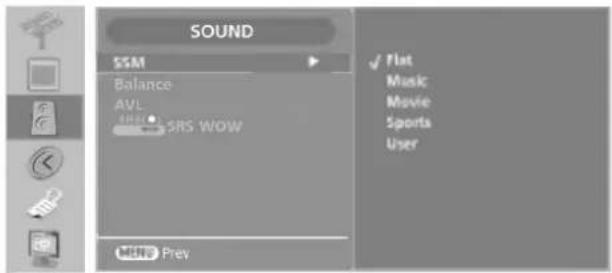
- SSM lets you enjoy the best sound without any special adjustment because the TV sets the appropriate sound options based on the programme content.
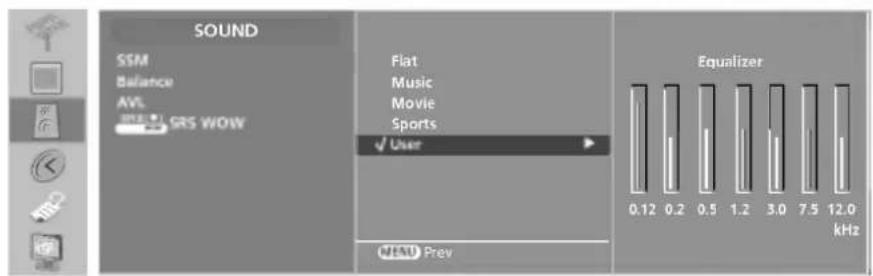
- You can select your preferred sound setting; Flat, Music, Movie, or Sports and you can also adjust the sound frequency of the equalizer.
- When adjusting sound equalizer manually, SSM automatically switches User.
- Flat, Music, Movie, and Sports are preset for good sound quality at the factory and are not adjustable.
text_image
SOUND SSM Balance AVL SRS WOW Menu Prey Flat Music Movie Sports User1 Press the MENU button and then ▲ /▼ button to select the SOUND menu.
2 Press the ▶ button and then ▲ / ▼ button to select SSM.
3 Press the ▶ button and then ▲ / ▼ button to select Flat, Music, Movie, Sports, or User.
4 Press the EXIT button to return to normal TV viewing.
Sound Frequency Adjustment (SSM - User option)
text_image
SOUND SSM Balance AVL GRS WOW Flat Music Movie Sports ✓ User MENU Prev Equalizer 0.12 0.2 0.5 1.2 3.0 7.5 12.0 kHz- Adjust the sound equalizer.
1 Press the MENU button and then ▲ /▼ button to select the SOUND menu.
2 Press the ▶ button and then ▲ / ▼ button to select SSM.
3 Press the ▶ button and then ▲ / ▼ button to select User.
4 Press the ▶ button.
5 Select a sound band by pressing the ◀/▶ button. Make appropriate sound level with the ▲/▼ button.
6 Press the EXIT button to return to normal TV viewing.
Balance Adjustment
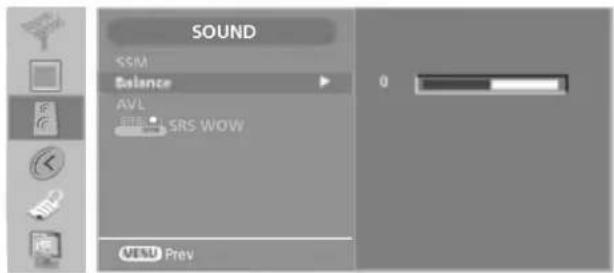
text_image
SOUND SSM Balance AVL SRS WOW MENU Prev- You can adjust the sound balance of speaker to the levels you prefer.
1 Press the MENU button and then ▲ /▼ button to select the SOUND menu.
2 Press the ▶ button and then ▲ / ▼ button to select Balance.
3 Press the ▶ button and then ◀/▶ button to make desired adjustment.
4 Press the EXIT button to return to normal TV viewing.
AVL (Auto Volume Leveler)
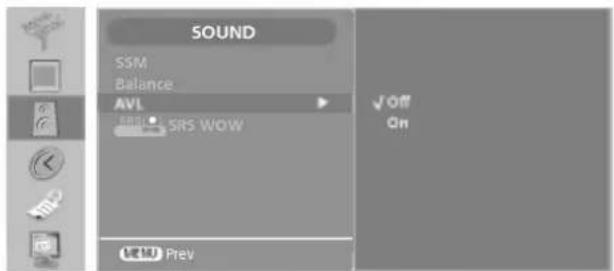
text_image
SOUND SSM Balance AVL SRS WOW Off On Prev- AVL automatically keeps on an equal volume level even if you change programmes.
1 Press the MENU button and then ▲ / ▼ button to select the SOUND menu.
2 Press the ▶ button and then ▲ /▼ button to select AVL.
3 Press the ▶ button and then ▲ / ▼ button to select Off or On.
4 Press the EXIT button to return to normal TV viewing.

Sound Menu Options continued
SRS WOW
- The SRS WOW function plays back the mono or stereo sound input with the dynamic surround effects. It will provide rich and profound sound tone.
- If you set the SRS WOW ON, SSM can not be adjusted.
Mini Glossary

is a trademark of SRS Labs, Inc. technology is incorporated under license from SRS Labs, Inc.
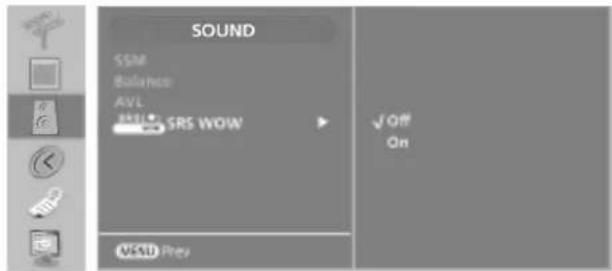
text_image
SOUND SSM Balance AVL SRS WOW MSU Prey ✓ Off On1 Press the MENU button and then ▲ / ▼ button to select the SOUND menu.
2 Press the ▶ button and then ▲ / ▼ button to select SRS WOW.
3 Press the ▶ button and then ▲ / ▼ button to select Off or On.
4 Press the EXIT button to return to normal TV viewing.
Digital Audio out (In Digital mode only)
- This function lets you select your preferred Digital Audio Output.
- When it doesn't apply the Dolby Digital Audio signal, select the PCM function to output the dolby digital audio by SPDIF output.
- When connecting with external audio equipments, such as amplifiers or speakers, please select the Dolby Digital.
- If you select the Dolby Digital when Dolby digital sound is included on the programme, the set speakers output Dolby digital sound.
- When it's applied the AC3 format, if you select Digital audio out-Dolby Digital, SPDIF output will be outputted AC3. Even if it's selected Dolby Digital, when it doesn't apply AC3 format, SPDIF output will be outputted PCM.
- If you set Digital audio out and Audio language function simultaneously, only Digital audio out function will work.
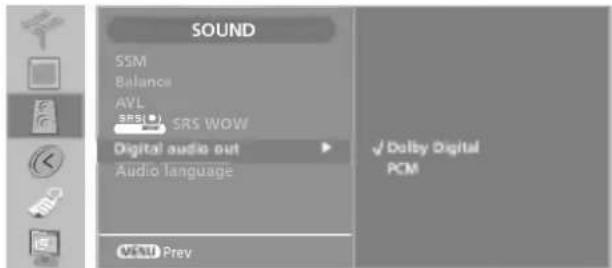
text_image
SOUND SSM Balance AVL SRS(S) SRS WOW Digital audio out Audio language ✓ Dolby Digital PCM MEALL Prev1 Press the MENU button and then ▲ / ▼ button to select the SOUND menu.
2 Press the ▶ button and then ▲ / ▼ button to select Digital audio out.
3 Press the ▶ button and then ▲ / ▼ button to select Dolby Digital or PCM (Pulse Code Modulation).
4 Press the EXIT button to return to normal TV viewing.
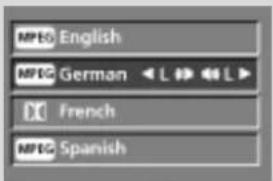
- You can select the audio language with the I/II button on the remote control when two or more Audio languages are broadcasted.
a. Press the ▲ /▼ button to select the desired language.
b. Press the ◀/▶ button to select L+L, L+R, or R+R.
c. The languages can be chosen for digital sources only if they are included on the program.
text_image
MPFG English MPFG German < L > < L > DC French MPFG Spanish| N.A | Not Available |
| Audio | Audio only service |
| Audio for visual impaired | |
| ABC | Audio for hearing impaired* The audio which it has not a language code will be displayed a 3 character. |
Audio Language (In Digital mode only)
text_image
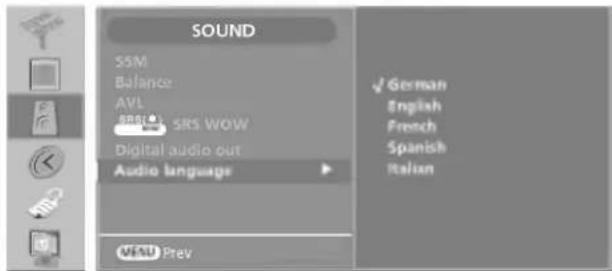
SOUND SSM Balance AVL SRS WO Digital audio out Audio language MEAU Prev ✓ German English French Spanish Italian- This function lets you select your preferred language for audio.
- If the audio data in selected language is not broadcasted, the default audio will be played.
- The Digital audio out function has priority over the Audio language function. So make sure to select Dolby audio out-PCM when selecting desired audio language.
1 Press the MENU button and then ▲ / ▼ button to select the SOUND menu.
2 Press the ▶ button and then ▲ / ▼ button to select Audio language.
3 Press the ▶ button and then ▲ / ▼ button to select German, English, French, Spanish, or Italian.
4 Press the EXIT button to return to normal TV viewing.

Sound Menu Options continued
Stereo/Dual Reception (In Analogue mode only)
- When a programme is selected, the sound information for the station appears after the programme number and station name disappear.
Mini Glossary
| DUAL I | Sends the primary broadcast language to the loudspeakers. |
| DUAL II | Sends the secondary broadcast language to the loudspeakers. |
| DUAL I+II | Sends a separate language to each loudspeaker. |
| Broadcast | On Screen Display |
| Mono | MONO |
| Stereo | STEREO |
| Dual | DUAL I |
■ Mono sound selection
If the stereo signal is weak in stereo reception, you can switch to mono by pressing the I/II button twice. In mono reception, the depth of sound is improved. To switch back to stereo, press the I/II button twice again.
■ Language selection for dual language broadcast
If a programme received two languages (dual language), you can switch to DUAL I, DUAL II or DUAL I+II by pressing the I/II button repeatedly.
NICAM Reception (In Analogue mode only)
- If the set is equipped with the receiver for NICAM reception, the high quality NICAM (Near Instantaneous Companding Audio Multiplex) digital sound can be received.
-
Sound output can be selected according to the type of received broadcast as follows by pressing the I/II button repeatedly.
-
When NICAM mono is received, you can select NICAM MONO or FM MONO.
- When NICAM stereo is received, you can select NICAM STEREO or FM MONO. If the stereo signal is weak, switch to FM mono.
- When NICAM dual is received, you can select NICAM DUAL I, NICAM DUAL II or NICAM DUAL I+II or MONO.
Speaker Sound Output Selection
- In AV, S-Video, Component, and DVI mode, you can select output sound for the left and right loud-speakers.
Repeatedly press the I/II button to select the sound output.
L+R: Audio signal from audio L input is sent to the left loud speaker and audio signal from audio R input is sent to the right loud speaker.
L+L: Audio signal from audio L input is sent to left and right loud speakers.
R+R: Audio signal from audio R input is sent to left and right loud speakers.

Time Menu Options
Clock Setup
text_image
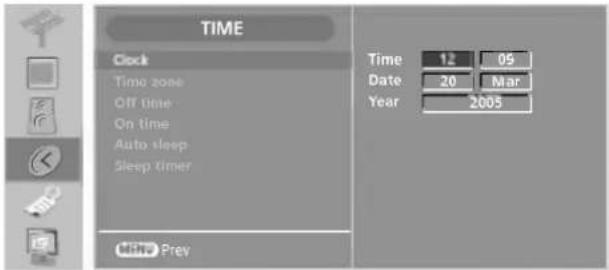
TIME Clock Time zone Off time On time Auto sleep Sleep timer Time 12 05 Date 20 Mar Year 2005 Min Prey- The clock is set automatically when receiving the digital signal. (You can set the clock if the TV has no DTV signal.)
- You must set to the time correctly before using on/off time function.
1 Press the MENU button and then ▲ / ▼ button to select the TIME menu.
2 Press the ▶ button and then ▲ / ▼ button to select Clock.
3 Press the ▶ button and then ◀/▶ button to select either the year, date, or time option.
4 Once selected, use the ▲ / ▼ button to set the year, date, and time options.
5 Press the EXIT button to return to normal TV viewing.
Time Zone
text_image
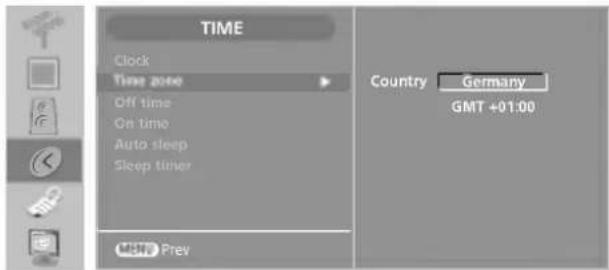
TIME Clock Time zone Off time On time Auto sleep Sleep timer Country Germany GMT +01:00 Prev- Select the time zone depending on your viewing area.
1 Press the MENU button and then ▲/▼ button to select the TIME menu.
2 Press the ▶ button and then ▲ /▼ button to select Time zone.
3 Press the ▶ button and then ▲ / ▼ button to select Germany, Italy, Spain, France, or Great Britain.
4 Press the EXIT button to return to normal TV viewing.

Time Menu Options Continued
On/Off Time
- The Off time automatically switches the set to standby at the preset time.
- Two hours after the set is switched on by the on time function it will automatically switch back to standby mode unless a button has been pressed.
- Once the on time/off time is set, these functions operate daily at the preset time.
- Off time function overrides On timer function if they are set both to the same time.
- The set must be in standby mode for the On timer to work.
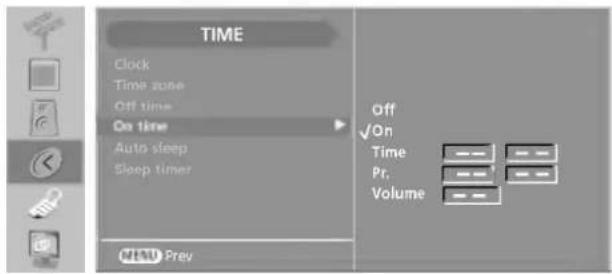
text_image
TIME Clock Time zone Off time On time Auto sleep Sleep timer Off ✓ On Time Pr. Volume MENU Prev1 Press the MENU button and then ▲ /▼ button to select the TIME menu.
2 Press the ▶ button and then ▲ / ▼ button to select Off time/On time.
3 Press the ▶ button and then ▲ / ▼ button to select On.
• To cancel On/Off timer function, select Off.
4 Press the ▶ button and then ▲ / ▼ button to set the hour.
5 Press the ▶ button and then ▲ / ▼ button to set the minutes.
6 only On timer function
- Programme: Press the ▶ button and then ▲ / ▼ button to select TV or DTV. And then, Press the ▶ button and then ▲ / ▼ button to select the programme.
- Volume: Press the ▶ button and then ▲ / ▼ button to adjust volume level at turn-on.
7 Press the EXIT button to return to normal TV viewing.
Auto Sleep
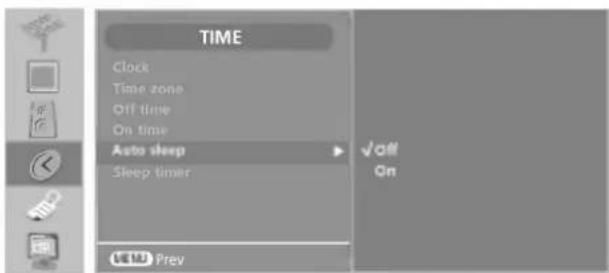
text_image
TIME Clock Time zone Off time On time Auto sleep Sleep timer ✓ Off On Prev- If set to on and there is no input signal, the TV turns off automatically after 10 minutes.
1 Press the MENU button and then ▲ /▼ button to select the TIME menu.
2 Press the ▶ button and then ▲ / ▼ button to select Auto sleep.
3 Press the ▶ button and then ▲ / ▼ button to select Off or On.
4 Press the EXIT button to return to normal TV viewing.
Sleep Timer
text_image
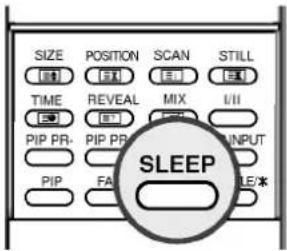
SIZE POSITION SCAN STILL TIME REVEAL MIX I/II PIP PR-PIP PR INPUT PIP FA INPUT SLEEP LE/- You don't have to remember to switch the set off before you go to sleep.
- The sleep timer automatically switches the set to standby after the preset time has elapsed.
- You can also use the TIME menu to adjust Sleep timer.

text_image
e² ....1 Press the SLEEP button repeatedly to select the number of minutes. First the 'O2' option appears on the screen, followed by the following sleep timer options: 10, 20, 30, 60, 90, 120, 180, and 240 minutes.
2 The timer begins to count down from the number of minutes selected.
3 To view the remaining sleep time, press the SLEEP button once.
4 To cancel the sleep time, repeatedly press the SLEEP button until the display 'O ^z - - -' appears.
5 When you switch the set off, the set releases the preset sleep time.

Special Menu Options
Lock System
text_image
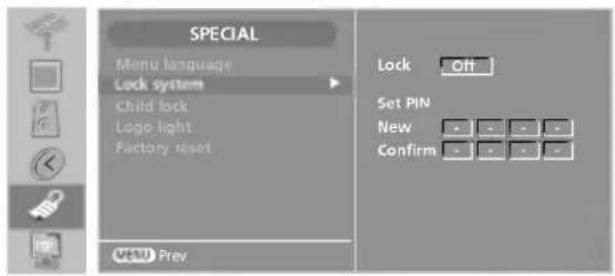
SPECIAL Menu language Lock system Child lock Logo light Factory reset VEND Prey Lock Off Set PIN New Confirm- Set up blocking schemes to block specific channels.
- A password is required to gain access to this menu if the Lock System is turned on.

- If you ever forget your password, key in '7', '7', '7', '7' on the remote control.
1 Press the MENU button and then ▲ /▼ button to select the SPECIAL menu.
2 Press the ▶ button and then ▲ / ▼ button to select Lock system. Then, press the ▶ button.
- If Lock is already set, enter the password as requested.
- The TV is set up with the initial password "0-0-0-0".
3 Press the ▲ / ▼ button to select On or Off.
4 Press the ▶ button and then enter a 4 digit password.
Enter it again when requested.
Change the password by inputting a new password twice.
Child Lock
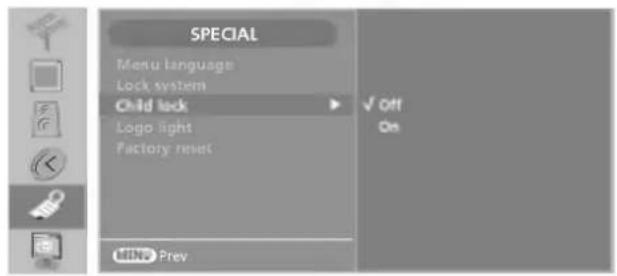
text_image
SPECIAL Menu language Lock system Child lock Logo light Factory reset MIND Prev ✓ Off On- The TV can be set so that the remote control is needed to control it. This feature can be used to prevent unauthorized viewing.
1 Press the MENU button and then ▲ /▼ button to select the SPECIAL menu.
2 Press the ▶ button and then ▲ / ▼ button to select Child lock.
3 Press the ▶ button and then ▲ / ▼ button to select Off or On.
4 Press the EXIT button to return to normal TV viewing.

- With the Child lock on, the display " 🔒 Child lock on" appears on the screen if any button on the front panel is pressed while viewing the TV.
Logo Light
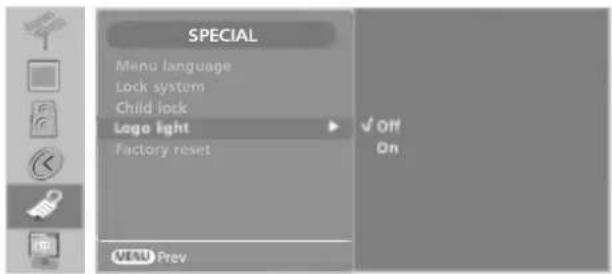
text_image
SPECIAL Menu language Lock system Child lock Logo light Factory reset ✓ off On MENU Prev- If you select On, the logo of TV front panel turns the lamp on.
1 Press the MENU button and then ▲ /▼ button to select the SPECIAL menu.
2 Press the ▶ button and then ▲ / ▼ button to select Logo light.
3 Press the ▶ button and then ▲ / ▼ button to select Off or On.
4 Press the EXIT button to return to normal TV viewing.
Factory Reset
- Use to quickly reset all the menu options to their original factory preset values.
- You can also see this OSD display when turning the TV on at first after purchasing it.
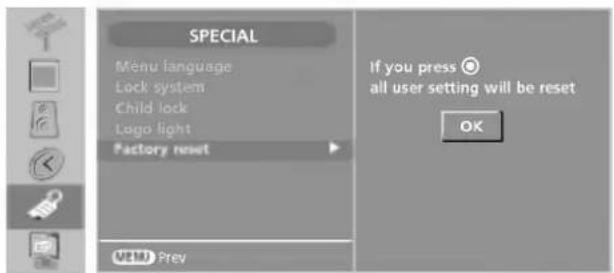
text_image
SPECIAL Menu language Lock system Child lock Logo light Factory reset If you press Ⓞ all user setting will be reset OK Prev
- If you ever forget your password, key in '7', '7', '7', '7' on the remote control.

text_image
Welcome Before starting, be sure that TV antenna is connected OK Channel searching VHP CH.8 1 analog programme(s) found 2 digital programmes found1 Press the MENU button and then ▲ /▼ button to select the SPECIAL menu.
2 Press the ▶ button and then ▲ / ▼ button to select Factory reset.
3 Press the ▶ button and then enter the password.
4 Press the OK button to reset the menu options to original values. At this time, the set turns off and then it automatically turns on. All user setting will be reset.
5 Press the EXIT button to return to normal TV viewing.

Screen Menu Options
* Be sure to select the DVI PC input source before operation.
When connecting a DVI PC and RGB PC with DVI INPUT jack on the set, Select the DVI PC input source.
Screen Position
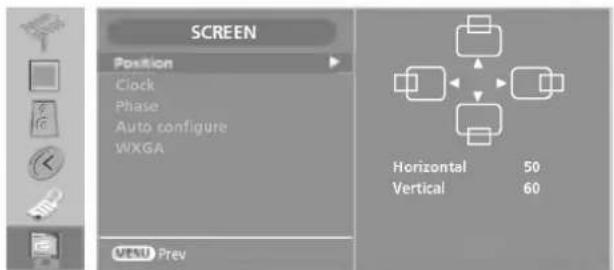
text_image
SCREEN Position Clock Phase Auto configure WXGA MENU Prev Horizontal 50 Vertical 60- This function is to adjust picture to left/right and up/down as you prefer.
1 Press the MENU button and then use ▲ / ▼ button to select the SCREEN menu.
2 Press the ▶ button and then use ▲ / ▼ button to select Position.
3 Press the ▶ button and then use ▲/▼/◀/▶ button to adjust the position.
4 Press the OK button to save.
Manual Configure (Clock & Phase)
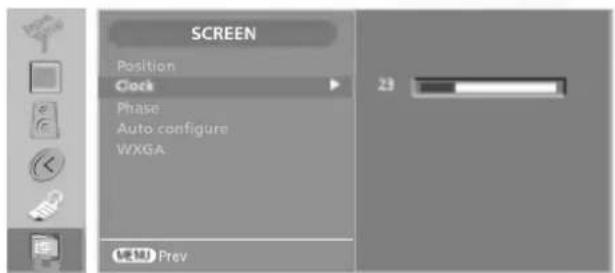
- If the picture isn't clear after auto adjustment and especially that characters are still trembling, adjust the picture phase manually.
- To correct the screen size, adjust Clock.
Mini Glossary
| Clock | This function is to minimize any vertical bars or stripes visible on the screen background. And the horizontal screen size will also change. |
| Phase | This function allows you to remove any horizontal noise and clear or sharpen the image of characters. |
text_image
SCREEN Position Clock Phase Auto configure WXGA Prev1 Press the MENU button and then use ▲ / ▼ button to select the SCREEN menu.
2 Press the ▶ button and then use ▲ / ▼ button to select Clock or Phase.
3 Press the ▶ button and then use ◀ / ▶ button to make appropriate adjustments.
• The adjustment range of Phase is 0\~63.
• The adjustment range of Clock is 0\~100.
4 Press the OK button to save.
Auto Configure
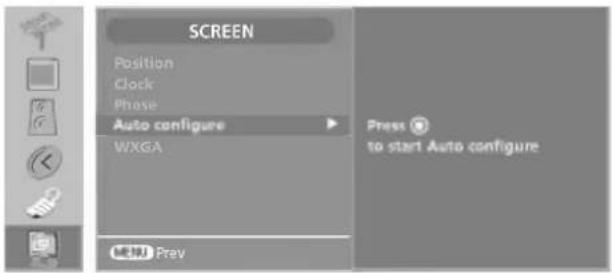
- Automatically adjusts picture position and minimizes image shaking.
- After adjustment, if the image is still not correct, your TV is functioning properly but needs further adjustment.
Mini Glossary
Auto configure
This function is for the automatic adjustment of the screen position, clock, and phase. The displayed image will disappear for a few seconds while the auto configuration is in progress.
text_image
SCREEN Position Clock Phase Auto configure WXGA Press ⚙ to start Auto configure Prey1 Press the MENU button and then use ▲ / ▼ button to select the SCREEN menu.
2 Press the ▶ button and then use ▲ / ▼ button to select Auto configure.
3 Press the ▶ button to start Auto configure.
- If the position of the image is still not correct, try it again.
WXGA Mode
text_image
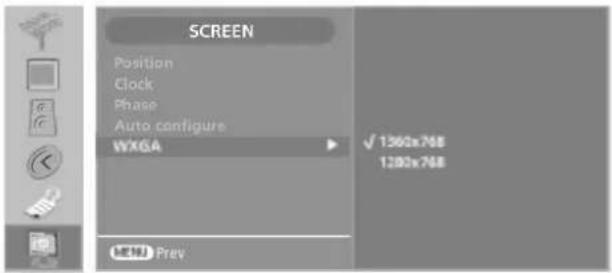
SCREEN Position Clock Phase Auto configure WXGA ✓ 1360x768 1200x768 Prev- For more improved or better picture quality, select the same mode corresponding to computer resolution.
1 Press the MENU button and then use ▲ / ▼ button to select the SCREEN menu.
2 Press the ▶ button and then use ▲ / ▼ button to select WXGA.
3 Press the ▶ button and then use ▲ / ▼ button to select desired mode. From this point on, the adjustment starts.
PIP (Picture-In-Picture) / Double Window / POP
- PIP lets you view 2 different inputs (sources) on your TV screen at the same time. One source will be large, and the other source will show a smaller inset image.
- Double window mode splits the screen into 2, allowing 2 picture sources to be shown on the TV screen at the same time. Each source is given half the screen.
text_image
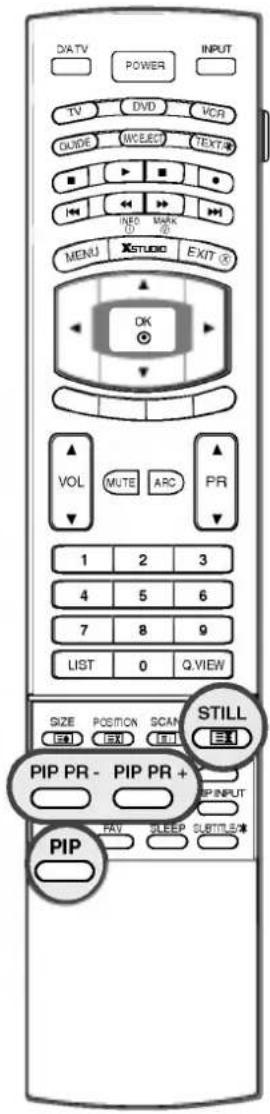
DATV POWER INPUT TV DVD VCR GUIDE WELEC TEXT ■ ▶ ■ ● I← ← ← → → INED MARK MENJ XSTUDIO EXIT OK VOL MUTE ARC PR 1 2 3 4 5 6 7 8 9 LIST 0 Q.VIEW SIZE POSITION SCAN SETTLE SETTLE PIP PR - PIP PR + PIP INPUT PAP SLEEP SUBTITLE/# PIPWatching PIP/Double Window/POP
Press the PIP button to access the sub picture. Each press of PIP changes the PIP options as shown below.
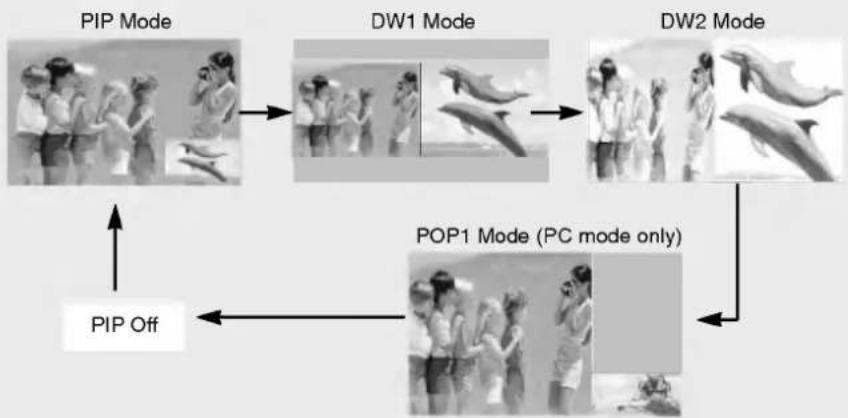
flowchart
graph TD
    A["PIP Mode"] --> B["DW1 Mode"]
    B --> C["DW2 Mode"]
    C --> D["POP1 Mode (PC mode only)"]
    D --> E["PIP Off"]
    style A fill:#f9f,stroke:#333
    style B fill:#ccf,stroke:#333
    style C fill:#cfc,stroke:#333
    style D fill:#fcc,stroke:#333
    style E fill:#ffc,stroke:#333

- You can hear the main picture sound in PIP mode. Exchange the main and sub picture to hear the sub picture sound.
Sub Picture Freeze
- Press the STILL button to freeze motion of the sub picture.
- Press the STILL button again to release the freeze motion.
Programme Selection for Sub Picture
- Press the PIP PR +/- button to select a programme for the sub picture. The selected programme number is displayed just below the programme number of main picture.

- When you press the PIP PR +/- button to select a programme for the sub picture, the sub picture is automatically changed to DTV mode.
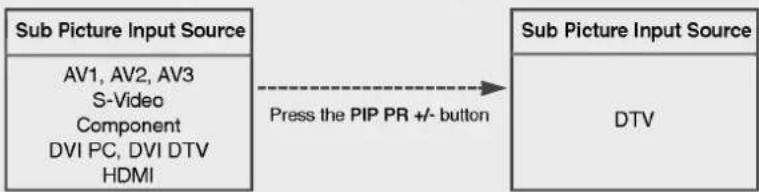
flowchart
graph LR
    A["Sub Picture Input Source"] -->|Press the PIP PR +/- button| B["Sub Picture Input Source"]
    A --> C["AV1, AV2, AV3\nS-Video\nComponent\nDVI PC, DVI DTV\nHDMI"]
    B --> D["DTV"]
- If you press the PIP PR +/- button in DTV mode for main picture, the sub picture is changed to Analog mode.
Input Source Selection for Sub Picture
Press the PIP INPUT button to select the input source for the sub picture.
Each press of PIP INPUT button is pressed, each input source for the sub picture is displayed as shown below.

flowchart
graph LR
    A["DTV/TV"] --> B["AV1"]
    B --> C["AV2"]
    C --> D["AV3"]
    D --> E["S-Video"]
    F["HDMI"] <--_G["DVI DTV"] <--_H["DVI PC"] <--_I["Component"]
| Main picture Input | Available Sub Picture Input for Each PIP Mode | ||
| PIP / DW1 / DW2 | POP1 | POP3 | |
| DTV | All (Except DTV) | Not available | TV Only |
| TV | All (Except TV) | Not available | DTV Only |
| AV1 | All (Except AV1) | Not available | TV / DTV |
| AV2 | All (Except AV2) | Not available | TV / DTV |
| AV3 | All (Except AV3) | Not available | TV / DTV |
| S-Video | All (Except S-Video) | Not available | TV / DTV |
| Component | DTV, TV, AV1, AV2, AV3, S-Video | Not available | TV / DTV |
| DVI DTV | DTV, TV, AV1, AV2, AV3, S-Video | DTV, TV, AV1, AV2, AV3, S-Video | TV / DTV |
| DVI PC | DTV, TV, AV1, AV2, AV3, S-Video | Not available | TV / DTV |
| HDMI | DTV, TV, AV1, AV2, AV3, S-Video | Not available | TV / DTV |
Sub Picture Size Adjustment (PIP mode only)
There are 2 types of sub picture size according to main and sub picture input source.
| Input source | Sub Picture Size | |
| Main Picture Input | Sub Picture Input | |
| DTV | TV, AV1, AV2, AV3, S-Video | Press the SIZE button in PIP mode.And press the ◀/► button until desired size is achieved.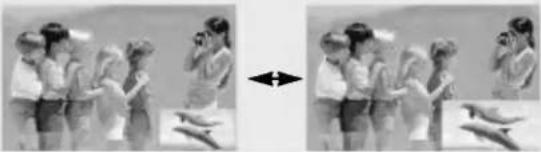 |
| TV | DTV, AV1, AV2, AV3, S-Video | |
| AV1 | DTV, TV, AV2, AV3, S-Video | |
| AV2 | DTV, TV, AV1, AV3, S-Video | |
| AV3 | DTV, TV, AV1, AV2, S-Video | |
| S-Video | DTV, TV, AV1, AV2, AV3 | |
| DTV, TV,AV1, AV2, AV3,S-Video | Component,DVI DTV, DVI PC,HDMI | Press the SIZE button in PIP mode.And press the ◀/► button until desired size is achieved. |
| Component,DVI DTV, DVI PC,HDMI | DTV, TV,AV1, AV2, AV3,S-Video | |
PIP (Picture-In-Picture) / Double Window / POP continued
Moving the Sub Picture (PIP mode only)
There are 2 types of sub picture position according to main and sub picture input source.
| Input Source | Sub Picture Position | ||
| Main Picture Input | Sub Picture Input | ||
| DTV | TV, AV1, AV2, AV3, S-Video |  | Press the POSITION button in PIP mode.Each press of the POSITION button will move the sub picture to a different position on the screen in a clockwise direction. |
| TV | DTV, AV1, AV2, AV3, S-Video | ||
| AV1 | DTV, TV, AV2, AV3, S-Video | ||
| AV2 | DTV, TV, AV1, AV3, S-Video | ||
| AV3 | DTV, TV, AV1, AV2, S-Video | ||
| S-Video | DTV, TV, AV1, AV2, AV3 | ||
| DTV, TV, AV1, AV2, AV3, S-Video | Component, DVI DTV, DVI PC, HDMI | 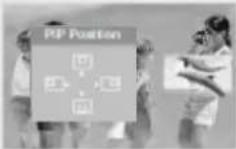 | Press the POSITION button in PIP mode.And press the ▲/▼/◄/►button until desired position is achieved. |
| Component, DVI DTV, DVI PC, HDMI | DTV, TV, AV1, AV2, AV3, S-Video | ||
Swapping between main and sub pictures
Press the SWAP button to exchange the main and sub pictures.
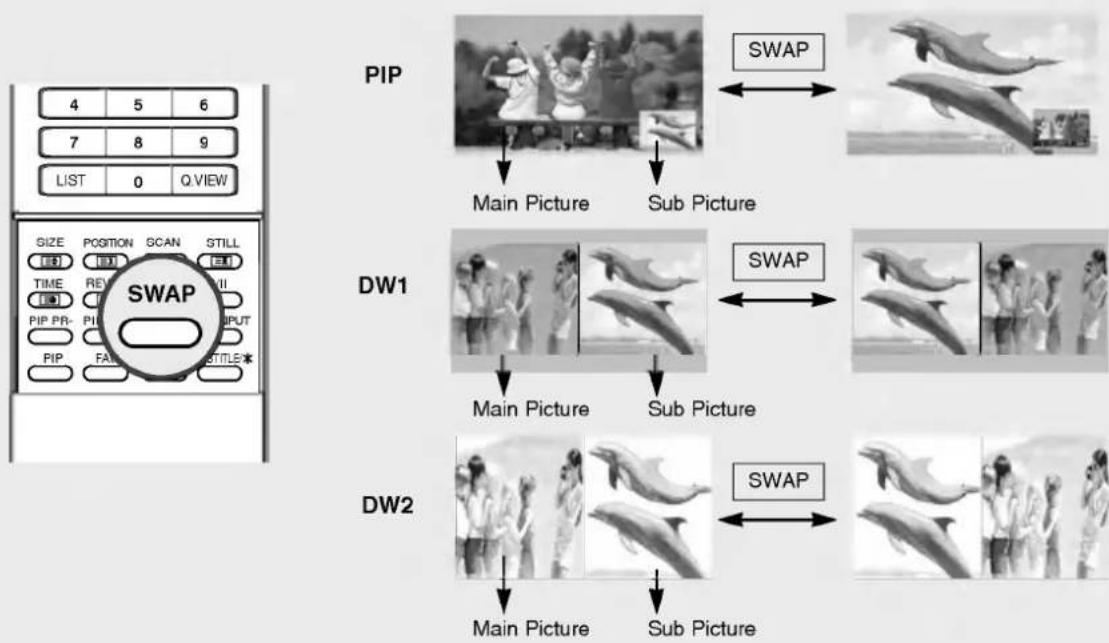
flowchart
graph TD
    A["PIP"] --> B["Main Picture"]
    B --> C["Sub Picture"]
    C --> D["SWAP"]
    E["DW1"] --> F["Main Picture"]
    F --> G["Sub Picture"]
    G --> H["SWAP"]
    I["DW2"] --> J["Main Picture"]
    J --> K["Sub Picture"]
    K --> L["SWAP"]
POP (Picture-out-of-Picture: Programme Scan)
- This function enables you to search all the stored stations on 3 sub pictures.
- Note: Run Auto programme channel search before using POP mode.
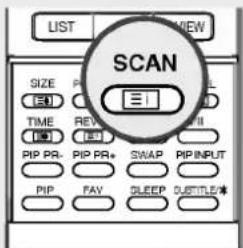
text_image
LIST VIEW SCAN SIZE TIME PIP PR. PIP PR* PIP PAP SWAP PIP INPUT SLEEP DUSTILE*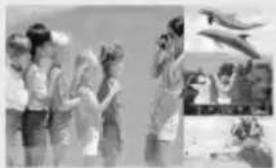
natural_image
Black-and-white photo collage showing children and an airplane in flight (no visible text or symbols)- Press the SCAN button to activate the programme scan mode while in PIP/DW/POP1 mode.
The selected sub pictures search all the stored stations. - Press the EXIT button to cancel POP3 mode.
TELETEXT
- Teletext (or TOP text) is an optional function, therefore only the set with the teletext system can receive the teletext broadcast.
- Teletext is a free service broadcast by most TV stations which gives up-to-the-minute information on news, weather, television programmes, share prices and many other topics.
- The teletext decoder of this TV can support the SIMPLE, TOP and FASTEXT systems. SIMPLE (standard teletext) consists of a number of pages which are selected by directly entering the corresponding page number. TOP and FASTEXT are more modern methods allowing quick and easy selection of teletext information.
Switch on/off
Press the TEXT button to switch to teletext. The initial page or last page appears on the screen. Two page numbers, TV station name, date and time are displayed on the screen headline. The first page number indicates your selection, while the second shows the current page displayed. Press the TEXT or EXIT button to switch off teletext.
SIMPLE Text
■ Page selection
- Enter the desired page number as a three digit number with the NUMBER buttons. If during selection you press a wrong number, you must complete the three digit number and then re-enter the correct page number.
- The PR ▲ / ▼ button can be used to select the preceding or following page.
TOP Text
- The user guide displays four fields-red, green, yellow and blue at the bottom of the screen. The yellow field denotes the next group and the blue field indicates the next block.
■ Block / group / page selection
- With the blue button you can progress from block to block.
- Use the yellow button to proceed to the next group with automatic overflow to the next block.
- With the green button you can proceed to the next existing page with automatic overflow to the next group.
Alternatively the PR ▲ button can be used. - The red button permits to return to previous selection. Alternatively the PR ▼ button can be used.
■ Direct page selection
Corresponding to the SIMPLE teletext mode, you can select a page by entering it as a three digit number using the NUMBER buttons in TOP mode.
FASTEXT
- The teletext pages are colour coded along the bottom of the screen and are selected by pressing the corresponding coloured button.
■ Page selection
- Press the ☐ button to select the index page.
- You can select the pages which are colour coded along the bottom line with the same coloured buttons.
- Corresponding to the SIMPLE teletext mode, you can select a page by entering its three digit page number with the NUMBER buttons in FASTEXT mode.
- The PR ▲ / ▼ button can be used to select the preceding or following page.
Special Teletext Functions

REVEAL
Press this button to display concealed information, such as solutions of riddles or puzzles. Press this button again to remove the information from the display.

SIZE
Selects double height text. Press this button to enlarge the top half of the page. Press this button again to enlarge the bottom half of the page. Press this button again to return to the normal display.

POSITION
Displays the TV picture on the screen while waiting for the new teletext page. The display Ⓑ will appear at the top left hand corner of the screen. When the updated page is available then displayed Ⓑ will change to the page number. Press this button to view the updated teletext page.

STILL
Stops the automatic page change which will occur if a teletext page consists of 2 or more sub pages. The number of sub pages and the sub page displayed is, usually, shown on the screen below the time. When this button is pressed the stop symbol is displayed at the top left-hand corner of the screen and the automatic page change is inhibited. To continue press this button again.

MIX
Displays the teletext pages superimposed on the TV picture. To switch the TV picture off press this button again.

TIME
a. When viewing a TV programme, press this button to display the time. Press this button again to remove the display.
b. In the teletext mode, press this button to select a sub page number. The sub page number is displayed at the bottom of the screen. To hold or change the sub page, press the RED/GREEN, PR ▲ / ▼ or NUMBER buttons.
Press this function again to exit.
EPG (Electronic Programme Guide) (In Digital mode)
- This system has an Electronic Programme Guide (EPG) to help your navigation through all the possible viewing options.
- The EPG supplies information such as programme listings, start and end times for all available services. In addition, detailed information about the programme is often available in the EPG (the availability and amount of these programme details will vary, depending on the particular broadcaster).
- This function can be used only when the EPG information is broadcasted by broadcasting companies.
- The EPG displays the programme description for next 8 days.
How to use EPG
1 Press the GUIDE button to switch on EPG.
2 Press the RED button repeatedly to select the EPG mode as shown below: Now/Next guide mode, 8 Days guide mode, or Channel guide mode.
3 Press the GUIDE or EXIT button again to switch off EPG and return to TV viewing.
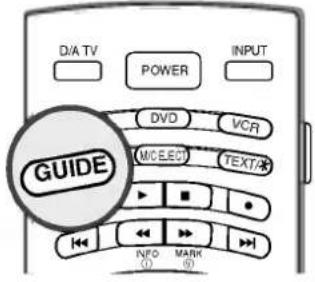
text_image
D/A TV POWER INPUT DVD VCR M/CELECT TEXT/ GUIDE INFO MARK (1) (2)Now/Next Guide Mode
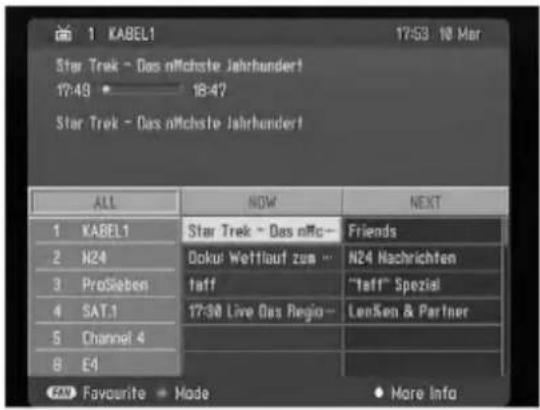
| Remote Control Buttons | Function |
| FAV | Shows the favourite programmes or all programmes |
| INFO | The detail information on or off (See p.58) |
| RED | Mode change to 8 days Guide |
| ◎ | Change to the selected channel |
| ◀ / ▶ | Select NOW or NEXT mode |
| ▲ / ▼ | Select the Broadcasting Programme |
| PR ▲ / ▼ | Page Up/Down |
| GUIDE/EXIT | Switch off EPG |
8Days Guide Mode
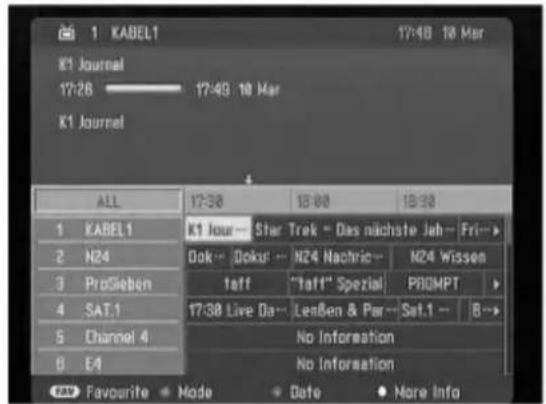
text_image
K1 Journal 17:26 — 17:49 18 Mar K1 Journal ALL 17:30 18:00 18:30 1 KABEL1 K1 Jour Star Trek - Das nächste Jah - Fri... 2 N24 Ook - Doksi -- N24 Hachric -- N24 Wissen 3 ProSieben taff "taff" Spezial PROMPT 4 SAT.1 17:30 Live Da-- Leaßen & Par-- Sat.1 - B 5 Channel 4 No Information 6 E4 No Information Favourite Mode Date More Info| Remote Control Buttons | Function |
| FAV | Shows the favourite programmes or all programmes |
| INFO | The detail information on or off (See p.58) |
| RED | Mode change to Channel Guide |
| GREEN | Show or hide the date change box (See p.58) |
| Change to the selected channel | |
| ◀ / ▶ | Select the programme for other time |
| ▲ / ▼ | Select the other programme for same time |
| PR ▲ / ▼ | Page Up/Down |
| GUIDE/EXIT | Switch off EPG |
Channel Guide Mode
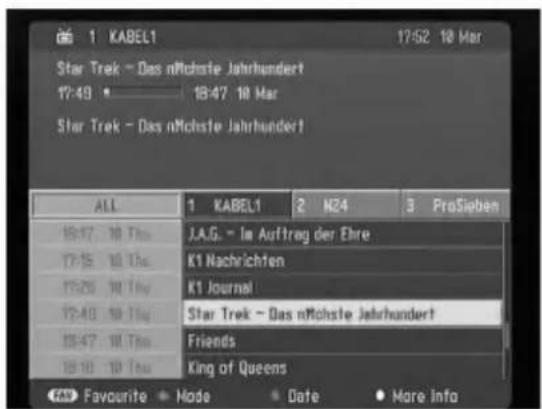
| Remote Control Buttons | Function |
| FAV | Shows the favourite programmes or all programmes |
| INFO | The detail information on or off (See p.58) |
| RED | Mode change to NOW/NEXT Guide |
| GREEN | Show or hide the date change box (See p.58) |
| ◎ | Change to the selected channel |
| ◀ / ▶ | Select a broadcasting station |
| ▲ / ▼ | Select a broadcasting programme time |
| PR ▲ / ▼ | Page Up/Down |
| GUIDE/EXIT | Switch off EPG |
EPG (Electronic Programme Guide) (In Digital mode) Continued
Button Function in Detail Information Box
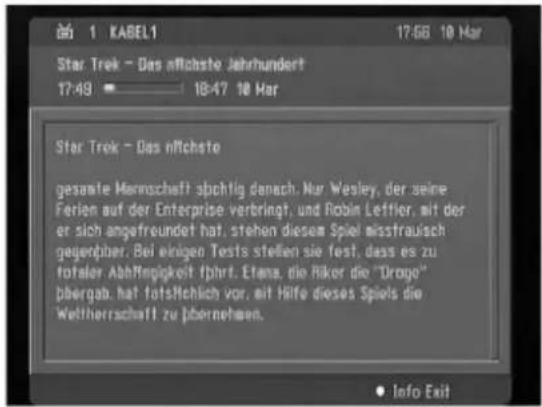
Button Function in Date Change Box
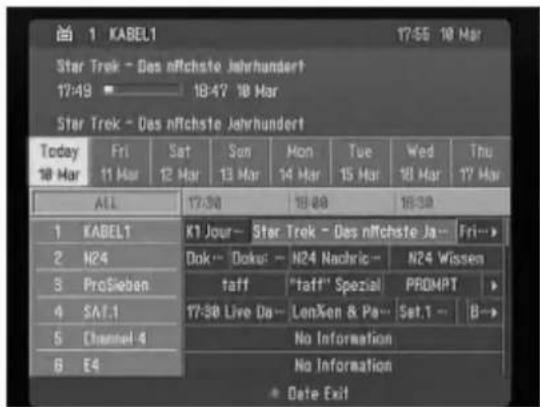
text_image
1 KABEL1 17:55 18 Mar Star Trek - Das nFchste Jahrhundert 17:49 18:47 18 Mar Star Trek - Das nFchste Jahrhundert Today Fri Sat Sun Mon Tue Wed Thu 18 Mar 11 Mar 12 Mar 13 Mar 14 Mar 15 Mar 16 Mar 17 Mar ALL 17:30 18:00 18:30 1 KABEL1 K1 Jour- Star Trek - Des nFchste Ja- Fri-► 2 H24 Dok- Doks- N24 Nachric- N24 Wissen 3 ProSieben taff "taff" Spezial PROMPT 4 SAT.1 17:30 Live Da- LenXen & Pa- Sat.1 - B-► 5 Channel 4 No Information 6 E4 No Information Date Exit| Remote Control Buttons | Function |
| GREEN | Show or hide the date change box |
| ◎ | Display the programme for the selected date |
| ◀ / ▶ | Change a date |
| ▼ | Hide the date change box |
| GUIDE/EXIT | Switch off EPG |
Notes on Memory card
Memory Card
This is a device equipment to communicate the data between AV external equipment. It's used to a digital camera, camcorder, MP3 player, notebook or PDA.
Precaution for Using the Memory Card
- Please be sure to insert the correct memory card type in the right direction. (Confirm between the two memory slots before insertion.)
- Don't insert metal substances into the slots of the memory card.
- Do not bend, drop or apply strong shock to memory card.
- After pulling the memory card out from the set, please keep the memory stick in an appropriate case to prevent it from static shock.
- The stored data may be changed or lost as a result of misuse or static electricity.
- Do not turn the power off while the memory card is in operation.
- Don't eject the memory card while in use. Otherwise, it may cause a data loss or card damage.
- Insert only one card into each slot.
- Static electricity and/or electrical noise has the potential to change or erase the stored data. Please take measures to avoid.
- This Company takes no responsibility for problems such as the damage or malfunction that occurs while using the set, inappropriate settings, or any other reasons, except for defects or malfunctions intrinsic to the product.
- Ensure to use a memory card that lists the manufacturers name and serial number.
- The manufacturer will not be responsible for any data damage. Making back up data is strongly recommended.
- Make sure to comply with the following steps when ejecting a memory card.
- Ensure each memory card has complied with standard.
XSTUDIO
- XSTUDIO mode supports JPEG images and MP3 music files.
Available Memory Card
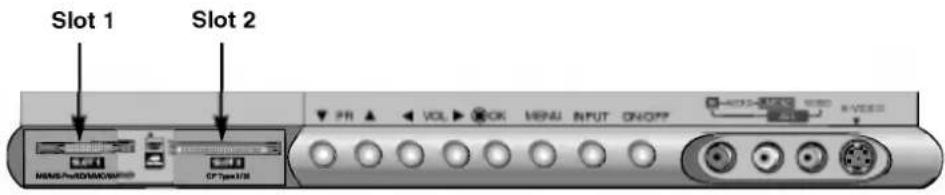
text_image
Slot 1 Slot 2 MAIN/PM/WM/WM/W/WM CP77mmX18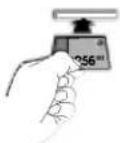

- Use the specified card based on the slot location.
- Some MagicStor Plus card is unavailable.
| Slot 1 | Slot 2 | ||||||
 |  |  |  |  |  |  |  |
| MS / MS-Pro(Memory Stick/Memory Stick Pro) | SD(Secure Digital) | MMC(MultiMedia Card) | SMC(Smart Media Card) | xD(xD-Picture Card) | CF I(CompactFlash) | CF II(MD, Microdrive) | CF II(Magicstor) |
Supported Files
| A sort of file | Photo Image (JPEG) | Music File (MP3) |
| Compatibility | *.jpg | *.mp3 |
| Memory card capacity | CF: 2GB Microdrive: 2GB Magicstor: 2.2GB MMC: 256MB SD: 512MB An error may occur if you use a memory card with greater than the specified capacity. | SMC: 128MB XD: 512MB MS: 128MB MS Pro: 1GB |
| Unsupported or damaged file | Unsupported or damaged JPEG or MP3 files can cause errors. Do not try to change the file extension of unsupported file types to the file extension of supported file types. | |
- Playback speed can vary dependent on the card type.
- You can assign 8 characters for the file name of the card. If the file name is longer than 8 characters, it will be truncated at 6 digits and "\~1, 2, 3, and 4" will be appended to the 7-8th position.
The JPEG Decoding/Thumbnail Supplied Spec
| Compression Method | Colour format | ||||
| Baseline | Progressive | 4:4:411:11:11 (Y, C_b , Cr) | 4:2:221:11:11 (Y, C_b , Cr)12:11:11 (Y, C_b , Cr) | 4:2:022:11:11 (Y, C_b , Cr) | |
| JPEG Decoding Support | O | X | X | O | O |
| Image Display | Image | invalid format | invalid format | Image | Image |
| Thumbnail Display | Display when there is no thumbnail. |  |  | Display when there is no thumbnail. | Display when there is no thumbnail. |
- If an error occur when decoding a JPEG, "Corrupted file" is displayed on screen.
How to insert and eject the card
■ Insert card
- Insert the card into the Slot 1 and/or Slot 2 with the hand softly and slowly.
- Press the XSTUDIO button to enter the XSTUDIO mode. Press the XSTUDIO button again to exit the XSTUDIO mode.
■ Eject card
- Press the M/C EJECT button on the remote control.
- Press ▲ / ▼ button to select the Memory 1 Eject or Memory 2 Eject based on the inserted card location. If selecting Cancel, OSD is disappeared.
- Press the OK button and then eject the card from the slot.
Memory 1 Eject

Memory 2 Eject
Cancel
- Do not insert or eject a card in one slot while the card in the other slot (slot 1 or slot 2) is in use, the product may run abnormally.
- When entering the photo or music media at first, the M/C EJECT button will not work. It's possible to use the M/C EJECT button during while using the photo or music media.
- Before you remove the memory card from the slot, don't forget to press the M/C EJECT button on the remote control or the memory card may be damaged.
Basic Operation
- The OSD of the ejected card slot is inactivated when ejecting the card with the hand.
- If there is any error in a memory card, it's impossible to enter XSTUDIO mode.
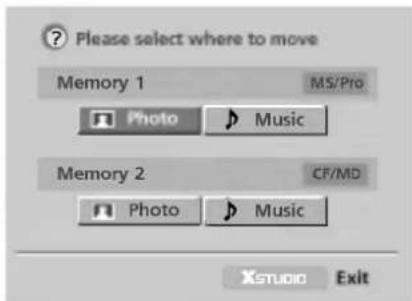
text_image
Please select where to move Memory 1 MS/Pro Photo Music Memory 2 CF/MD Photo Music Xstudio Exit- Insert the memory card to Slot 1 and/or Slot 2 on the TV.
- Press the XSTUDIO button.
- Press ▲ / ▼ / ◀ / ▶ button to select photo or music for slot1/2.
- Press the OK button to enter the photo or music media.
- Press the XSTUDIO button to exit the XSTUDIO mode.
JPEG File Viewing Options
Photo Media OSD Display
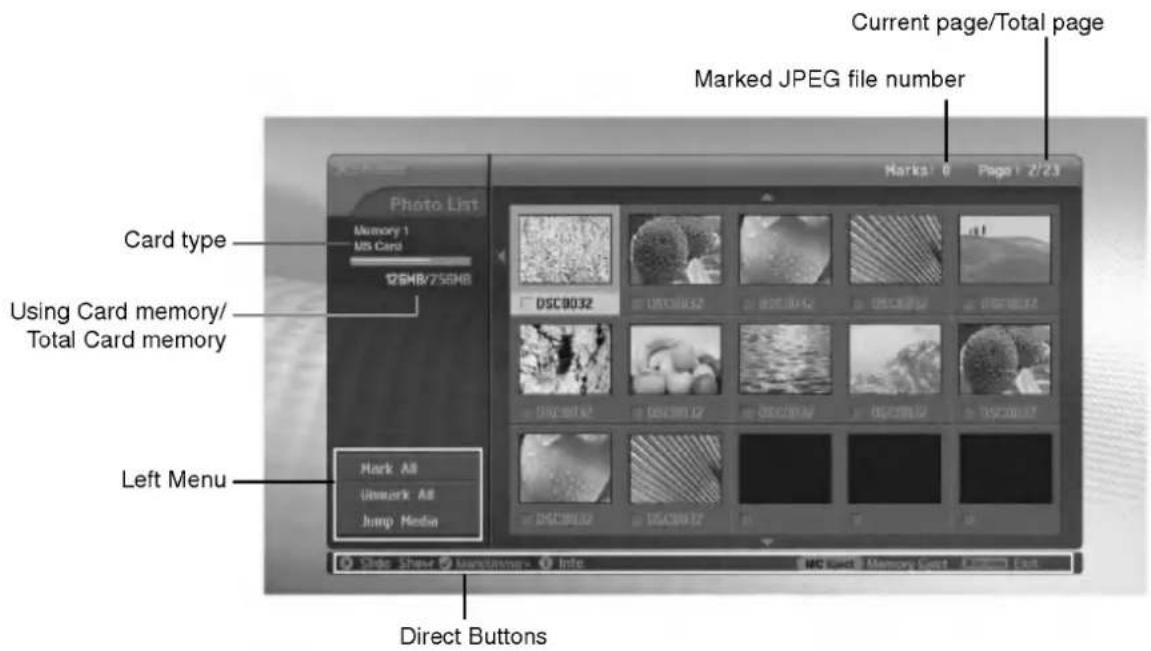
text_image
Current page/Total page Marked JPEG file number Photo List Memory 1 MS Card DSC0032 USDC0032 USDC0032 USDC0032 USDC0032 USDC0032 USDC0032 USDC0032 USDC0032 USDC0032 USDC0032 USDC0032 USDC0032 USDC0032 USDC0032 USDC0867 USDC0867 USDC0867 USDC0867 USDC0867 USDC0867 USDC0867 USDC0867 USDC0867 USDC0867 USDC0867 USDC0867 USDC0867 USDC0867 USDC0867 U.S.D. (Current page/Total page) Card type Using Card memory/ Total Card memory Left Menu Mark A8 Unmark A8 Jump Media Direct ButtonsPicture Selection and Viewing
- Select your desired image file.
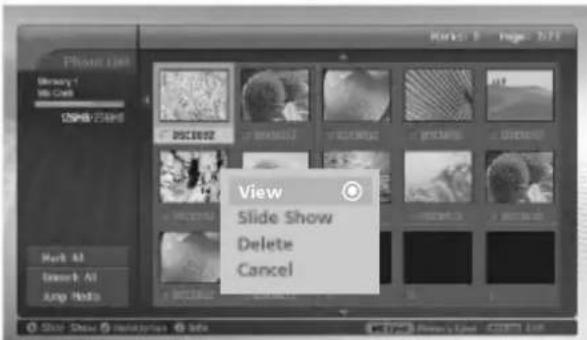
text_image
View Slide Show Delete Cancel1 Insert the memory card to Slot 1 and/or Slot 2 on the TV.
2 Press the XSTUDIO button.
3 Use ▲ / ▼ / ◀ / ▶ button to select photo media for slot1 or slot 2.
4 Press the OK button to enter the photo media.
Note: It's possible to display 15 JPEG files per page.
5 Press the ▲ / ▼ / ◀ / ▶ button to select JPEG file and then press the OK button.
6 Press the ▲ / ▼ button to select View and then press the OK button. The selected image will display on entire screen.
Mark/Unmark for JPEG file
- You can mark/unmark the file to view the desired file or use slide show for desired file conveniently.
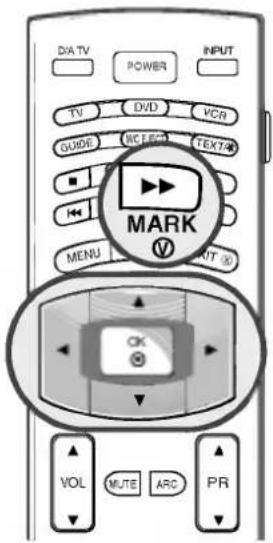
text_image
DA TV POWER INPUT TV DVD VCR GUIDE WCELE TEKT74 MENU VOL MUTE ARC PR MARK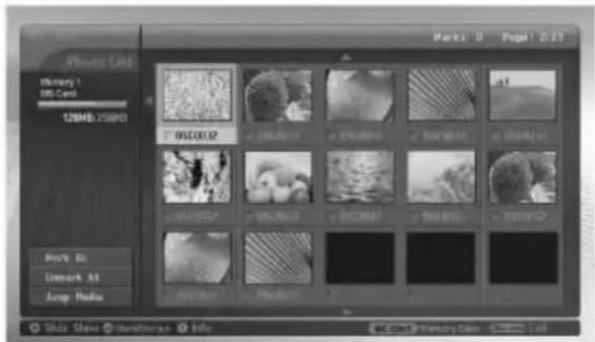
text_image
Video List Binary 1 RGB Card 128MB X50P0 0x2.00.02 128MB X50P0 128MB X50P0 128MB X50P0 128MB X50P0 128MB X50P0 128MB X50P0 128MB X50P0 128MB X50P0 128MB X50P0 128MB X50P0 128MB X50P 128MB X50P 128MB X50P 128MB X50P 128MB X50P 128MB X50P 128MB X50P 128MB X50P 128MB X50P 128MB X50P 128MB X50P 128MB X50P■ Mark/Unmark for all files
1 In photo media, Repeatedly press ◀ button to enter the left menu.
2 Press the ▲ / ▼ button to select Mark All or Unmark All.
- If you select Mark All, every file is selected.
- If you select Unmark All, the selection for every file is released.
3 Press the OK button and then ▶ button to return to the photo list.
■ Mark/Unmark for some file
1 Press the MARK button repeatedly to mark or unmark some JPEG file.
Jump Media
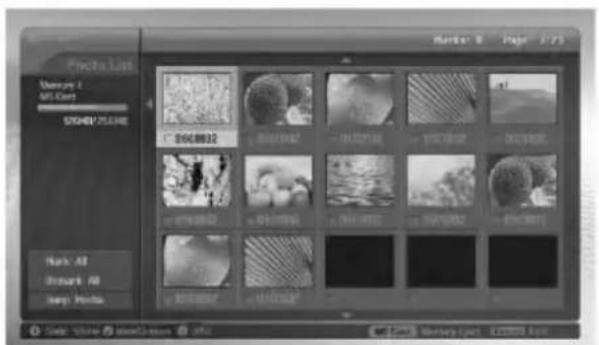
text_image
Photo List VMware 1 Mtl Cost SCHEN YUWE Mark: All Strain: All Sharp Media Marker: 0 Page 2.73 00468832 00468832 00468832 00468832 00468832 00468832 00468832 00468832 00468832 00468832 00468832 00468832
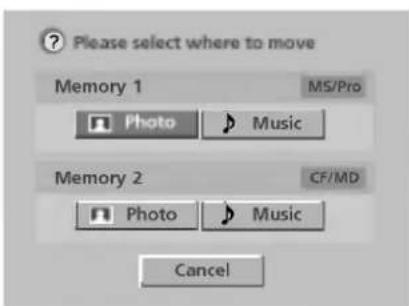
text_image
Please select where to move Memory 1 MS/Pro Photo Music Memory 2 CF/MD Photo Music Cancel- Use this function to jump to other media during using the photo media.
1 In photo media, press ◀ button repeatedly to enter the left menu.
2 Press the ▲ / ▼ button to select Jump Media and then press the OK button.
3 Press the ▲ / ▼ / ◀ / ▶ button to select desired media and then press the OK button. The screen displays the selected media list.
JPEG File Viewing Options Continued
Image Adjustment
- You can display the selected image on entire screen and do the various adjustment for the JPEG file.
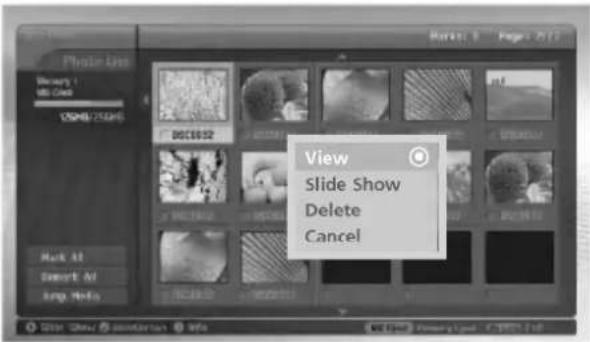
text_image
View Slide Show Delete Cancel1 Press the ▲/▼/◄/► button to select a JPEG file and then press the OK button.
2 Press the ▲ / ▼ button to select View and then press the OK button. The selected image will display on entire screen.
3 Adjust the JPEG file.
natural_image
Close-up of a beetle emerging from a textured rock surface (no visible text or symbols)| Image selection | Press the ▶ button to select next image.Press the ◀ button to select previous image.If you marked files, you will only see the marked files. |
| Image Rotation | Press the ▲ / ▼ button to rotate the image.▲: Rotate clockwise▼: Rotate counterclockwiseThe enlarged image cannot be rotated. |
| Image Zoom In/Out | Press the PR ▲ / ▼ button to enlarge or reduce the image 2 or 4 times.Press the ▲ / ▼ / ◀ / ▶ button to move the enlarged image. |
| Image Deletion | Press the MARK button to delete the current image. |
| Go to the Menu | Press the EXIT button to return to the photo list. |
| Shown/Hidden the menu | Pressing the OK button will toggle the menu on and off.The OSD menu is automatically disappear after a while. |
Slide Show
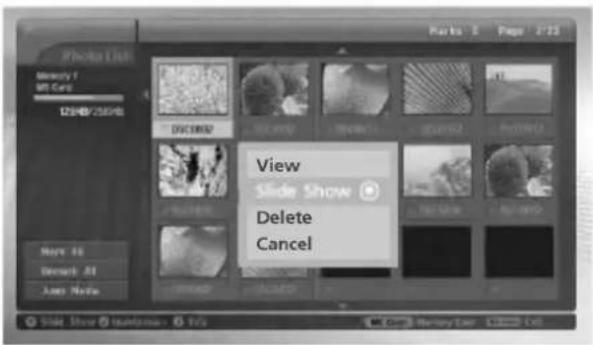
text_image
Photo List Memory 1 URL Bars 12548/23548 View Slide Show Delete Cancel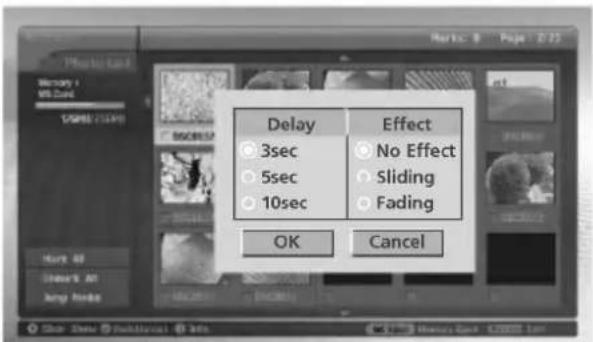
text_image
Delay 3sec 5sec 10sec Effect No Effect Sliding Fading OK Cancel
natural_image
Close-up photo of fresh fruits including bananas, apples, and cherries (no text or symbols visible)1 Press the ▲ / ▼ / ◀ / ▶ button to select the JPEG file and then press the OK button.
2 Press the ▲/▼ button to select Slide Show or Show Marked and then press the OK button. (If you mark the file with using MARK button, Show Marked is displayed on screen.)

- You can also operate the Slide Show or Show Marked with button directly as shown.
3 You can choose the slide show delayed time and effect. Press the ▲ / ▼ / ◀ / ▶ button to choose the slide show delayed time and effect.
4 Press the ▲ / ▼ / ◀ / ▶ button to select OK. Slide show start.

- If you mark for a file, slide show works only the marked image.
| Next / previousImage Selection | Press the ▶ button to select next image.Press the ◀ button to select previous image. |
| Image Pause | Press the II button to pause the current image.Press the [IMAGE] button to restart the slide show.By pressing ◀/▶ button, you can also select the next or previous image during pausing the image. |
| Go to the menu | Press the EXIT button to return to the photo list. |
| Shown/Hiddenthe menu | Pressing the OK button will toggle the menu on and off.The OSD menu is automatically disappear after a while. |
JPEG File Viewing Options Continued
JPEG File Deletion and Cancel
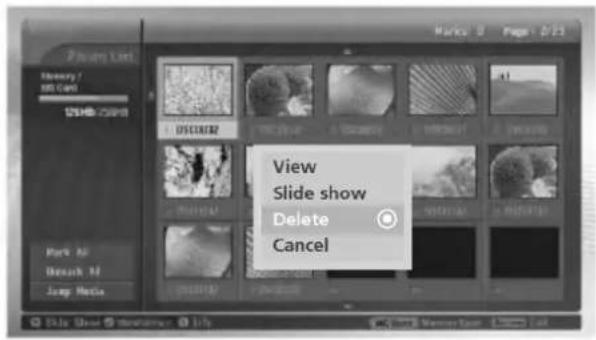
text_image
View Slide show Delete Cancel1 Use the ▲ / ▼ / ◀ / ▶ button to select the JPEG file and then press the OK button.
2 ■ Delete
To delete the file, press the ▲ / ▼ button to select Delete and then press the OK button. Select Yes with ◀ / ▶ button. The file is deleted, all the following files are shifted up one position.
- If you select Delete after marking some file, all of the marked file is deleted. - In case MS, SMC, SD memory card is set the write protection, "Protection Mode. Please push the OK buton" message is displayed. When you select OK, the screen is returned to the photo list. (Release the write protection to delete a JPEG file.)
3 ■ Cancel
To return to the photo list, press the ▲ / ▼ button to select Cancel and then press the OK button.
File Information
- Use it to check information for selected JPEG file.
text_image
GUIDE MO ELECT TEXT/# INFO MENU EXIT OK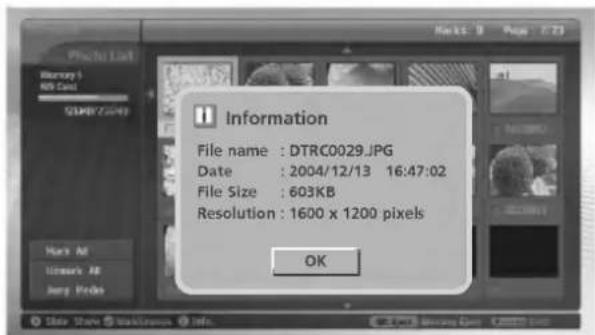
text_image
Information File name : DTRC0029.JPG Date : 2004/12/13 16:47:02 File Size : 603KB Resolution : 1600 x 1200 pixels OK1 In photo media, select your desired JPEG file.
2 Press the INFO button. The file information for selected JPEG file is displayed. If JPEG file has no information, you can't check it.
3 Press the OK, EXIT or INFO button to return to the photo list.
Screen Saver
- Screen saver operates to prevent fixed image.
- If you don't press any button about 30 secondes while displaying the photo list, the screen saver is worked.
XSTUDIO
- Press the ▲ / ▼ / ◀ / ▶, EXIT, ▶ (play), II, ■, I ◀◀, ▶▶I, INFO, MARK button to release the screen saver.
MP3 Files Playing Operation
- Purchased MP3/music files may contain copyright restrictions. Playback of these files may not be supported by this model.
Music Media OSD Display
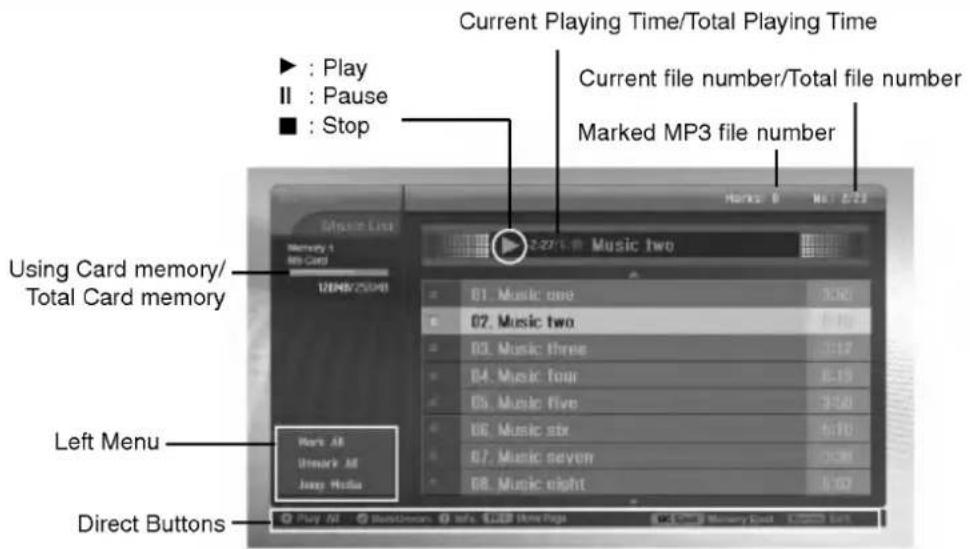
text_image
Current Playing Time/Total Playing Time ► : Play II : Pause ■ : Stop Current file number/Total file number Marked MP3 file number Music List 1284672048 Using Card memory/ Total Card memory Left Menu Upk All Umark All Joep Hella Play Out BackLineout info. LEEP New Page Play Out BackLineout info. LEEP New Page Play Out BackLineout info. LEEP New PageMP3 File Selection and Playback
- MP3 file Selection and delete function don't work while playing music.
- If pressing any button except ☐, ☑, ☒ button on the remote control while playing the music, the music playing is stopped.
- Moves from the current 8 files list to the next files list with PR ▲ / ▼ button.
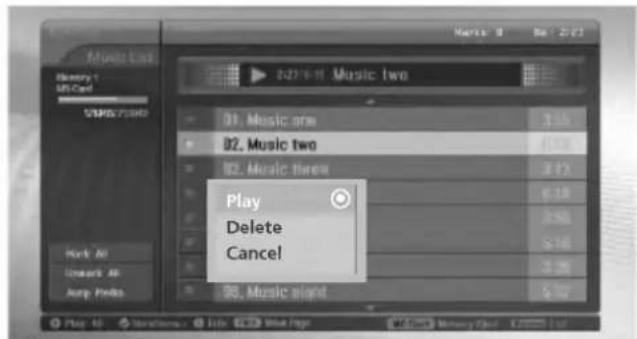
text_image
Music List History 1 M/F Card 2016/7/2016 01. Music one 02. Music two 03. Music three Play Delete Cancel! 06. Music signet Play 10 Variation: 1 July 2015 Blue Page M/F Card Memory Quick 1 July 20151 Insert the memory card to Slot 1 and/or Slot 2 on the TV.
2 Press the XSTUDIO button.
3 Use ▲ / ▼ / ◀ / ▶ button to select music media for slot1 or slot 2.
4 Press the OK button to enter the music media.
Note: It's possible to display 8 MP3 files per page.
5 Press the ▲ / ▼ button to select desired MP3 file and then press the OK button.
6 Press the ▲/▼ button to select Play or Play Marked and then press the OK button.(If you mark the file with using MARK button, Play Marked is displayed on screen.)

- You can also play the music with button directly.
• The current playing MP3 file displays ♩ in front of the title. - While playing music, press the ◀◀ or ▶▶I button to select the previous or next file.
- If you press the I◄◄ button while playing, the MP3 replays from the beginning.
(If you press the I◄◄ button within 1\~2 seconds after playing a file, it plays the previous file.)
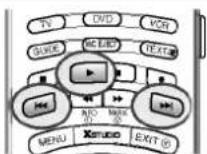
MP3 Files Playing Operation Continued
Stop/Pause Playback
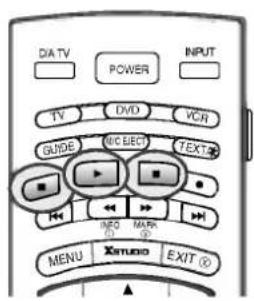
text_image
DIA TV POWER INPUT TV DVD VCR GUIDE MIC ELEC TEXT INFO MARK MENU Xmudio EXIT■ Stop Playback
Press the ■ button to stop playback.

- If you replay the MP3 file after stopping, the highlighted MP3 file on menu will play.
■ Pause Playback
- Press the II button to pause playback.
- Press the II or ▶ button to start from the point of your paused part.
Mark/Unmark for MP3 File
- You can mark/unmark the file to play the desired file only.
- The menu on the left can be used when playback is stopped.
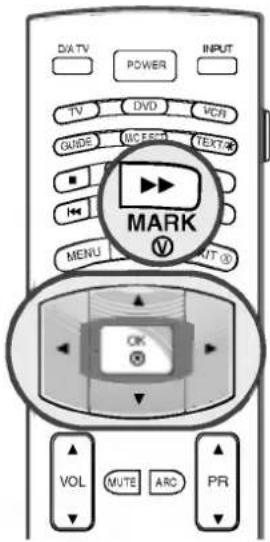
text_image
DIA TV POWER INPUT TV DVD VCN GUIDE MC ESCR TEXTR MENU VOLT MARK OK VOL MUTE ARC PR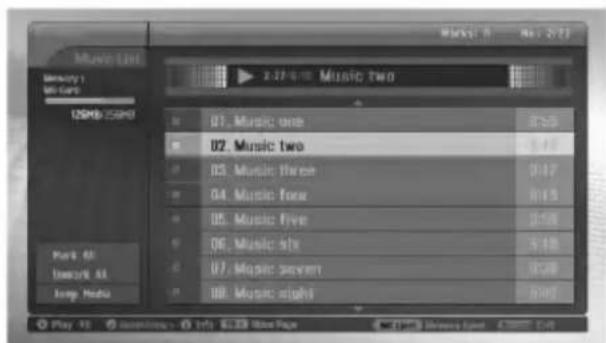
text_image
Music List Summary: Bio Camp USB/USB Part 41 Audio/81 Long Media 2.27-5: Music two 01. Music one 02. Music two 03. Music three 04. Music four 05. Music five 06. Music six 07. Music seven 08. Music eight■ Mark/Unmark for all files
1 In music media, press the ◀ button.
2 Press the ▲ / ▼ button to select Mark All or Unmark All.
- If you select Mark All, every file is selected.
- If you select Unmark All, the selection for every file is released.
3 Press the OK button and then ▶ button to return to the music list.
■ Mark/Unmark for some file
1 Press the MARK button repeatedly to mark or unmark an MP3 file.
Jump Media
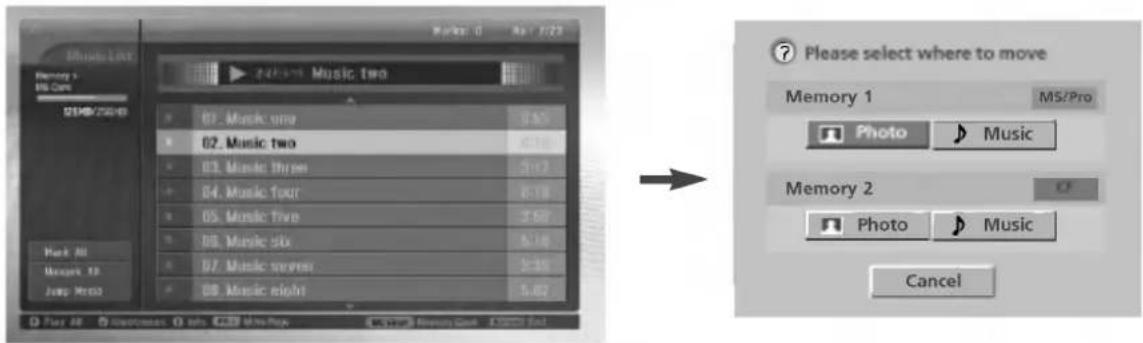
text_image
Music Two Memory 1 MS/Pro Photo Music Memory 2 Photo Music Cancel- Use this function to jump to other media during using music media.
1 In music media, press the ◀ button.
2 Press the ▲ / ▼ button to select Jump Media and then press the OK button.
3 Press the ▲ / ▼ / ◀ / ▶ button to select desired media and then press the OK button. The screen displays the each media list.
Screen Saver
- Screen saver operates to prevent fixed image.
- If you do not press a button within about 30 secondes, the screen saver is worked.
■ During playing the MP3

text_image
2:27:01 Music two- Press the 📄, 📋, 📋 buttons. The screen saver is release but the MP3 playback is restarted. If you press other button, the MP3 is stopped.
■ During stopping the MP3

text_image
XSTUDIO- Press the ▲ / ▼ / ◀ / ▶, EXIT, ▶ (play), II, ■, I ◀◀, ▶▶I, INFO, PR ▲ / ▼, MARK button to release the screen saver.
MP3 File Deletion and Cancel
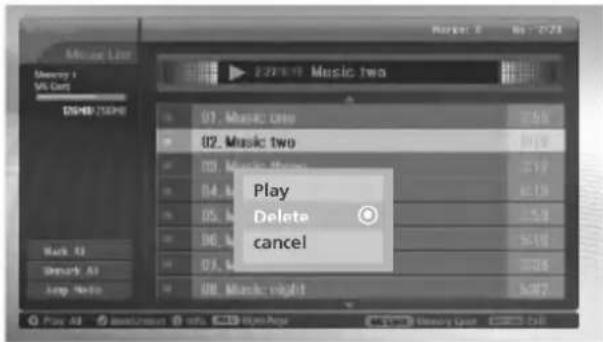
text_image
Music Line Moby 1 VR Card DSHD/150Hz 01. Music One 02. Music two 03. Music Two 04. Music Two 05. Music Two 06. Music Two 07. Music Two 08. Music Right Play Delete cancel1 Use the ▲ / ▼ button to select the MP3 file and then press the OK button.
2 ■ Delete
To delete the file, press the ▲ / ▼ button to select Delete and then press the OK button. Select Yes with ◀/▶ button. The file is deleted, all the following files are shifted up one position.

- If you select Delete after marking some file, all of the marked file is deleted.
- In case MS, SMC, SD memory card is set the write protection, "Protection Mode. Please push the OK button" message is displayed. When you select OK, the screen is returned to the music list. (Release the write protection to delete a MP3 file.)
Cancel
To return to the music list, press the ▲ / ▼ button to select Cancel and then press the OK button.
File Information
- Use it to check information for selected MP3 file.
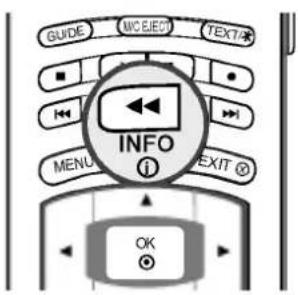
text_image
GUIDE MVC EJECT TEXT/4x INFO MENU EXIT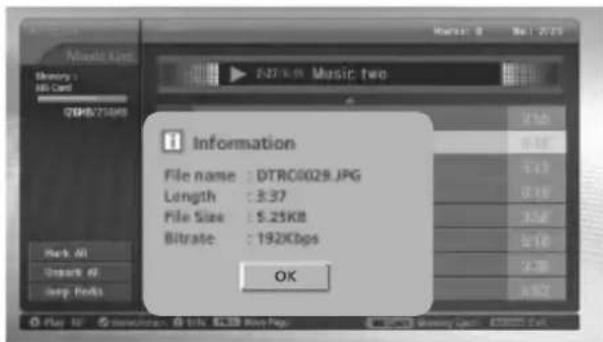
text_image
Music Two File name : DTRC0029.JPG Length : 3.37 File Size : 5.25KB Bitrate : 192Kbps OK1 In music media, select your desired MP3 file.
2 Press the INFO button. The file information for selected MP3 file is displayed.
If MP3 file has no information, you can't check it.
3 Press the OK, EXIT or INFO button to return to the previous menu.
Reference
IR Code
How to Connect
▶ Connect your wired remote control to the Remote Control port on the TV.
Remote Control IR Codes
▶ Output waveform
Single pulse, modulated with 37.917KHz signal at 455KHz
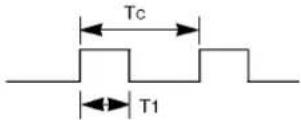
Carrier frequency
FCAR = 1/Tc = fosc/12
Duty ratio = T1/Tc = 1/3
▶ Configuration of frame
- 1st frame
text_image
Repeat code Tf▶ Lead code

text_image
9 ms 4.5 ms▶ Repeat code

text_image
9 ms 2.25 ms▶ Bit description
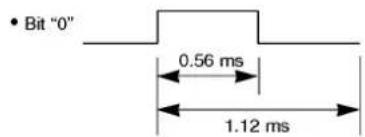
text_image
• Bit "0" 0.56 ms 1.12 ms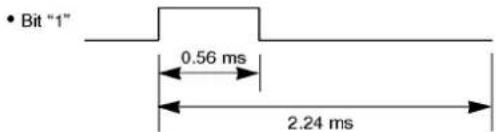
text_image
• Bit "1" 0.56 ms 2.24 ms▶ Frame interval : Tf
The waveform is transmitted as long as a key is depressed.

text_image
Tf Tf Tf=108ms @455KHz| Code (Hexa) | Function | Note |
| 0x0B | INPUT | Remote Control Button |
| 0x08 | POWER | |
| 0xCA | M/C EJECT | |
| 0xAB | GUIDE | |
| 0x50 | D/A TV | |
| 0xC8 | XSTUDIO | |
| 0xB1 | ■ | |
| 0xB0 | ▶ | |
| 0xBA | II | |
| 0xB2 | I◀◀ | |
| 0xAA | ◀◀ (INFO Ⓓ ) | |
| 0x7D | ▶▶ (MARK Ⓤ ) | |
| 0xB3 | ▶▶I | |
| 0x43 | MENU | |
| 0x20 | TEXT/★ | |
| 0x5B | EXIT | |
| 0x07 | ◀ | |
| 0x40 | ▲ | |
| 0x41 | ▼ | |
| 0x44 | OK | |
| 0x06 | ▶ | |
| 0x72 | RED | |
| 0x71 | GREEN | |
| 0x63 | YELLOW | |
| 0x61 | BLUE | |
| 0x02 | VOL▲ | |
| 0x03 | VOL▼ | |
| 0x09 | MUTE | |
| 0x79 | ARC | |
| 0x00 | PR▲ | |
| 0x01 | PR▼ | |
| 0x10 ~ 0x19 | Number Key 0~ 9 | |
| 0x53 | LIST | |
| 0x1A | Q.VIEW | |
| 0x62 | POSITION | |
| 0x64 | SIZE | |
| 0x65 | STILL | |
| 0x70 | SCAN | |
| 0x26 | TIME | |
| 0x2A | REVEAL | |
| 0x24 | MIX | |
| 0x0A | I/II | |
| 0xC1 | PIP RP- | |
| 0xC0 | PIP RP+ | |
| 0xC2 | SWAP | |
| 0xC3 | PIP INPUT | |
| 0x60 | PIP | |
| 0x1E | FAV | |
| 0x0E | SLEEP | |
| 0x39 | SUBTITLE/★ |
Programming the Remote control
The remote control is a multi-brand or universal remote control. It can be programmed to operate most remote-controllable devices of other manufacturers.
Note that the remote control may not control all models of other brands.
Programming a code into a remote mode
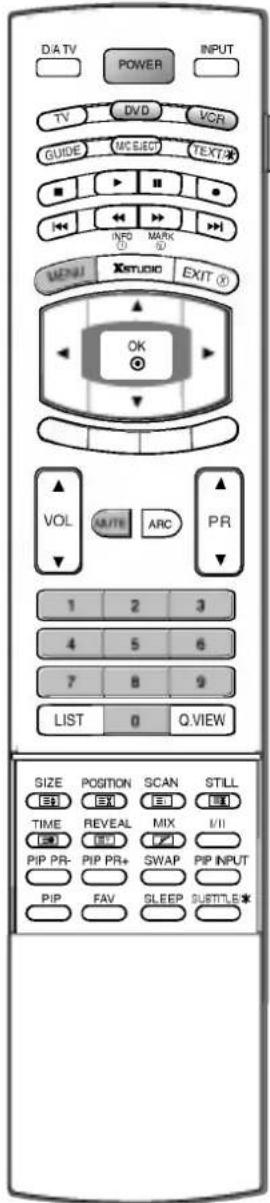
text_image
D/ATV POWER INPUT TV DVD VCR GUIDE MC ELECT TEXT ■ ▶ ■ ● ← ↔ >> → MENU XSTUDIO MARK OK VOL MUTE ARC PR 1 2 3 4 5 6 7 8 9 LIST 0 Q.VIEW SIZE POSITION SCAN STILL TIME REVEAL MIX I/ PIP PR- PIP PR+ SWAP PIP INPUT PIP FAV SLEEP SUSTITLE*1 To find out whether your remote can operate the device without programming, turn on the device such as a VCR and press the corresponding mode button on the remote.
After that, press the POWER button. If the device is turned off then it responds properly and the remote need not to be programmed. If not, the remote should be programmed to operate the device. The programming procedures are explained below.
2 Press the MENU and MUTE button continuously at the same time for 2 seconds, the current selected device button will be illuminated.
If you don't press any button for 20 seconds, the light on the mode button will be turned off. In that case, you have to repeat from step 2.
3 Enter code numbers using the number button on the remote by referring the code table on the following pages. When pressing the button, the light blinks at a time. If the device turned off, the programming is successful.
4 Press the MENU button to store the code. After blinking twice, this code is stored.
5 Test the remote functions to see if the device responds properly. If not, repeat from step 2.
Programming Codes
VCRs
| Brand | Codes | Brand | Codes | Brand | Codes | Brand | Codes | ||||||||||||
| AIWA | 034 | KENWOOD | 014 | 034 | 039 | 043 | PORTLAND | 108 | TATUNG | 039 | 043 | ||||||||
| AKAI | 016 | 043 | 046 | 124 | 047 | 048 | PULSAR | 072 | TEAC | 034 | 039 | 043 | |||||||
| 125 | 146 | LG (GOLDSTAR) | 001 | 012 | 013 | 020 | QUARTZ | 011 | 014 | TECHNICS | 031 | 033 | 070 | ||||||
| AMPRO | 072 | 101 | 106 | 114 | 123 | QUASAR | 033 | 066 | 075 | 145 | TEKNIKA | 019 | 031 | 033 | 034 | ||||
| ANAM | 031 | 033 | 103 | LLOYD | 034 | RCA | 013 | 020 | 033 | 034 | 101 | ||||||||
| AUDIO DYNAMICS | 012 | 023 | 039 | 043 | LXI | 003 | 009 | 013 | 014 | 040 | 041 | 062 | 063 | THOMAS | 034 | ||||
| BROKSONIC | 035 | 037 | 129 | 017 | 034 | 101 | 106 | 107 | 109 | 140 | 144 | TMK | 006 | ||||||
| CANON | 028 | 031 | 033 | MAGIN | 040 | 145 | 147 | TOSHIBA | 008 | 013 | 042 | 047 | |||||||
| CAPEHART | 108 | MAGNAVOX | 031 | 033 | 034 | 041 | REALISTIC | 003 | 008 | 010 | 014 | 059 | 082 | 112 | 131 | ||||
| CRAIG | 003 | 040 | 135 | 067 | 068 | 031 | 033 | 034 | 040 | TOTEVISION | 040 | 101 | |||||||
| CURTIS MATHES | 031 | 033 | 041 | MARANTZ | 012 | 031 | 033 | 067 | 053 | 054 | 101 | UNITECH | 040 | ||||||
| DAEWOO | 005 | 007 | 010 | 064 | 069 | RICO | 058 | VECTOR RESEARCH | 012 | ||||||||||
| 065 | 108 | 110 | 111 | MARTA | 101 | RUNCO | 148 | VICTOR | 048 | ||||||||||
| 112 | 116 | 117 | 119 | MATSUI | 027 | 030 | SALORA | 014 | VIDEO CONCEPTS | 012 | 034 | 046 | |||||||
| DAYTRON | 108 | MEI | 031 | 033 | SAMSUNG | 032 | 040 | 102 | 104 | VIDEOSONIC | 040 | ||||||||
| DBX | 012 | 023 | 039 | 043 | MEMOREX | 003 | 010 | 014 | 031 | 105 | 107 | 109 | 112 | WARDS | 003 | 013 | 017 | 024 | |
| DYNATECH | 034 | 053 | 033 | 034 | 053 | 072 | 113 | 115 | 120 | 122 | 031 | 033 | 034 | 040 | |||||
| ELECTROHOME | 059 | 101 | 102 | 134 | 139 | 125 | 053 | 054 | 131 | ||||||||||
| EMERSON | 006 | 017 | 025 | 027 | MGA | 045 | 046 | 059 | SANSUI | 022 | 043 | 048 | 135 | YAMAHA | 012 | 034 | 039 | 043 | |
| 029 | 031 | 034 | 035 | MINOLTA | 013 | 020 | SANYO | 003 | 007 | 010 | 014 | ZENITH | 034 | 048 | 056 | 058 | |||
| 036 | 037 | 046 | 101 | MITSUBISHI | 013 | 020 | 045 | 046 | 102 | 134 | 072 | 080 | 101 | ||||||
| 129 | 131 | 138 | 153 | 049 | 051 | 059 | 061 | SCOTT | 017 | 037 | 112 | 129 | |||||||
| FISHER | 003 | 008 | 009 | 010 | 151 | 131 | |||||||||||||
| FUNAI | 034 | MTC | 034 | 040 | SEARS | 003 | 008 | 009 | 010 | ||||||||||
| GE | 031 | 033 | 063 | 072 | MULTITECH | 024 | 034 | 013 | 014 | 017 | 020 | ||||||||
| 107 | 109 | 144 | 147 | NEC | 012 | 023 | 039 | 043 | 031 | 042 | 073 | 081 | |||||||
| GO VIDEO | 132 | 136 | 048 | 101 | |||||||||||||||
| HARMAN KARDON | 012 | 045 | NORDMENDE | 043 | SHARP | 031 | 054 | 149 | |||||||||||
| HITACHI | 004 | 018 | 026 | 034 | OPTONICA | 053 | 054 | SHINTOM | 024 | ||||||||||
| 043 | 063 | 137 | 150 | PANASONIC | 066 | 070 | 074 | 083 | SONY | 003 | 009 | 031 | 052 | ||||||
| INSTANTREPLAY | 031 | 033 | 133 | 140 | 145 | 056 | 057 | 058 | 076 | ||||||||||
| JCL | 031 | 033 | PENTAX | 013 | 020 | 031 | 033 | 077 | 078 | 149 | |||||||||
| JCPENNY | 012 | 013 | 015 | 033 | 063 | SOUNDESIGN | 034 | ||||||||||||
| 040 | 066 | 101 | PHILCO | 031 | 034 | 067 | STS | 013 | |||||||||||
| JENSEN | 043 | PHILIPS | 031 | 033 | 034 | 054 | SYLVANIA | 031 | 033 | 034 | 059 | ||||||||
| JVC | 012 | 031 | 033 | 043 | 067 | 071 | 101 | 067 | |||||||||||
| 048 | 050 | 055 | 060 | PILOT | 101 | SYMPHONIC | 034 | ||||||||||||
| 130 | 150 | 152 | PIONEER | 013 | 021 | 048 | TANDY | 010 | 034 | ||||||||||
DVD
| Brand | Codes | Brand | Codes | Brand | Codes | Brand | Codes |
| APEX DIGITAL | 022 | MAGNAVOX | 013 | PHILIPS | 013 | SONY | 007 |
| DENON | 020 014 | MARANTZ | 024 | PIONEER | 004 026 | THOMPSON | 005 006 |
| GE | 005 006 | MITSUBISHI | 002 | PROCEED | 021 | TOSHIBA | 019 008 |
| HARMAN KARDON | 027 | NAD | 023 | PROSCAN | 005 006 | YAMAHA | 009 018 |
| JVC | 012 | ONKYO | 008 017 | RCA | 005 006 | ZENITH | 010 016 025 |
| LG | 001 010 016 025 | PANASONIC | 003 009 | SAMSUNG | 011 015 |
Troubleshooting Checklist
| The operation does not work normally. | |
| The remote control doesn’t work | Check to see if there is any object between the product and the remote control causing obstruction.Are batteries installed with correct polarity (+ to +, - to -)?Correct remote operating mode set: TV, VCR etc.?Install new batteries. |
| Power is suddenly turned off | Is the sleep timer set?Check the power control settings. Power interruptedNo broadcast on station tuned with Auto off activated. |
| The video function does not work. | |
| No picture & No sound | ·Check whether the product is turned on.·Try another channel. The problem may be with the broadcast.·Is the power cord inserted into wall power outlet?·Check your antenna direction and/or location.·Test the wall power outlet, plug another product's power cord into the outlet where the product's power cord was plugged in. |
| Picture appears slowly after switching on | ·This is normal, the image is muted during the product startup process. Please contact your service centre, if the picture has not appeared after five minutes. |
| No or poor colour or poor picture | ·Adjust Colour in menu option.·Keep a sufficient distance between the product and the VCR.·Try another channel. The problem may be with the broadcast.·Are the video cables installed properly?·Activate any function to restore the brightness of the picture. |
| Horizontal/vertical bars or picture shaking | ·Check for local interference such as an electrical appliance or power tool. |
| Poor reception on some channels | ·Station or cable product experiencing problems, tune to another station.·Station signal is weak, reorient antenna to receive weaker station.·Check for sources of possible interference. |
| Lines or streaks in pictures | ·Check antenna (Change the direction of the antenna). |
| The audio function does not work. | |
| Picture OK & No sound | Press the VOL or VOLUME button.Sound muted? Press MUTE button.Try another channel. The problem may be with the broadcast.Are the audio cables installed properly? |
| No output from one of the speakers | Adjust Balance in menu option. |
| Unusual sound from inside the product | A change in ambient humidity or temperature may result in an unusual noise when the product is turned on or off and does not indicate a fault with the product. |
| There is a problem in PC mode.(Only PC mode applied) | |
| The signal is out of range. | Adjust resolution, horizontal frequency, or vertical frequency.Check it whether the signal cable is connected or loose.Check the input source. |
| Vertical bar or stripe on background & Horizontal Noise & Incorrect position | Work the Auto configure or adjust clock, phase, or H/V position. |
| Screen colour is unstable or single colour | Check the signal cable.Reinstall the PC video card. |
Product Specifications
| Power Requirement | 32LP1DA : AC 100-240V~ 50/60Hz 2.0A37LP1DA : AC 100-240V~ 50/60Hz 2.4A |
| Power Consumption | 32LP1DA : 150W37LP1DA : 200W |
| Television System | PAL/SECAM B/G/D/K, PAL I/II, SECAM L/L' |
| Programme Coverage | VHF: E2 ~ E12, UHF: E21 ~ E69, HYPER: S21 ~ S41, DVB-T: UHF |
| External Antenna Impedance | 75 Ω |
- The specifications shown above may be changed without prior notice for quality improvement.

LG