SDC750 - Coffee maker BLACK & DECKER - Free user manual and instructions
Find the device manual for free SDC750 BLACK & DECKER in PDF.


| Product Type | Drip Coffee Maker |
| Brand | Black & Decker |
| Model | SDC750 |
| Capacity | 12 cups (60 oz / 1.8 L) |
| Dimensions (W x H x D) | 10.2 x 13.8 x 9.4 inches |
| Weight | 3.5 lbs (1.6 kg) |
| Power | 900 W, 120 V, 60 Hz |
| Cord Length | 30 inches (76 cm) |
| Water Reservoir | Removable, dishwasher safe |
| Carafe Type | Glass carafe with ergonomic handle and drip-free pour spout |
| Filter Type | #4 cone paper filter or permanent mesh filter (included) |
| Brewing Functions | Auto shut-off, pause & serve, warming plate |
| Warming Plate | Automatic keep warm for 2 hours |
| Safety Features | Auto shut-off after 2 hours, boil-dry protection |
| Material | Plastic body with stainless steel accents |
| Cleaning & Maintenance | Descaling every 3 months; removable parts dishwasher safe (top rack) |
| Spare Parts Available | Replacement carafe, filter basket, and water reservoir |
| Repairability | User-replaceable parts; no internal fuses |
| Warranty | 2-year limited warranty |
| Included Accessories | Permanent mesh filter, instruction manual |
Frequently Asked Questions - SDC750 BLACK & DECKER
User questions about SDC750 BLACK & DECKER
0 question about this device. Answer the ones you know or ask your own.
Ask a new question about this device
Download the instructions for your Coffee maker in PDF format for free! Find your manual SDC750 - BLACK & DECKER and take your electronic device back in hand. On this page are published all the documents necessary for the use of your device. SDC750 by BLACK & DECKER.
USER MANUAL SDC750 BLACK & DECKER
Please Read and Save this Use and Care Book
Register your product online at www.prodprotect.com/applica, for a chance to WIN \$100,000! For US residents only
Accessories/Parts (USA/Canada)
When using electrical appliances, basic safety precautions should always be followed, including the following:
□ Read all instructions.
☐ Do not touch hot surfaces. Use handles or knobs.
☐ To protect against fire, electric shock and injury to persons do not immerse cord, plugs or appliance in water or other liquid.
☐ Close supervision is necessary when any appliance is used by or near children.
☐ Unplug from outlet when not in use and before cleaning. Allow to cool before putting on or taking off parts, and before cleaning the appliance.
☐ Do not operate any appliance with a damaged cord or plug, or after the appliance malfunctions or has been damaged in any manner. Return appliance to the nearest authorized service facility for examination, repair or adjustment. Or, call the appropriate toll-free number on the cover of this manual.
☐ The use of accessory attachments not recommended by the appliance manufacturer may result in fire, electric shock or injury to persons.
☐ Do not use outdoors.
☐ Do not let cord hang over edge of table or counter, or touch hot surfaces.
☐ Do not place on or near a hot gas or electric burner, or in a heated oven.
☐ To disconnect, turn any control to OFF, then remove plug from wall outlet.
☐ Do not use this appliance for other than intended use.
□ Keep lid on the carafe when in use.
☐ Scalding may occur if the lid is removed during the brewing cycles.
☐ To reduce the risk of fire, do not place any heating or cooking appliance beneath the appliance.
☐ To reduce the risk of fire, do not mount unit over or near any portion of a heating or cooking appliance.
☐ To reduce the risk of electric shock, do not mount over a sink.
☐ To reduce the risk of fire, do not store anything directly on top of the appliance surface when the appliance is in operation.
☐ This carafe is designed for use with this appliance. It must never be used on a range top.
☐ Do not set a hot carafe on a cold or wet surface.
☐ Do not use a cracked carafe or a carafe having a loose or weakened handle.
☐ Do not clean carafe with cleansers, steel wool pads, or other abrasive material.
SAVE THESE INSTRUCTIONS.
This product is for household use only.
GROUNDED PLUG
As a safety feature, this product is equipped with a grounded plug, which will only fit into a three-prong outlet. Do not attempt to defeat this safety feature. Improper connection of the grounding conductor may result in the risk of electric shock. Consult a qualified electrician if you are in doubt as to whether the outlet is properly grounded.
TAMPER-RESISTANT SCREW
Warning: This appliance is equipped with a tamper-resistant screw to prevent removal of the outer cover. To reduce the risk of fire or electric shock, do not attempt to remove the outer cover. There are no user-serviceable parts inside. Repair should be done only by authorized service personnel.
ELECTRICAL CORD
a) A short power-supply cord (or detachable power-supply cord) is to be provided to reduce the risk resulting from becoming entangled in or tripping over a longer cord.
b) Longer detachable power-supply cords or extension cords are available and may be used if care is exercised in their use.
c) If a long detachable power-supply cord or extension cord is used,
1) The marked electrical rating of the detachable power-supply cord or extension cord should be at least as great as the electrical rating of the appliance,
2) If the appliance is of the grounded type, the extension cord should be a grounding-type 3-wire cord, and
3) The longer cord should be arranged so that it will not drape over the countertop or tabletop where it can be pulled on by children or tripped over.
Note: If the power supply cord is damaged, it should be replaced by qualified personnel. In Latin America, by an authorized service center.
Product may vary slightly from what is illustrated.

text_image
BLACK DECKER SPACEMAKER ① ② ③ ④ ⑤ ⑥ ⑦ ⑧A1
- Brew basket (Part # SDC001) white, (Part # SDC002) black
- Sneak-A-Cup® interrupt feature
† 3. Glass carafe with lid (Part # SDC004) white, (Part # SDC005) black - "Keep Hot" carafe plate
† 5. Illuminated water reservoir with water-level markings (Part # SDC007) white, (Part # SDC008) black - Reservoir lid (not shown)
- Digital display
- Control panel
- Cord management hook (not shown)
- Plug receptacle (not shown)
† 11. Mounting kit (Part # SDC009-01) white, (Part # SDC009-02) black Mounting bracket (Part # SDC010) white, (Part # SDC011) black (not shown)
Note: † indicates consumer replaceable/removable parts
text_image
B A CA2
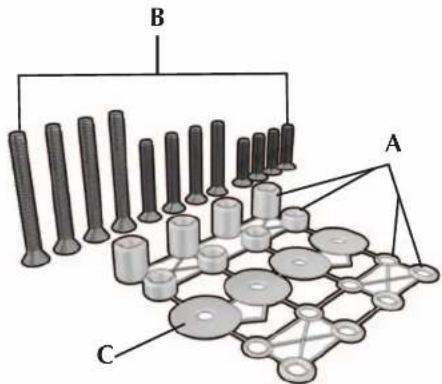
† 1. Mounting Parts
(Part # SDC-MOUNTING KIT)
A. 16 Spacers
4 1/2"
4 1/4"
4 3/16"
4 1/16"
- 12 Screws
4 1"
- 1 ^1/2
4 2¼"
C. 4 Washers
- Mounting Template (in box)
You will also need:
- Tape
- Ruler (or you may cut out the ruler provided on the template)
• Electric drill with a 14 " drill bit
GETTING STARTED
- Remove all packing material, labels and any stickers.
- Remove and save literature.
- Unpack mounting parts and set them aside in a safe place where they will not roll away or get lost.
Important: Do not attempt to operate appliance until it is properly installed.
CHOOSE A LOCATION
When choosing your location, consider the following:
• DO make sure to mount within reach of an electrical outlet.
- DO consider your normal work patterns in the kitchen when choosing location.
- DO NOT mount over any heating or cooking appliance such as your range or oven.
• DO NOT mount over or near a sink.
- DO NOT mount under, in front of or behind any under-cabinet light fixtures.
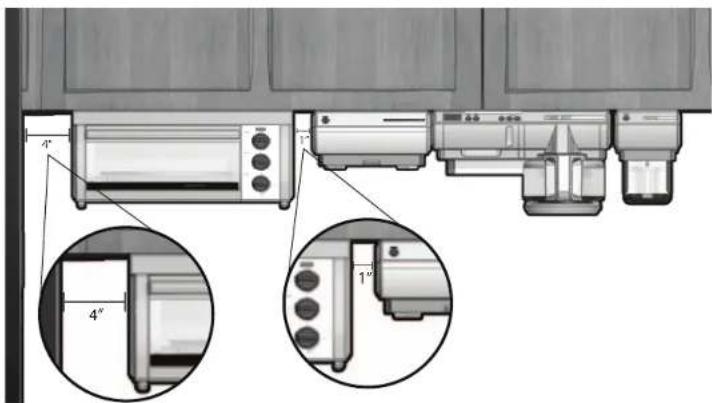
Note: If mounting multiple +SpaceMaker™ appliances and you are installing your appliance next to the SpaceMaker™ oven (Fig. A.3):
- Allow at least 1" between the control panel side of the oven and the appliance.
- Allow at least 4" between the side opposite the control panel of your oven and adjacent wall or other appliance. You can mount the other appliances flush to one another.
text_image
Technical diagram showing front and side views of a kitchen appliance with labeled dimensions in inchesA.3
6
7
Caution: This appliance features a Save-A-Plug™ outlet receptacle to connect smaller †SpaceMaker™ appliances such as the mini food processor / grinder or can opener. Do not use this outlet for any other appliance!
Caution: When selecting a location for your coffeemaker, make sure you have adequate room to reach the receptacle.
Note: If you are connecting another +SpaceMaker™ appliance into the Save-A-Plug™ outlet, make sure you can easily unplug the appliance after each use.
DETERMINE CABINET TYPE
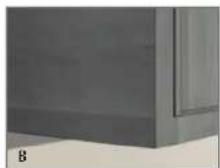
Prior to installation, determine if your cabinet has a flat bottom (B) or an overhanging molding (C). If your cabinet is flat, follow STANDARD INSTALLATION; if the cabinet has an overhang molding, refer to OVERHANG MOLDING INSTALLATION.

STANDARD INSTALLATION (FLAT CABINET)
Important: Always wear protective glasses or goggles to prevent injury when drilling.
- Clear countertop under installation area to avoid getting dust or debris on other appliances or items. Open cabinets and remove contents to make mounting easier.
- Clean both the underside and topside of the bottom panel of the cabinet.
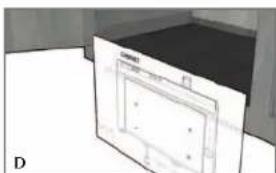
- With cabinet doors open, place mounting template flush against the surface of the underside of your cabinet, making sure to align thick line on template with bottom front edge of your cabinet (D).
natural_image
Diagram of a cabinet or enclosure with labeled components and mounting points (no readable text or symbols)Important: Do not align screw holes on template directly under the partition between cabinets, as this will prevent you from installing the appliance properly. Pay close attention to where the drill holes will be set so as not to damage your cabinets during mounting. Drilling through your cabinet's partition may cause damage to cabinets and prevent proper installation.
- Fold the template along the edge of your cabinet so the thick line is straight with bottom front edge; pull template tight and tape down to hold in place.
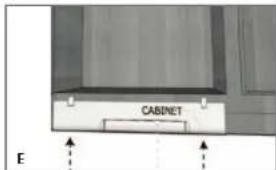
- Drilling from under the cabinet up, drill holes through the 4 places marked on the template, using a ¼-inch drill bit (E).
text_image
CABINET EImportant: Always ensure you are drilling straight up through the marked mounting hole on the template. Drilling at an angle may prevent proper installation and may damage cabinets if the drill bit pierces the partition.
- Once holes are drilled, remove tape and mounting template.
- Wipe dust and debris off the topside and underside of the cabinet surface.
- Place a washer inside the cabinet over each of the 4 holes you drilled.
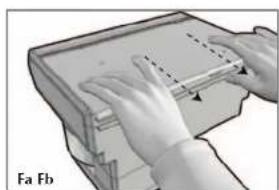
Important: Top panel of coffeemaker is removable to make installation easier. Simply grip the panel at the rear and pull back to remove (Fa) or insert a flathead screwdriver at the front of the panel by one of the mounting holes and twist to pop open (Fb). Once removed, mount panel in place following the directions below and then slide coffeemaker back on the panel track to reattach appliance once the panel has been mounted.
natural_image
Illustration of hands using a mechanical device to press or fold a sheet (no text or symbols visible)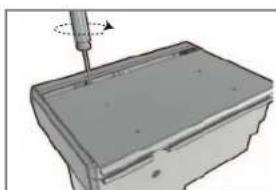
natural_image
3D illustration of a screwdriver inserted into a rectangular housing (no text or symbols visible)- Hold panel in place; drilled holes on cabinet should be aligned with mounting holes on the panel.
- From inside of the cabinet down into panel holes, drop 4 screws in place. Place a nut on each screw and tighten.
Note: To determine which screws to use, you must have enough of the screw exposed underneath the cabinet to properly thread the screw into the nut.
Note: Always tighten nuts to ensure the appliance does not move or shake during operation.
-
Once the panel is secure, reattach coffeemaker to panel by lifting appliance up, aligning it with the track on the panel and then sliding it back into place.
-
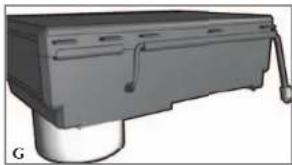
Plug into standard electrical outlet. Extra cord can be hung over cord management hook behind unit (G).
natural_image
3D rendering of a mechanical device with a cylindrical base and attached lever (no visible text or symbols)Caution: This appliance features a Save-A-Plug™ outlet receptacle to connect smaller †SpaceMaker™ appliances such as the mini food processor / grinder or can opener. Do not use this outlet for any other appliance!
Note: If you are connecting another †SpaceMaker™ appliance into the Save-A-Plug™ outlet, make sure you can easily unplug the appliance after each use.
- Your †SpaceMaker™ appliance is now ready for use!
OVERHANG MOLDING INSTALLATION
For cabinets with an overhang molding (see Illustration C)
Important: Always wear protective glasses or goggles to prevent injury when drilling.
Note: Spacers are provided in case your cabinet has an overhang molding at the front edge. Only use spacers on the rear screws of the appliance to ensure it is level with the front.
-
Clear countertop under installation area to avoid getting on other appliances or items. Open cabinets and remove contents to make mounting easier.
-
Clean both the underside and topside of the bottom panel of the cabinet.
-
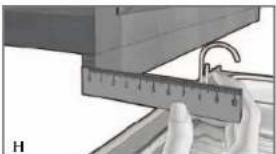
Using a ruler, measure the thickness of the overhang molding (H), accurately noting the number for use in the following step.
natural_image
Close-up of hands holding a ruler over a metal shelf, no visible text or symbolsNote: If you do not have a ruler, you may use the paper ruler provided on the edge of your mounting template.
-
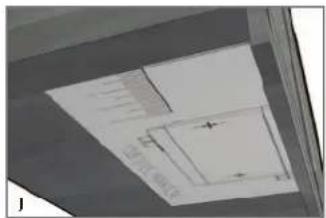
After measuring the overhang molding thickness as shown in Illustration H, look at the dashed lines on the mounting template; each line has a measurement next to it that indicates the thickness of the overhang molding used with that line. For example, if your cabinet has an overhang molding thickness of 12 ", you will use the 12 " dashed line on the template.
-
Fold the template along the dashed line that matches the thickness of your overhang molding.
-
Place the folded template against the back edge of the overhang molding, making sure the side with the drill hole marks is facing down (J).
natural_image
Architectural sketch of a ceiling structure with window and doorways (no text or symbols)Important: Do not align screw holes on template directly under the partition between cabinets, as this will prevent you from installing the appliance properly. Pay close attention to where the drill holes will be set so as not to damage your cabinets during mounting. Drilling through your cabinet's partition may cause damage to cabinets and prevent proper installation.
-
Making sure to keep the fold line straight against the back edge of the overhang molding, tape the template securely in place.
-
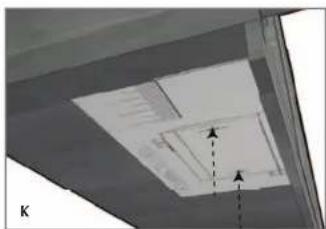
Drilling from under the cabinet up, drill holes through the 4 places marked on the template using a 14 -inch drill bit (K).
natural_image
Architectural ceiling view showing skylights and structural elements (no text or symbols)Important: Always ensure you are drilling straight up through the marked mounting hole on the template. Drilling at an angle may prevent proper installation and may damage cabinets if the drill bit pierces the partition.
-
Once holes are drilled, remove tape and mounting template.
-
Wipe dust and debris off underside and topside of cabinet surface.
-
Place a washer inside the cabinet over each of the 4 holes you drilled.
-
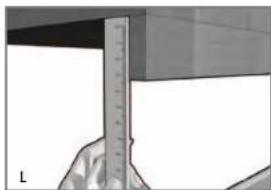
Now, use your ruler or the paper ruler provided to measure the overhang molding height, placing your ruler vertically against the underside of the cabinet behind the overhang molding. This number determines the number of spacers you need, using a number of spacers equal to the overhang molding height. For example, a 1" overhang molding would use 2, ½" spacers on each of the rear holes (L).
natural_image
Close-up of a hand holding a ruler above a surface, no visible text or symbols- Drop one of your screws through each of the washers covering the holes in the cabinet, from inside the cabinet down.
Note: To determine which screws to use, you must have enough of the screw exposed underneath the cabinet to properly thread the screw into the nut.
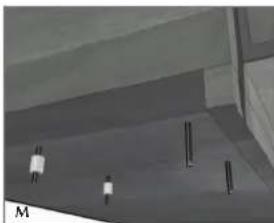
- Place the appropriate number of spacers determined in step 12 on both of the rear screws so the appliance will be even (M).
natural_image
3D architectural rendering of a ceiling structure with vertical supports and horizontal beams (no text or symbols)Note: If the height of your overhang molding is too tall to be accommodated by the number of spacers provided, you may call, toll-free, at 1-800-231-9786 to order additional spacers at no charge.
Note: For spacer installation, you may require assistance (in mounting) in order to hold spacers in place while securing the appliance at the same time. If assistance is not available, use a small clamp to hold the spacers in place while you position the appliance.
Important: Top panel of coffeemaker is removable to make installation easier. Simply grip the panel at the rear and pull back to remove (see Illustration Fa) or insert a flathead screwdriver at the front of the panel by one of the mounting holes and twist to pop open (see Illustration Fb). Once removed, mount in place following the directions below and then slide coffeemaker back on the panel track to reattach appliance once the panel has been mounted.
- Once spacers are set, hold panel up and tighten nuts onto each of the screws to secure.
Note: Always tighten nuts to ensure the appliance does not move or shake during operation.
-
Once the panel is secure, reattach coffeemaker to panel by lifting appliance up, aligning it with the track on the panel and then sliding it back into place.
-
Plug into standard electrical outlet. Extra cord can be hung over cord management hook behind unit (see Illustration G).
Caution: This appliance features a Save-A-Plug™ outlet receptacle to connect smaller †SpaceMaker™ appliances such as the mini food processor / grinder or can opener. Do not use this outlet for any other appliance!
Note: If you are connecting another +SpaceMaker™ appliance into the Save-A-Plug™ outlet, make sure you can easily unplug the appliance after each use.
- Your +SpaceMaker™ appliance is now ready for use!
How to Use
This appliance is for household use only.
BEFORE FIRST USE
Note: Time display will flash when you plug in your coffeemaker. You may set clock before, during or after brewing. (See SETTING THE CLOCK/TIMER.) You do not need to set clock before manual brewing. It is only absolutely necessary to set the clock if you are using the auto brew function.
- Grasp the integrated handle on the water reservoir and pull out from coffeemaker; remove lid to make filling easier. Fill carafe with 6 cups of fresh water and fill reservoir. Replace water reservoir with lid and carafe.
- Brew through the system, using an 8 – 12 cup basket-style paper filter as instructed in BREWING COFFEE. Do not add coffee grounds for this initial brewing, as this is simply to clean the interior of the unit and remove any dust or residue left from the manufacturing process.
- Once water has brewed through, press ON/OFF button.
- Clean water reservoir, brew basket, carafe and lid. (See CARE AND CLEANING.)
BREWING COFFEE
- Grasp handle and pull to remove the brew basket. Place an 8 – 12 cup basket-style paper filter inside basket and add coffee grounds (usually one heaping tablespoon for every cup – adjust to taste). Replace brew basket.
- Grasping integrated handle, pull out water reservoir. Fill carafe with cold water to desired water level and pour into reservoir; the lid of the reservoir may be removed to make pouring easier. Replace water reservoir with lid, making sure it snaps in place.
Caution: Do not overfill water reservoir.
- Replace empty carafe, making sure it is "seated" properly so that it fits against the lever at the back.
Important: If carafe is not placed against the safety lever at the back of the unit, your coffeemaker will not operate properly.
-
Press ON/OFF button. "ON" appears in the display and LED light above the button will illuminate as brewing begins.
-
After brewing is complete, brewed coffee will be kept warm on the "Keep Hot" carafe plate for up to 2 hours.
Note: Your coffeemaker features a 2-hour auto shutoff. Your coffeemaker will maintain the coffee's temperature for up to 2 hours before shutting off automatically.
-
Once coffee grounds have cooled, carefully remove brew basket and discard paper filter with grounds. Replace brew basket.
-
Coffeemaker can be turned off at any time by pressing the ON/OFF button.
SNEAK-A-CUP® INTERRUPT FEATURE
The Sneak-A-Cup ^® Interrupt Feature lets you pour a cup of coffee before brewing is complete. When the carafe is removed, the coffee flow will be paused for 20 seconds. After 20 seconds, the drip flow will start again.
Important: Carafe must be replaced in less than 20 seconds to prevent water from overflowing the brew basket.
Caution: Do not pull out brew basket when using this feature, as it is filled with hot coffee.
SETTING THE CLOCK/TIMER
You may set the clock before, during or after the brewing cycle.
To set current time: Press the HOUR, then MIN buttons until you reach the current time. Hold down buttons to advance quickly.
SETTING THE AUTO BREW FUNCTION
- Follow steps 1 - 3 in BREWING COFFEE.
- Make sure clock is set properly to present time (as instructed in SETTING THE CLOCK/TIMER).
- Set auto-on time: Press the PROG button. (PROGRAM will flash on the display, indicating auto brew time is being set.)
- Press HOUR and MIN buttons until you reach your desired preset brew time.
- After a few seconds, display will return to real time, indicating the PROG time has been set.
Note: To check preset auto-on time at any time, press PROG and preset time will display for a few seconds as "PROGRAM" flashes on the display. When it stops flashing, the display will automatically return to real time.
-
Press AUTO button; the preset program time will flash twice in the display to remind you of the time you set. The word "AUTO" will appear and the LED light above the AUTO button will illuminate; these will remain until brewing begins at preset auto-on time. At that time, "AUTO" will go out as "ON" appears in the display and the LED light of AUTO will go out as the light over the ON/OFF button illuminates.
-
To cancel auto brew, press ON/OFF button.

COFFEE BREWING TIPS
- Always use fresh, good water when making your coffee. Since coffee is 98% water, the quality of the water is extremely important to the taste of the coffee made with it.
- Stir coffee in carafe before serving to evenly distribute the flavor.
- Coffee that is poured during brewing cycle may vary in strength from the finished brew.
- Not sure how much coffee to use? Begin by using 1 level scoop of medium grind coffee for each cup of coffee to be brewed.
- Never reuse coffee filters; they absorb flavors from the brewed coffee and will give the newly brewed coffee a stale flavor. They may also tear and allow grinds to drip into the newly brewed coffee.
-
If filled carafe is left on the "Keep Hot" plate, be sure to remove the coffee grounds from the brew basket as soon as they have cooled slightly. This will keep the coffee from developing a bitter taste.
-
For a special occasion, whip some heavy cream with 1 or 2 tablespoons of hazelnut, chocolate or almond liqueur. Use to top off each cup of coffee.
- Add a 2-inch piece of vanilla bean to the sugar bowl to add a distinctive flavor to your coffee. You'll be surprised at how good it tastes.
- Keep your coffeemaker very clean; you'll be pleased with the flavor.
- For iced coffee, brew the coffee with twice the normal amount of grounds, as ice dilutes the coffee flavor. You may also make coffee ice cubes from left over coffee and brew your coffee at its normal strength.
- Remember when pouring hot liquid into a glass, always put a spoon in the glass before adding the hot liquid.
- Rinse both the carafe and the brew basket with warm water immediately after each use to maintain good coffee flavor.
Care and Cleaning
This product contains no user serviceable parts. Refer service to qualified service personnel.
Caution: Do not expose the control panel to water. Water may cause permanent damage and make the coffeemaker inoperable.
- Make sure the unit is unplugged and cooled before cleaning.
- Remove brew basket by grasping the integrated handle and pulling out.
- Discard the paper filter with the grounds.
- Clean parts as follows:
- Brew basket and carafe are top-rack dishwasher-safe; or they may be hand washed in warm, sudsy water.
- Wipe the exterior and "Keep Hot" carafe plate with a soft damp cloth. Do not use abrasive cleansers or scouring pads.
TREAT CARAFE WITH CARE
A damaged carafe may result in possible burns from a hot liquid. To avoid breaking:
- Do not allow all liquid to evaporate from the carafe while on the "Keep Hot" carafe plate or heat the carafe when empty.
- Discard the carafe if damaged in any manner. A chip or crack could result in breakage.
- Never use abrasive scouring pads or cleansers; they will scratch and weaken the glass.
- Do not place the carafe on or near a hot gas or electric burner, in a heated oven or in a microwave.
- Avoid rough handling and sharp blows.
MINERAL DEPOSITS AND CLOGGING
Mineral deposits left by hard water can clog your coffeemaker. Excessive steaming and/or a prolonged brewing cycle are signs that cleaning is needed. The frequency of cleaning out deposits is affected by the regularity of usage and water hardness. During cleaning, more steaming occurs than when brewing coffee and may emit spurts of steam. Cleaning is recommended every 60 brewing cycles.
- Fill carafe with white vinegar up to 6-cup water line. Add water up to 8-cup line. Remove the water reservoir and fill with vinegar mixture. Replace reservoir.
Caution: Do not overfill water reservoir.
- Put a paper filter in the brew basket and replace. Set empty carafe on the "Keep Hot" carafe plate.
- Turn on coffeemaker and let half the cleaning solution brew into carafe (until water level is around the 3-cup line in the carafe). Turn coffeemaker off and let it soak for at least 15 minutes to soften the deposits.
- Turn on coffeemaker and brew remaining cleaning solution into carafe.
- Turn off coffeemaker, empty carafe and discard filter.
- Use the carafe to fill water reservoir with fresh water to 6-cup line, replace empty carafe on the "Keep Hot" carafe plate and then turn on coffemaker for a complete brew cycle to flush out remaining cleaning solution. You may wish to repeat this step again to eliminate any remaining vinegar smell/taste.
- Wash the brew basket and carafe as instructed for normal cleaning.
TROUBLESHOOTING
| PROBLEM POSSIBLE CAUSE SOLUTION | ||
| Coffcemaker does not turn on. | Coffeemaker is not plugged in. | Check to be sure appliance is plugged into a working outlet and the ON/OFF button has been pressed. |
| Coffeemaker is leaking. | Water reservoir may be overfilled or not inserted properly OR carafe may not be correctly placed on “Keep Hot” carafe plate. | Make sure the water reservoir has not been filled beyond the MAX fill line OR make sure carafe is placed correctly on “Keep Hot” carafe plate and is centered under the filter basket holder. |
| Brewing takes too long. | The coffeemaker might need cleaning. | Follow procedures in CARE AND CLEANING. |
| Coffee is not brewing. | Water reservoir might be empty. | Make sure water reservoir has sufficient water to brew desired number of cups of coffee. |
| The coffeemaker brews clear water. | There may be no coffee grounds in the brew basket. | Add sufficient amount of coffee grounds to filter-lined brew basket. |
| Brew basket overflows. | Carafe may be improperly placed on the “Keep Hot” carafe plate. | Remove carafe and insert so that carafe rests comfortably within the grooves on the “Keep Hot” carafe plate. |
| Grounds in the brewed coffee. | The filter and/or the brew basket are not properly placed. | Insert paper filter into brew basket and insert brew basket properly in place. |
| Coffeemaker is brewing slowly; brewed coffee tastes bad. | Coffeemaker needs cleaning; wrong grind being used. | Follow directions in CARE AND CLEANING. Use only coffee ground for automatic drip coffeemakers. |
text_image
4" 1" 1" 4"A.3
natural_image
Diagram of a room interior with a door and ceiling, no visible text or symbolsnatural_image
Illustration of hands using a mechanical device to press or fold a sheet (no text or symbols visible)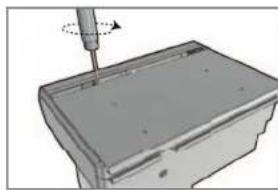
natural_image
3D illustration of a mechanical component with a tool inserted, showing a rotating shaft (no text or symbols)text_image
CABINET Enatural_image
3D rendering of a mechanical device with a cylindrical base and attached lever (no text or symbols visible)natural_image
Close-up of hands holding a ruler over a surface, no visible text or symbolsnatural_image
Interior ceiling view showing a skylight and a small rectangular object with directional arrows (no text or symbols)natural_image
Architectural ceiling view showing skylights and structural elements (no text or symbols)natural_image
Close-up of a ruler measuring a surface with a hand placed on it (no visible text or symbols)natural_image
Interior ceiling view showing structural beams and supports (no text or symbols visible)For service, repair or any questions regarding your appliance, call the appropriate 800 number on the cover of this book. DO NOT return the product to the place of purchase. Also, please DO NOT mail product back to the manufacturer, nor bring it to a service center. You may also want to consult the website listed on the cover of this manual.
Two-Year Limited Warranty
(Applies only in the United States and Canada)
What does it cover?
- Any defect in material or workmanship; provided; however, Applica's liability will not exceed the purchase price of the product.
For how long?
- Two years after the date of original purchase
What will we do to help you?
- Provide you with a reasonably similar replacement product that is either new or factory refurbished
How do you get service?
- Save your receipt as proof of the date of sale.
- Check our on-line service site at www.prodprotect.com/applica, or call our toll-free number, 1-800-231-9786, for general warranty service
- If you need parts or accessories, please call 1-800-738-0245.
What does your warranty not cover?
• Damage from commercial use
- Damage from misuse, abuse or neglect
- Products that have been modified in any way
- Products used or serviced outside the country of purchase
• Glass parts and other accessory items that are packed with the unit
- Shipping and handling costs associated with the replacement of the unit
- Consequential or incidental damages (Please note, however, that some states do not allow the exclusion or limitation of consequential or incidental damages, so this limitation may not apply to you.)
How does state law relate to this warranty?
- This warranty gives you specific legal rights, and you may also have other rights that vary from state to state or province to province.
¿NECESITA AYUDA?
BLACK & DECKER is a trademark of The Black & Decker Corporation, Towson, Maryland, USA Marca registrada de The Black & Decker Corporation, Towson, Maryland, E.U.
+Spacemaker is a registered trademark of General Electric Company, USA. +Spacemaker es una marca registrada de General Electric Company, EE.UU.

R22008/2-28-67E/S

Printed on recycled paper. Impreso en papel reciclado.
Copyright © 2008 - 2009 Applica Consumer Products, Inc.
Made in People's Republic of China
Printed in People's Republic of China
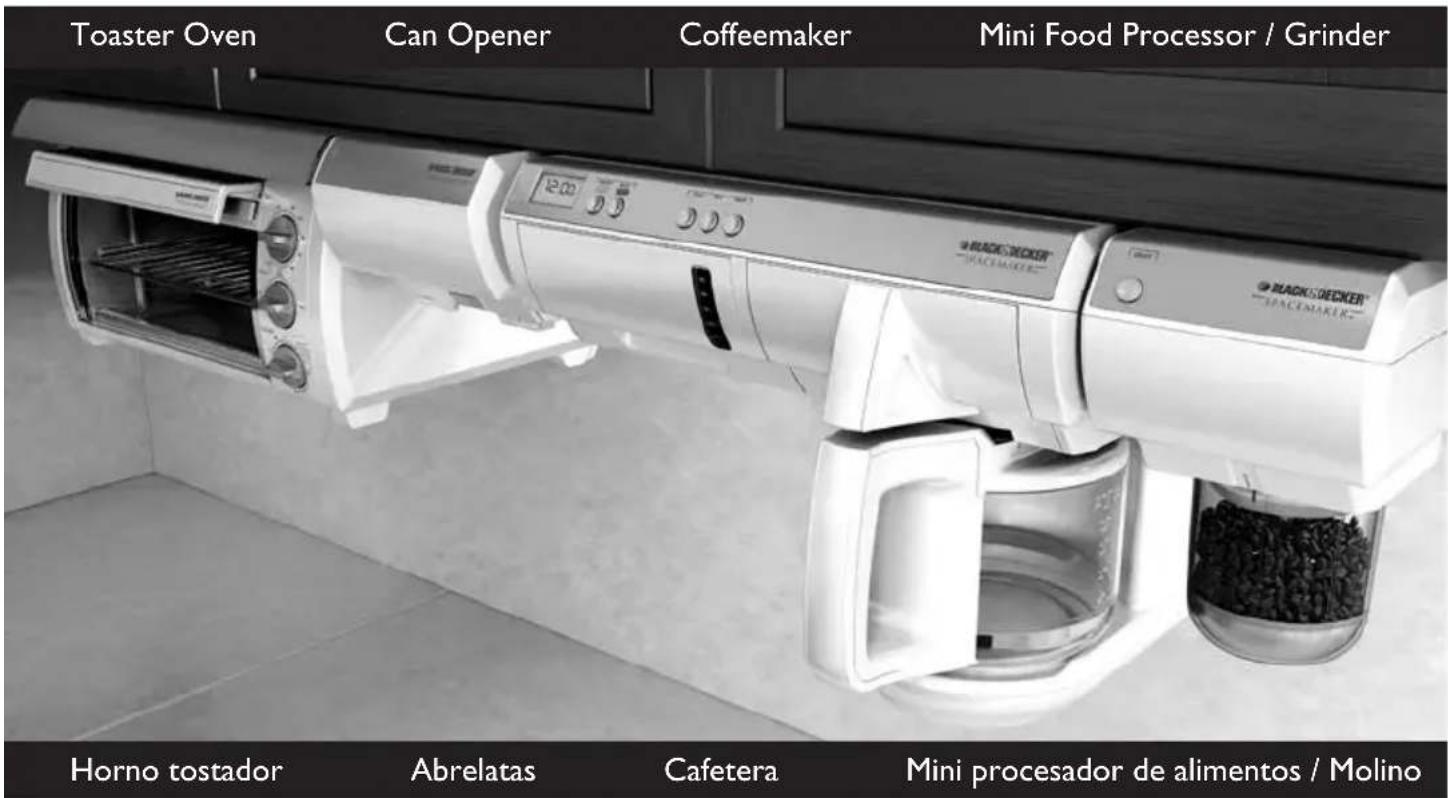
Save space and regain your counters in any kitchen with our full-line of space-saving appliances.
^† SpaceMaker™ appliances can help tackle all your kitchen tasks while keeping your counters free of clutter!
Visit www.bdspacemaker.com to learn more about †SpaceMaker™ appliances and see our latest promotional offers.
Your countertops will thank you!