
ML5100FB - Printer OKI - Free user manual and instructions
Find the device manual for free ML5100FB OKI in PDF.


User questions about ML5100FB OKI
0 question about this device. Answer the ones you know or ask your own.
Ask a new question about this device
Download the instructions for your Printer in PDF format for free! Find your manual ML5100FB - OKI and take your electronic device back in hand. On this page are published all the documents necessary for the use of your device. ML5100FB by OKI.
USER MANUAL ML5100FB OKI
natural_image
Exterior view of a white OPD printer with black cover and paper feed (no visible text or symbols)PREFACE
Every effort has been made to ensure that the information in this document is complete, accurate, and up-to-date. The manufacturer assumes no responsibility for the results of errors beyond its control. The manufacturer also cannot guarantee that changes in software and equipment made by other manufacturers and referred to in this guide will not affect the applicability of the information in it. Mention of software products manufactured by other companies does not necessarily constitute endorsement by the manufacturer.
While all reasonable efforts have been made to make this document as accurate and helpful as possible, we make no warranty of any kind, expressed or implied, as to the accuracy or completeness of the information contained herein.
The most up-to-date drivers and manuals are available from:
www.okiprintingsolutions.com
Copyright © 2009 Oki Europe Ltd. All rights reserved.
Oki is a registered trademark of Oki Electric Industry Company, Ltd.
Oki Printing Solutions is a registered trademark of Oki Data Corporation.
Hewlett-Packard, HP, and LaserJet are registered trademarks of Hewlett-Packard Company.
Microsoft, MS-DOS and Windows are registered trademarks of Microsoft Corporation.
ENERGY STAR is a trademark of the United States Environmental Protection Agency.
Apple, Macintosh, Mac and Mac OS are registered trademarks of Apple Computer.
Other product names and brand names are registered trademarks or trademarks of their proprietors.


As an ENERGY STAR Program Participant, the manufacturer has determined that this product meets the ENERGY STAR guidelines for energy efficiency.
This product complies with the requirements of the Council Directives 2004/108/EC (EMC) and 2006/95/EC (LVD) as amended where applicable on the approximation of the laws of the member states relating to electromagnetic compatibility and low voltage.
The following cables were used to evaluate this product to achieve EMC directive 2004/108/EC compliance and configurations other than this may affect that compliance.
| CABLE TYPE LENGTH(METRE) | CORE SHIELD | |
| Power 1.8 | × | |
| USB 3 | ×√ | |
| Serial 2 | ×√ | |
| Parallel 2 | ×√ | |
MANUFACTURER
Oki Data Corporation,
4-11-22 Shibaura, Minato-ku,
Tokyo 108-8551,
Japan
IMPORTER TO THE EU/AUTHORISED REPRESENTATIVE
Oki Europe Limited (trading as OKI Printing Solutions)
Blays House
Wick Road
Egham
Surrey TW20 OHJ
United Kingdom
For all sales, support and general enquiries contact your local distributor.
ENVIRONMENTAL INFORMATION

text_image
www.okiprintingsolutions.com OKICONTENTS
Preface 2
Manufacturer....3
Importer to the EU/authorised representative. . . . . . . . . . . . . . . . . . . . . . . . . . . . 3
Environmental Information. 3
Contents 4
Notes, cautions and warnings .....6
Introduction 7
About this guide 7
On-line usage 7
Printing pages. 8
Getting started 9
Retaining packing materials 9
Identifying component parts. 9
Front view 9
Rear view 10
Locating your printer 10
Powering on your printer 11
Producing a test print 12
Connecting to a computer .....13
Interconnecting printer and computer . . . . . . . . . . . . . . . . . . . . . . . . . . . . . . . . . . . . . . . . . . . . . . . . . . . . . . 13
Interfaces. 13
Interconnection....13
Installing the printer driver. 14
Printing a test page . . . . . . . . . . . . . . . . . . . . . . . . . . . . . . . . . . . . . . . . . . . . . . . . . . . . . . . . . . . 14
Printing from a computer .....15
Paper handling 16
Loading cut sheet paper. 16
Ejecting cut sheet paper. 17
Loading continuous forms. 18
Setting up continuous forms .....18
Feeding continuous forms. 18
Tearing off continuous forms 20
Aligning the tear-off perforations. 21
Removing continuous forms 21
Setting the Paper Thickness lever 22
Operating instructions 24
Operator panel 24
Indicators. 24
Button switches 25
Setting menu values 26
Confirming current settings 26
Menu setting. 26
Menu items and settings 27
Initialising menu settings 33
Adjusting TOF position ....33
Printer settings 34
Printer impact mode 34
Troubleshooting 35
Clearing paper jams 35
Cut sheet paper jammed in printer 35
Continuous forms jammed in printer . . . . . . . . . . . . . . . . . . . . . . . . . . . . . . . . . . . . . . . . . . . . . . . . . 37
Responding to alarm conditions. 38
Responding to general problems .....38
Cleaning your printer ....43
Printer exterior 43
Printer interior 43
Consumables and accessories....45
Consumables 45
Changing a ribbon cartridge . . . . . . . . . . . . . . . . . . . . . . . . . . . . . . . . . . . . . . . . . . . . . . . . . . . . . . . . . . . 45
Consumable order information 48
Specifications 49
Index ....51
Oki Printing Solutions contact details .....52
NOTES, CAUTIONS AND WARNINGS
NOTE
A note provides additional information to supplement the main text.
CAUTION!
A caution provides additional information which, if ignored, may result in equipment malfunction or damage.
WARNING!
A warning provides additional information which, if ignored, may result in a risk of personal injury.
For the protection of your product, and in order to ensure that you benefit from its full functionality, this model has been designed to operate only with genuine original ribbon cartridges. Any other ribbon cartridge may not operate at all, even if it is described as "compatible", and if it does work, your product's performance and print quality may be degraded.
Specifications subject to change without notice. All trademarks acknowledged.
INTRODUCTION
Congratulations on purchasing this printer!
The ML5100FB is designed to provide highly reliable letter quality printing and high resolution graphics for the desktop/office printing environment. It combines state-of-the-art, 24-pin, serial impact dot matrix printing technology with advanced materials and superior construction to provide high performance and versatility in a desktop sized unit. Careful attention to ergonomics and application needs provides user friendly operation for operators of varying technical capabilities.
ABOUT THIS GUIDE
This manual is your user's guide (check the web site, www.okiprintingsolutions.com, for the most up-to-date version) for your printer and forms part of the overall user support listed below:
Installation Safety booklet: provides information as to safe use of the printer.
This is a paper document that is packaged with the printer and should be read before setting up your printer.
Set-up guide: to describe how to unpack, connect and turn on your printer.
This is a paper document that is packaged with the printer.
This User's Guide: to help you to become familiar with your printer and make the best use of its many features. Also included are guidelines for troubleshooting and maintenance to ensure that it performs at its best.
This is an electronic document stored on the manuals CD.
Technical Reference Guide: to provide detailed technical information for programmers and more technical users.
This is an electronic document available on the web site www.okiprintingsolutions.com.
On-line Help: on-line information accessible from the printer driver and utility software.
ON-LINE USAGE
This guide is intended to be read on screen using an Adobe Acrobat Reader. Use the navigation and viewing tools provided in Acrobat.
You can access specific information in two ways:
In the list of bookmarks down the left hand side of your screen, click on the topic of interest to jump to the required topic. (If the bookmarks are not available, use the "Contents" on page 4.)
In the list of bookmarks, click on Index to jump to the Index. (If the bookmarks are not available, use the "Contents" on page 4.) Find the term of interest in the alphabetically arranged index and click on the associated page number to jump to the page containing the term.
PRINTING PAGES
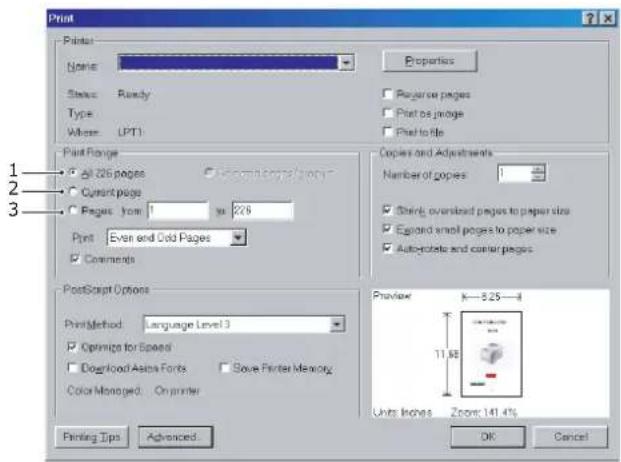
The whole manual, individual pages, or sections may be printed. The procedure is:
-
From the toolbar, select File, then Print (or press the Ctrl + P keys).
-
Choose which pages you wish to print:
(a) All pages, (1), for the entire manual.
(b) Current page, (2), for the page at which you are looking.
text_image
Print Printer Name: Properties Status: Ready Type: Writer: (LPT) Reverse pages Print as judge Print to file Print Range All 256 pages Current page Pages: from 1 to 228 Copies and Adjustments Number of copies Shiny, overloaded pages to paper size Eggiard small pages to paper size Auto-rotate and corner pages Print Even and Cold Pages Comments PostScript Options PrintMethod: Language Level 3 Optimize for Speed Download Assets Fonts Save Printer Memory Color Managed: On printer Preview K=8.25—4 11 MB Units Inches Zoom: 141.4% Printing Tips Advanced OK Cancel 1 2 3(c) Pages from and to, (3), for the range of pages you specify by entering their page numbers.
text_image
What is your own projects to use this in Name: The live images in this Portfolio. You can also to ensure that the Project is the live image will be resolution. Please application any option that either of your needs, you can choose to establish. It please note that if the time is not and Window applications, allow you to choose different at prior dialogues, so we complete using the other Notes: 10- Click on OK.
GETTING STARTED
WARNING!
If you have not already done so, familiarise yourself with the content of the Installation Safety booklet supplied with your printer.
RETAINING PACKING MATERIALS
After setting up your printer according to the instructions in the Set-up Guide, retain your packing materials and container in case you ever need to ship or transport your printer.
IDENTIFYING COMPONENT PARTS
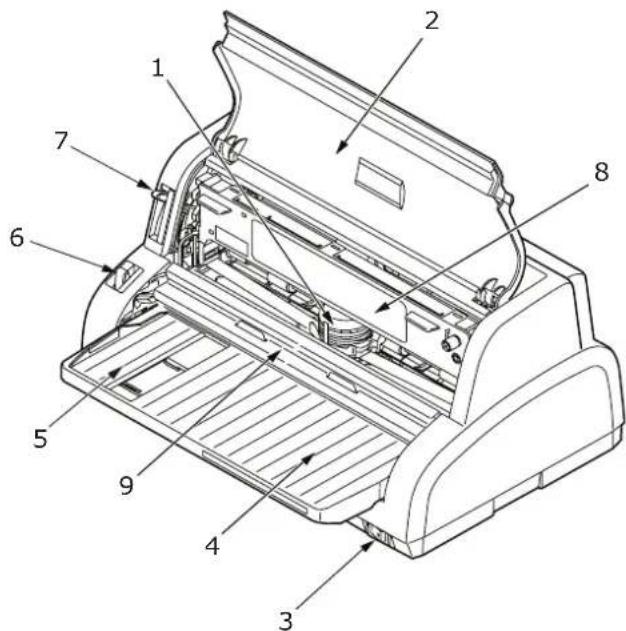
The main parts of your printer are identified and briefly explained below.
FRONT VIEW
text_image
Technical diagram of a printer with numbered parts for identification- Print Head: prints the characters on the paper.
- Top Cover: open and close for access, for example when changing a ribbon cartridge. Keep closed for noise reduction.
- Power Switch: to turn the printer power ON/OFF.
- Paper Tray: to hold cut sheet paper for use by the printer (one sheet at a time).
- Paper Guide: can be adjusted as required to locate the left edge of cut sheet paper.
- Paper Type Lever: set according to the type of paper used - cut sheet or continuous forms.
- Paper Thickness Lever: set according to the thickness of the paper.
- Ribbon Cartridge: holds the printer ribbon.
- Paper Feed Guide: lift and slide to access print head.
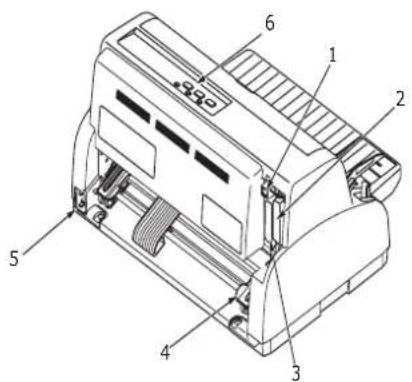
REAR VIEW
text_image
Technical diagram of a printer with numbered parts labeled 1 through 6- USB connector: connect to USB interface cable.
- Parallel connector: connect to parallel interface connector.
- Serial connector: connect to serial interface cable.
- Pin Tractor: to load and feed continuous forms.
- Power connector: connect to printer power cable.
- Operator Panel: contains button switches and indicators (described in detail later) that allow you to operate the printer.
LOCATING YOUR PRINTER
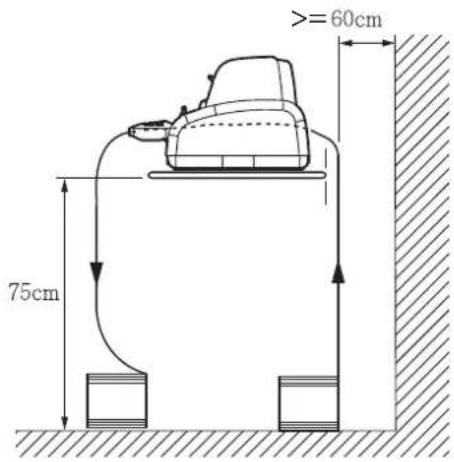
Select a firm, solid surface on which to site your printer.
Allow enough space around your printer (e.g. at least 60 cm from any wall) for easy access to the paper feed paths.
text_image
>=60cm 75cmMake sure a grounded power outlet is available nearby.
POWERING ON YOUR PRINTER
WARNING!
Operations of this equipment are not warranted when the equipment is connected to UPS (Uninterruptible Power Supply) and/or inverter. Doing so may result in damage of this equipment. Do not use an UPS and/or inverter.
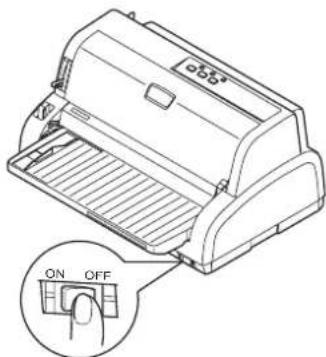
- Ensure that your printer Power Switch is set to OFF.
text_image
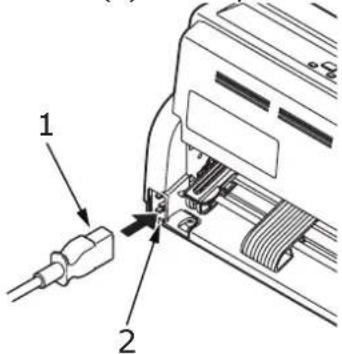
ON OFF- Connect the power cable connector (1) to the power connector (2) on the printer.
text_image
Technical diagram showing a connector assembly with labeled parts 1 and 2-
Connect the power cable to a 220/240 V AC power outlet and switch on the outlet power.
-
Turn the printer Power Switch to ON.
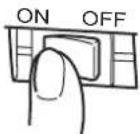
- Check that the POWER and SEL indicator on the control panel illuminates.
PRODUCING A TEST PRINT
To check that your printer is operational, produce a test print on a sheet of 80 gsm A4 paper (for example) as follows:
CAUTION!
Allow at least 5 seconds between turning the printer ON after turning it OFF. A shorter time interval between turning ON/OFF operations may cause printer power failure.
Do not turn the printer OFF while it is printing as this may result in damage to the print head.
-
Turn the printer Power Switch to OFF.
-
Set the Paper Type Lever to cut sheet and set the Paper Thickness Lever to position 1.
-
Press and hold the LF/FF button and turn the Power Switch to ON. The alarm indicator should be illuminated to indicate that there is no paper in the printer.
-
With the long side of the paper against the paper guide, insert the paper carefully into the printer. The printer will automatically grip the paper and start the test print.
NOTE
If required, you can pause the test print by pressing the SEL button and then resume the test print by again pressing the SEL button.
- When the test print has completed, the paper is automatically ejected.
NOTE
If you want to abort the test print for any reason, press the SEL button followed by the LOAD/PARK button to eject the paper and then turn the printer Power Switch to OFF.
CONNECTING TO A COMPUTER
In this section you will interconnect your printer and computer, install the printer driver in your computer and print a test page.
INTERCONNECTING PRINTER AND COMPUTER
INTERFACES
Your printer is equipped with three data interfaces:
CAUTION!
Do not use more than one of the following data interface methods to connect to your PC.
Parallel: for direct connection to a PC. This port requires a bi-directional (IEEE 1284 compliant) parallel cable.
USB: for connection to a PC running Windows 2000 or above. This port requires a shielded cable 3m long conforming to USB version 2.0.
Serial: for direct connection to a PC. This port requires a bi-directional RS232C serial interface cable.
NOTE
Interface cables are not supplied with your printer.
INTERCONNECTION
- Ensure that both printer and computer are turned OFF.
- Connect the required interface cable, USB (1) or parallel (2), or serial (3) to the printer and then to the computer (3).
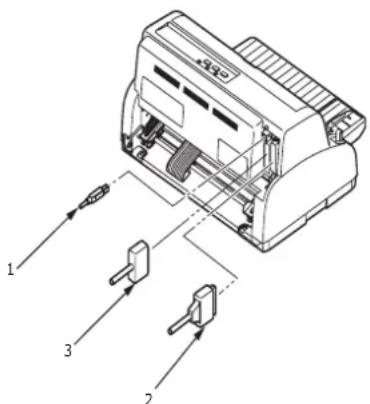
text_image
Technical diagram of a printer with labeled parts and connectors, showing internal structure and assembly details.- Turn ON the printer and then turn ON the computer.
INSTALLING THE PRINTER DRIVER
Insert the Drivers CD into your computer and follow the on-screen instructions to install the printer driver for use with your printer.
PRINTING A TEST PAGE
As an example, using Windows XP:
- Use Start > Printers and Faxes to show the Printers and Faxes window.
- Highlight the driver for your printer.
- Use File > Properties to show the Properties window.
- On the General tab, click the Print Test Page button.
- Ensure that a test page has printed, verifying your printer – computer setup.
PRINTING FROM A COMPUTER
When printing to your printer from, for example, a Windows application on your computer, make your printing selections from the driver windows that appear on screen. These driver windows have been designed to be easy to use and intuitive while supplementary on-line help is available by clicking each window Help button.
PAPER HANDLING
This section describes how to use cut sheet paper and continuous forms in your printer.
LOADING CUT SHEET PAPER
- Ensure that the printer is turned ON.
NOTE
If there are any continuous forms in the printer, eject them as described in
"Removing continuous forms" on page 21.
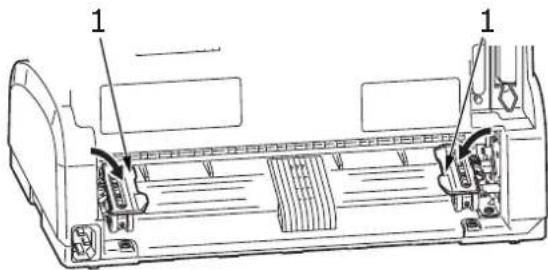
- Ensure that the Pin Tractor covers (1) are closed to avoid the possibility of paper jams.
text_image
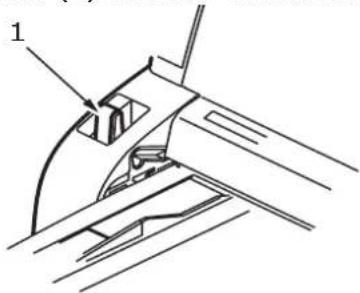
Technical diagram of a vehicle rear panel with labeled components and structural details- Ensure the Paper Type Lever (1) is set to Cut Sheet.
natural_image
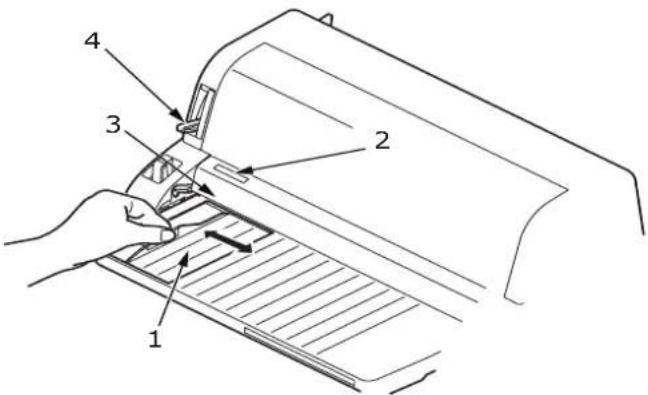
Technical line drawing of a mechanical component with no visible text or symbols- Set the left margin of the paper by adjusting the Paper Guide (1) along the scale (2) relative to the start of printed line marker arrow (3).
text_image
Technical diagram showing a hand operating a door panel with labeled parts 1, 2, 3, and 4.- Adjust the Paper Thickness Lever (4) to suit the paper. See "Setting the Paper Thickness lever" on page 22.
NOTE
If the Paper Thickness Lever setting does not match the paper being used, paper feeding and printing may not work properly.
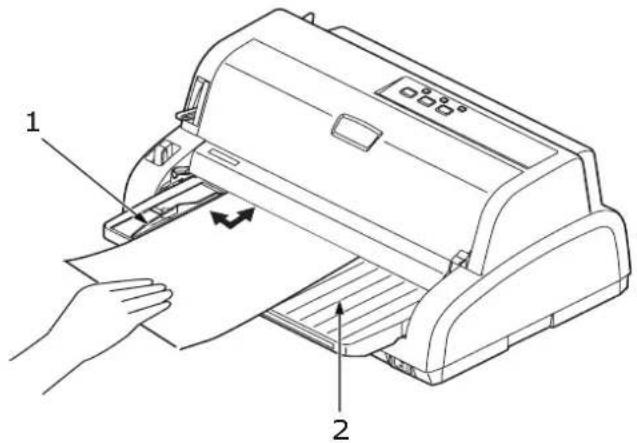
- With the printing side upwards and the left edge aligned with the Paper Guide (1), carefully insert the paper on the Paper Tray (2) into the printer until it is gripped.
text_image
Diagram of a printer printing paper with labeled parts 1 and 2, showing hand and paper movement arrows.NOTE
Ensure that the paper is accurately aligned along the Paper Guide to avoid the possibility of skew printing.
When printing an envelope, do not fold up the flap. A flap aligned along the Paper Guide can lead to skew printing.
EJECTING CUT SHEET PAPER
When the printer reaches the end of the cut sheet page it automatically ejects the page. If required, add another sheet for the printer to continue printing from where it left off.
To eject a cut sheet left in the printer, carry out the following:
-
Press the SEL button to put the printer off-line.
-
Press the LOAD/PARK button and the paper is ejected to the Paper Tray.
NOTE
Paper longer than A4 length (297 mm) may overlap and possibly fall off the Paper Tray.
LOADING CONTINUOUS FORMS
SETTING UP CONTINUOUS FORMS
To avoid paper feeding problems, carry out the following:
text_image
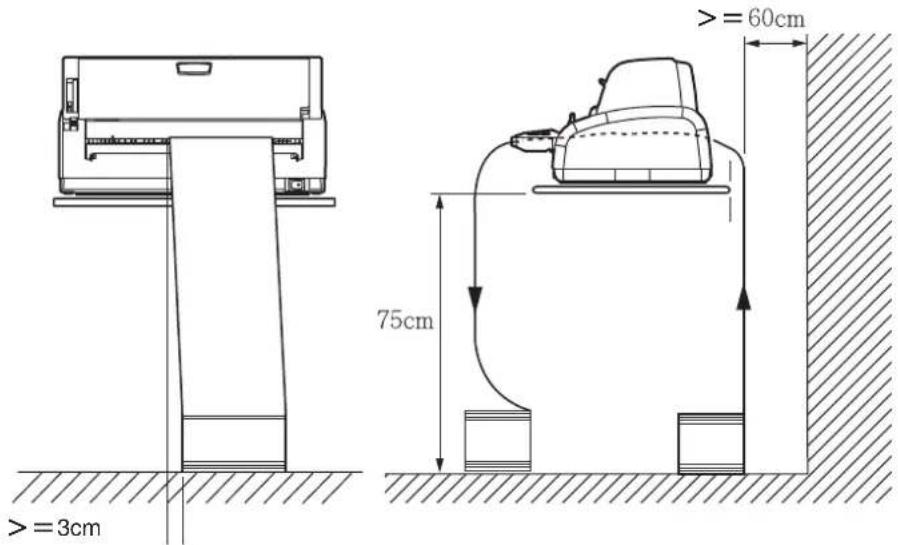
> = 3cm 75cm >= 60cm- Check your printer is on a surface approximately 75 cm above the floor.
- Position the continuous forms supply directly below the printer, no more than 3 cm left or right of the printer paper path.
- Ensure the rear of the printer is close to and parallel with the edge of the surface and at least 60 cm from any wall.
FEEDING CONTINUOUS FORMS
- Ensure that the printer is turned ON.
NOTE
If there is a cut sheet in the printer, eject it as described in "Ejecting cut sheet paper" on page 17.
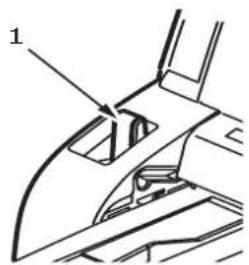
- Ensure the Paper Type Lever (1) is set to Continuous Forms.

text_image
1- Adjust the Paper Thickness Lever to suit the paper. See "Setting the Paper Thickness lever" on page 22.
NOTE
If the Paper Thickness Lever setting does not match the paper being used, paper feeding and printing may not work properly.
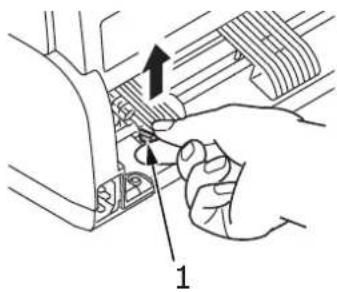
- Lift the locking lever (1) of the left Pin Tractor and slide the Pin Tractor as required to adjust the paper position relative to the first horizontal character centre mark.
text_image
Technical diagram showing a hand operating a mechanical component with labeled parts and an arrow indicating direction.Press the locking lever back down to lock the Pin Tractor in the desired position.
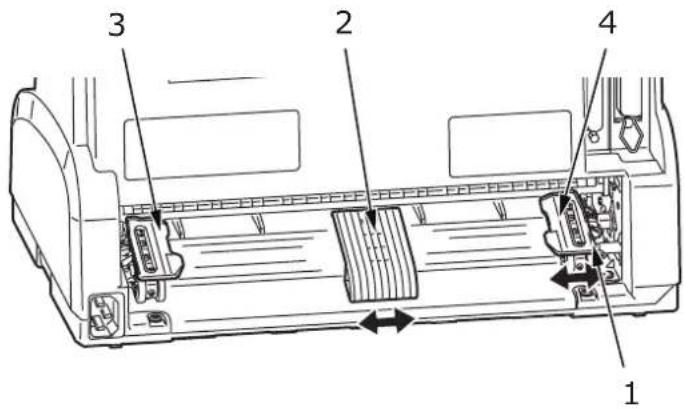
- Lift the locking lever (1) of the right Pin Tractor and slide the Pin Tractor to the required position to accommodate the width of the continuous forms to be used. Move the rear paper guide (2) to midway between the left (3) and right (4) Pin Tractors.
text_image
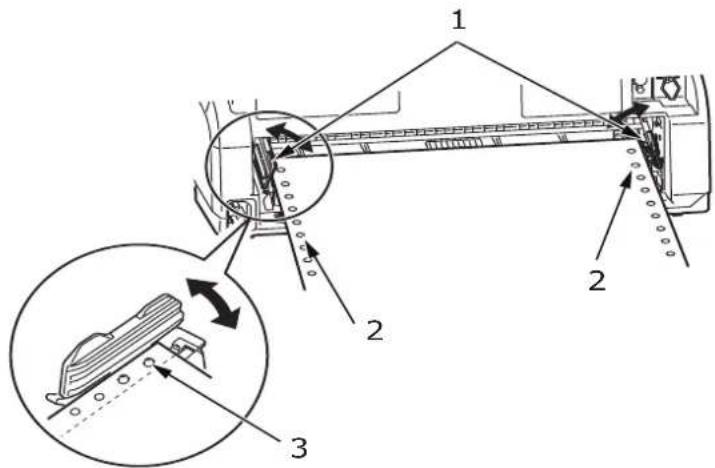
Technical diagram of a car air conditioner unit with numbered components and directional arrows indicating airflow or movement.- Open the left and right Pin Tractor covers (1) and feed the continuous forms in the direction of the arrows, locating the sprocket holes (2) in the forms onto the sprocket pins. Ensure that the forms are properly aligned on the sprocket pins (3), then close the covers.
text_image
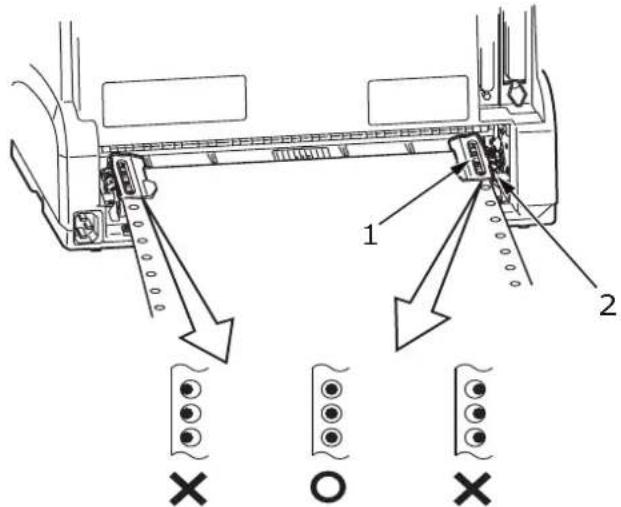
Technical diagram of a mechanical assembly with numbered components and directional arrows indicating motion or assembly.- Adjust the right Pin Tractor (1) to accommodate the width of the continuous forms, taking care that the forms are held neither too loosely nor too tightly between the Pin Tractors. Press the locking lever (2) down to lock the right Pin Tractor in the desired position.
text_image
Technical diagram showing mechanical assembly with labeled components and directional arrows indicating movement or force- Press the LOAD/PARK button. The continuous forms will be taken into the printer and positioned at the first line print position and the SEL indicator will illuminate.
TEARING OFF CONTINUOUS FORMS
-
With the SEL indicator illuminated, press the LOAD/PARK button to feed the continuous forms to the tear-off position.
-
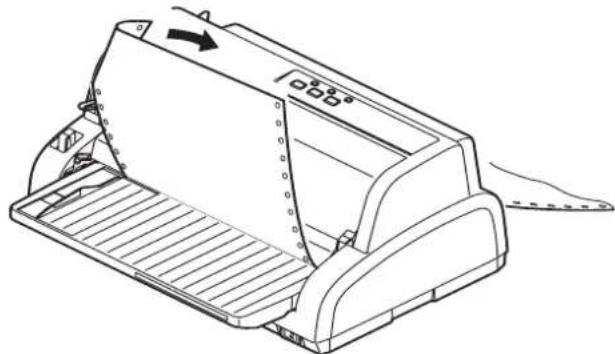
Carefully tear off the forms along the tear-off perforations in the direction shown. Using excessive force may result in tearing at a position other than the tear-off perforations.
natural_image
Line drawing of a paper<|im_start|> Puerto Rico printer with a paper roll and clasp (no text or symbols)- With the SEL indicator illuminated, press the LOAD/PARK button to reposition the continuous forms in the printer back to the first line print position.
ALIGNING THE TEAR-OFF PERFORATIONS
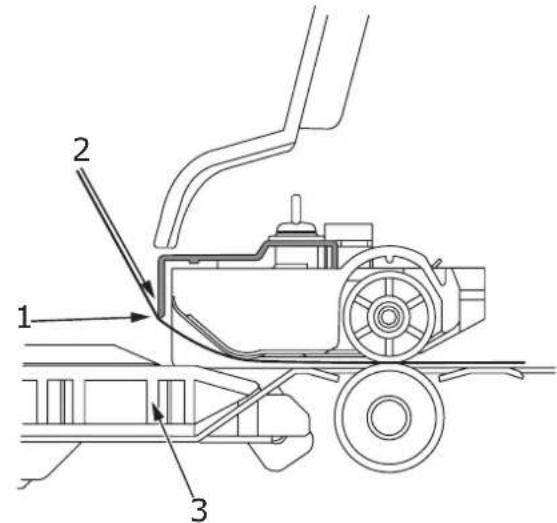
If the tear-off perforations are not aligned with the paper cutter on the Top Cover, align them as follows:
-
With the SEL indicator illuminated, press and hold the LOAD/PARK button to move the tear-off perforations to the paper cutter on the Top Cover.
-
Check the position of the tear-off perforations (1) relative to the paper cutter (2). (Paper Tray (3) is shown for clarity.)
text_image
Technical diagram of a mechanical assembly with labeled parts 1, 2, and 3(a) To advance the forms, hold down the LOAD/PARK button and press the SEL button.
(b) To retract the forms, hold down the LOAD/PARK button and press the LF/FF button.
NOTE
Do not release the LOAD/PARK button while performing steps 1 and 2.
When making adjustment (2a) or (2b), the ALARM indicator will be on. If a movement greater than +- 7/90 in is specified, the ALARM indicator blinks and the above adjustment cannot be made.
- Release the buttons after the tear-off perforations have been aligned with the paper cutter.
REMOVING CONTINUOUS FORMS
-
Tear off the continuous forms. See "Tearing off continuous forms" on page 20.
-
Press the SEL button to set the printer off-line and reposition the continuous forms in the printer.
-
Press the LOAD/PARK button to move the front edge of the continuous forms backwards to the Pin Tractors.
NOTE
The ALARM indicator illuminates to indicate there is no paper present.
If sprocket holes of the last page of the forms disengage from the sprocket pins, do not attempt to eject the paper to avoid the possibility of a paper jam.
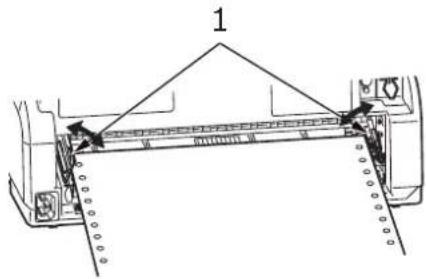
- Lift the Pin Tractor covers (1) and remove the forms.
text_image
1- Close the Pin Tractor covers.
SETTING THE PAPER THICKNESS LEVER
There are 9 lever positions, the first 9 for printing purposes and the ninth to also facilitate ribbon replacement.
Set the Paper Thickness lever for different paper types as follows:
| PAPER TYPE LEVER POSITION | |||||
| 1 2 3 | 4 5 - 9 | ||||
| Cut sheet paper See below | |||||
| 52 - 81 gsm X | |||||
| 81 - 128 gsm X | |||||
| 128 - 156 gsm X | |||||
| Postcard X | |||||
| Envelope X | |||||
| Continuous paper See Below | |||||
| 52 - 81 gsm X | |||||
| 81 - 128 gsm X | |||||
| Carbon paper or Pressure-sensitive paper (40 gsm) | See below | ||||
| 2 part X | |||||
| 3 part X | |||||
| 4 part | X | ||||
| 5 part | X | X | |||
Set the Paper Thickness lever for overall paper thickness as follows:
| OVERALL PAPER THICKNESS LEVER POSITION | |
| 0.06 - 0.12 mm 1 | |
| 0.13 - 0.21 mm 2 | |
| 0.22 - 0.30 mm 3 | |
| 0.31 - 0.39 mm 4 | |
| 0.40 - 0.48 mm 5 | |
| 0.49 - 0.57 mm 6 | |
| 0.58 - 0.66 mm 7 | |
| 0.67 - 0.75 mm 8 | |
| 0.76 - 0.84 mm 9 | |
NOTE
Printing with lever positions 5 - 9 is not guaranteed.
If the lever position does not suit the paper thickness, paper feeding and printing may not work properly.
Do not print bankbooks to avoid possible pin breakage/ribbon snagging.
Printing can be carried out with the lever position set to 4 for paper thickness up to 0.325mm.
When lever positions 5 - 9 are selected, printing quality for carbon paper may decline resulting in illegible characters for example.
OPERATING INSTRUCTIONS
OPERATOR PANEL
text_image
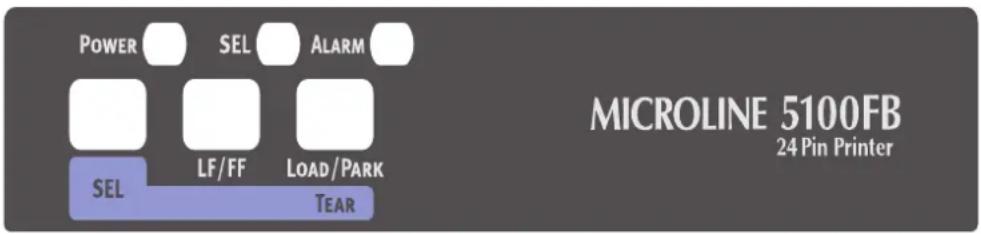
POWER SEL ALARM SEL LF/FF LOAD/PARK TEAR MICROLINE 5100FB 24 Pin PrinterThe status/alarm indicators and button switches on the operator panel allow you to check printer status and control the printer.
INDICATORS
| INDICATOR STATUS MEANING | ||
| SEL ON Printer is on-line i.e. is available to print. | ||
| High temperature alarm status. | ||
| ALARM ON Paper end status i.e. no paper present. | ||
| POWER ON Printer power is ON. | ||
BUTTON SWITCHES
| SWITCH STATUS FUNCTION | ||
| SEL On-line Sets the printer to off-line. | ||
| Off-line Sets the printer to on-line and disalarms the printer. | ||
| LF/FF Cut sheet manual mode On-line | Ineffective. | |
| Off-line Feeds paper by one line. Holding the button down ejects the cut sheet. | ||
| Continuous Forms mode Online | ||
| Offline Holding the button down results in continuous form being fed until first line of next page. | ||
| LOAD/PARK Continuous Forms mode On-line | Delivers the continuous form to the cut position.If the button is pressed again or data is received, the original form position is restored. | |
| Off-line If the continuous form is in position, press to retract the form to the Pin Tractors.(If the sprocket holes of the last page of the form disengage from the sprocket pins, do not attempt to eject the paper as a paper jam may result.) | ||
| LOAD/PARK + POWER ON Switch | ||
| LOAD/PARK + LF/FF On-line Ineffective. | ||
| Off-line Microfeed (0.14 mm step) downHold this button combination down for continuous feeding or ejecting of paper. | ||
| LOAD/PARK + SEL On-line Ineffective. | ||
| Off-line Microfeed (0.14 mm step) upHold this button combination down for continuous feeding or ejecting of paper. | ||
| SEL + LF/FF On-line Ineffective. | ||
| Off-line Saves the set paper start position (first line print position). | ||
| SEL + LOAD/PARK On-line Ineffective. | ||
| Off-line Ineffective. | ||
SETTING MENU VALUES
The following information explains the printer settings and how you can change them. Printer items and their values are printed for reference.
CONFIRMING CURRENT SETTINGS
To print the current menu settings, use a cut sheet of A4 paper or continuous forms of width at least 254 mm. In this example, a sheet of A4 paper is used.
- Set the Paper Type lever to cut sheet mode.
- To activate menu mode:
(a) Ensure that the printer is powered OFF.
(b) While holding down the LOAD/PARK button set the printer Power Switch to ON.
-
Place the cut sheet on the Paper Tray.
-
Press the LF/FF button and the printer prints out all the menu items currently selected and their corresponding settings.
- Exit or proceed to change menu settings:
(a) To exit menu settings confirmation, save the current settings and eject the paper, press and hold the LOAD/PARK button, then press the LF/FF and the SEL buttons together.
(b) To change menu settings, see "Menu setting" on page 26.
MENU SETTING
NOTE
Before changing menu settings, you may wish to print the current menu settings as in "Confirming current settings" on page 26.
Set menu item values (printed out for reference as you proceed) as follows:
- Press LOAD/PARK button and turn the Power ON, to enter the menu mode.
- Place the cut sheet on the Paper Tray.
- Press SEL to step forward, and hold LOAD/PARK and press SEL to step backward through the menu items to the required item.
- To change the setting for a selected item, press LF/FF to step forward, and press LOAD/PARK + LF/FF to step backward through the setting values to the required setting.
- Repeat steps 3 and 4 as required to change settings for other items.
- To exit menu setting, press and hold the LOAD/PARK button, then press SEL and LF/FF together to save the new settings and exit menu setting mode.
NOTE
Switching the printer OFF does not save the new settings.
MENU ITEMS AND SETTINGS
In the menu settings tables below, factory default settings are shown emboldened.
| ITEM FUNCTION SETTING | ||
| Emulation Mode Select EPSON LQ mode, IBM PPR mode, or IBM X24 AGM mode. | IBM PPRIBM AGMEPSON LQ | |
| Print Mode Select quality of ANK characters. | LQ CourierLQ RomanLQ SwissLQ Swiss BoldLQ OratorLQ GothicLQ PrestigeLQ OCR-ALQ OCR-BUtilityHSD | |
| Pitch | Select character pitch. | 10 CPI, 12 CPI, 15 CPI, 17.1 CPI, 20 CPI |
| Proportional Spacing Select whether to use proportional spacing or not. | YesNo | |
| Style Select either font style. Normal, Italics | ||
| Size Select the character scale size. Single, Double | ||
| Character Set Select either ANK character code table. | Set ISet II | |
| Language Set | Select a language character set. | ASCII, French, German,British, Danish I, Swedish I,Italian, Spanish I, Japanese,Norwegian, Danish II, SpanishII, Latin American, FrenchCanadian, Dutch, Swedish II,Swedish III, Swedish IV,Turkish, Swiss I, Swiss II,Publisher |
| Zero Character | Select either print font pattern to receive a zero character located at 30H in ANK code. | UnslashedSlashed |
| Code Page Select a code page. USA | Canada FrenchMultilingualPortugalNorwayTurkeyGreek_437Greek_869Greek_928Grk_437 CYPRUSPolska MazoviaSerbo Croatic ISerbo Croatic IIECMA-94Hungarian CWIWindows GreekWindows East EuropeWindows CyrillicEast Europe Latin II-852Cyrillic I-855Cyrillic II-866Kamenicky(MJK)ISO Latin 2Hebrew NC (862)Hebrew OCTurkey_857Latin 5 (Windows Turkey)Windows HebrewUkrainianBulgarianISO Latin 6 (8859/10)Windows BalticBaltic_774KBL-LithuanianCyrillic LatvianRoman-8Icelandic-861Multilingual 858ISO 8859-15Greek_737Asmo449+Asom708Arabic864Windows ArabicPOL1Macedonian | |
| Slashed Letter 0 Set whether to convert slashed0 located at 9BH and 9DH inUSA code page or not. | YesNo | |
| Multi Pass Select the printing directionwhen double-height print dataexists in a line. | Bi-directionalUni-directional | |
| Rcv Buffer Select size of the received buffer. | 0, 32 K, 64 K | |
| Print Suppress Effective Set whether to enable or disable a print suppress setup command. | YesNo | |
| Auto LF Select whether to perform autoLF operation or not upon receiving a CR code. | YesNo | |
| Auto CR*IBM PPR only | Select whether to perform auto CR operation upon receiving a carriage return command. | YesNo |
| SI Select Pitch (10CPI)*IBM PPR/AGM only | Set how to handle an SI command received in 10 CPI mode. | 15 CPI17.1 CPI |
| SI Select Pitch (12CPI)*IBM PPR/AGM only | Set how to handle an SI command received in 12 CPI mode. | 12 CPI20 CPI |
| Reset Inhibit Set whether to enable or disable an initial command. | NoYes | |
| Select Language Set*EPSON only | Set whether to enable or disable a combination of the code page setting and the language setting by menu. | CombinedCode Page Only |
| Impact Mode Select print mode on power on.(This item is referred to on initialisation only by I-PRIME or power on but not by an initialisation command.) | NormalQuietHi Copy | |
| Print Direction Command Select the validity of a one-way print setup command. | ValidInvalid | |
| Power Saving Set whether to enable or disable power save mode. | EnableDisable | |
| Power Save Time Set idle time to enter power save mode. | 5 min, 10 min, 15 min, 30 min, 60 min | |
| PE Detection Select whether to detect paper end or not. | OFFON | |
| Table Print Set whether to divide a path or not to print on occasions when printing by the same headpin continues for 3 in or more in the same print block. | StandardSpecial | |
| Carriage Position when cut sheet Gap 1 | Selects the carriage position for cut sheet paper fed (paper thickness level 1). | LeftMiddleRight |
| Carriage Position when cut sheet Gap >1 | Selects the carriage position for cut sheet paper fed (paper thickness level 2 or more). | LeftMiddleRight |
| Paper width mode Selects continuous form paper width used. Select Mode1 when using paper ≥8 inches wide, Mode2 when using paper >5 but <8 inches wide, and Mode3 when using paper less than <5 inches wide. | Mode1Mode2Mode3 | |
| Continuous paper top LF adjust Gap1 | Selects top LF correction amount for continuous form paper, when paper thickness level is 1 (Gap 1). The positive range adds correction amounts to the LF, and the negative range reduces the correction amounts to the LF. The amount of LF is in 1/360 inch increments. | -3 - -10+3 - +1 |
| Continuous paper top LF adjust Gap2 | Selects top LF correction amount for continuous form paper, when paper thickness level is 2 (Gap 2). The positive range adds correction amounts to the LF, and the negative range reduces the correction amounts to the LF. The amount of LF is in 1/360 inch increments. | -3 - -10+3 - +1 |
| Continuous paper top LF adjust Gap3 | Selects top LF correction amount for continuous form paper, when paper thickness level is 3 (Gap 3). The positive range adds correction amounts to the LF, and the negative range reduces the correction amounts to the LF. The amount of LF is in 1/360 inch increments. | -3 - -10+3 - +1 |
| Continuous paper top LF adjust Gap4 | Selects top LF correction amount for continuous form paper, when paper thickness level is 4 (Gap 4). The positive range adds correction amounts to the LF, and the negative range reduces the correction amounts to the LF. The amount of LF is in 1/360 inch increments. | -3 - -10+3 - +1 |
| Line Spacing Select line feed pitch. 6 LPI | 8 LPI | |
| Form Tear-Off Select manual or auto as the method to advance a continuous form to the form tear-off position. | Off500 ms1 sec2 sec | |
| Skip Over Perforation Select whether to skip over perforation or not. (When a skip over perforation setup command is received, the received command is given priority.) | YesNo | |
| Page Length(Continuous) | Select the length of a continuous form. | 3.5 in, 4 in, 5.5 in, 6 in, 7 in, 8 in, 8.5 in, 11 in, 11 2/3 in,12 in, 14 in, 17 in, 5 in, 3 in, 3.25 in |
| TOF (Continuous) Select the reference position for the TOF position when auto loading continuous form paper from the rear of the printer. (Up to the mid-section of characters in the first line.) | 2.12 mm (1/12 in)4.23 mm (1/6 in)6.35 mm (1/4 in)8.47 mm (1/3 in)10.58 mm (5/12 in)12.7 mm (1/2 in)14.82 mm (7/12 in)16.93 mm (2/3 in)19.05 mm (3/4 in)21.17 mm (5/6 in)23.28 mm (11/12 in)25.4 mm (1 in)27.52 mm (13/12 in)1Chr. Set Pos. | |
| Initial Position This is the position of the paper when the paper is already loaded at power on. (For continuous form mode only.) | PrintTear OFF | |
| Auto Eject Position Select a printable area at the bottom of cut sheets of paper in cut-paper mode (the character centre position). | 6.35 mm (1/4 in)14.8 mm | |
| Page Length (Cut Sheet) Select the page length of cut-paper. | 3.5 in, 4 in, 5.5 in, 6 in, 7 in, 8 in, 8.5 in, 11 in, 11 2/3 in, 12 in, 14 in, 16.57 in, 5 in, 3 in, 3.25 in | |
| TOF (Cut Sheet) Select the reference position for the TOF position when feeding cut-paper in manual mode. (Up to the mid-section of characters in the first line.) | 2.12 mm (1/12 in)4.23 mm (1/6 in)6.35 mm (1/4 in)8.47 mm (1/3 in)10.58 mm (5/12 in)12.7 mm (1/2 in)14.82 mm (7/12 in)19.05 mm (3/4 in)21.17 mm (5/6 in)23.28 mm (11/12 in)25.4 mm (1 in)27.52 mm (13/12 in)1Chr. Set Pos. | |
| Wait Time Select the waiting time between setting paper on the tray and feeding it while the printer is waiting for paper to be fed in cut-paper manual feed mode. | 500 ms1 sec2 sec | |
| FF Function*EPSON only | Set feeding operation upon receiving an FF code after cut-paper is fed. | EjectForm Feed |
| I-Prime | Select whether buffer contents upon initialisation by receiving I-PRIME. | In print or clearBuffer ClearBuffer Print |
| Auto Feed XT*EPSON only | Set the validity of an Auto Feed XT signal. | ValidInvalid |
| I/F Bi-Direction Set whether to return a device ID or not in accordance with IEEE1284. | EnableDisable | |
| ITEM FUNCTION SETTING | ||
| Parity(Displayed when connected to a Serial Interface) | None: Absence of parity bitOdd: Odd parityEven: Even parityIgnore: Do not convert the character to ox40 in case of parity error. | NoneOddEvenIgnore |
| Serial Bits(Displayed when connected to a Serial Interface) | Select the data bit length. 7 Bits | 8 Bits |
| Protocol(Displayed when connected to a Serial Interface) | Select an I/F Busy control method.Ready/Busy: Busy control by a DTR signalX-ON/X-OFF: Busy control by a DC3/DC codeDTR X-On/X-OFF: Busy controlDTR Signal and DC3/DCT control. | Ready/BusyX-On/X-OFFDTR X-ON/X-OFF |
| Diagnostic Test(Displayed when connected to a Serial Interface) | Select to perform input/output diagnosis of RS-232C interface signals. | NoYES |
| Baud Rate(Displayed when connected to a Serial Interface) | Select to set the Baud rate. 300bps | 600bps1200bps2400bps4800bps9600bps19,200 bps |
| DTR Signal(Displayed when connected to a Serial Interface) | Set a method to switch a DTR signal of a serial interface. | Ready on Power UPReady on Select |
| Busy Time(Displayed when connected to a Serial Interface) | Set the minimum time between BUSY to READY. | 0.2 sec1 sec |
| TOF Adjustment(Cut Sheet) | Select an adjustment value for the reference position in regard to the TOF position of cut-paper/passbooks.The position moves to the rear of the form by [+] and to the top of the form by [-] in 1/60 in increments. | -7 - -10+7 - +1 |
| Rear Load Adjustment Select | Select an adjustment value for the reference position in regard to the TOF position of a continuous form.The position moves to the rear of the form by [+] and to the top of the form by [-] in 1/60 in increments. | -7 - -10+7 - +1 |
| Cut Position Adjust Select | an adjustment value for the position to cut the end of a continuous form. (In 1/90 in increments) | -7 - -10+7 - +1 |
| ITEM FUNCTION SETTING | ||
| Registration Low Adjust the print starting position on printing in the reverse direction. (The position moves to the right or left in 1/720 in increments.) | -10 - -10+10 - +1 | |
| Registration Normal Adjust the print starting position on printing in the reverse direction. (The position moves to the right or left in 1/720 in increments.) | -10 - -10+10 - +1 | |
| Registration High1 Adjust the print starting position on printing in the reverse direction. (The position moves to the right or left in 1/720 in increments.) | -10 - -10+10 - +1 | |
| Registration High2 Adjust the print starting position on printing in the reverse direction. (The position moves to the right or left in 1/720 in increments.) | -10 - -10+10 - +1 | |
| LF Revise (Cut Sheet) Adjust a line feed amount in cut-paper mode. | -14 - -10+14 - +1 | |
INITIALISING MENU SETTINGS
To restore the menu settings to their initial values, carry out the steps below.
NOTE
The values adjusted by the Adjustment menus are not initialised by the following procedure.
- Set the Power Switch to OFF.
- Press and hold down the SEL and LOAD/PARK buttons together then set the Power Switch to ON.
ADJUSTING TOF POSITION
Use the following procedure to set TOF to accord with the reference position (6.35 mm (0.25 in)). The reference position refers to the first line of the paper i.e. the position to which the printer feeds the paper when automatically loading the paper.
NOTE
Adjusting of TOF can be done in cut sheet mode or continuous forms mode.
- Print out the menu settings of the printer as in "Confirming current settings" on page 26 and confirm that the TOF (in cut sheet mode or continuous forms mode) is 6.35 mm (0.25 in).
- Set the Paper Type lever to the required paper type.
- When continuous forms are used, place the paper on the Pin Tractor.
For cut sheet mode, do not insert the paper at this stage.
- In continuous forms mode, press the LOAD/PARK button.
In cut sheet manual feeding mode, press the LOAD/PARK button and place the paper on the Paper Tray.
After the paper has started to be taken into the printer, continue to press the LOAD/PARK button and the paper is taken into the 6.35 mm (0.25 in) position.
- Align the paper with the first print line position as follows:
In off-line mode, press the following buttons to adjust the first printing line:
To feed the paper forward by a small amount, hold down the LOAD/PARK button and then press the SEL button.
To feed the paper backward by a small amount, hold down the LOAD/PARK button and press the LF/FF button.
NOTE
If the specified correction range is more than +-7/60 in, the ALARM indicator flashes and the paper cannot be moved.
- When the paper is positioned at the required TOF, release the buttons in Step 5 above.
To save this position as the TOF, press and hold the SEL button and then press the LF/FF button.
PRINTER SETTINGS
PRINTER IMPACT MODE
When switched ON, the printer enters the impact mode selected in the menu. You can change this to normal speed, quiet printing or Emphasis printing.
Emphasis printing
CAUTION!
Do not use emphasis printing if performing horizontal tab character printing on thin paper as the paper may become damaged.
Use this for printing multipart forms.
You have to set emphasis printing by using the menus to set Impact Mode to Hi Copy as described in "Menu setting" on page 26.
NOTE
If the paper on top is so thick that duplication on the paper below it fails, use emphasis printing.
In emphasis printing mode, printing is carried out twice.
The print may become blurred if high density characters and graphics are printed using a new ribbon.
In emphasis mode, ensure that the paper is flat to avoid possible printing errors.
TROUBLESHOOTING
CLEARING PAPER JAMS
CUT SHEET PAPER JAMMED IN PRINTER
WARNING!
Do not carry out any operations inside the printer with the Power Switch set to ON.
- Set the Power Switch to OFF.
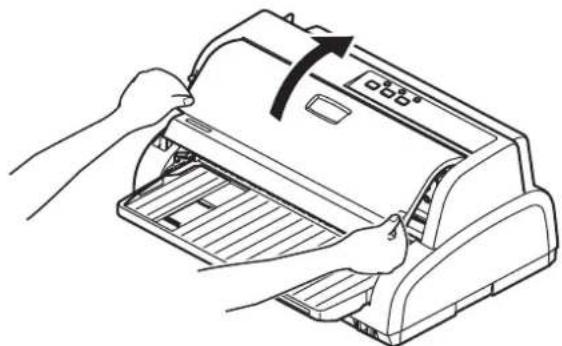
- Open the Top Cover.
natural_image
Line drawing of hands operating a printer with a paper airplane (no text or symbols)- Set the Paper Thickness lever to the Replace Ribbon position (position 9).
WARNING!
The Print Head may be hot after printing. Allow it to cool before touching it.
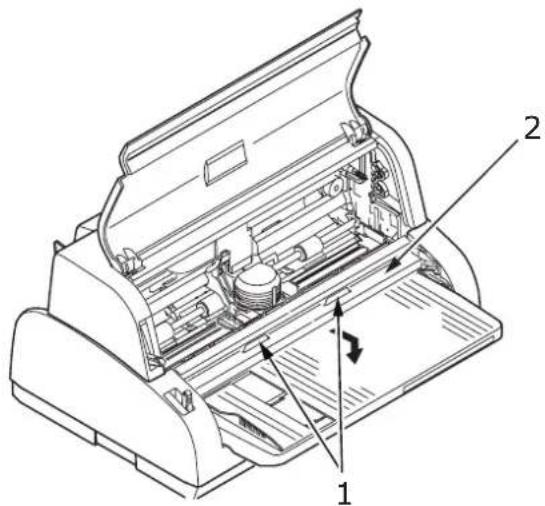
- Hold (1) and lift the paper feed guide (2) and slide it along the rails in the direction indicated by the arrows until it locks into position.
text_image
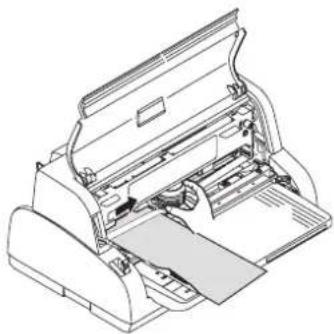
Technical diagram of a printer internal structure with labeled parts 1 and 2- Move the Print Head away from the paper.
natural_image
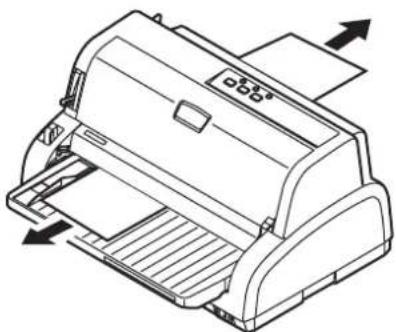
Technical line drawing of a printer or printer with internal components (no text or symbols)- Pull the cut sheet out from the front or rear of the printer.
natural_image
Line drawing of a printer with paper feed and paper tray, no text or symbols present-
If a paper fragment remains inside the printer, use forceps to grip and extract it.
-
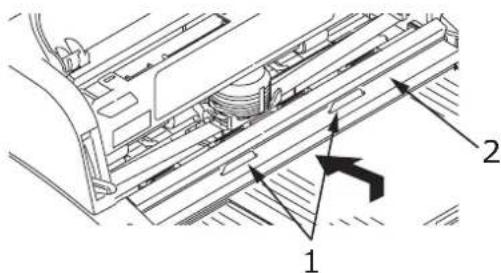
Hold (1) and lift the paper feed guide (2) and slide it along the rails in the direction indicated by the arrows until it locks back into position.
text_image
Technical diagram of a mechanical assembly with labeled parts 1 and 2, showing internal components and directional arrows.- When the paper jams are cleared, close the printer Top Cover.
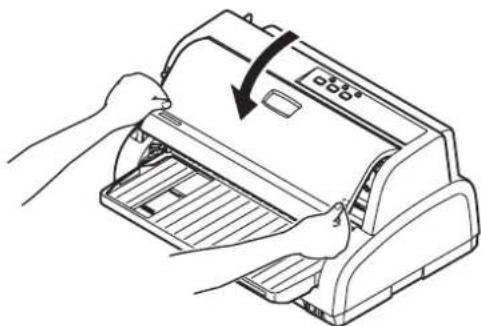
natural_image
Line drawing of hands operating a printer with a paper airplane being inserted (no text or symbols)- Set the Power Switch to ON.
CONTINUOUS FORMS JAMMED IN PRINTER
WARNING!
Do not carry out any operations inside the printer with the Power Switch set to ON.
-
Set the Power Switch to OFF.
-
Tear off any unprinted continuous forms.
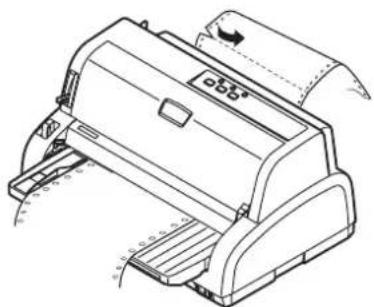
natural_image
Line drawing of a printer with paper feed and paper roll (no text or symbols)- Raise each Pin Tractor cover (1) and remove the continuous forms from the Pin Tractors.
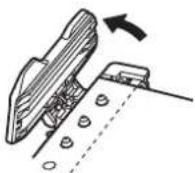
- Pull the continuous sheet from front or rear of the printer.
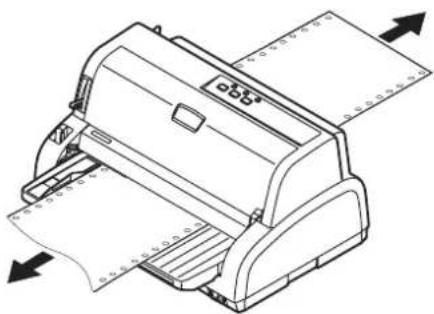
natural_image
Line drawing of an OBB printer with paper feed and paper roll (no text or symbols)- Set the Power Switch to ON.
RESPONDING TO ALARM CONDITIONS
Use the following table for guidance on how to respond to indicated alarm conditions.
| INDICATOR ALARM MEANINGS AND ACTIONS | ||
| SEL ALARM | ||
| OFF ON Paper has run out. Add paper and press the SEL button. | ||
| OFF Flashing The Paper Type lever is wrongly set for the type of paper in use. Press the SEL button and set the Paper Type lever to the correct position. | ||
| OFF Flashing Problem with cut sheet feeding. Remove the cut sheet. | ||
| Flashing ON Print data is received but printing does not start because no paper is being fed. Insert paper. | ||
| Flashing Flashing Printing cannot be resumed at this stage. Turn the power OFF, verify that the carriage moves properly, then turn the power ON again.If the problem is still there after you turn the power ON again, contact your dealer. | ||
RESPONDING TO GENERAL PROBLEMS
Use the following table to help you to identify symptoms with possible causes and take suggested remedial actions.
| PROBLEM CAUSE ACTION | ||
| No power | ||
| No power The power cable is not properly connected. | Check the power cable is properly connected at both power outlet and printer. | |
| Power outlet problem or power outage. | Plug another appliance into this outlet to check if it works. | |
| No printing takes place | ||
| SEL indicator is unlit. The printer driver is not installed properly. | Re-install the printer driver correctly. | |
| SEL indicator is illuminated but no printing takes place. | Ininterface cable is disconnected. | Reconnect the interface cable. |
| Wrong interface cable has been used. | Use correct interface cable. | |
| The print head is moving but no printing takes place. | The ribbon cartridge has not been installed. | Install the ribbon cartridge. |
| Print position offset | ||
| The horizontal printing position is offset. | The start position may change after the printer is powered on. | When the printer is powered ON, switch from off-line mode to on-line mode by pressing the SEL button. Reset the start position. You must set the Power Switch to OFF before you change the start position. |
| Printing slows down | ||
| Print direction changes suddenly to unidirectional. | When the print head overheats, the printer automatically starts unidirectional split printing. | When the print head temperature drops sufficiently, the printer will return to its original operation. |
| PE warning | ||
| The print carriage does not operate. | There is contamination on the carriage shaft. | Clean any paper dust and contamination from the carriage with a dry cloth. |
| Print blurring | ||
| The characters are too pale to display properly on the paper. | The Paper Thickness lever position does not match the paper. | Correct the Paper Thickness lever setting. |
| The printer is set to print at high speed. | Set the speed to normal. | |
| The ribbon has reached its end of life. | Replace the ribbon by a new one. | |
| The ribbon cartridge is not installed correctly. | Reinstall the ribbon cartridge correctly. | |
| The ribbon has been wound incorrectly. | Replace the ribbon cartridge by a new one. | |
| The ribbon is not transferring properly. | Replace the ribbon cartridge by a new one. | |
| A line of print is missing. Broken wire pins. Contact your dealer. | ||
| The printout differs from the screen display. | ||
| Printout of completely different characters or symbols. | Incorrect print setup for the user application. | Reselect print setup for the applications according to priority. |
| The application control codes for the previous print operation are still enabled. | Initialise the printer. | |
| The input application control signal is not correct. | Print in hex dump mode and verify the data content. Make corrections in the application. | |
| The interface cable is not properly connected. | Reconnect the cable correctly. | |
| Too high or too low TOF (where printing starts). | The TOF is not correctly selected. | Initialise the printer. |
| Select correct TOF for cut sheet and continuous forms. | ||
| Select the first-line print position and adjust the paper top position. | ||
| Reselect the margin correctly in the application. | ||
| Too large or small left and/or right margins. | The left or right margin is not correctly selected. | Incorrect positions of the Paper Guide or Pin Tractors. Select and adjust the position again depending on the paper type. |
| Reselect the left and right margins correctly in the application. | ||
| When continuous forms are used, the content of a single form is printed on two forms. | The paper length selected in the application does not match the physical paper length. | Match the paper length selected in the application with the physical paper length in use. |
| When cut sheets are used, the content of a single sheet is printed on two sheets. | The paper setting selected in the application does not match the physical paper size. | Match the paper setting selected in the application with the physical paper in use. |
| It does not match the lines per page as the printer automatically detected. | Leave enough top and bottom margin in the application. | |
| Correct the cut sheet LF adjustment. | ||
| The content of a single line is printed in two lines. | The left and/or right margins are not correctly selected. | Reselect the left and right margins correctly in the application. |
| When continuous forms are used, several blank lines appear in the printout. | Tear-off perforation spacing is selected. | Cancel tear-off perforation spacing. |
| Broken and uneven vertical lines. | This may happen in bidirectional printing. | Use Print Registration in the adjustment mode to adjust. |
| Too large or small line spacing. | Line spacing is not selected correctly. | Reselect line spacing correctly in the application. |
| Split print | ||
| Blanks appear in graphic printout. | This is a paper feed error, which is especially notable in printing regular characters. | This is not a failure. |
| Blanks or deformed characters appear in double height type or other extended types. | This is a paper feed error due to line feeding in printing a single character. | This is not a failure. Use the printer's built-in fonts when you print important documents or bills. |
| Improper cut sheet feed | ||
| No paper feed. | Sheets are located off the paper guide. | Load sheets with their left edges against the paper guide. |
| Sheets are not loaded to the end. | Load sheets to the end. | |
| Continuous forms instead of cut sheets are fed. | The printer is in the continuous forms mode. | Eject the continuous forms and select cut sheet mode for the printer. |
| Paper distortion. | Sheets are not loaded to the end, or they are not inserted straight. | Load sheets to the end. |
| Paper with wrinkles, folds or other defects. | Change paper. | |
| Paper not specified for the printer. | Use paper types specified for the printer. | |
| Unable to eject. | The LF/FF button is pressed. | Press the LOAD/PARK button. |
| Improper continuous forms feed. | ||
| No line feed, and no paper feed. | Paper is off the Pin Tractors. | Reload paper correctly. |
| The adjust lever position does not match the paper type. | Set the adjust lever to the correct position. | |
| Paper distortion or jam. Forms | are loaded with their left holes out of line with the right ones. | Load forms with their left holes in line with the right ones. |
| Inadequate distance between the left and right Pin Tractors, making for loose paper. | Relocate the Pin Tractors to tighten the paper. | |
| Skew paper feeding. Move the paper to make it straight. | Paper to make it straight. | |
| Paper movement is blocked. | Remove the blockage. | |
| Paper source is too far from the printer. | Move the paper source nearer to the printer. | |
| Paper not specified for the printer. | Use paper types specified for this printer. | |
| Several blank lines appear in the printout. | Skip over perforation spacing is selected. | Cancel the skip over perforation spacing. |
| The selected skip over perforation spacing does not match the physical tear-off perforation positions. | The paper length selected in the application does not match the physical paper length. | Match the paper length selected in the application with the physical paper length in use.Select the paper length in number of lines in the application. |
| Abnormal switchover between cut sheet and continuous forms modes. | ||
| No cut sheet feed. The printer | is in continuous forms mode. | Set the Paper Type lever to cut sheet mode. |
| No continuous forms feed. The | printer is in cut sheet mode. | Set the Paper Type lever to continuous forms mode. |
| Paper feed operations for both cut sheets and continuous forms are actuated. | The cut sheet is not ejected. | Eject the cut sheet. |
CLEANING YOUR PRINTER
To keep your printer in good operating condition, you are advised to clean it regularly.
WARNING!
Set the printer Power Switch to OFF and disconnect the power cable from the printer before cleaning the printer.
PRINTER EXTERIOR
CAUTION!
Keep the Top Cover closed to avoid the possibility of detergent entering the printer
Clean the exterior of the printer as required, but at least every six months or 300 hours of operation, whichever comes first.
- Moisten a piece of cotton cloth with diluted neutral detergent and carefully wipe the printer exterior.
PRINTER INTERIOR
WARNING!
As the print head becomes hot during printing, allow it to cool before carrying out any cleaning inside the printer. Do not use any flammable solvents for cleaning the printer to avoid any risk of fire or electric shock.
Clean the interior of the printer every 6 months or 300 hours of operation, whichever comes first.
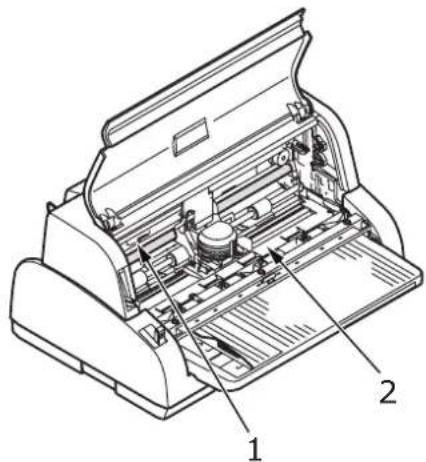
Using a soft cloth, cotton swabs and a vacuum cleaner, clean the interior of the printer as follows:
text_image
Technical diagram of a printer with labeled parts, showing internal components and part numbers 1 and 2.| WHERE TO CLEAN WHAT TO CLEAN | |
| The carriage (1) and the area around it | Clean and remove paper waste, dirt, dust and ribbon shreds. |
| The paper travel surface (2) | |
CAUTION!
When you clean the interior of the printer with a vacuum cleaner, do not attempt to clean any parts smaller than the suction nozzle. Do not clean any interior working parts with the suction nozzle to avoid possible damage to the printer.
CONSUMABLES AND ACCESSORIES
CONSUMABLES
When the printed image becomes faint or incomplete, replace the ribbon cartridge.
CHANGING A RIBBON CARTRIDGE
CAUTION!
Only use genuine Original consumables to ensure the best quality and performance from your hardware. Non Original products may damage your printer's performance and invalidate your warranty.
WARNING!
Do not change the ribbon cartridge with the Power Switch set to ON.
- Set the Power Switch to OFF.
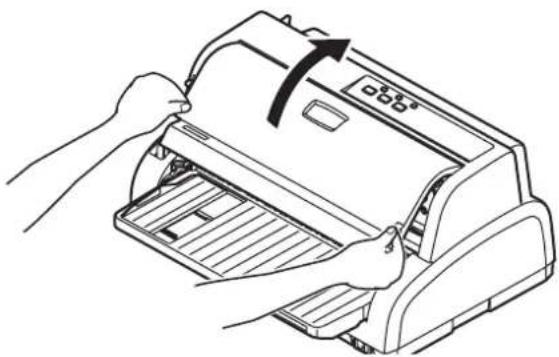
- Set the Paper Thickness lever to Replace Ribbon (position 9) and open the Top Cover.
natural_image
Line drawing of hands operating a printer with a paper airplane, showing internal structure and no text or symbolsWARNING!
The print head and area around it may be hot after printing. Allow it to cool down before touching it.
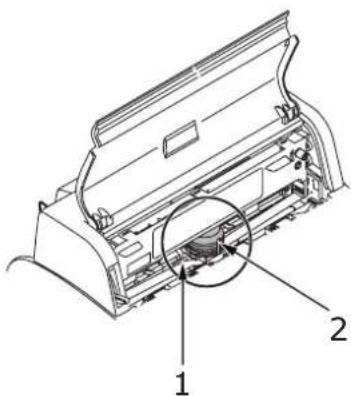
- Move the carriage (1) to the center (2) for ribbon replacement position.
text_image
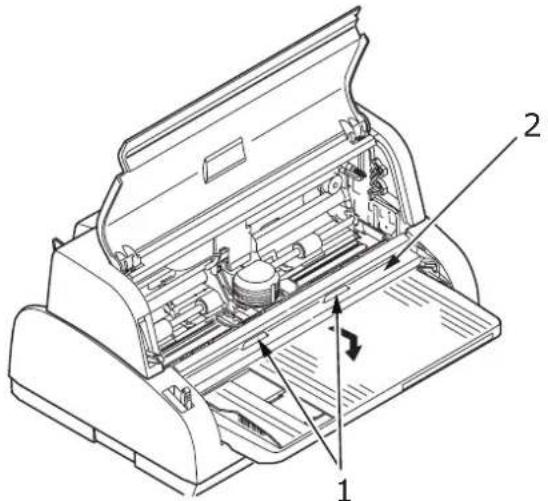
Technical diagram of a printer or printer with labeled parts 1 and 2, showing internal structure and component layout.- Hold (1) and lift the paper sheet guide (2) and slide it along the rails in the direction indicated by the arrow until it locks into position.
text_image
Technical diagram of a printer with labeled parts and directional arrows indicating internal components- Hold the ribbon cartridge (1) with your fingers pressing on its ribbon guide (2) and slope it up and out to remove it from the carriage.
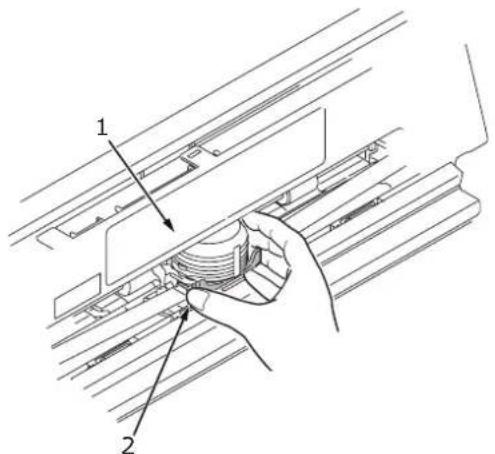
text_image
Technical diagram showing a hand holding a component with labeled parts 1 and 2, likely illustrating a mechanical or electrical assembly.- Holding the ribbon cartridge (1) close to both ends, slope it up and out until it unlocks then remove it along the direction indicated by the arrows.
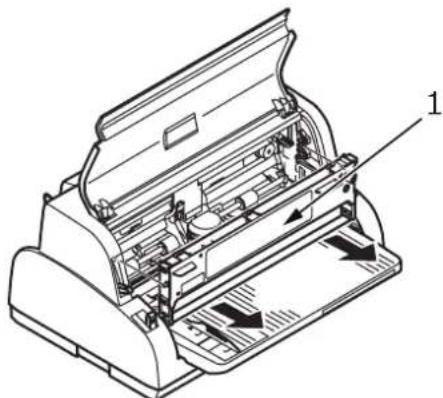
natural_image
Technical line drawing of a printer internal structure with no visible text or symbols-
Dispose of the cartridge in accordance with your local guidelines.
-
Remove the new ribbon cartridge from its wrapping and note the position of the Ribbon Guide (1), Knob (2) and Pin (3).
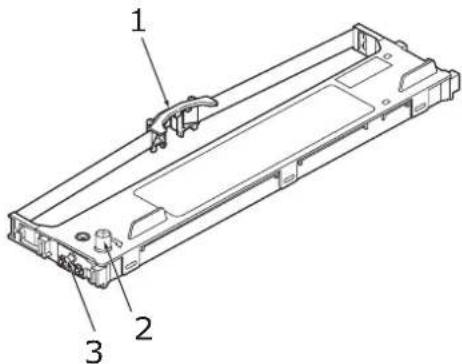
text_image
Technical diagram of a mechanical component with numbered parts labeled 1, 2, and 3.- In the direction indicated by the arrows, insert the pins at both ends of the ribbon cartridge (1) into the U grooves (2) in the printer until the ribbon cartridge is fully locked.
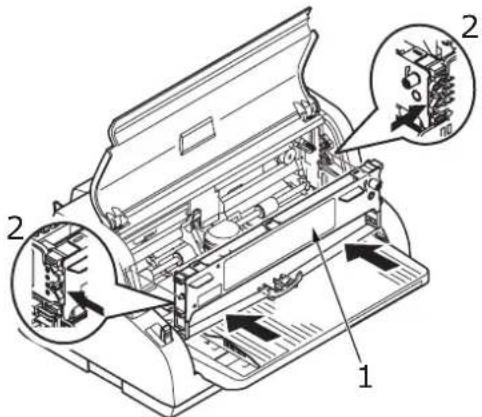
text_image
Technical diagram of a printer with labeled parts and directional arrows indicating internal componentsNOTE
It may be easier to mount the ribbon cartridge in place if you align it with the topside of the grooves. Also, a slightly loose ribbon may make it easier to mount the ribbon cartridge.
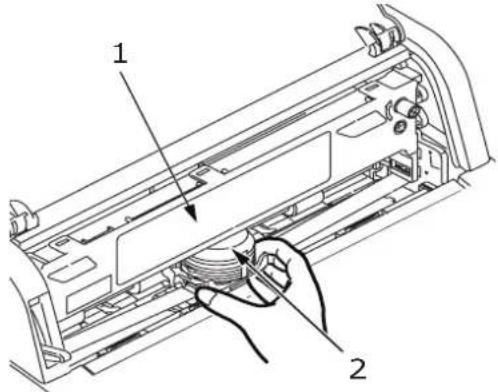
- Hold the ribbon cartridge (1) with your fingers pressing on its ribbon guide (2) and slope it downward until the ribbon guide (2) comes in line with the U slot at the top of the cartridge.
text_image
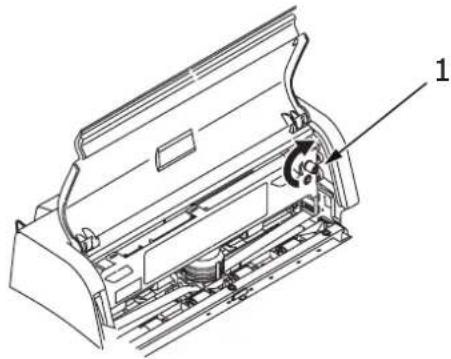
Technical diagram showing a hand operating a component with labeled parts 1 and 2- Turn the knob (1) clockwise (in the direction of the arrow) to wind up the ribbon.
natural_image
Technical line drawing of a mechanical device with labeled component (1), showing internal components and wiring (no text or symbols beyond label)CAUTION!
Do not turn the knob anticlockwise as the ribbon might jam.
Make sure that the ribbon is not twisted or damaged when it goes through the gap between the Print Head and the ribbon guide.
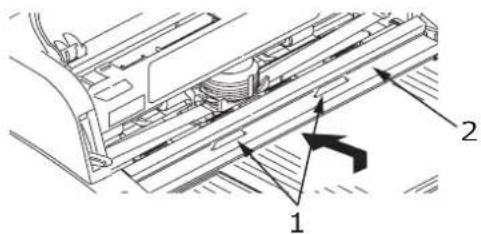
- Hold (1) and lift the paper feed guide (2) and slide it along the rails in the direction indicated by the arrows until it locks back into position.
text_image
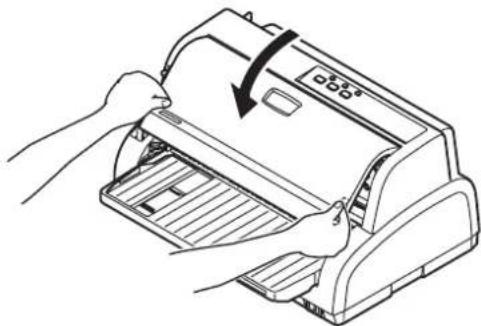
Technical diagram of a mechanical assembly with labeled parts 1 and 2, showing internal components and directional arrows.- Close the printer Top Cover.
natural_image
Line drawing of hands operating a printer with a paper airplane being inserted (no text or symbols)-
Set the Paper Thickness lever to match the paper being used. (See "Setting the Paper Thickness lever" on page 22.)
-
Set the printer Power Switch to ON.
CONSUMABLE ORDER INFORMATION
| ITEM LIFE ORDER | NO. | |
| Ribbon cartridge (Black) | 2 million characters 4 | 3821103 |
SPECIFICATIONS
| ITEM SPECIFICATION | |
| Model No. D22501B | |
| Print method Impact dot matrix | |
| Print head 24 pins, 0.2 mm (0.0079 in) | diameter |
| Print direction Bi-directional, Unidirectional, short-line-seeking printing | |
| Print speedHigh Speed Draft (HSD)Letter Quality (LQ)Utility | 333cps @ 10 cpi83cps @ 10 cpi250cps @ 10 cpi |
| Line Feed (LF) time Approximately 65 ms per line for LF of 4.23 mm (1/6 in) | |
| Form Feed (FF) speed | Approximately 114.3 mm/s (4.5 in/s) |
| Paper feed control Paper feed: yes | Vertical tab: yesDirect line feed: yes |
| Duplication capability Continuous forms: the original page +4 more pages(total maximum paper thickness less than 0.325mm)Cut sheet: the original page +4 more pages (total maximum paper thickness less than 0.325mm) | |
| Feeding direction Feed forward | Feed backward |
| Feeding mode Friction feed mode (front)Pin tractor feed mode (rear) | |
| Continuous forms tape tail detection method | Detected when remaining paper is approximately 14.8mm long. It can, however, print till about 6.35 mm from the paper bottom (measured at the centre of the characters).(The print accuracy of the last page cannot be guaranteed.) |
| Character sets Standard ASCII | Epson (Italics/Graphics)IBM (Set1/Set2)Windows Code Page |
| Cut-sheet paperPaper widthPaper lengthSingle-part WeightNumber of copiesThickness | 90 to 257mm (3.54 to 10.12in)70 to 364 mm (2.76 to 14.33 in)52 to 156gsmOriginal plus 4copies0.325mm (0.012in) maximum |
| Continuous PaperPaper widthPaper lengthSingle-part WeightPressure-sensitive WeightNumber of copiesThicknessMultipart-carbon-lined or multipart-interleaf WeightNumber of copiesThickness | 76.2 to 254mm (3 to 10in)76.2 to 355.6 mm (3 to 14 in)52 to 128 gsm30 to 40 gsm standardOriginal plus 4 copies0.06 to 0.16mm maximum30 to 40 gsm standardOriginal plus 4 copies0.325mm (0.012in) maximumMultiple-part paper should be fastened by spot-pasting or crimping on both sides, and should be free of wrinkles. |
| Original OKI cartridge ribbonInk colorRibbon life | Black2 million characters (Utility mode) |
| Print head life 300 million dots per pin. | |
| Printer Life 3 Years | |
| Dimensions 349mm(W) x 290mm(D) x | 180mm(H) |
| Weight 4 kg | |
| Power ratingVoltageFrequency | 220 - 240V ± 10%50/60 Hz ± 2Hz |
| Power consumptionOperationStandby modePowersave mode | Typ. 45W (ISO/IEC1056/Letter)15 W2.5W |
| Power cable 3 - core AC power cable, 1 | .8 m length |
| Interfaces Bi-directional parallel, IEEE1 | 284-1994USB 2.0RS-232C |
| Dust and corrosion Use the printer in a | general office environment. |
| Environmental conditionsOperatingStorage | 5°C - 40°C, 30% - 85% RH (Testing condition for print precision: 15°C - 30°C, 40% - 70%RH)-20°C - 60°C, 0% - 95% RHWhen the printer is stored, it should be in its original packaging, with no moisture formation. |
| Standard usageAverage power on timeAverage printing time | 200 h/month50 h/month (text density on page: 35%) |
| Noise level The acoustic noise of this product is less than 58dB (A)as measured in accordance with EN ISO 7779. | |
INDEX
A
alarm indications.... 38
aligning perforations ...... 21
B
button switches.... 25
C
cleaning
exterior.... 43
interior 43
D
drivers.... 14
E
ejecting paper
continuous forms 20
cut sheet.... 17
emphasis printing 34
F
fault finding.... 38
I
indicators 24
interface
parallel.... 13
serial.... 13
USB.... 13
L
loading paper
continuous forms ...... 18
cut sheet.... 16
M
menu mode
activate menu mode...... 26
menu settings
changing 26
confirming 26
initialising 33
list.... 27
P
paper jams
continuous forms ...... 37
cut sheet.... 35
printer
location 10
parts 9
test print.... 12
printing files 15
R
ribbon
changing 45
ordering 48
S
setting paper thickness ..... 22
specifications...... 49
switching ON 11
T
test page.... 14
TOF
saving 34
setting 33
U
user guide
list 7
printing......8
OKI PRINTING SOLUTIONS CONTACT DETAILS
Oki Systems (UK) Limited
550 Dundee Road
Slough Trading Estate
Slough, SL1 4LE
Tel:44 (0) 1753 819819
Fax:44 (0) 1753 819899
http://www.okiprintingsolutions.co.uk
Oki Systems Ireland Limited
The Square Industrial Complex
Tallaght, Dublin 24, Ireland
Tel:+353 1 4049590
Fax:+353 1 4049591
http://www.oki.ie
OKI Systems - Northern Ireland
40 Sydenham Park
Belfast, BT4 1PW
Tel:+44 (0)28 90 20 1110
http://www.oki.ie
Technical Support for all Ireland:
Tel:+353 1 4049570
Fax:+353 1 4049555
E-mail: tech.support@oki.ie
Oki Data Corporation
4-11-22 Shibaura, Minato-ku, Tokyo
108-8551, Japan
Tel:(81) 3 5445 6158
Fax:(81) 3 5445 6189
http://www.okidata.co.jp
Oki Data (Singapore) Pte. Ltd.
78 Shenton Way, #09-01,
Singapore 079120
Tel:(65) 221 3722
Fax:(65)421 1688
http://www.okidata.com.sg
Oki Systems (Thailand) Ltd.
1168/81-82 Lumpini Tower,
27th Floor, Rama IV Rd.,
Tungmahamek, Sathorn,
Bangkok 10120
Tel: +662 6799235
Fax :+662 6799245
http://www.okisysthai.com/oki
Oki Hong Kong Limited
Unit 607, 6/F, Island Place Tower,
510 Kings Road, North Point,
Hong Kong
Tel: (852) 3543 9200
Fax: (852) 3549 6040
The IPL Group
146 O'Riordan Street
Mascot NSW 2020 Australia
Tel : (61) 2 9667 7000
Fax : (61) 2 9667 7094
http://www.oki.com.au
Comworth Systems Ltd.
10 Constellation Drive Mairangi Bay,
Auckland, New Zealand
Tel:(64) 9 477 0500
Fax:(64) 9 477 0549
http://www.comworth.co.nz
Oki Data(S) P Ltd. Malaysia Rep Office
Suite 21.03, 21st Floor Menara IGB,
Mid Valley City,
Lingkaran Syed Pura 59200,
Kuala Lumpur, Malaysia
Tel: (60) 3 2287 1177
Fax: (60) 3 2287 1166
OKI EUROPE LIMITED
Blays House
Wick Road
Egham
Surrey TW20 0HJ
United Kingdom
Tel: +44 (0) 208 219 2190
Fax: +44 (0) 208 219 2199
WWW.OKIPRINTINGSOLUTIONS.COM