Vaio VGN-FS415S - Laptop SONY - Free user manual and instructions
Find the device manual for free Vaio VGN-FS415S SONY in PDF.


User questions about Vaio VGN-FS415S SONY
0 question about this device. Answer the ones you know or ask your own.
Ask a new question about this device
Download the instructions for your Laptop in PDF format for free! Find your manual Vaio VGN-FS415S - SONY and take your electronic device back in hand. On this page are published all the documents necessary for the use of your device. Vaio VGN-FS415S by SONY.
USER MANUAL Vaio VGN-FS415S SONY
Personal Computer VGN-FS series
SONY.
VAIO

Contents
Before Use 6
Notice....6
ENERGY STAR 7
Documentation....8
Ergonomic Considerations....12
Getting Started....14
Locating Controls and Ports....15
About the Indicator Lights ....21
Connecting a Power Source ....22
Using the Battery Pack 23
Shutting Down Your Computer Safely 28
Using Your VAIO Computer....29
Using the Keyboard 30
Using the Touch Pad ....32
Using Special-function Buttons ....33
Using the Optical Disc Drive ....34
Using PC Cards 42
Using the Memory Stick Media 45
Using the Internet....48
Using Wireless LAN (WLAN) 49
VAIO

Using Peripheral Devices....59
Connecting a Port Replicator 60
Connecting External Speakers ....64
Connecting an External Display....65
Selecting Display Modes....69
Using the Multiple Monitors Function....71
Connecting an External Microphone....73
Connecting a Universal Serial Bus (USB) Device....74
Connecting a Printer 77
Connecting an i.LINK Device 79
Connecting to a Network (LAN) 81
Customizing Your VAIO Computer 83
Setting the Password 84
Setting Up Your Computer with VAIO Control Center....86
Using the Power Saving Modes....87
Managing Power with VAIO Power Management....92
Setting Up Your Language with Windows XP Professional....94
Configuring Your Modem....97
Upgrading Your VAIO Computer....99
Adding and Removing Memory....100
VAIO
4
Precautions 106
On Handling the LCD Screen 107
On Using the Power Source 108
On Handling Your Computer....109
On Handling Floppy Disks 111
On Handling Discs 112
On Using the Battery Pack....113
On Using Headphones....114
On Handling Memory Stick Media....114
On Handling the Hard Disk 115
Troubleshooting 116
Computer 117
System Security 125
Battery....127
Internet....129
Networking 131
CDs and DVDs....134
Display 139
Printing....141
Microphone 142
Mouse 143
Speakers....144
Touch Pad....145
Keyboard....146
VAIO

Floppy Disks 147
PC Cards 148
Audio/Video....149
Memory Stick Media 150
Peripherals....151
Support Options 152
Sony Support Information 152
e-Support 153
Trademarks....155
Before Use
Congratulations on your purchase of this Sony VAIO ^® computer, and welcome to the on-screen User Guide. Sony has combined leading-edge technology in audio, video, computing, and communications to provide state-of-the-art personal computing.
Notice
© 2006 Sony Corporation. All rights reserved.
This manual and the software described herein, in whole or in part, may not be reproduced, translated, or reduced to any machine-readable form without prior written approval.
Sony Corporation provides no warranty with regard to this manual, the software, or other information contained herein and hereby expressly disclaims any implied warranties or merchantability or fitness for any particular purpose with regard to this manual, the software or such other information. In no event shall Sony Corporation be liable for any incidental, consequential, or special damages, whether based on tort, contract, or otherwise, arising out of or in connection with this manual, the software, or other information contained herein or the use thereof.
In the manual, the ^TM or marks are not specified.
Sony Corporation reserves the right to make any modification to this manual or the information contained herein at any time without notice. The software described herein is governed by the terms of a separate user license agreement.
ENERGY STAR
As an ENERGY STAR Partner, Sony has determined that this product meets the ENERGY STAR guidelines for energy efficiency.
The International ENERGY STAR Office Equipment Program is an international program that promotes energy saving through the use of computers and their office equipment. The program backs the development and dissemination of products with functions that effectively reduce energy consumption. It is an open system in which business proprietors can participate voluntarily. The targeted products are office equipment such as computers, displays, printers, facsimiles and copiers. Their standards and logos are uniform among participating nations.
ENERGY STAR is a U.S. registered mark.

Documentation
Your documentation includes printed information and user guides to read on your VAIO computer.
Guides are provided in PDF format, which you can easily browse through and print out.
The My Club VAIO portal is a perfect starting point to use your computer — a comprehensive collection of everything you need to get the most from your computer.
The user guides are collected under Documentation, which can be shown as follows:
1 Click Start and then the My Club VAIO icon
2 Click Documentation.
3 Select the guide you want to read.
[NO TEXT]
You can manually browse to the user guides by going to My Computer > VAIO (C:) (your C drive) > Documentation > Documentation and opening the folder for your language.
You may have a separate disc for the documentation of bundled accessories.
Printed Documentation
☐ A Setting Up Poster — Describes the process from unpacking to starting up your VAIO.
☐ Troubleshooting Guide — Contains solutions to common problems.
☐ Recovery Guide — Contains an explanation of how to recover your computer's system if you need to.
Booklets containing the following information: Sony Guarantee conditions, Safety Regulations, Modem Regulations, Wireless LAN Regulations and Bluetooth Regulations.
Non-printed Documentation
☐ User Guide (this manual) — Contains features of your computer. It also includes information about the software programs included with your computer, as well as information on solving common problems.
Specifications — The online Specifications describe the hardware and software configuration of your VAIO computer. To view the online Specifications:
1 Connect to the Internet.
2 Go to the Sony online support Web site at http://www.vaio-link.com/.
My Club VAIO
In My Club VAIO you can find:
Documentation, which gives you:
☐ Access to the User Guide. This manual explains the features of your computer in detail, how to use these features confidently and safely, connect peripheral devices and more.
☐ Access to Help & Training. This is the portal of VAIO Help and Support Center.
☐ Important information about your computer, in the form of notices and announcements.
In My Club VAIO you can also find:
□ Accessories
Want to expand the capabilities of your computer? Click on this icon and have a look at your compatible accessories.
□ Software
Feeling creative? Click this icon for an overview of your software and check out our upgrade options.
□ Wallpapers
Click this icon and check out our most popular Sony and Club VAIO wallpapers.
Links
Click this icon and check out our most popular Sony and Club VAIO web sites.
Help and Support Center
Help and Support Center is a comprehensive resource for practical advice, tutorials, and demonstrations to help you learn to use Microsoft Windows XP and your computer.
Use the Search feature, Index, or table of contents to view all Windows Help resources, including those that are on the Internet.
To access Help and Support Center, click Start and then Help and Support. Or go to the Help and Support Center by pressing the Microsoft Windows key and the F1 key.
Further Sources
Consult the help files on the software you are using for detailed information on features and troubleshooting.
☐ Go to www.club-vaio.com to find online tutorials about your favorite VAIO software.
Ergonomic Considerations
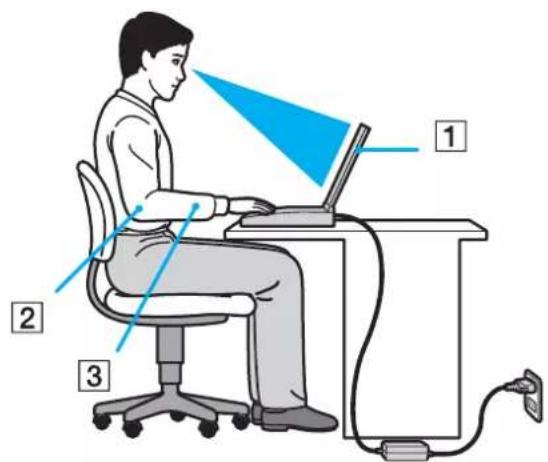
You will be using your computer as a portable device in a variety of environments. Whenever possible, you should attempt to take account of the following ergonomic considerations to both stationary and portable environments:
text_image
Illustration of a person using a laptop with labeled parts including head, arm, and cable☐ Position of your computer – Place the computer directly in front of you (1). Keep your forearms horizontal (2), with your wrists in a neutral, comfortable position (3) while using the keyboard, touch pad, or external mouse. Let your upper arms hang naturally at your sides. Have breaks during sessions with your computer. Excessive use of the computer may strain muscles or tendons.
☐ Furniture and posture – Sit in a chair with good back support. Adjust the level of the chair so your feet are flat on the floor. A footrest may make you more comfortable. Sit in a relaxed, upright posture and avoid slouching forward or leaning far backwards.
VAIO
☐ Viewing angle of the computer's display – Use the display's tilting feature to find the best position. You can reduce eye strain and muscle fatigue by adjusting the tilt of the display to the proper position. Adjust the brightness setting of the display as well.
☐ Lighting – Choose a location where windows and lights do not create glare and reflection on the display. Use indirect lighting to avoid bright spots on the display. You can also purchase accessories for your display that help reduce glare. Proper lighting adds to your comfort and work effectiveness.
☐ Positioning an external display – When using an external display, set the display at a comfortable viewing distance. Make sure the display screen is at eye level or slightly lower when you are sitting in front of the monitor.
Getting Started
This section describes how to get started with using your VAIO computer.
☐ Locating Controls and Ports (page 15)
☐ About the Indicator Lights (page 21)
□ Connecting a Power Source (page 22)
□ Using the Battery Pack (page 23)
□ Shutting Down Your Computer Safely (page 28)
Locating Controls and Ports
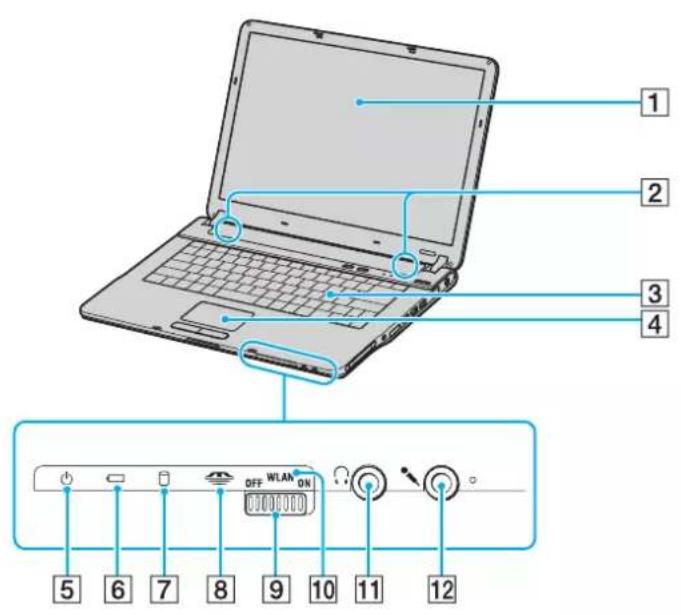
Take a moment to identify the controls and ports shown on the following pages.
Front
text_image
1 2 3 4 OFF WLAN ON 5 6 7 8 9 10 11 121 LCD screen (page 107)
2 Speakers
3 Keyboard (page 30)
4 Touch pad (page 32)
5 Power indicator (page 21)
6 Battery indicator (page 21)
7 Hard disk drive/Optical disc drive indicator (page 21)
8 Memory Stick media indicator (page 21)
9 WLAN (Wireless LAN) switch (on selected models only) (page 49)
10 WIRELESS LAN indicator (on selected models only) (page 21)
11 Headphones jack (page 64)
12 Microphone jack (page 73)
text_image
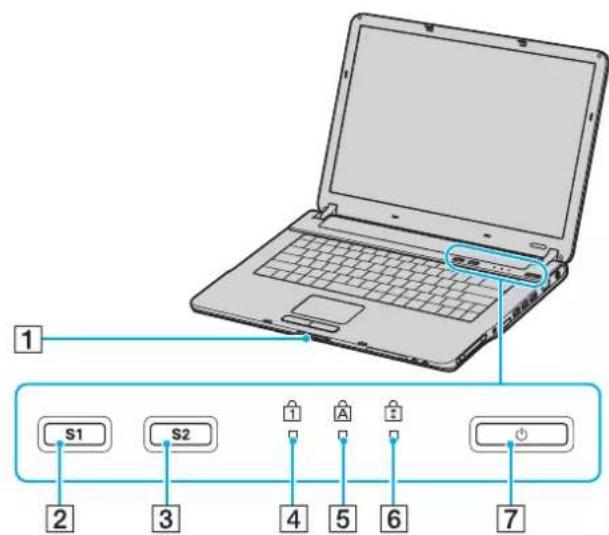
1 S1 S2 2 3 4 5 6 71 Display lock latch
2 S1 button (page 33)
3 S2 button (page 33)
4 Num lock indicator (page 21)
5 Caps lock indicator (page 21)
6 Scroll lock indicator (page 21)
7 Power button
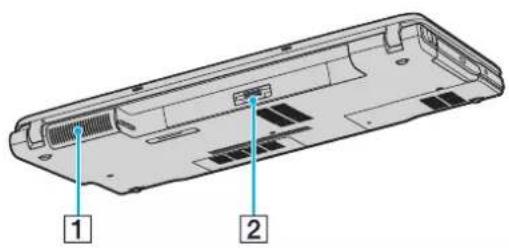
Back
text_image
Diagram of a computer rear panel with labeled components, showing two numbered parts (1 and 2) for identification.1 Air vent
2 Battery connector (page 23)
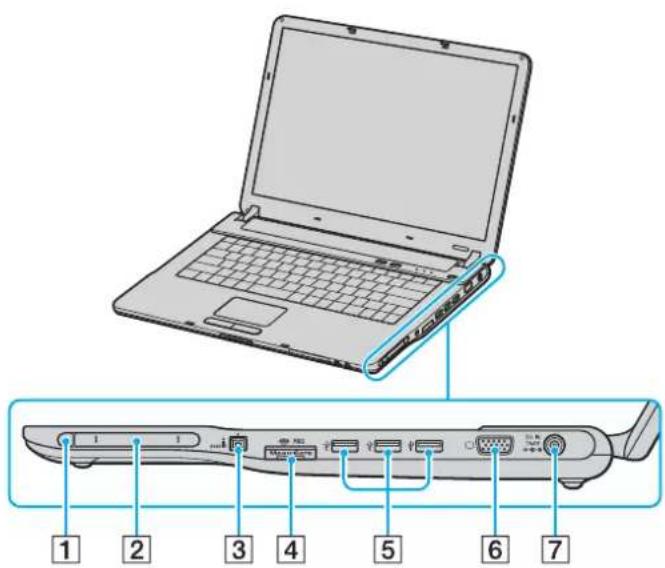
Right
text_image
Laptop screen diagram with labeled ports and connectors, showing front and rear views with numbered labels1 PC Card eject button (page 44)
2 PC Card slot (page 42)
3 i.LINK® (IEEE1394) S400 port (page 79)
4 Memory Stick media slot ^1 (page 45)
5 Hi-Speed USB (USB 2.0) ports ^4 (page 74)
6 Monitor (VGA) port (page 66)
7 DC In port (page 22)
*1 Your computer supports Memory Stick Duo media and Memory Stick PRO high speed and high capacity capabilities.
*2 Supports high-/full-/low- speeds.
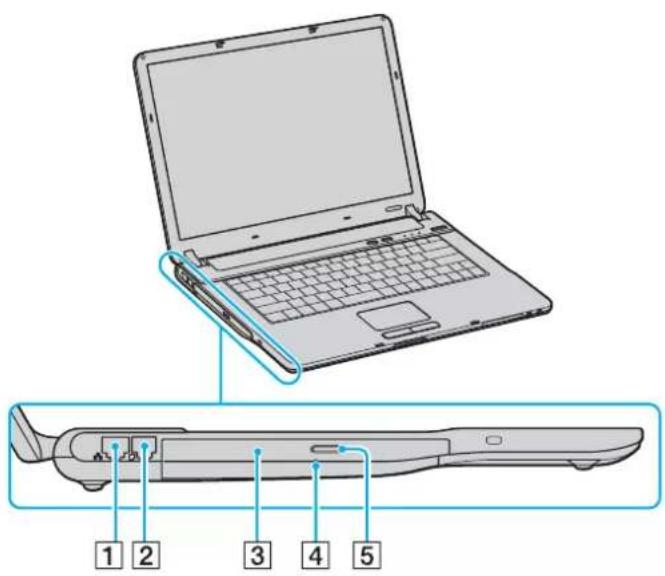
Left
text_image
Laptop diagram with labeled parts showing front and side views for device assembly1 Network (Ethernet) port (page 81)
2 Modem port (page 48)
3 Optical disc drive (page 34)
4 Manual eject hole (page 134)
5 Drive eject button (page 34)
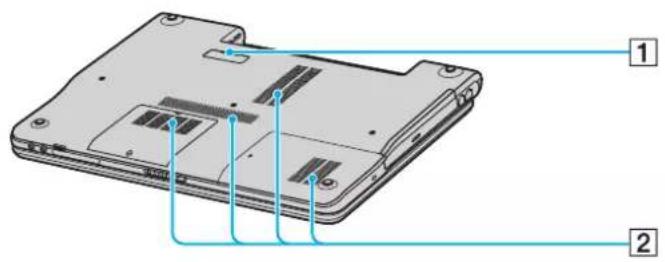
Bottom
text_image
Labeled diagram of a laptop showing internal components and numbered parts1 Port replicator connector (page 61)
2 Air vents
About the Indicator Lights
Your computer is equipped with the following indicator lights.
| Indicator Functions | |
| Power ⏻ | Illuminates when the power of the computer is on, blinks in Standby mode, and turns off when the computer is in Hibernate mode or off. |
| Battery ☐ | Illuminates when the computer is using battery power, blinks when the battery is running out of power, and double-blinks when the battery is charging. |
| Memory Stick PRO/Duo 📄 | Illuminates when data is read from or written to the Memory Stick media. (Do not enter Standby mode or turn off the computer when this indicator is on.) When the indicator is off, the Memory Stick media is not being used. |
| Hard disk/Optical disc drive 📁 | Illuminates when data is read from or written to the hard disk or the optical disc. Do not enter Standby mode or turn off the computer when this indicator is on. |
| Num lock 🔒 | Press the Num Lk key to activate the numeric keypad. Press it a second time to deactivate the numeric keypad. The numeric keypad is not active when the indicator is off. |
| Caps lock ⚠ | Press the Caps Lock key to type letters in uppercase. Letters appear in lowercase if you press the Shift key while the indicator is on. Press the key a second time to turn off the indicator. Normal typing resumes when the Caps Lock indicator is off. |
| Scroll lock 🔒 | Press the Scr Lk key to change how you scroll the display. Normal scrolling resumes when the Scr Lk indicator is off. The Scr Lk key functions differently depending on the program you are using and does not work with all programs. |
| WIRELESS LAN Illuminates when the wireless LAN function is running. | |
Connecting a Power Source
You can use either an AC adapter or a rechargeable battery pack as a power source for your computer.
Using the AC Adapter

Use the computer only with the supplied AC adapter.
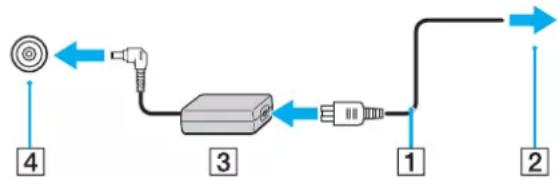
To use the AC adapter
1 Plug one end of the power cord (1) into the AC adapter (3).
2 Plug the other end of the power cord into an AC outlet (2).
3 Plug the cable attached to the AC adapter (3) into the DC In port (4) on the computer or on the (optional) port replicator.
flowchart
graph LR
    A["Sensor"] --> B["Port 3"]
    B --> C["Port 1"]
    C --> D["Port 2"]
    D --> E["Port 4"]
    style A fill:#f9f,stroke:#333
    style E fill:#bbf,stroke:#333

The shape of the DC In plug varies depending on the AC adapter.

To disconnect the computer completely from AC power, unplug the AC adapter.
Make sure that the AC outlet is easily accessible.
If you do not use the computer for a long period of time, put the computer into Hibernate mode. See Using Hibernate Mode (page 90). This power saving mode saves the time of shutting down or resuming.
Using the Battery Pack
The battery pack supplied with your computer is not fully charged at the time of purchase.
Installing the Battery Pack
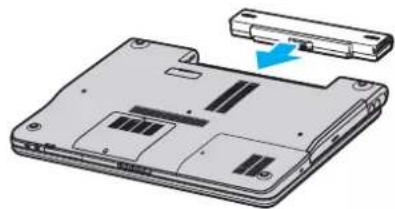
To install the battery pack
1 Turn off the computer and close the LCD screen lid.
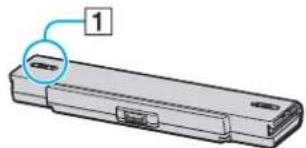
2 Slide the lock switch (1) to the UNLOCK position.
text_image
13 Slide the battery into the battery compartment until it clicks into place.
natural_image
Diagram of a laptop back panel showing internal components and a close-up of the lid (no text or symbols)4 Slide the lock switch (1) to the LOCK position to secure the battery on the computer.

When the computer is directly connected to AC power and has a battery pack installed, it uses power from the AC outlet.

Certain rechargeable batteries do not meet Sony quality and safety standards. For safety reasons this notebook only functions with genuine Sony batteries designed for this model. When inserting another kind of battery, the battery will not be charged and the notebook will not function.
Charging the Battery Pack
The battery pack supplied with your computer is not fully charged at the time of purchase.
To charge the battery pack
1 Install the battery pack.
2 Connect the AC adapter to the computer.
The computer automatically charges the battery (the battery indicator light flashes in a double blink pattern as the battery charges). When the battery is about 85% charged, the battery indicator turns off.
| Battery indicator light status Meaning | |
| On The computer is using battery power. | |
| Blinks The battery is running out of power. | |
| Double blinks The battery is charging. | |
| Off The computer is using AC power. | |

When the battery is running out of power, both the battery and power indicator lights blink.
Keep the battery pack in the computer while it is directly connected to AC power. The battery pack continues to charge while you are using the computer.
If the battery level falls below 10%, you should either attach the AC adapter to recharge the battery or shut down the computer and install a fully charged battery.
The battery pack supplied with the computer is a lithium ion battery and can be recharged any time. Charging a partially discharged battery does not affect battery life.
The battery indicator light is on while you use the battery pack as a power source. When the battery life is nearly depleted, both the battery and power indicator lights start flashing.
For some software applications and some peripheral devices, the computer may not enter Hibernate mode even when battery life is low. To avoid loss of data when using battery power, you should save your data frequently and manually activate a power management mode, such as Standby or Hibernate. If the battery wears out when the computer enters Standby mode, you will lose any unsaved data. Going back to the previous work state is impossible. To avoid loss of data, you should save your data frequently.
When the computer is directly connected to AC power and has a battery pack installed, it uses power from the AC outlet.
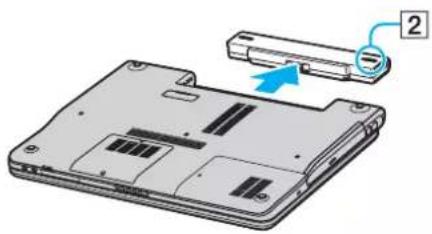
Removing the Battery Pack
You may lose data if you remove the battery pack while the computer is on and not connected to the AC adapter or if you remove the battery while the computer is in Standby mode.
To remove the battery pack
1 Turn off the computer and close the LCD screen lid.
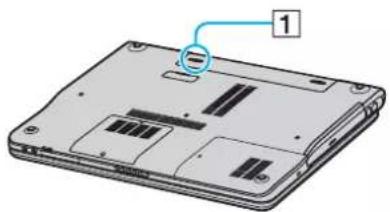
2 Slide the lock switch (1) to the UNLOCK position.
natural_image
Laptop back panel with labeled component (no text or symbols beyond label)3 Slide and hold the release latch (2) and slide the battery away from the computer.
natural_image
Illustration of a laptop chassis showing the rear panel and internal components, with a numbered component labeled '2' pointing to one side (no text or symbols on the diagram itself)Shutting Down Your Computer Safely
To avoid losing unsaved data, be sure to shut down your computer properly, as described below.
To shut down your computer
1 Turn off any peripherals connected to the computer.
2 Click Start and then Turn Off Computer. The Turn off computer window appears.
3 Click Turn Off.
4 Respond to any prompts warning you to save documents or to consider other users and wait for the computer to turn off automatically.
The power indicator light turns off.
Using Your VAIO Computer
Once you have read and followed the information in the online Specifications, you can start using your computer safely and confidently.
Read on to get the most out of using your computer.
□ Using the Keyboard (page 30)
□ Using the Touch Pad (page 32)
☐ Using Special-function Buttons (page 33)
□ Using the Optical Disc Drive (page 34)
□ Using PC Cards (page 42)
☐ Using the Memory Stick Media (page 45)
□ Using the Internet (page 48)
☐ Using Wireless LAN (WLAN) (page 49)
Using the Keyboard
Your keyboard is very similar to a desktop computer keyboard, but has additional keys that perform model-specific tasks.
The VAIO-Link web site (www.vaio-link.com) also contains glossary information to help you use the keyboard.
Combinations and Functions with the Fn Key

Some functions are not available until Windows is launched.
| Combinations/Feature Functions | |
| Fn + ☑ (F2): speaker switch | Turns on and off the built-in speakers and the headphones. |
| Fn + △ (F3/F4): speaker volume | Adjusts the built-in speaker volume.To increase volume, press Fn+F4 and then ↑ or →, or keep pressing Fn+F4.To decrease volume, press Fn+F3 and then ↓ or ←, or keep pressing Fn+F3. |
| Fn + ⚙ (F5/F6): brightness control | Adjusts the brightness of the LCD.To increase lightness intensity, press Fn+F6 and then ↑ or →, or keep pressing Fn+F6.To decrease lightness intensity, press Fn+F5 and then ↓ or ←, or keep pressing Fn+F5. |
| Fn + LCD / ⇌ (F7): switch to the external display | Toggles between the LCD, external device (e.g. monitor) and both LCD and external device. |
| Fn + 10): zoom | Changes the screen resolution to magnify/restore the screen view.The default resolutions of the standard view and the magnified view are as follows:Standard view: 1280 x 800 pixelsMagnified view: 1024 x 600 pixelsThe magnified view is not as clear as the standard view, as it is implemented by applying a lower resolution to the LCD screen with a higher resolution.This key combination is disabled during video playback. Make sure to quit such software before pressing the key combination.This key combination may not work with graphic images as it magnifies the screen view by changing the resolution.The location and size of software windows may change when the screen view is magnified or the standard view is restored because pressing this key combination changes the resolution.When the LCD screen view is magnified, switching the view to the external display disables the function and restores the standard view. |
| Fn + 12): Hibernate | Provides for the lowest level of power consumption. When you execute this command, the states of the system and the peripheral devices are written to the hard disk and the system power is turned off. To return the system to its original state, use the power button to turn on the power.For details on power management, see Using the Power Saving Modes (page 87). |
Using the Touch Pad
The keyboard contains a cursor-pointing device, the touch pad (1). You can point to, select, drag, and scroll objects on the screen using the touch pad.

flowchart
graph TD
    A["Step 1"] --> B["Step 2"]
    B --> C["Step 3"]
    B --> D["Step 4"]
| Action Description | |
| Point Slide one finger on the touch pad to place the pointer (2) on an item or object. | |
| Click Press the left button (3) once. | |
| Double-click Press the left button twice. | |
| Right-click Press the right button (4) once. In many applications, this action displays a shortcut menu. | |
| Drag Slide one finger while pressing the left button. | |
| Scroll | Move your finger along the right edge of the touch pad to scroll vertically. Move your finger along the bottom to scroll horizontally (the scroll function is available only with applications that support a touch pad scroll feature). |
Using Special-function Buttons
Your computer is equipped with special buttons to help you use specific functions of the computer.
| Special-function button Functions | |
| S1/S2 buttons | By default, the S1 button turns the volume on and off and the S2 button toggles the display output between the LCD and external device. You can change these button assignments on the window for changing the S button assignments. To display this window, press and hold either button or launch and navigate through VAIO Control Center.See the help file on VAIO Control Center for the S button assignments. |
Using the Optical Disc Drive
Your computer is equipped with an optical disc drive.
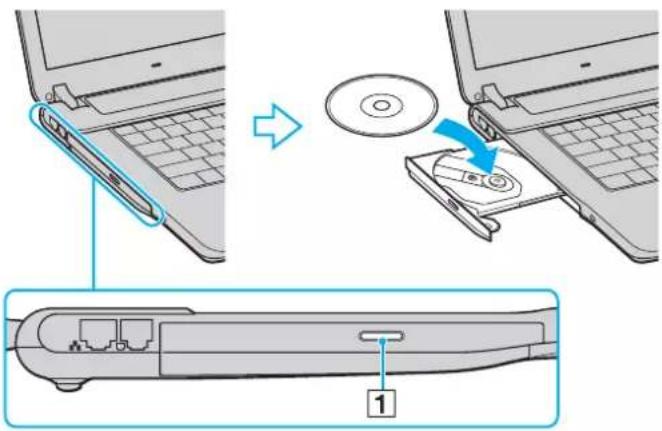
To insert a disc
1 Turn on the computer.
2 Press the drive eject button (1) to open the drive. The tray slides out.
3 Place a disc in the middle of the tray with the label side facing up and gently push until the disc clicks into place.
text_image
Diagram illustrating the process of inserting a CD into a laptop, showing component insertion and disassembly steps.4 Close the tray by pushing it in gently.
Do not remove the optical disc when the computer is in a power saving mode (Standby or Hibernate). Doing so may cause the computer to malfunction.
If you plan to use an external optical disc drive, connect the drive before you launch any preinstalled CD/DVD program.
Reading and Writing CDs and DVDs
Your computer plays and records CDs and DVDs, depending on the model you purchased. Check your specifications for the type of optical disc drive installed on your model. Use the table below to see which types of media your optical disc drive supports.
| Optical disc drive Plays Records to | ||
| DVD-ROM DVD and most DVD-R, DVD | -RW, DVD+R, DVD+RWand DVD+R DL (Double Layer) | — |
| CD-RW/DVD-ROM CD, CD-R, CD-RW | DVD, most DVD-R, DVD-RW,DVD+R, DVD+R DL (Double Layer) and DVD+RW | CD-R and CD-RW |
| DVD±RW CD, CD-R, CD-RW, DVD, most DVD-R, DVD-RW,DVD+R, DVD+R DL (Double Layer) and DVD+RW | CD-R, CD-RW, DVD-R, DVD-RW, DVD+R,DVD+R DL (Double Layer) and DVD+RW | |
| DVD±RW/RAM CD, CD-R, CD-RW, DVD | D, most DVD-R, DVD-RW,DVD+R, DVD+R DL (Double Layer), DVD+RW and DVD-RAM* | CD-R, CD-RW, DVD-R, DVD-RW, DVD+R,DVD+R DL (Double Layer), DVD+RW and DVD-RAM |
* On selected models only.
!
This product is designed to playback discs that conform to the Compact Disc Digital Audio standard specifications (CD Standard). A DualDisc is a two-sided disc product which mates DVD recorded material on one side with digital audio material on the other side. Please be aware that the audio side (non-DVD side) of a DualDisc may not play on this product because it does not conform to the CD Standard.
!
Due to the multiple formats of discs now available, when buying pre-recorded or blank discs for use with a VAIO computer, be sure to read the notices on the disc packaging carefully to check both playback and recording compatibility with your computer's optical disc drives. Sony does NOT guarantee the compatibility of VAIO CD drives with discs that not compliant with the official "CD" format standard (or "DVD" standard in relation to DVD drives). USING NON-COMPLIANT DISCS CAN CAUSE FATAL DAMAGE TO YOUR VAIO PC OR CREATE SOFTWARE CONFLICTS AND CAUSE SYSTEM HANGING. For inquiries about disc formats, contact the individual publisher of the pre-recorded disc or the manufacturer of the recordable disc.

Supports writing to DVD-RW discs compliant with DVD-RW version 1.1/1.2.
Supports writing to DVD-R discs compliant with DVD-R for General version 2.0/2.1.
Supports 8cm disc reading, but does not support 8cm disc writing.
Writing to DVD+R DL (Double Layer) discs is available only on discs supporting DVD+R DL (Double Layer) recording.
The DVD±RW/RAM disc drive on your computer dose not support the DVD-RAM cartridge. Use non-cartridge discs or discs with removable cartridge.
Writing to single-sided DVD-RAM discs (2.6 GB) compliant with DVD-RAM version 1.0 is not supported.
Notes on writing data onto a disc
☐ To make the data on a disc readable on an optical disc drive, you need to close the session when you eject it. To complete this process, follow the instructions included with your software.
☐ Only use circular discs. Do not use discs in any other shape (star, heart, card, etc.), as this may damage the optical disc drive.
☐ Do not strike or shake the computer while writing data onto a disc.
☐ Deactivate the screen saver and exit anti-virus software before writing data onto a disc.
☐ Do not use memory-resident utility software while writing data to a disc. This may cause the computer to malfunction.
☐ When using your software application to burn discs, make sure you exit and close all other applications.
☐ Never touch the surface of the disc. Fingerprints and dust on the surface of a disc may cause writing errors.
☐ Do not switch power modes while using the pre-installed software and while using the CD burning software.
☐ Never put stickers on discs. This will affect the use of the disc irreparably.
☐ Connect and use the AC adapter to power the computer or make sure your battery is at least 50 percent charged.
☐ Some DVD players and computer's DVD drives may not be able to play DVDs created on applicable models using the VAIO Zone software.
Notes on playing DVDs
To achieve optimum performance when playing DVDs, you should follow these recommendations.
☐ You can play DVDs using the optical disc drive and the DVD playback software, such as VAIO Zone or WinDVD. See the help file on such software for details.
☐ Close all open applications before playing a DVD movie.
☐ Do not use memory-resident utility software to speed up disc access when playing a DVD. This may cause the computer to malfunction.
☐ Deactivate the screen saver and exit anti-virus software before playing a disc.
☐ Some discs recorded at 20 or 24 bits may produce noise while playing. If you have audio devices connected, this may damage your hearing and the speakers. Reduce the volume before playing a DVD.
☐ Do not switch power saving modes while the computer is playing a DVD.
☐ Region codes indicators are labeled on the DVDs to indicate in which region and on what type of player you can play the disc. Unless a "2" (Europe belongs to region "2") or "all" (this means that you can play this DVD in most regions of the world) is labeled on your DVD disc or on the packaging, you cannot play the disc on this player.
! If you change the DVD region code while the WinDVD software is running, restart the software or eject the disc and re-insert it to make the new setting effective.
☐ Do not try to change the region code settings of the DVD drive. Any difficulties caused by changing the region code settings of the DVD drive are out of warranty.
☐ If the computer has Wireless LAN and Wireless LAN is activated, playing DVDs may cause some interruptions in audio and video.
☐ When you are playing a DVD (video or audio) and you want to remove a USB device, such as USB-compatible speakers, make sure you stop the DVD first. Removing a USB-compatible device during DVD (video or audio) playback may cause a malfunction.
Playing CDs
To play an audio CD
1 Insert the disc into the optical disc drive.
2 If nothing appears on the desktop once you insert an audio CD disc, then click Start, point to All Programs, and click to open a CD program, such as the SonicStage software.
If the Audio CD window appears, click to select an option.
Copying Files to CDs
See the online Specifications to find the type of your optical disc drive, and then Reading and Writing CDs and DVDs (page 36) to find about the supported disc media.
To copy files to a disc
! Do not strike or shake the computer while writing data onto a disc.
1 Insert a blank disc into the optical disc drive.
If the CD Drive window appears, click Take no action and then click OK.
2 Right-click Start and then click Explorer.
3 In the Folders panel on the left, locate the file(s) or folder(s) you want to copy, right-click the file(s) or folder(s), point to Send To, and then click the optical disc drive* name.
4 Close the window.
5 Click Start and then My Computer.
6 Click the optical disc drive icon under Devices with Removable Storage. A new window appears with the file(s) or folder(s) you want to copy listed under Files Ready to Be Written to the CD.
7 In the CD Writing Tasks box, click Write these files to CD.
8 Follow the instructions in the CD Writing Wizard.
Playing DVDs
To play a DVD
1 Close all open programs.
2 Insert the DVD into the optical disc drive.
3 Click Start and point to All Programs.
4 Select a DVD software program to play the DVD.
For instructions on how to use a program, see the help file included with the DVD software program.
Copying Files to DVDs
See the online Specifications to find the type of your optical disc drive, and then Reading and Writing CDs and DVDs (page 36) to find about the supported disc media.
To copy files to a disc
1 Connect the AC adapter to the computer.
2 Insert the disc into the optical disc drive.
3 Click Start and point to All Programs.
4 Select a DVD software program you want to use from the submenu.
For instructions on how to use a program, see the help file included with the DVD software program.
Using PC Cards
PC Cards allow you to connect portable external devices to your computer.
Inserting a PC Card
! Some PC Cards or their functions may not be compatible with the computer.
You do not need to shut down the computer before inserting or removing a PC Card.
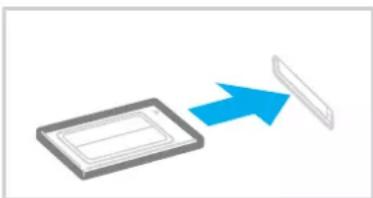
To insert a PC Card
1 Insert the PC Card into the PC Card slot with the front label facing up.
2 Gently push the PC Card into the slot.
The PC Card is automatically detected by your system.
The Safely Remove Hardware icon appears on the taskbar.
natural_image
Simple diagram showing a rectangular object with a blue arrow pointing to a rectangular block (no text or symbols)
Some devices may not function properly if you continually switch to Normal mode from Standby mode or Hibernate mode. For some PC Cards, if you alternate between Normal mode and Standby or Hibernate mode while the card is inserted, you may find that a device connected to your system is not recognized. Restart your system to correct the problem. Restarting will restore the original state of the computer.
While the card is inserted, the computer may not enter Hibernate power management mode. It may enter Standby mode. We recommend that you remove the card before the computer enters Hibernate mode.
Make sure you use the most recent software driver provided by the PC Card manufacturer.
If an "!" mark appears on the Device Manager tab in the System Properties window, remove the software driver and then reinstall it.
Do not force a PC Card into the slot. It may damage the connector pins. If you have difficulty inserting a PC Card, check that you are inserting the PC Card in the correct direction. See the manual supplied with your PC Card for more information on use.
Removing a PC Card
Follow the steps below to remove the PC Card while your computer is on. If it is not removed properly, your system may not work properly.
To remove a PC Card

To remove a PC Card when the computer is off, skip steps 1 to 6.
1 Double-click the Safely Remove Hardware icon on the taskbar.
The Safely Remove Hardware window appears.
2 Select the hardware you want to unplug.
3 Click Stop.
The Stop a Hardware Device window appears.
4 Confirm that the device can be safely removed from the system.
5 Click OK.
A window appears, explaining that it is safe to remove the device.
6 Click Close.
7 Push the PC Card release button so that the release button pops out.
8 Push the PC Card release button a second time so that the PC Card pops out.
9 Gently take hold of the Card and pull it out of the slot.
10 If the PC Card release button is still out, push it back in.
Using the Memory Stick Media
Your computer supports the Memory Stick media. Memory Stick media is a compact, portable, and versatile device especially designed for exchanging and sharing digital data with compatible products, such as digital cameras, mobile phones and other devices. Because it is removable, it can be used for external data storage.
See the online Specifications to see which Memory Stick media types are compatible with your model and if there are any limitations.
☐ You can purchase Memory Stick media from the Sony Style website (www.sonystyle-europe.com), or from your local Sony dealer.
☐ Detailed information about which VAIO computers are compatible with which Memory Stick media can be found at www.vaio-link.com.
Your computer has been tested and found compatible with the Sony branded Memory Stick media with capacity of up to 4 GB. Sony assumes no liability for compatibility with any other Memory Stick media.
Write-protecting a Memory Stick Media
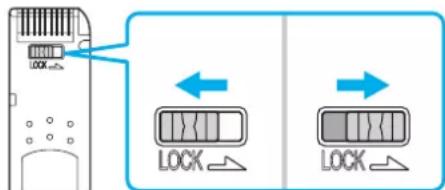
Some versions of Memory Stick media are designed with an erasure prevention switch to protect valuable data from accidental erasure or overwriting.
Move the tab horizontally or vertically ^* to set or release write-protection. When the erasure prevention switch is off, data can be saved on the Memory Stick media. When the erasure prevention switch is on, data can be read from but not saved on the Memory Stick media.
text_image
LOCK LOCK LOCK* Some versions of Memory Stick media do not have an erasure prevention switch.
Inserting a Memory Stick Media
To insert a Memory Stick media
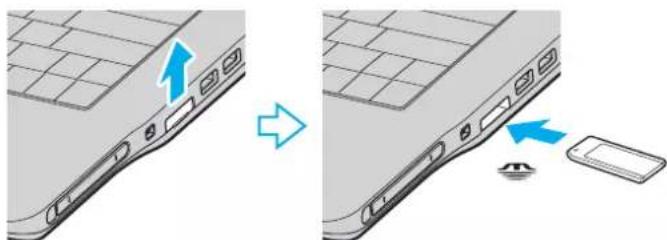
1 Hold the Memory Stick media with the arrow facing up and toward the Memory Stick media slot.
2 Lift the Memory Stick media slot cover.
3 Carefully slide the Memory Stick media into the slot until it clicks in place.
The Memory Stick media is automatically detected by your system and appears in your My Computer window as a local drive, under the appropriate letter (depending on the configuration of the computer).
natural_image
Diagram showing a device's edge panel before and after change, with no visible text or symbols.! Be sure to hold the Memory Stick media with the arrow pointing in the correct direction as you insert it into the slot. To avoid damaging the computer or the Memory Stick media, do not force the Memory Stick media into the slot if it does not insert smoothly.
Do not insert more than one Memory Stick media into the Memory Stick media slot. Inserting the media improperly may damage the computer.

The computer supports Memory Stick Duo media and is equipped with the Memory Stick combo slot that is compatible with both standard- and duo-size media. For more information on Memory Stick Duo media, visit the Memory Stick web site at http://www.memorystick.com/en/.
To view the contents of the Memory Stick media
1 Click Start and then My Computer to open the My Computer window.
2 Double-click the Memory Stick media icon 📂 to view the list of data files saved in the Memory Stick media.
To format a Memory Stick media
Use the Memory Stick Formatter software. See the help file on the Memory Stick Formatter software for details.
Removing a Memory Stick Media
To remove a Memory Stick media
1 Check that the Memory Stick media indicator is off.
2 Push the Memory Stick media in toward the computer. The Memory Stick media ejects.
3 Pull the Memory Stick media out of the slot.
! Always remove the Memory Stick media gently, or it may pop out unexpectedly.
Do not remove the Memory Stick media while the Memory Stick media indicator is turned on. If you do, you may lose data. Large volumes of data may take time to load, so be sure the indicator is off before removing the Memory Stick media.
Using the Internet
Setting Up a Dial-up Internet Connection
Before you can connect to the Internet, you need to connect your computer to a telephone line via a telephone cable (may not supplied). Once you set up your telephone cable, you're ready to connect to the Internet.
To connect a telephone cable
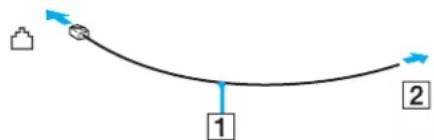
1 Plug one end of the phone cable (1) into the modem port on the computer.
2 Plug the other end into the wall jack (2).
flowchart
graph TD
    A["Start"] --> B["Node 1"]
    B --> C["Node 2"]

The computer does not work with party lines, cannot be connected to a coin-operated telephone, and may not work with multiple telephone lines or a private branch exchange (PBX). Some of these connections may result in excess electrical current and could cause a malfunction in the internal modem.
If you connect a telephone cable coming through a splitter, the modem or connected device may not work properly.
To set up a dial-up connection to the Internet
1 Click Start, point to All Programs, Accessories, Communications, and click New Connection Wizard.
The New Connection Wizard appears.
2 Click Next. If the Location Information window appears, follow the on-screen instructions.
3 If it is not already selected, click to select Connect to the Internet, and click Next.
4 Follow the on-screen instructions.
Using Wireless LAN (WLAN)
Using the Sony Wireless LAN (WLAN), all your digital devices with built-in WLAN functionality communicate freely with each other through a powerful network. A WLAN is a network in which a user can connect to a local area network (LAN) through a wireless (radio) connection. So there is no need anymore to pull cables or wires through walls and ceilings.
The Sony WLAN supports all normal Ethernet activities, but with the added benefits of mobility and roaming. You can still access information, internet/intranet and network resources, even in the middle of a meeting, or as you move from one place to another.
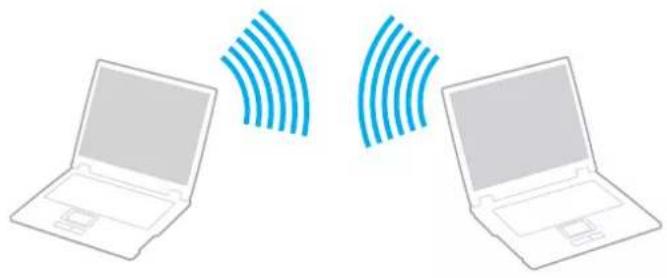
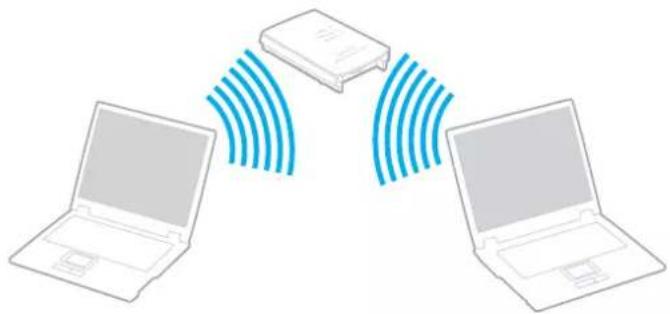
You can communicate without an Access Point, which means that you can communicate between a limited number of computers (ad-hoc). Or you can communicate through an Access Point, which allows you to create a full infrastructure network (infrastructure).

In some countries, using WLAN products may be restricted by the local regulations (e.g. limited number of channels). Therefore, before activating the WLAN functionality, read the Regulations Guide carefully. Channel selection is explained further in this manual (see Wireless LAN Channel Selection (page 57)).
WLAN uses the IEEE802.11b/g standard, which specifies the used technology. The standard includes the encryption method: Wired Equivalent Privacy (WEP), which is a security protocol and WiFi Protected Access (WPA - Proposed jointly by the IEEE and Wi-Fi Alliance, WiFi Protected Access is a specification of standards based, interoperable security enhancements that increase the level of data protection and access control for existing WiFi networks. WPA has been designed to be forward compatible with the IEEE802.11i specification. It utilizes the enhanced data encryption TKIP (Temporal Key Integrity Protocol) in addition to user authentication using 802.1X and EAP (Extensible Authentication Protocol)). Data encryption protects the vulnerable wireless link between clients and Access Points. Besides that, there are other typical LAN security mechanisms to ensure privacy, such as: password protection, end-to-end encryption, virtual private networks, and authentication.
Wireless LAN devices using the IEEE802.11a standard and the ones using the IEEE802.11b or g standard cannot communicate because the frequencies are different.
IEEE802.11b: The standard speed is 11 Mbps, or about 30 to 100 times faster than a standard dial up.
IEEE802.11a/g: The standard speed is 54 Mbps, or about 5 times faster than a Wireless LAN device using the IEEE802.11b standard.
Communicating without an Access Point (Ad-hoc)
An ad-hoc network is a network in which a local network is created only by the wireless devices themselves, with no other central controller or Access Point. Each device communicates directly with other devices in the network. You can set up an ad-hoc network easily at home.
natural_image
Illustration of two laptops with sound waves between them, no text or symbols presentTo communicate without an Access Point (ad-hoc)
1 Turn on the WIRELESS or WIRELESS LAN switch.
The WIRELESS LAN indicator lights up.
On models with the Bluetooth functionality ^*1 , double-click ( ) on the taskbar to display the Wireless Device Switch window. Select the Enable 2.4 GHz Wireless LAN check box and click OK.
2 Click Start and then Control Panel.
3 Click Network and Internet Connections.
4 Click Network Connections.
The Network Connections window appears.
5 Right-click Wireless Network Connection, then click Properties.
The Wireless Network Connection Properties window appears.
6 Select the Wireless Networks tab.
7 Click the Add... button.
The Wireless network properties window appears.
8 Enter a Network name (SSID) ^*2 .
You can choose a 32-digit alphanumeric name.
9 Select Open from the Network Authentication drop-down box.
10 Select WEP from the Data Encryption drop-down box.
11 Deselect the The key is provided for me automatically option button.
Some information becomes visible.
VAIO
53
Using Your VAIO Computer
12 Enter the Network key ^*2 .
The network key should be 5 or 13 alphanumeric characters or 10 or 26 hexadecimal ^3 characters long. You can choose whatever you want.
13 Enter exactly the same Network key again, for confirmation.
14 Select the check box This is a computer-to-computer (ad hoc) network; wireless access points are not used at the bottom of the screen.
15 Click OK.
Your Network name appears in the Preferred networks.
16 Click Advanced.
The Advanced window appears.
17 Select the Computer-to-computer (ad hoc) networks only option button.
18 Click Close.
19 Click OK.
The computer is ready to communicate with another computer.
*1 See the online Specifications to see whether your model supports the Bluetooth functionality.
*2 If you want to communicate between two or more computers, you need to configure all these computers the exact same way. This means that you need to enter the same Network name and the same Network key on all computers as on the first computer you configure.
^*3 Hexadecimal: A number representation using the digits 0-9, with their usual meaning, plus the letters A-F (or a-f) to represent hexadecimal digits with values of (decimal) 10 to 15.

An ad-hoc network does not support WPA.
!
In France, only certain channels are legally allowed when using WLAN outdoors. For more information, see the Regulations Guide.
To disconnect from a computer-to-computer (ad-hoc) network
1 Click Start and then Control Panel.
2 Click Network and Internet Connections.
3 Click Network Connections.
The Network Connections window appears.
4 In the right panel under LAN or High-Speed Internet, right-click Wireless Network Connection.
5 Click Properties.
The Wireless Network Connection Properties window appears.
6 On the Wireless Networks tab, click Advanced.
The Advanced window appears.
7 Click to select Any available network (access point preferred), and click Close.
8 Click OK.
9 Click OK to close the Network Connections window.
10 Turn off the WIRELESS or WIRELESS LAN switch.
Communicating with an Access Point (Infrastructure)
An infrastructure network is a network that extends an existing wired local network to wireless devices by providing an Access Point, for example the Sony Access Point. The Access Point bridges the wireless and wired LAN and acts as a central controller for the Wireless LAN. The Access Point coordinates transmission and reception from multiple wireless devices within a specific range.
natural_image
Illustration of two laptops connected via a wireless router, with no text or symbols present.To connect to a wireless network
1 Turn on the WIRELESS or WIRELESS LAN switch.
The WIRELESS LAN indicator lights up.
On models with the Bluetooth functionality ^* , double-click ( ) on the taskbar to display the Wireless Device Switch window. Select the Enable 2.4 GHz Wireless LAN check box and click OK.
2 Click Start and then Control Panel.
3 Click Network and Internet Connections.
4 Click Network Connections.
The Network Connections window appears.
5 In the right panel under LAN or High-Speed Internet, double-click Wireless Network Connection. The Wireless Network Connection window appears.
6 Select the network you want to use.
7 Enter the Network Key.
8 Click Connect.
After 30 seconds, the connection is established.
* See the online Specifications to see whether your model supports the Bluetooth functionality.
For more information about setting up an access point, see the documentation supplied with your Access Point.

The WPA key needs to contain at least 8 characters.
Wireless LAN Channel Selection
In an 802.11b/g configuration, channel 1 to 13 can be used.
(a) With an Access Point ("Infrastructure")
☐ The channel used will be the channel selected by the Access Point.
! For details on how to select the channel that will be used by the Access Point, see the access point manual.
(b) Without an Access Point ("ad-hoc")
☐ If the Wireless connection is initiated by the VAIO computer, channel 11 will be selected.
In France, only certain channels are legally allowed when using WLAN outdoors. For more information, see the Regulations Guide.
☐ If the Wireless connection is initiated by a peer Wireless LAN equipment, the Wireless LAN communication will make use of the channel selected by the peer Wireless LAN equipment.

The 2.4 GHz bandwidth used by wireless LAN compatible devices is also used by other various devices. Although technologies to minimize interference from other devices that uses the same bandwidth are employed on wireless LAN compatible devices, such interference may cause lower communication speed, narrower communication range, or broken wireless connections.
The communication speed varies depending on the distance between communication devices, existence of obstacles between such devices, the device configuration, the radio conditions, and the software in use. In addition, communications may be cut off depending on the radio conditions.
The communication range varies depending on the actual distance between communication devices, existence of obstacles between such devices, the radio conditions, the ambient environment that includes existence of walls and materials of such walls, and the software in use.
Deploying IEEE802.11b and IEEE802.11g products on the same wireless network may reduce the communication speed due to radio interference.
Taking this into consideration, the IEEE802.11g products are designed to reduce the communication speed to ensure communications with IEEE802.11b products.
When the communication speed is not as fast as expected, changing the wireless channel on the access point may increase the communication speed.

In France, only certain channels are legally allowed when using WLAN outdoors. For more information, see the Regulations Guide.
Using Peripheral Devices
You can add functionality to your computer by using the various ports on the computer.
☐ Connecting a Port Replicator (page 60)
□ Connecting External Speakers (page 64)
□ Connecting an External Display (page 65)
☐ Selecting Display Modes (page 69)
□ Using the Multiple Monitors Function (page 71)
☐ Connecting an External Microphone (page 73)
☐ Connecting a Universal Serial Bus (USB) Device (page 74)
□ Connecting a Printer (page 77)
☐ Connecting an i.LINK Device (page 79)
☐ Connecting to a Network (LAN) (page 81)
Connecting a Port Replicator
Attaching an optional port replicator enables you to connect additional peripherals to your computer, such as a printer and an external display.
Locating Ports on the Port Replicator
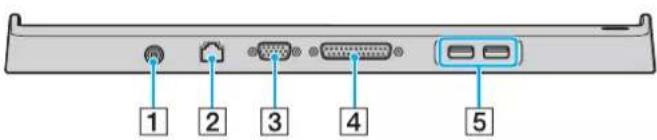
text_image
1 2 3 4 51 DC In port (page 22)
2 Network (Ethernet) port (100BASE-TX / 10BASE-T) (page 81)
3 Monitor (VGA) port (page 66)
4 Printer port (page 78)
5 Hi-Speed USB (USB 2.0) ports* (page 74)
* Supports high-/full-/low- speeds.
The port replicator can be powered only through the AC adapter supplied with the computer. Do not unplug the AC adapter from the port replicator and the AC outlet while using the port replicator; this may cause data damage or hardware malfunctions.

The printer port on the port replicator is intended for printer connections only.
Attaching Your Computer to the Port Replicator
To attach your computer to the port replicator
To prevent loss of unsaved data, be sure to turn off the computer before attaching your computer to the port replicator.
1 Disconnect all peripherals from the computer.
2 Plug the power cord (1) into the AC adapter (2) and an AC outlet.
3 Plug the cable attached to the AC adapter (2) into the DC In port (3) on the port replicator (4).
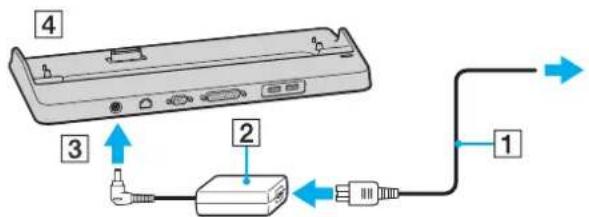
text_image
4 3 2 14 Open the port replicator connector cover on the bottom of the computer.
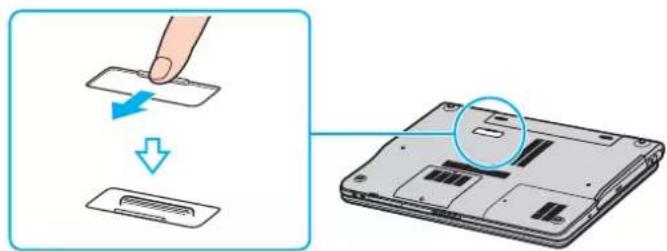
text_image
Diagram showing a hand pressing down on a device with a magnified view of the internal structure, illustrating the process from left to right.5 Align the bottom connector of the computer with the connector on the port replicator and push down until it clicks into place.
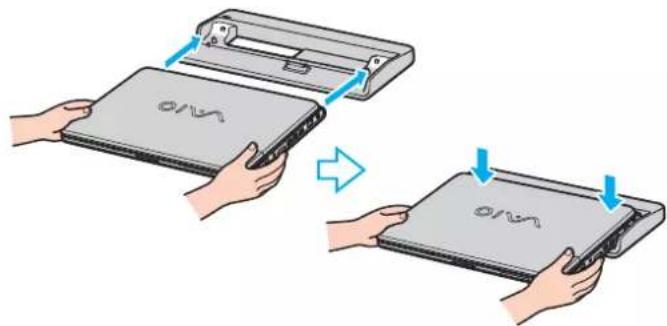
text_image
Diagram showing two-step installation of a device with 'OVA' branding, indicating change from opening to closing.6 Turn on the computer.
When the A/V port replicator is attached to the computer, you cannot access the DC In port, the monitor (VGA) port, the third USB port from the front, and the network (Ethernet) port on the computer.
! Use the AC adapter supplied with the computer.
Do not move the computer while attached to the port replicator; this may detach the port replicator and cause damage to the port replicator and the computer.
Disconnecting Your Computer from the Port Replicator
To prevent loss of unsaved data, be sure to turn off the computer before disconnecting it from the port replicator.
To disconnect your computer from the port replicator
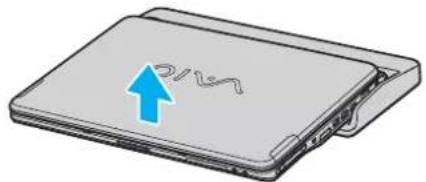
1 Lift the computer away from the port replicator.
natural_image
Illustration of a laptop with a blue upward arrow pointing to the front panel (no text or symbols)2 Close the port replicator connector cover on the bottom of the computer.

It is extremely important to close the port replicator connector cover after disconnecting the computer from the port replicator. If the cover is left open, dust may get inside and damage the computer.
To disconnect the port replicator completely from AC power, unplug the AC adapter.
Connecting External Speakers
To connect the supplied external speakers
You can enhance the sound quality of your computer by connecting external speakers.
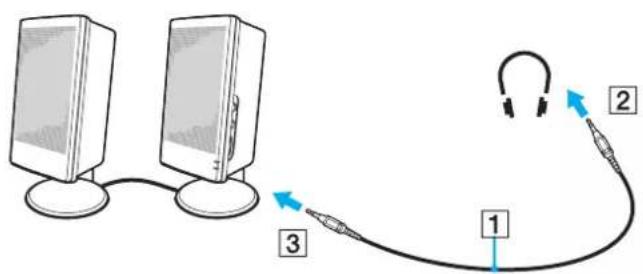
To connect external speakers
1 Plug the speaker cable (1) into the headphones jack (2) ☐.
2 Plug the other end of the speaker cable to the external speaker (3).
3 Turn down the volume of the speakers before you turn them on.
text_image
Diagram showing two desktop computer monitors connected to a wireless ear with labeled ports 1, 2, and 3
Make sure your speakers are designed for computer use.

Do not place floppy disks on the speakers; their magnetic field may damage the data on the disks.
Connecting an External Display
You can connect an external display to your computer. For example, you can use the computer with a computer display or a projector.
☐ Connecting a Computer Display (page 66)
□ Connecting a Multimedia Computer Display (page 67)
□ Connecting a Projector (page 68)

Connect the power cord after connecting all other cables.
Connected external displays are used as second screens.
On Windows systems only, you can also use an external display to set up multiple monitors.
Connecting a Computer Display
You can connect a computer display (monitor) either directly to your computer or via the (optional) port replicator.
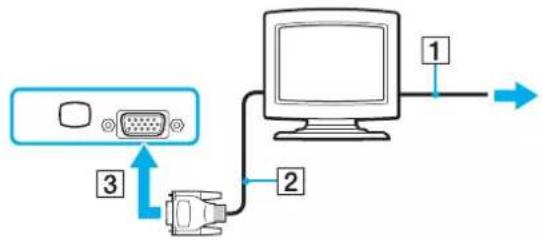
To connect a computer display
1 If necessary, plug one end of the display's power cord (1) into the display, and the other end into an AC outlet.
2 Plug the display cable (2) (not supplied) into the monitor (VGA) port (3) □ on the computer.
flowchart
graph TD
    A["Monitor"] -->|1| B["Computer"]
    B -->|2| C["USB Port"]
    C -->|3| D["Analog Device"]
    D --> A
A video adapter device is required to connect a VGA monitor using the DVI-D port.
Connecting a Multimedia Computer Display
You can connect a multimedia computer display that includes built-in speakers and a microphone to your computer or via the (optional) port replicator.
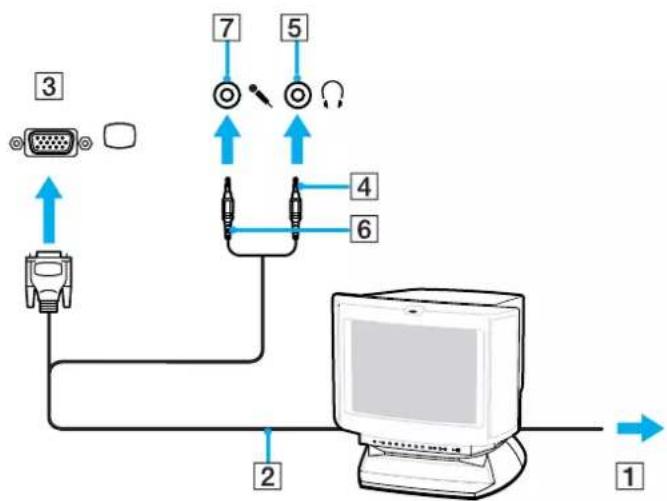
To connect a multimedia computer display
1 Plug the power cord of the multimedia computer display (1) into an AC outlet.
2 Plug the display cable (2) (not supplied) into the monitor (VGA) port (3) □ on the computer or on the port replicator.
3 Plug the speaker cable (4) into the headphones jack (5) ☐ on the computer.
4 Plug the microphone cable (6) into the microphone jack (7) ⚙ on the computer.
flowchart
graph TD
    A["Computer"] -->|2| B["Analog Devices"]
    B -->|3| C["Analog Device"]
    C -->|4| D["Electronic Interface"]
    D -->|5| E["Analog Device"]
    E -->|6| F["Analog Device"]
    F -->|7| G["Analog Device"]
    style A fill:#f9f,stroke:#333
    style B fill:#ccf,stroke:#333
    style C fill:#cfc,stroke:#333
    style D fill:#fcc,stroke:#333
    style E fill:#cff,stroke:#333
    style F fill:#ffc,stroke:#333
    style G fill:#fcf,stroke:#333
Connecting a Projector
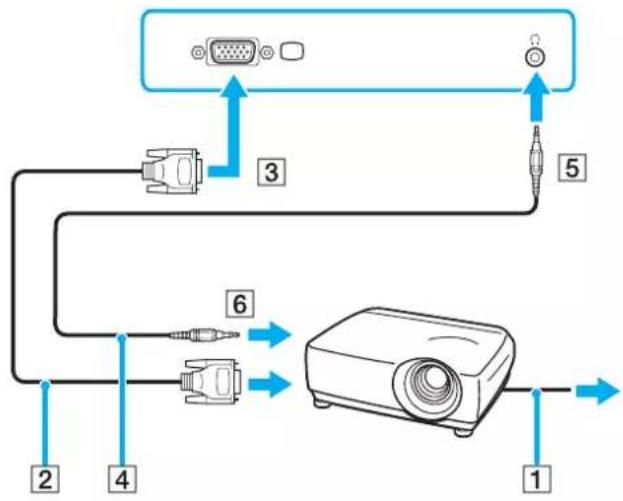
You can connect a projector (for example, the Sony LCD projector) directly to your computer or via the (optional) port replicator.
To connect a projector
1 Connect the power cord (1) of the projector into an AC outlet.
2 Plug the RGB signal cable (2) into the monitor (VGA) port (3) □ on the computer or on the port replicator.
3 Plug the audio cable (4) (not supplied) into the headphones jack (5) ☐.
4 Plug the RGB signal cable and the audio cable into the jack and port on the projector (6).
flowchart
graph TD
    A["Monitor"] -->|1| B["Device"]
    A -->|2| C["Switch 3"]
    A -->|4| D["Switch 4"]
    A -->|6| E["Switch 6"]
    A -->|5| F["Switch 5"]
    A -->|3| G["Switch 3"]
    A -->|1| H["Switch 1"]
Selecting Display Modes
You can select which display to be used as the primary monitor when an external display (desktop monitor, etc.) is connected to your computer.
The procedure for selecting a display depends on the video controller used in the computer. See the online Specifications for detailed information on the video controller.
If you want to work on the computer's LCD and the external display at the same time, see Using the Multiple Monitors Function (page 71) for more information.
To select a display
Models with the Intel Graphics Media Accelerator
1 Right-click on the desktop to display the context menu.
2 Click the menu item for graphic properties.
3 Follow the on-screen instructions to change the settings.

You may not be able to display on the computer's LCD and the external display or projector at the same time, depending on the type of your external display or projector.
Before turning on the computer, turn on the peripheral devices.
Models with the NVIDIA video controller
1 Click Start and then Control Panel.
2 Click Appearance and Themes.
3 Click Display.
4 Click the Settings tab.
5 Click Advanced.
6 Click the tab with its name beginning with GeForce.
7 Follow the on-screen instructions to change the settings.
Using the Multiple Monitors Function
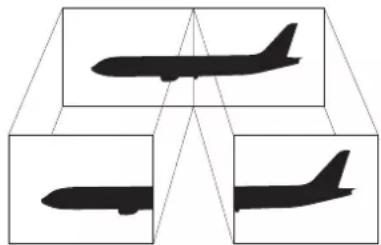
The Multiple Monitors function allows you to distribute portions of your desktop across separate displays. For example, if you have an external display attached to the monitor (VGA) port, your computer's LCD and the external display can function as a single desktop.
You can move the cursor from one display to the other. This allows you to drag objects, such as an open application window or a toolbar, from one display to the other.
natural_image
Three identical black silhouette figures of an airplane, arranged in a V-shape with no text or symbols.
Your external display may not support the Multiple Monitors function.
Certain software applications may not be compatible with Multiple Monitors settings.
Make sure that the computer does not enter Standby or Hibernate mode while you are using Multiple Monitors mode; otherwise the computer may not return to Normal mode.
If you set different colors on each display, do not divide one single window on two displays; otherwise your software may not work properly.
Set fewer colors or a lower resolution for each display.
To select the Multiple Monitors mode
To find which video controller your model includes, see the online Specifications.
Models with the Intel Graphics Media Accelerator
1 Right-click on the desktop to display the context menu.
2 Click the menu item for graphic properties.
3 Follow the on-screen instructions to change the settings.
Models with the NVIDIA video controller
1 Click Start and then Control Panel.
2 Click Appearance and Themes.
3 Click Display.
4 Select the Settings tab.
5 Click Advanced.
6 Click the tab with its name beginning with GeForce.
7 Follow the on-screen instructions to change the settings.

Additionally, you can set the display colors and resolution for each display and customize the Multiple Monitors mode.
Connecting an External Microphone
If you need to use a sound input device (for example, to chat on the Internet) you need to plug in an external microphone.
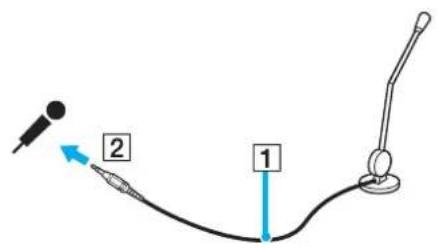
To connect an external microphone
Plug the microphone cable (1) into the microphone jack (2).
text_image
Diagram showing a medical or surgical procedure with labeled points 1 and 2, including a needle inserted into the second point.
Make sure your microphone is designed for computer use.
Connecting a Universal Serial Bus (USB) Device
To prevent your computer and/or USB devices from damage, observe the following:
☐ When moving the computer with USB devices connected, avoid any shock or force to the USB ports.
☐ Do not put the computer into a bag or carrying case when it has USB devices connected.
Connecting a USB Mouse
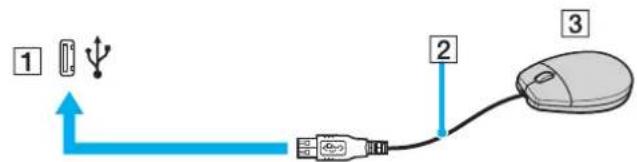
To connect a USB mouse
1 Choose the USB port (1) you prefer to use.
2 Plug the USB mouse cable (2) into the USB port. You can now use your USB mouse (3).
text_image
1 2 3
The VAIO USB mouse software driver is preinstalled on the computer. As a result, you only need to plug the USB mouse into the USB port and you can start working.
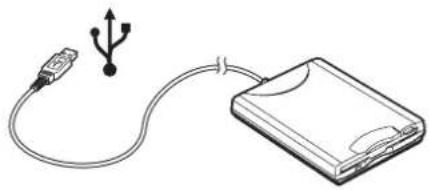
Connecting a USB Floppy Disk Drive
You can purchase a USB floppy disk drive and connect it to your computer.
To connect a USB floppy disk drive
1 Choose the USB port you prefer to use.
2 Plug the USB floppy disk drive cable into the USB port.
Your USB floppy disk drive is now ready for use.
natural_image
Illustration of a USB drive connected to a physical CD-ROM (no text or symbols)When using a USB floppy disk drive, do not apply force on the USB port. This may cause a malfunction.
Disconnecting a USB floppy disk drive
You can disconnect a USB floppy disk drive when the computer is on or off. Disconnecting the drive when the computer is in a power saving mode (Standby or Hibernate) may cause the computer to malfunction.
If the computer is off, you can unplug the USB cable directly from the computer.
To disconnect a USB floppy disk drive
1 Close all programs accessing the floppy disk drive.
2 Double-click the Safely Remove Hardware icon on the taskbar. The Safely Remove Hardware window appears.
3 Select the floppy disk drive you want to unplug.
4 Click Stop.
The Stop a Hardware device window appears.
5 Make sure the floppy disk drive is selected, and click OK.
A message appears stating it is now safe to remove the hardware device.
6 Click Close to close the Safely Remove Hardware window.
7 Remove the floppy disk drive from the computer.
Connecting a Printer
You can connect a Windows-compatible printer to your computer to print documents.
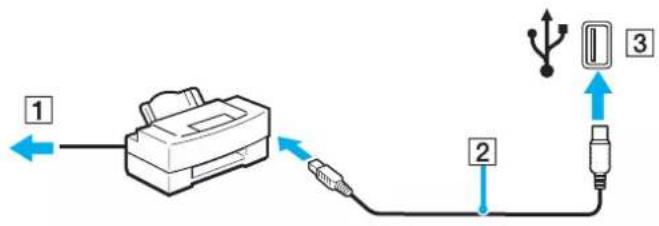
Connecting a Printer Using the USB Port
You can connect a USB printer compatible with your version of Windows to the computer.
To connect a printer using the USB port
1 Plug the printer power cord into an AC outlet (1).
2 Choose the USB port (3) you prefer to use.
3 Plug one end of a USB printer cable (2) into the USB port and the other end to your printer.
text_image
1 2 3Connecting a Printer Using the Printer Port
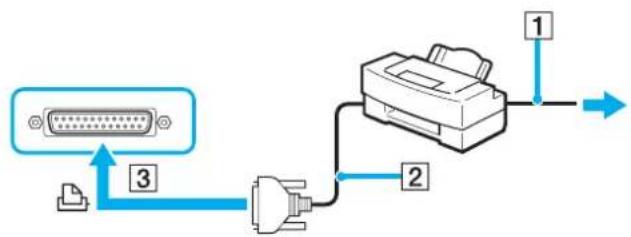
To connect a printer using the printer port
1 Plug the printer power cord (1) into an AC outlet.
2 Plug the printer cable (2) supplied with your printer into the printer port (3) 📋 on the (optional) port replicator.
flowchart
graph TD
    A["Device"] -->|3| B["Printer"]
    B -->|2| C["Printer"]
    C -->|1| D["Output"]

Before connecting the printer, turn off the computer and the printer, and unplug the AC adapter and the power cord.
Connecting an i.LINK Device
Notes on connecting i.LINK devices
☐ The computer includes an i.LINK (IEEE1394) port, which you can use to connect to an i.LINK device such as a digital video camera recorder or to connect two VAIO computers in order to copy, delete or edit files.
☐ The i.LINK port of the computer does not supply power to external devices generally powered by i.LINK ports.
☐ The i.LINK port supports transfer rates up to 400 Mbps; however, the actual transfer rate depends on the transfer rate of the external device.
☐ i.LINK cables compatible with the computer include cables with the following part numbers: VMC-IL4415 (a 1.5 meter cable with a 4-pin connector at each end), VMC-IL4408 Series (a 0.8 meter cable with a 4-pin connector at each end).
☐ The optional i.LINK cables may not be available, depending on the country or area of your residency.
☐ An i.LINK connection with other compatible devices is not fully guaranteed.
☐ The i.LINK connection varies depending on the software applications, operating system and i.LINK compatible devices you use. Refer to the manual that came with your software for more information.
☐ Check the working conditions and OS compatibility of i.LINK-compatible PC peripherals (for example, an HDD or CD-RW drive) before you connect them to the computer.
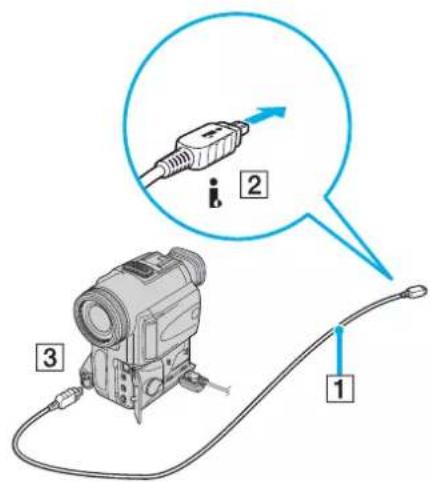
Connecting a Digital Video Camera Recorder
To connect a digital video camera recorder
1 Plug one end of the i.LINK cable (1) into the i.LINK port (2) on the computer and the other end into the DV In/Out ports (3) on the digital video camera recorder.
2 Launch the DVgate Plus software.
text_image
Diagram showing a device connected to a cable with labeled parts 1, 2, and 3, including an arrow pointing to component 2.On Sony digital video cameras, ports labeled DV Out, DV In/Out or i.LINK are i.LINK-compatible.
The Sony digital video camera recorder shown here is an example; your digital video camera recorder may need to be connected differently. You cannot access the pictures stored on a Memory Stick media when using an i.LINK connection.
Connecting to a Network (LAN)
You can connect your computer to 100BASE-TX/10BASE-T-type networks via an Ethernet network cable. Connect one end of an optional network cable to the Network (Ethernet) port on the computer or the (optional) port replicator and the other end to your network. For detailed settings and devices needed to connect to the network, see your network administrator.
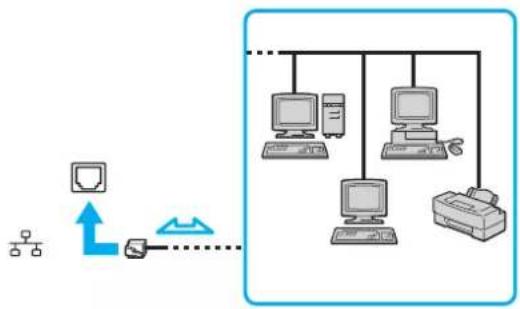
flowchart
graph TD
    A["Device"] -->|Up/Down| B["Printer"]
    B --> C["Computer 1"]
    B --> D["Computer 2"]
    B --> E["Computer 3"]
    B --> F["Computer 4"]
    B --> G["Printer 5"]
    style A fill:#f9f,stroke:#333
    style B fill:#ccf,stroke:#333
    style C fill:#cfc,stroke:#333
    style D fill:#cfc,stroke:#333
    style E fill:#cfc,stroke:#333
    style F fill:#cfc,stroke:#333
    style G fill:#cfc,stroke:#333

The computer can be connected to the network with the default settings.
When the computer is attached to the port replicator, you can only use the Network (Ethernet) port on the port replicator.
!
Telephone lines cannot be connected to the Network (LAN) connector on your computer.
If the Network (LAN) connector is connected to the telephone lines mentioned below, high electric current to the connector may cause damage, overheating or fire.
- Home (intercom speakerphone) or business-use telephone lines (multi-line business telephone)
- Public telephone subscriber line
- PBX (private branch exchange)
!
Do not plug a telephone cable into the network port.
Customizing Your VAIO Computer
This section briefly describes how to change the main settings of your computer. Among other things, you will learn how to use and customize the look of your Sony software and utilities, etc.
☐ Setting the Password (page 84)
Setting Up Your Computer with VAIO Control Center (page 86)
□ Using the Power Saving Modes (page 87)
☐ Managing Power with VAIO Power Management (page 92)
Setting Up Your Language with Windows XP Professional (page 94)
□ Configuring Your Modem (page 97)
Setting the Password
Use one of the BIOS functions to set the password.
Once you have set the password, you will have to enter the password after the VAIO logo appears to start your computer.
The power-on password will allow you to protect your computer from unauthorized access.
Adding the Power-on Password
! Once you have set the power-on password, you cannot start the computer without entering the password. Make sure not to forget the password. Write down your password and keep it safe and private from other people.
If you forget the power-on password and need assistance to reset, a password reset fee will be charged, and your computer may need to be sent in for depot service for password reset.
To add the power-on password
1 Turn on the computer.
2 Press the F2 key when the VAIO logo appears.
The BIOS setup screen appears. If not, restart the computer and press the F2 key several times when the VAIO logo appears.
3 Use the or key to select Security to display the Security tab, select Set Machine Password, and then press the Enter key.
4 On the password entry screen, enter the password twice and press the Enter key.
The password can be up to 7 alphanumeric characters long.

The following is to configure the computer to prompt password entry when you turn it on or display the BIOS setup screen.
5 Select Password when Power ON under Security.
Press the space bar to change the setting from Disabled to Enabled.
6 Use the ← or → key to select Exit and select Exit (Save Changes); and then press the Enter key.
On the Setup Confirmation screen, make sure that Yes is selected and then press the Enter key.
Changing/Removing the Power-on Password
To change or remove the power-on password
1 Turn on the computer.
2 Press the F2 key when the VAIO logo appears.
The BIOS setup screen appears. If not, restart the computer and press the F2 key several times when the VAIO logo appears.
3 Enter the current password for Enter Password:
4 Use the ← or → key to select Security to display the Security tab, select Set Machine Password, and then press the Enter key.
5 On the password entry screen, enter the current password once and a new password twice, and then press the Enter key. To remove the password, leave the Enter New Password and Confirm New Password fields blank and press the Enter key.
6 Use the or key to select Exit and select Exit (Save Changes); and then press the Enter key. On the Setup Confirmation screen, confirm that Yes is selected and then press the Enter key.
Setting Up Your Computer with VAIO Control Center
The VAIO Control Center utility allows you to consult system information and specify preferences for system behavior.
To use VAIO Control Center
1 Click Start, point to All Programs, and click VAIO Control Center. The VAIO Control Center window appears.
2 Select the desired control item and change the settings.
3 Once finished, click OK. The setting of the desired item has been changed.
For more information about each option, click Help on the VAIO Control Center window to display the help file. Some of the control items will not be visible if you open VAIO Control Center as a limited user.
Using the Power Saving Modes
When you use a battery as the power source for your computer, you can take advantage of power management settings to conserve battery life. In addition to the normal operating mode, which allows you to turn off specific devices, your computer has two distinct power saving modes: Standby and Hibernate. When using battery power, you should be aware that the computer automatically enters Hibernate mode when the remaining battery charge becomes short, regardless of the power management setting you select.
If the battery level falls below 10 percent, you should either attach the AC adapter to recharge the battery or shut down the computer and install a fully charged battery.
Using Normal Mode
This is the normal state of the computer when it is in use. The green power indicator light is on in this mode. To save power while not working, you can turn off a specific device such as the LCD or the hard disk.
Using Standby Mode
Standby mode turns off the LCD screen and sets the hard disk and the CPU to a low power consumption mode. The umber power light flashes in this mode.
To activate Standby mode
1 Click Start and then Turn Off Computer.
2 Click Stand By.
To return to Normal mode
Press any key.
! If you press the power button for more than four seconds, the computer will switch off automatically. You will lose any unsaved data.

When the computer is in Standby mode, you cannot insert a disc.
The computer comes out of Standby mode quicker than out of Hibernate mode.
Standby mode uses more power than Hibernate mode.
! If the battery runs down when the computer enters Standby mode, you will lose any unsaved data. Going back to the previous work state is impossible. To avoid loss of data, you should save your data frequently.
If the computer is not used for 25 minutes, it will enter Standby mode. To avoid this, you can change the Standby mode settings.
To change the Standby mode settings
1 Click Start and then Control Panel.
2 Click Performance and Maintenance.
3 Click Power Options.
The Power Options Properties window appears.
4 Select the Power Schemes tab.
5 Change the System Standby settings.
Using Hibernate Mode
In Hibernate mode, the state of the system is saved on the hard disk and power is turned off. Even when the battery runs down, no data will be lost. The power indicator light is off in this mode.
To activate Hibernate mode
Press the Fn+F12 keys.
The Hibernating screen appears and the computer enters Hibernate mode.
Alternatively,
1 Click Start and then Turn Off Computer.
2 Click Hibernate.
To return to Normal mode
Turn on the computer by pressing the power button.
The computer returns to its previous state.
! If you press the power button for more than four seconds, the computer will switch off automatically.

If you do not use the computer for a long period of time, put the computer into Hibernate mode. This power saving mode saves you the time of shutting down or resuming.
When the computer is in Hibernate mode, you cannot insert a disc.
Hibernate mode requires more time than Standby mode to be activated.
It takes more time to return to Normal mode from Hibernate mode than from Standby mode.
Hibernate mode uses less power than Standby mode.

Do not move the computer until its power indicator light turns off.
Managing Power with VAIO Power Management
Power management helps you to set up power schemes for running on AC power or batteries to suit your requirements for power consumption.
VAIO Power Management is a software application developed exclusively for VAIO computers. With this software application, you can enhance the Windows power management functions to ensure better operations of your computer and for longer battery life. For more information on VAIO Power Management, see the help file on the VAIO Power Management software.
Activating VAIO Power Management
When you start the computer, a power status icon appears on the taskbar. This icon indicates what kind of power source you are using at that time, for example, AC power. If you double-click this icon, the window appears showing your power status.
VAIO Power Management functionalities are added to the Windows Power Options Properties.
To activate VAIO Power Management
1 Click Start and then Control Panel.
2 Click Performance and Maintenance.
3 Click Power Options.
The Power Options Properties window appears.
4 Select the VAIO Power Management tab.
To restore the default settings
1 On the VAIO Power Management tab, click Advanced. The VAIO Power Management window appears.
2 Follow the on-screen instructions to change the settings.
Activating VAIO Power Management Power Schemes
VAIO Power Management provides several predefined power schemes. Each power scheme consists of a group of power management settings that are designed to meet specific power management goals, ranging from maximum power management to no power management.
To activate a VAIO Power Management power scheme
1 Click Start and then Control Panel.
2 Click Performance and Maintenance.
3 Click Power Options.
The Power Options Properties window appears.
4 Select the tab for power scheme settings.
5 Select a power scheme from the drop-down list.
6 If you now select the VAIO Power Management tab, you see that the selected power scheme appears on the tab.
7 If necessary, you can change the items in the list, for example, the brightness of the LCD.
8 Click OK.
The power scheme has been activated.

You must have administrator rights on the computer to set up a power scheme.
Setting Up Your Language with Windows XP Professional
The language mode selection is available on models with Windows XP Professional, but not with Windows XP Home Edition. Please see the online Specifications to see which Windows edition is installed on your model.
Windows XP Professional computers include the Multilingual User Interface (MUI) feature. It allows you to change the English operating system, some software applications and the keyboard layout into the language of your choice: French, German, Japanese, Dutch, Italian, Spanish, Czech, Finnish, Greek, Portuguese and Swedish.
It is important that you select the correct keyboard settings during the Windows Setup.
To select the correct keyboard settings during Windows Setup
1 At first boot, click Next, then Next again in the Windows XP Setup Wizard window. The Select Your System Settings window appears.
2 Fill in these three questions:
☐ I live the closest to this region.
☐ I type mostly in this language.
☐ I use this type of keyboard.
3 In the End User License Agreement, accept the License Agreement and click Next.
4 Continue your Windows setup until it is finished.
You can also change the country and language settings into your language as soon as Windows has been restarted.
To change the country and language settings
1 Click Start and then Control Panel.
2 In the Control Panel window, double-click the Regional and Language Options icon.
If you do not see this icon, click Switch to Classic View on the left side.
3 In the Regional Options tab of the Regional and Language Options window, select your language from the Standards and formats drop-down menu.
4 In the Advanced tab of the Regional and Language Options window, select your language from the Language for non-Unicode programs drop-down menu.
5 To change the language of the Windows menus, windows and online help files provided by Microsoft Windows, select the Languages tab of the Regional and Language Options window.

Non-Microsoft Windows applications stay in English, even if you change these settings.
6 Select your language from the drop-down list.
7 Click Apply to apply the changes. You are prompted to log off and log on again. Only then, the changes to the new language will take effect.
8 Click Start, and select Log Off.
9 Click Log Off in the Log Off Windows window. If necessary, enter your password to log on again. All the menus, help files and icons are then displayed in your selected language. However, some parts may remain in English.
To change the keyboard layout
1 Click Start and then Control Panel.
2 In the Control Panel window, double-click the Regional and Language Options icon. If you do not see this icon, click Switch to Classic View on the left side.
3 In the Languages tab of the Regional and Language Options window, click the Details button. The Text Services and Input Languages window appears.
4 In the Settings tab of the Text Services and Input Languages window, select your keyboard from the Default input language drop-down menu.
5 If your keyboard is not available, click the Add button. The Add Input Language window appears.
6 Select the input language and keyboard from the drop-down menu.
7 Click the OK button to close the Add Input Language window.
8 Click the OK button to close the Regional and Language Options window.
Configuring Your Modem
Before you can start using your internal modem (not all modem are built-in), or each time you use your modem while traveling, make sure that the country of the active location defined in the Phone and Modem Options dialog box matches the country you are dialing from.
You may notice a Country Selector tab under your current modem driver options. As the Country Selector tab is not a constant feature, do not use this tab to change the country settings. Only the following procedure is reliable.
To change your modem country settings
1 Click Start and then Control Panel.
2 Double-click Phone and Modem Options.
The Phone and Modem Options window appears.
If you do not see the Phone and Modem Options window, click Switch to Classic View on the left side.
3 Select your location on the Dialing Rules tab.
4 Click the Edit button to change the current configuration.
The Edit Location window appears.
Or
Click the New button to configure your modem.
The New Location window appears.
5 Check the country/region settings, and make sure it matches the place you are dialing from.
[Non-Text]
Pulse dial may not be supported in some counties and/or regions.
6 If you modified your location settings, click Apply, and then OK.
The Phone and Modem Options window appears.
7 Check that your modem is listed in the Modems tab. If your modem is not listed, click Add and follow the wizard.
8 Click Apply/OK. Your modem is configured.
Before applying new country settings, please make sure your phone cable is disconnected from your computer.
Updating the Modem Driver
To update the modem driver
1 Click Start and then Control Panel.
2 Click Printers and Other Hardware.
3 Click Phone and Modem Options. The Phone and Modem Options window appears.
4 Click the Modems tab and then click Properties to view the properties of your modem. The Modem Properties window appears.
5 On the Driver tab, click Update driver. The Hardware Update Wizard window appears. Follow the on-screen instructions. You can perform a Windows search for the driver, or point to the driver's location yourself.
Upgrading Your VAIO Computer
Your computer and memory modules use high precision components and electronic connectors technology. To avoid the invalidation of your guarantee due to mishandling, we recommend that:
☐ You contact your dealer to install a new memory module.
☐ You do not install it yourself, if you are not familiar with upgrading memory on a computer.
☐ You do not touch the connectors or open the memory panel.
For the type of module and amount of memory installed on your model, refer to the online Specifications.
Contact VAIO-Link if you need assistance.
Adding and Removing Memory
If you want to expand the functionality of your computer, you can increase the memory by installing optional memory modules. Before you upgrade your computer's memory, read the notes and procedures in the following pages. The number of available slots depends on the configuration of your model.
Notes on adding/removing memory modules
☐ Be careful when changing memory. Improper installation of memory modules may cause damage to your system. This damage may void your manufacturer's warranty.
☐ Only use memory modules that are compatible with the computer. If a memory module is not detected by the computer or Windows becomes unstable, contact your sales dealer or the manufacturer of your memory module.
Electrostatic discharge can damage electronic components. Before touching a memory module, ensure the following:
☐ The procedures described in this document assume familiarity with the general terminology associated with personal computers and with the safety practices and regulatory compliance required for using and modifying electronic equipment.
☐ Turn off the computer and disconnect the system from its power source (that is, battery or AC adapter) and from any telecommunication links, networks, or modems before you open the computer. Failure to do so may result in personal injury or equipment damage.
☐ Electrostatic Discharge (ESD) can damage memory modules and other components. Install the memory module only at an ESD workstation. If such a station is not available, do not work in a carpeted area, and do not handle materials that produce or hold static electricity (cellophane wrappers, for example). Ground yourself by maintaining contact with an unpainted metal portion of the chassis while performing the procedure.
☐ Do not open the memory module package until you are ready to change the module. The package protects the module from ESD.
VAIO
101
Upgrading Your VAIO Computer
☐ Use the special bag delivered with the memory module or wrap the module in aluminum foil to protect it from electrostatic discharge.
☐ Introducing any liquids or any foreign substances or objects into the memory slots, or other internal components of the computer, will result in damage to the computer and any repair costs will not be covered by the warranty.
☐ Do not place the memory module in places subject to:
☐ Heat sources such as radiators or air ducts
□ Direct sunlight
□ Excessive dust
□ Mechanical vibration or shock
☐ Strong magnets or speakers that are not magnetically shielded
☐ Ambient temperature of more than 35^ C or less than 5^ C
□ High humidity
☐ Handle the memory module with care. To avoid injuries to your hands and fingers, do not touch the edges of the components and circuit boards inside the computer.
Removing and Installing a Memory Module
To change or add a memory module
1 Shut down the computer and disconnect all peripheral devices.
2 Unplug the computer and remove the battery pack.
3 Wait until the computer cools down.
4 Unscrew the screw (indicated by the arrow below) on the bottom of the computer and remove the memory module compartment cover.
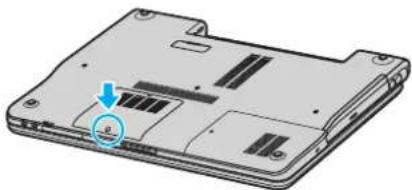
natural_image
Illustration of a laptop back panel with a highlighted internal component (no text or symbols)5 Touch a metal object (such as the connector panel on the back of the computer) to discharge static electricity.
6 Remove the memory module:
☐ Pull the latches in the direction of the arrows (1). The memory module is released.
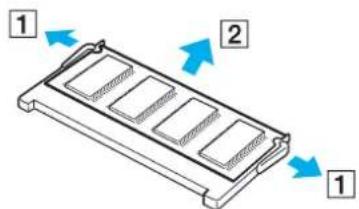
text_image
Diagram showing a device with labeled parts and directional arrows indicating flow or movement.☐ Make sure that the memory module tilts up and then pull it out in the direction of the arrow (2).
7 Remove the new memory module from its packaging.
8 Slide the memory module into the memory module slot and push it in until it clicks into place.
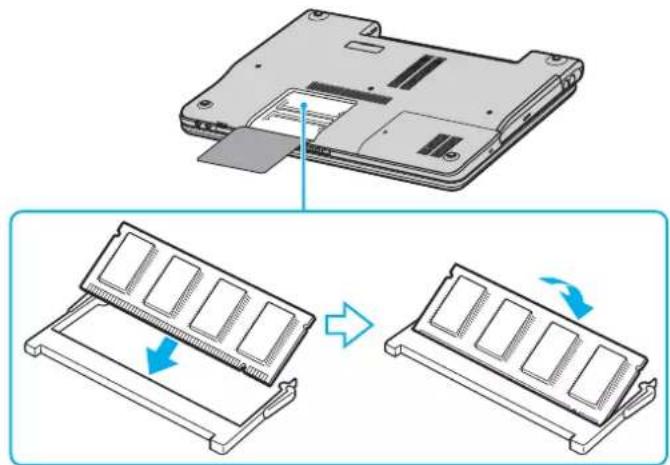
natural_image
Diagram showing a laptop back panel being processed with a rack, illustrating the process from disassembly to assembly (no text or symbols present)! Do not touch any other components on the motherboard.
Do not damage the inner film cover equipped for module protection.
9 Replace the memory module compartment cover.
10 Tighten the screw on the bottom of the computer.
11 Reinstall the battery and turn on the computer.
Viewing the Amount of Memory
To view the amount of memory
1 Turn on the computer.
2 Click Start, point to All Programs, and click VAIO Control Center.
3 Double-click the System Information folder in the VAIO Control Center window.
4 Double-click the System Information icon in the System Information folder.
You can view the amount of system memory. If the additional memory does not appear, repeat the whole procedure and restart the computer.
Precautions
This section describes safety guidelines and precautions to help you protect your computer from potential damage.
☐ On Handling the LCD Screen (page 107)
☐ On Using the Power Source (page 108)
☐ On Handling Your Computer (page 109)
☐ On Handling Floppy Disks (page 111)
☐ On Handling Discs (page 112)
☐ On Using the Battery Pack (page 113)
☐ On Using Headphones (page 114)
☐ On Handling Memory Stick Media (page 114)
☐ On Handling the Hard Disk (page 115)
On Handling the LCD Screen
☐ Do not leave the LCD facing the sun. This could damage the LCD. Be careful when using the computer near a window.
☐ Do not scratch the LCD or exert pressure on it. This could cause a malfunction.
☐ Using the computer in low temperature conditions may produce a residual image on the screen. This is not a malfunction. When the computer returns to normal temperature, the screen returns to normal.
☐ A residual image may appear on the screen if the same image is displayed for a lengthy period of time. The residual image disappears in a while. You can use a screen saver to prevent residual images.
☐ The screen becomes warm during operation. This is normal and does not indicate a malfunction.
☐ The LCD is manufactured using high-precision technology. You may, however, see tiny black points and/or bright points (red, blue, or green) that continuously appear on the LCD. This is a normal result of the manufacturing process and does not indicate a malfunction.
☐ Avoid rubbing the LCD screen. This could damage the screen. Use a soft, dry cloth to wipe the LCD screen.
On Using the Power Source
☐ See the online Specifications to check the power operation of your model.
☐ Do not share the AC outlet with other power-consuming equipment, such as a photocopier or shredder.
☐ You can purchase a power strip with a surge protector. This device prevents damage to the computer caused by sudden power surges, in an electrical storm, for example.
☐ Do not place heavy objects on the power cord.
☐ To disconnect the cord, pull it out by the plug. Never pull the cord itself.
☐ Unplug the computer from the AC outlet if you are planning to not use the computer for a long time.
☐ Make sure that the AC outlet is easily accessible.
☐ When the AC adapter is not used, unplug it from the AC outlet.
☐ Use the AC adapter supplied with the computer or genuine Sony products. Do not use any other AC adapter as it may cause a malfunction.
On Handling Your Computer
☐ Clean the cabinet with a soft cloth, which is dry or lightly moistened with a mild detergent solution. Do not use any type of abrasive pad, scouring powder, or solvent such as alcohol or benzine, as these may damage the finish of the computer.
☐ If you drop a solid object or any liquid onto the computer, shut down the computer and then unplug it. You may want to have the computer checked by qualified personnel before operating it again.
☐ Do not drop the computer or place heavy objects on top of the computer.
☐ Do not place the computer in a location subject to:
□ Heat sources, such as radiators or air ducts
□ Direct sunlight
□ Excessive dust
□ Moisture or rain
□ Mechanical vibration or shock
☐ Strong magnets or speakers that are not magnetically shielded
☐ Ambient temperature of more than 35^ C or less than 5^ C
□ High humidity
☐ Do not place electronic equipment near the computer. The electromagnetic field of the computer may cause a malfunction.
☐ Provide adequate air circulation to prevent internal heat from building up. Do not place the computer on porous surfaces such as rugs or blankets, or near material such as curtains or draperies that may block its ventilation slots.
☐ The computer uses high-frequency radio signals and may cause interference to radio or TV reception. If this occurs, relocate the computer a suitable distance away from the set.
☐ Use only specified peripheral equipment and interface cables; otherwise, problems may occur.
VAIO
110
Precautions
☐ Do not use cut or damaged connection cables.
☐ If the computer is brought directly from a cold location to a warm one, moisture may condense inside the computer. In this case, allow at least one hour before turning on the computer. If any problems occur, unplug the computer and contact VAIO-Link.
☐ Make sure you disconnect the power cord before cleaning the computer.
☐ To avoid losing data if the computer is damaged, back up your data regularly.
On Handling Floppy Disks
☐ Do not open the shutter manually or touch the surface of the floppy disk.
□ Keep floppy disks away from magnets.
- Keep floppy disks away from direct sunlight and other sources of heat.
☐ Keep the floppy disk away from any liquid. Do not let the floppy disk get wet. When you are not using the floppy disk, always remove it from the floppy disk drive and use a storage case.
☐ If the floppy disk comes with a label, make sure that the label is properly attached. If the edge of the label is curled up, the label may stick to the inside of the floppy disk drive and cause a malfunction or damage your floppy disk.
On Handling Discs
☐ Do not touch the surface of the disc.
☐ Do not drop or bend the disc.
☐ Fingerprints and dust on the surface of a disc may cause read errors. Always hold the disc by its edges and central hole, as shown below:

☐ Proper care of the disc is essential to its continuous reliability. Do not use solvents (such as benzine, thinner, alcohol, commercially available cleaners, or anti-static spray) which may cause damage to the disc.
☐ For normal cleaning, hold the disc by its edge and use a soft cloth to wipe the surface from the center out.
☐ If the disc is badly soiled, moisten a soft cloth with water, wring it out well, and use it to wipe the surface of the disc from the center out. Wipe off any remaining moisture with a dry soft cloth.
☐ Never put stickers on discs. This will affect the use of the disc irreparably.
On Using the Battery Pack
☐ Do not leave the battery pack in temperatures above 60^ C, such as in a car parked in the sun or under direct sunlight.
☐ Battery life is shorter in a cold environment. This is due to decreased battery efficiency at low temperatures.
☐ Charge the batteries at temperatures between 10^ C to 30^ C. Lower temperatures require a longer charging time.
☐ Certain rechargeable batteries do not meet Sony quality and safety standards. For safety reasons this notebook only functions with genuine Sony batteries designed for this model. When inserting another kind of battery, the battery will not be charged and the notebook will not function.
☐ While the battery is in use or being charged, the battery pack heats up. This is normal and is not cause for concern.
□ Keep the battery pack away from all sources of heat.
□ Keep the battery pack dry.
☐ Do not open or try to disassemble the battery pack.
☐ Do not expose the battery pack to any mechanical shock.
☐ If you are not using the computer for an extended period of time, remove the battery pack from the computer to prevent damage to the battery.
☐ If, after fully charging the battery pack, the battery power is still low, the battery pack may be reaching the end of its life and should be replaced.
☐ You do not need to discharge the battery before recharging.
☐ If you have not used the battery pack for a considerable amount of time, recharge the battery.
On Using Headphones
Road safety – Do not use headphones while driving, cycling, or operating any motorized vehicle. It may create a traffic hazard and is illegal in some areas. It can also be potentially dangerous to play loud music while walking, especially at pedestrian crossings.
☐ Preventing hearing damage – Avoid using headphones at high volume. Hearing experts advise against continuous, loud and extended play. If you experience a ringing in your ears, reduce the volume or discontinue use.
On Handling Memory Stick Media
☐ Do not use the media in locations that are subject to static electricity or electrical noise.
☐ Do not touch the Memory Stick media connector with your finger or metallic objects.
☐ Use only the label supplied with the Memory Stick media as a label.
☐ Do not bend, drop, or apply strong shock to the Memory Stick media.
☐ Do not disassemble or modify Memory Stick media.
☐ Do not let Memory Stick media get wet.
☐ Do not use or store Memory Stick media in a location subject to:
□ Extremely high temperatures, such as in a car parked in the sun
□ Direct sunlight
□ High humidity or
□ Corrosive substances
☐ Use the storage case supplied with the Memory Stick media.
On Handling the Hard Disk
The hard disk has a high storage density and reads or writes data in a short time. However, it can be easily damaged by mechanical vibration, shock or dust.
Although the hard disk has the internal safety device to prevent losing data due to mechanical vibration, shock or dust, you should be careful when handling the computer.
To avoid damaging your hard disk
☐ Do not subject the computer to sudden movements.
□ Keep the computer away from magnets.
☐ Do not place the computer in a location subject to mechanical vibration or in an unstable position.
☐ Do not move the computer while the power is on.
☐ Do not turn off the power or restart the computer while reading or writing data to disk.
☐ Do not use the computer in a place subject to extreme changes in temperature.

If the hard disk is damaged, the data cannot be restored.
Troubleshooting
This section describes how to solve common problems you might encounter when using your computer. Many problems have simple solutions. Try these suggestions before contacting VAIO-Link.
□ Computer (page 117)
□ System Security (page 125)
□ Battery (page 127)
□ Internet (page 129)
□ Networking (page 131)
□ CDs and DVDs (page 134)
□ Display (page 139)
□ Printing (page 141)
□ Microphone (page 142)
□ Mouse (page 143)
□ Speakers (page 144)
□ Touch Pad (page 145)
☐ Keyboard (page 146)
☐ Floppy Disks (page 147)
□ PC Cards (page 148)
□ Audio/Video (page 149)
☐ Memory Stick Media (page 150)
☐ Peripherals (page 151)
Computer
What should I do if my computer won't start?
☐ Make sure the computer is securely plugged into a power source and turned on. Make sure the power indicator shows the power is on.
☐ Make sure the battery is installed properly and charged.
☐ Make sure the floppy disk drive (if applicable) is empty.
☐ If the computer is plugged into a power strip or uninterruptible power supply (UPS), make sure the power strip or UPS is plugged into a power source and turned on.
☐ If you are using an external display, make sure it is plugged into a power source and turned on. Make sure the brightness and contrast controls are adjusted correctly. See the manual that came with your display for details.
☐ Disconnect the AC adapter and remove the battery. Wait three to five minutes. Reattach the AC adapter and reinstall the battery, and press the power button to turn on the computer.
☐ Condensation may cause the computer to malfunction. If this occurs, do not use the computer for at least one hour.
☐ Remove any extra memory modules you may have inserted since purchase.
☐ Check that you are using the supplied Sony AC adapter. For your safety, use only genuine Sony rechargeable battery packs and AC adapters, which are supplied by Sony for your VAIO computer.
What should I do if a BIOS error appears when my computer starts?
If the message "Press
1 Press the F2 key.
The BIOS setup screen appears.
2 Set the date (month/day/year). Press Enter.
3 Press the ↓ key to select System Time, and then set the time (hour: minute: second). Press the Enter key.
4 Press the → key to select the Exit tab, and then press the F9 key. The message Load default configuration now? appears.
5 Select Yes, and press the Enter key.
6 Select Exit (Save Changes), and press the Enter key. The message Save configuration changes and exit now? appears.
7 Select Yes, and press the Enter key. The computer restarts.
If this occurs on a regular basis, contact VAIO-Link.
What should I do if the power indicator (Green) lights but my screen does not display anything when I turn on my computer?
If nothing still appears on your screen after a while
1 Press the power button for more than four seconds to check that the power indicator goes out. Then turn on the computer again.
2 If nothing still appears on your screen, unplug the AC adapter, remove the battery, and leave the computer for about a minute. Then plug in the AC adapter, install the battery, and turn on the computer again.
What should I do if my computer or software stops responding?
☐ It is best to turn off the computer using the Turn Off Computer option on the Microsoft Windows Start menu, located on the taskbar. Using other methods, including those listed below, may result in loss of unsaved data.
☐ Click Start, point to Turn Off Computer, and then click Turn Off.
☐ If the computer does not turn off, press the Ctrl+Alt+Delete keys simultaneously. When the Windows Task Manager window appears, click Turn Off from the Shut Down menu.
When the Windows Security window appears, click Shut Down.
☐ If the computer still does not turn off, press and hold the power button or slide and hold the power switch until the computer turns off.
☐ If the computer stops responding while playing a CD or DVD, press the Ctrl+Alt+Delete keys simultaneously. You can turn off the computer from the Windows Task Manager.
☐ Pressing the Ctrl+Alt+Delete keys simultaneously or turning off the computer with the power button or switch may cause loss of data.
☐ Remove the AC adapter and battery.
☐ Try reinstalling the software.
☐ Contact the software publisher or designated provider for technical support.
Why won't my computer enter Standby or Hibernate mode?
The computer may become unstable if the operating mode is changed before the computer completely enters Standby or Hibernate.
To restore the computer to normal operating stability
1 Close all open programs.
2 Click Start, Turn Off Computer, and then Restart.
3 If the computer does not restart, press the Ctrl+Alt+Delete keys simultaneously. In the Windows Task Manager window, press the appropriate button and restart the computer.
Why doesn't the computer start or the power button does not work when the battery indicator is flashing?
☐ This symptom could be due to the battery pack not being installed properly. To resolve this symptom, switch off the computer and remove the battery pack. Then install the battery pack to the computer again. For details, see Installing the Battery Pack (page 23).
☐ If the symptom persists after performing the above, it means the installed battery pack is not compatible. Remove the battery pack and contact VAIO-Link.
Why does a window appear to notify of incompatibility of the battery pack or improper connection to the computer and an operating mode shift to Hibernate?
☐ This symptom could be due to the battery pack not being installed properly. To resolve this symptom, switch off the computer and remove the battery pack. Then install the battery pack to the computer again. For details, see Installing the Battery Pack (page 23).
☐ If the symptom persists after performing the above, it means the installed battery pack is not compatible. Remove the battery pack and contact VAIO-Link.
Why is the sound of my computer's fan so loud?
The computer's fan may be running at a high speed to cool the CPU. By lowering the CPU speed, you also lower the speed and noise level of the computer's fan. You can use the power schemes to lower the CPU speed.
To lower the CPU speed using the power schemes*
1 Click Start and then Control Panel.
2 Click Performance and Maintenance, and click Power Options. The Power Options Properties window appears.
3 Select Portable/Laptop in the Power schemes box.
4 Click Apply.
5 Click OK.
* Available on selected models only.
Why does the System Properties window display a slower CPU speed than the maximum?
This is normal. Because the computer's CPU utilizes a type of CPU speed controlling technology for power conservation purposes, System Properties may display the CPU's current speed instead of the maximum speed.
What should I do if I start my computer and the message "System Disabled" appears and Windows does not start?
If you enter a wrong power-on password three times consecutively, the System Disabled message appears and Windows does not start. Press the power button for more than four seconds to check that the power indicator goes off. Wait for 10 or 15 seconds, then restart the computer and enter the correct password. When entering the password, check that the Num lock indicator and Caps lock indicator are off. If any are lit, press the Num Lk key or the Caps Lock key to turn off the indicator before entering the password.
What should I do if my game software does not work or it keeps crashing?
☐ Check the web site of the game if there are any patches or updates to download.
☐ Make sure you have installed the latest video driver.
☐ On some VAIO models, the graphics memory is shared with the system. The optimal graphic performance in this case is not guaranteed.
What should I do if I cannot remember the password?
If you have forgotten the password, contact VAIO-Link to cancel it. A cancellation fee will be charged.
Why does it take time before my computer starts?
If Norton Internet Security's Personal Firewall is active, it may take some time before the Desktop screen appears due to network security checkups.
Why doesn't the LCD turn off when the time selected for the automatic turn-off action has passed?
The originally selected VAIO's screen saver disables the timer setting, which you can select using the Windows power options, for the LCD to turn off.
Change the originally selected VAIO's screen saver.
System Security
This section provides information about keeping your computer operating smoothly and protecting against potential threats to the computer's security.
How can I protect my computer against security threats, such as viruses?
The Microsoft Windows operating system is preinstalled on the computer. The best way to protect the computer against security threats, such as viruses, is to download and install the latest Windows updates regularly.
You can get important Windows updates by doing the following:
The computer must be connected to the Internet before you can receive updates.
1 Connect to the Internet.
2 Click the Automatic Updates icon on the taskbar.
3 Click Next, and follow the on-screen instructions to set up automatic or scheduled updates.
How do I keep my antivirus software updated?
You can keep the Norton Internet Security software program current with the latest updates from Symantec Corporation.
To download and install the latest security update
1 Double-click the Norton Internet Security icon on the taskbar. If you have not previously registered the antivirus software, a series of information wizards appear.
1 Follow the on-screen instructions to complete each wizard.
2 Double-click the Norton Internet Security icon again.
The Norton Internet Security window appears.
If you have previously registered this antivirus software, the Norton Internet Security window automatically appears.
2 Follow the on-screen instructions to select and download updates.
Battery
How do I know when the battery is charged?
To determine the remaining battery charge, see Charging the Battery Pack (page 25).
When is the computer using AC power?
When the computer is directly connected to the AC adapter, it uses AC power, even if a battery is installed.
When should I recharge the battery?
☐ When the battery level falls below 10 percent.
☐ When both the battery and power indicators blink.
☐ When you have not used the battery for a long time.
When should I replace the battery?
If the battery power is still low after charging it, the battery may be reaching the end of its life and should be replaced.
Should I be concerned that the installed battery is warm?
No, it is normal for the battery to be warm when it is powering the computer.
Can my computer enter Hibernate mode while using battery power?
The computer can enter Hibernate mode while using battery power, but some software programs and peripheral devices prevent the system from entering Hibernate mode. If you are using a program that prevents the system from entering Hibernate mode, save your data frequently to avoid losing data. See Using Hibernate Mode (page 90) for information on how you can manually activate Hibernate mode.
Why doesn't my computer enter Hibernate mode?
You may first need to enable Hibernate mode. Follow these steps:
1 Click Start and then Control Panel.
2 Click Performance and Maintenance.
3 Click Power Options.
The Power Options Properties window appears.
4 Select the Hibernate tab.
5 Click to check the box next to Enable hibernation.
Internet
Why doesn't my modem work?
☐ Make sure the telephone cable is securely plugged into the Modem port on the computer and the wall jack.
☐ Make sure the telephone cable is working. Plug the cable into an ordinary telephone and listen for a dial tone.
☐ Make sure the telephone number the program is dialing is correct.
☐ Make sure the software you are using is compatible with the computer's modem. (All preinstalled Sony programs are compatible.)
☐ Make sure that the modem is the only device connected to your phone line.
☐ Check the following setting:
1 Click Start and then Control Panel.
2 Click Printers and Other Hardware.
3 Click Phone and Modem Options.
4 On the Modems tab, check that your modem is listed.
5 On the Dialing Rules tab, check the location information is correct
Why is my modem connection slow?
The computer is equipped with a V.92/ V.90 compatible modem. Many factors may influence modem connection speed, including telephone line noise or compatibility with telephone equipment, such as fax machines or other modems. If you think your modem is not connecting properly to other PC-based modems, fax machines, or your Internet Service Provider (ISP), follow these steps:
☐ Ask your telephone company to verify your telephone line is free of any line noise.
☐ If your problem is fax-related, make sure there are no problems with the fax machine you are calling and that it is compatible with fax modems.
☐ If you are having a problem connecting with your ISP, make sure the ISP is not experiencing technical problems.
☐ If you have a second telephone line, try connecting the modem to that line.
Networking
Why can't my computer connect to a wireless LAN access point?
☐ Connection availability is affected by distance and obstructions. You may need to move the computer away from obstructions or closer to any access point you may be using.
☐ Make sure the WIRELESS or WIRELESS LAN switch is on and the WIRELESS LAN indicator is lit on the computer.
☐ Make sure power to the access point is on.
☐ Check the following setting:
1 Click Start and then Control Panel.
2 Click Network and Internet Connections.
3 Click Network Connections.
4 Right-click Wireless Network Connection.
5 Click Properties.
6 Click the Wireless Network tab.
7 Make sure the access point is displayed in the Available networks.
☐ Make sure the encryption key is correct.
Why can't I access the Internet?
☐ Check the access point settings. See the instructions supplied with the access point.
☐ Make sure the computer and the access point are connected to one another.
☐ Move the computer away from obstructions or closer to any access point you may be using.
☐ Make sure the computer is properly configured for Internet access.
Why is the data transfer speed slow?
☐ The wireless LAN data transfer speed is affected by distance and obstructions between devices and access points. Other factors include device configurations, radio conditions, and software compatibility. To maximize the data transfer speed, move the computer away from obstructions or closer to any access point you may be using.
☐ If you are using a wireless LAN access point, the device may be temporarily overloaded depending on how many other devices are communicating via the access point.
☐ If your access point interferes with other access points, change the access point channel. See your access point instructions for more information.
How do I avoid data transfer interruptions?
☐ When the computer is connected to an access point, data transfer interruptions may occur when using large files or if the computer is in close proximity to microwaves and cordless telephones.
☐ Move the computer closer to the access point.
☐ Make sure the access point connection is intact.
☐ Change the access point channel. See your access point manual for more information.
What are channels?
☐ Wireless LAN communication occurs on divided frequency bands known as channels. Third-party wireless LAN access point channels may be preset to different channels from Sony devices.
☐ If you are using a wireless LAN access point, see connectivity information contained in your access point instructions.
When I change the encryption key, the network connection stops. What should I do?
Two computers with built-in wireless LAN may lose a peer-to-peer network connection if the encryption key is changed. You can either change the encryption key back to the original profile or re-enter the key on both computers so the key matches.
CDs and DVDs
Why does my computer freeze when I try to read a disc?
The disc the computer is trying to read may be dirty or damaged. Follow these steps:
1 Restart the computer by clicking Start, Turn Off Computer, and Restart.
2 Eject the disc from the optical disc drive.
3 Examine the disc for dirt or damage. If the disc is dirty, see On Handling Discs (page 112) for instructions on how to clean it.
What should I do if the drive tray won't open?
☐ Make sure the computer is on.
☐ Press the drive eject button.
☐ If the drive eject button does not work, click Start and then My Computer. Right click the optical disc drive icon, and select Eject from the shortcut menu.
☐ If none of the above options work, insert a thin, straight object (such as a paper clip) in the manual eject hole near the drive eject button.
☐ Try restarting the computer.
What should I do if the optical disc drive isn't playing my CD or DVD properly?
☐ Make sure the disc was inserted into the optical disc drive with the label facing up.
☐ Make sure the necessary program(s) is installed according to the manufacturer's instructions.
☐ If the CD or DVD is dirty or damaged, the computer will stop responding. Follow these steps:
1 Restart the computer by pressing the Ctrl+Alt+Delete keys, and selecting Restart from the Shut Down menu of the Windows Task Manager window.
2 Remove the CD or DVD from the optical disc drive.
3 Check the disc for dirt or damage. If you need to clean the disc, see On Handling Discs (page 112) for instructions.
☐ If you are playing a CD or DVD and cannot hear sound, follow these steps:
☐ Double-click the Volume icon on the taskbar, and click to cancel the Master Volume Mute All and Wave Mute check boxes.
☐ Check the volume setting in the audio mixer.
☐ If you are using external speakers, check the volume settings on the speakers and the connections between the speakers and the computer.
☐ Make sure the CD audio feature is enabled and the correct driver software is installed. Follow these steps:
1 Click Start and then Control Panel.
2 Click Performance and Maintenance.
3 Click System.
The System Properties window appears.
4 Select the Hardware tab, and click Device Manager in the Device Manager box.
A window with a listing of the computer's hardware devices appears.
If an "X" or an exclamation point appears on the listed device, you may need to enable the device or reinstall the drivers.
VAIO
136
Troubleshooting
5 Double-click the optical disc drive device to open the submenu.
6 Double-click the listed drive, and select the Properties tab.
7 Click to select the Enable digital CD audio for this CD-ROM device check box, if it is not selected. You can confirm the driver software by selecting the Driver tab, and clicking Driver Details.
8 Click OK to close the window.
☐ Make sure an adhesive label was not attached to the CD or DVD. Adhesive labels can come off while the disc is in the optical disc drive and damage the drive or cause it to malfunction.
☐ If a region code warning appears, the disc may be incompatible with the optical disc drive. Check the DVD package to make sure the region code is compatible with the optical disc drive.
☐ If you notice condensation on the computer, do not use the computer for at least one hour. Condensation can cause the computer to malfunction.
☐ Make sure the computer is running on AC power supply and try the disc again.
What should I do if I cannot write to CD?
☐ Do not launch any software application or allow any to launch automatically, not even a screen saver.
☐ Do not use the keyboard.
☐ Do not use a CD-R/RW disc that has a label affixed to it. This could cause a write error or other damage.
What should I do if I cannot write to DVD?
□ Are you using the correct DVD recordable media?
☐ Check which DVD recordable format is compatible with the computer's built-in DVD recorder (DVD-R / DVD-RW / DVD+R / DVD+RW). Note the possibility that some brands of DVD recordable media do not work.
What should I do if I cannot write to DVD-RAM using Windows functions?
This Q & A entry applies to selected models only. See the online Specifications to see whether your model is equipped with the DVD±RW/RAM drive.
Follow these steps to change the settings:
1 Click Start and then My Computer.
2 Right-click the optical disc drive icon and select Properties.
3 Click the Recording tab.
4 Click to cancel the Enable CD recording on this drive check box.
5 Click OK.
Canceling the Enable CD recording on this drive check box disables writing to CD-R and CD-RW discs. To write to such discs, make sure to select this check box.
You cannot add data to DVD-RAM discs with data already written by the Roxio DigitalMedia software due to difference in disc formatting. Attempt to add data to such a disc will re-format the disc, resulting in loss of the entire written data.
Display
Why did the computer screen (LCD) go blank?
☐ The computer screen may go blank if the computer has lost power or has entered a power saving mode (Standby or Hibernate). If the computer is in LCD (Video) Standby mode, press any key to activate the computer screen. See Using the Power Saving Modes (page 87) for more information.
☐ Make sure the computer is plugged into a power source and is on. The power indicator on the computer will be on if the computer is on.
☐ If the computer is using battery power, make sure the battery is installed properly and is charged. See Using the Battery Pack (page 23) for more information.
☐ If the display mode is set to external display, use the Fn+F7 key combination. See Combinations and Functions with the Fn Key (page 30) for more information.
What should I do if the screen does not display a video?
☐ If the external display is selected for the output destination with the Fn+F7 keys and the external display is disconnected, you cannot display a video on your screen.
☐ In such a case, stop video playback, press the Fn+F7 keys to change the output destination to your screen, and then restart video playback.
What should I do if the screen is dark?
☐ Press the Fn+F6 keys to brighten the screen.
What should I do if the brightness of the screen changes?
The brightness of your screen when adjusted with the Fn+F5/F6 keys is temporary and this adjustment is overridden by the setting on the VAIO Power Management tab when another power scheme is selected.
To save this preference for the brightness

To do the following procedure, you must have administrator rights on the computer.
1 Click Start and then Control Panel.
2 Click Performance and Maintenance.
3 Click Power Options.
4 Select the tab for power scheme settings.
5 Select the desired power scheme from the drop-down list.
6 On the VAIO Power Management tab, select No change for LCD Brightness.
7 Click OK.
The preference for the brightness adjusted with the Fn+F5/F6 keys is saved and your screen brightness remains unchanged regardless of operating conditions.
What should I do if the external display (or TV) does not display anything?
If you change the log-on user with the Fast User Switching function after the computer started, you will not be able to select a display by pressing the Fn+F7 keys.
Printing
Why can't I print a document?
☐ Make sure the printer is on, and the printer cable is securely connected to the ports on the printer and computer.
☐ Make sure the printer is compatible with the Windows operating system installed on the computer.
☐ You may need to install the printer driver software before you use the printer. See the manual that accompanied the printer for more information.
☐ If the printer is not functioning after the computer resumes from a power saving mode (Standby or Hibernate), then restart the computer.
☐ If the bidirectional communication functions are provided with your printer, disabling the functions on the computer may enable printing. Follow these steps:
1 Click Start and then Control Panel.
2 Click Printers and Other Hardware.
3 Click Printers and Faxes.
4 Right-click an unused printer and select Properties.
5 Click the Ports tab.
6 Click to cancel the Enable bidirectional support check box.
7 Click OK.
This change to the settings disables the bidirectional communication functions of the printer, such as data transfer, status monitoring, and remote panel.
When your printer is connected to the port replicator, check the port replicator to see if it is connected to an AC power source.
Microphone
Why doesn't my microphone work?
If you are using an external microphone, make sure the microphone is turned on and is properly plugged into the Microphone jack on the computer.
Mouse
What should I do if the computer doesn't recognize the mouse?
☐ Make sure the mouse is securely plugged into the port.
☐ Restart the computer with the mouse connected to the computer.
What should I do if the pointer doesn't move when I use the mouse?
☐ Make sure another mouse is not installed.
☐ If you are playing a disc, press the Ctrl+Alt+Delete keys simultaneously to stop playback and restart the computer.
☐ If you still cannot use the pointer, restart the computer.
☐ Press the Ctrl+Alt+Delete keys simultaneously.
In the Windows Task Manager window, press the appropriate button and restart the computer.
☐ Press and hold the power button. When the computer turns off, wait 10 to 15 seconds then press the power button again to restart the computer.
☐ Avoid using radio-controlled toys or equipment, CB radios, and other wireless devices in the area near your wireless mouse. These devices may cause interference, causing your mouse to stop working properly.
☐ Do not place metal furniture near the computer or wireless mouse, as this may create interference, causing your mouse to stop working properly.
Speakers
Why won't my speakers work?
☐ Make sure the speakers are properly connected and the volume is turned up loud enough to hear sound.
☐ Your speakers may not be designed for computer use.
☐ If the speakers have a muting button, set the button to off.
☐ If the speakers have a volume control, make sure the volume is turned up loud enough to hear sound.
☐ If you have connected an audio cable to the Headphones jack, disconnect the cable and use the speaker cable that was supplied with the speakers.
☐ If you are using battery power, make sure the battery is installed properly and is charged.
☐ If the speakers require external power, make sure the speakers are connected to a power source. See the manual that came with the speakers for more information.
Why can't I hear sound from my speakers?
☐ If the computer is using battery power, make sure the battery is properly installed and is charged.
☐ If you are using a program that has its own volume control, make sure the volume control is properly set. See that program's help file for more information.
☐ The speaker volume may be turned off, the volume setting may be too low, or the audio option may be disabled.
☐ Check the volume controls in Windows.
Touch Pad
What should I do if the touch pad does not work?
☐ Try restarting the computer.
Press the Ctrl+Alt+Delete keys simultaneously.
In the Windows Task Manager window, press the appropriate button and restart the computer.
☐ If the pointer does not move while playing a disc, press the Ctrl+Alt+Delete keys simultaneously to stop playback and restart the computer.
☐ If you are still experiencing problems, make sure another mouse is not installed.
☐ You may have disabled the touch pad without connecting a mouse to the computer. See Using the Touch Pad (page 32).
How do I change the left and right button assignments?
If the computer is interpreting a single-click as a double-click, you may want to change the button assignments. Follow these steps:
1 Click Start and then Control Panel.
2 Click Printers and Other Hardware.
3 Click Mouse.
4 Click the Buttons tab.
5 Select your preferences in the Button Selection box, and then click Apply to install your settings.
You may need to use the Tab key and the ↑ and ↓ keys to make your selections.
6 Click OK to close the window.
Keyboard
What should I do if the keyboard configuration is wrong?
☐ The language layout of the computer's keyboard is specified on the sticker on the box. If you choose a different regional keyboard when you complete the Windows setup, the key configuration will be mismatched.
☐ To change the keyboard configuration, follow these steps:
1 Click Start and then Control Panel
2 Click Date, Time, Language and Regional Options, and click Regional and Language Options.
3 Change the settings as desired.
What should I do if I cannot enter certain characters with the keyboard?
If you cannot enter U, I, O, P, J, K, L, M, and so on, the Num Lk key may be activated. Check that the Num lock indicator is off. If the Num lock indicator is on, press the Num Lk key to turn it off before entering these characters.
Floppy Disks
Why doesn't the Safely Remove Hardware icon appear on the taskbar when the drive is connected?
The computer does not recognize the floppy disk drive. First, make sure the USB cable is properly connected to the USB port. If you need to secure the connection, wait a few moments for the computer to recognize the drive. If the icon still does not appear, follow these steps:
1 Close all programs that were accessing the floppy disk drive.
2 Wait for the LED indicator on the floppy disk drive to turn off.
3 Push the eject button to remove the disk, and disconnect the USB floppy disk drive from the computer.
4 Reconnect the floppy disk drive by inserting the USB connector (with the USB icon facing upward) into the USB port.
5 Restart the computer by clicking Start, Turn Off Computer, and then Restart.
Why is the drive unable to write data to a floppy disk?
☐ Make sure the floppy disk is properly inserted in the drive.
☐ If the disk is inserted properly and you are still unable to write data to it, the disk may be full or write-protected. You can either use a floppy disk that is not write-protected or disable the write-protect feature.
PC Cards
Why doesn't my PC Card work?
☐ Make sure the PC Card is inserted properly. See Inserting a PC Card (page 42) for more information.
☐ Make sure the PC Card is compatible with the Microsoft Windows operating system installed on the computer.
☐ See the instructions that accompanied your PC Card. You may need to install driver software if you are not using a Sony PC Card.
Why doesn't my computer recognize attached devices?
For some PC Cards, if you alternate between normal power operation and the Standby or Hibernate modes while the card is inserted into the PC Card slot, the computer may not recognize the PC Card or the connected device. Restart the computer.
Why can't I insert my PC Card?
☐ Make sure you are inserting the card correctly. See Inserting a PC Card (page 42) for more information.
☐ You may not be able to use some PC Cards or some functions of the PC Card with the computer. Check the manual that accompanied your PC Card for more information on its use.
Audio/Video
Why can't I use the DV camera recorder?
You may not be able to use the DV camera recorder, and the message DV equipment seems to be disconnected or turned off may appear because the i.LINK cable is not securely plugged into the ports on the computer or camera. Unplug the connectors, and plug them in again. See Connecting an i.LINK Device (page 79) for more information.
i.LINK is a trademark of Sony used only to designate that a product contains an IEEE1394 connection. The i.LINK connection may vary, depending on the software applications, operating system, and compatible i.LINK devices. All products with an i.LINK connection may not communicate with each other. See the manual that came with your compatible i.LINK device for information on operating conditions and proper connection. Before connecting compatible i.LINK PC peripherals to your system, such as CD-RW or hard disk drive, confirm their operating system compatibility and required operating conditions.
Memory Stick Media
Why can't I open my image files?
You may need to reformat your Memory Stick media.
Formatting Memory Stick media erases all data, including music data, previously saved to it. Before you reformat Memory Stick media, back up important data and confirm that the media does not contain files you want to keep.
1 Copy the data from the Memory Stick media onto the computer's hard disk to save data or images.
2 Format the Memory Stick media using the Memory Stick Formatter software preinstalled on the computer. For instructions about formatting a Memory Stick media, see the help file on the Memory Stick Formatter software.
Why can't I save music files onto my Memory Stick media?
☐ Copyright protected music cannot be checked out to any Memory Stick media other than MagicGate Memory Stick media.
☐ Using recorded music requires permission of the copyright holders.
□ Sony is not responsible for music files that cannot be recorded from a CD or downloaded from other sources.
Can I copy images from a digital video camera using Memory Stick media?
Yes, and you can view video clips that you have recorded with Memory Stick media-compatible video camera recorders.
Peripherals
What should I do if I cannot connect a USB device?
☐ If applicable, check the USB device is switched on and using its own power supply. For example, if you are using a digital camera, check the battery is charged. If you are using a printer, check the power cable is connected properly to the AC outlet.
☐ Try using a different USB port on the computer. The driver could be installed to the specific port you used the first time you connected the device.
☐ Check the manual provided with the USB device. You may need to install software before you connect the device.
☐ Try connecting a simple, low-powered device such as a mouse to test that the port is working at all.
☐ USB hubs may prevent a device from working because of the distribution of power. We recommend you connect the device directly to the computer without a hub.
Support Options
The section contains information on where to go for answers to questions about your computer.
Sony Support Information
See the following sources for answers in the sequence listed below.
See Documentation (page 8) for details on the printed and online documentation supplied with your computer, as well as further sources of reference.
☐ Go to the help files that accompany your software for instructions on using the software.
☐ Use the search functionality in Help and Support Center by pressing the Microsoft Windows key and the F1 key.
☐ VAIO-Link web site: if you have any problem with the computer, you can access the VAIO-Link web site for troubleshooting. Go to http://www.vaio-link.com.
e- Support: This interactive part of our web site http://www.vaio-link.com allows you to get in contact with our dedicated support team over the internet. Using a personalized account, you can log your technical queries with ease.
☐ VAIO-Link help lines: Before contacting VAIO-Link by telephone, try to solve the problem by reading the online and printed documentation.
□ Visit the other Sony web sites:
□ www.club-vaio.com if you want to know more about VAIO and become part of the growing VAIO community.
□ www.sonystyle-europe.com for online purchases.
□ www.sony.net for other Sony products.

You need to set up an Internet connection before you can access the online features described here.
e-Support
What is e-Support?
You have searched our user guides and web site (www.vaio-link.com) but have not found an answer to your question/issue? e-Support is the ideal solution for you!
Our e-Support Web Portal is an interactive web site on which you can submit any technical query you may have regarding your computer and receive answers from our dedicated support team.
Every submitted query will result in a unique 'case number' to ensure smooth communication between yourself and the e-Support Team.
Who can use e-Support?
All registered VAIO customers are entitled to unlimited access to the VAIO-Link e-Support Web Portal.
How can I access the e-Support portal?
When you register your computer, you will automatically receive an email with the link to the e-Support Web Portal, your Customer ID and some basic explanation a few hours later.
All you need to do is activate your account by clicking on the provided link in the email.
You are now ready to create your first case!
You can access the e-Support Web Portal from any computer with an active Internet connection.
A complete help file is available on the e-Support Web Portal to help you use our e-Support Service.
Can I submit questions in my native language?
Since you are interacting with our e-Support Team through a portal, which connects you directly to our central database, e-Support will only accept and deal with queries submitted in English, French or German.
Can I submit my questions at any time?
Yes, you can submit your questions 24/7, but please keep in mind that our e-Support Team can only treat your queries from Monday till Friday between 8am and 6pm.
Is there a cost involved for using e-Support?
No, this is a complete free of charge service offered to all registered VAIO customers!
How do I know when the e-Support Team has handled my query/case?
As soon as your case has been dealt with by our e-Support Team, you will receive an email, notifying you that your case has been updated.
Trademarks
Sony, Battery Checker, Click to DVD, DVgate Plus, HotKey Utility, Keyboard Utility, Memory Stick Formatter, Prepare your VAIO, SonicStage, SonicStage Mastering Studio, VAIO Control Center, VAIO Edit Components, VAIO Launcher, VAIO Media, VAIO Power Management, Image Converter, My Club VAIO, VAIO Update, Memory Stick, the Memory Stick logo, VAIO and the VAIO logo are trademarks of Sony Corporation.
Intel, Pentium, and Intel SpeedStep are trademarks or registered trademarks of Intel Corporation.
Microsoft, Internet Explorer, Windows Movie Maker, Windows Media Player, Windows XP Professional, Windows XP Home Edition, Windows Media Center Edition, MS Works 8.0, Microsoft Office 2003 SBE (Try & Buy) and the Windows logo are trademarks or registered trademarks of Microsoft Corporation in the U.S. and other countries.
i.LINK is a trademark of Sony used only to designate that a product contains an IEEE1394 connection.
Adobe, Adobe Acrobat Elements, Adobe Acrobat Professional, Adobe Reader, Adobe Premiere Elements and Adobe Photoshop Elements are trademarks of Adobe Systems Incorporated.
Norton Internet Security 2006 AntiSpyware Edition, Norton Password Manager 2004 and Norton Ghost 10 (try&buy) are trademarks or registered trademarks of Symantec Corporation.
Roxio DigitalMedia SE is a trademark of Sonic Solutions.
WinDVD for VAIO is a trademark of InterVideo, Inc.
Sun Java VM is a trademark of Sun Microsystems, Inc.
Google Toolbar and Google Desktop Search are trademarks of Google.
Yahoo! Messenger is a trademark of Yahoo!.
SafeGuard PrivateDisk is a trademark of Utimaco Software.
My Club VAIO uses Macromedia Flash™ Player software by Macromedia, Inc., Copyright © 1995-2003 Macromedia, Inc. All rights reserved. Macromedia and Flash are trademarks of Macromedia, Inc.
VAIO
156
Support Options
All other names of systems, products and services are trademarks of their respective owners. In the manual, the ^TM or ^ marks are not specified.
Specifications are subject to change without notice. All other trademarks are trademarks of their respective owners.
Please see the online Specifications to see what software is available for your model.