
Baby-G BGS-100SC-2AER - Watch CASIO - Free user manual and instructions
Find the device manual for free Baby-G BGS-100SC-2AER CASIO in PDF.


User questions about Baby-G BGS-100SC-2AER CASIO
0 question about this device. Answer the ones you know or ask your own.
Ask a new question about this device
Download the instructions for your Watch in PDF format for free! Find your manual Baby-G BGS-100SC-2AER - CASIO and take your electronic device back in hand. On this page are published all the documents necessary for the use of your device. Baby-G BGS-100SC-2AER by CASIO.
USER MANUAL Baby-G BGS-100SC-2AER CASIO
Operation Guide 5520
CASIO®
ENGLISH
Congratulations upon your selection of this CASIO watch.
Note that CASIO COMPUTER CO., LTD. assumes no responsibility for any damage or loss suffered by you or any third party arising through the use of your watch or its malfunction.
E-1
About This Manual
E-2
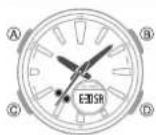
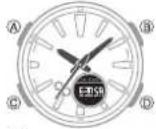
- Depending on the model of your watch, display text appears either as dark figures on a light background, or light figures on a dark background. All sample displays in this manual are shown using dark figures on a light background.
- Button operations are indicated using the letters shown in the illustration.
- Note that the product illustrations in this manual are intended for reference only, and so the actual product may appear somewhat different than depicted by an illustration.
Features
Your watch provides you with the features and functions described below.
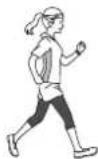
♦ Pedometer
Count the steps you take.
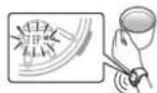
◆ Over-sitting prevention
Page E-49
A Step Reminder displays an indicator and sounds an alert whenever the watch determines that you have not walked for a specific amount of time. This helps to ensure that you are getting enough exercise on a regular basis.
E-3
◆ Step count data storage
Page E-35
- Today's and past seven day's daily data
This week's and past three week's weekly data - Count of the days you attained your daily step count goal (GOAL)
◆ Step count attainment
notification
Page E-35
A GOAL Indicator flashes when you attain your daily step goal. Your step goal progress is also displayed (Step goal progress).

♦ Stopwatch
Use the stopwatch to measure elapsed times and lap times. Memory for up to 30 lap time records.
Timer
Page E-58
The timer counts down from a preset start time. An alarm sounds when the end of the countdown is reached.
◆ Alarm
Page E-61
When the alarm time is reached, the watch sounds an alert.
Dual time
Page E-65
You can view the current time in your current location and in one more time zone.
E-5
E-4
Contents
About This Manual....E-2
Features....E-3
Mode Reference Guide....E-11
Timekeeping....E-17
Adjusting the Digital Time and Date Settings....E-18
To configure the digital time and date settings....E-18
To change the Daylight Saving Time (summer time) setting ....E-22
Pedometer....E-23
To check step count....E-28
To reset today's step count....E-31
E-6
To perform a countdown timer operation....E-60
To stop the alarm E-60
Using the Alarm....E-61
To enter the Alarm Mode....E-61
To set an alarm time....E-61
To test the alarm....E-62
To turn an alarm and the Hourly Time Signal on and off....E-63
To stop the alarm E-64
Dual Time Mode E-65
To enter the Dual Time Mode E-65
To set the Dual Time....E-65
To swap Timekeeping Mode and Dual Time Mode times . . . . . . . . . . . . . . . . . . . . . . . . . . . E-67
To specify a daily step goal E-33
To check your step count history....E-36
To reset the daily step goal attainment day count....E-48
To turn Step Reminder on or off....E-50
To clear the flashing "STEP!!" notification....E-51
Using the Stopwatch....E-52
To enter the Stopwatch Mode....E-53
To perform an elapsed time operation....E-53
To perform lap time measurement....E-54
To recall lap data....E-56
Countdown Timer E-58
To enter the Countdown Timer Mode. E-58
To configure the countdown timer....E-59
E-7
Illumination.....E-69
To illuminate the face. E-89
To change the illumination duration....E-69
Adjusting Hand Positions....E-71
To adjust hand alignment E-72
Button Operation Tone E-74
To turn the button operation tone on and off....E-74
Troubleshooting....E-75
Main Indicators E-78
Specifications....E-79
E-9
E-8
Mode Reference Guide
The mode you should select depends on what you want to do.
| To do this: Enter this mode: See: | ||
| • View the current time and date• Configure daylight saving time (DST) settings• Configure time and date settings• Record or view your stop count with the podometer• Daily stop goal and step reminder settings | Timekeeping Mode | E-17E-23 |
| • Measure elapsed time• Record lap times (up to 30) | Stopwatch Mode | E-52 |
| Use the countdown timer | Countdown Timer Mode | E-58 |
| • Set an alarm time• To turn an alarm or the hourly time signal on or off | Alarm Mode | E-61 |
| • Display a second time• Configure settings for a second time | Dual Time Mode | E-65 |
E-10
E-11
Selecting a Mode
- Press © to cycle between the modes as shown below.
- To return to the Timekeeping Mode from any other mode, hold down © for about two seconds.
- In any mode (except a setting mode), press Ⓗ to illuminate the display.
Timekeeping Mode Stopwatch Mode

flowchart
graph LR
    A["Clock 6000A"] --> B["Reset"]
    B --> C["00:00:ST"]
    C --> D["TR"]
    D --> E["10:00 TR"]
    E --> F["RL"]
    F --> G["12:00 -1"]
    G --> H["DT"]
E-12
E-13
General Functions (All Modes)
The functions and operations described in this section can be used in all of the modes.
Auto Return Features
If you leave a screen with flashing digits on the display for two or three minutes without performing any operation, the watch automatically exits the setting screen. The watch will automatically return to the Timekeeping Mode if you do not perform any operation for a certain amount of time, as described below.
Mode Approximate Elapsed Time
| Alarm 3 minutes | |
| Step count history screen 2 minutes |
- Scrolling
The Ⓑ and Ⓓ buttons are used on the setting mode to scroll through data on the display. In most cases, holding down these buttons during a scroll operation scrolls through the data at high speed.
E-14
Countdown Timer Mode Alarm Mode Dual Time Mode
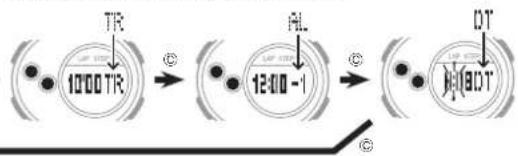
flowchart
graph LR
    A["TR"] --> B["1000TR"]
    B --> C["12:00-1"]
    C --> D["DT"]
    style A fill:#fff,stroke:#000
    style B fill:#fff,stroke:#000
    style C fill:#fff,stroke:#000
    style D fill:#fff,stroke:#000
Moving the Hands Out of the Way for Better Viewing
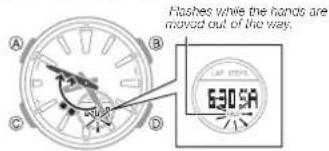
You can use the procedure below to temporarily move the hour and minute hands out of the way to better view what is on the display.
While holding down Ⓑ, press Ⓒ.
- The watch will beep twice and the hour and minute hands will move to a position where they do not block the digital display.
Example: When the current time is 8:25
text_image
A B C D Flashes while the hands are moved out of the way. 530.9AE-15
- Holding down Ⓑ again as you press Ⓒ will cause the hands to return to their normal positions (normal timekeeping).
Note
- This operation can be performed in any mode. In the case of a setting mode (setting flashing on the screen), the hour and minute hands will move out of the way, and the second hand will move to 12 o'clock automatically even if you do not perform the above operation.
- Watch button functions are the same regardless of whether the hands are move out of the way or at their normal positions.
- Changing to another mode will cause the hands to move back to their normal positions.
- The hands also will move back to their normal positions automatically if no operation is performed for about one hour.
E-16
Timekeeping
text_image
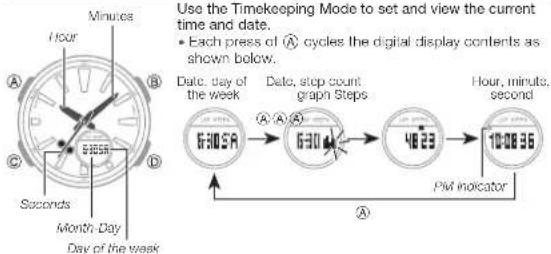
Use the Timekeeping Mode to set and view the current time and date. • Each press of Ⓐ cycles the digital display contents as shown below. Date. day of the week Date. stop count graph Steps 6:00:29 6:30 4:0:23 10:08:35 PM indicator A B C D Hours Minutes Hours Seconds Month-Day Day of the weekE-17
Adjusting the Digital Time and Date Settings
Use the procedure below to adjust the digital time and date settings.
To configure the digital time and date settings
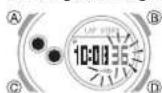
- In the Timekeeping Mode, hold down Ⓐ until the seconds digits start to flash (about two seconds).
• This enables setting of the seconds.
- Press © to move the flashing in the sequence shown below to select the other settings.
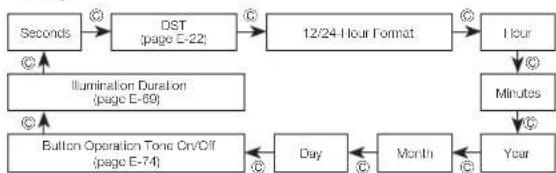
flowchart
graph TD
    A["Seconds"] --> B[" DST (page E-22)"]
    B --> C[" 12/24 Hour Format "]
    C --> D[" Hour "]
    D --> E[" Minutes "]
    E --> F[" Year "]
    G["Illumination Duration (page E-69)"] --> H[" Button Operation Tone On/Off (page E-74) "]
    H --> I[" Day "]
    I --> J[" Month "]
    J --> K[" Day "]
E-18
E-19
Operation Guide 5520
CASIO®
- When the timekeeping setting you want to change is flashing, use Ⓓ and/or Ⓔ to change it as described below.
| Screen To | do this: Do this: | |
| 35 | Rusel the seconds to 00 | Press 10. |
| 12H | Toggle between 12-hour (12H) and 24-hour (24H) timespassing | Press 10. |
| 10:19 | Change the hour or minute | Use 10 (-) and 8 (-). |
| 20 10 | Change the year | Use 10 (-) and 8 (-). |
| 6:30 | Change the month or day | Use 10 (-) and 8 (-). |
- Press Ⓐ to exit the setting mode.
E-20
Note
- Resetting the seconds to 00 while the current count is in the range of 30 to 59 causes the minutes to be increased by 1.
- The watch's built-in full automatic calendar makes allowances for different month lengths and leap years. Once you set the date, there should be no reason to change it except after you have the watch's battery replaced.
• The day of the week changes automatically when the date changes. - While the 12-hour format is selected for timekeeping, a P (PM) indicator will appear for times from noon to 11:59 p.m. No indicator appears for times from midnight to 11:59 a.m. With 24-hour format, time is displayed from 0:00 to 23:59, without any P (PM) indicator.
E-21
To change the Daylight Saving Time (summer time) setting
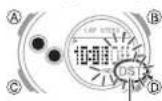
DST Indicator
- In the Timekeeping Mode, hold down Ⓐ until the seconds digits start to flash (about two seconds). This enables setting of the seconds.
- Press © to display the DST setting mode.
- Press Ⓓ to toggle between Daylight Saving Time (ON) and Standard Time (OFF).
- After the setting is the way you want, press Ⓐ to return to the Timekeeping Mode. • The DST indicator appears to indicate that Daylight Saving Time is turned on.
Note
- Daylight Saving Time (summer time) advances the time setting by one hour from Standard Time. Remember that not all countries or even local areas use Daylight Saving Time.
E-22
Pedometer
The watch has a built-in 3-axis accelerometer that counts the steps you take. You can specify a daily step goal and keep track of your step goal progress. A Step Reminder function helps to keep you from sitting too much.
Pedometer Precautions
While the watch is on your wrist, the pedometer may detect non-step movements and count them as steps. Also, abnormal arm movements while walking may cause a miss count of steps.
Wearing the Watch
OK NG
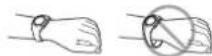
To ensure proper step count measurement, wear the watch as shown in the illustration nearby. Wear the watch on your wrist, with the band tightened securely.
E-23
Important!
- If the band is loose, the pedometer will count steps, but stop count accuracy may be reduced.
If you are experiencing problems getting relatively accurate step counts. Any of the conditions below may make proper measurement impossible.
- Wearing slippers, sandals, or other footwear that encourages a shuffling gait
- Walking on file, carpeting, snow, or other surface that causes a shuffling gait
- Irregular walking (in a crowded location, in a line where walking stops and starts at short intervals, etc.)
- Extremely slow walking or extremely fast running
- Pushing a shopping cart or baby stroller
- In a location where there is a lot of vibration, or riding in a car or other vehicle
- Frequent movement of the hand or arm (clapping, fanning movement, etc.)
- Walking while holding hands, walking with a cane or stick, or engaging in any other movement in which your hand and log movements are not coordinated with each other.
E-24
• Normal daily non-walking activities (cleaning, etc.)
- Wearing the watch on your dominant hand
- Walking for less than 10 seconds
- Watch hand movement (by the hand shift function, etc.)
Power Saving
To save power, sensor operation stops automatically if there is no movement detected by the watch and you do not perform any operation for two to three minutes.
E-25
Pedometer Details
Step Count
- The step counter can count from 0 to 999,999 steps. If the step count exceeds 999,999, the maximum value (999,999) remains on the display.
- The step count is not displayed at the beginning of a walk in order to avoid miscounting of non-walking movements. It appears only after you have continued walking for about 10 seconds, with the number of steps you took during that time added to the total.
• The step count is automatically reset to zero at midnight each day. - You can also manually reset the daily stop count that is displayed in the Timekeeping Mode. Note that doing so does not reset the daily step count on the history screen. This makes the displayed step count zero and counts steps from there. This comes in handy when you want to count the number of steps between two points. See "To reset today's step count" (page E 31).
- While you are walking, the step indicators alternately flash on the display at one-second intervals. Both step indicators are displayed without flashing while you are not moving, and both indicators are cleared from the display while the sensor is stopped, in order to conserve battery power.
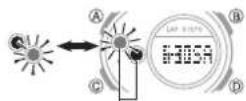
Step Indicators
E-26
E-27
Checking Step Count
To check step count
- In the Timekeeping Mode, use Ⓐ to cycle through step count information as shown below.
Timekeeping Mode Date, day of the Week

flowchart
graph LR
    A["Clock with HISP"] --> B["Date, step count graph"]
    B --> C["Step count hour, minute, second"]
    C --> D["Step count 100000000"]
    D --> E["Step count 4823"]
    E --> F["Step count 100000000"]
    F --> G["Step count 100000000"]
E-28
E-29
Operation Guide 5520
CASIO®
Step Count Graph
The Timekeeping Mode Step Count Graph shows the number of steps (up to 1,000) you have taken each hour.
This lets you easily check the walking pace over the past four or five hours.
Interpreting the Step Count Graph
Level 5:1001-
Level 4:751-1000
Level 3:501-750
Level 2:251-600
Level 1:1-250
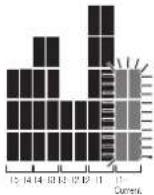
T1: Last top of the hour T2: One hour before T1 T3: Two hours before T1 T4: Three hours before T T5: Four hours before T1
E-30
- None of the segments of a bar are darkened when the step count for that hour is zero.
Note
- Graph contents are normally updated at the top of each hour.
- Graph contents continue to be updated while any one of the conditions below exists.
- When sensor operation is stopped to save power
- When measurement is not possible due to sensor error or insufficient power
To reset today's step count
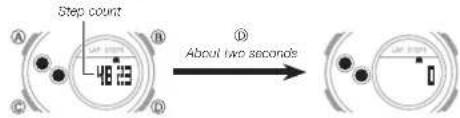
- In the Timekeeping Mode, use Ⓐ to display today's step count.
E-31
- Hold down (D) for about two seconds until zero starts flashing and then remains displayed without flashing.
- This operation resets the displayed step count value only, and does not affect the current day's total step count maintained in memory. You can view the current day's step count total using step count history.
text_image
Step count 48.12 About two secondsSetting a Daily Step Goal
After you set a daily step goal, the second hand and display will show what percent of your goal you have attained (step goal progress). You can specify a daily step goal in units of 1,000 steps within the range of 1,000 to 50,000.
- The initial default setting is 10,000 steps.
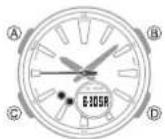
To specify a daily step goal
In the Timekeeping Mode, press Ⓓ.
- This displays DATA and then the daily data history screen.
E-33
E-32
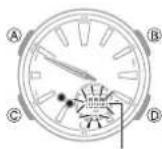
Daily step goal
- Hold down Ⓐ until the current daily step goal setting starts to flash (about two seconds).
- Use Ⓓ (+) and Ⓑ (−) to change the flashing daily step goal value.
- Press Ⓐ to exit the setting operation.
Note
- The GOAL indicator will flash on the display when you attain your daily step goal.
• The GOAL indicator will also be shown on the corresponding history screen when you attain a daily step count goal or a weekly step count goal.
Daily Step Goal Attainment Notification
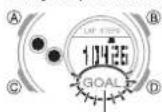
GOAL indicator
The GOAL indicator will flash on the display to let you know you attained your daily step goal.
The GOAL indicator will be cleared from the display at midnight of the current day. The GOAL indicator will also be cleared from the display if you change your daily step goal to a value that is greater than the current day's step count.
Checking Your Step Count Records (History)
You can use the procedure below to check your daily data for today and the previous seven days, as well as the count of the days you attained a daily step count goal (GOAL) defined by you.
Important!
- Battery replacement will cause step count history data to be deleted.
E-35
E-34
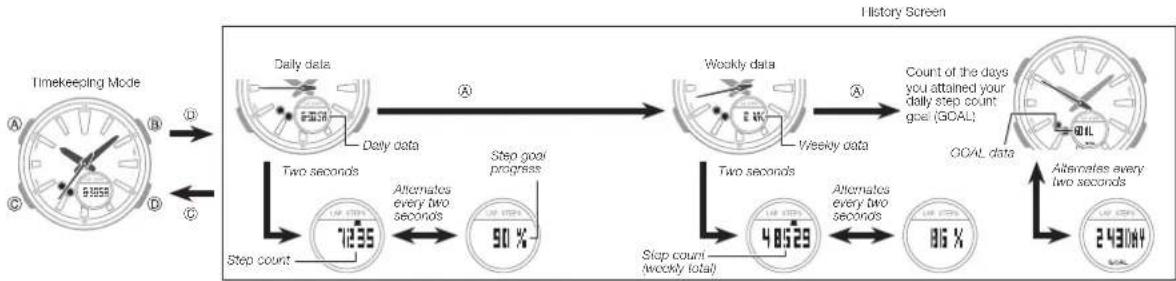
To check your step count history
- In the Timekeeping Mode, press Ⓓ.
• This displays DATA and then the daily data history screen.
2. Use Ⓐ to select the data you want.
• Each press of (A) cycles between data in the following sequence: Daily data (DAY) → Weekly data (WK) → Days step count goal was attained → Daily data (DAY) ... etc.
- To return to the Timekeeping Mode, press ©.
Note
- In the Timekeeping Mode, pressing ① nine times will scroll through daily data records (today and previous seven days) and will return to the Timekeeping Mode display.
E-37E-36
flowchart
graph LR
    A["Timekeeping Mode"] --> B["Daily data"]
    B --> C{Step count}
    C --> D["12:35"]
    D --> E["Two seconds"]
    E --> F["Step count (weekly total)"]
    F --> G["90%"]
    G --> H["Alternates every two seconds"]
    H --> I["Weekly data"]
    I --> J{Step count (weekly total)}
    J --> K["48:29"]
    K --> L["Two seconds"]
    L --> M["Change in steps"]
    M --> N["86%"]
    N --> O["Alternative every two seconds"]
    O --> P["24:30:4"]
    P --> Q["Count of the days you attained your daily step count goal (GOAL)"]
    Q --> R["Goal data"]
    R --> S["Change in steps"]
    S --> T["Alternative every two seconds"]
    T --> U["86%"]
    U --> V["Alternative every two seconds"]
E-38
E-39
Operation Guide 5520
CASIO®
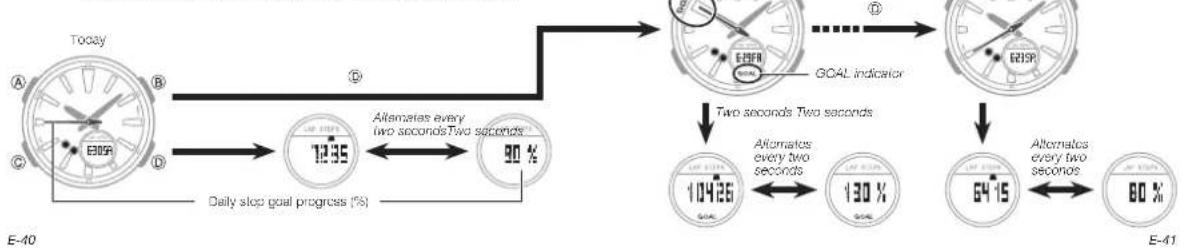
- You can use Ⓓ to view past daily and weekly data as shown below.
Daily data
Example: Today's data
Step count: 7,235; Daily step goal: 8,000; Step goal progress: 90%
flowchart
graph TD
    A["Today"] --> B{E-40}
    B --> C["72.95"]
    C --> D["90%"]
    D --> E["E-41"]
    E --> F["64.15"]
    F --> G["80%"]
    G --> H["E-41"]
    H --> I["Two seconds Two seconds"]
    I --> J["GOAL indicator"]
    J --> K["Alternates every two seconds"]
    K --> L["130%"]
    L --> M["Alternates every two seconds"]
    M --> N["104.26"]
    N --> O["Daily stop goal progress (%)"]
    style A fill:#f9f,stroke:#333
    style E fill:#f9f,stroke:#333
    style H fill:#f9f,stroke:#333
• After you set a daily stop goal, the second hand and a displayed value will show what percent of your daily and weekly goals you have attained.
- The maximum displayed step goal progress is 999%. 999% will remain displayed even if the step count reaches 1,000% or greater.
- The second hand indicates the step goal progress in units of 2%. It points to GOAL when the stop goal progress is 100% or greater.
- The GOAL indicator appears on the display when you attained your daily step count goal.
- To return to the Timekeeping Mode, normally press Ⓑ. If the data of seven days ago is displayed, press Ⓞ to return to the Timekeeping Mode.
E-43E-42
flowchart
graph LR
    A["This week"] --> B["Weekly step goal progress (%)"]
    B --> C["4.0529"]
    C --> D["Alternate every two seconds"]
    D --> E["86%"]
    E --> F["Last week 3 weeks ago"]
    F --> G["GCV/L Indicator"]
    G --> H["Two seconds Two seconds"]
    H --> I["5.6023"]
    I --> J["Alternate every two seconds"]
    J --> K["100%"]
    K --> L["Alternate every two seconds"]
    L --> M["12.7098"]
    M --> N["226%"]
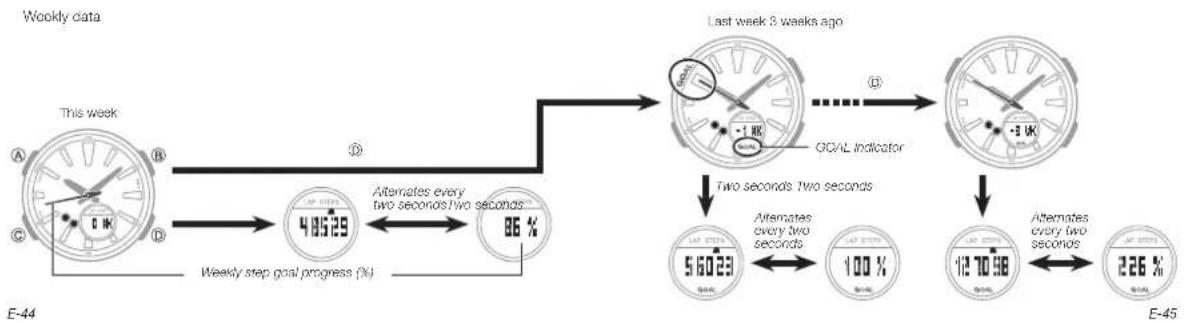
- Weekly data is the total number of steps from Monday through Sunday.
- The second hand and a displayed value show what percent of your weekly goals you have attained.
- The maximum displayed step goal progress is 999%. 999% will remain displayed even if the step count reaches 1,000% or greater.
- The second hand indicates the step goal progress in units of 2%. It points to GOAL when the step goal progress is 100% or greater.
- The GOAL indicator appears on the display when you attained your daily step count goal.
- To return to the Timekeeping Mode, normally press Ⓓ. If the data of three weeks ago is displayed, press Ⓓ to return to the Timekeeping Mode.
Count of the Days You Attained Your Daily Step Count Goal (GOAL)
- The day count value is incremented each time you attain your daily step count goal (GOAL).
- If you change your daily step goal to a greater value after you attain a previous daily step goal, the watch will still count the current day as successfully attaining your daily step goal (based on the previous value).
- If, before you reach your daily step goal, you change it to a value that is less than the current goal value, the day will remain counted as successful attainment of your step goal.
• To return to the Timekeeping Mode, press ©.
E-46
E-47
To reset the daily step goal attainment day count
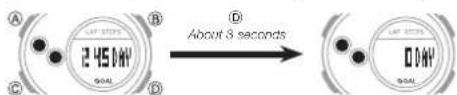
- While the total number days is displayed, hold down Ⓓ for about three seconds until zero starts flashing and then remains displayed without flashing.
text_image
A B 12:45:00V Goal C D About 3 seconds D Goal A B C DStep Reminder
Stop indicators
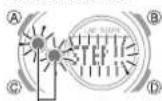
Studies indicate that sitting too much has an adverse effect on human health.
A Step Reminder feature displays an indicator and sounds an alert whenever the watch determines that you have not walked for a specific amount of time. This helps to ensure that you are getting enough exercise on a regular basis.
Make sure that you keep walking for at least five minutes after activating Step Reminder.
• The initial default Step Reminder setting is OFF.
E-49
Operation Guide 5520
CASIO®
To turn Step Reminder on or off
text_image
STEP 01 LIP STIPS STEP01E-50
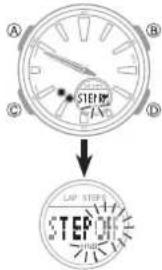
- In the Timekeeping Mode, press Ⓓ.
• This displays DATA and then the daily data history screen. - Hold down Ⓐ until the current daily step goal setting starts to flash (about two seconds).
-
Use © to move the flashing to the Step Reminder setting.
-
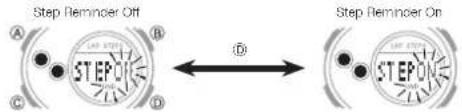
Press Ⓐ to toggle Step Reminder between on and off.
text_image
Step Reminner Off A B C D Step Reminner On ← D STEPONE- Press Ⓐ to exit the setting operation.
To clear the flashing "STEP!!" notification
- You can clear the flashing STEP!! notification by pressing Ⓐ, Ⓑ, or Ⓓ. The STEP!! notification will flash until you reach the prescribed step count or until power saving activates. If power saving is deactivated within one hour after activating, the notification will start flashing again.
E-51
Using the Stopwatch
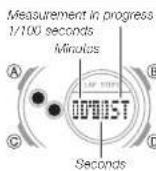
The stopwatch measures elapsed time and lap times, and recall lap times. Up to 30 lap times can be stored in memory.
- After the elapsed time reaches one hour, the display units change to hours, minutes, and seconds, and time is measured in one-second increments.
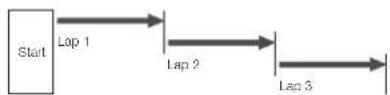
What is a lap time?
A lap time is the time elapsed over a specific segment of a race.
Example: Car race on an oval track
To enter the Stopwatch Mode
Use © to select the Stopwatch Mode as shown on page E-12.
To perform an elapsed time operation

Start Stop (Resume) (Stop) Reset
E-53
E-52
To perform lap time measurement

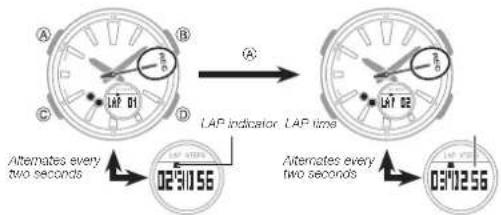
text_image
A B C D LAP 01 A LAP indicator LAP time 02:31:56 Alternates every two seconds Alternates every two seconds 03:40:256E-54
- The current lap time will remain displayed for about eight seconds after (A) is pressed. After that, the display returns to elapsed time.
- Each press of (A) records the current lap time. Memory can hold up to 30 lap time records.
- Recording a lap time while there are 30 records in memory will automatically delete the oldest record to make room for the new one.
- The final lap time (time displayed when the elapsed time operation is stopped) is recorded in memory when the stopwatch is reset to all zeros.
- Resetting the stopwatch to all zeros and starting a new elapsed time measurement operation causes all current lap time records to be deleted.
Note
- The Stopwatch Mode can indicate elapsed time up to 23 hours, 59 minutes, 59 seconds.
- An ongoing elapsed time measurement operation will continue internally even if you change to another mode. However, if you exit the Stopwatch Mode while a lap time is displayed, the lap time will not be displayed when you return to the Stopwatch Mode.
E-55
To recall lap data
- While the Stopwatch Mode screen is reset to all zeros, press Ⓐ. This displays the lap time record for Lap 1.
- Use Ⓐ to scroll through the lap time records and find the one you want. • The display alternates between a lap record number (LAP01 to LAP30) and its lap time. • The second hand points to REC while lap time records are being recalled.

text_image
A B C D A LAP Ⅱ LAP indicator 02:30:56 LAP number Alternates every two seconds Alternates every two seconds 03:02:56- Recording a lap time while there are already 30 records in memory will cause the oldest record (LAP01) to be deleted automatically to make room for the new record. For example, if you record 40 lap times, the lap numbers will be displayed as LAP11 through LAP40 (30 records).
E-57
E-56
Countdown Timer
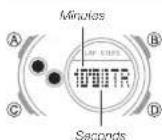
The countdown timer can be set within a range of one second to 100 minutes. An alarm sounds when the countdown reaches zero.
To enter the Countdown Timer Mode
Use © to select the Countdown Timer Mode as shown on page E-13.
To configure the countdown timer
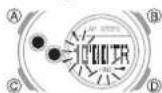
-
Hold down Ⓐ for about two seconds until the minute digits of the start time start to flash.
-
Press Ⓐ to toggle the flashing between the minutes and seconds.
-
If the countdown start time is not displayed, use the procedure under "To perform a countdown timer operation" (page E-60) to display it.
-
Use ① and ② to change the setting of the flashing digits (minutes or seconds).
-
You can set a start time in the range of one second to 100 minutes in one-second increments.
• To set the starting value of the countdown time to 100 minutes, set 00'00. -
Press Ⓐ to exit the setting mode.
E-58
E-59
Operation Guide 5520
CASIO®
To perform a countdown timer operation
D D D A
Start Stop (Resume) (Stop) Reset
- Before starting a countdown timer operation, check to make sure that a countdown operation is not in progress (indicated by the seconds counting down). If it is, press Ⓓ to stop it and then Ⓔ to reset to the countdown start time.
To stop the alarm
Press any button.
Using the Alarm
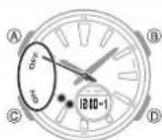
You can set up to five different alarms. The watch beeps for about 10 seconds when the alarm time is reached. The hourly time signal causes the watch to beep every hour on the hour.
To enter the Alarm Mode
Use © to select the Alarm Mode as shown on page E-13.
To set an alarm time
- Press Ⓓ to display the setting (-1 through -5, or 🔍) you want to change.
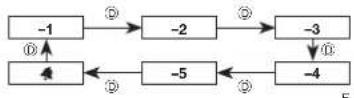
E-61
E-60
- Hold down (A) until the hour digits of the current alarm time start to flash (about two seconds). This is the setting mode.
- This also causes the alarm indicator to appear and turns on the alarm setting.
Alarm time hour
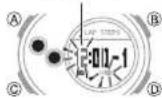
- Press Ⓒ to move the flashing between the hour and minute settings.
- While a setting is flashing, use Ⓓ (+) and Ⓑ (-) to change it.
- While the 12-hour format is selected for timekeeping, a P (PM) indicator will appear for times from noon to 11:59 p.m.
- Press Ⓐ to exit the setting mode.
To turn an alarm and the Hourly Time Signal on and off
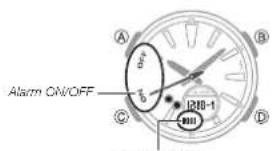
- In the Alarm Mode, use ① to select an alarm or the Hourly Time Signal. • Each press of ② cycles between the alarm time screen and the hourly time signal setting screen.
- Press Ⓐ to toggle the displayed setting (alarm or hourly time signal) between on and off.
- This will cause the second hand to move to ON or OFF.
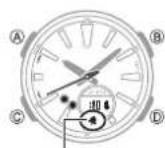
- An alarm on indicator will be on the display whenever any one of the five alarms is turned on. Turning on the hourly time signal causes its indicator to appear on the screen.
To test the alarm
In the Alarm Mode, hold down Ⓓ to sound the alarm.
E-62
E-63
text_image
Alarm ON/OFF 12:00-1 3:00-1Alarm indicator
Hourly time signal indicator
To stop the alarm
Press any button.
Dual Time Mode
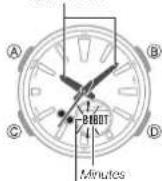
Current time
Hour
You can use the Dual Time Mode to set a second time (in 15 minute steps) that is different from the Timekeeping Mode time.
To enter the Dual Time Mode
Use © to select the Dual Time Mode as shown on page E-13.
To set the Dual Time
- Hold down Ⓐ while in the Dual Time Mode. The hour and minute digits flash on the display because they are selected.
E-64
E-65
- Press © to change the selection in the following sequence.

- Press Ⓐ to increase the selected digits and Ⓐ to decrease them. • Each press of Ⓐ toggles summer time between on (ON) and off (OFF). When summer time is on, a DST indicator is displayed on the Dual Time Mode screen. • While the 12-hour format is selected for timekeeping, a P (PM) indicator will appear for times from noon to 11:59 p.m.
- After you set the time, press Ⓐ to return to the Dual Time Mode. • In the Dual Time Mode, the seconds count is synchronized with the seconds count of the Timkeeping Mode.
Note
- Daylight Saving Time (summer time) advances the time setting by one hour from Standard Time. Remember that not all countries or even local areas use Daylight Saving Time.
To swap Timekeeping Mode and Dual Time Mode times
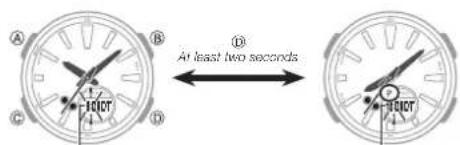
- In the Dual Time Mode, hold down Ⓓ for about two seconds. After the!!? → starts to flash, the Timekeeping Mode time and Dual Time Mode time will be swapped with each other.
E-66
E-67
text_image
A B C D At least two seconds TOUT TOUTDual time Timekeeping Mode time
Note
- The above operation swaps the times only. Dates are not swapped.
Illumination
The face of the watch is illuminated for easy reading in the dark.
To illuminate the face
In any mode (except a setting mode), press Ⓑ to illuminate the face.
Illumination Precautions
- Illumination may be hard to see when viewed under direct sunlight.
- Illumination turns off automatically whenever an alarm sounds.
• Frequent use of illumination runs down the battery.
To change the illumination duration
- In the Timekeeping Mode, hold down Ⓐ until the seconds digits start to flash (about two seconds).
• This enables setting of the seconds.
E-68
E-69
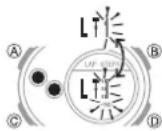
- Press © nine times to display the illumination duration setting screen (page E-19). The screen will show either LT1 or LT3.
- Press ① to toggle the illumination duration setting between LT1 (1.5 seconds) and LT3 (3 seconds).
- After all the settings are the way you want, press Ⓐ to exit the setting screen.
Adjusting Hand Positions
The watch hands can go out of alignment with the time on the digital display if it is exposed to strong magnetism or impact. If this happens, you should adjust the hand positions.
Note
- You do not need to perform the operation below as long as the analog hands indicate the same time as the digital display.
E-70
E-71
To adjust hand alignment
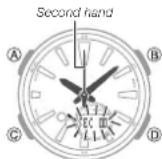
- In the Timekeeping Mode, hold down Ⓐ for about five seconds until SEC 00 appears.
- This indicates the second hand adjustment mode.
- Though SET and then H-S will appear as you hold down Ⓐ, do not release the button yet.
- SEC 00 flashes on the display while the second hand is moving to the home position (12 o'clock).
- If the second hand is not at 12 o'clock, use Ⓓ and Ⓑ to move it there.
Hour hand and minute hand
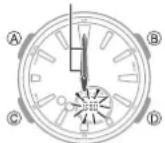
-
Press ©.
-
This enters the hour and minute hand adjustment mode.
- Press © again* to return to the second hand adjustment mode.
* Nothing will happen if you press © while the hands are moving. -
0:00 flashes on the display while the hour and minute hands are moving to the home position (12 o'clock).
-
If the hour and minute hands are not at 12 o'clock, use Ⓓ and Ⓔ to adjust them until they are.
-
Press Ⓐ to return to the Timekeeping Mode.
Check to make sure that the time indicated by the hands matches the time on the digital display. If the times don't match, perform the correction procedure above again.
E-72
E-73
Button Operation Tone
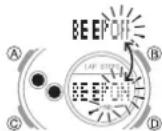
You can turn the button operation tone on or off as desired.
- Even if you turn off the button operation tone, alarms, the Hourly Time Signal, and other beepers all operate normally.
To turn the button operation tone on and off -
In the Timekeeping Mode, hold down Ⓐ until the seconds digits start to flash (about two seconds). This enables setting of the seconds.
-
Press © eight times to display the button operation tone On/Off screen (page E-19). The screen will show either BEEP ON or BEEP OFF.
-
Press Ⓓ to toggle the setting between BEEP ON and BEEP OFF.
-
After all the settings are the way you want, press Ⓐ to exit the setting screen.
E-74
Troubleshooting
Time Setting
■ The current time setting is off by one hour.
You may need to change standard time/daylight saving time (DST) setting. Use the procedure under "Adjusting the Digital Time and Date Settings" (page E-18) to change the standard time/daylight saving time (DST) setting.
Pedometer
■ Step count is not correct.
If the band is loose, the pedometer will count steps but step count accuracy may be reduced.
For details, see "Pedometer Precautions" (page E-23).
E-75
■ The step count does not increase.
The step count is not displayed at the beginning of a walk in order to avoid miscounting of non-walking movements. It appears only after you have continued walking for about 10 seconds, with the number of steps you took during that time added to the total.
■ "ERR" appears on the display while I use the watch.
Subjecting the watch to strong impact can cause sensor malfunction or improper contact of internal circuitry. When this happens, ERR (error) will appear on the display and sensor operations will be disabled.
- If the message does not disappear after about three minutes or if it keeps appearing, it may indicate sensor malfunction. Contact your original retailer or CASIO service center.
■History data was deleted.
Battery replacement will cause step count history data to be deleted.
E-76
Battery
■“R” is flashing on the digital display.
This happens when battery power is low or after the light or some other function is turned on repeatedly over a short amount of time, which temporarily runs down the battery. All functions other than timekeeping are disabled while R is flashing on the display.
If R remains on the display or if it keeps appearing, it may indicate that the battery needs to be replaced.
Request battery replacement by your original retailer or authorized CASIO service center.
E-77
Main Indicators
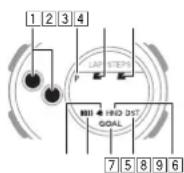
| Number | Name See | |
| 1 | Step indicators E-27 | |
| 2 | PM Indicator E-17 | |
| 3 | LAP indicator E-57 | |
| 4 | STEPS mark E-29 | |
| 5 | Hourly time signal Indicator E-84 | |
| 6 | Alarm indicator E-64 | |
| 7 | GOAL Indicator E 41, E 45 | |
| 8 | DST Indicator E 22 | |
| 9 | Hands shifted indicator E-15 |
E-78
Specifications
Accuracy at normal temperature: ±15 seconds a month
Digital Timekeeping: Hour, minutes, seconds, p.m. (P), month, day, day of the week
Time format: 12-hour and 24-hour
Calendar system: Full Auto-calendar pre-programmed from the year 2000 to 2099 Other: Standard Time/Daylight Saving Time (summer time)
Analog Timekeeping: Hour, minutes (hand moves every 10 seconds), seconds
Pedometer:
Step count using a 3-axis accelerometer
Step count display range: 0 to 999,999
Step indicators
Step count history screen
Daily data, weekly data, goal attainment count
Step goal progress
Step Count Graph
E-79
Operation Guide 5520
CASIO®
Step count reset
Auto reset at midnight each day
Manual reset
Daily step goal setting
Step count setting unit: 1,000 steps
Step count setting range: 1,000 to 50,000
Goal attainment notification
Step Reminder
Step count accuracy: ±3% (According to vibration testing)
Power saving function
Stopwatch:
Measuring unit: 1/100 second (1 second after 1 hour)
Measuring capacity: 23 hours 59 minutes, 59 seconds
Measuring modes: Elapsed time, Lap time, Last measurement sessions lap data
(up to 30 records)
Lap time record recall
Countdown Timer:
Measuring unit: 1 second
Countdown range: 100 minutes
Countdown start time setting range: 1 second to 100 minutes (1-second
increments)
Timer alert time: 10 seconds
Alarms: 5 daily alarms; Hourly time signal
Dual Time: Hour, minutes
Setting Unit: 15 minutes
Other: Daylight Saving Time (summer time)/Standard Time, Dual Time/Home
Time swapping
Illumination: LED (light-emitting diode); Selectable illumination duration
(approximately 1.5 seconds or 3 seconds)
Other: Alarm test; Button operation tone on/off; Moving the Hands to View the Digital Display
E-80
E-81
Power Supply: One lithium battery (Type: CR2016)
Approximate battery operating time: 2 years under the following conditions:
• 1 illumination operation (1.5 seconds) per day
• Alarm: 10 seconds/day
• Pedometer: 12 hours/day
Frequent use of illumination runs down the battery.
Specifications are subject to change without notice.
E-82