Linea ONE - Central heating boiler Vokèra - Free user manual and instructions
Find the device manual for free Linea ONE Vokèra in PDF.


| Product Type | Central Heating Boiler |
| Brand | Vokèra |
| Model | Linea ONE |
| Energy Source | Natural Gas / LPG |
| Heating Output (Nominal) | 24 kW |
| Dimensions (H x W x D) | 700 x 400 x 300 mm |
| Weight | 30 kg |
| Power Supply | 230 V ~ 50 Hz |
| Electrical Protection | IPX4 |
| Efficiency Class | A (ErP Directive) |
| Flue Type | Room-sealed (C13, C33) |
| Functions | Central heating, domestic hot water (if combi) |
| Control Interface | Electronic with LCD display |
| Maintenance Interval | Annually |
| Cleaning | Exterior wipe with damp cloth |
| Safety Features | Overheat protection, frost protection, gas valve safety |
| Spare Parts Availability | Available through authorized dealers |
| Repairability Index | 8.5/10 |
| Noise Level | < 50 dB(A) |
| Warranty | 2 years (conditional) |
Frequently Asked Questions - Linea ONE Vokèra
User questions about Linea ONE Vokèra
0 question about this device. Answer the ones you know or ask your own.
Ask a new question about this device
Download the instructions for your Central heating boiler in PDF format for free! Find your manual Linea ONE - Vokèra and take your electronic device back in hand. On this page are published all the documents necessary for the use of your device. Linea ONE by Vokèra.
USER MANUAL Linea ONE Vokèra
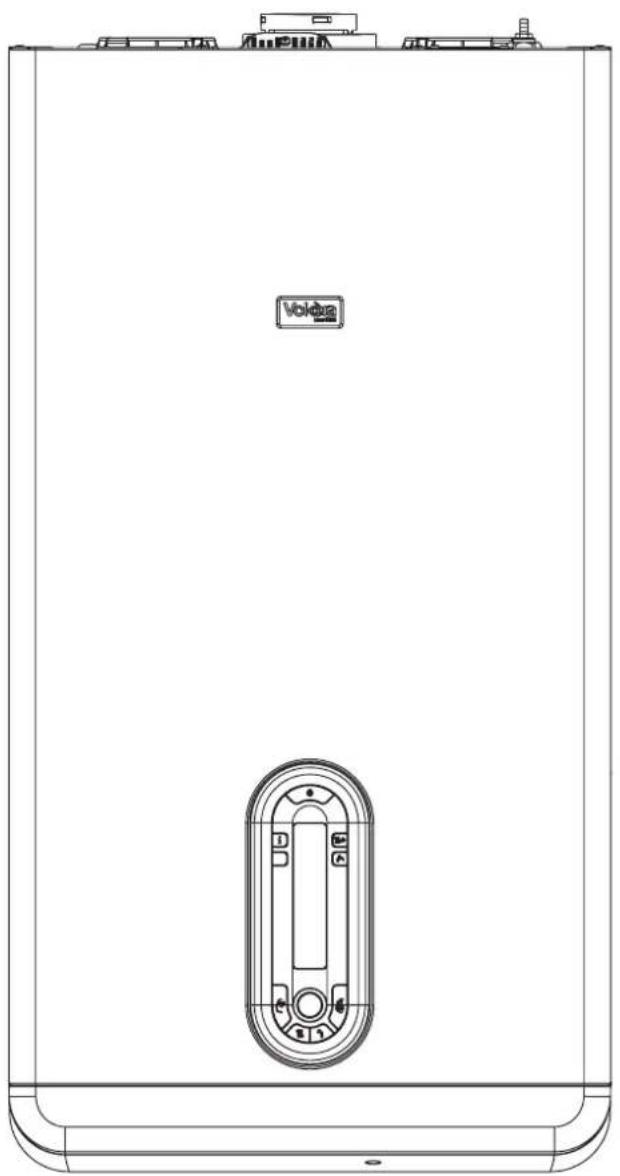
High efficiency combi boiler
natural_image
Line drawing of a white industrial water heater with a circular vent and control panel (no text or symbols)Users
Instructions
CE
THESE INSTRUCTIONS
TO BE RETAINED
BY USER
benchmark COLLECTIVE MARK
THE MARK OF QUALITY FOR THE INSTALLATION, COMMISSIONING AND SERVICING OF DOMESTIC HEATING AND HOT WATER SYSTEMS
Vokera is a licensed member of the Benchmark scheme which aims to improve the standards of installation and commissioning of domestic hot water systems in the UK.
Contents
| Introduction Page |
| Dear customer 2 |
| Do's and don't's 2 |
| Primary information 3 |
| Secondary information 3 |
| Things you should know Page | |
| 1.1 Gas appliances 4 | |
| 1.2 Electrical supply 4 | |
| 1.3 Guarantee registration card 4 | |
| 1.4 Benchmark log book 4 | |
| 1.5 How does it work? | 4 |
| 1.6 Dimensions | 4 |
| 1.7 Clearances required 4 | |
| 1.8 Frost protection system | 4 |
| 1.9 Additional controls | 4 |
| Getting started | Page |
| 2.1 Before switching on | 5 |
| 2.2 Appliance controls | 5 |
| 2.3 Lighting the boiler | 5 |
| 2.4 Adjusting the operating temperatures | 6 |
| 2.5 Temporary fault codes | 7 |
| 2.6 Final fault codes 7 | |
| 2.7 Information mode | 7 |
| How to... | Page |
| 3.1 Top-up the system pressure | 8 |
| 3.2 Reset the appliance | 8 |
| 3.3 Shut down the system for short periods | 8 |
| 3.4 Shut down the system for long periods | 8 |
| 3.5 Care for the appliance | 8 |
| 3.6 Regulate the hot water temperature | 8 |
| What if... | Page |
| 4.1 I suspect a gas leak | 9 |
| 4.2 I have to frequently to top-up the system | 9 |
| 4.3 The reset light is on 9 | |
| 4.4 The appliance is due its annual service | 9 |
| 4.5 I need to call an engineer | 9 |
INTRODUCTION
Dear Customer
Your Linea HE boiler has been designed to meet and exceed the very latest standards in gas central heating technology, and if cared for, will give years of reliable use and efficiency.
Please therefore take some time to read these instructions carefully.
Do's and Don't's
- Do ensure that the system pressure is periodically checked
- Do ensure that you know how to isolate the appliance in an emergency
- Do ensure that you are familiar with the appliance controls
- Do ensure that your installer has completed the appliance log book
- Do not attempt to remove the appliance casing or gain internal access
- Do not hang clothes etc. over the appliance
- Do not forget to have the appliance serviced annually.
PRIMARY INFORMATION
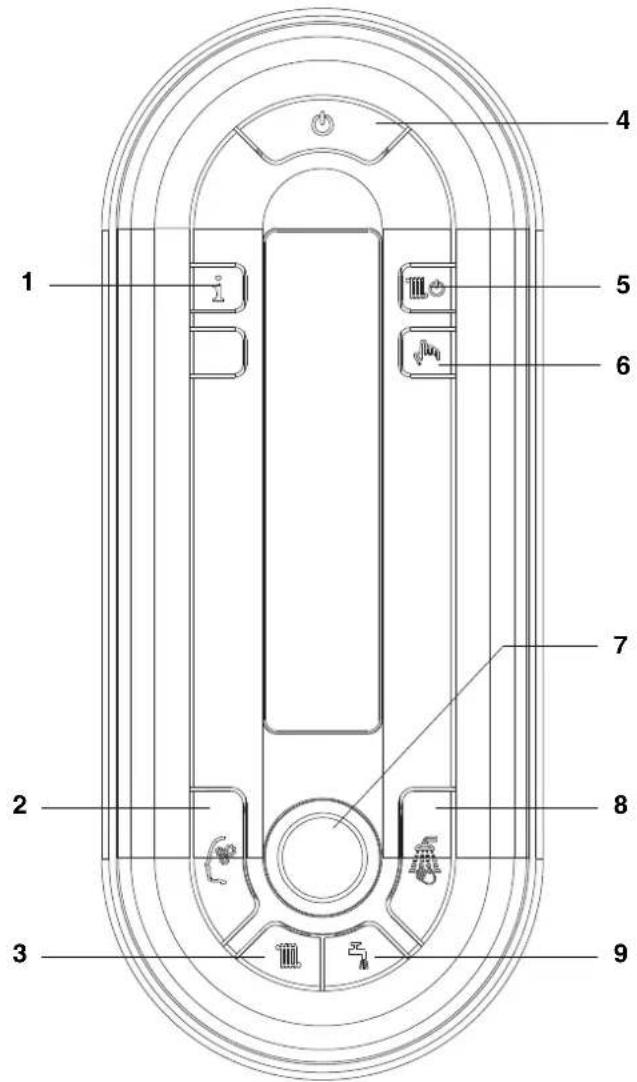
CONTROLS INTERFACE
text_image
Technical diagram of a device interior with numbered components and labeled parts1 Info key
Enables the function that allows the access to some information regarding the boiler operation.
2 Memory key
Enables the Memory function.
3 Heating temperature adjustment key
Allows the access to the adjustment of the heating water temperature by using the selector.
4 ON/OFF/RESET key
Allows you to:
●switch on the boiler
●switch off the boiler
●restart the boiler after a fault stop.
5 Heating ON/OFF key
Enables/disables the heating function
6 Dedicated to the Technical Assistance Service
Enables or disables the boiler's self-operation.
7 Encoder (adjustment selector)
Allows you to increase or decrease the preset values.
8 Comfort key
Enables Comfort function.
9 DHW temperature adjustment key
Allows the access to the adjustment of DHW temperature by using the selector.
fig. 1
SECONDARY INFORMATION
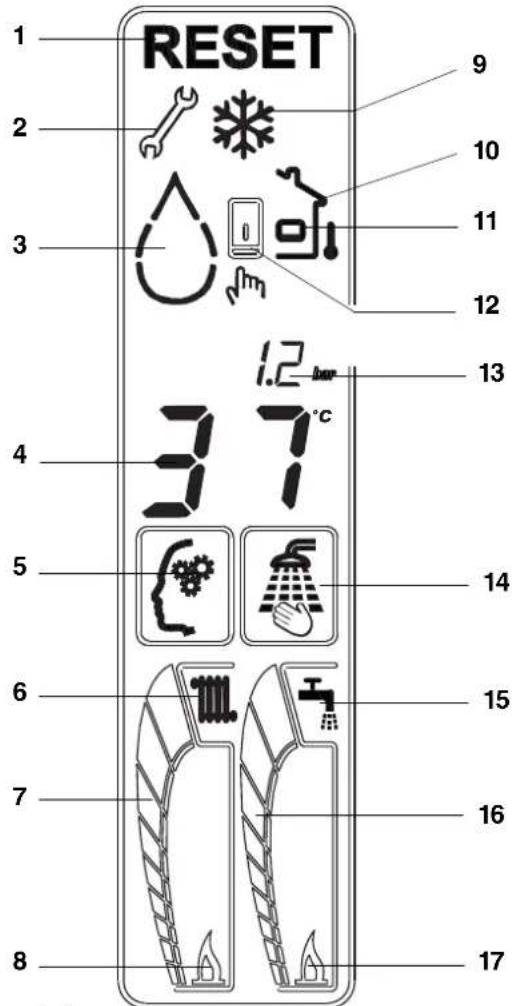
DISPLAY
text_image
1 RESET 2 3 9 10 11 12 13 4 37°C 5 14 6 15 7 16 8 171 Reset symbol
Indicates when it is necessary to restart the boiler (please read page 42 for details).
2 Key symbol
Indicates the presence of a fault (please read page 42 for details).
3 Drop symbol
Displaying that the system pressure is under the correct level
4 Displaying the operating temperature (DHW or heating).
5 Memory symbol
It is displayed when Memory function is on.
6 Heating symbol
Flashing, indicates a heating request in the room.
7 Heating layer
Indicates the position of the set heating temperature (position relative to the maximum and minimum).
8 When the heating flame is on, it indicates that the burner is on following a heat request in the room.
9 Anti-freeze symbol
It is displayed when the anti-freeze function is on.
10 External probe symbol
It is displayed when the external probe is connected.
11 Remote control panel
It is displayed when a remote control panel is connected.
12 Service icon
Indicates the boiler is self-operating.
13 Pressure value of the heating installation.
14 Comfort symbol
It is displayed when the Comfort function is on.
15 DHW symbol
Flashing, indicates a DHW request.
16 DHW layer
Indicates the position of the DHW temperature set (position relative to the maximum and minimum).
17 When the DHW flame is on, it indicates that the burner is on following a DHW request.
1.1 GAS APPLIANCE
Gas Safety (Installations and Use) Regulations.
In the interests of your safety and that of others it is a legal requirement that all gas appliances are installed and correctly maintained by a competent person and in accordance with the latest regulations.
1.2 ELECTRICAL SUPPLY
Please ensure that this appliance has been properly connected to the electrical supply by means of a double pole isolator or unswitched socket, and that the correct size of fuse (3 AMP) has been fitted.
Warning: this appliance must be earthed!
1.3 GUARANTEE REGISTRATION CARD
Please take the time to fill out your guarantee registration card. The completed warranty card should be posted within 30 days of installation.
1.4 BENCHMARK LOG BOOK
The Benchmark Log Book is supplied with your boiler. This important document must be completed during the installation/commissioning of your boiler. All GAS SAFE Registered Installers carry a GAS SAFE ID card and have a registration number. Both should be recorded in your Benchmark Log Book. You can check your installer by calling GAS SAFE direct on 08004085500. Failure to install and commission the appliance in accordance with the manufacturers instructions may invalidate the warranty. This does not affect your statutory rights.
1.5 HOW DOES IT WORK?
Your Linea ONE boiler is a high efficiency combination boiler, which supplies heated water to your radiators and hot water to your taps. The central heating is controlled via a time clock and/or any thermostats that your installer may have fitted. The boiler will light when a hot water outlet (a tap) is opened. The boiler may also function periodically to pre-heat the hot water heat exchanger. The Linea ONE boiler lights electronically and does not have a pilot light. In the unlikely event of a fault developing with your boiler, the supply of gas to the burner will be terminated automatically.
1.6 DIMENSIONS
| HEIGHT | 845 mm |
| WIDTH | 453 mm |
| DEPTH | 358 mm |
1.7 CLEARANCES REQUIRED
| ABOVE | 150 mm |
| BELOW | 120 mm |
| SIDES | (Left = 12 mm / Right = 25mm) |
| FRONT | 600 mm |
1.8 FROST PROTECTION SYSTEM
The Linea ONE is equipped with a built-in frost protection system, this enables the boiler to over-ride the time controls – if switched off – and operate the burner and/or pump, should the temperature drop below 7 °C.
Please note that the frost protection system is designed to protect the appliance only, should frost protection be required for the central heating system, additional controls may be required.
NOTE
The frost protection system is reliant on the appliance having a permanent electrical supply, and being in a non-fault condition.
1.9 ADDITIONAL CONTROLS
Additional controls such as an external temperature sensor kit or under floor heating safety thermostat are available as optional accessories for this appliance. You should consult your installer and/or the supplementary instructions supplied, on their use (if installed).
2.1 BEFORE SWITCHING ON
Before switching the appliance on please familiarise yourself with:
- how to isolate the appliance from the gas, water and electricity supplies;
- how to check and top-up – if necessary – the system water pressure;
- any external thermostats/time switches and their functions;
- the appliance controls.
2.2 APPLIANCE CONTROLS (see fig. 1)
The appliance controls are on the front cover.
The appliance is equipped with a simple control panel that can be used to alter or control the following functions:
- ON/OFF selection;
- mode of operation;
- the outlet flow temperature to the central heating system;
- the outlet temperature for domestic hot water.
In addition, the large LCD display shows the status of the appliance:
- current mode of operation;
- current appliance temperature;
- current temperatures selected;
- current system water pressure.
The system water pressure display shows the current pressure of the system, and when the appliance is operating the display may rise or fall, this is quite normal. The minimum permissible level for the safe and efficient operation of the appliance is 0.6 BAR. Should the pressure fall below 0.6 BAR, the boiler may lockout.
Depending on the type of controls specified by your installer you may have an external time clock or programmer fitted, please refer to the instructions supplied with such.
Ensure the electrical supply to the appliance is switched on. Press the ON/OFF switch to switch the appliance ON (indicated by active display), ensure any external controls are switched to an 'ON' position and are calling for heat.
After being powered, the boiler begins an automatic vent cycle lasting approximately 2 minutes. The display indicates "sf" and the "function selection indicators" light up in sequence. Press the MODE button to interrupt the automatic vent cycle.
Press the heating button, the appliance will now operate in the Heating mode.
2.3.1 MODES OF OPERATION
When the appliance is switched ON one of two modes of operation can be selected:
- boiler "ON" (heating mode on);
- boiler "OFF" (heating mode off - domestic hot water on).
BOILER "ON" IN HEATING MODE
When boiler is in the Heating position, the appliance is active for both heating and DHW requests.
The booster function and pre-heat function are active.
BOILER "OFF" (heating mode off - domestic hot water on)
When the function switch is in the DHW position, the appliance is active for DHW requests.
The TSC (Temperature Stability Control) function is active. All heating requests will be ignored.
2.3.2 FUNCTIONS
- TSC: when the TSC function is active the appliance may override the selected DHW temperature in order to maintain temperature stability.
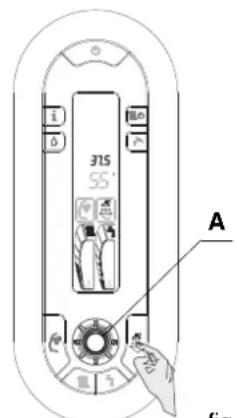
- Comfort button: by pressing the 📄 button, Comfort function enables and the correspondent symbol is displayed.
By pressing the 📄 button, domestic hot water is supplied at the
ideal temperature for shower; the standard temperature set is actually 40 °C.
It is possible to modify Comfort temperature from 35 °C to 45 °C with a 0,5 °C correction. In order to change this temperature, after selecting the function, press the button and turn the selector A.
The set temperature is displayed. Comfort function avoids searching for the right mix between hot and cold water in order to obtain the right temperature for shower.
Note
The value set is memorized by the boiler, so that, the next time you select Comfort button, the boiler should be ready to supply the water
Comfort button
text_image
375 55' A f-12fig. 2
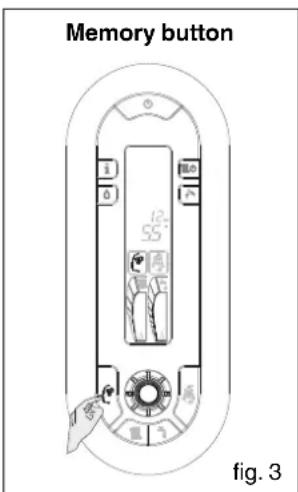
- Memory key: by pressing the ⌘ button, Memory function
enables and the correspondent symbol is displayed.
Memory function simultaneously enables a double electronic intelligence:
• domestic hot water intelligence
- heating intelligence.
DHW Memory
By enabling Memory button, the intelligence of the machine begins to memorize the usage habits of the user. After only one week, Memory function would have already learned the user's habits of using domestic hot water and therefore should be able to preheat it for each request.
The pre-heating is performed in the half hour before the request made memorized the week before.
text_image
Memory button 12.55" fig. 3Example
Thursday 15th at 7.00 a.m. a domestic hot water request is made. Next Thursday, the 22 ^nd , at 6.30 a.m., the boiler performs the pre-heating of domestic hot water.
When the user makes the hot water request at 7.00 a.m., finds the water already at the desired temperature.
If it is necessary to have pre-heated water besides the usual habits, please use the Touch & Go function.
In case the boiler lacks power supply, the data memorized by this function will be lost. When the boiler is power supplied again, Memory function restarts to memorize the habits. In order to benefit by the advantages off Memory function, you have to wait for one week to pass.
CH Memory
By enabling Memory button, the boiler takes in consideration the time that passes from ignition and after 10 minutes increases the delivery temperature memorized with 5 °C.
Memory repeats the cycle until the room temperature set on the room thermostat is reached or until the maximum temperature allowed is reached.
Due to this automatic function, it is possible to select lower delivery temperatures and at the same time to reduce the time for reaching the set room temperature.

KNOWING THE LINEA ONE
LINEA ONE is a combi boiler, fully condensing with a premix burner.
The boiler is characterized by very low emission, high modulation and top domestic hot water performance.
The above characteristics allow the boiler to maximize the end user comfort and maximize the energy saving both on the gas and the electricity.

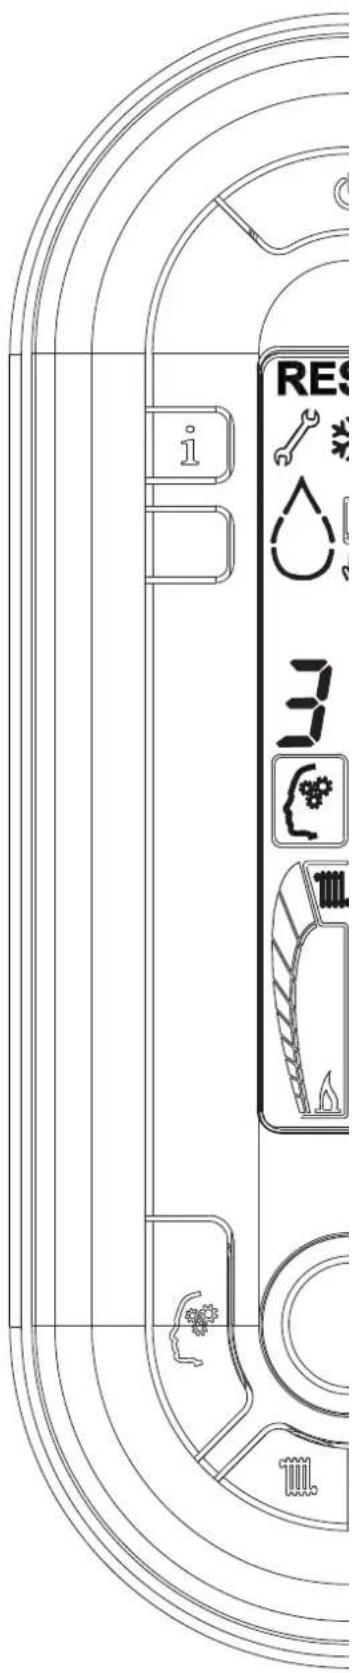
Button for central heating set point
Use this button to allow the encoder to set the central heating temperature set point.
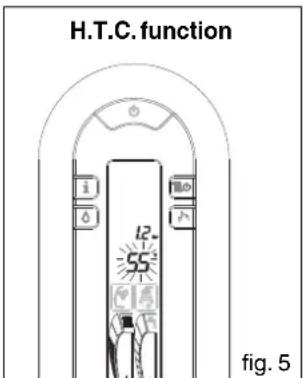
H.T.C. function: while adjusting the heating temperature, from the minimum value 40^ C to the maximum value 80^ C, the field where the H.T.C. system enables is met: Heating Temperature Control (from 55^ C to 65^ C).
The H.T.C. system autonomously manages the delivery temperature, adapting the boiler's operation to meet the dwelling's real needs.
When the heat need extends, the delivery temperature increases allowing a faster heating of the environment.
Once the desired comfort is reached, the system restores the delivery temperature to the value set at the beginning. All this assures minor consumptions, minor limestone deposits in the boiler and minor thermal ranges in the radiators.

Info button
By pressing the key, the InFO word appears on display. By turning the selector A, the display shows, one by one, the information described below.
Info list
Info 1 displays the external temperature recorded by the probe, only if an external probe is connected
Info 2 displays the system pressure
Info 3 displays the set heating temperature
Info 4 displays the set domestic hot water temperature.
If you don't make any selection within 10 seconds, the boiler automatically exits the function; if you want to exit immediately, press the key.

Memory button
Memory key: by pressing the button, Memory function enables and the correspondent symbol is displayed.
Memory function simultaneously enables a double electronic intelligence:
- domestic hot water intelligence
- heating intelligence.
Domestic hot water Memory
By enabling Memory button, the intelligence of the boiler begins to memorize the usage habits of the user. After only one week, Memory function would have already learned the user's habits of using domestic hot water and therefore should be able to pre-heat it for each request.
The pre-heating is performed in the half hour before the request
made in the day and at the hour memorized the week before.
Central heating Memory
By enabling Memory button, the boiler takes in consideration the time that passes from ignition and after 10 minutes increases the delivery temperature memorized with 5 °C.
Memory repeats the cycle until the room temperature set on the
room thermostat is reached or until the maximum temperature allowed is reached.
Due to this automatic function, it is possible to select lower delivery temperatures and at the same time to reduce the time for reaching the set room temperature.
text_image
i RES 3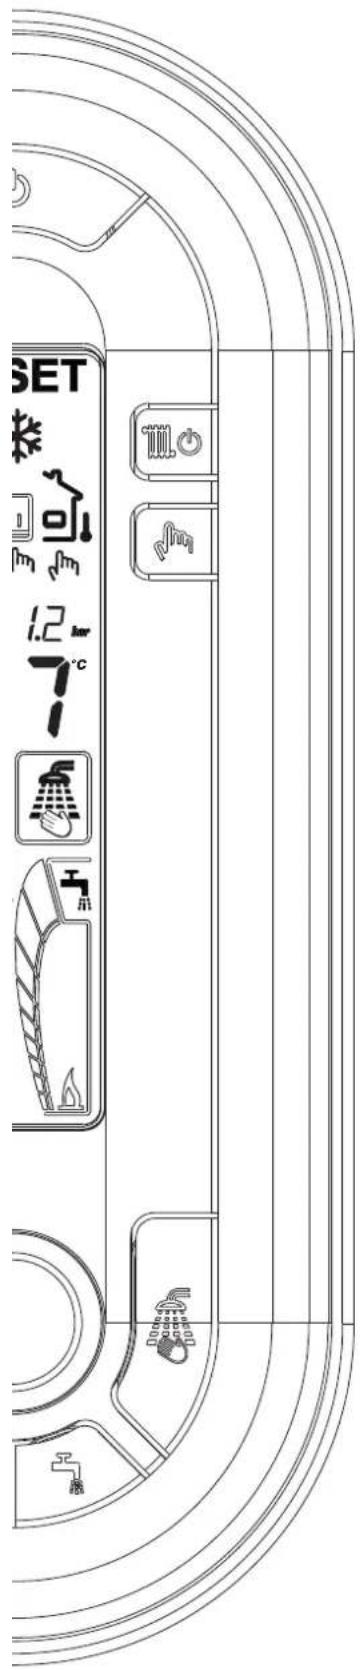
text_image
SET CO CO CO CO CO CO CO CO CO CO CO CO CO CO CO CO CO CO CO CO CO CO CO CO CO CO CO CO CO CO CO CO CO CO CO CO CO CO CO CO CO CO CO CO CO CO CO CO CO CO C
ON/OFF/RESET
Pressing this button the boiler:
- Switch on the boiler
- Switch off the boiler
- Reset in case of alarms

Central heating ON/OFF
Pressing this button the central heating is activated or deactivated (winter/summer function). Domestic hot water is supplied all the time.

Service button
This button is dedicated only for servicing to adjust the boiler in local, switching off the remote control in case it is connected.

Encoder
This knob allows you to increase or decrease the selected parameters

Comfort button: by pressing the button, Comfort function enables and the correspondent symbol is displayed.
By pressing the button, domestic hot water is supplied at the ideal temperature for shower; the standard temperature set is actually 40 °C. It is possible to modify Comfort temperature from 35 °C to 45 °C with a 0,5 °C correction. In order to change this temperature, after
selecting the function, press the button and turn the selector A. The set temperature is displayed. Comfort function avoids searching for the right mix between hot and cold water in order to obtain the right temperature for shower. Note
The value set is memorized by the boiler, so that, the next time you select Comfort button, the boiler should be ready to supply the water at the desired temperature.

Domestic hot water temperature selection
Press the key and turn the selector A to select desired domestic hot water temperature. The big digits will light up on display, indicating the selected temperature value. After a few seconds the display will show again the delivery temperature, effectively recorded by the boiler's probe.
Touch & Go Function: if you don't wish to keep the Memory function always enabled or if you need hot water to be ready fast besides the usual habits memorized, it is possible to perform the domestic hot water pre-heating only a few moments before the request.
Due to Touch & Go function, by turning on and off the tap the instantaneous preheating function enables, which prepares hot water only for that request.
-H.T.C. function: while adjusting the heating temperature, from the
minimum value 40^ C to the maximum value 80^ C, the field where the H.T.C. system enables is met: Heating Temperature Control (from 55^ C to 65^ C).
The H.T.C. system autonomously manages the delivery temperature, adapting the boiler's operation to meet the dwelling's real needs.
When the heat need extends, the delivery temperature increases allowing a faster heating of the environment.
Once the desired comfort is reached, the system restores the delivery temperature to the value set at the beginning. All this assures minor consumptions, minor limestone deposits in the boiler and minor thermal ranges in the radiators.
text_image
H.T.C. function i 0 12° 55° fig. 5- Touch & Go Function: if you don't wish to keep the Memory function always enabled or if you need hot water to be ready fast besides the usual habits memorized, it is possible to perform the domestic hot water pre-heating only a few moments before the request.
Due to Touch & Go function, by turning on and off the tap the instantaneous pre-heating function enables, which prepares hot water only for that request.
- Frost-protection: this function is only active when there are no requests for heating or HW. Should the temperature of the primary thermistor drop below 7°C, the boiler will operate to reduce the risk of frost damage
- ANTI-BLOCK: the anti-block function is active at all times even when the appliance ON/OFF selector is at OFF. Should the appliance be inactive for 24-hours, both the pump and divertor valve actuator will be energised for a short period to reduce the risk of component seizure.
NOTE
The frost protection and anti-block functions are reliant on the appliance having a permanent electrical supply, and being in a non-fault condition.
2.3.3 HEATING MODE
Press the 🔊 button to select the heating mode: the display will show both layers.
When there is a demand for heating via the time clock etc, the boiler will go through an ignition sequence, whereby the burner will light. When the appliance reaches the set temperature, the burner will go off for minimum period of approximately 5 minutes.
When the programmer/time clock or external thermostats heating request has been satisfied, the appliance will switch off automatically.
2.3.4 DHW MODE
Press the 🔊 key to select the DHW mode: the display will show only the DHW layer.
When a hot water outlet or tap is opened, the boiler senses water flow and initiates an ignition sequence. The boiler will modulate the output according to the temperature required, when the hot water request has been satisfied, the boiler may continue to operate if the pre-heat function is active.
NOTE
If the appliance fails to ignite during the ignition sequence, it will re-attempt ignition several times before going to a lockout condition.
Should this occur, please allow a period of two minutes before re-setting.
2.4 ADJUSTING THE OPERATING TEMPERATURES (see fig.1)
2.4.1 ADJUSTING HEATING TEMPERATURE
If you want to adjust the temperature value, by increasing or decreasing, proceed as follows:
- press the heating temperature adjustment key ☐, the number corresponding to the heating temperature will appear on the two digits
- turn the encoder to increase or decrease the value.
After three seconds last modified the value is automatically stored.
After a few seconds the display will show again the heating temperature, effectively recorded by the boiler's probe
2.4.2 ADJUSTING HEATING TEMPERATURE WITH AN EXTERNAL PROBE CONNECTED
When an external probe is connected, the value of the delivery temperature is automatically chosen by the system which rapidly adjusts the room temperature according to the variations in external temperature.
The external probe symbol appears on the display and just the central segment of the heating bar lights up.
If you want to adjust the temperature value, by increasing or decreasing it given the value automatically calculated by the electronic board, proceed as follows:
- press the heating temperature adjustment key ☐, the number corresponding to the set comfort level will appear on the two digits (standard setting)
- turn the encoder to increase or decrease the comfort level (the number corresponding to the selected comfort level will appear on the two digits +1, +2 etc or -1, -2 etc).
The illuminated segment of the heating bar will increase or decrease. Correction tolerance lies between -5 and +5 comfort.
These corrections are very important between seasons, when the value calculated by the curve could result too low and therefore the time for reaching the set room temperature could be too long. After 3 seconds from the last adjustment, the value is automatically memorized and the display shows again the value recorded instantaneously by the probe.
2.4.3 ADJUSTING THE HOT WATER TEMPERATURES (see fig.1)
Press the key and turn the selector A to select desired domestic hot water temperature. The big digits will light up on display, indicating the selected temperature value.
After a few seconds the display will show again the delivery temperature, effectively recorded by the boiler's probe.
2.5 TEMPORARY FAULT CODES
The built-in fault diagnostic system automatically displays a unique fault code that can be used to determine why the boiler has temporarily locked out. When the boiler displays a temporary fault code, the appropriate code is shown flashing on the display, accompanied by the symbol 🔍.
2.6 FINAL FAULT CODES
When the boiler displays a final fault code, the appropriate code is shown flashing on the display, accompanied by the symbol RESET (RESET).
2.6.1 CODE ERROR + RESET (RESET) ONLY
To reset the boiler, push ⏻ button. If the boiler starts without any problems, the lock-out is probably due to an accidental situation.
2.6.2 CODE ERROR + RESET (RESET) +
Refer to the following section and the detailed fault finding flow-charts overleaf.
Code Reason
| 11 false flame |
| 12 restart ignition |
| 13 check the wiring harness |
| 23 check the wiring harness |
| 25 high limit flow temperature probe |
| 27 high limit return temperature probe |
| 41 low water pressure |
| 60 DHW NTC error |
| 71 flow NTC error (2ndCH) |
| 77 over heat underfloor thermostat (2ndCH) |
| 78 flow/return ΔT error (2ndCH) |
Code Reason
| 10 no flame detected |
| 14 check the wiring harness |
| 15 false flame |
| 20 high limit thermostat/fume thermostat |
| 21 check the wiring harness |
| 22 check the wiring harness |
| 24 high limit flow temperature probe |
| 26 high limit return temperature probe |
| 28 flow/return ΔT error |
| 29 check the wiring harness |
| 34 fan error (start-up) |
| 37 fan error (high rpm) |
| 40 low water pressure |
| 42 pressure transducer fault |
| 50-59 internal PCB failure |
| 70 flow NTC error (2ndCH) |
| 72 return NTC error (2ndCH) |
| 79 flow/return ΔT error (2ndCH) |
| 80-83 internal fault |
| 91 condensing heat exchanger cleaning requirement |
2.7 INFORMATION MODE
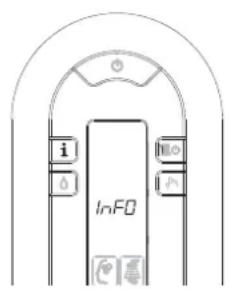
The appliance keypad can be used to display certain information on the working status of the boiler. Push the Info button 1 the InFO word appears on display. By turning the selector A, the display shows, one by one, the information described below.
Info list (fig. 6)
Info 1 displays the external temperature recorded by the probe, only if an external probe is connected
Info 2 displays the system pressure, accompanied by the filling symbol
Info 3 displays the set heating temperature
Info 4 displays the set domestic hot water temperature.
If you don't make any selection within 10 seconds, the boiler automatically exits the function; if you want to exit immediately, press the ⬆ key.
text_image
i Info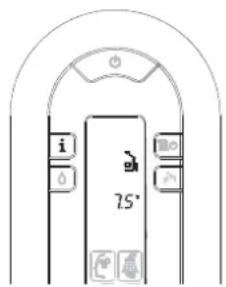
text_image
i 75°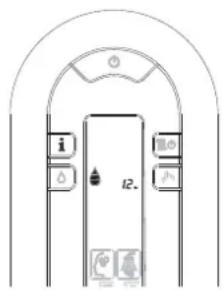
text_image
Diagram of an arched door with labeled compartments and directional indicators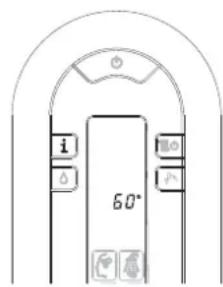
text_image
i o 60° p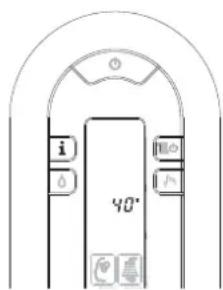
text_image
i 40°fig. 6
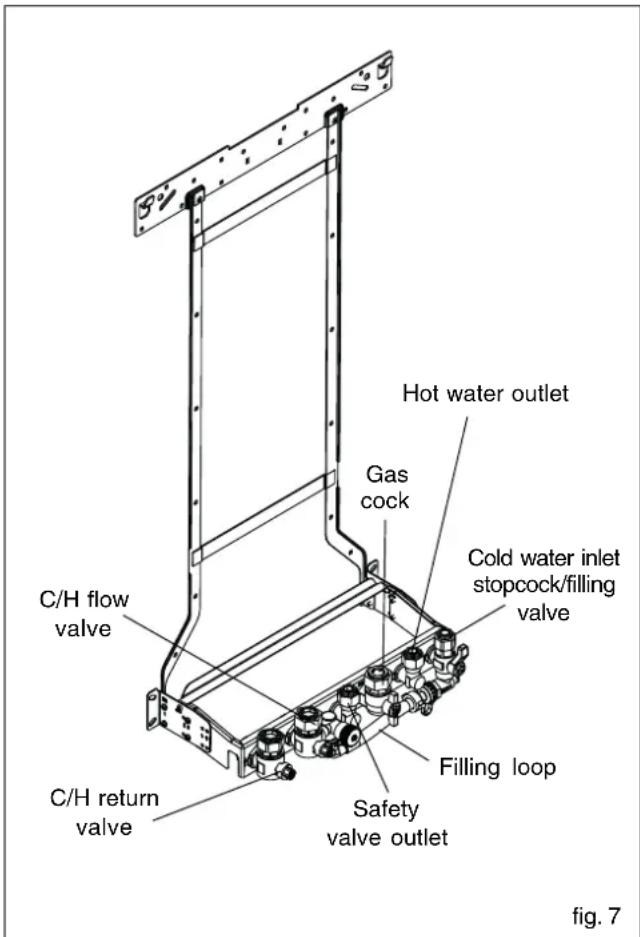
3.1 HOW TO TOP-UP THE SYSTEM PRESSURE (fig. 7)
The system pressure must be checked periodically to ensure the correct operation of the boiler. The display should ideally be reading between 0.6 (minimum) and 1.5 (maximum) when the boiler is in an off position and has cooled to room temperature. If the pressure requires 'topping-up' use the following instructions as a guide.
- Locate the filling valve connections (beneath the boiler).
- Attach the filling loop to both connections.
- Open the filling valve slowly until you hear water entering the system.
- Close the filling valve when the displayed pressure (on the boiler) reads between 1 and 1.5.
- Remove the filling loop from the connections.
3.2 HOW TO RESET THE APPLIANCE
When the display is flashing, or when the reset icon is shown, the appliance will require to be reset manually. Before resetting the boiler ensure that the displayed pressure is indicating the correct level. Allow a period of two minutes to elapse before pressing the reset button.
IMPORTANT
If the appliance requires to be reset frequently, it may be indicative of a fault, please contact your installer or Vokera Customer Services for further advice.
3.3 HOW TO SHUT DOWN THE SYSTEM FOR SHORT PERIODS
The system and boiler can be shut down for short periods by simply turning the time clock to the off position. It is also advisable to turn off the main water supply to the house.
3.4 HOW TO SHUT DOWN THE SYSTEM FOR LONG PERIODS
If the house is to be left unoccupied for any length of time – especially during the winter – the system should be thoroughly drained of all water.
The gas, water, and electricity supply to the house should also be turned off. For more detailed advice contact your installer.
3.5 HOW TO CARE FOR THE APPLIANCE
To clean the outer casing use only a clean damp cloth. Do not use any scourers or abrasive cleaners.
3.6 HOW TO REGULATE THE HOT WATER TEMPERATURE
Usually your installer will have adjusted the hot water output to suit your requirements, however if you would like to adjust the outlet temperature, please follow the instructions in section 2.4.
NOTE
If you find that the hot water temperature is still insufficient, try reducing the flow of water through the tap.
text_image
Hot water outlet Gas cock Cold water inlet stopcock/filling valve C/H flow valve Filling loop Safety valve outlet C/H return valve fig. 7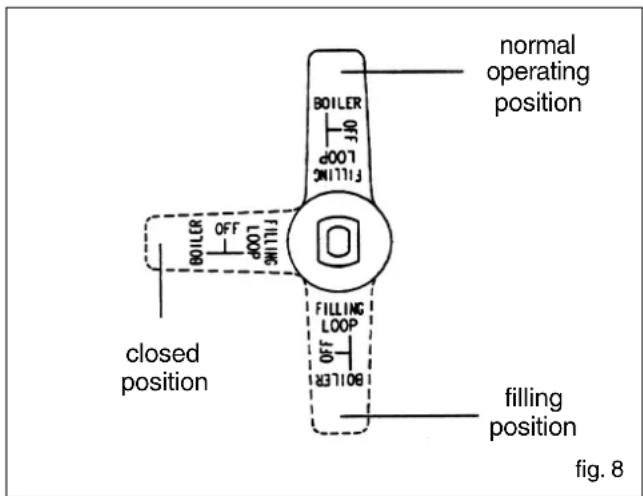
text_image
normal operating position BOILER OFF 100P FILLING LOOP FILLING OFF 337108 closed position filling position fig. 84.1 WHAT IF I SUSPECT A GAS LEAK
If you suspect a gas leak, turn off the gas supply at the gas meter, and contact your installer or local gas supplier. I you require further advice please contact your nearest Vokera office.
4.2 WHAT IF I HAVE FREQUENTLY TO TOP-UP THE SYSTEM
If the system regularly requires topping-up, it may be indicative of a leak. Please contact your installer and ask him to inspect the system.
4.3 WHAT IF THE RESET LIGHT IS ON
If the reset icon is shown, it indicates that the boiler has failed to ignite or has overheated, when this happens the boiler automatically shuts down and requires to be reset manually (see 3.2).
4.4 WHAT IF THE APPLIANCE IS DUE ITS ANNUAL SERVICE Advice for tenants only
Your landlord should arrange for servicing.
Advice for homeowners
Please contact Vokera Customer Service (0844 391 0999 (UK)
or 05655057 (ROI) if you would prefer a Vokera service engineer or agent to service your appliance. Alternatively your local GAS SAFE registered engineer may be able to service the appliance for you.
4.5 WHAT IF I NEED TO CALL AN ENGINEER
If you think your boiler may have developed a fault please contact your installer or Vokera Customer Services (0844 391 0999 (UK) or 05655057 (ROI) have all your details to hand including full address and postcode, relevant contact numbers, and your completed appliance log book.
Registered address:
Vokèra Ltd
Borderlake House
Unit 7 Riverside Industrial Estate
London Colney
Herts AL2 1HG
enquiries@vokera.co.uk
www.vokera.co.uk
www.vokera.ie
Sales, General Enquires
T 0844 391 0999
F 0844 391 0998
Vokèra Ireland
West Court, Callan
Co Kilkenny
T 056 7755057
F 056 7755060
Vokéra Limited reserve the right to change
specification without prior notice
Consumers statutory rights are not affected.
A Riello Group Company.
Company Reg No: 1047779