91807 - Thermometer Welby - Free user manual and instructions
Find the device manual for free 91807 Welby in PDF.


User questions about 91807 Welby
0 question about this device. Answer the ones you know or ask your own.
Ask a new question about this device
Download the instructions for your Thermometer in PDF format for free! Find your manual 91807 - Welby and take your electronic device back in hand. On this page are published all the documents necessary for the use of your device. 91807 by Welby.
USER MANUAL 91807 Welby
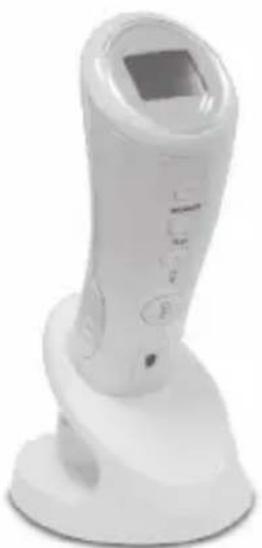
Ear and Forehead Thermometer
natural_image
White handheld electronic device with a display screen and control buttons (no visible text or symbols)INSTRUCTION MANUAL
Item No. 91807


USA
TABLE OF CONTENTS
No. Topic Page
1.0 Definition of symbols 5
2.0 Application and functionality 6
2.1 Intended use 6
2.2 Field of application 7
3.0 Safety instructions 7
3.1 General safety instructions 7
3.3 Environment for which the DSO 364 device is not suited 9
3.4 Usage by children and adolescents 10
3.5 Information on the application of the device 10
4.0 Questions concerning body temperature 13
4.1 What is body temperature? 13
4.2 Advantages of measuring the body temperature in the ear 14
4.3 Information on measuring the body temperature in the ear 15
5.0 Scope of delivery / contents 16
6.0 Designation of device parts 17
7.0 LCD display 18
8.0 Basic functions 19
8.1 Commissioning of the device 19
8.2 Warning indicator if the body temperature is 21 too high
2

TABLE OF CONTENTS

No. Topic Page
8.3 Backlighting / torch function 21
8.4 Energy saving mode 22
8.5 Setting °Celsius / °Fahrenheit 22
9.0 Display / setting time and date 23
9.1 Display of time and date 23
9.2 Setting time and date 23
10.0 Memory mode 26
11.0 Measuring the temperature in the ear 28
12.0 Measuring the temperature on the forehead 30
13.0 Object temperature measurement 32
14.0 Disposal of the device 33
15.0 Battery change and information concerning batteries 33
16.0 Cleaning and care 36
17.0 "Cleaning" warning indicator 37
18.0 Calibration 38
19.0 Malfunctions 39
20.0 Technical specification 41
21.0 Warranty 44


Thank you for purchasing Ear and Forehead Thermometer. For safe use of this product, be sure to read and fully understand this manual as well as the safety precautions, prior to any use. Please keep this manual safely stored for convenient reference. The device is intended for the intermittent measurement and monitoring of human body temperature by consumers in the home.

Measuring the body temperature in the ear
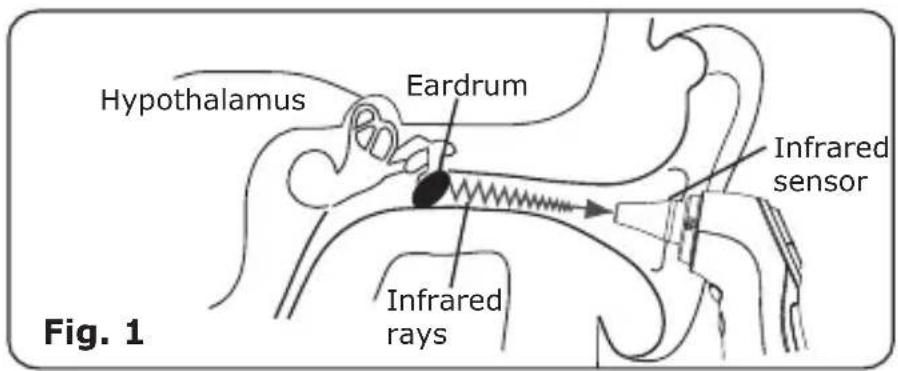
Scientific studies have shown that the ear is ideally suited to measure the body temperature. The body temperature is controlled by the hypothalamus, the blood vessels of which also supply the eardrum with blood. It is therefore advantageous to measure the body temperature whenever possible in the ear as shown in Fig. 1.
text_image
Hypothalamus Eardrum Infrared sensor Infrared rays Fig. 1In this respect, it is important that you apply the correct technique in order to achieve precise and reliable temperature measurements. For this purpose, please read this instruction manual carefully!


1.0 Definition of symbols
The safety symbols shown in this instruction manual contain information concerning the correct use of the device and your safety.
The symbols refer to the following content:

Read and follow the instruction manual!

Warning / danger: If not used correctly, there might be the risk of serious injury, damage and mortal danger!

These instructions must be followed under all circumstances!

Device with a Type B application part: Protection against electric shock by complying with the standards regarding the leakage currents.
PLEASE NOTE: The correct measuring technique is very important to achieve precise measurement results! Therefore, carefully read this instruction manual prior to using this device!
ATTENTION: For the users, it is dangerous to make a self-diagnosis and to treat themselves based on the measurement results. This may lead to a worsening of diseases and illnesses. Under no circumstances can this device replace any medical consultation – if in doubt, always seek medical advice!

2.0 Application and functionality
The Ear and Foreheadeter is an infrared temperature measurement device with which you can easily and straightforwardly carry out precise measurements of the body temperature on the forehead or in the ear as well as the temperature of liquids or surfaces. An acoustic signal indicates the end of the temperature measurement; then, you can read the temperature measured on the LCD display. The device can save and display the data of the last 9 body temperature measurements on the forehead or in the ear. Green / red indicator lights signalise if the body temperature measured is in the normal range (green) or if the body temperature is too high (red). The torch function facilitates orientation and application in the dark.
2.1 Intended use
Use the Ear and Forehead Thermometer solely for the intended purpose: to measure the temperature of the human body in the ear or on the forehead and to measure the temperature of liquids (such as milk or water) or surfaces.
This device is not intended to be used by people (including children) with limited physical, sensory or mental capabilities or with a lack of experience and / or knowledge unless they would be supervised by a person responsible for their safety or received instructions by such a person on how the device is to be used.
2.2 Field of application
This device is intended to be used and applied only in a domestic environment, but it is not suitable for commercial usage.
3.0 Safety instructions


3.1 General safety instructions
3.1.1 In case of a defect, the device must not be used. Do not try to modify (change), disassemble or repair the device or replace any parts.
3.1.2 If irregularities occur during the use of the device, you must stop the application immediately and seek medical advice.
3.1.3 During the measuring process, do not carry out any other activity.
3.1.4 If you have any doubts concerning the application of the device, you should seek medical advice in advance.
3.1.5 Please store this instruction manual during the useful life of the product for later reference and also hand it over if you pass the device to third parties. Please make the instruction manual also available to third parties. The instruction manual is an integral part of the device.
3.1.6 Any misuse and use not in conformity with the application must be avoided.
3.1.7 Accessories from other devices must not be used.
USA
SAFETY INSTRUCTIONS
3.1.8 Do not drop the device, do not shake it and do not expose it to any impacts.
3.1.9 In order to ensure precise measurement results, particularly protect the infrared sensor of the device against moisture, dirt and damage.
3.2.0 Do not expose the device to direct sunlight and excessively high or low temperatures. Use and store the device only in dry environments free from any contamination.
3.2.1 Do not open the device and do not try to repair it yourself in the event of malfunctions or damage, as this leads to the expiry of your warranty claim. The device may only be repaired by authorised specialist personnel.
3.2.2 Remove the batteries from the device if it is not used for a longer period of time in order to prevent damage caused by leaking batteries.
3.2.3 Do not store the device in places with extremely high or low ambient temperatures (below -4 °F-20°PC or above 131 55 °C) or in extremely dry or damp environments, since this could result in inaccurate measurement results.
3.2.4 The device is equipped with a class 1 LED (torch function). Do not look directly into the LED light beam for a longer period of time and do not point the LED light beam into the eyes of other people or animals!
8

3.3 Environment for which the DSO 364 device is not suited
3.3.1 Do not use the device in damp and wet environments. Keep the device away from any liquids while in use and, above all, never immerse it in liquids.
3.3.2 Do not use the device near highly flammable substances or gases or near explosives.
3.3.3 While using the device, it may interfere with other electric devices or may be impaired by other electric devices. Therefore, do not use the device near other electric devices.
3.3.4 Do not use mobile phones next to the device when carrying out the temperature measurements. Please note that portable and mobile HF (high-frequency) communication equipment (e.g. mobile phones) may influence medical electrical devices.
3.3.5 Keep a distance of at least 1.5 metres to shortwave or microwave devices and / or high-frequency (HF) surgical devices when using the temperature measurement device. Do not use the device on mountains higher than 3,000 metres.
3.3.6 Medical electrical devices are subject to special precautions regarding EMC (electromagnetic compatibility).
3.4 Usage by children and adolescents
3.4.1 The device must be stored out of the reach of children and adolescents younger than 18 years.
3.4.2 Supervise children in order to prevent them from playing with the device.
3.4.3 Keep the device out of the reach of children. Small parts or batteries could be swallowed by children who might then choke. Children could hurt themselves when using the device.
3.5 Information on the application of the device
3.5.1 This thermometer cannot replace any medical consultation or treatment! The measurement results are only used for comparative purposes. In the event of health problems, it is absolutely necessary to seek
your doctor's advice!
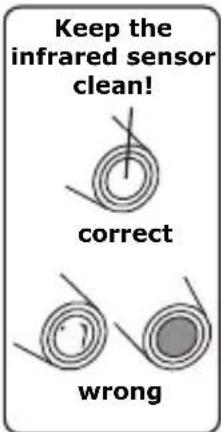
3.5.2 Keep the infrared sensor clean and dry and avoid any damage (see Fig. 2). This is the only way to obtain precise measurement results.
3.5.3 Do not touch the infrared sensor and do not blow at it. Any dirt on the infrared sensor might lead to inaccurate measurement results.
3.5.4 Do not measure the body temperature in the ear if the ear is inflamed or infected! Fig. 2
text_image
Keep the infrared sensor clean! correct wrongFig. 2
3.5.5 Do not use the device if it is damaged. Using a damaged device might result in injuries, serious risks and inaccurate measurement results.
3.5.6 Do not perform any measurements in the ear if you suffer from an ear disease or if there is still water in the ear (e.g. after having taken a shower, after swimming...).
3.5.7 Earwax or oily skin on the forehead might result in inaccurate measurements. Therefore, clean the ear and / or the forehead before carrying out a measurement. Afterwards, wait for approx. 5 - 10 minutes before measuring the temperature.
3.5.8 Do not start a measurement immediately if the device was stored in a place with a great temperature difference as compared to the place in which the measurement is to be performed. Both the device and the people whose body temperature is measured should have been in the same environment for at least 30 minutes.
3.5.9 Repeat the measurements approx. every 15 minutes if the measurement results are unusually low or do not reflect your personal feeling. In this case, also carry out a comparative oral or rectal measurement using a conventional clinical thermometer if possible. If in doubt, consult your doctor!
3.6.0 Whenever possible, always measure the body temperature in the same ear, since the temperature might be different in the right and left ear.
USA
SAFETY INSTRUCTIONS
3.6.1 If ear drops or other medication were administered in one ear, the measurement of the body temperature should be carried out in the other ear.
3.6.2 Babies and toddlers have a higher body temperature than adults. With increasing age, the body temperature decreases. In most cases, temperature fluctuations are higher for children and occur more quickly and more frequently.
3.6.3 Certain circumstances such as your age, clothing, the outside temperature, physical activities, your individual metabolism and the time of the day can, as a matter of principle, have an impact on the body temperature.
3.6.4 Please note that certain conditions might have an impact on the measurement of the body temperature in the ear, for example, if the ear was covered, after swimming or after having taken a bath, if the ear was exposed to particularly high or low temperatures or if you had lain on one ear for a longer period of time.
3.6.5 If the device has been held in your hand for a long period of time, the measurement result might be distorted by the heating of the device resulting from this.
3.6.6 If the temperature of people using hearing aids or earplugs is to be measured in the ear, it is recommended to wait for approx. 30 minutes after such equipment has been removed from the ear and only then carry out a measurement of the temperature.
12

4.0 Questions concerning body temperature
4.1 What is body temperature?
The body temperature is the internal temperature of the body (core temperature). It fluctuates during the course of the day and is lowest in the early morning and highest in the late afternoon.
The normal value of the body temperature is not a fixed value, but rather a temperature range. In general, the body temperature decreases with increasing age. The following table shows the respective normal temperature ranges for different age groups:
| Age | Normal body temperature in °F | Normal body temperature in °C |
| 0 - 2 years | 97.5 - 100.4 °F | 36.4 - 38.0 °C |
| 3 - 10 years | 97.0 - 100.0 °F | 36.1 - 37.8 °C |
| 11 - 65 years | 96.6 - 99.7 °F | 35.9 - 37.6 °C |
| > 65 years | 96.4 - 99.5 °F | 35.8 - 37.5 °C |
The range of the normal body temperature differs from one person to another and is determined by many factors: age, sex, time of day, location and type of the temperature measurement, level of activity, emotional state, influence by medication and other factors.
For instance, the body temperature of children is approx. 0.9 °E/5 °C higher than the body temperature of adults. While asleep, most people have a lower body temperature and the body temperature increases during the course of the day.
Measurements performed on different parts of the human body produce different results: Usually, the body temperature measured rectally is approx. 0.5 °F, 3 °C higher than the body temperature measured in the mouth, and this, in turn, is 0.5 °F / 0.3 °C higher than the body temperature measured in the armpit.
In order to determine your own body temperature and the body temperature of your family members, it is recommended to perform measurements of the body temperature when in a healthy condition on three to four consecutive days at different times of the day. Thus, you can determine the normal body temperature and write it down in order to be able to compare the temperature measurements to the normal values you have determined when required.
4.2 Advantages of measuring the body temperature in the ear
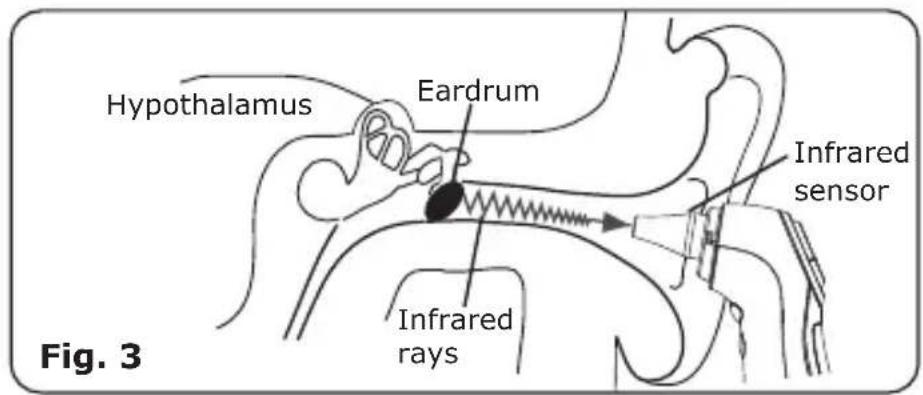
When measuring the body temperature, it is important to determine, if possible, the body core temperature corresponding to the temperature of the inner organs. Research findings have shown that the ear is ideally suited to measure the body temperature, since the hypothalamus (the area of the brain controlling the body temperature) and the eardrum are supplied with blood via joint blood vessels. Changes in the body temperature can thus be determined more quickly and more precisely than on other parts of the body. Therefore, it is advantageous to measure the body temperature, whenever possible, in the ear as shown in Fig. 3 on page 15.
4.3 Information on measuring the body temperature in the ear
For babies younger than 12 months:
Gently pull the ear slightly diagonally backwards in order to straighten the ear canal. Carefully insert the measuring probe into the ear canal in order to ensure that the measuring probe is directed towards the eardrum (see Fig. 3).
For children older than 12 months and adults:
Gently pull the ear backwards and carefully insert the measuring probe along the ear canal in order to ensure that the measuring probe is directed towards the eardrum (see Fig. 3).
text_image
Hypothalamus Eardrum Infrared sensor Infrared rays Fig. 35.0 Scope of delivery / contents
natural_image
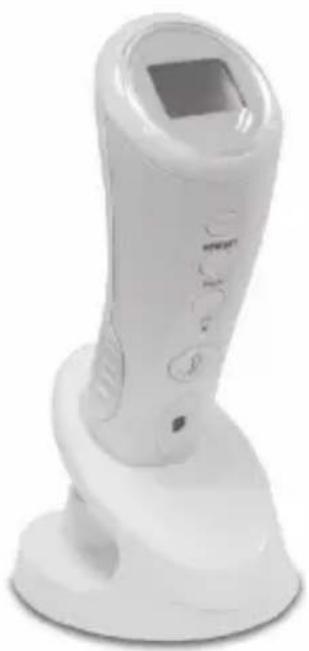
White handheld electronic device with a square display and control buttons (no visible text or symbols)1x Ear and Forehead Thermometer DSO 364 with stand
text_image
Welby® HEALTH® Ear and Forehead Thermometer INSTRUCTION MANUAL Item No. 918071x instruction manual
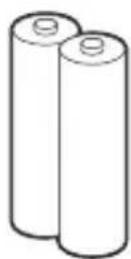
2x AAA batteries
6.0 Designation of device parts
text_image
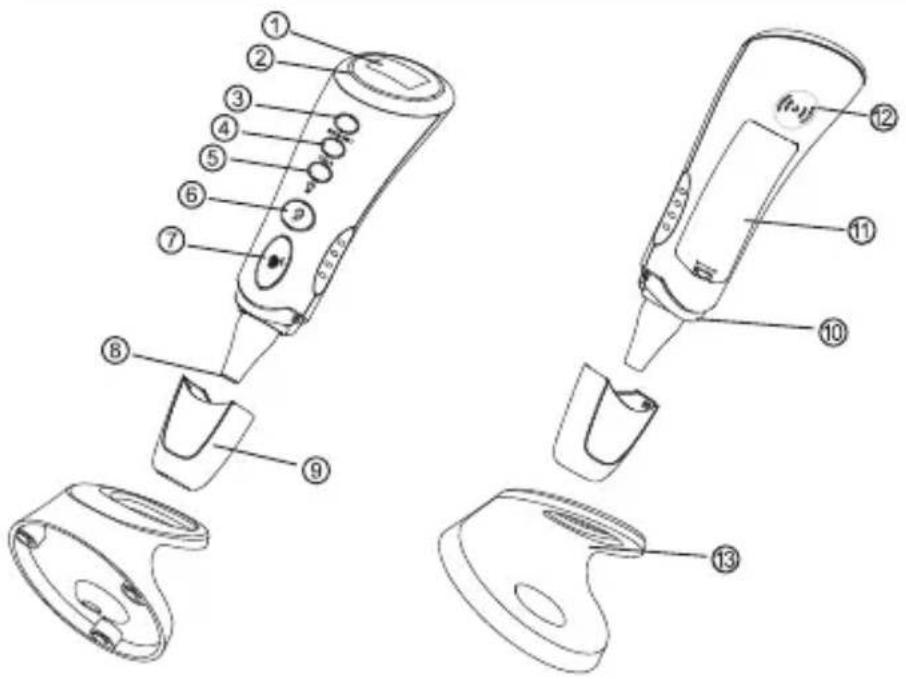
Technical diagram of a handheld device with numbered parts for identification and assembly reference.- LCD display
- Backlighting green / red as temperature range indicator and "Cleaning" warning indicator
- MEM button to recall the measured values saved
- SET button to set date / time
- (💡) button to switch on the torch
- (8) button to measure the temperature in the ear
- (☐) button to measure the temperature on the forehead
- Measuring tip with infrared sensor
- Plug-on attachment for measuring the temperature on the forehead
- Light (torch)
- Battery compartment cover
- Signal output opening
- Table stand
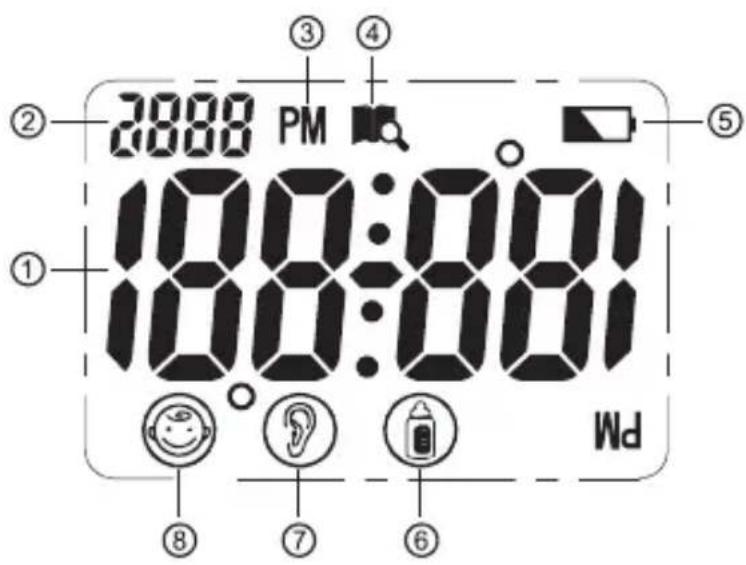
7.0 LCD display
text_image
28:00 PM 10:00:00 10:00:00 ① ② ③ ④ ⑤ ⑥ ⑦ ⑧ Pd-
Segment display of the temperature measured
-
Segment display for FE (fever indicator) and CL ("Cleaning" warning indicator)
-
Symbol PM ("post meridiem" = in the afternoon if the time is displayed in the 12-hour mode)
-
Symbol "Memory" (☐) when recalling the memory
-
Symbol (☐) for "weak batteries": change batteries
-
Symbol (☐) for measuring the temperature on an object (liquids / surfaces)
-
Symbol (♀) for measuring the temperature in the ear
-
Symbol (💡) for measuring the temperature on the forehead
8.0 Basic functions
8.1 Commissioning of the device
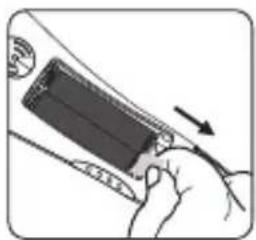
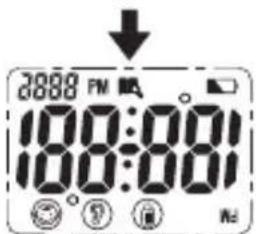
The two batteries have already been inserted in the device, but are protected by means of an insulating strip. Before using the device for the first time, open the cover of the battery compartment on the rear side of the device (see also page 34). Remove the insulating strip as shown in Fig. 4 and close the cover of the battery compartment. Now, the device switches on with 4 short acoustic signals and, on the LCD display, the full segment display as shown in Fig. 5 initially appears for a short period of time. Then, the display switches to the standby mode and alternately shows the basic values 0:00 (time), I- I (month and weekday) as well as the current ambient temperature. Now, it is recommended to set first the time and date (see Chapter 9.2 on page 23 - 25).
natural_image
Illustration of a hand holding a device with an arrow indicating direction (no text or symbols)Fig. 4
text_image
28:00 PM 100:00 100:00 NDFig. 5
PLEASE NOTE: By pressing any button, the green backlighting of the device is activated for approx. 5 seconds.
PLEASE NOTE: If the device is switched off, you can switch it on by pressing any button. Then, the device switches to the standby mode. In this mode, time, date and ambient temperature are alternately shown on the display.
PLEASE NOTE: In the standby mode and in the setting mode, the display is in the correct position

if you hold the device in such a manner that the front side with the buttons is facing the user. In the temperature measurement mode and in the memory mode, it is the other way round: In this case, the display is in the correct position if you hold the device in such a manner that the rear side is facing the user.
PLEASE NOTE: If you wish to immediately return to the standby mode from the setting or the memory mode, you must simultaneously press the (💡) "Ear measurement" and (💡) "Forehead measurement" buttons. The device, however, also switches to the standby mode if, after a measurement has been carried out, you do not press any button within a period of approx. 1 minute or if, in the setting or the memory mode, you do not press any button within a period of approx. 30 seconds.
PLEASE NOTE: If "Lo" or "Hi" are shown on the display after a measurement has been performed, the permissible measuring range was fallen short of or exceeded during the measurement.
ATTENTION - IMPORTANT INFORMATION concerning the "Cleaning" warning indicator:
If, after several temperature measurements, the device's green backlighting starts to flash for approx. 1 minute with acoustic signal output, this is not a malfunction, but the "Cleaning"
warning indicator! In this respect, please read section 17.0 on page 37! If this warning indicator is not switched off by pressing the MEM button, this indicator will occur every time you try to perform a measurement and will disable subsequent temperature measurements!
8.2 Warning indicator if the body temperature is too high
The device is equipped with a backlighting, which immediately indicates by means of different colours after the body temperature has been measured in which range the body temperature is:
Green backlighting: the body temperature measured is below 99.5 °F (37.5 °C)
Red backlighting: the body temperature measured is in the elevated temperature range from 99.5 °F (37.5 °C) to 100.3 °F (37.9 °C)
Red backlighting and, in addition to this, FE symbol (fever indicator) on the display: the body temperature measured is in the fever range between 100.4 °F (38.0 °C) and 109.3 °F (42.9 °C)
8.3 Backlighting / torch function
Backlighting: By pressing any button, the backlighting of the device is activated for approx. 5 seconds.
Torch: If you press the (💡) button and keep it pressed for approx. 2 seconds, the torch of the device (1 LED next to the measuring tip) is switched on for approx. 5 seconds.
PLEASE NOTE: The backlighting and the torch of the device are switched off automatically
within 5 seconds after the last button has been pressed as well as whilst a temperature measurement is carried out!
8.4 Energy saving mode
By default, the device has been set in such a way that it switches to the standby mode (time, date and ambient temperature are shown alternately) approx. 30 - 60 seconds, depending on the respective mode, after the last button has been pressed. If you wish that the device switches off completely after approx. 1 minute, you can proceed as follows:
Press the SET button in the standby mode and keep it pressed for approx. 2 seconds until the 24 hr symbol on the display starts to flash. Then press the SET button six times until the LCd symbol appears on the display for a short period of time and the ON symbol flashes immediately afterwards. If you press the MEM button now, the OFF symbol starts to flash on the display. Afterwards, press the SET button in order to save this setting. Now, the device returns to the standby mode and switches off automatically approx. 1 minute after the last button has been pressed. If you wish to switch the device back to the permanent standby mode, you can set the LCd / OFF setting to ON according to the description above.
8.5 Setting °Celsius / °Fahrenheit
Press the MEM button in order to access the memory mode. Then press the SET button and keep it pressed for approx. 2 seconds until the temperature measurement display has switched from °C (degree Celsius) to °F (degree Fahrenheit / 1 acoustic signal) or vice versa from °F (degree Fahrenheit) to °C (degree Celsius / 2 acoustic signals).
9.0 Display / setting time and date
9.1 Display of time and date
In the standby mode and in the memory mode, the device alternately shows ambient temperature (°C or °F), time (hours / minutes) in the 24-hour or 12-hour mode (PM) and date (month / weekday). The two flashing points between the hour and minute display signal intervals of one second.
9.2 Setting and time date
Step 1: Press the SET button and keep it pressed for approx. 2 seconds in order to access the setting mode. The display for the time mode (either 12 hr or 24 hr) flashes.
Step 2: By pressing the MEM button, you can select the required time mode and save it by pressing the SET button. If the 12-hour display (12 hr) has been set, the PM symbol appears on the display for time displays.
Step 3: On the display, the hour display flashes now and you can set the value, depending on the previously selected time mode, from 1 to 12 or from 1 to 24 by pressing the MEM button and save the value set by pressing the SET button.
Step 4: On the display, the minute display flashes now and you can set the value from 00 to 59 by pressing the MEM button and save the value set by pressing the SET button.
Step 5: On the display, the calendar year display flashes now and you can set the value from 2001 to 2099 by pressing the MEM button and save the value set by pressing the SET button.
Step 6: On the display, the month display flashes now and you can set the value from 1 to 12 by pressing the MEM button and save the value set by pressing the SET button.
Step 7: On the display, the weekday display flashes now and you can set the value from 1 to 31 by pressing the MEM button and save the value set by pressing the SET button.
Step 8: At last, the LCd symbol appears briefly on the display and immediately afterwards the flashing ON symbol. Using the MEM button, you can now choose between ON (device remains in the permanent standby mode) and OFF (device switches off automatically approx. 1 minute after the last button has been pressed) and save the selected setting by pressing the SET button. Now, the device returns to the standby mode. If ON was selected, the device always remains in the standby mode. If OFF was selected, it always switches off automatically from now on approx. 1 minute after the last button has been pressed.
PLEASE NOTE: If you press the MEM button when setting the date and time values, the respectively next higher value is set. If you press the MEM button and keep it pressed, the values which can be set are shown quickly one after another. This facilitates setting the values if a larger number of values which can be set is available. If you release the MEM button, the setting remains at the respectively reached value.
PLEASE NOTE: In order to save energy, it is recommended to activate the energy saving mode (LCd / OFF setting).
PLEASE NOTE: If you simultaneously press the (♀) "Ear measurement" and (♂) "Forehead measurement" buttons for a short period of time, the device returns to the standby mode and time, date and ambient temperature are again shown alternately. Switching to the standby mode is also carried out automatically if you do not press any button within a period of approx. 30 seconds!
10.0 Memory mode
The device saves the last 9 body temperature measurements carried out in the ear or on the forehead in the memory, with the current measurement being shown last in the memory. If all 9 memory locations are occupied, the oldest measurement is deleted from the memory.
In the standby mode, hold the device in order to display the measured data saved in such a manner that the rear side of the device is facing you and press the MEM button (see Fig. 6). On the display, the 🔒) (memory recall) symbol appears now and the number for the measurement saved last (e.g. 8, see Fig. 7) is shown for a short period of time. Immediately afterwards, the temperature measured is shown together with the symbol for ear measurement (💡) or forehead measurement (💡) (see Fig. 8) followed by the time (see Fig. 9) and the date (see Fig. 10). Every time the MEM button is pressed, first the number is briefly shown in descending order followed by the data saved of the next memory entry. If the oldest memory entry with number 1 has

been reached, the display switches back to the standby mode after the MEM button has been pressed once again and returns to the most recent entry only after the MEM button has been pressed once more (e.g. 8, see Fig. 7 on page 26) etc.
PLEASE NOTE: If no measured values have been saved, the (-- -°C) display with the (☐) symbol is shown on the display.
DISPLAY in the "Memory mode":
When recalling the measured values saved, the following symbols can be shown on the display:
: Symbol for "Memory mode" / memory recall
PM : PM symbol ("post meridiem" = in the afternoon if time displayed in the 12-hour mode)
: Ear temperature measurement saved
: Forehead temperature measurement saved
PLEASE NOTE: If you press the SET button and keep it pressed for approx. 2 seconds whilst the measured data saved are displayed, the respective saved temperature switches / is converted from °C (degree Celsius) to °F (degree Fahrenheit) or vice versa. Switching from °C to °F is confirmed by 1 short acoustic signal and switching from °F to °C by 2 short acoustic signals.
PLEASE NOTE: If you simultaneously press the (☐) "Ear measurement" and (☐) "Forehead measurement" buttons for a short period of time, the device returns to the standby mode and time, date and ambient temperature are shown alternately. Switching to the standby mode is also carried out automatically if you do not press any button within a period of approx. 30 seconds!
11.0 Measuring the temperature in the ear
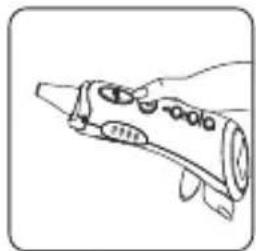
Step 1: Before measuring the temperature in the ear, remove the plug-on attachment for measuring the temperature on the forehead (9) from the device. Prior to the measurement, check if the infrared sensor is clean. Hold the device as shown in Fig. 11 with your thumb or index finger on the (☐) "Ear measurement" button, but do not press the (☐) button yet.
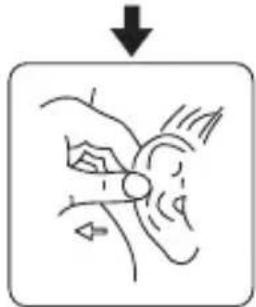
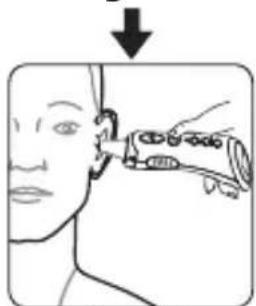
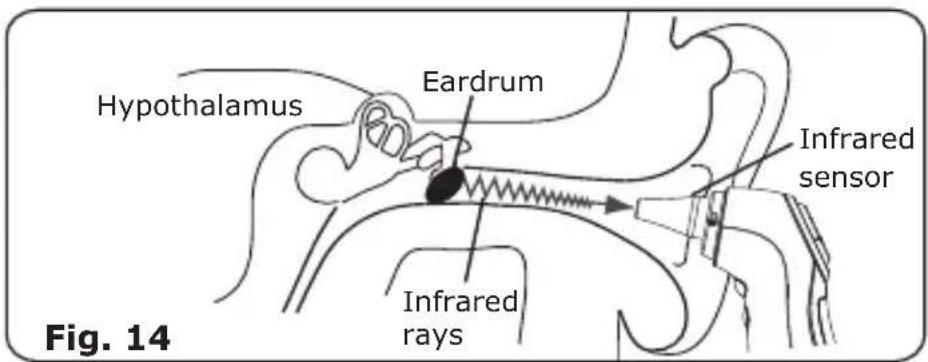
Step 2: Gently pull the ear backwards in order to straighten the ear canal (see Fig. 12) and slowly and carefully insert the measuring tip with the infrared sensor into the external ear canal (see Fig. 13). Hold the thermometer in such a way that the measuring tip is directly directed towards the eardrum in the inner ear (see Fig. 14). If possible, always measure the temperature in the same manner in the same ear.
natural_image
Line drawing of a hand holding a tool or device with no visible text or symbolsFig. 11
natural_image
Illustration of a hand performing a medical or therapeutic procedure on an ear, with a downward arrow indicating action (no text or symbols present)Fig. 12
natural_image
Illustration of a hand holding a syringe above a human head, with an arrow indicating direction (no text or symbols)Fig. 13
text_image
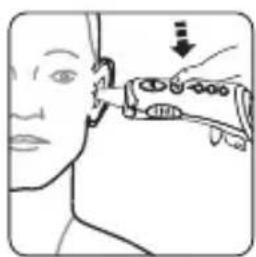
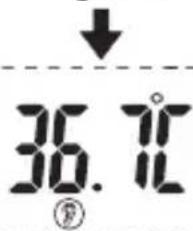
Hypothalamus Eardrum Infrared sensor Infrared rays Fig. 14Step 3: Keep the device still and then press the (♀) "Ear measurement" button (see Fig. 15). A single acoustic signal indicates that the measurement has been started. After approx. 2 seconds, two acoustic signals confirm that the temperature measurement has been completed. The (☐) symbol and the ear temperature measured are shown on the display (e.g. as shown in Fig. 16). At the same time, the backlighting lights up and signals if the temperature measured is below 99,5 °F (co stant green light), if there is elevated temperature in the range from 90,5108.3 °F(single acoustic signal and red flashing light / approx. every 2 seconds) or if the body temperature is in the fever range from 100.4 °F to 109.3 °F (two acoustic signals and red flashing light at intervals of one second; in addition to this, FE (for fever) is shown on the display). PLEASE NOTE: The corresponding temperature values in °C (degree Celsius) can be found in section 8.2 on page 21).
Step 4: Carefully remove the measuring tip of the thermometer from the external ear canal and read the temperature measured on the LCD display (e.g. as shown in Fig. 16). The symbol (💡) indicates that an ear temperature measurement was carried out. A new measurement can only be carried out after the backlighting has gone out (waiting time of approx. 6 seconds).
PLEASE NOTE: Wait until the measurement was saved and no more circles are shown on the display.
natural_image
Line drawing of a person applying a medical or cosmetic tool to their ear (no text or symbols present)Fig. 15
text_image
36.11° ⑧Fig. 16
12.0 Measuring the temperature on the forehead
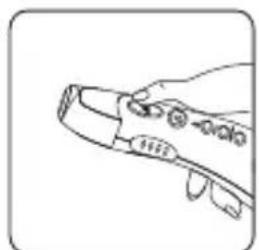
Step 1: Put the plug-on attachment for measuring the temperature on the forehead (9) firmly on the device. Prior to the measurement, check if the infrared sensor is clean. Hold the device as shown in Fig. 17 with your thumb on the (●) "Forehead measurement" button, but do not press the (●) button yet.
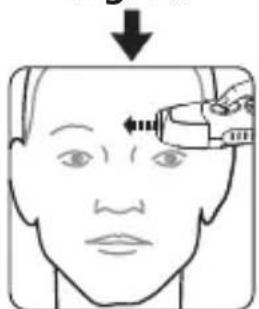
Step 2: Hold the device to the middle of the forehead (see Fig. 18) in such a way that the plug-on attachment for measuring the temperature on the forehead (9) rests gently on the forehead.
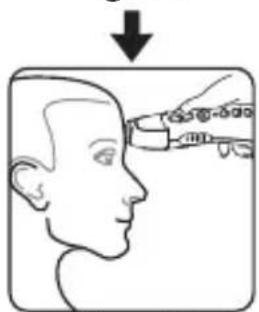
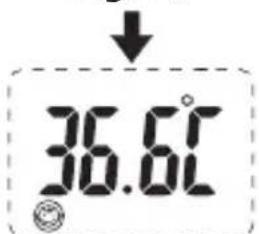
Step 3: Keep the device still and then press the "Forehead measurement" button (see Fig. 19). A single acoustic signal indicates that the measurement has been started. After approx. 2 seconds, two acoustic signals confirm that the measurement has been completed. The (😊) symbol and the forehead temperature measured are shown on the display (e.g. as shown in Fig. 20). At the same time, the backlighting lights up and signals if the temperature measured is below 99.5 °F (constant green light), if there is elevated
natural_image
Line drawing of a mechanical component with no visible text or symbolsFig. 17
text_image
Diagram showing a hand holding a syringe above a human head, with an arrow indicating downward motion or force direction.Fig. 18
natural_image
Illustration of a human head with an arrow pointing to the upper face, showing a medical or therapeutic device (no text or symbols present)Fig. 19
text_image
36.61°Fig. 20
temperature in the range from 99.5 °F to 100,3 °F (single acoustic signal and red flashing light / approx. every 2 seconds) or if the body temperature is in the fever range from 100.4 °F to 109,3 °F (two acoustic signals and red flashing light at intervals of one second; in addition to this, FE (for fever) is shown on the display). PLEASE NOTE: The corresponding temperature values in °C (degree Celsius) can be found in section 8.2 on page 21).
Step 4: Remove the measuring tip of the thermometer from the forehead and read the temperature measured on the LCD display (e.g. as shown in Fig. 20, page 30). The symbol (😊) indicates that the temperature was measured on the forehead. You can now immediately start to perform a new measurement.
PLEASE NOTE: If you wish to immediately return to the standby mode, you can briefly press the MEM button. Returning to the standby mode is also carried out automatically if you do not press any button within a period of approx. 1 minute.
PLEASE NOTE: Whenever possible, always measure the temperature on the forehead in the same manner in order to obtain reliable measurement results.
13.0 Object temperature measurement
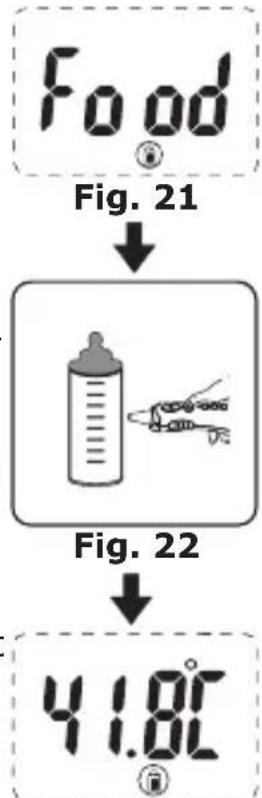
Step 1: Before measuring the object temperature (liquid / surface), remove the plug-on attachment for measuring the temperature on the forehead (9) from the device. Prior to the measurement, check if the infrared sensor is clean. Simultaneously press the (☐) "Ear measurement" and (☐) "Forehead measurement" buttons. On the display, the "Food" display now signals with the (☐) symbol that the object temperature measurement has been activated (see Fig. 21). PLEASE NOTE: This method of measurement is not suited to measure the body temperature!
Step 2: Hold the measuring tip with the infrared sensor in such a manner that it is within a distance of 1 cm to the liquid or surface the temperature of which is to be measured (see Fig. 22).
Step 3: Now, press the (☐) "Ear measurement" button. A single acoustic signal indicates that the measurement has been started. After approx. 2 seconds, two acoustic signals confirm that the temperature measurement has been completed. The object temperature measured is now shown on the display (for example as shown in Fig. 23).
text_image
Food Fig. 21 Fig. 22 41.8°CFig. 23
PLEASE NOTE: If you wish to immediately return to the standby mode, you can simultaneously press the (☐) "Ear measurement" and (☐) "Forehead measurement" buttons. Returning to the standby mode is also carried out automatically if you do not press any button within a period of approx. 1 minute.
14.0 Disposal of the device
Dispose of the DSO 364 forehead and ear thermometer according to the applicable local regulations and the EPA (Environmental Protection Agency / www.epa.gov.) recommendations.

15.0 Battery change and information concerning batteries
If the (☐) "Weak batteries" symbol appears on the display or if the device does not show any function at all, the batteries should be replaced immediately. PLEASE NOTE: If the batteries are empty and when replacing weak batteries, all settings and memory entries are deleted! After new batteries have been inserted, date, time and energy saving mode must thus be reset (see Chapter 9.2, steps 1 - 8 on page 23 - 24)!
15.1 Insert 2 batteries (type AAA) observing the correct polarity (+ positive / - negative pole) in the battery compartment of the device.
15.2 Battery types: For the Ear and Forehead Thermometer DSO 364, alkaline batteries of the type AAA are required. Do not use any rechargeable batteries!
natural_image
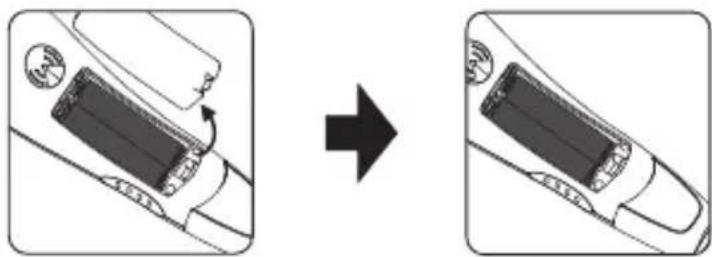
Diagram showing battery charging process with arrow indicating direction (no text or symbols)In order to open the cover of the battery compartment on the rear side of the device, press against the locking clip and remove the cover. Remove the used batteries. Then, insert two new alkaline batteries (size AAA). When inserting the batteries, observe the correct polarity (see marking / stamp in the battery compartment). Afterwards, re-insert the cover of the battery compartment and push it towards the housing of the device until it has engaged.
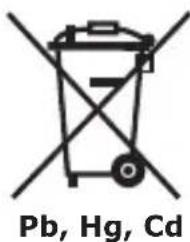
15.3 Disposal of the batteries: Used batteries must not be disposed of as household waste! Dispose of used batteries according to the applicable local regulations and the EPA (Environmental Protection Agency / www.epa.g recommendations.
text_image
Pb, Hg, Cd15.4 These chemical symbols indicate a battery containing harmful substances: Pb = contains lead, Hg = contains mercury, Cd = contains cadmium.
15.5 Batteries may be fatal if swallowed.
Therefore, store batteries and products out of the reach of infants. If a battery was swallowed, seek medical advice immediately.
15.6 If a battery has leaked, avoid any contact with the skin, the eyes and the mucous membranes. Immediately rinse the affected parts with plenty of clear water and instantly consult a doctor or seek medical advice.
15.7 Batteries must not be charged (except for rechargeable batteries), taken apart, thrown into fire or short-circuited.
15.8 Protect the batteries from excessive heat. Remove the batteries from the device if they are empty or if you do not use the product for a longer period of time. Thus, you can avoid any damage which may be caused by leaking batteries.
15.9 Always replace all batteries. Do not use any different battery types or brands, accumulators (rechargeable batteries) or batteries with different capacities.
16.0 Cleaning and care
16.1 In order to achieve a precise measurement result, it is very important to ensure that the infrared sensor of the device is clean and free from scratches. Therefore, check the sensor prior to each measurement and / or when the "Cleaning"
natural_image
Line drawing of a hand holding scissors above a small object (no text or symbols)Fig. 24
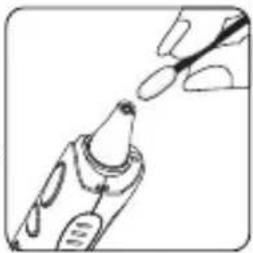
warning indicator (see Chapter 17.0, page 37) flashes and, if required, clean it carefully using a cotton bud (see Fig. 24) that has briefly been dipped in medical alcohol and then immediately using a clean and dry cotton bud.
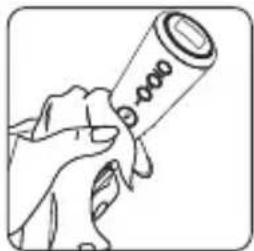
16.2 A dry and soft cloth (see Fig. 25) is suitable for cleaning the housing. Never try to clean the device using an abrasive cleaner, benzine or a solvent! Never immerse the device in water or other liquids!
natural_image
Illustration of a hand holding a cylindrical object with a coiled spring (no text or symbols)Fig. 25
16.3 After cleaning has been completed, keep the device at ambient temperature in a clean and dry place or store it in the table stand. Never expose the device to extreme temperatures, moisture, direct sunlight or vibrations!
17.0 "Cleaning" warning indicator
The device is equipped with a special warning indicator reminding the user to clean the infrared sensor on the measuring tip of the device. If you have not used the device for a longer period of time and / or after approx. 5 - 6 measurements, the
chemical
Chemical structure of a radical radical with oxygen and water moleculesFig. 26
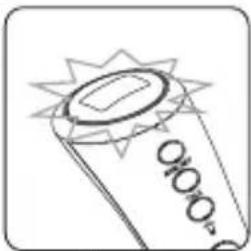
CL warning ("Cleaning" warning indicator)
appears top left of the display and the green backlighting of the device flashes for approx. 30 seconds at intervals of 1 second (see Fig. 26) whilst two acoustic signals are continually output as well as for another 30 seconds at intervals of approx. 2 seconds in order to remind the user that the measuring tip with the infrared sensor should be cleaned (in this respect, see Chapter 16.0 on page 36).
By pressing the MEM button, the "Cleaning" warning indicator can be turned off and the device can be switched to basic mode again for you to be able to carry out new temperature measurements. If you do not press the MEM button, the "Cleaning" warning indicator is turned off automatically after approx. 1 minute, but it is activated again every time you try to measure the temperature until you switch off the warning indicator using the MEM button. However, please always check before switching off the "Cleaning" warning indicator (when measuring the body temperature in the ear in particular) if the infrared sensor of the device is dirty, since this might cause inaccurate measurement results!
18.0 Calibration
The Ear and Forehead Thermometer DSO 364 was calibrated at the factory after manufacture had been completed. If the device is used according to the provisions and information provided in this instruction manual for private and non-commercial usage, it is not necessary to calibrate the device at specified time intervals. However, if you doubt the accuracy of the measured values, you should contact your dealer immediately. Never try to disassemble the device or to make any modifications, as this could lead to hazards and since, in this case, any warranty claim would also expire!
19.0 Malfunctions
| Malfunction | Cause | Solution | |
| The batteries have been inserted, but no information is shown on the display. | There might be foreign particles in the battery compartment. | Remove the foreign particles from the battery compartment. | |
| The batteries are empty (used) or have not been inserted with the correct polarity. | Replace the empty batteries by full batteries. Observe the correct polarity. | ||
| The battery contacts do not fit closely. | Check the battery contacts. | ||
| There is a malfunction of the electronic system. | Remove the batteries and re-insert them after approx. 3 seconds. | ||
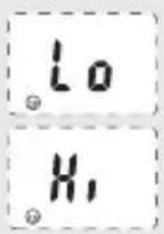 | The temperature measured is lower than 89.6 °F/32,0 °C or higher than 109.3 °F/42,9 °C. | Please follow the instructions in the instruction manual! | |
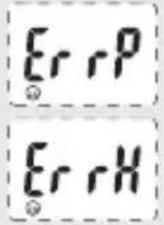 | The device is defective (hard-ware error). | Contact the manufacturer / dealer! | |
19.0 Malfunctions
| Malfunction | Cause | Solution |
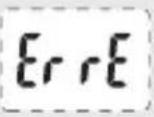 | Operating temperature exceeds the valid range. | Please comply with the operating conditions (see page 42). |
| The temperature measurement is inaccurate and / or there are doubts regarding the measurement result. | Check if the infrared sensor is dirty. | Clean the infrared sensor (see page 36). |
| Check if the device is used according to the instructions. | Please follow the instructions provided on how to use the device and on how to achieve a correct measurement result! | |
| Check if device and patient have been in the same room for at least 30 minutes prior to the measurement. | Ensure that device and patient have been in the same room for at least 30 minutes prior to the measurement. | |
| The device is used outdoors. | Only use the device indoors. | |
| You have held the device in your hands for a longer period of time. | Lay down the device on a table, for instance, in order to allow it to adapt to the ambient temperature. |
20.0 Technical specification
| Model / type: | DSO 364 |
| Dimensions:(L x W x T) | approx. 136.5 x 44.5 x 40.5 mm |
| Weight: | approx. 53.5 g (without batteries and table stand) |
| Material: | Plastics, metals |
| Power supply: | 3.0 V DC, 2 x AAA batteries (V = volt, DC = direct current) |
| Measurement: | |
| Method: | Contactless infrared measurement |
| Duration: | approx. 2 seconds |
| Distance: | approx. 1 cm (object measurement) |
| Display: | LCD display with green backlighting, display in °C (degree Celsius) or °F (degree Fahrenheit)Resolution: 0.1 °F / °C |
| Memory function: | Saving the last 9 body temperature measurements in the memory |
| Energy saving function: | The device switches off automatically after approx. 1 minute (if the energy saving mode has been activated / see page 22). |
| Laser class: | The LED light complies with protection class I (integrated torch) |
20.0 Technical specification
Body temperature:
| Measurement range: | 89.6 °F - 109.3 °F(32.0 °C - 42.9 °C) |
| Measurement accuracy: | from 95.9 °F - 107.6 °F:(35.5 °C to 42.0 °C)+/-0.4 °F (+/-0.2 °C)Other ranges:+/-0.5 °F (+/-0.3 °C) |
Object temperature:
| Measurement range: | 68.0 °F - 140.0 °F(20.0 °C - 60.0 °C) |
| Measurement accuracy: | +/-2.0 °F (+/-1.0 °C) |
Ambient temperature:
| Measurement range: | 41.0 °F - 139.8 °F(5.0 °C - 59.9 °C) |
| Measurement accuracy: | +/-2.0 °F (+/-1.0 °C) |
Operating conditions:
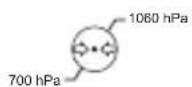
| Atmospheric pressure: | 700 hPa - 1060 hPa (hectopascal) |
| Forehead measurement: | 59.0 °F - 104.0 °F (15.0 °C - 40.0 °C ) at 20% - 85% relative humidity |
| Ear / object measuremt.: | 50.0 °F - 104.0 °F(10.0 °C - 40.0 °C)at 20% - 85% relativehumidity |
Storage / transport data:
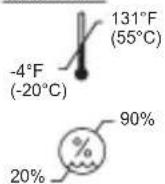
| Storage / transport temperature: -4 °F to 131 °F at 20% -90% relative humidity |

20.0 Technical specification


2014-06


Atmospheric pressure:
700 hPa - 1060 hPa
Use and store the device in a dry place
Lot designation:
LOT V5214DSO364
Serial number: SN 00001 (consecutive number)
Date of manufacture: 2014-06 (year, month)
Manufactured for: Handelshaus Dittmann GmbH, Kissinger
Straße 68, D-97727 Fuchsstadt / Germany
Protection against electric shock according to type BF (body
floating). An application device of the type BF with a higher de-gree of protection against electric shock on the body, but not directly on the heart
Type plate of the device:
Ear-and-Forehead Thermometer
Battery: 3V DC (2xAAA)
LOT V5214DSO364 item #91807
Manufactured for:
Handelshaus Dittmann GmbH warrants this product to be free from defects in material and workmanship for a period of ninety (90) days from the date of purchase. Should this product prove to be defective at any time during the warranty period, Handelshaus Dittmann GmbH will, at its option, either replace or repair it without charge. After the warranty period, a service charge will be applied for replacement of parts or labor for repair. To obtain warranty service please return the product to Dittmann along with a dated sales receipt from the place of purchase. This warranty does not cover damage caused by accident, misuse, abuse, improper maintenance, unauthorized modification, or connection to an improper power supply. A charge will be made for repair of such damage. The warranty excludes all incidental or consequential damages and any liability other than what is stated above.
© 2014 Handelshaus Dittmann GmbH. All Rights Reserved.
Welby item No. 91807

text_image
Welby® HEALTHDistributed by ALDI Inc.
Batavia, IL 60510
Visit us at
www.Aldi.us
Service-Center Adress:
Greater Concepts By Design Team
1803 Springside Drive
Plainfield IL 60586
www.greaterconceptsbydesign.com
815-342-5850 office
815-230-3318 fax
