
AKP 709 NB - Oven WHIRLPOOL - Free user manual and instructions
Find the device manual for free AKP 709 NB WHIRLPOOL in PDF.


User questions about AKP 709 NB WHIRLPOOL
0 question about this device. Answer the ones you know or ask your own.
Ask a new question about this device
Download the instructions for your Oven in PDF format for free! Find your manual AKP 709 NB - WHIRLPOOL and take your electronic device back in hand. On this page are published all the documents necessary for the use of your device. AKP 709 NB by WHIRLPOOL.
USER MANUAL AKP 709 NB WHIRLPOOL
GB TABLE OF CONTENTS
INSTALLATION PAGE 13
ELECTRICAL CONNECTION PAGE 14
CLEANING THE OVEN AND ACCESSORIES PAGE 18
TROUBLESHOOTING GUIDE PAGE 19
AFTER-SALES SERVICE PAGE 20
DECLARATION OF CONFORMITY CE PAGE 20
INSTALLATION
Technical information for the installer
- After removing the oven from its packaging, before making the connections place it on the polystyrene foam base to protect it from damage.
- Do not attempt to lift the oven by the handle. Lift at the sides as shown in the figure (see arrow).
- Check that the appliance has not been damaged in transit.
text_image
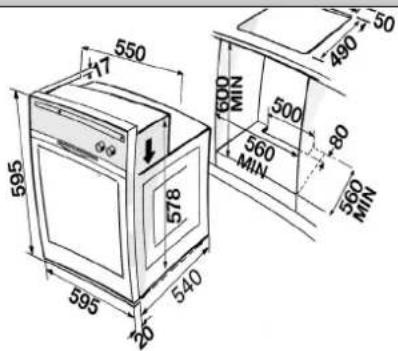
550 +17 9.9 595 578 540 595 20 600 N 500 80 560 MIN 560 MIN 490 50- Oven dimensions and kitchen unit dimensions are shown in the opposite figure.
- Kitchen units in contact with the oven must be heat resistant (80°C min).
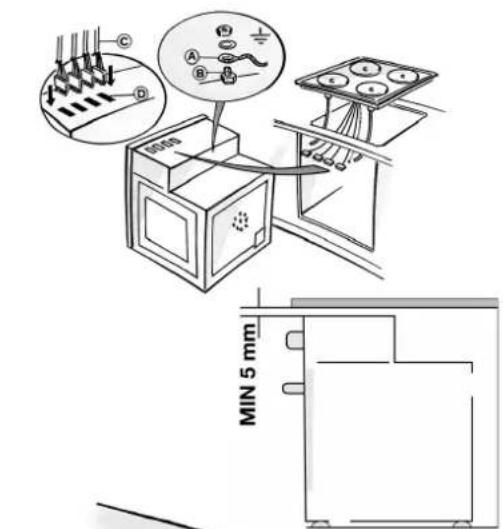
- Connect the earth wire (A) of the cooktop to the oven (B) as illustrated.
- Connect clamps (C) of the cooktop to the oven junction block (D) situated in the upper section, following the colour code indicated on the plate.
• Install the oven in the housing, lifting it at the sides, taking care not to trap the wires of the electrical supply cable. - For correct ventilation, follow the ventilation opening directions shown in the figure (at least 500 x 80 mm or an equivalent area). Also provide for at least 5 mm clearance between the top of the oven and the lower edge of the worktop. This space must not be obstructed by cross rails or other structural elements.
- During oven installation, care must be taken to ensure that the sides are not touching the front edges of the housing or adjacent drawers and doors (see picture).
- Carry out the electrical connections between cooktop and oven (see chapter "Electrical Connection").
- Secure the oven to the kitchen unit with screws (A) as shown.
text_image
MIN 5 mm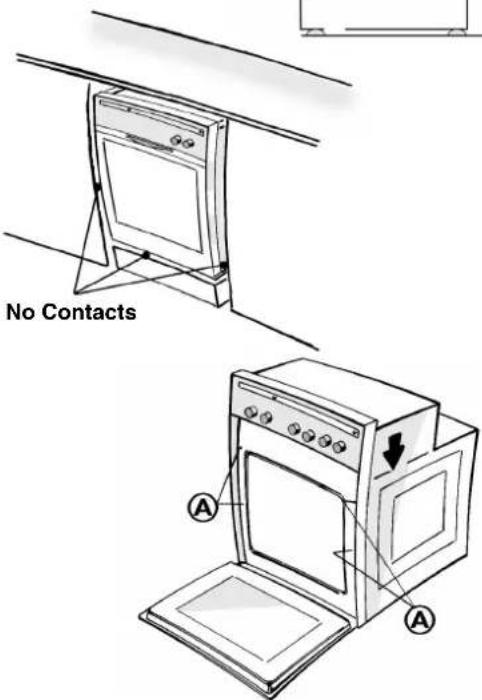
text_image
No Contacts A AELECTRICAL CONNECTION
- Warning: Do not connect to the power supply before you have finished connecting the oven and cooktop.
- Make sure the oven is installed and connected to the electricity supply by a qualified technician in accordance with the manufacturer's instructions and in compliance with local regulations.
- The installer is responsible for the correct electrical connection of the oven and the observance of the relative safety prescriptions.
Interconnecting cooktop and oven
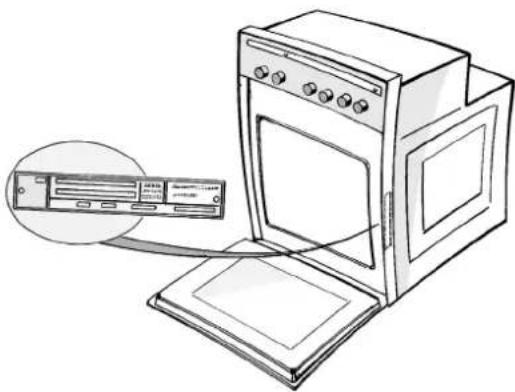
- Make sure that the voltage shown on the rating plate is the same as the power supply voltage in your home. The rating plate is on the front edge of the oven cavity (visible with oven door open).
- Use a type H05RR-F power cord (minimum length 800 mm):
| Conductors X number | Connection |
| 1N+ 1= | H05 RR-F 3x4 mm2 |
| 2N+ 1= | H05 RR-F 4x2,5 mm2 |
| 3 + 1= | H05 RR-F 4x2,5 mm2 |
| 3N+ 1= | H05 RR-F 5x1,5 mm2 |
- The oven must be connected to the electricity supply by means of an all-pole disconnect switch with minimum contact gap of 3 mm.
• The appliances must be earthed by law. - Do not use multiple plug adapters or extension leads.
• After the oven has been installed, the electrical components must be inaccessible.
natural_image
Line drawing of an open oven with a computer monitor and a close-up of the front panel (no text or symbols)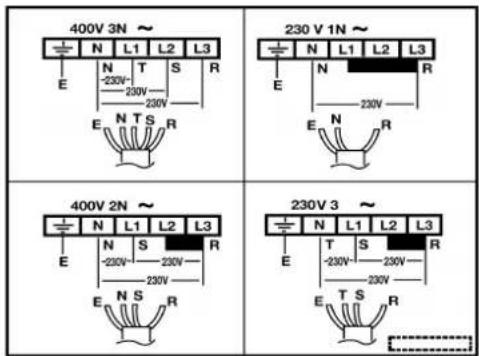
text_image
400V 3N ~ N L1 L2 L3 E N T S R -230V- 230V- 230V E N T S R 230V 1N ~ N L1 L2 L3 E N 230V E N R 400V 2N ~ N L1 L2 L3 E N S R -230V- 230V- 230V E N S R 230V 3 ~ N L1 L2 L3 E T S R -230V- 230V- 230V E T S R- To make the most of your new oven, read the users instructions carefully and keep them on hand for consultation in the future.
- Remove the cardboard protections and the protective plastic film.
- Remove the accessories from the oven and heat it 200° C for about an hour to eliminate the smell of protective grease and insulating materials. Keep the window open during this procedure.
PROTECTING THE ENVIRONMENT
1. Packing
- The packaging material can be 100% recycled, as confirmed by the recycling symbol (△)
2. Products
- The appliances are built from recyclable materials. If you decide to scrap the appliances act responsibly and observe local waste disposal by laws. Cut off the power cords so that the appliances cannot be connected to the mains.
natural_image
Simple black-and-white sketch of a four-leaf clover (no text or symbols)PRECAUTIONS AND GENERAL RECOMMENDATIONS
- Before any maintenance on the oven disconnect it from the electrical power supply.
- Keep children away from the oven when they are in use.
• The oven must be repaired or adjusted exclusively by a qualified technician. - Make sure that the electrical wires of other electrical appliances near the oven do not come into contact with hot parts and do not become entrapped in the oven door.
- Use oven gloves to remove baking trays and accessories when the oven is hot.
- Do not cover the bottom of the oven with aluminium foil.
- Do not place inflammable material in the oven - risk of fire if the oven is inadvertently switches on.
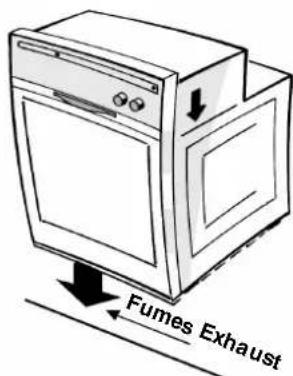
- During the cooking process, water evaporates from food. All ovens require this steam and other fumes to be vented from the oven cavity. For reasons of safety and aesthetics, we have determined that an opening at the bottom of the door is the optimum solution. Consequently, vapour
text_image
Fumes Exhaustmay be seen to be coming from this area on occasions (see picture). This is a normal occurrence and the bottom trim can be cleaned after removal of the dorr as described on "Cleaning the oven and Accessories".
- Heavy weights must not be placed on the open door as this may result in damage to the cavity and hinges. Max weight: 7 kg (15 lbs).
OVEN ACCESSORIES
- Accessories supplied depend on the model (refer to the "Product Description Sheet" supplied separately).
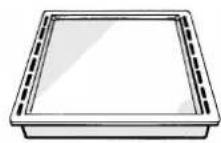
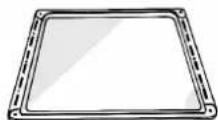
Drip tray
The drip tray is designed to collect fat and food particles when it is positioned under the grid; it can also be used as a griddle to cook meat, chicken and fish, with or without vegetables. When using the drip tray under the grid, pour in a little water to avoid fat spatters and smoke.
Baking tray
For cooking biscuits, meringues and pizzas.
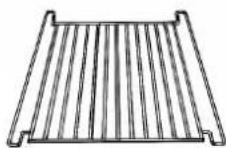
Grid
The grid can be used to grill food or as a support for baking trays, cake tins and other cooking receptacles. It can be placed on any of the runners in the oven.
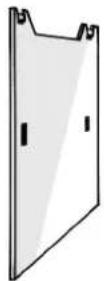
Catalytic panels (depending on model)
The catalytic panels have a microporous coating that absorbs fat spatters. We recommend an automatic cleaning cycle after cooking particulare fatty food.
- To clean the oven heat it to 200^ C when empty and leave it switched on for about an hour.
- At the end of the cycle and when the oven is cool, use a moist sponge to remove food residues if necessary.
Do not use detergent or cleaners - risk of damaging the catalytic enamel coating.
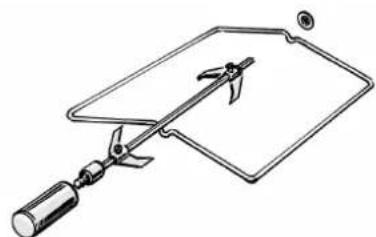
Spit (depending on model)
Use the spit as indicated in the relevant chapter in the "Product Description Sheet" supplied separately.
natural_image
Line drawing of a mechanical clamp or lever device with a handle and base, no text or symbols present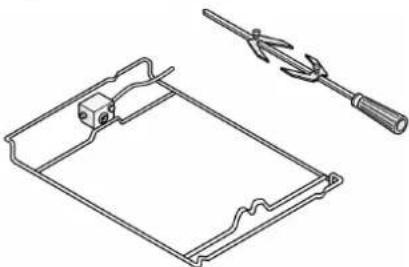
natural_image
Technical line drawing of a mechanical device with a fork and clip (no text or symbols)COOKING CHART
N.B: The oven functions depend on the model: refer to the separate Product Description Sheet.
| Food Static function Fan function Pastries | |||||||||
| Meat | Temp.°C | Runner from bottom | Cooking Time (Mins.) | Temp.°C | Runner from bottom | Cooking Time (Mins.) | Temp.°C | Runner from bottom | Cooking Time (Mins.) |
| Lamb (1,5 Kg) 220 2 | 80-90 200 2 75-85 | 180 2 70-80 | |||||||
| Kid (1,5 Kg) 220 2 80- | 90 200 2 75-85 | 180 2 70-80 | |||||||
| Mutton (1,5 Kg) 220 2 | 80-90 200 2 75-85 | 180 2 70-80 | |||||||
| Veal (1,5 Kg) | 220 2 80-90 | 200 2 75-85 | 175 2 70-80 | ||||||
| Beef (1 Kg) | 220 2 70-80 | 200 2 65-75 | 175 2 60-70 | ||||||
| Pork (1 Kg) | 220 2 70-80 | 200 2 65-75 | 175 2 60-70 | ||||||
| Rabbit (1,5 Kg) | 220 2 80-90 | 200 3 75-85 | 180 2 70-80 | ||||||
| Chicken (1 Kg) | 220 2 65-75 | 200 2 60- | 70 200 2 55-65 | ||||||
| Turkey (3 Kg) | 220 | 2 | 140-160 | 200 | 2 | 130-150 | 180 | 2 | 120-140 |
| Goose (2 Kg) | 220 | 2 | 100-120 | 200 | 2 | 90-100 | 200 | 2 | 85-95 |
| Duck (1,5 Kg) | 220 2 80-90 | 200 2 75-85 | 200 2 70-80 | ||||||
| Fish (~ 1 kg) | |||||||||
| Gilt head | 200 2 45-55 | 180 2 40- | 50 170 2 40-50 | ||||||
| Bass | 200 2 45-55 | 180 2 40- | 50 170 2 40-50 | ||||||
| Salmon | 200 2 45-55 | 180 2 40- | 50 170 2 40-50 | ||||||
| Tuna | 200 2 45-55 | 180 2 40- | 50 170 2 40-50 | ||||||
| Trout | 200 2 45-55 | 180 3 40-50 | 170 2 40-50 | ||||||
| Fish steaks (kg. 1) | |||||||||
| Swordfish | 200 2 45-55 | 180 3 35-45 | 170 2 30-40 | ||||||
| Tuna | 200 2 40-50 | 180 3 35- | 45 170 2 30-40 | ||||||
| Salmon | 200 2 40-50 | 180 3 35- | 45 170 2 30-40 | ||||||
| Cod | 200 2 40-50 | 180 3 35-45 | 170 2 30-40 | ||||||
| Fillet | 200 2 40-50 | 180 3 30- | 35 170 2 30-40 | ||||||
| Vegetables | |||||||||
| Stuffed peppers | 200 2 40-50 | 180 2 40- | 50 170 2 45-55 | ||||||
| Stuffed tomatoes | 200 2 60-70 | 180 3 55- | 65 180 2 50-60 | ||||||
| Baked potatoes | 200 2 60-70 | 200 3 55- | 65 190 2 55-65 | ||||||
| Au gratin | 200 2 70-80 | 200 3 65- | 75 190 2 60-70 | ||||||
| Desserts etc. | |||||||||
| Cakes | 160 2 35-45 | 150 3 30-40 | 150 2 40-50 | ||||||
| Cake with filling (fruit - cheese) | 180 2 40-50 | 160 3 45- | 55 160 2 45-55 | ||||||
| Tarts | 180 2 40-50 | 160 3 45-55 | 170 2 40-50 | ||||||
| Apple strudel | 200 2 45-55 | 190 | 3 45-50 | 180 2 45-55 | |||||
| Biscuits | 180 2 30-40 | 150 1-3 25-35 | 140 | 2-4 20-30 | |||||
| Choux pastry | 180 | 2 | 30-35 | 170 | 2-3 | 30-40 | 170 | 2-4 | 30-35 |
| Pies | 180 2 50-60 | 160 3 45- | 55 170 2 50-60 | ||||||
| Bread | 250 2 50-60 | 220 2 50-60 | 220 2 50-60 | ||||||
| Pizza | 250 2 20-30 | 250 1-3 | 30-40 | 250 2 20-30 | |||||
| Lasagne | 220 2 35-45 | 200 3 35-45 | 190 2 35-45 | ||||||
| Vol-au-vents | 225 | 2 | 15-20 | 200 | 1-3 | 15-20 | 190 | 2-4 | 15-20 |
| Souffles | 200 | 2 | 40-50 | 180 | 2 | 45-55 | 180 | 2 | 40-50 |
N.B.: Cooking times and temperatures are purely guidelines. Oven functions depend on the model. Refer to the separate Product Description Sheet.
COOKING CHART
| Food Grill Grill + Fan | ||||||
| Temp. °C | Runner from bottom | Cooking Time (Mins.) | Temp. °C | Runner from bottom | Cooking Time (Mins.) | |
| Sirloin steak 250 4 20-30 225 3 30-40 | ||||||
| Cutlets 250 4 15-20 225 3 20-40 | ||||||
| Sausages 250 4 20-30 225 3 30-40 | ||||||
| Pork chops 250 4 20-30 225 3 30-40 | ||||||
| Fish 225 4 15-25 220 3 20-30 | ||||||
| Chicken drumstick | 225 4 15-25 200 3 25-35 | |||||
| Kebabs | 225 4 20-30 200 3 35-45 | |||||
| Spare ribs | 225 4 30-40 200 3 40-50 | |||||
| Chicken halves | 225 3 35-45 200 3 40-50 | |||||
| Whole chicken | - | - | - | 200 | 3 | 60-70 |
| Roast (pork, beef, veal) (~ 1kg) | - | - | - | 175 | 2 | 90-100 |
| Duck | - | - | - | 180 | 2 | 90-120 |
| Leg of lamb | - | - | - | 200 | 2 | 80-90 |
| Roast Beef | - | - | - | 200 | 2 | 50-60 |
N.B.: Cooking times and temperatures are purely guidelines. Oven functions depend on the model. Refer to the separate "Product Description Sheet".
CLEANING THE OVEN AND ACCESSORIES
- When you finish cooking, wait for the oven to cool and then clean it to prevent the build-up of baked-on residues.
- If the food residues are baked on, use a specific oven cleaner and follow the manufacturer's instructions on the pack.
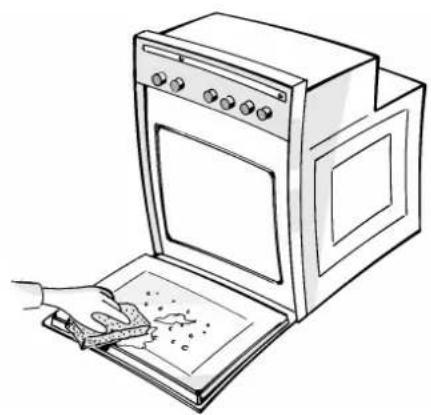
- Clean the exterior of the oven with a sponge and warm water.
- Do not use abrasive cleaners or pan scourers.
- Use a liquid detergent to clean the oven door window.
- Wash the accessories in a dishwasher or in the sink, using an oven cleaner.
- After the oven has been in prolonged use and when cooking on different levels (especially food with high water contents such as pizzas, stuffed vegetables, etc.) condensate may form on the inside of the door seal. When the oven is cool, dry any condensate with a cloth or sponge.
natural_image
Line drawing of an oven with a hand using a tool to clean food (no text or symbols)CLEANING THE OVEN AND ACCESSORIES
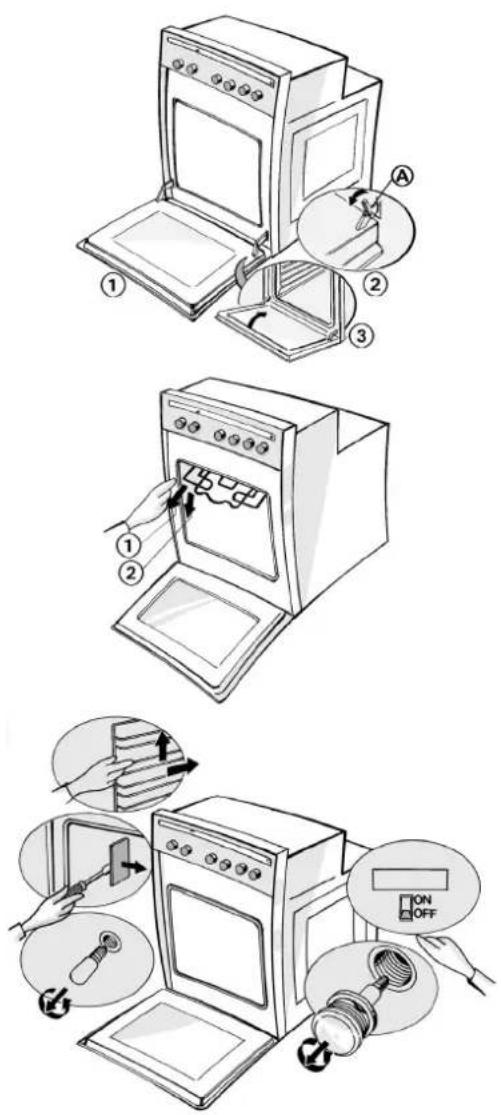
Removing the oven door (for cleaning)
- Open the oven door.
- Press hinge catches (A) forwards.
- Lift the catches until they engage and then remove the door.
- Warning: while you are cleaning the oven, ensure you do not disengage the hinge retainer catches.
- Refit the oven door by following the above steps in reverse order.
Dropping the grill element to clean the oven roof (depending on model)
- Do not attempt to clean the oven until it is cool.
- To clean the oven roof, pull out the grill element and lower it as far as it will go.
- Clean the oven roof and then return the grill element to its original position.
Changing the oven lamp
- Disconnect the oven from electrical supply.
- Unscrew the lamp cover.
- Change the lamp (see N.B.).
- Refit the lamp cover.
- Reconnect the electrical supply.
Changing the lateral lamp (depending on model)
- Disconnect the oven from electrical supply.
- Remove the left hand side grid.
- Use a screwdriver to prize off the lamp cover.
- Change the lamp (see N.B.).
- Reposition the lamp cover and press it against the oven wall until it clicks into place.
- Refit the side grid.
- Reconnect the power supply.
N.B:
Use exclusively 25 W 230 V lamps, type E-14, T300° C, available from After-Sales Service.
TROUBLESHOOTING GUIDE
Oven not working
- Switch the oven off and then on again to see if the problem persists.
- Check for the presence of mains electrical power.
- Oven selector on position "0" ♀ ?
-
Check whether you have made the temperature setting and the function setting.
-
If the electronic programmer (depending on model) display presents the message "OFF", press any key to reset the oven and then set the clock.
- Ensure that the mechanical programmer (depending on model) is set to 🏠
AFTER-SALES SERVICE
Before contacting After Sales Service:
- Try to solve the problem (see "Troubleshooting Guide").
- Turn off the appliance and restart it to see if the fault is repeated.
If after the above checks the fault still occurs, get in touch with the nearest After Sales Service.
Please give:
• a short description of the fault,
• the exact type and model,
- the service number (number after the word Service on the rating plate) is located on the right hand edge of the oven cavity (visible when the oven door is open). The service numbers are also indicated on the guarantee booklet,
- Your complete address and phone number.
natural_image
Cartoon illustration of a man in a suit holding a briefcase (no text or symbols)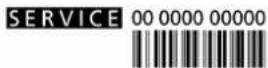
DECLARATION OF CONFORMITY CE
• These appliances are designed to come into contact with foodstuffs and they are constructed in compliance with Directive 89/109/EEC.
- The appliances are designed solely for use as cooking appliances. Any other use of the appliances (e.g. for room heating) is considered as improper use and potentially dangerous.
- The appliances are designed, built and sold in compliance with:
- The safety requirements of "Low Voltage" Directive 73/23/EEC.
• The protection requirements of EMC Directive 89/336/EEC.
• The requirement of Directive 93/68/EEC.