YF1600A1 - Pressure washer Yard Force - Free user manual and instructions
Find the device manual for free YF1600A1 Yard Force in PDF.


User questions about YF1600A1 Yard Force
0 question about this device. Answer the ones you know or ask your own.
Ask a new question about this device
Download the instructions for your Pressure washer in PDF format for free! Find your manual YF1600A1 - Yard Force and take your electronic device back in hand. On this page are published all the documents necessary for the use of your device. YF1600A1 by Yard Force.
USER MANUAL YF1600A1 Yard Force
natural_image
Technical line drawing of a YARD FORCE industrial machine with wheels and internal components (no text or symbols)QUESTIONS?
Our Customer Service staff is ready to provide assistance. In the case of a damaged or missing part, most replacement parts ship from our facility.
For immediate help with assembly, or for additional product information, visit www.YardForceUSA.com or email support@ForceToolsUSA.com
¿PREGUNTAS?
SAVE THIS MANUAL FOR REFERENCE
You will need this manual for safety instructions, operating procedures, and Warranty. The original sales invoice is required for warranty service.
Important safety instructions ....2
Safety features ....5
Parts and diagram list ....6
Technical data 7
Assembly and operation instructions ....8
Machine assembly 8
Operation instructions ....11
Cleaning detergent dispenser 12
Shutting down and storage ....14
Cleaning and maintenance ....15
Troubleshooting ....16
Warranty 19
IMPORTANT SAFETY INSTRUCTIONS
Please read all of the safety precautions before operating this machine every time. Please pay particular attention to all sections with following symbols.

WARNING
Could cause injury or death if not followed.

CAUTION
Could damage machine if not followed.

WARNING
When using this product, basic precautions should always be followed, including:
- Read all instructions before using the product.
- To reduce the risk of injury, do not operate the machine near children.
- Learn how to stop this product and release pressure quickly. Be thoroughly familiar with the controls.
- Stay alert - watch what you are doing.
- Do not operate this product when fatigued or under the influence of alcohol or drugs.
- Keep operating area clear of all people and pets.
- Do not stand on unstable surfaces. Do not overreach or stand on unstable support. Keep good footing and balance at all times.
- Follow the maintenance instructions specified in the manual.
- If replacement of the plug or cord is needed, use only identical replacement parts.
- This product or its power cord contains lead, a chemical known to cause cancer, birth defects or other reproductive harm. Wash hands after handling.

WARNING
Risk of injury Injection Hazard.
- Equipment can cause serious injury if the spray penetrates the skin.
- Do not point the gun at anyone or any part of the body. In case of penetration, seek medical aid immediately.

WARNING
Risk of injury.
DO NOT direct discharge stream at self or other persons.
• High-pressure jet can be dangerous if misused.
- The jet must not be directed at persons, animals, electrical devices, or the unit itself.

WARNING
Risk of Explosion - Do not spray flammable liquids.
- Do not use acids, alkaline, solvents or any flammable material in this product. These products can cause physical injuries to the operator and irreversible damage to the machine.

WARNING
Risk of Electric Shock.
- Inspect cord before using - do not use if cord is damaged.
- Keep all connections dry and off the ground.
- Do not touch plug with wet hands.

CAUTION
Gun Kick Back.
- Hold with both hands.
- The trigger gun safety lock prevents the trigger from being engaged accidentally.
- The safety feature DOES NOT lock trigger in the ON position.
GENERAL SAFETY RULES
- Never operate the machine without all components properly connected to the machine (handle, gun/wand assembly, nozzle, etc.).
- Never operate pressure washer with broken or missing parts. Check equipment regularly and repair or replace worn or damaged parts immediately.
- Never put hand or fingers over the nozzle or spray tip while operating the unit.
- Never spray flammable liquids or use pressure washer in areas containing combustible dust, liquids or vapors. An electric spark could cause an explosion.
- Never leave the wand unattended while the machine is running or switched on.
- Never disconnect the high pressure discharge hose from the machine while the system is pressurized. To depressurize machine, turn power and water supply off, then depress gun trigger 2-3 times.
- Never cover the pressure washer during operation to allow free air cooling.
- Always wear safety glasses or goggles when operating or performing maintenance.
- Always move switch on unit to "OFF" (O) position before connecting or disconnecting cord to electrical outlets.
- Always turn water supply "on" before turning pressure washer "on" unless draining for storage. Running pump dry causes serious damage.
- Always hold gun and wand firmly when starting and operating the machine.
- Always follow detergent manufacturer's label recommendations for proper use of detergents. Always protect eyes, skin and respiratory system from detergent if used.
- Always lock the trigger of spray gun in the safety position when not in use.
-
Do not use pressure that exceeds the operating pressure of any of the parts (hoses, fittings, etc.) in the pressurized system. Never use with any other manufacturer's accessories or components.
-
Do not spray electrical apparatus and wiring or the machine itself.
- Do not operate the pressure washer with the inlet water filter screen removed. Keep filter clear of debris and sediment.
- Discharge residual pressure by depressing the trigger until no more water comes out of the nozzle.
- Keep clear of nozzle. Never direct high pressure spray at any person, animal or self.
- To minimize the amount of water getting into the pressure washer, the unit should be placed as far as possible from the cleaning site during operation.
GROUND FAULT CIRCUIT INTERRUPTER PROTECTION
This device provides additional protection from the risk of electrical shock. Plug the Ground Fault Circuit Interrupter (GFCI) into a power outlet. Indicator should turn red. TEST BEFORE EACH USE. Press the "TEST" button. Red indicator should disappear. Press "RESET" button again for use. Do not use if above test fails.
DOUBLE-INSULATION INSTRUCTION

In a double-insulation product, two systems of insulation are provided instead of grounding. No grounding is provided on a double-insulated product, nor should a means for grounding be added to the product. Servicing a double-insulated product requires extreme care and knowledge of the system, and should be done only by qualified service personnel. Replacement parts of a double-insulated product must be identical to the parts they replace. A double-insulated product is marked with the words “DOUBLE-INSULATION” or “DOUBLE-INSULATED”.
The symbol “☐” may also be marked on the product.
SAFETY FEATURES
TOTAL STOP SYSTEM (TSS)
The pressure washer is equipped with a total stop system (TSS) that will sense when the trigger on the gun is depressed or released. It will open the power circuit to the motor, and cause the pressure washer motor to stop. The motor will start again when the trigger is depressed.

WARNING
The pressure washer is also equipped with a main power “ON/OFF” (I/O) switch located on the unit. It should always be moved to the “OFF” (O) position when the pressure washer is not being used to prevent possible injury or damage.
EXTENSION CORDS
If possible, do not use extension cords with this product. However, if you must use one, observe all of the warnings and instructions listed below:
Use a sufficient gauge:
Maximum extension cord length: 50' (15.2 m). Only use 12 or 14 AWG rated extension cords.
- Use only extension cords that are intended for outdoor use. These extension cords are identified by a marking that reads “Acceptable for use with outdoor appliances; store indoors while not in use.”
- Use only extension cords having an electrical rating not less than the rating of the product.
- Do not use damaged extension cords. Examine extension cord before using and replace if damaged. Do not abuse extension cord and do not yank on any cord to disconnect.
- Keep cord away from heat and sharp edges.
• Always disconnect the extension cord from the receptacle before disconnecting the product from the extension cord. - To reduce the risk of electric shock, keep all connections dry and off the ground. Do not touch plug with wet hands.

CAUTION
This machine has been designed for use with detergents that are specifically approved for pressure washer use. The use of other cleaning detergents may affect the operation of the machine and void the warranty.
PARTS AND DIAGRAM LIST
PARTS AND DIAGRAM LIST
text_image
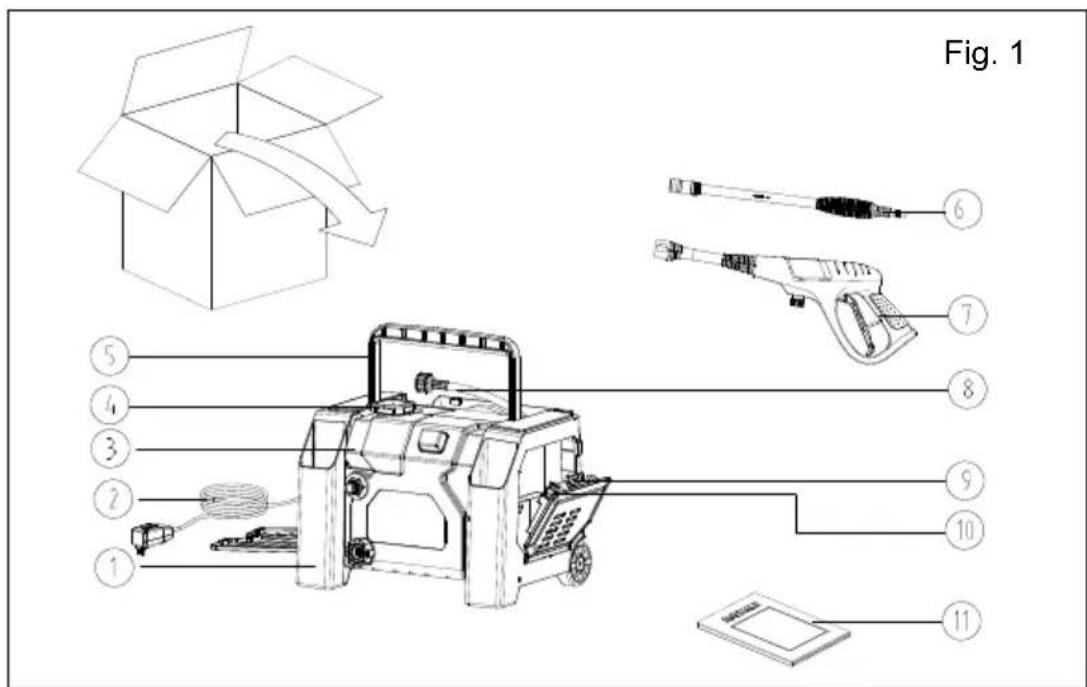
Fig. 1 ① ② ③ ④ ⑤ ⑥ ⑦ ⑧ ⑨ ⑩ ⑪Check contents of the box
As shown in Fig. 1
Carefully remove the pressure washer and parts from its packaging. Identify all the parts packaged in the carton against the parts list. Please contact our customer service center (Monday - Friday 8:30AM - 5:00PM ET) at (866) 902-9690 if anything is missing.
① high pressure washer
② Power Cable with GFCI
③ Detergent bottle
④ Detergent bottle cap
⑤ handle
⑥ Spray wand with quick-connect
⑦ Spray gun with trigger handle
⑧ Highe-pressure hose
⑨ Tips (25°, Soap and Turbo)
⑩ Tip neddle
⑪ Operator's manual

WARNING: If any parts are damaged or missing, do not operate this tool until the missing parts are replaced. Failure to heed this warning could result in serious personal injury.

NOTE! Always recycle the packaging in accordance with local recycling codes.
TECHNICAL DATA
| Model YF1600A1 | |
| Input voltage rating 120 V, 60 Hz | |
| Rated Power 13 A | |
| Working pressure 1600 PSI | |
| Max pressure 1750 PSI | |
| Rated Flow rate 1.20 GPM (275 LPH) | |
| Max. Flow rate 1.35 GPM (306 LPH) | |
| Inlet pressure 40~80 PSI | |
| Supply water temperature (max.) Cold tap water 104 °F (40 °C) | |
| Electrical cord 35 ft. (10.7 m) | |
| High-pressure hose 20 ft. (6.1 m) | |
| Detergent injection rate 3%~12% | |
ASSEMBLY AND OPERATION INSTRUCTIONS
Surface Preparation
Before starting any cleaning task, it is important to inspect the area for objects that could create a hazard. Remove any objects from the work area that could be tripped over, such as toys or outdoor furniture. Ensure that all doors and windows are closed tightly.
Water Supply (Cold Water Only)
Only draw water through the unit. For use with cold water supply only. Garden hose must be at least a 1/2" (13 mm) in diameter. Flow rate of water supply must not fall below 2 GPM (gallons per minute). Flow rate can be determined by running the water for one minute into an empty 5-gallon container. The water supply temperature must not exceed 104 °F (40 °C).

CAUTION
- Never use the pressure washer to draw in water contaminated with solvents (e.g. paint thinners, gasoline, oil, etc.).
- Dirt in the water inlet will damage the unit. To avoid this risk, we recommend checking the water filter (located inside the water inlet. To clean it out, see Maintenance section).
• Always prevent debris from being drawn into the unit by using a clean water source and an additional accessory water filter if required. - To prolong the life of the unit, rest the unit for 5 minutes after every 30 minutes of use.
MACHINE ASSEMBLY
Your YardForce pressure washer will need following tools free assemble before operation:
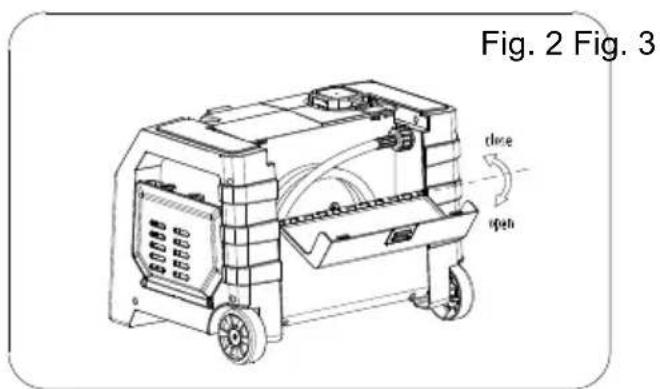
1. Take out high-pressure hose (Fig. 2)
Open the back storehousing and take out the hige-pressure hose for assembly.
2. Connect high-pressure hose to pressure washer (Fig. 3)
Attach the high-pressure hose to the pressure washer's outlet, tigthen by hand.
text_image
Fig. 2 Fig. 3 close open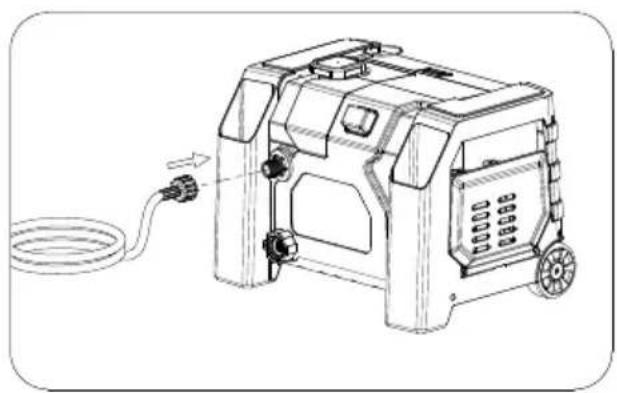
natural_image
Line drawing of a portable water heater with coiled cable and attached control panel (no text or symbols)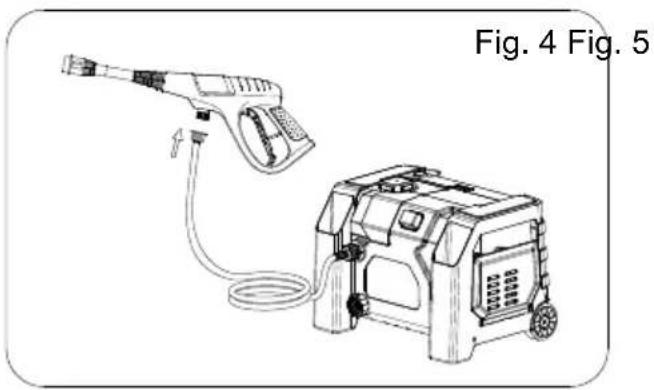
natural_image
Line drawing of a spray gun and a portable water heater device (no text or symbols)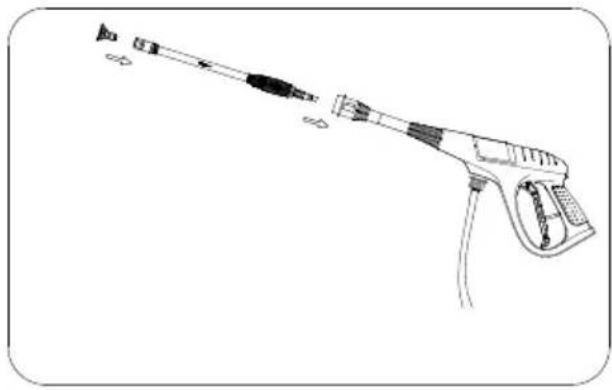
natural_image
Line drawing of a hairless spray gun with lever and trigger (no text or symbols)3. Connect high-pressure hose to spray gun (Fig. 4)
Attach high-pressure hose to the spray gun, tighten by hand until two parts are locked.
4. Fit the spray wand to spray gun (Fig. 5)
Attach desired color coded spray tip to quick-connect spray wand by pushing to ensure it is clicked in securely. Insert quick-connect spray wand into the spray gun, hand tighten until two parts are locked.

CAUTION
Placing any spray tip too close to a surface can result in permanent damage to the surface being sprayed. Maintain at least a 24" distance between the tip and the surface being sprayed until you have determined it is safe to move the tip closer to the surface.
natural_image
Technical line drawing of a portable industrial machine with hoses and control panel (no text or symbols)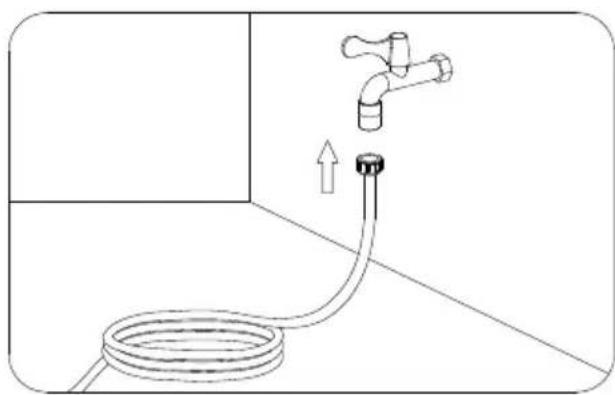
natural_image
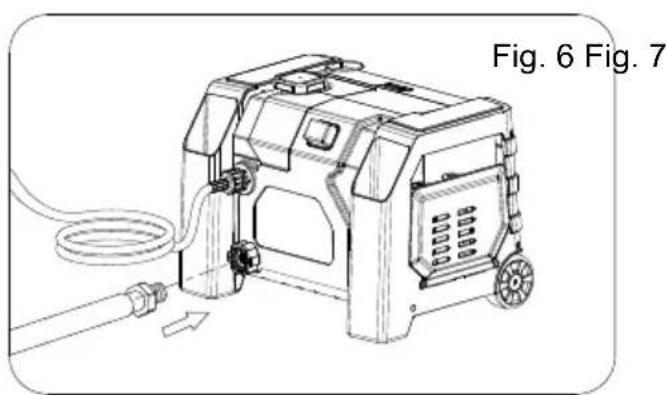
Diagram showing a pipe being inserted into a water tap, with an upward arrow indicating flow direction (no text or symbols)5. Connect garden hose (Fig. 6)
Attach the garden hose to water inlet of the pressure washer, tighten by hand.
6. Connect to water supply (Fig. 7)
Attach garden hose to water supply and turn water valve on to the fall on position. The water temperature must not exceed 104 °F and the supply pressure must be between 40 to 80 PSI.

CAUTION
The pressure washer must only be used with clean water. Use of unfiltered water or corrosive chemicals will damage the pressure washer.
This pressure washer is not intended to pump hot water. Never connect it to a hot water supply as it will significantly reduce the life of the pump.
text_image
Fig. 8 Fig. 9 OFF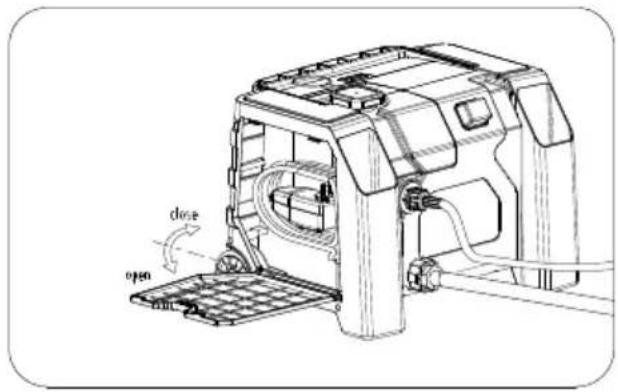
text_image
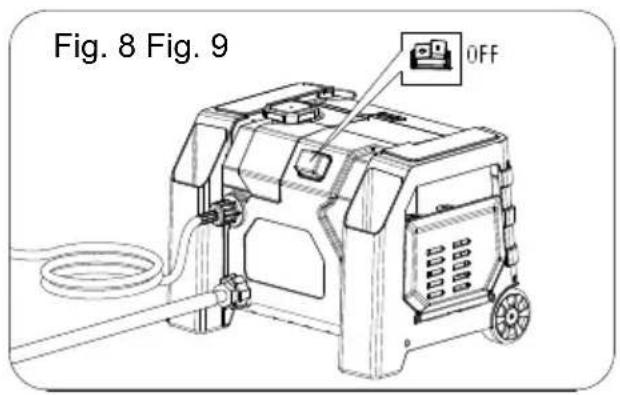
close open7. OFF position (Fig. 8)
Make sure the ON/OFF switch is on the OFF position before plugging in the unit, press the switch button with mark "O" to ensure it is off.
8. Take out power cord (Fig. 9)
Open the side storehousing and take out power cord with GFCI.
natural_image
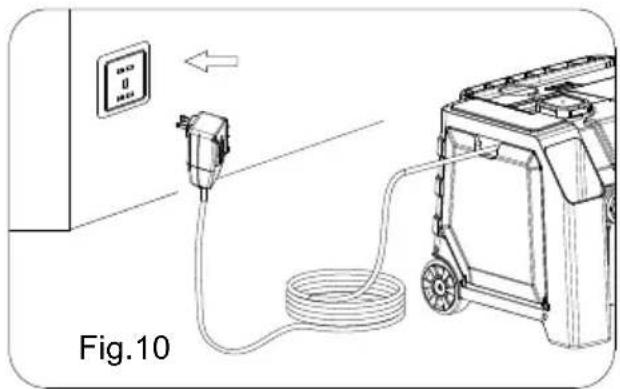
Diagram showing a power plug connected to a washing machine with coiled cable, labeled Fig.10 (no text or symbols on the diagram itself)9. Connect to power socket (Fig. 10)
Insert the plug into the power socket.

WARNING
The pressure washer is also equipped with a main power “ON/OFF” (I/O) switch located on the unit. It should always be moved to the “OFF” (O) position when the pressure washer is not being used to prevent possible injury or damage.
Ground Fault Circuit Interrupter Protection
This device provides additional protection from the risk of electrical shock. Plug the Ground Fault Circuit Interrupter (GFCI) into a power outlet. Indicator should turn red. TEST BEFORE EACH USE. Press the "TEST" button. Red indicator should disappear. Press "RESET" button again for use. Do not use if above test fails.

WARNING
Risk of injury, Do Not Direct discharge stream at self or other persons.

WARNING
Before cleaning any surface, an inconspicuous area should be cleaned to test spray pattern and distance for maximum cleaning results.
text_image
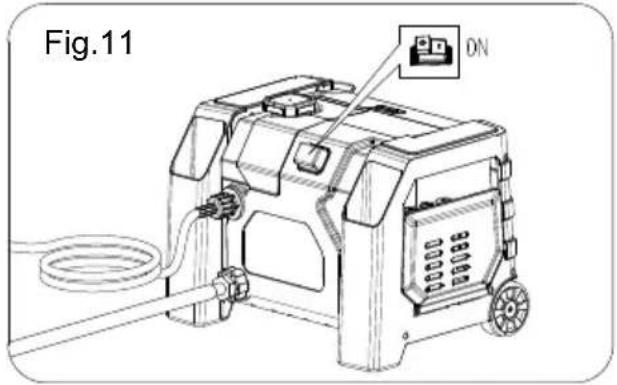
Fig.11 ONTurn ON the pressure washer by pressing the button with mark "I". The unit will run for a few seconds to build up pressure, then will stop on the function of total stop system (TSS)(Fig.11).
text_image
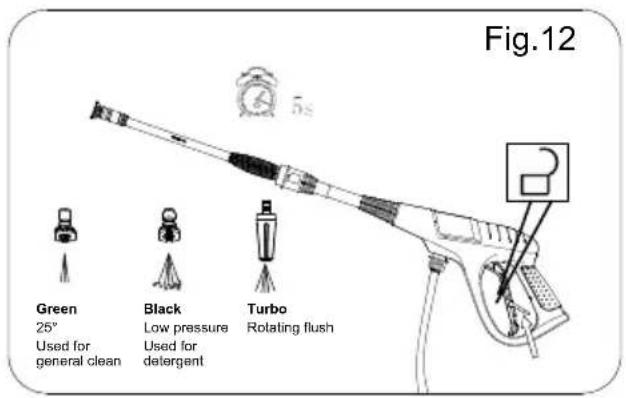
Fig.12 Green 25° Used for general clean Black Low pressure Used for detergent Turbo Rotating flushRelease the spray gun trigger lock and squeeze the gun trigger until there is a steady stream of water (Fig.12). Change the spray tip as per the recommendation above if necessary. Before changing spray tip, switch the machine OFF, depress trigger to release pressure and engage the trigger lock.

CAUTION
Make sure spray tip and wand is well locked. Do not move the spray tip while trigger is depressed.

CAUTION
If painted surfaces are peeling or chipping, use extreme caution as pressure washer may remove the loose paint from the surface.
For most cleaning applications, a twenty-five degree (25°) spray angle be recommended to avoid damage to the surface being sprayed.
The pressure of spray on the surface will increase when you move the wand closer to the surface.
text_image
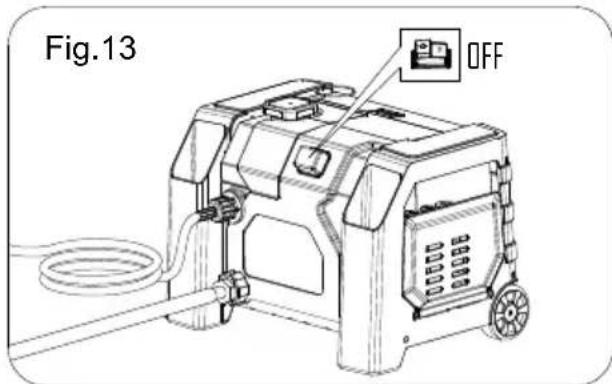
Fig.13 OFFTurn off the pressure washer by pressing the switch button with mark “O”, activate the safety latch for a break. For storage, drain machine after use by removing water connection, turning ON the machine for a few seconds and depressing gun trigger to release remaining water in the pump. Turn OFF immediately (Fig. 13).
CLEANING DETERGENT DISPENSER
Only use cleaning detergent recommended for pressure washers.
Always follow detergent manufacturer's label recommendations for proper use of detergent or soap. Always protect eyes, skin and respiratory system from detergent if used.

CAUTION
Working with detergent ensures a quick soaking of the dirt, and allows the high-pressure water to penetrate and remove the dirt more effectively.
To apply detergent you must be operating at low pressure. This provides a gentle application of detergent, with the pressure equivalent to the lowest garden hose. The high-pressure setting is used for cleaning, you cannot apply detergent when working at high pressure.
Always test detergent in an inconspicuous area before use.
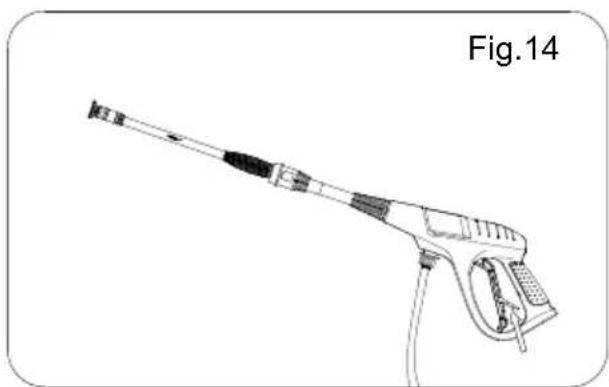
- Engage spray gun safety lock (Fig. 14).
natural_image
Line drawing of a hairless water gun (no text or symbols on the device itself)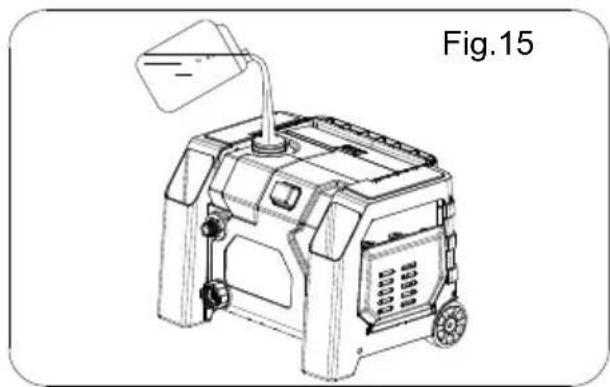
natural_image
Line drawing of a portable electronic device with a lamp and wheels (no text or symbols)- Attach the low-pressure spray tip (black) for soap or detergent application. Detergent application will only work with low pressure spray tip.
- Remove the cap of detergent tank, fill tank with detergent or soap and replace the cap. Apply detergent as instructed by the detergent manufacturer (Fig. 15).
- Turn on the pressure washer. Squeeze trigger to operate unit. The liquid detergent will automatically mix with water, and be discharged through the nozzle. Apply detergent to work surface, from bottom to top.
- Allow detergent to remain on the surface for a short time before rinsing. Do not allow detergent to dry on surface.
- Rinse with clean water under high pressure. On a vertical surface, rinse from the bottom up, then rinse from the top down to avoid streaking. Hold nozzle 6-8" from the cleaning surface, at a 45° angle.

CAUTION
Failure to follow detergent cleaning procedure will cause the dispensing system to become clogged.
Damage may occur to painted surfaces if a chemical is allowed to dry on surface. Wash and rinse a small section at a time. Avoid working on hot surfaces or in direct sunlight.
Never use:
- Bleach, chlorine products and other corrosive chemicals
• Liquids containing solvents (i.e., paint thinners, gasoline, oils)
• Tri-sodium phosphate products - Ammonia products
- Acid-based products
These chemicals will harm the unit and will damage the surface being Cleaned.
SHUTTING DOWN AND STORAGE
- (If you are not using detergent, go directly to Step 2.) When you have finished using the detergent dispensing system, fill detergent tank with clean water to rinse the system clean. Squeeze the gun trigger for one minute at low pressure so that all detergent remaining in system are thoroughly flushed out. Empty the remaining water, and rinse it until it is thoroughly cleaned.
- Turn off water supply and disconnect the garden hose from the faucet and the water inlet on the unit.
- Squeeze the gun trigger for a few seconds to release any remaining water until water spray stops, turn off unit immediately.
- Unplug power cord from the power outlet and wrap it then can store it in the side storehousing.
- Disconnect the high-pressure hose from the gun wand and wrap it, then can store it in the back storehousing.
- Engage gun trigger lock and disconnect the quick-connect wand from trigger handle, disassemble and replace the spray tip to tip holder on the unit, insert the wand into the wand holder, turn back the handle to the down position.
- Store the machine and accessories in a room that does not reach freezing temperatures. Do not store near furnace or other sources of heat as it may dry out the pump seals.

WARNING
Turn off water supply and squeeze trigger to depressurize the unit. Failure to do so could result in personal injury due to discharge of high-pressure Water.
Optimum Winterizing Procedure
Winterizing your pressure washer will help protect and prolong its life. We strongly recommend you follow the below steps using *Pressure Washer Pump Saver.
This will keep the internal parts lubricated, protected from rust, and prevents the pump from freezing.
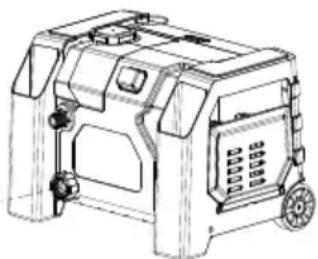
Fig.16
natural_image
Line drawing of a 3D printer or enclosure with wheels and internal components (no text or symbols)- Connect Pressure Washer Pump Saver hose onto the water inlet.
- Depress button on top of pump saver container.
- Continue until fluid exits the high-pressure hose for 15 seconds.
- Remove the hose from pump inlet (water inlet).
*Pressure Washer Pump Saver not included
CLEANING AND MAINTENANCE
Water Filter Screen
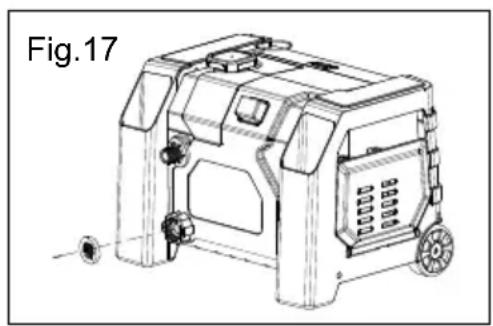
The pressure washer is equipped with a water inlet filter screen to protect the pump. If the screen is not kept clean, the flow of water to the pressure washer will be restricted and the pump may be damaged (Fig. 17).
natural_image
Technical line drawing of a mechanical device labeled Fig.17, showing internal components and wheels (no text or symbols on the device itself)- To clean inner water screen, remove the inlet adaptor and remove the filter screen from the pump inlet.
- Rinse screen until it is free of debris and blockage.
- Replace screen immediately to prevent any foreign matter from entering the pump.
A clogged water filter screen can cause excessive pressure to build-up in the pressure washer's pump. The wand's water filter screen should be cleaned regularly to avoid damaging the wand or pump. For new purchase please call at (866) 902-9690.
- Using needle-nose pliers, carefully take the water filter screen out of the wand.
- Clean the water filter screen by carefully inserting the water filter cleaning tool provided or a thin and sharp instrument (e.g. paperclip) into the filter to remove any dirt deposited. Rinse with clean water.
- Using needle-nose pliers, carefully reinsert the water filter screen into the wand. Ensure the screen fits tightly into the wand's water inlet opening.
Main body cleaning
Use only mild soap and damp cloth to clean the main body.

WARNING
Never use the unit to clean itself.
Connections
Connections on pressure washer hoses, gun and spray wand should be cleaned regularly and lubricated with non-water soluble grease.
Spray Tips Only
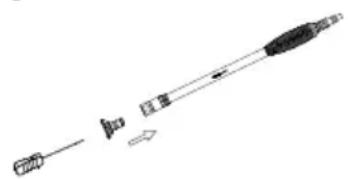
Clogging of the spray tips causes the pump pressure to be too high and cleaning is immediately required. Clean the spray tips by carefully inserting the needle provided into the tip to remove any dirt deposited (Fig. 18).
Fig.18
natural_image
Pure technical line drawing of a mechanical component without any text, numbers, or symbols
WARNING
To assure product safety and reliability, repairs should be performed by authorized service centers or other qualified service personnel, always use identical replacement parts.
TROUBLESHOOTING
Disconnect the machine from the power source before making any repairs.
| Symptom Cause Solution | ||
| Motor does not run when “ON” (I), fully connected and trigger depressed. | On/Off switch is in the “OFF” (O) position. | Turn switch to the “ON” (I) position. |
| Power cord is not plugged in. | Plug in power cord. | |
| Extension cord is too long. Extension cord is not proper gauge. Extension cord is damaged. | Replace extension cord with either a 25' (7.6 m) 14/3 gauge cord or a 50' (15 m) 14/3 gauge cord. | |
| Electrical outlet does not supply adequate power. | Try a different outlet. | |
| Tripped pressure washer thermal protector. | Allow to cool, and restart unit. | |
| Unit does not reach high pressure. | Diameter of garden hose is too small. | Replace with a 1" (25 mm) or 5/8" (16 mm) garden hose. |
| Water supply is restricted. | Check garden hose for kinks, leaks and blockage. | |
| Not enough water supply. Open water source fully. | ||
| Water inlet filter is clogged. | Remove filter and rinse in warm water. | |
| Power nozzle is in low pressure | Replace with desired high pressure tip. | |
| Pump is sucking air. | Check that hoses and fittings are airtight. Turn OFF machine, and purge pump by squeezing trigger gun until a steady flow of water emerges through the nozzle. | |
| Output pressure varies hOn/Off switch is in the “OFF” (O) position.igh and low. | Not enough inlet water supply. | Turn water on fully. Check garden hose for kinks, leaks or blockage. |
| Pump is sucking air. | Check that hoses and fittings are airtight. Turn OFF machine, and purge pump by squeezing trigger gun until a steady flow of water emerges through the nozzle | |
| Water inlet filter is clogged. | Remove filter and rinse with warm water. | |
| Discharge nozzle is obstructed. | Blow out or remove debris with a fine needle. | |
| Calcified gun, hose or power nozzle. | Run distilled vinegar through detergent tank. | |
| Detergent is not working. | Detergent container is empty. | Add more detergent. |
| Detergent bottle or suction tube not properly connected. | Check connections. | |
| Detergent is too thick. Dilute | detergent. | |
| Filter on detergent suction tube is clogged. | Run warm water through filter to remove build-up. | |
| Damaged or clogged detergent suction tube. | Remove obstruction or replace detergent suction tube. | |
| Nozzle is in high-pressure position. | Use low pressure (black) tip. | |
| Discharge nozzle is obstructed. | Blow out or remove debris with a fine needle. | |
| Garden hose connection leaks. | Loose fittings. Tighten fittings. | |
| Missing / worn rubber washer. | Insert new washer. | |
| Spray wand, extension, or nozzle leaks. | Spray nozzle not properly attached. | Ensure quick-connect wand is attached securely. Ensure spray tip is clicked in securely. |
| Broken o-ring or plastic insert. | Call the Toll-Free Hotline. | |
| Pump is noisy. | Pump is sucking air. | Check that hoses and fittings are airtight. Turn off machine and purge pump by squeezing trigger gun until a steady flow of water emerges through the nozzle. |
| Water filter is clogged. | Remove water filter and rinse in warm water. | |
| Water leaks from pump (up to 10 drops per minute is permissible). | Loose fittings. | Check that all fittings are tight. |
| Water seals are damaged or worn. | Call the Toll-Free Hot line. | |
| Oil is dripping. | Oil seals are damaged or worn. | Call the Toll-Free Hot line. |
| Motor buzzes but fails to run. | Supply voltage below minimum. | Verify that only the pressure washer is running on this circuit. |
| System has residual pressure. | Turn unit OFF, squeeze trigger on spray wand to release pressure, then turn unit ON. | |
| Voltage loss due to extension cord. | Unplug any extension cords attached and plug the unit directly into the outlet. | |
| Motor buzzes but fails to run. (continued) | Pressure washer not used for long periods. | Call the Toll-Free Hot line. |
| Residual friction among components. Unit might hum. | Disconnect water supply and power ON for 2 to 3 seconds, repeat couple times or until the motor starts. | |
| No water. | Water supply is OFF. Turn ON water supply. | |
| Kink in the garden hose. | Remove kink in garden hose. | |
If you have any questions, visit our website for key FAQ's, downloadable troubleshooting steps, instructional videos, and replacement parts purchase at www. ForceToolsUSA.com, or call our toll free hot line: 1-866-902-9690.
WARRANTY
Product Warranty
Please keep your original purchase receipt in a safe place as proof of purchase. Warranty coverage for this product must be verified by the original purchase receipt. The warranty period begins on the day that the product was purchased from an authorized retailer of Yard Force products. Warranty coverage only applies to the original purchaser and is not transferrable. Warranty coverage is only provided on products purchased from authorized Yard Force retailers.
Warranty only applies to products purchased and OPERATED in the USA. Any product purchased or operated outside of the USA is not covered by any warranty.
(1) Two-Year Warranty – Pump and Motor
The YF1600A1 has a 2-Year Limited Warranty on the electric motor and water pump from the date of purchase against manufacturer defects for residential use only. Commercial use voids the warranty. This warranty does not cover accidental damage, unreasonable use, normal wear and tear, neglect or non-compliance with the Operating, Safety and Maintenance Instructions. All service, outside of normal maintenance as described in this manual, must be done by an authorized service technician. Any unauthorized service or changes to the original configuration of this product will void the warranty. All parts and accessories used on and with this product must be manufactured and/or authorized by Merotec Inc., a SUMEC company.
(2) Ninety-Day Warranty – Accessories
The accessories included with the YF1600A1 including hose, trigger handle and wand, and other similar parts are warranted against manufacturer defects for residential use only for a period of 90 days from date of purchase.
Warranty does not cover loss of use or other consequential damages arising from any of the above, nor does it cover repairs made or attempted by unauthorized persons. This warranty is void if the product is used for commercial, rental or industrial purposes. Certain parts, attachments and accessories are subject to normal wear and tear and are excluded from the warranty.
Service and Warranty Claims Process
Contact the Yard Force Support Center toll-free at (866) 902-9690 Monday-Friday between 8:30 AM and 5:00 PM Eastern Time for service and warranty support.
Yard Force Service Support agents can help you troubleshoot problems over the phone to get you back up and running as quickly as possible. In the situation where service or warranty inspection is needed, please follow these steps:
-
Call Yard Force at (866) 902-9690 Monday-Friday between 8:30 AM and 5:00 PM Eastern Time.
-
Send in proof-of-purchase and serial number (if applicable) to confirm warranty Coverage as directed by Yard Force.
-
If service or a warranty evaluation is requested, Yard Force will provide an RGA number that should be used in all communications with Yard Force and is required to be indicated on the product itself and on the outside of the box.
- All shipments to Yard Force must have an RGA number. Any shipment received that does not have an RGA number clearly marked on the outside of the box will be refused.
- All shipments must be sent pre-paid, Yard Force does not pay for any shipping costs for service or warranty evaluation. Yard Force is not responsible for any packages that are lost by carrier. We recommend that shipments are made by a carrier that provides tracking and delivery confirmation.
For more information or to ask questions, please call toll-free (866) 902-9690 Monday-Friday between 8:30 AM and 5:00 PM Eastern Time.