
Ultra IPC-HDBW8232E-Z-SL - Security Camera Dahua Technology - Free user manual and instructions
Find the device manual for free Ultra IPC-HDBW8232E-Z-SL Dahua Technology in PDF.


User questions about Ultra IPC-HDBW8232E-Z-SL Dahua Technology
0 question about this device. Answer the ones you know or ask your own.
Ask a new question about this device
Download the instructions for your Security Camera in PDF format for free! Find your manual Ultra IPC-HDBW8232E-Z-SL - Dahua Technology and take your electronic device back in hand. On this page are published all the documents necessary for the use of your device. Ultra IPC-HDBW8232E-Z-SL by Dahua Technology.
USER MANUAL Ultra IPC-HDBW8232E-Z-SL Dahua Technology
Dahua Anti-corrosion Network Speed Dome Web3.0 Operation Manual
Version 1.0.0
Dahua Vision Technology CO., Ltd.
Table of Contents
1 Network Config....1
1.1 Network Connection....1
1.2 Log in 1
2 Live....5
2.1 Encode Setup....5
2.2 System Menu....6
2.3 Video Window Function Option 6
2.4 Video Window Setup....7
2.4.1 Image Adjustment....7
2.4.2 Original Size 8
2.4.3 Full Screen....8
2.4.4 Width and Height Ratio....8
2.4.5 Fluency Adjustment....9
2.4.6 Rule Info....9
2.4.7 PTZ....9
2.5 PTZ Configuration....9
2.5.1 PTZ Control....9
2.5.2 Virtual Joystick....10
2.5.3 PTZ Function....11
3 Playback....13
3.1 Playback....13
3.1.1 Function of Play....14
3.1.2 Playback File 14
3.1.3 Playback Cut (Clip) 17
3.1.4 Record Type 17
3.1.5 Progress Bar Time Format....17
3.1.6 Assistant Function 18
3.2 Picture Playback 18
3.2.1 Play....19
3.2.2 Playback File 19
3.2.3 Snapshot Type 20
4 Setup....21
4.1 Camera....21
4.1.1 Conditions....21
4.1.2 Video 31
4.1.3 Audio 37
Dahua Network Speed Dome Web3.0 Operation Manual
4.2 IVS Setup 38
4.2.1 Global Setup 38
4.2.2 Scene Setup....40
4.2.3 Rule Setup....42
4.2.4 Parameter....51
4.2.5 Calibrate Config 52
4.3 Network....53
4.3.1 TCP/IP 53
4.3.2 ONVIF 55
4.3.3 Connection....56
4.3.4 PPPoE....58
4.3.5 DDNS 59
4.3.6 IP filter....61
4.3.7 SMTP (e-mail) 62
4.3.8 UPnP....64
4.3.9 SNMP 65
4.3.10 Bonjour....68
4.3.11 Multicast....68
4.3.12 802.1x 69
4.3.13 QoS 70
4.4 PTZ....71
4.4.1 Protocol....71
4.4.2 Function 72
4.5 Peripheral 82
4.5.1 IR Light....82
4.6 Event 84
4.6.1 Video detect....84
4.6.2 Audio Detect....87
4.6.3 Alarm Setup....90
4.6.4 Abnormality....92
4.7 Storage Management....95
4.7.1 Schedule....95
4.7.2 Destination....99
4.7.3 Record control 101
4.8 System....102
4.8.1 General....102
4.8.2 Account....103
4.8.3 Default 108

Dahua Network Speed Dome Web3.0 Operation Manual
4.8.4 Import/Export 108
4.8.5 Auto Maintenance....109
4.8.6 Upgrade 109
4.9 Information 110
4.9.1 Version....110
4.9.2 Log....110
4.9.3 Online User....111
5 Alarm....113
6 Log out....115
Important
The following functions are for reference only. Some series products may not support all the functions listed below.
Cybersecurity Recommendations
Cybersecurity Recommendations
Mandatory actions to be taken towards cybersecurity
1. Change Passwords and Use Strong Passwords:
The number one reason systems get “hacked” is due to having weak or default passwords. It is recommended to change default passwords immediately and choose a strong password whenever possible. A strong password should be made up of at least 8 characters and a combination of special characters, numbers, and upper and lower case letters.
2. Update Firmware
As is standard procedure in the tech-industry, we recommend keeping NVR, DVR, and IP camera firmware up-to-date to ensure the system is current with the latest security patches and fixes.
"Nice to have" recommendations to improve your network security
1. Change Passwords Regularly
Regularly change the credentials to your devices to help ensure that only authorized users are able to access the system.
2. Change Default HTTP and TCP Ports:
- Change default HTTP and TCP ports for systems. These are the two ports used to communicate and to view video feeds remotely.
- These ports can be changed to any set of numbers between 1025-65535. Avoiding the default ports reduces the risk of outsiders being able to guess which ports you are using.
3. Enable HTTPS/SSL:
Set up an SSL Certificate to enable HTTPS. This will encrypt all communication between your devices and recorder.
4. Enable IP Filter:
Dahua Network Speed Dome Web3.0 Operation Manual
Enabling your IP filter will prevent everyone, except those with specified IP addresses, from accessing the system.
5. Change ONVIF Password:
On older IP Camera firmware, the ONVIF password does not change when you change the system's credentials. You will need to either update the camera's firmware to the latest revision or manually change the ONVIF password.
6. Forward Only Ports You Need:
- Only forward the HTTP and TCP ports that you need to use. Do not forward a huge range of numbers to the device. Do not DMZ the device's IP address.
- You do not need to forward any ports for individual cameras if they are all connected to a recorder on site; just the NVR is needed.
7. Disable Auto-Login on SmartPSS:
Those using SmartPSS to view their system and on a computer that is used by multiple people should disable auto-login. This adds a layer of security to prevent users without the appropriate credentials from accessing the system.
8. Use a Different Username and Password for SmartPSS:
In the event that your social media, bank, email, etc. account is compromised, you would not want someone collecting those passwords and trying them out on your video surveillance system. Using a different username and password for your security system will make it more difficult for someone to guess their way into your system.
9. Limit Features of Guest Accounts:
If your system is set up for multiple users, ensure that each user only has rights to features and functions they need to use to perform their job.
10. UPnP:
- UPnP will automatically try to forward ports in your router or modem. Normally this would be a good thing. However, if your system automatically forwards the ports and you leave the credentials defaulted, you may end up with unwanted visitors.
- If you manually forwarded the HTTP and TCP ports in your router/modem, this feature should be turned off regardless. Disabling UPnP is recommended when the function is not used in real applications.
Dahua Network Speed Dome Web3.0 Operation Manual
11. SNMP:
Disable SNMP if you are not using it. If you are using SNMP, you should do so only temporarily, for tracing and testing purposes only.
12. Multicast:
Multicast is used to share video streams between two recorders. Currently there are no known issues involving Multicast, but if you are not using this feature, deactivation can enhance your network security.
13. Check the Log:
If you suspect that someone has gained unauthorized access to your system, you can check the system log. The system log will show you which IP addresses were used to login to your system and what was accessed.
14. Physically Lock Down the Device:
Ideally, you want to prevent any unauthorized physical access to your system. The best way to achieve this is to install the recorder in a lockbox, locking server rack, or in a room that is behind a lock and key.
15. Connect IP Cameras to the PoE Ports on the Back of an NVR:
Cameras connected to the PoE ports on the back of an NVR are isolated from the outside world and cannot be accessed directly.
16. Isolate NVR and IP Camera Network
The network your NVR and IP camera resides on should not be the same network as your public computer network. This will prevent any visitors or unwanted guests from getting access to the same network the security system needs in order to function properly.
Privacy Protection Notice
As the device user or data controller, you might collect personal data of others' such as face, fingerprints, car plate number, Email address, phone number, GPS and so on. You need to be in compliance with the local privacy protection laws and regulations to protect the legitimate rights and interests of other people by implementing measures include but not limited to: providing clear and visible identification to inform data subject the existence of surveillance area and providing related contact.
About the Manual
- The Manual is for reference only. If there is inconsistency between the Manual and the actual product, the actual product shall govern.
- We are not liable for any loss caused by the operations that do not comply with the Manual.
- The Manual would be updated according to the latest laws and regulations of related regions. For detailed information, see the paper Quick Start Guide, CD-ROM, QR code or our official website. If there is inconsistency between paper Quick Start Guide and the electronic version, the electronic version shall prevail.
- All the designs and software are subject to change without prior written notice. The product updates might cause some differences between the actual product and the Manual. Please contact the customer service for the latest program and supplementary documentation.
- There still might be deviation in technical data, functions and operations description, or errors in print. If there is any doubt or dispute, please refer to our final explanation.
- Upgrade the reader software or try other mainstream reader software if the Guide (in PDF format) cannot be opened.
- All trademarks, registered trademarks and the company names in the Manual are the properties of their respective owners.
- Please visit our website, contact the supplier or customer service if there is any problem occurred when using the device.
- If there is any uncertainty or controversy, please refer to our final explanation.
1 Network Config
1.1 Network Connection
Speed dome and PC connection mainly has two ways. See Figure 1-1 and Figure 1-2.
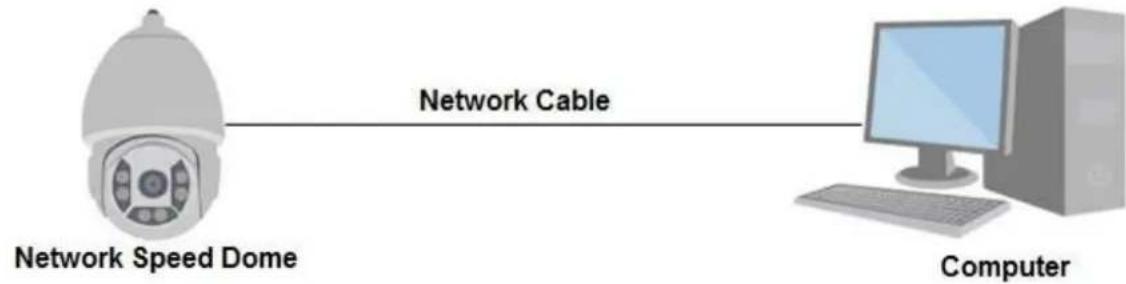
flowchart
graph LR
    A["Network Speed Dome"] -->|Network Cable| B["Computer"]
Figure 1-1
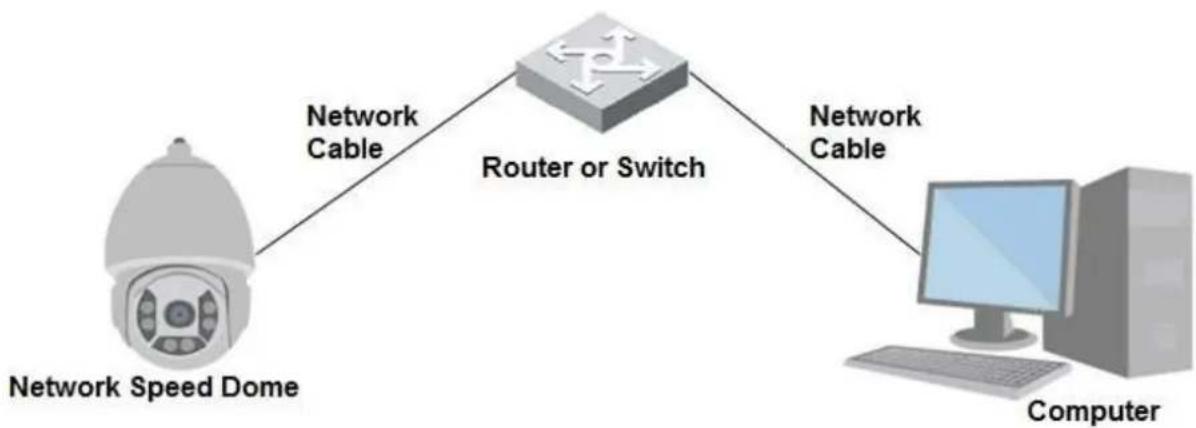
flowchart
graph TD
    A["Network Speed Dome"] -->|Network Cable| B["Router or Switch"]
    B -->|Network Cable| C["Computer"]
Figure 1-2
Before you access speed dome via the Internet, you need to have its IP address. You can use quick config tool to search IP of the speed dome. Please refer to Quick Configuration Tool manual.
1.2 Log in
Open IE and input speed dome address in the address bar.
For example, if your speed dome IP is 192.168.1.108, then please input http://192.168.1.108 in IE address bar. See Figure 1-3.
Dahua Network Speed Dome Web3.0 Operation Manual
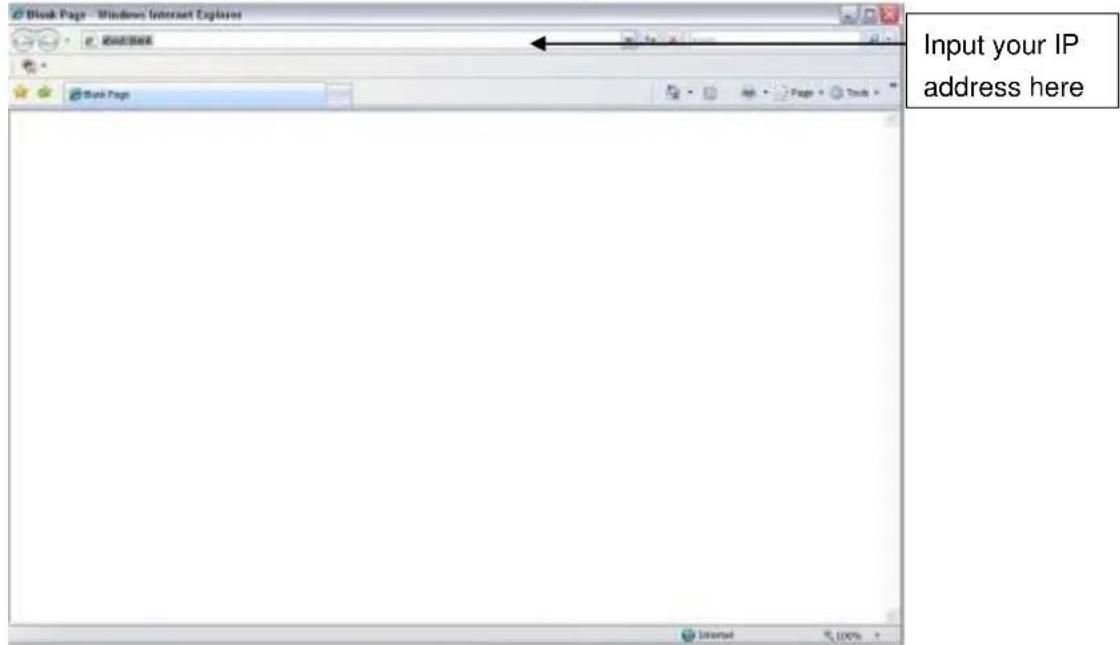
text_image
Input your IP address hereFigure 1-3
The login interface is shown as below. See Figure 1-4.
Please input your user name and password.
Default factory username is admin and password is admin.
Note: For security reasons, please modify your password after you first login.
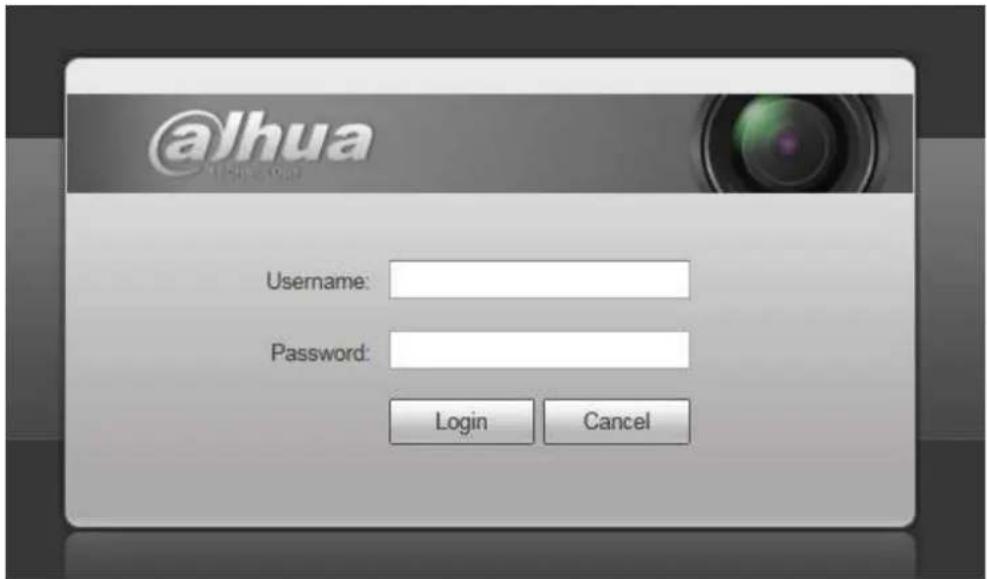
text_image
@Jhua Username: Password: Login CancelFigure 1-4
Dahua Network Speed Dome Web3.0 Operation Manual
If it is your first time to login in, you may see the interface shown as in Figure 1-5.
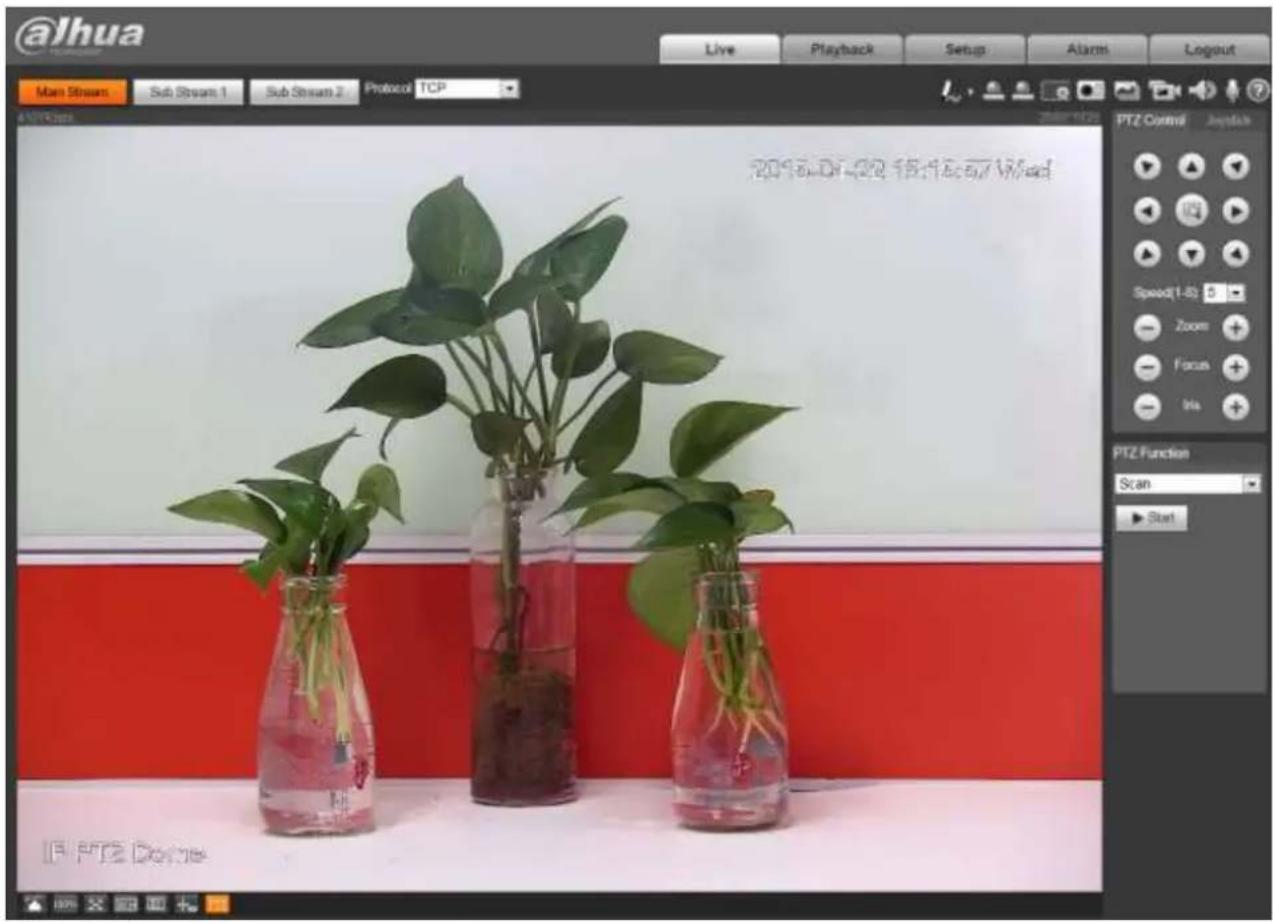
text_image
@lhua Live Playback Setup Alarms Logout Main Stream Sub Stream 1 Sub Stream 2 Protocol TCP PTZ Control Jockbox Speed(1-5) Zoom Focus Ins PTZ Function Scan ▶ Start IP PTZ DemoFigure 1-5
Click "Please click here to download and install the plug-in". The system pops up warning information to ask you whether run or save this plug-in. Please download to your local computer and then click webplugin.exe; you can see an interface shown as in Figure 1-6.
Dahua Network Speed Dome Web3.0 Operation Manual
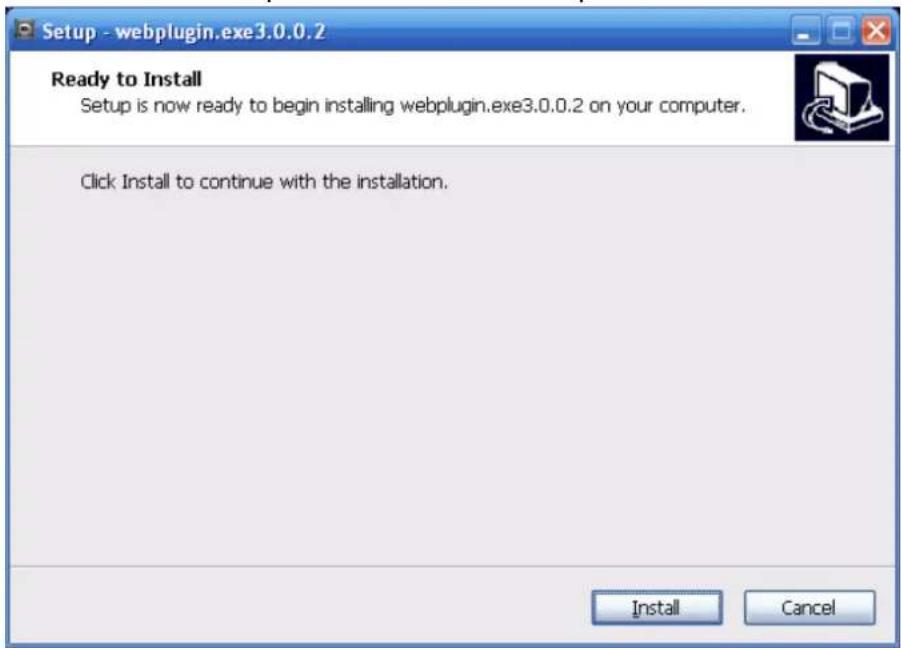
text_image
Setup - webplugin.exe3.0.0.2 Ready to Install Setup is now ready to begin installing webplugin.exe3.0.0.2 on your computer. Click Install to continue with the installation. Install CancelFigure 1-6
Click install, you will see Figure 1-7.
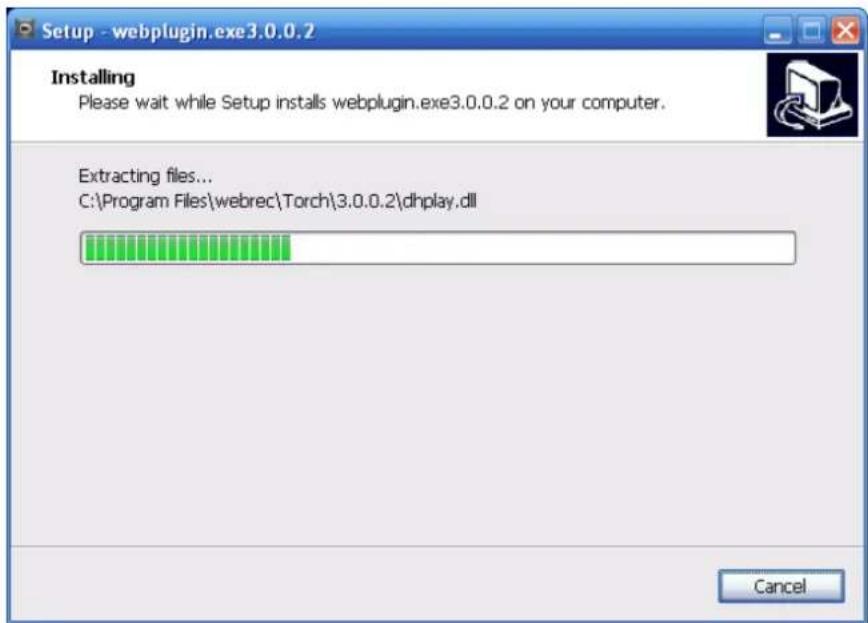
text_image
Setup - webplugin.exe3.0.0.2 Installing Please wait while Setup installs webplugin.exe3.0.0.2 on your computer. Extracting files... C:\Program Files\webrec\Torch\3.0.0.2\dhplay.dll CancelFigure 1-7
When plug-in installation is complete, the installation page closes automatically. The web-end will refresh automatically, and then you can view video captured by the camera.
2 Live
After you logged in, you can see the live monitor window. See Figure 2-1.
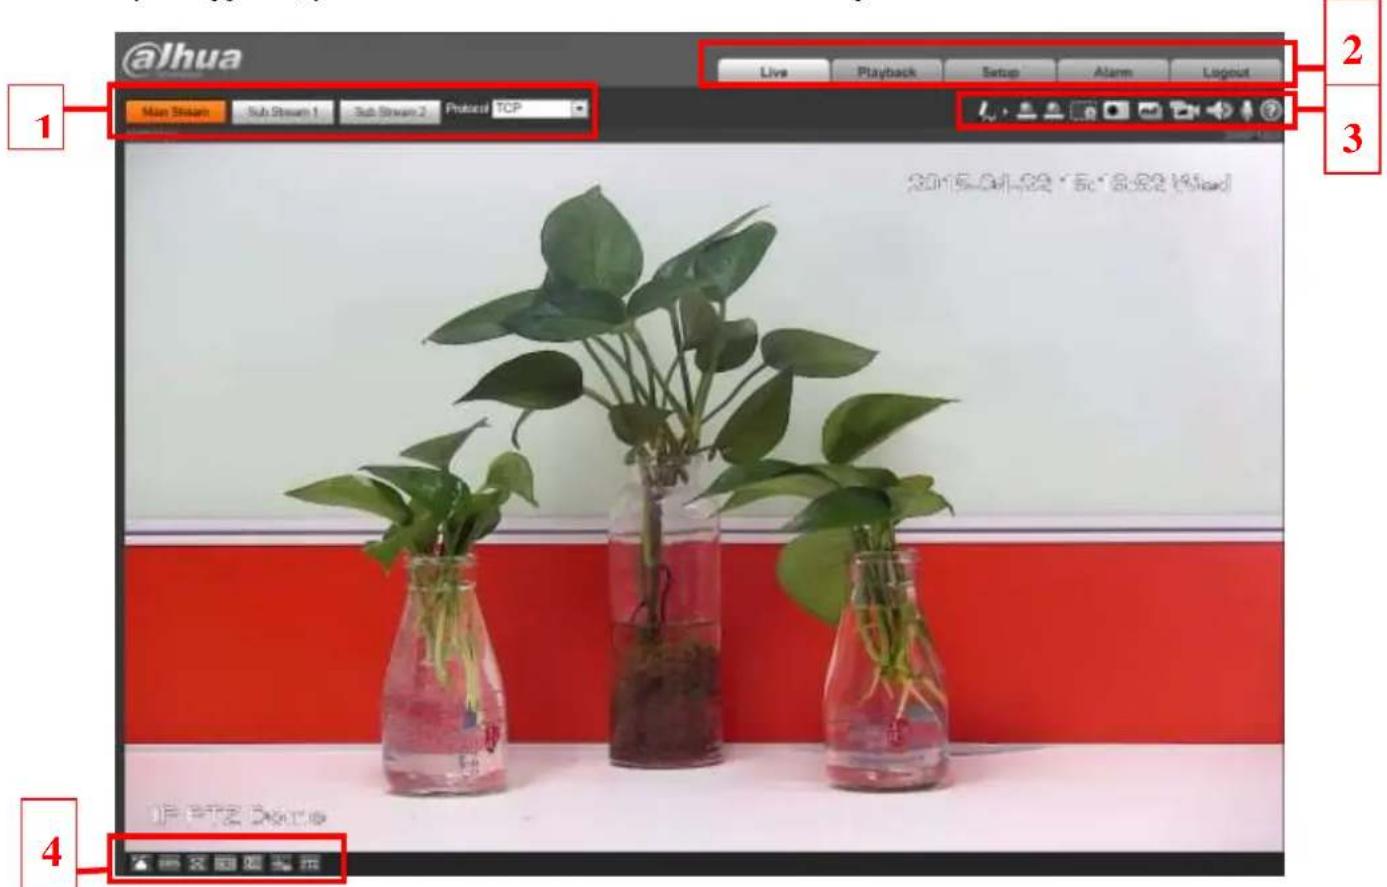
text_image
@Jhua Live Playback Setup Alarm Layout Main Stream Sub Stream 1 Sub Stream 2 Protact TCP 2015-01-02 5c 8:02 (load) 1 3 4 @艾圆度演示Figure 2-1
There are four sections:
- Section 1: Encode setup bar
• Section 2: System menu
● Section 3: Window function option bar
● Section 4: Window adjust bar
2.1 Encode Setup
The encode setup interface is shown as in Figure 2-2.

text_image
Main Stream Sub Stream 1 Sub Stream 2 Protocol TCPFigure 2-2
Please refer to the following sheet for detailed information.
| Parameter | Function |
| Main stream | Streaming media protocol connection, under main stream config, monitor video or not. Generally for storage and monitor. |
| Sub (Extra) stream 1 | Streaming media protocol connection, under sub stream 1 config, monitor video or not. When network bandwidth is insufficient, it substitutes main stream for monitoring. |
| Sub (Extra) stream 2 | Streaming media protocol connection, under sub stream 2 config, monitor video or not. When network bandwidth is insufficient, it substitutes main stream for monitoring. |
| Protocol | You can select stream media protocol from the dropdown list. There are three options: TCP/UDP/Multicast |
2.2 System Menu
System menu is shown as in Figure 2-3.
Please refer to chapter 2 Live, chapter 3 Playback, chapter 4 Setup, chapter 5 Alarm, chapter 6 Log out for detailed information.

text_image
Live Playback Setup Alarm LogoutFigure 2-3
2.3 Video Window Function Option
The interface is shown as below. See Figure 2-4.
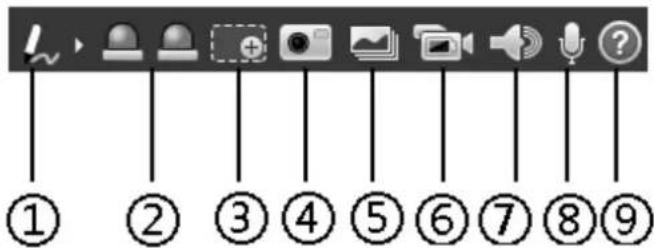
text_image
① ② ③ ④ ⑤ ⑥ ⑦ ⑧ ⑨Figure 2-4
Please refer to the following sheet for detailed information.
Dahua Network Speed Dome Web3.0 Operation Manual
| SN | Parameter | Function |
| 1 | Remark | Click it and then select pen color, you can write down the mark information on the preview interface. |
| 2 | Alarm Output 1/2 | Click it to trigger alarm, state description as follows:Red: means there is alarm output and alarm output is forced to be on.Grey: means there is no alarm output and alarm is forced to be off. |
| 3 | Zoom | When the video is in the original status, click it you can select any zone to zoom in. In the non-original status, you can drag the zoom-in zone in specified range. Right click mouse to restore previous status.Click it; you can use the middle button of the mouse to zoom in/out the video size. |
| 4 | Snapshot | Click the button to snapshot, save picture to path in Chapter 4.1.2.5. |
| 5 | Triple snap | Click it, system can snap at 1f/s. All images are saved to path in Chapter 4.1.2.5. |
| 6 | Record | Click it, system can record. All images are saved to path in Chapter 4.1.2.5. |
| 7 | Audio | Click it to turn on or off audio output when monitoring stream. |
| 8 | Bidirectional Talk | Click it to start or end bidirectional talk. |
| 7 | Help | Click it to open help file. |
2.4 Video Window Setup
The interface is shown as in Figure 2-5.
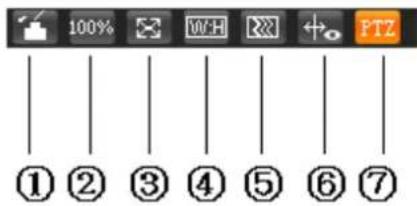
text_image
100% WCH PTZ ① ② ③ ④ ⑤ ⑥ ⑦Figure 2-5
2.4.1 Image Adjustment
Dahua Network Speed Dome Web3.0 Operation Manual
Click this button to display/hide image control interface. Click it to open picture setup interface. This interface is on the top right pane. See Figure 2-6
| Parameter | Function | ||
| Video setup |  | It is to adjust monitor video brightness. | Note:● All the operations here apply to WEB end only.● Please go to Setup->Camera->Conditions to adjust corresponding items. |
 | It is to adjust monitor video contrastness. | ||
 | It is to adjust monitor video hue. | ||
 | It is to adjust monitor video saturation. | ||
| Reset | Restore brightness, contrastness saturation and hue to system default setup. | ||
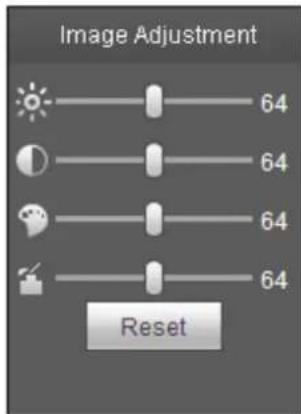
text_image
Image Adjustment 64 64 64 64 ResetFigure 2-6
2.4.2 Original Size
Click this button to go to original size. It is to display the actual size of the video stream. It depends on the resolution of the bit stream.
2.4.3 Full Screen
Click it to go to full-screen mode. Double click the mouse or click the Esc button to exit the full screen.
2.4.4 Width and Height Ratio
Click it to restore original ratio or suitable window.
2.4.5 Fluency Adjustment
There are three levels of fluency for you to select (real-time, normal, fluent). The default is normal.
2.4.6 Rule Info
Click it to enable the function that the intelligent rule will be displayed in the live interface. The default is enable.
2.4.7 PTZ
Click it to open PTZ setup interface. Please refer to chapter 2.5 for detailed setup information.
2.5 PTZ Configuration
2.5.1 PTZ Control
Before PTZ operation, please make sure you have properly set PTZ protocol.
| Parameter | Note |
| 1 Quick Position | Use mouse to draw a box in monitoring video, PTZ will rotate and focus to quickly positioning. |
| 2 PTZ direction | PTZ supports eight directions: left/right/up/down/upper left/upper right/bottom left/bottom right. |
| 3 Speed | It controls rotation speed. The longer the step length, the higher the speed.Step length control PTZ, zoom, focus and iris. |
| 4 Zoom/focus/Iris | Click to increase value and click to decrease value. |
The PTZ setup/Menu interface is shown as in Figure 2-7.
Dahua Network Speed Dome Web3.0 Operation Manual
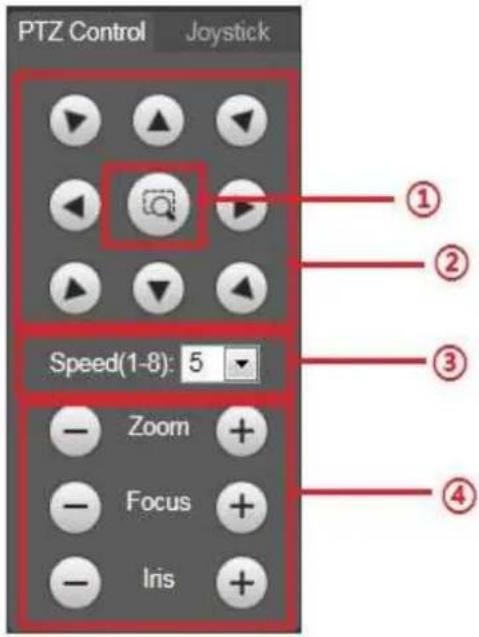
text_image
PTZ Control Joystick Speed(1-8): 5 Zoom Focus Iris ① ② ③ ④Figure 2-7
2.5.2 Virtual Joystick
The virtual joystick interface is shown as below. See Figure 2-8.
This function allows you to control the button in then center to simulate the joystick operation. You can use it to control device movement.
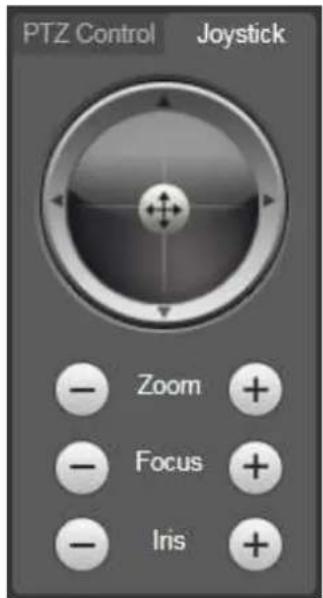
text_image
PTZ Control Joystick - Zoom + - Focus + - Iris +2.5.3 PTZ Function
Click PTZ set button, the interface is shown as in Figure 2-9. Here you can select scan, preset, tour pattern, assistant function and etc.
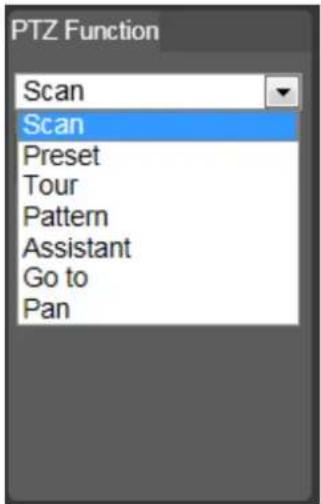
text_image
PTZ Function Scan Scan Preset Tour Pattern Assistant Go to PanFigure 2-9
Please refer to the following sheet for PTZ setup information.
| Parameter | Function |
| Scan | ● Select Scan from the dropdown list, click Start button, you can begin scan operation. Default SN is 1. |
| Preset | ● Input the preset value and then click View button, the camera turns to the corresponding position of the preset. |
| Tour | ● Select Tour from the dropdown list and then click Start button, you can begin tour. |
| Pattern | ● You can select Pattern from the dropdown list and then click Start button to begin PTZ movement. |
| Assistant | ● Reserved assistant function. |
| Go to | ● It is the accurate positioning function. Please input corresponding horizontal angle, tilt angle, and speed dome zoom speed and then click Goto button to go to a specified position.● One unit of the horizontal angle or tile angle stands for 0.1 degree. |
| Pan Rotation | Select pan rotation from the dropdown list and click “Start” button to make pan rotation for the camera. |
For detailed setup information, please go to Setup->PTZ->Function.
Click button to begin a PTZ operation. Now you can see it becomes Stop button. Click it again to stop current PTZ operation.
3 Playback
Web client playback supports video playback and picture playback.
Note:
Before playback, user shall set storage management as in Chapter 4.7.
3.1 Playback
The playback interface is shown as in Figure 3-1.
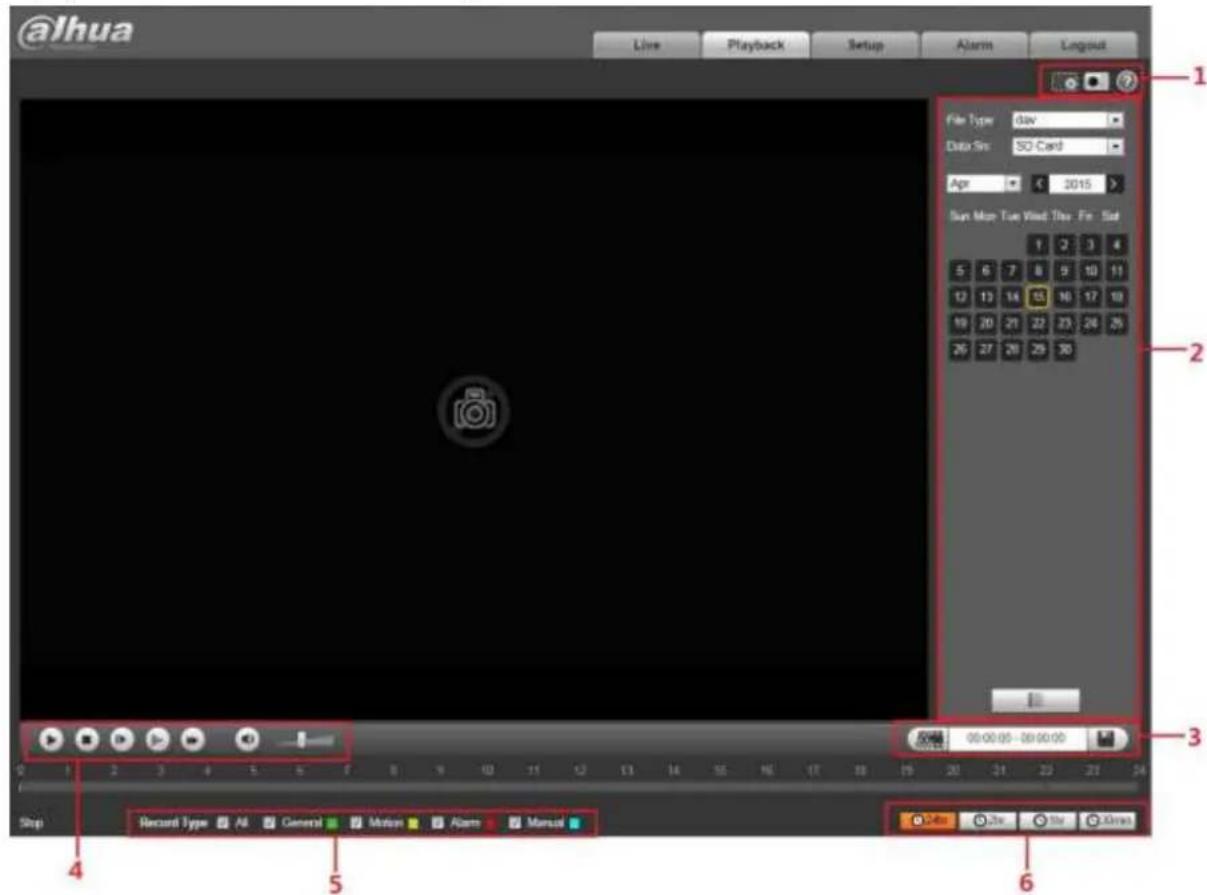
text_image
@lhua Live Playback Setup Alarm Layout File Type: dav Data Site: SO Card Apr 2015 Sun Map Tue Vid The Fri Sid 1 2 3 4 5 6 7 8 9 10 11 12 13 14 15 16 17 18 19 20 21 22 23 24 25 26 27 28 29 30 3 00:00:05 - 00:00:00 Record Type All General Motion Alarm Manual Stop 4 5 6Figure 3-1
There are six sections:
● Section 1: Assistant function
• Section 2: Playback file
- Section 3: Clip
● Section 4: Playback bar
- Section 5: Record type
● Section 6: Progress bar time format
3.1.1 Function of Play
The function of play is shown as in Figure 3-2.
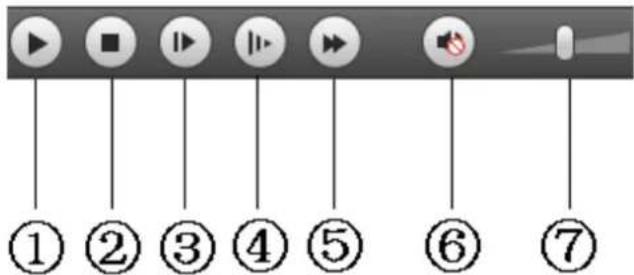
text_image
① ② ③ ④ ⑤ ⑥ ⑦Figure 3-2
| Parameter | Function |
| 1 Play | When you see this button, it means pause or not played record. Click this button, switch to normal play status. |
| 2 Stop | Click this button to stop playing. |
| 3 Frame by frame play | Click this button to go to next frame.Note:You shall pause record when you use this function. |
| 4 Slow | Click this button to play slowly. |
| 5 Quick | Click this button to play quickly. |
| 6 Mute | When this button displays, it means audio is silent. Click this button to switch back to normal. |
| 7 Volume | Left click mouse to adjust volume. |
3.1.2 Playback File
In calendar, blue date represents data currently has video record or snapshot. See Figure 3-3.
Dahua Network Speed Dome Web3.0 Operation Manual
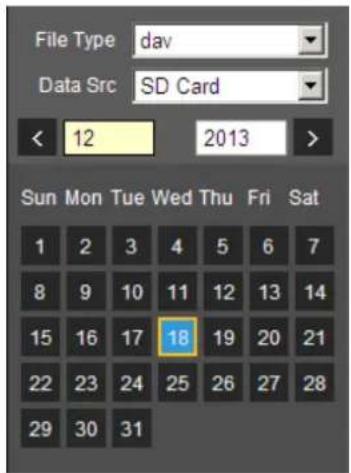
text_image
File Type dav Data Src SD Card < 12 2013 > Sun Mon Tue Wed Thu Fri Sat 1 2 3 4 5 6 7 8 9 10 11 12 13 14 15 16 17 18 19 20 21 22 23 24 25 26 27 28 29 30 31Figure 3-3
| Parameter | Function |
| File Type | Select “dav”, as video playback.Select “jpg” as picture playback. |
| Data Source | Default is SD card. |
Step 1.
Click data in blue, time axis displays record file progress bar in color. While, green represents normal record, yellow represents motion detect record, red represents alarm record, and blue represents manual record.
Step 2. Click certain time on progress bar, playback starts from this time. See Figure 3-4.

text_image
1 2 3 4 5 6 7 8 9 10 11 12 13 14 15 16 17 18 19 20 21 22 23 24Figure 3-4
Step 3. Click file list, select date file will be displayed in list.
Step 4. Double click file in list, playback this file and display file size, start time and end time. See Figure 3-5.
Dahua Network Speed Dome Web3.0 Operation Manual
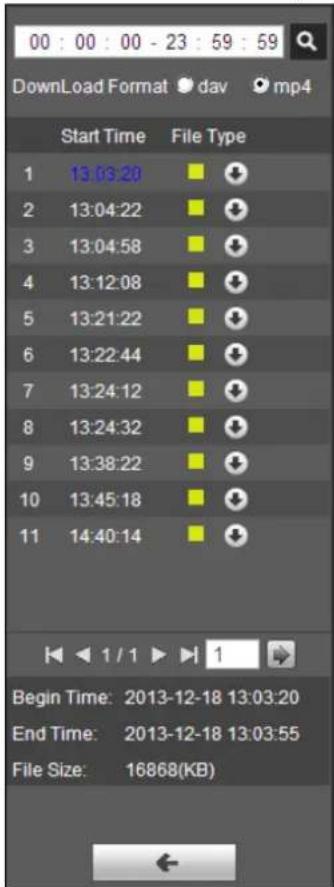
text_image
00 : 00 : 00 - 23 : 59 : 59 DownLoad Format dav mp4 Start Time File Type 1 13:03:28 2 13:04:22 3 13:04:58 4 13:12:08 5 13:21:22 6 13:22:44 7 13:24:12 8 13:24:32 9 13:38:22 10 13:45:18 11 14:40:14 Begin Time: 2013-12-18 13:03:20 End Time: 2013-12-18 13:03:55 File Size: 16868(KB)Figure 3-5
| Parameter | Function |
 Search Search | It means records within searched start time and end time on the date. |
| Record Download Format | There are two formats: dav, mp4. |
 Download Download | Record type is “dav”, click download button to download file to local.Record type is “mp4”, click download button and download file to path in Ch 5.1.2.5.Note:System does not support download and playback of MP4 file at the same time. |
 Back Back | Click back button to go to calendar interface. |
3.1.3 Playback Cut (Clip)
Note:
Playback cut function will automatically pause playing record as playback cut and playback cannot be at the same time.
Step 1.
Click start time to cut on time axis. This time must be within progress bar range.
Step 2.
Move mouse to cut icon. You will be ask to select start time. Click cut icon as finish cutting.
Step 3.
Click playback cut end time on time axis. This time must be within progress bar range.
Step 4.
Move mouse to cut icon, you will be asked to select end time. Click cut icon as finish cutting.
Step 5.
Click Save button to save file cut to path in chapter 4.1.2.5. See Figure 3-6.

text_image
00:00:00 - 00:00:00Figure 3-6
3.1.4 Record Type
Check record file type, only selected file will be displayed in progress bar and file list. See Figure 3-7.

text_image
Record Type ✓ All ✓ General ✓ Motion ✓ Alarm ✓ ManualFigure 3-7
3.1.5 Progress Bar Time Format
The interface is shown as in Figure 3-8.

Figure 3-8
Please refer to the following sheet for detailed information.
Dahua Network Speed Dome Web3.0 Operation Manual
| Parameter | Function |
 24 hours 24 hours | Click it, means video in past 24 hours. |
 2 hours 2 hours | Click it, means video in past 2 hours. |
 1 hour 1 hour | Click it, means video in past 1 hour. |
 30 min 30 min | Click it, means video in past 30 min. |
3.1.6 Assistant Function
Video playback assistant function is shown in Figure 3-9.
Figure 3-9
Please refer to the following sheet for detailed information.
| Parameter | Function | |
 | Digital Zoom | Click it, you can zoom in any area when then playback video is in original status. In non-original status, you can zoom in specified zone, Right click mouse to restore its original size.Click this button; you can scroll to zoom in/out video. |
 | Snapshot | Click this button; you can snapshot video under playback status. Snapshot will be saved to path in chapter 4.1.2.5. |
3.2 Picture Playback
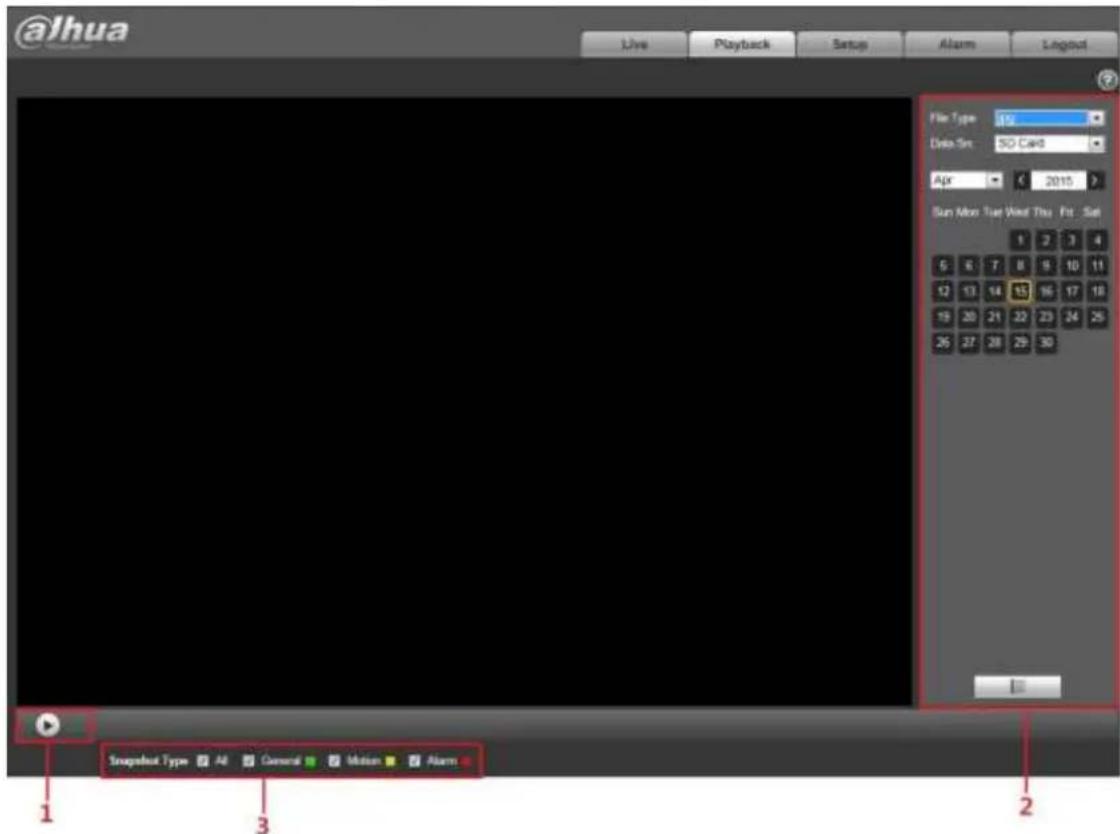
Web client picture playback interface has the following three functions. See Figure 3-10.
| Parameter | Function |
| 1 | Play function bar |
| 2 | Playback file bar |
| 3 | Snapshot type bar |
Dahua Network Speed Dome Web3.0 Operation Manual
text_image
@lhua Live Playback Setup Alarm Layout File Type: 49 Data Set: 50 Card Apr 2015 Sun Mon Tue Wed Thu Fri Sat 1 2 3 4 5 6 7 8 9 10 11 12 13 14 15 16 17 18 19 20 21 22 23 24 25 26 27 28 29 30 Snapshot Type All General Motion Alarm 1 2Figure 3-10
3.2.1 Play
The play button is shown as below. See Figure 3-11.

Figure 3-11
Default icon is, and it means pause or not played picture.
- Click play button to switch to normal play status. Icon becomes
- Click it to pause.
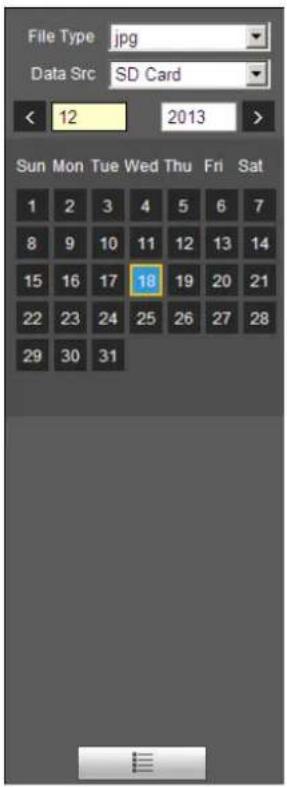
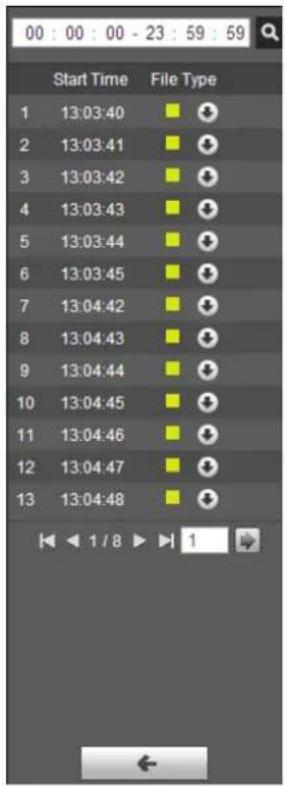
3.2.2 Playback File
Step 1: Click file list, select snapshot file of the date.
Step 2: Double click file in list to play this snapshot.
text_image
File Type jpg Data Src SD Card < 12 2013 > Sun Mon Tue Wed Thu Fri Sat 1 2 3 4 5 6 7 8 9 10 11 12 13 14 15 16 17 18 19 20 21 22 23 24 25 26 27 28 29 30 31Figure 3-12
text_image
00 : 00 : 00 - 23 : 59 : 59 Start Time File Type 1 13:03:40 2 13:03:41 3 13:03:42 4 13:03:43 5 13:03:44 6 13:03:45 7 13:04:42 8 13:04:43 9 13:04:44 10 13:04:45 11 13:04:46 12 13:04:47 13 13:04:48 1 / 8 1Figure 3-13
Please refer to the following sheet for detailed information.
3.2.3 Snapshot Type
Check snapshot file type, file list only displays file of selected type. See Figure 3-14.

text_image
Snapshot Type All General Motion AlarmFigure 3-14
4 Setup
Web client setup supports camera, network, PTZ, peripheral, event, storage, system and system info view.
4.1 Camera
4.1.1 Conditions
Here you can view device property information. Slight differences may be found due to different speed dome series. The setups become valid immediately after you set. See Figure 4-1.
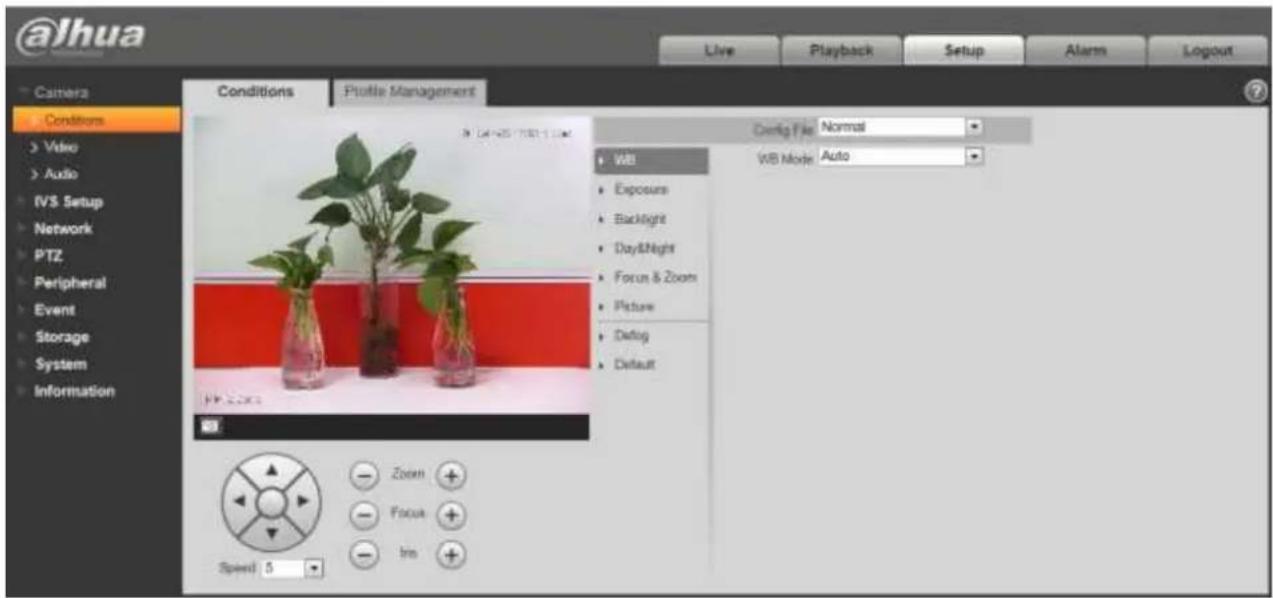
text_image
@Jhua Live Playback Setup Alarm Logout Camera Conditions Video Audio IVS Setup Network PTZ Peripheral Event Storage System Information Conditions Profile Management Config File Normal WB Exposure Backlight Day&Night Focus & Zoom Picture Debug Default WB Movie Auto Zoom Focus Info Speed 5Figure 4-1
Please refer to the following sheet for detailed information.
| Parameter | Function |
| Config File | Here you can set camera setup mode. It includes: normal/day/night. |
| White Balance | It is to set camera white balance. It includes: auto/manual/ATW/outdoor/indoor/outdoor auto/sodium light auto/sodium light. |
| Exposure | It is to set camera exposure mode. It includes: auto and manual, iris priority, shutter priority. |
| Backlight | It is to set camera backlight mode, including WDR, HLC, and BLC. |
Dahua Network Speed Dome Web3.0 Operation Manual
| Day/Night | It is to set camera day/night switch mode.The type includes: electronic/mechanical.It includes four modes: auto/B&W/Color/Photosensor. |
| Zoom& Focus | It is to set camera zoom and focus mode. It is to set digital zoom/camera zoom rate. Focus mode includes:auto/manual/semi auto. |
| Picture | It is to set camera video. It includes:style/hue/brightness/saturation/ chroma control/gamma/picture flip/picture freeze/sharpness /sharpness control |
| Default | It is to restore factory default setup. |
Important
Please make sure your purchased camera supports all the functions listed here.
White balance interface is shown as below. See Figure 4-2.
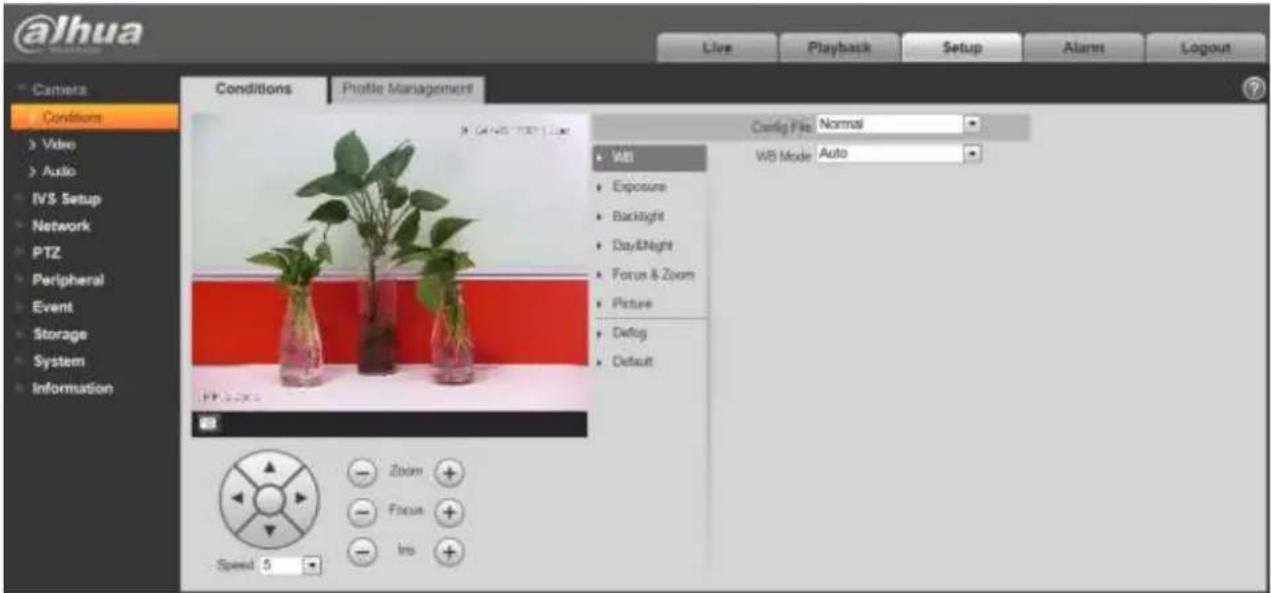
text_image
@lhua Live Playback Setup Alarms Logout Camera Conditions Video Audio IVS Setup Network PTZ Peripheral Event Storage System Information Conditions Profile Management WB Exposure Backlight Day/Night Focus & Zoom Picture Debug Default Config File Normal WB Mode Auto Speed 5 Zoom Focus InsFigure 4-2
Please refer to the following sheet for detailed information.
Dahua Network Speed Dome Web3.0 Operation Manual
| Parameter | Function |
| WB mode | ● It is to set camera white balance. It includes: auto/manual/ATW/outdoor/indoor/outdoor auto/sodium light auto/sodium light. ● For manual mode, you can input red gain and blue gain value. |
4.1.1.2 Exposure
Exposure interface is shown as below. See Figure 4-3.
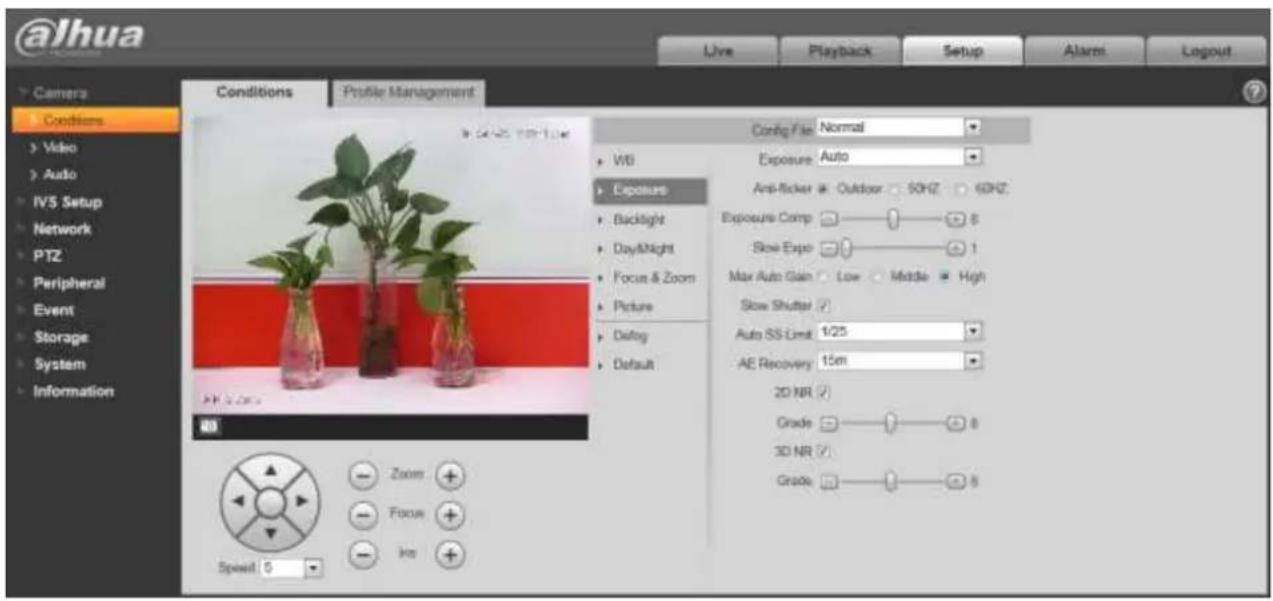
text_image
@lhua Live Playback Setup Alarm Logout Camera Conditions Video Auto IVS Setup Network PTZ Peripheral Event Storage System Information Conditions Profile Management Config Fix: Normal Exposure: Auto Anti-Flower Outdoor 50HZ 60HZ Exposure Comp 6 Slow Expo 1 Max Auto Gain Low Middle High Slow Shutter Auto SS Limit 1/25 AE Recovery 15m 2D NR Grade 8 3D NR Grade 8 Zoom Focus Ira Speed 5Figure 4-3
Please refer to the following sheet for detailed information.
| Parameter | Function |
| Exposure mode | It is to set camera exposure mode. It includes: auto and manual. The default setup is auto.For the auto exposure mode, the gain, shutter and iris are in auto mode.For manual exposure mode, the gain, shutter and iris are in manual mode.For iris priority mode, iris needs manual setting, gain, shutter auto adjustment.For shutter priority mode, shutter needs manual setting, gain, iris auto adjustment. |
Dahua Network Speed Dome Web3.0 Operation Manual
| Anti-flicker | 50Hz: Under the condition of AC/50Hz, automatically adjust exposure and ensure there are no horizontal stripes in the image according to the scene brightness.60Hz: Under the condition of AC/60Hz, automatically adjust exposure and ensure there are no horizontal stripes in the image according to the scene brightness.Outdoor: Able to switch exposure mode under this mode, and reach the effect of corresponding exposure mode. |
| Exposure compensation | It can adjust video whole brightness via setting exposure object brightness so that it can suit for different environments. |
| Gain level | It is to set video brightness under the low illumination environments. |
| Shutter | It is to set camera exposure time. |
| Iris | It is to set the light amount. |
| Slow exposure | If the light may change greatly, you can use slow exposure to get image so that the camera can get stable video. |
| Max Auto gain | It is to set camera max gain. |
| Slow shutter | In lower illumination environment, you can lower the cameras auto exposure time to capture the image and enhance the definition. For the moving object, the trail may appear. Please note it is valid in auto mode. |
| Auto Slow Shutter Min value | It is to set camera min shutter value. |
| Auto Exposure Recovery | After manual adjustment “Iris +” or “Iris −”, scheduled recovery to exposure mode before adjustment. |
| 2D NR | It is to control noise. The higher the level is; the small the noise is. Comparing with the previous one, the picture may become a little bit blurry. |
| 3D NR | It is to control noise. The higher the level is; the small the noise is. Comparing with the previous one, there may appear some smear phenomenon. |
4.1.1.3 Backlight
The backlight interface is shown as in Figure 4-4.
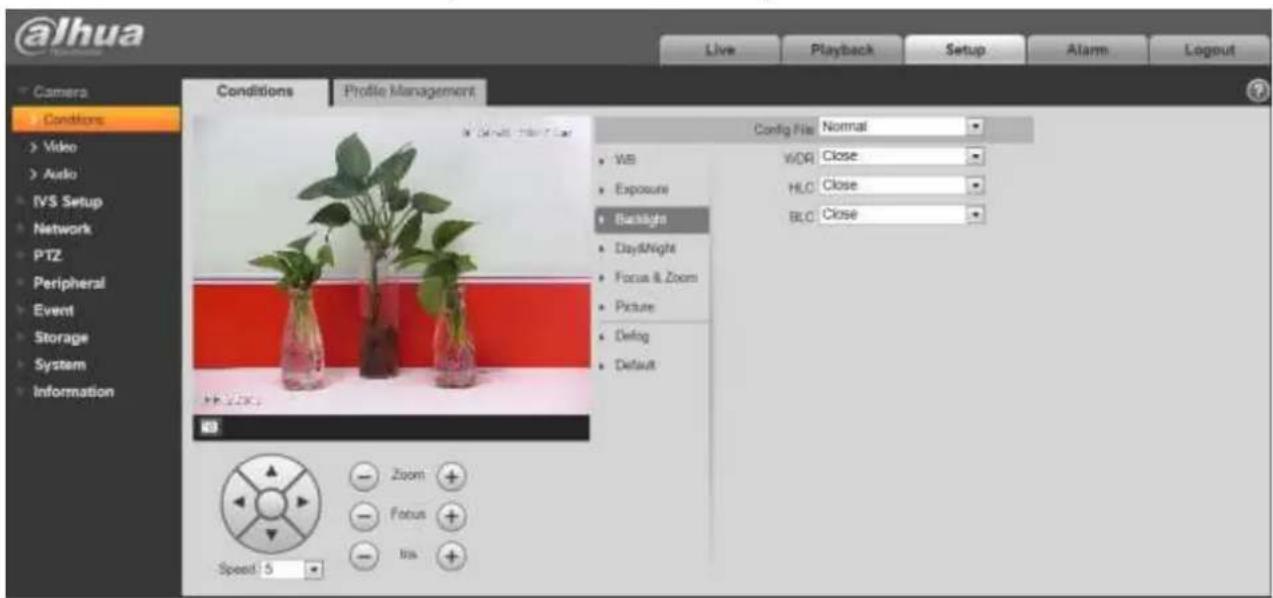
text_image
@lhua Camera Conditions Video Audio IVS Setup Network PTZ Peripheral Event Storage System Information Live Playback Setup Alarm Logout Conditions Profile Management Config File Normal WB WDR Close Exposure HLC Close Backlight BLC Close Day/Night Focus & Zoom Picture Debug Default Zoom Focus Ins Speed 5Figure 4-4
Please refer to the following sheet for detailed information.
| Parameter | Function |
| WDR Mode | For the environments of strong contrast effect, it can auto adjust image contrast so that you can see the dark and bright section at the same time. |
| HLC | When there is strong light source in the environment, system can auto adjust video brightness to remove the over exposure effect. |
| BLC | For the environments of strong contrast effect, such as under the backlight environment, system can auto adjust image contrast to get clear object. |
4.1.1.4 Day/Night
Important
Please make sure your purchased product camera supports this function.
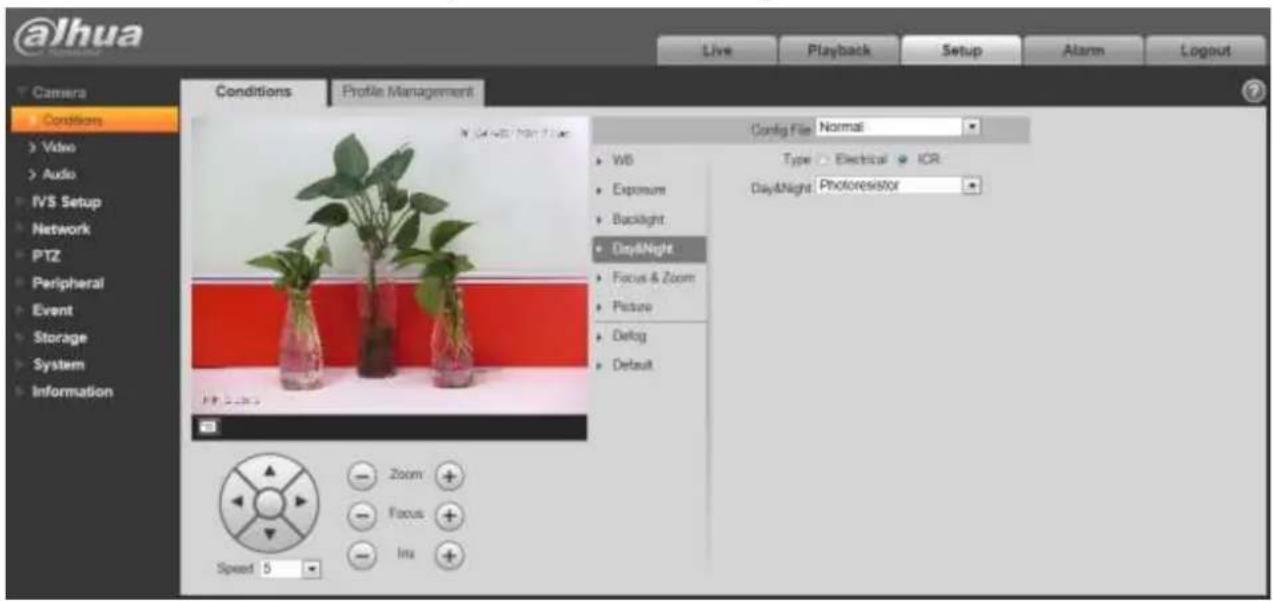
The day/night mode is shown as in Figure 4-5.
Dahua Network Speed Dome Web3.0 Operation Manual
text_image
@lhua Live Playback Setup Alarm Logout Camera Conditions Profile Management Conditions Normal Type Electrical ICR Day&Night Photoresistor WB Exposure Backlight Day&Night Focus & Zoom Picture Debug Default Zoom Focus Inu Speed 5Figure 4-5
Please refer to the following sheet for detailed information.
| Parameter | Function |
| Type | It is to set camera day/night type, including electronic and ICR. |
| Day/night | It is to set camera day/night mode.The mode includes: B&W/color/auto. |
4.1.1.5 Zoom & Focus
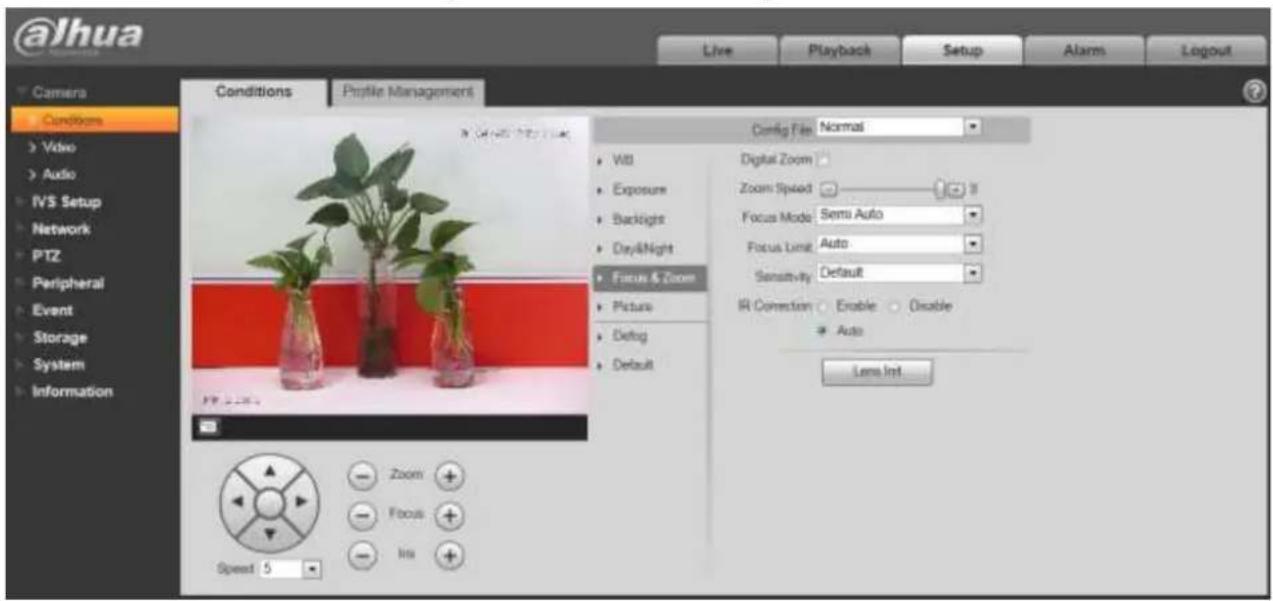
The zoom &focus interface is shown as in Figure 4-6.
Dahua Network Speed Dome Web3.0 Operation Manual
text_image
@lhua Live Playback Setup Alarms Logout Camers Conditions Video Audio IVS Setup Network PTZ Peripheral Event Storage System Information Conditions Profile Management Config File Normal VIII Exposure Backlight Day&Night Focus & Zoom Picture Debug Default Digital Zoom Zoom Speed Focus Mode Semi Auto Focus Line Auto Sensitivity Default IR Correction Enable Disable Auto Lens Int Zoom Focus Ins Speed 5Figure 4-6
Please refer to the following sheet for detailed information.
| Parameter | Function |
| Digital zoom | Check the box here to enable digital zoom function. |
| Zoom speed | It is to set camera zoom speed. The bigger the value is, the faster the speed is. |
| Focus mode | It is to set camera focus mode. It includes: auto/manual/semi auto. |
| Focus limit | It is to camera focus distance in case the focus distance is too small and the focus goes to the enclosure. At the same time, you can change focus distance to adjust focus speed. |
| Sensitivity | It is to set camera focus sensitivity. The higher the value is, the easier it is to activate focus. The lower the value is, the difficult it is to activate focus. |
| IR Correction | It is to set IR light focus correction function to enhance focus effect and remove the IR light effect on the focus. |
| Lens Init | Click it to set initialization to the lens. |
4.1.1.6 Picture
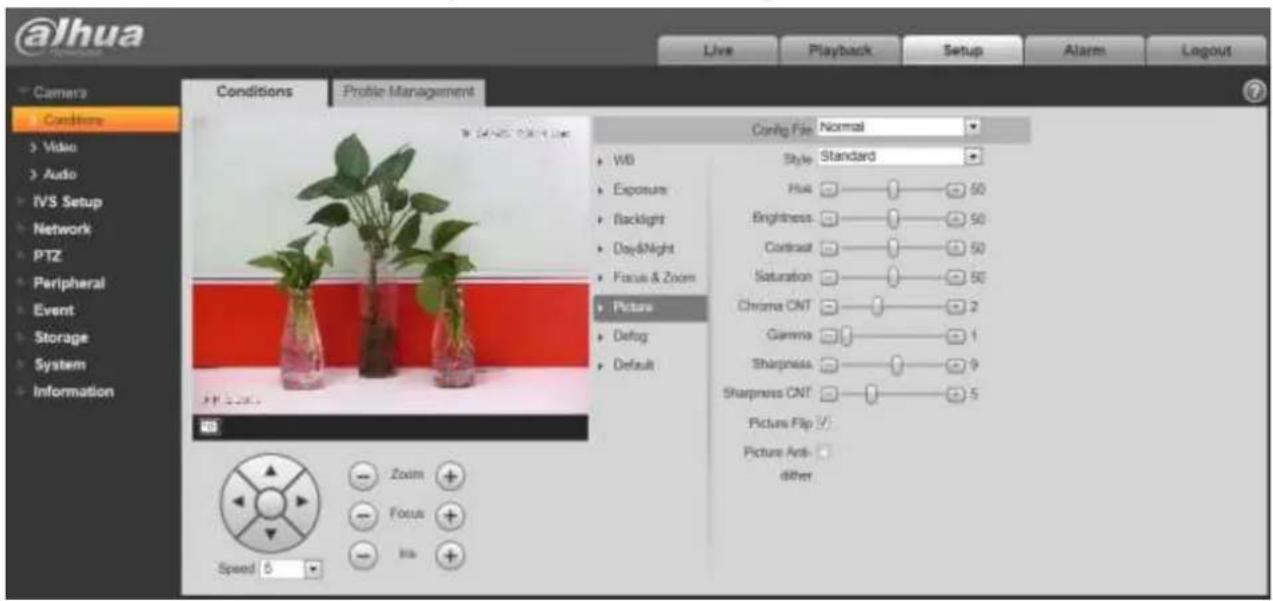
Picture interface is shown as in Figure 4-7.
text_image
@lhua Live Playback Setup Alarm Logout Camera Conditions Profile Management Config File: Normal Style Standard Hue 50 Brightness 50 Contrast 50 Saturation 50 Chrome CNT 2 Gamma 1 Sharpness 9 Sharpness CNT 5 Picture Flip Picture Anti- dither WB Exposure Backlight Day&Night Focus & Zoom Picture Debug Default Zoom Focus Ins Speed 5Figure 4-7
Please refer to the following sheet for detailed information.
| Parameter | Function |
| Style | It is to set video style. |
| Hue | It is to set picture hue. |
| Brightness | It is to set video brightness. The higher is value is, the bright the video is. |
| Saturation | It is to set color purity. The higher the purity is, the more color the video is. The lower the purity is, the dark the video is. |
| Chroma control | It is to set video color control level. The higher the value is, the higher the control level is. |
| Gamma | It is to set image gamma value. |
| Sharpness | It is to set camera sharpness. The higher the sharpness is, the clearer the image is. The object edge becomes clear too. |
| Sharpness control level | It is to set camera control level. The higher the value is, the stronger the control level is. |
| Picture Flip | It is to set video display mode. It is to turn camera. |
| Picture Anti-dither | The device doesn’t support enabling image anti-dither and intelligent function at the same time. |
4.1.1.7 Defog
Dahua Network Speed Dome Web3.0 Operation Manual
text_image
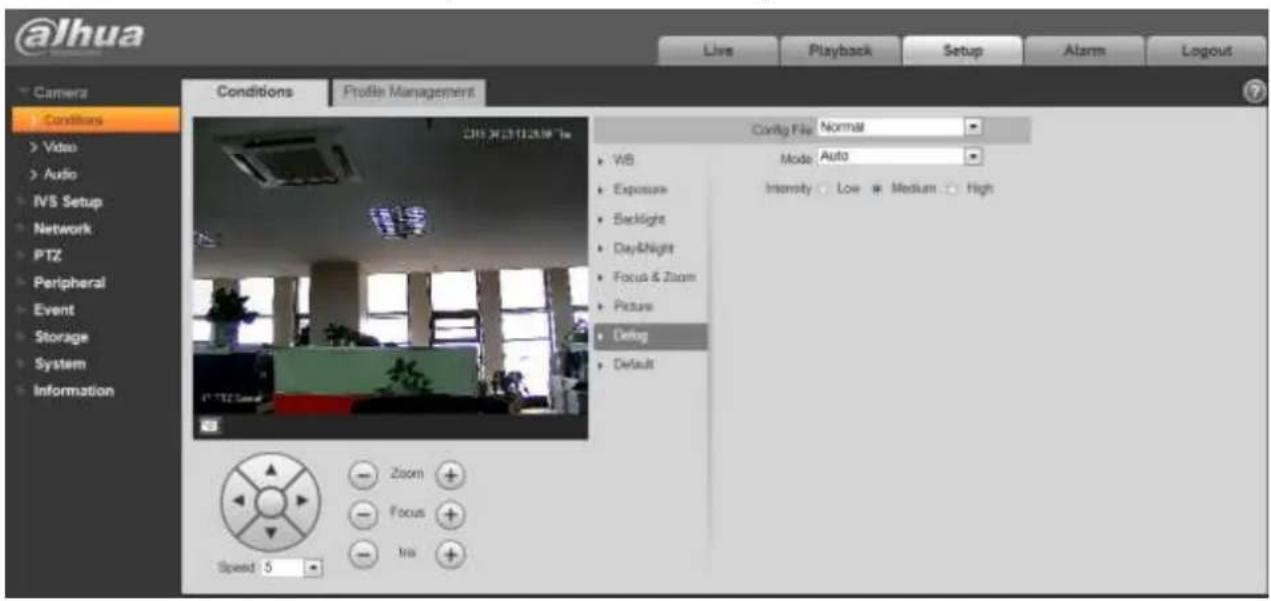
@lhua Live Playback Setup Alarm Logout Camera Conditions Video Audio IVS Setup Network PTZ Peripheral Event Storage System Information Conditions Profile Management 2015.31.23 12:25:06 Time Config File Normal WB Mode Auto Exposure Intensity Low Medium High Backlight Day&Night Focus & Zoom Picture Debug Default Zoom Focus Trio Speed 5Figure 4-8
| Parameter | Note |
| Mode | It is to set the camera defog mode, it includes: off and auto. |
| Intensity | It is to set the camera defog intensity, it includes: low, middle, high. |
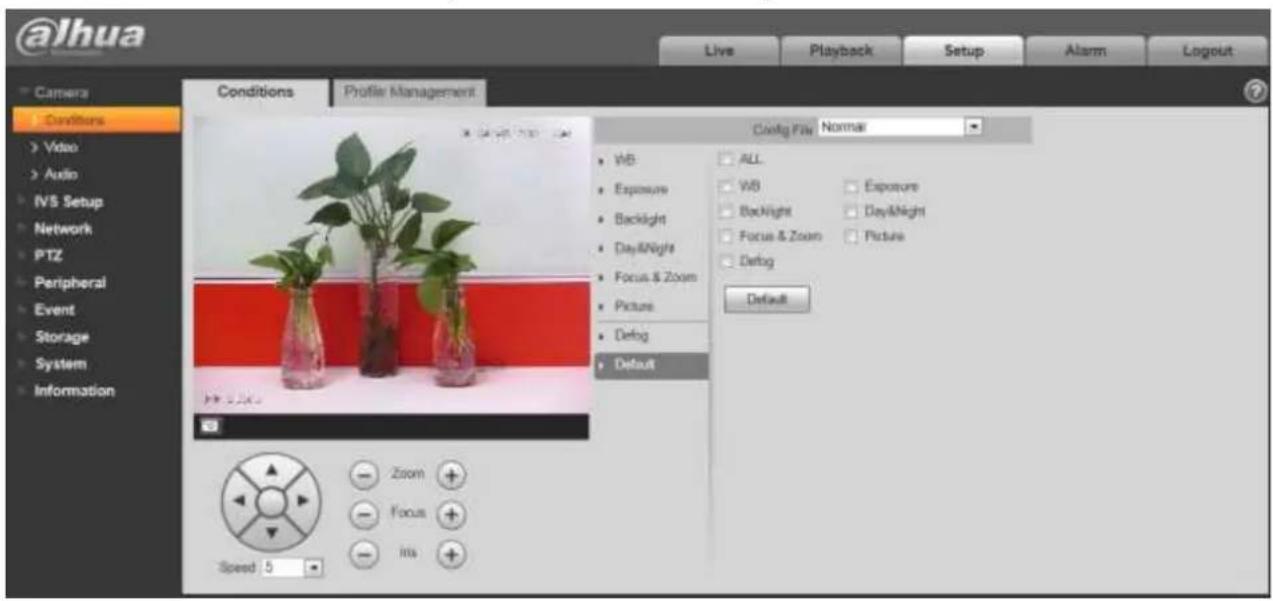
4.1.1.8 Default
Default interface is shown as in Figure 4-9.
Dahua Network Speed Dome Web3.0 Operation Manual
text_image
@Jhua Live Playback Setup Alarm Logout Camera - Davidius > Video > Audio IVS Setup Network PTZ Peripheral Event Storage System Information Conditions Profile Management Config Flow: Normal WB ALL Exposure WB Exposure Backlight Backlight DayNight DayNight Focus & Zoom DayNight Focus & Zoom Picture Picture Debug Debug Default Zoom + Focus + Ins + Speed 5Figure 4-9
Please refer to the following sheet for detailed information.
| Parameter | Function |
| Default | It is to restore camera parameter to factory default setup. |
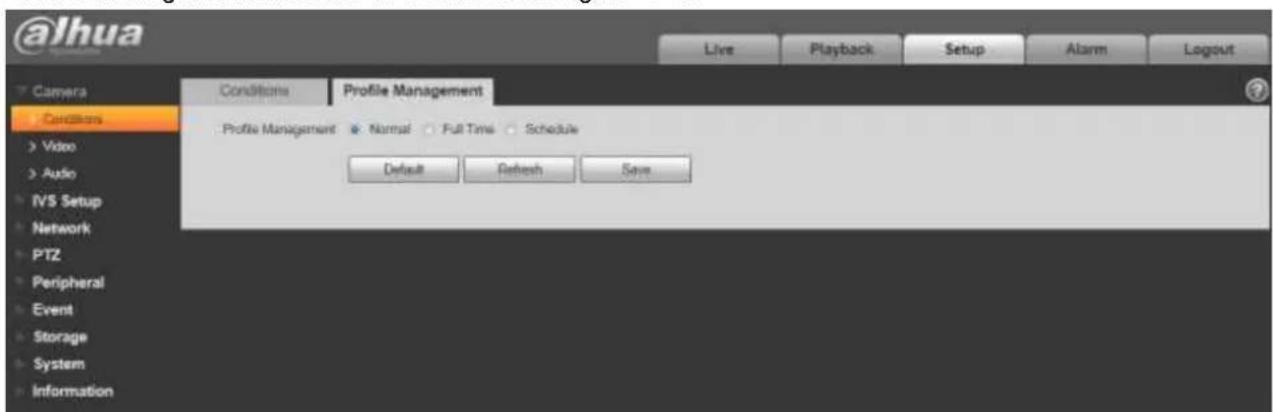
4.1.1.9 Profile Management
Profile management interface is shown as in Figure 4-10.
text_image
@lhua Live Playback Setup Alarm Logout Camera Conditions Video Audio IVS Setup Network PTZ Peripheral Event Storage System Information Conditiona Profile Management Profile Management Normal Full Time Schedule Default Refresh SaveFigure 4-10
Please refer to the following sheet for detailed information.
Dahua Network Speed Dome Web3.0 Operation Manual
| Parameter | Function |
| Profile Management | There are three modes: normal/full-time/schedule. The default setup is normal. |
| Normal | It is to adopt the general parameter on the profile file. |
| Full-time | It is to adopt day or night general parameter on the profile file all the time. |
| Schedule | It is to adopt the day or night parameter on the profile file by time you set here. |
4.1.2 Video
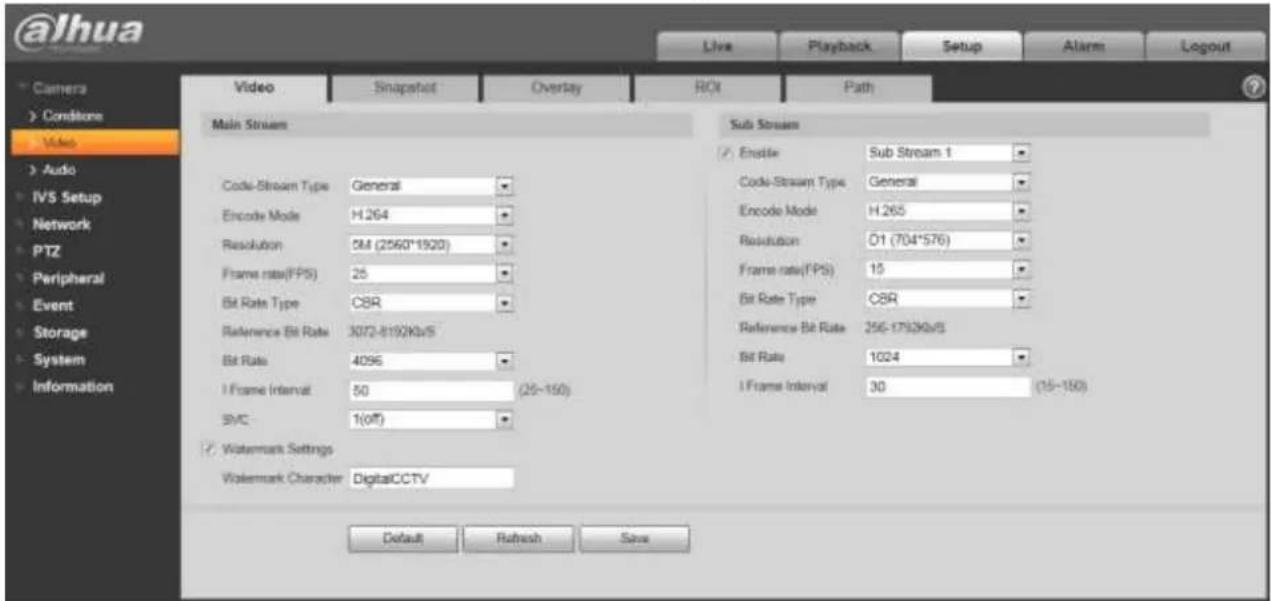
4.1.2.1 Video bit stream
The video bit stream interface is shown as below. See Figure 4-11.
text_image
@lhua Video Snapshot Overlay ROI Path Main Stream Code-Stream Type General Encode Mode H.264 Resolution 0M (2560*1920) Frame rate(FPS) 25 Bit Rate Type CBR Reference Bit Rate 3072-8192Kb/s Bit Rate 4096 1 Frame Interval 50 (25~150) SVC 1(off) Watermark Settings Watermark Character DigitalCCTV Sub Stream Enster Sub Stream 1 Code-Stream Type General Encode Mode H.265 Resolution D1 (704*576) Frame rate(FPS) 15 Bit Rate Type CBR Reference Bit Rate 256-1792Kb/s Bit Rate 1024 1 Frame Interval 30 (15~150) Default Refresh SaveFigure 4-11
Please refer to the following sheet for detailed information.
| Parameter | Function |
| Sub Stream Enable | Please check the box here to enable extra stream function.This function is enabled by default. |
| Code-Stream Type | ACF means using different fps to record.There are two options: VBR and CBR.Please note, you can set video quality in VBR mode. |
Dahua Network Speed Dome Web3.0 Operation Manual
| Parameter | Function |
| Encode mode | There are four options: H.264, H.264H, H.265 and MJPEG encode.H.264: Main Profile encode mode.H.264H: High Profile encode mode.H.265: Main Profile encode mode.Note:Only supported by some models.MJPEG: In this encode mode, the video needs large bit stream to guarantee the video definition.You can use the max bit stream value in the recommend bit to get the better video output effect. |
| Resolution | There are multiple resolutions. You can select from the dropdown list.For each resolution, the recommended bit stream value is different. |
| Frame Rate (FPS) | PAL: 1~25f/s, NTSC: 1~30f/s..The frame rate may vary due to different resolutions. |
| Bit Rate Type | There are two options: VBR and CBR.Please note, you can set video quality in VBR mode.Under MJPEG mode, only CBR is available. |
| Recommended Bit | Recommended bit rate value according to the resolution and frame rate you have set. |
| Bit Rate | In CBR, the bit rate here is the max value. In dynamic video, system needs to low frame rate or video quality to guarantee the value.The value is null in VBR mode.Please refer to recommend bit rate for the detailed information. |
| I Frame | Here you can set the P frame amount between two I frames. The value ranges from 1 to 150. Default value is 50.Recommended value is frame rate *2. |
| Watermark Settings | By calibrating watermark, to see if video is modified.Select Watermark function. Default watermark is Digital CCTV.Watermark character can only be number, letter, _, - within 128 characters. |
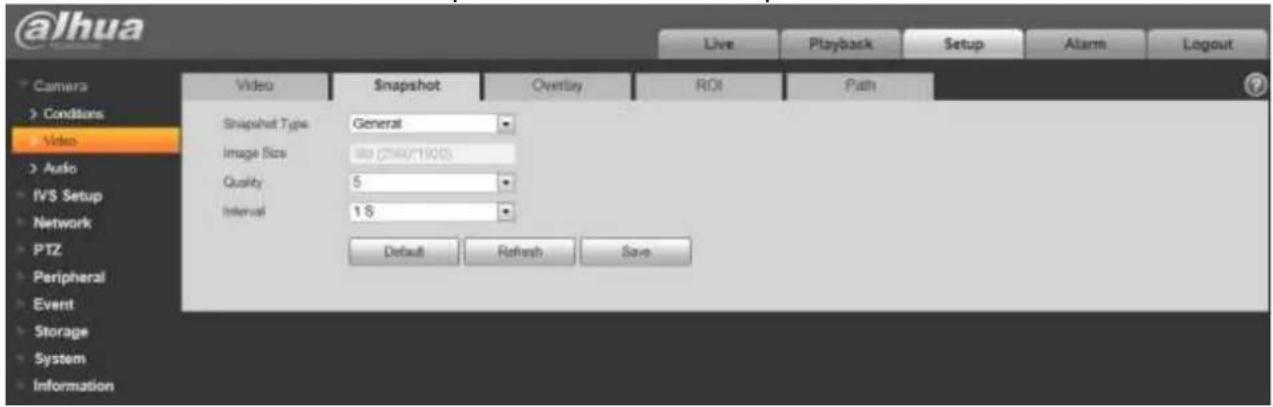
4.1.2.2 Snapshot
The snapshot interface is shown as in Figure 4-12.
Dahua Network Speed Dome Web3.0 Operation Manual
text_image
@lhua Live Playback Setup Alarms Logout Camera > Conditions > Video > Auto IVS Setup Network PTZ Peripheral Event Storage System Information Video Snapshot Overlay ROI Path Snapshot Type General Image Size 80 (2400*1900) Quality 5 Interval 1.5 Default Refresh SaveFigure 4-12
Please refer to the following sheet for detailed information.
| Parameter | Function |
| Snapshot type | There are two modes: general (schedule) and Event (activation). |
| Image size | It is the same with the resolution of snapshot (main stream or sub stream). |
| Quality | It is to set the image quality. There are six levels. |
| Interval | It is to set snapshot frequency. The value ranges from 1s to 7s. |
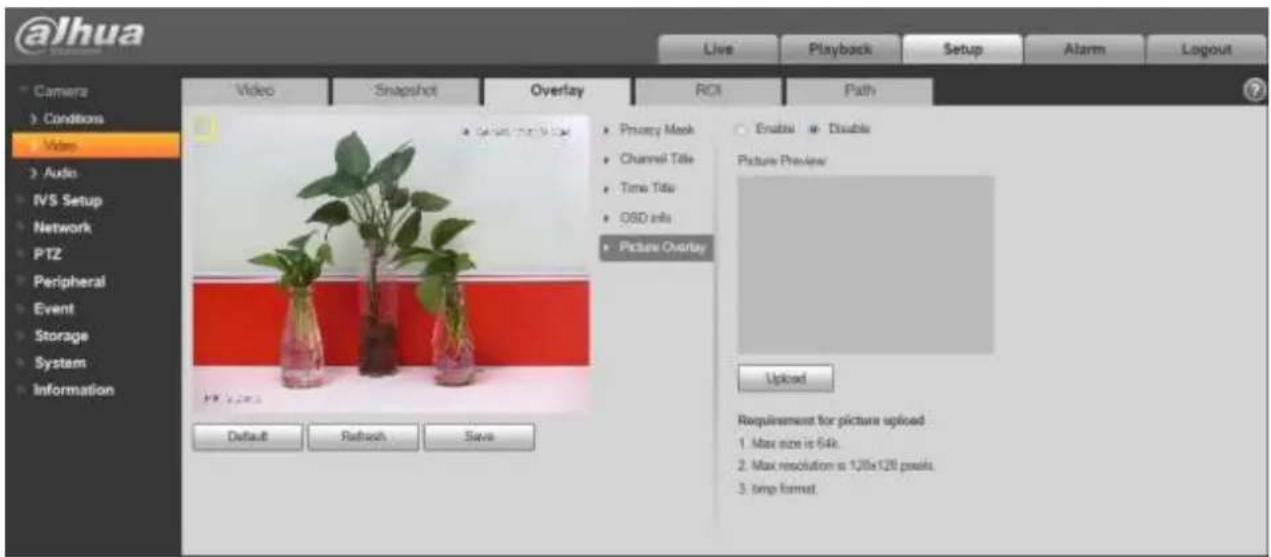
4.1.2.3 Video Overlay
The video overlay interface is shown as in Figure 4-13 to Figure 4-17.
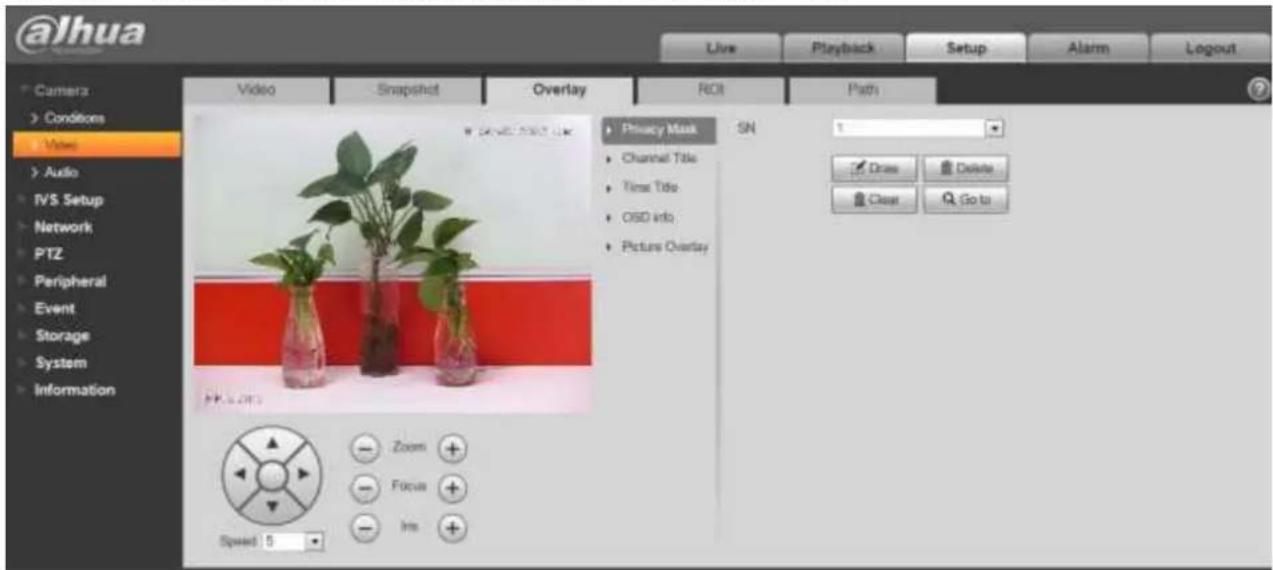
text_image
@lhua Live Playback Setup Alarm Logout Camera > Conditions > Video > Audio > IVS Setup > Network PTZ Peripheral Event Storage System Information Video Snapshot Overlay ROI Path SN Privacy Mask Channel Title Time Title OSD Info Picture Overlay 1 Draws Delete Clear Go to Zoom Focus Ins Speed 5Figure 4-13
Dahua Network Speed Dome Web3.0 Operation Manual
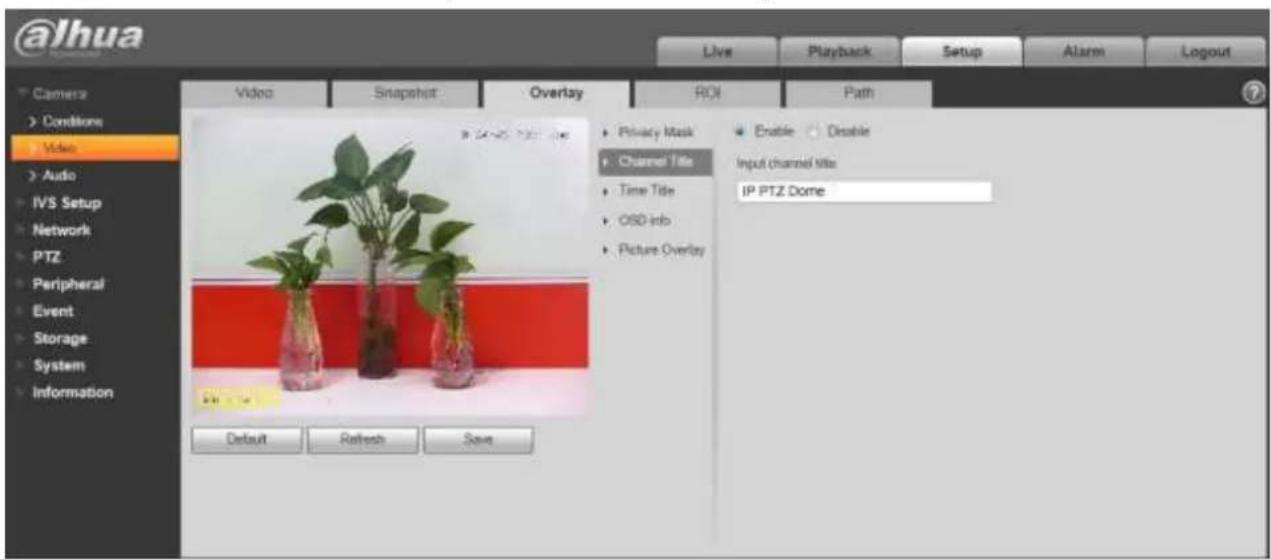
text_image
@lhua Live Playback Setup Alarm Logout Camera Conditions Video Audio IVS Setup Network PTZ Peripheral Event Storage System Information Video Snapshot Overlay ROI Path Privacy Mask Channel Title Time Title OSD info Picture Overlay Enable Disable Input (channel title) IP PTZ Dome Default Refresh SaveFigure 4-14
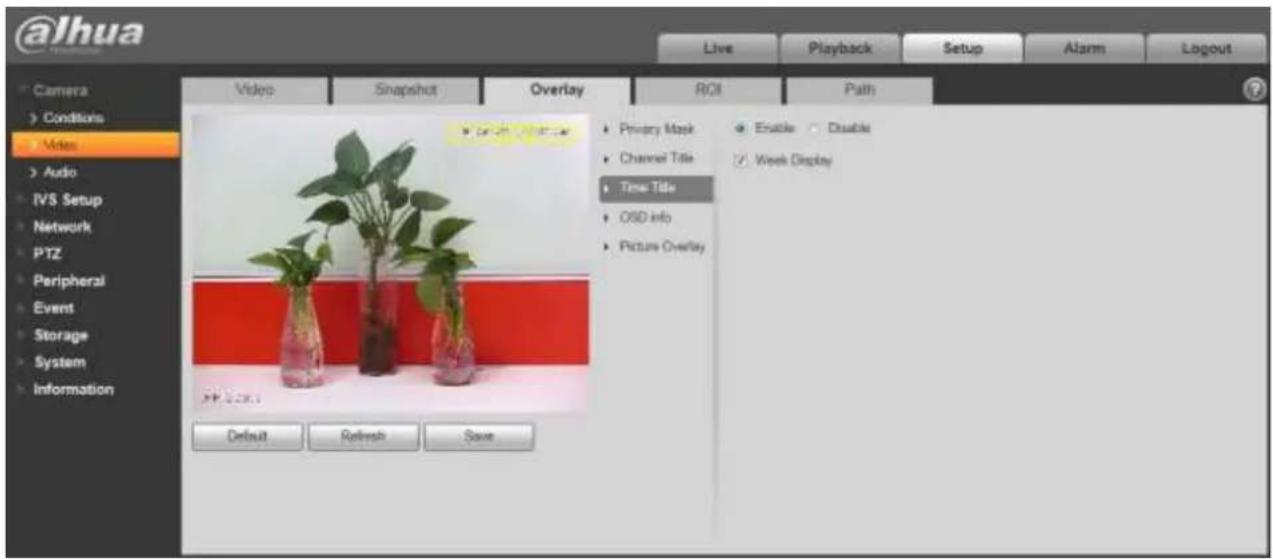
text_image
@lhua Live Playback Setup Alarms Logout Camera Conditions Video Audio IVS Setup Network PTZ Peripheral Event Storage System Information Video Snapshot Overlay ROI Path Privacy Mask Enable Disable Channel Title Week Display Time Title OSD info Picture Overlay Default Refresh SaveFigure 4-15

Dahua Network Speed Dome Web3.0 Operation Manual
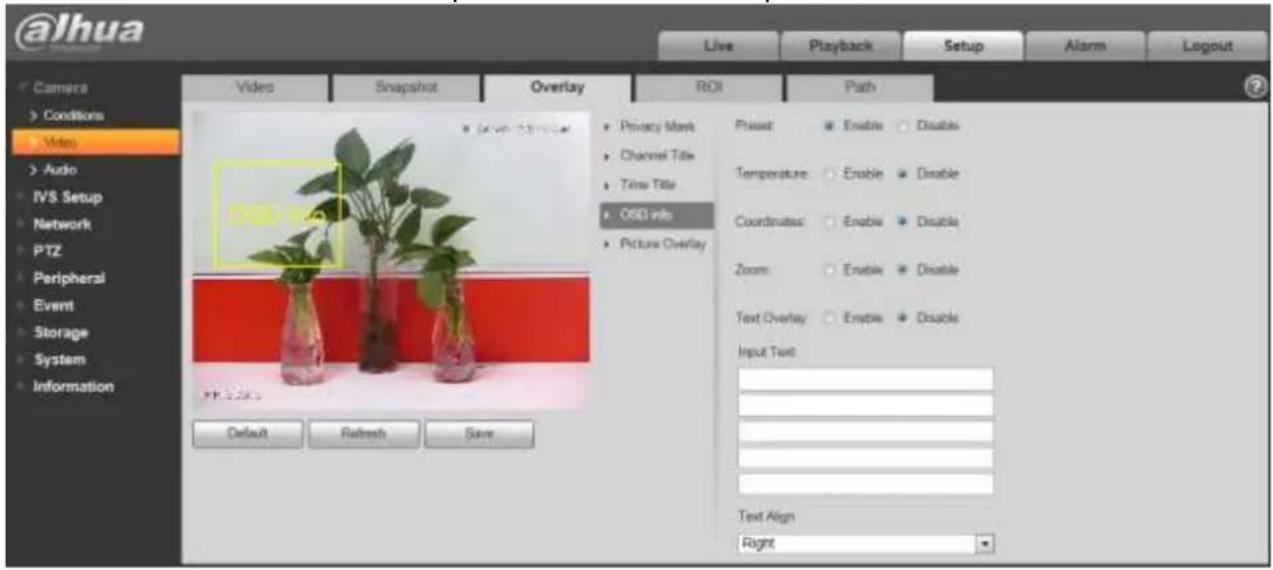
text_image
@lhua Live Playback Setup Alarm Logout Camera > Conditions > Video > Audio > IVS Setup > Network > PTZ > Peripheral > Event > Storage > System > Information Videos Snapshot Overlay ROI Path Privacy Mask Channel Title Time Title 060 info Picture Overlay Privat: Enable Disable Temperature: Enable Disable Coordinates: Enable Disable Zoom: Enable Disable Text Overlay: Enable Disable Input Text: Default Refresh Save Text Align RightFigure 4-16
text_image
@Jhua Live Playback Setup Alarm Logout Camera Conditions Video Audio IVS Setup Network PTZ Peripheral Event Storage System Information Video Snapshot Overlay ROI Path ■ Default 20x100% ■ Privacy Mask ■ Channel Title ■ Time Title ■ OBD info ■ Picture Overlay Enable ■ Disable Picture Preview Upload Requirement for picture uploaded 1. Max size is 64s. 2. Max resolution is 120x120 pixels. 3. tmp format.Figure 4-17
Please refer to the following sheet for detailed information.
Dahua Network Speed Dome Web3.0 Operation Manual
| Parameter | Function |
| Channel Title | ● You can enable this function so that system overlays channel information in video window. See Figure 4-.● You can use the mouse to drag the channel tile position. |
| Time Title | ● You can enable this function so that system overlays time information in video window. See Figure 4-.● You can use the mouse to drag the time tile position. |
| OSD | ● Select corresponding “enable” button, it will display preset, temperature, PTZ coordinate, zoom, location in video window. It won’t display if you select corresponding “disable” button. See● You can adjust preset, temperature, PTZ coordinate, zoom, location by dragging “OSD Info” box. Alignment include align left and align right. |
| Picture Overlay | ● You can enable this function to display overlay picture. Click disable to turn it off. See Figure 4-.● Click Upload Picture to overlay local picture into monitoring window. You can drag the yellow box to move it.Note:You cannot enable OSD and overlay at the same time. |
| Refresh | ● Set channel title, time title, OSD info, picture overlay and save the change. You can click Refresh to see effect. |
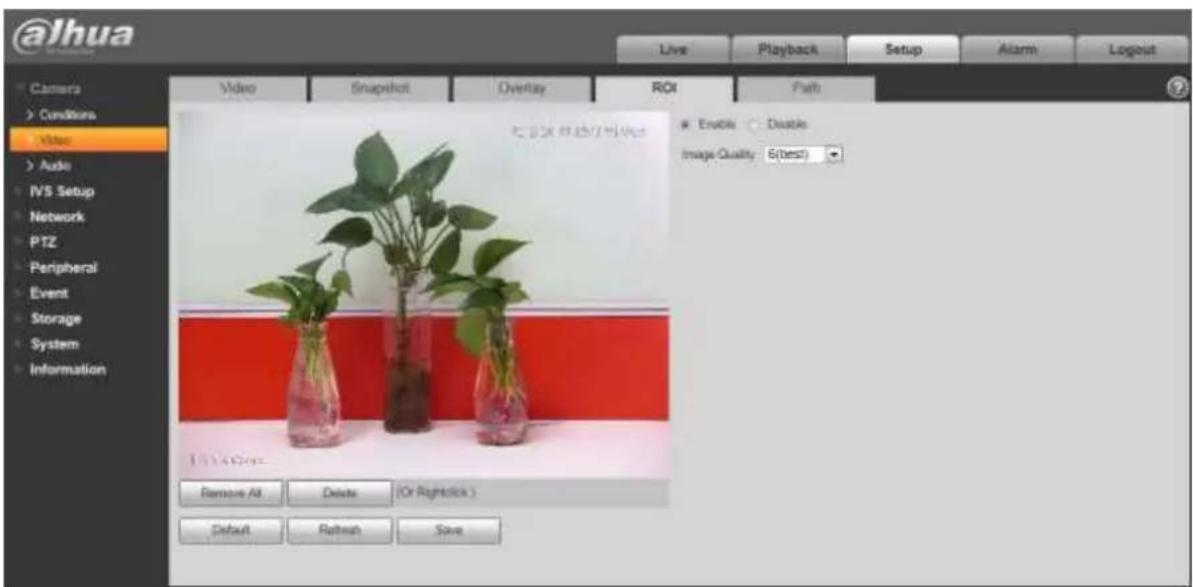
4.1.2.4 ROI
text_image
@lhua Live Playback Setup Alarm Logout Camera > Conditions > Video > Audio IVS Setup Network PTZ Peripheral Event Storage System Information Video Snapshot Overlay ROI Fish Enable Disable Image Quality 6(test) Remove All Delete (Or Rightstick ) Default Refresh SaveFigure 4-18
Dahua Network Speed Dome Web3.0 Operation Manual
| Parameter | Note |
| Enable | Check “Enable” to display ROI in the video monitoring window; check “Disable” not to display. |
| Image Quality | It is to set the image quality of ROI, ranging from 1~6. |
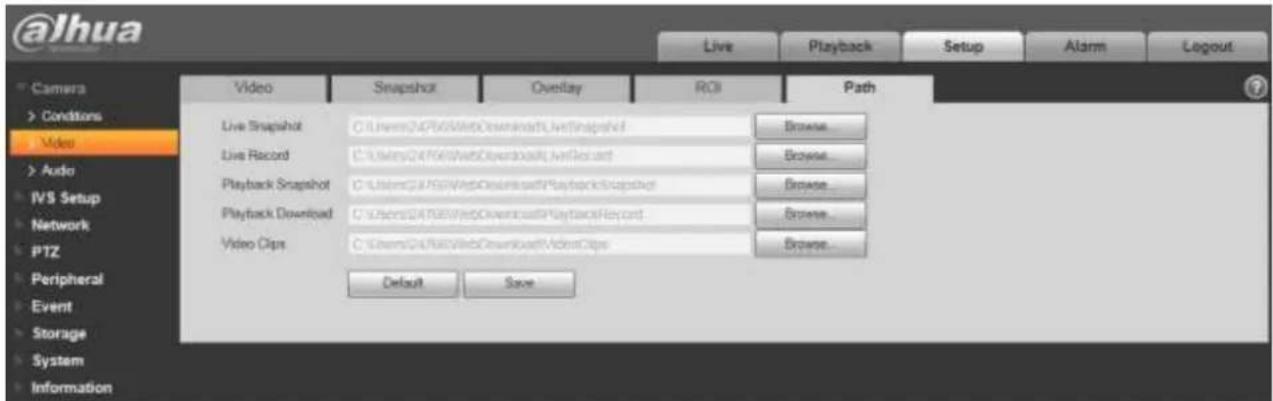
4.1.2.5 Path
The storage path interface is shown as in Figure 4-19.
Here you can set snap image saved path and the record storage path.
- The default monitor image path is C:\Documents and Settings\Administrator\WebDownload\LivePicture.
- The default monitor record path is C:\Documents and Settings\Administrator\WebDownload\LiveRecord.
- The default playback snapshot path is C:\Documents and Settings\Administrator\WebDownload\PlayBackPicture.
- The default playback download path is C:\Documents and Settings\Administrator\WebDownload\PlayBackRecord.
- The default playback cut path is: C:\Documents and Settings\Administrator\WebDownload\PlayBackRecordCut.
Note:
Administrator is locally logged in PC account.
Please click the Save button to save current setup.
text_image
@lhua Live Playback Video C:\Users\2476\WebDownload\LiveSnapshot Browse... Live Record C:\Users\2476\WebDownload\PlaybackRecord Browse... Playback Snapshot C:\Users\2476\WebDownload\PlaybackSnapshot Browse... Playback Download C:\Users\2476\WebDownload\PlaybackRecord Browse... Video Clips C:\Users\2476\WebDownload\Video Clips Browse... Default SaveFigure 4-19
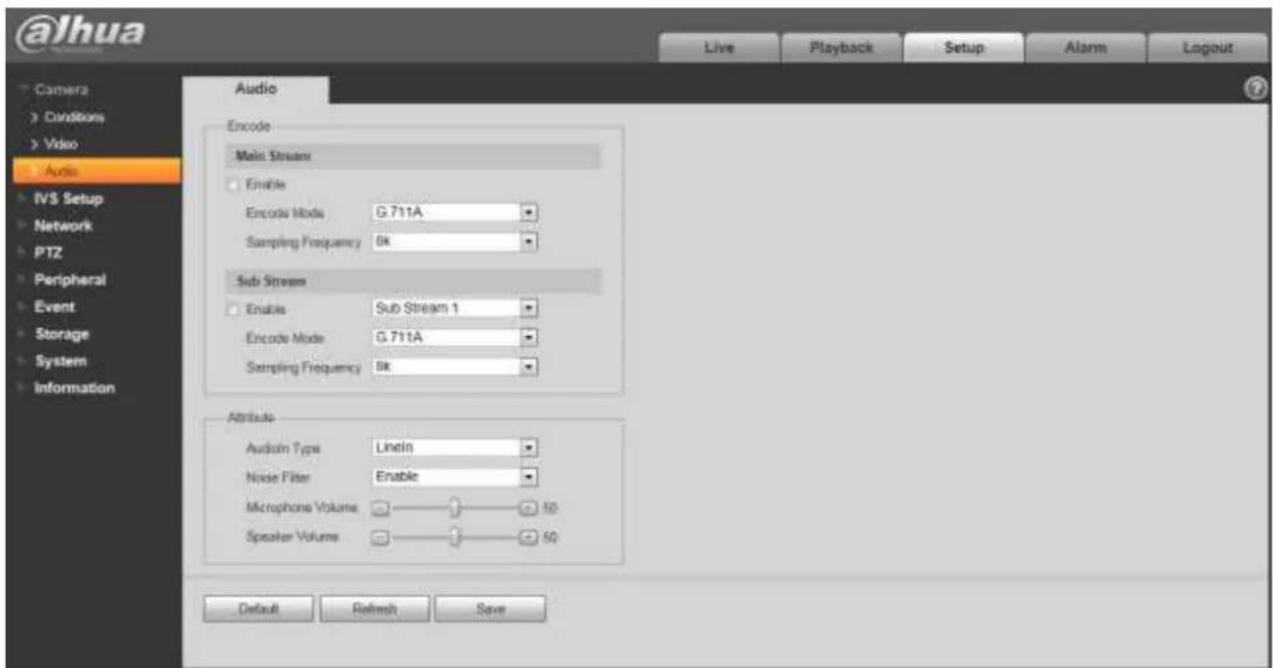
4.1.3 Audio
Note:
Some series don't support audio function.
Dahua Network Speed Dome Web3.0 Operation Manual
text_image
@Jhua Live Playback Setup Alarm Logout Audio Encode Main Stream Enable Encode Mode G 711A Sampling Frequency Bk Sub Stream Enable Sub Stream 1 Encode Mode G 711A Sampling Frequency Bk Attribute Audio Type Linlin Noise Filter Enable Microphone Volume 50 Speaker Volume 50 Default Refresh SaveFigure 4-20
| Parameter | Note |
| Audio Enable | Check “Enable” and the transmitted bit stream becomes AV combined stream, otherwise it only includes video image.Audio can be enabled only when video is enabled. |
| Encode Mode | Audio encode mode includes G.711A and G.711Mu, it is G.711A by default. |
| Sampling Frequency | Sampling frequency includes two types: 8k and 16K. |
| Audio Input Type | Currently it can only select Lineln. |
| Noise Filter | It is to set if it enables I noise filter function. |
| Microphone Volume | It is to set Microphone volume. |
| Speaker Volume | It is to set speaker volume. |
4.2 IVS Setup
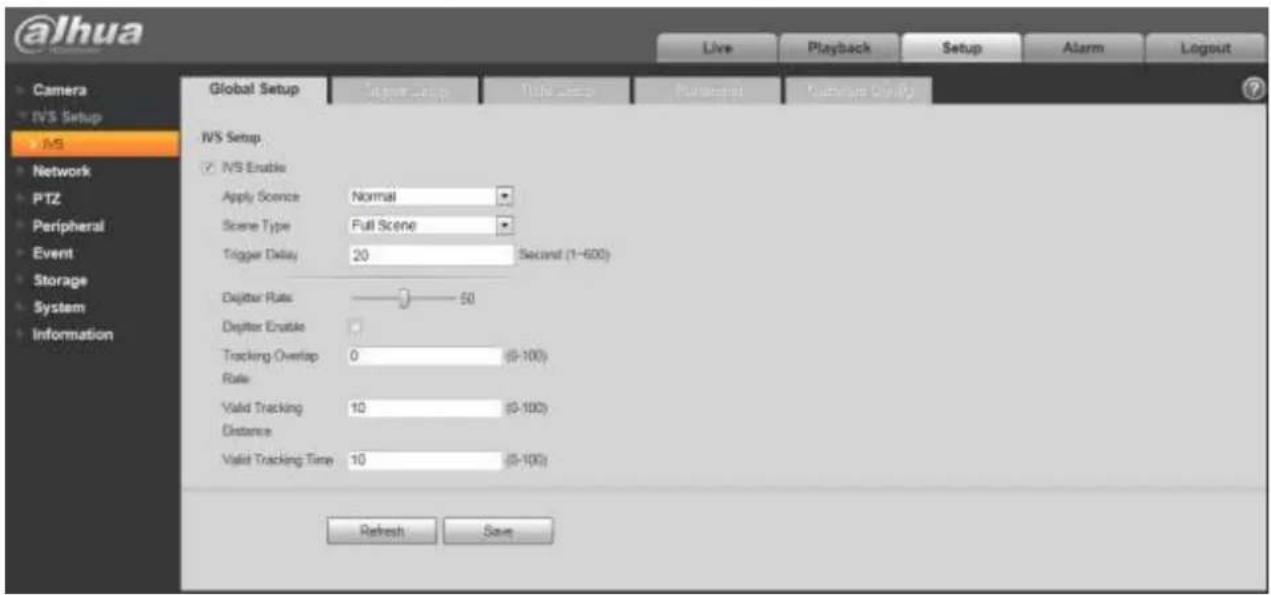
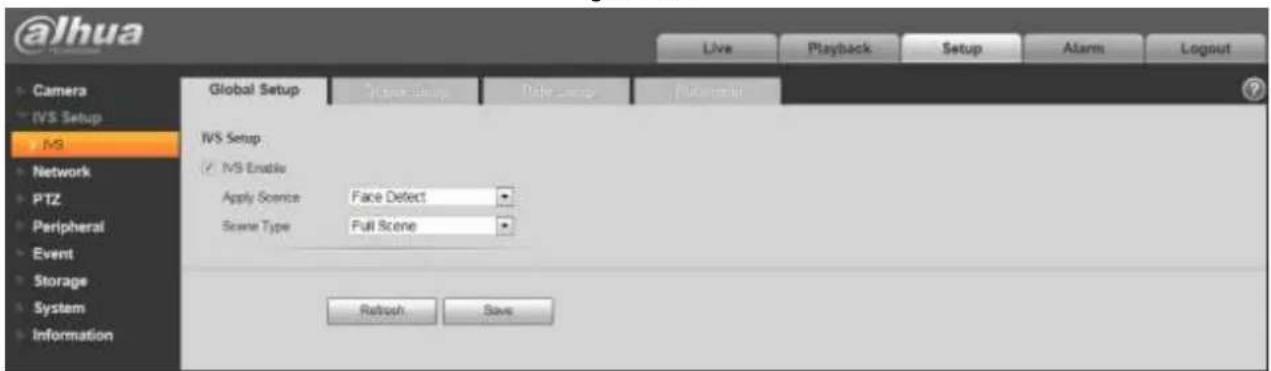
4.2.1 Global Setup
Dahua Network Speed Dome Web3.0 Operation Manual
text_image
@Ihua Live Playback Setup Alarm Logout Camera IVS Setup IVS Network PTZ Peripheral Event Storage System Information Global Setup VISA Setup Tina Setup Pulsetpoint Pulsetpoint Group IVS Setup ✓ IVS Enable Apply Scene Normal Scene Type Full Scene Trigger Delay 20 Second (1-600) Dejitter Rate 50 Dejitter Enable Tracking Overlap 0 (0-100) Rate Valid Tracking 10 (0-100) Distance Valid Tracking Time 10 (0-100) Refresh SaveFigure 4-21
text_image
@lhua Live Playback Setup Alarm Logout Camera IVS Setup MS Network PTZ Peripheral Event Storage System Information Global Setup Type Setup Date Setup Default IVS Setup ✓ IVS Enable Apply Scene Face Defect Scene Type Full Scene Refresh SaveFigure 4-22
| Parameter | Note |
| IVS Enable | Check to enable IVS function. |
| Apply Scene | Able to select normal scene and face detect scene, it is “Normal Scene: I default. |
| Scene Type | Full scene, single scene, multi scene:Full scene: It can realize IVS analysis of the current monitoring image after preview.Single scene: It can realize IVS analysis of the single scene.Multi scene: It can realize the IVS analysis of multi scene, and switch tour between scenes. |
| Dejitter Rate | It is to set dejitter rate of the camera. |
| Tracking Overlap rate | It is to set the tracking overlap rate, 0~100 optional. |
Dahua Network Speed Dome Web3.0 Operation Manual
| Parameter | Note |
| Valid Tracking Distance | It is to set valid tracking distance, 0~100 optional. |
| Valid Tracking Time | It is to set valid tracking time, 0~100 optional. |
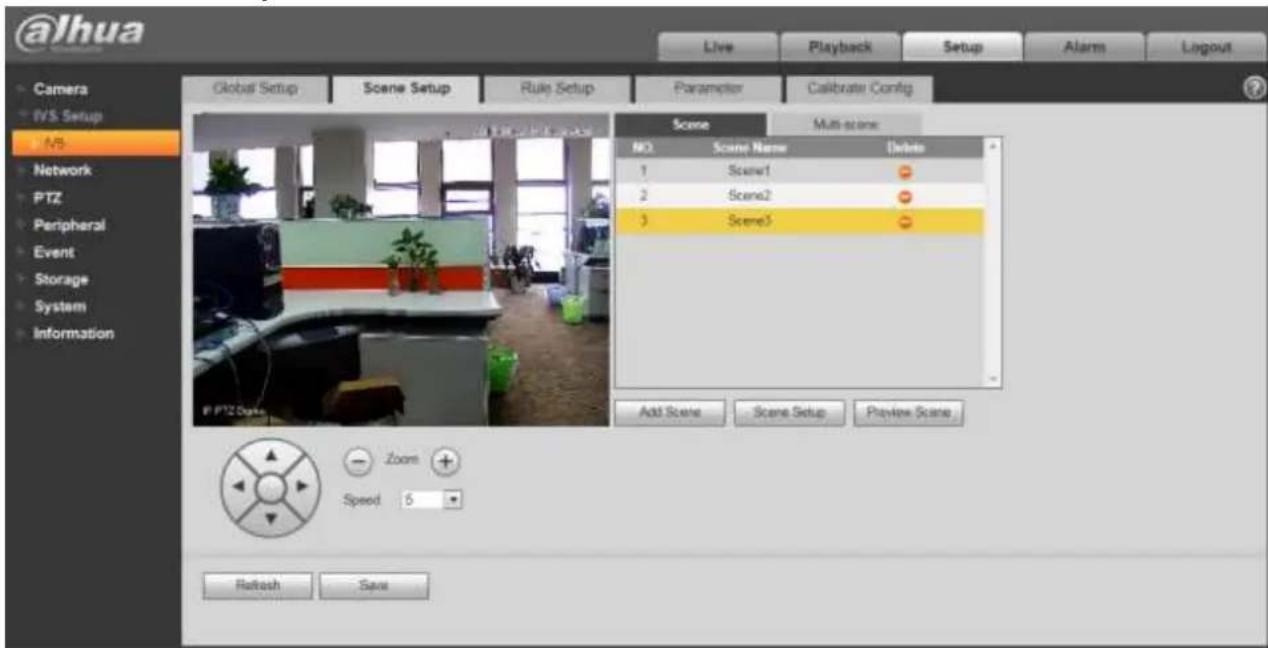
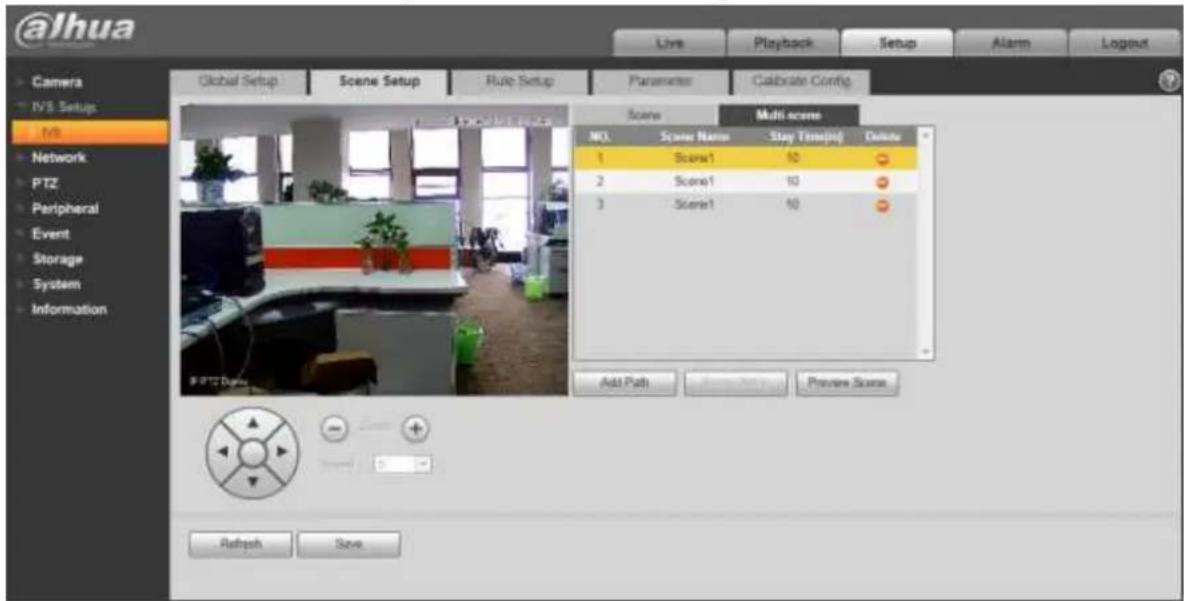
4.2.2 Scene Setup
text_image
@Ihua Live Playback Setup Alarm Logout Camera IVS Setup MS Network PTZ Peripheral Event Storage System Information Global Setup Scene Setup Rule Setup Parameter Calibrate Config. Scene Multi-scene: NO. Scene Name Delete 1 Scene1 2 Scene2 3 Scene3 Add Scene Scene Setup Preview Scene Zoom Speed 5 Refresh SaveFigure 4-23
| Parameter | Note |
| Add Scene | Click Add Scene to add scene. |
| Scene Setup | Click Scene Setup it to set current monitor video as the scene of corresponding scene number. |
| Preview Scene | Click Preview Scene to preview the selected scene. |
| Zoom | Click to zoom in and click to zoom out. |
| Speed | It is to set PTZ movement speed. The value ranges from 1 to 8. |
Dahua Network Speed Dome Web3.0 Operation Manual
text_image
@lhua Live Playback Setup Alarm Logout Camera IVS Setup MB Network PTZ Peripheral Event Storage System Information Global Setup Scene Setup Rule Setup Parameter Calibrate Config. Scene Multi scene NO. Scene Name Stay Time(s) Online 1 Score1 10 2 Score1 10 3 Score1 10 Add Path Preview Scene Refresh SaveFigure 4-24
Single scene: enter "single scene" interface, click the box and select the scene which needs to be monitored.
Note:
The function needs to select the "Single Scene" in "IVS Setup > Global Setup > Scene Type".
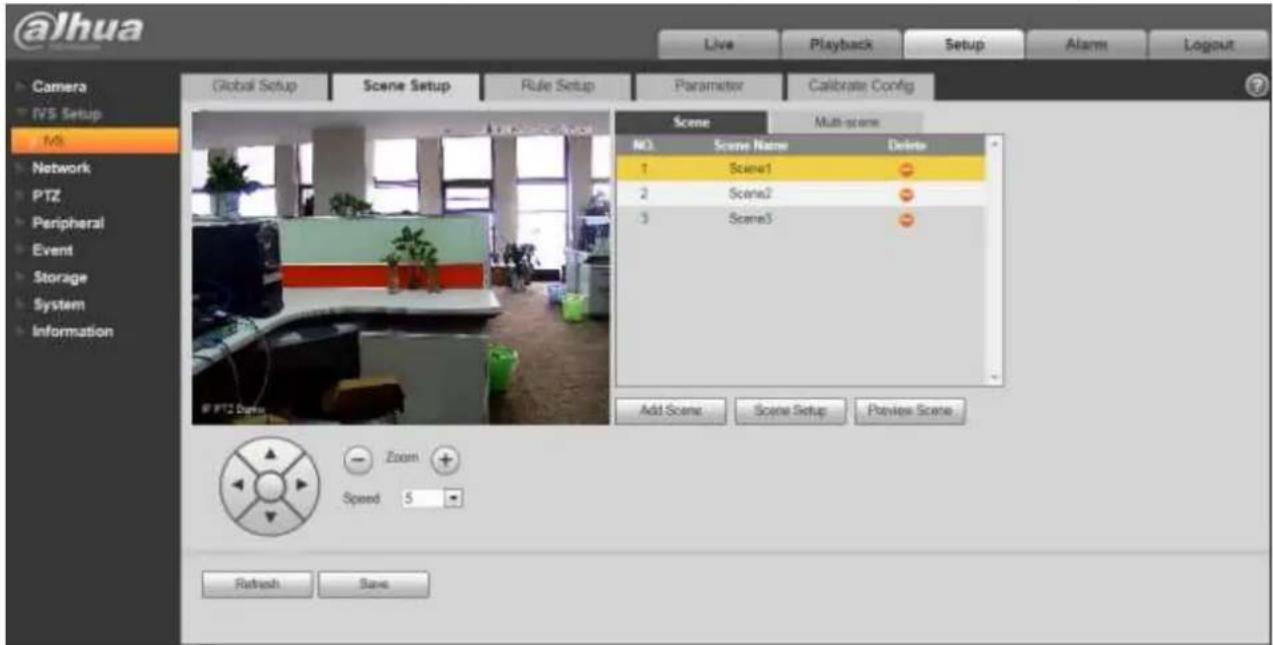
text_image
@lhua Live Playback Setup Alarm Logout Camera IVS Setup MS Network PTZ Peripheral Event Storage System Information Global Setup Scene Setup Rule Setup Parameter Calibrate Config Scene Multi-scene NO. Scene Name Delete 1 Scene1 2 Scene2 3 Scene3 Add Scene Scene Setup Pavise Scene Zoom Speed 5 Refresh SaveFigure 4-25
Dahua Network Speed Dome Web3.0 Operation Manual
Multiple-scene: Enter "Multiple Scene" interface, click Add Path to add tour scene, move the mouse to the "Scene Name" list; you can select several scenes as a tour. Move the mouse to the "Stay Time", you can set stay time period.
Note:
The function needs to select "Multiple Scene" in the "IVS Setup > Global Setup > Scene Type".
4.2.3 Rule Setup
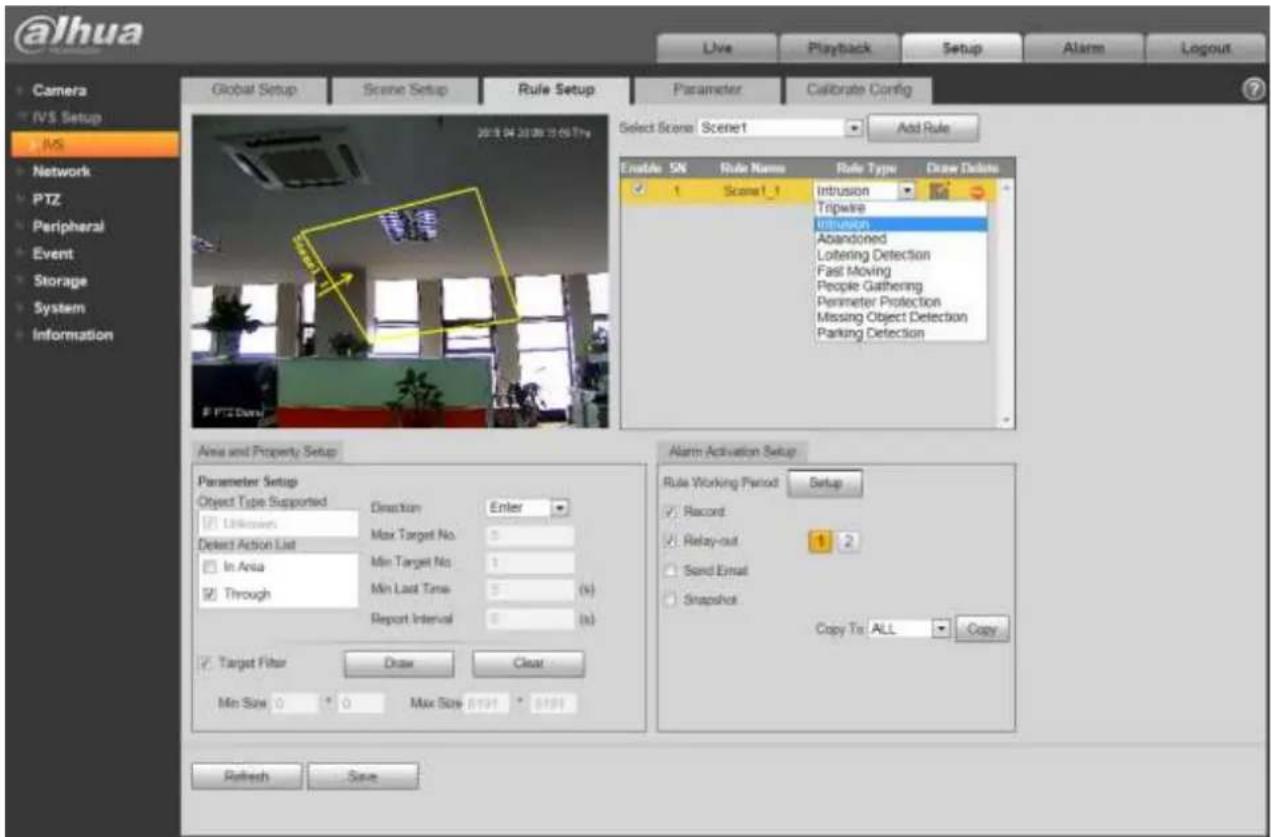
text_image
@lhua Live Playback Setup Alarm Logout Camera IVS Setup IMS Network PTZ Peripheral Event Storage System Information Global Setup Scene Setup Rule Setup Parameter Calibrate Config Select Scene Scene1 Add Rule Enable SN Rule Name Rule Type Draw Delete 1 Scene1_1 Intrusion Tripwire Intrusion Abandoned Lottering Detection Fast Moving People Gathering Perimeter Protection Missing Object Detection Parking Detection Area and Property Setup Parameter Setup Object Type Supported Direction Enter Unknowns Max Target No. 5 Detect Action List In Area Min Target No. 1 Through Min Last Time. 5 (s) Report Interval. 0 (s) Target Filter Draw Clear Min Size 0 * 0 Max Size 61941 * 61941 Alarm Activation Setup Rule Working Period Setup Record Relay-out 1 2 Send Email Snapshot Copy To ALL Copy Refresh SaveFigure 4-26
| Parameter | Note |
| Select Scene | You can select the scene from the dropdown list so that you can add the corresponding rule. |
| Add Rule | Click to add a rule to the selected scene. |
| Rule Enable | Check the box here to enable the rule. |
| Rule Name | Move your mouse to the rule name column to set a name. |
Dahua Network Speed Dome Web3.0 Operation Manual
| Parameter | Note |
| Rule Type | Move your mouse to the Rule type column to set the rule type. The option includes: Tripwire/Cross warning zone/Object abandoned and etc. |
| Draw Rule | Click button to draw current rule. |
| Delete Rule | Click button to delete current rule. |
4.2.3.1 Tripwire
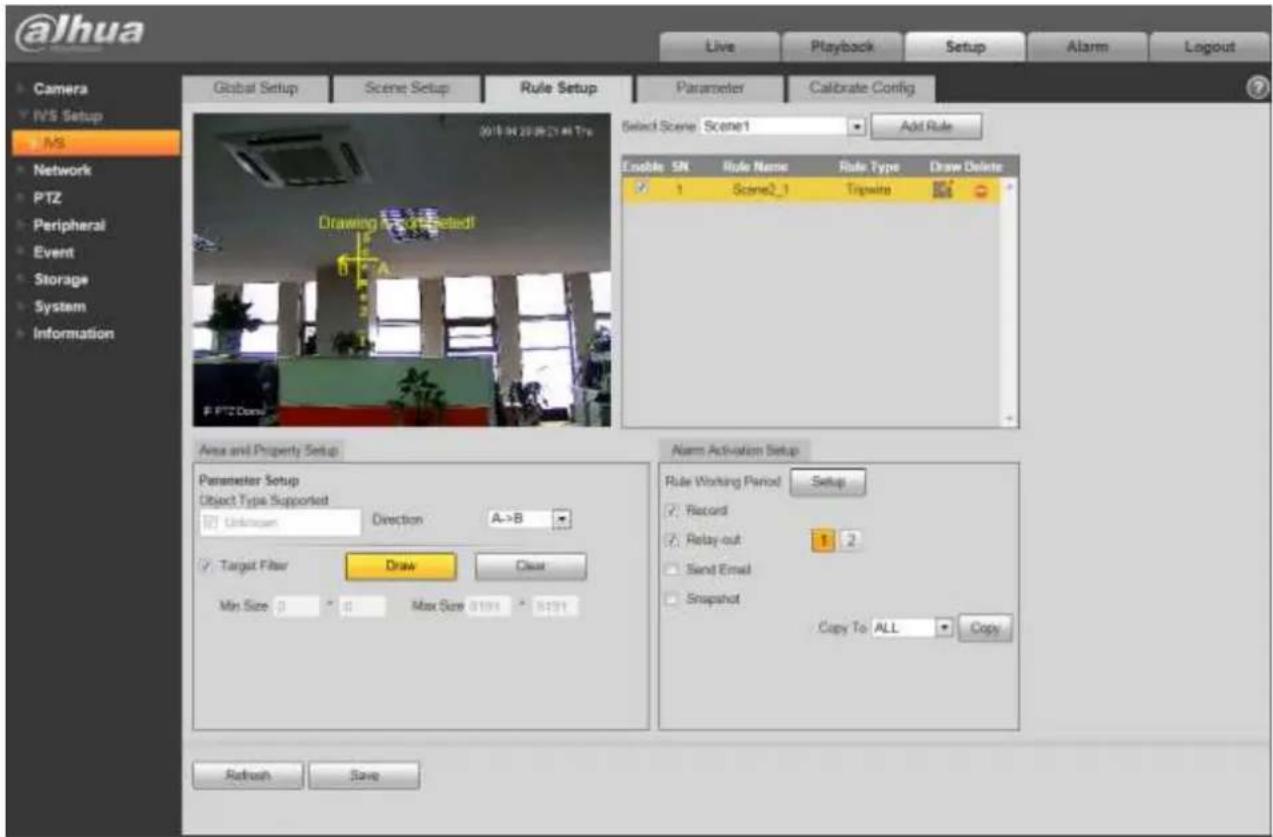
text_image
@lhua Live Playback Setup Alarm Logout Camera IVS Setup MS Network PTZ Peripheral Event Storage System Information Global Setup Scene Setup Rule Setup Parameter Calibrate Config Select Scene1 Scene1 Add Rule Enable SN Rule Name Rule Type Draw Delete ✓ 1 Scene2_1 Tripwise Area and Property Setup Parameter Setup Object Type Supported Unknown Direction A->B ✓ Target Filter Draw Clear Min Size 0 0 Max Size 01991 01991 Alarm Activation Setup Rule Working Period Setup ✓ Record ✓ Relay-out 1 2 Send Email ✓ Snapshot Copy To ALL Copy Refresh SaveFigure 4-27
| Parameter | Note |
| Object type supported | You can select an object type here. The default setup is all types. |
| Direction | It is to set tripwire direction. The option includes: A->B、B->A、A<->B. |
| Target filter | Check the box here to enable this function and then click button, you can set the target filter model in this scene for this rule. Click the button, you can remove selected target filter model. |
4.2.3.2 Intrusion
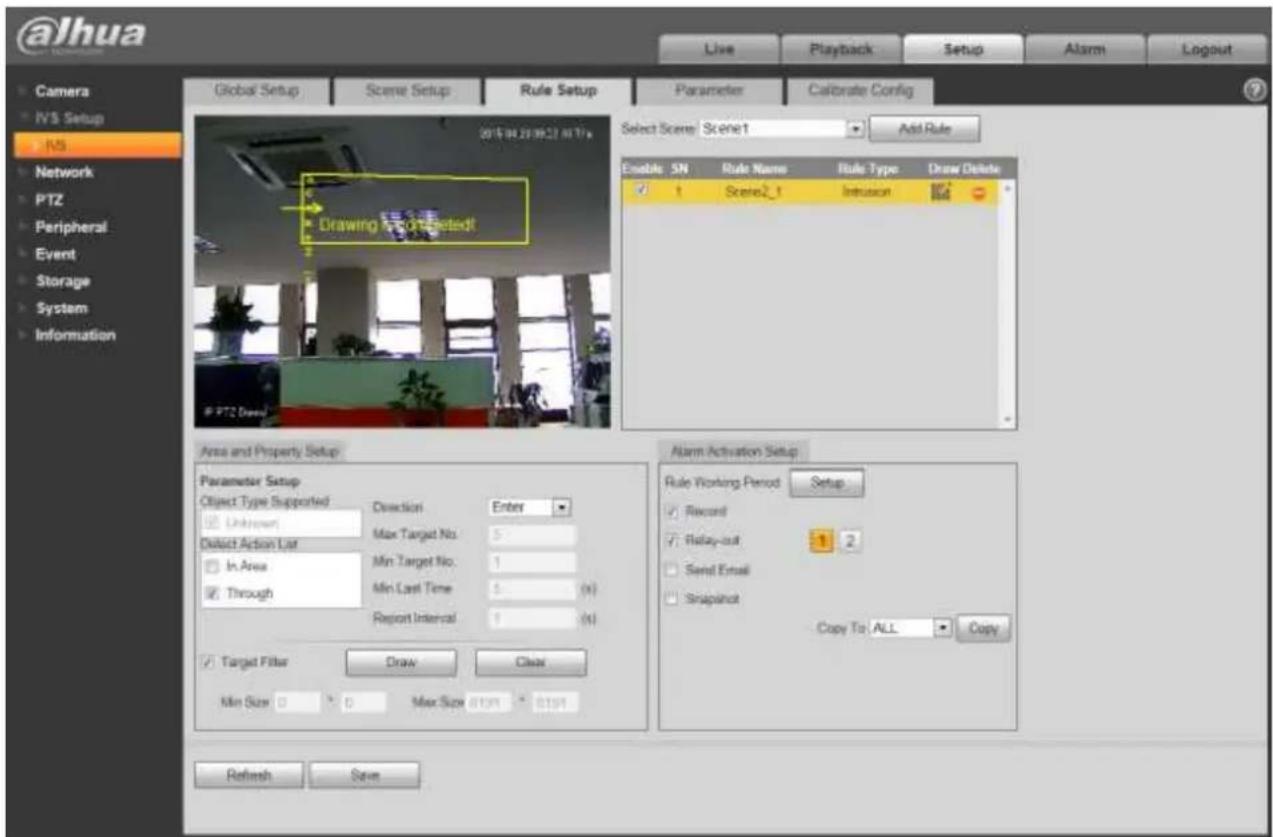
text_image
@Jhua Global Setup Scene Setup Rule Setup Parameter Calibrate Config Select Scene: Scene1 Add Rule Enable SN Rule Name Rule Type Draw Delete 1 Scene2_1 Infusion Area and Property Setup Parameter Setup Object Type Supported Direction Enter Unknown Max Target No. 5 Detect Action List Min Target No. 1 In Area Min Last Time 5 Through Report Interval 1 N Target Filter Draw Clear Min Size 0 0 Max Size 0.194 0.194 Alarm Activation Setup Rule Working Period Setup Record Relay-out 1 2 Send Email Snapshot Copy To ALL Copy Refresh SaveFigure 4-28
| Parameter | Function |
| Object type supported | You can select an object type here. The default setup is all types. |
| Detect action list | In area: When the tracking object is in the detect zone and the stay time is more than the time threshold you set here, system can activate an alarm.Through area: System can generate an alarm when the tracking object is crossing the limit you set here. |
| Direction | It is for the Through area option in the Detect action list item. It is to set the cross direction. The option includes: in/out/both (in&out) |
| Max target No. | It is for the In area option in the Detect action list item. It is to set the alar activation amount in the zone. System will not generate an alarm when the object amount in the zone is more than the threshold you set here. |
Dahua Network Speed Dome Web3.0 Operation Manual
| Parameter | Function |
| Min target No. | It is for the In area option in the Detect action list item. It is to set the alar activation amount in the zone. System will not generate an alarm when the object amount in the zone is less than the threshold you set here. |
| Min last time | It is for the In area option in the Detect action list item. Here is to set the min time between the target in the zone and an alarm activation occurrence. |
| Report interval | It is for the In area option in the Detect action list item. It is to set alarm period. System just alarms once if the value is 0 here. |
| Target filter | Check the box here to enable this function and then click button , you can set the target filter model in this scene. Click the button , you can remove selected target filter model. |
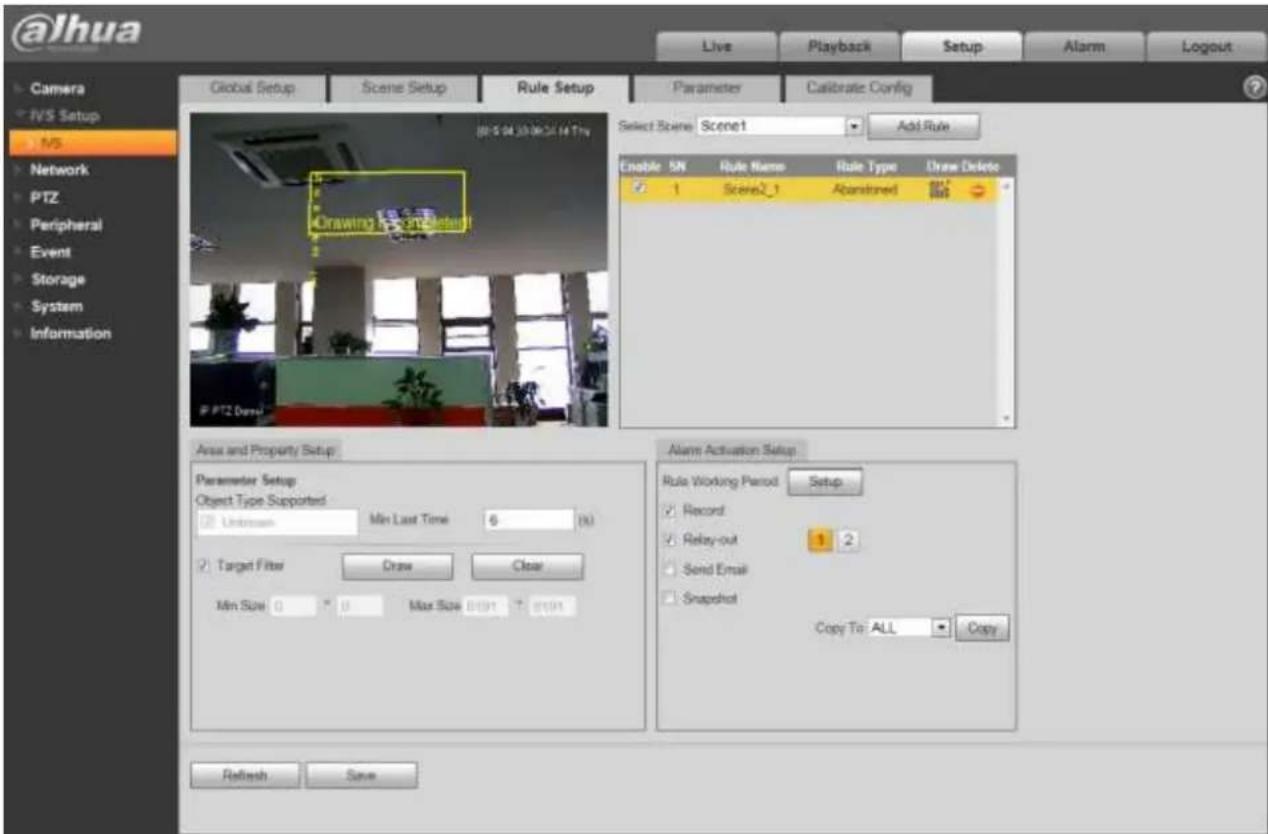
4.2.3.3 Abandoned Object Detection
text_image
@lhua Live Playback Setup Alarm Logout Camera IVS Setup MS Network PTZ Peripheral Event Storage System Information Global Setup Scene Setup Rule Setup Parameter Calibrate Config Select Scene Scene1 Add Rule Enable SN Rule Name Rule Type Draw Delete 1 Scene2_1 Abandoned Area and Property Setup Parameter Setup Object Type Supported Unknown Min Last Time 6 (N) Target Filter Draw Clear Min Size 0 Max Size 0191 7 0191 Alarm Activation Setup Rule Working Period Setup Record Relay-out 1 2 Send Email Snapshot Copy To ALL Copy Refresh SaveFigure 4-29
| Parameter | Function |
| Object type supported | You can select an object type here. The default setup is all types. |
Dahua Network Speed Dome Web3.0 Operation Manual
| Parameter | Function |
| Min last time | It is to set the min time between the abandoned object occurrence and alarr activation. |
| Target filter | Check the box here to enable this function and then click button, you can set the target filter model in this scene. Click the button, you can remove selected target filter model. |
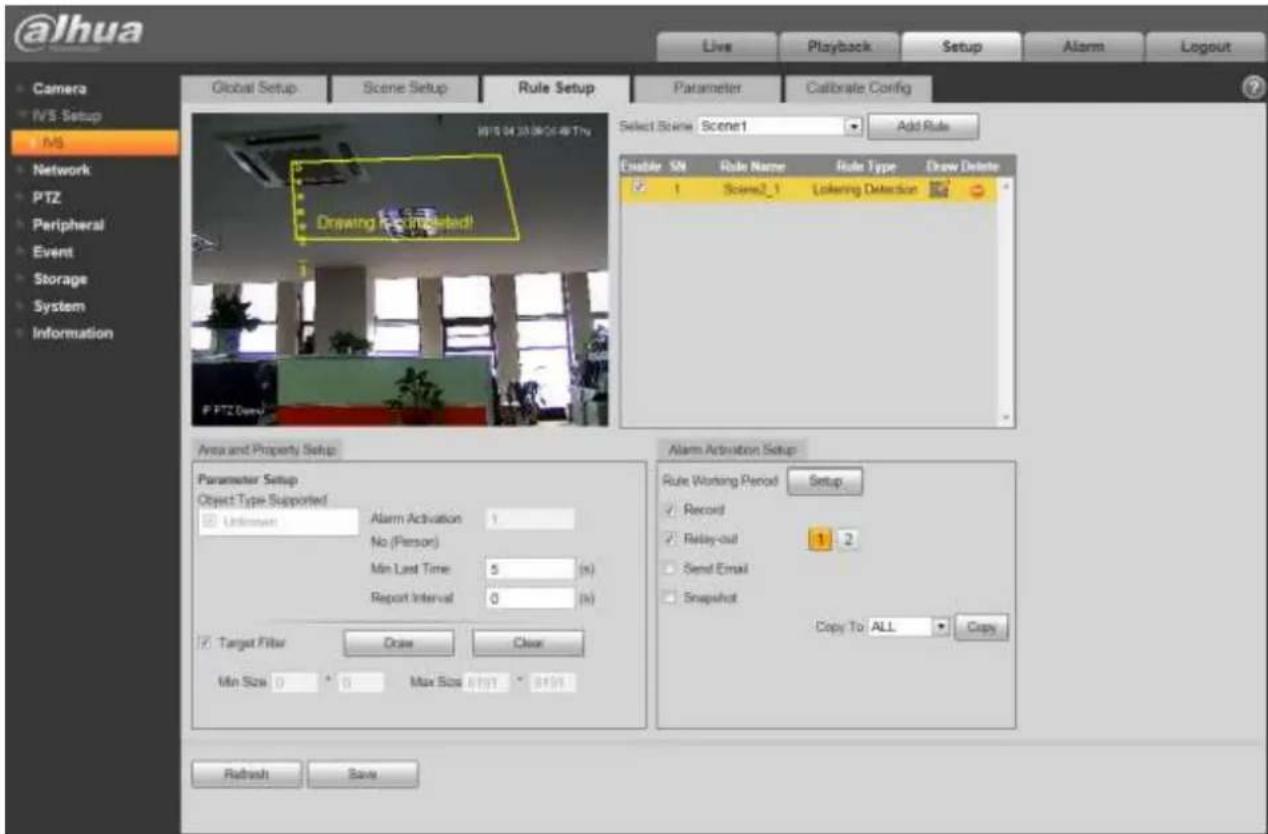
4.2.3.4 Loitering Detection
text_image
@lhua Camera IVS Setup MS Network PTZ Peripheral Event Storage System Information Global Setup Scene Setup Rule Setup Parameter Calibrate Config Select Scene Scene1 Add Rule Enable SN Role Name Role Type Draw Delete 1 Scene2_1 Littering Detection Area and Property Setup Parameter Setup Object Type Supported Unknown Alarm Activation 1 No (Person) Min Last Time 5 (s) Report Interval 0 (s) Target Filter Close Clear Min Size 0 Max Size 4997 3498 Alarm Activation Setup Rule Working Period Setup Record Relay-out 1 2 Send Email Snapshot Copy To ALL Copy Refresh SaveFigure 4-30
| Parameter | Function |
| Object type supported | You can select an object type here. The default setup is all types. |
| Alarm activation number (Person) | Here you can set the alarm activation threshold. The default setup is 1. |
| Min last time | Here is to set the min time between the target in the zone and an alarm activation occurrence. |
Dahua Network Speed Dome Web3.0 Operation Manual
| Parameter | Function |
| Report interval | It is to set alarm period. System just alarms once if the value is 0 here. |
| Target filter | Check the box here to enable this function and then click button, you can set the target filter model in this scene. Click the button, you can remove selected target filter model. |
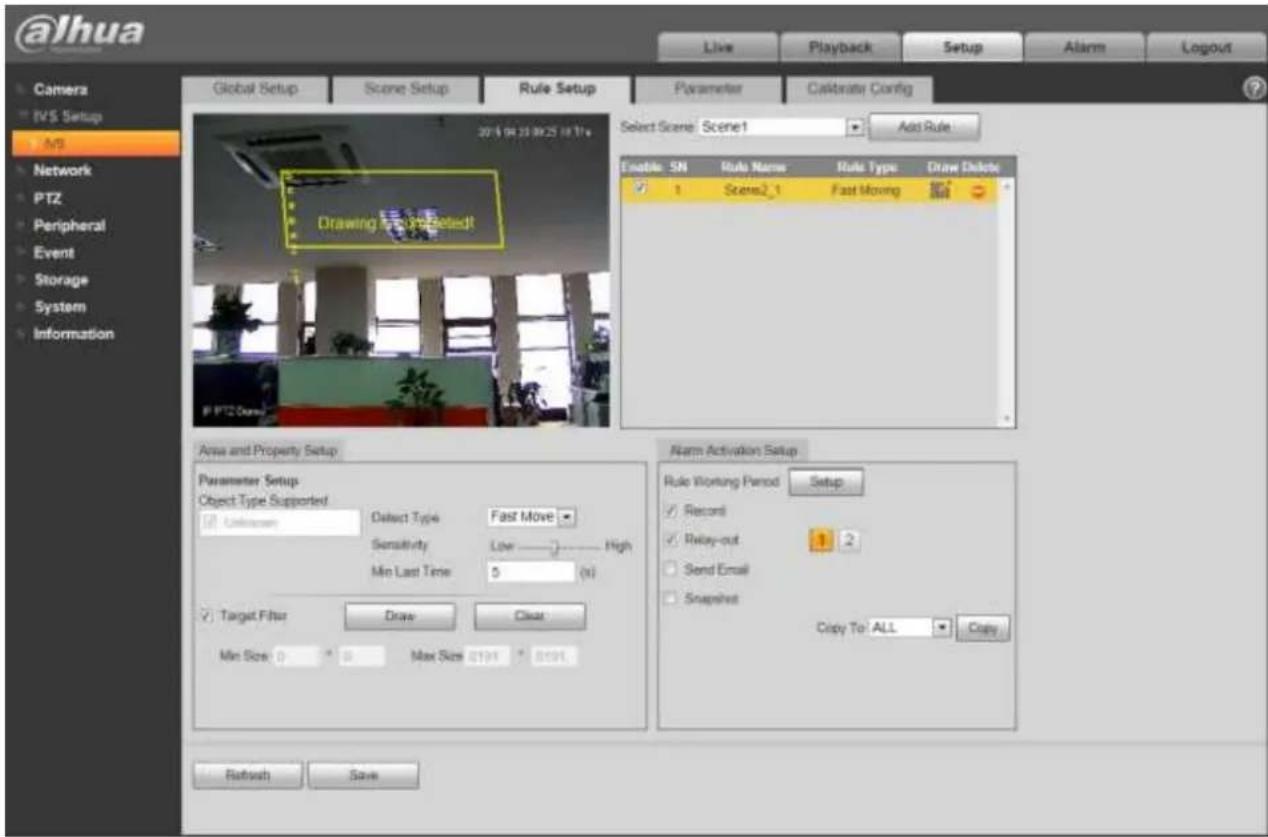
4.2.3.5 Fasting Moving
text_image
@lhua Global Setup Scene Setup Rule Setup Parameter Calibrate Config Camera IVS Setup MS Network PTZ Peripheral Event Storage System Information 2014 04 23 09:25 16:17* Drawing Event selected! Select Scene Scene1 Add Rule Enable SN Rule Name Rule Type Draw Delete 1 Scene2_1 Fast Moving Area and Property Setup Parameter Setup Object Type Supported Citation Select Type Fast Move Sensitivity Low High Min Last Time 5 (x) Target Filter Draw Clear Min Size 0 Max Size 0.0% 0.0% Alarm Activation Setup Rule Working Period Setup Record Relay-out 1 2 Send Email Snapshot Copy To ALL Copy Refresh SaveFigure 4-31
| Parameter | Function |
| Object type supported | You can select an object type here. The default setup is all types. |
| Detect type | It is to set detection type. The default setup is “Fast move”. The rule is to detect the fast moving object in the warning zone. |
| Sensitivity | Here you can set the alarm activation sensitivity. |
Dahua Network Speed Dome Web3.0 Operation Manual
| Parameter | Function |
| Min last time | It is to set the min time between the object continuous movement and alarm activation. |
| Target filter | Check the box here to enable this function and then click button, you can set the target filter model in this scene. Click the button, you can remove selected target filter model. |
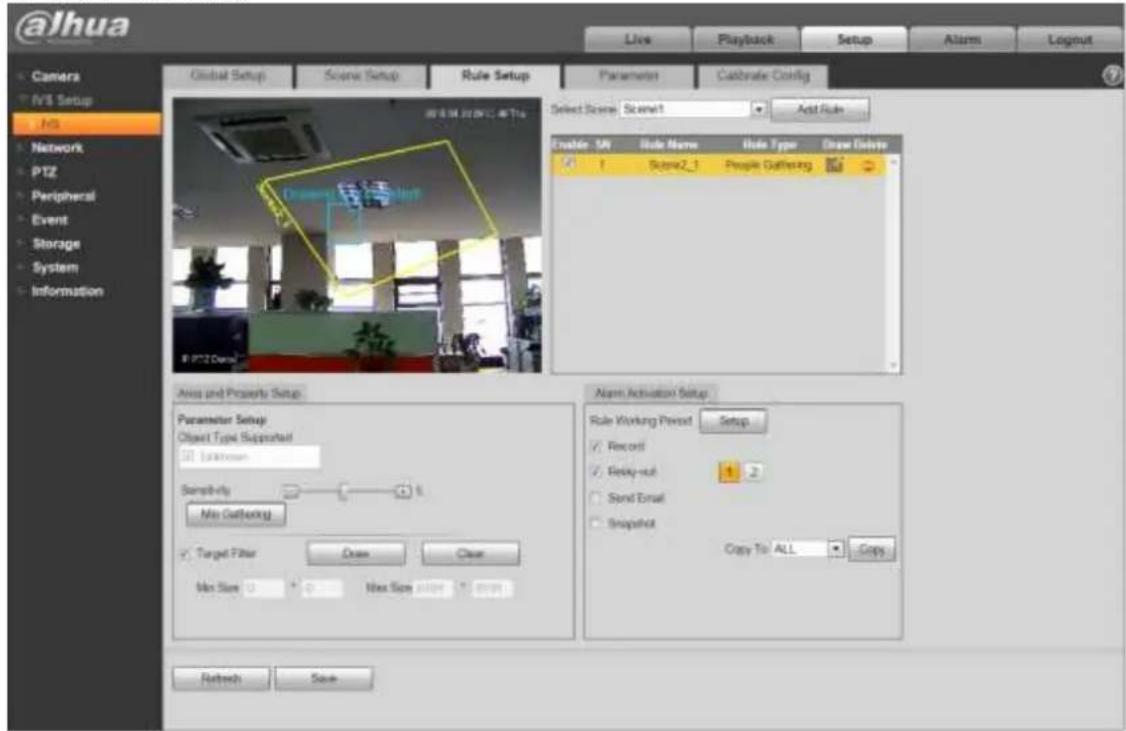
4.2.3.6 People Gathering
text_image
@Jhua Global Setup Scene Setup Rule Setup Parameter Calibrate Config Camera R/S Setup HIS Network PTZ Peripheral Event Storage System Information Select Scene Scene1 Add Rule Enable: SW Rule Name Rule Type Draw Delete 1 Scene2_1 People Gathering Area and Properties Setup Parameter Setup Object Type Supportset Unknown Sensitivity Min Gathering Target Filter Draw Clear Min Size 0 Next Size 0.000 Refresh Save Alarm Activation Setup Rule Working Prefix Setup Record1 Ready-out Send Email Snapshot Copy To ALL CopyFigure 4-32
| Parameter | Note |
| Object type supported | You can select an object type here. The default setup is all types. |
| Sensitivity | Here you can set the alarm activation sensitivity. |
| Min gathering | Min gathering is used to set alarm when it meets the expected number of gathering people, draw the size of corresponding area of expected number of people in the people gathering area which is already drawn. |
Dahua Network Speed Dome Web3.0 Operation Manual
| Parameter | Note |
| Target filter | Check the box here to enable this function and then click button, you can set the target filter model in this scene. Click the button, you can remove selected target filter model. |
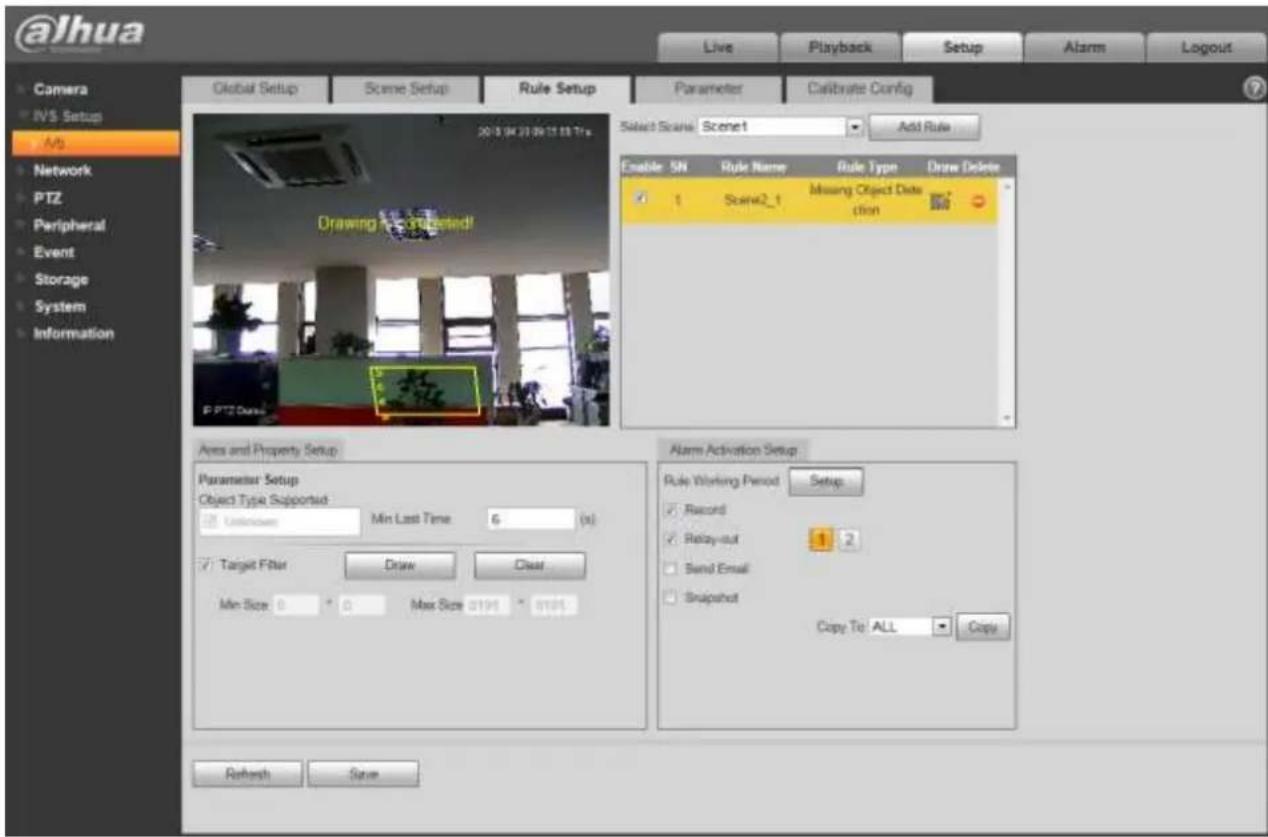
4.2.3.7 Missing Object Detection
text_image
@lhua Live Playback Setup Alarm Logout Global Setup Scene Setup Rule Setup Parameter Calibrate Config Camera IVS Setup MS Network PTZ Peripheral Event Storage System Information 2013 04 27:09:12:13:17x Drawing is returned! Select Scene: Scene 1 Add Rule Enable SN Rule Name Rule Type Draw Delete ✓ 1 Scene2_1 Missing Object Date ction Area and Property Setup Parameter Setup Object Type Supported: Unknown Min Last Time 6(s) ✓ Target Filter Draw Clean Min Size 0 0Max Size 2194 6194 Alarm Activation Setup Rule Working Period Setup ✓ Record ✓ Relay-out 1 2 ✓ Send Email ✓ Snapshot Copy To ALL Copy Refresh SaveFigure 4-33
| Parameter | Function |
| Object type supported | You can select an object type here. The default setup is all types. |
| Min last time | It is to set the min time between the missing object occurrence and alarm activation. |
| Target filter | Check the box here to enable this function and then click button, you can set the target filter model in this scene. Click the button, you can remove selected target filter model. |
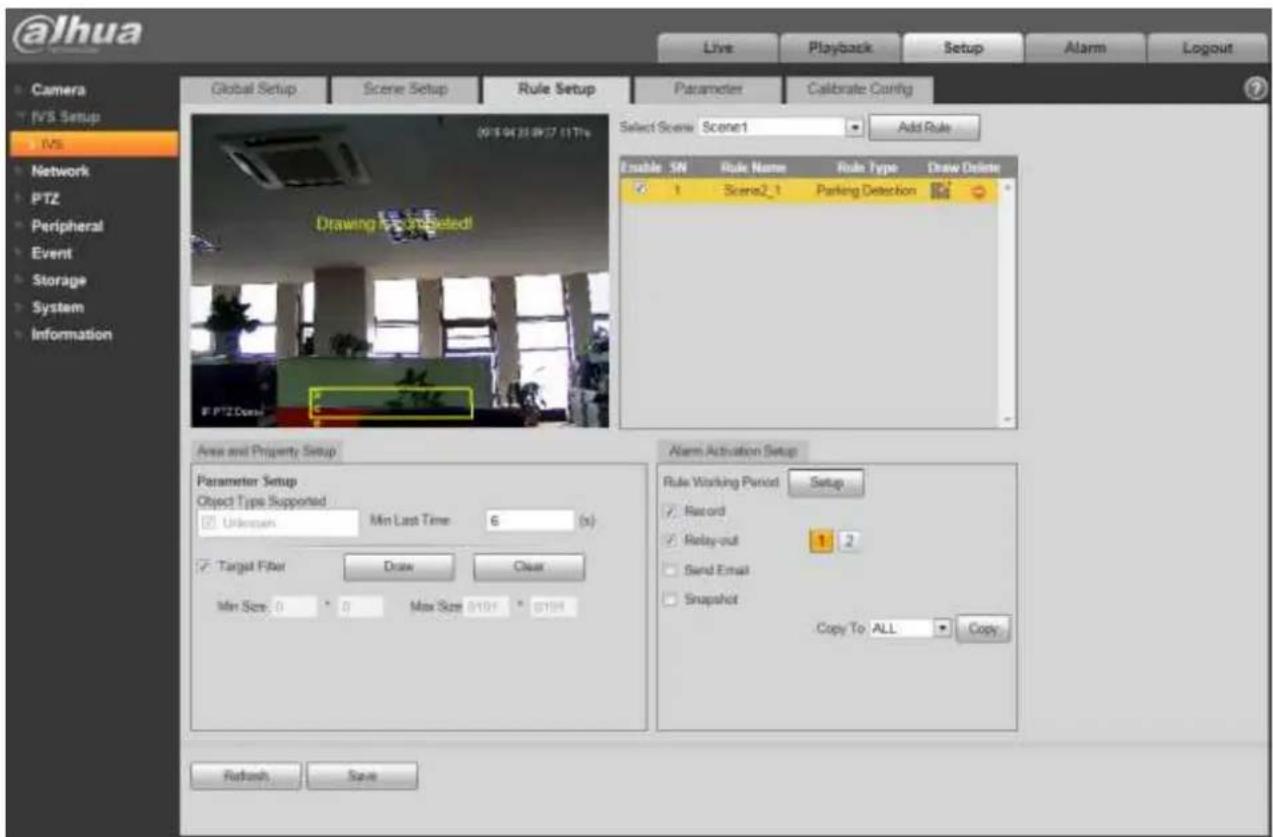
4.2.3.8 Illegal parking
text_image
@lhua Live Playback Setup Alarm Logout Camera IVS Setup IVS Network PTZ Peripheral Event Storage System Information Global Setup Scene Setup Rule Setup Parameter Calibrate Curing Select Scene Scene1 Add Rule Enable SN Rule Name Rule Type Draw Delete 1 Scene2_1 Parking Detection Area and Property Setup Parameter Setup Object Type Supported Unknown Min Last Time 6 (s) Target Filter Draw Clear Min Size: 0 0 Max Size 0/104 0/104 Alarm Activation Setup Rule Working Period Setup Record Relay-out 1 2 Send Email Snapshot Copy To ALL Copy Refresh SaveFigure 4-34
| Parameter | Function |
| Object type supported | You can select an object type here. The default setup is all types. |
| Min last time | It is to set the min time between the illegal parking occurrence and alarm activation. |
| Target filter | Check the box here to enable this function and then click button, you can set the target filter model in this scene. Click the button, you can remove selected target filter model. |
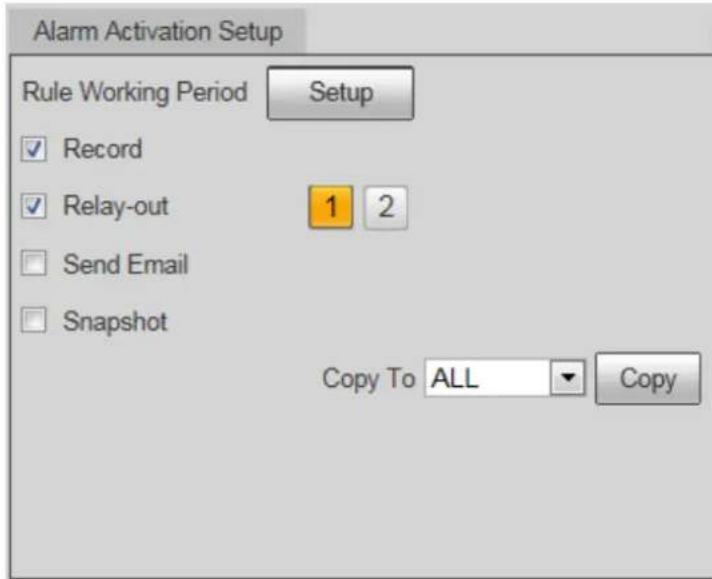
4.2.3.9 Alarm Activation Setup
Dahua Network Speed Dome Web3.0 Operation Manual
text_image
Alarm Activation Setup Rule Working Period Setup ✓ Record ✓ Relay-out 1 2 □ Send Email □ Snapshot Copy To ALL CopyFigure 4-35
| Parameter | Function |
| Rule Working period | Here you can set rule arm and disarm period. Please click the Setup button to set. |
| Record | Check the box here so that the device can record when alarm activation occurred. |
| Relay output | Check the box here so that the device can output an alarm when alarm activation occurred. |
| Send e-mail | · Check the box here so that the device can send out an email when alarm activation occurred.· Please note current function is null when the device is offline, or IP conflict occurred. |
| Snapshot | Check the box here so that the device can snapshot when alarm activation occurred. |
| Copy | Select a rule name from the dropdown list and then click button; you can copy the alarm activation setup of current rule to the selected rule. |
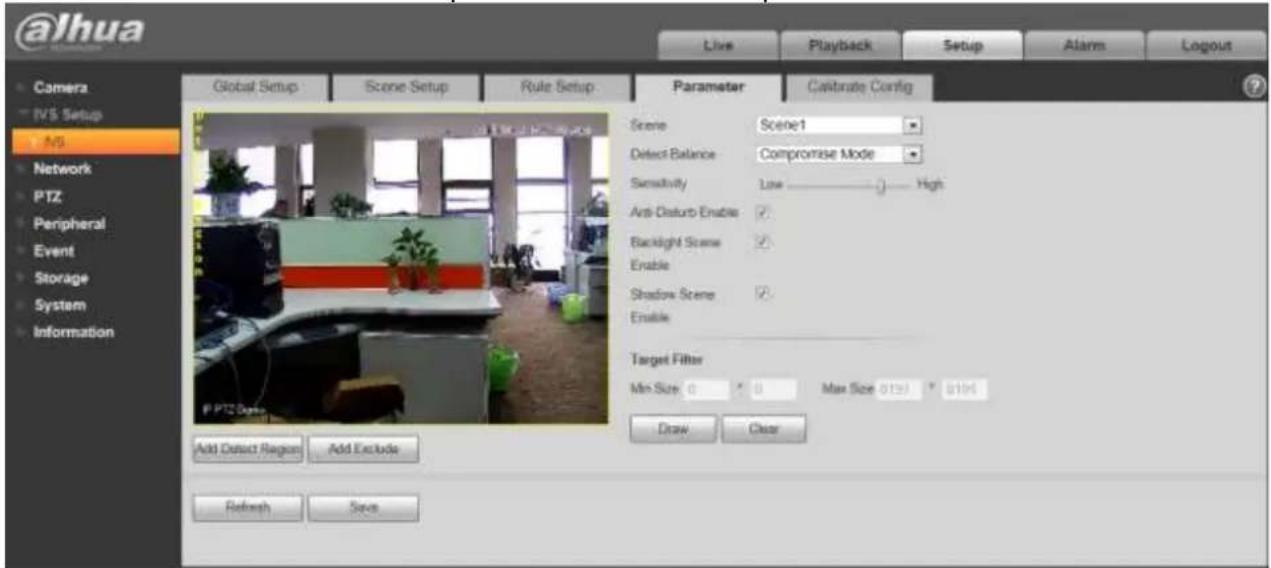
4.2.4 Parameter
Dahua Network Speed Dome Web3.0 Operation Manual
text_image
@lhua Live Playback Setup Alarms Logout Camera IVS Setup MS Network PTZ Peripheral Event Storage System Information Global Setup Scene Setup Rule Setup Parameter Calibrate Config Scene Scene1 Detect Balance Compromise Mode Sensitivity.Low_High Anti-Disrupt Enable Backlight Scene Enable Shadow Scene Enable Target Filter Min Size: 0 0Max Size: 0.15 0.16 Add Detect Region Add Exclude Draw Clear Refresh SaveFigure 4-36
| Parameter | Function |
| Scene | Please select a scene from the dropdown list you want to set. |
| Detect balance | There are three modes: compromise mode, omission detect less and error detect less. |
| Sensitivity | The level ranges from 1 to 10. The default setup is 5. The higher the sensitivity is, the easier for the device to detect the low contrast object and small object. At the same time, the error detect may become more. |
| Anti-disturbance mode | It is to control the random disturbance in the scene. |
| Backlight scene enable | Check the box here so that the device can have higher recognition capability in the backlight scene. |
| Shadow scene enable | Check the box here so that the device can have higher recognition capability in the shadow scene. |
| Target filter | Click button , you can set the target filter model in this scene. Click the button , you can remove selected target filter model. |
| Add detect region | Click button , you can draw a detection zone. |
| Add excluded region | Click button , you can draw the privacy mask (shield) zone. |
4.2.5 Calibrate Config
Dahua Network Speed Dome Web3.0 Operation Manual
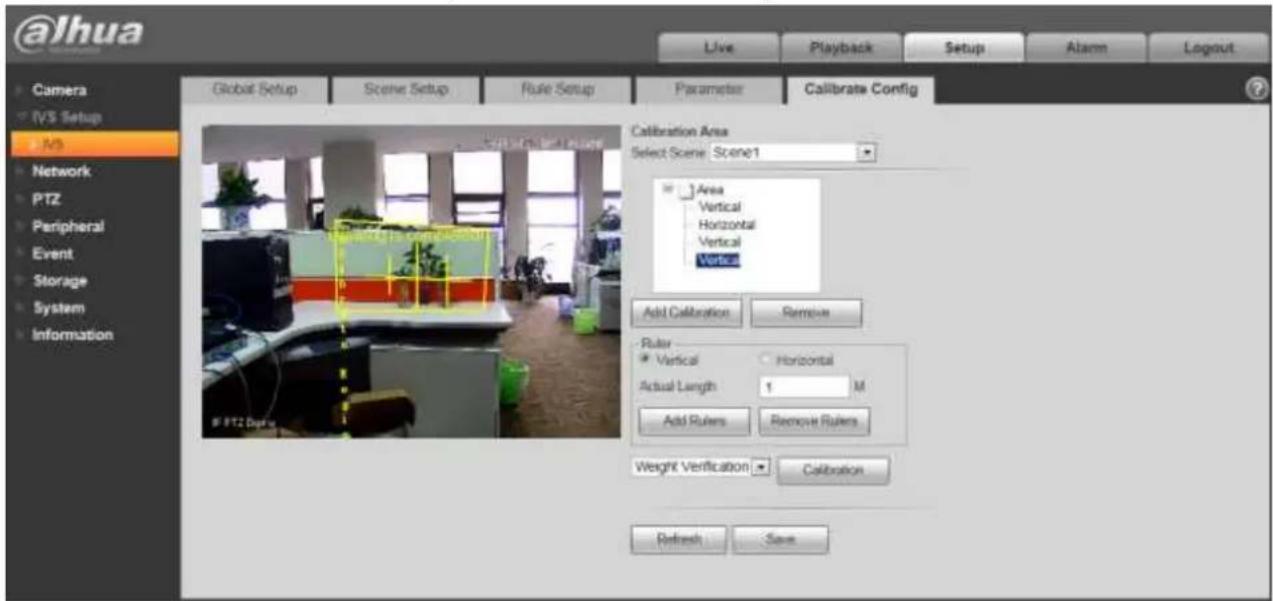
text_image
@lhua Live Playback Setup Alarm Delhi Camera IVS Setup MS Network PTZ Peripheral Event Storage System Information Global Setup Scene Setup Rule Setup Parameter Calibrate Config Calibration Area Select Scene: Scene1 Area Vertical Horizontal Vertical Vertical Add Calibration Remove Ruler Vertical Horizontal Actual Length 1 M Add Rulers Remove Rulers Weight Verification Calibration Refresh SaveFigure 4-37
| Parameter | Note |
| Select scene | Select corresponding scene to set parameters. |
| Add calibration | Click to draw calibration area in the monitoring image. |
| Remove | Select area in the calibrated area, click the button to remove. |
| Ruler | Able to draw vertical and horizontal ruler.Click “Add ruler” to draw a horizontal ruler in the calibrated area, and set its length in the actual scene; draw 3 vertical rulers in different locations, and set their height in the actual scene, the 3 vertical rulers have the same length but look different in the image.Select the exact ruler on the left preview interface or on the navigation tree, click “Remove ruler” to remove the corresponding ruler. |
| Verification | Select weight/height verification, click the button to draw any straight line in the calibration area, then it will display its corresponding length. |
4.3 Network
4.3.1 TCP/IP
The TCP/IP interface is shown as in Figure 4-38. It supports IPv4 and IPv6. IPv4 supports static IP and DHCP. IPv6 supports static IP only. When you manually modify IP address, WEB will automatically jump to the new IP address.
Dahua Network Speed Dome Web3.0 Operation Manual
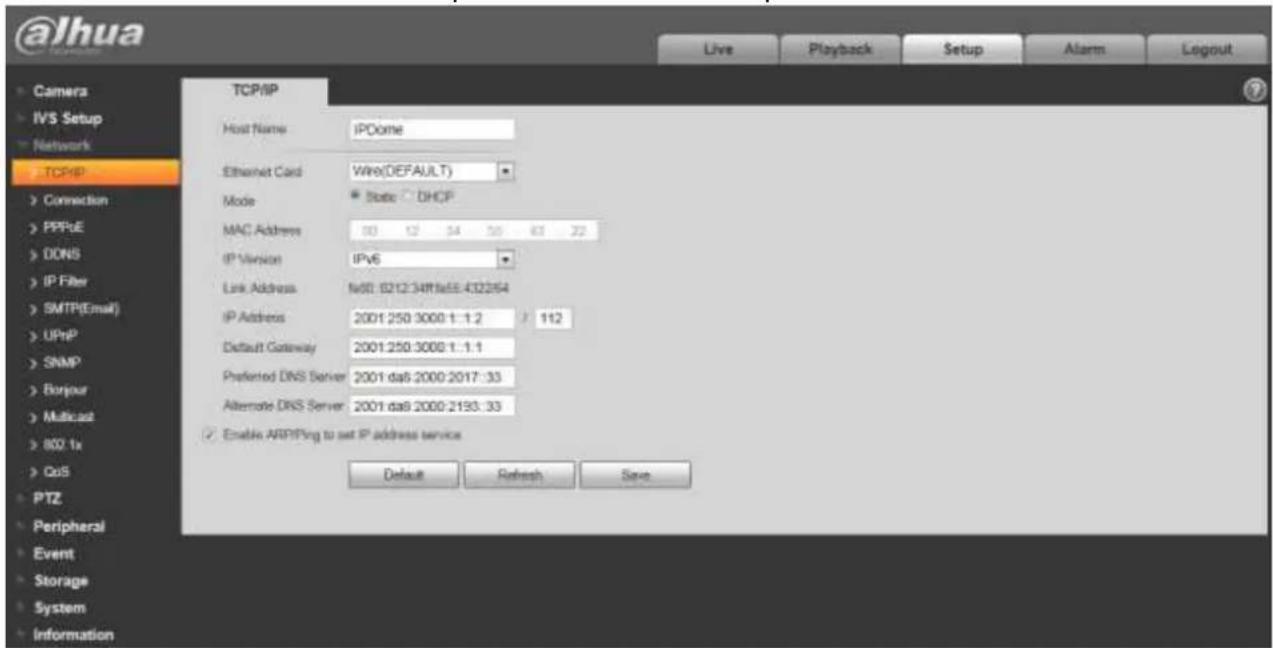
text_image
@lhuua Live Playback Setup Alarm Logout Camera IVS Setup Network TCP/IP Connection PPPoE DONS IP Filter SMTP(Email) UPnP SNMP Bonjour Multicast 802.1x CoS PTZ Peripheral Event Storage System Information TCP/IP Host Name: IPDome Ethernet Card: Wire(DEFAULT) Mode: State DHCP MAC Address: 50 12 34 50 61 72 IP Version: IPv6 Link Address: No: 0212-34Rfa5E-432264 IP Address: 2001 250 3000 1:1.2 / 112 Default Gateway: 2001 250 3000 1:1.1 Preferred DNS Server: 2001 da6 2000 2017:33 Alternate DNS Server: 2001 da6 2000 2193:33 Enable ARPIPing to set IP address service Default Refresh SaveFigure 4-38
Please refer to the following sheet for detailed information.
| Parameter | Function |
| Host Name | It is to set current host device name. It max supports 15 characters. |
| Ethernet Card | Please select the Ethernet port. Default is wired.Please note you can modify the default Ethernet card if there is more than one card..Please note the device needs to reboot to activate the new setup once you modify the default setup. |
| Mode | There are two modes: static mode and the DHCP mode. Select DHCP mode, it auto searches IP, and you cannot set IP/subnet mask/gateway. Select static mode, you must manually set IP/subnet mask/gateway. |
| Mac Address | It is to display hose Mac address. |
| IP Version | It is to select IP version. IPV4 or IPV6.You can access the IP address of these two versions. |
| IP Address | Please use the keyboard to input the corresponding number to modify the IP address and then set the corresponding subnet mask and the default gateway. |
| Preferred DNS | DNS IP address. |
Dahua Network Speed Dome Web3.0 Operation Manual
Alternate DNS
Alternate DNS IP address.
Enable
You can use ARP/Ping command to modify or set the device IP address if you know the device MAC address.
ARP/Ping set device IP address service.
Before the operation, please make sure the speed dome and the PC in the same LAN. This function is on by default.
You can refer to the steps listed below.
Step 1: Get an IP address. Set the speed dome and the PC in the same LAN.
Step 2: Get the physical address from the label of the speed dome.
Step 3: Go to the Run interface and then input the following commands.
arp -s
ping -l 480 -t
Such as: arp -s 192.168.0.125 11-40-8c-18-10-11
ping -l 480 -t 192.168.0.125
Step 4: Reboot the device.
Step 5: You can see the setup is OK if you can see there are output information such as "Reply from 192.168.0.125 ..." from the command output lines. Now you can close the command line.
Step 6: Open the browse and then input http://
Click the Enter button, you can access now.
4.3.2 ONVIF
ONVIF(Open Network Video Interface Forum), this specification describes the model, port, data type and data interaction mode of network video. ONVIF specification's aim is to realize a framework agreement of network video to make the network video products (including video front end, video device and etc) from different manufacturers completely compatible.
ONVIF function is "disable" by default, see Figure 4-39 for more information.
Dahua Network Speed Dome Web3.0 Operation Manual
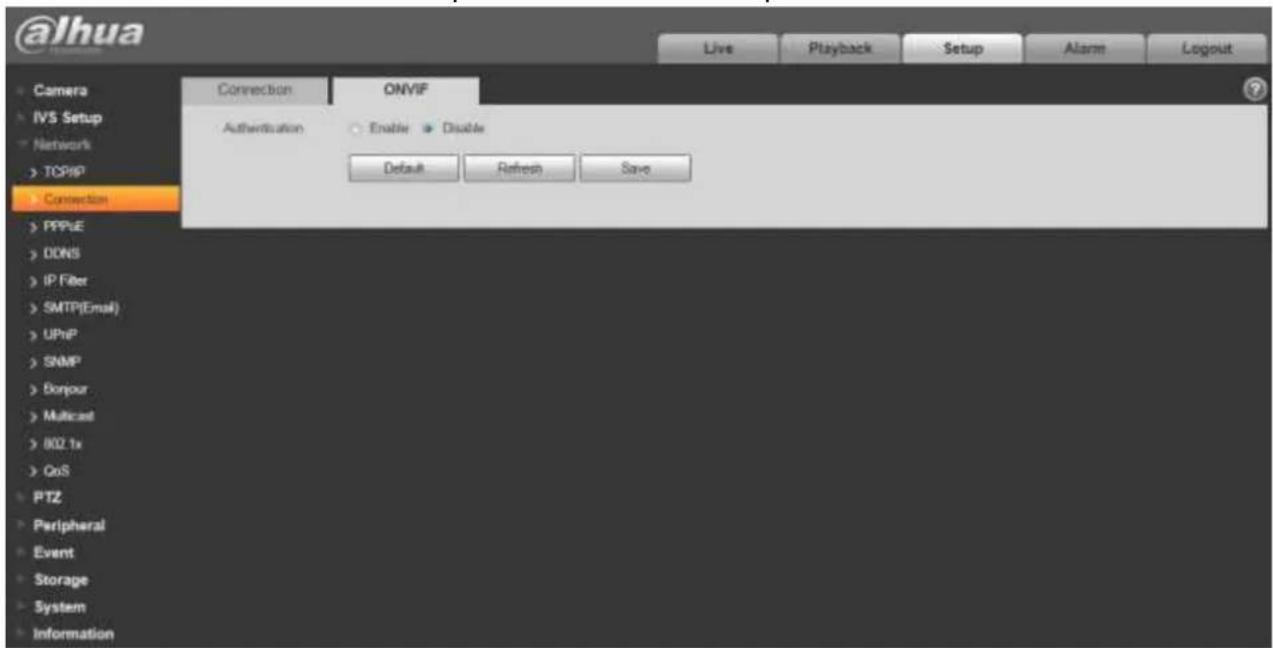
text_image
@lhuα Live Playback Setup Alarm Logout Camera IVS Setup Network TCP/IP Connection ONVIF Authentication Enable Disable Default Refresh Save PPPUE DDNS IP Filter SMTP(Email) UPnP SNMP Bonjour Multicast 802.1x QoS PTZ Peripheral Event Storage System InformationFigure 4-39
4.3.3 Connection
4.3.3.1 Connection
The connection interface is shown as in Figure 4-40.
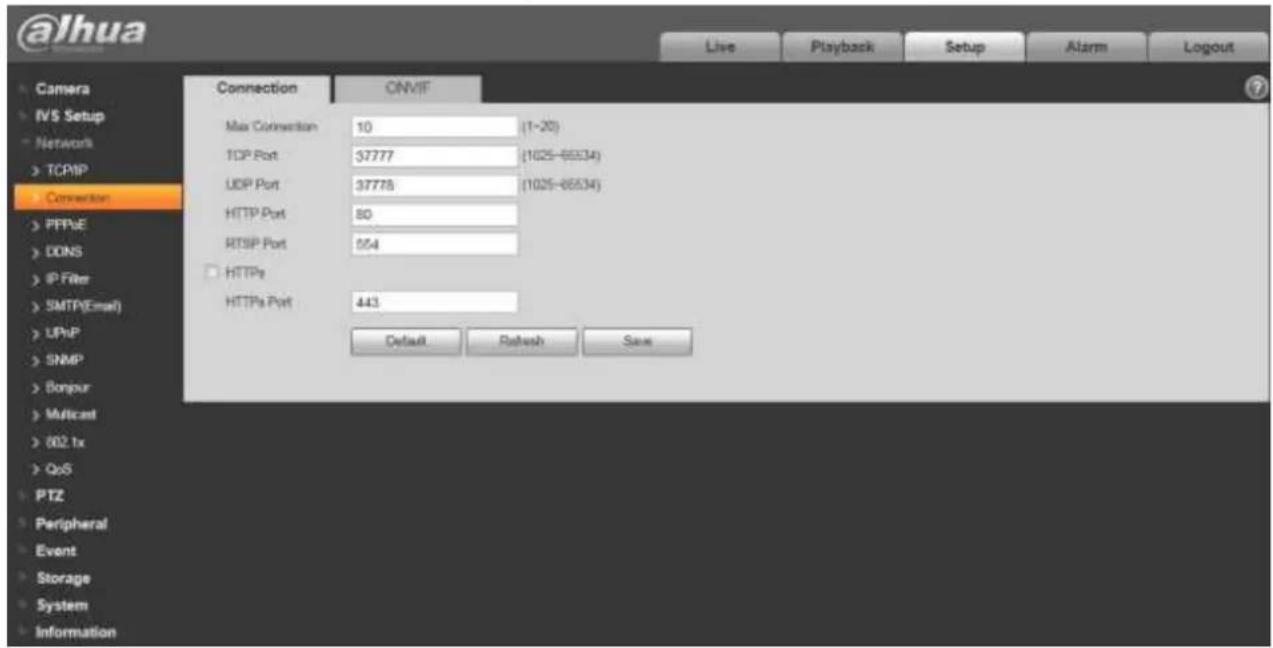
text_image
@Jhua Live Playback Setup Alarm Logout Camera IVS Setup Network TCP/IP Connection PPPvE DONS IP Filter SMTP(Email) UPnP SNMP Bonjour Multicast 802 tx QoS PTZ Peripheral Event Storage System Information Connection ONVIF Max Connection 10 (1~20) TCP Port 37777 (1025-66534) UDP Port 37778 (1025-66534) HTTP Port 80 RTSP Port 554 HTTPS HTTPS Port 443 Default Refresh SaveFigure 4-40
Please refer to the following sheet for detailed information.
Dahua Network Speed Dome Web3.0 Operation Manual
| Parameter | Function |
| Max connection | It is the max Web connection for the same device. The value ranges from 1 to 20. Default connection amount is 10. |
| TCP port | Port range is 1025~65534. The default value is 37777. You can input the actual port number if necessary. |
| UDP port | Port range is 1025~65534. The default value is 37778. You can input the actual port number if necessary. |
| HTTP port | Port range is 1025~65524. The default value is 80. You can input the actual port number if necessary. |
| RTSP port | The default value is 554. Please leave blank if use default. User uses QuickTime or VLC can play the following formats. BlackBerry can play too.Real-time monitoring URL format, please require real-time RTSP media server, require channel no., bit stream type in URL. You may need username and password.Users use BlackBerry need to set encode mode to H.264B, resolution to CIF and turn off audio.URL format is:rtsp://username:password@ip:port/cam/realmonitor?channel=1&subtype=0 username/password/IP and port.The IP is device IP and the port default value is 554. You can leave it in blank if it is the default value.Follow standard RTP protocol and when encode mode is MJPEG; the max resolution only supports 2040*2040. |
| HTTPS Enable | Check HTTPS enable, login as https://ip:port. Protect data. Default port ishttps://ip. It is disabled by default. |
| HTTPS Port | HTTPS communication port, range is 1025~65534, default is 443. |
Note:
- 0\~1024, 37780\~37880, 1900, 3800, 5000, 5050, 9999, 37776, 39999, 42323 are all special ports. User cannot modify them.
- Avoid using default port value of other ports.
4.3.3.2 ONVIF
ONVIF (Open Network Video Interface Forum) describes network video model, port, data type and data switch modes. ONVIF standard targets to create a network video frame protocol that communicates network video products from different manufacturers. See Figure 4-41.
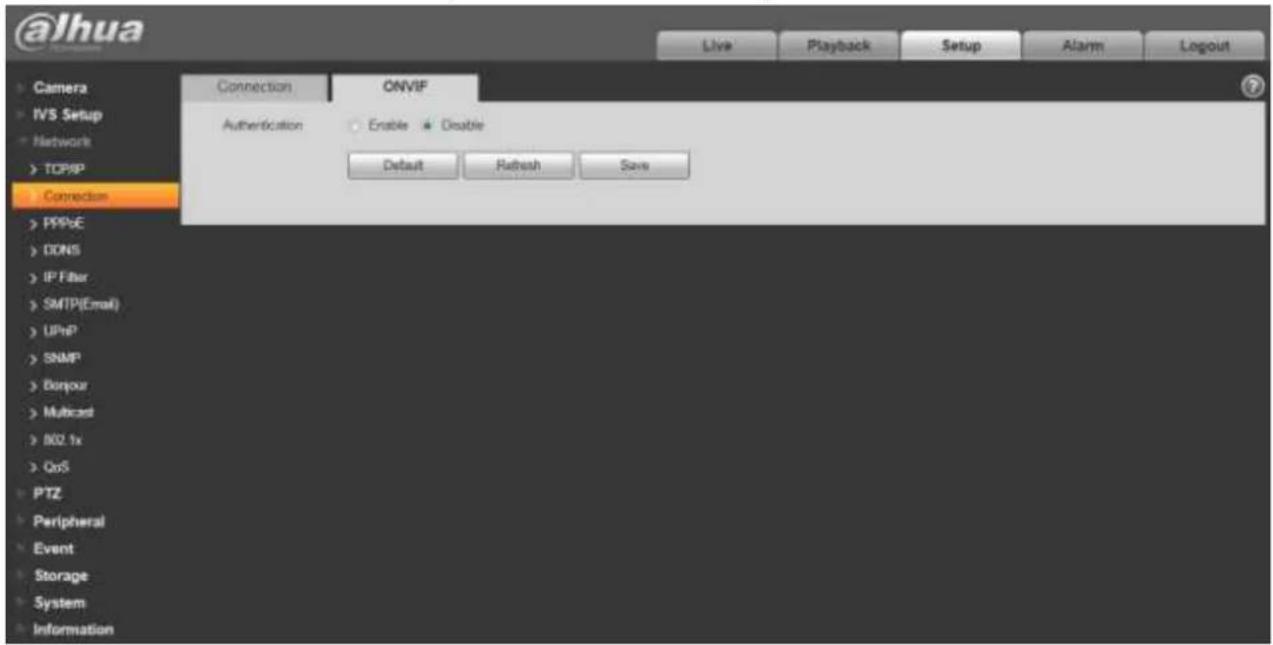
text_image
@lhua Live Playback Setup Alarm Logout Camera IVS Setup Network TCP/IP Connection ONVIF Authentication Enable Disable Default Refresh Save PPPoE DONS IP Filter SMTP(Email) UPnP SNMP Bonpur Multicost 802.1x QoS PTZ Peripheral Event Storage System InformationFigure 4-41
Please refer to the following sheet for detailed information.
| Parameter | Function |
| Authentication | The login authentication is off by default. |
4.3.4 PPPoE
The PPPoE interface is shown as in Figure 4-42.
Input the PPPoE user name and password you get from the IPS (internet service provider) and enable PPPoE function. Please save current setup and then reboot the device to get the setup activated.
Device connects to the internet via PPPoE after reboot. You can get the IP address in the WAN from the IP address column. When PPPoE is on, please disable UPnP to avoid influence on dial-up.
When you Check PPPoE enable, please disable UPnP.
Please note, you need to go to the IP address item to via the device current device information.
You can access the client-end via this address.
Dahua Network Speed Dome Web3.0 Operation Manual
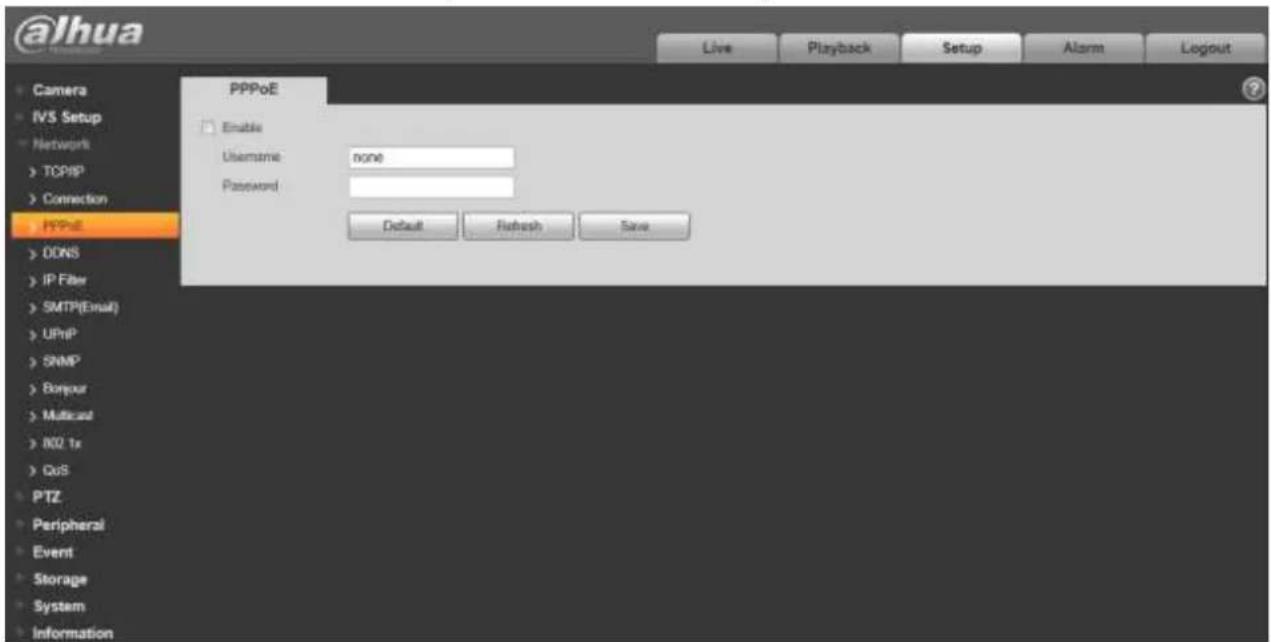
text_image
@lhua Live Playback Setup Alarm Logout Camera IVS Setup Network > TCP/IP > Connection PPPoE Enable Username none Password Default Refresh Save ODNS IP Fiber SMTP(Email) UPnP ShMP Bonpur Multicaul K02 tx QoS PTZ Peripheral Event Storage System InformationFigure 4-42
4.3.5 DDNS
The DDNS interface is shown as in Figure 4-43.
The DDNS is to set to connect the various servers so that you can access the system via the server. Please go to the corresponding service website to apply a domain name and then access the system via the domain. It works even your IP address has changed. When the device connects to WLAN, you should disable UPnP.
Dahua Network Speed Dome Web3.0 Operation Manual

text_image
@Jhua Live Playback Setup Alznn Logout Camera IVS Setup Networks TCP/IP Connection PPPUE DONS DONS Server Type: DoUSA DONS Server Address: www.4thwahdns.com Mode: Auto Manual Domain Name: 007234164322 dshuaddre.com Username: (Optional)Please input the malloc Default Refresh Save IP Filter SMTP(Email) UPnP SNMP Bonjour Multicast 802.tr QoS PTZ Peripheral Event Storage System InformationFigure 4-43
Please refer to the following sheet for detailed information.
| Parameter | Function |
| Server Type | You can select DDNS protocol from the dropdown list: CN99 DDNS, NO-IP DDNS, Dyndns DDNS, and Dahua DDNS. The QUICK DDNS protocol means you use your self-defined private protocol to realize DDNS function. |
| Server Address | DDNS server IP address |
| Domain Name | Your self-defined domain name. |
| Username | The user name you input to log in the server. |
| Password | The password you input to log in the server. |
| Update period | Device sends out alive signal to the server regularly. Default is 10min. |
The DAHUA DDNS interface is shown as in Figure 4-44.
Dahua Network Speed Dome Web3.0 Operation Manual
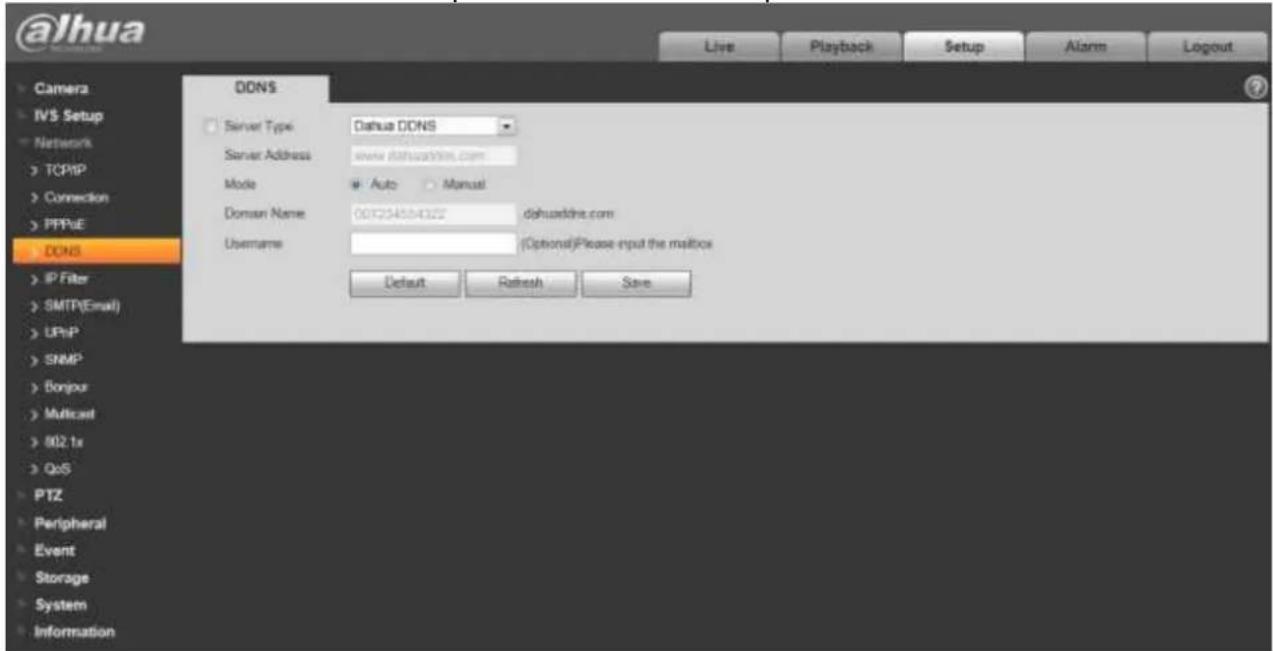
text_image
@Jhua Live Playback Setup Alznn Logout Camera IVS Setup Networks TCP/IP Connection PPPUE DONS DONS Server Type: DoUSA DONS Server Address: www.4thwahdns.com Mode: Auto Manual Domain Name: 00F234104322 dshuaddre.com Username: (Optional)Please input the malloc Default Refresh Save IP Filter SMTP(Email) UPnP SNMP Bonjour Multicast 802.tr QoS PTZ Peripheral Event Storage System InformationFigure 4-44
Please refer to the following sheet for detailed information.
| Parameter | Function |
| Server Type | You can select DDNS protocol from the dropdown list and then enable DDNS function. The Dahua DDNS means you use your self-defined private protocol to realize DDNS function. |
| Server Address | DDNS server IP address. Under DDNS the default server address is www.Dahuaddns.com |
| Mode | The default is auto, and you can select manual. |
| Domain Name | Auto and self-defined domain names are both MAC address.quickddns.com. You can self-define prefix. |
| Test | It is to test domain name. It is available only under manual mode. |
| Username | The user name you input to log in the server. Optional. |
4.3.6 IP filter
The IP filter interface is shown as in Figure 4-45.
You can enable IP filter function so that some specified IP/MAC user can access the speed dome.
You can add IP address or IP address section.
If you do not check the box here, it means there is on access limit.
Dahua Network Speed Dome Web3.0 Operation Manual
Here you can add IP address and MAC address. You must add these addresses before enabling the trusted sites.
Please note: You must set MAC address in the same network segment.
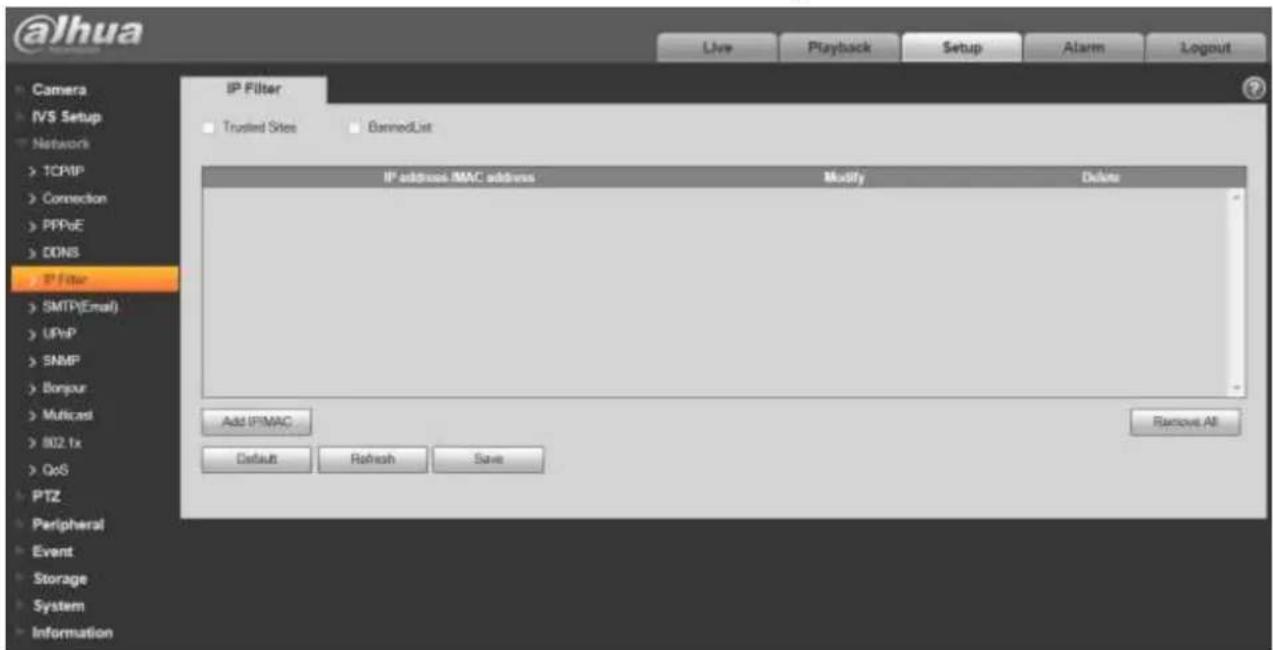
text_image
@lhua Live Playback Setup Alarm Logout Camera IVS Setup Network > TCP/IP > Connection > PPPoE > DONS IP Filter > SMTP(Email) > UPnP > SNMP > Bonpur > Multicast > 802.1x > QoS PTZ Peripheral Event Storage System Information IP Filter Trusted Sites BannedList IP addresses IMAC address Modify Delete Add IP MAC Default Renish Save Remove AllFigure 4-45
4.3.7 SMTP (e-mail)
The SMTP interface is shown as in Figure 4-46.
Dahua Network Speed Dome Web3.0 Operation Manual
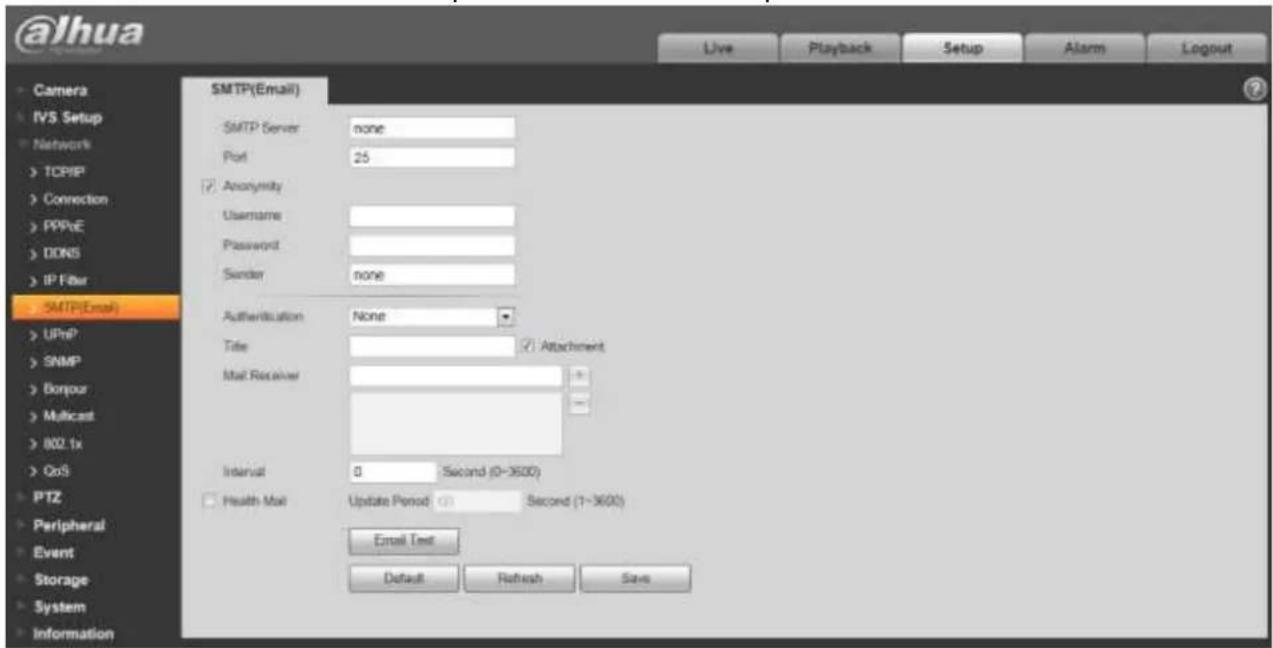
text_image
@lhua Live Playback Setup Alarm Logout Camera IVS Setup Networks TCP/IP Connection PPPoE DDNS IP Fiber SMTP(Email) SMTP Server none Port 25 Anonymity Username Password Sender none Authentication None Title Attachment Mail Receiver Interval 0 Second (0~3600) Health Mail Update Period 01 Second (1~3600) Email Test Default Refresh SaveFigure 4-46
Please refer to the following sheet for detailed information.
| Parameter | Function |
| SMTP Server | Input server address and then enable this function. |
| Port | Default value is 25. You can modify it if necessary. |
| Anonymity | For the server supports the anonymity function. You can auto login anonymously. You do not need to input the user name, password and the sender information. |
| User Name | The user name of the sender email account. |
| Password | The password of sender email account. |
| Sender | Sender email address. |
| Authentication (Encryption mode) | You can select SSL, TLS or none. |
| Title (Subject) | Input email subject here. |
| Attachment | System can send out the email of the snapshot picture once you check the box here. |
| Mail receiver | Input receiver email address here. Max three addresses. |
Dahua Network Speed Dome Web3.0 Operation Manual
| Parameter | Function |
| Interval | The send interval ranges from 0 to 3600 seconds. 0 means there is no interval.Please note system will not send out the email immediately when the alarm occurs. When the alarm, motion detection or the abnormality event activates the email, system sends out the email according to the interval you specified here. This function is very useful when there are too many emails activated by the abnormality events, which may result in heavy load for the email server. |
| Health mail enable | Please check the box here to enable this function. |
| Email test | The system will automatically sent out a email once to test the connection is OK or not .Before the email test, please save the email setup information. |
4.3.8 UPnP
It allows you to establish the mapping relationship between the LAN and the public network.
Here you can also add, modify or remove UPnP item. For UPnP on different routers, you must disable UPnP function. See Figure 4-47.
In the Windows OS, From Start->Control Panel->Add or remove programs. Click the "Add/Remove Windows Components" and then select the "Network Services" from the Windows Components Wizard. Click the Details button and then check the "Internet Gateway Device Discovery and Control client" and "UPnP User Interface". Please click OK to begin installation.
Enable UPnP from the Web. If your UPnP is enabled in the Windows OS, the speed dome can auto detect it via the "My Network Places".
Under manual mode, you can add, delete or modify mapping. Under auto mode, select idle port for auto port mapping without user modification.
Dahua Network Speed Dome Web3.0 Operation Manual
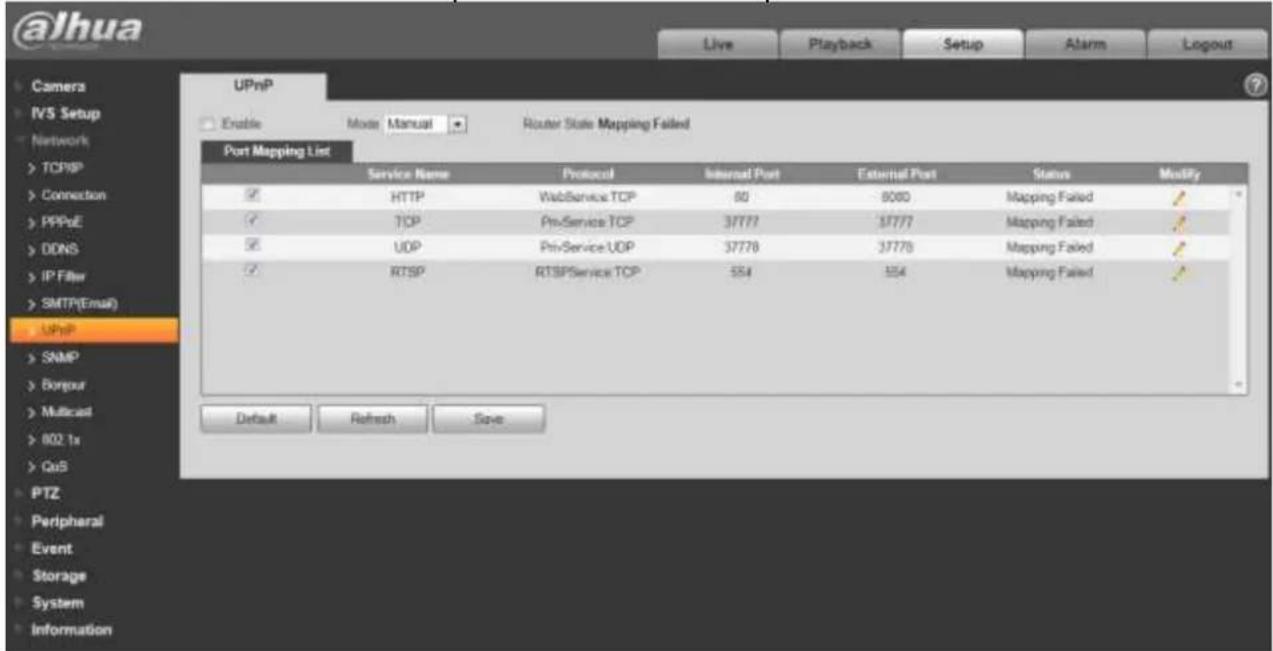
text_image
@lhua Live Playback Setup Alarm Logout Camera IVS Setup Network >TCP/IP >Connection >PPP&E >DDNS >IP Filter >SMTP(Email) UPnP >SNMP >Borgour >Multicast >802 tx >QoS PTZ >Peripheral >Event >Storage >System >Information UPnP Enable Mode Manual Router State Mapping Failed Port Mapping List Service Name Protocol Internal Port External Port Status Modify HTTP WebService TCP 60 8000 Mapping Failed TCP Pr-Service TCP 37777 37777 Mapping Failed UDP Pr-Service UDP 37778 37778 Mapping Failed RTSP RTSPService TCP 554 554 Mapping Failed Default Refresh SaveFigure 4-47
4.3.9 SNMP
The SNMP interface is shown as in Figure 448.
The SNMP allows the communication between the network management work station software and the proxy of the managed device. Please install the software such as MG MibBrowser 8.0c software or establish the SNMP service before you use this function. You need to reboot the device to activate the new setup.
Dahua Network Speed Dome Web3.0 Operation Manual
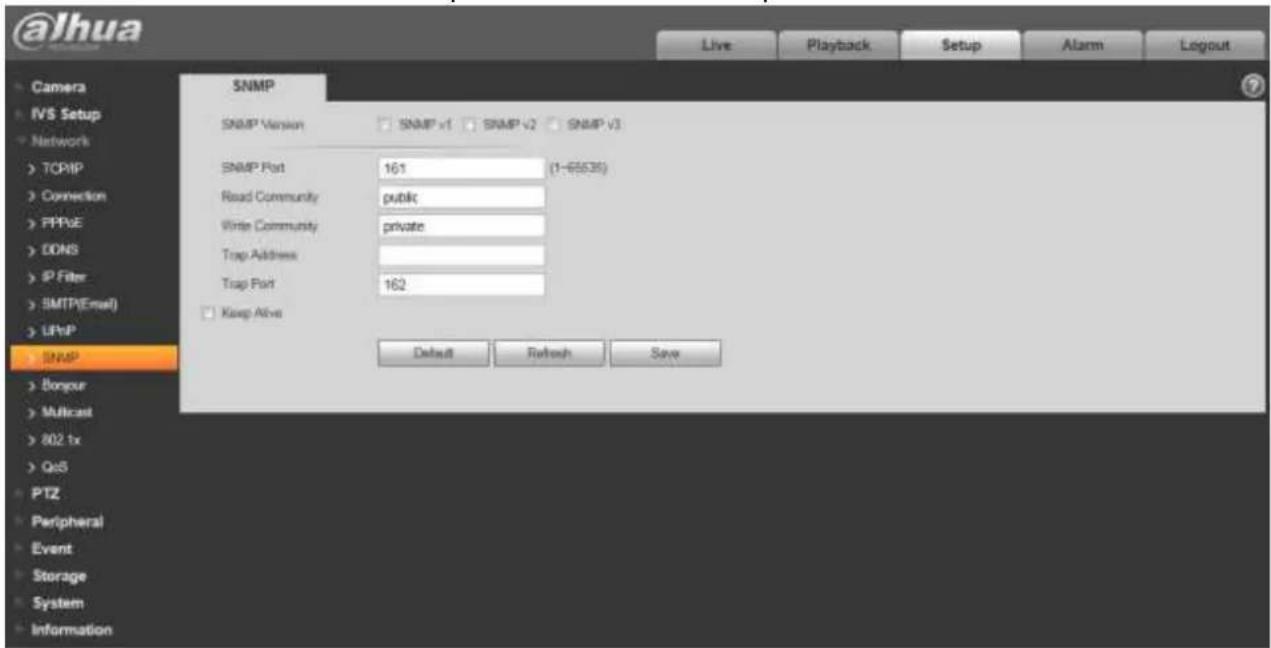
text_image
@lhua Live Playback Setup Alarm Logout SNMP SNMP Version SNMP v1 SNMP v2 SNMP v3 SNMP Port 161 (1-65538) Road Community pudk Write Community private Trap Address Trap Port 162 Keep Alive Default Refresh Save Camera IVS Setup Network > TCP/IP > Connection > PPPvE > DONS > IP Filter > SMTP(Email) > LPnP SNMP > Bonpur > Multicast > 802 tx > QoS > PTZ > Peripheral Event > Storage System InformationFigure 4-48
Please refer to the following sheet for detailed information.
| Parameter | Function |
| SNMP Version | Check SNMP v1, device only process v1 info.Check SNMP v2, device only process v2 info.Check SNMP v3, can set username, password and encryption method. Server calibrate corresponding username, password and encryption method too access device and v1/v2 are unavailable. |
| SNMP port | The listening port of the proxy program of the device. It is a UDP port not a TCP port. The value ranges from 1 to 65535. The default value is 161 |
| Community | It is a string, as command between management and proxy, , defining a proxy, and a manager's authentication. |
| Read community | Read-only access to all SNMP targets, default is public. Note: Only number, letter, _, and – supported. |
| Write community | Read/write access to all SNMP targets, default is private. Note: Only number, letter, _, and – supported. |
| Trap address | The destination address of the Trap information from the proxy program of the device. |
| Trap | SNMP trap is a proxy message sent to admin as important event notice or status change. |
Dahua Network Speed Dome Web3.0 Operation Manual
| Parameter | Function |
| Trap Address | Address where to send Trap message. |
| Trap Port | Port which send Trap message, default is 162, range 1~65535. |
Check SNMP v3 version and SNMP port, read community, write community, Trap address, Trap port are same with SNMP v1 and SNMP v2 versions. Only when SNMP version is SNMP v3, users need to configure parameter in chart. See Figure 4-49.
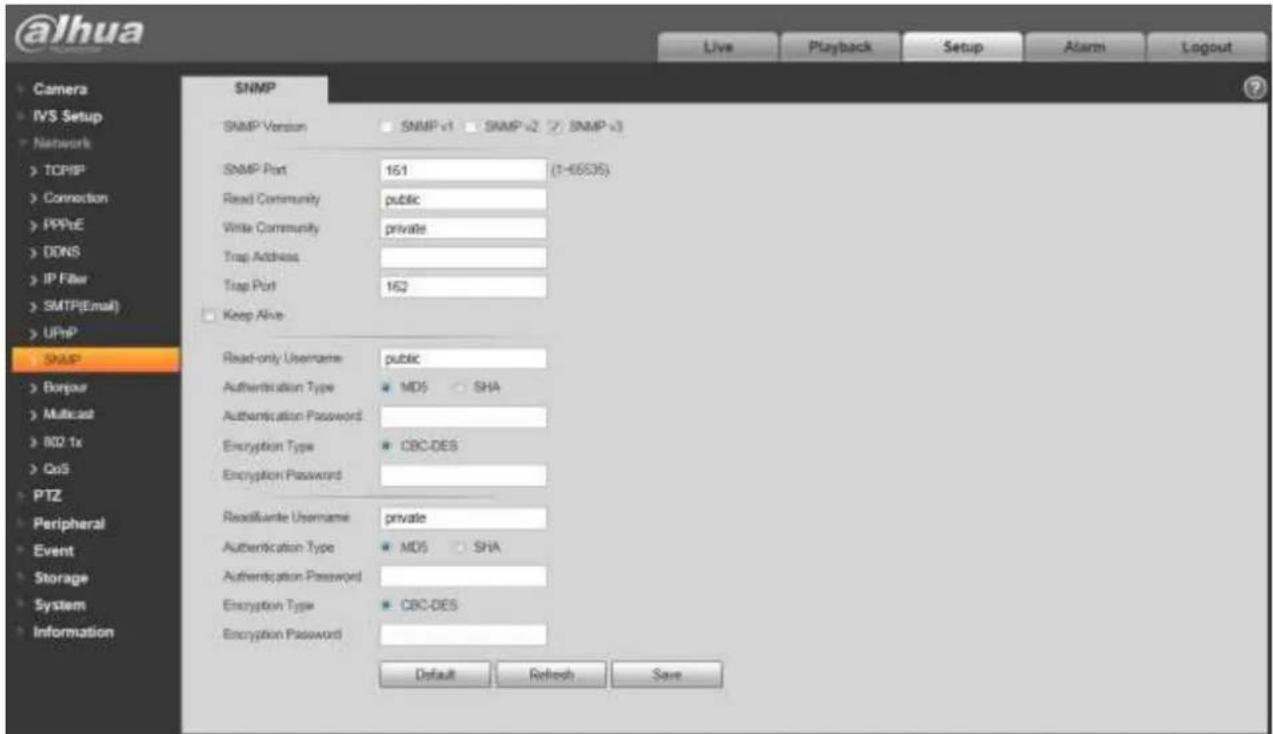
text_image
@lhua SNMP SNMP Version SNMP v1 SNMP v2 SNMP v3 SNMP Port 161 (1-65535) Read Community public Write Community private Trap Address Trap Port 162 Keep Alive Read-only Username public Authentication Type MD5 SHA Authentication Password Encryption Type CBC-DES Encryption Password Readsuite Username private Authentication Type MD5 SHA Authentication Password Encryption Type CBC-DES Encryption Password Default Refresh Save Camera IVS Setup Network TCP/IP Connection PPPoE DDNS IP Filter SMTP(Email) UPnP SNMP Bonjour Multicast 802.1x QoS PTZ Peripheral Event Storage System InformationFigure 4-49
Please refer to the following sheet for detailed information.
| Parameter | Function |
| SNMP Version | SNMP v3 |
| Read-onlyUsername | Default is public.Note:Name only can be number, letter and underline. |
| Read/WriteUsername | Default is private.Note:Name only can be number, letter and underline. |
| Authentication | You may select MD5 or SHA, default is MD5. |
Dahua Network Speed Dome Web3.0 Operation Manual
| Parameter | Function |
| Authentication Password | Password not less than 8 characters. |
| Encryption | Default is CBC-DES. |
| Encryption Password | Password not less than 8 characters. |
4.3.10 Bonjour
The Bonjour interface is shown as below. See Figure 4-50.
Bonjour is based on the multicast DNS service from the Apple. The Bonjour device can automatically broadcast its service information and listen to the service information from other device.
You can use the browse of the Bonjour service in the same LAN to search the speed dome device and then access if you do not know the speed dome information such as IP address.
You can view the server name when the speed dome is detected by the Bonjour. Please note the safari browse support this function. Click the "Display All Bookmarks: and open the Bonjour, system can auto detect the speed dome of the Bonjour function in the LAN.
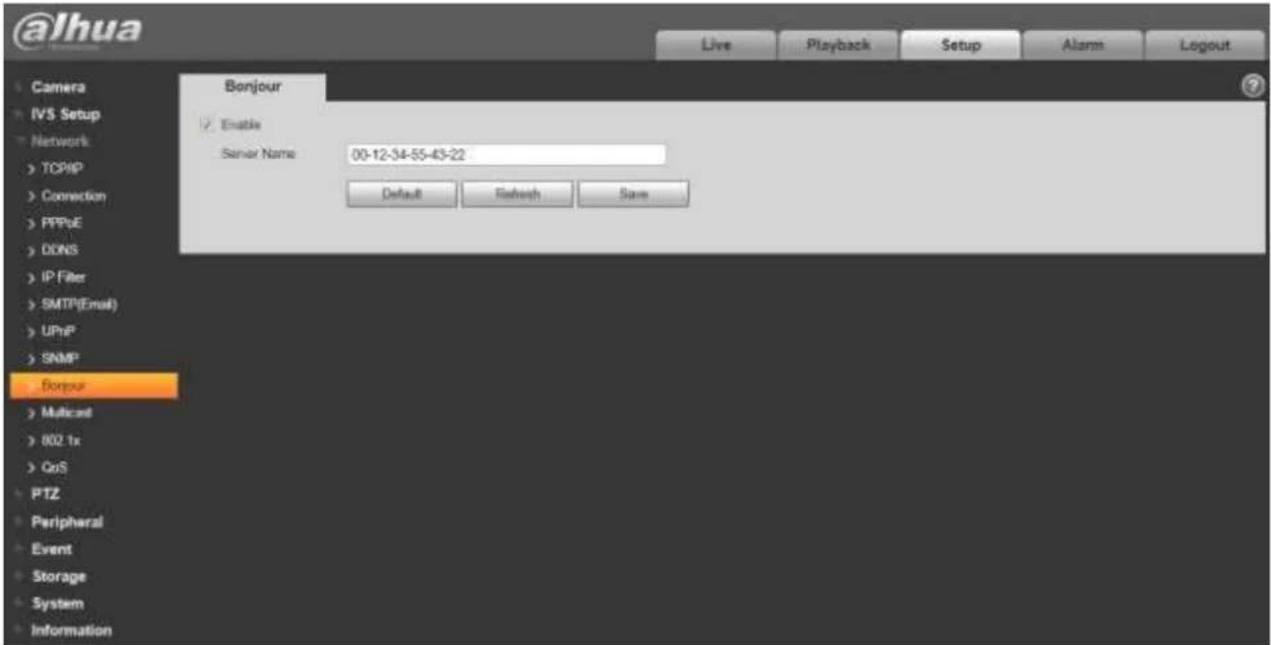
text_image
@lhua Live Playback Setup Alarm Logout Camera IVS Setup Network TCP/IP Connection PPPoE DDNS IP Filter SMTP(Email) UPnP SNMP Bonjour Enable Senior Name: 00-12-34-55-43-22 Default Renlish Save Mantcast 802.1x CoS PTZ Peripheral Event Storage System InformationFigure 4-50
4.3.11 Multicast
The multicast interface is shown as in Figure 4-51.
Multicast is a transmission mode of data packet. When there is multiple-host to receive the same data packet, multiple-cast is the best option to reduce the broad width and the CPU load. The source host
Dahua Network Speed Dome Web3.0 Operation Manual
can just send out one data to transit. This function also depends on the relationship of the group member and group of the outer.
Note:
- Open preview, streaming media protocol, select multicast, and monitor via multicast format.
- Here you can set multicast address and port. You also need to go to Live interface to set the protocol as Multicast.
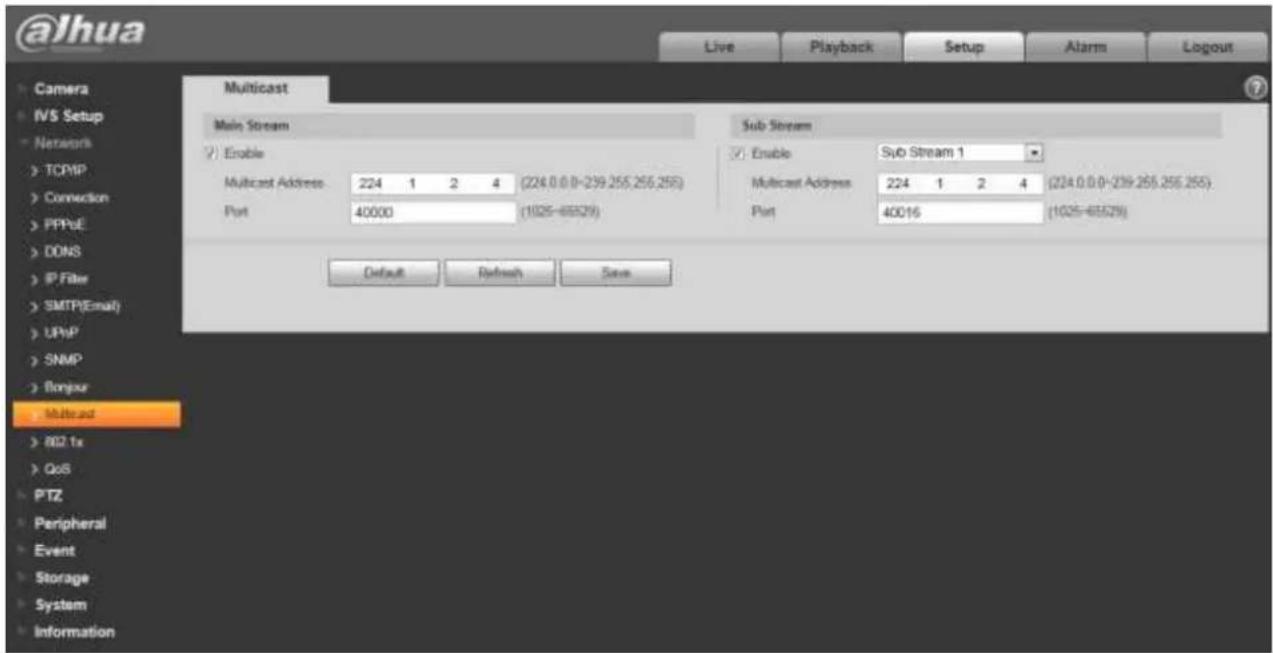
text_image
@Jhua Live Playback Setup Alarm Logout Camera IVS Setup Network TCP/IP Connection PPPoE DONS IP Filter SMTP(Email) UPNP SNMP Bonjour Multicast 802 tx QoS PTZ Peripheral Event Storage System Information Multicast Main Stream Sub Stream Enable Sub Stream 1 Multicast Address 224 1 2 4 (224.0.0-239.255.255.255) Port 40000 (1025-65529) Port 40016 (1025-65529) Default Refresh SaveFigure 4-51
Please refer to the following sheet for detailed information.
| Parameter | Function |
| Enable | Select to enable multicast function. Main stream and sub stream cannot be used at the same time. |
| Multicast address | Main/sub stream multicast default address is 224.1.2.4 and its range is 224.0.0.0~239.255.255.255. |
| Port | Multicast port. Main stream is 40000, sub stream is 40002 and the range is 1025~65534. |
4.3.12 802.1x
802.1x (port based network access control protocol) supports manual selection of authentication method to control if device connected to LAN can join the LAN. It well supports authentication, charging, safety and management requirement of network. See Figure 4-52.
Dahua Network Speed Dome Web3.0 Operation Manual
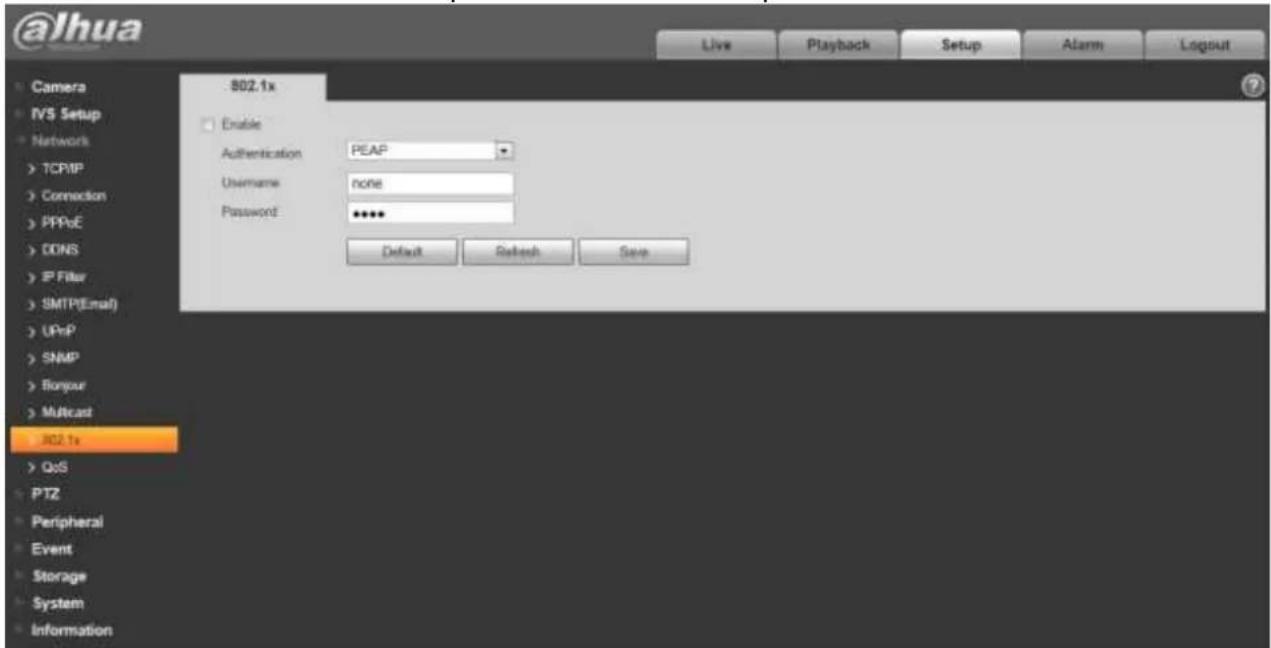
text_image
@lhua Live Playback Setup Alarm Logout Camera IVS Setup Network TCP/IP Connection PPPoE DONS IP Filter SMTP(Email) UPnP SNMP Bonpur Multicast J02.1x QoS PTZ Peripheral Event Storage System Information 802.1x Enable Authentication PEAP Username台灣none Password **** Default Retail SaveFigure 4-52
Please refer to the following sheet for detailed information.
| Parameter | Function |
| Authentication | PEAP (protected EAP protocol). |
| Username | It needs the username to login, which is authenticated by the server. |
| Password | Please input password here. |
4.3.13 QoS
The QoS interface is shown as below. See Figure 4-53.
Qos (Quality of Service) is network security mechanism. It is a technology to fix the network delay and jam problem and etc. For the network service, the quality of service includes the transmission bandwidth, delay, the packet loss and etc. We can guarantee the transmission bandwidth, lower the delay, reduce the loss of the data packet and anti-dither to enhance the quality.
We can set the DSCP (Differentiated Services Code Point) of the IP to distinguish the data packet so that the router or the hub can provide different services for various data packets. It can select the different queues according to the priority (64 different priority levels) of the packets and select the bandwidth of the each queue. Level 0 is the lowest, and level 63 is the highest. It can also discard at the different ratio when the broad bandwidth is jam.
Dahua Network Speed Dome Web3.0 Operation Manual
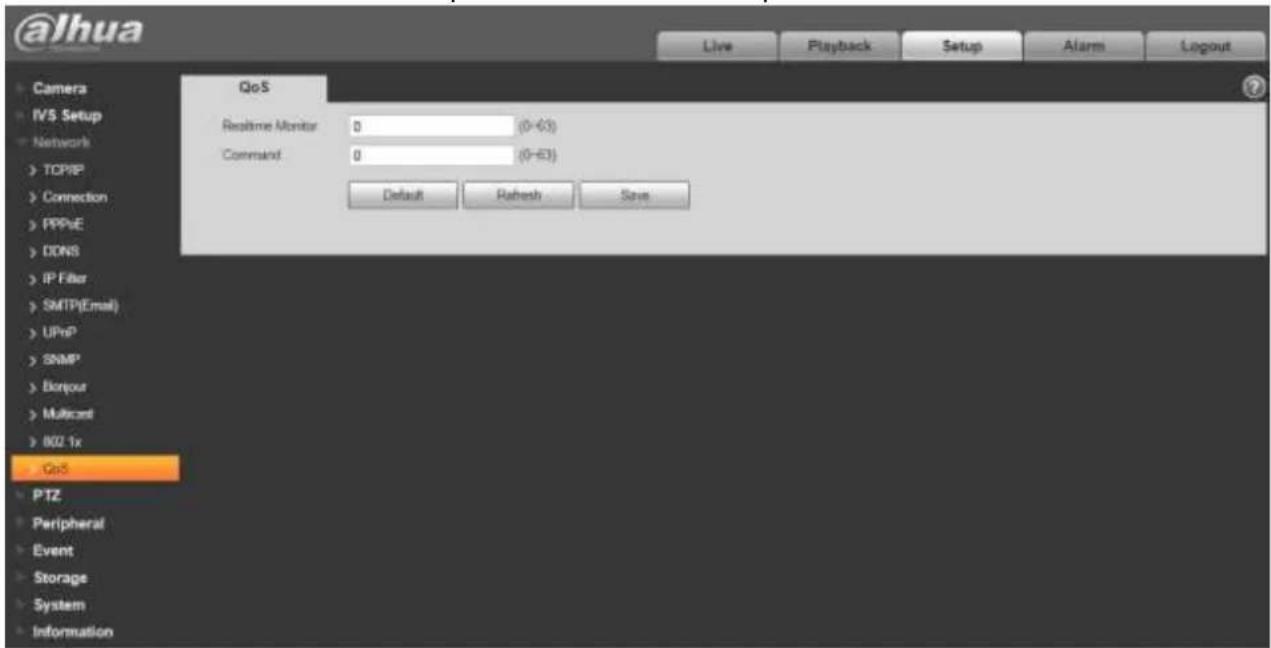
text_image
@lhua Live Playback Setup Alarm Logout Camera IVS Setup Network > TCP/IP > Connection > PPPvE > DDNS > IP Fiber > SMTP(Email) > UPnP > SNMP > Bitpou > Multicent > 802.1x QoS PTZ Peripheral Event Storage System Information QoS Realtime Monitor 0 (0-63) Command 0 (0-63) Default Reshsh SaveFigure 4-53
Please refer to the following sheet for detailed information.
| Parameter | Function |
| Real-time monitor | The value ranges from 0 to 63. The router or the switcher can provide different service for various data packets. |
| Command | The value ranges from 0 to 63. The router or the switcher can provide different service for various data packets. |
4.4 PTZ
4.4.1 Protocol
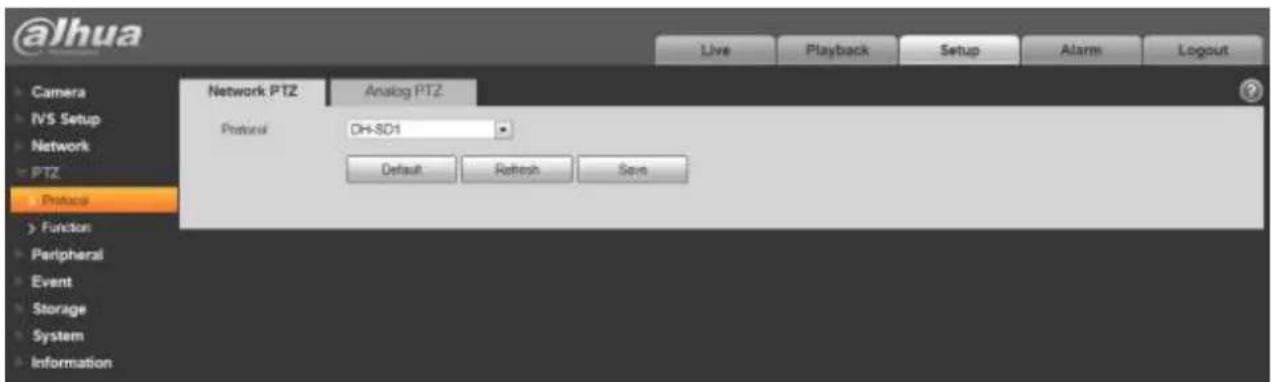
text_image
@lhua Live Playback Setup Alarm Logout Camera IVS Setup Network PTZ Protocol Analog PTZ Protocol DH-SD1 Default Refresh Save Functional Peripheral Event Storage System InformationFigure 4-54
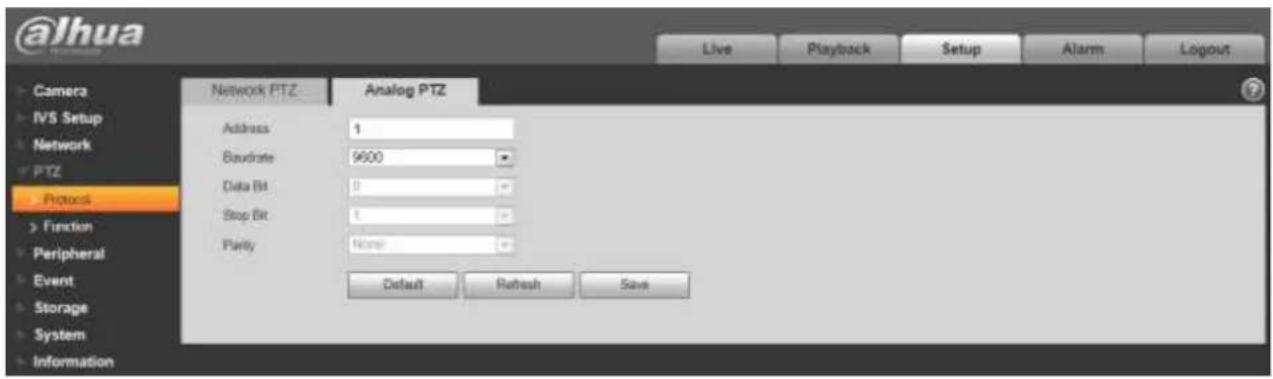
text_image
@lhua Live Playback Setup Alarm Logout Camera IVS Setup Network PTZ Protocol Function Peripheral Event Storage System Information Network PTZ Analog PTZ Address 1 Baudrate 9600 Data Bit 0 Stop Bit 1 Parity None Default Refresh SaveFigure 4-55
| Parameter | Note |
| Protocol | It is DH-SD1 by default. |
| Address | It is to set the corresponding speed dome address, default is 0. |
| Baud rate | It is to select the Baud rate of the camera, the default is 38400. |
| Data bit | Default is 8. |
| Stop bit | Default is 1. |
| Parity | It is to set protocol parity mode, the default is none. |
4.4.2 Function
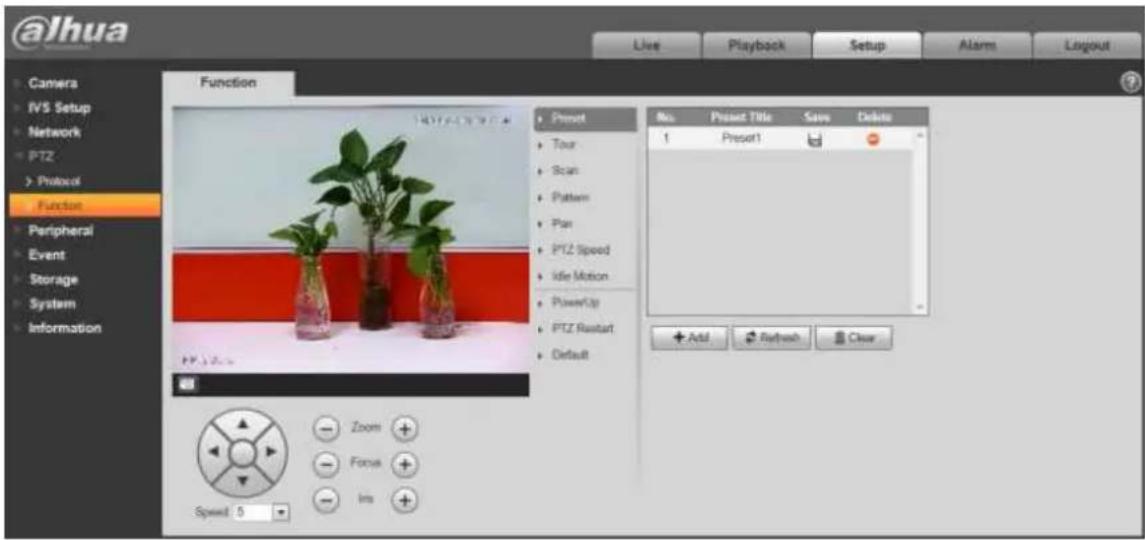
text_image
@jhua Live Playback Setup Alarms Logout Camera IVS Setup Network PTZ Protocol Function Peripheral Event Storage System Information Function 14076-2097 Preset Tour Scan Pattern Plan PTZ Speed Idle Motion PowerUp PTZ Restart Default No Preset Title Save Delete 1 Preset1 Add Refresh Clear Zoom Focus Ins Speed 5Figure 4-56
In this part, you can operate the PTZ of the camera and control PTZ movement.
| Parameter | Function |
| Preset | Set camera preset. |
| Tour | Set camera tour. Max 8 tours. |
| Scan | Set camera scan. |
| Pattern | Set camera pattern. |
| Pan rotation | Set pan rotation speed. |
| PTZ speed | Set PTZ movement speed. |
| Idle motion | Set camera idle operation. |
| Power up | Set camera operation when system boots up. |
| PTZ restart | Restart camera PTZ. |
| Default | Restore camera PTZ default setup. |
4.4.2.1 Preset
Preset interface is shown as in Figure 4-57.
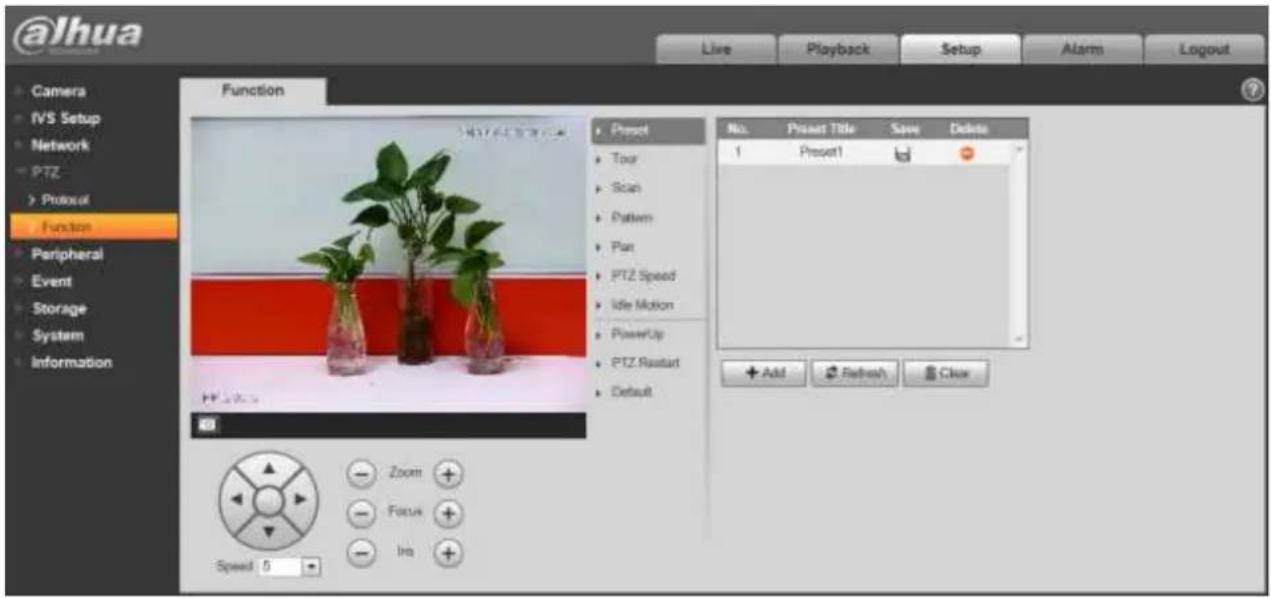
text_image
@lhua Live Playback Setup Alarm Logout Camera IVS Setup Network PTZ Protocol Function Peripheral Event Storage System Information Function Preview Tour Scan Pattern Part PTZ Speed Idle Motion PowerUp PTZ Restart Default No. Preset Title Save Delete 1 Preset1 Add Refresh Close Zoom Focus Ina Speed 5Figure 4-57
Please refer to the following sheet for detailed information.
| Parameter | Function |
| Preset No. | Set preset No. It becomes valid after you set. |
| Preset title | Set preset name. You can input self-defined preset name here. |
| Delete | Delete corresponding preset. |
| Save | Save current preset setup. |
| Add | Click it to add a new preset. |
| Clear | Clear all presets setup. |
4.4.2.2 Tour
Tour interface is shown as below. See Figure 4-58.
Dahua Network Speed Dome Web3.0 Operation Manual
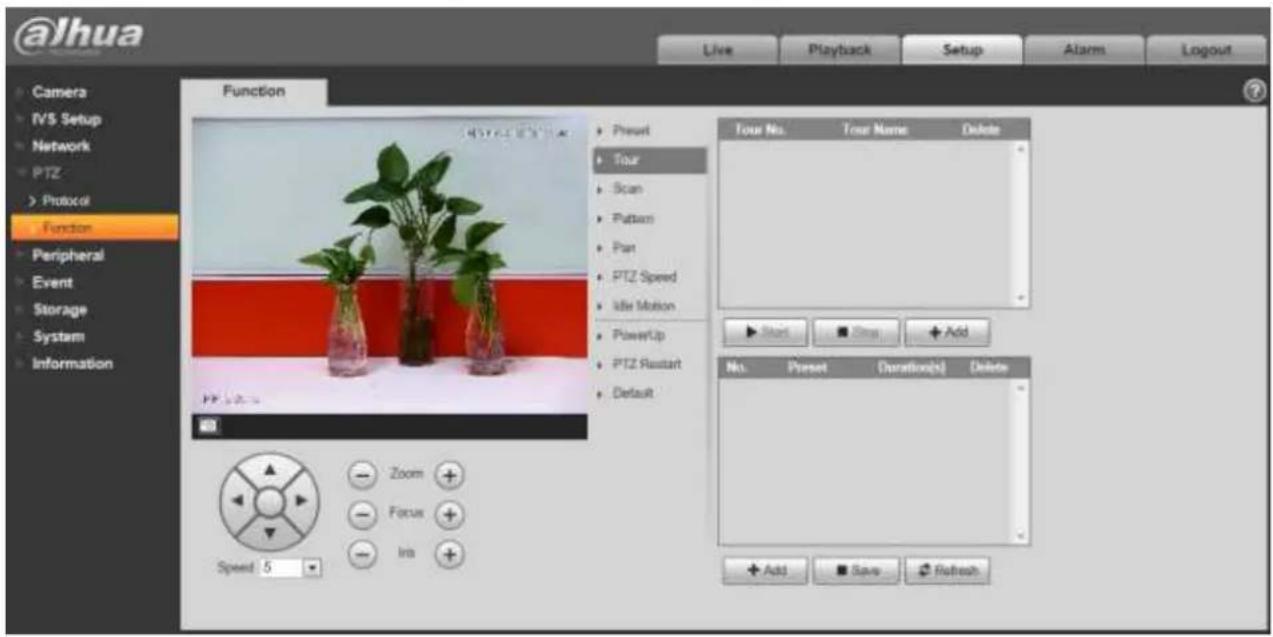
text_image
@lhua Live Playback Setup Alarms Logout Camera IVS Setup Network PTZ Protocol Function Peripheral Event Storage System Information Function • Preset • Tour • Scan • Pattern • Part • PTZ Speed • Idle Motion • PowerUp • PTZ Restart • Default Tour No. Tour Name Delete ▶ Start ■ Stop + Add No. Preset Duration(s) Delete + Add ■ Save + RefreshFigure 4-58
Please refer to the following sheet for detailed information.
| Parameter | Function |
| Tour No. | System auto allocates. |
| Tour title | Set tour name. You can input self-defined tour name here. |
| Start | Begin tour.Please note this function is null if you have not set a tour. |
| Stop | Stop tourPlease note this function is null if you have not set a tour |
| Add | Click it to add a new tour. |
| Preset | Click Add button, you can add a new tour. The default preset value is 1.Double click tour No, you can see a dropdown list for you select.Please set presets before you use tour function. |
| Duration (Interval) | It is to set the staying time of the tour. |
| Save | Click it to save current setup. |
| Refresh | Refresh current interface. |
4.4.2.3 Scan
Scan interface is shown as below. See Figure 4-59.
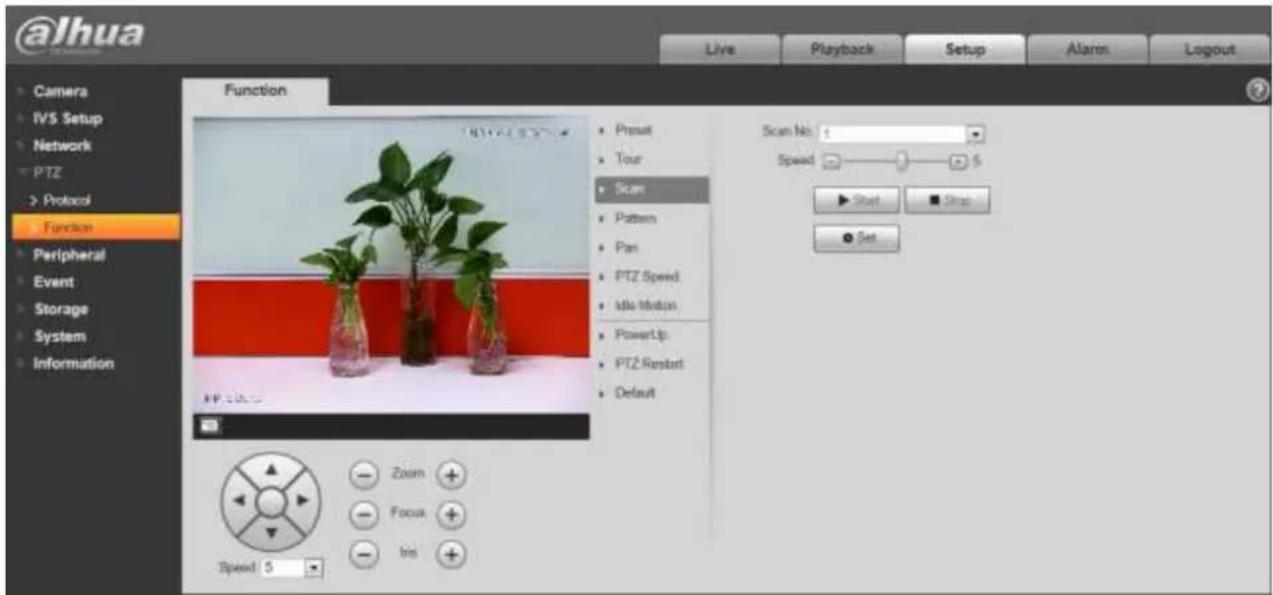
text_image
@lhua Live Playback Setup Alarm Layout Camera IVS Setup Network PTZ > Protocol Function Peripheral Event Storage System Information Function ■ Presat ■ Tour ■ Scan ■ Pattern ■ Pan ■ PTZ Speed ■ Idle Motion ■ PowerUp ■ PTZ Restart ■ Default Scan No 1 Speed 5 ▶ Start ■ Init ● Set Zoom Focus Ins Speed 5Figure 4-59
Please refer to the following sheet for detailed information.
| Parameter | Function |
| Scan No. | System auto allocates. |
| Speed | Set scan speed here.You cannot set speed when camera is running scan. |
| Start | Begin scan.Please note this function is null if you have not set a scan. |
| Stop | Stop scanPlease note this function is null if you have not set a scan |
| Set | Click set button, you can set left limit and right limit. |
| Left limit | Set camera left limit. |
| Right limit | Set camera right limit. |
4.4.2.4 Pattern
Pattern interface is shown as below. See Figure 4-60.
Dahua Network Speed Dome Web3.0 Operation Manual
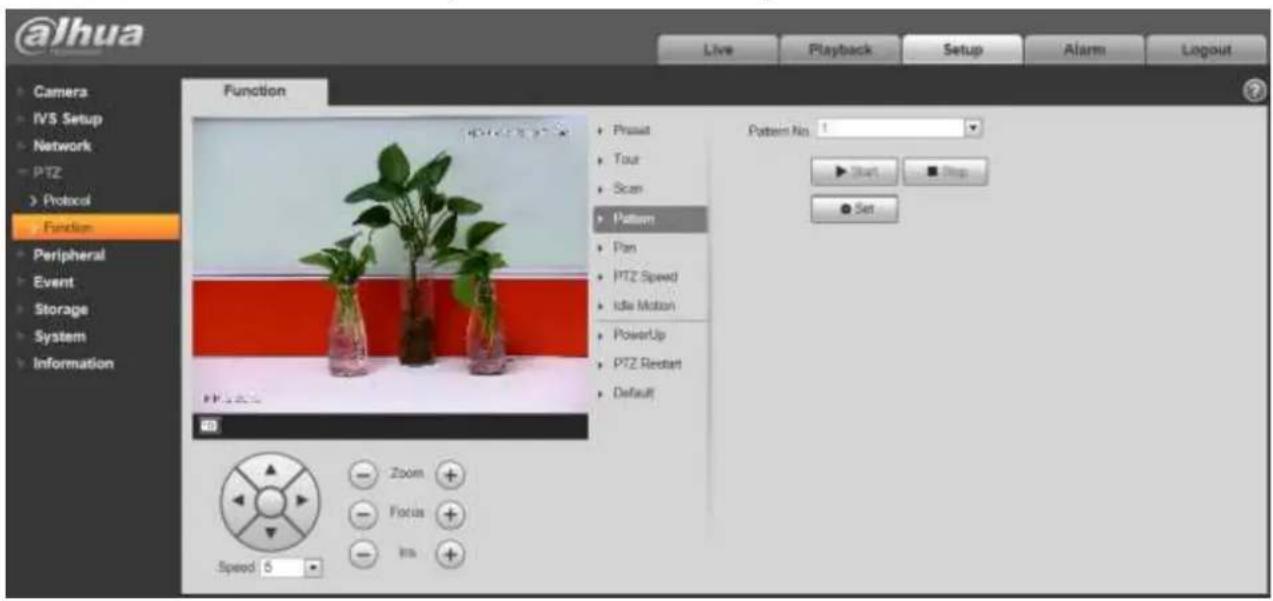
text_image
@lhua Live Playback Setup Alarm Logout Camera IVS Setup Network PTZ Protocol Function Peripheral Event Storage System Information Function Praxit Tour Scan Pattern Pan PTZ Speed Idle Motion PowerUp PTZ Restart Default Pattern No. 1 Start Stop Set Zoom Focus Ins Speed 5Figure 4-60
Please refer to the following sheet for detailed information.
| Parameter | Function |
| Pattern No. | System auto allocates. |
| Start | Begin pattern.Please note this function is null if you have not set a pattern. |
| Stop | Stop patternPlease note this function is null if you have not set a pattern |
| Set | Click it you can see start/stop record buttons. |
| Start record | Click it to begin recording pattern setup. |
| Stop record | Click it to stop recording pattern setup. |
4.4.2.5 Pan Rotation
Dahua Network Speed Dome Web3.0 Operation Manual
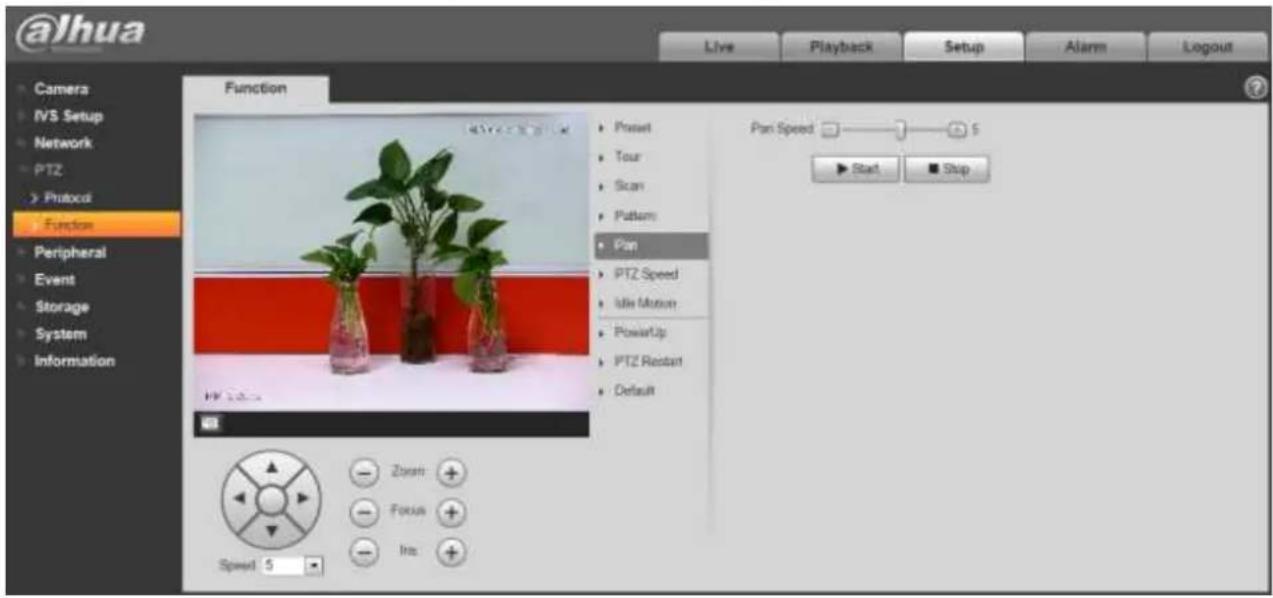
text_image
@Jhua Live Playback Setup Alarm Logout Camera IVS Setup Network PTZ Protocol Function Peripheral Event Storage System Information Function • Preset • Tour • Scan • Pattern • Pan • IPTZ Speed • Idle Motion • PowerUp • PTZ Restart • Default Pan Speed: 5 ▶ Start ▪ Stop Zoom Focus Ins Speed 5Figure 4-61
| Parameter | Note |
| Rotation speed | It is to set the camera pan rotation speed. |
| Start | It is set to start pan rotation. |
| Stop | It is set to stop pan rotation. |
4.4.2.6 PTZ speed
PTZ speed interface is shown as below. See Figure 4-62.
Dahua Network Speed Dome Web3.0 Operation Manual
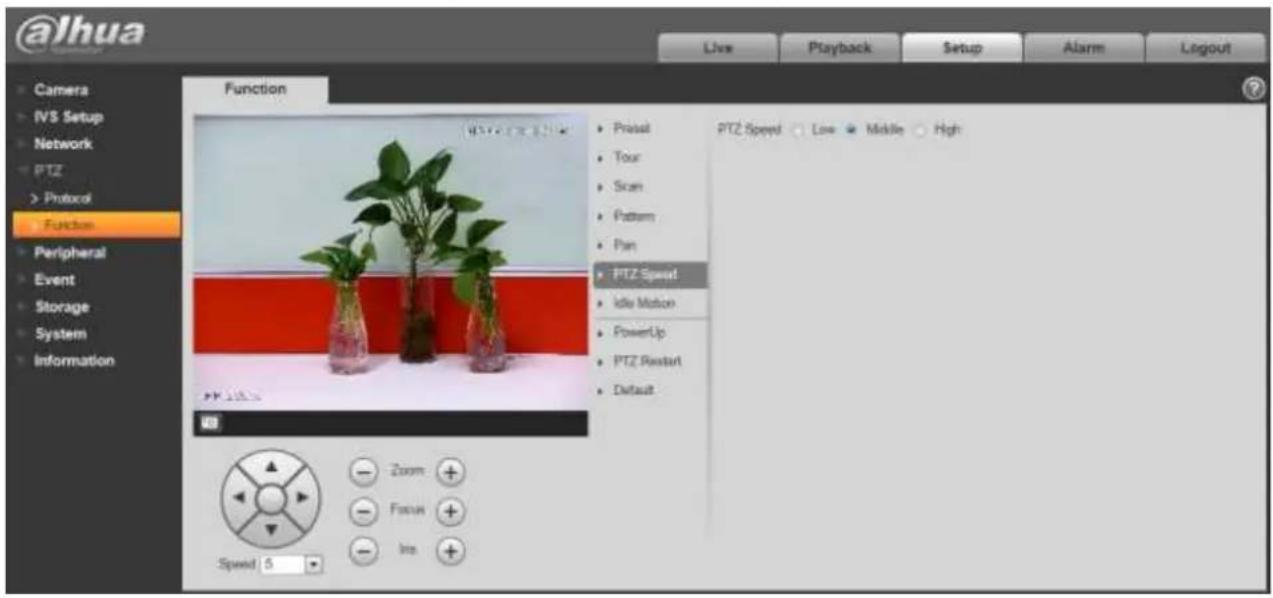
text_image
@Jhua Camera IVS Setup Network PTZ > Protocol Function Peripheral Event Storage System Information Live Playback Setup Alarm Logout Function PTZ Speed Low Middle High Protest Tour Scan Pattern Pan PTZ Speed Idle Motion PowerUp PTZ Restart Default Zoom Focus Imp Speed 5Figure 4-62
Please refer to the following sheet for detailed information.
| Parameter | Function |
| PTZ speed | Here you can set camera PTZ speed. |
4.4.2.7 Idle Motion
Idle motion interface is shown as below. See Figure 4-63.
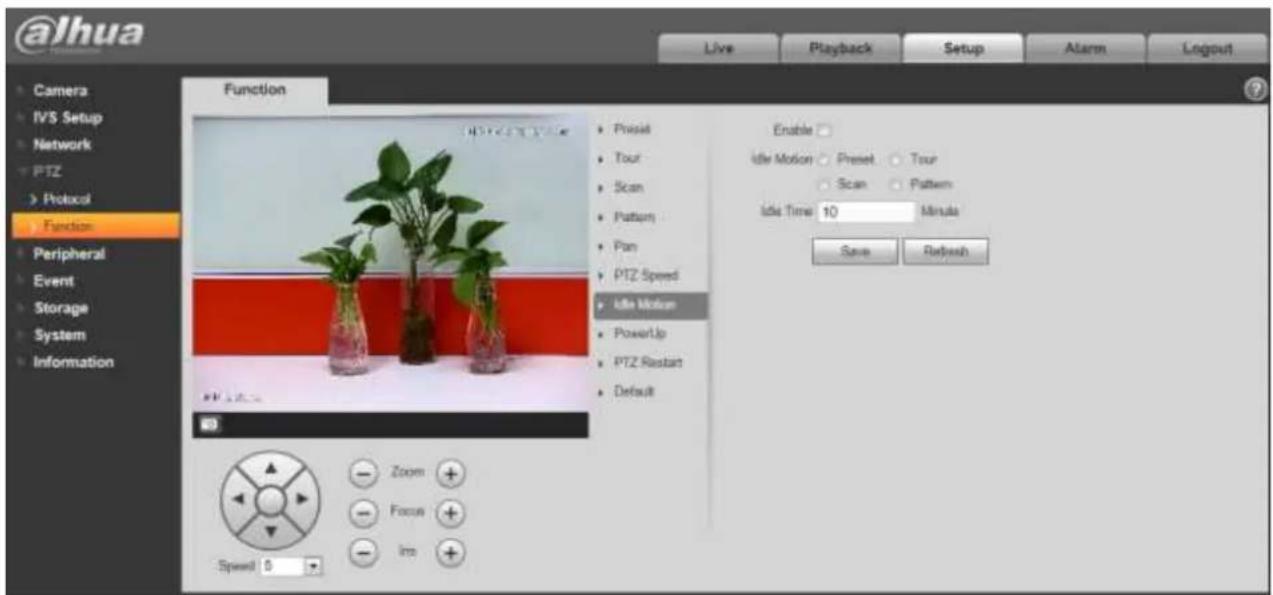
text_image
@lhua Live Playback Setup Alarm Logout Camera IVS Setup Network PTZ Protocol Function Peripheral Event Storage System Information Function Pristat Tour Scan Pattern Pan PTZ Speed Idle Motion PowerUp PTZ Restart Default Enable Idle Motion Preset Tour Scan Pattern Idle Time 10 Minutes Save Refresh Zoom Focus Imp Speed 5Please refer to the following sheet for detailed information.
| Parameter | Function |
| Enable | Check the box here to enable idle motion function. |
| Idle Motion | Here you can set preset, scan, pattern, tour.Please note you need to set the corresponding operation first if you want to use this function. |
| Idle time | Set idle time. |
4.4.2.8 Power up
Power up interface is shown as below. See Figure 4-64.
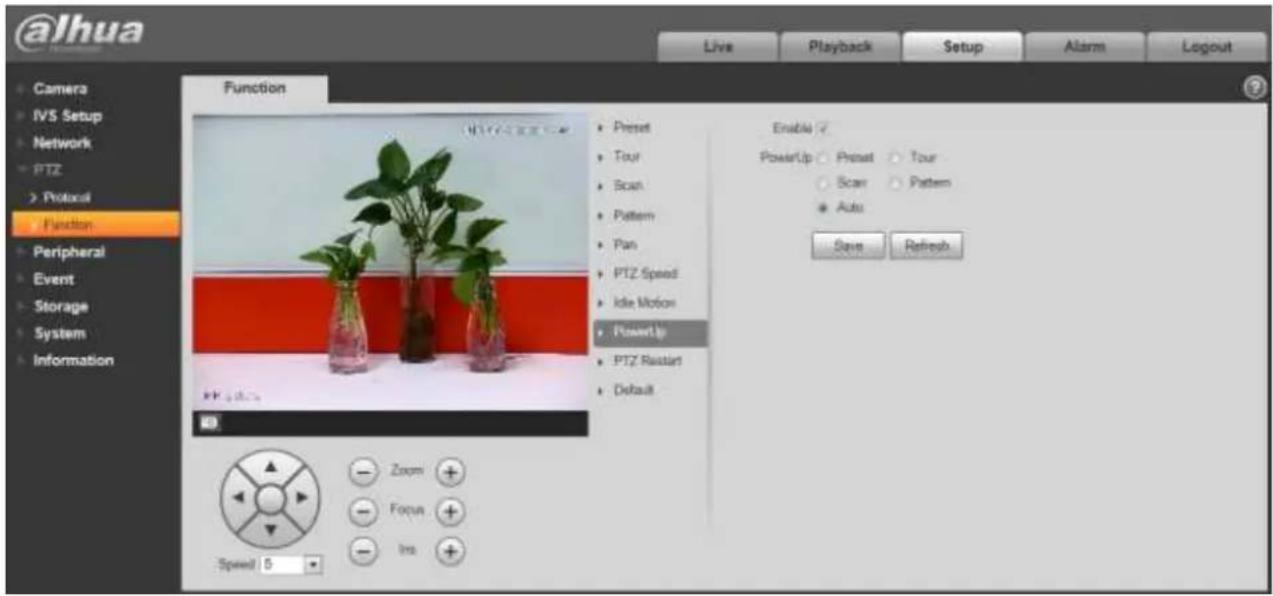
text_image
@lhua Live Playback Setup Alarm Logout Function • Preset • Tour • Scan • Pattern • Pan • PTZ Speed • Idle Motion • PowerUp • PTZ Restart • Default Enable ? PowerUp ○ Preset ○ Tour ○ Scan ○ Pattern ● Auto Save Refresh Zoom Focus Ins Speed 5Figure 4-64
Please refer to the following sheet for detailed information.
| Parameter | Function |
| Enable | Check the box here to enable power up function. |
| Power up | Here you can set preset, scan, pattern, tour and auto.Please note you need to set the corresponding function first if you want to use it. |
4.4.2.9 PTZ Restart
PTZ restart interface is shown as below. See Figure 4-65.
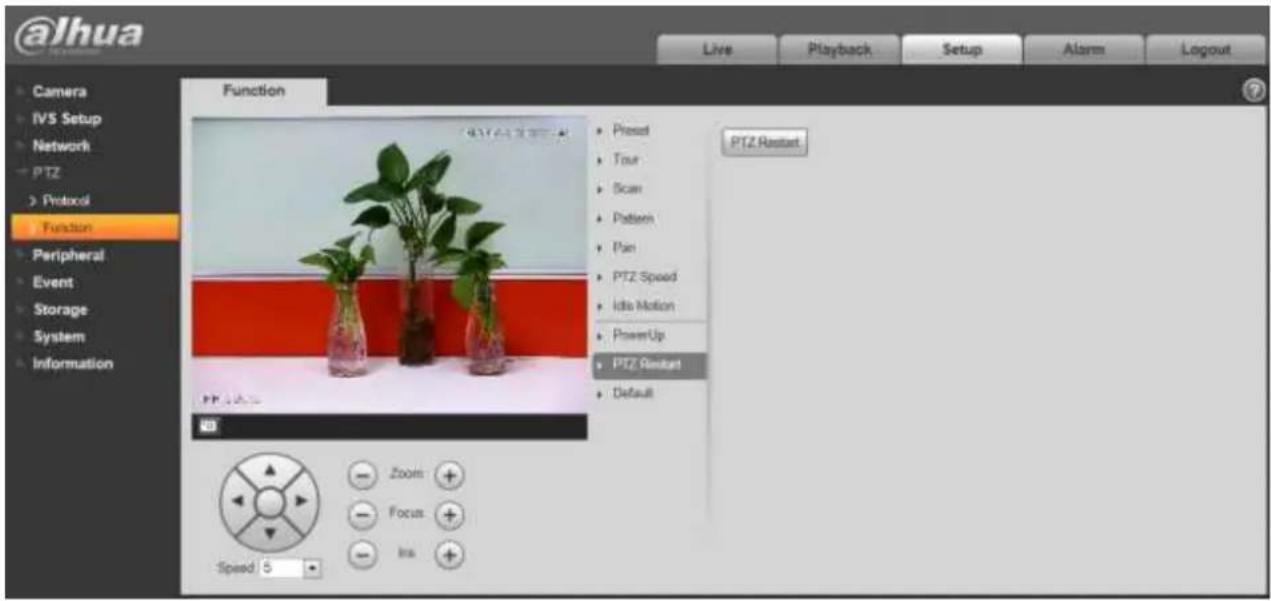
text_image
@lhua Live Playback Setup Alarm Logout Camera IVS Setup Network PTZ > Protocol Function Peripheral Event Storage System Information Function PTZ Restart Zooms Focus Ins Speed 5 • Preset • Tour • Scan • Pattern • Pan • PTZ Speed • Idle Motion • PowerUp • PTZ Restart • Default PTZ RestartFigure 4-65
Please refer to the following sheet for detailed information.
| Parameter | Function |
| PTZ restart | It is to reboot PTZ. |
4.4.2.10 Default
Default interface is shown as below. See Figure 4-66.
Dahua Network Speed Dome Web3.0 Operation Manual
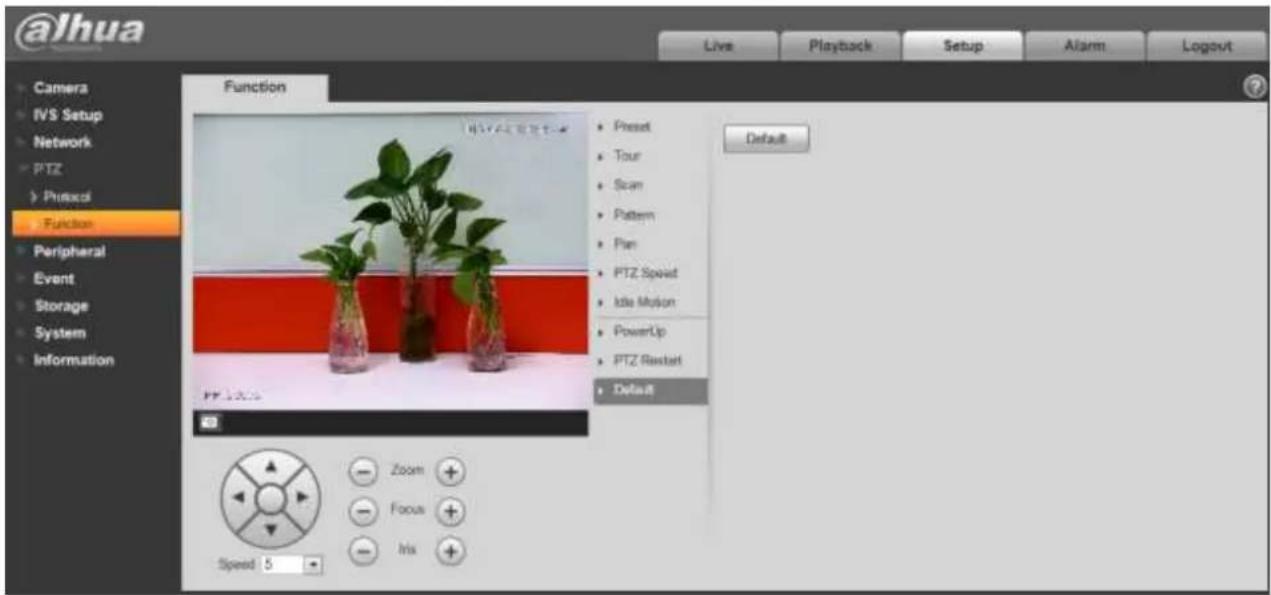
text_image
@lhua Live Playback Setup Alarm Logout Camera IVS Setup Network PTZ Physical Function Peripheral Event Storage System Information Function PTZ Setup Zoom Focus Init Reset PowerUp PTZ Reset Default Speed 5 Preset Tour Scan Pattern Plan PTZ Speed Idle Motion PowerUp PTZ Reset Default DefaultFigure 4-66
Please refer to the following sheet for detailed information.
| Parameter | Function |
| Default | Restore PTZ factory default setup. |
4.5 Peripheral
4.5.1 IR Light
Note:
The function is only supported by some product series.
Dahua Network Speed Dome Web3.0 Operation Manual
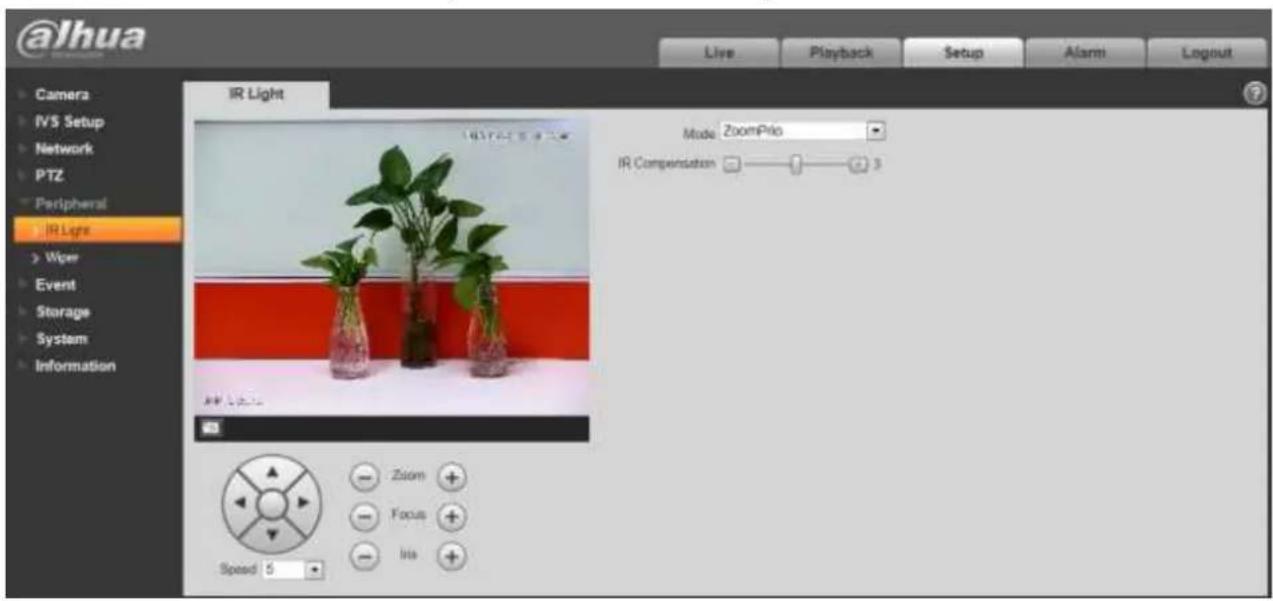
text_image
@Jhua Live Playback Setup Alarm Logout IR Light Camera IVS Setup Network PTZ Peripheral IR Light Wiper Event Storage System Information Mode ZoomPlus IR Compensation 3 Zoom Focus Info Speed 5Figure 4-67
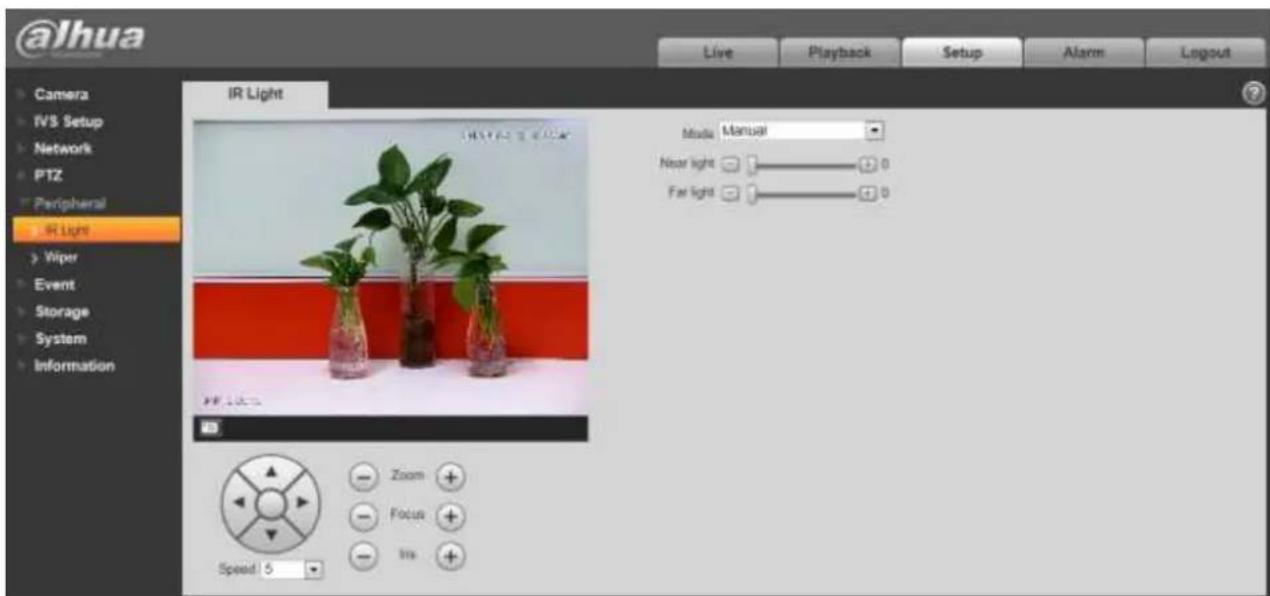
text_image
@Jhua Live Playback Setup Alarm Logout IR Light Media Manual Near light Far light IR Light Wiper Event Storage System Information Zoom Focus Ins Speed 5Figure 4-68
Dahua Network Speed Dome Web3.0 Operation Manual
| Parameter | Note |
| Zoom priority | Enable IR light under zoom priority, the value of far and near IR light can auto switch according to the zoom rate. |
| Manual | It can set the value of near light and far light under manual mode. |
4.6 Event
4.6.1 Video detect
4.6.1.1 Motion Detect
The motion detect interface is shown as in Figure 4-69 through Figure 4-72.
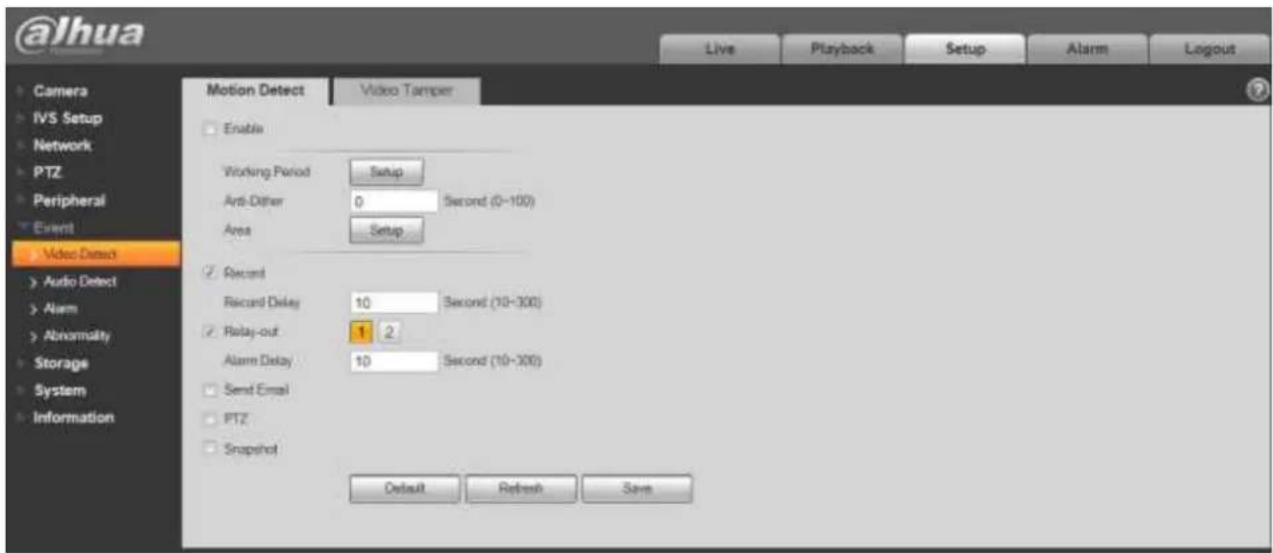
text_image
@lhua Live Playback Setup Alarm Layout Motion Detect Video Tamper Enable Working Period Setup Anti-Dither 0 Second (0-100) Area Setup ✓ Record Record Delay 10 Second (10-300) ✓ Relay-out 1 2 Alarm Delay 10 Second (10-300) ✓ Send Email PTZ Snapshot Default Refresh SaveFigure 4-69
Dahua Network Speed Dome Web3.0 Operation Manual
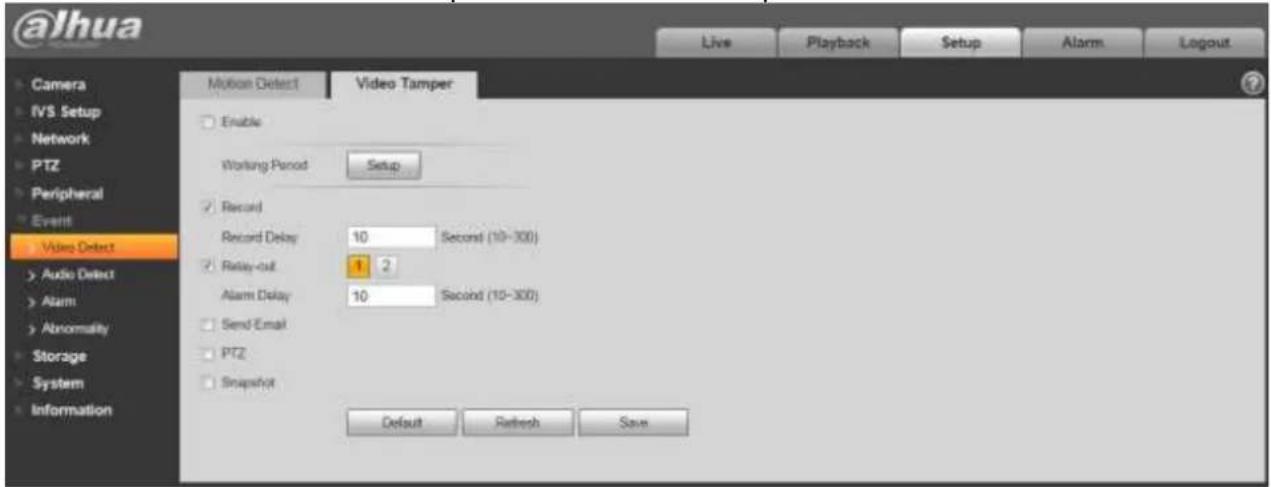
text_image
@lhua Live Playback Setup Alarm Logout Motion Detect Video Tamper Enable Working Period Setup Record Record Delay 10 Second (10-300) Relay-out 1 2 Alarm Delay 10 Second (10-300) Send Email PTZ Snapshot Default Refresh Save Camera IVS Setup Network PTZ Peripheral Event Video Detect Audio Detect Alarm Abnormality Storage System InformationFigure 4-70
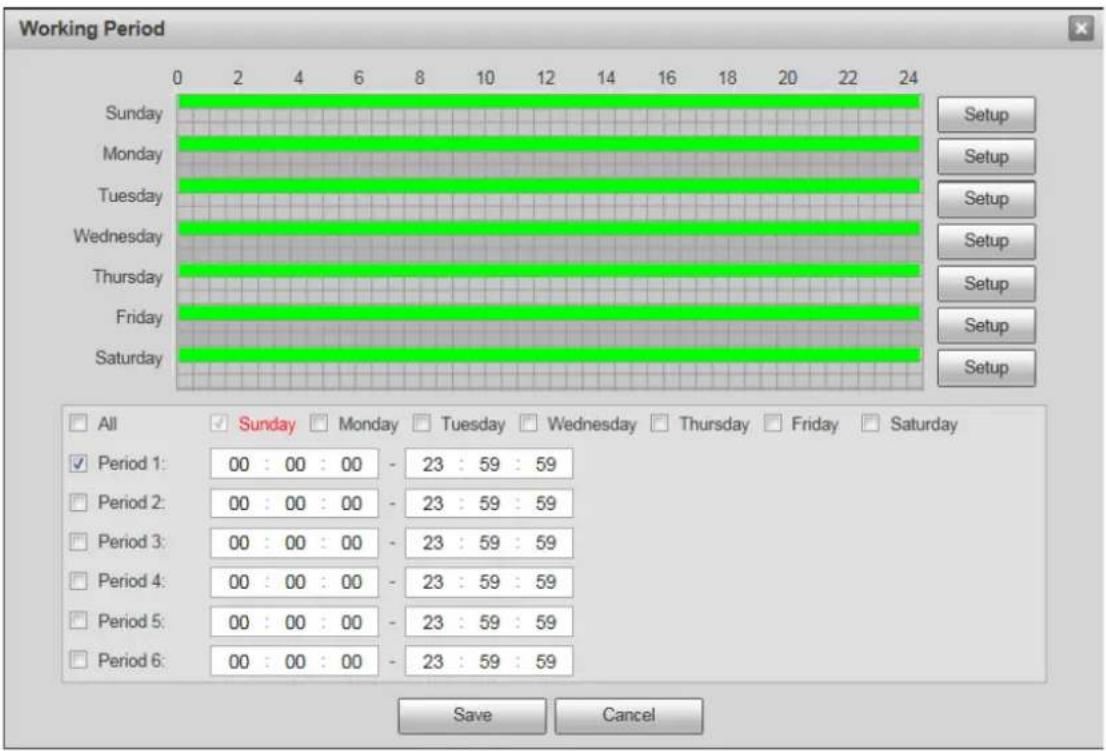
text_image
Working Period Sunday Monday Tuesday Wednesday Thursday Friday Saturday 0 2 4 6 8 10 12 14 16 18 20 22 24 Setup Setup Setup Setup Setup Setup Setup All Sunday Monday Tuesday Wednesday Thursday Friday Saturday Period 1: 00 : 00 : 00 - 23 : 59 : 59 Period 2: 00 : 00 : 00 - 23 : 59 : 59 Period 3: 00 : 00 : 00 - 23 : 59 : 59 Period 4: 00 : 00 : 00 - 23 : 59 : 59 Period 5: 00 : 00 : 00 - 23 : 59 : 59 Period 6: 00 : 00 : 00 - 23 : 59 : 59 Save CancelFigure 4-71
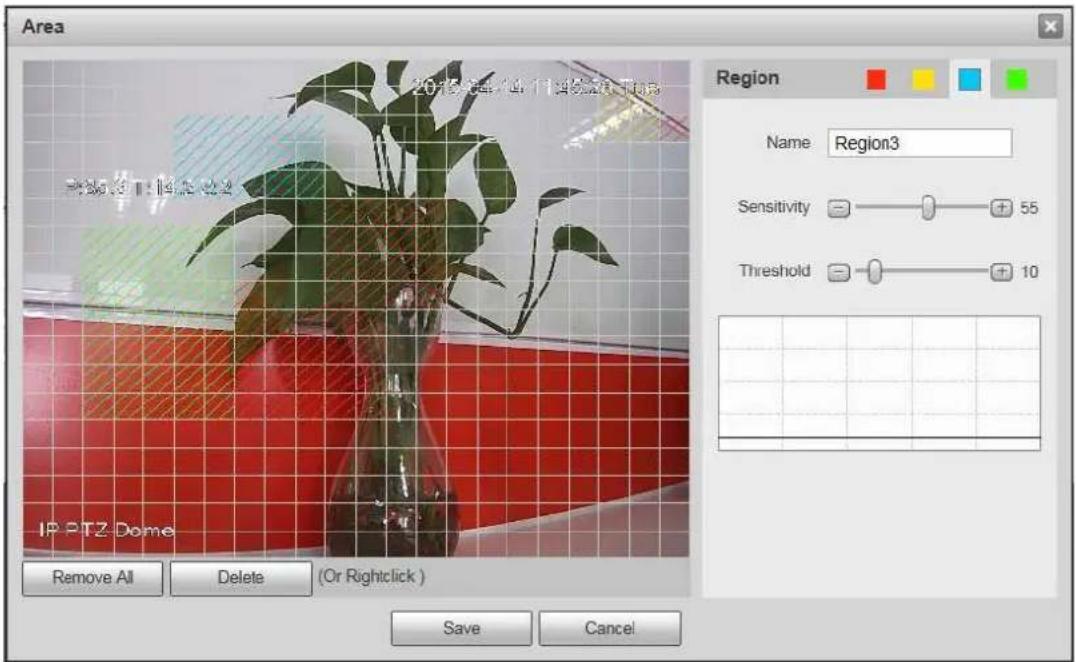
text_image
Area 2014激光车(4) 月光检测-图像 IP PTZ Dome Remove All Delete (Or Rightclick) Save Cancel Region Name Region3 Sensitivity 55 Threshold 10Figure 4-72
Please refer to the following sheet for detailed information.
| Parameter | Function |
| Enable | You need to check the box to enable motion detection or video tamper function. |
| Working Period | Here you can set arm/disarm period. Click set button to open period setup menu.There are six periods every day for setup and you must check box in front of each period to enable it.Note: Period setup can be done by dragging mouse while not release left mouse. |
| Anti-dither | System only memorizes one event during the anti-dither period. The value ranges from 0s to 100s. |
| Area | Here you can set motion detection region and its sensitivity and area. (The higher the sensitivity is, the easier to trigger motion detect; the smaller the area, the easier to trigger motion detect.) The default covers all regions. You must click save before enabling your setup. |
| Record | Check it and so when alarm occurs, system will auto record. You shall set record period in Storage>Schedule and select auto record in record control interface. |
| Record Delay | System can delay the record for specified time after alarm ended. The value ranges from 10s to 300s. |
Dahua Network Speed Dome Web3.0 Operation Manual
| Parameter | Function |
| Relay-out | Check to enable alarm activation output port, it can activate corresponding alarm output device when alarm occurs. |
| Alarm Delay | System can delay alarm for specified time after alarm ended. The value ranges from 10s to 300s. |
| Send Email | If you enabled this function, System can send out email to alert y when alarm occurs and ends. User can set email address in Network>SMTP. |
| PTZ | ● Here you can set PTZ movement when alarm occurs. Such as go to preset x when there is an alarm. ● The event type includes: preset, tour and pattern. |
| Snapshot | You need to check the box here so that system can backup motion detection snapshot file. You shall set snapshot period in Storage>Schedule. |
The zone setup interface is shown in the figure above. Different colors represent different areas. Each area can set different detection zones. Detection zone can be irregular and discontinuous. If device monitoring zone is large, user can sub-divide the area into several zones for better motion detect. Please refer to the following sheet for detailed information.
| Parameter | Function |
| Name | Default area name includes Region0, Region1, Region2, Region3 and custom. |
| Sensitivity | It is sensitivity of brightness as motion detection is more possible to be trigger with high sensitivity. You can set up to four areas. The range is 0~100. The recommenced value is 30~70. |
| Area threshold | It is to check target object area related to detection area. The lower the area threshold, the easier to trigger motion detection. You can set up to four areas. The range is 0~100. The recommenced value is 0~10. |
| Waveform | Red means motion detect is triggered. Green means motion detect is not triggered. |
| Delete all | Clear all areas. |
| Delete | Delete all the selected area. |
4.6.2 Audio Detect
Dahua Network Speed Dome Web3.0 Operation Manual
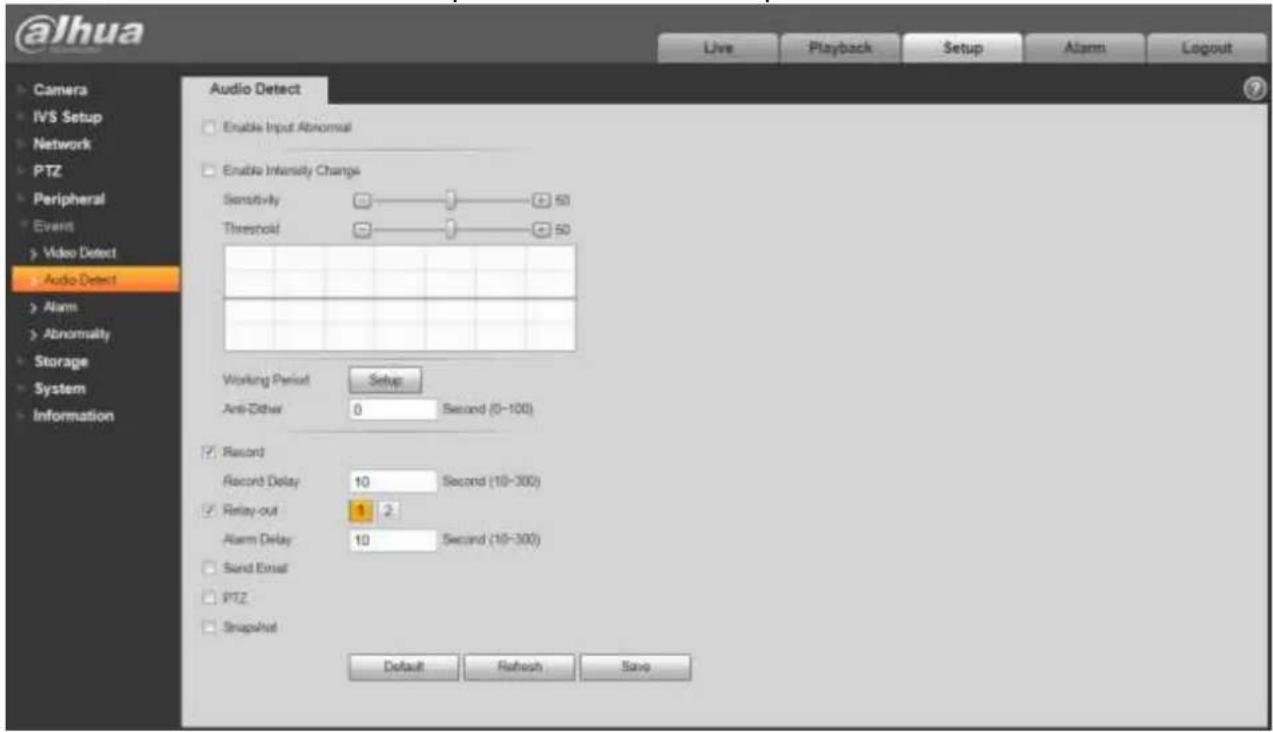
text_image
@lhua Live Playback Setup Alarm Logout Camera IVS Setup Network PTZ Peripheral Event Video Detect Audio Detect Alarm Abnormality Storage System Information Audio Detect Enable Input Abnormal Enable Intensity Change Sensitivity 50 Threshold 50 Working Period Setup Anti-Dither 0 Second (0-100) Record Record Delay 10 Second (10-300) Relay-out 1 2 Alarm Delay 10 Second (10-300) Send Email PTZ Snapshot Default Refresh SaveFigure 4-73
Dahua Network Speed Dome Web3.0 Operation Manual
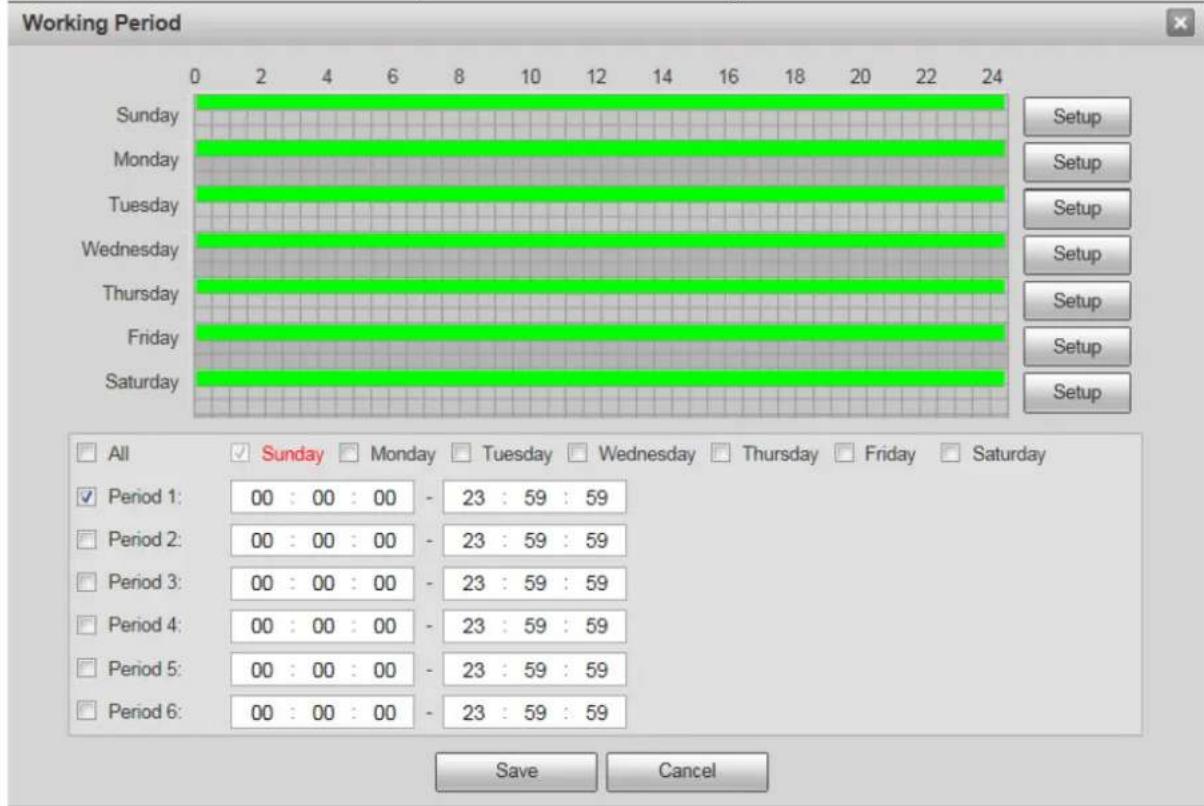
bar
| Day | All | | --------- | --- | | Sunday | 00 | | Monday | 00 | | Tuesday | 00 | | Wednesday | 00 | | Thursday | 00 | | Friday | 00 | | Saturday | 00 |Figure 4-74
| Parameter | Note |
| Enable Input Abnormal | Check “Enable input abnormal” and it will generate alarm when detecting audio input abnormal. |
| Enable Intensity Change | Check “Enable intensity change” and it will generate alarm when detecting audio intensity change surpasses the threshold. |
| Sensitivity | 1~100 level adjustable, the smaller the value is, the more input volume chang surpasses continuous environment volume, then it can be judged as audio abnormal, users need to adjust according to actual environment test. |
| Threshold | 1~100 level adjustable, it is used to set the filtered environment sound intensity, the bigger environmental noise is, the higher value it needs to be set. Users need to adjust according to the actual environment test. |
Dahua Network Speed Dome Web3.0 Operation Manual
| Parameter | Note |
| Working Period | ● This function becomes activated in the specified periods.● There are six periods in one day. Please draw a circle to enable corresponding period.● Select date. If you do not select, current setup applies to today only. You can select all week column to apply to the whole week.● Click OK button, system goes back to motion detection interface; please click save button to exit.Note: User can set via dragging mouse while not releasing left mouse. |
| Anti-dither | System only memorizes one event during the anti-dither period. The value ranges from 0s to 100s. |
| Record | Check it and the system auto activates alarm record once local alarm occurs. Meanwhile, set the record period in the “Storage > Schedule” and select auto record in the record control interface. |
| Record Delay | System can delay the record for specified time after alarm ended. The value ranges from 10s to 300s. |
| Relay-out | Check to enable alarm activation output port, it can activate corresponding alarm output device when alarm occurs. |
| Alarm Delay | System can delay the alarm record for specified time after alarm ended, the unit is second, and it ranges from 10s ~ 300s. |
| Send Email | If you enabled this function, the system can send out email to inform the user when alarm occurs. User can set email address in “Network>SMTP”. |
| PTZ | ● Here you can set PTZ movement when alarm occurs. Such as go to preset x when there is an alarm.● The event type includes: preset, tour and pattern. |
| Snapshot | Check it and the system can auto activate alarm snapshot when alarm occurs. You shall set snapshot period in Storage>Schedule. |
4.6.3 Alarm Setup
Note:
Some devices don't support alarm function.
Dahua Network Speed Dome Web3.0 Operation Manual
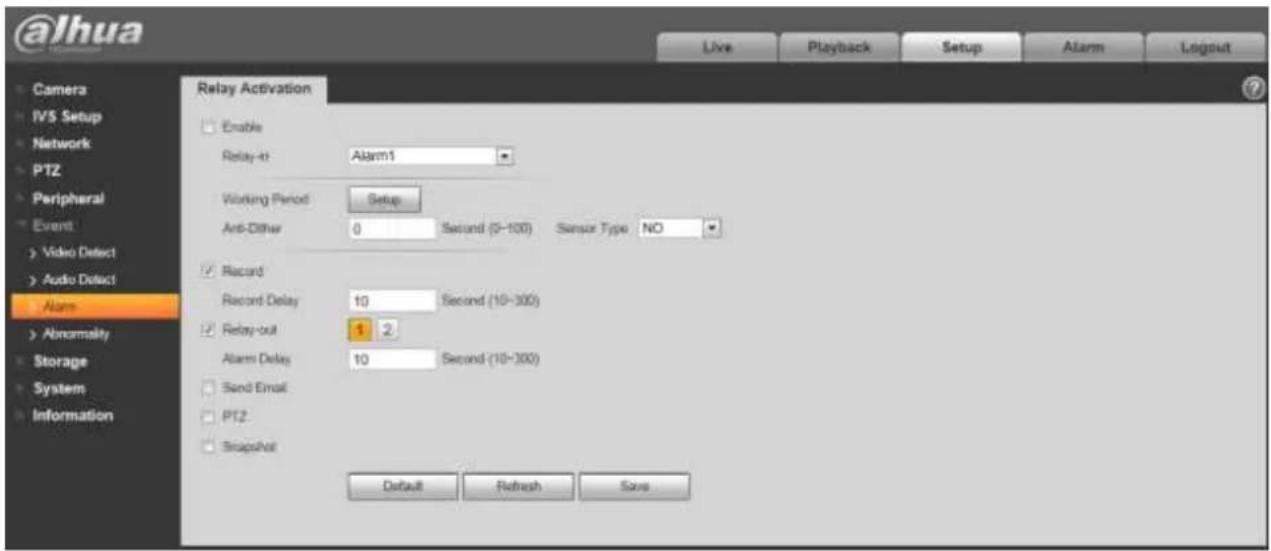
text_image
@lhua Live Playback Setup Alarm Logout Camera IVS Setup Network PTZ Peripheral Event Video Detect Audio Detect Alarm Abnormality Storage System Information Relay Activation Enable Relay-45 Alarm1 Working Period Setup Anti-Dither 0 Second (9-100) Sensor Type NO Record Record Delay 10 Second (10-300) Relay-out 1 2 Alarm Delay 10 Second (10-300) Send Email PTZ Snapshot Default Refresh SaveFigure 4-75
| Parameter | Note |
| Enable | Check to enable alarm activation. |
| Relay-in | Default alarm 1, some models can select alarm 2. |
| Working Period | ● This function becomes activated in the specified periods. ● There are six periods in one day. Please draw a circle to enable corresponding period. ● Select date. If you do not select, current setup applies to today only. You can select all week column to apply to the whole week. ● Click OK button, system goes back to motion detection interface; please click save button to exit. Note: User can set via dragging mouse while not releasing left mouse. |
| Anti-dither | System only memorizes one event during the anti-dither period. The value ranges from 0s to 100s. |
| Sensor Type | It includes two types: NO and NC, it enables alarm by switching from NO to NC, and it disables alarm by switching from NC to NO. |
| Record | Check it and the system auto activates alarm record once local alarm occurs. Meanwhile, set the record period in the “Storage > Schedule” and select auto record in the record control interface. |
| Record Delay | System can delay the record for specified time after alarm ended. The value ranges from 10s to 300s. |
| Relay-out | Check to enable alarm activation output port, it can activate corresponding alarm output device when alarm occurs. |
Dahua Network Speed Dome Web3.0 Operation Manual
| Parameter | Note |
| Alarm Delay | System can delay the alarm record for specified time after alarm ended, the unit is second, and it ranges from 10s ~ 300s. |
| Send Email | If you enabled this function, the system can send out email to inform the user when alarm occurs. User can set email address in “Network>SMTP”. |
| PTZ | ● Here you can set PTZ movement when alarm occurs. Such as go to preset x when there is an alarm.● The event type includes: preset, tour and pattern. |
| Snapshot | Check it and the system can auto activate alarm snapshot when alarm occurs. You shall set snapshot period in Storage>Schedule. |
4.6.4 Abnormality
Abnormality includes SD Card (Figure 4-76 to Figure 4-78), network (Figure 4-79 to Figure 4-80), and Unauthorized Access (Figure 4-81).
Note: Only device with SD card function has these three statuses: No SD card, capacity warning, and SD card error.
Device without SD card function does not have the above three statuses.
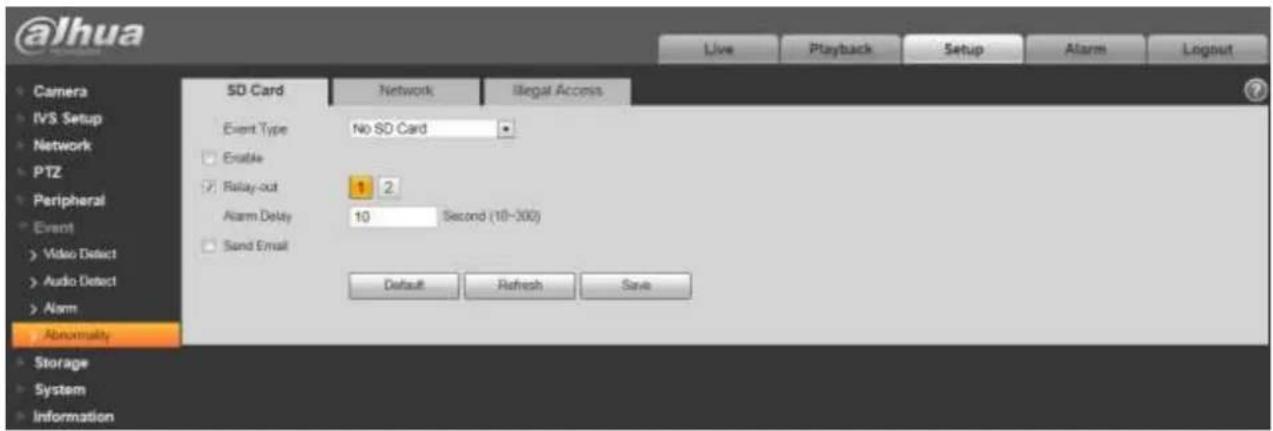
text_image
@lhua Live Playback Setup Alarm Logout Camera IVS Setup Network PTZ Peripheral Event Video Detect Audio Detect Alarm Abnormality Storage System Information SD Card Network Illegal Access Event Type No SD Card Enable Relay-out 1 2 Alarm Delay 10 Second (10-300) Send Email Default Refresh SaveFigure 4-76
Dahua Network Speed Dome Web3.0 Operation Manual
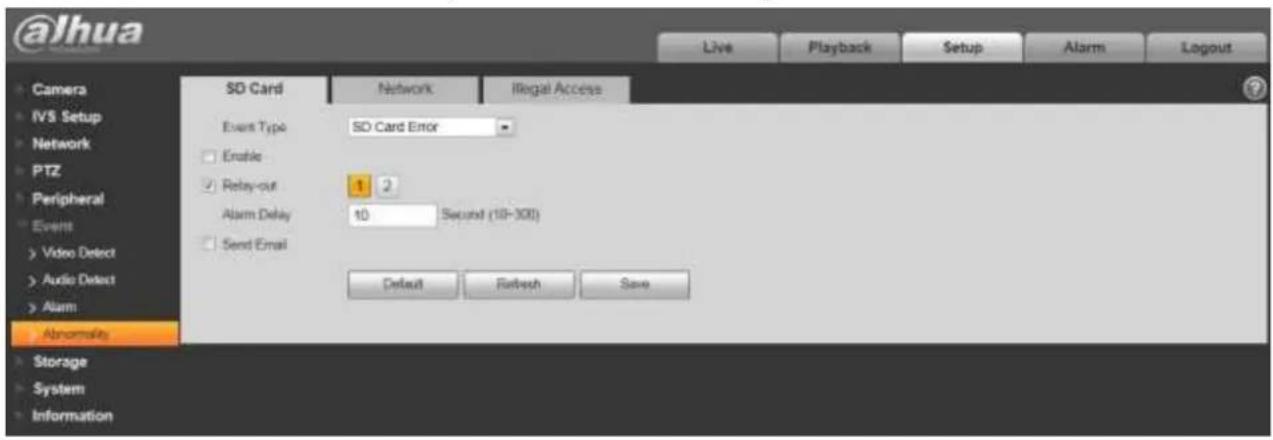
text_image
@lhua Live Playback Setup Alarm Logout Camera IVS Setup Network PTZ Peripheral Event Video Detect Audio Detect Alarm Abnormal Storage System Information SD Card Network Illegal Access Event Type SD Card Error Enable Relay-out 1 2 Alarm Delay 10 Seconds (10-300) Send Email Default Retash SaveFigure 4-77
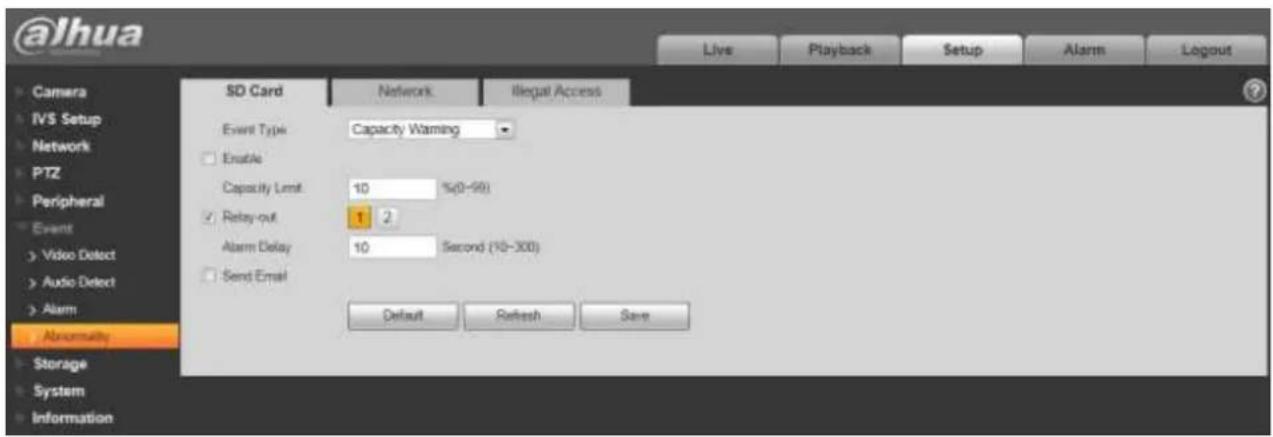
text_image
@lhua Live Playback Setup Alarm Logout Camera IVS Setup Network PTZ Peripheral Event Video Detect Audio Detect Alarm Abnormality Storage System Information SD Card Network Illegal Access Event Type Capacity Warning Enable Capacity Limit 10 %(0-99) Relay-out 1 2 Alarm Delay 10 Second (10-300) Send Email Default Refresh SaveFigure 4-78
Please refer to the following sheet for detailed information.
| Parameter | Function |
| Event Type | There are three kinds of events for SD card abnormality alarm: No SD card, Capacity Warning, SD card error. |
| Enable | Check to alarm when SD card is abnormal. |
| Relay-out | Check to enable alarm activation output port, it can activate corresponding alarm output device when alarm occurs. |
| Alarm Delay | System can delay the alarm record for specified time after alarm ended, the unit is second, and it ranges from 10s ~ 300s.Note:No SD card, capacity warning, SD card error, alarm delay all starts from the moment when alarm occurs. |
Dahua Network Speed Dome Web3.0 Operation Manual
| Parameter | Function |
| Send email | After you enabled this function, the system can send out email to alarm the specified user.This function is invalid when network is offline or IP conflict occurs. |
| SD Card Capacity Limit | User can set SD card capacity that is left free. When SD card space left is smaller than this limit, alarm occurs. |
When device is offline or IP conflicts, you can go to Figure 4-79 and Figure 4-80 to set.
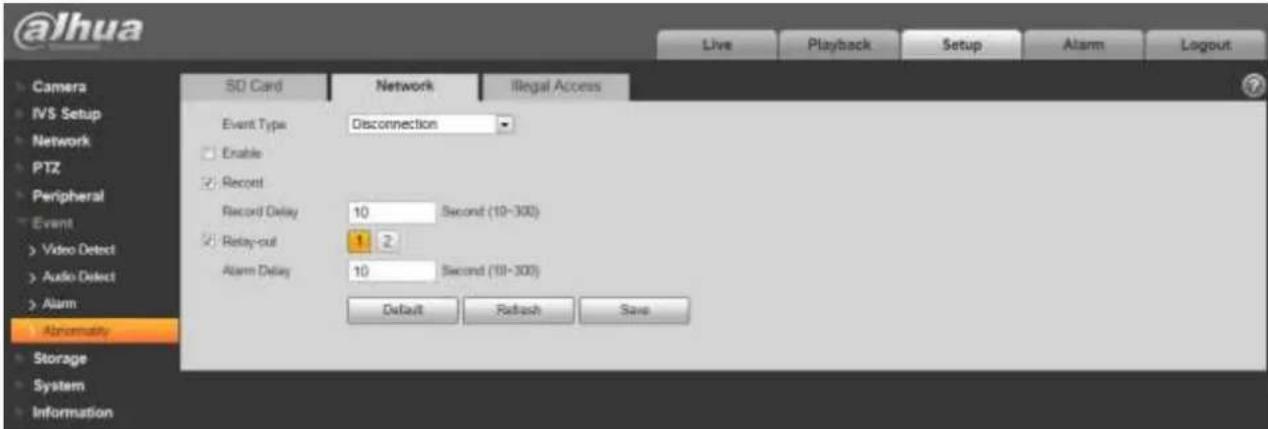
text_image
@lhua Live Playback Setup Alarm Logout Camera IVS Setup Network PTZ Peripheral Event Video Detect Audio Detect Alarm Abnormality Storage System Information SD Card Network Illegal Access Event Type Disconnection Enable Recent Record Delay 10 Second (10-300) Relay-out 1 2 Alarm Delay 10 Second (10-300) Default Ratch SaveFigure 4-79
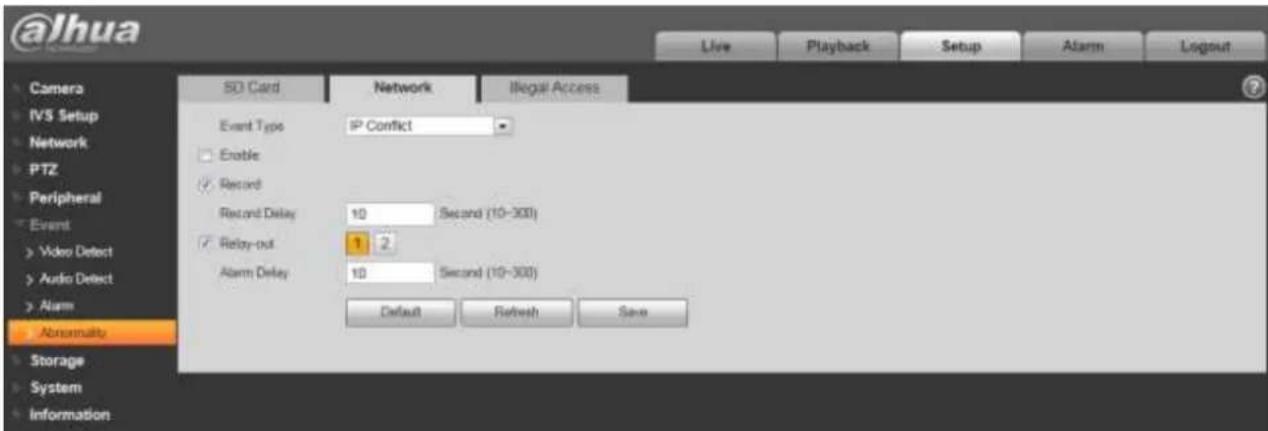
text_image
@Jhua Live Playback Setup Alarm Logout Camera IVS Setup Network PTZ Peripheral Event > Video Detect > Audio Detect > Alarm Abnormality Storage System Information SD Card Network Illegal Access Event Type IP Conflict Enable ✓ Record Record Delay 10 Second (10-300) ✓ Relay-out 1 2 Alarm Delay 10 Second (10-300) Default Refresh SaveFigure 4-80
When login password keep been wrong for a few times, unauthorized access alarm occurs. This operation is similar to SD card error. Allow login error times as when it exceeds this limit, user account will be locked. See Figure 4-81.
Dahua Network Speed Dome Web3.0 Operation Manual
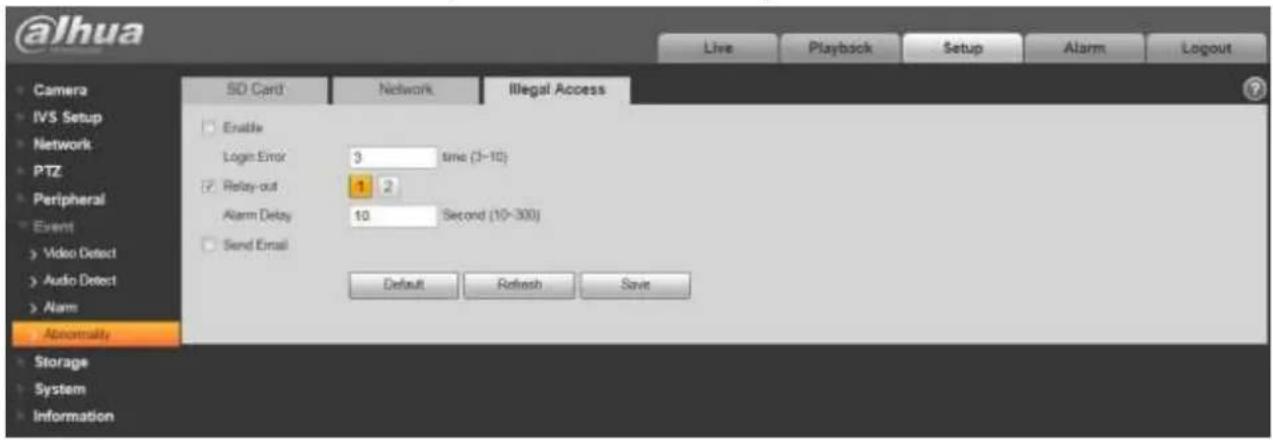
text_image
@lhua Live Playback Setup Alarm Logout Camera IVS Setup Network PTZ Peripheral Event Video Detect Audio Detect Alarm Abnormality Storage System Information SD Card Network Illegal Access Enable Login Error 3 since (3-10) Relay-out 1 2 Alarm Delay 10 Second (10-300) Send Email Default Refresh SaveFigure 4-81
4.7 Storage Management
4.7.1 Schedule
Before schedule setup, user must set record mode is auto or manual.
Note:
If record mode in record control is off, then device will not snapshot according to schedule.
4.7.1.1 Record Schedule
Record schedule steps:
Step 1. Click Record Schedule, see Figure 4-82.
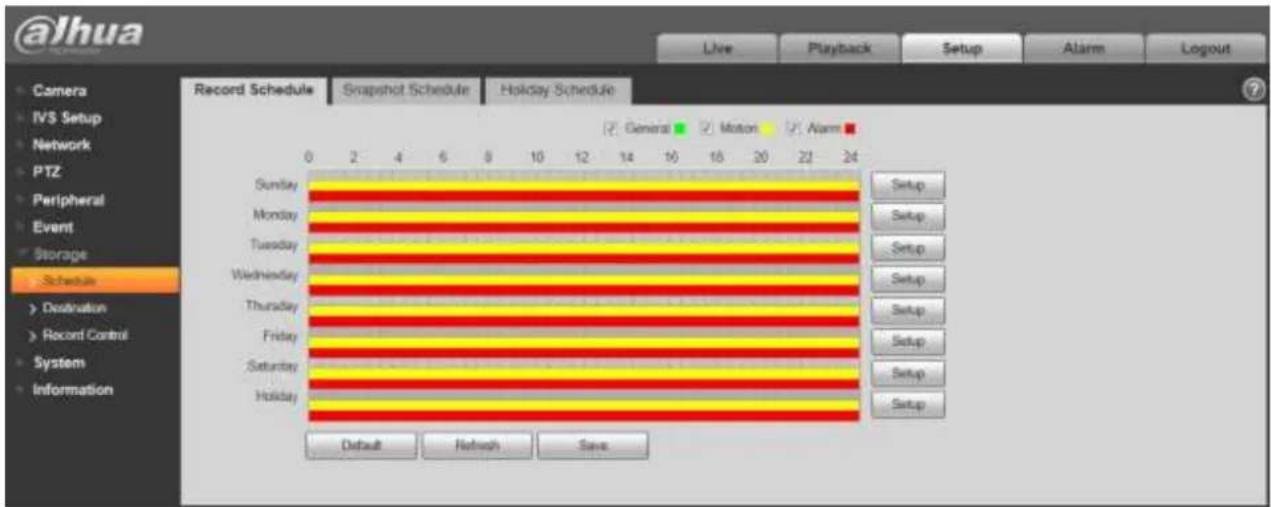
text_image
@lhua Live Playback Setup Alarm Logout Camera IVS Setup Network PTZ Peripheral Event Storage Schedule Destination Record Control System Information Record Schedule Snapshot Schedule Holiday Schedule General Motion Alarm Sunday Monday Tuesday Wednesday Thursday Friday Saturday Holiday Setup Setup Setup Setup Setup Setup Setup Default Refresh SaveFigure 4-82
Step 2. From Monday to Sunday select record time, click setup on the right. See Figure 4-83.
Dahua Network Speed Dome Web3.0 Operation Manual
- Set period according to actual need. There are six periods available each day.
- By checking or cancel, you can add or delete three types of record schedule: General, Motion, and Alarm.
Note:
Period setup can be done by dragging in record schedule interface while not releasing left mouse.
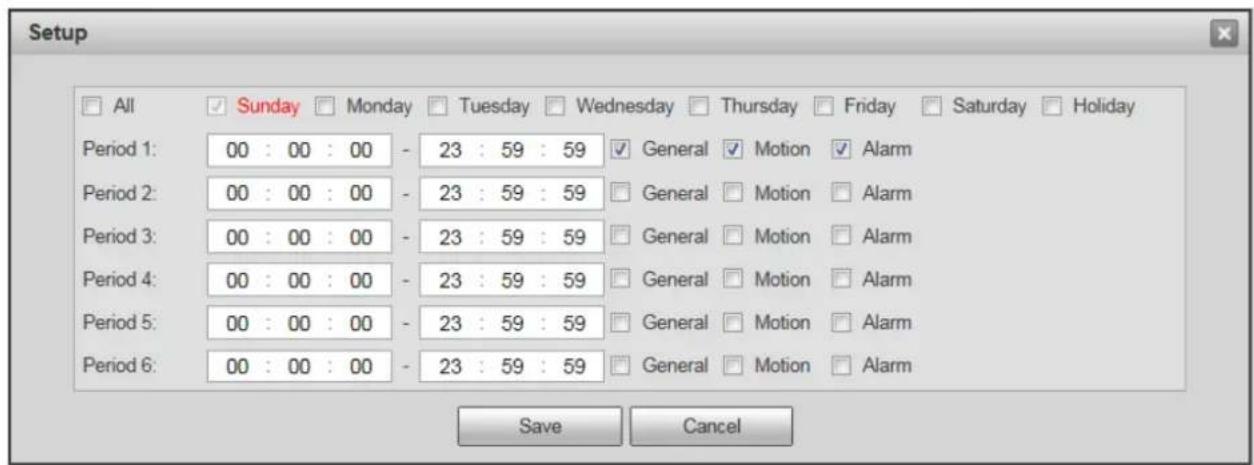
text_image
Setup All Sunday Monday Tuesday Wednesday Thursday Friday Saturday Holiday Period 1: 00 : 00 : 00 - 23 : 59 : 59 General Motion Alarm Period 2: 00 : 00 : 00 - 23 : 59 : 59 General Motion Alarm Period 3: 00 : 00 : 00 - 23 : 59 : 59 General Motion Alarm Period 4: 00 : 00 : 00 - 23 : 59 : 59 General Motion Alarm Period 5: 00 : 00 : 00 - 23 : 59 : 59 General Motion Alarm Period 6: 00 : 00 : 00 - 23 : 59 : 59 General Motion Alarm Save CancelFigure 4-83
Step 3. Click OK, return to record schedule interface. See Figure 4-84.
● Green color stands for the general record/snapshot.
● Yellow color stands for the motion detect record/snapshot.
● Red color stands for the alarm record/snapshot.
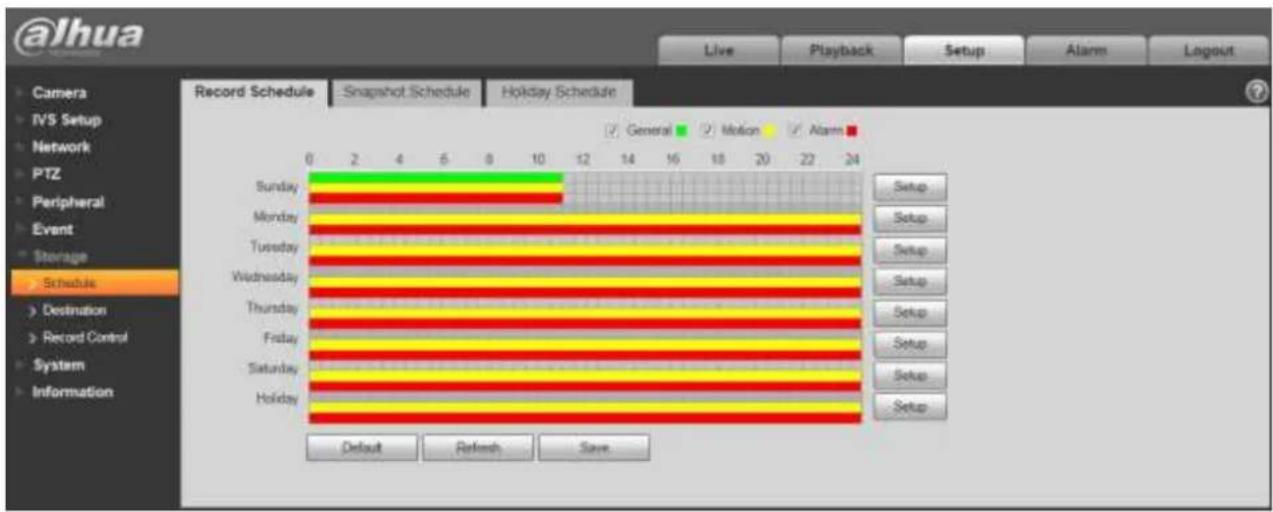
text_image
@lhua Live Playback Setup Alarm Logout Record Schedule Snapshot Schedule Holiday Schedule General Motion Alarm Sunday 12 14 16 18 20 22 24 Monday Tuesday Wednesday Thursday Friday Saturday Holiday Setup Setup Setup Setup Setup Setup Setup Setup Default Refresh SaveFigure 4-84
Step 4. In record schedule interface, click OK. System prompts it is successfully saved.
4.7.1.2 Snapshot Schedule
Snapshot setup as:
Step 1. Click Snapshot Schedule tab, see Figure 4-85.

text_image
@Jhua Live Playback Setup Alarm Logout Camera IVS Setup Network PTZ Peripheral Event Storage Schedule Destination Record Control System Information Record Schedule Snapshot Schedule Holiday Schedule General Milton Alarm 0 2 4 6 8 10 12 14 16 18 20 22 24 Sunday Monday Tuesday Wednesday Thursday Friday Saturday Holiday Setup Setup Setup Setup Setup Setup Setup Default Robash.SaveFigure 4-85
Step 2. From Monday to Sunday select snapshot time, click setup on the right. See Figure 4-86.
- Set snapshot period according to actual need. There are six periods available each day.
- By checking or cancel, user can add or delete three types of snapshot schedule: General, Motion and Alarm.
Note: Period setup can be done by dragging in snapshot schedule interface while not releasing left mouse.
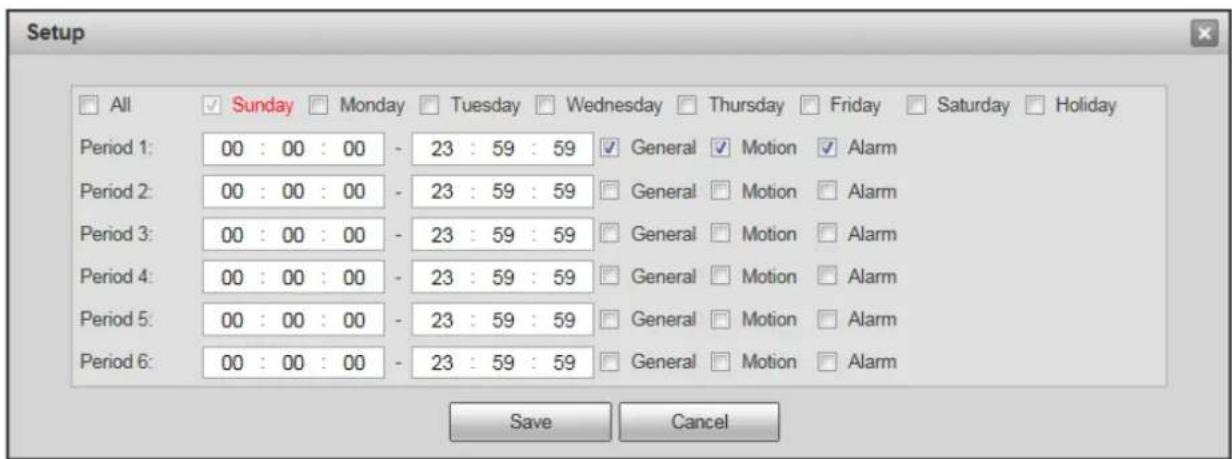
text_image
Setup All Sunday Monday Tuesday Wednesday Thursday Friday Saturday Holiday Period 1: 00 : 00 : 00 - 23 : 59 : 59 General Motion Alarm Period 2: 00 : 00 : 00 - 23 : 59 : 59 General Motion Alarm Period 3: 00 : 00 : 00 - 23 : 59 : 59 General Motion Alarm Period 4: 00 : 00 : 00 - 23 : 59 : 59 General Motion Alarm Period 5: 00 : 00 : 00 - 23 : 59 : 59 General Motion Alarm Period 6: 00 : 00 : 00 - 23 : 59 : 59 General Motion Alarm Save CancelStep 3. Click OK, return to snapshot schedule interface. See Figure 4-87.
● Green color stands for the general record/snapshot.
● Yellow color stands for the motion detect record/snapshot.
● Red color stands for the alarm record/snapshot.
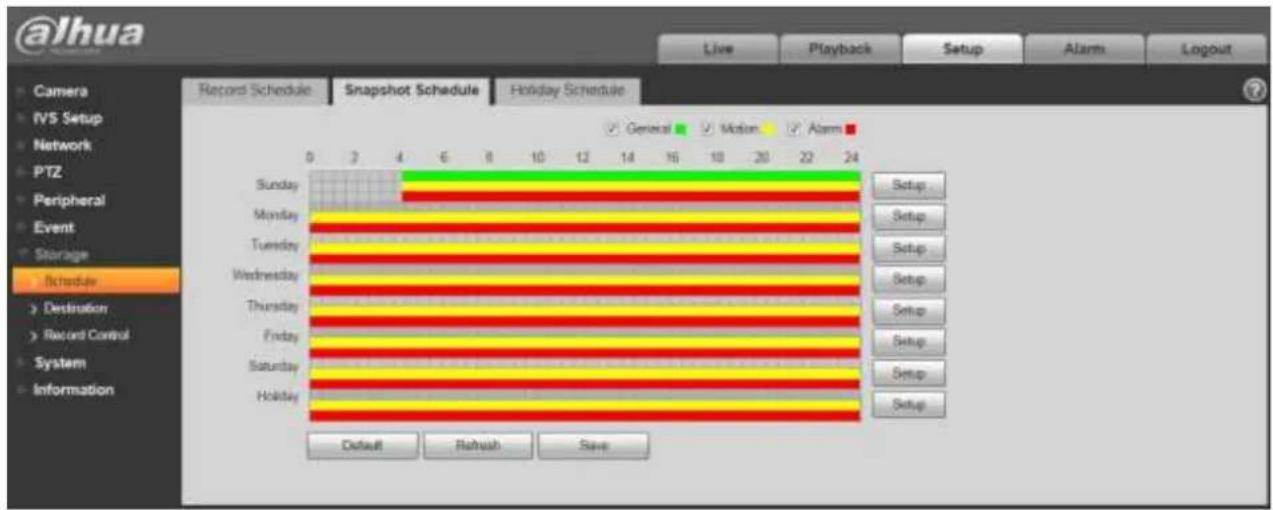
text_image
@lhua Live Playback Setup Alarms Logout Record Schedule Snapshot Schedule Holiday Schedule Camera IVS Setup Network PTZ Peripheral Event Storage Schedule Destination Record Control System Information 0 3 4 6 8 10 12 14 16 18 20 22 24 Sunday Monday Tuesday Wednesday Thursday Friday Saturday Holiday General Motion Alarm Setup Setup Setup Setup Setup Setup Setup Setup Default Renish SaveFigure 4-87
Step 5. In snapshot interface, click OK. System prompts it is successfully saved.
4.7.1.3 Holiday Schedule
Holiday schedule can set specific date as holiday.
Step 1. Click Holiday Schedule tab. See Figure 4-88.

text_image
@lhua Live Playback Setup Alarm Logout Camera IVS Setup Network PTZ Peripheral Event Storage Schedule Destination Record Control System Information Record Schedule Snapshot Schedule Holiday Schedule Record Snapshot Calendar-Apr Sun Mon Tue Wed Thu Fri Sat 1 2 3 4 8 6 7 8 9 10 11 12 13 14 15 16 17 18 19 20 21 22 23 24 25 26 27 28 29 30 Refresh SaveStep 2. Select date to set as holiday. The selected date will be highlighted in yellow.
Step 3. Check Record/Snapshot, click Save. System prompts it is successfully saved.
Step 4. Check Record Schedule/Snapshot Schedule interface, click setup next to Holiday, refer to setup of Monday to Sunday.
Step 5. Complete setup of holiday, then it records/snapshots according to date in holiday schedule.
4.7.2 Destination
4.7.2.1 Path
The destination interface is shown as in Figure 4-89.
Path can config record and snapshot storage path. There are three options: Local, FTP and NAS. You can only select one mode. System can save according to the event types. It is corresponding to the three modes (general/motion/alarm) in the Schedule interface. Please check the box to enable the save functions.
Note: Only device supports SD card has local.
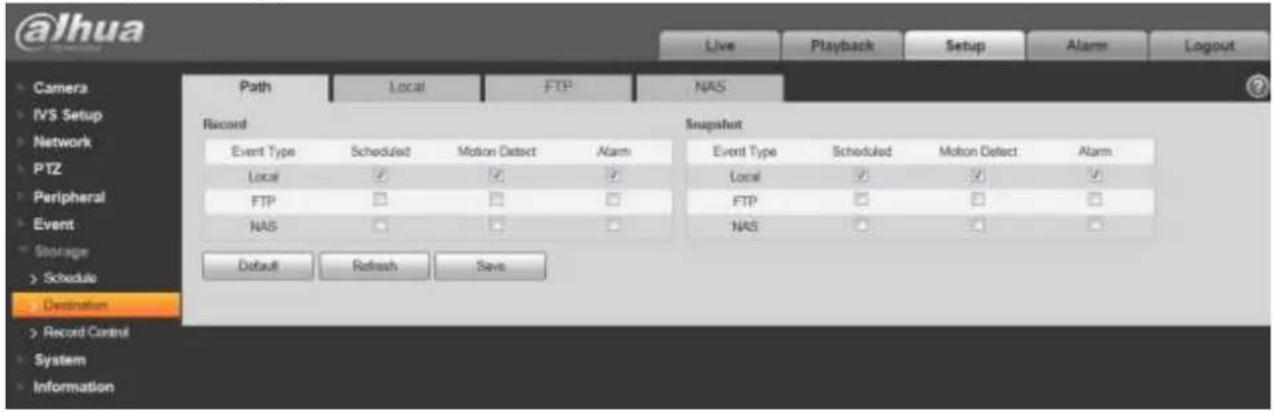
text_image
@lhuua Live Playback Setup Alarm Logout Camera IVS Setup Network PTZ Peripheral Event Storage Schedule Destination Record Control System Information Path Local FTP NAS Record Snapshot Event Type Scheduled Motion Detect Alarm Event Type Scheduled Motion Detect Alarm Local ✓ ✓ ✓ Local ✓ ✓ ✓ FTP □ □ □ FTP □ □ □ NAS □ □ □ NAS □ □ □ Default Refresh SaveFigure 4-89
Please refer to the following sheet for detailed information.
| Parameter | Function |
| Event Type | It includes: scheduled, motion detect and alarm. |
| Local | It saved in the SD card. |
| FTP | It saved in the FTP server. |
| NAS | It saved in NAS disk. |
4.7.2.2 Local
Dahua Network Speed Dome Web3.0 Operation Manual
The local interface is shown as in Figure 4-90.
Here you can view local Micro SD card or NAS disk information. You can also operate the read-only, write-only, hot swap and format operation.
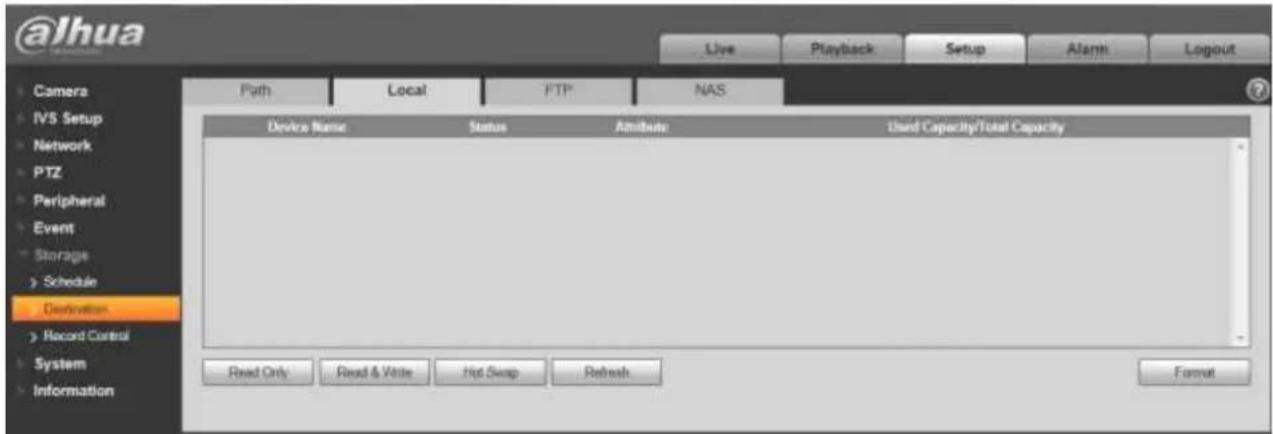
text_image
@lhua Live Playback Setup Alarm Logout Camera IVS Setup Network PTZ Peripheral Event Storage Schedule Destination Record Control System Information Path Local FTP NAS Device Name Status Attribute Used Capacity/Total Capacity Read Only Read & Write Hip Swap Refresh FormatFigure 4-90
4.7.2.3 FTP
The FTP interface is shown as in Figure 4-91.
You need to check the box to enable the FTP function. When network disconnect occurred or there is malfunction. Emergency storage can save the record/snapshot picture to the local SD card.
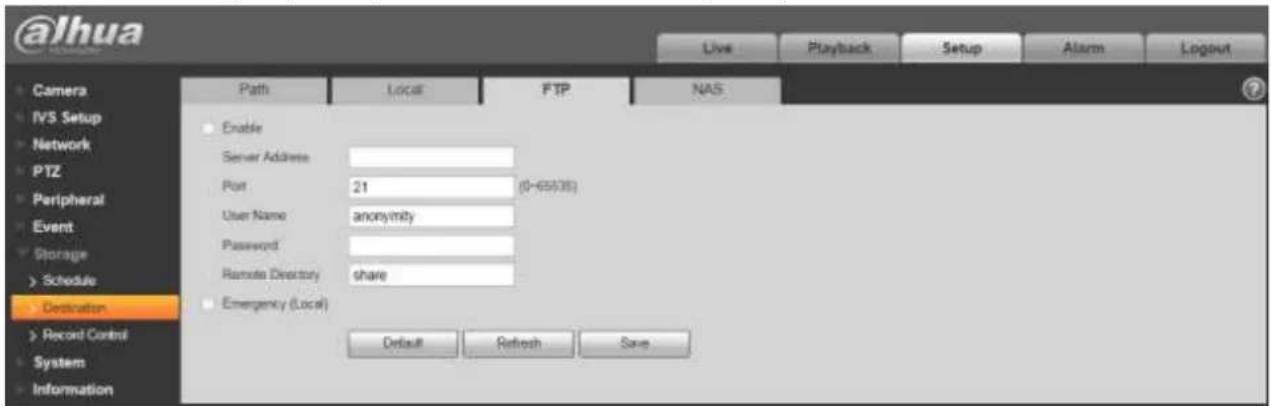
text_image
@lhua Live Playback Setup Alarm Logout Camera IVS Setup Network PTZ Peripheral Event Storage Schedule Destination Record Control System Information Path Local FTP NAS Enable Server Address Port 21 (0-655/38) User Name anonymity Password Remote Directory share Emergency (Local) Default Refresh SaveFigure 4-91
4.7.2.4 NAS
You need to check the box to enable the NAS function. Select NAS storage as to same file to NAS disk. See Figure 4-92.
Dahua Network Speed Dome Web3.0 Operation Manual
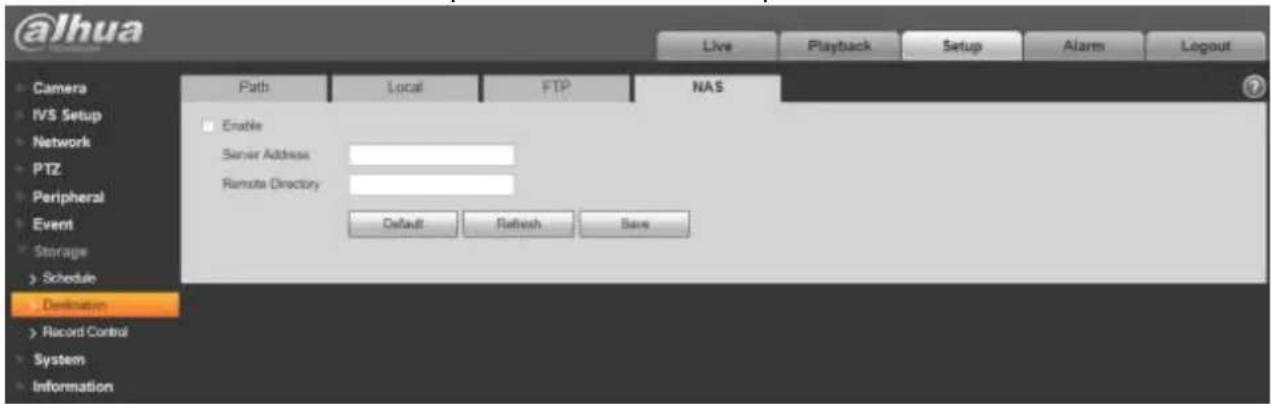
text_image
@lhua Live Playback Setup Alarm Logout Camera Path Local FTP NAS IVS Setup Network PTZ Peripheral Event Storage Schedule Destination Record Control System Information Enable Server Address Remote Directory Default Retush SaveFigure 4-92
4.7.3 Record control
The record control interface is shown as in Figure 4-93.
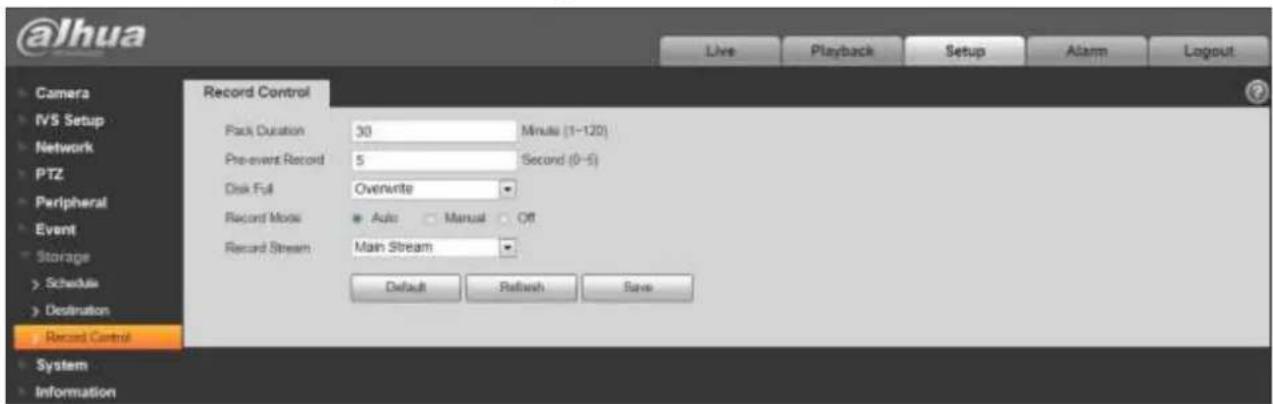
text_image
@Jhua Live Playback Setup Alarm Logout Camera IVS Setup Network PTZ Peripheral Event Storage Schedule Destination Record Control System Information Record Control Pack Duration 30 Minutes (1-120) Pre-event Record 5 Second (0-5) Disk Full Overwrite Record Mode Auto Manual Off Record Stream Main Stream Default Rashush SaveFigure 4-93
Please refer to the following sheet for detailed information.
| Parameter | Function |
| Pack Duration | Here you can select file size within 1min~120min. Default setup is 8 minutes. |
| Pre-record | Please input pre-record value here.For example, system can record the four seconds video in the buffer.The record begins from the fifth second.Note:Configure pre-record time, when alarm or motion detection occurs, if there is no record, system will record the preceding n seconds record. |
Dahua Network Speed Dome Web3.0 Operation Manual
| Disk Full | There are two options: stop recording or overwrite the previous files when HDD is full.● Stop: Current working HDD is overwriting or current HDD is full, it will stop record.● Overwrite: Current working HDD is full; it will overwrite the previous file. |
| Record mode | There are three modes: Auto/manual/close. |
| Record stream | There are two options: main stream and sub stream. |
4.8 System
4.8.1 General
The General interface is shown as in Figure 4-94.
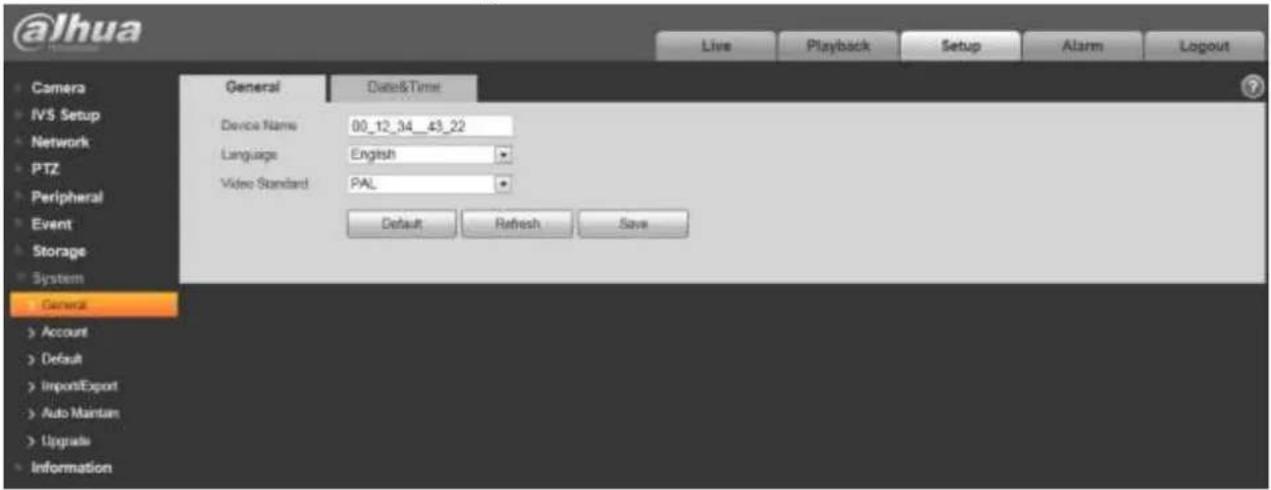
text_image
@lhua Live Playback Setup Alarm Logout Camera IVS Setup Network PTZ Peripheral Event Storage System General Device Name 80_12_34_43_22 Language English Video Standard PAL Default Refresh Save Account Default ImportExport Auto Mantan Upgrade InformationFigure 4-94
Please refer to the following sheet for detailed information.
| Parameter | Function |
| Device Name | It is to set device name. |
| Video Standard | This is to display video standard such as PAL. |
| Language | You can select the language from the dropdown list. |
The date and time interface is shown as in Figure 4-95.
Dahua Network Speed Dome Web3.0 Operation Manual
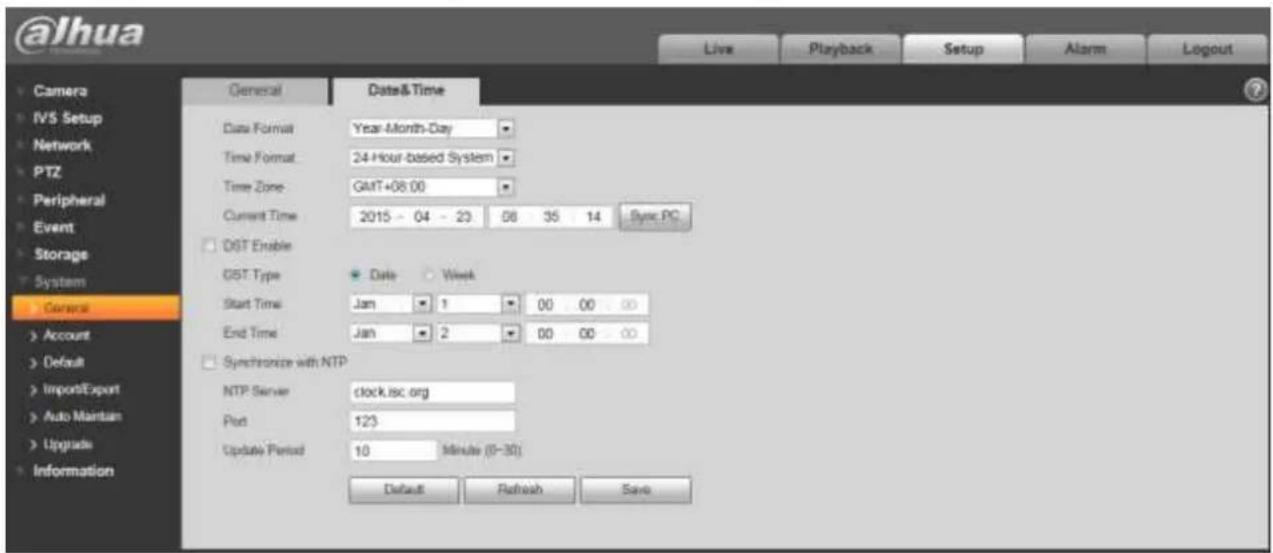
text_image
@lhua Live Playback Setup Alarm Logout Camera IVS Setup Network PTZ Peripheral Event Storage System General Account Default Import/Export Auto Maintain Upgrade Information General Data&Time Data Format.Year-Month-Day Time Format:24-Hour-based System Time Zone:GMT+08.00 Current Time:2015 - 04 - 23 58 35 14 Sync PC DST Enable DST Type:+ Date-Week Start Time:Jan 1 00 00 00 End Time:Jan 2 00 00 00 Synchronize with NTP NTP Server:clock.isc.org Port:123 Update Period:10 Minute (0-30) Default Refresh SaveFigure 4-95
Please refer to the following sheet for detailed information.
| Parameter | Function |
| Date format | Here you can select date format from the dropdown list. |
| Time Format | There are two options: 24-H and 12-H. |
| Time zone | The time zone of the device. |
| System time | It is to set system time. It becomes valid after you set. |
| Sync PC | You can click this button to save the system time as your PC current time. |
| DST | Here you can set day night save time begin time and end time. You can set according to the date format or according to the week format. |
| NTP | You can check the box to enable NTP function. |
| NTP server | You can set the time server address. |
| Port | It is to set the time server port. |
| Update period | It is to set the sync periods between the device and the time server. |
4.8.2 Account
Dahua Network Speed Dome Web3.0 Operation Manual
- For the character in the following user name or the user group name, system max supports 15-digits. The valid string includes: character, number, and underline.
- Password can be 0\~32 characters in number and letter only. User can modify other user's password.
- The user amount is 18 and the group amount is 8 when the device is shipped out of the factory. The factory default setup includes two levels: user and admin. You can set the corresponding group and then set the rights for the respective user in the specified groups.
- User management adopts group/user modes. The user name and the group name shall be unique. One user shall be included in only one group.
● Currently logged in user cannot change his/her own right.
4.8.2.1 Username
In this interface you can enable anonymity login, add/remove user and modify user name. See Figure 4-96.
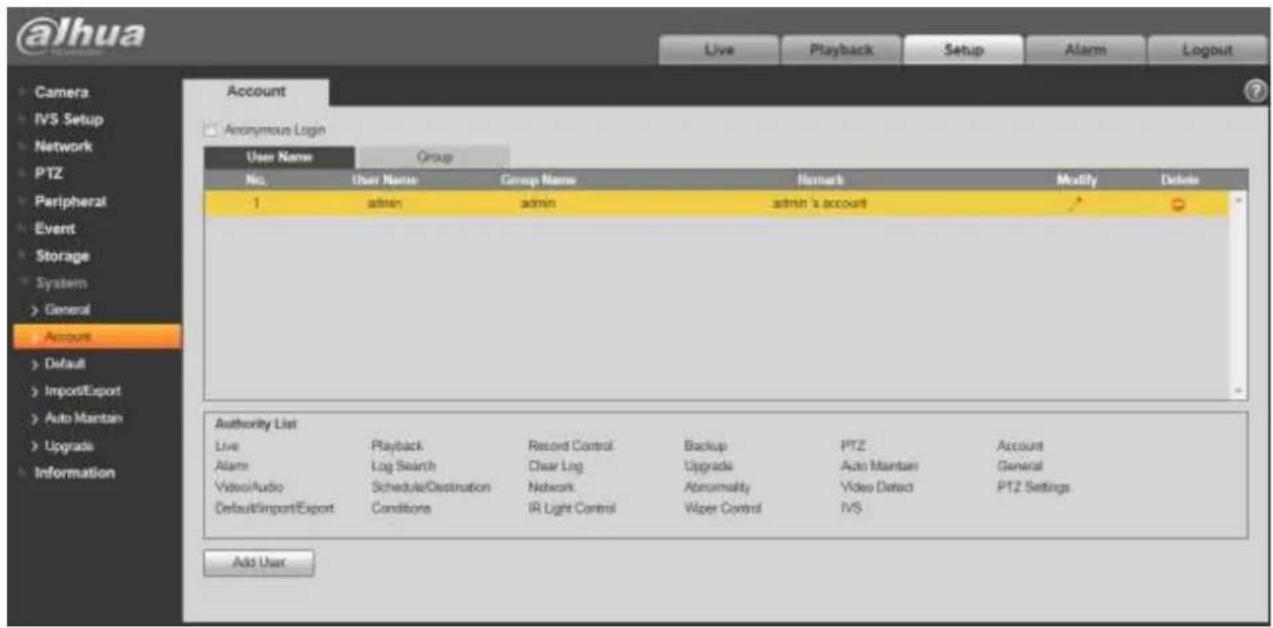
text_image
@lhua Live Playback Setup Alarm Logout Account Anonymous Login User Name Group No User Name Group Name Nemark Modify Delete 1 adults adults admin's account Authority List Live Playback Record Control Backup PTZ Account AlarmLoad Log Search Clear Log Upgrade Auto Maintain General VideoAudio Schedule/Destination Network Abnormality Video Detect P12 Settings Default/Import/Export Conditions IR Light Control Wiper Control IVS Add UserFigure 4-96
Enable anonymity login: Enable anonymity login, and input IP. No username or password is required, you can log in by anonymity (with limited rights). You can click logout to end your session.
Add user: It is to add a name to group and set the user rights. See Figure 4-97.
There are four default users: admin/888888/666666 and hidden user "default". Except user 6666, other users have administrator right. The user 666666 can only have the monitor rights.
Dahua Network Speed Dome Web3.0 Operation Manual
Hidden user "default" is for system interior use only and cannot be deleted. When there is no login user, hidden user "default" automatically login. You can set some rights such as monitor for this user so that you can view some channel view without login.
Here you can input the user name and password and then select one group for current user.
Please note the user rights shall not exceed the group right setup.
For convenient setup, please make sure the general user has the lower rights setup than the admin.
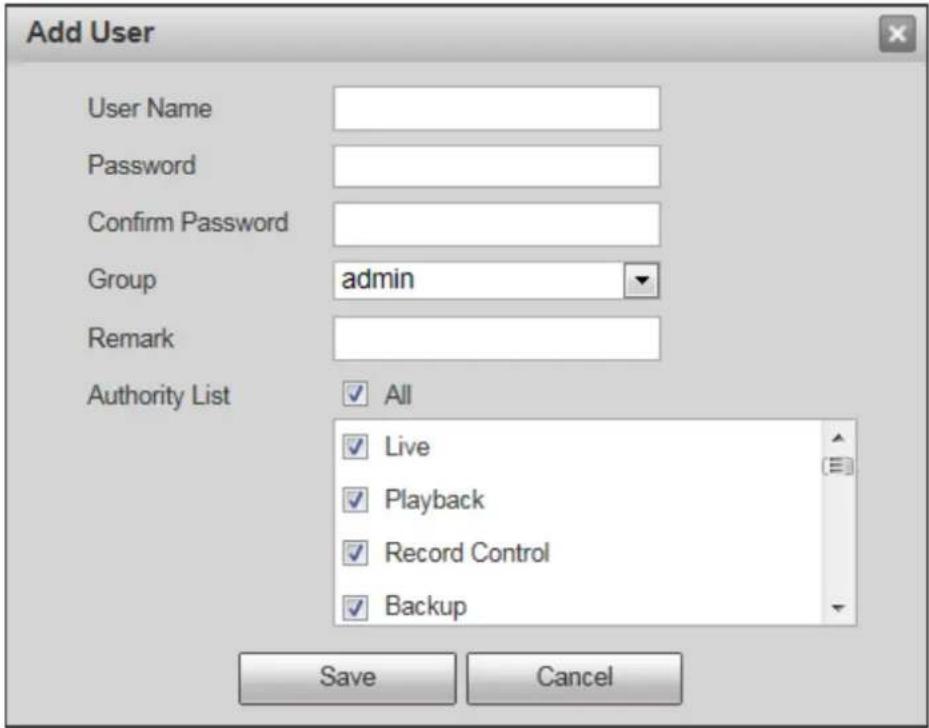
text_image
Add User User Name Password Confirm Password Group admin Remark Authority List All Live Playback Record Control Backup Save CancelFigure 4-97
Modify user
It is to modify the user property, belonging group, password and rights. See Figure 4-98.
Modify password
It is to modify the user password. You need to input the old password and then input the new password twice to confirm the new setup. Please click the OK button to save.
Please note, the password ranges from 0-digit to 32-digit. It shall include the number and letter only. For the user who has the account rights, he can modify the password of other users.
Dahua Network Speed Dome Web3.0 Operation Manual
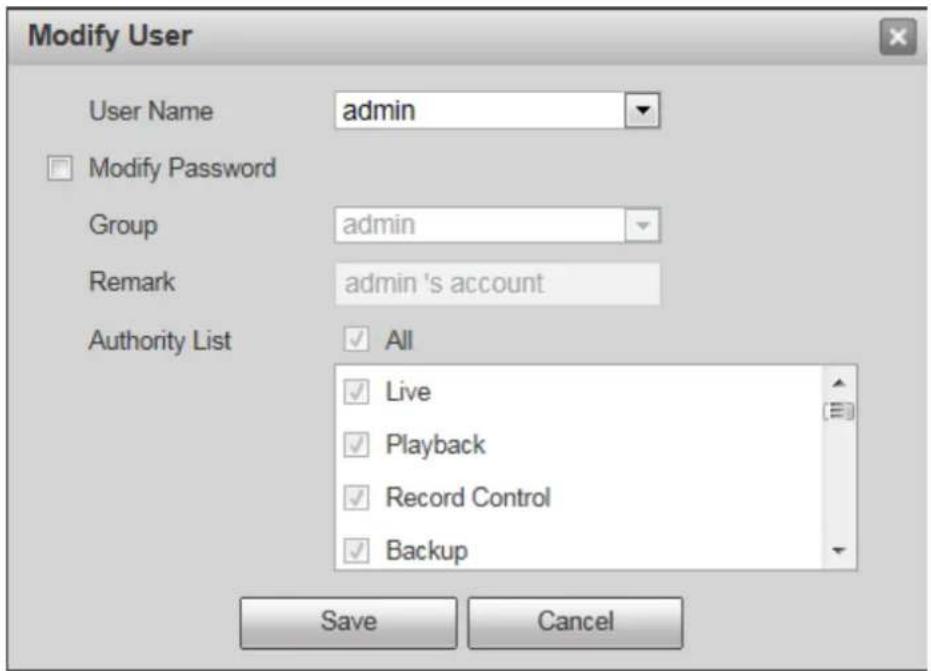
text_image
Modify User User Name admin Modify Password Group admin Remark admin 's account Authority List All Live Playback Record Control Backup Save CancelFigure 4-98
4.8.2.2 Group
The group management interface can add/remove group, modify group password and etc. The interface is shown as in Figure 4-99.

text_image
@lhua Live Playback Setup Alarm Logout Camera IVS Setup Network PTZ Peripheral Event Storage System General Account Default Import/Export Auto Maintain Upgrade Information Account Anonymous Logn User Name Group No.Group Name Remark Modify Delete 1 adults-administrator group 2 user-user group Authority List Live Playback Record Control Backup PTZ Account Alarm Log Search Clear Log Upgrade Auto Maintain General Video/Audio Schedule/Destination Network Abnormality Video Detect PTZ Settings Default/Import/Export Conditions IR Light Control Wiper Control IVS Add GroupAdd group: It is to add group and set its corresponding rights. See Figure 4-100.
Please input the group name and then check the box to select the corresponding rights. It includes: preview, playback, record control, PTZ control and etc.
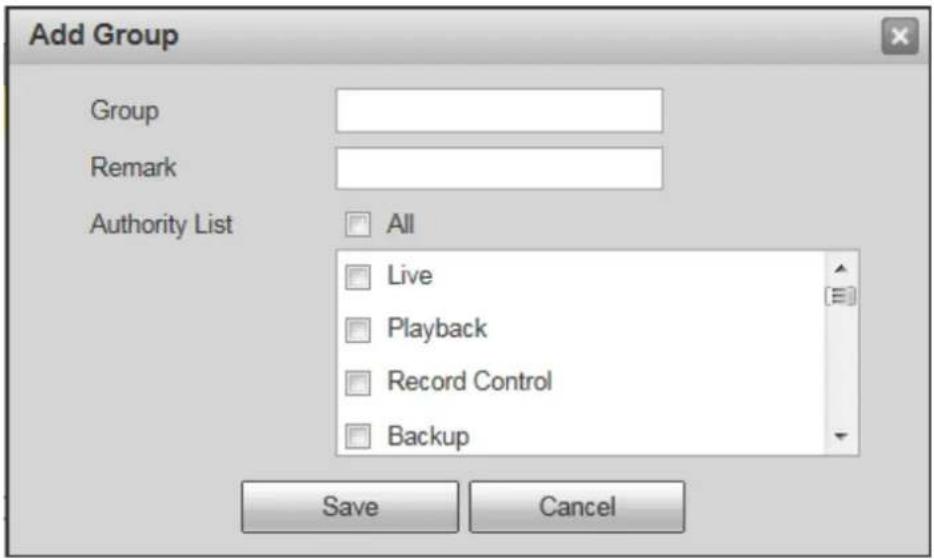
text_image
Add Group Group Remark Authority List All Live Playback Record Control Backup Save CancelFigure 4-100
Modify group
Click the modify group button, you can see an interface is shown as in Figure 4-101. Here you can modify group information such as remarks and rights.
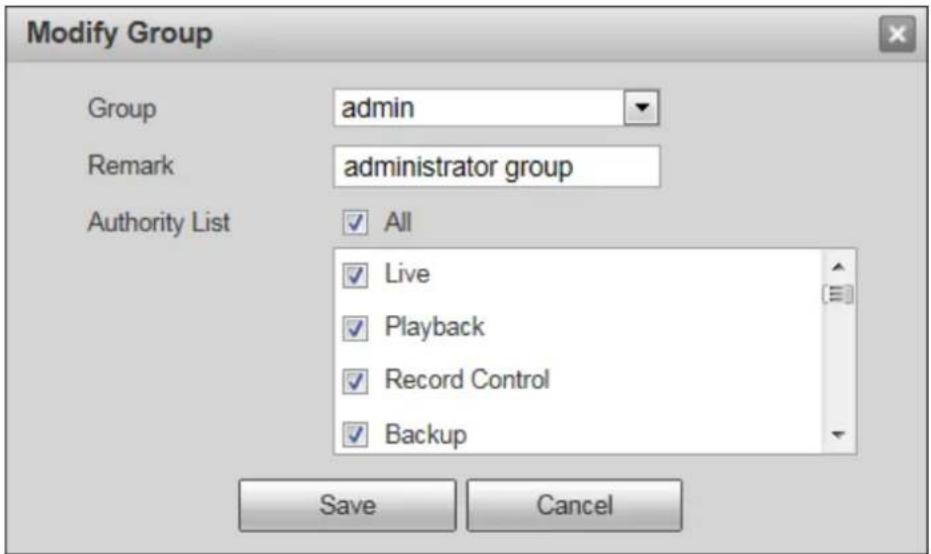
text_image
Modify Group Group admin Remark administrator group Authority List All Live Playback Record Control Backup Save Cancel4.8.3 Default
The default setup interface is shown as in Figure 4-102.
Please note system cannot restore some information such as network IP address.
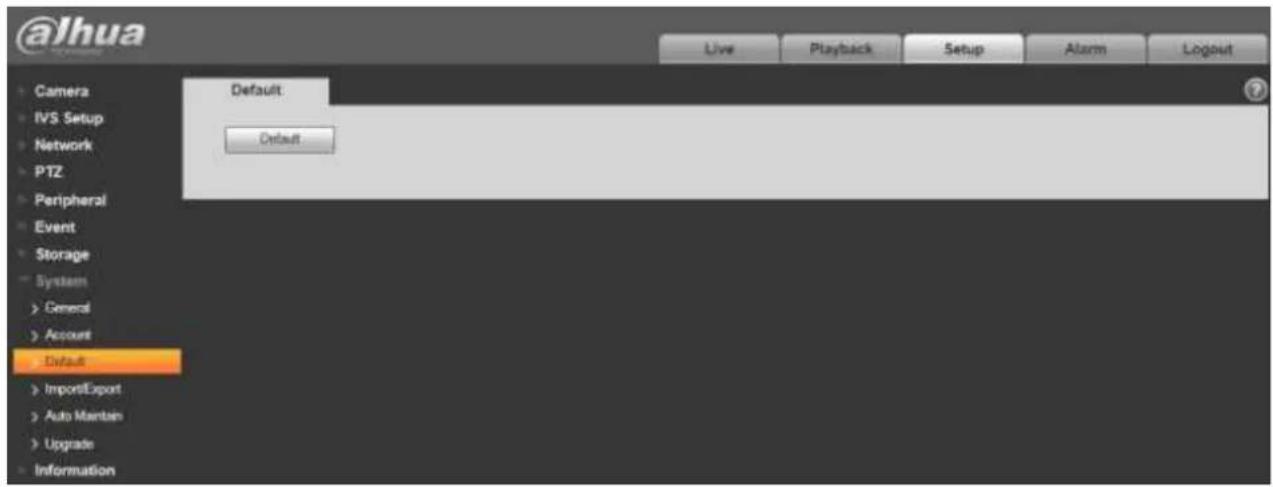
text_image
@Jhua Camera IVS Setup Network PTZ Peripheral Event Storage System General Account Default Import/Export Auto Maintain Upgrade Information Default Default Live Playback Setup Alarm LogoutFigure 4-102
4.8.4 Import/Export
The interface is shown as in Figure 4-103.
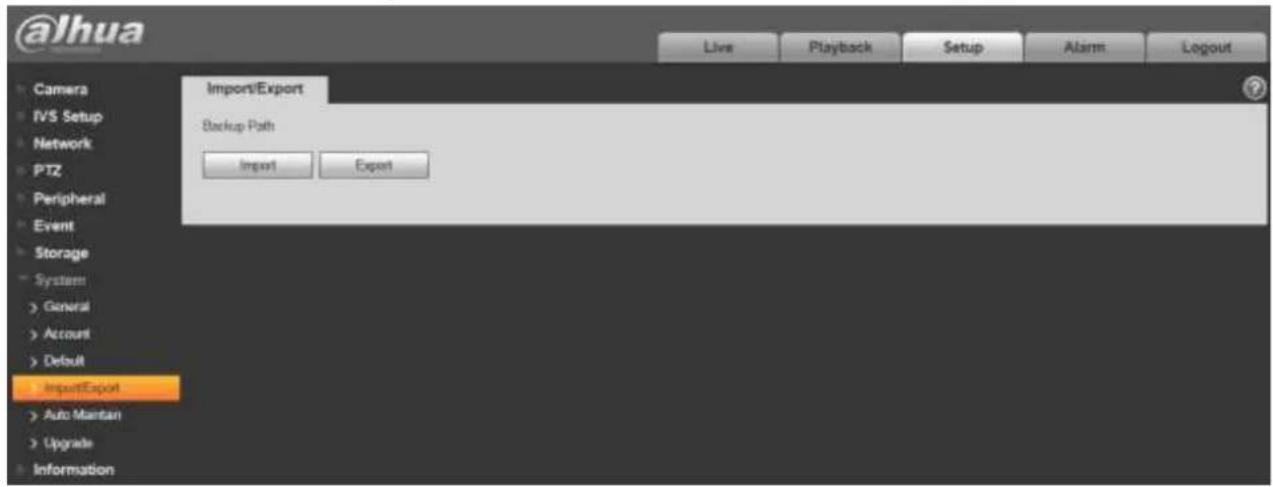
text_image
@lhua Camera IVS Setup Network PTZ Peripheral Event Storage System General Account Default Import/Export Auto Maintan Upgrade Information Import/Export Backup Path Import ExportFigure 4-103
Please refer to the following sheet for detailed information.
Dahua Network Speed Dome Web3.0 Operation Manual
| Parameter | Function |
| Import | It is to import the local setup files to the system. |
| Export | It is to export the corresponding system setup to your local PC. |
4.8.5 Auto Maintenance
The auto maintenance interface is shown as in Figure 4-104.
Here you can select auto reboot and auto delete old files interval from the dropdown list.
If you want to use the auto delete old files function, you need to set the file period.
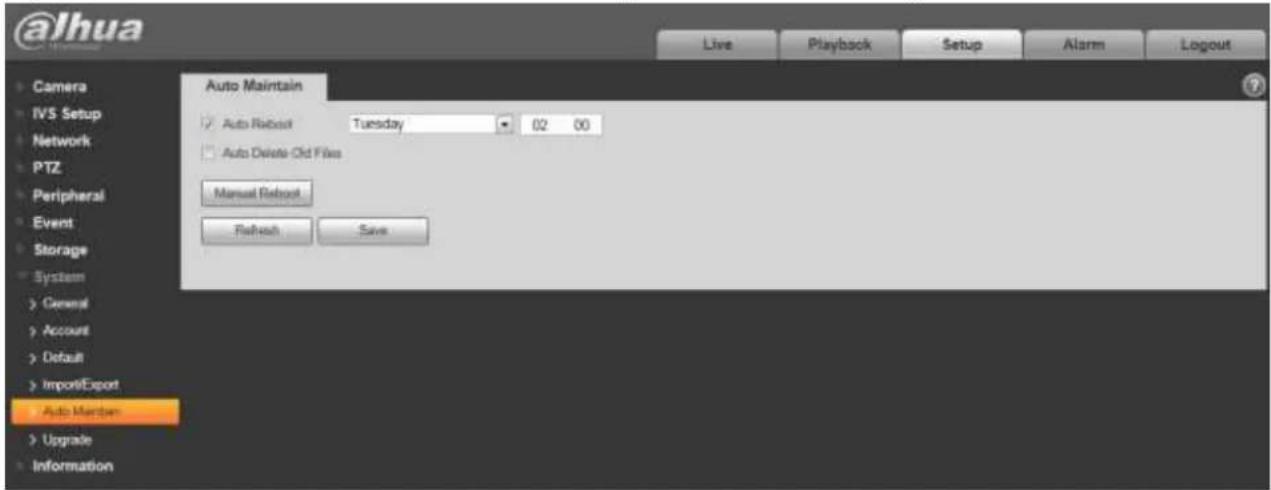
text_image
@lhua Live Playback Setup Alarm Logout Camera IVS Setup Network PTZ Peripheral Event Storage System > General > Account > Default > ImportExport Auto Marsten > Upgrade Information Auto Maintain ✓ Auto Reboot Tuesday 02 00 ✓ Auto Delete Old Files Manual Reboot Refresh SaveFigure 4-104
| Parameter | Function |
| Auto Reboot | Check it and set auto reboot time. |
| Auto Delete Old Files | Check it and set period within 1~31 days. |
4.8.6 Upgrade
The upgrade interface is shown as in Figure 4-105.
Please select the upgrade file (file extension is ".bin") and then click the update button to begin firmware update.
Important
Improper upgrade program may result in device malfunction!

Dahua Network Speed Dome Web3.0 Operation Manual
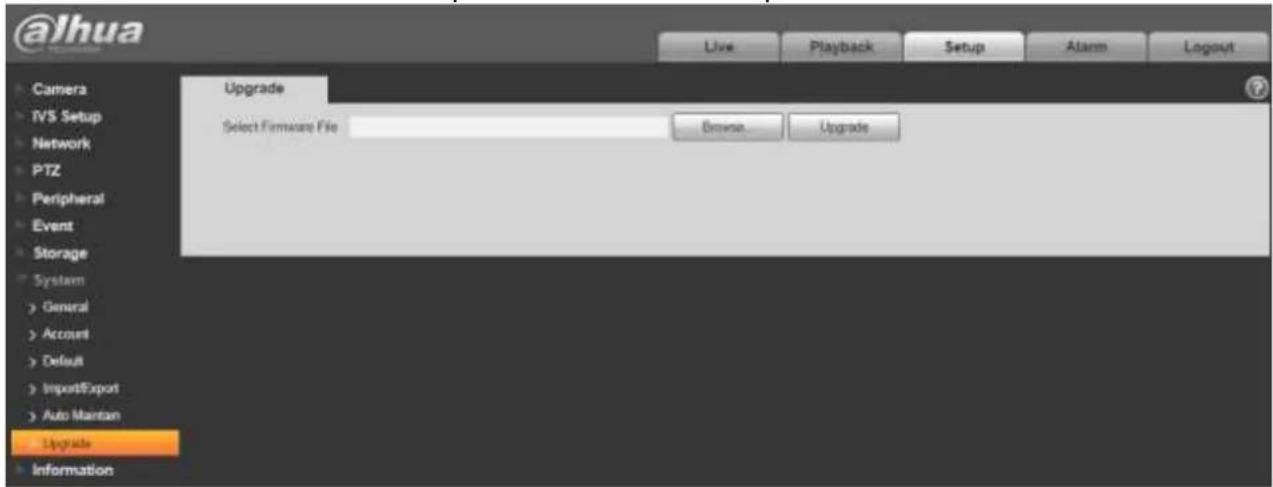
text_image
@lhua Camera IVS Setup Network PTZ Peripheral Event Storage System > General > Account > Default > Import/Export > Auto Mantan Upgrade Information Upgrade Select Firmware File Browse UpgradeFigure 4-105
4.9 Information
4.9.1 Version
The version interface is shown as in Figure 4-106.
Here you can view system hardware features, software version, release date and etc. Please note the following information is for reference only.
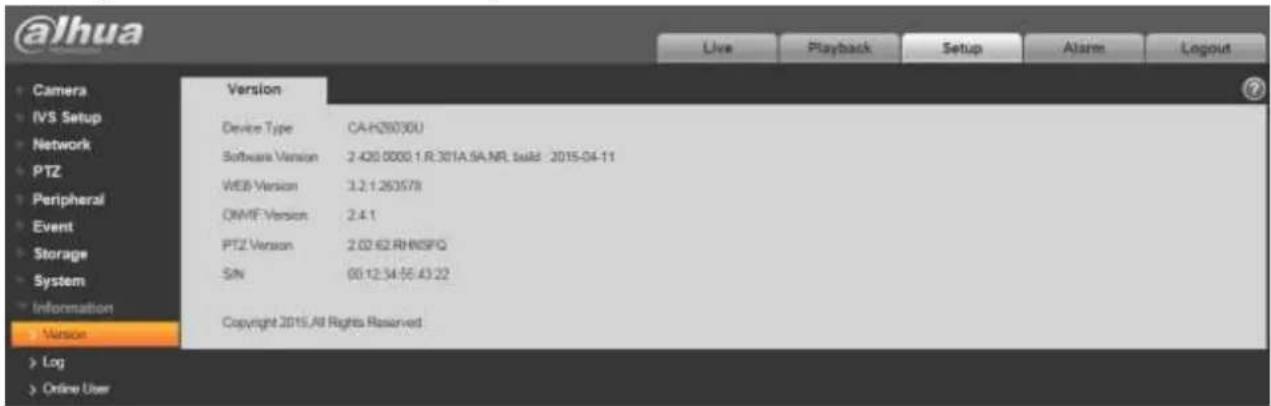
text_image
@lhua Live Playback Setup Alarm Logout Camera IVS Setup Network PTZ Peripheral Event Storage System Information Version Device Type CA-H29030U Software Version 2.420.0000 1.R.301A.SA.NR build: 2015-04-11 WEB Version 3.2.1.263578 OMIF Version 2.4.1 PTZ Version 2.02.62.RHNSFQ SIN 00.12.34:56.43.22 Copyright 2015/All Rights Reserved Log Online UserFigure 4-106
4.9.2 Log
Here you can view system log. See Figure 4-107.
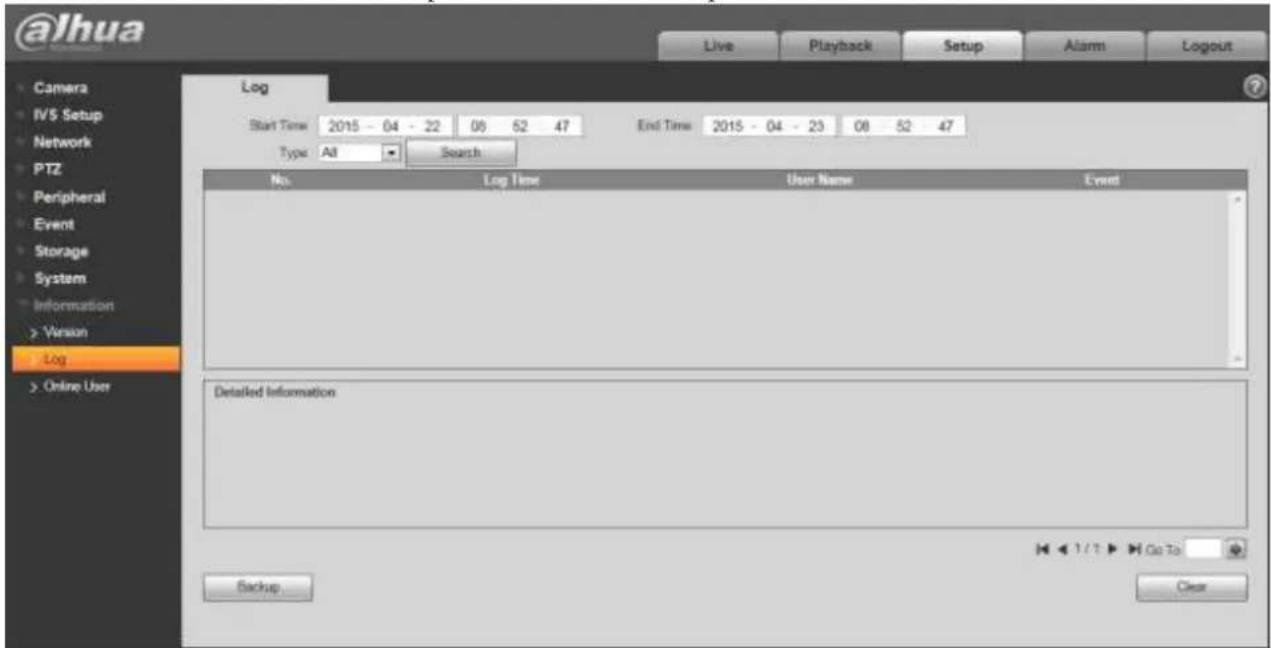
text_image
@lhua Live Playback Setup Alarm Logout Camera IVS Setup Network PTZ Peripheral Event Storage System Information Venson Log Online User Log Start Time 2015 - 04 - 22 08 52 47 End Time 2015 - 04 - 23 08 52 47 Type All Search No. Log Time User Name Event Detailed Information Backup 1 / 1 Go To ClearFigure 4-107
Please refer to the following sheet for log parameter information.
| Parameter | Function |
| Start time | Set the start time of the requested log. (The earliest time is 2000/1/1) |
| End time | Set the end time of the requested log. (The latest time is 2037/12/31) |
| Type | Log type. |
| Search | You can select log type from the drop down list and then click search button to view the list.You can click the stop button to terminate current search operation. |
| Log information | You can select one item to view the detailed information. |
| Clear | You can click this button to delete all displayed log files. Please note system does not support clear by type. |
| Backup | You can click this button to backup log files to current PC. |
4.9.3 Online User
The online user interface is shown as in Figure 4-108.
Here you can view current online user, group name, IP address and login time.
Dahua Network Speed Dome Web3.0 Operation Manual
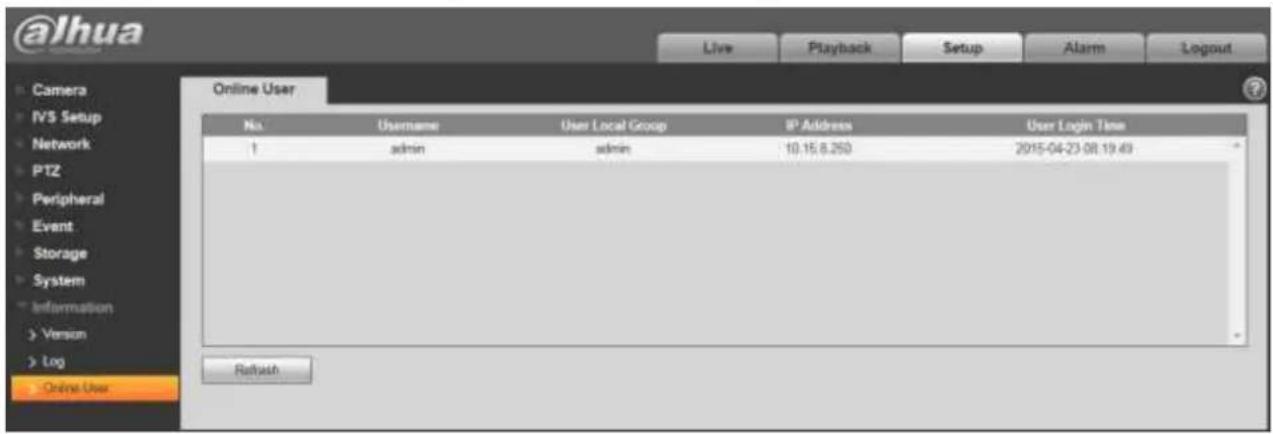
text_image
@lhua Live Playback Setup Alarm Logout Camera IVS Setup Network PTZ Peripheral Event Storage System Information Version Log Online User Online User No. Username User Local Group IP Address User Login Time 1 admin admin 10.15.8.250 2015-04-23 08:19:49 RefreshFigure 4-108
5 Alarm
Please note some series product does not support this function.
Click alarm function, you can see an interface is shown as in Figure 5-1.
Here you can set device alarm type and alarm sound setup.
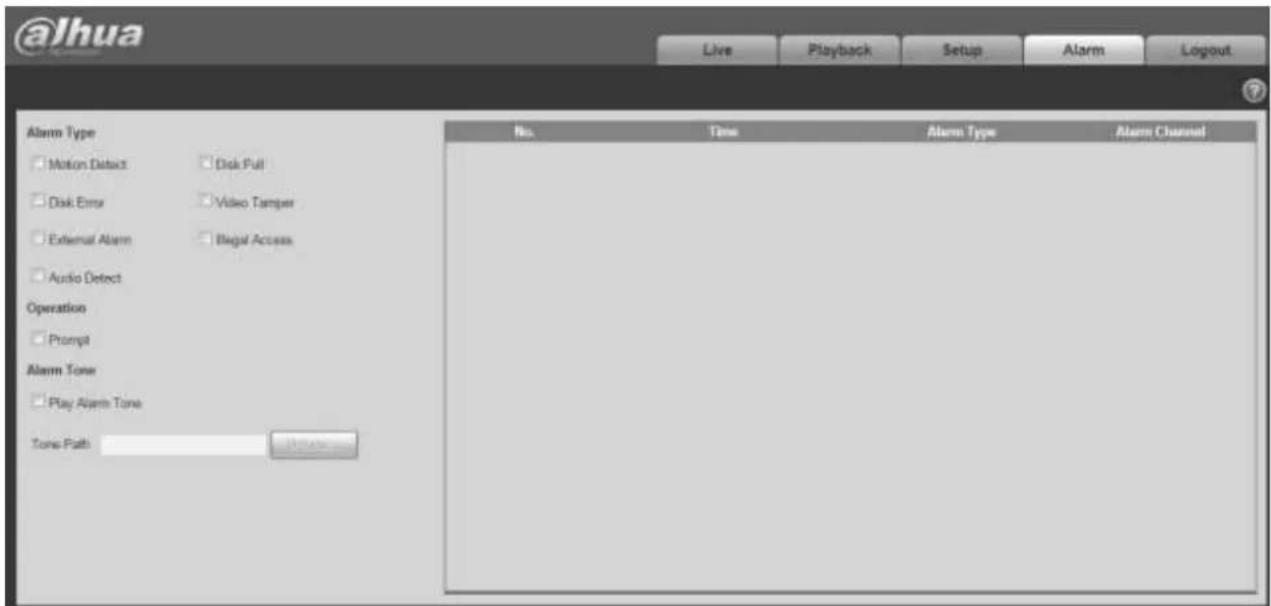
text_image
@Jhua Live Playback Setup Alarm Logout Alarm Type Motion Detect Disk Pull Disk Error Video Tamper External Alarm Blegal Access Audio Detect Operation Prompt Alarm Tone Play Alarm Tone Tone Path No. Time Alarm Type Alarm Channel VolumeFigure 5-1
Please refer to the following sheet for detailed information.
| Type | Parameter | Function |
| Alarm type | Motion detection | System alarms when motion detection alarm occurs, |
| Disk full | System alarms when disk is full. | |
| Disk error | System generates an alarm when HDD is malfunction. | |
| Video tampering | System alarms when camera is viciously masking. | |
| External alarm | System alarms when alarm inputs device. | |
| Illegal access | System alarms when there is unauthorized access. | |
| Audio detect | System alarms when audio detect occurs. | |
| Operation | Prompt | When alarm is triggered, there will be s  inmain menu of alarm interface and system automatically records alarm info. The icon disappears when user click alarm menu bar. Note: If alarm interface is displayed, when alarm is triggered, there will be no image prompt, but alarm record will be in list on the right. inmain menu of alarm interface and system automatically records alarm info. The icon disappears when user click alarm menu bar. Note: If alarm interface is displayed, when alarm is triggered, there will be no image prompt, but alarm record will be in list on the right. |
Dahua Network Speed Dome Web3.0 Operation Manual
| Type | Parameter | Function |
| Alarm audio | Audio | When alarm occurs, system auto generates alarm audio. The audio supports customized setup. |
| Path | Here you can specify alarm sound file. |
6 Log out
Click log out button, system goes back to log in interface. See Figure 6-1.
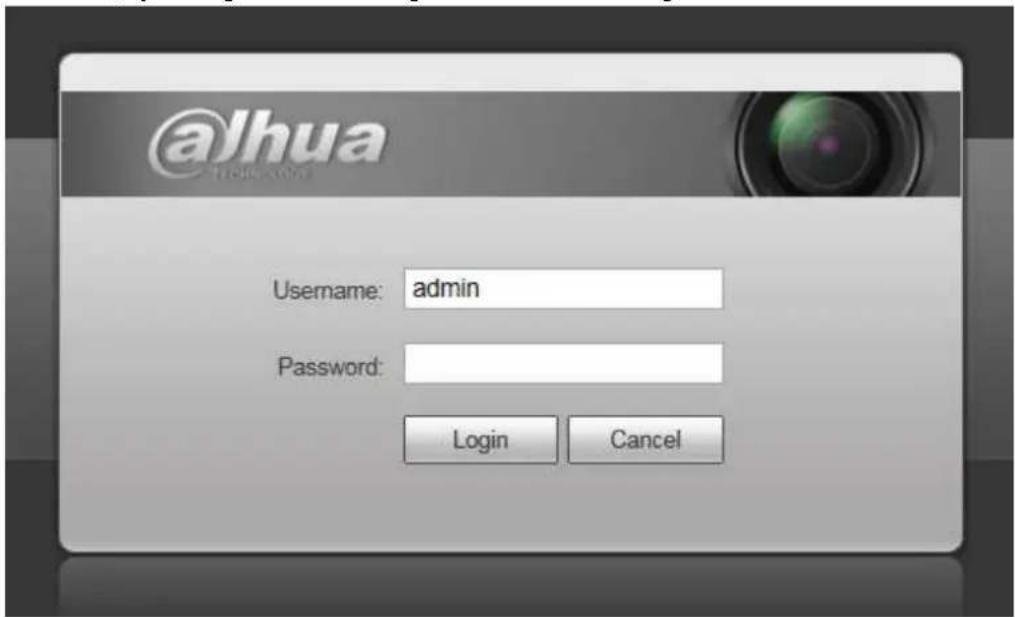
text_image
@lhua Username: admin Password: Login CancelFigure 6-1
Note:
● This manual is for reference only. Slight difference may be found in user interface.
● All the designs and software here are subject to change without prior written notice.
- All trademarks and registered trademarks mentioned are the properties of their respective owners.
- If there is any uncertainty or controversy, please refer to the final explanation of us.
- Please visit our website for more information.

Dahua Vision Technology Co., Ltd
Address: No.1199 Bin'an Road, Binjiang District, Hangzhou, China.
Postcode: 310053
Tel: +86-571-87688883
Fax: +86-571-87688815
Email:overseas@dahuatech.com
Website: www.dahuasecurity.com