
DA-71035 - Switch Digitus - Free user manual and instructions
Find the device manual for free DA-71035 Digitus in PDF.


| Product Type | External Hard Drive Enclosure |
| Interface | USB 3.0 to SATA III |
| Compatible Drive | 3.5" (8.89 cm) SATA HDD |
| Maximum Transfer Rate | 5 Gbps |
| USB Backward Compatibility | USB 2.0 (480 Mbps) |
| Backup Function | One-touch backup button with PCClone EX Lite software |
| Power Supply | Input: AC 100-240V, 50/60Hz; Output: DC 12V/2A |
| Dimensions (approx.) | 200 x 120 x 40 mm |
| Weight (approx.) | 350 g (without drive) |
| Material | ABS plastic |
| Color | Black |
| Operating System Support | Windows 7, Vista, XP, 2000 |
| Hot-Plug Support | Yes |
| Plug & Play | Yes |
| Drive Installation | Screwless sliding design |
| Stand Included | Yes, vertical stand |
| Package Contents | Enclosure, power adapter, USB 3.0 cable, software CD, stand |
| Software Included | PCClone EX Lite backup software (multi-language) |
| Safety | CE, FCC compliant |
Frequently Asked Questions - DA-71035 Digitus
User questions about DA-71035 Digitus
0 question about this device. Answer the ones you know or ask your own.
Ask a new question about this device
Download the instructions for your Switch in PDF format for free! Find your manual DA-71035 - Digitus and take your electronic device back in hand. On this page are published all the documents necessary for the use of your device. DA-71035 by Digitus.
USER MANUAL DA-71035 Digitus
USB 3.0 External HDD Enclosure 3.5" (8,89cm)

User Manual
DA-71035
Foreword
Congratulations on your purchase of our product! We will show you a new storage concept with safety and convenience, It is our pleasure to give you the best solution to expand your HDD's Capacity and enhance your data's reliability in PC system or Mac system. Before using the product, please read this manual carefully for further recognizing of the product.
I. System Requirement
Hardware requirement: a PC or Notebook with free USB interface
Operation system: Windows 7/Vista/XP/2000
II. Feature
- Screwless design, easy install or remove disk drive
- Suitable for 3.5" (8,89cm) SATA HDD
- Compliant with USB 3.0 to SATA interface
• Transfer rate max up to 5Gb/s
• Backwards compatibility with USB 2.0, supports High-Speed (480Mbps)
• One touch backup function - Support Hot-Plugging, and Plug & Play compatible
• Power Supply: AC100\~240V input, DC 12V/2A output
III. Package content
Before using the product, please check the contents in the package as follows.
If it is not correct, please contact the local dealers timely.
• USB 3.0 External HDD Enclosure, 3.5 inches (8,89cm)
• Power adapter 12V/2A
• Product supported CD (Multi-language User Manual)
- User Manual
• USB 3.0 connection cable
IV. Hardware Install
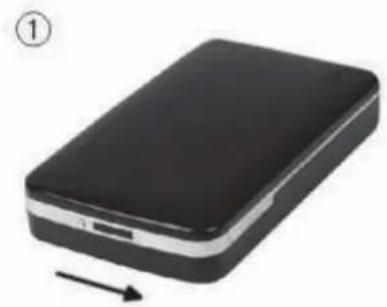
- Slide the button to [OPEN] position,
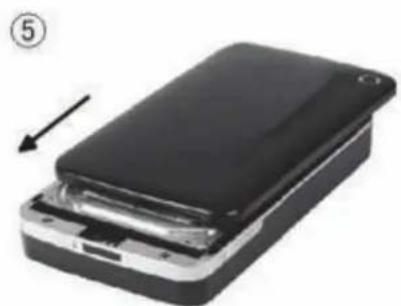
- Slide the top cover to the direction of USB socket
- Remove the top cover
- Connect the 3.5" (8,89cm) SATA HDD to the 22pin SATA connector at the rear of the HDD firmly
- Push the HDD into the enclosure slowly and carefully
- Slide the top cover to the main case
- Slide the button to the [CLOSE] position
- Insert the enclosure to the attached stand
- Connect the USB 2.0 connection cable to enclosure and PC
- Connect the power adapter to the enclosure and power source




V. Driver Installation
a. Under Windows 2000/XP/Vista/7: No driver needed
Under system Windows 7/XP/Vista/2000, system will automatically detect the new hardware and finish
the setup! An icon will appear on the right-bottom area of the system toolbar as below:

Congratulations to enjoy this product now!
VI. Power Supply:
Power Supply: Voltage input: AC 100\~240V, 50/60Hz Voltage output: DC 12V/2A
VII. Backup software installation and usage
A. Software installation and use
- Open the folder [PCCLONEEX_LITE] and double click [Setup], the below window will appear:

- Click [Agree] to accept the license agreement

- Click [Install] to enter next step

- Click [OK] to finish installation

B. Use back-up function
- After finish the installation, on icon will appear on desktop, double click [PCCloneEX], then one window will appear as below:
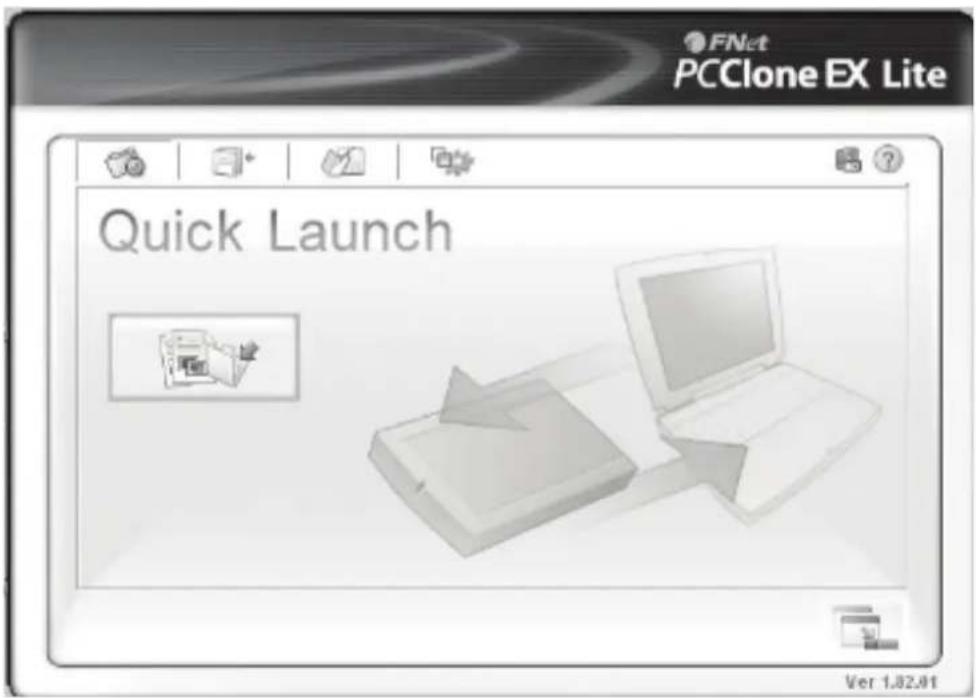
- Press the backup button, then program will appear [Please select file(s)], click [OK]

- Please select the file(s) which you want to backup in the left window, then press the button again
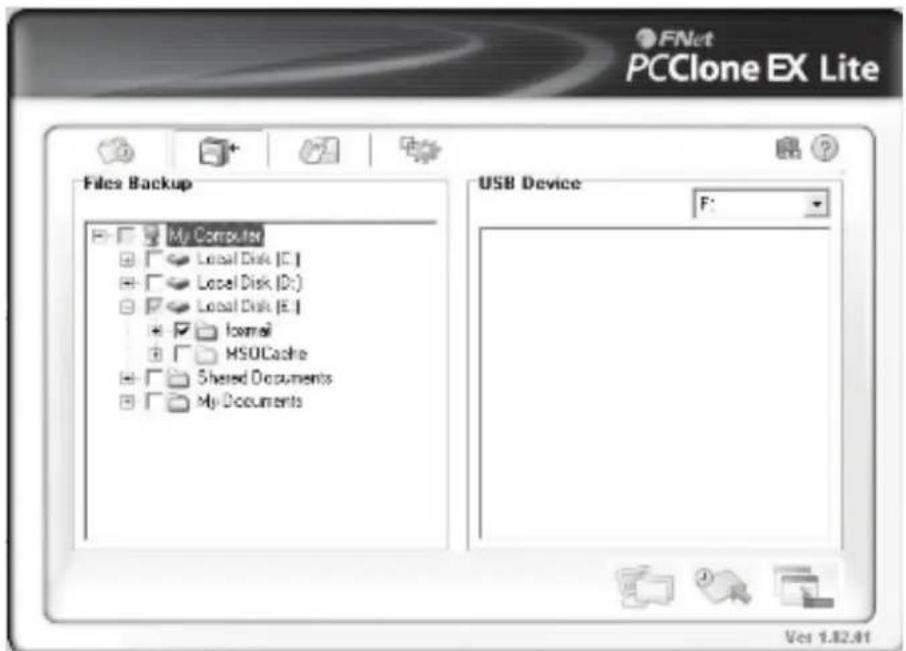
- Follow the instruction to press the button again or click [Start]

- System starts to backup the file(s) which you have selected, when it is finished, it will display [Backup finished], click [OK]

- Backup file finished now you may check the file on right window
![FNat PCClone EX Lite File Backup Up PCIe Local Disk IC Local Disk [O] Local Disk IE I/II I/O I/O Cache Shared Documents My Documents USB Device F: First E I/II RECYCULES Express Volume Information Ver 1.02.01](/content/2026/05/798105/images/97303202c68b5a62c5f922e71a92821f282fa39e7e17387462fe0666c75afcb4.jpg)
VIII. Remove the external enclosure
Before removing this unit from your computer, please finish the following procedures for a safe removal:

1). Click the icon in the [Desktop] window of your computer
2). A [Safely Remove Hardware] message window will appear, click the [Stop] button
3). [It is now safe to remove the USB device] message will appear, close the [Safely Remove Hardware] window
4). Remove the USB cable and switch off the power adapter if it is applied.
IX. Format a new Hard Disk Drive
If you use a new Hard Disk Drive, you must format it before you use it. Please follow the steps as bellow to format your new Hard Disk Drive:
1). Right click [My Computer], and select [Manager]
2). System will display a "Computer Manager" window, and click [Disk Manager] in left window
3). In right window, the message of the new Hard Disk Drive will appear under the system disk, such as [Seagate....]
4). Right click the new disk drive, and select [Delete partition]
5). Right click the new disk drive, select [New partition]
6). Right click the new disk drive, select [New logical drive]
7). Right click the new disk drive, select [Format disk drive]
8). Now you have formatted the new disk drive, then in [My Computer], the new Hard Disk Drive will appear and you can use it.


- USB 3.0 EXTERNAL HDD ENCLOSURE 3.5" (8,89CM)
- FOREWORD
- SYSTEM REQUIREMENT
- FEATURE
- PACKAGE CONTENT
- HARDWARE INSTALL
- DRIVER INSTALLATION
- UNDER WINDOWS 2000/XP/VISTA/7: NO DRIVER NEEDED
- POWER SUPPLY
- BACKUP SOFTWARE INSTALLATION AND USAGE
- SOFTWARE INSTALLATION AND USE
- USE BACK-UP FUNCTION
- REMOVE THE EXTERNAL ENCLOSURE
- FORMAT A NEW HARD DISK DRIVE
Brand : Digitus
Model : DA-71035
Category : Switch