
Savi W8210-M - Headphones POLYCOM - Free user manual and instructions
Find the device manual for free Savi W8210-M POLYCOM in PDF.


User questions about Savi W8210-M POLYCOM
0 question about this device. Answer the ones you know or ask your own.
Ask a new question about this device
Download the instructions for your Headphones in PDF format for free! Find your manual Savi W8210-M - POLYCOM and take your electronic device back in hand. On this page are published all the documents necessary for the use of your device. Savi W8210-M by POLYCOM.
USER MANUAL Savi W8210-M POLYCOM
Wireless Headset System
User Guide
Contents
DECT Information 3
DECT Enhanced Security 3
Overview 4
Base and Headset Basics 4
Accessories 5
Hook up your system 6
Desk phone setup details 6
Position Your Base 7
Fit and charge 8
Customize Your Headset 8
Charge Your Headset 8
Talk Time 8
Headset Battery Status 8
Pair your headset 9
Auto Connect Feature 9
Load software 10
The basics 11
Headset Controls 11
Power on your headset 11
Make, answer, end calls 11
Change your default phone line 12
Get a dial tone 12
Adjust volume 12
Mute 12
Transfer mobile audio 12
Audio streaming 12
ANC 12
Optimize audio quality 12
Mini conference call 12
Set up a conference call 12
Change voice prompt language 13
More Features 14
Base Subscription Button 14
Troubleshooting 16
Headset 16
Desk Phone 17
Mobile 17
Softphone 17
Appendix 19
Plantronics Hub configurable settings 19
System Requirements 20
Support 21
DECT Information
DECT 6.0 products should never be used outside the region in which they were originally purchased and intended to be used.
The enclosed DECT 6.0 wireless product uses restricted wireless radio frequencies which vary by country. DECT 6.0 devices are generally authorized for use in The Americas. Use of this DECT 6.0 product in unauthorized countries is a violation of law, may disrupt telecommunications networks and devices, and can subject you to fines and penalties by regulatory agencies.
DECT Enhanced Security
Plantronics is a member of the DECT Forum and has fully adopted their recommendations for enhancements to security within all DECT products.
Plantronics DECT-based products now fully incorporate the latest recommendations on Enhanced Security from the DECT Forum and ETSI. These improvements cover registration, authentication, authorization and encryption procedures. Plantronics DECT products are now secure against all the known vulnerabilities that were highlighted by the public announcements of the Chaos Council in 2009.
Plantronics Savi 8200 Series DECT products have been tested against and passed the DECT Forum security certification requirements and consequently have been granted 'DECT Forum security' logo certification.
Plantronics products using the new enhanced version of DECT that includes these security improvements are marked on the base with the DECT Forum security logo.

Overview
Base and Headset Basics
Base
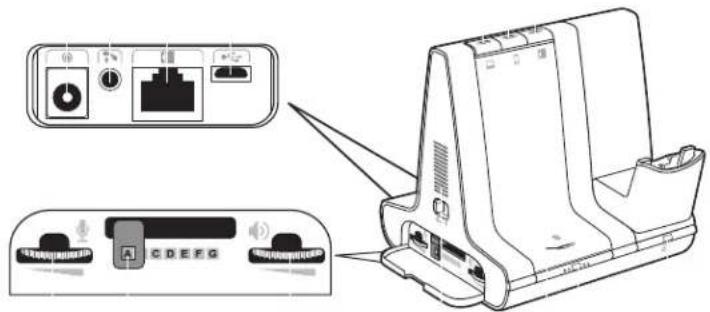
text_image
Technical diagram showing device rear panel with ports, ports, and a speaker interface, alongside an inset of the front panel.1 Power jack
2 Handset lifter jack
3 Telephone interface cable jack
4 USB port
5 Desk phone speaking volume
6 Desk phone configuration switch
7 Desk phone listening volume
8 Computer button
9 Mobile phone button
10 Desk phone button
11 Incoming call ringer
12 Bluetooth pairing button/LED
13 Subscription button/LED
14 Charging LED
Headset
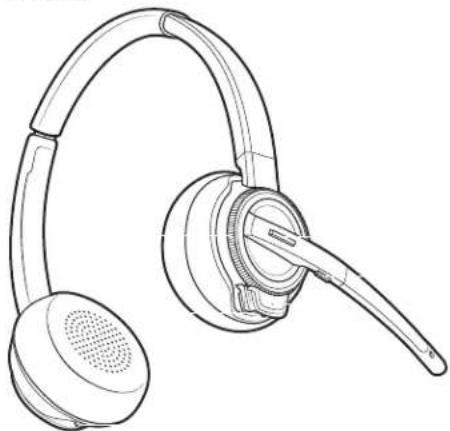
natural_image
Line drawing of a pair of耳机 headsets with earphones and speaker (no text or symbols)1 Volume wheel
2 Call button
3 Mute
4 Headset LED
5 Power button
6 ANC (Active Noise Canceling)
Be safe
Please read the safety guide for important safety, charging, battery and regulatory information before using your new headset.
Accessories
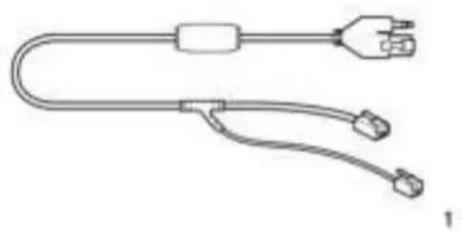
natural_image
Line drawing of a U-shaped cable with two connectors and a plug, no text or symbols present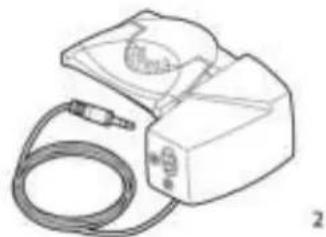
natural_image
Line drawing of a medical or laboratory device with a coiled cable and connector (no text or symbols)1 Electronic hookswitch cable (EHS cable) Electronically and automatically answers/ends a desk phone call. Enables remote call control with your headset.
2 HL10 lifter Automatically lifts handset and returns it to the cradle. Enables remote call control with your headset.
Hook up your system
Using the diagram, connect your headset system.
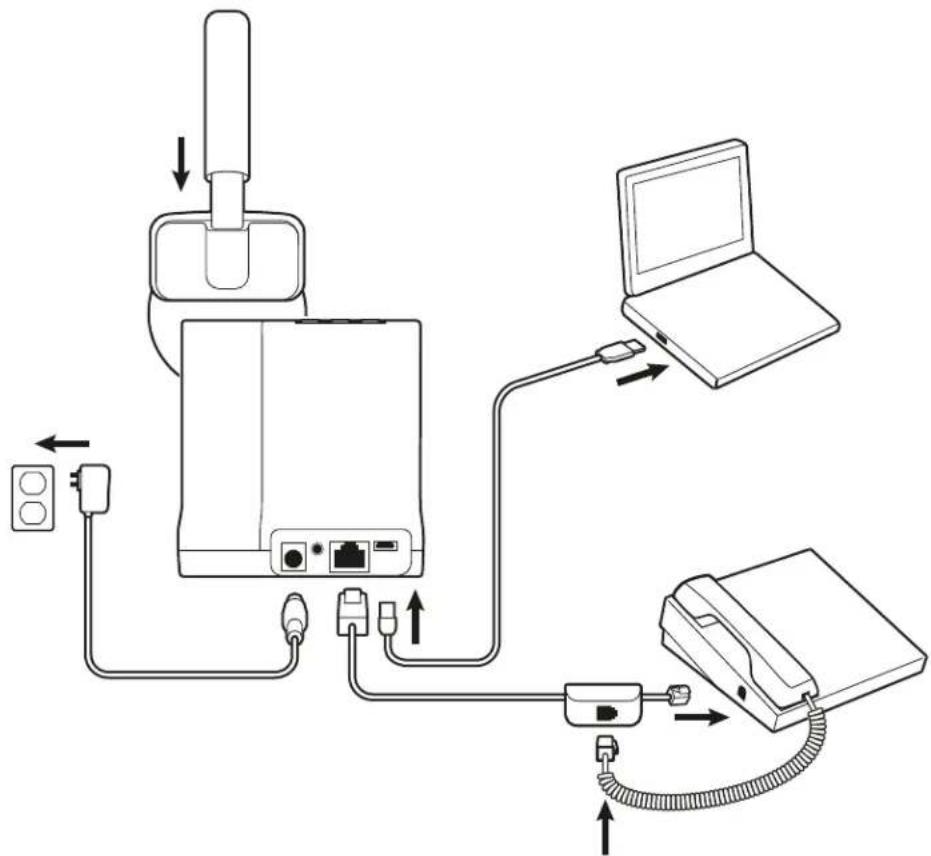
flowchart
graph TD
    A["Router"] -->|USB| B["Laptop"]
    B -->|USB| C["Mobile Phone"]
    C -->|USB| D["Switch"]
    D -->|USB| E["Switch"]
    E -->|USB| F["Switch"]
    F -->|USB| G["Switch"]
    G -->|USB| H["Switch"]
    H -->|USB| I["Switch"]
    I -->|USB| J["Switch"]
    J -->|USB| K["Switch"]
    K -->|USB| L["Switch"]
    L -->|USB| M["Switch"]
    M -->|USB| N["Switch"]
    N -->|USB| O["Switch"]
    O -->|USB| P["Switch"]
    P -->|USB| Q["Switch"]
    Q -->|USB| R["Switch"]
    R -->|USB| S["Switch"]
    S -->|USB| T["Switch"]
    T -->|USB| U["Switch"]
    U -->|USB| V["Switch"]
    V -->|USB| W["Switch"]
    W -->|USB| X["Switch"]
    X -->|USB| Y["Switch"]
    Y -->|USB| Z["Switch"]
Desk phone setup details
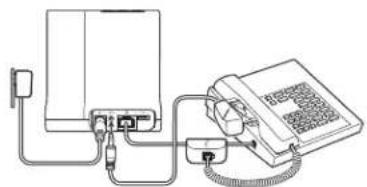
Choose a desk phone setup A, B or C and connect cables.
A Desk phone (standard)
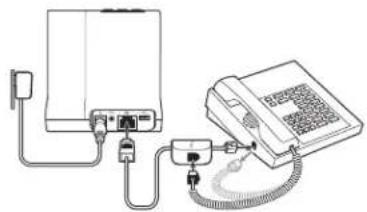
natural_image
Line drawing of a wireless device connected to a telephone with a keypad and cable (no text or symbols)USE

- Connect one end of the telephone interface cable to the back of the base
- Disconnect the handset coil cord from the base of the desk phone and re-connect it to the telephone interface cable junction box.
- Finally connect the remaining end of the telephone interface cable into the open handset port on the desk phone.
NOTE If your phone has a built-in headset port, you should only use the headset port if you will not be using the HL10 lifter. In this configuration, you must press both the headset button on your phone and the call control button on the headset to answer or end calls.
B Desk phone + EHS cable (sold separately)
See the user guide at plantronics.com/accessories for details.
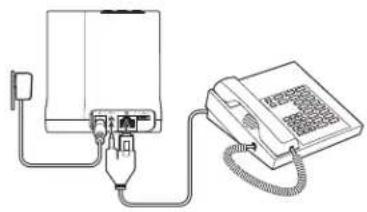
natural_image
Line drawing of a device connected to a telephone, showing wiring and ports (no text or symbols)USE
C Desk phone + HL10 lifter (sold separately)
See the user guide at plantronics.com/accessories for details.
natural_image
Line drawing of a telephone handset connected to a device via cable (no text or symbols)USE
Position Your Base
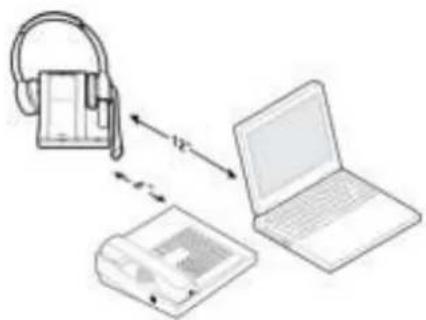
The minimum recommended separation between your desk phone and the base is 6 inches.
The minimum recommended separation between the base and computer is 12 inches. Incorrect position can cause noise and interference problems.
text_image
Diagram illustrating the connection between a medical device, laptop, and blood pressure monitor with labeled distance '12'Fit and charge
Customize Your Headset
Optimize the comfort and fit of your headset.
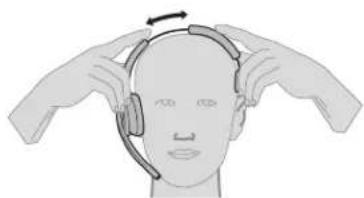
Adjust the Headband
1 To adjust the headband, lengthen or shorten the band until it fits comfortably. Position the earcups so that the foam cushions sit comfortably over the center of your ears.
natural_image
Illustration of a person wearing a headset with hands adjusting the head (no text or symbols)2 Position the stabilizer T-bar above your ear, if applicable.
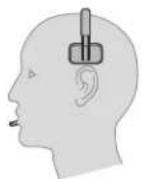
Adjust the Boom
For optimum audio, bend the boom so it is approximately two finger widths from the corner of your mouth.

NOTE For true stereo listening when wearing the boom on the left, adjust the setting in Plantronics Hub (plantronics.com/software) by going to Settings > Ringtones and Volumes > Wearing preference for volume control.
Charge Your Headset
Place the headset in the charge cradle. The headset charging LED flashes green when charging the headset and turns solid green when the headset is fully charged. Charge for at least 20 minutes prior to the first use. A full charge takes 3 hours.
Talk Time
With a single full charge, the headset provides up to 13 hours of continual talk time in wideband mode.
Headset Battery Status
There are 3 ways to determine your headset battery status.
- Listen to the voice prompts after powering on the headset
• Hover over the Plantronics Hub system tray icon - Press the base subscription button; the base Audio buttons light up (solid green is high battery, flashing green is medium, flashing yellow is low, flashing red is critical).
Pair your headset
1 To pair your base and mobile phone, first power on your headset. Press and hold the Bluetooth pairing button on the base for 4 seconds until the Bluetooth LED flashes red and blue. NOTE Your base and headset are automatically paired/subscribed.
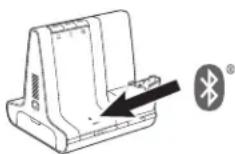
2 Go to Bluetooth settings on your mobile phone and select PLT Savi. Once successfully paired, the Bluetooth LED on the base turns solid blue.
Auto Connect Feature
Once you have paired and connected your mobile phone to the base, the base automatically connects to it when you are in range of your base.
To manually disconnect/connect your mobile phone from the base, press the base Bluetooth button.
You may customize this feature in Plantronics Hub Settings > Wireless > Auto Connect to Mobile Phone.
Load software
Plantronics Hub for Windows/Mac is an invaluable resource to change settings, update firmware, change your headset language and more.
1 Download Plantronics Hub for Windows/Mac by visiting plantronics.com/software.
2 Manage your headset settings on your computer with Plantronics Hub:
- Call control for softphones NOTE Some softphones require the installation of Plantronics Hub for Windows/Mac to enable headset call control (answer/end and mute) functionality.
- Change headset language
- Update firmware
- Turn features on/off
- View user guide
The basics
Headset Controls
natural_image
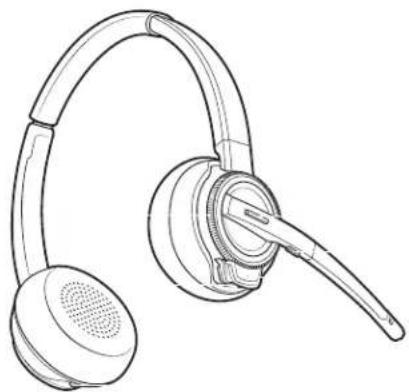
Line drawing of a pair of耳机 headsets (no text or symbols)1 Volume wheel Rotate volume wheel to adjust volume
2 Call button Press to place, answer, end a call
3 Mute button During a call, press to mute and unmute
4 Headset LED Flashes when in use
5 Power button Toggle on and off
6 ANC (Active Noise Canceling) Toggle on and off
Power on your headset
To turn on the headset, slide the Power button on the bottom of the earcup to reveal green.
Make, answer, end calls
On the top of the base there are three Audio buttons: computer, mobile, desk phone. These buttons allow you to switch to a different phone line/audio channel.
Make a call
1 Tap an Audio button on the base.
2 Deskphone only: Manually remove the handset if you don't have an HL10 lifter or EHS cable. You should hear a dial tone.
TIP If you do not hear a dial tone, open the base side panel and adjust the middle switch (A--G). "A" works for the majority of desk phones.
3 Dial from your softphone/mobile phone/desk phone.
Answer/end a call
To answer or end a call, tap the Audio button on the base or tap the headset Call button. TIP Headset call control for the computer requires Plantronics software and softphone compatibility. See "Download software."
Answer a second call
1 While on a call, press the headset Call button for 2 seconds to answer the second call. This will place the first call on hold.
2 To switch between the calls, press the headset Call button for 2 seconds.
Reject a Mobile Call
To reject an incoming call, hold the base mobile button down for 3 seconds.
| Change your default phone line | With the system idle, change your default phone line/audio channel by pressing and holding for 4 seconds the desired base Audio button until it flashes green 4 times. Customizable in Plantronics Hub also. |
| Get a dial tone | To open an audio channel or get a dial tone, press the headset Call button for 1 second while the system is idle; the default base Audio button turns green. |
| Adjust volume | Headset volume Fine-tune your headset volume by adjusting the volume wheel.Desk phone volume When you are on a desk phone call and your voice is too quiet/loud, adjust the microphone volume on the side of the base, located behind the access panel. If your caller's voice is too loud/quiet on a desk phone call, adjust the base volume dial.Base ringtone volume Adjust the base ringtone volume on the left side of the base. This ringtone alerts you if you are not wearing your headset and a call comes in. |
| Mute | To mute your headset during on a call, press the headset Mute button. When mute is active, the base button is red. To unmute, press the headset Call button or the active base Audio button. |
| Transfer mobile audio | When you answer a call, the audio stays with that device (if you answer with the headset, the audio stays on the headset; answer with your mobile phone, the audio stays on your mobile). |
| 1 | To transfer a mobile call from your headset to your mobile phone, press the base mobile phone button for 3 seconds. The green LED turns off. |
| 2 | To transfer a mobile call from your mobile phone to your headset, press the base mobile phone once. The green LED turns on. |
| Audio streaming | To stream audio from your computer or mobile device, first press the computer or mobile base Audio button and then play the audio. When streaming audio, the base Bluetooth button is purple. |
| ANC | Active Noise Canceling (ANC) reduces external noise and enhances your music and sound quality.Your headset ships with ANC on. To turn ANC off, slide the switch away from "ANC." |
| Optimize audio quality | There are 3 audio modes: wideband stereo (default), wideband (high quality telephony) and multimedia (high quality listening).To optimize your audio quality for your activity, with the system idle, press the headset Mute button for 4 seconds. The base cycles through the modes with each 4 second press. The base blinks yellow for wideband stereo, green for wideband and red for multimedia mode. |
| Mini conference call | Simultaneously hold the base buttons of any two of the three base buttons until the LEDs become solid green to combine the audio of any two devices and create a mini conference call. |
| It up a conference call | You can set up a conference call with 4 additional headsets.Join similar Savi headsets1 While on a call, place the guest headset into the primary user's charge cradle.The base subscription LED flashes yellow and green.2 The primary user will hear a request "Conference requested." To accept the request, press the primary user's headset Call button. The base subscription LED turns solid yellow to indicate conference call mode. View conference call status by going to Plantronics Hub About > Connections > Conferenced headsets.Join different Savi headsets |
1 While on a call, press the base subscription button.
The base subscription LED flashes yellow and green.
2 Next press the guest headset volume up button until the headset LED turns on.
3 The primary user will hear a request "Conference requested." To accept the request, press the primary user's headset Call button. The base subscription LED turns solid yellow to indicate conference call mode. View conference call status by going to Plantronics Hub About > Connections > Conferenced headsets.
Exit a conference call
1 Guest headsets can remain as guests through multiple calls. To remove a guest headset, either press the guest headset's Call button or dock the primary user's headset in the charge cradle.
Change voice prompt language
To change the voice prompt language on your headset, directly connect your headset to your computer via a USB/USB-C cable (do not dock it in the base cradle).
2 Open Plantronics Hub and go to Settings > Language You can choose from: Cantonese, Danish, English (UK, US), French, German, Indonesian, Italian, Japanese, Korean, Mandarin, Norwegian, Russian, Spanish, Swedish and Thai.
More Features
Base Subscription Button
The headset and base that came in the box are subscribed (connected) to each other. However, if you wish to use a new headset or need to restore subscription to your current headset (base subscription button is red), the units can be subscribed to each other by the following methods.
The subscription button is below the Bluetooth button on the front of the base.
Base Subscription Button LED
Base Subscription LED Base Status
Flashes green and red Primary headset subscription mode
Solid green Primary headset subscribed to base
Solid yellow Active conference call with guest headsets
Solid red No headset subscribed
Flashes green 3X, the yellow 2X Security level changed from enhanced to standard
Set the Range
Changing the range can help with desk phone/PC audio quality, improve user density or restrict range of users.
You can change the range using the subscription button on the base. With the system idle, press the subscription and desk phone buttons for 3 seconds. With each 3 second press the desk phone button will cycle through ranges: green for high range, yellow for medium and red for low.
Setting Range
High (Default) (green) up to 350 ft.
Medium (yellow) up to 150 ft.
Low (red) up to 50 ft.
You can also adjust the range setting in Plantronics Hub Settings > Wireless. > Range.
Automatic secure subscription
With your system idle, docking a new headset automatically subscribes it to the base, making it the primary headset. The base subscription LED blinks green/red during subscription mode and remains green when the new subscription is established.
Manual secure subscription
With your system idle and your headset docked, double press the subscription button on the base. The subscription light will flash red and green. When the subscription light on the base becomes solid green, the headset and base are subscribed to one another.
Manual over-the-air subscription
1 With your system idle and your headset undocked, double press the subscription button on the base. The subscription light will flash green and red.
2 Press the headset Call button up for 4 seconds; you hear "pairing." Upon release, the headset LED flashes red/green. When the subscription light on the base remains solid green, the headset and base are subscribed to one another; you hear "pairing successful. Base connected."
NOTE If the base subscription LED goes solid red, after flashing red/green, the subscription attempt has failed and should be repeated.
End Subscription
If the base is in subscription mode and you want to stop the base from searching for a headset, press the subscription button again. The subscription light will be solid red for four seconds and then go to its previous state.
Disabling Over-the-Air Subscription
The Savi system ships with the over-the-air headset subscription enabled. In a multi-shift environment, you may want to disable this mode of subscription.
To disable over-the air subscription, while your system is idle, hold the subscription button and the base computer button down simultaneously until the base computer button LED flashes (green for enabled, red for disabled).
You can also adjust the over-the-air subscription setting in Plantronics Hub Settings > Wireless.
Subscription and Security Levels
Your Savi 700 Series headset system (v28 or later) supports DECT Forum recommendations for "Enhanced Security". Products with Enhanced Security are marked with the DECT Forum security logo on the base.
Both your headset and headset base are compatible with older (prior to v28) headset bases and headsets supporting older versions of DECT. Below is helpful information if you plan to use Enhanced Security and older DECT components together.
If your Enhanced Security headset or headset base is subscribed with an older headset or headset base, the resulting security level for the mixed headset and base combination will be set to the level of the older headset for all calls. This is because older system components are not able to support Enhanced Security.
All subscription details above apply when subscribing an Enhanced Security headset to an older base, or visa versa, however there are unique system alerts indicating that the system is changing the security level from Enhanced Security to the older version of security.
If an older headset is subscribed to an Enhanced Security Base:
- The subscription LED (lower left) will flash GREEN 3 times followed by YELLOW 2 times. This flash pattern repeats 2 times.
If an Enhanced Security headset is subscribed to an older base:
- The Enhanced Security headset will play a security notification tone.
- The mono-colored LED on the headset will flash 3 times, then 2 times. This flash pattern is repeated 2 times.
Troubleshooting
Headset
| My headset is unstable. When you wear the headset, the microphone should rest as close to your cheek as possible without touching. The microphone can be adjusted inward by the pivoting earpiece to optimize the position of the headset. See Position Your Headset. | |
| Talk time performance is significantly degraded even after a full recharge. | Battery is wearing out. Contact us at plantronics.com/support . |
| I can't hear a dial tone in the headset. | Make sure your headset is charged.Make sure your headset is subscribed to base. See Base Subscription.Press the base desk phone button.Make sure the lifter is lifting the handset high enough to operate the hookswitch; set to a higher setting if necessary.Adjust the configuration switch on the base until a dial tone is heard. The default A works for most phones. See Make a Desk Phone Call.Fine tune the listening volume with the headset call control button.See Adjust Your Headset Volume.If the volume is still too low, adjust the desk phone listening volume on the base. See Adjust Your Headset Volume. |
| I hear static. Make sure there is at least 12 inches between your base and your computer, and 6 inches between your base and your telephone. If adjusting the distance doesn't help, your headset is going out of range, move closer to the base. See Position Your Base. | |
| The sound is distorted. | Lower the desk phone speaking volume and/or desk phone listening volume on the base. For most telephones the correct setting is position 3. See Adjust Your Headset Volume.If your desk phone has a volume control, lower until the distortion disappears.If the distortion is still present, adjust the headset volume control to lower the headset speaker volume. See Adjust Your Headset Volume.Make sure there is 12 inches between your base and your computer, and 6 inches between your base and your telephone.See Position Your Base. |
| I hear echo in the headset. | Lower the desk phone speaking volume and/or desk phone listening volume on the base. For most telephones the correct setting is position 3. See Adjust Your Headset Volume.If the audio level is too low in this position, increase the headset volume. See Adjust Your Headset Volume.If your speaking volume is too low for your listener in this position, adjust the position of the headset to make sure the microphone is as close as possible to your mouth.Adjust the configuration switch on the base until a dial tone is heard. The default A works for most phones. See Make a Desk Phone Call. |
Desk Phone
Mobile
| People I talk to can hear a buzz in the background. | Move the base further away from your phone. See Position Your Base.If the base power supply is plugged into a power strip, plug it into the wall directly. |
| The handset lifter is installed but does not lift the handset. | Be sure the handset lifter power cord is firmly pushed into the handset lifter jack on the base. |
| Pairing problems | Ensure the Bluetooth LED on the base flashes red and blue by pressing the Bluetooth button for four seconds.Ensure the Bluetooth mobile phone is in search mode.When an active Bluetooth connection has been made, the base Bluetooth LED is solid blue. |
| Why doesn't the base automatically reconnect with my mobile phone? | Ensure Plantronics Hub software had been installed.Adjust the "Auto-connect to mobile phone" in Plantronics Hub Settings > Wireless. Make sure that "Never" is not selected. |
| When I dial from my softphone application, nothing happens. | Ensure your headset is charged.Ensure your headset is subscribed to the base. See Subscribing a Headset.Ensure that the Plantronics software is installed. To download, visit plantronics.com/software.Ensure that you are using a compatible softphone application. For a list of compatible softphones, visit plantronics.com/software.If the Plantronics software is not installed and you do not have a compatible softphone, you must first press the base computer call button and then use the softphone interface to place/answer/end calls.Ensure that the headset is the default sound device by going to your Sound Control Panel (Windows) or your Sound System Preferences (Mac).Restart your computer. |
| Speaking and/or listening volume is too low or too high. | Adjust headset listening volume with volume button.Adjust listening/speaking volumes in the computer's sound control panel/system preferences.Adjust listening/speaking volumes in the softphone application. |
| The sound is distorted or I hear an echo in the headset. | Reduce speaking and/or listening volume on the computer using your softphone application.Point microphone towards your chin.If the distortion is still present, lower the volume on the headset. |
| I can no longer hear any audio through my PC Speakers. | For Windows XP systems |
Softphone
- Go to Start > Control Panel > Sounds and Audio Devices > Audio > Sound Playback and change the default setting from your Savi headset to your PC speakers. Click "OK" to confirm your change.
For Windows Vista and Windows 7 systems
- Go to Start > Control Panel > Sounds > Playback and change the default setting from your Savi headset to your PC speakers. Click "OK" to confirm your change.
For Mac OS X
- Choose Apple menu > System Preferences and click Sound.
- Click Output, and then select "Internal Speakers" or your speaker choice.
No audio connection to PC. Unplug USB and power cables from base. Reconnect power cable first. Wait for power LED to illuminate, then re-connect USB cable. Quit and then re-start your PC audio or softphone application.
Appendix
Plantronics Hub configurable settings
| Feature Location | ||
| Answering Call Alert General | ||
| Audio channel tone General | ||
| Audio sensing General | ||
| Close conversation limiting General | ||
| Default phone line General | ||
| Online indicator General | ||
| Second incoming call General | ||
| Headset to PC radio link General | ||
| Plantronics product improvement program General | ||
| Software log level General | ||
| Change languageBrazilian Portugese, Cantonese, Danish, English (UK, US), French, German, Indonesian, Italian, Japanese, Korean, Mandarin, Norwegian, Russian, Spanish, Swedish and Thai. | Language | |
| Answering call Base connected/disconnected/not connected | Battery high/medium/low | |
| Call ignored Connection failed Conference requested/failed | ||
| Guest exited conference | Mute on/off/Muted No number available | |
| Pairing/Pairing incomplete | Phone connected/disconnected | Power on/off |
| Recharge headset Volume maximum/minimum | ||
| Desk phone ringtone | Ringtone and Volume | |
| PC ringtone | Ringtone and Volume | |
| Mobile phone ringtone | Ringtone and Volume | |
| Volume level tones | Ringtone and Volume | |
| Wearing preference for volume control (stereo audio) | Ringtone and Volume | |
| Ring location | Ringtone and Volume | |
| Dial tone | Softphones | |
| Target softphone | Softphones | |
| Media player action on incoming call | Softphones | |
| Softphones and media players (PLT enabled) | Softphones | |
| Software settings (Aware for Microsoft) | Sensors and Presence | |
| Audio quality | Wireless | |
| Auto connect to mobile phone | Wireless | |
| Bluetooth | Wireless | |
| Mobile voice commands | Wireless | |
| Over-the-air subscription | Wireless | |
| Range | Wireless | |
| Anti-startle | Advanced | |
| Noise exposure | Advanced | |
System Requirements
Computer
- Supported Operating Systems: Windows ^ 7, Windows ^ 8, 8.1 and Windows 10; Mac OS X El Capitan, Mac OS X Sierra, Mac OS X High Serra, Mac OS X 10.11 and Mac OS X 10.13, Mac OS X Mojave
- Processor: 400 MHz Pentium® processor or equivalent (Minimum); 1 GHz Pentium processor or equivalent (Recommended)
• RAM: 96 MB (Minimum); 256 MB (Recommended) - Hard Disk: 280 MB (Minimum); 500 MB or more (Recommended)
Display
- At least 800 x 600, 256 colors
- 1024 x 768 high color, 32-bit (Recommended)
Browser
- Internet Explorer ^ V10 or better must be on the user's system (Required) Google Chrome ^TM
Support
NEED MORE HELP?
plantronics.com/support
habitatsoundscaping@plantronics.com
Plantronics, Inc. Plantronics B.V.
345 Encinal Street
Scorpius 171
Santa Cruz, CA 95060
2132 LR Hoofddorp
United States
Netherlands
© 2018 Plantronics, Inc. The Bluetooth® word mark and logos are registered trademarks owned by Bluetooth, SIG, Inc. and any use of such marks by Plantronics, Inc. is under license. All other trademarks are the property of their respective owners.
Patents pending.
212206-06 (09.18)