
310-0203 - Remote control Neets - Free user manual and instructions
Find the device manual for free 310-0203 Neets in PDF.


| Product Type | Remote Control |
| Brand | Neets |
| Model | 310-0203 |
| Dimensions (HxWxD) | 150 x 45 x 20 mm |
| Weight | 80 g |
| Power Source | 2 x AAA batteries (not included) |
| Operating Range | Up to 30 meters |
| Transmission Type | Infrared (IR) |
| Button Feedback | Tactile, soft touch |
| Compatibility | Neets devices (projectors, screens, etc.) |
| Material | ABS plastic |
| Color | Black |
| Battery Life | Approximately 12 months with normal use |
| Operating Temperature | 0°C to 40°C |
| Storage Temperature | -20°C to 60°C |
| Warranty | 2 years |
| Maintenance | Clean with a soft dry cloth; avoid liquids |
| Safety Precautions | Keep away from children; do not disassemble; avoid exposure to moisture |
| Spare Parts Available | Batteries (AAA) only |
| Repairability | Non-repairable; replace if defective |
| General Info | User manual and instructions available for free download on notice-facile.com |
Frequently Asked Questions - 310-0203 Neets
User questions about 310-0203 Neets
0 question about this device. Answer the ones you know or ask your own.
Ask a new question about this device
Download the instructions for your Remote control in PDF format for free! Find your manual 310-0203 - Neets and take your electronic device back in hand. On this page are published all the documents necessary for the use of your device. 310-0203 by Neets.
USER MANUAL 310-0203 Neets
Neets Control – SieRRa II
Installation Manual
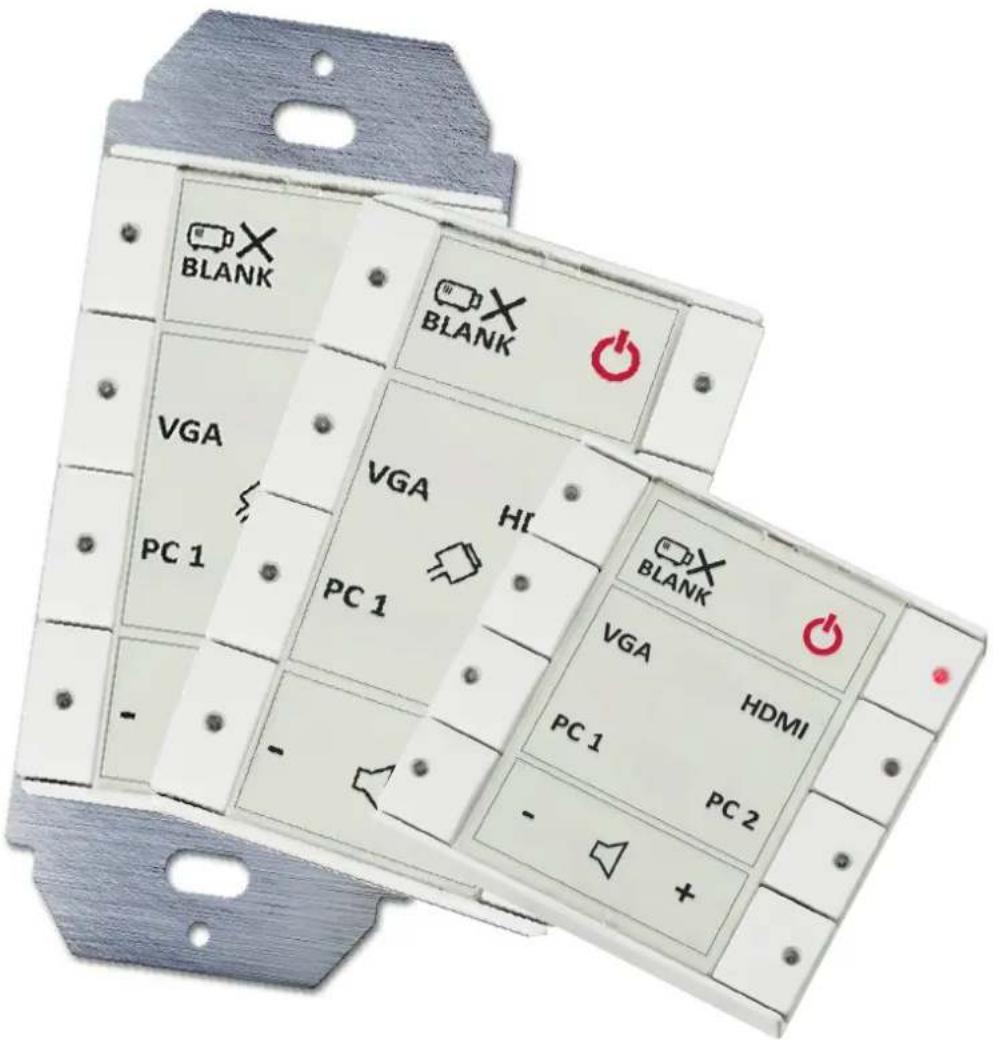
Neets
Foreword
The purpose of this document is to describe how to install and configure the Neets Control – SieRRa II, hereafter the SieRRa II.
COPYRIGHT - All information contained in this manual is the intellectual property of and copyrighted material of Neets. All rights are reserved. You may not allow any third party access to content, information or data in this manual without Neets' express written consent.
CHANGES - Neets reserve the right to change the specification and functions of this product without any notice. Check www.neets.dk for the latest updated version of this manual.
Questions, AFTER reading this manual, can be addressed to your local distributor or:
Neets A/S
Denmark
by E-Mail: Support@Neets.dk
or you may use our contact form at www.neets.dk
Revision list
This document (no: 230-028-310-0102) has the following revision changes:
| Author: Date Description Pages Rev | ||
| MH: 10-06-2015 First release. All 1.00 | ||
| MH: 03-06-2015 Various changes and added important safety instruction 3 | 2.00 | |
| MH: 09-07-2015 Prod. number removed on frontpage and anthracite prod. numbers added in specifications | 1 and 13 | 3.00 |
| MH: 19-04-2016 Changes the content “What is in the Box?” 2 4.00 | ||
| DB: 06-12-2016 Update to tabel | 12 | 5.00 |
| DB: 13-03-2017 Added error indications to the troubleshooting overview | 13 | 6.00 |
SieRRa II, DK
1 x Neets Control - SieRRa II
1 x 12V wall plug PSU
Terminal connectors
1 x Front cover
1 x Paper cover
Quick guide
SieRRa II, EU
1 x Neets Control - SieRRa II
1 x 12V wall plug PSU
Terminal connectors
1 x Front cover
1 x Paper cover
Metal plate
2 x screws for metal plate
Quick guide
SieRRa II, US
1 x Neets Control - SieRRa II
1 x 12V wall plug PSU
1 x Wall plate
Terminal connectors
1 x Front cover
1 x Paper cover
2 x #6-32 screws for mounting in standard US one-gang electrical wall box or mounting bracket ("mud ring")
2 x white headed #6-32 screws for wall plate fixation Quick guid
Important Safety Instructions
Caution:
Read these instructions:
Read and understand all safety and operating instructions before using the equipment.
Keep these Instructions:
The safety instructions should be kept for future reference.
Heed all Warnings:
Follow all warnings and instructions marked on the equipment or in the user information.
Avoid Attachments:
Do not use tools or attachments that are not recommended, because they may be hazardous
Warning!:
- This equipment should be operated only from the included power supply.
- To remove power from the equipment safely, remove all power cords from the rear of the equipment, or the desktop power module (if detachable), or from the power source receptacle (wall plug).
- Power cords should be routed so that they are not likely to be stepped on or pinched by items placed upon or against them.
- Do not defeat the safety purpose of a polarized or grounding-type plug. A polarized plug has two blades with one wider than the other. A grounding-type plug has two blades and a third grounding prong. The wide blade or the third prong is provided for your safety. If the provided plug does not fit into your outlet, consult an electrician for replacement of the obsolete outlet.
- Unplug this apparatus during lightning storms or when unused for long periods of time.
- Refer all servicing to qualified service personnel. There are no user-serviceable parts inside. To prevent the risk of shock, do not attempt to service this equipment yourself because opening or removing covers may expose you to dangerous voltage or other hazards. Contact your local Neets reseller or distributor.
- If the equipment has slots or holes in the enclosure, these are provided to prevent overheating of sensitive components inside. These openings must never be blocked by other objects.
- Do not use this equipment near water.
- To reduce the risk of fire or electric shock, do not expose this apparatus to rain or moisture and objects filled with liquids.
- Unplug the product before cleaning. Clean only with a dry cloth and not cleaning fluid or aerosols. Such products could enter the unit and cause damage, fire, or electric shock. Some substances may also mar the finish of the product.
FCC Class A Notice:
This equipment has been tested and found to comply with the limits for a Class A digital device, pursuant to part 15 of the FCC Rules. Operation is subject to the following two conditions:
- This device may not cause harmful interference.
- This device must accept any interference received, including interference that may cause undesired operation. The Class A limits are designed to provide reasonable protection against harmful interference when the equipment is operated in a commercial environment. This equipment generates, uses, and can radiate radio frequency energy and, if not installed and used in accordance with the instruction manual, may cause harmful interference to radio communications. Operation of this equipment in a residential area is likely to cause harmful interference, in which case the user will be required to correct the interference at his own expense.
FCC regulations state that any unauthorized changes or modifications to this equipment, not expressly approved by the manufacturer, could void the user's authority to operate this equipment.
The lightning bolt triangle is used to alert the user to the presence of uninsulated “dangerous voltages” within the unit’s chassis that may be of sufficient magnitude to constitute a risk of electric shock to humans.

The exclamation point triangle is used to alert the user to presence of important operating and service instructions in the literature accompanying the product.
Contents
Foreword 2
Revision list 2
Important Safety Instructions 3
Contents 4
Description....5
Quick guide to the SieRRa II 6
Installation 7
Connections and Controls 9
Power input port....9
I/O ports....9
RS-232/IR port 9
IR learner....10
NEB port 10
LAN port 11
Buttons 11
Configuration through USB port 11
Troubleshooting....12
Error indication using LEDs 12
Specifications 14
Description
SieRRa II is a compact yet surprisingly intelligent AV control system. It is remarkably simple to use, thanks to an intuitive graphical interface with a minimum number of buttons.
With SieRRa II anyone can start up a presentation without complicated procedures.
Simply press ONE button and you are ready to begin!
SieRRa II is a perfect choice for the classroom, meeting or conference room and is easy to install. SieRRa II can control devices through IR, RS232 or even LAN. SieRRa II is available in polar white and anthracite.
The drawings in the manual of Neets Control - SieRRa II is based on the DK, US and EU versions.
| Function description | |
| RS-232 (Tx+Rx) or IR (Tx) (controls up to 2 IR devices on the port) 1 | |
| RS-232 (Tx) or IR (controls up to 2 IR devices on each port) 2 | |
| LAN device control 10 | |
| Power over Ethernet Yes | |
| I/O 3 | |
| Buttons 8 | |
| NEB Bus 1 (5 NEB) | |
| IR Learn option with Device editor Yes | |
| USB port for programming 1 | |
| PIR sensor input Yes | |
| Light on/off Yes | |
| Room darkening Yes | |
| Screen up/down Yes | |
| Volume control | Yes |
| Device feedback Yes |
Quick guide to the SieRRa II
Buttons, indicators and connectors are available on the front and rear panels. These are shown below:
Front:
With front cover Without front cover
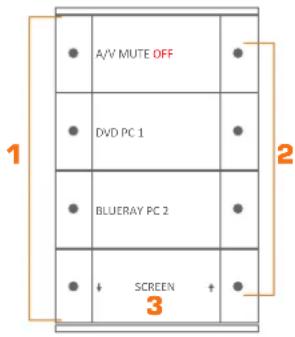
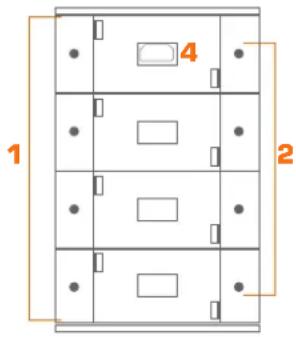
| Number: Description |
| 1 Push buttons for controlling the AV setup |
| 2 Red LED lights for indication of AV setup status |
| 3 Front cover with label for button description |
| 4 Mini USB for programming (behind front cover) |
Rear:
DK version US version EU version
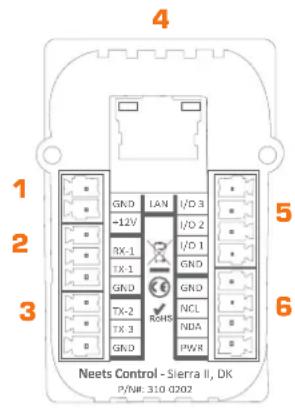
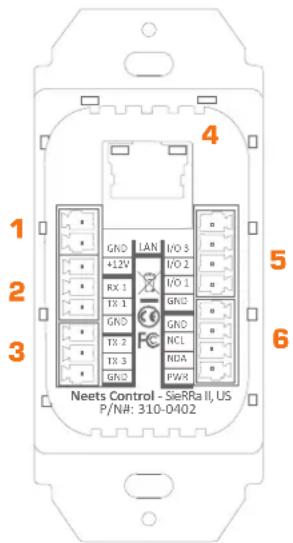
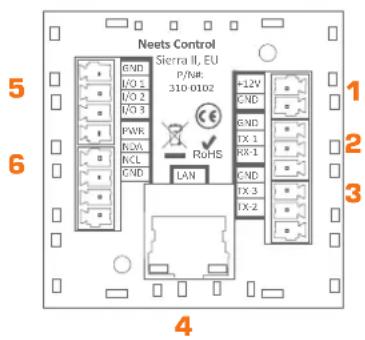
| Number: Description | |
| 1 1 x 12 VDC power input | |
| 2 1 x RS-232 port, Bidirectional or IR Unidirectional | |
| 3 2 x RS-232 or IR ports, Unidirectional | |
| 4 1 x RJ-45 Network (LAN) connector with PoE functionality | |
| 5 3 x Digital Input/Output | |
| 6 1 x NEB bus port |
Installation
The Neets Control - SieRRa II can be installed in standard electrical back boxes or by using mounting brackets. Each model (DK, US, EU) fits in typical boxes matching specific installation requirements for the country of sale.
- Prepare the installation site by installing the needed back box or brackets. Pull the needed cables through the back box or bracket.
- Mount the supplied connectors to the cables as needed and connect to the control system.
- Mount the control system in the back box or on the bracket:
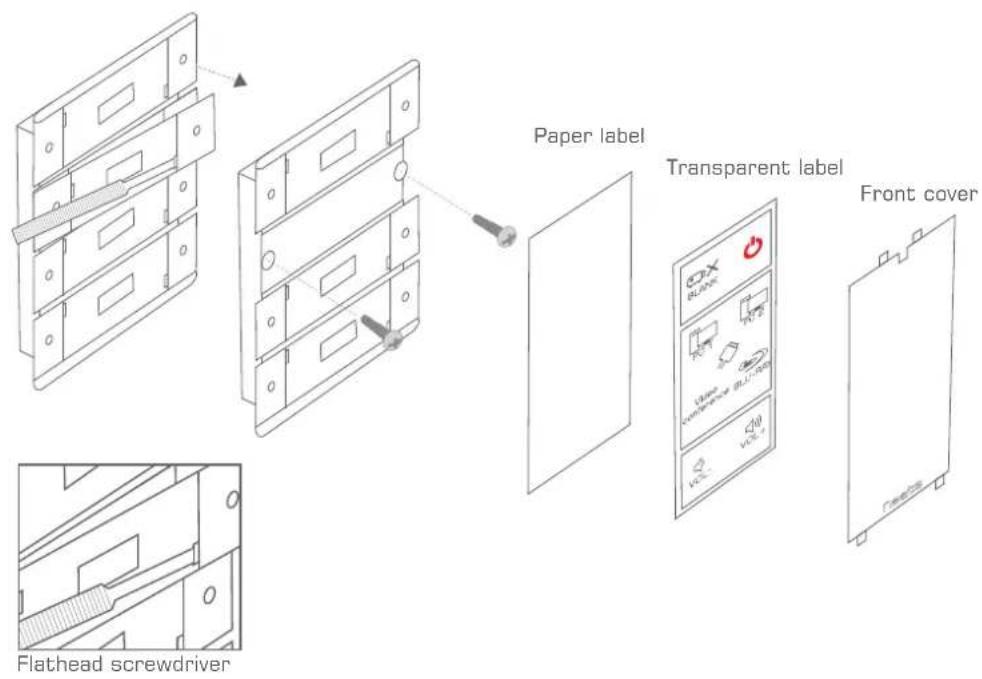
DK version
Insert a flathead screwdriver gently and pry out the front cover. Remove the front cover and the paper label behind it.
Insert a flathead screwdriver into the button. Gently push and pry out the button. Insert the control system in a frame matching the back box used.
Insert screws (not supplied) matching the back box into the two holes. Secure the control system to the back box without overtightening the screws.
Remount the paper label, insert a printed transparent label showing the button functions, and mount the front cover. Note that the front cover mounts in only one direction.
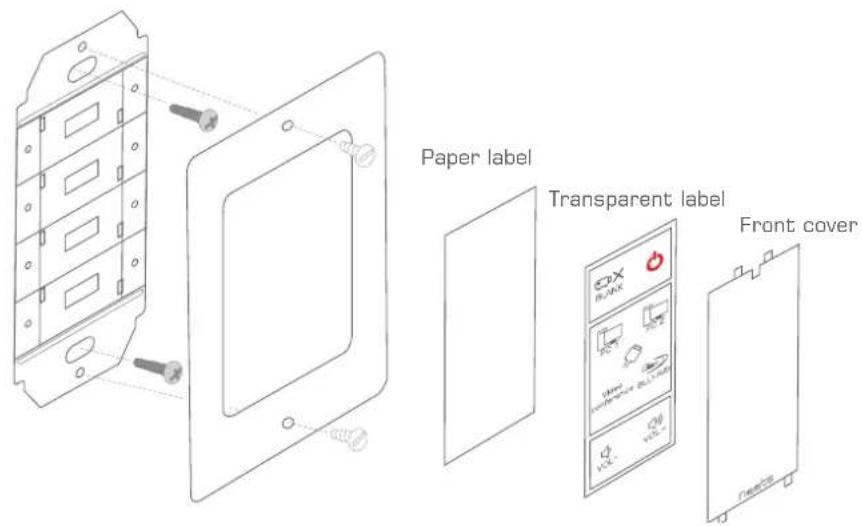
US version
Insert screws matching the back box into the two mounting holes. Secure the control system to the back box or bracket without overtightening the screws.
Mount the frame on the control system with the supplied screws.
Insert a flathead screwdriver gently and pry out the front cover. Remove the front cover and the paper label behind it.
Remount the paper label, insert a printed transparent label showing the button functions, and mount the front cover. Note that the front cover mounts in only one direction.
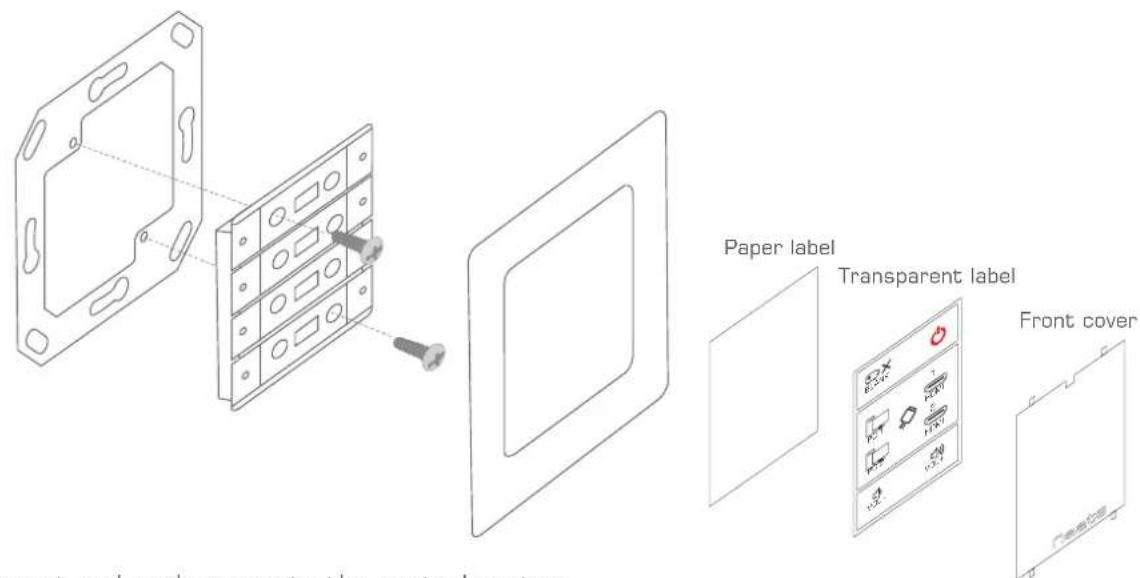
EU version
Insert a flathead screwdriver gently and pry out the front cover. Remove the front cover and the paper label behind it.
Insert the control system in a frame matching the back box used.
Insert screws matching the back box or bracket into the two holes. Secure the control system to the back box or bracket without overtightening the screws. Remount the paper label, insert a printed transparent label showing the button functions, and mount the front cover. Note that the front cover mounts in only one direction.
-
Connect and apply power to the control system.
-
Configure the control system using the Neets Project Designer.
Connections and Controls
Power input port
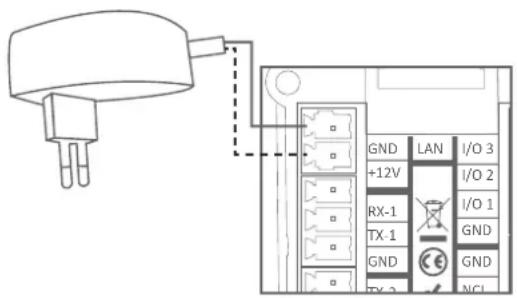
Connect the SieRRa II to the supplied AC power adaptor using the supplied 2 pole screw block terminal. White/black wire connects to 12V, black wire connects to GND.
The SieRRa II adaptor incorporates a universal mains input which accepts AC line input from 100 V to 240 V.
Note: If using the PoE functionality to power the SieRRa II, do not connect the AC power adaptor.
I/O ports
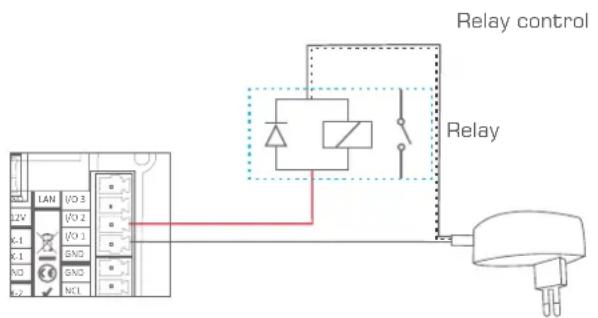
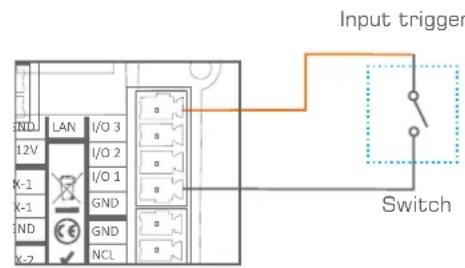
The three I/O (Inputs/Outputs) can be configured as either output or input. Each is available for connection to a PIR (movement) sensor, keyboard lock, relays or for other compatible uses. The ports are not potential free; you may need external relays to prevent ground loops depending on your application.
When used as outputs, the I/O ports are active low. When activated, the I/O ports are tied to GND through a FET transistor (also called open drain/collector function). Each I/O can draw up to 24VDC/500mA.
When used as inputs, the applied voltage must be below 1 VDC to be accepted as LOW, and above 4 VDC (but below 24 VDC) to be accepted as HIGH. The inputs are default HIGH and must be connected to ground in order to change state.
flowchart
graph TD
    A["LAN 3"] --> B["Relay control"]
    C["V0 2"] --> B
    D["V0 1"] --> B
    E["X-1"] --> B
    F["X0"] --> B
    G["X0"] --> B
    H["NCL"] --> B
    B --> I["Relay"]
    I --> J["Power plug"]
RS-232/IR ports
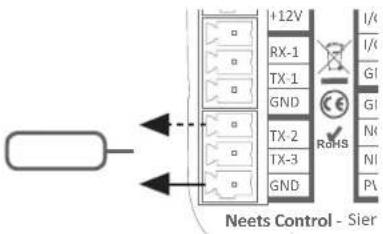
The RS-232 ports (TX-1, RX-1, TX-2, TX-3) are used for one- or two-way communication. Port 1 is a two way port, which can be used for devices for which a reply function is required, such as a projector.
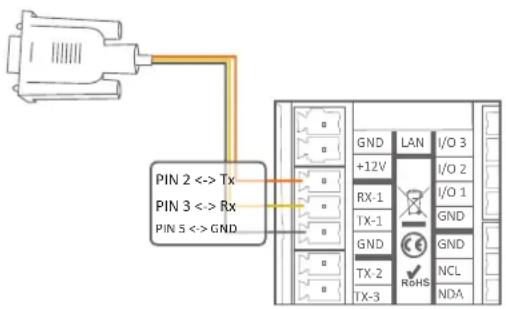
All of the RS-232/IR ports can be configured in the Neets Project Designer software either as RS-232 or as IR emitter.
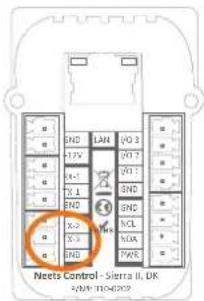
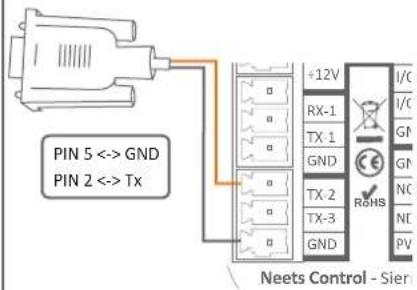
Connect the port as shown below.
 |  | Junction |
| When used as RS-232 transmit port: Connect the device to TX-1 and GND, as shown above. | When used as single IR port: Connect the IR emitter to TX-2 (striped wire) and GND, as shown above.Use Neets IR-Emitter | When used as dual IR port: Connect the IR 1 emitter to TX-2 (striped wire) and black wire on IR 1 emitter to IR 2 emitter (striped wire), and black wire from IR 2 emitter to GND, as shown above.Use Neets IR-Emitter |
IR learner
The IR learner can be connected directly to the Neets Device Editor software through the USB port. With this you can learn IR codes from your existing IR remote for easy configuration on-site, or even on your desk. (Remember to remove front cover)
NEB port
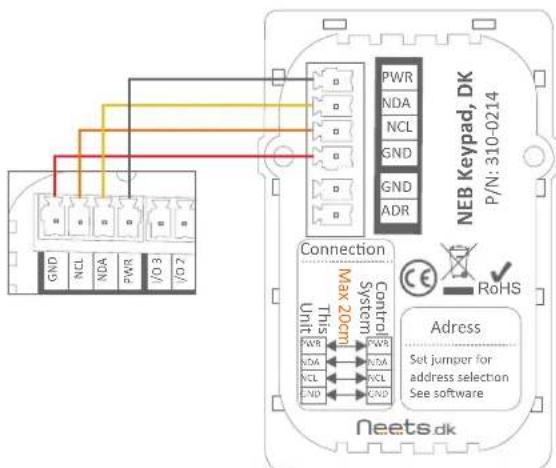
The SieRRa II has a built-in NEB (Neets Extension Bus). This port is used to add up to 5 NEB devices (e.g. two Keypads, two Level Controls and one Expander).
Connect your NEB devices to this port with a cable not exceeding 20 cm of length. Connections are PWR to PWR, NCL to NCL, NDA to NDA and GND to GND.
If additional cable length is needed in your application, please use the NEB extender to allow placement of the devices up to 40 meters from the SieRRa II. See the Neets website for details on the NEB Extender.
LAN port
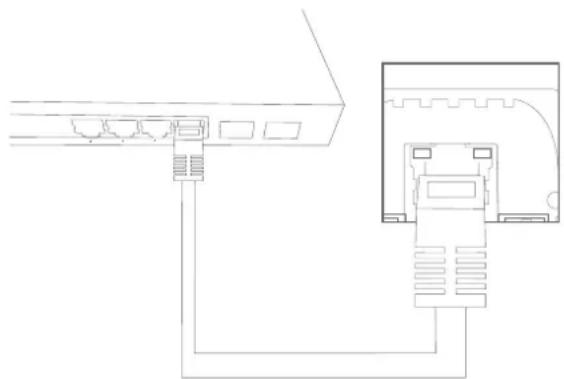
The network connector integrates the system into a local area network. You must connect the SieRRa II to your LAN if you are using any of the LAN features of the product.
The SieRRa II has Power over Ethernet functionality built into the LAN interface which can power up the entire control system and up to two connected NEB units through a PoE-enabled PSE (power sourcing equipment) device. To power the SieRRa II, use a PoE enabled switch or a PoE power injector which complies with IEEE802.3af.
natural_image
Line drawing of a router connector with cable and socket (no text or symbols)Two LEDs on the connector indicate the following:
| Color: Off On Blink | |||
| Yellow No Link | Link Activity | ||
| Green 10Mbit | 100Mbit | ||
Buttons
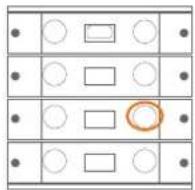
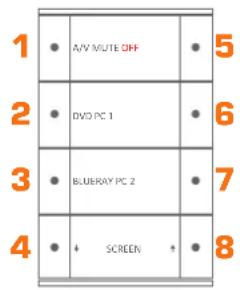
SieRRa II has eight front panel buttons available for the end user to access controller functions. The buttons are numbered as shown to the right.
Each button has a tactile click feedback to ensure proper activation. Also, each button has an embedded multicolor LED light to indicate current status of the AV system.
Button function and LED indication are set up using the Neets Project Designer software.
Configuration through USB port
The USB port is used exclusively for configuring the SieRRa II from the Neets Project Designer software. It can't be used to control any external devices.
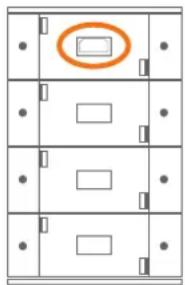
The front panel USB port is located beneath the front cover and label. The host USB port can power the control system while configuring, so no external power is needed when configuring the SieRRa II. However, external power (either from AC adaptor or Power over Ethernet) and the USB port may be connected at the same time, for example when changing the configuration on an already installed unit.
The USB connector for connecting to the SieRRa II is type "mini USB B 5P". (It is available on the web as a USB A to Mini USB B 5P).
Neets website - sign up
natural_image
Pure diagram of three horizontal panels with no text, numbers, or symbolsTroubleshooting
Error indication using LEDs
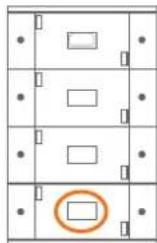
If there is a fault in either the configuration or the SieRRa II unit, this will be indicated on the front button LED indicators. Button LEDs 1-4 are used to indicate the error; the LED indicators are numbered as shown.
| ● | A/V MUTE |
| ● | DVD |
| ● | BLUERAY |
| ● | + SCREEN |
The flashing error descriptions and patterns are described below:
| LED shows | Description Solution | ||
| 1 [2T0S] | Off | No connection to one or more NEB units. | Check that the NEB units used in the project are connected.Check that the NEB units used in the project are configured correctly.After doing one of the above, remove the power to the control system for 20 sec before reconnecting the power again. |
| 2 [TCX2] | Off | ||
3  | Off | ||
| 4 [6CC5] | Flashing | ||
| 1 [HCGT] | Flashing | No project found on the control system or unable to start the project | Try to upload the project again.Alternatively, there can be a problem in the project you have uploaded. In this case, try uploading an empty project and see if this works. |
| 2 [W007] | Flashing | ||
| 3 [8Z02] | Flashing | ||
| 4 [07SA] | Off | ||
| 1 [XC0H] | Flashing | Unexpected Error Turn off | the power to the control system for 20 sec before turning the power on again. |
| 2 [SZ63] | Flashing | ||
| 3 [XDH0] | Off | ||
| 4 [ZS38] | Off | ||
| 1 [3B9G] | Off | No contact to Neets extension unit | Check to confirm that the serial number used in Project Designer matches the Neets extension unit.Check the network or RS-232 connection from the control system to the Neets extension unit. |
| 2 [YYK] | Flashing | ||
3  | Flashing | ||
| 4 [XDS2] | Off | ||
1  | Off | Wrong firmware version in Neets extension unit | The Neets extension unit has a different firmware than the one in the control system.Please upgrade the firmware by plugging in the USB cable from the Neets extension unit into a PC running Project Designer and follow the instructions. |
| 2 [44V0] | Flashing | ||
| 3 [CVX7] | Flashing | ||
| 4 [XZ7T] | Flashing | ||
| 1 [TH0G] | Off | Error in serial number | You need to return the unit to Neets or your local dealer for replacement/repair. |
| 2 [SB7T] | Off | ||
3  | Flashing | ||
| 4 [TCC5] | Off | ||
1  | Flashing | Resuming factory default settings | When pressing Switch 1 and 4 during power on, the system will delete the current settings and resume factory default.This method is only intended to be used if the control system locks up and enters "Unexpected Error" |
2  | Off | ||
| 3 [SKX4] | Off | ||
4  | Flashing | ||
 Off button flashing once per second (all buttons flash if no off button is configured) Off button flashing once per second (all buttons flash if no off button is configured) | Unable to connect to configured TCP device. | ○ Verify the TCP device in the project is alive and responding on the specified IP. |
| [2T4G] Off button flashing 4 times per second (all buttons flash if no off button is configured) | Password incorrect on configured LAN device. | ○ Verify that the password is entered correctly in Project Designer for all LAN devices that require password. |
Specifications
Power input
Input voltage 12 VDC
Power Usage 1 W
Connector 2 pin screw block
Power adaptor (included)
Input voltage 100 VAC - 240 VAC
Line frequency 50 Hz – 60 Hz
Max power usage Max 8 W
RS-232 / IR port
Ports 1 x bidirectional
2 x uni-directional
Baud rate 1200 - 115200 bit/sec
Data bits 7, 8
Parity Even, Odd, None
Stop bits 1, 2
IR frequency 400 Hz to 500 KHz
Connector 3 pin screw block
IR learn
IR Learn frequency 1 KHz to 150 KHz
Product number
310-0102 SieRRa II EU, white
310-0103 SieRRa II EU, anthracite
310-0202 SieRRa II DK, white
310-0203 SieRRa II DK, anthracite
310-0402 SieRRa II US, white
Compliancy
IEC/EN 61000-6-1
IEC/EN 61000-6-2
FCC Part 15, Class A
CE
Input / Output
Ports 3 x I/O
Input trigger low < 1VDC
Input trigger high > 4VDC
Output type Open drain
Isolated output No
Max voltage load 24 VDC
Max current 0.5 A
Connector 4 pin screw block
Network (LAN)
Speed 10 / 100 Mbit
Duplex modes Half or Full
DHCP Default off
Default IP 192.168.254.252
Default gateway 192.168.1.1
Default subnet mask 255.255.255.0
Power over Ethernet
Compliance 802.3af / 802.3at
802.3af mode A + B
PD Class 1
General
Width, EU 55 mm
Height, EU 55 mm
Depth, EU 17 mm
Width, DK 45 mm
Height, DK 72 mm
Depth, DK 17 mm
Width, US 45 mm
Height, US 105 mm
Depth, US 24 mm
Weight, EU/DK 90 g
Shipping weight 0,3 kg
Shipping dimension: EU, DK
(W/D/H) 155x85x55 mm
Shipping dimension: US
(W/D/H) 150x170x55 mm
Storage temperature -20 °C to 50 °C
Storage moisture Non-condensing
Operation temperature 0 °C to 30 °C
Operation moisture Non-condensing

- Neets Control – SieRRa II
- Foreword
- Revision list
- SieRRa II, DK
- SieRRa II, EU
- SieRRa II, US
- Important Safety Instructions
- Caution:
- Warning!:
- FCC Class A Notice:
- Contents
- Description
- Quick guide to the SieRRa II
- Installation
- DK version
- US version
- EU version
- Connections and Controls
- Power input port
- I/O ports
- RS-232/IR ports
- IR learner
- NEB port
- LAN port
- Buttons
- Configuration through USB port
- Troubleshooting
- Error indication using LEDs
- Specifications
- Power input
- Power adaptor (included)
- RS-232 / IR port
- IR learn
- Product number
- Compliancy
- Input / Output
- Network (LAN)
- Power over Ethernet
- General
Brand : Neets
Model : 310-0203
Category : Remote control