
NQuire 1000 Manta II - Cash register Newland - Free user manual and instructions
Find the device manual for free NQuire 1000 Manta II Newland in PDF.


User questions about NQuire 1000 Manta II Newland
0 question about this device. Answer the ones you know or ask your own.
Ask a new question about this device
Download the instructions for your Cash register in PDF format for free! Find your manual NQuire 1000 Manta II - Newland and take your electronic device back in hand. On this page are published all the documents necessary for the use of your device. NQuire 1000 Manta II by Newland.
USER MANUAL NQuire 1000 Manta II Newland
text_image
Google NewlandNQuire 1000 Manta
micro kiosk
user guide
Revision History
| Version | Description | Date |
| V0.1 | Initial release. | August 4 ^th , 2016 |
| V0.2 | Fine-tuned for NQuire1000 specific features | January 5 ^th , 2017 |
| V0.3 | 1) Revised home page2) Added hardware & accessory installation & operation | January 31 ^st , 2017 |
| V1.0 | Updated all the screenshots. | November 23, 2018 |
| V1.1 | Updated the “12. Control I/O Ports & Cover” section. | January 8, 2019 |
| V1.2 | Updated the “Installation & Operation” section. | April 4, 2019 |
Table of Content
Disclaimer 4
Device Instruction & Installation 5
Hardware Instruction....5
- LED Indicator 6
- SD Card Slot / Cover 6
3/4/5. Push Buttons....7 - Expansion Slots & Add-on modules .... 7
- Speaker....8
- Vesa Mount Holes....8
- DC-In Jack 9
- Barcode Scanner 9
- Control I/O Ports & Cover 9
- Generic I/O Port Covers....12
14/15/16 Generic I/O Ports 13 - Power Switch 13
- Headphone Audio Jack.... 13
Accessory & Installation 14
VESA Wall Mount 14
Installation & Operation....14
Feature Programming....15
Home Screen....15
Change Wallpaper 15
Add Widgets....18
System Bar 20
Navigation Buttons....20
Status Notifications 21
Applications....22
Language & Input Method 23
Date & Time....24
Volume....25
Brightness....26
Schedule Power On/Off 27
Wi-Fi....29
Ethernet 29
Bluetooth....31
Virtual Keyboard 32
Take Photos....34
Surf Online 35
Browse Files 36
Play Media 37
Install & Uninstall Apps 38
Install Apps....38
Uninstall Apps 41
Reset to Factory Default 43
Disclaimer
√ Please read the instructions carefully before equipment installation and using the device.
√ Do not put the product in high temperature, humid or dusty environment.
√ Do not drop, crash or break down this product.
√ Do not power off the device when it's formatting or upgrading, otherwise it will cause operation system error.
√ This product is IP54 certified in waterproof and dustproof on front panel (only).
√ Use only approved add-on enhancements.
Device Instruction & Installation
Hardware Instruction
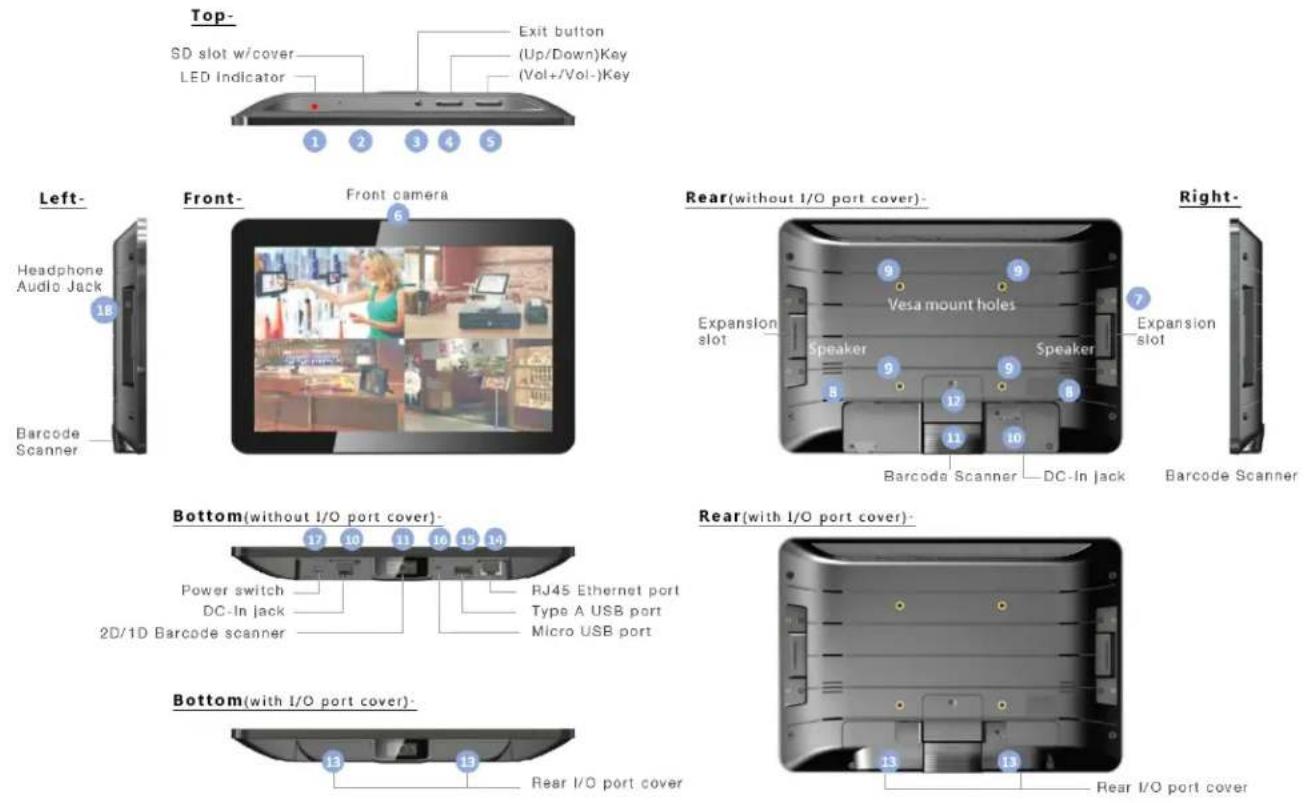
- LED Indicator
- SD Card Slot / Cover: support external SD card
- Exit Button: return to the previous page
- Up / Down Buttons: navigate up/down to select an item
- Vol+ / Vol- Buttons: adjust the system volume
- Front Camera: embedded 2M pixels (& 5MP or 8MP) optional
- Expansion Slot: install optional add-on modules
- Speakers: dual audio output
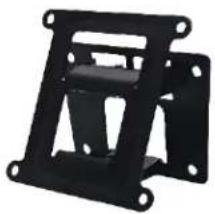
- VESA75 Mounting Holes: max. screw depth 4.5mm from mounting surface
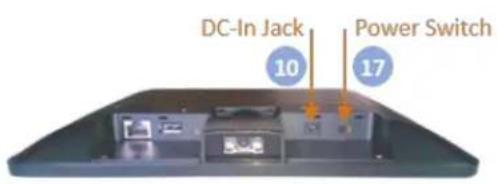
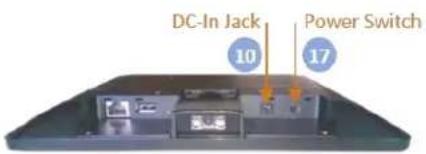
- DC-In Jack: powered by 12V/2A DC input
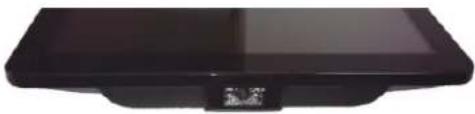
- Barcode Scanner: 2D barcode scanner to scan barcode
- Control I/O Port Cover: cover for GPIO and RS-232 ports
- Generic I/O Port Covers (left and right pieces):
cover for frequently used I/O ports
- 10/100Mbps Ethernet Port: RJ45 connector supporting Ethernet connection
- USB Host Port: support USB 2.0 Host type A
- Micro-USB OTG Port: USB 2.0, Micro-USB type B jack, OTG
- Power Switch: switch power ON/OFF
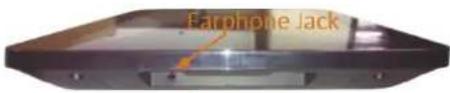
- Headphone Audio Jack
Hardware Instruction & Operations
(Installation & Uninstallation)
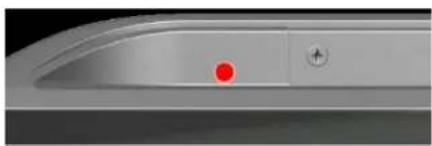
1. LED Indicator
| Red | Power supply is on. |
| Light Off | Power supply is off. |
natural_image
Close-up of a metallic control panel with a red dot and plus button (no text or symbols visible)2. SD Card Slot / Cover
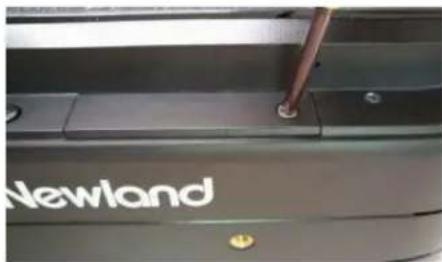
Support external SD card up to 32GB (/ 64GB)
INSTALLATION:
1) Release the screw on SD card cover
2) Remove SD card cover
3) Insert SD card into the push-push SD card slot
natural_image
Close-up of a mechanical component with a metallic rod inserted, labeled 'Newland' (no other text or symbols visible)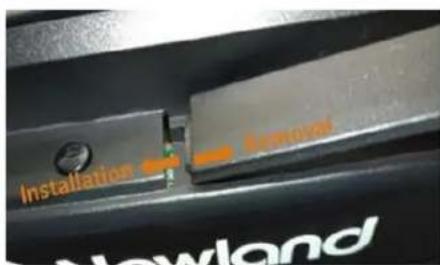
text_image
Installation Newland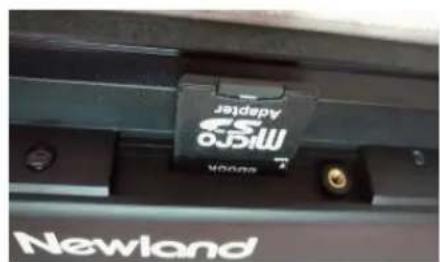
text_image
Adapter MS30 NewlandREMOVAL:
1) Push SD card inside the slot, release press force suddenly to let SD card popped out from the slot
2) Insert cover and fix it by screw
3/4/5. Push Buttons

text_image
Exit button ( Up/Down) Key ( Vol+/Vol-) Key 3 4 57. Expansion Slots & Add-on modules
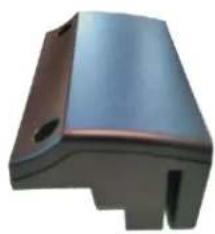
For add-on modules like existing barcode scanner, MSR and NFC.
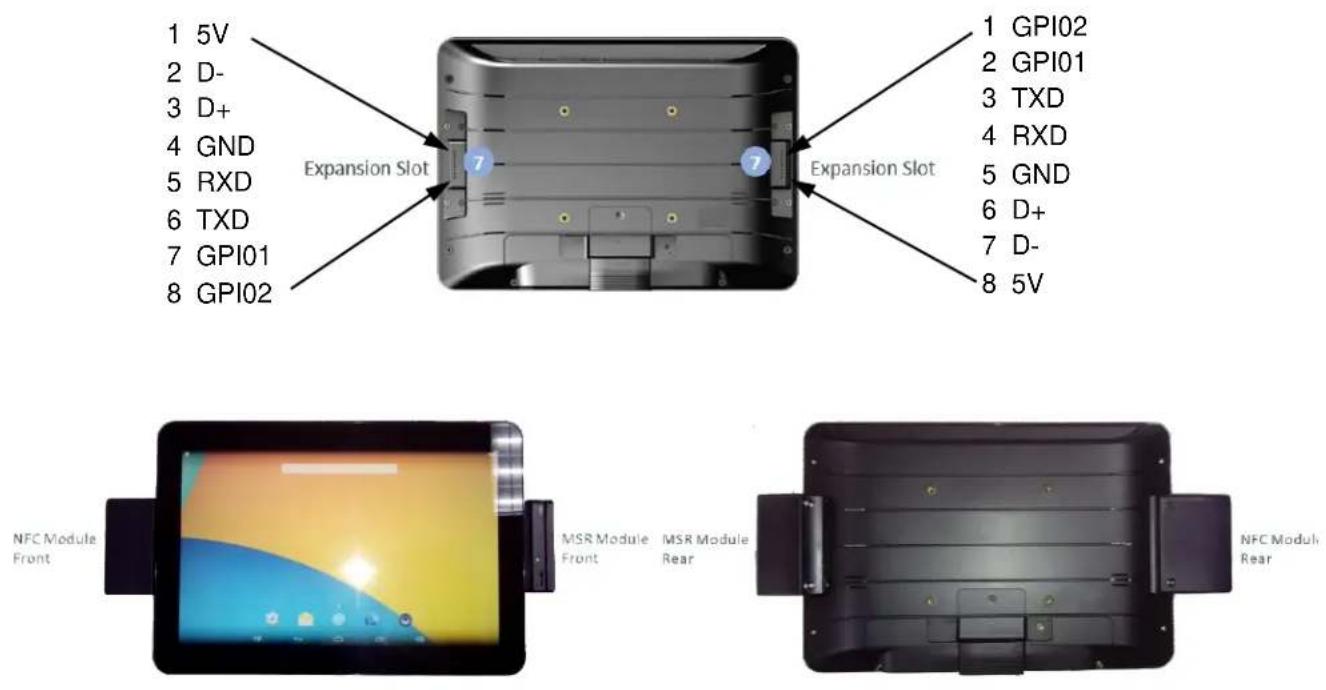
ADD-ON MODULES
NFC MODULE
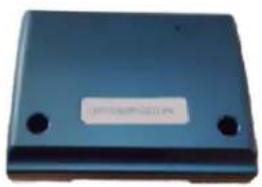
natural_image
Blue rectangular electronic device with two black holes, no visible text or symbols on the body.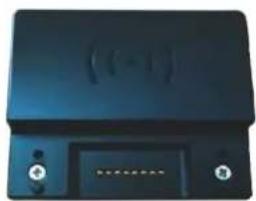
natural_image
Blue electronic device with control buttons and a display screen (no visible text or symbols)MSR MODULE
natural_image
Metallic mechanical component with a recessed flange and mounting holes (no text or symbols visible)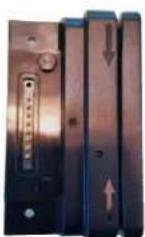
INSTALLATION
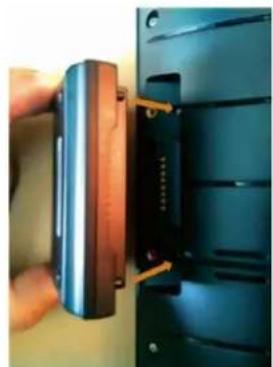
- Align the positioning bumps on module with the pits on main device and gently press down until they are fully inserted.
- Fix module on main device by screws*.
natural_image
Close-up of a hand holding a black rectangular electronic device with a metallic connector (no visible text or symbols)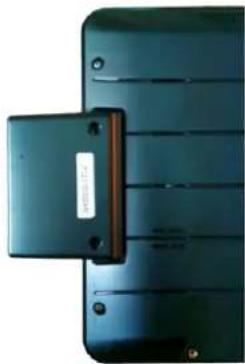
natural_image
Close-up of a dark blue electronic device with a rectangular clip attached to its side (no visible text or symbols)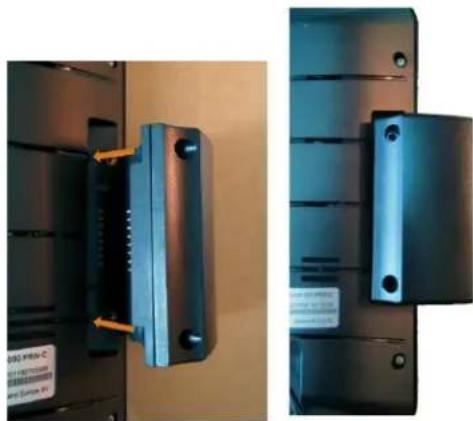
natural_image
Close-up of a black electronic device with a labeled component, showing front and side views (no readable text or symbols)*the torque of the screws for modules (LTE1000V2, MSR1000V2, LF1000V2 & NFC1000V2) is 0,4 N·m
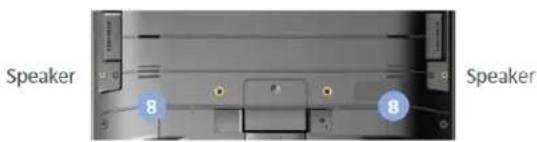
8. Speaker
Dual audio output.
text_image
Speaker 8 8 Speaker9. Vesa Mount Holes
natural_image
Black metal bracket component with mounting holes and structural ribs (no text or symbols visible)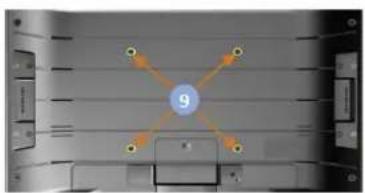
natural_image
Interior view of a server rack with four orange connectors and a central blue circle labeled '9' (no readable text or symbols beyond the number)10. DC-In Jack
Plug the power adapter into the power jack, and fix the position by a small metal
bracket to prevent it from loosening.
text_image
DC-In Jack 10 Power Switch 17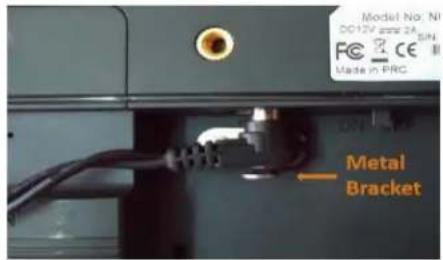
text_image
Model No. Ni DC12V arm 2A SIN Made in PRC Metal Bracket11. Barcode Scanner
Barcode engine is set up in auto mode as default setting. LED will light up when any object shows in front of barcode scanner within proper distance, and barcode engine will automatically scan when a barcode showed within proper distance.
natural_image
Black rectangular electronic device with a small display and control panel (no visible text or symbols)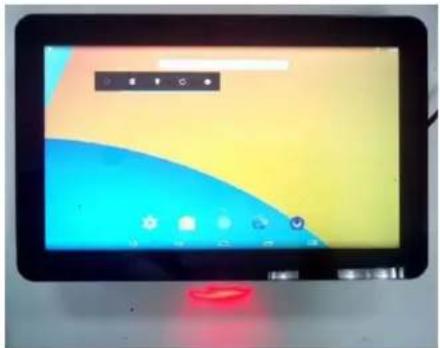
natural_image
Tablet displaying a colorful abstract design with blue, yellow, and orange panels, no visible text or symbols on the screen.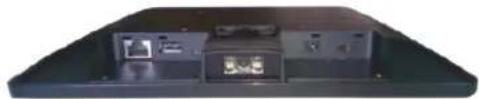
natural_image
Back view of a black electronic device with two ports and a display (no visible text or symbols)12. Control I/O Ports & Cover
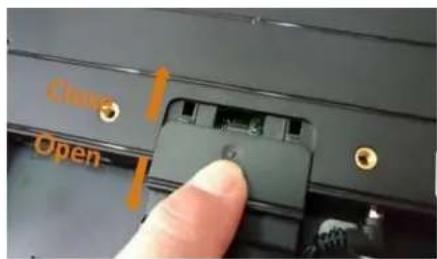
There are control IO ports (RS-232 & GPIO) under the Control IO cover (#12 in Device Instruction). Press the cover to slide backward to open the cover, or slide forward to close the cover.
RS-232 port pinout (PIN1-PIN6): GND, RX, TX, GND, 5V, 5V.
text_image
Close Open-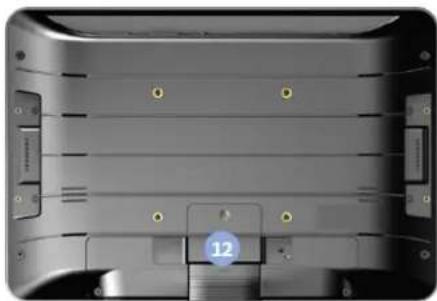
natural_image
Close-up of a mechanical component with no visible text or symbols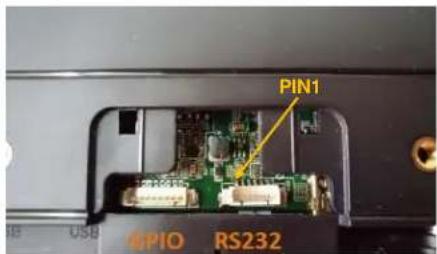
text_image
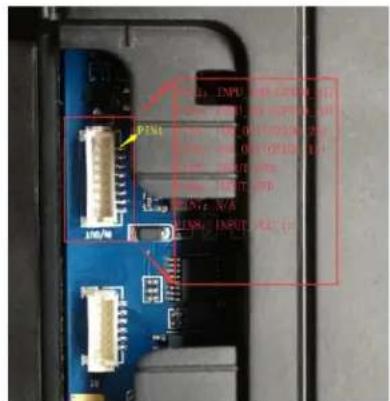
PIN1 GPIO RS232GPIO port pinout (PIN1-PIN8): INPU_VOD (GPIO0_31), INPU_VOC (GPIO0_30), VOB_OUT (GPIO0_29), VOA_OUT (GPIO0_15), INPUT_GND, INPUT_GND, N/A, INPUT_VCC_In.
The NQuire can be connected to devices, such as LED lamp, door lock or access control system via its GPIO port.
text_image
P2M 100V/50 100V/50 100V/50 100V/50 100V/50 100V/50 100V/50 100V/50 100V/50 100V/50 100V/50 100V/50 100V/50 10V/50 10V/50 10V/50 10V/50 10V/50 10V/50 10V/50 10V/50 10V/50 10V/50 10V/50 10V/50 10V/50 10V/50 10A, 1MP, 1N, 2G, 3M, 4T, 5U, 6U, 7U, 8U, 9U, 10U, 11U, 12U, 13U, 14U, 15U, 16U, 17U, 18U, 19U, 20U, 21U, 22U, 23U, 24U, 25U, 26U, 27U, 28U, 29U, 30U, 31U, 32U, 33U, 34U, 35U, 36U, 37U, 38U, 39U, 40U, 41U, 42U, 43U, 44U, 45U, 46U, 47U, 48U, 49U, 50U, 51U, 52U, 53U, 54U, 55U, 56U, 57U, 58U, 59U, 60U, 61U, 62U, 63U, 64U, 65U, 66U, 67U, 68U, 69U, 70U, 71U, 72U, 73U, 74U, 75U, 76U, 77U, 78U, 79U, 80U, 81U, 82U, 83U, 84U, 85U, 86U, 87U, 88U, 89U, 90U, 91U, 92U, 93U, 94U, 95U, 96U, 97U, 98U, 99UCall the NQuire's GPIO control API: Reference
nq1000_interface_api.jar and then import com.android.nq1000.NQManager in your code.
Introduction to the NQManager class:
| API | Description | Parameters | Type of Return Value | Return Value |
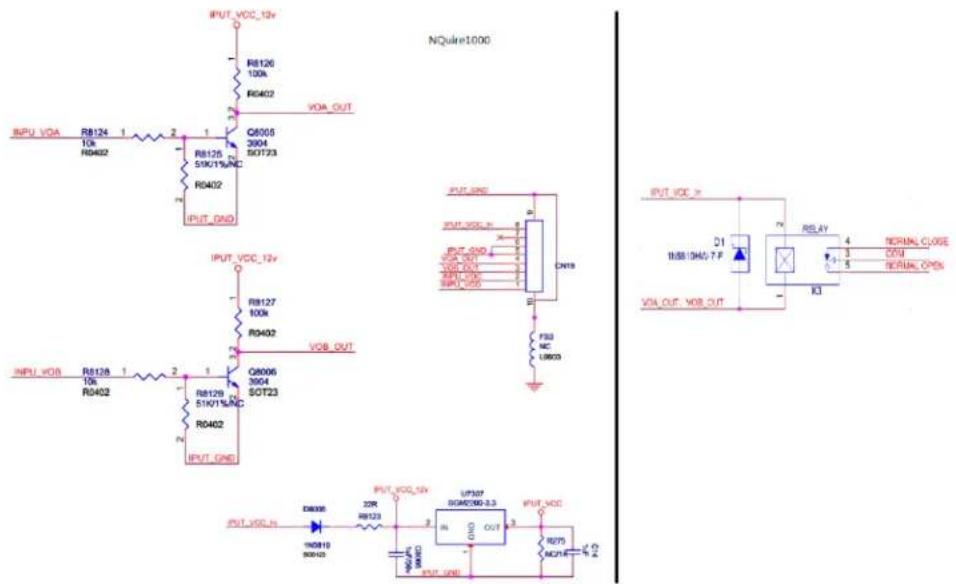
| setdoorThreshold (String value) | Set GPIO pin state | 150: Set VOA_OUT (GPIO0_15) to high151: Set VOA_OUT (GPIO0_15) to low290: Set VOB_OUT (GPIO0_29) to high291: Set VOB_OUT (GPIO0_29) to low1011: Enable UART1010: Disable UART | boolean | true: successfalse: failure |
| getdoorData() | Read the state of INPU_VOC (GPIO0_30) and INPU_VOD (GPIO0_31) | Null | String | 00: GPIO0_30 high, GPIO0_31 high01: GPIO0_30 high, GPIO0_31 low10: GPIO0_30 low, GPIO0_31 high11: GPIO0_30 low, GPIO0_31 low |
GPO circuit example:
text_image
INPUT VOC_12V R8126 100k R5402 VOA_OUT INPUT VOC_12V R8124 1 10k R5402 Q8005 3904 50T723 R8125 51K/1%/NC R5402 IPUT_GND INPUT VOC_12V R8127 100k R5402 Q8006 3904 50T23 R8128 1 10k R5402 IPUT_GND INPUT VOC_12V R8129 51K/1%/NC R5402 Q8006 3904 50T23 IPUT_GND INPUT VOC_12V R8123 20k RB123 IN307 SGM250-3.3 IN307 OUT IN307 OUT IN307 OUT IN307 OUT IN307 OUT IN307 OUT IN307 OUT IN307 OUT IN307 OUT IN307 OUT IN307 OUT IN307 OUT IN307 OUT IN307 OUT IN307 OUT IN307 OUT IN307 OUT IN3OOUT 7-F RELAY 4 NORMAL CLOSE D1 11:58:10H:7-F NORMAL OPEN IC3 VOL OUT_VOB_OUTGPI circuit example:
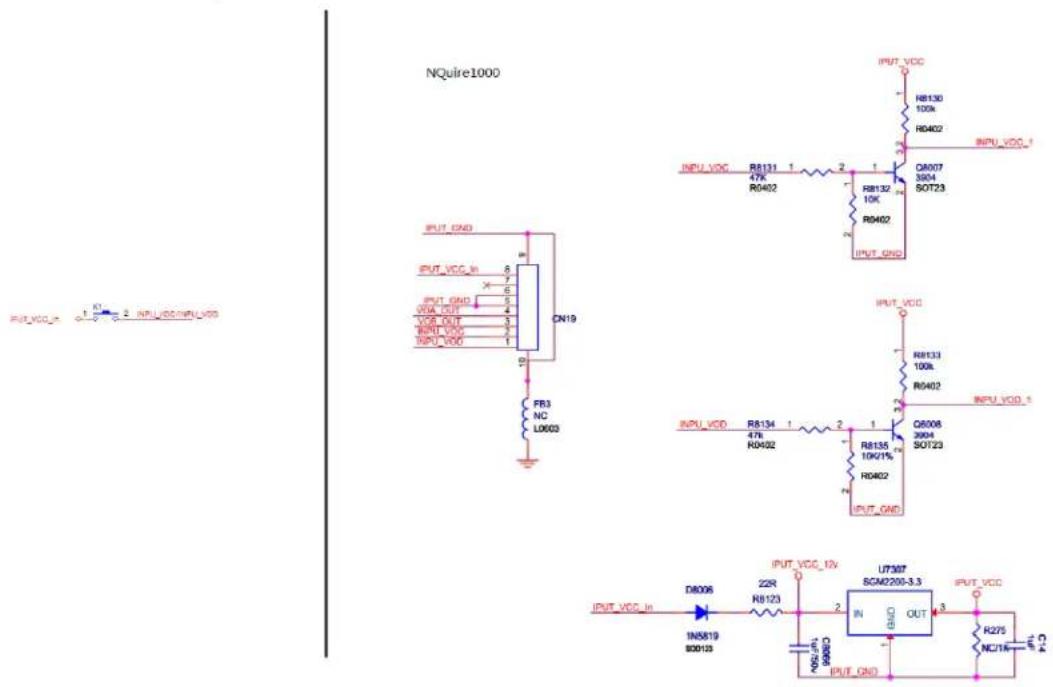
Electrical requirements:
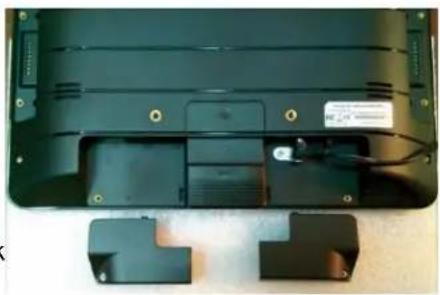
ANALYSIS OF STRUCTURE
Covers for right cabinet and left cabinet.
natural_image
Back view of a black electronic device showing internal components and mounting brackets (no visible text or symbols)INSTALLATION
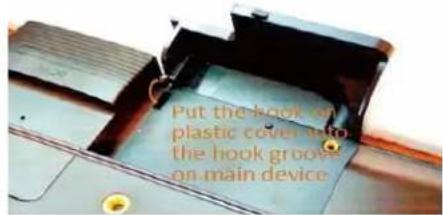
1) Put the hook on plastic cover into the hook
2) Level the plastic cover.
3) Pushing cover forward, let positioning tenon into the positioning groove on main device.
4) Tighten screw to fix the cover.
text_image
Put the hook of plastic cover into the hook groove on main device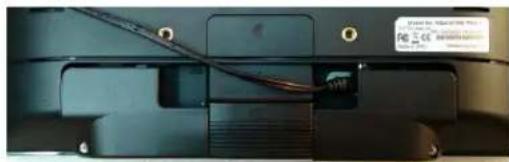
natural_image
Back view of a black electronic device with visible wiring and connectors (no readable text or symbols)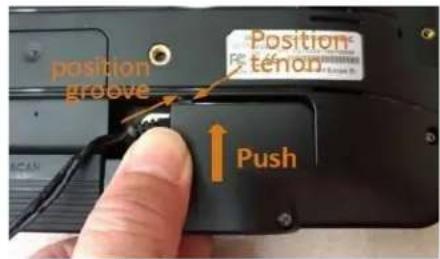
text_image
position groove Position ténon PushREMOVAL
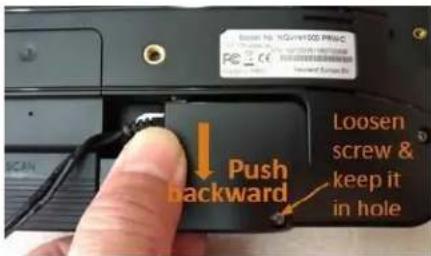
1) Loosen screw to release the cover.
It is recommended not to pull screw out completely to prevent it from being lost.
2) Pull cover backward horizontally.
3) Pull up the front end of cover to remove cover.
text_image
Push backward Loosen screw & keep it in hole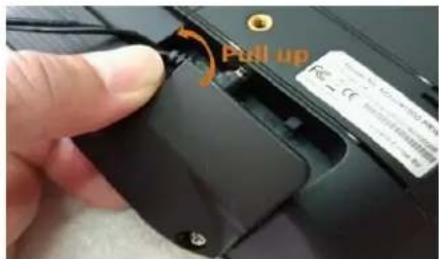
text_image
Pull up Fe2- - CESCENARIO
1) With both covers fixed and cables
2) Without both covers, with cables
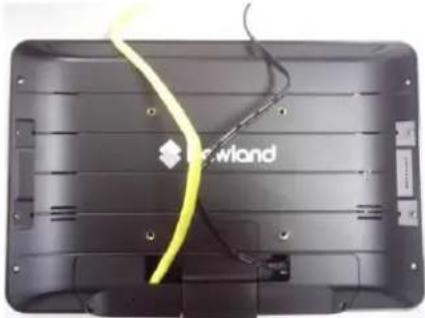
natural_image
Back view of a black electronic device with visible wiring and a yellow cable, no text or symbols present.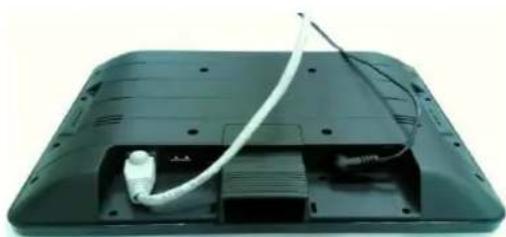
natural_image
Black rectangular electronic device with a white cable inserted into the top panel, showing internal components and mounting holes (no text or symbols visible)14/15/16 Generic I/O Ports
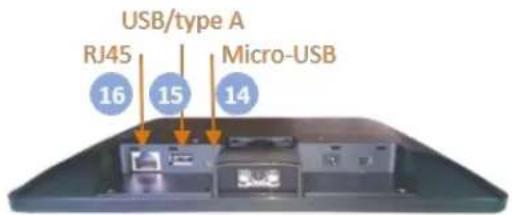
text_image
USB/type A RJ45 16 15 Micro-USB 1417. Power Switch
1) Switch on to boot up device.
2) By default, power switch is in ON position.
ON position.
text_image
DC-In Jack 10 Power Switch 17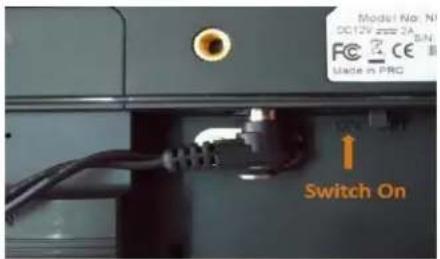
text_image
Model No. N DC12V 2022 2A SN Made in PRO Switch On- Headphone Audio Jack
text_image
Farphone JackAccessory & Installation
VESA Wall Mount
Installation & Operation
- Select a mounting location that is convenient for operation.
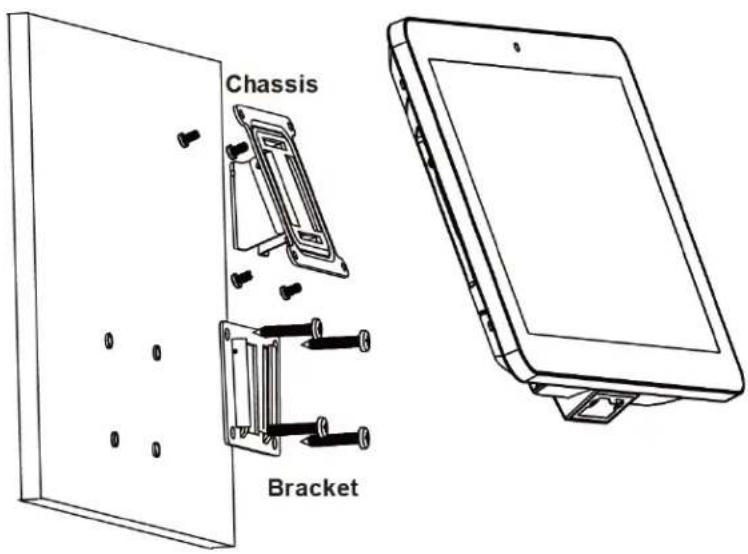
- Remove the screw attaching the bracket to the chassis of The VESA 75 mount.
- For wall mounting, install the four plastic wall anchors in a wall and then secure the bracket of VESA 75 mount to the wall using the four large screws. For countertop/shelf mounting, secure the bracket of VESA 75 mount to a countertop/shelf using the four large screws.
- Complete all wire/cable connections to the NQuire. Secure the chassis of VESA 75 mount to the back of the NQuire using the four small screws. Note that the depth of screw insertion into the NQuire must not exceed 4.5mm.
- Attach the bracket back to the chassis with the screw that was removed in step 2.
text_image
Chassis BracketFeature Programming
Home Screen
On the home screen, you can long-tap on any blank area to change the wallpaper or drag widgets to desktop.
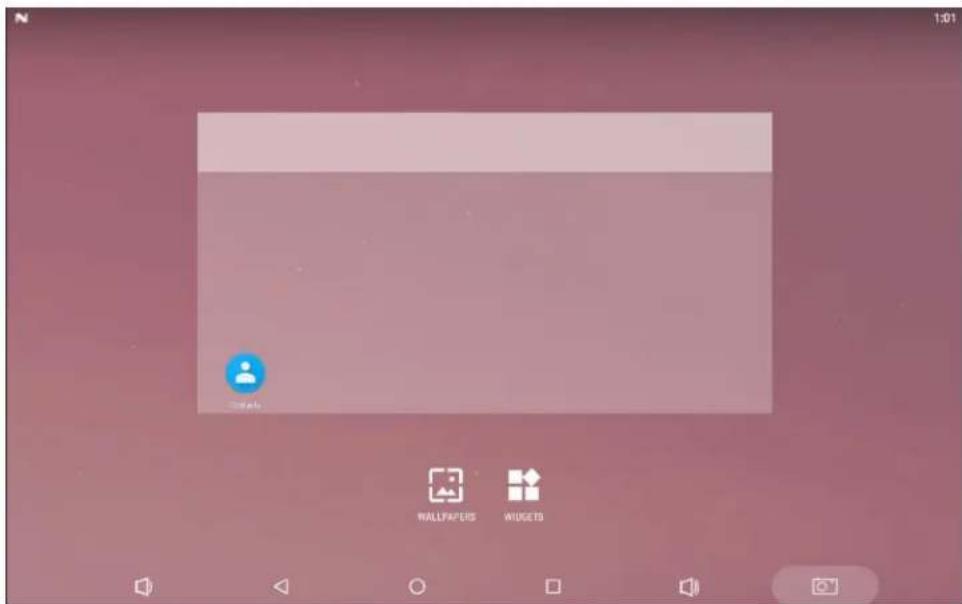
text_image
1:01 WALLPAPERS WUGETSChange Wallpaper
- Tap

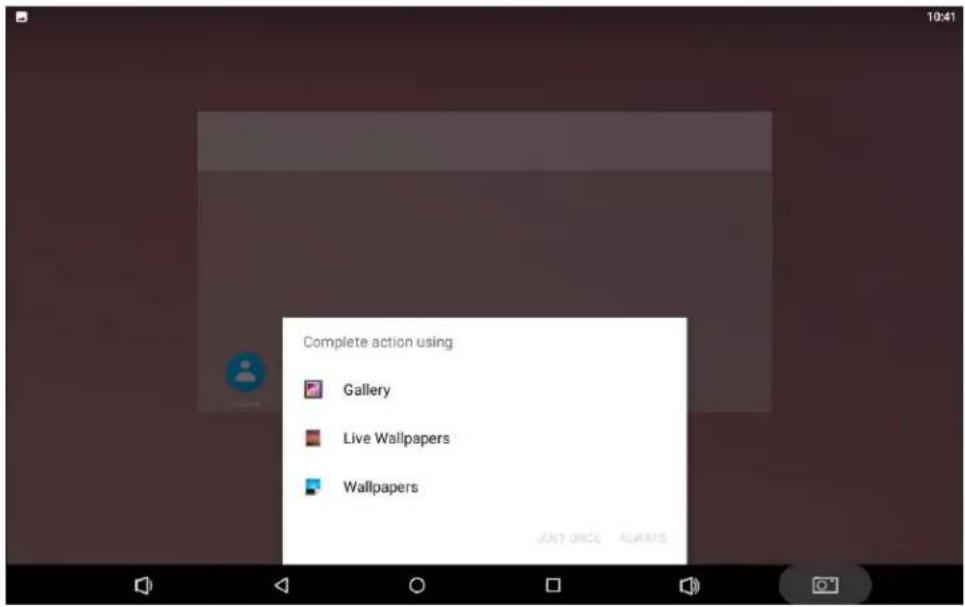
text_image
Complete action using Gallery Live Wallpapers Wallpapers JUST ONCE ALWAYS- Tap "Wallpapers".
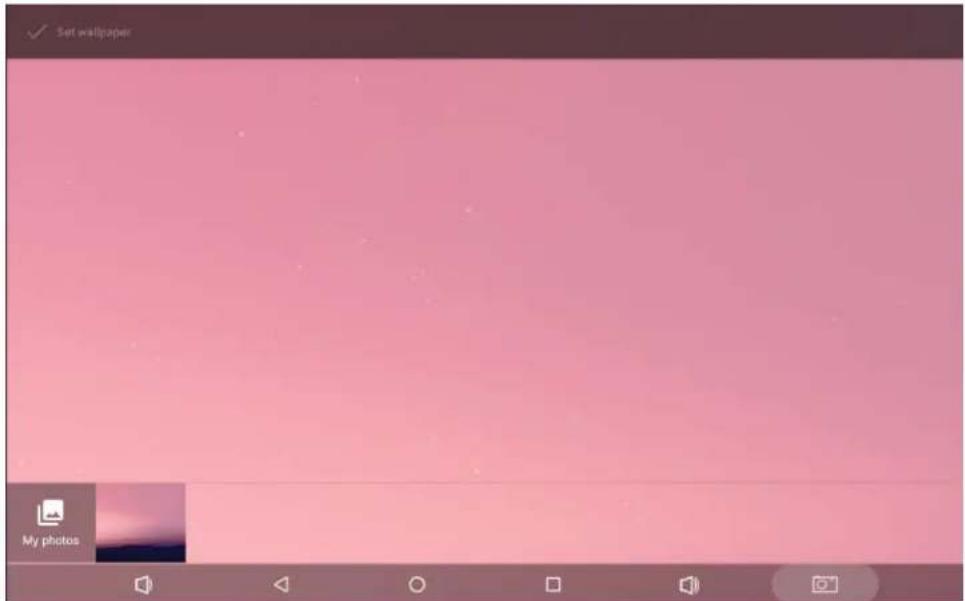
text_image
Set wallpaper My photos- Select the image you want as your wallpaper.
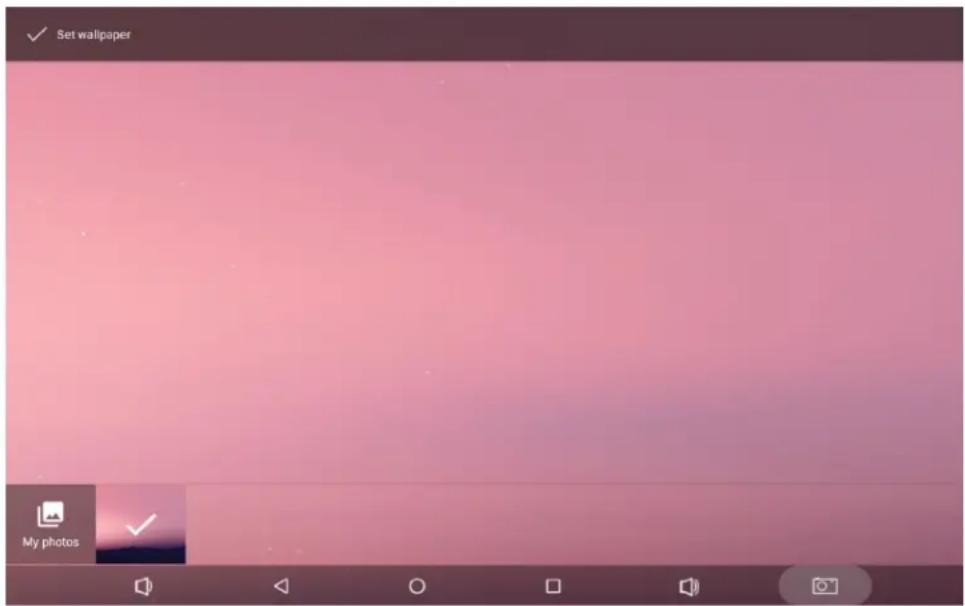
text_image
✓ Set wallpaper My photos ✓- Tap "Set wallpaper" on the upper-left corner of the screen then "Home screen" to apply the new wallpaper.
Add Widgets
1. Tap

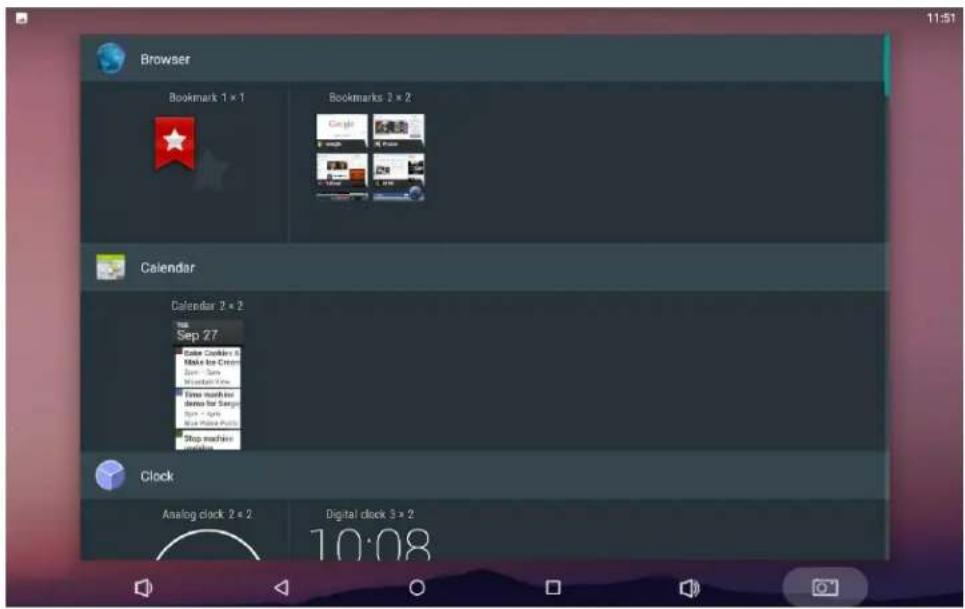
text_image
Browser Bookmark 1 x 1 Bookmarks 2 x 2 Calendar Calendar 2 x 2 Sep 27 Color Cooking 6 Make for Cream Spin Bars Monthly Time Temp much in Bottle for Sanger Spin Bars Blue Phone Police Stop Machine Clock Analog clock 2 x 2 Digital clock 3 x 2 10:08- Long-tap on a widget and drag it to desktop.
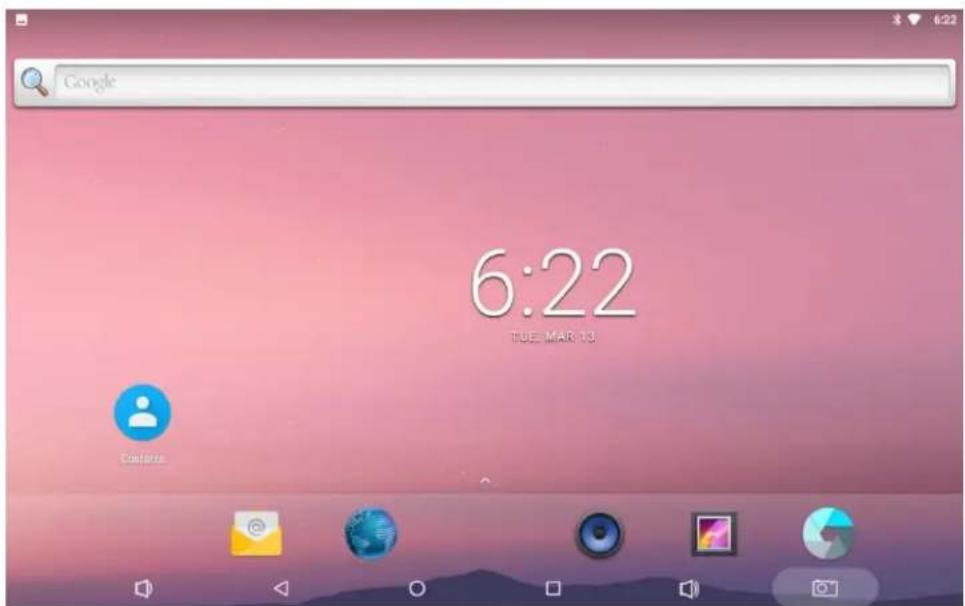
text_image
Google 6:22 TUE: MAR 13 Cancel- If you want to remove an icon, long-tap on the widget and then drag it onto "X Remove" at the top of the screen.
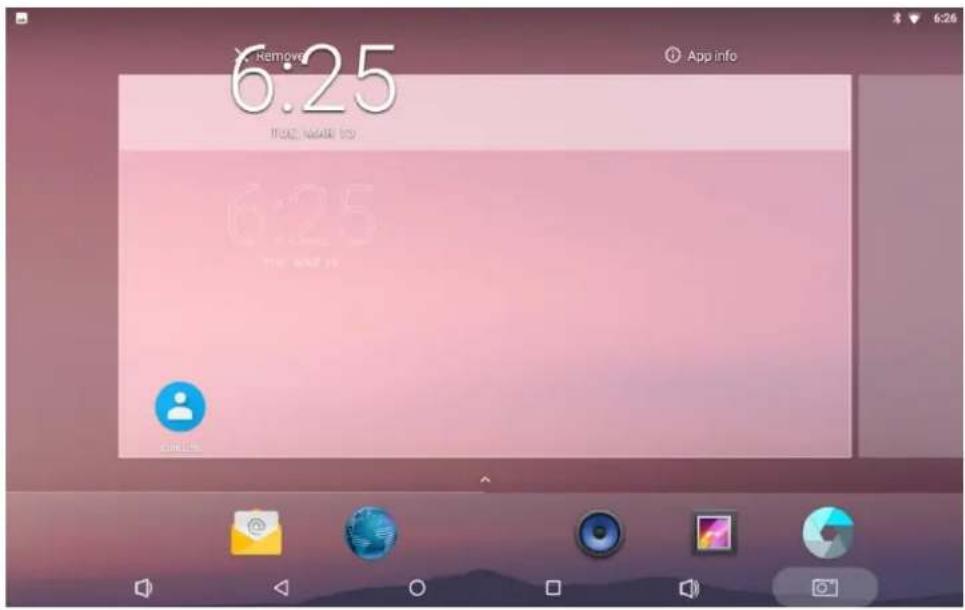
text_image
X: Remove 6:25 App info TIME: NAME: 03 6:25 CALLSystem Bar
Navigation Buttons

text_image
1 2 3 4 5 6- Volume-: Decrease the system volume.
- Back: Return to the previous page.
- Home: Return to the home screen.
- Recents: Switch between recently used apps.
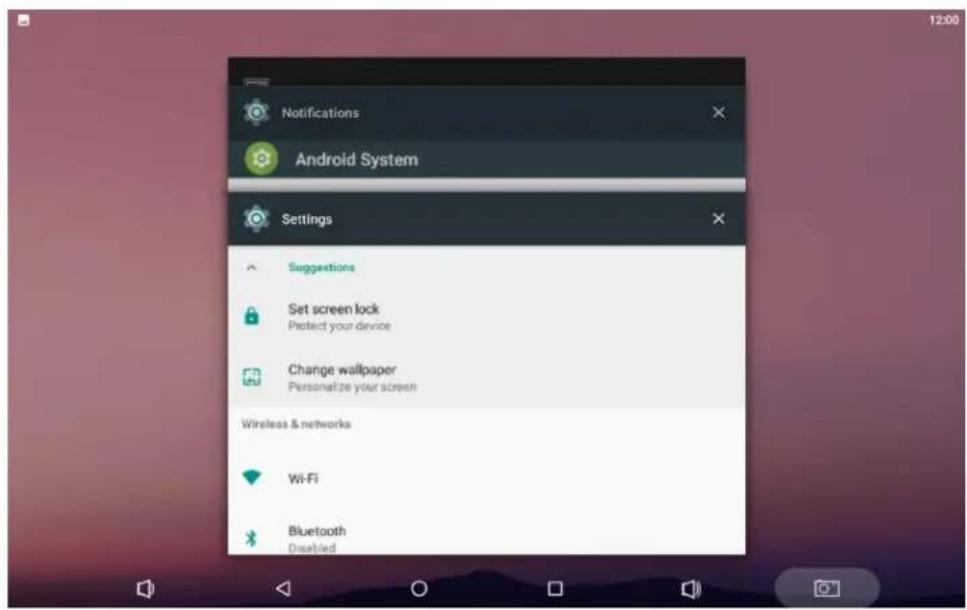
text_image
Notifications Android System Settings Suggestions Set screen lock Protect your device Change wallpaper Personalize your screen Wireless & networks Wi-Fi Bluetooth DisabledTo remove an app from the list, swipe the app item left or right or tap "X" in the upper-right corner of the app window to remove it.
- Volume+: Increase the system volume.
- Screenshot: Take a screenshot.
Status Notifications

text_image
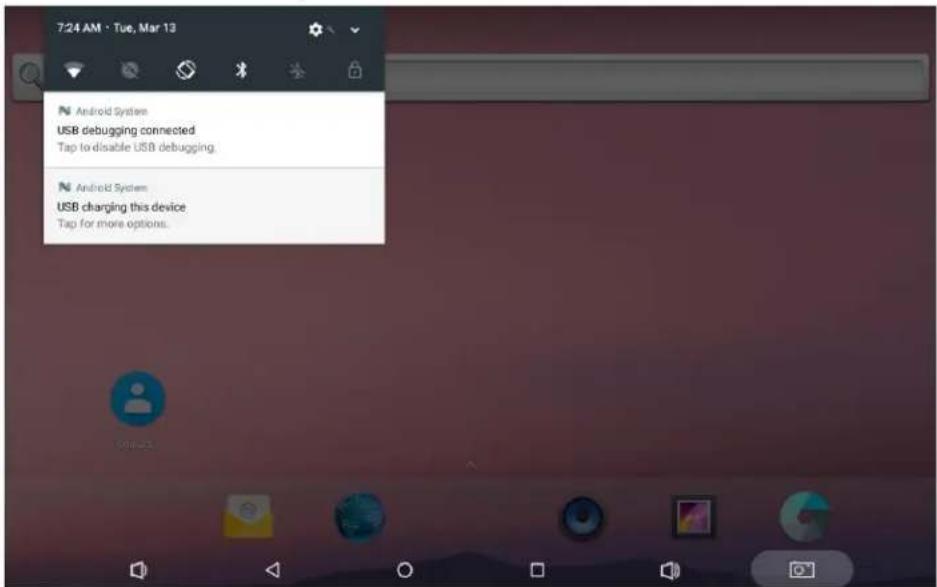
N 8 7:14Status bar at the top of the screen displays system status, such as time, Wi-Fi, SD card and USB connection, etc.
Pull down the status bar to open the status window.
text_image
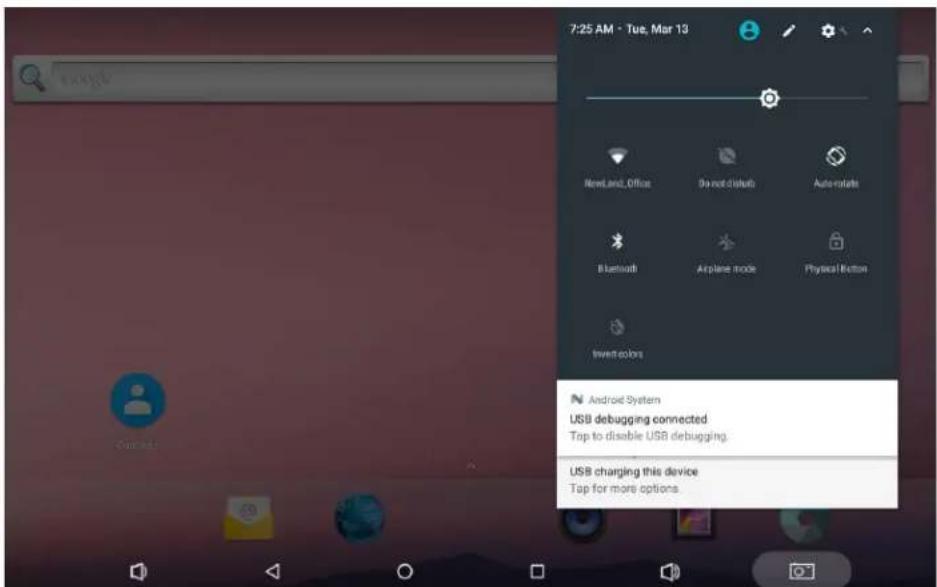
7:24 AM · Tue, Mar 13 Android System USB debugging connected Tap to disable USB debugging. Android System USB charging this device Tap for more options.Pull down the status bar to open the shortcuts window which contains brightness adjustment, Wi-Fi, Do Not Disturb, auto rotate, Bluetooth, airplane mode, physical button and invert colors, and system settings entrance.
text_image
7:25 AM - Tue, Mar 13 NewLand,Office Do not default Auto-ratabs Bluetooth Airplane mode Physical Button Invent colors Android System USB debugging connected Top to disable USB debugging. USB charging this device Top for more options.Applications
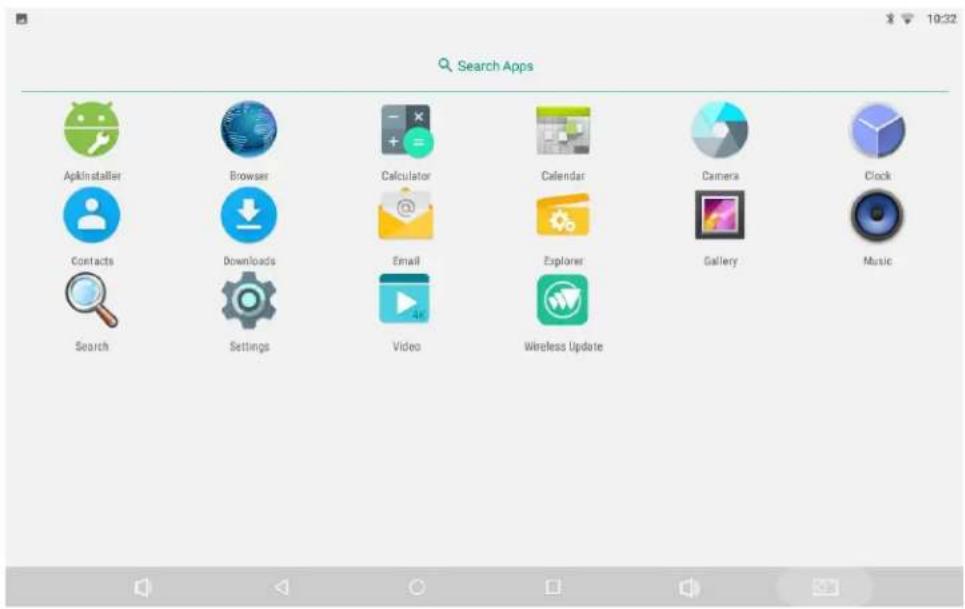
Tap ^ above the app shortcuts on the home screen to view the App list.
text_image
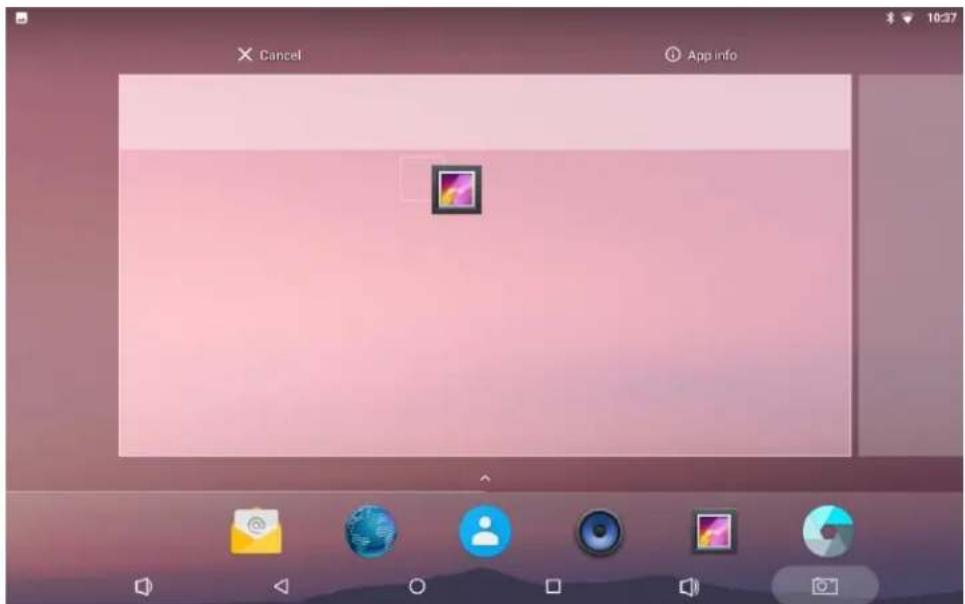
Search Apps Apikinstaller Browser Calculator Calendar Camera Clock Contacts Downloads Email Explorer Gallery Music Search Settings Video Wireless UpdateThe installed applications will be shown here and you can open an app by tapping its icon. To find an app easily, you can create a shortcut by long-taping on the icon and dragging it into the home screen.
text_image
Cancel App infoLanguage & Input Method
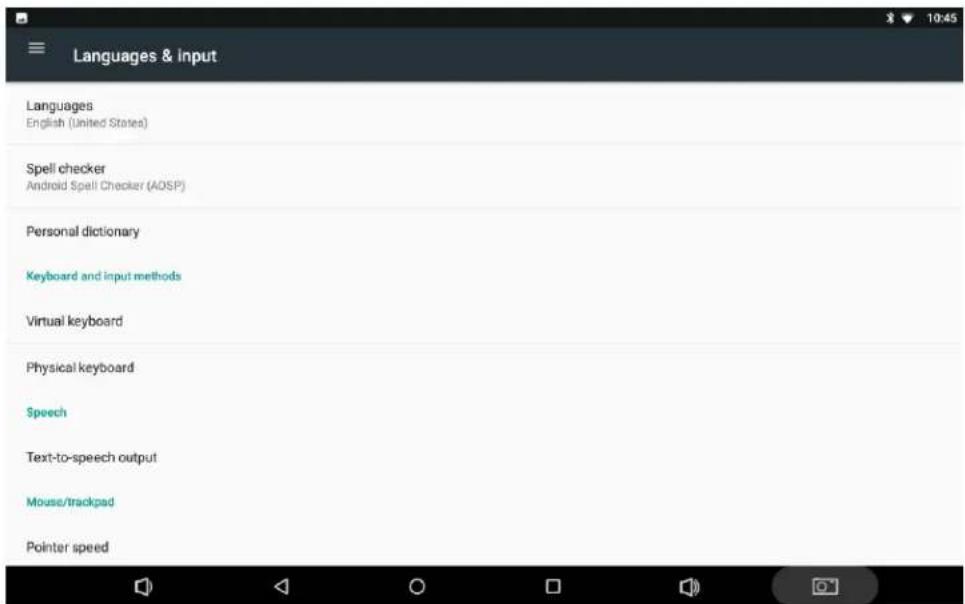
In the App list, tap "Settings"

to open the system settings app, and select "Language &
input".
text_image
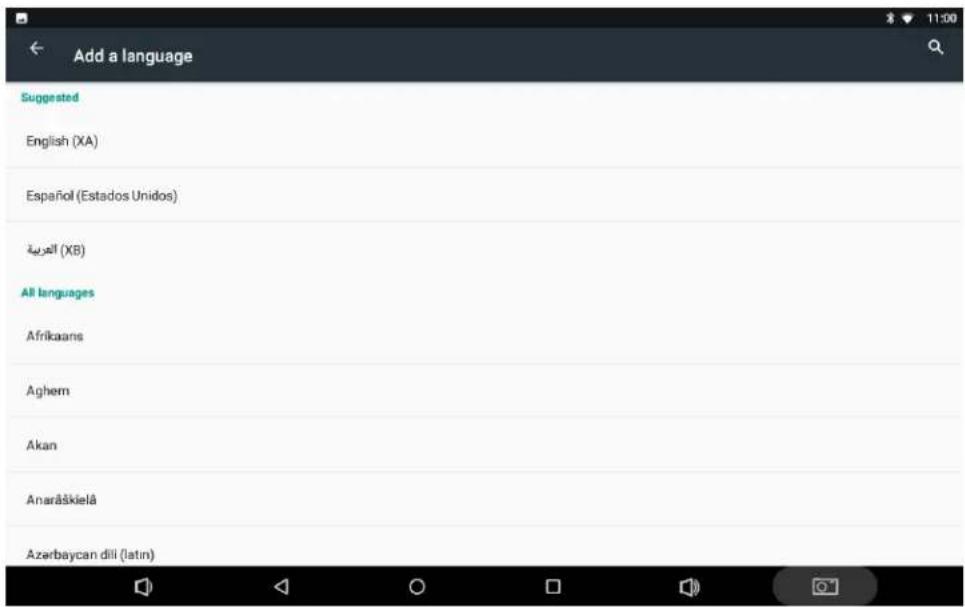
Languages & input Languages English (United States) Spell checker Android Spell Checker (ADSP) Personal dictionary Keyboard and input methods Virtual keyboard Physical keyboard Speech Text-to-speech output Mouse/trackpad Pointer speedChange language: Tap "Language" then "Add a language", and then you can change the system language according to your preference.
text_image
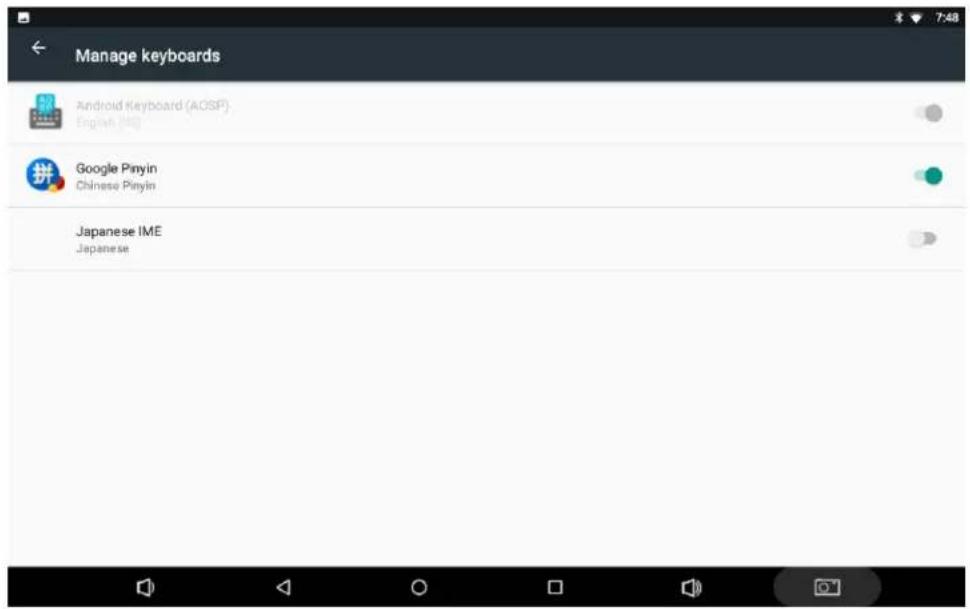
Add a language Suggested English (XA) Español (Estados Unidos) العربية (XB) All languages Afrikaans Aghem Akan Anarāskielā Azerbaycan dill (latin)Enable an input method: Tap "Virtual keyboard" then "Manage keyboards", and then enable the desired input method.
text_image
Manage keyboards Android Keyboard (ACSP) English (AIS) Google Pinyin Chinese Pinyin Japanese IME JapaneseDate & Time
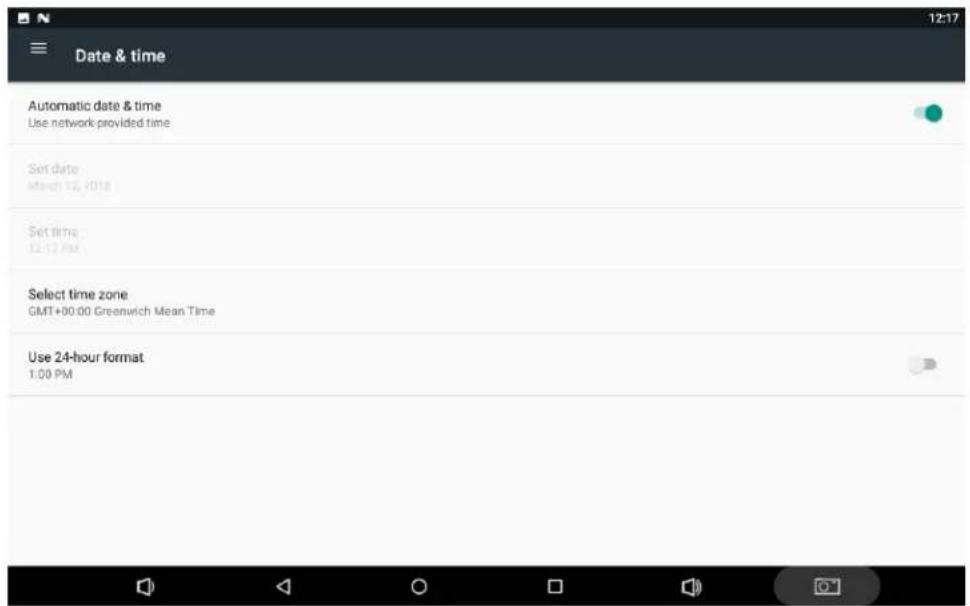
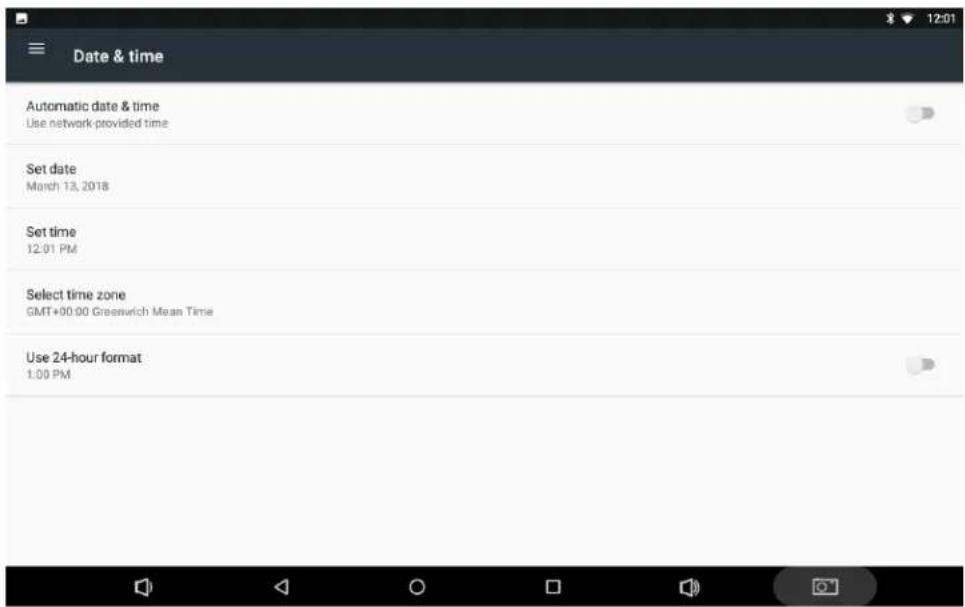
In the App list, tap "Settings" to open the system settings app, and select "Date & time".
text_image
Date & time Automatic date & time Use network provided time Set date March 12, 2018 Set time 12:12 PM Select time zone GMT+00.00 Greenwich Mean Time Use 24-hour format 1:00 PMIf the "Automatic date & time" option is enabled, system date and time will be synchronized automatically with network time when you connect your device to a Wi-Fi network.
To set the time manually, you need to disable "Automatic date & time".
text_image
Date & time Automatic date & time Use network-provided time Set date March 13, 2018 Set time 12:01 PM Select time zone GMT+00.00 Greenwich Mean Time Use 24-hour format 1.00 PMBesides, you can also set time zone and time format as per your needs.
Volume
On the system bar, click the Volume- icon to decrease the system volume, and click the
Volume+ icon to increase the system volume.
Or you can press the Vol+ / Vol- buttons (#5 in Device Instruction) on the top of the device to adjust the volume.
Brightness
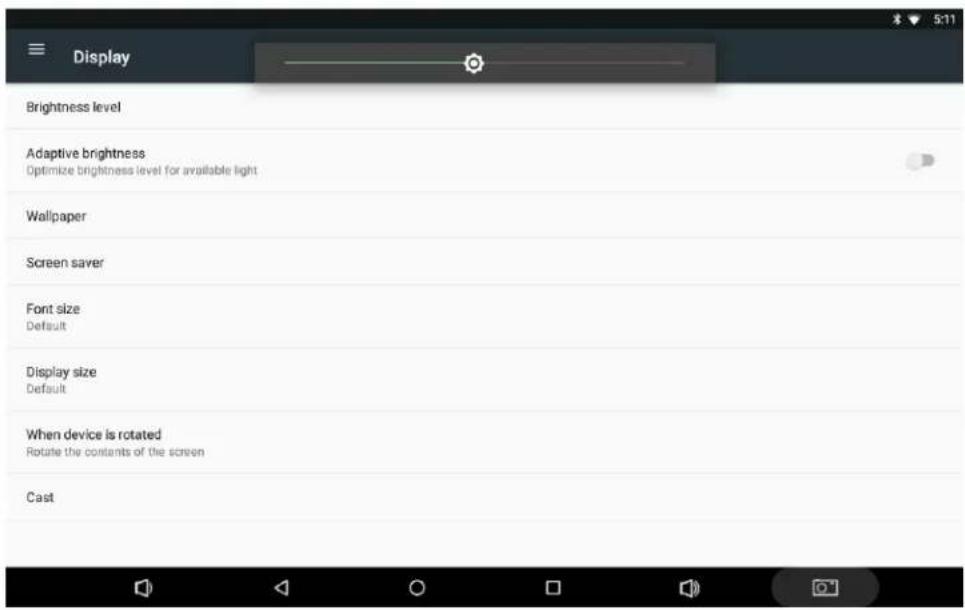
In the App list, tap "Settings" to open the system settings app, and select "Display".
Tap "Brightness level" and then move the brightness slider to the left to decrease the brightness and right to increase it.
text_image
Display Brightness level Adaptive brightness Optimize brightness level for available light Wallpaper Screen saver Font size Default Display size Default When device is rotated Rotate the contents of the screen CastIf you want the brightness to be adjusted automatically based on ambient lighting, enable the "Adaptive brightness" option.
Schedule Power On/Off
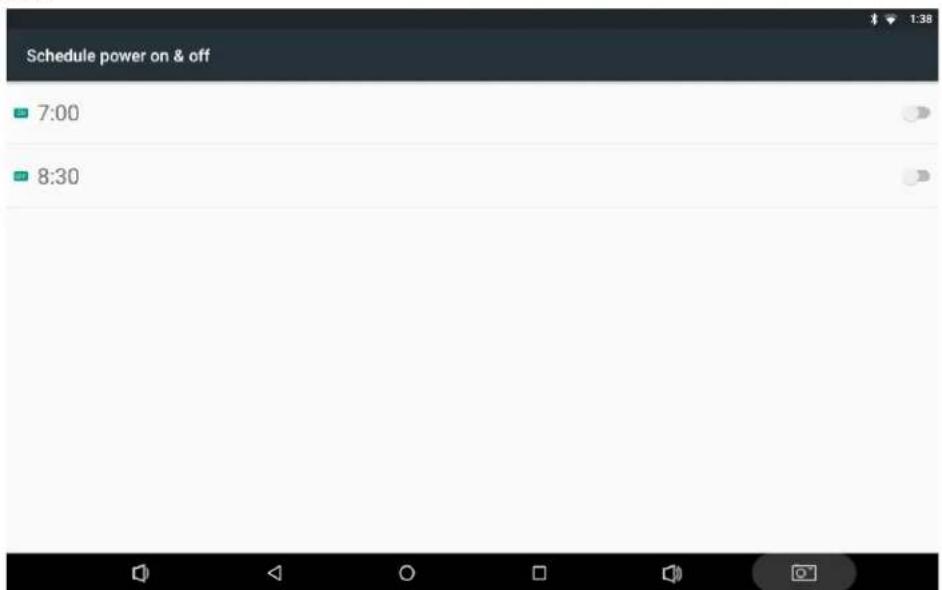
This function is used to power the device on and off automatically at a specific time each day.
In the App list, tap "Settings" to open the system settings app, and select "Time Screen".
text_image
Schedule power on & off 7:00 8:30The top row is for power on clock, and the following row is for power off clock. To enter the power on/off clock settings, tap the corresponding row.
text_image
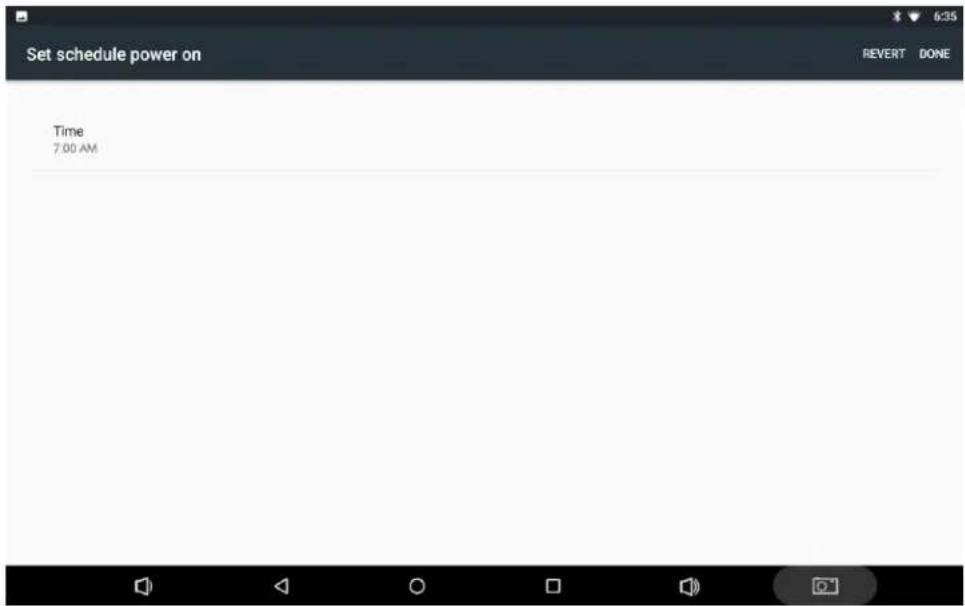
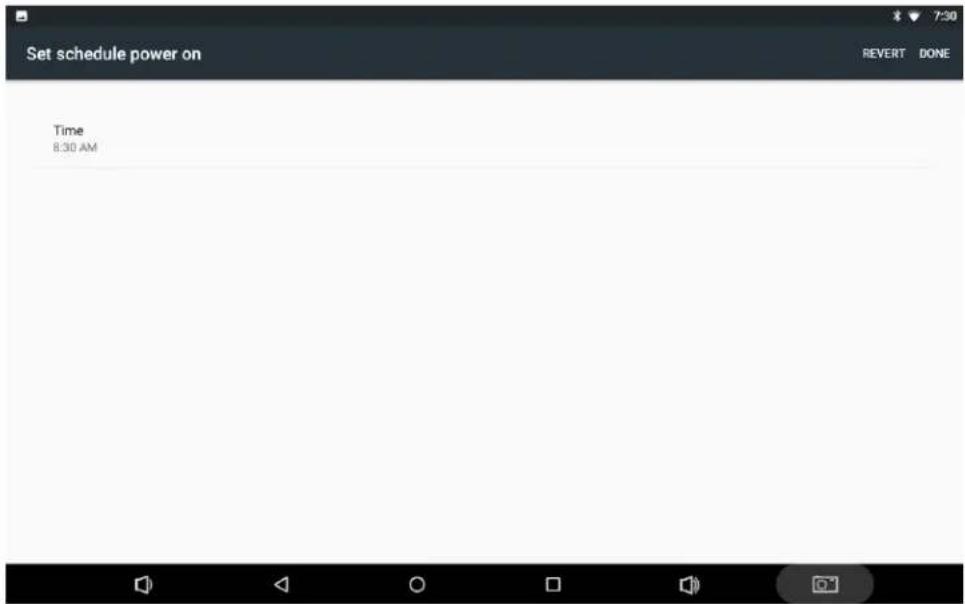
Set schedule power on REVERT DONE Time 7:00 AMTap "Time". Then set the time and tap "OK".

text_image
Set schedule power on Time 7:00 AM 8:30 AM PM 55 00 50 05 45 10 40 15 35 20 30 25 CANCEL OKTap "DONE" at the upper-right corner of the screen to save the setting.
text_image
Set schedule power on REVERT DONE Time 8:30 AMWi-Fi
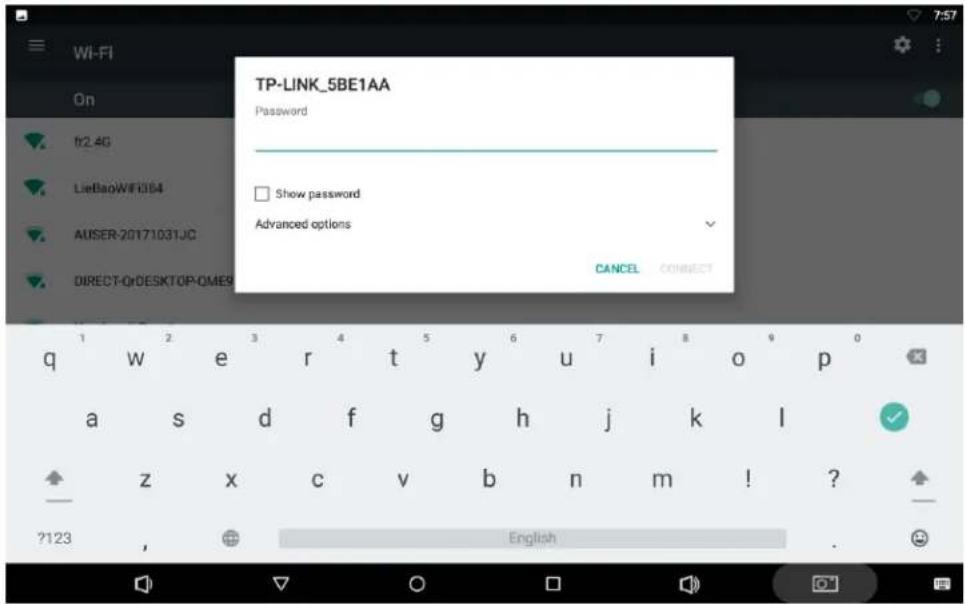
Join a Wi-Fi network: In App list, tap "Settings" to open system settings app, and select "Wi-Fi". Turn Wi-Fi on to find available Wi-Fi networks. Select a network and enter the password, then tap "CONNECT".
text_image
TP-LINK_5BE1AA Password Show password Advanced options CANCEL CONNECT q w e r t y u i o p a s d f g h j k l z x c v b n m ! ? ?123 English .Ethernet
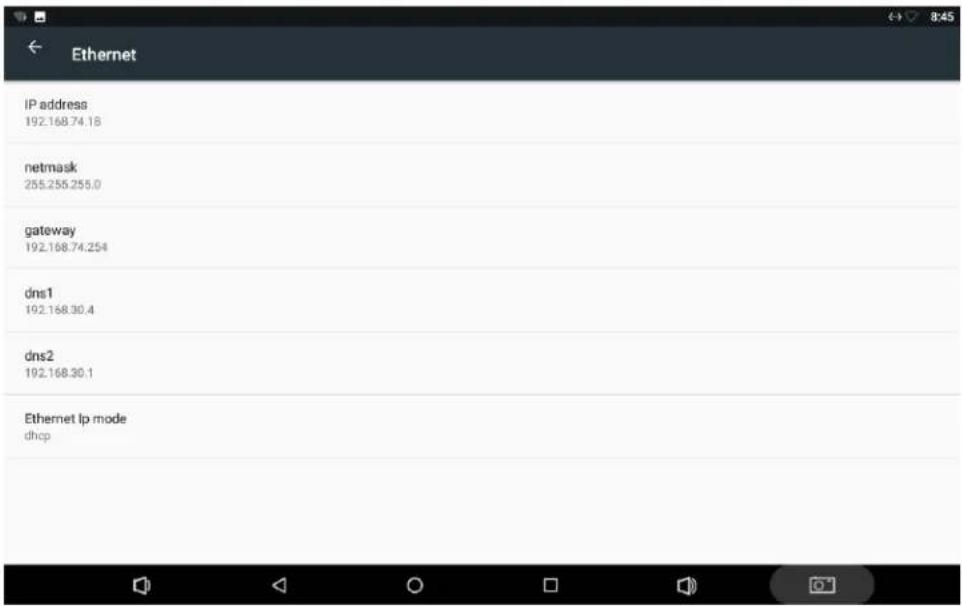
Be sure to turn off Wi-Fi if you want to connect your device to the Internet through Ethernet. Plug the Ethernet cable into your device's Ethernet port (#14 in Device Instruction).
In the App list, tap “Settings” to open the system settings app, and select “More”. Tap “Ethernet”.
text_image
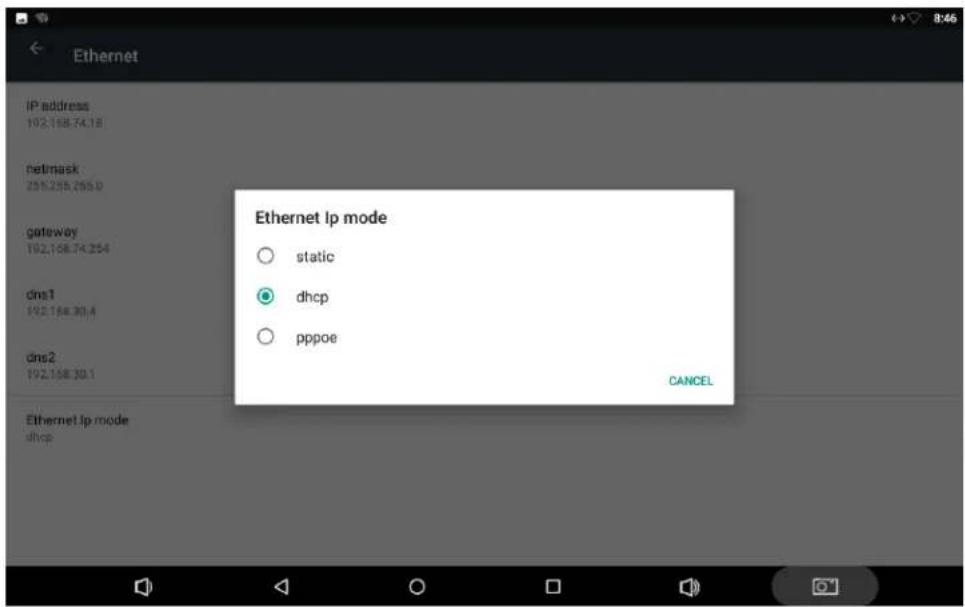
Ethernet IP address 192.168.74.18 netmask 255.255.255.0 gateway 192.168.74.254 dns1 192.168.30.4 dns2 192.168.30.1 Ethernet ip mode dhcpIf you want to specify a static IP address for your device, tap "Ethernet Ip mode" then "static", and enter the IP address, gateway, netmask and DNS server. Tap "CONNECT".
text_image
Ethernet IP address 192.168.74.18 netmask 255.255.255.0 gateway 192.168.74.254 dns1 192.168.30.4 dns2 192.168.30.1 Ethernet lp mode ulhcp Ethernet lp mode static dhcp pppoe CANCELBluetooth
You can set up a Bluetooth connection between the device and other Bluetooth devices, such as PC, mobile phone. Note that Bluetooth connection works better if there are no obstacles between them.
Pair your device to a Bluetooth device in the App list, tap "Settings" to open the
system settings app, and select “Bluetooth”. Turn Bluetooth on to search for available Bluetooth devices. Select the desired device from the search results and then tap “PAIR”.
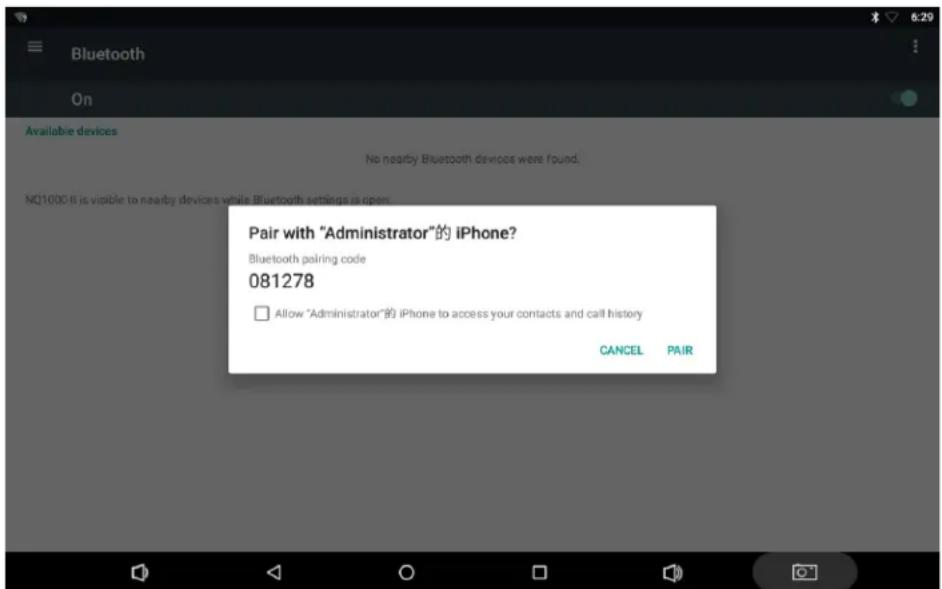
text_image
Bluetooth On Available devices No nearby Bluetooth devices were found. NQ1000 II is visible to nearby devices while Bluetooth settings is open. Pair with "Administrator"的 iPhone? Bluetooth pairing code 081278 Allow "Administrator"的 iPhone to access your contacts and call history CANCEL PAIRAfter pairing, the paired device will be moved to the "Paired Devices" list.
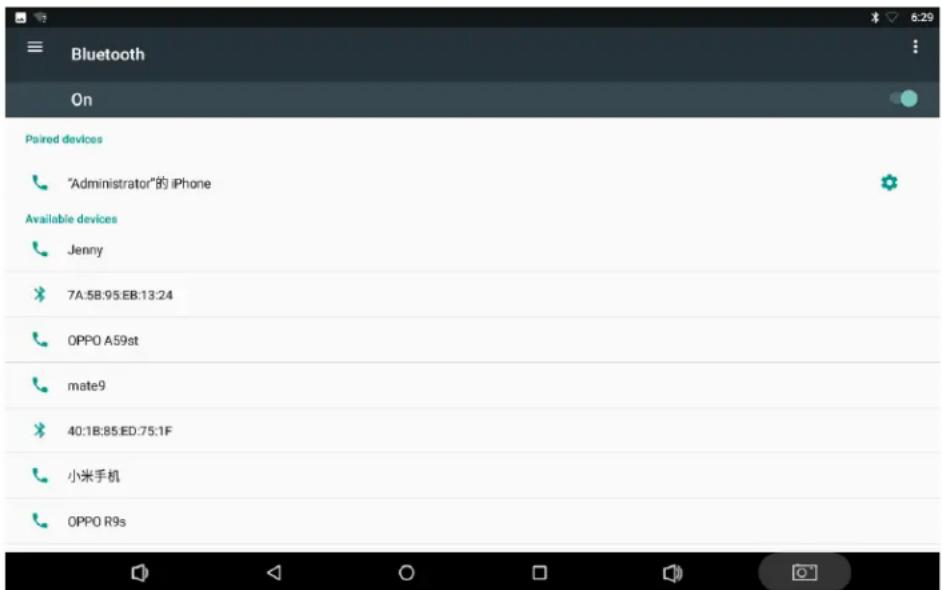
text_image
Bluetooth On Paired devices "Administrator"的 iPhone Available devices Jenny 7A:58:95:EB:13:24 OPPO A59st mate9 40:1B:85:ED:75:1F 小米手机 OPPO R9sVirtual Keyboard
The device provides a virtual keyboard for typing. You can use it as a real one.
When you tap a text input field, the virtual keyboard will appear at the bottom of the screen.
To close the virtual keyboard, you can tap ▼ in the system bar at the bottom of the screen.

text_image
Google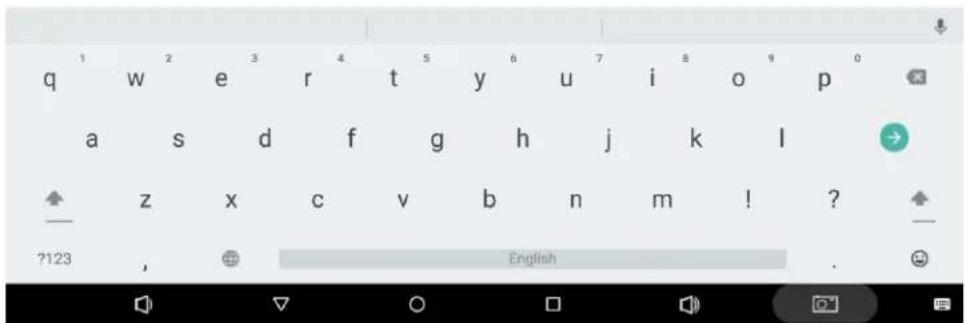
text_image
q w e r t y u i o p a s d f g h j k l z x c v b n m ! ? ?123 English .Change keyboard: Tap 📄 in the lower-right corner of the screen, and then select the desired keyboard from the pop-up window.
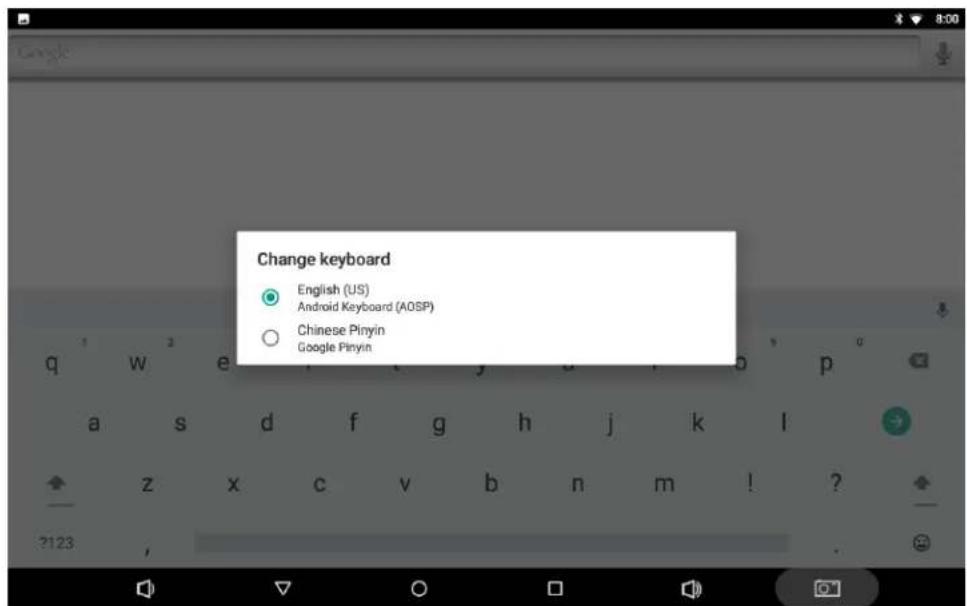
text_image
Change keyboard English (US) Android Keyboard (AOSP) Chinese Pinyin Google PinyinIf the keyboard icon is not present in the system bar, go to
Settings > Languages &
input > Virtual keyboard > Manage keyboards > enable the input method(s) you want to use.

text_image
Virtual keyboard Android Keyboard (AOSP) English (US) Google Pinyin Chinese Pinyin + Manage keyboards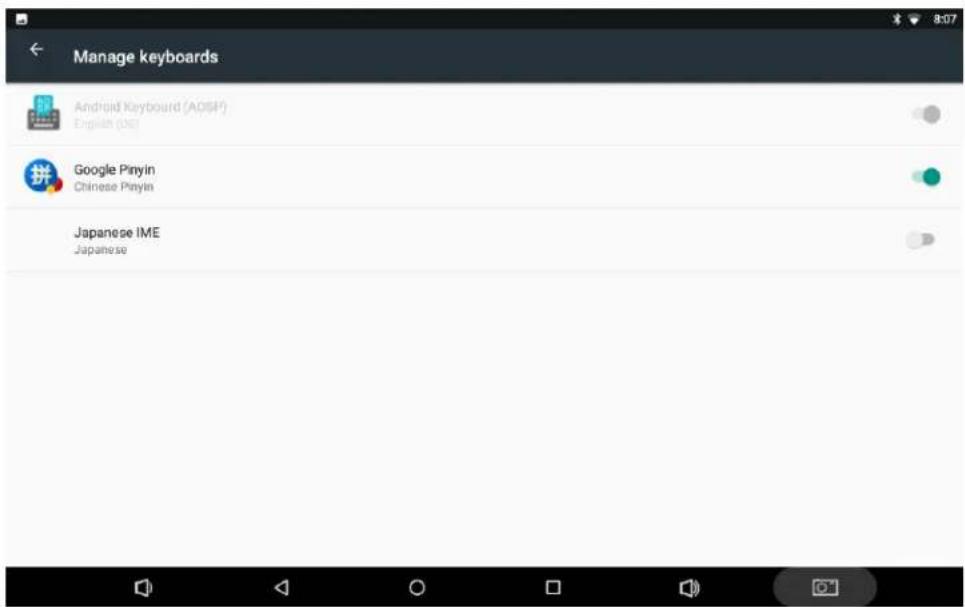
text_image
Manage keyboards Android Keyboard (ADSP) English (US) Google Pinyin Chinese Pinyin Japanese IME JapaneseTake Photos
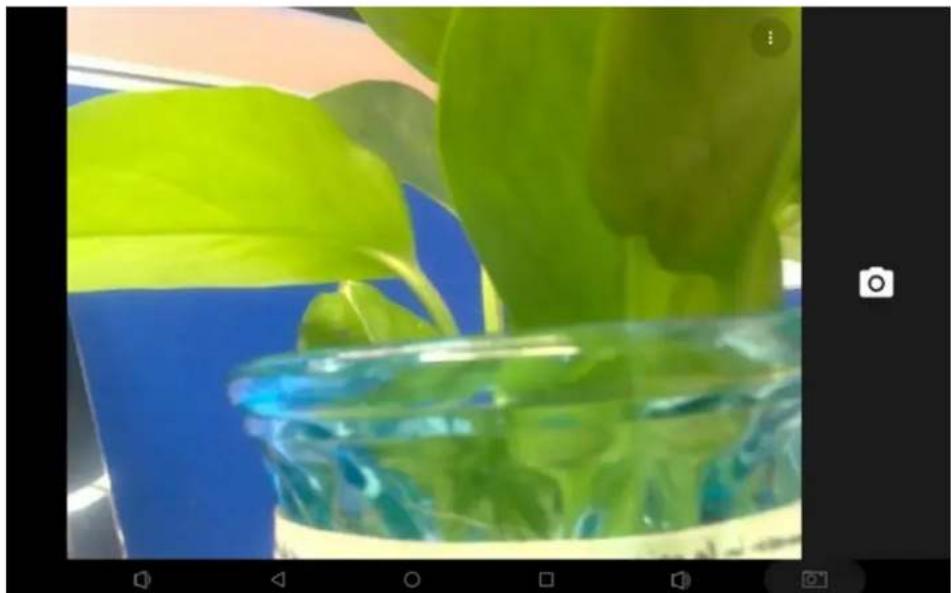
In the App list, tap to launch the Camera app.
Tap take a photo.
natural_image
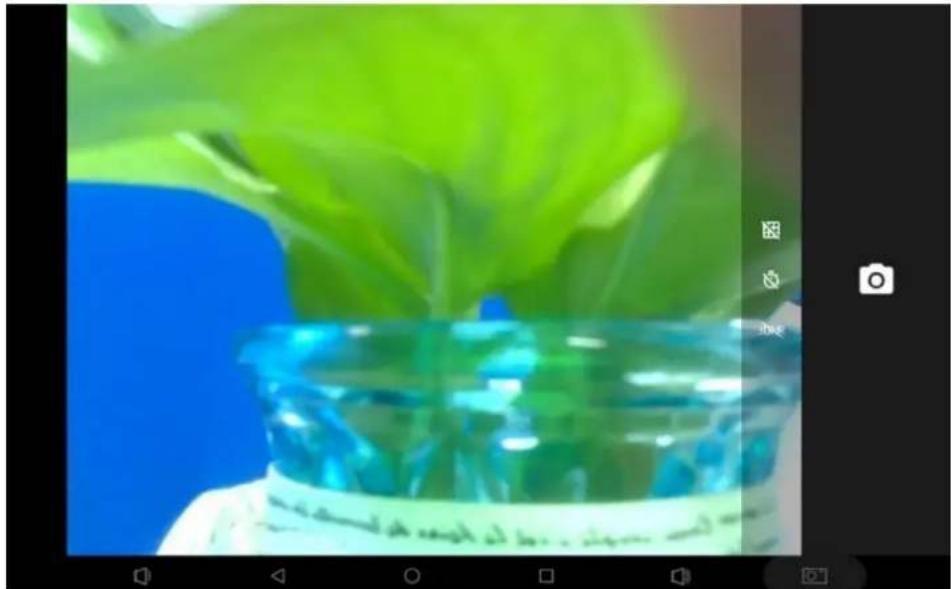
Close-up of a person pouring green liquid into a glass bowl with blue background (no text or symbols visible)Tap to open detail settings. From top to bottom in the picture are: grid lines, timer and 3DNR.
text_image
Photo of a lab flask with green liquid and blue liquid, showing Chinese text on the label 'الصين مهان' in the corner.Surf Online
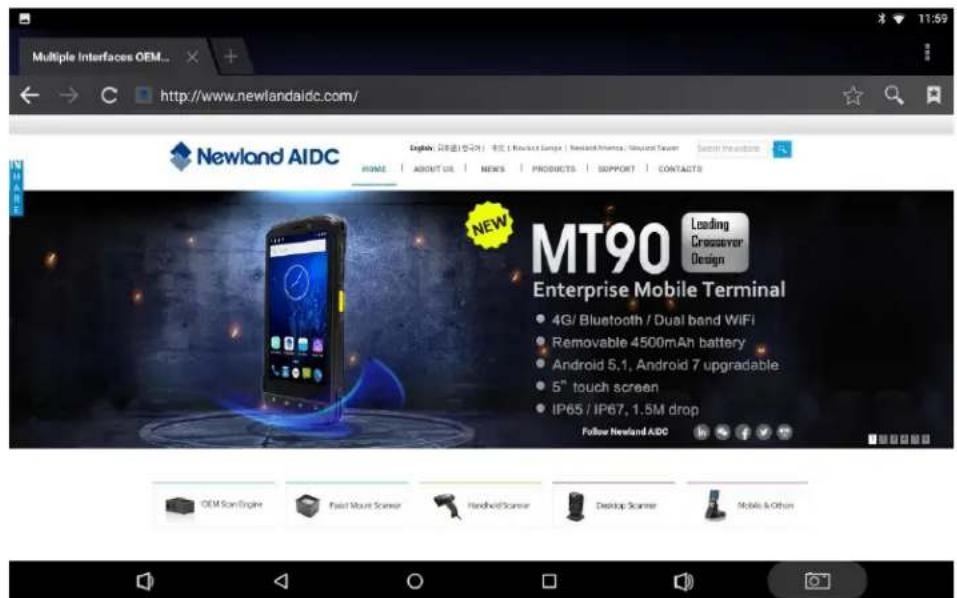
In the App list, tap to launch the Browser app.
When connecting the device to a network, you can visit websites, play online media or download files via the browser.
In a browser window, enter a URL into the address bar and tap on the virtual keyboard to open the URL. You can also tap to add new tabs to open multiple webpages simultaneously in one window.
text_image
Multiple Interfaces OEM... http://www.newlandaidc.com/ Newland AIDC Digital 2D制造(5G+4G) 电讯 / Riuscat Sange / Newland AIDC / Microsoft Server HOME | ABOUT US | NEWS | PRODUCTS | SUPPORT | CONTACTS NEW MT90 Leading Crossover Design Enterprise Mobile Terminal • 4G/ Bluetooth / Dual band WiFi • Removable 4500mAh battery • Android 5.1, Android 7 upgradable • 5" touch screen • IP65 / IP67, 1.5M drop Follow Newland ADC OEM Son Engine Fast Mount Scanner Handheld Scanner Desktop Scanner Mobile & OthersBrowse Files
In the App list, tap "Explorer" to view local files.
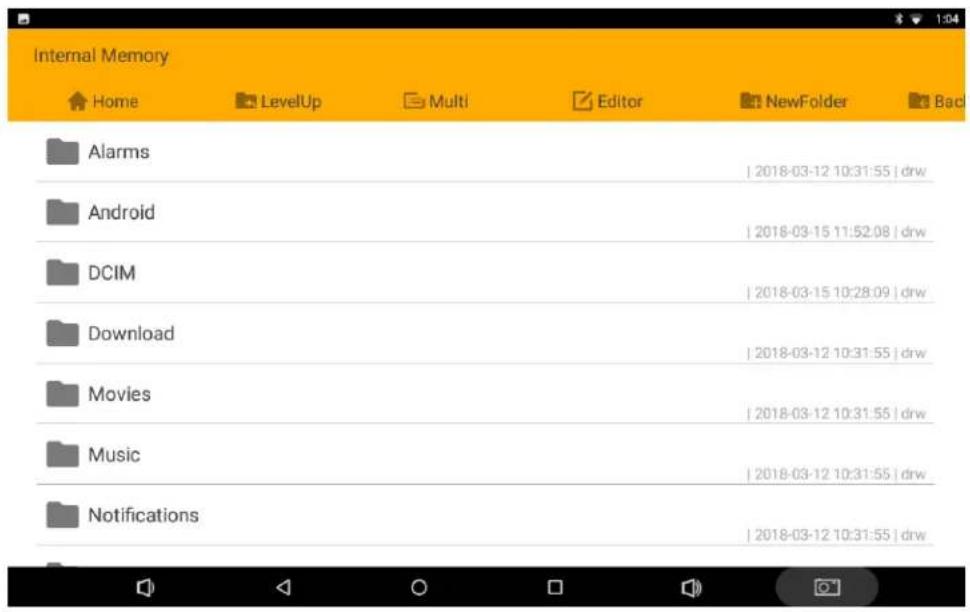
text_image
Internal Memory Home LevelUp Multi Editor NewFolder Back Alarms Android DCIM Download Movies Music Notifications [ 2018-03-12 10:31:55 ] drw [ 2018-03-15 11:52:08 ] drw [ 2018-03-15 10:28:09 ] drw [ 2018-03-12 10:31:55 ] drw [ 2018-03-12 10:31:55 ] drw [ 2018-03-12 10:31:55 ] drwLong-tap a file or folder to perform file operations, such as copy, delete, move (cut), paste, rename, send (share) and create shortcut.
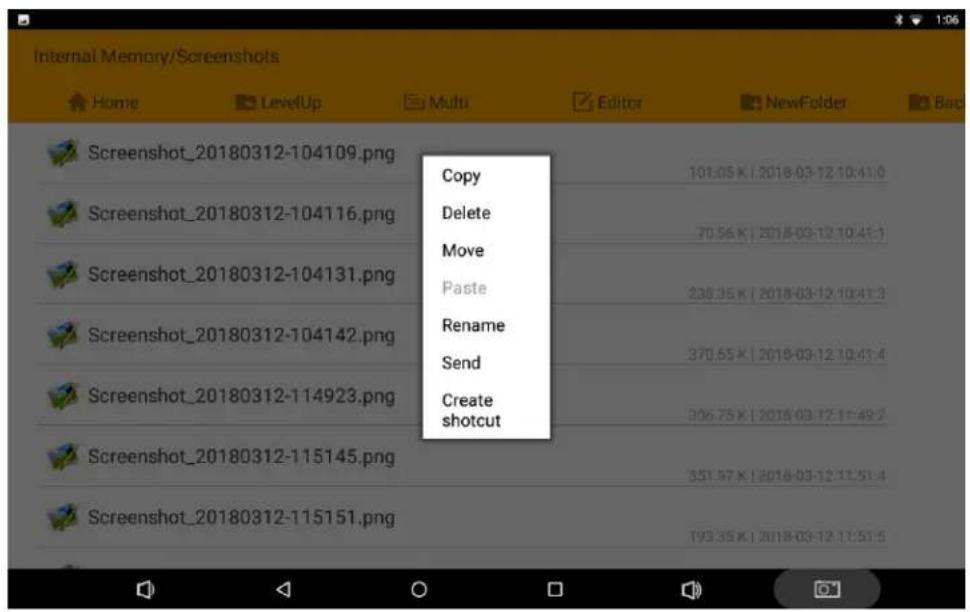
text_image
Internal Memory/Screenshots Home LevelUp Multi Editor NewFolder Back Screenshot_20180312-104109.png Copy Delete Move Paste Rename Send Create shotcutTo select multiple files/folders, tap "Multi" in the menu and then select files/folders. The selected files/folders will be highlighted in yellow.
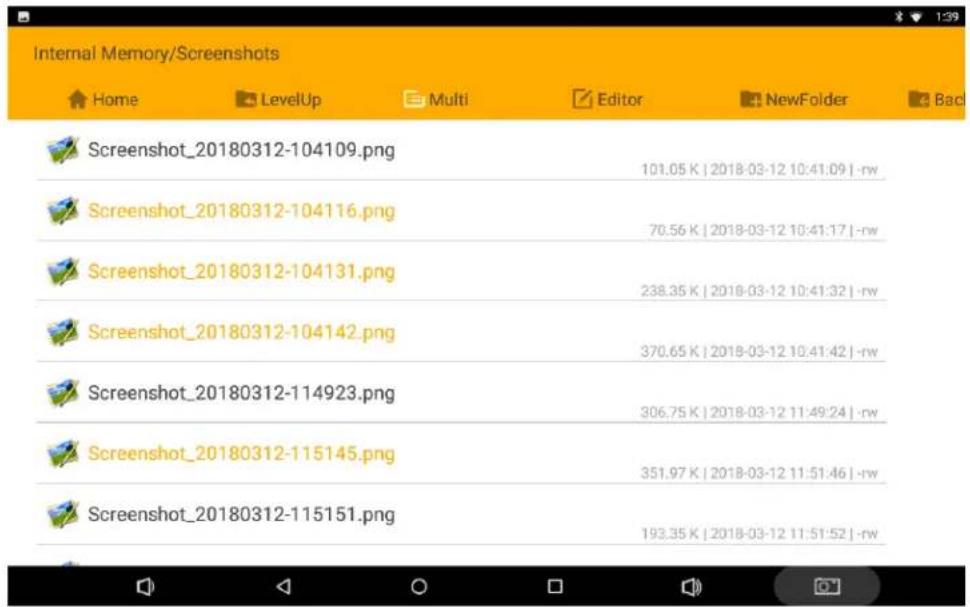
text_image
Internal Memory/Screenshots Home LevelUp Multi Editor NewFolder Back Screenshot_20180312-104109.png 101.05 K | 2018-03-12 10:41:09 | -rw Screenshot_20180312-104116.png 70.56 K | 2018-03-12 10:41:17 | -rw Screenshot_20180312-104131.png 238.35 K | 2018-03-12 10:41:32 | -rw Screenshot_20180312-104142.png 370.65 K | 2018-03-12 10:41:42 | -rw Screenshot_20180312-114923.png 306.75 K | 2018-03-12 11:49:24 | -rw Screenshot_20180312-115145.png 351.97 K | 2018-03-12 11:51:46 | -rw Screenshot_20180312-115151.png 193.35 K | 2018-03-12 11:51:52 | -rwTap "Editor" in the menu to operate the selected files/folders.
Play Media
With the provided apps, you can play your media files on your storage, such as pictures, music and videos.

Picture Player:
Support JPG, BMP, GIF, PNG.

Music Player:
Support MP2, WMA, WAV, AAC, OGG, ASF.

Video Player:
Support MKV, TS, FLV, AVI, VOB, MPG, DAT, ASF, RM, MOV, 3GP, MP4, WMV.
Install & Uninstall Apps
Install Apps
Before installing an app, please download the app (.apk) to using the browser, or copy a downloaded app (.apk) to the device from your computer.
Then you can open the ApkInstaller app in the App list to install the downloaded app.
Tap "Install" button.
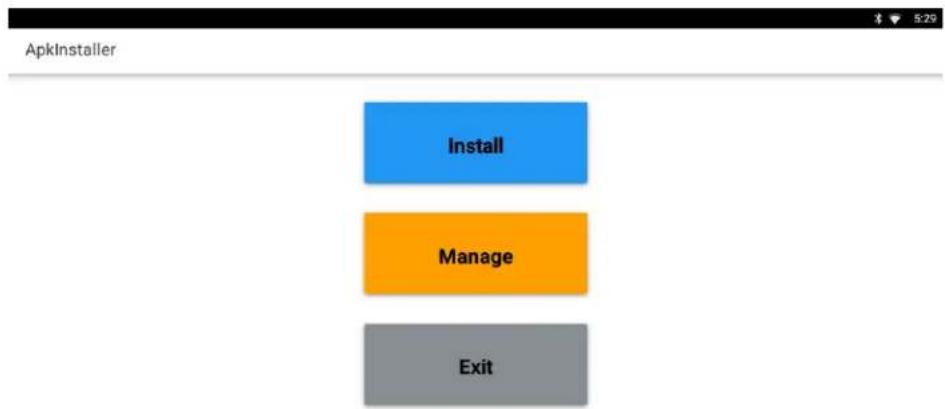
text_image
ApkInstaller Install Manage Exit
text_image
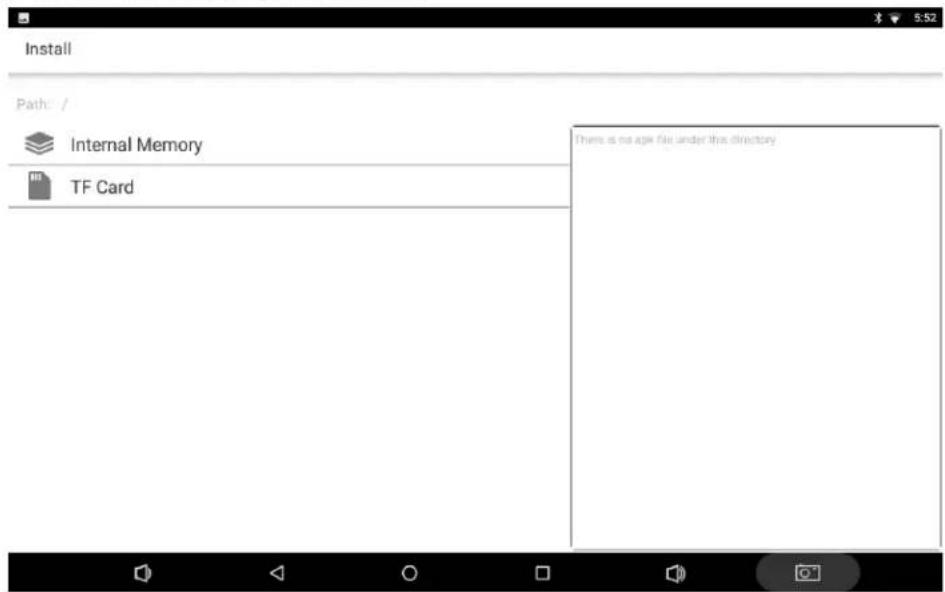
Media player control bar with playback, audio, and video iconsOpen the folder containing the apk file.
text_image
Install Path: / Internal Memory TF Card There is no age file under this directory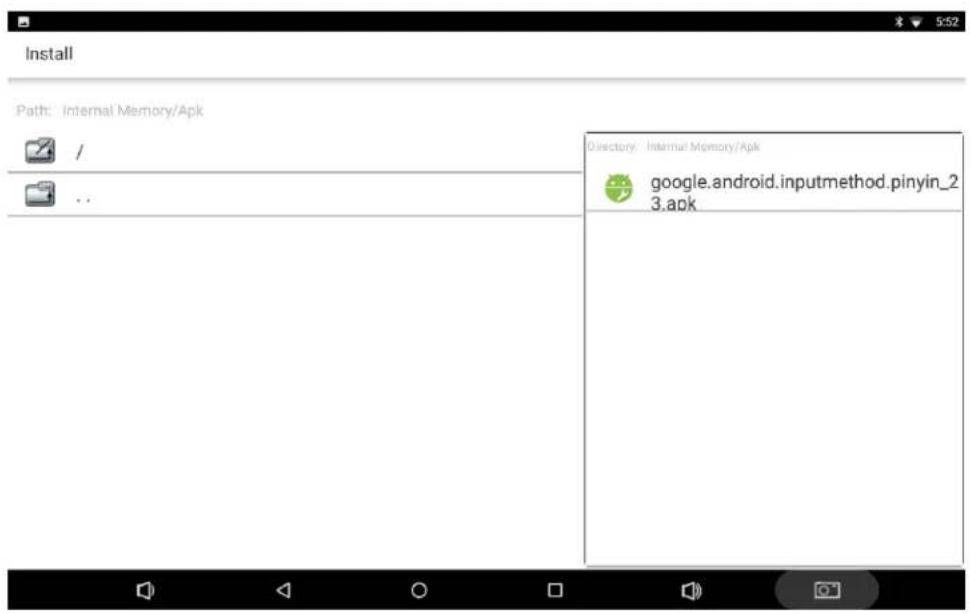
text_image
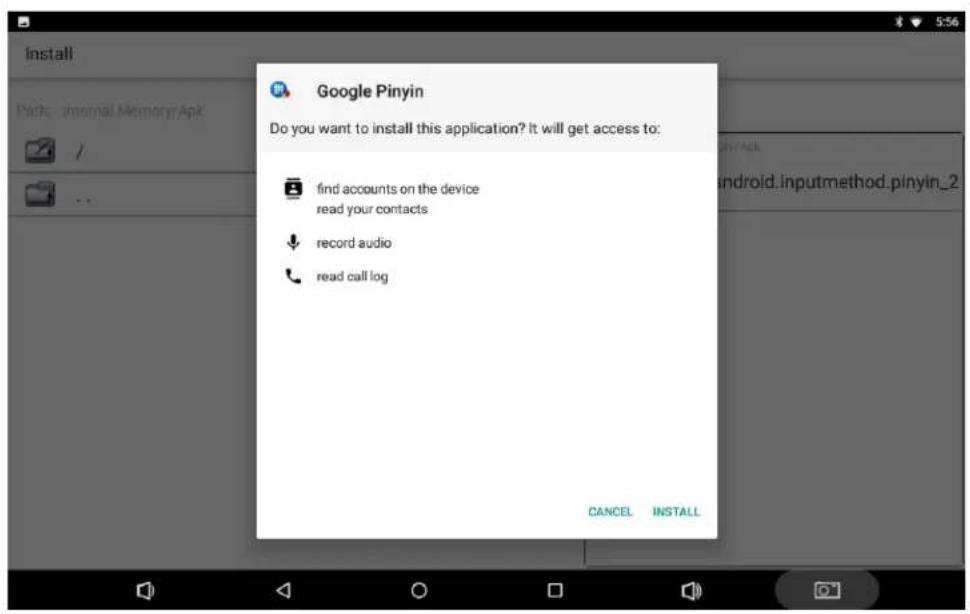
Install Path: Internal Memory/Apk / .. Directory: Internal Memory/Apk google.android.inputmethod.pinyin_2 3.apkTap the apk you want to install.
text_image
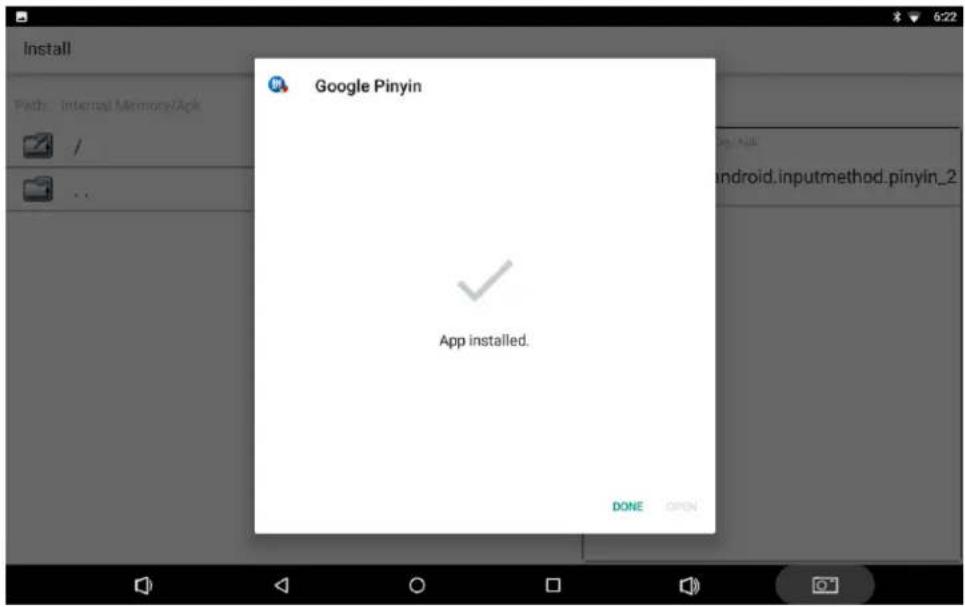
Google Pinyin Do you want to install this application? It will get access to: find accounts on the device read your contacts record audio read call log CANCEL INSTALLTap "INSTALL" and then wait for the installation to complete.
text_image
Google Pinyin App installed. DONE OPENYou can also download an android app market, and install the apps via the market.
If receiving the “For security, your tablet is set to block installation of apps obtained from unknown sources” message when installing an app, tap “ SETTINGS”, and enable the “Unknown sources” option, and then reinstall the app.
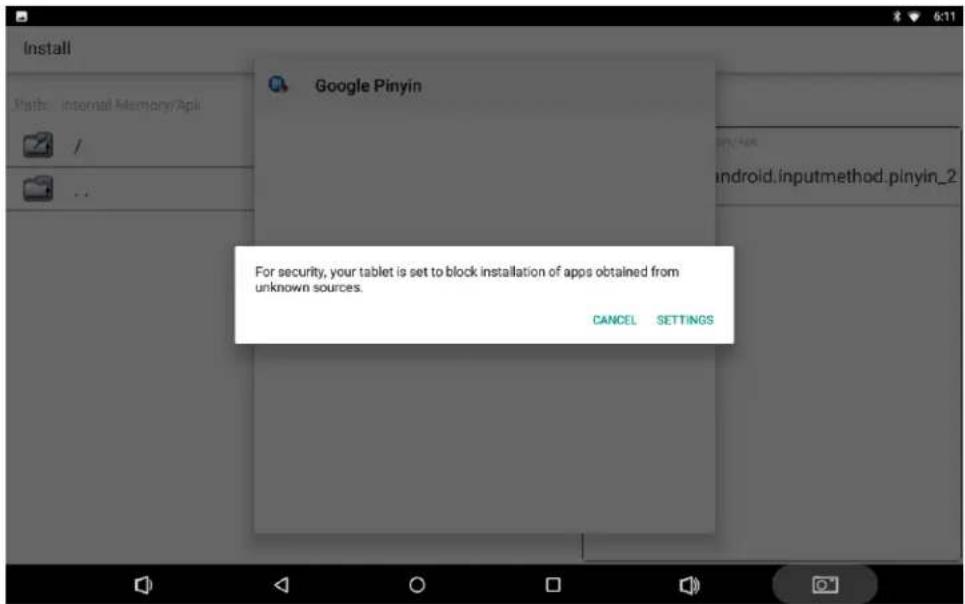
text_image
For security, your tablet is set to block installation of apps obtained from unknown sources. CANCEL SETTINGS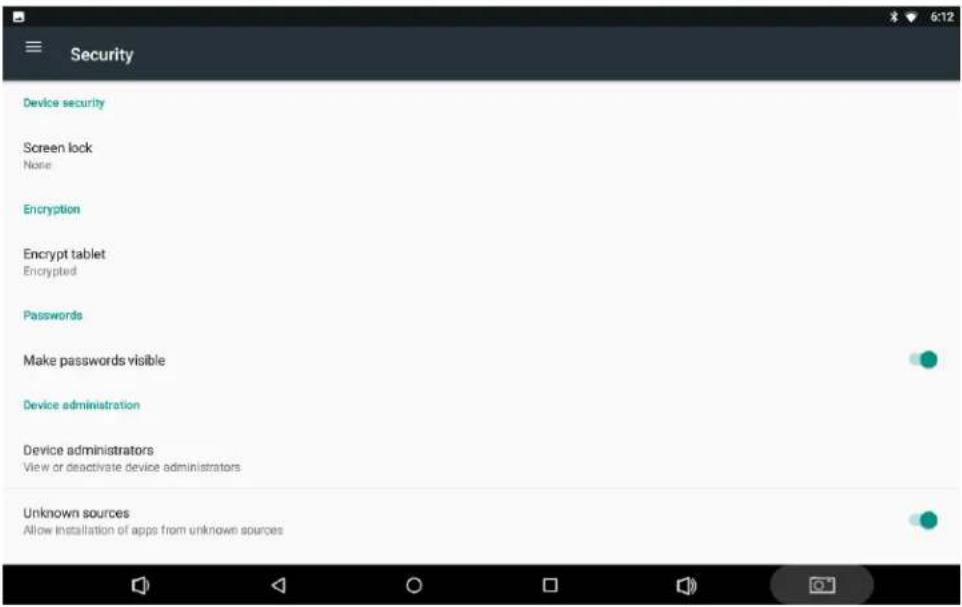
text_image
Security Device security Screen lock None Encryption Encrypt tablet Encrypted Passwords Make passwords visible Device administration Device administrators View or deactivate device administrators Unknown sources Allow installation of apps from unknown sourcesUninstall Apps
To uninstall an app, Open the Settings app in the App list, and select "Apps".
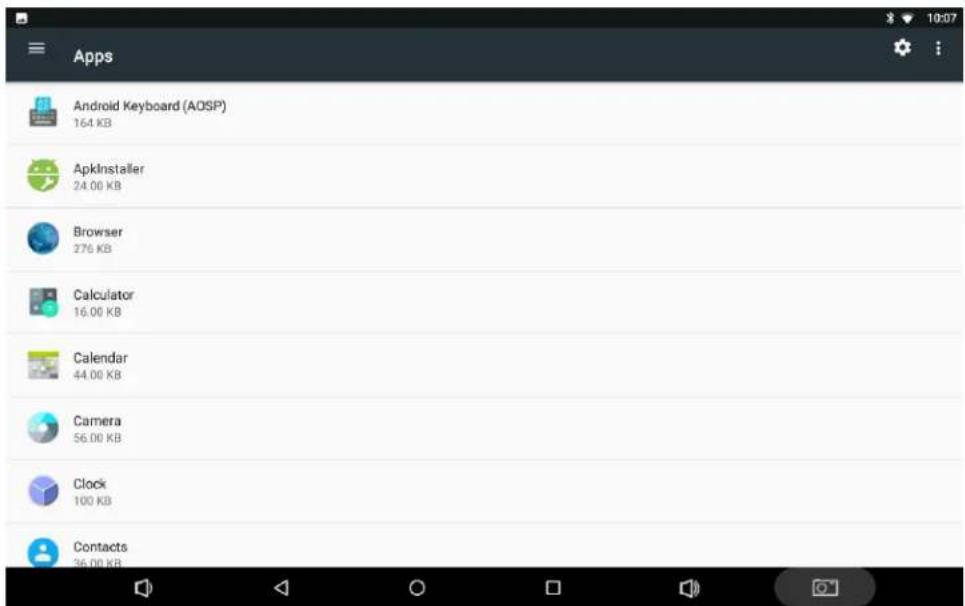
text_image
Apps Android Keyboard (AOSP) 164 KB ApkInstaller 24.00 KB Browser 276 KB Calculator 16.00 KB Calendar 44.00 KB Camera 56.00 KB Clock 100 KB Contacts 36.00 KBTap the app you want to remove.
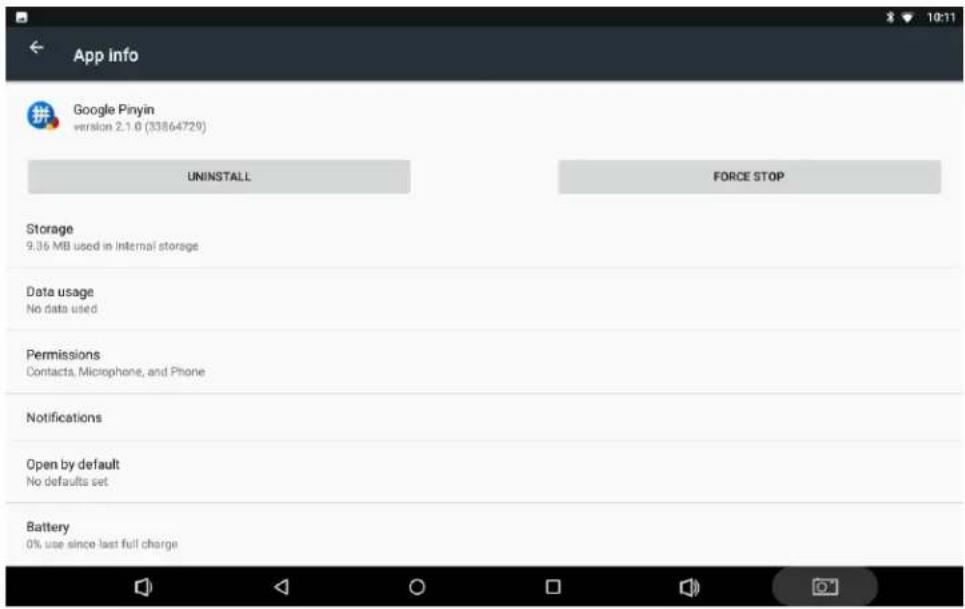
text_image
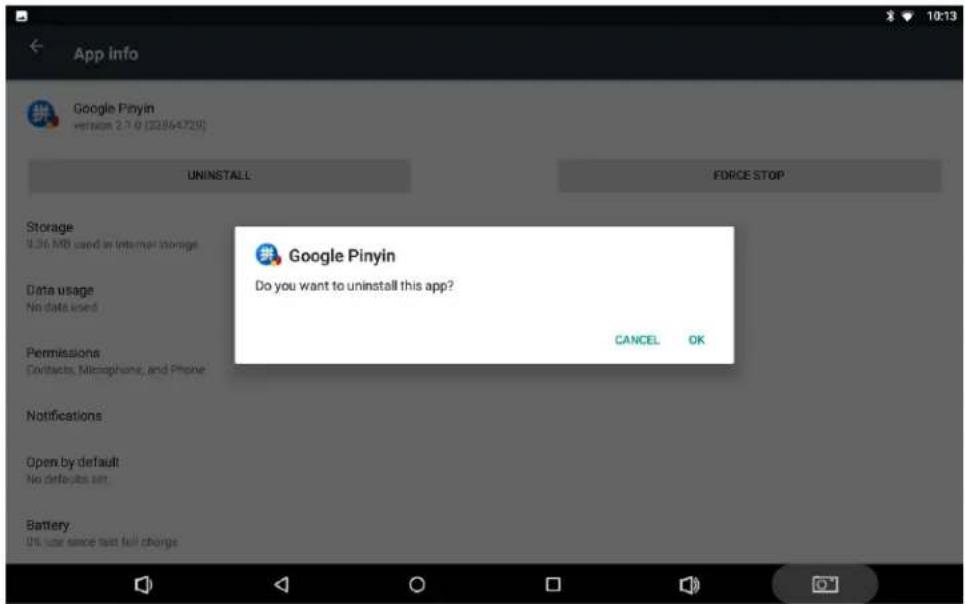
App Info Google Pinyin version 2.1.0 (33864729) UNINSTALL FORCE STOP Storage 9.35 MB used in internal storage Data usage No data used Permissions Contacts, Microphone, and Phone Notifications Open by default No defaults set Battery 0% use since last full chargeTap the "UNINSTALL" button then "OK", and then wait for the uninstallation to complete.
text_image
App info Google Pinyin version 2.1.0 (33:86:72:5) UNINSTALL FORCE STOP Storage 9.26 MB used in Internet storage Data usage No data used Permissions Contacts, Microphone, and Phone Notifications Open by default No default set Battery OK user since last full charge Google Pinyin Do you want to uninstall this app? CANCEL OKReset to Factory Default
Please make sure to back up the important data before resetting the device.
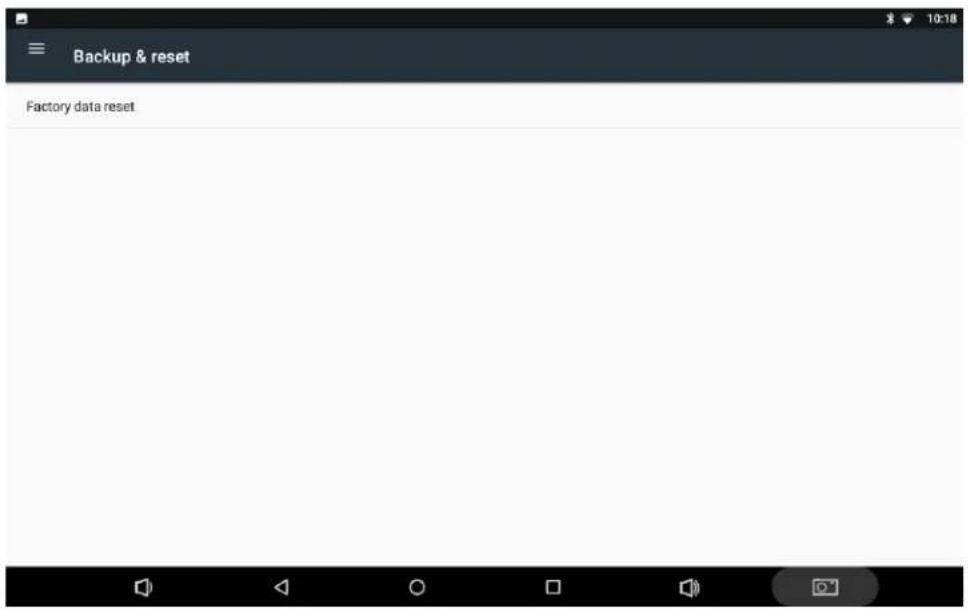
In the App list, tap "Settings" to open the system settings app, and select "Backup & reset".
text_image
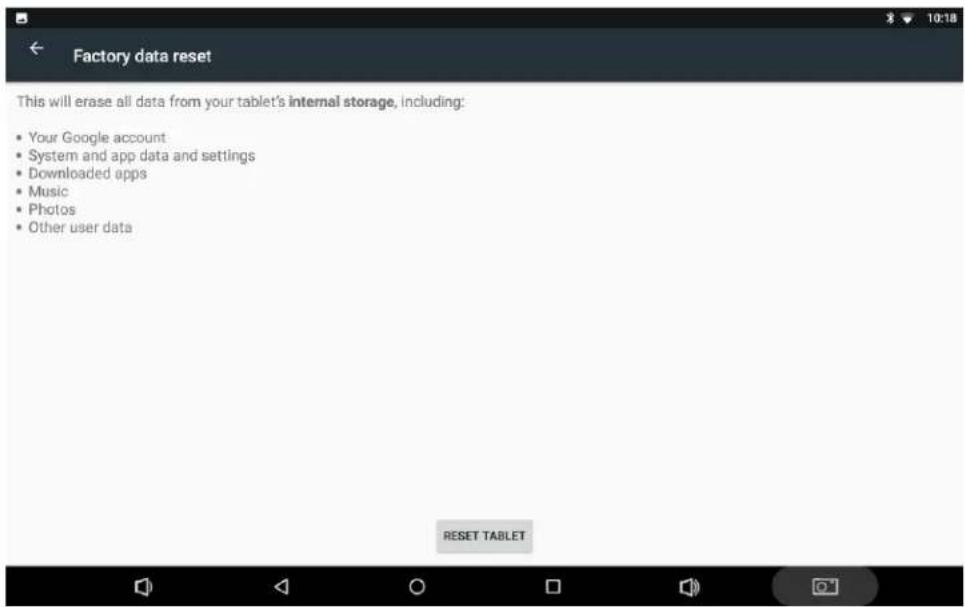
Backup & reset Factory data resetTap "Factory data reset".
text_image
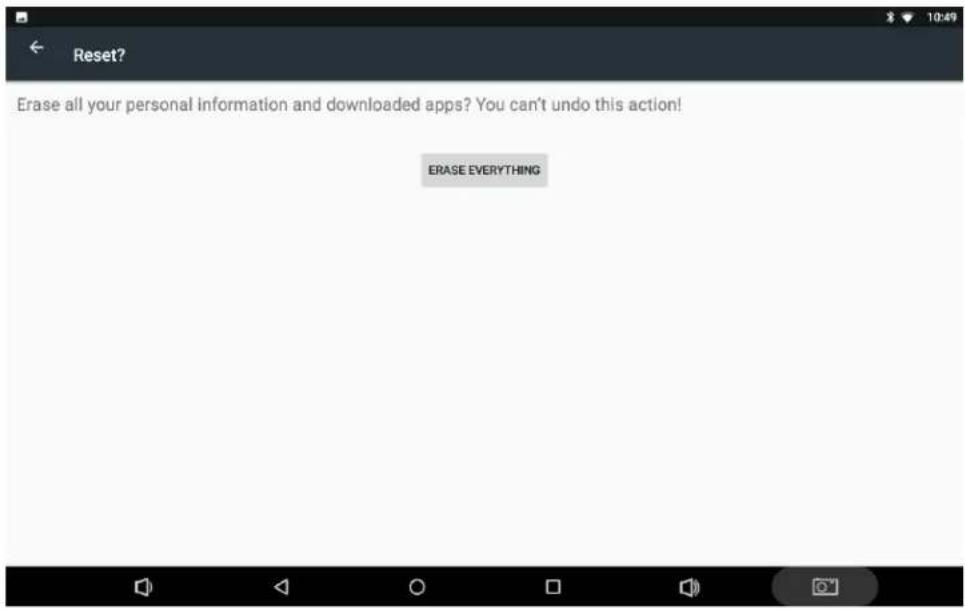
Factory data reset This will erase all data from your tablet's internal storage, including: • Your Google account • System and app data and settings • Downloaded apps • Music • Photos • Other user data RESET TABLETTap the "RESET TABLET" button.
text_image
Reset? Erase all your personal information and downloaded apps? You can't undo this action! ERASE EVERYTHINGTap the "ERASE EVERYTHING" button. Then the device will reboot and reset to factory default.

Newland
SCANNING MADE SIMPLE