IS1210E - Power bank Projecta - Free user manual and instructions
Find the device manual for free IS1210E Projecta in PDF.


User questions about IS1210E Projecta
0 question about this device. Answer the ones you know or ask your own.
Ask a new question about this device
Download the instructions for your Power bank in PDF format for free! Find your manual IS1210E - Projecta and take your electronic device back in hand. On this page are published all the documents necessary for the use of your device. IS1210E by Projecta.
USER MANUAL IS1210E Projecta
IMPORTANT SAFETY INFORMATION
Please read this manual thoroughly before use and store in a safe place for future reference.
WARNINGS
- Risk of explosive gas. Working in the vicinity of a lead-acid battery can be dangerous. Batteries release explosive gases during normal operation, charging and while jumpstarting a battery. Before using this Jumpstarter, read and follow the instructions carefully. Follow all manufacturer's instructions and warnings on the vehicle's battery and other equipment being used.
- Jumpstart 12V lead-acid batteries only. Do not use to jumpstart dry-cell batteries commonly found in household appliances. These batteries may burst and cause injury and/or property damage.
- Do not smoke, use matches, use a cigarette lighter, or allow a spark or flame near the battery.
- Do not allow metal to come in contact with the battery posts. It may spark or short circuit the battery and cause an explosion/fire.
- Always wear eye protection when operating the Jumpstarter.
- Remove rings, bracelets, necklaces and watches when working with a lead-acid battery.
- Contains a Lithium Cobalt battery and must be disposed of properly.
- Ensure correct polarity when connecting to vehicle.
- Although the Jumpstarter is rain proof it is not designed to be left outside for extended periods or submerge in water.
- Although the Jumpstarter has been designed to protect the battery it is best to not drop the Jumpstarter or try and pierce the Jumpstarter in anyway, as this can result in a fire. If the Jumpstarter is physically damaged in any way do not use.
- Do not store the Jumpstarter in temperatures above 40 ° Celsius or below -10° Celsius, as this can affect the health of the battery and if the temperature is above 120° Celsius the battery may catch fire.
- Not intended for people (including children) with reduced physical or mental capability.
- Once the vehicle is started disconnect the Jumpstarter immediately after starting.
- Do not try and charge via the USB output as this will damage the Jumpstarter and the USB output.
IMPORTANT CHARGING INFORMATION
- Charge Jumpstarter prior to first use, this may take up to 4 to 8 hours depending on the model.
- Fully recharge the Jumpstarter after every use to ensure your Jumpstarter is ready in emergencies.
- To extend the life of your battery do not let the battery charge level fall below 20%.
- To extend the life of the Jumpstarter battery, do not charge above 45 °C or below 0°C.
FEATURES
IS910E
The IS910E is suitable for starting most 12V Petrol vehicles up to 6 litres.
IS1210E
The IS1210E is suitable for starting most 12V Petrol vehicles up to 7 litres and diesel vehicles up to 3.2 litres.
12V USB CHARGING – Allowing the Jumpstarter to be charged from your vehicle cigarette socket.
LITHIUM BATTERY – Increased storage life and a much more compact lightweight unit.
PREMIUM SPARK FREE CLAMPS – Ensuring safe Jumpstarting.
INCORPORATING HIGHEST RATE OF DISCHARGE BATTERY – For increased starting capacity.
POWER BANK WITH 2.1AMP USB PORT – Allowing charging of phones, tablets and other small portable devices.
EASY TO READ BATTERY STATUS INDICATOR – Shows battery status and when recharge is required.
CONNECTION INDICATION – Confirms clamp connectivity and status.
INBUILT LED FLOOD LIGHT – Inbuilt LED flood light provides illumination for safer, more convenient operation at night.
ADDED PROTECTION, SAFETY AND RELIABILITY
TOTAL SAFEGUARD PROTECTION – Includes Over voltage Protection, Battery & Switch Over-temperature Protection, Short Circuit Protection, Over Current Protection, Over Cranking Protection, Under-voltage Protection, Low voltage indication, Battery Cell Balancing to protect the user, vehicle and Jumpstarter.
SMART MODULE – A second layer of protection, preventing the unit from over charging.
REVERSE POLARITY PROTECTION & ALARM – Prevents sparking from accidental reverse connection. The alarm sounds when the Jumpstarter clamps are connected incorrectly.
SURGE PROTECTION – IS910E/IS1210E features built in surge protection so you can safely Jumpstart vehicles with EFI (electronic fuel injection) and computer management systems.
SPECIFICATIONS
| Part No. IS910E IS1210E | ||
| Battery | ||
| Battery Type Lithium Cobalt (LiCo) | ||
| Voltage 12 Volt only | ||
| Battery Capacity 6,600mAhr at 3.7V 13,500mAhr at 24.4wHr at 3.7V 50.0wHr at 3.7V2.2Ahr at 12.0V 4.5Ahr at 12.0V | 3.7V | |
| Peak Amps 900A 1200A | ||
| Clamp Power 240A 330A | ||
| Number of Jumpstarts(vehicle without a battery) | 7 Starts (Petrol)0 Starts (Diesel) | 14 Starts (Petrol)0 Starts (Diesel) |
| Number of Emergency Jumpstarts*(with a flat vehicle battery) | 14 Starts (Petrol)0 Starts (Diesel) | 28 Starts (Petrol)5 Starts (Diesel) |
| Battery Cycles 500 500 | ||
| USB Output | ||
| USB output | 2.1A, 5.0V | |
| USB low Voltage Disconnect | Battery voltage at 9.0V | |
| Jumpstarter Leads | ||
| Length | Positive 23.5cm, Negative 16.5cm | |
| Cable | 8mm^2 8(AWG) | |
| Polarity Protection | MCU controlled with Electronic Switch Smart Module | |
| Overload Protection | MCU controlled with Electronic Switch Smart Module | |
| Recharging | ||
| Cable | 1m long USB to Micro USB | |
| Micro USB Charging port | 2.1Amp micro USB charging port3rd party 10W 240VAC USB adaptors can be used. (Not Provided) | |
| 12V DC charging | 12V to 5V 2.1Amp USB charger (provided) | |
| Recharge time | 4 hours | 8 hours |
| Jumpstart Connection Voltages | ||
| Vehicle Voltage Range | 0~15.0V | |
| Dimensions, Weight & Environmental | ||
| Height | 47mm | |
| Width | 178mm | |
| Depth | 91mm | |
| Weight | 0.61Kg | 0.76Kg |
| Operating Temperature | 0 to 45°C | |
| Storage Temperature | -20 to 40°C | |
| Ingress Protection | IP52 (Rain Proof) with covers over the ports | |
* Tested on a Ford Ranger 3.2L Diesel and Ford Territory 4.0L Petrol with a flat battery in good condition
PRODUCT OVERVIEW
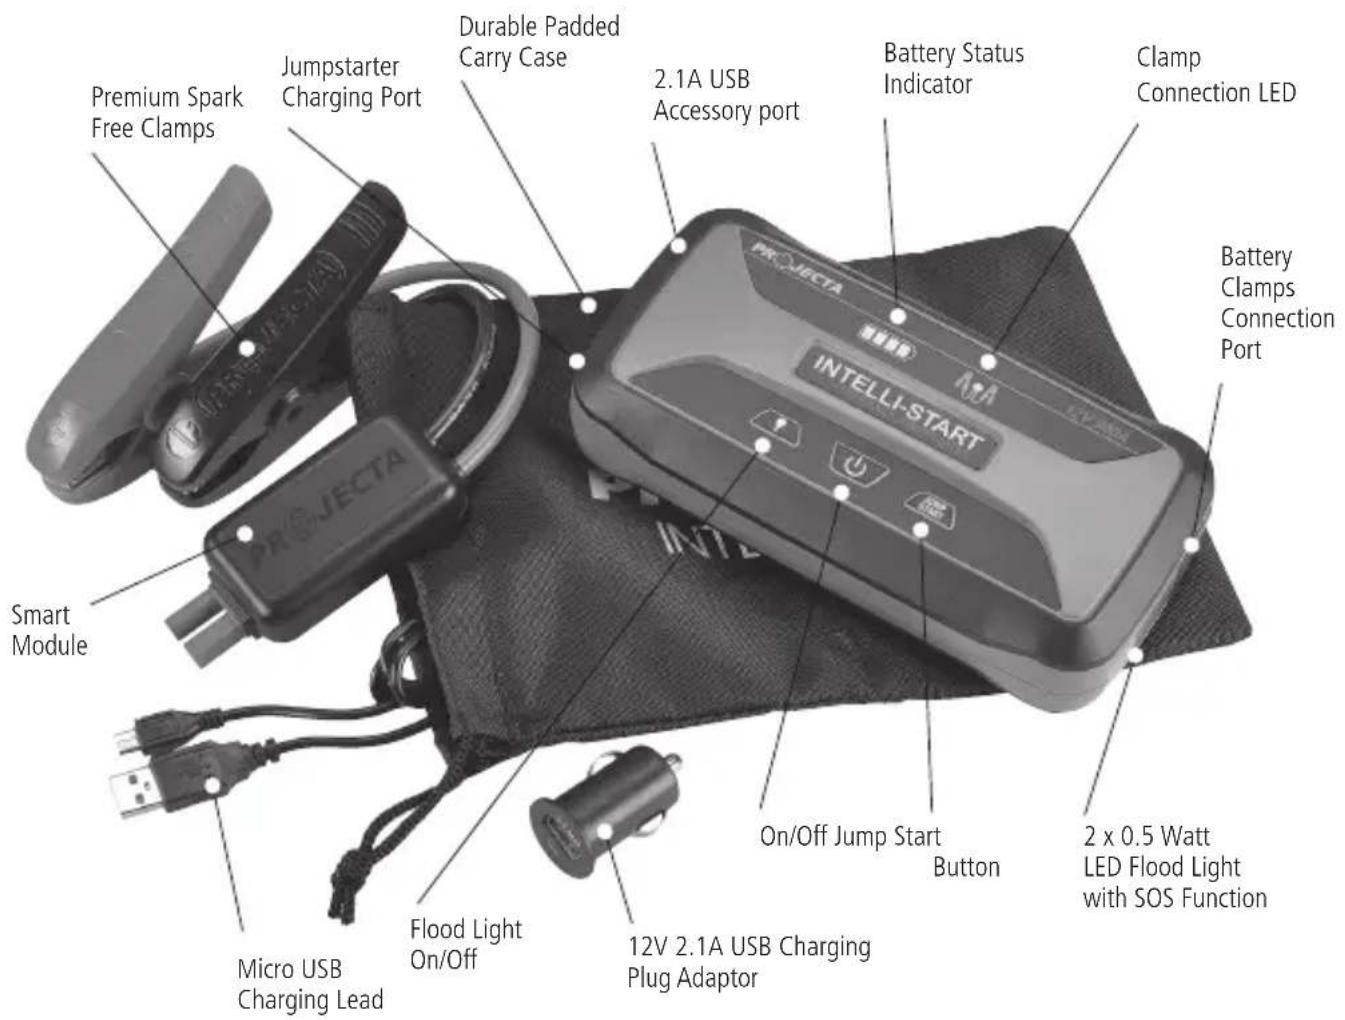
text_image
Premium Spark Free Clamps Jumpstarter Charging Port Durable Padded Carry Case 2.1A USB Accessory port Battery Status Indicator Clamp Connection LED Battery Clamps Connection Port Smart Module INTELLI-START Micro USB Charging Lead Flood Light On/Off 12V 2.1A USB Charging Plug Adaptor On/Off Jump Start Button 2 x 0.5 Watt LED Flood Light with SOS FunctionVEHICLE JUMPSTARTING INSTRUCTIONS
- Your Jumpstarter should be charged for 8 hours prior to first use and as soon as possible after each use.
- Before making any connections, check the Jumpstarter battery status by turning on the Jumpstarter. The Jumpstarters battery capacity should show at least 2 bars or 50% charged.
- Turn your vehicle's ignition OFF before connecting the Jumpstarters clamps to your vehicle.
- Connect the Red Positive (+) clamp to the positive (+) terminal of the battery in the vehicle and the Black Negative (-) clamp to the negative (-) terminal of the battery or any non moving metal part of the engine block. DO NOT CONNECT TO FUEL LINE. Always double check that you have the proper connections.
- Press and hold the Jump Start button for 1 second. The Clamp LED should turn on to Green.
- Turn the vehicle's ignition to ON and start the vehicle. After the engine has started, turn the Jumpstarter off. If the Jumpstarter fails to start your vehicle refer to the Clamp Connection LED table below for any error it may indicate & check that the clamps are correctly connected with good contact.
- Disconnect the Black clamp and then the Red clamp.
- Recharge the Jumpstarter.
UNDERSTANDING YOUR JUMPSTARTER CLAMP CONNECTION LED
| Jumpstart Status LED State | ||
| Jumpstarter clamps connected to vehicle and ready to jumpstart Green | Solid | |
| Jumpstarting for more than 5 seconds 2 x Yellow Flash, pause & repeat | ||
| Battery or Jumpstarter switch, Over-temperature Red/Green Alternate flashing | ||
| Battery Charging in Temperatures >60°C or <0°C flashing and Siren | Red/Green Alternate | |
| Short Circuit Beeping Siren | Red | Flashing & |
| Clamps reverse connected to battery Siren on | Red | Solid and |
| Jumpstarter is connected to vehicle battery and the Smart Module has failed. Go to store to get P/n: ISECLAMP. | Red | fast flash, Siren Steady on |
| Jumpstarter is not connected to a vehicle battery. Jumpstarter has an internal fault and can not be used. | Red | fast flash, Siren Steady on |
BATTERY STATUS INDICATOR
When Jumpstarter is turned on battery gauge LED's are displayed.
| State of Charge Battery Gauge LED Display | |
| <20% – Red Flashing |  |
| 20–25% – Red |  |
| 25–50% – Yellow |  |
| 50–75% – Green |  |
| 75–100% – Green |  |
The Jumpstarter will beep if less than 10.0V until charged or turned off.
CHARGING THE JUMPSTARTER
The Jumpstarter can be charged with the provided 12V DC to USB charge adaptor or a via 3rd party 10 Watt USB 240VAC charger (tablet charger).
- Plug the 12V to 2.1A USB charge adaptor into a 12V socket.
- Use the provided USB to micro USB cable:
a. Connect the USB end into the 12V to USB socket.
b. Connect the micro USB end to the Jumpstarter.
The Jumpstarter will now turn on and start charging. The BATTERY STATUS INDICATOR will now start to scroll in the following ways depending on its state of charge.
| State of Charge Battery Gauge LED Display | |
| <20% – All Flashing |  |
| 20–50% – Red with Yellow & Gre |  shing shing |
| 50–75% – Yellow with Green Fla |  |
| 75–99% – Green with Green Fla |  |
| 100% – All Solid Green |  |
- When your Jumpstarts is fully changed after 4 hours for IS910E or 8 hours for IS1210E, simply disconnect the leads and put the Jumpstarter away.
WHEN TO CHARGE
Your Jumpstarter is shipped partially charged. Therefore you should charge the Jumpstarter before using it for the first time. It is recommended to charge fully after each use so the Jumpstarter is ready in case it is required.
POWER BANK
The Jumpstarter has a USB output with 2.1A out. It is suitable to charge phones, tablets, cameras and GPS devices. The Jumpstarter will turn off after 5 minutes of no activity or the USB device has been fully charged.
If the USB output becomes overloaded, remove the device and check it. Turn the Jumpstarter off and back on again, the USB output should work again
WARNING: Charging devices from the Jumpstarter will drain the battery and potentially cause the Jumpstarter to fail to start your vehicle in an emergency. Recharge the Jumpstarter as soon as possible.
FLOOD LIGHT
The Flood light has two functions, Flood light mode and SOS mode.
Flood light mode
Press and hold the light button for less than 3 seconds and the light will turn on. Press the Light button again to turn the light off when you are finished.
Note: If the Jumpstarter is off and the light button is pressed, the button will need to be pressed for at least 12 second before the light will turn on.
SOS mode
Press and hold the light button for more than 3 seconds and the work light will now transmit SOS in Morse code. Press the light button again to turn off.
Note: The Flood light is not on a timer and will continue to operate until the battery is flat.
FREQUENTLY ASKED QUESTIONS
Q. Why didn't my Jumpstarter start my vehicle?
A. There could be a number of reasons why the Jumpstarter did not start you vehicle. Check the following:
1. Ensure the Jumpstarter battery is fully charged. Refer to page 7 ("BATTERY STATUS INDICATOR") for further information.
2. Ensure you have followed the correct operating procedure. Refer to page 5 ("Vehicle Jumpstarting Instructions").
3. Ensure the vehicle operates on 12V DC
4. Ensure the vehicle being jumpstarted does not require a clamp output greater than 240 Amps (IS910E) or 330 Amps (IS1210E) in order to jumpstart the vehicle.
Q. Can I leave my Jumpstarter connected to car after it has started?
A. No. The Jumpstarter is not a replacement battery and should be disconnect from the vehicle battery after the engine has started. Once the engine has started the jumpstarter has already internally disconnected so the jumpstarter is not providing any benefit to the vehicle and is best packed away so the jumpstarter does not fall into the engine or moving parts.
Q. How often should I charge my Jumpstarter?
A. The Jumpstarter uses Lithium technology which self discharges only a very small amount. To be safe the Jumpstarter should be charged at least every year to be sure it is ready in case of an emergency.
Q. Can I charge the Jumpstarter and use the USB output at the same?
A. Yes that will not be a problem.
Q. What is Peak Amps?
A. Peak amps is the maximum current the battery in the Jumpstarter can produce.
Q. What is Clamp Power?
A. Clamp power is the maximum current available at the clamps.
Q. What is the Smart Module?
A. The Smart Module prevents the unit from overcharging and creates a second layer of protection.
NOTES
NOTES
WARRANTY STATEMENT
Brown & Watson International Pty. Ltd. ("BWI") of 1500 Ferntree Gully Road, Knoxfield, Vic., telephone (03) 9730 6000, fax (03) 9730 6050, warrants that all products described in its current catalogue will under normal use and service be free of failures in material and workmanship for a period of one (1) year from the date of the original purchase by the customer as marked on the invoice (see elsewhere for specific warranty period). This warranty does not cover ordinary wear and tear, abuse, alteration of products or damage caused by the purchaser.
To make a warranty claim the consumer must deliver the product at their cost to the original place of purchase or to any other place which may be nominated by either BWI or the retailer from where the product was bought in order that a warranty assessment may be performed. The consumer must also deliver the original invoice evidencing the date and place of purchase together with an explanation in writing as to the nature of the claim.
In the event that the claim is determined to be for a minor failure of the product then BWI reserves the right to repair or replace it at its discretion. In the event that a major failure is determined the consumer will be entitled to a replacement or a refund as well as compensation for any other reasonably foreseeable loss or damage.
This warranty is in addition to any other rights or remedies that the consumer may have under State or Federal legislation.
IMPORTANT NOTE
Our goods come with guarantees that cannot be excluded under the Australian Consumer Law. You are entitled to a replacement or refund for a major failure and compensation for any other reasonably foreseeable loss or damage. You are also entitled to have the goods repaired or replaced if the goods fail to be of acceptable quality and the failure does not amount to a major failure.
Distributed by
AUSTRALIA
Brown & Watson International Pty Ltd
Knoxfield, Victoria 3180
Telephone (03) 9730 6000
Facsimile (03) 9730 6050
National Toll Free 1800 113 443
NEW ZEALAND
Narva New Zealand Ltd
22–24 Olive Road
PO Box 12556 Penrose
Auckland, New Zealand
Telephone (09) 525 4575
Facsimile (09) 579 1192