
DC210 Plus - Camera KODAK - Free user manual and instructions
Find the device manual for free DC210 Plus KODAK in PDF.


| Product Type | Digital Zoom Camera |
| Model | KODAK DC210 Plus |
| Dimensions | 5.15 x 1.87 x 3.20 in (131 x 48 x 82 mm) |
| Weight (without batteries) | Approx. 12 oz (340 g) |
| Power | 4 AA batteries (alkaline, lithium, Ni-MH, or Ni-Cd) |
| Image Sensor | CCD, 1160 x 872 pixels |
| Picture Resolution | High: 1152 x 864; Standard: 640 x 480 |
| Color Depth | 24-bit, millions of colors |
| File Format | FlashPix (FPX) or JPEG (JPG) |
| Storage Media | CompactFlash memory card (ATA compatible) |
| Lens | 2X zoom, 4.4-8.8 mm (29-58 mm equivalent), optical quality glass |
| Aperture | Wide: f/4 to f/13.5; Telephoto: f/4.7 to f/16 |
| Shutter Speed | 1/2 to 1/362 sec |
| Focus Distance | Wide: 1.64 ft (0.5 m) to infinity; Telephoto: 3.28 ft (1 m) to infinity; Close-up: 8 in (20 cm) |
| Flash Range (DC210) | Wide: 1.6 to 9.84 ft (0.5 to 3.0 m); Telephoto: 3.2 to 8.8 ft (1.0 to 2.7 m) |
| Flash Modes | Auto, Auto Red-eye, Fill, Fill Red-eye, Off |
| Viewfinder | Real image optical viewfinder |
| Display | 1.8 in color LCD (for preview and review) |
| Video Output | NTSC or PAL (selectable) |
| Connectivity | Serial port; Infrared (DC210 only) |
| Self-Timer | 10-second delay |
| Operating Temperature | 40 to 104°F (4.4 to 40°C) |
| Maintenance | Clean with dry cloth; wipe lens gently with soft lint-free cloth |
| Safety | Do not disassemble; avoid moisture and extreme temperatures; remove batteries if not used for extended period |
Frequently Asked Questions - DC210 Plus KODAK
User questions about DC210 Plus KODAK
0 question about this device. Answer the ones you know or ask your own.
Ask a new question about this device
Download the instructions for your Camera in PDF format for free! Find your manual DC210 Plus - KODAK and take your electronic device back in hand. On this page are published all the documents necessary for the use of your device. DC210 Plus by KODAK.
USER MANUAL DC210 Plus KODAK
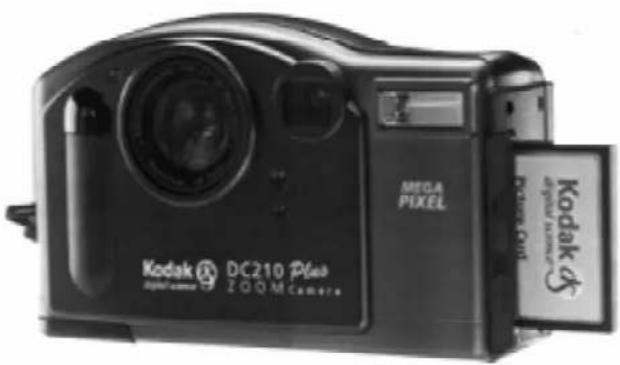
KODAK DC200 Plus Camera and KODAK DC210 Plus Zoom Camera
natural_image
Black Kodak 3201 Proo ZOOM camera with visible lens and control panel (no text or symbols on body)User's Guide
for the cameras, KODAK Installation Software, KODAK DC200/DC210 Mounter Software, and KODAK Acquire/TWAIN Software.
Visit Kodak on the World Wide Web at www.kodak.com


Chap1newBook Page 2 Friday, February 5, 1999 7:02 AM



©Eastman Kodak Company, 1999
Kodak, FlashPix, Photolife are trademarks of
Eastman Kodak Company.
The FlashPix format is defined in a specification and test suite developed and published by Kodak in collaboration with Microsoft, Hewlett-Packard, and Live Picture. Only products that meet the specification and pass the test suite may use the FlashPix name and logo.




Table of Contents
Chapter-Page
Table of Contents ...... i
Getting Started 1-1
Camera Specifications 1-2
Your DC200/DC210 Camera 1-3
Capturing a Picture 2-1
Camera Power 2-1
Take a Picture 2-2
Preview 2-2
Delete One Picture 2-3
Exposure Compensation 2-4
Exposure Lock 2-5
Status Display....2-6
Pictures Remaining 2-6
Self-Timer 2-7
Memory Card 2-7
Close-Up —DC210 Only 2-8
Flash 2-9
Resolution 2-10
Quality 2-11
Batteries 2-12
Zoom—DC210 Only 2-14
General Maintenance and Safety 2-15
Review 3-1
View Pictures ....3-1
Delete One or All Pictures 3-2
Magnify Pictures 3-3
Slide Show 3-4
i
Preferences 4-1
Quality 4-2
Resolution 4-3
Template 4-4
Date Stamp 4-5
File Type 4-6
Quickview 4-7
Date and Time 4-8
LCD Brightness 4-9
Format Memory Card 4-10
Video Out 4-11
Language 4-12
About 4-13
Installation Software 5-1
WINDOWS System Requirements 5-1
Installing the Software 5-1
Connect 6-1
Checking Serial Port Availability 6-1
Infrared Connection —DC210 Only 6-1
Serial Cable Connection 6-2
Mounter Software 7-1
Installation 7-1
Camera Communication Settings....7-1
Overview 7-2
Using Mounter Software 7-2
Setting and Viewing Properties 7-4
Memory Card Properties 7-4
Picture File Properties 7-5
Camera Properties 7-6
TWAIN Software 8-1
Installation 8-1
Camera Communication Settings 8-1
Starting TWAIN Software 8-2
Overview 8-2
Transferring Pictures from DC200/DC210 ....8-3
Picture Information 8-4
Preferences Settings 8-5
Tips and Troubleshooting 9-1
Communicating with the Computer 9-1
Monitor Adjustment 9-1
Printing 9-2
Troubleshooting 9-3
Where to
Get Help 10-1
Software Help 10-1
Online Services....10-1
Faxed Information 10-1
Customer Support....10-2
Warranty & Regulatory Information .... warranty1
Warranty Time Period .... warranty1
Warranty Repair Coverage .... warranty1
Limitations warranty2
Application Support ....warranty3
How to Obtain Service .... warranty3
Regulatory Information warranty4
iii


Chap1newBook Page iv Friday, February 5, 1999 7:02 AM










text_image
1Getting Started
Congratulations on your purchase of the new KODAK DC200 Plus Camera (referred to as DC200), and the KODAK DC210 Plus Zoom Camera (referred to as DC210). The cameras that capture pictures digitally, without the use of film.
The DC200 camera features:
√ built-in flash with red-eye reduction
√ an easy to use status display of camera settings
√ removable memory card
√ video out capabilities which allow you to connect and run a slide show on your TV
√ color LCD to immediately see or preview your pictures
√ software to easily transfer pictures from the camera to your computer
√ a mode dial to activate one of four different functions on the camera:
Capture—takes, previews, or deletes a picture and adjusts the exposure
Review—review or delete pictures
Preference—adjust camera settings
Connect—camera communicates with your computer
The DC210 has all of the features of the DC200 and more:
√ infrared remote connection to compatible devices
√ 2X zoom lens (29 to 58mm) to zoom in on subjects and a close up option to set the focus at 8in. (20cm)
The pictures used in this manual were captured with a Kodak digital camera. This user's guide includes operating instructions for the DC200/DC210 cameras and detailed information on the KODAK Installation Software (chapter 5), Mounter Software (chapter 7), and TWAIN Software (chapter 8). Instruction manuals for the additional software packages included on the DC200/DC210 CD are included in the camera package.
Camera Specifications
Picture Pixel Resolution—
High—1152 x 864 = 995,328
Standard—640 x 480 = 307,200
CCD Resolution—
1160 x 872 = 1,011,520
Flash Range—
DC200—2.23 ft. to 9.84 ft.
(0.7 to 3.0 m)
DC210—
wide—1.6 to 9.84 ft.(0.5 to 3.0 m)
telephoto—3.2 to 8.8 ft.
(1.0 to 2.7 m)
Color—24-bit, millions of colors
Storage—external memory only
ATA Compatible Compact Flash Card
Power— 4 AA batteries
Shutter Speed—1/2 to 1/362 sec
File Format—FlashPix or JPG
Lens—optical quality glass
Weight—without batteries
Operating Temperature—
40 to 104°F (4.4 to 40°C)
Focus Distance—
DC200—
fixed—2.23 ft. (.68 m) to infinity
DC210—
wide—1.64 ft. (0.5 m) to infinity
telephoto—3.28 ft. (1 m) to infinity
close up—8 in. (20 cm)
Sensitivity—ASA/ISO rating
equivalent to 140
Accessory Lens Thread—
37 mm—DC200 only
Viewfinder—Real image
Tripod Socket—.25 in.
Focal Length—
DC200—6.0 mm
Actual is 39mm
DC210—2X zoom lens-4.4 to 8.8 mm
Actual is 29 to 58 mm
Equivalent for 35 mm camera
Aperture—
DC200—f/4 to f/13.5
DC210—
wide—f/4 to f/13.5
telephoto—f/4.7 to f/16
Dimensions—5.15 X 1.87 X 3.20 in.
(131 X 48 X 82 mm)
Your DC200/DC210 Camera

The illustrations throughout this user's guide are of the DC210 unless otherwise stated.
Camera Front
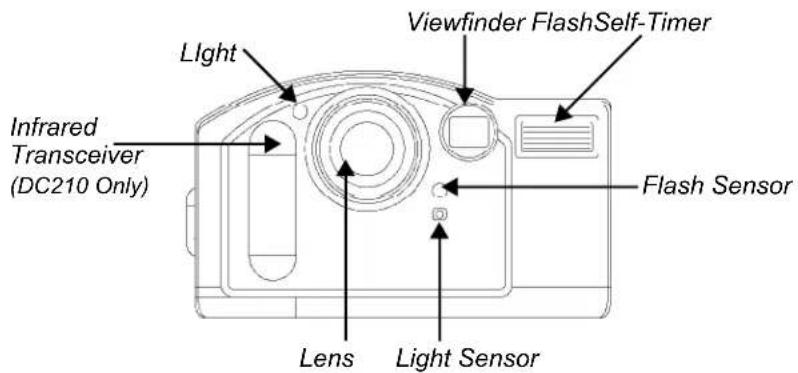
text_image
Infrared Transceiver (DC210 Only) Light Viewfinder FlashSelf-Timer Flash Sensor Lens Light SensorGetting Started
Camera Top
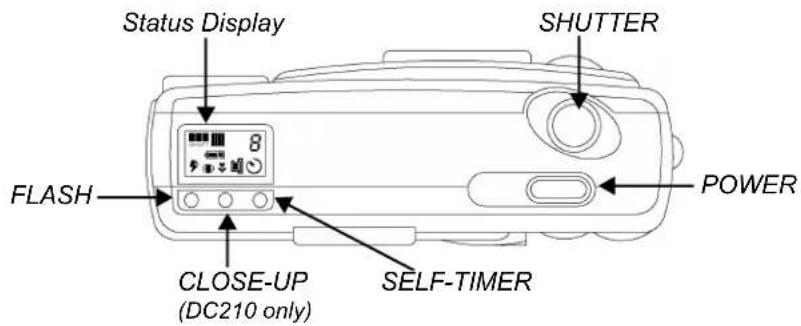
text_image
Status Display SHUTTER FLASH CLOSE-UP (DC210 only) SELF-TIMER POWER1-3


Chap1newBook Page 4 Friday, February 5, 1999 7:02 AM


Camera Back
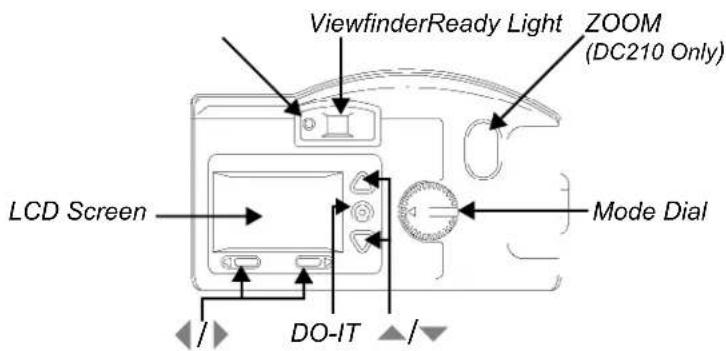
text_image
ViewfinderReady Light ZOOM (DC210 Only) LCD Screen Mode Dial DO-IT
Camera Bottom
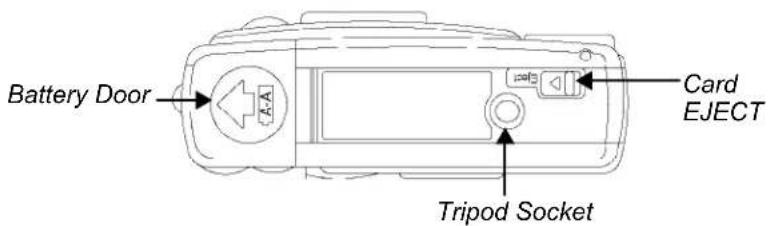
text_image
Battery Door A-A Tripod Socket Card EJECT
Camera Side
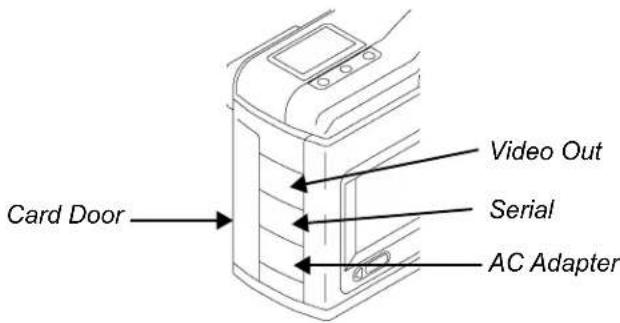
text_image
Card Door Video Out Serial AC Adapter

1-4



text_image
2Capturing a Picture
When the Mode dial is set to Capture, the camera can perform the following functions:
√ capture a picture
√ preview pictures on the Liquid Crystal Display (LCD)
√ delete a picture just taken
√ adjust the exposure
√ adjust some camera settings using the Status Display
Camera Power
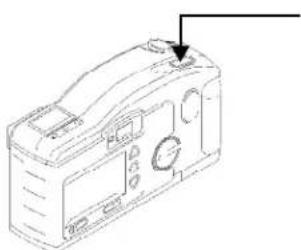
To turn the camera on/off:
natural_image
Technical line drawing of a mechanical housing component with no visible text or symbolsPress the POWER button.
The green Ready light, on the back of the camera, and the Status Display screen turns on or off.
If the camera is turned off while a picture is being processed, the camera will finish processing the picture before turning off.
If you are not using an AC power adapter and your camera is idle for approximately 5 minutes, it automatically turns off. To turn the camera on again, press the camera's power button.
Take a Picture
To take a picture:
natural_image
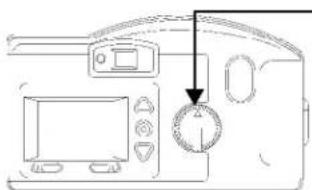
Line drawing of a computer monitor with a circular dial indicator (no text or symbols)1 Set the Mode dial to Capture.
2 Turn the camera on.
3 Center subject in the viewfinder.
4 Press the SHUTTER button.
The green Ready light, Memory Card icon, Pictures Remaining number on the Status Display blink rapidly, as the camera processes the picture.

You do not need to hold the camera still while the green Ready light is blinking, but you will not be able to take another picture until it stops.
Preview
You may also use the LCD as a live viewfinder while in Capture mode. This allows you to preview your picture before it is taken.

Using the Preview option significantly shortens battery life.
To activate Preview:
natural_image
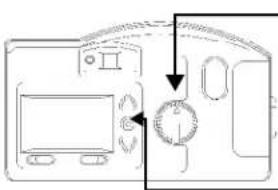
Diagram of a microwave oven with control panel and rotary dial (no text or symbols)1 Set the Mode dial to Capture.
2 Turn the camera on.
3 Press the DO-IT button.
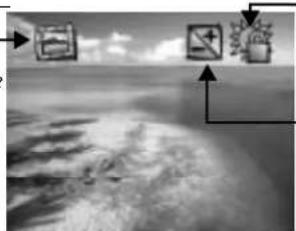
The LCD displays the subject that is viewed from the viewfinder with the icons of activated camera features.
Template icon—appears if the _ template option is activated. See "Template" on page 4-4 for details.
natural_image
Black-and-white aerial view of Earth from space with directional arrows and icons (no readable text or symbols)Exposure Lock icon—appears if the exposure lock option is activated. See “Exposure Lock” on page 2-5 for details.
Exposure Compensation icon—appears if the exposure value is adjusted. See “Exposure Compensation” on page 2-4 for details.
To exit: press the DO-IT button again to turn Preview off. The Preview setting automatically turns off when the camera is turned off.
2-2




Delete One Picture
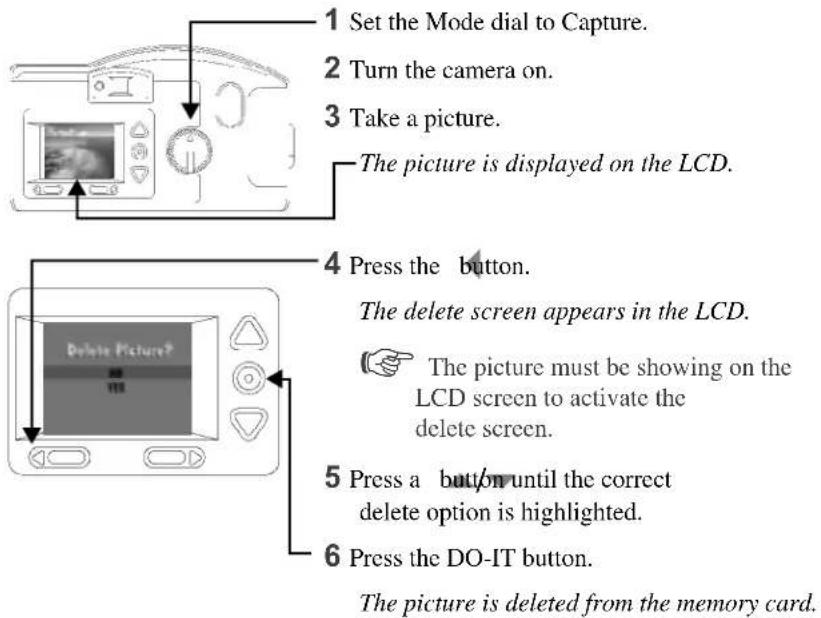
You may delete the picture that was just taken without leaving Capture mode.

This delete feature is only available when the picture is shown on the LCD and the Quickview option is activated. See “Quickview” on page 4-7.
To delete the most recent picture taken in Capture mode:
text_image
1 Set the Mode dial to Capture. 2 Turn the camera on. 3 Take a picture. The picture is displayed on the LCD. 4 Press the button. The delete screen appears in the LCD. 5 The picture must be showing on the LCD screen to activate the delete screen. 6 Press a button until the correct delete option is highlighted. 6 Press the DO-IT button. The picture is deleted from the memory card.To exit: press a button until NO is highlighted and then press the DO-IT button.
Exposure Compensation
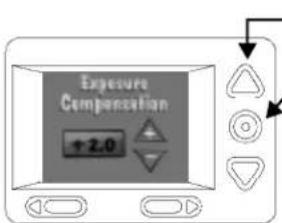
The camera's exposure value (EV) can be adjusted from -2.0 to +2.0 EV in 0.5 EV increments while in Capture mode. A +1.0 adjustment in EV, in effect doubles the amount of light allowed to reach the CCD (charge coupled device) in your camera. A -1.0 adjustment in EV, halves the amount the light allowed to reach the CCD in your camera. Below shows how changes in EV can effect your pictures.
If your pictures are too:
√ dark—increase (+) the exposure compensation setting
√ light—decrease (-) the exposure compensation setting
To change Exposure Compensation:
natural_image
Diagram of a microwave oven with labeled ports and control panel (no text or symbols)1 Set the Mode dial to Capture.
2 Turn the camera on.
3 Press the button.
The LCD displays the Exposure Compensation screen.
text_image
Exposure Compensation +2.04 Use the buttons to adjust the exposure.
5 Press DO-IT to select the Exposure setting.
To reset: the Exposure setting automatically resets to 0.0 EV when the camera is turned off.
Exposure Lock
Use the Exposure Lock to take a sequence of pictures that require the same exposure. When this setting is activated, the camera maintains a constant exposure setting.
To turn on Exposure Lock:
text_image
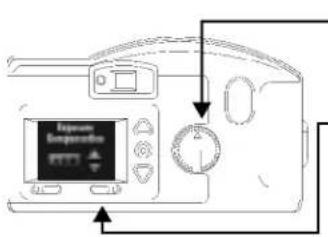
Exposure Temperature EPTT1 Set the dial to Capture.
2 Turn the camera on.
3 Press the button two times.
The Exposure Compensation screen appears, followed by the Exposure Lock screen.

Press the button a third time to xit the exposure menu.
text_image
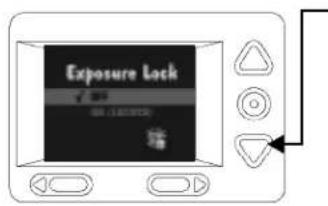
Exposure Lock √ 200 (1.65%)4 Press a button until ON is highlighted.
5 Press the DO-IT button.
The Take a Picture screen appears.
6 Center the area you want to lock the exposure on in the viewfinder
7 Press the SHUTTER button to lock in the exposure setting.
To Reset: The Exposure Lock setting automatically resets when the camera is turned off.
Status Display
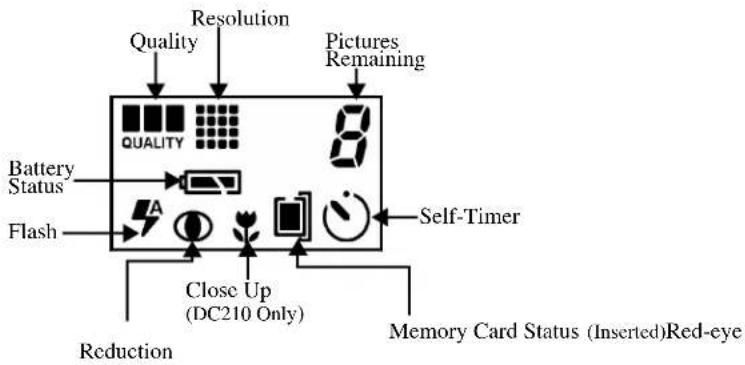
The Status Display, located at the top of your camera, allows you to view and change some camera settings. The following sections offer detailed descriptions of Status Display settings.

The DC200/DC210 must be turned on to view the Status Display.
text_image
Resolution Quality Pictures Remaining Battery Status Flash Self-Timer Close Up (DC210 Only) Reduction Memory Card Status (Inserted)Red-eyePictures Remaining

The Pictures Remaining icon changes automatically to indicate the remaining number of pictures which can be stored at the current quality and resolution setting. You may not select or change the Pictures Remaining icon.
When the card's memory is full the Status Display indicates Full. You must delete existing pictures or change memory cards to capture additional pictures. To save pictures, transfer them to your computer before deleting them. For more information on how to move or delete pictures, see "Delete One Picture" on page 2-3, "Delete One or All Pictures" on page 3-2, or the software chapters.

The Pictures Remaining number does not always change by one when a picture is taken if the picture content is easily compressed.
Self-Timer

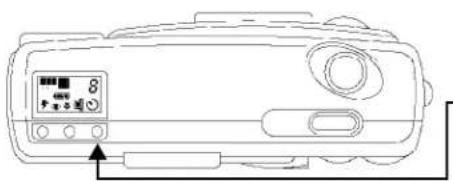
Activating the Self-Timer option creates a 10-second delay between the time you press the SHUTTER button and when the picture is taken. This allows you to include yourself in the picture.
To activate the Self-Timer:
natural_image
Line drawing of a medical device with a digital display and control buttons (no text or symbols)1 Set the Mode dial to Capture.
2 Turn the camera on.
3 Press the SELF-TIMER button.
The Self-Timer icon appears on the Status Display.
4 Place the camera on a flat, steady surface or tripod.
5 Press the SHUTTER button.
The red Self-Timer light, located on the front of the camera, turns on and stays lit for 8 seconds. The Self-Timer light flashes for 2 additional seconds just before the picture is taken. The Self-Timer returns to the off setting once the picture is taken.
To stop the Self-Timer: press the SELF-TIMER button again before the picture is taken.
Memory Card

The DC200/DC210 comes equipped with a KODAK Picture Card (memory card). The reusable memory card is used to store the pictures taken with the camera. The camera does not have an internal memory and will not operate without a memory card. The Card Status icon changes automatically to indicate if there is a memory card inserted in the camera. You may not select or change this icon.

No card inserted—pictures cannot be taken.

Card inserted—pictures are saved to the card's memory.
2-7
To insert a memory card:
natural_image
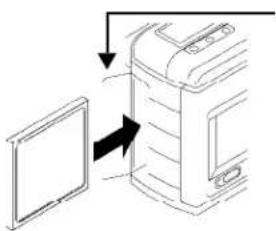
Diagram showing a device with an open screen and directional arrows indicating flow or interaction (no text or symbols present)1 Open the card door.
2 Hold the memory card with the connecting end pointed at the camera.
3 Push the card all of the way into the card slot and close the card door.
To remove a memory card:

natural_image
Top-down schematic of a device casing with control buttons and a directional arrow (no text or symbols)1 Open the card door.
2 Press the EJECT button
The card partially slides out of the slot.
3 Take hold of the card, carefully remove it from the slot, and close the card door.
WARNING: Do not insert or eject a card when the Ready light is blinking.
This may damage your pictures or camera.

CompactFlash™
Use only certified memory cards in your camera that carry the CompactFlash logo.
Close-Up

—DC210 Only
The DC210 offers a Close-Up setting which allows you to set the camera's focus distance at 8 in. (20 cm).
The red-eye reduction option for the Flash setting is not available when Close-Up is on.

To accurately capture the picture in Close-Up, the Preview option automatically starts when the CLOSE-UP button is pressed. See "Preview" on page 2-2 for detailed information. To deactivate the Preview option, press the DO-IT button.
2-8


To turn on the Close-Up setting:
natural_image
Line drawing of a medical device with a digital display and control buttons (no text or symbols)1 Set the Mode dial to Capture.
2 Turn the camera on.
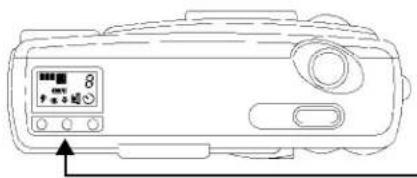
3 Press the CLOSE-UP button.
The Close-Up icon appears on the Status Display.
4 View the subject on the LCD display to accurately capture the picture.
To cancel Close-Up: press the CLOSE UP button again and the Close-Up icon disappears from the Status Display. The Close-Up setting is automatically turned off when the camera is turned off.
Flash

The DC200/DC210 is equipped with a built-in flash that offers an optional red-eye reduction feature. The flash has an effective range of approximately 2.23 to 9.84 ft. (0.7 to 3 m) for the DC200, and 1.6 to 9.8 ft. (0.5 to 3 m) for the DC210. There are five Flash settings:

Auto—flash fires automatically when the SHUTTER button is pressed and the camera determines that there is not enough light. This is the default setting.

Auto Red-eye—works the same as auto flash except the flash fires once before the picture is taken to reduce the chance of red-eye and then flashes a second time when the picture is taken.

Fill—flash fires every time you press the SHUTTER button. Use this setting when the lighting is poor or when your subject is lit from behind.

Fill Red-eye—works the same as fill flash except the flash fires once before the picture is taken to reduce the chance of red-eye and then flashes a second time when the picture is taken.

Off—flash is turned off and will not fire.
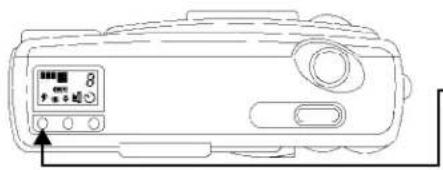
To change the Flash setting:
natural_image
Line drawing of a medical device with digital display and control buttons (no text or symbols)1 Set the Mode dial to Capture.
2 Turn the camera on.
3 Press the FLASH button to scroll through and select the appropriate Flash settings.
To cancel the Flash setting: Flash setting returns to the default setting when the camera is turned off.
Resolution

Resolution indicates the size of the picture in pixels. The camera can be set to capture pictures in a High or Standard resolution. Your pictures include more detail with high resolution, but they will use more memory on the card than at the standard resolution setting.
You can switch freely between the two settings when taking pictures. The number of pictures the DC200/DC210 is able to store will vary accordingly.
The Resolution setting is indicated on the Status Display using the following icons:

High—the picture size is 1152 x 864 pixels.
This is the default setting. Use this setting when your pictures are to be printed.

Standard—the picture size is 640 x 480 pixels. Use this setting when the pictures are for email or on-line use.
The Resolution setting is changed using the Preferences mode. See “Resolution” on page 4-3 for more information.
2-10




Quality

You may set your camera to capture pictures in a Good, Better, or Best quality setting. The Quality setting indicates how much the picture is compressed to save space on the memory card. Your pictures include more detail with the Best or Better setting, but they will use more memory on the card than with the Good setting.
You may switch freely between the three settings when taking pictures. The number of pictures the DC200/DC210 is able to store will vary accordingly.
The Quality setting is indicated on the Status Display using the following icons:

Best—you can store approximately 4 pictures per 1 MB of storage at this Quality setting and when the Resolution is set to High. Use this setting when image quality is very important for maximum picture quality, especially for larger sized or zoom prints.

Better—you can store approximately 6 pictures per 1 MB of storage at this Quality setting and when the Resolution is set to High. Use this setting for a good picture quality and to store a large number of pictures. This setting is good for general picture taking.

Good—you can store approximately 9 pictures per 1 MB of storage at this Quality setting and when the Resolution is set to High. Use this setting to maximize the number of pictures stored.
The Quality setting is changed using the Preferences mode. See “Quality” on page 4-2 for more information.
Batteries

The DC200/DC210 comes with four AA batteries. Standard 1.5V alkaline, 1.5V lithium, or rechargeable 1.2V Ni-Cd or Ni-MH batteries may be used.
The battery power icon changes automatically. You may not select or change this icon.

Full—batteries are fully charged.

Low—batteries need to be replaced.

Blinking—batteries are insufficient to run camera and need to be replaced.
Pictures on memory cards are not lost if batteries are depleted.
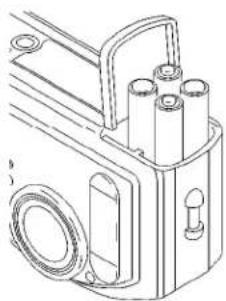
To install the batteries:
natural_image
Technical line drawing of a mechanical device with cylindrical components and mounting holes (no text or symbols)1 Place your thumb on the battery door.
2 Slide the battery door away from the camera.
3 Insert the batteries as indicated on the battery cover and close the battery door.
Remove the batteries if the camera will not be used for an extended period of time. This extends battery life and prevents camera damage from battery leaks or corrosion. If the batteries are removed from the camera for more than a few minutes the date and time will be deleted and must be reset.
Battery Usage Guidelines
Always follow your battery manufacturer's directions fully. Do not attempt to disassemble, recharge, short circuit, or subject the battery to high temperature or fire. When removing, batteries may be hot, allow them to cool before touching.
Dispose of batteries according to Federal and Local Regulations.
Failure to replace the batteries when they are low may cause the DC210 to shut down with the camera lens extended.
Your camera has been designed to operate correctly using a variety of AA-size batteries currently available. These include 1.5-volt alkaline, 1.5-volt lithium, or 1.2-volt Nickel Metal Hydride (Ni-MH) and Nickel Cadmium (Ni-Cd) batteries.
NOT ALL BATTERIES ARE CREATED EQUAL! Battery life depends significantly on age, usage conditions, type and brand. Digital camera requirements are very demanding on batteries. Not all battery brands perform well under these challenging conditions. In Kodak lab tests, Ni-MH rechargeable batteries delivered the best results in a variety of conditions. Ni-MH batteries are designed for high demand devices like digital cameras, and do not exhibit the "memory" effects seen with other rechargeable technologies. Kodak offers Ni-MH rechargeable batteries (with charger) as an optional accessory. Refer to catalog number 152 7068 (U.S. and Canada), 852 2344 (Europe), 867 9953 (UK), 870 8141 (Asia), 910 7632 (Japan).
If you elect to use alkaline batteries in your camera, you will obtain better performance from "photo-flash grade" alkaline batteries, such as KODAK PHOTOLIFE Alkaline Batteries. These types of batteries last more than twice as long in digital cameras as ordinary alkaline batteries.
Ni-Cd batteries work well in digital cameras, but typically have the shortest “duty cycle,” or usable power provided between charges.
Lithium batteries typically provide the longest overall battery life, but carry a higher cost-per-picture than other non-rechargeable battery types.
When using your camera on battery power, we recommend you limit continuous LCD "Preview" or "Review" to less than 20-minutes per session. If you anticipate using your camera for longer periods in these modes, it is recommended that you do so with the camera powered by the AC adapter.
Zoom —DC210 Only
The DC210 comes equipped with a 2X zoom lens that allows you to zoom in on your subject from Wide Angle (29mm) to TelePhoto (58mm).
Wide Angle TelePhoto

natural_image
Black-and-white photo of an ornate garden with a spherical structure on a pedestal, surrounded by trees and pathways (no visible text or symbols)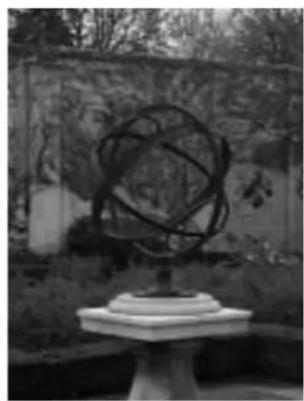
natural_image
Black-and-white photo of an ornate abstract sculpture mounted on a pedestal in a garden setting (no visible text or symbols)To activate the zoom:
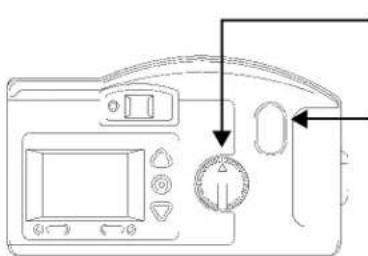
natural_image
Line drawing of a device control panel with buttons and a dial (no text or symbols)1 Set the Mode dial to Capture.
2 Turn the camera on.
3 Press the ZOOM button.
The subject will appear closer or farther away when you look through the viewfinder and press the ZOOM button.
The camera's default lens position is Wide Angle. All other lens positions are considered TelePhoto settings.
2-14




General Maintenance and Safety
√ To keep from damaging your DC200/DC210, avoid exposing it to moisture and extreme temperatures.
√ Clean the outside of the DC200/DC210 by wiping with a clean, dry cloth. Never use harsh or abrasive cleaners or organic solvents on the camera or any of its parts.
√ Never disassemble or touch the inside of the DC200/DC210. This could result in electrical shock.
√ If you notice smoke or a strange smell coming from the DC200/DC210, immediately turn the camera off, wait a few minutes until the camera cools, and then remove the batteries.
√ Cleaning the lens and back LCD screen:
1 Blow gently on the lens or LCD screen to remove dust and dirt.
2 Moisten the lens or LCD screen by breathing lightly on it.
3 Wipe the lens or LCD screen gently with a soft, lint-free cloth or an untreated lens-cleaning tissue.

Do not use cleaning solutions unless they are designed specifically for camera lenses. Do not wipe the camera lens or LCD screen with chemically treated eyeglass lens tissue as it may scratch the lens.
√ Service agreements are available in some countries. Please contact your Kodak dealer for more information.


Chap1newBook Page 16 Friday, February 5, 1999 7:02 AM










text_image
3Review
When the Mode dial is set to Review, you may use the LCD to view the pictures stored on the KODAK Picture Card (memory card). Using the Overlay screen the camera can perform the following functions:
√ view the amount of unused memory left on the memory card
√ view thumbnails of the pictures
√ delete one or all pictures from the memory card
√ view pictures, and run a slide show from the camera on your TV
View Pictures
To view pictures:
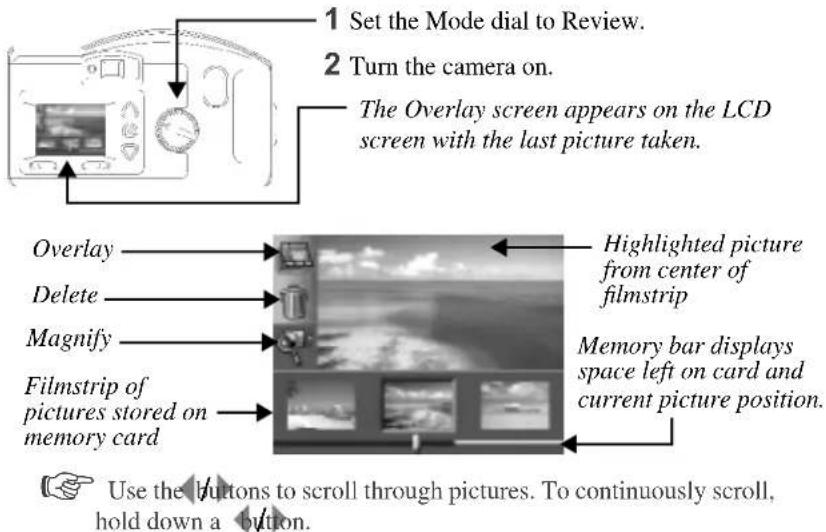
text_image
1 Set the Mode dial to Review. 2 Turn the camera on. The Overlay screen appears on the LCD screen with the last picture taken. Overlay Delete Magnify Filmstrip of pictures stored on memory card Highlighted picture from center of filmstrip Memory bar displays space left on card and current picture position. Use the buttons to scroll through pictures. To continuously scroll, hold down a button.To exit: press the buttons to highlight the Overlay icon. Press DO-IT to turn off the Overlay screen. The main Review screen reappears.
Delete One or All Pictures
You can delete one or all of the pictures on the memory card when in the Review mode.
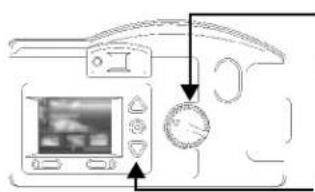
To delete a picture in Review mode:
text_image
Diagram showing a device control panel with a digital display and a stopwatch, likely illustrating a home control or navigation system.1 Set the Mode dial to Review.
2 Turn the camera on.
The last picture taken appears on the LCD screen. The Overlay screen is turned on.
3 Press a button until the Delete icon is highlighted.
4 Press the DO-IT button.
The delete screen appears on the LCD.
5 Press a button until the appropriate picture is highlighted on the filmstrip.

To delete all the pictures on the memory card, press a button until ALL PICTURES is highlighted and then press the DO-IT button.
6 Press the DO-IT button.
That picture is deleted from the memory card.
To exit: press a ▲/▼ button until Exit is highlighted and then press the DO-IT button. The main Review screen reappears.
Memory cards containing images captured from other digital cameras will have less memory space available when used in the DC200/DC210 cameras. To free-up memory space on the memory card you must delete the images in the model of camera that captured those images.
Magnify Pictures
The magnify feature allows you to view the current picture at 2x size on the LCD screen when in Review mode.
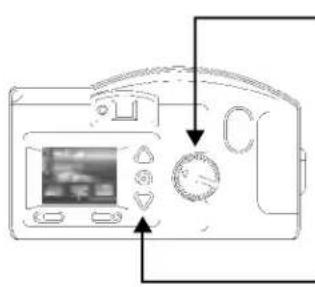
To magnify a picture in Review mode:
text_image
Diagram of a camera control panel with display and rotary dial indicators1 Set the Mode dial to Review.
2 Turn the camera on.
The last picture taken appears on the LCD screen. The overlay screen is turned on.
3 Press a button until the appropriate picture is highlighted on the filmstrip.
4 Press a button until the Magnify icon is highlighted.
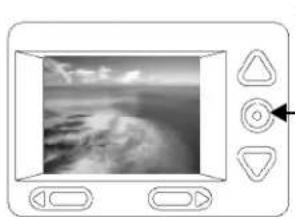
5 Press the DO-IT button.
The LCD displays a magnified view of the selected picture.

Use the and buttons to
scroll to different parts of the picture.
natural_image
Computer monitor interface showing a grayscale image of a landscape with a circular button and control buttons (no readable text or symbols)To exit: press the DO-IT button to cancel the Magnify feature. The magnify feature stops and the Overlay screen reappears.
Slide Show
The slide show feature on the DC200/DC210 allows you to connect the camera to a TV and view the pictures from the memory card on your TV! This is especially useful when sharing pictures with family and friends.

The camera's LCD is disabled when the camera is attached to the video cable.
To view pictures on a TV:
natural_image
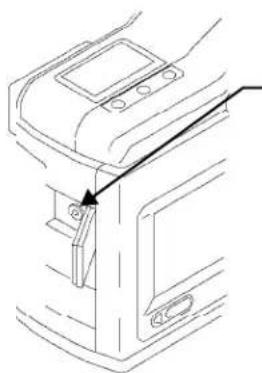
Technical line drawing of a mechanical device with a handle and mounting bracket (no text or symbols)1 Turn your TV and the DC200/DC210 camera off.
2 Insert the video output cable into the video out connection on the side of your camera.
3 Connect the other end of the cable to the video in connection on your TV.
4 Turn on the camera and TV.
5 Set the Mode dial to Review.
6 Set the TV to the correct video setting.
The pictures that are stored on the memory card appear on the TV screen.

You may need to adjust the Video Out preference on the camera. See "Video out" on page 4-11 for details.
7 Press a button on the camera to scroll through the pictures on the TV.

To run a slide show, press the DO-IT button. The slide show starts, and the pictures change every five seconds for a period of five minutes. If you are using an AC adapter, the slide show runs indefinitely.
To cancel Slide Show: press the DO-IT button to stop the slide show. The slide show stops and the main Review screen reappears.

text_image
4Preferences
When the Mode dial is set to Preferences, the main Preferences screen appears on the LCD. Using the Preferences screen the following settings can be adjusted or activated:
√ Quality
√ File type
√ Format memory card
√ Resolution
√ Quickview
√ Video out
√ Template
√ Date/Time
√ Language
√ Date stamp
√ LCD brightness
√ About
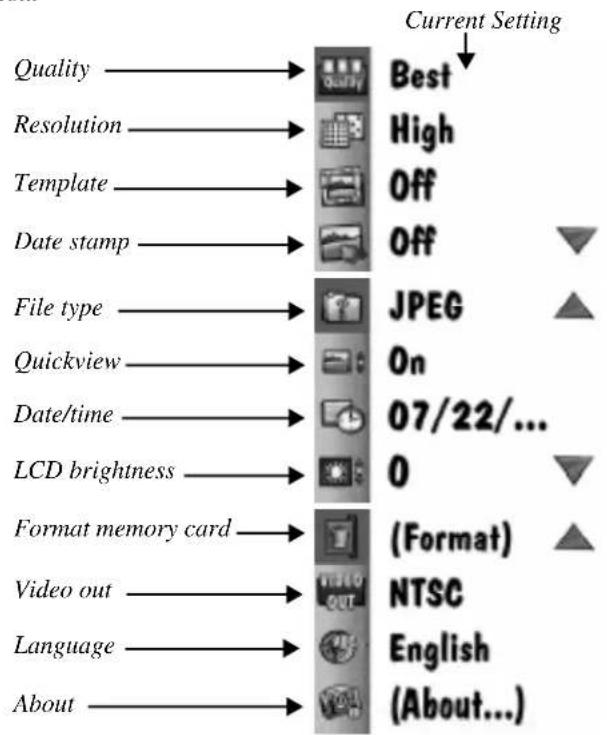
The Preferences screens, illustrated below, display the current setting of each icon.
text_image
Quality → Resolution → Template → Date stamp → File type → Quickview → Date/time → LCD brightness → Format memory card → Video out → Language → About → Current Setting Best ↓ High Off Off ▼ JPEG ▲ On 07/22/... 0 ▼ (Format) ▲ NTSC English (About...)Quality

The Quality screen is used to set the picture quality to Best, Better, or Good. See "Quality" on page 2-11 for more information on picture quality.
To set quality:

text_image
2.5011 Set the Mode dial to Preferences.
2 Turn the camera on.
The LCD displays the Preferences screen.
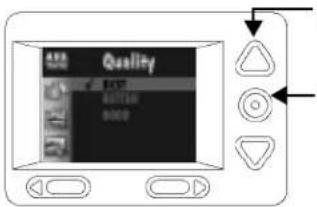
3 Press a button until the Quality icon is highlighted.
4 Press the DO-IT button.
The LCD displays the main Quality screen. The current setting is checked (√).
text_image
Quality ✓ OFF BUTTON DOWN5 Press a button until the appropriate option is highlighted.
6 Press the DO-IT button.
The main Preferences screen reappears.
To reset: the Quality setting is maintained until another setting is selected. This setting does not change when the camera is turned off.
Resolution

The Resolution screen is used to set the picture resolution to High (1152x864) or Standard (640x480). See “Resolution” on page 2-10 for more information on picture resolution.
To set resolution:
text_image
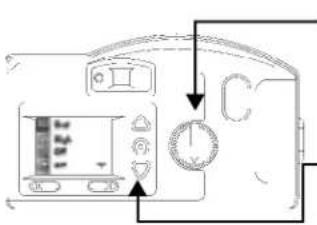
Diagram showing a device with labeled buttons and directional arrows indicating movement or control.1 Set the Mode dial to Preferences.
2 Turn the camera on.
The LCD displays the Preferences screen.
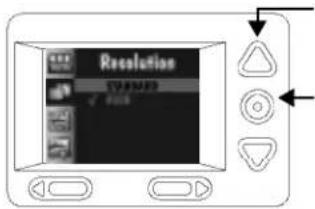
3 Press a button until the Resolution icon is highlighted.
4 Press the DO-IT button.
The LCD displays the main Resolution screen. The current setting is checked (√).
text_image
Resolution STRAWND 0.0000 0.0000 0.00005 Press a button until the appropriate option is highlighted.
6 Press the DO-IT button.
The main Preferences screen reappears.
To reset: the Resolution setting is maintained until another setting is selected. This setting does not change when the camera is turned off.
Template
The Template screen is used to select a creative border and/or logo that is added to your picture when the picture is captured. Once a picture is captured with the template feature activated, the template cannot be removed. The memory card supplied with your camera comes with some templates already pre-loaded.

For more information on using templates with your DC200/DC210 camera, refer to the readme file on the DC200/DC210 software CD.
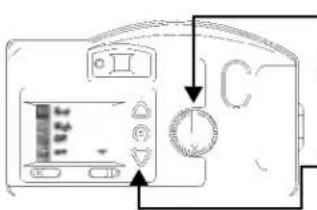
To select a template:
text_image
Diagram of a microwave oven control panel with labeled buttons and dials1 Set the Mode dial to Preferences.
2 Turn the camera on.
The LCD displays the Preferences screen.
3 Press a button until the Template icon is highlighted.
4 Press the DO-IT button.
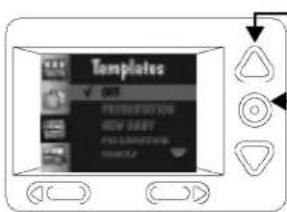
The LCD displays the main Template screen. The current setting is checked (√).
text_image
Templates OK PRESENTATION NEW ARTY PRESENTATION NEW ARTY5 Press a button until the appropriate option is highlighted.
6 Press the DO-IT button.
The main Preferences screen reappears.

The template is only visible after the picture has been taken with the camera in either Review mode, or in Capture mode with Quickview activated. See “Quickview” on page 4-7, or chapter 3 “Review” on page 3-1 for details.
To cancel Template: press a button until OFF is highlighted, and then press the DO-IT button. The Template setting is maintained until another setting is selected. This setting does not change when the camera is turned off.
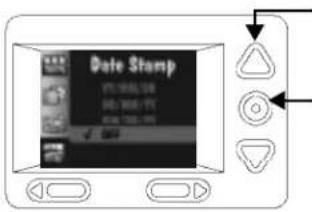
Date Stamp

The Date Stamp screen is used to record the date on your pictures.
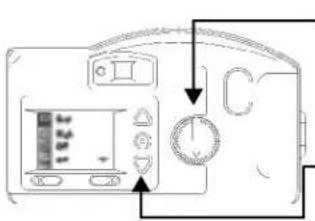
To turn on the Date Stamp:
natural_image
Diagram of a microwave oven with control panel and rotary dial (no text or symbols)1 Set the Mode dial to Preferences.
2 Turn the camera on.
The LCD displays the Preferences screen.
3 Press a button until the Date Stamp icon is highlighted.
4 Press the DO-IT button.
The LCD displays the main Date Stamp screen. The current setting is checked (√).
text_image
Date Stamp VOLATELS COL 100-TY ITEMS 100-TY5 Press a button until the appropriate date stamp order is highlighted.
6 Press the DO-IT button.
The main Preferences screen reappears.
The next time you take a picture the Date Stamp will appear in the lower right hand corner of the picture on the LCD screen.

The date stamp is only visible after the picture has been taken with the camera in either Review mode, or in Capture mode with Quickview activated. See “Quickview” on page 4-7, or chapter 3, “Review” on page 3-1 for details.
To cancel Date Stamp: press a button until OFF is highlighted, and then press the DO-IT button. The Date Stamp setting is maintained until another setting is selected. This setting does not change when the camera is turned off.
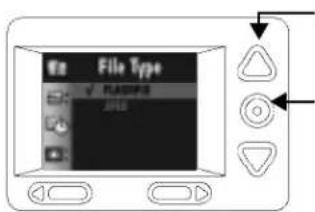
File Type

The File Type screen is used to select how the picture file is saved, in a FlashPix or JPG (default setting) format. Select a format that is compatible with the software you use on your computer.
To set the file type:
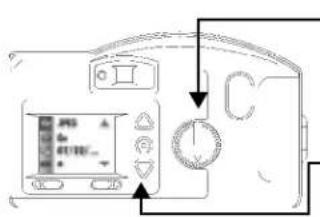
text_image
Diagram of a microwave oven with labeled control panel and directional arrows indicating movement or operation.1 Set the Mode dial to Preferences.
2 Turn the camera on.
The LCD displays the Preferences screen.
3 Press a button until the File Type icon is highlighted on the second Preferences screen.
4 Press the DO-IT button.
The LCD displays the main File Type screen. The current setting is checked (√).
5 Press a button until the appropriate option is highlighted.
6 Press the DO-IT button.
The main Preferences screen reappears.
text_image
File Type ✓ PLASTERS JPGTo reset: the File Type setting is maintained until another setting is selected. This setting does not change when the camera is turned off.
Quickview


The Quickview screen is used to turn the camera's Quickview setting on or off. When you take a picture with Quickview on, the picture momentarily appears on the LCD seconds after the picture is taken!

The Quickview option must be activated to use the delete feature available in Capture mode. See “Delete One Picture” on page 2-3 for more details.
To turn on Quickview:
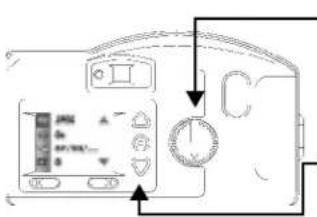
text_image
Diagram of a microwave oven control panel with labeled buttons and indicator lights1 Set the Mode dial to Preferences.
2 Turn the camera on.
The LCD displays the Preferences screen.
3 Press a button until the Quickview icon is highlighted on the second Preferences screen.
4 Press the DO-IT button.
The LCD displays the main Quickview screen. The current setting is checked (√).
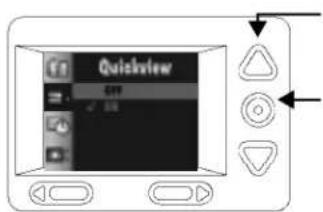
text_image
QuickView OFF 1.005 Press a button until ON is highlighted.
6 Press the DO-IT button.
The main Preferences screen reappears.
The next time you take a picture, it will appear for a moment on the LCD screen.
To cancel Quickview: press a button until OFF is highlighted and then press the DO-IT button. The Quickview setting is maintained until another setting is selected. This setting does not change when the camera is turned off.
Date and Time

The Date and Time screen is used to set the camera's date and time.
To set the date and time:
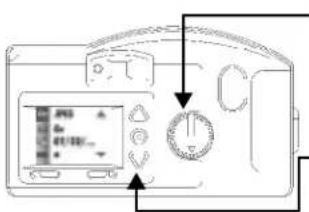
text_image
Diagram of a microwave oven control panel with display, rotary knob, and indicator lights1 Set the Mode dial to Preferences.
2 Turn the camera on.
The LCD displays the Preferences screen.
3 Press a button until the Date/Time icon is highlighted on the second Preferences screen.
4 Press the DO-IT button.
The LCD displays the main Date/Time screen with the current date and time listed.
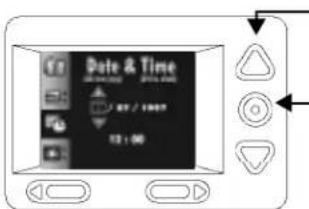
text_image
Date & Time 07 / 19:00 13:005 Press a button to highlight the day, month, year, hour, or minute setting.
6 Press a button to adjust the setting.
7 Repeat steps 5 and 6 until the information is correct.
8 Press the DO-IT button.
The main Preferences screen reappears.
To reset: the Date and Time setting is maintained until another setting is selected. This setting does not change when the camera is turned off.

If batteries are removed from the camera for more than a few minutes, the Date/Time will be deleted and must be reset.

If batteries are removed from the camera when the camera is on, the Date/Time may be deleted and must be reset.
LCD Brightness

The LCD Brightness screen is used to adjust the brightness of the LCD screen.
To adjust the LCD brightness:
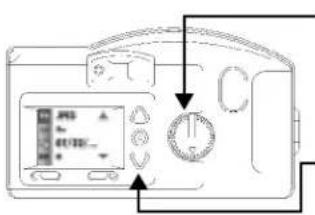
text_image
Diagram of a microwave oven control panel with labeled buttons and dials1 Set the Mode dial to Preferences.
2 Turn the camera on.
The LCD displays the Preferences screen.
3 Press a button until the LCD
Brightness icon is highlighted on the second Preferences screen.
4 Press the DO-IT button.
The LCD displays the main LCD
Brightness screen.
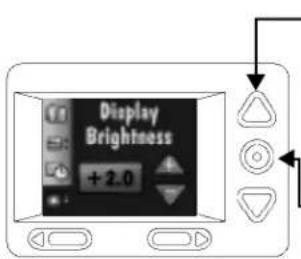
text_image
Display Brightness + 2.05 Press a button to adjust the brightness of the LCD screen to the appropriate level.
The brightness of the LCD screen changes as the setting is adjusted.
6 Press the DO-IT button.
The main Preferences screen reappears.
To reset: the LCD Brightness setting is maintained until another setting is selected. This setting does not change when the camera is turned off.


Format Memory Card

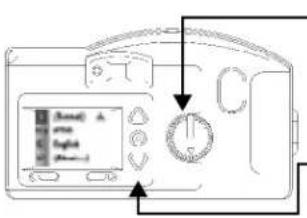
The Format Memory Card screen formats the memory card while it is in the camera. When a memory card is formatted it erases everything, including any templates on the card, and sets up new directories and pointers on the memory card.
To format a memory card:
text_image
Audio Image English Audio-11 Set the Mode dial to Preferences.
2 Turn on the camera.
The LCD displays the Preferences screen.
3 Press a button until the Format
Memory Card icon is highlighted on the third Preferences screen.
4 Press the DO-IT button.
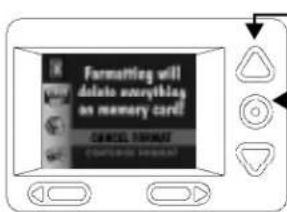
The LCD displays the main Format Memory Card screen.
text_image
Formatting will delete everything on memory card! CANCEL FROM CONTENTS FROM5 Press a button until CONTINUE
FORMAT is highlighted.
6 Press the DO-IT button.
The card is formatted and the main Preferences screen reappears.
To cancel format: press a button until CANCEL FORMAT is
highlighted and then press the DO-IT button. The card is not formatted and the main Preferences screen reappears.
Video Out

The Video Out screen is used to set the camera's video output format to NTSC or PAL. The video out format selected depends on your TV or video monitor. In most cases European countries use PAL, other countries use NTSC.
To set the video out format:
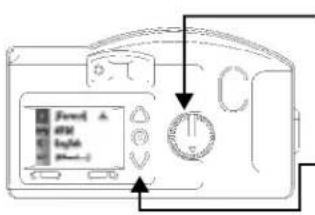
text_image
Form1 A FM English Sheet-11 Set the Mode dial to Preferences.
2 Turn on the camera.
The LCD displays the Preferences screen.
3 Press a button until the Video Out icon is highlighted on the third Preferences screen.
4 Press the DO-IT button.
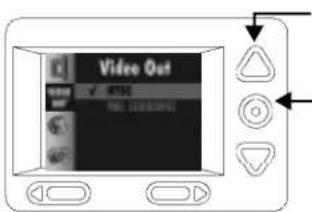
The LCD displays the main Video Out screen. The current setting is checked (√).
text_image
Video Out ✓ MT50 FIL (L1201)5 Press a button until the appropriate option is highlighted.
6 Press the DO-IT button.
The main Preferences screen reappears.
To reset: the Video Out setting is maintained until another setting is selected. This setting does not change when the camera is turned off.
Language

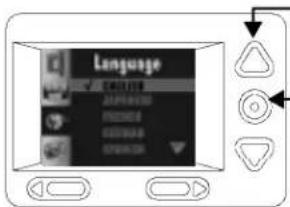
The Language screen is used to select a language interface for the camera. When a specific language is selected, the LCD screens on the back of the camera will change to reflect the language selected.
To select a language:
text_image
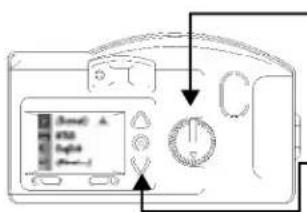
Diagram of a device control panel with labeled buttons and indicators1 Set the Mode dial to Preferences.
2 Turn the camera on.
The LCD displays the Preferences screen.
3 Press a button until the Language icon is highlighted on the third Preference screen.
4 Press the DO-IT button.
The LCD displays the main Language screen. The current setting is checked (√).
5 Press a button until the appropriate language is highlighted.
6 Press the DO-IT button.
The main Preferences screen reappears.
text_image
Language SQL Server ASP.NET ASP.NET GOOGSTo change Language: press a button until another language is highlighted and then press the DO-IT button. The Language setting is maintained until another is selected. This setting does not change when the camera is turned off.
About
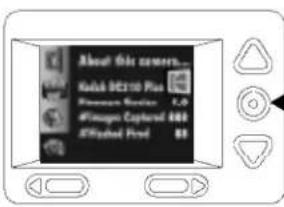
The About screen is a view only screen that keeps a record of the camera's use. While viewing the About screen, you can look-up the following information:
√ firmware version
√ total number of pictures taken over the lifetime of the camera
√ total number of flashes fired over the lifetime of the camera
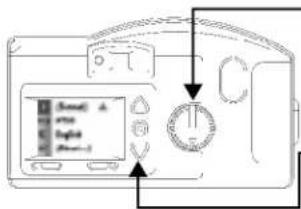
To view the About screen:
text_image
Diagram of a digital camera control panel with labeled buttons and dials, showing status indicators and function keys.1 Set the Mode dial to Preferences.
2 Turn the camera on.
The LCD displays the Preferences screen.
3 Press a button until the About icon is highlighted on the third Preferences screen.
4 Press the DO-IT button.
The LCD displays the About screen
5 Press the DO-IT button to return to the main Preferences screen.
text_image
About this content... Kala6 9210 Plus Macromedia Player 1.0 #Image Captured 488 #Rapidant Prod 88

Chap1newBook Page 14 Friday, February 5, 1999 7:02 AM










text_image
5Installation Software
KODAK Installation Software (Installation software) quickly and easily installs the software included on the DC200/DC210 CD to your computer.
WINDOWS System Requirements
√ WINDOWS 95, WINDOWS 98, or WINDOW NT System Software
√ Personal computer with 486/66MHz microprocessor minimum, PENTIUM Processor recommended
√ 8 MB or more of RAM available, 16 MB recommended
√ available serial port and CD-ROM drive
Installing the Software
While the Installation software is automatically loading your software, take a few minutes to fill out and send in the DC200/DC210 product registration card. This allows you to receive information regarding software updates and registers some of the products included with the camera.
Close all other applications before starting the Installation software.
1 Place the DC200/DC210 CD into your CD-ROM drive.

If Auto Run is turned on in WINDOWS 95, WINDOWS 98, or WINDOWS NT, the first install window automatically appears. Proceed to step 4. If the first install window does not automatically appear proceed to step 2.
2 Choose Run from the Start menu.
3 Type the path to the drive that contains the CD and then type \setup.exe
For example: d:\setup.exe
text_image
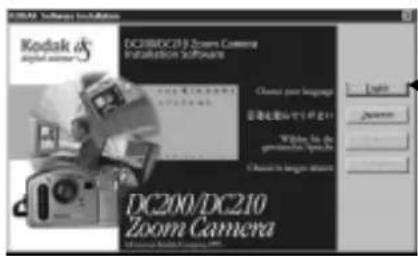
Kodak d3 digital camera DC200/DC210 Zoom Camera Installation software Channel your language 连接电源和传感器 Windows For the generation window Channel's longer alarm DC200/DC210 Zoom CameraThe install window appears.
4 Select the language you want to install.
The Welcome window appears.
5 Click on the NEXT button.
text_image
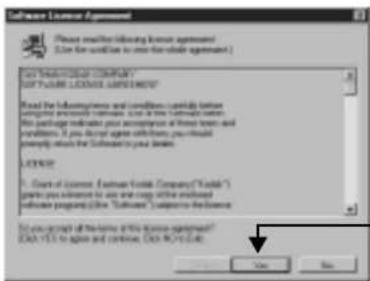
Software License Agreement Please mail the following license agreement: Use the code to use the website agreement. GO TEXTILENT COMPANY GO TEXTILENT COMPANY Read the information and conditions carefully notice to complete previously available or a time certificate version the package indicator you accept any of these items and conditions. If you have agreed otherwise, you should propley which the Software to you make LICENSE 1. Start of License: Getman Excel Company ("Excel") partly you offer to use and copy online authorized info request (see "Table10") subject to this license Do you group of the name of the software organization: GO TEXTILENT to access and continue GO TEXTILENT. OK Cancel Help6 Read the agreement and click on the YES button to accept the software license agreement.

If you do not accept the license you will not be able to install the software.
text_image
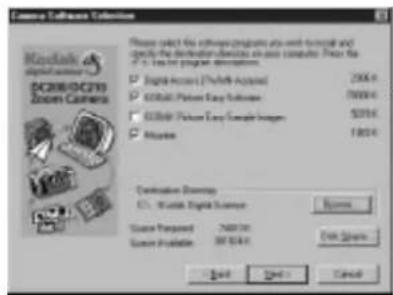
Kodiak Digital Camera DC208/DC210 Zoom Camera Please select the software programs at any end of session and check the destination to access to new computer. From the CPU to test program projections. □ Digital Camera (Windows Account) 2006 □ Digital Phone Easy Software 5000 □ Digital Phone Easy Sample Images 5000 □ Mouse 1800 Destination Settings C:\ -\ Kodiak Digital Camera Source Required: NMB100 Source Application: NT-3441 OK Cancel Cancel7 Select which software you wish to install and click on the NEXT button.
text_image
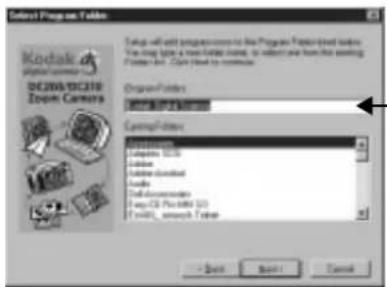
Design Programs Files Setup will edit programmes to the Program Framework tables. This may include a new software setup, or better we have from this existing Program Files. Click Next by continue. Organ Programs Control Programs Modules: 10.00 Modules: 10.00 Modules: 10.00 Files: 25 (File ID: 10) Files: 25 (File ID: 10) Control Programs OK Cancel Help8 Select the name of the Program Folder and click on the NEXT button.

If necessary, type a new folder name or select from the Existing Folders list.
text_image
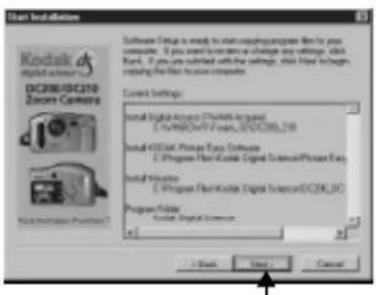
User Installation KodaK DC200/DC210 Zoom Camera Software Setup is ready to start operating programs for the user computer. If you want to continue to change any settings, click Back. If you are satisfied with the settings, click Now Inalign using the first focus computer. Current Settings: Initial Digital Accuracy (Standard) setup C:\Program Files\DC200\DC210 Initial 453Set: Prime Eqs Software C:\Program Files\DC200\DC210\Program Files\DC200\DC210\Program Files\DC200\DC210\Program Files\DC200\DC210 [ ] [ ] [ ] [ ] [ ] [ ] [ ] [ ] [ ] [ ] [ ] [ ] [ ] [ ] [ ] [ ] [ ] [ ] [ ] [ ] [ ] [ ] [ ] [ ] [ ] [ ] [ ] [ ] [ ] [ ] [ ] [ ] [ ] [ ] $ Back Next Cancel9 Verify the settings and then click on the NEXT button.
A progress screen appears while the software is installed.
text_image
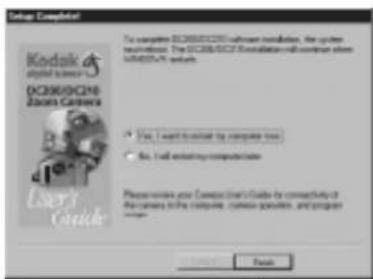
Setup Completed Kodak digital science DC306/DC26 Zoom Camera User's Guide To complete DC306/DC26 software installation, the system system is introduced. The DC306/DC26 installation will continue to install all systems. Do: I want to install your computer tool. Do: I will establish computer tools. Please review your computer tool guide for connectivity of the camera to the computer, custom provides, and program support... OK Cancel10 Select the preferred restart option and click on the FINISH button.

If you have installed the KODAK DC200/DC210 Mounter Software you must restart your computer.
You are now ready to run the newly installed software. Detailed information on KODAK DC200/DC210 Mounter Software (chapter 7) and TWAIN Software (chapter 8) are included in this user manual. Instruction manuals for the additional software packages that were installed are included in the camera package.
When using DC200/DC210 software, if your computer does not recognize that the camera is attached and turned on, you may need to adjust the serial port and speed settings. Use the software's Preferences or Properties window to adjust the camera communications settings.


Chap1newBook Page 4 Friday, February 5, 1999 7:02 AM










text_image
6Connect
When the Mode dial is set to Connect, the camera can communicate with your computer using a serial cable or infrared transceiver (DC210 only).
The camera automatically detects if it is attached to the computer via the serial cable or an infrared transceiver. While in Connect mode the camera is controlled by the computer. Except for the Mode dial and POWER button, all other camera buttons are ignored. The Ready light indicates when the camera is on.
Once the camera is connected to a computer and the DC200/DC210 software is installed, you are now ready to transfer the pictures from the camera to your computer. Refer to the appropriate chapters of this user's guide, or the software's quick setup guides, for more information on the software programs.
Checking Serial Port Availability
If your computer cannot communicate with the DC200/DC210 you may need to adjust the serial port and speed settings. Adjust the settings using the KODAK Mounter Software (chapter 7) or KODAK TWAIN Software (Chapter 8), or follow the instructions on the Kodak Web site at http://www.kodak.com.
Infrared Connection —DC210 Only
The camera can connect to a computer using an infrared transceiver connection. Your computer must be set up with an infrared connection before the camera's infrared transceiver can be used.
Refer to the instructions included with your computer's infrared connection package for more details on setting up an infrared transceiver connection. Additional information is available in the README file on the DC200/DC210 software CD.

If you are using the camera's infrared transceiver to connect to the computer, and the camera automatically turns off because of inactivity, you need to press the camera's POWER button to turn the camera back on.
Serial Cable Connection
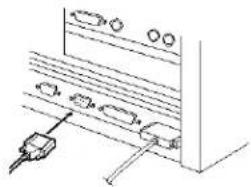
The camera can connect to a computer using the serial cable included in your camera package. In order to connect the DC200/DC210, you need to find an available serial (COM) port on your PC. Most PCs come configured with two serial communication ports labeled COM1 and Com2, or A and B. These COM ports are usually labeled on the back of your PC. If they are not labeled, see your computer's user guide for a diagram that illustrates all your external ports on the back of your PC.

For more information on serial cable connection, refer to “Resolving COM Port Connectivity problems for IBM-Type PCs, with KODAK Digital Cameras” section in the readme file on the DC200/DC210 software CD, or click “Service and Support” on the Kodak Web site at http://www.kodak.com.
To connect to your computer with a serial cable:
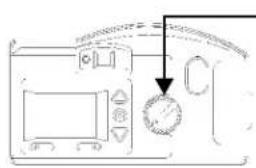
text_image
Diagram showing a kitchen control panel with a dial indicator and a downward arrow pointing to the dial.1 Set the Mode dial to Connect.
natural_image
Pure technical line drawing of a mechanical assembly with no text or symbols2 Plug one end of the serial cable into a COM port on the back of your PC.

If your computer has a 25-pin port, you need to use an optional 9-pin adapter (available at your local computer store) and attach it to the port before attaching the serial cable to the computer.
natural_image
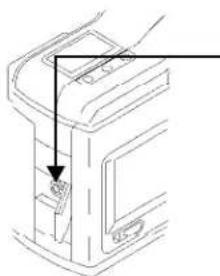
Line drawing of a mechanical device with an arrow pointing to a component (no text or symbols present)3 Open the serial port on the side of your camera.
4 Plug the other end of the serial cable into the camera's serial port.
5 Turn on the camera.
To cancel connection: turn the Mode dial to another setting or turn the camera off.
6-2





text_image
7Mounter Software
KODAK DC200/DC210 Mounter Software (Mounter software) is an easy way to view, transfer, or delete pictures stored on the memory card using your PC and WINDOWS 95, WINDOW 98, or WINDOWS NT software.
Using Mounter software, the DC200/DC210 camera icon appears in the My Computer window, and within file browsers included in many software applications.
Mounter software extends WINDOWS 95, WINDOWS 98, or WINDOWS NT to present the camera contents as though it were an extension of your hard drive. For more detailed information on working with WINDOWS 95, WINDOWS 98, or WINDOWS NT, refer to that Software's user guide.
Installation
If you accepted the default installation settings when you installed the software from the DC200/DC210 CD (see Chapter 5 - Installation Software), Mounter software is already installed. If it is not installed, complete the instructions in Chapter 5 and select the Mounter software option.
Camera Communication Settings
If your computer does not recognize that the camera is attached and turned on, you may need to adjust the serial port and speed settings. See “Communication Settings” on page 7-8 for details or follow the instructions on the Kodak Web site at http://www.kodak.com.
Overview
Mounter software uses the following icons:

Camera icon—displays the DC200/DC210 camera.

Memory Card icon—displays picture files stored on the memory card.

Picture File icon—displays picture files with FlashPix (FPX) or JPEG (JPG) extensions when appropriate viewing option is selected. If the picture file has been registered by another application this icon may be different.
Using Mounter Software
Mounter software allows you to open picture files into a software application, transfer, or delete picture files and adjust the camera settings. You may not copy picture files into the memory card using Mounter software. The camera needs to be connected to your computer and turned on to access your picture files.
natural_image
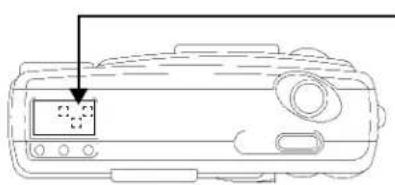
Line drawing of a device with an LCD screen and control buttons (no text or symbols)When the camera is correctly connected to your computer the camera's Status Display is replaced with the following screen.
Opening Picture Files
Mounter software allows you to open picture files into a registered software application. Simply double-click on the Camera icon and then double-click on the Memory Card icon to view the picture files. Double-click on a picture file to open it into a registered software application.
Transferring Pictures to your Computer
Mounter software allows you to transfer picture files from the memory card to a new location on your computer using the drag and drop method.
To transfer files:
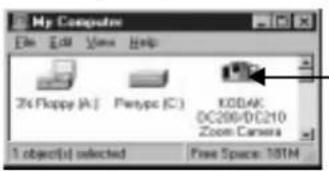
1 Double-click on the My Computer icon.

The My Computer window appears.
text_image
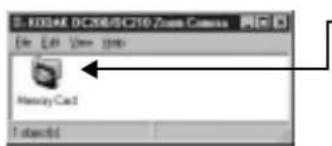
My Computer File Edit View Help 3x Floppy (A:) P-type (C:) KODAK: DC206/DC210 Zoom Camera 1 object(s) selected Free Space: 101M2 Double-click on the Camera icon. The Memory Card icon appears.
text_image
KIDSAC DCX8/DC210 Zoom Capsets File Edit View Tools Memory Card I object3 Double-click on the Memory Card icon. The Memory Card window appears listing individual picture files.
flowchart
graph TD
    A["DCP00001.FPX"] --> B[" Vacation Picture"]
    C["DCP00002.FPX"] --> B
    B --> D[" Tension1 12/03"]
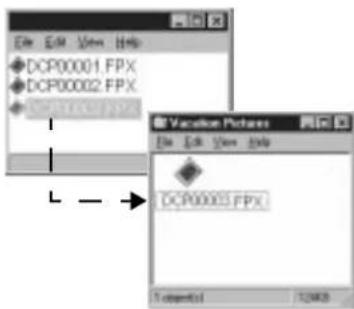
4 Open the folder that the picture files will be dragged into.
5 Click on the picture file to highlight it and while holding the mouse button down, drag the picture file to the new location. The picture file appears in the new location.

To select and move multiple pictures, hold down the Control key and click on additional files.
To exit Mounter software: select Close from the File menu. The Mounter Camera icon remains in the My Computer folder even when the camera is not accessed.
Setting and Viewing Properties
Mounter software displays memory card, picture file, or camera information from the Properties window.
Memory Card Properties

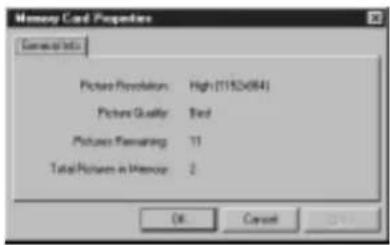
The General Info tab on the Camera Card Memory Properties window displays the current setting for the memory card. You cannot change settings on this window.

You must have a memory card inserted to view the properties window.
To open the Camera Memory Card Properties window:
1 Double-click on the Camera icon in the My Computer window.
2 Click on the Memory Card icon with the right mouse button.
3 Select Properties from the pop-up menu.
The Memory Card Properties window appears and displays:
text_image
Memory Card Properties General Info Picture Resolution High (11524064) Picture Quality Best Pictures Remaining 11 Total Pictures in Memory 2 OK Cancel OK√ Resolution setting (High or Standard)
√ Quality setting (Good, Better, or Best)
√ Remaining number of pictures that can be stored on the memory card at the current settings
√ Number of pictures currently stored on the memory card
To exit: click on the OK or CANCEL button.
Picture File Properties

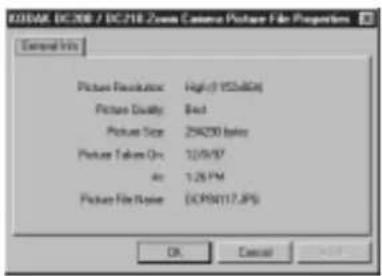
The General Info tab on the Picture File Properties window displays information about the current picture file. You cannot change any settings on this window.
To open the Picture File Properties window:
1 Double-click on the Camera icon in the My Computer window.
2 Double-click on the Memory Card icon.
3 Click on the Picture File icon with the right mouse button.
4 Select Properties from the pop-up menu.
The Picture File Properties window appears and displays:
text_image
FIDEM-DC208 / DC218 Zoom Camera Picture File Properties External Info Picture Resolution: Highly 950x60x Picture Quality: Best Picture Size: 294250 pixels Picture Tablon Qtr: 12/9/07 Air: 1.25PM Picture File Name: (CPSN)(17JP) OK Cancel√ Resolution setting (High or Standard)
√ Quality setting (Good, Better, or Best)
√ Picture size, in bytes
√ Date and time the picture was taken
√ Name of the picture file
To exit: click on the OK or CANCEL button.
Camera Properties

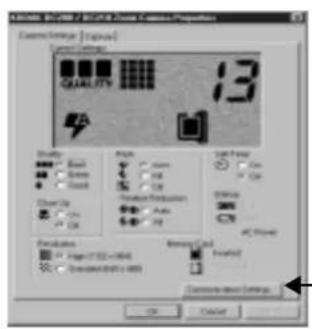
The Camera Properties window displays the Camera Settings and Capture tab cards.
Camera Settings Tab
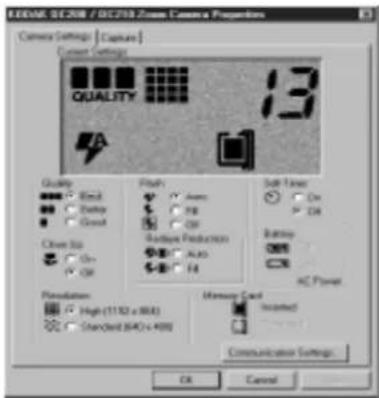
The Camera Settings tab on the Camera Properties window is used to view and change the camera's current settings, and open to the Communication Settings window.
To adjust the camera settings:
1 Click on the Camera icon with the right mouse button.
2 Select Camera Properties from the pop-up menu.
The Camera Properties window appears with the Camera Setting tab open.
text_image
EXCMR 9C208 / EC208-Box Camera Properties Camera Settings | Capture | Camera Settings QUALITY 13 Quality Blend Supply Gross Clean Size On Off Flash Zoom FIB Off Radial Production ALAD F4 Soft Tone On Off Battery AC Power Playability: High (51.52 x 80Hz) Standard (640 x 40Hz) Harmonic Card Installed Communication Settings... OK Cancel3 Click on the appropriate button to adjust the following settings:
√ Quality setting
√ Flash
√ Self-Timer
√ Close Up (DC210 only)
√ Red-eye Reduction
√ Resolution
The Battery Level and Memory Card information cannot be adjusted.

Select the COMMUNICATIONS SETTINGS button to adjust the serial port and speed. See "Communication Settings" on page 7-8 for more details.
To exit: click on the OK button to apply the changes and exit the window. To exit the window without making any changes, click on the CANCEL button.
Capture
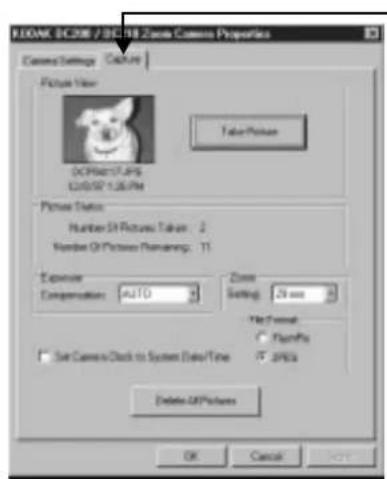
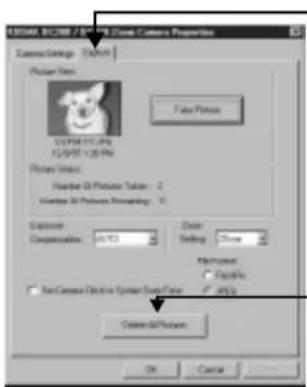
The Capture tab on the Camera Properties window allows you to take a picture, and adjust the exposure and zoom settings, and adjust the file format while the camera is attached to the computer.
To open the Capture tab:
1 Click on the Camera icon with the right mouse button.
2 Select Camera Properties from the pop-up menu.
The Camera Properties window appears.
text_image
EDDAC EC208 / 3D-3B Zone Camera Properties Camera Settings - Camera Picture View DCP/DCP/DCP DC/PDF/DC/PDF Timer/Timer Picture Status Number 54 Pictures Tabes: 2 Number Of Pictures Remaining: 11 Exposure Compensation: AUTO Zone Setting: 25 sec No Format Flare/Fits Set Camera Clock to System Date/Time JPGs Delete JPG Pictures OK Cancel NET3 Click on the Capture tab.
The Capture tab appears.
4 If necessary click on the buttons to adjust the:
√ Exposure compensation
√ Zoom (DC210 only)
√ File format
5 Click on the TAKE A PICTURE button to take a picture while the camera is attached to computer.
The picture appears in the Picture View Area.

Select the DELETE SELECTED PICTURES or DELETE ALL PICTURES button to delete picture files. See "Delete" on page 7-9 for more details.
To exit: click on the OK button to apply the changes and exit the window. To exit the window without making any changes, click on the CANCEL button.
Communication Settings
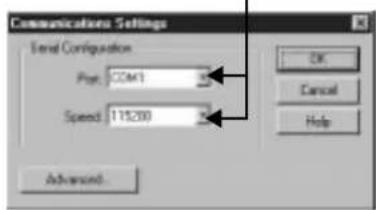
The Communications Settings window allows you to view and change the serial port and port speed settings while the camera is attached to your computer. See "Camera Communication Settings" on page 7-1 for more detailed information.
To open the Communication Setting window:
1 Click on the Camera icon with the right mouse button.
2 Select Camera Properties from the pop-up menu.
text_image
Quality 13 Quality Quality Quality Quality Quality Quality Quality Quality Quality Quality Quality Quality Quality Quality Quality Quality Quality Quality Quality Quality Quality Quality Quality Quality Quality Quality Quality Quality Quality Quality Quality Quality Quality Quality Quality Quality Quality Quality Quality Quality Quality Quality Quality Quality Quality Quality Quality Quality Quality Quality Quantity/Label Created Custom-Model Settings3 Click on the COMMUNICATIONS SETTINGS button.
4 If necessary, click on the arrows to adjust the:
√ port, if your computer does not recognize the camera
√ speed, to optimize picture transfer time
If your computer is faster than 166 MHz you can click on the ADVANCED button and adjust the serial speed.
text_image
Communications Settings Serial Configuration Page: COM1 Speed: 115200 OK Cancel Help Advanced...
If the software does not recognize the camera, continue to adjust the serial port speed on COM1, and the other COM ports, until it is recognized. Once your computer can communicate with your camera, gradually increase speed to optimize transfer picture time.
To exit: click on the OK button to apply the changes and exit the window. To exit the window without making any changes, click on the CANCEL button.
Delete
The Delete window allows you to delete the pictures from the memory card.
To delete a picture:
1 Click on the Camera icon with the right mouse button.
2 Select Camera Properties from the pop-up menu.
text_image
C:\COM\COM / 10.9.9.9 CBox Camera Properties Camera Settings - [COM] Photo Type: C:\COM\COM\COM 12/07/2014 Photo Units: Number 30 Pulsifier: 2 Number 30 Pulsifier: 10 Exposure: Cosmication: 0x10 Chain: Setting: Group Print/Pattern: □ Copy/Print □ Print/Case Display System Tools/Time □ OFFS Create all pictures: OK Cancel3 Click on the Capture tab.
4 Click on the DELETE ALL PICTURES button to delete all the pictures from the memory card.

You may also delete individual picture files using the Camera icon. Simply double-click on the Camera icon, then double-click on the Memory Card icon. Click once on the picture file that you wish to delete. From the File pulldown menu, select Delete.
To exit: click on the OK button to apply the changes and exit the window. To exit the window without making any changes, click on the CANCEL button.
7-9


Chap1newBook Page 10 Friday, February 5, 1999 7:02 AM










text_image
8TWAIN Software
KODAK DC200/DC210 Digital Access TWAIN Acquire Software (TWAIN) for WINDOWS 95, WINDOWS 98, or WINDOWS NT is a special industry-standard interface that allows the DC200/DC210 camera to transfer pictures from your camera directly to your favorite TWAIN-compliant software, such as ADOBE PHOTODELUXE.
Installation
If you accepted the default installation settings when you installed the software from the DC200/DC210 CD (see Chapter 5 - Installation Software), TWAIN software is already installed. If it is not installed, complete the instructions in Chapter 5 and select the TWAIN software option.
Camera Communication Settings
If your computer does not recognize that the camera is attached and turned on, you may need to adjust the serial port and speed settings. See “Preferences Settings” on page 8-5 for details or follow the instructions on the KODAK Web site at http://www.kodak.com.
Starting TWAIN Software
1 Connect the DC200/DC210 camera to your computer.
See "Connect" on page 8-1.
2 Open a TWAIN-compliant software (for example, ADOBE PHOTODELUXE).
3 Pull down the File menu and select TWAIN Source.
4 Select Kodak DC200/DC210 Zoom Acquire TWAIN.
5 Pull down the File menu and select TWAIN Acquire.
The TWAIN software main window appears.
Overview
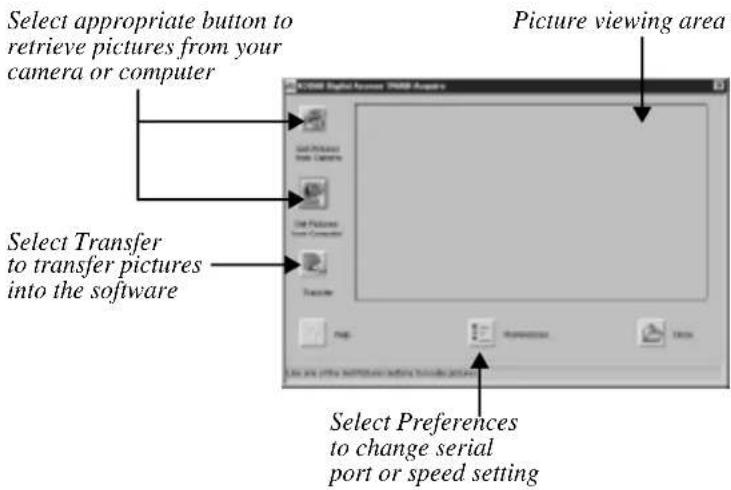
The following is the main window of TWAIN software. More detailed information is offered in the following sections.
text_image
Select appropriate button to retrieve pictures from your camera or computer Select Transfer to transfer pictures into the software Picture viewing area Select Preferences to change serial port or speed settingTransferring Pictures from DC200/DC210
The DC200/DC210 needs to be turned on and connected to your computer to transfer pictures from the camera.
text_image
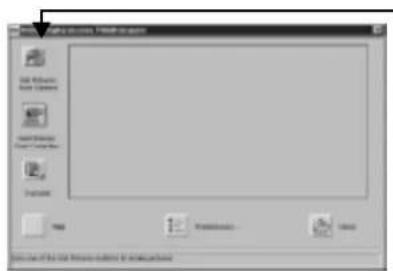
File Selection Tools Help to export File Options New Document Export Export View Import Export1 Click on the GET PICTURES FROM CAMERA button.
The Get Camera Pictures window appears.

Select Get Pictures from Computer to transfer pictures from an existing folder on your computer.
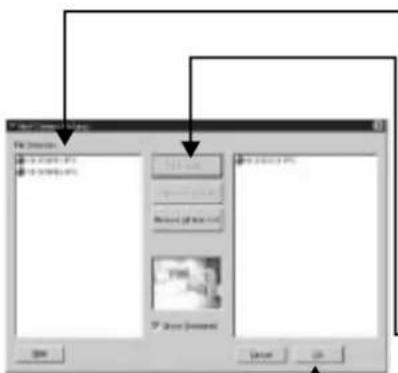
2 Select the picture file from the File Selection area.
The picture file is highlighted. To select multiple files at one time, hold down the CONTROL or SHIFT key and click on the picture files.

Check Show Thumbnail to preview the picture file.
3 Click on the ADD TO LIST button.
The picture file is listed in the transfer window.

You may also select:
√ Remove from List to remove a picture file from the transfer list.
√ Remove All from List to remove all the picture files from the transfer list.
4 Click on the OK button.
text_image
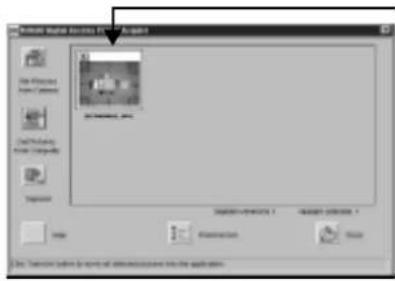
Microsoft Internet Services Help - Open Web File Options Open Windows Download Open Windows Properties OK Cancel Paste OK Cancel Paste OK Cancel Paste OK Cancel Paste OK Cancel Paste OK Cancel Paste OK Cancel Paste OK Cancel Paste OK Cancel Paste OK Cancel Paste OK Cancel Paste OK Cancel Paste OK Cancel Paste OK Cancel Paste OK Cancel Paste OK Cancel Paste OK Cancel Paste OK CancelThe main TWAIN software window reappears with a thumbnail of your picture.
5 Click on a picture to select it.

To select multiple pictures, hold down the Control or Shift key and click on the pictures.
6 Click on the TRANSFER button.
The picture is displayed in the previously opened TWAIN-compliant software window.
To exit: click on the CLOSE button.
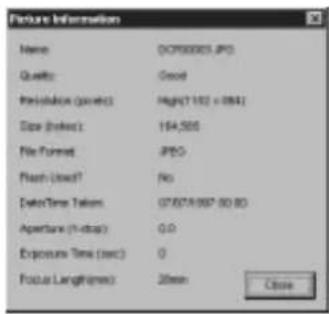
Picture Information
The Picture Information window displays information about the picture and camera settings when the picture was taken. You may not select or change any settings on the window.
To display picture information:
Click on the ☐ the upper left corner of the picture to open the Picture Information window.
The Picture Information window appears and displays:
text_image
Picture Information Name: OCP00005.JPG Quality: Good Resolution (seconds): High(7102 x 0.84) Size (inches): 164.506 File Format: JPEG Flash (head): No Data Time Taken: 07/07/097-00:00 Aperture (V-drop) 0.0 Exposure Time (sec) 0 Focus Length(mm): 20mm Close√ Name of the picture file
√ Quality setting
√ Resolution setting
√ Size (in bytes)
√ File Format
√ Flash information
√ Date and time picture was taken
√ Aperture information
√ Exposure Time, in seconds
√ Focal Length
To exit: click on the CLOSE button.
Preferences Settings

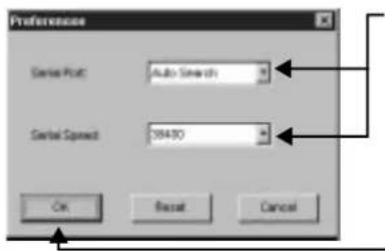
The Preferences window allows you to change serial port and speed settings.
If your computer does not recognize that the camera is attached and turned on, you may need to adjust the serial port and speed setting.
To change serial port or speed setting:
1 Click on the PREFERENCES button.
The Preferences window appears.
text_image
Preferences Serial Float: Auto Search Serial Spread: 38430 OK Reset Cancel2 If necessary, click on the arrows and adjust the:
√ serial port, if your computer does not recognize the camera
√ port speed, to optimize picture transfer time
3 Click on the OK button.

To reset the values to the default settings click the RESET button.

If the software does not recognize the camera, continue to adjust the serial port speed on the appropriate COM port until it is recognized. Once your computer can communicate with your camera, gradually increase speed to optimize transfer picture time.
To exit: click on the OK button. To exit the window without making any changes, click the CANCEL button.


Chap1newBook Page 6 Friday, February 5, 1999 7:02 AM









text_image
9Tips and Troubleshooting
Communicating with the Computer
If your computer cannot communicate with the camera you may need to adjust the serial port and speed settings. Adjust the settings using the KODAK Mounter Software (chapter 7) or KODAK TWAIN Software (Chapter 8), or follow the instructions on the Kodak Web site at http://www.kodak.com
Monitor Adjustment
Your monitor display settings may need to be adjusted to view pictures from the camera.
1 Double-click on the My Computer icon.
2 Double-click on the Control Panel icon.
3 Double-click on the Display icon and click on the Settings tab.
4 From the Color Palette field, select the highest available setting {256, High (16-bit), or True (32-bit) color} and click the OK button.
Printing
You may notice that the colors on your computer screen do not always match those in your documents or prints. This is because monitors and printers use different color systems.
You may be able to achieve more predictable results in your printed documents by:
√ improving the quality of your paper. Copier paper may not offer the same results as coated paper or paper made especially for ink jet printers.
√ adjusting your printer software settings.
√ using fresh ink cartridges. Do not use ink cartridges beyond their life expectancy.
Remember these few tips when it comes time to print your document:
√ color printing takes more time. The more complex your document is increases the printing and drying time.
√ color printing is more memory intensive than black and white. If your computer gives you an insufficient memory message, you may need to close some applications, change some settings, or add additional memory.
√ color prints may not photocopy as clearly as black and white. If you plan to photocopy documents, you may consider printing the document in gray scale. This setting is usually changed from the Print menu.
√ resizing the picture to a smaller size or printing the picture on glossy paper may increase the quality of the print.
To improve the quality of your prints, you may want to print your pictures on KODAK Inkjet Snapshot Paper (Snapshot Paper). Snapshot Paper is made to work with most inkjet printers to give you clearer, crisper, and more detailed images on your prints.
Troubleshooting
If you are experiencing difficulties with your camera, check the following table for possible solutions. If the difficulties persist, refer to Chapter 11 - Where to Get Help.

Additional technical information is available in the ReadMe file located in the KODAK DC200/DC210 Folder.
| Computer Monitor | ||
| Problem Cause Solution | ||
| The image on your monitor is jagged or inappropriately colored. | Monitor is not set correctly. | Adjust your monitor display settings. See “Monitor Adjustment” on page 9-1. |
| Memory Card | ||
| Problem Cause Solution | ||
| The DC200/DC210 does not recognize your memory card. | The memory card may not be ATA compatible. | Memory cards must be ATA compatible to work with the camera. |
| The memory card may contain compression or stacker software. | Reformat any memory cards that contain compression or stacker software.Refer to the memory card’s user’s guide or see “Format Memory Card” on page 4-10 for instructions on reformatting the card. | |

| Windows-DC200/DC210 Camera Communications | ||
| Problem Cause Solution | ||
| Computer cannot communicate with the camera. | Some Advanced Power Management utilities on laptops can turn off ports to save battery life. | See the Power Management section of your laptop's user guide to disable this feature. |
| Conflict with another serial device, such as a modem. | Refer to the serial communication or corresponding section of your computer's modem, and/or operating system's user's guide. | |
| Camera power is off. T | Turn the camera on. | |
| Camera is not connected to serial cable or cable is not connected to the computer's COM port. | Connect serial cable to camera and COM port. See “Serial Cable Connection” on page 6-2. | |
| Infrared port is not responding. | Check the computer's infrared connection. Be sure that the camera is on. | |
| Port settings in software's Acquire-Preferences may be set to the incorrect COM port. | Change the COM port settings to Auto-Search or to a specific COM port. | |
| The Mode dial is not set to Connect. | Set the camera's Mode dial to Connect. | |


| DC200/DC210 Camera | ||
| Problem Cause Solution | ||
| Ready light does not turn on and the camera does not work. | Batteries are low or empty. | Replace the batteries.Pictures remain in thecamera’s memorywhen the battery isremoved. |
| Camera is not turned on. | Turn the camera onand verify that thegreen Ready lightturns on. | |
| Shutter button does not work. | camera is not turned on. | Turn the camera onand verify that thegreen Ready lightturns on. |
| Mode dial is not set to Capture. | Set the Mode dial toCapture. | |
| Ready light is blinking. Camera is processing picture. | Wait until Ready lightstops blinking beforeattempting to takeanother picture. | |
| The Status Display reads Full. Thememory card is full. | Transfer pictures toyour computer orinsert a memory cardthat has availablememory. | |
| Camera is connected to the computer. | Disconnect camerafrom computer. | |
| Camera does not turn on. Batteries are not properly installed. | Remove the batteriesand install themaccording to thedirections on theoutside of the batterydoor. | |
| DC200/DC210 Camera | ||
| Problem Cause Solution | ||
| Part of the picture is missing. | Something was blocking the lens when the picture was taken. | Keep hands, fingers, or other objects away from the lens when taking pictures. |
| Your eye or the picture was not centered correctly in the viewfinder. | Leave space around subject when centering picture in viewfinder. | |
| Picture is too dark. Flash is not | on or did not go off. | Turn on the flash. See “Flash” on page 2-9. |
| The subject is too far away for the flash to have an effect. | Move so there is no more than 10 feet (3 m) between the camera and the subject. | |
| The subject is in front of a bright light. | Change your position so the light is not behind the subject. | |
| Picture is too light. The flash is | not needed. | Change to automatic flash. See“Flash” on page 2-9. |
| The subject is too close when the flash was used. | Move so there is at least 1.6 ft. (0.5 m) between the camera and the subject. | |
| The light sensor is covered. | Hold the camera so your hands or other objects do not cover the light sensor. | |
| Stored pictures are damaged. | The memory card was removed when the Ready light was blinking. | Make sure the Ready light is not blinking before removing the memory card. |

| DC200/DC210 Camera | ||
| Problem Cause Solution | ||
| Pictures remaining number does not decrease. | The image resolution does not take up sufficient space to decrease the picture remaining number. | The camera is operating normally. Continue taking pictures. |
| Picture is not clear. The lens is | dirty. Clean the lens. See | “General Maintenance and Safety” on page 2-15. |
| Subject too close when taking picture | Stand at least 2.23 ft. (.68m) with DC200; at least 8 in. (20 cm.) in close-up, 3.28 ft. (1m) in telephoto, 1.64 ft. (0.5 m) with DC210. | |
| Subject or the camera moved while the picture was taken. | Hold camera steady until the picture is taken. | |
| The subject is too far away for the flash to be effective. | Move so the subject is less than 10 ft. (3 m) away. | |
| LCD Messages | ||
| Message Cause Solution | ||
| Memory Card is Full. Memory | card is full and cannot hold additional pictures | Transfer pictures to your computer or insert a memory card that has available memory. |
| LCD Messages | ||
| Message | Cause | Solution |
| No Memory Card. There is no memory card inserted in the camera. | Insert a memory card into the camera. | |
| Cannot read memory card. Memory card is corrupted. | Insert a new or reformat the memory card. | |
| Cannot establish connection. The camera cannot communicate with the computer. | Change the COM port settings to Auto-Search or to a specific COM port. See “Serial Cable Connection” on page 6-2. | |
| Camera needs service. The camera is malfunctioning. | Have the camera serviced. | |

text_image
10Where to Get Help
Help with your DC200/DC210 is available from a number of resources.
√ in Tips and Troubleshooting, Chapter 9
√ your place of purchase
√ the software's manufacturer
√ World Wide Web
√ product information by fax
√ technical support
Software Help
Help with any software packaged with your DC200/DC210 can be obtained from the software instructions, the software's help screens, or by contacting the manufacturer of that product.
Online Services
Contact Kodak via:
World Wide Web—http://www.kodak.com
America Online—(keyword) KODAK
CompuServe—GO KODAK
Kodak Internet listserver—photo-cd@info.kodak.com; or ftp.kodak.com
Faxed Information
Kodak offers automated support for digital imaging products and services. Product information can be faxed to you by calling:
U.S.—1-800-295-5531
Canada—1-800-295-5531
Europe—44-131-458-6962
U.K.—44-0-131-458-6962
Customer Support
If you have questions concerning the operation of Kodak software, or the DC200/DC210, you may speak directly to a customer support representative. Have the camera connected to your computer, its serial number ready, and be at your computer when you call.
U.S. and Canada—call toll free, 1-888-395-6325, between the hours of 9:00 a.m. and 8:00 p.m. (Eastern Standard Time) Monday through Friday.
Europe—call the Kodak Digital Imaging Support Centre toll free number associated with your location, or the U.K. toll line, 44-131-458-6714, between the hours of 09.00 and 17.00 (GMT/CET) Monday through Friday.
Outside the U.S., Canada, and Europe—call the number on the following pages that is associated with your location.
| Country Help number Fax | ||
| Argentina 54-1-808-300 54-1-808-3328 | ||
| Australia 1-800-674-831 61-3-9353-2488 | ||
| Austria 0-660-7348 44-131-458-6962 | ||
| Belgium 0800-72247 44-131-458-6962 | ||
| Brazil 0-800-15-0000 55-2-331-8571 | ||
| Caribbean 78-7-757-5500 78-7-757-8760 | ||
| Chile 56-2-697-2000 56-2-697-0310 | ||
| China-Shanghai 8621-647 20888 8621-647 26582 | ||
| China-Beijing | 8610-63471155 | 8610-63475641 |
| Colombia | 57-1-629-0266 57-1-629-0673 | |
| Denmark | 80-01-09-24 | 44-131-458-6962 |
| Dominican Republic | 809-563-1252 | 809-563-1264 |
| Egypt | 20-2-394-2205 20-2-393-1 119 | |
| France | 0800-90-6281 | 44-131-458-6962 |
| Finland | 0800-117056 | 44-131-458-6962 |
| Germany | 0130-82-54-02 44-131-458-6962 | |
| Greece | 00800-44125605 44-131-458-6962 | |
| Hong Kong 852-2564-9777 852-2564-9753 | ||

| Country Help number Fax | ||
| Hungary 36-1-269-71-17 | 36-1-269-71-13 | |
| India 91-22-617-5823 91- | 22-617-6004 | |
| Ireland 1-800-409391 44- | 131-458-6962 | |
| Italy 1678-72-996 44-131 | 458-6962 | |
| Japan 81-3-5488-2390 81- | 3-5488-4512 | |
| Korea 82-2-708-5400 82-2 | 2-708-5500 | |
| Latin America 1-305-267- | 4700 1-305-267-4780 | |
| Lebanon 961-1-883822 96 | 1-1-881726 | |
| Malaysia | 60-3-757-2722 60-3-755-5 | 919 |
| Mexico | 52-5-449-4300 52-5-449-4 | 400 |
| Middle East | 971-4-444-910 971-4-447 | 059 |
| Netherlands | 06-0224428 | 44-131-458-6962 |
| New Zealand | 0800-500-135 64-9-302-8 | 637 |
| Norway | 800-1-1848 | 44-131-458-6962 |
| Panama | 52-3-678-6200 52-3-678-6 | 210 |
| Peru 51-1-224-8610 51-1- | 224-8605 | |
| Philippines | 63-2-810-0331 63-2-816-6 | 718 |
| Portugal | 351-1-4149-500 351-1419 | 4-321 |
| Russia | 7-095-929-9166 7-095-929 | 9-9170 |
| Singapore | 65-470-9875 65-479-8397 | |
| South Africa | 27-11-804-2852 27-11-804 | 4-5013 |
| Spain 900-98-4485 44-131 | -458-6962 | |
| Sweden | 020-793169 | 44-131-458-6962 |
| Switzerland | 0800-551034 | 44-131-458-6962 |
| Taiwan | 886-2-893-8210 886-2-895 | 1069 |
| Thailand | 66-2-271-3040 66-2-279-5 | 5073 |
| Turkey 90-216-342-3332 | 90-216-343-6743 | |
| U.K. | 0800-281487 | 44-131-458-6962 |
| Uruguay 59-2-92-0473 | 59-2-92-1796 | |
| Venezuela | 58-2-903-1111 58-2-943-2 | 2081 |


Chap1newBook Page 4 Friday, February 5, 1999 7:02 AM









Warranty & Regulatory Information
Warranty Time Period
Kodak warrants the KODAK DC200 plus Camera and KODAK DC210 Plus Zoom camera (excluding the batteries) to be free from malfunctions and defects in both materials and workmanship for one year from the date of purchase.
Warranty Repair Coverage
This warranty will be honored within the geographical location that the product was purchased.
If the equipment does not function properly during the warranty period due to defects in either materials or workmanship, Kodak will, at its option, either repair or replace the equipment without charge, subject to the conditions and limitations stated herein. Such repair service will include all labor as well as any necessary adjustments and/or replacement parts.
If replacement parts are used in making repairs, these parts may be remanufactured, or may contain remanufactured materials. If it is necessary to replace the entire system, it may be replaced with a remanufactured system.
Kodak will also provide telephone assistance during the warranty period.
Warranty-1
Limitations
WARRANTY SERVICE WILL NOT BE PROVIDED WITHOUT DATED PROOF OF PURCHASE. PLEASE RETURN THE WARRANTY REGISTRATION CARD WITHIN 30 DAYS OF PURCHASE.
THIS WARRANTY BECOMES NULL AND VOID IF YOU FAIL TO PACK YOUR DC200/DC210 CAMERA IN A MANNER CONSISTENT WITH THE ORIGINAL PRODUCT PACKAGING AND DAMAGE OCCURS DURING PRODUCT SHIPMENT.
THIS WARRANTY DOES NOT COVER: CIRCUMSTANCES BEYOND KODAK'S CONTROL; SERVICE OR PARTS TO CORRECT PROBLEMS RESULTING FROM THE USE OF ATTACHMENTS, ACCESSORIES OR ALTERATIONS NOT MARKETED BY KODAK; SERVICE REQUIRED AS THE RESULT OF UNAUTHORIZED MODIFICATIONS OR SERVICE; MISUSE, ABUSE; FAILURE TO FOLLOW KODAK'S OPERATING, MAINTENANCE OR REPACKAGING INSTRUCTIONS; OR FAILURE TO USE ITEMS SUPPLIED BY KODAK (SUCH AS ADAPTERS AND CABLES).
KODAK MAKES NO OTHER WARRANTIES, EXPRESS, IMPLIED, OR OF MERCHANTABILITY OR FITNESS FOR A PARTICULAR PURPOSE FOR THIS EQUIPMENT OR SOFTWARE.
REPAIR OR REPLACEMENT WITHOUT CHARGE ARE KODAK'S ONLY OBLIGATION UNDER THIS WARRANTY. KODAK WILL NOT BE RESPONSIBLE FOR ANY SPECIAL, CONSEQUENTIAL OR INCIDENTAL DAMAGES RESULTING FROM THE PURCHASE, USE, OR IMPROPER FUNCTIONING OF THIS EQUIPMENT REGARDLESS OF THE CAUSE. SUCH DAMAGES FOR WHICH KODAK WILL NOT BE RESPONSIBLE INCLUDE, BUT ARE NOT LIMITED TO, LOSS OF REVENUE OR PROFIT, DOWNTIME COSTS, LOSS OF USE OF THE EQUIPMENT, COST OF ANY SUBSTITUTE EQUIPMENT, FACILITIES OR SERVICES, OR CLAIMS OF YOUR CUSTOMERS FOR SUCH DAMAGES.
Depending on your geographical location, some limitations and exclusions may not apply.
Application Support
For application specific support, contact your reseller, systems integrator, software manufacturer, or dealer.
How to Obtain Service
Visit us on the Internet at http://www.kodak.com
Please refer to the Service and Support section of your user's guide for the support hotline designated to your location.
When returning a DC200/DC210 camera for repair, the unit shall be packed in its original packing materials. A problem report should also be enclosed with the equipment. If the original packaging has been discarded or is not available, packing will be at the owner's expense.
Unless a specific Kodak warranty is communicated to the purchaser in writing by a Kodak company, no other warranty or liability exists beyond the information contained above, even though defect, damage or loss may be caused by negligence or other act.
To obtain warranty repair service contact your local Kodak representative. For assistance, refer to the Service and Support information in the KODAK DC200/DC210 Camera User's Guide.
Regulatory Information
FCC Compliance and Advisory
This device complies with Part 15 of the FCC Rules. Operation is subject to the following two conditions: 1) this device may not cause harmful interference, and 2) this device must accept any interference received, including interference that may cause undesired operation.
This equipment has been tested and found to comply with the limits for a Class B digital device, pursuant to Part 15 of the FCC Rules. These limits are designed to provide reasonable protection against harmful interference in a residential installation.
This equipment generates, uses, and can radiate radio frequency energy and, if not installed or used in accordance with the instructions, may cause harmful interference to radio communications. However, there is no guarantee that interference will not occur in a particular installation.
If this equipment does cause harmful interference to radio or television reception, which can be determined by turning the equipment off and on, the user is encouraged to try to correct the interference by one or more of the following measures: 1) reorient or relocate the receiving antenna; 2) increase the separation between the equipment and the receiver; 3) connect the equipment to an outlet on a circuit different from that to which the receiver is connected; 4) consult the dealer or an experienced radio/TV technician for additional suggestions.
Any changes or modifications not expressly approved by the party responsible for compliance could void the user's authority to operate the equipment. Where shielded interface cables have been provided with the product or specified additional components or accessories elsewhere defined to be used with the installation of the product, they must be used in order to ensure compliance with FCC regulation.
Canadian DOC Statement
DOC Class B Compliance—This digital apparatus does not exceed the Class B limits for radio noise emissions from digital apparatus set out in the radio interference regulations of the Canadian Department of Communications.
About, Viewing the 4-13
Adjusting Camera Settings Using Mounter Software 7-6
Adjusting Port and Port Speed Using TWAIN Software 8-5 With Camera Attached to the Computer 7-8
Adjusting the Exposure 2-4
Auto Flash 2-9
Auto Red-Eye Flash 2-9
B
Batteries
Installing 2-12
Types of 2-12
C
Camera
Connecting to a Computer 6-1
Getting Help or Information 10-1, 10-2
Modes 1-1
Mounter Software 7-1, 7-2, 7-4, 7-5, 7-6, 7-7, 7-8, 7-9
Package Contents 1-2
Parts 1-3, 1-4
Power 2-1
Properties 7-6
Specifications 1-2
Troubleshooting 9-1, 9-2, 9-3, 9-4, 9-5, 9-6, 9-7, 9-8
Turning On and Off 2-1
TWAIN Software 8-1, 8-2, 8-3, 8-4, 8-5
Camera Parts
Back 1-4
Bottom 1-4
Front 1-3
Side 1-4
Top 1-3
Camera Settings
Adjusting Using Mounter Software 7-6
Date and Time 4-8
File Type 4-6
LCD Screen Brightness 4-9
Picture Quality 4-2
Resolution 4-3
Video Output Format 4-11
Camera Settings, Changing
Activating and Stopping the Self-Timer 2-7
Selecting the Flash Setting 2-9
Selecting the Resolution 2-10
Turning Close Up On and Off 2-8
Zooming 2-14
Capture Mode 2-1
Capturing an Image See Taking a Picture
Close Up Setting 2-8
CompactFlash 2-8
Computer Monitor Problems 9-3
Connect Mode 6-1
Connecting the Camera to a TV 3-4
Connecting to a Computer
Using a Serial Cable 6-2
Index-1


Using an Infrared Sensor 6-1
D
Dark Pictures 2-4
Date Stamp, Setting the 4-5
Date, Setting the 4-8
DC200/DC210
Connecting to a Computer 6-1, 6-2
Getting Help or Information 10-1, 10-2
Installing Software 5-1, 5-2, 5-3
Mounter Software 7-1, 7-2, 7-4, 7-5, 7-6, 7-7, 7-8, 7-9
Package Contents 1-2
Parts 1-3, 1-4
Power 2-1
Properties 7-6
Specifications 1-2
Troubleshooting 9-1, 9-2, 9-3, 9-4, 9-5, 9-6, 9-7, 9-8
Turning On and Off 2-1
TWAIN Software 8-1, 8-2, 8-3, 8-4
Delete Icon 3-1
Deleting a Picture
Deleting a Picture From the Memory Card 3-2
Deleting a Picture Using Mounter Software 7-9
Deleting All Pictures From the Memory Card 3-2
Deleting all Pictures Using Mounter Software 7-9
Deleting the Current Picture 2-3
Deleting a Picture in Capture Mode 2-3
E
Error Messages 9-7, 9-8
Exposure
Adjusting With Camera Attached to the Computer 7-7
Compensating for Dark or Light Pictures 2-4
Locking the exposure setting 2-5
Exposure Compensation Icon 2-2
Exposure Lock Icon 2-2
F
File
Properties 7-5
Type 4-6
Files
Opening 7-2
Transferring to a Computer 7-2
Fill Flash 2-9
Fill Red-Eye Flash 2-9
Filmstrip Display 3-1
Flash Settings 2-9
FlashPix File Format 4-6
Formatting the Memory Card 4-10
Full Memory Card 2-6
H
Help, Getting 10-1, 10-2
I
Information
Getting 10-1
Regulatory warranty4
Infrared Sensor 6-1
Inserting a Memory Card 2-7
Installing Batteries 2-12
Installing Software 5-1, 5-2, 5-3
Requirements for 5-1
Index-2
J
JPEG File Format 4-6
K
Kodak
Contacting 10-1
Getting Help From 10-2
L
Language, Setting the 4-12
Launching TWAIN Software 8-2
LCD Messages 9-7, 9-8
LCD Screen Brightness 4-9
Light Pictures 2-4
M
Magnify Icon 3-1
Magnifying a picture in Review Mode 3-1
Memory Bar Display 3-1
Memory Card
CompactFlash logo 2-8
Deleting a Picture From Using Mounter Software 7-9
Deleting Pictures From 3-2
Formatting 4-10
Full 2-6
Inserting and Removing 2-7
Problems 9-3
Properties 7-4
Viewing Available Memory 3-1
Viewing Pictures On 3-1
Memory Card Icon 2-7
Modes
Capture 2-1
Connect 6-1
Preferences 4-1
Review 3-1
Monitor Problems 9-3
Monitor Settings 9-1
Mounter Software 7-1, 7-2, 7-4, 7-5, 7-6, 7-7, 7-8, 7-9
N
NTSC Format 4-11
0
Overlay Screen 3-1
P
Package Contents 1-2
PAL Format 4-11
Parts of the Camera 1-3, 1-4
Picture File
Properties 7-5
Picture Files
Opening 7-2
Transferring to a Computer 7-2
Picture Quality 2-11
Setting 4-2
Picture Resolution See Resolution
Picture Taking See Taking a Picture
Pictures Remaining 2-6
Port and Port Speed
Adjusting Using TWAIN Software 8-5
Adjusting With Camera Attached to the Computer 7-8
Preferences Mode 4-1
Preview Display
Exposure Compensation Icon 2-2
Exposure Lock Icon 2-2
Template Icon 2-2
Previewing the Image Before Taking the Picture 2-2
Previewing the Picture Just After Taking It 4-7
Index-3
Printing
Screen and Print Colors Do Not Match 9-2
Tips 9-2
Problems See Troubleshooting
Q
Quality See Picture Quality
Quickview Option 4-7
R
Regulatory Information warranty4
Removing a Memory Card 2-7
Requirements for Installing Software 5-1
Requirements, System 5-1
Resolution 2-10
Setting 4-3
Review Display Delete Icon 3-1
Filmstrip Icon 3-1
Magnify Icon 3-1
Memory Bar 3-1
Overlay Icon 3-1
Review Mode 3-1
S
Screen Brightness 4-9
Self-Timer 2-7
Serial Connection 6-2
Serial Port
Checking Availability 6-1
Serial Port and Port Speed
Adjusting Using TWAIN Software 8-5
Adjusting With Camera Attached to the Computer 7-8
Service Agreement 2-15
Settings See Camera Settings
Index-4
Slide Show 3-4
Software
Installing 5-1, 5-2, 5-3
Requirements for Installing 5-1
TWAIN 8-1, 8-2, 8-3, 8-4, 8-5
Specifications 1-2
Starting TWAIN Software 8-2
Status Display
Battery Icon 2-12
Close Up Icon 2-8
Flash Icon 2-9
Memory Card Icon 2-7
Picture Quality Icon 2-11
Pictures Remaining Icon 2-6
Resolution Icon 2-10
Self-Timer Icon 2-7
System Requirements 5-1
T
Taking a Picture 2-2
Adjusting the Exposure 2-4
Deleting the Current Picture 2-3
Previewing the Image Before Taking the Picture 2-2
Previewing the Picture Just After Taking It 4-7
Selecting the Flash Setting 2-9
Selecting the Resolution 2-10
Setting the Self-Timer 2-7
Using the Close Up Setting 2-8
With Camera Attached to the Computer 7-7
Zooming 2-14
Template, Setting the 4-4
Time
Setting 4-8
Tips
Adjusting Monitor Settings 9-1
Printing 9-2
Transferring Picture Files to a Computer 7-2
Transferring Pictures Using TWAIN Software 8-3, 8-4
Troubleshooting 9-1
DC200/DC210 Problems 9-5, 9-6, 9-7
LCD Messages 9-7, 9-8
Memory Card Problems 9-3
Monitor Problems 9-3
Screen and Print Colors Do Not Match 9-2
The Camera and Computer Cannot Communicate 9- 1
Windows-DC200/DC210
Communication
Problems 9-3, 9-4
Turning the Camera On and Off 2-1
TWAIN Software 8-1
Adjusting Port and Port Speed 8-5
Starting 8-2
Transferring Pictures 8-3, 8-4
Viewing Picture Information 8-4
warranty3
Repair Coverage warranty1
Service Agreements 2-15
Time Period warranty1
What Comes With the Camera? 1-2
Windows System Requirements 5-1
Windows-DC200/DC210
Communication Problems 9-3, 9-4
Z
Zooming 2-14
With Camera Attached to the
Computer 7-7
V
Video Output Format 4-11
Viewing a Slide Show on TV 3-4
Viewing Picture Information Using TWAIN Software 8-4
Viewing Pictures on the Memory Card 3-1
Viewing Pictures on TV 3-4
Viewing the About Screen 4-13
Viewing the Available Memory 3-1
W
Warranty
Limitations warranty2
Obtaining Repair Service