Virtual DJ Remote - Logiciel photo/vidéo ATOMIX - Free user manual and instructions
Find the device manual for free Virtual DJ Remote ATOMIX in PDF.


User questions about Virtual DJ Remote ATOMIX
0 question about this device. Answer the ones you know or ask your own.
Ask a new question about this device
Download the instructions for your Logiciel photo/vidéo in PDF format for free! Find your manual Virtual DJ Remote - ATOMIX and take your electronic device back in hand. On this page are published all the documents necessary for the use of your device. Virtual DJ Remote by ATOMIX.
USER MANUAL Virtual DJ Remote ATOMIX
Remote Control for VirtualDJ
Table of Contents
VIRTUALDJ REMOTE APPLICATION ....3
SETUP 4
TABLET VIEW....5
RHYTHM WAVE & DECK INFO DISPLAY 6
BASIC DECK CONTROLS 6
ADVANCED DECK CONTROLS....7
MIXER 9
PHONE VIEW 12
DECK INFO DISPLAY ....13
BASIC DECK CONTROLS 13
ADVANCED DECK CONTROLS....14
VIRTUALDJ REMOTE APPLICATION
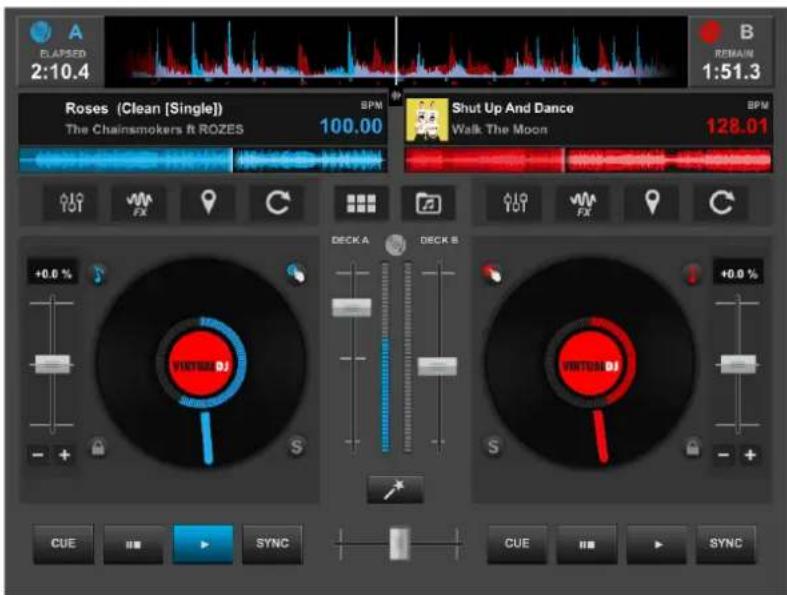
text_image
A BLAPSED 2:10.4 B REMAIN 1:51.3 Roses (Clean [Single]) The Chainsmokers It ROZES 100.00 Shut Up And Dance Walk The Moon 128.01 CUE SYNC CUE SYNCTablet View
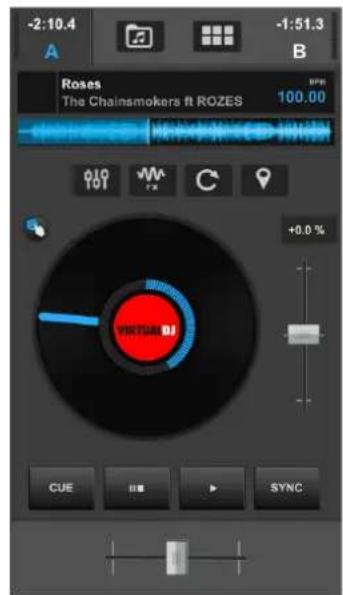
text_image
-2:10.4 A B -1:51.3 Roses The Chainsmokers ft ROZES 100.00 0.0 101 +0.0 % CUE HIB SYNCPhone View
VirtualDJ Remote is an application for iOS and Android that uses mobile devices as an additional interface to remotely control the VirtualDJ software. The Remote connects to VirtualDJ wirelessly over WiFi and is completely secure since only Remote devices on the accept list will be able to interact with VirtualDJ. The Remote's display is dependent on the aspect ratio of the mobile device. In most cases the default tablet display will show both decks while the default phone display will show a single deck due to having less available space on the screen.
The App can be downloaded from the following links:
iOS Version (iPhone/iPad)
https://itunes.apple.com/us/app/virtualdj-remote/id407160120
Android Version
https://play.google.com/store/apps/details?id=org.atomixproductions.VirtualDJRemote
Minimum System Requirements
| iOS Version | Android Version | |
| Operating system | iOS 7.0 or later | Android 4.1 or later |
| Devices | iPhone 4S or lateriPad 2 or lateriPad MiniiPod TouchSee details athttp://iossupportmatrix.com/ | Phones & Tablets |
SETUP
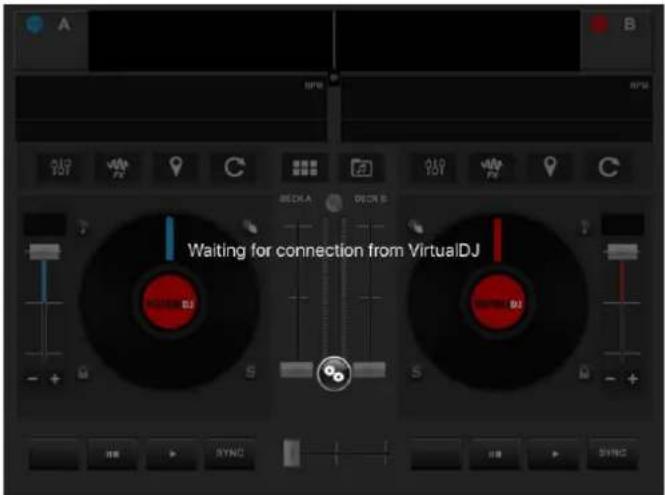
Once the Application is downloaded, ensure that the WiFi Network on your mobile device is on the same Network as the computer that is running VirtualDJ. Open the App and it will advise that it is waiting for a connection.
text_image
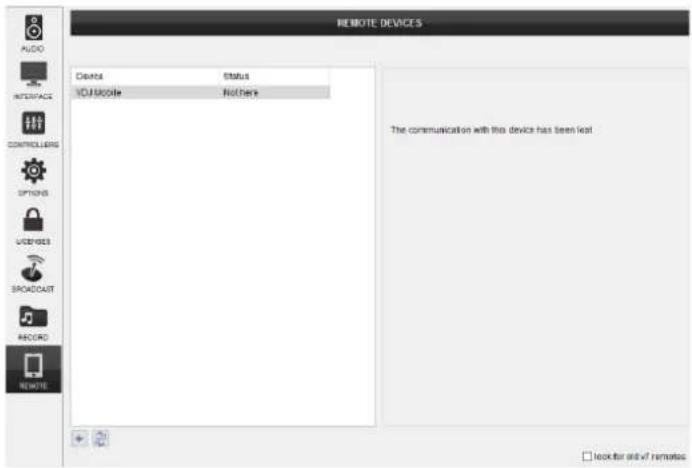
Waiting for connection from VirtualDJGo to Settings, then click on the Remote Tab. The device and it's status will be displayed in the window.
text_image
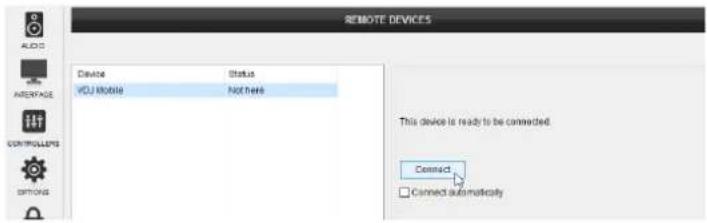
REMOTE DEVICES Device Status VOL/Mobile Not here The communication with this device has been lost look for pad v1 remntsecClick on the device in the list and the Connect button will appear. Click on Connect to authorize the mobile device to be used with the computer. Check the box labeled "Connect automatically" if you wish for the device to connect at any time in the future without having to be re-authorized.
text_image
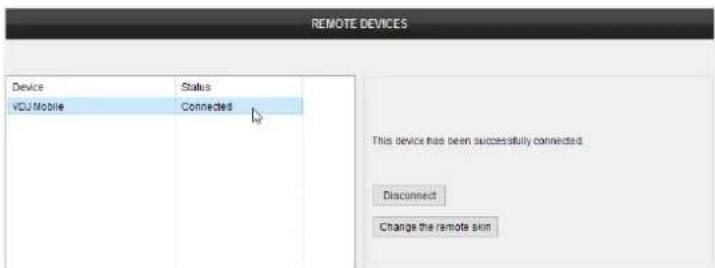
REMOTE DEVICES Device Status VCDJ Mobile Not here This device is ready to be connected. Connect Connect automaticallyOnce successfully connected, the status of the device will change and the options to disconnect or change the remote skin will become available. At this point, the Remote is ready for use and the settings window can be closed.
text_image
REMOTE DEVICES Device Status VDJ Mobile Connected This device has been successfully connected. Disconnect Change the remote skinTABLET VIEW
text_image
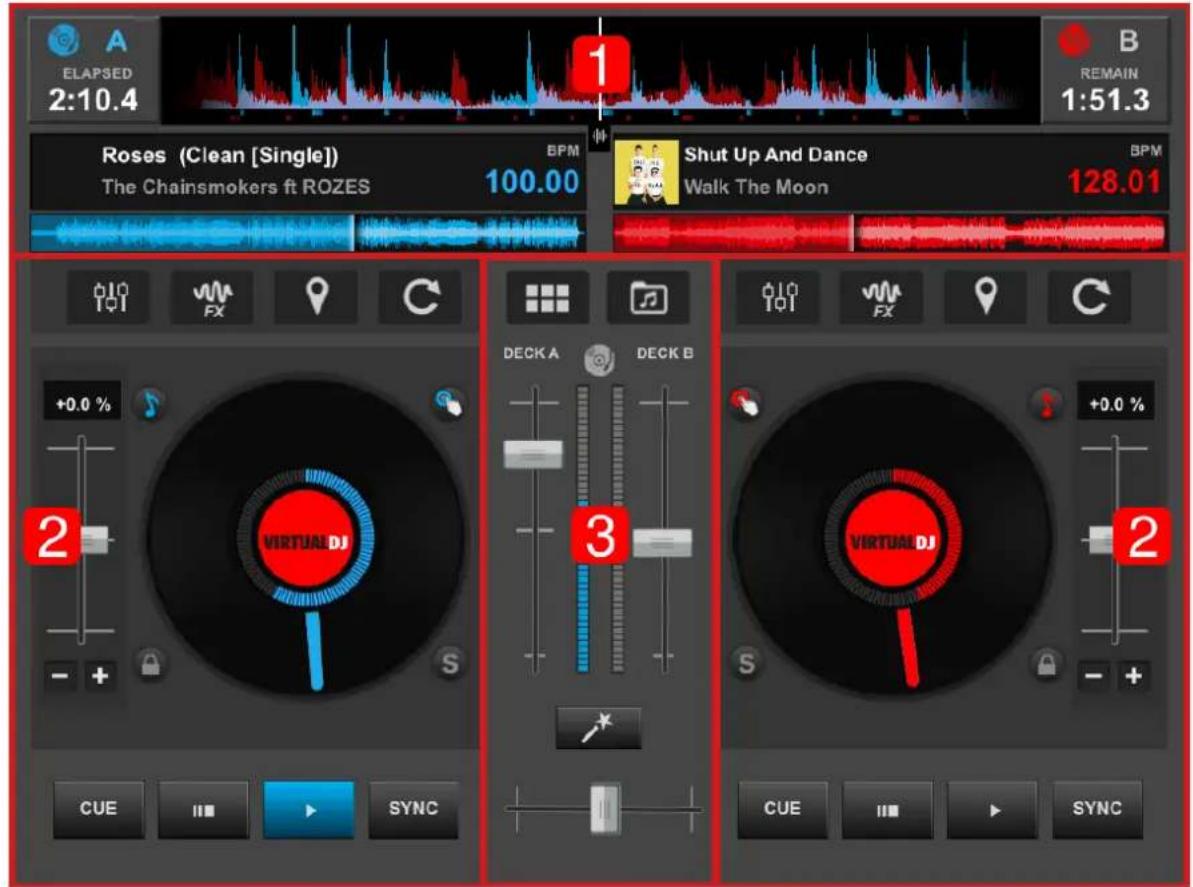
ELAPSED 2:10.4 1 B REMAIN 1:51.3 Roses (Clean [Single]) The Chainsmokers ft ROZES BPM 100.00 Shut Up And Dance Walk The Moon BPM 128.01 CUE SYNC +0.0 % DECK A DECK B VIRTUA DJ 3 +0.0 % S CUE SYNC VIRTUA DJOn a tablet, the VDJ Remote displays most of the information and controls in the main interface so that VirtualDJ can be monitored and controlled while away from the main computer. Anything that is done in the remote will directly reflect on the software interface on the computer as well. Multiple remotes can be connected and used at the same time.
RHYTHM WAVE & DECK INFO DISPLAY
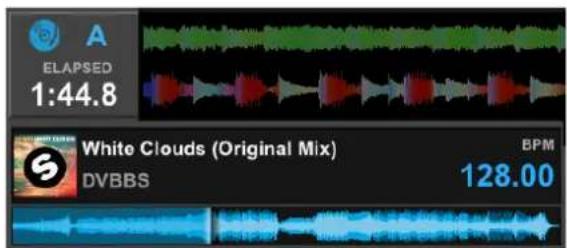
Time, Track Information and a Waveform with a progress indicator are displayed in both decks. Touching the Time Display will toggle it from Elapsed to Remaining. The active deck will be indicated (A or B) and will change automatically or can be changed manually by touching the unfocused deck indicator.
text_image
ELAPSED 1:44.8 White Clouds (Original Mix) DVBBBS BPM 128.00
line
| Time | Value 1 | Value 2 | |------|---------|---------| | 0 | 0 | 0 | | 1 | 0 | 0 | | 2 | 0 | 0 | | 3 | 0 | 0 | | 4 | 0 | 0 | | 5 | 0 | 0 | | 6 | 0 | 0 | | 7 | 0 | 0 | | 8 | 0 | 0 | | 9 | 0 | 0 | | 10 | 0 | 0 | | 11 | 0 | 0 | | 12 | 0 | 0 | | 13 | 0 | 0 | | 14 | 0 | 0 | | 15 | 0 | 0 | | 16 | 0 | 0 | | 17 | 0 | 0 | | 18 | 0 | 0 | | 19 | 0 | 0 | | 20 | 0 | 0 | | 21 | 0 | 0 | | 22 | 0 | 0 | | 23 | 0 | 0 | | 24 | 0 | 0 | | 25 | 0 | 0 | | 26 | 0 | 0 | | 27 | 0 | 0 | | 28 | 0 | 0 | | 29 | 0 | 0 | | 30 | 0 | 0 | | 31 | 0 | 0 | | 32 | 0 | 0 | | 33 | 0 | 0 | | 34 | 0 | 0 | | 35 | 0 | 0 | | 36 | 0 | 0 | | 37 | 0 | 0 | | 38 | 0 | 0 | | 39 | 0 | 0 | | 40 | 0 | 0 | | 41 | 0 | 0 | | 42 | 0 | 0 | | 43 | 0 | 0 | | 44 | 0 | 0 | | 45 | 0 | 0 | | 46 | 0 | 0 | | 47 | 0 | 0 | | 48 | 0 | 0 | | 49 | 0 | 0 | | 50 | 0 | 0 | | 51 | 0 | 0 | | 52 | 0 | 0 | | 53 | 0 | 0 | | 54 | 0 | 0 | | 55 | 0 | 0 | | 56 | 0 | 0 | | 57 | 0 | 0 | | 58 | 0 | 0 | | 59 | 0 | 0 | | 60 | 0 | 0 | | 61 | 0 | 0 | | 62 | 0 | 0 | | 63 | 0 | 0 | | 64 | 0 | 0 | | 65 | 0 | 0 | | 66 | 0 | 0 | | 67 | 0 | 0 | | 68 | 0 | 0 | | 69 | 0 | 0 | | 70 | 0 | 0 | | 71 | 0 | 0 | | 72 | 0 | 0 | | 73 | 0 | 0 | | 74 | 0 | 0 | | 75 | 0 | 0 | | 76 | 0 | 0 | | 77 | 0 | 0 | | 78 | 0 | 0 | | 79 | 0 | 0 | | 80 | 0 | 0 | | 81 | -1 | -1 | | 82 | -1 | -1 | | 83 | -1 | -1 | | 84 | -1 | -1 | | 85 | -1 | -1 | | 86 | -1 | -1 | | 87 | -1 | -1 | | 88 | -1 | -1 | | 89 | -1 | -1 | | 90 | -1 | -1 | | 91 | -1 | -1 | | 92 | -1 | -1 | | 93 | -1 | -1 | | 94 | -1 | -1 | | 95 | -1 | -1 | | 96 | -1 | -1 | | 97 | -1 | -1 | | 98 | -1 | -1 | | 99 | -1 | -1 | | Note: The actual values for 'Value' are not provided in the code. I have used the label 'Value' to indicate the specific value in the chart. The values for 'Value' are estimated based on the formula 'E' and 'E'' in the code.Rhythm Wave (default)

natural_image
Abstract pattern of red, white, and blue arrow-like shapes on black background (no text or symbols)Horizontal Scratch Wave
The Rhythm Wave displays the peaks and curves of the files on both decks to better visualize the tracks relationships with one another and make beat matching easier. There are 2 views available; the default Rhythm Wave or the Horizontal Scratch Wave.

Waveform Selector
Use this button (located below the center of the Rhythm Wave) to toggle between the 2 different available views.
The Waveform can be resized by pinching in and out to adjust it's zoom level.
BASIC DECK CONTROLS
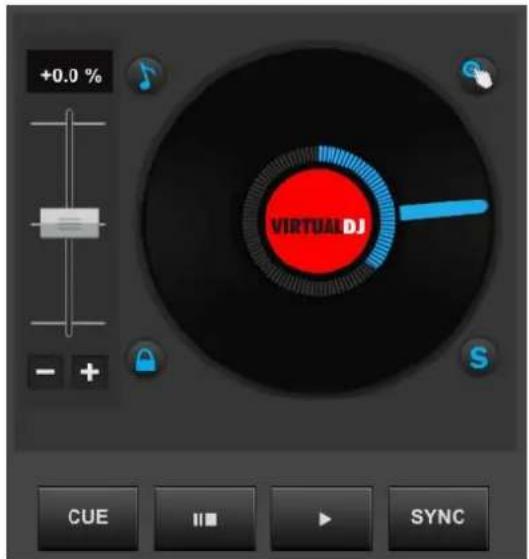
Each deck offers a Jog Wheel, Pitch Fader and set of Transport controls to easily control what is happening in VirtualDJ while away from the main computer. The Jog Wheel can be touched to Scratch or perform Pitch Bends depending on the mode selected. Double tapping the Pitch Fader will set the pitch back to its neutral position (0%).
In addition to these Basic Controls, there are 4 separate buttons available around the outside of the Jog Wheel that provides additional features that can be toggled on and off. These features are enabled when the button is the same color as the deck and disabled when the button is greyed out.
text_image
+0.0 % VIRTUAL DJ CUE SYNC| Master Tempo | Keeps the key of the song unchanged when the pitch of the song is changed | |
| Vinyl Mode | Enable to emulate the sound of scratching when the position of the Jog Wheel is moved. Disable to temporarily bend the pitch. | |
| Pitch Lock | Locks the position of the pitch faders on both decks together. | |
| Slip Mode | Hot Cues, Loops and Scratching will only affect the position of the song temporarily |
ADVANCED DECK CONTROLS
In order to conserve space, the Advanced Deck Controls are placed above the decks as buttons. Touching one of these buttons will replace the basic deck controls with the specified EQ, Effects, Hot Cue or Loop Control panel. Touching the button a second time will revert the deck back to the default view.
EQUALIZER
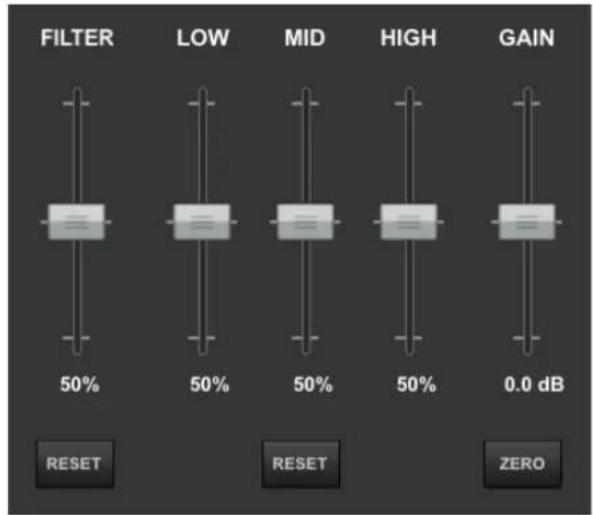
Since the Mixer area is limited, EQ controls are available as an Advanced Deck Control. The 3 band EQ, Filter and Gain controls are offered as sliders instead of dials for greater control on touch screens.
At the bottom of each set of sliders, a reset button (zero for gain) can be found to bring any of the adjusted parameters back to their neutral positions quickly.
text_image
FILTER 50% LOW 50% MID 50% HIGH 50% GAIN 0.0 dB RESET RESET ZERO
EFFECTS
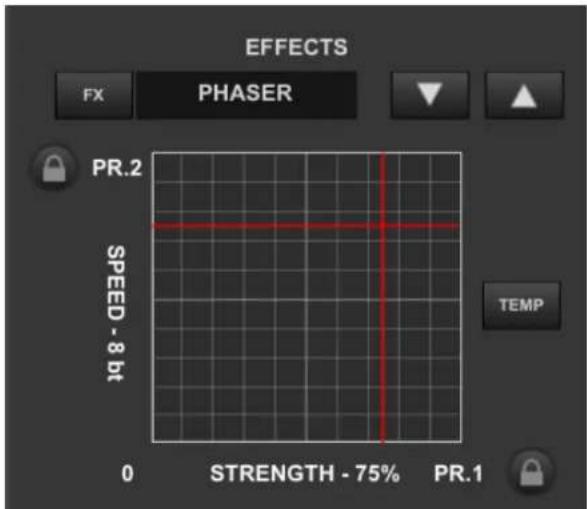
Effects are activated by touching the FX button or the text of the specified effect. Use the Up/Down arrows to cycle through the effects list.
Effect parameters are controlled by touching and dragging the XY Pad with the added capability of locking one or both of the parameters into position by using the lock icons.
Toggling the TEMP button on and off will activate the selected effect only while the XY Pad is touched.
text_image
EFFECTS FX PHASER PR.2 SPEED - 8 bit 0 STRENGTH - 75% PR.1 TEMP
HOT CUES
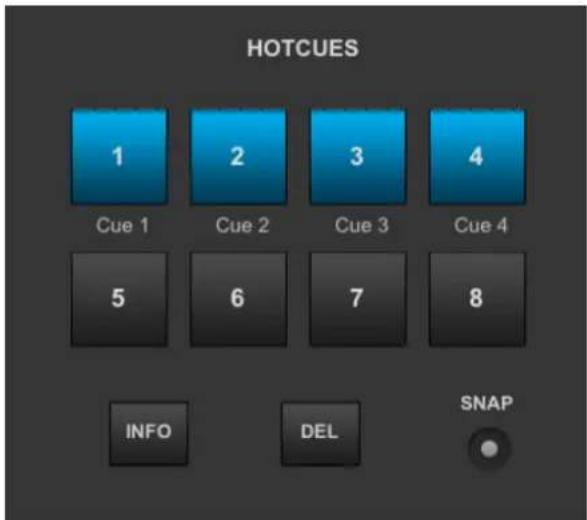
Hot Cues can be triggered or set (if the cue is empty) by touching any of the 8 available Hot Cue buttons.
The INFO button will cycle through the Cue's stored information on each press to display Cue Names, Cue Time Position, or Beats.
The DEL button can be toggled on and off. When on, any set cues that are touched will be deleted.
Enable the SNAP (Smart Cue) which will automatically adjust the jump position to keep the song beat-matched.
text_image
HOTCUES 1 2 3 4 Cue 1 Cue 2 Cue 3 Cue 4 5 6 7 8 INFO DEL SNAP
LOOP CONTROLS
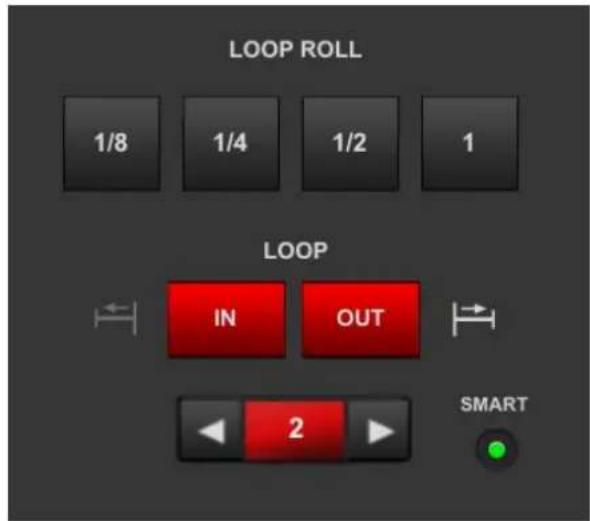
The Loop Control Panel offers the most commonly used LOOP ROLLs; 18 , 14 , 12 , and 1 beat rolls. While these buttons are held the track will loop and once released will continue from the position the track would have been in if the loop was never pressed.
The IN and OUT buttons are available to manually control the loops size or the Loop can be triggered by clicking on the loop size while using the arrow buttons to increase or decrease it.
Toggle the SMART button to enable/disable Smart Loop to make the loop seamless.
text_image
LOOP ROLL 1/8 1/4 1/2 1 LOOP IN OUT SMART 2MIXER
The Mixer has 2 separate layouts to control the decks as well as the master output.
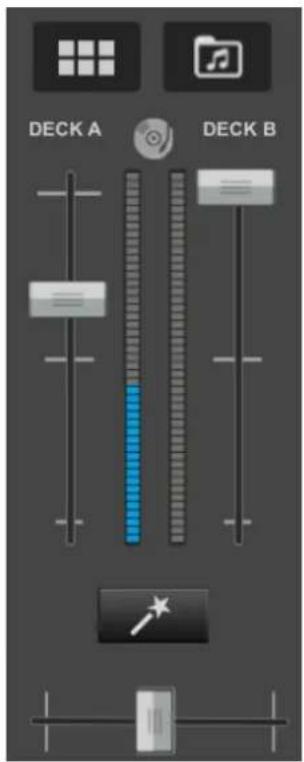
In Deck View, Volume faders and VU Meters for both decks are available.
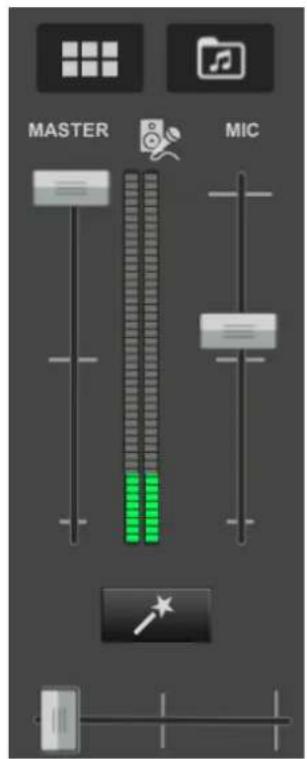
In Master View, a Master volume fader, Mic input fader and VU Meters for the Master and Mic are displayed.
In both Mixer Views an Audio Crossfader is available as well as Sampler, Browser and Smart Mix buttons.
The Mixer view can be toggled by touching the corresponding icon above the VU Meters.

Deck Mixer

Master/Mic Mixer
text_image
DECK A DECK BDeck Mixer
text_image
MASTER MICMaster/Mic Mixer

SMART MIX
The Smart Mix button will appear in the Mixer area providing that one deck is stopped or remains unloaded. Touching the Smart Mix button will quickly crossfade from deck to deck and sync the two tracks.
Once the crossfader has fully moved to the far right or left, Smart Mix will load the opposing deck with the next song that is in the Sidelist. If Smart Mix cycles through all of the tracks loaded in the Sidelist, it will go back to the top of the list. If the Sidelist is empty, Smart Mix will then use the Automix List.
SAMPLER
text_image
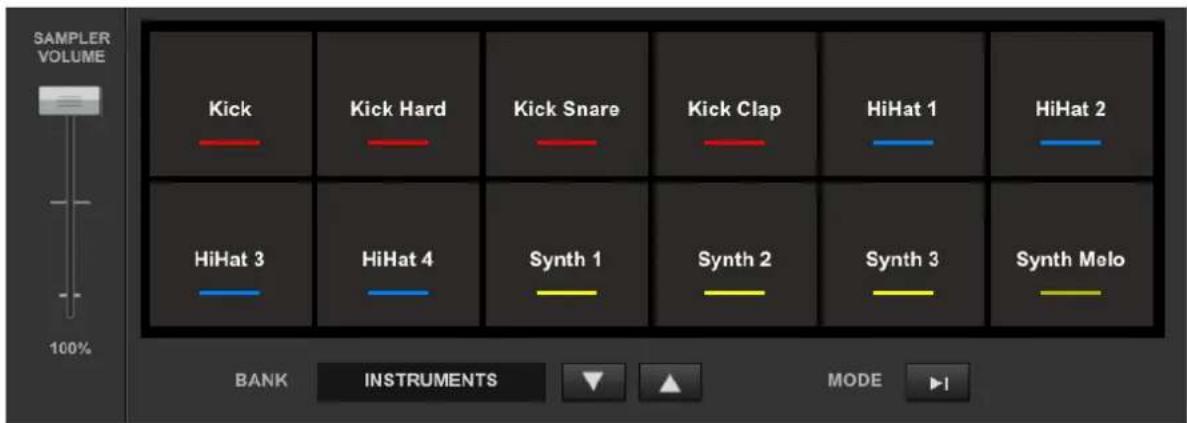
SAMPLER VOLUME Kick Kick Hard Kick Snare Kick Clap HiHat 1 HiHat 2 HiHat 3 HiHat 4 Synth 1 Synth 2 Synth 3 Synth Melo BANK INSTRUMENTS MODE IThe Sampler offers 12 sample pads with a sampler volume fader for quick triggering and adjustment. Any Sample Bank created in the program can be accessed by using the Up and Down arrows to cycle through the banks and the Trigger Mode can be cycled for the Bank by tapping the Mode button.

BROWSER
text_image
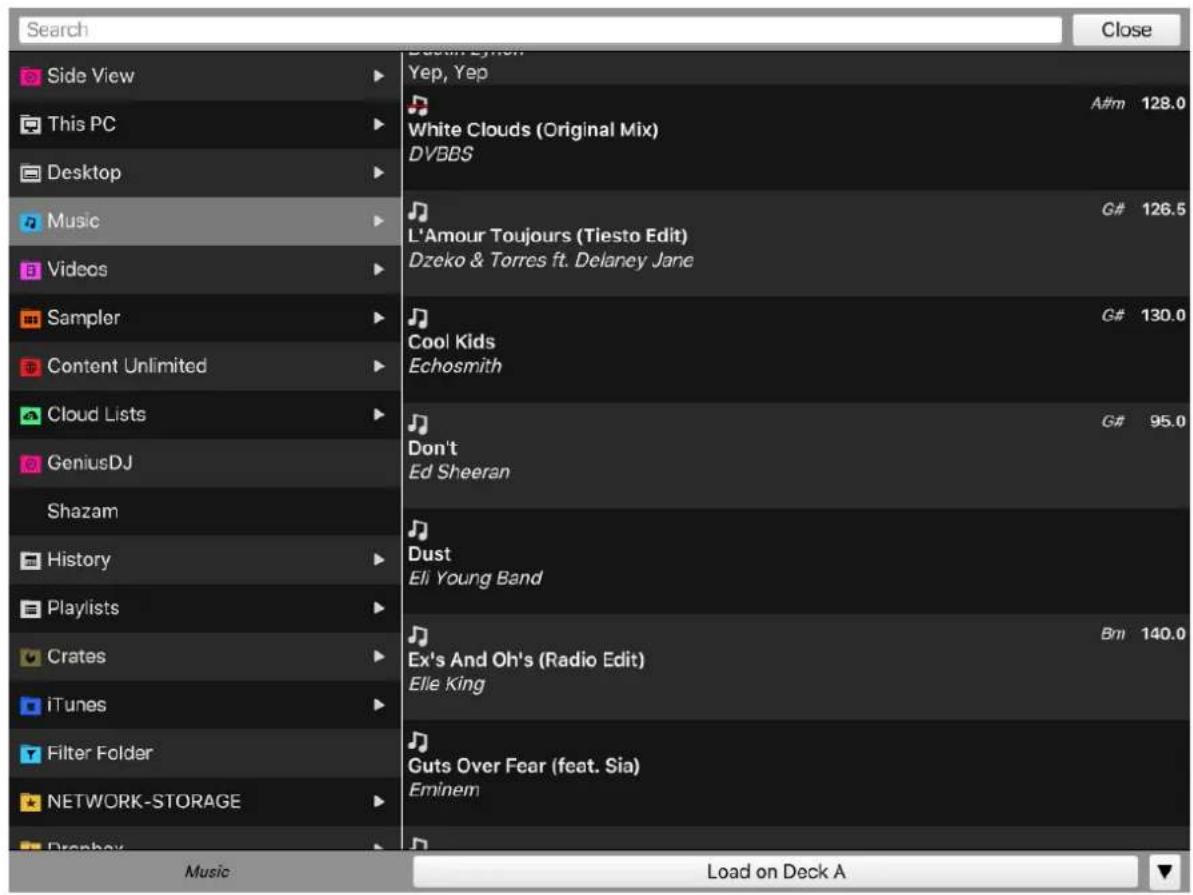
Search Side View This PC Desktop Music Videos Sampler Content Unlimited Cloud Lists GeniusDJ Shazam History Playlists Crates iTunes Filter Folder NETWORK-STORAGE Drosby Yep, Yep A#m 128.0 White Clouds (Original Mix) DVBBS G# 126.5 L'Amour Toujours (Tiesto Edit) Dzeko & Torres ft. Delaney Jane Cool Kids Echosmith G# 130.0 G# 95.0 Don't Ed Sheeran Dust Eli Young Band Bm 140.0 Ex's And Oh's (Radio Edit) Elie King Guts Over Fear (feat. Sia) Eminem Load on Deck AThe Browser provides full accessibility of the entire library of files on the host computer. Files can be searched by using the large Search Bar at the top and loaded to a deck or Side View panel using the Load button at the bottom.
The content of a folder from the Folder List can be displayed in the File List by tapping on the required folder. If a folder has Sub-folders, swiping left on the Parent Folder will display all its Sub-folders. Navigating back to the Parent Folder from the Sub-folder view is accomplished by swiping to the right.

text_image
Automix Sidelist Karaoke Stressed Out Twenty One Pilots Clean [Single] Roses The Chainsmokers fit ROZES Clean [Single]A special Side View folder is available in the Folder List to provide quick access to Automix, Sidelist and Karaoke panels.
Side View > Sidelist
Load on Deck A
The bottom of the browser displays what folder the current focus is on as well as a button to load a deck or Side View Panel. The default is set to Automatic which will automatically load the inactive deck. Touch the button to load the selected file to the specified selection.
Automatic (pack A)
Dock A
Deck B
Sidelist
Automix list
Karaoke list
Touching the down arrow to the right of the load button will provide the load options. A track can be loaded to either deck (Automatic is the default), the Sidelist, Automix List or Karaoke List.
PHONE VIEW
text_image
-1:42.3 A -1:12.8 B Roses The Chainsmokers ft ROZES 100.00 +0.0 % CUE SYNC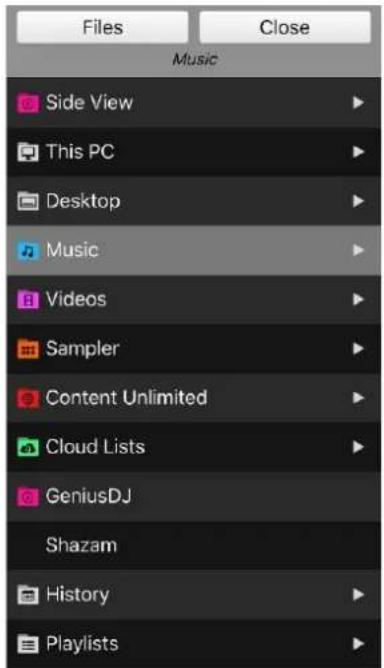
text_image
Files Music Side View This PC Desktop Music Videos Sampler Content Unlimited Cloud Lists GeniusDJ Shazam History Playlists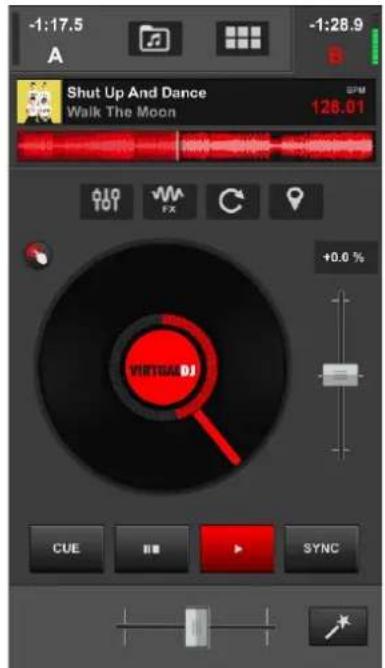
text_image
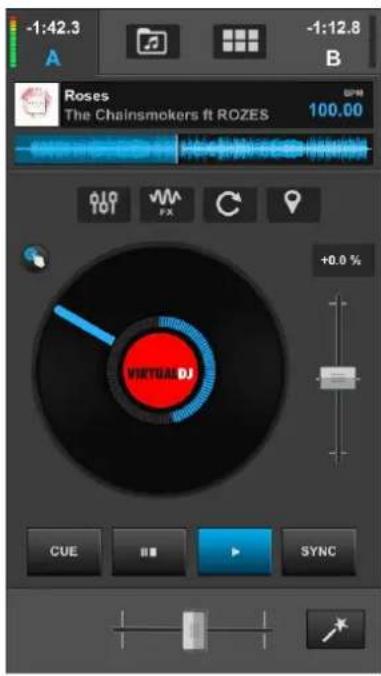
-1:17.5 -1:28.9 Shut Up And Dance Walk The Moon 126.01 +0.0 % CUE B SYNCOn a phone, the VDJ Remote focusses on deck information and controls from the main interface so that VirtualDJ can be monitored and controlled while away from the main computer. Anything that is done in the remote will directly reflect on the software interface on the computer as well. Multiple remotes can be connected and used at the same time.
DECK INFO DISPLAY
Time,Track Information, VU Meter and a Waveform with a progress indicator are displayed for the active deck. The active deck will be indicated (A or B) and will change automatically or can be changed manually by touching the unfocused deck indicator. This will also change the deck being displayed on the device.
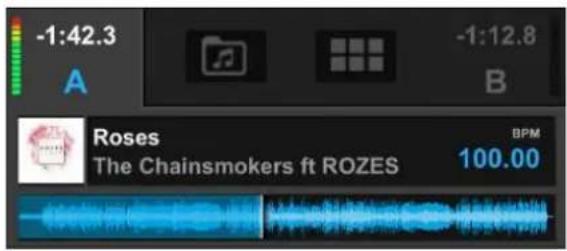
text_image
-1:42.3 -1:12.8 A B Roses The Chainsmokers ft ROZES BPM 100.00BASIC DECK CONTROLS
Each deck offers a Jog Wheel, Pitch Fader and set of Transport controls to easily control what is happening in VirtualDJ while away from the main computer. The Jog Wheel can be touched to Scratch or perform Pitch Bends depending on the mode selected. Double tapping the Pitch Fader will set the pitch back to it's neutral position (0%).
Additionally a Vinyl Mode button is offered to the upper left of the Jog Wheel. Enable it to emulate the sound of scratching when the position of the Jog Wheel is moved. Disable it to temporarily bend the pitch.
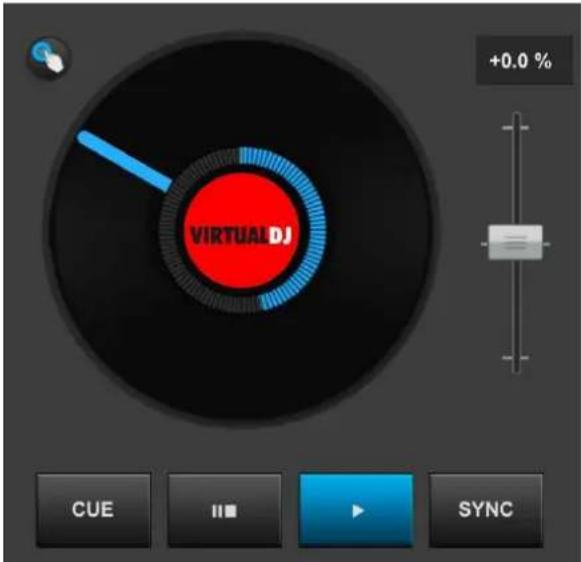
text_image
VIRTUAL DJ +0.0 % CUE II■ SYNCADVANCED DECK CONTROLS
In order to conserve space, the Advanced Deck Controls are placed above the decks as buttons. Touching one of these buttons will replace the basic deck controls with the specified EQ, Effects, Hot Cue or Loop Control panel. Touching the button a second time will revert the deck back to the default view.
Underneath the Deck Controls are the Mixing Controls which consist of the Crossfader and Smart Mix buttons.
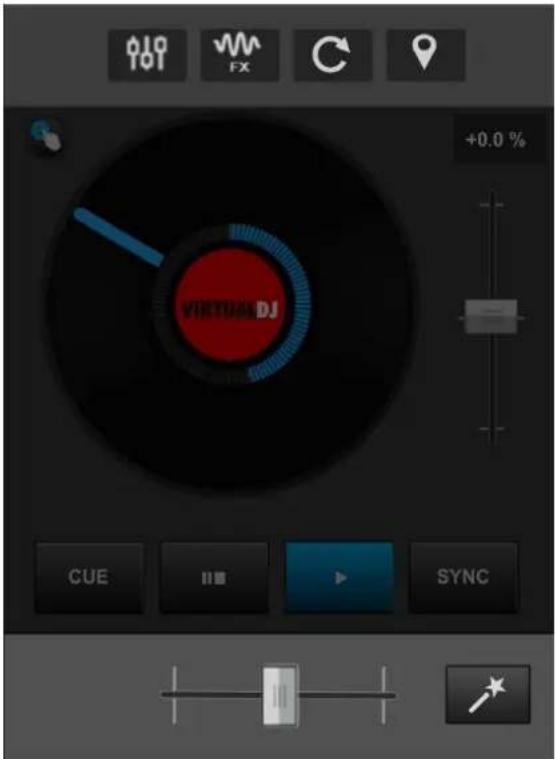
text_image
VIRTUAL DJ +0.0 % CUE SYNC
EQUALIZER
Since there is no Mixer area, EQ controls are available as an Advanced Deck Control. The 3 band EQ, Filter and Volume controls are offered as sliders instead of dials for greater control on touch screens.
At the bottom of each set of sliders (except Volume), a reset button can be found to bring any of the adjusted parameters back to their neutral positions quickly.
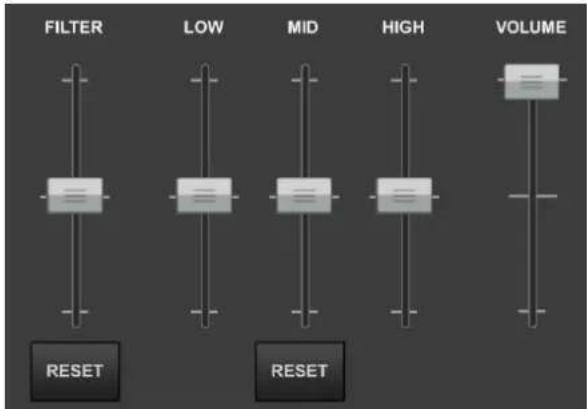
flowchart
graph TD
    A["FILTER"] --> B["RESET"]
    C["LOW"] --> D["RESET"]
    E["MID"] --> F["RESET"]
    G["HIGH"] --> H["RESET"]
    I["VOLUME"] --> J["RESET"]
EFFECTS
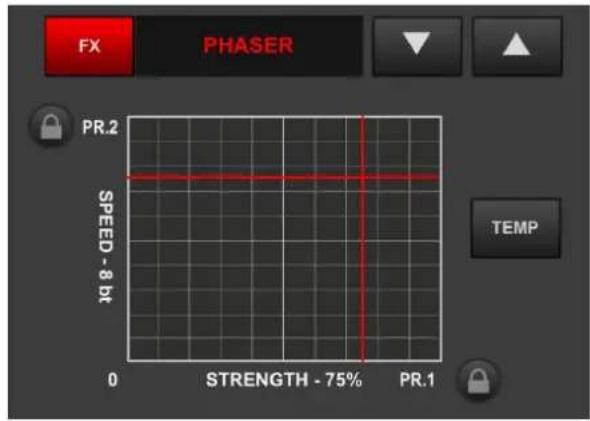
Effects are activated by touching the FX button or the text of the specified effect. Use the Up/Down arrows to cycle through the effects list.
Effect parameters are controlled by touching and dragging the XY Pad with the added capability of locking one or both of the parameters into position by using the lock icons.
Toggling the TEMP button on and off will activate the selected effect only when the XY Pad is touched.
text_image
FX PHASER PR.2 SPEED - 8 bit 0 STRENGTH - 75% PR.1 TEMP
LOOP CONTROLS
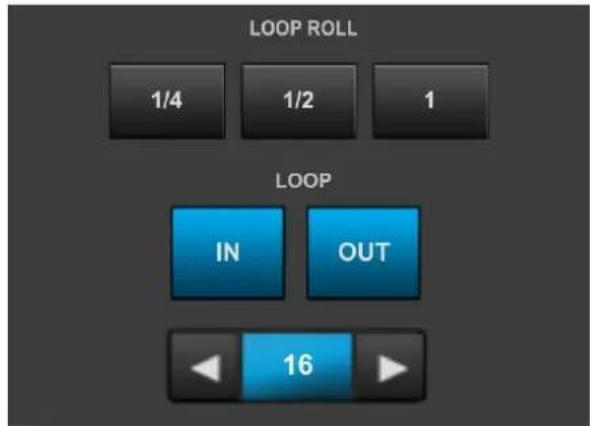
The Loop Control Panel offers the most commonly used LOOP ROLLs; 14 , 12 , and 1 beat rolls. While these buttons are held the track will loop and once released will continue from the position the track would have been in if the loop was never pressed.
The IN and OUT buttons are available to manually control the loops size or the Loop can be triggered by clicking on the loop size while using the arrow buttons to increase or decrease it.
text_image
LOOP ROLL 1/4 1/2 1 LOOP IN OUT 16
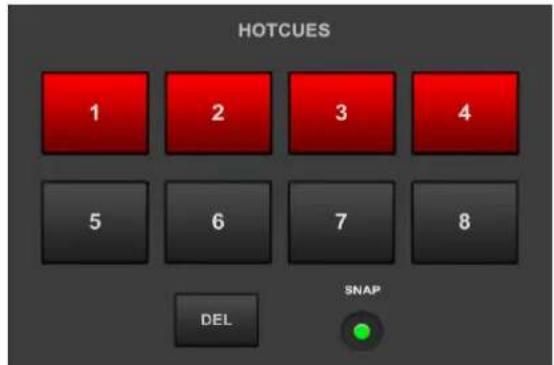
HOT CUES
Hot Cues can be triggered or set (if the cue is empty) by touching any of the 8 available Hot Cue buttons.
The DEL button can be toggled on and off. When on, any set cues that are touched will be deleted.
Enable the SNAP (Smart Cue) which will automatically adjust the jump position to keep the song beat-matched.
text_image
HOTCUES 1 2 3 4 5 6 7 8 DEL SNAP
SMART MIX
The Smart Mix button will appear in the Mixer area providing that one deck is stopped or remains unloaded. Touching the Smart Mix button will quickly crossfade from deck to deck and sync the two tracks.
Once the crossfader has fully moved to the far right or left, Smart Mix will load the opposing deck with the next song that is in the Sidelist. If Smart Mix cycles through all of the tracks loaded in the Sidelist, it will go back to the top of the list. If the Sidelist is empty, Smart Mix will then use the Automix List.
SAMPLER AND BROWSER

text_image
-1:17.5 A -1:28.9 BAt the top of the display between the Deck Indicators are buttons for the Sampler and Browser. These buttons make it easy to switch between them or to view either of the decks quickly.
SAMPLER
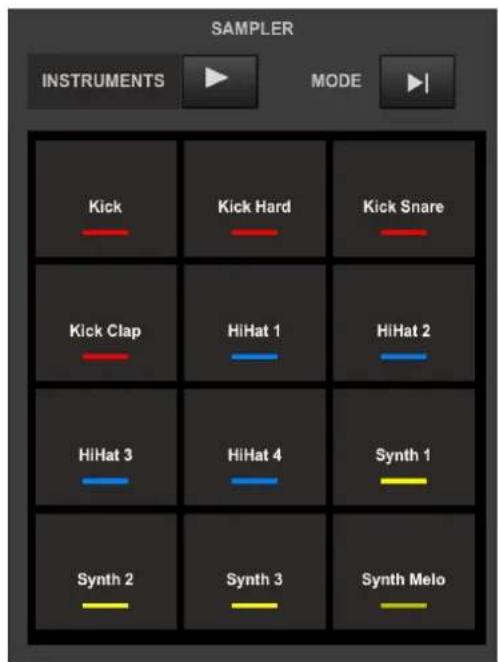
The Sampler offers 12 sample pads for quick triggering and adjustment. Any Sample Bank created in the program can be accessed by using the Up and Down arrows to cycle through the banks and the Trigger Mode can be cycled for the Bank by tapping the Mode button.
text_image
SAMPLER INSTRUMENTS MODE Kick Kick Hard Kick Snare Kick Clap HiHat 1 HiHat 2 HiHat 3 HiHat 4 Synth 1 Synth 2 Synth 3 Synth Melo
BROWSER
text_image
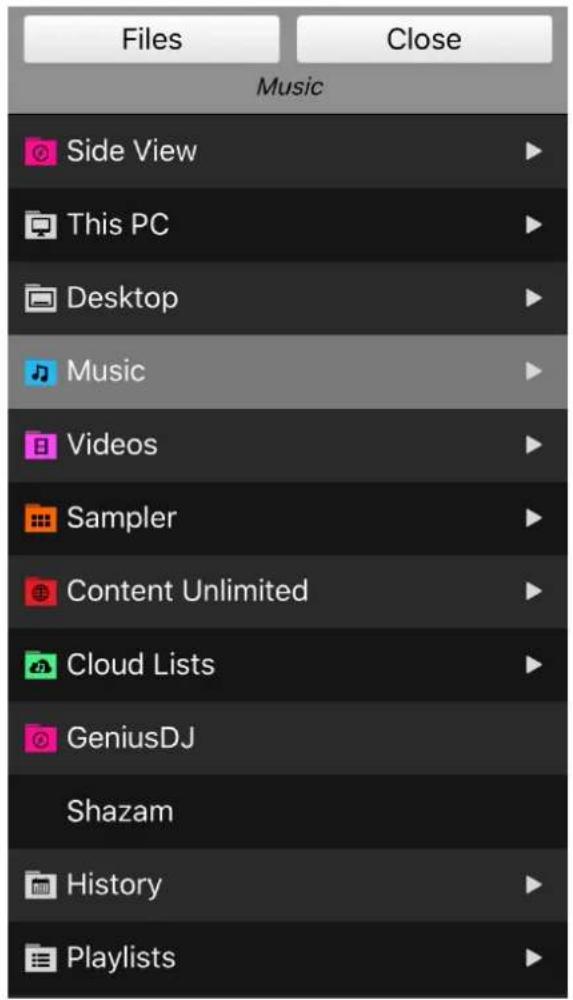
Files Music Music Side View This PC Desktop Music Videos Sampler Content Unlimited Cloud Lists GeniusDJ Shazam History Playlists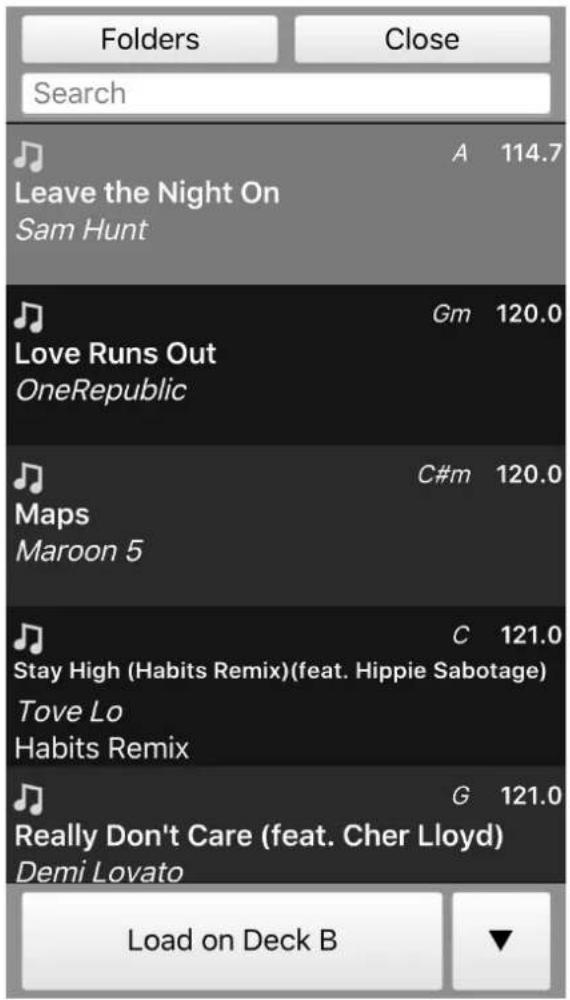
text_image
Folders Close Search Leave the Night On Sam Hunt A 114.7 Gm 120.0 Love Runs Out OneRepublic Maps Maroon 5 C#m 120.0 Stay High (Habits Remix)(feat. Hippie Sabotage) Tove Lo Habits Remix G 121.0 Really Don't Care (feat. Cher Lloyd) Demi Lovato Load on Deck BThe Browser provides full accessibility of the entire library of files on the host computer and offers a Folder List view as well as a File List view by using the buttons at the top of the interface.
In the Folder List view, if a folder has Sub-folders, swiping left on the Parent Folder will display all its Sub-folders. Navigating back to the Parent Folder from the Sub-folder view is accomplished by swiping to the right. Touching the FILES button will display the folder's contents in the File List.
In File List view, files can be searched by using the Search Bar at the top and loaded to a deck or Side View panel using the Load button at the bottom. Touching the FOLDERS button will revert back to the Folder List view.
The bottom of the File List view displays a button to load a deck or Side View Panel. The default is set to Automatic which will automatically load the inactive deck. Touch the button to load the selected file to the specified selection.
Touching the down arrow to the right of the load button will provide the load options. A track can be loaded to either deck (Automatic is the default), the Sidelist, Automix List or Karaoke List.
Automatic (deck A)
Deck A
Deck B
Sidelist
Automix list
Karaoke list
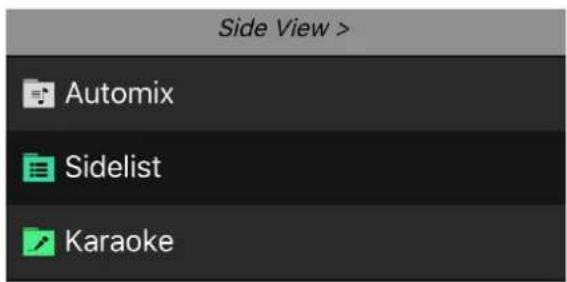
A special Side View folder is available in the Folder List to provide quick access to Automix, Sidelist and Karaoke panels.
text_image
Side View > Automix Sidelist Karaoke
2016 - ATOMIX PRODUCTIONS
Reproduction of this manual in full or in part without written permission from Atomix Productions is prohibited.