TDP86 - Monitor HELGI - Free user manual and instructions
Find the device manual for free TDP86 HELGI in PDF.


User questions about TDP86 HELGI
0 question about this device. Answer the ones you know or ask your own.
Ask a new question about this device
Download the instructions for your Monitor in PDF format for free! Find your manual TDP86 - HELGI and take your electronic device back in hand. On this page are published all the documents necessary for the use of your device. TDP86 by HELGI.
USER MANUAL TDP86 HELGI
Interactive Intelligent Panel
User's Operating Manual

natural_image
Abstract spiral pattern with concentric gray arcs and radial lines, no text or symbols present
natural_image
Abstract concentric circular pattern with radial gradient, no text or symbols present
natural_image
Circular gradient pattern with horizontal striped bands (no text or symbols)Contents
Safety Warning & Statements 1
Prepare to Install 2
Connection and Setting 7
Menu Operation 11
Simple Troubleshooting 14
Maintenance 15
Safety Warning
Placement
Do not place the unit on an unstable cart, stand, tripod, bracket, table, or shelf.
Do not expose the unit to direct sunlight and other sources of heat.
Do not put the unit near appliances that generate magnetic fields.
Do not put any liquid near or on the unit, make sure do not spill any liquid inside the unit.
Do not put heavy objects on top of the unit.
Power Supply
Check that the unit's operating voltage is identical with your local power supply.
Please unplug power supply and antenna plug when the weather is thunder-storm or lightning.
Please unplug power supply, when there is nobody home or the unit will be in idle for a long time.
Please keep power cable from physical or mechanical damage.
Please use the original power cable from the accessory bag, don't modify or lengthen it.
Please check and ensure AC source is connected with the ground.
This power cable comes with the device exclusively for this device only.
LED Screen
Never use any other hard or sharp object to replace the touch pen.
Unplug the power cable before cleaning.
Clean the screen with a soft, dustless and dry cloth.
Never use water or the spray type detergent to clean the unit.
For deep clean, please contact an authorized service center.
Better for the panel lifetime and the display performance, do not display high brightness image for long time.
Temperature
Do not place the unit near or over a radiator or a heater.
If your unit is suddenly moved from a cold to a warm place, please unplug the power cable and do not turn it on at least 2 hours, making sure the moisture inside the unit is all evaporated.
Normal operating temperature is 0 \~ 40°C.
Humidity
Do not expose the unit in rain, or place in high humidity area.
Please make sure indoor environment is dry and cool. Normal operating humidity is 10%\~90%RH.
Ventilation
Please put the unit in a well ventilated place, so the heating can be released easily.
Ensure that the unit has enough space for ventilation. Space requirement: left, right and back >10cm, top>20cm.
Earphone
Using the earphone to listen loud sound for a long time might effect the hearing.
Before using earphone, please turn down the volume in advance.
Standby
It will enter standby mode but not turn off the unit after press the standby key.
Battery
Please make sure the battery get proper disposal or recycle after using.
Please keep the battery away from kids and don't throw the battery into fire.
Notes for Cleaning
There are vents on back cover, please do not use any liquid or spray directly during cleaning.
Power Switch Status Signs
"I" means power on, "O" means power off.
Notes for Maintenance
This machine can only be maintained by certified engineer.
Statements
Copyright ownership of hardware and software design belongs to Guangzhou Shirui Electronics Co., Ltd., shall not be reproduced, copied, or used in other ways without permission. Otherwise Guangzhou Shirui Electronics Co., Ltd. will have the right to pursue legal responsibilities.
The image shown in this manual is indicative only. If there is inconsistency between the image and the actual product, the actual product shall govern.
Prepare to Install
1. Control Panel
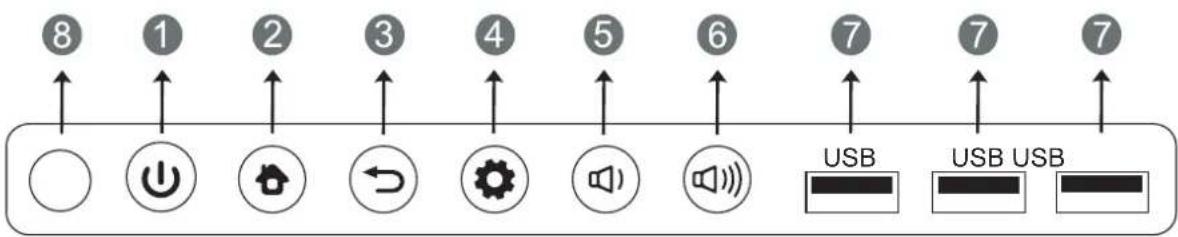
text_image
8 1 2 3 4 5 6 7 USB USB USB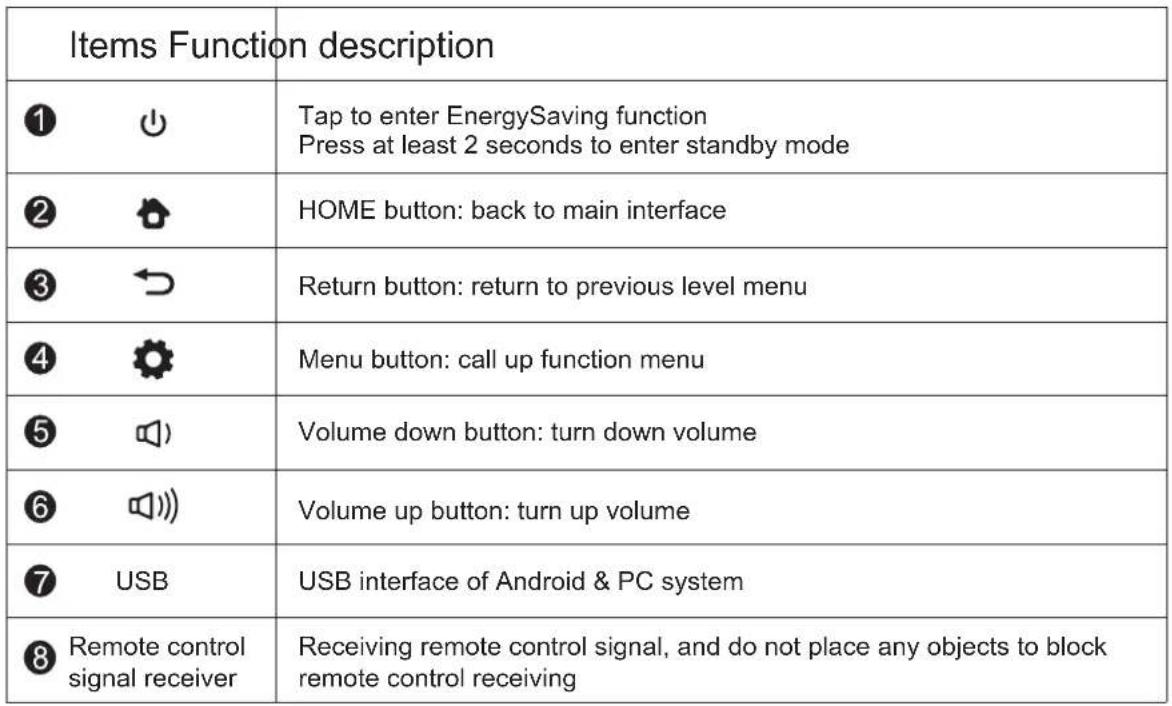 |
- Terminal Interface

text_image
1 2 3 3 4 3 5 6 7 4 2 HDMI OUT USB 2.0 HDMI IN 1(2.0) HDMI IN 2(1.4) TOUCH 1 HDMI IN 3(1.4) DP IN AUDIO IN VGA IN TOUCH 2 USB 3.0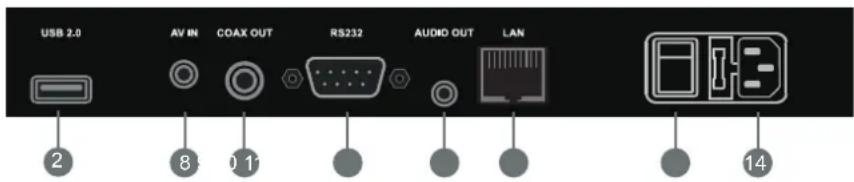
text_image
USB 2.0 AV IN COAX OUT RS232 AUDIO OUT LAN 2 8 0 11 14| Items Function description | |
| 1 HDMI OUT | Connected to the devices with HDMI input function |
| 2 USB | Connect USB devices such as mobile hard disk, U disk, USB keyboard and mouse, USB drives, etc. |
| 3 HDMI IN | High-definition multimedia interface signal input, connect to PC with HDMI output, set-top box, or other video device |
| 4 TOUCH | Touch signal output to the external computer |
| 5 DP | Connected to devices with DisplayPort output function |
| 6 AUDIO IN | External computer audio input |
| 7 VGA IN | External computer image input |
| 8 AV IN | Composite video and audio input |
| 9 COAX OUT | Coaxial output |
| 10 RS232 | Serial interface, used for mutual transfer of data between devices |
| 11 AUDIO OUT | Audio output to the external speaker |
| 12 LAN | Connecting RJ45 terminals |
| 13 AC SWITCH | To open or shut down AC power supply. “ I ” means power on, “ O ” means power off |
| 14 AC IN | AC power input, connecting AC power supply |
3. Remote Control
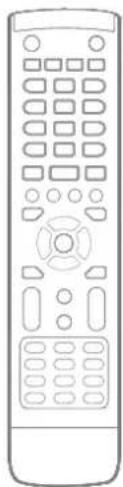
1) Remote control button instruction

text_image
1 2 3 4 Space All + Tab All + F4 1 2 3 4 5 6 7 8 9 Display 0 8 9 10 Input Home Menu 11 12 13 14 15 16 17 18 19 Enter 20 Back 21 22 23 24 CH.+ 25 PGUp VOL+ 26 CH.- PgDn VOL- 27 28 29 30 F1 F2 F3 F4 F5 F6 F7 F8 F9 F10 F11 F12| 1 | : | Power on/off |
| 2 | : | Mute switch |
| 3 | : | Built-in computer Windows key |
| 4 | Space : | Built-in computer Space key |
| 5 | Alt+Tab : | Built-in computer spacebar Alt + Tab |
| 6 | Alt+F4 : | Built-in computer program window close button |
| 7 | Numeric keys : | Numeric input keys |
| 8 | Display : | Display channel information |
| 9 | : | Function button |
| 10 | Input : | Input signal source selection key, choose different sourced according to need |
| 11 | Home : | Android system main screen button |
| 12 | Menu : | Setting menu button, press this button to pop up |
| 13 | Red : | Lock and unlock Buttons and Touch function |
| 14 | Green : | Lock and unlock Buttons function |
| 15 | Yellow : | Lock and unlock Touch function |
| 16 | Blue : | Freeze and zoom |
| 17 | : | One key for blank screen |
| 18 | : | Backspace key |
| 19 | ▲ : | Direction key, press this button for upwards selection |
| 20 | ◀ : | Direction key, press this button for left selection |
| 21 | ▶ : | Direction key, press this button for right selection |
| 22 | ▼ : | Direction key, press this button for downwards selection |
| 23 | Enter : | Confirmation key, press this key to confirm selection state |
| 24 | : | Quickly start writing software |
| 25 | Back : | Return key |
| 26 | PgUp : | Built-in computer page (previous page) |
| 27 | PgDn : | Built-in computer page (next page) |
| 28 | CH.+ \ CH-.: | Function button |
| 29 | VOL+ \ VOL- : | Volume switch key |
| 30 | F1-F12 : | Built-in computer F1 - F12 function keys |
NOTE: In case of no built-in computer, all function keys related with computer are regarded as no operating functions.
2) Remote Control Instruction
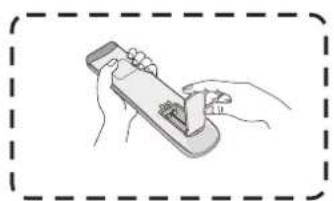
Install Batteries
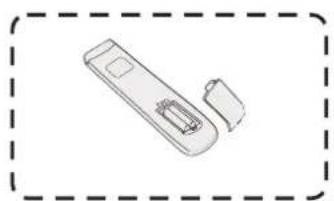
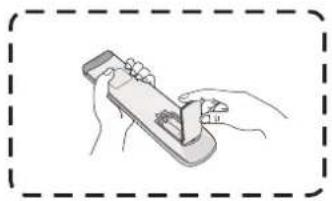
(1) Open back cover of battery component on the back of remote control
(2) Install AAA type battery according to the corresponding electrode, make sure battery positive and negative pole are correct ("+"to"+", "-" to "-"), please do not mix using old and new batteries
(3) After battery is installed, close the back cover of battery components, and make the following clip buckled to the bottom
natural_image
Illustration of a hand holding a smartphone with a small object inserted (no text or symbols visible)(1)
natural_image
Simple line drawing of a remote control device with handle and socket (no text or symbols)(2)
natural_image
Illustration of a hand holding a small object over a rectangular device, enclosed in a dashed border (no text or symbols)(3)
Range of remote control
text_image
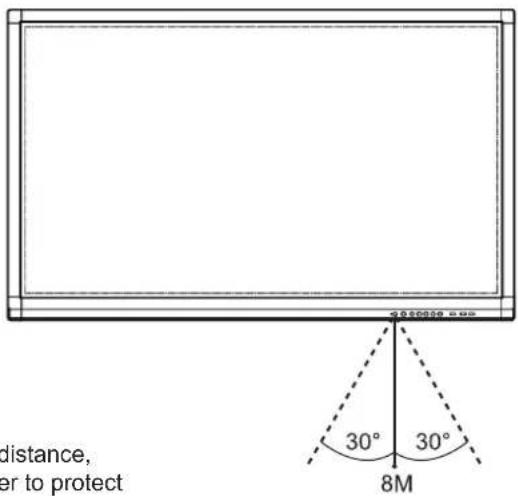
distance, er to protect 30° 30° 8MRemote control can work normally within the range of 8 meters distance, 30 degrees left and right from the remotecontrol receiver; in order to protect environment, please dispose waste battery into recycling box.

If the battery is replaced by an incorrect type, it may lead to explosion.
natural_image
Line drawing of a remote control with keypad and buttons (no text or symbols)Connection and Setting

For the safety of you and the machine, please do not connect any power plug before connection.
1. External Computer and Touch Connection
text_image
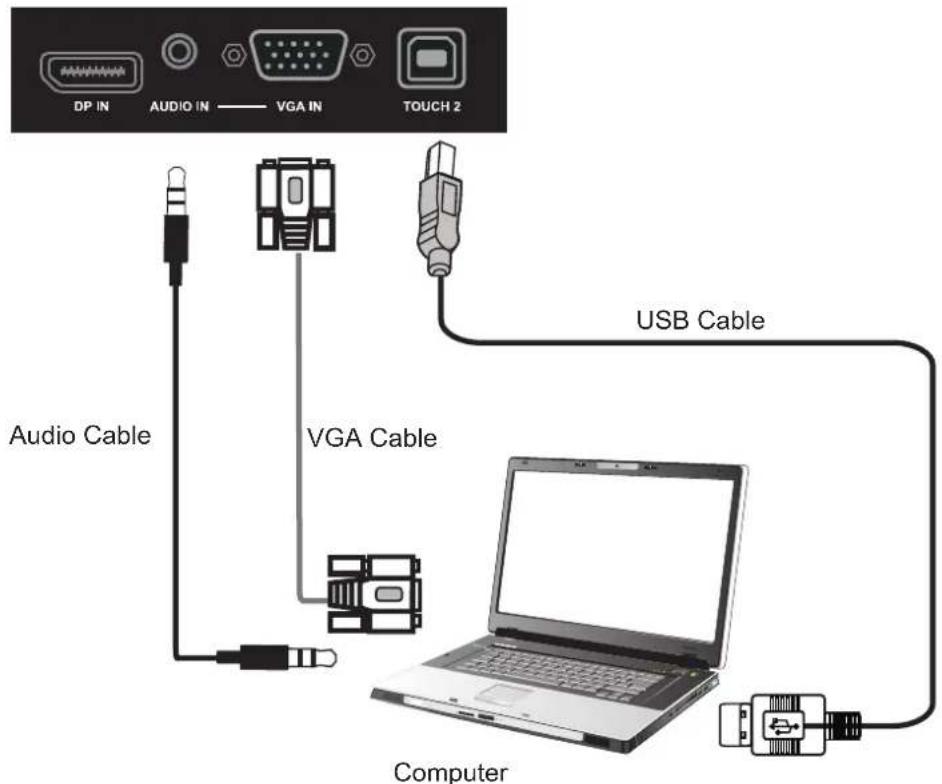
DP IN AUDIO IN VGA IN TOUCH 2 Audio Cable VGA Cable USB Cable Computer(1) Use VGA cable to connect to VGA output port of external computer, and meanwhile use headphone audio cable to connect to external computer audio output interface
(2) Use USB cable to connect to external computer USB port
(3) After cable connection, plug in power cord, and switch power on
(4) Start external computer
(5) Press ⏻ key, and the equipment is power on
(6) Press the INPUT key to switch to VGA channel

NOTE:
External computer input, equipment's best resolution is 1920 x1080
External computer can also connect to the equipment through the HDMI cable
- Recommended computer configuration:
2.0GHz Processor, 1GB Memory More than 256 color display card
1GB Available Hard Drive
Support Resolution 800*600,1024*768,1920*1080
VGA-OUT/HDMI-OUT、Audio-OUT、USB Interface
2. Audio and Video Equipment
1) AV IN
flowchart
graph TD
    A["AV IN COAX OUT"] --> B["VIDEO R L"]
    B --> C["VIDEO R L"]
    C --> D["AV Cable"]
    D --> E["VIDEO OUT"]
    F["Video Game"] --> G["Video recorder"]
    H["DVD"] --> I["Set-top"]
    I --> J["Satellite TV receiver"]
    style A fill:#f9f,stroke:#333
    style E fill:#ccf,stroke:#333
    style F fill:#cfc,stroke:#333
    style H fill:#fcc,stroke:#333
    style I fill:#cff,stroke:#333
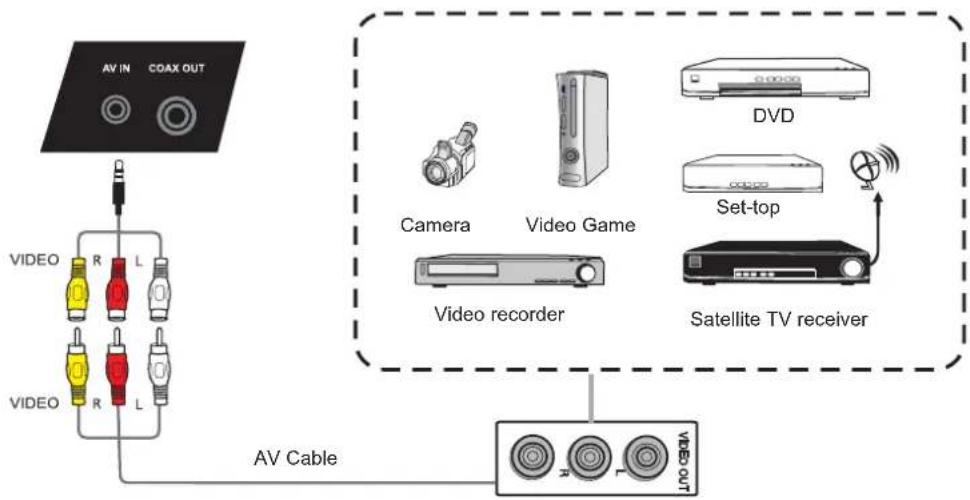
(1) Use AV audio and video cables to connect audio and video equipments with AV output (yellow for video, red for right sound channel, and white for left sound channel)
(2) After cable connection, plug in power cord, and switch power on
(3) Press ⏻ to turn equipment on
(4) Press INPUT key to switch to AV port
2) HDMI
text_image
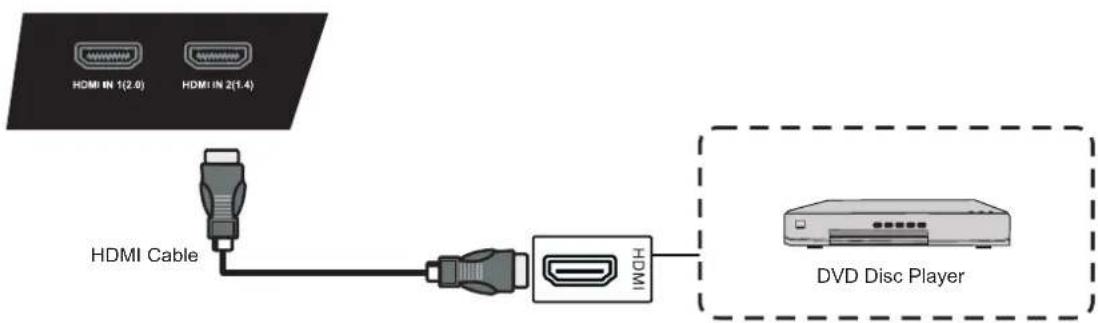
HDMI IN 1(2.0) HDMI IN 2(1.4) HDMI Cable WCH DVD Disc Player(1) Use HDMI cable to connect audio and video equipment with HDMI output
(2) After cable connection, plug in power cord, and switch power on
(3) Press ⏻ to turn equipment on
(4) Press INPUT key to switch to HDMI port
3. Coaxial Connection
text_image
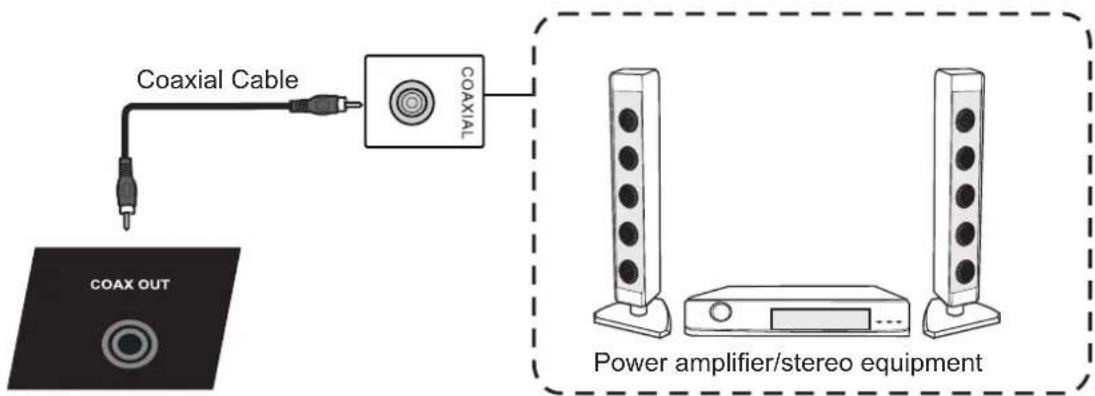
Coaxial Cable COAXIAL COAX OUT Power amplifier/stereo equipment(1) Use coaxial cable to connect audio device with coaxial input
(2) After cable connection, plug in power cord, and switch power on
(3) Press ⏻ to turn equipment on
4. Video Output Connection
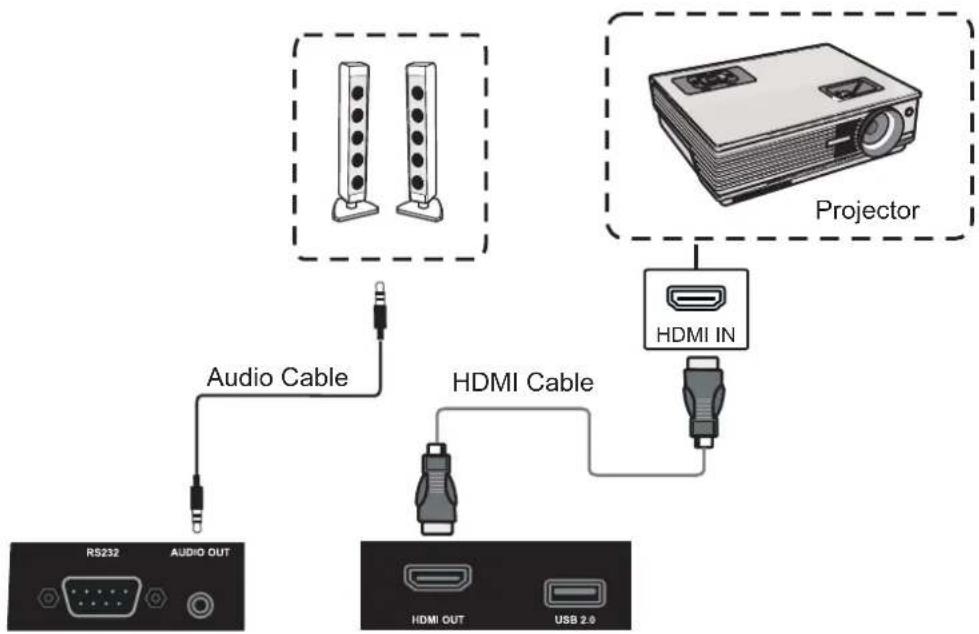
flowchart
graph TD
    A["RS232 AUDIO OUT"] -->|Audio Cable| B["+"]
    C["Projector"] -->|HDMI Cable| D["+"]
    D --> E["HDMI OUT USB 2.0"]
    F["+"] --> G["+"]
    H["+"] --> I["+"]
    J["+"] --> K["+"]
(1) Use HDMI cable to connect display devices with HDMI in, and use audio cable to connect sound output
(2) After cable connection, plug in power cord, and switch power on
(3) Press ⏻ to turn equipment on
(4) Press INPUT key to switch to HDMI port
5. LAN Connection

flowchart
graph LR
    A["LAN"] --> B["Network Cable"]
    B --> C["Internet"]
6. RS232 Connection
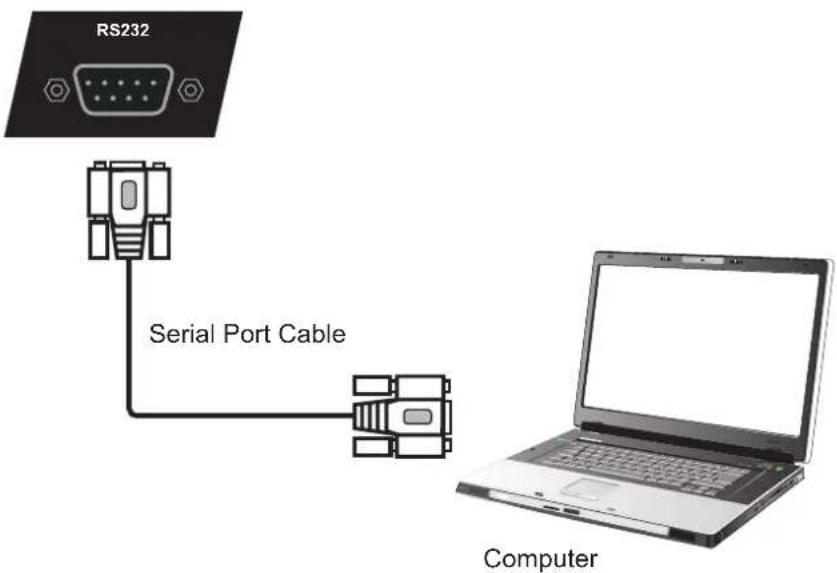
text_image
RS232 Serial Port Cable ComputerAfter using serial port cable to connect central control equipment and machine, certain function of the machine can be controlled via central control equipment, such as: machine ON/OFF, and adjustment of sound volume, etc.
Menu Operation
Touch Menu Operation
Call up Method
Take middle point position on the bottom of display screen as starting point, use touch pen to drag towards screen center position to call up touch menu, as shown below.
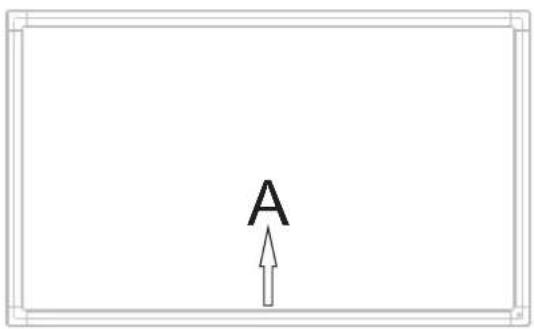
text_image
ANote: "Touch A Method" mentioned in this manual to call up touch menu method is shown above.
Setting Menu
General Setting
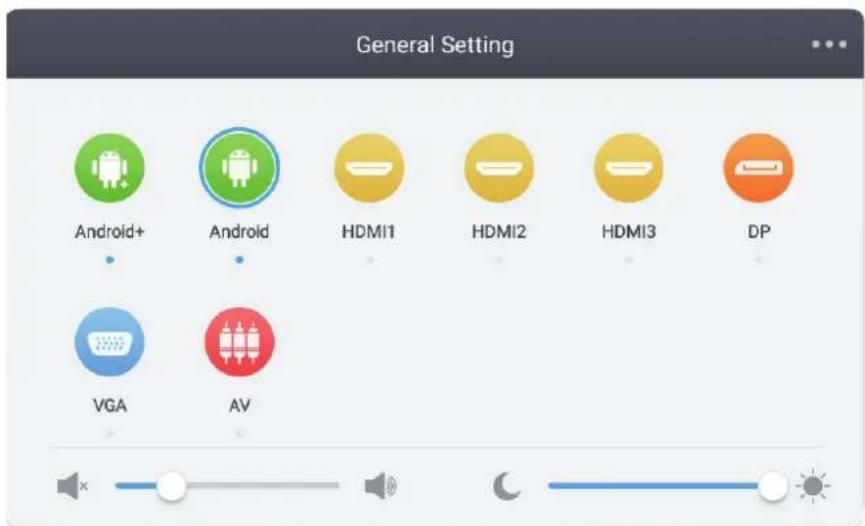
text_image
General Setting Android+ Android HDMI1 HDMI2 HDMI3 DP VGA AV- Press INPUT button on remote control or via touch A method to call up General Setting menu.
- Press ▼/▲/◄/► button on remote control to select the channel you need.
- Press the Enter button on remote control or directly click with touch pen to confirm selected input channel.
- Press return key on remote control, or click blank area outside menu with touch pen to exit menu.
Note: PC channel will only display when the equipment connect the built-in computer.
Android channel will only display when the equipment connect the built-in Android module.
Detail Setting Menu
- Press Menu on remote control or click the icon ... on General Setting menu with touch pen to call up detail setting menu. Detail setting menu includes Audio, Screen, Display and Adjust.
Audio
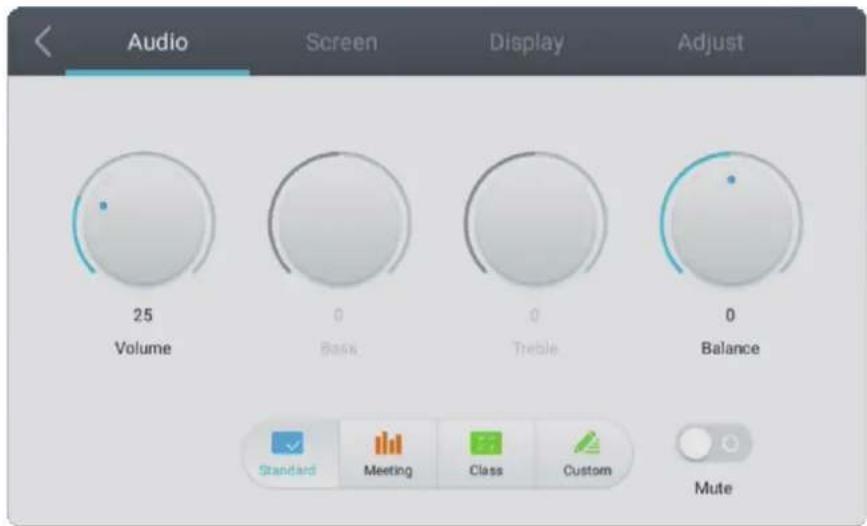
text_image
Audio Screen Display Adjust 25 Volume 0 Bass 0 Treble 0 Balance Standard Meeting Class Custom Mute- Press ▶ button on remote control to select Audio setting menu.
- Press ▼/▲/◄/► button on remote control or directly click with touch pen to select the option.
- Press Enter on remote control to enter adjustment mode, and press ◀/▶ button or directly click with touch pen to adjust each option. Press Enter/Back to exit adjustment.
- Press Mute on remote control or directly click with touch pen to open or close mute state.
- Press Back on remote control, or click blank area outside menu with touch pen to exit menu.
Screen
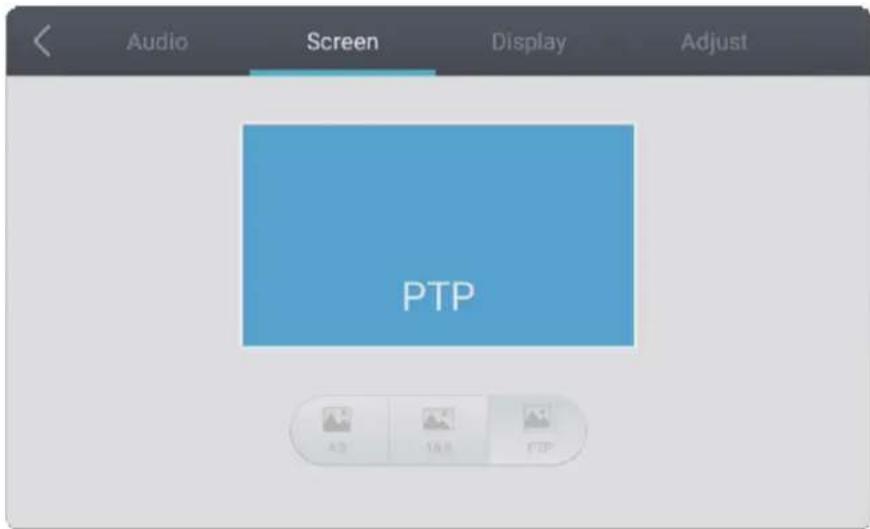
text_image
Audio Screen Display Adjust PTP AD 168 FTP- Press ▶ button on remote control to select Screen setting menu.
- Press ▼/▲/◄/► on remote control or directly click with touch pen to select the option.
- Press Enter on remote control or directly click with touch pen to enter the selected mode.
- Press Back on remote control, or click blank area outside menu with touch pen to exit menu.
Display
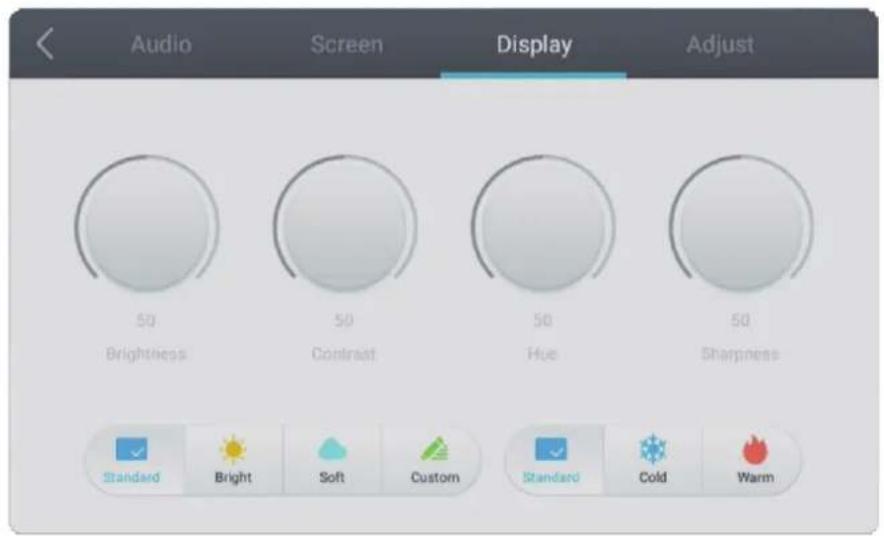
text_image
Audio Screen Display Adjust 50 Brightness 50 Contrast 50 Hue 50 Sharpness Standard Bright Soft Custom Standard Cold Warm- Press ▶ button on remote control to select Display setting menu.
- Press ▼/▲/◄/► button on remote control or directly click with touch pen to select the option.
- Press Enter on remote control to enter adjustment mode, and press ◀/▶ button or directly click with touch pen to adjust each option. Press Enter/Back to exit adjustment.
- Press Back on remote control, or click blank area outside menu with touch pen to exit menu.
Adjust
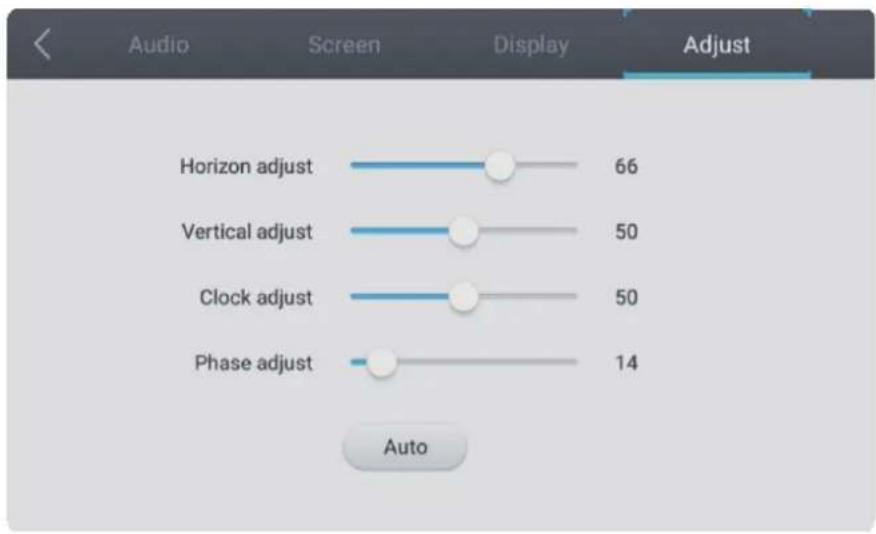
bar
| Adjustment | Count | | ---------------- | ----- | | Horizon adjust | 66 | | Vertical adjust | 50 | | Clock adjust | 50 | | Phase adjust | 14 |- Press ▶ button on remote control to select Adjust setting menu.
- Press ▼/▲/◄/► button on remote control or directly click with touch pen to select the option.
- Press Enter on remote control to enter adjustment mode, and press ◀/▶ button or directly click with touch pen to adjust each option. Press Enter/Back to exit adjustment. You can also click the "Auto" icon to adjust automatically.
- Press Back on remote control, or click blank area outside menu with touch pen to exit menu.
Simple Troubleshooting
Machine fails to work normally
| Remote control failure | 1. Check whether there are other objects between remote control and equipment control receiving window, thus leading to failure of remote control.2. Check whether the battery electrode in the remote control is correct.3. Check whether remote control needs to replace battery. |
| Machine automatically shut down | 1. Whether set sleep or not.2. Check whether there is sudden power outage.3. Check whether there is no signal automatic shutdown. |
PC mode
| Signal out of range | 1. Check whether display is set correctly2. Check whether resolution is the best resolution.3. Adjust line and field synchronization in menu. |
| Background has vertical lines or streaks | 1. Select automatic correction in menu.2. Adjust clock and phase position in menu. |
| Image lack of color, color is incorrect | 1. Check whether VGA is not well connected or has quality problem.2. Adjust chromaticity and brightness or contrast in menu. |
| Display format that is not supported | 1. Select automatic correction in menu.2. Adjust clock and phase position in menu. |
Touch Function
| Touch function invalid | 1. Check whether touch driver is installed and started.2. Check whether the size of article touched is comparable with finger. |
| Touch positioning not correct | 1. Check whether driver is properly installed and make correction.2. Check whether touch pen is facing the screen. |
Video function can't work normally
| No picture and no sound | 1. Check whether the machine is started state.2. Check whether signal wire is well plugged, whether INPUT is corresponding to it.3. If in internal computer mode, check whether internal computer is started. |
| With horizontal or vertical stripes or image dithering | 1. Check whether signal wire is well connected.2. Check whether other electronic equipment or power tools are placed around the machine. |
| No color, color is weak or image is weak | 1. Adjust chromaticity and brightness or contrast in menu.2. Check whether signal wire is well connected. |
Audio function can't work normally
| With image but without sound | 1. Check whether mute button is pressed for mute.2. Press VOL + / - to adjust volume.3. Check whether audio line is connected correctly. |
| Only one speaker has sound | 1. Adjust sound balance in menu.2. Check whether computer sound control panel only sets up one sound channel.3. Check whether audio line is connected correctly. |
| VGA output without sound | 1. Check whether connect external device with headphone cable. |
Maintenance
Proper maintenance can avoid many early faults and regular careful cleaning can make machine brand new. Please unplug power plug before cleaning and maintenance, to prevent electric shock.
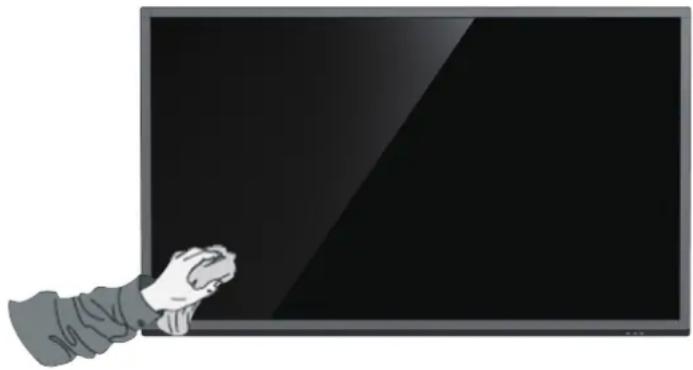
Clean screen
Please mix and stir even a little fabric softener or tableware detergent with warm water.
Please use a soft cloth to be completely soaked in the mixture.
Please take out cloth and twist to half dry state to wipe machine screen.
Repeat for several times, pay attention not to squeeze water flow into machine when wiping machine.
natural_image
Illustration of a hand holding a blank blackboard (no text or symbols visible)Clean face frame
Please use dry, soft, lint-free cloth to wipe front frame.
No use of machine for a long time
In case of no use of machine for a long time, such as holiday, please make sure to unplug the plug to prevent any possible dangers caused by power supply ripple from lightning.