
KX-TG7122E - Phone PANASONIC - Free user manual and instructions
Find the device manual for free KX-TG7122E PANASONIC in PDF.


User questions about KX-TG7122E PANASONIC
0 question about this device. Answer the ones you know or ask your own.
Ask a new question about this device
Download the instructions for your Phone in PDF format for free! Find your manual KX-TG7122E - PANASONIC and take your electronic device back in hand. On this page are published all the documents necessary for the use of your device. KX-TG7122E by PANASONIC.
USER MANUAL KX-TG7122E PANASONIC
TG7100 7120E(e) QG.fm Page 1 Wednesday, July 5, 2006 10:18 AM
natural_image
Pure geometric diagram with intersecting lines and circles, no text or symbols presentPanasonic
Digital Cordless Phone
Model No. KX-TG7100E/KX-TG7102E
KX-TG7103E
Digital Cordless Answering System
Model No. KX-TG7120E/KX-TG7122E
KX-TG7123E
Quick Guide
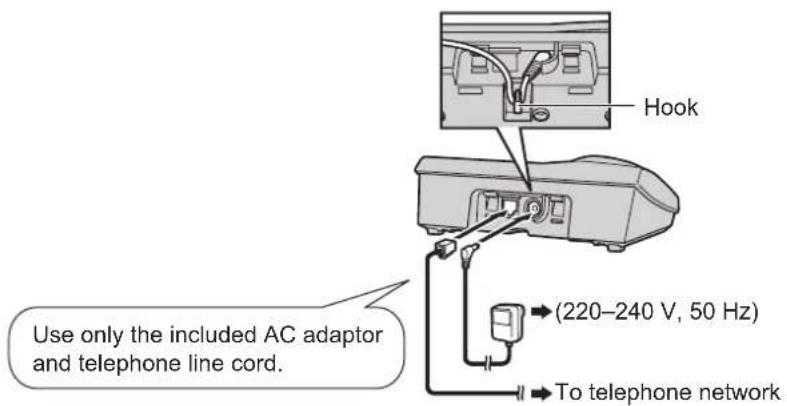
1 Connections
Base unit
text_image
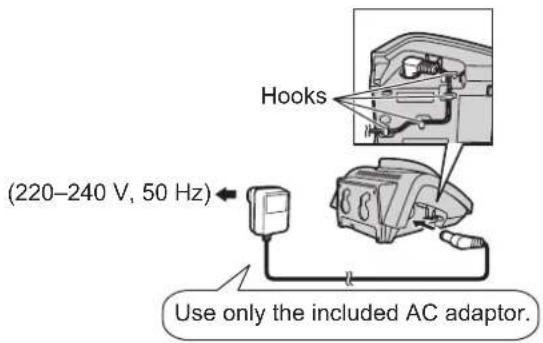
Use only the included AC adaptor and telephone line cord. Hook (220–240 V, 50 Hz) To telephone networkCharger (KX-TG7102, KX-TG7103, KX-TG7122, and KX-TG7123 only)
text_image
Hooks (220-240 V, 50 Hz) Use only the included AC adaptor.PQQW15103YA DC0206DS2076
natural_image
Pure geometric lines and crosshair symbols without any text or labels
natural_image
Pure electrical circuit lines without any symbols
natural_image
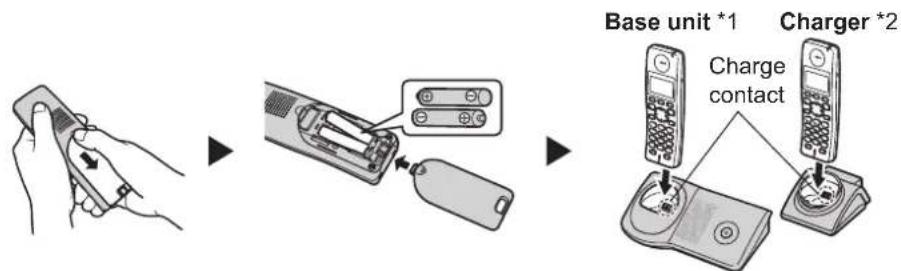
Pure geometric diagram with intersecting lines and circles, no text or symbols present② Battery installation/ Battery charge (Initial charge: 7 hours)
flowchart
graph LR
    A["Hand holding remote"] --> B["Switch with two buttons"]
    B --> C["Base unit *1"]
    C --> D["Charge contact"]
    D --> E["Charger *2"]
*1 The pictured model is KX-TG7100.
*2 KX-TG7102, KX-TG7103, KX-TG7122, and KX-TG7123 only
Note:
- Use only the included rechargeable batteries.
③Symbols used in these operating instructions
| Symbol Meaning | |
| 【☐/OK】 | Press 【☐/OK】. |
| →Proceed to the next operation. | |
| “ ” | Select the words in quotations shown on the display (e.g., “Handset Setup”) by pressing [▲] or [▼]. |
Date and time
1 [目/OK]
2 Press [▲] or [▼] to select "Handset Setup". → [▶]
3 KX-TG7100/KX-TG7102/KX-TG7103
Press [▲] or [▼] to select "Set Date & Time". → [▶]
KX-TG7120/KX-TG7122/KX-TG7123
Press [▲] or [▼] to select "Time Settings". → [▶] → Press [▲] or [▼] to select "Set
Date & Time". → [▶]
4 Enter the current day, month, and year.
5 Enter the current hour and minute.
6 [☐/OK] → [✗①]
natural_image
Pure geometric lines and crosshair symbols without any text or labels
natural_image
Pure geometric diagram with intersecting lines and circles, no text or symbols present4 Basic operations
| Feature Operation | |
| Making a call | Dial the phone number. → [↖]/[⇨] |
| Answering a call [↖] | |
| Hanging up [✕1] | |
| Receiver/speaker volume | Press [▲] or [▼] while on a call. |
| Last number redial | [○●] → [↖] |
| Making a call with redial list | [○●] → Press [▲] or [▼] to select the desired number. → [↖] |
| Handset phonebook: storing an entry (name and phone numbers) | [□□] → [□/OK] → “New Entry” → [▶] → Enter the party’s name (16 characters max.). → [□/OK] → Enter the party’s phone number (24 digits max.). → [□/OK] → “Save” → [▶] → [✕1]●To enter a name, see the character table in the operating instructions. |
| Handset phonebook: making a call | [□□] → Press [▲] or [▼] to display the desired entry. → [↖] |
| Handset ringer volume | [□/OK] → “Handset Setup” → [▶] → “Ringer Setup” → [▶] → “Ringer Volume” → [▶] → Press [▲] or [▼] to select the desired volume. → [▶] → [✕1] |
| Changing ringtone (outside calls) | [□/OK] → “Handset Setup” → [▶] → “Ringer Setup” → [▶] → “Ext. Ringtone” → [▶] → Select the desired ringtone. → [▶] → [✕1] |
Answering system (KX-TG7120, KX-TG7122, and KX-TG7123 only)
| Feature Operation | |
| Answering on/off | [≡/OK] → “Answer System” → [▶] → “Answer On” or “Answer Off” → [▶] → [✗1] |
| Listening to messages | [≡/OK] → “Answer System” → [▶] → “Play New Msg.” or “Play All Msg.” → [▶] |
⑤Frequently asked questions
| Question Cause & solution | |
| What kind of power outlet should I connect the AC adaptor to? | Connect the AC adaptor to a 220–240 V outlet. |
| Why is Flashing? | The handset is too far from the base unit. Move closer.The AC adaptor is not connected. Check the connections.You are using the handset or base unit in an area with high electrical interference. Place the handset and base unit away from interference sources, such as antennas and mobile phones.The handset is not registered to the base unit. Register it. [☐/OK] → “Handset Setup” → [▶] → “Registration” → [▶] → “Register H.set” → [▶] → Press and hold [•••] on the base unit for about 3 seconds, until the registration tone sounds. → Wait until “Enter Base PIN” is displayed. → Enter the base unit PIN (default: “0000”). → [☐/OK] |
| Why is the handset display blank? | The handset is not turned on. To turn the power on, press [✗1] for about 1 second. |
| What should I do when the handset does not turn on? | Make sure that the batteries are installed correctly.Fully charge the batteries.Clean the charge contacts and charge again. |
| How long should I charge new batteries? | Charge the batteries for about 7 hours. |
| How long is the battery operating time? | When you are using fully-charged Ni-MH batteries (included batteries);In continuous use: 17 hours max.In continuous standby mode: 180 hours max.It is normal for batteries not to reach full capacity at the initial charge. Maximum battery performance is reached after a few complete cycles of charge/discharge (use).Actual battery performance depends on a combination of how often the handset is in use and how often it is not in use (standby). |
| Can I keep the handset on the base unit or charger when I am not using it? | Even after the handset is fully charged, the handset can be left on the base unit or charger without any ill effect on the batteries. |


natural_image
Pure geometric lines and crosshair symbols without any text or labels
natural_image
Pure geometric lines and shapes without any text, numbers, or symbols| Question Cause & solution | |
| When should I replace the batteries? | If the batteries are fully charged until [■■] is displayed, but [■] is displayed after a few calls, replace the batteries with new ones. |
| What is a PIN? The PIN is a 4-digit number that must be entered in order to change certain base unit settings. The default PIN is “0000”. | |
| What do I need to do to display caller information? | ●You need to subscribe to Caller ID service. Consult your service provider/telephone company for details.●The message “You must first subscribe to Caller ID.” will be displayed until you receive caller information after subscribing to Caller ID service. |
⑥ Optional service (Caller ID)
If you subscribe to Caller ID service, you can:
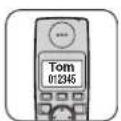
– display caller information
7 Sales and support information
Customer Care Centre
●For customers within the UK: 08700 100 076
●For customers within the Republic of Ireland: 01289 8333
- Visit our website for product information: www.panasonic.co.uk
•E-mail: customer.care@panasonic.co.uk
Direct Sales at Panasonic UK
- Order accessory and consumable items for your product with ease and confidence by phoning our Customer Care Centre Monday - Thursday 9:00am - 5:30pm, Friday 9:30am - 5:30pm (Excluding public holidays).
- Or go on line through our Internet Accessory ordering application at www.panasonic.co.uk
- Most major credit and debit cards accepted.
- All enquiries transactions and distribution facilities are provided directly by Panasonic UK Ltd.
- It couldn't be simpler!
- Also available through our Internet is direct shopping for a wide range of finished products, take a browse on our website for further details.
Customer Care Helpline Tel. No.: U.K. 08700 100 076 / R.O.I. 01289 8333
natural_image
Pure geometric lines and crosshair symbols without any text or labels
natural_image
Pure geometric diagram with intersecting lines and shapes, no text or symbols presentIMPORTANT
If you have problems setting up or operating this product please call the Panasonic DECT Helpline 08700 100 076 (UK) 01289 8333 (Repl of Ireland)