
SC-HTB258 - Hi-Fi System PANASONIC - Free user manual and instructions
Find the device manual for free SC-HTB258 PANASONIC in PDF.


User questions about SC-HTB258 PANASONIC
0 question about this device. Answer the ones you know or ask your own.
Ask a new question about this device
Download the instructions for your Hi-Fi System in PDF format for free! Find your manual SC-HTB258 - PANASONIC and take your electronic device back in hand. On this page are published all the documents necessary for the use of your device. SC-HTB258 by PANASONIC.
USER MANUAL SC-HTB258 PANASONIC
Operating Instructions
Home Theater Audio System
Model No. SC-HTB258
SC-HTB250
SC-HTB208
SC-HTB200
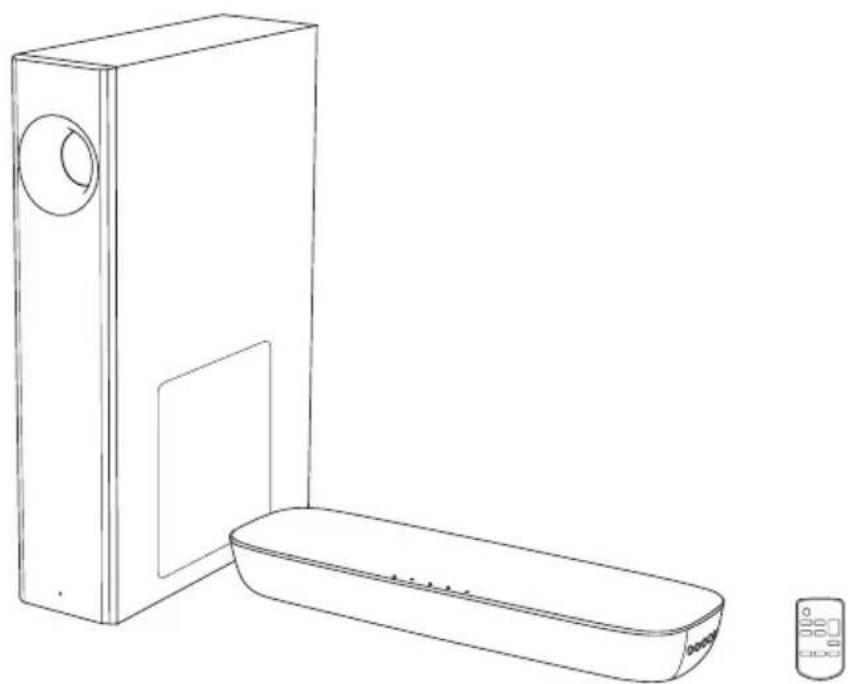
natural_image
Line drawing of a modern electronic device with a rectangular box and a rectangular tray, accompanied by a small remote control panel (no text or symbols)This illustration shows SC-HTB250.
Thank you for purchasing this product.
For optimum performance and safety, please read these instructions carefully.
Please keep this manual for future reference.
“EB” indicates the United Kingdom model.
Safety precautions
WARNING!
Unit
- To reduce the risk of fire, electric shock or product damage,
- Do not expose this unit to rain, moisture, dripping or splashing.
- Do not place objects filled with liquids, such as vases, on this unit.
– Use the recommended accessories. - Do not remove covers.
- Do not repair this unit by yourself. Refer servicing to qualified service personnel.
AC mains lead
- To reduce the risk of fire, electric shock or product damage,
- Ensure that the power supply voltage corresponds to the voltage printed on this unit.
- Insert the mains plug fully into the socket outlet.
- Do not pull, bend, or place heavy items on the lead.
- Do not handle the plug with wet hands.
- Hold onto the mains plug body when disconnecting the plug.
- Do not use a damaged mains plug or socket outlet.
Small objects
- Keep the speaker feet out of reach of children to prevent swallowing.
Button-type battery (Lithium battery)
- Risk of fire, explosion and burns. Do not recharge, disassemble, heat above 60^ or incinerate.

WARNING
DO NOT INGEST BATTERY, CHEMICAL BURN HAZARD
This remote control contains a coin/button cell battery. If the coin/button cell battery is swallowed, it can cause severe internal burns in just 2 hours and can lead to death. Keep new and used batteries away from children. If the battery compartment does not close securely, stop using the remote control and keep it away from children. If you think batteries might have been swallowed or placed inside any part of the body, seek immediate medical attention.
CAUTION!
Unit
- To reduce the risk of fire, electric shock or product damage,
- Do not install or place this unit in a bookcase, built-in cabinet or in another confined space. Ensure this unit is well ventilated.
- Do not obstruct this unit's ventilation openings with newspapers, tablecloths, curtains, and similar items.
- Do not place sources of naked flames, such as lighted candles, on this unit.
- This unit is intended for use in moderate climates.
- This unit may receive radio interference caused by mobile telephones during use. If such interference occurs, please increase separation between this unit and the mobile telephone.
- Product Identification Marking is located on the bottom of the unit.
- Set the unit up on an even surface away from direct sunlight, high temperatures, high humidity, and excessive vibration.
- This system might get warm after prolonged usage. This is normal. Do not be alarmed.
AC mains lead
- The mains plug is the disconnecting device. Install this unit so that the mains plug can be unplugged from the socket outlet immediately.
Button-type battery (Lithium battery)
- Danger of explosion if battery is incorrectly replaced. Replace only with the type recommended by the manufacturer.
- When disposing of the batteries, please contact your local authorities or dealer and ask for the correct method of disposal.
- Do not heat or expose to flame.
- Do not leave the battery(ies) in a car exposed to direct sunlight for a long period of time with doors and windows closed.
- Insert with poles aligned.
- Remove the battery if you do not use the remote control for a long period of time. Keep in a cool, dark area.
Caution for AC mains lead
(For the AC mains plug of three pins)
For your safety, please read the following text carefully.
This appliance is supplied with a moulded three pin mains plug for your safety and convenience. A 5-ampere fuse is fitted in this plug. Should the fuse need to be replaced please ensure that the replacement fuse has a rating of 5-ampere and that it is approved by ASTA or BS to BS1362.
Check for the ASTA mark or the BSI mark on the body of the fuse.
If the plug contains a removable fuse cover you must ensure that it is refitted when the fuse is replaced.
If you lose the fuse cover the plug must not be used until a replacement cover is obtained. A replacement fuse cover can be purchased from your local dealer.
Before use
Remove the connector cover.
How to replace the fuse
The location of the fuse differ according to the type of AC mains plug (figures A and B). Confirm the AC mains plug fitted and follow the instructions below.
Illustrations may differ from actual AC mains plug.
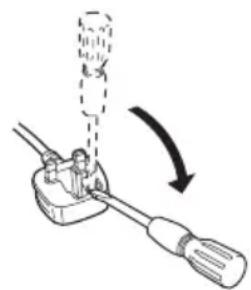
- Open the fuse cover with a screwdriver.
Figure A Figure B
natural_image
Illustration of a tool with a spring and arrow indicating rotation (no text or symbols)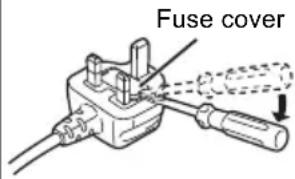
text_image
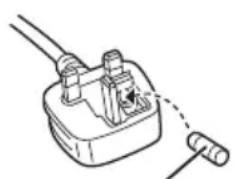
Fuse cover- Replace the fuse and close or attach the fuse cover.
Figure A Figure B
natural_image
Simple line drawing of a plug with wires and a cable, no text or symbols presentFuse (5 ampere)
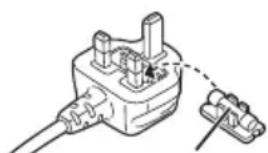
natural_image
Pure electrical circuit lines without any symbolsFuse (5 ampere)
The symbols on this product (including the accessories) represent the following:

AC

Class II equipment (The construction of the product is double-insulated.)

ON

Standby
Sales and Support Information
For the United Kingdom and Ireland
Customer Communications Centre
• For customers within the UK: 0344 844 3899
• For customers within Ireland: 01 289 8333
- Monday – Friday 9:00am – 5:00pm (Excluding public holidays).
- For further support on your product, please visit our website: www.panasonic.co.uk
Direct Sales at Panasonic UK
- Order accessory and consumable items for your product with ease and confidence by phoning our Customer Communications Centre Monday – Friday 9:00am – 5:00pm (Excluding public holidays).
- Or go on line through our Internet Accessory ordering application at www.pas-europe.com.
- Most major credit and debit cards accepted.
- All enquiries transactions and distribution facilities are provided directly by Panasonic UK.
- It couldn't be simpler!
- Also available through our Internet is direct shopping for a wide range of finished products. Take a browse on our website for further details.
Table of contents
Safety precautions 2
Caution for AC mains lead 3
Sales and Support Information .... 3
Supplied items 4
References 5
Placement 5
Overview of controls 7
Making the connections 9
Basic control 12
Advanced operations 12
HDMI CEC....14
Troubleshooting 14
Unit care 16
Indicators illumination 17
Specifications....18
Limited Warranty (For Australia only). 23
HTB258: Indicate features applicable to SC-HTB258 only.
HTB250: Indicate features applicable to SC-HTB250 only.
HTB208: Indicate features applicable to SC-HTB208 only.
HTB200: Indicate features applicable to SC-HTB200 only.
Supplied items
Product numbers correct as of January 2018. These may be subject to change.
This system
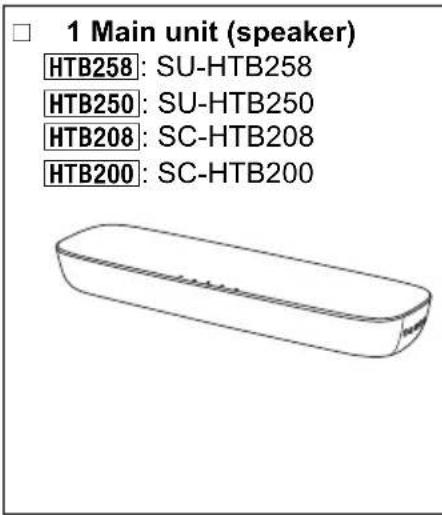
text_image
1 Main unit (speaker) HTB258: SU-HTB258 HTB250: SU-HTB250 HTB208: SC-HTB208 HTB200: SC-HTB200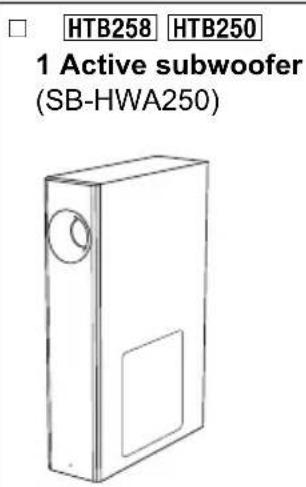
text_image
HTB258 HTB250 1 Active subwoofer (SB-HWA250)Accessories
Check and identify the supplied accessories.
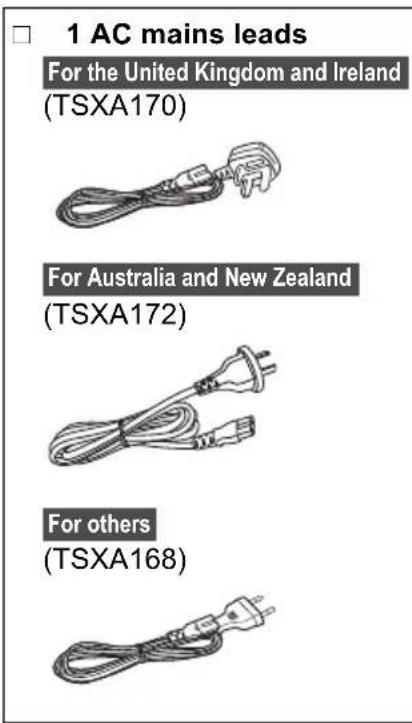
text_image
1 AC mains leads For the United Kingdom and Ireland (TSXA170) For Australia and New Zealand (TSXA172) For others (TSXA168)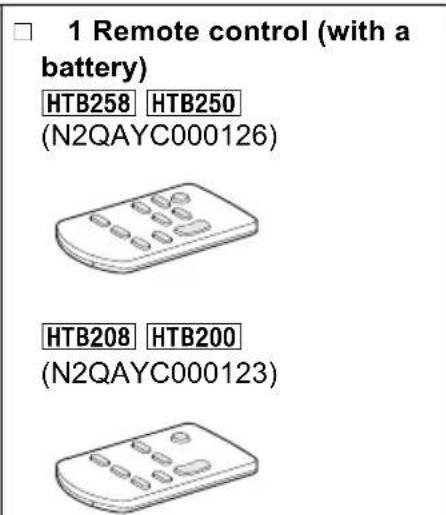
text_image
1 Remote control (with a battery) HTB258 HTB250 (N2QAYC000126) HTB208 HTB200 (N2QAYC000123)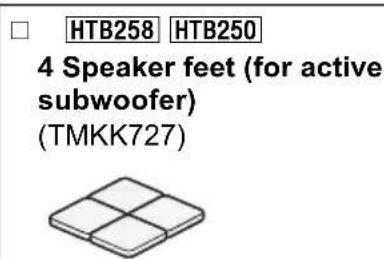
text_image
HTB258 HTB250 4 Speaker feet (for active subwoofer) (TMKK727)References
About Bluetooth®
Panasonic bears no responsibility for data and/or information that is compromised during a wireless transmission.
Frequency band
- This system uses the 2.4 GHz frequency band.
Certification
- This system conforms to the frequency restrictions and has received certification based on frequency laws. Thus, a wireless permit is not necessary.
- The actions below are punishable by law in some countries:
– Taking apart or modifying the unit.
– Removing specification indications.
Restrictions of use
- Wireless transmission and/or usage with all Bluetooth® equipped devices is not guaranteed.
- All devices must conform to standards set by the Bluetooth SIG, Inc.
- Depending on the specifications and settings of a device, it can fail to connect or some operations can be different.
- This system supports Bluetooth ^ security features. But depending on the operating environment and/or settings, this security is possibly not sufficient. Transmit data wirelessly to this system with caution.
- This system cannot transmit data to a Bluetooth® device.
Range of use
- Use this device at a maximum range of 10 m.
- The range can decrease depending on the environment, obstacles or interference.
Interference from other devices
- This system may not function properly and troubles such as noise and sound jumps may arise due to radio wave interference if this unit is located too close to other Bluetooth® devices or the devices that use the 2.4 GHz band.
- This system may not function properly if radio waves from a nearby broadcasting station, etc. is too strong.
Intended usage
- This system is for normal, general use only.
- Do not use this system near an equipment or in an environment that is sensitive to radio frequency interference (example: airports, hospitals, laboratories, etc.).
Licenses
Dolby, Dolby Audio, and the double-D symbol are trademarks of Dolby Laboratories.
For DTS patents, see http://patents.dts.com. Manufactured under license from DTS Licensing Limited.
DTS, the Symbol, & DTS and the Symbol together are registered trademarks, and DTS Digital Surround is a trademark of DTS, Inc. © DTS, Inc. All Rights Reserved.
The terms HDMI and HDMI High-Definition Multimedia Interface, and the HDMI Logo are trademarks or registered trademarks of HDMI Licensing Administrator, Inc. in the United States and other countries.
The Bluetooth® word mark and logos are registered trademarks owned by the Bluetooth SIG, Inc. and any use of such marks by Panasonic Corporation is under license. Other trademarks and trade names are those of their respective owners.
Placement
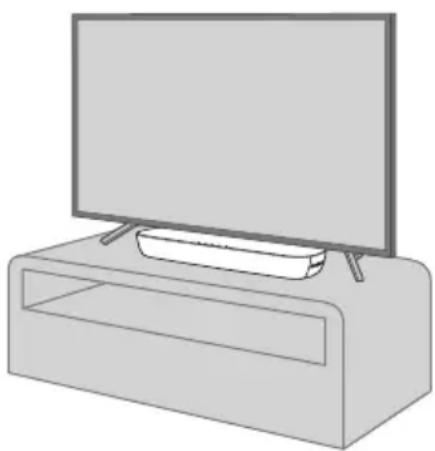
Place the main unit in a rack or on a table.
natural_image
Illustration of a flat-screen TV mounted on a rectangular base (no text or symbols)When placing the main unit in front of the TV The main unit may block or interfere with the TV's various sensors and the 3D Eyewear transmitter of a 3D compatible TV. If interferences occur, move the main unit further away from the TV. If the TV still does not function correctly, try using it in a rack.
Placement of the active subwoofer
HTB258 HTB250
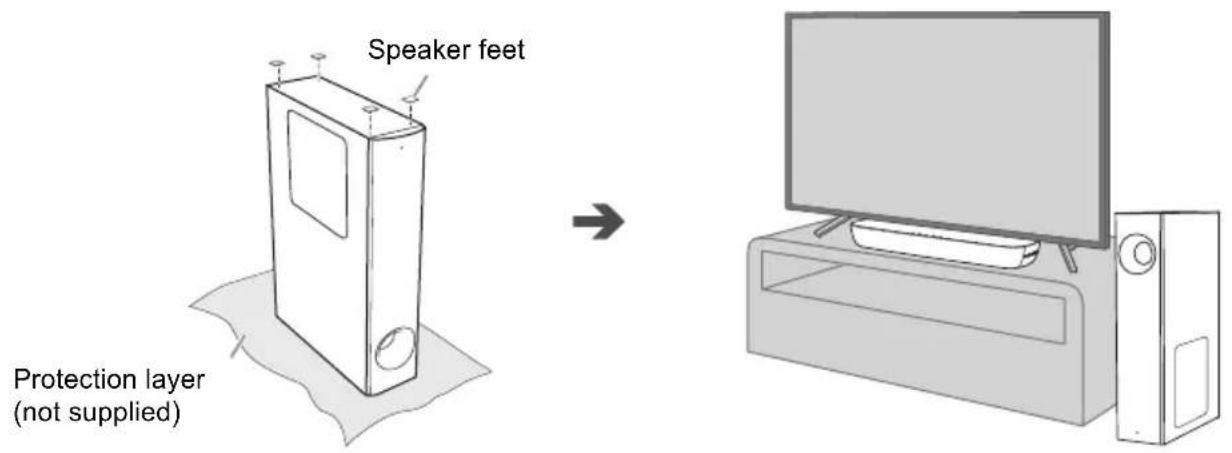
You can place the subwoofer vertically or horizontally.
Based on your option of subwoofer placement, paste the supplied speaker feet on the subwoofer accordingly.
Vertical placement
text_image
Speaker feet Protection layer (not supplied)For stability and to avoid injury, when the subwoofer is placed vertically,
- Do not stack any object on the subwoofer.
- Do not allow children to climb on the subwoofer.
- Be careful when babies or children are near.
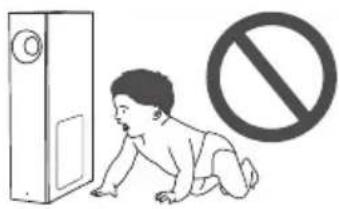
natural_image
Illustration of a baby crawling near a door with a prohibition symbol (no text or labels)Horizontal placement
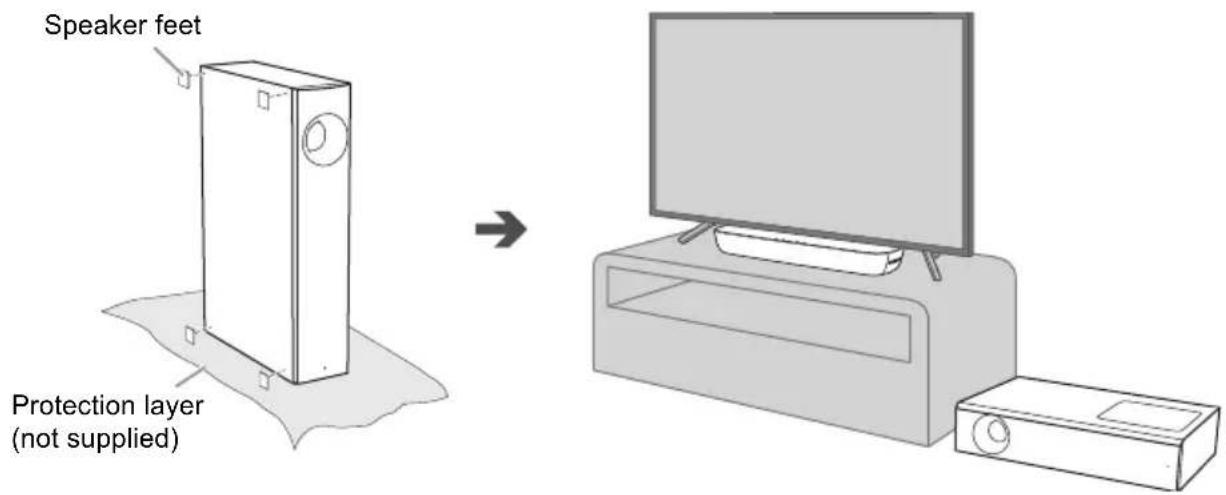
text_image
Speaker feet Protection layer (not supplied)Note:
- Place the system on a flat safe surface.
- Do not put the system in a metal cabinet.
- Place the active subwoofer within a few meters from the main unit.
- Depending on the position of the active subwoofer, the effect may vary.
Placing the active subwoofer too close to the walls and corners can result in excessive bass. Cover walls and windows with thick curtains.
You may change the position of the active subwoofer, or adjust the subwoofer level ( 12) to achieve optimum effect.
- Keep other 2.4 GHz frequency band electronic devices such as wireless router, cordless phone, etc. at least 2 m away from this system to avoid wireless interference.
- If irregular colouring occurs on the TV, switch off the TV for 30 minutes. If the demagnetising of the TV does not correct the problem, increase the distance between this system and the TV.
- Keep magnetised items away. Magnetised cards, watches, etc., can be damaged if put too near to the system.
Overview of controls
Main unit
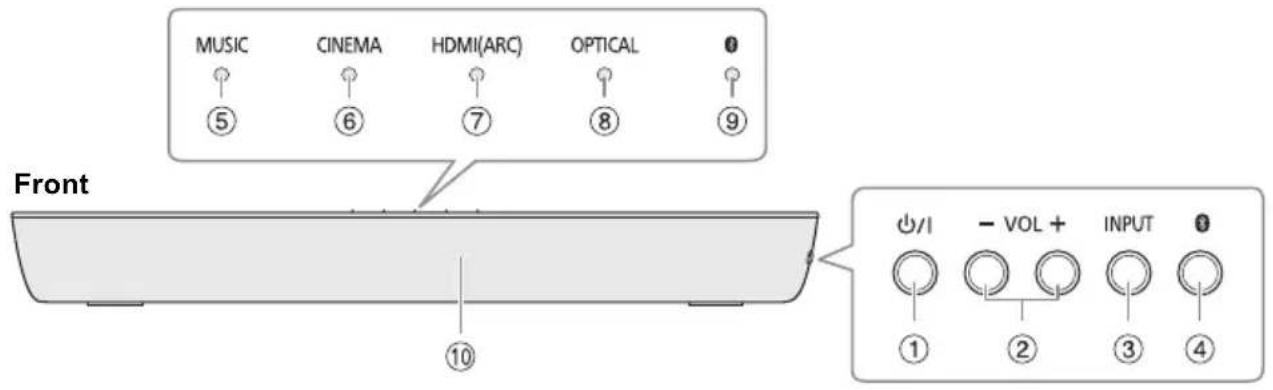
text_image
MUSIC CINEMA HDMI(ARC) OPTICAL # ⑤ ⑥ ⑦ ⑧ ⑨ Front ⑩ #/I - VOL + INPUT ① ② ③ ④Rear

text_image
⑪ ⑫ ⑬① Standby/on switch [⏻/ɪ]
Press to switch the unit from on to standby mode or vice versa. In standby mode, the unit is still consuming a small amount of power.
②Adjust the volume level ( 12)
③Select the input source

④Select the Bluetooth ^® device as the source
To start Bluetooth® pairing, press and hold [ B]
⑤MUSIC indicator
⑥CINEMA indicator
⑦HDMI (ARC) indicator
⑧OPTICAL indicator
⑨ (Bluetooth ^ ) indicator
⑩ Remote control sensor
Distance: Within approximately 7 m
Angle: Approximately 20^ up and down, 30^ left and right
⑪OPTICAL DIGITAL AUDIO IN terminal
⑫ USB port (for software update) (⇒ 16)
⑬HDMI (ARC) terminal (ARC compatible)
Active subwoofer
HTB258 HTB250
Front
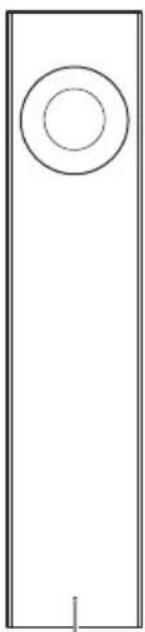
natural_image
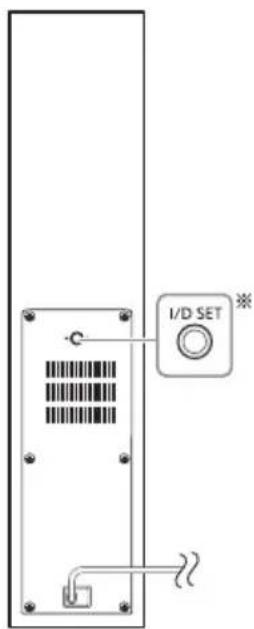
Simple line drawing of a vertical rectangular frame with a circular top and a small vertical line at the bottom (no text or symbols)WIRELESS LINK indicator
Rear
text_image
I/D SET* The I/D SET button is only used when the main unit is not paired with the active subwoofer.
Remote control
HTB258 HTB250
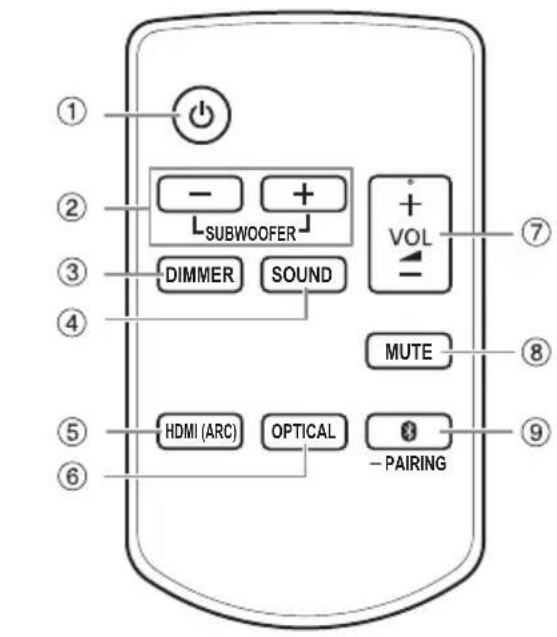
text_image
① ② ③ ④ ⑤ ⑥ - SUBWOOFER DIMMER SOUND HDMI (ARC) OPTICAL - PAIRING ⑦ + VOL MUTE ⑧HTB208 HTB200
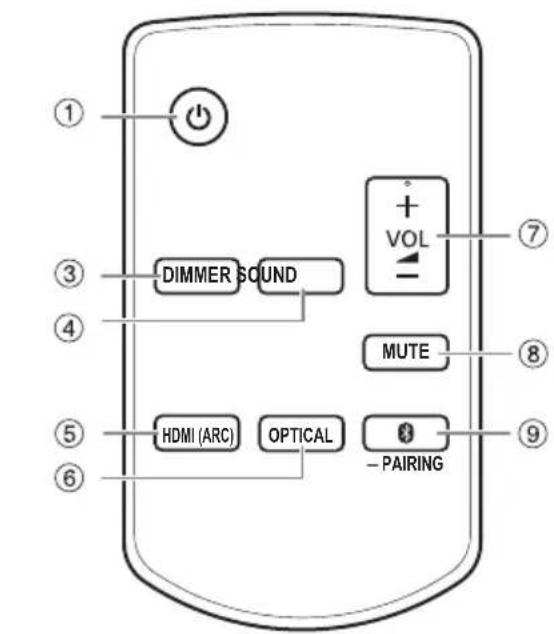
text_image
① ③ DIMMER SOUND ④ ⑤ HDMI (ARC) OPTICAL - PAIRING ⑦ ⑧ MUTE ⑨①Switch the main unit on or off
②HTB258 HTB250
Adjust the subwoofer level ( 12)
③Dim the indicators on the main unit
④Select the sound mode ( 12)
⑤Select the HDMI (ARC) device as the source
⑥Select the optical device as the source
⑦Adjust the volume level ( 12)
⑧Mute the sound ( 12)
⑨Select the Bluetooth ® device as the source
To start Bluetooth® pairing, press and hold [PAIRING].
Preparing the remote control
Before using for the first time
Remove the insulation sheet.
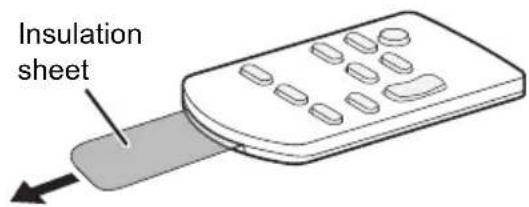
text_image
Insulation sheetReplacing the battery
Replace with a new battery (CR2025 lithium battery).
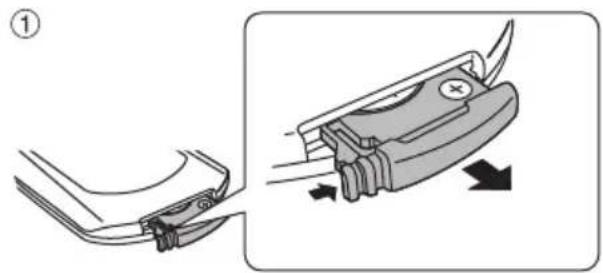
natural_image
Diagram showing a cable connector being inserted into a device, with arrows indicating direction (no text or symbols present)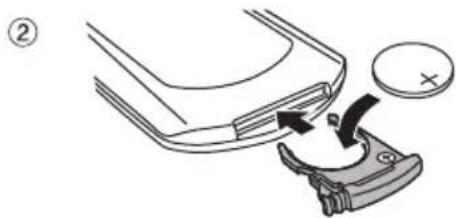
natural_image
Diagram showing a mechanical component with an arrow indicating rotation, no text or symbols presentInsert a new battery with the (+) side facing up.
Making the connections
Switch off all equipment before connection.
Components and cables are sold separately.
Connect the AC mains lead only after all the other connections have been made.
Connecting the TV
Connect an ARC compatible TV
Connect to the ARC compatible terminal of the TV with an ARC compatible high speed HDMI cable.
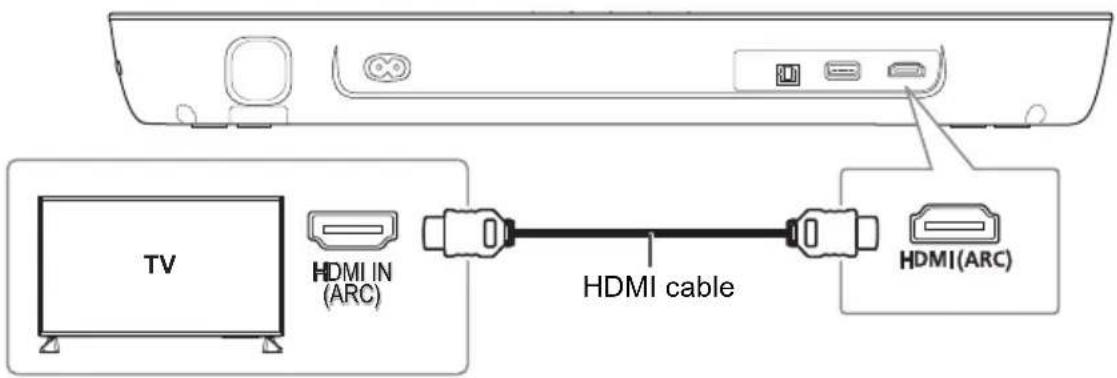
text_image
TV HDMI IN (ARC) HDMI cable HDMI(ARC)ARC (Audio Return Channel)
ARC is an HDMI function that lets you enjoy both sound and TV pictures with one HDMI cable, the optical digital audio cable that is usually required in order to listen to sound from a TV is no longer required.
Connect a non-ARC compatible TV
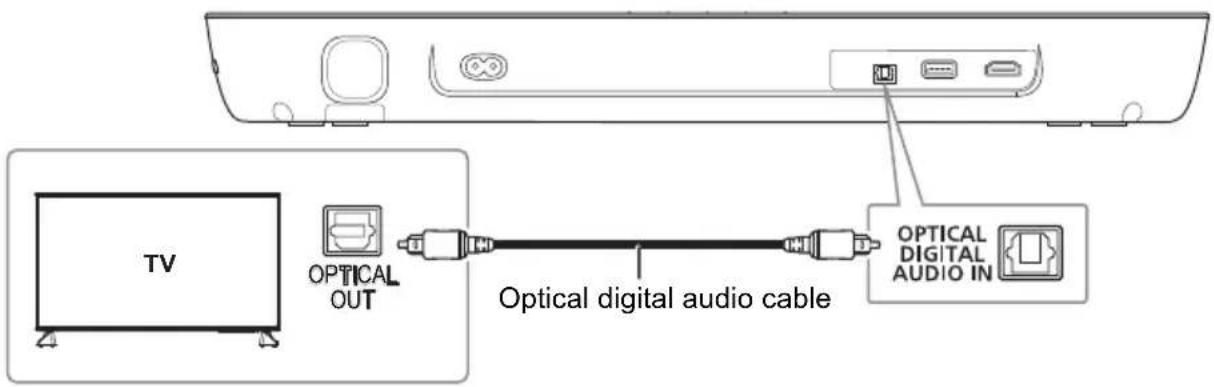
text_image
TV OPTICAL OUT Optical digital audio cable OPTICAL DIGITAL AUDIO INWhen connecting the optical digital audio cable, observe the orientation and insert the tip correctly into the terminal.
Connecting a 4K Ultra HD TV
The system cannot pass-through the 4K video signal of a 4K compatible equipment to a 4K Ultra HD TV. However, you can connect the system to a 4K Ultra HD TV to enjoy the 4K content.
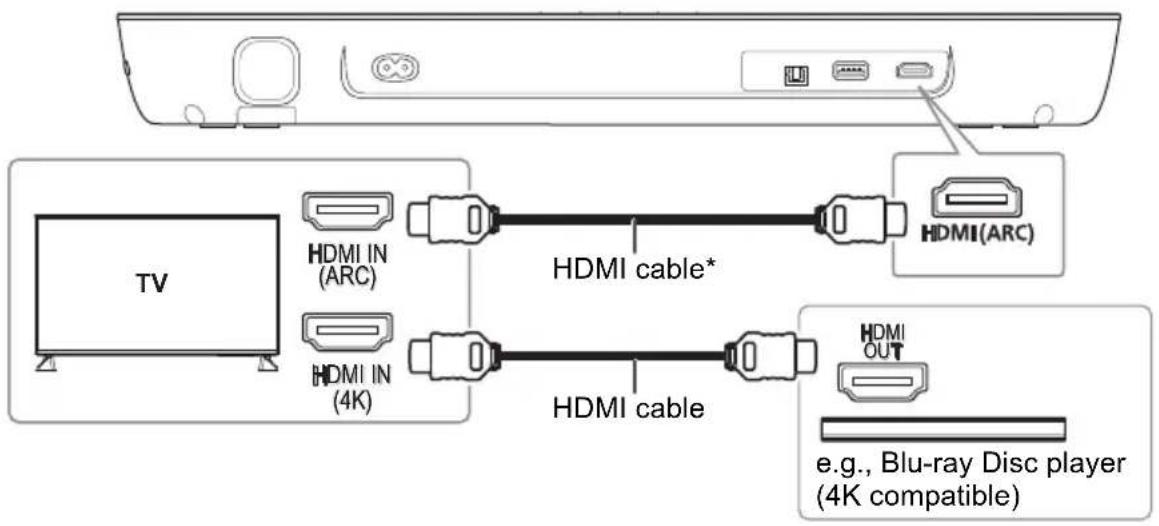
text_image
TV HDMI IN (ARC) HDMI IN (4K) HDMI cable* HDMI cable e.g., Blu-ray Disc player (4K compatible)* Make sure to connect the HDMI cable to ARC compatible terminals.
Note:
- Refer to the operating instructions of the 4K Ultra HD TV (VIERA) and the 4K/60p compatible equipment for setup and for playing the 4K content.
• To enjoy multi-channel output from this system, set the audio output of other equipment to Bitstream.
• The audio signal input to this system is up to 5.1 channels.
Connecting the AC mains lead
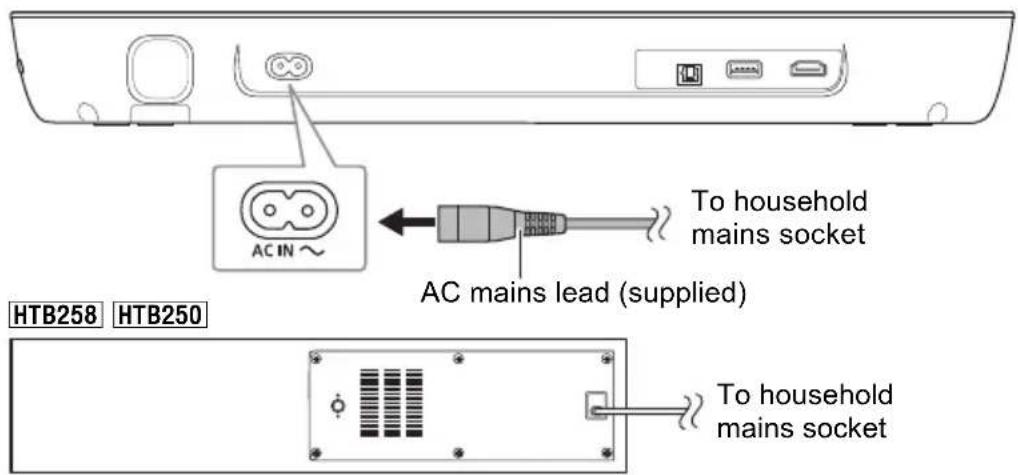
text_image
To household mains socket AC mains lead (supplied) HTB258 HTB250 To household mains socketConserving power
The system consumes a small amount of power when it is in standby mode. Disconnect the power supply if you do not use the system.
The main unit will automatically switch to standby mode when no signal is input and no operation is performed for approx. 20 minutes. Refer to page 13 "Auto power down" to switch this function off.
Note:
The active subwoofer is in the standby condition when the AC mains lead is connected. The primary circuit is always "live" as long as the AC mains lead is connected to an electrical outlet.
Bluetooth® connection
You can connect and play an audio device wirelessly through Bluetooth®.
Preparation
- Switch on the main unit.
- Switch on the Bluetooth ^ feature of the device and put the device near the system.
- Read the operating instructions of the device for details.
Pairing a device
Preparation
If this system is connected to a Bluetooth ^® device, disconnect it ( right).
1 Press [ -BAIRING].
If the “*indicator blinks quickly, continue with step 3.
2 Press and hold [-AIRING] until the “” indicator blinks quickly.
If the " indicator blinks slowly, repeat this step.
3 Select "SC-HTB258", "SC-HTB250", "SC-HTB208" or "SC-HTB200" from the Bluetooth® menu of the device.
The MAC address (e.g., 6C:5A:B5:B3:1D:0F) may be shown before "SC-HTB258", "SC-HTB250", "SC-HTB208" or "SC-HTB200" is shown.
If prompted for a passkey, input "0000" or "1234".
Once the Bluetooth® device is connected, the “ Indicator stops blinking and lights up.
Note:
You can pair up to 8 devices with this system. If a 9th device is paired, the device that has not been used for the longest time will be replaced.
Connecting a paired device
Preparation
If this system is connected to a Bluetooth ^® device, disconnect it ( right).
1 Press [ -BAIRING].
2 Select "SC-HTB258", "SC-HTB250", "SC-HTB208" or "SC-HTB200" from the Bluetooth® menu of the device.
Disconnecting a device
Press and hold [ AIRING] until the “ ” indicator blinks slowly.
Note:
- This system can only connect to one device at a time.
- When “ ” selected as the source, this system will automatically try to connect to the last connected device.
- The Bluetooth ^ device will be disconnected when you select another source.
Active subwoofer wireless connection
HTB258 HTB250
Preparation
Switch on the main unit.
Check that the wireless link is activated.
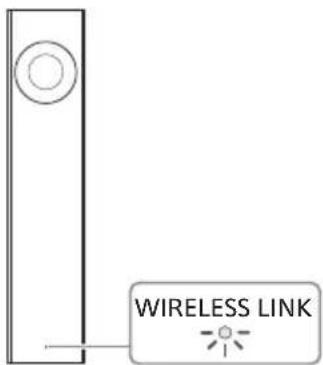
text_image
WIRELESS LINKWIRELESS LINK indicator
Lights up: The wireless link is activated.
Lights off: The wireless link is not activated.
Blinks: The active subwoofer is trying to activate the wireless link with the main unit.
Note:
- The wireless link will be activated when the main unit and the active subwoofer are both switched on.
- The I/D SET button is only used when the main unit is not paired with the active subwoofer. (⇒ 16)
Basic control
Preparation
Switch on the TV and/or connected device.
1 Press [⏻] to switch on the system.
2 Select the source.
HDMI: Press [HDMI (ARC)] on the remote control or [INPUT] on the main unit.
OPTICAL: Press [OPTICAL] on the remote control or [INPUT] on the main unit.
* (Bluetooth®): Press [ *PAIRING] on the remote control or [ *on the main unit.
3 Press [+ VOL -] to adjust the volume of the system.
Volume range: 0 to 100
The indicators will scroll every time you adjust the volume, and stop blinking when reached the minimum or maximum level.
MUSIC CINEMA HDMI(ARC) OPTICAL

When "s selected as the source
Select this system as the output speaker from the menu of the connected Bluetooth® device.
When "OPTICAL" is selected as the source
On the TV and the connected device, select the TV's input for this system and starts playback on the connected device.
To select the sound mode
Press [SOUND].
| Sound mode Indication | |
| StandardBest suited for dramas and comedy shows. | MUSIC CINEMA |
| MusicEnhance the sound of musical instruments and songs. | MUSIC CINEMA |
| Cinema (default)Produces three-dimensional sound unique to movies. | MUSIC CINEMA |
To mute the sound
Press [MUTE].
All indicators blinks simultaneously.
To cancel, press [MUTE] again or adjust the volume.
To adjust the subwoofer level
HTB258 HTB250
Press [SUBWOOFER +] or [SUBWOOFER -] to adjust the level.
| Indication Effect levels | ||
| MUSIC CINEMA HDMI(ARC) OPTICAL | 4 Highest | |
| MUSIC CINEMA HDMI(ARC) OPTICAL | 3 | |
| MUSIC CINEMA HDMI(ARC) OPTICAL | 2 | |
| MUSIC CINEMA HDMI(ARC) OPTICAL | 1 Lowest | |
Advanced operations
Dual audio
Sets the preferred audio channel mode when there are two audio modes received by this system.
Press and hold [MUTE] for a minimum of 4 seconds.
| Audio mode | Indication | ||||
| Main (default) | MUSIC | CINEMA | HDMI(ARC) | OPTICAL | 0 |
| Secondary | MUSIC | CINEMA | HDMI(ARC) | OPTICAL | 0 |
| Main + Secondary | MUSIC | CINEMA | HDMI(ARC) | OPTICAL | 0 |
Note:
- This effect only works if the audio output of the TV or player is set to "Bitstream" and "Dolby Dual Mono" is available in the sound source.
- The indicator for the selected setting blinks for 5 seconds and then exits the setting mode.
Audio format
You can view the current audio format.
Press and hold [SOUND] for a minimum of 4 seconds.
| Audio mode | Indication |
| Dolby Digital | MUSIC CINEMA HDMI(ARC) OPTICAL   [220w1] [312w1] [220w1] [312w1] |
| DTS® | MUSIC CINEMA HDMI(ARC) OPTICAL [IMAGE] |
| PCM | MUSIC CINEMA HDMI(ARC) OPTICAL [IMAGE] |
Note:
- The indicator for the selected setting blinks for 5 seconds and then exits the setting mode.
- The indicators may work differently if the main unit detects an unsupported audio format from the connected TV.
- This function does not work when is selected as the source.
Auto power down
The main unit is automatically switched off if there is no audio input and when you do not use it for approx. 20 minutes.
Press and hold [HDMI (ARC)] for a minimum of 4 seconds to select the mode.
| Mode Indication | |
| On (default) | MUSIC CINEMA HDMI(ARC) OPTICAL  [GND1] [GND2] [GND1] [GND2] |
| Off | MUSIC CINEMA HDMI(ARC) OPTICAL [GND3] [GND4] |
Note:
- The indicator for the selected setting blinks for 5 seconds and then exits the setting mode.
- The setting is maintained until it is changed again.
Bluetooth® standby
This function allows you to connect a paired Bluetooth ^® device when the main unit is in standby mode.
Press and hold [OPTICAL] for a minimum of 4 seconds.
| Mode Indication | |
| On | MUSIC CINEMA HDMI(ARC) OPTICAL0 |
| Off (default) | MUSIC CINEMA HDMI(ARC) OPTICAL0 |
Note:
- The indicator for the selected setting blinks for 5 seconds and then exits the setting mode.
- The setting is maintained until it is changed again.
- If the AC mains lead is disconnected, the Bluetooth ^ standby function may not work. Make the setting again.
Volume limitation
The volume is set to 50 when you switch on the system although the volume is set to above 50 before it is switched off.
Press and hold [DIMMER] for a minimum of 4 seconds.
| Mode Indication | |
| On (default) | MUSIC CINEMA HDMI(ARC) OPTICAL0 |
| Off | MUSIC CINEMA HDMI(ARC) OPTICAL0 |
Note:
- The indicator for the selected setting blinks for 5 seconds and then exits the setting mode.
- The setting is maintained until it is changed again.
HDMI CEC
This unit supports "HDMI CEC" (Consumer Electronics Control) function.
See the operating instructions for connected equipment for operational details.
Preparation
Confirm that the HDMI connection has been made. ( 9, 10)
Power on link
When the TV is switched on, the main unit also switches on automatically. (This function does not work when OPTICAL or Bluetooth ^® is the source.)
Power off link
When the TV is switched off, the main unit also switches off automatically. (This function does not work when OPTICAL or Bluetooth ^® is the source.)
Volume adjustment
You can control the volume setting of this system using the volume or mute button on the TV remote control.
If the TV's speaker selection is changed to the TV speakers, the main unit's speakers are muted. Muting will be cancelled by selecting the main unit's speakers again.
Changing speakers
When the main unit switches on, this system will be selected as the TV's speakers automatically. When you switch off the main unit, TV speakers will be automatically activated.
Note:
The operation cannot be guaranteed on all HDMI CEC equipment.
Troubleshooting
Before requesting service, make the following checks. If you are in doubt about some of the check points, or if the solutions indicated do not solve the problem, consult your dealer for instructions.
Common problems
No power
• After connecting the AC mains lead, wait about 10 seconds before switching on the main unit.
- Disconnect the AC mains lead for 10 seconds before connect again.
• After switching on the main unit, if the main unit immediately switches off, disconnect the AC mains lead and consult your dealer.
- If the main unit does not switch on when switching on TV (HDMI CEC), switch on the main unit manually.
No operations can be done with the remote control.
- Remove the insulation sheet before you use the remote control for the first time. (⇒ 8)
- Examine that the battery is installed correctly. ( 8)
- The battery is weak. Replace it with a new one. ( 8)
- Set the remote control code again after replacing the battery. (⇒ 16)
- Use the remote control within the correct operation range. ( 7)
The system automatically switched to standby mode
- "Auto power down" function is on. The system automatically switches to standby mode if there is no signal input and no operation is being performed for approximately 20 minutes. Refer to page 13 to switch off this function.
Bluetooth®
Pairing cannot be done.
- Check the Bluetooth ^ device condition.
- The device is out of the 10 m communication range. Move the device nearer to the system.
The device cannot be connected.
- The pairing of the device was unsuccessful. Do pairing again.
- The pairing of the device has been replaced. Do pairing again.
- This system might be connected to a different device. Disconnect the other device and try connecting the device again.
- The system may have a problem. Switch off the system and then switch on again.
The device is connected but audio cannot be heard through the system.
- For some built-in Bluetooth ^ devices, you have to set the audio output to "SC-HTB258," "SC-HTB250", "SC-HTB208" or "SC-HTB200" manually. Read the operating instructions of the device for details.
Sound from the device is interrupted.
- The device is out of the 10 m communication range. Move the device nearer to the system.
- Remove any obstacle between the system and the device.
- Other devices that use the 2.4 GHz frequency band (wireless router, microwaves, cordless phones, etc.) are interfering. Move the device nearer to the system and distance it from the other devices.
HDMI
HDMI CEC related operations no longer function properly.
- Check the setting on the connected devices.
- Switch on HDMI CEC function on the connected devices.
- Select this system as the speaker in the TV's HDMI CEC menu.
- When the HDMI connections are changed, after a power failure or after the AC mains lead has been removed, HDMI CEC operations may not function properly.
- Switch on all the devices that are connected to the TV with an HDMI cable and then switch on the TV.
- Switch off the HDMI CEC settings of the TV and switch it on again. For details refer to the operating instructions for the TV.
- While the system and the TV are connected with an HDMI cable, switch on the TV, disconnect the AC mains lead of this system and then connect it again.
Sound
No sound
- Cancel muting. (⇒ 12)
- Check the connections to the other devices. ( 9,10)
- Make sure that the received audio signal is compatible with this system.
- If the system is connected to the TV with an HDMI cable only, make sure that the HDMI terminal of the TV is labelled "HDMI (ARC)". If not, connect an optical digital audio cable. ( 9, 10)
- Check the connections. Change the cables if the connections are correct.
- Check the audio output settings on the connected device.
The dual audio cannot be changed from main to secondary.
- If the audio received from the connected device is not “Dolby Dual Mono” or the output setting is not “Bitstream”, the setting cannot be changed from this system. Change the setting on the connected device.
The volume is lowered when the system is switched on.
• "Volume limitation" is on. (⇒ 13)
- If the system is switched off with the volume above 50, the volume will automatically set to 50 when you switch on the system. (⇒ 13)
The sound lags behind the image.
- Depending on the TV, when this system is connected to it via Bluetooth®, the sound output from this system may lag behind the TV image. Connect this system and the TV with an HDMI cable/optical digital audio cable. (⇒ 9, 10)
The audio format indicator does not correspond to the playback source.
- If the playback source is Dolby Digital or DTS ^® , set the audio output setting of the connected equipment (e.g., TV, player) to bitstream. For details, refer to the operating instructions for the connected equipment.
There is no audio.
The power of the main unit switches off automatically.
(When the main unit detects a problem, a safety measure is activated and the main unit automatically switches to standby mode.)
- There is a problem with the amplifier.
• Is the volume extremely high? If so, lower the volume. - Is this system placed in an extremely hot place? If so, move this system to a cooler place and wait a few moments and then try to switch it on again.
If the problem persists, confirm the indicators status, switch off this system, disconnect the AC mains lead and consult your dealer. Please be sure to remember the indicators status and inform the dealer.
Active subwoofer
No power.
- Make sure the AC mains lead of the active subwoofer is connected.
After switching on the subwoofer, it immediately switches off.
- Disconnect the AC mains lead and consult your dealer.
No sound from the subwoofer.
- Check that the active subwoofer is switched on.
- Check that the WIRELESS LINK indicator lights up. (⇔ 11)
The WIRELESS LINK indicator does not lights up.
- There is no link between the main unit and the active subwoofer.
Check that the main unit is switched on.
- The active subwoofer and the main unit may not be paired correctly. Try the following operation.
(Wireless pairing)
①Switch on the main unit.
②Press and hold [I/D SET] on the rear of active subwoofer for a minimum of 4 seconds.
The wireless link indicator will blink.
③Press [MUTE], [SOUND]*, [MUTE]*,
[PAIRING]* consecutively.
* Within 3 seconds.
“✗, “OPTICAL” and “HDMI (ARC)” indicators will blink in rotation.
When the wireless link pairing is successful, “✗”,
"OPTICAL" and "HDMI (ARC)" indicators will switch off.
Consult your dealer if the problem persists.
Remote control code
When other Panasonic equipment responds to the remote control of this system, change the remote control code for this system.
Preparation
- Switch off all other Panasonic products.
- Switch on this system.
- Aim the remote control at the remote control sensor of this system.
To set the code to code 2
Press and hold [PAIRING] and [SOUND] on the remote control for a minimum of 4 seconds.
![PANASONIC SC-HTB258 - Press and hold [PAIRING] and [SOUND] on the remote control for a minimum of 4 seconds. - 1](/content/2026/05/797151/images/be8a27dffcc240c0148064549a8dde9a48bb0b0049318b9477ee9f354537b0f4.jpg)
To set the code to code 1
Press and hold [PAIRING] and [DIMMER] on the remote control for a minimum of 4 seconds.
![PANASONIC SC-HTB258 - Press and hold [PAIRING] and [DIMMER] on the remote control for a minimum of 4 seconds. - 1](/content/2026/05/797151/images/683dec935791824cbdd05026ab6141981d124deb53a50c9ef0dd0366ad426be7.jpg)
System memory reset
Reset the memory when the following situations occur:
- There is no response when buttons are pressed.
- You want to clear and reset the memory contents.
Press and hold [↓/l] on the main unit for a minimum of 4 seconds.
All the indicators blink until the system restarts.
Note:
The remote control code will set back to code 1 after memory reset, refer to "Remote control code" on how to change to code 2.
Unit care
Disconnect the AC mains lead before maintenance. Clean this system with a soft, dry cloth.
- When dirt is heavy, wring a cloth moistened in water tightly to wipe the dirt, and then wipe it with a dry cloth.
- When cleaning the speakers, use a fine cloth. Do not use tissues or other materials (towels, etc.) that can fall apart. Small grains may get stuck inside the speaker cover.
- Never use alcohol, paint thinner or benzine to clean this system.
- Before using chemically treated cloth, read the instructions that came with the cloth carefully.
To dispose or transfer this system
This system may keep the user settings information in the main unit. If you discard the main unit either by disposal or transfer, then follow the procedure to return all the settings to the factory presets to delete the user settings.
(⇒ above)
- The operation history may be recorded in the memory of the main unit.
Software update
Occasionally, Panasonic may release updated software for this unit that may add or improve the way a feature operates. These updates are available free of charge. For more details, refer to the following website.
http://panasonic.jp/support/global/cs/
(This site is in English only.)
Indicators illumination
The indicators show the condition of this system. The indicator patterns illustrated below are shown during normal operational conditions. They do not refer to the indications of a problem.
| Indicators Description | ||
| OPTICAL | The indicator blinks for 5 seconds.·When the setting is on(“Auto power down”, “Bluetooth® standby”, “Volume limitation”)(⇒13)·When the audio format is Dolby Digital. (⇒13)·When the dual audio is main. (⇒12) | |
| OPTICAL | The indicator blinks for 5 seconds.·When the audio format is DTS ®. (⇒13) | |
| OPTICAL | The indicator blinks for 5 seconds.·When the setting is off(“Auto power down”, “Bluetooth® standby”, “Volume limitation”)(⇒13)·When the audio format is PCM. (⇒13)·When the dual audio is secondary. (⇒12) | |
| OPTICAL | The indicator blinks quickly.·When the main unit is ready for pairing. (⇒11)The indicator blinks slowly.·When the main unit is waiting to connect. (⇒11)The indicator lights on.·When the main unit is connected to a Bluetooth ® device.(⇒11) | |
| OPTICAL | The indicator blinks for 5 seconds.·When the dual audio is main+secondary. (⇒12) | |
| OPTICAL | The indicator blinks for 10 seconds.·When the remote control is set to code 2. (⇒16) | |
| OPTICAL | The indicator blinks for 10 seconds.·When the remote control is set to code 1. (⇒16) | |
| OPTICAL | The indicators blink until the system restarts.·When the main unit is reset. (⇒16)The indicators blink continuously.·When the sound is muted. (⇒12)The indicators blink 10 times.·When active subwoofer is failed to connect. (⇒16) |


urin


[Non-Text]


Specifications
Amplifier section
HTB258 HTB250
RMS output power: Dolby Digital Mode
Front ch 40 W per channel (6 Ω),
1 kHz, 10% THD
Subwoofer ch 40 W per channel (4 Ω),
100 Hz, 10% THD
Total RMS Dolby Digital mode power 120 W
HTB208 HTB200
RMS output power stereo mode (both ch driven)
Front ch 40 W per channel (6 Ω),
1 kHz, 10% THD
Total RMS Stereo mode power 80 W
Terminals section
HDMI output (ARC)
Output connector Type A (19 pin)
Digital audio input
Optical digital input Optical terminal
Sampling frequency 32 kHz, 44.1 kHz, 48 kHz
Audio format LPCM, Dolby Digital,
DTS Digital Surround™
USB Port For software update
Bluetooth® section
Version Bluetooth
® Ver. 2.1 + EDR
Class Class 2
Supported profiles A2DP
Operating frequency
2.4 GHz band FH-SS
Frequency band
2402 MHz to 2480 MHz
Operation distance
10 m line of sight
Maximum RF Power
4 dBm
Supported codec
SBC
Speaker section
Front speakers (Built-in)
Full range
4 x 10 cm (Cone type) x 1/ch
Active subwoofer HTB258 HTB250
Woofer
14 cm cone type x 1
Wireless section
Wireless module
Frequency range
2404 MHz to 2476 MHz
No. of channels
38
RF output power
7 dBm (max.)
General
Power supply AC 220 V to 240 V, 50 Hz
Power consumption
Main unit
15 W
Active subwoofer HTB258 HTB250
7.5 W
Dimensions (W x H x D)
Main unit
450 mm x 51 mm x 135 mm
Active subwoofer HTB258 HTB250
97 mm x 451 mm x 307 mm
Mass
Main unit
1.6 kg
Active subwoofer HTB258 HTB250
4.4 kg
Operating temperature range 0°C to +40°C
Operating humidity range
20% to 80% RH (no condensation)
Power consumption in standby mode (approximate)
Main unit
When Bluetooth ^® standby is off 0.5 W
When Bluetooth ^® standby is on 2.0 W
Active subwoofer HTB258 HTB250 0.5 W
When wireless activated in network standby
2.0 W
Note:
- Specifications are subject to change without notice. Mass and dimensions are approximate.
- Total harmonic distortion is measured by the digital spectrum analyser.
Disposal of Old Equipment and Batteries Only for European Union and countries with recycling systems

These symbols on the products, packaging, and/or accompanying documents mean that used electrical and electronic products and batteries must not be mixed with general household waste.
For proper treatment, recovery and recycling of old products and used batteries, please take them to applicable collection points in accordance with your national legislation.
By disposing of them correctly, you will help to save valuable resources and prevent any potential negative effects on human health and the environment. For more information about collection and recycling, please contact your local municipality.
Penalties may be applicable for incorrect disposal of this waste, in accordance with national legislation.

Note for the battery symbol (bottom symbol):
This symbol might be used in combination with a chemical symbol. In this case it complies with the requirement set by the Directive for the chemical involved.
CE
English
Declaration of Conformity (DoC)
Hereby, "Panasonic Corporation" declares that this product is in compliance with the essential requirements and other relevant provisions of Directive 2014/53/EU.
Customers can download a copy of the original DoC to our RE products from our DoC Server:
http://www.ptc.panasonic.eu
Contact to Authorised Representative:
Panasonic Marketing Europe GmbH, Panasonic Testing
Centre, Winsbergring 15, 22525 Hamburg, Germany
| Type of wireless | Frequency band | Maximum power (dBm E.I.R.P.) |
| Bluetooth® | 2402 – 2480 MHz | 4 dBm |
| 2.4 GHz wireless system | 2404 – 2476 MHz | 7 dBm |
Ελληνικά
Limited Warranty (For Australia only)
Panasonic Warranty
- The product is warranted for 12 months from the date of purchase. Subject to the conditions of this warranty Panasonic or its Authorised Service Centre will perform necessary service on the product without charge for parts or labour, if in the opinion of Panasonic, the product is found to be faulty within the warranty period.
- This warranty only applies to Panasonic products purchased in Australia and sold by Panasonic Australia or its Authorised Distributors or Dealers and only where the products are used and serviced within Australia or it's territories. Warranty cover only applies to service carried out by a Panasonic Authorised Service Centre and only if valid proof of purchase is presented when warranty service is requested.
- This warranty only applies if the product has been installed and used in accordance with the manufacturer's recommendations (as noted in the operating instructions) under normal use and reasonable care (in the opinion of Panasonic). The warranty covers normal domestic use only and does not cover damage, malfunction or failure resulting from use of incorrect voltages, incorrect installation, accident, misuse, neglect, build-up of dirt or dust, abuse, maladjustment of customer controls, mains supply problems, thunderstorm activity, infestation by insects or vermin, tampering or repair by unauthorised persons (including unauthorised alterations), introduction of sand, humidity or liquids, commercial use such as hotel, office, restaurant, or other business or rental use of the product, exposure to abnormally corrosive conditions or any foreign object or matter having entered the product.
-
This warranty does not cover the following items unless the fault or defect existed at the time of purchase:
(a) Cabinet Part(s) (e) DVD, Blu-ray or Recordable Discs
(b) Video or Audio Tapes (f) Video / Audio Heads from wear and tear in normal use
(c) SD cards or USB devices (g) Information stored on Hard Disk Drive, USB stick or SD card
(d) User replaceable Batteries (h) DTV reception issues caused by TV Aerial / Cabling / Wall socket(s) etc -
Some products may be supplied with Ethernet connection hardware. The warranty is limited on such products and will not cover
(a) Internet and or DLNA connection / setup related problems
(b) Access fees and or charges incurred for internet connection
(c) The use of incompatible software or software not specifically stipulated in the product operations manual; and
(d) Any indirect or consequential costs associated with the incorrect use or misuse of the hardware, its connection to the internet or any other device.
- To claim warranty service, when required, you should:
- Telephone Panasonic's Customer Care Centre on 132600 or visit our website referred to below and use the Service Centre Locator for the name / address of the nearest Authorised Service Centre.
- Send or take the product to a Panasonic Authorised Service Centre together with your proof of purchase receipt as a proof of purchase date. Please note that freight and insurance to and / or from your nearest Authorised Service Centre must be arranged by you.
- Note that home or pick-up / delivery service is available for the following products in the major metropolitan areas of Australia or the normal operating areas of the nearest Authorised Service Centres:
- Plasma / LCD televisions / displays (screen size greater than 103 cm)
- The warranties hereby conferred do not extend to, and exclude, any costs associated with the installation, de-installation or re-installation of a product, including costs related to the mounting, de-mounting or remounting of any screen, (and any other ancillary activities), delivery, handling, freighting, transportation or insurance of the product or any part thereof or replacement of and do not extend to, and exclude, any damage or loss occurring by reason of, during, associated with, or related to such installation, de-installation, re-installation or transit.
Panasonic Authorised Service Centres are located in major metropolitan areas and most regional centres of Australia, however, coverage will vary dependant on product. For advice on exact Authorised Service Centre locations for your product, please telephone our Customer Care Centre on 132600 or visit our website and use the Service Centre Locator.
In addition to your rights under this warranty, Panasonic products come with consumer guarantees that cannot be excluded under the Australian Consumer Law. If there is a major failure with the product, you can reject the product and elect to have a refund or to have the product replaced or if you wish you may elect to keep the goods and be compensated for the drop in value of the goods. You are also entitled to have the product repaired or replaced if the product fails to be of acceptable quality and the failure does not amount to a major failure.
If there is a major failure in regard to the product which cannot be remedied then you must notify us within a reasonable period by contacting the Panasonic Customer Care Centre. If the failure in the product is not a major failure then Panasonic may choose to repair or replace the product and will do so in a reasonable period of time from receiving notice from you.
THIS WARRANTY CARD AND THE PURCHASE DOCKET (OR SIMILAR PROOF OF PURCHASE) SHOULD BE RETAINED BY THE CUSTOMER AT ALL TIMES
If you require assistance regarding warranty conditions or any other enquiries, please visit the
Panasonic Australia website www.panasonic.com.au or contact by phone on 132 600
If phoning in, please ensure you have your operating instructions available.
Panasonic Australia Pty. Limited
ACN 001 592 187 ABN 83 001 592 187
1 Innovation Road, Macquarie Park NSW 2113
ADVARSEL!
Produkt
Manufactured by: Panasonic Corporation
Kadoma, Osaka, Japan
Importer for Europe: Panasonic Marketing Europe GmbH
Panasonic Testing Centre
Winsbergring 15, 22525 Hamburg, Germany
EU

Panasonic Corporation
Web Site: http://www.panasonic.com
En
TQBJ2086