
SC-MT1P - Hi-Fi System PANASONIC - Free user manual and instructions
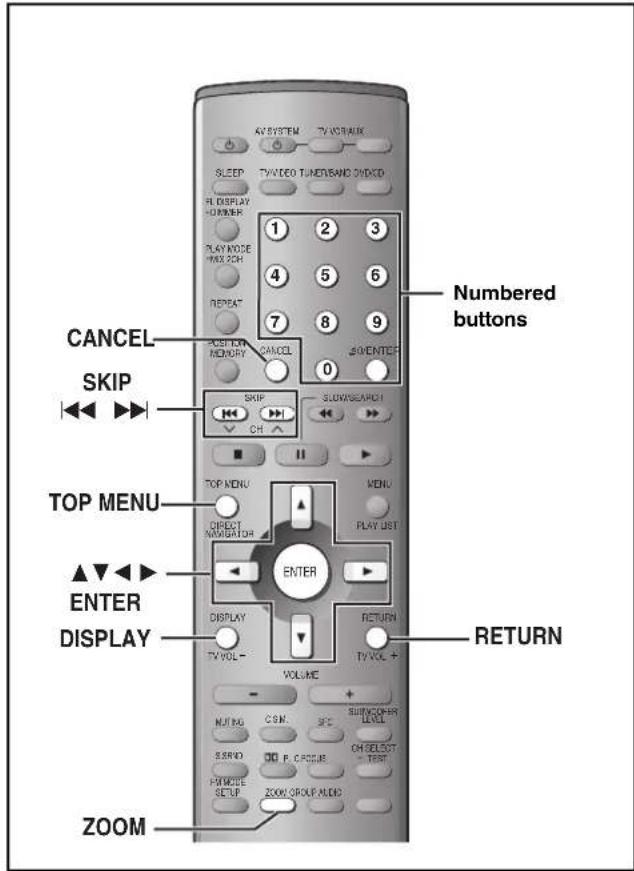
Find the device manual for free SC-MT1P PANASONIC in PDF.


User questions about SC-MT1P PANASONIC
0 question about this device. Answer the ones you know or ask your own.
Ask a new question about this device
Download the instructions for your Hi-Fi System in PDF format for free! Find your manual SC-MT1P - PANASONIC and take your electronic device back in hand. On this page are published all the documents necessary for the use of your device. SC-MT1P by PANASONIC.
USER MANUAL SC-MT1P PANASONIC
natural_image
Illustration of a Panasonic audio equipment setup including tower, multiple speakers, and monitor (no text or symbols visible)Panasonic®
DVD System
Operating Instructions
Model No. SC-MT1
natural_image
Abstract digital interface with a central user at a desk surrounded by floating screens and cityscape visuals (no text or symbols)Before connecting, operating or adjusting this product, please read these instructions completely. Please keep this manual for future reference.
Region number supported by this player
Region numbers are allocated to DVD players and software according to where they are sold.
- The region number of this player is "1".
- The player will play DVD-Video marked with labels containing "1" or "ALL".
Example:



For U.S.A. only
The warranty can be found on page 39.
P
RQT6719-P
Dear customer
Thank you for purchasing this product.
For optimum performance and safety, please read these instructions carefully.
Operations in these instructions are described mainly with the remote control, but you can do the operations on the main unit if the controls are the same.
| System SC-MT1 | |
| Main unit SA-MT1 | |
| Front and surround speakers | SB-FS801A |
| Center speaker SB-PC700 | |
| Active subwoofer SB-WA340 |
CAUTION!
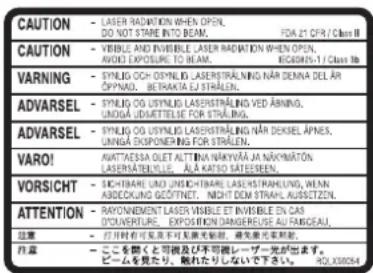
THIS PRODUCT UTILIZES A LASER. USE OF CONTROLS OR ADJUSTMENTS OR PERFORMANCE OF PROCEDURES OTHER THAN THOSE SPECIFIED HEREIN MAY RESULT IN HAZARDOUS RADIATION EXPOSURE. DO NOT OPEN COVERS AND DO NOT REPAIR YOURSELF REFER SERVICING TO QUALIFIED PERSONNEL.
WARNING:
TO REDUCE THE RISK OF FIRE, ELECTRIC SHOCK OR PRODUCT DAMAGE, DO NOT EXPOSE THIS APPARATUS TO RAIN, MOISTURE, DRIPPING OR SPLASHING AND THAT NO OBJECTS FILLED WITH LIQUIDS, SUCH AS VASES, SHALL BE PLACED ON THE APPARATUS.
CAUTION:
TO PREVENT ELECTRIC SHOCK MATCH WIDE BLADE OF PLUG TO WIDE SLOT, FULLY INSERT.
CAUTION!
DO NOT INSTALL OR PLACE THIS UNIT IN A BOOKCASE, BUILT-IN CABINET OR IN ANOTHER CONFINED SPACE. ENSURE THE UNIT IS WELL VENTILATED. TO PREVENT RISK OF ELECTRIC SHOCK OR FIRE HAZARD DUE TO OVERHEATING, ENSURE THAT CURTAINS AND ANY OTHER MATERIALS DO NOT OBSTRUCT THE VENTILATION VENTS.

CAUTION
RISK OF ELECTRIC SHOCK DO NOT OPEN

CAUTION: TO REDUCE THE RISK OF ELECTRIC SHOCK, DO NOT REMOVE SCREWS. NO USER-SERVICEABLE PARTS INSIDE. REFER SERVICING TO QUALIFIED SERVICE PERSONNEL.

The lightning flash with arrowhead symbol, within an equilateral triangle, is intended to alert the user to the presence of uninsulated "dangerous voltage" within the product's enclosure that may be of sufficient magnitude to constitute a risk of electric shock to persons.

The exclamation point within an equilateral triangle is intended to alert the user to the presence of important operating and maintenance (servicing) instructions in the literature accompanying the appliance.
text_image
CAUTION - LASER RADIMATION WHEN OPEN, DO NOT STARE INTO BEAM. FDA 21 CFR / Class II CAUTION - VIRBLE AND INVISIBLE LASER RADIMATION WHEN OPEN, AVOID EXPOSURE TO BEAM. RADANSI-1 / Class IIa VARNING - SYNLIG OCHYNLIG LASERSTRÄLNING NÄR DENNA DEL ÄR ÖPNAD. BETRAKTA EL STRÄLEN. ADVARSEL - SYNLIG OCHYNLIG LASERSTRÄLNING VED ABNING, UNIGA EDMETTELSE FOR STRÄLEN. ADVARSEL - SYNLIG OCHYNLIG LASERSTRÄLNING NÄR DEKSEL ÄPNE5, UNIGA EXPONERING FOR STRÄLEN. VARO! - AWATESSA OLET ALTT BHA NAKIVÄVA JÄ NAKNMÄTÖN LASERSTRÄLELLIE, ÄLA KARTO SATEESEN. VORSICHT - SICHTBARI UMD UNSICHTBARI LASERSTRÄPELUNG, WENN. ABDECCKING GEÖFTNET, NICHT DOM STRAIH, AUSSSTEZN. ATTENTION - RAYONNEMENT LASER VIRBLE ET INVISIBLE EN CAR D'OUVERTURE. EXPOSUNDIN DANGERREUSE AU FARGEAU. 注意 - 另时有可见不可及客观判断,避免激光光刻蚀。 开盖 - ここを聞くと可能及び不可被レザーを发出ます。 ビームを提供し、触れたりしないで下さい。 HOLX3024(Inside of product)
THE FOLLOWING APPLIES ONLY IN THE U.S.A.:
CAUTION:
This equipment has been tested and found to comply with the limits for a Class B digital device, pursuant to Part 15 of the FCC Rules.
These limits are designed to provide reasonable protection against harmful interference in a residential installation. This equipment generates, uses and can radiate radio frequency energy and, if not installed and used in accordance with the instructions, may cause harmful interference to radio communications. However, there is no guarantee that interference will not occur in a particular installation. If this equipment does cause harmful interference to radio or television reception, which can be determined by turning the equipment off and on, the user is encouraged to try to correct the interference by one or more of the following measures:
●Reorient or relocate the receiving antenna.
- Increase the separation between the equipment and receiver.
- Connect the equipment into an outlet on a circuit different from that to which the receiver is connected.
- Consult the dealer or an experienced radio/TV technician for help.
Any unauthorized changes or modifications to this equipment would void the user's authority to operate this device.
This device complies with Part 15 of the FCC Rules. Operation is subject to the following two conditions: (1) This device may not cause harmful interference, and (2) this device must accept any interference received, including interference that may cause undesired operation.
RQT6719
Accessories
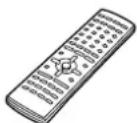
Please check and identify the supplied accessories. Use numbers indicated in parentheses when asking for replacement parts.
(Only for U.S.A.)
To order accessories contact 1-800-332-5368 or web site (http://www.panasonic.com).
(Only for Canada)
To order accessories, call the dealer from whom you have made your purchase.
□ 1 Remote control (EUR7623X20)
□ 2 Batteries
for remote control
☐ 1 AC power supply cord (RJA0065-1D)
□ 1 AM loop antenna (N1DAAAA00001)
☐ 1 FM indoor antenna (RSA0007-J)
□ 1 Video cable (RJL1P016815A)
□ 1 System cable (K1HA25HA0001)
☐ 5 Speaker cables
(RFA2163-J)
3×4-m (13-foot) cables
2×10-m (33-foot) cables
□ 1 Antenna plug (K2RC021B0001)
□ 1 Sheet of speaker-cable stickers


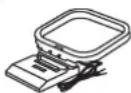





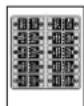
Note
The included AC power supply cord is for use with this unit only. Do not use it with other equipment.
User memo:
DATE OF PURCHASE
DEALER NAME
DEALER ADDRESS
TELEPHONE NUMBER
The model number and serial number of this product can be found on either the back or the bottom of the unit.
Please note them in the space provided below and keep for future reference.
MODEL NUMBER SC-MT1
SERIAL NUMBER
Table of contents
Getting started
Accessories.... 3
IMPORTANT SAFETY INSTRUCTIONS 4
Disc information 5
Simple setup
STEP1 Locating ....6
STEP2 Speakers ....7
STEP3 Television ....8
STEP4 Connecting the subwoofer, antennas, and AC power supply cord....9
STEP5 The remote control....9
Other speaker setup options
STEP6 QUICK SETUP....11
Control reference guide 12
Disc operations
Discs—Basic play.... 13
Position Memory function 13
Skipping items/Fast forward and rewind—SEARCH.....14
Slow-motion play/Frame-by-frame viewing 14
Discs—Convenient functions 15
Starting play from a selected item/Repeat play....15
A-B repeat play/Selecting groups to play 15
All group play/Program play/Random play 16
Soundtracks/Subtitles 17
Marking places to play again/Variable Zoom function.....18
WMA/MP3 and CD text navigation menus 19
Playing the programs or play lists on DVD-RAM.....20
Selecting a program to play—DIRECT NAVIGATOR ..... 20
Using the play list menu 20
Using On-Screen Menu Icons 21
Common procedures/Progress indicator. 21
Disc information/Unit information 22
Radio operations
The radio 24
Manual tuning/Preset tuning 24
Sound field/sound quality operations
Sound field 25
Dolby Digital and DTS/Dolby Pro Logic. 25
Speaker level adjustments 25
Super Surround/Sound Field Control 26
Center Focus....26
Custom Sound Memory—Store the sound settings ..... 26
Sound quality 27
Adjusting the bass. 27
Re-master—Enjoying more natural sound 27
Other functions
Convenient functions 28
Muting the volume/Dimming the display 28
The sleep timer/Using headphones. 28
Changing settings.... 29
Language code list 31
Optional antenna connections 31
Operating a television or video cassette recorder ... 32
Reference
Glossary.... 34
Specifications 35
Troubleshooting guide.... 36
Product Service. 38
Maintenance 38
Limited Warranty (U.S.A). 39
IMPORTANT SAFETY INSTRUCTIONS
Read these operating instructions carefully before using the unit. Follow the safety instructions on the unit and the applicable safety instructions listed below. Keep these operating instructions handy for future reference.
1) Read these instructions.
2) Keep these instructions.
3) Heed all warnings.
4) Follow all instructions.
5) Do not use this apparatus near water.
6) Clean only with dry cloth.
7) Do not block any ventilation openings. Install in accordance with the manufacturer's instructions.
8) Do not install near any heat sources such as radiators, heat registers, stoves, or other apparatus (including amplifiers) that produce heat.
9) Do not defeat the safety purpose of the polarized or grounding-type plug. A polarized plug has two blades with one wider than the other. A grounding-type plug has two blades and a third grounding prong. The wide blade or the third prong are provided for your safety. If the provided plug does not fit into your outlet, consult an electrician for replacement of the obsolete outlet.
10) Protect the power cord from being walked on or pinched particularly at plugs, convenience receptacles, and the point where they exit from the apparatus.
11) Only use attachments/accessories specified by the manufacturer.
12) Use only with the cart, stand, tripod, bracket, or table specified by the manufacturer, or sold with the apparatus. When a cart is used, use caution when moving the cart/apparatus combination to avoid injury from tip-over.
13) Unplug this apparatus during lightning storms or when unused for long periods of time.
14) Refer all servicing to qualified service personnel. Servicing is required when the apparatus has been damaged in any way, such as power-supply cord or plug is damaged, liquid has been spilled or objects have fallen into the apparatus, the apparatus has been exposed to rain or moisture, does not operate normally, or has been dropped.

■ Discs that can be played
| Disc type Logo Indication used in | instructions | |
| DVD-RAM RAM |  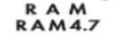 | |
| DVD-Audio DVD-A |  AUDIO AUDIO | |
| DVD-Video |   VIDEO VIDEO | DVD-V |
| DVD-R |  RR4.7 RR4.7 | |
| Video CD |  | VCD |
| CD |   | CDIncluding CD text |
| CD-R/RW | — | WMAMP3 |
- Use discs with the above logos and that conform to specifications. The unit cannot play other discs correctly.
- Do not use irregularly shaped discs (e.g. heart-shaped), as these can damage the unit.
■ Discs that cannot be played
PAL discs (except DVD-Audio), DVD-ROM, CD-ROM, CDV, CD-G, +RW, DVD-RW, CVD, SVCD, SACD, Divx Video Discs and Photo CD.
■ Disc structure
Disc structure and the labels given to the items on discs depend on the disc type.
Track: the smallest division on DVD-Audio, CDs and Video CDs, or a single WMA/MP3 file.
Chapter: the smallest division on DVD-Video.
Group: collections of tracks on DVD-Audio and equivalent to folders or albums on data discs.
Title: the largest division on DVD-Video, usually an entire movie.
Program: the division on DVD-RAM equivalent to a single recording.
Play list: a group of scenes on DVD-RAM.
Scene: DVD-RAM program sections specified and grouped into play lists on a DVD video recorder.
Playing DVDs and Video CDs
The producer of these discs can control how they are played so you may not always be able to control play as described in these operating instructions (for example if the play time is not displayed or if a Video CD has menus). Read the disc's instructions carefully.
■ CD-R and CD-RW discs
This unit can play CD-R/RW (audio recording disc) recorded with CD-DA, video CD, WMA or MP3. Finalize ^® the disc after recording.
DVD-R discs
Panasonic DVD-R recorded and finalized* on a Panasonic DVD video recorder are played as DVD-Video on this unit.
* A process that allows play on compatible equipment.
DVD-RAM discs
DVD-RAM discs must meet the following conditions for this unit to be able to play them.
| Type | ●Non-cartridge discs●Discs that can be removed from their cartridges (TYPE 2 and 4) |
| Capacity | ●12 cm (5") 9.4 GB (double-sided) and 4.7 GB (single-sided)●8 cm (3") 2.8 GB (double-sided) |
| Recording format | Discs recorded with DVD video recorders, DVD video cameras, personal computers, etc., using Version 1.1 of the Video Recording Format (a unified video recording standard). |
- Remove TYPE 2 and 4 discs from their cartridges before use, then return them when you are finished. Read the instructions for the disc carefully.
- Do not allow the disc to become dirty or scratched. Store discs in their cartridges and ensure the disc label and cartridge label face the same way.
- Some parts of the disc, for example where one program ends and another begins, may not play smoothly.
Note
It may not be possible to play CD-R, CD-RW, DVD-R and DVD-RAM in all cases due to the type of disc or condition of the recording.
■ Playing PAL system DVD-Audio
This unit converts PAL to NTSC for play. The picture is compressed to show it in its entirety, but this may cause it to be stretched vertically.
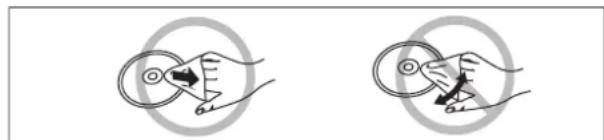
■ To clean discs
DVD-Audio, DVD-Video, Video CD, CD
Wipe with a damp cloth and then wipe dry.
natural_image
Two hand-drawn diagrams showing finger positioning and angle measurement (no text or symbols)DVD-RAM, DVD-R
- Clean with an optional DVD-RAM/PD disc cleaner (LF-K200DCA1, where available).
- Never use cloths or cleaners for CDs etc.
■ Handling precautions
- Do not write on the label side with a ball-point pen or other writing instrument.
- Do not use record cleaning sprays, benzine, thinner, static electricity prevention liquids or any other solvent.
- Do not attach labels or stickers to discs. (Do not use discs with exposed adhesive from tape or left over peeled-off stickers.)
- Do not use scratch-proof protectors or covers.
- Do not use discs printed with label printers available on the market.
Simple setup
STEP 1 Locating
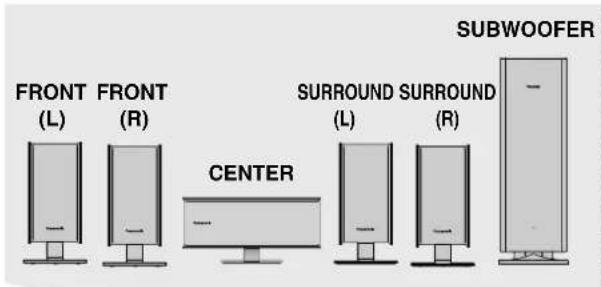
text_image
FRONT (L) FRONT (R) CENTER SURROUND SURROUND (L) SURROUND (R) SUBWOOFERCaution
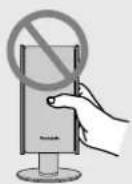
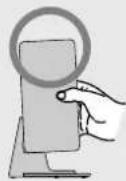
Hold the speakers by the sides.
Applying pressure to the front net can damage the speaker.
text_image
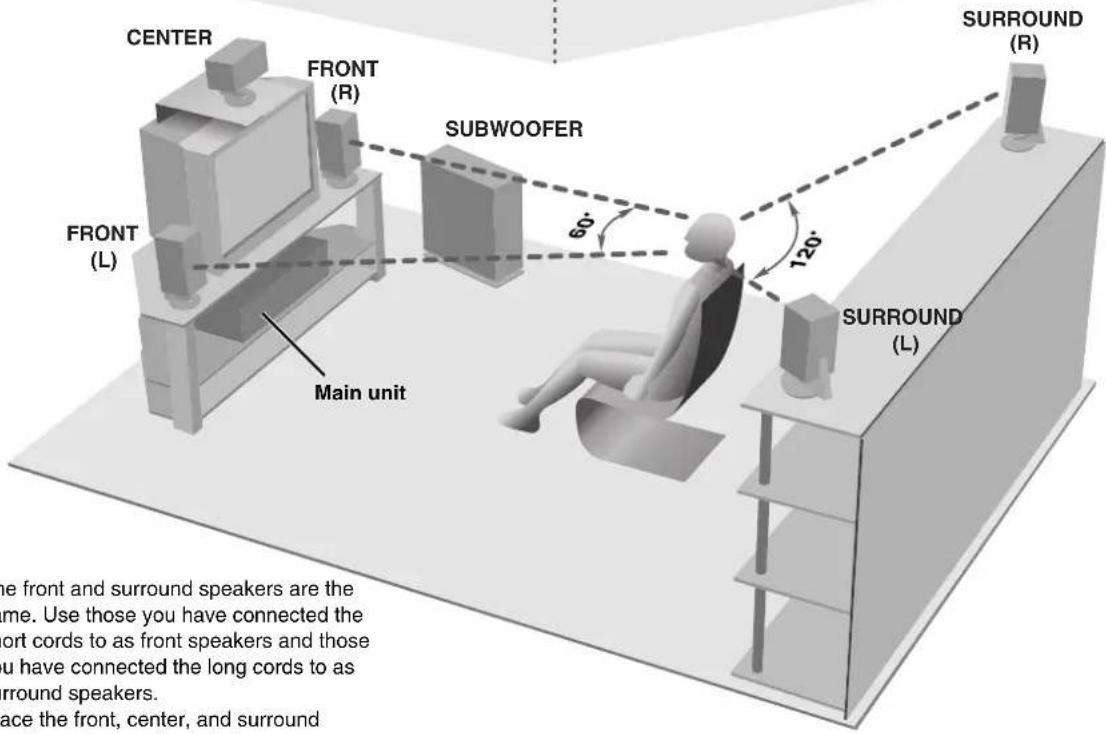
CENTER FRONT (R) SUBWOOFER 60° 120° FRONT (L) SURROUND (R) SURROUND (L) Main unit the front and surround speakers are the time. Use those you have connected the fort cords to as front speakers and those you have connected the long cords to as round speakers. face the front, center, and surround- The front and surround speakers are the same. Use those you have connected the short cords to as front speakers and those you have connected the long cords to as surround speakers.
- Place the front, center, and surround speakers at approximately the same distance from the seating position. The angles in the diagram are approximate.
- Use only supplied speakers
Using other speakers can damage the unit and sound quality will be negatively affected.
- Set the speakers up on an even surface to prevent them from falling. Take proper precautions to prevent the speakers from falling if you cannot set them up on an even surface.
Positioning for best effect
How you set up your speakers can affect the bass and the sound field. Note the following points.
- Place speakers on flat secure bases.
- Placing speakers too close to floors, walls, and corners can result in excessive bass. Cover walls and windows with thick curtain.
Main unit
Note
Keep your speakers at least 10 mm ( ^13/_32 ) away from the system for proper ventilation.
Center speaker
- You can also put this speaker directly under the television.
- Vibration caused by the center speaker can disrupt the picture if it is placed directly on the television. Put the center speaker on a rack or shelf.
Subwoofer
Place to the right of the television, on the floor or a sturdy shelf so that it won't cause vibration.
Leave 10 cm (4") on the right for the woofer to be effective. Leave 10 cm (4") at the rear for ventilation.
STEP2 Speakers
Speaker cables
- 3×4-m (13-foot) cables
- 2×10-m (33-foot) cables

Sheet of speaker-cable stickers
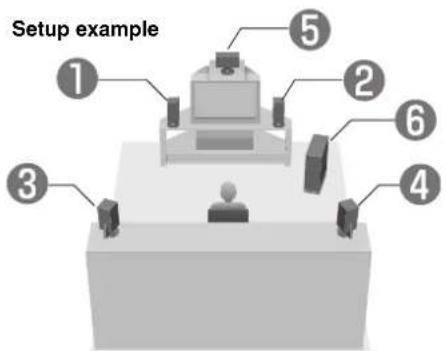
text_image
Setup example ① ② ③ ④ ⑤ ⑥1 Attaching the stickers to the speaker cables
Attach the speaker-cable stickers to make connection easier.
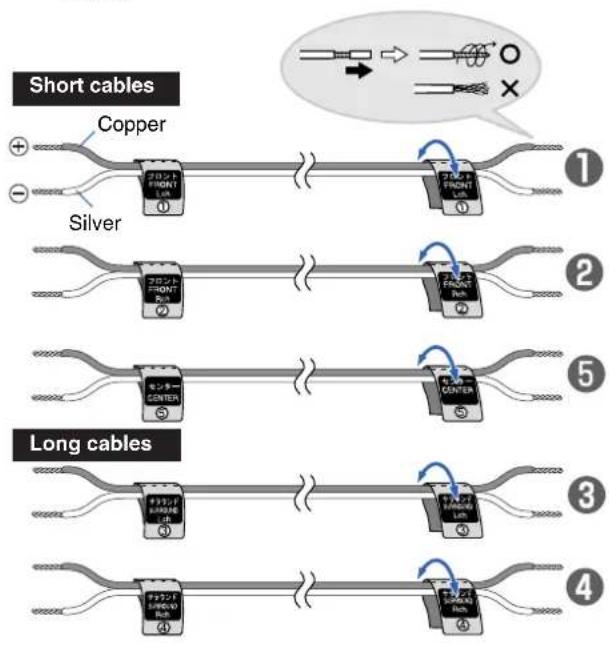
flowchart
graph TD
    A["Short cables"] --> B["Copper"]
    A --> C["Silver"]
    D["Long cables"] --> E["Polymer"]
    D --> F["Polymer"]
    G["Diagram: Short cables connected to Copper and Silver wires"] --> H["Arrow pointing to a wire symbol with X and O"]
2 Connecting the speakers
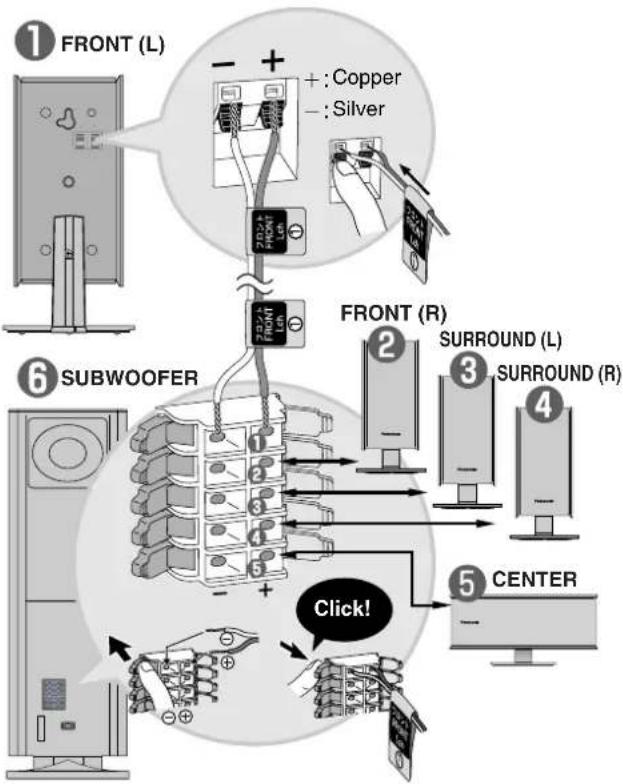
flowchart
graph TD
    A["① FRONT (L)"] --> B["② SURROUND (L)"]
    B --> C["③ SURROUND (R)"]
    C --> D["④ CENTER"]
    D --> E["⑤ Click!"]
    F["⑥ SUBWOOFER"] --> G["⑦ FRONT (L)"]
    G --> H["⑧ Copper + Silver"]
    H --> I["⑨ FRONT (L)"]
    style A fill:#f9f,stroke:#333
    style F fill:#f9f,stroke:#333
    style G fill:#ccf,stroke:#333
    style H fill:#ccf,stroke:#333
    style I fill:#ccf,stroke:#333
Keeping the cables out of the way
Pass the cables through the holes in the stand to keep them out of the way.
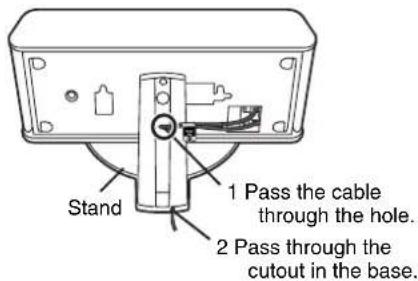
text_image
Stand 1 Pass the cable through the hole. 2 Pass through the cutout in the base.Note
- Never short-circuit positive (+) and negative (−) speaker wires.
- Be sure to connect only positive (copper) wires to positive (+) terminals and negative (silver) wires to negative (−) terminals. Incorrect connection can damage the speakers.
STEP3 Television
Video cable

■ Connecting a television with a VIDEO IN terminal
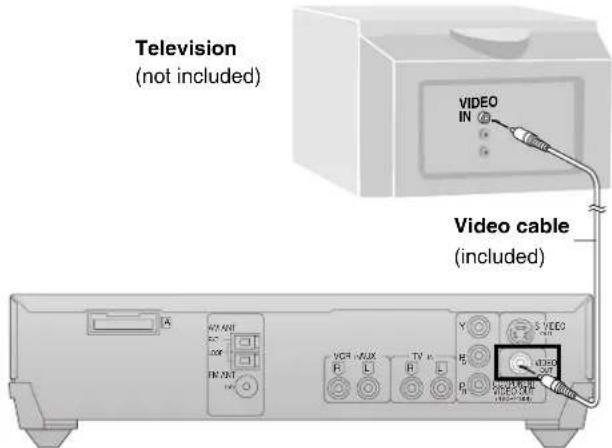
text_image
Television (not included) VIDEO IN Video cable (included)Connect directly to your television.
Do not connect the unit through a video cassette recorder, because the picture may not be played correctly due to the copy guard.
■ Connecting a television with COMPONENT VIDEO terminals
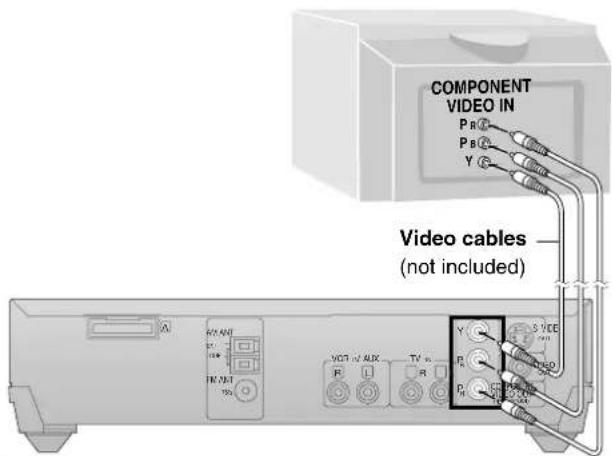
text_image
COMPONENT VIDEO IN P R ② P B ③ Y ④ Video cables (not included) VCT AUX TV 10 R S VCE R R RCOMPONENT VIDEO OUT terminal
These terminals can be used for either interlace or progressive output and provide a purer picture than the S VIDEO OUT terminal. Connection using these terminals outputs the color difference signals ( P_B/P_R ) and luminance signal (Y) separately in order to achieve high fidelity in reproducing colors.
- The description of the component video input terminals depends on the television or monitor (e.g. Y/P_B/P_R , Y/B-Y/R-Y , Y/C_B/C_R ). Connect to terminals of the same color.
- After making this connection, change the black level for a better picture (→ page 29, Video—Black Level Control).
To enjoy progressive video
- Connect to the component video (480P) input terminals on a television compatible with this unit's copy guard system. (Video will not be displayed correctly if connected to an incompatible television.)
- Press [PROGRESSIVE OUT] on the main unit so "PROG." appears on the display (→ page 13).
- All televisions manufactured by Panasonic and that have 480P input connectors are compatible. Consult the manufacturer if you have another brand of television.
■ Connecting a television with an S-VIDEO IN terminal
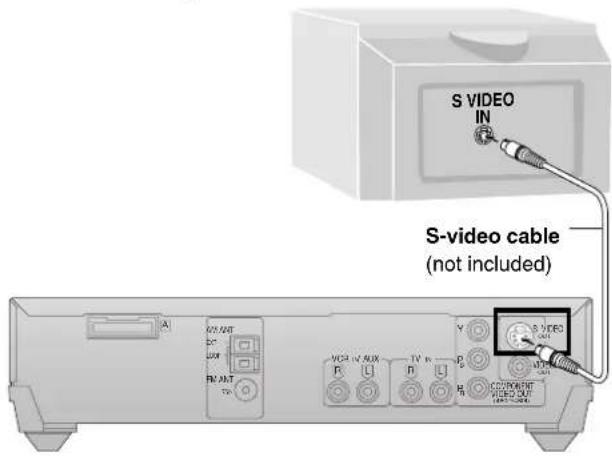
text_image
S VIDEO IN S-video cable (not included)S VIDEO OUT terminal
The S video terminal achieves a more vivid picture than the VIDEO OUT terminal by separating the chrominance (C) and luminance (Y) signals. (Actual results depend on the television.)
STEP4
Connecting the subwoofer, antennas, and AC power supply cord
System cable AM loop antenna


FM indoor antenna

AC power supply cord

Connect the AC power supply cord after all other connections are complete.
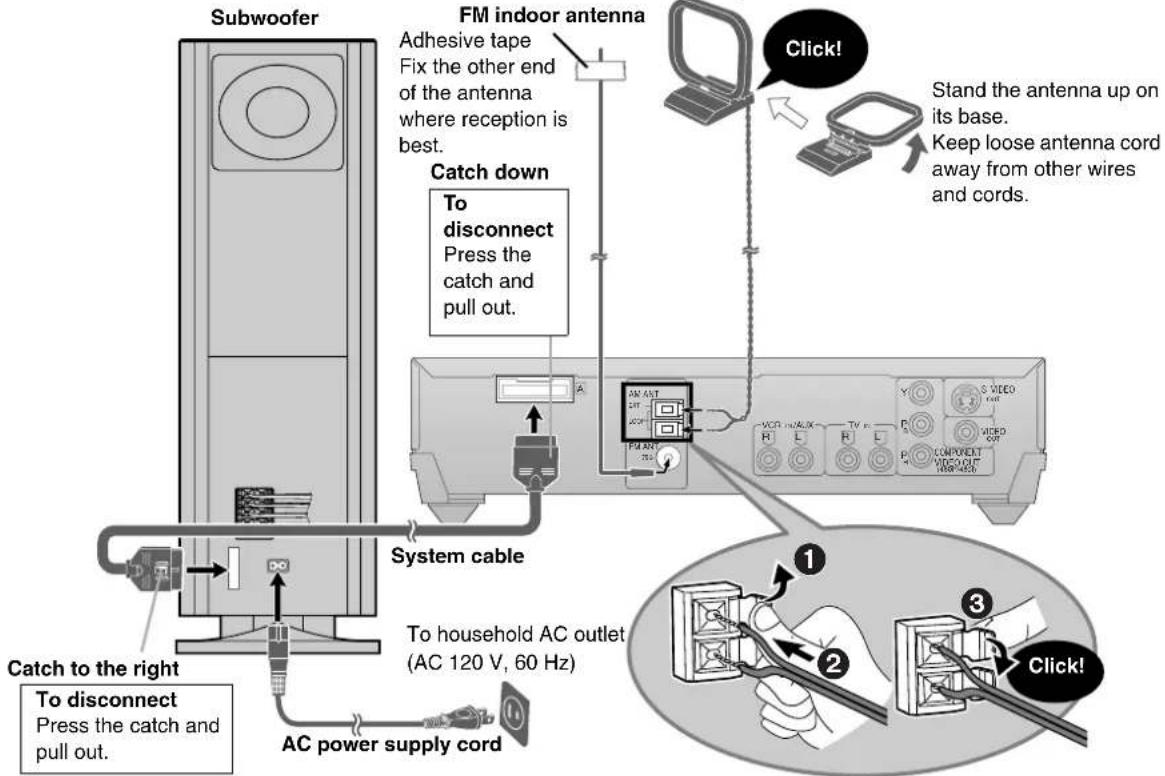
flowchart
graph TD
    A["Subwoofer"] --> B["FM indoor antenna"]
    B --> C{Check down}
    C -->|To disconnect Press the catch and pull out.| D["AC power supply cord"]
    C -->|To disconnect Press the catch and pull out.| E["System cable"]
    E --> F["FM indoor antenna"]
    F --> G["Click!"]
    G --> H["Stand the antenna up on its base. Keep loose antenna cord away from other wires and cords."]
    style A fill:#f9f,stroke:#333
    style B fill:#ccf,stroke:#333
    style C fill:#cfc,stroke:#333
    style D fill:#fcc,stroke:#333
    style E fill:#cff,stroke:#333
    style F fill:#ffc,stroke:#333
    style G fill:#fcf,stroke:#333
    style H fill:#cff,stroke:#333
Conserving power
The unit consumes power (approx. 0.5 W) even when it is turned off with [☐]. To save power when the unit is not to be used for a long time, unplug it from the household AC outlet.
Remember to reset the radio stations and any other memory items before using the unit again.
Information you enter into the unit's memory remains intact for up to 2 weeks after the AC power supply cord is disconnected.
STEP5
The remote control
Remote control
Batteries

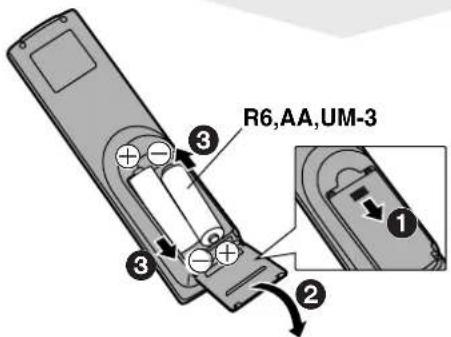
text_image
R6,AA,UM-3 ① ② ③ ③- Insert so the poles (+ and -) match those in the remote control.
- Do not use rechargeable type batteries.
Do not;
- mix old and new batteries.
- use different types at the same time.
- heat or expose to flame.
●take apart or short circuit.
- attempt to recharge alkaline or manganese batteries.
- use batteries if the covering has been peeled off.
Mishandling of batteries can cause electrolyte leakage which can damage items the fluid contacts and may cause a fire.
Remove if the remote control is not going to be used for a long period of time. Store in a cool, dark place.
Use
Aim at the sensor, avoiding obstacles, at a maximum range of 7 m (23 feet) directly in front of the unit.
Other speaker setup options
Attaching to a wall
Note
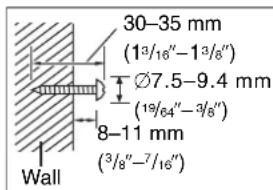
The wall or pillar on which the speakers are to be attached should be capable of supporting 10 kg (22 lb.) per screw.
1 Remove the stand.
BEFORE REMOVING THE STAND
- Take the speaker cable out of the stand's hole if it is threaded through.
- Lay the speaker on a soft cloth.
Unscrew the screw with a Phillips-head screwdriver.
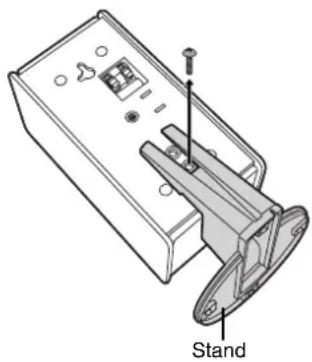
text_image
Stand2 Screw a screw (not included) into the wall.
text_image
30-35 mm (1³/₁₆″-1³/₈") Ø7.5-9.4 mm (¹⁹/₆₄″-³/₈") 8-11 mm (³/₈"-⁷/₁₆") Wall3 Fit the speaker securely onto the screw with the hole or holes.

text_image
Vertical Horizontal 100 mm (3¹⁵/₁⁶")Fitting speaker stands (optional)
Preparation
Remove the stand (→ step 1 above).
Ensure the stands meet these conditions before purchasing them.
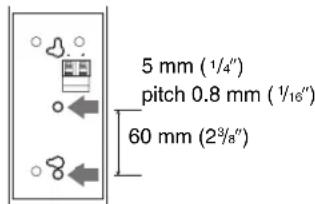
- Observe the diameter and length of the screws and the distance between screws as shown in the diagram.
●The stands must be able to support over 10 kg (22 lb.). - The stands must be stable even if the speakers are in a high position.
Notes on speaker use
- You can damage your speakers and shorten their useful life if you play sound at high levels over extended periods.
- Reduce the volume in the following cases to avoid damage.
-When playing distorted sound.
-When the speakers are receiving howling from a record player, noise from FM broadcasts, or continuous signals from an oscillator, test disc, or electronic instrument.
-When adjusting the sound quality.
-When turning the unit on or off.
If irregular coloring occurs on your television
These speakers are designed to be used close to a television, but the picture may be affected with some televisions and setup combinations.
If this occurs, turn the television off for about 30 minutes.
The television's demagnetizing function should correct the problem. If it persists, move the speakers further away from the television.
text_image
5 mm (1/4") pitch 0.8 mm (1/16") 60 mm (23/8")
Caution
- Use the speakers only with the recommended system. Failure to do so may lead to damage to the amplifier and/or the speakers, and may result in the risk of fire. Consult a qualified service person if damage has occurred or if you experience a sudden change in performance.
- Do not attempt to attach these speakers to walls using methods other than those described in this manual.
STEP6 QUICK SETUP
text_image
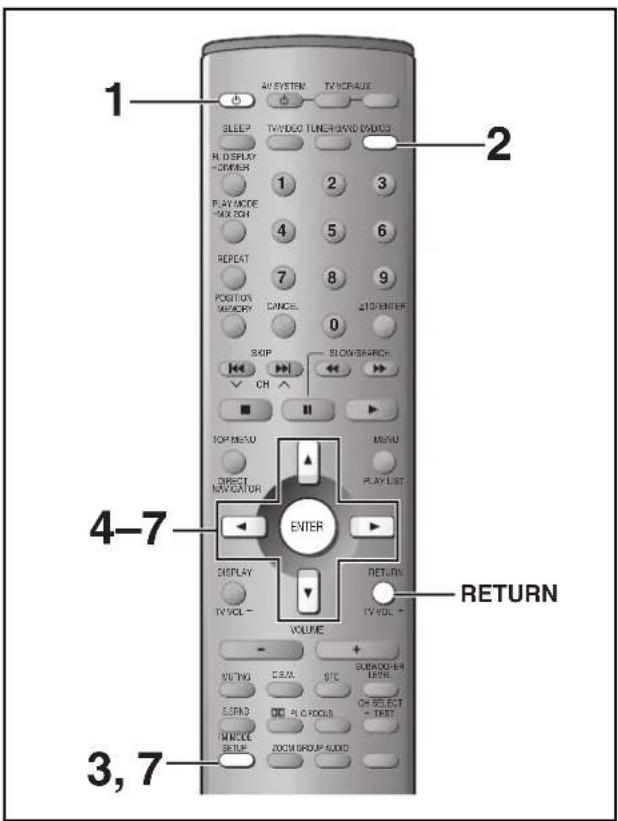
1 AV SYSTEM TV/CREAUX SLEEP TV/DOO TUNER/BND VASCO R. DISPLAY POWER PLAY MODE MOX ZON 1 2 3 4 5 6 REPEAT 7 8 9 POSITION MEMORY CANCEL 0 SKIP SLOWSHANCE CH TOM MENU MENU DIRECT NEW CATOR PLAY LIST ENTER DISPLAY RETURN TV VOL - VOLUME WINDO CASM STC SUBLOCKER LETR. SRRND P. R. ROOLS CH SELECT - TEST VINCLE SETUP ZOOM GROUP AUDIO RETURN 3,7The QUICK SETUP screen appears when you press [SETUP] the first time after purchase and assists you to make necessary settings. You can access this screen again later if you need to (→ page 29, Others—QUICK SETUP).
Preparation
Turn on the television and select the appropriate video input on the television to suit the connections for the unit.
1 Press [⏻] to turn on the unit.
2 Press [DVD/CD] to select "DVD/CD" as the source.
3 Press [SETUP] to show the QUICK SETUP screen.
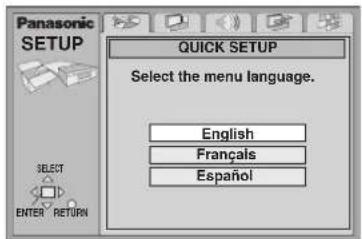
text_image
Panasonic SETUP QUICK SETUP Select the menu language. English Français Español SELECT ENTER RETURN4 Press [▲, ▼] to select the menu language and press [ENTER].
5 Press [▲, ▼] to select "Yes" to continue and press [ENTER].
6 Press [▲, ▼, ◀, ▶] to select the item and press [ENTER].
●Audio Language (→ page 29)
- Subtitle Language (→ page 29)
•TV Type (→ below)
•TV Aspect (→ below)
7 Press [ENTER] and then [SETUP] to end the settings.
To return to the previous screen
Press [RETURN].
TV Type
Select to suit the type of television.
- Standard (Direct View TV) (factory preset)
•CRT Projector
•LCD TV/Projector
•Projection TV - Plasma TV
TV Aspect
Select "4:3" (regular) or "16:9" (widescreen) to suit your television.
If you have a regular 4:3 television, you can also select how video on some discs is shown (→ page 29, Video—TV Aspect).
●4:3 Pan&Scan (factory preset)
Widescreen software is expanded to fill the screen of a 4:3 aspect television (unless prohibited by the producer of the disc).
- 4:3 Letterbox
Widescreen software is shown in the letterbox style on a 4:3 aspect television.
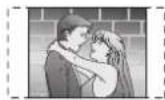
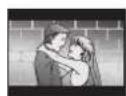
text_image
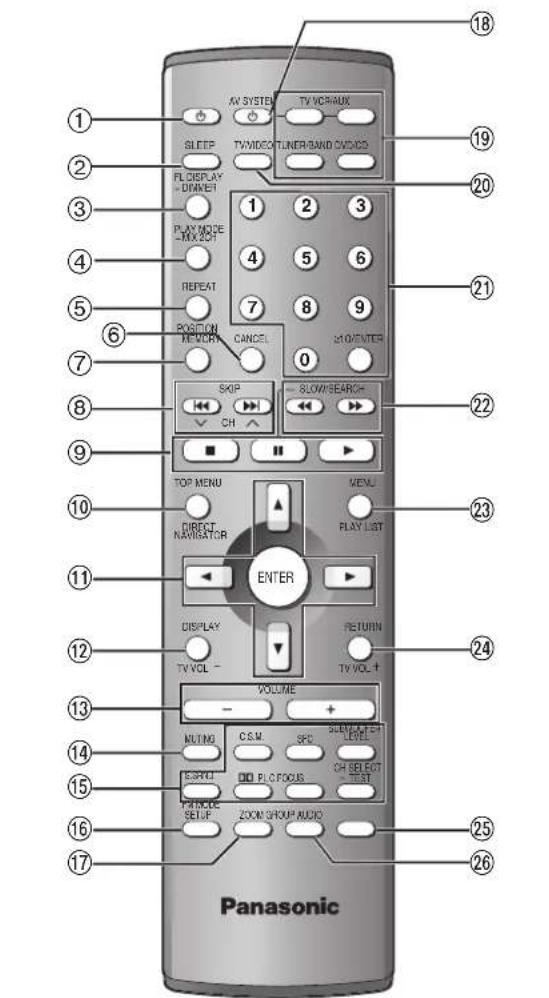
1 2 3 4 5 6 7 8 9 10 11 12 13 14 15 16 17 18 19 20 21 22 23 24 25 26 Panasonic AV SYSTEM TV VCRANUX SLEEP TVVIDEO TUNER/BAND COLDING FL DISPLAY - DIMMER PLAY MODE - MAX 2.0T RESET POSITION NEW YORK CANCEL SHOWENTER SKIP ← SLOW/SEARCH CH ↑ TOP MENU MENU DIRECT NAVIGATOR PLAY LIST ENTER DISPLAY RETURN TV VOL - VOLUME - + NUTING C.S.M. SPECI SPEED/ATCH LEVEL SELECT COM P.C.OCUS CH SELECT TEST PROMICS SELF ZOOM/SHOW/AUDIO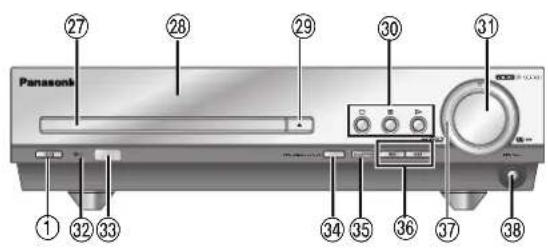
text_image
Panasonic 1 27 28 29 30 31 32 33 34 35 36 37 38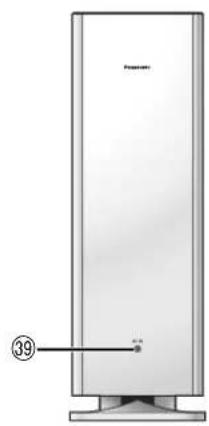
text_image
Prenzlauer 39Remote control
① Standby/on switch [⏻] ......11
② Sleep button [SLEEP]....28
③ FL display, Dimmer button [FL DISPLAY, -DIMMER] . . .25, 28
④ Play mode, Mix 2ch button
[PLAY MODE, -MIX 2CH] .....16, 25
⑤ Repeat button [REPEAT]....15
⑥ Cancel button [CANCEL] .....16
⑦ Position memory button [POSITION MEMORY]....13
⑧ Skip, Preset channel, TV channel buttons
[◀◀ ▶▶|, SKIP, ∨ CH ∧]....14, 24, 32
⑨ Basic operation buttons....13
⑩ Top menu, Direct navigator button
[TOP MENU, DIRECT NAVIGATOR] .....14, 20
⑪ Cursor buttons [▲, ▼, ◀, ►], Enter button [ENTER] .....11
⑫ Display, TV volume down button
[DISPLAY, TV VOL—]....21, 32
⑬ Volume buttons [−, +, VOLUME]....13
⑭ Muting button [MUTING]....28
⑮ Sound field, sound quality buttons .....25–27
⑯ FM mode, Setup button [FM MODE, SETUP] .....11, 24
⑰ Zoom button [ZOOM] ....18
⑱ AV system standby/on button [☐, AV SYSTEM]....32
19 Source select buttons
• Face towards this unit to change the source.
• Press [TV] or [VCR/AUX] first to operate a Panasonic television or video cassette recorder (→ page 32).
⑳ TV/VIDEO button [TV/VIDEO]....32
②1 Numbered buttons [1-9, 0, ≧10/ENTER]....14
②2 Slow/search, Tuning buttons
[◀◀, ▶▶ SLOW/SEARCH]....14, 24
②3 Menu, Play list button [MENU, PLAY LIST] .....14, 20
②4 Return, TV volume up button [RETURN, TV VOL+]....11, 32
②5 Audio button [AUDIO]....17
②6 Group button [GROUP]....15
Main unit
① Standby/on switch [☐/I, POWER] .....11
Press to switch the unit from on to standby mode or vice versa. In standby mode, the unit is still consuming a small amount of power.
⑳ Disc tray....13
⑳ Display
⑲ Open/close button [▲] ....13
③0 Basic operation buttons....13
③1 Volume control [VOLUME, DOWN, UP]....13
32 Standby/on indicator [☐]
When the unit is connected to the AC mains supply, this indicator lights up in standby mode and goes out when the unit is turned on.
③3 Remote control signal sensor
③4 Progressive out button [PROGRESSIVE OUT]....13
③5 Source select button [SELECTOR]
DVD/CD→FM→AM→TV→VCR/AUX
③6 Skip, Preset channel buttons [◀◀ ▶▶] .....14, 24
③7 Shuttle dial [SEARCH ◀◀, ►▶] .....14
③8 Headphone jack [PHONES] 28
Subwoofer
39 AC supply indicator [AC IN] This indicator lights when the unit is connected to the AC mains supply.
text_image
2 PROGRESSIVE OUT 3 4 1 SLEEP TV/VIDEO TUNER/BAND ON/OCC 1 2 3 PLAY MODE MIX DO-1 4 5 6 RESET 7 8 9 POSITION MEMORY CANCEL F10/ENTER SKIP SLOWSEARCH CH 3 Position MEMORY TOP MENU MENU DIRECT NAVIGATOR PLAY LIST ENTER DISPLAY RETURN TV VOL TV VOL + VOLUME + - OUTWO CSM SFG SOUND/COM SPRING FL OFOOLS CH SELECT TEST INVOICE ZOOM GROUP AUDIORAM DVD-A DVD-V VCD CD WMA MP3
Preparation
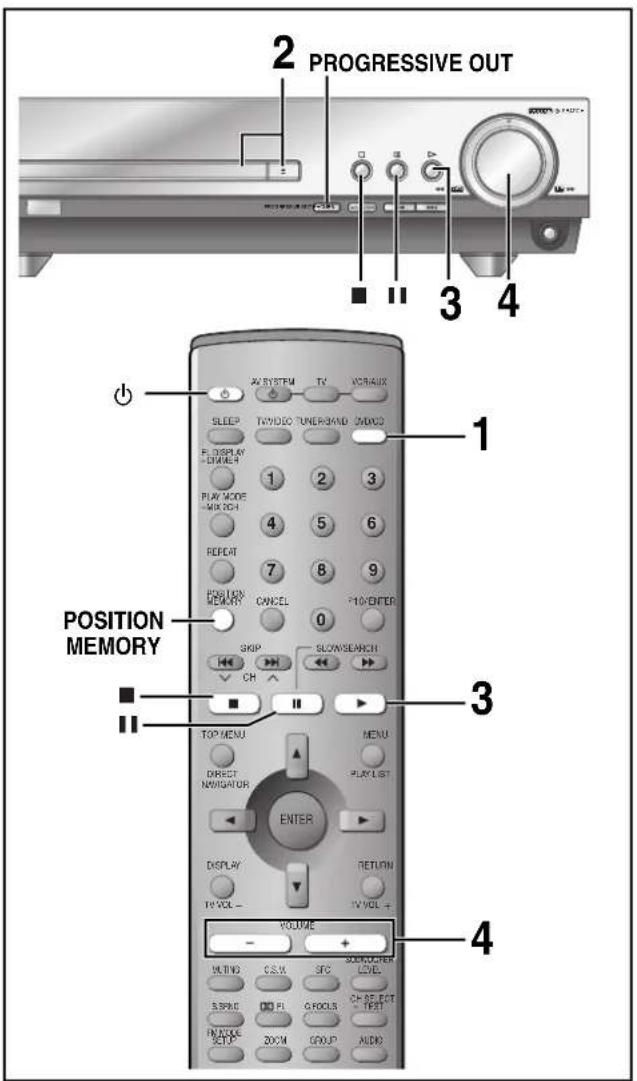
- Press [⏻] to turn on the unit.
- Turn on the television and select the appropriate video input on the television to suit the connections for the unit.
1 Press [DVD/CD] to select "DVD/CD" as the source.
To enjoy progressive video Press [PROGRESSIVE OUT].
The television will be disrupted for a moment but this is normal.
![PANASONIC SC-MT1P - To enjoy progressive video Press [PROGRESSIVE OUT]. - 1](/content/2026/05/797150/images/166660540b4a740cd26dd76c1868675f27f4a1273981d6a0ec20472f47abef5e.jpg)
- Output from this unit is interlace if you have connected to the television through VIDEO OUT or S-VIDEO OUT or playing PAL discs, even if "PROG." is on the display.
- When progressive output is on, closed captions will not be displayed.
2 Press [▲] to open the disc tray and place the disc.
- Remove TYPE 2 and 4 discs from their cartridges before use. RAM
![PANASONIC SC-MT1P - Press [▲] to open the disc tray and place the disc. - 1](/content/2026/05/797150/images/bce05aa1b3272d846e7024027c8a8e97db9d4dad993c99f15f1fe1086ef3a0fb.jpg)
- Label-up (With double-sided discs, load so the label for the side you want to play is facing up.)
![PANASONIC SC-MT1P - Press [▲] to open the disc tray and place the disc. - 2](/content/2026/05/797150/images/5c50ec5fdb3d082962c21775969d38eba01d44e85a5fd090e9ef4bcfc67b497a.jpg)
3 Press [▶] (play).
The disc tray closes and play begins.
WMA MP3 CD (CD text only)
Group and track names are displayed on the television.
- To turn the display on or off page 22, Disc information ⑤
- You can also use the navigation menus to control play (→ page 19).
4 Adjust the volume.
Turn the inner dial on the main unit.

(Minimum) (Maximum)
■ To pause play
Press [11] during play.
Press [▶] (play) to restart play.
■ To stop play
Press [■] (→ below, Resume function).
Note
- If "⊗" appears on the television
The operation is prohibited by the unit or disc. - It may take some time for play to start but this is normal.
Position Memory function
RAM DVD-A DVD-V VCD CD WMA MP3
During play
Press [POSITION MEMORY] to memorize a position.
![PANASONIC SC-MT1P - Press [POSITION MEMORY] to memorize a position. - 1](/content/2026/05/797150/images/da36e2d5cbd3b3522d7543d8a9d978678e0df232d97fe1031f1d15ebff794717.jpg)
Press again to replace the position.
This position is saved even if you turn the unit off, change the source or open the disc tray. When you turn the unit on, reselect "DVD/CD" or reinsert the disc whose position you memorized, "RESUME" lights on the display. Press [▶] (play) to start play from the memorized position. The position is cleared.
- You can memorize positions on up to five different discs at a time. When you memorize another position, the earliest position is replaced.
Resume function
"RESUME" lights on the display when the unit has recorded the position at which you stopped play.
Press [▶] (play) to start play from that position.
●The position is cleared when you:
—Turn the unit off.
—Select another source or open the disc tray.
- Press [■] to clear the position.
Chapter Preview
DVD-V
The following message appears
immediately after you press [▶] (play)
when "RESUME" is displayed.
Press [▶] (play) while the message is displayed and the beginning portions of each chapter up to the current one are played.
Full play resumes from the point where you pressed [■] or [POSITION MEMORY].
(This feature works only within a title.)
If you do not press [▶] (play), the message disappears and play starts from where you pressed [■] or [POSITION MEMORY].

text_image
Numbered buttons SLOW/SEARCH SKIP TOP MENU ENTER ENTRY RETURN ENTER DISPLAY VOLUME MUTAG OSM SEC SIRNOCFST LEVEL SEND DD P.C/CFOCUS CH/SELECT TEST FX/MOSF SETUP ZOOM GROUP ALIKOWhen a menu appears on the television
DVD-A DVD-V VCD
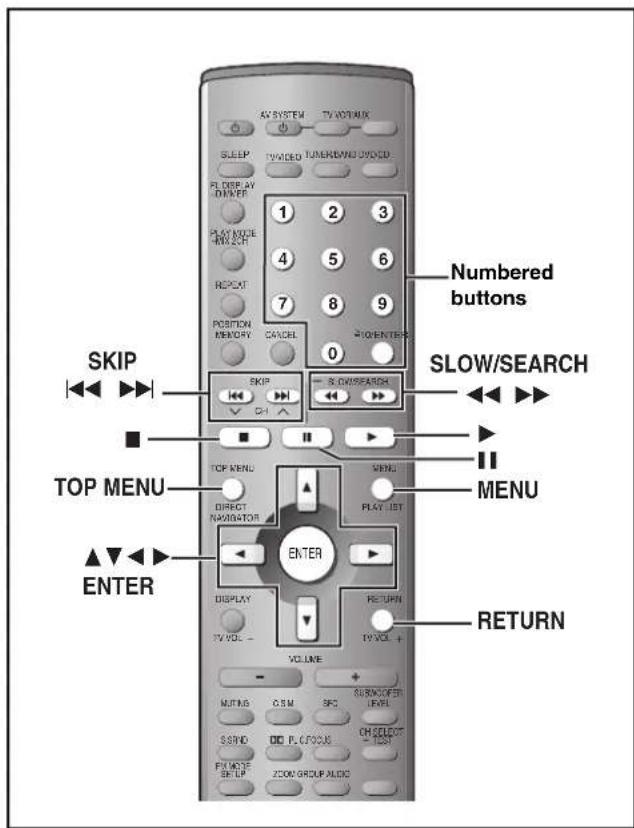
Press the numbered buttons to select an item.
To select a 2-digit number
Example: To select item 23, press [≥10] → [2] → [3].
- When playing DVDs, you can also use [▲, ▼, ◀, ▶] to select items. Press [ENTER] to confirm your selection.
To return to the menu screen
DVD-A DVD-V [TOP MENU]: Shows the first menu screen.
DVD-V [MENU]: Shows the menu screen.
VCD [RETURN]: Shows the menu screen.
Note
- The disc continues to rotate while the menu is displayed even after you finish playing an item. Press [■] when you finish to preserve the unit's motor and your television screen.
Skipping items
RAM DVD-A DVD-V VCD CD WMA MP3
During play or while paused
Press [◀◀] or [▶▶].
●Each press increases the number of skips.
DVD-A DVD-V VCD CD WMA MP3
Play position


text_image
RAM Play position Marker Program/scene Program/scene Program/scene twice once once twice three timesFast forward and rewind—SEARCH
RAM DVD-A DVD-V VCD CD WMA MP3
During play
Press [◀◀] or [▶▶].
- Turn the shuttle dial [◀◀, ▶▶] (the outer dial) on the main unit. Play starts again when you release the shuttle dial.
- Audio will be heard during search for most discs. You can turn this audio off if you want to (→ page 29, Audio—Audio during Search).
• DVD-V You can slow down or speed up play (→ page 21).
Slow-motion play
RAM DVD-V VCD
DVD-A (Motion picture parts only)
While paused
Press [◀◀] or [▶▶].
Turn the shuttle dial [◀◀, ▶▶] (the outer dial) on the main unit. The picture stills again when you release the shuttle dial.
Frame-by-frame viewing
RAM DVD-V VCD
DVD-A (Motion picture parts only)
While paused
Press [◀] or [▶].
The frame changes each time you press the button.
●The frames change in succession if you press and hold the button.
- Pressing [11] also activates forward frame-by-frame.
Notes
- The speed of search and slow-motion increases up to 5 steps.
- Press [▶] (play) to restart play.
- You cannot move backwards with Video CD during frame-by-frame and slow-motion.
When playing Video CDs with playback control
Pressing buttons to perform skip, search or slow-motion may take you to a menu screen.
text_image
REPEAT Numbered buttons ENTER DISPLAY RETURN GROUP VOLUME + - NUTING OS N SCS SUBACCPER LEVEL SEND PLOCCUS CH SELECT TCM PAMMIE REF UP ZOOM/SEE ALICStarting play from a selected item
RAM DVD-A DVD-V VCD CD WMA MP3
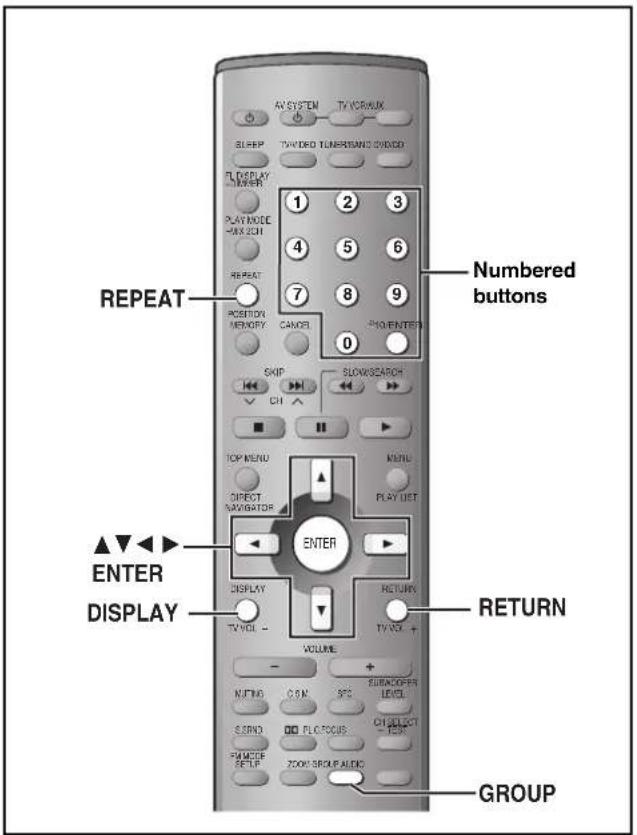
Press the numbered buttons to select the item.
Play starts from the selected item.
To select a 2-digit number
Example: To select track 23, press [≥10] → [2] → [3].
WMA MP3 [2] → [3] → [ENTER]
Note
This works only when stopped with some discs.
Repeat play
RAM DVD-A DVD-V VCD CD WMA MP3
During play
Press [REPEAT].
Each time you press the button:
RAM
Program→All (Entire disc)→Off
●During play list play
Scene→Playlist→Off
DVD-V
Chapter→Title*→Off
VCD CD
Track→All (Entire disc)→Off
DVD-A WMA MP3
Track→Group *→Off
※During all group (DVD-A), program and random play
"All" is displayed.
■ To repeat only your favorite tracks/chapters
Start program play (→ page 16) and press [REPEAT] to select the repeat mode.
A-B repeat play
RAM DVD-A DVD-V VCD CD WMA MP3
You can repeat a section between points A and B within a program, title or track.
1 During play
Press [DISPLAY] until the unit information screen is displayed
(→ page 22).
2 Press [▲, ▼] to select the play menu.

A-B Repeat
3 Press [◀, ▶] to select "A-B Repeat" and
① Press [ENTER] at the starting point (A).
② Press [ENTER] at the finishing point (B).
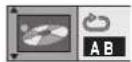
A-B repeat starts.
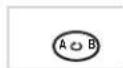
To return to the normal play
Press [ENTER] again
To clear the menus
Press [RETURN] until the menu disappears.
Selecting groups to play
DVD-A WMA MP3
1 During play
Press [GROUP].
Example MP3
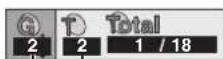
Track number in group
Group number
2 Press the numbered buttons to select the group and press [ENTER].
3 Press the numbered buttons to select the track number and press [ENTER].
DVD-A
Playing all the groups in succession (→ page 16, All group play)
Playing bonus groups
Some discs contain bonus groups. If a password screen appears after selecting a group, enter the password with the numbered buttons. Refer also to the disc's jacket.
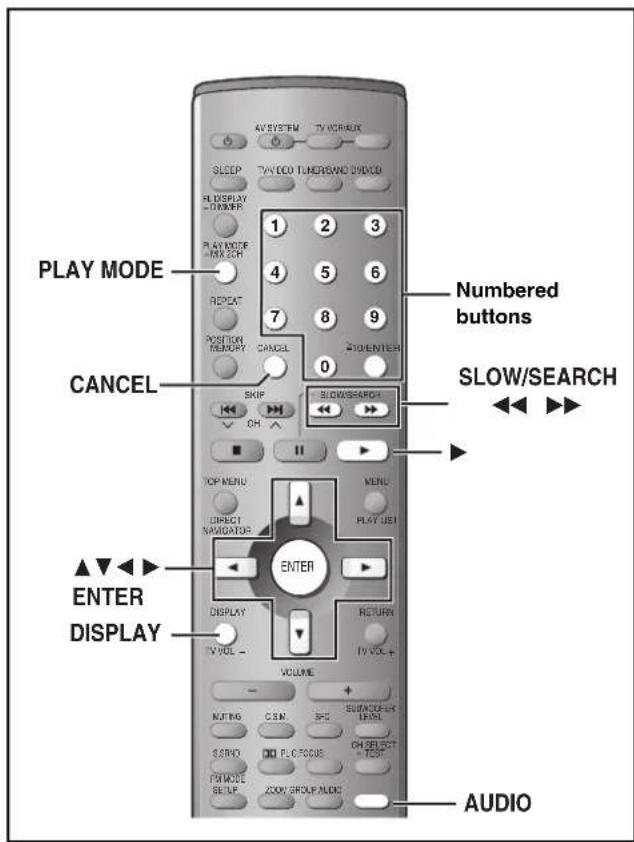
text_image
PLAY MODE CANCEL ENTER DISPLAY Numbered buttons SLOW/SEARCH AUDIODVD-A DVD-V VCD CD WMA MP3
Common procedures for all group, program and random play
While stopped
Press [PLAY MODE].
Each time you press the button:
All group (DVD-A)→Program→Random
Off (Normal play)
DVD-A
If you select bonus groups, you will have to enter a password
(→ page 15).
All group play
DVD-A
Press [▶] (play).
![PANASONIC SC-MT1P - Press [▶] (play). - 1](/content/2026/05/797150/images/5f70f30a3b9b48ce3f6e56a2019105c982fe5b40f134586d0ff056354c2a1ff4.jpg)
Program play
You can select up to 32 items to play in the order you choose.
Example DVD-V
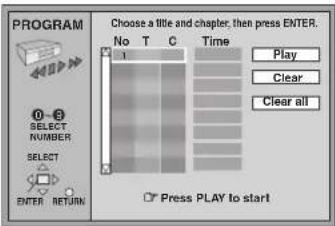
text_image
PROGRAM Choose a title and chapter, then press ENTER. No T C Time 1 Play Select Clear Clear all SELECT NUMBER SELECT ENTER RETURN Press PLAY to startRQT6719
1 Press the numbered buttons to select a title, chapter, group or track (WMA MP3 then press [ENTER]).
![PANASONIC SC-MT1P - Press the numbered buttons to select a title, chapter, group or track (WMA MP3 then press [ENTER]). - 1](/content/2026/05/797150/images/d6e502ec4729548f064beb6e1e38feddb5ca402de78b387b8d1bd0813908bfa6.jpg)
text_image
2 TTL CHAP PGM P: Title No. Chapter No. Program No.•To select a 2-digit number
Example: To select item 25, press [≥10] → [2] → [5].
WMA MP3: [2] → [5] → [ENTER]
- Repeat this step to program other items.
- To select an item using the cursor buttons
Press [ENTER] and [▲, ▼] to select an item, then press
[ENTER] again to register the number.
All the items in the selected disc, title or group are selected
when you select "ALL".
2 Press [▶] (play).
To add or change the program
Press [▲, ▼] to select an available item, then repeat step 1.
To move to the page before or after the one shown
Press [◀◀, ▶▶].
To clear an item
1 Select the item you want to clear with [▲, ▼].
2 Press [CANCEL], or select "Clear" with [▲, ▼, ◀, ▶] and press [ENTER].
To clear the whole program
Select "Clear all" with [▲, ▼, ◀, ▶] and press [ENTER].
Note
• DVD-V WMA MP3
Times are not displayed while programming.
- The program is cleared when you switch the unit to standby, open the disc tray, select another source, or exit the program mode by pressing [PLAY MODE].
Random play
1 DVD-A DVD-V
Press the numbered buttons to select a title or a group.
Example DVD-V
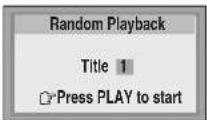
DVD-A
- You can select more than one group.
- To enter all groups, select "All" using [◀, ▶] and press [ENTER].
- To deselect a group, press the numbered buttons corresponding to the group you want to clear.
2 Press [▶] (play).
- “—” or “—” is displayed instead of the language number in circumstances such as when no language is recorded on the disc.
Soundtracks
RAM DVD-A DVD-V VCD
(Discs with multiple soundtracks)
During play
Press [AUDIO].
The number changes each time you press the button.
![PANASONIC SC-MT1P - Press [AUDIO]. - 1](/content/2026/05/797150/images/8559d03f70899f1a1cbf1de84779562ae8702af967c24b7b5914ba1daad758f0.jpg)
text_image
DVD-A LPCM 192k24b 2ch Soundtrack selected Soundtrack playing Audio language Signal type/data (→ below) DVD-V Digital English 3/2.1 ch Number of channels (→ below)RAM VCD
![PANASONIC SC-MT1P - Press [AUDIO]. - 2](/content/2026/05/797150/images/d3ad5106b702c991d2f4a9107ea761dac2cc3b4a73475ce5a96ece8e2cab26ea.jpg)
LR→L→R
- You can also use this button to turn the vocals on and off on karaoke discs. Read the disc's instructions for details.
DVD-A
- Play restarts from the beginning of the soundtrack when changing soundtracks that are accompanied by still pictures.
- Even if a second soundtrack isn't recorded, two soundtrack numbers will normally be shown when you press [AUDIO]. The soundtrack currently playing is number 1.
Signal type/data
LPCM/PPCM/□□Digital/DTS: Signal type
k (kHz): Sampling frequency
b (bit): Number of bits ch (channel): Number of channels
Example:
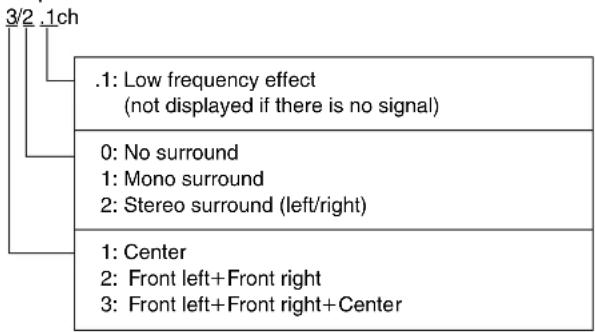
text_image
.1: Low frequency effect (not displayed if there is no signal) 0: No surround 1: Mono surround 2: Stereo surround (left/right) 1: Center 2: Front left+Front right 3: Front left+Front right+CenterSubtitles
DVD-A (Motion picture parts only)
DVD-V
(Discs with multiple subtitle languages)
You can change the subtitle language and turn the subtitles on and off.
RAM
You can turn the subtitles on and off.
1 During play
Press [DISPLAY] until the disc information screen is displayed.
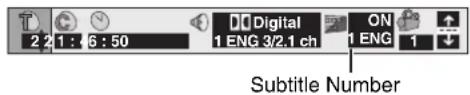
text_image
2 2:1 : 6 : 50 Digital 1 ENG 3/2.1 ch ON 1 ENG 1 Subtitle Number2 Press [◀, ▶] to select "Subtitle Number".
![PANASONIC SC-MT1P - Press [◀, ▶] to select "Subtitle Number". - 1](/content/2026/05/797150/images/11287ba28e0470b18b94afd819b5e0bba2ac380530f56d48f5d6f636c52811cc.jpg)
3 Press [▲, ▼] to select the language.
![PANASONIC SC-MT1P - Press [▲, ▼] to select the language. - 1](/content/2026/05/797150/images/2e6a8575173c48391f7b7065909782701fea98414581aa9a4b2ca70d332da9da.jpg)
- In some cases, the subtitle language is not changed to the selected one immediately.
- Refer to "Audio/Subtitle language" (→ page 22) for language abbreviations.
- If the subtitles overlap closed captions recorded on discs, turn the subtitles off.
To clear/display the subtitles
1 Press [◀, ▶] to highlight the following icon.
DVD-A DVD-V
RAM
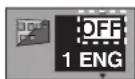

2 Press [▲, ▼] to select "OFF" or "ON".
■ Changing the position and brightness of the subtitles ( page 23)
text_image
Numbered buttons CANCEL SKIP TOP MENU ▲▼◀◀ ENTER DISPLAY ZOOM AV SYSTEM TV VOLUME SLEEP TV VIDEO TIMER/BOARD VIDEO FL DISPLAY HOMMER PLAY NODE HMAX 2CH REPEAT POST LIME MEMORY CANCEL 0 #VENTICE SKIP SLOWS/SEARCH CH II TOP MENU MENU DIRECT NAVIGATION PLAY LIST ENTER DISPLAY RETURN TV VOL + VOLUME NUTING CSM. SFC SUBMODER LEVEL SERVO P. CROCKE CH SELECT TEST FATMODE SETUP ZOOM GROUP ALDISMarking places to play again
RAM DVD-A DVD-V VCD CD WMA MP3
You can mark a position so you can return to it easily at a later time.
1 During play
Press [DISPLAY] until the unit information screen is displayed
(→ page 22).
2 Press [▲, ▼] to select the play menu.
Example DVD-V
** OFF *****
Marker
3 Press [◀, ▶] to select "Marker" and press [ENTER].
RAM
Press [▶] to select an asterisk (*).
4 Press [ENTER] at the point you want to mark.
To mark another position
Up to 5 points (RAM only: up to 999 points)
1 Press [▶] to select " ×".
2 Press [ENTER] at the point.
To recall or erase a marker
1 Press [◀, ▶] to select a marker.
2 Press [ENTER] to recall or press [CANCEL] to erase.
RAM
To mark the eleventh point and beyond
1 Press [◀, ▶] to select the marker pin icon.
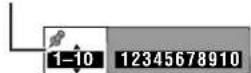
2 Press [▲, ▼] to select "11-20".
You can select the next group when the current group is full.
Note
Markers added with this unit clear when you switch the unit to standby, change the source, or open the disc tray.
Variable Zoom function
RAM DVD-V VCD
DVD-A (Motion picture parts only)
Change the zoom ratio so the picture expands to the optimum size to fill the screen.
Preparation
Change the setting "TV Aspect" to suit your television (→ page 29).
During play
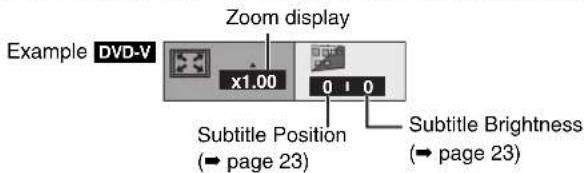
Press [ZOOM] to select the aspect ratio.
text_image
Example DVD-V x1.00 Zoom display 0 0 Subtitle Position (→ page 23) Subtitle Brightness (→ page 23)Each time you press the button:
4:3 Standard→European Vista→16:9 Standard
Cinemascope2←Cinemascope1←American Vista
- Refer to the disc's instructions and "Screen size" below for the aspect ratio of the picture.
To restore the original ratio
Press [ZOOM] until the ratio returns to 1.00.
- The ratio also returns to 1.00 when you open the disc tray, change the source or switch the unit to standby.
●The ratio may return to 1.00 when a menu is displayed.
Making fine adjustments to the zoom ratio
While the ZOOM icon is displayed
Press [▲,▼].
The ratio changes in 0.01 units between 1.00 and 1.60 and in 0.02 units between 1.60 and 2.00.
Screen size
Movies are made using a variety of screen sizes.
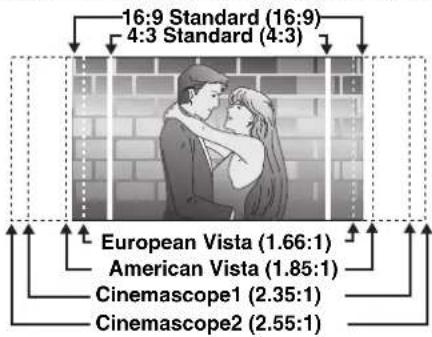
text_image
16:9 Standard (16:9) 4:3 Standard (4:3) European Vista (1.66:1) American Vista (1.85:1) Cinemascope1 (2.35:1) Cinemascope2 (2.55:1)WMA MP3 CD (CD text only)
Various menus help you find items you want to start play.
1 Press [TOP MENU].
Example MP3 navigation menu
Group name
![PANASONIC SC-MT1P - Press [TOP MENU]. - 1](/content/2026/05/797150/images/c0ffefe8879d48b918e21ab572e8a702ef75d78d46f7116ffd69fb87204a5c0a.jpg)
text_image
MENU G 1 T 1 Total 223 0 - 0 SELECT NUMBER SELECT ENTER RETURN No Group: 001 My favorite Tree 1 001 Both Ends Freezing ▶ 2 002 Lady Starfish ▶ 3 003 Life on Jupiter ▶ 4 004 Metal Glue ▶ 5 005 Paint It Yellow ▶ 6 006 Pyjamamama ▶ 7 007 Shrimps from Mars ▶ 8 008 Starperson ▶ 9 009 Velvet Coppermine ▶ 10 010 Ziggy Starfish ▶ Find NextPrev2 Press [▲, ▼] to select a track, and press [ENTER].
“☐” indicates the track currently playing.
To show other pages
Press [▲, ▼, ◀, ▶] to select "Prev" or "Next" and press [ENTER].
After listing all the tracks in one group, the list for the next group appears.
To exit the navigation menu
Press [TOP MENU].
Track title search
Example: finding a track including the word "LOVE"
1 Press [▲, ▼] to select "Find" and press [ENTER].
![PANASONIC SC-MT1P - Press [▲, ▼] to select "Find" and press [ENTER]. - 1](/content/2026/05/797150/images/ba917003dbf9538a5242c04ae98ab7c533b6413629f29e85743046e88849af16.jpg)
2 Press [▲, ▼] to select "L" and press [ENTER].
Characters change in alphanumeric order each time you press [▲].
Repeat this step to enter "O", "V", and "E".
- Press [◀◀,▶▶] to skip between A, E, I, O, and U.
- Only uppercase appear but the search also includes lower case.
- Press [◀] to erase a character.
- You can erase the asterisk (*) to search for the first word in a title.
- You can enter numbers with the numbered buttons.
3 Press [▶] to select "Find" and press [ENTER].
The search results screen appears.
4 Press [▲, ▼] to select the track and press [ENTER].
To return to the navigation menu
Press [RETURN].
To use the tree screen to find a group WMA MP3
1 Press [▶] while a track is highlighted to display a tree screen.
![PANASONIC SC-MT1P - Press [▶] while a track is highlighted to display a tree screen. - 1](/content/2026/05/797150/images/12779cfe76d4627843ca33598acc1e315fa96f5ae360570b749b104142edc360.jpg)
text_image
MENU G 8 T 14 Total 123 Select NUMBER SELECT ENTER RETURN Tree MP3 music 001 My favorite 001 Brazilian pops 002 Chinese pops 003 Czech pops 004 Hungarian pops 005 Japanese pops 007 Mexican pops 008 Philippine pops 009 Swedish pops 001 Momoko 002 Standard number 001 Piano solo 002 Vocal G 7/16You cannot select groups that contain no compatible files.
2 Press [▲, ▼, ◀, ▶] to select a group and press [ENTER].
The navigation menu for the group appears.
To return to the navigation menu
Press [RETURN].
To use the contents screen to find a track CD (CD text only)
You can use the text information recorded on these discs to find a track to play.
1 Press [▶] while a track is highlighted to display the contents screen.
![PANASONIC SC-MT1P - Press [▶] while a track is highlighted to display the contents screen. - 1](/content/2026/05/797150/images/327a71ab55fd2616c29410e201c18e941c10e4f13822317879217583528e6d1c.jpg)
text_image
MENU T 10/14 Selected ENTER RETURN Contents Disc Title/Artist • SHIPWRECKED • ORIGINAL SOUNDTRACK Track 10 Title/Artist • Pink Island • Long John Platinum2 Press [◀, ▶] to move through the tracks and press [ENTER].
See page 34 for details about WMA, MP3, and CD text.
Playing the programs or play lists on DVD-RAM
text_image
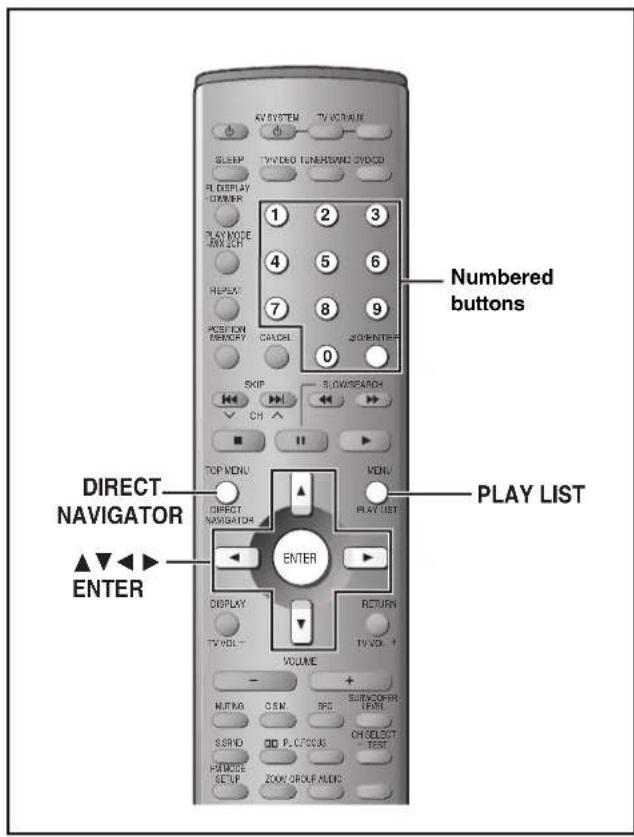
AV SYSTEM TV VOLUME SLEEP TV VIDEO TIMER/WIND VIDEO PL DISPLAY ORDER PLAY MODE MAX SCH 1 2 3 REPEAT 4 5 6 POSITION MEMORY CANCEL 7 8 9 SKIP SCREEN 0 CH ▲ TOP MENU DIRECT NAVIGATOR DIRECT NAVIGATOR4 ENTER DISPLAY VOLUME RETURN TV VOL + MUTING OSM SFD SURVOCORATE LEVEL SSHIO QQ PLC/FOX US CH SELECT TEST POTRICE SETUP ZOOM GROUP ALONG Numbered buttons PLAY LIST DIRECT NAVIGATOR ▲▼◀◀ ENTERRAM
Selecting a program to play —DIRECT NAVIGATOR
Use the program list to find programs to play.
1 Press [DIRECT NAVIGATOR].
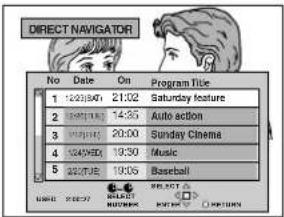
text_image
DIRECT NAVIGATOR No Date On Program Title 1 12/03/07 21:02 Saturday feature 2 12/03/10 14:35 Auto action 3 12/03/12 20:00 Sunday Cinema 4 12/03/15 19:30 Music 5 20/03/16 19:05 Baseball2 Press [▲, ▼] to select the program.
The selected program plays in the background.
- You can select programs with the numbered buttons.
To select a 2-digit number
Example 23: [≥10] → [2] → [3]
3 Press [ENTER].
The program being played in the background continues.
To clear the program list
Press [DIRECT NAVIGATOR].
Note
- Titles appear only if you have entered them.
- You cannot change program and disc titles.
Using the play list menu
You can play a group of scenes, a play list, created on other equipment such as a DVD video recorder.
1 Press [PLAY LIST].
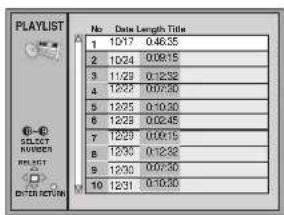
text_image
PLAYLIST 1 10/17 0:46.35 2 10/24 0:09.15 3 11/28 0:12.32 4 12/22 0:07.30 5 12/25 0:10.20 6 12/28 0:02.45 7 12/29 0:06.15 8 12/30 0:12.32 9 12/30 0:07.30 10 12/31 0:10.302 Press [▲, ▼] to select the play list.
- You can select play lists with the numbered buttons.
To select a 2-digit number
Example 23: [≥10] → [2] → [3]
3 Press [ENTER] to start play.
To clear the play list screen
Press [PLAY LIST].
text_image
AV SYSTEM TV WORK SLEEP INVUSIC UNDERHAND DAMAGE T-LOPLAY OWNER PLAY MODE 20X 201 RESET POSTO MEMORY CANCEL 210 ENTER 0 Numbered buttons SKIP SLOWSFANCH CH II TOP MENU MENU DIRECT NAVATOR PLAY LIST ENTER DISPLAY RETURN TV VOL - TV VOL - VOLUME - + - VOUTING C.S.M SRC REMOOPER LEVEL S.ORD PLC TOUS CH SELECT TEST R/NORER SETUP ZOOM GROUP ALDCGRAM DVD-A DVD-V VCD CD WMA MP3
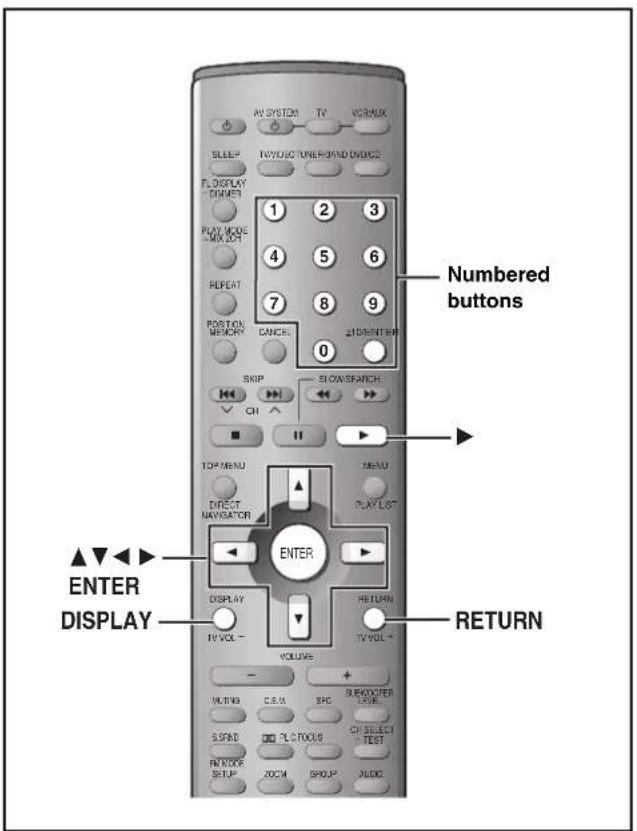
On-Screen Menu Icons are menus that contain information about the disc or unit. These menus allow you to perform operations by changing this information.
Common procedures
1 Press [DISPLAY].
Each time you press the button:
![PANASONIC SC-MT1P - Press [DISPLAY]. - 1](/content/2026/05/797150/images/49f0d0d5c262373cf9b3d152f0bf16bb98618a1541767c89e68aa68e39569e2e.jpg)
flowchart
graph TD
    A["Original display"] --> B["Unit information (→ page 22)"]
    B --> C["Progress indicator (→ right)"]
    C --> D["Disc information (→ page 22)"]
2 Unit information only
While the leftmost icon is highlighted
Press [▲, ▼] to select the menu.
Each time you press the button:
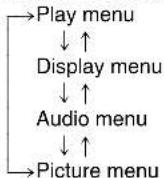
3 Press [◀, ▶] to select the item.
4 Press [▲, ▼] to select the setting.
- Items with “▲” or “▼” above and below can be changed by [▲, ▼].
- Press [ENTER] if the setting does not change after pressing [▲, ▼].
- Some items require different operations. Read the explanations on the following pages.
For your reference
- Depending on the condition of the unit (playing, stopped, etc.) and the type of software you are playing, there are some items that you cannot select or change.
- When numbers are displayed (e.g. title No.), the numbered buttons are also effective for setting. After entering the numbers, press [ENTER] to register the setting.
To clear the menus
Press [RETURN] until the menus disappear.
■ To change the position of the icons
1 Press [◀, ▶] to select the rightmost icon.
2 Press [▲, ▼] to move the icons. (There are 5 positions.)

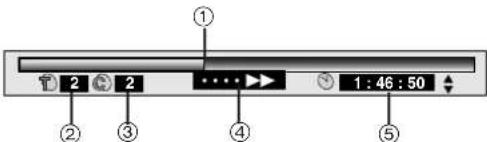
Progress indicator
Indicates how far you have played through an item.
Example DVD-V
text_image
① 2 2 .... 1:46:50 ② ③ ④ ⑤① Current position RAM DVD-A DVD-V VCD CD | WMA | MP3
② PG: Program number RAM
PL: Play list number RAM
T: Title number DVD-V
Track number VCD CD
G: Group number DVD-A WMA MP3
③ T: Track number in group DVD-A WMA MP3
C: Chapter number DVD-V
④ Condition – play, pause, or slow/search
RAM DVD-A DVD-V VCD CD WMA MP3 Play speed (→ below)
⑤ Changing the time display RAM DVD-A DVD-V VCD CD
Press [▲, ▼] to show the elapsed play time or remaining time for the program, play list, track or title (or chapter during program and random play).
Elapsed play time WMA MP3
(display only, cannot be changed)
Changing play speed
DVD-V (Dolby Digital only)
You can slow down or speed up play.
During play
Press [◀] (slower) or [▶] (faster).
There are five speeds:
×0.8←→×0.9←→×1.0 (normal speed)←→×1.2←→×1.4
After you change the speed, output is in stereo.
Sound is stereo as long as "×1.0" is orange.
To return to normal play (surround sound), press [▶] (play) or [ENTER].
Normal play is also restored when you return the speed to ×1.0 and clear the progress indicator.
Unless otherwise indicated, select items with [◀, ▶] and change with [▲, ▼].
Disc information
![PANASONIC SC-MT1P - Press [◀] (slower) or [▶] (faster). - 1](/content/2026/05/797150/images/97f479615a803132ebe5e7eef306dc366a7b445864ec7725956d60d1e6612c1c.jpg)
text_image
2 2 1 : 6 : 50 Digital 1 ENG 3/2.1 ch ON 1 ENG 1 ① ② ③ ④ ⑤ ⑥ Total 12/18 Vocal 1* OFF 128kbps 44.1kHz L R PBC ON Page 1 Return Slideshow 1 ⑦ ⑧ ⑨ ⑩ ⑪ ⑫ ⑬ ⑭ ⑮ ⑯ ⑰ ⑱ ⑲ ⑳ ㉑ ㉒ ㉓ ㉔ ㉕ ㉖ ㉗ ㉘ ㉙ ㉚ ㉛ ㉜ ㉝ ㉞ ㉟ ㉳ ㉟ ㉟ ㉟ ㉟ ㉟ ㉟ ㉟ ㉟ ㉟ ㉟ ㉟| 1 | PG: Program number RAMPL: Play list number RAMG: Group number DVD-A WMA MP3T: Title number DVD-VTrack number VCD CD | [▲,▼]↓[ENTER] |
| 2 | T: Track number in groupDVD-A WMA MP3C: Chapter number DVD-V | |
| 3 | Time RAM DVD-A DVD-VSelect a position to start play byspecifying a time. | Numberedbuttons↓[ENTER] |
| Changing the time displayRAM DVD-A DVD-V VCD CD(WMA MP3 Display only)→Elapsed play time for the program, play list, title or track↓↑Remaining time for the group (DVD-A) or disc(VCD CD)↓↑→Remaining time for the program, play list, title or track | ||
| 4 | Soundtrack RAM DVD-A DVD-V(→ page 17) | |
| 5 | Subtitle language DVD-A DVD-V(→ page 17)Subtitles on/off RAM DVD-A DVD-VTrack information on/off WMA MP3 CD (CD text only) | |
| 6 | Angle number DVD-A DVD-V | |
| 7 | Track number in discWMAMP3 | [▲,▼]↓[ENTER] |
| 8 | Total number of tracks on discWMA MP3 | Display only |
| 9 | Karaoke vocal on/offDVD-V(Karaoke DVD only)If a DVD title is a duet, select V1 or V2 to duet with the unit. | |
| 10 | Current bitrate (kbps)Current sampling frequency (kHz)WMA MP3 | Display only |
| 11 | Audio modeRAMVCDLR←→L←→R↑ | Display only |
| 12 | Menu playVCD(with playback control only) | Display only |
| 13 | Still picture numberDVD-A●To return to page 1[◀,▶]→Select “Return”→[ENTER] | |
| 14 | SlideshowDVD-APicture number | Display only |
Audio/Subtitle language
| ENG: EnglishFRA: FrenchDEU: GermanITA: ItalianESP: SpanishNLD: Dutch | SVE: SwedishNOR: NorwegianDAN: DanishPOR: PortugueseRUS: RussianJPN: Japanese | CHI: ChineseKOR: KoreanMAL: MalayVIE: VietnameseTHA: Thai*: Others |
Unit information
Play menu
![PANASONIC SC-MT1P - Press [◀] (slower) or [▶] (faster). - 2](/content/2026/05/797150/images/4d5819d004cba4b8c16c5758c2f14a6fffdb24d1c5a491648f6c0b5a82791671.jpg)
| 1 | A-B repeat (→ page 15)RAM DVD-A DVD-V VCD CD WMA MP3 | [ENTER] |
| 2 | Repeat mode (→ page 15)RAM DVD-A DVD-V VCD CD WMA MP3 | |
| 3 | Play mode(→ page 16)DVD-A DVD-V VCD CD WMA MP3---: Normal play PGM: Program playRND: Random playALL: All group play (DVD-A) | Display only |
| 4 | MarkerRAM DVD-A DVD-V VCD CD WMA MP3 | → Page 18 |
Audio menu
![PANASONIC SC-MT1P - Press [◀] (slower) or [▶] (faster). - 3](/content/2026/05/797150/images/be6f3639d3a683a7dfad31255a88d78b473655beb3c13b8e565a0321162c1761.jpg)
| 1 | Re-master (→ page 27)RAM DVD-A DVD-V CD WMA MP3 |
| 2 | Dialogue Enhancer on/off DVD-V(Discs where the dialogue is recorded in the center channel)This makes the dialogue in movies easier to hear. |
RQT6719
Display menu

text_image
Normal x1.00 0 0 BR OFF 0 ① ② ③ ④ ⑤| 1 | 4:3 AspectRAM DVD-A DVD-V VCDSelect how to show images made for 4:3 aspect screens on a 16:9 aspect television.Normal: laterally stretches images made for a 4:3 screen.Auto: expands suitable 4:3 letterbox images to fill more of the screen. Other images appear in full in the center of the screen.Shrink: images appear in the center of the screen.Zoom: expands all images to fill the screen.If your television has a similar feature, use it instead for a better effect. | |
| 2 | Zoom (→ page 18)RAM DVD-A DVD-V VCDMaking fine adjustments to the zoom ratio | [ENTER]↓[◀,▶][ENTER] |
| 3 | Subtitle position/Subtitle brightness DVD-A DVD-VPosition (0 to -60): in 2 unit stepsBrightness (Auto*/0 to -9)*The brightness adjusts automatically against the background. | |
| 4 | Bitrate display on/off RAM DVD-A DVD-V VCDDuring play: shows the bitrate (approximate values) of the video being playedWhile paused: shows the data volume of the frame and type of picture (→ page 34, Glossary—I/P/B)9.438 Mbps▲[◀,▶]●Bit rateCur. 7.507 Mbps 5.0Ave. 6.730 MbpsMbpsCurrent bitrate A record of bitrates fora sampling period.Average bitrate | |
| 5 | OSD brightness (-3 to +3)Adjust the brightness of the on-screen displays. | |
Picture menu RAM DVD-A DVD-V VCD

① ② ③:…… Only when "PROG." is on
| 1 | Picture modeN: Normal modeS: Soft mode (Soft picture with fewer video artifacts)F: Fine mode (Details are sharper)C1: Mellows images and enhances detail in dark scenesC2: Sharpens images and enhances detail in darkscenesU1/U2/U3: User mode (→ below) |
| 2 | Video output mode480I: Interlace video480P: Progressive video (“PROG.” is on) |
| 3 | Transfer modeSelect the method of conversion for progressive output to suit the type of material being played.Auto 1 (normal): for viewing film materialAuto 2: for viewing film material (the same as Auto 1, but able to convert 30-frame-per-second progressive video)Video: for video material |
To change the user mode
1 Select User mode and press [▶] to highlight the number.

2 Press [▲, ▼] to select "1", "2" or "3".
U1: MPEG D.N.R. (Digital Noise Reduction)

text_image
U1 0 0 0 0 ① ④ ⑤ ⑥ ⑦| 4 | Depth Enhancer (0 to +4)Reduces the rough noise in the background to give a greater feeling of depth. |
| 5 | 3D-NR (0 to +4)/Dot NR (On)Reduces overall noise/Reduces the dot noise that occurs at the borders between colors. |
| 6 | Block NR (0 to +3)Smoothes block noise. |
| 7 | Mosquito NR (0 to +3)Reduces the smudging that appears around contrasting sections of the picture. |
U2

| 8 | Contrast (-7 to +7)Increases the contrast between light and dark parts of the picture. |
| 9 | Brightness (0 to +15)Brightens the picture. |
| 10 | Sharpness (-7 to +7)Adjusts the sharpness of the edges of the horizontal lines. |
| 11 | Color (-7 to +7)Adjust the shade of the picture's color. |
| 12 | Gamma (0 to +5)Emphasis of outlines. |
U3

text_image
U3 480P Auto1 ① ② ③ Only when "PROG." is on ①-③ (→ above)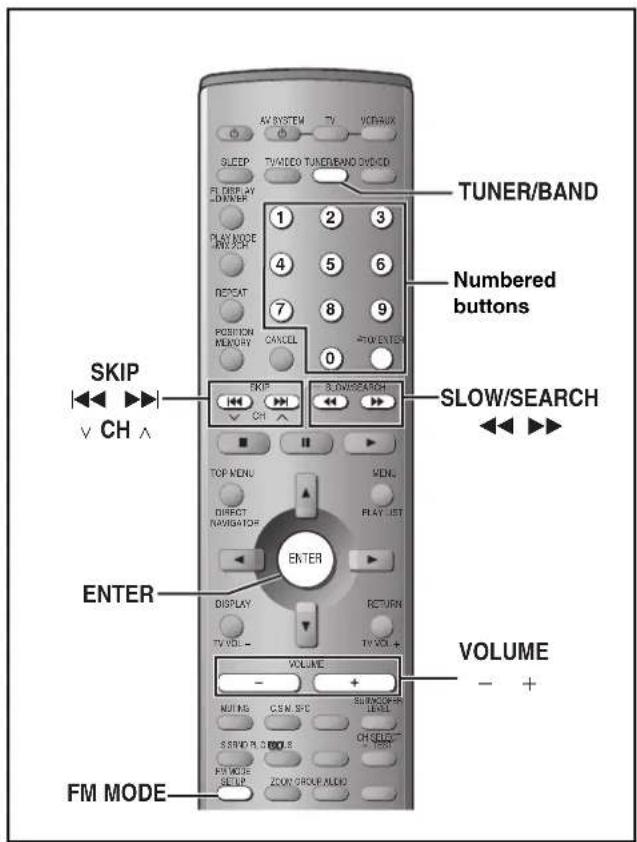
text_image
TUNER/BAND Numbered buttons SLOW/SEARCH SKIP V CH A ENTER DISPLAY TV VOL - VOLUME - + FM MODE NUTING C.S.N.S.P.C SUMMER/OPEN LEVEL SSND NO. COLDERS CH SELIC ON VOUT F.M MODE SETUP ZOOM GROUP AUDIOManual tuning
1 Press [TUNER/BAND] to select "FM" or "AM".
2 Press [◀◀] or [▶▶] to select the frequency of the required station.
TUNED: Displayed when a radio station is tuned.
ST: Displayed when a stereo FM broadcast is being received.
Press and hold [◀◀] or [▶▶] until the frequency starts scrolling to start automatic tuning. Tuning stops when a station is found.
3 Adjust the volume.
■ If noise is excessive in FM
Press [FM MODE] to display "MONO".
Press [FM MODE] again to cancel the mode.
The mode is also canceled when you changed the frequency.
■ FM frequency step
The step is factory-set to 0.2 MHz, but you can change it to receive broadcasts allocated 0.1-MHz steps.
1 Press [TUNER/BAND] to select "FM".
2 Press and hold [TUNER/BAND].
After a few seconds the display changes to show the current minimum frequency. Continue to hold the button down. The minimum frequency changes and the step is changed.
To return to the original step, repeat the above steps.
Note
Any FM frequencies preset in channels will be changed by this procedure. Preset them again.
Preset tuning
Preset channels to make selection simple.
Up to 15 stations can each be set in the FM and AM bands.
Automatic presetting
1 Tune to "FM 87.9 MHz" or "FM 87.5 MHz" ( left).
2 Press and hold [ENTER].
Release the button when "FM AUTO" is displayed.
The tuner presets all the stations it can receive into the channels in ascending order.
"SET OK" is displayed when the stations are set. The last station to be set is then played.
3 Tune to "AM 520 kHz".
4 Press and hold [ENTER].
■ "ERROR" is displayed
Presetting was unsuccessful. Preset manually.
Manual presetting
1 Tune to the station ( left).
2 Press [ENTER].
3 While "PGM" is flashing
Press the numbered buttons to select a channel.
Alternatively, press [|◀◀, ∨ CH] or [▶▶|, CH ∧] then press [ENTER].
The station occupying a channel is erased if another station is preset in that channel.
Selecting channels
1 Press [TUNER/BAND] to select "FM" or "AM".
2 Press the numbered buttons or [◀◀, ∨ CH] or [▶▶|, CH ∧] to select the channel.
To select a 2-digit number
Example: To select channel 12, press [≥10] → [1] → [2]
text_image
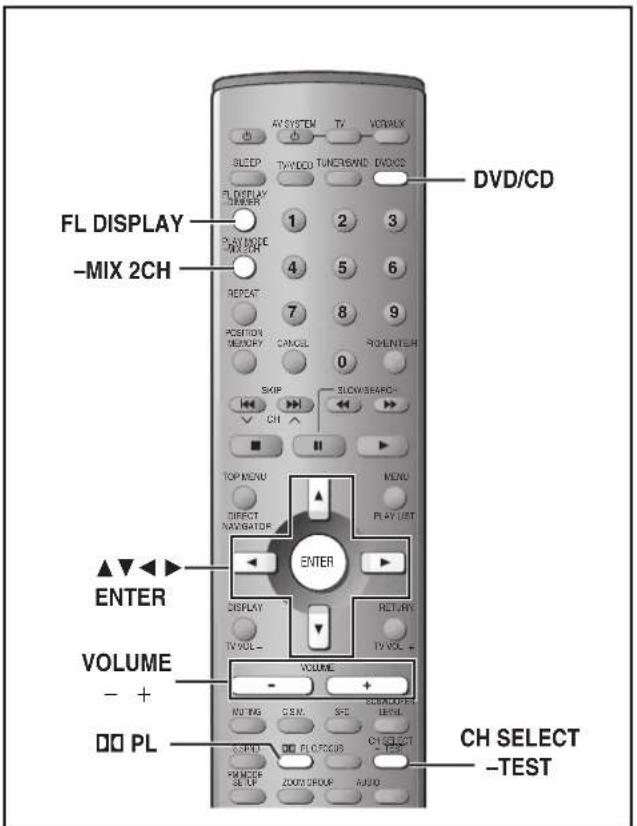
FL DISPLAY -MIX 2CH ENTER VOLUME - + DO PL AV SYSTEM TV VOLUME SLEEP TWOOD TUNERSWIND DVD/CD 1 2 3 4 5 6 7 8 9 0 SPEED RESET MEMORY CANCEL SOLENTUCH SKIP SLOWSHARCH CH MENU PLAY LIST ENTER DISPLAY RETURN TV/VOL - VOLUME + - SUMMER LEVEL COLD FLOODS CH SELECT -TEST CH SELECT -TEST- Dolby Pro Logic, Super Surround, Center Focus and Subwoofer Level adjusting (→ page 27) cannot be used if headphones are connected ("ERROR" appears on the display).
- You may experience a reduction in sound quality when these sound field systems are used with some sources. If this occurs, turn the sound field system off.
Dolby Digital and DTS
- Dolby Digital and DTS are digital encoding systems used on DVD to carry surround sound. Both were originally developed for use in cinemas.
- This unit automatically recognizes and decodes these systems.
Software encoded with Dolby Digital can be identified with this mark.

Software encoded with DTS can be identified with this mark.

Play a Dolby Digital or DTS source.
The Dolby Digital or DTS indicator lights.

■ To down-mix Dolby Digital or DTS (multiple-channel) signals to 2 channels
Press and hold [-MIX 2CH].

To cancel, press and hold [-MIX 2CH] again.
To check the current setting
Press [FL DISPLAY].
When "D.MIX" flashes on the display DVD-A
The DVD-Audio contains multiple-channel signals that cannot be down-mixed.
Dolby Pro Logic
Dolby Pro Logic is a decoding system that was developed to get a better sense of presence from sources encoded with Dolby Surround. The feeling of position has been improved by the addition of a separate center speaker channel.
Software encoded with Dolby Surround can be identified with this mark (DVD, CD, Video CD, Laser Disc, Video tape).
DOLBY SURROUND
1 Press [☐☐PL].
![PANASONIC SC-MT1P - Press [☐☐PL]. - 1](/content/2026/05/797150/images/e8183663feadac325818bcb65f2bb1f55388c1a4284c1c0a3fa5857be8aba983.jpg)
2 Play a Dolby Surround source.
To cancel
Press [☐☐PL] again.
Note
This does not work when playing multi-channel Dolby Digital.
Speaker level adjustments
If the level of the speakers appears to be different while listening to a source, adjust the level of the speakers to the same apparent level.
Preparation
- Press [DVD/CD].
1 Press and hold [-TEST] to output a test signal.
Lch: Front left
Cch: Center
Rch: Front right
RSch: Right surround
LSch: Left surround
2 Press [VOLUME, +] or [-] to set the volume level normally used for enjoying the source.
3 Press [▲] (to increase) or [▼] (to decrease).
L, R: -16 dB to 0 dB
C, RS, LS: -10 dB to +6 dB
To stop the test signal, press and hold [-TEST] again.
■ To adjust speaker level during play
1 Press [CH SELECT] to select the speaker.
Lch→Cch→Rch→RSch→LSch→SWch
SWch: Subwoofer
- You can only adjust SWch if the disc includes a subwoofer channel.
2 Press [▲] (to increase) or [▼] (to decrease).
L, R: -16 dB to 0 dB
C, RS, LS: -10 dB to +6 dB
SW: -10 dB to +10 dB
text_image
AV SYSTEM TV VORIUX SLEEP TUNDED TUNER/BAND DVD F- DISPLAY DANGER 1 2 3 PLAY MODE MIXICO 4 5 6 REPEAT 7 8 9 POSITION MEMORY CANCEL Δ#N ENTER 0 SKIP SLOVSEARCH CH II TOP MENU MENU DIRECT NAVIGATOR PLAY LIST ENTER DISPLAY RETURN TV VOL - TV VOL + VOLUME + - MUTING C.S.M SFC SUBDIVIDER C.C. S.S.R.N.D. C.C. S.S.R.N.D. C.C. S.C.FOCUS INTROCC SETUP ROOM GROUP AUDIO C. FOCUSSuper Surround
Add surround effects to stereo sound.
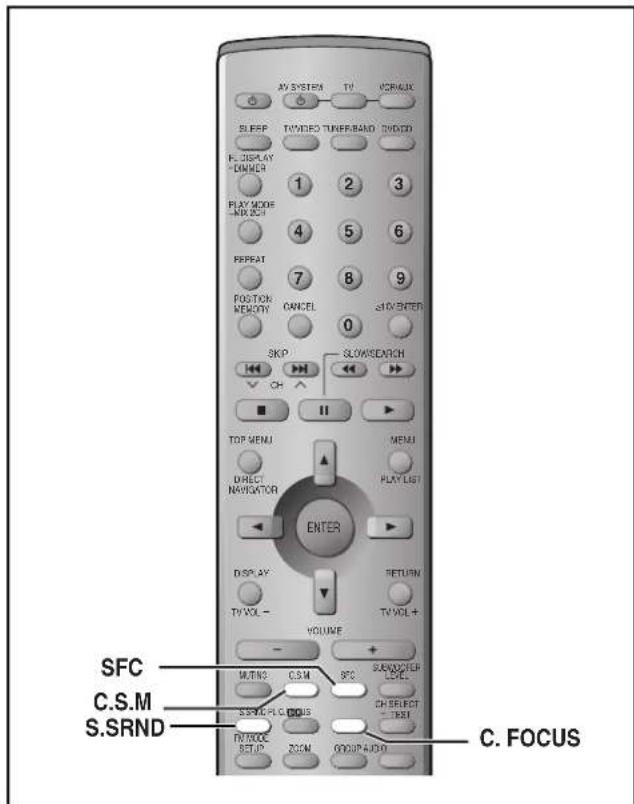
Press [S.SRND].
![PANASONIC SC-MT1P - Press [S.SRND]. - 1](/content/2026/05/797150/images/e383da1e1120964b182b7a2c3eabf5f7dd5d101fb59078417bbbdc575d5039a4.jpg)
Each time you press the button:
MUSIC→MOVIE→OFF
![PANASONIC SC-MT1P - Press [S.SRND]. - 2](/content/2026/05/797150/images/a604d3ff742d634273b08843abeaefccf81f9d734c725e5e423a943ff76e6cef.jpg)
- You can adjust the volume of the surround speakers to get the best surround effect (→ page 25, Speaker level adjustments).
Note
- Turn Super Surround off when playing a DVD recorded with Dolby Digital or DTS. The surround effects will not be reproduced correctly if this is left on.
- Dolby Pro Logic (→ page 25) switches off.
Sound Field Control
Press [SFC] to select a setting.
SFC
Each time you press the button:
HEAVY: Adds punch to rock.
CLEAR: Clarifies higher sounds.
SOFT: For background music.
DISCO: Reverberates sound to make you feel like you were in a disco.
LIVE: Makes vocals more alive.
HALL: Expands sound to make you feel like you were in a hall.
FLAT: Canceled (no effect is added) (factory preset).
To check the current setting
Press [SFC].
Center Focus
You can make the sound of the center speaker seem like it is coming from within the television.
Press [C.FOCUS].
![PANASONIC SC-MT1P - Press [C.FOCUS]. - 1](/content/2026/05/797150/images/ee8729f2a4a10d47b8678fd0bd638b6dd9bc5eb22e85f839b01c0e813737fbcc.jpg)
![PANASONIC SC-MT1P - Press [C.FOCUS]. - 2](/content/2026/05/797150/images/829c43369fb7ecb42468af96d483af2b46de450af32540c81b7fb5e6f06e646f.jpg)
Each time you press the button:
CENTER FOCUS 1 (Normal)→CENTER FOCUS 2 (Enhanced)
![PANASONIC SC-MT1P - Press [C.FOCUS]. - 3](/content/2026/05/797150/images/dc4c4959e4b6829cf5a7f1022d303e0f9daa966476554a90e0e0449971dc84c5.jpg)
●This does not work when Super Surround is turned on.
●This will have less effect when Dolby Pro Logic is turned on.
Custom Sound Memory—Store the sound settings
DVD-A DVD-V VCD CD
Store the sound settings for a disc so the unit recalls them the next time you play it.
●Number of discs: 30
- Settings: Dolby Pro Logic, Subwoofer level, Center Focus, Sound Field Control, Super Surround
■ Store the settings
1 Make the settings.
2 Press and hold [C.S.M].
![PANASONIC SC-MT1P - Press and hold [C.S.M]. - 1](/content/2026/05/797150/images/1d0b4f26ad1d1f2c225e1a00d71c2ccb8ad652e5d73e61c8ae72b955283e090c.jpg)
■ Recall the settings
The unit recalls the settings when you play the disc again.
●The settings are replaced if you change them.
- When you store settings for a 31st disc, the earliest settings disappear.
- Press [C.S.M] while "CSM" is lit and the settings return to those that were on before the settings are recalled.
- Press [C.S.M] while "CSM" is out and you are playing a disc for which you stored settings and those settings are recalled.
text_image
AN SYSTEM TV MORALEX SLEEP TVMERC TUNER/READ DIRECTION F: DISPLAY -DINNER 1 2 3 PLAY MODE -MIX 2CH 4 5 6 PEEPEAT 7 8 9 POSITION MEMORY CANCEL FLOWENTER 0 SKIP SLOVSEARCH CH II TOP MENU MENU DIRECT NAVICATOR PLAYLIST ENTER DISPLAY RETURN TV VOL - TV VOL + VOLUME + SUBWOOFER LEVEL MILTING C.S.M. SPC SUBWOOFER LEVEL SSHINE PL CROOLS ON SEIFOT TEST TV WOICE SETUP ZOOM GROUP AUDIO SUBWOOFER LEVELAdjusting the bass
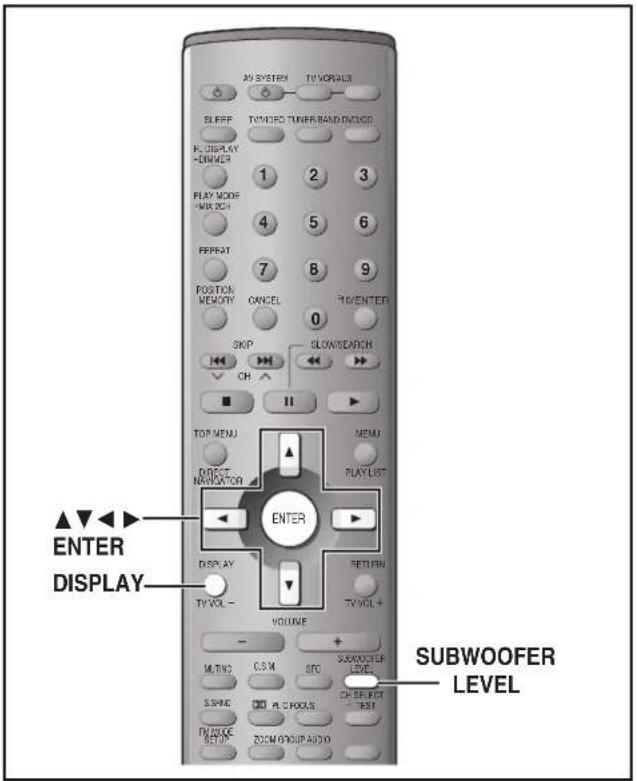
Press [SUBWOOFER LEVEL].
![PANASONIC SC-MT1P - Press [SUBWOOFER LEVEL]. - 1](/content/2026/05/797150/images/70e47ec0f5aae3dc331438b75f1b4d8cd7023fe26d55b7c5fc636005eabece75.jpg)
Each time you press the button:
SUB W 1→SUB W 2→SUB W 3→SUB W 4 (factory preset)
Re-master— Enjoying more natural sound
RAM DVD-A DVD-V CD
Discs recorded with 2-channel LPCM at 44.1 kHz or 48 kHz
This feature gives you a more natural sound by adding the higher frequency signals not recorded on the disc.
WMA MP3
Discs recorded at 44.1 kHz or 48 kHz
This feature reproduces the frequencies lost during recording to give you a sound closer to the original.
1 During play
Press [DISPLAY] until the unit information screen is displayed (→ page 22).
2 Press [▲, ▼] to select the audio menu.
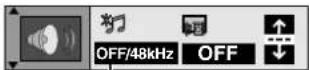
Re-master
3 Press [◀, ▶] to select "Re-master".
4 Press [▲, ▼].
Each time you press the button:
| Setting | RAM DVD-A DVD-V CDType of music | WMA MP3Effect level |
| 1 High tempo (e.g., pops and rock) | Light | |
| 2 Various tempos (e.g., jazz) Medium | ||
| 3 Low tempo (e.g., classical) Strong | ||
| OFF Off Off | ||
text_image
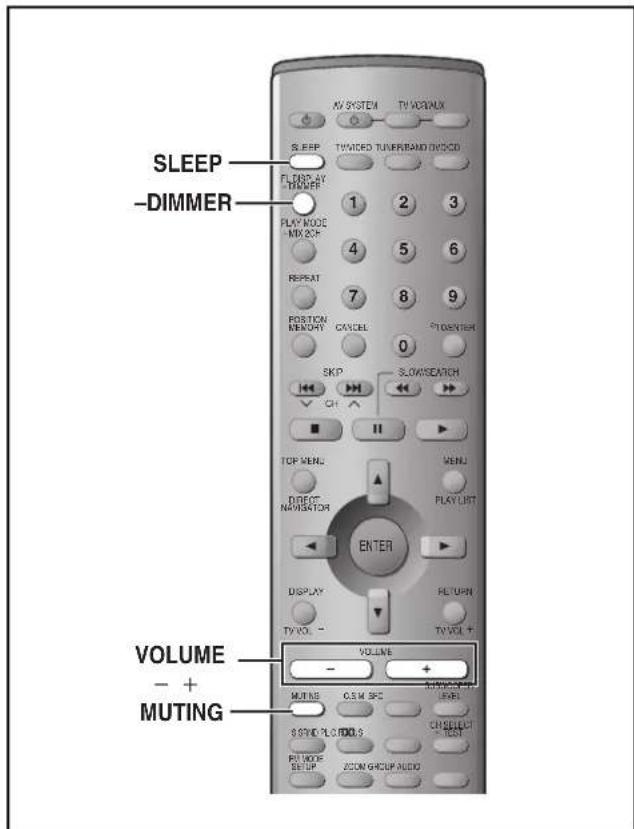
SLEEP -DIMMER VOLUME - + MUTINGMuting the volume
Press [MUTING].
![PANASONIC SC-MT1P - Press [MUTING]. - 1](/content/2026/05/797150/images/f7c309136e34212d5e1f5e5cdbcbd10ad5d9ee4c631bb86d6308ee2a92279350.jpg)
Volume is reduced to minimum.
To cancel
Press [MUTING] again or reduce the volume to minimum (— dB), then raise it to the required level.
Muting is also canceled when you switch the unit to standby.
Dimming the display
Press and hold [-DIMMER].
To return to the original brightness, press and hold [-DIMMER] again.
The display also returns to the original brightness when you switch the unit to standby.
The sleep timer
This timer turns the unit off after a set time.
Press [SLEEP] to select the time (minutes).
![PANASONIC SC-MT1P - Press [SLEEP] to select the time (minutes). - 1](/content/2026/05/797150/images/8909d42093832c27d8432122a287dcadd3c684d6bde8189bc484ee4d1c6087bc.jpg)
text_image
SLEEP SLEEP 30Each time you press the button:
SLEEP 30 → SLEEP 60 → SLEEP 90
SLEEP OFF←SLEEP 120←
To cancel the timer
Press [SLEEP] to select "SLEEP OFF".
To check the SLEEP setting
Press [SLEEP] once.
•The time remaining appears.
To change the setting
Press [SLEEP] to display the remaining time, then press again to select the required time.
Using headphones
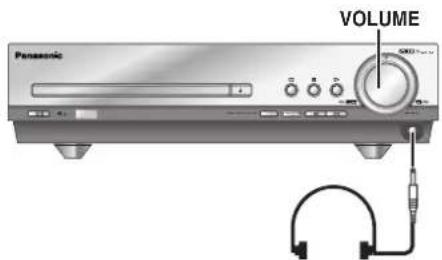
1 Reduce the volume and connect the headphones (not included).
Headphone plug type: 3.5 mm ( ^1/_8 ) stereo
text_image
Panasonic VOLUME 5000+2 Adjust headphone volume with [VOLUME].
Audio is automatically switched to stereo (2-channel).
Note
Avoid listening for prolonged periods of time to prevent hearing damage.
Changing settings
This chart shows the settings for this unit. Change the settings to suit your preferences and to suit the unit to the environment in which it is being used. These settings are retained in memory until they are changed, even if the unit is turned off. See page 30 for details on menu operation.
● Underlined items are the factory preset.
| Menus Items Options | ||
| Disc | AudioChoose the preferred audio language. | English French Spanish Original Other ××××Original: The original language of each disc will be selected.Other * * * * : Input a code number with the numbered buttons (→ page 31). |
| SubtitleChoose the preferred subtitle language. | Automatic English French Spanish Other ××××Automatic: If the language selected for “Audio” is not available, subtitles of that language will automatically appear if available on that disc. | |
| MenusChoose the preferred language for disc menus. | English French Spanish Other ×××× | |
| Ratings (→ page 30)Set a ratings level to limit DVD-Video play.•The password screen is shown if you choose levels 0 to 7 or if you choose “Ratings” when levels 0 to 7 have been selected.•Select “Level 0” to prevent play of discs that do not have ratings levels recorded on them. | Setting ratings (When level 8 is selected)8 No Limit: All DVD-Video can be played.1 to 7: Prohibits play of DVD-Video with corresponding ratings recorded on them.0 Lock All: Prohibits play of all DVD-Video.Changing ratings (When level 0–7 is selected)Unlock Player Change LevelChange Password Temporary Unlock | |
| Video | TV Aspect (→ page 11)Choose the setting to suit your television and preference. | 4:3 Pan&Scan 4:3 Letterbox 16:9 |
| TV Type (→ page 11)Select to suit the type of television. | Standard (Direct View TV)CRT Projector LCD TV/ProjectorProjection TV Plasma TV | |
| Still ModeSpecify the type of picture shown when paused. | Automatic Field Frame | |
| Black Level ControlChange the black level of the picture if you connected a television through the COMPONENT VIDEO OUT terminals. | Lighter: when connected to a TV through the VIDEO OUT or S VIDEO OUT terminal.Darker: when connected to a TV through the COMPONENT VIDEO OUT (Y/PB/PR) terminals. | |
| Audio | Speaker Setting (→ page 30)Set the delay time for your center and surround speakers. | Multi-channelCenter: 0/1.3/2.6/3.9/5.3 msSurround (L/R): 0/5.3/10.6/15.9 ms |
| Dynamic Range Compression (Dolby Digital only)Change the dynamic range for late night viewing. | OffOn: For clear dialog when listening at low volume. | |
| Audio during SearchChoose whether to have sound during search. | OnOffThis feature doesn’t work for some discs. | |
| Display | Menu LanguageChoose the preferred language for these menus and the on-screen messages. | English Français Español |
| On-Screen MessagesChoose whether to show on-screen messages or not. | On Off | |
| Others | DVD-Video ModeSelect how to play pictures contained on some DVD-Audio. The setting returns to “Off” when you remove the disc, turn the unit off or change the source. | Off: DVD-Audio are played as DVD-Audio.On: DVD-Video contents found on DVD-Audio can be played. |
| QUICK SETUP (→ page 11)Answer questions to make basic settings. | Yes (Menu language, Audio language, Subtitle language, TV type, TV aspect)No | |
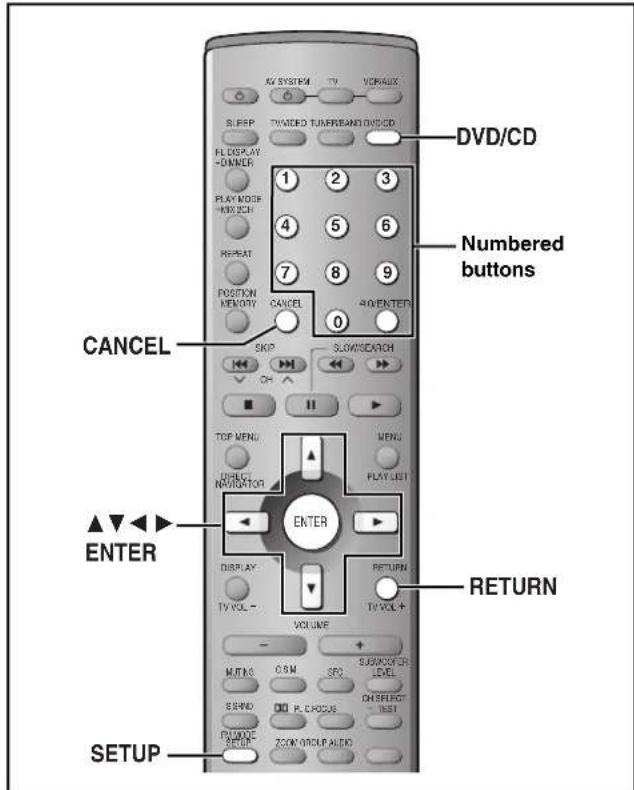
text_image
DV/DVD/CD Numbered buttons CANCEL ENTER RETURN SETUP AV SYSTEM TV VORALEX SLEEP TV/RWD TURR/BAND DVD/C FL DISPLAY -DINNER PLAY MODE -MIX/CH REPEAT POSITION MEMORY CANCEL 40/ENTER SKIP SLOW/SEARCH TOP MENU MENU DIRECT NAVIGATION PLAY LIST ENTER DISPLAY RETURN TV VOL TV VOL + VOLUME MINING O&M SPO SWITCHER 2.5MP DIO PLC/ACCESS CHECKOUT TEST PUMBOE RESET ZOOM/ROCKU AUDIOCommon procedures
See page 29 for menu and option details.
Preparation
Press [DVD/CD].
1 Press [SETUP] to show the menus.
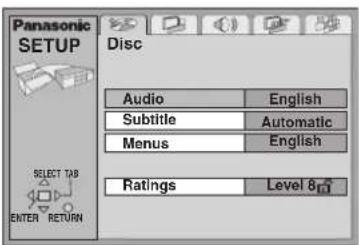
text_image
Panasonic SETUP Disc Audio English Subtitle Automatic Menus English Ratings Level 8 SELECT TAB ENTER RETURN2 Press [◀, ▶] to select the menu's tab.
The screen changes to display the menu.
Disc Video Audio Display Others

flowchart
graph LR
    A["Input Data"] <--> B["Processing Unit"]
    B <--> C["Speaker"]
    C <--> D["Storage System"]
    D --> E["Output"]
3 Press [▲, ▼] to select the item you want to change and press [ENTER].
4 Press [▲, ▼, ◀, ▶] to select the option and press [ENTER].
The screen now shows the menu again.
To return to the previous screen
Press [RETURN].
When you are finished
Press [SETUP].
RQT6719
Entering a password (Ratings)
DVD-V
The password screen is shown when you select levels 0 to 7.
1 Input a 4-digit password with the numbered buttons and press [ENTER].
- If you enter a wrong number, press [CANCEL] to erase it before you press [ENTER].
●The lock symbol appears closed to show the rating is locked. - Do not forget your password.
2 Press [ENTER] to confirm the 4 digits.
Now, when you insert a DVD-Video that exceeds the ratings limit you set, a message appears on the television.
Follow the on-screen instructions.
Changing the delay time (Speaker Setting)
DVD-V
(Center and surround speakers only)
For optimum listening with 5.1-channel sound, all the speakers, except for the subwoofer, should be the same distance from the seating position. If you have to place the center or surround speakers closer to the seating position, adjust the delay time to make up for the difference.
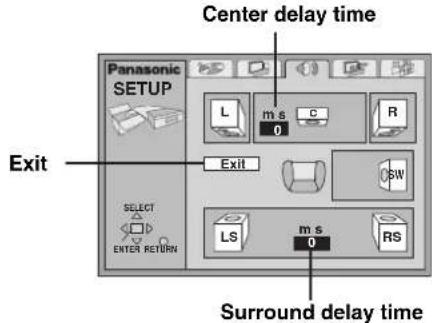
text_image
Center delay time Panasonic SETUP L m s C R 0 Exit Exit SW SELECT LS m s 0 RS ENTER RETURN Surround delay time1 Press [▲, ▼, ◀, ▶] to select the delay time box and press [ENTER].
2 Press [▲, ▼] to adjust the delay time and press [ENTER].
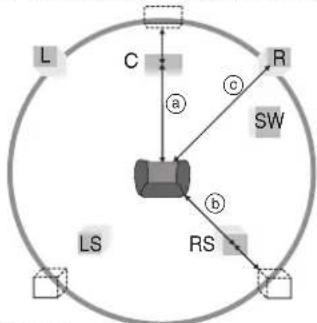
flowchart
graph TD
    L --> C
    C --> R
    R --> SW
    SW --> RS
    RS --> LS
    style A fill:#f9f,stroke:#333
    style B fill:#ccf,stroke:#333
    style C fill:#cfc,stroke:#333
    style D fill:#fcc,stroke:#333
    style E fill:#cff,stroke:#333
    style F fill:#ffc,stroke:#333
    style G fill:#cfc,stroke:#333
    style H fill:#fcc,stroke:#333
    style I fill:#ffc,stroke:#333
    style J fill:#cfc,stroke:#333
    style K fill:#fcc,stroke:#333
Values
If distance ① or ② is greater than or equal to distance ③, set to "0". If distance ④ or ⑤ is less than distance ⑥, set as follows.
(a) Center speaker
| Difference | Setting |
| Approx. 50 cm ( 1^1/2 feet) | 1.3 ms |
| Approx. 100 cm (3 feet) | 2.6 ms |
| Approx. 150 cm (5 feet) | 3.9 ms |
| Approx. 200 cm (6 feet) | 5.3 ms |
b Surround speakers
| Difference | Setting |
| Approx. 200 cm (6 feet) | 5.3 ms |
| Approx. 400 cm (12 feet) | 10.6 ms |
| Approx. 600 cm (18 feet) | 15.9 ms |
When you are finished
Press [▲, ▼, ◀, ▶] to select "Exit" and press [ENTER].
| Abkhazian: 6566 | Chinese: 9072 | Hausa: 7265 | Lithuanian: 7684 | Romanian: 8279 | Telugu: 8469 |
| Afar: 6565 | Corsican: 6779 | Hebrew: 7387 | Macedonian: 7775 | Russian: 8285 | Thai: 8472 |
| Afrikaans: 6570 | Croatian: 7282 | Hindi: 7273 | Malagasy: 7771 | Samoan: 8377 | Tibetan: 6679 |
| Albanian: 8381 | Czech: 6783 | Hungarian: 7285 | Malay: 7783 | Sanskrit: 8365 | Tigrinya: 8473 |
| Ameharic: 6577 | Danish: 6865 | Icelandic: 7383 | Malayalam: 7776 | Scots Gaelic: 7168 | Tonga: 8479 |
| Arabic: 6582 | Dutch: 7876 | Indonesian: 7378 | Maltese: 7784 | Serbian: 8382 | Turkish: 8482 |
| Armenian: 7289 | English: 6978 | Interlingua: 7365 | Maori: 7773 | Serbo-Croatian: 8372 | Turkmen: 8475 |
| Assamese: 6583 | Esperanto: 6979 | Irish: 7165 | Marathi: 7782 | Shona: 8378 | Twi: 8487 |
| Aymara: 6588 | Estonian: 6984 | Italian: 7384 | Moldavian: 7779 | Sindhi: 8368 | Ukrainian: 8575 |
| Azerbaijani: 6590 | Faroese: 7079 | Japanese: 7465 | Mongolian: 7778 | Singhalese: 8373 | Urdu: 8582 |
| Bashkir: 6665 | Fiji: 7074 | Javanese: 7487 | Nauru: 7865 | Slovak: 8375 | Uzbek: 8590 |
| Basque: 6985 | Finnish: 7073 | Kannada: 7578 | Nepali: 7869 | Slovenian: 8376 | Vietnamese: 8673 |
| Bengali; Bangla:6678 | French: 7082 | Kashmiri: 7583 | Norwegian: 7879 | Somali: 8379 | Volapük: 8679 |
| Bhutani: 6890 | Frisian: 7089 | Kazakh: 7575 | Oriya: 7982 | Spanish: 6983 | Welsh: 6789 |
| Bihari: 6672 | Galician: 7176 | Kirghiz: 7589 | Pashto, Pushto: 8083 | Sundanese: 8385 | Wolof: 8779 |
| Breton: 6682 | Georgian: 7565 | Korean: 7579 | Persian: 7065 | Swahili: 8387 | Xhosa: 8872 |
| Bulgarian: 6671 | German: 6869 | Kurdish: 7585 | Polish: 8076 | Swedish: 8386 | Yiddish: 7473 |
| Burmese: 7789 | Greek: 6976 | Laotian: 7679 | Portuguese: 8084 | Tagalog: 8476 | Yoruba: 8979 |
| Byelorussian: 6669 | Greenlandic: 7576 | Latin: 7665 | Punjabi: 8065 | Tajik: 8471 | Zulu: 9085 |
| Cambodian: 7577 | Guarani: 7178 | Latvian, Lettish: 7686 | Quechua: 8185 | Tamil: 8465 | |
| Catalan: 6765 | Gujarati: 7185 | Lingala: 7678 | Rhaeto-Romance: 8277 | Tatar: 8484 |
Optional antenna connections
Use outdoor antennas if radio reception is poor.
Note
Disconnect the antenna when the unit is not in use.
Do not use the outdoor antenna during an electrical storm.
AM outdoor antenna (Using a vinyl wire)
Run a piece of vinyl wire horizontally across a window or other convenient location. 5–12 m

text_image
AM ANT EXT LOOP FM ANT 75½ (16–39 feet) Leave the loop antenna connected. FM outdoor antenna (Using a television antenna) • Disconnect the FM indoor antenna. • The antenna should be installed by a competent technician. Rework your outdoor antenna's 75 Ω coaxial cable as follows. 75 Ω coaxial cable (not included) Antenna plug (included)① Remove a piece of the outer vinyl insulator.
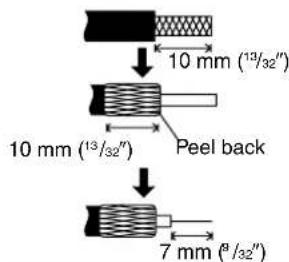
text_image
10 mm (13/32") 10 mm (13/32") Peel back 7 mm (3/32")② Carefully pull the tabs apart to remove the cover.
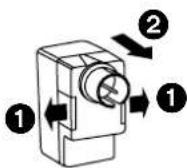
③ Install the coaxial cable.
Clamp the cable conductor, and wind it on so that it does not contact anything else.
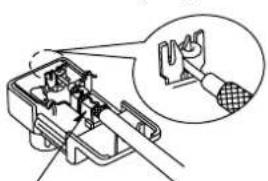
natural_image
Diagram of a hand holding a tool, showing internal components and a magnified view (no text or symbols)Clamp with pliers
④ Attach the cover.
RQT6719
Operating a television or video cassette recorder
You can use the remote control to operate a Panasonic television or a video cassette recorder. (Some models cannot be operated by this remote control.)
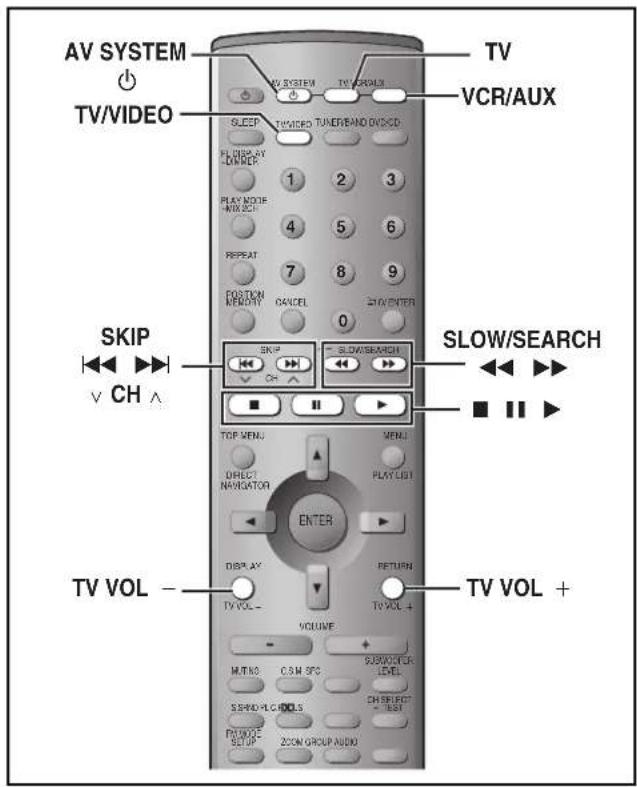
text_image
AV SYSTEM TV/VIDEO SLEEP TV/VIDEO TUNER/BAND OXICO VCR/AUX SKIP ✓ CH ^ TV VOL - TV VOL + TV VOL - VOLUME MUTNO C.M. SPC SUBVATOR LEVEL SPRING-PLC DOOLS CH SELECT LIST FROM/DO SET UP ZOOM GROUP AUDIO ENTER TOP MENU MENU DIRECT NAVIGATOR PLAY LIST DISPLAY RETURN TV VOL - TV VOL + SLOW/SEARCHOperating a television
Preparation
- Face the remote control at this unit and press [TV]. The button lights and "TV" appears on the unit's display. You can now operate the television.
- Face the remote control at the television for the following operations.
Turning the television on/off
Press [⏻ AV SYSTEM].
Switching the television's video input mode Press [TV/VIDEO].
Changing channels
Press [|◀◀, ∨ CH] or [▶▶|, CH ∧].
Adjusting the volume
Press [TV VOL+] or [TV VOL-].
Playing the television through this unit's speakers
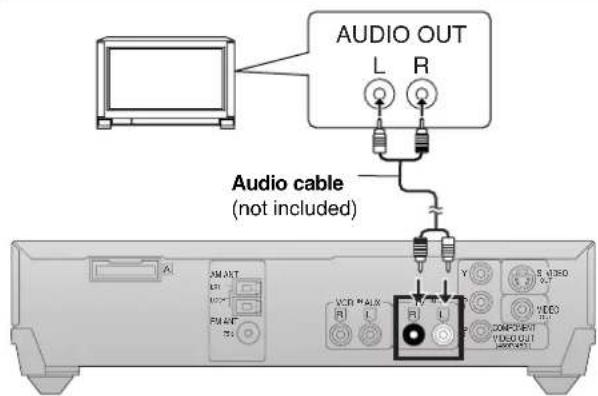
text_image
AUDIO OUT L R Audio cable (not included)RQT6719
Reduce the volume on the television to minimum and control the volume on this unit.
Operating a video cassette recorder
Connection example
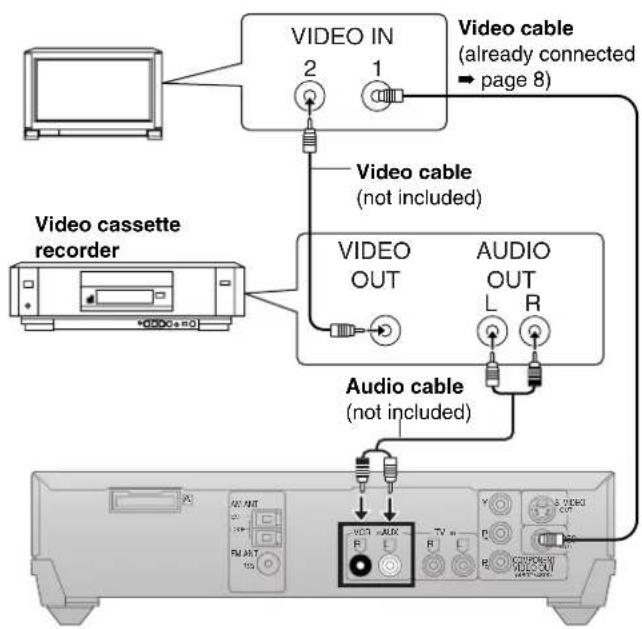
flowchart
graph TD
    A["Video cassette recorder"] --> B["VIDEO OUT"]
    A --> C["VIDEO IN"]
    B --> D["Audio OUT L R"]
    C --> E["Audio cable (not included)"]
    D --> F["TV 100"]
    E --> G["TV 100"]
    H["Monitor"] --> I["Video cable (already connected → page 8)"]
    J["Audio cable (not included)"] --> K["Video cable (not included)"]
Preparation
- Face the remote control at this unit and press [VCR/AUX]. The button lights and "VCR/AUX" appears on the unit's display. You can operate the video cassette recorder.
- Change the video input mode on the television ("VIDEO 2" in the example).
- Face the remote control at the video cassette recorder for the following operations.
Turning the video cassette recorder on/off Press [☐ AV SYSTEM].
Play, pause and stop
Press [▶], [■] or [■].
Fast forward and rewind
Press [◀◀] or [▶▶].
You can connect a laser disc or record player instead of a video cassette recorder.
Connect as shown above and select "VCR/AUX" as the source.
When connecting a record player
We recommend using a record player with a built-in phono equalizer. If your player doesn't have a built-in equalizer, connect it first to a separate equalizer and then connect that to this unit.
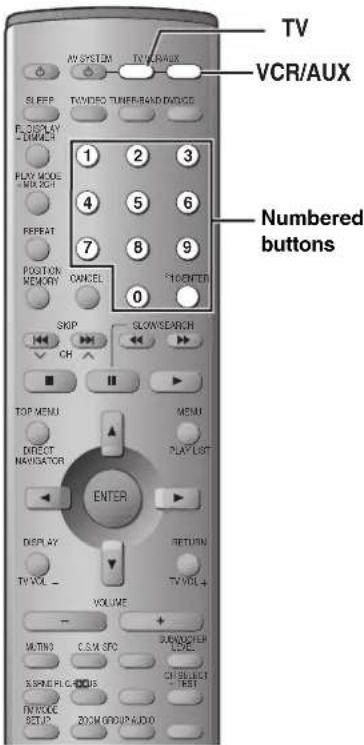
text_image
TV VCR/AUX 1 2 3 4 5 6 7 8 9 0 Numbered buttons SHOP SLOWSearch CH TOP MENU MENU DIRECT NAVIGATOR PLAY LIST ENTER DISPLAY RETURN TV VOL - VOLUME MUTING C.S.M SPC SUNBUCKER SPRING RED CIOUS CH SELECT TEST TWO/CCC SET UP ZOOM GROUP AUDIOChanging the remote control code
The remote control can also operate some other brands of televisions and video cassette recorders. Change the code to operate such equipment and some Panasonic products.
While aiming the remote control at the equipment,
Press and hold [TV] or [VCR/AUX],
Press a numbered button to enter the first digit,
Press a numbered button to enter the second digit.
The remote control outputs the on/off signal.
If the code is correct, the equipment turns on or off.
If it doesn't, try entering another code.
- Note that this remote control cannot operate some equipment and that it may not be able to perform some operations.
● Reenter the codes after you change the batteries.
| Television code list | Video cassette recorder code list | ||
| Panasonic: 01, 02, 26Sony: 04Fisher: 14G-E: 02, 03, 07, 09Gold Star: 07, 15Hitachi: 05, 07JVC: 12LXI: 03, 06, 07, 10, 14, 15Magnavox: 06, 07, 11, 15, 22Mitsubishi: 07, 15, 16, 21NEC: 07, 15 | Philco: 06, 07Philips: 06Pioneer: 02, 10, 19Quasar: 02RCA: 03, 07, 09, 13, 23, 24, 25Sanyo: 14Sharp: 08, 21Sylvania: 06, 07, 15Symphonic: 17Toshiba: 10, 21Zenith: 18, 20 | Panasonic: 01, 02, 09, 33Sony: 05, 06, 07, 35, 36, 37Fisher: 13, 14, 15, 18, 34Funai: 08, 30G-E: 02, 03, 11Gold Star: 27Hitachi: 09, 10, 11JVC: 19, 25, 31, 38, 39, 40LXI: 10, 13, 14, 15, 18, 27, 30Magnavox: 02, 09, 12Mitsubishi: 21, 22, 28, 29NEC: 19, 25, 31, 38 | Philco: 02, 09, 12, 30Philips: 02, 09, 12Pioneer: 09Quasar: 01, 02, 09, 33RCA: 02, 03, 04, 09, 10, 11, 12, 23, 24, 26Sanyo: 14, 18, 34Sharp: 16, 17Shintom: 32Sylvania: 02, 09, 12, 30Symphonic: 30Toshiba: 23, 24Zenith: 20 |
Glossary
Decoder
A decoder restores the coded audio signals on DVDs to normal. This is called decoding.
Dolby Digital
This is a method of coding digital signals developed by Dolby Laboratories. Apart from stereo (2-channel) audio, these signals can also be multi-channel audio. A large amount of audio information can be recorded on one disc using this method.
Dolby Pro Logic
A surround system where a 4-channel audio track is recorded as 2 channels and then is restored to 4 channels for play. The surround channel is monaural and can reproduce up to 7 kHz.
DTS (Digital Theater Systems)
This surround system is used in many movie theaters around the world. There is good separation between the channels, so realistic sound effects are possible.
Dynamic range
Dynamic range is the difference between the lowest level of sound that can be heard above the noise of the equipment and the highest level of sound before distortion occurs.
Film and video
DVD-Videos are recorded using either film or video. Usually, film is recorded at 24 frames per second, the rate movies are filmed at, while video is recorded at 30 frames per second.
Frame still and field still
Frames are the still pictures that go together to make a moving picture. There are about 30 frames shown each second. One frame is made up of two fields. A regular television shows these fields one after the other to create frames.
A still is shown when you pause a moving picture. A frame still is made up of two alternating fields, so the picture may appear blurred, but overall quality is high.
A field still is not blurred, but it has only half the information of a frame still so picture quality is lower.
Interlace and progressive output
NTSC, the video signal standard, has 480 interlaced (I) scan lines, whereas progressive scanning uses twice the number of scan lines. This is called 480P. The video signals output from this unit's COMPONENT VIDEO OUT terminals (Y, PB, PR) allow you to enjoy higher quality pictures than if the signals were output from the VIDEO OUT terminal or S VIDEO OUT terminal.
I/P/B
MPEG 2, the video compression standard adopted for use with DVD-Video, codes frames using these 3 picture types.
I: Intra coded picture
This picture has the best quality and is the best to use when adjusting the picture.
P: Predictive coded picture
This picture is calculated based on past I or P-pictures.
B: Bidirectionally-predictive coded picture
This picture is calculated by comparing past and future I and P-pictures so it has the lowest volume of information.
Linear PCM (pulse code modulation)
These are uncompressed digital signals, similar to those found on CDs.
Playback control (PBC)
If a Video CD has playback control, you can select scenes and information with menus.
WMA, MP3, and CD text information
- Discs must conform to ISO9660 level 1 or 2 (except for extended formats).
- This unit is compatible with multi-session but if there are a lot of sessions it takes more time for play to start. Keep the number of sessions to a minimum to avoid this.
- The order tracks appear in the menus may differ to the order shown on your computer.
WMA
- Noise may occur when playing WMA files.
- You cannot play WMA files that are copy protected.
MP3
- This unit is not compatible with ID3 tags.
- If you play an MP3 track that includes still picture data, it will take some time before the music itself starts playing and the elapsed time will not be displayed during this time. Even after the track starts, the correct play time will not be displayed.
Order of play
WMA MP3
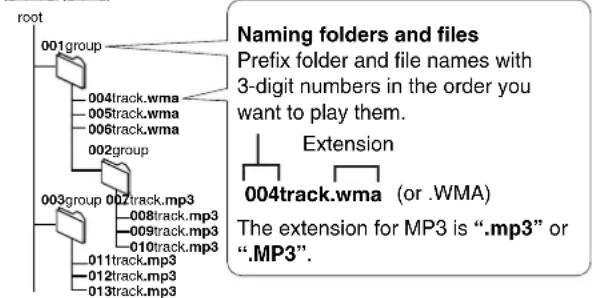
flowchart
graph TD
    A["root"] --> B["001group"]
    B --> C["004track.wma"]
    C --> D["005track.wma"]
    D --> E["006track.wma"]
    E --> F["002group"]
    F --> G["003group"]
    G --> H["007track.mp3"]
    H --> I["008track.mp3"]
    I --> J["009track.mp3"]
    J --> K["010track.mp3"]
    K --> L["011track.mp3"]
    L --> M["012track.mp3"]
    M --> N["013track.mp3"]
CD (CD text only)
When making your own CD text discs
The unit plays the tracks in the order you record them so you do not have to prefix the titles with numbers.
Windows Media, and the Windows logo are trademarks, or registered trademarks of Microsoft Corporation in the United States and/or other countries.
WMA is a compression format developed by Microsoft Corporation. It achieves the same sound quality as MP3 with a file size that is smaller than that of MP3.

MPEG Layer-3 audio decoding technology licensed from Fraunhofer IIS and Thomson multimedia.
Specifications
AMPLIFIER SECTION
RMS Output Power: Dolby Digital Mode, 10 % Total Harmonic Distortion
1 kHz Front CH 55 W per channel 6 Ω
1 kHz Surround CH 55 W per channel 6 Ω
1 kHz Center CH 160 W per channel 6 Ω
100 Hz Subwoofer CH 220 W per channel 4 Ω
Total RMS Dolby Digital Mode Power 600 W
RMS Output Power Stereo Mode:
1 kHz Front CH 45 W per channel 6 Ω
100 Hz Subwoofer CH 220 W per channel 4 Ω
Total RMS Stereo Mode Power 310 W
FTC Output Power: Dolby Digital Mode, 1 % Total Harmonic Distortion
120 Hz–20 kHz Front CH 30 W per channel 6 Ω
120 Hz–20 kHz Surround CH 30 W per channel 6 Ω
120 Hz–20 kHz Center CH 110 W per channel 6 Ω
45 Hz–120 Hz Subwoofer CH 140 W per channel 4 Ω
Total FTC Dolby Digital Mode Power 370 W
FTC Output Power Stereo Mode:
120 Hz–20 kHz Front CH 25 W per channel 6 Ω
45 Hz–120 Hz Subwoofer CH 140 W per channel 4 Ω
Total FTC Stereo Mode Power 190 W
Input sensitivity/Input impedance
AUX 350 mV, 10 kΩ
FM TUNER SECTION
Frequency range 87.9–107.9 MHz (200-kHz step)
87.5–108.0 MHz (100-kHz step)
Sensitivity 2.5 μV (IHF)
S/N 26 dB 2.2 μV
Antenna terminals 75 Ω (unbalanced)
Preset station 15
AM TUNER SECTION
Frequency range 520–1710 kHz (10-kHz step)
AM Sensitivity S/N 20 dB at 1000 kHz 560 μV/m
Preset station 15
DISC SECTION
Disc played (one layer per side)
DVD-Audio/Video 8 cm/12 cm, single/double-sided,
single/double-layer
DVD-RAM/R (DVD-Video formatted discs)
CD (CD-DA), Video-CD
CD/VCD/MP3/WMA 8 cm/12 cm, CD-R/RW
Video
Signal system NTSC
Output level Composite video 1 Vp-p (75 Ω)
S-video Y 1 Vp-p (75 Ω)
S-video C 0.286 Vp-p (75 Ω)
Audio
Sampling frequency
CD 44.1 kHz
MP3 32 kHz, 44.1 kHz, 48 kHz
DVD 48 kHz, 96 kHz, 192 kHz
Bitrate
MP3 32–320 kbps
Decoding 16/20/24 bit linear
Pick up
Beam Source Semiconductor Laser
Wavelength
CD/VCD 780 nm
DVD 658 nm
Number of channels 5.1 ch (FL, FR, SL, SR, C, SW)
Frequency response 20 Hz–20 kHz (+1, -2 dB)
Wow and flutter Less than possible measurement data
Digital filter 8 fs
D/A converter Delta signal DAC
SPEAKER SECTION
Front/Surround speakers SB-FS801A
Type 1 way, 1 speaker, Bass-ref.
Speakers
Full range 6.5 cm (2 ^1/2'' ) cone type 6 Ω
Input power 60 W (Music)
Output sound pressure level 79 dB/W (1.0 m)
Frequency range 110 Hz–25 kHz (−16 dB)
130 Hz–22 kHz (−10 dB)
Dimensions (W×H×D) 110×226×133 mm (4 ^11 /32"×8 ^29 /32"×5 ^1 /4")
(With stand)
Mass 0.93 kg (2.1 lb.)
Center speaker SB-PC700
Type 1 way, 2 speaker, Bass-ref.
Speakers
Full range 6.5 cm (2 ^1/2'' ) cone type 6 Ω
Input power (with filter) 220 W (Music)
Output sound pressure level 82 dB/W (1.0 m)
Frequency range 110 Hz–25 kHz (−16 dB)
130 Hz–22 kHz ( -10 dB)
Dimensions (W×H×D) 250×140×145 mm (9 ^27/32 ″×5 ^1/2 ″×5 ^23/32 ″)
(With stand)
Mass 1.6 kg (3.5 lb.)
Active subwoofer SB-WA340
Type 1 way, 1 speaker, Bass-ref.
Speaker unit
Woofer 17 cm (6 ^3/4 ) cone type 6 Ω
Input power 240 W (Music)
80 dB/W (1.0 m)
Frequency range 40 Hz–220 Hz (−16 dB)
45 Hz–180 Hz (−10 dB)
Dimensions (W×H×D) 160×450×424 mm
(6^5 / 16'' × 17^23 / 32'' × 16^11 / _16'')
Mass 12 kg (26.5 lb.)
GENERAL
Power supply AC 120 V, 60 Hz
Power consumption SA-MT1 25 W
SB-WA340 250 W
Dimensions (W×H×D) 280×76×316 mm (11"×3"×12 ^7/16 ")
Mass 2.4 kg (5.3 lb.)
Power consumption in standby mode (Subwoofer) 0.5 W
Note
-
Specifications are subject to change without notice. Mass and dimensions are approximate.
-
Total harmonic distortion is measured by the digital spectrum analyzer.
Troubleshooting guide
Before requesting service, make the below checks. If you are in doubt about some of the check points, or if the remedies indicated in the chart do not solve the problem:
In the U.S.A., contact the Panasonic Customer Call Center at 1-800-211-7262, or e-mail consumerproducts@panasonic.com, or web site (http://www.panasonic.com).
In Canada, contact Panasonic Canada Inc. Customer Care Centre at 1-800-561-5505, web site (www.panasonic.ca), or an authorized Servicentre closest to you.
Power Page
| No power. | ●Insert the AC power supply cord and system cable securely. | 9 |
| The unit is automatically switched to the standby mode. | ●The unit was switched to standby by the sleep timer. | 28 |
Operation
| No response when buttonspressed. | Some operations may be prohibited by the disc.The unit may not be operating properly due to lightning, static electricity or some other external factor.Reset procedure:Press [⏻] to switch the unit to the standby mode and then back to ON.Alternatively, press [⏻] to switch the unit to the standby mode, disconnect the AC power supply cord, and then reconnect it. | —— |
| No operations can be performed with the remote control. | Check that the batteries are installed correctly.The batteries are depleted: Replace them with new ones.Point the remote control at the remote control sensor and operate. | 99— |
| Cannot switch on the television with the remote control. | Press [TV] first to operate the television. — | |
| Play doesn't start (or stops immediately) when you press [▶] (play). | Condensation has formed: Wait 1 to 2 hours for it to evaporate.This unit cannot play discs other than the ones listed in these operating instructions.This unit cannot play DVD-Video with a region number other than “1”, “ALL” or multiple region numbers including “1”.The disc may be dirty and may require cleaning.Ensure that the disc is installed with the label of the side to be played facing upwards.Check that the DVD-RAM has something recorded on it. | ——5Cover513— |
| Cannot select alternative languages. | This function is dependent on software availability.Try selecting from the disc's menu if one is available. | ——14 |
| No menu play. | This function is dependent on software availability. | — |
| No subtitles. | This function is dependent on software availability.Subtitles are cleared from the television. Display the subtitles. | ——17 |
| The position of the subtitles is incorrect. | Change the position of the subtitles with “Subtitle Position” in the on-screen icon menus. | 23 |
| Soundtrack and/or subtitle language is not the one selected with the SETUP menus. | This function is dependent on software availability. | — |
| Cannot change angle. | This function is dependent on software availability. Even if a disc has a number of angles recorded, these angles may be recorded for specific scenes only. | — |
| The SETUP menu cannot be accessed. | Select “DVD/CD” as the source.Cancel all group, program and random play. | ——16 |
| Cannot add markers. | You cannot add markers while playing a play list or if the disc's play time doesn't appear on the unit's display. | — |
| There are already markers. RAM | The unit reads and displays the markers added with a DVD video recorder. You can clear them but reappear when you switch the unit to standby, change the source, or open the disc tray. | — |
| Marker numbers I added are different when I call them up.RAM | The unit numbers markers by time so they change when you add and delete them. | — |
| Cannot select random or program play. | You cannot select random or program play with some DVD-Video. | — |
| Folders deeper than the eighth layer on a data CD are not displayed correctly. | Folders deeper than the eighth layer are displayed as the eighth layer. | — |
| You have forgotten your ratings password.Reset all the SETUP settings to Factory Preset. | While stopped and “DVD/CD” is the source, press and hold [■] on the unit and [≥10] on the remote control for about 3 seconds until “Initialized” disappears from the television. Turn the unit off and on again.All settings will return to the default values. | — |
Sound
| No sound. Distorted sound. | ●Check the connections. ●Turn the volume up. ●Turn muting off. ●Switch off the unit, determine and correct the cause, then switch the unit on. Causes include: -Shorting (bare wires touching) of positive and negative speaker wires. -Using speakers with an impedance lower than that rated for this unit. -Straining of the speakers through excessive volume or power. -Using the unit in a hot environment without proper ventilation. | 7 — 28 — |
| Humming heard during play. | ●An AC power supply cord or fluorescent light is near the subwoofer. Keep other appliances and cords away from the subwoofer. | — |
Picture
| Picture distorted. | ●Some distortion is normal during SEARCH. | — |
| No picture. ●Check the connection. | ●Make sure the television is on.●Ensure the television's video input setting (e.g., VIDEO 1) is correct. | 8—— |
| The picture shown on the television is not normal.(The sides of the picture are cut off, the picture is stretched horizontally, or black bands appear at the top and bottom of the screen.) | ●Go to Video in the SETUP menus, and change “TV Aspect” to suit your television.●Use the television to change the aspect to the correct one.If your television cannot change the aspect when input is progressive, try changing 4:3 Aspect with the on-screen menu icons.●Ensure that the unit is connected directly to the television, and is not connected through a video cassette recorder.●Connect to the component video (480P) input terminals on a television compatible with this unit’s copy guard system. You cannot view progressive video if your television is not compatible.●Change the size with the variable zoom function.●The images on PAL system DVD-Audio are compressed for display. They may also appear vertically stretched. | 29——23——818— |
| There is ghosting when progressive output is on. | ●Press [PROGRESSIVE OUT] so the indicator goes out. This problem is caused by the editing method or material used on DVD-Video, but should be corrected if you use interlace output. | 13 |
| Picture quality is poor. | ●Check the settings in the On-Screen Menu Icons’ Picture Menu.●The “U1” settings do not work on the images from PAL system DVD-Audio. | 2323 |
| The picture on the television disappears or stripes appear on the screen. | ●Mobile telephone chargers can cause some disturbance.●The location and orientation of the antenna are incorrect. If you are using an indoor antenna, change to an outdoor antenna.●The television antenna wire is too close to the unit. Separate the antenna wire of the television from the unit. | ——31— |
| Menus not displayed correctly. | ●Change the zoom ratio to “×1.00”.●With the on-screen icon menus, change “Subtitle Position” to “0” or change “4:3 Aspect” to “Normal”. | 1823 |
Listening to the radio
| Noise is heard.“ST” flickers or doesn’t light.Sound is distorted. | ●Adjust the position of the FM or AM antenna.●Use an outdoor antenna. | —31 |
| A beat sound is heard. | ●Turn the television off or separate it from the unit. | — |
| A low hum is heard during AM broadcasts. | ●Separate the antenna from other cables and cords. — |
Troubleshooting guide
Unit displays
| The display is dark. | ●Press and hold [–DIMMER] to brighten the display. | 28 |
| “NO PLAY” | ●You inserted a disc the unit cannot play; insert one it can.●You inserted a blank DVD-RAM. | 5— |
| “NO DISC” ●You haven’t inserted a disc; insert one.●You haven’t inserted the disc correctly; insert it correctly. | —13 | |
| “F61” ●Check and correct the speaker cord connections.If this does not fix the problem, there is a power supply problem. Consult the dealer. | 7 | |
| “DVD U11” | ●Disc is dirty. Wipe it clean. | 5 |
| “ERROR” | ●Incorrect operation performed. Read the instructions and try again. | — |
| “DVD H□□”□□ stands for a number. | ●Trouble may have occurred. The number following “H” depends on the status of the unit.Reset procedure:Press [⏻] to switch the unit to the standby mode and then back to ON. Alternatively, press [⏻] to switch the unit to the standby mode, disconnect the AC power supply cord, and then reconnect it.●If the service numbers fail to clear, note the service number and contact a qualified service person. | —— |
Television displays
| No on-screen display. | ●Go to Display in the SETUP menus, and select “On” for “On-Screen Messages”. | 29 |
| On-Screen Menu Icons not displayed or only partially displayed on the television. | ●Press [▲, ▼] while the rightmost icon is highlighted to move them down. | 21 |
| The disc’s menu is displayed in a different language. | ●Go to Disc in the SETUP menus, and select the preferred language for “Menus”. | 29 |
Product Service
- Damage requiring service—The unit should be serviced by qualified service personnel if:
(a) The AC power supply cord or AC adaptor has been damaged; or
(b) Objects or liquids have gotten into the unit; or
(c) The unit has been exposed to rain; or
(d) The unit does not operate normally or exhibits a marked change in performance; or
(e) The unit has been dropped or the cabinet damaged.
- Servicing—Do not attempt to service the unit beyond that described in these operating instructions. Refer all other servicing to authorized servicing personnel.
- Replacement parts—When parts need replacing ensure the servicer uses parts specified by the manufacturer or parts that have the same characteristics as the original parts. Unauthorized substitutes may result in fire, electric shock, or other hazards.
- Safety check—After repairs or service, ask the servicer to perform safety checks to confirm that the unit is in proper working condition.
The servicer will require all components to service your system.
Therefore, should service ever be necessary, be sure to bring the entire system.
Product information
For product information or assistance with product operation:
In the U.S.A., contact the Panasonic Customer Call Center at 1-800-211-7262, or e-mail consumerproducts@panasonic.com, or web site (http://www.panasonic.com).
In Canada, contact Panasonic Canada Inc. Customer Care Centre at 1-800-561-5505, web site (www.panasonic.ca), or an authorized Servicentre closest to you.
Maintenance
To clean this unit, wipe with a soft, dry cloth.
●Never use alcohol, paint thinner or benzine to clean this unit.
- Before using chemically treated cloth, read the instructions that came with the cloth carefully.
Before moving the unit, ensure the disc tray is empty.
Failure to do so will risk severely damaging the disc and the unit.
Panasonic Consumer Electronics Company, Division of Matsushita Electric Corporation of America One Panasonic Way Secaucus, New Jersey 07094
Panasonic Sales Company, Division of Matsushita Electric of Puerto Rico, Inc. Ave. 65 de Infantería, Km. 9.5 San Gabriel Industrial Park, Carolina, Puerto Rico 00985
Panasonic/Technics Audio Products Limited Warranty
Limited Warranty Coverage
If your product does not work properly because of a defect in materials or workmanship, Panasonic Consumer Electronics Company or Panasonic Sales Company (collectively referred to as "the warrantor") will, for the length of the period indicated on the chart below, which starts with the date of original purchase ("warranty period"), at its option either (a) repair your product with new or refurbished parts, or (b) replace it with a new or a refurbished product. The decision to repair or replace will be made by the warrantor.
| Product or Part Name Parts Labor | ||
| Audio Products (except items listed below) | One (1) year One (1) year | |
| All Audio Racks (cabinets) Thirty (30) | days | Not Applicable |
| Technics Stand Alone Speakers, Subwoofer Speakers | Three (3) years Three (3) years | |
| USB Reader-Writer, Personal Computer Card Adapters(in exchange for defective item) | One (1) year Not Applicable | |
| Accessories: Headphones, Cartridges, Microphones, Adapters | Ninety (90) days | Ninety (90) days |
| Rechargeable Batteries (In exchange for defective item) | Ten (10) days Not Applicable | |
| SD Memory Cards, Rechargeable Battery Packs (in exchange for defective item) | Ninety (90) days | Not Applicable |
During the "Labor" warranty period there will be no charge for labor. During the "Parts" warranty period, there will be no charge for parts. You must carry-in or mail-in your product during the warranty period. If non-rechargeable batteries are included, they are not warranted. This warranty only applies to products purchased and serviced in the United States or Puerto Rico. This warranty is extended only to the original purchaser of a new product which was not sold "as is". A purchase receipt or other proof of the original purchase date is required for warranty service.
Carry-In or Mail-In Service
For Carry-In or Mail-In Service in the United States call 1-800-211-PANA (1-800-211-7262) or visit Panasonic web site: http://www.panasonic.com For assistance in Puerto Rico call Panasonic Sales Company (787)-750-4300 or fax (787)-768-2910.
Limited Warranty Limits And Exclusions
This warranty ONLY COVERS failures due to defects in materials or workmanship, and DOES NOT COVER normal wear and tear or cosmetic damage. The warranty ALSO DOES NOT COVER damages which occurred in shipment, or failures which are caused by products not supplied by the warrantor, or failures which result from accidents, misuse, abuse, neglect, mishandling, misapplication, alteration, faulty installation, set-up adjustments, misadjustment of consumer controls, improper maintenance, power line surge, lightning damage, modification, or commercial use (such as in a hotel, office, restaurant, or other business), rental use of the product, service by anyone other than a Factory Servicenter or other Authorized Servicer, or damage that is attributable to acts of God.
THERE ARE NO EXPRESS WARRANTIES EXCEPT AS LISTED UNDER “LIMITED WARRANTY COVERAGE”. THE WARRANTOR IS NOT LIABLE FOR INCIDENTAL OR CONSEQUENTIAL DAMAGES RESULTING FROM THE USE OF THIS PRODUCT, OR ARISING OUT OF ANY BREACH OF THIS WARRANTY. (As examples, this excludes damages for lost time, travel to and from the servicer, loss of media or images, data or other memory content. The items listed are not exclusive, but are for illustration only.) ALL EXPRESS AND IMPLIED WARRANTIES, INCLUDING THE WARRANTY OF MERCHANTABILITY, ARE LIMITED TO THE PERIOD OF THE LIMITED WARRANTY.
Some states do not allow the exclusion or limitation of incidental or consequential damages, or limitations on how long an implied warranty lasts, so the exclusions may not apply to you. This warranty gives you specific legal rights and you may also have other rights which vary from state to state. If a problem with this product develops during or after the warranty period, you may contact your dealer or Servicenter. If the problem is not handled to your satisfaction, then write to the warrantor's Consumer Affairs Department at the addresses listed for the warrantor.
PARTS AND SERVICE WHICH ARE NOT COVERED BY THIS LIMITED WARRANTY ARE YOUR RESPONSIBILITY.
Customer Services Directory
For Product Information, Operating Assistance, Literature Request, Dealer Locations, and all Customer Service inquiries please contact: 1-800-211-PANA (7262), Monday–Friday 9 am–9 pm; Saturday–Sunday 9 am–7 pm, EST. or send e-mail: consumerproducts@panasonic.com For hearing or speech impaired TTY users, TTY: 1-877-833-8855
Web Site: http://www.panasonic.com You can purchase parts, accessories or locate your nearest servicenter by visiting our Web Site.
Accessory Purchases:
1-800-332-5368 (Customer Orders Only)
For hearing or speech impaired TTY users, TTY: 1-866-605-1277
Panasonic Services Company 20421 84th Avenue South, Kent, WA 98032
(6 am to 5 pm Monday–Friday; 6 am to 10:30 am Saturday; PST)
(Visa, MasterCard, Discover Card, American Express, Check)
Service in Puerto Rico Matsushita Electric of Puerto Rico, Inc. Panasonic Sales Company/Factory Servicenter: Ave. 65 de Infanteria, Km. 9.5, San Gabriel Industrial Park, Carolina, Puerto Rico 00985 Phone (787) 750-4300 Fax (787) 768-2910
Listening caution


Selecting fine audio equipment such as the unit you've just purchased is only the start of your musical enjoyment. Now it's time to consider how you can maximize the fun and excitement your equipment offers. This manufacturer and the Electronic Industries Association's Consumer Electronics Group want you to get the most out of your equipment by playing it at a safe level. One that lets the sound come through loud and clear without annoying blaring or distortion—and, most importantly, without affecting your sensitive hearing.
We recommend that you avoid prolonged exposure to excessive noise.
Sound can be deceiving. Over time your hearing "comfort level" adapts to higher volumes of sound. So what sounds "normal" can actually be loud and harmful to your hearing.
Guard against this by setting your equipment at a safe level BEFORE your hearing adapts.
To establish a safe level:
- Start your volume control at a low setting.
- Slowly increase the sound until you can hear it comfortably and clearly, and without distortion.
Once you have established a comfortable sound level:
- Set the dial and leave it there.
Taking a minute to do this now will help to prevent hearing damage or loss in the future. After all, we want you listening for a lifetime.
Manufactured under license from Dolby Laboratories.
"Dolby", "Pro Logic" and the double-D symbol are trademarks of Dolby Laboratories.
Manufactured under license from Digital Theater Systems, Inc. US Pat. No. 5,451,942, 5,956,674, 5,974,380, 5,978,762 and other world-wide patents issued and pending. "DTS" and "DTS Digital Surround" are registered trademarks of Digital Theater Systems, Inc. © 1996, 2000 Digital Theater Systems, Inc. All rights reserved.
Apparatus Claims of U.S. Patent Nos. 4,631,603, 4,577,216, and 4,819,098, licensed for limited viewing uses only.
This product incorporates copyright protection technology that is protected by method claims of certain U.S. patents and other intellectual property rights owned by Macrovision Corporation and other rights owners. Use of this copyright protection technology must be authorized by Macrovision Corporation, and is intended for home and other limited viewing uses only unless otherwise authorized by Macrovision Corporation. Reverse engineering or disassembly is prohibited.
For U.S.A.

As an ENERGY STAR® Partner, Panasonic
has determined that this product meets the
ENERGY STAR® guidelines for energy
efficiency.
Panasonic Consumer Electronics Company, Division of Matsushita Electric Corporation of America
One Panasonic Way Secaucus,
New Jersey 07094
http://www.panasonic.com
Panasonic Sales Company, Division of Matsushita Electric of Puerto Rico, Inc. ("PSC")
San Gabriel Industrial Park, Carolina,
Puerto Rico 00985
Panasonic Canada Inc.
5770 Ambler Drive
Mississauga, Ontario
L4W 2T3
www.panasonic.ca

© 2003 Matsushita Electric Industrial Co., Ltd.
Printed in Singapore
RQT6719-P
F0103MF0