Invoicing (2010) - Logiciel photo/vidéo PayPal - Free user manual and instructions
Find the device manual for free Invoicing (2010) PayPal in PDF.


User questions about Invoicing (2010) PayPal
0 question about this device. Answer the ones you know or ask your own.
Ask a new question about this device
Download the instructions for your Logiciel photo/vidéo in PDF format for free! Find your manual Invoicing (2010) - PayPal and take your electronic device back in hand. On this page are published all the documents necessary for the use of your device. Invoicing (2010) by PayPal.
USER MANUAL Invoicing (2010) PayPal
Invoicing User's Guide
PayPal Invoicing User's Guide
Document Number: 10115.en_US-201009
© 2010 PayPal, Inc. All rights reserved. PayPal is a registered trademark of PayPal, Inc. The PayPal logo is a trademark of PayPal, Inc. Other trademarks and brands are the property of their respective owners.
The information in this document belongs to PayPal, Inc. It may not be used, reproduced or disclosed without the written approval of PayPal, Inc.
Copyright © PayPal. All rights reserved. PayPal S.à r.l. et Cie, S.C.A., Société en Commandite par Actions. Registered office: 22-24 Boulevard Royal, L-2449, Luxembourg, R.C.S. Luxembourg B 118 349
Consumer advisory: The PayPal™ payment service is regarded as a stored value facility under Singapore law. As such, it does not require the approval of the Monetary Authority of Singapore. You are advised to read the terms and conditions carefully.
Notice of non-liability:
PayPal, Inc. is providing the information in this document to you “AS-IS” with all faults. PayPal, Inc. makes no warranties of any kind (whether express, implied or statutory) with respect to the information contained herein. PayPal, Inc. assumes no liability for damages (whether direct or indirect), caused by errors or omissions, or resulting from the use of this document or the information contained in this document or resulting from the application or use of the product or service described herein. PayPal, Inc. reserves the right to make changes to any information herein without further notice.
Contents
Preface 7
About This Guide 7
Intended Audience 7
Revision History 7
Where to Go for More Information . . . . . . . . . . . . . . . . . . . . . . . . . . . . . . . . . . . . . . . . . . . . . . . . . . . . . . . 7
Documentation Feedback 7
Chapter 1 About Invoicing . . . . . . . . . . . . . . . . . . . . . . . . . . . . . . . . . . . . . . . . . . . . . 9
What is Invoicing? 9
What's the Difference Between Request Money and Invoicing?....9
Invoicing End-to-End. 10
What Does Your Customer See? 11
Accessing PayPal Invoicing 13
Chapter 2 Creating Invoices .....15
The Invoicing Process 15
What's in an Invoice? 17
Creating Invoices and Entering Details 17
- Accessing the Create a New Invoice Page . . . . . . . . . . . . . . . . . . . . . . . . . . . 19
- Entering Your Contact Information ..... 19
- Entering Recipient Information 20
- Entering Invoice Information 23
- Entering Item Information 24
- Entering a Discount, Shipping Fee, and Invoice Notes ..... 26
- Finalizing an Invoice 27
Previewing Invoices 28
Previewing an Invoice 30
Saving Invoices 30
Saving an Invoice as a Draft. 30
Sending Invoices....31
Sending an Invoice 31
Printing Invoices 32
Printing an Invoice from the Preview Page 33
Printing an Invoice from the Invoice Details Page 34
Chapter 3 Managing Your Invoices....35
About the Manage Invoices Page 35
About Invoice Statuses 37
Searching Invoices.... 38
About the Basic Filters. 39
About the Advanced Filters 39
Searching Invoices with a Basic Filter 40
Searching Invoices with an Advanced Filter. 41
Reviewing Invoice Details 42
Opening Invoice Details From the Manage Invoice Page 45
Editing Invoices 47
Editing an Invoice 47
Exporting Invoice Information 49
Invoice Summary Activity Information 50
Invoice Details Activity Information 50
Downloading and Saving Invoice Activity 51
Downloading and Opening Invoice Activity 53
Copying Invoices....54
Copying an Invoice from the Manage Invoices Page 54
Copying an Invoice from the Invoice Details Page 54
Sending Invoice Reminders 55
Sending a Reminder....55
Canceling Invoices....56
Canceling an Invoice from the Manage Invoices Page 56
Canceling an Invoice from the Invoice Details Page. 57
Archiving and Unarchiving Invoices 58
Archiving an Invoice 58
Unarchiving an Invoice. 59
About Invoices and Shipping. 61
Chapter 4 Managing Invoice Payments....63
About Invoice Payments 63
Viewing PayPal Invoice Payments....63
Viewing a PayPal Invoice Payment 64
Recording Invoice Payments. 65
Marking an Invoice as Paid 65
Viewing and Editing Manually Recorded Payments 66
Chapter 5 Customizing Your Invoice Information .....69
About Invoice Customization. 69
Customizing Your Contact Information. 69
Editing Your Contact Information in an Invoice 70
Editing Your Contact Information in Invoice Settings 72
Including a Logo in Your Invoices 74
Adding a Logo When You Create an Invoice 75
Adding a Logo in Invoice Settings 76
Changing Your Invoice Logo. 77
Deleting Your Invoice Logo 78
Including a Logo on Your Payment Page 79
Adding Your Payment Logo 79
Changing Your Payment Logo in Invoice Settings. 80
Deleting Your Payment Logo in Invoice Settings 81
Chapter 6 Working with Invoice Templates. . . . . . . . . . . . . . . . . . . . . . . . . . . . . . . . . . . . . . . . . . . . . . . . . . . . . . . . . . . . . . . . . . . . . . . . . . . . . . . . .
About Invoice Templates....83
How Invoice Settings Relate to Invoice Template Contents 84
Working with Templates 85
Creating Templates 87
Saving an Invoice as a Template 87
Creating a Template in the Create a New Invoice Page. 89
Adding a Template in Invoice Settings. 91
Managing Templates....94
About the Manage Your Templates Page 94
Editing a Template....94
Setting the Default Template....98
Previewing Templates 99
Deleting Templates 101
Chapter 7 Working with the Address Book. . . . . . . . . . . . . . . . . . 103
About the Address Book 103
Accessing the Address Book. 104
Adding Contacts to the Address Book . . . . . . . . . . . . . . . . . . . . . . . . . . . . . . . . . . . . . . . . . . . . . . . . . . . . . . . . . . . 104
Saving Recipient Information to the Address Book .....104
Adding a Contact in the Address Book Page . . . . . . . . . . . . . . . . . . . . . . . . . . . . . . . . . . . . . . . . . . . . . . . . . . . . . 107
Editing Address Book Entries 110
Editing a Contact. 110
Searching for Contacts. 114
Searching for a Contact . . . . . . . . . . . . . . . . . . . . . . . . . . . . . . . . . . . . . . . . . . . . . . . . . . . . . . . . . . 115
Deleting Address Book Entries. 115
Deleting Contacts . . . . . . . . . . . . . . . . . . . . . . . . . . . . . . . . . . . . . . . . . . . . . . . . . . . . . . . . . . . . 116
Chapter 8 Working with Saved Items. . . . . . . . . . . . . . . . . . . . . . . . . 119
About Saved Items. 119
What's in a Saved Item?....120
Adding a Saved Item. 120
Adding an Item in an Invoice. 120
Adding an Item in Invoice Settings. . . . . . . . . . . . . . . . . . . . . . . . . . . . . . . . . . . . . . . . . . . . . . . . . . . . . . . . . . . 121
Editing Saved Items 123
Editing a Saved Item. 123
Deleting Saved Items 125
Deleting a Saved Item . . . . . . . . . . . . . . . . . . . . . . . . . . . . . . . . . . . . . . . . . . . . . . . . . . . . . . . . . . . 125
Chapter 9 Managing Your Tax Information ..... 127
About Tax Information 127
Adding Tax Information. 128
Adding Tax Information in an Invoice or Template....128
Adding Tax Information in Invoice Settings . . . . . . . . . . . . . . . . . . . . . . . . . . . . . . . . . . . . . . . . . . . . . 130
Adding Tax Information in a Saved Item . . . . . . . . . . . . . . . . . . . . . . . . . . . . . . . . . . . . . . . . . . . . . . . . . . . . . . . . . . 131
Editing Tax Information. 132
Editing a Tax. 133
Deleting Tax Information 134
Deleting a Tax . . . . . . . . . . . . . . . . . . . . . . . . . . . . . . . . . . . . . . . . . . . . . . . . . . . . . . . . . . . . . . . . 134
Chapter 10 Invoice Administration ..... 135
Managing Your Invoices and Payments . . . . . . . . . . . . . . . . . . . . . . . . . . . . . . . . . . . . . . . . . . . . . . . . . . . . . . . . . 135
Maintaining Your Invoice Settings .....136
Adding Users to Perform Invoicing Tasks . . . . . . . . . . . . . . . . . . . . . . . . . . . . . . . . . . . . . . . . . . . . . . . . . . . 136
Invoicing and Reporting 137
About This Guide
The Invoicing User's Guide describes how to create and send invoices in your PayPal account.
Intended Audience
This guide is for merchants and secondary users who log in to PayPal accounts to create and send invoices.
Revision History
The following table lists the revisions made to the Invoicing User's Guide.
TABLE 1.1 Revision History for This Guide
| Date Published Description |
| September 2010 New guide. |
Where to Go for More Information
For information on the administrative tasks you can perform from your PayPal account, see the Merchant Setup and Administration Guide. The guide is located on the Documentation page linked to the Library tab in Developer Central.
Documentation Feedback
Help us improve this guide by sending feedback to:
documentationfeedback@paypal.com
1
About Invoicing
PayPal Invoicing lets you create and send professional invoices through email. You can save invoice information for re-use, reducing the amount of time it takes to create invoices.
Read the following topics to learn more about PayPal Invoicing:
- “What is Invoicing?” on page 9
- “What’s the Difference Between Request Money and Invoicing?” on page 9
- “Invoicing End-to-End” on page 10
- “What Does Your Customer See?” on page 11
- “Accessing PayPal Invoicing” on page 13
What is Invoicing?
PayPal Invoicing provides a way to create and send invoices to your customers. Invoicing lets you save item details, tax rates, and recipients so you can use them for future invoices. You can customize how your business information appears on the invoices, making them more professional.
PayPal provides a default invoice template for you to use or you can create your own customized templates. Using customized templates saves time by storing details about your items, prices, and standard tax rates.
Using Invoicing, you send invoices by email and get paid through PayPal. Your invoice recipients can view and pay through their PayPal accounts. Recipients without PayPal accounts can pay you in several other ways.
Invoicing does not replace the Request Money feature. You can still use Request Money for those items that don't need an invoice. You access both the Invoicing and Request Money features from the Request Money tab in your PayPal account.
What's the Difference Between Request Money and Invoicing?
Use Request Money to request payment for goods or services where tracking item detail is not required, or when sending payment requests to multiple recipients. You must enter the total amount to be paid because Request Money does not calculate tax or add shipping amounts for you. When your recipients look at details of the money request, they see your name and email address, the amount and date requested, a subject line, and any notes you entered. When you view a payment request in History, you see the request information and payment information when the request is paid.
Use Invoicing to request payments for goods or service when you want to provide item details, have the tax and discount amounts automatically calculated, and you want to track and manage your invoices and payments. When your recipients review an invoice, they see your customized contact information, payment terms, line item details including unit prices and taxes, shipping and discount information, and invoice totals. When you view the invoice in Manage Invoices, you see the same details your recipient sees, invoice status information, and payment information when the invoice is paid.
Invoicing End-to-End
Invoicing has two participants: you and your customer. You create, send, and manage invoices. Your customer, the invoice recipient, receives the invoice and makes a payment.
The following illustrates the invoice flow for both you and your customer.
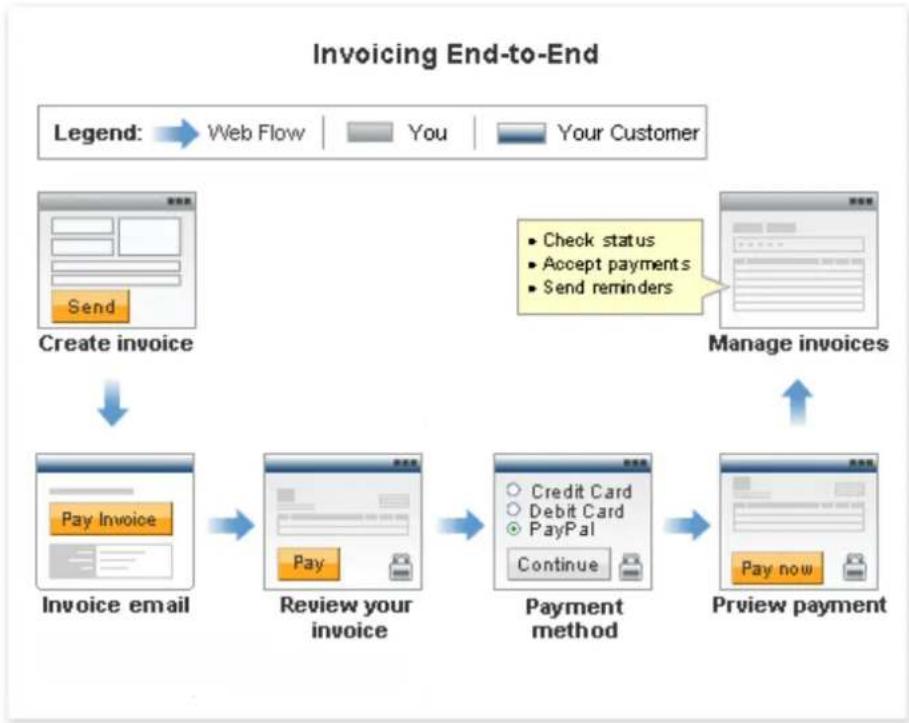
flowchart
graph TD
    A["Create invoice"] --> B["Invoice email"]
    B --> C["Review your invoice"]
    C --> D["Payment method"]
    D --> E["Preview payment"]

    F["Manage invoices"] --> E

    G["Web Flow"] --> A
    H["You"] --> A
    I["Your Customer"] --> A

    J["Check status"] --> D
    K["Accept payments"] --> D
    L["Send reminders"] --> D

    M["Pay Now"] --> E

    N["Pay"] --> C
    O["Continue"] --> D
- You create the invoice.
When you create an invoice, you identify the invoice recipient, set the payment terms, enter item details, enter shipping or discount amounts, and enter notes to the recipient, if necessary. When you send the invoice, an email is sent to the invoice recipient.
See "Creating Invoices" on page 15 for instructions.
- Your customer receives an email that contains a link to the invoice.
Customers can use the email link to view invoices. PayPal account holders can view invoices through their PayPal accounts.
- Your customer opens the invoice and reviews it.
You customer can start the payment process by clicking Pay.
- Your customer determines the payment method.
Your customer can pay in one of two ways:
– Using a PayPal account.
- By credit or debit card, check, or bank transfer.
- Your customer reviews the payment.
After reviewing the payment information, your customer approves the payment.
- You manage invoices and payments.
You can check an invoice's status and determine whether to send a reminder about payment, cancel the invoice, or print the invoice to mail to the recipient.
When you receive a PayPal payment, PayPal updates the invoice status and provides a link to the Transaction Details for the payment. The money is added to your account.
If your customer pays by another method, you can manually record the payment for the invoice.
See “Managing Invoice Payments” on page 63 and “Managing Your Invoices” on page 35 for more information.
See “What Does Your Customer See?” on page 11 for more information about your customer’s payment experience.
What Does Your Customer See?
When you send invoices, email notifications are sent to your customers (invoice recipients). Invoice emails contain a summary of the invoice information and requests payment. Email messages also contain a link and a URL that open in the invoice.
The following illustration shows the steps your customers take to pay invoices.

flowchart
graph TD
    A["Customer receives email\nPay Invoice"] --> B["Invoice email OR\nPayPal Account holder"]
    B --> C["Account Overview"]
    C --> D["Review Invoice & Pay"]
    D --> E["Payment method\nCredit Card\nDebit Card\nPayPal\nContinue"]
    E --> F["Review payment and approve\nPay Now"]
    F --> G["Payment verification\nSee Invoice"]
- Your customer opens an invoice
Invoice recipients can open their invoices in the following ways:
- Click the Pay Invoice button in the email.
– Copy the invoice URL in the email message and paste it in a web browser. -
Open their PayPal accounts and open the invoice from their Account Overview or History page.
-
Your customer reviews the invoice and clicks Pay.
The Review your invoice page displays the invoice details including payment terms, item details, and the invoice totals. Before starting the payment process, your customer can print a copy of the invoice.
- Your customer selects the payment method.
Customers who want to use their PayPal accounts to pay the invoice must first log in (if they are not already) and select the payment method from their account.
Customers who do not use a PayPal account to pay the invoice can enter debit or credit card information for online payment.
Recipients who pay by offline methods should contact you for payment instructions.
- Your customer reviews and approves the payment.
The Review your payment page displays a summary of the payment information. Your customers click Pay Now to finalize payments.
- Your customer receives verification of the completed payment.
A final page displays the transaction ID for the payment and an order summary email is sent to your customer.
PayPal account holders can see invoice and payment details through their Account Overview or History pages.
Accessing PayPal Invoicing
You access PayPal Invoicing by clicking the Request Money tab in your PayPal account.
Request Money displays the Request Money subtab and three invoicing subtabs.
NOTE: The Request Money feature is not an invoicing component and is not included in this guide.
Use the following subtabs to access invoicing components:
- Manage Invoices: Opens the Manage Invoices page.
Use this page to review your invoices, search for invoices, and perform invoice actions.
See “Managing Your Invoices” on page 35 for information about this page and how to use it.
- Create Invoice: Opens the Create a new invoice page.
Use this page to create an invoice or save an invoice as a template. Also, you can save information to your Invoice Settings, such as customer contact information, to use again later.
See “Creating Invoices” on page 15 to learn how to create invoices.
- Invoice Settings: Opens the Enter your contact information page with an Invoice Settings navigation box on the left.
Invoice Settings lets you save your invoice contact information and logo, your payment logo, tax information, items to invoice, invoice templates, and customer contact information. Use the Invoice Settings navigation box to open one of these pages. For example, click Address book to open the Address book page.
See the following sections to learn about Invoice Settings.
- “Customizing Your Invoice Information” on page 69
- “Working with Invoice Templates” on page 83
- “Working with the Address Book” on page 103
- “Working with Saved Items” on page 119
- “Managing Your Tax Information” on page 127
1
About Invoicing
Accessing PayPal Invoicing
2
Creating Invoices
Create invoices for goods and services through the Request Money tab.
• “The Invoicing Process” on page 15
- “Creating Invoices and Entering Details” on page 17
- "Previewing Invoices" on page 28
- "Saving Invoices" on page 30
- "Sending Invoices" on page 31
- "Printing Invoices" on page 32
The Invoicing Process
The invoicing process begins with creating an invoice and ends with managing the invoices.
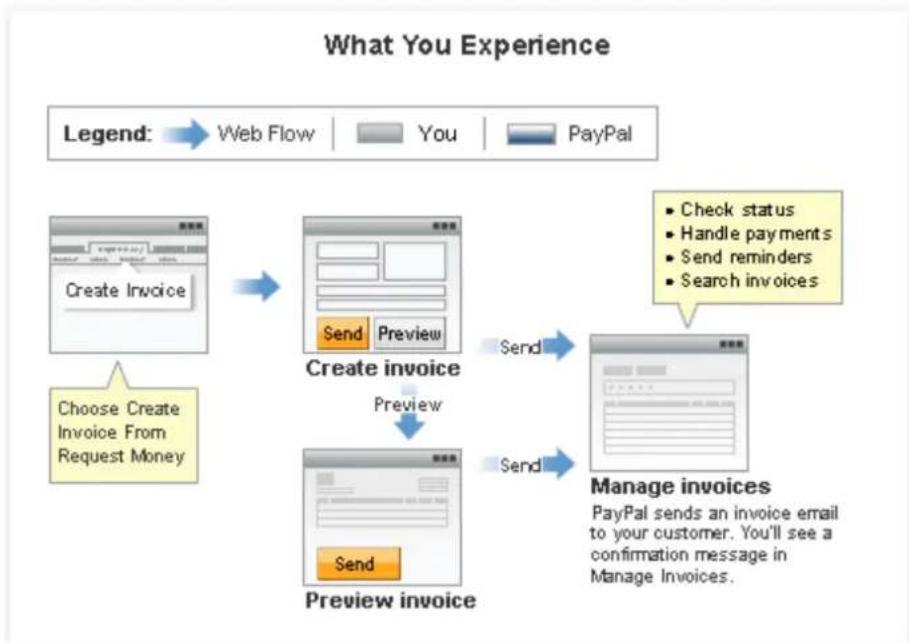
flowchart
graph TD
    A["Create Invoice"] --> B["Create invoice"]
    B --> C["Manage invoices"]
    C --> D["Receive PayPal"]

    subgraph Legend
        E["Web Flow"]
        F["You"]
        G["PayPal"]
    end

    subgraph Legend
        H["Choose Create Invoice From Request Money"]
        I["Send Preview"]
        J["Send Preview"]
        K["Send Preview"]
    end

    style A fill:#f9f,stroke:#333
    style B fill:#ccf,stroke:#333
    style C fill:#cfc,stroke:#333
    style D fill:#fcc,stroke:#333
    style E fill:#ffc,stroke:#333
    style F fill:#ffc,stroke:#333
    style G fill:#ffc,stroke:#333
    style H fill:#fff,stroke:#333
    style I fill:#fff,stroke:#333
    style J fill:#fff,stroke:#333
    style K fill:#fff,stroke:#333
    style L fill:#fff,stroke:#333
    style M fill:#fff,stroke:#333
    style N fill:#fff,stroke:#333
    style O fill:#fff,stroke:#333
    style P fill:#fff,stroke:#333
    style Q fill:#fff,stroke:#333
    style R fill:#fff,stroke:#333
    style S fill:#fff,stroke:#333
    style T fill:#fff,stroke:#333
    style U fill:#fff,stroke:#333
    style V fill:#fff,stroke:#333
    style W fill:#fff,stroke:#333
    style X fill:#fff,stroke:#333
    style Y fill:#fff,stroke:#333
    style Z fill:#fff,stroke:#333
- Create an invoice.
You create an invoice for goods and services by clicking Create Invoice from Request Money.
When you first open the Create a new invoice page, it automatically selects the default invoice template for your account. In the beginning, it is a PayPal-defined template. You can create your own templates and customize some of the invoice entries, such as the payment terms shipping cost. The template also identifies the currency to use for your invoices. See “Working with Invoice Templates” on page 83 for instructions.
The Create a new invoice page displays the primary contact information from your Account Profile. You can change the information displayed by selecting an alternate address or email stored in your profile. You can customize your contact information by specifying what information to display, adding a web site URL or fax number, and including a logo. See “Customizing Your Invoice Information” on page 69 for instructions.
NOTE: Customizing contact information in invoicing does not affect the information in your Account Profile. To edit your address, phone number, or email, go to your Profile Summary page.
- Enter invoice details.
You identify the invoice recipient (your customer) by email address. You can also enter optional billing and shipping addresses for the invoice recipient. You can store this information in your address book to use in future invoices. See “Working with the Address Book” on page 103 for instructions.
You add one or more items to invoice by entering item names or your product IDs. For each item, you enter a date, a quantity, and a unit price. If an item is subject to tax, you can select the rate. You can store item information for reuse by clicking a link on the invoice or by adding items through the Invoice Settings page. You can also store tax information in the Invoice Settings page. See “Working with Saved Items” on page 119 and “Managing Your Tax Information” on page 127 for instructions.
As you complete each item, the invoice amounts are automatically calculated. You can apply a discount to the invoice, add a shipping/handling fee, and add a tax rate for the shipping fee. Other things you can include in the invoice are a terms and conditions description and a note to the recipient. You can include a memo that does not appear on the invoice and can be used as an advanced search criteria in Manage Invoices.
When you have entered invoice information, you can preview how it will appear to the recipient, save it for a later time, save it as a template, or close it.
See “Creating Invoices and Entering Details” on page 17 for instructions.
- Preview the invoice (optional).
You can use the Preview invoice page to see how the invoice will appear to your customer. From Preview invoice, you can send the invoice, print it, or edit it.
See “Previewing Invoices” on page 28 and “Printing Invoices” on page 32 for instructions.
- Send the invoice to your customer.
After you enter and review the invoice, click Send. PayPal sends an email notification to your customer about the invoice.
See “Sending Invoices” on page 31 for instructions.
- Manage your invoices.
After sending an invoice, you can check the status of your invoices, send reminders to your customers, manage invoice payments, and research invoices in the Manage Invoices page. You can also review invoices in your History page.
See “Managing Your Invoices” on page 35 for instructions.
What's in an Invoice?
Invoices contain the following information:
- Your contact information: Your name, email address, street address, phone number, company name, and a logo.
- Invoice recipient (your customer) information: Email address (required), billing address, shipping address, and business name.
- Invoice information: Invoice number, invoice date, payment terms, and due date.
- Item and invoice details: Name, date, quantity, unit price and tax for each item, discount, shipping amounts, terms and conditions, and notes to the recipient.
- Memo: Text to track with the invoice.
When you create an invoice, the Create a new invoice page accesses information from your Account Profile and Invoice Settings to pre-fill some of the fields. As you enter invoice information, additional Invoice Settings are available to help speed up invoice entry. For example, if you save tax rate information in Invoice Settings, you can select a saved rate to use in the invoice.
Creating Invoices and Entering Details
You can create an invoice right away using the PayPal Default Template. You can add your own templates later or save your current invoice to use as a template.
As you create an invoice, you can choose to save some of the information in your Invoice Settings to reuse at a later time. This information includes some of your contact information, your logo, recipient contact information, invoice line items, and tax amounts.
You use the Create a new invoice page to enter invoice information. The following illustration shows the Create a new invoice page as it appears the first time you open it.
2
Creating Invoices
Creating Invoices and Entering Details
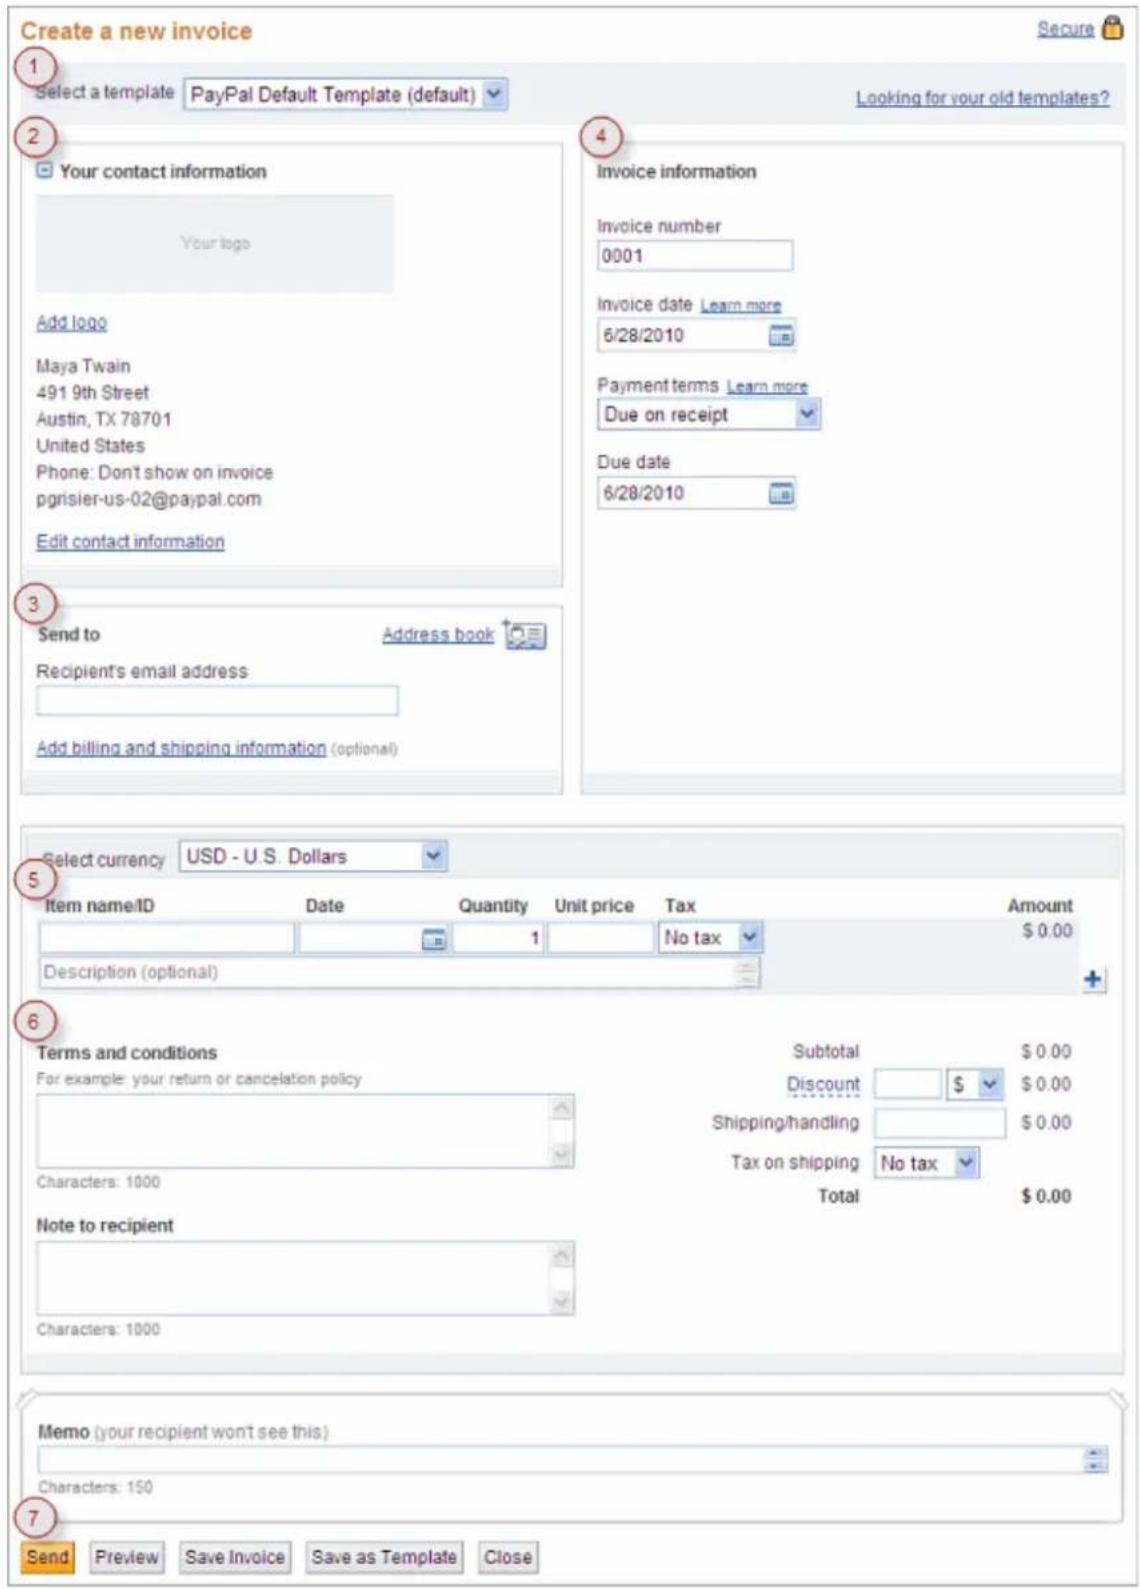
text_image
Create a new invoice 1 Select a template PayPal Default Template (default) Looking for your old templates? 2 Your contact information Your logo Add logo Maya Twain 491 9th Street Austin, TX 78701 United States Phone: Don't show on invoice pgrisler-us-02@paypal.com Edit contact information 3 Send to Address book Recipient's email address Add billing and shipping information (optional) 4 Invoice information Invoice number 0001 Invoice date Learn more 6/28/2010 Payment terms Learn more Due on receipt Due date 6/28/2010 5 Select currency USD - U.S. Dollars Item name/ID Date Quantity Unit price Tax Amount 1 No tax $ 0.00 Description (optional) 6 Terms and conditions Subtotal $ 0.00 For example: your return or cancelation policy Discount $ 0.00 Shipping/handling $ 0.00 Tax on shipping No tax Total $ 0.00 Characters: 1000 Note to recipient Characters: 1000 Memo (your recipient won't see this) Characters: 150 Send Preview Save Invoice Save as Template CloseThe numbers in this illustration correspond with the instruction steps in this chapter:
- “1. Accessing the Create a New Invoice Page” on page 19
- “2. Entering Your Contact Information” on page 19
- “3. Entering Recipient Information” on page 20
- “4. Entering Invoice Information” on page 23
- “5. Entering Item Information” on page 24
- “6. Entering a Discount, Shipping Fee, and Invoice Notes” on page 26
- “7. Finalizing an Invoice” on page 27
1. Accessing the Create a New Invoice Page
- Log in to your PayPal account.
- Click the Request Money tab.
- Click Create an Invoice.
The Create a new invoice page opens. The default template is selected automatically. If you have not added your own templates yet, the PayPal Default Template is selected.
- To use a different template, select one from Select a template.
See “Working with Invoice Templates” on page 83 for more information.
2. Entering Your Contact Information
1. Edit Your contact information.
The displayed contact information is stored in your Account Profile information. If your address, phone number, or email are incorrect, you must correct them in your Profile page. You can add more contact information or control whether your phone numbers or email address appear in the invoice by customizing your contact information. See “Customizing Your Invoice Information” on page 69 for instructions.
- Add or change the logo for the invoice.
Setting Action
| Add logo Click to add a logo to the template.This setting appears when the template does not have a logo. |
| Change logo Click to use a different logo.This setting appears when the template already contains a logo. |
| Remove logo Click to delete the logo.This setting appears when the template already contains a logo. |
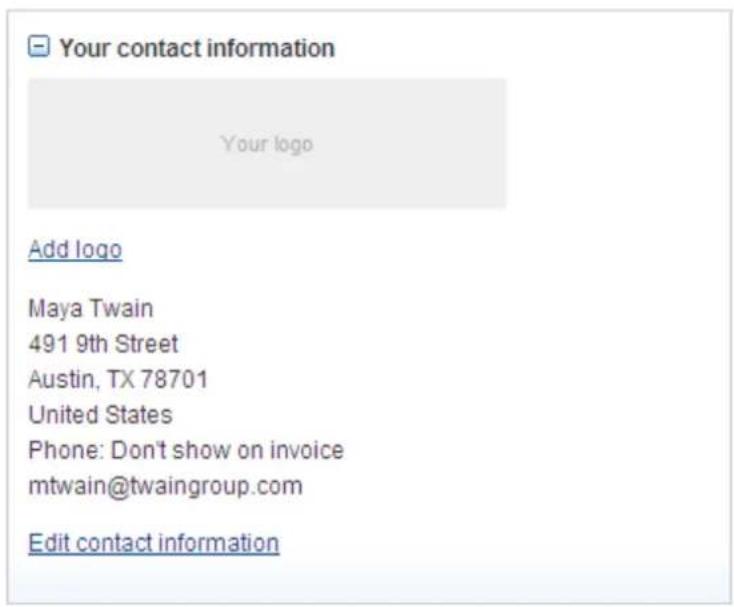
text_image
Your contact information Your logo Add logo Maya Twain 491 9th Street Austin, TX 78701 United States Phone: Don't show on invoice mtwain@twaingroup.com Edit contact informationSee "Including a Logo in Your Invoices" on page 74 for detailed instructions.
3. Entering Recipient Information
1. Enter the Recipient's email address. (Required)
As you type the email address, you will see a list of your address book contacts that match the characters you enter, starting with the third character. The search process looks through the address book for matches in email addresses, names, and business names and shows all matches in the list.
If your recipient is in the list, select it. If not, continue entering the address until you have entered the correct recipient email address.
- Or -
Click Address book to search for a recipient in your address book and return it to the invoice. See “Searching for a Contact” on page 115 for instructions.
2. Click Add billing and shipping information. (Optional)
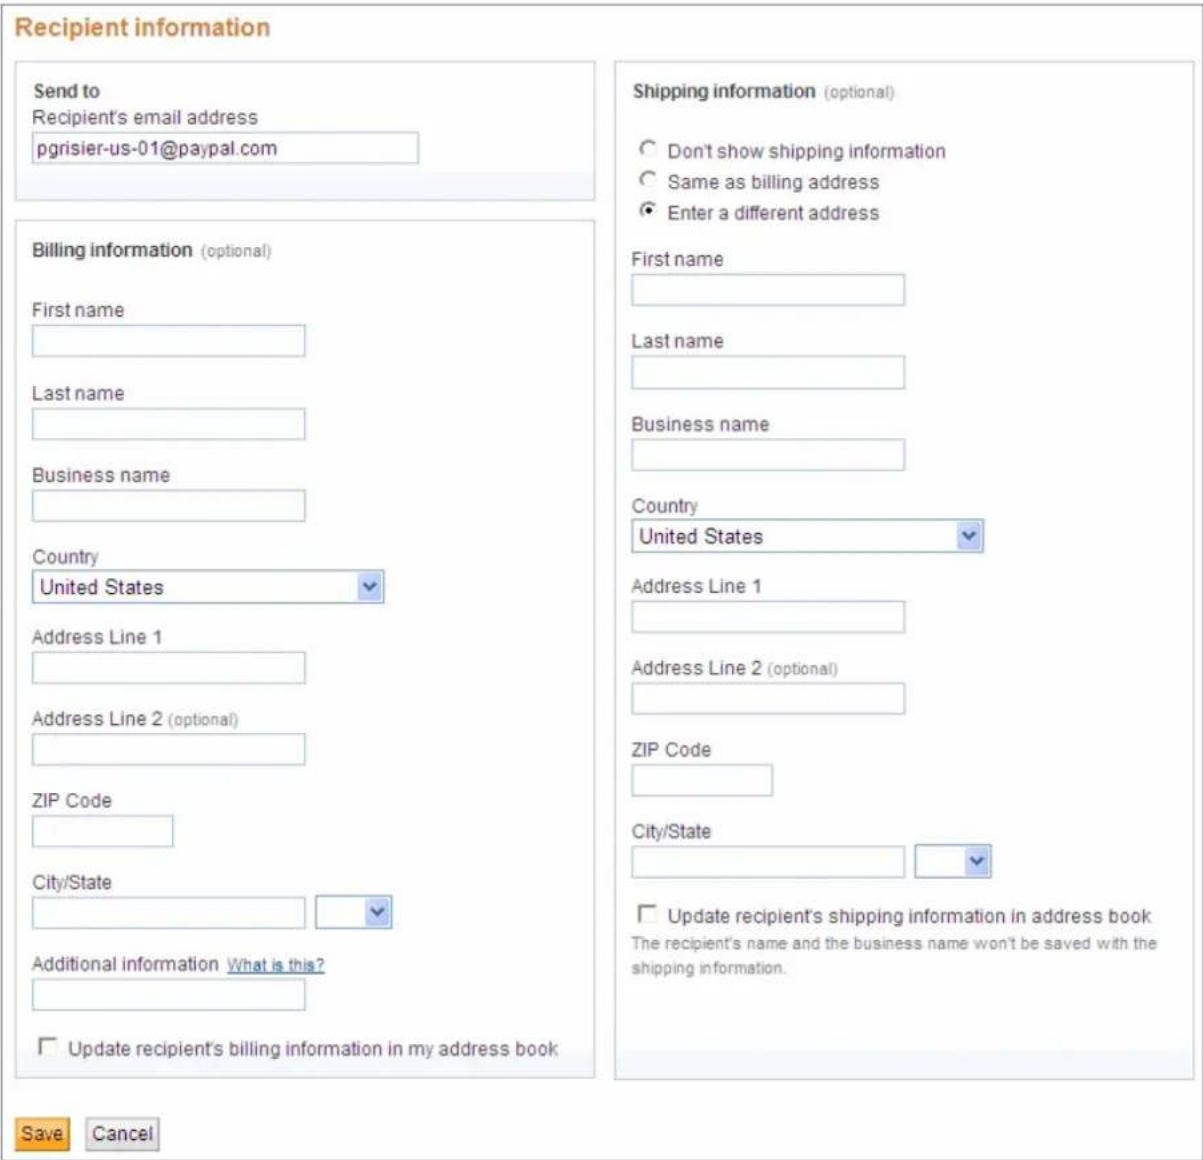
The Recipient information page opens. If you selected a recipient from the address book, the billing and shipping information fields display the recipient's saved information.
text_image
Recipient information Send to Recipient's email address pgrisier-us-01@paypal.com Billing information (optional) First name Last name Business name Country United States Address Line 1 Address Line 2 (optional) ZIP Code City/State Additional information What is this? Update recipient's billing information in my address book Shipping information (optional) Don't show shipping information Same as billing address Enter a different address First name Last name Business name Country United States Address Line 1 Address Line 2 (optional) ZIP Code City/State Update recipient's shipping information in address book The recipient's name and the business name won't be saved with the shipping information. Save Cancel3. Enter Billing information.
| Setting Action | |
| First name Enter the recipient's first or given name. | |
| Last name Enter the recipient's last or family name. | |
| Business name Enter the name of recipient's business. | |
| Country Select the country for the billing address. | |
| Address line 1 | Enter up to 2 lines of the contact's billing address. |
| Address line 2 | |
| Setting | Action |
| Zip code Enter the zip or postal code. | |
| City/State Enter the city name for the billing address in the first field.Select a state code from the drop down list in the second field. | |
| Additional information | Enter any information you want to appear on the invoice. For example, use this field to track the contact’s account number. |
| Update recipient’s billing information in my address book | Select this option to save the billing information to your address book. |
4. Click Enter a different address to add Shipping information.
| Setting Action | |
| First name Enter the recipient's first or given name. | |
| Last name Enter the recipient's last or family name. | |
| Business name Enter the name of recipient's business. | |
| Country Select the country for the shipping address. | |
| Address line 1 | Enter up to 2 lines of the contact's shipping address. |
| Address line 2 | |
| Zip code Enter the zip or postal code. | |
| City/State Enter the city name for the shipping address in the first field. | |
| Select a state code from the drop down list in the second field. | |
| Update recipient's shipping information in address book | Select this option to save the shipping information to your address book. |
5. Click Save.
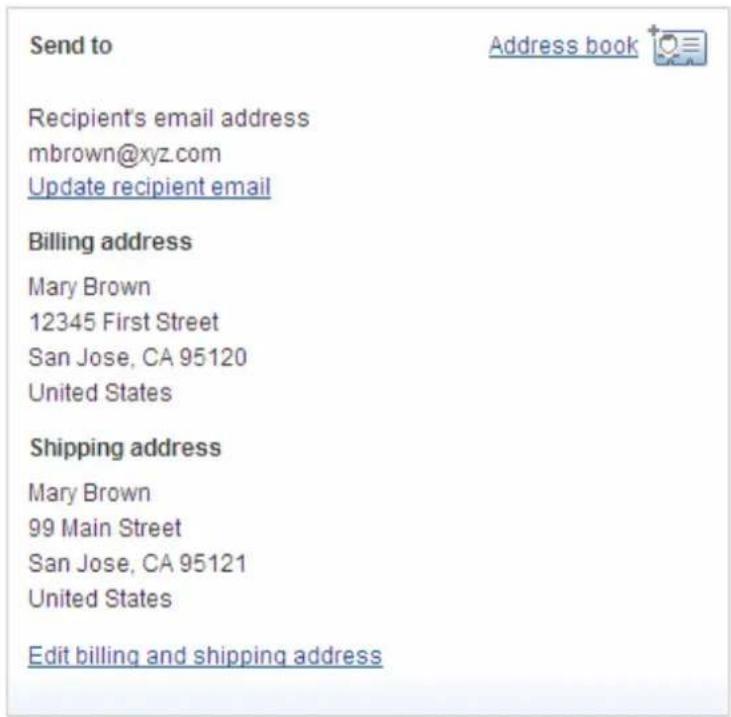
The Create a new invoice page displays the recipient's billing and shipping information.
text_image
Send to Address book Recipient's email address mbrown@xyz.com Update recipient email Billing address Mary Brown 12345 First Street San Jose, CA 95120 United States Shipping address Mary Brown 99 Main Street San Jose, CA 95121 United States Edit billing and shipping address4. Entering Invoice Information
Review the Invoice Information section and make any necessary changes.
- Change the Invoice number to use a different numbering system than the default.
Invoice numbering automatically starts with 0001 and increments by 1 for each subsequent invoice. You can use the default numbering system or use one of your own.
- Change the Invoice date to use a different date.
The Invoice date is automatically set to today's date. Enter the date of the invoice or select one from the calendar control.
You can use an invoice date that is after the current date. However, when you click Send, the invoice is sent right away regardless of the date you entered.
- Change the Payment terms.
Select the number of days before payment is due. This field is automatically set to Due on receipt. For example, to specify that full payment is due in 30 days, select Net 30.
NOTE: When you select a different term, the invoice Due date might change to match the option you selected.
- Change the Due date only if you selected Due on date specified in Payment terms.
The Due date is automatically set to match the Payment terms. For example, if you select Net 30, the due date changes to a date that is 30 days after the Invoice date.
NOTE: If you enter a date in Due date, Payment terms will automatically change to Due on date specified.
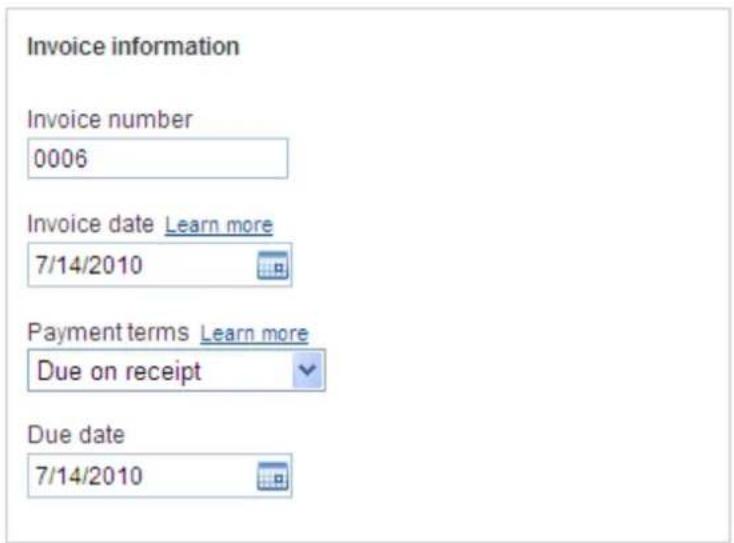
text_image
Invoice information Invoice number 0006 Invoice date Learn more 7/14/2010 Payment terms Learn more Due on receipt Due date 7/14/20105. Entering Item Information
Your invoice must contain at least one item before you can send it.
- If you started with the PayPal Default Template, you must add item information.
- If you started with a template that contains item information, review the included items and make any necessary changes. You can add more items, if necessary.

text_image
Select currency USD - U.S. Dollars Item name/ID Date Quantity Unit price Tax Amount 1 No tax $ 0.00 Description (optional)Complete the following information for each item.
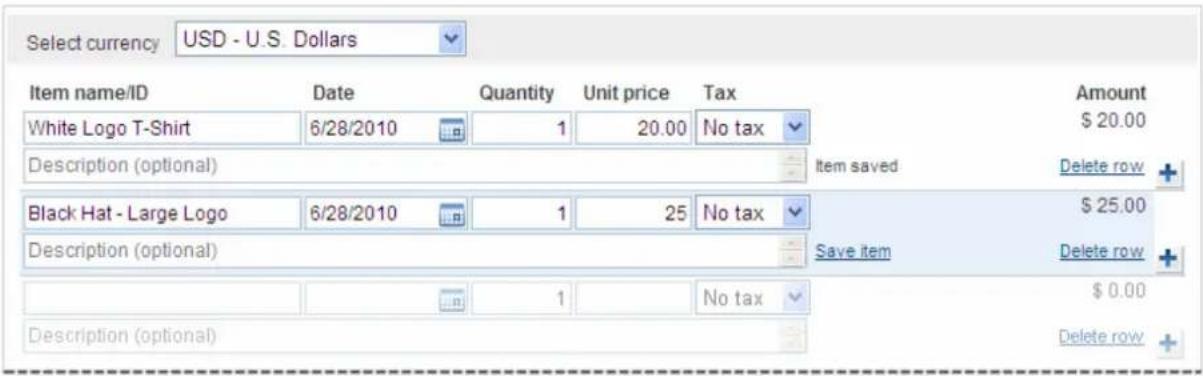
1. Enter the Item name/ID.
If you have saved items, you can select one from the list that appears when you click in the field.
- Enter the Date for the item.
When you tab or click in the date field, a Calendar opens. Select the date from the Calendar or type the date in the field.
-
Enter the number of items in Quantity.
-
Enter a Unit price.
If you selected a saved item, the stored unit price displays.
- Select the Tax for this item.
- If you selected a saved item with an assigned tax rate, the Tax displays. To change it, select a tax from the list.
- If the item does not have a tax, select No tax.
- If the correct tax rate is not listed, select Add tax. See “Adding Tax Information in an Invoice or Template” on page 128 for instructions.
Taxes are not displayed at the item level. The taxes applied to the invoice displays above the invoice total.
-
Enter an item Description. (Optional)
-
Click Save item to add it to your Invoice Settings.
When you save an item, Save item changes to Item saved. The item will appear in the Saved items page of your Invoice Settings. See “Working with Saved Items” on page 119 for more information.
- Review the item Amount.
The Amount is calculated by multiplying Quantity times Unit price. Amount does not include any specified tax for the item at this level. Taxes are totalled for the invoice and display above the invoice total.
-
To remove an item from the invoice, click Delete row.
-
Click the Plus button to add more blank rows to the item section.
NOTE: Each time you add an item to the invoice, an empty item row is added to the end of the list. The Plus button is another way to add rows to the invoice.
text_image
Select currency USD - U.S. Dollars Item name/ID Date Quantity Unit price Tax Amount White Logo T-Shirt 6/28/2010 1 20.00 No tax $ 20.00 Description (optional) Item saved Delete row + Black Hat - Large Logo 6/28/2010 1 25 No tax $ 25.00 Description (optional) Save item Delete row + Description (optional) 1 No tax $ 0.00 Delete row +6. Entering a Discount, Shipping Fee, and Invoice Notes
You can specify additional information that applies to the entire invoice. This information includes discounts, shipping and handling costs, and invoice notes.
- Enter a Discount amount and select the type of discount.
Discount applies to the entire invoice and appears in the invoice totals section.
NOTE: If you want the discount to appear in the invoice items list, enter it as an invoice item with a negative amount.
-
Enter a Shipping/handling amount.
-
If your shipping or handling fee is subject to tax, select a tax rate from Tax on shipping.
If the correct tax rate is not listed, add a new tax. See “Adding Tax Information in an Invoice or Template” on page 128 for instructions.
-
Enter Terms and conditions text, up to 1,000 characters. This text appears in the invoice.
-
Enter Note to recipient text, up to 1,000 characters. This text appears in the invoice.
-
Enter Memo text, up to 150 characters. This text does not appear in the invoice.
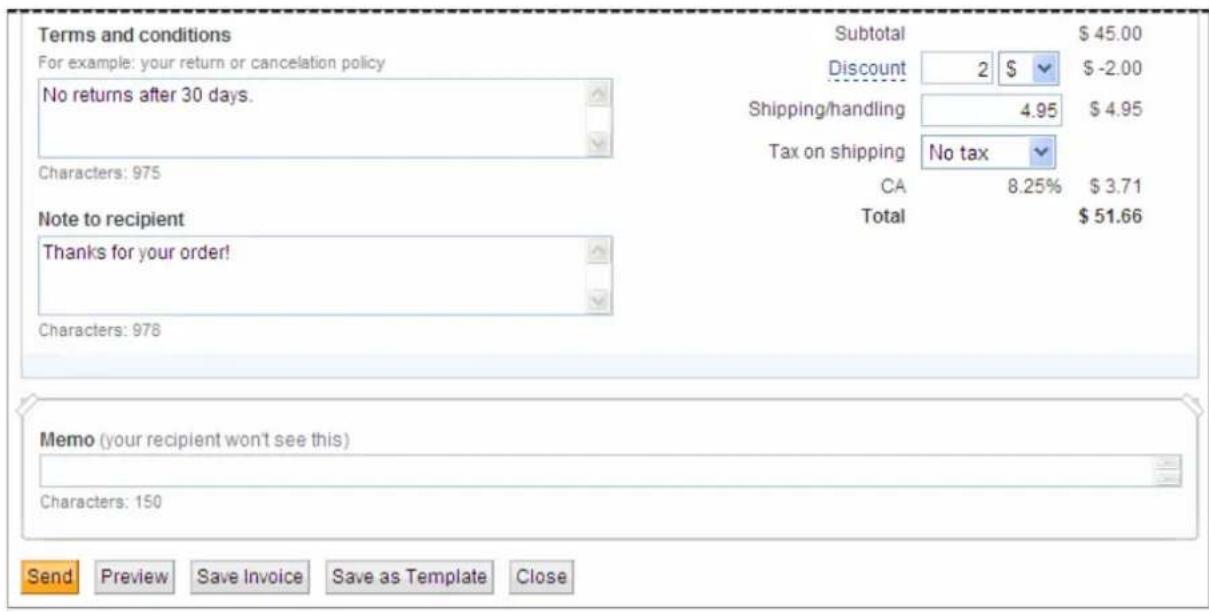
text_image
Terms and conditions For example: your return or cancelation policy No returns after 30 days. Characters: 975 Note to recipient Thanks for your order! Characters: 978 Subtotal Discount 2 $ -2.00 Shipping/handling 4.95 $ 4.95 Tax on shipping No tax CA 8.25% $ 3.71 Total $ 51.66 Memo (your recipient won't see this) Characters: 150 Send Preview Save Invoice Save as Template Close7. Finalizing an Invoice
When you have entered invoice information, you can perform several tasks using the buttons at the bottom of the page.
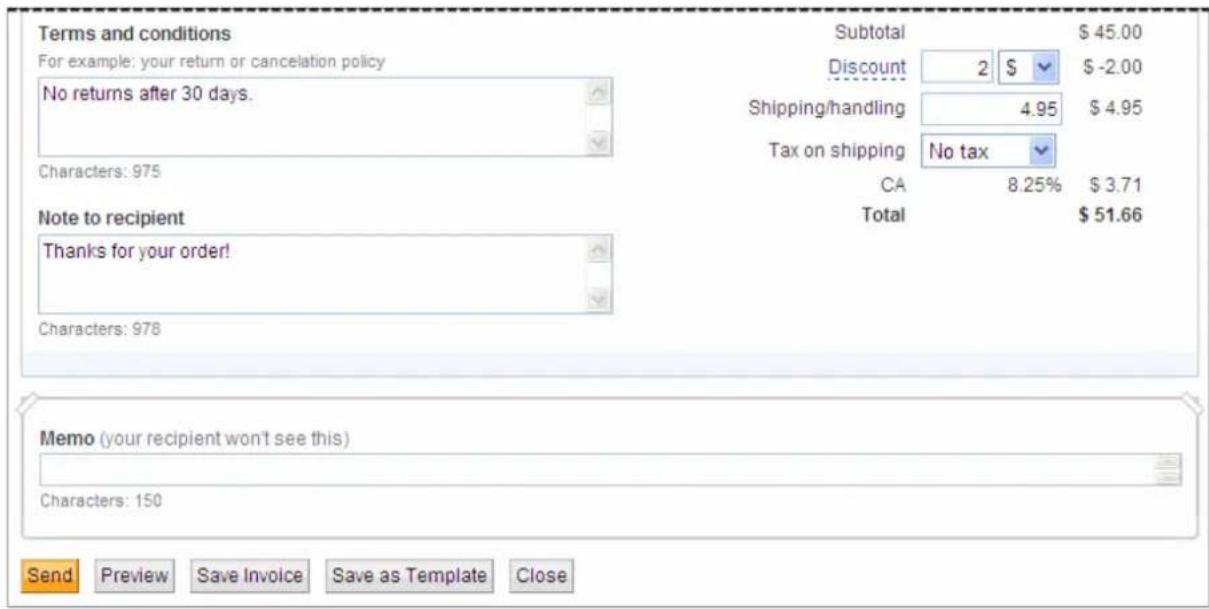
text_image
Terms and conditions For example: your return or cancelation policy No returns after 30 days. Characters: 975 Note to recipient Thanks for your order! Characters: 978 Subtotal Discount 2 $ -2.00 Shipping/handling 4.95 $ 4.95 Tax on shipping No tax CA 8.25% $ 3.71 Total $ 51.66 Memo (your recipient won't see this) Characters: 150 Send Preview Save Invoice Save as Template Close- Send the invoice. See "Sending Invoices" on page 31.
- Preview the invoice to see it from your recipient's point of view. See “Previewing Invoices” on page 28.
- Save invoice as a draft to complete or use as a template at a later time. See “Saving Invoices” on page 30.
- Save as Template to use the current invoice again. See “Saving an Invoice as a Template” on page 87.
- Close the invoice.
When you close an invoice, a dialog box opens and gives you the option of saving your changes. Click Don't Save to discard your changes.
Previewing Invoices
You can preview how an invoice will look to your customer before sending it. The Preview invoice page displays the invoice information you have entered. You can preview the invoice just before sending it or any time you want to see how the invoice looks.
Preview invoice


INVOICE
Maya Twain
491 9th Street
Austin, TX 78701
United States
Phone: Don't show on invoice
mtwain@twaingroup.com
Invoice number
0006
Invoice date
7/14/2010
Payment terms
Due on receipt
Due date
7/14/2010
Bill To
mbrown@xyz.com
Mary Brown
12345 First Street
San Jose, CA 95120
United States
Ship To
Mary Brown
99 Main Street
San Jose, CA 95121
United States
| Description | Quantity | Unit price | Amount | |
| Shirt - 12345 - White Logo T-Shirt | 1 | 20.00 | 20.00 | |
| Hat - 23456 - Black Hat with small logo | 1 | 25.00 | 25.00 | |
| Terms and conditionsNo returns after 30 days.Note to recipientThanks for your order! | SubtotalShipping/handlingCA 8.25% | 45.004.953.71 | ||
| Total | 53.66 USD | |||


After reviewing the invoice, you can send, edit, or print it from the Preview invoice page.
Previewing an Invoice
- Open the Create a new invoice page and enter invoice information.
See “Creating Invoices and Entering Details” on page 17 for detailed instructions. - Click Preview at the bottom of the Create a New Invoice page.
The Preview page opens. The Preview box displays your contact information, invoice dates, payment terms, and the invoice information you entered. - Review the invoice and determine whether it is ready to send.
-
Perform one of the following actions:
-
Click Send to send the invoice to the customer.
See "Sending Invoices" on page 31 for more information. - Click Edit to go back to the Create a new invoice page.
See “Creating Invoices and Entering Details” on page 17 for more information. - Click Print to make a hard-copy of the invoice.
See “Printing Invoices” on page 32 for instructions.
Saving Invoices
There might be occasions when you want to save an invoice without sending it. For example, if you need to clarify an order, you can enter the invoice information you have and save it as a draft. When you know how to handle the order, you can open the saved invoice and complete it.
When you save an invoice as a draft, a time stamp appears below the button indicating the date and time your invoice was saved. You can access saved invoices in the Manage Invoices page. See “Managing Your Invoices” on page 35 for information about this page.
You can also save an invoice as a template. See “Saving an Invoice as a Template” on page 87 for instructions.
Saving an Invoice as a Draft
- Log in to your PayPal account.
- Click the Request Money tab and then click Create Invoice.
The Create a new invoice page opens. - Enter information for the invoice.
See “Creating Invoices and Entering Details” on page 17 for instructions.
- Click Save Invoice at the bottom of the page.
The date and time you saved the invoice appears at the bottom of the page.
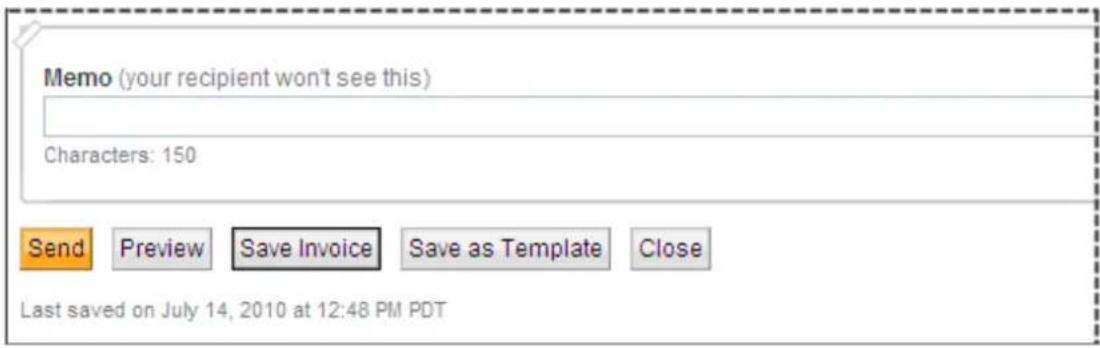
text_image
Memo (your recipient won't see this) Characters: 150 Send Preview Save Invoice Save as Template Close Last saved on July 14, 2010 at 12:48 PM PDTSending Invoices
After you enter invoice information, you can send the invoice from the Create a new invoice page or preview it before sending.
When you send invoices, an email notifications are sent to your recipients. PayPal account holders see invoices in their account History. You can see the invoices in your Manage Invoices page.
See "Managing Your Invoices" on page 35 for more information.
Sending an Invoice
- Log in to your PayPal account.
- Click the Request Money tab and then click the Manage Invoices subtab.
The Manage invoices page opens.
- Click the Request Money tab and then click Create Invoice.
The Create a new invoice page opens.
- Enter information for the invoice.
See "Creating Invoices and Entering Details" on page 17 for instructions.
- Click Send to send the invoice.
The Manage Invoices page opens. A message at the top of the page confirms that your invoice was sent. Your invoice appears at the top of the invoice list.
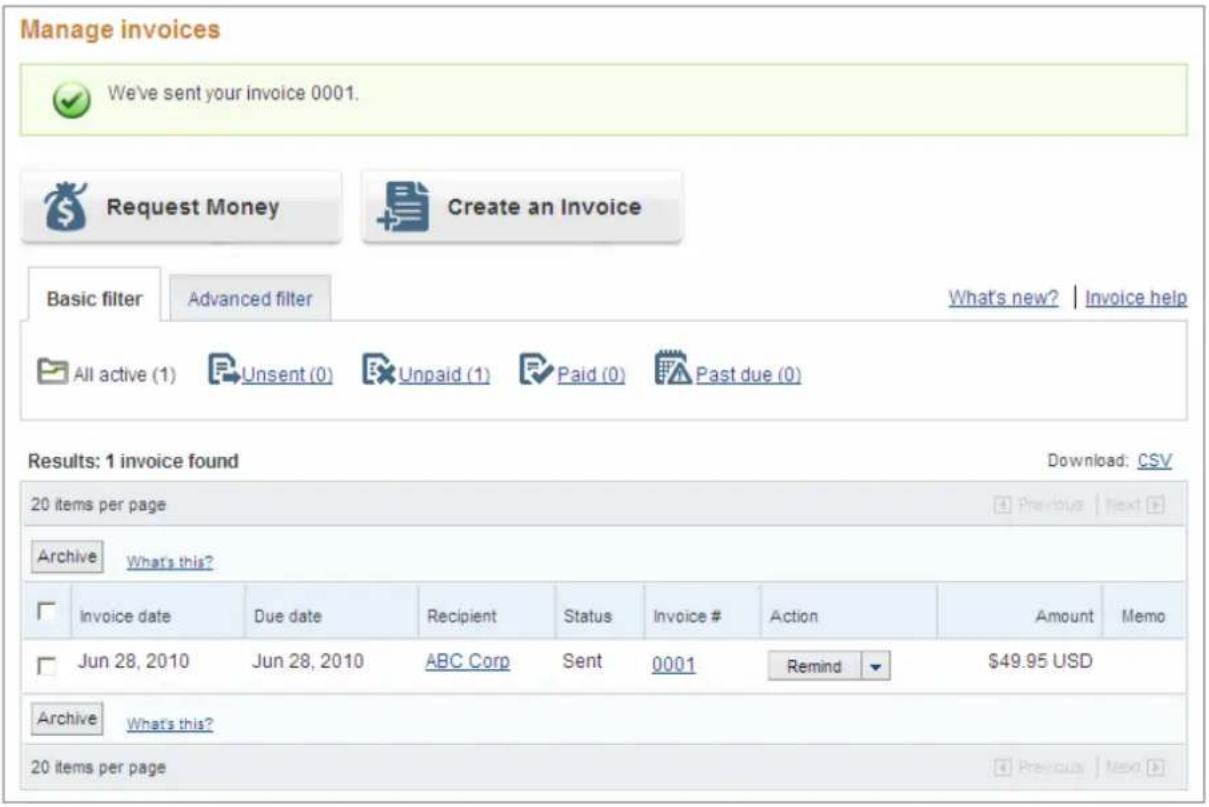
text_image
Manage invoices We've sent your invoice 0001. Request Money Create an Invoice Basic filter Advanced filter What's new? | Invoice help All active (1) Unsent (0) Unpaid (1) Paid (0) Past due (0) Results: 1 invoice found Download: CSV 20 items per page Archive What's this? Invoice date Due date Recipient Status Invoice # Action Amount Memo Jun 28, 2010 Jun 28, 2010 ABC Corp Sent 0001 Remind $49.95 USD Archive What's this? 20 items per page Previous NextSee "Managing Your Invoices" on page 35 for more information.
Printing Invoices
If you need a copy of the invoice to send to your customer or for your records, you can print it from the Preview page or from the Invoice Details page. A print version of the invoice displays in a separate window.
| INVOICE | |||
| Maya Twain491 9th StreetAustin, TX 78701United StatesPhone: Don't show on invoicemtwain@twaingroup.com | Invoice number | 0006 | |
| Invoice date | 7/14/2010 | ||
| Payment terms | Due on receipt | ||
| Due date | 7/14/2010 | ||
| Bill Tombrown@xyz.comMary Brown12345 First StreetSan Jose, CA 95120United States | Ship ToMary Brown99 Main StreetSan Jose, CA 95121United States | ||
| DescriptionQuantityUnit priceAmount | |||
| Shirt - 12345 - White Logo T-Shirt | 1 | 20.00 | 20.00 |
| Hat - 23456 - Black Hat with small logo | 1 | 25.00 | 25.00 |
| Terms and conditionsNo returns after 30 days.Note to recipientThanks for your order! | SubtotalShipping/handlingCA 8.25% | 45.004.953.71 | |
| Total | 53.66 USD | ||
After printing, the window closes.
Printing an Invoice from the Preview Page
- Enter invoice information in the Create a new invoice page.
See "Creating Invoices and Entering Details" on page 17 for detailed instructions.
- Click Preview at the bottom of the Create a new invoice page.
The Preview page opens. The Preview box displays your invoice information.
- Click Print.
A Print Invoice window and the Print dialog box open. Your invoice information displays in a printer-ready format in the Print Invoice window.
- Select a printer in the Print dialog box.
- Click Print.
After printing, close the Print Invoice. You can now perform other actions on the Preview page.
Printing an Invoice from the Invoice Details Page
- Log in to your PayPal account.
- Click the Request Money tab and then click the Manage Invoices subtab.
The Manage invoices page opens.
- Click an invoice number in the Invoice # column of the Manage Invoices page.
The Invoice details page opens. The page displays invoice status information and the invoice details.
- Click Print.
A Print Invoice window and the Print dialog box open. Your invoice information displays in a printer-ready format in the Print Invoice window.
- Select a printer in the Print dialog box.
- Click Print.
After printing, close the Print Invoice window. You can now perform other actions on the Invoice details page or return to the Manage Invoices page.
3
Managing Your Invoices
After sending invoices, you'll want to manage and track your invoices and payments. The Manage Invoices page contains a set of tools for you to quickly find the invoices you need and perform invoicing tasks.
Read the following topics to learn about managing your invoices.
- “About the Manage Invoices Page” on page 35
- “Searching Invoices” on page 38
- “Reviewing Invoice Details” on page 42
- “Editing Invoices” on page 47
- “Exporting Invoice Information” on page 49
- “Copying Invoices” on page 54
- “Sending Invoice Reminders” on page 55
- “Canceling Invoices” on page 56
- “Archiving and Unarchiving Invoices” on page 58
- “About Invoices and Shipping” on page 61
See “Managing Invoice Payments” on page 63 for instructions on handling invoice payments.
About the Manage Invoices Page
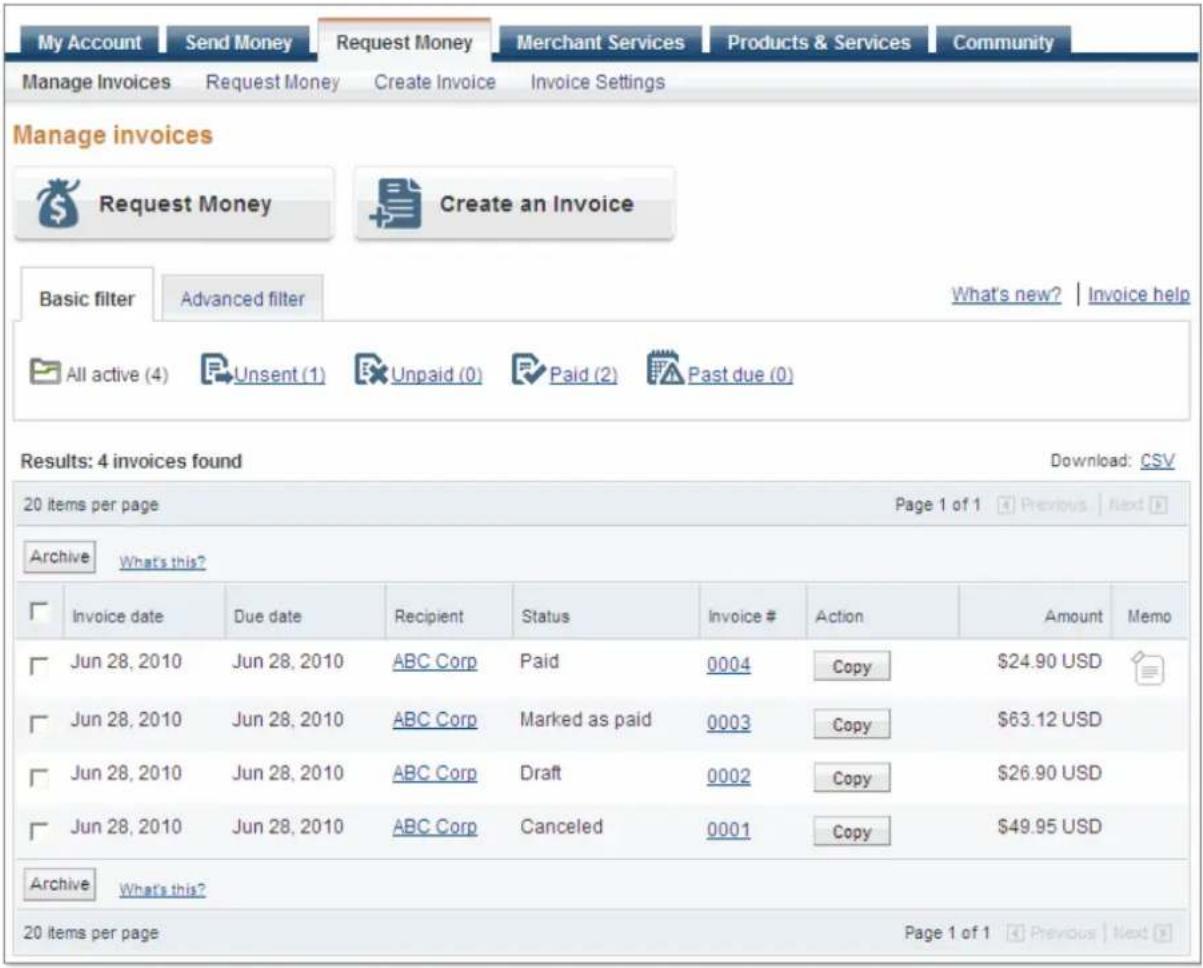
The Manage Invoices page opens when you click Manage invoices on the Request Money tab. This page automatically opens after you send or save an invoice. Manage Invoices is the main page to use when managing your invoices and payments.
When you click the Request Money tab, it displays either the Request Money page or the Manage Invoices page depending on the last request you performed. For example, if you sent an invoice the last time you visited this tab, the Manage Invoices page opens.
text_image
My Account Send Money Request Money Merchant Services Products & Services Community Manage Invoices Request Money Create Invoice Invoice Settings Manage invoices Request Money Create an Invoice Basic filter Advanced filter What's new? | Invoice help All active (4) Unsent (1) Unpaid (0) Paid (2) Past due (0) Results: 4 invoices found Download: CSV 20 items per page Page 1 of 1 Previous Next # Archive What's this? Invoice date Due date Recipient Status Invoice # Action Amount Memo Jun 28, 2010 Jun 28, 2010 ABC Corp Paid 0004 Copy $24.90 USD Jun 28, 2010 Jun 28, 2010 ABC Corp Marked as paid 0003 Copy $63.12 USD Jun 28, 2010 Jun 28, 2010 ABC Corp Draft 0002 Copy $26.90 USD Jun 28, 2010 Jun 28, 2010 ABC Corp Canceled 0001 Copy $49.95 USD Archive What's this? 20 items per page Page 1 of 1 Previous NextManage Invoices displays the list of invoices that you have sent or saved. It displays the following information for each invoice:
| Column Description | |
| Invoice date Date sent or saved. | |
| Due date | Date payment is due according to the payment terms in the invoice. |
| Recipient | Name of the recipient or the recipient's company name if one was used in the invoice.If you saved the recipient in the add res ss book, click the recipient to open its address book entry. |
| Status | Current status of the invoice. See “About Invoice Statuses” on page 37 for a list of statuses. |
| Invoice # | ID number assigned to the invoice. Click this number to open Invoice details. |
| Action | Available actions for the invoice depending on the invoice's status. If there are multiple actions, an arrow displays in the box. |
| Amount Invoice total amount. | |
| Memo | Displays an icon when the invoice contains a note to yourself. Hover over the icon to display the contents of the memo. |
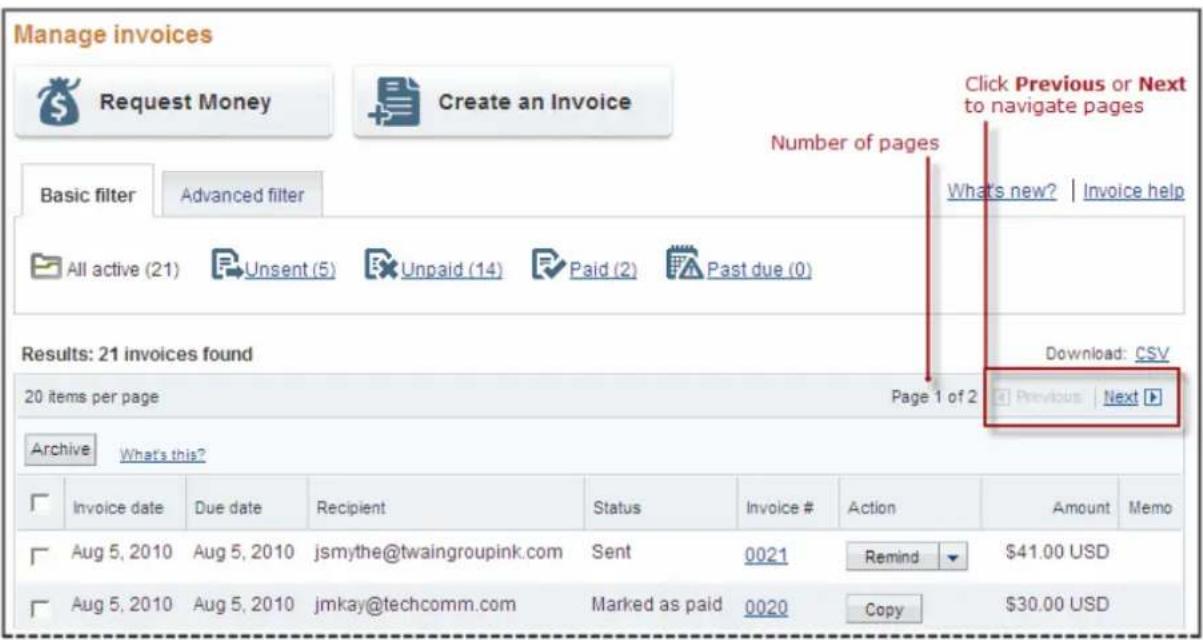
Manage Invoices displays 20 invoices per page. If there are multiple pages of invoices, Page displays the number of the current page and the total number of pages. You change pages by clicking Previous and Next, which display at the top and bottom of the invoice list.
text_image
Manage invoices Request Money Create an Invoice Basic filter Advanced filter All active (21) Unsent (5) Unpaid (14) Paid (2) Past due (0) Number of pages Click Previous or Next to navigate pages What's new? | Invoice help Results: 21 invoices found 20 items per page Page 1 of 2 Download: CSV Archive What's this? Invoice date Due date Recipient Status Invoice # Action Amount Memo Aug 5, 2010 Aug 5, 2010 jsmythe@twaingroupink.com Sent 0021 Remind $41.00 USD Aug 5, 2010 Aug 5, 2010 jmkay@techcomm.com Marked as paid 0020 Copy $30.00 USDUse other Manage Invoice options to create invoices, filter and search invoices, archive and unarchive invoices, and download invoice activity. From this page, you can open Invoice Settings, Create an invoice, or the Request Money page.
About Invoice Statuses
Each invoice is assigned a status based on where it is in the invoicing process. A status appears for each invoice listed in your History and Manage Invoices pages. At a quick glance, you can determine whether an invoice is paid. You can review the details for all invoices regardless of invoice status.
The available invoice statuses are listed below in alphabetical order.
Status Description
Canceled Invoice was canceled.
Draft Invoice was created and saved. It was not sent to the recipient.
Marked as paid Invoice was manually marked as paid.
Paid Invoice was paid by a PayPal account holder.
Sent Invoice was sent.
Depending on an invoice's status, you can perform certain actions on an invoice. For example, you can print all invoices, but you can only edit invoices that have not been paid, marked as paid, or canceled. Some actions can be performed either on the Manage Invoices or Invoice details pages. Other actions can only be performed on the Invoice details page.
You can perform the following actions on the Manage Invoices page:
- Send a Reminder: Only available when invoice status is Sent.
• Mark as Paid: Only available when invoice status is Sent. - Cancel the invoice: Only available when invoice status is Sent.
- Copy the invoice: Available for all invoice statuses.
You can perform all of these actions and the following actions on the Invoice details page:
- Edit the invoice: Only available when the invoice status is Draft or Sent.
- Print the invoice: Available for all invoice statuses.
See “Reviewing Invoice Details” on page 42 for instructions on using the Invoice details page.
Searching Invoices
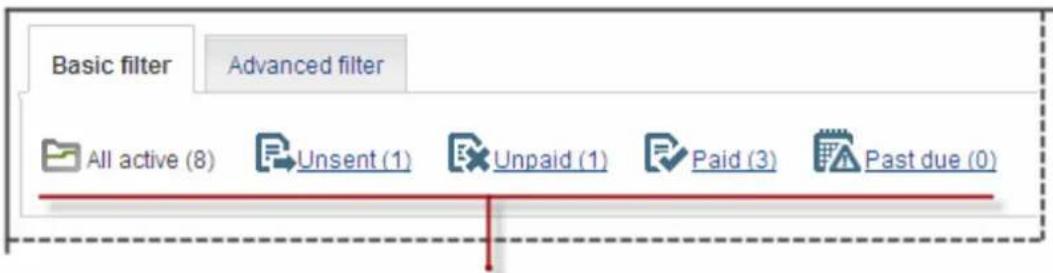
The Manage Invoices page contains two search filters: Basic and Advanced. Use these search filters to find invoices that match certain criteria. For example, if you want to see all invoices that are past due, you can use the Past due filter in Basic filter to quickly find them. If you want to see all invoices sent to a particular recipient, you can search by email address in Advance filter.
When you open the Manage Invoices page, the Basic filter selections and All Active invoices display in the page. As you apply search filters, the invoice list changes to display invoices that match your filter.
About the Basic Filters
Basic filter contains predefined filters for some of the most common searches you might need.
| Filter Results |
| All active All invoices that have not been archived. |
| Unsent Saved invoices.The invoice status is Draft. |
| Unpaid Sent invoices that have not been paid.The invoice status is Sent. |
| Paid Paid invoices.The invoice status is either Paid or Marked as paid. |
| Past due Sent invoices that are past their due dates. |
With one click, Basic filter displays the invoices that match the search criteria.
If you need to narrow down the list of invoices more than Basic filter allows, use Advanced filter instead.
About the Advanced Filters
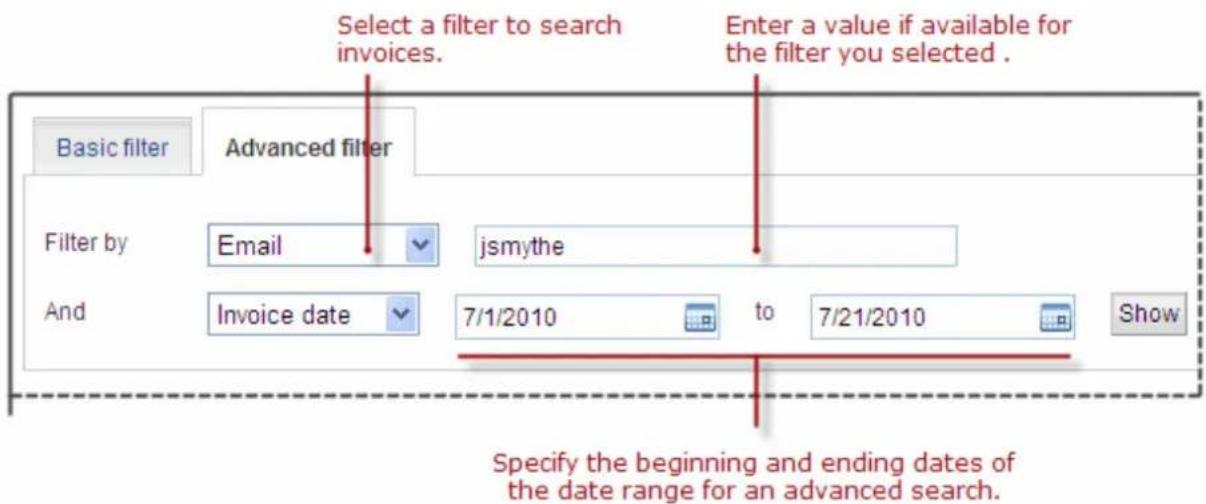
Use Advanced filter to filter your searches by almost every top-level invoice value. Advanced filters are useful when you need to search for specific invoice data.
You can apply the following filters.
| Filter Search Criteria | |
| Email Enter all or part of the recipient's email address. | |
| Recipient name Enter all or part of the recipient's first and last name. | |
| Company name | Enter all or part of the recipient's company name. |
| Invoice number Enter all or part of the invoice number. | |
| Status Select an invoice status. | |
| Archived items No additional criteria.See “Archiving and Unarchiving Invoices” on page 58 for information about archived invoices. | |
| Amount | Enter an amount range in the two boxes that display. |
| Currency | Select a currency. |
| Memo | Enter memo text or keywords that might appear in invoice memos.For example, if you typically include a memo about special discounts, search for discount. |
| Payment date | Specify the payment date range. Enter the From and To dates of the date range in the text boxes or use the Calendar controls to select them. |
| Due date | Specify the due date range. Enter the From and To dates of the date range in the text boxes or use the Calendar controls to select them. |
| Invoice date | Specify the invoice date range. Enter the From and To dates of the date range in the text boxes or use the Calendar controls to select them. |
For most of the text filters, partial text can match. For example, the text mit matches Smith and Mitty.
Searching Invoices with a Basic Filter
- Log in to your PayPal account.
- Click the Request Money tab and then click the Manage Invoices subtab.
The Manage invoices page opens.
-
Click a filter in the Basic filter box.
-
All Active
- Unsent
- Unpaid
- Paid
- Past due
text_image
Basic filter Advanced filter All active (8) Unsent (1) Unpaid (1) Paid (3) Past due (0)Select a filter to start a basic search.
See “About the Basic Filters” on page 39 for a description of these filters.
The Manage Invoices page refreshes and displays the invoices matching the search filter. You can apply another filter or look an the invoice details for one or more of the invoices listed.
Searching Invoices with an Advanced Filter
- Log in to your PayPal account.
- Click the Request Money tab and then click the Manage Invoices subtab.
The Manage invoices page opens.
- Click Advanced filter.
The Advanced filter search box displays on the page. The Basic filter search box moves to the back.
-
Select a filter in Filter by.
-
Email
- Recipient name
- Company name
- Invoice number
- Status
- Archived items
- Amount
- Currency
- Memo
If the filter lets you enter search criteria, one or more fields display next to your Filter by selection.
See “About the Advanced Filters” on page 39 for a description of these filters.
-
Enter search criteria for your filter, if available.
-
For Status and Currency filters, select an item from the drop down list.
-
For other filters, enter the criteria to find.
-
To use a date range to filter the search, select a date type from And (below the Filter by field) and enter a date range.
-
Select a date from the Calendar control.
- Or -
Enter the starting date in the first date field.
- Select a date from the Calendar control.
- Or -
Enter a date in the to field (second date field).
text_image
Select a filter to search invoices. Enter a value if available for the filter you selected . Basic filter Advanced filter Filter by Email jsmythe And Invoice date 7/1/2010 to 7/21/2010 Show Specify the beginning and ending dates of the date range for an advanced search.7. Click Show.
The Manage Invoices page displays a list of invoices that match your criteria. If there are no matches, the page displays a message indicating that there are no matches.
Reviewing Invoice Details
The Manage Invoices page lists the invoices that you sent or saved. Invoices also appear in your History page. You can view detailed information for an invoice in the Invoice details page.
You can access the Invoice details page from the following pages:
- Manage Invoices
• Account Overview for recent invoices
• History
• Any page that contains an invoice number link
The Invoice details page is divided into three sections:
- Invoice status: Contains the recipient's email address, current status, and invoice memo text display at the top of the page.
- Invoice actions: A set of buttons for the actions you can perform for the current invoice and a link you can use to return to the previous page.
- Invoice: Displays the invoice as it appears to the recipient. This section shows your contact information, the invoice date and payment terms, the recipient's information, the items invoiced, and the invoice totals. If you included Terms and Conditions or Notes text, it appears below the item list.
Use the Invoice details page to review the contents of the invoice, recipient information, and the invoice terms. From this page, you can perform the following actions for open invoices.
- Edit: Update or change the invoice contents. For example, if the recipient moved, you can edit the address information.
See “Editing Invoices” on page 47 for instructions.
- Remind: Send an email reminder to the recipient.
See “Sending Invoice Reminders” on page 55 for instructions.
- Print: Print the invoice for your records or to send a copy to your customer.
See “Printing Invoices” on page 32 for instructions.
• Mark as Paid: Manually set the invoice to Paid.
See “Recording Invoice Payments” on page 65 for instructions.
- Copy: Use a copy of the invoice as the starting point for a new invoice.
See “Copying Invoices” on page 54 for instructions.
- Cancel Invoice: Mark the invoice as canceled and send an email notification to the recipient.
See “Canceling Invoices” on page 56 for instructions.
After an invoice is paid or canceled, you can only print or copy it.
Invoice details
Invoice sent to: Nick Michael (pgrisier-us-01@paypal.com)
Status: Sent on Jul 20, 2010
Memo: Special tax in shipping
Edit
Remind
Mark as Paid
Copy
Cancel Invoice
Go to Manage Invoices
INVOICE
Maya Twain
491 9th Street
Austin, TX 78701
United States
Phone: Don't show on invoice
pgrisier-us-02@paypal.com
Invoice number
0008
Invoice date
7/20/2010
Payment terms
Due on receipt
Due date
7/20/2010
Bill To
pgrisier-us-01@paypal.com
| Description | Quantity | Unit price | Amount | |
| Shirt - 12345 - White Logo T-Shirt | 1 | 20.00 | 20.00 | |
| Hat - 23456 - Black Hat with small logo | 1 | 25.00 | 25.00 | |
| Keychain - 98765 | 1 | 8.00 | 8.00 | |
| Subtotal | 53.00 | |||
| Shipping/handling | 4.95 | |||
| CA 8.25% | 4.78 | |||
| Total | 62.73 USD | |||
Opening Invoice Details From the Manage Invoice Page
- Log in to your PayPal account.
- Click the Request Money tab and then click the Manage Invoices subtab.
The Manage invoices page opens. - Click the invoice number in the Invoice # column to open that invoice.
The Invoice details page opens.
Invoice details
Invoice sent to: Nick Michael (pgrisier-us-01@paypal.com)
Status: Sent on Jul 20, 2010
Memo: Special tax in shipping
Edit
Remind
Mark as Paid
Copy
Cancel Invoice
Go to Manage Invoices
INVOICE
Maya Twain
491 9th Street
Austin, TX 78701
United States
Phone: Don't show on invoice
pgrisier-us-02@paypal.com
Invoice number
0008
Invoice date
7/20/2010
Payment terms
Due on receipt
Due date
7/20/2010
Bill To
pgrisier-us-01@paypal.com
| Description | Quantity | Unit price | Amount |
| Shirt - 12345 - White Logo T-Shirt | 1 | 20.00 | 20.00 |
| Hat - 23456 - Black Hat with small logo | 1 | 25.00 | 25.00 |
| Keychain - 98765 | 1 | 8.00 | 8.00 |
| Subtotal | 53.00 | ||
| Shipping/handling | 4.95 | ||
| CA 8.25% | 4.78 | ||
| Total | 62.73 USD | ||
- Click a button to perform an action on this invoice.
For example, click Print to make a copy of the invoice for your records.
- Or -
Click Go to Manage Invoices to return to the Manage Invoices page.
Editing Invoices
You can update or change invoices that have not been paid, marked as paid, or canceled. For example, if your customer ordered another item, you can add it to an existing invoice. Use the Invoice details page to edit the contents of the invoice, recipient information, and the invoice terms.
When you select an invoice to edit, the Edit invoice page opens and displays the information that was sent to your customer. You can edit any of the fields in the invoice, but you cannot use a different template for the invoice. Because you are editing an existing invoice, you can only Send, Print, or Close the invoice.
When you send an edited invoice, the Manage Invoices page displays information about the edited invoice, replacing the original entry for the invoice.
When your customer views the invoice details, the invoice Status displays a message indicating that the invoice was edited and the date it was edited. Your customer sees only the edited version of the invoice.
Editing an Invoice
NOTE: If you need more detailed information about completing invoice fields, see “Creating Invoices and Entering Details” on page 17.
- Log in to your PayPal account.
- Click the Request Money tab and then click the Manage Invoices subtab.
The Manage invoices page opens.
- Click an Invoice #.
The Edit invoice page opens.
- Add or change the logo for the invoice.
| Setting Action | |
| Add logo Click to add a logo. | This setting appears when the invoice does not have a logo. |
| Change logo Click to use a different logo. | This setting appears when the invoice contains a logo. |
| Remove logo Click to delete the logo. | This setting appears when the invoice contains a logo. |
See “Including a Logo in Your Invoices” on page 74 for detailed instructions.
- Click Edit contact information to change your information.
See “Editing Your Contact Information in an Invoice” on page 70 for instructions.
-
Update the recipient information in Send to.
-
Update the following Invoice information:
-
Invoice number
- Invoice date
- Payment terms
-
Due date
-
To change the currency, select one in Select currency.
- Edit or add items.
Setting Action
| Item name/ID Enter the item name. | |
| If you have saved items, select one from the list that appears when you click in the field. | |
| Date | Enter the Date for the item.When you tab or click in the date field, a Calendar opens. Select the date from the Calendar or type the date in the field. |
| Quantity Enter the number of items. | |
| Unit price Enter the unit price. | |
| If you selected a saved item, the stored amount displays. You can change it, if necessary. | |
| TaxSelect the tax for this item. | |
| If you selected a saved item with an assigned tax rate, the tax displays. You can change it, if necessary.If the correct tax rate is not listed, add a new tax. See “Adding Tax Information in an Invoice or Template” on page 128 for instructions. | |
- Edit or add shipping and discount information:
Setting Action
Discount Enter a number and select a discount type.
Shipping/handling Enter an amount.
Tax on shipping Select the tax to apply to the shipping or handling fee.
If the correct tax rate is not listed, add a new tax. See “Adding Tax Information in an Invoice or Template” on page 128 for instructions.
-
Edit or add invoice notes and text:
-
Enter Terms and conditions text, up to 1,000 characters. This text appears on an invoice.
- Enter Note to recipient text, up to 1,000 characters. This text appears on an invoice.
- Enter Memo text, up to 150 characters. This text does not appear on an invoice.
12.Click Send.
The Manage invoices page opens and displays a message verifying that your editing invoice was sent. The edited invoice's information appears in the invoice list.
Before sending the edited invoice, you can click Print to make a copy for your records or mail to your customer.
Exporting Invoice Information
You can export invoice information to use in a spreadsheet or other application by downloading invoice activity from the Manage Invoices page. You can open the activity file immediately or save file to use later.
Each invoice in the activity file generates one row of information. Each column in the activity file represents a piece of the invoice's information,. If an invoice does not contain certain data, such as tax or shipping amounts, the columns are empty.
Before downloading the activity, use a basic or advanced filter to display only the invoices you want in the file. For example, use a filter to limit the downloaded activity to paid invoices. See “Searching Invoices” on page 38 for filtering instructions.
You can download two levels of invoice activity information:
- Invoice Summary: The downloaded activity information contains one row of information for each invoice. This is the default download.
See “Invoice Summary Activity Information” on page 50 for a list of the columns contained in each row.
- Invoice Details: The downloaded activity information contains one invoice summary row and additional rows for each item, tax, shipping, and discount within an invoice. The summary row contains the same information as the Invoice Summary download.
Additional columns appear for item details, tax amounts, shipping amounts and discount amounts.
See “Invoice Details Activity Information” on page 50 for more information about the columns contained in this download.
Invoice Summary Activity Information
The default download contains invoice summary information. Each row can contain the information in the following table.
| Date created | Time created | Invoice date | Invoice date | Due date |
| Payment date | Status | From email | To email | Name |
| Company | Invoice number | Currency | Item total | Discount amount |
| Shipping amount | Tax total | Total invoice amount | Transaction ID | Terms note |
| Customer note | Invoice memo | Invoice billing address | Other recipient details | Invoice shipping address |
Invoice Details Activity Information
You can download item details for each invoice to see a breakdown of the invoice's contents. In addition to the invoice summary information, you'll see one item detail row for each invoice item. If the invoice contains shipping charges or discounts, there is one row for each. A Type column identifies the kind of data included in the row:
- Invoice summary row: Contains all of the information listed in the previous table.
-
Invoice item row: Contains the invoice identification fields and the following item-specific columns:
-
Item date
- I t e m n a m e
- Item description
- Item quantity
- Item unit price
- Item total
- Tax name
- Tax rate
- Shipping amount row: Displays invoice identification information and contains information in the following columns:
- Shipping amount
- Tax name
- Tax rate
- Tax total
- Discount amount row: Displays invoice identification information and an amount in the Discount amount column.
The following table contains a complete list of the columns in the invoice details activity.
| Date created | Time created | Invoice date | Due date |
| Payment date | Type | Status | From email |
| To email | Name | Company | Invoice number |
| Currency | Item date | Item name | Item description |
| Item quantity | Item unit price | Item total | Discount amount |
| Shipping amount | Tax name | Tax rate | Tax total |
| Total invoice amount | Transaction ID | Terms note | Customer note |
| Invoice memo | Invoice billing address | Other recipient details | Invoice shipping address |
Downloading and Saving Invoice Activity
- Log in to your PayPal account.
- Click the Request Money tab and then click the Manage Invoices subtab.
The Manage invoices page opens.
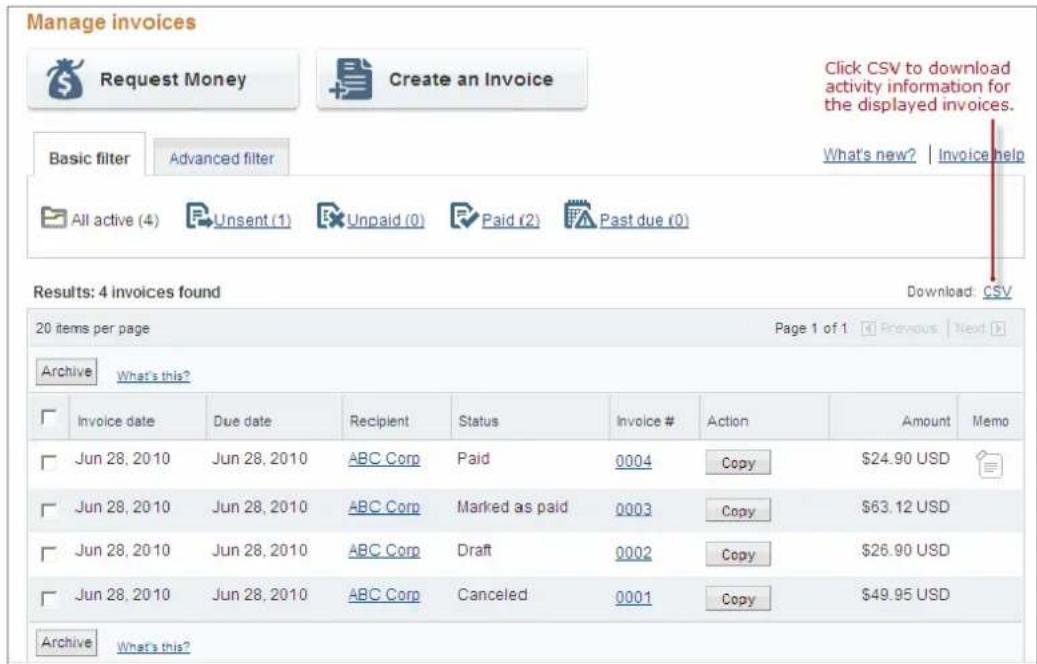
- Search for the invoices to export by applying a Basic or Advanced filter.
See “Searching Invoices” on page 38 for instructions.
text_image
Manage invoices Request Money Create an Invoice Click CSV to download activity information for the displayed invoices. Basic filter Advanced filter What's new? Invoice help All active (4) Unsent (1) Unpaid (0) Paid (2) Past due (0) Results: 4 invoices found Download: CSV 20 items per page Page 1 of 1 Archive What's this? Invoice date Due date Recipient Status Invoice # Action Amount Memo Jun 28, 2010 Jun 28, 2010 ABC Corp Paid 0004 Copy $24.90 USD Jun 28, 2010 Jun 28, 2010 ABC Corp Marked as paid 0003 Copy $63.12 USD Jun 28, 2010 Jun 28, 2010 ABC Corp Draft 0002 Copy $26.90 USD Jun 28, 2010 Jun 28, 2010 ABC Corp Canceled 0001 Copy $49.95 USD Archive What's this?- Click CSV above the invoice list.
The Download your activity dialog box opens.
- Select a type in Choose the file type.
The file type specifies how you want the activity data separated in each row. For example, select Comma delimited to use a comma to separate the columns.
-
Click Include Item Details to export detailed information about each item in the invoice.
-
Click Download.
The File Download dialog box opens.
- Click Save.
The Save File dialog box opens.
- Enter a name in File name.
10.Click Save.
NOTE: To save the file in a different folder, browse to find the folder to use before clicking Save.
The Manage Invoices page opens.
Downloading and Opening Invoice Activity
- Log in to your PayPal account.
- Click the Request Money tab and then click the Manage Invoices subtab.
The Manage invoices page opens.
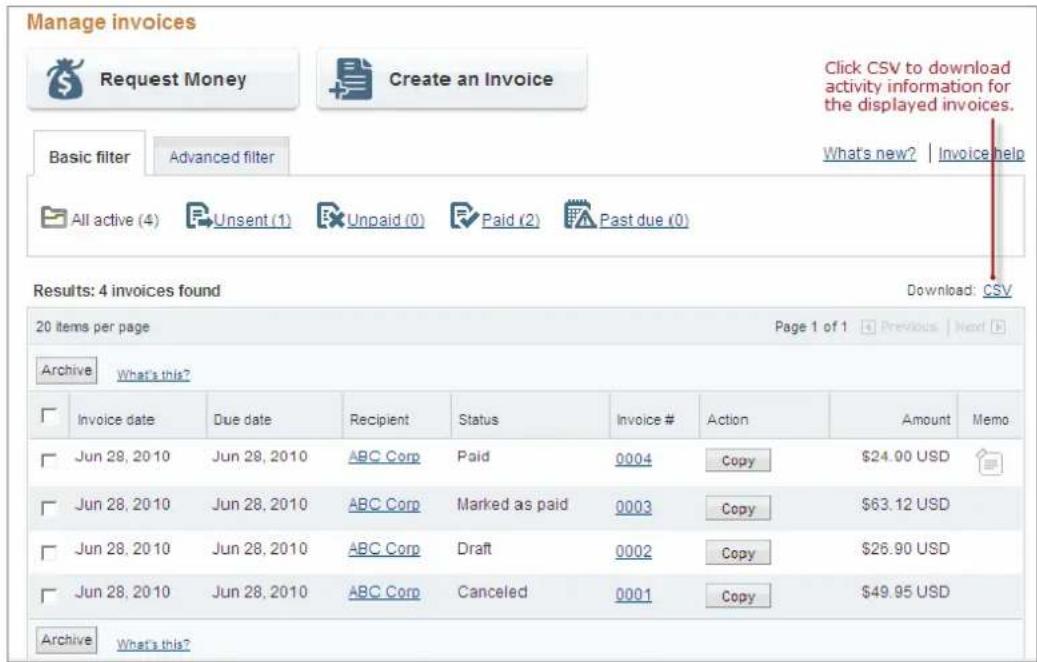
- Search for the invoices to export by applying a Basic or Advanced filter.
See "Searching Invoices" on page 38 for instructions.
text_image
Manage invoices Request Money Create an Invoice Click CSV to download activity information for the displayed invoices. Basic filter Advanced filter What's new? | Invoice help All active (4) Unsent (1) Unpaid (0) Paid (2) Past due (0) Results: 4 invoices found Download: CSV 20 items per page Page 1 of 1 Previous | Next > Archive What's this? Invoice date Due date Recipient Status Invoice # Action Amount Memo Jun 28, 2010 Jun 28, 2010 ABC Corp Paid 0004 Copy $24.00 USD Jun 28, 2010 Jun 28, 2010 ABC Corp Marked as paid 0003 Copy $63.12 USD Jun 28, 2010 Jun 28, 2010 ABC Corp Draft 0002 Copy $26.90 USD Jun 28, 2010 Jun 28, 2010 ABC Corp Canceled 0001 Copy $49.95 USD Archive What's this?- Click CSV above the invoice list.
The Download your activity dialog box opens.
- Select a type in Choose the file type.
The file type specifies how you want the activity data separated in each row. For example, select Comma delimited to use a comma to separate the columns.
-
Click Include Item Details to export detailed information about each item in the invoice.
-
Click Download.
The File Download dialog box opens.
- Click Open to display the information in an application.
Your selected application opens. Follow the directions to convert the information to your application's format, if necessary.
Copying Invoices
You can copy an existing invoice as a quick way to create a new invoice. When you copy an invoice, the Create a new invoice page opens and displays an exact replica of the original invoice except for the invoice number, invoice date, and due date. These three fields are reset. You can make any necessary edits before sending the invoice.
You can copy an invoice from the Manage Invoices page or from the Invoice details page.
Copying an Invoice from the Manage Invoices Page
- Log in to your PayPal account.
- Click the Request Money tab and then click the Manage Invoices subtab.
The Manage invoices page opens. -
Click Copy in the Action column for the invoice you want to copy.
The Create a new invoice page opens. -
Edit or add information to an invoice copy as you would with any other new invoice.
When you are finished, you can send, preview, or save the invoice. You can also save the invoice as a template.
See “Creating Invoices” on page 15 for instructions.
Copying an Invoice from the Invoice Details Page
- Log in to your PayPal account.
-
Click the Request Money tab and then click the Manage Invoices subtab.
The Manage invoices page opens. -
Click the Invoice #.
The Invoice details page opens. -
Click Copy.
The Create a new invoice page opens. -
Edit or add information to the invoice copy as you would with any other new invoice.
When you are finished, you can send, preview, or save the invoice. You can also save the invoice as a template.
See “Creating Invoices” on page 15 for instructions.
Sending Invoice Reminders
If you have not received payment for your invoice, you can send a reminder that payment is due. You can send invoice reminders for open invoices through the Manage Invoices page.
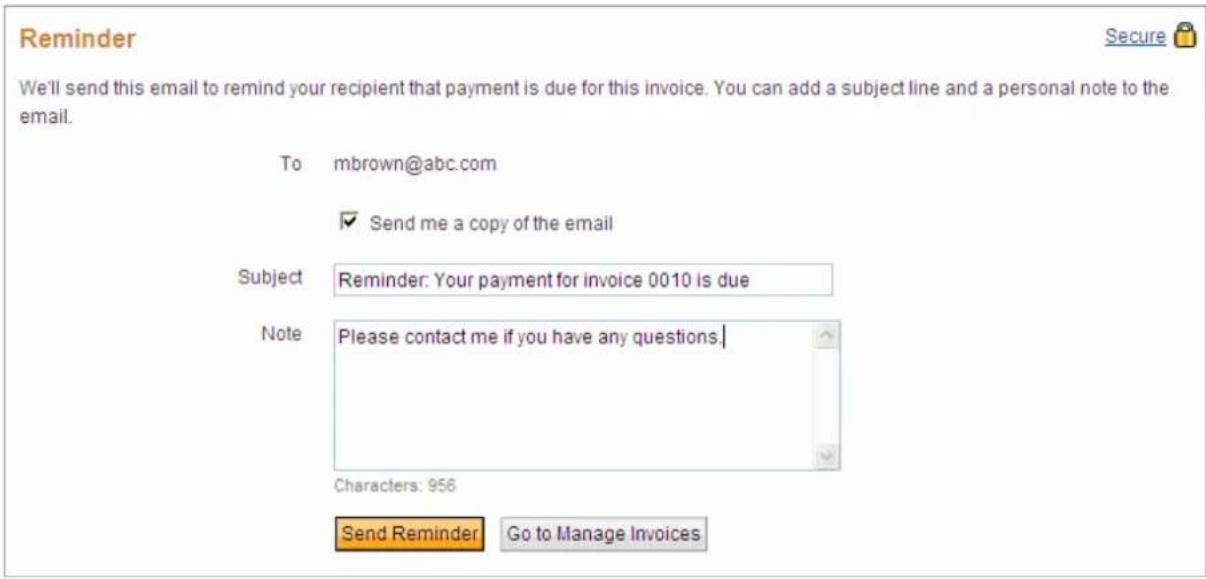
The reminder is an email message that you send to the invoice recipient. The email subject contains the invoice number to help identify the invoice. You can include a personal message of up to 1,000 characters. You can send a copy of the email to yourself for your records.
Sending a Reminder
-
Log in to your PayPal account.
-
Click the Request Money tab and then click the Manage Invoices subtab.
The Manage invoices page opens.
- Select Remind in the Action column for the invoice that needs a reminder.
The Reminder page opens. The invoice recipient's email displays in To: and the subject line contains the invoice number.
-
Select Send me a copy of the email. (Optional)
-
Edit the Subject text, if necessary.
This is the email subject.
- Enter a Note to the invoice recipient. (Optional)
Note text cannot exceed 1,000 characters. It appears in the body of the email message.
text_image
Reminder We'll send this email to remind your recipient that payment is due for this invoice. You can add a subject line and a personal note to the email. To mbrown@abc.com ✓ Send me a copy of the email Subject Reminder: Your payment for invoice 0010 is due Note Please contact me if you have any questions. Characters: 956 Send Reminder Go to Manage Invoices7. Click Send Reminder.
The Manage Invoices page displays a message confirming that your reminder was sent. If you chose to receive a copy of the email, it will arrive in your email shortly.
Canceling Invoices
When a recipient cancels an order or you decide not to pursue an invoice for some reason, you can cancel it through the Invoice details page. You can also cancel an invoice using an option in the Manage Invoices page.
When you cancel an invoice, the invoice recipient receives an email notification. The default email subject line contains the invoice number to help identify the invoice. You can include a personal message of up to 1,000 characters. You can send a copy of the email to yourself for your records.
The invoice status changes to Canceled. This invoice status displays in the History list in the Payment Status column and in the Manage Invoices page in the Status column. The Invoice details page displays the status, the date the status occurred, and the user who set the status.
You can still access Invoice details for canceled invoices through the Manage Payment or History pages. You can also print or copy them. However, canceled invoices are considered complete and you cannot edit them.
Canceling an Invoice from the Manage Invoices Page
- Log in to your PayPal account.
- Click the Request Money tab and then click the Manage Invoices subtab.
The Manage invoices page opens.
- Select Cancel in the Action column for the invoice you want to copy.
The Cancel this invoice and email the recipient page opens. The recipient's email displays in To: and the default subject line contains the invoice number.
- Edit the Subject text, if necessary.
This text becomes the email subject.
- Enter a Note to the recipient. (Optional)
Note text cannot exceed 1,000 characters. It appears in the body of the email message.
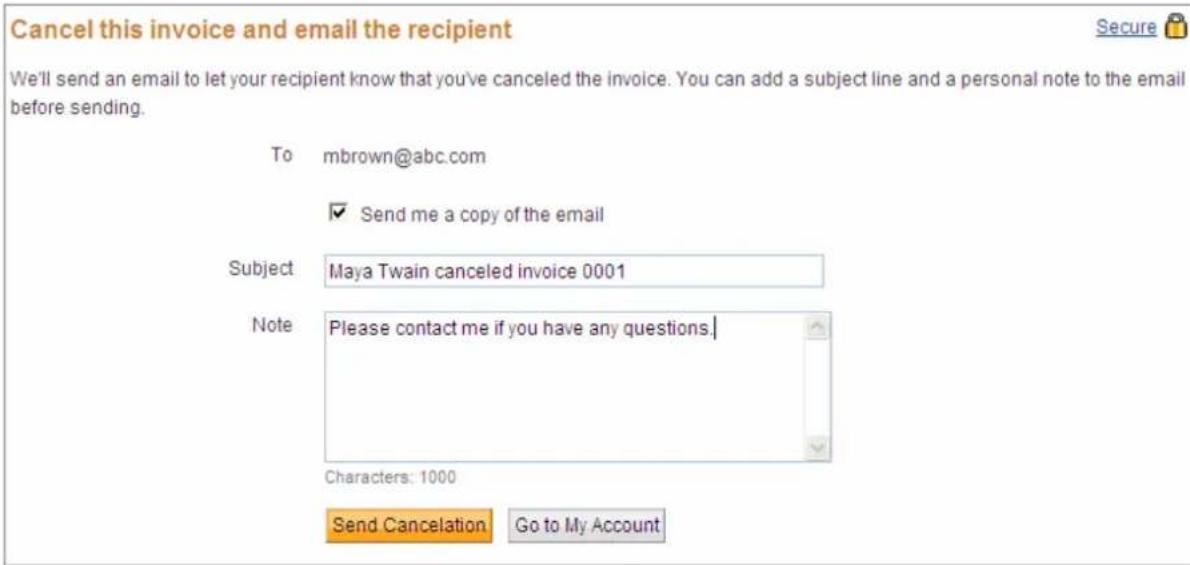
text_image
Cancel this invoice and email the recipient We'll send an email to let your recipient know that you've canceled the invoice. You can add a subject line and a personal note to the email before sending. To mbrown@abc.com ✓ Send me a copy of the email Subject Maya Twain canceled invoice 0001 Note Please contact me if you have any questions. Characters: 1000 Send Cancelation Go to My Account6. Click Send Cancelation.
The Manage Invoices page displays a message confirming that the invoice was canceled and an email was sent to the recipient. The invoice's Status displays Canceled.
If you chose to receive a copy of the email, it will arrive in your email shortly.
Canceling an Invoice from the Invoice Details Page
- Log in to your PayPal account.
-
Open the Invoice Details page using one of the following methods:
-
In your Account Overview page, click Details for a canceled invoice.
- Click History. The History page opens.
Locate a canceled invoice. Click Details.
- Click Request Payment. The Manage Invoices page opens.
Click the Invoice # for a canceled invoice.
The Invoice details page opens. Invoice sent to displays the recipient's email address and Status displays the status, date the status occurred, and who set the status.
3. Click Cancel Invoice.
The Cancel this invoice and email the recipient page opens. The recipient's email displays in To: and the default subject line contains the invoice number.
- Edit the Subject text, if necessary.
This text becomes the email subject.
5. Enter a Note to the recipient. (Optional)
Note text cannot exceed 1,000 characters. It appears in the body of the email message.
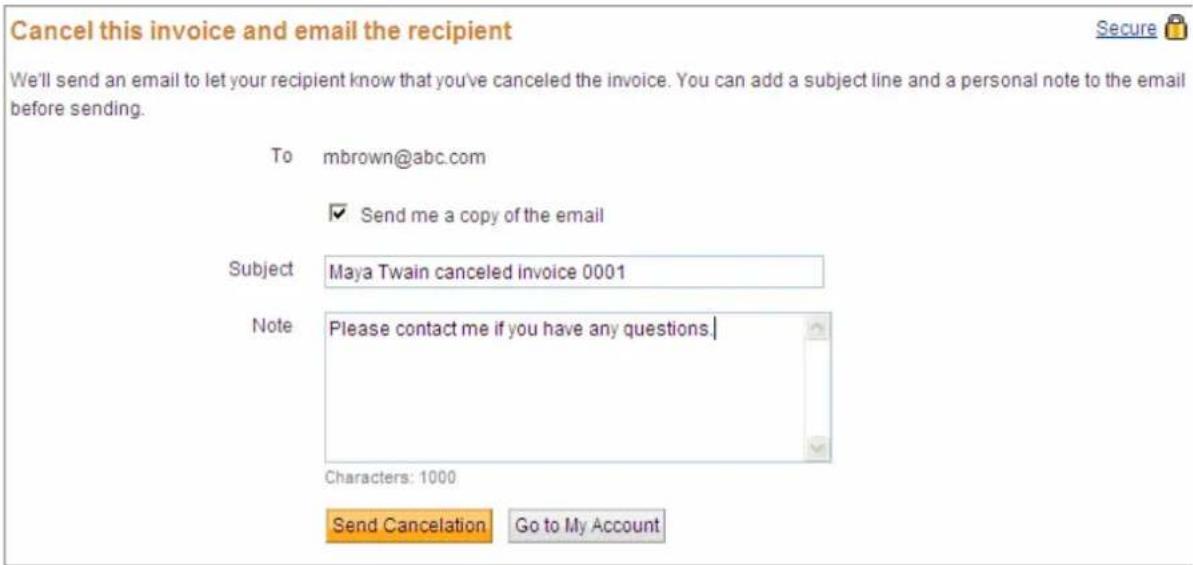
text_image
Cancel this invoice and email the recipient We'll send an email to let your recipient know that you've canceled the invoice. You can add a subject line and a personal note to the email before sending. To mbrown@abc.com ✓ Send me a copy of the email Subject Maya Twain canceled invoice 0001 Note Please contact me if you have any questions. Characters: 1000 Send Cancelation Go to My Account6. Click Send Cancelation.
The Invoice details page displays a message confirming that the invoice was canceled and an email was sent to the recipient. If you chose to receive a copy of the email, it will arrive in your email shortly.
- Click Go to log or Go to Manage Invoices to return to your starting page.
Archiving and Unarchiving Invoices
All invoices that you create appear in the All Active invoices list. You can store, or archive, invoices that you are not actively using. When you archive invoices, they no longer appear in the All Active invoices list in the Manage Invoices page. You can see your archived invoices by using an Advanced Filter to search for them.
If you want archived invoices to appear in the All Active invoices list again, you can unarchive them. See “Unarchiving an Invoice” on page 59.
Archiving an Invoice
-
Log in to your PayPal account.
-
Click the Request Money tab and then click the Manage Invoices subtab.
The Manage invoices page opens.
- Click the selection box next to each invoice to archive. To select all displayed invoices, click the section box at the top of the column.
Each selected invoice is highlighted.
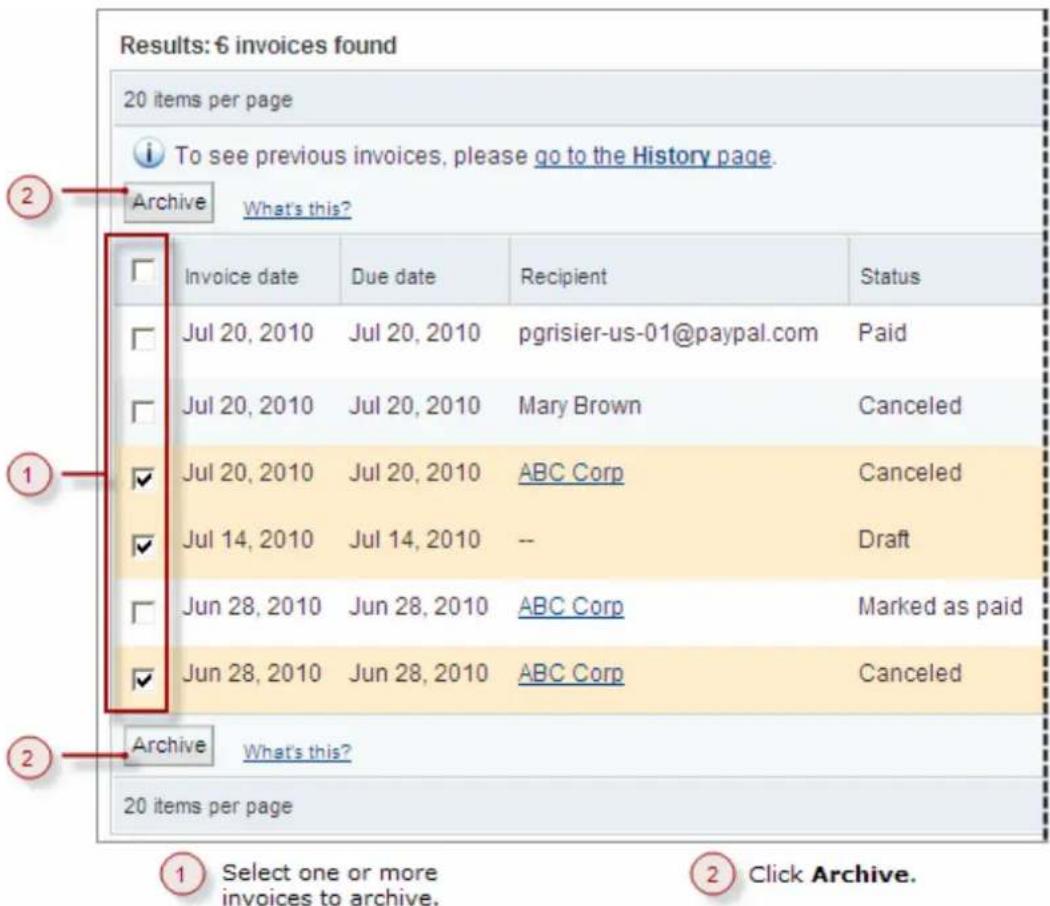
text_image
Results: 6 invoices found 20 items per page To see previous invoices, please go to the History page. Archive What's this? Invoice date Due date Recipient Status Jul 20, 2010 Jul 20, 2010 pgrisier-us-01@paypal.com Paid Jul 20, 2010 Jul 20, 2010 Mary Brown Canceled Jul 20, 2010 Jul 20, 2010 ABC Corp Canceled Jul 14, 2010 Jul 14, 2010 -- Draft Jun 28, 2010 Jun 28, 2010 ABC Corp Marked as paid Jun 28, 2010 Jun 28, 2010 ABC Corp Canceled Archive What's this? 20 items per page Select one or more invoices to archive. Click Archive.- Click Archive.
The Manage Invoices page displays only the active invoices. You can search for your archived invoices using an Advanced filter.
Unarchiving an Invoice
- Log in to your PayPal account.
- Click the Request Money tab and then click the Manage Invoices subtab.
The Manage invoices page opens.
- Click Advanced Filter.
The Advanced Filter settings display.
-
Select Archived Items in Filter by.
-
Enter a date range for Invoice date, Due date, or Payment date to further filter your search.
-
Click Show.
A list of archived invoices meeting your search criteria displays in the page.
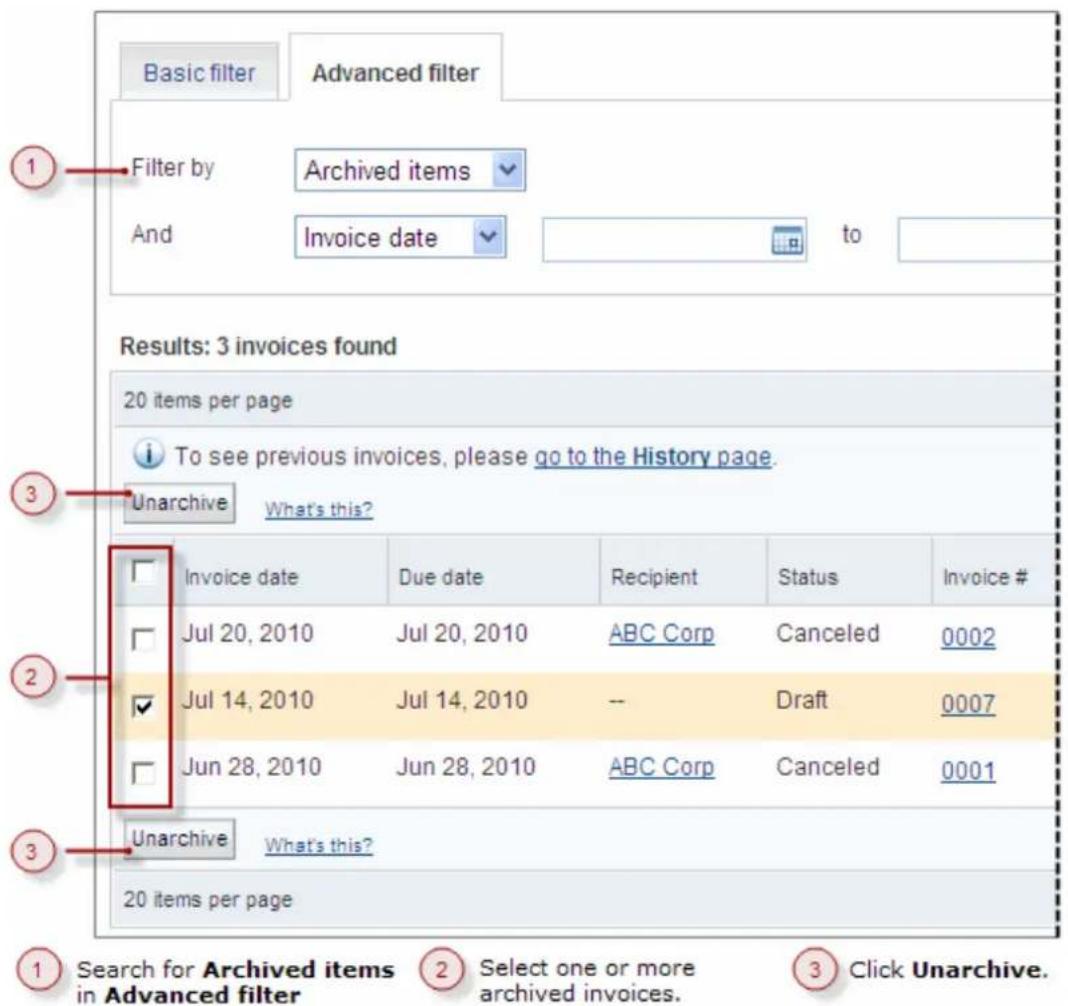
text_image
Basic filter Advanced filter Filter by Archived items And Invoice date to Results: 3 invoices found 20 items per page To see previous invoices, please go to the History page. Unarchive What's this? Invoice date Due date Recipient Status Invoice # Jul 20, 2010 Jul 20, 2010 ABC Corp Canceled 0002 Jul 14, 2010 Jul 14, 2010 -- Draft 0007 Jun 28, 2010 Jun 28, 2010 ABC Corp Canceled 0001 Unarchive What's this? 20 items per page Search for Archived items in Advanced filter Select one or more archived invoices. Click Unarchive.-
Click the selection box for the invoices to unarchive. To select all displayed invoices, click the selection box at the top of the column.
-
Click Unarchive.
The search results list refreshes and the unarchived invoice no longer appears. The unarchived invoice appears in the All Active invoice list.
About Invoices and Shipping
The ability to create shipping labels and packing slips for your orders is not integrated in PayPal invoicing. However, when you receive a PayPal payment for an invoice, you can print shipping labels and packing slips by opening the payment's Transaction Details page and using the links listed there.
4
Managing Invoice Payments
PayPal Invoicing automatically records payments made through PayPal accounts. You can manually record payments made by invoice recipients without PayPal accounts or by PayPal account holders who choose to use a different payment method.
Read the following topics to learn about payments:
- “About Invoice Payments” on page 63
- “Viewing PayPal Invoice Payments” on page 63
- “Recording Invoice Payments” on page 65
See “Managing Your Invoices” on page 35 for instructions on managing other invoicing tasks.
About Invoice Payments
Paid invoices have different statuses to distinguish between PayPal payments and manually recorded payments.
- Paid: Identifies an invoice paid using PayPal
- Marked as paid: Identifies an invoice with a manually recorded payment.
Regardless of how payments are recorded, you can view and manage payments in the Invoice details page. You can access Invoice details from the following pages:
- Manage Invoices: Click an invoice number in the list.
- Account Overview: Click Details for invoices created within the last 7 days.
• History: Click Details. - Transaction Details: Click the invoice number in Payment For.
The Invoice details page provides a link to the payment information for the invoice. Use this link to see more information about the payment and to perform different actions.
Viewing PayPal Invoice Payments
Invoice recipients who are PayPal account holders can choose to pay your invoices using their accounts. When they access their PayPal accounts, they see your invoices listed in their Account Overview or History pages. When they click Pay, they choose a payment method and approve the payment.
When an invoice payment clears, the invoice status changes to Paid. The Invoice details page shows the changed status and provides a link to the Transaction Details page for that
payment. Use this link to see more information about the payment, issue a refund, manage tracking information, or print a shipping label or packing slip.
Viewing a PayPal Invoice Payment
- Log in to your PayPal account.
- Click the Request Money tab and then click the Manage Invoices subtab.
The Manage invoices page opens. - Click the invoice number in the Invoice # column to open that invoice.
The Invoice details page opens. - Click More information.
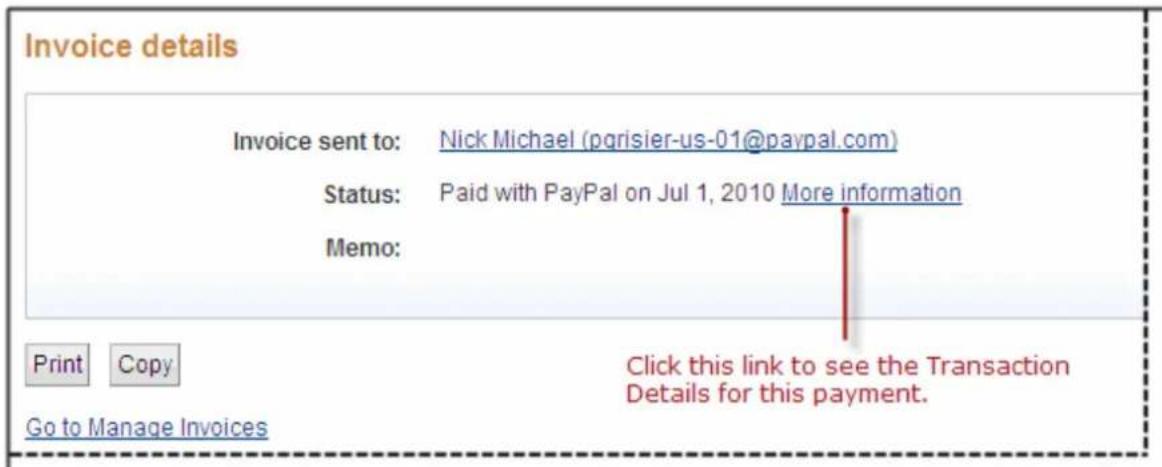
text_image
Invoice details Invoice sent to: Nick Michael (pgrisier-us-01@paypal.com) Status: Paid with PayPal on Jul 1, 2010 More information Memo: Print Copy Go to Manage Invoices Click this link to see the Transaction Details for this payment.The Transaction Details page opens. It displays the payment details.
- Perform one of the following actions, if necessary.
– Issue a refund within 60 days of the payment.
- Enter tracking information for the item(s) you shipped.
- Print a shipping label or packing slip for the item(s) you will ship.
- Edit tracking information.
- Click the invoice number in Payment for to return to the Invoice details page.
- Or -
Click Return to Log to open your History page.
Recording Invoice Payments
Invoice recipients do not need a PayPal account to pay your invoices. They can pay online using a debit or credit card, or pay offline by mailing payments or making wire transfers. When recipients use a method other than PayPal to pay an invoice, PayPal cannot update the invoice status for you. You must manually record the payment information and mark the invoice as paid. You record an invoice payment using an option on the Manage Invoices page.
When you enter and save the payment information, the invoice displays the Marked as paid status on the Manage Invoices, Account Overview, and History pages. When you view the Invoice details page for the invoice, it contains a link to the Mark as paid dialog box. Use this link to view or edit payment information for this invoice.
Marking an Invoice as Paid
- Log in to your PayPal account.
- Click the Request Money tab and then click the Manage Invoices subtab.
The Manage invoices page opens.
- Select Mark as paid in the Action column.
The Mark as paid dialog opens. It displays the invoice number, invoice date, and the invoice amount for the invoice you selected.
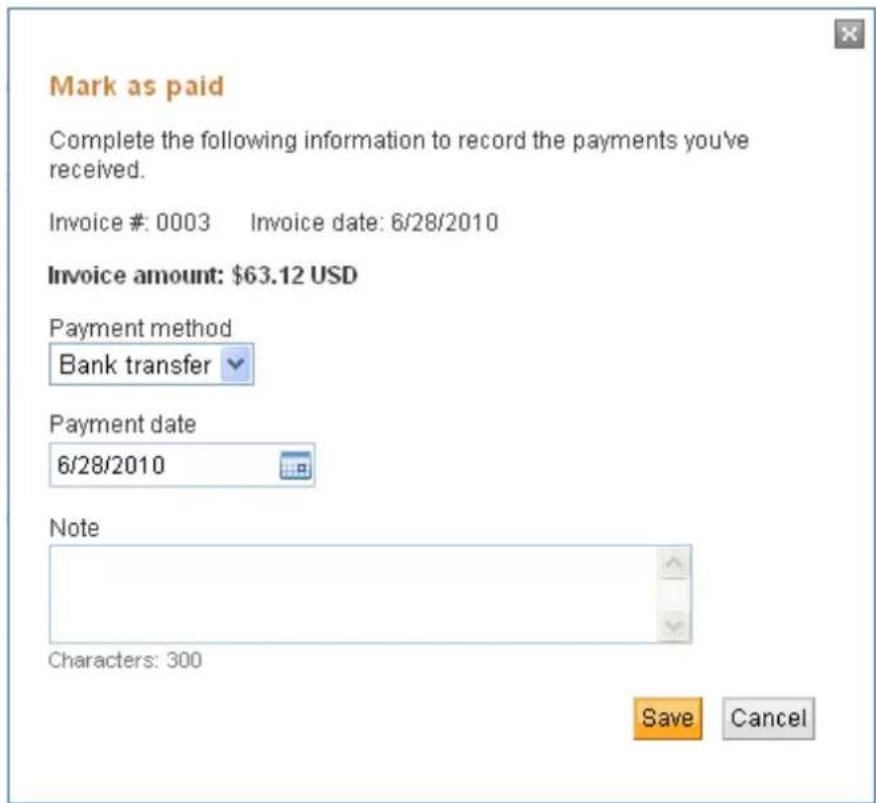
text_image
Mark as paid Complete the following information to record the payments you've received. Invoice #: 0003 Invoice date: 6/28/2010 Invoice amount: $63.12 USD Payment method Bank transfer Payment date 6/28/2010 Note Characters: 300 Save Cancel- Select a Payment method.
- Enter a Payment date or select one from the Calendar.
- Enter an optional Note of 300 characters or less.
- Click Save.
The Manage Invoices page displays the Marked as paid status for the invoice.
Viewing and Editing Manually Recorded Payments
NOTE: This task describes how to access the Invoice details page from the Manage Invoices page. You can also access the Invoice details page from the Account Overview and History pages, as well as any page that contains an invoice number link.
- Log in to your PayPal account.
- Click the Request Money tab and then click the Manage Invoices subtab. The Manage invoices page opens.
- Click the invoice number in the Invoice # column to open that invoice. The Invoice details page opens.
4. Click View/edit details.
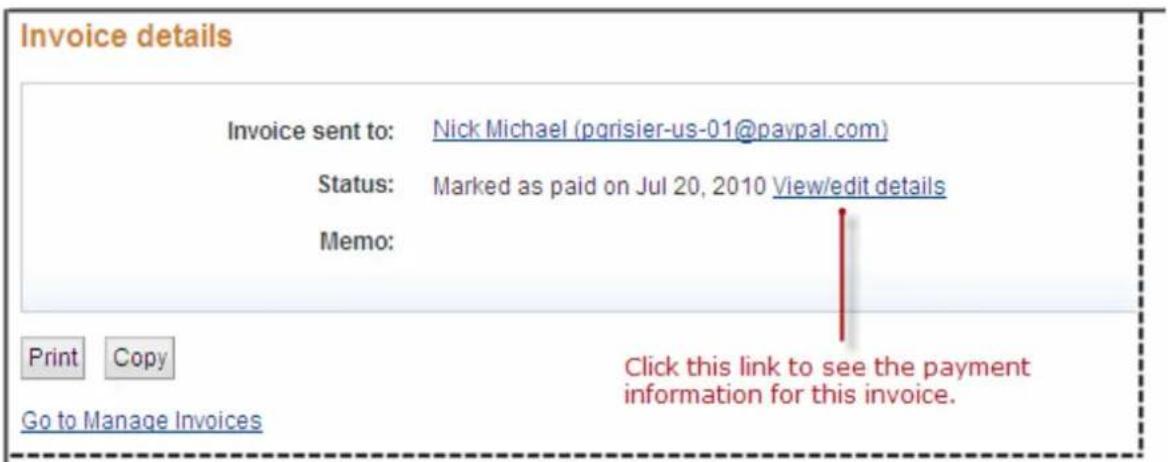
text_image
Invoice details Invoice sent to: Nick Michael (pqrisier-us-01@paypal.com) Status: Marked as paid on Jul 20, 2010 View/edit details Memo: Print Copy Go to Manage Invoices Click this link to see the payment information for this invoice.The Mark as paid dialog box opens. It displays the invoice number, invoice date, the invoice amount, and the saved payment information for this invoice.
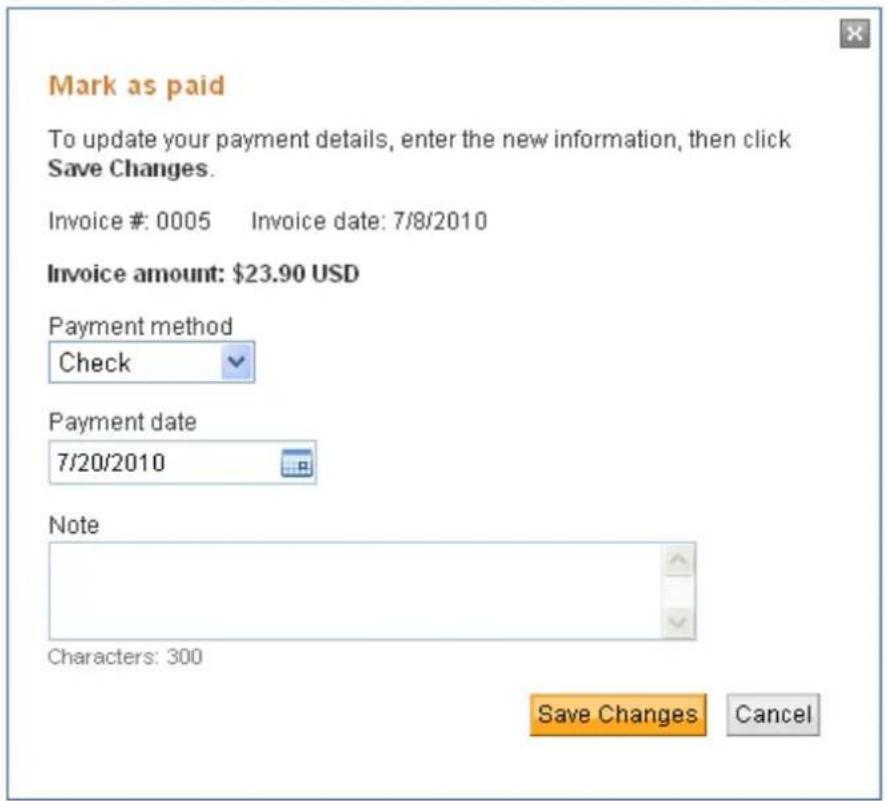
text_image
Mark as paid To update your payment details, enter the new information, then click Save Changes. Invoice #: 0005 Invoice date: 7/8/2010 Invoice amount: $23.90 USD Payment method Check Payment date 7/20/2010 Note Characters: 300 Save Changes Cancel- Update the payment information for the invoice.
6. Click Save Changes.
The Mark as paid dialog box closes. You can continue to review the Invoice details page or perform other actions.
7. Click Go to Manage Invoices.
The Invoice details page closes and the Manage Invoices page opens.
5
Customizing Your Invoice Information
You can customize what appears on your invoices by editing your contact information or including a logo.
Read the following topics to learn about customizing your invoices.
- “About Invoice Customization” on page 69
- “Customizing Your Contact Information” on page 69
- “Including a Logo in Your Invoices” on page 74
- “Including a Logo on Your Payment Page” on page 79
About Invoice Customization
Your contact information identifies you as the invoice sender and provides the recipient with a way to contact you, if necessary. When you create an invoice, the invoice contact information fields automatically display your Profile information. You can customize what appears on the invoice by editing your contact information.
Another way to customize your invoices is to include your logo. Sending invoices with your logo helps your recipients identify you as the sender.
Customizing Your Contact Information
Your contact information identifies you as the invoice sender and provides the recipient with a way to contact you if necessary. When you create an invoice, the invoice contact information fields automatically display your Profile information.
You can customize what appears on the invoice by editing your contact information. You can edit your contact information in two ways:
- Edit your contact information in an invoice.
- Edit the information in the Enter your contact information page in Invoice Settings.
Any edits you save do not affect existing invoices, invoice templates, or your Account Profile. You must edit your templates to change the contact information they contain. To change your Account Profile information, you must edit it directly.
NOTE: You must edit your address, phone number, and email address in your Account Profile.
See “Managing Templates” on page 94 for instructions on editing your invoice templates.
Editing Your Contact Information in an Invoice
NOTE: Any changes you make to your invoice contact information will not affect the information stored in your Account Profile.
- Log in to your PayPal account.
- Click the Request Money tab and then click Create Invoice.
The Create a new invoice page opens. - Click Edit contact information.
The Your contact information page opens.
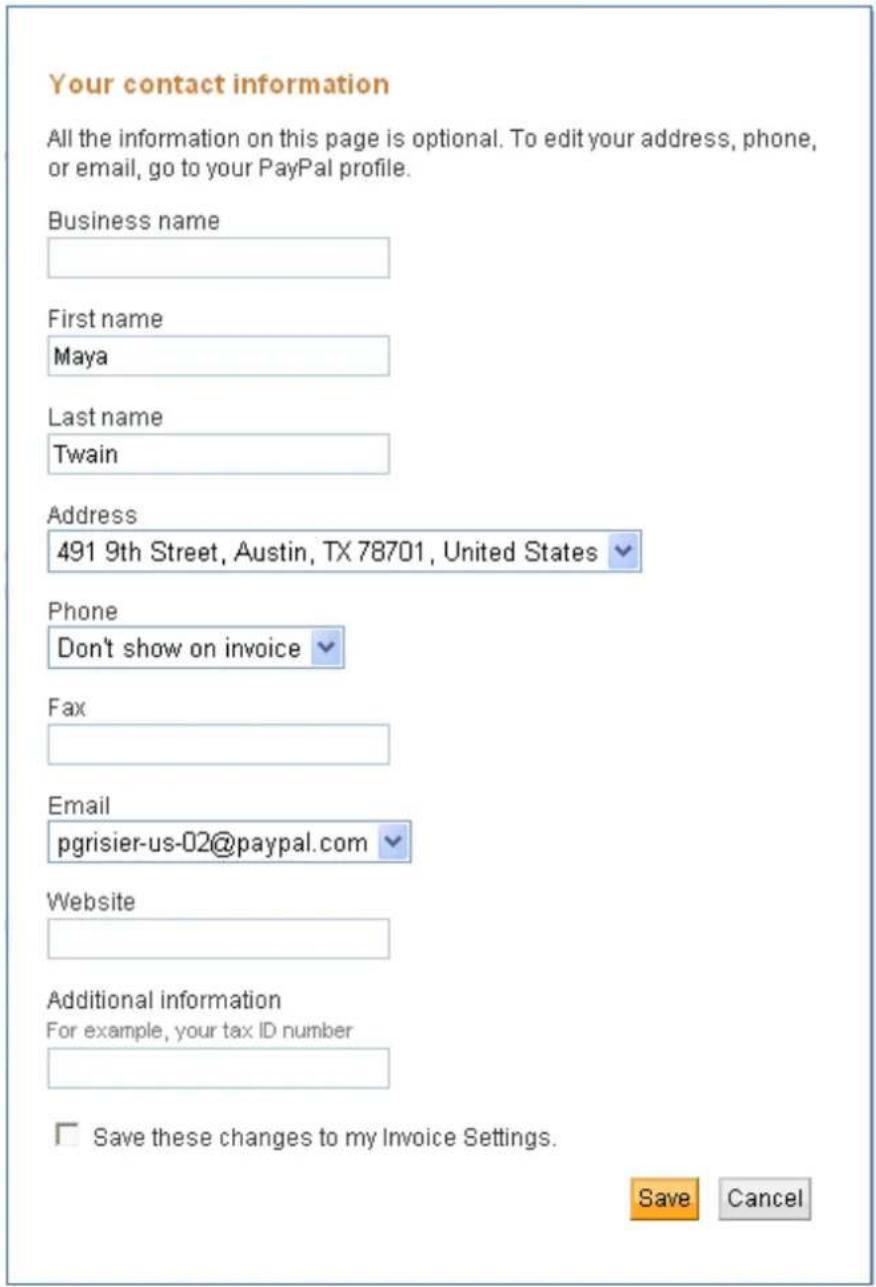
text_image
Your contact information All the information on this page is optional. To edit your address, phone, or email, go to your PayPal profile. Business name First name Maya Last name Twain Address 491 9th Street, Austin, TX 78701, United States Phone Don't show on invoice Fax Email pgrisier-us-02@paypal.com Website Additional information For example, your tax ID number Save these changes to my Invoice Settings. Save Cancel- Add or edit your contact information.
NOTE: All information on this page is optional.
| Setting Action | |
| Business Name Enter the name of your business. This item is included in the invoice. | |
| First Name Enter your first or given name.When you first create an invoice, this information is accessed from your Account Profile. If you change and save it, the edited name will be used for all future invoices. | |
| Last Name Enter your last or family name.When you first create an invoice, this information is accessed from your Account Profile. If you change and save it, the edited name will be used for all future invoices. | |
| Address | Select your address. Addresses are stored in your Account Profile.To exclude the address from the invoice, select Don’t show on invoice. |
| Phone | Select your phone number. Phone numbers are stored in your Account Profile.To exclude the phone number from the invoice, select Don’t show on invoice. |
| Fax Enter your fax number.Enter the number as you want it to appear on the invoice, or leave it blank. | |
| Select your email address. Email addresses are stored in your Account Profile.To exclude the email address from the invoice, select Don’t show on invoice. | |
| Website | Enter your website address as you wish it to appear on your invoice, or leave it blank. |
| Additional Information | Enter additional contact information to display on the invoice.For example, enter your tax ID number or business license number. |
- To store this information, select Save these changes to my Invoice Settings,
- Click Save.
Your edits appear in the contact information section of the invoice. If you chose to save the edits to your Invoice Settings, your updated contact information will also appear in the Enter your contact information page.
Editing Your Contact Information in Invoice Settings
NOTE: Any changes you make to your invoice contact information will not affect the information stored in your Account Profile.
- Log in to your PayPal account.
-
Click the Request Money tab.
-
Click Invoice Settings.
The Enter your contact information page opens.
- Add or edit your contact information.
NOTE: All information on this page is optional.
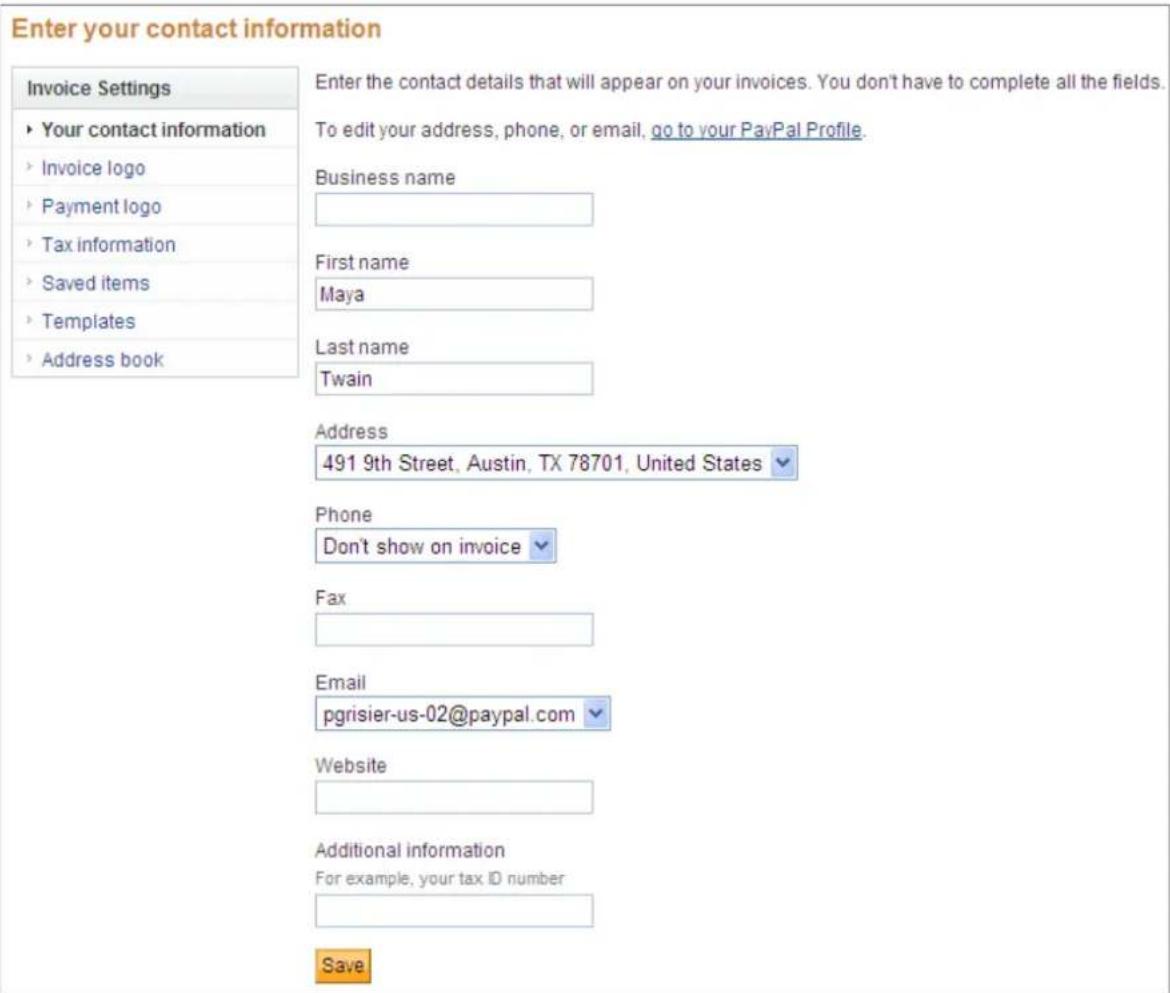
text_image
Enter your contact information Invoice Settings ► Your contact information ► Invoice logo ► Payment logo ► Tax information ► Saved items ► Templates ► Address book Enter the contact details that will appear on your invoices. You don't have to complete all the fields. To edit your address, phone, or email, go to your PayPal Profile. Business name First name Maya Last name Twain Address 491 9th Street, Austin, TX 78701, United States Phone Don't show on invoice Fax Email pgrisier-us-02@paypal.com Website Additional information For example, your tax ID number SaveSetting Action
Business Name Enter your business name as you want it to appear on an invoice.
First Name Enter your first or given name.
When you first create an invoice, this information is accessed from your Account Profile. If you change it, the edited name will be used for all future invoices.
| Setting | Action |
| Last Name Enter your last or family name. | |
| When you first create an invoice, this information is accessed from your Account Profile. If you change it, the edited name will be used for all future invoices. | |
| Address | Select your address. Addresses are stored in your Account Profile.To exclude the address from the invoice, select Don’t show on invoice. |
| Phone | Select your phone number. Phone numbers are stored in your Account Profile.To exclude the phone number from the invoice, select Don’t show on invoice. |
| Fax Enter your fax number. | |
| Enter the number as you want it to appear on the invoice, or leave it blank. | |
| Select your email address. Email addresses are stored in your Account Profile.To exclude the email address from the invoice, select Don’t show on invoice. | |
| Website | Enter your website address as you wish it to appear on your invoice, or leave it blank. |
| Additional Information | Enter additional contact information to display on the invoice.For example, enter your tax ID number or business license number. |
5. Click Save.
Your updated contact information appears in the Enter your contact information page. When you create your next invoice, it will use the updated information.
Including a Logo in Your Invoices
Sending invoices with your logo helps your customers identify you as the sender.
Your invoice logo must meet the following requirements:
- File format: JPG, GIF, or PNG
- File size limit: 100KB, maximum
- File resolution: 75 pixels high x 100 pixels wide, maximum
If your image does not meet these requirements, adjust the image before you add it.
IMPORTANT: Before you add a logo to use in your invoices, you must certify that you have the right to distribute the image and that it does not violate the PayPal User Agreement and the Acceptable Use policies.
You can add or change an invoice logo when you create an invoice, or through the Invoice Logo page in Invoice Settings.
Adding a Logo When You Create an Invoice
- Log in to your PayPal account.
- Click the Request Money tab and then click Create Invoice.
The Create a new invoice page opens. - Click Add Logo.
The Add your invoice logo page opens.
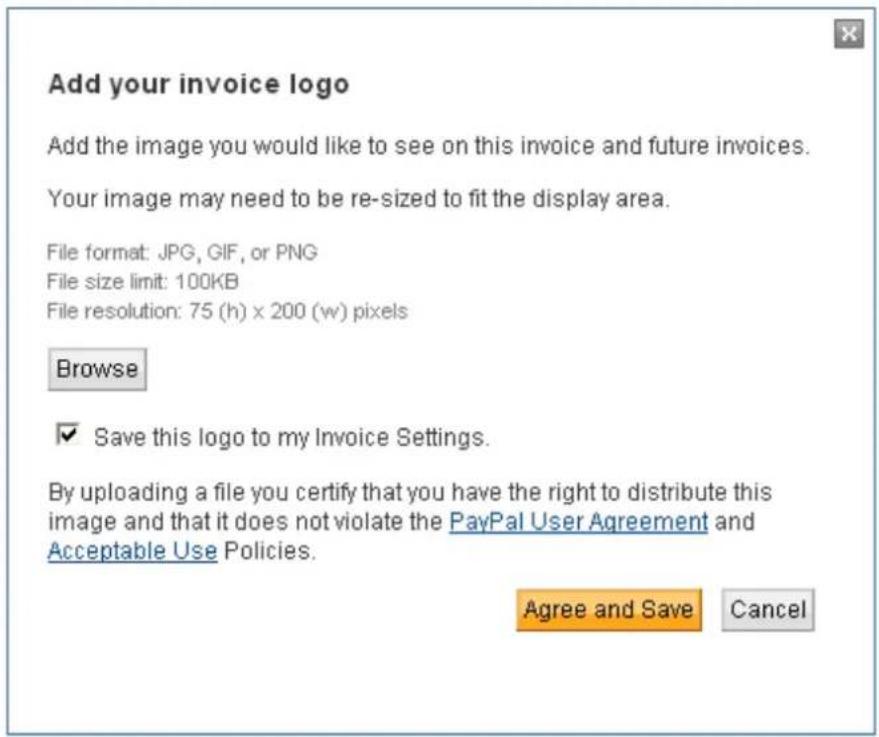
text_image
Add your invoice logo Add the image you would like to see on this invoice and future invoices. Your image may need to be re-sized to fit the display area. File format: JPG, GIF, or PNG File size limit: 100KB File resolution: 75 (h) x 200 (w) pixels Browse ✓ Save this logo to my Invoice Settings. By uploading a file you certify that you have the right to distribute this image and that it does not violate the PayPal User Agreement and Acceptable Use Policies. Agree and Save Cancel- Click Browse.
The Browse dialog box opens. - Select the logo file to use and click Open.
- Select Save this logo to my Invoice Settings to use this logo for all future invoices.
- Click Agree and Save.
IMPORTANT: When you click Agree and Save you are certifying that you have the right to distribute the image and that it does not violate the PayPal User Agreement and the Acceptable Use policies.
The logo displays in the Create a new invoice page and is included with the invoice when you send or save it.
Adding a Logo in Invoice Settings
- Log in to your PayPal account.
- Click the Request Money tab and then click the Manage Invoices subtab.
The Manage invoices page opens.
- Click Invoice Settings.
The Enter your contact information page opens.
- Click Invoice logo in the Invoice Settings box at the left of the page.
The Add your invoice logo page opens. It displays a gray box as a placeholder for the logo and No file selected next to the Browse button.
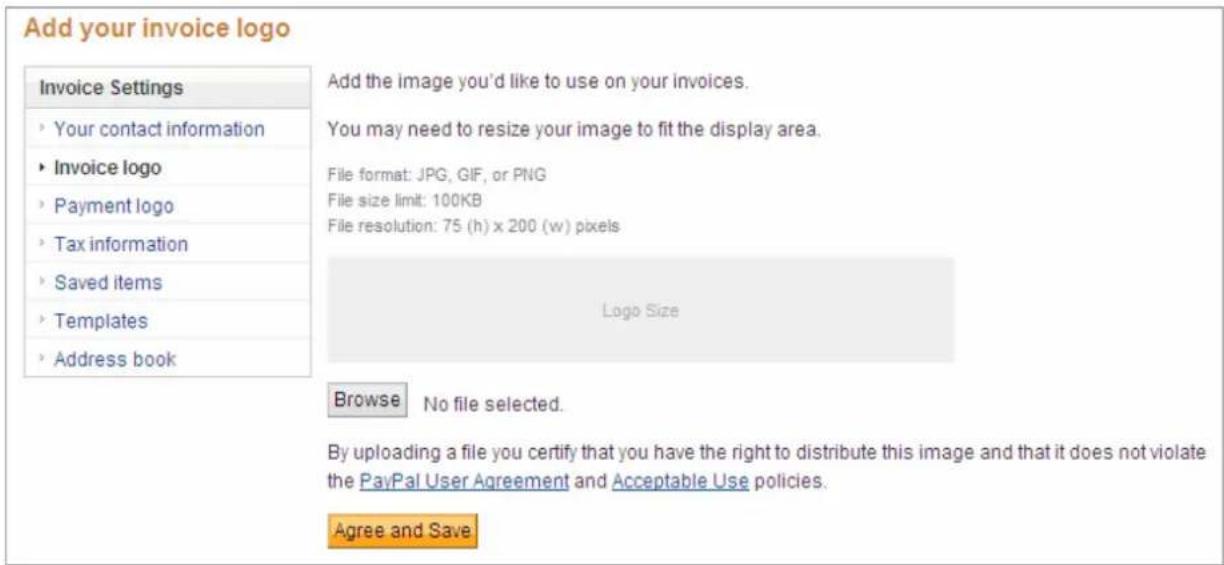
text_image
Add your invoice logo Invoice Settings ► Your contact information ► Invoice logo ► Payment logo ► Tax information ► Saved items ► Templates ► Address book Add the image you'd like to use on your invoices. You may need to resize your image to fit the display area. File format: JPG, GIF, or PNG File size limit: 100KB File resolution: 75 (h) x 200 (w) pixels Logo Size Browse No file selected. By uploading a file you certify that you have the right to distribute this image and that it does not violate the PayPal User Agreement and Acceptable Use policies. Agree and Save- Click Browse.
The Browse dialog box opens.
- Select the logo file to use and click Open.
- Click Agree and Save.
IMPORTANT: When you click Agree and Save you are certifying that you have the right to distribute the image and that it does not violate the PayPal User Agreement and the Acceptable Use policies.
The Add your invoice logo page replaces the gray box with your logo image and changes No file selected to the logo's file name. The logo is included in all future invoices unless you remove it.
Changing Your Invoice Logo
If you want to use a different logo image, upload a different file in the Add your invoice logo page in Invoice Settings. Uploading another logo does not change any existing invoices or templates that use the previous logo. To change the logo in your template, you must edit the template to read the new logo.
- Log in to your PayPal account.
- Click the Request Money tab and then click the Manage Invoices subtab.
The Manage invoices page opens.
- Click Invoice Settings.
The Enter your contact information page opens.
- Click Invoice logo in the Invoice Settings box at the left of the page.
The Add your invoice logo page opens. It displays the logo currently in Invoice Settings.
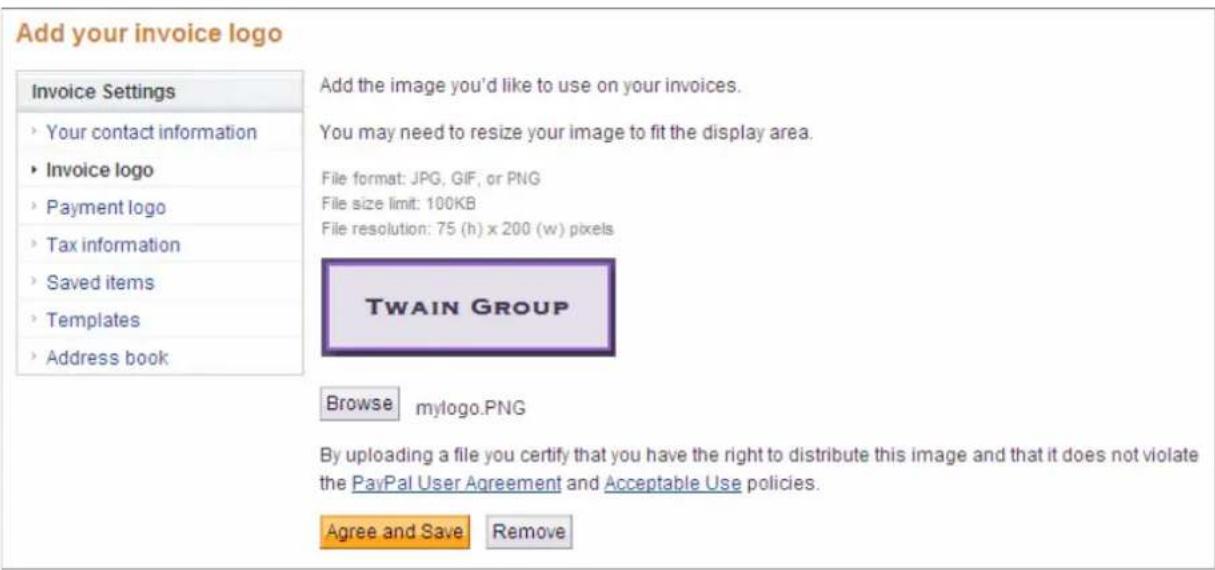
text_image
Add your invoice logo Invoice Settings Your contact information Invoice logo Payment logo Tax information Saved items Templates Address book Add the image you'd like to use on your invoices. You may need to resize your image to fit the display area. File format: JPG, GIF, or PNG File size limit: 100KB File resolution: 75 (h) x 200 (w) pixels TWAIN GROUP Browse mylogo.PNG By uploading a file you certify that you have the right to distribute this image and that it does not violate the PayPal User Agreement and Acceptable Use policies. Agree and Save Remove- Click Browse.
The Browse dialog box opens.
- Select the logo file to use and click Open.
- Click Agree and Save.
IMPORTANT: When you click Agree and Save you are certifying that you have the right to distribute the image and that it does not violate the PayPal User Agreement and the Acceptable Use policies.
The Add your invoice logo page replaces the old logo image with the new logo image and displays the new logo's file name next to the Browse button. The logo is included in all future invoices unless you remove it.
Deleting Your Invoice Logo
You can remove the logo in the Add your invoice logo page in Invoice Settings. Removing the logo will not change any existing invoices or templates. To remove a logo stored in a template, you must edit the template.
- Log in to your PayPal account.
- Click the Request Money tab and then click the Manage Invoices subtab.
The Manage invoices page opens.
- Click Invoice Settings.
The Enter your contact information page opens.
- Click Invoice logo in the Invoice Settings box at the left of the page.
The Add your invoice logo page opens.
Add your invoice logo
Invoice Settings
- Your contact information
- Invoice logo
Payment logo
Tax informationSaved items
Templates
Address book
Add the image you'd like to use on your invoices.
You may need to resize your image to fit the display area.
File format: JPG, GIF, or PNG
File size limit: 100KB
File resolution: 75 (h) x 200 (w) pixels
Browse
mylogo.PNG
By uploading a file you certify that you have the right to distribute this image and that it does not violate the PayPal User Agreement and Acceptable Use policies.
Agree and Save
Remove
5. Click Remove.
The Add your invoice logo page displays a gray box instead of a logo and displays No file selected instead of the logo file name.
Including a Logo on Your Payment Page
You can use Invoice Settings as another way to add an image for your payment page. A payment logo is the image that your customers see when they pay you with PayPal.
If you already added a payment logo in your Account Profile, you don't need to add another one in Invoice Settings. If you add a payment logo in Invoice Settings, it will replace any existing payment page logo.
Your payment logo must meet the following requirements:
- File format: JPG, GIF, or PNG
- File size limit: 100KB, maximum
- File resolution: 90 pixels high x 500 pixels wide, maximum
If your image does not meet these requirements, adjust the image before you add it.
IMPORTANT: Before you add a logo, you must certify that you have the right to distribute the image and that it does not violate the PayPal User Agreement and the Acceptable Use policies.
Adding Your Payment Logo
- Log in to your PayPal account.
-
Click the Request Money tab and then click the Manage Invoices subtab.
The Manage invoices page opens. -
Click Invoice Settings.
The Enter your contact information page opens.
- Click Payment logo in the Invoice Settings box at the left of the page.
The Add your payment logo page opens. It displays a gray box as a placeholder for the logo and No file selected next to the Browse button.
Add your payment logo
Invoice Settings
- Your contact information
Invoice logo - Payment logo
Tax information
Saved items
Templates
Address book
Add the image your customers will see when they pay you with PayPal.
If you've already added a custom payment logo to your PayPal profile, we'll use that – you don't need to upload another one.
If you upload a new payment logo here, the new logo will replace your existing one.
You may need to resize your image to fit the display area.
File format: JPG, GIF, or PNG
File size limit: 100KB
File resolution: 90 (h) x 500 (w) pixels
Logo Size
Browse
No file selected.
By uploading a file you certify that you have the right to distribute this image and that it does not violate the PayPal User Agreement and Acceptable Use policies.
Agree and Save
- Click Browse.
The Browse dialog box opens.
- Select the logo file to use and click Open.
- Click Agree and Save.
IMPORTANT: When you click Agree and Save you are certifying that you have the right to distribute the image and that it does not violate the PayPal User Agreement and the Acceptable Use policies.
The Add your payment logo page replaces the gray box with your logo image and changes No file selected to the logo's file name. The logo is stored in your Account Profile and will appear on your customer's PayPal payment pages.
Changing Your Payment Logo in Invoice Settings
If you want to use a different payment logo, you can upload a different file in the Add your payment logo page in Invoice Settings.
- Log in to your PayPal account.
- Click the Request Money tab and then click the Manage Invoices subtab.
The Manage invoices page opens.
- Click Invoice Settings.
The Enter your contact information page opens.
- Click Payment logo in the Invoice Settings box at the left of the page.
The Add your payment logo page opens. It displays the logo currently stored in your Account Profile.
- Click Browse.
The Browse dialog box opens.
-
Select the logo file to use and click Open.
-
Click Agree and Save.
IMPORTANT: When you click Agree and Save you are certifying that you have the right to distribute the image and that it does not violate the PayPal User Agreement and the Acceptable Use policies.
The Add your payment logo page replaces the old logo image with the new logo image and displays the new logo's file name next to the Browse button. The logo is stored in your Account Profile and will appear on your customer's PayPal payment pages.
Deleting Your Payment Logo in Invoice Settings
You can remove the logo in the Add your payment logo page in Invoice Settings. Deleting the logo in Invoice Settings will remove it from your Account Profile.
-
Log in to your PayPal account.
-
Click the Request Money tab and then click the Manage Invoices subtab.
The Manage invoices page opens.
- Click Invoice Settings.
The Enter your contact information page opens.
- Click Payment logo in the Invoice Settings box at the left of the page.
The Add your payment logo page opens.
- Click Remove.
The Add your payment logo page displays a gray box instead of a logo and displays No file selected instead of the logo file name.
6
Working with Invoice Templates
Invoice templates allow you to create invoices faster. You store details about invoice items, prices, and standard tax rates in templates that you can use as a starting point for invoicing your customers.
Read the following topics to learn about creating and managing invoice templates.
- “About Invoice Templates” on page 83
- “Creating Templates” on page 87
- “Managing Templates” on page 94
About Invoice Templates
An invoice template contains values that you frequently include in an invoice. Using a template saves you time when you create an invoice by pre-filling invoice fields. For example, if you typically sell two taxable products together, you can create a template that contains the two items and their applicable taxes. Each time you have an order for those two products, you can use this template to enter the item information for you.
You can save the following information in an invoice template:
- Your contact information, including your logo
- Payment terms
- Currency
- Item information: Item name, quantity, unit price, tax, description
- Discount
- Shipping/handling
- Tax on shipping
- Terms and conditions text
- Note to recipient
- Memo
In the Create a new invoice page, you can see a list of the available templates in Select a template. When you first open the Create a new invoice page, the only template listed is the PayPal Default Template. As you add templates, they become available in Select a template. You can specify which template to use as the default in Invoice Settings.
You can create a maximum of 50 templates.
How Invoice Settings Relate to Invoice Template Contents
When you create a template, you can complete the invoice fields by entering the information directly or by selecting information that you have already saved in Invoice Settings.
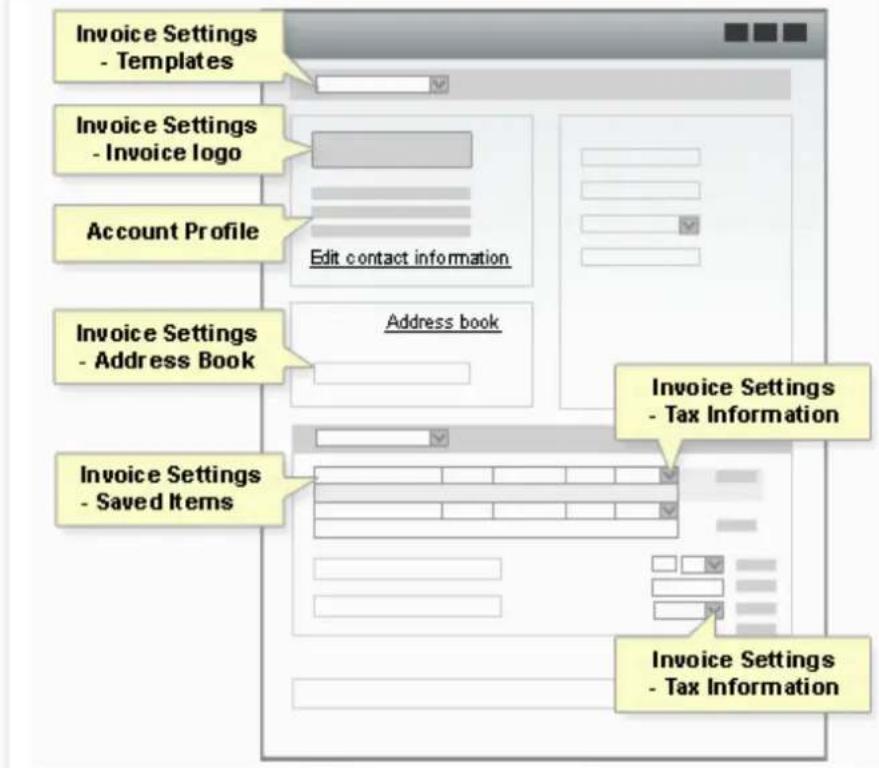
text_image
Invoice Settings - Templates Invoice Settings - Invoice logo Account Profile Edit contact information Invoice Settings - Address Book Address book Invoice Settings - Tax Information Invoice Settings - Saved Items Invoice Settings - Tax InformationSetting From Stored Information
| Select a template | Invoice Settings: Templates | Includes one or more of the following:Payment itemsItem informationShipping informationTerms and conditionsNoteMemoUse the template as a starting point to create an invoice or to create a new template. |
| Your contact information: Your logo | Invoice Settings: Invoice logo | The logo or image you want to appear on the invoice. |
| Setting | From | Stored Information |
| Your contact information | Account Profile Displays the following information from your profile:Email addressNameStreet addressPhone number(s) | |
| Send to | Invoice Settings: Address book | Recipient's email address and the following optional information:Business nameBilling addressShipping address |
| Item information | Invoice Settings: Saved items | Item name and one or more of the following:DescriptionCurrencyUnit priceTax |
| Tax | Invoice Settings: Tax information | Tax name and tax percentage. |
Working with Templates
You can create and edit templates at several points in the invoicing process.
- Open the Manage your templates page in Invoice Settings.
Use the Manage your templates page when you want to perform maintenance on your templates or to view template contents without creating an invoice. On this page you can change your default template, delete a template, or open an Edit template page to view, create, or edit a template.
See “Managing Templates” on page 94 for instructions.
- In the Create a new invoice page, select Create a new template from Select a template to open the Edit template page.
The Edit template page displays the default template's information. You can edit the information and save it as a new template or save the changes to the default template.
See “Creating a Template in the Create a New Invoice Page” on page 89 for instructions.
- Save an invoice as a template.
When you create an invoice, you can save the invoice information in a template before completing the invoice. The recipient's email address, shipping, and billing information is not saved with the template.
See “Saving an Invoice as a Template” on page 87 for instructions.
You create and edit templates using the Edit template page.
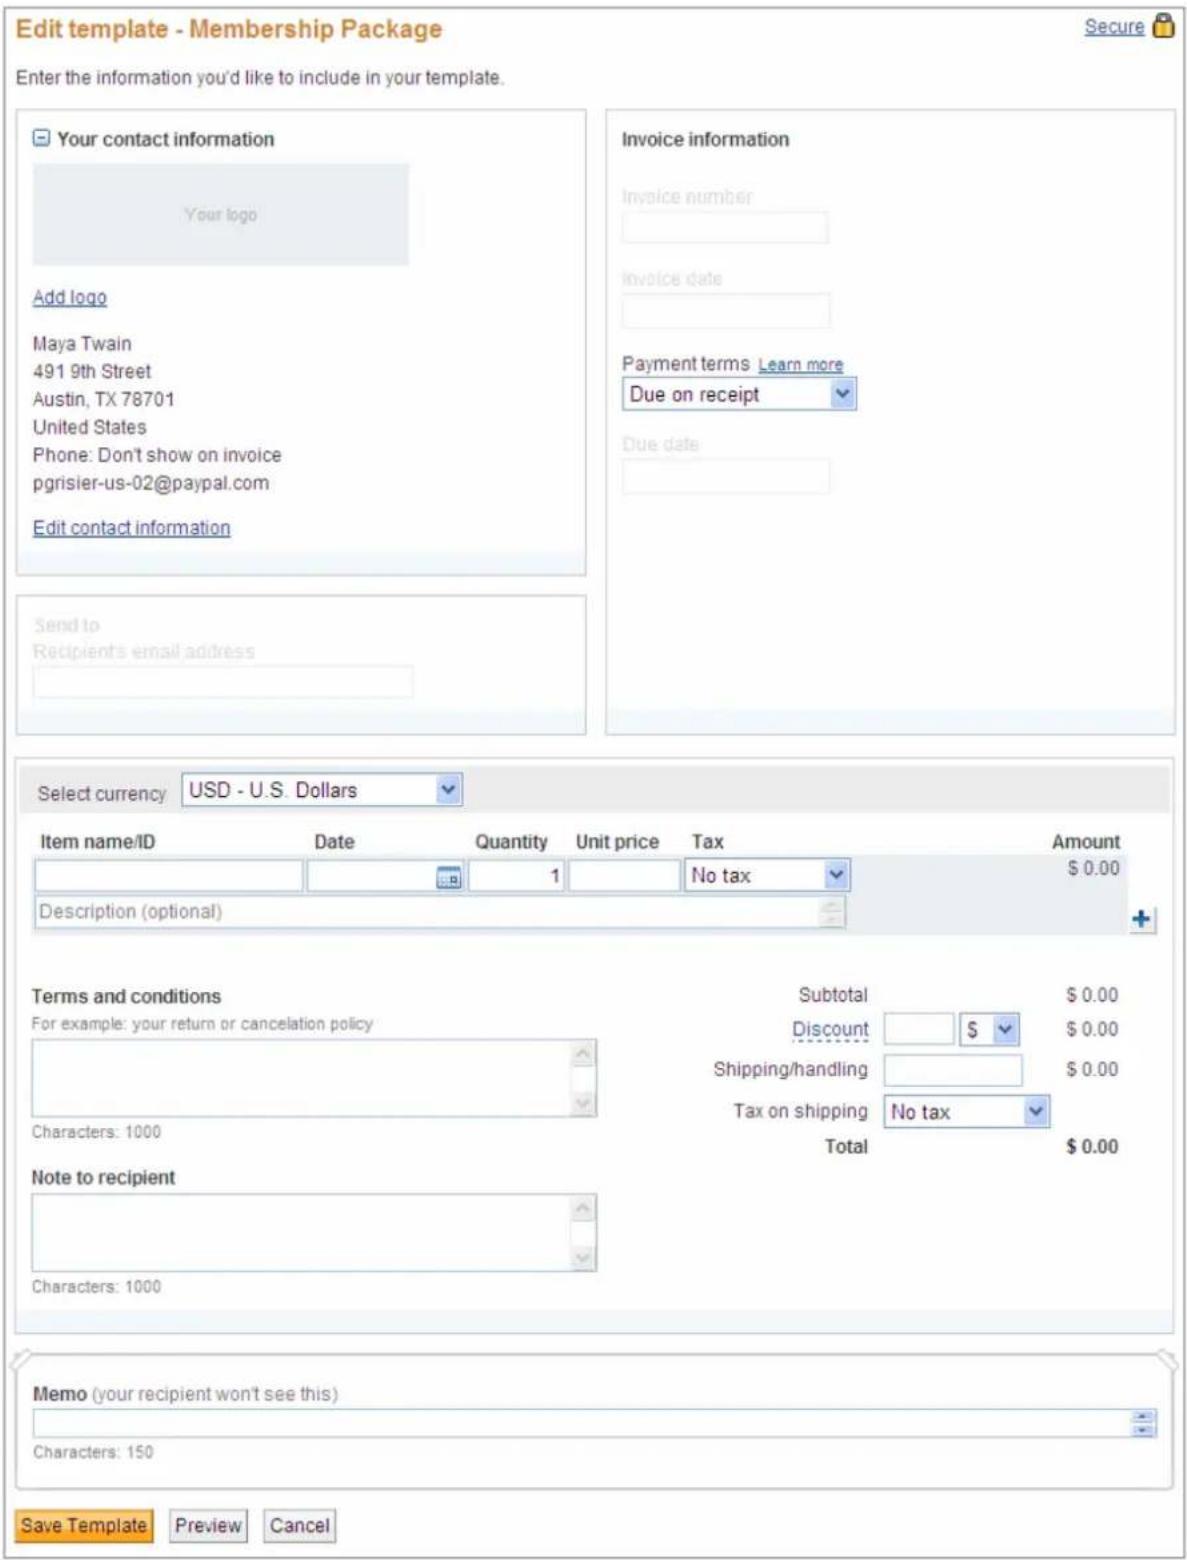
text_image
Edit template - Membership Package Enter the information you'd like to include in your template. Your contact information Your logo Add logo Maya Twain 491 9th Street Austin, TX 78701 United States Phone: Don't show on invoice pgrisier-us-02@paypal.com Edit contact information Send to Recipient's email address Invoice information Invoice number Invoice date Payment terms Learn more Due on receipt Due date Select currency USD - U.S. Dollars Item name/ID Date Quantity Unit price Tax Amount 1 No tax $ 0.00 Description (optional) + Terms and conditions Subtotal $ 0.00 For example: your return or cancelation policy Discount $ 0.00 Shipping/handling $ 0.00 Tax on shipping No tax Total $ 0.00 Characters: 1000 Note to recipient Characters: 1000 Memo (your recipient won't see this) Characters: 150 Save Template Preview CancelThis page looks like the Create a new invoice page except that certain fields are inactive. For example, the Send to section is inactive because you only need recipient information for an invoice.
Creating Templates
You can create invoice templates in the following ways:
- Enter invoice information in the Create a new invoice page and save it as a template.
- Select Create a new template from the Select a template list in the Create a new invoice page.
- Add a new template in the Templates page in Invoice Settings.
Saving an Invoice as a Template
NOTE: If you need more detailed information about completing invoice fields, see “Creating Invoices and Entering Details” on page 17.
- Log in to your PayPal account.
- Click the Request Money tab and then click Create Invoice.
The Create a new invoice page opens.
- Select a template name from Select a template to use as a starting point.
The Create a new invoice page displays the information stored in the template you selected.
- Add or change the logo for the template.
Setting Action
| Add logo Click to add a logo to the template.This setting appears when the template does not have a logo. |
| Change logo Click to use a different logo.This setting appears when the template already contains a logo. |
| Remove logo Click to delete the logo.This setting appears when the template already contains a logo. |
See “Including a Logo in Your Invoices” on page 74 for detailed instructions.
- Click Edit contact information to change your information for the new template.
See “Editing Your Contact Information in an Invoice” on page 70 for instructions.
- Select the Payment terms for the template.
- To change the currency for this template, select one in Select currency.
- Enter one or more items.
| Setting Action | |
| Item name/ID Enter the item name. | If you have saved items, select one from the list that appears when you click in the field. |
| Date | Enter the Date for the item.When you tab or click in the date field, a Calendar opens. Select the date from the Calendar or type the date in the field.The date is not saved with the template, but you can enter it if you plan to send an invoice with this information after you save the template. |
| Quantity Enter the number of items. | |
| Unit price Enter the unit price. | If you selected a saved item, the stored amount displays. You can change it, if necessary. |
| Tax | Select the tax for this item.If you selected a saved item with an assigned tax rate, the tax displays. You can change it, if necessary.If the correct tax rate is not listed, add a new tax. See “Adding Tax Information in an Invoice or Template” on page 128 for instructions. |
- Enter shipping and discount information:
| Setting Action | |
| Discount | Enter a number and select a discount type. |
| Shipping/handling | Enter an amount. |
| Tax on shipping | Select the tax to apply to the shipping or handling fee.If the correct tax rate is not listed, add a new tax. See “Adding Tax Information in an Invoice or Template” on page 128 for instructions. |
10.Enter invoice notes and text:
- Enter Terms and conditions text, up to 1,000 characters. This text appears on an invoice.
- Enter Note to recipient text, up to 1,000 characters. This text appears on an invoice.
- Enter Memo text, up to 150 characters. This text does not appear on an invoice.
11.Click Save as Template.
The Save template dialog box opens. The default template name displays in the text box.
Save template
Enter a name for your template and click Save.
The recipient's email address, shipping, and billing information won't be saved to the template.
Membership Package
√ Make this my default template. To change your default, go to your Invoice Settings.
12.Enter a template name in the text box.
- Select Make this my default template to use this template as your default.
14.Click Save.
The Create a new invoice page opens and automatically selects the new template. You can send an invoice using your new template directly from this page.
Creating a Template in the Create a New Invoice Page
-
Log in to your PayPal account.
-
Click the Request Money tab and then click Create Invoice.
The Create a new invoice page opens.
- Select Create a new template from Select a template.
The Edit template page opens. It automatically displays the information from your default invoice template.
- Add or change the logo for the template.
| Setting Action |
| Add logo Click to add a logo to the template.This setting appears when the template does not have a logo. |
| Change logo Click to use a different logo.This setting appears when the template already contains a logo. |
| Remove logo Click to delete the logo.This setting appears when the template already contains a logo. |
See “Including a Logo in Your Invoices” on page 74 for detailed instructions.
- Click Edit contact information to change your information for the new template.
See “Editing Your Contact Information in an Invoice” on page 70 for instructions. - Select the Payment terms for the template.
- To change the currency for this template, select one in Select currency.
- Enter one or more items.
| Setting Action | |
| Item name/ID Enter the item name. | If you have saved items, select one from the list that appears when you click in the field. |
| Quantity Enter the number of items. | |
| Unit price Enter the unit price. | If you selected a saved item, the stored amount displays. You can change it, if necessary. |
| Tax | Select the tax for this item.If you selected a saved item with an assigned tax rate, the tax displays. You can change it, if necessary.If the correct tax rate is not listed, add a new tax. See “Adding Tax Information in an Invoice or Template” on page 128 for instructions. |
- Enter shipping and discount information:
| Setting | Action |
| Discount Enter a number and select a discount type. | |
| Shipping/handling | Enter an amount. |
| Setting Action | |
| Tax on shipping | Select the tax to apply to the shipping or handling fee.If the correct tax rate is not listed, add a new tax. See “Adding Tax Information in an Invoice or Template” on page 128 for instructions. |
10.Enter invoice notes and text:
- Enter Terms and conditions text, up to 1,000 characters. This text appears on an invoice.
- Enter Note to recipient text, up to 1,000 characters. This text appears on an invoice.
-
Enter Memo text, up to 150 characters. This text does not appear on an invoice.
-
Click Save Template.
The Save template dialog box opens. The default template name displays in the text box.
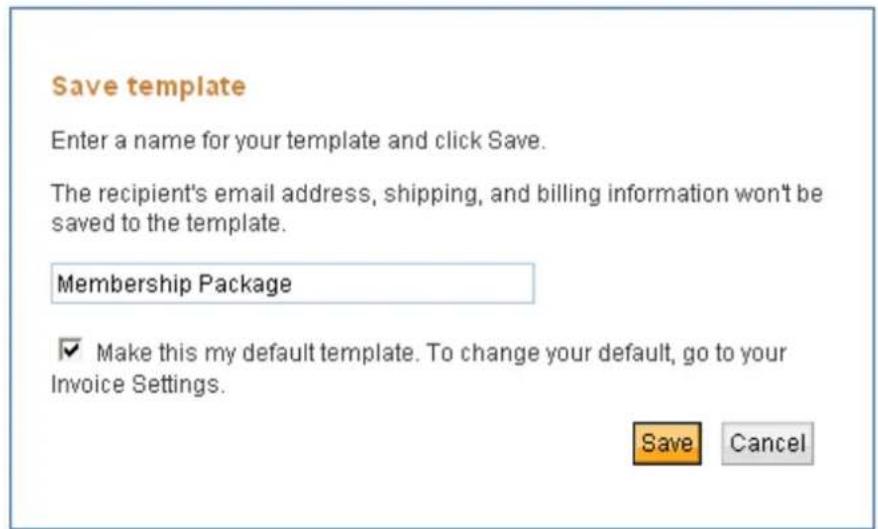
text_image
Save template Enter a name for your template and click Save. The recipient's email address, shipping, and billing information won't be saved to the template. Membership Package ✓ Make this my default template. To change your default, go to your Invoice Settings. Save Cancel12.Enter a template name in the text box.
13. Select Make this my default template to use this template as your default.
14.Click Save.
The Create a new invoice page opens and automatically selects the new template. You can now send an invoice using your new template.
Adding a Template in Invoice Settings
- Log in to your PayPal account.
- Click the Request Money tab.
- Click Invoice Settings.
The Enter your contact information page opens.
- Click Templates in the Invoice Settings navigation list.
The Manage your templates page opens.
- Click Create a New Template.
The Edit template page opens. It automatically displays the information from your default invoice template.
- Add or change the logo for the template.
Setting Action
| Add logo Click to add a logo to the template.This setting appears when the template does not have a logo. |
| Change logo Click to use a different logo.This setting appears when the template already contains a logo. |
| Remove logo Click to delete the logo.This setting appears when the template already contains a logo. |
See “Including a Logo in Your Invoices” on page 74 for detailed instructions.
- Click Edit contact information to change your information for the new template.
See “Customizing Your Contact Information” on page 69 for instructions.
-
Select the Payment terms for the template.
-
To change the currency for this template, select one in Select currency.
10.Enter one or more items.
Setting Action
| Item name/ID Enter the item name. | |
| If you have saved items, select one from the list that appears when you click in the field. | |
| Quantity Enter the number of items. | |
| Unit price | Enter the unit price.If you selected a saved item, the stored amount displays. You can change it, if necessary. |
| Tax | Select the tax for this item.If you selected a saved item with an assigned tax rate, the tax displays.You can change it, if necessary.If the correct tax rate is not listed, add a new tax. See “Adding Tax Information in an Invoice or Template” on page 128 for instructions. |
- Enter shipping and discount information:
| Setting Action |
| Discount Enter a number and select a discount type. |
| Shipping/handling Enter an amount. |
| Tax on shipping Select the tax to apply to the shipping or handling fee.If the correct tax rate is not listed, add a new tax. See “Adding Tax Information in an Invoice or Template” on page 128 for instructions. |
12.Enter invoice notes and text:
- Enter Terms and conditions text, up to 1,000 characters. This text appears on an invoice.
- Enter Note to recipient text, up to 1,000 characters. This text appears on an invoice.
- Enter Memo text, up to 150 characters. This text does not appear on an invoice.
13.Click Save Template.
The Save template? dialog box opens. The default template name displays in the text box.
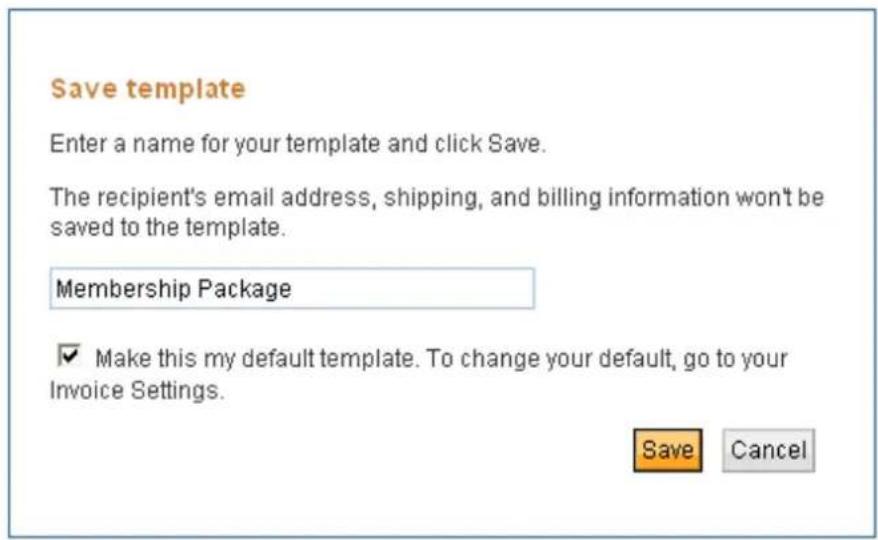
text_image
Save template Enter a name for your template and click Save. The recipient's email address, shipping, and billing information won't be saved to the template. Membership Package ✓ Make this my default template. To change your default, go to your Invoice Settings. Save Cancel14.Enter a template name in the text box.
- Select Make this my default template to use this template as your default.
16.Click Save.
The Manage your templates page opens. Your saved templates display in the template list. The default template is highlighted and displays Current default in the Default column.
Managing Templates
When you create templates, you save information about invoice items, tax and shipping informations, and your contact information. When item costs or other information changes, you can edit your template to reflect the new information. You can make these changes as you create invoices. However, if you don't have an invoice to send or you have a lot of changes to make, use the Manage your templates page in Invoice Settings to go directly to your templates.
About the Manage Your Templates Page
The Manage your templates page displays a list of your saved templates. It displays the creation date, template name, whether it is the default template, and available actions.
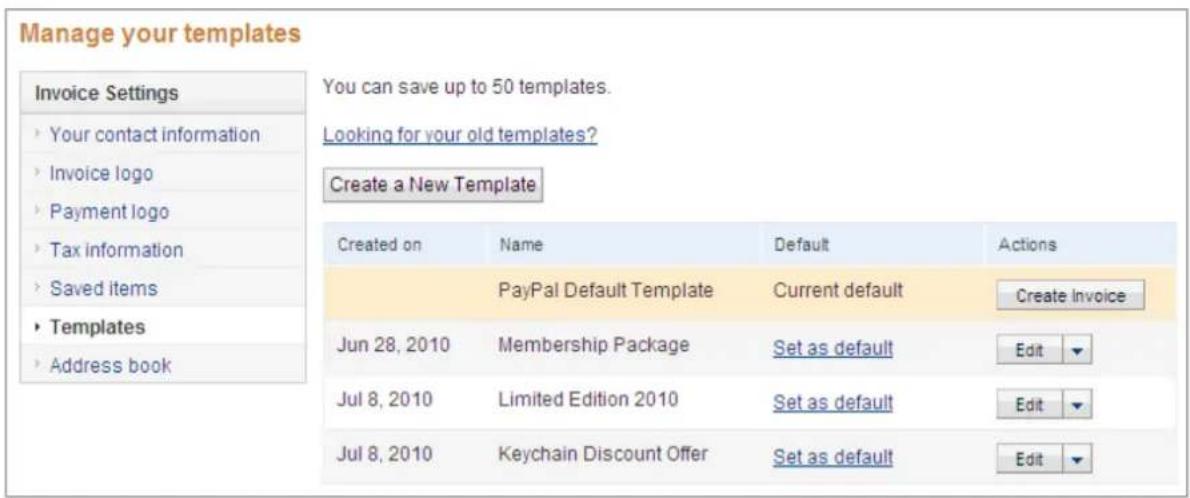
text_image
Manage your templates Invoice Settings Your contact information Invoice logo Payment logo Tax information Saved items Templates Address book You can save up to 50 templates. Looking for your old templates? Create a New Template Created on Name Default Actions PayPal Default Template Current default Create Invoice Jun 28, 2010 Membership Package Set as default Edit Jul 8, 2010 Limited Edition 2010 Set as default Edit Jul 8, 2010 Keychain Discount Offer Set as default EditUse the Manage your templates page to perform the following tasks:
- Edit your templates.
- Change which template is the default.
- Delete an obsolete template.
- Create an invoice using a specific template.
In addition, you can preview what an invoice will look like when you create or edit a template.
Editing a Template
- Log in to your PayPal account.
-
Click the Request Money tab.
-
Click Invoice Settings.
The Enter your contact information page opens.
- Click Templates in the Invoice Settings navigation list.
The Manage your templates page opens.
- Select Edit next to the template you want to see.
The Edit template page opens. The information for the selected template displays.
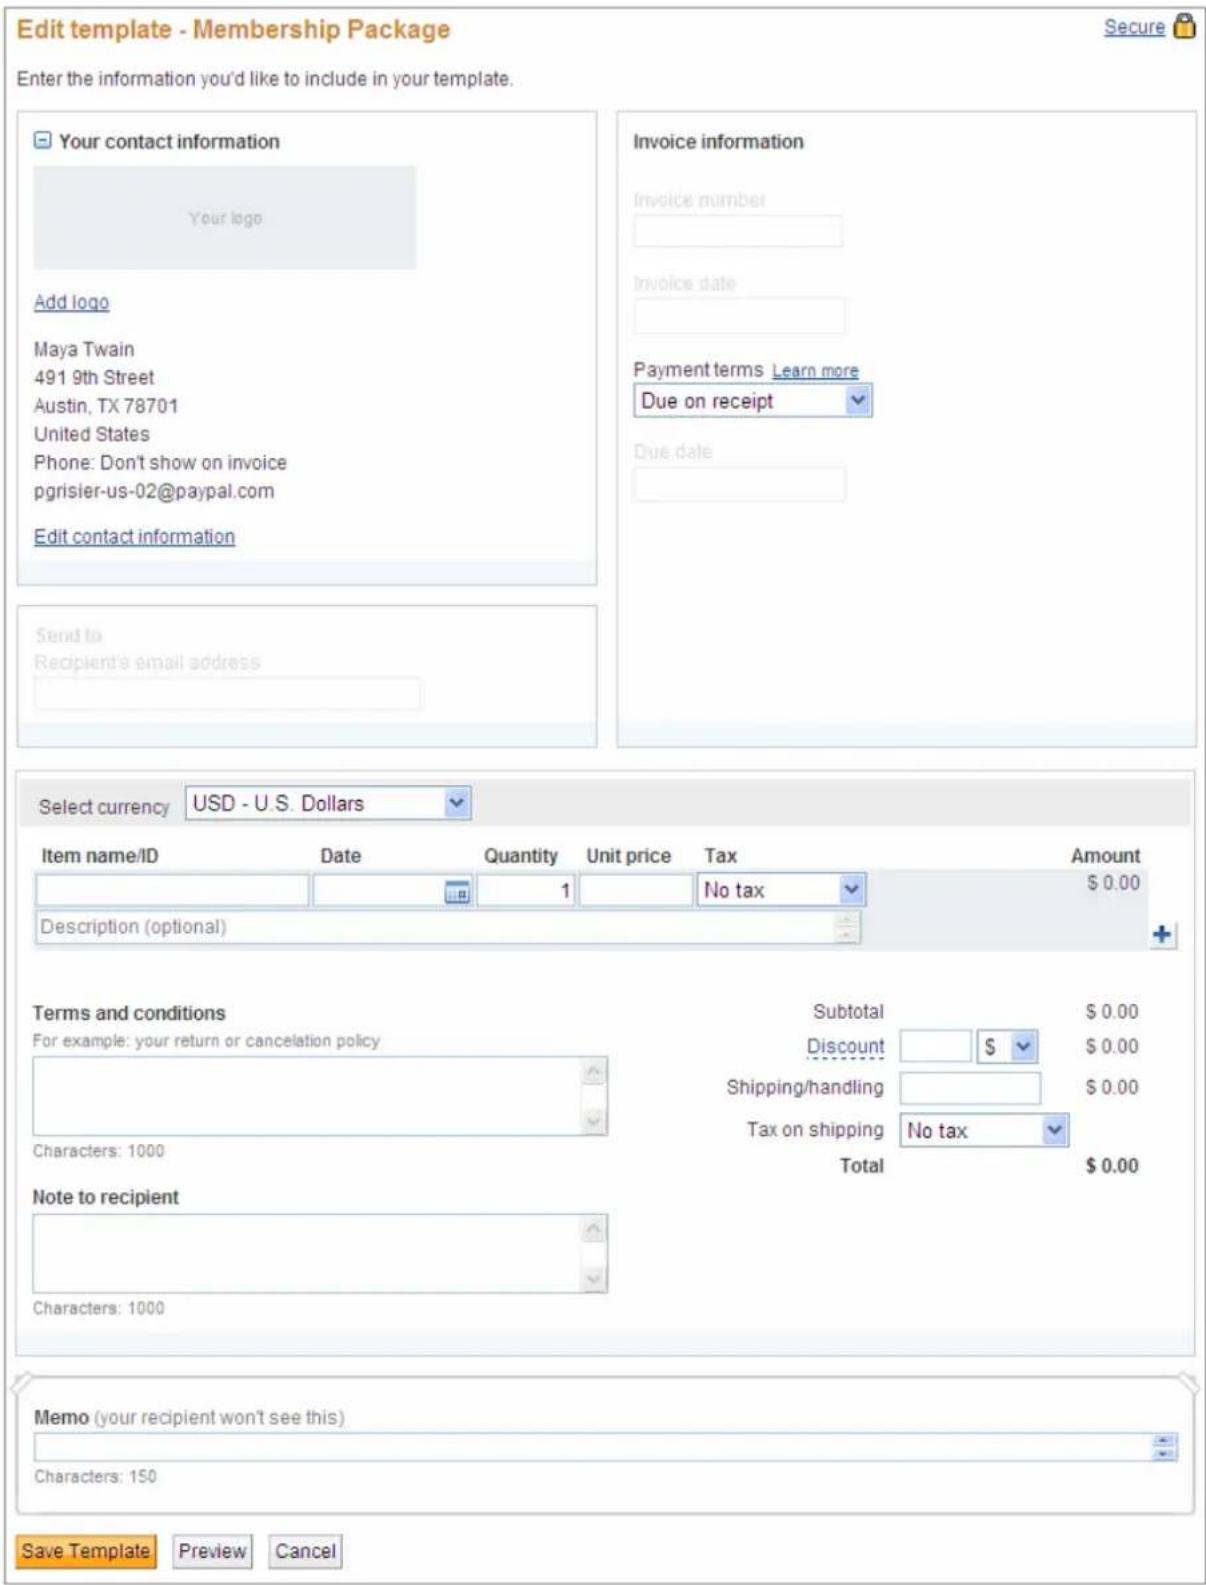
text_image
Edit template - Membership Package Enter the information you'd like to include in your template. Your contact information Your logo Add logo Maya Twain 491 9th Street Austin, TX 78701 United States Phone: Don't show on invoice pgrisier-us-02@paypal.com Edit contact information Send to Recipient's email address Invoice information Invoice number Invoice date Payment terms Learn more Due on receipt Due date Select currency USD - U.S. Dollars Item name/ID Date Quantity Unit price Tax Amount 1 No tax $ 0.00 Description (optional) + Terms and conditions Subtotal $ 0.00 For example: your return or cancelation policy Discount $ 0.00 Shipping/handling $ 0.00 Tax on shipping No tax Total $ 0.00 Characters: 1000 Note to recipient Characters: 1000 Memo (your recipient won't see this) Characters: 150 Save Template Preview Cancel- Add or change the logo included with the template.
| Setting Action |
| Add logo Click to add a logo to the template.This setting appears when the template does not have a logo. |
| Change logo Click to use a different logo.This setting appears when the template already contains a logo. |
| Remove logo Click to delete the logo.This setting appears when the template already contains a logo. |
See “Including a Logo in Your Invoices” on page 74 for detailed instructions.
- Click Edit contact information to change your information for the new template.
See “Customizing Your Contact Information” on page 69 for instructions.
-
Select the Payment terms for the template.
-
To change the currency for this template, select one in Select currency.
10.Add, edit, or delete items.
| Setting Action | |
| Item name/ID Enter the item name. | |
| If you have saved items, select one from the list that appears when you click in the field. | |
| Quantity Enter the number of items. | |
| Unit price Enter the unit price. | |
| If you selected a saved item, the stored amount displays. You can change it, if necessary. | |
| TaxSelect the tax for this item. | |
| If you selected a saved item with an assigned tax rate, the tax displays. You can change it, if necessary. | |
| If the correct tax rate is not listed, add a new tax. See “Managing Your Tax Information” on page 127 for instructions. | |
| Delete row | Click to delete the entire row for the item. |
- Enter shipping and discount information:
| Setting Action | |
| Discount | Enter a number and select a discount type. |
| Shipping/handling | Enter an amount. |
Setting Action
Tax on shipping Select the tax to apply to the shipping or handling fee.
If the correct tax rate is not listed, add a new tax. See “Managing Your Tax Information” on page 127 for instructions.
12.Enter invoice notes and text:
- Enter Terms and conditions text, up to 1,000 characters. This text appears on an invoice.
- Enter Note to recipient text, up to 1,000 characters. This text appears on an invoice.
- Enter Memo text, up to 150 characters. This text does not appear on an invoice.
13.Click Save Template.
The Save template dialog box opens. It displays the name of your template.
- Select Make this my default template to use this template as your default.
15.Click Save.
The Manage your templates page opens. Your saved templates display in the template list. The default template is highlighted and displays Current default in the Default column.
Setting the Default Template
When you open the Manage your templates page, the default template is highlighted and displays Current default in the Default column.
Manage your templates
Invoice Settings
Your contact information
Invoice logo
Payment logo
Tax information
Saved items
- Templates
Address book
You can save up to 50 templates.
Create a New Template
Created on
Name
PayPal Default Template
Default
Set as default
Jun 28, 2010
Membership Package
Current default
Actions
Create Invoice
Edit
- Log in to your PayPal account.
- Click the Request Money tab.
- Click Invoice Settings.
The Enter your contact information page opens.
- Click Templates in the Invoice Settings navigation list.
The Manage your templates page opens.
- Click Set as default in the Default column for the template to use as the default.
The Default column entry changes to Current default and the template information is highlighted. The old default template now displays Set as default in the Default column.
When you create a new invoice, it will automatically select the default template.
Previewing Templates
When you create or edit a template, you can preview how an invoice based on that template will look.
- Log in to your PayPal account.
- Click the Request Money tab.
- Click Invoice Settings.
The Enter your contact information page opens.
- Click Templates in the Invoice Settings navigation list.
The Manage your templates page opens.
- Create a new template and add information.
- Or -
Edit an existing template.
See “Creating Templates” on page 87 and “Editing a Template” on page 94 for detailed instructions.
- Click Preview.
The Preview template page opens and displays a sample invoice. It does not display information for fields that are not saved with the template.
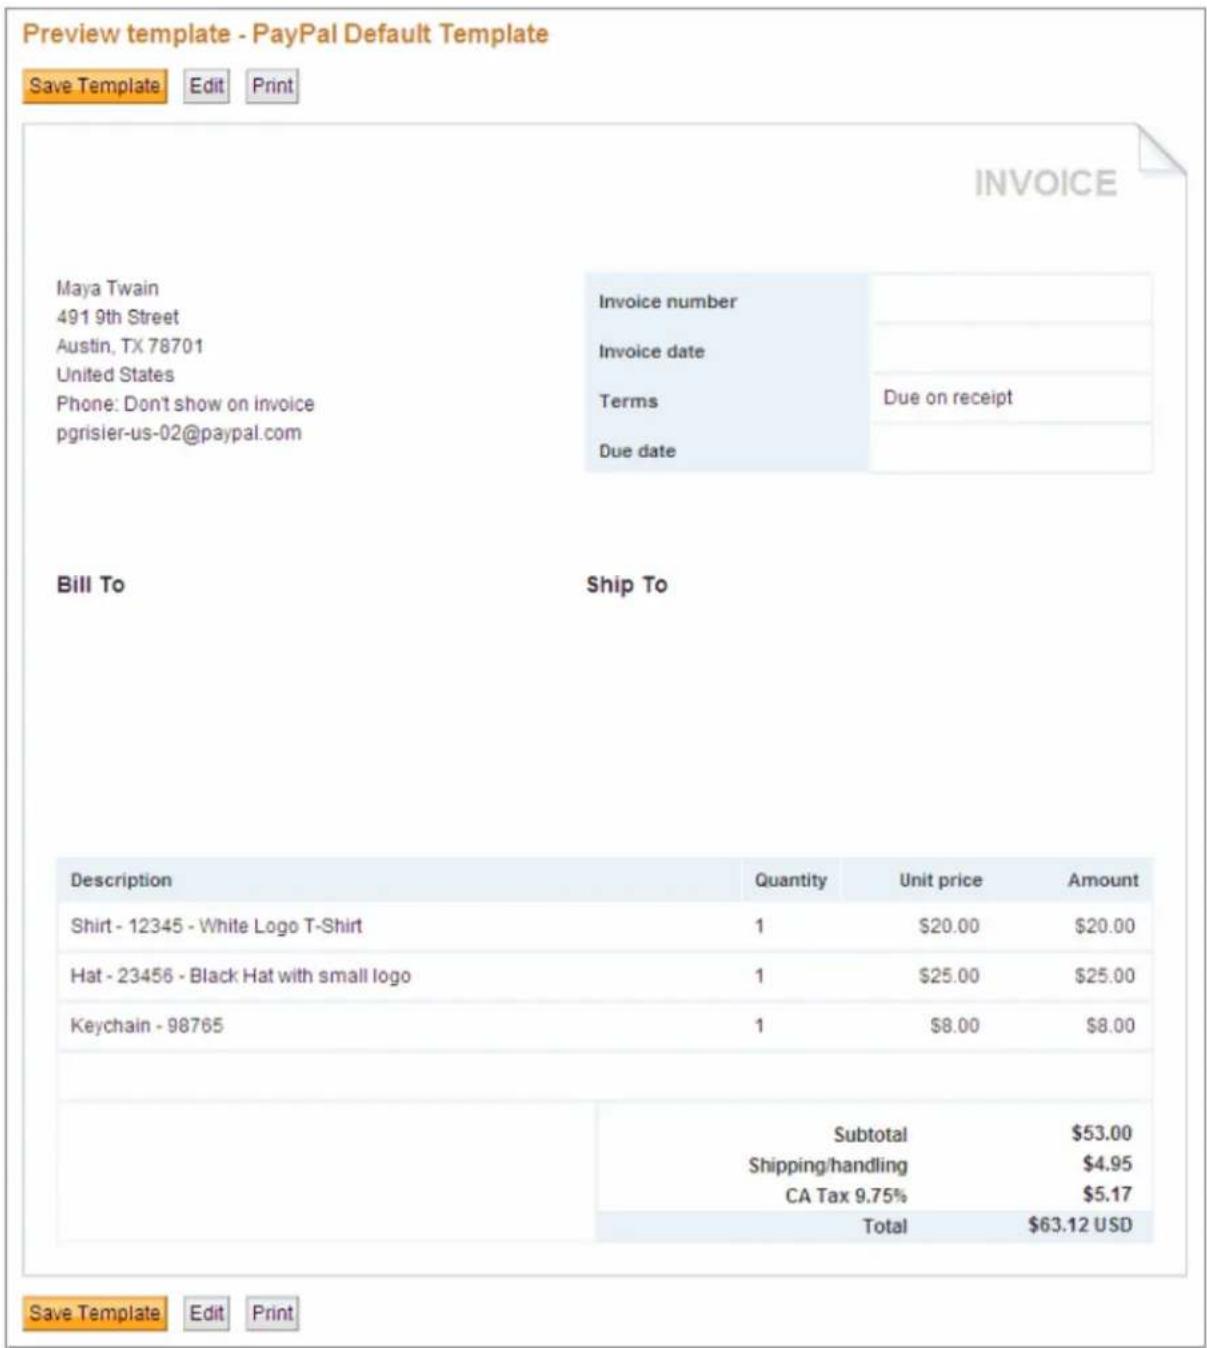
text_image
Preview template - PayPal Default Template Save Template Edit Print INVOICE Maya Twain 491 9th Street Austin, TX 78701 United States Phone: Don't show on invoice pgrisier-us-02@paypal.com Invoice number Invoice date Terms Due date Due on receipt Bill To Ship To Description Quantity Unit price Amount Shirt - 12345 - White Logo T-Shirt 1 20.0020.00 Hat - 23456 - Black Hat with small logo 1 25.0025.00 Keychain - 98765 1 8.008.00 Subtotal $53.00 Shipping/handling $4.95 CA Tax 9.75% $5.17 Total $63.12 USD Save Template Edit Print- After reviewing the invoice, perform one of the following actions.
- Click Save Template.
The Manage your templates page opens. It displays a list of your invoice templates.
- Click Print to print the sample invoice.
- Click Edit to change template information.
See “Editing a Template” on page 94 for instructions.
Deleting Templates
- Log in to your PayPal account.
- Click the Request Money tab.
- Click Invoice Settings.
The Enter your contact information page opens.
- Click Templates in the Invoice Settings navigation list.
The Manage your templates page opens.
- Select Delete in the Actions column for the template to remove.
The Delete template? dialog box opens.
- Click Delete to confirm that you want to delete this template.
The Manage your templates page opens. The template you deleted no longer appears in the template list.
7
Working with the Address Book
Use the Address book to store contact information for your customers. You can access your Address book information through Invoice Settings or during the invoicing process.
Read the following topics to learn about creating and managing Address book entries.
- “About the Address Book” on page 103
- “Adding Contacts to the Address Book” on page 104
- “Editing Address Book Entries” on page 110
- “Searching for Contacts” on page 114
- “Deleting Address Book Entries” on page 115
About the Address Book
Use the Address book to store information about your customers. You identify customers by their email addresses. You can add the following optional information for each customer:
- Name
- Company name
- Phone numbers
- Country
- Currency
- Language
- Billing information
- Shipping information
In addition, you can add notes to include in an invoice and memos to yourself that will not appear on the invoice.
You can access Address book information when you create invoices, when you research invoices in Manage Invoices, and in Invoice Settings.
You can search your address book by email address, contact name, or company name.
You can edit any field for a contact or delete a contact if you no longer need it.
Accessing the Address Book
You can access the Address book in the following ways:
- Click the Address book link in the Create a new invoice page.
The Address book page opens and lists your contacts. You can search for a contact or add a new one to use in the invoice. - Click the recipient name in the Manage Invoices page.
The Address book page opens and displays the contact's information in the right column. - Select Address book from the Invoice Settings navigation box.
The Address book page opens and lists your contacts. You can add, edit, delete, or search for your contacts.
Adding Contacts to the Address Book
You can add contact information to the Address book in the following ways:
- Select Add billing and shipping information in an invoice.
When you complete the recipient information for the current invoice, you can save it to your Address book to use again. When you enter a recipient's email address in an invoice, a drop down list displays any matching Address book entries.
- Add new contact using the Address book page in Invoice Settings.
You must enter an email address for each contact. All remaining Address book information is optional.
Saving Recipient Information to the Address Book
- Log in to your PayPal account.
- Click the Request Money tab and then click Create Invoice.
The Create a new invoice page opens. - Enter the Recipient's email address.
- Click Add billing and shipping information.
The Recipient information page opens.
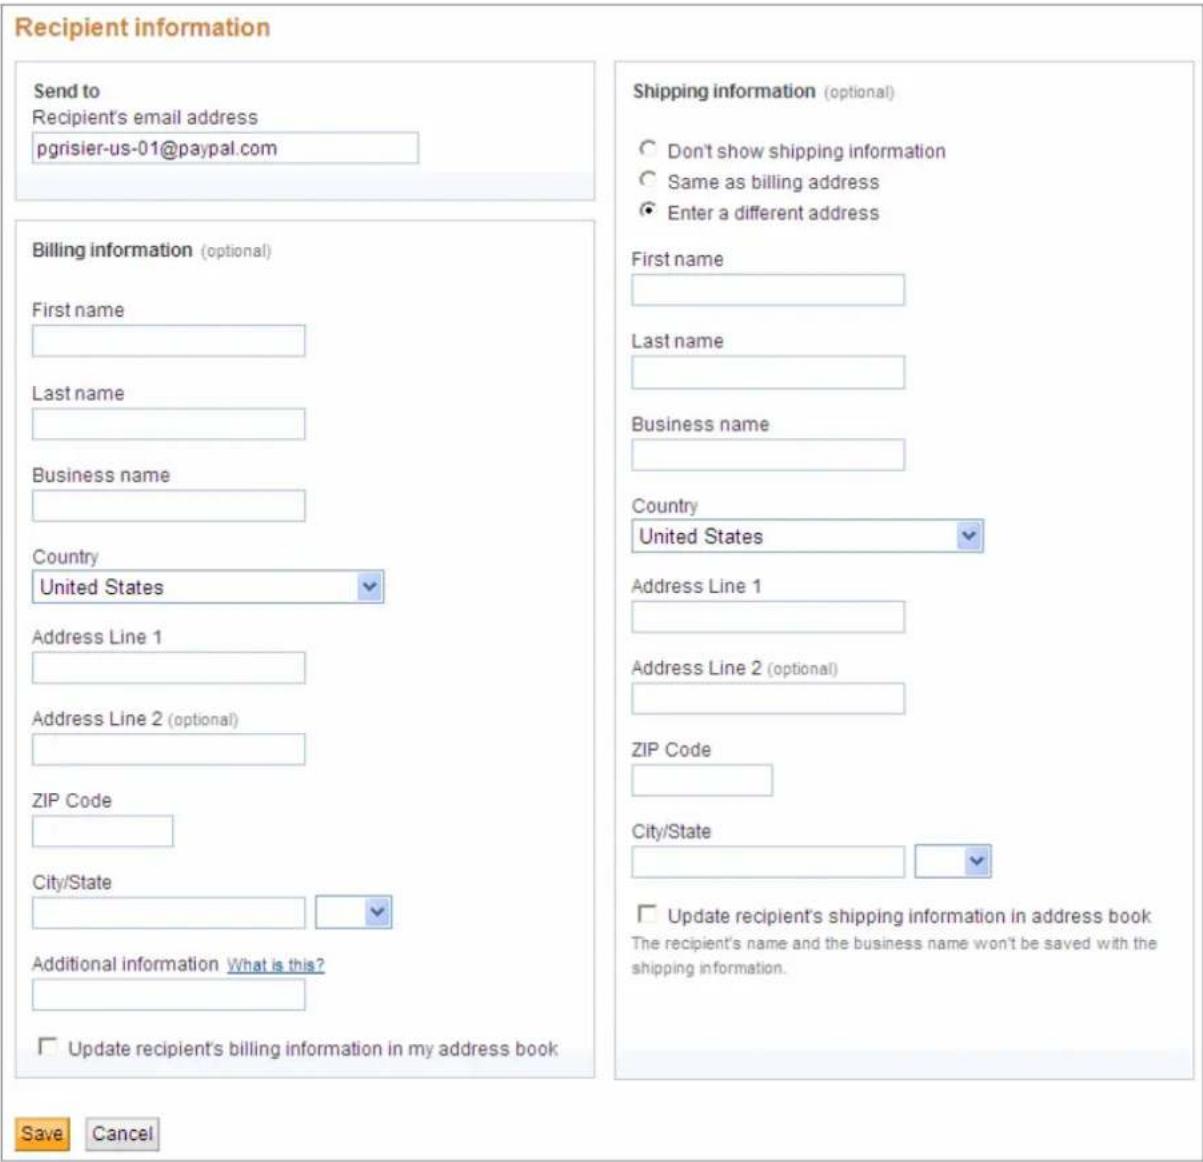
text_image
Recipient information Send to Recipient's email address pgrisier-us-01@paypal.com Billing information (optional) First name Last name Business name Country United States Address Line 1 Address Line 2 (optional) ZIP Code City/State Additional information What is this? Update recipient's billing information in my address book Shipping information (optional) Don't show shipping information Same as billing address Enter a different address First name Last name Business name Country United States Address Line 1 Address Line 2 (optional) ZIP Code City/State Update recipient's shipping information in address book The recipient's name and the business name won't be saved with the shipping information. Save Cancel- Enter Billing information (optional).
| Field Description | |
| First name Enter the recipient's first or given name. | |
| Last name Enter the recipient's last or family name. | |
| Business name Enter the name of recipient's business. | |
| Country Select the country from the drop down list. | |
| Address line 1 | Enter up to 2 lines of the recipient's address. |
| Address line 2 | |
| Field | Description |
| Zip code Enter the zip or postal code. | |
| City/State Enter the city name in the first field. | |
| Select a state code from the drop down list in the second field. | |
| Additional information | Enter any information you want to track for this recipient. For example, you can enter your recipient's account number in this field. |
6. Click Update recipient's billing information in my address book.
7. Select a shipping address option:
- Don't show shipping information
Select this option when you want to track shipping information, but do not want it to appear in the invoice. When you select this option, the page does not display shipping information fields. You must select the Same as billing address option to show the shipping information fields.
– Same as billing address
Select this option when the billing and shipping information are the same. This option is automatically selected when you add address information for a recipient.
- Enter a different address
Select this option when the billing and shipping information are different and you want the shipping information to appear in the invoice. When you select this option, the Recipient information page displays shipping information fields for you to use.
8. Enter Shipping Information.
| Field Description | |
| First name Enter the recipient's first or given name. | |
| Last name Enter the recipient's last or family name. | |
| Business name Enter the name of recipient's business. | |
| Country Select the country from the drop down list. | |
| Address line 1Address line 2 | Enter up to 2 lines of the recipient's address. |
| Zip code | Enter the zip or postal code. |
| City/State | Enter the city name in the first field.Select a state code from the drop down list in the second field. |
| Update recipient's shipping information in address book | Select this option to save the shipping address in your Address book. The recipient's shipping name and shipping business name are for this invoice only and not saved in the Address book. |
9. Click Save.
When you save the recipient information, it displays the address information in the invoice. If you chose to save the billing or shipping information, you will see this information in your Address book.
Adding a Contact in the Address Book Page
- Log in to your PayPal account.
- Click the Request Money tab.
- Open the Address book page.
- Click Invoice Settings. The Enter your contact information page opens.
Click Address book in the Invoice Settings navigation box.
- Or -
- Click Create an invoice. The Create a new invoice page opens.
Click Address book.
- Click Add a new contact.
The Add Contact page opens.
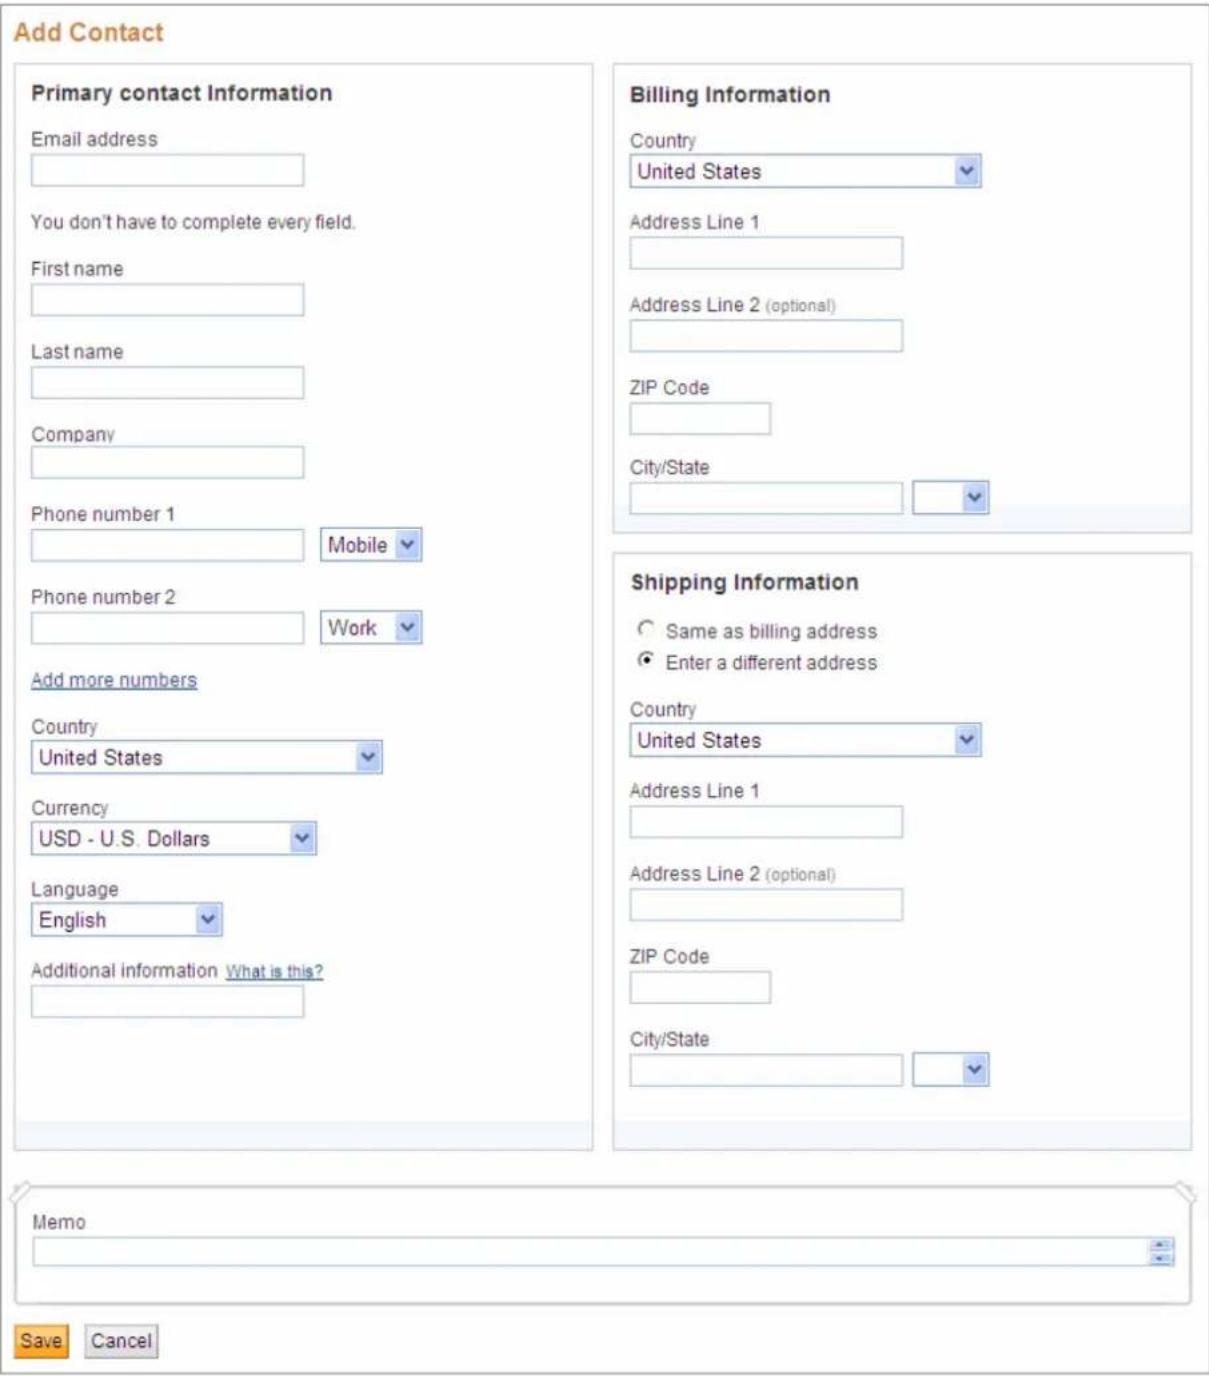
text_image
Add Contact Primary contact Information Email address You don't have to complete every field. First name Last name Company Phone number 1 Mobile Phone number 2 Work Add more numbers Country United States Currency USD - U.S. Dollars Language English Additional information What is this? Memo Billing Information Country United States Address Line 1 Address Line 2 (optional) ZIP Code City/State Shipping Information Same as billing address Enter a different address Country United States Address Line 1 Address Line 2 (optional) ZIP Code City/State Save Cancel- Enter Primary contact information. You must enter an email address, but the rest of the fields are optional.
| Field Description | |
| Email address | Enter the contact's email address. (Required) |
| First name Enter the contact's first or given name. | |
| Last name Enter the contact's last or family name. | |
| Company Enter the name of contact's business. | |
| Phone number 1 Enter a phone number. | Select a phone number type from the drop down list. For example, if this is a mobile phone number, select Mobile. |
| Phone number 2 Enter a second phone number. | Select a phone number type from the drop down list. For example, if this is a mobile phone number, select Mobile. |
| Add more numbers Click to add more numbers if you need more that two numbers for this contact. When you select this option, another Phone Number field displays below the last number you entered. | |
| Country Select the country from the drop down list. | |
| Currency | Select the currency to use for this contact's invoices from the drop down list. |
| Language | Select the language to use for this contact's invoices. |
| Additional information | Enter any information you want to appear on the invoice. For example, use this field to track the contact's account number. |
- Enter Billing information.
| Field Description | |
| Country Select the billing address country from the drop down list. | |
| Address Line 1 | Enter up to 2 lines of the contact's billing address. |
| Address Line 2 | |
| Zip Code | Enter the zip or postal code. |
| City/State | Enter the city name for the billing address in the first field.Select a state code from the drop down list in the second field. |
- Click Enter a different address in Shipping information to enter a separate shipping address.
When you select this option, the Add Contact page displays shipping address fields.
| Field Description | |
| Country Select the shipping address country from the drop down list. | |
| Address Line 1 | Enter up to 2 lines of the contact's shipping address. |
| Address Line 2 | |
| Zip Code Enter the zip or postal code. | |
| City/State | Enter the city name for the shipping address in the first field.Select a state code from the drop down list in the second field. |
- Enter text in Memo to track information for your own use.
NOTE: This information does not appear in the invoice.
- Click Save.
The Address book page opens. Your new contact appears in the list on the left side of the page and is automatically selected. The contact's information appears on the right side of the page.
10.Click Add to Invoice.
The Create a new invoice page opens. It displays the contact's information from the Address book.
Editing Address Book Entries
When a recipient's information changes, you can edit it in your address book. You can access the Address book to edit entries in the following ways:
- Click the Address book link in an invoice.
- Select the Address book page in Invoice Settings.
Editing a Contact
To add or edit contact information, you can access the Address book in Invoice Settings or from the Create a new invoice page.
- Log in to your PayPal account.
- Click the Request Money tab.
-
Open the Address book page.
-
Click Invoice Settings. The Enter your contact information page opens Click Address book in the Invoice Settings navigation box.
- Or -
-
Click Create an invoice. The Create a new invoice page opens.
Click Address book. -
Select the contact to edit in the address list on the left side of the page.
The contact's information appears on the right side of the page.
- Click Edit.
The Edit contact information page opens.
Edit contact information
Primary contact Information
Email address
pgrisier-us-01@paypal.com
You don't have to complete every field.
First name
Phil
Last name
Grisier
Company
ABC Corp
Phone number 1
Mobile
Work
Phone number 2
Add more numbers
Country
United States

Currency
USD - U.S. Dollars
Language
English

Additional information What is this?
123-456
Memo

Cancel
Billing Information
Country
United States

Address Line 1
1221 South First St.
Address Line 2 (optional)
102
ZIP Code
95131
City/State
San Jose


Shipping Information
Shipping Address
Same as billing address
Enter a different address
Country
United States

Address Line 1
1234 Main Street
Address Line 2 (optional)
ZIP Code
95131
City/State
San Jose


- Edit the Primary contact information.
| Field Description | |
| Email address Contact's email address. (Required) | |
| First name Contact's first or given name. | |
| Last name Contact's last or family name. | |
| Company Name of contact's business. | |
| Phone number 1 First phone number. | Select a phone number type from the drop down list. For example, if this is a mobile phone number, select Mobile. |
| Phone number 2 Second phone number. | Select a phone number type from the drop down list. For example, if this is a mobile phone number, select Mobile. |
| Add more numbers Click if you need more that two phone numbers for this contact.When you select this option, another Phone Number field displays below the last number you entered. | |
| Country Country; select from the drop down list. | |
| Currency | Currency to use for this contact's invoices; select from the drop down list. |
| Language | Language to use for this contact's invoices. |
| Additional information | Any information you want to appear on the invoice. For example, use this field to track the contact's account number. |
- Edit Billing information.
| Field Description | |
| Country Billing address country; select from the drop down list. | |
| Address Line 1 | Up to 2 lines of the contact's billing address. |
| Address Line 2 | |
| Zip Code | Zip or postal code. |
| City/State | City name for the billing address in the first field.State code in the second field; select from the drop down list. |
- Edit any existing shipping information.
- Or -
Click Enter a different address in Shipping information to enter a shipping address. When you select this option, the Edit Contact page displays shipping address fields.
| Field Description | |
| Country Shipping address country; select from the drop down list. | |
| Address Line 1 | Up to 2 lines of the contact's shipping address. |
| Address Line 2 | |
| Zip Code Zip or postal code. | |
| City/State | Shipping address city name in the first field. |
| Shipping state code in the second field; select from the drop down list. | |
- Enter text in Memo to track information for your own use.
NOTE: This information does not appear in the invoice.
10.Click Save.
The Address book page opens. Your edited contact appears in the list on the left side of the page and is automatically selected. The contact's information appears on the right side of the page.
- You can now add or edit other Address book entries.
- Or -
If you opened the Address book from the Create a new invoice page, click Add to Invoice.
The Create a new invoice page opens and displays the contact's edited information from the Address book.
Searching for Contacts
When you open the Address book, you can look for contacts using the Search field. Address book Search looks through the following fields to locate matching information:
- Email address
- First or given name
- Last or family name
- Company name
When you enter text in the field, Search automatically begins looking for a match on the third character you type. Matching contacts display below Search. You can continue to refine the
search by entering more characters. If you want Search to start before the third character, click Go.
If there are no matches, a message displays. Enter different search text to try again.
Searching for a Contact
1. Open the Address book.
Click Address book in the Create an invoice page.
- Or -
Click Address book in Invoice Settings.
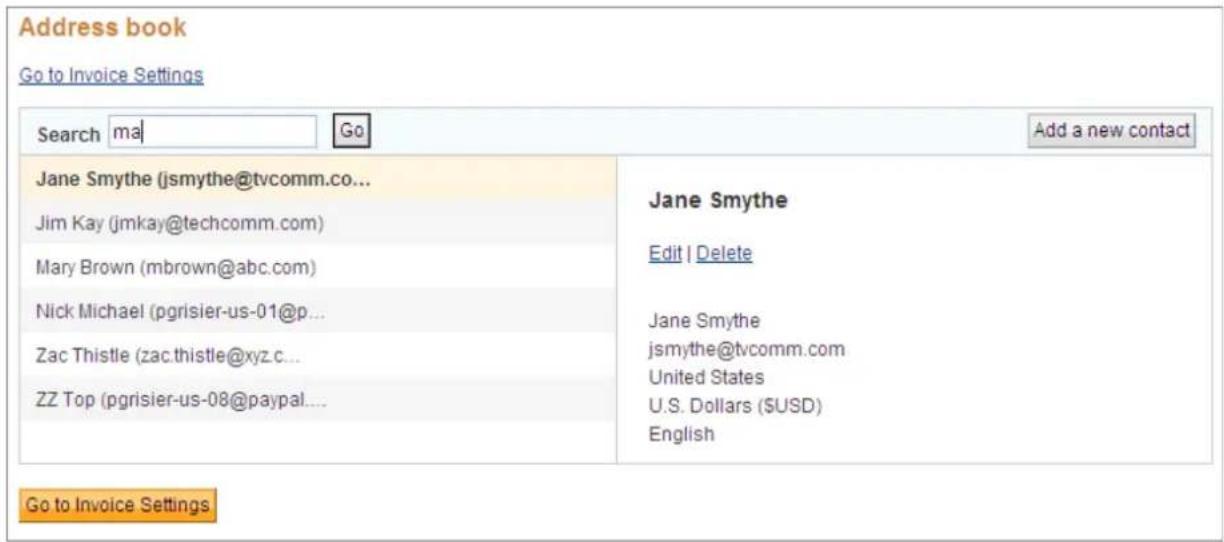
text_image
Address book Go to Invoice Settings Search ma Go Add a new contact Jane Smythe (jsmythe@tvcomm.co... Jim Kay (jmkay@techcomm.com) Mary Brown (mbrown@abc.com) Nick Michael (pgrisier-us-01@p... Zac Thistle (zac.thistle@xyz.c... ZZ Top (pgrisier-us-08@paypal.... Jane Smythe Edit | Delete Jane Smythe jsmythe@tvcomm.com United States U.S. Dollars ($USD) English Go to Invoice Settings2. Begin entering text in Search.
Address book begins searching for matches on the third character. You can start the search sooner by clicking Go.
A list of matching contacts displays below the Search field. If there are no matches, you'll see a message instead.
- Delete the text in Search to show all Address book entries again.
Deleting Address Book Entries
If you no longer need a contact, you can delete the entry from the Address book. You can access the Address book to delete entries in the following ways:
- Click the Address book link in an invoice.
- Select the Address book page in Invoice Settings.
Deleting Contacts
You can access your address book from the Create a new invoice page to delete contact information for a recipient.
- Log in to your PayPal account.
- Click the Request Money tab.
- Open the Address book page.
- Click Invoice Settings. The Enter your contact information page opens.
Click Address book in the Invoice Settings navigation box.
- Or -
- Click Create an invoice. The Create a new invoice page opens.
Click Address book.
- Click the contact to delete in the address list on the left side of the page.
The contact's information appears on the right side of the page.
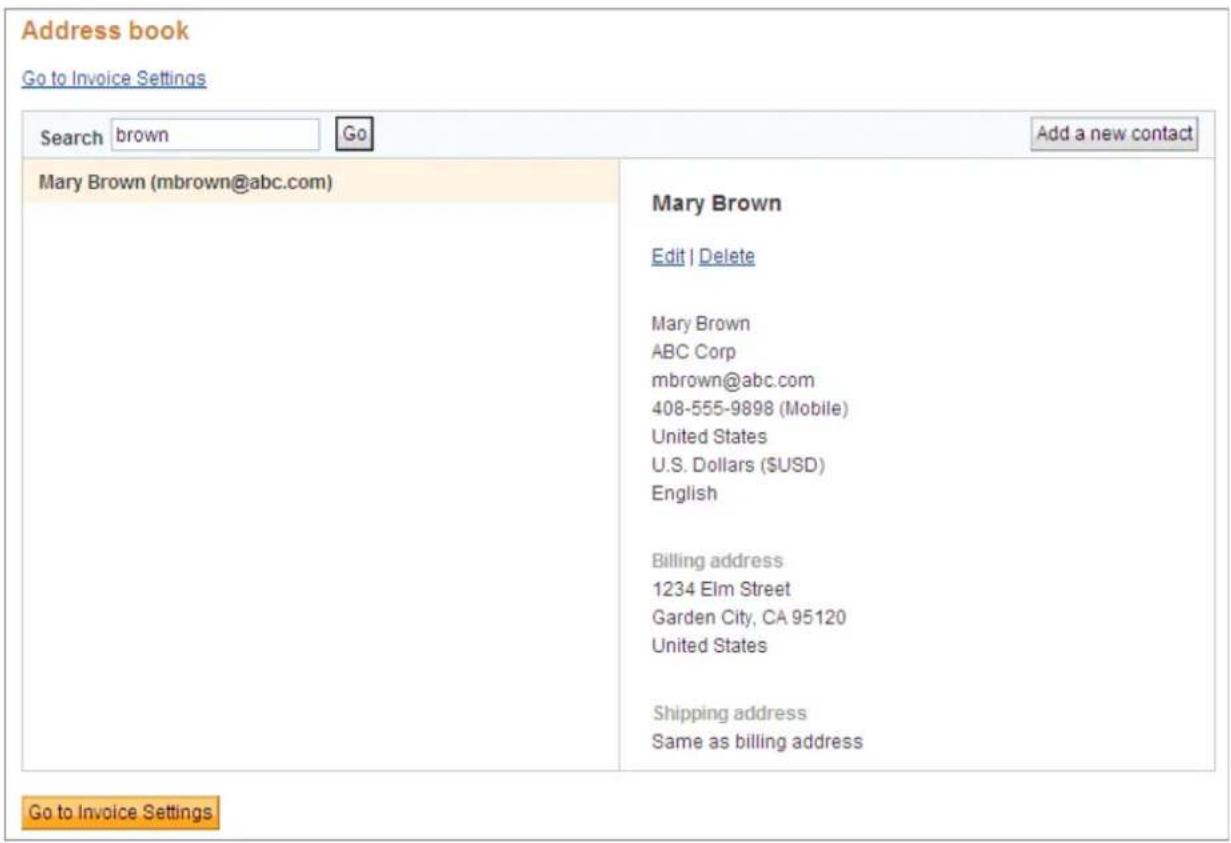
text_image
Address book Go to Invoice Settings Search brown Go Add a new contact Mary Brown (mbrown@abc.com) Mary Brown Edit | Delete Mary Brown ABC Corp mbrown@abc.com 408-555-9898 (Mobile) United States U.S. Dollars ($USD) English Billing address 1234 Elm Street Garden City, CA 95120 United States Shipping address Same as billing address Go to Invoice Settings- Click Delete.
The Delete contact? dialog box opens.
6. Click Delete.
The Address book page opens. The deleted contact no longer appears in the list on the left side of the page.
7. You can now work on other Address book entries.
- Or -
If you opened the Address book from the Create a new invoice page and do not want to use an Address book contact in your invoice, click Go to invoice.
The Create a new invoice page opens. It does not display a recipient.
- Or -
If you opened the Address book from the Create a new invoice page and want to use an Address book contact in your invoice, select a contact and click Add to Invoice.
The Create a new invoice page opens and displays the contact's Address book information.
8
Working with Saved Items
If you frequently include particular items in your invoices, such as your best-selling products or services, you can store that information and use it again to save time when you create invoices.
Read the following topics to learn about saving and editing invoice items.
- "About Saved Items" on page 119
- “Adding a Saved Item” on page 120
- "Editing Saved Items" on page 123
- “Deleting Saved Items” on page 125
About Saved Items
Saved items are items you frequently include in your invoices. Using saved items reduces the number of things you type when you create an invoice. Instead of entering all of the information for an invoice item, you select a saved item from a drop down list to use its information to complete the fields. After entering a date and a quantity for the item, you can go on to the next invoice item.
You can easily edit information about saved items using the Saved items page in Invoice Settings. You can store up to 100 items. For each item, you assign an item name or ID to identify the item, select the currency to use, and enter a description, the cost per unit, and any applicable taxes.
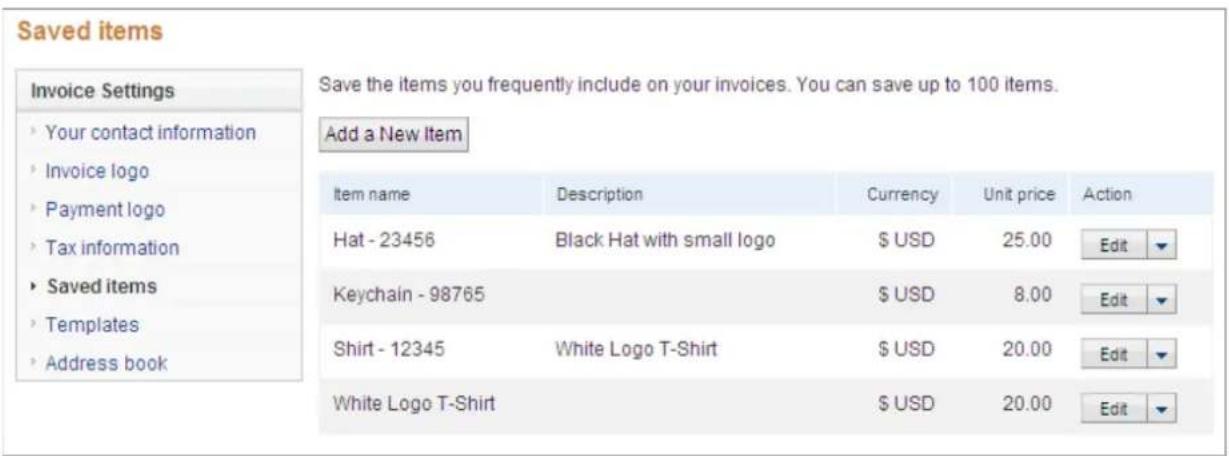
text_image
Saved items Invoice Settings Your contact information Invoice logo Payment logo Tax information Saved items Templates Address book Save the items you frequently include on your invoices. You can save up to 100 items. Add a New Item Item name Description Currency Unit price Illustration Hat - 23456 Black Hat with small logo $ USD 25.00 Keychain - 98765 $ USD 8.00 Shirt - 12345 White Logo T-Shirt $ USD 20.00 White Logo T-Shirt $ USD 20.00If you reach the maximum of 100 items, you must delete a saved item before you can add another.
What's in a Saved Item?
- Item name: (Required) Identifies the item. You can use the item's name or some other identifier. This name appears on the invoice.
- Description: Describes the item to your customer. This information appears on the invoice. One way to use the description is to identify the SKU# for the item. Description has a maximum of 300 characters.
- Currency: Currency code to use for this item. It defaults to the currency you identified as your primary currency in your Account Profile. You can select a different currency from the drop down list.
- Unit Price: (Required) Cost of one item.
- Tax: Percentage of tax that applies to this item. You can select a saved tax or add a new one.
Adding a Saved Item
You can save item information in two ways:
- Save item information entered in an invoice.
- Add an item in the Saved items page in Invoice Settings.
The minimum information you can save for an item is the item name and the unit price. All other item information is optional.
Adding an Item in an Invoice
- Log in to your PayPal account.
-
Click the Request Money tab and then click Create Invoice.
The Create a new invoice page opens. -
Enter item information.
- Item name/ID Enter the item name. This name is required and will appear in the drop down list when you enter invoice items.
- Date
When you tab or click in the date field, a Calendar opens. Select the date from the Calendar or type the date in the field.
NOTE: This field is not stored with the item, but is required to send an invoice.
- Quantity
Automatically set to 1.
NOTE: This field is not stored with the item, but is required to send an invoice.
- Unit price
Enter the price of a single item. This price is required to save the item.
- Tax
Automatically set to No tax. Select a tax from the drop down list, if this item is subject to tax. If the tax does not appear in the drop down list, select Add tax to create one. See "Adding Tax Information" on page 128 for instructions.
- Description
Enter optional information about the item to include in the invoice. Use the description to help the recipient identify the item or to track additional information, such as the product SKU#.
4. Click Save Item next to the item to store.
Save Item changes from a link to unlinked text to show it is stored.
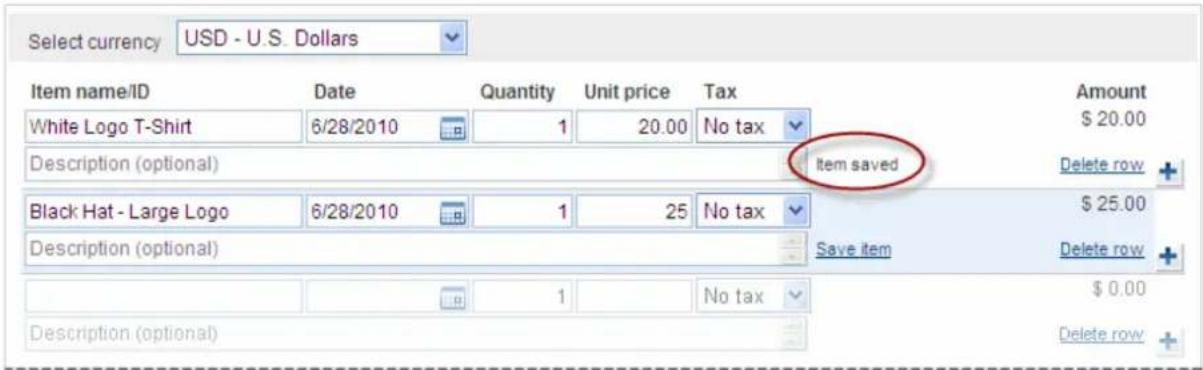
text_image
Select currency USD - U.S. Dollars Item name/ID Date Quantity Unit price Tax Amount White Logo T-Shirt 6/28/2010 1 20.00 No tax $ 20.00 Description (optional) Item saved Delete row + Black Hat - Large Logo 6/28/2010 1 25 No tax $ 25.00 Description (optional) Save item Delete row + Description (optional) 1 No tax $ 0.00 Delete row +Adding an Item in Invoice Settings
- Log in to your PayPal account.
- Click the Request Money tab.
- Click Invoice Settings.
The Enter your contact information page opens.
- Click Saved Items in the Invoice Settings box at the left of the page.
- Click Add a New Item.
The Add a new item box opens.
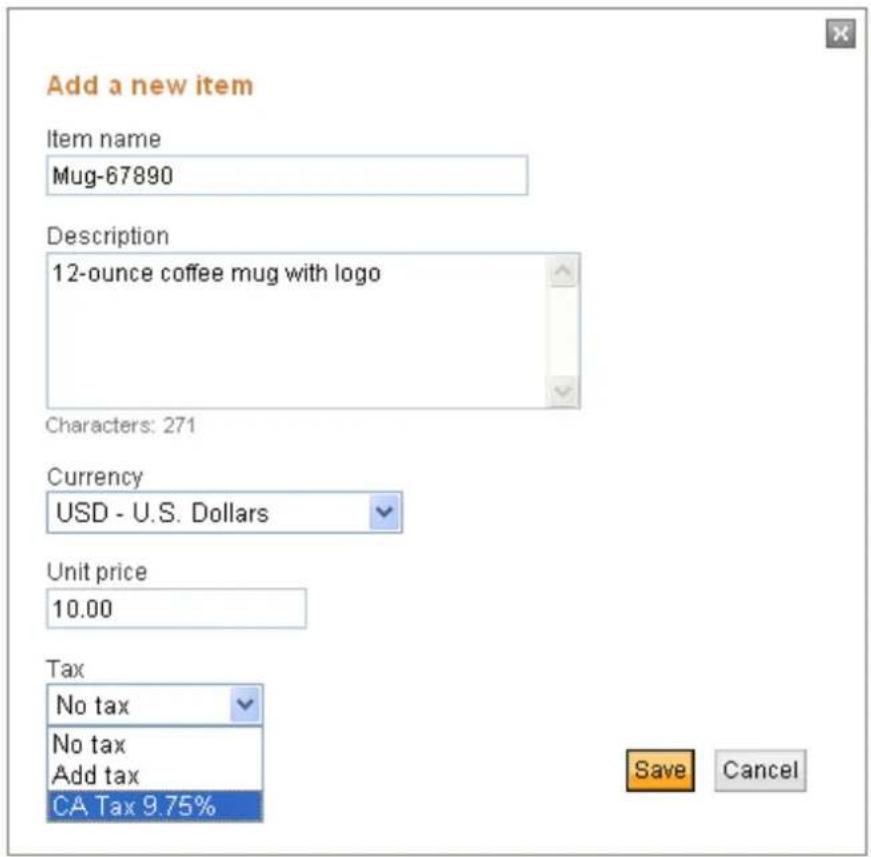
text_image
Add a new item Item name Mug-67890 Description 12-ounce coffee mug with logo Characters: 271 Currency USD - U.S. Dollars Unit price 10.00 Tax No tax No tax Add tax CA Tax 9.75% Save Cancel- Enter item information.
- Item name
Enter the item name. This is a required field. The name appears in the drop down list when you enter invoice items.
- Description
Enter optional information about the item to include in the invoice. Use the description to help the recipient identify the item or to track additional information, such as the product SKU#.
- Currency
Select the currency to use for this item.
- Unit price
Enter the price of a single item. You must enter a price to save the item.
- Tax
Automatically set to No tax. If this item is subject to tax, select a tax from the drop down list. If the tax you need does not appear in the drop down list, select Add tax to create one. See “Adding Tax Information” on page 128 for instructions.
7. Click Save.
The item appears in the list of saved items on the page. When you create a new invoice, the item appears in the drop down list when you click in Item Name/ID.
Editing Saved Items
If item information has changed or you want to add more information to a saved item, you can make those changes in the Saved items page. There are no restrictions on what you can change for a saved item. When you save the edited information, the item is updated and will be available to all invoices created after the edit.
Editing a saved item does not change any existing invoices or templates that contain the previous information for the item. To use the updated item in your template, you must edit the template.
See “Managing Templates” on page 94 for instructions on updating your templates.
Editing a Saved Item
Use the Saved items page in Invoice Settings to edit saved items.
- Log in to your PayPal account.
- Click the Request Money tab.
- Click Invoice Settings.
The Enter your contact information page opens.
-
Click Saved Items in the Invoice Settings navigation list at the left of the page.
-
Select Edit from the Action drop down list.
The Edit an item box opens.
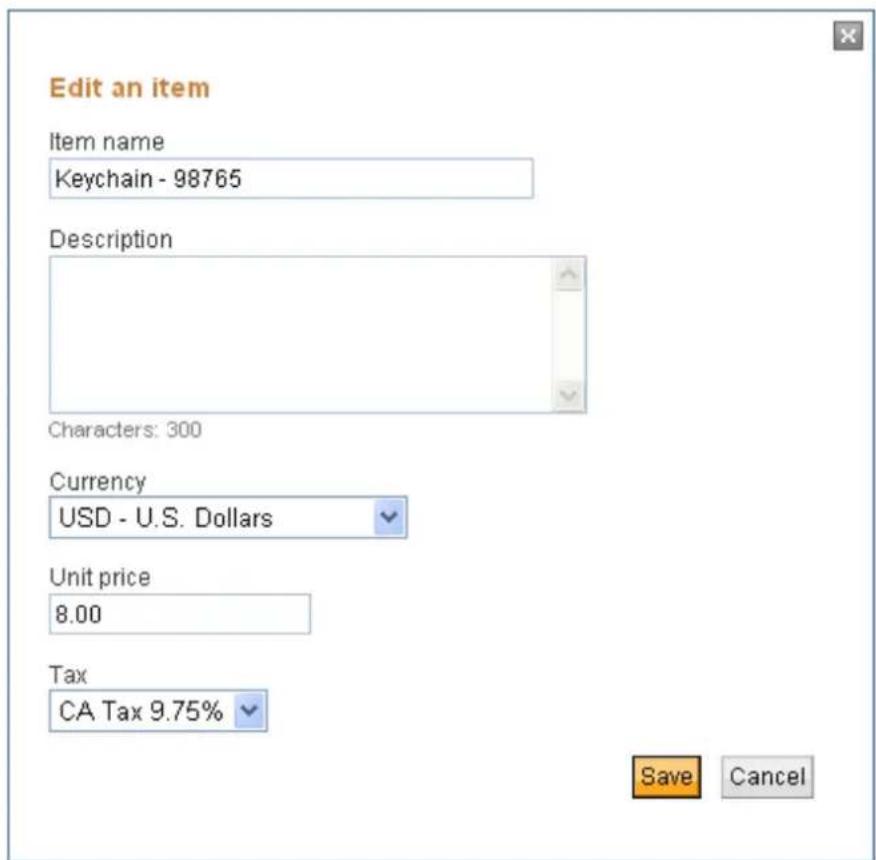
text_image
Edit an item Item name Keychain - 98765 Description Characters: 300 Currency USD - U.S. Dollars Unit price 8.00 Tax CA Tax 9.75% Save Cancel- Change or add information in any of the fields:
- Item name
This is a required field. The name appears in the drop down list when you enter invoice items.
- Description
Optional information about the item to include in the invoice. Use the description to help the recipient identify the item or to track additional information, such as the product SKU#.
- Currency
Change the currency to use for this item.
- Unit price
Change the price of a single item. This is a required field.
- Tax
Select a tax from the drop down list or create a new one. See “Adding Tax Information” on page 128 for instructions.
7. Click Save.
The edited item appears in the list of saved items on the page. When you create a new invoice, the edited item appears in the drop down list when you click in Item Name/ID.
Deleting Saved Items
You can delete any saved item in the Saved items page. Deleting a saved item does not affect any existing invoices or templates that use that item. To remove the deleted item from a template, you must edit the template.
See “Managing Templates” on page 94 for instructions on updating your templates.
Deleting a Saved Item
Use the Saved items page in Invoice Settings to delete stored items.
- Log in to your PayPal account.
- Click the Request Money tab.
- Click Invoice Settings.
The Enter your contact information page opens.
- Click Saved Items in the Invoice Settings navigation list at the left of the page.
- Select Delete from the Action drop down list.
The Delete item box opens.
- Click Delete.
The deleted item no longer appears in the Saved items list.
9
Managing Your Tax Information
If you must collect tax on invoice items or shipping costs, you can add the tax rates to your Invoice Settings to use in your invoices.
Read the following topics to learn about saving and editing invoice items.
- "About Tax Information" on page 127
- “Adding Tax Information” on page 128
- “Editing Tax Information” on page 132
- "Deleting Tax Information" on page 134
About Tax Information
You can store tax information to use in your invoices. Taxes can include sales taxes, GST, or VAT. You can store up to 10 taxes in Invoice Settings.
For each tax, assign a name and enter a percentage rate to apply to invoice items. Stored taxes appear in all Tax drop down lists in the invoice. You can edit and delete tax information without restriction.
Enter your tax information
Invoice Settings
Your contact information
Invoice logo
Payment logo
Tax information
Saved items
Templates
Address book
Enter up to 10 taxes (for example, Tax, GST, VAT) that will be available for specific items and invoices.
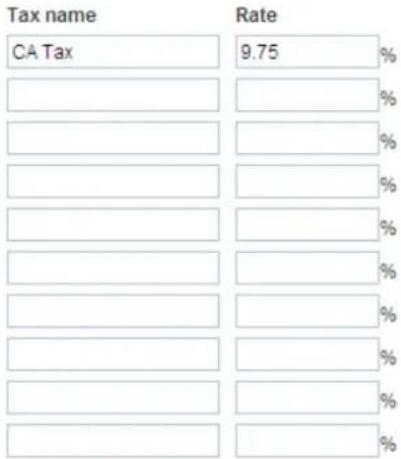
Changing or deleting tax information does not affect existing invoices, saved items, or templates that contain the old tax information. To reflect the new tax in a saved item or template, you must edit them.
See “Managing Templates” on page 94 and “Editing Saved Items” on page 123 for instructions.
Adding Tax Information
You can add tax information in two ways:
- Select Add tax from the Tax or Tax on shipping drop down lists when you create an invoice.
- Add a tax in the Tax information page in Invoice Settings.
You can add up to 10 tax percentages to use in invoices.
Adding Tax Information in an Invoice or Template
You can add tax information during invoice creation or when you are adding or updating invoice templates.
- Select Add tax from one of the following drop down lists: or from Tax on shipping drop down list.
– Tax in the invoice item list
– Tax on shipping below Shipping/handling
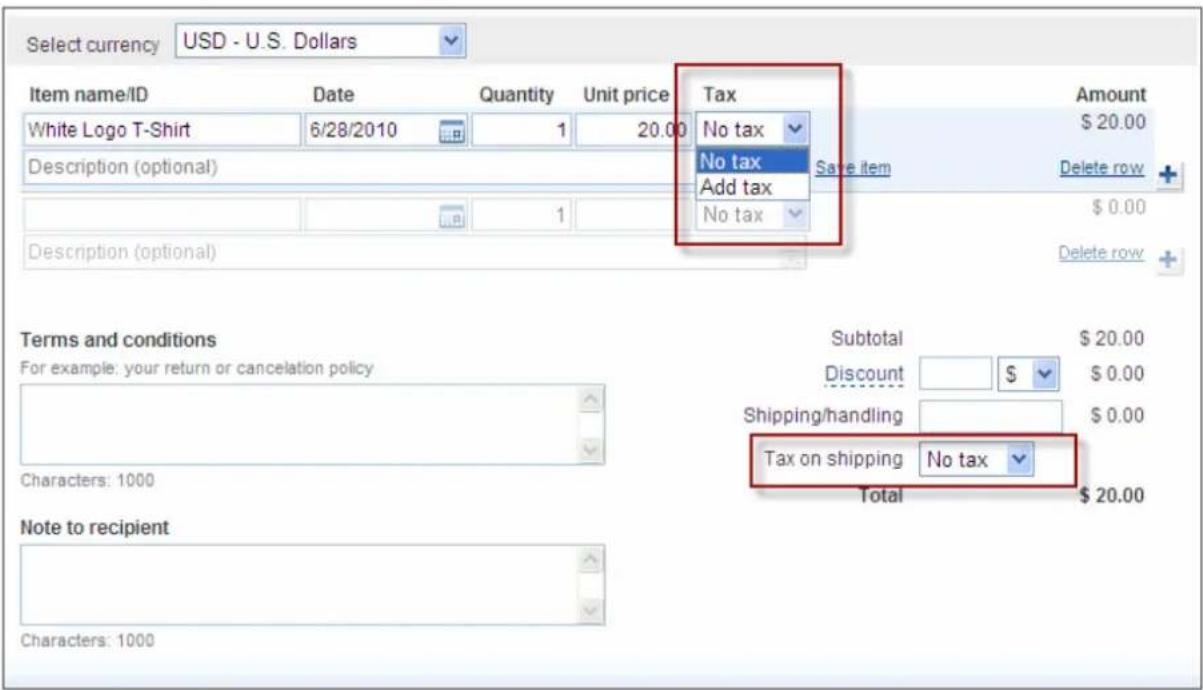
text_image
Select currency USD - U.S. Dollars Item name/ID Date Quantity Unit price Tax Amount White Logo T-Shirt 6/28/2010 1 20.00 No tax $ 20.00 Description (optional) No tax Save item Delete row + Description (optional) 1 No tax $ 0.00 Delete row + Terms and conditions Subtotal $ 20.00 For example: your return or cancelation policy Discount 0.00 Shipping/handling $ 0.00 Characters: 1000 Tax on shipping No tax Total $ 20.00 Note to recipient Characters: 1000The Enter your tax information box opens.
- Enter a name in Tax name. Tax names have a maximum of 6 characters.
- Enter a tax percentage in Percentage.
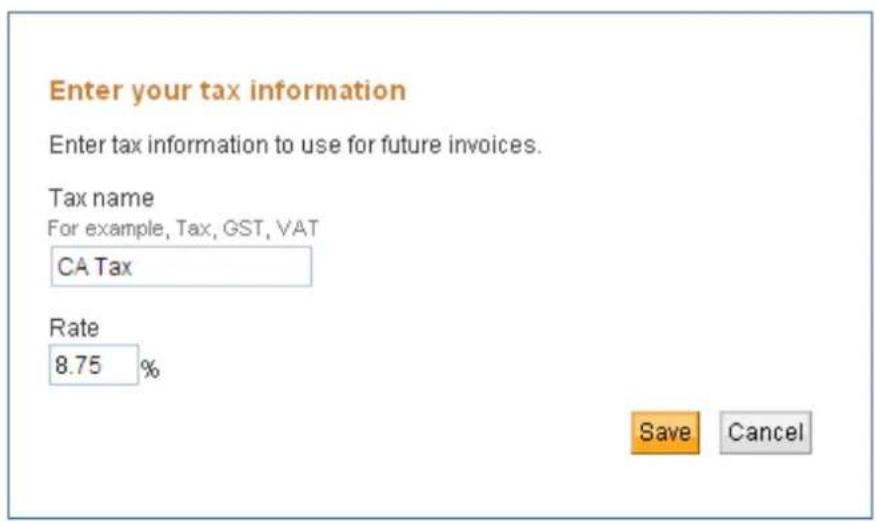
text_image
Enter your tax information Enter tax information to use for future invoices. Tax name For example, Tax, GST, VAT CA Tax Rate 8.75 %4. Click Save.
The tax name and percentage display in the invoice or template. The tax appears in the Enter your tax information page in Invoice Settings and appears as a selection in the Tax and Tax on shipping drop down lists.
Adding Tax Information in Invoice Settings
- Log in to your PayPal account.
- Click the Request Money tab.
- Click Invoice Settings.
The Enter your contact information page opens.
- Click Tax information in the Invoice Settings box at the left of the page.
Enter your tax information
Invoice Settings
Your contact information
Invoice logo
Payment logo
Tax information
Saved items
Templates
Address book
Enter up to 10 taxes (for example, Tax, GST, VAT) that will be available for specific items and invoices.
Tax name
CA Tax
Rate
9.75
%









Save
- Enter a name in an empty Tax name field. Tax names have a maximum of 6 characters.
- Enter the tax percentage in the Percentage box next to the new name.
- Click Save.
When you create a new invoice, your new tax rate appears in the Tax and Tax on shipping drop down lists.
When you add or create a saved item in Invoice Settings, your new tax rate appears in the Tax drop down list.
Adding Tax Information in a Saved Item
- Log in to your PayPal account.
- Click the Request Money tab.
- Click Invoice Settings.
The Enter your contact information page opens.
-
Click Saved Items in the Invoice Settings box at the left of the page.
-
Click Add a new item.
The Add a new item dialog box opens for a new item.
- Or -
Click Edit for an existing item.
The Edit item dialog box opens.
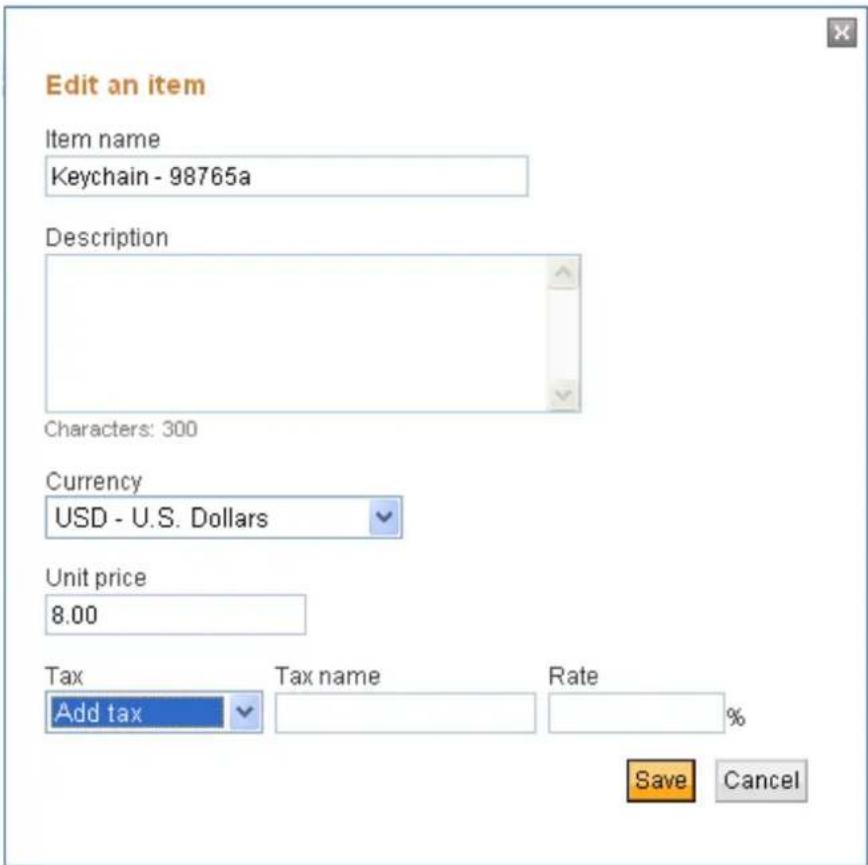
text_image
Edit an item Item name Keychain - 98765a Description Characters: 300 Currency USD - U.S. Dollars Unit price 8.00 Tax Add tax Tax name Rate Save Cancel- Select Add tax in Tax.
- Enter Tax name.
-
Enter Rate.
-
Enter or update any other information for the saved item.
10.Click Save.
The tax rate is saved with the item description. When you use this saved item in an invoice or template, the tax rate will be set automatically.
The new tax will appear in the Tax information page in Invoice Settings.
Editing Tax Information
If your tax information has changed, you can edit the tax in the Enter your tax information page. You can change the tax name, rate, or both fields. When you save the edited information, the tax is stored and will be available to all invoices created after the edit.
Editing a tax does not affect any invoices you already sent. However, you will see a warning message when you open a saved invoice, template, or saved item that uses the edited tax. The message prompts you to review and update the tax, if necessary. For example, if you edit a saved item that contains an changed tax rate, you will see a message at the top of the dialog box.
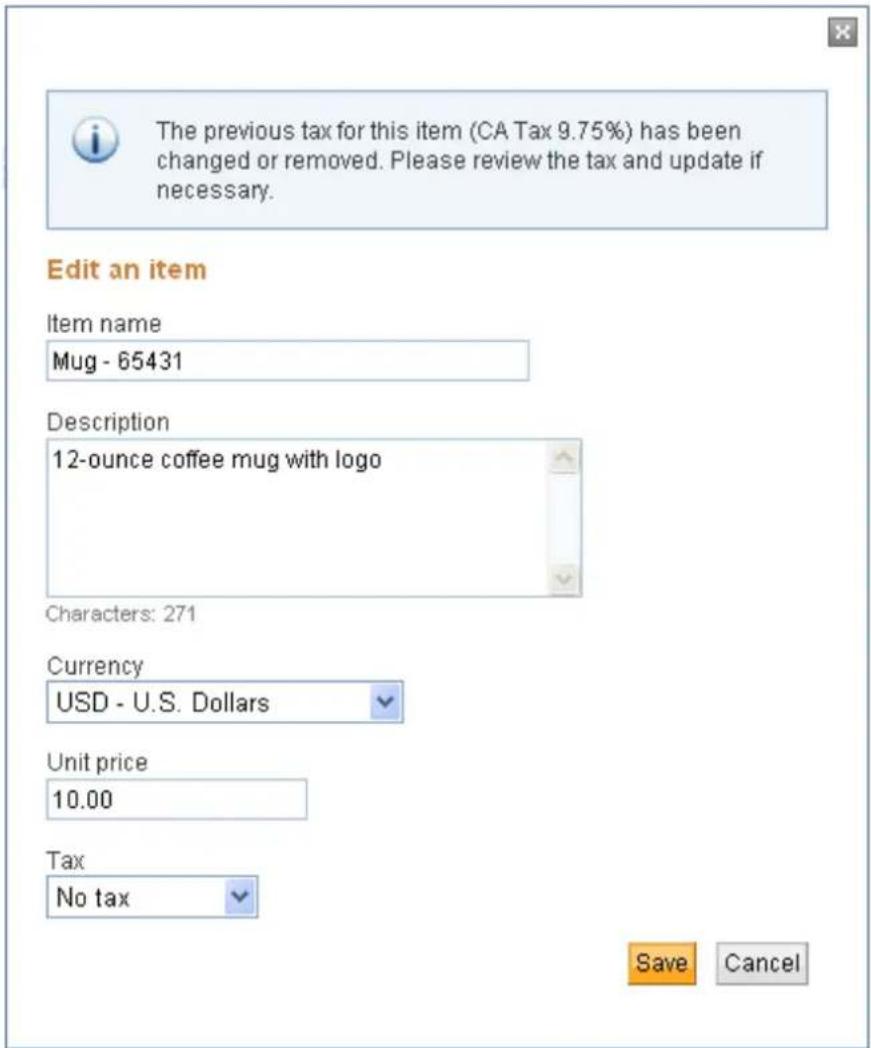
text_image
The previous tax for this item (CA Tax 9.75%) has been changed or removed. Please review the tax and update if necessary. Edit an item Item name Mug - 65431 Description 12-ounce coffee mug with logo Characters: 271 Currency USD - U.S. Dollars Unit price 10.00 Tax No tax Save CancelSee “Managing Templates” on page 94 for instructions on updating your templates and Editing Saved Items for instructions on updating saved items.
Editing a Tax
- Log in to your PayPal account.
- Click the Request Money tab.
- Click Invoice Settings.
The Enter your contact information page opens.
- Click Tax information in the Invoice Settings box at the left of the page.
-
Edit the Tax name to rename the tax.
-
Enter a percentage in Rate to change the tax calculation.
- Click Save.
The edited tax is saved. When you create a new invoice, the edited tax appears the Tax or Tax on shipping drop down lists.
Deleting Tax Information
You can delete any tax in the Tax Information page. Deleting a tax does not affect any invoices you sent that used it. However, you will see a warning message when you open a saved invoice, template, or saved item that uses the deleted tax. The message prompts you to review and update the tax, if necessary.
See “Managing Templates” on page 94 for instructions on updating your templates.
Deleting a Tax
- Log in to your PayPal account.
- Click the Request Money tab.
- Click Invoice Settings.
The Enter your contact information page opens.
- Click Tax information in the Invoice Settings box at the left of the page.
- Clear the text in Tax name.
- Delete the percentage in Rate.
- Click Save.
The deleted tax no longer appears in the Enter your tax information list and no longer appears in the Tax and Tax on shipping drop down lists.
10
Invoice Administration
Managing invoices and maintaining invoice settings are on-going tasks. Invoicing lets you easily find, manage, and track your invoices and payments, allowing you to spend more time on your business instead of administrative tasks.
Keeping your Invoice Settings updated helps your invoicing tasks to run smoothly. When your invoice settings are current, you can create invoices quickly without having to leave the Create a new invoice page.
Read the following topics to learn more about invoice administration:
- “Managing Your Invoices and Payments” on page 135
- “Maintaining Your Invoice Settings” on page 136
- “Adding Users to Perform Invoicing Tasks” on page 136
- “Invoicing and Reporting” on page 137
Managing Your Invoices and Payments
The Manage Invoices page lists all the invoices you sent or saved. Use this page as the starting point to research invoices, perform actions, and review or update payment information.
When you need to research one or more invoices, use the Manage Invoices page to find them quickly. To help you find invoices, the Manage Invoices page contains basic and advanced filters. In Basic filter, you can use one of predefined filters to find paid, unpaid, past due, or unsent invoices. In Advanced filter, you can select filter options and date ranges to narrow the search. For example, you can use an Advanced filter to find all invoices sent to a specific email address.
In the Action column of the Manage Invoices page, you select options to cancel invoices, copy invoices, or send reminders to recipients. When you cancel an invoice or send a reminder, the recipient receives an email about the action.
You can view an invoice's details by clicking its invoice number. The Invoice details page displays status information and a replica of the saved or sent invoice. From this page, you can print the invoice, send reminders, copy, or cancel the invoice.
The Invoice details page also provides a way to view payment information. For invoices paid with PayPal, the page contains a link to the Transaction Details for that payment. For payments made using other methods, you can record or update a recorded payment manually. The Manage Invoices page also provides an option to manually record payment.
For instructions on using the Manage Invoices page, see “Managing Your Invoices” on page 35. For information on managing your payments, see “Managing Invoice Payments” on page 63.
Maintaining Your Invoice Settings
Use Invoice Settings to store information to use during invoice creation. You can store your invoice contact information, your logo, tax information, invoice items and costs, invoice templates, and recipient contact information.
You can add or update your settings during invoice creation. However, if you have many items to add or update, it might be more efficient to use Invoice Settings to make the changes before creating an invoice.
Each invoice setting has its own page that you access from the Invoice Settings navigation box. For example, you add or update invoice item information in the Saved items page. When you are finished with one setting, you can select another from the Invoice Settings navigation box or go to another part of your account.
Use invoice templates to store items, payment terms, tax rates, shipping amounts, and discount information for invoices that you send frequently. Using custom templates saves time at invoice creation. See “Working with Invoice Templates” on page 83 for more information.
Use the Address book to store contact information for your recipients. The minimum information is the recipient's email address. You can also save optional information, such as name, company name, phone numbers, billing address, and shipping address. See “Working with the Address Book” on page 103 for more information.
When you create invoices, all of your Invoice Settings are available for use. You can choose one of your stored templates to use as a starting point and modify it from there.
To read more about Invoice Settings, see “Customizing Your Invoice Information” on page 69, “Working with Saved Items” on page 119, and “Managing Your Tax Information” on page 127.
Adding Users to Perform Invoicing Tasks
If you have a PayPal Business account, you can let people in your organization access your account by adding them as users and granting them specific access privileges. You can use this feature to assign invoicing tasks to one or more people. For example, you could assign the create invoices task to one user and assign the maintenance of Invoice Settings to another user.
PayPal invoicing contains controls to prevent multiple users from adding, updating, or deleting the same information at the same time. For example, two users open the same saved item. User 1 deletes it, while User 2 enters updated information. When User 2 clicks Save, an error message displays indicating that the item was deleted by another user.
To give users access to Invoicing, you add them to your Account Profile in Manage User and grant them Request Money access. Request Money access allows users to send invoices, send money requests, and add or update Invoice Settings. It is up to the account holder or administrator to assign specific tasks to users.
For information about adding users to your account, see the Merchant Setup and Administration Guide.
Invoicing and Reporting
The Manage Invoices page displays the invoices you have sent or saved. Use the available filters to search for specific invoices. You can export invoice information and details by downloading invoice activity. See “Exporting Invoice Information” on page 49 for instructions.
In addition to reviewing invoice information on the Manage Invoices page, you can see your invoices in your Account History. You can use the available filters to search for invoices and download history information. For information about using Account History, see the Merchant Setup and Administration Guide.
PayPal's standard reports include invoice information. See the Transaction Detail Report Specification or one of the other PayPal reporting guides for more information.