BFD 105 Chrono - Watch Nautica - Free user manual and instructions
Find the device manual for free BFD 105 Chrono Nautica in PDF.


| Product Type | Watch |
| Brand | Nautica |
| Model | BFD 105 Chrono |
| Category | Watch |
| Movement | Quartz analog |
| Display | Analog with INDIGLO night-light |
| Water Resistance | Up to 200 meters (depending on model variant) |
| Crown | Screw-down type (ensure tightened for water resistance) |
| Calendar | Date display (day on some variants) |
| Chronograph | Yes, measures 1/5 second up to 60 minutes (standard, accumulated, split time) |
| INDIGLO Night-Light | Electroluminescent backlight, press crown or left pusher |
| Rotating Bezel | Elapsed time ring for timing activities |
| Tachymeter | Measures speed over distance |
| Band | Interchangeable with spring bar |
| Battery | One battery (type not specified, recycle properly) |
| Case Material | Stainless steel (typical) |
| Crystal | Mineral (typical) |
| Dimensions | Case diameter approx. 42 mm (estimated) |
| Weight | Approx. 120 g (estimated) |
| Care | Avoid pressing buttons underwater; rinse with fresh water after saltwater exposure |
| Safety | Do not dispose of battery in fire; keep away from children |
| Warranty | Not specified |
Frequently Asked Questions - BFD 105 Chrono Nautica
User questions about BFD 105 Chrono Nautica
0 question about this device. Answer the ones you know or ask your own.
Ask a new question about this device
Download the instructions for your Watch in PDF format for free! Find your manual BFD 105 Chrono - Nautica and take your electronic device back in hand. On this page are published all the documents necessary for the use of your device. BFD 105 Chrono by Nautica.
USER MANUAL BFD 105 Chrono Nautica
WATCH INFORMATION AND CARE 2 - 5
OPERATING INSTRUCTIONS
BASIC MODELS 6 - 7
DATE MODELS 8 - 9
MULTI MODELS 10 - 13
INDIGLO MODELS 14 - 15
CHRONOGRAPH MODELS 16 - 52
ANALOG & DIGITAL MODELS 53 - 62
DIGITAL MODELS 63 - 66
SPECIAL MODELS
TIDE 67 - 69
WORLD TIME 70 - 73
HIGH PERFORMANCE MODELS
TIDE, TEMPERATURE & COMPASS 74 - 79
SOLAR 80 - 81
DEPTH 82 - 85
NAUTICA watches have been developed with the highest attention to quality, function and detail, as befits the NAUTICA tradition. Please read the following instructions carefully to fully understand all of the functions of your finely crafted timepiece.
WATER-RESISTANCE
If your watch is water-resistant, it will be indicated on the watch face or on the caseback.
- 50 Meter Water-Resistant watch withstands water pressure to 86p.s.i.a. (equals immersion to 164 feet or 50 meters below sea level) and dust as long as crystal, crown and case remain intact.
- 100 Meter Water-Resistant watch withstands water pressure to 160p.s.i.a. (equals immersion to 328 feet or 100 meters below sea level) and dust as long as crystal, crown and case remain intact.
- 200 Meter Water-Resistant watch withstands water pressure to 320p.s.i.a. (equals immersion to 656 feet or 200 meters below sea level) and dust as long as crystal, crown and case remain intact.
NOTE: CROWN MUST BE SCREWED INTO THE CASE PROTRUSION TO ASSURE WATER RESISTANCE. WATCH IS NOT AN ISO 6425 CERTIFIED DIVE WATCH.
If your watch has "INDIGLO" on the dial, your watch is equipped with the INDIGLO Night-Light. To activate this feature, depress the crown or the pusher on the left side of the watch to illuminate the entire dial for easy reading during nighttime or low light conditions. Light will appear immediately.
Your NAUTICA watch featuring INDIGLO Night-Light contains a patented electroluminescent technology (U.S. Patent Number 4,527,96 and 4,775,964). The INDIGLO Night-Light illuminates the entire watch lens with a uniform bright light that offers superior readability in all low light and nighttime conditions. Simply press the appropriate button to activate.
WARNING: DO NOT PRESS THE BUTTON UNDER WATER AS THE WATCH WILL NOT RETAIN WATER RESISTANCE
INDIGLO is a registered trademark of Indiglo Corporation.
BATTERY
Please recycle or dispose of battery properly. Do not dispose of battery in the fire. Do not recharge battery. Keep loose batteries away from children.
SCREW-IN SETTING CROWN
text_image
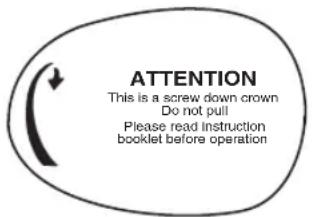
ATTENTION This is a screw down crown Do not pull Please read instruction booklet before operationSCREW-IN SETTING CROWN STICKER
Some deep-depth water-resistant watches require the setting crown to be screwed in to ensure water-resistancy. If your Nautica watch has a transparent sticker at back of the case back (diagram above) please unscrew the crown before setting your watch, and the crown must be screwed in after setting the watch.
To screw in, push in the crown firmly against the thread protrusion and hold it in while turning the crown clockwise. Continue to screw in the crown light until it is tight.
ELAPSED TIME RING
If your watch is equipped with a rotating outer dial with numbers and indicators, this Elapsed Time Ring may be used to indicate the length of time remaining for an activity or the starting time of an activity.
TIME REMAINING - set the outer ring so that the triangle is pointing to the time the activity is to end.
STARTING TIME - set the triangle on the time the activity is to begin.
TACHYMETER
A tachymeter measures the speed at which the wearer has traveled over a measured distance, i.e., a measured mile on the highway. For example, start the chronograph when you pass the starting point and stop it when you pass the finish point. You can then read your speed in units per hour off the tachymeter scale.
BAND ADJUSTMENT
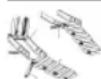
To disconnect band from clasp, press in end of spring bar (use pin or small paper clip) and separate link band from clasp as illustrated.
To reassemble band to clasp, place spring bar in band and place end of spring bar into desired hole in clasp. Press opposite end of spring bar in and slide into clasp and position so tip snaps into corresponding hole.
BASIC MODELS
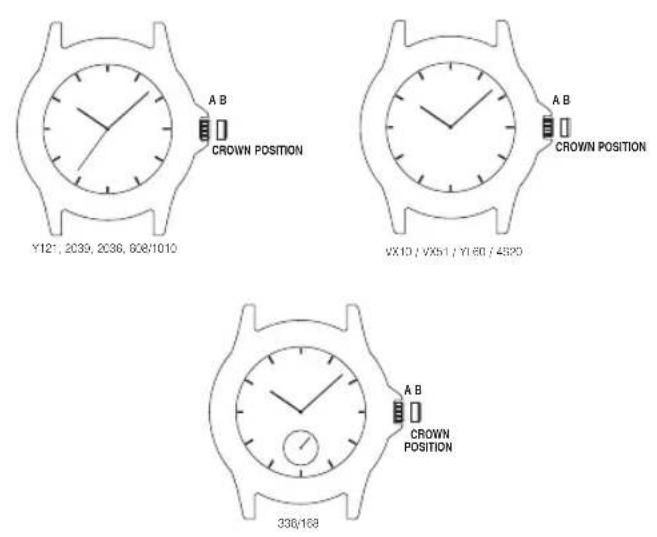
TIME
To set the time:
- Pull crown to "B" position.
- Turn crown clockwise /counter clockwise to correct time.
- Push crown to "A" position.
DATE MODELS
text_image
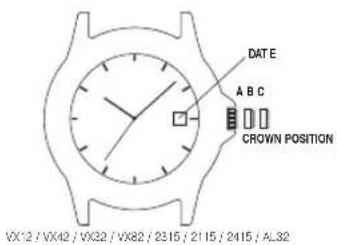
DATE A B C CROWN POSITION VX'12 / VX42 / VX32 / VX82 / 2315 / 2115 / 2415 / AL32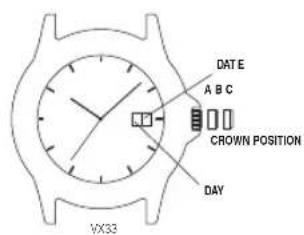
text_image
DATE A B C CROWN POSITION DAY VX33TIME
To set the time:
- Pull out crown to "C" position.
- Turn crown clockwise / counter clockwise to correct time.
- Push in crown to "A" position.
CALENDAR
To set the calendar/date:
- Pull out crown to "B" position.
2A. Turn crown clockwise / counter clockwise to correct date.
2B. Turn crown counter clockwise to correct date. (For VX33 only) - Push in crown to "A" position.
NOTE: The date changes automatically every 24 hours.
MULTI MODELS
text_image
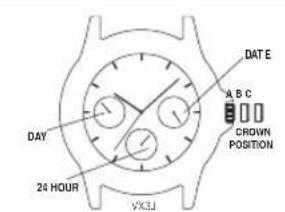
DAY 24 HOUR VX3J DATE A B C CROWN POSITION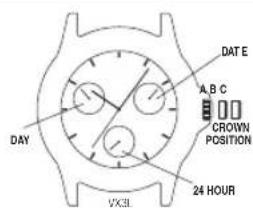
text_image
DAY DATE E A.B.C CROWN POSITION 24 HOUR VX31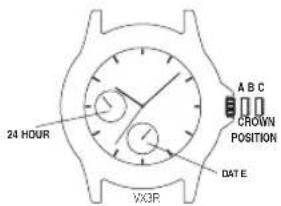
text_image
24 HOUR VX3R A B C CROWN POSITION DATE E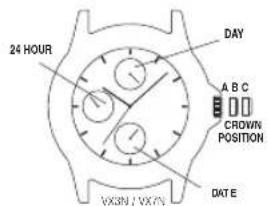
text_image
24 HOUR DAY A B C CROWN POSITION DATE VIXN / VIXN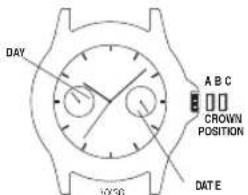
text_image
DAY A B C CROWN POSITION DATE VX36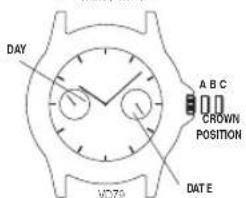
text_image
DAY A B C CROWN POSITION DATE VD7910
TIME
To set the time:
-
Pull crown to "C" position.
-
Turn crown either way to correct time.
-
Push crown to "A" position
DATE
To set the date:
Note: the date changes automatically every 24 hours.
- Pull crown to "B" position.
- Turn crown to correct date.
- Push crown to "A" position.
DAY OF WEEK (for VX3J / VX3L / VX3N / VX36 / VX7N / VD79) To set the day:
- Pull crown to "C" position.
- Advance time 24 hours to change the day.
- Push crown to "A" position.
Note: 24 hour indicator can be changed only when setting the time.
text_image
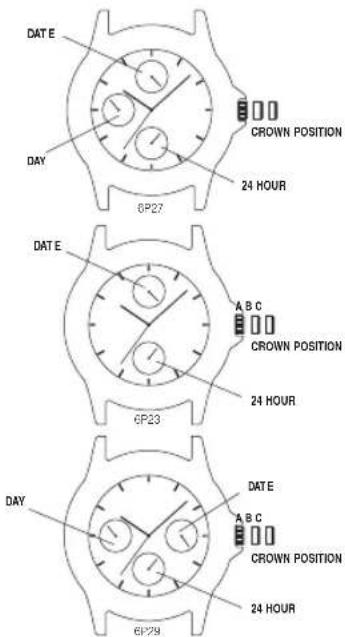
DATE DAY 6P27 CROWN POSITION 24 HOUR DATE A B C CROWN POSITION 24 HOUR 6P23 DAY DATE A B C CROWN POSITION 24 HOUR 6P2912
TIME
To set the time:
-
Pull crown to "C" position.
-
Turn crown either way to correct time.
-
Push crown to "A" position.
DATE
To set the date :
-
Pull crown to "B" position.
-
Turn crown counter clockwise to correct date.
-
Push crown to "A" position.
Note: The day changes automatically every 24 hours.
DAY OF WEEK (for 6P27 / 6P29)
To set the day:
-
Pull crown to "C" position.
-
Turn crown clockwise (hour hands rotate 24 hours) to correct day of week.
-
Push crown to "A" position.
Note: The day of week changes automatically every 24 hours.
INDIGLO MODELS
text_image
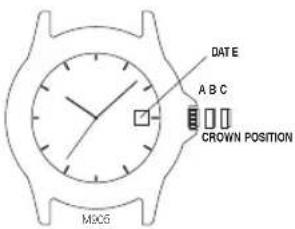
DATE A B C CROWN POSITION M50GTo activate the Indiglo:
Press crown to indicate Indiglo night light.
TIME
To set the time:
- Pull crown to "C" position.
- Turn crown clockwise / counter clockwise to correct time.
- Push crown to "A" position.
CALENDAR
To set the date:
- Pull crown to "B" position.
- Turn crown counter clockwise or towards you to correct date.
- Push crown to "A" position.
Note: The date changes automatically every 24 hours.
CHRONOGRAPH MODELS
text_image
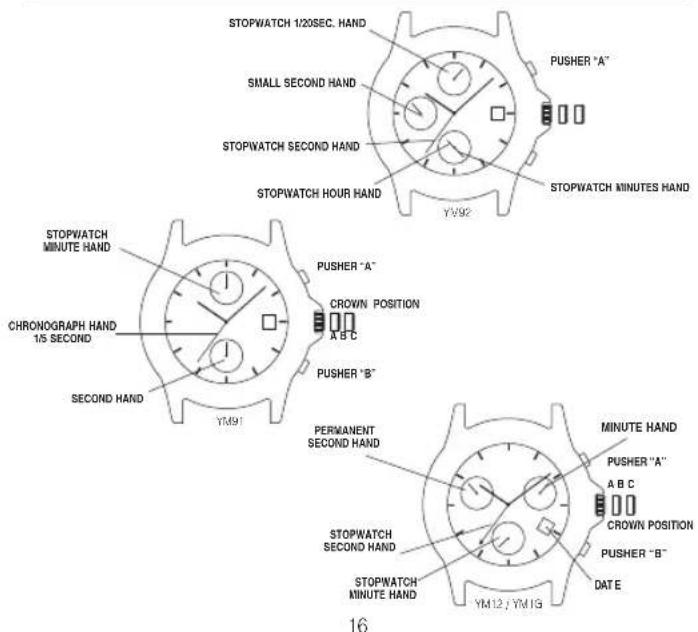
STOPWATCH 1/20SEC. HAND PUSHER "A" SMALL SECOND HAND STOPWATCH SECOND HAND STOPWATCH HOUR HAND YM92 STOPWATCH MINUTES HAND STOPWATCH MINUTE HAND PUSHER "A" CROWN POSITION A B C CHRONOGRAPH HAND 1/5 SECOND PUSHER "B" SECOND HAND YM91 PERMANENT SECOND HAND MINUTE HAND PUSHER "A" A B C CROWN POSITION PUSHER "B" STOPWATCH SECOND HAND STOPWATCH MINUTE HAND YM12 / YM13 DATE 16This Chronograph watch has three functions:
TIME, CALENDAR, STOPWATCH
TIME
To set the time:
- Pull crown to position "C".
- Turn crown clockwise / counter clockwise to correct time.
- Push crown to position "A".
CALENDAR
To set the calendar:
- Pull crown to position "B".
- Turn crown clockwise to correct calendar.
- Push crown to position "A".
STOPWATCH
This stopwatch is capable of measuring:
- 1/5 second elapsed up to 60 minutes.
- After 60 minutes, it will start counting again from "0" repeatedly up to 12 hours.
Before using the stopwatch, reset the stopwatch hands.
To the "12" and "0" position.
STANDARD STOPWATCH MEASUREMENT:
- Press pusher "A" to start timing.
- Press pusher "A" to stop timing.
- Press pusher "B" to reset.
ACCUMULATED ELAPSED TIME MEASUREMENT:
- Press pusher "A" to start timing.
- Press pusher "A" to stop timing.
- Press pusher "A" to restart timing.
- Press pusher "A" to stop 2nd timing.
- Press pusher "B" to reset.
Example of using split time measurement for two runners.
Two runners can be timed simultaneously; the first runner's time can be recorded while the second runner's time will continue to be accumulated until he finishes.
SPLIT TIME MEASUREMENT:
- Press pusher "A" to start the timing of the first runner.
- Press pusher "B" to stop and record the timing of the first runner. (Once pusher B is activated, even though the stopwatch 1/20 sec. hand and the big stopwatch sec. hand stop on the dial, the stopwatch still continues to time internally.)
- Press pusher "B" to start the timing of the second runner. The stopwatch sec. hand will jump to show internal accumulated time and to carry on timing of the second runner.
- Press pusher "A" to stop the timing of the second runner and record the time.
- Press pusher "B" for third time to reset, all stop watch hands will return to 12 o'clock position.
TO ADJUST STOPWATCH HAND (for YM12 / YM91 / YM1G):
- Pull crown to position "C".
- Press pusher "A" for 2 seconds, the stopwatch minute hand turns a full cycle.
- Press pusher "B" repeatedly to set stopwatch minute hand to "0" position.
-
Press pusher "A" again for 2 seconds, the stopwatch second hand turns a full cycle.
-
Press pusher "B" repeatedly to set stopwatch second hand to "0" position.
- Push crown to position "A".
Remarks:
This is suggested to check the hour and minute hands to ensure they are correct before pushing the crown back to position "A"
TO ADJUST STOPWATCH HAND (for YM92):
- Pull crown to "C" position.
- Press pusher "A" for 2 seconds.
- Press pusher "B" to "0" setting for the 1/20 sec. hand. If the hand is not at "0" or "12" position, then, press pusher "B" repeatedly, until the hand moves by each interval and returns to "0" or "12" position.
- Press pusher "A" for 2 seconds.
-
Press pusher "B" to "0" setting for the stopwatch sec. hand. If the hand is not at "0" or "12" position, then, press pusher "B" repeatedly, until the hand moves by each interval and returns to "0" or "12" position.
-
Press pusher "A" for 2 seconds.
- Press pusher "B" to "0" setting for the stopwatch min. / hour hand. If the hand is not at "0" or "12" position, then, press pusher "B" repeatedly, until the hand moves by each interval and returns to "0" or "12" position.
- Push crown to "A" position after the adjustments of all stopwatch hands.
Note: Please make sure that the stopwatch is stopped and reset before adjusting.
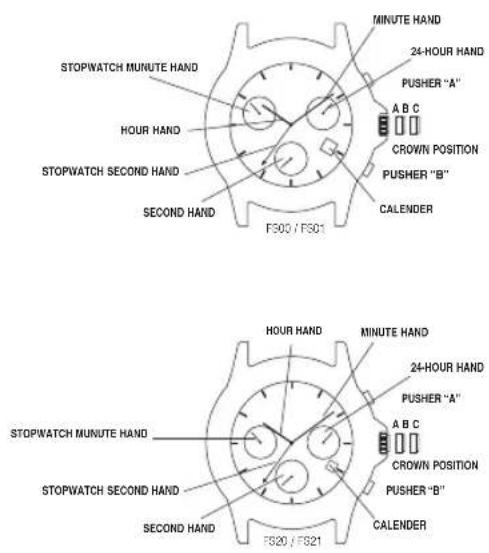
This Chronograph watch has 3 functions:
TIME, CALENDAR, STOPWATCH
TIME
To set the time:
- Pull crown to position "C".
- Turn crown clockwise / counter clockwise to correct time.
- Push crown to position "A".
CALENDAR
To set the calendar:
- Pull crown to position "B".
- Turn crown clockwise to correct calendar.
- Push crown to position "A".
STOPWATCH
The stopwatch is capable of measuring and displaying 1/1 second unit up to maximum 1 hour. The stopwatch minute hand synchronizes with the stopwatch second hand.
- Press pusher "A" to start timing.
- Press pusher "A" again to stop timing.
- Press pusher "B" to reset.
CORRECTING STOPWATCH HANDS
If after resetting the stopwatch hands it is found that they are not at the '12' or '0' position, correct them as follows:
- Pull crown to "C" position.
- Press pusher "A" continuously, the stopwatch hand will advance rapidly until it gets close to the "12" position. Then, press pusher "A" repeatedly, the stopwatch hand will move by intervals until it returns to "12" position.
- Push crown back to "A" position.
- Press pusher "A" to activate the stopwatch hand.
- Press pusher "B" reset the stopwatch minute hand at 10 o'clock until it returns to "0" position.
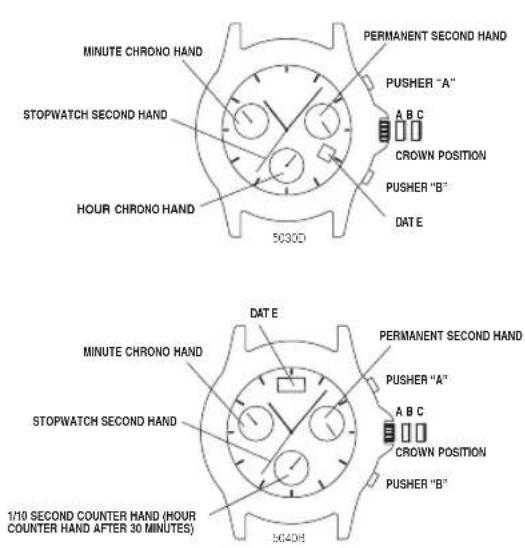
This Chronograph watch has 3 functions:
TIME, CALENDAR, STOPWATCH
TIME
To set the time:
- Pull crown to position "C".
- Turn crown clockwise / counter clockwise to correct time.
- Push crown back to position "A".
Calendar
To set the calendar:
- Pull crown to position "B".
- Turn crown clockwise to correct calendar.
- Push crown back to position "A".
STOPWATCH
This stopwatch is capable of measuring:
Chrono Hours elapsed up to 12 hours. (6 o'clock eye) (For 5030D) Chrono Hours elapsed up to 10 hours. (6 o'clock eye) (For 5040B) Chrono Minutes elapsed up to 30 minutes. (9 o'clock eye) Stopwatch Second up to 1 minute. (Big second hand)
Before using the stopwatch, reset stopwatch chrono hands to the "12" and "0" position.
Standard Stopwatch Measurement
- Press pusher "A" to start timing.
- Press pusher "A" again to stop timing.
- Press pusher "B" to reset.
Accumulated Elapsed Time Measurement
- Press pusher "A" to start timing.
- Press pusher "A" again to stop timing.
- Press pusher "A" to restart timing.
- Press pusher "A" again to stop second timing.
- Press pusher "B" to reset.
Split Time Measurement
Example of using split time measurement for two runners. Two runners can be timed simultaneously; the first runner's time can be recorded while the second runner's time will continue to be accumulated until he finishes.
- Press pusher "A" to start the timing of the first and second runner.
- Press pusher "B" to stop and record the timing of the first runner.
(Once pusher "B" is activated, even though the chrono minute hand and the big stopwatch sec. hand stop on the dial, the stopwatch still continues to run internally.)
- Press pusher "B" to catch up the timing of the second runner. The stopwatch sec. hand will jump to show internal accumulated time and to carry on timing of the second runner.
- Press pusher "A" to stop the timing of the second runner and record the time.
- Press pusher "B" for third time to reset, all stopwatch chrono hands will return to "12" and "0" position.
CORRECTIVE MODE FOR STOPWATCH CHRONO HANDS
- Pull crown to position "C".
- Press pushers "A" and "B" simultaneously for at least 2 seconds.
- The big stopwatch sec hand rotates by 360 degree to activate corrective mode.
TO ADJUST THE BIG SEC. STOPWATCH HAND
If it is not located at "12" or "0" position, either press pusher "A" continuously or repeatedly until the hand moves by each interval and returns to "12" and "0" position.
After finishing the big sec. stopwatch hand adjustment, press crown back to position "A" to terminate the adjustment.
TO ADJUST THE 1/10 SECOND COUNT HAND (FOR 5040B)
After activating the corrective mode, if the 1/10 second counter hand is not located at '12' or '0' position, press pusher "B" once to activate the corrective mode of the 1/10 second counter hand. Press pusher "A" continuously or repeatedly until the hand moves by each interval and returns to "12" and "0" position.
Press crown back to position "A" to terminate the adjustment.
TO ADJUST THE HOUR CHRONO HAND (for 5030D)
After activating the corrective mode, if the hour chrono hand is not located at '12' or '0' position, press pusher "B" once to activate the corrective mode of the hour chrono hand. Press pusher "A" continuously or repeatedly until the hand moves by each interval and returns to "12" and "0" position.
Press crown back to position "A" to terminate the adjustment.
TO ADJUST THE MINUTE CHRONO HAND
After activating the corrective mode, if the minute chrono is not located at '12' or '0' position, press pusher "B" twice to activate the corrective mode of the minute chrono hand.
Press pusher "A" continuously or repeatedly until the hand moves by each interval and returns to "12" and "0" position. Press crown back to position "A" to terminate the adjustment.
Once finished adjusting all stopwatch chrono hands, press crown back to "A" position to terminate adjustment.
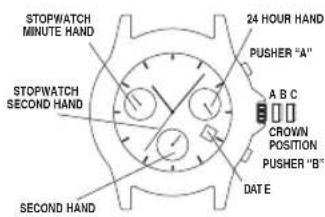
text_image
STOPWATCH MINUTE HAND 24 HOUR HAND PUSHER "A" STOPWATCH SECOND HAND A B C CROWN POSITION PUSHER "B" SECOND HAND DATE E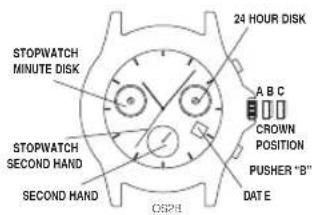
text_image
STOPWATCH MINUTE DISK 24 HOUR DISK A B C CROWN POSITION PUSHER "B" DATE E STOPWATCH SECOND HAND SECOND HAND CSP/B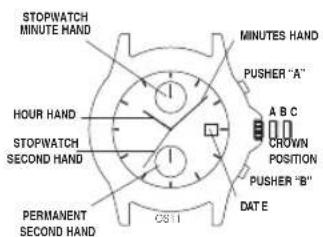
text_image
STOPWATCH MINUTE HAND HOUR HAND STOPWATCH SECOND HAND PERMANENT SECOND HAND CS11 MINUTES HAND PUSHER "A" A B C CROWN POSITION PUSHER "B" DATE E
text_image
MINUTES HAND 24 HOUR HAND HOUR HAND PUSHER "A" A B C CROWN POSITION PUSHER "B" STOPWATCH MINUTE HAND PUSHER "A" STOPWATCH SECOND HAND DATE E 0521This Chronograph watch has three functions:
TIME, CALENDAR, STOPWATCH
TIME
To set the time:
- Pull crown to position "C".
- Turn crown clockwise / counter clockwise to correct time.
- Push crown to position "A".
CALENDAR
To set the calendar:
- Pull crown to position "B".
- Turn crown counter-clockwise to set calendar.
- Push crown to position "A".
STOPWATCH
The stopwatch is capable of measuring and displaying time in 1/1 second united up to a maximum of 59 minutes 59 seconds.
- Press pusher "A" to start timing.
- Press pusher "A" again to stop timing.
- Press pusher "B" to reset.
CORRECTING STOPWATCH HAND
If after resetting the stopwatch second hand it is found that they are not at the '12' or '0' position, correct as follows:
- Pull crown to "C" position.
- Press pusher "A" continuously, the stopwatch second hand will advance rapidly until it gets close to the "12" position. Then, press pusher "A" repeatedly, the stopwatch second hand will move by intervals until it returns to "12" position.
- Push crown to position "A".
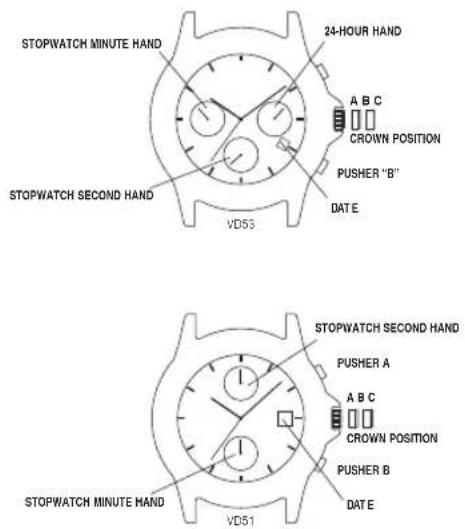
This Chronograph watch has 3 functions:
TIME, CALENDAR, STOPWATCH
TIME
To set the time:
- Pull crown to position "C".
- Turn crown clockwise / counter clockwise to correct time.
- Push crown to position "A".
CALENDAR
To set the calendar:
- Pull crown to position "B".
- Turn crown clockwise to correct calendar.
- Push crown to position "A".
STOPWATCH
The stopwatch is capable of measuring:
1 minute elapsed up to 60 minutes.
Before using the stopwatch, reset the stopwatch hands to the "12" & "0" position.
STANDARD STOPWATCH MEASUREMENT:
- Press pusher "A" to start timing.
- Press pusher "A" to stop timing.
- Press pusher "B" to reset.
split time Measurement
Example of using split time measurement for two runners. Two runners can be timed simultaneously; the first runner's time can be recorded while the second runner's time will continue to be accumulated until he finishes.
- Press pusher "A" to start the timing of the first and second runner.
- Press pusher "B" to stop and record the timing of the first runner. (Once pusher "B" is activated, even though the chrono minute hand and the big stopwatch sec. hand stop on the dial, the stopwatch still continues to run internally.)
- Press pusher "B" to catch up the timing of the second runner. The stopwatch sec. hand will jump to show internal accumulated time and to carry on timing of the second runner.
- Press pusher "A" to stop the timing of the second runner and record the time.
- Press pusher "B" for third time to reset, all stopwatch chrono hands will return to "12" and "0" position.
TO ADJUST STOPWATCH HAND
-
Pull crown to position "C".
-
Press pusher "A" continuously or repeatedly to adjust the stopwatch second hand to "0" or "12" position.
- Press pusher "B" continuously or repeatedly to adjust the stopwatch minute hand to "0" or "12" position.
- Push back the crown to position "A".
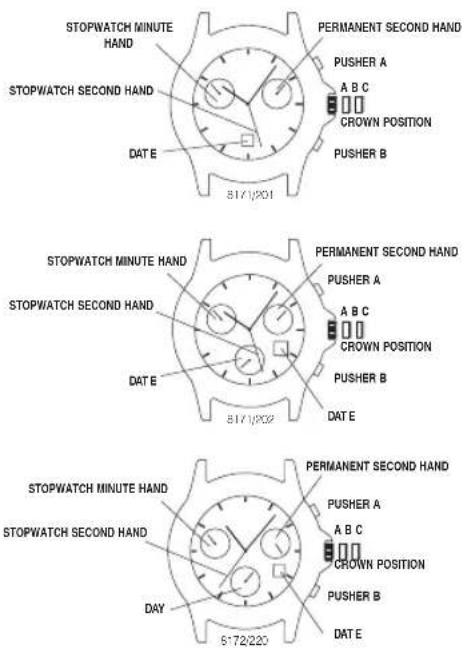
text_image
STOPWATCH MINUTE HAND STOPWATCH SECOND HAND DATE E 517/2001 PERMANENT SECOND HAND PUSHER A A B C CROWN POSITION PUSHER B 517/2002 STOPWATCH MINUTE HAND STOPWATCH SECOND HAND DATE E 517/2002 PERMANENT SECOND HAND PUSHER A A B C CROWN POSITION PUSHER B DATE E STOPWATCH MINUTE HAND STOPWATCH SECOND HAND DAY 5172/220 PERMANENT SECOND HAND PUSHER A A B C CROWN POSITION PUSHER B DATE E40
This Chronograph watch has 3 functions:
TIME, CALENDAR, STOPWATCH
TIME
To set the time:
- Pull crown to position "C".
- Turn crown clockwise / counter clockwise to correct time.
- Push crown to position "A".
CALENDAR
To set the calendar:
- Pull crown to position "B".
- Turn crown clockwise to correct calendar.
- Push crown to position "A".
DAY OF WEEK (For 8172/220)
To set the day:
- Pull crown to "C" position.
- Turn crown clockwise (hour hands rotate 24 hours) to correct day of week.
- Push crown to "A" position.
Note: The day of week changes automatically every 24 hours.
STOPWATCH
The stopwatch is capable of measuring:
- 1 minute elapsed up to 30 minutes.
- Chronograph hand 1/5 second.
Before using the stopwatch, reset the stopwatch hands to the "12" & "0" position.
STANDARD STOPWATCH MEASUREMENT:
- Press pusher "A" to start timing
- Press pusher "A" to stop timing
- Press pusher "B" to reset.
SPLIT TIME MEASUREMENT:
- Press pusher "A" to start timing.
- Press pusher "B" to split.
- Press pusher "B" to begin again.
- Press pusher "A" to stop.
- Press pusher "B" to reset.
TO ADJUST STOPWATCH HAND:
- Pull crown to position "B".
- Press pusher "A" continuously or repeatedly to adjust the stopwatch second hand to "0" or "12" position.
- Press pusher "B" continuously or repeatedly to adjust the stopwatch minute hand to "0" or "12" position.
- Push back the crown to position "A".
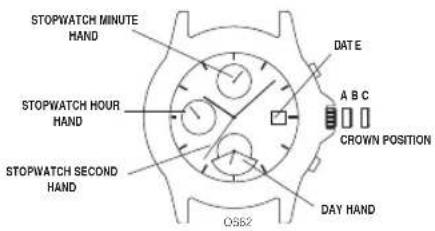
text_image
STOPWATCH MINUTE HAND STOPWATCH HOUR HAND STOPWATCH SECOND HAND DATE A B C CROWN POSITION DAY HAND OS52This Chronograph watch has three functions:
TIME, CALENDAR, STOPWATCH
TIME
To set the time:
- Pull crown to position "C", the small hand at 6 o'clock returns to "60" position.
- Turn crown clockwise to correct time.
- Push crown to position 'A', the small hand at 6 o'clock begins to run.
CALENDAR
To set the date:
- Pull crown to position "B".
- Turn crown counter clockwise to correct date.
- Push crown to position "A".
STOPWATCH
This stopwatch is able to measure and display time in 1/20 (1/1) second united up to max 11 hrs 59 min 59 sec.
The retrograde stopwatch 1/20 (1/1) second hands keeps continuously running for 60 seconds after starting, and then stops at "0" position.
- Press pusher "B" to enter the chrono mode.
- Press pusher "A" to start timing.
- Press pusher "A" again to stop timing.
- Press pusher "B" to reset.
Note: Motion of the retrograde stopwatch is a demo. Actual measurement will be shown when it stopped while "stop" button is pressed.
Correct the stopwatch hands
If after resetting the stopwatch hands it is found that they are not at the '12' or '0' position, correct them as follows:
- Pull crown to position "B".
- Press pusher "A" to set the stopwatch second hand to the "0" position.
- Press pusher "B" to set the stopwatch 1/20 second hand to the "0" position.
- The stopwatch hands can be advanced rapidly by continuously pressing pushers 'A' or "B".
- Once the hands return to "0" position, reset time and push crown to
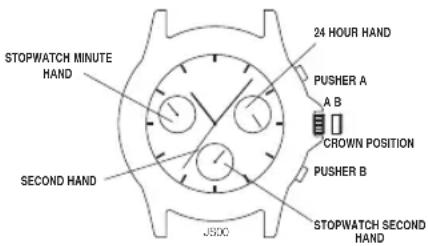
text_image
STOPWATCH MINUTE HAND SECOND HAND J500 24 HOUR HAND PUSHER A A B CROWN POSITION PUSHER B STOPWATCH SECOND HANDThis Chronograph watch has two functions:
TIME, STOPWATCH
TIME
To set the time:
- Pull crown to position "B".
- Turn crown clockwise to correct time.
- Push crown to position "A", the second hand begins to run.
STOPWATCH
This stopwatch is able to measure and display time in 1 second intervals up to max 29 min 59 sec.
It will stop automatically after running continuously for 30 minutes.
- Press pusher "A" to start timing.
- Press pusher "A" again to stop timing.
- Press pusher "B" to reset.
Correcting the stopwatch hands:
If after resetting the stopwatch hands it is found that they are not at the '12' or '0' position, correct them as follows:
- Pull crown to position "B".
- Press pusher "A" to set the stopwatch second hand to the "0" position.
- The stopwatch minute hand is synchronized with the stopwatch second hand and the second hand can be advanced rapidly by continuously pressing pusher "A".
- Once the hands return to "0" position, reset time and push crown to position "A".
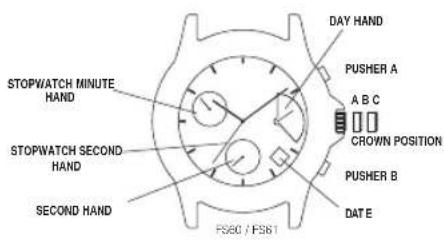
text_image
STOPWATCH MINUTE HAND STOPWATCH SECOND HAND SECOND HAND DAY HAND PUSHER A A B C CROWN POSITION PUSHER B DATE E FS60 / FS61This Chronograph watch has four functions:
TIME, CALENDAR, DAY OF WEEK, STOPWATCH
TIME
To set the time:
- Pull crown to position "C".
- Turn crown clockwise to correct time.
- Push crown to position "A".
CALENDAR
To set the date:
- Pull crown to position "B".
- Turn crown clockwise to correct date.
- Push crown to position "A".
DAY
To set the day:
- Pull crown to position "B".
- Turn crown counter clockwise to correct day.
- Push crown to position "A".
STOPWATCH:
This stopwatch is able to measure and display time in 1 second intervals up to max 59 min 59 sec.
After elapsed for 59 min. 59 sec, the stopwatch second hand resumes timing from 0 second, the stopwatch minute hand continues and accumulates timing of stopwatch until it is stopped by pressing pusher "A".
- Press pusher "A" to start timing.
- Press pusher "A" again to stop timing.
- Press pusher "B" to reset.
Correcting the stopwatch hands
If after resetting the stopwatch second hand it is found that they are not at the '12' or '0' position, correct it as follows:
- Pull crown to position "C".
- Press pusher "A" continuously, the stopwatch second hand will advance rapidly until it gets close to "0" position.
- Press pusher "B" to check that all stopwatch hands have been reset to "0" position.
text_image
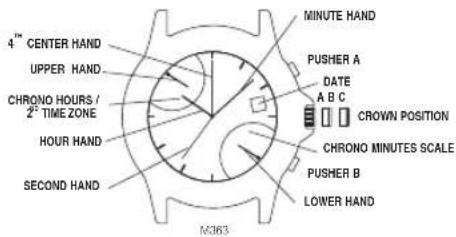
4™ CENTER HAND UPPER HAND CHRONO HOURS / 2° TIME ZONE HOUR HAND SECOND HAND MINUTE HAND PUSHER A DATE A B C CROWN POSITION CHRONO MINUTES SCALE PUSHER B LOWER HAND M3863This Chronograph watch has 3 functions: TIME, CALENDAR, STOPWATCH
TIME
To set the time:
- Pull crown to position "C"
- Turn crown clockwise / counter clockwise to correct the time.
- Push crown back to position "A".
CALENDAR
To set the Calendar:
- Pull crown to position "B"
- Turn crown counter clockwise to correct the calendar.
- Push crown back to position "A".
STOPWATCH
This stopwatch is capable of measuring and displaying 1/5 second up to maximum 4 hours.
- Press pusher "A" to start the timing.
- Press pusher "A" again to stop the timing.
- Press pusher "B" to reset.
Note
- Press and hold pusher "B" anytime to restart the timing; the hand will start running again after pusher "B" is released.
- The upper hand will move to "0" after the timing is reset; the watch will return to display second time zone after eight seconds.
SECOND TIME ZONE
The upper hand shows the time for the second time zone; the scale is 24 hours.
To set the Second Time Zone:
- Pull crown to position "B". The 4th center hand will display the minutes of the second time zone.
- Press pusher "A" to set the hour of second time zone.
- Press pusher "B" to set the minutes.
- Push crown back to position "A".
4 ^th CENTER HAND ADJUSTMENT
- Pull crown to position "C". The upper and lower hand will reset to "0" automatically.
- Press pusher "A" or "B" to adjust the 4th center hand to "12" position.
- Push back the crown to position "A".
ANALOG AND DIGITAL MODELS
text_image
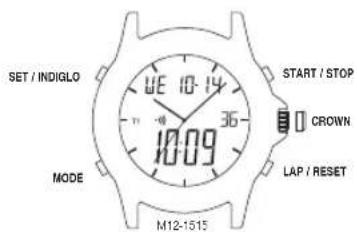
SET / INDIGLO MODE 10:09 36 10:14 10:15 M12-1515 START / STOP CROWN LAP / RESETThis Analog and Digital watch has 6 function:
Analog and digital time display / Auto calendar 2000-2099 / Two time zones / Two daily alarms linked to time zone / Three linked countdown timers / Chronograph with 42-lap memory / Indiglo Night Light.
BASIC OPERATION
- In TIME mode, press and hold START/STOP to shut off digital display. Press once to turn back on.
-
Press SET/INDIGLO to illuminate watch face.
-
Press MODE to cycle through CHRONO, RECALL, TIMER, ALARM and TIME modes. Press and hold MODE in any mode to return to TIME display.
- When setting digits, press START/STOP to go forward or LAP/RESET to go backward or hold to change rapidly.
ANALOG TIME
To set the time:
- Pull out the crown and turn clockwise or counter clockwise to correct the time.
- Push the crown in after complete setting.
DIGITAL TIME AND CALENDAR
To set the time and calendar:
- Press MODE until TIME appears. Press and hold SET/INDIGLO to begin setting time.
- Press START/STOP or LAP/RESET to set SECONDS to 0.
- Press MODE to select HOURS digits.
-
Press START/STOP or LAP/RESET to advance. Go through 12 hours for AM or PM.
-
Press MODE to select MINUTES, YEAR, MONTH, DAY, DAY of WEEK, 12 or 24 time display, MONTH-DAY or DAY-MONTH date display. Press START/STOP or LAP/RESET to advance selected item.
- Press SET/INDIGLO when done.
- Press and hold LAP/RESET and wait for beep to change display to second TIME ZONE. Repeat above to set time.
Note: once date is set, calendar runs automatically.
CHRONOGRAPH
- Press MODE until CHRONO appears. Watch will briefly display available storage (1-42).
- Press START/STOP to start CHRONO.
- Press LAP/RESET to take a lap. Display of running time resumes after 5 seconds.
- Press START/STOP to stop timing. Press again to resume.
- While CHRONO is stopped, press MODE to enter RECALL mode. Press START/STOP repeatedly to recall stored lap and split times.
- Press and hold LAP/RESET to clear stored times. Chrono will automatically clear. OR
- In RECALL mode, press and hold LAP/RESET to reset and stored laps/splits will automatically clear.
| LAP 1 | LAP 2 | LAP 3 | LAP 4 |
| 7:11 MIN | 7:50 MIN | 7:08 MIN | 7:30 MIN |
| 7:11 MIN | |||
| SPLIT 1 | 15:01 MIN | ||
| SPLIT 2 | 22:09 MIN | ||
| SPLIT 3 | 29:39 MIN | ||
| SPLIT 4 |
COUNTDOWN TIMER
- Press MODE until TIMER appears. Press LAP/RESET to select LOOP 1, 2 or 3. Timers will count upwards starting with last LOOP TIMER set, unless last LOOP TIMER set is 3 (timers will then count backwards from LOOP 3).
- Press and hold SET/INDIGLO to set LOOP TIMER. Press START/STOP or LAP/RESET to set seconds.
- Press MODE to select MINUTES, press START/STOP or LAP/RESET to set minutes.
- Press MODE and then START/STOP or LAP/RESET to select next LOOP.
- Repeat above steps to set each additional LOOP.
-
Press SET/INDIGLO when done.
-
Press START/STOP to start or stop LOOP TIMER.
- With TIMER stopped, press and hold SET/INDIGLO to reset all LOOPS to zero.
At end of timed LOOP, next LOOP TIMER starts. Cycle is continuous for up to 30 loops.
ALARM
- Press MODE until ALARM appears.
- Press LAP/RESET to select ALARM 1 or 2.
- Press and hold SET/INDIGLO to set.
- Press START/STOP or LAP/RESET to set HOURS. Go through 12 hours for AM or PM.
- Press MODE to select MINUTES, press START/STOP or LAP/RESET to set.
- Press MODE to select TIME ZONE for alarm, press START/STOP or LAP/RESET to set.
- Repeat to select MONTH and DAY. Leave blank for daily alarm.
- Press SET/INDIGLO when done.
- Repeat for second ALARM.
- Press START/STOP to turn ALARM on or off.
Alarm symbol (•) will appear in TIME display when ALARM is armed for that TIME ZONE.
Beep will sound when ALARM time is reached. Press any button to silence alarm.
INDIGLO @ NIGHT LIGHT
Press SET/INDIGLO to illuminate watch face. Patented (U.S. pat. 4,527,096 and 4,775,964) electroluminescent technology used in the INDIGLO® night-light illuminates entire watch face at night and in low light conditions.
text_image
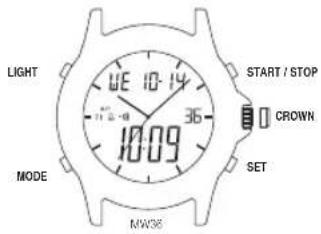
LIGHT MODE 10:14 36 10:09 START / STOP CROWN SET MW36This Digital watch has 7 functions
Analog and Digital Time display / Dual Time / Calendar / Chronograph / Timer / Alarm / Electroluminescent backlight
MODE SELECTION
Press "Mode" button to cycle through "TIME", "ALARM", "CHRONOGRAPH" and "TIMER" mode.
ANALOG TIME
To set the time:
- Pull out the crown and turn clockwise or counter clockwise to correct the time.
- Push the crown in after setting is complete.
DIGITAL TIME AND CALENDAR
To set the time and calendar:
- Press "Mode" button until time mode appears.
- Press and hold "Set" button to begin setting time.
- Press "Mode" button to select the setting item in the order, Second → Minute → Hour → Time Format → Month → Date → Day of Week
- Press "Start/Stop" button to set the time.
- Press and hold the "Start/Stop" button to set time more rapidly.
- Press "Set" button to exit the time setting.
DUAL TIME
- Press "Start/Stop" button to display the dual time under time mode.
- Press and hold "Set" button to begin setting time.
- Press "Mode" button to select the hour or minute for setting.
- Press "Start/Stop" button to set the hour or minute.
- Press "Set" button after timing is completed.
- Press "Start/Stop" button to return display to normal time.
ALARM MODE
In alarm mode, press "Start/Stop" button to enable or disable the Alarm (●) and Chime (☐) function.
Chime Function
The Beep will sound every hour after activate the chime function.
To set the Alarm:
- Press "Mode" button until alarm mode appears.
- Press and hold "Set" button to begin setting alarm.
- Press "Mode" button to select the alarm hour or minute for setting.
- Press "Start/Stop" button to set the alarm hour or minute.
- Press "Set" button to exit the alarm setting.
CHRONOGRAPH MODE
The chronograph counts up to 23 hours, 59 minutes, 59.99 seconds with 1/100 second and split time function.
- Press "Mode" button until chronograph mode appears.
- Press "Start/Stop" button to start the chronograph.
- Press "Start/Stop" button to stop the chronograph.
- Press "Set" button again to reset the chronograph.
Split time Measurement
Example of using split time measurement for two runners. Two runners can be timed simultaneously; the first runner's time can be recorded while the second runner's time will continue to be accumulated until he finishes.
- Press "Start/Stop" button to start the timing of the first and second runner
- Press "Set" button to stop and record the timing of the first runner.
("SPL" will blink on the display if the split time function is active. Even though the stop watch is not on display, the timing will continue to run internally.)
- Press "Set" button again to see the timing of the second runner. The stopwatch will switch to display the internal accumulated time and continue timing of the second runner.
- Press "Start/Stop" button to stop the timing of the second runner and record the time.
- Press "Set" button to reset timing.
TIMER FUNCTION
- Press "Start/Stop" button to start the timer.
- Press "start/Stop" button to stop the timer.
- Press "Set" Button to reset the timer.
To set the Timer:
- Press "Mode" button until timer mode appears.
- Press and hold "Set" button to begin setting timer.
- Press "Mode" button to select between hour or minute.
- Press "Start/Stop" button to set the timer hour or minute.
- Press "Set" button to exit the timer setting.
ELECTROLUMINESCENT BACKLIGHT
Press "Light" Button to activate the light function under each mode anytime.
DIGITAL MODELS
text_image
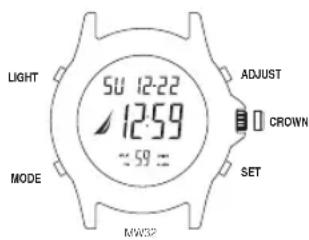
LIGHT MODE 50 12:22 12:59 ~59 = ADJUST CROWN SET MW32This Digital watch has 6 functions
Time / Calendar / Day of week / Chronograph / Alarm / Electroluminescent backlight
MODE SELECTION
Press "Mode" button to cycle through "TIME", "CHRONOGRAPH", "ALARM" and "TIME SET" mode.
TIME MODE
In time mode, the watch displays the current time information on hour, minute, second, date, month and day of week. It also displays the "ON/OFF" status of Alarm or Chime.
CHRONOGRAPH MODE
The stop watch counts up to 19 hours 59 minutes 59.99 seconds with 1/100 second and split time function.
- Press "Mode" button until chronograph mode appears.
- Press "Adjust" button to start the chronograph.
- Press "Adjust" button to stop the chronograph.
- Press "Set" button again to reset the chronograph.
Split time Measurement
Example of using split time measurement for two runners. Two runners can be timed simultaneously; the first runner's time can be recorded while the second runner's time will continue to be accumulated until he finishes.
-
Press "Adjust" button to start the timing of the first and second runner
-
Press "Set" button to stop and record the timing of the first runner. ("Split" will blink on the display if the split time function is active. Even though the stop watch is not on display, the timing will continue to run internally.)
- Press "Set" button again to catch up the timing of the second runner. The stopwatch will jump to show the internal accumulated time and to carry on timing of the second runner.
- Press "Adjust" button to stop the timing of the second runner and record the time.
- Press "Set" button to reset timing.
ALARM MODE
In alarm mode, press "Adjust" button to enable or disable the Alarm and Chime function.
Alarm Function
- Press "Mode" button until Alarm mode appears.
- Press "Set" button to select the alarm hour setting, the alarm will be set to ON.
- Press "Adjust" button to set the alarm hour.
- Press "Set" button to select the alarm minute setting and press "Adjust" button to set the alarm minute.
- Press "Set" button again to exit the alarm setting.
Chime Function
The Beep will sound every hour after activating the chime function.
TIME SET MODE
- Press "Mode" button until Time Set mode appears.
- Press "Set" button to select the setting item in the order, Second → Hour → Minute → Month → Date → Day of Week
- Press "Adjust" button to set the time.
- Press and hold the "Start/Stop" button to set time more rapidly.
- When setting the hour, the "H" indicate 24 hours mode, "A" or "P" indicate 12 hours mode.
- Press "Mode" button to exit the time setting mode.
ELECTROLUMINESCENT BACKLIGHT
Press "Light" button to activate the light function under each mode anytime.
SPECIAL FUNCTION MODELS
text_image
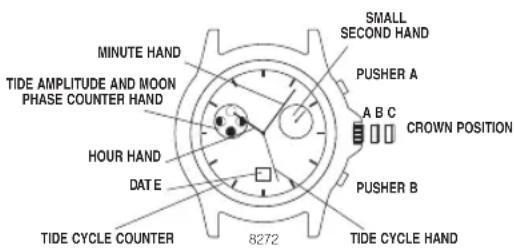
MINUTE HAND TIDE AMPLITUDE AND MOON PHASE COUNTER HAND HOUR HAND DATE TIDE CYCLE COUNTER 8272 SMALL SECOND HAND PUSHER A A B C CROWN POSITION PUSHER B TIDE CYCLE HANDThis Chronograph watch has 3 functions:
TIME, CALENDAR, TIDE
TIME
To set the time:
- Pull crown to position "C".
- Turn crown clockwise / counter clockwise to correct time.
- Push crown to position "A".
CALENDAR
To set the calendar:
- Pull crown to position "B".
- Turn crown clockwise to correct calendar.
- Push crown to position "A".
TIDE FUNCTION
To set the Tide Function - Central Hand
The tide cycle takes place over one revolution of the dial in 12 hours 25 minutes and 14 seconds. High tide corresponds to the "12 o'clock" position and low tide corresponds to the opposite position, hence "6 o'clock".
- Press and hold pusher "B" to 3 seconds after the beep indicated for enter in setting mode.
- Press pusher "B" again to set the state of the local tide.
- Continue pressing pusher "B" to enable rapid setting to be performed.
Note: After 3 second without pressing pusher "B", a beep indicated exit from setting mode.
To set the Tide Amplitude (Moon Phase) – Counter at 10 o'clock small eye
The tide amplitude counter performs one revolution in 29 days 12 hours and 44 minutes.
- Press and hold pusher "A" to 3 seconds after the beep indicated for enter in setting mode.
- Press pusher "A" again to set the tide amplitude corresponding to the moon phase.
- Continue pressing pusher "A" to enable rapid setting to be performed.
Note:
- After 3 seconds without pressing pusher "A", a beep indicates exit from setting mode.
- The moon phase hand will start with its setting time, jumps step forward every 24 hours.
text_image
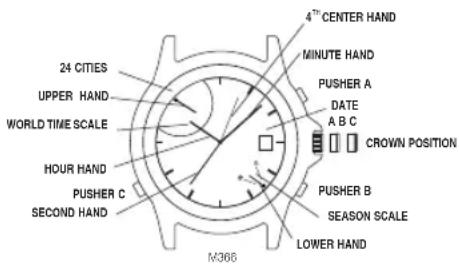
24 CITIES UPPER HAND WORLD TIME SCALE HOUR HAND PUSHER C SECOND HAND M366 4TH CENTER HAND MINUTE HAND PUSHER A DATE A B C CROWN POSITION PUSHER B SEASON SCALE LOWER HANDThis watch has 4 functions:
TIME, CALENDAR, WORLD TIMES, SEASON
TIME
To set the time:
- Pull crown to position "C"
- Turn crown clockwise / counter clockwise to correct the time.
- Push crown back to position "A".
CALENDAR
To set the CALENDAR:
- Pull crown to position "B"
- Turn crown counter clockwise to correct the calendar.
- Push crown back to position "A".
WORLD TIME
To Set the World Time:
- Pull crown to position "B". The 4th center hand shows the world time zone city and the upper hand shows the world time.
- Press pusher "A" or "B" to move the 4th center hand to the city that represents your home time zone.
-
Pull the crown to position "C". The 4th center hand will revert back to the 12:00 position. After five seconds, the upper hand moves and shows the world time (the time of the city selected in previous step), the center hand shows the minutes of the world time, and the lower hand shows the season.
IMPORTANT: After pulling out the crown to position "C", don't press any of the pushers and turn the crown until all hands stop moving. (Approximately 10 seconds) -
Press pusher "A" or "B" to move the 4th center hand backward or forward to adjust the world time, respectively, to set the world time zone to be the same as the home time zone. Press and hold a pusher to change the time quickly. The hands move together as the center hand makes one revolution, the upper hand moves one hour.
- Press pusher "C" to adjust the season if the displayed season is not correct for the home time zone. If the home time zone observes daylight savings time, the upper hand will move by one hour.
- Push crown to position "A" after setting is complete.
City Time Display Selection:
Press pusher "A" or "B" to move the 4th center hand backward or forward to select city. The upper hand will show the time in the selected city.
Note: The world time scale is 24 hours.
4 ^th CENTER HAND ADJUSTMENT
- Pull crown to position "C". The upper and lower hand will reset to the end of their sweeps automatically.
-
Press pusher "A" or "B" to adjust the 4th center hand to "12" position.
-
Push back the crown to position "A".
Note: If no pusher is pressed within five seconds of the hands stopping, the watch will proceed to the world time setting operation (see WORLD TIME setting).
SEASON SETTING
The season setting allows the watch to compensate for daylight savings time (also called "summer time").
The watch provides one setting to represent daylight savings time and standard time. For the watch, the period of daylight savings time is SUMMER and the period of standard time is WINTER. When the season in one city is set to SUMMER, all cities in the same hemisphere are automatically set to SUMMER, while all cities in the other hemisphere are automatically set to WINTER. The watch knows which cities are in each hemisphere.
Press pusher "C" to adjust the season in the selected city.
HIGH PERFORMANCE MODELS
text_image
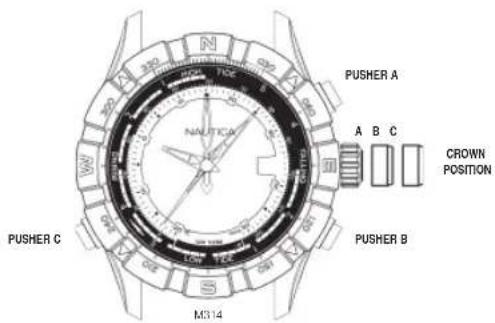
N TCE PUSHER A A B C CROWN POSITION N/A M314 PUSHER C PUSHER BThis watch has 6 functions:
TIME, CALENDAR, TIDE, TEMPERATURE, COMPASS and NIGHT LIGHT
Press the crown to activate the light.
TIME
To set the time:
- Pull crown to position "C"
- Turn crown clockwise / counter clockwise to correct time
- Push crown to position "A"
CALENDAR
To set the calendar:
- Pull crown to position "B"
- Turn crown clockwise / counter clockwise to correct calendar
- Push crown to position "A"
Note: Don't change the date between 10pm and 2am as it could damage the watch movement.
INDICATOR HAND ADJUSTMENT
- Pull crown to position "C"
- Press either TIDE or TEMP push button to move indicator hand until it points to 12 o'clock.
- Push crown to position "A" when done.
Note: Don't change the date between 10pm and 2am as it could damage the movement.
TIDE / TEMPERATURE SELECTION
Tide Function:
- Press B (TIDE) push button to select the tide clock.
(The indicator hand moves to low tide and then to current tide)
Temperature Function:
- Press A (TEMP) push button to select the thermometer.
(The indicator hand moves to beginning of thermometer scale and then to current temperature)
Note: the indicator hand will not move if the hand has already indicated the function you selected.

TIDE CLOCK
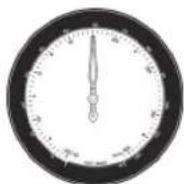
Indicator hand always rotates clockwise, so tide is rising when hand is pointing left and falling when pointing right. The tide cycle takes place over one revolution of the dial in 12 hours 25 minutes and 14 seconds. High tide corresponds to the "12 o'clock" position and low tide corresponds to the opposite position, hence "6 o'clock".
Tides are influenced by moon and sun and shape of shoreline, so tide clock cannot precisely give times of high and low tides. Periodic adjustment may be necessary.
To set the Tide Function – Indicator Hand
- Pull crown to position "B".
- Press B (TIDE) push button to set the state of the local tide.
- Push crown to position "A".
THERMOMETER
When worn on wrist, thermometer reading is affected by body heat. For more accurate readings, remove watch and put in shade for at least several minutes. Watch can measure water temperature also, if submerged. Be sure to select temperature display before placing watch in water, as buttons should not be pressed when watch is underwater. Thermometer readings are taken every minute, and more frequently, if temperature is changing.
COMPASS CALIBRATION
The compass must be calibrated before use. Since a compass uses the earth's magnetic field, you must be aware of large metallic objects, such as vehicles or bridges, or objects that give off electromagnetic radiation, such as televisions or computers, which could affect the
magnetic field around the watch. Do not store the watch near any source of magnetism, such as a computer, appliance, or television, as the watch can take on a magnetic charge, yielding inaccurate headings. Typical accuracy of wrist-worn instruments is within +/- 10 degrees.
To calibrate the compass:
- Pull the crown to position "B" and wait for the indicator hands to stop moving.
- Keep the watch in horizontal position and dial facing upward.
-
Press C (COMPASS) to begin. The indicator hand rotates two revolutions to remind you to rotate the watch. While level, SLOWLY rotate the watch two revolutions, taking at least 15 seconds per revolution.
-
When done, press C (Compass), keeping the watch level. The indicator hand moves back and forth to acknowledge
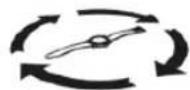
the end of calibration and then moves to the current magnetic declination setting.
- If you do not wish to set the magnetic declination, push the crown in. Otherwise, to have watch automatically compensate for the
declination angle, turn the compass ring until north is at 12 o'clock. 6. Press A or B pusher to move the indicator hand west (-) or east (+), respectively, to point to your location's declination angle using the declination scale. Hold a button to move the hand quickly.
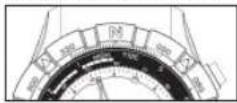
MAGNETIC DECLINATION SET TO -14° (14°W)
- Push the crown to position "A" when done.
COMPASS OPERATION
Normally, the compass is inactive. While holding the watch level, press C (COMPASS) to activate the compass. The indicator hand moves to point north. If the watch is turned, the indicator hand will continue to move, always pointing north. After 20 seconds, the compass will automatically turn off and the indicator hand will return to the previous function indicator. This conserves battery life. Press C (COMPASS) at any time to keep the compass on for another 20 seconds.
Note: During compass operation, the second hand moves in two-second increments.
text_image
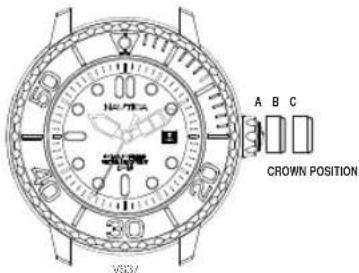
A B C CROWN POSITION V537This watch has 3 functions:
TIME, CALENDAR and SOLAR POWER
TIME
To set the time:
- Pull crown to position "C".
- Turn crown clockwise / counter clockwise to correct time.
- Push crown to position "A"
CALENDAR
To set the calendar:
- Pull crown to position "B".
- Turn crown clockwise to correct date.
- Push crown to position "A".
NOTE: The date changes automatically every 24 hours.
SOLAR POWER
The guideline for charging time
| Illumination (Lx) | Source of light | Environment | A (Approx. Hours) | B (Approx. Hours) | C (Approx. Minutes) |
| 700 | A fluorescent lamp20cm 43 B 12 | Inside the office | 197 37 54 | ||
| 3,000 30W |
* For reference: 1,000Lx is 70cm under from 30W fluorescent lamp
Condition A: Time required for full charge
Condition B: Time required for steady operation
Condition C: Time to charge 1 day of power
Working time Approx. 6 months (After fully charged)
Charging time Approx. 6 hours (Under 100 KLX sunlight)
Approx. 43 hours (Under 3000LX fluorescent lamp)
Quick-start function
The watch will start operating immediately with second hand moving at 2-second intervals when the watch is exposed to sunlight or strong artificial light (of more than 1,000 Lx).
Power depletion warning function
The two-second interval movement of the second hand is a signal of energy depletion. The watch continuous working time after two-second interval movement is approximately 3 days. When the second hand starts moving at two-second intervals, please charge the watch by exposing it to light.
DEPTH SCALE
A B C
CROWN
POSITION
4TH CENTER HAND
PUSHER
LOWER HAND
M367
OFF INDICATOR
This watch has 4 functions:
Time, Calendar, Temperature and Depth Sensor
TIME
To set the time:
- Pull crown to position "C"
- Turn crown clockwise / counter clockwise to correct time
- Push crown to position "A"
CALENDAR
To set the calendar:
- Pull crown to position "B"
- Turn crown counter clockwise to correct calendar
- Push crown to position "A"
Note: Don't change the date between 10pm and 2am as it could damage the movement.
*** Please pull up the crown cover before unscrewing the crown for setting ***
TEMPERATURE
The temperature sensor is always on and will take reading at least once every 60 seconds.
DEPTH SENSOR
Turn on the Sensor:
The depth sensor is normally off.
- Press the pusher to turn on the sensor.
- The 4th center hand will move from the OFF (6 o'clock) position to the 12 o'clock position and begin to take readings at least once every 5 seconds.
Note: If the readings remain in the range of 0 to 2 meters (0-6 feet) for 5 minutes, the sensor will turn off automatically.
Turn off the Sensor:
After turning on the sensor, you can turn it off manually.
-
Press and hold pusher for 2 seconds.
-
The 4th center hand will move back to the OFF (6 o'clock) position.
Recall Maximum Depth/Minimum Temperature
- Pull crown to position "B".
- The center and lower hands will move to display the maximum recorded depth value and the minimum recorded temperature value respectively.
- The center and lower hands will move to display 0 meters/feet and 0°C/32 °F respectively if the watch has not yet been used.
- The crown must be screwed back in prior to use to prevent any water resistance issue.
Battery Level Detection
The watch determines the battery level status and provides the user with a visual indication corresponding to the current battery level. The battery level status is classified as Normal Level, Battery Low
Level, and Replace Battery Level, with each level indicated by the movement of the second hand.
In Normal Level, the second hand will move one hand position every one second.
In Battery Low Level, the second hand will only move at 2-second intervals and shall move by two hand positions. It is recommended that the user replace the battery.
In Replace Battery Level, the second hand will only move at 5-second intervals and will move by five hand positions. At this point, dive mode cannot be activated, and the user must replace the battery immediately.