
KX-WP1050 - Phone PANASONIC - Free user manual and instructions
Find the device manual for free KX-WP1050 PANASONIC in PDF.


User questions about KX-WP1050 PANASONIC
0 question about this device. Answer the ones you know or ask your own.
Ask a new question about this device
Download the instructions for your Phone in PDF format for free! Find your manual KX-WP1050 - PANASONIC and take your electronic device back in hand. On this page are published all the documents necessary for the use of your device. KX-WP1050 by PANASONIC.
USER MANUAL KX-WP1050 PANASONIC
Operating Instructions
Wi-Fi Phone for Skype™
Executive Travel Set
Model No. KX-WP1050
natural_image
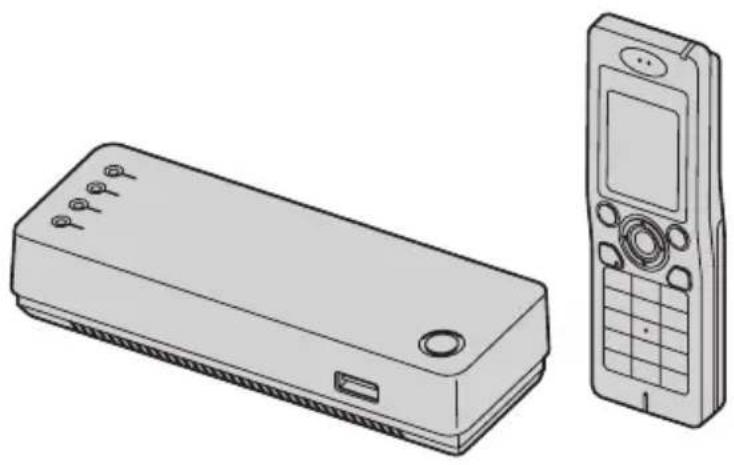
Line drawing of a remote control device and its mobile phone (no text or symbols)Charge the handset battery for 6 hours before initial use.
Please read these Operating Instructions before using the unit and save for future reference.
This product is designed for use in the following countries:
USA, Canada, Japan, UK, Germany, France (indoor use)
For assistance, please visit http://www.panasonic.com/help
Introduction
Feature highlights....5
Important safety instructions 8
Security cautions 11
Countries permitted to use this product 12
Open Source Software....12
For best performance....13
Accessory information 15
Controls 18
Base unit status indicators 23
Symbols and screen shots used in these operating instructions . . . . . . . . . . . . . . . 25
System requirements 27
Getting Started
Setup flow....28
Installing the base unit 29
While you are in a hotel room. 30
While you are at home 32
Setting up the base unit for the first time (Initialization Setup)....36
Troubleshooting for installation 54
Setting up the handset 57
Text entry 60
Turning on the handset (Signing in to Skype) 63
Handset displays 66
Main menu 69
Idle mode option screen....71
Setting the time and date 72
Managing Contacts
Contact list 73
Adding contacts 76
Searching for Skype contacts. 78
Removing contacts....79
Contact list options....80
Viewing a contact profile 81
Blocking contacts 82
Making/Answering Calls
Making calls 83
Answering calls 86
Useful features during a call....88
Diverting calls....90
Skype Voicemail....93
Managing History
History 95
Notifications
Notification screen 99
Personal Skype Online Status and Settings
Personal Skype online status and profile 103
Personal Skype settings....105
Handset Wireless Network Connection and Settings
Wireless network connection 107
Wireless network settings....112
Handset Settings
General settings....118
Tones 124
Phone settings 125
Handset Information....126
Advanced settings 127
Recovering the handset 129
Services
Service information....131
Handset Locator and Registration
Locating the handset 132
Registering the handset 133
Base Unit Settings
Setting the base unit from Top Menu 134
Network Connection....136
Updating the firmware (Base Unit) 141
Advanced Setup....143
Handset Information....195
Temporary LAN Side Network Setting when networks on the WAN side and the LAN side overlap 196
Downloading the version-up firmware to your computer for recovering the base unit . 199
Mode selector....200
Table of Contents
Reset button....201
Setting your computer 203
Useful Information
Additional accessories 210
Error messages 211
Troubleshooting 215
FCC and other information....223
Industry Canada (IC) and other information 225
Specifications....230
Index
Index....234
Feature highlights
Thank you for purchasing a Panasonic Wi-Fi Phone for Skype™ Executive Travel Set.
Wi-Fi Phone for Use with Skype ^*1
- Free yourself from a computer while enjoying Skype
- Don't miss incoming calls because you're away from the computer
- Maintain your Skype presence from the home, office, or even on the road
- Enjoy free and low-cost calling ^2
– Free Skype-to-Skype calls
- Use SkypeOut ^TM3 to call any phone, anywhere for just a few cents per minute to more than 20 countries worldwide (As of August 2006)
- Use Skypeln ^TM3 to receive calls from any phone, anywhere, to a local number you can choose
- Use Skype Voicemail ^3 and participate in Skype conference calls ^4
●Hands free speakerphone
Wireless Travel Router (Base Unit)
- For easy setup at home or in the office
- Can establish a simultaneous Wi-Fi connection for a laptop and Wi-Fi phone
*1 Skype-to-Skype Calls capable. SkypeOut, SkypeIn and Skype Voicemail compatible.
*2 Broadband required and not included.
*3 Requires subscription to SkypeOut, SkypeIn and/or Skype Voicemail for a fee.
*4 Can join but not initiate a conference call.
- Makes and receives calls within a range determined by the maximum power allowed by FCC rules. Range depends on local reception conditions.
Note:
- Wireless travel router is called "base unit" in these operating instructions.
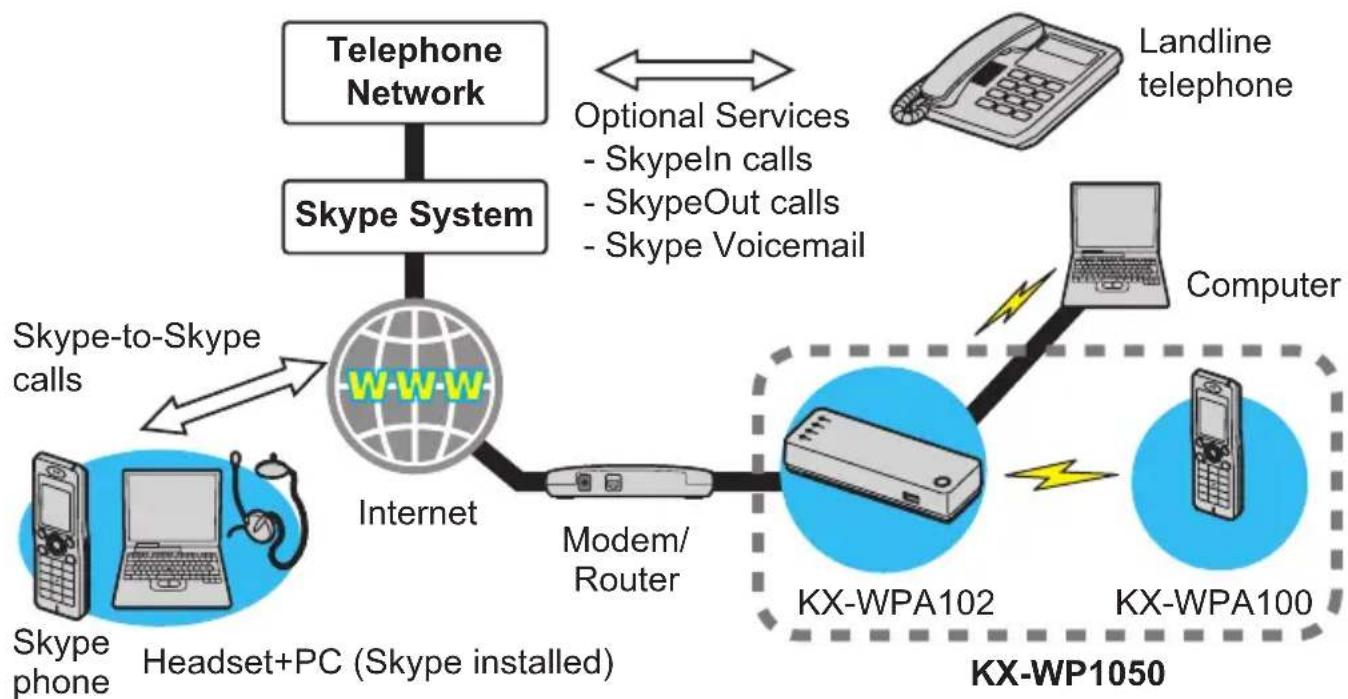
How do the units work?
flowchart
graph TD
    A["Telephone Network"] --> B["Skype System"]
    B --> C["Internet"]
    C --> D["Modem/Router"]
    D --> E["KX-WPA102"]
    E --> F["KX-WPA100"]
    F --> G["Computer"]
    G --> H["Landline telephone"]
    I["Skype phone"] --> J["Headset+PC (Skype installed)"]
    K["Optional Services"] --> L["- SkypeIn calls"]
    K --> M["- SkypeOut calls"]
    K --> N["- Skype Voicemail"]
The KX-WP1050 Wi-Fi Phone for Skype Executive Travel Set consists of the KX-WPA100 wireless handset and the KX-WPA102 wireless travel router (base unit) (router/wireless access point functioning). It enables you to make and answer Skype-to-Skype calls with its handset anywhere an Internet connection is available. In order to make Skype-to-Skype calls, the handset needs wireless connection to the base unit which provides an access to the Internet. You also need to sign in to Skype with your Skype account to make Skype-to-Skype calls. You can create your Skype account with the handset or on your computer.
Note:
- Depending on the network you use, you may not be able to connect to Skype due to intentional restriction.
What is Skype?
Skype is a little piece of software that lets you call people you know, all over the world, for free.
With this product you have the added convenience of using Skype without being tied to your computer.
SkypeOut, SkypeIn and Skype Voicemail are optional services available from Skype.
| SkypeOut SkypeOut allows you to make calls to landline and mobile phones. | |
| Skypeln | Skypeln is a subscribed feature that provides you with a phone number for receiving Skype calls on your handset from landlines and mobile phones. |
| Skype Voicemail Skype | Voicemail allows you to send/receive voicemail messages and record a greeting. |
- For information about Skype, please visit the Skype homepage: http://www.skype.com/
No emergency calls: Skype is not a replacement for your ordinary telephone and cannot be used for emergency calling.
- Specifications are subject to change without notice.
Trademarks
- Microsoft, Windows and Internet Explorer are either registered trademarks or trademarks of Microsoft Corporation in the United States and/or other countries.
- UPnP is a trademark of the UPnP Implementers Corporation.
- Skype, SkypeIn, SkypeOut and the S logo are trademarks of Skype Limited.
● Wi-Fi is a trademark of the Wi-Fi Alliance.
- Mozilla and Firefox are registered trademarks of the Mozilla Foundation.
- All other trademarks identified herein are the property of their respective owners.
Important safety instructions
When using the product, basic safety precautions should always be followed to reduce the risk of fire, electric shock, or personal injury.
- Read all instructions carefully.
- Follow all warnings and instructions marked on the product.
- Unplug the product from power outlets before cleaning. Do not use liquid or aerosol cleaners. Use a moist cloth for cleaning.
- Do not use the product near water, for example near a bathtub, wash bowl, kitchen sink, etc.
- Place the product securely on a stable surface. Serious damage and/or injury may result if the product falls.
- Do not cover slots and openings on the product. They are provided for ventilation and protection against overheating. Never place the product near radiators, or in a place where proper ventilation is not provided.
- Use only the power source marked on the product. If you are not sure of the type of power supplied to your home, consult your dealer or local power company.
- Do not place objects on the power cord. Install the product where no one can step or trip on the cord.
- Do not overload power outlets and extension cords. This can result in the risk of fire or electric shock.
- Never push any objects through slots in the product. This may result in the risk of fire or electric shock. Never spill any liquid on the product.
- To reduce the risk of electric shock, do not disassemble the product. Take the product to an authorized service center when service is required. Opening or removing covers may expose you to dangerous voltages or other risks. Incorrect reassembly can cause electric shock when the product is subsequently used.
- Unplug the product from power outlets and take to an authorized service center when the following conditions occur:
A. When the power cord is damaged or frayed.
B. If liquid has been spilled into the product.
C. If the product has been exposed to rain or water.
D. If the product does not work normally by following the operating instructions. Adjust only controls covered by the operating instructions. Improper adjustment may require extensive work by an authorized service center.
E. If the product has been dropped or physically damaged.
F. If the product exhibits a distinct change in performance. - Do not touch the units, AC adaptor cord, AC cord, or charge cable during lightning storms.
-
Do not use the product to report a gas leak, when in the vicinity of the leak.
-
Do not use the units on airplanes, in hospitals, or in other locations where wireless LAN signals may affect the operation of devices in the vicinity.
- Abide by instructions regarding use in airplanes and hospitals.
SAVE THESE INSTRUCTIONS
WARNING:
- To prevent the risk of fire or electrical shock, do not expose the product to rain or any type of moisture.
- Unplug the product from power outlets if it emits smoke, an abnormal smell, or makes an unusual noise. These conditions can cause fire or electric shock. Confirm that smoke has stopped emitting and contact the Panasonic Call Center at 1-800-211-PANA (1-800-211-7262).
CAUTION:
Installation
- Do not touch the plug with wet hands.
- The AC adaptor is used as the main disconnect device. Ensure that the AC outlet is installed near the product and is easily accessible.
- It is necessary to use the proper AC cord. See page 17.
Battery
To reduce the risk of fire or injury to persons, read and follow these instructions.
- Use only the battery(ies) specified.
- Do not dispose of the battery(ies) in a fire. They may explode. Check with local waste management codes for special disposal instructions.
- Do not open or mutilate the battery(ies). Released electrolyte is corrosive and may cause burns or injury to the eyes or skin. The electrolyte may be toxic if swallowed.
- Exercise care when handling the battery(ies). Do not allow conductive materials such as rings, bracelets or keys to touch the battery(ies), otherwise a short circuit may cause the battery(ies) and/or the conductive material to overheat and cause burns.
- Charge the battery(ies) provided, or identified for use with the product only, in accordance with the instructions and limitations specified in this manual.
Medical:
- Consult the manufacturer of any personal medical devices, such as pacemakers or hearing aids, to determine if they are adequately shielded from external RF (radio frequency) energy. (The product operates in the frequency range of 2.412 GHz to 2.462 GHz, and the power output is 30 mW.) Do not use the product in health care facilities if any regulations posted in the area instruct you not to do so. Hospitals or health care facilities may be using equipment that could be sensitive to external RF energy.
If you have any problems:
Please visit:
http://www.panasonic.com/help
No responsibility will be taken by our company with respect to consequences resulting from the inappropriate use, damage or both of the unit.
Security cautions
When using this product, take appropriate measures to avoid the following security breaches.
●Leaks of private information via this product
- Illegal use of this product by a third party
- Interference or suspension of the use of this product by a third party
Take the following measures to avoid security breaches:
- To prevent illegal access, keep the update firmware (If you do not have the latest version of firmware, this can lead to blocked access or information leaks).
- When downloading data from the Internet, ensure that viruses or illegal programs are not inadvertently downloaded.
- You are responsible for the security settings, such as user name and password, to access this product. This information should not be made available to any third parties outside the user group. This information is transferred using plain text between the base unit and your computer.
- Place this product where it is unlikely to be stolen.
- You are responsible for this product's user information, such as contact list, Internet settings etc. This information should not be made available to any third parties outside the user group.
- You are responsible for keeping the user name and password used for PPPoE connection.
- You are responsible for using No Encryption mode for wireless security setting, since there is a risk of sending/receiving data being intercepted by a third party.
- When sending this product to be repaired with a company not related to Panasonic, make a back-up file of the base unit settings, if necessary, and reset this product to factory default.
- When transferring this product to another party, make a back-up file of the base unit settings, if necessary, and reset this product to factory default.
- When disposing of this product, reset this product to factory default, or erase information by means of electrical deletion or physical dismantlement.
User Name and Password Protection
The use of a unique User Name and secret Password for accessing to the base unit is an important tool that will help limit unauthorized individuals from accessing the base unit. Also a secret password for your Skype account prevents a third party from using your Skype account. To change your password and user name, see page 182. To change the password for Skype account, see page 105.
Countries permitted to use this product
IMPORTANT:
- This product is designed for use in the United States of America, Canada, Japan, the United Kingdom, Germany and France with certain restrictions. Sales or use of this product in other countries may violate local laws.
- Ce produit a été conçu pour une utilisation aux États-Unis d'Amérique, au Canada, au Japon, au Royaume-Uni, en Allemagne et en France avec certaines restrictions. La vente ou l'utilisation de ce produit dans d'autres pays peuvent enfreindre des lois locales.
- Este producto está diseñado para usarse en los Estados Unidos de América, Canadá, Japón, el Reino Unido, Alemania y Francia, con ciertas restricciones. Es posible que la venta o uso de este producto en otros países viole las leyes locales.
●本產品設計適用於美國、加拿大、日本、英國、德國及法國,並有所限制。在其他國家銷售或使用本產品可能違反當地法律。 - この製品は、アメリカ合衆国、カナダ、日本、イギリス、ドイツ、フランスでの使用(制限つき)を目的として設計されています。従って、その他の国での販売・使用は法律違反となる可能性があります。
Open Source Software
Parts of this product use Open Source Software supplied based on the conditions of the Free Software Foundation's GPLs and/or LGPLs and other conditions. Relevant conditions apply to this software. Therefore, please read license information about GPLs and LGPLs, and information about other Open Source Software in the included CD-ROM before using this product. Also, some software parts of this product are licensed under the MOZILLA PUBLIC LICENSE (MPL). You can get the MPL source code. Please note that this software is not under warranty.
For inquiries regarding the contents above, see
http://panasonic.co.jp/pcc/cs/en/telecom/wi-fi-hs.htm.
Enter the necessary firmware information on the Inquiry form and submit it.
For best performance
Base unit location/avoiding noise:
The base unit and other compatible Panasonic units use radio waves to communicate with each other.
For maximum distance and noise-free operation, we recommend the following:
- Placing the product away from electrical appliances.
- If you use the handset or base unit near a microwave oven which is being used, noise may be heard. Move away from the microwave oven and bring the handset closer to the base unit.
- If you use the handset or base unit near another cordless phone's base unit, noise may be heard. Move away from the other cordless phone's base unit and bring the handset closer to your base unit.
Environment:
- Keep the product away from electrical noise generating devices, such as fluorescent lamps and motors.
- The product should be kept free from excessive smoke, dust, high temperature, and vibration.
●The product should not be exposed to direct sunlight. - Do not place heavy objects on top of the product.
- When you leave the product unused for a long period of time, unplug the product from the power outlet.
- The product should be kept away from heat sources such as heaters, kitchen stoves, etc. It should not be placed in rooms where the temperature is less than 0 °C (32 °F) or greater than 40 °C (104 °F). Damp basements should also be avoided.
- The maximum calling distance may be shortened when the product is used in the following places: Near obstacles such as hills, tunnels, underground, near metal objects such as wire fences, etc.
- Operating the product near 2.4 GHz electrical appliances may cause interference. Move away from the electrical appliances.
Routine care:
- Wipe the outer surface of the product with a soft moist cloth. Do not use benzine, thinner, or any abrasive powder.
Obstacles during Wireless Connection:
The radio wave range may decrease depending on the surrounding environment or existence of obstacles. If obstacles such as the following are placed between the base unit and the handset (or a wireless device), radio waves will weaken.
Therefore, even if the distance between the base unit and the handset (or the wireless device) is short, noise may be heard.
●A metallic door or shutter
●A wall made of tin
●A wall made of concrete, stone or brick
- Fireproof glass
- Several walls separated by open space
●A steel shelf
●A wall with an insulation material that contains aluminum foil
Accessory information
Included accessories
AC adaptor for base unit...... 1 pc. (Cord length: approx. 1.83 m (6 feet)) Order No. PQWEWP1050  | AC cord*1 ...... 1 pc. (Cord length: approx. 1.7 m (5.6 feet)) Order No. PQJA10188Z  | Battery...... 1 pc. Order No. CGA-P001  |
Handset cover*2 ...... 1 pc. Order No. PQYNWPA100R  | Handset stand...... 1 pc. Order No. PQKE10465Z  | Charge cable...... 1 pc. (Cord length: approx. 0.5 m (1.6 feet)) Order No. PQJA10184Z  |
Ethernet cable...... 1 pc. (Cord length: approx. 0.5 m (1.6 feet)) Order No. PQJA10185Z  | CD-ROM*3 ...... 1 pc. Order No. PQQX15539Z  | Carrying case...... 1 pc. Order No. PQQD10002Z  |
Wireless LAN sticker*4 ...... 1 pc.  | ||
*1 You might need a separate AC cord when you use this product in other countries. See page 17 for details.
The included AC cord is compatible with a power source up to 125 V AC.
*2 The handset cover comes attached to the handset.
*3 Operating Instructions are included.
*4 Your base unit's default network name (SSID) and network key for wireless connection are printed. As this information is important for the base unit settings, save this sticker in a safe place.
Note:
- All the accessory items except the CD-ROM and Wireless LAN sticker are included in the carrying case.
Packing the accessories
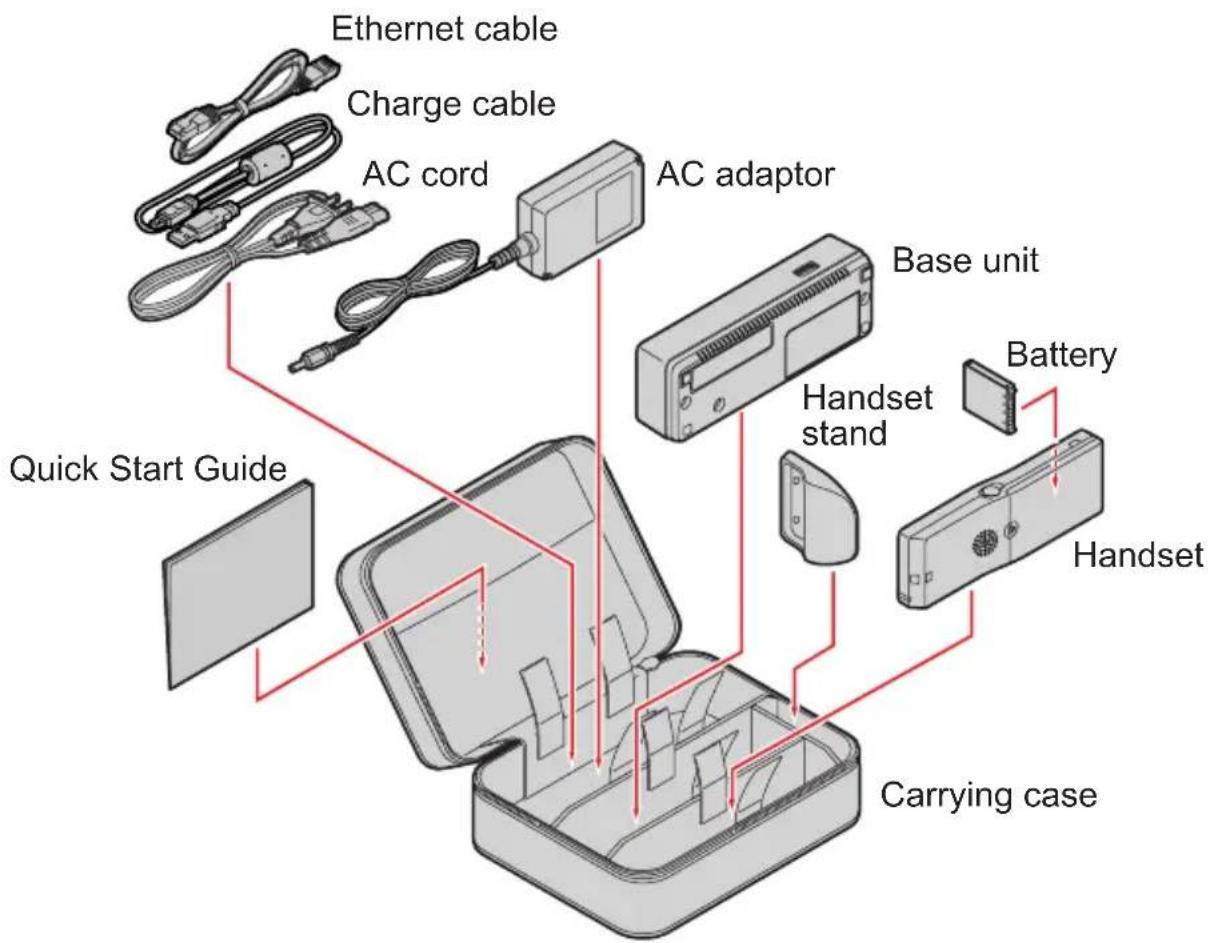
text_image
Ethernet cable Charge cable AC cord AC adaptor Quick Start Guide Base unit Handset stand Battery Handset Carrying caseNote:
- Do not include the CD-ROM when packing the accessories in the carrying case.
Additional/replacement accessories
| Accessory item Order number | |
| AC cord PSJA1106Z (for UK) | PFJA02A006Z (for Germany and France) |
| Rechargeable lithium-ion (Li-ion) battery CGA-P001 | |
| Headset KX-TCA88HA | KX-TCA86KX-TCA91KX-TCA92KX-TCA93KX-TCA94KX-TCA95 |
Changing the AC cord while traveling:
Due to voltage difference, when you travel, be sure to carry the appropriate AC cord(s) designed for use in your destination countries.
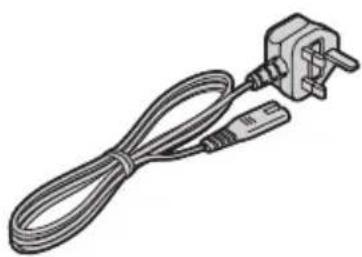
natural_image
Line drawing of a single electrical outlet with a coiled cable (no text or symbols)(For UK)
Order No. PSJA1106Z

natural_image
Line drawing of a cable with two leads and a power plug (no text or symbols)(For Germany and France)
Order No. PFJA02A006Z
Sales and support information
- To order additional/replacement accessories, call 1-800-332-5368.
- TTY users (hearing or speech impaired users) can call 1-866-605-1277.
Controls
Base unit (Wireless travel router)
Front view
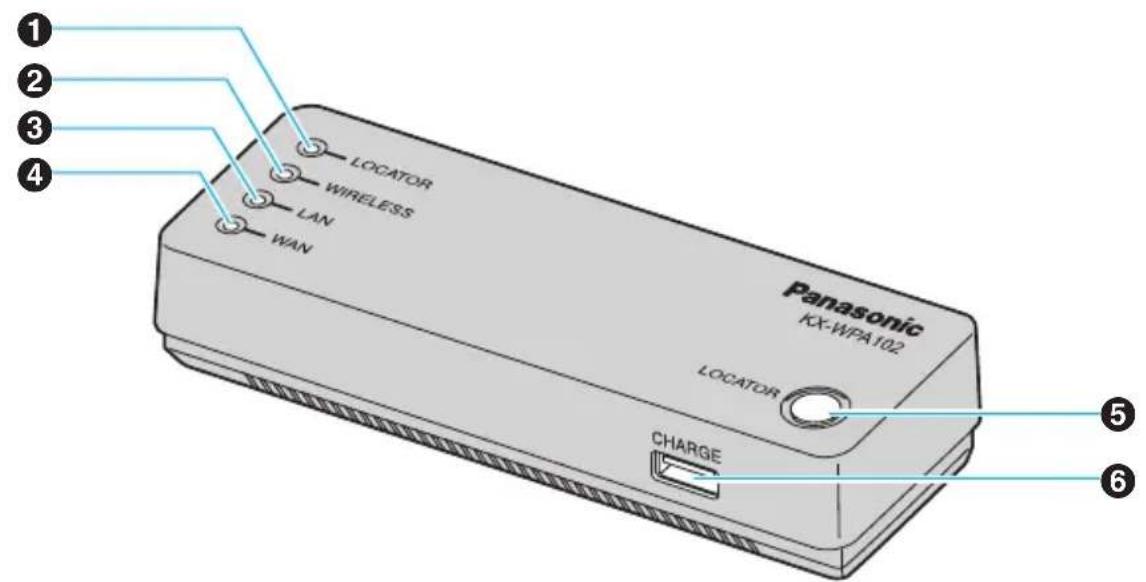
text_image
① ② ③ ④ LOCATOR WIRELESS LAN. WAN Panasonic KX-WPA102 LOCATOR CHARGE ⑤ ⑥Rear view
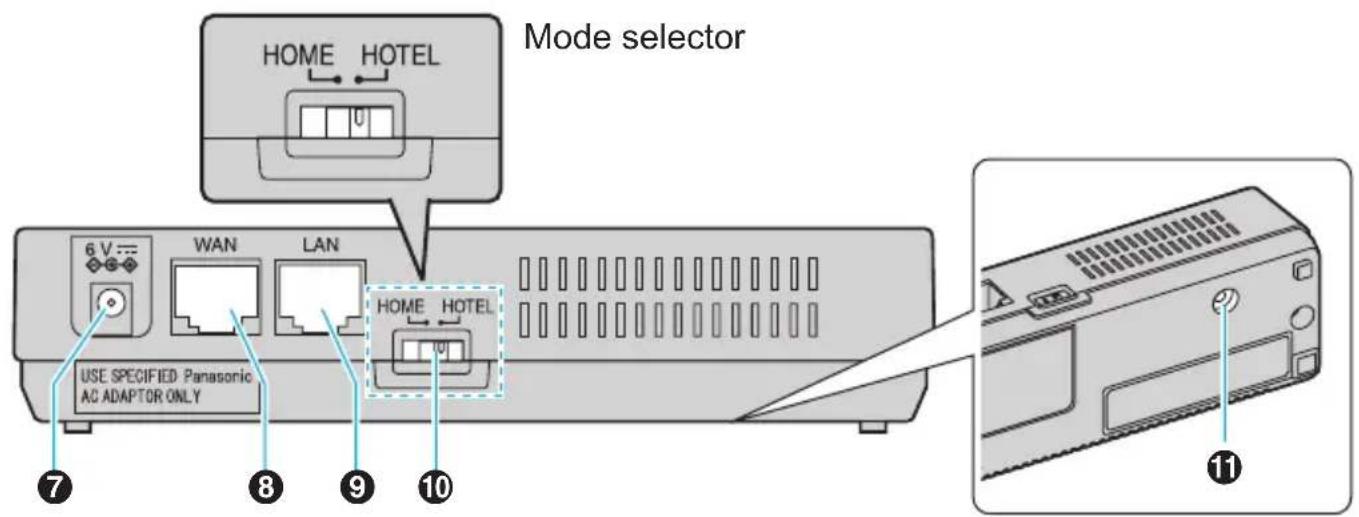
text_image
MODE selector 6 V... WAN LAN HOME HOTEL USE SPECIFIED Panasonic AC ADAPTOR ONLY 7 8 9 10 11①LOCATOR indicator
②WIRELESS indicator
③LAN (Ethernet) indicator
④WAN (Internet) indicator
⑤LOCATOR button
⑥CHARGE port
⑦Power port
⑧WAN (Internet) port
⑨LAN (Ethernet) port
⑩Mode selector (page 200)
①FACTORY DEFAULT RESET button (page 201)
Handset
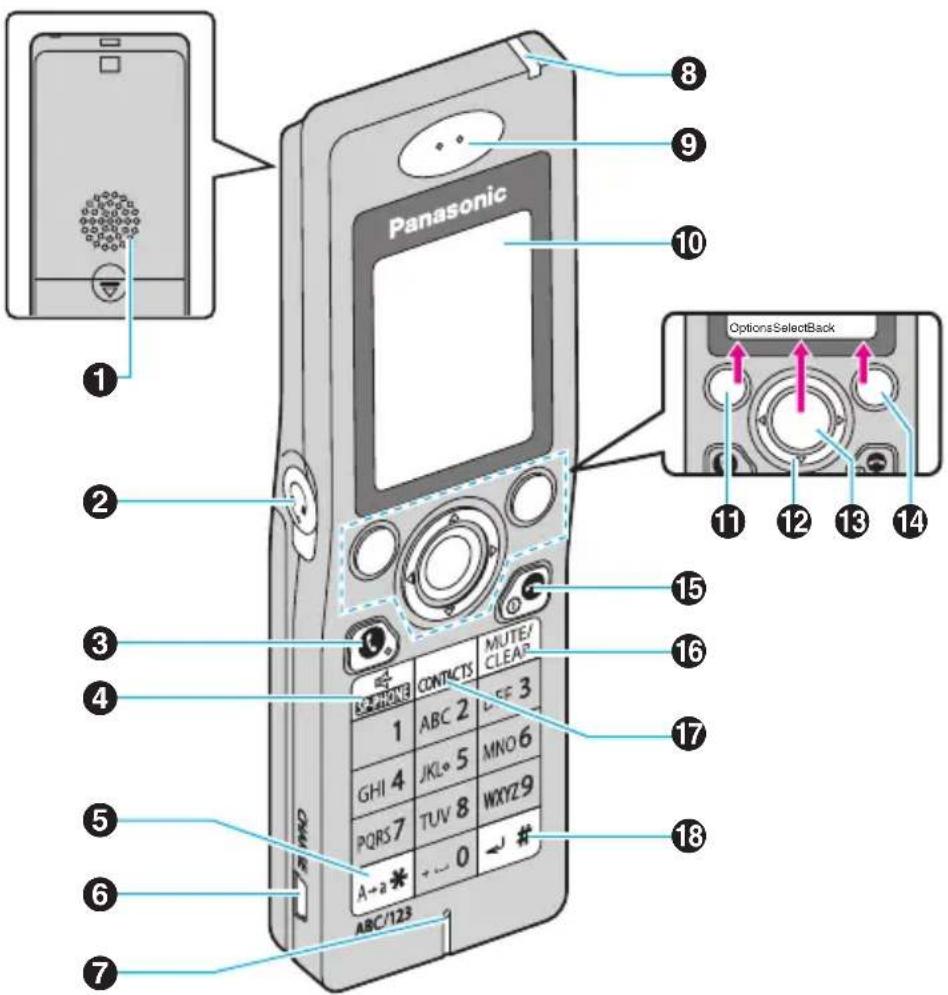
text_image
Panasonic 1 2 3 4 5 6 7 8 9 10 11 12 13 14 15 16 17 18 ABC/123 CONTACTS MUTE/ CLEAR 1 ABC 2 FE 3 GHI 4 JKLo 5 MNO 6 PQRS 7 TUV 8 WXYZ 9 A→a * + - - 0 → # ABC/123①Speaker
②Headset jack
③【c】(SEND)
4【 speaker 】(SP-PHONE)
⑤ [★] / [A→a] (Character entry mode key)
⑥CHARGE port
⑦Microphone
⑧Charge/Ringer indicator
⑨Receiver
10Display
⑪ Left soft key
⑫ Navigator key ([▲] [▼] [◀] [▶])
⑬Middle soft key: Press the center of the navigator key.
14Right soft key
15【—】(END) / Power key (ON/OFF)
⑯ 【MUTE】/【CLEAR】
⑰[CONTACTS]
⑱ 【#】/【←】(Line feed key*1)
*1 Valid depending on the text entry screen
To turn on/off the handset
Press and hold [→] for 2 seconds to turn on or off the handset.
Keypad lock:
While in the Idle mode, press and hold [Menu] (middle soft key) to lock the keypad. To release the lock, press and hold the middle soft key again.
- While the keypad is locked, “ ”icon is displayed on the handset display.
Key functions
Base unit:
| Key Name Figure No. Function | ||
| LOCATOR button | 5 | ● Locate the handset (page 132) or register the handset (page 133). |
| FACTORY DEFAULT RESET | 11● Reset the base unit to factory default (page 201). | |
Handset:
| Key Name Figure No. Function | |
| 【(SEND) | 3Make or receive a call.While in the Idle mode, press to access the outgoing calls list.Switch to the receiver when you are on the speakerphone. |
| 【(SP-PHONE) | 4Make or receive a call.Turn the speakerphone on or off. |
| 【※】/【A→a】 | 5Change the character entry mode.Toggle between upper and lower case.While in the Idle mode, press to make a Skype-to-Skype call (page 85). |
| Left soft key | 11Activate the functions indicated at the bottom left corner on the display.While in the Idle mode, press to access the Idle mode option screen (page 71). |
| Key Name Figure No. | Function | |
| Right soft key | 14 | Activate the functions indicated at the bottom right corner on the display.While in the Idle mode, press to sign in or connect to a network. |
| Navigator key [▲] | 12 | Move up the cursor to select a menu item.Move up the cursor when entering characters.Increase the receiver/speaker volume while talking.Increase the ringer volume while ringing or in the volume setting.While in the Idle mode, press to change your Skype online status (page 103). |
| Navigator key [▼] | 12 | Move down the cursor to select a menu item.Move down the cursor when entering characters.Decrease the receiver/speaker volume while talking.Decrease the ringer volume while ringing or in the volume setting. |
| Navigator key [◀] | 12 | Move left the cursor when entering characters. |
| Navigator key [▶] | 12 | Move right the cursor when entering characters. |
| Middle soft key | 13 | Activate the functions indicated at the bottom center on the display.While in the Idle mode, press and hold to lock or unlock the keypad (page 20). |
| 【─】(END)/Power key | 15 | End a call, return to the Idle mode and reject an incoming call.Press and hold for 2 seconds to turn on or off the handset. |
| MUTE/CLEAR | 16 | Mute your voice while talking. Press again to release the mute.Delete the character(s) when entering characters. |
| CONTACTS | 17 | ● While in the Idle mode or in the Main menu, press to access the contact list (page 73). |
| Alphanumeric keypad | - ●Enter numbers, characters, or symbols when entering characters.●While in the Idle mode, press to make a SkypeOut call (page 84). | |
| # | 18 | ● Enter # or a Line feed when entering characters. |
Base unit status indicators
On different occasions you may notice that the status indicators on the base unit are flashing. You may find the following flash patterns helpful to you:
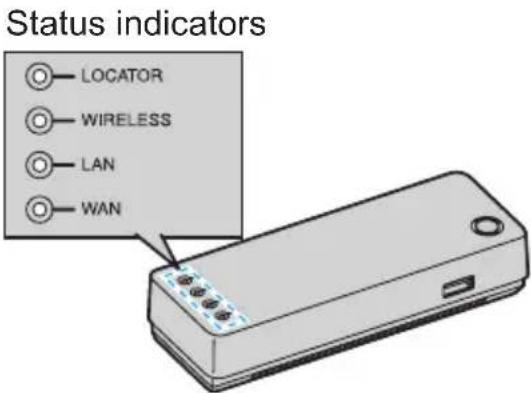
text_image
Status indicators LOCATOR WIRELESS LAN WAN| Indicator type | Indicator color | Indicator pattern | Status |
| LOCATOR Green On The | Green On The | base unit is locating the handset. | |
| Flashing The | base unit is registering the handset. | ||
| WIRELESS Green On The | Green On The | wireless LAN | of the base unit is available. |
| Flashing A w | wireless data transfer is in progress. | ||
| LAN Green On A connection to LAN has been established. | |||
| OFF – The | Ethernet cable | is not connected to the LAN port on the rear of the base unit. | |
| WAN Green On An Internet connection has been established (IP address obtained). | |||
| WAN Green/ | Amber | A short blinking in Amber and a long flash in Green | An Internet connection has been established using the Temporary LAN side network settings.●During this time, Port Forwarding, DMZ, Packet Filtering and Static Routing features are disabled. To re-activate these features, change the LAN network settings. |
| Alternate flashing | The networks on the LAN and WAN sides overlap and the connection to the WAN side of the base unit is terminated.●The network configuration of the LAN needs to be temporarily changed to avoid an overlap of the LAN and WAN networks. | ||
| Amber On | An Internet connection has not yet to be established (No IP address obtained). | ||
| Flashing The base unit firmware may be defective and requires a firmware update.●See “Downloading the version-up firmware to your computer for recovering the base unit” (page 199). | |||
| Red Flashing | The base unit hardware may be defective.●Visit: http://www.panasonic.com/help | ||
| Off – The Ethernet cable is not connected to the WAN port on the rear of the base unit. | |||
Symbols and screen shots used in these operating instructions
Symbols used for operations
| Symbol Meaning Example | ||
| 【 】 The | words in the brackets indicate button names/soft key names on the handset. | - Buttons: [ ], [CONTACTS] - Soft keys: [Options], [Menu] |
| “ ” The words | in quotations indicate menu items displayed on the handset screen. | “Add contact” |
| →Proceed to the next operation. - | ||
| [ ] The words | in the brackets indicate button names and hyperlinks displayed on the computer screen. | [Next>], [OK] |
Sending voicemail messages
You can send voicemail messages using your contact list or History.
1 [Menu] (middle soft key)
2 "Contacts" → [Select]
3 Select the desired contact. → [Options]
1 While in the idle mode, press [Menu] (middle soft key).
2 Press [▲] or [▼] to select "Contacts", then press [Select] (middle soft key).
3 Press [▲] or [▼] to select the desired contact, then press [Options] (Left soft key).
Screen shots used for operations
- Microsoft product screen shots are reprinted with permission from Microsoft Corporation.
- The screen shots in these instructions are from Microsoft ^® Windows ^® XP using Internet Explorer ^® 6.0 and are included for reference purposes only.
- The screen shots in these instructions may differ slightly from what are shown on your computer screen.
System requirements
Your computer and network must meet the following technical specifications for the unit to work properly.
For your computer
| Item Description | |
| Operating system Microsoft | Windows XPMicrosoft Windows 2000 |
| Interface Ethernet network | device installedor IEEE 802.11b/g wireless network device installed. |
| Web browser Microsoft Internet Explorer | Internet Explorer 6.0 or later for WindowsMozilla® Firefox® 1.5 or later for Windows |
For Base unit
| Item Description | |
| Internet connection 10/100 | Mbps Ethernet connection port device which provides access to Internet, such as Cable or DSL modem (USB-only modems are not supported.) |
For Handset
| Item Description | |
| Internet connection | ● Base unit or IEEE 802.11b wireless access point which provides access to Internet● IEEE 802.11b wireless access point that supports either Open, WEP (64 bit/128 bit), WPA-PSK (TKIP) or WPA2-PSK (AES) as a wireless security type |
Setup flow
Follow the procedures below to start using the unit.
| 1 | Installing the base unitSelect the appropriate setup procedure according to where and how you want to use the unit.•In a hotel room page 30•At home– AP (Bridge) mode– Router mode | page 29 |
| page 32 | ||
| page 33 | ||
| page 34 |

| 2 | Setting up the base unit for the first time (Initialization Setup) | page 36 |

| 3 | Setting up the handset | page 57 |

| 4 | Turning on the handset (Signing in to Skype) | page 63 |
Installing the base unit
You need to install the base unit before using this product. The installation methods differ depending on whether you are in a hotel room or at home.
- Hotel: See the instructions "While you are in a hotel room" on page 30.
- Home: See the instructions "While you are at home" on page 32.
Note:
- The AC adaptor and base unit may become warm during use, however this is not a sign of malfunction.
- You need to connect a computer to the base unit in order to set up the base unit.
- You can also connect your computer to the base unit via wireless LAN connection instead of using the Ethernet cable. To establish a wireless connection between your computer and the base unit, you need to set the wireless LAN configuration on your computer (The SSID and the Network key are shown on the included Wireless LAN sticker). See “Using your computer on a wireless LAN” on page 209 for details.
- Use only the included Panasonic AC adaptor PQWEWP1050 and AC cord PQJA10188Z. In UK, Germany and France, you need to use the appropriate AC cord(s) designed for use in your destination countries. See “Changing the AC cord while traveling:” for detail on page 17.
- Leave the AC adaptor cord plugged into the AC outlet the whole time.
●The unit will not work during a power failure.
While you are in a hotel room
You can use the handset while you are traveling by accessing the Internet from a hotel room.
The hotel you are staying in may give you specific instructions as to what Internet connection mode you should select. In that case, follow their instructions. Otherwise, you are suggested to select [Default Profile] when you set the connection mode in Initialization Setup (page 36).
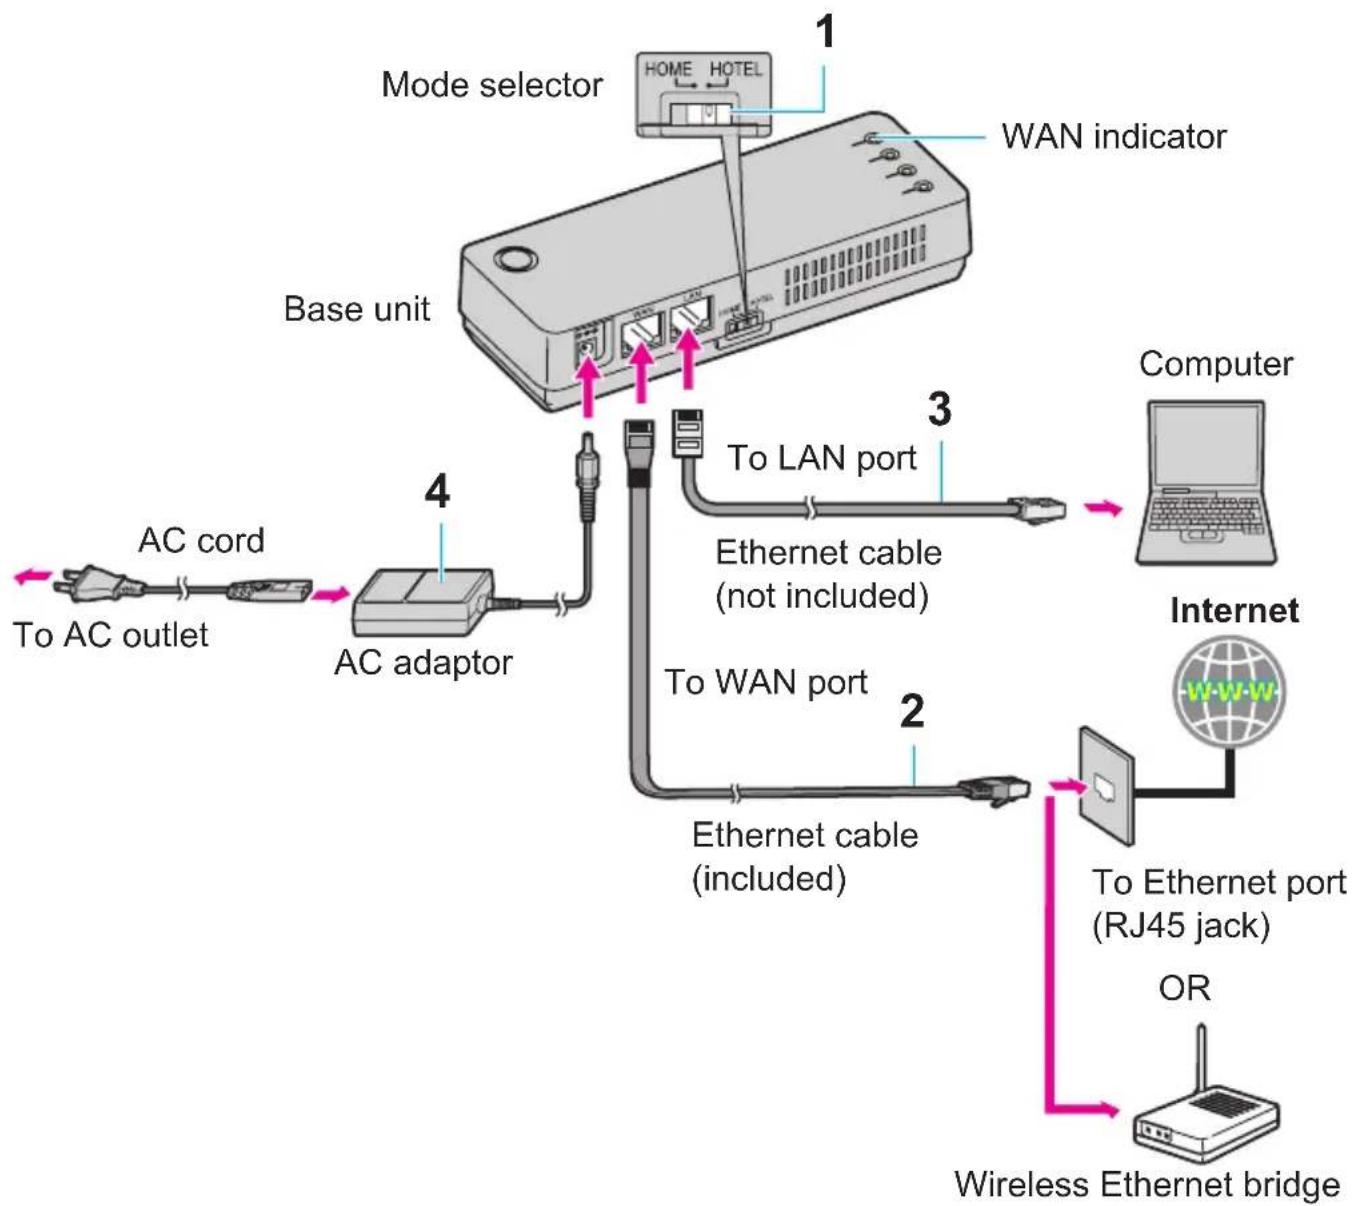
flowchart
graph TD
    A["Base unit"] -->|1: MODE selector| B["Computer"]
    A -->|2: Ethernet cable (included)| C["Internet"]
    A -->|3: Ethernet cable (not included)| D["Computer"]
    A -->|4: AC adaptor| E["AC cord"]
    E -->|5: AC outlet| F["AC cord"]
    A -->|6: Mode selector| G["WAN indicator"]
    A -->|7: To LAN port| H["Computer"]
    A -->|8: To WAN port| I["Internet"]
    A -->|9: To Ethernet port (RJ45 jack)| J["OR"]
    A -->|10: Wireless Ethernet bridge| K["OR"]
1 Switch the Mode selector to "HOTEL".
2 Make sure the base unit is left unplugged. Connect the included Ethernet cable to the "WAN" port on the base unit and the Ethernet port (RJ45 jack) in the hotel room.
30 For assistance, please visit http://www.panasonic.com/help
3 Connect a separate Ethernet cable to the "LAN" port on the base unit and the Ethernet (LAN) port on your computer.
- You can also connect your computer to the base unit via wireless LAN connection.
4 Connect the included AC adaptor cord to the power port on the base unit and an AC outlet.
- When the base unit turns on (The WAN indicator lights in green or amber), the installation is complete.
Note:
- In step 2, if you cannot find the Ethernet port (RJ45 jack) in the hotel room, ask the hotel front desk. In some hotels, the wireless Internet connection service may be available by using a wireless Ethernet bridge prepared by the hotel.
While you are at home
The base unit has 2 modes of operation for use at home: AP (Bridge) mode and Router mode.
AP (Bridge) mode:
Designed for the case when you have an existing router or modem (DSL or cable) with a built-in router.
●Refer to the instructions on page 33.
Router mode:
Designed for the case when you only have a standard DSL or cable modem.
●Refer to the instructions on page 34.
Note:
- If your modem has more than 1 Ethernet port, then you have a modem with a built-in router.
- If you have more than 1 computer connected to the Internet, then you have a router.
- If you do not know what type of modem you have, ask your Internet service provider.
AP (Bridge) mode - With an EXISTING ROUTER or MODEM with a built-in ROUTER
If you install the base unit with your existing router or modem with a built-in router, the base unit should be set to AP (Bridge) mode. Select [AP (Bridge)] for your connection mode in Initialization Setup (page 36). In AP (Bridge) mode, the base unit connects wireless devices to one another and to the LAN, and allows wireless devices to use a DHCP server on the LAN. In most cases, routers are equipped with the function as the DHCP server.
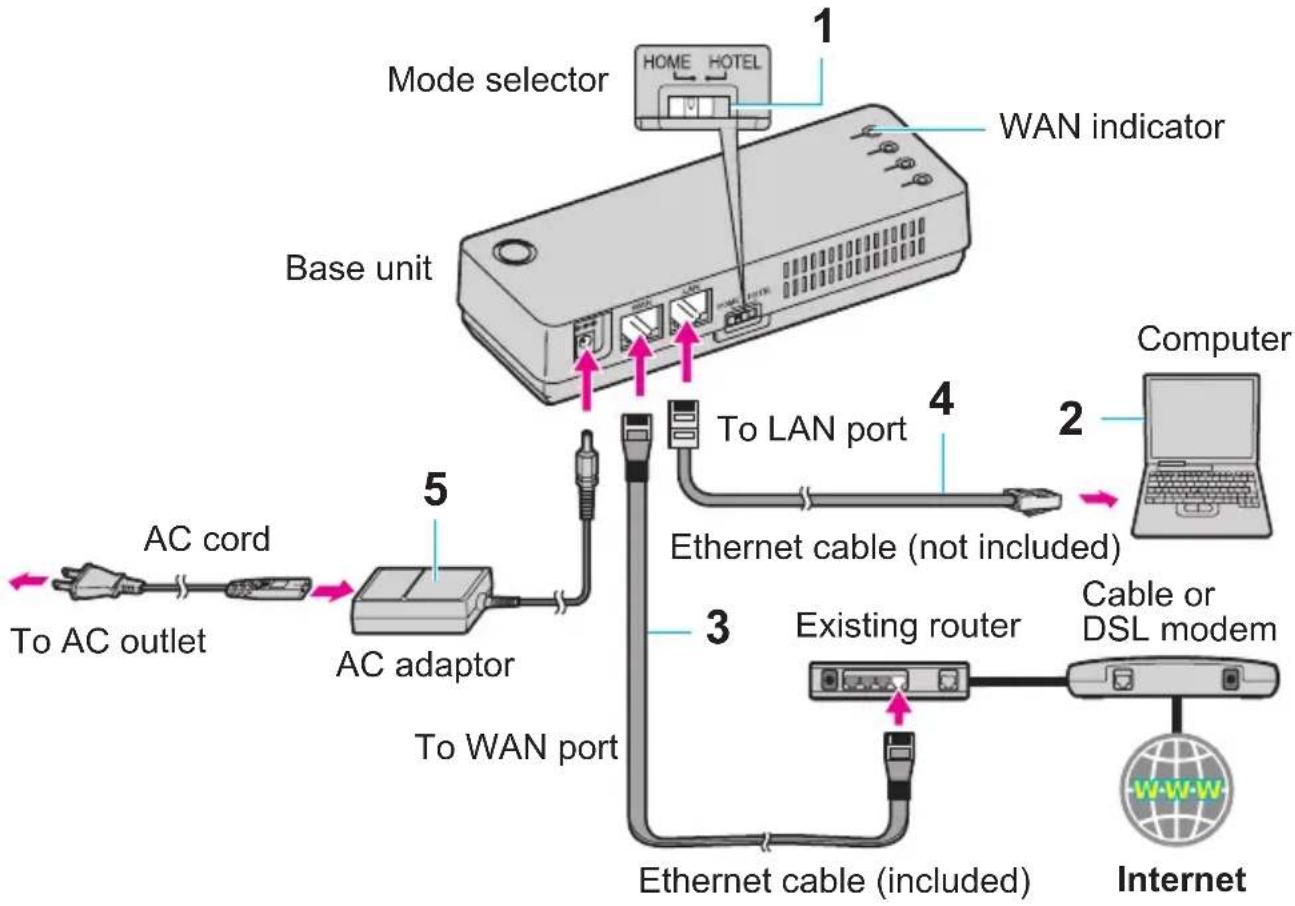
flowchart
graph TD
    A["AC cord"] --> B["AC adaptor"]
    B --> C["To LAN port"]
    C --> D["Ethernet cable (not included)"]
    D --> E["Computer"]
    F["Home HOTEL"] --> G["WAN indicator"]
    H["To AC outlet"] --> I["AC cord"]
    J["To WAN port"] --> K["AC adaptor"]
    L["Cable or DSL modem"] --> M["Internet"]
    N["Existing router"] --> O["Ethernet cable (included)"]
1 Switch the Mode selector to "HOME".
2 Turn off your computer properly. Unplug any cable connecting your existing router (or modem with a built-in router) to your computer. However, your existing router (or modem with a built-in router) needs to remain connected to your cable or DSL modem.
3 Make sure the base unit is left unplugged. Connect the included Ethernet cable to the "WAN" port on the base unit and an unused Ethernet (LAN) port on your existing router (or modem with a built-in router).
Getting Started
4 Connect a separate Ethernet cable to the "LAN" port on the base unit and the Ethernet (LAN) port on your computer (the same Ethernet (LAN) port you have just unplugged the router from in step 2).
- You can also connect your computer to the base unit via wireless LAN connection.
5 Connect the included AC adaptor cord to the power port on the base unit and an AC outlet.
- When the base unit turns on (The WAN indicator lights in green or amber), the installation is complete.
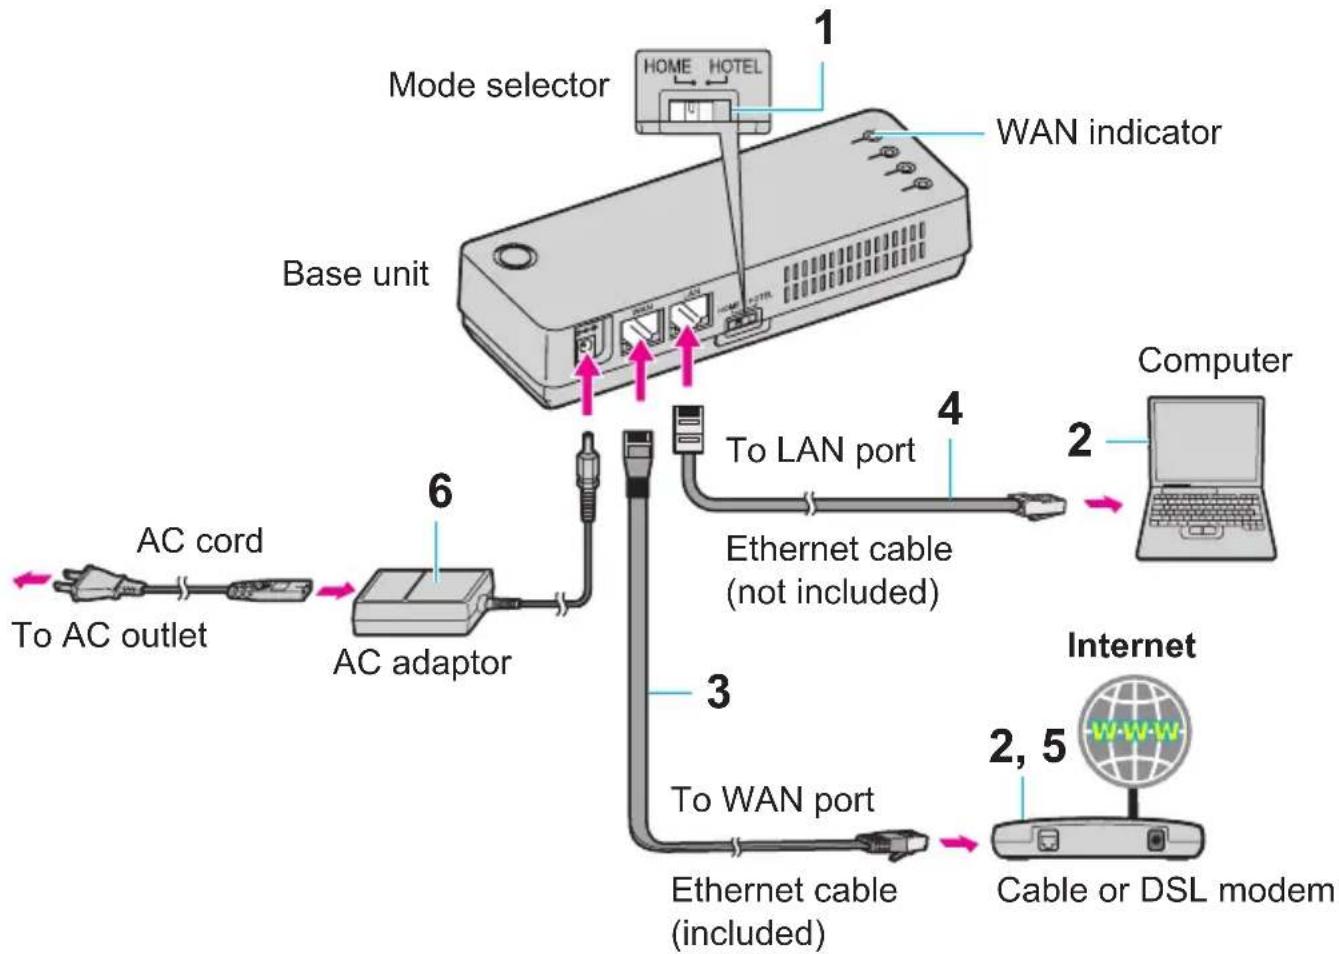
Router mode - With a MODEM only
If you install the base unit with a modem only, the base unit should be set to Router mode. In Router mode, the base unit assigns IP addresses to network devices (including wireless devices) as a DHCP server. It also protects the network devices from being directly exposed to the WAN. For your connection mode, select [DHCP], [Static] or [PPPoE] in Initialization Setup (page 36).
flowchart
graph TD
    A["AC cord"] --> B["AC adaptor"]
    B --> C["To AC outlet"]
    C --> D["AC unit"]
    D --> E["Home HOTEL"]
    E --> F["WAN indicator"]
    D --> G["To LAN port"]
    G --> H["Ethernet cable (not included)"]
    H --> I["Computer"]
    I --> J["Internet"]
    J --> K["Cable or DSL modem"]
    D --> L["To WAN port"]
    L --> M["Ethernet cable (included)"]
1 Switch the Mode selector to "HOME".
2 Turn off your computer properly. Unplug your cable or DSL modem's power cord and leave the modem turned off for at least 10 minutes to clear its memory. Unplug any cable connecting the modem to your computer. However, the modem needs to remain connected to the Internet.
3 Make sure the base unit is left unplugged. Connect the included Ethernet cable to the "WAN" port on the base unit and the Ethernet (LAN) port on the modem.
4 Connect a separate Ethernet cable to the "LAN" port on the base unit and the Ethernet (LAN) port on your computer (the same Ethernet (LAN) port you have just unplugged your modem from in step 2).
- You can also connect your computer to the base unit via wireless LAN connection.
5 Plug your modem's power adaptor into an AC outlet.
- Wait for your modem's power light to stop flashing before you go to the next step. (It may take a few minutes.)
6 Connect the included AC adaptor cord to the power port on the base unit and an AC outlet.
- When the base unit turns on (The WAN indicator lights in green or amber), the installation is complete.
Setting up the base unit for the first time (Initialization Setup)
For security purpose and enabling the Internet connection, it is necessary to set up the base unit at the very first time. You can log in the base unit and configure the unit's settings using the Web browser on the computer you connected to the base unit's “LAN” port.
Important:
- Required Web browser: Microsoft Internet Explorer 6.0 or later for Windows Mozilla Firefox 1.5 or later for Windows
- You may need to change the appropriate settings of your computer (page 203).
When you access to the base unit for the first time or after resetting the base unit to factory default (page 186 and 201), you must go through Initialization Setup.
First you must set the user name and the password. (Remember your user name and password in order to access the base unit again.) After that you need to configure the Internet connection settings.
The base unit has a Mode selector (page 200) to allow users to switch its Internet connection settings between the HOME mode and the HOTEL mode simply.
The base unit can contain up to 4 Internet connection setting profiles and 2 among those 4 setting profiles can be assigned to the mode selector positions which are HOME mode and HOTEL mode.
For example, a setting profile of AP (Bridge) connection mode for the HOME mode and an another setting profile of DHCP connection type for the HOTEL mode.
You are going to set up those profiles for HOME and/or HOTEL mode settings through the initialization setup shown in the following pages.
Initialization Setup flow
Follow the procedures below to set up the base unit for Internet connection.
| 1 | Setting your login user name and passwordSet your user name and password to log in the base unit. | Step 1–4 from page 38 |
| 2 | Creating a new Internet connection profileSelect the Internet connection modeMODE available in HOME mode: DHCP, Static, PPPoE, AP (Bridge)Mode available in HOTEL mode: DHCP, Static, PPPoE | Step 5–7 from page 41 |
| 3 | Configuration of the connection modeConfigure each setting for the connection mode you selected. | Step 8 on page 45 |
| 4 | Registering the Internet connection settings as a profileConfirm the settings you have configured, and save it as new profile. | Step 9 on page 46 |
| 5 | Restarting the base unit and confirming the Internet accessThe base unit restarts with the Internet connection profile you have just saved. | Step 10–11 from page 46 |
Initialization Setup
1 After the base unit installation (page 29 – 35), turn on the computer you connected to the base unit's "LAN" port.
2 Open the Web browser. Enter http://192.168.102.1/ (the base unit's default IP address) or http://kxwpa.webpage in the address field of the browser and press the ENTER key.
You can also double click the KX-WPA102 icon in My Network Places in the Start menu when using Windows XP to enable UPnP ^TM . See “Setting UPnP to display the shortcut” on page 209 for details.
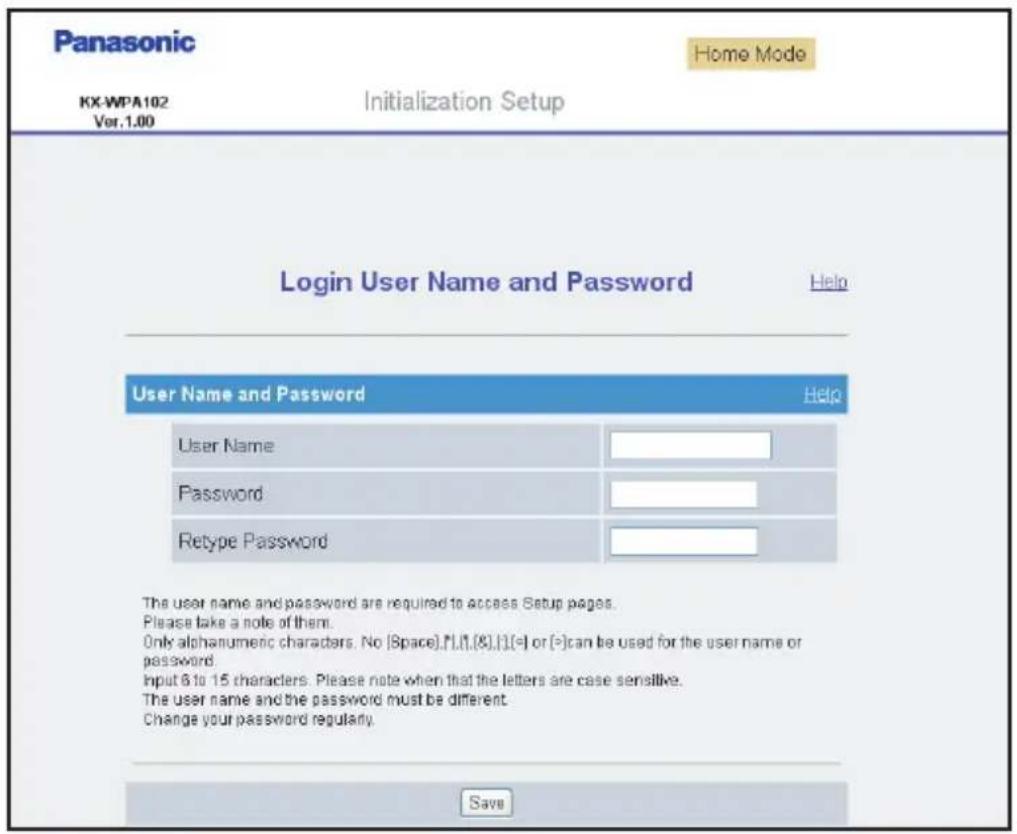
- Initialization Setup starts. A screen with fields for your user name and password (Login User Name and Password page) is displayed.
text_image
Panasonic Home Mode KX-WPA102 Ver.1.00 Initialization Setup Login User Name and Password Help User Name and Password Help User Name Password Retype Password The user name and password are required to access Setup pages. Please take a note of them. Only alphanumeric characters. No [Space].[I].[&].[I(=)] or (=) can be used for the user name or password. Input 6 to 15 characters. Please note when that the letters are case sensitive. The user name and the password must be different. Change your password regularly. Save- If you have already set your user name and password, skip to step 4.
If "Initialization Setup" window is not displayed:
- Check the network settings of your computer. It is necessary to obtain an IP address of your computer automatically from a DHCP server (page 203).
- Sometimes it is necessary to set up your Web browser's proxy server to access the base unit (page 207).
3 Enter the desired user name and password, then click [Save].
Important:
- Please keep your user name and password secure.
| Setting Description | |
| [User Name] | ● The user name and password can contain 6 to 15 alphanumeric characters.● The following cannot be used: [ "", [ ', ], [&], [<], [>], [:], [(space)]● User name and password must be different from each other.● User name and password are case-sensitive. |
| [Password] | |
| [Retype Password] | ● Enter the password again to verify. |
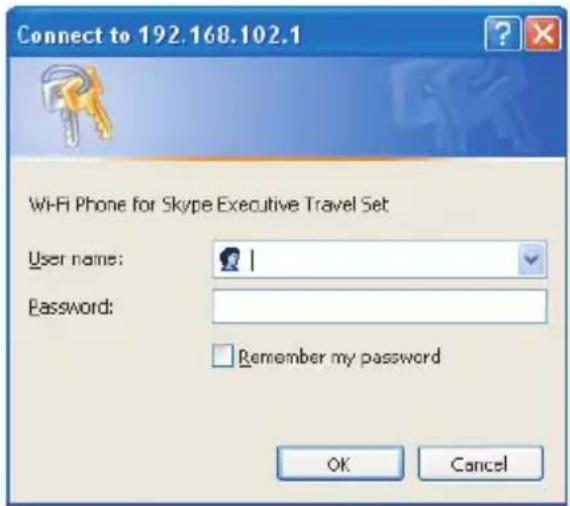
- The base unit begins restarting and a prompt screen with fields for your user name and password is displayed.
text_image
Connect to 192.168.102.1 Wi-Fi Phone for Skype Executive Travel Set User name: Password: Remember my password OK Cancel4 Enter the user name and password set in step 3. Then click [OK].
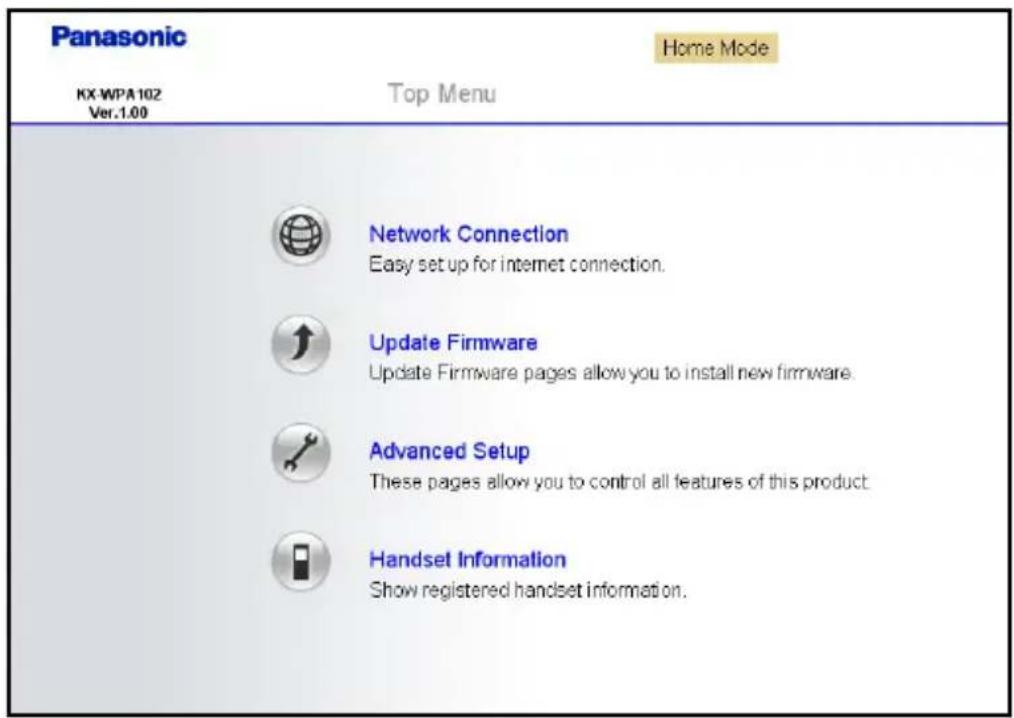
- Top Menu is displayed.
text_image
Panasonic Home Mode KX-WPA102 Ver.1.00 Top Menu Network Connection Easy setup for internet connection. Update Firmware Update Firmware pages allow you to install new firmware. Advanced Setup These pages allow you to control all features of this product. Handset Information Show registered handset information.5 Click [Network Connection] on the Top Menu.
- The current Internet connection settings and information of the wireless connection are displayed.
![PANASONIC KX-WP1050 - Click [Network Connection] on the Top Menu. - 1](/content/2026/05/796742/images/2c00a710f74795c25ecbe2a6f630e4e0aaa55dabff95f84e4aaa1043ac0e586a.jpg)
text_image
Panasonic KX.WPA102 Vol.1.00 Home Mode TopPage Network Connection New Profile Help New Profile Default Profile Internet Connection Help Refresh Mode Home Mode Profile Name Default Connection Connection Mode DHCP IP Address 0.0 0.0 Subnet Mask 0.0 0.0 MAC Address Connecting... Connection Status Modify Wireless Information Help Mode 802.11b/g SSD Channel 5 Security WEP(Key1) Network Key View MAC Address Modify6 Click [New Profile] under the New Profile heading.
- If you click [Default Profile], you can revert the Internet connection settings back to default setting (DHCP).
- If you have no specific instructions for the Internet connection from the hotel, you can use [Default Profile] for an easy setup. Ask the hotel front desk for details. If you select [Default Profile], skip to step 10.
7 Select the desired connection mode used in the current mode (HOME or HOTEL), then click [Next>].
When the Mode selector is set to "HOME":
![PANASONIC KX-WP1050 - Click [New Profile] under the New Profile heading. - 1](/content/2026/05/796742/images/efebdbf40ffce164b01cf72756da426f2caf3d4a893dcb717740ae233694eb44.jpg)
text_image
Panasonic Home Mode TopPage KX-WPA102 Ver.1.00 Network Connection Connection Mode Help Mode DHCP Static PPPoE AP(Bridge) Next > Cancel- Internet connection modes vary according to the Internet service provider. Select a connection mode referring to the Internet service provider's setup information.
- Select [DHCP], [Static] or [PPPoE] if the base unit is installed in Router mode.
- Select [AP (Bridge)] if the base unit is installed in AP (Bridge) mode.
| Setting Description | |
| [DHCP] | ● Allows the base unit to receive an IP address automatically from a DHCP server. This connection mode is usually required for use with cable modems. Select if you are instructed to specify DHCP, host name and/or MTU value by your Internet service provider. Otherwise, select [Default settings] in step 6. |
| [Static] | ● Allows the base unit to assign a specific IP address. |
| [PPPoE] | ● Allows the base unit to receive an IP address from a PPPoE server. This connection mode is usually required for use with DSL modems. |
| [AP (Bridge)] | ● Allows the base unit to work as an access point when you have a router at home. |
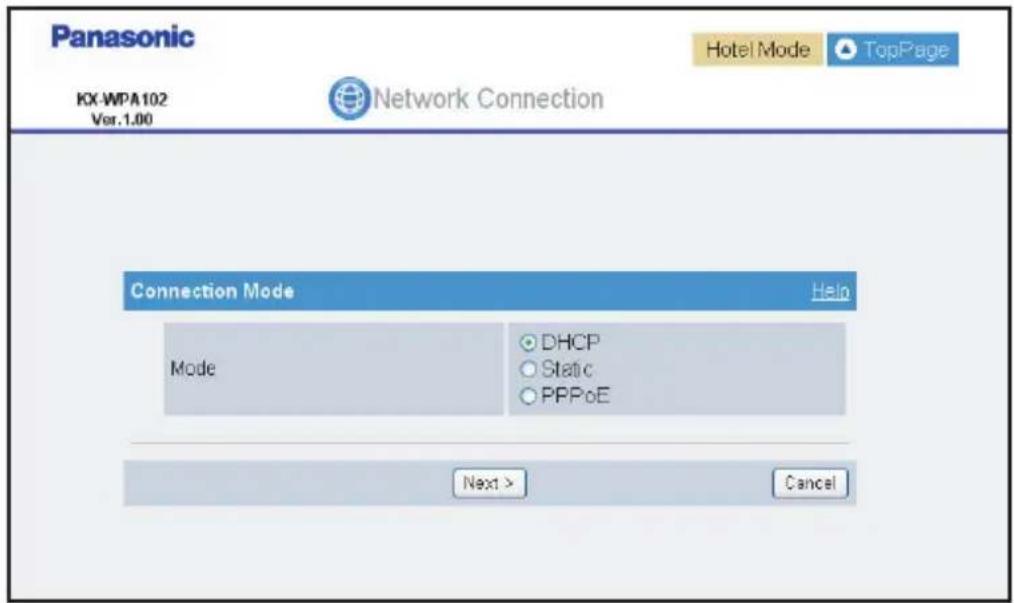
When the Mode selector is set to "HOTEL":
text_image
Panasonic KX-WPA102 Ver.1.00 Hotel Mode TopPage Network Connection Connection Mode Help Mode DHCP Static PPPoE Next > Cancel- Select the connection mode as specific instructions for the Internet connection from the hotel. ([AP (Bridge)] is not available in HOTEL mode.)
| Setting Description | |
| [DHCP] | ● Allows the base unit to receive an IP address automatically from a DHCP server. |
| [Static] | ● Allows the base unit to assign a specific IP address. |
| [PPPoE] | ● Allows the base unit to receive an IP address from a PPPoE server. |
- A screen with fields for configuring the connection mode you select in this step is displayed.
- For example: When you select [DHCP] in HOME mode
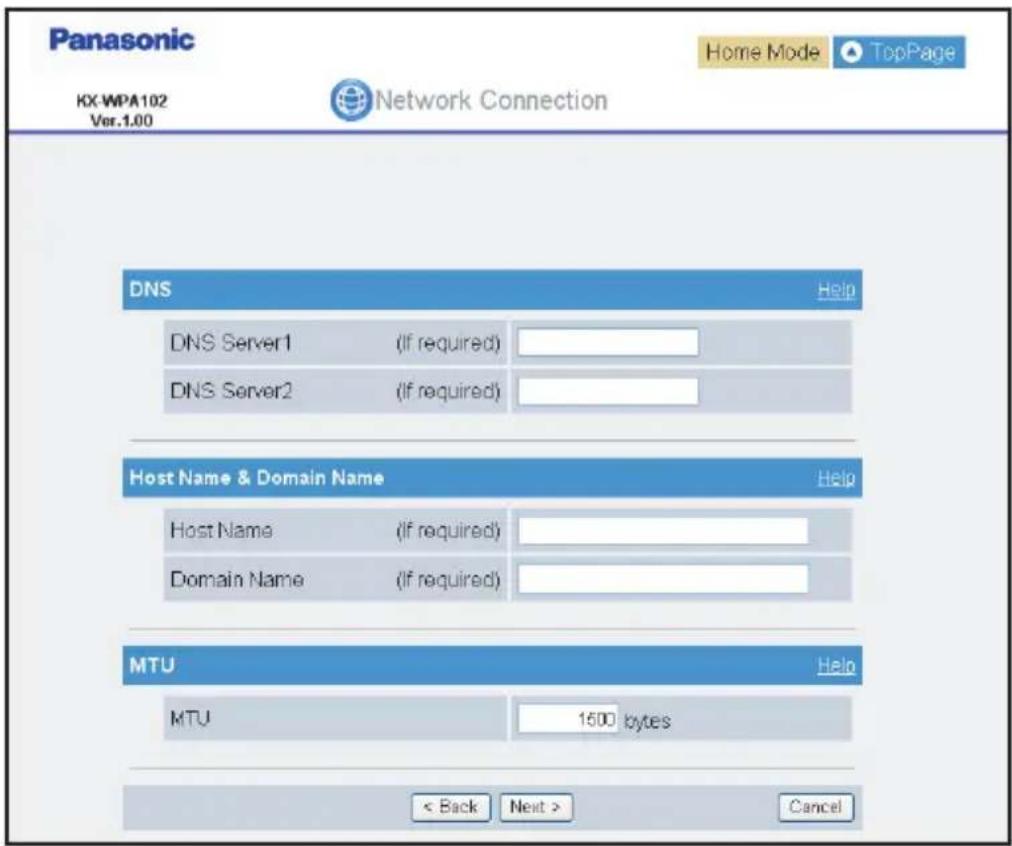
text_image
Panasonic KX-WPA102 Ver.1.00 Home Mode TopPage Network Connection DNS Help DNS Server1 (If required) DNS Server2 (If required) Host Name & Domain Name Help Host Name (If required) Domain Name (If required) MTU Help MTU 1500 bytes < Back Next > Cancel8 Configure the settings, then click [Next>].
- See "Configuring the Internet connection settings" on page 48 for each setting.
- If your Internet service provider or the hotel you are staying in does not specify any of the settings, leave the data fields blank except for MTU entry.
●The Save Settings page is displayed.
![PANASONIC KX-WP1050 - Configure the settings, then click [Next>]. - 1](/content/2026/05/796742/images/a021e35bb57757d20b9e7ad303ef8bd4e701ba649a39e6ae33e39817ebf4d580.jpg)
text_image
Panasonic Home Mode TopPage KX-WPA102 Ver.1.00 Network Connection Save Settings Help Profile Name Automatic generation Profile No. 1 Connection Type DHCP DNS Server1 DNS Server2 Host Name Domain Name MTU 1600 < Back Save9 Confirm the settings you are about to save, then click [Save].
- The settings that you have just configured are saved as profile No. 1 (HOME mode) or No. 2 (HOTEL mode) according to the position of the Mode selector. The profile is automatically named “Automatic generation” and saved.
![PANASONIC KX-WP1050 - Configure the settings, then click [Next>]. - 2](/content/2026/05/796742/images/f731558a7bae686c06b69dae2db2fce61d0598e993352656d5eea73615fb6689.jpg)
text_image
Panasonic Home Mode TopPage KC-WPA102 Ver.1.00 Network Connection Save Settings Help Profile Name Automatic generation Profile No. 1 Connection Type DHCP DNS Server1 DNS Server2 Host Name Domain Name MTU 1500 < Back Save10 Click [Restart].
- The base unit restarts with the Internet connection profile you have just saved, and the Top Menu is displayed.
- When the WAN indicator lights in steady green, the Initialization Setup is complete.
![PANASONIC KX-WP1050 - Configure the settings, then click [Next>]. - 3](/content/2026/05/796742/images/63d017c4b5c6033f3f0c6f3dd85c5c06369b9d37389dcae0e9b5f7af3767c634.jpg)
text_image
LOCATOR WIRELESS LAN WAN WAN indicator11 After the Initialization Setup is complete, try to access a website in order to confirm the Internet connection setting. Enter http://www.panasonic.com in the address field of the browser and press the ENTER key.
- If the Panasonic website is displayed, you have successfully connected to the Internet.
- If you are in a hotel room, an authorization for the Internet access may be required. Ask the hotel front desk and follow their instructions.
Note:
- You can change the user name and password after logging in to the base unit (page 182).
- Once you have configured the Internet connection settings in Initialization Setup, you can connect to the Internet in the connection mode that is saved as HOME or HOTEL mode by simply switching the Mode selector (page 200) to "HOME" or "HOTEL" beforehand.
- You can create up to 4 Internet connection profiles (page 147).
- You can modify the Internet connection profile after the Initialization Setup (page 137).
Configuring the Internet connection settings
Configure the connection mode you select in the Initialization Setup (in step 8 of page 45).
- If your Internet service provider or the hotel you are staying does not specify any of the settings, leave the data fields blank except for MTU entry.
DHCP Configuration: Allows the base unit to receive an IP address automatically from a DHCP server.
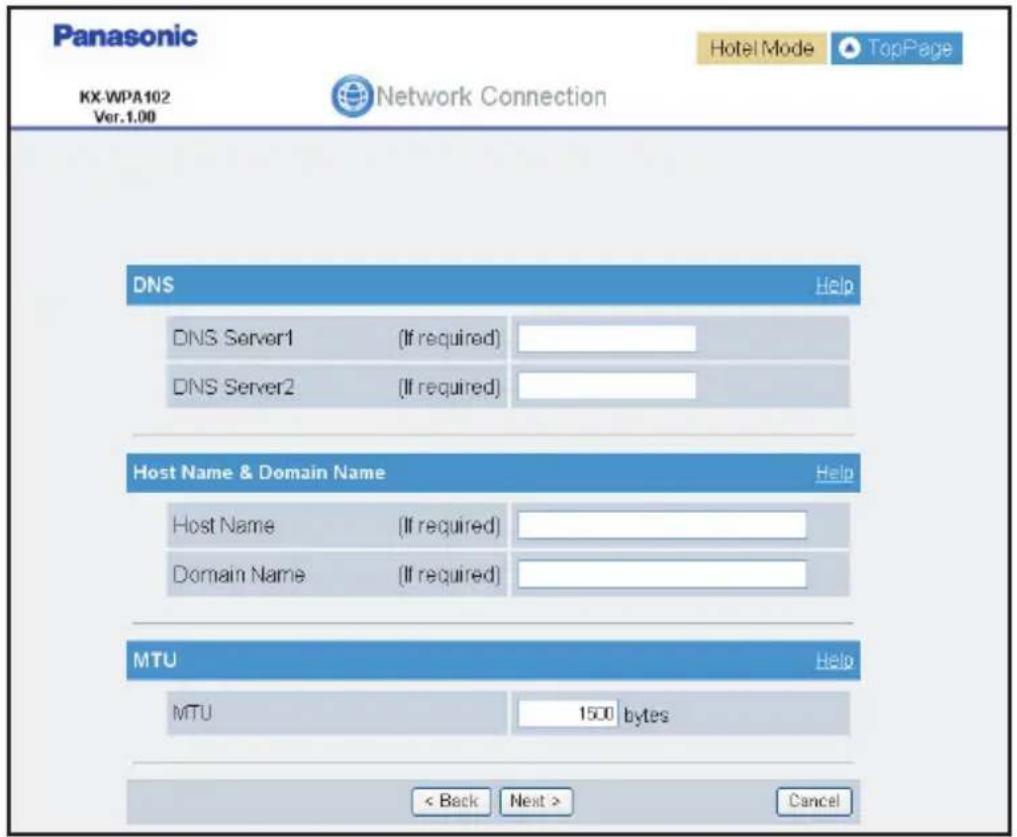
text_image
Panasonic KX:WPA102 Ver.1.00 Hotel Mode TopPage Network Connection DNS Help DNS Server1 (If required) DNS Server2 (If required) Host Name & Domain Name Help Host Name (If required) Domain Name (If required) MTU Help MTU 1500 bytes < Back Next > Cancel| Setting Description | |
| [DNS Server 1] | ● If you have the DNS (Domain Name System) server address assigned by your Internet service provider or the hotel you are staying in, enter them in this data field. They usually have two addresses. |
| [DNS Server 2] | ● Set 4 numbers (0 – 255) separated by periods such as “192.168.102.253”.Note:● There are some restrictions on IP address entry. For example, “0.0.0.0” and “255.255.255.255” are not available. |
| [Host Name] | ● If you have the host name assigned by your Internet service provider or the hotel you are staying in, enter host name (1 – 31 characters) in this data field. |
| [Domain Name] | ● If you have the domain name assigned by your Internet service provider or the hotel you are staying in, enter domain name (1 – 255 characters) in this data field. |
| [MTU] | ● MTU is the maximum size of packet that can be sent.● If you have the MTU value assigned by your Internet service provider or the hotel you are staying in, enter the MTU value (576 – 1500) in this data field. Otherwise you need to leave the default MTU value (1500). |
Static Configuration: Allows the base unit to assign a specific IP address.
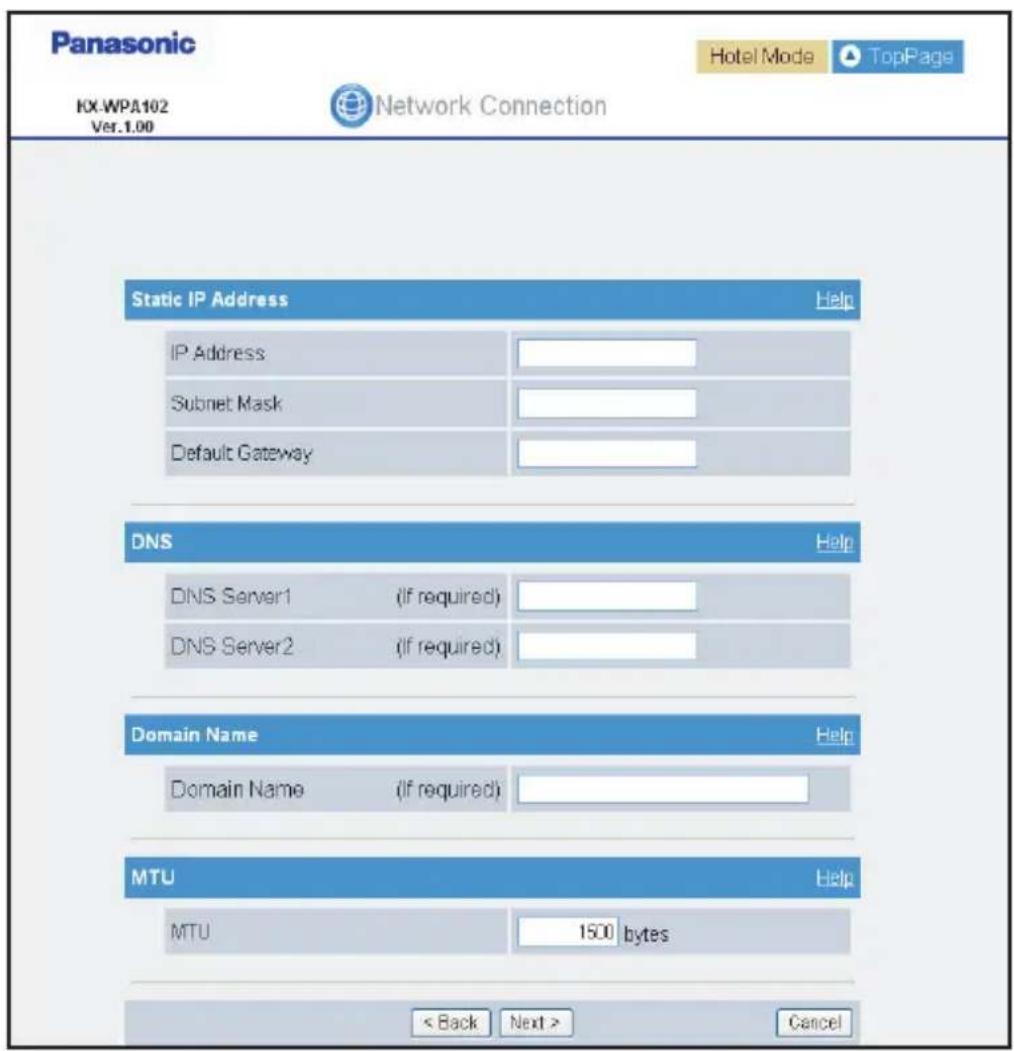
text_image
Panasonic Hotel Mode TopPage KX.WPA102 Ver.1.00 Network Connection Static IP Address Help IP Address Subnet Mask Default Gateway DNS Help DNS Server1 (if required) DNS Server2 (if required) Domain Name Help Domain Name (if required) MTU Help MTU 1500 bytes < Back Next > Cancel| Setting Description | ||
| [IP Address] | ● Enter the IP address and subnet mask assigned by your Internet service provider or the hotel you are staying in in each data field.● Set 4 numbers (0 – 255) separated by periods such as “192.168.102.253”.Note:● There are some restrictions on IP address entry. For example, “0.0.0.0” and “255.255.255.255” are not available. | |
| [Subnet Mask] | ||
| [Default Gateway] | ● Enter the default gateway address assigned by your Internet service provider or the hotel you are staying in in each data field.● Set 4 numbers (0 – 255) separated by periods such as “192.168.102.253”.Note:● There are some restrictions on IP address entry. For example, “0.0.0.0” and “255.255.255.255” are not available. | |
| [DNS Server 1] | ● If you have the DNS (Domain Name System) server addresses assigned by your Internet service provider or the hotel you are staying in, enter them in this data field. They usually have two addresses.● Set 4 numbers (0 – 255) separated by periods such as “192.168.102.253”.Note:● There are some restrictions on IP address entry. For example, “0.0.0.0” and “255.255.255.255” are not available. | |
| [DNS Server 2] | ||
| [Domain Name] | ● If you have the domain name assigned by your Internet service provider or the hotel you are staying in, enter domain name (1 – 255 characters) in this data field. | |
| [MTU] | ● MTU is the maximum size of packet that can be sent.● If you have the MTU value assigned by your Internet service provider or the hotel you are staying in, enter the MTU value (576 – 1500) in this data field. Otherwise you need to leave the default MTU value (1500). | |
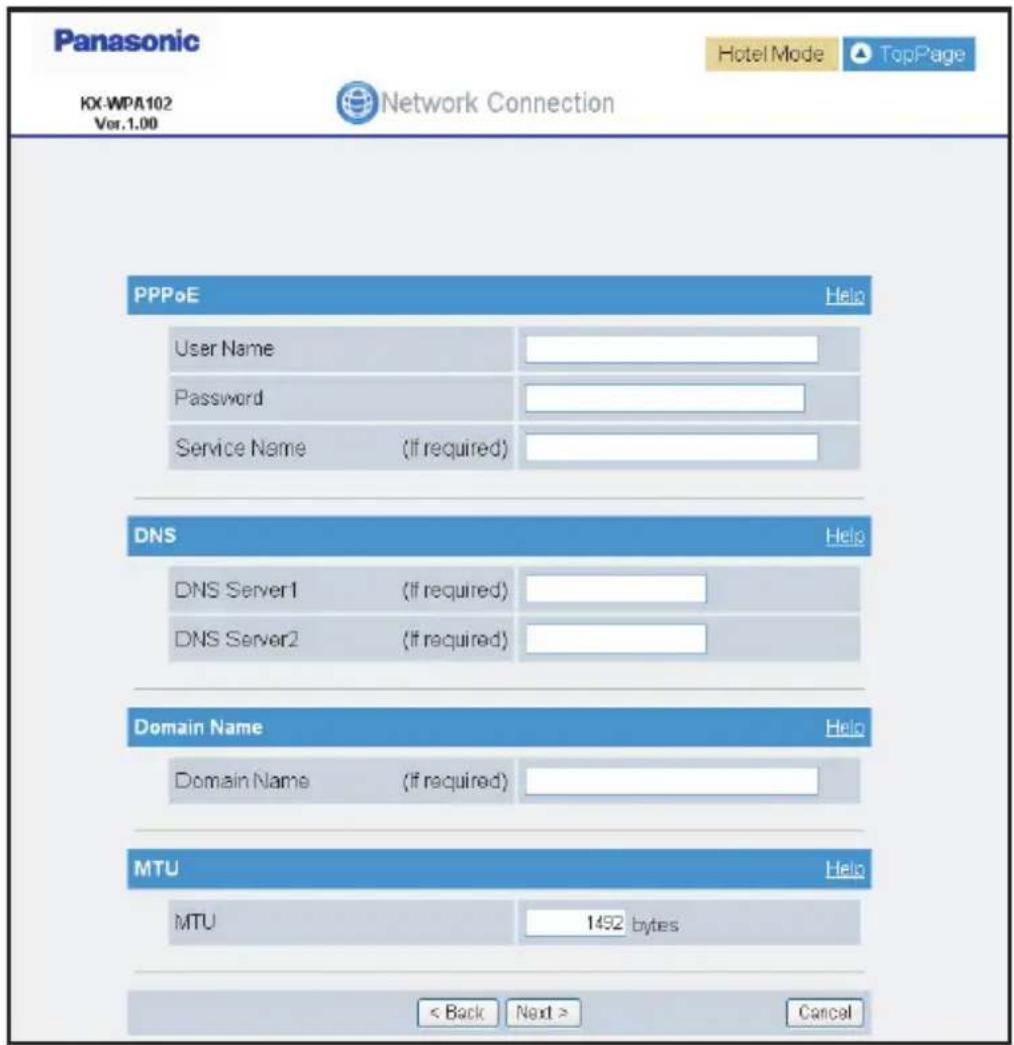
PPPoE Configuration: (Point to Point Protocol over Ethernet) Allows the base unit to receive an IP address from a PPPoE server.
text_image
Panasonic Hotel Mode TopPage KX-WPA102 Ver.1.00 Network Connection PPPoE Help User Name Password Service Name (If required) DNS Help DNS Server1 (If required) DNS Server2 (If required) Domain Name Help Domain Name (If required) MTU Help MTU 1492 bytes < Back Next > Cancel| Setting Description | |
| [User Name] | ● Enter the user name (1 – 63 characters) assigned by your Internet service provider or the hotel you are staying in this data field. |
| [Password] | ● If you have the password assigned by your Internet service provider or the hotel you are staying in, enter password (1 – 63 characters) in this data field. |
| [Service Name] | ● If you have the service name assigned by your Internet service provider or the hotel you are staying in, enter the service name (1 – 63 characters) in this data field. |
| [DNS Server 1] | If you have the DNS (Domain Name System) server address assigned by your Internet service provider or the hotel you are staying in, enter them in this data field. They usually have two addresses.Set 4 numbers (0 – 255) separated by periods such as “192.168.102.253”.Note:There are some restrictions on IP address entry. For example, “0.0.0.0” and “255.255.255.255” are not available. |
| [DNS Server 2] | |
| [Domain Name] | If you have the domain name assigned by your Internet service provider or the hotel you are staying in, enter the domain name (1 – 255 characters) in this data field. |
| [MTU] | MTU is the maximum size of packet that can be sent.If you have the MTU value assigned by your Internet service provider or the hotel you are staying in, enter the MTU value (576 – 1492) in this data field. Otherwise you need to leave the default MTU value (1492). |
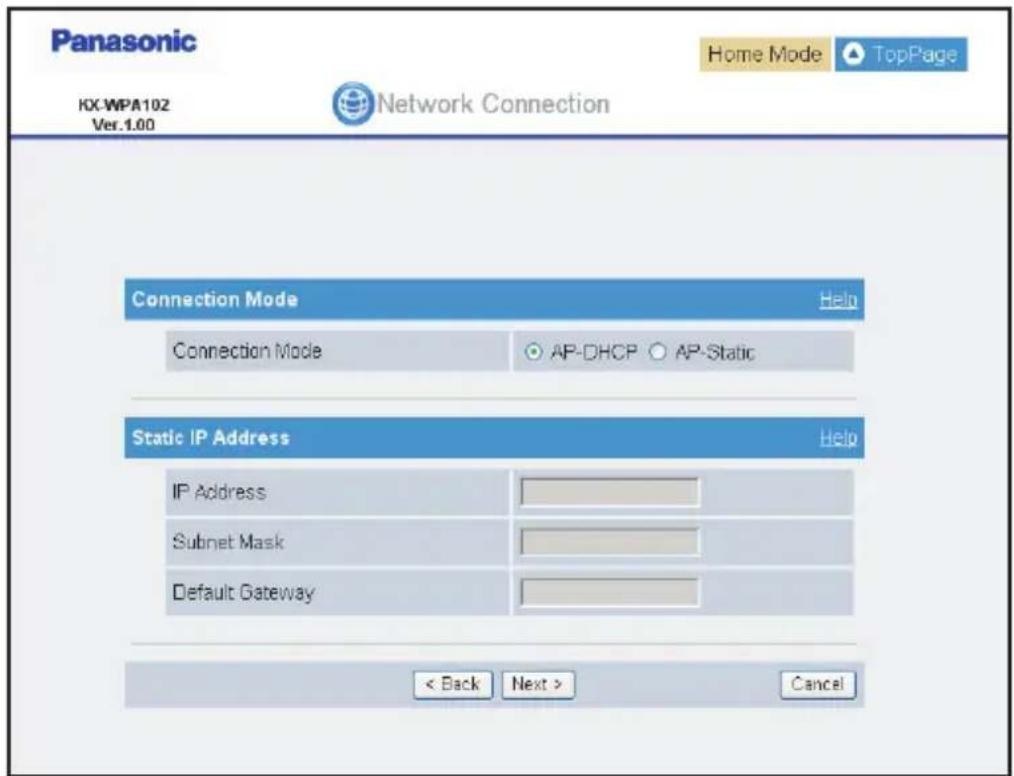
AP Configuration: Allows the base unit to work as an access point when you have a router at home. (AP Configuration is not available in the HOTEL mode.)
text_image
Panasonic Home Mode TopPage KX-WPA102 Ver.1.00 Network Connection Connection Mode Help Connection Mode AP-DHCP AP-Static Static IP Address Help IP Address Subnet Mask Default Gateway < Back Next > Cancel| Setting Description | |
| [Connection Mode] | Select [AP-DHCP] for Connection Mode if the DHCP server is operating in the router or modem with a built-in router you are using. Select [AP-Static] if you want to assign Static IP address. |
| [IP Address] For [AP-Static]: | |
| [Subnet Mask] | Enter the IP address and subnet mask corresponding to your local network.Set 4 numbers (0 – 255) separated by periods such as “192.168.102.253”.Note:There are some restrictions on IP address entry. For example, “0.0.0.0” and “255.255.255.255” are not available. |
| [Default Gateway] | For [AP-Static]:Enter the default gateway address corresponding to your local network by entering the IP address of your existing router or modem with a built-in router, for example.Set 4 numbers (0 – 255) separated by periods such as “192.168.102.253”.Note:There are some restrictions on IP address entry. For example, “0.0.0.0” and “255.255.255.255” are not available. |
Troubleshooting for installation
If problems occur while installing the base unit, you can refer to the check list below. For up-to-date support information, visit http://www.panasonic.com/help. Please refer to it along with this guide for troubleshooting.
Connection:
| Problem Solution | |
| The modem is connected but the WAN indicator is off. | ●Check that the modem and this product are connected.●Check that the power of the modem and this product are turned on.●It is possible that the Ethernet cable is torn apart. Check a link lamp of the device that the base unit is connected to. |
| The Ethernet is connected but the LAN indicator is off. | ●Check the computer connection.●Check that the computer is turned on.●Check that the LAN card and driver are installed on the computer.●It is possible that the Ethernet cable is torn apart. Check a link lamp of the device that the base unit is connected to. |
Initialization Setup:
| Problem Solution | |
| Initialization Setup is not displayed. | ●Dialog boxes may not be displayed immediately due to the state of the LAN.●Check that the LAN or WIRELESS indicator lights in green. Also, check if the LAN card or wireless LAN card is on. If not, check that the LAN is connected.●Check that the power supply was turned on in the following order: modem, router (if you have one), base unit, computer. When turning off the power supply, do so in the following order: modem, base unit, router (if you have one), computer. |
| I cannot find the IP address assigned to the base unit on LAN side after restarting the base unit in [AP-DHCP] mode. | ●IP address of the base unit on LAN side changes from the default IP address (192.168.102.1), after you restart the base unit in [AP-DHCP] mode.●The handset shows the new IP address assigned to the base unit on LAN side. See “View wireless network status” on page 107. |
| The Initialization Setup still indicates hotel mode after switching the mode selector to home mode. | ●To make the new mode effective, restart the base unit (page 189) after the mode selector position is changed. |
| After failure to enter the user name and the password to a prompt screen asking for them for 3 times, the base unit does not respond. | ●Wait for 1 minute until the base unit becomes ready and access to http://192.168.102.1 (the base unit's default IP address) or http://kxwpa.webpage●One minute interval is intentional to avoid malignant access to the base unit. |
Internet access:
| Problem Solution | |
| I cannot connect to the Internet. | Check the modem connection. Also check the connection between this product and the LAN.Check the information received from Internet service provider or the hotel you are staying in regarding Internet connection.When instructed to do so by the Internet service provider, set a web browser proxy server (page 207).Check that the power supply was turned on in the following order: modem, router (if you have one), base unit, computer. When turning off the power supply, do so in the following order: modem, base unit, router (if you have one), computer.For Cable modem users: Turn off the modem for 10 minutes to erase the old information in the modem. If this still does not work, you may need to register the base unit with your Internet service provider. Provide them with the WAN MAC registration number found on the bottom of the base unit.For DSL modem users: You may need to set the PPPoE configuration for your connection mode in Initialization Setup (page 36). Do not unplug the power of the base unit while setting this. If unplugged, it may take a few minutes or more to reset the PPPoE connection. |
Setting up the handset
Battery installation/replacement
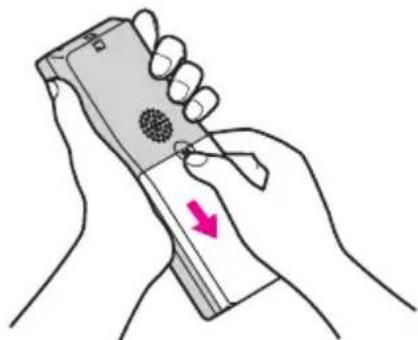
1 Press the notch of the handset cover firmly, and slide it in the direction of the arrow.
- For replacement, remove the old battery.
natural_image
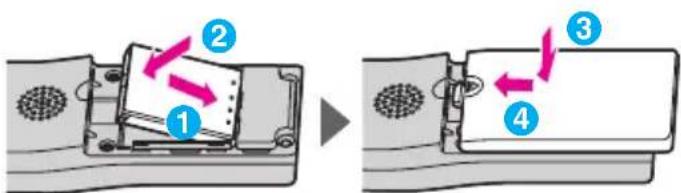
Illustration of a hand holding a smartphone with a magnifying glass and a pink arrow indicating the action (no text or symbols present)2 Insert the battery (①), and press it down until it snaps into position (②). Then close the handset cover (③, ④).
text_image
Diagram illustrating a mechanical or electrical component assembly with numbered parts and directional arrows indicating motion.Important:
- Use only the rechargeable Panasonic battery noted on page 17.
Note:
- The battery terminal indicated “” is not used for the handset.
Attention:

text_image
RECYCLE RBRC Li-ion 7.800.822.8837A lithium-ion battery that is recyclable powers the product you have purchased.
Please call 1-800-8-BATTERY (1-800-822-8837) for information on how to recycle this battery.
Battery charge
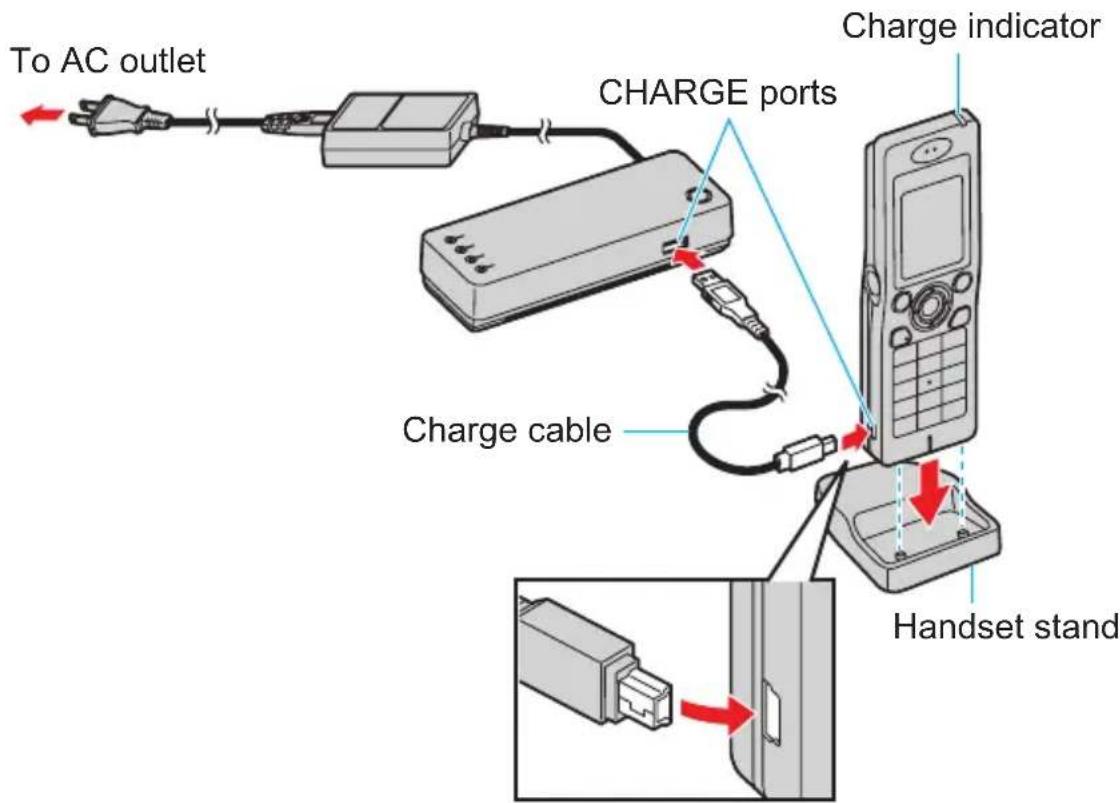
Connect the included charge cable to the CHARGE port of the handset. Connect the other end to the CHARGE port of the base unit that is connected to the power supply.
Charge the battery for 6 hours before initial use.
● While charging, the charge indicator on the handset lights in red. When the battery is fully charged, the indicator goes out.
- You can use the included handset stand while charging the battery. To use the stand, align the grooves of the handset with the tabs of the stand and insert.
text_image
To AC outlet CHARGE ports Charge indicator Charge cable Handset standNote:
- If you want to use the handset immediately, charge the battery for at least 15 minutes.
- You can use the handset while charging the battery. However, we recommend you wait for the handset to be charged to the full level before using the handset.
Battery level:
| Status Battery level | ||
| Not charging Charging | ||
| [6X30] |  | Full |
| [1Y3XT] | [9Z38] | Medium |
 |  | Low |
 (Flashing) (Flashing) | [24DG] | Very lowNeed to be recharged |
Note:
- When the battery needs to be charged, the handset beeps intermittently during a call or a voicemail.
Panasonic battery performance:
| Operation Operating time | |
| While in use (talking) Up to 4.5 hours | |
| While not in use (idle) Up to 55 hours |
Note:
- Battery operating time may be shortened over time depending on usage conditions and surrounding temperature.
- Battery operating time may be shortened when you connect to a different access point, or after you change settings in the handset.
- The battery level may not be displayed correctly after you replace the battery. In this case, let the battery charge for 6 hours.
- You can charge the battery at the temperature range between 5^ C and 40^ C (41 °F and 104 °F).
Text entry
The dial keys are used to enter characters and numbers. Each dial key has multiple characters assigned to it. Use the character table (page 62) and symbol table (page 62) for reference when you enter characters or numbers.
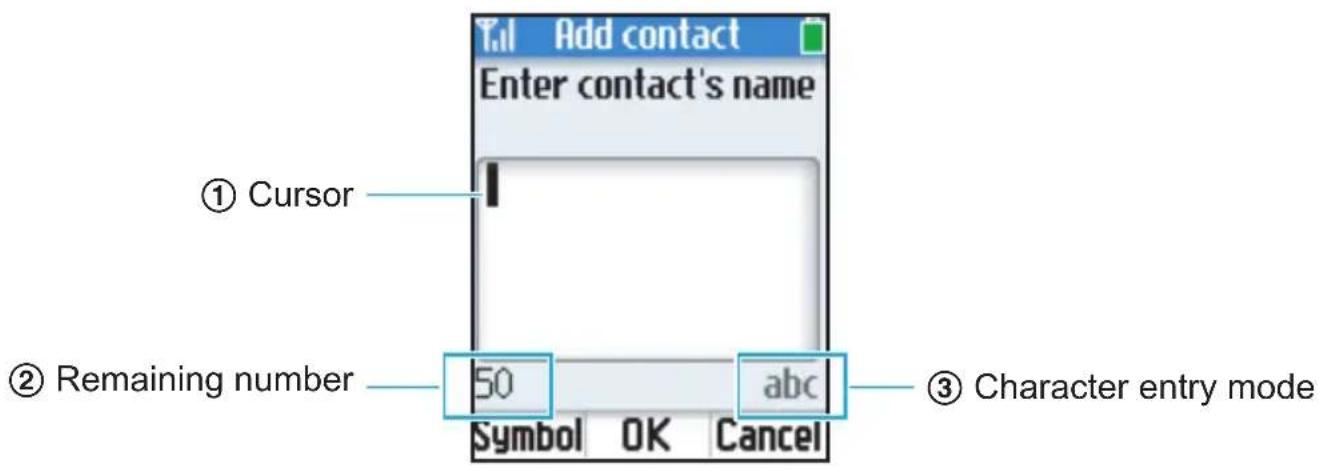
Text entry screen
text_image
Add contact Enter contact's name ① Cursor ② Remaining number 50 abc Symbol OK Cancel ③ Character entry mode①Cursor: It is a pointer that indicates a position to insert or erase the character(s).
②Remaining number: It indicates the number of remaining character(s) you can enter. The number of the character(s) you can enter differ depending on the text entry screen.
③ Character entry mode: It indicates the current character entry mode. To change the character entry mode, press 【*】 repeatedly.
Basic operation
- To move the cursor, press [◀] or [▶].
- Press dial keys to enter characters and numbers.
- To enter another character located on the same dial key, leave for a second after pressing the dial key, so that the cursor automatically moves to the right.
- To change the character entry mode, press [] repeatedly to shift through Lowercase (abc), Uppercase (ABC), Numeric (123) and Hexadecimal (HEX) modes. (Changing the character entry mode is invalid when you enter phone numbers.)
- Press【*】to switch between uppercase and lowercase just after entering a character.
- To enter symbols while in the text entry screen, press [Symbol] and select the desired symbol, then press [Insert].
- Press [CLEAR] to erase the character highlighted by the cursor (or at the end of the text).
- Press and hold [CLEAR] to erase all characters when the cursor is positioned after the last character.
- Press and hold [CLEAR] to erase the character on the cursor and all characters to the right of the cursor if the cursor is in the middle of the text.
Character table
| Key | Text entry Screen | Phone number entry Screen | |||
| Lowercase (abc) | Uppercase (ABC) | Numeric (123) | Hexadecimal (HEX) | Numeric (123) | |
| [1]1 | . , ? ! - *1 @ | 1 | 1 | 1 | |
| [2]a | b c 2 A | B C 2 2 | 2 a b c | 2 | |
| [3]d | e f 3 | D E F 3 | 3 3 d e f | 3 | |
| [4] | g h i 4 | G H I 4 | 4 | 4 | 4 |
| [5] | j k l 5 | J K L 5 | 5 | 5 | 5 |
| [6] | m n o 6 | M N O 6 | 6 | 6 | 6 |
| [7] | p q r s 7 | P Q R S 7 | 7 | 7 | 7 |
| [8] | t u v 8 | T U V 8 | 8 | 8 | 8 |
| [9] | w x y z 9 | W X Y Z 9 | 9 | 9 | 9 |
| [0]Space *1 0 | Space*1 0 | 0 + (Press and hold)*1 | 0 | 0 + (Press and hold) | |
| [*] | Change character entry mode | * | |||
| [#] | Line feed*1 | # | |||
*1 Valid depending on the text entry screen.
Symbol table
| . , ' ? ! " - ( ) |
| @/ : _ ; + & % * |
| = <> £ ∈ $ ¥° [ |
| ] { } \ ~ ^ i S i |
| # | ` |
Note:
●The available symbols differ depending on the text entry screen.
Turning on the handset (Signing in to Skype)
To use the handset, you need a Skype account and need to connect to a network and sign in to Skype. If you do not have a Skype account, you can create it using the handset (page 65).
Starting up for the first time
1 Press and hold [—] for 2 seconds to turn on the handset.
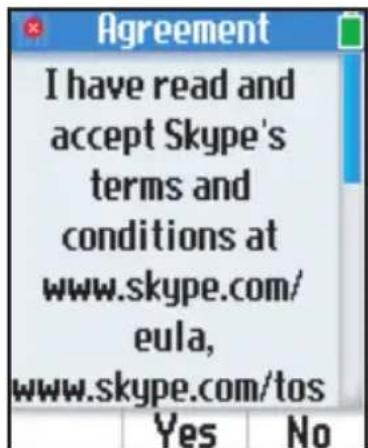
2 Read the entire Skype agreement. → [Yes]
● The handset starts searching for available networks in range.
- If the network list is displayed, select the desired network and press [Connect].
- When the network list is not displayed, the handset automatically connects to the base unit.
3 After a network connection is complete, select "Sign in to Skype" if you already have a Skype account. → [Select]
text_image
Agreement I have read and accept Skype's terms and conditions at www.skype.com/ eula, www.skype.com/tos Yes No- To create a new account, see "Creating a new account" on page 65.
4 Enter your Skype name. → [OK]
5 Enter your password. → [OK]
6 Press [Yes] or [No] to decide whether to sign in automatically from the next time on.
●The Idle screen appears (page 66).
Note:
- You can refer to these instructions again when you start up the handset after you reset the handset. For resetting the handset, see page 123 for details.
- In step 2, you can connect to specific networks that require you to select security type and enter the network key. See “To connect to a wireless network that is found in range:” on page 108 or “To connect to a wireless network that is not found in range:” on page 110.
- In step 2, you can also connect to open networks. When connecting to open networks, a display prompt appears to confirm whether you want to connect or not. See “Auto-connect to open networks list” on page 116.
- For text entry, see page 60 for details.
Starting up for the second time
1 Press and hold [→] for 2 seconds to turn on the handset.
- The handset starts searching for available networks. If any networks you normally use are already in your preferred networks list (page 112), the handset automatically connects to one of the networks in the list.
2 After a network connection is complete, select "Sign in to Skype". → [Select]
- To create a new account, see "Creating a new account" on page 65.
- If the handset is set to "Auto sign in" (page 118) and you did not sign out the previous time, the Idle screen appears instead of the "Sign in" screen, and steps 3-5 are skipped.
3 Enter your Skype name. → [OK]
4 Enter your password. → [OK]
5 Press [Yes] or [No] to decide whether to sign in automatically from the next time on.
●The Idle screen appears (page 66).
Note:
- For text entry, see page 60 for details.
Creating a new account
If you do not have a Skype account, or want to create another account, select “Create new account” in step 3 in “Starting up for the first time” (page 63) or step 2 in “Starting up for the second time” (page 64) to create a new account.
1 "Create new account" → [Select]
2 Enter a Skype name. → [OK]
3 Enter a password. → [OK]
4 Re-enter the password. → [OK]
5 Read the entire Skype agreement. → [Yes]
●The Idle screen appears.
Note:
- For text entry, see page 60 for details.
- Skype names can be 6 – 32 characters, numbers, and punctuation marks. You cannot use spaces or start your name with a number or punctuation mark. If the name is already in use, you will be prompted to try another name.
Password can be 4 – 20 characters. You can use any mix of uppercase and lowercase characters, numbers, and punctuation marks. You cannot use spaces, start your name with a number or punctuation mark, or use your Skype name as a password.
Handset displays
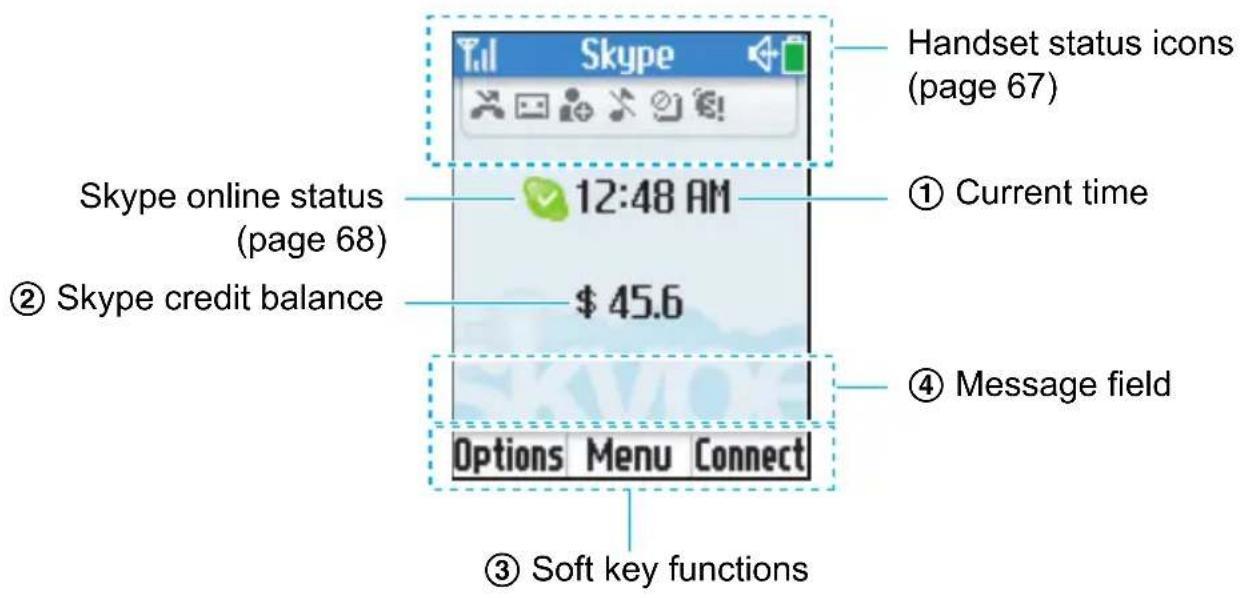
Idle screen
text_image
Skype online status (page 68) Skype credit balance 12:48 AM $ 45.6 Handset status icons (page 67) ① Current time ② ③ Soft key functions Options Menu Connect①Current time: Current time represents currently set time on the handset.
Set the correct date and time before you start using the handset (page 72).
②Skype credit balance: Skype credit balance represents your current Skype credit balance. To purchase Skype credit or change currency, please visit:
http://www.skype.com/
③Soft key functions: Soft key functions represents the actions activated by pressing the corresponding Soft key.
④Message field: Message field represents the following conditions of the handset.
- “No connection”: Indicates that the handset has not yet connected to a wireless network.
- “Short battery life”: Indicates that the operating time is shorter than normal. Please connect to another wireless network.
Handset status icons
| Icon Meaning | |
 | In range of the wireless LAN |
 | Handset has no link to the wireless LAN. |
| Battery level and status (page 59) | |
 | Speakerphone is on. |
| *1 Iced | A recently missed call has been listed in History. |
| *1 Iced | A recently received voicemail has not yet been heard. |
| *1 Iced | A recently received authorization request is on the pending authorization requests list in History. |
| *1 Iced | Your Skype credit is low, or a Skype service you receive is close to expiring. |
| *1 Iced | Silent mode |
| *1 Iced | Handset ringer is off. |
| *1 Iced | Keypad locked |
*1 These icons appear from the left in order of priority.
Skype online status
Skype online status in the Idle screen:
Skype online status in the Idle screen represents your current Skype online status.
| Icon Your status | |
 | Offline: Indicates that you are not connected to Skype, but you have still been authenticated as a Skype user. |
 | Online: Indicates that you are signed in to Skype and currently online. You can make calls and accept calls that are allowed by your privacy settings (page 106). |
 | Skype me: Indicates that you are available for anyone to call. This mode temporarily disables your privacy settings (page 106). |
 | Away: Indicates that you are currently away from phone, but you are still signed in to Skype and can make calls. |
 | Not available: Indicates that you are currently not available, but you are still signed in to Skype and can make calls. |
 | Do not disturb: Indicates that you are signed in to Skype, but do not want to receive calls. In this mode, the ringer tone is set to be silent. |
 | Invisible: Indicates that you are offline, but you are still signed in to Skype and can make calls. |
 | Connecting: Indicates that you are connecting to Skype. |
Note:
- You can change your Skype online status. See “Changing your status” on page 103.
Display backlight
After 10 seconds of inactivity the display becomes dark. After additional 50 seconds of inactivity, the display backlight automatically turns off in order to preserve the life of the battery.
To turn on the display backlight:
To use the handset when the display backlight is turned off, press any key to turn the display backlight on again.
Main menu
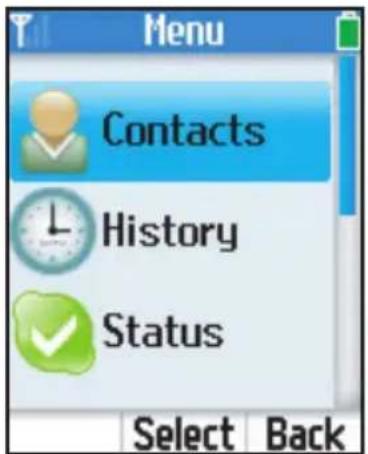
Skype's Main menu provides 7 menus as shown below.
1 While in the Idle mode, press [Menu] (middle soft key).
2 Select the desired menu. → [Select]
text_image
Menu Contacts History Status Select Back| Menu Description Page | ||
| Contacts^*1 | View a list of Skype and SkypeOut contacts, with their current Skype online status. | 73 |
| History^*1 | View history of missed calls, incoming calls, outgoing calls, voicemails and authorization requests. | 95 |
| Status^*1 | Define your personal Skype settings.Change status: Change your Skype online status. 103My profile: Change your Skype profile details. 103Sign out: Sign out of Skype. 104 | |
| Add contact^*1 | Add Skype and SkypeOut contacts to your contact list. 76 | |
| Search^*1 | Search for Skype contacts over the Internet. 78 | |
| Services^*1 | View Skype credit, SkypeIn and voicemail information. 131 | |
| Settings Configure handset settings. | ||
| Network: Search for networks, manage preferred networks list, and set auto-connection to open networks. | 112 | |
| General: Change your password^*1 , set auto sign-in ^*1 ,update software, and reset handset settings. | 118 | |
| Call divert ^*1 : Set call forwarding, voicemail and welcome message. | 90 | |
| Privacy^*1 : Restrict incoming calls to those you specify. | 106 | |
| Tones: Set the ringer type, tone, volume, notification tone, Keypad tone and out of service tone. | 124 | |
| Time and Date: Set the time and date, time zone, daylight saving and date format. | 72 | |
| Blocked users^*1 : View the blocked users list and unblock users you desire. | 82 | |
| Phone settings: Register the handset to the base unit and adjust the brightness of the handset display. | 125 | |
| Information: View handset information such as product ID, software/firmware versions and MAC address. | 126 | |
| Advanced: Set the notification for a software update, and set network proxy. | 127 | |
*1 Available only when you are signed in to Skype.
Idle mode option screen
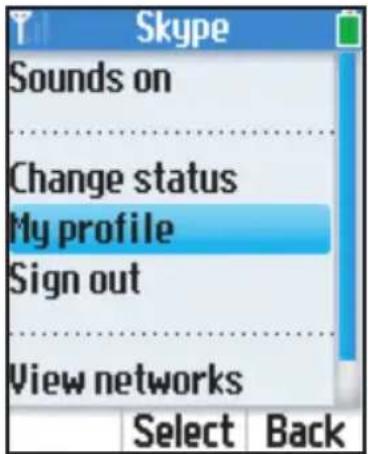
The Idle mode option screen is another main menu that provides different functions such as turning the silent mode on or off, viewing the list of networks, changing your profile details, Skype online status, and signing out of Skype. Functions available in the menu depend on whether you are signed in to Skype.
1 While in the Idle mode, press [Options].
2 Select the desired menu. → [Select]
text_image
Skype Sounds on Change status My profile Sign out View networks Select Back| Menu Description | |
| Silent^*1 | Set the silent mode to on/off. |
| Sounds on^*1 | |
| Change status^*2 | Change your Skype online status. |
| My profile^*2 | Change your Skype profile details (page 103). |
| Sign out^*2 | Sign out of Skype. |
| View networks View a list of networks found in range. | |
| Network details View wireless network status (page 107). | |
*1 Either is displayed according to the current silent mode settings.
*2 Available only when you are signed in to Skype.
Setting the time and date
Set the correct time and date before you start using the handset. The time zone and the daylight saving need to be set first before setting the time.
1 [Menu] (middle soft key)
2 "Settings" → [Select]
3 "Time and Date" → [Select]
4 Select the desired setting. → [Select]
| Time zone | Select the desired time zone. → [Select] |
| Daylight saving | Select “Standard” or “Daylight saving”. → [Select]“Daylight saving” adds 1 hour to the time setting of “Standard”. |
| Time Enter the current hour and minute (12-hour clock format) by selecting 2 digits for each. Press [★] to select “AM” or “PM”. → [OK] | |
| Date | Enter the current month, day and year by selecting 2 digits for month and day, and 4 digits for year. → [OK]●Date can be set from 01/01/2006 to 12/31/2030. |
| Date format | Select the desired format. → [Select] |
Note:
- If you make a mistake when entering the time and date, press [◀] or [▶] to move the cursor, then make the correction.
- Changing "Time zone" and "Daylight saving" sets the displayed time forward or backward. When you set the time and date for the first time, set the time after all the other time and date settings.
- When the time setting is reset to an initial condition by removing the battery or for some other reasons, the time is displayed as “12:00 AM” and it stops.
Contact list
Your contact list displays all of the display names you can make calls to. If you have an existing Skype account, your contact list is automatically downloaded when you sign in. If you are new to Skype and have just created an account, your contact list will be empty. You will need to add contacts to your list (page 76).
Skype protects the privacy of users by requiring authorization on names that you wish to add to your contact list. When you add a name to your list, you can decide whether to send an authorization request to the user or not. The user can accept or deny the request. When a request is accepted, you can see when the contact is online. You can also view their personal profile details.
Important:
- You can use up to 500 contacts. If you have more than 500 contacts, the handset cannot be synchronized with your existing contacts, and you need to reduce contacts on your computer (page 101).
Using your contact list:
You can use some useful features in the contact list, such as viewing the Skype online status or profile of the desired contact.
1 While in the Idle mode, press [CONTACTS].
- The message "Waiting to download contacts from network" may be displayed while downloading your contact list.
2 Select the desired contact.
- To view the contact's profile, press [View] (page 81).
text_image
Contacts Emily Johnson George Marti... John Smith Maria Alvarez Taro Matsush... David Kim Matthew | NJ Options View BackNote:
- In step 1, you can also press [Menu] (middle soft key). "Contacts" [Select]
- In step 2, the quick filter is available for searching a contact's name.
- Enter initial or a starting part of a name. When the entered character(s) match a contact's name as initial or a starting part, the name is listed as a candidate. To select the desired contact from candidates, press [▲] or [▼].
- Contacts are listed alphabetically in the following order:
- Online Skype contacts
- Offline Skype contacts with call forwarding number and SkypeOut contacts
- Offline and unauthorized Skype contacts
- Display names in the contact list are shown in order of the following priority.
– Names renamed by the user
– Names registered by the contacts
- Skype names
- If the message "Contact list full" is displayed, you need to reduce contacts on your computer (page 101).
Skype status icons in contact list:
Skype status icons represent the current Skype online status of the contacts in contact list.
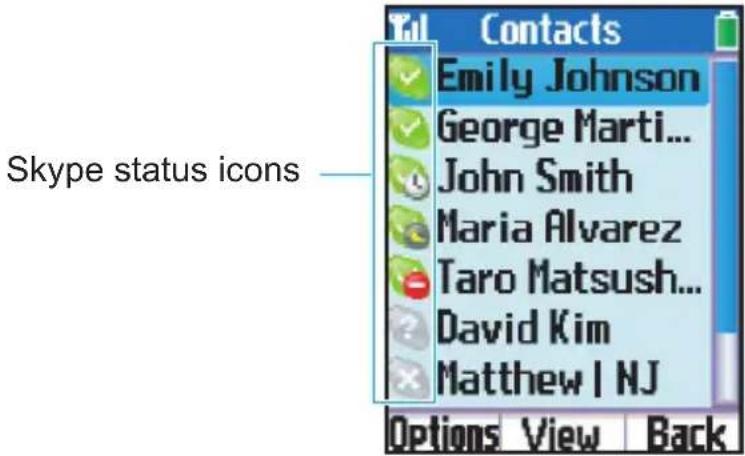
text_image
Skype status icons Contacts Emily Johnson George Marti... John Smith Maria Alvarez Taro Matsush... David Kim Matthew | NJ Options View Back| Icon Status | |
 | Online: Indicates that the contact is signed in to Skype and currently online. |
 | Skype me: Indicates the contact is available for calls from anyone. |
 | Away: Indicates that the contact is signed in to Skype but currently away. |
 | Not available: Indicates that the contact is signed in to Skype but is currently not available. |
 | Do not disturb: Indicates that the contact is signed in to Skype but does not want to receive calls. |
 | Calls forwarded: Indicates that calls are forwarded to a specified number. |
 | SkypeOut: Indicates the contact is a SkypeOut contact. |
 | Pending: Indicates that the contact is pending your authorization. |
 | Offline: Indicates that the contact is not signed in to Skype. |
 | Offline voicemail: Indicates that the contact is not signed in to Skype but can receive voicemails. |
 | Blocked: The contact is blocked and cannot contact you. |
 | SkypeOut blocked: Indicates the SkypeOut contact is blocked and cannot contact you. |
Adding contacts
You can add up to 500 contacts to your contact list.
Adding Skype contacts
1 [Menu] (middle soft key)
2 "Add contact" → [Select]
3 "Skype" → [OK]
4 Enter the Skype name (max. 32 characters). → [OK]
5 Press [Yes] to add the contact to your list and to authorize the contact to see when you are online.
- Press [No] to add the contact without the authorization.
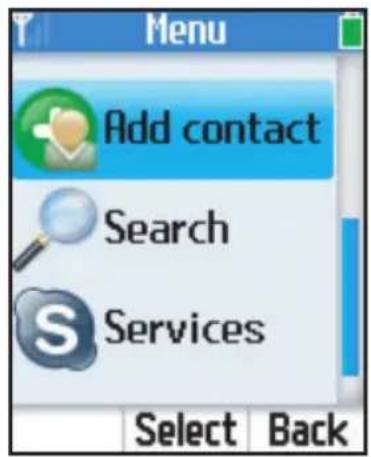
text_image
Menu Add contact Search Services Select Back6 Press [OK] to send an authorization request to the added contact.
7 Enter text to send with the request (max. 200 characters). → [OK]
Note:
- You can also search and add Skype contacts from the "Search" menu (page 78).
- You can also add Skype contacts from the "History" menu (page 95).
- In step 2, if the message "The maximum number of contacts has been reached." is displayed, remove the unwanted contacts before adding contacts (page 79).
- In step 5, if the message "Edit your list of blocked users" is displayed, see "Unblocking contacts" (page 82).
- In step 5, if you previously sent an authorization request to the same user and the user accepted the request, skip steps 6 and 7, then press [OK].
- In step 6, the authorization request is sent to the newly added contact so that the person will allow you to see when the person is online.
- For text entry, see page 60 for details.
Adding SkypeOut numbers
You can add non-Skype (SkypeOut) numbers to your contact list. SkypeOut numbers are listed with “ ” icon in your contact list.
1 【Menu】(middle soft key)
2 "Add contact" → [Select]
3 "SkypeOut number" → [OK]
4 "Contact's name" → [Select]
5 Enter the name if you desire (max. 50 characters). → [OK]
6 "Phone number" → [Select]
7 Enter the phone number (max. 20 digits). → [OK]
• The phone number should start with the country code.
8 [Save]
Note:
- You can also add SkypeOut numbers from the "History" menu (page 95).
- In step 2, if the message "The maximum number of contacts has been reached." is displayed, remove the unwanted contacts before adding contacts (page 79).
- In step 7, enter the phone number in the following way (even for local calls): "country code" + "area code" + "local phone number"
Example (using the country code "1" for calling USA): + 1 555 321 5555 - “+” (international prefix) is automatically added.
- For some countries, you may need to exclude "0" at the beginning of the area code.
- To correct a digit, press [CLEAR].
- In step 8, if the message "Edit your list of blocked users" is displayed, see "Unblocking contacts" (page 82).
- For text entry, see page 60 for details.
Searching for Skype contacts
You can search the Skype directory for your desired Skype contacts over the Internet so that you can call, add to your contact list, or view the profiles of the contacts.
1 [Menu] (middle soft key)
2 "Search" → [Select]
3 Enter the name or E-mail address to search for. → [OK]
● The contacts containing the entered characters are listed.
4 Select the desired Skype contact.
- To view the contact's profile, press [View].
- To call the contact, press [bell] or [open].
- To access options, press [Options] and select the desired option. [Select]
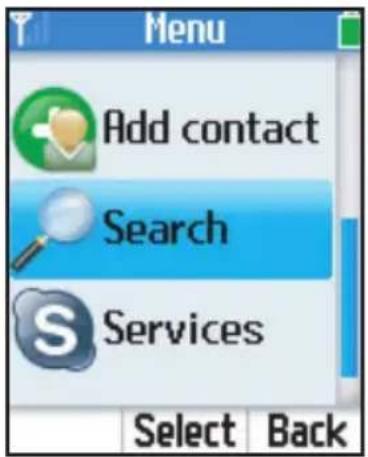
text_image
Menu Add contact Search Services Select Back| More results View the next 20 results. |
| Previous results View the previous 20 results. |
| Search again Search again with another name or E-mail address. |
| Add to contacts Add the contact to your contact list. |
| View profile View the profile of the contact. |
Note:
- For text entry, see page 60 for details.
- In step 3, you can enter either the Skype name or the full name of the contact. You can also search for a contact by entering a part of the name.
Removing contacts
You can remove contacts from contact list.
1 While in the Idle mode, press [CONTACTS].
2 Select the desired contact. → [Options]
3 "Remove" → [Select]
4 Select "Remove and block" or "Remove only". → [Select]
| Remove and block Remove the contact from your contact list and block this contact. The contacts that are removed and blocked are moved from your contact list to the blocked users list. To unblock the contacts that are removed and blocked, see “Unblocking contacts” on page 82. |
| Remove only Remove the contact from your contact list. This contact is not blocked. |
5 [OK].
Note:
- In step 1, you can also press [Menu] (middle soft key) "Contacts" [Select]
Contact list options
You can access the option menu while viewing the contact list.
1 While in the Idle mode, press [CONTACTS].
2 Select the desired contact. → [Options]
3 Select the desired option. → [Select]
| Call*1 | Call the contact. Select the desired phone number or the display name of the desired contact to call. →【Select】/【/【】●Not available if the contact is a blocked user. |
| Send voicemail*1 | Send a voicemail to the contact. |
| View profile View the | profile of the contact. |
| Rename*1 | Rename the display name of the contact. |
| Edit*2 | Edit the SkypeOut contact's name and phone number. |
| Remove | Remove the contact from your contact list (page 79). |
| Block user*3 | Block or unblock the contact (Skype status icon changes after setting). |
| Unblock user*3 | |
| Request auth.*1 | Send an authorization request to the contact (page 76).●Not available if a request is already sent and authorized. |
| Add SkypeOut*1 | Add a SkypeOut contact to your contact list. |
*1 Available only for Skype contacts.
*2 Available only for SkypeOut contacts.
*3 Either is displayed depending on the contact.
Note:
- In step 1, you can also press [Menu] (middle soft key). "Contacts" [Select]
- You can also access the contact list options when viewing a contact profile. In step 2, press [View] after finding the desired contact to view the contact profile. Then, press [Options] to access the options.
Viewing a contact profile
You can view the profile of the contact you select.
1 While in the Idle mode, press [CONTACTS].
2 Select the desired contact. → [View]
Note:
- In step 1, you can also press [Menu] (middle soft key). "Contacts" [Select]
- In step 2, you can also select the desired contact. [Options] "View profile"
- The display name of the contact may not be properly displayed if the name was not entered using the Roman alphabet. In this case, press [Options], and select "Rename" to change the name.
Blocking contacts
Blocking contacts
You can block contacts that you do not wish to receive calls from in your contact list.
1 While in the Idle mode, press [CONTACTS].
2 Select the desired contact. → [Options]
3 "Block user" → [Select]
Unblocking contacts
You can unblock contacts that are blocked in your contact list.
1 While in the Idle mode, press [CONTACTS].
2 Select the desired contact. → [Options]
3 "Unblock user" → [Select]
To unblock contacts that are removed and blocked:
Contacts that are removed and blocked from contact list go to the blocked users list. You can release the blocked contacts from the blocking status.
1 【Menu】(middle soft key)
2 "Settings" → [Select]
3 "Blocked users" → [Select]
4 Select the desired user. → [Unblock]
Making calls
You can make calls to the Skype users (Skype-to-Skype calls) for free. You can also make calls to landlines and mobile phones (SkypeOut calls). To make SkypeOut calls, you must have Skype credit. For more information, please visit:
http://www.skype.com/
Making a call using the contact list
You can make a call using your contact list.
You must add Skype contacts in the contact list beforehand by using your handset or a computer version of Skype. See “Adding contacts” on page 76.
1 While in the Idle mode, press [CONTACTS].
2 Select the desired Skype contact.
3【】
- To make a call using the speakerphone, press 【✿】.
4 When you are finished talking, press [\~].
Note:
- In step 1, you can also press [Menu] (middle soft key). "Contacts" [Select]
- In step 2, you can also search for a contact by entering a part of the name. Press the dial keys to enter the name, then press [▲] or [▼] to select the desired contact from the candidates.
- In step 2, you can also view the contact's profile to select the desired Skype contact. 【View】
Making a call from the contact's profile:
You can make a call to home, office or mobile phone number using the contact's profile.
1 While in the Idle mode, press [CONTACTS].
2 Select the desired Skype contact.
3 [Options]
4 "Call" → [Select]
5 Select the desired number.
text_image
call client1 Ringing...6【】
- To make a call using the speakerphone, press 【◀】.
7 When you are finished talking, press [\~].
Note:
- In step 1, you can also press [Menu] (middle soft key). "Contacts" [Select]
- In step 2, you can also search for a contact by entering a part of the name. Press the dial keys to enter the name, then press [▲] or [▼] to select the desired contact from the candidates.
- In step 2, you can also view the contact's profile to select the desired Skype contact. 【View】
Making a call using History
You can make a call using History.
1 [Menu] (middle soft key)
2 "History" → [Select]
3 Select the desired list. → [Select]
4 Select the desired log.
5【】
- To make a call using the speakerphone, press 【◀】.
- If you select a voicemail log, press [Options]. "Call" [Select]
6 When you are finished talking, press [\~].
Note:
- In step 1, you can also press 【◀】 to access the outgoing calls list → Press 【◀】 or 【▶】 to switch between the outgoing calls, incoming calls and missed calls lists, then skip to step 4.
Making a direct regular phone call (SkypeOut)
You can make a call to landline and mobile phone (SkypeOut call) directly while in the Idle mode.
1 While in the Idle mode, enter the phone number in the following way (even for local calls):
"country code" + "area code" + "local phone number"
Example (using the country code "1" for calling USA):
+ 1 555 321 5555
●“+” (international prefix) is automatically added.
- For some countries, you may need to exclude "0" at the beginning of the area code.
- To correct a digit, press [CLEAR].
2 [t]
- To make a call using the speakerphone, press [◀].
3 When you are finished talking, press [\~].
Making a direct Skype-to-Skype call
You can make a call to Skype user (Skype-to-Skype call) directly while in the Idle mode.
1 While in the Idle mode, enter [★].
2 Enter the Skype name that you want to call.
3【】
- To make a call using the speakerphone, press 【✿】.
Answering calls
When a call is being received, the handset rings and the ringer indicator on the handset flashes rapidly.
1 Press ( ) or ( ).
2 When you are finished talking, press [\~].
Note:
- When a call is received while your Skype online status is “Do not disturb”, the handset does not ring. To change the Skype online status, see “Changing your status” on page 103.
- The handset does not ring when the handset ringer volume is off (page 124) or silent mode is on (page 71).
Temporary ringer off
While the handset is ringing, you can turn the ringer off temporarily by pressing 【Silent】.
Note:
- While the handset is ringing, you can also press [▲] or [▼] to adjust the ringer volume temporarily. The adjusted ringer volume is reverted to the set volume next time and not saved.
Adjusting the ringer volume
1 【Menu】(middle soft key)
2 "Settings" → [Select]
3 "Tones" → [Select]
4 "Ring volume" → [Select]
5 Press [▲] or [▼] repeatedly to select the desired volume. → [OK]
Rejecting the call
While the handset is ringing, press 【─】.
Note:
- Pressing [\~] to reject a call is logged in the incoming calls list.
Conference
You can receive a conference call that enables you have a conversation with more than 1 person at a same time.
When a conference call is being received, the title at the top of the screen shows "Conference".
1 Press [ ] or [].
2 When you are finished talking, press [\~].
Note:
- You can join but can not initiate a conference call. If you want to initiate a conference call, you need to use other Skype product that can host a conference call.
- To reject a conference call, press [\~].
Useful features during a call
Using the speakerphone
1 During a conversation, press [◀].
2 When you are finished talking, press [\~].
Note:
- Use the speakerphone in a quiet environment.
- Press [◀] to turn the speakerphone on or off.
- Press【】to switch the receiver if you are on the speakerphone.
Adjusting the receiver/speaker volume
Press [▲] or [▼] repeatedly while talking.
Hold
This feature allows you to put a call on hold.
1 Press [Hold] during a call.
2 To release hold, press [Resume] or [☐].
- To release hold while on the speakerphone, press [Resume] or [◀].
Mute
This feature allows you to mute your voice. While mute is turned on, you can hear the other party, but the other party cannot hear you.
1 Press [MUTE] during a call.
2 To return to the conversation, press [MUTE] or [C].
- To return to the conversation on the speakerphone, press [MUTE] or [◀].
Call Waiting
This feature allows you to receive calls while you are already talking on the phone.
If you receive a call while on the phone, you will hear a call waiting tone and the 2nd caller's information will be displayed.
To answer 2nd call:
1 Press [Answer] to answer 2nd call.
- 1st caller is automatically held.
2 When you are finished talking with 2nd caller, press [→].
To reject 2nd call:
While 2nd caller is calling, press [Reject].
Note:
- Pressing [Reject] to reject a call is logged in the incoming calls list.
To resume conversation with 1st caller while you talking with 2nd caller:
1 Press [Switch] to switch 1st caller.
- 2nd caller is automatically held.
2 To resume conversation with 1st caller, press [Resume].
3 When you are finished talking with 1st caller, press [\~].
Diverting calls
This feature diverts incoming calls to the voicemail box or another forward number (phone number/Skype name) that has been registered as call divert destination when you cannot answer a call or when you are offline.
Setting the call divert destination
You need to set the voicemail box and/or a specific phone number as the call divert destination in advance.
Note:
- If no phone number is set as the call divert destination, unanswered calls are forwarded to the voicemail box.
- You need to subscribe to the Skype Voicemail service to divert calls to the voicemail box. You also need to subscribe to the SkypeOut service if you want to divert calls to landline or mobile phone numbers (SkypeOut numbers). If you do not subscribe to the Skype Voicemail and SkypeOut services, you can only divert incoming calls to a Skype contact.
Diverting to other numbers:
1 【Menu】(middle soft key)
2 "Settings" → [Select]
3 "Call divert" → [Select]
4 "Call forwarding" → [Select]
5 "Yes" → [Select]
6 Select the desired destination number field. → [Select]
7 Enter the Skype name or SkypeOut number. → [OK]
Note:
- In step 4, if the number is already set, select "Forwarding to". [Select], then skip to step 6.
- For text entry, see page 60 for details.
Diverting to voicemail box:
Voicemail is an automatic answering service offered by Skype. After you subscribe to this service, the Skype Voicemail system will answer calls for you when you are offline or unavailable to answer the phone. Messages are recorded in the Skype Voicemail box, not your handset. To listen to voicemail messages, see “Listening to voicemail message” on page 93. For more information about Skype Voicemail, please visit:
http://www.skype.com/
1 【Menu】(middle soft key)
2 "Settings" → [Select]
3 "Call divert" → [Select]
4 "Voicemail" → [Select]
5 "Yes" → [Select]
Setting your welcome message
You can play and record your welcome (greeting) message.
To play your welcome message:
1 【Menu】(middle soft key)
2 "Settings" → [Select]
3 "Call divert" → [Select]
4 "Welcome message" → [Select]
5 [Play]
●The handset starts playing your welcome message.
- Press [◀] to turn the speakerphone on and off.
- Press 【】 to switch to the receiver if you are on the speakerphone.
- Press [▲] or [▼] to adjust the volume.
- Press [Stop] to stop the welcome message.
Note:
- In steps 2 to 4 you can also select "History" → [Select] → "Voicemails" → [Select] → [Options] → "My greeting" → [Select]
- In step 5, you can also press [Options] "Play" [Select]
To record a new welcome message:
1 【Menu】(middle soft key)
2 "Settings" → [Select]
3 "Call divert" → [Select]
4 "Welcome message" → [Select]
5 [Options]
6 "Record new" → [Select]
8 Press [End] when finished.
7 Record your message after the beep (max. 1 minute).
Note:
- In steps from 2 to 4, you can also select "History". [Select] "Voicemails" [Select] [Options] "My greeting" [Select]
- In step 6, you can reset the welcome messages to default by selecting "Reset to default". Press [Select], then skip to steps 7 and 8.
- In step 7 even if you exit recording by pressing [→], the message may have been already recorded.
Skype Voicemail
You can receive voicemail messages from users who subscribe to Skype Voicemail service. You can also send voicemail messages to them.
If you subscribe to this service, you can send or receive voicemails regardless of user's subscription.
To receive voicemail messages when you are offline or unavailable to answer the phone, you must set the call divert destination to voicemail (page 91).
Listening to voicemail message
You can listen to voicemail messages using History.
Also the handset lets you know you have new voicemails in the following ways:
- Charge/Ringer indicator flashes for about 5 seconds and an incoming message tone beeps twice.
– A new voicemails notification is displayed. - “ ” is displayed in the Idle screen.
1 [Menu] (middle soft key)
2 "History" → [Select]
3 "Voicemails" → [Select]
4 Select the desired log.
- Press [▼] to search from the most recent log, or [▲] from the oldest.
5 Press [Play] on the voicemails list.
●The handset starts playing back the message.
- Press [◀] to turn the speakerphone on or off.
- Press【】to switch to the receiver if you are on the speakerphone.
- Press [▲] or [▼] to adjust the volume.
- Press [Stop] to stop the message.
Note:
- In step 1, you can also press [View] to access the voicemails list while a new voicemails notification is displayed, then skip to step 4.
- In step 5, you can also press [Options]. "Play" [Select]
- Received voicemails are listed in chronological order in the voicemails list.
“ ” indicates a new voicemail that you have not played back in the voicemails list.
“ ” indicates a voicemail that you have already played back in the voicemails list.
Sending voicemail messages
You can send voicemail messages using your contact list or History.
1 【Menu】(middle soft key)
2 "Contacts" → [Select]
3 Select the desired contact → [Options]
4 "Send voicemail" → [Select]
6 Press [End] to finish recording.
5 After the greeting is played and the beep sounds, record your message.
Note:
- In step 2, you can also select "History". [Select] "Missed calls"/ "Incoming calls"/"Outgoing calls"/"Voicemails" [Select]
- In step 3, you can select the desired contact. [View] [Options]
- In step 6, even if you exit recording by pressing [—], the message may be recorded.
History
The following events are logged in the “History” menu: 50 missed calls, 20 incoming calls, 20 outgoing calls, 100 voicemails and 20 authorization requests. These logged events are listed in chronological order, most recent first.
Missed calls, incoming calls, outgoing calls
You can manage the missed calls list, the incoming calls list and the outgoing calls list. Also the handset lets you know you have new missed calls in the following ways:
– A new missed calls notification is displayed.
- “” is displayed in the Idle screen.
1 [Menu] (middle soft key).
2 "History" → [Select]
3 Select the desired list. → [Select]
4 Select the desired log.
- Press [▼] to search from the most recent log, or [▲] from the oldest.
- To view details of the log, press [Select].
- To call back, press 【】 or 【】.
- To access options, press [Options] and select the desired option. [Select]
| Call Make a call. | ●Not available if this contact is a blocked user. |
| Send voicemail Send a | voicemail to the contact (page 94).●Not available if this contact is a blocked user. |
| Details | View details of the log: contact's name/number, date, time. |
| Delete Delete the log. | |
| View profile View the | profile of the contact (page 81). |
| Add to contacts Add the | contact to your contact list (page 76).●Not available if this contact is already in your contact list. |
| Clear list Delete the entire list. | |
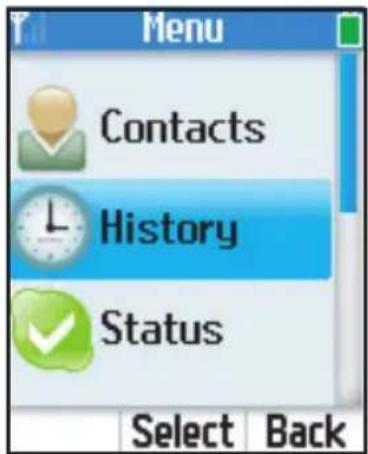
text_image
Menu Contacts History Status Select BackNote:
- In step 1, you can also press 【】 to access the outgoing calls list while in the idle mode, then skip to step 4.
- In step 1, you can also press [View] to access the missed calls list while a new missed calls notification is displayed, then skip to step 4.
- In step 4, you can also press [◀] or [▶] to switch between the outgoing calls, incoming calls and missed calls lists.
- “ ” indicates a new missed call in the missed calls list.
Voicemails
You can manage the voicemails list.
Also handset lets you know you have new voicemails in the following ways:
- Charge/Ringer indicator flashes for about 5 seconds and an incoming message tone beeps twice.
– A new voicemails notification is displayed.
- “” is displayed in the Idle screen.
1 【Menu】(middle soft key)
2 "History" → [Select]
3 "Voicemails" → [Select]
4 Select the desired log.
- Press [▼] to search from the most recent log, or [▲] from the oldest.
- To play the voicemail, press [Play] (page 93).
- To access options, press [Options] and select the desired option. [Select] - You can access options while viewing details of the log. Press [Options] "Details" [Select] [Options] Select the desired option. [Select]
| Play^*1 | Play the voicemail (page 93). |
| Details^*1 | View details of the log: contact's name/number, date, time. |
| Delete Delete the log. | |
| Call Make a call. | ●Not available if this contact is a blocked user. |
| Send voicemail Send a | voicemail to the contact (page 94).●Not available if this contact is a blocked user. |
| View profile View the profile of the contact (page 81). | |
| Block user*2*3 | Block or unblock the contact.●Not available if this contact is not in your contact list. |
| Unblock user*2*3 | |
| Request auth.*2 | Send an authorization request to the contact (page 76).●Not available if a request is already sent and authorized or this contact is not in your contact list. |
| Add to contacts Add the contact to your contact list (page 76).●Not available if this contact is already in your contact list. | |
| My greeting*1 | Record and play welcome message (page 91). |
*1 Available only while viewing the log
*2 Available only while viewing details of the log
*3 Either is displayed depending on the contact.
Note:
- In step 1, you can also press [View] to access the voicemails list while a new voicemails notification is displayed, then skip to step 4.
●“” indicates a new voicemail that you have not played back in the voicemails list. - “” indicates a voicemail that you have already played back in the voicemails list.
Authorization requests
You can manage the authorization requests list.
Also the handset lets you know you have new authorization requests in the following ways:
- Charge/Ringer indicator flashes for about 5 seconds and an incoming message tone beeps twice.
– A new authorization requests notification is displayed.
- “” is displayed in the Idle screen.
1 [Menu] (middle soft key)
2 "History" → [Select]
3 "Authorizations" → [Select]
4 Select the desired log.
- Press [▼] to search from the most recent log, or [▲] from the oldest.
6 Read the authorization request message. → [Options]
7 Select "Accept" or "Decline" → [Select]
| Accept Accept the authorization request from the contact. |
| Decline Decline the authorization request from the contact. |
Notification screen
Notification screen appears to notify you of some specific events. You need to read the full message shown on each notification screen and follow the instruction if necessary. The following notifications are provided:
New missed calls notification
text_image
You have new missed call(s)This notification appears when you missed a call.
- To view the missed call log, press [View].
- If you view it later, press [Cancel].
Note:
- For missed call logs, see page 95 for details.
New voicemails notification
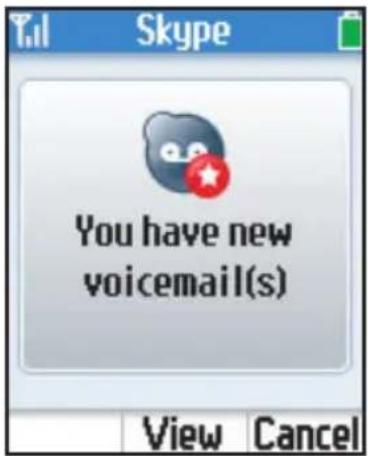
text_image
You have new voicemail(s)This notification appears when you receive a new voicemail.
- To view the voicemail log, press [View].
- If you view it later, press [Cancel].
Note:
- For voicemail logs, see page 96 for details.
New authorization requests notification

text_image
You have received new authorization request(s)This screen appears when someone requests to exchange contact details.
- To view the request, press [View].
- If you view it later, press [Cancel].
Note:
- For handling of request, see page 97 for details.
New available software notification
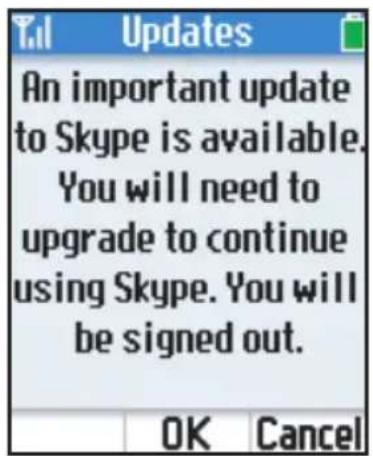
text_image
Updates An important update to Skype is available. You will need to upgrade to continue using Skype. You will be signed out.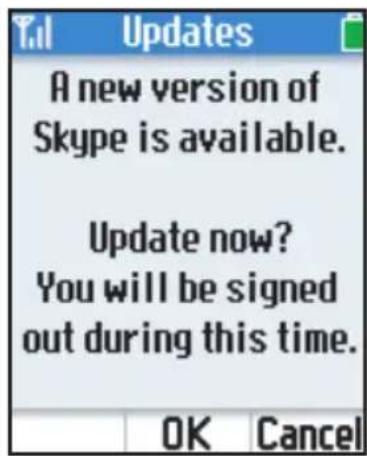
text_image
Updates A new version of Skype is available. Update now? You will be signed out during this time.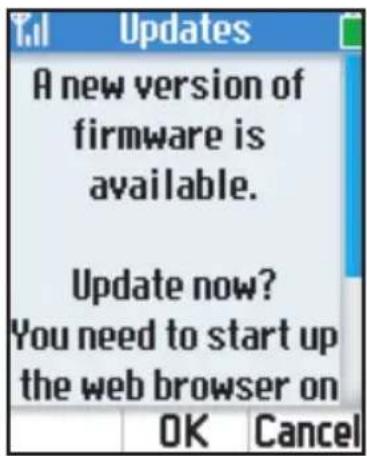
text_image
Updates A new version of firmware is available. Update now? You need to start up the web browser on OK CancelThese screens appear when there is new available software.
- To update the software, press [OK].
- If you update it later, press [Cancel]
Note:
- For updating the software, see page 118 for details.
- When “An important update to Skype is available” is displayed, you cannot use all Skype functions unless you complete updating the software.
Contact list full notification
These screens appear when the number of contacts in contact list is over 500.
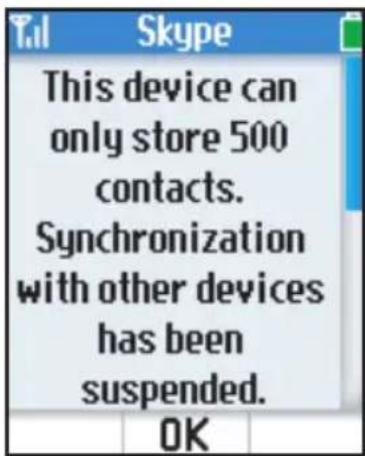
text_image
This device can only store 500 contacts. Synchronization with other devices has been suspended. OK- To clear this message, press [OK].
Note:
- You can still use this handset as phone, and you can manage your contact list. However, the handset can not be synchronized with Skype servers, so any changes on your
contact list can not be stored on Skype servers. If you sign in again, these changes disappear.
- If you want to resume the synchronization between your handset and Skype servers, you need to reduce contacts to less than 500 by using computer installed Skype software. Then you need to reset the handset. Press [Menu] (middle soft key) → "Settings" → [Select] → "General" → [Select] → "Reset" → [Select] → "Keep network settings" → [Select] → [Yes].
- When you removed and blocked a certain contact from your contact list, the contact is registered with your blocked users list. Keep the sum of your contact list and your blocked users list under 500. For deleting blocked contact in the blocked users list, press "Contacts" → "Advanced" → "Manage Blocked Users..." on computer Skype.
Personal Skype online status and profile
Skype online status and profile features allow you to define your Skype online status and personal profile details, and to sign out of Skype.
Changing your status
You can change your Skype online status to let other users know when to call you.
1 While in the Idle mode, press [Options].
2 "Change status" → [Select]
3 Select the desired Skype online status. → [Select]
- See the Skype online status icon list on page 68. You can select a Skype online status except "Connecting" status.
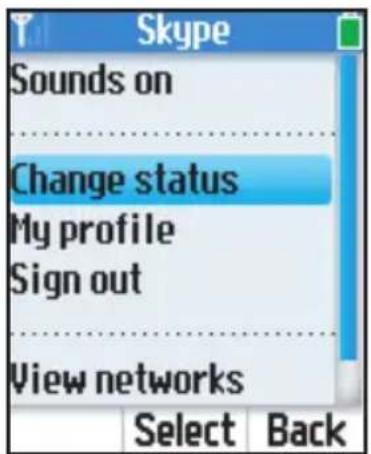
text_image
Skype Sounds on Change status My profile Sign out View networks Select BackNote:
- In step 1, you can also press [Menu] (middle soft key). "Status" [Select]
- In step 1, while in the Idle mode, you can also press [▲] to access to the “Change status” menu.
Setting your profile
You can enter your profile data in My profile.
1 While in the Idle mode, press [Options].
2 "My profile" → [Select]
3 Select the desired setting. → [Select]
| Details shown to all | Allows you to enter your profile details open to the public. Entries are available for your Skype name, full name, country/region, gender, phone number, language and other information about yourself. Your profile you enter helps other Skype users to identify you.●Skype name cannot be edited.●For Birth date, less than 13 years old cannot be entered. |
| Private details Allows | you to enter your private details.●You can edit, add and delete the E-mail address.Note:●E-mail address that can be set here is not for the purpose of user support.For more details, visit http://www.skype.com/ |
4 Fill in the fields or select the desired item. → [OK]/[Select]
Important:
- Do not enter the information that you do not want to be shown to the public.
Note:
- In step 1, you can also press [Menu] (middle soft key). "Status" [Select]
- For text entry, see page 60 for details.
Signing out of Skype
You cannot receive a call and your contact list will not be available.
1 While in the Idle mode, press [Options].
2 "Sign out" → [Select]
3 Press [OK] when the confirmation message appears.
Note:
- In step 1, you can also press [Menu] (middle soft key). "Status" [Select]
Personal Skype settings
Personal Skype settings allow you to define your password, and ensure your privacy by restricting incoming calls to only specified types of calls.
Changing your password
This feature changes the password for signing in to Skype.
1 [Menu] (middle soft key)
2 "Settings" → [Select]
3 "General" → [Select]
4 "Change password" → [Select]
5 Enter your current password. → [OK]
6 Enter your new password. → [OK]
7 Re-enter the new password. → [OK]

text_image
Menu Search Services Settings Select BackImportant:
- Please keep your password secure.
- We recommend that you change the password regularly.
Note:
- For text entry, see page 60 for details.
Privacy settings
This feature allows you to restrict incoming calls to only those from specified types of callers.
1 【Menu】(middle soft key)
2 "Settings" → [Select]
3 "Privacy" → [Select]
4 Select "Calls" or "SkypeIn calls". → [Select]
5 Select the desired type of callers that you want to receive calls from. → [Select]
When you select “Calls” in step 4:
| Anyone All Skype users | |
| Only my contacts Only | Skype contacts listed in your contact list |
| Only authorized contacts | Only authorized Skype contacts listed in your contact list |
When you select "SkypeIn calls" in step 4:
| Anyone All SkypeIn callers | |
| Known numbers | Only SkypeIn callers notifying of their numbers |
| Only my contacts Only | SkypeOut contacts listed in your contact list |
Important:
- When your Skype online status is in “Skype me”, the privacy settings are not valid.
Wireless network connection
When you turn on the handset, it searches for available wireless networks in range. After searching, the handset attempts to connect to the registered network first, and then, to any open network if “Auto-connect to open networks list” (page 116) is set.
The wireless network settings can be registered in the preferred networks list. You can manage the preferred networks list.
You can also use some network features, viewing current network status, finding the networks and selecting the desired network manually.
View wireless network status
You can view the wireless network status of the handset.
1 While in the Idle mode, press [Options].
2 "Network details" → [Select]
| Status Show the network | is connected or not. |
| Name Show the network name (SSID) when network is connected.When connected the base unit, it is displayed as “Base unit” | |
| Security Show the wireless security type when network is connected. | |
| Channel Show the wireless channel. | |
| IP address Show the IP | address of the handset. |
| Subnet mask Show the subnet mask of the handset. | |
| Default gateway Show | the default gateway of the handset. |
| DNS server Show the IP | address(es) of the DNS server(s). |
| Base unit Show the IP address of the base unit when connected to the base unit. | |
Find wireless networks
You can search for available wireless networks in range.
1 While in the Idle mode, press [Options].
2 "View networks" → [Select]
● Wireless networks in range are displayed.
- The base unit is displayed as "Base unit".
●The list is ordered by signal strength.
- A secure network is shown with the padlock icon. A secure network encrypts data and requires you to enter a network key.
- An open network is shown without the padlock icon. An open network does not encrypt data.
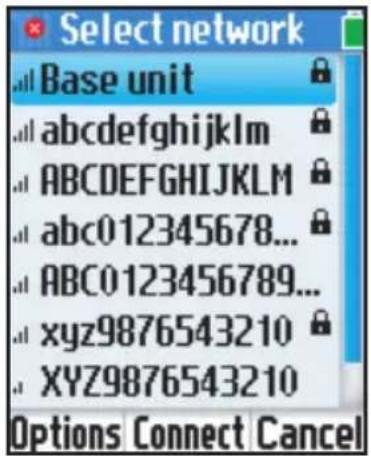
text_image
Select network Base unit abcdefghijklmnopqrstuvwxyz abcdefghijklmnopqrstuvwxyz XYZ9876543210 Options Connect Cancel3 Select the desired network.
- To connect to the network, press [Connect] (page 108)
- To access options, press [Options] and select the desired options. [Select]
| Connect Connect to the selected network (page 108). | |
| Network details View | the network name, the wireless security type and the wireless channel of the selected network. |
| Search again Search for | available networks and attempt to connect again. |
| Add manually | Add a network to your preferred networks list and connect to this network (page 110). |
| Preferred networks View | your preferred networks list (page 112). |
Note:
- In step 1, you can also press [Menu] → "Settings" → [Select] → "Network" → [Select] → "Networks in range" → [Select]
Connect to a wireless network
You can connect to a wireless network manually.
To connect to a wireless network that is found in range:
You can connect to a wireless network that is found in range manually.
1 While in the Idle mode, press [Options].
2 "View networks" → [Select]
● Wireless networks in range are displayed.
3 Select the desired network. → [Connect]
- When you select an open network, skip to step 6.
- When you select a secure network which is already registered in your preferred networks list, skip to step 6.
4 Enter the network key. → [OK]
For WEP security network:
- Enter the network key containing 5 alphanumeric or 10 hexadecimal characters for WEP 64bit or 13 alphanumeric or 26 hexadecimal characters for WEP 128bit.
For WPA-PSK(TKIP) or WPA2-PSK(AES) security network:
- Enter the network key containing between 8 and 63 alphanumeric characters or 64 hexadecimal characters, then skip to step 6.
5 Select the key index. → [Select]
- Most of wireless networks use key index 1.
6 The handset attempts to connect the network. After a network connection is completed, you are required to sign in to Skype if you have not signed in yet.
- If failed, error message is displayed, then press [OK] to return to step 3.
Note:
- In step 3, you can also press [Options]. "Connect" [Select]
- In step 3, when you select an open network, the prompt message to confirm whether you want to connect or not may be shown. If you do not want the prompt message to be shown, you can set "Auto-connect to open networks". See "Auto-connect to open networks" on page 116 for details.
- In step 4, the wireless network you selected supports multiple security types, you are required to select a security type. Select the desired security type. [Select] Enter the network key. [OK]
- When the connection to a secure network succeeded and your preferred networks list isn't full, the network is automatically registered in your preferred networks list.
- When the connection to a secure network succeeded and your preferred networks list is full, press [OK]. Select a network to be deleted. [Select] [Yes]. Then the new secure network is registered in your preferred networks list.
- For text entry, see page 60 for details.
To connect to a wireless network that is not found in range:
Some networks do not broadcast their network name (SSID), and you can not find these networks in range. When you want to connect to such a network, you need to enter its network name (SSID) and network key.
1 While in the Idle mode, press [Options].
2 "View networks" → [Select]
3 [Options]
4 "Add manually" → [Select]
5 Enter the network name (SSID) → [OK]
6 "Network security" → [Select]
7 Select the security type → [Select]
8 Enter the network key → [Select]
For WEP security network:
- Enter the network key containing 5 alphanumeric or 10 hexadecimal characters for WEP 64bit or 13 alphanumeric or 26 hexadecimal characters for WEP 128bit.
For WPA-PSK(TKIP) or WPA2-PSK(AES) security network:
- Enter the network key containing between 8 and 63 alphanumeric characters or 64 hexadecimal characters, then skip to 10.
9 Select the key index. → [Select]
- Most of wireless networks use key index 1.
10 [Back]
- The handset attempts to connect the network. After a network connection is completed, you are required to sign in to Skype if you have not signed in yet.
- If failed, error message is displayed, then press [OK] and go back to step 3.
Note:
- In step 5, after [OK], "Saved" message is displayed. Press [OK] or leave the display for 3 seconds.
- In step 6 to 9, you can set other settings, such as TCP IP and Advanced settings.
To connect to a wireless network while "No connection" is displayed:
When “No connection” message is displayed in the Idle screen, the handset is not connected to any network.
1 While in the Idle mode, press [Connect].
2 The handset attempts to connect a network. After a network connection is completed, you are required to sign in to Skype if you have not signed in yet.
- If wireless networks in range are displayed, select the desired network. 【Connect】
- If error message “Networks were not found” is displayed, press [Search] to search and attempt to connect again.
Wireless network settings
This feature allows you to set the handset to connect to wireless networks.
Networks in range
See "Find wireless networks" on page 108.
Preferred networks list
This feature allows you to manage the wireless networks settings registered in the handset. The preferred networks enable you to connect automatically to the wireless networks you usually use. The handset will attempt to connect to network beginning with the highest position networks in the preferred networks list.
Up to 21 entries can be registered. 1 is reserved for the base unit. If you can't find the base unit, register the handset (page 133).
To view network settings in preferred networks list:
1 [Menu] (middle soft key)
2 "Settings" → [Select]
3 "Network" → [Select]
4 "Preferred networks" → [Select]
- The base unit is displayed as "Base unit"
5 Select the desired network. → [Select]
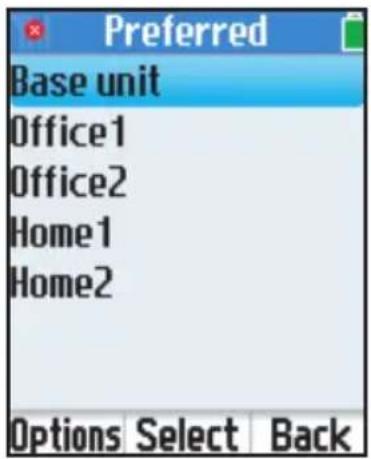
text_image
Preferred Base unit Office1 Office2 Home1 Home2 Options Select BackNetwork settings of the base unit:
| TCP IP (HOME) / TCP IP (HOTEL) | Select “TCP IP (HOME)” or “TCP IP (HOTEL)” →【Select】• View connection type (DHCP/Static IP)• View IP address, Subnet mask, Default gateway, DNS server 1 and DNS server 2 when connection type is Static IP. |
Network settings except for the base unit:
| Network name ●View the network name (SSID) | |
| Network security | ● View the network security type (Open/WEP/WPA-PSK(TKIP)/WPA2-PSK(AES))● View the key index when security type is WEP (Key 1/2/3/4) |
| TCP IP | Select “TCP IP” → [Select]● View connection type (DHCP/Static IP)● View IP address, Subnet mask, Default gateway, DNS server 1 and DNS server 2 when connection type is Static IP. |
| Advanced setting | Select “Advanced setting” → [Select]● View SSID broadcast (Broadcast/No broadcast).● View the authentication type (Open/Shared). |
Note:
- For the base unit, 2 network settings TCP IP (HOME) and TCP IP (HOTEL) are available. Either of the 2 settings is selected automatically depending on the Mode selector position of the base unit.
To edit network settings in preferred networks list:
1 【Menu】(middle soft key)
2 "Settings" → [Select]
3 "Network" → [Select]
4 "Preferred networks" → [Select]
- The base unit is displayed as "Base unit"
5 Select the desired network. → [Select]
6 Select the desired network settings. → [Select]
Network settings of the base unit:
| TCP IP (HOME) / TCP IP (HOTEL) | Select “TCP IP (HOME)” or “TCP IP (HOTEL)”. →【Select】For more instruction, see below “TCP IP” settings. |
Network settings except for the base unit:
| Network name Enter the | network name containing between 1 and 32 characters. → [OK] |
| Network security For | Open network:“Open” → [Select]For WEP security network:“WEP” → [Select] → Enter the network key containing 5 alphanumeric or 10 hexadecimal characters for WEP 64bit or 13 alphanumeric or 26 hexadecimal characters for WEP 128bit. → [OK] → Select the key index. → [Select]For WPA-PSK(TKIP)/WPA2-PSK(AES) security network:“WPA-PSK (TKIP)” or “WPA2-PSK (AES)” → [Select] → Enter the network key containing between 8 and 63 alphanumeric characters or 64 hexadecimal characters. → [OK] |
| TCP IP For DHCP network | Obtain IP address automatically):“Connection type” → [Select] → “DHCP” → [Select] → [Save]For Static IP network:“Connection type” → [Select] → “Static IP” → [Select]→ “IP address” → [Select] → Enter the IP address → [OK]→ “Subnet mask” → [Select] → Enter the subnet mask → [OK]→ “Default gateway” → [Select] → Enter the default gateway → [OK]→ “DNS server 1” → [Select] → Enter the DNS server 1 → [OK]→ “DNS server 2” → [Select] → Enter the DNS server 2 → [OK]→ [Save] |
Advanced setting SSID broadcast:
"SSID broadcast" → [Select] → Select "Broadcast" or "No broadcast". → [Select]
- When the network does not broadcast the SSID, select "No broadcast".
Authentication:
"Authentication" [Select] Select "Open" or "Shared". [Select]
● Available only when network security type is Open or WEP.
- If you have no specific instruction for wireless connection, select "Open".
Note:
- In step 5, you can also select the desired network. [Options] "Configure network" [Select]
To add a network to preferred networks list:
1 [Menu] (middle soft key)
2 "Settings" → [Select]
3 "Network" → [Select]
4 "Preferred networks" → [Select]
5 [Options]
6 "Add manually" → [Select]
7 Enter the network name containing between 1 and 32 characters. → [OK]
- To configure other network settings, see “Configuring network settings in preferred networks list” for more details.
Note:
- In step 6, you can also select "Add current" [Select] to add the currently connected network to your preferred networks.
To delete networks from preferred networks list:
1 【Menu】(middle soft key)
2 "Settings" → [Select]
3 "Network" → [Select]
4 "Preferred networks" → [Select]
5 Select the desired network. → [Options]
6 Select the "Remove network" or "Remove all" → [Select]
| Remove network Remove the selected network from the list. This option is not available for the base unit. | |
| Remove all Remove all the networks from the list. The base unit is not removed. |
7 [Yes]
To change priority in preferred networks list:
1 [Menu] (middle soft key)
2 "Settings" → [Select]
3 "Network" → [Select]
4 "Preferred networks" → [Select]
5 Select the desired network. → [Options]
6 Select the "Move up", "Move to top" or "Move down" → [Select]
| Move up Move the selected network up in the list. |
| Move to top Move the selected network to the top of the list. |
| Move down Move the selected network down in the list. |
Auto-connect to open networks list
This feature allows you to decide whether to connect to open networks automatically. An open network does not encrypt data and it does not require you to enter a network key.
1 [Menu] (middle soft key)
2 "Settings" → [Select]
3 "Network" → [Select]
4 "Auto-connect" → [Select]
5 Select "Yes" or "No" to decide whether you want to auto-connect to open networks. → [Select]
Important:
- When you enable “Auto-connect”, the handset may automatically connect to a network that does not have the security settings. Also, you might connect to other person’s/company’s network illegally. When you enable “Auto-connect”, be sure to confirm whether you are allowed and want to connect to the network you select before connecting to it.
- When the handset connect to an undesired open network, please select the desired network manually
See "To connect to a wireless network that is found in range" for details. (page 108).
General settings
Change password
See "Changing your password" on page 105.
Auto sign in
Auto sign in allows you to sign in to Skype automatically when the handset is starting up.
1 [Menu] (middle soft key)
2 "Settings" → [Select]
3 "General" → [Select]
4 "Auto sign in" → [Select]
5 Select "Automatically sign in" or "Prompt for password". → [Select]
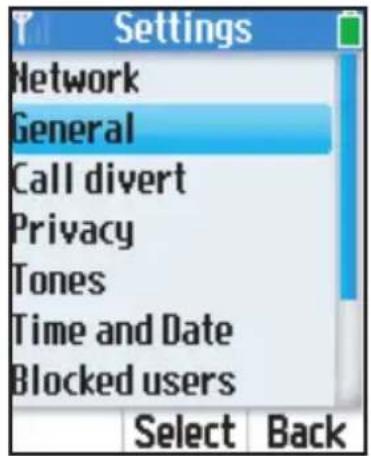
text_image
Settings Network General Call divert Privacy Tones Time and Date Blocked users Select BackUpdating software (Handset)
This feature allows you to update the Skype application or Panasonic firmware in the handset.
Important:
●While you update software/firmware, do not unplug the charge cable.
To update the Skype application:
When you update software/firmware, battery level needs to be medium or full.
1 [Menu] (middle soft key)
2 "Settings" → [Select]
3 "General" → [Select]
4 "Software updates" → [Select]
5 Press [OK] to update the application if a new version is available.
6 Plug the charge cable into the handset and the base unit for battery charging (page 58) if the battery is not fully charged. → [OK]
●The handset starts to download the Skype application.
7 Read the entire Skype agreement. → [Yes]
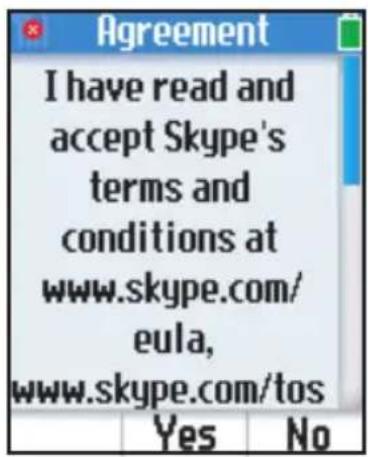
text_image
Agreement I have read and accept Skype's terms and conditions at www.skype.com/ eula, www.skype.com/tos Yes No- The handset starts to update. After an update is completed, the handset begins to restart.
Note:
- When "An important update to Skype is available." or "A new version of Skype is available." is displayed, skip to step 5.
To update the Panasonic firmware:
We recommend you update the Panasonic firmware regularly. For information, visit:
http://panasonic.co.jp/pcc/cs/en/telecom/wi-fi/us_wp1050.htm.
1 [Menu] (middle soft key)
2 "Settings" → [Select]
3 "General" → [Select]
4 "Software updates" → [Select]
5 Press [OK] to update the firmware if a new version is available.
6 Plug the charge cable into the handset and the base unit for battery charging (page 58) if the battery is not fully charged. → [OK]
7 Read the entire Skype agreement. → [Yes]
text_image
Agreement I have read and accept Skype's terms and conditions at www.skype.com/ eula, www.skype.com/tos Yes No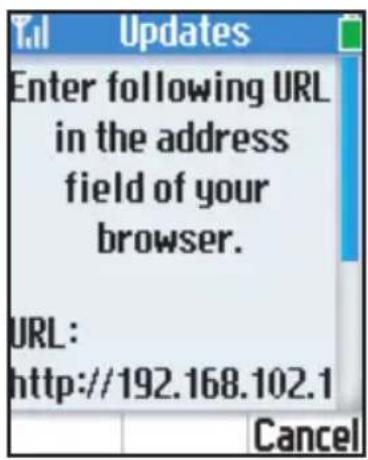
text_image
Enter following URL in the address field of your browser. URL: http://192.168.102.1 Cancel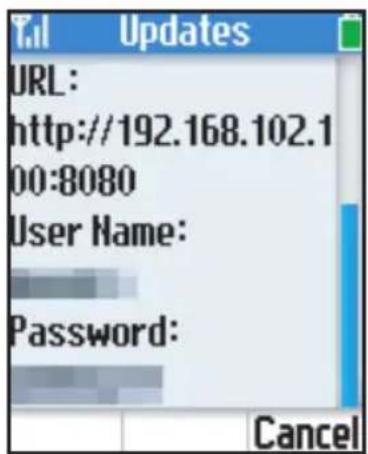
text_image
URL: http://192.168.102.1 00:8080 User Name: Password: Cancel8 Computer:
Start up the Web browser on the computer you connected to the LAN port on the base unit.
9 Computer:
Enter the URL displayed on the handset in the address field of your browser and press ENTER key.
- You need to enter both IP address and port number
(e.g. http://192.168.102.100:8080).
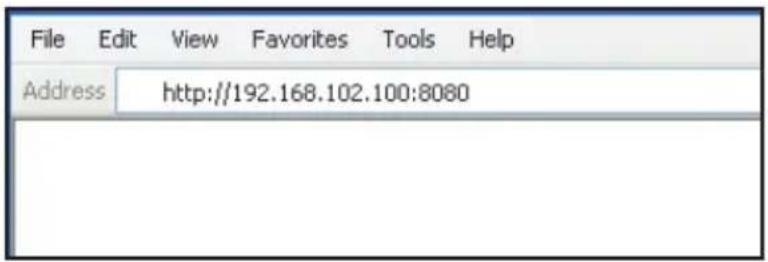
text_image
File Edit View Favorites Tools Help Address http://192.168.102.100:808010 Computer:
Enter the user name and the password (shown on the handset display) when prompted.
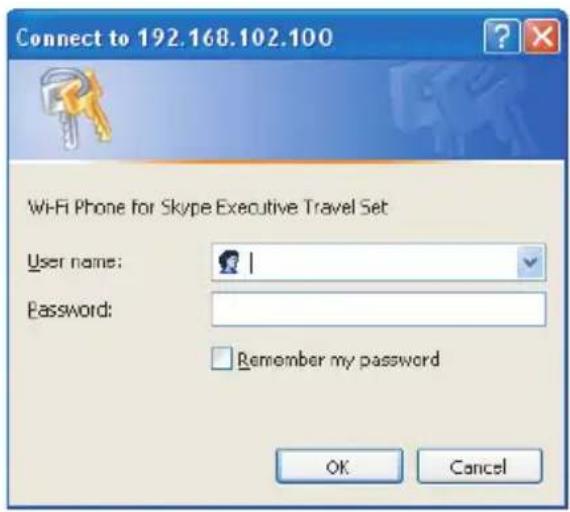
text_image
Connect to 192.168.102.100 Wi-Fi Phone for Skype Executive Travel Set User name: Password: Remember my password OK Cancel11 Computer:
Download the updated firmware to your computer from the firmware information URL.
12 Computer:
Enter the file name under the Update Firmware heading.
- You can also click [Browse...] to select the desired file name from the list.
13 Computer:
Click [Update].
14 Computer:
Click [OK] in the confirmation dialog box.
- The handset starts to update. After an update is completed, the handset begins to restart.
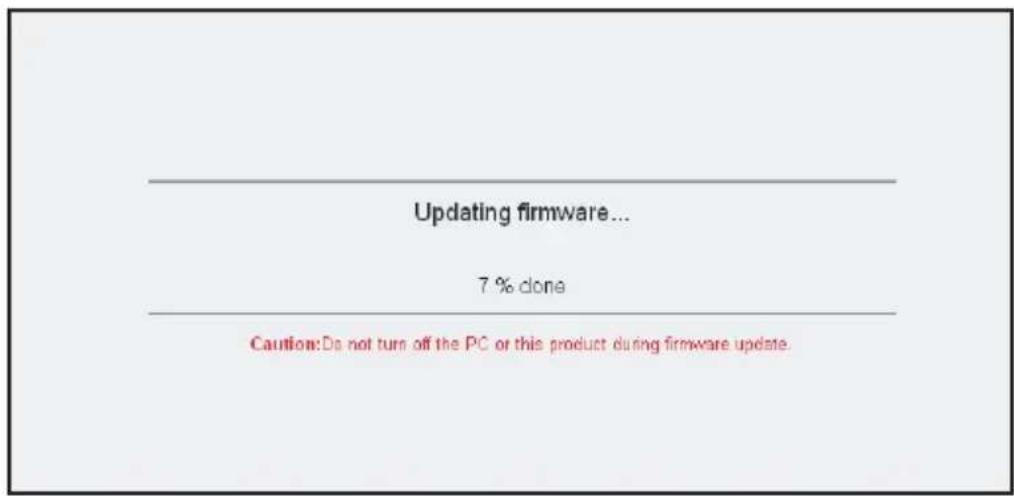
text_image
Updating firmware... 7 % done Caution: Do not turn off the PC or this product during firmware update.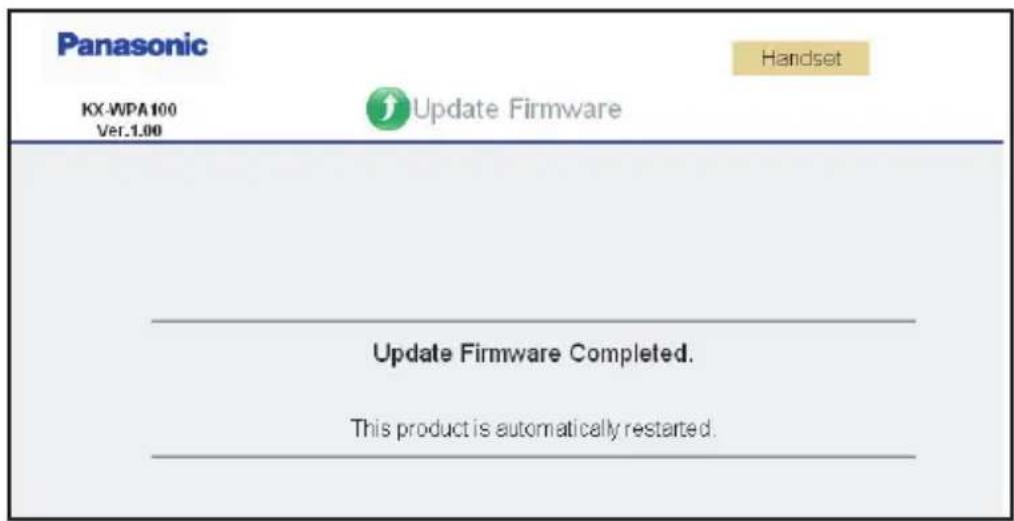
text_image
Panasonic KX-WPA100 Ver.1.00 Update Firmware Update Firmware Completed. This product is automatically restarted.Note:
- When "A new version of firmware is available." is displayed, skip to step 5.
- In step 5, the message "You already have the latest software installed." is shown, but a new Panasonic firmware is available from Panasonic firmware site. [Options] "Update manually" [Select] [OK]
- In step 9, for the safety, the user name and the password is temporarily available. When you try to update next time, the user name and the password is changed.
To receive software update notifications:
You can allow the handset to notify you of software updates.
1 [Menu] (middle soft key)
2 "Settings" → [Select]
3 "Advanced" → [Select]
4 "Software updates" → [Select]
5 Select "Yes" or "No". → [Select]
Reset
This feature resets all the handset settings or all except the network settings.
1 [Menu] (middle soft key)
2 "Settings" → [Select]
3 "General" → [Select]
4 "Reset" → [Select]
5 Select "Keep network settings" or "Reset all". → [Select]
| Keep network settings | Resets all the handset settings except “Preferred networks”, “Auto-connect” and “Network proxy”. |
| Reset all Resets all the | handset settings. However, the contacts stored centrally on Skype servers will be downloaded and displayed on your handset’s contact list when you sign in to Skype with the handset. |
6 [Yes]
● The handset begins to restart after 3 seconds.
Note:
- If you select "Reset all" in step 5, you need to register the handset to the base unit again. See "Registering the handset" on page 133 for details.
Tones
You can change the handset's ringer type, tone, volume, and other types of tones.
1 【Menu】(middle soft key)
2 "Settings" → [Select]
3 "Tones" → [Select]
4 Select the desired setting. → [Select]
| Ring type | Set the ringer type to “Ringing” or “Ring once”. |
| Ring tone ●Set the desired ringer tone.●The ringer tone sounds while receiving a call. | |
| Ring volume Adjust the ringer volume. | |
| Notification tone | ● Set the notification tone to “On” or “Off”.● The notification tone sounds when a new voicemail message or Authorization request is received. |
| Keypad tone | ● Set the keypad tone to “On” or “Off”.● The keypad tone sounds when you press keys. |
| Out of service tone | ● Set the out of service tone to “On” or “Off”.● The out of service tone sounds when the handset is going to be out of wireless LAN service range for making/answering calls or listening/recording voicemail messages. |
5 Select the desired item. → [Select] or change the setting by pressing [▲] or [▼]. → [OK]
Note:
- The preset melodies in this product are used with permission of (C) 2006 Copyrights Vision Inc.
- When you change the selection on ring tone or ring volume screen, a tone sounds for confirmation (Tone does not sound when ringer volume is off, silent mode is on and/or your Skype online status is "Do not disturb").
Phone settings
Register the handset
See "Registering the handset" on page 133.
Brightness
This feature adjusts the brightness of the screen.
1 [Menu] (middle soft key)
2 "Settings" → [Select]
3 "Phone settings" → [Select]
4 "Brightness" → [Select]
5 Press [◀] or [▶] to adjust the brightness.
6 [OK]
Handset Information
This feature shows device information such as product ID, software/firmware version and MAC address.
1 [Menu] (middle soft key)
2 "Settings" → [Select]
3 "Information" → [Select]
Advanced settings
Software update
See "To receive software update notifications" on page 123.
Network proxy
Network proxy allows you to decide whether you want to use proxy servers on the LAN for Skype traffic. Setting is required if you are instructed by the Internet service provider to enter the specific settings required for the network proxy.
1 [Menu] (middle soft key)
2 "Settings" → [Select]
3 "Advanced" → [Select]
4 "Network proxy" → [Select]
5 Select the desired item. → [Select]
| Proxy type | Select the proxy server type from “None”, “HTTP/HTTPS” or “SOCKS5”. |
| Host Enter the proxy server | IP address or name (max.100 characters) in this data filed if it is specified by your Internet service provider or the hotel you are staying in in the following way:“192.168.0.1”(Do not enter “http://192.168.0.1”) |
| Port Enter the port number | used by the proxy server (value1-65535) in this data field if it is specified by your Internet service provider or the hotel you are staying in. |
| Authentication Enable | or disable the proxy authentication which requires the user name and password to access the Internet. |
| User name Enter the user | name for proxy host authentication (max.127 characters) in this data field if it is specified by your Internet service provider or the hotel you are staying in. |
| Password Enter the password | word for proxy host authentication (max.127 characters) in this data field if it is specified by your Internet service provider or the hotel you are staying in. |
6 Enter the information. → Press [OK] or select the desired item. → [Select]
7 [Save]
8 [OK]
Note:
- For text entry, see page 60 for details.
●The new settings will become effective after restarting the handset.
Recovering the handset
When software/firmware of handset is defective, you are required to update a software/firmware.
1 This error message appears when the handset software/firmware may be defective.
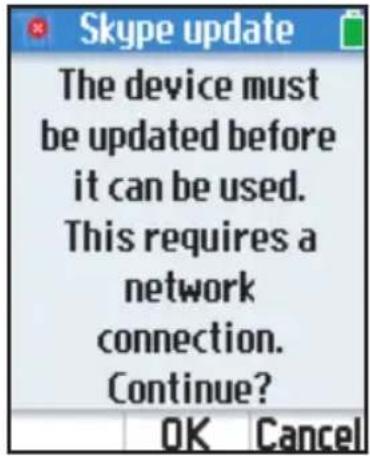
text_image
Skype update The device must be updated before it can be used. This requires a network connection. Continue? OK Cancel2 Press [OK].
●The handset searches for available networks in range.
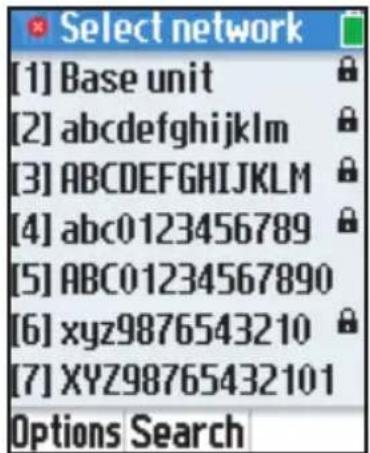
text_image
[1] Base unit [2] abcdefghijklm [3] ABCDEFGHIJKLM [4] abc0123456789 [5] ABC01234567890 [6] xyz9876543210 [7] XYZ98765432101 Options Search- If the networks list is displayed, enter the number to connect to the desired network.
- To view more available networks in range list, press [▲] or [▼].
- To search for available networks, press [Search].
- To access options, press [Options].
| More networks View more networks. | |
| Add network Set the network | settings when you need to connect to a secure network that is not registered in your preferred networks. |
| HTTP proxy Set the http proxy server when your must use proxy server to connect to the Internet. | |
3 After a network connection is completed, follow the same step as software/firmware update.
To update the Skype application: Skip to step 6 on page 118.
To update the Panasonic firmware: Skip to step 6 on page 119.
Note:
Followings are the differences from normal usages:
- You need to press [▲] or [▼] to scroll pages.
- You need to enter the number key to select a network or options.
- You need to press [Symbol] (left soft key) repeatedly to enter symbol.
Service information
You can view information about the following optional services by Skype: Skype credit, SkypeIn and Skype Voicemail.
Note:
- SkypeIn numbers are regular phone numbers sold on a subscription basis. If your friends who are not using Skype want to call you, they can call your SkypeIn number and you receive the call in Skype. If you buy a SkypeIn number, you get a free Skype Voicemail subscription along with it.
- To purchase Skype credit, Skype Voicemail or SkypeIn with Skype Voicemail, please visit: http://www.skype.com/
Viewing the service information
1 [Menu] (middle soft key)
2 "Services" → [Select]
3 Select the desired item. → [Select]
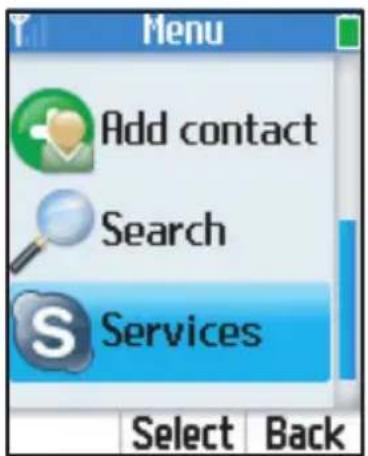
text_image
Menu Add contact Search Services Select Back| Skype credit View the remaining Skype credit available and the expiration date. | |
| SkypeIn View the list of the SkypeIn numbers you subscribe to. | |
| Voicemail | View the expiration date of the Skype Voicemail service. |
4 If you select "Skype credit", view the information. → Press [▼] to scroll down for more information, if necessary.
If you select "SkypeIn", select the desired number. → [Select] → View the information.
If you select "Voicemail", view the information.
If you subscribe to only 1 SkypeIn number, the number is displayed. → [Select] → View the expiration date of the SkypeIn number.
Locating the handset
You can locate the misplaced handset by paging it from the base unit.
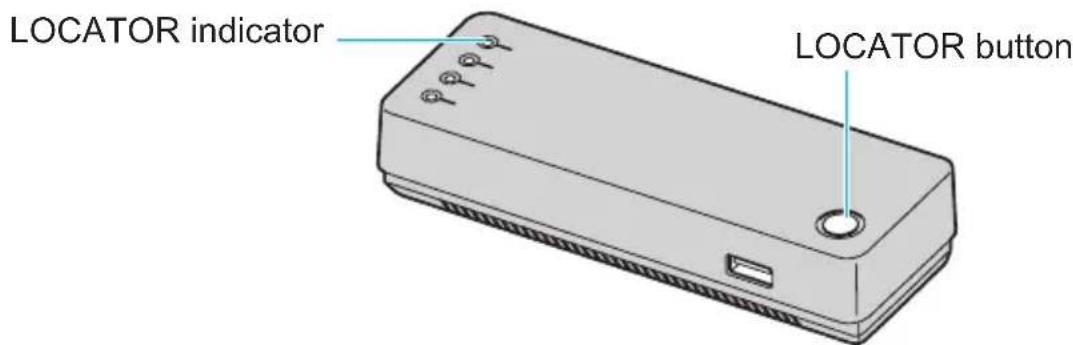
text_image
LOCATOR indicator LOCATOR button1 Base unit:
Press the LOCATOR button to page the handset.
●The LOCATOR indicator on the base unit lights up.
● The handset beeps for 1 minute, and the display, keypad and ringer indicator light up.
2 Base unit:
To stop paging, press the LOCATOR button.
OR
Handset:
To stop paging, press any key except [CONTACTS], navigator key and middle soft key.
Note:
●The base unit only locates the registered handset.
- When the wireless connection between the handset and the base unit is not established, locating the handset is not available.
Registering the handset
The handset and the base unit are preregistered. If for some reason the handset is not registered to the base unit, after you change the base unit's wireless settings (page 168), or after you reset all the handset settings (page 123), register the handset. The handset and the base unit need to be closely located during the registration.
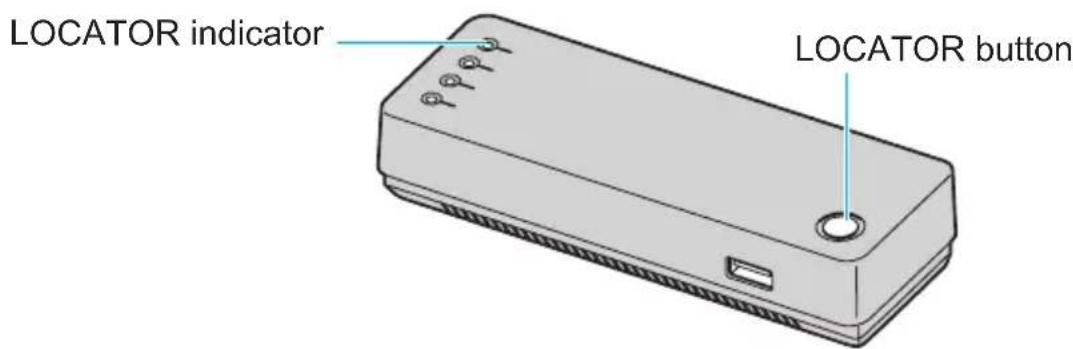
text_image
LOCATOR indicator LOCATOR button1 [Menu] (middle soft key)
2 "Settings" → [Select]
3 "Phone settings" → [Select]
4 "Registration" → [Select]
5 "HS registration" → [Select]
6 Press and hold the LOCATOR button on the base unit for 4 seconds until you see the LOCATOR Indicator on the base unit flashing in green. → [OK]
- The registration starts. The status message changes from "Handset registering" to "Handset registered".
Note:
- In step 5, select "Information" to view the network name and BSSID (the MAC address) information for the base unit. [Select]
- When the handset registration fails, the status message "Handset could not register. Please try again." is displayed. Press [OK]. Try step 6 again.
- You can register only 1 handset to the base unit. Therefore, if you register another handset to the base unit, the previously registered handset cannot be connected to the base unit.
- While the handset is being registered, the LOCATOR indicator on the base unit flashes.
Setting the base unit from Top Menu
After the settings in Initialization Setup (page 36) are successfully completed, Top Menu will be displayed on the top page each time you log in the base unit.
1 Open the Web browser on the computer you connected to the LAN (Ethernet) port on the base unit.
2 Enter http://192.168.102.1/ (the base unit's default IP address) or http://kxwpa.webpage in the address field of the browser and press the ENTER key. You can also double click the KX-WPA102 icon in My Network Places in the Start menu when using Windows XP and UPnP is enabled. See "Setting UPnP to display the shortcut" on page 209 for details.
- A prompt screen with fields for your user name and password is displayed.
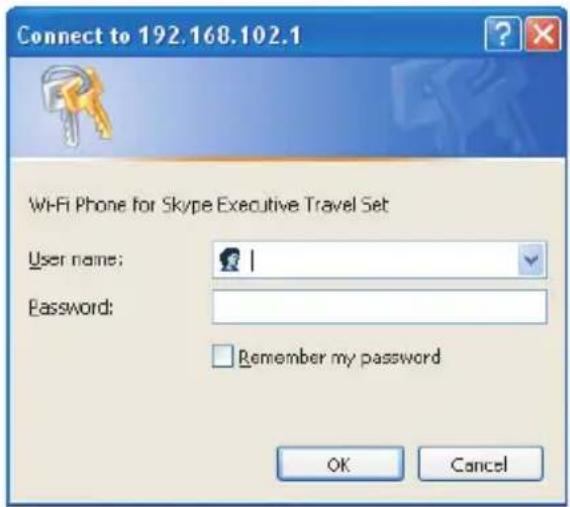
text_image
Connect to 192.168.102.1 WiFi Phone for Skype Executive Travel Set User name: Password: Remember my password OK Cancel- After failure to enter the user name and the password to a prompt screen asking for them for 3 times, the base unit does not respond.
3 Enter the user name and password you set in Initialization Setup.
- Top Menu is displayed.

text_image
Panasonic Home Mode KX-WPA102 Ver.1.00 Top Menu Network Connection Easy set up for internet connection. Update Firmware Update Firmware pages allow you to install new firmware. Advanced Setup These pages allow you to control all features of this product. Handset Information Show registered handset information.① Current mode:
Indicate the current selected mode. The mode is determined by the position of the Mode selector switch (page 200).
②Menu items:
●Network Connection: Provide an easy setup for Internet connection (page 136). Allow you to create a new profile of network connection and modify the existing network connection profile (page 137).
- Update Firmware: Update the firmware to the latest version (page 141).
- Advanced Setup: Allow you to control all features of the base unit (page 143).
● Handset Information: Display the connection status of the handset (page 195).
Network Connection
Creating a new Internet connection profile
1 Click [Network Connection] on the Top Menu.
- The current Internet connection settings and information of the wireless connection are displayed.
- See the Network Status page for each of the setting (page 175).
![PANASONIC KX-WP1050 - Click [Network Connection] on the Top Menu. - 1](/content/2026/05/796742/images/fdd5b896a9103d56470fee4b9a81c0148aee4329161cf9f766c0575531c6f9e4.jpg)
text_image
Panasonic Home Mode TopPage KX.WPA102 Vol.1.00 Network Connection New Profile Help New Profile Default Profile Internet Connection Help Refresh Mode Home Mode Profile Name Default Connection Connection Mode DHCP IP Address 0.0.0.0 Subnet Mask 0.0.0.0 MAC Address Connection Status Connecting... Modify Wireless Information Help Mode 802.11b/g SSD Channel 5 Security WEP(Key1) Network Key View MAC Address Modify2 Click [New Profile] under the New Profile heading.
3 Select the connection mode, then click [Next>].
4 Configure the connection mode you select in step 3, then click [Next>].
- See "Configuring the Internet connection settings" on page 48 for instructions.
5 Confirm the settings you are about to save, then click [Save].
6 Click [Restart].
- The settings that you have just configured are saved as profile No. 1 (HOME mode) or No. 2 (HOTEL mode) according to the position of the Mode selector. The profile is automatically named “Automatic generation” and saved.
- If you click [Default Profile], you can revert the WAN side setting back to default setting (DHCP).
If you have no specific instructions for the Internet connection from the hotel front desk, use [Default Profile] for an easy setup.
- When you click [Refresh], the Internet connection status is refreshed.
- When PPPoE is selected in the Connection Mode, [PPPoE Connect] and [PPPoE Disconnect] are available. You can connect PPPoE by clicking [PPPoE Connect] and disconnect PPPoE by clicking [PPPoE Disconnect].
Modifying the existing network connection profile
1 Click [Network Connection] on the Top Menu.
2 Click [Modify] under the Network Connection heading.
3 Select the profile you wish to modify from the pull-down menu under the Select Profile heading, then click [Edit].
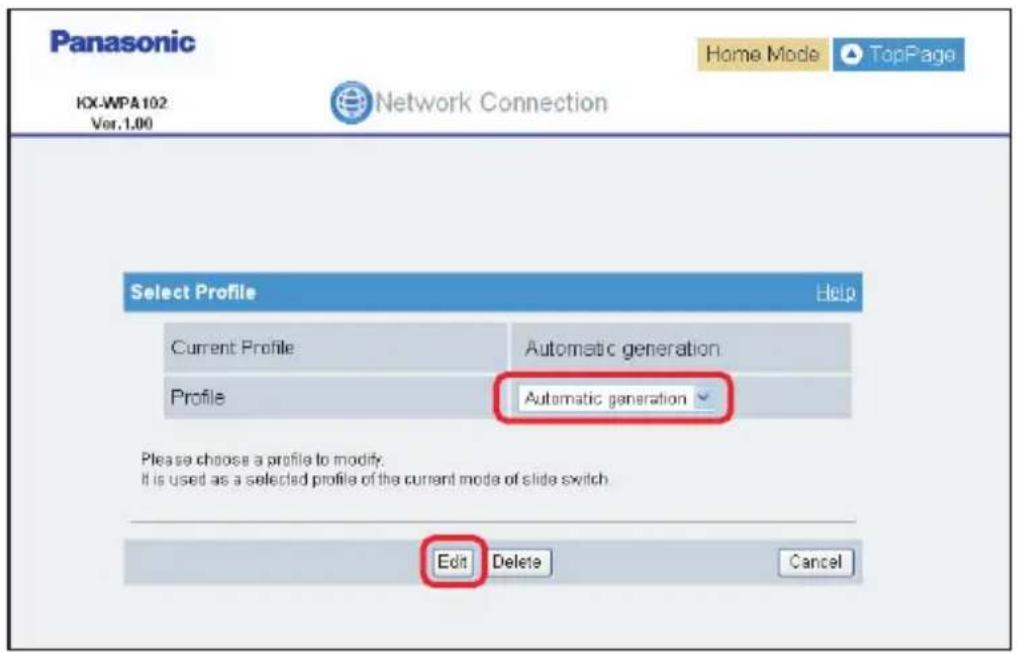
text_image
Panasonic KX-WPA102 Ver.1,00 Home Mode TopPage Network Connection Select Profile Help Current Profile Automatic generation Profile Automatic generation Please choose a profile to modify. It is used as a selected profile of the current mode of slide switch. Edit Delete Cancel4 Configure the connection mode of the profile you select in step 3, then click [Next>].
- See "Configuring the Internet connection settings" on page 48 for instructions.
5 Confirm the settings you are about to save, then click [Save].
6 Click [Restart].
- The base unit restarts in the connection mode that is registered as HOTEL or HOME mode in the profile you have just created. (The position of the Mode selector switch determines the connection mode.) However, editing the AP (Bridge) mode profile while the Mode selector is switched to “HOTEL” does not restart the base unit with the AP (Bridge) mode profile.
Note:
- To delete a profile
1 Select the desired profile from pull-down menu, then click [Delete] in step 3.
2 Click [OK] in the confirmation dialog box.
3 Click [Restart].
- If you delete the profile you are currently using for HOTEL or HOME mode, the profile will be reset to the default setting (DHCP).
Modifying the wireless information
1 Click [Network Connection] on the Top Menu.
2 Click [Modify] under the Wireless Information heading.
3 Configure the wireless connection basic settings, then click [Next>].
| Setting Description | |
| [Mode] | Select your wireless network mode from the pull-down menu.If you have both 802.11b and 802.11g wireless devices in your network, select [802.11b/g].If you have only 802.11b wireless devices, select [802.11b]. |
| [Channel] | Select [Auto] or the desired channel from [1] to [11]. |
| [Network Name (SSID)] | Enter your wireless network name (SSID) (1 – 32 alphanumeric characters) in this data field. |
| [SSID Broadcast] | Enable or disable the broadcasting of your SSID.If you select [Disable], only wireless devices that know the SSID of the base unit can connect to the base unit.If you select [Enable], any wireless device can detect the SSID of the base unit. |
4 Configure the wireless connection security settings, then click [Save].
| Setting Description | |
| [Security Mode] ● Select the desired security mode.● No Encryption (Open), WEP, WPA-PSK and WPA2-PSK are available for the wireless devices, including the handset.Select the desired security mode for your wireless devices connected to the base unit. Default is set to WEP. | |
| WEP settings | |
| [Network Key] For WEP 64bit:● Enter the network key containing 5 alphanumeric characters or 10 hexadecimal characters.For WEP 128bit:● Enter the network key containing 13 alphanumeric characters or 26 hexadecimal characters.● Press [View] to display the network key. | |
| [Key Index] | ● Select [Key 1], [Key 2], [Key 3] or [Key 4] to be used if you use WEP. The default is set to [Key 1]. |
| WPA-PSK/WPA2-PSK Settings | |
| [Network Key] | ● Enter the network key (8 – 63 alphanumeric characters) in this data field.● Press [View] to display the network key. |
| [Data Encryption] | ● Select the desired data encryption method.For WPA-PSK● If your wireless devices use TKIP, select [TKIP] or [TKIP+AES].● If your wireless devices use AES, select [TKIP+AES].For WPA2-PSK● If your wireless devices use TKIP, select [TKIP+AES].● If your wireless devices use AES, select [AES] or [TKIP+AES]. |
| [Session-Key renewal interval] | ● Set the interval for refreshing the encryption key between 30 and 604800 seconds. 604800 seconds is the equivalent of one week. The default is set to 1800. |
5 Click [Restart].
- The base unit automatically restarts and the Top Menu is displayed.
Note:
- The settings under the Network Connection heading display the network information for the Internet connection on WAN side. See the Network Status page on page 175 for detail.
- The settings under the Wireless Information heading display the wireless network information for the handset and wireless devices connected to the base unit. See the Wireless Status page on page 179 for detail.
- If you click [View], the current network key is displayed. You may need this information when you set up your wireless devices.
Updating the firmware (Base Unit)
To prevent the leaking of customer information, illegal operation of this product, interference or involuntary shutdown etc., we recommend you update the firmware regularly. For firmware information,
visit http://panasonic.co.jp/pcc/cs/en/telecom/wi-fi/us_wp1050.htm.
Important:
- Do not interrupt the firmware updating process by cutting the power supply until the updating is complete and the base unit restarts itself.
1 Click [Update Firmware] on the Top Menu.
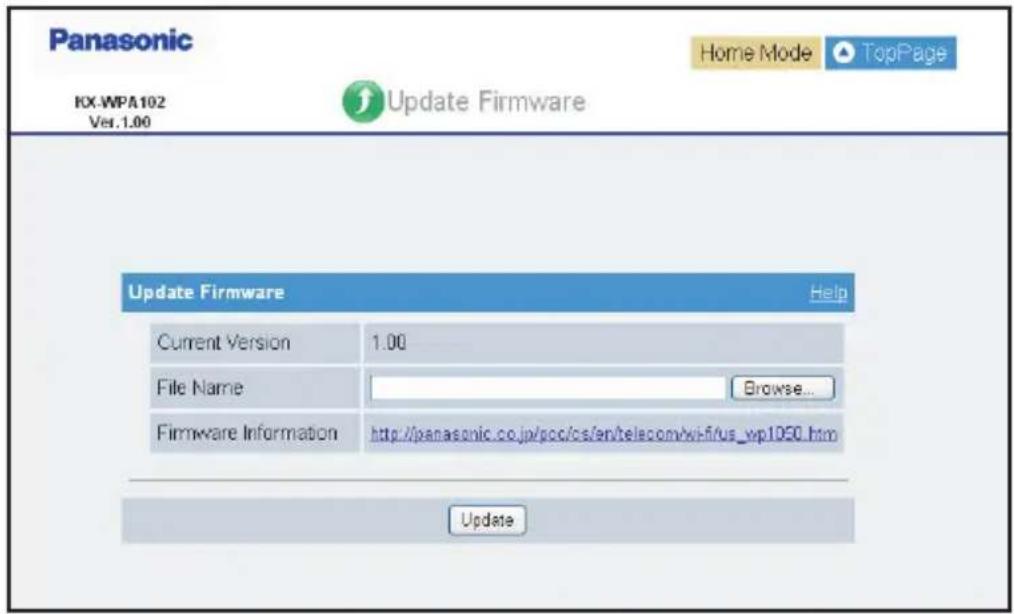
text_image
Panasonic Home Mode TopPage KX-WPA102 Ver.1.00 Update Firmware Update Firmware Help Current Version 1.00 File Name Browse... Firmware Information http://panasonic.co.jp/gcc/cs/en/telecom/wi-fius_wp1050.htm Update2 Check for the latest version by clicking the firmware information URL.
3 If the version is updated, download the updated firmware to your computer.
4 Enter the file name of the downloaded firmware in the File Name field.
- You can also click [Browse...] to select the firmware file name from the list.
5 Click [Update].
6 Click [OK].
- The base unit automatically restarts after the firmware is updated.
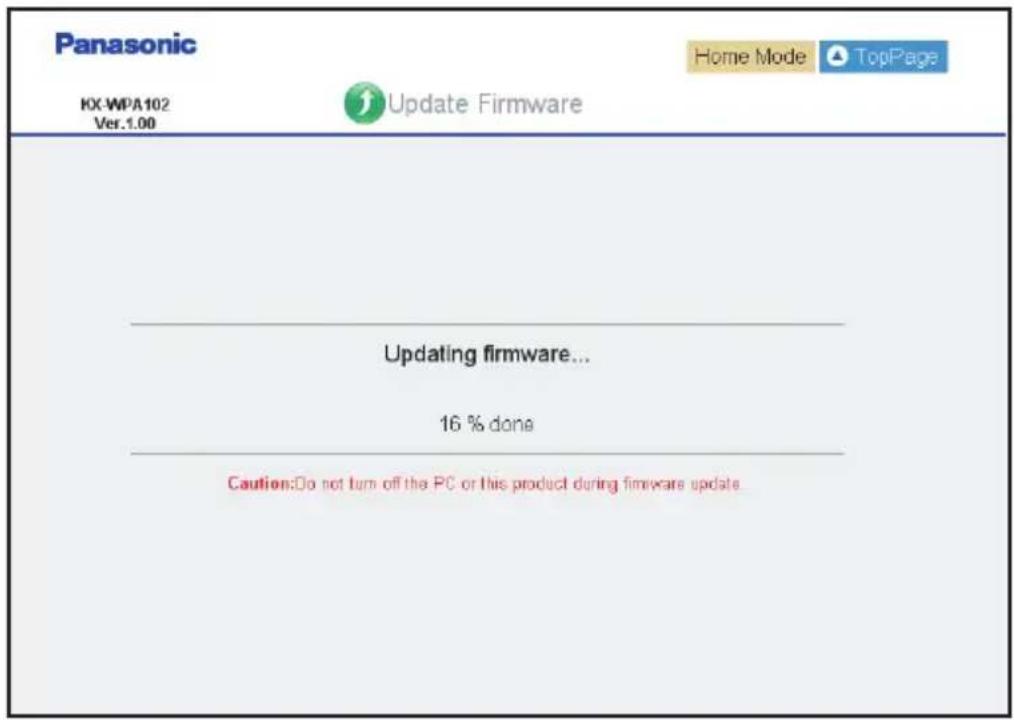
text_image
Panasonic Home Mode TopPage KX-WPA102 Ver.1.00 Update Firmware Updating firmware... 16 % done Caution:Do not turn off the PC or this product during firmware update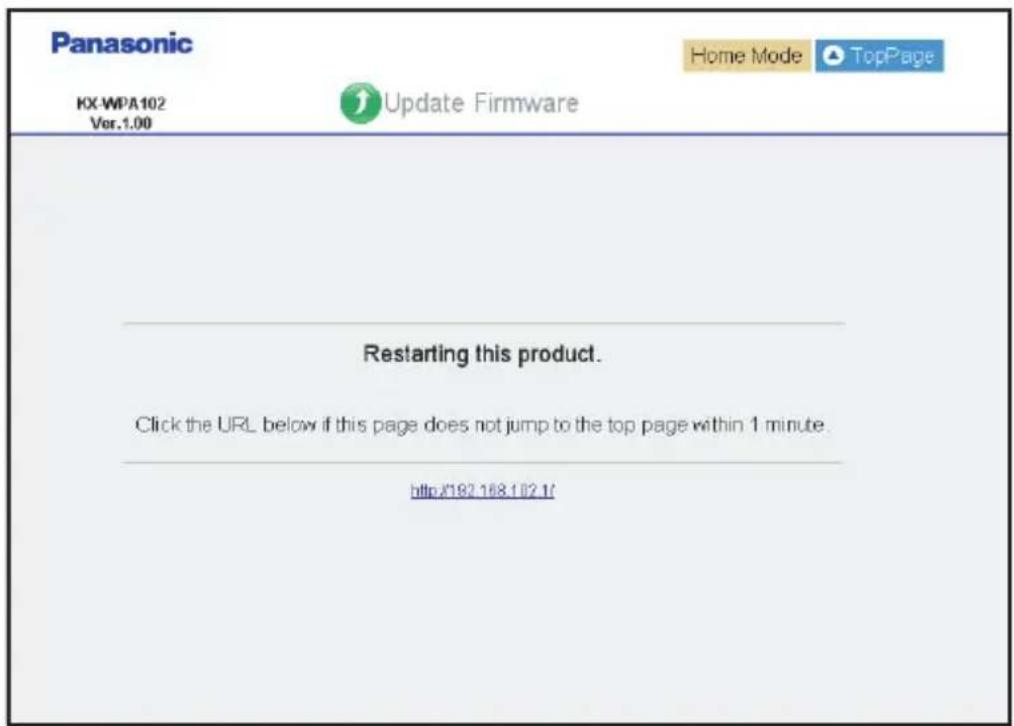
text_image
Panasonic Home Mode TopPage KX-WPA102 Ver.1.00 Update Firmware Restarting this product. Click the URL below if this page does not jump to the top page within 1 minute. http://192.168.1/02.1/Advanced Setup
1 Click [Advanced Setup] on the Top Menu.
![PANASONIC KX-WP1050 - Click [Advanced Setup] on the Top Menu. - 1](/content/2026/05/796742/images/68b623549c3c7eb046c7b2b65bfb1ab1688b85a97bbd4f1878c66eaa5f99e8b8.jpg)
text_image
Panasonic Advanced Setup Hotel Mode TopPage KK/WPA102 Ver. 1.00 Basic Advanced Wireless Status Maintenance Support ① Tab Advanced LAN/DHCP Server Setting of LAN side network information and DHCP server. This function is not available in AP mode. LAN Help IP Address 192.168.102.1 Subnet Mask 256.255.255.0 ② Menu ③ Sub menu 1 DHCP Server Help DHCP Server Enable Disable Starting IP Address 192.168.102.100 Number of Leased IP Address 5 DHCP Server Lease Table The number of leased IP address is selected from 1 to 5. When you change the LAN side network and DHCP server settings, the DHCP static entry which accepting wireless handset is deleted. Save Static DHCP (IP Address Reservation) Help No MAC Address IP Address 1 Handset 192.168.102.100 Add ④ Sub menu 2①Tab
- Basic: Display the setting pages for the Internet connection profile.
● Advanced: Display the setting pages for the local network configuration, security, and routing.
● Wireless: Display the setting pages for the basic and security settings for the wireless network connection. - Status: Display the status pages for the basic WAN/LAN and wireless network interface.
● Maintenance: Display the setting pages for maintenance features.
●Support: Display the Help and Support link pages.
②Menu
Menu items contained in the selected Tab are shown.
③Sub menu 1
Sub menu 1 is shown as the heading title on the Menu page.
④Sub menu 2
Sub menu 2 is a separate page that is available from the Menu page by clicking the underlined item.
2 Click the desired tab, then click the desired item from the menu on the left side.
| Tab Menu Sub menu1 Sub menu2 | Page | |||
| Basic Internet | Connection | Profiles Profile Setting 147 | ||
| Profile Selection – | ||||
| MAC Address Clone*3 | – | 150 | ||
| Advanced LAN/DHCP Server*3 | LAN – 152 | |||
| DHCP Server | – | |||
| Static DHCP*3(IP Address Reservation) | Static DHCP Setting | 154 | ||
| Port Forwarding*3 | Port Forwarding Table | Port Forwarding Setting | ||
| DMZ*3 | – | 158 | ||
| UPnP*4 | – | 159 | ||
| Easy Security*3 | Easy-To-Use Filtering | |||
| Packet Filtering*3 | Packet Filtering Table | Packet Filtering Setting | ||
| Routing*3 | Static Routing Table | Routing Setting | ||
| Tab | Menu | Sub menu1 | Sub menu2 | Page |
| Wireless Wireless | less Basic Wireless Mode – 168 | |||
| SSID – | ||||
| Wireless Security Security Mode – 170 | ||||
| WEP Settings – | ||||
| WPA-PSK/WPA2-PSKSettings | – | |||
| MAC Address Filtering | MAC Address Filtering | – | 172 | |
| MAC Address Filtering Table | MAC Address Filtering Setting | |||
| Status Network | Status WAN Interface Status*1 | – | 175 | |
| LAN Interface Status*1 | – | |||
| Routing Table – | ||||
| ARP Table – | ||||
| DHCP Lease Table DHCP Server Status*2 | – | 177 | ||
| DHCP Lease Table*2 | – | |||
| UPnP Port Mapping Table | UPnP Status*2 | – | 178 | |
| UPnP Port Mapping Table*2 | – | |||
| Wireless Status | – | 179 | ||
| Handset Status | – | 180 | ||
| Version Information | – | 181 | ||
| Save Status | – | 181 | ||
| Maintenance P | Password – 182 | |||
| Update Firmware – 184 | ||||
| Reset to Factory Default | - | 186 | ||
| Save Settings – 187 | ||||
| Load Settings – 188 | ||||
| Restart – 189 | ||||
| Packet Filtering Log | - | 190 | ||
| UPnP Port Mapping Log | - | 191 | ||
| Connection Log – 192 | ||||
| Support Help – | 193 | |||
| Support Link | - 194 | |||
*1 While in AP (Bridge) mode, Interface Status is displayed instead of WAN Interface Status and LAN Interface Status.
*2 While in AP (Bridge) mode, these menus are not available.
*3 While in AP (Bridge) mode, these menus are displayed but these features are not available.
*4 While in AP (Bridge) mode, this feature is available automatically.
Basic settings
Internet Connection:
This feature allows you to select and configure the Internet connection mode.
You can add, modify, and delete the Internet connection profile. You can also select the desired network profile to be used from the list of network profiles. Up to 4 profiles can be registered.
1 Click [Advanced Setup] on the Top Menu.
2 Click the [Basic] tab, then click [Internet Connection].
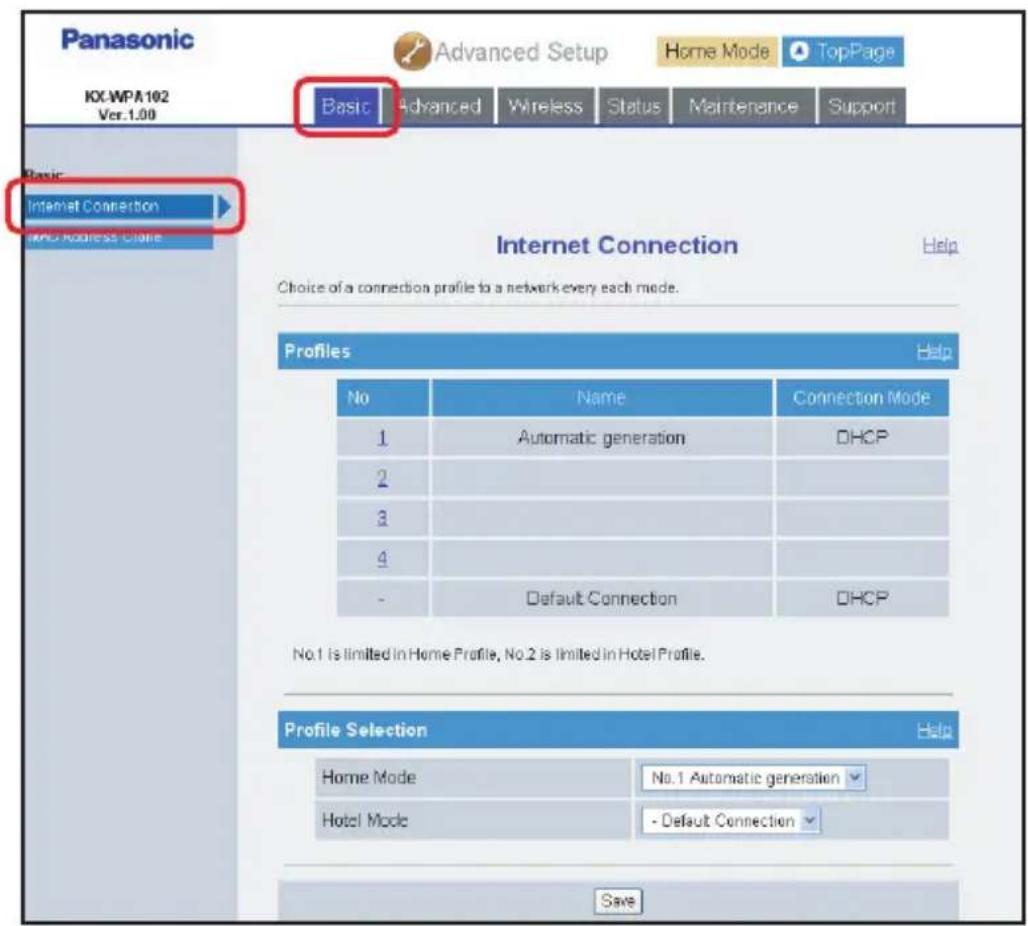
text_image
Panasonic KX-WPA102 Ver.1.00 Basic Advanced Wireless Status Maintenance Support Basic Advanced Wireless Status Maintenance Support Internet Connection Internet Connection Help Choice of a connection profile to a network every each mode. Profiles Help No Name Connection Mode 1 Automatic generation DHCP 2 3 4 Default Connection DHCP No.1 is limited in Home Profile, No.2 is limited in Hotel Profile. Profile Selection Help Home Mode No.1 Automatic generation Hotel Mode - Default Connection Save3 To add a new entry, click the entry number with blank fields under the Profiles heading.
●The Connection Mode page is displayed.
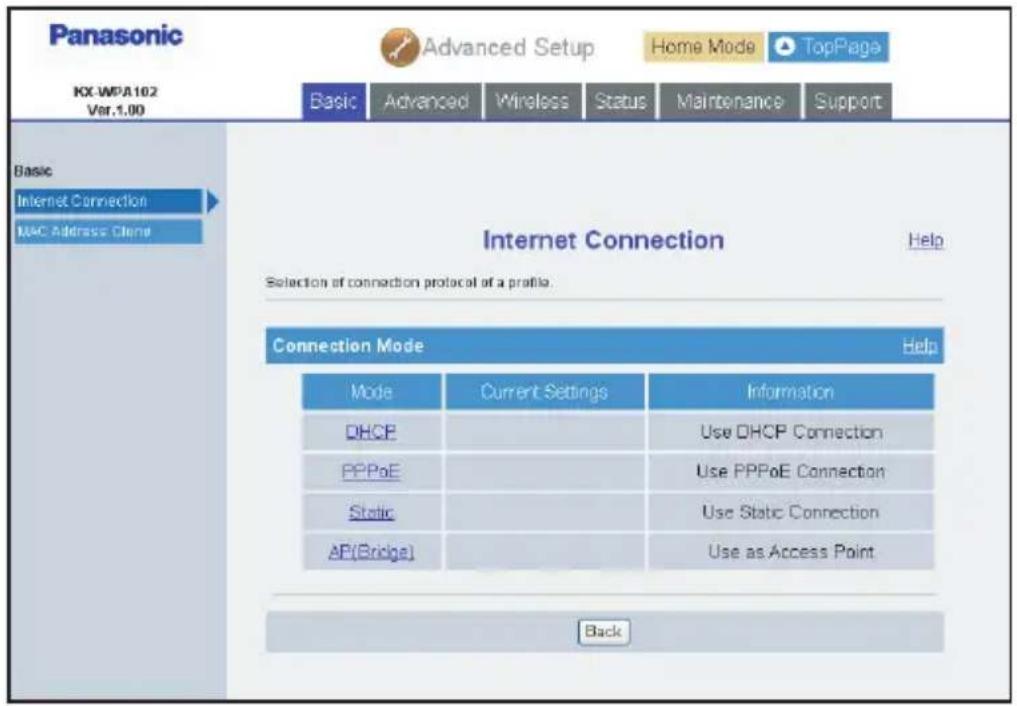
text_image
Panasonic KX-WPA102 Ver.1.00 Advanced Setup Home Mode TopPage Basic Advanced Wireless Status Maintenance Support Basic Internet Connection MAC Address Clene Internet Connection Help Selection of connection protocol of a profile. Connection Mode Help Mode Current Settings Information DHCP Use DHCP Connection PPPoE Use PPPoE Connection Static Use Static Connection AP(Bridge) Use as Access Point Back4 Click the desired Internet connection mode under the Mode column.
●The configuration page is displayed (page 48).
5 Configure the Internet connection mode you select in step 4, then click [Save].
- See "Configuring the Internet connection settings" on page 48.
- The new profile is registered and displayed under the Profiles headings.
6 Click the pull-down menu and select the desired profile under the Profile Selection heading, then click [Save].
| Setting Description | |
| Home Mode | Select a profile to use when Mode selector is at “HOME”.Profile No.1 is used only for HOME Mode. |
| Hotel Mode | Select a profile to use when Mode select is at “HOTEL”.Profile No.2 is used only for HOTEL Mode. |
7 Click [Restart].
- The base unit automatically restarts and the Top Menu is displayed.
Note:
- To change the profile:
1 Click the pull-down menu and select the desired profile under the Profile Selection heading in step 3.
2 Click [Save].
3 Click [Restart].
- To edit the profile:
1 Click the desired entry number in step 3. Then follow to steps 4 to 7.
- To delete the profile:
1 Click the desired entry number in step 3.
2 Click [Delete].
3 Click [OK] in the confirmation dialog box.
4 Click the pull-down menu and select the desired profile under the Profile Selection heading, then click [Save].
5 Click [Restart].
MAC Address Clone:
This feature allows you to clone the MAC (Media Access Control) address of your computer's network adaptor onto this product.
A MAC address is a 12-digit code assigned to a unique piece of hardware for identification. Some Internet service providers require that you register the MAC address of your computer's network adaptor, which was connected to your cable or DSL modem during installation.
In such cases, you will need to re-register the MAC address of the base unit with the Internet service provider, but you can avoid re-registering the MAC address by using this feature. You can copy the MAC address of your computer's network adaptor to the base unit and use its address for the Internet connection.
1 Click [Advanced Setup] on the Top Menu.
2 Click the [Basic] tab, then click [MAC Address Clone].
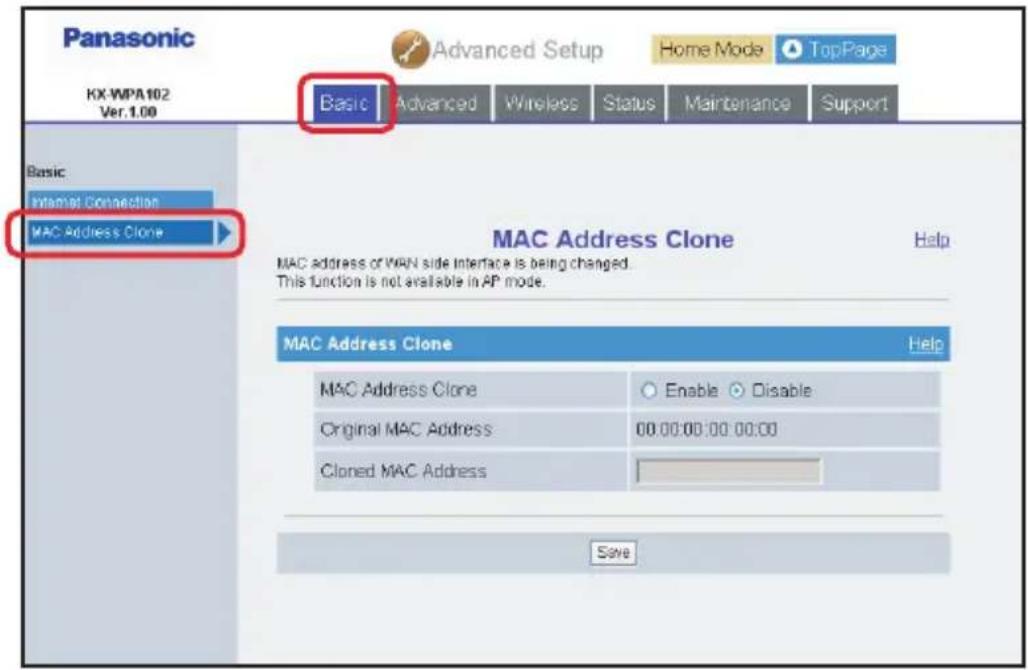
text_image
Panasonic KX-WPA102 Ver.1.00 Basic Advanced Setup Home Mode TopPage Basic Advanced Wireless Status Maintenance Support Internet Connection MAC Address Clone MAC Address Clone Help MAC Address Clone Enable Disable Original MAC Address 00:00:00:00:00:00 Cloned MAC Address SaveNote:
● This feature is not available in AP (Bridge) mode.
3 Configure the settings, then click [Save].
| Setting Description | |
| [MAC Address Clone] | ● Select whether to enable or disable the MAC address clone feature. |
| [Original MAC Address] | ● Base unit's MAC address is displayed. |
| [Cloned MAC Address] ● | Enter MAC address to be cloned.● Set 12 hexadecimal characters, with separation by colon (:) of every 2 digits (e.g. “12:34:56:78:9F:0A”). |
4 Click [Restart].
- The base unit automatically restarts and the Top Menu is displayed.
Advanced settings
LAN/DHCP Server:
This feature allows you to configure the local network settings and DHCP server settings.
1 Click [Advanced Setup] on the Top Menu.
2 Click the [Advanced] tab, then click [LAN/DHCP Server].
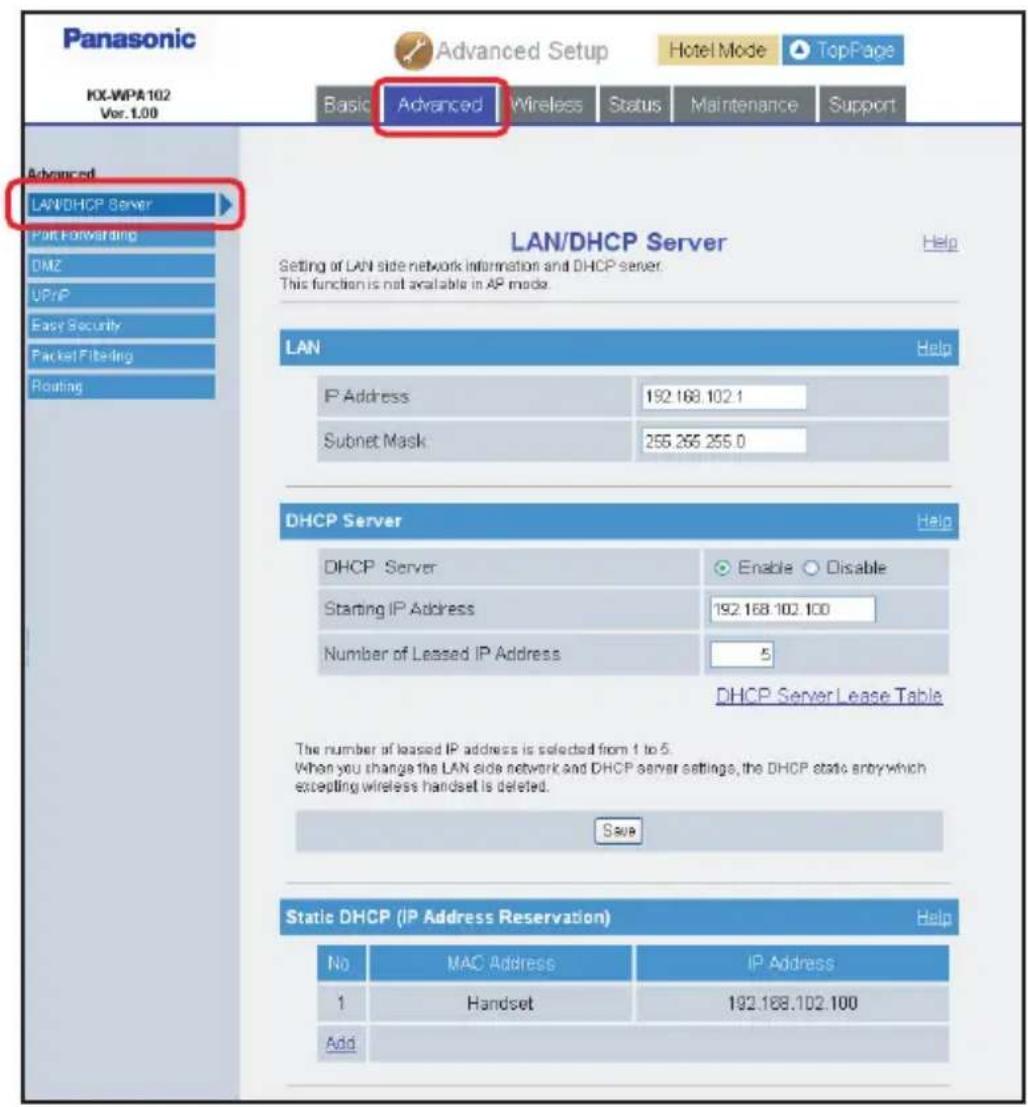
text_image
Panasonic KX-WPA102 Var. 1.00 Advanced Setup Hotel Mode TopPage Basic Advanced Wireless Status Maintenance Support Advanced LAN/DHCP Server Setting of LAN side network information and DHCP server. This function is not available in AP mode. LAN/DHCP Server Help IP Address 192.168.102.1 Subnet Mask 255.255.255.0 DHCP Server Help DHCP Server Enable Disable Starting IP Address 192.168.102.100 Number of Leased IP Address 5 DHCP Server Lease Table The number of leased IP address is selected from 1 to 5. When you change the LAN side network and DHCP server settings, the DHCP static entry which excepting wireless handset is deleted. Stop Static DHCP (IP Address Reservation) Help No MAC Address IP Address 1 Handset 192.168.102.100 AddNote:
● This feature is not available in AP (Bridge) mode.
3 Configure the settings, then click [Save].
| Setting Description | |
| [IP Address] | ● Enter the IP address and subnet mask corresponding to your local network.● Set 4 numbers (0 – 255) separated by periods such as “192.168.0.253”.Note:● There are some restrictions on IP address entry. For example, “0.0.0.0” and “255.255.255.255” are not available. |
| [Subnet Mask] | |
| [DHCP Server] | ● This setting assigns IP addresses to devices on your LAN. Select whether to enable or disable this feature. |
| [Starting IP Address] | ● Enter the starting IP address for the DHCP server’s IP assignment. |
| [Number of Leased IP Address] | ● Enter the number of the leased IP addresses (maximum: 5). The first IP address is assigned to the handset. The subsequent ones are assigned to computers. |
4 Click [Restart].
- The base unit automatically restarts and the Top Menu is displayed.
Note:
- If you change the LAN network settings or DHCP server settings, the entries in the Static DHCP table will be deleted.
- In step 4, if the LAN side setting is changed, you need to change your computer's setting and click the link shown on the Restarting page.
Static DHCP (IP Address Reservation):
The Static DHCP function allows you to stabilize the IP address assigned to the computer by registering the computer's MAC address. Up to 5 entries can be registered. The first entry is reserved for the handset.
1 Click [Add] under the Static DHCP (IP Address Reservation) heading in LAN/DHCP Server page (page 152), then configure the settings.
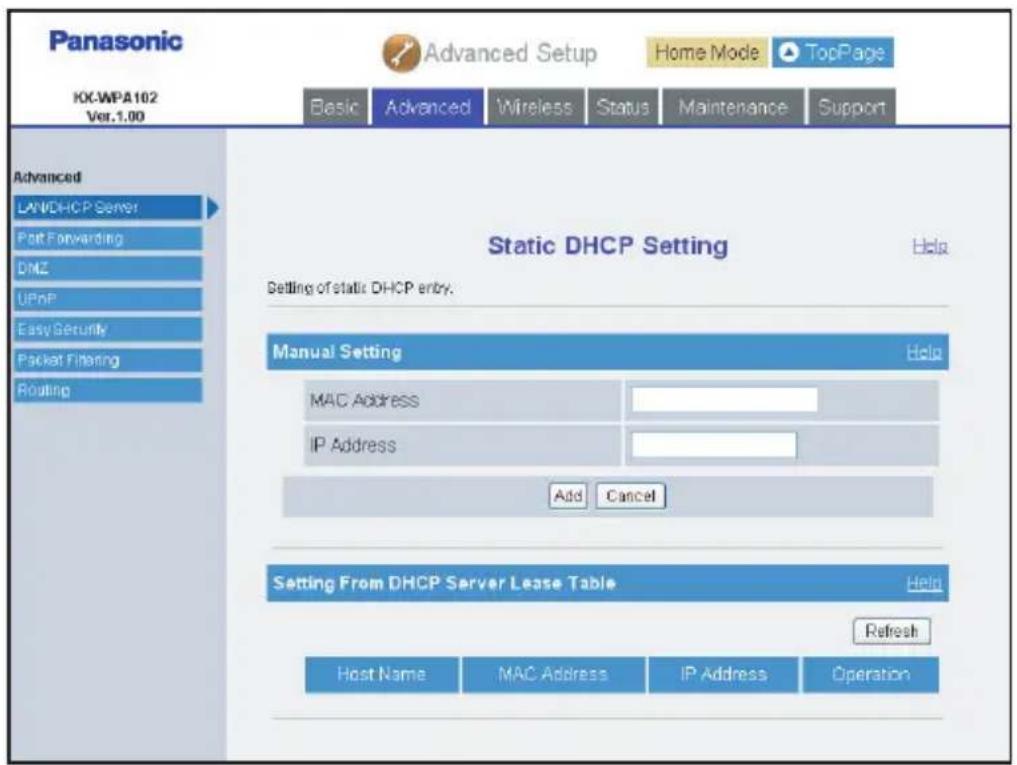
text_image
Panasonic KCKWPA102 Ver.1.00 Advanced Setup Home Mode TopPage Basic Advanced Wireless Status Maintenance Support Advanced LAN/CHCP Server Port Forwarding DMZ UPnP Easy Security Packet Filtering Routing Static DHCP Setting Help Setting of static DHCP entry. Manual Setting Help MAC Address IP Address Add Cancel Setting From DHCP Server Lease Table Help Refresh Host Name MAC Address IP Address Operation| Setting Description | |
| [MAC Address] | ● Enter the LAN card's MAC address for the corresponding computer.● Set 12 hexadecimal characters, with separation by colon(:) of every 2 digits (e.g.12:34:56:78:9F:0A). |
| [IP Address] | ● Enter the IP address that you want to stabilize for the corresponding computer. |
- You can also select the setting from the DHCP Server Lease Table. Click [Add] in the "Operation" column under the Setting From DHCP Server Lease Table heading.
- When you click [Refresh], the network connection status is refreshed.
2 Click [Add] under the Manual Setting heading.
3 Click [Restart].
- The base unit automatically restarts and the Top Menu is displayed.
Note:
- To edit the settings:
1 Click the desired entry number under the static DHCP setting, click the desired entry number under the Static DHCP (IP Address Reservation) heading in LAN/DHCP Server page (page 152).
2 Edit the items in the Static DHCP Setting page.
3 Click [Save].
4 Click [Restart].
- To delete the settings:
1 Click the desired entry number under the static DHCP setting, click the desired entry number under the Static DHCP (IP Address Reservation) heading in LAN/DHCP Server page (page 152).
2 Click [Delete] in the Static DHCP Setting page.
3 Click [OK] in the confirmation dialog box.
4 Click [Restart].
Port Forwarding:
This feature allows you to configure the port forwarding settings. Enabling Port Forwarding allows other Internet users to access services running on your LAN.
Up to 10 settings can be stored.
Important:
- When setting up the port forwarding feature, there is a possibility of illegal access to the forwarding port from the Internet. For safety reasons, set this feature only when required.
1 Click [Advanced Setup] on the Top Menu.
2 Click the [Advanced] tab, then click [Port Forwarding].
![PANASONIC KX-WP1050 - Click the [Advanced] tab, then click [Port Forwarding]. - 1](/content/2026/05/796742/images/fea3e1c1cb2a419b972e398cc575a4e35fc50ff4d0cc40fa3b75787307455254.jpg)
text_image
Panasonic KX WPA102 Ver.1.00 Advanced Setup Home Mode TopPage Basic Advanced Wireless Status Maintenance Support Advanced LAVHDB Series Port Forwarding LAN2 LPnP Easy Security Packet Filtering Routing Port Forwarding Help Setting of port forwarding function. This function is not available in AP mode. Port Forwarding Table Help No Status Forwarding IP Address Protocol Port Add3 To add a new entry, click [Add] under the Port Forwarding Table heading.
![PANASONIC KX-WP1050 - To add a new entry, click [Add] under the Port Forwarding Table heading. - 1](/content/2026/05/796742/images/f46bc593372963efb717c12f4e25f6b504d7316540a0ea972aff46e1424f62d2.jpg)
text_image
Panasonic KX-WPA102 Ver. 1.00 Advanced Setup Home Mode TopPage Basic Advanced Wireless Status Maintenance Support Advanced LANDHCP Server Port Forwarding DM2 UPnP Easy Security Packet Filtering Routing Port Forwarding Setting Help Setting of port forwarding entry. Port Forwarding Setting Help No. 1 Status/Port Forwarding Enable Disable Forwarding IP Address Protocol TCP&UDP Port When forwarding a packet to a range of port numbers, enter the range, separated by a ~* (e.g. 2000-3000). Add Cancel4 Configure the settings under the Port Forwarding Setting heading. Click [Add] to add a new entry.
| Setting Description | |
| [No.] | Select the desired entry number for the port forwarding setting.Entry number represents the priority. Entry number 1 has the highest priority. |
| [Status/Port Forwarding] | Select whether to enable or disable the port forwarding feature. |
| [Forwarding IP Address] | Enter the IP address of the computer that is hosting the service.The device registered as the forwarding IP address can be accessed from the Internet through the registered protocol and port. |
| [Protocol] | Select the desired protocol used to access your hosting service from TCP/UDP/TCP&UDP/ESP/GRE. |
| [Port] | Enter the forwarding port number when you select the protocol from TCP/UDP/TCP&UDP.If you want to set one port, enter its port number only.If you want to set a range of ports, enter the port numbers in the following way: “2000 – 3000” |
5 Click [Restart].
- The base unit automatically restarts and the Top Menu is displayed.
Note:
- To edit the setting:
1 Click the desired entry number in step 3.
2 Edit the items in the Port Forwarding Setting page.
3 Click [Save].
4 Click [Restart].
- To delete the setting:
1 Click the desired entry number in step 3.
2 Click [Delete] in the Port Forwarding Setting page.
3 Click [OK] in the confirmation dialog box.
4 Click [Restart].
●This feature is not available in AP (Bridge) mode.
DMZ:
This feature allows you to configure the DMZ (DeMilitarized Zone) settings. Enable DMZ to expose a specified computer on your LAN to the Internet.
Important:
- A computer specified as the DMZ host may be vulnerable to security risks.
1 Click [Advanced Setup] on the Top Menu.
2 Click the [Advanced] tab, then click [DMZ].
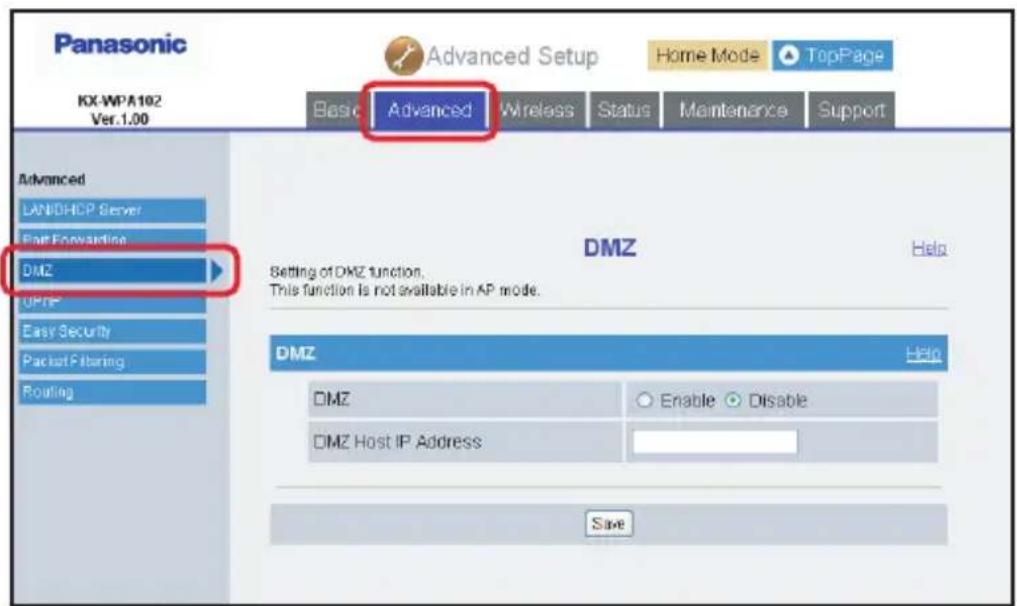
text_image
Panasonic KX-WPA102 Ver.1.00 Advanced Setup Home Mode ▲ TopPage Basic Advanced Wireless Status Maintenance Support Advanced LANDHCP Server Fast Forwarding DMZ OPNP Easy Security Packet Filtering Routing DMZ Help Setting of DMZ function. This function is not available in AP mode. DMZ Help DMZ Enable Disable DMZ Host IP Address Save3 Configure the settings, then click [Save].
| Setting Description | |
| [DMZ] | ● Select whether to enable or disable the DMZ feature. |
| [DMZ Host IP Address] | ● Enter the IP address of the computer to be exposed to the Internet. |
4 Click [Restart].
- The base unit automatically restarts and the Top Menu is displayed.
Note:
●This feature is not available in AP (Bridge) mode.
UPnP:
This feature allows you to configure the UPnP (Universal Plug and Play) settings. Enabling UPnP allows the base unit to be compliant with the UPnP standard.
1 Click [Advanced Setup] on the Top Menu.
2 Click the [Advanced] tab, then click [UPnP].
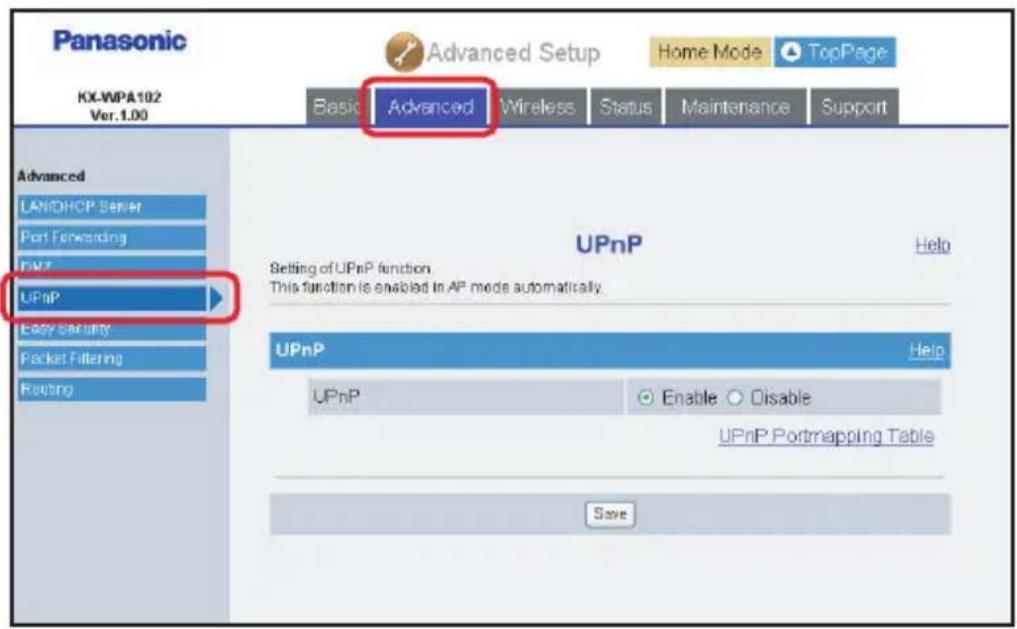
text_image
Panasonic KX-WPA102 Ver.1.00 Advanced Setup Home Mode TopPage Basic Advanced Wireless Status Maintenance Support Advanced LANDHCP Server Port Forwarding UPnP UPnP Easy Security Packet Filtering Routing UPnP Help Setting of UPnP function This function is enabled in AP mode automatically. UPnP Help UPnP Enable Disable UPnP Portmapping Table Save3 Select the desired setting, then click [Save].
| Setting Description | |
| [UPnP] | ● Select whether to enable or disable the UPnP feature. |
4 Click [Restart].
- The base unit automatically restarts and the Top Menu is displayed.
Note:
- This feature is enabled in AP (Bridge) mode automatically.
Easy Security:
This feature allows you to easily set up packet filtering.
1 Click [Advanced Setup] on the Top Menu.
2 Click the [Advanced] tab, then click [Easy Security].
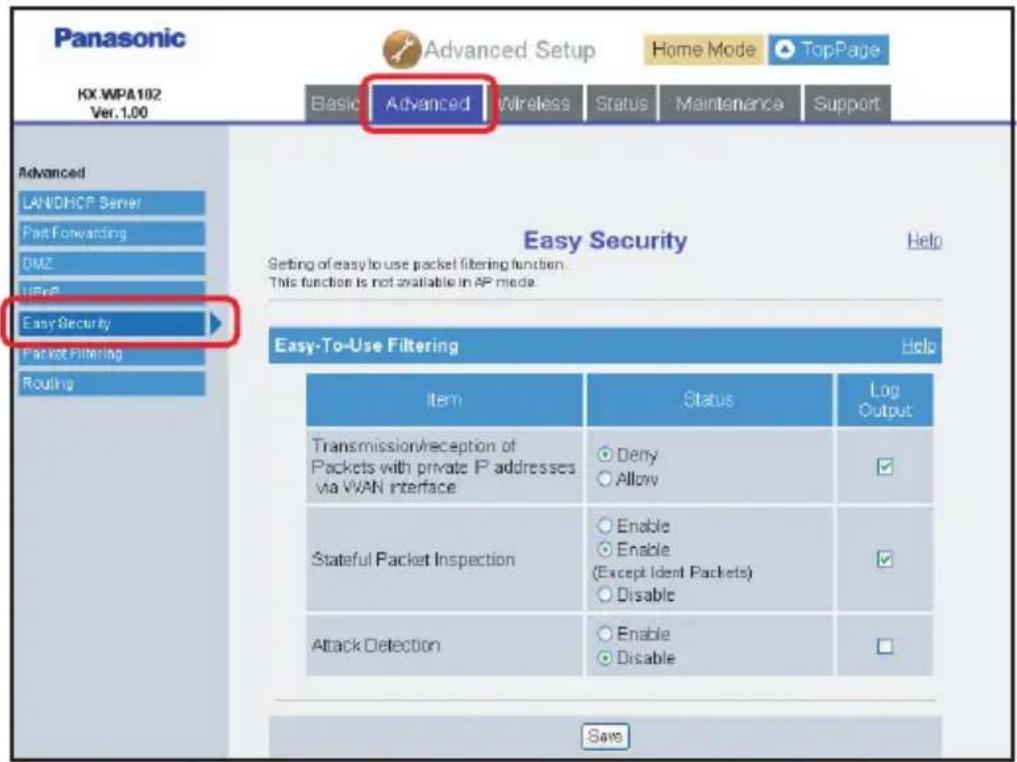
text_image
Panasonic KX WPA102 Ver. 1.00 Advanced Setup Home Mode TopPage Basic Advanced Wireless Status Maintenance Support Advanced LANDHCP Server Part Forwarding DMZ USBP Easy Security Packet Filtering Routing Easy Security Setting of easy to use packet filtering function. This function is not available in AP mode. Easy-To-Use Filtering Help Item StatusLoad Output Transmission/reception of Packets with private IP addresses via VIAN interface Deny Allow Stateful Packet Inspection Enable Enable (Except Ident Packets) Disable Attack Detection Enable Disable Save3 Configure the settings, then click [Save].
| Setting Description | |
| [Transmission/reception of Packets with private IP addresses via WAN interface] | Select whether to deny or allow packets to be sent or received when the source of an incoming (from WAN) packet and the destination of an outgoing (to WAN) packet are private IP addresses. This feature is valid when the WAN IP address is global. The default is set to Deny.Check whether output or not this log. The default is set to ON. |
| [Stateful Packet Inspection] | Select whether to enable or disable the stateful packet inspection feature.Some E-mail servers authenticate clients using identification packets which use TCP port 113. If the E-mail feature does not work well, select [Enable (Except Ident Packets)], which is the default setting for this feature.Check whether output or not this log. The default is set to ON. |
| [Attack Detection] | Select whether to enable or disable the attack detection feature. The default is set to Disable.The following type of attacks can be detected:- T C P S c a n- U D P S c a n- ICMP EchoCheck whether output or not this log. The default is set to OFF. |
- Check the box in the Log Output column to create a log of each action.
- If you select [Enable] and check "Log Output", the log will be output. If you select [Disable], the log will not be output even if you check "Log Output".
4 Click [Restart].
- The base unit automatically restarts and the Top Menu is displayed.
Note:
●This feature is not available in AP (Bridge) mode.
Packet Filtering:
This feature allows you to configure the packet filtering settings, and to control the packets to be received/transmitted between the Internet and the computers on your LAN. Up to 20 settings can be registered.
1 Click [Advanced Setup] on the Top Menu.
2 Click the [Advanced] tab, then click [Packet Filtering].
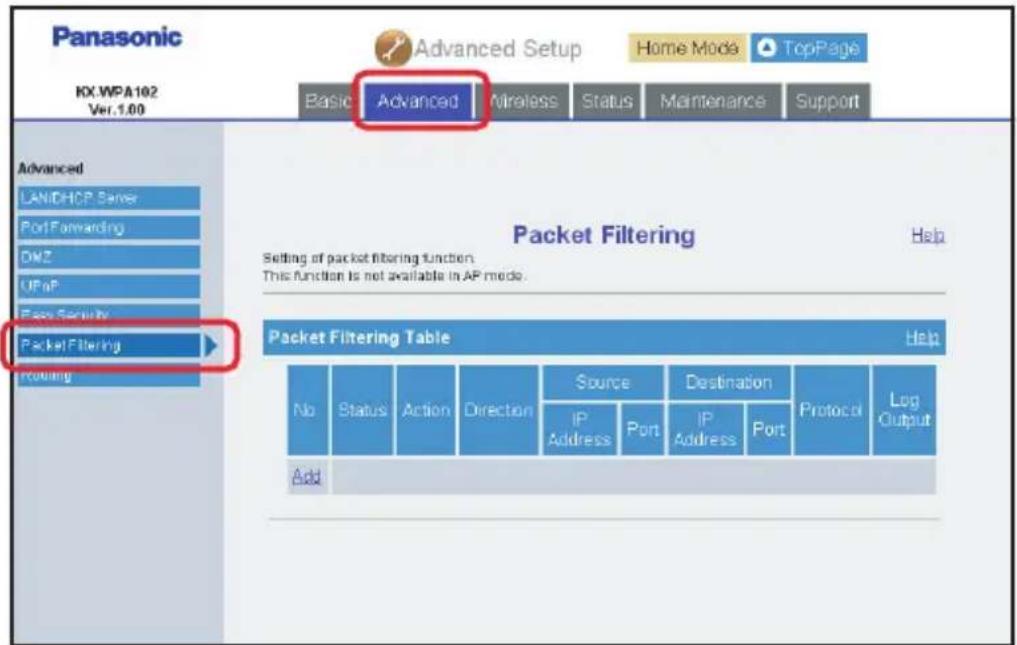
text_image
Panasonic KX.WPA102 Ver. 1.00 Advanced Setup Home Mode TopPage Basic Advanced Wireless Status Maintenance Support Advanced LAN/DHP Server Port Forwarding DNZ UPnP Face Security Packet Filtering Routing Packet Filtering Setting of packet filtering function This function is not available in AP mode. Packet Filtering Table Help No Status Action Direction Source Destination Protocol Log Output IP Address Port IP Address Port Add3 To add a new entry, click [Add] under the Packet Filtering Table heading.
![PANASONIC KX-WP1050 - To add a new entry, click [Add] under the Packet Filtering Table heading. - 1](/content/2026/05/796742/images/d39380cf2a7ebda91d2e028f3990b711980ab4244732470d765aadcb43519ee1.jpg)
text_image
Panasonic KX-WPA102 Ver. 1.00 Advanced Setup Home Mode TopPage Basic Advanced Wireless Status Maintenance Support Advanced LAN/DHCP Server Port Forwarding CMZ UPnP Easy Security Packet Filtering Routing Packet Filtering Setting Help Setting of packet filtering entry. Packet Filtering Setting No. 1 Status/Packet Filtering Enable Disable Action Allow Deny Direction L > W W > L Source IP Address / Source Port Destination IP Address / Destination Port Protocol * Log Output ON OFF -IP Address If *** is entered, all the IP addresses are selected. If 'local' is entered, the address is this product. -Port When specifying all ports, enter *** When specifying 1 port only, enter, for example, '300'. When specifying a port range, enter, for example, '300-400'. Add Cancel4 Configure the settings under the Packet Filtering Setting heading, then click [Add] to add the new entry.
| Setting Description | |
| [No.] | Select the desired entry number for the packet filtering setting. Entry number represents the priority. Entry number 1 has the highest priority. |
| [Status/Packet Filtering] | Select whether to enable or disable the packet filtering feature. |
| [Action] | Select whether to allow or deny IP packets that are being received. |
| [Direction] | Select [L→W] (filtering when sending to WAN) or [W→L] (filtering when receiving from WAN). |
| [Source IP Address] | Enter the packet source IP address/netmask to be filtered.If you want to set one IP address, enter that IP address in IP address field and “32” in netmask field. (e.g. If you want to control the packet from 192.168.102.10, enter “192.168.102.10” in IP address field and “32” in netmask field.)If you want to set a range of IP addresses, enter that network address in IP address field and it’s netmask in netmask field. (e.g. If you want to control the packet from 192.168.102.0 - 192.168.102.255, enter “192.168.102.0” in IP address field and “24” in netmask field.)If you want to set the base unit’s address, enter “local” in IP address field. Leave the netmask field blank.*1If you want to set all IP address, select “*” in IP address field. Leave the netmask field blank. |
| [Source Port] | Enter the packet source port to be filtered when you select the protocol from TCP/UDP/TCP&UDP.If you want to set one port, enter its port number only.If you want to set a range of ports, enter the port numbers in the following way: “2000 – 3000”If you want to set all ports, select “*”. |
| [Destination IP Address] | Enter the packet destination IP address to be filtered.The entry is the same as the Source IP Address. |
| [Destination Port] | ● Enter the packet destination IP address/netmask to be filtered.● The entry is the same as the Source Port. |
| [Protocol] | ● Select the protocol to be used from TCP/UDP/TCP&UDP/ESP/GRE/ICMP. If you want to set all protocols, select “*”. |
| [Log Output] | ● Set whether to display the temporarily saved packet information on the “Packet Filtering Log:” (page 190). |
*1 When direction is W→L, Source IP 'local' is Invalid. When direction is L→W, Destination IP 'local' is invalid.
5 Click [Restart].
- The base unit automatically restarts and the Top Menu is displayed.
Important:
●The packet filtering is NOT executed for the DMZ host.
Note:
- To edit the setting:
1 Click the desired entry number in step 3.
2 Edit the items in the Packet Filtering Setting page.
3 Click [Save].
4 Click [Restart].
- To delete the setting:
1 Click the desired entry number in step 3.
2 Click [Delete] in the Packet Filtering Setting page.
3 Click [OK] in the confirmation dialog box.
4 Click [Restart].
- As the default security policy, outgoing packets initiated from the computer on your LAN to the Internet are allowed, but other packets are denied.
● Security functions are executed in the following order:
– Easy security (Attack detection)
- Packet filtering
- Easy security (except for Attack detection)
●This feature is not available in AP (Bridge) mode.
Routing:
This feature allows you to set static routing between the base unit and another network. Use this feature when you have several local networks. Up to 4 settings can be registered.
1 Click [Advanced Setup] on the Top Menu.
2 Click the [Advanced] tab, then click [Routing].
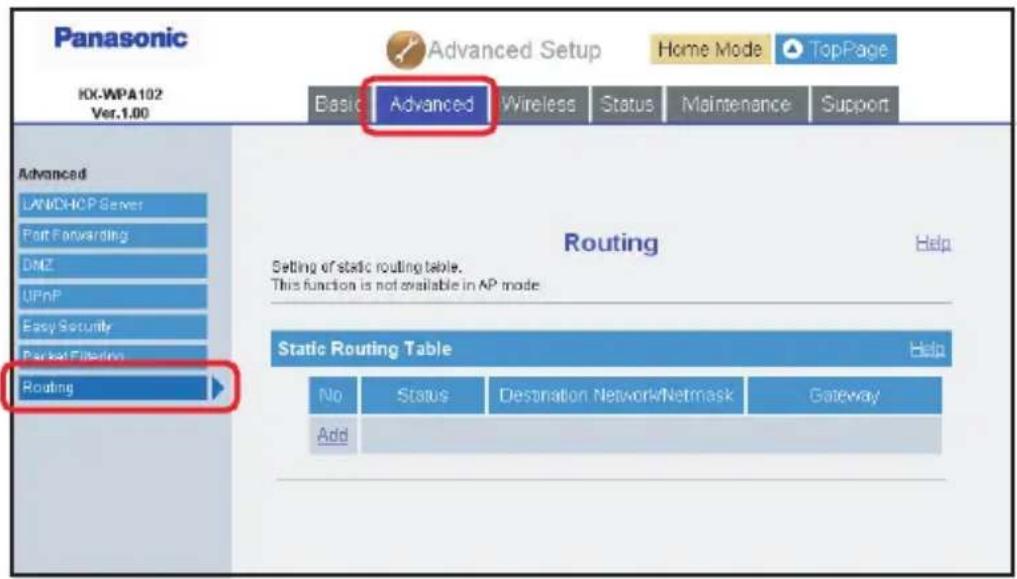
text_image
Panasonic IXI-WPA102 Ver.1.00 Advanced Setup Home Mode TopPage Basic Advanced Wireless Status Maintenance Support Advanced LANCHCP Server Port Forwarding DMZ UPnP Easy Security Parking Filtering Routing Routing Setting of static routing table. This function is not available in AP mode Static Routing Table Help No Status Destination Network/Netmask Gateway Add3 To add a new entry, click [Add] under the Static Routing Table heading.
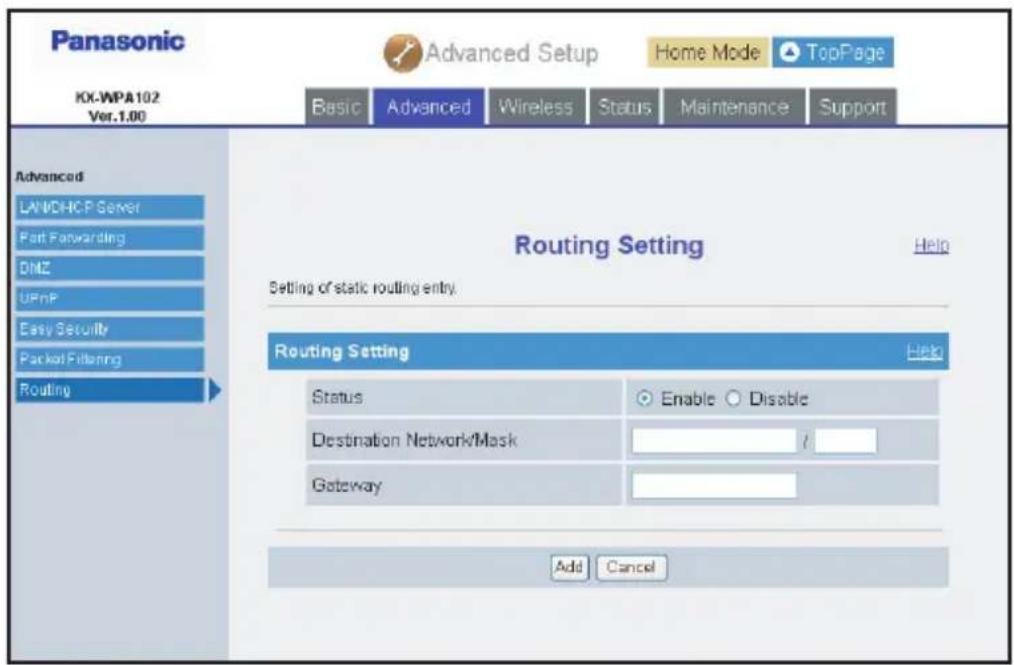
text_image
Panasonic KK-WPA102 Ver.1.00 Advanced Setup Home Mode TopPage Basic Advanced Wireless Status Maintenance Support Advanced LANCHCP Server Port Forwarding DMZ UPnP Easy Security Packet Filtering Routing Routing Setting Help Setting of static routing entry. Routing Setting Help Status Enable Disable Destination Network/Mask / Gateway Add Cancel4 Configure the settings under the Routing Setting heading, then click [Add] to add a new entry.
| Setting Description | |
| [Status] | ● Select whether to enable or disable the routing setting. |
| [Destination Network/Mask] | ● Enter the network address/netmask for the destination IP address.● If you want to set one IP address, enter that IP address in IP address field and “32” in netmask field. (e.g. If you want to control the packet from 192.168.1.1, enter “192.168.1.1” in IP address field and “32” in netmask field.)● If you want to set a range of IP addresses, enter that network address in IP address field and it’s netmask in netmask field. (e.g. If you want to control the packet from 192.168.1.0 - 192.168.1.255, enter “192.168.1.0” in IP address field and “24” in netmask field.) |
| [Gateway] ●Enter the gateway IP address. | |
5 Click [Restart].
- The base unit automatically restarts and the Top Menu is displayed.
Note:
- To edit the setting:
1 Click the desired entry number in step 3.
2 Edit the items in the Routing Setting page.
3 Click [Save].
4 Click [Restart].
- To delete the setting:
1 Click the desired entry number in step 3.
2 Click [Delete] in the Routing Setting page.
3 Click [OK] in the confirmation dialog box.
4 Click [Restart].
● This feature is not available in AP (Bridge) mode.
Wireless
Wireless Basic:
This feature allows you to set the wireless mode and network name (SSID: Service Set Identifier).
1 Click [Advanced Setup] on the Top Menu.
2 Click the [Wireless] tab, then click [Wireless Basic].
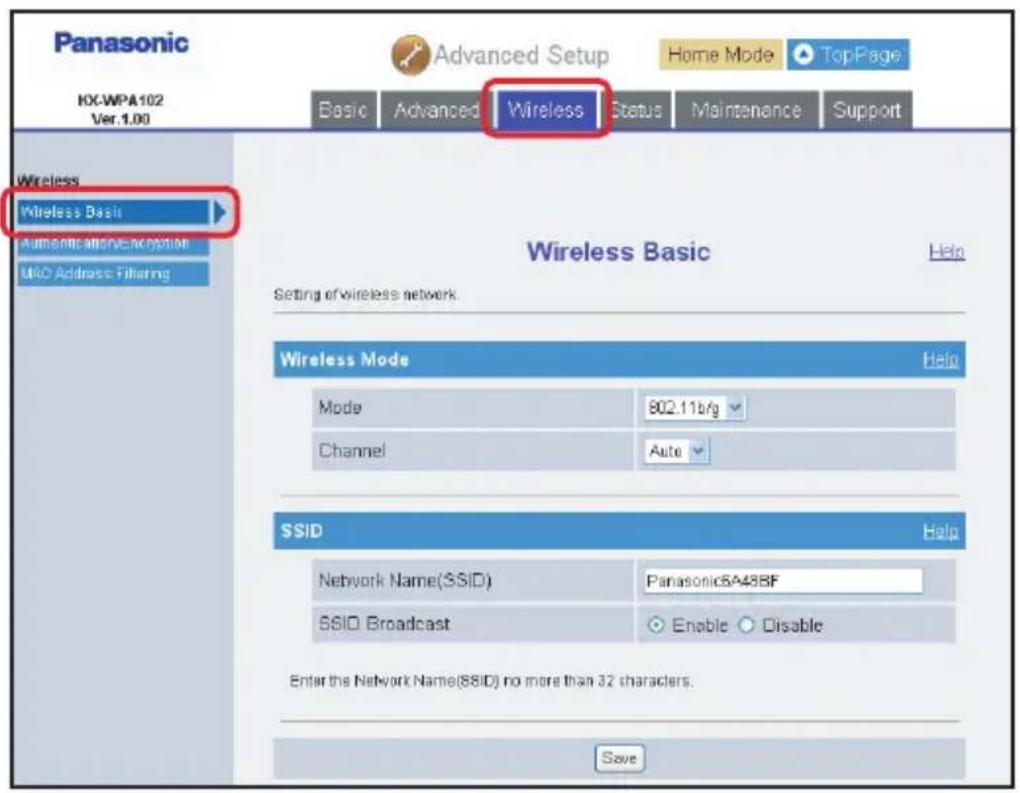
text_image
Panasonic Advanced Setup Home Mode TopPage KC-WPA102 Ver.1.00 Basic Advanced Wireless Status Maintenance Support Wireless Wireless Basic Wireless Basic Setting of wireless network. Wireless Mode Help Mode 802.11b/g Channel Auto SSID Help Network Name(SSID) Panasonic5A48BF SSID Broadcast Enable Disable Enter the Network Name(SSID) no more than 32 characters. Save3 Configure the settings, then click [Save].
| Setting Description | |
| [Mode] | Select your wireless network mode from the pull-down menu.If you have both 802.11b and 802.11g wireless devices in your network, select [802.11b/g].If you have only 802.11b wireless devices, select [802.11b] |
| [Channel] | Select [Auto] or the desired channel from 1 to 11. |
| [Network Name (SSID)] | Enter your wireless network name (SSID) (1 – 32 alphanumeric characters) in this data field. |
| [SSID Broadcast] | Enable or disable the setting to broadcast your SSID.If you select [Disable], only wireless devices that know the SSID of the base unit can connect to the base unit.If you select [Enable], any wireless device can detect the SSID of the base unit. |
4 Click [Restart].
- The base unit automatically restarts and the Top Menu is displayed.
Note:
- You need to register the handset to the base unit again when you change the network name (SSID). See “Registering the handset” on page 133.
Wireless Security:
This feature allows you to set security measures for connecting to wireless LAN.
1 Click [Advanced Setup] on the Top Menu.
2 Click the [Wireless] tab, then click [Wireless Security].
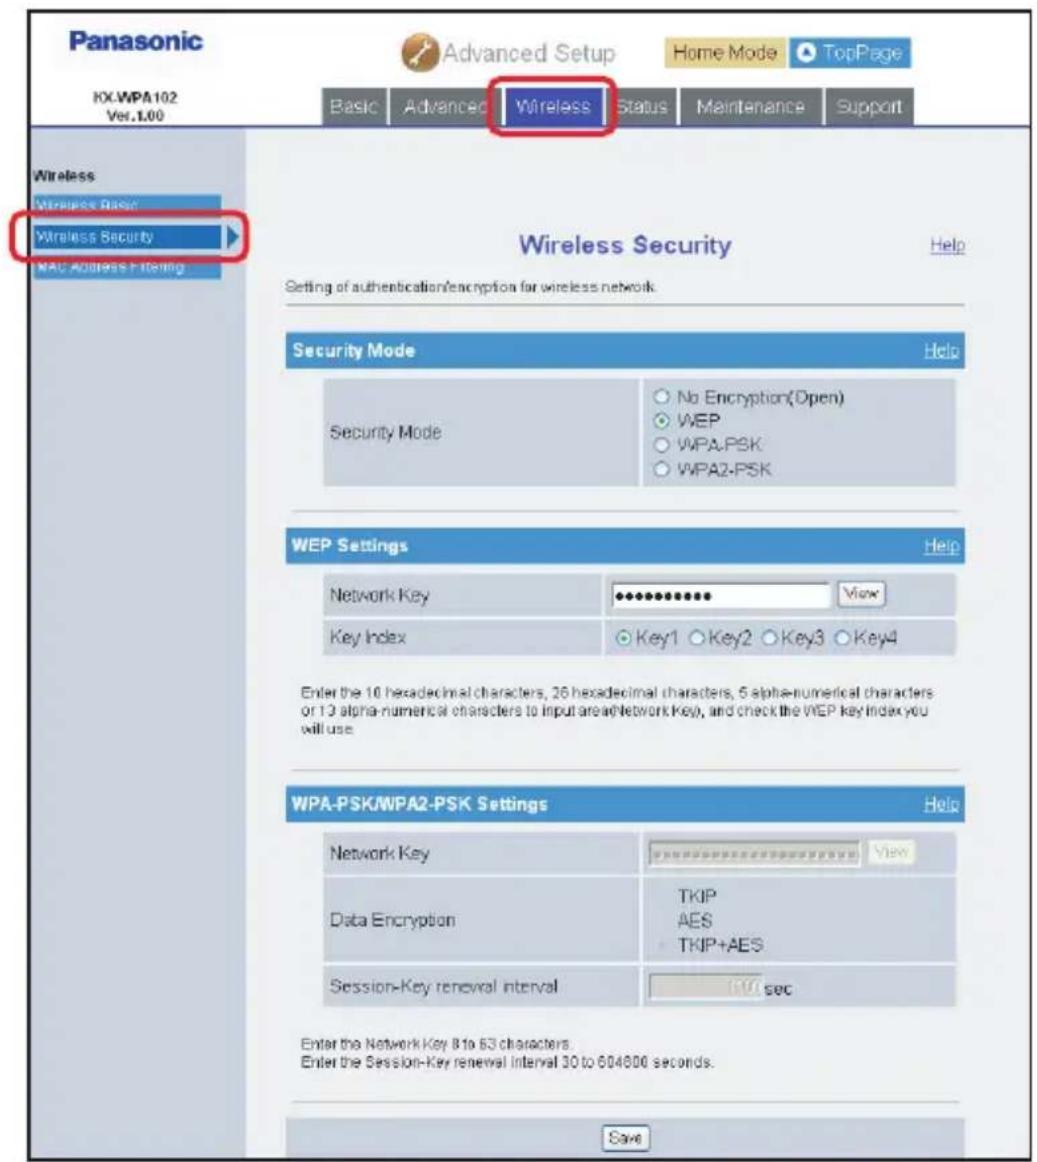
text_image
Panasonic Advanced Setup Home Mode TopPage HX-WPA102 Ver.1.00 Basic Advanced Wireless Status Maintenance Support Wireless Wireless Base Wireless Security MAU Address Filtering Wireless Security Help Setting of authentication/encryption for wireless network. Security Mode Help Security Mode No Encryption(Open) WEP WPA-PSK WPA2-PSK WEP Settings Help Network Key View Key Index Key1 Key2 Key3 Key4 Enter the 10 hexadecimal characters, 26 hexadecimal characters, 5 alpha-numerical characters or 13 alpha-numerical characters to input are a network key, and check the WEP key index you will use. WPA-PSK/WPA2-PSK Settings Help Network Key View Data Encryption TKIP AES TKIP+AES Session-Key renewal interval 80 sec Enter the Network Key 8 to 63 characters. Enter the Session-Key renewal interval 30 to 604806 seconds. Save3 Configure the settings, then click [Save].
| Setting Description | |
| [Security Mode] ● Select the desired security mode.● No Encryption (Open), WEP, WPA-PSK and WPA2-PSK are available for the wireless devices, including the handset.Select the desired security mode for your wireless devices connected to the base unit. Default is set to WEP. | |
| WEP settings | |
| [Network Key] For WEP 64bit:● Enter the network key containing 5 alphanumeric characters or 10 hexadecimal characters.For WEP 128bit:● Enter the network key containing 13 alphanumeric characters or 26 hexadecimal characters.● Press [View] to display the network key. | |
| [Key Index] | ● Select [Key 1], [Key 2], [Key 3] or [Key 4] to be used if you use WEP. The default is set to [Key 1]. |
| WPA-PSK/WPA2-PSK Settings | |
| [Network Key] | ● Enter the network key (8 – 63 alphanumeric characters) in this data field.● Press [View] to display the network key. |
| [Data Encryption] | ● Select the desired data encryption method.For WPA-PSK● If your wireless devices use TKIP, select [TKIP] or [TKIP+AES].● If your wireless devices use AES, select [TKIP+AES].For WPA2-PSK● If your wireless devices use TKIP, select [TKIP+AES].● If your wireless devices use AES, select [AES] or [TKIP+AES]. |
| [Session-Key renewal interval] | ● Set the interval for refreshing the encryption key between 30 and 604800 seconds. 604800 seconds is the equivalent of one week. The default is set to 1800. |
4 Click [Restart].
- The base unit automatically restarts and the Top Menu is displayed.
Note:
- You need to register the handset to the base unit again when you change the security mode, the network key and/or the key index. See "Registering the handset" on page 133.
- When you use WEP for the network key, set either the Network Key No. 1, No. 2, No. 3 or No. 4 as a key index according to the setting of the wireless LAN card you use. When you do not use WEP, you are suggested to use WPA-PSK/WPA2-PSK as the security mode.
MAC Address Filtering:
This feature allows you to configure the MAC address filtering settings so that devices without the particular MAC address will be filtered.
MAC address filtering is available only for wireless devices. Up to 5 entries can be registered. The first entry is reserved for the handset.
To enable or disable MAC address filtering feature:
1 Click [Advanced Setup] on the Top Menu.
2 Click the [Wireless] tab, then click [MAC Address Filtering].
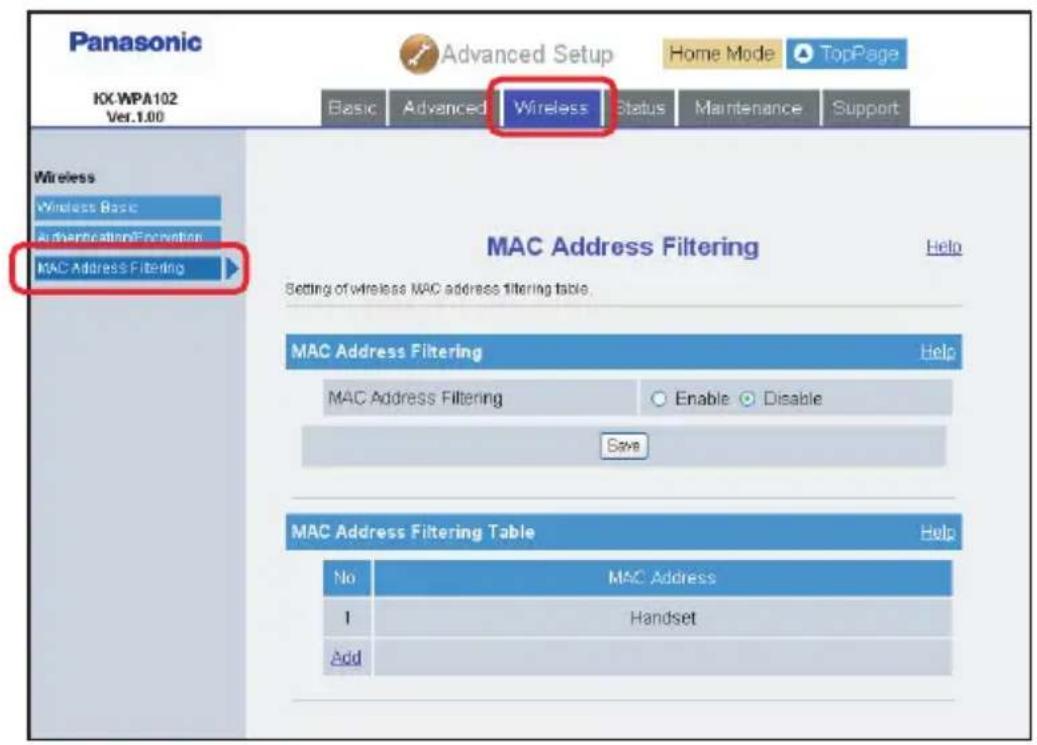
text_image
Panasonic IX:WPA102 Ver.1.00 Advanced Setup Home Mode TopPage Basic Advanced Wireless Status Maintenance Support Wireless Wireless Basic Authentication/Correction MAC Address Filtering MAC Address Filtering Help Setting of wireless MAC address filtering table. MAC Address Filtering Help MAC Address Filtering Enable Disable Save MAC Address Filtering Table Help No MAC Address 1 Handset Add3 Configure the setting, then click [Save].
| Setting Description | |
| [MAC Address Filtering] | ● Select whether to enable or disable the MAC address filtering feature.● If the MAC address filtering is enabled, only the wireless device with the registered MAC address can send/receive data. |
4 Click [Restart].
- The base unit automatically restarts and the Top Menu is displayed.
To configure MAC address filtering entry:
1 Click [Advanced Setup] on the Top Menu.
2 Click the [Wireless] tab, and then click [MAC Address Filtering].
3 To add a new entry, click [Add] under the MAC Address Filtering Table heading.
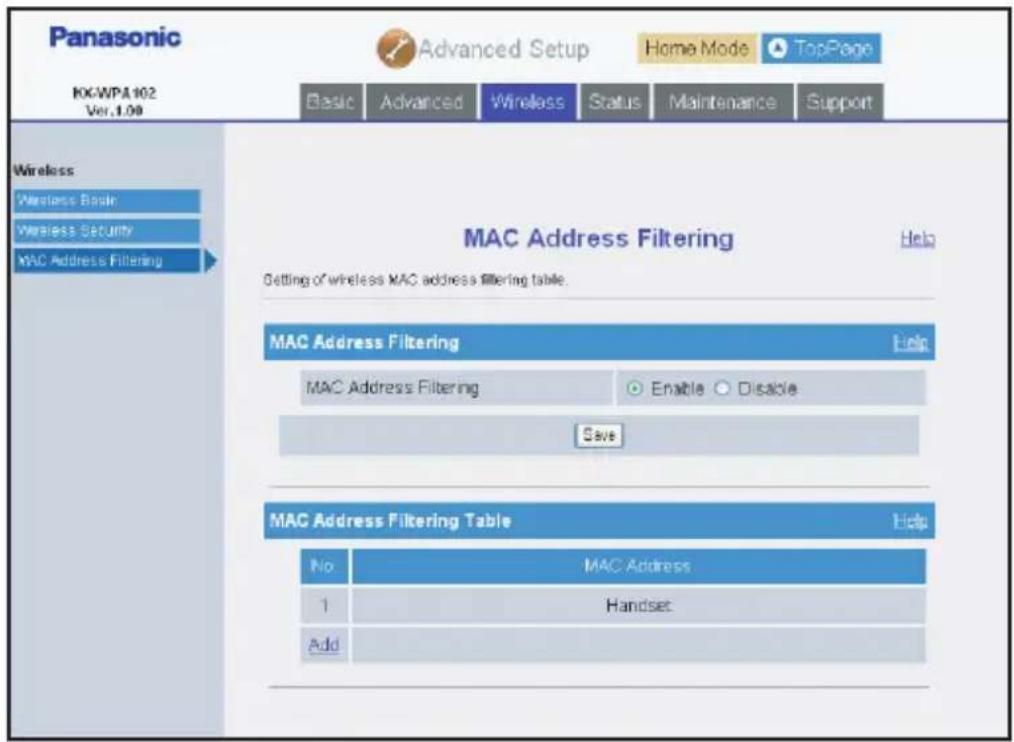
text_image
Panasonic KK/WPA102 Ver. 1.08 Advanced Setup Home Mode TopPage Basic Advanced Wireless Status Maintenance Support Wireless Wireless Basic Wireless Security MAC Address Filtering MAC Address Filtering Setting of wireless MAC address filtering table. MAC Address Filtering MAC Address Filtering Enable Disable Save MAC Address Filtering Table Help No MAC Address 1 Handset Add●MAC Address Filtering Setting page is displayed.
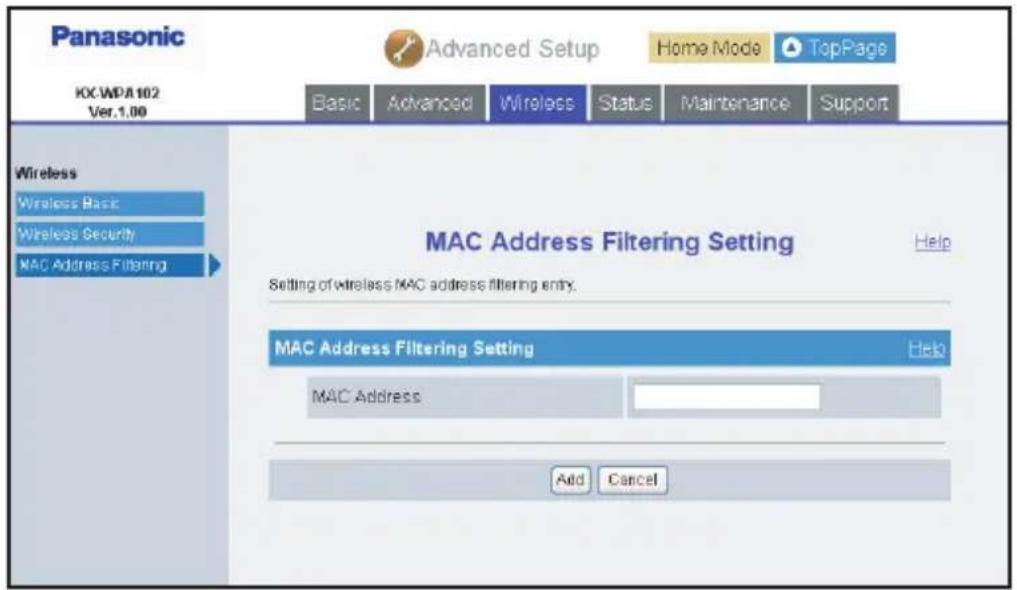
text_image
Panasonic KX:WPA102 Ver.1.00 Advanced Setup Home Mode ▲ TopPage Basic Advanced Wireless Status Maintenance Support Wireless Wireless Basic Wireless Security MAC Address Filtering MAC Address Filtering Setting Help Setting of wireless MAC address filtering entry. MAC Address Filtering Setting Help MAC Address Add Cancel4 Configure the setting, and then click [Add].
| Setting Description | |
| [MAC Address] ●Enter the desired MAC address.●Set 12 hexadecimal characters, with separation by colon (:) of every 2 digits (e.g. “12:34:56:78:9F:0A”). | |
5 Click [Restart].
- The base unit automatically restarts and the Top Menu is displayed.
Note:
- To edit the setting:
1 Click the desired entry number.
2 Edit the items in the MAC Address Filtering Setting page.
3 Click [Save].
4 Click [Restart].
- To delete the setting:
1 Click the desired entry number.
2 Click [Delete] in the MAC Address Filtering Setting page.
3 Click [OK] in the confirmation dialog box.
4 Click [Restart].
● The registered handset is automatically listed in the MAC Address Filtering Table.
Status
The status pages allow you to view the status of the base unit.
The information displayed on the pages are useful when contacting an authorized servicenter.
1 Click [Advanced Setup] on the Top Menu.
2 Click the [Status] tab, then click the desired item on the left.
[Network Status] shows the WAN/LAN interface status and routing/ARP tables.
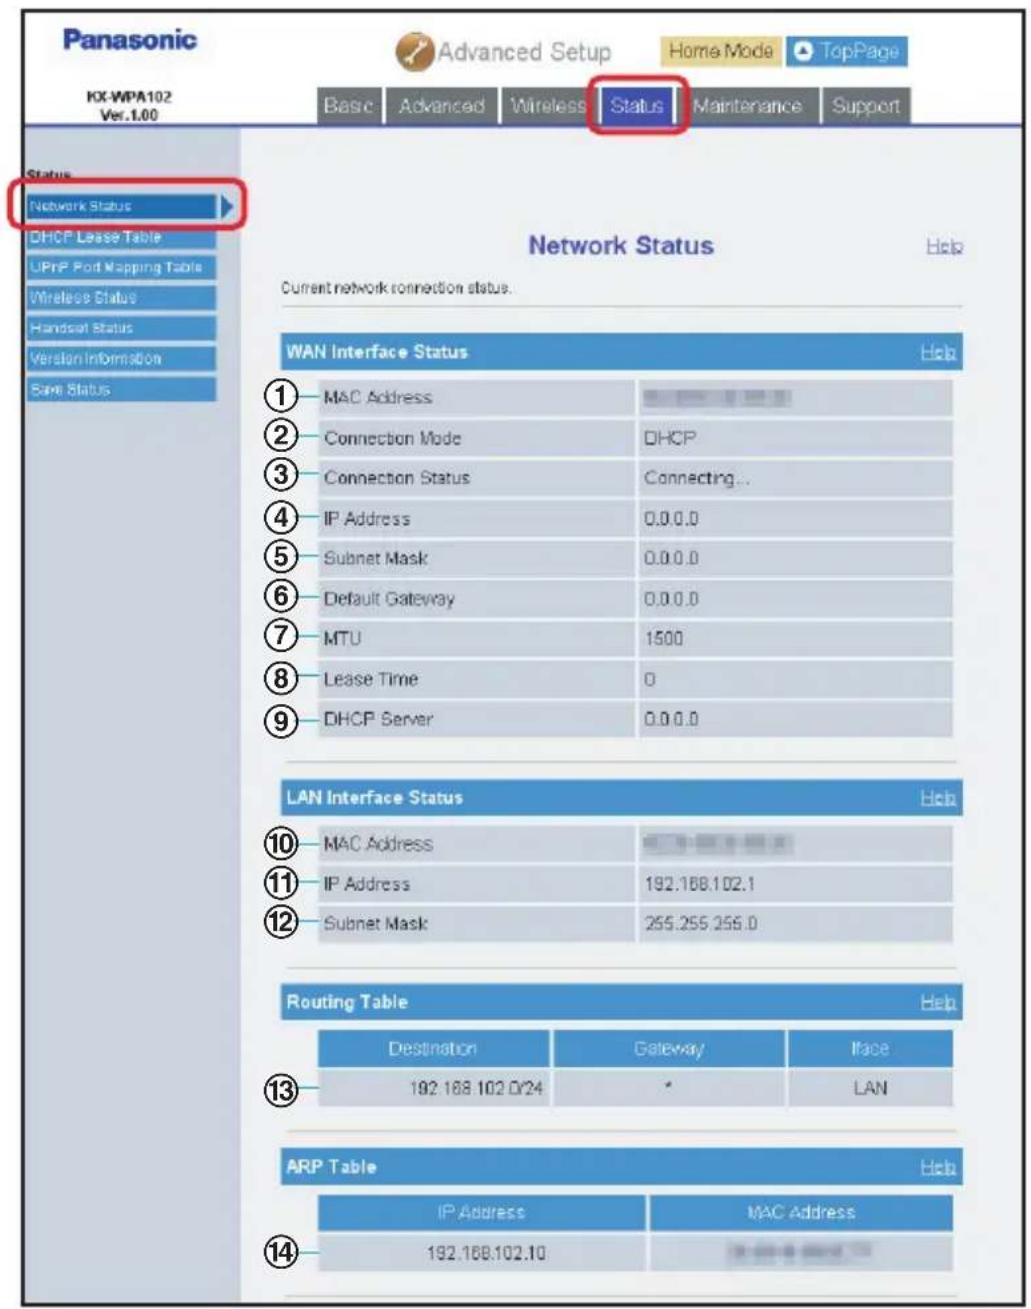
text_image
Panasonic KX-WPA102 Ver.1.00 Advanced Setup Home Mode TopPage Basic Advanced Wireless Status Maintenance Support Status Network Status DHCP Lease Table UPnP Port Mapping Table Wireless Status Handset Status Version Information Save Status Network Status Help Current network connection status. WAN Interface Status Help ① MAC Address ② Connection Mode DHCP ③ Connection Status Connecting... ④ IP Address 0.0.0.0 ⑤ Subnet Mask 0.0.0.0 ⑥ Default Gateway 0.0.0.0 ⑦ MTU 1500 ⑧ Lease Time 0 ⑨ DHCP Server 0.0.0.0 LAN Interface Status Help ⑩ MAC Address ⑪ IP Address 192.168.102.1 ⑫ Subnet Mask 255.255.255.0 Routing Table Help Destination Gateway Place 192.168.102.0/24 LAN ⑬ ARP Table Help IP Address MAC Address 192.168.102.10WAN Interface Status:
①MAC Address: Show the MAC address of the WAN port.
② Connection Mode: Show the Internet connection mode. (DHCP/ PPPoE/AP/Static)
③Connection Status: Show whether the WAN port is connecting to the Internet or not.
④IP Address: Show the IP address of the WAN port.
⑤Subnet Mask: Show the subnet mask of the WAN port.
⑥Default Gateway: Show the IP address of the default gateway.
⑦MTU: Show the current MTU value.
⑧Lease Time: Show DHCP refresh interval time (in second)
assigned by the DHCP server of the WAN side.
This is available in DHCP only.
⑨DHCP Server: Show the IP address of DHCP server of the WAN side. This is available in DHCP only.
LAN Interface Status:
⑩MAC Address: Show the MAC address of the LAN port.
⑪IP Address: Show the IP address of the LAN port.
⑫Subnet Mask: Show the subnet mask of the LAN port.
Routing Table:
⑬Routing Table: Routing table shows the routing.
ARP Table:
⑭ARP Table: ARP (Address Resolution Protocol) table shows the list of the hosts that are reached directly from the base unit. Combinations of IP address and MAC address of each host are shown.
[DHCP Lease Table] shows the DHCP server status and lease table.
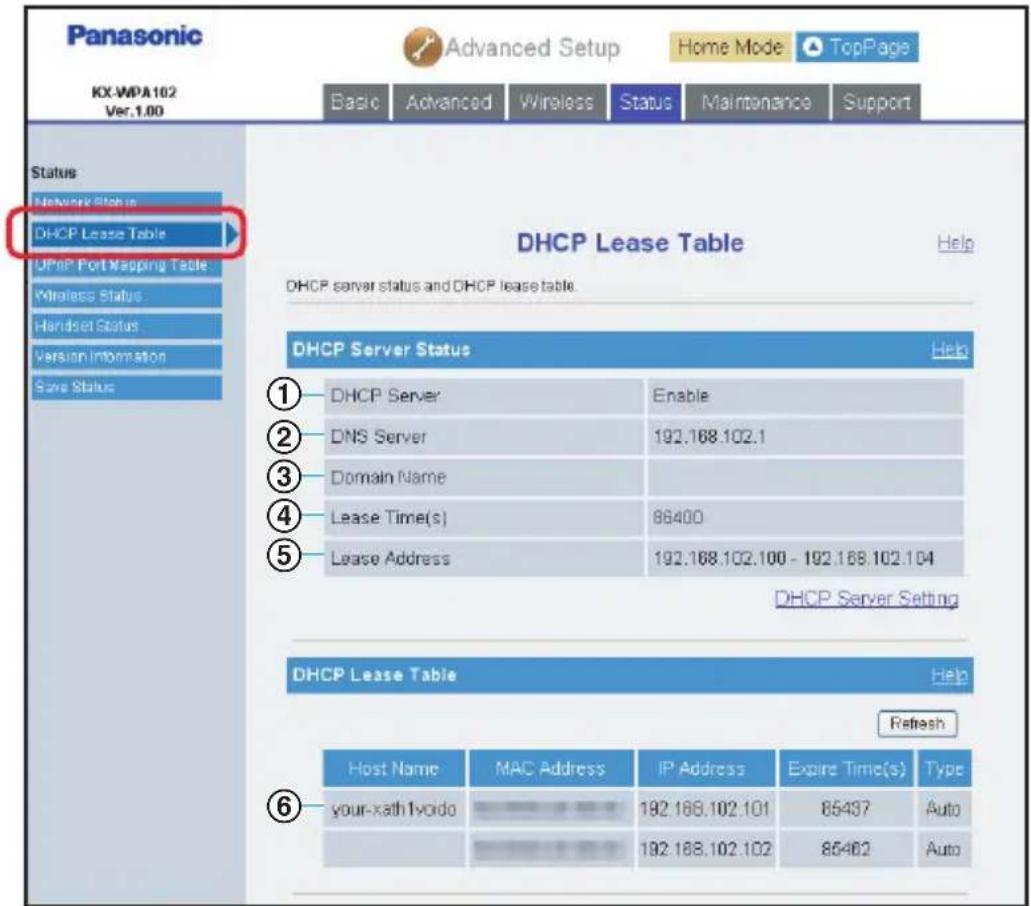
text_image
Panasonic KX-WPA102 Ver.1.00 Advanced Setup Home Mode TopPage Basic Advanced Wireless Status Maintenance Support Status Network Status DHCP Lease Table UPnP Port Mapping Table Wireless Status Handset Status Version Information Save Status DHCP Lease Table Help DHCP server status and DHCP lease table. DHCP Server Status Help ① DHCP Server Enable ② DNS Server 192.168.102.1 ③ Domain Name ④ Lease Time(s) 86400 ⑤ Lease Address 192.168.102.100 - 192.168.102.104 DHCP Server Setting DHCP Lease Table Help Refresh Host Name MAC Address IP Address Expire Time(s) Type your-xath Ivoids 192.168.102.101 85437 Auto 192.168.102.102 85462 AutoDHCP Server Status:
①DHCP Server: Show whether the DHCP server feature is enabled or not.
②DNS Server: Show the IP address of the DNS server.
③Domain Name: Show the domain name of the local network.
④Lease Time(s): Show DHCP refresh interval time (in second) assigned for the DHCP clients connected to the local network.
⑤Lease Address: Show the IP address range that can be assigned for the DHCP clients.
DHCP Lease Table:
⑥ DHCP Lease Table:
Show the list of DHCP client hosts. Combinations of the IP address and MAC address are shown. Expire Time is shown in seconds. Type shows Auto or Static.
[UPnP Port Mapping Table] shows the UPnP status and port mapping table.
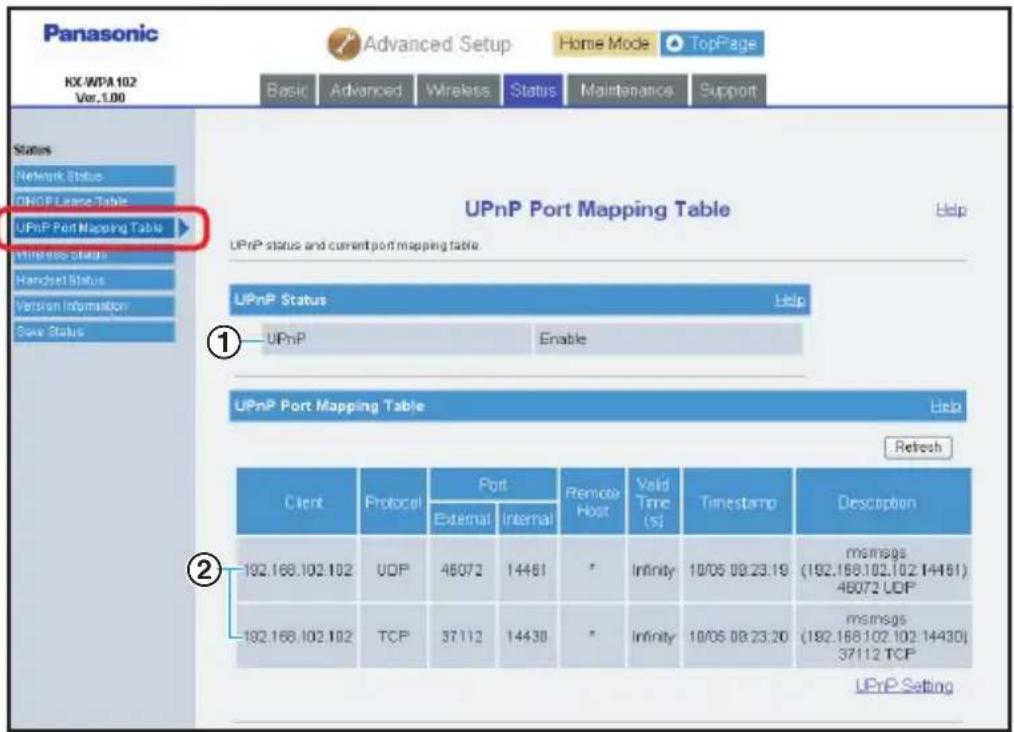
text_image
Panasonic KX WPA 102 Var. 1.00 Advanced Setup Home Mode TopPage Basic Advanced Wireless Status Maintenance Support States Network Status ONCP Lease Table UPnP Port Mapping Table Enterprise status Handset Status Version Information Save Status UPnP Port Mapping Table Help UPnP Status and current port mapping table. UPnP Status Help UPnP Enable UPnP Port Mapping Table Help Refresh Client Protocol Port Remote Valid Timestamp Description External Internal Host(s) Infinity 10/06 08:23:19 msmsgs 192.168.102.102 UOP 46072 14461 * Infinity 10/06 08:23:19 192.168.102.102 14461) 46072 UOP 192.168.102.102 TCP 37112 14430 * Infinity 10/06 08:23:20 msmsgs (192.168.102.102.14430) 37112 TCP UPnP SettingUPnP Port Mapping Table:
① UPnP Status:
② UPnP Port Mapping Table:
Show whether UPnP feature is enabled or not.
Show the list of UPnP client host's IP address, along with the protocol and port number set to be opened for a specified amount of time for communication with UPnP feature.
[Wireless Status] shows the wireless LAN status.
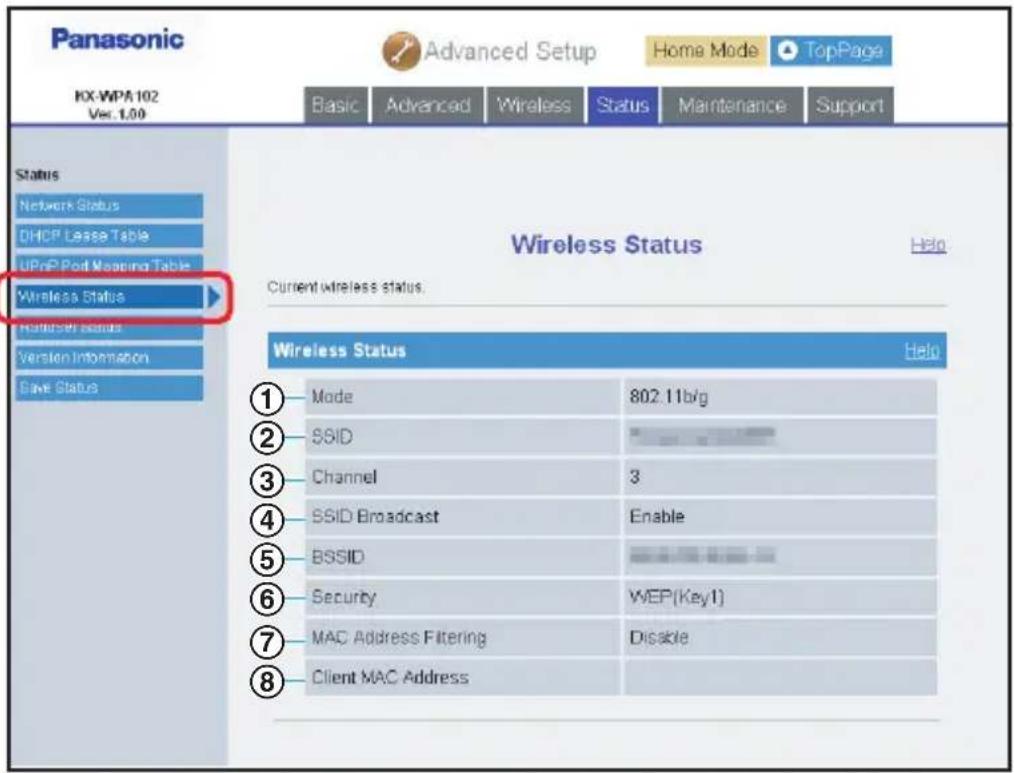
text_image
Panasonic KX-WPA 102 Ver: 1.00 Advanced Setup Home Mode TopPage Basic Advanced Wireless Status Maintenance Support Status Network Status DHCP Lease Table UPnP Post Mapping Table Wireless Status Controller Status Version Information Save Status Wireless Status Help Current wireless status. Wireless Status Help ① Mode 802.11big ② SSID ③ Channel 3 ④ SSID Broadcast Enable ⑤ BSSID ⑥ Security WEP(Key1) ⑦ MAC Address Filtering Disable ⑧ Client MAC AddressWireless Status:
①Mode: Show 802.11b or 802.11b/g.
②SSID: Show the network name.
③Channel: Show wireless data channel.
④ SSID Broadcast: Show whether the SSID Broadcast feature is enabled or not.
⑤BSSID: Show the base unit's MAC address currently in use by the handset.
⑥Security: Show the authentication methods and/or encryption types and Key Index number used for the wireless devices connected to the local network.
⑦MAC Address Filtering: Show whether the MAC address filtering is enabled or not.
⑧Client MAC Address: Show the MAC addresses of the wireless devices connected to the local network.
[Handset Status] shows the handset connection status.
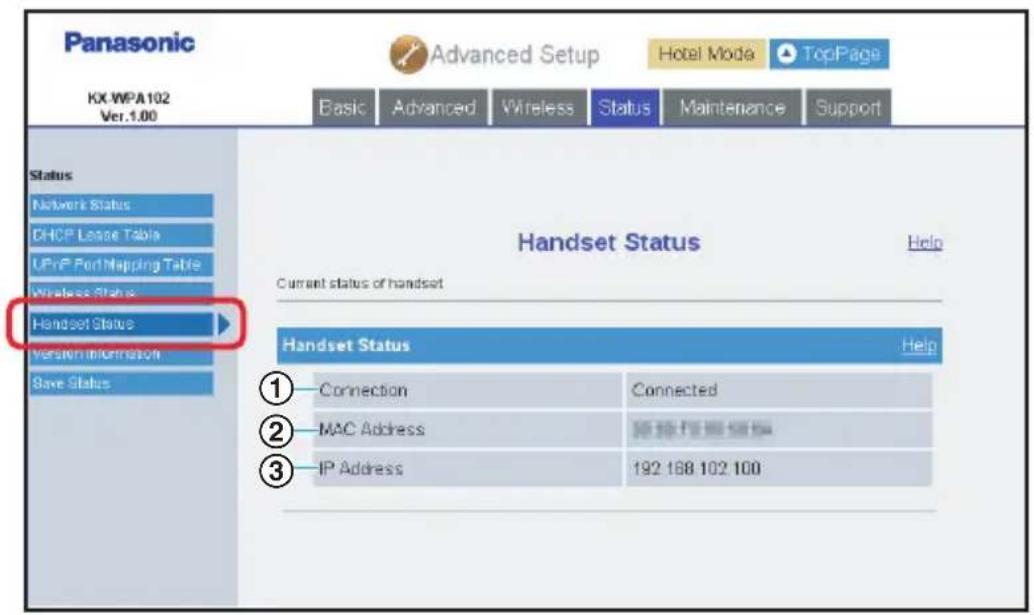
text_image
Panasonic KX WPA102 Ver.1.00 Advanced Setup Hotel Mode TopPage Basic Advanced Wireless Status Maintenance Support Status Network Status CHCP Lease Table UPnP Port Mapping Table Wireless Status Handset Status Version Information Save Status Handset Status Help Current status of handset Handset Status Help ① Connection Connected ② MAC Address 网络地址编码 ③ IP Address 192 168 102 100Handset Status:
① Connection: Show the status of the handset registration and connection to the base unit.
② MAC Address: Show the MAC address of the registered handset.
③IP Address: Show the IP address of the handset.
Note:
- It may take a while to display this screen in order to check if the handset is connected.
[Version Information] shows the firmware version and configuration database version.
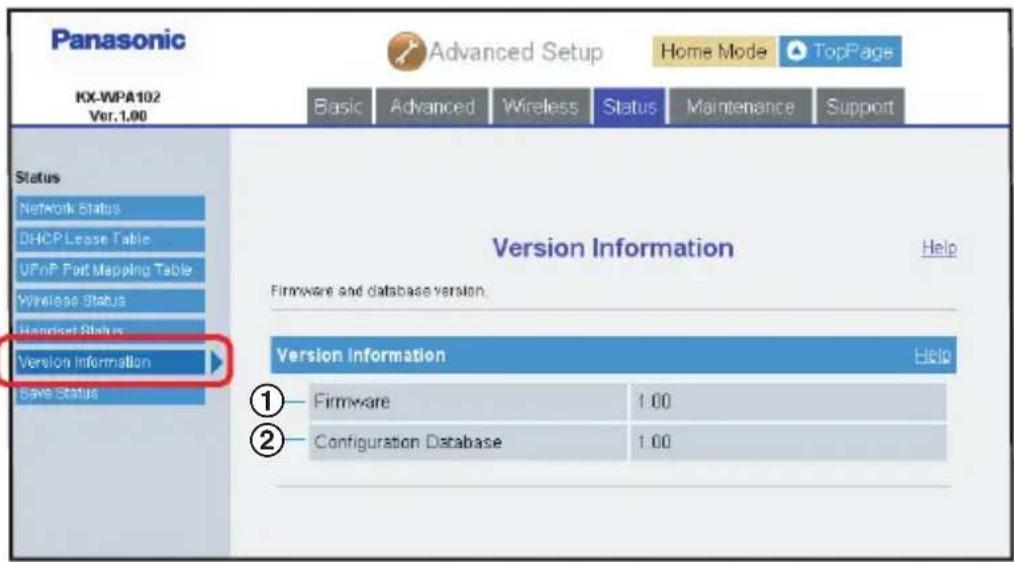
text_image
Panasonic IX-WPA102 Ver. 1.00 Status Network Status DHCP Lease Table UPnP Port Mapping Table Wireless Status Handset Status Version Information Save Status Advanced Setup Home Mode TopPage Basic Advanced Wireless Status Maintenance Support Version Information Firmware and database version. Version Information Help ① Firmware 1.00 ② Configuration Database 1.00Version Information:
①Firmware: Show the firmware version of the base unit.
② Configuration Database: Show the configuration database version of the base unit.
[Save Status] allows you to save the current status of the base unit to a computer you are using.
A status log file can be saved on your computer in a text format.
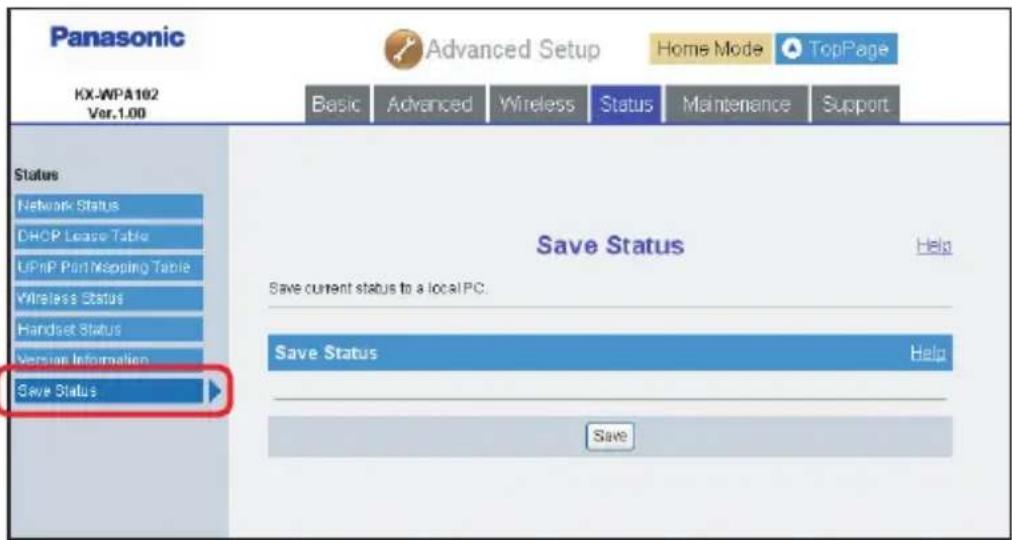
text_image
Panasonic KX-WPA102 Ver.1.00 Advanced Setup Home Mode TopPage Basic Advanced Wireless Status Maintenance Support Status Network Status DHCP Lease Table UPnP Port Mapping Table Wireless Status Handset Status Version Information Save Status Save Status Help Save current status to a local PC. Save Status Help Save1 Click [Save].
●The file download confirmation message is displayed.
2 Specify the location and enter the file name, then click [Save] in the Save As dialog box.
Maintenance
Password:
This feature allows you to change the user name and password that are required to access the base unit.
Important:
- Make a note of the user name and password so that you will not forget them.
- We recommend that you change the password regularly.
1 Click [Advanced Setup] on the Top Menu.
2 Click the [Maintenance] tab, then click [Password].
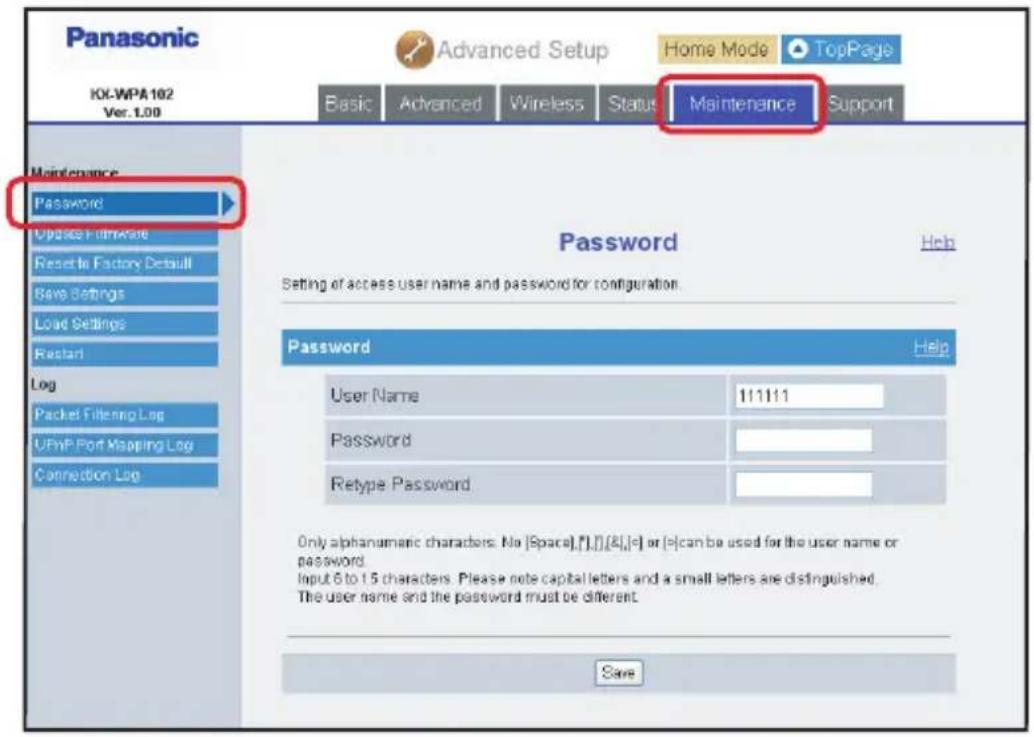
text_image
Panasonic Advanced Setup Home Mode TopPage IOI-WPA102 Ver. 1.00 Basic Advanced Wireless Status Maintenance Support Maintenance Password Updates Firmware Reset to Factory Default Save Settings Load Settings Restart Log Packet Filtering Log UPnP Port Msoring Log Connection Log Password Help Setting of access user name and password for configuration. Password Help User Name 111111 Password Retype Password Only alphanumeric characters: No [Space],[],][&],[e] or [e] can be used for the user name or password. Input 6 to 15 characters. Please note capital letters and a small letters are distinguished. The user name and the password must be different. Save3 Configure the settings, then click [Save].
| Setting Description | |
| [User Name] | ● The user name and password can contain 6 to 15 alphanumeric characters.● The following cannot be used: [ ” ], [ ’ ], [&], [<], [>], [: ], [(space)]● User name and password must be different from each other.● User name and password are case-sensitive. |
| [Password] | |
| [Retype Password] | ● Enter the password again to verify. |
4 Click [Restart].
- The base unit automatically restarts and the Top Menu is displayed.
Update Firmware:
This feature allows you to update the firmware of the base unit to the latest version. To prevent the leaking of customer information, illegal operation of this product, interference or involuntary shutdown etc., we recommend you update the firmware regularly. For firmware information, visit:
http://panasonic.co.jp/pcc/cs/en/telecom/wi-fi/us_wp1050.htm
Important:
- Do not interrupt the firmware updating process by cutting the power supply until the updating is complete and the base unit restarts itself.
1 Click [Advanced Setup] on the Top Menu.
2 Click the [Maintenance] tab, then click [Update Firmware].
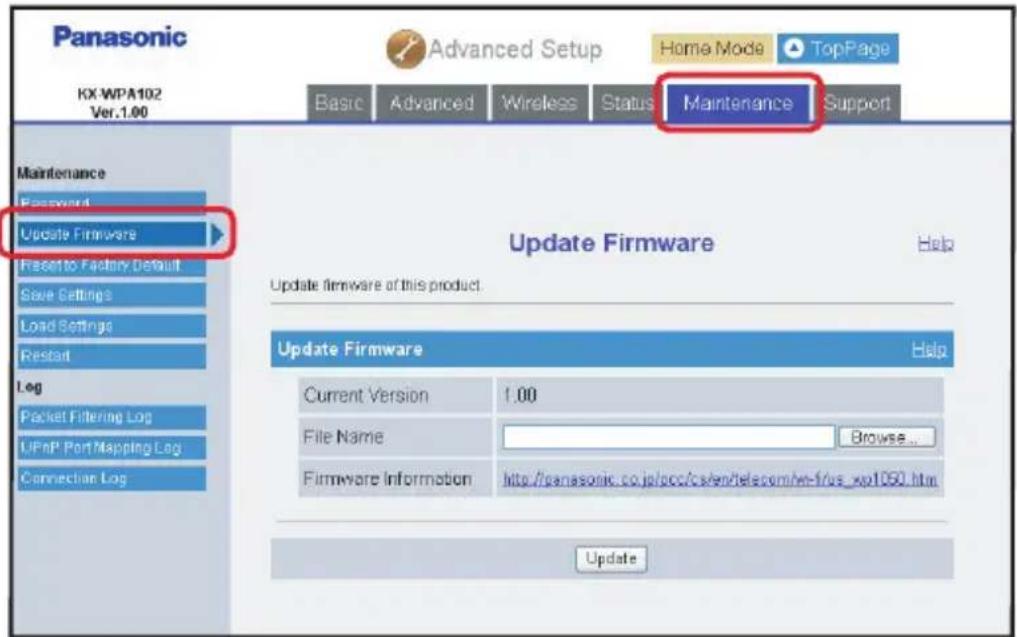
text_image
Panasonic KX WPA102 Ver.1.00 Advanced Setup Home Mode TopPage Basic Advanced Wireless Status Maintenance Support Maintenance Password Update Firmware Reset to Factory Default Save Settings Load Settings Restart Log Packet Filtering Log UPnP PortMapping Log Connection Log Update Firmware Help Update firmware of this product. Update Firmware Help Current Version 1.00 File Name Browse... Firmware Information http://panasonic.co.jp/pc/s/s/entele.com/wt-1/us_wp1050.htm Update3 Check for the latest version by clicking the firmware information URL.
4 If the version is updated, download the updated firmware to your computer.
5 Enter the file name under the Update Firmware heading.
- You can also click [Browse...] to select the desired file name from the list.
6 Click [Update].
7 Click [OK] in the confirmation dialog box.
- The base unit automatically restarts after the firmware is updated.
![PANASONIC KX-WP1050 - Click [OK] in the confirmation dialog box. - 1](/content/2026/05/796742/images/f7bd0cdead1993df3b987d2def18ea1fe6475534552bc86d20eed2fa4580bee6.jpg)
text_image
Panasonic KX-WPA102 Ver.1.00 Advanced Setup Home Mode TopPage Basic Advanced Wireless Status Maintenance Support Maintenance Password Update Firmware Reset to Factory Default Save Settings Load Settings Restart Log Packet Filtering Log UFnP Port Mapping Log Connection Log Updating firmware... 11 % done Caution:Do not turn off the PC at this product during firmware update.![PANASONIC KX-WP1050 - Click [OK] in the confirmation dialog box. - 2](/content/2026/05/796742/images/0c82c80cf1dc343a4dbf8b9259627c7871ed416757ee453e9b17501979423b66.jpg)
text_image
Panasonic KX-WPA102 Var.1.00 Advanced Setup Home Mode TopPage Basic Advanced Wireless Status Maintenance Support Maintenance Password Update Firmware Reset to Factory Default Save Settings Load Settings Restart Log Packet Filtering Log UPnP Port Mapping Log Connection Log Restarting this product. Click the URL below if this page does not jump to the top page within 1 minute. http://192.168.102.17Reset to Factory Default:
The base unit settings can be reset to the base unit's factory default. See page 201 for the default settings.
1 Click [Advanced Setup] on the Top Menu.
2 Click the [Maintenance] tab, then click [Reset to Factory Default].
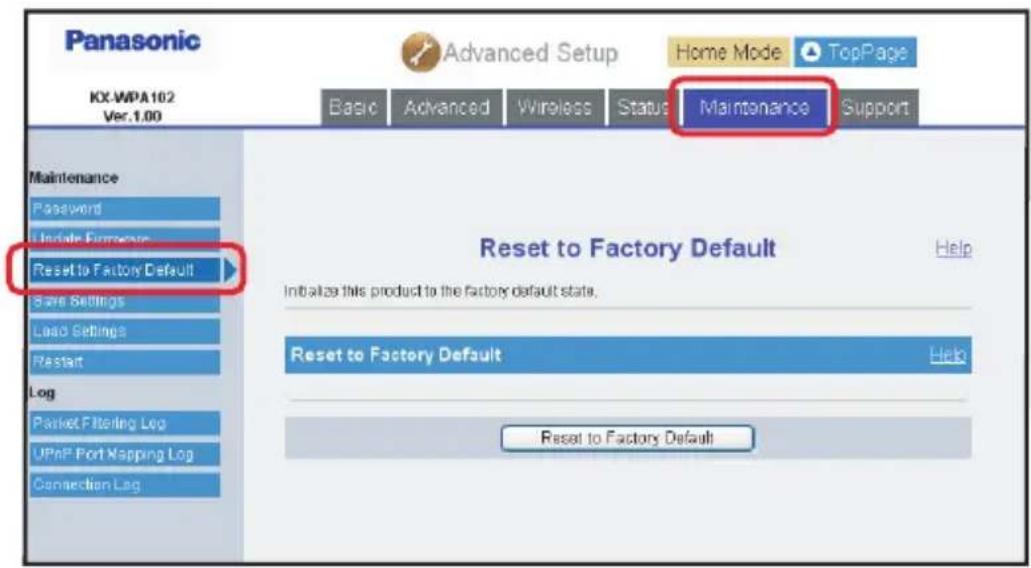
text_image
Panasonic Advanced Setup Home Mode TopPage KX-WPA102 Ver.1.00 Basic Advanced Wireless Status Maintenance Support Maintenance Password Include Updates Reset to Factory Default Save Settings Load Settings Restart Log Market Filtering Log UPnP Port Mapping Log Connection Log Reset to Factory Default Help Initialize this product to the factory default state. Reset to Factory Default Help Reset to Factory Default3 Click [Reset to Factory Default] to reset the base unit settings.
●The confirmation message is displayed.
4 Click [OK] in the confirmation dialog box.
●The base unit begins to restart and the Top Menu is displayed.
Note:
- In step 4, if the LAN side setting is changed or AP (Bridge) mode is used, the base unit restart automatically, but the Top Menu is not displayed automatically.
You need to click to the link shown on the Restarting page to access to the Top Menu. - You need to register the handset to the base unit again when you reset the base unit to factory default.
See "Registering the handset" on page 133.
Save Settings:
A backup file can be saved on your computer. You can load the base unit settings from the backup file on the Load Settings page (page 188).
1 Click [Advanced Setup] on the Top Menu.
2 Click the [Maintenance] tab, then click [Save Settings].
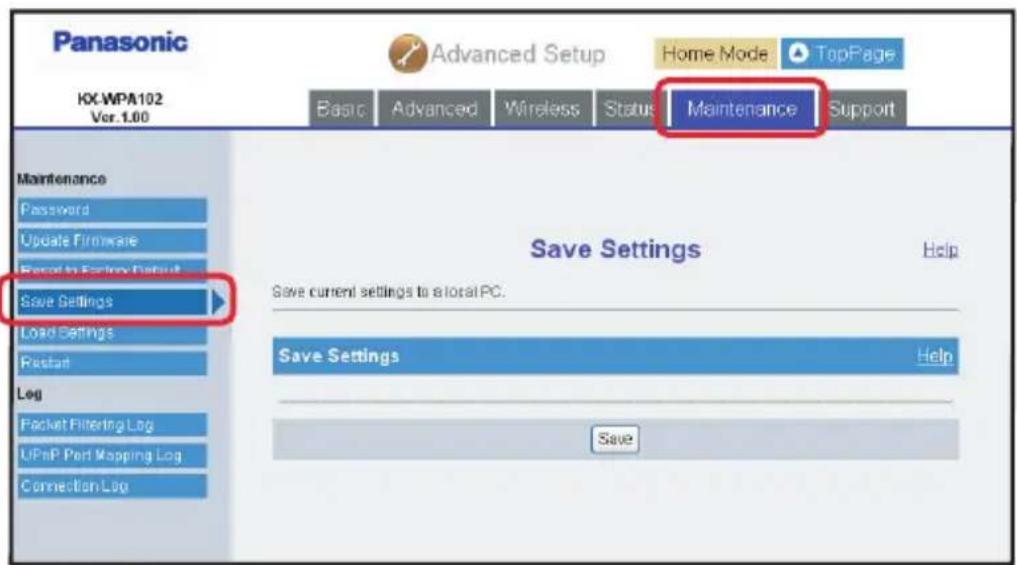
text_image
Panasonic Advanced Setup Home Mode TopPage KX WPA102 Ver. 1.00 Basic Advanced Wireless Status Maintenance Support Maintenance Password Update Firmware Record to Easlow Data Save Settings Load Settings Restart Log Packet Filtering Log UPnP Port Mapping Log Connection Log Save Settings Help Save current settings to a total PC. Save Settings Help Save3 Click [Save].
4 Specify the location and enter the file name, then click [Save] in the Save As dialog box.
Note:
- User name and password can not be saved.
Load Settings:
The base unit settings can be loaded from a backup file. If you reset the base unit settings to factory default, the Load Settings page can load its settings from the backup file.
Note:
- The backup file contains network settings. When these settings are loaded, all network settings except for the user name and password for the base unit are changed as they were saved.
1 Click [Advanced Setup] on the Top Menu.
2 Click the [Maintenance] tab, then click [Load Settings].
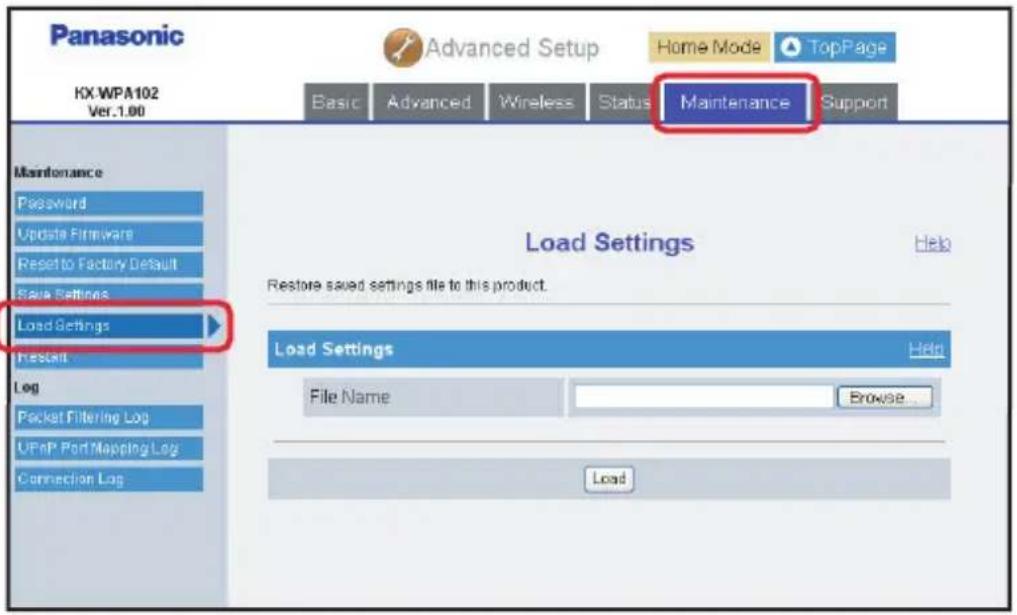
text_image
Panasonic KX.WPA102 Ver.1.90 Advanced Setup Home Mode TopPage Basic Advanced Wireless Status Maintenance Support Maintenance Password Update Firmware Reset to Factory Default Base Settings Load Settings Reset Log Packet Filtering Log UPnP Port Mapping Log Connection Log Load Settings Help Restore saved settings file to this product. Load Settings Help File Name Browse... Load3 Enter the file name under the Load Settings heading.
- You can also click [Browse...] to select the desired backup file name on the Choose file dialog box, and click [Open].
4 Click [Load].
5 Click [Restart].
●The base unit restarts and the Top Menu is displayed.
Restart:
You can restart the base unit.
1 Click [Advanced Setup] on the Top Menu.
2 Click the [Maintenance] tab, then click [Restart].
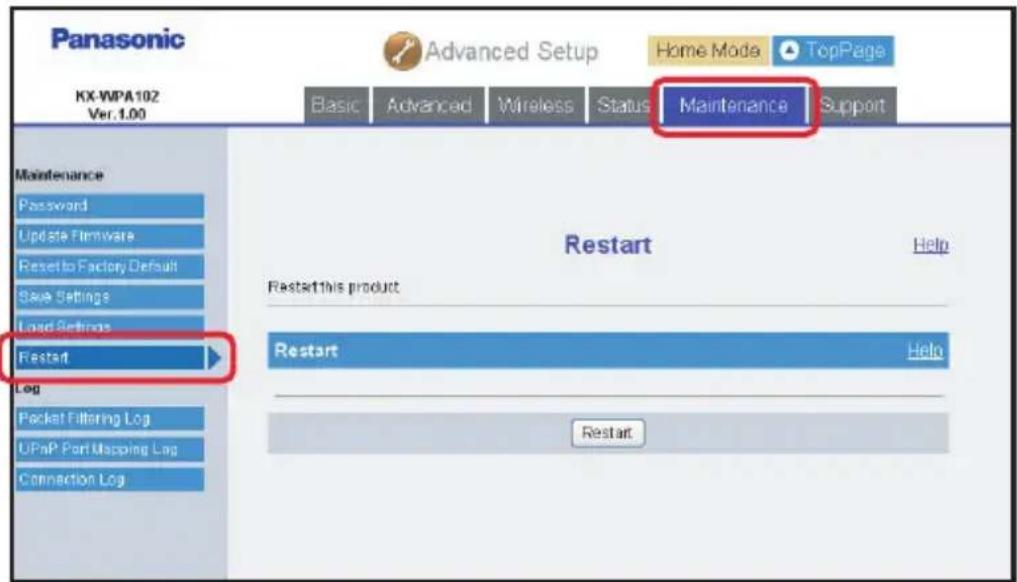
text_image
Panasonic KX-VPA102 Ver.1.00 Advanced Setup Home Mode TopPage Basic Advanced Wireless Status Maintenance Support Maintenance Password Update Firmware Reset to Factory Default Save Settings Load Settings Restart Log Packet Filtering Log UPnP Port Mapping Log Connection Log Restart this product Restart Help Restart Help Restart3 Click [Restart].
●The confirmation message is displayed.
4 Click [OK] in the confirmation dialog box.
- The base unit begins to restart and the Top Menu is displayed.
Packet Filtering Log:
This feature displays the packet filtering logs that are temporarily saved, and saves the logs to your computer. This feature is enabled when [Log Output] in [Packet Filtering Setting] (page 165) is set to "ON" and [Log Output] in [Easy Security] (page 160) is set to "ON".
1 Click [Advanced Setup] on the Top Menu.
2 Click the [Maintenance] tab, then click [Packet Filtering Log].
● Packet filtering logs are displayed.
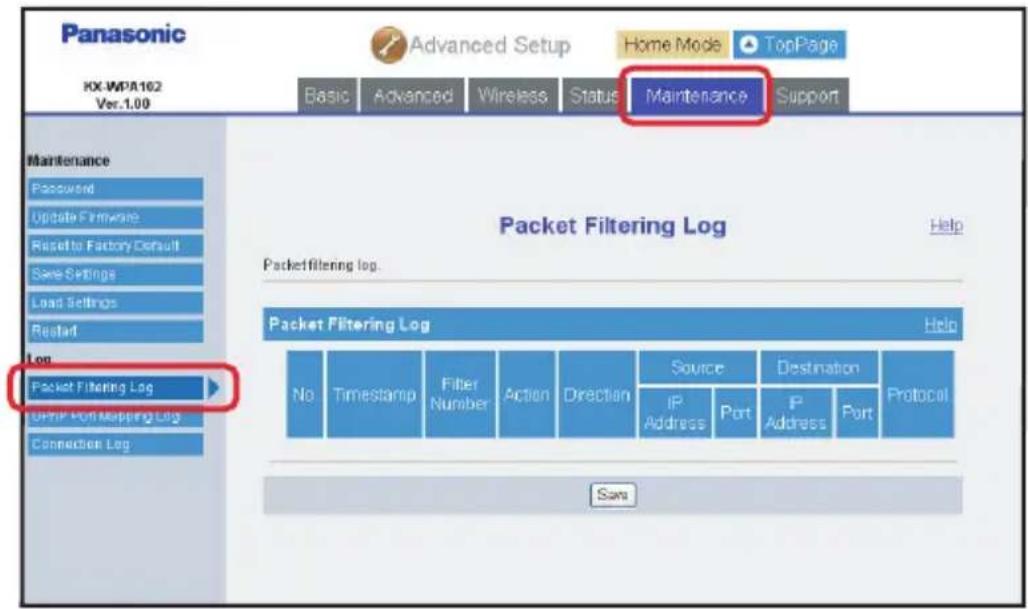
text_image
Panasonic Advanced Setup Home Mode TopPage KX-MPA102 Ver.1.00 Basic Advanced Wireless Status Maintenance Support Maintenance Password Update Firmware Reset to Factory Default Save Settings Load Settings Restart Log Packet Filtering Log UPM Port Mapping Log Connection Log Packet Filtering Log Help Packet Filtering Log Help No Timestamp Filter Number Action Direction Source Destination Protocol IP Address Port IP Address Port Sana3 Click [Save].
4 Specify the location and enter the file name, then click [Save] in the Save As dialog box.
Note:
●The log stores up to 200 most recent events.
This feature displays the temporarily saved logs of port mapping additions, deletions and failures. It also saves the logs to your computer. This feature is enabled when [UPnP] (page 159) is set to "Enable".
1 Click [Advanced Setup] on the Top Menu.
2 Click the [Maintenance] tab, then click [UPnP Port Mapping Log].
- UPnP port mapping logs are displayed.
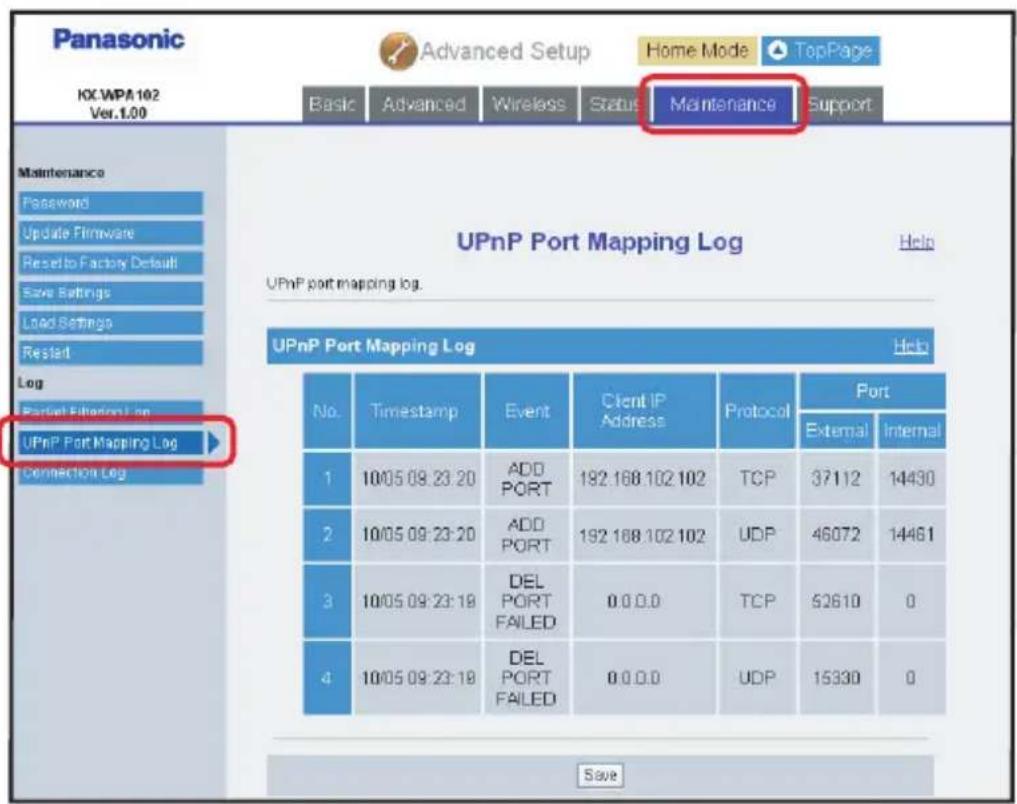
text_image
Panasonic Advanced Setup Home Mode TopPage IX:WPA 102 Ver.1.00 Basic Advanced Wireless Status Maintenance Support Maintenance Password Update Firmware Reset to Factory Default Solve Settings Load Settings Restad Log Parallel Filtration Log UPnP Port Mapping Log UPnP port mapping log. UPnP Port Mapping Log Help No. Timestamp Event Client IP Address Protocol Port External Internal 1 10/05 09:23:20 ADD PORT 192.168.102.102 TCP 37112 14430 2 10/05 09:23:20 ADD PORT 192.168.102.102 UDP 46072 14461 3 10/05 09:23:19 DEL PORT FAILED 0.0.0.0 TCP 52610 0 4 10/05 09:23:19 DEL PORT FAILED 0.0.0.0 UDP 15330 0 Save3 Click [Save].
4 Specify the location and enter the file name, then click [Save] in the Save As dialog box.
Note:
●The log stores up to 20 most recent events.
Connection Log:
This feature displays the temporarily saved Internet connection logs, such as disconnection and authentication logs for PPPoE and DHCP connections. It also saves the logs to your computer.
1 Click [Advanced Setup] on the Top Menu.
2 Click the [Maintenance] tab, then click [Connection Log].
- Connection logs are displayed.
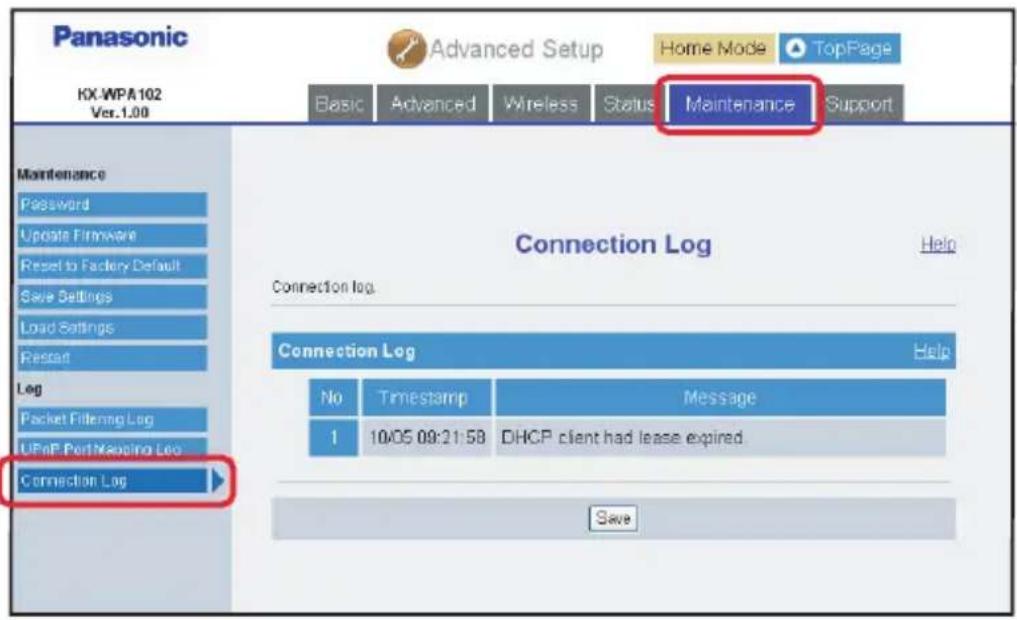
text_image
Panasonic KX-WPA102 Ver.1.00 Advanced Setup Home Mode TopPage Basic Advanced Wireless Status Maintenance Support Maintenance Password Update Firmware Reset to Factory Default Save Settings Load Settings Restart Log Packet Filtering Log UPnP Port Mapping Loo Connection Log Connection Log Help Connection Log Help No Timestamp Message 1 10/05 09:21:58 DHCP client had lease expired Save3 Click [Save].
4 Specify the location and enter the file name, then click [Save] in the Save As dialog box.
Note:
●The log stores up to 20 most recent events.
Support
Help:
The Help page describes the features of each of the following:
- Initial Setup
- Top Menu
- Network Connection
- Update Firmware
-
Advanced Setup
Basic Advanced Wireless Status Maintenance Support -
Handset Information
-
Temporary LAN Side Network Setting
1 Click [Advanced Setup] on the Top Menu.
2 Click the [Support] tab, then click [Help].
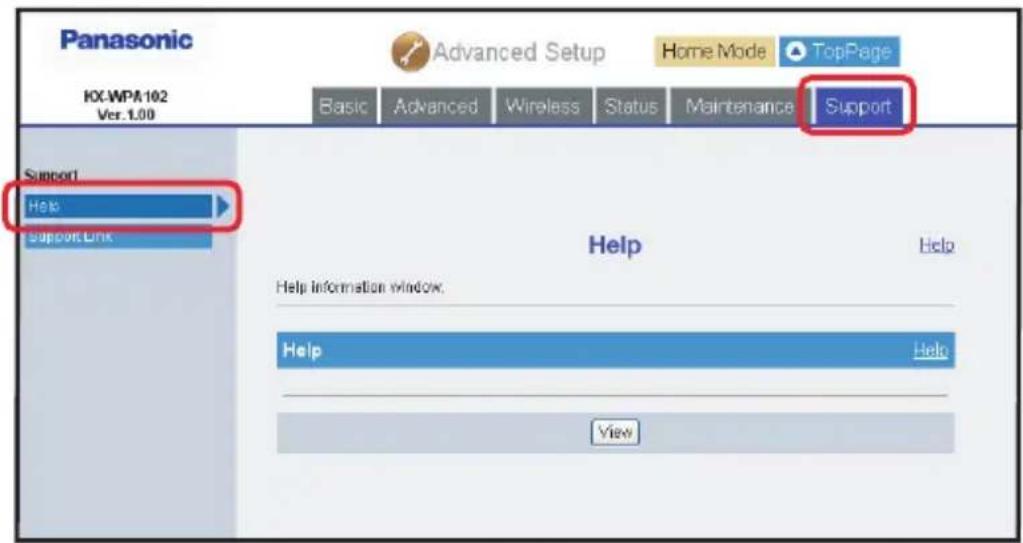
text_image
Panasonic Advanced Setup Home Mode TopPage KXWPA 102 Ver. 1.00 Basic Advanced Wireless Status Maintenance Support Support Help Support Link Help Help Help information window. Help Help View3 Click [View].
4 Click the desired item to view its help page.
Note:
- You can also view help by clicking [Help] on each setup page.
Support Link:
This feature allows you to get product and support information from the Internet.
1 Click [Advanced Setup] on the Top Menu.
2 Click the [Support] tab, then click [Support Link].
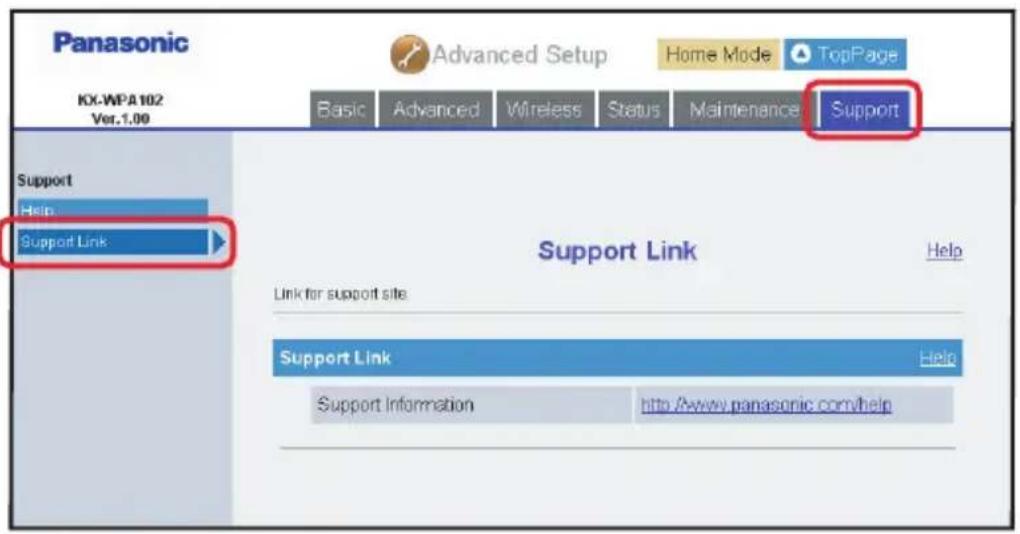
text_image
Panasonic Advanced Setup Home Mode TopPage KO-WPA102 Ver.1.00 Basic Advanced Wireless Status Maintenance Support Support Help Support Link Support Link Help Link for support site Support Link Help Support Information http://www.panasonic.com/help3 Click the URL.
Handset Information
This feature displays the registered handset's wireless connection status to the base unit. It also displays the handset's MAC address and IP address when connected to the base unit.
1 Click [Handset Information] on the Top Menu.
- The handset status is displayed when the wireless connection between the registered handset and the base unit is established.
![PANASONIC KX-WP1050 - Click [Handset Information] on the Top Menu. - 1](/content/2026/05/796742/images/1872d818fcc873ddde9fbc7104055288c051d51f085e7d324bdb8dd03809b0f6.jpg)
text_image
Panasonic KX-WPA102 Ver.1.00 Home Mode TopPage Handset Information Handset Status Help Connection Connected MAC Address 防伸扫描器 IP Address 192.188.102.100Note:
- It may take a while to display the screen.
Temporary LAN Side Network Setting when networks on the WAN side and the LAN side overlap
When networks on the WAN side and the LAN side overlap, the connection to the WAN side of the base unit is terminated. In this case, you are required to change the LAN side settings from the current LAN side settings (default IP address: 192.168.102.1, default subnet mask: 255.255.255.0).
If the unit detects a network overlapping, the Temporary LAN Side Network Setting page is displayed.
You can change the LAN side settings temporarily with the following steps:
- WAN Indicator on the base unit alternately flashes between in Amber and Green in turn. This state represents that the connection to the WAN side of the base unit is terminated.
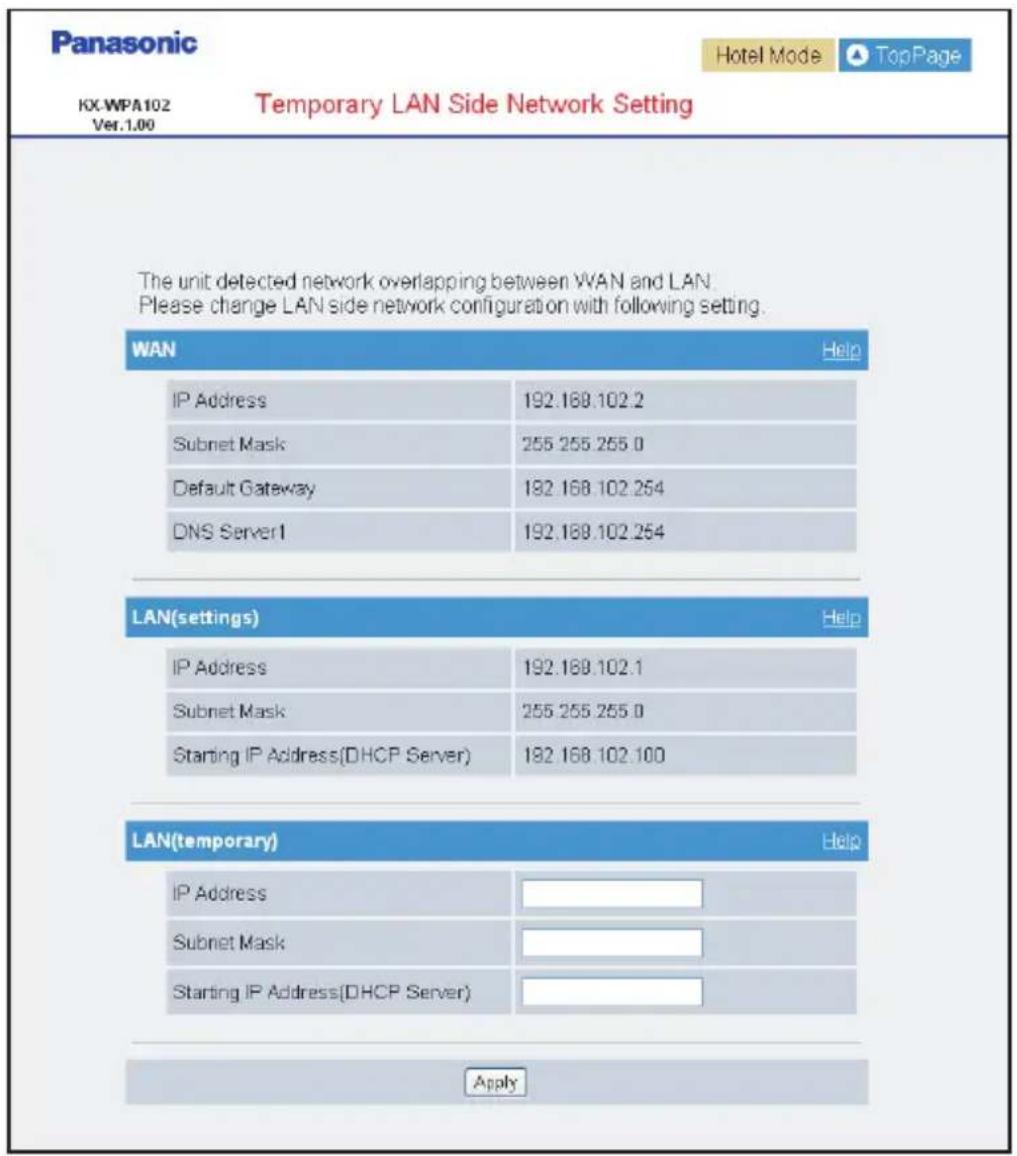
text_image
Panasonic Hotel Mode TopPage KX-WPA102 Temporary LAN Side Network Setting Ver.1.00 The unit detected network overlapping between WAN and LAN. Please change LAN side network configuration with following setting. WAN Help IP Address 192.168.102.2 Subnet Mask 255.255.255.0 Default Gateway 182.168.102.254 DNS Server1 192.168.102.254 LAN(settings) Help IP Address 192.168.102.1 Subnet Mask 255.255.255.0 Starting IP Address(DHCP Server) 182.168.102.100 LAN(temporary) Help IP Address Subnet Mask Starting IP Address(DHCP Server) Apply- IP address and Subnet Mask under the WAN heading show the current WAN side settings of the base unit.
- IP address, Subnet mask and Starting IP address (DHCP Server) under the LAN (settings) heading show the current LAN side settings of the base unit.
1 Enter IP address, Subnet Mask and Starting IP address (DHCP Server) under the LAN (temporary) heading.
- See also the Help on the LAN (temporary) heading for data entry.
| Setting Description | |
| [IP Address] | ● Enter the IP address and subnet mask corresponding to your temporary local network.● Set the third number (0 – 255) separated by periods different from that of the WAN, such as “192.168.101.1”Note:● There are some restrictions on IP address entry. For example, “0.0.0.0” and “255.255.255.255” are not available. |
| [Subnet Mask] | |
| [Static IP Address (DHCP Server)] | ● Enter the starting IP address for the DHCP server’s IP assignment.● Set the third number (0 – 255) separated by periods same as that of the LAN (temporary) you set above, such as “192.168.101.100” |
2 Click [Apply].
●The restarting page is displayed when the entered IP address, Subnet mask and Starting IP address (DHCP Server) are correct.
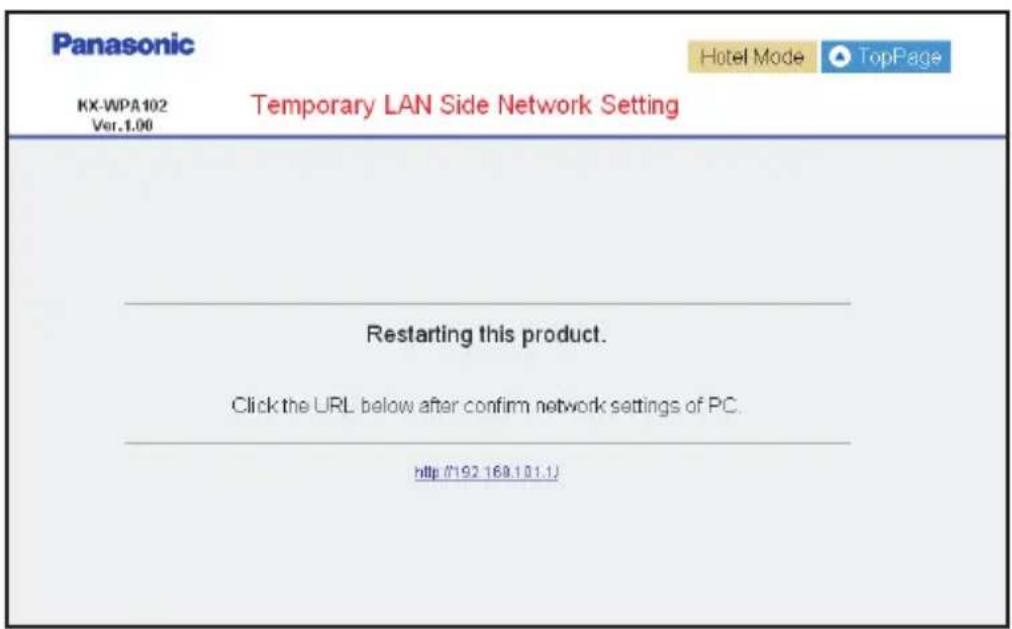
text_image
Panasonic Hotel Mode TopPage KX-WPA102 Temporary LAN Side Network Setting Ver.1.00 Restarting this product. Click the URL below after confirm network settings of PC. http://92.168.101.1.3 Change the network setting on your computer.
- If DHCP is enabled for obtaining IP address on your computer, you need to obtain IP address again.
- If Static IP address is entered on your computer, you need to change IP address and subnet mask on your computer manually. See “Setting the static IP address on your computer” (page 204).
- Other operations may be possible for recovering the Network setting on your computer.
4 Click the IP address shown on the restarting page.
●The Top Menu is displayed.
- WAN Indicator flashes as a short blinking in Amber and a long flash in Green in turn. This state indicates that the connection to the WAN side of the base unit has been recovered for the Internet connection. During this state, Port Forwarding, DMZ, Packet Filtering and Static Routing functions are disabled.
Note:
- In step 2, Configuration Error message is displayed if network still overlaps or your data entry is not correct. You need to try to enter the IP address, Subnet mask and Starting IP address (DHCP Server) again. See also the Help on the LAN (temporary) heading for data entry.
- The IP address, Subnet mask and Starting IP address (DHCP Server) entered in the Temporary setting are effective while the base unit is turned on, and will be cleared away from the unit when the base unit is turned off.
- If you want to change the LAN side settings permanently, click [Top Page] button on the right top of the Temporary LAN Side Network Setting page and change the LAN side settings from [Advanced Setup].
Downloading the version-up firmware to your computer for recovering the base unit
When the WAN Indicator is flashing in amber, the firmware of the base unit is defective and the base unit is operating in recovery mode.
Before downloading the firmware for the base unit, you need to set the static IP address on your computer. For setting the static IP address on your computer, see page 204.
On your computer:
1 On the Web browser, enter http://192.168.102.1
On the base unit:
2 Specify the file name.
You can also click [Browse...] to select the desired file name from the list.
3 Click [Start].
- The base unit automatically restarts after the firmware is updated.
Important:
- Do not interrupt the firmware updating process by cutting the power supply until the progress indicator reaches 100% and the base unit restarts itself.
4 Confirm the WAN Indicator is not flashing in amber, then set your computer settings back to the previous conditions.
Mode selector
Once you have created a new profile in the Initialization Setup (page 36), or added/edited profiles (page 136, 147) in the base unit settings, you do not need to log in the base unit each time. You only need to slide the Mode selector switch to “HOME” or “HOTEL” mode so that the base unit can connect to the Internet in the connection mode that is pre-registered for either “HOME” or “HOTEL” mode. You need to switch the Mode selector before turning on the base unit.
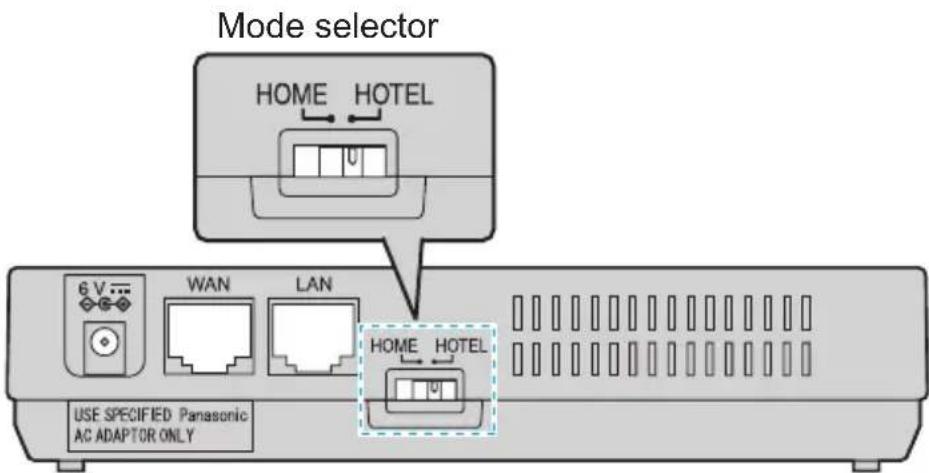
text_image
Mode selector HOME HOTEL 6 V WAN LAN HOME HOTEL USE SPECIFIED Panasonic AC ADAPTOR ONLYReset button
If you forget the user name and password for the base unit, press and hold the “FACTORY DEFAULT RESET” button on the bottom of the base unit with a pointed object until all the indicators go out. The settings are reset to default (see below). If necessary, set the settings again.
Note:
- You need to register the handset to the base unit again when you reset the base unit to factory default.
See "Registering the handset" on page 133.
FACTORY DEFAULT RESET button
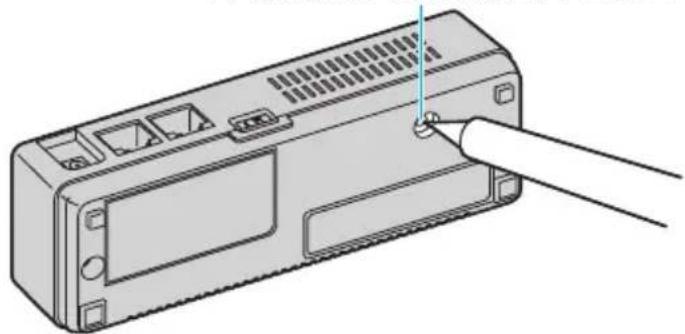
natural_image
Illustration of a device rear panel with a hand inserting a cable to its side (no text or symbols)Default settings
Internet Connection Mode
| Connection Mode DHCPMTU size– PPPoE 1492 bytes– DHCP 1500 bytes– Static 1500 bytes |
Wireless Connection Settings
| Wireless Mode 802.11b/gNetwork Name (SSID) (Shown on the included Wireless LAN sticker)SSID Broadcast EnableWEP key (Shown on the included Wireless LAN sticker)Security Mode WEPKey Index for Network Key (WEP) Key 1MAC Address Filtering Disable |
Advanced Setup
| LAN- IP Address 192.168.102.1- Subnet Mask 255.255.255.0DHCP Server- DHCP Server Enable- Starting IP Address 192.168.102.100- Number of Lease IP Addresses | 5 (One of which is assigned to the handset) |
| DMZ- DMZ- DMZ Host IP Address | Disable(Blank) |
| Port Forwarding Unset | |
| UPnP | Enable |
| Packet Filtering | Unset |
| Easy Security-Sends/Receives packets to/from IP addressesLog Output- Stateful Packet InspectionLog Output- Attack DetectionLog Output | DenyONEnable (Except Ident Packets)ONDisableOFF |
| Routing- Static Routing Unset |
Setting your computer
Obtaining an IP address automatically on your computer
When you cannot log in the base unit by using the computer you connected to the Ethernet (LAN) port on the base unit, check the Local Area Connection setting on the computer. It is necessary to obtain an IP address automatically from a DHCP server.
- You must be logged in as an administrator in order to set the Local Area Connection.
1 Click [Start], then click [Control Panel].
2 Click [Network and Internet Connections], then click [Network Connections].
3 Right-click the Local Area Connection icon connected to the base unit, then select [Properties].
4 Select [Internet Protocol (TCP/IP)], then click [Properties].
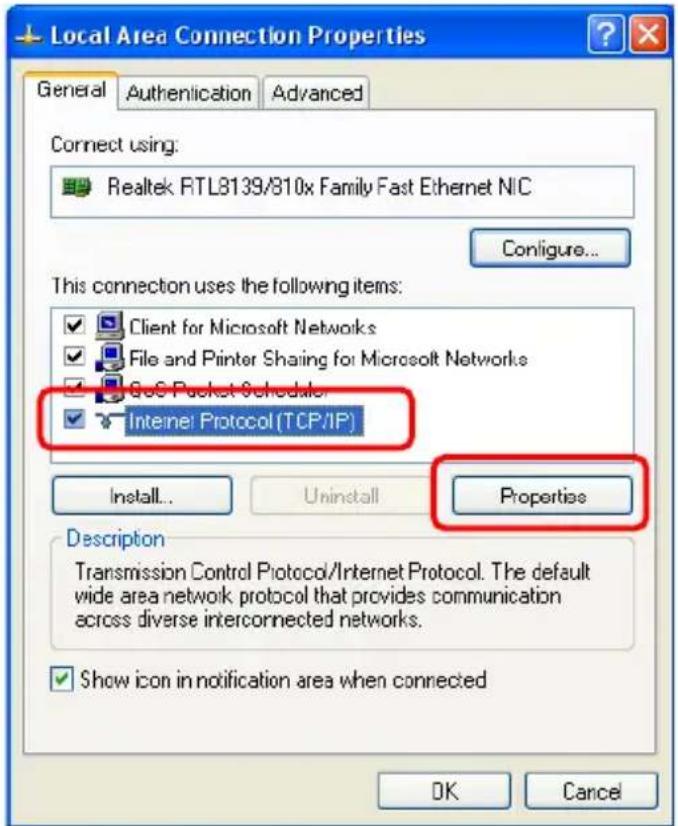
text_image
Local Area Connection Properties General Authentication Advanced Connect using: Realtek RTL8139/810x Family Fast Ethernet NIC Configure... This connection uses the following items: Client for Microsoft Networks File and Printer Sharing for Microsoft Networks GoS Packet Schedule Internet Protocol (TCP/IP) Install... Uninstall Properties Description Transmission Control Protocol/Internet Protocol. The default wide area network protocol that provides communication across diverse interconnected networks. Show icon in notification area when connected OK Cancel5 Select [Obtain an IP address automatically].
![PANASONIC KX-WP1050 - Select [Obtain an IP address automatically]. - 1](/content/2026/05/796742/images/f3900aac0500ed3bec0d28935bd5d9d2be96f1b39f47125705577b893a357956.jpg)
text_image
Internet Protocol (TCP/IP) Properties General Alternate Configuration You can get IP settings assigned automatically if your network supports this capability. Otherwise, you need to ask your network administrator for the appropriate IP settings. Obtain an IP address automatically Use the following IP address: IP address: Subnet mask: Default gateway Obtain DNS server address automatically Use the following DNS server addresses: Preferred DNS server: Alternate DNS server: Advanced... OK Cancel6 Click [OK].
7 Click [OK], then close the Network Connection window.
Setting the static IP address on your computer
When you log in the base unit with defective firmware, the firmware update screen will be displayed. In this case, a static IP address needs to be set on your computer.
1 Click [Start], then click [Control Panel].
2 Click [Network and Internet Connections], then click [Network Connections].
3 Right-click the Local Area Connection icon connected to the base unit, then select [Properties].
4 Select [Internet Protocol (TCP/IP)], then click [Properties].
![PANASONIC KX-WP1050 - Select [Internet Protocol (TCP/IP)], then click [Properties]. - 1](/content/2026/05/796742/images/870c09ecbbed00daf7126d6fe47509b279d5e4e89adcac281e883504c131e394.jpg)
text_image
Local Area Connection Properties General Authentication Advanced Connect using: Realtek RTL3139/810x Family Fast Ethernet NIC Configure... This connection uses the following items: Client for Microsoft Networks File and Printer Sharing for Microsoft Networks GoS Packet Schedule Internet Protocol (TCP/IP) Install... Uninstall Properties Description Transmission Control Protocol/Internet Protocol. The default wide area network protocol that provides communication across diverse interconnected networks. Show icon in notification area when connected OK Cancel5 Select [Use the following IP address:].
![PANASONIC KX-WP1050 - Select [Use the following IP address:]. - 1](/content/2026/05/796742/images/4f4323fb0a7a45f66dde9f8990a8c15aed2369ec0c39bbdd6ca44f4cb3d44958.jpg)
text_image
Internet Protocol (TCP/IP) Properties General You can get IP settings assigned automatically if your network supports the capability. Otherwise, you need to ask your network administrator for the appropriate IP settings. Obtain an IP address automatically Use the following IP address: IP address: 192 . 168 . 102 . 2 Subnet mask: 255 . 255 . 255 . 0 Default gateway: . Obtain DNS server address automatically Use the following DNS server addresses: Preferred DNS server: . Alternate DNS server: . Advanced... OK CancelBase Unit Settings
6 Enter the IP address.
- The IP address must be within the range of 192.168.102.1 - 192.168.102.254 except for 192.168.102.1 (the default IP address of the base unit on the LAN side).
7 For Subnet mask, enter 255.255.255.0.
8 Click [OK].
9 Click [OK], then close the Network Connection window.
Changing the proxy server settings on Web browser
If your Internet service provider uses the proxy server, you cannot log in the base unit. Change the proxy server settings on your Web browser.
1 Open your Web browser. (The below example is Internet Explorer 6.0.)
2 Click [Tools], then select [Internet Options...].
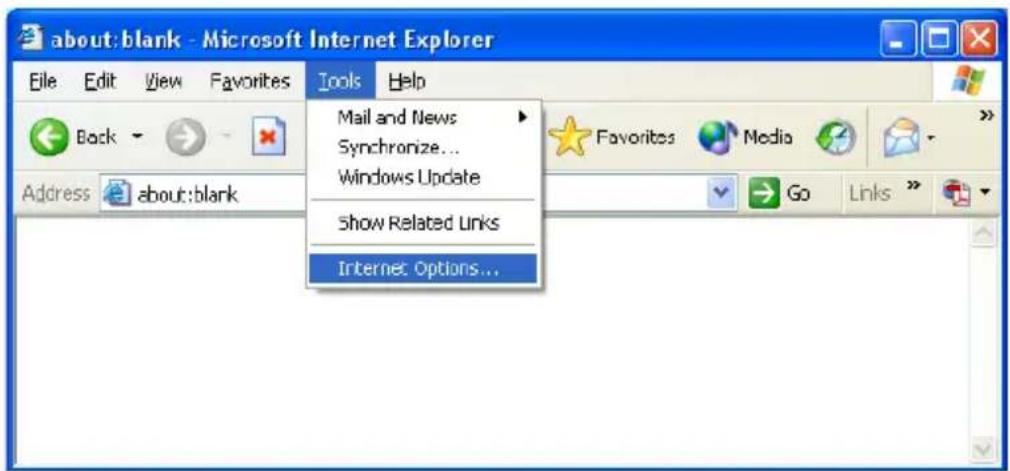
text_image
about:blank - Microsoft Internet Explorer File Edit View Favorites Tools Help Mail and News Synchronize... Windows Update Show Related Links Internet Options...3 Click [Connections] tab, then click [LAN Settings...].
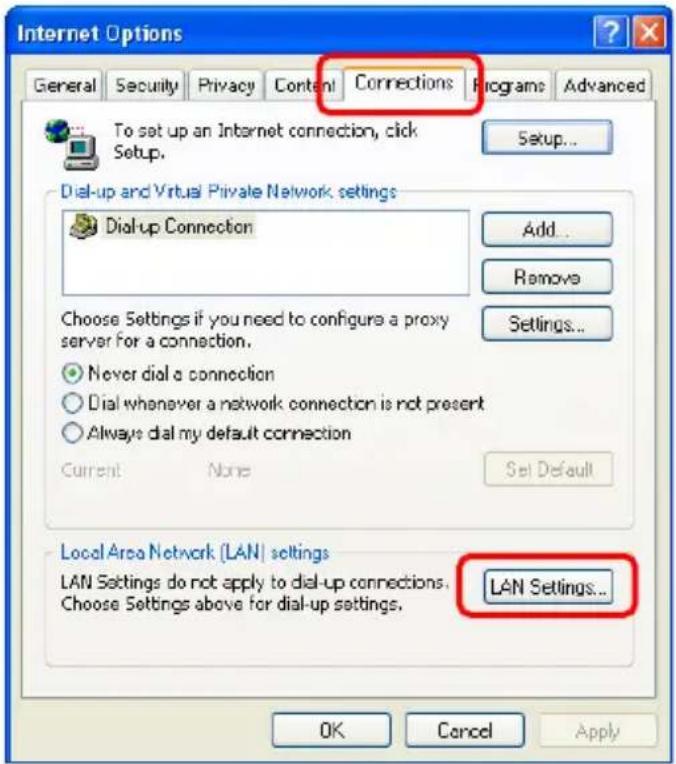
text_image
Internet Options General Security Privacy Content Connections Programs Advanced To set up an Internet connection, click Setup. Setup... Dial-up and Virtual Private Network settings Dial-up Connection Add... Remove Choose Settings if you need to configure a proxy server for a connection. Never dial a connection Dial whenever a network connection is not present Always dial my default connection Current None Set Default Local Area Network (LAN) settings LAN Settings do not apply to dial-up connections. Choose Settings above for dial-up settings. LAN Settings... OK Cancel Apply4 See if the "Use a proxy server for your LAN" check box is checked or not.
■ If checked, click [Advanced...] and go to step 5.
■ If not checked, click [Cancel] then close the Internet Options window. Proxy server settings are not required.
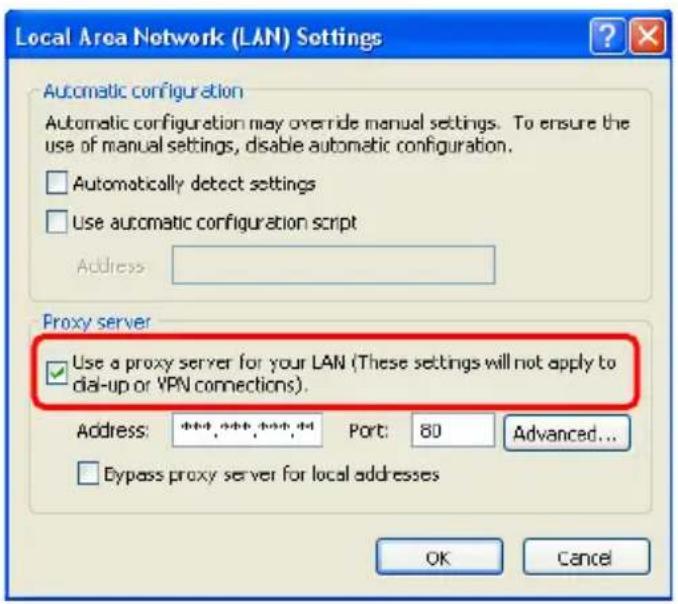
text_image
Local Area Network (LAN) Settings Automatic configuration Automatic configuration may override manual settings. To ensure the use of manual settings, disable automatic configuration. □ Automatically detect settings □ Use automatic configuration script Address Proxy server ✓ Use a proxy server for your LAN (These settings will not apply to dial-up or VPN connections). Address: ###, ###, ###, ## Port: 80 Advanced... □ Bypass proxy server for local addresses OK Cancel5 Enter the base unit's IP address into the "Do not use proxy server for addresses beginning with:" data field.
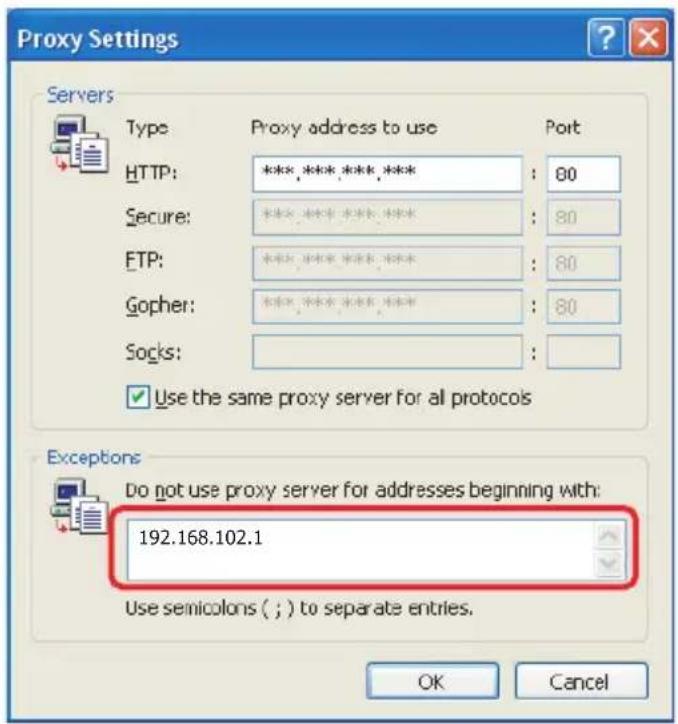
text_image
Proxy Settings Servers Type Proxy address to use Port HTTP: ***,***,***,*** Secure: ***,***,***,*** FTP: ***,***,***,*** Gopher: ***,***,***,*** Socks: ✓ Use the same proxy server for all protocols Exceptions Do not use proxy server for addresses beginning with: 192.168.102.1 Use semicolons ( ; ) to separate entries. OK Cancel6 Click [OK].
7 Click [OK], then close the Internet Options window.
Note:
- In step 5, enter the handset's IP address into the "Do not use proxy server for addresses beginning with:" data field when you update the firmware of the handset.
Setting UPnP to display the shortcut
To display the KX-WPA102 shortcut in the My Network Places folder, Windows components should be added. Enable UPnP (Universal Plug and Play) following the steps below.
1 Click [Start], then click [Control Panel].
3 Select [Networking Services], then click [Details...].
4 Check [Universal Plug and Play], then click [OK].
5 Click [Next>].
2 Click [Add or Remove Programs], then click [Add/Remove Windows Components].
Note:
- If you are using Windows XP Service Pack 2, check [Internet Gateway Device Discovery and Control Client] and [UPnP User Interface] in step 4.
●This feature is only available when using Windows XP.
Using your computer on a wireless LAN
The 15 character device-specific network name (SSID) and 13 alphanumeric character 128 bit encryption network key (WEP) are set as factory defaults. These factory default setting values are shown on the included Wireless LAN sticker. If you use your computer on a wireless LAN, use the values on the sticker to set the wireless LAN configuration on your computer. To set your computer to be used on a wireless LAN, see the manual for the computer you use.
Note:
- To use your computer on a wireless LAN, a wireless LAN card needs to be installed on your computer.
Additional accessories
Sales and support information
●To order additional accessories, call 1-800-332-5368.
- TTY users (hearing or speech impaired users) can call 1-866-605-1277.
Headset (optional)
Connecting a headset to the handset allows hands-free phone conversations. We recommend using the Panasonic headset shown below.
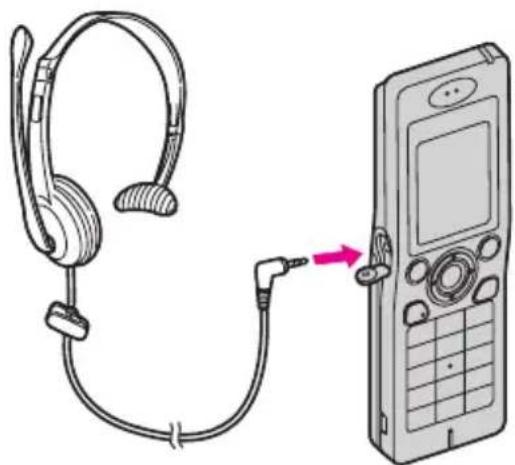
natural_image
Illustration of a pair of headphones connected to a mobile phone via cable (no text or symbols)●The headset model numbers compatible with the handset:
KX-TCA88HA
KX-TCA86
KX-TCA91
KX-TCA92
KX-TCA93
KX-TCA94
KX-TCA95
Error messages
If the unit detects a problem, one of the following messages is shown on the handset display.
Network:
| Display message Cause/solution | |
| Networks were not found. | ●Move closer to the base unit or an access point.●Press [Search] to search for networks again.●Press [Options] → Select “Add manually” to add network manually.●Press [Options] → Select “Preferred networks” to configure preferred networks list. |
| Could not connect to | ●A network connection failed.●Check that the security type and the network key are correct.●Press [OK] → Re-connect the network again. |
| Could not get IP address from | ●The handset could not get an IP address automatically.●Check that the DHCP server of the base unit is enabled.●Make sure the Static IP address of the computer uses the same address as DHCP lease address. |
| Failed to connect to the base unit. Register again. | ●The handset is not registered to the base unit.●Resister the handset (page 133). |
Sign in:
| Display message Cause/solution | |
| Your Skype name and password were not recognized. | ●The Skype name and/or password you entered are not correct.●Press [Retry] → Re-enter the Skype name and password correctly. |
| Sign in was not successful. | ●Check the network connection.●Press [Retry] to try again.●The Skype name you selected is already in use.●Press [OK] → Select another Skype name. |
| This name is not available.Please select another. | |
General:
| Display message Cause/solution | |
| Not logged in.You need to sign in. | ●You need to sign in to Skype to use this feature.●Press [OK] to sign in to Skype. |
| This feature can only be used when connected to a network.Please try again later. | ●You need to connect to a network to use this feature.●Press [Connect] while in the Idle mode to connect to a network. |
| This feature is not available when offline. | ●This feature is not available when your Skype online status is offline.●Change your Skype online status (page 103) and try again. |
| Network connection lost. | ●Network connection is lost.●Move closer to the base unit or the access point.●Press [Connect] while in the Idle mode to connect to network again. |
| ErrorPlease note the error code above and visit http://www.panasonic.com/helpThen enter model no. KX-WP1050 | ●Restart the handset.If this doesn’t resolve the problem, note the error code and visit http://www.panasonic.com/helpThen enter model no. KX-WP1050 |
Battery:
| Display message Cause/solution | |
| Battery or charger error occurred.Please unplug charge cable.Press OK to restart your device. | ●Battery or charger error occurred.●Unplug charge cable and press [OK] to restart the handset. |
| Battery error occurred.Press OK to power off your device. | ●Battery error occurred.●Press [OK] and check your battery. |
Contact list:
| Display message Cause/solution | |
| This device can only store 500 contacts.Synchronization... | ●The total number of contact list and blocked users list entries exceeds 500.●Sign in to Skype on a computer, remove some contacts from your contact list (page 101). |
| The maximum number of contacts has been reached. | ●The total number of contact list and blocked users list entries exceeds 500.●Remove some contacts from your contact list.●Unblock some contacts in blocked users list and remove them from your contact list. |
| is blocked and was not added.Edit your list of blocked users. | ●The user who you are trying to add is blocked in your contact list.●If you want to add a contact, unblock this user (page 82). |
Making a call:
| Display message Cause/solution | |
| ●The user who you are trying to call is blocked in your contact list.●If you want to make a call, unblock this user (page 82). | |
| Sorry call failed! | ●The user you are calling may be offline.●Make a call again later.●Enter the phone number including country code (page 84). |
Settings:
| Display message Cause/solution | |
| Invalid ●The settings you entered are not correct.●Press [OK] and enter correctly. | |
| Handset could not register.Please try again. | ●Press [OK] → Press and hold the LOCATOR button on the base unit for 4 seconds again until you see the LOCATOR indicator on the base unit flashing in green. |
Software update:
| Display message Cause/solution | |
| The battery level is too low to proceed with the update process. | ●The battery level is too low to update software/firmware.●The battery level needs to be medium or full.●Recharge the battery and press [OK] to proceed again. |
| The device must be updated before it can be used. This requires a network connection. Continue? | ●Software/firmware may be defective and requires a software/firmware update (page 118). |
Troubleshooting
If problems occur while operating the handset and the base unit, you can refer to the check list below. For up-to-date support information, visit http://www.panasonic.com/help. Please refer to it along with this guide for troubleshooting.
Base Unit:
Top Menu:
| Problem Cause/Solution | |
| I do not know the base unit IP address. | Confirm the KX-WPA102 icon in My Network Places in the Start menu when using Windows XP to enable UPnP (page 209).The handset shows the IP address assigned to the base unit (page 107).When the Internet connection mode is DHCP, Static or PPPoE, confirm the base unit's IP address using Windows command.Click [Start]. → [All Programs] → [Accessories] → [Command Prompt].Command Prompt window is displayed.Enter "ipconfig /all".Default Gateway stands for the base unit's IP address.When the Internet connection mode is AP (Bridge), switch the Mode selector to “HOTEL” and restart the base unit. You can confirm the base unit's IP address using Windows command as above. |
| I forget my user name and/or password for the Top Menu. | Press and hold the “FACTORY DEFAULT RESET” button on the bottom of the base unit with a pointed object until all the Indicators go out. The settings are reset to default (page 201). |
| The Update Firmware page is displayed. | The base unit firmware may be defective and requires an update firmware (page 199). |
| The Temporary LAN side Network setting page is displayed. | ●The networks on the WAN side and the LAN side overlap (page 196). |
| After clicking [Restart], the Top Menu is not displayed. | ●In the case of AP-DHCP mode or LAN network are changed, Top Menu page is not displayed automatically. Enter the new base unit IP address in the web browser's address bar.●When you restart the base unit from wireless computer, this problem may occur. In such case, re-enter http://192.168.102.1/(the base unit's default IP address) or http://kxwpa.webpage in the address field of the browser.●Click the web browser's refresh button.●After restarting the computer, access the Setup Menu page again.●If the Top Menu is still not displayed, restart the computer and try again or change the network settings of the computer to appropriate values if they are manually set. |
| The setting screen does not show the hotel mode at the top of the screen in spite of the mode selector being switched to the hotel mode, and vice versa. | ●The selector position was switched after the base unit is turned on.●Restart the base unit (see page 189). |
| The Initialization Setup screen still indicates hotel mode after switching the mode selector to home mode. | ●To make the changed new mode effective, restart the base unit (see page 189) after the mode selector position is changed. |
| After failing to enter the user name and the password on a prompt screen for three times successively, the base unit does not respond. | ●Wait for one minute until the base unit becomes ready and access to http://192.168.102.1/ (the base unit's default IP address) or http://kxwpa.webpage. One minute interval is intentional to avoid malignant access to the base unit. |
Computer communication:
| Problem Cause/Solution | |
| “The system has detected a conflict for IP address with the system having hardware address XX:XX:XX:XX:XX:XX” or “Another device on your TCP/IP Internet, which has the physical address XX:XX:XX:XX:XX:XX, is currently using the same IP address (XXX.XXX.XXX.XXX). Your TCP/IP network interface has been shut down.” is displayed in the dialog box. | ●Turn off all the devices. Turn on the base unit and then the computer’s and the handset.●Check that all the computers are set to Obtain an IP Address automatically.●Check that the available address range and each of the IP addresses of the specific devices in the network do not overlap. |
| Shortcut icon is not displayed in the My Network Places folder. | ●UPnP Windows component is not installed in Windows XP. Enable UPnP Windows component (page 209). |
| My computer cannot obtain IP address. | ●When the Internet connection mode is DHCP, Static or PPPoE, the base unit may lease all IP addresses. Restart the base unit and your computer’s.●When the Internet connection mode is AP (Bridge), check the existing router. |
| Wireless communication does not work. | ●Check that the SSID and wireless security settings are same as the base unit settings. These factory default setting values are shown on the included Wireless LAN sticker.●When signal strength is weak, change the location of the base unit or get rid of the obstacle around the base unit. |
| After setting MAC Address Filtering, wireless communication does not work. | ●Check that your computer’s MAC Address is registered in the MAC Address Filtering table (page 172). |
Base unit Indicators:
| Problem Cause/Solution | |
| The WAN Indicator is blinking in red. | ●The base unit hardware may be defective.●Unplug the base unit's AC adaptor. Reconnect the adaptor and try again.●If this doesn't resolve the problem, visit http://www.panasonic.com/helpThen enter model no. KX-WP1050. |
| The WAN Indicator is blinking in amber. | ●The base unit firmware may be defective and requires an update firmware (page 199). |
| The WAN Indicator is amber. | ●An Internet connection has not yet to be established.●Check the Internet connection settings.●Check that you are required to register MAC address (page 150).●When you change the Internet connection device from your existing router to the base unit, it may take time to connect. |
| The WAN Indicator alternately flashes in amber and green in turn. | ●The networks on the WAN side and the LAN side overlap. Change the LAN side network settings (“Temporary LAN Side Network Setting when networks on the WAN side and the LAN side overlap” on page 196). |
| The WAN Indicator flashes as a short blinking in amber and a long flash in green in turn. | ●LAN side network setting is changed temporarily (“Temporary LAN Side Network Setting when networks on the WAN side and the LAN side overlap” on page 196). |
| The WAN Indicator is off. In the hotel room:●Check that the base unit and the Ethernet port (RJ45 jack) in the hotel room are connected properly.●Check that the power of the base unit is turned on. At home:●Check that the base unit and your device (modem, existing router or modem with a build-in router) are connected properly.●Check that the power of the base unit and your device are turned on. | |
| The LAN Indicator is off. | Check that the base unit and the computer are connected properly.Check that the computer is turned on.Check that the LAN card and driver are installed on the computer. |
Handset:
Battery charge:
| Problem Cause/Solution | |
| The handset is not charged. | ●Connect the included charge cable to the CHARGE port of the handset. Connect the other end to the CHARGE port of the base unit that is connected to the power supply. |
| I fully charged the battery, but “ continues or “ ” is displayed, or operating time is shorter than before. | ●Make sure that the included charge cable is connected correctly (page 58).●The battery may need to be replaced with a new one (page 17). |
| The handset display is blank. | ●Confirm that the battery is properly installed.●Fully charge the battery (page 58). |
Network connection:
| Problem Cause/Solution | |
| The handset cannot connect to a network. | ●Check that security settings, such as network key, are correct (page 112).●Move closer to the base unit.●Register the handset to the base unit again (page 133). |
Contact list:
| Problem Cause/Solution | |
| “Waiting to download contacts from the network” message remains displayed. | ●Check the network connection of the handset.If the handset is not connected to the network, the contact list may not be downloaded. |
Sign in to Skype:
| Problem Cause/Solution | |
| I cannot sign in to Skype. | Make sure that you use the correct Skype name and password. If you have forgotten your password, please visithttp://www.skype.comCheck that the handset connects to the base unit or an access point.If you press【~】while signing in to Skype, it may take a while to sign in again. Please wait for a while and try again. |
Making/Answering calls:
| Problem Cause/Solution | |
| “”is displayed, but I cannot make a call. | ●The handset and the base unit could not communicate for some reason, such as interference from other electrical appliances. Perform the following:– Move the handset and the base unit away from other electrical appliances.– Move closer to the base unit.●In the Idle screen, press [Options] → “Network details” → [Select]. Then check the IP address.– If the handset cannot obtain IP address, restart the base unit, an access point or the handset. |
| During a conversation, the following occurs:– Noise is heard.– The sound is interrupted.– The sound is delayed. | ●It may be interference from other electrical appliances.●Move the handset and base unit away from other electrical appliances.●Move closer to the base unit.●The network may be congested. |
| I cannot have a conversation using the headset. | ●Make sure that an optional headset is connected properly (page 210). |
| The handset does not ring. | ●The ringer volume is turned off. Adjust the volume (page 86).●The silent mode is on. Change the silent mode to off (page 71).●Check your Skype online status. If your Skype online status is “Do not disturb”, the handset does not ring. Change your Skype online status (page 103). |
| I cannot make a Skype-to-Skype call. | ●Check that Skype name you are making a call is correct. |
| I cannot make a SkypeOut call. | ●Enter the phone number including country code (page 84).●Check your Skype credit (page 131). |
| I cannot send a voicemail. | ●Check your Skype Voicemail subscription (page 131). |
| I cannot record my greeting. | ●Check your Skype Voicemail subscription (page 131). |
| I cannot receive a call. | ●Check your Skype online status. If your are using “Offline”, you cannot receive a call. Change your Skype online status (page 103). |
| The diverting calls do not work. | ●Check that the number or Skype name you are forwarding to is entered correctly.●Check your Skype credit if you are forwarding to the number (page 131). |
Handset Indicator:
| Problem Cause/Solution | |
| Charge Indicator is flashing in red, except for when the handset is receiving calls or is being located by the base unit. | ●Battery or charging error occurred.Follow the instructions on the handset display if the error message appears. If the message does not appear, check the battery or charge cable connection. |
Updating Firmware (Handset):
| Problem Cause/Solution | |
| During the handset downloads the Panasonic firmware, “Cannot display the webpage” is displayed on the web browser. | ●The network connection between your computer and the handset is disconnected.●Turn off the handset. Try again to update the Panasonic firmware. |
Handset locator:
| Problem Cause/Solution | |
| I cannot locate the handset by using the handset locator. | ●The handset is out of range.●The handset connects other wireless device.●The handset is in use. Try again later.●The handset has not been registered to the base unit. Register the handset (page 133). |
FCC and other information
This device complies with Part 15 of the FCC Rules. Operation is subject to the following two conditions:
(1) This device may not cause harmful interference, and (2) this device must accept any interference received, including interference that may cause undesired operation.
Privacy of communications may not be ensured when using this phone.
CAUTION:
Any changes or modifications not expressly approved by the party responsible for compliance could void the user's authority to operate this device.
NOTE:
This equipment has been tested and found to comply with the limits for a Class B digital device, pursuant to Part 15 of the FCC Rules. These limits are designed to provide reasonable protection against harmful interference in a residential installation. This equipment generates, uses, and can radiate radio frequency energy and, if not installed and used in accordance with the instructions, may cause harmful interference to radio communications. However, there is no guarantee that interference will not occur in a particular installation. If this equipment does cause harmful interference to radio or television reception, which can be determined by turning the equipment off and on, the user is encouraged to try to correct the interference by one or more of the following measures:
– Reorient or relocate the receiving antenna.
– Increase the separation between the equipment and receiver.
- Connect the equipment into an outlet on a circuit different from that to which the receiver is connected.
- Consult the dealer or an experienced radio/TV technician for help.
FCC RF Exposure Warning:
- This product complies with FCC radiation exposure limits set forth for an uncontrolled environment.
- To comply with FCC RF exposure requirements, the base unit must be installed and operated 20 cm (8 inches) or more between the base unit and all person's body (excluding extremities of hands, wrists and feet).
- This product may not be collocated or operated in conjunction with any other antenna or transmitter.
- For body-worn operation, the handset must be used only with a non-metallic accessory. Use of other accessories may not ensure compliance with FCC RF exposure requirements.
Responsible party:
Panasonic Corporation of North America
One Panasonic Way,
Secaucus, New Jersey 07094
Phone number: 1-800-211-PANA (1-800-211-7262)
FCC Warning:
To ensure compliance with FCC emissions limits, use only the included charge cable with the ferrite core when connecting the handset to the base unit.
Industry Canada (IC) and other information
The term “IC:” before the radio certification number only signifies that Industry Canada radio technical specifications were met.
Notice:
Operation is subject to the following two conditions: (1) this device may not cause interference, and (2) this device must accept any interference, including interference that may cause undesired operation of the device.
Privacy of communications may not be ensured when using this phone.
RF Exposure Warning:
- This product complies with IC radiation exposure limits set forth for an uncontrolled environment.
- To comply with IC RF exposure requirements, the base unit must be installed and operated 20 cm (8 inches) or more between base unit and all person's body (excluding extremities of hands, wrists and feet).
- This product may not be collocated or operated in conjunction with any other antenna or transmitter.
- For body-worn operation, the handset must be used only with a non-metallic accessory. Use of other accessories may not ensure compliance with IC RF exposure requirements.
Environment:
Do not install the unit where the temperature is less than 0 ^ (+32 ^ ) or greater than +40 ^ (+104 ^ ). Allow 10 cm (4 inches) clearance around the unit for proper ventilation.
Avoid excessive smoke, dust, mechanical vibration, shock, or direct sunlight.
Routine care:
Wipe the unit with a soft cloth. Do not use benzine, thinner, or any abrasive powder. When you leave the unit unused for a long period of time, disconnect the AC adaptor from the outlet.
CAUTION:
Any changes or modifications not expressly approved by the party responsible for compliance could void the user's authority to operate this device.
No responsibility will be taken by our company with respect to consequences resulting from the inappropriate use, damage or both of the unit.
Declaration of Conformity:
Panasonic Communications Co., Ltd. declares that this equipment is in compliance with the essential requirements and other relevant provisions of Radio & Telecommunications Terminal Equipment (R&TTE) Directive 1999/5/EC.
Declarations of Conformity for the relevant Panasonic products described in this manual are available for download by visiting:
http://www.doc.panasonic.de
Contact:
Panasonic Services Europe
a Division of Panasonic Marketing Europe GmbH
Panasonic Testing Centre
Winsbergring 15, 22525 Hamburg, Germany
CE0682①
1999/5/EC
Important Safety Information:
Use only the included Panasonic AC adaptor (model No. PQWEWP1050).
Information on Disposal for Users of Waste Electrical & Electronic Equipment (private households)

This symbol on the products and/or accompanying documents means that used electrical and electronic products should not be mixed with general household waste.
For proper treatment, recovery and recycling, please take these products to designated collection points, where they will be accepted on a free of charge basis. Alternatively, in some countries you may be able to return your products to your local retailer upon the purchase of an equivalent new product.
Disposing of this product correctly will help to save valuable resources and prevent any potential negative effects on human health and the environment which could otherwise arise from inappropriate waste handling. Please contact your local authority for further details of your nearest designated collection point.
Penalties may be applicable for incorrect disposal of this waste, in accordance with national legislation.
For business users in the European Union:
If you wish to discard electrical and electronic equipment, please contact your dealer or supplier for further information.
Information on Disposal in other Countries outside the European Union:
This symbol is only valid in the European Union.
If you wish to discard this product, please contact your local authorities or dealer and ask for the correct method of disposal.
Specifications
Base unit:
| Router feature WAN connection mode: DHCP, PPPoE, Static | ||
| DHCP server: Yes (max. 5 clients, including 1 for handset) | ||
| DNS relay (DNS Proxy): Yes | ||
| Easy Security: - Transmission/reception of Packets with private IP addresses via WAN interface - Stateful Packet Inspection - Attack Detection | ||
| IP packet filtering: Yes (max. 20) | ||
| UPnP: Internet Gateway Device (IGD) | ||
| Address translation: IP masquerade, port forwarding (max. 10), DMZ | ||
| AP (Bridge) feature Connection mode: DHCP, Static | ||
| Network Interface feature | WAN: 10Base-T/100Base-TX RJ-45 connector x 1 | |
| LAN: 10Base-T/100Base-TX Ethernet RJ-45 connector x 1 | ||
| Wireless: IEEE 802.11b, IEEE 802.11b/g | ||
| Wireless feature Transmission speed *1: IEEE 802.11b: 11/5.5/2/1 MbpsIEEE 802.11g: 54/48/36/24/18/12/9/6 Mbps | ||
| Other feature Indicators: WAN, LAN, WIRELESS, LOCATOR | ||
*1 The figures shown are theoretical maximums and not the actual figures when using the product.
Handset:
| Skype feature Calls: Skype | skype-to-Skype callsSkypeIn callsSkypeOut callsConference calls (guest only)Call waiting | |
| Skype Voicemail: Yes | ||
| Contact list: Yes (max. 500) | ||
| History: Incoming calls (max. 20)Outgoing calls (max. 20)Missed calls (max. 50)Voicemails (max. 100)Authorizations (max. 20) | ||
| Network feature Connection mode: DHCP, Static | ||
| Network Interface feature | Wireless: IEEE 802.11b,IEEE 802.11g*1 | |
| Wireless feature Transmission speed *2: IEEE 802.11b: 11/5.5/2/1 MbpsIEEE 802.11g: 54/48/36/24/18/12/9/6 Mbps | ||
| Other feature Indicators: | Charge/Ringer | |
| Display: 1.8 inch TFT LCD, 65k colors | ||
| Dimension (HWD): Approx. 142 mm x 45 mm x 20 mm ( 5^5/_8 inches x 1^3/_4 inches x ^3/_4 inch) | ||
| Mass (Weight): Approx. 100 g (0.22 lb.) | ||
| Power output: 30 mW | ||
| Power supply: Li-lon battery (3.6 V, 730 mAh) | ||
| Operating environment 0 °C – 40 °C (32 °F – 104 °F) temperature: | ||
| Charging environment 5 °C – 40 °C (41 °F – 104 °F) temperature: | ||
*1 IEEE 802.11g is used for maintenance.
*2 The figures shown are theoretical maximums and not the actual figures when using the product.
Note:
- Design and specifications are subject to change without notice.
- The illustrations in these instructions may vary slightly from the actual product.
Index
A Answering calls: 86 AP Configuration: 52 Auto sign in: 118
B Base unit Setting: 36 Battery
Charge: 58
Installation: 57
Level: 59
Performance: 59
Replacement: 57
C Call divert: 90
Call Waiting: 88
Contact list: 73, 83
Contact list options: 80
D Default settings: 201
DHCP Configuration: 48
DHCP Lease Table: 177
DMZ: 158
DNS Server: 48, 50, 52
E Error messages: 211
H Handset registration: 133
Handset Status: 180
Headset, optional: 210
Help: 193
History: 84, 95
Hold: 88
I Idle mode option screen: 71
Idle screen: 66
Initialization Setup: 36, 38
Internet connection: 48, 147
IP Address: 50, 53
L LAN/DHCP Server: 152
Load Settings: 188
Log
Connection: 192
Packet Filtering: 190
UPnP Port Mapping: 191
M MAC Address Clone: 150
MAC Address Filtering: 172
Main menu: 69
Making calls: 83
Mute: 88
N Network Connection: 136
Network Status: 175
P Packet Filtering: 162
Password: 38, 105, 182
Port Forwarding: 155
PPPoE Configuration: 51
R Reset: 123, 186
Reset button: 201
Ringer off: 86
Routing: 166
S Skype credit: 131
Skype online status: 68
Skypeln: 131
SkypeOut: 77, 84
Software updates: 118, 123
Speakerphone: 88
Static Configuration: 49
Status indicators: 23
Subnet Mask: 50, 53
Support: 193
System requirements: 27
T Time and Date: 72
Tones: 124
Top Menu: 134
Troubleshooting: 215
Troubleshooting for installation: 54
TTY: 17, 210
U Update Firmware: 141, 184
UPnP: 159
UPnP Port Mapping Table: 178
User name: 38
V Version Information: 181
Voicemail: 91, 93
Volume
Receiver: 88
Ringer: 86
Speaker: 88
W Wireless: 168
Wireless Security: 170
Wireless Status: 179
If you need assistance with setup or operation
1 Visit our website: http://www.panasonic.com/help
2 Contact us via the web at: http://www.panasonic.com/contactinfo
3 Call us at: 1-800-211-PANA (1-800-211-7262)
TTY users (hearing or speech impaired users) can call 1-877-833-8855.
When you ship the product
- Carefully pack your unit, preferably in the original carton.
- Attach a letter, detailing the symptom, to the outside of the carton.
- Send the unit to Panasonic Service and Technology Company Customer Servicenter, prepaid and adequately insured.
- Do not send your unit to Panasonic Consumer Electronics Company listed below or to executive or regional sales offices. These locations do not repair consumer products.
Panasonic Consumer Electronics Company, Division of Panasonic Corporation of North America
One Panasonic Way, Secaucus, New Jersey 07094
Panasonic Puerto Rico, Inc.
San Gabriel Industrial Park, Ave. 65 de Infantería, Km. 9.5, Carolina, Puerto Rico 00985
Copyright:
This material is copyrighted by Panasonic Communications Co., Ltd., and may be reproduced for internal use only. All other reproduction, in whole or in part, is prohibited without the written consent of Panasonic Communications Co., Ltd.
© 2006 Panasonic Communications Co., Ltd. All Rights Reserved.