
SL-PS7 - Hi-Fi System PANASONIC - Free user manual and instructions
Find the device manual for free SL-PS7 PANASONIC in PDF.


User questions about SL-PS7 PANASONIC
0 question about this device. Answer the ones you know or ask your own.
Ask a new question about this device
Download the instructions for your Hi-Fi System in PDF format for free! Find your manual SL-PS7 - PANASONIC and take your electronic device back in hand. On this page are published all the documents necessary for the use of your device. SL-PS7 by PANASONIC.
USER MANUAL SL-PS7 PANASONIC
Operating Instructions
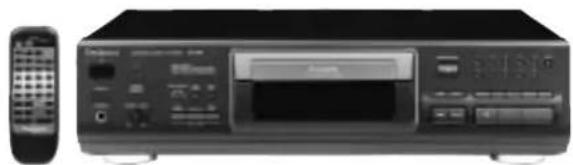
Model No. SL-PS7
natural_image
Front view of a black audio workstation with control panel and remote control (no visible text or labels)
natural_image
Black-and-white illustration of a saxophone with a magnifying glass resting on an open musical instrument, no text or symbols visible.Technics®
Note:
"EB" on the packaging indicates the United Kingdom.
Before connecting, operating or adjusting this product, please read these instructions completely.
Please keep this manual for future reference.
RQT5414-B
Supplied accessories
Please check and identify the supplied accessories.
Use numbers indicated in parentheses when asking for replacement parts.
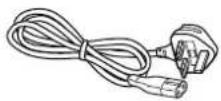
☐ AC mains lead .... 1 pc. (RJA0044-3C)
Note
The included AC mains lead is for use with this unit only. Do not use it with other equipment.
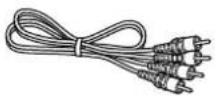
□ Stereo phono cable (RJL2P004B08A) ..... 1 pc.
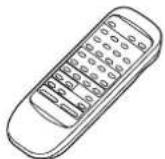
☐ Remote control (EUR645275) .... 1 pc.
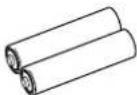
□ Batteries for remote control .... 2 pcs.
Dear customer
Thank you for purchasing this product.
For optimum performance and safety, please read these instructions carefully.
Table of contents
Caution for AC mains lead 3
Suggestions for safety 4
Connections 5
Concerning the remote control 5
Controls 6
Sequential play Basic Play 7
Direct access play 8
Random play 8
Program play 9
Other CD play functions
Repeat 10
A-B repeat 10
Output level control 10
Time fade 11
Time mode selection 11
Auto cue 12
Peak search 12
CD edit recording 13
To listen with headphones 14
Concerning CDs 15
Maintenance 15
Troubleshooting guide Back cover
Specifications...... Back cover
(For United Kingdom)
("EB" area code model only)
For your safety, please read the following text carefully.
This appliance is supplied with a moulded three pin mains plug for your safety and convenience.
A 5-ampere fuse is fitted in this plug.
Should the fuse need to be replaced please ensure that the replacement fuse has a rating of 5-ampere and that it is approved by ASTA or BSI to BS1362.
Check for the ASTA mark 📄 or the BSI mark ♥ on the body of the fuse.
If the plug contains a removable fuse cover you must ensure that it is refitted when the fuse is replaced.
If you lose the fuse cover the plug must not be used until a replacement cover is obtained.
A replacement fuse cover can be purchased from your local dealer.
CAUTION!
IF THE FITTED MOULDED PLUG IS UNSUITABLE FOR THE SOCKET OUTLET IN YOUR HOME THEN THE FUSE SHOULD BE REMOVED AND THE PLUG CUT OFF AND DISPOSED OF SAFELY.
THERE IS A DANGER OF SEVERE ELECTRICAL SHOCK IF THE CUT OFF PLUG IS INSERTED INTO ANY 13-AMPERE SOCKET.
If a new plug is to be fitted please observe the wiring code as stated below.
If in any doubt please consult a qualified electrician.
IMPORTANT
The wires in this mains lead are coloured in accordance with the following code:
Blue: Neutral, Brown: Live.
As these colours may not correspond with the coloured markings identifying the terminals in your plug, proceed as follows:
The wire which is coloured Blue must be connected to the terminal which is marked with the letter N or coloured Black or Blue.
The wire which is coloured Brown must be connected to the terminal which is marked with the letter L or coloured Brown or Red.
WARNING: DO NOT CONNECT EITHER WIRE TO THE EARTH TERMINAL WHICH IS MARKED WITH THE LETTER E, BY THE EARTH SYMBOL ± OR COLOURED GREEN OR GREEN/YELLOW.
THIS PLUG IS NOT WATERPROOF—KEEP DRY.
Before use
Remove the connector cover.
How to replace the fuse
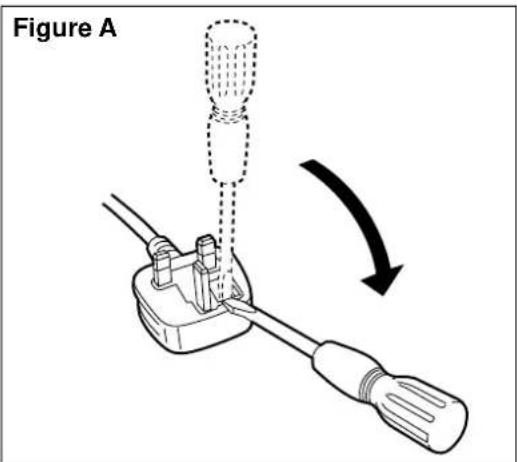
The location of the fuse differ according to the type of AC mains plug (figures A and B). Confirm the AC mains plug fitted and follow the instructions below. Illustrations may differ from actual AC mains plug.
- Open the fuse cover with a screwdriver.
text_image
Figure A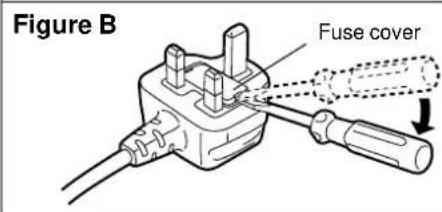
text_image
Figure B Fuse cover- Replace the fuse and close or attach the fuse cover.
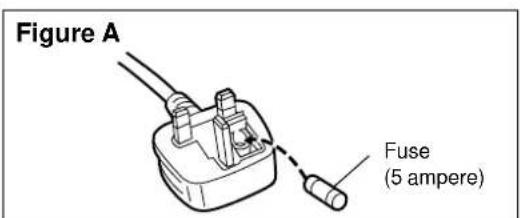
text_image
Figure A Fuse (5 ampere)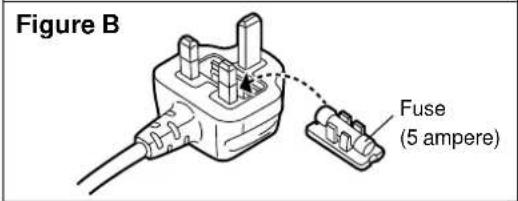
text_image
Figure B Fuse (5 ampere)Placement
Avoid placing the unit in areas of:
- direct sunlight
•high temperature
•high humidity
•excessive vibration
- uneven surfaces (Place the unit on a flat level surface.)
Such conditions might damage the cabinet and/or other component parts and thereby shorten the unit's service life.
To protect the unit against sound distortion and accoustical effects, please place the unit at least 15 cm away from wall surfaces etc.
Stacking
Never place heavy items on top of the unit or the AC mains lead.
Voltage
- It is very dangerous to use an AC power source of high voltage such as for an air conditioner.
A fire might be caused by such a connection.
- A DC power source can not be used.
Be sure to check the power source carefully, especially if on a ship or other place where DC is used.
AC mains lead protection
- Avoid cuts, scratches or poor connection of the AC mains lead, as this may result in fire or electric shock.
Excessive bending, pulling or slicing of the AC mains lead should also be avoided. - Do not pull on the AC mains lead when you are disconnecting the power, as this could cause an electric shock. Grasp the plug firmly when you disconnect the AC mains lead.
- Never touch the plug with wet hands or a serious electric shock could result.

text_image
CLASS 1 LASER PRODUCT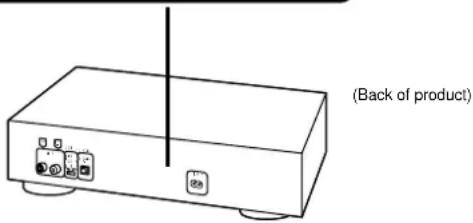
text_image
(Back of product)| DANGER | INVISIBLE LESTERSTÄLNG VED NENING, VÄR SIKCHEDSATBRYDEE ERUDE AF FUNKTOL. UNIDÄ ASSET TELSE FORSTÄLNG. |
| ADWARSEL | USYNIL LASERSTÄLNG VED NENING, VÄR SIKCHEDSATBRYDEE ERUDE AF FUNKTOL. UNIDÄ ASSET TELSE FORSTÄLNG. |
| VAROI | AVATTRESSA, JA SUJALUKTOS CHIETTALESSA CLET ALTITIVA NAVYMATONTÄ LASERSTÄLNG YLLÄ - ALAKATSO SÄTESEN. |
| VARNING | OSYNILIC LASERSTÄLNGN VÄR DENNA DEL AF OPPVAD OCH SÄVNLEN AR UIKOPPLÄD, BETRAKTA EL STRÄLEN. |
| ADWARSEL | USYNILIC LASERSTÄLNG VÄR DESÄL APENS DE SIKCHEDSÄS BRYTES. UNIDA EKSPOVERNING FOR STRÄLEN. |
| VORSICHT | USNCHARTER LASERSTÄLNG, MENA ARBECKUNG GEÖFNET, NICIT DOM STRAHIL ASSETZEN. |
(Inside of product)
(Indersiden at apparatet)
(Tuotteen sisällä)
(Apparatens insida)
(Produktets innside)
- Ensure that no foreign objects, such as needles, coins, screwdrivers etc., accidentally fall into the unit.
Otherwise, a serious electric shock or malfunction could occur. - Be extremely careful about spilling water or liquid on/into the unit, as a fire or electric shock could occur.
(Disconnect the power plug and contact your dealer immediately if this occurs.) - Avoid spraying insecticides onto the unit as they contain flammable gases which can be ignited.
- Insecticides, alcohol, paint thinner and similar chemicals should never be used to clean the unit as they can cause flaking or cloudiness to the cabinet finish.
Service
- Never attempt to repair, disassemble or reconstruct the unit if there seems to be a problem.
A serious electric shock could result if you ignore this precautionary measure. - If a problem occurs during operation (the sound is interrupted, indicators fail to light up, smoke is detected, etc.) contact your dealer or Authorized Service Center immediately.
- Disconnect the AC mains lead if the unit will not be used for a long time. Otherwise the operation life could be shortened.
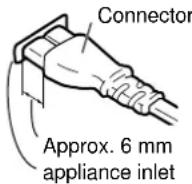
Insertion of connector
Even when the connector is perfectly inserted, depending on the type of inlet used, the front part of the connector may jut out as shown in the drawing.
However there is no problem using the unit.
CAUTION!
THIS PRODUCT UTILIZES A LASER.
USE OF CONTROLS OR ADJUSTMENTS OR PERFORMANCE OF PROCEDURES OTHER THAN THOSE SPECIFIED HEREIN MAY RESULT IN HAZARDOUS RADIATION EXPOSURE.
DO NOT OPEN COVERS AND DO NOT REPAIR YOURSELF. REFER SERVICING TO QUALIFIED PERSONNEL.
CAUTION!
DO NOT INSTALL OR PLACE THIS UNIT IN A BOOKCASE, BUILT IN CABINET OR IN ANOTHER CONFINED SPACE. ENSURE THE UNIT IS WELL VENTILATED. ENSURE THAT CURTAINS AND ANY OTHER MATERIALS DO NOT OBSTRUCT THE VENTILATION TO PREVENT RISK OF ELECTRIC SHOCK OR FIRE HAZARD DUE TO OVERHEATING.
A
text_image
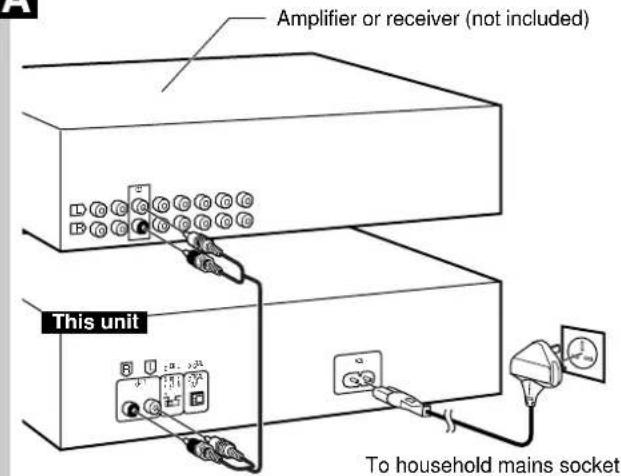
Amplifier or receiver (not included) This unit To household mains socketFOR UNITED KINGDOM ONLY READ THE CAUTION FOR THE AC MAINS LEAD ON PAGE 3 BEFORE CONNECTION.
B
text_image
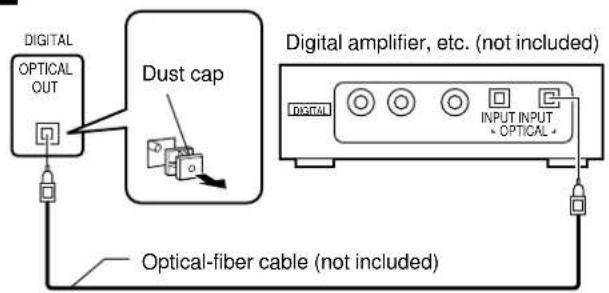
DIGITAL OPTICAL OUT Dust cap Digital amplifier, etc. (not included) DIGITAL INPUT INPUT OPTICAL Optical-fiber cable (not included)C
text_image
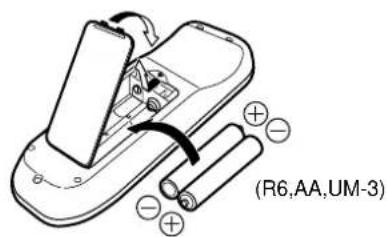
(R6,AA,UM-3)D
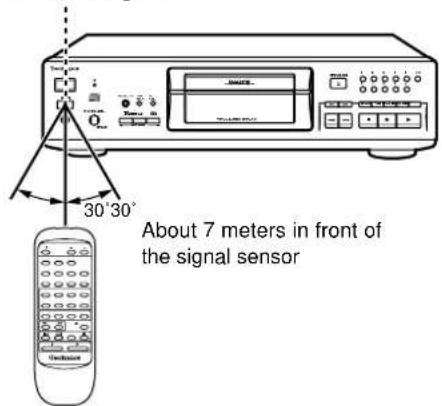
Remote control signal sensor
text_image
About 7 meters in front of the signal sensor
Connections
Before making connections, be sure that the power of this unit and all other system components is first turned off.

text_image
Stereo phono cable White (L) Red (R)Note
Although the figure shows the AC mains lead being connected to a household mains socket, if the amplifier (or receiver) is equipped with an AC outlet, connect the cord to that outlet.

To connect a digital amplifier
Note
Remove the dust cap which is inserted in the DIGITAL OPTICAL OUT terminal only if you connect a digital amplifier.
When this terminal is not being used, attach the cap.
Concerning the remote control

Battery installation
Use of batteries
- Align the poles (+ and -) properly when inserting the batteries.
- Do not mix old and new batteries, or batteries of different types.
- Do not recharge ordinary dry cell batteries.
- Do not heat or disassemble the batteries. Do not allow them to contact flame or water.
- Remove the batteries if the unit is not to be used for a long time.
- Do not keep together with metallic objects such as necklaces.
- Do not use batteries if the covering has been peeled off.
- Do not use rechargeable type batteries.
Mishandling of batteries can cause electrolyte leakage which can damage items the fluid contacts and may cause a fire.
If electrolyte leaks from the batteries, consult your dealer.
Wash thoroughly with water if electrolyte comes in contact with any part of your body.

Correct method of use
Operation notes
- Do not place obstacles between the remote control signal sensor and remote control unit.
- Do not expose the remote control signal sensor to direct sunlight or to the bright light of an inverter fluorescent light.
- Take care to keep the remote control signal sensor and end of the remote control unit free from dust.
- If this system is installed in a rack with glass doors, the thickness and color of the glass doors might make it necessary to use the remote control a shorter distance from the system.
To prevent damage
- Do not place heavy items on the unit.
- Do not disassemble or reconstruct it.
- Do not spill water or other liquids onto it.
A
text_image
Diagram of a device rack with numbered ports and labeled connectors, showing connections between ports 1 through 23.B
text_image
Technics 1 2 3 4 5 6 7 8 9 10 11 12 13 14 15 16 17 18 19 20 21 22 23 24 25 26 27 28 29 30 31 32 33 34 35 36 37 38 39 40 41 42 43 44 45 46 47 48 49 50 51 52 53 54 55 56 57 58 59 60 61 62 63 64 65 66 67 68 69 70 71 72 73 74 75 76 77 78 79 80 81 82 83 84 85 86 87 88 89 90 91 92 93 94 95 96 97 98 99 100Controls

Main unit
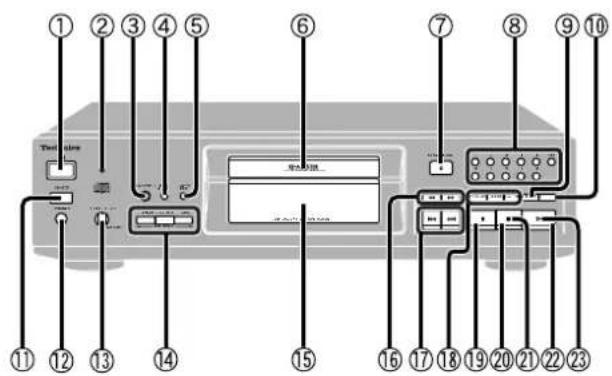
① Standby/on switch ( ⏻/I )
Press to switch the unit from on to standby mode or vice versa. In standby mode, the unit is still consuming a small amount of power.
② Standby indicator ( ⏻ )
When the unit is connected to the AC mains supply, this indicator lights up in standby mode and goes out when the unit is turned on.
③ Peak search button (PEAK SEARCH)
④ Time mode select button (TIME MODE)
⑤ Auto cue button ( AUTO CUE )
⑥ Disc tray
⑦ Disc tray open/close button ( ▲ OPEN/CLOSE )
⑧ Numeric buttons (1–9, 0, ≥10)
⑨ Random play button ( RANDOM )
⑩ Repeat button ( REPEAT )
⑪ Remote control signal sensor (SENSOR)
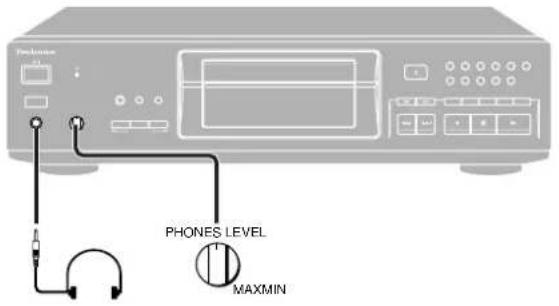
⑫ Headphones jack ( PHONES )
⑬ Headphones volume control ( PHONES LEVEL )
⑭ CD edit record buttons (EDIT GUIDE)
• Tape length button ( TAPE LENGTH )
• Tape side select button (SIDE A/B)
• Time fade button (TIME FADE)
⑮ Display panel
⑯ Search buttons ( ◀◀,▶▶ )
⑰ Skip buttons ( ◀◀◀,▶▶▶)
⑱ Program play buttons
•Program button (PROGRAM)
- Clear button ( CLEAR )
- Recall button ( RECALL )
⑲ Stop button ( ■ )
⑳ Pause button ( Ⅲ )
② Pause indicator ( )
② Play button ( ▶ )
②3 Play indicator ( ▶ )

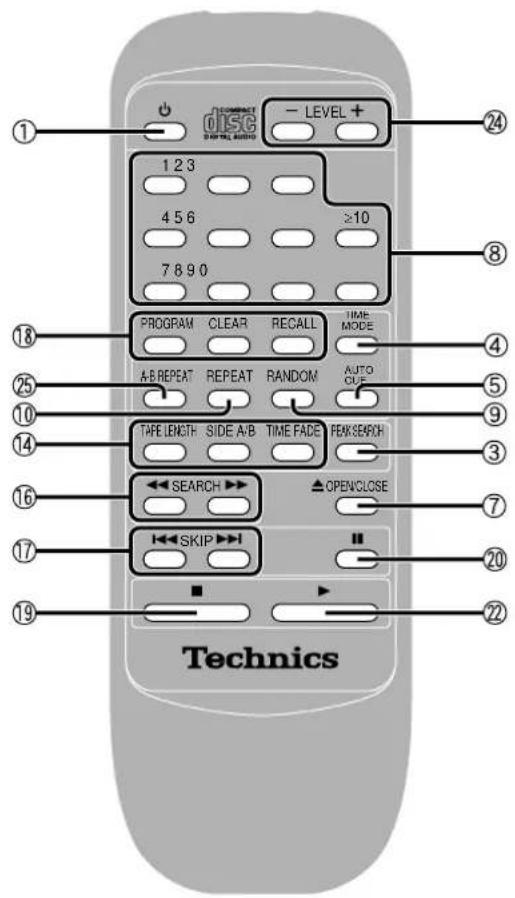
Remote control
With the exception of ②4 and ⑦5, the buttons on the remote control function the same as the buttons on the main unit.
Label must face upward
3
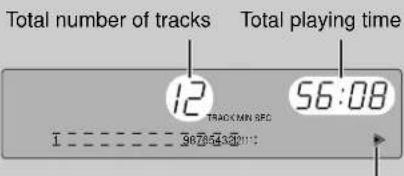
text_image
Total number of tracks 12 56:08 TRACK/MN SPC 36705430111Displayed if there are 21 or more tracks on the disc.
4

Track currently playing Index number
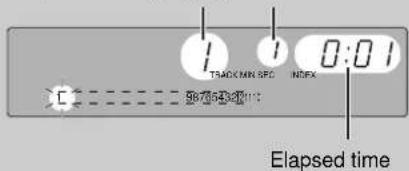
text_image
1 0:01 TRACK MIN SFD NEFX 987632111 Elapsed timeA
×

×
B
text_image
R L OUT RE-MASTER PROCESSING ON OFF OPTICAL OUT DIGITAL DIGITALSequential play Basic Play
1 Press [ ⏻/ I ] to turn the unit on.
- "no dISC" indicates that a CD has not been inserted.
- If a CD is already in the disc tray, it automatically begins playing from the first track.
2 Press [▲ OPEN/CLOSE] to open the tray and insert a disc.
3 Press [▲ OPEN/CLOSE] to close the tray.
4 Press [▶] to start play.
The play indicator illuminates green.
Play stops automatically after all tracks have been played.
To stop play
Press [■].
| To pause | Press [ ] during play.The pause indicator illuminates orange.To resume play, press []. |
| To search forward/backward (SEARCH) | Hold down [ ◀◀] (backward)or [▶▶] (forward) during play. |
| To skip forward/backward(SKIP) | Press [ ◀◀◀] (backward) or[▶▶▶] (forward) during play. |
For your reference
- If you skip step 3 and press [▶], the tray automatically closes and play begins from the first track.
- When you use the timer with another unit, be sure to turn this unit on.
Virtual battery operation
This unit has a circuit (virtual battery) which operates to remove the small amount of noise contained in the mains when playing.
Note
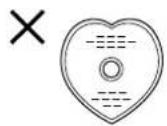
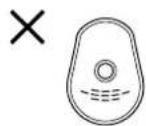
A Do not use irregular shape CDs.
- During random play (→ page 8): You cannot skip backward to previous tracks. You can search only in the current track.
- During program play (→ page 9): Skipping is performed in the programmed order. You can search only in the current track.
- During A-B repeat (→ page 10): Searching can be performed beyond the A-B segment. (A-B repeat will not be canceled.)
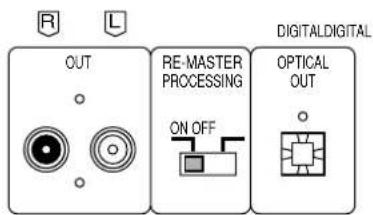
B To improve sound quality
Switch [RE-MASTER PROCESSING] (located on the rear panel) to "ON".
The RE-MASTER circuit starts operating and sound quality is improved.
[RE-MASTER] is switched to "ON" at the time of shipment.
![PANASONIC SL-PS7 - Switch [RE-MASTER PROCESSING] (located on the rear panel) to "ON". - 1](/content/2026/05/796521/images/d5fa0e0c32005958d2f6d8e2b15db2657e8a464c78e424fe961ce50ca198d2b9.jpg)
text_image
1 ... 9 0 >10 RandomA
![PANASONIC SL-PS7 - Switch [RE-MASTER PROCESSING] (located on the rear panel) to "ON". - 2](/content/2026/05/796521/images/e69da626870a0d6d78bc0bd208baf8567eac234a9b17ec9d1e9988ecba02404c.jpg)
![PANASONIC SL-PS7 - Switch [RE-MASTER PROCESSING] (located on the rear panel) to "ON". - 3](/content/2026/05/796521/images/49f23612d6b3d5138a2a390bfc85b034686dc8c0dfe80b671e1f8d0e318f93a6.jpg)
text_image
2 TRACK MIN SEC INDEX 0:01 987054321112B
![PANASONIC SL-PS7 - Switch [RE-MASTER PROCESSING] (located on the rear panel) to "ON". - 4](/content/2026/05/796521/images/2ad25fc2f21d2414afe57ce4a5b798246dc126f5d2e8c82d76838fd4c991bc22.jpg)
![PANASONIC SL-PS7 - Switch [RE-MASTER PROCESSING] (located on the rear panel) to "ON". - 5](/content/2026/05/796521/images/9c530f384b769d2cdf3c4c744f4e7ead7173eed17548168336d44fbcc1bdfe87.jpg)
text_image
RANDOM 6 1 0:01 TRACK MIN SECONDEX 1 9870643(2)(1)![PANASONIC SL-PS7 - Switch [RE-MASTER PROCESSING] (located on the rear panel) to "ON". - 6](/content/2026/05/796521/images/7d48b18ae056114a95c112c3feec296be00827d355a85b101124676eeb4ecd0f.jpg)
Direct access play
With this function, a disc is played from a desired track to the last track and then stops automatically.
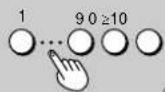
Press the numeric buttons.
Play will begin from the selected track number.
To select a two-digit track
Press [≥10] and then the two numbers you want within 7 seconds.
For example
Track No. 25: [≥10] → [2] → [5]
Track No. 30: [≥10] → [3] → [0]

Random play
With this function, all tracks on a disc are played one time each in random order, and then play stops automatically.
Press [RANDOM].
Random play is canceled when play is stopped.
To cancel random play
Press [RANDOM].
For your reference
During program play:
The programmed tracks will be played in random order.
text_image
1 2 3 CLEAR ECALL1

2
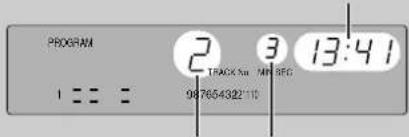
Total playing time of programmed tracks
text_image
PROGRAM 2 3 13:41 TRACK No. AIR REG 98765432:110Last track number programmed
Number of tracks programmed
3

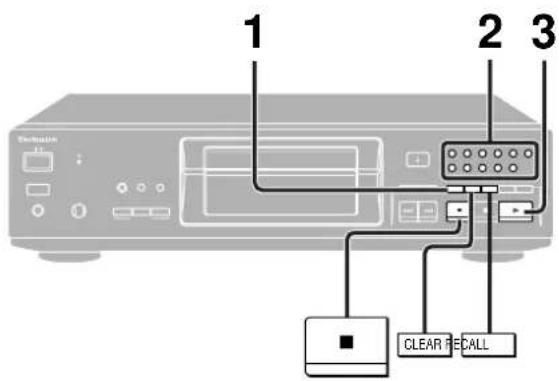
Program play
With this function, you can program up to 20 tracks in any order you like.
1
While the disc is stopped:
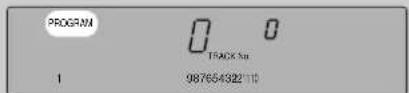
Press [PROGRAM].
If the button is pressed while the disc is playing, that track is programmed as the first.
2
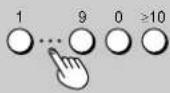
Press the numeric buttons to specify the track numbers in order.
If you make a mistake when pressing a track number, press [CLEAR].
3
Press [▶].
Tracks are played in the programmed order, and then play stops automatically.
Program contents are stored even after play ends.
To play the same program contents again, press [ ]
To cancel program mode
Press [PROGRAM].
To select a two-digit track
Press [≥10] and then the two numbers you want within 7 seconds.
For example
Track no. 25: [≥10] → [2] → [5]
Track no. 30: [≥10] → [3] → [0]
Checking program contents
Press [RECALL].
Each time the button is pressed, a track number and sequence number are displayed.
To program additional tracks
Press the numeric buttons.
To erase programmed tracks
• To erase the last programmed track
While the disc is stopped:
Press [CLEAR].
One track is erased each time the button is pressed.
• To erase a track within the program
Press [RECALL] to display the track to be erased, and then press [CLEAR] to erase the displayed track.
• To erase all tracks
While the disc is stopped:
Press [ ]
Program mode is also switched off.
For your reference
“-” appears on the display:
When 21 tracks have been specified (no further programming possible).
“--”appears on the display:
- When the total playing time of the programmed tracks exceeds 99 minutes and 59 seconds.
- When a track numbered 21 or higher has been specified.
In these instances, the total playing time will not be displayed, but up to 20 tracks can still be programmed.
text_image
REPEAT 1,2 A-B REPEAT - LEVEL + TechnicsA

text_image
REPEAT 12 TIME MIN SEC 56:08 T 08:08:43:01:11B
1

text_image
A-B REPEAT A- 1 1 0:18 TRACK MIN SEC INDEX 1 0576543211132

text_image
A-B REPEAT 2 1 0:03 TIMCK MIN SECONDS 98/04/24 (1):C
text_image
- LEVEL + LEVEL - 2 dB 1 0.856±3.4±11.0Indicates that output level has been decreased by 2 dB
Other CD play functions
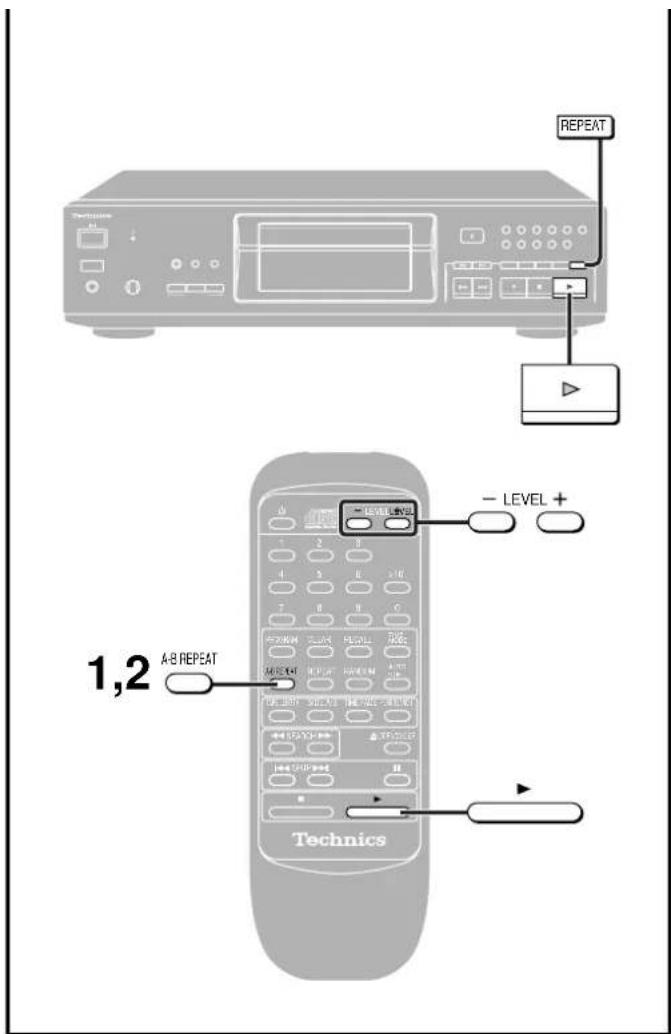
A Repeat
Play of all tracks or desired tracks will be repeated.
Press [REPEAT] before or during play.
To cancel repeat
Press [REPEAT].
To repeat only one track or specific tracks
① Specify the track numbers.
Perform steps 1 and 2 on page 9.
② Press [REPEAT].
③ Press [▶].
B A-B repeat
Remote control only
While a disc is playing, if you specify a start point (point A) and an end point (point B), that segment will be repeated.
1
While the disc is playing:
Press [A-B REPEAT] at the start point (point A).
2
2 Press [A-B REPEAT] at the end point (point B).
The segment between A and B is played repeatedly.
To cancel A-B repeat
Press [A-B REPEAT].
For your reference
- A-B repeat is not possible during random play (→ page 8) and program play (→ page 9).
- If you press [▶] during A-B repeat, play returns to point A.
- If you only specify point A, play will still return to point A if you press [▶] at any point.
c Output level control
Remote control only
Rather than adjusting the volume of the amplifier, you can temporarily lower the sound by decreasing the output of the CD player.
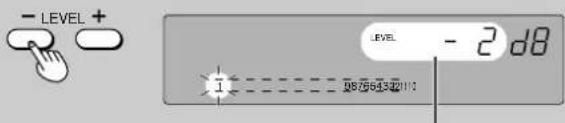
Press [− LEVEL] to decrease the volume.
Each time the button is pressed, the volume changes as follows.
$$ 0 \mathrm{dB} \rightarrow - 2 \mathrm{dB} \rightarrow - 4 \mathrm{dB} \dots \rightarrow - 1 2 \mathrm{dB} $$
To increase the output after it has been decreased
Press [LEVEL+].
Note
During CD edit recording (→ pages 13 and 14), in order to maintain a constant recording level, the output level cannot be adjusted.
For your reference
- If the unit is turned off and then turned on again, the output level returns to 0 dB (normal sound level).
- When the output level is decreased, the headphone volume decreases as well.
A
text_image
1 TIME MODE 2 3 CLEAR1

text_image
I 98754362.10 MIN SEC2
text_image
T.FADE I 98764342110 25:30 MIN/SEC3
B
text_image
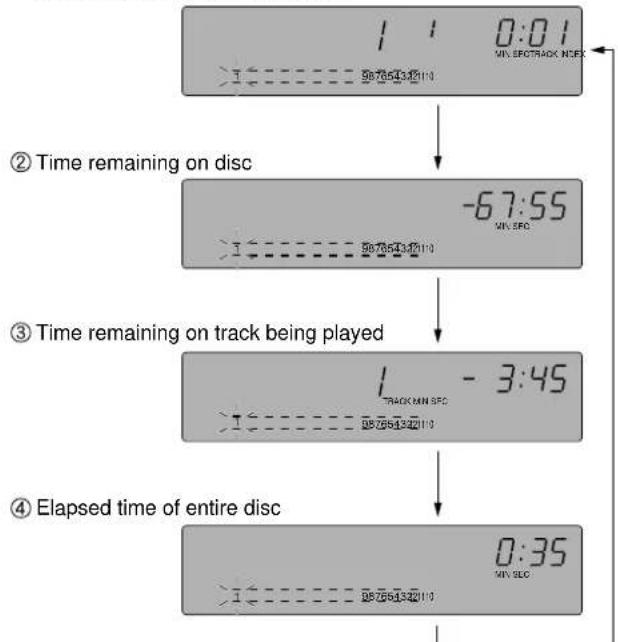
TIME MODE① (Original state)
Elapsed time of track being played
flowchart
graph TD
    A["1: 0:01 MIN. SEC TRACK NEFX"] --> B["Time remaining on disc"]
    B --> C["-67:55 MIN. SFC"]
    C --> D["Time remaining on track being played"]
    D --> E["1 - 3:45 TRACK MIN. SFC"]
    E --> F["Elapsed time of entire disc"]
    F --> G["0:35 MIN. SEC"]
Other CD play functions
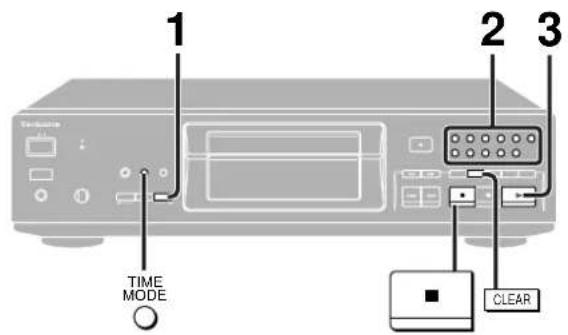
A Time fade
With this function you specify a time, and when that time is reached, the volume is gradually decreased and play ends.
1 While the disc is stopped or paused: Press [TIME FADE].
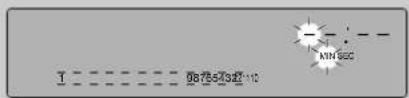
2 Press the numeric buttons to specify the play time.
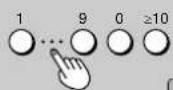
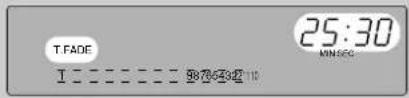
(5 seconds through 99 minutes and 59 seconds) For example, to play a disc for 25 minutes and 30 seconds and then stop: [2] → [5] → [3] → [0] If you make a mistake while specifying the time, press [CLEAR] and specify it again.
3 Press [▶].
Five seconds before the specified time "T.FADE" flashes, the volume is gradually decreased, and the disc is paused. Time fade is canceled simultaneously.
To cancel time fade
Press [ ]
To check the time remaining until fade out
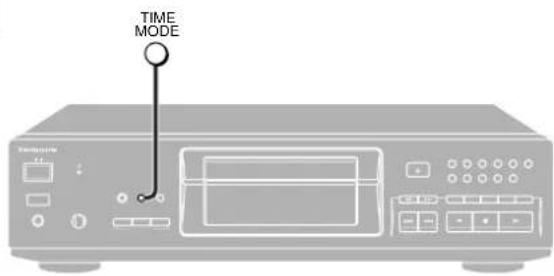
Press [TIME MODE] three times during play.
Note
This function may not work properly if the disc is scratched or soiled.
B Time mode selection
While the disc is playing or paused:
Press [TIME MODE].
Each time the button is pressed, the display changes in the order shown in the illustration.
If play is stopped and then started again, the display returns to its original state.
For your reference
- During play of tracks numbered above 20;
Display ③appears as " "----:--
• During program play;
Time for programmed tracks appears for displays ② and . ④
• During random play;
Display ②appears as “ ”, and display as “ ”④ --:-- - During CD edit recording (→ pages 13 and 14);
Display 📋 shows the time remaining on the side of the tape being recorded on.
• During time fade;
The time remaining until fade out is displayed between displays ③ and ④
text_image
11 2 3 Exclusive RANDOMA
1

text_image
A.CUE 12 56:08 TRACK MIN SEC 1 0870513421112
text_image
ACUE 1:1 0:01 TRACK MIN SECINDEX 987054321113

B
1

text_image
A-B PEAK 5 1 2:18 TRACK INDEX MIN SEC 1 5 9678432 121112Other CD play functions
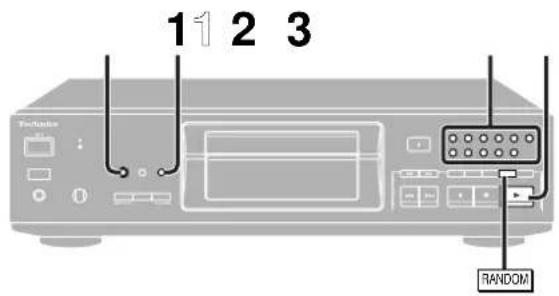
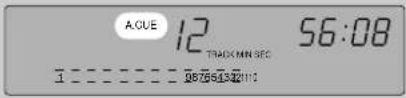
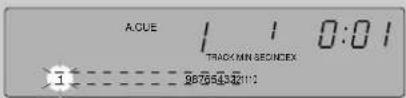
A Auto cue
With this function, play is paused at the beginning (where sound can be heard) of all tracks, one track at a time.
1 Press [AUTO CUE].
If the disc was playing, play is paused at the beginning of the next track.
2 Press the numeric buttons to select the track number.
The unit switches to the play standby mode.
The pause indicator illuminates and the play indicator flashes.
3 Press [▶].
Sound can be heard immediately.
To play tracks successively, press [] for each track.
To cancel auto cue
While the disc is playing:
Press [AUTO CUE].
In combination with program play
Instead of step 2 above, program tracks following steps 1 and 2 on page 9 and then press [ ]
In combination with random play
Instead of step 2 above, press [RANDOM].
Note
This function may not work properly on tracks which have soft sounds at the beginning, or on tracks which have large amounts of noise, etc.
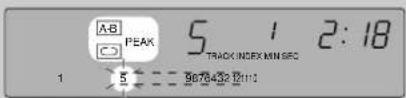
B Peak search
This function searches for the peak level on the disc.
This is convenient when adjusting the recording level on the cassette deck.
1 Press [PEAK SEARCH].
The search for the peak level is started.
Searching for the peak level takes about 2 minutes and 30 seconds for a 60 minute CD. When the peak level is found, the unit repeatedly produces an approximately 6 second segment around the peak level.
2 Adjust the recording level on the cassette deck.
Refer to the operating instructions of your cassette deck for details on this procedure.
For your reference
Since multiple peaks exist on compact discs, even for the same disc a different peak level may be found each time a peak search is performed on a disc.
text_image
2 3 SIDE A/B 4 52
text_image
TAPE LENGTH → C-46 C-60 C-90 C--- Arbitrary tape length Time remaining on side A Last track on side A Number of tracks on side A PROGRAM 5 5 5:32 EDIT#: 1 5 987643212110 TRACK MIN SEC#NL Track numbers on side A Track numbers on side B3

text_image
PEAK SEARCH PROGRAM A-B PEAK 5 1 2:18 EORT A B 1 9876432 121104

5

A
text_image
TAPE LENGTH 1 ... 9 0CD edit recording
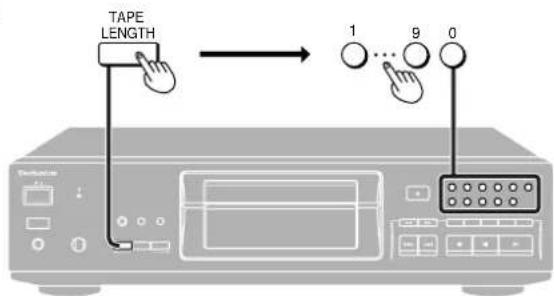
CD edit recording allows you to specify a tape length and then it automatically performs editing such that no tracks get cut off at the end of the tape.
With this function, an interval is automatically added between tracks if an interval doesn't already exist (auto space function). This is so tape search functions that use 4 second intervals to find the beginnings of tracks will work correctly.
1 Prepare the cassette deck.
- Wind the leader tape and insert the tape.
- Select noise reduction.
- (Double-side play decks only)
Set the reverse mode to single side playback (→), and set the running direction of the tape to [▶].
- Set the cassette deck to recording standby mode.
(For details, refer to the operating instructions for the cassette deck.)
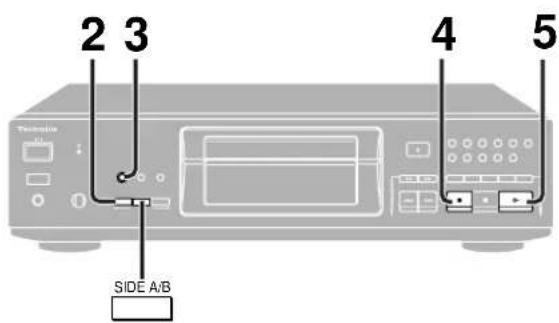
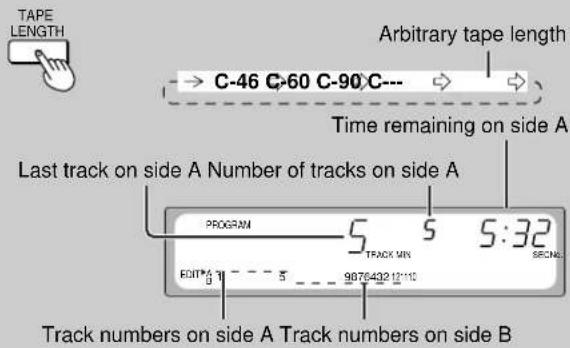
2 Press [TAPE LENGTH] to specify the tape length.
This function divides the tracks on a disc between the two sides of a tape.
Each time the button is pressed, the tape length changes as illustrated.
• To select an arbitrary recording length, see below.
• To add tracks in the extra space on the tape, see page 14.
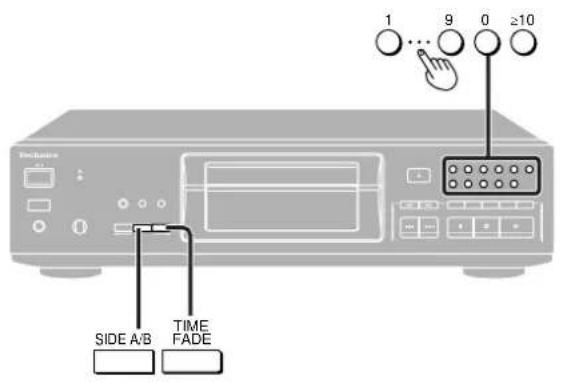
- To check the edit contents for side B or make changes, press [SIDE A/B].
3 Press [PEAK SEARCH] to search for the peak level on the disc, and adjust the recording level on the cassette deck.
(→ page 12)
4 Press [■].
5 Press [▶] at the same time you begin recording on the cassette deck.
- When the tracks allotted to side A have been recorded:
The CD player pauses at the beginning of the first track on side B. The cassette deck continues to record to the end of side A and then stops automatically.
• To record side B:
- Remove the tape to wind the leader.
- For a double-side play deck
Re-insert the tape and set the running direction to [◀].
For a single-side play deck
Turn the tape around and re-insert it.
- Press [▶] at the same time you begin recording on the cassette deck.
To cancel CD edit mode
Press [■].
A To select an arbitrary recording length
Press [TAPE LENGTH] to select "C---" and enter the total time for both sides of the tape with the numeric buttons (1 to 99 minutes).
For example
To select 30 minutes: [3] → [0]
To select 5 minutes: [0] → [5]
If you make a mistake when entering this value, select "C---" again.
(Continued on next page)
A
text_image
1 ... 9 0 ≥10 SIDE A/B TIME FADE
text_image
Minus sign display (insufficient time on tape) PROGRAM 12 6 0:35 EEDIT*2 T - - - 5 9670430 0:11:0B
text_image
PHONES LEVEL MAXMINCD edit recording

To add tracks in the extra space on the tape
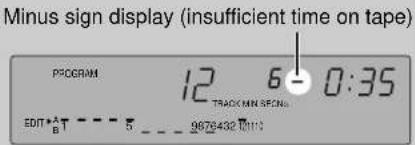
After step 2 on page 13, press the numeric buttons to specify the track number.
A minus sign on the display indicates that the time remaining on the tape is insufficient.
To fade out at the end of the tape when the minus sign is displayed
Press [TIME FADE].
At the end of the tape the sound will gradually decrease and recording will end.
If you want to fade out at the end of side B, press [SIDE A/B], then repeat the above procedure.
Note
Editing cannot be performed on more than 20 tracks or on tracks numbered above 20.
In such instances, don't use the edit recording function, and simply perform recording in the normal play mode.
To edit record programmed tracks
Program your tracks as in steps 1 and 2 on page 9 and then follow the steps on page 13.
Program tracks so that the total playing time is less than the length of the tape.

To listen with headphones
Reduce the volume, and connect the headphones.
Plug type: 6.3 mm stereo
To adjust the headphones volume
Adjust the volume with [PHONES LEVEL].
Note
Avoid listening for prolonged periods of time to prevent hearing damage.
A
B
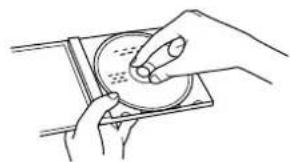
How to return CDs to their case
natural_image
Line drawing of hands holding a circular object with dots, no text or symbols presentFace label upwards and press down.
C
How to hold CDs
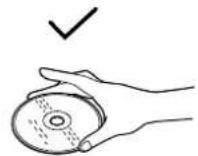
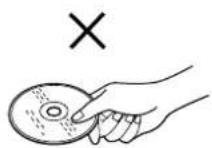
Do not touch the recorded surface.
D
How to clean CDs
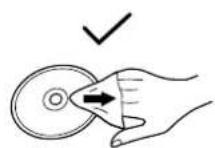
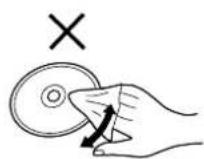
Wipe from inside outward.
E
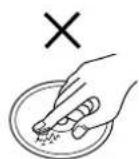
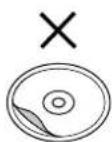
Concerning CDs
With this system, you can only play CDs having this mark.
A However, do not use irregular shape CDs. CDs of the sort can damage the unit.



E Handling precautions
- If you are taking the CD from a cold to a warm environment, moisture may form on the CD. Wipe this off with a soft, dry, lint-free cloth before using the CD.
- Do not write on the label side with a ball-point pen or other writing instrument.
- Do not use record cleaning sprays, benzine, thinner, static electricity prevention liquids or any other solvent.
- Do not attach labels or stickers to CDs. (Do not use CDs with exposed adhesive from tape or left over peeled off stickers.)
- Do not use scratch-proof protectors or covers other than those specified for use with this system.
- Do not use CDs printed with label printers available on the market.
Storage precautions
Be sure to store CDs in their cases to protect them from dust, scratches, and warping.
Do not place or store CDs in the following places
- Locations exposed to direct sunlight
• Humid or dusty locations - Locations directly exposed to a heat vent or heating appliance
• In the glove compartment or on the rear deck of an automobile
Maintenance
To clean this unit, wipe with a soft, dry cloth.
If the surfaces are extremely dirty, use a soft cloth dipped in a soap-and-water solution or a weak detergent solution.
- Never use alcohol, paint thinner, or benzine to clean this unit.
- Before using chemically treated cloth, read the instructions that came with the cloth carefully.
Troubleshooting guide
Before requesting service for this unit, check the chart below for a possible cause of the problem you are experiencing. Some simple checks or a minor adjustment on your part may eliminate the problem and restore proper operation.
If you are in doubt about some of the check points, or if the remedies indicated in the chart do not solve the problem, refer to the directory of Authorized Service Centers (enclosed with this unit) to locate a convenient service center, or consult your dealer for instructions.
| Problem | Probable cause(s) | Suggested remedy | Reference page(s) |
| After inserting a disc, the tray will not close even after pressing [▲ OPEN/CLOSE]. | Is the disc inserted properly ? | Re-insert the disc. | 7 |
| Even after inserting a disc, the total number of tracks and other indicators do not appear on the display. Even after pressing [▶], disc play does not begin. | Is the disc inserted upside-down ? | Re-insert the disc. | 7 |
| Is the disc dirty ? | Wipe with a soft cloth. | 15 | |
| Is the disc scratched ? | Use another disc. | ||
| Is the disc extremely warped ? | |||
| Are you using a non-standard disc ? | |||
| Has moisture condensed in the unit ? | Wait an hour before using. | ||
| Specific areas do not play properly. | Is the disc dirty ? | Wipe with a soft cloth. | 15 |
| The remote control does not work. | Are the batteries inserted with the ⊕ and ⊖ ends reversed ? | Insert with ⊕ and ⊖ oriented correctly. | 5 |
| Are the batteries worn out ? | Replace batteries. | 5 |
Specifications
•Audio
No. of channels 2 (left and right, stereo)
Frequency response 2–20,000 Hz, ±0.3 dB
Output voltage 2 V (at 0 dB)
Dynamic range 100 dB
S/N 115 dB
Harmonic distortion
([DIGITAL RE-MASTER PROCESSING] OFF)
0.0018% (1 kHz, 0 dB)
Total harmonic distortion
([DIGITAL RE-MASTER PROCESSING] OFF)
0.0023% (1 kHz, 0 dB)
Wow and flutter Below measurable limit
DA converter MASH (1 bit)
Output impedance Approximate 600 Ω
Load impedance More than 10 kΩ
Headphone output level 15 mW max. 32 Ω (adjustable)
- Pickup
Wavelength 780 nm
Laser Power No hazardous radiation is emitted
- General
Power supply AC 230–240 V, 50 Hz
Power consumption 15 W
Dimensions (W×H×D) 430
Mass
×114×290 mm
4.0 kg
Note
Specifications are subject to change without notice.
Mass and dimensions are approximate.
Environment friendly printed on chlorine free bleached paper.