
SV-SR100 - Hi-Fi System PANASONIC - Free user manual and instructions
Find the device manual for free SV-SR100 PANASONIC in PDF.


User questions about SV-SR100 PANASONIC
0 question about this device. Answer the ones you know or ask your own.
Ask a new question about this device
Download the instructions for your Hi-Fi System in PDF format for free! Find your manual SV-SR100 - PANASONIC and take your electronic device back in hand. On this page are published all the documents necessary for the use of your device. SV-SR100 by PANASONIC.
USER MANUAL SV-SR100 PANASONIC
natural_image
Illustration of a Panasonic 4G network device with ports and buttons (no text or symbols on the device body)Panasonic
SD Audio Recorder
Operating Instructions
Model No. SV-SR100

natural_image
Monochrome artistic illustration of a globe with a stylized sunburst and floating elements, no text or symbols present.
PRINTED WITH SOYINK

This manual was printed with soy based ink.
Dear customer
Thank you for purchasing this product.
Before connecting, operating or adjusting this product, please read these instructions completely. Please keep this manual for future reference.
Note:
"EB" on the packaging indicates the United Kingdom.
For U.S.A.
The warranty can be found on pages 22 and 23.
WARNING:
TO REDUCE THE RISK OF FIRE, ELECTRIC SHOCK OR PRODUCT DAMAGE, DO NOT EXPOSE THIS APPARATUS TO RAIN, MOISTURE, DRIPPING OR SPLASHING AND THAT NO OBJECTS FILLED WITH LIQUIDS, SUCH AS VASES, SHALL BE PLACED ON THE APPARATUS.
This product may receive radio interference caused by mobile telephones during use. If such interference is apparent, please increase separation between the product and the mobile telephone.
For Europe, the U.S.A, and Canada
THIS UNIT IS INTENDED FOR USE IN MODERATE CLIMATES.
For other areas
THIS UNIT IS INTENDED FOR USE IN TROPICAL CLIMATES.
THE FOLLOWING APPLIES ONLY IN THE U.S.A.:
CAUTION:
This equipment has been tested and found to comply with the limits for a Class B digital device, pursuant to Part 15 of the FCC Rules.
These limits are designed to provide reasonable protection against harmful interference in a residential installation. This equipment generates, uses and can radiate radio frequency energy and, if not installed and used in accordance with the instructions, may cause harmful interference to radio communications. However, there is no guarantee that interference will not occur in a particular installation. If this equipment does cause harmful interference to radio or television reception, which can be determined by turning the equipment off and on, the user is encouraged to try to correct the interference by one or more of the following measures:
● Reorient or relocate the receiving antenna.
- Increase the separation between the equipment and receiver.
- Connect the equipment into an outlet on a circuit different from that to which the receiver is connected.
- Consult the dealer or an experienced radio/TV technician for help.
Any unauthorized changes or modifications to this equipment would void the user's authority to operate this device.
This device complies with Part 15 of the FCC Rules. Operation is subject to the following two conditions: (1) This device may not cause harmful interference, and (2) this device must accept any interference received, including interference that may cause undesired operation.
CAUTION!
THIS PRODUCT UTILIZES A LASER. USE OF CONTROLS OR ADJUSTMENTS OR PERFORMANCE OF PROCEDURES OTHER THAN THOSE SPECIFIED HEREIN MAY RESULT IN HAZARDOUS RADIATION EXPOSURE.
DO NOT OPEN COVERS AND DO NOT REPAIR YOURSELF. REFER SERVICING TO QUALIFIED PERSONNEL.
CAUTION!
- DO NOT INSTALL, OR PLACE THIS UNIT, IN A BOOKCASE, BUILT-IN CABINET OR IN ANOTHER CONFINED SPACE. ENSURE THE UNIT IS WELL VENTILATED. TO PREVENT RISK OF ELECTRIC SHOCK OR FIRE HAZARD DUE TO OVERHEATING, ENSURE THAT CURTAINS AND ANY OTHER MATERIALS DO NOT OBSTRUCT THE VENTILATION VENTS.
- DO NOT OBSTRUCT THE UNIT'S VENTI-LATION OPENINGS WITH NEWSPAPERS, TABLECLOTHS, CURTAINS, AND SIMILAR ITEMS.
- DO NOT PLACE SOURCES OF NAKED FLAMES, SUCH AS LIGHTED CANDLES, ON THE UNIT.
- DISPOSE OF BATTERIES IN AN ENVIRONMENTALLY FRIENDLY MANNER.
Marking sign is located on bottom of the unit.
For areas except Europe, the U.S.A. and Canada
Make sure the voltage of the AC adaptor suits your local voltage before plugging it into the household AC outlet. If it doesn't, use a flat-headed screwdriver to set the VOLTAGE ADJUSTOR to the voltage corresponding to your area.
If the power supply in your area is 115 V or 120 V, please set the VOLTAGE ADJUSTOR as follows:
For 115 V: set to 110 V
For 120 V: set to 127 V
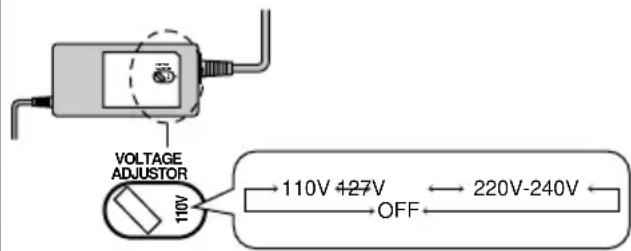
text_image
VOLTAGE ADJUSTER 110V 110V 427V OFF 220V-240VTable of contents
Getting started
Supplied accessories 3
IMPORTANT SAFETY INSTRUCTIONS.... 4
Listening caution 5
Selection and care of batteries ..... 5
Control guide.... 6
Power supply.... 7
Recording and playing on this unit ... 8
CD and SD card information ..... 8
Inserting CDs and SD cards. 9
HOLD 9
Playback
Playing CDs and SD cards ..... 10
Other ways of playing CDs and SD cards 11
Recording
Recording from a CD to an SD card 12
Recording from a microphone and other equipment 14
Other ways of recording..... 15
Editing
Titling SD cards.... 16
Erasing tracks 17
Formatting SD cards.... 17
Reference
Anti-Skip System.... 17
Convenient functions ..... 18
Changing the display 18
Using the unit with other equipment.... 19
Specifications 19
Displays 20
Troubleshooting guide 21
Maintenance 21
Limited Warranty (U.S.A). 22
Product Service.... 23
Supplied accessories
Please check and identify the supplied accessories.
For the U.S.A.
To order accessories contact 1-800-332-5368 or web site (http://www.panasonic.com).
For other areas
To order accessories, call the dealer from whom you have made your purchase.
□1 Remote control: N2QCBD000022
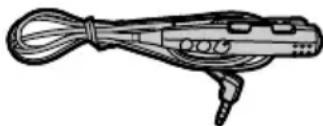
natural_image
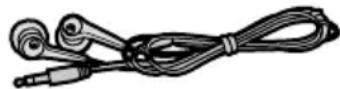
Line drawing of a handheld electronic device with coiled cable and connector (no text or symbols)☐1 Pair of stereo earphones: L0BAB0000170
□1 Carrying case: RFC0073-H
□1 Cleaning cloth: RFE0088-1

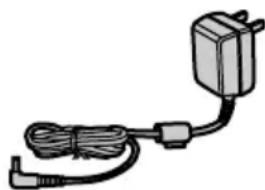
□1 AC adaptor
natural_image
Simple line drawing of a connected electrical plug with cable and power cord (no text or symbols)The configuration of the AC adaptor depends on the area.
U.S.A. and Canada: RFA2002A
United Kingdom: RFA2002C
Continental Europe: RFA2002B
Other areas: RFA2002D
Use numbers indicated when asking for replacement parts.
IMPORTANT SAFETY INSTRUCTIONS
Read these operating instructions carefully before using the unit. Follow the safety instructions on the unit and the safety precautions listed below. Keep these operating instructions handy for future reference.
Safety
- Power source—Connect the unit to a power source of the type described in these instructions or as marked on the unit.
- Polarization—The unit is equipped with a polarized power plug where one blade is wider than the other. This safety feature ensures that the plug fits into your household AC outlet only one way. If the plug doesn't fit one way, try reversing it. If the plug still doesn't fit, contact an electrician to replace the obsolete outlet. Do not attempt to defeat the safety purpose of the plug.
- Power cord protection—Route the AC power supply cord so that it will not be walked on or pinched by items placed on or against it. Never take hold of the plug or cord with wet hands. Always grasp the plug body firmly when connecting and disconnecting it.
- Overloading—When connecting the AC power supply cord, be careful not to overload the household AC outlet, extension cord, or outlet from any other device as this can result in fire or electric shock.
- Nonuse periods—Turn the unit off when it is not in use. Unplug the unit from the household AC outlet if it is not to be used for a long time. Unplug the unit during lightning storms. Leaving the unit connected to a household AC outlet for extended periods can cause battery fluid leakage.
- Attachments and accessories—Use only the attachments and accessories recommended in these operating instructions.
Installation
Placement
- Foreign material—Ensure objects and liquids do not get into the unit. Avoid exposing the unit to excessive smoke, dust, mechanical vibration, and shock.
- Magnetism—Situate the unit away from equipment and devices that generate strong magnetic fields.
- Stacking—Do not place anything on top of this unit.
- Wall and ceiling mounting—Do not mount the unit on walls or ceilings unless specified in the instructions.
■Environment
- Water and moisture—Do not use the unit near water, such as near a bathtub or swimming pool. Avoid damp basements.
- Heat—Situate the unit away from heat sources, such as radiators. Do not leave it in an automobile exposed to direct sunlight with the doors and windows closed as this may deform the cabinet.
Do not situate where temperatures fall below 5^ C ( 41^ F) or rise above 35^ C ( 95^ F).
Maintenance
(See page 21 for details.)
Unplug the unit from the household AC outlet before cleaning.
Clean with a damp cloth.
Do not use abrasive pads, scouring powders, or solvents.
Service
- Damage requiring service—The unit should be serviced by qualified service personnel if:
(a) The AC power supply cord or AC adaptor has been damaged; or
(b) Objects or liquids have gotten into the unit; or
(c) The unit has been exposed to rain; or
(d) The unit does not operate normally or exhibits a marked change in performance; or
(e) The unit has been dropped or the cabinet damaged.
- Servicing—Do not attempt to service the unit beyond that described in these operating instructions. Refer all other servicing to authorized servicing personnel.
- Replacement parts—When parts need replacing ensure the servicer uses parts specified by the manufacturer or parts that have the same characteristics as the original parts. Unauthorized substitutes may result in fire, electric shock, or other hazards.
- Safety check—After repairs or service, ask the servicer to perform safety checks to confirm that the unit is in proper working condition.
(Item 2 in "Safety" applies only in the U.S.A. and Canada.)
Listening caution

Do not play your headphones or earphones at a high volume. Hearing experts advise against continuous extended play.
If you experience a ringing in your ears, reduce volume or discontinue use.
Do not use while operating a motorized vehicle. It may create a traffic hazard and is illegal in many areas.
You should use extreme caution or temporarily discontinue use in potentially hazardous situations.
Even if your headphones or earphones are the open-air type designed to let you hear outside sounds, don't turn up the volume so high that you can't hear what's around you.
Sound can be deceiving. Over time your hearing “comfort level” adapts to higher volumes of sound. So what sounds “normal” can actually be loud and harmful to your hearing.
Guard against this by setting your equipment at a safe level BEFORE your hearing adapts.
To establish a safe level:
- Start your volume control at a low setting.
- Slowly increase the sound until you can hear it comfortably and clearly, and without distortion.
Once you have established a comfortable sound level:
- Leave it there.
Discontinue use if you experience discomfort with the earphones or any other parts that directly contact your skin. Continued use may cause rashes or other allergic reactions.
For United Kingdom and Continental Europe
Notice about the rechargeable battery
The battery is designated recyclable.
Please follow your local recycling regulations.
Suomi
Selection and care of batteries
Selection
As a safety precaution, this unit is constructed so it is impossible to recharge ordinary batteries.
Only batteries especially designed for this unit can be recharged.
Special rechargeable Ni-Cd batteries (set of 2)
• U.S.A. and Canada: P-3GAVA/2B
●United Kingdom and Europe: P-3GAVE/2B
●Other areas: P-3GAVT/2B
For details, check with your dealer.
Special rechargeable batteries
Ordinary dry cell batteries/rechargeable batteries


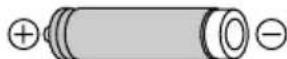
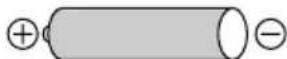
- You can recharge the batteries about 300 times. They have reached the end of their useful life if play time dramatically reduces after recharging.
- Play time may be shorter than usual after recharging batteries for the first time or after they have been unused for a long time. Repeatedly recharge and discharge the batteries if this occurs to restore them to normal.
Care
To prevent battery damage, electrolyte leakage, and short-circuiting, heed the following points.
- Do not peel off the covering on batteries and do not use if the covering has been peeled off.
- Align the poles and correctly when inserting the batteries.
- Do not mix different types of batteries or old and new batteries.
- Remove the batteries if you do not intend to use the unit for a long time.
- Do not throw into fire, short-circuit, disassemble, or subject to excessive heat.
- Do not attempt to recharge dry cell batteries.
- Do not allow metal objects to touch the battery terminals as this may cause short-circuiting which is dangerous.
- When carrying batteries in a pocket or bag, ensure no metal objects such as necklaces are placed together with them. Contact with metal may cause short-circuiting which can cause a fire.
Control guide
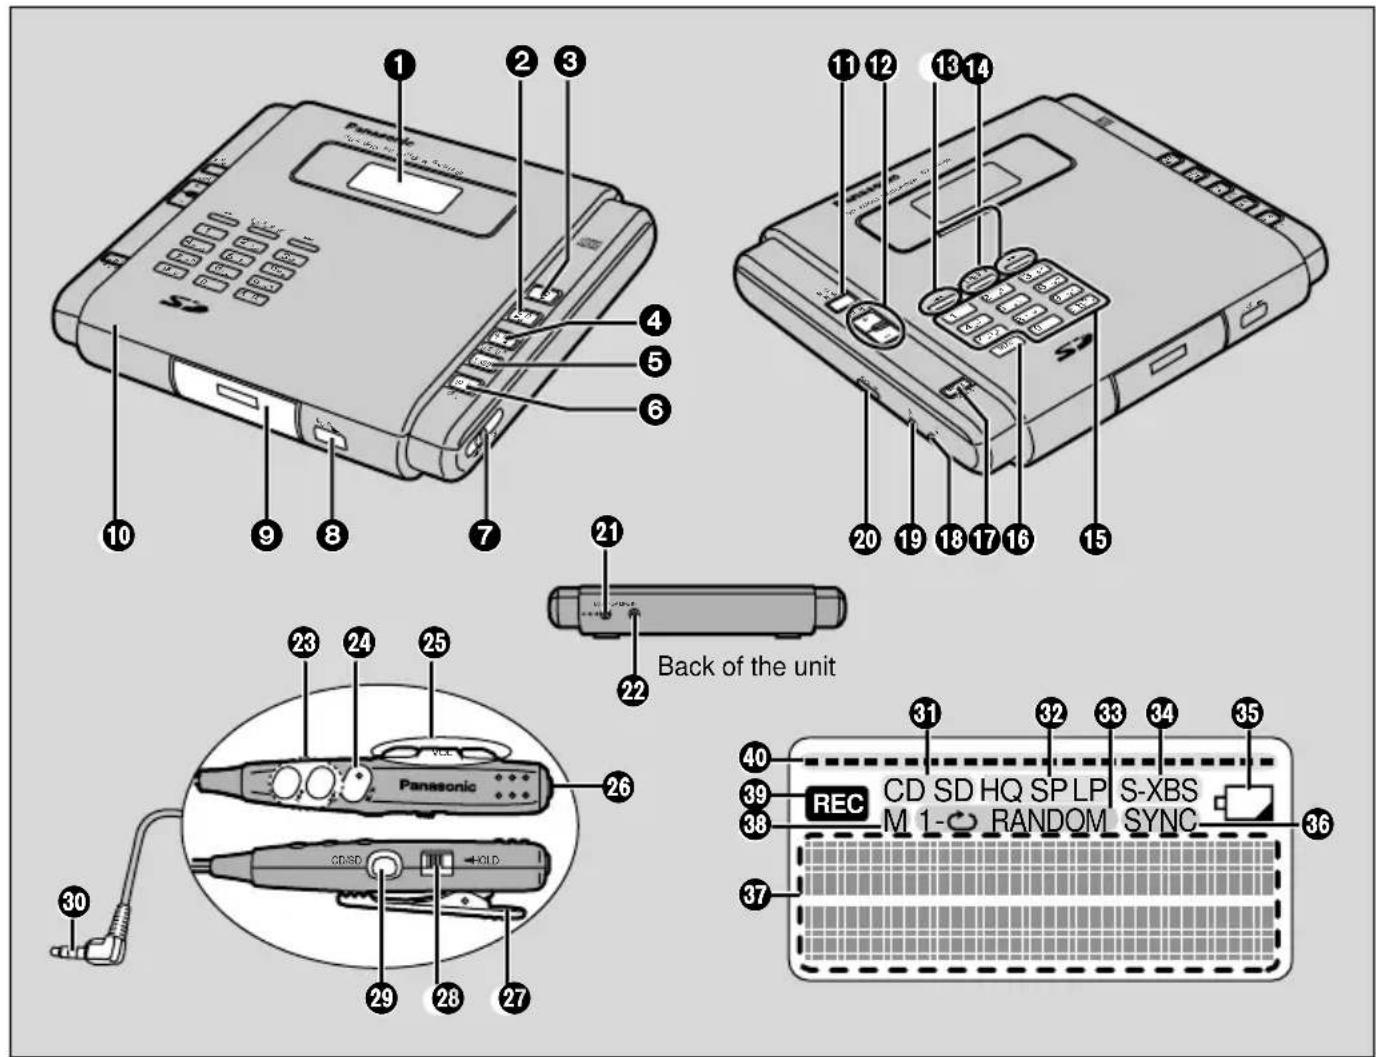
text_image
1 2 3 4 5 6 10 9 8 7 21 Back of the unit 22 23 24 25 Panasonic 26 30 CD/SD 29 28 27 11 12 13 14 20 19 18 17 16 15 31 32 33 34 35 39 REC CD SD HQ SP LP S-XBS M 1- RANDOM SYNC 36 38① Display panel
② ▶/II, CD: to play or pause a CD
③ ▶, SD: to play an SD card
4 ■, OPR OFF, FUNCTION: to turn the unit off, stop play, and switch between CD and SD mode
⑤ S-XBS: to emphasize the bass
⑥ MODE, DEL: to change the play mode and delete characters
7 ◀ CD OPEN: to open the CD lid
⑧ SD OPEN ▶: to open the SD card lid
9 SD memory card lid
10 CD lid
⑪ REC PAUSE: to put the unit into recording standby mode
⑫ VOLUME buttons
13 |◀◀, ▶▶|: to skip or search and to select menu items
14 ENTER/MEMORY: to enter menu items and program CD tracks
15 Character/numbered buttons
16 MENU: to enter and exit menus
⑰ DISPLAY, CHARA: to change the display and type of character
18: earphone/remote control jack
19 MIC: microphone jack
20 HOLD: to prevent accidental operation on the main unit
② DC IN 4.5 V ◇-●-◆ : terminal for AC adaptor
22 LINE IN: to connect other equipment for recording
23 |◀◀, ▶▶|: to skip or search
24 ■/▶: to start and stop play and to turn the unit off
25 VOLUME buttons
26 Earphone jack
27 Clip
28 HOLD: to prevent accidental operation on the remote control
29 CD/SD: to switch between CD and SD mode
30 Plug
■Display panel
31 Current mode
32 Recording mode
33 Play mode
34 S-XBS indicator
35 Battery indicator
36 Synchronized recording indicator
37 General display: shows source, track numbers, recording level and other text information
38 CD program play indicator
39 Recording indicator
40 Recording time meter
Power supply
Using the AC adaptor
Use only the included AC adaptor. Use of other adaptors can damage the unit.
DC IN 4.5 V ◇-●-
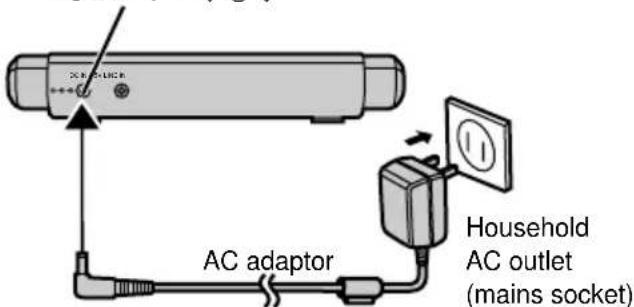
text_image
AC adaptor Household AC outlet (mains socket)Note:
- The configuration of the AC adaptor differs according to the area.
- The unit is in the standby condition when the AC adaptor is connected. The primary circuit is always "live" as long as the AC adaptor is connected to an electrical outlet.
For areas except Europe, the U.S.A. and Canada
The AC voltage is different according to the area. Be sure to set the proper voltage in your area before use. (For details, please refer to page 2.)
When the unit is not to be used for a long time
The unit continues to use power (for U.S.A. and Canada: 1.9 W, for United Kingdom: 2.0 W, for Continental Europe: 2.1 W, for others: 1.5 W) when the AC adaptor is connected, even if the unit is off. Disconnect the AC adaptor to save electricity.
Do not connect or disconnect the AC adaptor while recording. This can cause recording to stop and data to be corrupted.
Using dry cell batteries (not included)
Disconnect the AC adaptor.
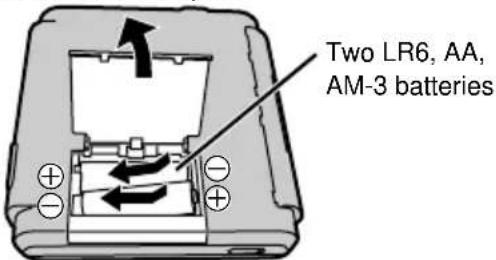
text_image
Two LR6, AA, AM-3 batteriesNote:
Use Panasonic alkaline batteries. (Operation time will be extremely short if you use manganese batteries.)
■If the battery lid comes loose
Insert the protrusions on the lid into the holes in the unit.
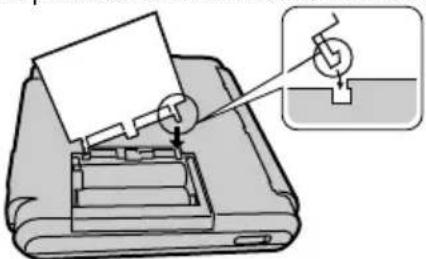
natural_image
Illustration of a printer's internal structure being inserted into a paper holder, with a magnified inset showing the tip (no text or symbols present)Using rechargeable batteries (not included)
Obtain the optional rechargeable Ni-Cd batteries ( page 5).
■Recharging
- Insert the special rechargeable batteries.
(→ Using dry cell batteries)
- Connect the AC adaptor.
(→ Using the AC adaptor)
Recharging starts.
"CHARGE" flashes.
"CHARGE" goes out when charging is complete (3 to 4 hours).
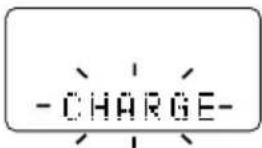
The optional rechargeable batteries take 3 to 4 hours to fully charge. Full charging can take up to 5 hours, depending on the ambient temperature and condition of the batteries.
Disconnect the AC adaptor (leaving it connected can discharge the batteries).
Note:
- You can recharge the batteries before they are fully discharged.
●Recharging may only be performed when the unit is off. - It is normal for the AC adaptor and batteries to become warm during recharging.
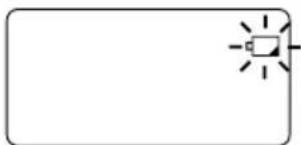
The battery indicator
This indicator flashes when the batteries are almost fully discharged.
Replace with fresh dry cell batteries or recharge.
natural_image
Simple line drawing of a rectangular frame with a small icon in the center (no text or symbols)Note:
- The time between when the indicator starts flashing and when the power is cut off depends on the type of batteries you are using.
-
This indicator may not function correctly if you use batteries other than the specified rechargeable batteries (→ page 5).
-
Settings return to the default values if you disconnect the power sources (AC adaptor and batteries).
- If the unit malfunctions or freezes during use, disconnect the power sources (the AC adaptor or batteries).
Re-connect the power source and continue operation.
Recording and playing on this unit
Recording
This unit uses the "SD Audio Format", an audio standard set down by the SD Association, which uses superior copyright protection technology.
■Secure Digital Music Initiative (SDMI)
This is copyright-protection technology that encodes audio data to protect the rights of the producers of music, promote a healthy music industry, and protect the rights of the original purchaser of the music.
The use of this technology entails the following limitations.
- This unit encodes music data for recording. You cannot copy this data to other equipment.
- Encoded data cannot be backed-up or restored.
- It may be impossible to use data if it has copyright protection or if it was recorded on DVD Audio equipment.
■Serial Copy Management System (SCMS)
Recordings from CDs to SD memory cards are restricted by this system. Such recordings are of high quality, but it is not possible to record from CDs that are restricted by this system.
■Approximate recording times in minutes
| Card volume | Recording mode | ||
| HQ (high quality) | SP (standard play) | LP (long play) | |
| 64 MB | 64 | 86 | 129 |
| 256 MB | 265 | 353 | 530 |
| 512 MB | 535 | 713 | 1070 |
Playback
- This unit's CD section cannot play AAC, MP3, or WMA audio data.
- This unit's SD card section can only play audio data (AAC, MP3, and WMA) recorded using the SD Audio Format.
- Windows Media, and the Windows logo are trademarks, or registered trademarks of Microsoft Corporation in the United States and/or other countries.
- WMA (Windows Media Audio) is a compression format developed by Microsoft Corporation. It achieves the same sound quality as MP3 with a file size that is smaller than that of MP3.

CD and SD card information
CDs
Choose CDs with this mark:

Do not;
- use CDs with labels and stickers that are coming off or with adhesive exuding from under labels and stickers.
- attach scratch-proof covers or any other kind of accessory.
- write anything on the CD.
- clean CDs with liquids. (Wipe with a soft, dry cloth.)
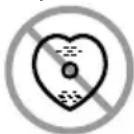
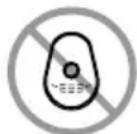
- use CDs printed with label printers available on the market.
- use irregularly shaped CDs.
CD-R and CD-RW discs
This unit can play CD-DA (digital audio) format audio CD-R and CD-RW that have been finalized (a process that enables CD-R and CD-RW players to play audio CD-R and CD-RW) upon completion of recording. It may not be able to play some CD-R/RW due to the condition of the recording.
SD cards
It may not be possible to use cards formatted on other equipment.
Protecting your recordings
- Do not open the SD lid or connect or disconnect the power sources while operating the unit, especially while "CARD Writing" is on the unit's display, as this can damage your data.
- Set the write-protect switch to LOCK. Release the write-protect switch to make other recordings and to use the editing features.
Write-protect switch
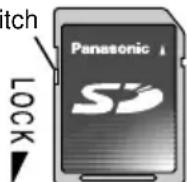
- SD logo is a trademark.
- Portions of this product are protected under copyright law and are provided under license by ARIS/SOLANA/4C.
Handling precautions
- Store cards in their cases when not in use.
- Do not take apart.
- Do not touch the metal terminals with your hands or metal objects.
- Do not detach the label and do not attach other labels.
CD and SD card storage
Do not store:
- In direct sunlight,
• In humid or dusty locations, - In locations directly exposed to heating appliances,
- On the dashboard or rear deck of a car.
Inserting CDs and SD cards
CDs
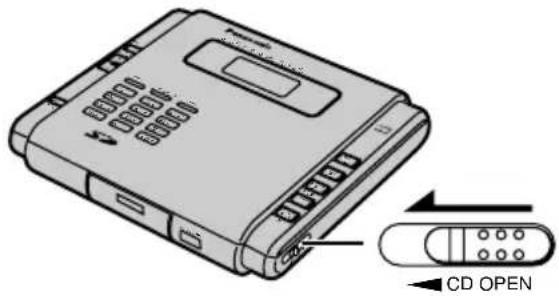
text_image
CD OPEN
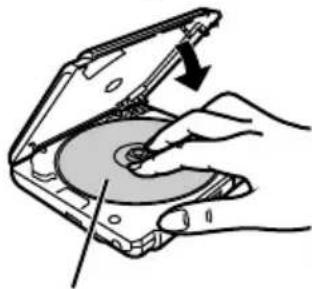
natural_image
Illustration of a hand inserting a CD into a hard drive (no text or symbols)Insert label-up. Press until the CD clicks into place.
Removing CDs
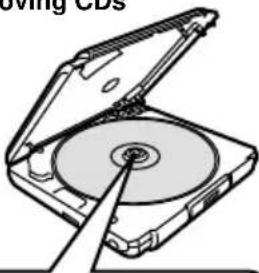
natural_image
Diagram of an open CD or DVD drive with a pointer inserted, showing internal components (no text or symbols)After the CD has stopped Press [PUSH].
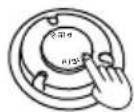
Note:
Do not open during play. Insert only CDs.
SD cards
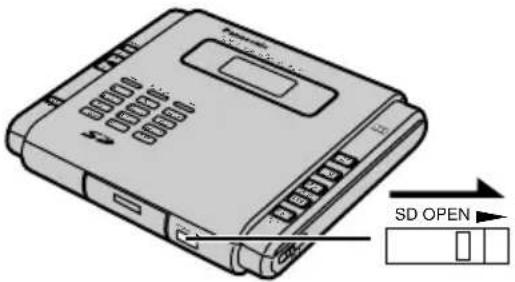
text_image
SD OPEN
Insert label-up with the cut-off corner facing in.
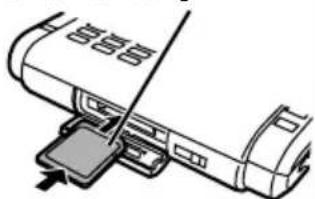
natural_image
Diagram of a device with a cable and connector, no visible text or symbolsPress on the center to lock into place.
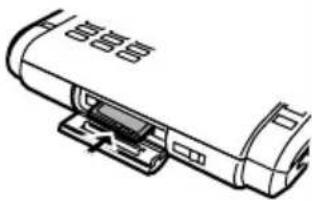
Removing SD cards
natural_image
Line drawing of a device with ports and connectors (no text or symbols)Press on the center of the card to unlock.
HOLD
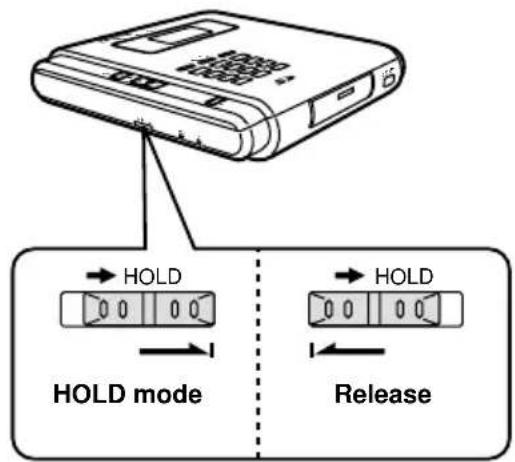
HOLD causes the unit to ignore short, accidental button presses. You can still open the disc and card lids.
It prevents:
- The unit powering on accidentally and depleting the batteries.
- Interruption of play or recording due to a button being accidentally pressed.
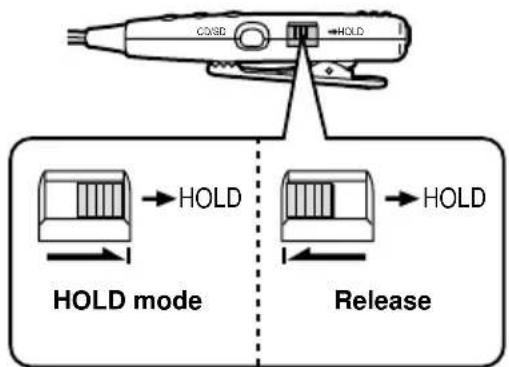
The unit and remote control each have independent HOLD switches.
To use HOLD
Set [HOLD] to the "HOLD" position.
When HOLD on the main unit is on, "HOLD" appears on the display for a few seconds after pressing a button.
flowchart
graph TD
    A["Device"] -->|HOLD| B["HOLD mode"]
    A -->|HOLD| C["Release"]
flowchart
graph TD
    A["CO/SD"] --> B["HOLD"]
    C["HOLD mode"] --> D["HOLD"]
    E["Release"] --> F["HOLD"]
Playing CDs and SD cards
text_image
1 HOLD 5 VOLUME 4 SD CD Elapsed play time of the current track CD SD SD TRACK TITLE Track title (SD only) OPR OFF FUNCTION 3 2 Plug type: 3.5 mm (1/8 in.) stereo Panasonic1 Release the HOLD mode.
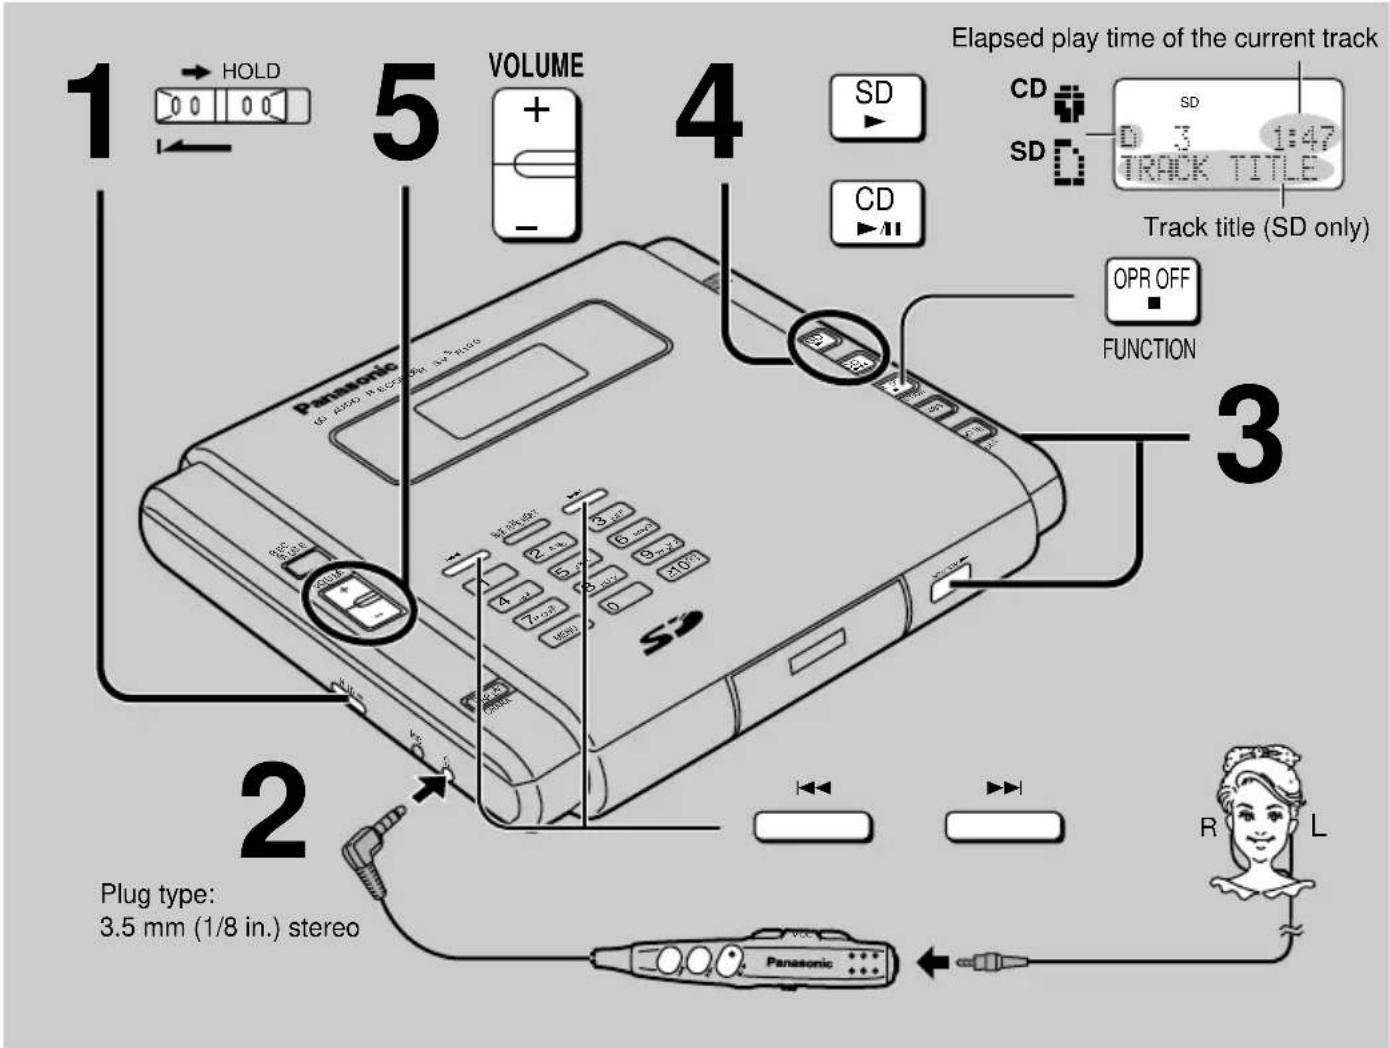
2 Connect the remote control and stereo earphones. (Plug in firmly.)
3 Insert the CD or SD card ( page 9).
4 Press [▶, SD] or [▶/■, CD].
The unit comes on and play starts.
Play stops after the last track.
5 Adjust the volume.
Choose a level between 0 and 25. Press and hold to change successively.
The level returns to 10 when you disconnect the power sources (AC adaptor and batteries).
■To stop play
Press [■, OPR OFF, FUNCTION] (main unit) or [■/▶] (remote control).
The unit turns off about 5 minutes later.
CD SD
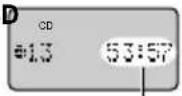
Total play time
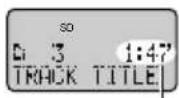
Position you stopped play
■To turn the unit off
While stopped, press and hold [■, OPR OFF, FUNCTION] or [■/▶] until the display goes out.
■To pause CD play
Press [▶/■, CD].
Press again to restart play.
■Skipping tracks
During play
Press [◀◀] (Backward) or [▶▶] (Forward).
■Searching through tracks
During play
Press and hold [◀◀] (Backward) or [▶▶] (Forward).
Resume
The unit stores the place where you stop play or turn the unit off. Play starts from that position when you restart SD play (from the beginning of the track if you turned the unit off), or from the beginning of the track if you restart CD play.
Depending on the position or track, this may not work correctly.
Play starts from the first track if:
- You open the CD or SD lid.
(Resume may work if you change the disc or card while the unit is off.)
- Disconnect the power source (AC adaptor or batteries) while off.
■Auto power off
To save the batteries, the unit turns off after about five minutes after being stopped, unless menus are being used.
Other ways of playing CDs and SD cards
text_image
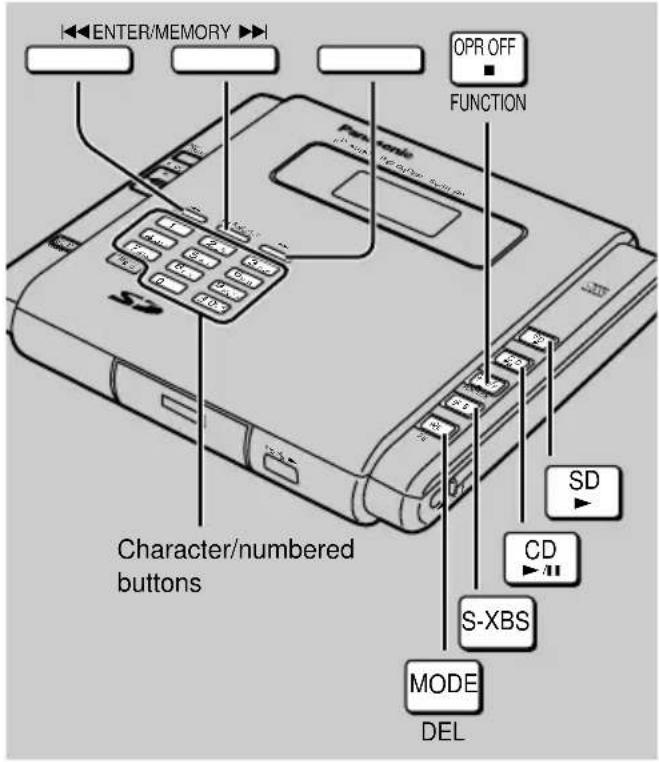
ENTER/MEMORY OPR OFF FUNCTION Character/numbered buttons SD CD S-XBS MODE DELPreparation: Press [■, OPR OFF, FUNCTION] to select CD or SD.
Boosting the bass
Press [S-XBS].
Each time you press the button: S-XBS←→Cancel (no indicator)
Direct play:
Start play from a specific track
1. Press the character/numbered buttons to select track.
- For tracks numbered 10 and over, press [≥ 10] then the two digits.
- For tracks numbered 100 and over, press [≥10] twice then the three digits.
- You can also press [|◀◀] or [▶▶] to select the track.
- "ERROR" appears if you enter a number that doesn't exist on the disc or card.
2. Press [▶/II, CD] or [▶, SD].
Play starts at the selected track and plays through to the end of the disc or card.
Play modes:
Repeat one track (1- ), all tracks ( ), play them randomly once (RANDOM) or repeatedly ( RANDOM)
Press [MODE, DEL].
Each time you press the button:
1- → RANDOM → RANDOM Cancel (no indicator)
The mode cancels when you open the disc or card lid.
Note:
- When using the above modes (except “☐”), you can search only within the current track.
- In the “☐” mode, you can also skip and search between the first and last tracks. (You cannot skip or search back from the first track to the last track when playing a CD.)
- You cannot skip or search back to tracks that have been played in random or random repeat.
CD program play:
Play up to 24 tracks in the order you choose
1 Press the numbered buttons while stopped to select a track.
- For tracks numbered 10 and over, press [≥10] then the two digits.
- You can also select tracks with [◀◀] or [▶▶].
- "ERROR" appears if you enter a number that doesn't exist.
2 Press [ENTER/MEMORY].
![PANASONIC SV-SR100 - Press [ENTER/MEMORY]. - 1](/content/2026/05/796490/images/78d18d9da44e9ee3af49d9a0e9acc0ecdef6f5fc2a18ace89767c6939faed096.jpg)
text_image
M 3 -- 0.1 Program sequence3 Repeat steps 1 and 2 to program other tracks.
4 Press [▶/II, CD].
The program is cleared when play finishes.
■“PROGRAM FULL” is displayed
If you have programmed 24 tracks.
■To check the contents of the program
Press [ENTER/MEMORY] during play.
The track numbers and their sequence appear in order, one after the other.
■To clear the program
Press [■, OPR OFF, FUNCTION] during play.
Note:
- You cannot program tracks on an SD card.
- Tracks are skipped in the programmed order when you press [|◀◀] or [▶▶].
Recording from a CD to an SD card (Main unit only)
text_image
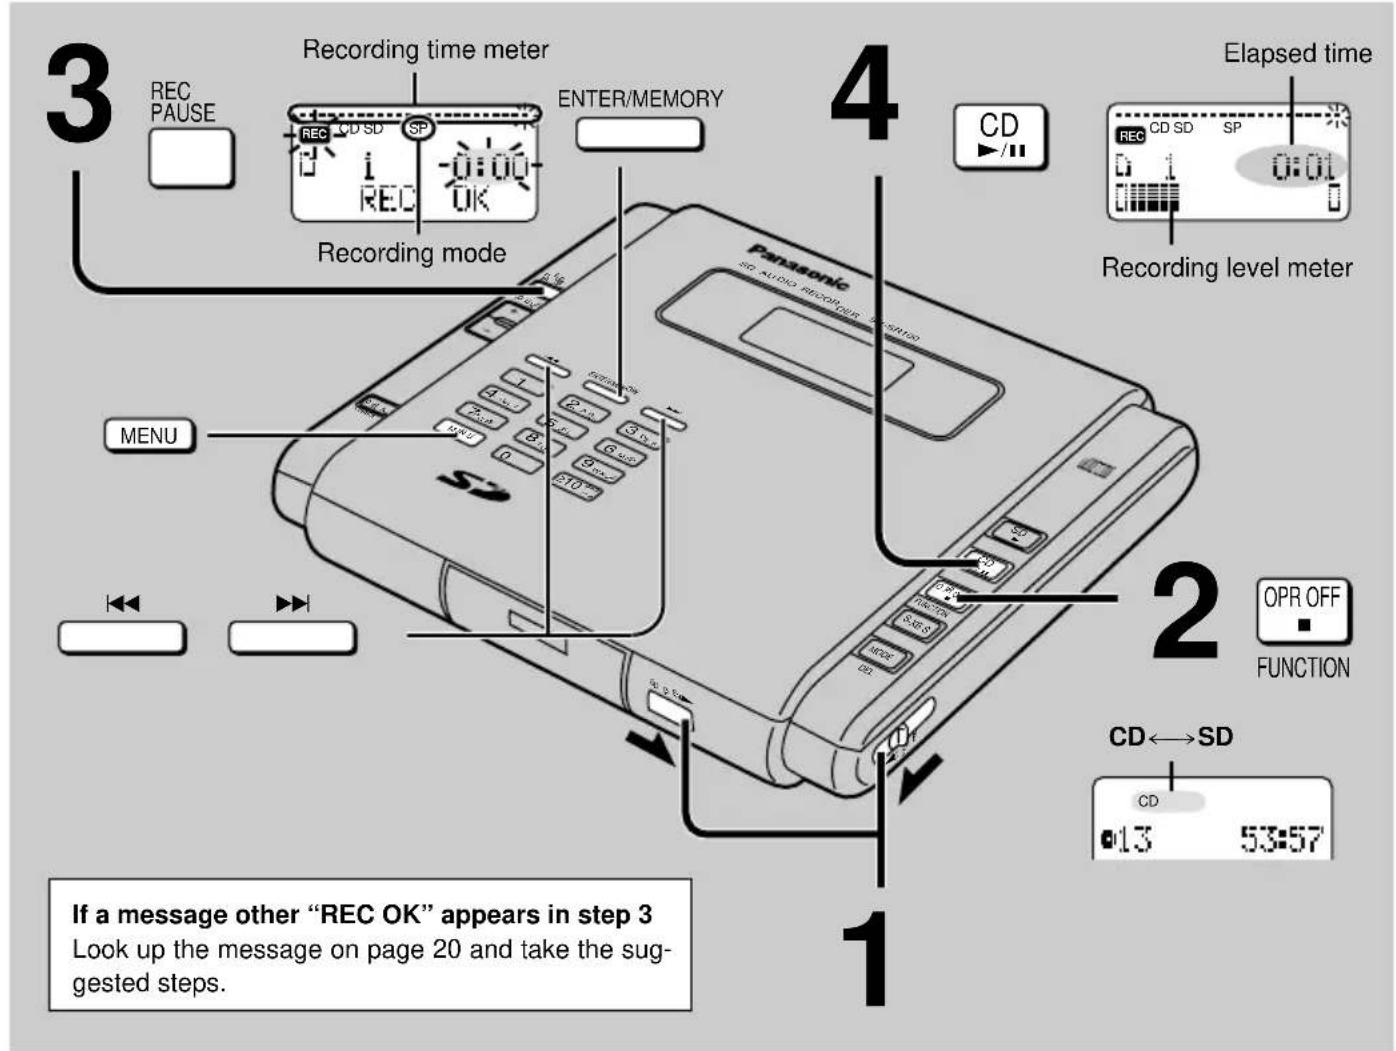
3 REC PAUSE Recording time meter ENCER/MEMORY 4 Elapsed time CD ►/II Recording level meter Recording mode MENU 2 OPR OFF FUNCTION CD←SD CD 0:13 53:57 If a message other "REC OK" appears in step 3 Look up the message on page 20 and take the sug- gested steps.Preparation:
- Release HOLD mode (→ page 9).
- Release the card's write-protect switch (→ page 8).
1 Insert the SD card and CD ( page 9).
2 Press [■, OPR OFF, FUNCTION] to switch to "CD".
Each time you press the button: CD←→SD
3 Press [REC PAUSE] to enter the recording standby mode.
Recording time meter
This gives you a rough guide to how much memory is left on the card.
Recording mode
See next page.
4 Confirm that "REC OK" appears, then press [▶/■, CD].
Recording and CD play start.
Recording starts from the first available space.
Play and recording stop when the CD ends.
■To stop
Press [■, OPR OFF, FUNCTION].
"CARD Writing" appears on the display while the unit writes to the card.
The unit turns off about 5 minutes later.
■To turn the unit off
Press and hold [■, OPR OFF, FUNCTION] while stopped until the display goes out.
Note:
Your attention is drawn to the fact that recording pre-recorded tapes or discs or other published or broadcast material may infringe copyright laws.
Recording modes
Total recording time and sound quality depend on the recording mode you choose for recording.
Approximate recording times (using a 64-MB card)
| Recording mode | Total time (minutes) |
| HQ (high quality): 128 kbps | 64 |
| SP (standard play, default setting): 96 kbps | 86 |
| LP (long play): 64 kbps | 129 |
For other cards, see page 8.
■Changing the recording mode
1 While in the recording standby mode, press [MENU].
You can also change the recording mode while stopped.
2 Press [◀◀] or [▶▶] to select "REC MODE?".
3 Press [ENTER/MEMORY].
"BITRATE?" appears on the display.
4 Press [ENTER/MEMORY].
5 Press [◀◀] or [▶▶] to select the recording mode.
Each time you press the button:
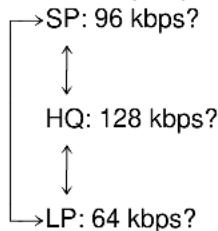
flowchart
graph TD
    A["SP: 96 kbps?"] --> B["HQ: 128 kbps?"]
    B --> C["LP: 64 kbps?"]
6 Press [ENTER/MEMORY].
To stop partway
Press [MENU] before step 6.
Track marks
These marks are added between tracks when recording. The area between two track marks is counted as one track.
Track marks are added automatically:
When recording CDs
Track marks correspond to those on the CD.
When recording from other equipment
If there is 2-second silence.
When recording through a microphone
Every 5 minutes.
Note:
- You can change the way track marks are added when recording from other equipment or through a microphone (→ page 15).
- Track marks may not be added correctly in some cases.
Recording a track that is playing
Recording starts from the beginning of the track.
1 Press [REC PAUSE] while playing the track.
Play stops and the unit enters the recording standby mode.
2 Confirm that "1-REC OK" appears, then press [▶/II, CD].
Play and recording stop at the end of the track.
Recording selected tracks
1 Program the tracks you want to record (→ page 11).
2 Press [REC PAUSE] to enter the recording standby mode.
3 Press [▶/II, CD].
Recording and program play start.
Note:
- This unit uses the AAC format to compress digital signals recorded from a CD to an SD card.
- Tracks recorded on this unit can be played on an SD audio player.
- Recording time may shorten after repeatedly recording and erasing tracks. Reformat the card to correct this (→ page 17).
- Depending on the condition of the CD recording, track marks may be added unnecessarily. You can erase such tracks after recording.
■To ensure recording is completed correctly
Use the AC adaptor to power the unit. Recording stops if the batteries are depleted.
■During recording
- Do not connect or disconnect the AC adaptor.
- Do not shake the unit.
- Do not open the card and disc lids.
Doing any of these can cause recording and play to stop and the data to be corrupted. Be especially careful while “CARD Writing” is on the display as recording may not be completed correctly.
- The anti-skip system (→ page 17) is off while recording.
Recording from a microphone and other equipment (Main unit only)
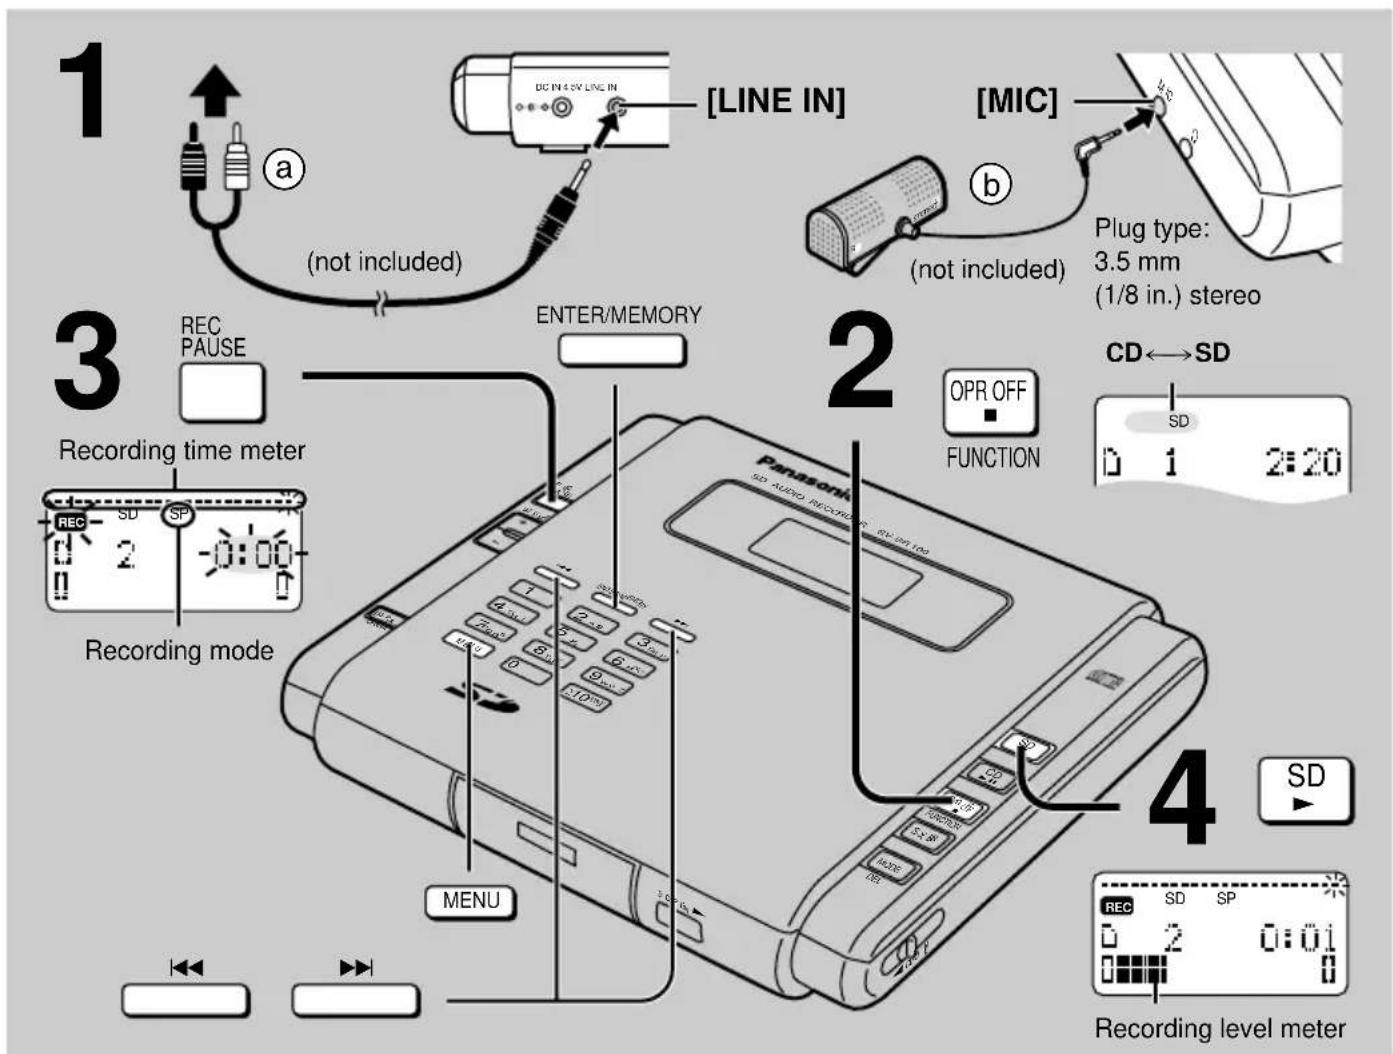
text_image
1 (a) (not included) DC IN 4.0V LINE IN [LINE IN] [MIC] (b) (not included) Plug type: 3.5 mm (1/8 in.) stereo 3 REC PAUSE ENTER/MEMORY Recording time meter REC SD SP Recording mode MENU 2 OPR OFF FUNCTION CD←SD SD 0 1 2:20 4 SD REC SD SP 0 2 0:01 0 Recording level meterPreparation:
- Release the HOLD mode (→ page 9).
- Release the card's write-protect switch (→ page 8).
- Insert an SD card (→ page 9).
1 Connect the other equipment while the unit is stopped.
Do not connect a microphone and other equipment at the same time.
(a) Connecting other audio equipment
Purchase a stereo connection (phono) cable.
⑥ Connecting a microphone
Purchase a stereo microphone.
2 Press [■, OPR OFF, FUNCTION] to switch to SD.
3 Press [REC PAUSE] to enter the recording standby mode.
4 Press [▶, SD] to start recording, then start the source (or face the microphone towards the source).
■To pause recording
Press [REC PAUSE].
A track mark is added.
Press [▶, SD] to restart recording.
■To stop
Press [■, OPR OFF, FUNCTION].
"CARD Writing" appears on the display while the unit writes to the card.
The unit turns off about 5 minutes later.
■To turn the unit off
Press and hold [■, OPR OFF, FUNCTION] while stopped until the display goes out.
Note:
- Keep the microphone away from the unit so it doesn't record sound from the unit itself.
- Ensure you do not connect the microphone to the headphone jack.
- Adjust the volume on the other equipment if you make the connection through the other unit's headphone jack.
Other ways of recording
There are various settings you can change to record in other ways.
A SYNCHRO recording:
To start recording when this unit receives input from other equipment. Recording pauses when input stops.
B Recording sensitivity:
Lower the level if the level meter frequently reaches the maximum level when recording from other equipment.
Raise the level if the level meter barely moves.
Track marking:
Choose how to add track marks when recording through a microphone or other equipment.
Changing settings
- Press [MENU] while in the recording standby mode.
(You can also change these settings while stopped.
You cannot change them while recording.)
-
Press [◀◀] or [▶▶] to select "REC MODE?".
-
Press [ENTER/MEMORY].
-
Press [◀◀] or [▶▶] to select the mode.
A Turning SYNCHRO on
(1) Select "LINE SYNCHRO?".
(2) Press [ENTER/MEMORY].
(3) Press [◀◀] or [▶▶] to select "LINE SYNCHRO ON?".
BSetting recording sensitivity
(1) Select "LINE REC SENS?".
(2) Press [ENTER/MEMORY].
(3) Press [◀◀] or [▶▶] to select the sensitivity. Each time you press the button:
REC SENS H?: When recording from

REC SENS L?: When recording from stereo components
cSelecting a marking mode
(1) When recording from other equipment
Select "LINE MARK MODE?".
When recording through a microphone
Select "MIC MARK MODE?".
(2) Press [ENTER/MEMORY].
(3) Press [◀◀] or [▶▶] to select the mode.
Each time you press the button:
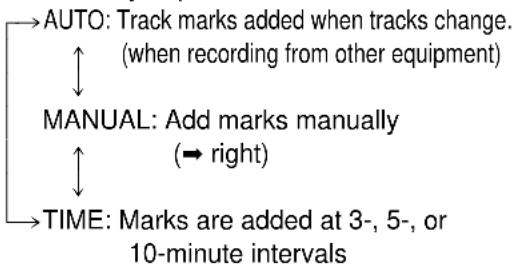
flowchart
graph TD
    A["AUTO: Track marks added when tracks change. (when recording from other equipment)"] --> B["MANUAL: Add marks manually (→ right)"]
    B --> C["TIME: Marks are added at 3-, 5-, or 10-minute intervals"]
- Press [ENTER/MEMORY].
Note:
While SYNCHRO recording
- [REC PAUSE] does not respond to touch.
- The beginning of the track may not be recorded in some cases. Select "OFF" if this occurs.
■MANUAL track marking
Press [ENTER/MEMORY] at the place you want to mark.
- You can still do this even if you didn't select MANUAL.
- You cannot add the next track mark until 2 seconds have passed since adding the last one.
Titling SD cards
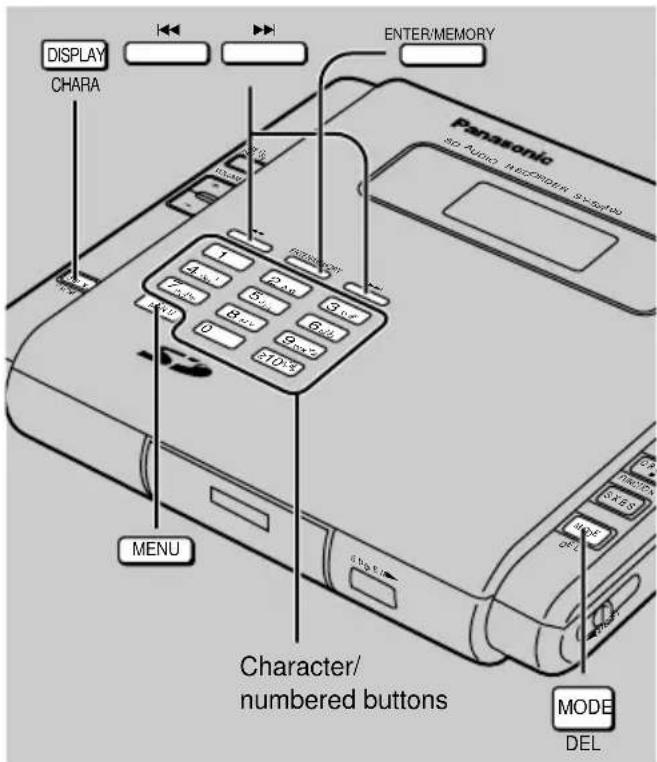
text_image
DISPLAY CHARA ENTER/MEMORY Panasonic 5D AUDIO MECKROOM SYSTEM T P 2.0 3.0 4.0 5.0 6.0 7.0 8.0 9.0 10.0 MENU Character/ numbered buttons MODE DEL| Button Number | Alphabet | ||
| CAPITALS | lower case | ||
| 1 | 1 | ||
| 2 | ABC | abc | 2 |
| 3 | DEF | def | 3 |
| 4 | GHI | ghi | 4 |
| 5 | JKL | jkl | 5 |
| 6 | MNO | mno | 6 |
| 7 | PQRS | pqrs | 7 |
| 8 | TUV | tuv | 8 |
| 9 | WXYZ | wxyz | 9 |
| 0 | 0 | ||
| 10 | (space) ! " # $ % & ' () * + , - . / : ; <= > ? @ [ \ ] ^ _ { | } ~ | ||
You can enter up to 60 characters for card and track titles and artist names.
Preparation:
- Press [■, OPR OFF, FUNCTION] to select SD.
- Release the write-protect switch (→ page 8).
1 Press [MENU].
"EDIT?" is displayed.
2 Press [ENTER/MEMORY].
3 Press [◀◀] or [▶▶] to select the item you want to enter.
"TRACK TITLE?"
"TRACK ARTIST INFO?"
"CARD TITLE?"
4 Press [ENTER/MEMORY].
Steps 5 and 6 are unnecessary when titling the card. Proceed to "Entering characters" in step 6.
5 Press [◀◀] or [▶▶] to select the track you want to title.
6 Press [ENTER/MEMORY].
You can now enter characters.
Entering characters
1 Press [DISPLAY, CHARA] to select the type.
Each time you press the button:
![PANASONIC SV-SR100 - Press [DISPLAY, CHARA] to select the type. - 1](/content/2026/05/796490/images/6c55598d9963e85a89c5a177c21e77ba7808757bc255a4345d7e22f06070449e.jpg)
2 Press the character/numbered buttons to select.
The characters change each time you press a button.
Step 3 is unnecessary when entering numbers.
3 Press [ENTER/MEMORY].
The character moves to the title section and the unit is ready to accept the next character.
7 Press [ENTER/MEMORY].
Editing is complete when "CARD Writing" goes out.
When entering track titles or artist names, you can continue to enter other titles or names as necessary. Repeat the steps from step 5 and press [MENU] when you are finished.
When entering the card title, editing ends automatically.
To stop partway
Press [MENU] before step 7.
Note:
The maximum number of characters may be reduced if the audio data was recorded on other equipment.
■“TEXT FULL” is displayed
If the title has 60 characters.
You cannot enter more than 60 characters.
■Deleting and correcting characters
1 Press [◀◀] or [▶▶] to move the cursor over the character you want to correct or delete.
2 Press [MODE, DEL].
The character is deleted and characters after it move to the left.
(When correcting a character)
3 Insert the character.
■To insert another character
1 Press [◀◀] or [▶▶] to move the cursor to the position you want to insert the character.
2 Enter the character.
Characters after it move to the right.
Erasing tracks
text_image
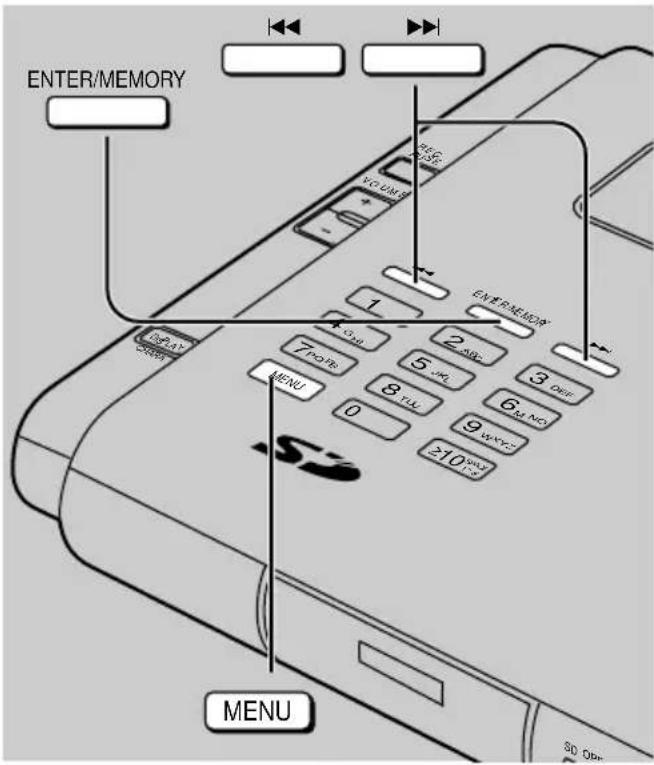
ENTER/MEMORY MENU 30 ObPreparation:
- Press [■, OPR OFF, FUNCTION] to select SD.
- Release the write-protect switch (→ page 8).
1 Press [MENU].
"EDIT?" is displayed.
2 Press [ENTER/MEMORY].
3 Press [◀◀] or [▶▶] to select how to erase tracks.
■TRACK ERASE: Erase one track at a time
(1) Select "TRACK ERASE?".
(2) Press [ENTER/MEMORY].
(3) Press [◀◀] or [▶▶] to select the track you want to delete.
(4) Press [ENTER/MEMORY].
If you selected the wrong track
Press [◀◀] or [▶▶] to select "CANCEL?" and press [ENTER/MEMORY].
■ ALL TRACK ERASE: Erase all tracks on the card
(1) Select "ALL ERASE?".
(2) Press [ENTER/MEMORY].
4 After confirming the item to be erased, press [ENTER/MEMORY].
Erasing is complete when "CARD Writing" goes out. After erasing one track, you can continue to erase other tracks. Repeat the steps from step 3 and press [MENU] when you are finished.
After erasing all tracks, editing ends automatically.
To stop partway
Press [MENU] before step 4.
Note:
- ALL ERASE can take several minutes (10 or more in some cases) if there are a number of tracks on the card or if it has a large volume.
- You cannot erase tracks that are in play lists created on computer software (e.g., Panasonic Media Manager).
Formatting SD cards
All data is erased when you format a card, including data recorded with other equipment.
Preparation:
- Press [■, OPR OFF, FUNCTION] to select SD.
- Release the write-protect switch (→ page 8).
1 Press [MENU].
"EDIT?" is displayed.
2 Press [ENTER/MEMORY].
3 Press [◀◀] or [▶▶] to select "CARD FORMAT?".
4 Press [ENTER/MEMORY].
5 Press [ENTER/MEMORY].
Formatting is complete when "CARD Writing" goes out.
To stop partway
Press [MENU] before step 5.
Anti-Skip System
This system uses digital compression technology to save CD audio data in the memory (a maximum of 48 seconds) and uses this data to fill in gaps caused by bumps or vibration.
1 Press [MENU] while stopped.
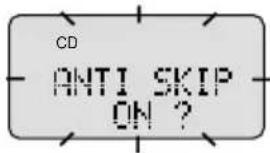
2 Press [◀◀] or [▶▶] to select "ANTI SKIP ON/OFF?".
3 Press [ENTER/MEMORY].
The current settings appears.
text_image
CD ANTI SKIP ON ?4 Press [|◀◀] or [▶▶] to select "ON?" or "OFF?".
5 Press [ENTER/MEMORY].
Note:
- If bumps or vibration continue, the elapsed play time disappears and play is interrupted.
- The disc rotates faster while the system is on so there may be a slight increase in disc rotation noise.
- The anti-skip system switches off automatically during recording, but switches back on when you are finished.
Convenient functions
text_image
ENTER/MEMORY DISPLAY CHARA MENU 1 2 ABC 3 DRY 4 EML 5 UKL 6 MNO 7 PLOTS 8 TIL 9 WNC ≥10 MHz ENTER/MEMORYAdjusting the contrast of the display
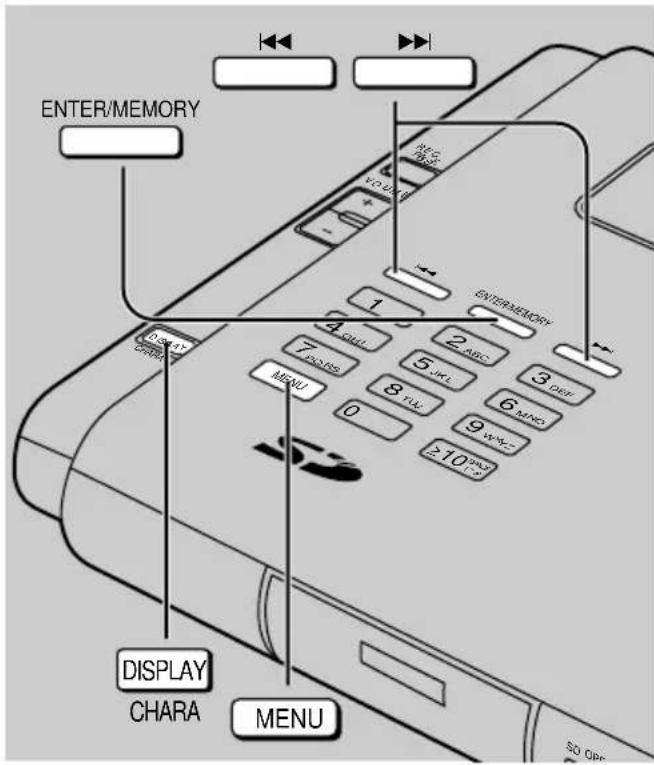
1 Press [MENU] while stopped.
2 Press [◀◀] or [▶▶] to select "DISPLAY CONTRAST?".
3 Press [ENTER/MEMORY].
4 Press [◀◀] to reduce the contrast or [▶▶] to increase the contrast.
5 Press [ENTER/MEMORY].
The operation tones
A "beep" sounds when you press buttons on the remote control. You can turn this tone off.
1 Press [MENU] while stopped.
2 Press [|◀◀] or [▶▶] to select "BEEP ON/OFF?".
3 Press [ENTER/MEMORY].
The current setting is shown.
4 Press [◀◀] or [▶▶] to select "ON?" or "OFF?".
5 Press [ENTER/MEMORY].
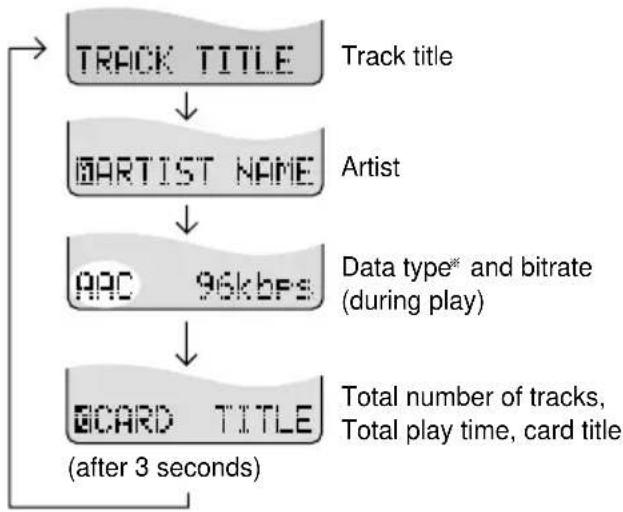
Changing the display
Press [DISPLAY, CHARA].
CD
The current anti-skip ( page 17) setting appears for 3 seconds.
SD
Each time you press the button:
flowchart
graph TD
    A["TRACK TITLE"] --> B["MARTIST NAME"]
    B --> C["90kbps"]
    C --> D["BOARD TITLE"]
    D --> E["(after 3 seconds)"]
    style A fill:#f9f,stroke:#333
    style B fill:#ccf,stroke:#333
    style C fill:#cfc,stroke:#333
    style D fill:#fcc,stroke:#333
    style E fill:#ffc,stroke:#333
*Data types: data recorded on this unit is AAC (advanced audio coding). This unit can also play MP3 (MPEG-1, MPEG-2 audio layer 3) and WMA (Windows Media Audio) recorded on other equipment.
Note:
“□” is displayed in place of characters this unit cannot display.
■While on standby to record from a CD
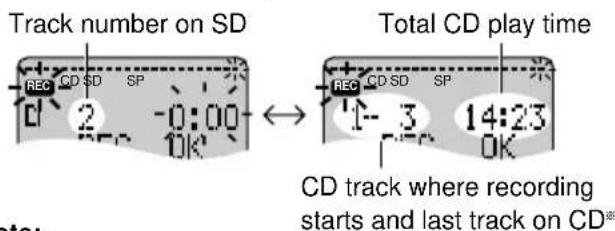
text_image
Track number on SD Total CD play time REC CD SD SP 1-3 14:23 0K CD track where recording starts and last track on CD*Note:
*“MEM” is displayed when recording a CD program (→ page 11).
■While recording from a CD
Elapsed recording time Elapsed CD play time
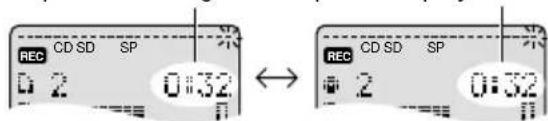
text_image
REC CD SD SP 0 2 0:32 REC CD SD SP 0 2 0:32Note:
There may be some difference between the recording time and CD play time.
Using the unit with other equipment
Connecting the unit to an audio system Input
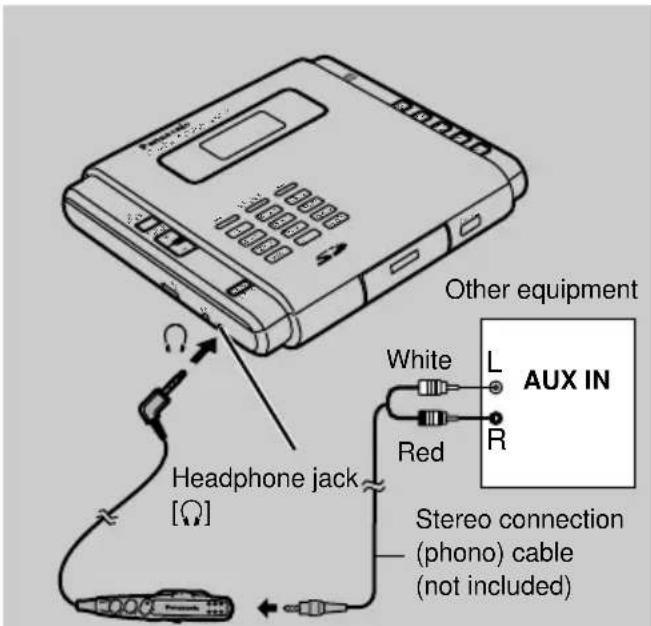
text_image
Other equipment White L AUX IN Red Red Headphone jack [Ω] Stereo connection (phono) cable (not included)Connect through remote control to the [Ω] jack.
The unit may malfunction if you connect this cable directly to the unit.
Turn off this unit and the other equipment before connection.
- Do not connect the cable to the PHONO jacks on an amplifier.
- Turn the operation tones off so they are not heard when you press buttons on the remote control (→ page 18).
- Set the volume to 10. Make further volume adjustments with the other equipment.
- Obtain the optional connecting cable if the other equipment comes with mini-phone jacks.
- It you connect speakers (active or otherwise) directly to the unit's headphone jack, ensure they have an impedance of 1 kΩ or less.
Specifications
SD Audio compatible data formats:
Playback: AAC, MP3, WMA
Recording:
AAC
CD playback format:
CD-DA
Number of channels:
2, stereo
Frequency response:
20 to 20,000 Hz
(+0 dB to -7 dB)
CD:
D/A converter:
MASH (1 bit DAC)
Beam source:
Semiconductor laser
Wave length:
780 nm
(NORSK)
Bølgelengde
780 nm
Laser-styrke
Ingen farlig strålning sendes ut (med sikkerhets-beskyttelse)
LINE IN: 3.5-mm stereo jack
Input level: SENS H: -10±2 dBV
SENS L: -1±2 dBV
MIC: 3.5-mm stereo jack
Impedance: 200 to 600 Ω
Output
Headphone: 3.5-mm stereo jack
Output level: RMS max. 7mW+7mW (16 Ω)
Power supply:
Batteries: DC 3V (two AA, LR6 alkaline batteries)
AC adaptor:
Input: AC 120 V (For U.S.A. and Canada)
AC 230–240 V (For United Kingdom)
AC 220–230 V (For Continental Europe)
AC 110 V/127 V/220–240 V (For other areas)
Output: DC 4.5 V
Power consumption:
Using included AC adaptor:
3.0 W (For U.S.A. and Canada)
3.2 W (For United Kingdom and Europe)
2.6 W (For others)
Recharging: 4.3 W (For U.S.A. and Canada)
4.8 W (For United Kingdom and Europe)
4.3 W (For others)
Dimensions (W×H×D):
140×27×133 mm
(5^1/2 × 1^1/16 × 5^1/4)
Mass: 347 g (12.24 oz.) (With batteries)
300 g (10.58 oz.) (Without batteries)
Approximate operating times in hours:
| Batteries | CD play | SD play | Recording (from a CD in this unit) |
| Alkaline batteries (LR6) | 25 | 30 | 4.5 |
| Recharge-able Ni-cd batteries | 12 | 14 | 3 |
Recharging time: 3 to 4 hours
- CD play and recording times measured with S-XBS canceled, at 25 °C, on a flat, stable surface.
- Actual operating times depend on operating conditions.
- Play time is reduced when playing CD-RW.
Power consumption in standby mode
For U.S.A. and Canada: 1.9 W
For United Kingdom: 2.0 W
For Continental Europe: 2.1 W
For other areas: 1.5 W
Note:
Specifications are subject to change without notice.
Mass and dimensions are approximate.
Displays
Reference pages are shown as black circled numbers (17).
| Can't COPY SCMS | This track has SCMS copyright protection and cannot be recorded on this unit. |
| Can't COPY WM | This track has “watermark” copyright protection and cannot be recorded on this unit. |
| Can't EDIT | You cannot edit at this time. Follow the instructions on the second line. |
| Can't ERASE | The card contains data this unit cannot process. Erase the data with the equipment used to record it. |
| Can't REC | You cannot record at this time. Follow the instructions on the second line. |
| CARD FULL | The card's memory is full. Erase unneeded tracks 17 or use another card. |
| CARD PROTECT | The card's write-protect switch is engaged. Release it 8. |
| CD OPEN | The CD lid is open. Close it. |
| DATA ERROR | The data on the card cannot be used or is corrupted. Reformat the card 17 or use another one. |
| DIGITAL IN UNLOCK | A problem has occurred with the unit's circuitry. Consult a qualified serviceperson or your dealer. |
| ERROR | An error has occurred. Try reinserting the card, turning the unit off, or reinserting the batteries. If this doesn't remedy the situation reformat the card 17. |
| F15 | A problem has occurred with the unit's circuitry. Consult a qualified serviceperson or your dealer. |
| LOCKED | This card cannot be used. Insert another one. |
| MEMORY SHORT | The card doesn't have enough memory to record all of the tracks, but you can still go on with recording. Erase unneeded tracks 17, use another card, or change the recording mode 18. |
| NO CARD | You haven't inserted a card. |
| NO DISC | You haven't inserted a disc. |
| NO INFO. | You haven't entered an artist name 16. |
| NO TITLE | There is no title for the track or card 16. |
| NO TRACK | The card doesn't contain audio data. Record tracks on the card or replace it with one that already has tracks on it. |
| NotDISPLAY | The title contains characters this unit cannot display. |
| NotPLAY | The unit cannot play the data. Rerecord it using a format this unit can play 8. |
| NotSUPPORT | The unit cannot play the data or card itself. Reformat or replace the card. |
| Now Busy | The unit is processing data. Wait until the display disappears. |
| SD OPEN | The SD lid is open. Close it. |
| SYSTEM ERROR | The unit has detected an error. Consult a qualified serviceperson or your dealer if this appears regularly. |
| TEXT FULL | You are entering titles and the maximum number of characters has been reached 16. |
| TEXT OVER | You are about to edit a title that has more than 60 characters. If you continue, text over the character limit will be deleted. |
| TRACK FULL | You have reached the maximum number of 998 tracks (or the card is full for some other reason), so you cannot record anymore. Erase unneeded tracks 17 or use another card. |
| UNFORMAT | The card is not formatted. Format it with this unit 17. |
| U01 | The batteries are depleted. Replace or recharge them, or power the unit with the AC adaptor. |
| LOW BATTERY |
Troubleshooting guide
Before requesting service, make the below checks. If you are in doubt about some of the check points, or if the remedies indicated in the chart do not solve the problem:
In the U.S.A., contact the Panasonic Customer Call Center at 1-800-211-7262, or e-mail consumerproducts@panasonic.com, or web site (http://www.panasonic.com/sd).
In Canada, contact Panasonic Canada Inc. Customer Care Centre at 905-624-5505, web site (www.panasonic.ca), or an authorized Servicentre close to you.
In other areas, consult your dealer.
Reference pages are shown as black circled numbers (9).
| No operation. | ●The hold function is on.9●The disc or card isn’t correctly set.9●The batteries are depleted. If not, try reinserting them.●The AC adaptor isn’t connected fully.7●The disc or card is scratched or dirty. Replace the disc or card if it is scratched.●There is moisture on the disc or card. Wipe dry.●There is moisture on the lens. Wait for about an hour and then try again. If the unit malfunctions or freezes during use, disconnect the power sources (the AC adaptor or batteries).Re-connect the power source and continue operation. |
| Cannot recharge the batteries. | ●You aren’t using the special rechargeable batteries.5 |
| Cannot play tracks on an SD card. | ●Make sure the card has tracks recorded on it. “NO TRACK” appears if the card is blank. |
| Play doesn’t start from the first track. | ●The CD play mode may be set to play tracks randomly.11●The resume function has worked.10 |
| No sound or there is a lot of noise. | ●Raise the volume.10●Ensure the plugs are inserted fully.●Wipe the plugs clean with a soft cloth.●Separate this unit from mobile telephones. |
| No recording or editing. | ●Release the write-protect switch.8●Ensure connections to other equipment are correct.14 |
| Titles are cutoff or not displayed correctly. | ●The titles exceed the 60-character limit of this unit.16●This unit cannot display some characters entered with computers and other equipment. “☐” is displayed. |
Maintenance
If the surfaces are dirty
The surface of the cabinet is polished.
Use the included cloth to clean it.
Never use alcohol, paint thinner or benzine to clean this unit.
Maintaining the lens
Open the lid and clean the lens as shown in the figure. Use a cotton swab to gently wipe off any finger-prints. Recommended product: Lens cleaner kit (SZZP1038C)
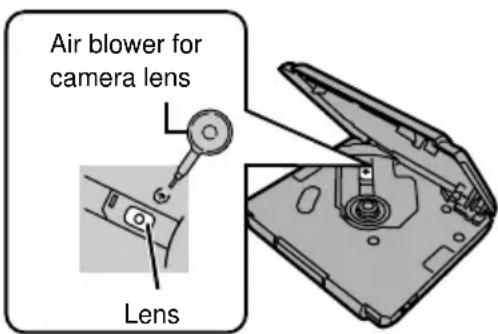
text_image
Air blower for camera lens LensONLY FOR U.S.A.
Panasonic Consumer Electronics Company, Division of Matsushita Electric Corporation of America
One Panasonic Way Secaucus, New Jersey 07094
Panasonic Sales Company, Division of Matsushita Electric
of Puerto Rico, Inc.
San Gabriel Industrial Park, Carolina, Puerto Rico 00985
Panasonic/Technics Audio Products Limited Warranty
Limited Warranty Coverage
If your product does not work properly because of a defect in materials or workmanship, Panasonic Consumer Electronics Company or Panasonic Sales Company (collectively referred to as "the warrantor") will, for the length of the period indicated on the chart below, which starts with the date of original purchase ("warranty period"), at its option either (a) repair your product with new or refurbished parts, or (b) replace it with a new or a refurbished product. The decision to repair or replace will be made by the warrantor.
| Product or Part Name | Parts | Labor |
| Audio Products(except items listed below) | One (1)year | One (1)year |
| All Audio Racks (cabinets) | Thirty (30)days | NotApplicable |
| Technics Stand Alone Speakers,Subwoofer Speakers | Three (3)years | Three (3)years |
| USB Reader-Writer, Personal Computer Card Adapters(in exchange for defective item) | One (1)year | NotApplicable |
| Accessories: Headphones, Cartridges, Microphones,Adapters | Ninety(90) days | Ninety(90) days |
| Rechargeable Batteries(in exchange for defective item) | Ten (10)days | NotApplicable |
| SD Memory Cards, Rechargeable Battery Packs(in exchange for defective item) | Ninety(90) days | NotApplicable |
During the “Labor” warranty period there will be no charge for labor. During the “Parts” warranty period, there will be no charge for parts. You must carry-in or mail-in your product during the warranty period. If non-rechargeable batteries are included, they are not warranted. This warranty only applies to products purchased and serviced in the United States or Puerto Rico. This warranty is extended only to the original purchaser of a new product which was not sold “as is”. A purchase receipt or other proof of the original purchase date is required for warranty service.
Carry-In or Mail-In Service
For Carry-In or Mail-In Service in the United States call 1-800-211-PANA (1-800-211-7262) or visit Panasonic web site: http://www.panasonic.com
For assistance in Puerto Rico call Panasonic Sales Company (787)-750-4300 or fax (787)-768-2910.
Limited Warranty Limits And Exclusions
This warranty ONLY COVERS failures due to defects in materials or workmanship, and DOES NOT COVER normal wear and tear or cosmetic damage. The warranty ALSO DOES NOT COVER damages which occurred in shipment, or failures which are caused by products not supplied by the warrantor, or failures which result from accidents, misuse, abuse, neglect, mishandling, misapplication, alteration, faulty installation, set-up adjustments, misadjustment of consumer controls, improper maintenance, power line surge, lightning damage, modification, or commercial use (such as in a hotel, office, restaurant, or other business), rental use of the product, service by anyone other than a Factory Servicenter or other Authorized Servicer, or damage that is attributable to acts of God.
THERE ARE NO EXPRESS WARRANTIES EXCEPT AS LISTED UNDER “LIMITED WARRANTY COVERAGE”. THE WARRANTOR IS NOT LIABLE FOR INCIDENTAL OR CONSEQUENTIAL DAMAGES RESULTING FROM THE USE OF THIS PRODUCT, OR ARISING OUT OF ANY BREACH OF THIS WARRANTY. (As examples, this excludes damages for lost time, travel to and from the servicer, loss of media or images, data or other memory content. The items listed are not exclusive, but are for illustration only.)
ALL EXPRESS AND IMPLIED WARRANTIES, INCLUDING THE WARRANTY OF MERCHANTABILITY, ARE LIMITED TO THE PERIOD OF THE LIMITED WARRANTY.
Some states do not allow the exclusion or limitation of incidental or consequential damages, or limitations on how long an implied warranty lasts, so the exclusions may not apply to you.
This warranty gives you specific legal rights and you may also have other rights which vary from state to state. If a problem with this product develops during or after the warranty period, you may contact your dealer or Servicenter. If the problem is not handled to your satisfaction, then write to the warrantor's Consumer Affairs Department at the addresses listed for the warrantor.
PARTS AND SERVICE WHICH ARE NOT COVERED BY THIS LIMITED WARRANTY ARE YOUR RESPONSIBILITY.
The model number and serial number of this product can be found on either the back or the bottom of the unit.
Please note them in the space provided below and keep for future reference.
MODEL NUMBER SV-SR100
SERIAL NUMBER ____
User memo:
DATE OF PURCHASE ____
DEALER NAME ____
DEALER ADDRESS ____
TELEPHONE NUMBER ____
For Product Information, Operating Assistance, Literature Request, Dealer Locations, and all Customer Service inquiries please contact: 1-800-211-PANA (7262), Monday–Friday 9 am–9 pm; Saturday–Sunday 9 am–7 pm, EST. or send e-mail: consumerproducts@panasonic.com
Web Site: http://www.panasonic.com You can purchase parts, accessories or locate your nearest servicenter by visiting our Web Site.
Accessory Purchases:
1-800-332-5368 (Customer Orders Only) Panasonic Services Company 20421 84th Avenue South, Kent, WA 98032 (6 am to 5 pm Monday–Friday; 6 am to 10:30 am Saturday; PST) (Visa, MasterCard, Discover Card, American Express, Check)
Product Repairs
Centralized Factory Servicenter
Panasonic Services Company
MAIL TO:
1705 N. Randall Road,
Elgin, IL 60123-7847
Attention: SD Repair
Please carefully pack and ship, prepaid and insured, to the Elgin Centralized Factory Servicenter.
Customer's in Puerto Rico, please ship or carry in to location below ("Service in Puerto Rico")
Service in Puerto Rico
Matsushita Electric of Puerto Rico, Inc. Panasonic Sales Company/Factory Servicenter:
Ave. 65 de Infanteria, Km. 9.5, San Gabriel Industrial Park, Carolina, Puerto Rico 00985
Phone (787) 750-4300 Fax (787) 768-2910
Product Service
- Damage requiring service—The unit should be serviced by qualified service personnel if:
(a) The AC power supply cord or AC adaptor has been damaged; or
(b) Objects or liquids have gotten into the unit; or
(c) The unit has been exposed to rain; or
(d) The unit does not operate normally or exhibits a marked change in performance; or
(e) The unit has been dropped or the cabinet damaged.
- Servicing—Do not attempt to service the unit beyond that described in these operating instructions. Refer all other servicing to authorized servicing personnel.
- Replacement parts—When parts need replacing ensure the servicer uses parts specified by the manufacturer or parts that have the same characteristics as the original parts. Unauthorized substitutes may result in fire, electric shock, or other hazards.
- Safety check—After repairs or service, ask the servicer to perform safety checks to confirm that the unit is in proper working condition.
Product information
For product information or assistance with product operation:
In the U.S.A., contact the Panasonic Customer Call Center at 1-800-211-7262, or e-mail consumerproducts@panasonic.com, or web site (http://www.panasonic.com/sd).
In Canada, contact Panasonic Canada Inc. Customer Care Centre at 905-624-5505, web site (www.panasonic.ca), or an authorized Servicentre close to you.
In other areas, consult your dealer.
SUOMI
VAROITUS!
- ÄLÄ ASENNA TAI LAITA TÄTÄ LAITETTA KABINETTITYYPPISEEN KIRJAKAAPPIIN TAI MUUHUN SULJETTUUN TILAAN, JOTTA TUULETUS ONNISTUISI. VARMISTA, ETTÄ VERHO TAI MIKÄÄN MUU MATERIAALI EI HUONONNA TUULETUSTA, JOTTA VÄLTETTÄISIIN YLIK-UUMENEMISESTA JOHTUVA SÄHKÖISKU-TAI TULIPALOVAARA.
- ÄLÄ PEITÄ LAITTEEN TUULETUSAUKKOJA SANOMALEHDELLÄ, PÖYTÄLIINALLA, VERHOLLA TAI MUULLA VASTAAVALLA ESINEELLÄ.
- ÄLÄ ASETA PALAVAA KYNTTILÄÄ TAI MUUTA AVOTULEN LÄHDETTÄ LAITTEEN PÄÄLLE.
•HÄVITÄ PARISTOT LUONTOA VAHINGOITTAMATTOMALLA TAVALLA.
• TÄMÄ LAITE ON TARKOITETTU KÄYTETTÄVÄKSI LEUDOSSA ILMASTOSSA.
VAROITUS:
TULIPALO-, SÄHKÖISKUVAARAN TAI TUOTETTA KOHTAAVAN MUUN VAHINGON VÄHENTÄMISEKSI EI LAITETTA SAA ALTISTAA SATEELLE, KOSTEUDELLE, VESIPISAROILLE TAI ROISKEELLE, EIKÄ NESTETTÄ SISÄLTÄVIÄ ESINEITÄ, KUTEN ESIMERKIKSI MALJAKOITA, SAA ASETTAA LAITTEEN PÄÄLLE.
VAROITUS!
LAITTEEN KÄYTTÄMINEN MUULLA KUIN TÄSSÄ KÄYTTÖOHJEESSA MAINITULLA TAVALLA SAATTAA ALTISTAA KÄYTTÄJÄN TURVALLIS- UUSLUOKAN 1 YLITTÄVÄLLE NÄKYMÄT- TÖMÄLLE LASERSÄTEILYLLE.
Except for U.S.A. and Canada
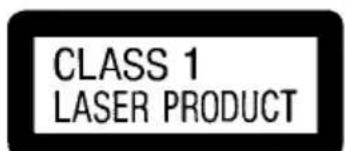
text_image
CLASS 1 LASER PRODUCT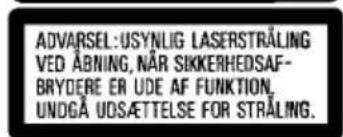
text_image
ADVARSEL:USYNLIG LASERSTRÅLING VED ÅBNING, Når SIKKERHEDSAF- BRYDERE EN UDE AF FUNKTION, UNDGÅ UDSÄTTELSE FOR STRÅLING.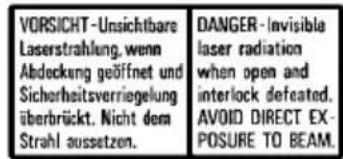
natural_image
Pure technical diagram of a mechanical component with no text or symbolsNORSK
ADVARSEL!
- APPARATET MÅ IKKE PLASSERES I EN BOKHYLLE, ET INNEBYGGET KABINETT ELLER ET ANNET LUKKET STED HVOR VENTILASJONSFORHOLDENE ER UTILSTREKKELIGE. S∅RG FOR AT GARDINER ELLER LIGNENDE IKKE FORVERRER VENTILASJONSFORHOLDENE, SÅ RISIKO FOR ELEKTRISK SJOKK ELLER BRANN FORÅRSAKET AV OVERHETING UNNGÅS.
- APPARATETS VENTILASJONSÅPNINGER MÅ IKKE DEKKES TIL MED AVISER, BORDDUKER, GARDINER OG LIGNENDE.
- PLASSER IKKE ÅPEN ILD, SLIK SOM LEVENDE LYS, OPPÅ APPARATET.
- BRUKTE BATTERIER MÅ KASSERES UTEN FARE FOR MILJ∅ET.
- DETTE APPARATET ER BEREGNET TIL BRUK UNDER MODERATE KLIMAFORHOLD.
ADVARSEL:
FOR Å REDUSERE FAREN FOR BRANN, ELEKTRISK ST∅T ELLER SKADER PÅ PRODUKTET, MÅ DETTE APPARATET IKKE UTSETTES FOR REGN, FUKTIGHET, VANNDRÅPER ELLER VANNSPRUT. DET MÅ HELLER IKKE PLASSERES GJENSTANDER FYLT MED VANN, SLIK SOM BLOMSTERVASER, OPPÅ APPARATET.
ADVARSEL!
DETTE PRODUKTET ANVENDER EN LASER. BETJENING AV KONTROLLER, JUSTERINGER ELLER ANDRE INNGREP ENN DE SOM ER BE- SKREVENT I DENNE BRUKSANVISNING, KAN F∅RE TIL FARLIG BESTRÅLING.
DEKSLER MÅ IKKE ÅPNES, OG FORS∅K ALDRI Å REPARERE APPARATET PÅ EGENHÅND. ALT SERVICE OG REPARASJONSARBEID MÅ UTF∅RES AV KVALIFISERT PERSONELL.
(Bottom of product)
(Tuotteen pohjassa)
(Produktets underside)
LUOKAN 1 LASERLAITE KLASS 1 LASER APPARAT
For the U.S.A.
Panasonic Consumer Electronics Company, Division of Matsushita Electric Corporation of America
One Panasonic Way Secaucus, New Jersey 07094
http://www.panasonic.com
Panasonic Sales Company, Division of Matsushita Electric of Puerto Rico, Inc. ("PSC")
Park, Carolina, Puerto Rico 00985
For Canada

Panasonic Canada Inc.
5770 Ambler Drive, Mississauga, Ontario L4W 2T3
www.panasonic.ca
For other areas
Matsushita Electric Industrial Co., Ltd.
Web Site: http://www.panasonic.co.jp/global/