
NV-HV60EBL - VCR PANASONIC - Free user manual and instructions
Find the device manual for free NV-HV60EBL PANASONIC in PDF.


| Product Type | VCR (Video Cassette Recorder) |
| Brand | Panasonic |
| Model | NV-HV60EBL |
| Playback Format | VHS |
| Recording Format | VHS |
| Video Head System | 4-head helical scan |
| Audio System | Hi-Fi stereo, mono |
| Timer Recording | Programmable up to 1 month/8 events |
| On-Screen Display | Yes (OSD with menu) |
| Inputs | RF antenna, AV (RCA), S-Video |
| Outputs | RF modulator, AV (RCA), S-Video |
| Remote Control | Infrared, included |
| Dimensions (W x H x D) | 430 x 90 x 250 mm |
| Weight | 3.5 kg |
| Power Consumption | 20 W (operating), 3 W (standby) |
| Power Supply | AC 220-240 V, 50 Hz |
| Playback Features | Play, pause, stop, rewind, fast forward, slow motion, still frame, frame advance |
| Recording Features | Record, timer record, one-touch recording (OTR) |
| Head Cleaning | Auto head cleaning system |
| Safety Features | Auto power off, child lock |
| Spare Parts Availability | Belt, heads, loading mechanism, remote control |
| Repair Index | Moderate (professional repair recommended) |
Frequently Asked Questions - NV-HV60EBL PANASONIC
User questions about NV-HV60EBL PANASONIC
0 question about this device. Answer the ones you know or ask your own.
Ask a new question about this device
Download the instructions for your VCR in PDF format for free! Find your manual NV-HV60EBL - PANASONIC and take your electronic device back in hand. On this page are published all the documents necessary for the use of your device. NV-HV60EBL by PANASONIC.
USER MANUAL NV-HV60EBL PANASONIC
(Model suffix: 'EB' for UK model, 'EBL' for Ireland model)
Operating Instructions
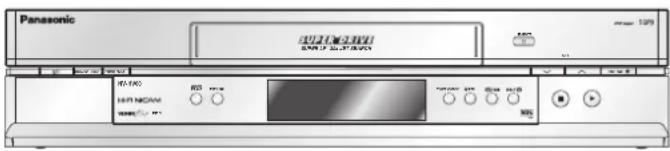
text_image
Panasonic R2100000 R2100000 123.75.2024 R21 R22 R23 R24 R25 R26 R27 R28 R29 R30 R31 R32 R33 R34 R35 R36 R37 R38 R39 R40 R41 R42 R43 R44 R45 R46 R47 R48 R49 R50 R51 R52 R53 R54 R55 R56 R57 R58 R59 R60 R61 R62 R63 R64 R65 R66 R67 R68 R69 R70 R71 R72 R73 R74 R75 R76 R77 R78 R79 R80 R81 R82 R83 R84 R85 R86 R87 R88 R89 R90 R91 R92 R93 R94 R95 R96 R97 R98 R99 R100SUPER DRIVE
VIDEOPlus+®

CVC super
Before attempting to connect, operate or adjust this product, please read these instructions completely.
| Contents | page |
| CAUTION 2-4 | |
| Check List / Shop@Panasonic 5 | |
| Front Panel 6 | |
| Rear Panel / Inserting batteries 7 | |
| Remote control functions 8-9 | |
| Connections | |
| without Scart cable | 10-11 |
| with Scart cables | 12-13 |
| Decoder /Amplifier | 14-15 |
| AUTO SETUP 16-17 | |
| Checking the Settings for Auto Setup 18 | |
| Removing Interference / Changing RF -channel | 19 |
| Menu System / Menu Overview 20-21 | |
| Playback /S2PB / NTSC playback | |
| Tracking control 23 | |
| Recording 24 | |
| External recording control | 25 |
| Timer recording | 26-28 |
| INTELLIGENT TIMER | 29 |
| VIDEO Plus+ | 30-32 |
| Others Menu | 33 |
| Manual setup | |
| Manual Tuning | 34 |
| Changing the name of TV stations | 35 |
| Changing the order of TV stations / deleting a station | 36 |
| RestartAuto Setup | 37 |
| Shipping condition / restoring factory defaults | 37 |
| Owner ID | 38 |
| Clock setting | 39 |
| TV control 40 | |
| AUDIO out settings / NICAM sound system | 41 |
| Advanced functions | 42-43 |
| Before requesting service | 44-45 |
| Tape Care / Cassette erasure protection | 46 |
| Specifications | 47 |
| Index | Last Page |
Caution
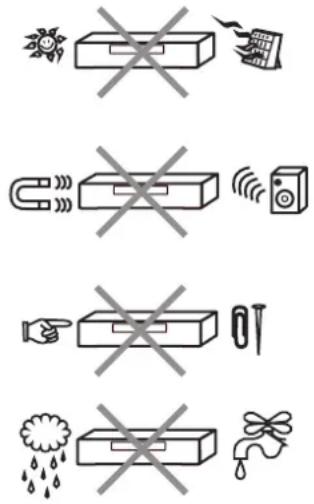

Be sure to read the cautions carefully before you operate this VCR.
Keep the VCR away from high temperatures
Keep the VCR away from sources of heat such as direct sunlight, heating radiators, or closed vehicles.
Avoid magnets or magnetized objects
Never bring a magnet or magnetized object close to the VCR because this could adversely affect the performance of the VCR. When using the VCR together with other equipment, keep as much distance as possible between them to prevent them from adversely affecting each other's performance.
No fingers or other objects inside
Touching internal parts of the VCR is dangerous, and may cause serious damage. Do not attempt to remove the cover as; there are no user serviceable parts inside.
Keep away from liquids
Keep the VCR away from all liquids.
Caution: If water or some other liquid is spilled into the VCR, serious damage could occur. If this happens, disconnect from the mains socket immediately and consult your dealer.
Video head clogging
The picture and sound can be lost or become distorted if video heads become clogged. This may happen in certain environmental conditions or if old or damaged or damp tapes are used or after long use of the VCR.
If this occurs then please consult your dealer. Note: Video Head Cleaning is NOT covered by the warranty.
Cleaning the VCR
Wipe the VCR with a clean, dry cloth. Never use any cleaning fluid or other chemicals. Also do not use compressed air to remove dust.
Avoid sudden changes in temperature
If the VCR is moved from a cold to a warm place or if a heater is turned on, condensation may form on the tape surface and inside the VCR. If this happens, leave the VCR at room temperature for at least 1 hour before operating it.

Avoid humidity and dust
Do not use the VCR in very humid or dusty places.
This may cause damage to its internal parts.
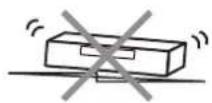
Stacking
Install the VCR in a horizontal position and do not place anything heavy on it.
Condensation may form in the following cases:
- If the VCR is in a room that was very cold before a heater has just been turned on.
- If the VCR is in a room with steam or high humidity.
- If the VCR is brought from cold surroundings into a well-heated room.
- The VCR is suddenly brought from cool surroundings, such as an air-conditioned room or car, to a place, which is hot and humid.
Note: • In any of the above-mentioned conditions, do not operate the VCR for at least 1 hour.
This VCR is not equipped with a dew sensor.
IMPORTANT
Your attention is drawn to the fact that the recording of pre-recorded tapes or discs or other published or broadcast material may infringe copyright laws.
WARNING! TO REDUCE THE RISK OF FIRE, ELECTRIC SHOCK OR PRODUCT DAMAGE, DO NOT EXPOSE THIS APPARATUS TO RAIN, MOISTURE, DRIPPING OR SPLASHING AND ENSURE THAT NO OBJECTS FILLED WITH LIQUIDS, SUCH AS VASES, SHALL BE PLACED ON THE APPARATUS.
CAUTION!
- DO NOT INSTALL, OR PLACE THIS UNIT, IN A BOOKCASE, BUILT-IN CABINET OR IN ANOTHER CONFINED SPACE. ENSURE THE UNIT IS WELL VENTILATED. TO PREVENT RISK OF ELECTRIC SHOCK OR FIRE HAZARD DUE TO OVERHEATING, ENSURE THAT CURTAINS AND ANY OTHER MATERIALS DO NOT OBSTRUCT THE VENTILATION VENTS.
- DO NOT OBSTRUCT THE UNIT'S VENTILATION OPENINGS WITH NEWSPAPERS, TABLECLOTHS, CURTAINS, AND SIMILAR ITEMS.
- DO NOT PLACE SOURCES OF NAKED FLAMES, SUCH AS LIGHTED CANDLES, ON THE UNIT.
• DISPOSE OF BATTERIES IN AN ENVIRONMENTALLY FRIENDLY MANNER.
THIS UNIT IS INTENDED FOR USE IN MODERATE CLIMATES.
This product may receive radio interference caused by mobile telephones during use. If such interference is apparent, please increase separation between the product and the mobile telephone.
CAUTION
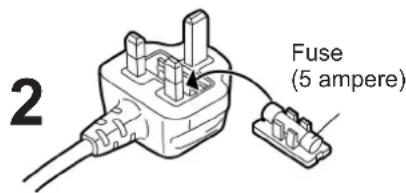
How to replace the fuse
Confirm the AC mains plug fitted and follow the instructions below. Illustrations may differ from actual AC mains plug.
- Open the fuse cover with a screwdriver.
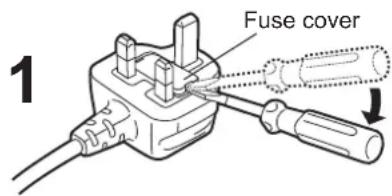
text_image
Fuse cover 1- Replace the fuse and attach the fuse cover.
text_image
2 Fuse (5 ampere)Caution for AC Mains Lead
For your safety, please read the following text carefully.
This appliance is supplied with a moulded three pin mains plug for your safety and convenience.
A 5-ampere fuse is fitted in this plug. Should the fuse need to be replaced please ensure that the replacement fuse has a rating of 5-ampere and that is approved by ASTA or BSI to BS1362. Check for the ASTA mark ☑ or the BSI mark ♥ on the body of the fuse. If the plug contains a removable fuse cover you must ensure that it is refitted when the fuse is replaced. If you lose the fuse cover the plug must not be used until a replacement cover is obtained. A replacement fuse cover can be purchased from your local dealer.
CAUTION!
IF THE FITTED MOULDED PLUG IS UNSUITABLE FOR THE SOCKET OUTLET IN YOUR HOME THEN THE FUSE SHOULD BE REMOVED AND THE PLUG CUT OFF AND DISPOSED OF SAFELY. THERE IS A DANGER OF SEVERE ELECTRICAL SHOCK IF THE CUT OFF PLUG IS INSERTED INTO ANY 13-AMPERE SOCKET.
If a new plug is to be fitted please observe the wiring code as stated below. If in any doubt please consult a qualified electrician.
IMPORTANT
The wires in this mains lead are coloured in accordance with the following code: Blue: Neutral, Brown: Live.
As these colours may not correspond with the coloured markings identifying the terminals in your plug, proceed as follows: The wire which is coloured Blue must be connected to the terminal which is marked with the letter N or coloured Black or Blue. The wire which is coloured Brown must be connected to the terminal which is marked with the letter L or coloured Brown or Red.
WARNING: DO NOT CONNECT EITHER WIRE TO THE EARTH TERMINAL WHICH IS MARKED WITH THE LETTER E, BY THE EARTH SYMBOL 12 OR COLOURED GREEN OR GREEN/YELLOW. THIS PLUG IS NOT WATERPROOF - KEEP DRY.
FOR YOUR SAFETY DO NOT REMOVE OUTER COVER. To prevent electric shock, do not remove the cover. There are no user serviceable parts inside. Refer all servicing to qualified service personnel. For your safety, be sure not to connect or handle the equipment with wet hands.
Check List
Check that you have the accessories and items shown
text_image
Diagram showing a hand writing on a checkmark next to a CD-ROM drive with control buttons
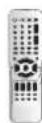
Remote Control N2QAKB000044
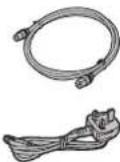
RF cable K2KF2BA00001, VJA0728-A or K1TWACC00001
AC Mains lead RJA0044-3C
Operating Instructions RQTD0078-B
Batteries for the Remote Control R6 size
Quick Start Guide RQCAD0006
Guarantee Card

Shop @ Panasonic
www.panasonic.co.uk
(for UK and Republic of Ireland customers only)
- Order accessory and consumable items for your product with ease and confidence by phoning our Customer Care Centre Mon-Friday 9:00am–5:30pm. (Excluding public holidays.)
- Or go on line through our Internet Accessory ordering application.
- Most major credit and debit cards accepted
- All enquiries transactions and distribution facilities are provided directly by Panasonic UK Ltd.
- It couldn't be simpler!
Customer Care Centre
For UK customers: 08705 357357
For Republic of Ireland customers: 01 289 8333
Front Panel
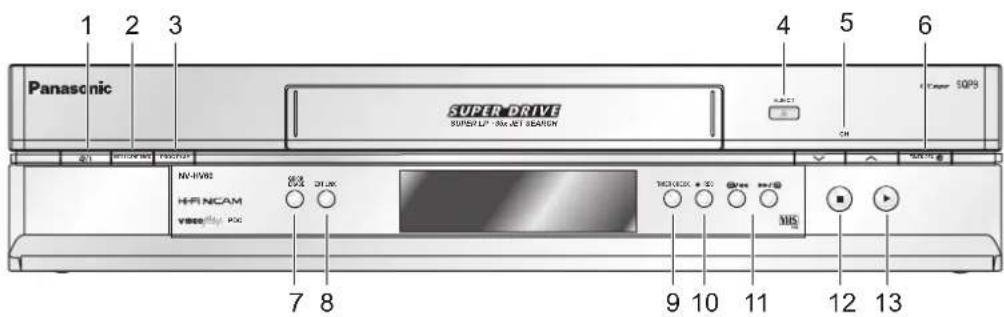
text_image
Panasonic SUPER DRIVE SUPER-LP - 50k NET SEARCH 4 5 6 SOPs 8 7 8 9 10 11 12 13| 1 |  | Stand-by/on switch |
| 2 |  | Defines timer programmes. |
| 3 |  | Plays back programmed recordings. |
| 4 |  | Ejects the cassette. |
| 5 |  | Selects a channel. |
| 6 |  | Activates the recording timer. |
| 7 | 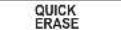  | Erases a cassette. |
| 8 |  | Activates the recording timer for externally controlled recording. |
| 9 | TIMER CHECK | Displays the timer programme for verification. |
| 10 | REC | Record button |
| 11 |   | Fast winding / JET SEARCH |
| 12 | | Stop button |
| 13 |  | Playback button |
Rear Panel
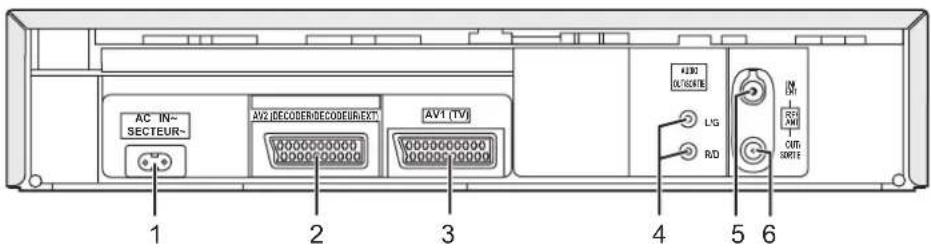
text_image
AC IN~ SECTEUR~ AV2 (DECODER/DECODEUR/EXT) AV1 (TV) AUX OUTCATE L/G R/D IN OUT SOME 1 2 3 4 5 6| 1 AC Input socket ( Power supply) |
| 2 AV2 21-pin Scart socket |
| 3 AV1 21-pin Scart socket |
| 4 AUDIO OUT socketL/G = AUDIO output left channelR/D = AUDIO output right channel |
| 5 RF IN socket (Aerial input) |
| 6 RF OUT socket (Aerial output) |
text_image
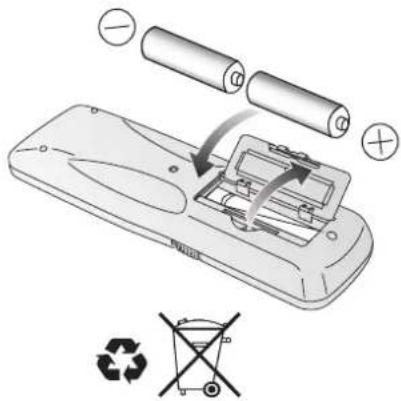
Diagram illustrating battery charging process with labeled components and recycling symbolInserting batteries into the remote control unit:
The batteries last for about a year, depending on how often you use the RC unit.
- Do not mix old with new batteries or batteries of different types.
- Only use batteries without any harmful substances (such as lead, cadmium, mercury).
- Do not use rechargeable type batteries.
- Remove the batteries if the remote control unit will remain unused for longer periods of time.
- Do not heat or short-circuit the batteries.
- Immediately remove used-up batteries and replace with batteries of type AA, UM3 or R6.
- Be sure to put in the batteries the right way round (+and -).
Dispose of batteries, according to statistical the unit regulations. They must not be thrown into the household refuse.
Remote control functions
1
| Stand-by/on switch ⏻/IPress to switch the unit from on to stand-by mode or vice versa. In stand-by mode, the unit is still consuming a small amount of power. | VCR TV | |
| EXT LINK | Activates the recording timer for externally controlled recording. | VCR P25 |
| TV ASPECT | Changes the screen format. | TV |
| TV/TEXT | Toggles between TV reception and video text reception. | TV |
Control menu
2
| OSD menu selection buttons. ENTER: Selects or saves a setting. | VCR | |
| Displays the menu. | VCR | |
| Quits a menu. | VCR |




Some Panasonic TV sets accept control signals from the VCR's remote control unit. In the table, the TV buttons are marked with TV, the VCR buttons with VCR.
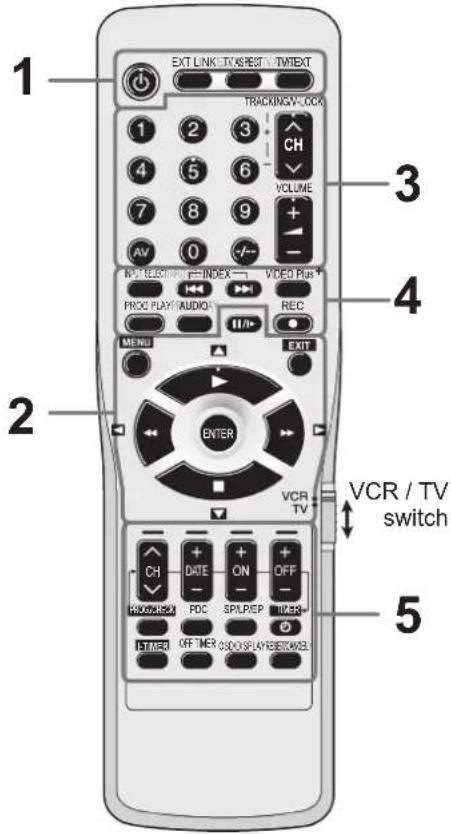
text_image
1 EXT LINK TV BEST TWEXT TRACKINGV CLOCK 1 2 3 CH VOLUME 7 8 9 AV 0 RQI ELEMONI INDEX VIDEO Plus PROC PLAY AUDIO REC MENU EXIT ENTER VCR TV VCR / TV switch 5 CH DATE ON OFF PROGRAM PDC SPL/PIP TIMER TIMER OFF TIMER OSO DISPLAYSHEETBACK3
| Selects a programme memory location and inputs the VIDEO Plus+ number.Example: 18= ⚡18 | VCR TV | |
| Selects the TV set's AV port. | TV | |
| TRACKING/V-LOCK | Channel selectorTracking control of disturbed VCR image. | VCR TV |
| Volume control. | TV |
4
| VIDEO Plus+ | Displays the menu.VIDEO Plus+ | VCRP.30 |
| PROG PLAY | Plays back programmed recordings. | VCRP.27 |
| REC | Record | VCRP.24 |
| INPUT SELECT | Toggles between AV inputs A1 and A2. | VCR |
| INDEX | Finds the start of a recording. | VCRP.42 |
| AUDIO | Audio out settings | VCRP.41 |
| TV: Selects the AV input and navigates in the menu.VCR: Menu entries. | TVVCR | |
| Displays the Timer recording menu. | VCRP.26 | |
| Controls the beginning and end of a recording session by a special signal. | VCRP.28 | |
| Sets the tape speed. | VCRP.24 |
5
| OFF TIMER | Switches the unit into stand-by mode after the set time of recording, playback or in Stop mode. | VCR P.43 |
| I-TIMER | Recalls last 5 timer programmes | VCR P.29 |
| TIMER | Activates the recording timer. | VCR P.26 |
| OSD/DISPLAY | Press the button repeatedly to display the time, tape counter or remaining tape. | VCR P.24 |
| RESET/CANCEL | RESET: Resets the counter to 0:00.00.CANCEL: Clears an entry you made. | VCR P.43 |
Connections without Scart cable
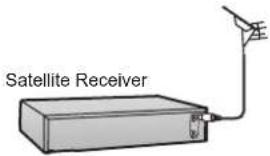
You can connect your VCR to a TV and Satellite Receiver using RF cable. However, using this connection method it may be difficult to obtain a clear picture from the Satellite Receiver. For this reason it is not recommended for inexperienced users. (See preferred connection on page 12.)
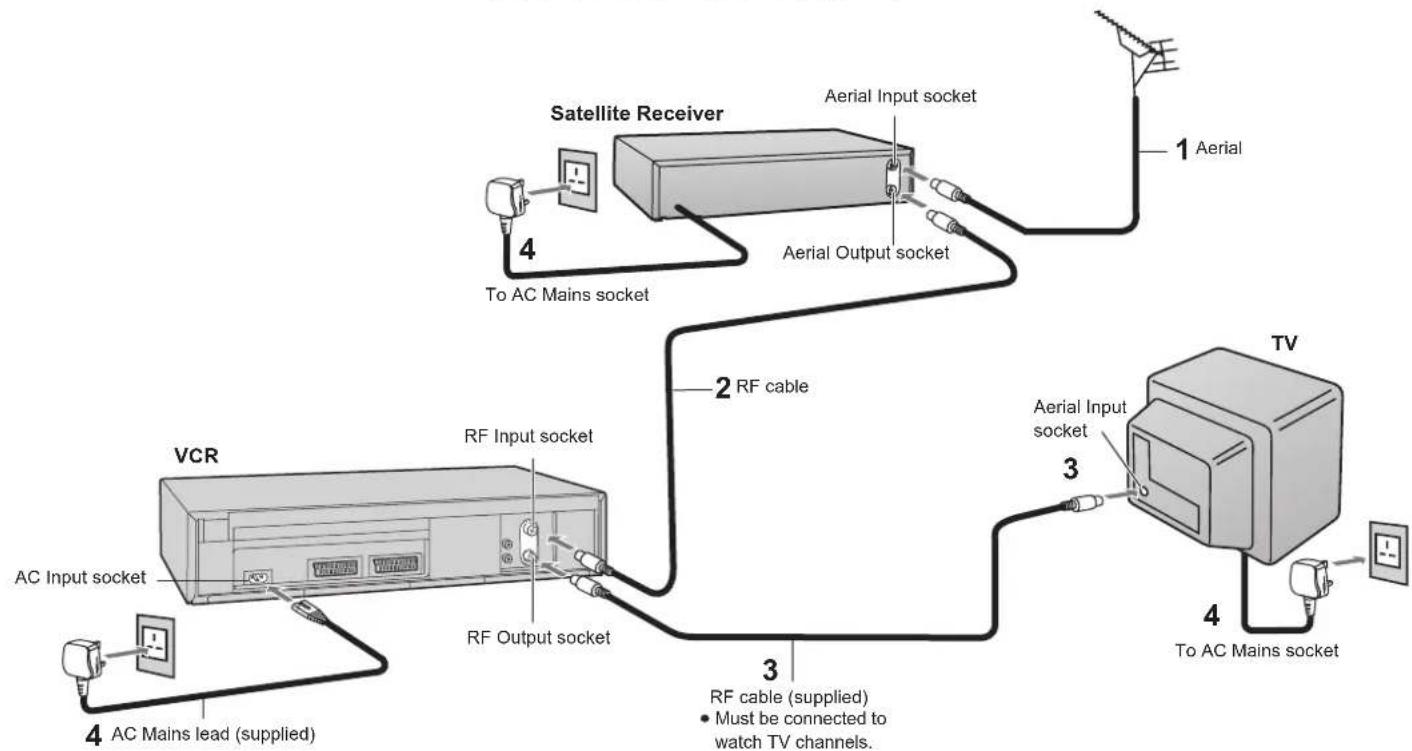
flowchart
graph TD
    A["Satellite Receiver"] -->|Aerial Input socket| B["TV"]
    A -->|Aerial Output socket| B
    C["VCR"] -->|RF Input socket| B
    C -->|RF Output socket| B
    D["To AC Mains socket"] -->|4 AC Mains lead (supplied)| C
    E["Aerial Input socket"] -->|1 Aerial| B
    F["Aerial Input socket"] -->|3 Aerial Input socket| B
    G["To AC Mains socket"] -->|4 To AC Mains socket| B
    H["RF cable (supplied)"] -->|2 RF cable| B
    I["Must be connected to watch TV channels."] --> B
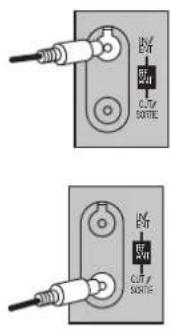
text_image
Diagram showing two identical electrical component setups with labeled pins and connections, including 'OUT/ SOUTIE' labels.Follow the step-by-step guide below.
1 Connect the aerial to the aerial input socket of the Satellite Receiver.
- If you do not have a Satellite Receiver, connect the aerial to the RF input socket of the VCR and go to step 3.
2 Connect the aerial from Satellite Receiver to the RF Input socket.
3 Connect the RF output socket to the TV aerial socket.
4 Plug the TV, VCR and Satellite Receiver into the mains.
5 Switch ON your Satellite Receiver, to ensure reliable tuning select either SKY ONE or SKY NEWS.
text_image
Satellite Receiver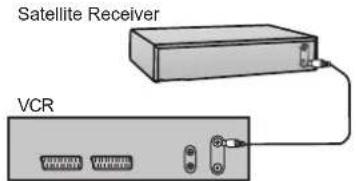
text_image
Satellite Receiver VCR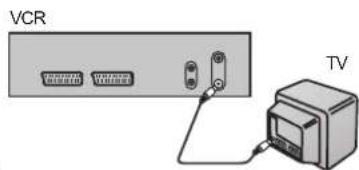
text_image
VCR TVNotes: If, after Auto Setup is complete, the programme position of the satellite receiver is not to your preference, or 'SAT' name is not shown in the Program List, you can re-arrange the programme position and enter 'SAT' name manually (See pages 34-36).
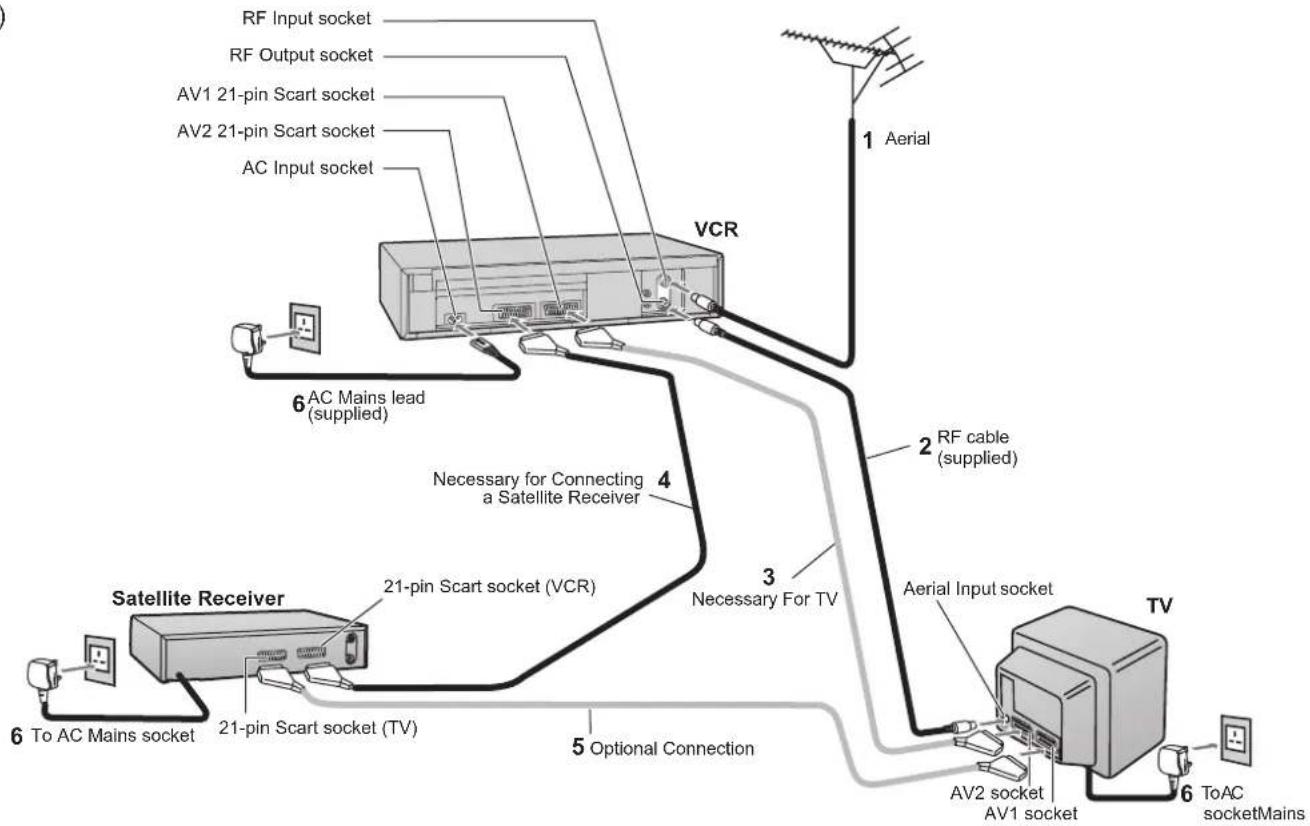
Connections with Scart cables
(fully-wired)
text_image
RF Input socket RF Output socket AV1 21-pin Scart socket AV2 21-pin Scart socket AC Input socket VCR 1 Aerial 6 AC Mains lead (supplied) 2 RF cable (supplied) 4 Necessary for Connecting a Satellite Receiver 3 Necessary For TV 5 Optional Connection 6 To AC Mains socket 21-pin Scart socket (VCR) Satellite Receiver TV Aerial Input socket AV2 socket AV1 socket 6 ToAC socketMains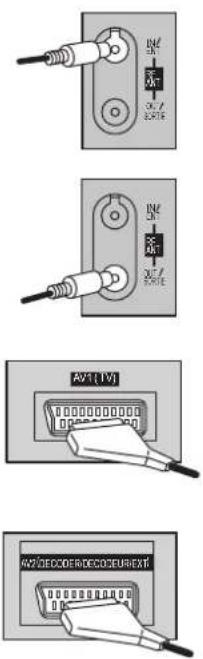
Follow the step-by-step guide below.
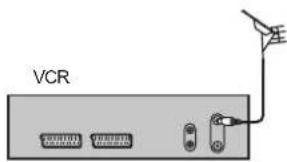
1 Connect the aerial to the RF Input socket of the VCR.
2 Connect the RF cable from the RF Output socket of the VCR to the TV aerial input socket.
3 Connect the AV1 21-pin scart socket to the TV scart socket. If your TV does not have a scart socket or you do not have a scart cable, skip this step.
4 Connect the AV2 21-pin scart socket to the VCR scart socket on your Satellite Receiver/Digital Receiver. If you are not connecting a Satellite Receiver, skip this step.
5 Connect the TV scart socket of your Satellite Receiver to the AV1 scart socket of your TV. If you are not connecting a Satellite Receiver, skip this step.
6 Plug the TV, VCR and Satellite Receiver into the mains.
text_image
VCR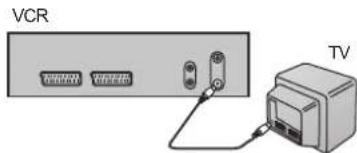
text_image
VCR TV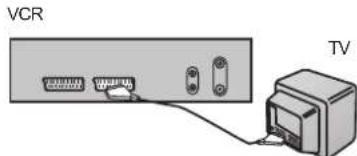
text_image
VCR TV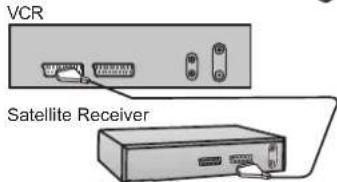
text_image
VCR Satellite Receiver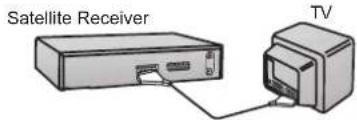
text_image
Satellite Receiver TVDecoder
Connecting the VCR to a Decoder
To connect this VCR to a decoder, make the connections shown in the illustration below. For the connection to the TV, see page 12. For details about the connection, also read the operating instructions of the decoder. Be sure to keep the VCR, TV and decoder disconnected from mains until you have finished all connections.
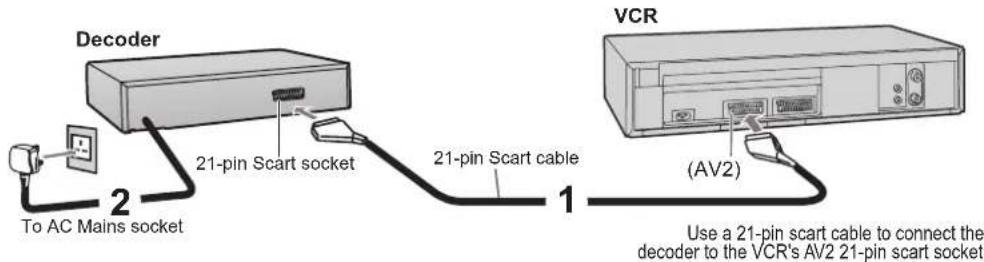
text_image
Decoder 21-pin Scart socket To AC Mains socket 21-pin Scart cable VCR (AV2) 1 Use a 21-pin scart cable to connect the decoder to the VCR's AV2 21-pin scart socket1 Connect a 21-pin scart cable to the AV2 21-pin scart socket on the VCR and to the 21-pin scart socket on the decoder.
2 Connect the decoder's mains lead to an AC mains socket.
3 Set AV2 DECODER . For details, see page 33.
Note: [RGB] means separate Red/Green/Blue colour signals. If you connect a TV equipped with RGB input capability to the AV1 socket on this VCR, and a decoder equipped with RGB output capability to the AV2 socket, RGB signals will pass through the VCR to the TV when the VCR is in stand-by mode. The RGB signals cannot be recorded or produced by this VCR.
Amplifier
Connecting the VCR to a Stereo Amplifier
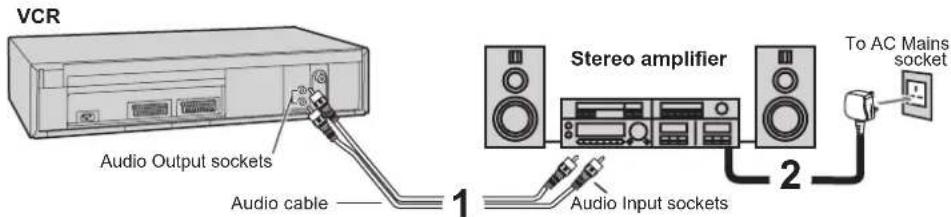
To connect this VCR to a stereo amplifier, make the connections shown in the illustration below. For the connection to the TV, see page 12. For details about the connection, also read the operating instructions of the stereo amplifier. Be sure to keep the VCR, TV and stereo amplifier disconnected from mains until you have finished all connections.
1 Connect an Audio cable (not supplied) to the Audio Output sockets on the VCR and to the Audio Input sockets on the stereo amplifier. left = white (L/G) right = red (R/D). If you have a scart adapter cable you can also connect the video recorder's AV 21-pin scart socket to an amplifier.
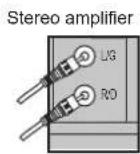
2 Connect the stereo amplifier's mains lead to an AC Mains socket.
text_image
VCR Audio Output sockets Audio cable 1 Stereo amplifier 2 To AC Mains socket Audio Input socketsAUTO SETUP
text_image
0 Ch:-- ↓ Ch:28VCR Display
On-Screen Display
text_image
Owner ID PIN number : 846* Name : ********** House No : ********** Postcode : ********** You now have the opportunity to enter your details and help the police crack crime see instruction book. :select ENTER : store EXIT : exitOn-Screen Display

- Set the VCR/TVb VCR.
- Turn on the TV,
-
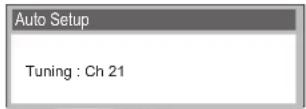
then press the VCR-Stand-by/ON button to switch on the VCR. The VCR will now start Auto Setup.
-
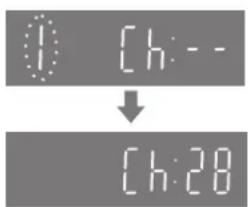
While Auto Setup is running the first digit of the VCR display will flash. After a while it will stop flashing and the RF output channel number will be displayed.
- Select an unused channel pre-set on your TV and tune it to the RF output channel number shown on the VCR display (or until you can clearly see the Auto Setup screen). Store the new video playback channel (refer to the instructions for your TV).
- If you connect your VCR to the TV by a Scart cable, you do not need to tune the TV as described above simply select appropriate input mode on TV.

Owner ID
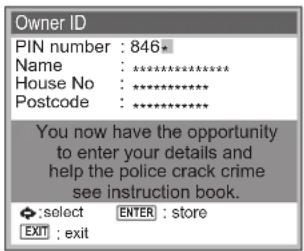
You can complete the Owner ID now or skip this step and do it later. To do it later, press the EXIT button again. Your VCR is now ready to use.
- To set the Owner ID now, press the Numeric buttons or ▲▼▶ to enter a four-digit PIN number.
- Press ◀, to correct the digit.
- Make sure that you will remember the PIN number (make a note of it).
- Press the ENTER button twice to confirm.
- Enter the [Name], [House No] and [Postcode] in the same way.
- Press the ENTER button to confirm each entry.
- Press the EXIT button to leave the Owner ID screen.
- You will now see the TV picture. Your VCR is now ready to use.
| Clock set | |
| MANUAL | |
| Time | : 12 : 00 : 00 |
| Date | : 11. 6. 03 |
If the clock setting menu appears
(Auto clock set was not possible due to a weak signal)
- Press ▲▼◀▶ to set the correct time and date.
- Press the ENTER button to finish this setting.
Note: - If Auto Setup has previously been completed the VCR will not start Auto Setup automatically. In this case you can re-start Auto Setup again. See page 37.
- If you want to cancel Auto Setup before it has finished, press the EXIT button. You can restart Auto Setup again. See page 37.
- In some cases, the RF output channel may interfere with the TV stations transmitted in your area. This may prevent you from seeing the On-Screen Display clearly. Please see page 19 for removing the interference before restarting Auto Setup (page 37).
TV Reception Channels
Example of UK model
| Tuning | |||
| Pos Name Ch Pos Name Ch | |||
| 1 BBC1 22 | 6 | **** | 30 |
| 2 BBC2 23 | 7 | ---- | ---- |
| 3 ITV 24 | 8 | ---- | ---- |
| 4 CH4 25 | 9 | ---- | ---- |
| 5 CH5 26 | 1 0 | ---- | ---- |
Example of Ireland model
| Tuning | |||||||
| Pos | Name | Ch | Pos | Name | Ch | ||
| 1 | R | T | E | 1 | 2 | 6 | ITV 24 |
| 2 | N | E | T | 2 | 4 | 7 | CH4 25 |
| 3 | T | N | G | 6 | 8 | CH5 | 26 |
| 4 | BBC1 | 22 | 9 | ---- | ---- | ||
| 5 | BBC2 | 23 | 1 | 0 | ---- | ||
The reception channels are different from UK and Ireland.
List of TV Reception Channels
| VHF | UHF | CATV | |
| UK | - | 21–68 | - |
| Ireland | A-J | 21–69 | 104–470MHz |
Channel Listing may differ from the examples shown left, depending on signal reception condition.
Checking the Settings for Auto Setup
On Screen Display
text_image
Menu Timer recording Tuning Clock set Others ◆:select : acca:EBER EXIT : exit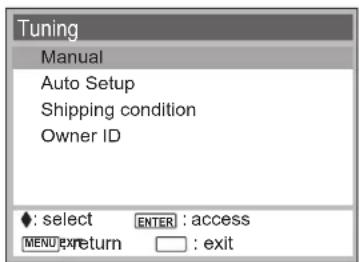
text_image
Tuning Manual Auto Setup Shipping condition Owner ID ◆: select ENTER : access MENU:return : exitTo confirm that the TV stations have been tuned correctly by Auto Setup
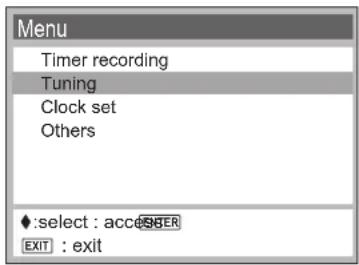
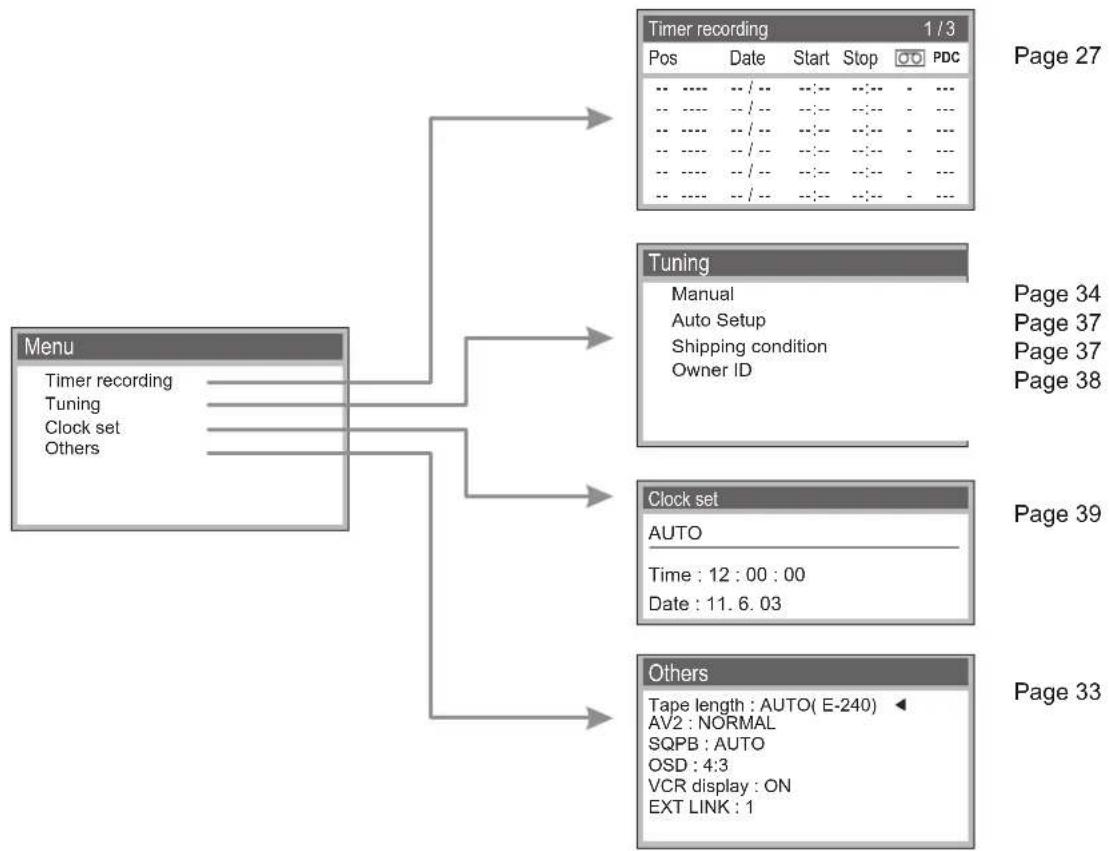
- Press the MENU button to display the OSD Main menu on the TV screen.
- Press ▲ to select Tuning then press the ENTER button.
- Press ▲▼ to select Manual then press the ENTER button to display the list of tuned TV stations and confirm that all available TV stations have been set correctly.
- Positions 5 and 6 may differ from the example shown on page 17. If Channel 5 is received, it is usually found on programme position 5 and a connected satellite receiver on programme position 6.
- If Channel 5 is not received but a satellite receiver is connected, then the satellite receiver is found on programme position 5.
- Press the EXIT button to exit the On Screen Display.


When the station names and/or channel numbers have not been set correctly. See page 35 for details.
When no station has been found, confirm all connections of the VCR again and restart the Auto Setup. See page 37 for details.
Notes:
- If station name is [****]:
The asterisks indicate that a station was found during Auto Setup but has not been named (due to weak signal).
The stations in the list with asterisk will need to be named manually. (See page 35.)
- If station name is [---]:
The dashes represent unused channel positions.
The stations in the list with dashes will need to be set manually. (See page 34.).
Removing Interference / Changing RF-channel
The picture with interference
On-Screen Display
Test pattern indication
VCR display
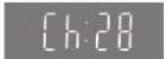
Indication when the RF output channel is 28 (example)
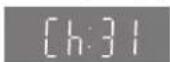
Indication after changing the RF output channel to 31 (example)
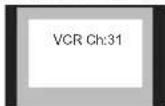
Test pattern indication
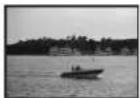
The clear picture
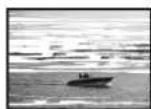
In some cases, interference (lines or patterning) or a very poor picture may appear on the TV when the VCR is connected. If this happens, follow the steps below to change the video playback channel (RF output channel) to remove the interference.
- Set the VCR/TV switch to VCR.
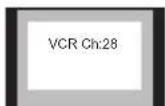
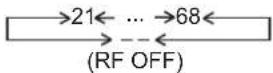
- Press the MENU button for more than 5 seconds. The RF output channel number is displayed on the VCR display.
- Press the Numeric buttons or use the Channel (CH) button to select a channel number, which differs by 2 or 3 from the present channel number. (For example, if the original channel number was 28, enter 31.)
- Retune your TV until you receive the Test pattern. It may be necessary to repeat steps 2 and 3 above until you can see the Test pattern clearly. If using a Scart cable please see the note below.
- Press to finish this setting. ENTER
Note: Set the RF output channel of the VCR to [- -] (RF OFF) if the VCR is connected to the TV via the 21-pin Scart cable.
- Press the 0 button or Channel button to display [- -], if using a 21-pin Scart cable.


Menu System
flowchart
graph TD
    A["Menu"] --> B["Timer recording"]
    A --> C["Tuning"]
    A --> D["Clock set"]
    A --> E["Others"]
    B --> F["Timer recording 1/3"]
    C --> G["Tuning"]
    D --> H["Clock set"]
    E --> I["Others"]
    F --> J["Page 27"]
    G --> K["Page 34"]
    G --> L["Page 37"]
    G --> M["Page 37"]
    G --> N["Page 38"]
    H --> O["Page 39"]
    I --> P["Page 33"]
Menu Overview
text_image
Menu Timer recording Tuning Clock set Others ◆:select : acc###SER EXIT : exit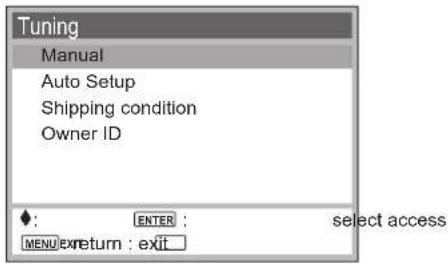
text_image
Tuning Manual Auto Setup Shipping condition Owner ID ◆: ENTER : select access MENU EX return : exitThe cursor keys of the remote control unit ◀▶▲▼ allow you to move between menus and to change settings.
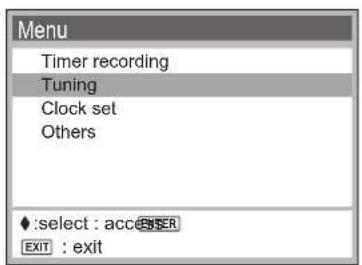
- Press MENU to display the Menu screen.
- Select an entry by pressing ▲▼.
- Press ENTER to access the selected sub-menu.
The selected sub-menu is displayed.
- Select the item you wish to edit ▲.
- Press ENTERess.
- Make the changes as appropriate. Follow the on-screen instructions.
- Press MENU to return to the previous menu.
- Press Exit the menu.
Playback
Set the TV set to the video channel and insert a cassette into the VCR

Normal Playback:
Press ▶
Cue or Review Playback:
During playback, press and release ▶▶ or ◀◀.
- To return to normal playback, press ▶.
- If you press and hold down the ▶▶ or ◀◀, Cue or review playback continues for as long as you keep the button pressed.
High Speed Cue or Review Playback (JET SEARCH):
During playback, press and release ▶▶ or ◀◀ twice.
- During high-speed cue or review, the tape transport noise will increase. This is normal.
Still Playback:
During playback, press III/▶
- To return to normal playback, press ▶ or ▶.
Slow Playback:
During playback, keep III/▶ pressed for more than 2 seconds.
- To return to normal playback, press ▶.

Press ■ stop playback.

Playing back S-VHS Cassette Tape (SQPB=S-VHS Quasi Playback)
It is also possible to play back tapes recorded on an S-VHS VCR.
- The picture quality will be similar to VHS playback.
- It is not possible to make an S-VHS recording with this VCR.
Playing back NTSC video cassettes
You can play back NTSC video cassettes for viewing on a PAL system (PAL 60) TV set. You cannot record on or copy video cassettes to NTSC-format cassettes.
CVC Super - Crystal View Control Super
CVC Super gives the best picture quality possible by adjusting to the individual tape characteristics.
Tracking control
natural_image
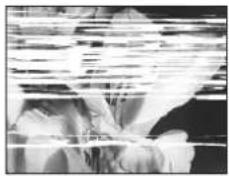
Black-and-white photo of a person in uniform standing with arms crossed (no visible text or symbols)Playback picture containing noise bars
natural_image
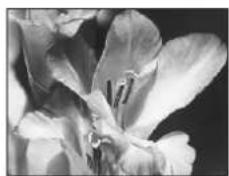
Close-up black-and-white photo of a blooming flower with visible petals and stamens (no text or symbols)TRACKING/V-LOCK

Adjusting the playback picture
Under normal conditions, the VCR automatically adjusts the tracking for optimum performance.
However, in some cases it may be necessary to adjust it manually.
If the picture contains noise bars and it is not clear to see (tracking adjustment): If noise bars appear during normal playback, slow playback or still playback, follow the operations below.
During normal or slow playback, press CH ∨ or ∧ until the bars noise disappear.
- If the noise bars appear during still playback, switch the VCR over to the slow playback mode and then adjust the tracking as explained above.
To return to Auto Tracking:
Press 6H simultaneously.
If the still picture jitters or jumps (V-lock adjustment):
If the still picture jitters or jumps, perform the following.
During still playback, keep the CH button ∨ or ∧ pressed until the picture becomes stable.
Notes:
- With certain TV models and tapes, it may not be possible to adjust the tracking.
- If you play back a cassette that was recorded on another unit of VCR, the picture quality may be inferior in the normal playback, slow playback, and still playback, and it may need to manual adjust the tracking by above method.
- Also, on some TVs, the picture may scroll up and down in the special playback functions.
However, these are not malfunctions.
Recording

Set the TV set to the video channel and insert a cassette into the VCR; make sure that the cassette's protection tab is still in.
- Select a channel to record from.
Select the AV channel if you are recording via the 21-pin scart cable. - Press REstart recording.
- Press ▪ stop recording.
• To pause recording: □/▶
The function will switch itself off after approx. 5 minutes to protect the video heads.
• To resume recording: □/▶
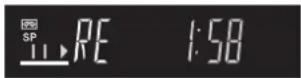

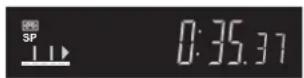
Tape Remain Counter / Indicator
The display of the VCR shows: time - counter - tape remain. The start of a cassette is indicated as ----.
- Press OSD/BISPLAYdisplayed.

- Prior to starting the recording session, press SP/LP/EP to set the tape speed.
SP : normal recording time
- optimal picture quality
LP : double recording time
- simple picture quality
EP : triple recording time
- reduced picture quality
Note: - When you play back LP or EP recordings, some cassettes (e.g. E-300 type) may produce interference. This is not indicative of a malfunction.
External recording control
text_image
VCR Aerial Satellite Receiver TV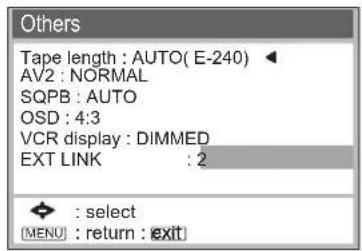
text_image
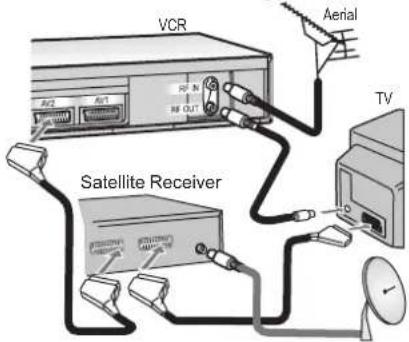
Others Tape length : AUTO( E-240) AV2 : NORMAL SQPB : AUTO OSD : 4:3 VCR display : DIMMED EXT LINK : 2 : select [MENU] : return : exitThe AV2 input of this VCR is equipped for future use with external equipment having external timer recording control such as digital satellite receivers. The AV2 input can be set to EXT LINK 1 or EXT LINK 2 depending on the equipment to be connected. Fully wired 21-pin scart cable is required. Refer also to the manufacturer's instruction for the external unit.
EXT LINK 1: The VCR recording start and stop time is controlled by a control signal sent via the 21-pin scart cable from the external unit, for example Sky Digibox.
EXT LINK 2: The VCR will start recording when AV2 input detects the video signal and stop recording when the video signal is switched off by the external unit.
External recording control
- Press MENU and select Others ▼
- Press ENTER
- Select EXT LINK 2 or 1
- Press MENU to return to the Menu screen.
- Press the EXT LINK button to activate the VCR's recording stand-by mode. As long as the Video- or Controlsignal is being transmitted by the Satellite or Digital Receiver, the VCR will record.
The following screen will be shown if you selected EXT LINK 2:
EXT LINK recording in progress.
ENTER: yes EXT LINK :cancel
- Press ENTER the message.
- Press the EXT LINK button to stop recording.
Notes: - Be sure that the timer programmes stored by your VCR do not overlap the ones of the satellite or digital receiver.
- Some external equipment may not work with this function, refer to the operating instructions for the external unit.
Timer recording
text_image
Timer recording 1 / 3 Pos Date Start Stop PDC 1 BBC1 31/12 10:30 11:30 SP ON 2 BBC2 31/12 11:30 12:30 SP ON 3 ITV 31/12 12:30 13:30 SP ON 4 CH4 31/12 13:30 14:30 SP ON 5 CH5 31/12 14:30 15:30 SP ON --- --- --- --- --- SP --- ◆ :select ENTER : store CANCEL : delete EXIT : exit
PROG/CHECK
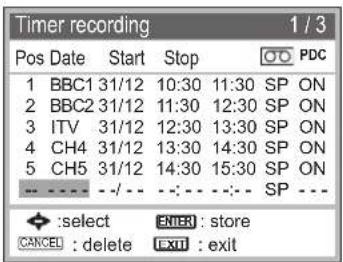
The recording timer allows you to programme the recording time of TV programmes up to 1 month in advance. Use the on-screen menu to programme a maximum of 16 recordings.
- Press MENut and preTimer recording ENTER or press PROG/CHECK Timer recording menu.
- Press ENTER Use the cursor keys or [REDACTED] to make the next entries.
- Select a station ▲▼, ▶ or press CH (example BBC1)
- Set the date, week or day of week ▲▼, ▶ or press DATE (example 31/12)
- Enter the recording start time: ▲▼, ▶ or press ON (example 10:30)
- Enter the recording stop time: ▲▼, ▶ or press OFF (example 11:30) Keep the buttons pressed to change the time in 30-minute steps.
- Set the tape speed: A (Automatic), SP, LP, EP ▲▼, ▶
- Press ▲▼ or the PDC button to change the PDC setting (ON/OFF).
- Press ENTER to save the timer programme.
- Repeat these steps for further recordings you may wish to program
- Press TIMER to activate the VCR's Timer stand-by mode Ensure that the video recorder symbol ⊙ is displayed.
Do not forget to verify that there is enough tape remain. The total recording time must not exceed the length of tape on the video cassette.
Timer recording



Quitting the timer mode
- Press TIMER; the video recorder symbol ⏻ turns off. You can now play back a cassette or make a manual recording. Press TIMER again to reactivate the timer programme you entered previously.
Displays the timer programmes for verification. (button on the unit only)
- Repeatedly press TIMER CHECK to view the details of the timer programmes on the VCR's display.
Checking the timer programme
- Press PROG/CHECK; the Timer Recording menu will appear. - Press PROG/CHECK EATn or to quit the menu.
Changing or cancelling a timer programme
- Press PROG/CHECK to display the Timer Recording menu.
- Press ▲▼ to select the entry you wish to edit.
- Press ENTER
- Use to change the entries.
- Press ENTER
- Press RESET/CANCEL to cancel the timer programme.
Playing back programmed recordings
The unit will rewind to the beginning of the programmed recording and automatically start playing it back.
You can also play back programmed recordings manually.
This function will not work if the tape has been ejected after Timer Recordings have been completed.
Timer recording
Automatic SP/LP selection
A: If, at the beginning of a timer programme, there is not enough tape left to complete it, the SP/LP function will automatically run the tape at LP speed. This ensures that the entire programme will be recorded. If the LP mode is not enough to 'stretch' the remaining tape to fit you will not be able to record all of the TV programme.
Note: - It is not possible to automatically activate the EP mode.
PDC function
Programme Delivery Control adjusts the start and stop time of a timer recording automatically to ensure the recording starts and finishes in line with the programme broadcast.
This is useful when a programme over-runs the published times.
The station must be transmitting PDC and the exact time must be set for PDC to work. The VCR detects whether a station is transmitting PDC only during the tuning process.
If PDC is introduced or discontinued by a station you will need to re-tune the VCR before it becomes aware of this.
PDC transmissions are not currently nation-wide so please check with your local broadcaster for more information.
PDC

ON : The station transmits PDC signals. You must set the start time to the time specified in the TV magazines.
- - - : The station does not transmit PDC signals. Try to set the start and stop times such that the entire film can be recorded even if a programme begins or ends earlier or later than planned.
INTELLIGENT TIMER
text_image
INTELLIGENT TIMER 25/10/03 Pos Date Start Stop 1 BBC1 25/10 10:30 11:30 SP ON 1 BBC1 25/10 18:30 19:30 SP OFF 2 BBC2 25/10 12:30 13:30 A ON ◆ [TIMER]: select : TIMER ENTER : edit : unlock : lock ▶ CANCEL : delete : exit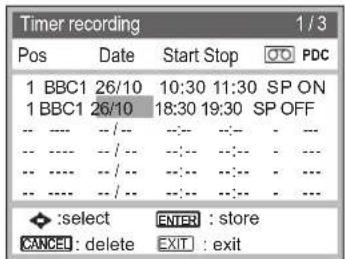
text_image
Timer recording 1/3 Pos Date Start Stop PDC 1 BBC1 26/10 10:30 11:30 SP ON 1 BBC1 26/10 18:30 19:30 SP OFF ---- ---- ---- ---- ---- ---- ---- ---- ---- ---- ---- ● :select ENTER : store CANCEL : delete EXIT : exit
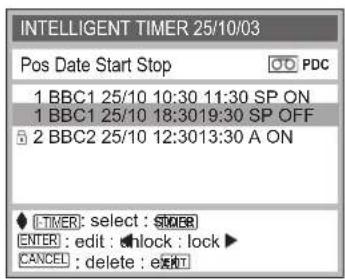
This function makes it easier for you to time the recording of programmes transmitted by the same station at the same time but on different days. You can fully modify the programmes once they have been transferred to the Timer Recording menu. The INTELLIGENT TIMER menu lists the information of the last 5 timer programmes.
To use the INTELLIGENT TIMER function you must first programme at least one normal timer programme.
Setting a programme at it is
- Press I-TIMER.
- Press ▲▼ or I-TIMER to select a programme.
- Press TIMER to activate the timer mode.
Editing a programme
- Press I-TIMER.
- Press ▲▼ or I-TIMER to select a programme.
- Press ENTER to display the Timer recording screen.
- Use ◀▶▲▼ to change any of the data.
- Press ENTER to store a change.
- Press TIMER to activate the timer mode.
Protect and unprotect a Programme
If more than 5 timer programmes are made, the oldest entry will be deleted automatically if it is not protected.
- To protect a programme, select the entry ▲▼ and press▶; the symbol 🔒 is displayed.
- To unprotect press ◀; the symbol 🔒 disappears.
VIDEO Plus+
text_image
Video Plus+ 8 3 5 4 2 - - - - 0 - 9 :enter : a##663 ← : correct : ex#EXITVIDEO Plus+

Programming with the VIDEO Plus+ Function
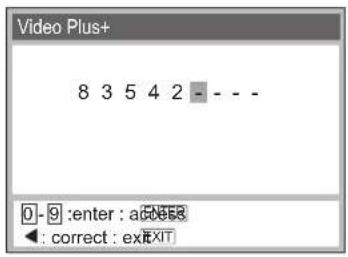
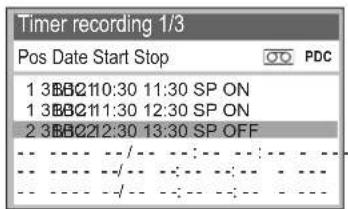
The VIDEO Plus+ Codes (numbers) make it easy to set the VCR for timer recording from TV channel and SAT channel.
The recording time may be slightly longer than the TV programme.
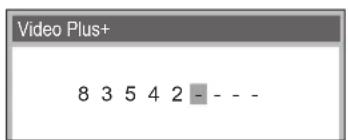
- Press the VIDEO Plus+ button.
- Press the Numeric button to enter the VIDEO Plus+ code (press ◀ to correct any mistakes)
- Press ENTER
The Timer recording screen is displayed.
- Set the tape speed: A (Automatic), SP, LP, EP ▲▼, ▶ (for automatic setting see page 28)
If you do not wish to edit the Timer recording data.
- Press TIMER to activate the timer mode. Ensure that the video recorder symbol ⏻ is displayed.

• To edit Timer recording data press ENTER
- Use ▲▼, ▶ to select a station or press CH
- Use ▲▼, ▶ to set the date, week or day of week or press DATE
- Use ▲▼, ▶ to change the start time or press ON
- Use ▲▼,▶ to change the stop time or press OFF
• See page 28 for PDC recording
- Press ENTER
- Press TIMER to activate the timer mode.
Ensure that the video recorder symbol ⏻ is displayed.
VIDEO Plus+
text_image
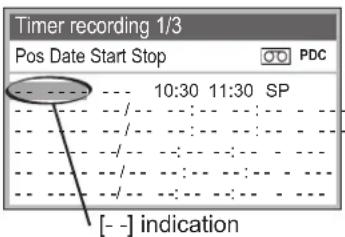
Timer recording 1/3 Pos Date Start Stop 10:30 11:30 SP [-] indicationIf [--] appears under Pos after entering a VIDEO Plus+ Code (Number)
Pos is the Programme Position/TV Station Name.
Normally, the name of the TV station and the number of the programme position is displayed under [Pos].
However, if the TV station information was not automatically set during Auto Setup due to adverse reception conditions, the [--] indication appears instead.
The [--] will also appear, when using VIDEO Plus+ to record from a Satellite broadcast for the first time. For each satellite station, you will have to set the Pos for the first time (for details see page 32).
In this case, follow the steps below to set the Pos.
Press the CH button repeatedly to select the programme position on which the TV programme to be recorded will be broadcast.
After you have entered the information of a TV station, it remains stored in the VCR's memory, and you do not need to enter it again in the future.
To suspend the Timer recording Standby Mode
When you want to use the VCR for playback or manual recording before the programmed timer recording will be performed, you can temporarily suspend the timer recording standby mode by pressing the TIMER REC button so that the ⏻ indication on the VCR display disappears.
However, after you have finished using the VCR, remember to reactivate the timer recording standby mode by pressing the TIMER REC button again, otherwise the programmed timer recording will not take place.
VIDEO Plus+ and PlusCode are registered trademarks of Gemstar Development Corporation. The VIDEO Plus+ system is manufactured under license from Gemstar Development Corporation.
VIDEO Plus+
text_image
Video Plus+ 8 3 5 4 2 - - -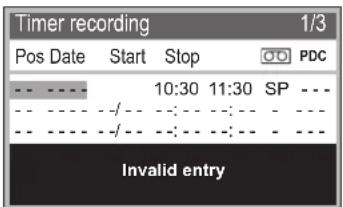
text_image
Timer recording 1/3 Pos Date Start Stop PDC -- -- -- 10:30 11:30 SP -- -- -- -- /-- : - : - : - -- -- -- /-- : - : - : - Invalid entry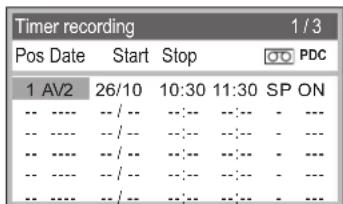
text_image
Timer recording 1 / 3 Pos Date Start Stop PDC 1 AV2 26/10 10:30 11:30 SP ON ---- --/-- --:--- --:--- - --- ---- --/-- --:--- --:--- - --- ---- --/-- --:--- --:--- - --- ---- --/-- --:--- --:--- - --- ---- --/-- --:--- --:--- - --- ---- --/-- --:--- --:--- - --- 1/3VIDEO Plus+ Codes for Satellite Receivers /Cable TV
This VCR is not designed to control (switch on or change channel) your satellite receiver or Cable TV box, however, it can be taught to recognise VIDEO Plus+ Codes for Satellite stations. The Satellite receiver or Cable TV box must be switched on and the correct station selected. Some receivers have their own timer facility for this purpose. Please refer to your Satellite Receiver/Cable TV box instructions for use of such timer facilities.
For your VCR to recognise the VIDEO Plus+ Codes for each satellite station, you must teach your VCR which channel or AV input to record from for the first time. Otherwise when setting a VIDEO Plus+ recording, the [- -] symbol will appear in the channel position indicating that the VCR does not know which channel position to set. Once you have set the channel/AV input once the VCR will remember it whenever you use a VIDEO Plus+ Code for the station again.

- Press the button. VIDEO Plus+
- Enter a VIDEO Plus+ Code from a Satellite TV Guide for a satellite channel, e.g. Sky 1 using the Numeric buttons. Press ◀ to correct any mistakes.
- Press the ENTER button. [- -] will appear instead of a channel number/AV input.
- Press the CH button to select the channel or AV input that is to be used for recording from the satellite channel.
- Press the ENTERbutton to memorise the setting. The VCR will now automatically set the programme position or AV input correctly when a VIDEO Plus+ recording is set for this satellite station in the future.
- Press ▲▼ to select the programme that you have just set. Now press the CANCEL button to delete it from the timer recording list. It is no longer needed.
- Repeat the steps above until you have set and deleted dummy timer recordings for each of the satellite stations that you will make VIDEO Plus+ recordings from.
- Press EXIT when you have finished.
Others Menu
text_image
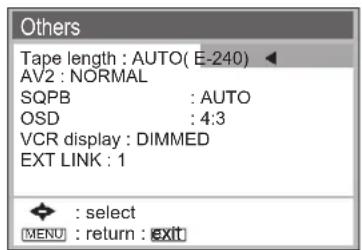
Others Tape length : AUTO( E-240) AV2 : NORMAL SQPB : AUTO OSD : 4:3 VCR display : DIMMED EXT LINK : 1 : select MENU : return : exit| Tape length | Sets the tape length of the cassette you use.AUTO ( ◀E - 240), E - 195, E - 260, E - 300 |
| AV2 | Selects the type of external unit connected to the VCR's AV2 21-pin scart socket.DECODER: If a decoder is connected.NORMAL : If another video recorder or satellite receiver is connected. |
| SQPB | AUTO : The VCR automatically detects the type of recording.ON : Plays back S-VHS format cassettes in quasi S-VHS format.OFF : Plays back cassettes recorded in VHS format only. |
| OSD | 4:3 : Displays appear at the edge of the screen (displays not visible on 16:9 format screens).WIDE : Displays appear at the edge of the screen (displays appear in the middle on 4:3 format screens).OFF : No on-screen displays |
| VCR display | DIMMED : The VCR's display is dimmed.ON : The VCR's display is on at normal brightness.(only in stand-by mode) |
| EXT LINK | 1 : The VCR recording start and stop time is controlled by a control signal sent via the 21-pin cable from the external unit, for example Sky Digibox.2 : The VCR will start recording when AV2 input detects the video signal and stop recording when the video signal is switched off by the external unit. |
Manual setup
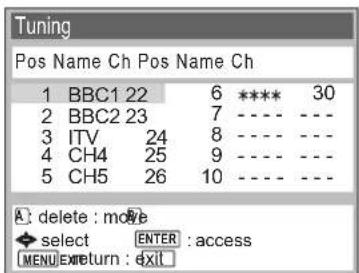
text_image
Tuning Pos Name Ch Pos Name Ch 1 BBC1 22 6 **** 30 2 BBC2 23 7 ---- -- 3 ITV 24 8 ---- -- 4 CH4 25 9 ---- -- 5 CH5 26 10 ---- -- A: delete : move select ENTER : access MENU:return : exit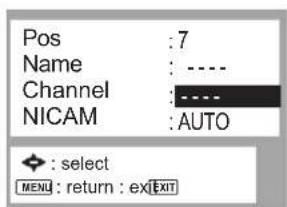
text_image
Pos : 7 Name : ---- Channel : ---- NICAM : AUTO ◆ : select MENU : return : ex | ExitThis VCR has 99 programme positions that can be tuned to receive TV stations.
In certain circumstances you may wish to tune in a station manually or rename a TV station.
Manual Tuning
- Press MENSelect
Tuning ▲▼ - Press ENTER
- Select Manual ▲d press
ENTER - Select a free line down the list: ◀▶▲▼
- Press ENTER
- Press ◀ to start Channel tuning, or the Numeric buttons to enter the channel number.
Wait until the desired station has been set.
- Press MENU to return to the Tuning screen.
Note: If you have performed Manual Tuning to find TV stations, the [ - - ] indication may appear under [Pos/Name] on the On Screen Display when programming a VIDEO Plus+ timer recording.
Manual setup
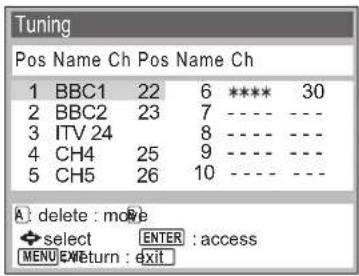
text_image
Tuning Pos Name Ch Pos Name Ch 1 BBC1 22 6 **** 30 2 BBC2 23 7 ---- -- 3 ITV 24 8 ---- -- 4 CH4 25 9 ---- -- 5 CH5 26 10 ---- -- A) delete : move select ENTER : access MENU RETURN : exit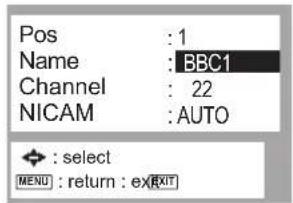
text_image
Pos : 1 Name : BBC1 Channel : 22 NICAM : AUTO : select MENU : return : exEXITChanging the name of TV stations
- Press Mehselect Tuning
- Press ENTER
- Select Maharals ENTER
- Select a TV station ◀▶▲▼
- Press ENTER

- Select the Name entry ◀.
The cursor will mark the first letter BBC1. - Change that letter ▲▼
- Next letter ▶, B□C 1
- Press MENU
The new name will be stored in the station table.
Manual setup
| Tuning | |||||
| Pos | Name | Ch | Pos | Name | Ch |
| 1 | BBC1 | 22 | 6 | **** | 30 |
| 2 | BBC2 | 23 | 7 | ---- | ---- |
| 3 | ITV | 24 | 8 | ---- | ---- |
| 4 | CH4 | 25 | 9 | ---- | ---- |
| 5 | CH5 | 26 | 10 | ---- | ---- |
Changing the order of TV stations or deleting a station
- Press MENU elect
Tuning ▲▼ - Press ENTER
- Select Maniprabs ENTER
- Press Green Datten ( ), an arrow at the left edge indicates which field has been selected.
- You can now move the station to any other location ◀▲▼.
- Press ENTER
- Press Red button (CH^) to delete the station.
Manual setup
text_image
Tuning Manual Auto Setup Shipping condition Owner ID OK? ENTER : yes : B&T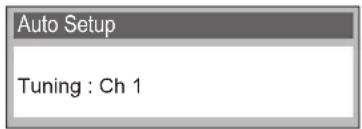
text_image
Auto Setup Tuning : Ch 1Restart Auto Setup
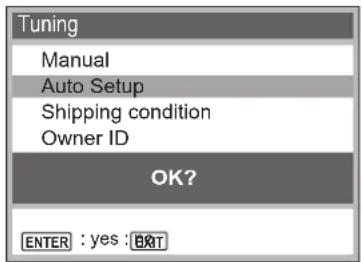
- Press MENDlect Tuning ▲▼
- Press ENTER
- Select Setup and pass ENTER
- Press ENTER
The Auto Setup menu will be displayed. The Tuning will start automatically.
Note: - When no stations have been set, confirm all connections and restart Auto Setup.
- You can restart Auto Setup, without using remote controller, by pressing some buttons on the front of the unit. Hold down ▼ and ▲ on the main unit simultaneously for about 5 seconds.
Shipping condition / restoring factory defaults
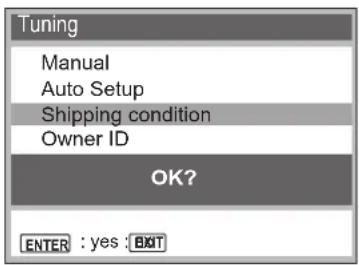
Shipping condition resets the VCR back to the original factory settings. This is useful if the VCR is going to be used in a new location as auto-setup will begin again when the unit is switched on (after connecting to aerial and mains).
- Press MENDlect Tuning ▲▼
- Press ENTER
- Select Shipping condition ▲▼ ENTER
- Press ENTER
text_image
Tuning Manual Auto Setup Shipping condition Owner ID OK? ENTER : yes : EXITNote: - To re-tune the VCR, disconnect and reconnect the AC Mains lead.
Owner ID
text_image
Tuning Manual Auto Setup Shipping condition Owner ID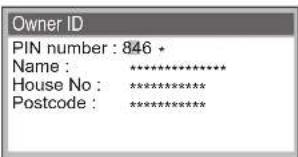
text_image
Owner ID PIN number : 846 * Name : (**)\nHouse No : (**)\nPostcode : (**)\n ****To change the Owner ID

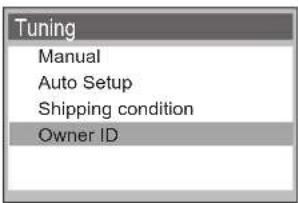
- Press MENSelect Tuning
- Press ENTER
- Select Owner ID ▲d press . ENTER
- Use the Numeric buttons or ▲▼ to enter the current PIN number.
- After entering the correct PIN number, you can change the Name, House No and Postcode.
- Press ENTERlude the setting.
- Use ▲▶, the Numeric buttons and ENTER to select and change the desired information.
- Press EXIT to exit the On Screen Display.
text_image
Owner ID Name : MARWIN House No : BANKS Postcode : RG12 8FTEJECT

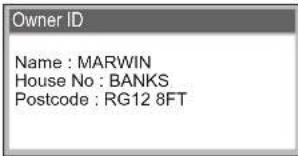
To display the Owner ID information
- Keep EJECT pressed for more than 5 seconds.
Notes:
- The PIN number is not displayed.
- After 30 seconds, this menu automatically disappears.
Clock setting
On Screen Display.
| Menu |
| Timer recording |
| Tuning |
| Clock set |
| Others |
| ◆:select : acc###SER |
| EXIT : exit |
| Clock set | |
| MANUAL | |
| Time : 12:00:00 | |
| Date : 11. 6. 03 |
The clock will normally be set correctly during Auto-Setup however, in some circumstances the VCR cannot set the clock automatically. In this case, follow the operation steps below to manually set the clock.
To manually adjust the clock
- Press MENduct Clock set.
- Press ENTER
- Confirm that Clock set is set to MANUAL, and press ENTER.
- Use AvellonsNumeric and . Date Time
- Press ENTERude the settings.
- Press EXIT to exit the On Screen Display.
To activate the automatic time correction function
The correct time for the VCR clock can be automatically maintained when the VCR is tuned to a station that transmits a time signal.
- Press MENDlect Clock set.
- Press ENTER
- Use to bet AUTO.
- Press ENTERude the setting.
Under adverse reception conditions, etc., the Automatic time correction function may not work. In this case, the indication for Clock setting is automatically reset to MANUAL. If the reception conditions improve later on, it may be possible to activate this function. - Press EXIT to exit the On Screen Display.
Notes: - If Clock setting is set to AUTO when you open the Clock screen, do not set it to MANUAL, otherwise, the automatic time correction function is deactivated.
- This VCR uses a 24 hour clock.
- In case of a power failure, an automatic back-up system maintains the clock for approximate 60 minutes.
- When Clock setting is set to AUTO, the automatic time correction function checks and if necessary adjusts the time several times every day. The automatic time correction function only works when the VCR is in standby, it does not work in the timer recording mode.
TV control


TRACKING/V-LOCK



Setting the Remote Control to operate your TV
- Set the MORTV TV.

Only Panasonic TVs can be operated with the provided remote control.
The settings for operating the TV with the remote control have already been made.
No additional settings need to be performed.
However, some of old Panasonic TVs cannot be operated using this remote control.
TV-Stand-by/on
Press to switch the TV from on to stand-by mode or vice versa. In stand-by mode, the unit is still consuming a small amount of power.
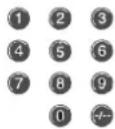
Numeric (0-9)
To select desired programme position.
AV
To select desired AV input on the TV.
CH
Channel selector
Teletext
If your TV is equipped for Teletext reception, you can use these buttons to change the teletext information displayed on the screen and select desired information. For details, refer to your TV's operating instructions.
VOLUME
To adjust the volume of the TV.
TV/TEXT
To switch between normal TV mode and teletext mode.
TV ASPECT
To switch the screen format between the wide-screen and other aspects.
AUDIO out settings

NICAM sound system
| Tuning | ||
| Pos Name Ch Pos Name Ch | ||
| 1 BBC1 7 | 6 | ---- ---- |
| 2 BBC2 4 | 7 | ---- ---- |
| 3 ITV 2 | 8 | ---- ---- |
| 4 CH4 12 | 9 | ---- ---- |
| 5 CH5 13 | 1 0 | ---- ---- |
Audio mode (L/R)
At each press of the AUDIO button, the selected sound output is indicated with L (Left) and R (Right).
| Stereo playback | : | Display: LR |
| Left audio channel playback | : | Display: L - |
| Right audio channel playback | : | Display: - R |
| Playback of normal audio (Mono) sound : | Display: - - | |
The NICAM System is a 2 channel digital sound broadcast system which in most instances provides high quality stereo sound.
Broadcasters can also transmit two separate mono soundtracks on this system.
AUTO: When you record a programme which is broadcast with NICAM sound, the NICAM sound is automatically recorded.
OFF: If you want to record the normal (mono) sound on the Hi-Fi audio tracks during a NICAM broadcast, or if the stereo sound is distorted due to poor reception conditions.
- Press MeohseTeaching
- Press ENTER
- Select Manipress
- Select a channel ◀▶▲▼
- Press ENTER
- Select NICAM OFF ◀
ENTER
The video recorder repeats playback from beginning to end of a recording.
- In Stop or Playback mode, press the Playback button for longer than 5 seconds. The video recorder displays an 'R', indicating repeat play mode.
- Press ■ to stop playing back at any time.
- The end of a recording is marked by noise portion without picture and sound.

Finding the start of a recording
Quickly finds the start of a recording during playback or in Stop mode.
- Fast Forward /eɪnɪər
Every time you press the button (max. 20 times) the video recorder will find the start of the next recording. Playback will automatically start for all recordings that are longer than 5 minutes.
- Press ■ to exit the Search function.
QUICK
ERASE

Erasing a cassette
Press and hold for a few seconds the QUICK ERASE button on the unit to remove all recordings from a cassette.
It takes approx. 30 minutes to erase an E-180 cassette.
Erasing avoids noise bands that may occur at the beginning and end of a recording over an existing one.
Note: To protect the video heads, the unit automatically quits the Forward/Backward Search, Jet Search, Still Playback, Slow Playback functions after 5-10 minutes. Interference and motor noise are not indicative of a malfunction.
Advanced functions


Limiting the recording and playback time
Switches the unit into stand-by mode after the set time of recording, playback or in Stop mode.
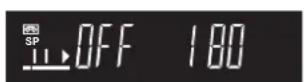
- Press OFF TIMER repeatedly to extend the switch-off time from 30 to 60, 120, 180 or 240 minutes. The timer setting appears on the display of the VCR.
Tape Counter
To reset the tape counter (elapsed time) to "0:00.00".
- The tape counter is automatically reset to "0:00.00" when a video cassette is inserted.
- The tape counter can also be reset to "0:00.00" by pressing the RESET button on the remote control.
Convenient Automatic Functions
VCR Auto Power On
When you insert a video cassette, the VCR switches on automatically.
Auto Playback Start
When you insert a video cassette with a broken erasure prevention tab, playback starts automatically without pressing the Play button.
VCR-off Playback
When the VCR is off, and you press the Play button with a tape inserted, the VCR switches on and playback begins.
Auto Rewind
When the tape reaches the end, the VCR automatically rewinds it to the beginning (This function is disabled during timer recording).
Automatic Switch Off and Eject
When the VCR is switched off, a tape can be ejected by pressing the EJECT button. The VCR will eject the cassette and automatically turn itself off again.
To eject the Video Cassette using the Remote Control
Keep the Stop button pressed for more than 3 seconds.
Before requesting service
I HAVE AN ON SCREEN MESSAGE.
You have attempted to carry out a function, which is not possible at this time. It may be that no tape is inserted and you have pressed Play, or that you tried to change the details of a timer recording whilst it was being carried out.
→ Please follow the instructions as given on the display.
THE VCR DISPLAY IS NOT ILLUMINATED.
The AC mains lead has become disconnected.
→ Connect mains lead securely.
THE DISPLAY IS LIT, BUT THE VCR CANNOT BE OPERATED.
The VCR is in timer recording mode.
→ Press TIMER REC to cancel the mode.
Safety devices are operating.
→ Disconnect the mains, wait for 1 minute and reconnect. If problem persists, consult service engineer.
VCR PICTURE DOES NOT APPEAR ON THE SCREEN.
If connected via RF
→ Check RF output channel and adjust if necessary. (See page 19 for details.)
If connected via SCART
→ Check connections and choose appropriate AV channel on TV.
AUTO CLOCK SETTING DOES NOT OPERATE.
Teletext information is not available or cannot be read.
→ Set the clock manually. (See page 39 for details.)
THE PLAYBACK PICTURE IS DISTORTED, BLACK AND WHITE OR HAS HORIZONTAL NOISE BARS.
The tracking adjustment is not correct.
→ Adjust the tracking. (See page 23.)
The playback channel on the TV has not been tuned properly.
→ Re-tune the TV.
The video heads may be worn or clogged.
→ Consult service engineer.
Before requesting service
THE PICTURE OF A RECORDED PROGRAMME IS DISTORTED OR MISSING.
The aerial or connection is defective.
No programme was recorded because the VCR is not tuned correctly.
Incorrect programme position was selected.
Time and date were not set correctly.
The start or finish time was not set correctly.
The VCR was not put into timer recording mode.
RECORDING FROM AN EXTERNAL SOURCE IS NOT POSSIBLE.
The incorrect AV input was selected.
The cables are not connected properly.
THE REMOTE CONTROL DOES NOT OPERATE CORRECTLY.
The remote signal cannot reach the VCR.
The remote is too far from the VCR.
The batteries have been inserted incorrectly.
The wrong remote control mode has been selected.
→ Check connections and reconnect as necessary.
→ Re-tune the VCR.
→ Select correct channel.
→ Re-set correctly.
→ Re-set correctly.
→ Put VCR into timer recording mode.
→ Check which AV input is in use and select this on the VCR.
→ Check connections and adjust as necessary.
→ Point the remote at the front of VCR and make sure that there are no objects in the way.
→ Move closer to the VCR or replace the batteries.
→ Insert the batteries correctly.
→ Switch over to VCR.
Tape Care
natural_image
Illustration of a screwdriver pressing down on a rectangular electronic component (no text or symbols)Some do's and dont's on tape care.
DO:
1) Use a good quality branded tape, such as Panasonic.
2) Keep in the box supplied with the tape, or a video case, when not in use.
3) Try to use the whole tape when making recordings and avoid re-recording over the same section of the tape repeatedly as this will help prevent premature tape wear.
4) Take care to insert a tape correctly into the VCR to avoid damage.
DO NOT:
1) Expose the tape to high humidity or temperature.
2) Expose to liquid.
3) Expose to dust particles by storing directly on a carpet for example.
4) Use a damaged tape or attempt to repair it.
5) Dismantle the cassette housing.
6) Attempt to lift the front cassette flap or touch the tape surface.
Cassette erasure protection
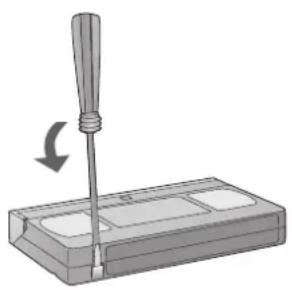
Break out the erasure protection tab to protect the cassette against accidental erasure of recordings you wish to keep. Stick adhesive tape over the gap if you wish to re-record a protected cassette.
Specifications
NV-HV60EB/EBL
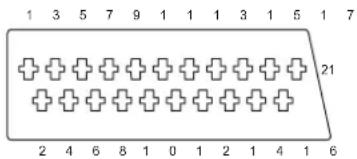
21-pin Scart Socket
text_image
1 3 5 7 9 1 1 1 3 1 5 1 7 21 2 4 6 8 1 0 1 2 1 4 1 6AV1/AV2 Scart Socket
1 Audio output CH2 (R)
2 Audio input CH2 (R)
3 Audio output CH1 (L)
4 Audio ground
5 Blue ground
6 Audio input CH1 (L)
7 Blue
8 Switching voltage
9 Green ground
10 Reserved
11 Green
12 Reserved
13 Red ground
14 Blanking ground
15 Red
16 Blanking
17 Video output ground
18 Video input ground
19 Video output
20 Video input
21 Ground
| Power supplyPower consumption in operation | 220-240 V AC, 50/60 Hz18W |
| Controls | multifunctional remote control (VCR and Panasonic TV) / VCR direct controls (main functions) |
| Video and Audio heads (helical scanning system)Tape speedRecord and playback time (E240 cassette)Fast forward or fast rewind time (E180 cassette) | 4 heads (Super Ferrite Head) / 2 heads Hi-FiSP: 23.39 mm/s, LP: 11.7 mm/sSP: 240 min, LP: 480 minapprox. 60 s |
| TV systemVideo input and output levelRF modulated output | PAL 625 linesI1.0 V peak-to-peak, 75 Ohm, terminatedUHF channel (21-68), 75 Ohm |
| Audio Input levelAudio Output level | -6 dBV, more than 10 kOhm-6 dBV, less than 1 kOhm |
| Horizontal resolution (colour)Signal-to-noise ratio video (colour)Signal-to-noise ratio audioDynamic range audioAudio frequency response | more than 240 lines (SP)more than 43 dB (SP)more than 43 dB (SP, normal)more than 90 dB (Hi-Fi sound tracks)80 Hz to 8 kHz (SP, normal)20 Hz to 20 kHz (Hi-Fi sound tracks) |
| Operating temperature / humidity | 5°C to 40°C / 35-80% relative humidity |
| Weight and Dimensions (approximate value) | 3.5 kg / 430 (width) x 87 (height) x 282 mm (depth) |
* These specifications are subject to change without notice.
| Page | Page | Page | |||
| Aerial input/output 7 | JET SEARCH 22 | Satellite Receiver | 10,25 | ||
| AUDIO 41 | Scart Cable | 12,14,25 | |||
| AUDIO output 7,15 | Manual Tuning | 34 | Shipping condition | 37 | |
| Auto Setup 16,37 | Mono | 41 | Slow playback 22 | ||
| AV17 | NICAM | 41 | SQPB | 22,33 | |
| AV2 7,25,33 | NTSC | 22 | Stereo | 15,41 | |
| Batteries 7 | OFF TIMER 9,43 | Still playback | 22 | ||
| Channel 17,19,34 | OSD | 33 | S-VHS | 22,33 | |
| Clock 17,39 | Playback | 8,22 | Tape length | 33 | |
| Date 26,30 | PDC | 9,28 | Tape speed | 24,26 | |
| DECODER 14,33 | PROG PLAY | 27 | Teletext | 40 | |
| Digital Receiver 25 | Quick Erase | 6,42 | TIMER CHECK 6,27 | ||
| Dimmed 33 | Timer recording | 26 | |||
| Erasure protection 46 | Recording | 24,25 | TRACKING/V-LOCK | 9,23 | |
| EXT LINK | 25,33 | Remain | 24 | Tuning | 34 |
| Factory defaults | 37 | Remote | 8,9,40 | TV Aspect | 8,40 |
| Repeat Playback | 42 | TV control | 40 | ||
| INDEX | 9,42 | RF cable | 10,12 | VCR display | 33 |
| INTELLIGENT TIMER | 29 | VIDEO plus+ | 30 |
This equipment complies with European conformity requirements, in accordance with the conditions of electromagnetic compatibility and product safety.
☐ This equipment complies with the requirements of protection class 2.
Matsushita Electric Industrial Co., Ltd.