
AG-520 - TV PANASONIC - Free user manual and instructions
Find the device manual for free AG-520 PANASONIC in PDF.


User questions about AG-520 PANASONIC
0 question about this device. Answer the ones you know or ask your own.
Ask a new question about this device
Download the instructions for your TV in PDF format for free! Find your manual AG-520 - PANASONIC and take your electronic device back in hand. On this page are published all the documents necessary for the use of your device. AG-520 by PANASONIC.
USER MANUAL AG-520 PANASONIC
natural_image
Front view of a vintage CRT television with blank screen (no visible text or symbols)VHS
Panasonic
Professional / Industrial Video
Combination VCR
Operating Instructions
Models No. AG-513E / AG-520E
natural_image
Black-and-white photo of a bedroom with wicker chairs, a bed made of floral bedding, and stuffed toys in a woven basket (no visible text or symbols)- Initial Setup and Connection Procedures are on pages 8 to 13.


As an ENERGY STAR® Partner, Matsushita Electric Corporation of America has determined that this product or product model meets the ENERGY STAR® guidelines for energy efficiency.
Please read these instructions carefully before attempting to connect, operate, or adjust this product. Please save this manual.
LSDT0606A
Important Safeguards and Precautions
READ AND RETAIN ALL SAFETY AND OPERATING INSTRUCTIONS. HEED ALL WARNINGS IN THE MANUAL AND ON UNIT
INSTALLATION
1 POWER SOURCE CAUTION
Operate only from power source indicated on unit or in this manual. If uncertain, have your Electric Utility Service Company or Video Products Dealer verify your home power source.
2 POWER CORD PLUG
For safety, this unit has a polarized type plug (one wide blade), or a three-wire grounding type plug. Always hold the plug firmly and make sure your hands are dry when plugging in or unplugging the AC power cord. Regularly remove dust, dirt, etc. on the plug.
POLARIZED PLUG CAUTION:
The plug fits into the outlet only one way. If it cannot be fully inserted, try reversing it. If it still will not fit, have an electrician install the proper wall outlet. Do not tamper with the plug.
GROUNDING PLUG CAUTION:
The plug requires a three-hole grounding outlet. If necessary, have an electrician install the proper outlet. Do not tamper with the plug.
3 POWER CORD
To avoid unit malfunction, and to protect against electrical shock, fire, or personal injury:
- Keep power cord away from heating appliances and walking traffic. Do not rest heavy objects on, or roll such objects over the power cord.
- Do not tamper with the cord in any way. - An extension cord should have the same type plug (polarized or grounding) and must be securely connected.
- Overloaded wall outlets or extension cords are fire hazards.
- Frayed cords, damaged plugs, and damaged or cracked wire insulation are hazardous and should be replaced by a qualified electrician.
4 DO NOT BLOCK VENTILATION HOLES
Ventilation openings in the cabinet release heat generated during operation. If blocked, heat build-up may result in a fire hazard or heat damage to cassettes. For your protection:
a. Never cover ventilation slots while unit is ON, or operate unit while placed on a bed, sofa, rug, or other soft surface.
b. Avoid built-in installation, such as a book case or rack, unless properly ventilated.
5 AVOID EXTREMELY HOT LOCATIONS OR SUDDEN TEMPERATURE CHANGES
Do not place unit over or near a heater or radiator, in direct sunlight, etc. If unit is suddenly moved from a cold place to a warm place, moisture may condense in unit and on the tape causing damage.
6 TO AVOID PERSONAL INJURY
- Never place unit on support or stand that is not firm, level, and adequately strong. The unit could fall causing serious injury to a child or adult and damage to the unit.
- Move any appliance and cart combination with care. Quick stops, excessive force, and uneven surfaces may cause objects to overturn. - Carefully follow all operating instructions.

OUTDOOR ANTENNA INSTALLATION
1 SAFE ANTENNA AND CABLE CONNECTION
An outside antenna or cable system must be properly
grounded to provide some pro against built up static charges and voltage. Section 810
of the National Electrical Code, ANSI/NFPA 70 (in Canada, part 1 of the
Canadian Electrical Code) provides information
regarding proper grounding of the mast and supporting structure, grounding of the lead-in wire to an antenna discharge unit, size of grounding conductors, location of antenna discharge unit, connection to grounding

electrodes, and requirements for the grounding electrode.
2 KEEP ANTENNA CLEAR OF HIGH VOLTAGE POWER LINES OR CIRCUITS
Locate an outside antenna system well away from power lines and electric light or power circuits so it will never touch these power sources should it ever fall. When installing antenna, absolutely never touch power lines, circuits or other power sources as this could be fatal.
USING THE UNIT
Before unit is brought out of storage or moved to a new location, refer again to the INSTALLATION section of these safeguards.
1 KEEP UNIT WELL AWAY FROM WATER OR
MOISTURE, such as vases, sinks, tubs, etc.
2 IF EXPOSED TO RAIN, MOISTURE, OR
STRONG IMPACT, unplug unit and have it inspected by a qualified service technician before use.
3 ELECTRICAL STORMS
During a lightning storm, or before leaving unit unused for extended periods of time, disconnect all equipment from the power source as well as the antenna and cable system.
4 WHEN UNIT IS PLUGGED IN
• DO NOT OPERATE IF:
- liquid has spilled into unit.
- unit was dropped or otherwise damaged.
- unit emits smoke, odours, or noises.
Immediately unplug unit, and have it inspected by a service technician to avoid potential fire and shock hazards.
- Never drop or push any object through openings in unit.
Touching internal parts may cause electric shock or fire hazard.
- Keep magnetic objects, such as speakers, away from unit to avoid electrical interference.
5 USING ACCESSORIES
Use only accessories recommended by the manufacturer to avoid risk of fire, shock, or other hazards.
6 CLEANING UNIT
Unplug unit. Use a clean, dry, chemically untreated cloth to gently remove dust or debris. DO NOT USE cleaning fluids, aerosols, or forced air that could over-spray, or seep into unit and cause electrical shock. Any substance, such as wax, adhesive tape, etc. may mar the cabinet surface. Exposure to greasy, humid, or dusty areas may adversely affect internal parts.
SERVICE
1 DO NOT SERVICE PRODUCT YOURSELF
If, after carefully following detailed operating instructions, the unit does not operate properly, do not attempt to open or remove covers, or make any adjustments not described in the manual. Unplug unit and contact a qualified service technician.
2 REPLACEMENT OF PARTS
Make sure the service technician uses only parts specified by the manufacturer, or have equal safety characteristics as original parts. The use of unauthorized substitutes may result in fire, electric shock, or other hazards.
3 SAFETY CHECK AFTER SERVICING
After unit is serviced or repaired, request that a thorough safety check be done as described in the manufacturer's service literature to ensure video unit is in safe operating condition.
Warning : To prevent fire or shock hazard, do not expose this equipment to rain or moisture.
Caution : To prevent electric shock, match wide blade of plug to wide slot and insert fully.
This video recorder, equipped with the HQ (High Quality) System, is compatible with existing VHS equipment.
Only use those tapes with the MBSark. It is recommended that only cassette tapes that have been tested and inspected for use in 2, 4, 6, and 8 hour VCR machines be used. This television receiver provides display of television closed captioning in accordance with §15.119 of the FCC rules.
FCC WARNING : Any unauthorized changes or modifications to this equipment would void the user's authority to operate.

text_image
CAUTION RISK OF ELECTRIC SHOCK DO NOT OPEN CAUTION: TO REDUCE THE RISK OF ELECTRIC SHOCK, DO NOT REMOVE COVER (OR BACK) NO USER-SERVICEABLE PARTS INSIDE REFER SERVICING TO QUALIFIED SERVICE PERSONNEL
This symbol warns the user that uninsulated voltage within the unit may have sufficient magnitude to cause electric shock. Therefore, it is dangerous to make any kind of contact with any inside part of this unit. This symbol alerts the user that important literature concerning the operation and maintenance of this unit has been included. Therefore, it should be read carefully in order to avoid any problems.
This product utilizes both a Cathode Ray Tube (CRT) and other components that contain lead. Disposal of these materials may be regulated in your community due to environmental considerations. For disposal or recycling information please contact your local authorities, or the Electronics Industries Alliance: http://www.eiae.org.
Before Using
Congratulations
on your purchase of one of the most sophisticated and reliable products on the market today. Used properly, it will bring you and your family years of enjoyment. Please fill in the information below. The serial number is on the tag located on the back of your unit.
Date of Purchase____
Dealer Purchased From ____
Dealer Address ____
Dealer Phone No. ____
Model No.
Serial No.
Accessories
text_image
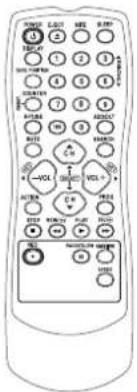
VOL VOL+□ Remote Control
LSSQ0280
□ Batteries 2 "AA"
Prevent Accidental Tape Erasure
Break off the tab to protect.
Record Tab
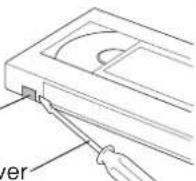
To record again.
Cover the hole with cellophane tape.

Loading the Batteries
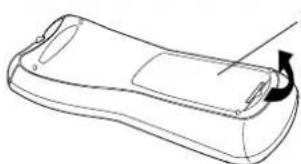
natural_image
Line drawing of a handheld device with a handle and arrow indicator (no text or symbols)1) Open the cover.
2) Insert batteries as marked.
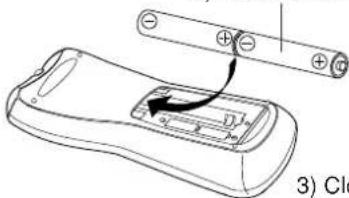
text_image
3) Clo3) Close the cover.
□ Battery replacement caution
- Do not mix old and new batteries.
- Do not mix alkaline with manganese batteries.
Head Cleaning
Playing older or damaged tapes may eventually cause video heads to become clogged.
Video Head Clog Sensor
During playback this screen appears if clogging is detected. To remove screen, press PLAY on the remote or unit.
VIDEO HEADS MAY NEED CLEANING PLEASE INSERT HEAD CLEANING CASSETTE OR REFER TO MANUAL
END:PLAY
- Use "dry" type head cleaning cassette only. (Part No. NV-TCL30PT is recommended.)
- Follow cleaning tape directions carefully. Excessive use of head cleaning tape can shorten the video head life.
• If head clog symptoms persist, contact your nearest Factory Service Center.
Record/Playback Time
Only use tapes with the VMSrk in this unit.
| Tape Speed Setting | Type of Video Cassette | ||
| T160T120T60 | |||
| SP (Standard Play) | 1 Hour | 2 Hours | 2 Hours40 Minutes |
| LP (Long Play) | 2 Hours | 4 Hours | 5 Hours20 Minutes |
| (Super Long Play) | 3 Hours | 6 Hours | 8 HoursSLP |
Table of Contents
Important Safeguards and Precautions / Safety Precautions ..... 2, 3
Before Using 4
Table of Contents 5
Location of Controls 6,7
Connections 8
Initial Setup 9 - 11
Reset Language, Channels, Clock, Time Zone Adjust 12, 13
Playback a Tape 14
Record On a Tape 14
Copy Your Tapes (Dubbing) 15
TV Operation 16
Picture Adjustment 17
TV Timer Features 18, 19
Closed Caption System 20, 21
Timer Recording.... 22, 23
Tape Operation 24 - 27
Special VCR Features 28 - 31
V-Chip Control Feature.... 32 - 35
On-Screen Displays (OSD) 36
Unit Information 37
Before Requesting Service 38
Index 39
Location of Controls
Remote Control Buttons
EJECT button:
When EJECT is pressed, the tape is ejected from Cassette Compartment.
If EJECT is pressed during recording, the unit will not respond to the command.
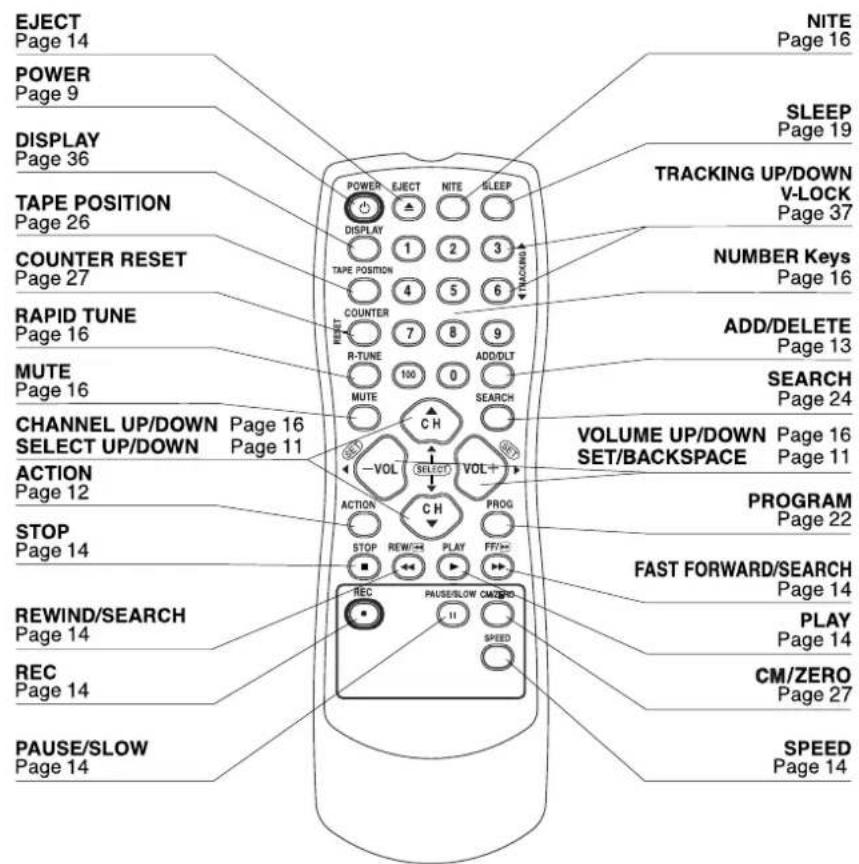
text_image
EJECT Page 14 POWER Page 9 DISPLAY Page 36 TAPE POSITION Page 26 COUNTER RESET Page 27 RAPID TUNE Page 16 MUTE Page 16 CHANNEL UP/DOWN SELECT UP/DOWN ACTION Page 12 STOP Page 14 REWIND/SEARCH Page 14 REC Page 14 PAUSE/SLOW Page 14 NITE Page 16 SLEEP Page 19 TRACKING UP/DOWN V-LOCK Page 37 NUMBER Keys Page 16 ADD/DELETE Page 13 SEARCH Page 24 VOLUME UP/DOWN SET/BACKSPACE Page 16 PROGRAM Page 22 FAST FORWARD/SEARCH Page 14 PLAY Page 14 CM/ZERO Page 27 SPEED Page 14Front View of the unit and Indicators on the Front Panel
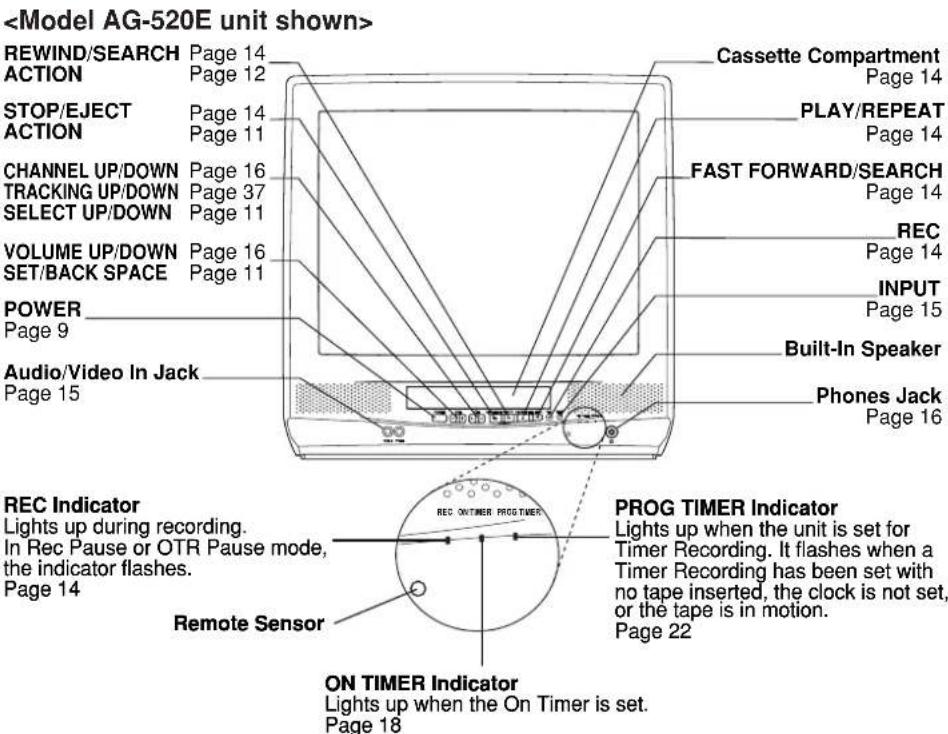
text_image
Initial Setup
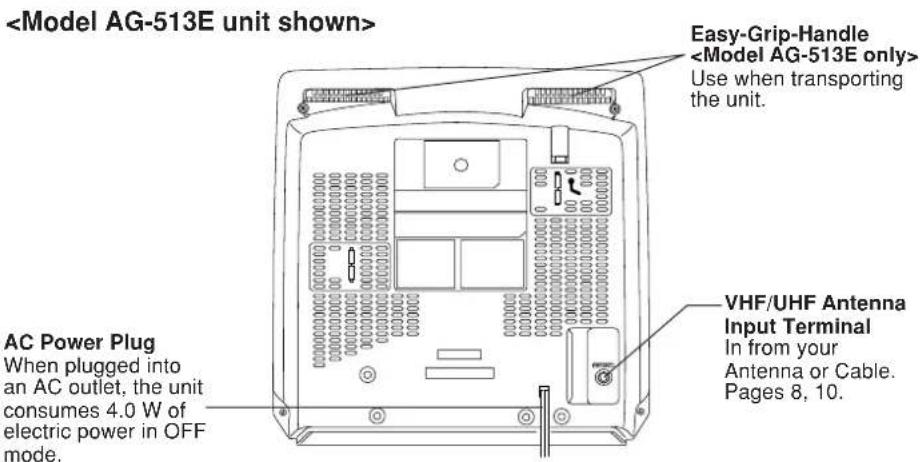
Rear View of the unit
text_image
Connections
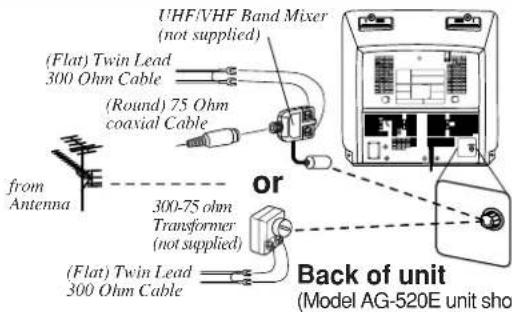
Outdoor Antenna Connections
Unhook the antenna from your previous TV or VCR and connect it to the back of the unit as shown in the diagram. If your antenna system has separate UHF and VHF lead-ins, you need a UHF/VHF Band Mixer (not supplied.)
WARNING:
When using "Nut type" RF coaxial cables, tighten with fingers only. Overtightening may damage terminals.
text_image
UHF/VHF Band Mixer (not supplied) (Flat) Twin Lead 300 Ohm Cable (Round) 75 Ohm coaxial Cable from Antenna or 300-75 ohm Transformer (not supplied) (Flat) Twin Lead 300 Ohm Cable Back of unit (Model AG-520E unit shot)DSS/Cable Box Connections
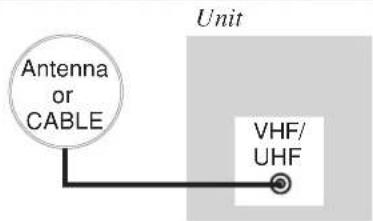
■ Without a Cable Box
You can;
- record or view unscrambled channels. You cannot;
- record or view scrambled channels. - view a channel other than the one selected for any type of recording.
text_image
Antenna or CABLE Unit VHF/ UHF■ With a Cable Box
You can;
- record or view any channel including scrambled channels.
NOTE: Channel selection must be made at the cable box.
You cannot;
- view a channel other than the one selected for any type of recording. - do a Timer recording of a channel unless you select it at the cable box.
Note to CABLE System Installer
This reminder is provided to call the CABLE (Cable TV) System Installers attention to Article 820-40 of the NEC that provides guidelines for proper grounding and, in particular, specifies that the cable ground shall be connected to the grounding system of the building, as close to the point of cable entry as practical.
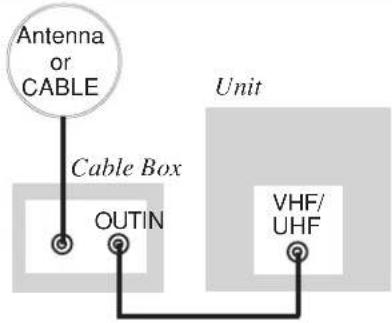
flowchart
graph TD
    A["Antenna or CABLE"] --> B["Cable Box"]
    B --> C["OUTIN"]
    C --> D["VHF/UHF"]
    D --> E["Unit"]
■ With a DSS Receiver
You can;
- record or view any channel including scrambled channels.
NOTE: Channel selection must be made at the DSS Receiver.
You cannot;
• view a channel other than the one selected for any type of recording.
- do a Timer recording of a channel unless you select it at the DSS box.
NOTE: The DSS receiver must be turned off to view programs from a cable box or antenna. See the DSS manual for details.
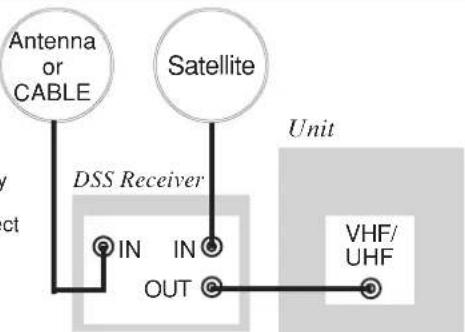
flowchart
graph TD
    A["Antenna or CABLE"] --> B["DSS Receiver"]
    C["Satellite"] --> B
    B --> D["IN OUT"]
    B --> E["VHF/UHF"]
    style B fill:#f9f,stroke:#333
    style D fill:#ccf,stroke:#333
    style E fill:#ccf,stroke:#333
Initial Setup
Set the Clock (Initial Power On)
1 Press POWER on the remote or unit.
2
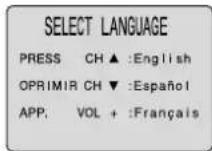
- If wrong language is set, complete "Reset all unit Memory Functions" steps on page 37.
- If you use a cable box, it must be left on.
3
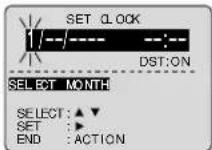
To Make Corrections, repeatedly press ◀▶to move to error, then correct.
4 Press ACTION to end setup. (Clock starts.)
Tuner ON / OFF
When Tuner OFF is selected, your unit is automatically in LINE mode. When Tuner ON is selected, Channel selection, Input selection, Channel Add/Delete, etc. is available.
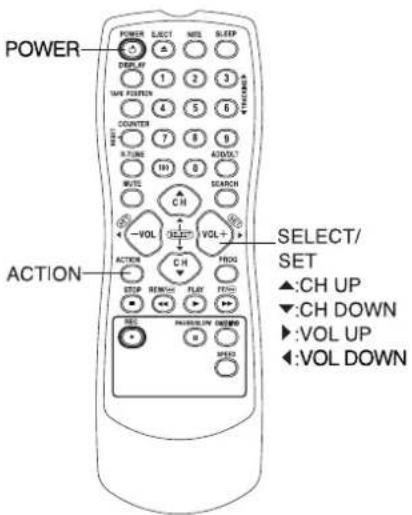
1 Press ACTION to display MAIN MENU.
2
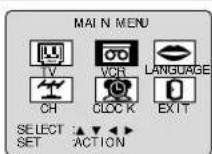
3
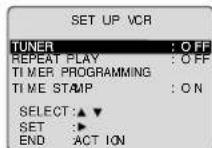
- If you selected ON, go to "Setup Channel and Auto Clock Set" selection on pages 10 and 11.
4 Press ACTION twice to return to the normal screen.
Your unit can be set to Tuner ON or Tuner OFF. When the unit is first turned on, the tuner is set to off and a prompt to set the clock is displayed.
By selecting "TUNER:ON" (see below left), you can place channels in memory and use the Auto Clock Set feature (see pages 10 and 11).
text_image
POWER ACTION SELECT/ SET ▲:CH UP ▼:CH DOWN ►:VOL UP ◄:VOL DOWNInitial Setup (continued)
Setup Channel and Auto Clock Set (TUNER:ON only)
1 Press CH ▲ or CH ▼ to display CHANNEL/CLOCK AUTO SET screen. • If you use a cable box, turn it on and select PBS channel in your time zone.
2
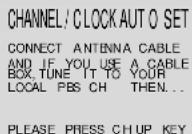
Press CH ▲ to start Channel Auto Set.
These on-screen displays will appear in sequence.
• CH AUTO SET PROCEEDING
• CH AUTO SET COMPLETED
Auto Clock Set
Auto Clock Set is performed only when Channel Auto Set is completed in above steps.
1 Press ACTION to display MAIN MENU.
2
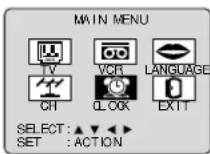
1) Press ▲▼◀▶ to select "CLOCK." 2) Press ACTION to display SET CLOCK screen.
3
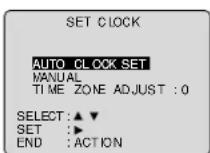
1) Press ▲▼ to select "AUTO CLOCK SET," then press ▶ 2) Press CH▲to start. • If Channel Auto Set is not performed, "CH AUTO SET PROCEEDING" appears.
- "AUTO CLOCK SET PROCEEDING" appears.
Setup completed
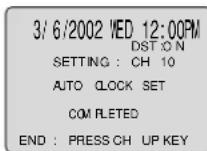
Press CH ▲ to exit. • If your area observes daylight saving time, but you would like to turn the DST feature off, set DST : OFF (see "Clock" on pages 12 and 13).
- If time is not correct... even though your area observes daylight saving time and DST is set to ON, do "Time Zone Adjust" steps on page 13.
Setup incomplete
text_image
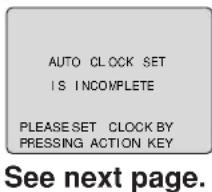
AUTO CLOCK SET IS INCOMPLETE PLEASE SET CLOCK BY PRESSING ACTION KEY See next page.IMPORTANT NOTE FOR AUTO CLOCK SET
- Auto clock set is performed the first time the unit is turned off each day. If used, a cable box must be left on and tuned to the PBS channel at the time the unit power is turned off if you want auto clock set to be done.
- If using a DSS receiver, it must be turned off for auto clock set.
- If a Cable Box or DSS receiver is connected to the unit via Audio/Video Jacks, an RF coaxial cable must also be connected for auto clock set and channel auto set features.
- If for any reason the time is changed manually, automatic time correction will not occur.
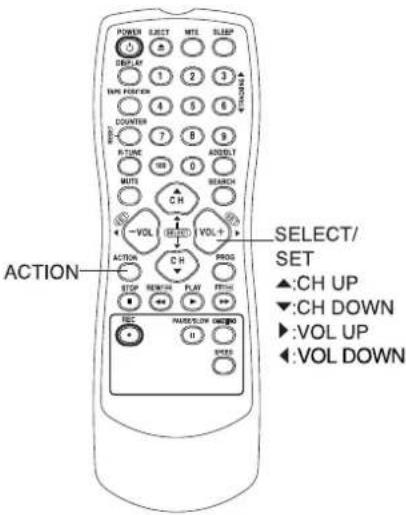
text_image
POWER LIGHT MTR SLEEP 1 2 3 DISPLAY OPEN FORM/VIEW 4 5 6 COUNTER 7 8 9 R-TIME INT 0 MUTS SEARCH CH VOL SELECT/ SET ACTION CH PROG STOP RENEW PLAY FETISH OFF HAPP/CLOL/ON/OFF/OFFO II SHOP SELLERSetup incomplete
Set the clock manually.
a
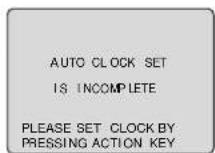
Press ACTION to display SET CLOCK screen.
b
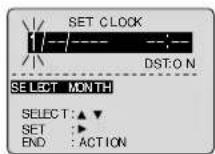
1) Press ▲ to select the month. 2) Press ▶ to set. • Likewise, set date, year, time, and DST (Daylight Saving Time).
To Make Corrections, repeatedly press ◀▶to move to error, then correct.
C
Press ACTION twice to end setup. (Clock starts.)
Notes
- Channel auto set selects normal TV or Cable channels depending on your unit hookup.
- The Language, Channel, and Clock settings can be changed at a later time (see pages 12 and 13). To reset all of these settings, do the "Reset all unit Memory Functions" steps on page 37.
- This unit's calendar is accurately maintained up to Dec. 31, 2089, 11:59 PM.
ACTION key on the unit
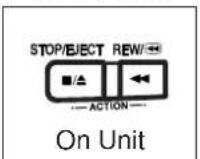
You can operate the menu screen using unit buttons. To display the menu press STOP/EJECT and REW together with no tape inserted. To exit the menu, repeat above with or without tape inserted until normal screen appears.
Using
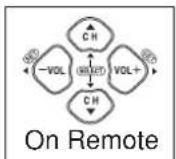
Ray
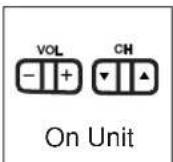
▲ CH UP
▼. CH DOWN
▶: VOLUME UP
VOLUME DOWN
Whenever the menu or program screen is displayed, CHANNEL UP/DOWN function as ▲▼ and VOLUME UP/DOWN function as ◀▶ only.
Reset Language, Channels, Clock, Time Zo
1
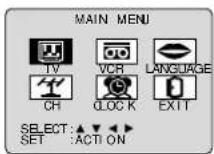
Press ACTION to display MAIN MENU.
2
Language
1) Press ▲▼o▶ select language icon.
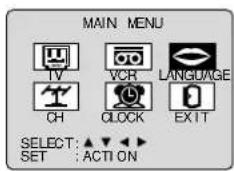
text_image
MAIN MENU IV VCR LANGUAGE CH OLOCK EXIT SELECT: ▲▼▼▼ SET : ACTION2) Press ACTION repeatedly.
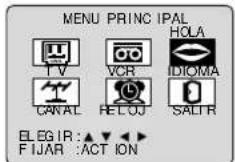
For Spanish
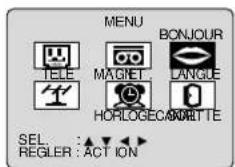
text_image
MENU BONJOUR TELE MAGNET LANGLE HORLOGECANDETTE SEL : ↑ REGLER : ACT IONFor French
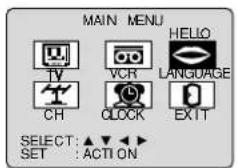
text_image
MAIN MENU TV VCR HELIO LANGUAGE CH OLOCK EXIT SELECT: ▲▼▼▼ SET : ACTIONFor English
3)
Press ▲▶▶ select "EXIT," then press ACTION to exit.

Channels
(TUNER:ON only)
1) Press select

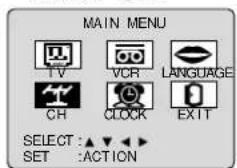
text_image
MAIN MENU TV VCR LANGUAGE CH CLOCK EXIT SELECT :▲▼▼▼ SET :ACTION2) Press ACTION.
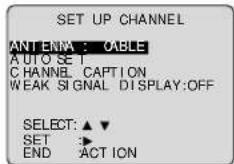
text_image
SET UP CHANNEL ANTENNA : CABLE AUTO SET CHANNEL CAPTION WEAK SIGNAL DISPLAY:OFF SELECT: ▲▼ SET :► END :ACT ION3) Press ▲▼ select "ANTENNA," then press ▶to set your antenna system ("TV" or "CABLE").
4) Press ▲▼ select "AUTO SET," then press ▶

Clock
1) Press ▲▶▶ select "CLOCK."
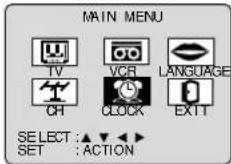
2) Press ACTION. If TUNER:OFF, go to step 4).
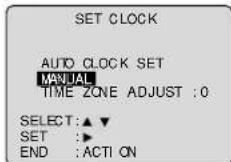
("TIME ZONE ADJUST" appears only when auto clock is set.)
3) Press ▲ to select "MANUAL," then press ▶
(For Auto Clock Set, select "AUTO CLOCK SET," and press ▶. Then, press CH ▲)
Continued on the next page.
k, Time Zone Adjust
text_image
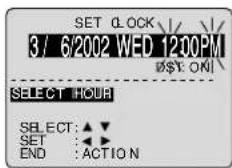
SET CLOCK 3 / 6/2002 WED 12:00PM $ST: ON! SELECT HOUR SELECT: ▲▼ SET: ▲▼ END: ACTION4)Press ▲ and
press ▶ to select and set the month, date, year, time, and DST (Daylight Saving Time).
To Make Corrections, repeatedly press ◀▶ to move to error, then correct.
5) Press ACTION twice to start the clock and exit this mode.
■ Time Zone Adjust (TUNER:ON only)
(Only when Auto Clock is set.)
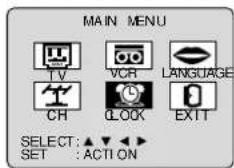
1) Press ▲▼▶
select "CLOCK."
text_image
MAIN MENU TV VCR LANGUAGE CH CLOCK EXIT SELECT: ▲▼▼▼ SET: ACTION2) Press ACTION.
text_image
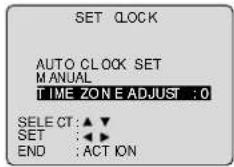
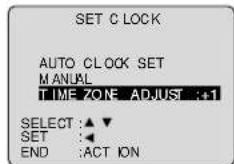
SET CLOCK AUTO CLOCK SET MANUAL TIME ZONE ADJUST : 0 SELECT CT: ▲▼ SET: ◀◀ END: ACT ON3) Press ▲▼ select "TIME ZONE ADJUST" and press ▶or ▶ subtract or add hour(s) as necessary.
text_image
SET C LOCK AUTO CLOCK SET MANUAL TIME ZONE ADJUST :+1 SELECT :▲▼ SET :◆ END :ACT ON4) Press ACTION twice to exit.
- TIME ZONE ADJUST returns to "0" if clock is set manually.
text_image
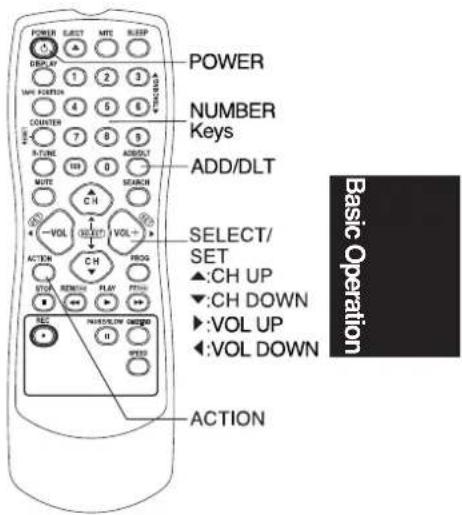
POWER NUMBER Keys ADD/DLT SELECT/ SET ▲:CH UP ▼:CH DOWN ►:VOL UP ◄:VOL DOWN ACTION REC PANDBLOW ON/OFF HOLD DOWN REACH VOL VOL C.H. R-TIME R-TIME MUTE COOUNTER 1 2 3 4 5 6 7 8 9 10 11 12 13 14 15 16 17 18 19 20 21 22 23 24 25 26 27 28 29 30 31 32 33 34 35 36 37 38 39 40 41 42 43 44 45 46 47 48 49 50 51 52 53 54 55 56 57 58 59 60 61 62 63 64 65 66 67 68 69 70 Basic OperationAdd or Delete a Channel (TUNER:ON only)
To add channel:
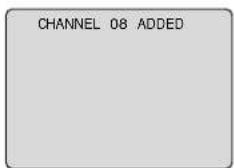
Select channel with number keys and press ADD/DLT.
text_image
CHANNEL 08 ADDEDTo delete channel:
Select channel with CH▲▼ or number keys and press ADD/DLT.

text_image
CHANNEL 08 DELET EDPlayback a Tape
Record On a Tape

Ready Checklist

All connections are made. Your unit is plugged in.

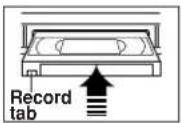
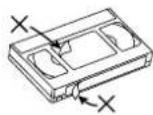
To prevent tape jam, remove loose or peeling labels from tapes.
Insert a tape.
• The unit power comes on automatically.

Press PLAY to play a tape.
- If tape has no record tab (see page 4), auto play begins.
■Forward/Reverse scene search → Press FF or REW. → Press again or PLAY to release.
■Still (Freeze) picture →Press PAUSE/SLOW. →Press PLAY to release.
■Slow Motion picture →Hold down PAUSE/SLOW in Still mode. →Press PLAY to release.
■Frame by Frame picture →Press PAUSE/SLOW in Still mode. →Press PLAY to release.
Notes
- These features work best in SP or SLP mode. - After the unit is in Still or Slow mode for 3 minutes, it will switch to Stop mode automatically to protect the tape and the video head.
■ Stop → Press STOP.
■ Rewind tape → Press REW in Stop mode.
■Fast forward tape → Press FF in Stop mode
■ Eject tape → Press EJECT on the remote or STOP/EJECT on the unit.
Operation using unit button
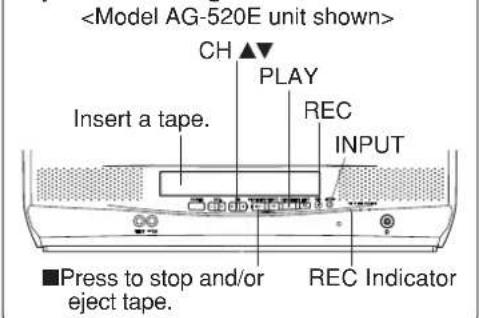
text_image

Insert a tape with record tab.
• The unit power comes on automatically.

Press CH ▲ number keys to select Channel.
- For "LINE" input, see bottom of next page.

Press SPEED to select recording speed (see page 4).
SP = Standard Play
LP = Long Play
SLP = Super Long Play
- Selected speed is displayed.

Press REC to start recording.
• To edit out unwanted portions, press PAUSE/SLOW to pause and resume recording.
- You cannot view another channel during recording.
■ Stop → Press STOP.
■One Touch Recording (OTR)
Press REC repeatedly to set the recording length (30 min - 4 hours.)
- The unit stops recording at a preset time. - PROG TIMER Indicator lights up on the unit.
Notes
- After the unit has been in Rec Pause mode for 5 minutes, it will stop automatically to protect the tape and the video head. - The remaining recording time of an OTR can be displayed by pressing DISPLAY.
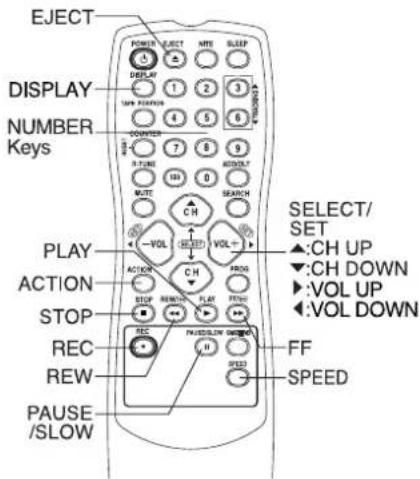
text_image
EJECT DISPLAY NUMBER Keys PLAY ACTION STOP REC REW PAUSE /SLOW POWER EJECT MPI SLEEP 1 2 3 4 5 6 7 8 9 10 11 12 13 14 15 16 17 18 19 20 21 22 23 24 25 26 27 28 29 30 31 32 33 34 35 36 37 38 39 40 41 42 43 44 45 46 47 48 49 50 51 52 53 54 55 56 57 58 59 60 61 62 63 64 65 66 67 68 69 70 71 72 73 74 75 76 77 78 79 80 81 82 83 84 85 86 87 88 89 90 91 92 93 94 95 96 97 98 99 100 SELECT/ SET ▲:CH UP ▼:CH DOWN ▶:VOL UP ◀:VOL DOWNCopy Your Tapes (Dubbing)
Connections you'll need to make.
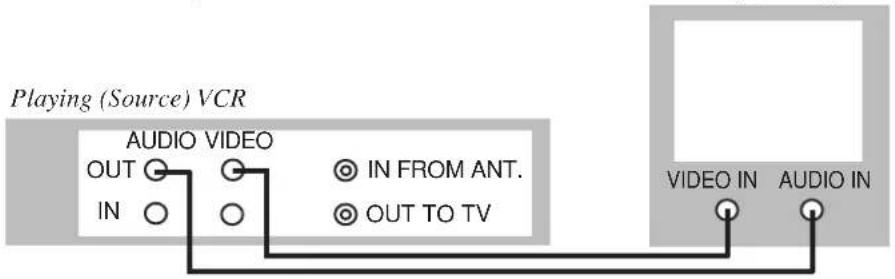
flowchart
graph LR
    A["Playing (Source) VCR"] --> B["AUDIO VIDEO"]
    B --> C["OUT"]
    B --> D["IN"]
    B --> E["IN FROM ANT."]
    B --> F["OUT TO TV"]
    G["VIDEO IN"] --> H["AUDIO IN"]
Playback (Source)
1
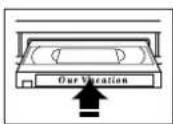
Insert pre-recorded tape.
Recording (Editing) unit
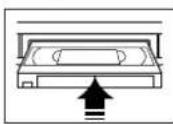
Insert blank tape with record tab.
- Dubbing tapes protected with Copy Guard will have poor quality results.
2
Select "LINE" mode. See "Selecting Input Mode" below.
3
Press REC, then PAUSE/SLOW immediately to put in Standby mode.
(No text)
(Perform operation of steps 4 and 5 on both units simultaneously.)
4
Press PAUSE/SLOW to start dubbing.
5
Press STOP to stop dubbing. Press STOP to stop dubbing.
Selecting Input Mode (TUNER:ON only)
Method 1:
Press INPUT on the unit. Channel Number ←→ LINE
Method 2:
Press CH ▲▼.
The display will change as follows.
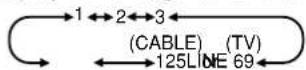
Method 3:
a) Press ACTION for MAIN MENU.
b) Press ▲▼◀▶ to select "TV," then press ACTION for SET UP TV sc
c) Press ▲▼ to select "INPUT SELECT," and then press ▶ to select "TUNER" or "LINE."
d) Press ACTION twice to exit this mode.
Caution
- Unauthorized exchanging and/or copying of copyrighted recordings may be copyright infringement.
TV Operation

Ready Checklist
□ All connections are made.
□ Your unit is plugged in.
(Model AG-520E unit shown>
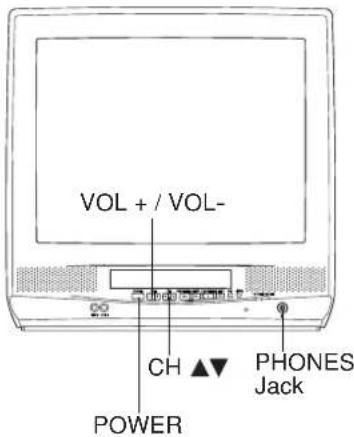
text_image
VOL + / VOL- CH ▲▼ PHONES Jack POWER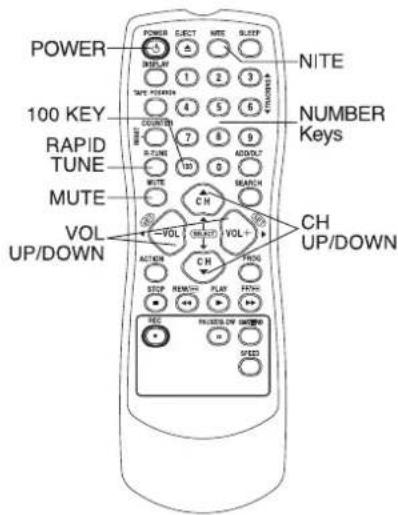
text_image
POWER 100 KEY RAPID TUNE MUTE VOL UP/DOWN NITE NUMBER Keys CH UP/DOWN POWER ELECT NITE SLIPP DISPLAY 1 2 3 SATE SWITCH 4 5 6 COUNTER 7 8 9 R-TUNE 10 11 ADD/DOT WRITE SEARCH CH VOLT CH VOLT ACTION C/H FLOW STOP REMOCH FLIP REC PICSICUM SNOW +/-1 Press POWER on the remote or unit.
2
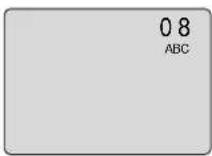
Use CH ▲▼ number keys to select a channel.
3
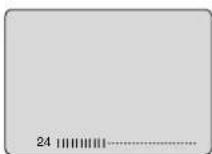
Press VOL + or VOL - to adjust volume.
NIGHT (NITE) Mode
Color and picture intensity levels are adjusted so the screen is easier on your eyes during night time use.
NIGHT
Press NITE to set NIGHT mode.
• NIGHT mode may be selected when watching TV or playing a tape.
Press NITE to cancel.
- Previous settings are restored.
- NIGHT mode is canceled when power is turned off or power failure occurs.
■Using the 100 key
When selecting CABLE channels 100 to 125 with the number keys, first press the 100 key, and then enter the remaining two digits.
■Rapid Tune
Press R-TUNE to display the last channel you were watching.
■Audio Mute
Press MUTE to instantly mute the sound. Press again to restore the previous sound level.
■Phones
Connect an earphone (not supplied) or headphones (not supplied) to the Phones Jack.
Picture Adjustment
1 Press ACTION to display MAIN MENU.
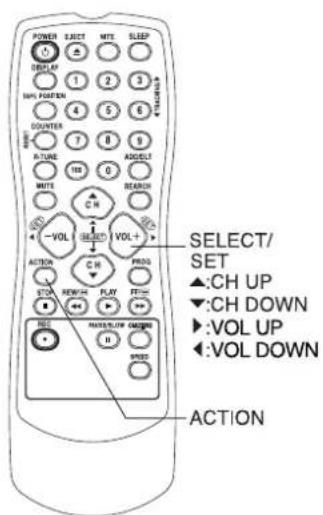
text_image
POWER EJECT MITE SLEEP 1 2 3 4 5 6 7 8 9 10 R-TUNE ADDLET HIS BEARUM MITE C H VOL I VOL+ SELECT/ SET ▲:CH UP ▼:CH DOWN ►:VOL UP ◄:VOL DOWN ACTION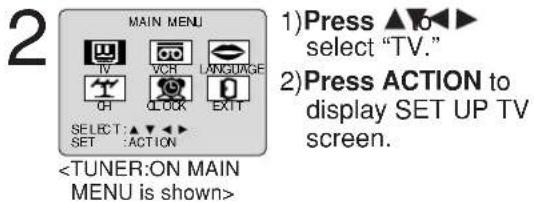
text_image
2 MAIN MENU 1)Press ▲▶▶▶▶▶▶▶▶▶▶▶▶▶▶▶▶▶▶▶▶▶▶▶▶▶▶▶▶▶▶▶▶▶▶▶▶▶▶▶▶▶▶▶▶▶▶▶▶▶▶▶▶▶▶▶▶▶▶▶▶▶▶▶▶▶▶▶▶▶▶▶▶▶▶▶▶▶▶▶▶▶▶▶▶▶▶▶▶▶▶▶▶▶▶▶▶▶▶▶▶> TV VCH LANGUAGE OH CLOCK EXTT SELECT:▲▼▼▼▼ SET :ACTION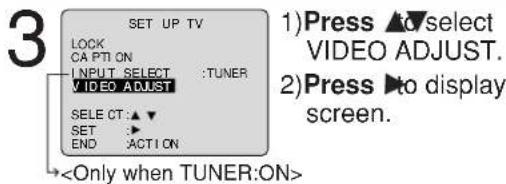
text_image
3 SET UP TV LOCK CA PTI ON INPUT SELECT :TUNER VIDEO ADJUST SELECT CT ▲▼ SET ▶ END ACTIONTV Operation
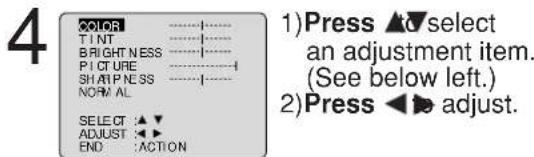
text_image
4 COLOR ...... T I NT ...... B RIGHT NESS ...... P I CTURE ...... S H A P N E S S ...... N O R M A L SELECT :▲▼ ADJUST :▲▼ END :ACTION 1)Press ▲▼ select an adjustment item. (See below left.) 2)Press ◀► adjust.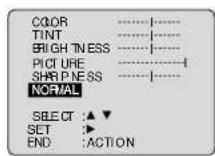
To Reset Picture Controls. Press ▲ and to select and set "NORMAL." All controls return to their factory settings.
Picture Adjustment
■ COLOR Control
Adjust color intensity.
■ TINT Control
Adjust for natural flesh tones.
Adjust picture brightness.
■ PICTURE Control
Adjust picture intensity by adjusting both contrast and color level in the proper balance.
■ SHARPNESS Control
Adjust picture sharpness.
5 Press ACTION three times to exit.
TV Timer Features
ON-TIMER with Alarm
This unit can be set to automatically power on in one of 2 modes (TV or Playback). Even if you set the On Timer, it will not be performed during Play Lock mode. You can also combine the On-Timer with a one minute alarm that gradually increases in volume.
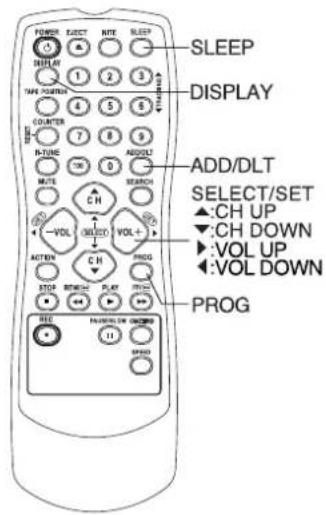
1 Press PROG to display SET PROGRAM screen.
2
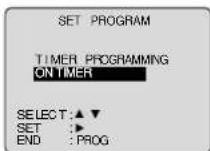
1) Press ▲▼ select "ON TIMER."
2) Press ▶ to display ON TIMER screen.
3
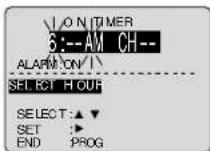
1) Press ▲ select desired settings.
2) Press ▶ to set the ON-TIMER TIME or ON-TIMER mode.
- You can choose TV or PLAY for the On Timer mode. (If TUNER:OFF, you can only select PLAY.)
- Make sure a tape is inserted if Playback mode is selected.
4
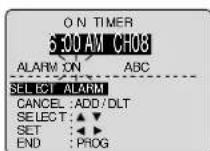
Press ▲▼ select ALARM "ON" or "OFF."
When "ON" is selected, an alarm will gradually increase in volume for one minute or until canceled by pressing any button (including VOL + -).
To Make Corrections, use ▲▼ and ◀▶ to move back and correct.
5 Press PROG to set ON TIMER.
- "ON TIMER SET" is displayed.
• ON TIMER Indicator lights up on the unit.
To Cancel ON-TIMER set, repeat steps 1 and 2. Then, press ADD/DLT to clear the time in step 3. Now, press PROG to end. "ON TIMER END" briefly appears on-screen.

Ready Checklist
☐ The clock is set to correct time.
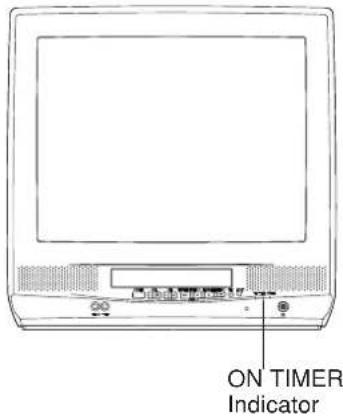
text_image
ON TIMER IndicatorNote
- If no button on the remote or unit (including a button used to turn off the alarm) is pressed within 60 minutes after unit turns itself on, it will turn itself back off.
Sleep Timer
This unit can be set for auto power off.
Press SLEEP repeatedly to set SLEEP TIMER.
- Pressing DISPLAY with sleep timer set displays remaining time.
- Sleep Timer will not be performed during Play Lock mode.
text_image
SLEEP DISPLAY ADD/DLT SELECT/SET ▲:CH UP ▼:CH DOWN ►:VOL UP ◄:VOL DOWN PROG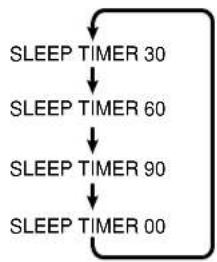
flowchart
graph TD
    A["SLEEP TIMER 00"] --> B["SLEEP TIMER 90"]
    B --> C["SLEEP TIMER 60"]
    C --> D["SLEEP TIMER 30"]
Press SLEEP repeatedly until "SLEEP TIMER 00" appears to cancel.
Closed Caption System
Closed Caption is ...
This multi-use system not only allows the hearing impaired to enjoy selected programs, but also makes useful information from TV stations available to everyone.
Closed Caption Mode Feature
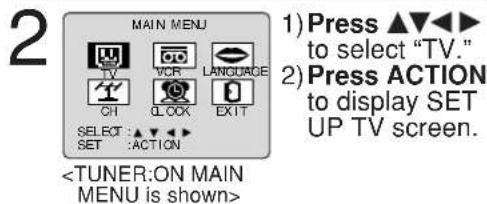
1 Press ACTION to display MAIN MENU.
text_image
2 MAIN MENU TV VCR LANGUAGE CH LOCK EXIT SELECT :▲▼▲▼ SET :ACTION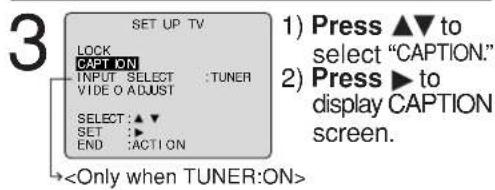
text_image
3 SET UP TV LOCK CAPTION INPUT SELECT :TUNER VIDEO O ADJUST SELECT :▲▼ SET :► END :ACTION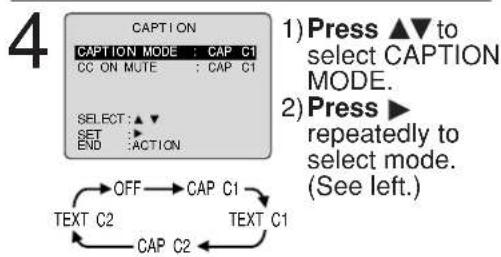
text_image
CAPTION CAPTION MODE : CAP C1 CC ON MUTE : CAP C1 SELECT: ▲▼ SET :→ END :ACTION OFF → CAP C1 TEXT C2 ← CAP C2 ← CAP C1 1) Press ▲▼ to select CAPTION MODE. 2) Press ▶ repeatedly to select mode. (See left.)5 Press ACTION three times to return to the normal screen.
Closed Caption Mode Selections
Caption Mode: CAP C1 or C2 A narration of selected TV programs is displayed. Check TV program listings for CC (Closed Caption) broadcasts.
Caption Mode: TEXT C1 or C2 The all of the screen will be blocked out. When the TV station broadcasts information, such as program listings, it will appear in this space.
Caption Mode: OFF
Closed Caption/Text narration will not be displayed.
NOTE :
The closed caption or text signal may be broadcast over C1, C2, or both. Also, text contents can vary so you may wish to try different settings.
Recording and Playing Back a Closed Caption/Text Program
Record : Record normally. Closed Caption/Text signal, if present, is recorded automatically. Playback : Start playback. Do above steps to select desired caption mode.
text_image
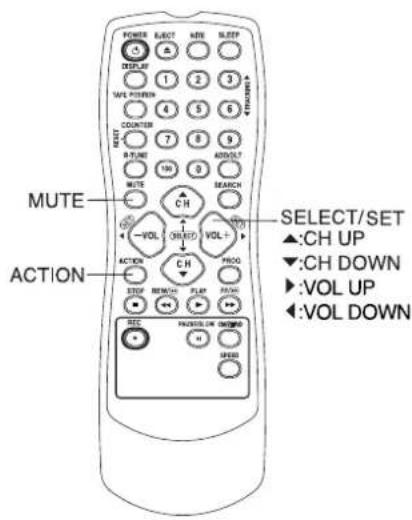
MUTE ACTION SELECT/SET ▲:CH UP ▼:CH DOWN ►:VOL UP ◄:VOL DOWNCaption On Mute Feature
Closed Caption narration, if available, is displayed when MUTE button is pressed for silence.
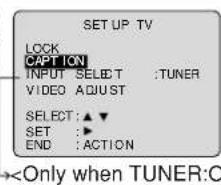
1 Press ACTION to display MAIN MENU.

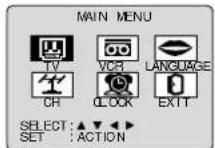
1) Press ▲▼◀▶ to select "TV." 2) Press ACTION to display SET UP TV screen.

text_image
SET UP TV LOCK CAPTION INPUT SELECT :TUNER VIDEO ADJUST SELECT: ▲▼ SET :▼ END :ACTIONTimer Recording
You can set up to 8 programs to be recorded while you are away. 1 Press PROG to display SET PROGRAM screen. 2  1) Press ▲▼ select TIMER PROGRAMMING. 2) Press▶ to display screen. - If a program is already in memory, press ▲ and ▶ to select an unused program number. 3  Press ▲▼ select and ▶or 🔍 set the recording DATE. - 1\~31 = One time - DAILY = MON\~FRI - WEEKLY SUN\~SAT = Same time once a week Example Today's —7 SELECT ▲/▼ Selection Order WEEKLY (SAT) ...... WEEKLY (MON) — WEEKLY (SUN) DAILYRepeat step 3 to set:
- start time, stop time • Channel (or LINE for outside source) - Category [N/A (not applicable), SPORTS, MOVIE, COMEDY, MUSIC, DRAMA] • Speed (SP, LP, SLP) 4  Press PROG (or ACTION) to end the program. To Enter More Programs, press ▲ to select and ▶ to set a blank program number, and then repeat step 3. 5 Press PROG twice (or ACTION) to exit this mode. - If you're using a cable box, make sure that it is tuned to the desired channel and the power is left on for timer recording. • Make sure TUNER:ON is selected for Channel Timer Recording. • PROG TIMER Indicator lights up on the unit. Ready Checklist
□ All connections are made. □ Your unit is plugged in. ☐ The clock is set to the correct time. □ The tape is long enough. ☐ The record tab is in place.text_image
PROG TIMER IndicatorTimer Recording Using unit Buttons
You can set a Timer Recording using ACTION key on the unit. (See page 11.) text_image
VOL CH STOP/EJECT REW/↔ — ACTION — (Model AG-520E button shown)Cancel a Timer Recording: (Recording is in progress)
Hold down STOP for a few seconds to cancel the Timer Recording. \- Any future daily or weekly recordings will be performed as programmed.Review, Replace or Clear Program Contents : (Recording is not in progress)
1 Repeat steps 1 and 2 on page 22.
text_image
2 P DT START STOP CH SPD 1 day 9:00p12:00a 08 SP 2 8 10:00 at 2:00p 125 SP 3 10 8:00 p 9:00p 10 SP 4 SU 9:00 p10:00p L LP CANCEL: ADD'DLT SELECT 1 -8:▲▼ ENTER :► END :PROG/ACTION Press ▲to select the desired program.text_image
POWER ELECT KEY SLEEP DISPLAY 1 2 3 TAFE PATTERN 4 5 6 COUNTER 7 8 9 R-TIME 100 0 MUTE SEARCH CH VOL VOLT ACTION CH PROG STOCK FLOW-UP PLAY PUSH PROG PROG PUCUCULAR ON/OFF STOP ADD/DLT SELECT/ SET ▲:CH UP ▼:CH DOWN ▲:VOL UP ▲:VOL DOWN ACTION STOP3 To Replace program... DATE: 4, START, STOP, CH 1) Press
DATE/ START STOP CH 8 SAT 9:00P 12:00A 08 TODAY ABC CATEGORY: MOVIE SP SELECT START DATE SELECT: ▲ SET : ◀ END : PROG/ACTION 1) Press ▶ to display. 2) Press ▶ to select and press ◀ or ▶ to set new program contents. 3) Press PROG (or ACTION).To Clear program...
text_image
PT START STOP CH SPD 2 8 10:00p12:00+125 SP 3 10 8:00p 9:00p 10 SP 4 SU 9:00p10:00p L LP SELECT 1-8 ▲▼ ENTER :► END :PROG /ACTION4 Press PROG twice (or ACTION) to exit this mode.
Notes
- 2 minutes before Timer recording is performed, "PLEASE PREPARE FOR TIMER REC" appears and/or the PROG TIMER Indicator flashes. Be sure a cassette with record tab is loaded and the unit is in Stop mode. - If the start times of two programs overlap, the lower numbered program will have priority. - If the start time for a Timer Recording comes up during a normal recording or One Touch Recording (page 14), the Timer Recording will not be performed. - If there is a power interruption of more than one minute, the recording may not be performed or continued. - If "INCOMPLETE" appears after all items have been set, check all entries and make necessary corrections.Tape Operation
Search System is ...
Each time a recording is made, an invisible index mark is placed on the tape. When timer recordings are made, program index and information is also included. These index marks can be used to access or scan recordings.Index Search
Go directly to the desired recording. 1 Press SEARCH in Playback or Stop mode to display INDEX SEARCH screen. 2 text_image
INDEX SEARCH ENTER INDEX NUMBER:1 USING 1-9 KEYS FORWARD SEARCH:FF REVERSE SEARCH:REW NEXT : SEARCH EXIT : STOP INDEX SEARCH 3 IND EX SEARCHtext_image
61Example 2:
To go to rec. 6 from rec. 2, enter 4 and press FF.  NOTE: ↓indicates start points of each recording. text_image
POWER LIGHT MINT SLIPP DISPLAY 1 2 3 TIME POSITION 4 5 6 COUNTER 7 8 9 R-TIME 10 ADD/UT WRITE SEARCH VOL VOL C-H FROG REW PLAY STOP WHIP OFF NUMBER Keys SEARCHNotes
- Make each entry within 5 minutes, or the Index Search mode will be canceled. - If Index Search is started very close to an index mark, that index mark may not be counted in the search. text_image
POWER GHOST MODE BLEEP 1 2 3 DISPLAY SATE POSITION 4 5 6 COUNTER 7 8 9 &TUNE 10X ADDRESS WNTL VOL VOL+ CH CALL ACTION STOP FROM PLAY FF FOR FOR FOR FOR FOR FOR FOR FOR FOR FOR FOR FOR FOR FOR FOR FOR FOR FOR FOR FOR FOR FOR FOR FOR FOR FOR FOR FOR FOR FOR FOR FOR FOR FOR FOR FOR FOR FOR FOR FOR FOR FOR FOR FOR FOR FOR FOR FOR FOR FOR FIRE FIRE/FLUSH/FLUSH/FLUSH/FLUSH/FLUSH/FLUSH/FLUSH/FLUSH/FLUSH/FLUSH/FLUSH/FLUSH/FLUSH/FLUSH/FLUSH/FLUSH/FLUSH/FLUSH/FLUSH/FLUSH/FLUSH/FLUSH/FLUSH/FLUSH/FLUSH/FLUSH/FLUSH/FLUSH/FLUSH/FLUSH/FLUSH/FLUSH/FLUSH/FLUSH/ PULLULLULLULLULLULLULLULLULLULLULLULLULLULLULLULLULLULLULLULLULLULLULLULLULLULLULLULLULLULLULLULLULLULLULLULLULLULLULLULLULLULLULLULLULLULLULLULLULLULLULLULLULLULLULLULLULLULLULLULLULLULLULLULLULLULLULLULLULLULLULLULLULLULLULLULLULLULLULLULLULLULLULLULLULLULLULLULLULLULLULLULLULLULLULLULLULLULLULLULLULProgram End Search
Locates end point of recording for continuity. 1 Press SEARCH twice in Playback or Stop mode to display PROGRAM END SEARCH screen.2
PROGRAM END SEARCH SEARCH START:FF EXIT:SEARCH Press FF to start search. To cancel, press PLAY or STOP. Example of Program End Search operation. flowchart
graph LR
    A["Program 1"] --> B["Press SEARCH button FF"]
    C["Program 2 or BLANK"] --> D["End Point"]
    style A fill:#f9f,stroke:#333
    style C fill:#f9f,stroke:#333
    style D fill:#ccf,stroke:#333
flowchart
graph TD
    A["Program 1"] --> B["Press SEARCH button"]
    C["BLANK"] --> D["FF"]
    E["Program 2"] --> F["End Point"]
    G["BLANK"] --> F
flowchart
graph TD
    A["End Point"] --> B["Program 1"]
    B --> C["Blank"]
    C --> D["FF"]
    D --> E["Program 2"]
Upon locating end point...
The unit searches slightly past end point, reverse searches, and plays the last few seconds of the program, then stops. flowchart
graph TD
    A["Program 1 (BLANK)"] --> B["Press SEARCH button"]
    C["Program 2 (BLANK)"] --> D["SEARCH"]
    D --> E["REVERSE SEARCH"]
    E --> F["STOP"]
    F --> G["PLAY"]
    G --> H["FF"]
Note
\- If Program End Search is started very close to an index mark, that mark may be skipped over.Tape Operation (continued)
Auto Operation Functions
■ Auto Shut Off
No broadcast signal in TV mode, blank tape is played for 5 minutes → Power turns off \- This feature is canceled if any button is pressed during above conditions.■ Auto Playback
Insert a tape in Power off mode → Power turns on \- Playback begins if tape has no record tab.■ Auto Rewind
Tape reaches its end → Rewind, → Stop■ Playback Auto Eject (Repeat Play is "OFF")
Tape with no record tab reaches its end → Rewind, → Stop, → EjectTape Position Display
To find out present tape position and amount of tape remaining. Tape position cannot be detected for C-Cassettes, tapes under 30 minutes, and some other tapes. 1 Press TAPE POSITION to detect current tape position. flowchart
graph TD
    A["DETECTING TAPE POSITION"] --> B["SLP"]
    B --> C["BED IN"]
    B --> D["END"]
    style A fill:#f9f,stroke:#333
    style B fill:#ccf,stroke:#333
    style C fill:#dfd,stroke:#333
    style D fill:#dfd,stroke:#333
Note
\- This function cannot display exact amount of tape remaining for tapes 30 minutes or less, or for tapes over 120 minutes in length.Repeat Play
Set to see a recording over and over. 1 Press ACTION to display MAIN MENU.   1) Press ▲▼◀▶ to select "VCR." 2) Press ACTION to display SET UP VCR screen.   1) Press ▲ to select "REPEAT PLAY." 2) Press ▶ to set REPEAT PLAY "ON" or "OFF." 4 Press ACTION twice to end setup.Notes
- Playback repeats when tape end is reached or unrecorded portion over 30 seconds is detected. - During playback, you may also press PLAY/REPEAT repeatedly on the unit to select REPEAT "ON" or "OFF."Play Lock mode
The unit may be locked in Repeat Play mode so that all other function keys are inoperative.  To turn "ON," hold down PLAY on the remote or unit for 7 seconds. To turn "OFF." Repeat above operation in Play Lock mode. When the Play Lock mode is selected, • Auto Repeat function is activated automatically. - On Timer and Sleep Timer become nonfunctional.text_image
PLAY/REPEATtext_image
TAPE POSITION COUNTER RESET PLAY ACTION STOP DISPLAY SELECT/ SET ▲:CH UP ▼:CH DOWN ►:VOL UP ◄:VOL DOWN CM/ZERONote
\- If a blank portion exists on the tape, and depending on the position of the mark, the mark display may be out of position.Commercial Skip
By pressing the CM/ZERO button in Playback mode you can skip over 1 to 3 minutes of recorded tape in just a few seconds. 1 Press CM/ZERO repeatedly to select skip time in Playback mode. flowchart
graph TD
    A["OFF"] --> B["1st Press → 1 mln Sklp"]
    B --> C["2nd Press → 2 mln Sklp"]
    C --> D["3rd Press → 3 mln Sklp"]
Zero Search
To quickly return to a specific tape counter location. 1 Press DISPLAY during playback to display the Counter. 2  Press COUNTER RESET at the desired position to reset to "0:00:00." 3 Continue playback, rewind, or fast forward. 4 Press STOP. 5 Press CM/ZERO in stop mode to start ZERO SEARCH. • ▼Present position mark v : Zero position mark - Unit goes into FF or REW mode and stops at the last point the Counter was set to 0:00:00.Special VCR Features
Channel Caption is ...
Station names, e.g. ABC, CNN, etc. are set so they will appear when a channel is selected. Choose 24 preset names (Preset Caption), or make up to 10 names of your own (Manual Caption). Ready Checklist
□You need a list of stations and the channel numbers you receive them on. text_image
POWER SLEET MITE SLEEP 3 4 5 6 DISPLAY 1 2 3 TARE SWITCH 4 5 6 RUMBER 7 8 9 RUNTER 10 ADD/DT WRITE C H SEARCH VOL SELECT/SET ▲:CH UP ▼:CH DOWN ►:VOL UP ◄:VOL DOWN ACTION C H PROD START REACH FLAME FT/HG REC PULLION ON/OFF H OFF2Preset Caption (TUNER:ON only)
1 Press ACTION to display MAIN MENU.   1) Press ▲▼▶ select "CH." 2) Press ACTION to display SET UP CHANNEL screen.   1) Press ▲ select CHANNEL CAPTION. 2) Press ▶ to display screen.   1) Press ▲▼ to select PRESET CAPTION. 2) Press ▶ to display screen. • To create your own captions, go to "Manual Caption" on page 29.   1) Press ▲▼ to select a station. 2) Press ▶ to move cursor to the right. 3) Press ▲u select channel number. 4) Press ◀ to set preset captions. - Repeat step 5 until the Caption List is complete. To Make Corrections
Press ▲men to select channel number. Press ▲▼ to change, or ADD/DLT to delete. 6 Press ACTION four times to end setup. natural_image
Pure black rectangular shape with no visible text, symbols, or markingsManual Caption (TUNER:ON only)
1 Do "Preset Caption" steps 1\~3 (page 28).2
 1) Press ▲ select MANUAL CAPTION. 2) Press ▶ to display screen.3
 1) Press ▲ select CH NUMBER. 2) Press ▶ to move cursor to the right. - Channels already set in Preset Caption and channels deleted from Channel Memory are not displayed. - You can set a total of ten channel captions with up to four characters each. text_image
POWER EJECT MTE SLEEP C DISPLAY 1 2 3 TATE POSTER 4 5 6 COUNTER 7 8 9 R-TIME 10 0 MUTE CH ANSOLT SEARCH VOL SELECT/ SET ▲:CH UP ▼:CH DOWN ►:VOL UP ◄:VOL DOWN ACTION C H HOG STOP REACH PLAY FROOD REC HUAU/LOUR (WHIP) HUAU ADD/DLT4
 1) Press ▲ select and ▶ to enter your caption. \- Characters change in the following order.  \- Press ◀ repeatedly to move the cursor to "CH NUMBER." Repeat steps 3 and 4 as desired. Advanced OperationTo Make Corrections
Press ▲men to select channel number. Press ▲▼ to change, or ADD/DLT to delete. 5 Press ACTION four times to end setup.Special VCR Features (continued)
text_image
POWER ELECT WRITE SLEEP 1 2 3 14V RISPEN 4 5 6 COUNTER 7 8 9 R-TUNE 103 ADDUCT WRITE STARCH C H 4 VOLT SELECT/ SET ▲:CH UP ▼:CH DOWN ►:VOL UP ◄:VOL DOWN ACTION DOWN STOP REVIEW FLUO FETTS ←→ ←→ ←→ ←→ ←→ ←→ ←→ ←→ ←→Weak Signal Display Feature (TUNER:ON only)
When "ON" is selected, the picture is displayed even when a broadcast signal is weak or non-existent. 1 Press ACTION to display MAIN MENU.2
 1) Press ▲▼◀▶ to select "CH." 2) Press ACTION to display SET UP CHANNEL screen.3
 1) Press ▲ to select WEAK SIGNAL DISPLAY. 2) Press ▶ to set "ON" or "OFF."Notes
- "ON" = Picture is displayed regardless of signal condition, and may not always be clearly visible. "OFF" = Screen turns solid blue when signal is absent or weak. - If unit is connected to equipment which has blue back feature, selecting "ON" will have no effect on the other equipment. 4 Press ACTION twice to return to the normal screen. text_image
VCR Lock
All operations are prohibited except Timer recording and tape eject. Useful for families with small children. text_image
VCR LOCK ACTIVATED VCR LOCK OFFtext_image
POWER ELECT MIME SLEEP DISPLAY 1 2 3 TAFE POSITION 4 5 6 COUNTER 7 8 9 R-TIME 100 ADDULT MUTE SEARCH CN VOL VOL+ ACTION C H RECAG STOP REACH PLAY FROCK OFF FAIR/STIM STARTER SELECT/ SET ▲:CH UP ▼:CH DOWN ►:VOL UP ◄:VOL DOWNReady Checklist
□The clock is set to correct time. □The record tab is in place.Time Stamp Feature
This unit writes program data (see example below) for about the first 10 seconds of every recording. The information is then displayed about 10 seconds after playback begins. 1 Press ACTION to display MAIN MENU. text_image
2 MAIN MENU Press ▲▼◀▶ to select "VCR." 2)Press ACTION to display SET UP VCR screen.text_image
3 SET UP VCR TUNER : OFF REPEAT PLAY : OFF TIM ER PROGRAMMING TIME STAMP : ON SELECT: ▲▼ SET : ▶ END : ACTION 1)Press ▲▼ select TIME STAMP. 2)Press ▶to set "ON" or "OFF."text_image
12/18/2001 TUE 12:00PM CH 08 ABCtext_image
12/18/2001 TUE 12:00PM - 1:00PM CH 08 ABC MOVIEtext_image
-/-/- --:-- CH 08 ABCV-Chip Control Feature
Process of V-Chip Control Feature Enter Code → Setup → Blocking V-Chip Control Feature is... This unit has a built-in V-Chip Control which allows you to block unwanted TV usage based on US MOVIES and US TV PROGRAMS Ratings.Secret Code
A 4-digit code must be entered to view a blocked program or change rating settings. 1 Press ACTION to display MAIN MENU. text_image
POWER ELECT MTN LEEP 5 DISPLAY 1 2 3 TAFE ORDER 4 5 6 COUNTER 7 8 9 R-TIME 103 ADD/DT MUTE 0 SEARCH C H VOL SELECT VOL+ SELECT/ SET ▲:CH UP ▼:CH DOWN ►:VOL UP ◄:VOL DOWN ACTION C H STOP REMOCK PLAY FROG SELL PATTERN/UNI ON/OFFO H SPEEDStext_image
2 MAIN MENU TV VCR LANGUAGE OH CLOCK EXIT SELECT: ACTION SETtext_image
SET UP TV 3 LOCK CAPTION INPUT SELECT : TUNER VIDEO ADJUST SELECT:▲▼ SET :► END :ACTIONChanging your secret code
- You will need your current code. Do steps 1 \~ 4. In step 5, press ADD/DLT to clear current code. Repeat steps 4 and 5 to enter new code. text_image
4 LOCK ENTER 4 -DIT CODE --- ENTER :0-9 END :ACT IONNotes
• DO NOT forget your secret code. - Once ratings are set, restricted tapes or programs cannot be accessed unless the secret code is entered. - Some rental movies do not include V-Chip data.5
 Press ▶ to display US Ratings menu (see pages 33 and 34). Or Press ACTION three times to exit. If LOCK menu is not displayed, "Secret Code" steps on page 32.US MOVIES Ratings
1
 1) Press ▲▼ select US MOVIES. 2) Press ▶ to set "ON" or "OFF." ■ "ON" → V-Chip Control is activated. ■ "OFF" → V-Chip Control is deactivated.Note
\- "NEXT PAGE" displays CANADIAN V-Chip setting menu. Not necessary except when viewing Canadian tapes or broadcasts.2
 1) Press ▲▼ select CHANGE SETTINGS. 2) Press ▶ to display screen.3
 1) Press ▲▼ select VIEW NR PROGRAMS?. 2) Press ▶ to set "YES" or "NO."NR (Not Rated) PROGRAMS
Some movies, such as old movies or foreign movies usually have no ratings.4
Press ▲
select and ▶ to set ratings to be blocked. (See ratings chart right.)5
Press ACTION to redisplay LOCK menu and continue with US TV PROGRAMS Ratings Setup (next page). Or, press ACTION four times to exit.  text_image
POWER GHOST NET BLIGHT 1 2 3 4 5 6 TAXI FLOWER COUNTER UNIT R-TIME OFF MUTE VOLT SELECT/SET ▲:CH UP ▼:CH DOWN ►:VOL UP ◄:VOL DOWN ACTION CONTROL HOLD HOLD HOLD HOLD HOLD| G | GENERAL AUDIENCE:All ages admitted. |
| PG | PARENTAL GUIDANCE:Some material may not be suitable for children. |
| PG-13 | PARENTS CAUTIONED:Some material may be inappropriate for children under 13. |
| R | RESTRICTED:Children under 17 must be accompanied by a parent or adult. |
| NC-17 | OVER AGE 17 ONLY:No one 17 and under admitted. |
| X | ADULTS ONLY: |
V-Chip Control Feature (continued)
If LOCK menu is not displayed, "Secret Code" steps on page 32.US TV PROGRAMS Ratings
1
 1) Press select US TV PROGRAMS. 2) Press ▶ to set "ON" or "OFF." ■ "ON" → V-Chip Control is activated. ■ "OFF" → V-Chip Control is deactivated.Note
\- "NEXT PAGE" displays CANADIAN V-Chip setting menu. Not necessary except when viewing Canadian tapes or broadcasts.2
 1)Press select CHANGE SETTINGS. 2)Press ▶to display screen.3
 1) Press select VIEW NR PROGRAMS?. 2) Press ▶ to set "YES" or "NO."NR (Not Rated) PROGRAMS
Some TV shows, such as news, sports, weather, bulletins, and emergency information usually have no ratings.4
 1) Press ▲ select and ▶ to set ratings to be blocked. (See ratings charts right.) \- Ratings highlighted in Green will be blocked. Ratings in white letters will not be blocked.5
Press ACTION four times to exit this mode.US TV PROGRAMS RATINGS: Chart 1
| TV-Y | FOR ALL CHILDREN:Content specifically geared to young viewers ages 2-6. |
| TV-Y7 | FOR AGE 7 AND OLDER:May contain mild physical or comedic violence which may frighten children under 7. |
| TV-G | GENERAL AUDIENCE:Contains little or no violence, strong language, sexual dialogue or situations. |
| TV-PG | PARENTAL GUIDANCE:May contain infrequent coarse language, limited violence, some suggestive sexual dialogue and situations. |
| TV-14 | PARENTS CAUTIONED:May contain sophisticated themes, sexual situations, strong language, and more intense violence. |
| TV-MA | MATURE AUDIENCE:May contain mature themes, profane language, graphic violence, and sexual situations. |
US TV PROGRAMS RATINGS: Chart 2
| FV | Fantasy Violence |
| V | Violence |
| S | Sexual Situations |
| L | Adult Language |
| D | Sexually Suggestive Dialogue |
text_image
DISPLAY ACTION POWER EAST MTE SLEEP C A O DISPLAY 1 2 3 WTR POWER 4 5 6 COUNTER 7 8 9 A-TIME 100 ADDOUT MUTE 0 SEARCH C N -VOL ISEN VOL+ ACTION C N PROG STOP RETURN PLAY HOLD REC NURCUER NURCUER H SPEED SELECT/ SET ▲:CH UP ▼:CH DOWN ►:VOL UP ◄:VOL DOWNBlocking Message
To View a Blocked Program / Movie
[Temporarily Deactivate V-Chip Control] Enter your secret code (ACCESS CODE) in the Blocking Message screen. • V-Chip Control is reactivated when power is turned off or power failure occurs.[Deactivate V-Chip Control]
Enter your secret code (steps 1-4 on page 32). Then, set US MOVIES and/or US TV PROGRAMS to "OFF" using ▲▼and ▶ (Ratings set on pages 33 and 34 are retained and will be in effect when V-Chip Control is activated again.) \- If DISPLAY is pressed, even when V-Chip control is deactivated, rating is displayed on-screen.  Advanced Operation \- If DISPLAY is pressed, even when no V-Chip data, "NO V-CHIP DATA" is displayed on-screen. On-Screen Displays (OSD)
VCR Status & Clock Display
Press DISPLAY
to display or remove the overlay. text_image
Function Status Current Time Rec Time Remaining (OTR mode only, see page 14.) REC 0:25 12:00 PM ABC -0:1 2 34 SP Counter Tape Speed (See page 4.) 12/2 4/2 001 MON 12:00PM - 1:00PM CH 08 ABC MOVIE Time Stamp Data (See page 31.)Blue Screen Display
Whenever a blank section of a tape comes up in Play mode, or when the selected channel has no broadcast signal with the Weak Signal Display Feature set to "OFF" (see page 30), the screen will turn solid blue.Channel & Function Display
When a function button is pressed (PLAY, FF, etc.) or you change channels, the unit mode or channel number will be displayed. (Some station names may also appear if Channel Caption is set. See pages 28 and 29.) 08 ABC Warning and Instruction Displays These displays will alert you to a missed operation or provide further instructions.| OSD | Caution | Page |
| NO CH FOUND PLEASE CHECK ANTENNA CABLE CONNECTION THEN PUSH CH UP KEY AGAIN | • If no active channels are found for CHANNEL MEMORY... | 8, 10, 12 |
| PLEASE SET CLOCK BEFORE PROGRAMMING | • If you attempt to set or review a Timer Recording, or set the On-Timer and the Clock is not set... | 12, 13 |
| CHECK CASSETTE RECORD TAB | • If you press REC, and a cassette is inserted with no record tab... | 4, 14 |
| TO CANCEL TIMER REC HOLD DOWN STOP KEY FOR APPROX 3 SEC | • If you press STOP during a Timer Recording... | 23 |
| NO CASSETTE PLEASE INSERT A CASSETTE | • If you press PLAY, FF, REW, or REC without a cassette inserted... | 14 |
| PLEASE PREPARE FOR TIMER REC | • If the unit is not in Stop mode or a cassette with record tab is not inserted two minutes before a Timer Recording is about to begin... | 22, 23 |
| VIDEO HEADS MAY NEED CLEANING PLEASE INSERT HEAD CLEANING CASSETTE OR REFER TO MANUAL END: PLAY KEY | • If head cleaning becomes necessary while playing back a tape... | 4 |
| VCR LOCK ACTIVATED | • If you press a function button other than STOP/EJECT or POWER while the unit is in VCR Lock mode... | 30 |
Unit Information
Reset all unit Memory Functions
When moving unit to a new location, or if a mistake was made in the Initial Setup section. • Make sure a tape is not inserted in the unittext_image
1 Turn the unit Power on.Features for a Quality Picture
Digital Auto Tracking
Continuously analyzes the signal and adjusts for optimum picture quality.Manual Tracking Control (to reduce picture noise)
Use during Playback and Slow Motion mode to reduce picture noise. Press the 3 or 6 number key on the remote control or CH ▲▼ on the unit until the picture clears up. To return to Auto Tracking, press POWER off, then on again a few seconds later.V-Lock Control
In Still mode, the 3 or 6 number key on the remote control or CH ▲▼ on the unit operate as a V-Lock control to reduce jitter.PanaBlack Picture Tube
Specifications
Display
Picture Tube: 13 inch (AG-513E) 20 inch (AG-520E) measured diagonal 90° deflection Picture TubeVCR
Video Recording System: 4 rotary heads helical scanning system Audio Track: 1 trackTuner
Broadcast Channels: VHF 2 \~ 13, UHF 14 \~ 69 CABLE Channels: Midband A through I (14 \~ 22) Superband J through W (23 \~ 36) Hyperband AA \~ EEE (37 \~ 64) Lowband A-5 \~ A-1 (95 \~ 99) Special CABLE channel 5A (01) Ultraband 65 \~ 94, 100 \~ 125General
Power Source: 120 V AC, 60 Hz Power Consumption: Power On Approx. 69 watts (AG-513E) Approx. 110 watts (AG-520E) Power Off Approx. 4.0 watts Television System: EIA Standard NTSC color Speaker: 1 piece Operating Temperature: 5 °C \~ 40 °C (41 °F \~ 104 °F) Operating Humidity: 10 % \~ 75 % Weight: 12 Kg (26.4 lbs.) (AG-513E) 23 Kg (50.7 lbs.) (AG-520E) Dimensions: 386 (W) X 385 (H) X 374 (D) mm 15-3/16" (W) X 15-3/16" (H) X14-3/4" (D) (AG-513E) 515 (W) X 505 (H) X 474 (D) mm 20-5/16" (W) X 19-7/8" (H) X 18-11/16" (D) (AG-520E) Note: Designs and specifications are subject to change without notice.DST (Daylight Saving Time)
Unit auto adjusts clock for DST (Daylight Saving Time.)■Spring (First Sunday in April)
DST : ON → Sets clock ahead one hour.■Autumn (Last Sunday in October)
DST : ON → Turns clock back one hour. \- If your area does not observe Daylight Saving Time, select DST:OFF (see "Clock" on pages 12 and 13.) \- Keep these time changes in mind when programming the unit for timer recordings.Before Requesting Service
Check the following points if you are having trouble with your unit.| Power | Correction |
| No power... | Completely insert Power Plug into an AC outlet.Set POWER button to ON. |
| Monitor | Correction |
| No picture or sound...Poor picture with normal sound...Poor sound with normal picture...Poor TV reception...No color or poor color...Ghost (multiple) images...TV programs cannot be watched...Channel cannot be selected... | Make sure your antenna system (TV or CABLE), is correctly set. (P. 8, 12)Completely insert Power Plug into an AC outlet.Set POWER button to ON.Adjust BRIGHTNESS, SHARPNESS, and PICTURE controls in the SET UP TV menu. (P. 17)Adjust VOLUME control. (P. 16)Adjust SHARPNESS and PICTURE controls in the SET UP TV menu. (P. 17)Adjust TINT and COLOR controls in the SET UP TV menu. (P. 17)Install a directional antenna.Make sure the selected channel is in unit's memory. (P. 10, 12)Only the channel being recorded can be viewed on this unit. |
| VCR | Correction |
| TV program cannot be recorded...Timer recording cannot be performed...No playback picture, or the playback picture is noisy or contains streaks...VCR cannot be controlled... | Make sure your antenna system (TV or CABLE), is correctly set. (P. 8, 12)Make sure cassette record tab is intact. (P. 4)Check that clock is set to current time and date.Make sure DSS/CABLE box (if used) is left on and tuned to channel to be recorded.Set recording Start/Stop times correctly. (P. 22, 23)Timer recording may not be performed or continued if a power interruption of more than 1 minute occurs before or during a Timer recording even after power is restored.Adjust TRACKING control in either direction. (P. 37)Try Head Cleaning. (P. 4)Make sure PLAY/VCR LOCK is set to off. (P. 26, 30)Make sure unit is not in a Timer Record operation. |
| Remote Control | Correction |
| Unit cannot be controlled...ACTION and PROG buttons cannot be selected... | Aim remote at remote sensor on unit (P. 7) so that signal is unobstructed.Inspect the remote batteries. (P. 4)Make sure PLAY/VCR LOCK is set to off. (P. 26, 30)Exposing unit remote sensor to direct fluorescent or outdoor light may cause signal interference.Check remote batteries. |
| Miscellaneous | Correction |
| Video cassette cannot be inserted...Video cassette cannot be removed...Tape cannot be ejected or inserted...Video cassette ejects when a recording is started, or the power is turned off for timer recording...In Stop mode, the VCR motor (CYLINDER) continues to rotate...VCR cannot be controlled... | Insert the cassette window side up; record tab facing you.Completely insert Power Plug into an AC outlet.Try ejecting or inserting the tape again after turning POWER off, then back on.Make sure cassette record tab is intact. (P. 4)To enable Quick Play mechanism, the VCR cylinder will rotate for about 3 minutes. This reduces response time from Stop to Play mode and from Play to Rewind Search mode.Make sure PLAY/VCR LOCK is set to off. (P. 26, 30) |