
RC-CD300 - Hi-Fi PANASONIC - Free user manual and instructions
Find the device manual for free RC-CD300 PANASONIC in PDF.


| Product Type | CD Clock Radio |
| Brand | Panasonic |
| Model | RC-CD300 |
| Dimensions (W x H x D) | 232 x 107 x 215 mm (9.1 x 4.2 x 8.5 in) |
| Weight (without battery) | 1.55 kg (3 lb 6.7 oz) |
| Power Supply | AC 120 V, 60 Hz |
| Power Consumption | 14 W (standby: 1.6 W) |
| Memory Backup Battery | 9 V (6F22/6LR61/006P), not included |
| Speakers | 4.5 cm (1.8 in), 6 Ω × 2 |
| Frequency Range (FM) | 87.5 – 108.0 MHz |
| Frequency Range (AM) | 525 – 1710 kHz |
| Laser Type | Semiconductor laser, wavelength 780 nm |
| Number of Audio Channels | 2 (stereo) |
| Clock Display | 12-hour, with monthly accuracy ±30 seconds |
| Alarms | 2 independent (AL1: CD/Radio, AL2: Buzzer) |
| Sleep Timer | Yes, adjustable |
| Playback Modes | Skip, repeat (1/all), random |
| Included Accessories | FM/AM loop antenna (RSA0031) |
| Cleaning Instructions | Use soft damp cloth; no alcohol, thinner, or benzine |
| Safety Features | Polarized plug, automatic shutdown after 10 min CD stop |
| Lens Maintenance | Clean with cotton swab; recommended lens cleaner kit SZZP1038C |
| Warranty (USA) | 1 year parts and labor |
Frequently Asked Questions - RC-CD300 PANASONIC
User questions about RC-CD300 PANASONIC
0 question about this device. Answer the ones you know or ask your own.
Ask a new question about this device
Download the instructions for your Hi-Fi in PDF format for free! Find your manual RC-CD300 - PANASONIC and take your electronic device back in hand. On this page are published all the documents necessary for the use of your device. RC-CD300 by PANASONIC.
USER MANUAL RC-CD300 PANASONIC
IMPORTANT SAFETY INSTRUCTIONS
Read these operating instructions carefully before using the unit. Follow the safety instructions on the unit and the safety precautions listed below. Keep these operating instructions handy for future reference.
Safety
- Power source—Connect the unit to a power source of the type described in these instructions or as marked on the unit.
- Polarization—The unit is equipped with a polarized power plug where one blade is wider than the other. This safety feature ensures that the plug fits into your household AC outlet only one way. If the plug doesn't fit one way, try reversing it. If the plug still doesn't fit, contact an electrician to replace the obsolete outlet. Do not attempt to defeat the safety purpose of the plug.
- Power cord protection—Route the AC power supply cord so that it will not be walked on or pinched by items placed on or against it. Never take hold of the plug or cord with wet hands. Always grasp the plug body firmly when connecting and disconnecting it.
- Overloading—When connecting the AC power supply cord, be careful not to overload the household AC outlet, extension cord, or outlet from any other device as this can result in fire or electric shock.
- Nonuse periods—Turn the unit off when it is not in use. Unplug the unit from the household AC outlet if it is not to be used for a long time. Unplug the unit during lightning storms.
- Attachments and accessories—Use only the attachments and accessories recommended in these operating instructions.
Installation
Placement
- Ventilation—Situate the unit so that it receives proper ventilation. Do not install in a confined space such as a bookcase or cabinet. Allow at least 10 cm (4 inches) clearance from the rear of the unit. To prevent the risk of electric shock or fire due to overheating ensure curtains and other materials do not obstruct the unit's ventilation.
- Foreign material—Ensure objects and liquids do not get into the unit. Avoid exposing the unit to excessive smoke, dust, mechanical vibration, and shock.
- Magnetism—Situate the unit away from equipment and devices that generate strong magnetic fields.
- Stacking—Do not place heavy objects on top of this unit.
- Surface—Place the unit on a flat, level surface.
- Carts and stands—Use the unit only with carts and stands recommended by the manufacturer. Move carts with care. Sudden stops, excessive force, and uneven surfaces can cause carts to overturn.
- Wall and ceiling mounting—Do not mount the unit on walls or ceilings unless specified in the instructions.
■Environment
- Water and moisture—Do not use the unit near water, such as near a bathtub or swimming pool. Avoid damp basements.
- Heat—Situate the unit away from heat sources, such as radiators. Do not situate where temperatures fall below 5^ C ( 41^ F) or rise above 35^ C ( 95^ F).
Maintenance
(See below for details.)
Unplug the unit from the household AC outlet before cleaning.
Clean with a damp cloth.
Do not use abrasive pads, scouring powders, or solvents.
Service
-
Damage requiring service—The unit should be serviced by qualified service personnel if:
(a) The AC power supply cord or the plug has been damaged; or
(b) Objects or liquids have gotten into the unit; or
(c) The unit has been exposed to rain; or
(d) The unit does not operate normally or exhibits a marked change in performance; or
(e) The unit has been dropped or the cabinet damaged. -
Servicing—Do not attempt to service the unit beyond that described in these operating instructions. Refer all other servicing to authorized servicing personnel.
-
Replacement parts—When parts need replacing ensure the servicer uses parts specified by the manufacturer or parts that have the same characteristics as the original parts. Unauthorized substitutes may result in fire, electric shock, or other hazards.
-
Safety check—After repairs or service, ask the servicer to perform safety checks to confirm that the unit is in proper working condition.
Maintenance
To clean this unit, wipe with a soft, damp cloth.
- Never use alcohol, paint thinner or benzine to clean this unit.
- Before using a chemically treated cloth, read the instructions that came with the cloth carefully.
- Never use alcohol, paint thinner or benzine to clean this unit. - Before using a chemically treated cloth, read the instructions that came with the cloth carefully.
Panasonic®
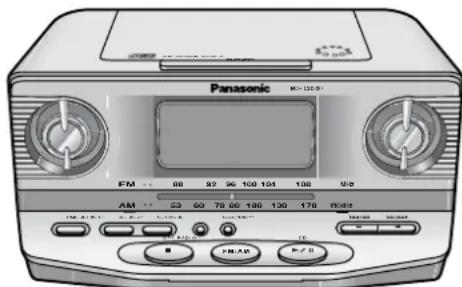
CD Clock Radio
Operating Instructions
Model No. RC-CD300
text_image
Panasonic M-130-9 FM 68 92 96 100 104 108 U/2 AM 53 60 70 80 100 130 170 24:42 (100 MHz) 1.5V 1.5V 1.5V +/- 1.5V 1.5V +/- 1.5V 1.5V +/- 1.5V 1.5V +/- 1.5V 1.5V +/- 1.5V 1.5V +/- 1.5V 1.5V +/- 1.5V 1.5V +/- 1.5V 1.0V +/- 1.5V 1.0V +/- 1.5V 1.0V +/- 1.5V 1.0V +/- 1.5V 1.0V +/- 1.5V 1.0V +/- 1.5V 1.0V +/- 1.5V 1.0V +/- 1.5M +/- 1.5M +/- 1.5M +/- 1.5M +/- 1.5M +/- 1.5M +/- 1.5M +/- 1.5M +/- 1.5M +/- 1.5M +/- 1.5M +/- 1.5M +/- 1.5M +/- -Dear Customer
Thank you for purchasing this product.
For optimum performance and safety, please read these instructions carefully.
Before connecting, operating or adjusting this product, please read these instructions completely. Please keep this manual for future reference.

Panasonic Consumer Electronics Company, Division of Matsushita Electric Corporation of America
One Panasonic Way Secaucus, New Jersey 07094 http://www.panasonic.com
Panasonic Sales Company, Division of Matsushita Electric of Puerto Rico, Inc. ("PSC")
Ave. 65 de Infantería, Km. 9.5 San Gabriel Industrial Park, Carolina, Puerto Rico 00985
Panasonic Canada Inc.
5770 Ambler Drive, Mississauga, Ontario L4W2T3
www.panasonic.ca
© 2003 Matsushita Electric Industrial Co., Ltd. RQTT0530-1P
Printed in China

F0203TH1033
- The following mark and symbols are located on the bottom of the unit.

CAUTION
RISK OF ELECTRIC SHOCK DO NOT OPEN

CAUTION: TO REDUCE THE RISK OF ELECTRIC
SHOCK, DO NOT REMOVE SCREWS.
NO USER-SERVICEABLE PARTS INSIDE.
REFER SERVICING TO QUALIFIED SERVICE PERSONNEL.

The lightning flash with arrowhead symbol, within an equilateral triangle, is intended to alert the user to the presence of uninsulated “dangerous voltage” within the product’s enclosure that may be of sufficient magnitude to constitute a risk of electric shock to persons.

The exclamation point within an equilateral triangle is intended to alert the user to the presence of important operating and maintenance (servicing) instructions in the literature accompanying the appliance.
The model number and serial number of this product can be found on either the back or the bottom of the unit.
Please note them in the space provided below and keep for future reference.
MODEL NUMBER
RC-CD300
SERIAL NUMBER
Supplied accessories
Please check and identify the supplied accessories.
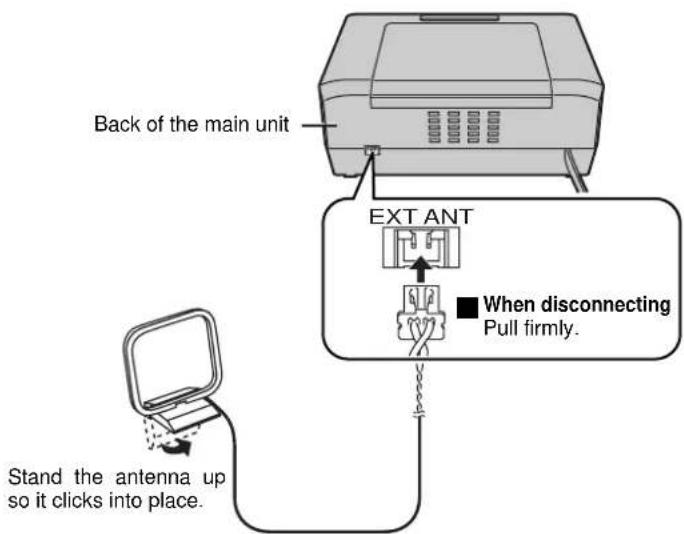
□1 FM/AM loop antenna (RSA0031)

Use numbers in parentheses when asking for replacement parts.
(Only for U.S.A.)
To order accessories, contact 1-800-332-5368 or the website (http://www.panasonic.com).
Connecting the FM/AM loop antenna
text_image
Back of the main unit EXT ANT When disconnecting Pull firmly. Stand the antenna up so it clicks into place.Concerning Compact Discs

Only compact discs bearing this mark can be used with this unit.
However, continued use of irregularly shaped CDs can damage the unit.
 |  |
How to store the disc in its case How to remove a disc from its case. The battery lasts about a year.
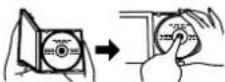 | Label side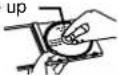 |
How to hold a disc


If the surface is dirty
Wipe it with a damp cloth and then wipe dry.
Wipe from the center toward the outer circumference.
| Play surface (shiny surface) |
Handling precautions
- If you are taking the CD from a cold to a warm environment, moisture may form on the CD. Wipe this off with a soft, dry, lint-free cloth before using the CD.
- Do not write on the label side with a ball-point pen or other writing instrument.
- Do not use record cleaning sprays, benzine, thinner, static electricity prevention liquids or any other solvent.
- Do not attach labels or stickers to CDs. (Do not use CDs with exposed adhesive from tape or left over peeled off stickers.)
- Do not use scratch-proof protectors or covers other than those specified for use with this unit.
Storage precautions
Be sure to store CDs in their cases to protect them from dust, scratches, and warping.
Do not place or store CDs in the following places
- Locations exposed to direct sunlight
● Humid or dusty locations - Locations directly exposed to a heat vent or heating appliance
- In the glove compartment or on the rear deck of an automobile
Power sources
AC power supply cord
Connect the AC power supply cord to a household AC outlet.
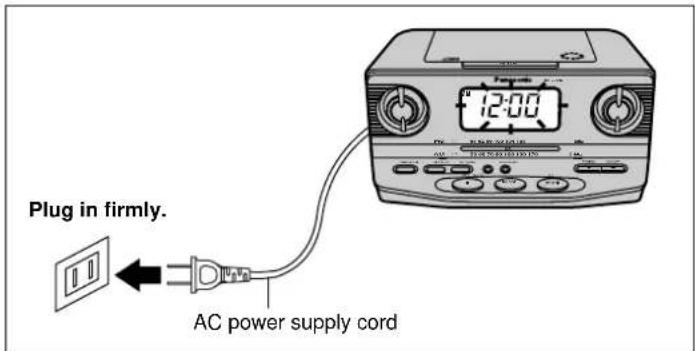
text_image
Plug in firmly. AC power supply cord 12:00Note
These speakers do not have magnetic shielding. Do not place them near televisions, personal computers or other devices easily influenced by magnetism.
Memory back-up battery (not included)
This battery saves the clock and alarm settings if there is a power interruption.
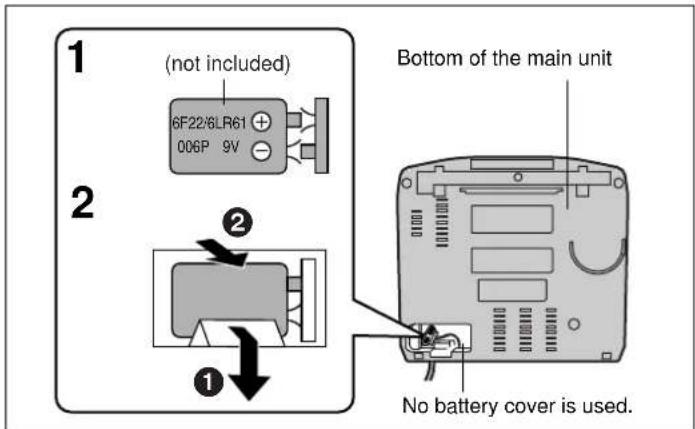
text_image
(not included) 6F22/8LR61 006P 9V Bottom of the main unit No battery cover is used.Replacing the battery
- remove a disc from its case.
The battery lasts about a month if the unit is disconnected from the household AC outlet.
- Protect the memory by connecting the AC power cord before changing the battery.
Note
- Align the poles (⊖ and ⊕) properly when inserting the battery.
- Do not heat or disassemble batteries. Do not allow them to contact flame or water.
- Remove the battery if the unit is not to be used for a long time.
- Do not use the battery if the covering has been peeled off.
Mishandling of batteries can cause electrolyte leakage which can damage items the fluid contacts and may cause a fire. If electrolyte leaks from the batteries, consult your dealer.
Wash thoroughly with water if electrolyte comes in contact with any part of your body.
Controls
CD, Radio
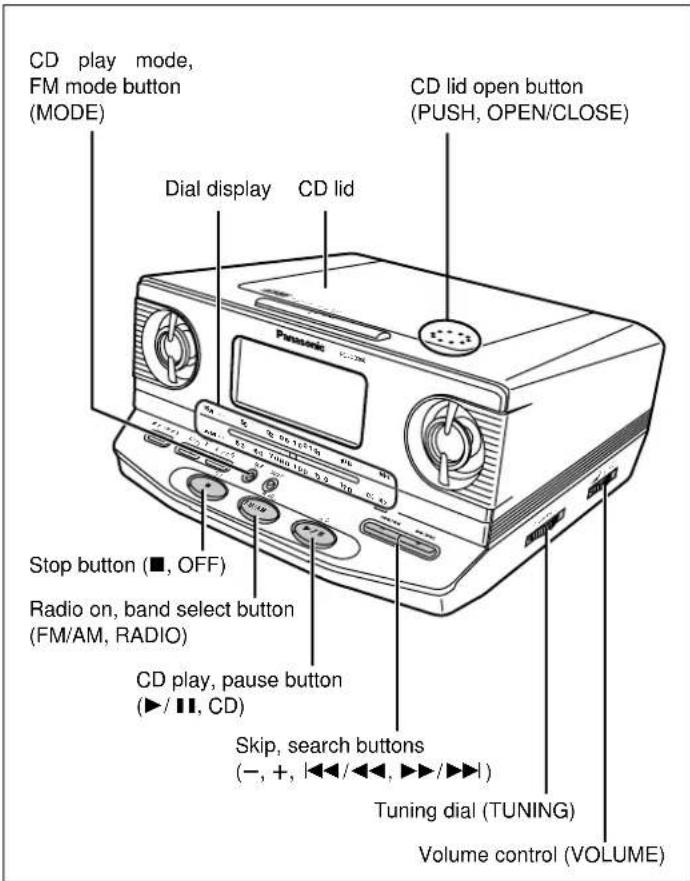
text_image
CD play mode, FM mode button (MODE) Dial display CD lid CD lid open button (PUSH, OPEN/CLOSE) Stop button (■, OFF) Radio on, band select button (FM/AM, RADIO) CD play, pause button (▶/■, CD) Skip, search buttons (-, +, ◀◀/◀◀, ▶▶/▶▶) Tuning dial (TUNING) Volume control (VOLUME)Alarm, Sleep timer and Basic operations
text_image
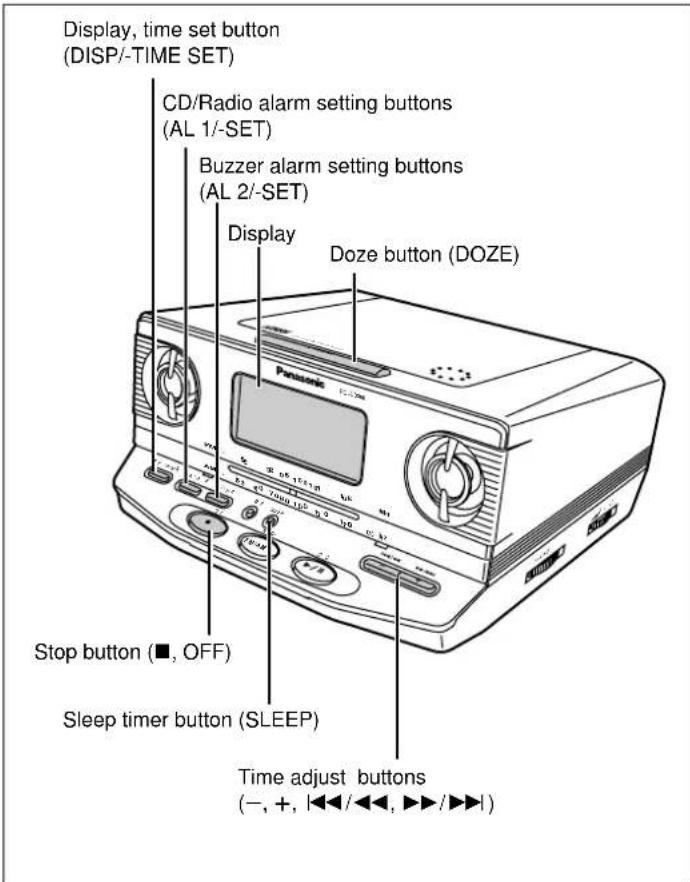
Display, time set button (DISP/-TIME SET) CD/Radio alarm setting buttons (AL 1/-SET) Buzzer alarm setting buttons (AL 2/-SET) Display Doze button (DOZE) Pantonic Stop button (■, OFF) Sleep timer button (SLEEP) Time adjust buttons (−, +, |◀◀/◀◀, ▶▶/▶▶)Setting the time
Reset the clock regularly to maintain accuracy. (Monthly accuracy +/-30 seconds)
This is a 12-hour clock.
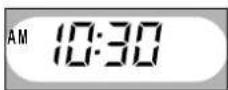
This example shows how to set the clock for 10:30 A.M.
text_image
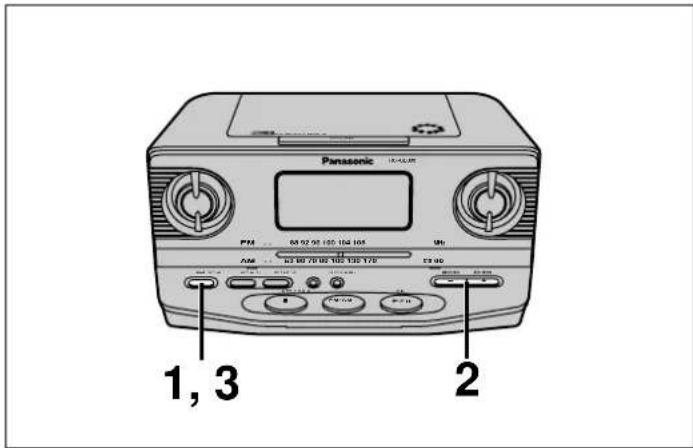
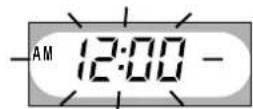
Panasonic 1, 3 21 Press and hold [DISP/-TIME SET] until the time display flashes.
2 Press [+,▶▶/▶▶] or [−, |◀◀/◀◀] to adjust the time.
[+,▶▶/▶▶]: Increases the time by one-minute units. [-,|◀◀/◀◀]: Decreases the time by one-minute units.
The time changes faster if you hold [+,/] or [-,/] down.
3 Press [DISP/-TIME SET]. The time is set.
For your reference:
- When you play a CD, the display changes but the clock is displayed again after about 10 seconds.
- The light in the main unit's display comes on for about 5 seconds when you press a button.
Listening to CDs
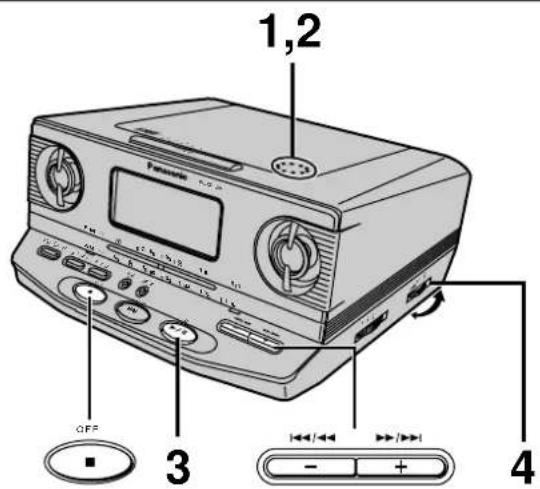
text_image
1,2 OFF 3 41 Press [PUSH, OPEN/CLOSE] to open the CD lid and insert the CD.
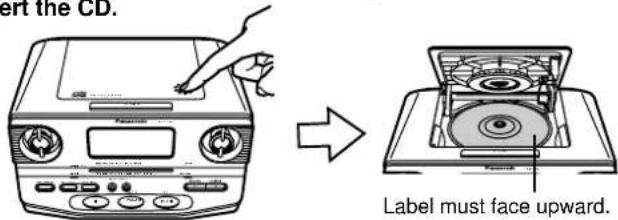
text_image
ert the CD. Label must face upward.2 Press [PUSH, OPEN/CLOSE] to close the CD lid.
“-- --” is displayed if there is no disc in the unit.
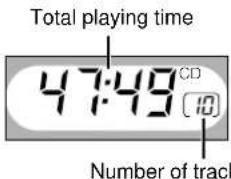
text_image
Total playing time 47:49 CD Number of track3 Press [▶/II, CD] to start play. Play starts from the first track and continues to the last track.
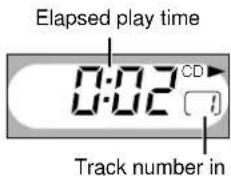
text_image
Elapsed play time 0:02 CD Track number in p4 Adjust the volume.
■ To stop play
Press [■, OFF].
The CD section is turned off if you press [■, OFF] again.
■ To pause play
Press [▶/Ⅱ, CD] during playback.
To resume, press [▶/Ⅱ, CD].
■ To search forward/backward
Press and hold [+, ►►/►►] (forward) or [-, |◄◄/◄◄] (backward) during playback.
■ To skip forward/backward
Press [+, ▶▶/▶▶] (forward) or [-, |◀◀/◀◀] (backward).
Note
- The clock is displayed after about 10 seconds after you perform operations.
●The CD section is turned off if it is stopped for about 10 minutes. - Do not press [PUSH, OPEN/CLOSE] during play, pause or immediately after you inserted a CD and closed the CD lid. CD may be scratched.
Other play methods
text_image
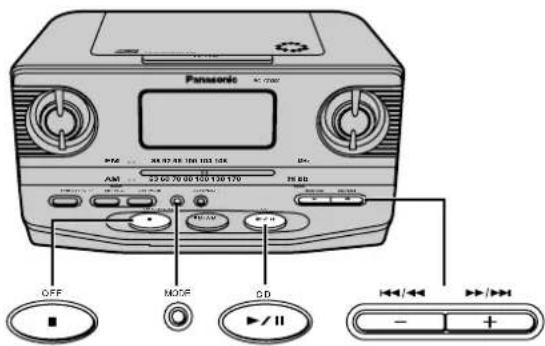
Panasonic AC 700V PSA 30.92.88 100 100 15K AM 22.62.70 00 100 100 170 PS BD OFF MODE CD +/-Preparation for skip play and random play
- Press [▶/II, CD].
- Press [■, OFF] to stop play.
"CD" must be displayed on the display for these methods to work.
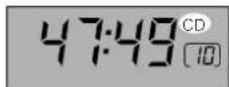
Note
The CD section is turned off if it is stopped for about 10 minutes.
Skip play
While stopped
1 Press [+, ▶▶/▶▶] or [−, |◀◀/◀◀] to select a track.
2 Press [▶/II, CD] to start play.
Play starts and continues to the last track.
You can also select a track during play.
Repeat play
Plays a track or all tracks repeatedly.
1 Press [▶/II, CD] to start play.
2 Press [MODE] to select the repeat mode.
Each time [MODE] is pressed
1 → ↻ → RANDOM
↑— Off (no indication)←
1 : One track repeated
: All tracks repeated
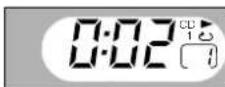
To cancel
Press [MODE] until "1 ➕" and " ➕" are cleared.
Note
The mode is also canceled if the CD lid is opened.
Random play
Plays the tracks once each in random order.
While stopped
1 Press [MODE] to select "RANDOM".
Each time [MODE] is pressed
1 → 🏠 → RANDOM
Off (no indication)
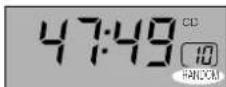
2 Press [▶/II, CD] to start play.
Note
- You cannot skip to tracks already played.
- Search can be done within a track only.
To cancel
Press [MODE] to clear "RANDOM".
Note
- If canceled during play, play continues to the end of the disc.
- The mode is also canceled if the CD lid is opened.
Listening to the radio
text_image
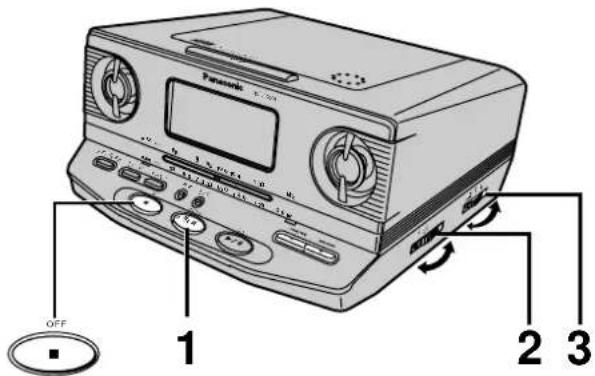
Panasonic OFF 1 2 31 Press [FM/AM, RADIO] to select the band.
Each time [FM/AM, RADIO] is pressed
![PANASONIC RC-CD300 - Press [FM/AM, RADIO] to select the band. - 1](/content/2026/05/796369/images/fddcebb325fd79f23a41ed5a9fc11fd3ae021ac366b3cc5d3501bbbfd48e43d0.jpg)
![PANASONIC RC-CD300 - Press [FM/AM, RADIO] to select the band. - 2](/content/2026/05/796369/images/4e8e0b5be50b0f6b7fa33d2a1850623d9a612bc486ee7f5125029057e1778c64.jpg)
2 Turn the dial to tune to the desired station.
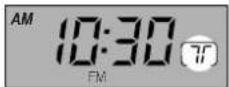
“7” lights up when the station is tuned in.
3 Adjust the volume.
To turn off
Press [■, OFF].
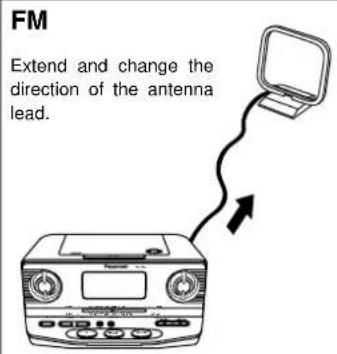
To improve reception
text_image
FM Extend and change the direction of the antenna lead.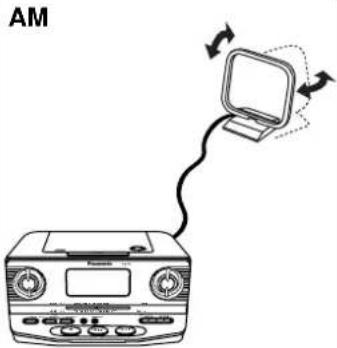
text_image
AMIf noise is excessive in the FM stereo mode Press [MODE].
"MONO" lights up.
![PANASONIC RC-CD300 - If noise is excessive in the FM stereo mode Press [MODE]. - 1](/content/2026/05/796369/images/b73bf90a560e6b3acd3da7be3e5ce597d49aa1a4ed8ad2a61ea9a1bb8ad01b3d.jpg)
text_image
PANSSON MODE![PANASONIC RC-CD300 - If noise is excessive in the FM stereo mode Press [MODE]. - 2](/content/2026/05/796369/images/b19a9863e0eb4a6a67471651fc5dd749d08ce51f334d220546965f077c0461d6.jpg)
Sound will be produced in monaural, but this also reduces noise.
Press the button again to cancel. ("MONO" goes out.)
Using the sleep timer
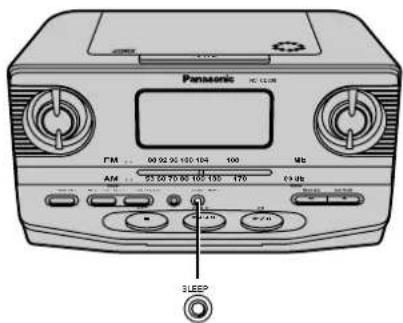
text_image
Panasonic TM 90 92 93 100 104 100 Mb AM 93 90 70 80 100 150 170 69 dB 3 SLEEPPress [SLEEP].
Each time [SLEEP] is pressed
![PANASONIC RC-CD300 - Press [SLEEP]. - 1](/content/2026/05/796369/images/8998a43826a1c042d30dc48fa129736199fc5312bedd9f0cadf88d4b36922dba.jpg)
■ To release the timer
Press [SLEEP] to select "OFF".
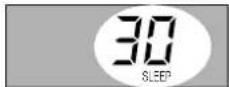
■ To check the remaining time
Press [SLEEP] once.
The time display is restored after the remaining time is displayed.
■ To change the remaining time
Press [SLEEP] to display the remaining time then press again to change the time.
For your reference:
You can combine the alarm and sleep timer. Be sure the volume is at an appropriate level before you turn the unit off.
Using the alarm
You can set the unit to come on at a set time and play a CD, the radio or a buzzer. The unit turns off automatically after one hour.
Preparation: Set the current time. (Refer to page 3 "Setting the time")
Setting the CD/Radio alarm (ALARM 1)
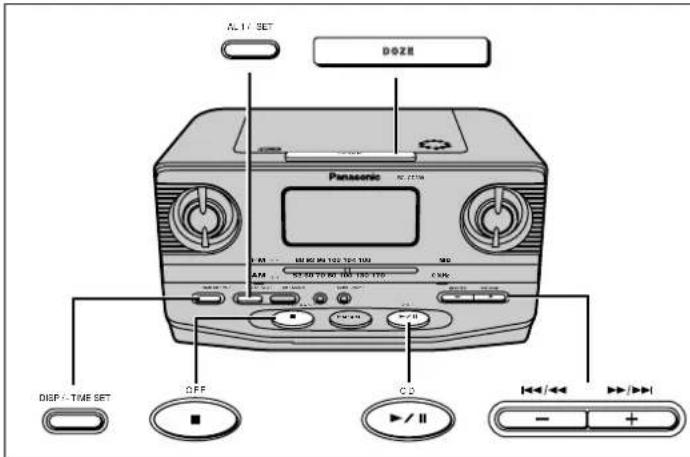
text_image
A-11 SET D2E Panasonic 9C/758 0.00 100 MHz 100 MHz 100 AM 50 MHz TO 50 MHz 100 OFF C2 +/-CD
1 Press [▶/II, CD] to start play.
2 Press [+, ▶▶/▶▶] or [−, ◀◀/◀◀] to select the desired track.
3 Press and hold [AL 1/-SET] until the display flashes.
4 Press [+,▶▶/▶▶] or [−, |◀◀/◀◀] to adjust the alarm time.
[+, ▶▶/▶▶]: Increases the time by one-minute units. [-, |◀◀/◀◀]: Decreases the time by one-minute units.
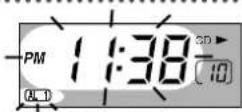
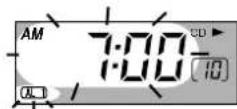
The time changes faster if you hold [+, ▶▶/▶▶] or [−, |◀◀/◀◀] down.
5 Press [AL 1/-SET]. The alarm time is set and "AL 1" is indicated on the display.
6 Press [■, OFF] to turn off.
RADIO
1 Tune to the station. (Refer to page 5 "Listening to the radio")
2 Press and hold [AL 1/-SET] until the display flashes.
3 Press [+,▶▶/▶▶] or [−, |◀◀/◀◀] to adjust the alarm time.
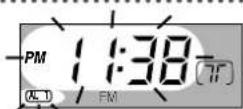
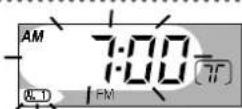
4 Press [AL 1/-SET]. The alarm time is set and "AL 1" is indicated on the display.
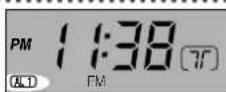
5 Press [■, OFF] to turn off.
For your reference:
The unit can be used after the CD/Radio alarm has been set. Be sure the volume is at an appropriate level before you turn the unit off.
Note
If you set the CD alarm but do not insert a CD or set the radio alarm but do not receive a station, the buzzer will sound at the set time instead.
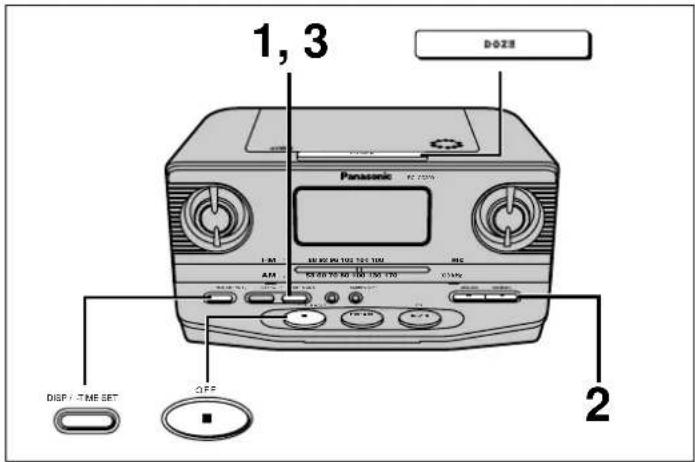
Setting the buzzer alarm (ALARM 2)
text_image
1, 3 DOZZ Panasonic AC 2000 L 40 AM DC 200 DC 100 DC 70 DC 50 DC 30 DC 100 DC 70 DC 50 DC 30 DC 100 DC 70 DC 50 DC 30 DC 100 DC 70 DC 50 DC 30 DC 100 DC 70 DC 50 DC 30 DC 100 DC 70 DC 30 DC 100 DC 70 DC 50 DC 30 DC 100 DC 70 DC 50 DC 30 DC 100 DC 70 DC 50 DC 30 DC 100 DC 70 DC 50 DC 30 DC 100 DC 80 DC 60 DC 40 DC 20 DC 10 DC 5 DC 3 DC 1 DC 2 DC 3 DC 4 DC 5 DC 6 DC 7 DC 8 DC 9 DC 10 DC 11 DC 12 DC 13 DC 14 DC 15 DC 16 DC 17 DC 18 DC 19 DC 20 DC 21 DC 22 DC 23 DC 24 DC 25 DC 26 DC 27 DC 28 DC 29 DC 30 DC 31 DC 32 DC 33 DC 34 DC 35 DC 36 DC 37 DC 38 DC 39 DC 40 DC 41 DC 42 DC 43 DC 44 DC 45 DC 46 DC 47 DC 48 DC 49 DC 50 DC 51 DC 52 DC 53 DC 54 DC 55 DC 56 DC 57 DC 58 DC 59 DC 60 DC 61 DC 62 DC 63 DC 64 DC 65 DC 66 DC 67 DC 68 DC 69 DC 70 DC 71 DC 72 DC 73 DC 74 DC 75 DC 76 DC 77 DC 78 DC 79 DC 80 DC 81 DC 82 DC 83 DC 84 DC 85 DC 86 DC 87 DC 88 DC 89 DC 90 DC 91 DC 92 DC 93 DC 94 DC 95 DC 96 DC 97 DC 98 DC 99 DC1001 Press and hold [AL 2/-SET] until the display flashes.
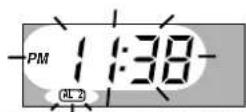
2 Press [+, ▶▶/▶▶] or [−, ◀◀/◀◀] Example: set the alarm time for "7:00 AM". to adjust the alarm time.
[+, ▶▶/▶▶]: Increases the time by one-minute units. [-, |◀◀/◀◀]: Decreases the time by one-minute units.
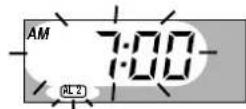
The time changes faster if you hold [+, ▶▶/▶▶] or [−, ◀◀/◀◀] down.
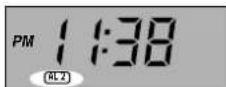
3 Press [AL 2/-SET].
The alarm time is set and "AL 2" is indicated on the display.
Note
You cannot adjust the volume of the buzzer alarm.
To shut off the alarm
Press [■, OFF].
The alarm is turned off but the setting remains intact so the alarm will operate as set the next day as well.
■ To clear the alarm setting
Press [AL 1/-SET] or [AL 2/-SET] again.
"AL 1" or "AL 2" is cleared.
■ To snooze a few more minutes even after the alarm has sounded Press [DOZE].
The alarm sounds again 6 minutes later.
Press [■, OFF] to shut off the alarm.
To check the alarm time
Press [DISP/-TIME SET].
The alarm time is displayed. (ALARM 1 and then ALARM 2)
Note
This unit enables two alarms (ALARM 1, ALARM 2) to be set separately.
Troubleshooting guide
Before requesting service, make the below checks. If you are in doubt about some of the check points, or if the remedies indicated in the chart do not solve the problem,
In the U.S.A., contact the Panasonic Customer Call Center at 1-800-211-7262, or e-mail
consumerproducts@panasonic.com, or the website (http://www.panasonic.com).
In Canada, contact the Panasonic Canada Inc. Customer Care Centre at 905-624-5505, or visit the website
(www.panasonic.ca), or an authorized Servicentre closest to you.
Common problems
| Problem Check this | |
| “” 12:00 ” is displayed. ●The clock hasn’t “---” is displayed. | been set. Set the current time. ●A CD hasn’t been inserted. |
| The alarm doesn’t sound at the set time. Ensure the | alarm’s indicator is on (“AL 1” or “AL 2”). |
| The memory has been cleared. ●Reset the items into | the memory. ●Insert a memory back-up battery to preserve the contents of the memory. |
CD
| Problem Check this | |
| “E” is displayed. Indicates incorrect operation. Read the instructions. | |
| Play doesn’t start or display is incorrect. ●Clean the CD. | ●Wait for an hour for condensation to dry, then try again.●Make sure the label is facing up.●Replace the CD if it is scratched, warped, or irregularly shaped. |
Radio
| Problem Check this | |
| The picture is distorted. Are you using the unit too A lot of noise. | near a TV or Tuner? Move the unit away from a TV or tuner or turn off. |
ONLY FOR U.S.A.
Panasonic Consumer Electronics Company, Division of Matsushita Electric Corporation of America
One Panasonic Way Secaucus, New Jersey 07094
Panasonic Sales Company, Division of Matsushita Electric of Puerto Rico, Inc. Ave. 65 de Infantería, Km. 9.5
San Gabriel Industrial Park, Carolina, Puerto Rico 00985
Panasonic Audio Products Limited Warranty
Limited Warranty Coverage
If your product listed below does not work properly because of a defect in materials or workmanship, Panasonic Consumer Electronics Company or Panasonic Sales Company (collectively referred to as "the warrantor") will, for the length of the period indicated on the chart below, which starts with the date of original purchase ("warranty period"), at its option either (a) repair your product with new or refurbished parts, or (b) replace it with a new or a refurbished product. The decision to repair or replace will be made by the warrantor.
| Product or Part Name | Parts | Labor |
| Radio, Clock Radio, Radio with Tape Player or Recorder, Portable CD Player, Headphone Stereo, Tape Recorder, Speaker | One (1) Year | One (1) Year |
| Rechargeable batteries (in exchange for defective item) | Ten (10) Days | Not Applicable |
| SD Memory Card (in exchange for defective item) | Ninety (90) Days | Not Applicable |
During the "Labor" warranty period there will be no charge for labor. During the "Parts" warranty period, there will be no charge for parts. You must mail-in your product during the warranty period. This Limited Warranty excludes both parts and labor for batteries, antennas, and cosmetic parts (cabinet). This warranty only applies to products purchased and serviced in the United States or Puerto Rico. This warranty is extended only to the original purchaser of a new product which was not sold "as is". A purchase receipt or other proof of the original purchase date is required for warranty service.
To obtain service in the USA please contact:
Panasonic Services Company, Panasonic Plus Department
20421 84th Avenue South
Kent, WA 98032
Tel: 1-800-833-9626 Fax: 1-800-237-9080
For assistance in Puerto Rico call Panasonic Sales Company (787)-750-4300 or fax (787)-768-2910.
When shipping the unit carefully pack and send it prepaid, adequately insured and preferably in the original carton. Include a letter detailing the complaint and provide a day time phone number where you can be reached.
Customer Services Directory
For Product Information, Operating Assistance, Literature Request, Dealer Locations, and all Customer Service inquiries please contact: 1-800-211-PANA (7262), Monday–Friday 9 am–9 pm; Saturday–Sunday 9 am–7 pm, EST.
Web Site: http://www.panasonic.com You can purchase parts, accessories or locate your nearest servicenter by visiting our Web Site.
Limited Warranty Limits And Exclusions
This warranty ONLY COVERS failures due to defects in materials or workmanship, and DOES NOT COVER normal wear and tear or cosmetic damage. The warranty ALSO DOES NOT COVER damages which occurred in shipment, or failures which are caused by products not supplied by the warrantor, or failures which result from accidents, misuse, abuse, neglect, mishandling, misapplication, alteration, faulty installation, set-up adjustments, misadjustment of consumer controls, improper maintenance, power line surge, lightning damage, modification, introduction of sand, humidity or liquids, commercial use such as hotel, office, restaurant, or other business or rental use of the product, or service by anyone other than a Factory Servicenter or other Authorized Servicer, or damage that is attributable to acts of God.
THERE ARE NO EXPRESS WARRANTIES EXCEPT AS LISTED UNDER "LIMITED WARRANTY COVERAGE".
THE WARRANTYOR IS NOT LIABLE FOR INCIDENTAL OR CONSEQUENTIAL DAMAGES RESULTING FROM THE USE OF THIS PRODUCT, OR ARISING OUT OF ANY BREACH OF THIS WARRANTY. (As examples, this excludes damages for lost time, cost of having someone remove or re-install an installed unit if applicable, travel to and from the servicer, loss of or damage to media or images, data or other memory or recorded content. The items listed are not exclusive, but are for illustration only.)
ALL EXPRESS AND IMPLIED WARRANTIES, INCLUDING THE WARRANTY OF MERCHANTABILITY, ARE LIMITED TO THE PERIOD OF THE LIMITED WARRANTY.
Some states do not allow the exclusion or limitation of incidental or consequential damages, or limitations on how long an implied warranty lasts, so the exclusions may not apply to you.
This warranty gives you specific legal rights and you may also have other rights which vary from state to state. If a problem with this product develops during or after the warranty period, you may contact your dealer or Servicenter. If the problem is not handled to your satisfaction, then write to the warrantor's Consumer Affairs Department at the addresses listed for the warrantor.
PARTS AND SERVICE, WHICH ARE NOT COVERED BY THIS LIMITED WARRANTY, ARE YOUR RESPONSIBILITY.
Service in Puerto Rico Matsushita Electric of Puerto Rico, Inc. Panasonic Sales Company/Factory Servicenter: Ave. 65 de Infanteria, Km. 9.5, San Gabriel Industrial Park, Carolina, Puerto Rico 00985 Phone (787) 750-4300 Fax (787) 768-2910
Accessory Purchases:
1-800-332-5368 (Customer Orders Only) Panasonic Services Company 20421 84th Avenue South, Kent, WA 98032 (6 am to 5 pm Monday–Friday; 6 am to 10:30 am Saturday; PST) (Visa, MasterCard, Discover Card, American Express, Check)
F0502
Product service
- Damage requiring service—The unit should be serviced by qualified service personnel if:
(a) The AC power supply cord or AC adaptor has been damaged; or
(b) Objects or liquids have gotten into the unit; or
(c) The unit has been exposed to rain; or
(d) The unit does not operate normally or exhibits a marked change in performance; or
(e) The unit has been dropped or the cabinet damaged.
-
Servicing—Do not attempt to service the unit beyond that described in these operating instructions. Refer all other servicing to authorized servicing personnel.
-
Replacement parts—When parts need replacing ensure the servicer uses parts specified by the manufacturer or parts that have the same characteristics as the original parts. Unauthorized substitutes may result in fire, electric shock, or other hazards.
-
Safety check—After repairs or service, ask the servicer to perform safety checks to confirm that the unit is in proper working condition.
Product information
For product information or assistance with product operation:
In the U.S.A., contact the Panasonic Customer Call Center at 1-800-211-7262, or e-mail consumerproducts@panasonic.com, or the website (http://www.panasonic.com).
In Canada, contact the Panasonic Canada Inc. Customer Care Centre at 905-624-5505, or visit the website (www.panasonic.ca), or an authorized Servicentre closest to you.
User memo:
DATE OF PURCHASE
DEALER NAME
DEALER ADDRESS
TELEPHONE NUMBER
Specifications
Frequency range
FM: 87.5–108.0 MHz
AM: 525–1710 kHz
Sampling frequency 44.1 kHz
Decoding 16 bit linear
Beam source Semiconductor laser
(wavelength 780 nm)
No. of channels 2 channel, stereo
Wow and flutter Less than possible measurement
data
DA converter MASH (1 bit DAC)
Speakers 4.5 cm (1
Power requirement AC 120 V, 60 Hz
^3/_4 ) 6 Ω×2
Power consumption: 14 W
Memory back-up 9 V (One 6F22/6LR61, 006P bat-
tery)
Dimensions (W×H×D)
232×107×215 mm
(9^1 / 8^ × 4^3 / 16^ × 8^7 / 16^ )
Mass 1.55 kg (3 lb 6.7 oz) without bat-
tery
Note:
Specifications are subject to change without notice.
Mass and dimensions are approximate.
Power consumption in standby mode: 1.6 W
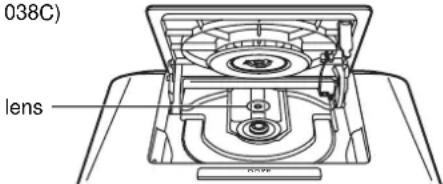
Maintaining the Lens
Open the lid and clean the lens.
Use a cotton swab to gently wipe off any finger-prints.
Recommended product:
Lens cleaner kit (SZZP1038C)
text_image
038C) lensWARNING:
TO REDUCE THE RISK OF FIRE, ELECTRIC SHOCK OR PRODUCT DAMAGE, DO NOT EXPOSE THIS APPARATUS TO RAIN, MOISTURE, DRIPPING OR SPLASHING AND THAT NO OBJECTS FILLED WITH LIQUIDS, SUCH AS VASES, SHALL BE PLACED ON THE APPARATUS.
CAUTION:
TO PREVENT ELECTRIC SHOCK MATCH WIDE BLADE OF PLUG TO WIDE SLOT, FULLY INSERT.
CAUTION!
THIS PRODUCT UTILIZES A LASER. USE OF CONTROLS OR ADJUSTMENTS OR PERFORMANCE OF PROCEDURES OTHER THAN THOSE SPECIFIED HEREIN MAY RESULT IN HAZARDOUS RADIATION EXPOSURE. DO NOT OPEN COVERS AND DO NOT REPAIR YOURSELF. REFER SERVICING TO QUALIFIED PERSONNEL.
THE FOLLOWING APPLIES ONLY IN THE U.S.A.
CAUTION:
This device complies with Part 15 of the FCC Rules. Operation is subject to the conditions that this device does not cause harmful interference.
Any unauthorized changes or modifications to this equipment would void the user's authority to operate this device.
ONLY FOR CANADA
| CAUTION | IMMILLE LASER RADIORM WHEN OPEN AND INTERLOCKS DEFEATED,AVOID EXPEDURE TO BEAM. | DEMONS-10 Class No |
| ATTENTION | RADIORMENT LASER IMMILLE DANGERLER EN CAS O'OUVERTURE ET,LOWSQUE LA SECURATE EST NATURAL EEE, EXPEDURE EN DANGERLISSE AU FABRICUL | |
| ADVARSEL | USYML LASERSTRALING YES ARMING, NAR UNIVER-BESAFRYOERE ENLOX IF PUMION, UNDAI LIDATE LEF FOR STRALING. | |
| ANTARESSA LA SOUVALUTUS CHIFETRESA OLET ALTINA NAYKARTONTÄ LA RESPARTELLE, ALA KATO SATEESEN. | ||
| WARNING | OSYNIL LASERSTRALING NAR DENNA DEL AR OFFNAD OCH SPARENAN UROPOLED, BRETAKA IS STRALEN. | |
| VORSICHT | UNIDITRATE LASERSTRALUNG, MEN ANSOCKUNG GEÖFTNET UNDSDIEN/BEETHEWHEELING (OBERTOC), NOT IT DEM ILLAI ASSETZEN. | |
| ADVARSEL | USYML LASERSTRALING NAR DENNA DELG, JÄPNE OS UIKNERESILÄS JÄRTES,UNDAI ESPONEERING FOR STRALEN. | ROLLS0059 |
Inside of product