
RF-D7 - Hi-Fi PANASONIC - Free user manual and instructions
Find the device manual for free RF-D7 PANASONIC in PDF.


User questions about RF-D7 PANASONIC
0 question about this device. Answer the ones you know or ask your own.
Ask a new question about this device
Download the instructions for your Hi-Fi in PDF format for free! Find your manual RF-D7 - PANASONIC and take your electronic device back in hand. On this page are published all the documents necessary for the use of your device. RF-D7 by PANASONIC.
USER MANUAL RF-D7 PANASONIC
natural_image
Illustration of a portable electronic device with control knobs and a display screen (no text or symbols visible)The illustrations show RF-D7.
Panasonic®
Operating Instructions
DAB-FM Radio
Model No. RF-D7
RF-D5

Digital Audio Broadcasting
Supplied accessories
Use the numbers indicated in parentheses when asking for replacement parts. "As of January 2007"

1 AC mains lead (K2CT3CA00004)
Note
- The included AC mains lead is for use with this unit only. Do not use it with other equipment.
- Do not use an AC mains lead from any other type of equipment with this unit.
Dear customer
Thank you for purchasing this product.
Before connecting, operating or adjusting this product, please read the instructions completely.
Please keep this manual for future reference.
Note
"EB" on the packaging indicates the United Kingdom.
RF-D7 is used in the illustrations unless otherwise mentioned.
Matsushita Electric Industrial Co., Ltd.
Web site: http://panasonic.net
EB En
RQT8947-B
M0107KS0
Troubleshooting guide
Before requesting service, make the following checks. If you are in doubt about any of the check points, or if the solutions indicated in the chart do not solve the problem, consult your dealer for instructions.
| The reception is poor.There is too much noise and distortion. | Try changing the length and angle of the rod antenna.Inside some buildings and on some means of transport, the signals may be weak, making it hard to hear the stations. In such cases, use the unit as close to the windows as possible.If this unit is used close to another radio, TV, VCR or other electrical appliance, noise may be heard from the resulting mutual interference. Try turning off the power of the radio, TV or VCR, etc. in the vicinity.This unit may not operate properly after it has been moved from a cold location to a warm place. This happens because condensation has formed on the unit's operating parts: The unit will return to normal in about 60 minutes.Noise may be caused if a mobile telephone is brought close to the unit. Use the unit at a distance from mobile telephones. |
| No sound is heard. | Is the volume control at the lowest position?Adjust the volume level using [VOLUME] |
| Dry cell batteries were installed in the unit,but the unit won't work. | Is the AC mains lead connected to the unit? To power the unit using the batteries, unplug the AC mains lead from the unit. |
| When the unit's power is turned on, the “CHANGE BATTERY” message is displayed. | Replace the existing batteries with new ones or use a household mains socket. |
| The unit's power is not turned off even when the set time is reached. | Is “SLEEP” displayed on the display panel?(page 7)If it is, press [SLEEP] and check the remaining time. |
| The timer does not work. | Is the timer setting OFF?(page 8, Setting the timer settings to ON). |
Display
| --:-- | You plugged the AC mains lead in or used batteries if the AC mains lead was not connected for the first time or there was a power failure recently. Set the time.(page 7) |
| NO SERVICE The DAB station is currently not broadcasting. | |
| NO SIGNAL | This DAB station cannot be received. Check your antenna (page 4). |
| DATA | Data broadcast being received over the DAB broadcast signal cannot be used on this unit. |
| SCRAMBLED | The DAB broadcast station being received cannot be accessed (E.g. pay per use etc.). |
| Scan Failed. | DAB stations are not receivable. Check your antenna and try Auto scanning (page 5). |
| F□□(Indicates a number.) | Connect the AC mains lead firmly to the unit and the outlet. If the unit still cannot be turned on, disconnect the AC mains lead, remove the batteries, and consult your dealer. |
| STATION FULL | DAB station memory is full. Use the following method to clear station memory.1. Press [MENU].2. Select “STATION CLEAR” with [TUNING].3. Press [ENTER]. “OK? Push ENTER” is displayed.4. Press [ENTER].Station memory is erased and the unit automatically begins Auto scanning. |
CAUTION!
- DO NOT INSTALL OR PLACE THIS UNIT IN A BOOKCASE, BUILT-IN CABINET OR IN ANOTHER CONFINED SPACE. ENSURE THE UNIT IS WELL VENTILATED. TO PREVENT RISK OF ELECTRIC SHOCK OR FIRE HAZARD DUE TO OVERHEATING, ENSURE THAT CURTAINS AND ANY OTHER MATERIALS DO NOT OBSTRUCT THE VENTILATION VENTS.
• DO NOT OBSTRUCT THE UNIT'S VENTILATION OPENINGS WITH NEWSPAPERS, TABLECLOTHS, CURTAINS, AND SIMILAR ITEMS.
•DO NOT PLACE SOURCES OF NAKED FLAMES, SUCH AS LIGHTED CANDLES, ON THE UNIT.
• DISPOSE OF BATTERIES IN AN ENVIRONMENTALLY FRIENDLY MANNER.
The socket outlet shall be installed near the equipment and easily accessible.
The mains plug of the power supply cord shall remain readily operable. To completely disconnect this apparatus from the AC Mains, disconnect the power supply cord plug from AC receptacle.
WARNING:
TO REDUCE THE RISK OF FIRE, ELECTRIC SHOCK OR PRODUCT DAMAGE,
- DO NOT EXPOSE THIS APPARATUS TO RAIN, MOISTURE, DRIPPING OR SPLASHING AND THAT NO OBJECTS FILLED WITH LIQUIDS, SUCH AS VASES, SHALL BE PLACED ON THE APPARATUS.
- USE ONLY THE RECOMMENDED ACCESSORIES. - DO NOT REMOVE THE COVER (OR BACK); THERE ARE NO USER SERVICEABLE PARTS INSIDE. REFER SERVICING TO QUALIFIED SERVICE PERSONNEL.
This product may receive radio interference caused by mobile telephones during use. If such interference is apparent, please increase separation between the product and the mobile telephone.
THIS UNIT IS INTENDED FOR USE IN MODERATE CLIMATES.
These speakers do not have magnetic shielding. Do not place them near televisions, personal computers or other devices easily influenced by magnetism.
CAUTION
Danger of explosion if battery is incorrectly replaced. Replace only with the same or equivalent type recommended by the manufacturer. Dispose of used batteries according to the manufacturer's instructions.
Safety precautions
Placement
Set the unit up on an even surface away from direct sunlight, high temperatures, high humidity, and excessive vibration. These conditions can damage the cabinet and other components, thereby shortening the unit's service life.
Do not place heavy items on the unit.
Voltage
Do not use high voltage power sources. This can overload the unit and cause a fire.
■ AC mains lead protection
Ensure the AC mains lead is connected correctly and not damaged. Poor connection and lead damage can cause fire or electric shock. Do not pull, bend, or place heavy items on the lead.
Grasp the plug firmly when unplugging the lead. Pulling the AC mains lead can cause electric shock.
Do not handle the plug with wet hands. This can cause electric shock.
■ Foreign matter
Do not let metal objects fall inside the unit. This can cause electric shock or malfunction.
Do not let liquids get into the unit. This can cause electric shock or malfunction. If this occurs, immediately disconnect the unit from the power supply, remove all the batteries and contact your dealer.
Do not spray insecticides onto or into the unit. They contain flammable gases which can ignite if sprayed into the unit.
Service
Do not attempt to repair this unit by yourself. If sound is interrupted, indicators fail to light, smoke appears, or any other problem that is not covered in these instructions occurs, disconnect the AC mains lead, remove all the batteries and contact your dealer or an authorized service center. Electric shock or damage to the unit can occur if the unit is repaired, disassembled or reconstructed by unqualified persons.
Extend operating life by disconnecting the unit from the power source if it is not to be used for a long time.
Caution for AC Mains Lead
For your safety, please read the following text carefully.
This appliance is supplied with a moulded three pin mains plug for your safety and convenience.
A 5-ampere fuse is fitted in this plug.
Should the fuse need to be replaced please ensure that the replacement fuse has a rating of 5-ampere and that it is approved by ASTA or BSI to BS1362.
Check for the ASTA mark on the BSI mark on the body of the fuse.
If the plug contains a removable fuse cover you must ensure that it is refitted when the fuse is replaced.
If you lose the fuse cover the plug must not be used until a replacement cover is obtained.
A replacement fuse cover can be purchased from your local dealer.
CAUTION!
IF THE FITTED MOULDED PLUG IS UNSUITABLE FOR THE SOCKET OUTLET IN YOUR HOME THEN THE FUSE SHOULD BE REMOVED AND THE PLUG CUT OFF AND DISPOSED OF SAFELY. THERE IS A DANGER OF SEVERE ELECTRICAL SHOCK IF THE CUT OFF PLUG IS INSERTED INTO ANY 13-AMPERE SOCKET.
If a new plug is to be fitted please observe the wiring code as stated below. If in any doubt please consult a qualified electrician.
IMPORTANT
The wires in this mains lead are coloured in accordance with the following code:
Blue: Neutral, Brown: Live.
As these colours may not correspond with the coloured markings identifying the terminals in your plug, proceed as follows:
The wire which is coloured Blue must be connected to the terminal which is marked with the letter N or coloured Black or Blue.
The wire which is coloured Brown must be connected to the terminal which is marked with the letter L or coloured Brown or Red.
WARNING: DO NOT CONNECT EITHER WIRE TO THE EARTH TERMINAL WHICH IS MARKED WITH THE LETTER E, BY THE EARTH SYMBOL OR COLOURED GREEN OR GREEN/YELLOW.
THIS PLUG IS NOT WATERPROOF-KEEP DRY.
Before use
Remove the connector cover.
How to replace the fuse
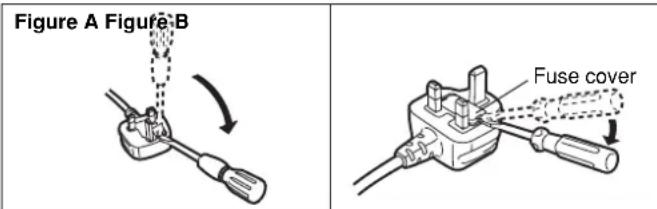
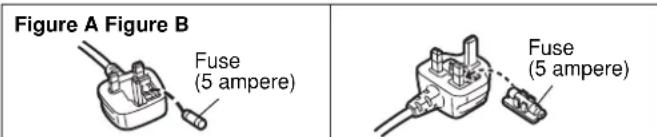
The locations of the fuse differ according to the type of AC mains plug (figures A and B). Confirm the AC mains plug fitted and follow the instructions below. Illustrations may differ from actual AC mains plug.
- Open the fuse cover with a screwdriver.
text_image
Figure A Figure B Fuse cover- Replace the fuse and close or attach the fuse cover.
text_image
Figure A Figure B Fuse (5 ampere) Fuse (5 ampere)Maintenance
If the surfaces are dirty
To clean this unit, wipe with a soft, dry cloth.
- Never use alcohol, paint thinner or benzine to clean this unit.
- Before using a chemically treated cloth, read the instructions that came with the cloth carefully.
■ Sales and Support Information
Customer Care Centre
• For customers within the UK: 08705 357357
• For customers within the Republic of Ireland: 01 289 8333
- Visit our website for product information
• E-mail: customer.care@panasonic.co.uk
Direct Sales at Panasonic UK
- Order accessory and consumable items for your product with ease and confidence by phoning our Customer Care Centre Monday – Thursday 9:00am - 5:30pm, Friday 9:30am - 5:30pm (Excluding public holidays).
- Or go on line through our Internet Accessory ordering application at www.panasonic.co.uk.
- Most major credit and debit cards accepted
- All enquiries transactions and distribution facilities are provided directly by Panasonic UK Ltd.
- It couldn't be simpler!
- Also available through our Internet is direct shopping for a wide range of finished products, take a browse on our website for further details.
Interested in purchasing an extended guarantee?
Please call 0870 240 6284 or visit our website
www.panasonic.co.uk/guarantee.
Information on Disposal for Users of Waste Electrical & Electronic Equipment (private households)
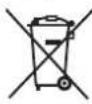

This symbol on the products and/or accompanying documents means that used electrical and electronic products should not be mixed with general household waste.
For proper treatment, recovery and recycling, please take these products to designated collection points, where they will be accepted on a free of charge basis. Alternatively, in some countries you may be able to return your products to your local
retailer upon the purchase of an equivalent new product.
Disposing of this product correctly will help to save valuable resources and prevent any potential negative effects on human health and the environment which could otherwise arise from inappropriate waste handling. Please contact your local authority for further details of your nearest designated collection point.
Penalties may be applicable for incorrect disposal of this waste, in accordance with national legislation.
For business users in the European Union
If you wish to discard electrical and electronic equipment, please contact your dealer or supplier for further information.
Information on Disposal in other Countries outside the European Union. This symbol is only valid in the European Union.
If you wish to discard this product, please contact your local authorities or dealer and ask for the correct method of disposal.
Power sources
The unit can be powered with household AC power or dry cell batteries (not included).
Using a household mains socket
READ THE CAUTION FOR THE AC MAINS LEAD ON PAGE 2 BEFORE CONNECTION.
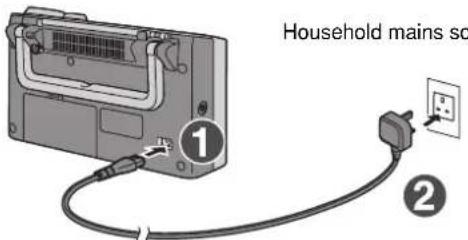
Connect the AC mains lead firmly to the unit and the outlet.
- Plug one end of the AC mains lead (included) into the unit's AC IN socket.
- Plug the other end into the household mains socket.
Note
If you are not going to use the unit for a prolonged time, it is recommended that you unplug the AC mains lead from the household mains socket. Power will still be consumed even when the unit's power is not turned on. (Approx. 1 W)
text_image
Household mains so ① ②AC mains lead (included)
Using dry cell batteries (not included)
-
Unplug the AC mains lead from the unit's AC IN socket.
-
When the AC mains lead is connected to the unit, the unit cannot be powered by the dry cell batteries.
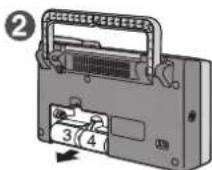
- Remove the battery cover.
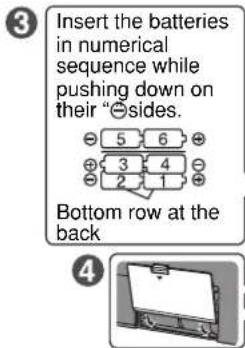
- Insert six R14/LR14 batteries (not included) in the numerical sequence.
- Insert the batteries correctly with their “⊕” and “⊖” poles aligned as displayed.
- Put the battery cover back in its original position.
■ Removing the batteries
- Push the “⊕” side of battery 6 toward its “⊖” side, and remove batteries 5 and 6.
- Put your finger into the cutout inside the compartment, and remove batteries 3, 4, 1 and 2.
text_image
Insert the batteries in numerical sequence while pushing down on their "sides. Bottom row at the back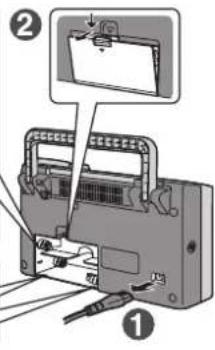
text_image
Diagram showing a device with labeled parts, including a clipboard and tool, with numbered annotations.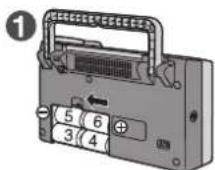
■ Dry cell battery
- Align the poles (+ and -) properly when inserting the batteries.
- Do not mix old and new batteries or different types of batteries.
- Do not recharge ordinary dry cell batteries.
- Do not heat or disassemble the batteries. Do not allow them to contact flame or water.
- If the unit is not going to be used for a long time or if the unit is to be powered exclusively by AC power, remove the batteries and store them in a cool dark place.
- Do not keep together with metallic objects such as necklaces.
- Do not use rechargeable type batteries
- Do not use batteries if the covering has been peeled off.
Mishandling of batteries can damage other items, cause damage to the unit, and may cause a fire through short-circuiting or electrolyte leakage.
If electrolyte leaks from the batteries, consult your dealer.
Wash thoroughly with water if electrolyte comes in contact with any part of your body.
Note
- When the charge of the dry cell batteries is depleted, "LOW BATTERY" appears and "flashes on the display panel.
• After replacing the batteries, set the clock again (page 7). - The registered preset stations (page 4) will be lost if the batteries have been removed for more than 3 minutes. Register the stations again when using the radio next.
FM Radio operations
1. Turn on the unit's power.
Press

To turn the unit off, press the button again.
Note
When the power is turned on again, the broadcast station that was last tuned in when the power was turned off, will be tuned in.
Standby/on switch (9/1)
Press to switch the unit from on to standby mode or vice versa.
In standby mode, the unit is still consuming a small amount of power.
2. Select the broadcast station.
Turn
to s

matic tuning
ENTER

Automatic tuning
ENTER
When
is n
ress
—DAB SECONDARY
—FIM AUTO TUNE
first. F
Repea
at this
Note
Depending on the quality of the reception, automatic tuning may not be possible.
ENTER
• During tuning press
to stop.
一)34 SECONDARY
—FM AUTO TUNE
FM 87.50MHz
TUNED
"TUNED" appears for about 1 second when a station is tuned in.
When
is n
ress
DARY
WE
at
at clinic
Loper
veper
[Non-Text]
Durin
Dami
[Non-Text]
ENTER
to plo
to stop.
—FM AUTOTUNE
(二)交易对方情况
text_image
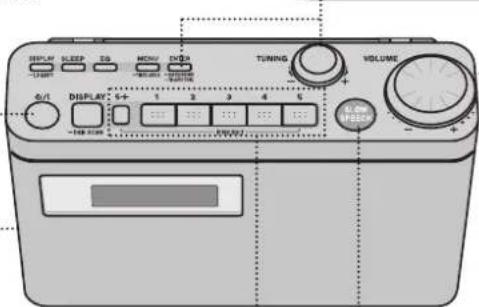
DISPLAY SLEEP DS MENU TURING VOLUME 0/1 DISPLAY 5+ 1 2 3 4 5 +/-The illustrations show RF-D7.
Preset tuning
A total of 10 FM stations can be preset.

Preset stations
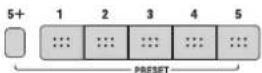
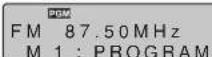
While listening to the station you want to register, hold down one of the number buttons [1] to [5] for at least 1 second. The number of the button you pressed and "PROGRAM" now appear on the display panel, and the station is registered in the button concerned.
Example: When you registered a station in button [1]
- To register a station greater than 5, first press [5+], then, e.g. to register 7 (within 10 seconds) press and hold [2].
■ Listening to a station which you have registered
After the power has been turned on, press the number button in which the desired station has been registered. (To listen to, e.g., station 7, press [5+], then press [2].) The station will then be tuned in.
■ Changing a station which you have registered
With the new station you want to register already tuned in, press and hold the button with the number whose registered station is to be changed so that you will overwrite the existing station with the new one.
Listening to sound via earphone (not included)
Turn the volume down before connecting the earphone.
Plug type:
Avoid listening for prolonged periods of time to prevent hearing damage.
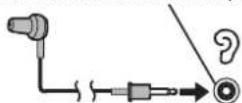
3. Adjust the volume.
Turn to
adjust the volume. (0 to 50)
VOLUME 28
Making it easier to understand what's being said (RF-D7 only)
You can adjust the speed of what's being said to understand newscasts, the dialogue of characters in dramas, etc. better.
Press

• T
The
inc
licato
r a
rou
nd
无法识别
• T
-0
clos
se th
e s
slov
v sp
Note
- When the
quality wil
cannot be
• The slow sp
The Slow Sp music program
music progra
- The slow sp
(1) When the
(2) When you
- When the s
will change
- The speed
- When the
When the reception i
reception
noise will be
At a time ll

slow
sp
pee
ech
fL
inc
tio
n i
s a
act
iva
te
d.
the
S
ou
nd
■ To improve reception
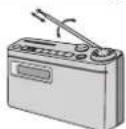
Adjust the length and angle of the rod antenna to obtain the best reception.
Note
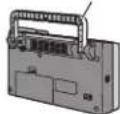
If you take hold of the unit's rod antenna and move it from one place to another, you may damage the unit. To move the unit, make sure you pick it up by the handle on the rear panel, and then move it.
Handle
Specifications
• Frequency range
FM 87.50-108.00 MHz (50 kHz steps)
DAB BANDIII 5A-13F (174.928-239.200 MHz)
(For the United Kingdom) 11B-12D (218.640-229.072 MHz)
- Terminals
Output PHONES ∅3.5 mm monaural (8-16 Ω)
• Power output 1 W (RMS)
• Power supply AC 230-240 V, 50 Hz
Battery DC 9 V (Six R14/LR14, batteries)
- Battery life
(Panasonic alkaline battery)
DAB: About 25 hours
FM: About 50 hours
• Power consumption
7 W (RF-D5EB)
9 W (RF-D7EB)
- Speakers
Full range
• Dimensions (W × H × D)
10 cm, 8 Ω × 1
270 mm × 152 mm × 92.5 mm
• Mass
With batteries
Without batteries
Approx. 1.67 kg
Approx. 1.26 kg
Power consumption in standby mode: 1 W
Specifications are subject to change without notice.
What is DAB?
DAB stands for digital audio broadcasting. It is a new form of radio that is broadcast digitally. Digital audio provides a superior quality of sound compared to regular analogue broadcasting.
■ DAB structure
Band
There are two types of DAB bands, "BAND III" (Receivable on this unit) and "L BAND" (Not receivable on this unit).
Frequencies
There are 41 frequencies on BAND III. Among those frequencies, 7 are used in the UK (current as of January, 2007).
Ensemble, station and service
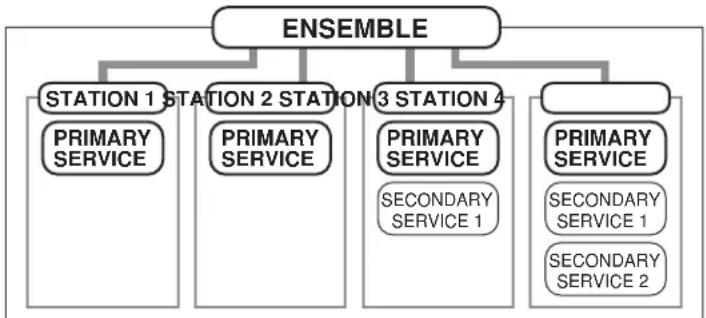
The number of stations that make up one frequency differ between DAB and analogue radio. Analogue stations all broadcast on different frequencies, even if it is the same company doing the broadcasting. With DAB however, it is possible to broadcast a number of stations on the same frequency. In DAB terminology, a group of stations on the same frequency is called an ensemble.
flowchart
graph TD
    A["ENSEMBLE"] --> B["STATION 1 STATION 2 STATION 3 STATION 4"]
    B --> C["PRIMARY SERVICE"]
    B --> D["PRIMARY SERVICE"]
    B --> E["PRIMARY SERVICE SECONDARY SERVICE 1"]
    B --> F["PRIMARY SERVICE SECONDARY SERVICE 1 SECONDARY SERVICE 2"]
As shown in the above diagram, an ensemble consists of a group of stations which have primary services, they can also have secondary services. This means, for example, that commentary on sports events from different areas can all be broadcast at once.
■ DAB reception method on this unit
Depending on the region there is a difference between broadcast frequency and stations broadcast along the same frequency. For this reason, a memory of receivable stations should first be created and then selected from those memorized stations.
DAB Auto Scan
This function searches for currently receivable stations and inputs them into unit memory.
When DAB is selected for the first time, this function starts automatically.
Note
Even if the station is stored into memory, some stations may not broadcast depending on the time of day etc. If this occurs, "NO SERVICE" is displayed.
Station Memory Updating
- When there is a station name change
Station names are updated automatically when a station name that was stored in memory before the update was selected. However preset registered station names are not changed, therefore you need to perform presetting again.
- When a new station begins broadcasting
When a new station name is found on the frequency currently being broadcast, it is automatically added to the list of station names created with Auto scan.
Note
- Deleting stations that are no longer broadcasting is not automatic. If you want to delete a station, perform Auto scan again and the new memory is created.
- When a new frequency begins broadcasting, stations on that new frequency are not automatically added to memory. Perform Auto scan to add them to memory. Also, you may need to change the Auto scan range if the new frequency is outside the factory set Auto scan range (page 7).
text_image
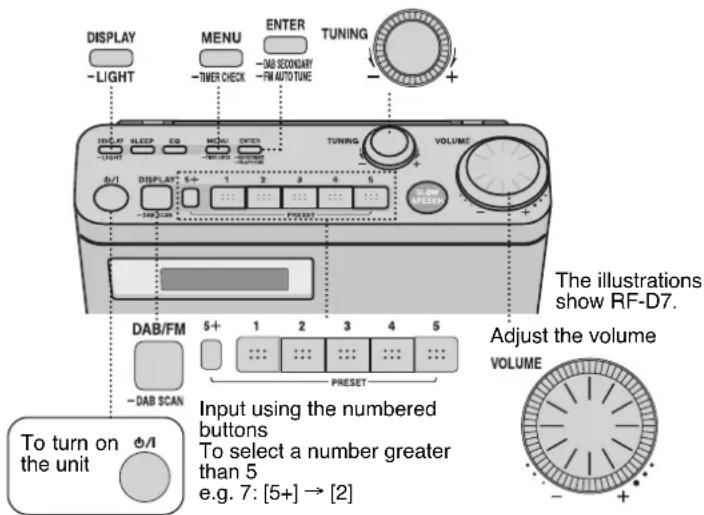
DISPLAY -LIGHT MENU -TIMER CHECK ENTER -DAB SECONDARY -FM AUTO TUNE TUNING - + - - - - - - - - - - - - - - - - - - - - - - - - - - - - - - - - - - - - - - - - - - - - - - - - - - - - - - - - - - - - - - - - - - - - - - - - - - - - - - - - - - - - - - - - - - - - - - - - - - - - - DAB/FM 5+ 1 2 3 4 5 - DAB SCAN Preset The illustrations show RF-D7. Adjust the volume VOLUME Input using the numbered buttons To select a number greater than 5 e.g. 7: [5+] → [2] To turn on the unitManual tuning
DAB stations can be tuned manually by selecting the station name in alphanumeric order.
1. Enter DAB mode.
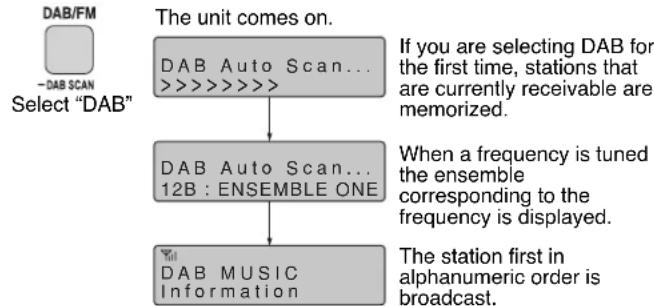
flowchart
graph TD
    A["DAB FM"] --> B["Select "DAB""]
    B --> C{The unit comes on.}
    C -->|Yes| D["DAB Auto Scan... >>>>>>>|<br>    C -->|No| E[DAB Auto Scan... 12B : ENSEMBLE ONE"]
    D --> F["If you are selecting DAB for the first time, stations that are currently receivable are memorized."]
    E --> G["When a frequency is tuned the ensemble corresponding to the frequency is displayed."]
    F --> H["The station first in alphanumeric order is broadcast."]
    G --> H
    H --> I["DAB MUSIC Information"]
Note
"Scan Failed." appears if no stations are memorized. If this occurs, adjust the antenna or relocate the unit, then try Auto scanning. (page 4 and below)
2. Select the station.
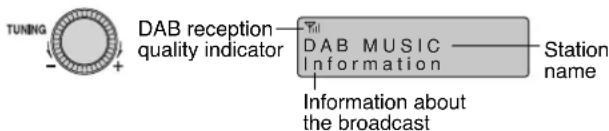
text_image
TUNING DAB reception quality indicator DAB MUSIC Information Information about the broadcast Station nameThe station name changes in alphanumeric order.
DAB Auto Scan
Receivable stations are updated into memory.
Receivable stations are different depending on the area you live in. If you have moved perform Auto scan and the stations are updated into memory.

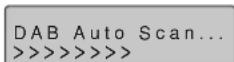
Press and hold until "DAB
Auto Scan..." appears
When a frequency is tuned by Auto scanning on this unit, the ensemble corresponding to the frequency is displayed for approximately 2 seconds.
Note
- When updating memory with Auto scan, preset stations are not erased or changed.
- When a frequency cannot be received, the previous memory is restored.
Presetting
Stations can be preset into channels to make selection easier. You can preset up to 10 channels.
■ To preset
Select the station you want to set as the preset.

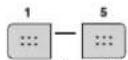
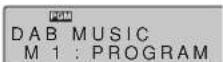
Press and hold the desired numbered button for more than 1 second
• To select a number greater than 5 e.g. 7: Press [5+] and press and hold [2]
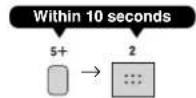
Note
You cannot preset stations when the station is not broadcasting or when you are selecting a secondary service.
■ To select a channel

—DAB SCAN Select "DAB"

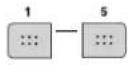
Press
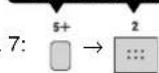
• To select a number greater than 5 e.g. 7: Press [5+] and press [2]
e.g. 7:
within 10 seconds
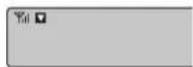
Listening to a secondary service
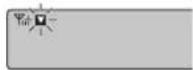
" ▼ is displayed if there is a secondary service broadcast.

Press and hold
Select a secondary service
Secondary service can be selected with each press and hold of the button. The unit returns to the primary service after the last secondary service.
Display
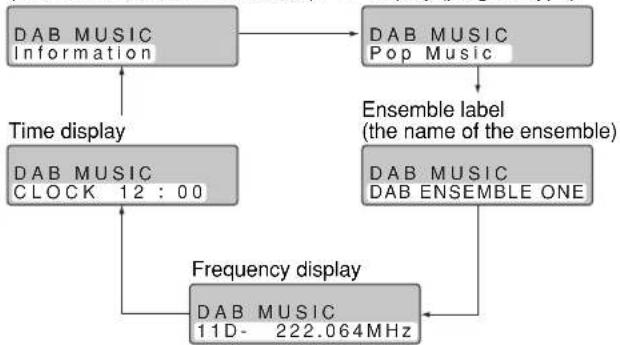
You can change information displays.
The following information displays are available while enjoying DAB.

Select a display
Each time you press the button:
Dynamic label
(information about the broadcast) PTY display (program type)
flowchart
graph TD
    A["DAB MUSIC Information"] --> B["DAB MUSIC Pop Music"]
    B --> C["Ensemble label (the name of the ensemble)"]
    C --> D["DAB MUSIC DAB ENSEMBLE ONE"]
    D --> E["Frequency display"]
    E --> F["DAB MUSIC 11D-222.064MHz"]
    F --> G["Time display"]
    G --> H["DAB MUSIC CLOCK 12:00"]
DAB Preparatory steps (Other functions)
First of all, make sure the unit is in DAB mode.

flowchart
graph LR
    A["TINER CHECK"] --> B["Within 10 seconds"]
    B --> C["TUNING"]
    C --> D["ENTER"]
    style C fill:#f9f,stroke:#333
    style D fill:#ccf,stroke:#333
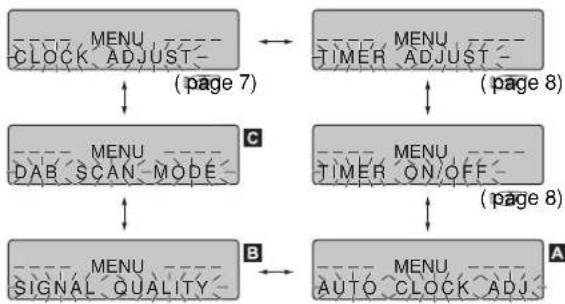
Press PressSelect "DAB SCAN
MODE", "SIGNAL
QUALITY", or "AUTO
CLOCK ADJ."
flowchart
graph TD
    A["CLOCK"] -->|PAGE 7| B["DAB"]
    B -->|PAGE 8| C["SCAN"]
    C -->|PAGE 8| D["MENU"]
    D -->|PAGE 8| E["SIGNAL QUALITY"]
    E -->|PAGE 8| F["AUTO"]
    F -->|PAGE 8| G["MENU"]
    G -->|PAGE 8| H["TIMER"]
    H -->|PAGE 8| I["ADJUST"]
    I -->|PAGE 8| J["MENU"]
    J -->|PAGE 8| K["TIMER"]
    K -->|PAGE 8| L["ADJUST"]
    L -->|PAGE 8| M["MENU"]
• To cancel partway

Press

Automatic clock adjustment function
Time information that is
transmitted during DAB
broadcasting is read and the time
is adjusted automatically
This function is preset to ON.
■ To set the function to OFF
First, select "AUTO CLOCK ADJ" in the DAB preparatory steps.
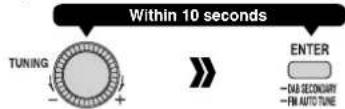
Select "ADJUST OFF" Press
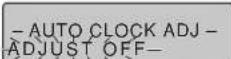
Select "ADJUST ON" to turn the automatic clock adjustment function on.
• To cancel partway
Press MENU -TIMER CHECK

Checking the DAB signal quality
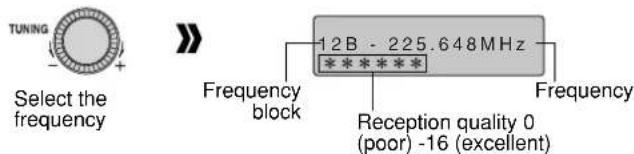
While monitoring the signal quality on the display, adjust the antenna to improve reception.
First, select "SIGNAL QUALITY" in the DAB preparatory steps.
text_image
TUNING Select the frequency 12B - 225.648MHz Frequency block Reception quality 0 (poor) -16 (excellent) Frequency• To cancel the signal quality check
Press MENU -TIMER CHECK
Note
In order to enjoy the new stations after adjusting the antenna, it is necessary to perform Auto scanning and update the station memory.
© Changing the Auto scan frequency range
Only the frequencies currently used in the UK as of January, 2007 on BAND III are Auto scanned ("United Kingdom", factory setting). Select "ALL BAND III" when you want to store stations on other frequencies to memory.
(E.g. When using on the European mainland or when a new frequency begins broadcasting other than the "United Kingdom", use "ALL BAND III".)
First, select "DAB SCAN MODE" in the DAB preparatory steps.
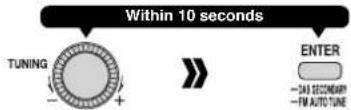
PressSelect "ALL BAND III"
or "United Kingdom"
-DAB AUTO SCAN-ALL BAND III-
Auto scan begins automatically after the change has been made.
• To cancel partway
Press MENU - TIMER CHECK
Note
When the "DAB SCAN MODE" is changed, the DAB preset channels are erased and if the DAB play timer has been set the timer switches to off.
ALL BAND III Frequency
| Frequency block F | Frequency (MHz) |
| 5A 174.928 | |
| 5B 176.640 | |
| 5C 178.352 | |
| 5D 180.064 | |
| 6A 181.936 | |
| 6B 183.648 | |
| 6C 185.360 | |
| 6D 187.072 | |
| 7A 188.928 | |
| 7B 190.640 | |
| 7C 192.352 | |
| 7D 194.064 | |
| 8A 195.936 | |
| 8B 197.648 | |
| 8C 199.360 | |
| 8D 201.072 | |
| 9A 202.928 | |
| 9B 204.640 | |
| 9C 206.352 | |
| 9D 208.064 | |
| 10A 209.936 |
| Frequency block F | frequency (MHz) |
| 10N 210.096 | |
| 10B 211.648 | |
| 10C 213.360 | |
| 10D 215.072 | |
| 11A 216.928 | |
| 11N 217.088 | |
| 11B 218.640 | |
| 11C 220.352 | |
| 11D 222.064 | |
| 12A 223.936 | |
| 12N 224.096 | |
| 12B 225.648 | |
| 12C 227.360 | |
| 12D 229.072 | |
| 13A 230.784 | |
| 13B 232.496 | |
| 13C 234.208 | |
| 13D 235.776 | |
| 13E 237.488 | |
| 13F 239.200 |
Shaded areas are frequencies used currently as of January, 2007 in the UK ("United Kingdom").
Timer and others
text_image
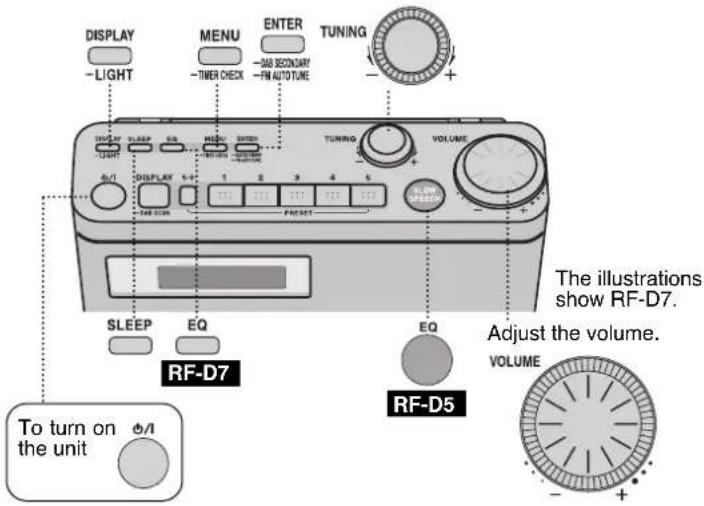
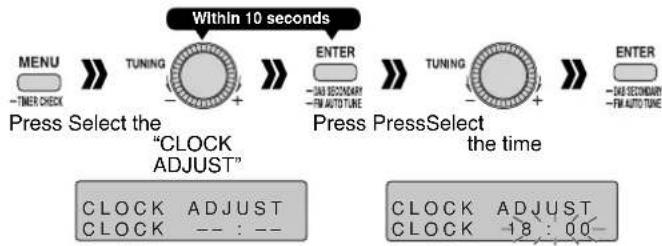
DISPLAY -LIGHT MENU -TIMER CHECK ENTER -08 SECONDARY -FM AUTO TUNE TUNING - + - TURNO VOLUME SLEEP EQ 1 2 3 4 5 FRESET SLEEP EQ RF-D7 EQ RF-D5 The illustrations show RF-D7. Adjust the volume. VOLUME To turn on the unitSetting the clock The 24-hour system is used to display the time on the clock.
flowchart
graph LR
A["MENU<br>-TIMER CHECK"] --> B["TUNING<br>-"]
B --> C["ENTER<br>-DAS SECONDARY<br>-FM AUTO TUNE"]
C --> D["TUNING<br>-"]
D --> E["ENTER<br>-DAS SECONDARY<br>-FM AUTO TUNE"]
E --> F["Press Select the "CLOCK ADJUST""]
F --> G["CLOCK ADJUST<br>CLOCK -- : --"]
G --> H["Within 10 seconds"]
H --> I["CLOCK ADJUST<br>CLOCK -18:00-"]
• To display the clock when the unit is on
Press DISPLAY -LIGHT
Note
- The clock is accurate to within ± 60 seconds a month. Readjust if necessary.
- You can also use the DAB automatic clock adjustment function (page 6).
Using the sleep timer
The unit's power is automatically turned off when the set time is reached.
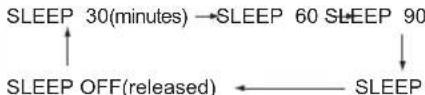
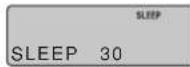
SLEEP Press

Each time the button is pressed, the setting changes in the following sequence:
flowchart
graph TD
    A["SLEEP 30(minutes)"] --> B["SLEEP 60 SLEEP 90"]
    C["SLEEP OFF(released)"] --> D["SLEEP"]
■ To display how much time remains until the set time
Press SLEEP
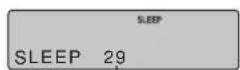
Remaining time
Note
- When the power is turned on again, the broadcast station that was last tuned in when the power was turned off, will be tuned in.
- The sleep timer always has priority. Be sure not to overlap timer settings.
Play timer
Play of the selected source begins at the selected time.
1. Setting the timer times
Preparation: Select the source and adjust the volume. Setting the clock (page 7).
(1) Enter the time setting mode
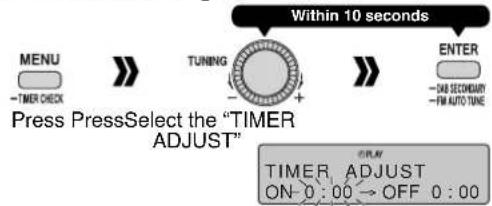
flowchart
graph LR
    A["MENU<br>-TIMER CHECK"] --> B["TUNING<br>-"]
    B --> C["ENTER<br>- DIA SECONDARY<br>-FM AUTO TUNE"]
    C --> D["Within 10 seconds"]
    D --> E["TIMER ADJUST<br>ON 0:00 → OFF 0:00"]
If this display appears ...

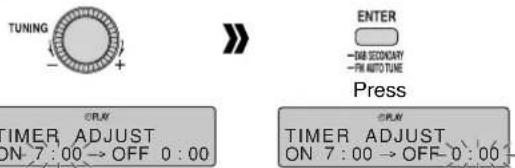
(2) Select the ON time
text_image
TUNING OFF TIMER ADJUST ON 7:00 → OFF 0:00 》 ENTER —DAS SECONDARY —PIN AUTO TUNE Press 》 TIMER ADJUST ON 7:00 → OFF 0:00(3) Select the OFF time
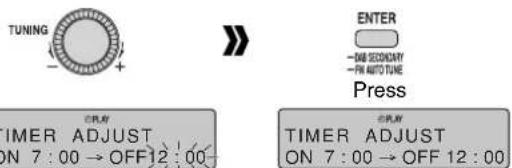
text_image
TUNING OFF ENTER - 046 SECONDARY - PM AUTO TIME Press PLAY TIMER ADJUST ON 7:00 → OFF 12:00 PLAY TIMER ADJUST ON 7:00 → OFF 12:00If this display appears ...
TIMER ADJUST CHANGE OFF-TIMER The same time has been set for both the ON time and OFF time. Set the timer times again.
2. Setting the timer settings to ON
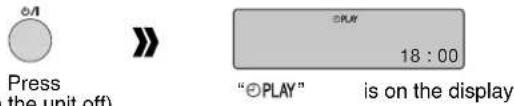
text_image
Press the unit off) " play" is on the display 18 : 00The unit must be off for the timer to operate.
Note • Once the timer times are set, they need not be set the next time.
• To change the times, perform time setting procedure again.
- Setting the timer settings to OFF
These steps can be taken while the power is on.
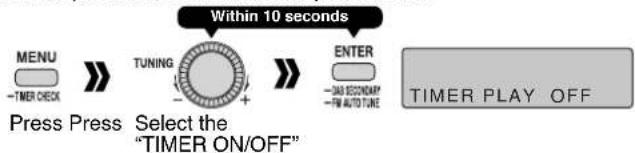
flowchart
graph LR
    A["MENU<br>-TIMER CHECK"] --> B["TUNING<br>-"]
    B --> C["ENTER<br>- DAS SECONDARY<br>-FM AUTO TUNE"]
    C --> D["TIMER PLAY OFF"]
    style A fill:#f9f,stroke:#333
    style B fill:#ccf,stroke:#333
    style C fill:#cfc,stroke:#333
    style D fill:#fcc,stroke:#333
- Setting the timer settings to ON
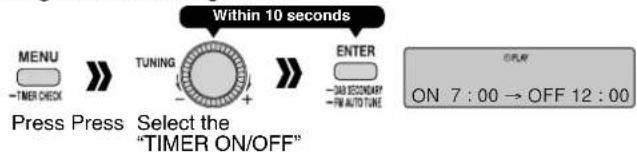
text_image
Within 10 seconds MENU TIMER CHECK TUNING - + ENTER -348 SECONDARY -FM AUTO TUNE DISPLAY ON 7:00 → OFF 12:00 Press Press Select the "TIMER ON/OFF"The unit must be off for the timer to operate.
Note Even when the timer settings are set to OFF, the timer time settings remain in the memory so that when the timer settings are next set to ON, the timer function will be activated at the set times.
Checking the timer settings when the unit is off

Press and hold
What has been set is now displayed.
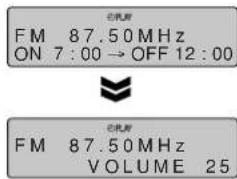
text_image
自孔率 FM 87.50MHz ON 7:00→OFF 12:00 自孔率 FM 87.50MHz VOLUME 25Selecting the sound quality that suits the broadcast
Each time you press the button:
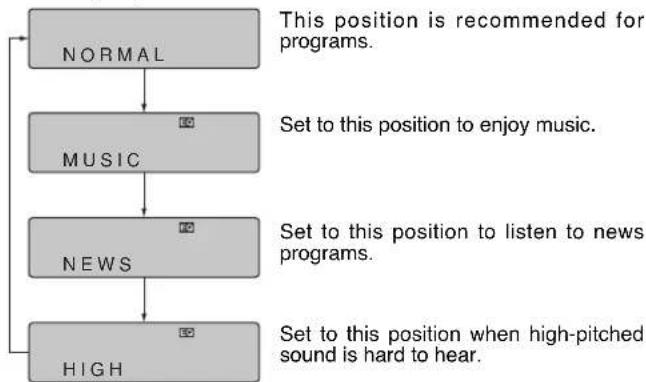
flowchart
graph TD
    A["NORMAL"] --> B["MUSIC"]
    B --> C["NEWS"]
    C --> D["HIGH"]
    style A fill:#ccc,stroke:#333
    style B fill:#ccc,stroke:#333
    style C fill:#ccc,stroke:#333
    style D fill:#ccc,stroke:#333
Display
(While enjoying FM radio or DAB)

- For FM radio
The clock display can be turned on and off. - For DAB (page 6)
LCD Light

Press and hold
Each time you press and hold the button:
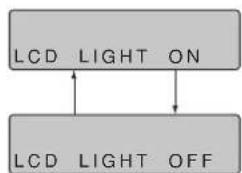
flowchart
graph TD
    A["LCD"] --> B["ON"]
    C["LCD"] --> D["OFF"]
    B --> C
While the power is on, the display panel is lighted at all times.
Even when the display panel light has been turned off, it will come back on for about 10 seconds when any of the buttons is pressed.