J12 Diamond Dial - Watch Chanel - Free user manual and instructions
Find the device manual for free J12 Diamond Dial Chanel in PDF.


| Product Type | Luxury Quartz or Automatic Watch |
| Brand | Chanel |
| Model | J12 Diamond Dial |
| Case Diameter | 38 mm (typical for J12) |
| Weight | Approximately 100 g (depending on strap material) |
| Power Source | Battery (Quartz) or Self-winding (Automatic) |
| Main Functions | Time display, date, chronograph, GMT, tachymeter, moon phase (depending on variant) |
| Crown | Screw-down or non-screw-down crown for water resistance |
| Movement | Swiss-made, COSC-certified for chronograph models |
| Water Resistance | Typically 200 m (2000 ft) for J12 models |
| Care Instructions | Avoid contact with chemicals; clean with soft cloth; ensure crown is screwed down after adjustment |
| Safety | Keep away from strong magnetic fields; avoid extreme temperatures |
| Spare Parts & Repairability | Service by authorized Chanel center; genuine parts only |
| General Information | High-tech ceramic and diamond elements; unidirectional rotating bezel on Marine models |
Frequently Asked Questions - J12 Diamond Dial Chanel
User questions about J12 Diamond Dial Chanel
0 question about this device. Answer the ones you know or ask your own.
Ask a new question about this device
Download the instructions for your Watch in PDF format for free! Find your manual J12 Diamond Dial - Chanel and take your electronic device back in hand. On this page are published all the documents necessary for the use of your device. J12 Diamond Dial by Chanel.
USER MANUAL J12 Diamond Dial Chanel
WINDING THE WATCH AND MAKING ADJUSTMENTS
Watches equipped with a non screw down crown
The crown E is ordinarily placed in position 1.
1/ Winding watches with automatic movements
Activate the automatic winding mechanism by turning the crown 5 times in a clockwise direction.
2/ Adjusting the time
Carefully pull the crown E out to position 2 (one notch) or until position 3 (two notches) according to the model. Then turn the crown to move the hands to the desired time.
On every model, stopping the second hand makes it possible to set the time to the nearest second. Push the crown back to position 1.
3/ Adjusting the date
Carefully pull the crown out to position 2 (one notch) and turn it in an anti clockwise direction until the desired date is shown.
Push the crown back to position 1.
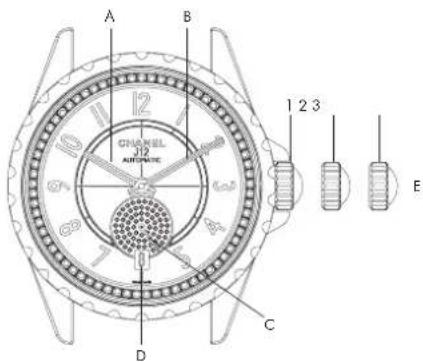
text_image
A B 1 2 3 E C D J12 AUTOPIATEA - Hour hand
B - Minute hand
C - Second hand
D - Date
E - Non-screw-down crown
Watches equipped with a screw down crown
The crown E is ordinarily placed in position 1.
To unscrew the crown, turn it in an anti clockwise direction to position 2.
1/ Winding watches with automatic movements
Unscrew the crown E to position 2 and activate the automatic winding mechanism by turning the crown 5 times in a clockwise direction. Push the crown back to position 1.
2/ Adjusting the time
Unscrew the crown E to position 2 and carefully pull it out to position 3 (1 notch) or position 4 (2 notches) depending on the model. Then turn it to move the hands to the desired time. On every model, stopping the second hand makes it possible to set the time to the nearest second. Push the crown back to position 2 and screw it back to position 1.
3/ Adjusting the date
Unscrew the crown E to position 2 and carefully pull it out to position 3 (one notch).
-J12 quartz models: turn the crown clockwise until you obtain the desired date.
-J12 automatic models: turn the crown anti clockwise until you obtain the desired date.
Push the crown back to position 2 and screw it back to position 1.
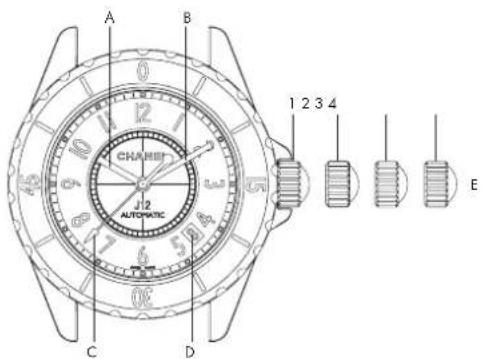
text_image
A B 12 1 CHAMBER J 12 AUTOMATIC C D 1 2 3 4 EA - Hour hand
B - Minute hand
C - Second hand
D - Dole
E - Screw down crown
FUNCTIONS
J12 GMT
The GMT function allows you to simultaneously know the time in two different locations across the globe:
- Local Time,
- Home Time.
| J12 model reference H3 | 099/H3101/H3102/H3103 (figure1) | H2012/H2126/H2620 (figure2) |
| Setting the Local Time | Pull the crown H out to position 3 (2 notches) and turn it until the desired time is indicated on the 12 hour dial.Screw the crown back to position 1. | Unscrew the crown H to position 2 and pull it out to position 4 (2 notches).Then turn the crown until the desired time is indicated on the 12 hour dial.Push the crown back to position 2 and screw it back to position 1. |
| Setting the date / Home Time | Pull the crown H out to position 2 (1 notch), then:- turn the crown anti clockwise until the desired date is indicated.- turn the crown clockwise until the desired time is indicated on the 24 hour graduated Flange.Screw the crown back to position 1. | Unscrew the crown H to position 2 and pull it out to position 3 (1 notch), then:- turn the crown anti clockwise until the desired date is indicated.- turn the crown clockwise until the desired time is indicated on the 24 hour bezel.Push the crown back to position 2 and screw it back to position 1. |
Figure 1
A - 12 hour dial (Local Time)
B - 24 hour flange (Home Time)
C - Hour hand (Local Time)
D - Minute hard | Local Time
E - Second hand
F - GMT hand (Home Time)
G - Dole
H - Non-screw-down crown
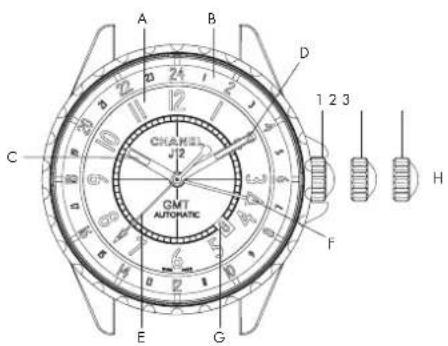
text_image
A B C D 1 2 3 CHAMEL J2 OMT AUTOMATIC E G F H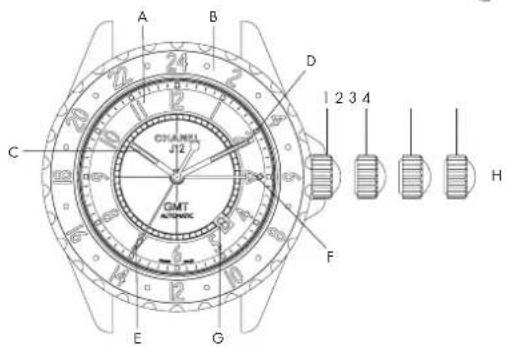
text_image
A B C D 1 2 3 4 GMT AUTOMATIC E F HFigure 2
A - 12 hour dial (Local Time)
B - 24 hour bezel (Home Time)
C - Hour hand (Local Time)
D - Minute hand (Local Time)
E - Second hand
F·GMT hand (Home Time)
G - Dale
H - Screw-down crown
J12 Marine
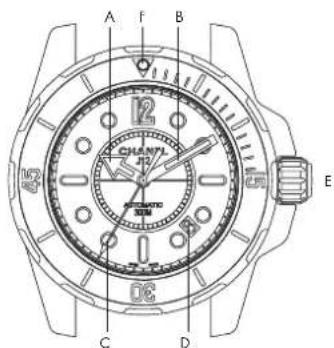
J12 Marine watches have a steel unidirectional rotating bezel, notched and with a high-tech ceramic or sapphire disc with 60 minute graduations for easy and accurate reading of dive times.
To measure the length of dive time, align the luminescent chip with the minute hand at the start of a dive, then later read the time passed on the bezel where indicated by the same hand.
text_image
A f B CHAVI 30mm C D EA - Hour hand
B - Minute hand
C. Second hard
D - Date
E - Screw-down crown
F - lumnescent chip
FUNCTIONS
J12 Chronograph
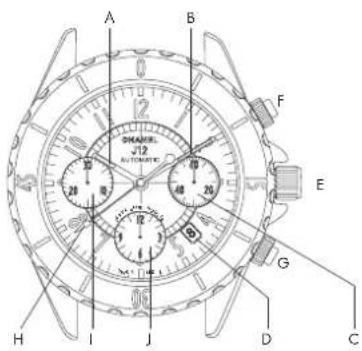
The Chronograph can be used to measure time or record several periods of time, thanks to the central arrow shaped second hand H and the counters I and J, which display the elapsed minutes and hours respectively. The CHANEL Chronograph movement has a COSC certificate (Swiss Official Chronometer Control). The COSC certificate is specific to each watch and is attached to the guarantee card.
a) To start the Chronograph, press the button F: The 1 ^st press triggers the time measurement. A 2 ^rd stops it and a 3 ^rd restarts it. This makes it possible to record several time intervals at different times. b) To reset the Chronograph, press the button G. The central arrow shaped second hand H returns to its initial position (numeral 12) as do the small hands on counters I and J.
text_image
A B F E G H I J D C 0 1 2 3 4 5 6 7 8 9 10 11 12 13 14 15 16 17 18 19 20 21 22 23 24 25 26 27 28 29 30 31 32 33 34 35 36 37 38 39 40 41 42 43 44 45 46 47 48 49 50 51 52 53 54 55 56 57 58 59 60 61 62 63 64 65 66 67 68 69 70 71 72 73 74 75 76 77 78 79 80A - Hour hand
B - Minute hand
C -60 second courier
D - Date
E - Screw-down crown
F - Start push button
G - Return to zero push button
H - Chronograph second hand
1 - 30 minute counter
J - 12 hour counter
J12 Superleggera Chronograph
Chronograph Function
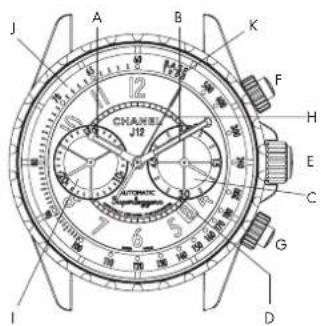
a) To start the Chronograph, unscrew then press button F: this first press starts the measurement of time. Pressing again stops it and pressing a third time, restarts the measurement. This allows several measurements to be accumulated at different intervals.
b) To reset the Chronograph to zero, unscrew then press button G. The central second hand H will return to its starting position (numeral 12), as will do the hand on counter I.
Tachymetric Function
The Tachymetric function enables to measure the speed of an object moving over a known distance. The base length is indicated on the scale J. The speed per hour readings, indicated by the scale, are based on an observational distance of 1,000 metres.
The user starts the chronograph (button F) when the vehicle crosses the starting marker and stops it when it passes the end marker (button F). The position of the chronograph second hand on the tachymetric scale corresponds to the average speed in km/h.
E.g. If it takes 40 seconds to cover 1,000 m, the average speed is 90 km/h.
text_image
A B K J F H E C G D I CHANEJ12A - Hour hand
B - Minute hand
C - 60 second counter
D - Dole
E - Screw down crown
F - Start push button
G - Reset to zero push button
H - Chronograph second hand
1 - 30 minute counter
J - Tachymetric Scale
K - 1,000 m base
FUNCTIONS
J12 Moon Phase
This complication identifies the various lunar phases.


NEW MOON FIRST QUARTER FULL MOON LAST QUARTER
A lunar cycle lasts 29 days, 12 hours, 44 minutes and 2.8 seconds.
Adjusting the time
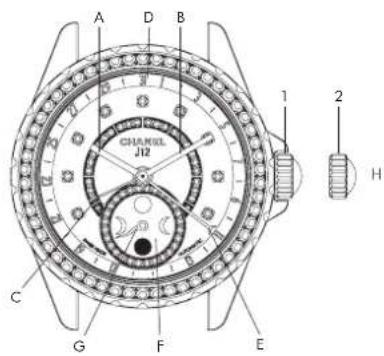
Pull out the crown H to position 2 (1 notch) and turn it until the desired time is indicated. Push the crown back to position 1.
Adjusting the date
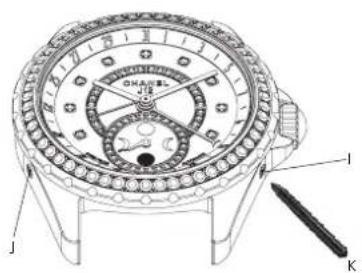
Using the tool K supplied in the gift box, press the corrector button I until the desired date is indicated.
Adjusting the moon phase function
a) Press the corrector button J until the serpentine hand G points to the full moon on the moon phase counter F.
b) Ascertain the date of the last full moon using the lunar calendar. (Refer to the following page).
c) Press the corrector button twice for every day that has elapsed since the date of the last full moon.
E.g. It today's date is 10th January 2015, then five days have passed since the last full moon on 5th January. In this case, the corrector button would need to be pressed ten times.
Warning: we recommend avoiding adjusting the date or the moon phase function between 4.30 p.m and 1 a.m.
text_image
A D B CHANKL J12 C G F E 1 2 HA - Hour hand
B - Minure hand
C - Second hand
D - Date
E - Crescent shaped date hand
F - Moon chase counter
G - Serpentine moon phase hard
H - Non-screw-down crown
text_image
CHA151 J KI - Date corrector
J - Moon phase corrector
K - Tool for adjusting the date and moon phase function
Lunar Calendar (UTC*)
| 2015 | FIRST QUARTER2nd January2nd February2nd March25th April25th May24th June24th July22nd August21st September20th October19th November18th December | FULL MOON5th January3rd February5th March4th April4th May2nd June2nd July31st July29th August28th September27th October25th November25th December | LAST QUARTER13th January12th February13th March12th April11th May9th June8th July7th August5th September4th October3rd November3rd December | NEW MOON20th January18th February20th March18th April18th May16th June16th July14th August13th September13th October11th November11th December |
| 2016 | FIRST QUARTER16th January15th February15th March14th April13th May12th June12th July10th August9th September9th October7th November7th December | FULL MOON24th January22nd February23rd March22nd April21st May20th June19th July18th August16th September16th October14th November14th December | LAST QUARTER2nd January1st February1st March31st March30th April29th June27th June26th July25th August23rd September22nd October21st November21st December | NEW MOON10th January8th February9th March7th April6th May5th June4th July2nd August1st September1st October30th October29th November29th December |
| 2017 | FIRST QUARTER5th January4th February5th March3th April3rd May1st June1st July30th July29th August28th September27th October26th November26th December | FULL MOON12th January11th February12th March11th April10th May9th June9th July7th August6th September5th October4th November3rd December | LAST QUARTER19th January18th February20th March19th April19th May17th June16th July15th August13th September12th October10th November10th December | NEW MOON28th January26th February28th March26th April25th May24th June23th July21st August20th September19th October18th November18th December |
| 2018 | FIRST QUARTER24th January23rd February24th March22nd April22nd May20th June19th July18th August17th September16th October15th November15th December | FULL MOON2nd January31st January2nd March31st March30th April29th May28th June27th July26th August25th September24th October23rd November22nd December | LAST QUARTER8th January7th February9th March8th April8th May6th June6th July4th August3rd September2nd October31st October30th November29th December | NEW MOON12th January15th February17th March16th April15th May13th June13th July11th August9th September9th October7th November7th December |
SECURING AND REMOVING THE STRAP
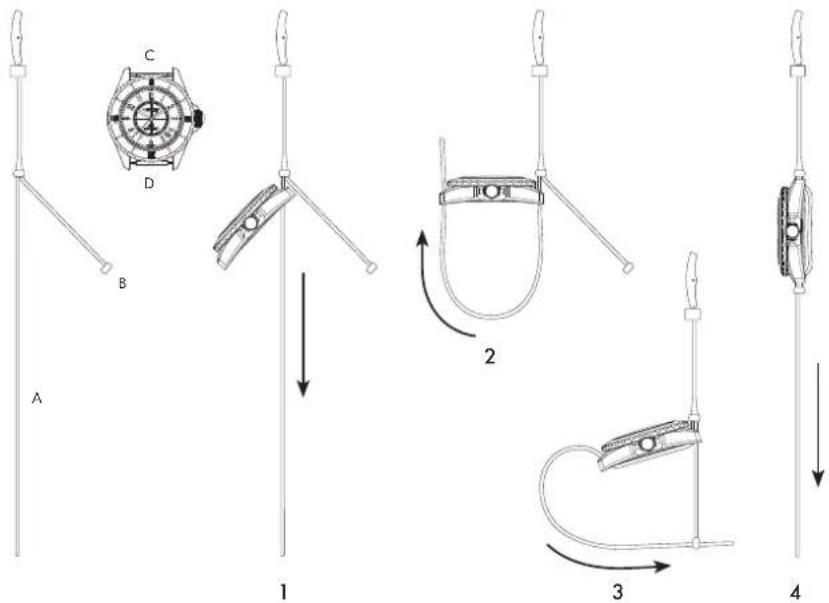
J12 - G10
The strap is secured and removed in the same manner.
text_image
A B C D 1 2 3 41 - Thread the loose end of the strap (A) above the metal bar (C) and underneath the case.
2 - Thread the strap end (A) up between the case and the metal bar (D).
3 - Slide the case along the strap (A) towards the buckle, then insert the strap end through the loop (B).
4 - Gently pull the strap end (A) to adjust.