
KX-FLB881 - Fax PANASONIC - Free user manual and instructions
Find the device manual for free KX-FLB881 PANASONIC in PDF.


User questions about KX-FLB881 PANASONIC
0 question about this device. Answer the ones you know or ask your own.
Ask a new question about this device
Download the instructions for your Fax in PDF format for free! Find your manual KX-FLB881 - PANASONIC and take your electronic device back in hand. On this page are published all the documents necessary for the use of your device. KX-FLB881 by PANASONIC.
USER MANUAL KX-FLB881 PANASONIC
natural_image
Line drawing of a printer with paper sheets and control panel (no text or symbols)Panasonic®
Operating Instructions
Flatbed Laser All-In-One
Model No. KX-FLB881
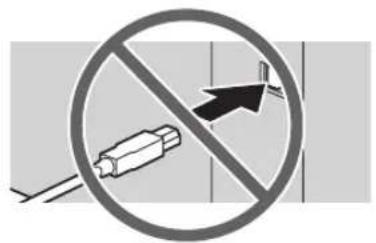
Do NOT connect the USB cable until prompted by the Multi-Function Station (CD-ROM).
1
text_image
Prohibition sign with no smoking symbol and directional arrow, commonly used for anti-smoking measures2
text_image
PanasonicDesigned to be used only in the U.S.A.
- This unit is compatible with Caller ID. To use this feature, you must subscribe to the appropriate service of your service provider.
Thank you for purchasing a Panasonic fax machine.
You can select English or Spanish for the language.
The display and reports will be in the selected language. The default setting is English. If you want to change the setting, see feature #110 on page 51.
Trademarks:
- Microsoft, Windows, Windows Vista, Internet Explorer and PowerPoint are either registered trademarks or trademarks of Microsoft Corporation in the United States and/or other countries.
- Pentium is a registered trademark or trademark of Intel Corporation in the United States and/or other countries.
- Screen shots reprinted with permission from Microsoft Corporation.
- Adobe and Reader are either registered trademarks or trademarks of Adobe Systems Incorporated in the United States and/or other countries.
- 3M is a trademark or registered trademark of Minnesota Mining and Manufacturing Company.
- Avery is a registered trademark of Avery Dennison Corporation.
● XEROX is a registered trademark of Xerox Corporation.
●PCL is a trademark of Hewlett-Packard Company. - All other trademarks identified herein are the property of their respective owners.
Copyright:
- This material is copyrighted by Panasonic Communications Co., Ltd., and may be reproduced for internal use only. All other reproduction, in whole or in part, is prohibited without the written consent of Panasonic Communications Co., Ltd.
© 2007 Panasonic Communications Co., Ltd. All Rights Reserved.
For best performance
Toner cartridge and drum unit
- When replacing the toner cartridge or drum unit, do not allow dust, water, or liquids to come in contact with the drum. This may affect print quality.
- For optimal performance, genuine Panasonic toner cartridges and drum units are recommended. We cannot be responsible for problems that may be caused by a non-Panasonic toner cartridge or drum unit:
- Damage to the unit
– Poor print quality - Improper operation
Toner cartridge
- Do not leave the toner cartridge out of the protection bag for a long time. It will decrease the toner life.
Drum unit
- Read the instructions on page 9 before you begin installation of the drum unit. After you have read them, open the drum unit protection bag. The drum unit contains a photosensitive drum. Exposing it to light may damage the drum. Once you have opened the protection bag:
- Do not expose the drum unit to light for more than 5 minutes.
- Do not touch or scratch the black drum surface.
- Do not place the drum unit near dust or dirt, or in a high humidity area.
- Do not expose the drum unit to direct sunlight.
- To extend the life of the drum unit, the unit should never be turned OFF immediately after printing. Leave the power turned ON for a minimum of 30 minutes after printing.
Location
- To avoid malfunction, do not position the unit near appliances such as TVs or speakers which generate an intense magnetic field.
Static electricity
- To prevent static electricity damage to the interface connectors or other electrical components inside the unit, touch a grounded metal surface before touching the components.
Environment
- Keep the unit away from electrical noise generating devices, such as fluorescent lamps and motors.
●The unit should be kept free from dust, high temperature and vibration.
●The unit should not be exposed to direct sunlight. - Do not place heavy objects on top of the unit. When you leave the unit unused for a long period of time, unplug this unit from the power outlet.
-
The unit should be kept away from heat sources such as heaters, kitchen stoves, etc. Damp basements should also be avoided.
-
In the printing process, heat is used to fuse toner onto the page. As a result, it is normal for the machine to produce an odor during and shortly after printing. Be sure to use this unit in an area with proper ventilation.
- Do not place any objects within 10 cm (4 inches) of the right, left and back sides of the unit.
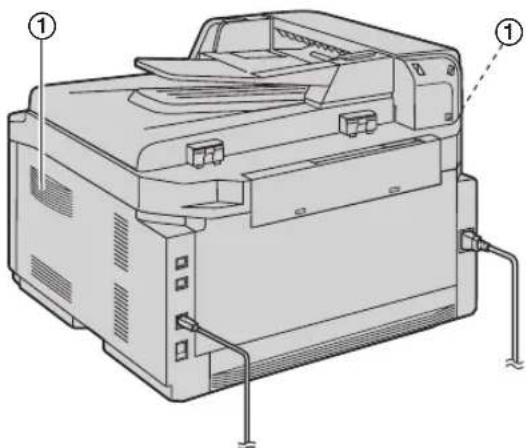
- Do not cover slots or openings on the unit. Inspect the air circulation vents regularly and remove any dust build-up with a vacuum cleaner (①).
natural_image
Technical line drawing of a printer with labeled parts (no text or symbols present)Routine care
- Wipe the outer surface of the unit with a soft cloth. Do not use benzine, thinner, or any abrasive powder.
1. Introduction and Installation
Accessories
1.1 Supplied accessories ...... 6
1.2 Accessory information...... 6
Finding the Controls
1.3 Button descriptions.... 7
1.4 Overview 8
Installation
1.5 Toner cartridge and drum unit 9
1.6 Document tray 11
1.7 Output tray.... 12
1.8 Recording paper.... 13
2. Preparation
Connections and Setup
2.1 Connections 15
2.2 Dialing mode 16
2.3 Selecting the operation mode (Fax/Copy/Scan) 16
Document Requirements
2.4 Setting the original.... 17
Help
2.5 Help function 18
Volume
2.6 Adjusting volume 19
Initial Programming
2.7 Date and time 19
2.8 Your logo.... 20
2.9 Your fax number 20
2.10 Configuring the unit to access the LAN..... 21
2.11 Installing Multi-Function Station 22
2.12 Starting Multi-Function Station.... 24
3. Printer
Printer
3.1 Printing from Windows applications ..... 25
4. Scanner
Scanner
4.1 Scanning from the unit (Push Scan)...... 29
4.2 Scanning from a computer (Pull Scan)...... 31
5. Copier
Copy
5.1 Making a copy 32
5.2 More copying features.... 33
6. Fax
Sending Faxes
6.1 Sending a fax manually 37
6.2 Storing items for the one-touch dial feature and navigator directory.... 38
6.3 Sending a fax using one-touch dial feature and navigator directory.... 39
6.4 Broadcast transmission 40
6.5 Sending a computer document as a fax message from your computer ....42
Receiving Faxes
6.6 Receiving a fax automatically – Auto answer ON....42
6.7 Receiving a fax manually – Auto answer OFF 43
6.8 Using the unit with an answering machine...44
6.9 Junk fax prohibitor (preventing fax reception from undesired callers)....45
6.10 Receiving a fax into your computer......46
7. Caller ID
Caller ID
7.1 Caller ID service....47
7.2 Viewing and calling back using caller information ....47
7.3 Erasing caller information....48
7.4 Storing caller information .....48
8. Distinctive Ring
Distinctive Ring
8.1 Distinctive Ring service....49
8.2 Using two or more phone numbers on a single telephone line....49
8.3 Using three or more phone numbers on a single telephone line ....49
8.4 Programming the ring pattern assigned for fax 49
9. Programmable Features
Features Summary
9.1 Programming....50
9.2 Basic features .....51
9.3 Fax features 54
9.4 Copy features....57
9.5 PC print features .....58
9.6 Scan features 60
9.7 LAN features 61
9.8 Network features (LAN connection only)......63
10. Useful Information
Useful Information
10.1 Character entry 64
10.2 Status of the unit 64
10.3 Changing the default output tray 65
10.4 Canceling the operations ......65
10.5 Optional handset unit 66
11.Help
Error Messages
11.1 Error messages – Reports ......67
11.2 Error messages – Display....68
Troubleshooting
11.3 When a function does not work....70
12.Paper Jams
Jams
12.1 Recording paper jam 78
12.2 Document jams (Auto document feeder)..... 81
13.Cleaning
Cleaning
13.1 Cleaning the white plates and glass...... 83
13.2 Cleaning the document feeder rollers...... 86
14.General Information
Printed Reports
14.1 Reference lists and reports 88
Specifications
14.2 Specifications 88
Copyrights
14.3 Information of copyrights and licenses ..... 91
15.Index
15.1 Index.... 98
1.1 Supplied accessories
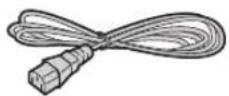
①Power cord ②CD-ROM
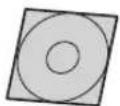
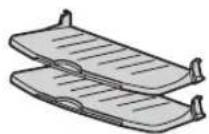
③ Output tray
④ Document tray
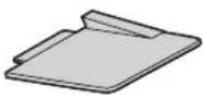
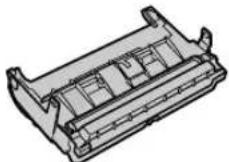
⑤Drum unit ⑥Starter toner
cartridge ^*1
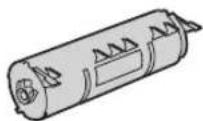
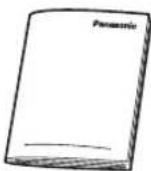
⑦ Quick reference guide
⑧ Quick installation guide

⑨Telephone line cord
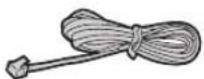
*1 Prints about 800 letter-sized pages with a 5% image area (page 90).
Note:
- Save the original carton and packing materials for future shipping and transportation of the unit.
1.2 Accessory information
Accessories for this unit can be ordered online, by fax, or by telephone.
- Replacement toner cartridge *1
●Model No. (Part No.): KX-FA87/KX-FA85
- Replacement drum unit *1
●Model No. (Part No.): KX-FA86
- Optional handset unit
●Model No. (Part No.): KX-FA103
*1 Approx. 2,500 sheets of letter size paper can be printed with KX-FA87 and approx. 5,000 sheets with KX-FA85. To ensure that the unit operates properly, we recommend the use of Panasonic toner cartridge and drum unit.
To place an order online (for customers in the U.S.A. ONLY)
Visit our web site:
http://www.panasonic.com/mfpsupplies
- For questions regarding online orders:
E-mail:
customerservice@shop.us.panasonic.com
Telephone: (800) 405-0652
To place an order by fax
Fax: (800) 237-9080
Include:
– your name, shipping address and telephone number
– credit card type, number, expiration date and your signature
- part number and quantity
To place an order by telephone
Telephone: (800) 332-5368
(Monday - Friday 9 am to 9 pm, EST.)
1.3 Button descriptions

text_image
Diagram of a device control panel with numbered labels pointing to various ports and function keys①Station keys
●To use the one-touch dial feature (page 38, 39).
②[BROADCAST]
● To send a document to multiple parties (page 40).
③[MANUAL BROAD]
- To send a document to multiple parties manually (page 40).
4[LOWER]
- To select stations 8–14 for the one-touch dial feature (page 38, 39).
⑤ [COLLATE][DIRECTORY]
● To make a collated copy (page 36).
●To initiate the navigator directory (page 39, 40).
⑥ [QUALITY][CONTRAST]
- To select a contrast or a resolution when copying (page 32).
- To select a contrast when sending a fax (page 37).
⑦ [ZOOM][RESOLUTION]
- To enlarge or reduce a document when copying (page 33).
● To select a resolution when sending a fax (page 37).
⑧ [PAGE LAYOUT][QUICK SCAN]
●To make quick ID, poster or N in 1 copy (page 34).
- To store a scanned document into memory, and then send it (page 38).
⑨[MENU]
● To initiate or exit programming.
⑩[TONE]
● To change from pulse to tone temporarily during dialing when your line has rotary/pulse service.
11[STOP]
● To stop an operation or programming session.
- To erase a character/number.
⑫[CALLER ID]
●To use Caller ID features (page 47).
- To change the display of the caller information (page 47).
⑬[FAX AUTO ANSWER]
- To turn the auto answer setting ON/OFF (page 42).
14[HELP]
- To print helpful information for quick reference (page 18).
15[FAX]
● To switch to the fax mode (page 16, 37).
⑯[COPY]
●To switch to the copy mode (page 16, 32).
17[SET]
●To store a setting during programming.
18[SCAN]
●To switch to the scan mode (page 16, 29).
19 Navigator key
● To select desired settings during scanning, copying or sending a fax (page 29, 32, 37).
● To adjust volume (page 19).
●To search for a stored item (page 39).
20 [REDIAL][PAUSE]
● To redial the last number dialed.
- To insert a pause during dialing.
21[FLASH]
● To access special telephone services or for transferring extension calls.
22【MONITOR】
- To initiate dialing. When you press [MONITOR] while receiving a call, you will be able to hear the other party, but the other party will not be able to hear you.
23[START]
● To copy a document (page 32).
- To scan a document (page 29).
●To send or receive a fax (page 37, 43).
1.4 Overview
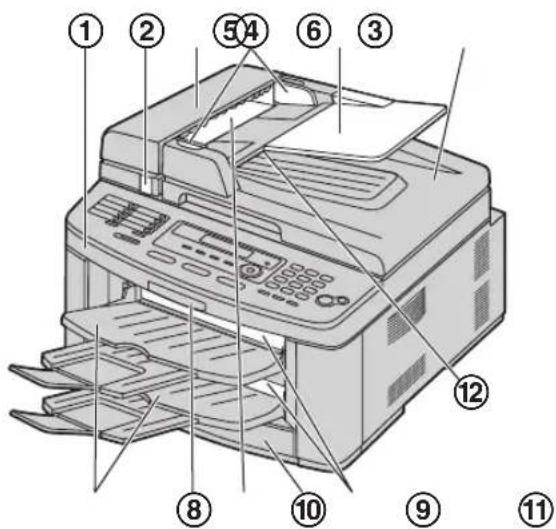
1.4.1 Front view
text_image
Diagram of a printer with numbered parts for identification and assembly reference①Top cover
②ADF (Auto Document Feeder) cover release button
③ADF cover
④Document guides
⑤Document tray
⑥Document cover
⑦ Output tray
⑧Top cover release lever
⑨Document entrance
⑩Paper input tray
⑪Recording paper exit
⑫Document exit
1.4.2 Rear view
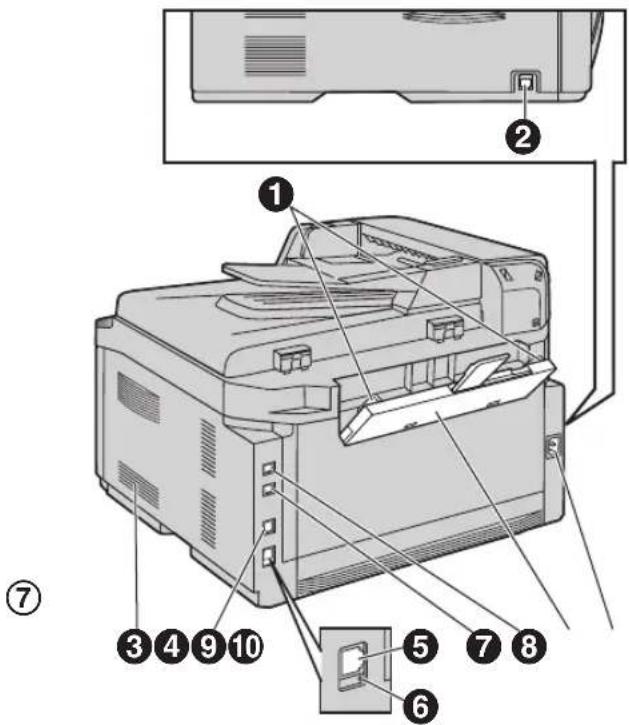
text_image
Technical diagram of a printer with numbered parts labeled for identification①Recording paper guides
②Handset unit (Optional) connection jack
③Speaker
④USB interface connector
⑤LAN interface connector
⑥LED
⑦External telephone jack
⑧Telephone line jack
⑨Manual input tray
⑩Power inlet
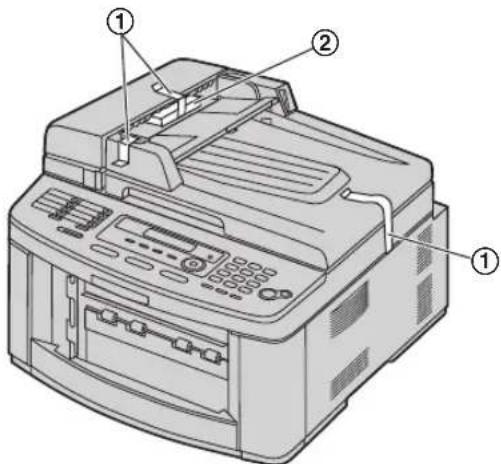
Removing the shipping tape
Remove the shipping tape (①) and pad (②).
text_image
Technical diagram of a printer with labeled parts, showing front and back views with numbered annotations.Note:
- Shipping tape positions are subject to change without notice.
1.5 Toner cartridge and drum unit
The supplied toner cartridge is a starter toner cartridge.
Caution:
- Read the following instructions before you begin installation. After you have read them, open the drum unit protection bag. The drum unit contains a photosensitive drum. Exposing it to light may damage the drum. Once you have opened the protection bag:
- Do not expose the drum unit to light for more than 5 minutes.
- Do not touch or scratch the black drum surface.
- Do not place the drum unit near dust or dirt, or in a high humidity area.
- Do not expose the drum unit to direct sunlight.
- We cannot be responsible for any damage to the unit or degradation of print quality which may occur from the use of a non-Panasonic toner cartridge and drum unit.
- Do not leave the toner cartridge out of the protection bag for a long time. It will decrease the toner life.
- Do not add toner to the toner cartridge.
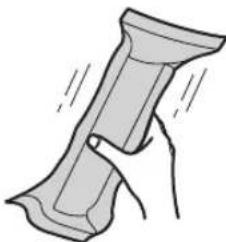
1 Before opening the protection bag of the new toner cartridge, shake it vertically more than 5 times.
natural_image
Illustration of a hand gripping a mechanical component with motion lines indicating movement (no text or symbols)2 Remove the toner cartridge and drum unit from the protection bags.
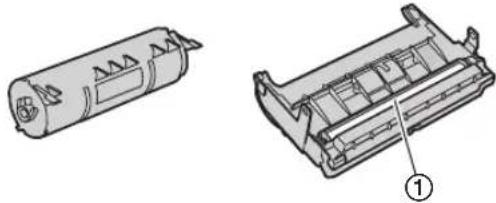
natural_image
Technical line drawing of two electronic component assemblies (no text or symbols)- Do not touch or scratch the black drum surface (①).
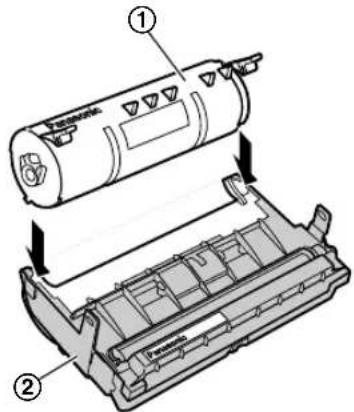
3 Place the toner cartridge (①) into the drum unit (②).
text_image
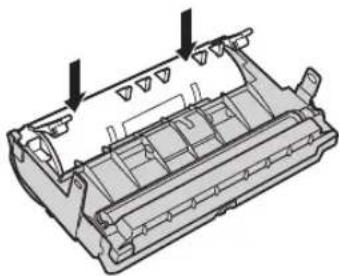
Technical diagram showing assembly of a cylindrical device with labeled parts, including internal components and directional arrows.4 Firmly press down the toner cartridge to snap into position.
natural_image
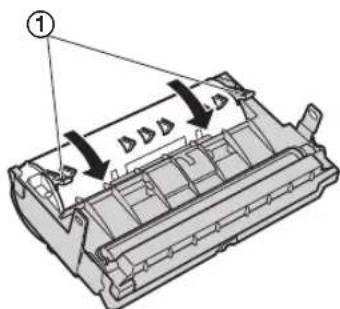
Technical line drawing of a mechanical component with internal compartments and mounting brackets (no text or symbols)5 Turn the two green levers (①) on the toner cartridge firmly.
text_image
Technical diagram of a mechanical component with labeled parts and directional arrows indicating assembly or movement.1. Introduction and Installation
6 Make sure that the triangles (①) match to install the toner cartridge correctly.
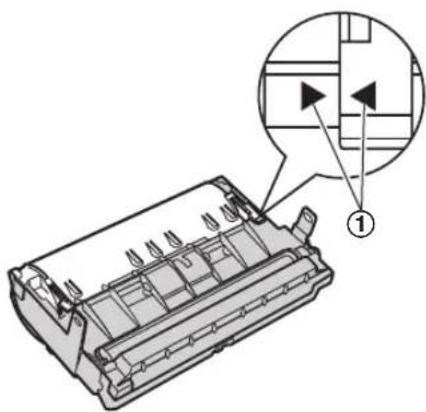
text_image
Technical diagram of a mechanical component with labeled parts and an inset view showing internal structure.7 Lift the top cover release lever (①) and open the top cover (②).
Important:
- Close the manual input tray (③) before opening the top cover.
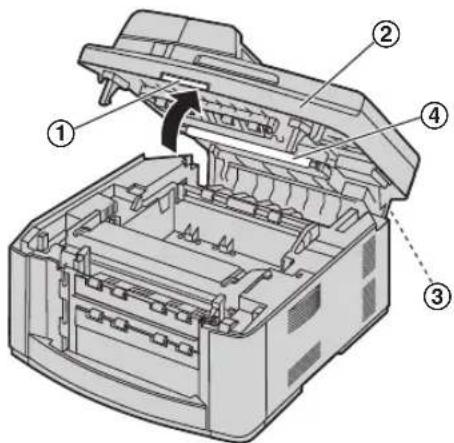
text_image
Technical diagram of a printer internal structure with numbered components and an arrow indicating assembly directionNote:
- Do not touch the transfer roller (④).
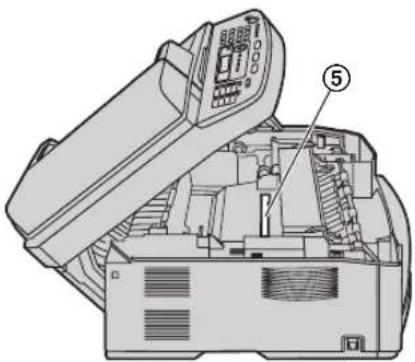
- If the lower glass (⑤) is dirty, clean it with a soft and dry cloth.
natural_image
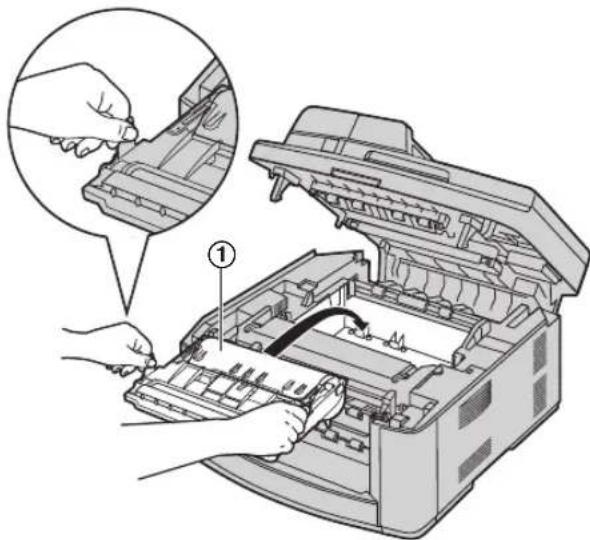
Technical line drawing of an open industrial machine with labeled component (no text or symbols present)8 Install the drum and toner unit (①) by holding the tabs.
text_image
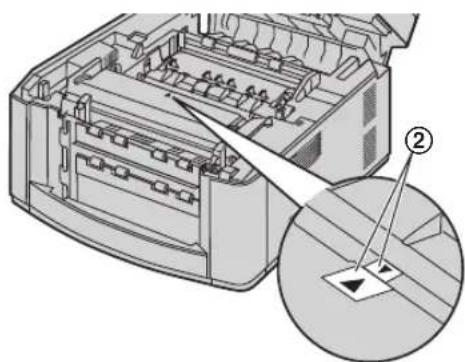
Diagram showing hands installing or adjusting a printer's internal structure with labeled parts, including a magnified inset view.- Make sure that the triangles (②) match to install the drum and toner unit correctly.
natural_image
Technical diagram of a mechanical device with internal components and an inset view showing a detail (no text or symbols)9 Close the top cover until locked.
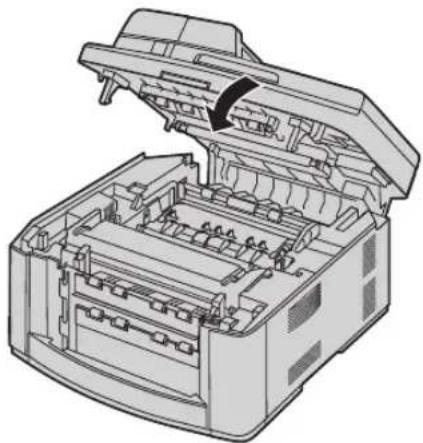
natural_image
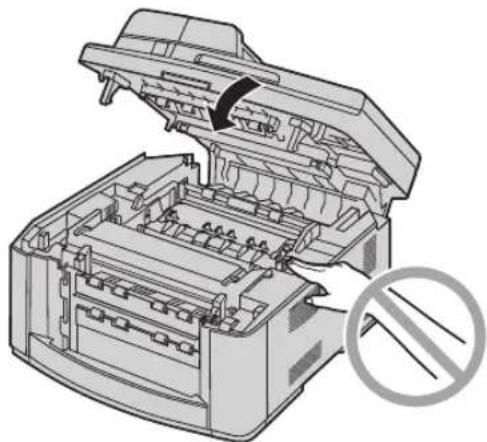
Technical line drawing of an open industrial machine with internal compartments and housing (no text or symbols)Caution:
- To prevent injuries, be careful not to put your hands under the top cover.
natural_image
Technical illustration of a printer internal structure with no visible text or symbolsTo replace the toner cartridge and the drum unit
When the display shows the following, replace the toner cartridge.
TONER LOW
TONER EMPTY
- To check the drum life and quality, please print the printer test list (page 88) and refer to page 90 for information on the drum life. If printing quality is still poor or "REPLACE DRUM" appears on the display, replace the toner cartridge and drum unit.
- To ensure that the unit operates properly, we recommend the use of Panasonic toner cartridge (Model No. KX-FA87/KX-FA85) and drum unit (Model No. KX-FA86). See page 6 for accessory information.
- To maintain print quality and machine life, we recommend you to clean slots and openings (page 3) and the inside of the unit (page 83, 86) when replacing the toner cartridge and/or drum unit.
Waste disposal method
Waste material should be disposed of under conditions which meet all national and local environmental regulations.
Toner save feature
If you want to reduce toner consumption, set the toner save setting to ON (feature #482 on page 53). The toner cartridge will last approximately 40 % longer. This feature may lower the print quality.
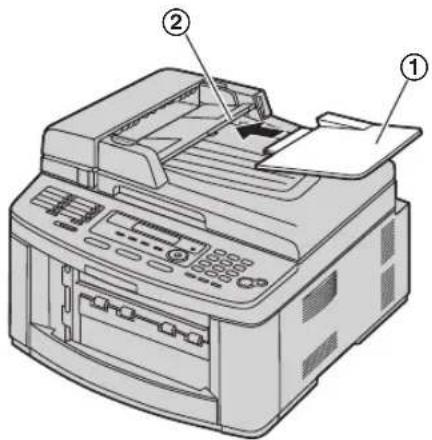
1.6 Document tray
Insert the document tray (①) into the slot (②) on the unit.
text_image
Diagram of a printer with labeled parts showing front and back views1.7 Output tray
Note:
- Do not place the unit in an area where the output tray may be easily bumped into.
As the default setting, printed paper is stacked on the output tray as follows.
- Upper output tray ("#1"): Printed document by using the computer and copied document.
- Lower output tray (“#2”): Received fax document.
- You can change the output tray setting for faxing (feature #441 on page 56) and for copying (feature #466 on page 57).
To change the output tray from the computer, set the printer properties. See page 25 for details.
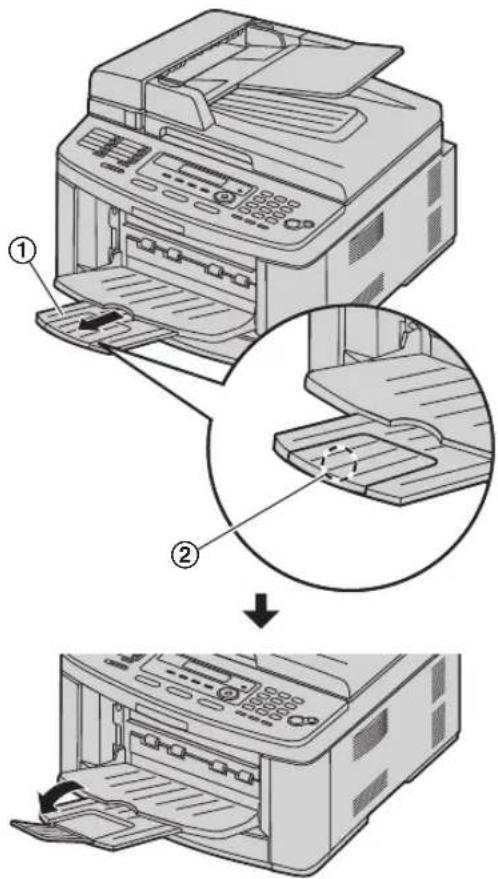
1 Insert the output tray (①) into the slots (②), then push the tray down until it locks into place.

text_image
Diagram showing printer operation steps with labeled parts and directional arrows indicating process flow2 Pull the output tray extender (①) forward gently until it clicks into place, then press the center part of the extender (②) to open.
- Repeat from step 1 to install the upper output tray.
text_image
Diagram illustrating the process of printer printing and disassembly, showing steps from printer opening to disassembly.Note:
- The upper output tray can hold up to approximately 100 sheets of printed paper. The lower output tray can hold up to approximately 50 sheets of printed paper.
Remove the printed paper before the output tray becomes full.
If the top part of the extender is detached
- With the top part of the extender in the open position, insert the tab (①) into the left hole (②) of the extender.
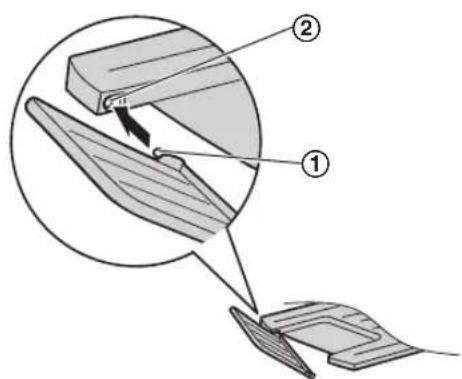
text_image
Diagram showing a mechanical assembly with labeled parts, including a component labeled '①' and parts numbered ②.- Slide the other tab (①) into the right hole (②) of the extender from below until it clicks into place.
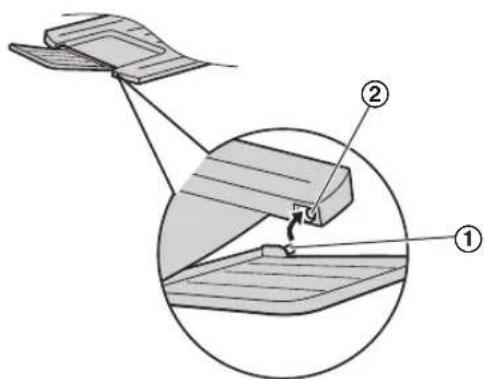
text_image
Technical diagram showing a mechanical assembly with labeled parts ① and ②, likely illustrating a folding or mounting process.If the extender is detached
- Line up the extender (①) underneath the output tray (②), and insert the left side of the extender into the output tray.
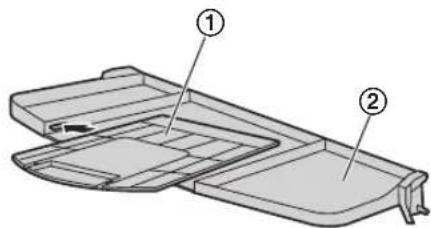
text_image
Technical diagram of a mechanical component with labeled parts ① and ②- Attach the extender (①) by bending the side of the output tray downward slightly and pressing the right side of the extender.
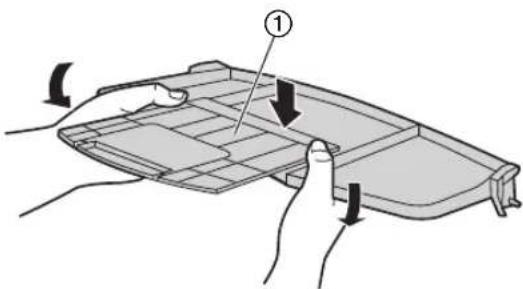
text_image
Diagram showing a hand holding a device with labeled component '①' and directional arrows indicating movement or assembly.1.8 Recording paper
The paper input tray unit can hold:
- Up to 250 sheets of 60g / m^2 to 75g / m^2 (16 lb. to 20 lb.) paper.
- Up to 230 sheets of 80g / m^2 (21 lb.) paper.
- Up to 200 sheets of 90g / m^2 (24 lb.) paper.
- Please refer to page 89 for information on recording paper.
- The unit is set for printing letter size paper by default. If you want to use A4 or legal size paper, change the setting (feature #380 on page 52).
1 Pull the paper input tray (①) completely out.
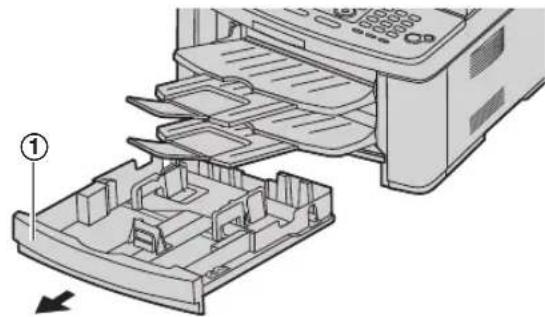
natural_image
Diagram of an printer's internal structure showing paper feeding into a plastic case (no text or symbols present)2 Pinch the front side of the recording paper guide (①), then slide it to match the paper size mark. Pinch both sides of the recording paper guides (②), then slide them to match the paper size mark.
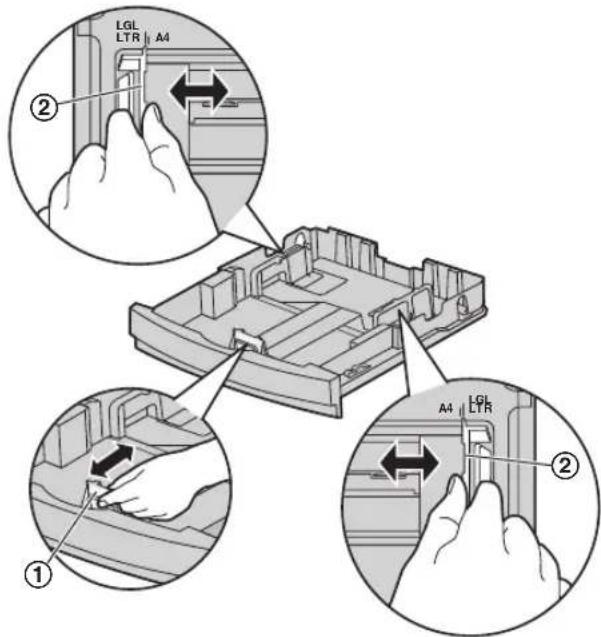
text_image
LGL LTR A4 ② ① A4 LTR ②1. Introduction and Installation
3 Before loading a stack of paper, fan the paper to prevent paper jams.
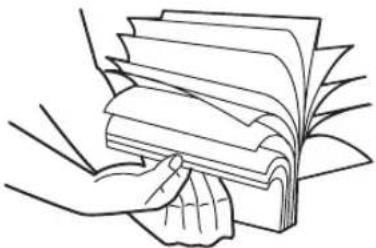
natural_image
Line drawing of a hand holding a stack of papers (no text or symbols)4 Load the paper, print-side up (①).
Important:
- Push and lock the plate (②) in the paper input tray, if it is lifted.
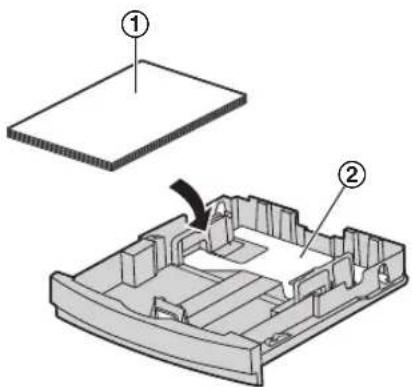
text_image
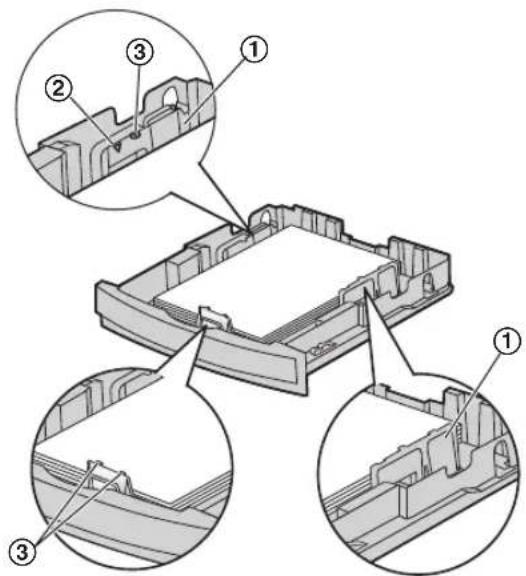
Technical diagram showing a component with labeled parts, including a 3D model and a cross-sectional view.- Make sure that the recording paper guides (①) are at the paper size mark and the recording paper is under the paper limit mark (②). The paper should not be loaded over the snubbers (③).
text_image
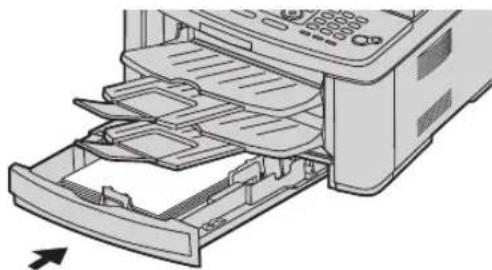
Technical diagram of a mechanical assembly with numbered components and cross-sectional views5 Insert the paper input tray into the unit.
natural_image
Diagram of a printer's internal structure showing paper feed, paper tray, and paper holder (no text or symbols)Note:
- If the paper is not loaded correctly, re-adjust the paper guides, or the paper may jam.
- If the paper input tray does not close, the plate in the paper input tray may be lifted. Push the paper and make sure that the paper is laid flat in the paper input tray.
Caution for the paper input tray
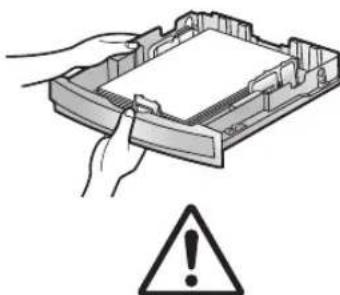
- Do not drop the paper input tray.

natural_image
Illustration showing a no-smoking symbol, a boat with people inside, and a table under a beam (no text or symbols present)- Hold the paper input tray with both hands when removing or installing. The paper input tray weighs approximately 2 kg (4.4 lb.) when the recording paper is fully installed.
natural_image
Illustration of a hand holding a tray with a warning triangle (no text or symbols)Approx. 2 kg (4.4 lb.)
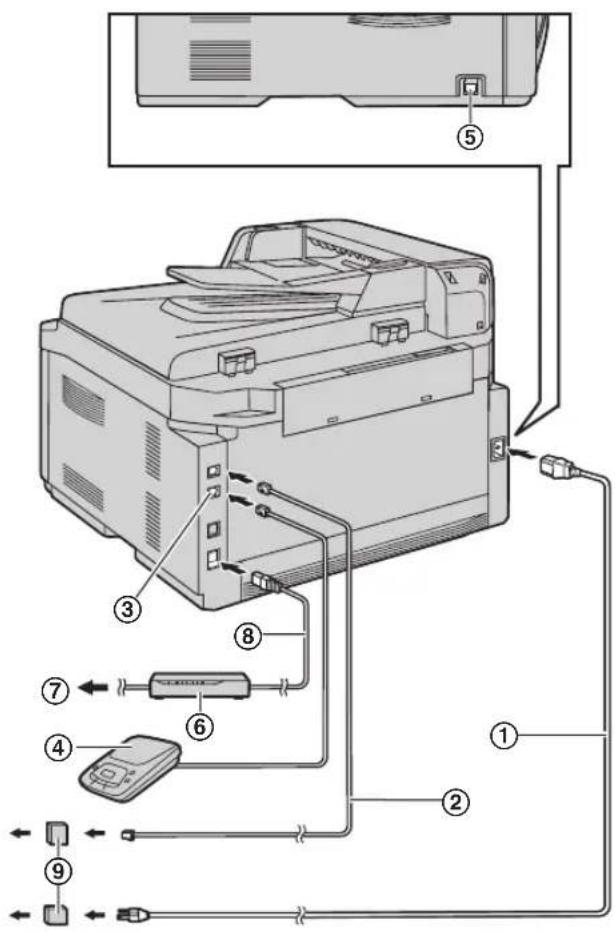
2.1 Connections
Caution:
- When you operate this product, the power outlet should be near the product and easily accessible.
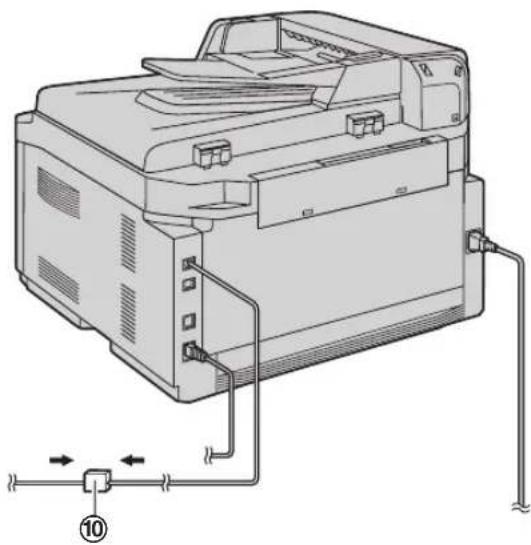
①Power cord
- Connect to a power outlet (120 V, 60 Hz).
②Telephone line cord
- Connect to a single telephone line jack (RJ11).
③[EXT] jack
- You can connect an answering machine or an extension telephone. Remove the stopper if attached.
④Answering machine (not supplied)
⑤Handset unit (optional) connection jack
- You can connect the optional handset unit (page 66). Remove the seal if attached.
⑥Network router/Network hub (not supplied)
- Also connect networked computers.
⑦To the internet
⑧LAN cable (not supplied)
- To assure continued emission limit compliance, use only shielded LAN cable (category 5 straight cable).
text_image
Diagram of a printer system with numbered components and labeled connection pointsImportant notice for the USB connection
- Do NOT connect the USB cable until prompted by the Multi-Function Station (page 22).
Note:
- If any other device is connected to the same telephone line, this unit may disturb the network condition of the device.
Using surge protectors
- The warranty does not cover damage due to power line surges or lightning. For additional protection, we recommend using surge protectors (⑨).
If the unit shares a single telephone line with a DSL service
Fax transmission/reception may be disturbed, noise interference may be heard during telephone conversations, or Caller ID (page 47) may not function properly. A filter to prevent this is provided by your provider. Please attach the filter ( ⑩ ) to the telephone line cord of the unit.
natural_image
Technical line drawing of a printer with attached cable and pipe connection (no text or symbols)2.2 Dialing mode
If you cannot dial (page 37), change this setting according to your telephone line service.
text_image
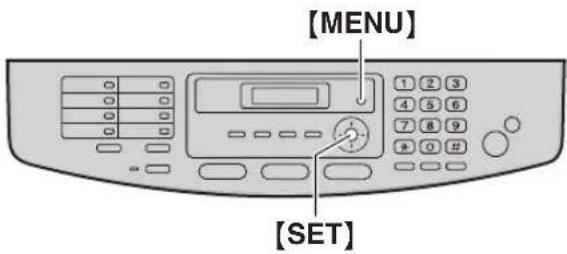
[MENU] [SET]1 [MENU] → [#][1][2][0]
DIALING MODE =TONE [▼▲]
2 Press [1] or [2] to select the desired setting.
[1] "PULSE": For rotary/pulse dial service.
[2] "TONE" (default): For tone dial service.
3 [SET]
4 Press [MENU] to exit.
2.3 Selecting the operation mode (Fax/Copy/Scan)
You can select the desired mode by pressing one of the following buttons.
text_image
FAX COPY SCAN- [FAX]: Select this mode when using the unit as a fax machine (page 37).
- 【COPY】: Select this mode when using the unit as a copier (page 32).
- 【SCAN】: Select this mode when using the unit as a scanner for the computer (page 29).
Note:
● The default operation mode is the copy mode.
- You can change the default operation mode (feature #463 on page 52) and the timer before returning to the default operation mode (feature #464 on page 53).
2.4 Setting the original
2.4.1 Using the scanner glass
text_image
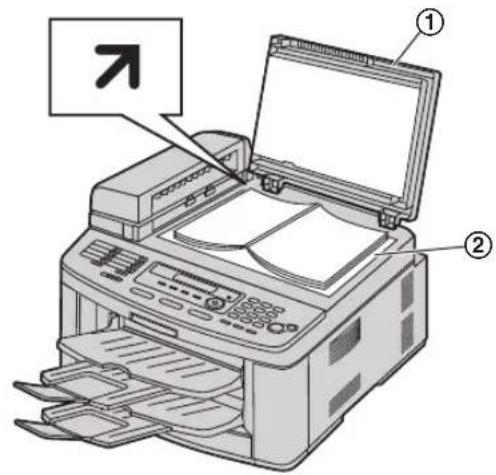
Diagram of an open printer with labeled parts and directional arrow indicator1 Open the document cover (①).
2 Place the document FACE DOWN on the scanner glass (②), aligning the top left of the document with the corner to which the ↗ mark points.
3 Close the document cover.
Note:
- Confirm that there are no documents in the auto document feeder. - Place the original onto the scanner glass gently and do not press down too firmly to avoid malfunction.
- If the original is a thick book, do not close the document cover.
- Check that the ink, paste or correction fluid has dried completely.
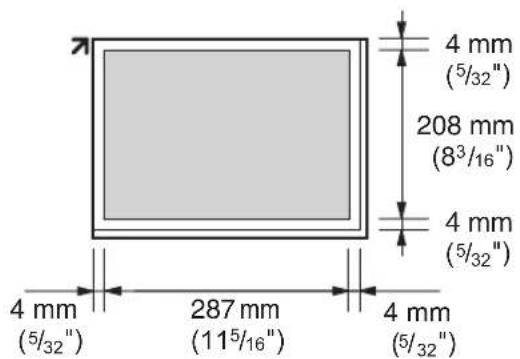
●Effective scanning area is as follows:
Effective scanning area
- Shaded area will be scanned.
text_image
4 mm (5/32") 208 mm (8³/16") 4 mm (5/32") 4 mm (5/32") 287 mm (11⁵/16") 4 mm (5/32)2.4.2 Using the auto document feeder
natural_image
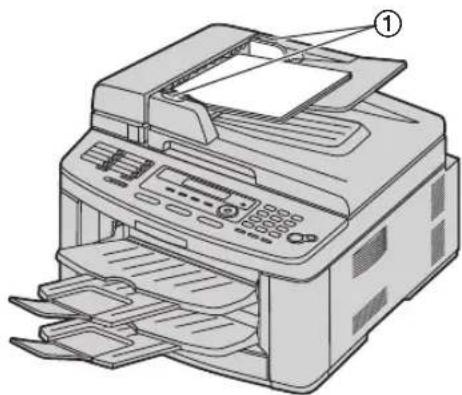
Illustration of a printer with paper sheets and control panel (no text or symbols)1 Insert the document (up to 40 pages) FACE UP into the feeder until a single beep is heard.
2 Adjust the width of the document guides (①) to fit the actual size of the document.
Note:
- Confirm that there are no documents on the scanner glass.
- Check that ink, paste or correction fluid has dried completely.
- Remove clips, staples or other fasteners.
- Do not set the following types of documents: (Make a copy of the document using the scanner glass and set the copy instead.)
- Chemically treated paper such as carbon or carbonless duplicating paper
– Electrostatically charged paper
– Badly curled, creased or torn paper
– Paper with a coated surface
– Paper with printing on the opposite side that can be seen through the other side, such as newsprint
- The total height of the documents when laid flat, must be less than 4 mm ( ^5/_32 ). If the documents exceed the capacity of the auto document feeder, they may fall or cause a jam in the feeder.
- To set a document with a width of less than 210 mm (8 ^1/4 "), we recommend using the scanner glass to copy the original document onto A4 or letter-sized paper, then setting the copied document.
- Do not set documents that do not satisfy the requirements of size and weight. Make a copy of the document using the scanner glass and set the copy.
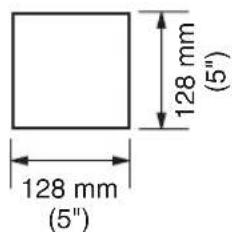
● Available document size, document weight and effective scanning area are as follows:
Minimum document size
text_image
128 mm (5") 128 mm (5")Maximum document size
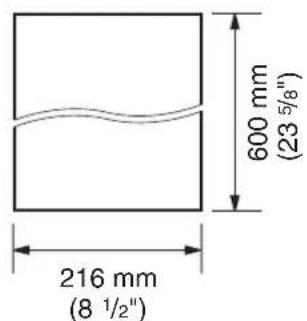
text_image
600 mm (23 5/8") 216 mm (8 1/2")Effective scanning area
● Shaded area will be scanned.
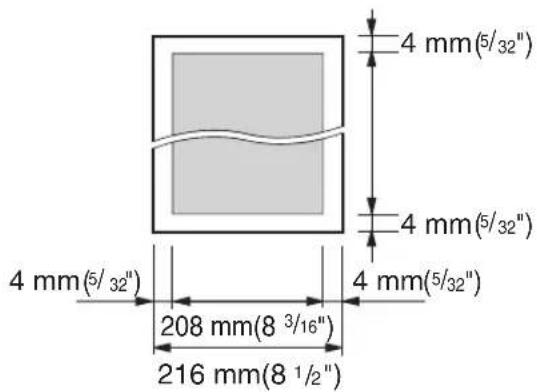
text_image
4 mm(5/32") 4 mm(5/32") 4 mm(5/32") 208 mm(8 3/16") 216 mm(8 1/2")Document weight
- Single sheet:
45 g/m² to 90 g/m² (12 lb. to 24 lb.)
● Multiple sheets:
60 g/m² to 80 g/m² (16 lb. to 21 lb.)
2.5 Help function
The unit contains helpful information on the following topics which can be printed for reference purposes, as follows:
- "BASIC SETTINGS"
- "FEATURE LIST"
- "DIRECTORY"
- "FAX SND/RCV"
- "COPIER"
- “Q and A”
- "ERRORS"
- "REPORTS"
- "CALLER ID"
text_image
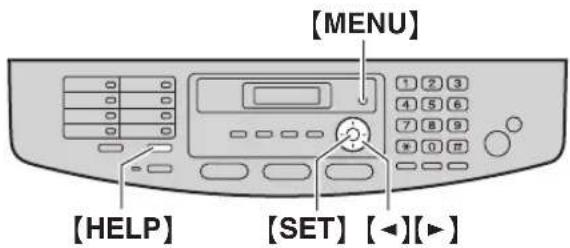
[MENU] [HELP] [SET] [◀][▶]1 [HELP]
2 Press [◀] or [▶] repeatedly to display the desired item. → [SET]
2.6 Adjusting volume
Important:
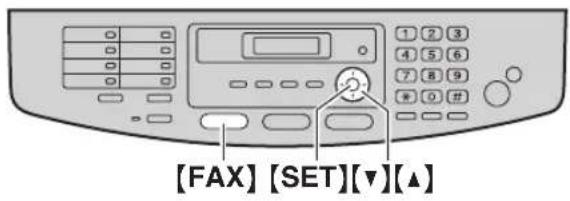
- Before adjusting volume, set the operation mode to fax mode. If the [FAX] light is OFF, turn it ON by pressing [FAX].
text_image
[FAX] [SET][▼][▲]Ringer volume
While the unit is idle, press [▼] or [▲].
- If there are any documents in the document entrance, you cannot adjust the volume. Confirm that there are no documents in the entrance.
To turn the ringer OFF
Press [▼] repeatedly to display "RINGER OFF= OK?". → [SET]
●The unit will not ring.
- To turn the ringer back ON, press [▲].
Ringer pattern
- You can select one of 3 ringer patterns (feature #161 on page 52).
Monitor volume
While using the monitor, press [▼] or [▲].
2.7 Date and time
text_image
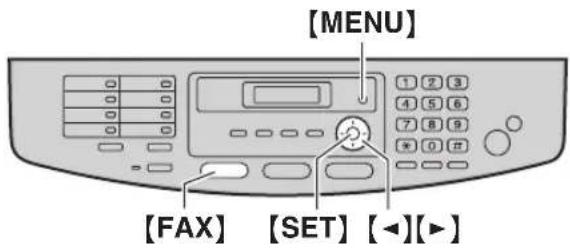
[MENU] [1 2 3 4 5 6 7 8 9 * 0 H [FAX] [SET] [◀][▶]1 [MENU] → [#][1][0][1] → [SET]
M:01/D:01/Y:07
TIME: 12:00AM
2 Enter the current month/date/year/hour/minute by selecting 2 digits for each.
Example: August 10, 2007 10:15 PM (12 hour clock format)
- Press [0][8] [1][0] [0][7] [1][0] [1][5].
M: 08/D:10/Y:07
TIME: 10:15AM
- Press 【*】 repeatedly to select "PM".
3 [SET]
4 Press [MENU] to exit.
Note:
- The other party's fax machine will print the date and time on the top of each page you send according to your unit's date and time setting.
- After setting the date and time, if the unit is in the copy mode, change it to the fax mode by pressing [FAX]. You can check your unit's date and time setting on the display.
To correct a mistake
Press [◀] or [▶] to move the cursor to the incorrect number, and make the correction.
If you have subscribed to a Caller ID service
The date and time will be automatically set according to the received caller information.
- If the time has not previously been set, Caller ID will not adjust the clock.
- You can turn this feature OFF (feature #226 on page 52).
2.8 Your logo
You can program your logo (name, company name, etc.) so that it appears on the top of each page sent.
text_image
[MENU] [SET] [◀][▶] [STOP]1 [MENU] → [#][1][0][2] → [SET]
2 Enter your logo, up to 30 characters (see page 64 for character entry). → [SET]
3 Press [MENU] to exit.
To correct a mistake
Press [◀] or [▶] to move the cursor to the incorrect character, and make the correction.
- To erase all characters, press and hold [STOP].
2.9 Your fax number
You can program your fax number so that it appears on the top of each page sent.
text_image
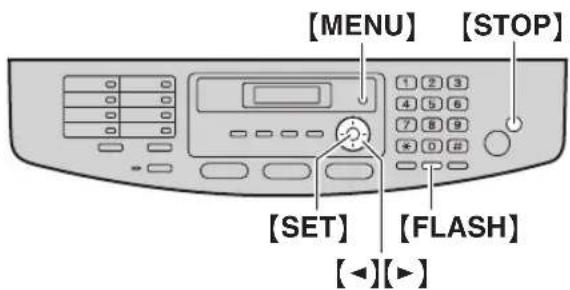
[MENU] [STOP] [SET] [FLASH] [◀][▶]1 [MENU] → [#][1][0][3] → [SET]

2 Enter your fax number, up to 20 digits.
- To enter a “+”, press [★].
- To enter a space, press [#].
- To enter a hyphen, press [FLASH].
• To erase a number, press [STOP].
3 [SET]
4 Press [MENU] to exit.
To correct a mistake
Press [◀] or [▶] to move the cursor to the incorrect number, and make the correction.
- To erase all numbers, press and hold [STOP].
2.10 Configuring the unit to access the LAN
You can print documents, scan documents, receive faxes or send faxes using a computer on the LAN. To enable these features, you need to set the IP address, subnet mask, and default gateway for the unit.
Important:
- Consult your network administrator when setting the IP address, subnet mask, and default gateway.
2.10.1 Setting up automatically with a DHCP server
Your situation:
- When only one unit is connected to the LAN.
If your network administrator manages the network with a DHCP (Dynamic Host Configuration Protocol) server, it will automatically assign an IP (Internet Protocol) address, subnet mask, and default gateway to the unit.
1 After connecting the LAN cable to the unit and the computer, connect the power cord.
- The IP address, subnet mask, and default gateway will be set automatically.
2 Install Multi-Function Station on the computer that you want to use it with. See page 22 for details.
Note:
- You can connect two or more units and assign IP addresses automatically with a DHCP server, but we recommend assigning static IP addresses manually for each unit to avoid unnecessary trouble.
2.10.2 Setting up manually
Your situation:
- When your network administrator does not manage the network with a DHCP server.
- When two or more units are connected to the LAN.
You need to assign an IP address, subnet mask, and default gateway manually.
1 [MENU] → [#][5][0][0]
DHCP =ENABLED [▼▲]
2 Press [0] to select "DISABLED" → [SET]
3 Set each item.
For the IP address:
- Press [5][0][1].
IP ADDRESS PRESS SET
- [SET] → Enter the IP address of the unit. → [SET]
For the subnet mask:
- Press [5][0][2].
SUBNET MASK PRESS SET
- [SET] → Enter the subnet mask of the network. → [SET]
For the default gateway:
- Press [5][0][3].
DEFAULT GATEWAY PRESS SET
- [SET] → Enter the default gateway of the network. → [SET]
4 Press [MENU] to exit.
5 Install Multi-Function Station on the computer that you want to use it with. See page 22 for details.
To correct a mistake in the IP address, subnet mask, or default gateway
Press [◀] or [▶] to move the cursor to the incorrect number, and make the correction.
2.10.3 Setting the computer for PC fax reception
You need to select the computer that will be used for receiving faxes.
- Make sure PC fax setting is turned ON beforehand (feature #442 on page 56).
1 [MENU] → [#][4][4][3] → [SET]
2 Press [▼] or [▲] repeatedly to select the desired computer. → [SET]
3 Press [MENU] to exit.
Note:
- If the unit is not connected to the LAN, the computer connected to the unit by USB is assigned as the default computer for PC fax reception.
- To select the desired computer easily, change the PC name beforehand (page 24).
2.11 Installing Multi-Function Station
2.11.1 Required computer environment
Panasonic Multi-Function Station software enables the unit to carry out the following functions:
- Printing on plain paper, transparencies, labels and envelopes
- Scanning documents and converting an image into text with Readiris OCR software
- Scanning from other applications for Microsoft ^ Windows ^ that support TWAIN scanning
- Storing, editing or erasing items in directories using your computer
- Programming the features using your computer
- Sending, receiving fax documents using your computer
To use Multi-Function Station on your computer, the following are required:
Operating System:
Windows 98/Windows Me/Windows 2000/Windows XP/Windows Vista™ operating system
CPU:
Windows 98: Pentium® 90 MHz or faster
Windows Me: Pentium 150 MHz or faster
Windows 2000: Pentium 166 MHz or faster
Windows XP: Pentium 300 MHz or faster
Windows Vista: Recent Processor (x86) 800 MHz or higher processor
RAM:
Windows 98: 24 MB (32 MB or more recommended)
Windows Me: 32 MB (64 MB or more recommended)
Windows 2000: 64 MB or more
Windows XP: 128 MB or more
Windows Vista: 512 MB or more
Other Hardware:
CD-ROM drive
Hard disk drive with at least 150 MB of available space USB interface
LAN interface (10Base-T/100Base-TX)
Other:
Internet Explorer® 5.0 or later
Warning:
●To assure continued emission limit compliance;
- use only shielded USB cable.
- use only shielded LAN cable (category 5 straight cable).
Note:
- Be sure to use a Hi-Speed USB 2.0 certified cable if your computer is equipped with the Hi-Speed USB 2.0 interface.
- USB cable is not supplied. Please purchase a shielded Type-A male/Type-B male USB cable.
2.11.2 Installing Multi-Function Station on a computer
- Install Multi-Function Station (CD-ROM) before connecting the unit to a computer with USB cable. If the unit is connected to a computer with USB cable before installing Multi-Function Station, the [Found New Hardware Wizard] dialog box will appear. Click [Cancel] to close it.
- The screenshots shown in these instructions are for Windows XP and are included for reference only.
●The screenshots shown in these instructions may differ slightly from those of the actual product. - Software features and appearance are subject to change without notice.
1 Start Windows and exit all other applications.
- For Windows 2000, Windows XP and Windows Vista users, you must be logged in as an administrator in order to install Multi-Function Station.
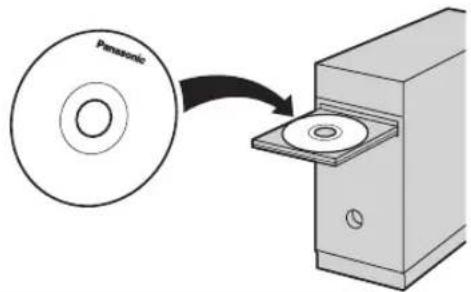
2 Insert the supplied CD-ROM into your CD-ROM drive.
- If the [Select Language] dialog box appears, select the desired language that you want to use with this software. Click [OK].
- If the installation does not start automatically: Click [Start]. Choose [Run...]. Type "D:\Install" (where "D" is the drive letter of your CD-ROM drive). Click [OK].
(If you are not sure what the drive letter is for your CD-ROM drive, use Windows Explorer and look for the CD-ROM drive.)
3 [Easy installation]
●The installation will start.
4 When the setup program starts, follow the on-screen instructions.
- Readiris OCR software (page 30) and Device Monitor (page 65) will also be installed.
5 The [Connect Type] dialog box appears.
For USB connection:
- [Connect directly with a USB cable.] → [Next]
-
The [Connect Device] dialog box will appear.
-
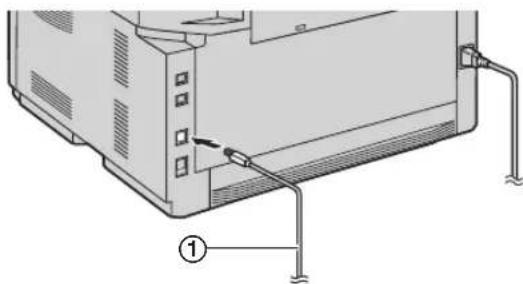
Connect the unit with the USB cable (①), then click [Next].
natural_image
Diagram of a computer monitor with cable and connectors, labeled with number ① (no text or symbols on the diagram itself)- If the unit is connected to your computer, the model name will be automatically detected.
-
You can change the name of the unit if necessary.
-
Click [Install], then follow the on-screen instructions.
●The files will be copied to your computer.
For LAN connection:
- [Connect via the Network.] → [Next]
- The [Select a Network Device] dialog box will appear.
- Check [Select in the searched list] and select the unit from the list.
- If the name of the desired unit is not displayed on the list, and the IP address for the unit has been assigned, check [Direct input] and enter the IP address.
- [Next]
- You can change the name of the unit if necessary.
- Click [Install], then follow the on-screen instructions.
●The files will be copied to your computer.
Important notice
If you use Windows XP or Windows Vista, a message may appear after connecting the unit with the USB cable. This is normal and the software will not cause any difficulties with your operating system. You can continue the installation with no problem. This kind of message is displayed:
- For Windows XP users
"The software you are installing for this hardware has not passed Windows Logo testing to verify its compatibility with Windows XP."
- For Windows Vista users
"Would you like to install this device software?"
To view or install the operating instructions in the CD-ROM
-
Start Windows and insert the supplied CD-ROM into your CD-ROM drive.
-
Click [Operating Instructions], then follow the on-screen instructions to view or install the operating instructions in PDF format.
- Adobe ^ Reader ^ is required to view them.
Note:
- If the screen prompts to insert the CD-ROM for the operating system when installing Multi-Function Station, insert it into your CD-ROM drive.
- If you install the operating instructions, you can view it anytime from [?] on the Multi-Function Station launcher.
To use another unit with the computer
You need to add the printer driver for each unit, as follows.
[Start] → [All Programs] or [Programs] → [Panasonic] → the unit's name → [Add Printer Driver]. Then follow the on-screen instructions.
Note:
- You cannot connect more than one unit to the same computer at the same time.
To modify the software
You can select the components to install anytime after the installation.
For Windows 2000, Windows XP and Windows Vista users, you must be logged in as an administrator in order to modify Multi-Function Station.
-
Start Windows and insert the supplied CD-ROM into your CD-ROM drive.
-
[Start] → [All Programs] or [Programs] → [Panasonic] → the unit's name → [Uninstall or Modify] → [Modify] → [Next]. Then follow the on-screen instructions.
To uninstall the software
For Windows 2000, Windows XP and Windows Vista users, you must be logged in as an administrator in order to uninstall Multi-Function Station.
-
[Start] → [All Programs] or [Programs] → [Panasonic] → the unit's name → [Uninstall or Modify]
-
[Uninstall] → [Next]. Then follow the on-screen instructions.
Note:
- If you want to uninstall each component, select [Modify] and click [Next] in step 2. Then follow the on-screen instructions.
2.12 Starting Multi-Function Station
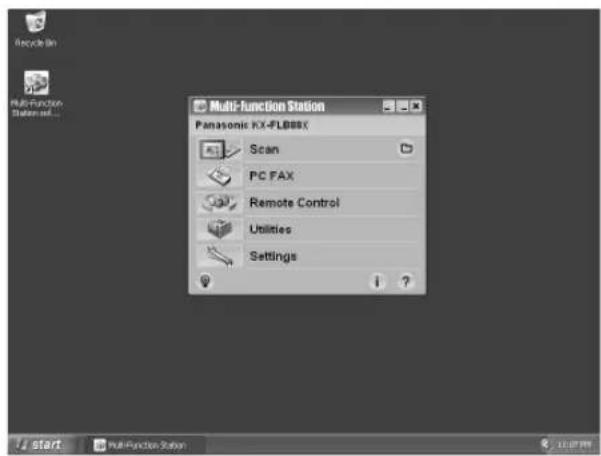
[Start] → [All Programs] or [Programs] → [Panasonic] → the unit's name → [Multi-Function Station]
●Multi-Function Station will appear.
text_image
Recycle Bin Multi-Function Station Panasonic FX-PLB88X Scan PC FAX Remote Control Utilities Settings start Multi-Function Station[Scan] (page 31)
- To scan and display the scanned images.
- To scan and create an image file.
● To scan and send by e-mail. - To scan and convert an image into editable text data.
[PC FAX]
- To send a document created on the computer (page 42).
- To display a document received on the computer (page 46).
[Remote Control] (page 64)
● To program the features.
- To store, edit or erase items in directories.
● To view items in the journal report or Caller ID list.
- To store caller information into directories.
- To store or erase items for broadcast transmission.
[Utilities]
- To start Multi-Function Viewer (page 31).
● To start Device Monitor (page 65). - To start OCR application (page 30).
- To start the configuration web page (page 50, 65) (LAN connection only).
[Settings] (page 24)
- To change the general settings.
- To change the settings for scanning.
[?]
- For detailed instructions on Multi-Function Station.
- To view operating instructions.
[ ]
- To display usage tips.
[i]
- To display information about Multi-Function Station.
Note:
- You can confirm if the unit is connected to your computer on Device Monitor (page 65).
● Computer features (printing, scanning, etc.) may not function properly in the following situations: - When the unit is connected to a computer that was custom-built by the user.
- When the unit is connected to the computer via a PCI card or other expansion card.
- When the unit is connected to another piece of hardware (such as a USB hub or interface adapter) and not connected directly to the computer.
To change the settings
You can change the settings for Multi-Function Station beforehand.
- Select [Settings] from Multi-Function Station.
- Click the desired tab and change the settings. → [OK]
[General]
- Launcher display: To select the display type of the launcher.
- OCR Path: To select the OCR software.
- PC name list up (LAN connection only): To select whether or not your computer name is displayed on the unit.
- PC name (LAN connection only): The computer name that will be displayed on the unit.
[Scan]
- Save to: To select the folder where the scanned image will be saved.
- Viewer/File/E-Mail/OCR/Custom: To change scanning settings for Multi-Function scan application.
Note:
- Assign a unique name for the [PC name] to avoid overlapping, or the scanned image may be sent to an undesired computer.
To select the default E-mail software
The default E-mail software is used when using "4.1.3 Scan to E-mail", page 29.
You can select the default E-mail software as follows.
For Windows XP:
- [Start] → [Control Panel] → [Internet Options] → [Programs] → [E-mail]
- Select the desired MAPI-compliant E-mail software such as [Outlook Express], etc. → [OK]
● These steps may vary depending on your operating system.
3.1 Printing from Windows applications
You can print a file created in a Windows application. For example, to print from WordPad, proceed as follows.
1 Open the document you want to print.
2 Select [Print...] from the [File] menu.
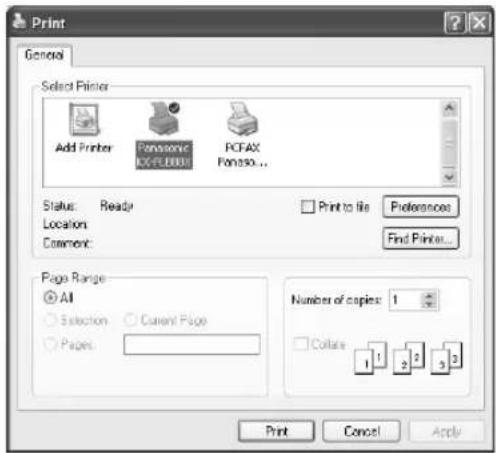
- The [Print] dialog box will appear. For details about the [Print] dialog box, click [?], then click the desired item.
text_image
Print General Select Printer Add Printer Panasonic PCFAX PCC-PLUBB3 PONSO... Status: Ready Location: Comment: Print to file Preferences Find Printer... Page Range All Selection Current Page Pages: Number of copies: 1 Collate 1 2 3 4 Print Cancel ApplyNote:
- For Microsoft PowerPoint ^ , select [Color] or remove the check next to [Grayscale] in the print dialog so that colored text will be printed in grayscale.
3 Select the unit's name as the active printer.
- If you have changed the name of the unit when installing, select that name from the list.
- To change the printer settings, proceed as follows.
For Windows 98/Windows Me:
Click [Properties], then click the desired tab. Change the printer settings, then click [OK].
For Windows 2000:
Click the desired tab and change the printer settings.
For Windows XP/Windows Vista:
Click [Preferences], then click the desired tab. Change the printer settings, then click [OK].
4 Click [Print] or [OK].
●The unit will start printing.
Note:
● To stop printing from the unit, see page 65.
● To load paper, see page 13, 26.
- When using the manual input tray, load the recording paper after step 4.
- For details about the paper specifications, see page 89.
- If a printing error occurs, the Device Monitor will be started automatically and display the error information.
Setting the printer properties
You can change the printer setting in step 3. We recommend that you test paper (especially special sizes and types of paper) on the unit before purchasing large quantities.
You can change or display the settings on the following tabs.
[Basic]: Paper size, media type, page per sheet, etc.
[Output]: Number of prints, collate, etc.
[Quality]: Resolution, contrast, toner save feature, etc.
[Effects]: Watermark, overlay.
[Profile]: Saving the desired settings, selecting the saved settings, etc.
[Support]: Version information.
Note:
- When using special media (transparencies/labels/envelopes), change the setting as follows.
For envelopes:
Select [Envelope #10] or [Envelope DL] on the [Basic] tab for paper size.
For transparencies and labels:
Select [Transparency] or [Label] on the [Basic] tab for media type, then select the desired size for paper size.
- You can select the output tray for each printing on the [Output] tab. To change the default output tray, see page 65.
- When printing from a computer, the toner save feature on the [Quality] tab overrides the unit's toner save setting (feature #482 on page 53).
3.1.1 Using the manual input tray
You can print not only on plain paper but also on special media (transparencies / labels / envelopes).
The manual input tray is used only for printing with the computer and can hold one page at a time. When printing multiple pages, add a next page after the first page has been fed into the unit.
- Please refer to page 89 for information on recording paper.
Load the recording paper after you have started printing with the computer.
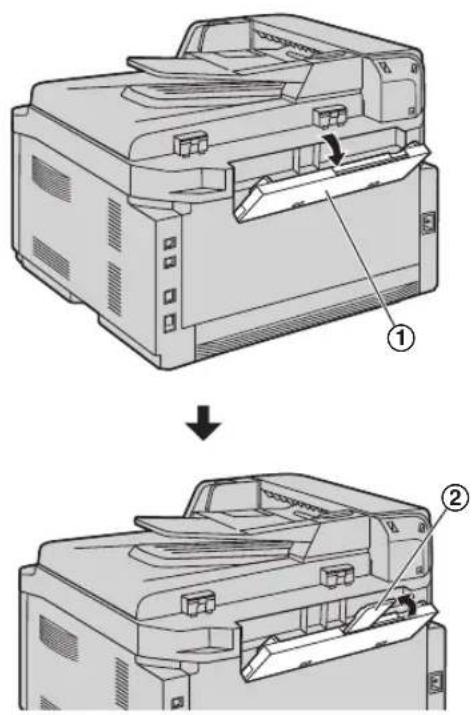
1 Pull open the manual input tray (①), and then raise the extender (②) gently until it clicks into place.
text_image
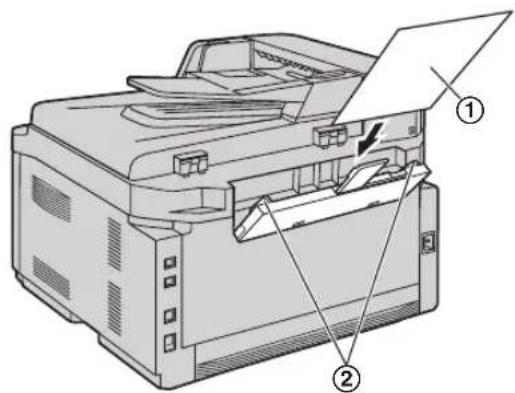
Technical diagram showing a printer assembly process with labeled parts and directional arrows indicating steps ① and ②.2 Insert the paper, print-side down (①) until the unit grasps the paper and a single beep is heard.
- Adjust the width of the guides (②) to the size of the recording paper.
text_image
Technical diagram of a printer with labeled parts, showing front and back views and a paper airplane.Note:
- If the paper is not inserted correctly, re-adjust the paper, or the paper may jam.
- Make sure the unit grasps the recording paper as specified in step 2. The display shows the following.
PAPER IN TRAY #2 FOR PC PRINTING
- To use the manual input tray, you must change the paper source in the [Basic] tab when setting the printer properties (page 25). You can also select the desired media type.
To print on transparencies
Use transparencies designed for laser printing. We recommend the following:
3M® CG3300/CG5000
- Use the manual input tray to print transparencies.
- Load transparency sheets one page at a time for printing, print-side down.
- Printed transparency will be stacked on the upper output tray.
- Remove each transparency after printing and place it on a flat surface to cool and to prevent it from curling.
- Do not re-use transparencies that have already been fed through the unit. This includes transparencies that have been fed through and ejected without being printed on.
- Some types of transparencies have instructions recommending which side to print on. If the print quality is poor, try printing on the other side of a new transparency.
To print on labels
Use labels designed for laser printing. We recommend the following:
Avery®
- Use the manual input tray to print labels.
- Load label sheets one page at a time for printing, print-side down.
- Printed label will be stacked on the upper output tray.
- Remove each label after printing.
-
Do not use the following types of labels:
-
Labels that are wrinkled, damaged or separated from the backing sheet.
– Any sheet of labels that has spaces in it where some of the labels have been removed. - Labels that do not completely cover the backing sheet as follows.

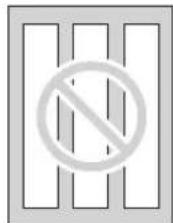

To print on envelopes
Use envelopes designed for laser printing. We recommend the following:
– High quality envelopes of 90 g/m ^2 (24 lb.) paper,
- Envelopes that have thin, sharply creased leading edges,
- Envelopes that have diagonal seams, and
- Envelopes with a moisture content of 4% to 6% by weight.
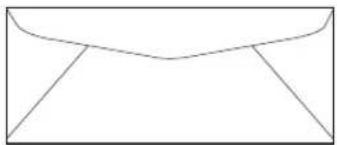
natural_image
Simple line drawing of a closed envelope (no text or symbols)- Use the manual input tray to print envelopes.
- You can load 1 envelope of 90 ~g / m^2 (24 lb.) paper at a time for printing, print-side down (①).
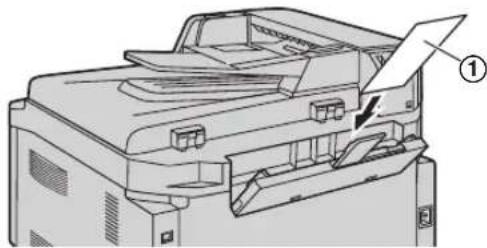
natural_image
Technical line drawing of a printer or printer with a paperclip inserted, showing internal components and no text or symbols.- Printed envelope will be stacked on the upper output tray.
- Remove each envelope after printing.
Note:
- Wrinkles and waving may occur in some cases, even if high quality envelopes are used.
- Avoid printing in high humidity. High humidity may cause the envelope to curl or seal the envelope.
- Store envelopes away from moisture and humidity, where they can lay flat and their edges will not be bent or damaged.
Do not use envelopes with any of the following characteristics (using these may result in paper jams):
- Irregularly shaped envelopes
- Envelopes with curls, wrinkles, nicks, twists, dogears or other damage
● Envelopes with side seam construction
● Highly textured envelopes, or envelopes with extremely shiny surfaces
● Envelopes that seal by removing a peel-off strip
● Envelopes with more than one flap to be sealed
● Self-adhesive envelopes
● Envelopes that are baggy or not sharply creased - Embossed envelopes
● Envelopes that have previously been printed on
● Envelopes that include cotton and/or fiber material

Side seam construction

Peel-off strip Multiple flaps




Twisted Curled Bent-edged
3. Printer
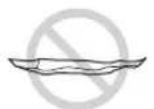


Waved Dog-eared Self adhesive
Do not attempt to print on any of the following types of envelopes (these may cause damage to the unit):
- Envelopes with clasps, snaps or tie strings
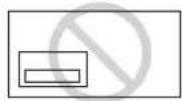
●Envelopes with transparent windows - Envelopes that use encapsulated types of adhesive that do not require moistening but rely on pressure to seal them

Clasp Transparent window
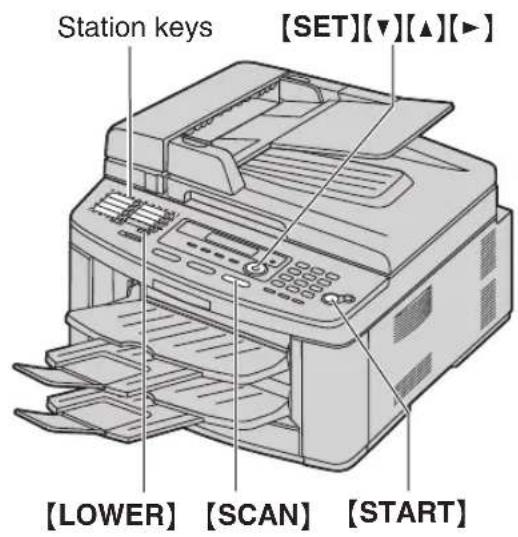
4.1 Scanning from the unit (Push Scan)
You can easily scan the document by operating the operation panel on the unit. Select following scanning modes depending on the way to use the scanned image.
- Viewing using Multi-Function Viewer (Viewer)
– Saving as a file to your computer (File)
- Sending as an attached file to e-mail destination (E-Mail)
- Using OCR software (OCR)
Note:
- You can set the desired scan mode for push scan beforehand (feature #493 on page 60).
- The scanned image will be automatically saved in the folder selected by [Settings] window.
- When scanning a document, we recommend using the scanner glass rather than the auto document feeder for better results.
- Do not open the document cover when scanning a document with the auto document feeder.
text_image
Station keys [SET][▼][▲][►] [LOWER] [SCAN] [START]4.1.1 Scan to Multi-Function Viewer
1 Set the original (page 17).
2 [SCAN]
3 Press [▼] or [▲] repeatedly to select "VIEWER". → [SET]
4 For USB connection:
Press [▼] or [▲] repeatedly to select "USB HOST". → [SET]
For LAN connection:
Press [▼] or [▲] repeatedly to select the computer that you want to send the scanned image. → [SET]
5 If necessary, change the scanning settings (scan type / resolution / file format / brightness / contrast / scan size). Press [▶], press [▼] or [▲] repeatedly to select the desired setting. → [SET] → [START]
- The scanned image will be displayed in the [Multi-Function Viewer] window after scanning. However, when you select PDF as a file format, the software that is associated to open PDF file will start.
Note:
●To stop scanning, see page 65.
- You can save the images in TIFF, JPEG, BMP or PDF formats.
- See page 17 for document requirements.
4.1.2 Scan to save as a file
1 Set the original (page 17).
2 [SCAN]
3 Press [▼] or [▲] repeatedly to select "FILE". → [SET]
4 For USB connection:
Press [▼] or [▲] repeatedly to select "USB HOST". → [SET]
For LAN connection:
Press [▼] or [▲] repeatedly to select the computer that you want to send the scanned image. → [SET]
5 If necessary, change the scanning settings (scan type / resolution / file format / brightness / contrast / scan size). Press [▶], press [▼] or [▲] repeatedly to select the desired setting. → [SET] → [START]
- The scanned image will be automatically saved in the folder selected by [Settings] window. To change the folder, see page 24.
Note:
● To stop scanning, see page 65.
- You can save the images in TIFF, JPEG, BMP or PDF formats.
4.1.3 Scan to E-mail
You can send the scanned image as attached file to an e-mail using e-mail software in your computer.
1 Set the original (page 17).
2 [SCAN]
3 Press [▼] or [▲] repeatedly to select "E-MAIL". → [SET]
4 For USB connection:
Press [▼] or [▲] repeatedly to select "USB HOST". → [SET]
For LAN connection:
Press [▼] or [▲] repeatedly to select the computer that you want to send the scanned image. → [SET]
5 If necessary, change the scanning settings (scan type / resolution / file format / brightness / contrast / scan size). Press [▶], press [▼] or [▲] repeatedly to select the desired setting. → [SET] → [START]
- The e-mail software will automatically start and the scanned image will be attached to a new e-mail message.
Note:
- To select the default E-mail software, see page 24.
- To stop scanning, see page 65.
- You can save the images in JPEG or PDF formats.
To send the scanned image via e-mail server (LAN connection only)
You can send the scanned image as an attachment without using e-mail software. To select the e-mail destination easily, register e-mail addresses using the web browser beforehand (page 60).
Important:
- Program the SMTP server setting beforehand (see page 63).
- Set the original (page 17).
- [SCAN]
- Press [▼] or [▲] repeatedly to select "E-MAIL". → [SET]
- Press [▼] or [▲] repeatedly to select "E-MAIL SERVER". → [SET]
- Enter the destination e-mail address.
Using stations 1-7:
Press the desired station key.
Using stations 8-14:
Press [LOWER], then press the desired station key.
Using navigator key:
Press [▼] or [▲] repeatedly to select the desired destination.
Using dial keypad:
Press [SET], then enter the e-mail address using the dial keypad (page 64).
-
[SET]
-
If necessary, change the scanning settings. Press [▶], press [▼] or [▲] repeatedly to select the desired setting. → [SET] → [START]
Note:
- If you select black/white for the scan type, you can save the images in TIFF or PDF formats. If you select grayscale or color for the scan type, you can save the images in JPEG or PDF formats.
4.1.4 Scan to OCR
With OCR software, you can convert an image into text data that can be edited with word processor software. Readiris OCR software can be installed when installing Multi-Function Station.
1 Set the original (page 17).
2 [SCAN]
3 Press [▼] or [▲] repeatedly to select "OCR". → [SET]
4 For USB connection:
Press [▼] or [▲] repeatedly to select "USB HOST". → [SET]
For LAN connection:
Press [▼] or [▲] repeatedly to select the computer that you want to send the scanned image. → [SET]
5 If necessary, change the scanning settings (scan type / resolution / file format / brightness / contrast / scan size). Press [▶], press [▼] or [▲] repeatedly to select the desired setting. → [SET] → [START]
- The scanned image will be displayed in the OCR window after scanning.
Note:
- You can save the images in TIFF, JPEG or BMP formats.
- For detailed instructions about OCR, select [Help].
4.2 Scanning from a computer (Pull Scan)
Note:
- When scanning a document, we recommend using the scanner glass rather than the auto document feeder for better results.
- Do not open the document cover when scanning a document with the auto document feeder.
4.2.1 Using Multi-Function scan application
By clicking an application icon, the selected application starts automatically after scanning.
1 Set the original (page 17).
2 Start Multi-Function Station. → [Scan]
3 Click the desired application icon.
- When you click [Custom], the pre-programmed application starts.
- To cancel scanning while the documents is being scanned, click [Cancel].
Note:
- You can change the scanning settings beforehand for each application (page 24).
- By pointing the application icon, scanning settings can be displayed as tooltip.
- See page 17 for document requirements.
4.2.2 Using Multi-Function Viewer
1 Set the original (page 17).
2 Start Multi-Function Station.
3 [Utilities] → [Viewer]
• [Multi-Function Viewer] will appear.
4 Click the [Scan] icon in the [Multi-Function Viewer] window.
- The unit's name dialog box will appear.
5 If necessary, change the scanning settings on your computer.
- To preview the scanned image, click [Preview]. You can drag the frame to specify the scanned area. If you change the scan mode, brightness, contrast setting, etc., click [Preview] to refresh the scanned image. If you use the auto document feeder, only the first page will be previewed. When you need to refresh the scanned image, set the document to preview again.
6 [Scan]
- If you preview the scanned image using the auto document feeder in step 5, set the document again and click [Scan].
- The scanned image will be displayed in the [Multi-Function Viewer] window after scanning.
- To save the scanned image, select [Save As ...] from the [File] menu.
- To cancel scanning while the document is being scanned, click [Cancel].
Note:
- You can display images in applications that support TIFF, JPEG, PCX, DCX and BMP formats.
- You can save images in TIFF, JPEG, PCX, DCX, BMP or PDF formats.
- If the [Select...] button is displayed in the [Target Device], click the [Select...] to select the unit from the list, then click [OK].
The [Select...] button will not be displayed when the only one printer driver has been installed. - You can move, copy and delete a file or page.
4.2.3 Using other applications
Multi-Function Station includes a TWAIN compliant scanner driver. You can also scan using other applications that support TWAIN scanning. For example, proceed as follows.
1 Set the original (page 17).
2 Start an application that supports TWAIN scanning.
3 Select [Acquire Image...] from the [File] menu.
- The unit's name dialog box will appear.
4 If necessary, change the scanning settings on your computer. → [Scan]
●The scanned image will be displayed in the application window after scanning.
- To cancel scanning while the document is being scanned, click [Cancel].
Note:
- Depending on the application used, the appearance may differ slightly.
- If the [Select...] button is displayed in the [Target Device], click the [Select...] to select the unit from the list, then click [OK].
The [Select...] button will not be displayed when the only one printer driver has been installed.
5.1 Making a copy
Illegal copies
- It is unlawful to make copies of certain documents.
Copying certain documents may be illegal in your country. Penalties of fines and/or imprisonment may be imposed on those found guilty. The following are examples of items that may be illegal to copy in your country.
- Currency
– Bank notes and checks
– Bank and government bonds and securities - Passports and identification cards
– Copyright material or trademarks without the consent of the owner - Postage stamps and other negotiable instruments
This list is not inclusive and no liability is assumed for either its completeness or accuracy. In case of doubt, contact your legal counsel.
Notice:
- Install your machine near a supervised area to prevent illegal copies from being made.
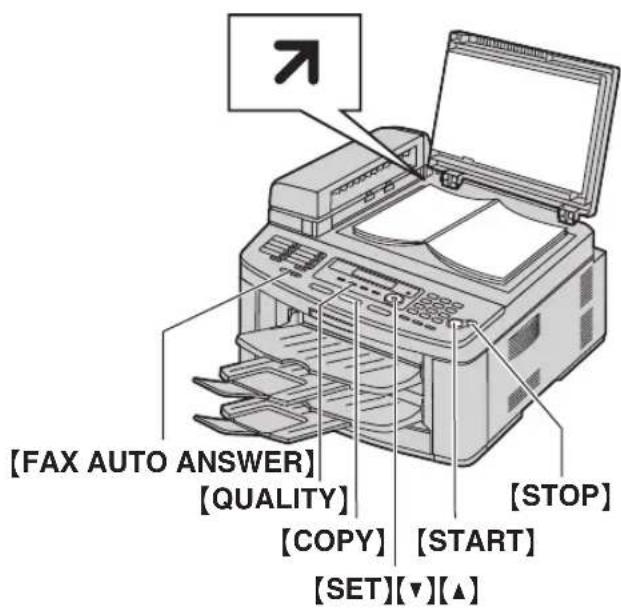
5.1.1 Using the scanner glass
text_image
[FAX AUTO ANSWER] [QUALITY] [COPY] [START] [SET][▼][▲] [STOP]1 If the [COPY] light is OFF, turn it ON by pressing [COPY].
2 Set the original (page 17).
3 If necessary, change the resolution and contrast according to the type of document.
- To select the resolution, see page 32.
● To select the contrast, see page 32.
4 If necessary, enter the number of copies (up to 99).
5 [START]
●The unit will start copying.
6 After you finish copying, press [STOP] to reset the settings you set in step 3 and 4.
Note:
●To stop copying, see page 65.
- You can change the default operation mode (feature #463 on page 52) and the timer before returning to the default operation mode (feature #464 on page 53).
- Copied documents will be stacked on the upper output tray. You can change the output tray for copying (feature #466 on page 57).
- If the [FAX AUTO ANSWER] indicator is ON, the unit can receive faxes automatically even when in the copy mode.
To select the resolution
- Press [QUALITY] 2 times.
-
Press [▼] or [▲] repeatedly to select the desired resolution.
-
"TEXT/PHOTO": For both text and photographs.
- “TEXT”: For text only.
- “PHOTO”: For photographs, shaded drawings, etc.
3. [SET]
Note:
- You can change the default resolution (feature #461 on page 57).
To select the contrast
You can adjust this setting depending on the darkness or lightness of the document. 5 levels (light to dark) are available.
1. [QUALITY]
-
Press [▼] or [▲] repeatedly to select the desired contrast.
-
To make lighter, press [▼].
- To make darker, press [▲].
3. [SET]
Note:
- You can hold the previous contrast setting (feature #462 on page 52).
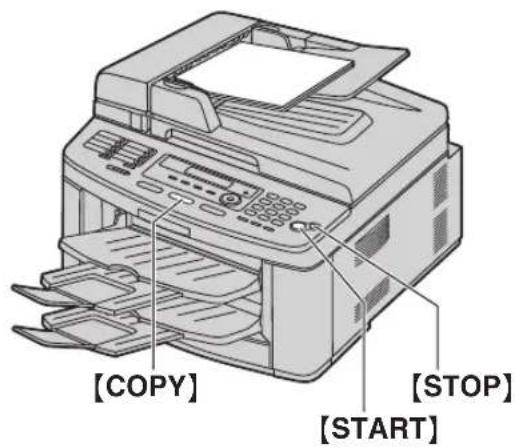
5.1.2 Using the auto document feeder
text_image
[COPY] [START] [STOP]1 If the [COPY] light is OFF, turn it ON by pressing [COPY].
2 Set the original (page 17).
3 If necessary, change the resolution and contrast according to the type of document.
● To select the resolution, see page 32.
- To select the contrast, see page 32.
4 If necessary, enter the number of copies (up to 99).
5 [START]
●The unit will start copying.
6 After you finish copying, press [STOP] to reset the settings you set in step 3 and 4.
Note:
● To stop copying, see page 65.
5.2 More copying features
- Make sure that the [COPY] light is ON.
5.2.1 To enlarge/reduce a document
1 Set the original (page 17).
2 Press [ZOOM] repeatedly to select the enlargement / reduction rate that fits the size of your document and recording paper.
$$ \begin{array}{l} - \text { “ZOOM } = 100 \% \ - “ 50 \% \ - “ 200 \% \ - \quad “ L T R \blacktriangleright A 4 ” \ - \quad \text { "A4 } \blacktriangleright \text { LTR" } \ - \quad “ L G L \blacktriangleright A 4 ” \ - \quad “ L G L \blacktriangleright L T R ” \ \end{array} $$
- If you select "ZOOM =100%", press [▼] or [▲] repeatedly to change the enlargement / reduction rate by 1% at a time from "25%" to "400%".
You can also enter the desired percentage specifically by using the dial keys.
3 [SET]
4 If necessary, enter the number of copies (up to 99).
→ [START]
5 After you finish copying, press [STOP] to reset this feature.
Note:
- Enlargement / reduction copy is not available for quick ID copy feature (page 34), poster feature (page 35) or N in 1 feature (page 35).
- You can hold the previous zoom (enlargement / reduction) setting (feature #468 on page 57).
- When using the scanner glass, the unit will only enlarge the right top corner of the document starting from the 7 mark on the unit.
- When using the auto document feeder, the unit will only enlarge the center of the upper part of the document. To make an enlarged copy of the bottom of the document, turn the document around, and then make a copy.
Example: 150% enlarged copy Using the scanner glass (①):
Original document Enlarged copy
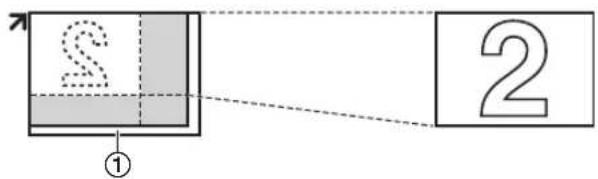
text_image
① ②Using the auto document feeder:
Original document Enlarged copy
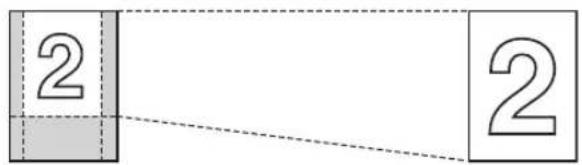
text_image
2 2Example: 70% reduced copy Using the scanner glass (①):
Original document Reduced copy
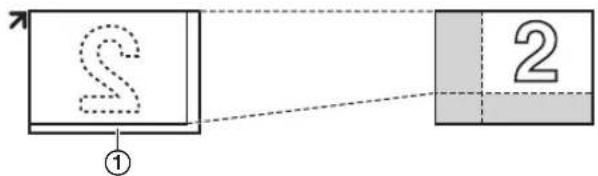
flowchart
graph LR
    A["S"] --> B["2"]
    style A fill:#f9f,stroke:#333
    style B fill:#bbf,stroke:#333
Using the auto document feeder:
Original document Reduced copy
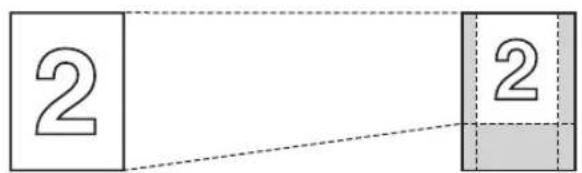
text_image
2 25.2.2 To copy 2-sided documents onto 1 page (Quick ID copy feature) (Scanner glass only)
You can make copies of both sides of 2-sided documents and print them on the same side of paper. The documents will not be reduced to fit the recording paper, so this feature is useful for copying small sized documents such as business cards.
1 Set the original (page 17).
- To make a landscape copy, set the original in landscape direction. To make a portrait copy, set the original in portrait direction.
●The scanning area changes according to the selected setting in step 3. See the following table for details. The shaded area will be scanned.
2 Press [PAGE LAYOUT] repeatedly to select "QUIK ID COPY". → [SET]
3 Press [▼] or [▲] repeatedly to select the number of original documents from "2 in 1", "4 in 1" or "8 in 1". → [SET]
4 Press [▼] or [▲] repeatedly to select the page layout from "LANDSCAPE" or "PORTRAIT". → [SET]
5 If necessary, enter the number of copies (up to 99).
→ [START]
●The unit will scan 1 page.
6 To continue scanning, place the next document on the scanner glass and press [SET]. Repeat this until all the documents are scanned.
●The unit will start copying.
- You can press [START] anytime to start copying.
7 After you finish copying, press [STOP] to reset this feature.
| Original document Page layout | |
“2 in 1”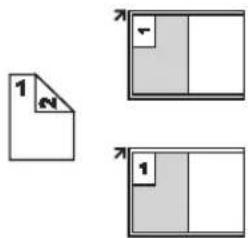 | “LANDSCAPE” “PORTRAIT” “PORTRAIT” |
“4 in 1”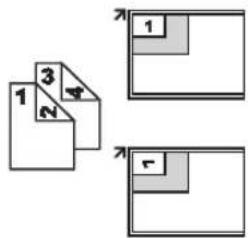 | “LANDSCAPE”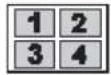 “PORTRAIT” “PORTRAIT”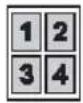 |
| “8 in 1” | “LANDSCAPE” |
| “PORTRAIT” | |
Note:
- You can save the previous page layout setting (feature #467 on page 57).
5.2.3 To make a poster size copy (Poster feature) (Scanner glass only)
You can make copies divided in to 4 ("2 × 2") or 9 ("3 × 3") sections to make enlarged copies of the individual sections. You can then glue them together to make a poster.
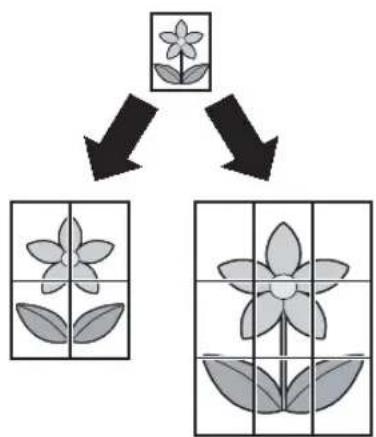
flowchart
graph TD
    A["Flower"] --> B["Split Image"]
    A --> C["Split Image"]
1 Set the original (page 17).
2 Press [PAGE LAYOUT] repeatedly to select "POSTER". → [SET]
3 Press [▼] or [▲] repeatedly to select “2 × 2” or “3 × 3”. → [SET]
4 If necessary, enter the number of copies (up to 99).
→ [START]
5 After you finish copying, press [STOP] to reset this feature.
Note:
- You can save the previous page layout setting (feature #467 on page 57).
5.2.4 To copy several pages onto 1 page (N in 1 feature)
You can save paper by copying 2, 4 or 8 pages onto 1 page. The documents will be reduced to fit the recording paper.
1 Set the original (page 17).
- To make a portrait copy, set the original in portrait direction. To make a landscape copy, set the original in landscape direction.
2 Press [PAGE LAYOUT] repeatedly to select "N in 1". → [SET]
3 Press [▼] or [▲] repeatedly to select the number of original documents from "2 in 1", "4 in 1" or "8 in 1". → [SET]
4 Press [▼] or [▲] repeatedly to select the layout from "PORTRAIT" or "LANDSCAPE". → [SET]
5 If necessary, enter the number of copies (up to 99).
6 When using the scanner glass:
1. [START]
●The unit will scan 1 page.
- Place the next document on the scanner glass and press [SET]. Repeat this until all the documents are scanned.
●The unit will start copying.
- You can press [START] anytime to start copying.
When using the auto document feeder: [START]
7 After you finish copying, press [STOP] to reset this feature.
| Original document Page layout | |
“2 in 1”![PANASONIC KX-FLB881 - When using the auto document feeder: [START] - 1](/content/2026/05/795043/images/73b9aea14e117ab3a427a8fa7f644ac6dc6acc8359202d6c07ea0d1a7fef80d9.jpg) | “PORTRAIT”![PANASONIC KX-FLB881 - When using the auto document feeder: [START] - 2](/content/2026/05/795043/images/28d7024f6e5cffefb3d96b0d78726784db64197c04b680f695a880945d94b18b.jpg) “LANDSCAPE” “LANDSCAPE”![PANASONIC KX-FLB881 - When using the auto document feeder: [START] - 3](/content/2026/05/795043/images/fbe96181626fda528bcc3149619ab8f9feefc424f4c304561ed974889138f085.jpg) |
“4 in 1”![PANASONIC KX-FLB881 - When using the auto document feeder: [START] - 4](/content/2026/05/795043/images/b9abf1e5bb12d45c661e3e6dda83827968157c1496353caefbf1d8b68180af8e.jpg) | “PORTRAIT”![PANASONIC KX-FLB881 - When using the auto document feeder: [START] - 5](/content/2026/05/795043/images/e90b916913c57130e86949af0049d860a89f299311bfbe4b8ac7b06e42e19d43.jpg) “LANDSCAPE” “LANDSCAPE”![PANASONIC KX-FLB881 - When using the auto document feeder: [START] - 6](/content/2026/05/795043/images/fd8c6bb694c4d6497be5b4eb7c165266d4e261bb304ac11b0661d52b5df707fe.jpg) |
| “8 in 1” | “PORTRAIT” |
| “LANDSCAPE” | |
| 1 2 3 4 5 6 7 8 | |
Note:
- You can save the previous page layout setting (feature #467 on page 57).
5.2.5 To collate multiple copies
The unit can collate multiple copies in the same order as the original document pages.
1 Set the original (page 17).
2 Press [COLLATE] repeatedly to display "ON".
3 [SET]
4 Enter the number of copies (up to 99).
5 When using the scanner glass:
1. [START]
●The unit will scan 1 page.
- Place the next document on the scanner glass and press [SET]. Repeat this until all the documents are scanned, then press [START].
●The unit will start copying.
When using the auto document feeder:
[START]
6 After you finish copying, press [STOP] to reset this feature.
Example: Making 2 copies of a 4-page original document
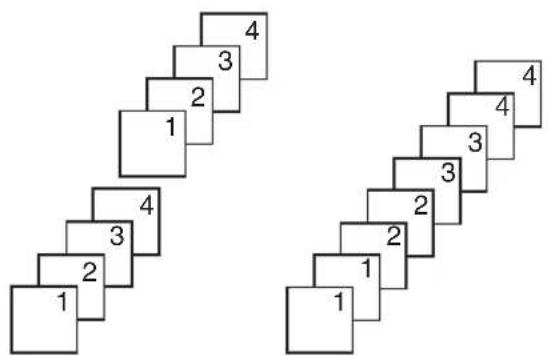
text_image
Two identical staircase-shaped diagrams with numbered blocks, likely for geometric or puzzle solving.Collated pages Uncollated pages
Note:
- The unit will store the documents into memory while collating the copies. If memory becomes full while storing, the unit will only print out the stored pages.
- You can hold the previous collate setting (feature #469 on page 57).
During poster feature
- Set the original and enter necessary settings for poster size copy (steps 2 to 3 on "5.2.3 To make a poster size copy (Poster feature) (Scanner glass only)", page 35).
- Press [COLLATE] repeatedly to display "ON" and continue copying (steps 3 to 6 on "5.2.5 To collate multiple copies", page 36).
During N in 1 feature
- Set the original and enter necessary settings for N in 1 copy (steps 2 to 4 on "5.2.4 To copy several pages onto 1 page (N in 1 feature)", page 35).
- Press [COLLATE] repeatedly to display "ON" and continue copying (steps 3 to 6 on "5.2.5 To collate multiple copies", page 36).
Copy reservation
You can reserve your copy;
-
while the unit is printing documents from your computer.
– while the unit is printing received fax documents. -
Set the original (page 17).
- While "PC PRINTING" or "PRINTING" is displayed, press [COPY].
- Make necessary settings such as number of copies, resolution, zoom features and page layout features.
- "COPY RESERVED" will be displayed. The unit will start copying after the current printing job.
Proof set feature
To make 1 set of collate copy first, press [COLLATE] repeatedly to display "PROOF SET" (step 2 on "5.2.5 To collate multiple copies", page 36). The unit will make 1 set of collate copy and stop temporarily so you can check whether the copy is made as you expected. If the copy is correct, press [START] to continue copying.
If the copy is not correct, press [STOP] and start again from the beginning.
6.1 Sending a fax manually
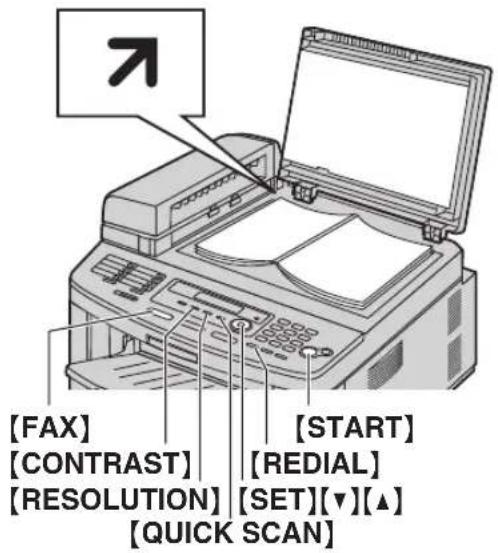
6.1.1 Using the scanner glass
By using the scanner glass, you can send a page from booklets or small size paper that cannot be sent with the auto document feeder.
text_image
[FAX] [CONTRAST] [RESOLUTION] [QUICK SCAN] [START] [REDIAL] [SET][▼][▲]1 If the [FAX] light is OFF, turn it ON by pressing [FAX].
2 Set the original (page 17).
3 If necessary, change the resolution and contrast according to the type of document.
- To select the resolution, see page 37.
● To select the contrast, see page 37.
4 Dial the fax number.
- To send a single page, skip to step 7.
- To send multiple pages, go to the next step.
5 Press [QUICK SCAN] to scan the document into memory.
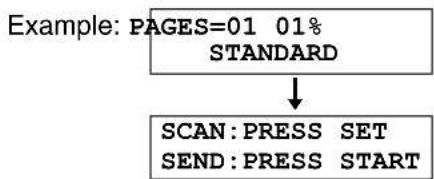
flowchart
graph TD
    A["Example: PAGES=01 01% STANDARD"] --> B["SCAN: PRESS SET\nSEND: PRESS START"]
6 Place the next page on the scanner glass. → [SET]
- To send more pages, repeat this step.
7 [START]
Note:
● To stop sending, see page 65.
- You can change the default operation mode (feature #463 on page 52) and the timer before returning to the default operation mode (feature #464 on page 53).
To select the resolution
1. [RESOLUTION]
-
Press [▼] or [▲] repeatedly to select the desired resolution.
-
"STANDARD": For normal-sized characters.
- “FINE”: For small-sized characters.
- "SUPER FINE": For very small-sized characters.
- "PHOTO": For photographs, shaded drawings, etc.
3. [SET]
- Using the "FINE", "SUPER FINE" and "PHOTO" settings will increase transmission time.
To select the contrast
You can adjust this setting depending on the darkness or lightness of the document. 5 levels (light to dark) are available.
1. [CONTRAST]
- Press [▼] or [▲] repeatedly to select the desired contrast.
• To make lighter, press [▼].
- To make darker, press [▲].
3. [SET]
Note:
- You can hold the previous contrast setting (feature #462 on page 52).
To redial the last number
[REDIAL] → [START]
- If the line is busy, the unit will automatically redial the number.
Note:
●To stop sending, see page 65.
Reserving the fax transmission (Dual Access)
You can reserve the fax transmission even when the unit is just receiving a fax or sending a fax from memory.
- Up to 3 reservations when sending
- Up to 4 reservations when receiving
-
Set the original during fax reception or fax memory transmission.
-
Enter the fax number using the dial keypad, one-touch dial or navigator directory.
-
When using the scanner glass, press [QUICK SCAN]. The unit will scan 1 page. Place the next document on the scanner glass and press [SET]. Repeat this until all the documents are scanned, then press [START].
When using the auto document feeder, press [START].
- If the document exceeds the memory capacity, transmission will be canceled. You must send the entire document manually.
Printing a confirmation report
A confirmation report provides you with a printed record of transmission results. To print confirmation reports, make sure feature #401 is activated (page 54). For an explanation of error messages, see page 67.
Printing a journal report
A journal report provides you with a printed record of the 30 most recent faxes. To print it manually, see page 88. To print it automatically after every 30 new fax transmissions and receptions, make sure feature #402 is activated (page 54). For an explanation of error messages, see page 67.
6.1.2 Using the auto document feeder
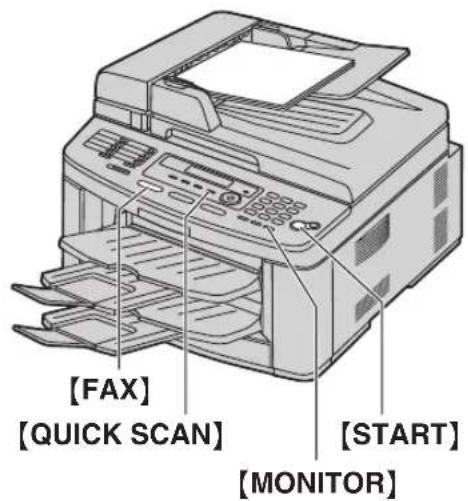
text_image
[FAX] [QUICK SCAN] [START] [MONITOR]1 If the [FAX] light is OFF, turn it ON by pressing [FAX].
2 Set the original (page 17).
3 If necessary, change the resolution and contrast according to the type of document.
●To select the resolution, see page 37.
● To select the contrast, see page 37.
4 [MONITOR]
5 Dial the fax number. → [START]
Note:
● To stop sending, see page 65.
- See page 17 for document requirements.
- Do not open the document cover when sending a fax with the auto document feeder.
Pre-dialing a fax number
-
Enter the fax number.
-
Set the original. → [START]
Sending from memory (Quick scan feature)
- Set the original.
- Enter the fax number. → [QUICK SCAN]
6.2 Storing items for the one-touch dial feature and navigator directory
The unit provides the one-touch dial feature (14 items) and navigator directory (300 items).
- Station 1 to 3 can be used alternatively as broadcast keys (page 40).
- Make sure that the [FAX] light is ON.
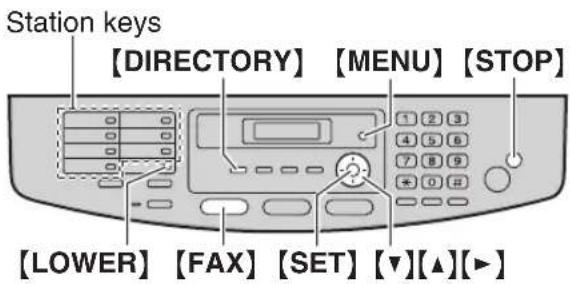
text_image
Station keys [ DIRECTORY] [ MENU] [ STOP ] [ LOWER] [ FAX ] [ SET ] [ ▼ ][ ▲ ][ ▶ ]6.2.1 Storing one-touch dial item
1 Press [MENU] repeatedly to display "DIRECTORY SET".
2 Select the desired station key.
For stations 1–3:
- Press one of the station keys.
Example: STATION 1 DIAL MODE [▼▲]
2. [SET]
For stations 4–7:
Press one of the station keys.
For stations 8–14:
Press [LOWER], then press one of the station keys.
3 Enter the name, up to 16 characters (see page 64 for character entry). → [SET]
4 Enter the telephone number, up to 32 digits. → [SET]
●To program other items, repeat steps 2 to 4.
5 [STOP]
Note:
- A hyphen or a space entered in a telephone number counts as 2 digits.
6.2.2 Storing navigator directory items
1 Press [MENU] repeatedly to display "DIRECTORY SET". → [▶]
2 Enter the name, up to 16 characters (see page 64 for character entry). → [SET]
3 Enter the telephone number, up to 32 digits. → 【SET】
● To program other items, repeat steps 2 to 3.
4 [MENU]
Note:
● A hyphen or a space entered in a telephone number counts as 2 digits.
6.2.3 Editing a stored item
1 [DIRECTORY]
2 Press [▼] or [▲] repeatedly to display the desired item. → [MENU] → [★]
3 Edit the name if necessary. For further details, see the storing procedure on page 38. → [SET]
4 Edit the telephone number if necessary. For further details, see the storing procedure on page 38. → [SET]
6.2.4 Erasing a stored item
1 [DIRECTORY]
2 Press [▼] or [▲] repeatedly to display the desired item. → [MENU] → [#]
- To cancel erasing, press [STOP].
3 [SET]
6.3 Sending a fax using one-touch dial feature and navigator directory
Before using this feature, store the desired names and telephone numbers into one-touch dial feature and navigator directory (page 38).
- Make sure that the [FAX] light is ON.
6.3.1 Using the scanner glass
1 Set the original (page 17).
2 If necessary, change to the desired resolution (page 37) and the desired contrast (page 37).
3 Enter the fax number.
Using stations 1–7:
Press the desired station key.
Using stations 8–14:
Press [LOWER], then press the desired station key.
Using navigator directory:
Press [DIRECTORY], then press [▼] or [▲] repeatedly to display the desired item.
- To send a single page, skip to step 6.
●To send multiple pages, go to the next step.
4 Press [QUICK SCAN] to scan the document into memory.
5 Place the next page. → [SET]
- To send more pages, repeat this step.
6 [START]
To search for a name by initial
Example: "LISA"
-
[DIRECTORY]
-
Press [▼] or [▲] to initiate the navigator directory.
- Press [5] repeatedly to display any name with the initial "L" (see page 64 for character entry).
- To search for symbols, press [★].
- Press [▼] or [▲] repeatedly to display "LISA".
- To stop the search, press [STOP].
Fax auto redial
If the line is busy or if there is no answer, the unit will automatically redial the number.
Note:
●To stop sending, see page 65.
6.3.2 Using the auto document feeder
1 Set the original (page 17).
2 If necessary, change to the desired resolution (page 37) and the desired contrast (page 37).
3 Enter the fax number using one-touch dial or navigator directory.
4 [START]
6.4 Broadcast transmission
By storing one-touch dial and navigator directory items (page 38) into the broadcast memory, you can send the same document to multiple parties (up to 20). Your programmed items will remain in the broadcast memory, allowing frequent re-use.
- The broadcast function utilizes stations 1–3. The one-touch dial function will be canceled.
- Make sure that the [FAX] light is ON.
6.4.1 Programming items into the broadcast memory
1 Press [MENU] repeatedly to display "DIRECTORY SET".
2 Select the desired broadcast key.
For BROADCAST 1-2:
- [BROADCAST]
- Press [▼] or [▲] repeatedly to select "BROADCAST".
For MANUAL BROADCAST (using the dial keypad):
- [MANUAL BROAD]
- Press [▼] or [▲] repeatedly to select "MANUAL BROAD".
3 [SET]
4 Program items.
Using stations 1–7:
Press the desired station key.
Using stations 8–14:
Press [LOWER], then press the desired station key.
Using navigator directory:
Press [▼] or [▲] repeatedly to display the desired item. → [SET]
Using the dial keypad:
Enter the fax number. → [SET]
- The number in brackets indicates the number of registered items.
- To program other items, repeat this step (up to 20 items).
- If you have programmed the wrong item, press [STOP] to erase the item.
5 [SET]
- To program another broadcast key, repeat steps 2 to 5.
6 [STOP]
6.4.2 Adding a new item into the broadcast memory
1 [DIRECTORY]
2 Press [▼] or [▲] repeatedly to display the desired broadcast memory (“
3 Press [▼] or [▲] repeatedly to display the desired item you want to add. → [SET] • To add other items, repeat this step (up to 20 items).
4 [STOP]
Note:
- When adding new items to the MANUAL BROADCAST memory, you can only select stored items.
6.4.3 Erasing a stored item from the broadcast memory
1 [DIRECTORY]
2 Press [▼] or [▲] repeatedly to display the desired broadcast memory ("
3 Press [▼] or [▲] repeatedly to display the desired item you want to erase. • To cancel erasing, press [STOP].
4 [SET] [SET] [STOP]
6.4.4 Sending the same document to pre-programmed parties
To send the same document using the scanner glass
- Set the original (page 17).
- If necessary, change to the desired resolution (page 37) and the desired contrast (page 37).
- Press [BROADCAST] (1-2) or [MANUAL BROAD].
- To send a single page, skip to step 5.
- To send multiple pages, go to the next step.
- Place the next page. → [SET]
●To send more pages, repeat this step.
5. [START]
● After transmission, the unit will automatically print a report (broadcast sending report).
Note:
● To stop sending, see page 65.
- If you select "FINE", "SUPER FINE" or "PHOTO" resolution, the number of pages that the unit can send will decrease.
- If the document exceeds the memory capacity, sending will be canceled.
- If a party is busy or does not answer, it will be skipped and redialed later.
To send the same document using the auto document feeder
- Set the original (page 17).
- If necessary, change to the desired resolution (page 37) and the desired contrast (page 37).
- Press [BROADCAST] (1–2) or [MANUAL BROAD].
6.5 Sending a computer document as a fax message from your computer
You can access the fax function from a Windows application using Multi-Function Station. For example, to send a document created from WordPad, proceed as follows.
1 Open the document you want to send.
2 Select [Print...] from the [File] menu.
- The [Print] dialog box will appear.
3 Select the PCFAX unit's name as the active printer.
4 Click [Print] or [OK].
- The [Send a Fax] dialog box will appear.
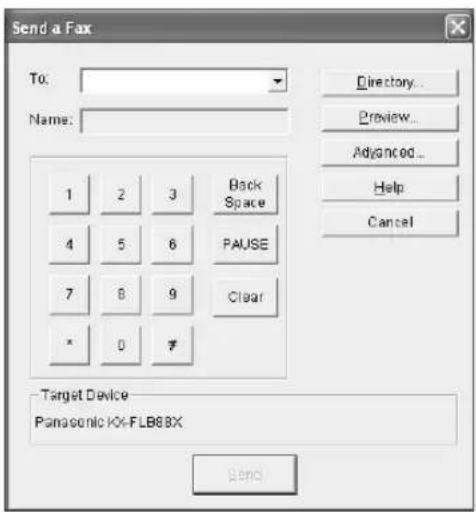
text_image
Send a Fax To: Name: 1 2 3 Back Space 4 5 6 PAUSE 7 8 9 Clear * 0 ?* Directory... Preview... Advanced... Help Cancel Target Device Panasonic IO-FLB8BX Send5 Enter the fax number using the keypad display or the directory.
- To stop the operation, click [Cancel].
6 [Send]
● The document will be sent through the unit from your computer.
Note:
● To stop sending, see page 65.
- If the document exceeds the memory capacity of the unit, sending will be canceled.
- For details, see the help file by selecting [💡] from Multi-Function Station.
- Click [Select...] to change the active unit.
6.6 Receiving a fax automatically – Auto answer ON
Note:
- Received documents will be stacked on the lower output tray. You can change the output tray for faxing (Feature #441 on page 56).
6.6.1 Activating FAX ONLY mode
Press [FAX AUTO ANSWER] repeatedly to display "FAX ONLY MODE".
- The display will show the ring count in FAX ONLY mode. If you wish to change it, press [▼] or [▲] repeatedly to display the desired setting, and press [SET].
• The [FAX AUTO ANSWER] indicator turns ON.

text_image
[SET][▼][▲] FAX AUTO ANSWERHow faxes are received
When receiving calls, the unit will automatically answer all calls and only receive fax documents.
Note:
- The number of rings before a call is answered in FAX ONLY mode can be changed (feature #210 on page 52).
If you have subscribed to a Distinctive Ring service See page 49.
6.7 Receiving a fax manually – Auto answer OFF
Important:
- Use this mode with an extension telephone or the optional handset unit.
6.7.1 Activating TEL mode
Set the unit to TEL mode by pressing [FAX AUTO ANSWER] repeatedly to display "TEL MODE".
- The [FAX AUTO ANSWER] indicator turns OFF.
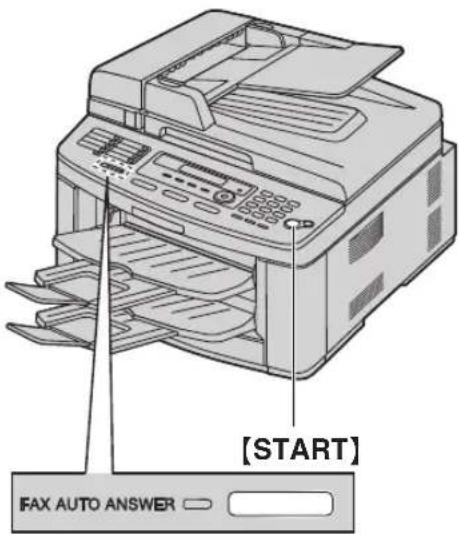
text_image
[START] FAX AUTO ANSWERNote:
- If you do not answer the call within 10 rings, the unit will temporarily switch to fax reception. The other party can then send a fax.
How to receive faxes with an extension telephone
If you have another telephone connected to the [EXT] jack or the same line (extension telephone), you can use the extension telephone to receive faxes.
- When the extension telephone rings, lift the handset of the extension telephone.
- When:
– document reception is required,
- a fax calling tone (slow beep) is heard, or
- no sound is heard,
press [∗] [#] [9] (default fax activation code) firmly.
- Replace the handset.
Note:
- To stop receiving, see page 65.
- To receive fax documents using the extension telephone, make sure remote fax activation is turned ON (feature #434 on page 55) beforehand. The default setting is ON.
How to receive faxes with the optional handset unit
- Lift the handset to answer the call.
- When:
– document reception is required,
- a fax calling tone (slow beep) is heard, or
- no sound is heard,
press [START].
- Replace the handset.
Note:
●To stop receiving, see page 65.
6.8 Using the unit with an answering machine
6.8.1 Setting up the unit and an answering machine
1 Connect the answering machine (①).
- Answering machine is not supplied.
- Remove the stopper (②) if attached.
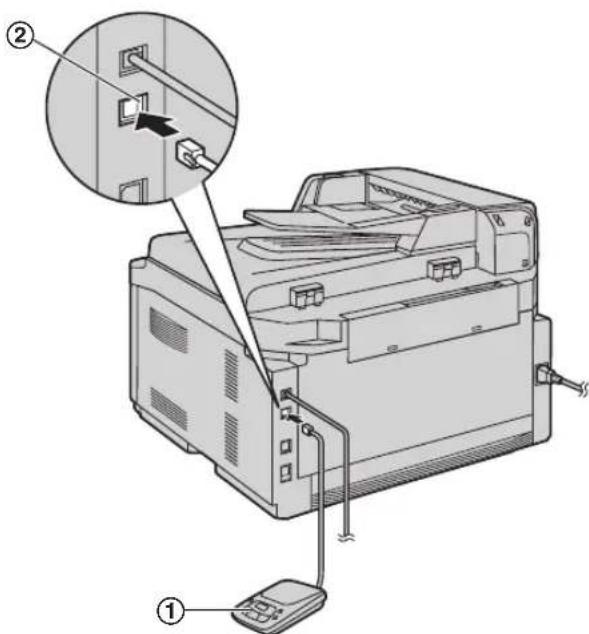
text_image
Diagram of a printer with labeled parts showing internal components and a magnified view of the device's internal structure.2 Set the number of rings on the answering machine to 4 rings or less.
● This will allow the answering machine to answer the call first.
3 Record a greeting message on the answering machine.
- We recommend you record a message up to 10 seconds long, and not to pause for more than 4 seconds during the message. Otherwise, both machines will not function correctly.
4 Activate the answering machine.
5 Set the unit to the desired receiving mode (page 42).
- If you set to FAX ONLY mode, change the ring setting in FAX ONLY mode to "5 EXT. TAM" (feature #210 on page 52).
6 Make sure each of the following are unique:
– the remote access code of the answering machine
– the fax activation code (feature #434 on page 55)
- remote access to Phone Companies Voice Mail (if you subscribed)
Note:
- If the call is a phone call, the answering machine will record voice messages.
If a fax calling tone is detected, the fax machine will receive a fax automatically.
- Regarding the remote access code for the answering machine, see the operating instructions of the answering machine.
Receiving a voice message and fax document in one call
The caller can leave a voice message and send a fax document during the same call. Inform the caller of the following procedure beforehand.
- The caller calls your unit.
●The answering device will answer the call.
-
The caller can leave a message after the greeting message.
-
The caller presses [★][#][9] (pre-selected fax activation code).
●The unit will activate the fax function.
- The caller presses the start button to send a document.
Note:
- To use this feature, make sure remote fax activation is turned ON (feature #434 on page 55). The fax activation code can also be changed.
- If there is no room left in the memory of your answering machine, the unit may not be able to receive documents. See the operating instructions of the answering machine and erase unnecessary messages.
6.9 Junk fax prohibitor (preventing fax reception from undesired callers)
If you subscribe to Caller ID service (page 47), this feature prevents fax reception from calls that do not show caller information.
Additionally, the unit will not accept faxes originating from numbers that match the ones on a programmable junk fax prohibitor list.
Important:
- This feature does not work when manual reception is performed.
6.9.1 Activating the junk fax prohibitor
1 Press [MENU] repeatedly to display "JUNK FAX PROH.". → [▶]
2 Press [▼] or [▲] repeatedly to select "ON". → [SET]
3 Press [STOP] to exit.
6.9.2 Storing undesired callers
You can register up to 20 undesired numbers from the Caller ID list (page 47) if you do not wish to receive faxes from them.
1 Press [MENU] repeatedly to display "JUNK FAX PROH.".
2 Press [▶] repeatedly to display "JUNK LIST SET". → [SET]
3 Press [▼] or [▲] repeatedly to display the party you wish to prevent fax reception from. → [SET]
4 Press [STOP] 2 times to exit.
To display the junk fax prohibitor list
- Press [MENU] repeatedly to display "JUNK FAX PROH."
- Press [▶] repeatedly to display "JUNK LIST DISP.". → [SET]
- Press [▼] or [▲] to display the items on the list.
- Press [STOP] to exit.
To print the junk fax prohibitor list
- Press [MENU] repeatedly to display "JUNK FAX PROH."
- Press [▶] repeatedly to display "JUNK LIST PRINT". → [SET]
- Press [STOP] to exit.
To erase an item from the junk fax prohibitor list
-
Press [MENU] repeatedly to display "JUNK FAX PROH."
-
Press [▶] repeatedly to display "JUNK LIST DISP.". → [SET]
- Press [▼] or [▲] repeatedly to display the desired item. → [◀]
- To cancel erasing, press [STOP], then press [MENU].
- [SET] → [MENU]
6.10 Receiving a fax into your computer
You can receive a fax document on your computer. The received fax document is saved as an image file (TIFF-G4 format).
To receive a fax document using your computer, make sure the following features are set beforehand.
- PC fax reception (feature #442 on page 56)
- Computer setting for the PC fax reception (feature #443 on page 56)
1 Press [FAX AUTO ANSWER] repeatedly to turn the auto answer setting ON (page 42).
2 Start Multi-Function Station. → [PC FAX]
3 When a fax call is received, your computer will receive a document through the unit.
Note:
- You can view, print or transfer the received document using your computer.
Viewing a received document
-
Select [PC FAX] from Multi-Function Station.
-
Select [Received Log] in [Communication Log].
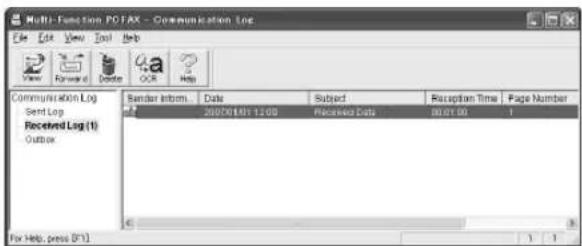
text_image
Multi-Function POTAX - Communication Log File Edit View Tools Help View Forward Delete PCR Help Communication Log Send Log Received Log(1) Outlook Send Inform. Date Subed Reception Time Page Number 200701851 12:00 Received Data 00:01:00 1 For Help, press (F1)-
Click the item you want to view.
-
Click [File] in the menu bar, then select [View], or click [View] icon in the toolbar.
●The received fax will be displayed.
If the unit's memory stores a received fax document. You can load the document into your computer.
-
Select [PC FAX] from Multi-Function Station.
-
Select [Received Log] in [Communication Log].
-
Click [File] in the menu bar. → [Receive a Fax]
- If feature #442 is activated, the received fax document will be automatically transferred to the computer.
7.1 Caller ID service
This unit is compatible with the Caller ID service offered by your local telephone company. To use this unit's Caller ID features, you must subscribe to a Caller ID service.
Make sure the following ring count is set to 2 or more rings beforehand.
- FAX ring count (feature #210 on page 52)
- The name display service may not be available in some areas. For further information, please contact your telephone company.
7.1.1 How Caller ID is displayed
The calling party's name or telephone number will be displayed after the 1st ring. You have the option of whether or not to answer the call.
The unit will automatically store caller information (name, telephone number and date and time of the call) from the 30 most recent calls. It is possible to view caller information one at a time on the display (page 47) or print the entire Caller ID list (page 88).
- When caller information is received and it matches a telephone number stored in the unit's one-touch dial or navigator directory, the stored name will be displayed.
- If the unit is connected to a PBX (Private Branch Exchange) system, caller information may not be received properly. Consult your PBX supplier.
- If the unit cannot receive caller information, the following will be displayed:
"OUT OF AREA": The caller dialed from an area which does not provide Caller ID service.
"PRIVATE CALLER": The caller requested not to send caller information.
"LONG DISTANCE": The caller made a long distance call.
To confirm caller information by printing the Caller ID list
- To print manually, see page 88.
- To print automatically after every 30 new calls, activate feature #216 (page 52).
7.2 Viewing and calling back using caller information
1 [CALLER ID]
2 Press [▼] to search from the recently received caller information.
- If you press [▲], the display order will be reversed.
3 Press [MONITOR] to return the call.
● To make a phone call, lift the handset of the optional handset unit.
- To send a fax using the auto document feeder, set the original and then press [START].
To change the way caller information is displayed Press [CALLER ID] repeatedly after step 2.
![PANASONIC KX-FLB881 - [CALLER ID] - 1](/content/2026/05/795043/images/3c31313d6cd1759169652c5e4439d74fa6599c94be3f262100ea593689778fbc.jpg)
text_image
Example: SAM LEE 11:20AM Jul. 20√ 1-134-567-8901 11:20AM Jul. 20√7.2.1 Symbols and operations for caller information
What "√" means
“√” on the display means the call has already been viewed or answered.
To stop viewing
Press [STOP].
To edit a telephone number before calling back/storing
While displaying a desired caller information, press [★] repeatedly. Each time you press [★], the telephone number will be changed as follows:
① 1 – Area code – Local telephone number (“1” added)
② Local telephone number only (area code omitted)
③ Area code – Local telephone number
④ 1 – Local telephone number (“1” added and area code omitted)
- To store the number in one-touch dial or navigator directory, follow from step 3 of the storing procedure on page 48.
7.3 Erasing caller information
7.3.1 Erasing all caller information
1 Press [MENU] repeatedly to display "CALLER SETUP". → [SET]
- "CALL LIST ERASE" will be displayed.
2 [SET]
- To cancel erasing, press [STOP], then [MENU].
3 [SET] → [STOP]
7.3.2 Erasing specific caller information
1 [CALLER ID]
2 Press [▼] or [▲] repeatedly to display the desired item. → [◀] → [SET] → [STOP]
7.4 Storing caller information
7.4.1 Into the one-touch dial feature and navigator directory
1 [CALLER ID]
2 Press [▼] or [▲] repeatedly to display the desired item.
3 [MENU]
4 Select the station key or navigator directory.
For stations 1–3:
-
Press the desired station key.
-
Press [▼] or [▲] repeatedly to select "DIAL MODE". → [SET] → [SET]
For station 4–7:
Press the station key. → [SET]
For stations 8–14:
Press [LOWER], then press the desired station key. → [SET]
For navigator directory:
Press [◀] or [▶]. → [SET]
5 [SET]
Note:
- To edit a name or number, see page 39.
- If you assign an item to a station key which already contains an item, the previous item will be replaced.
- Station 1 to 3 can be used alternatively as broadcast keys (page 40).
8.1 Distinctive Ring service
When a call is made to one of your phone numbers, the telephone company sends a ring pattern to your telephone line to indicate which number the call is intended for. By setting up this unit for Distinctive Ring, you can make the unit automatically start fax reception when a call comes to the fax number.
To use this service, you must subscribe to the Distinctive Ring service offered by your local telephone company. Consult your local telephone company for availability.
8.2 Using two or more phone numbers on a single telephone line
8.2.1 Activating the Distinctive Ring feature
1 [MENU] → [#] → [4][3][0]
2 Press [1] to select "ON".
- press [0] to select "OFF".
3 [SET] → [MENU]
Note:
●While the Distinctive Ring feature is activated, you cannot change the receiving mode.
How phone calls and faxes are received
If the incoming call is for the fax number, the unit will ring with the assigned ring pattern and automatically start fax reception.
If the incoming call is for the phone number, the unit will keep on ringing.
- If an external telephone answering machine is connected, set the ring count of the answering machine to more than 2.
8.3 Using three or more phone numbers on a single telephone line
You may wish to use three or more phone numbers for a single telephone line. In order to distinguish which number the call was addressed to, a different ring pattern must be assigned for each number.
Example: Using three phone numbers
| Telephone number | Ring pattern Use | |
| 012 1234 Standard | ring Personal | |
| 012 5678 Double | ring Business | |
| 012 9876 Triple | ring Fax |
To use one phone number for the fax, program the ring pattern assigned for the fax (feature #431 on page 49). In the example, the ring pattern assigned for fax is a triple ring, so you should program "C" (triple ring).
| Ring pattern Selection | |
| Standard ring (one long ring)1st ring 2nd ring | [1] “A” |
| Double ring (two short rings)1st ring 2nd ring | [2] “B” |
| Triple ring (short-long-short rings)1st ring 2nd ring | [3] “C” |
| Other triple ring (short-short-long rings)1st ring 2nd ring | [4] “D” |
Note:
- The default setting is [5] “B-D”. The fax will respond to all calls with ring tone patterns “B”, “C” and “D”.
8.4 Programming the ring pattern assigned for fax
1 Set feature #430 to "ON" (page 49).
2 [MENU] → [#] → [4][3][1]
3 Press [1] to [5] to select the ring pattern assigned for fax. → [SET] → [MENU]
9.1 Programming
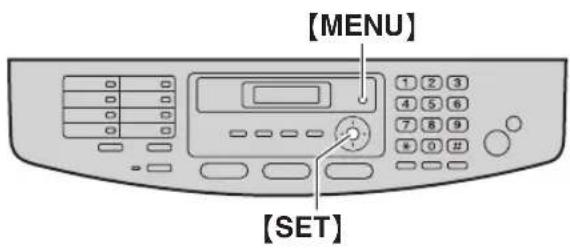
text_image
[MENU] [SET]1 [MENU]
2 Press【】and the 3-digit code (page 51 to page 62).
3 Press the desired selection to display the desired setting.
● This step may be slightly different depending on the feature.
4 [SET]
5 Press [MENU] to exit.
To select features using the web browser (LAN connection only)
You can change features using the web browser instead of the unit.
- Start Multi-Function Station. → [Utilities] → [Configuration Web Page]
- You can also access the unit by entering its IP address on the web browser.
- Select the desired category from the menu bar.
[Device Configuration]: features of the unit [Network Configuration]: features of the network
-
Type "root" as the user name, then enter the password (feature #155 on page 52). → [OK]
-
Select the desired feature tab at the top of the right frame.
-
Change the settings or edit information.
● This step may be slightly different depending on the feature.
6. [Submit]
●The new data will be transferred to the unit.
- Close the web browser.
Note:
- The settings displayed in the web browser will be updated by clicking [Reload].
9.2 Basic features
| Feature/Code Selection | |
| Setting the quick setup[♯][1][0][0] | You can print out the quick fax setup guide and select the desired receiving mode depending on your situation.[1] “FAX ONLY” (default): Use only as a fax (page 42).[2] “DIST. RING”: With the Distinctive Ring service (page 49).[3] “EXT. TAM”: With an external telephone answering machine (page 44).[4] “TEL ONLY”: Mostly phone calls (page 43).1. [MENU] → [♯][1][0][0]2. [SET]3. Press [SET] again to print the quick fax setup guide.• If you do not wish to print it, press [STOP].4. Press [1] to [4] to display the desired setting.5. [SET] → [MENU] |
| Setting the date and time[♯][1][0][1] | Enter the date and time using the dial keypad. See page 19 for details. |
| Setting your logo[♯][1][0][2] | Enter your logo using the dial keypad. See page 20 for details. |
| Setting your fax number[♯][1][0][3] | Enter your fax number using the dial keypad. See page 20 for details. |
| Selecting the language[♯][1][1][0] | The display and reports will be in the selected language.[1] “ENGLISH” (default): English is used.[2] “SPANISH”: Spanish is used.1. [MENU] → [♯][1][1][0]2. Press [1] or [2] to select the desired language. → [SET] → [MENU] |
| Setting the dialing mode[♯][1][2][0] | [1] “PULSE”[2] “TONE” (default)See page 16 for details. |
| Setting flash time[♯][1][2][1] | The flash time depends on your telephone exchange or host PBX.[0] “900ms”[1] “700ms” (default)[2] “600ms”[3] “400ms”[4] “300ms”[5] “250ms”[6] “200ms”[7] “160ms”[8] “110ms”[9] “100ms”[∗] “90ms”[♯] “80ms”Note:•If the unit is connected via a PBX, PBX functions (transferring a call, etc.) might not work correctly. Consult your PBX supplier for the correct setting. |
| Changing the LCD display contrast[♯][1][4][5] | [1] “NORMAL” (default)[2] “DARKER” |
| Changing the password for feature programming via remote operation [#][1][5][5] | 1. [MENU] → [#][1][5][5] → [SET]2. Enter the current password. → [SET]● The default password is “1234”.3. Enter a new 4-digit password using 0–9. → [SET]4. Enter the new password again. → [SET] → [MENU]Note:● If you forget your current password, “0101” can always be entered in step 2 to continue changing the password.● This password is also used for feature programming via web browser. |
| Setting the ringer pattern [#][1][6][1] | [1] “A” (default)[2] “B”[3] “C” |
| Changing the ring count in FAX ONLY mode [#][2][1][0] | [1] “1”[2] “2”[3] “3” (default)[4] “4”[5] “5 EXT. TAM” (External Telephone Answering Machine) |
| Setting the Caller ID list to print automatically [#][2][1][6] | [0] “OFF” (default): The unit will not print the Caller ID list, but will keep records of the information for the last 30 callers.[1] “ON”: The unit will print the Caller ID list automatically after every 30 new calls (page 47). |
| Setting the time adjustment [#][2][2][6] | Using this feature, the unit’s date and time setting will be automatically adjusted when caller information is received.[1] “AUTO” (default): The date and time setting will be automatically adjusted.[2] “MANUAL”: Deactivates this features. |
| Setting the recording paper size in the paper input tray [#][3][8][0] | [1] “LETTER” (default): Letter size paper[2] “A4”: A4 size paper[3] “LEGAL”: Legal size paper |
| Setting the waiting time for the power save mode [#][4][0][3] | To set the length of time before the unit enters the power save mode.[1] “5min”: 5 minutes[2] “15min” (default): 15 minutes[3] “30min”: 30 minutes[4] “1h”: 1 hourNote:● During the power save mode, the unit needs to preheat the fuser unit before printing. |
| Holding the previous contrast setting [#][4][6][2] | [0] “DISABLED” (default): Deactivates this feature.[1] “ENABLED”: The unit will hold the previous setting.Note:● The previous setting will be held individually for copying and sending faxes. |
| Setting the default operation mode [#][4][6][3] | To select the default operation mode when the selected time of the mode timer (feature #464) passes.[1] “COPY” (default): Copy mode is selected as default.[2] “FAX”: Fax mode is selected as default.Note:● You cannot select the scan mode using this feature. |
| Setting the default operation mode timer[1][4][6][4] | To set the timer before returning to the default operation mode (feature #463).[0] “OFF”: Deactivates this feature.[1] “30s”: 30 seconds[2] “1min” (default): 1 minute[3] “2min”: 2 minutes[4] “5min”: 5 minutes |
| Setting toner save feature[1][4][8][2] | [0] “OFF” (default): Deactivates this feature.[1] “ON”: The toner cartridge will last longer.Note:●This feature may lower the print quality by reducing toner consumption. |
9.3 Fax features
| Feature/Code Selection | |
| Printing a confirmation report【#】【4】【0】【1】 | [0] “OFF”: Confirmation reports will not be printed.【1”“ON”: A confirmation report will be printed after every fax transmission.【2”“ERROR” (default): A confirmation report will be printed only when fax transmission fails. |
| Setting the journal report to print automatically【#】【4】【0】【2】 | [0] “OFF”: The unit will not print a journal report, but will keep a record of the last 30 fax transmissions and receptions.【1”“ON” (default): The unit will print a journal report automatically after every 30 new fax transmissions and receptions (page 38). |
| Sending documents overseas【#】【4】【1】【1】 | If you cannot send a fax overseas even if the number is correct and the line is connected, activate this feature before sending the fax.This feature improves the reliability by reducing the transmission speed.【0”“OFF”: Deactivates this feature.【1”“NEXT FAX”: This setting is effective only for the next attempted fax transmission. After transmission, the unit will return to the previous setting.【2”“ERROR” (default): When the previous fax transmission fails and you wish to re-send the document.Note:●This feature is not available for broadcast transmission.●Calling charges may be higher than usual. |
| Sending a fax at a specific time【#】【4】【1】【2】 | This feature allows you to take advantage of low-cost calling hours offered by your telephone company. This feature can be set up to 24 hours in advance of the desired time.【0”“OFF” (default)【1”“ON”To send a document:If the [FAX] light is OFF, turn it ON by pressing [FAX].Set the original (page 17).If necessary, change to the desired resolution (page 37) and the desired contrast (page 37).【MENU】→【#】【4】【1】【2】Press [1] to select “ON”. →【SET】Enter the fax number.To enter an item using one-touch dial feature and navigator directory, see step 3 on “6.3.1 Using the scanner glass”, page 39. (When using navigator directory, you do not have to press [DIRECTORY] before pressing [▼] or [▲].)7. [SET]Enter the transmission start time.Press [★] repeatedly to select “AM” or “PM”.When using the scanner glass, press [SET]. →【START】When using the auto document feeder, press [SET].The document will be fed into the unit and scanned into memory. The unit will then send the data at the specified time.Note:To cancel after programming, press [STOP] while the unit is idle, and then press [SET]. |
| Setting the Error Correction Mode (ECM)【#】【4】【1】【3】 | This feature is available when the sending / receiving fax machines are ECM compatible.【0】“OFF”: Deactivates this feature.【1】“ON” (default): If there is an error during fax transmission / reception, the unit will support the communication. |
| Setting the connecting tone【#】【4】【1】【6】 | If you often have trouble when sending faxes, this feature allows you to hear connecting tones: fax tone, ring back tone and busy tone. You can use these tones to confirm the status of the other party's machine.【0】“OFF”: Deactivates this feature.【1】“ON” (default): You will hear connecting tones.Note:●If the ring back tone continues, the other party's machine may not be a fax machine or may have run out of paper. Check with the other party.●The connecting tone volume cannot be adjusted. |
| Activating the Distinctive Ring feature【#】【4】【3】【0】 | 【0】“OFF” (default)【1】“ON”See page 49 for details. |
| Setting the ring pattern for fax (Distinctive Ring feature)【#】【4】【3】【1】 | 【1】“A”【2】“B”【3】“C”【4】“D”【5】“B-D” (default)See page 49 for details. |
| Setting auto reduction feature【#】【4】【3】【2】 | To receive a fax document that is longer than your recording paper.【0】“OFF”: The unit will print the original size.【1】“ON” (default): The unit will fit received documents onto your recording paper. |
| Changing the fax activation code【#】【4】【3】【4】 | If you wish to use an extension telephone to receive faxes, activate this feature and program the activation code.Important:●The fax activation code must be different from the code that you programmed on the answering machine.【0】“OFF”【1】“ON” (default)1. 【MENU】→【#】【4】【3】【4】2. Press【1】to select “ON”. →【SET】3. Enter your code from 2 to 4 digits, using 0–9,【*】and【#】.●The default code is “*#9”.●Do not enter “0000”.4.【SET】→【MENU】 |
| Setting the memory reception alert【#】【4】【3】【7】 | To alert you with a beeping sound when a received fax document is stored into memory due to some existing problem.【0】“OFF”: Deactivates this feature.【1】“ON” (default): You will hear a beeping sound.Note:●The slow beeps will continue until you solve the printing problem and make sure the unit is supplied with enough paper to print the stored document. |
| Setting friendly reception【#】【4】【3】【8】 | To receive a fax automatically when you answer a call and hear a fax calling tone (slow beep).【0】“OFF”: You have to press【START】for fax reception.【1】“ON” (default): You do not have to press【START】for fax reception. |
| Setting the output tray to use for faxing【#】【4】【4】【1】 | You can select the output tray that will be used for printing received faxes.【1】“#1”: Upper output tray (Up to approx. 100 sheets)【2】“#2” (default): Lower output tray (Up to approx. 50 sheets)Note:● Lists or reports printed by pressing【HELP】(page 18) or【MENU】(page 88) will be stacked on the upper output tray. |
| Receiving a fax into the computer【#】【4】【4】【2】 | If you wish to receive a fax into the computer, activate this feature and run [PC FAX] from Multi-Function Station.【0】“OFF” (default): Deactivates this feature.【1】“ALWAYS”: If the unit recognizes the connection to the computer, it will transfer a received document to the computer. If the unit cannot recognize the connection, it will store a received document in the memory once, then transfer the data after recognition of the connection.【2】“CONNECTED”: If the unit recognizes the connection to the computer, it will transfer a received document to the computer. If the unit cannot recognize the connection, it will print out the data. |
| Setting the computer for PC fax reception【#】【4】【4】【3】 | To select the computer that will be used for receiving a fax. See page 21 for details. |
| Resetting fax features to their default settings【#】【4】【5】【9】 | 【0】“NO” (default)【1】“YES”To reset the fax features:1. 【MENU】→【#】【4】【5】【9】2. Press【1】to select “YES”. →【SET】→【SET】→【MENU】Note:●The PC fax reception (feature #443 on page 21) will not be reset. |
9.4 Copy features
| Feature/Code Selection | |
| Changing the default copy resolution【#】【4】【6】【1】 | To change the default resolution setting for copying.【1】“TEXT/PHOTO”: For documents containing both text and photographs.【2】“TEXT” (default): For documents containing only text.【3】“PHOTO”: For documents containing photographs, shaded drawings, etc. |
| Setting the output tray to use for copying【#】【4】【6】【6】 | You can select the output tray that will be used for copying.【1】“#1” (default): Upper output tray (Up to approx. 100 sheets)【2】“#2”: Lower output tray (Up to approx. 50 sheets) |
| Holding the previous page layout setting【#】【4】【6】【7】 | 【0】“DISABLED” (default): Deactivates this feature.【1】“ENABLED”: The unit will hold the previous setting. |
| Holding the previous zoom (enlargement / reduction) setting【#】【4】【6】【8】 | 【0】“DISABLED” (default): Deactivates this feature.【1】“ENABLED”: The unit will hold the previous setting. |
| Holding the previous collate setting【#】【4】【6】【9】 | 【0】“DISABLED” (default): Deactivates this feature.【1】“ENABLED”: The unit will hold the previous setting. |
9.5 PC print features
| Feature/Code Selection | |
| Setting the input tray in PCL®[#][7][6][0] | You can select the input tray that will be used in PCL printing.[1] “#1” (default): Paper input tray[2] “#2”: Manual input tray |
| Setting the output tray in PCL[#][7][6][1] | You can select the output tray that will be used in PCL printing.[1] “#1” (default): Upper output tray (Up to approx. 100 sheets)[2] “#2”: Lower output tray (Up to approx. 50 sheets) |
| Setting the number of copies in PCL[#][7][6][2] | 1. [MENU] → [#][7][6][2] → [SET]2. Enter the number of copies from “001” to “999”, using the dial keypad.The default setting is “001”.3. [SET] → [MENU] |
| Setting the recording paper size in PCL[#][7][6][3] | [1] “LETTER” (default): Letter size paper[2] “A4”: A4 size paper[3] “LEGAL”: Legal size paper |
| Setting the image reduction feature in PCL[#][7][6][4] | [0] “OFF”: Deactivates this feature.[1] “ON” (default): The document resolution will be automatically reduced when the data size is too large to print.Note:This feature may lower the print quality by reducing the resolution. |
| Setting the recording paper direction in PCL[#][7][6][5] | [1] “PORTRAIT” (default): The document will be printed in portrait direction.[2] “LANDSCAPE”: The document will be printed in landscape direction. |
| Setting the A4 wide feature in PCL[#][7][6][6] | You can change the margin and printable area of A4 size recording paper so that 80 characters in 10 cpi font may be printed on a line.[0] “OFF” (default): Deactivates this feature.[1] “ON”: The margin and printable area of A4 recording paper will be changed. |
| Setting the line per page in PCL[#][7][6][7] | To set the number of lines per page in PCL printing.[1] [MENU] → [#][7][6][7] → [SET]2. Enter the number of lines per page from “005” to “128”, using the dial keypad.The default setting depends on the recording paper size (feature #763) and the recording paper direction (feature #765).3. [SET] → [MENU] |
| Setting the font source in PCL[#][7][6][8] | This feature is available when the download font is registered to the unit.[1] “RESIDENT” (default): The document will be printed using resident font.[2] “DOWNLOAD FONT”: The document will be printed using download font. |
| Setting the font number in PCL[#][7][6][9] | To set the font number to be used in PCL printing. The unit assigns a number to each font.[1] [MENU] → [#][7][6][9] → [SET]2. Enter the font number from “000” to “054”, using the dial keypad.The default setting is “000”.3. [SET] → [MENU]Note:If feature #768 is set to “DOWNLOAD FONT”, the default setting is “001”.To print the font list, see page 88. |
| Setting the font pitch/point in PCL[‡][7][7][0] | To set the font pitch/point to be used in PCL printing.1. [MENU] → [‡][7][7][0] → [SET]2. Enter the font pitch from “00 . 44” to “99 . 99”, or the point from “004 . 00” to “999 . 75”, using the dial keypad.The default pitch is “10 . 00” and the default point is “012 . 00”.3. [SET] → [MENU] |
| Setting the symbol set in PCL[‡][7][7][1] | To set the symbol set to be used in PCL printing.1. [MENU] → [‡][7][7][1]2. Press [▼] or [▲] repeatedly to display the desired symbol set. → [SET]→ [MENU] |
| Setting the line breaks in PCL[‡][7][7][2] | To set each behavior when receiving CR, LF, and FF codes.【1】“CR/LF/FF” (default): CR=CR, LF=LF, FF=FF【2】“CR+LF/LF/FF”: CR=CR+LF, LF=LF, FF=FF【3】“CR/CR+LF/CR+FF”: CR=CR, LF=CR+LF, FF=CR+FF |
| Setting the waiting time for auto continue mode[‡][7][7][3] | To set the length of time before the unit recovers if memory overflow occurs.【1】“OFF” (default): Deactivates this feature.【2】“20s”: 20 seconds【3】“30s”: 30 seconds【4】“60s”: 60 seconds【5】“90s”: 90 seconds【6】“120s”: 120 seconds |
| Changing the data timeout setting[‡][7][7][4] | The unit will automatically print the remaining data in memory when the computer does not send data to the unit during the set time.1. [MENU] → [‡][7][7][4] → [SET]2. Enter the desired data timeout setting from “005” seconds to “600” seconds, using the dial keypad.The default setting is “060” seconds.3. [SET] → [MENU] |
9.6 Scan features
| Feature/Code Selection | |
| Setting the scan mode for Push Scan【#】【4】【9】【3】 | [1] “VIEWER” (default): The scanned image will be displayed in the [Multi-Function Viewer] window.[2] “FILE”: The scanned image will be saved as a file.[3] “E-MAIL”: The scanned image will be saved for e-mail attachment.[4] “OCR”: The scanned image will be displayed in the OCR window. |
| Holding the previous scanning parameter for Push Scan【#】【4】【9】【4】 | [0] “DISABLED” (default): Deactivates this feature.[1] “ENABLED”: The unit will hold the previous scan settings for each mode of push scan; scan type, resolution, file format, brightness, contrast, scan size. |
| SMTP setting for scan to e-mail (via e-mail server) (LAN connection only) | This feature can be programmed only by the web browser (page 63). |
| Registering the scan to e-mail destinations (via e-mail server) (LAN connection only)●This feature can be programmed only by the web browser. | When you send scanned files via e-mail server, you can register e-mail destinations (up to 30 destinations) to the unit using the web browser in advance.1. Start Multi-Function Station.2. [Utilities] → [Configuration Web Page] → [Device Configuration]3. Type “root” as the user name, then enter the password (feature #155 on page 52). → [OK]4. Select the [SCAN FEATURE] tab.5. Click [Edit] next to [SCAN TO E-MAIL].6. Click [Edit] next to the desired scan to e-mail user.7. Enter name and e-mail address, and then select the station key number from the drop-down list if necessary. → [Submit]8. Close the web browser. |
9.7 LAN features
| Feature/Code Selection | |
| LAN setting with a DHCP server【#】【5】【0】【0】 | [0] “DISABLED”: Deactivates this feature.【1】“ENABLED” (default): The following will be allocated automatically using a DHCP (Dynamic Host Configuration Protocol) server.- IP address- Subnet mask- Default gateway |
| Setting the IP address for the LAN connection【#】【5】【0】【1】 | This feature is available when feature #500 is deactivated.1. [MENU] → 【#】【5】【0】【1] → [SET]2. Enter the IP address of the unit on the LAN using the dial keypad. → [SET] → [MENU] |
| Setting the Subnet mask for the LAN connection【#】【5】【0】【2】 | This feature is available when feature #500 is deactivated.1. [MENU] → 【#】【5】【0】【2] → [SET]2. Enter the subnet mask of the network on the LAN using the dial keypad. → [SET] → [MENU] |
| Setting the default gateway for the LAN connection【#】【5】【0】【3】 | This feature is available when feature #500 is deactivated.1. [MENU] → 【#】【5】【0】【3] → [SET]2. Enter the default gateway of the network on the LAN using the dial keypad. → [SET] → [MENU] |
| Setting the primary DNS server for the LAN connection【#】【5】【0】【4】 | This feature is available when feature #500 is deactivated.1. [MENU] → 【#】【5】【0】【4] → [SET]2. Enter the primary DNS server of the network on the LAN using the dial keypad. → [SET] → [MENU] |
| Setting the secondary DNS server for the LAN connection【#】【5】【0】【5】 | This feature is available when feature #500 is deactivated.1. [MENU] → 【#】【5】【0】【5] → [SET]2. Enter the secondary DNS server of the network on the LAN using the dial keypad. → [SET] → [MENU] |
| Setting the machine name【#】【5】【0】【7】 | 1. [MENU] → 【#】【5】【0】【7] → [SET]2. Enter the name of the unit to recognize on the LAN, up to 15 characters (see page 64 for character entry). → [SET] → [MENU]Note:●In order to recognize the unit on the LAN, the default name of the unit is assigned automatically. If you change the name, assign the unique name to avoid overlapping. |
| Displaying the MAC address of the unit【#】【5】【0】【8】 | 1. [MENU] → 【#】【5】【0】【8] → [SET]2. The MAC address of the unit will be displayed. → [MENU] |
| Approving users for the LAN connection【#】【5】【3】【2】 | [0] “DISABLED” (default): Deactivates this feature.【1】“ENABLED”: The unit will deny/approve access from the pre-programmed IP patterns. Whether to deny or approve, and up to 4 patterns can be programmed using the web browser (page 50). |
| Setting the IP address automatically for the LAN connection【#】【5】【3】【3】 | This feature is available when feature #500 is activated.【0】“DISABLED” (default): Deactivates this feature.【1】“ENABLED”: IP address will be allocated automatically without using a DHCP (Dynamic Host Configuration Protocol) server. |
9. Programmable Features
| Feature/Code Selection | |
| Setting HTTPD for the LAN connection【#】【5】【3】【4】 | [0] “DISABLED”: Denies access to the web browser.【1] “ENABLED” (default): Allows access to the web browser. |
9.8 Network features (LAN connection only)
These features can be programmed only by using the web browser.
| Feature TabSelection | ||
| Setting the location where you use this unit | [LAN FEATURE] | Enter the location information of the unit. |
| SMTP setting for scan to e-mail (via e-mail server) | [E-MAIL FEATURE] | Enter the SMTP server information to send scanned image from the unit via e-mail server. Consult your service provider or network administrator for details. |
| Setting the error notify feature | [ERROR NOTIFY] | [ENABLED]: The unit will send an e-mail to registered destinations when the printing problem occurs.[DISABLED] (default): Deactivates this feature. |
| SMTP setting for error notify feature | [ERROR NOTIFY] | Enter the SMTP server information to send an error notify e-mail. |
| Registering destinations for error notify feature | [ERROR NOTIFY] | Enter the e-mail address to which error notify will be sent, and select the type of problems. |
Note:
- See the following sections for details on these related features:
- Change password (feature #155 on page 52)
- DHCP mode (feature #500 on page 61)
- IP address (feature #501 on page 61)
- Subnet mask (feature #502 on page 61)
- Default gateway (feature #503 on page 61)
- DNS server #1 (feature #504 on page 61)
- DNS server #2 (feature # 505 on page 61)
- Machine name (feature #507 on page 61)
- Approved users (feature #532 on page 61)
- Auto IP (feature #533 on page 61)
- HTTPD (feature #534 on page 62)
10.1 Character entry
The dial keypad is used to enter characters and numbers.
- Press [◀] or [▶] to move the cursor.
- Press dial keys to enter characters and numbers.
- Press [STOP] to erase the character or number highlighted by the cursor. Press and hold [STOP] to erase all characters or numbers.
- To enter another character located on the same dial key, press [▶] to move the cursor to the next space, then press the appropriate dial key.
| Keypad Characters | |
| [1]1 . _ - [ | ] { } +/ = , ` : ; ? | |
| [2] | A B C a b c 2 |
| [3] | D E F d e f 3 |
| [4] | G H I g h i 4 |
| [5] | J K L j k l 5 |
| [6] | M N O m n o 6 |
| [7] | P Q R S p q r s 7 |
| [8] | T U V t u v 8 |
| [9]W X Y Z w x y z 9 | |
| [0] | 0 @ ( ) < > ! " #$ % & ¥ * ^ ' → |
| [#] | To switch between uppercase or lowercase letters. |
| [FLASH] | Hyphen |
| [ZOOM] | To insert a space. |
| [STOP] | To delete a character. |
To select characters using [▼] or [▲]
Instead of pressing the dial keys, you can select characters using [▼] or [▲].
- Press [▼] repeatedly to display the desired character. Characters will be displayed in the following order:
① Uppercase letters
② Number
③ Symbol
④ Lowercase letters
- If you press [▲], the order will be reversed.
- Press [▶] to insert the displayed character.
- Return to step 1 to enter the next character.
10.2 Status of the unit
10.2.1 Using Remote Control
You can easily operate the following functions from your computer.
- Programming the features (page 51)
- Storing, editing or erasing items in directories (page 38)
- Storing or erasing items for broadcast transmission (page 40)
- Viewing items in the journal report (page 38)
- Storing the journal report as the computer file
– Viewing items in the Caller ID list (page 47) - Storing caller information into directories (page 48)
- Storing the Caller ID list as the computer file
1 Start Multi-Function Station. → [Remote Control]
- The [Multi-Function Remote Control] window will appear.
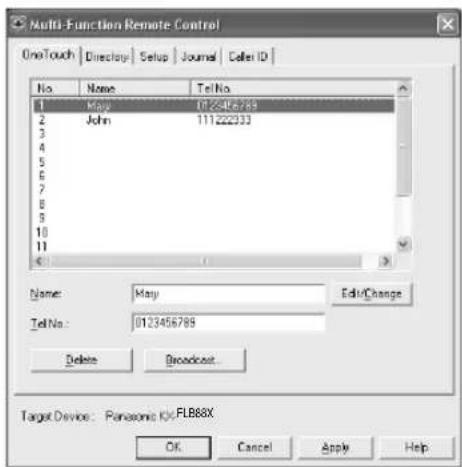
text_image
Multi-Function Remote Control OneTouch | Directory | Setup | Journal | Caller ID | No Name Tel No 1 May 072456789 2 John 111222033 3 4 5 6 7 8 9 10 11 Name: May Edit/Change Tel No: 0123456789 Delete Broadcast... Target Device: Panasonic 0xFLB88X OK Cancel Apply Help2 Select the desired tab.
●The latest data in the unit will be displayed.
3 Perform the desired operation.
- For details about each function, click [Help].
- To stop the operation, click [Cancel].
4 [OK]
- You can also click [Apply] to continue the next operation without closing the window.
5 Enter the password (feature #155 on page 52). → [OK]
- The new data will be transferred to the unit and the window will close.
Note:
- Some of the features cannot be programmed from your computer.
- For details, see the help file by selecting [💡] from Multi-Function Station.
10.2.2 Using Device Monitor
You can confirm the setting information and current status of the unit from your computer.
1 Start Multi-Function Station.
2 [Utilities] → [Device Monitor]
- The [Device Monitor] window will appear.
3 Confirm the status of the unit.
[Status]: Current status of the unit
Note:
- Additional information (toner and recording paper status, unit information, etc.) will be displayed in [Status] tab by clicking [Advanced Information].
●The status of the unit will be updated by clicking [Refresh]. - If a printing error occurs, the Device Monitor will be started automatically and display the error information.
- For details, see the help file by selecting [💡] from Multi-Function Station.
10.2.3 Using the web browser (LAN connection only)
You can confirm the setting information and status of the unit from the web browser.
1 Start Multi-Function Station. → [Utilities] → [Configuration Web Page]
- You can also access the unit by entering its IP address on the web browser.
2 Select the category from the menu bar.
[Status]: Toner and paper information, etc.
[Device]: Current status of the unit, etc.
[Network]: Network information, etc.
- When you select [Device] or [Network], you can change which features are displayed by clicking the feature tabs at the top of the right frame.
3 Confirm the status of the unit.
Note:
- The status of the unit will be updated by clicking [Reload].
10.3 Changing the default output tray
To change the default output tray when printing, proceed as follows.
1 [Start]
2 Open the printer window.
For Windows 98/Windows Me/Windows 2000: [Settings] → [Printers]
For Windows XP Professional: [Printers and Faxes]
For Windows XP Home:
[Control Panel] → [Printers and Other Hardware] → [Printers and Faxes]
For Windows Vista:
[Control Panel] → [Printers]
3 Select the unit's name.
4 Select [Properties] from the [File] or [Organize] menu.
●The printer properties window will appear.
- For Windows 2000, Windows XP and Windows Vista users, click [Printing Preferences...] on the [General] tab.
5 Select the desired output tray on the [Output] tab.
6 [OK]
●The selected output tray will be set as default.
- For details, see the help file by selecting [💡] from Multi-Function Station.
10.4 Canceling the operations
You can cancel the current operation from the unit. You can also select the desired operation to cancel.
1 [STOP]
- "USER STOPPED" is displayed.
- When "USER STOPPED" is not displayed, go to step 2.
2 To cancel printing:
Press [STOP] repeatedly to display "STOP PRINTING?".
To cancel scanning:
Press [STOP] repeatedly to display "STOP SCANNING?".
To cancel copying:
Press [STOP] repeatedly to display "STOP COPYING?".
To cancel sending or receiving faxes:
Press [STOP] repeatedly to display "STOP FAX?".
To cancel broadcast transmission:
Press [STOP] repeatedly to display "BROAD CANCELED?".
To cancel fax redialing:
Press [STOP] repeatedly to display "SEND CANCELED?".
3 [SET]
10.5 Optional handset unit
You can add the optional handset unit. See page 6 for accessory information.
1 Connect the handset cord (①).
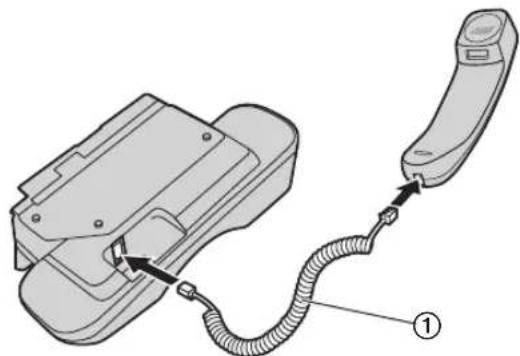
natural_image
Diagram of a telephone handset with cord and connector, no text or symbols present2 Connect the handset connector (②).
- Remove the seal from the handset unit connection jack if attached.
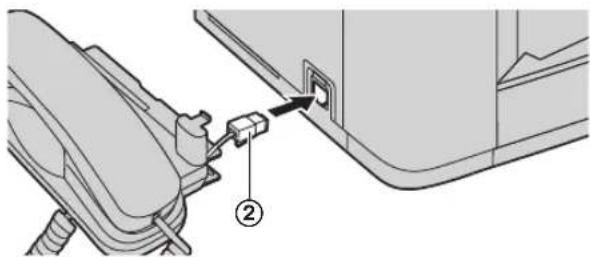
natural_image
Mechanical assembly diagram showing a connector inserted into a housing (no text or symbols present)3 Insert the tab (③) and rib (④).
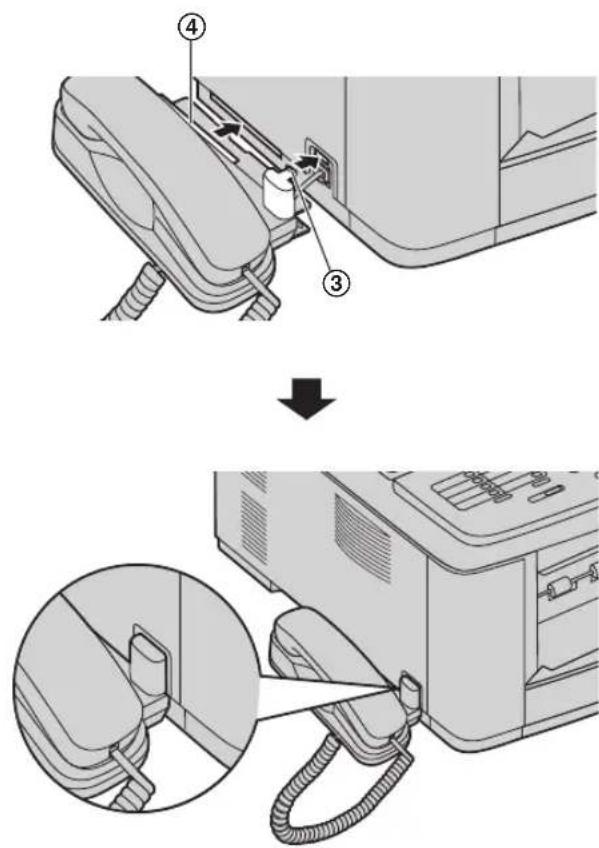
text_image
Diagram illustrating a cable or cable connector assembly process, showing step-by-step insertion and detail view.Caution:
- When moving the unit, be sure to hold by the grip. Do not hold by the handset unit.
Correct Incorrect
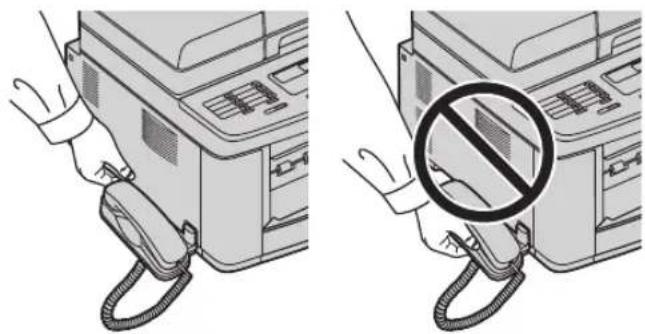
natural_image
Illustration of two hands operating a printer with a no-smoking symbol overlay (no text or symbols present)To remove the handset unit
- Pull the handset unit slightly forward (①), then lift it in the direction of the arrow (②) to remove the rib.
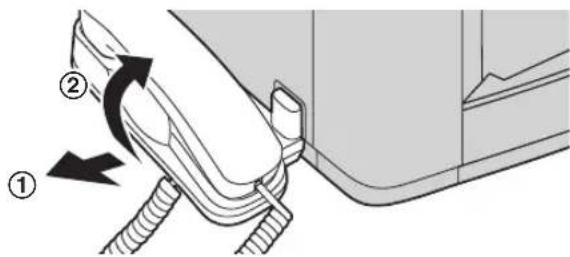
text_image
Diagram showing a mechanical component with numbered parts and directional arrows indicating motion or assembly.- Remove the tab (③), then disconnect the handset connector (④).
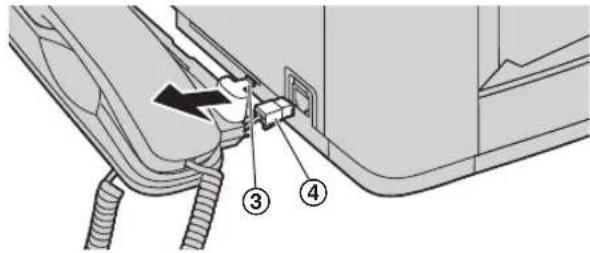
text_image
Diagram showing a mechanical or electrical component with labeled parts ③ and ④, and an arrow indicating direction.11.1 Error messages – Reports
If a problem occurs during fax transmission or reception, one of the following messages will be printed on the confirmation and journal reports (page 38).
| Message Code Cause & Solution | ||
| COMMUNICATION ERROR 40-42 | 46-72FF | ●A transmission or reception error occurred. Try again or check with the other party. |
| 4344 | ●A line problem occurred. Connect the telephone line cord to a different jack and try again.●An overseas transmission error occurred. Try using the overseas mode (feature #411 on page 54). | |
| DOCUMENT JAMMED | ---- | ● Remove the jammed document (page 81). |
| ERROR-NOT YOUR UNIT 53 | 545970 | ●A transmission or reception error occurred because of a problem with the other party's fax machine.Check with the other party. |
| JUNK FAX PROH. REJECT | ---- | ● The junk fax prohibitor feature of this unit rejected fax reception. |
| MEMORY FULL | ---- | ● The memory is full of received documents due to a lack of recording paper or a recording paper jam.Install paper (page 13) or remove the jammed paper (page 78).● If feature #442 is set to “ALWAYS” (page 56), check the connection between the computer and the unit. |
| NO DOCUMENT / FAILED PICKUP | ---- | ● The document was not fed into the unit properly. Re-insert it and try again. |
| OTHER FAX NOT RESPONDING | ---- | ● The other party's fax machine is busy or has run out of recording paper. Try again.●The other party's fax machine rings too many times.Send the fax manually (page 37).●The other party's machine is not a fax machine.Check with the other party.●The number you dialed is not in service. |
| PRESSED THE STOP KEY | ---- | ● [STOP] was pressed and fax communication was canceled. |
| THE COVER WAS OPENED | ---- | ● The top cover was opened. Close it and try again. |
| OK | ---- | ● Fax transmission or reception was successful. |
11.2 Error messages – Display
If the unit detects a problem, one or more of the following messages will appear on the display.
| Display Cause & Solution | |
| “CALL SERVICE” | There is something wrong with the unit. Contact our service personnel. |
| “CARRIAGE ERROR” | There is something wrong with the carriage sensor. Contact our service personnel. |
| “CHANGE DRUM” | There is something wrong with the drum unit. Replace the drum unit and the toner cartridge. |
| “CHECK DOCUMENT” | The document was not fed into the unit properly. Remove the document, then press [STOP] to clear the message. Re-insert the document. If misfeeding occurs frequently, clean the document feeder rollers (page 86) and try again. |
| “CHECK DRUM” | The drum unit is not inserted properly. Re-insert it correctly (page 9). |
| “CHECK PICK UP INPUT TRAY #1” | Recording paper was not fed into the unit properly. Re-insert the recording paper (page 80).Note:“#1”: Paper input tray“#2”: Manual input tray |
| “CLOSE ADF COVER” | The ADF cover is open. Close it. |
| “DIRECTORY FULL” | There is no space to store new items in navigator directory. Erase unnecessary items (page 39). |
| “DRUM LIFE LOW REPLACE SOON” | The drum life is near its end. Replace the drum unit as soon as possible. |
| “FAX IN MEMORY” | The unit has a document in memory. See the other displayed message instructions to print out the document. For fax memory capacity, see page 88.If feature #442 is set to “ALWAYS” (page 56), check the connection between the computer and the unit. |
| “KEEP COPYING” | Copying has stopped due to a lack of recording paper or misfeeding of recording paper. See the other displayed message instructions to continue copying. |
| “LOW TEMP.” | The inside of the unit is extremely cold and cannot be operated. Use the unit in a warmer area. While the unit cannot be operated, the received documents are temporarily stored into the memory, and will be printed out automatically when the unit warms up. |
| “MEMORY FULL” | When performing memory transmission, the document being stored exceeded the memory capacity of the unit. Send the entire document manually.When making a copy, the document being stored exceeded the memory capacity of the unit. Press [STOP] to clear the message. Divide the document into sections. |
| “MODEM ERROR” | There is something wrong with the unit's modem. Contact our service personnel. |
| “NO FAX REPLY” | The other party's fax machine is busy or has run out of recording paper. Try again. |
| “OUT OF PAPER INPUT TRAY #1” | Recording paper is not installed or the input tray has run out of paper. Install paper (page 13, 26).Recording paper is not fed into the unit properly. Reinstall paper (page 13, 26).The paper input tray is not installed or is not inserted completely. Insert the paper input tray into the unit.Note:“#1”: Paper input tray“#2”: Manual input tray |
| “PAPER JAMMED”“OPEN TOP COVER” | A recording paper jam occurred. Remove the jammed paper (page 78). |
| “PC FAIL OR BUSY” | The cable or the computer power cord is not connected correctly. Check the connections (page 15, 22).The software is not running on the computer. Restart the software and try again. |
| “PLEASE WAIT” | The unit is warming up. Wait for a while. |
| “REDIAL TIME OUT” | The other party's fax machine is busy or has run out of recording paper. Try again. |
| “REMOVE DOCUMENT” | The document is jammed. Remove the jammed document (page 81).Attempted to send or copy a document longer than 600 mm ( 23^5/8 ) using the auto document feeder. Press [STOP] to remove the document. Divide the document into two or more sheets and try again. |
| “REMOVE PAPER IN INPUT TRAY #2” | The recording paper is installed in the manual input tray when trying to copy, receive faxes or print reports. Remove the recording paper from the manual input tray. |
| “REPLACE DRUM CHANGE SUPPLIES” | The drum unit's service life is finished. Replace the drum unit immediately. |
| “RX MEMORY FULL” | The memory is full of received documents due to a lack of recording paper or a recording paper jam. Install paper (page 13) or remove the jammed paper (page 78).If feature #442 is set to “ALWAYS” (page 56), check the connection between the computer and the unit. |
| “TONER EMPTY”“CHANGE SUPPLIES” | The toner's service life is finished. Replace the toner cartridge immediately. |
| “TONER LOW”“CHANGE SUPPLIES” | The toner's service life is near its end. Replace the toner cartridge as soon as possible. |
| “TOP COVER OPEN” | The top cover is open. Close it. |
| “TRANSMIT ERROR” | A transmission error occurred. Try again. |
| “WARMING UP” | The inside of the unit is cold. Let the unit warm up. Wait for a while. |
| “WRONG PAPER” | The fax message was printed on paper which is shorter than letter size paper. Use appropriate size paper (page 89). |
11.3 When a function does not work
11.3.1 General
| Problem Cause & Solution | |
| The unit does not work. | Check the connections (page 15, 22). |
| The output tray becomes full quickly or the recording paper does not stack properly on the output tray. | High humidity may cause the recording paper to curl. Try turning the paper over and re-inserting it. If the curl on the paper is heavy, please remove it from the output tray. If you still have this problem, contact our service personnel. |
| I cannot adjust volumes or display items stored in one-touch dial and navigator directory. | The unit is set to the scan mode or copy mode. Press [FAX] to switch modes. If you still have this problem, contact our service personnel. |
| A printing error is displayed while using PC FAX and Remote Control. | This is because the printer driver is used for PC FAX and Remote Control. The transmission error will be displayed as the printing error. |
| Multi-Function Station does not work properly. | If you connect the USB cable to USB hub, connect it to the USB port of your computer directly.Make sure you have installed the latest Service Pack available for the version of Windows installed on your computer. See the Microsoft web site for details.If you have any other multifunction softwares installed on your computer, uninstall them.Check that your computer has enough memory and hard disk space. If your computer warns of insufficient memory, close other applications. If there is not enough space on the hard disk, delete unnecessary files.Uninstall Multi-Function Station once, and re-install it. |
| I cannot install or uninstall Multi-Function Station. | Some of the files needed to install or uninstall Multi-Function Station may be corrupted. Use the MfsCleaner utility (found on the supplied CD-ROM) to solve the problem.Insert the supplied CD-ROM into your CD-ROM drive.The setup program will start automatically.[Tools] → [Cleanup Tool]The [MfsCleaner] window will appear.Click [Clean], then click [Yes] to restart the computer.Note:To install Multi-Function Station again, see page 22. |
| I cannot view the operating instructions using Multi-Function Station. | Install the operating instructions to your computer beforehand (page 23). |
| I cannot find the unit in the [Target Device] or [Device Select] dialog box when operating the following functions.- Scanning- Remote Control- PC FAX- Device Monitor | The printer driver has not been installed. Install it on your computer (page 22). |
11.3.2 Printing problems
| Problem Cause & Solution | |
The printing quality is poor.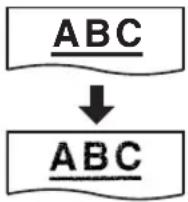 | Some paper has instructions recommending which side to print on. Try turning the recording paper over.You may have used paper with a cotton and/or fiber content that is over 20%, such as letterhead or resume paper.The recording paper is too damp. Use new paper.The remaining toner is low. Replace the toner cartridge.To check the drum life and quality, please print the printer test list (page 88). If printing quality is still poor, replace the toner cartridge and drum unit.The toner save mode of feature #482 is ON (page 53). |
| A blank sheet is ejected. | You placed the document facing the wrong way when using the copier.The other party placed the document in their fax machine the wrong way. Check with the other party. |
| Black lines, white lines or smudges appear on the printed documents. | The glass or rollers are dirty with correction fluid, etc. Clean them (page 83, 86). Please do not insert a document before correction fluid has dried completely. |
| Colored text is printed in black instead of grayscale when printing from Microsoft PowerPoint or other applications. | Select [Color] or remove the check next to [Grayscale] in the print dialog so that colored text will be printed in grayscale. |
| I cannot find the PCL driver. | The PCL driver can be found in the following folder on the supplied CD-ROM."D:Drivers\Printer\2kXp\PCL" (where "D" is the drive letter of your CD-ROM drive)For more details, refer to:http://panasonic.co.jp/pcc/cs/en/telecom/mfp-faq.htm |
11.3.3 Scanner
| Problem Cause & Solution | |
| I cannot scan. | When scanning at a high resolution, a large amount of available memory is required. If your computer warns of insufficient memory, close other applications and try again.The unit is in use. Try again later.There is not enough space on the hard disk. Delete unnecessary files and try again.Restart the computer, and try again.Check the connection between the computer and the unit (page 15, 22).You attempted to scan a document longer than the paper size which you set. Change the setting or divide the document into the appropriate paper size, and try again. |
| The document is not fed into the unit when using the unit as a scanner. | Remove the document in the auto document feeder and re-insert it. |
| Even after clicking [Cancel], scanning continues. | Please wait. It may take a while for the cancel request to be accepted. |
| The name of the desired computer will not be displayed on the unit when scanning documents from the unit (LAN connection only). | ●The printer driver has not been installed. Install it on your computer (page 22).●The PC name list up feature has been set to [Off]. Set to [On] in the [Settings] (page 24).●The maximum number of computers on the LAN is connected to the unit (up to 30 computers). Set the PC name list up feature to [Off] on the other computers (page 24).●The IP address of the unit may have changed. To detect the IP address, proceed as follows.[Start] → [All Programs] or [Programs] → [Panasonic] → the unit's name → [IP Address Checker].●The IP address for the unit will be detected. |
11.3.4 Copier
| Problem Cause & Solution | |
| The unit will not make a copy. | You cannot make a copy during programming. Make the copy after programming.The document was not fed into the unit properly. Re-insert the document.Recording paper is not installed or the unit has run out of paper. Install paper (page 13).Recording paper is installed in the manual input tray. Remove the recording paper from the manual input tray. |
| Letters on the copied documents are not clear. | The original document is too dark or too light. Change the contrast setting by pressing [QUALITY], then [▼] or [▲], and try again. |
| The copied documents are too dark and cannot be read. | You used a colored paper as a document. Change the contrast (page 32) and make a lighter copy of the document, using “TEXT” resolution (page 32). |
11.3.5 Fax
| Problem Cause & Solution | |
| I cannot send documents. | The telephone line cord is connected to the [EXT] jack on the unit. Connect to the [LINE] jack (page 15).The other party's fax machine is busy or has run out of recording paper. Try again.The other party's machine is not a fax machine. Check with the other party.The other party's fax machine failed to answer the fax automatically. Send the fax manually (page 37). |
| I cannot send a fax overseas. | Use the overseas transmission mode (feature #411 on page 54).Add two pauses at the end of the telephone number or dial manually. |
| The other party complains that letters on their received document are distorted. | If your line has special telephone services such as call waiting, the service may have been activated during fax transmission. Connect the unit to a line that does not have these services.Another telephone on the same line is off the hook. Hang up the extension telephone and try again. |
| The other party complains about the quality of their received documents. | Try copying the document. If the copied image is clear, there may be something wrong with the other party's machine.If the copied image is not clear, too dark, black and white lines or smudges appear, refer to “11.3.2 Printing problems”, page 71.The original document is too dark or too light. Change the contrast setting by pressing [CONTRAST], then [▼] or [▲], and try again. |
| The other party complains that received documents are too dark and cannot be read. | You used a colored paper as a document. Change the contrast (page 32) and make a lighter copy of the document, using “TEXT” resolution (page 32), and try again. |
| I cannot receive documents. | You may have subscribed to a voice mail service due to service packs offered by your telephone company. Fax reception may not be possible when voice mail is activated so we recommend you to: - contact your telephone company and request to deactivate voice mail service, or - subscribe to a Distinctive Ring service (page 49).The telephone line cord is connected to the [EXT] jack on the unit. Connect to the [LINE] jack (page 15).Feature #442 is activated and the received fax documents are automatically transferred to the computer. View the received documents using the computer (page 46).Recording paper is installed in the manual input tray. Remove the recording paper from the manual input tray. |
| I cannot receive documents automatically. | The receiving mode is set to TEL mode. Set to FAX ONLY mode. Press [FAX AUTO ANSWER] repeatedly to turn ON the [FAX AUTO ANSWER] indicator.The time taken to answer the call is too long. Decrease the number of rings before the unit answers a call (feature #210 on page 52).Make sure that the Distinctive Ring of feature #430 is set properly (page 49). If you do not subscribe to the Distinctive Ring service offered by your local telephone company, this feature should be OFF. |
| The display shows “CONNECTING . . . .”, but faxes are not received. | The incoming call is not a fax. Set to TEL mode. Press [FAX AUTO ANSWER] repeatedly to turn OFF the [FAX AUTO ANSWER] indicator. |
| The printing quality of the received documents is poor. | If documents can be copied properly, the unit is working normally. The other party may have sent a faint document or there may be something wrong with the other party’s machine. Ask them to send a clearer copy of the document or to check their fax machine.If documents can not be copied properly, refer to “11.3.2 Printing problems”, page 71. |
| The other party complains that they cannot send a document. | The memory is full of received documents due to a lack of recording paper or a recording paper jam. Install paper (page 13) or remove the jammed paper (page 78).If feature #442 is set to “ALWAYS” (page 56), check the connection between the computer and the unit.The unit is not in FAX ONLY mode. Press [FAX AUTO ANSWER] repeatedly to turn ON the [FAX AUTO ANSWER] indicator. |
| I cannot select the desired receiving mode. | If you want to set FAX ONLY mode:- press [FAX AUTO ANSWER] repeatedly to turn ON the [FAX AUTO ANSWER] indicator.If you want to set TEL mode:- press [FAX AUTO ANSWER] repeatedly to turn OFF the [FAX AUTO ANSWER] indicator.The Distinctive Ring of feature #430 is activated (page 49). |
| When an extension telephone is connected, I cannot receive documents by pressing [*][‡][9]. | You must set remote fax activation to ON (feature #434 on page 55) beforehand.Press [*][‡][9] firmly.You may have changed the remote fax activation code from [*][‡][9](default setting). Verify the remote fax activation code (feature #434 on page 55). |
| I cannot hear a dial tone. | The telephone line cord is connected to the [EXT] jack on the unit. Connect to the [LINE] jack (page 15).If you use a splitter/coupler to connect the unit, remove the splitter/coupler and connect the unit to the wall jack directly. If the unit operates properly, check the splitter/coupler.Disconnect the unit from the telephone line and connect a known working telephone. If the working telephone operates properly, contact our service personnel to have the unit repaired. If the working telephone does not operate properly, contact your telephone company.The power cord or telephone line cord is not connected. Check the connections (page 15).If you connected the unit through a computer modem, connect the unit directly to a telephone line jack. |
| I cannot make calls. | The dialing mode setting may be wrong. Change the setting (feature #120 on page 16). |
| The unit does not ring. | The ringer volume is turned OFF. Adjust it (page 19). |
| The other party complains they only hear a fax tone and cannot talk. | FAX ONLY mode is set. Tell the other party the number is only used for faxes.If you use a Distinctive Ring service, make sure you have set the same ring pattern assigned by the telephone company (page 49). |
| The [REDIAL] or [PAUSE] button does not function properly. | If this button is pressed during dialing, a pause will be inserted. If pressed immediately after a dial tone is obtained, the last number dialed will be redialed. |
| The receiving mode does not function properly. | Distinctive Ring is set (feature #430 on page 49). |
| Whenever I try to retrieve my voice mail messages, I am interrupted by the fax tone. | You are probably entering [×][#][9]. This is the default setting for the fax activation code. If you use a voice mail service, turn the fax activation feature OFF or reprogram the activation code (feature #434 on page 55). |
| I cannot receive a fax document on the computer. | Make sure the following features are set beforehand.- PC fax reception (feature #442 on page 56)- Computer setting for the PC fax reception (feature #443 on page 21) |
11.3.6 Network
| Problem Cause & Solution | |||
| I cannot operate the following functions.- PC printing- Scanning- Remote Control- PC FAX- Device Monitor | Confirm the LED via the LAN port of the main board. If the LED is glowing or blinking red, the network access is working correctly.If the LED is not glowing or blinking, confirm the LAN cable (category 5 straight cable) is connected to the LAN port of the main board correctly.If the LED is blinking and you cannot perform the desired operation, the IP address of the unit may have changed.To detect the IP address, proceed as follows.[Start] → [All Programs] or [Programs] → [Panasonic] → the unit's name → [IP Address Checker].The IP address for the unit will be detected.Note:If the IP address cannot be detected, enter it manually (feature #501 on page 61). The IP address of the computer and the unit must be in the same local IP address class as shown below. Set the IP address in the range of the number specified in the class corresponding to your local network scale. | ||
| Class Subnet mask | IP address | ||
| Class A 255.0.0.0 10. | 0.0.1 - | 10.255.255.254 | |
| Class B 255.255.0.0 | 172.xx.0.1 - | 172.xx.255.254^*1 | |
| Class C 255.255.255. | 0 192.168.xx.1 - | 192.168.xx.254^*2 | |
| *1 “xx” should be the same value for the unit and for the computer, as shown in the following example.Example: 172.16.0.1 - 172.16.255.254(The available range of “xx” is 16 - 31)*2 “xx” should be the same value for the unit and for the computer, as shown in the following example.Example: 192.168.0.1 - 192.168.0.254(The available range of “xx” is 0 - 255) | |||
| Your firewall software is blocking the connection. Disable the firewall software or change the firewall settings to make the Multi-Function Station work properly. | |||
| The unit does not appear in the [Select a Network Device] dialog box when installing Multi-Function Station. | Your firewall software is blocking the connection and the setup program may not list any units. Consult your network administrator and temporarily disable the firewall software. | ||
| The [Windows Security Alert] dialog box appears and asks if you want to block [PCCMFLPD] and I cannot operate the following functions after installing the Microsoft Windows XP Service Pack 2.- PC printing- Scanning- Remote Control- PC FAX- Device Monitor | Click [Keep Blocking] and run the Windows Firewall Setting Tool to allow the data transmission for Multi-Function Station (page 76). | ||
11.3.7 Using an answering machine
| Problem Cause & Solution | |
| I cannot receive documents automatically. | ●Your greeting message on the answering machine is too long. Shorten the message. Record a message up to 10 seconds long.●The answering machine rings too many times. Set to 1 or 2 rings. |
| I cannot receive voice messages. | ●Check if the answering machine is turned ON and connected to the unit properly (page 44).●Set the number of rings on the answering machine to 1 or 2. |
| I pressed the remote access code to access the answering machine remotely, but the line was disconnected. | ●The code may include “#” which is used for certain features provided by telephone companies. Change the code on the answering machine to another number which does not include “#”. |
| Callers complain that they cannot send a document. | ●There is no room left in memory of your answering machine to record voice messages. See the operating instructions of the answering machine and erase unnecessary messages.●You set the answering machine to only give a greeting message. |
11.3.8 If a power failure occurs
●The unit will not function.
- If any documents are stored in the memory (i.e. during copy, PC printing, fax transmission or fax reception), they will be lost.
- The unit is not designed for making emergency telephone calls when the power fails. Alternative arrangements should be made for access to emergency services.
●Fax transmission and reception will be interrupted.
- When power is restored, a power down report will be printed out stating which fax items in the memory have been erased.
11.3.9 Firewall setting tool for Microsoft Windows XP Service Pack 2/Windows Vista users (LAN connection only)
After installing Microsoft Windows XP Service Pack 2/Windows Vista, you will not be able to use the following functions because the Windows Firewall feature will be activated and block the connection.
- Device Monitor - LPD Manager (Network communication tool)
The Windows Firewall Setting Tool enables you to change the Windows Firewall security settings and to use the above functions properly.
1 Insert the CD-ROM that is supplied with the unit into your CD-ROM drive.
- [Panasonic Setup] dialog box will appear.
2 [Tools] → [Windows Firewall Setting]
- The [Windows Firewall Setting Tool] window will appear.
3 [Add to the exceptions list] → [OK] → [OK]
To confirm the security settings (For Windows XP users)
- [Start] → [Control Panel] → [Security Center]
- The [Windows Security Center] window will appear.
- [Windows Firewall]
- The [Windows Firewall] dialog box will appear.
-
Click the [Exceptions] tab.
-
Confirm that [Panasonic Trap Monitor Service] and [PCCMFLPD] are displayed and checked on the [Programs and Services] list.
To confirm the security settings (For Windows Vista users)
- [Start] → [Control Panel] → [Security Center]
- The [Windows Security Center] window will appear.
- [Windows Firewall]
- The [Windows Firewall] dialog box will appear.
- [Change Settings]
- The [User Access Control] dialog box will appear.
-
[Continue]
-
Click the [Exceptions] tab.
-
Confirm that [Panasonic Trap Monitor Service], [PCMFSMLM] and [PCCMFLPD] are displayed and checked on the [Program or Port] list.
12.1 Recording paper jam
12.1.1 When the recording paper has jammed inside of the unit
The display will show the following.
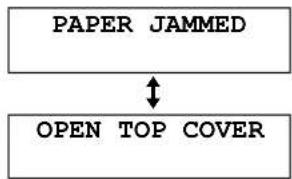
flowchart
graph TD
    A["PAPER JAMMED"] --> B["OPEN TOP COVER"]
Caution:
- Do not pull out the jammed paper forcibly before opening the top cover.
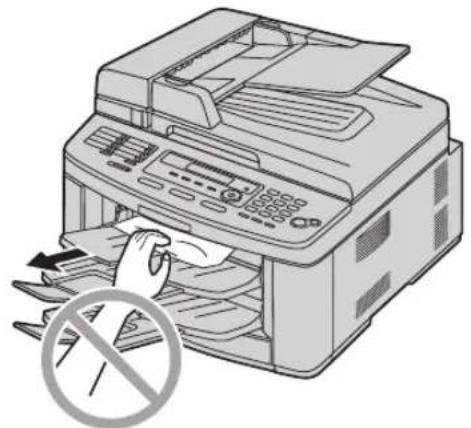
natural_image
Illustration of a printer with a hand inserting paper into the machine, no text or symbols present- To prevent injuries, be careful not to put your hands under the top cover.
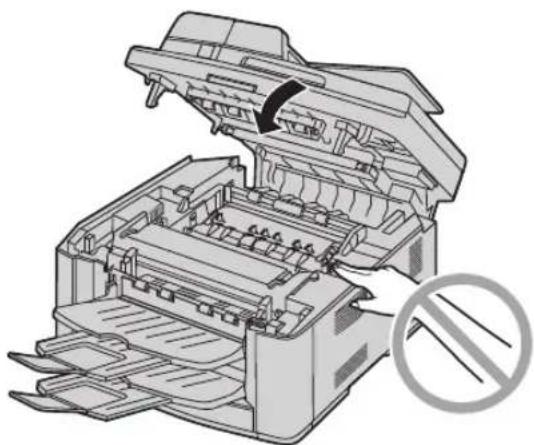
natural_image
Diagram of an open printer with a circular prohibition symbol indicating no text or symbols on the printer itself (no text or symbols present)1 Lift the top cover release lever (①) and open the top cover (②).
Important:
- Close the manual input tray (③) before opening the top cover.
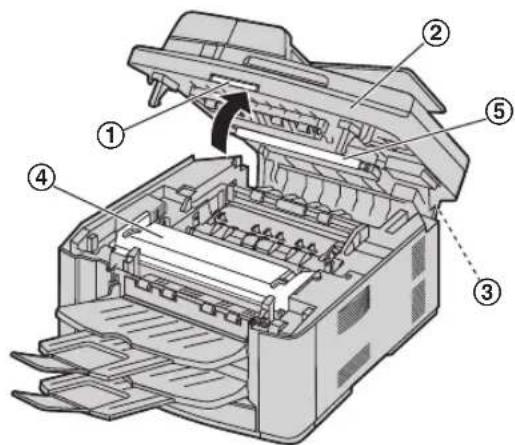
text_image
Technical diagram of an open printer with numbered parts labeled 1 to 5
Caution:
The fuser unit (④) gets hot. Do not touch it.
Note:
- Do not touch the transfer roller (⑤).
2 Remove the jammed paper.
Case 1:
When the recording paper has jammed near the drum and toner unit:
- Pull the paper input tray completely out.
- Remove the jammed paper (①) carefully by pulling it upwards.
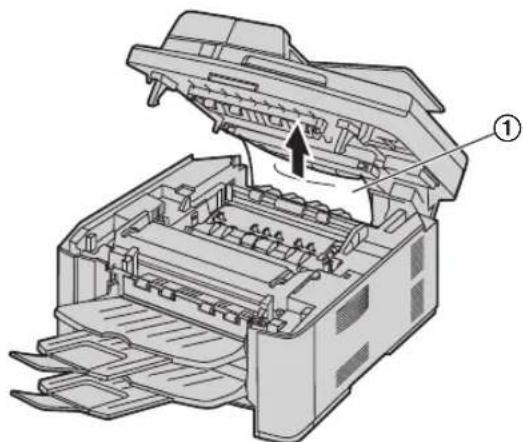
natural_image
Technical illustration of a printer with internal structure and labeled component (no text or symbols)Remove the jammed paper (①) carefully by pulling it toward you.
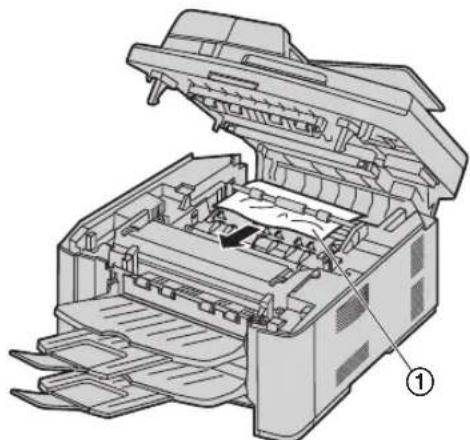
natural_image
Technical illustration of a printer internal structure showing internal components and page number (no text or symbols)- Insert the paper input tray into the unit.
Case 2:
When the recording paper has jammed near the fuser unit:
- Lift both green levers (①) until they stop.
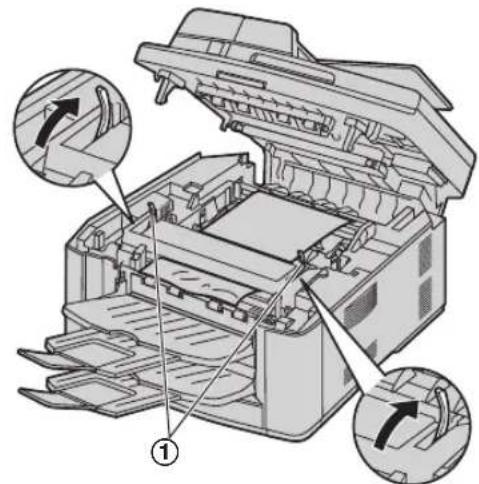
natural_image
Technical illustration of an open printer with internal compartments and labeled parts (no text or symbols present)- Remove the jammed paper (①) carefully by pulling it upwards.
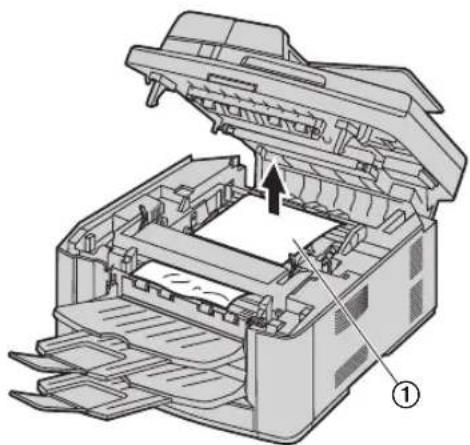
natural_image
Technical illustration of a printer with open lid and internal structure, showing paper feed and paper rolls (no text or symbols)- Push back the green levers (①) to the original position.
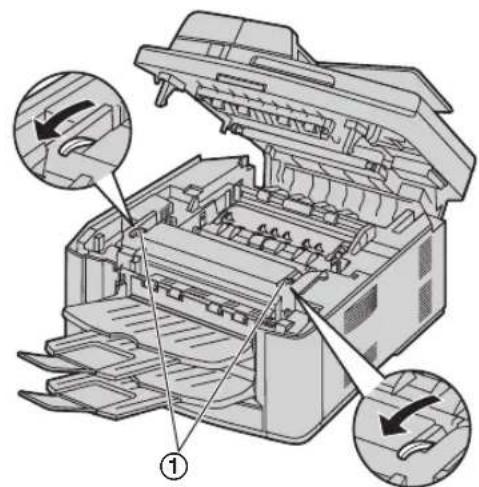
natural_image
Technical illustration of an open printer with internal compartments and labeled parts (no text or symbols present)Case 3:
When the recording paper has jammed near the output tray:
- Pull and hold the lever (①) to release the jammed paper.
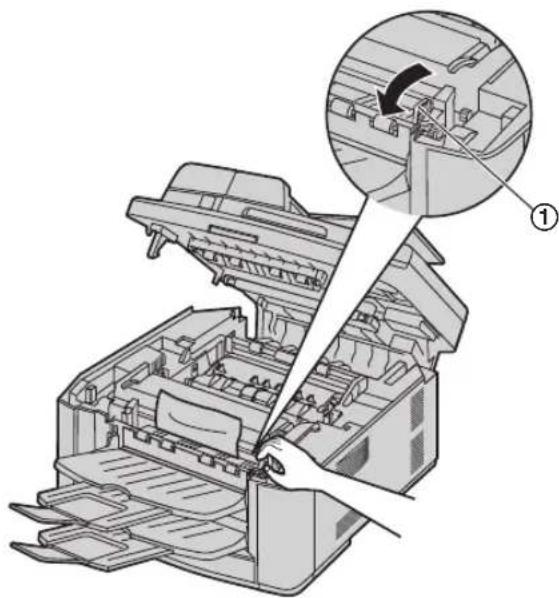
natural_image
Diagram of a printer internal structure showing internal components and a hand inserting a component (no text or symbols present)- Remove the jammed paper (①) carefully by pulling it upwards.
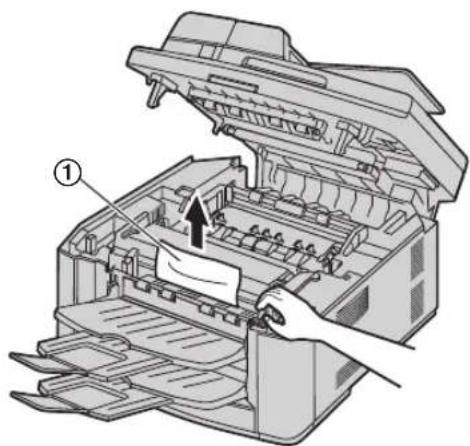
natural_image
Diagram of a printer internal structure showing paper feed, paper tray, and paper holder (no text or symbols)- Close the top cover until locked.
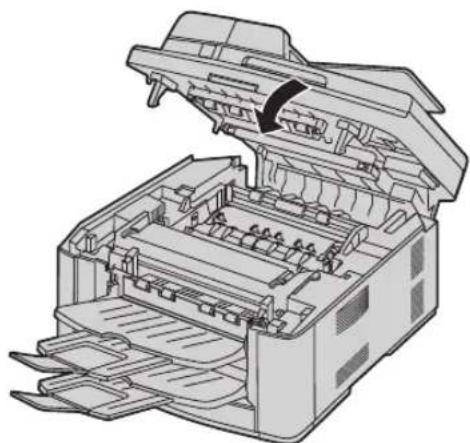
natural_image
Technical line drawing of an open printer with internal components (no text or symbols)12.1.2 When the recording paper is not fed into the unit properly
The display will show the following.
CHECK PICK UP INPUT TRAY #1
1 Pull the paper input tray completely out, then remove the recording paper and straighten it.
2 Re-load the recording paper.
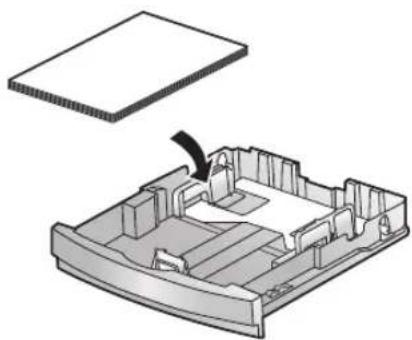
natural_image
3D diagram of a mechanical component with a flat plate and internal structure, showing no text or symbols.3 Insert the paper input tray into the unit.
Note:
- If the error message is still displayed, check the recording paper specifications and re-install recording paper. See page 13 for details.
12.1.3 When the recording paper in the manual input tray is not fed into the unit properly
The display will show the following.
CHECK PICK UP INPUT TRAY #2
1 Remove the recording paper.
2 Re-insert the recording paper.
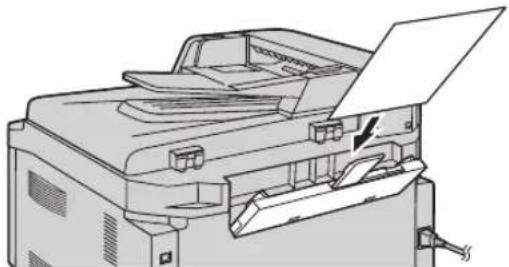
natural_image
Technical line drawing of a mechanical device with an open lid and internal components (no text or symbols)Note:
- If the error message is still displayed, check the recording paper specifications and re-install recording paper. See page 26 for details.
12.2 Document jams (Auto document feeder)
Caution:
- Do not pull out the jammed document forcibly before lifting the ADF cover.
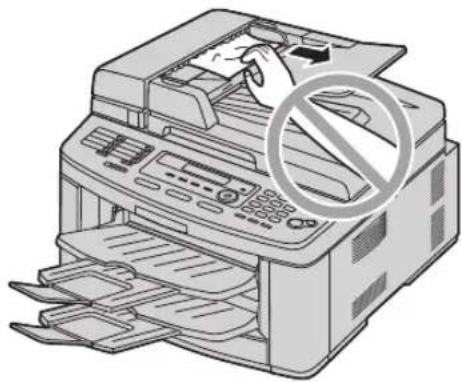
natural_image
Illustration of a printer with a hand inserting paper into the cover, showing no text or symbols on the printer itself.1 Hold the ADF cover firmly and lift it to open the upper part (①) of the ADF cover.
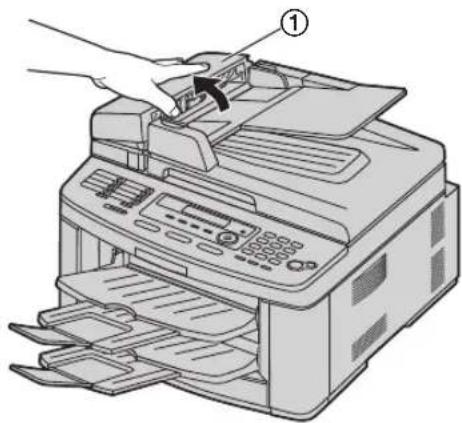
natural_image
Illustration of a printer being inserted into a paper airplane, showing the printer's handle and control panel (no text or symbols present)2 When the document has jammed near the document entrance:
Remove the jammed document (①) carefully.
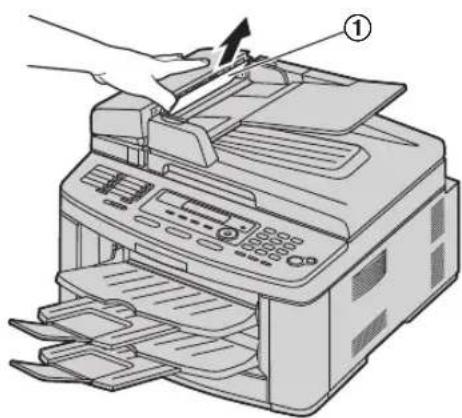
text_image
Diagram of a printer with hand operating the page, showing paper feeding into a printer's tray and cover.12. Paper Jams
When the document has jammed near the document exit:
Press the ADF cover release button (①) and open the middle part (②) of the ADF cover.
Remove the jammed document (③) carefully.
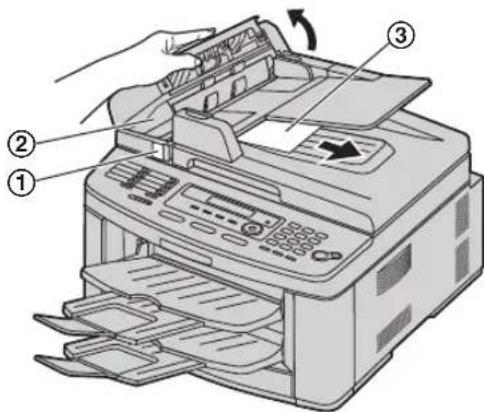
text_image
Diagram of a printer with numbered parts and directional arrow indicating operation3 Close the ADF cover.
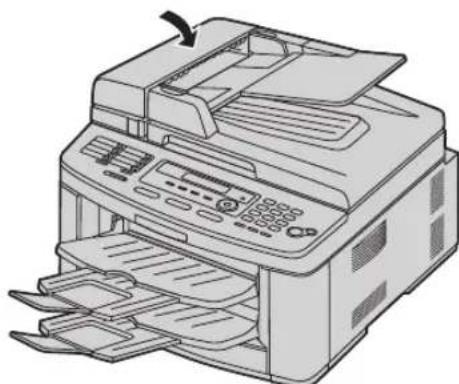
natural_image
Line drawing of a printer with paper sheets and control panel (no text or symbols)13.1 Cleaning the white plates and glass
Clean the white plates and glass when a black line, a white line or a dirty pattern appears on:
- your recording paper,
– the original document,
– the scanned data, or
– the fax document received by the other party.
Caution:
- Be careful when handling the drum and toner unit. See the caution for the drum unit on page 9 for details.
- Do not use paper products, such as paper towels or tissues, to clean the inside of the unit.
13.1.1 White plates and scanner glass
1 Disconnect the power cord.
2 Open the document cover (①).
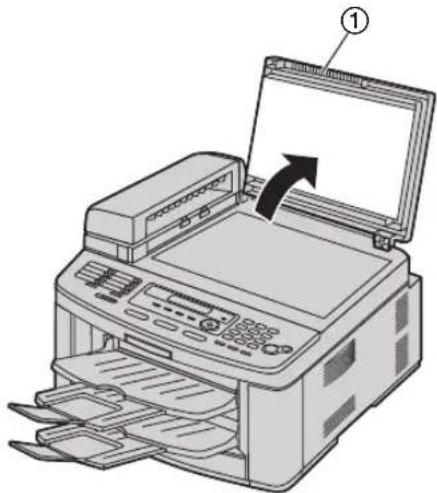
natural_image
Illustration of a printer with an open lid and paper feed being inserted, showing internal components (no text or symbols)3 Press the ADF cover release button (①) and open the middle part (②) of the ADF cover.
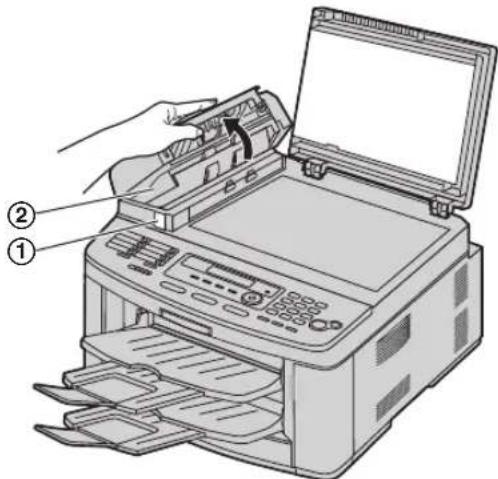
text_image
Diagram of a printer with labeled parts showing paper feeding into an open page, including a hand operating the printer.4 Clean the scanner glass (①) and the white cover sheet (②) and its circumference (③) with a soft and dry cloth.
- Clean the white cover sheet carefully to avoid damaging it.
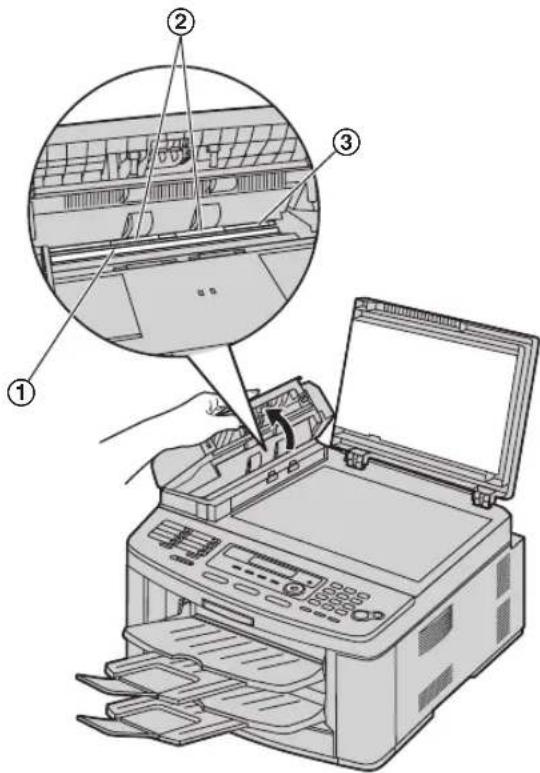
text_image
Diagram of a printer with labeled parts showing internal structure and operation, including a hand inserting a component.5 Close the ADF cover (①), then hold the document cover (②) while cleaning the white plate (③) and the scanner glass (④).
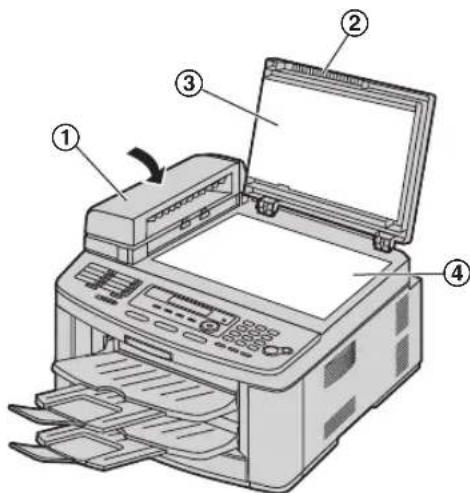
text_image
Diagram of a printer with numbered parts for identification and assembly reference13. Cleaning
6 Close the document cover (①).
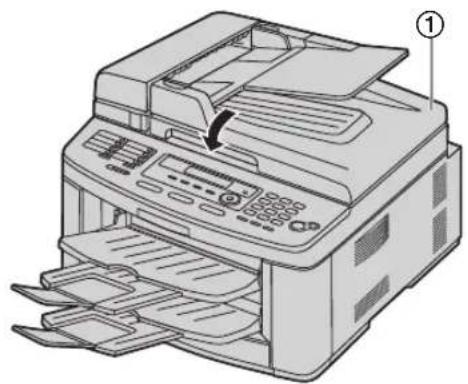
natural_image
Line drawing of a printer with paper sheets and control panel (no text or symbols)7 Re-connect the power cord.
If the document cover comes off from the unit
- Attach the hinges (①) to the document cover (②). Make sure that the inserted direction is correct. Otherwise, the hinges cannot be inserted into the slots in step 3.
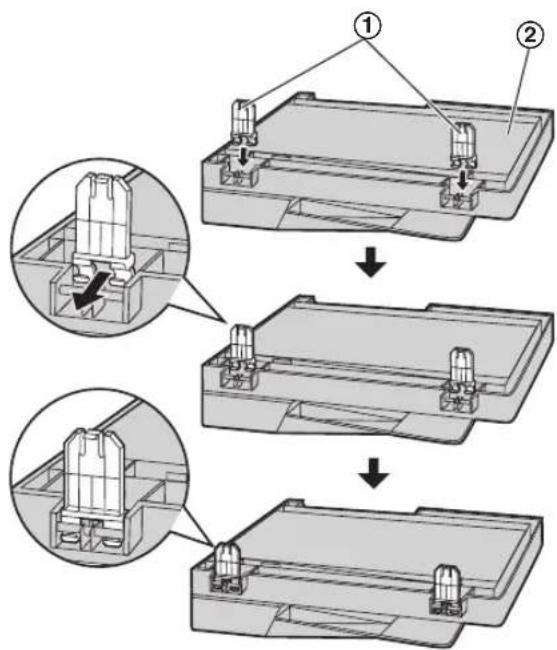
text_image
Technical diagram showing three-step assembly of a mechanical component with labeled parts and cross-sectional views.- Lay down the hinges (①).
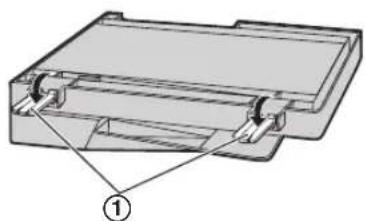
natural_image
3D mechanical part diagram showing a housing with internal components and directional arrows (no text or symbols)- Insert the hinges (①) into the slots (②) on the unit.
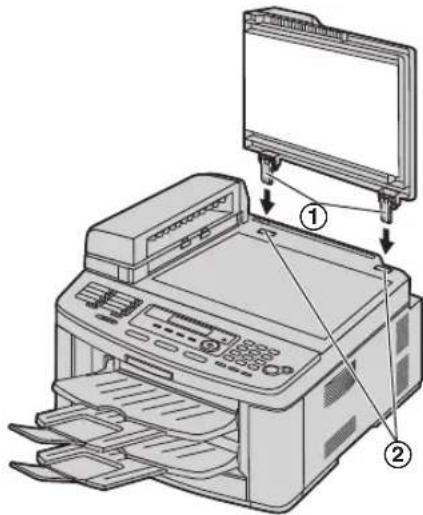
text_image
Diagram of a printer with labeled parts showing front, back, and top views of the printer's screen.- Close the document cover.
13.1.2 Lower glass
1 Disconnect the power cord.
2 Lift the top cover release lever (①) and open the top cover (②).
Important:
- Close the manual input tray (③) before opening the top cover.
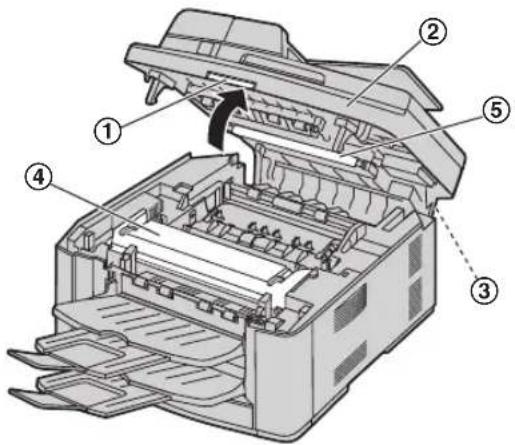
text_image
Technical diagram of a printer internal structure with numbered components and an arrow indicating rotation or movement.
Caution:
The fuser unit (④) gets hot. Do not touch it.
Note:
- Do not touch the transfer roller (⑤).
3 Remove the drum and toner unit (①) by holding the tabs.
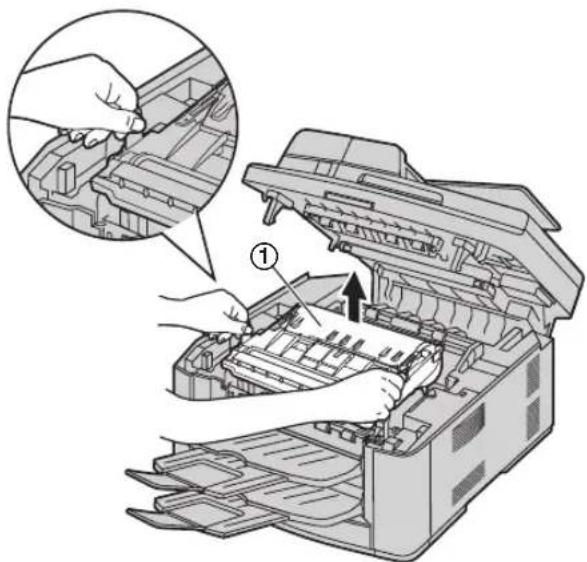
text_image
Diagram showing hands installing or adjusting a printer's internal structure with an inset magnified view of the component.4 Clean the lower glass (①) with a soft and dry cloth.
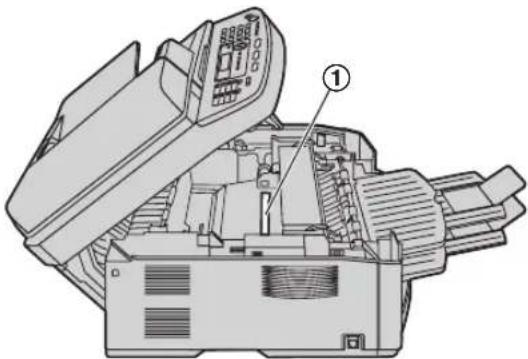
natural_image
Technical diagram of a mechanical device with open lid and internal components (no text or symbols)5 Reinstall the drum and toner unit (①) by holding the tabs.
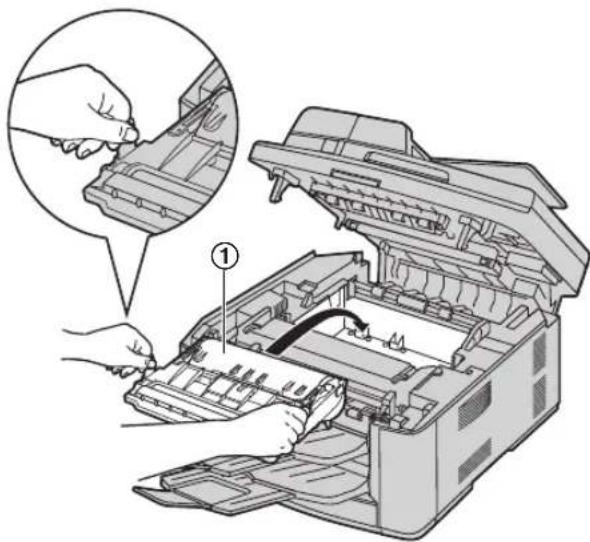
natural_image
Illustration of a printer's internal structure with hands inserting a component (no text or symbols visible)- Make sure that the triangles (②) match to install the drum and toner unit correctly.
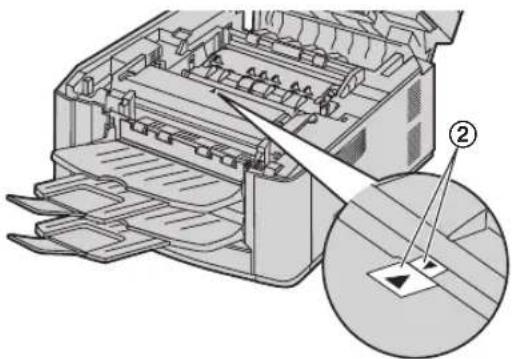
natural_image
Technical illustration of a printer internal structure with an inset showing a magnified view of the base (no text or symbols present)13. Cleaning
6 Close the top cover until locked.
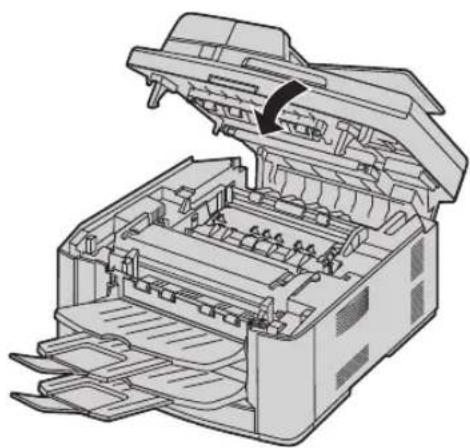
natural_image
Technical line drawing of an open printer with internal compartments and a handle (no text or symbols)Caution:
- To prevent injuries, be careful not to put your hands under the top cover.
7 Re-connect the power cord.
13.2 Cleaning the document feeder rollers
Clean the rollers when the document frequently misfeeds.
1 Disconnect the power cord.
2 Hold the ADF cover firmly and lift it to open the upper part (①) of the ADF cover.
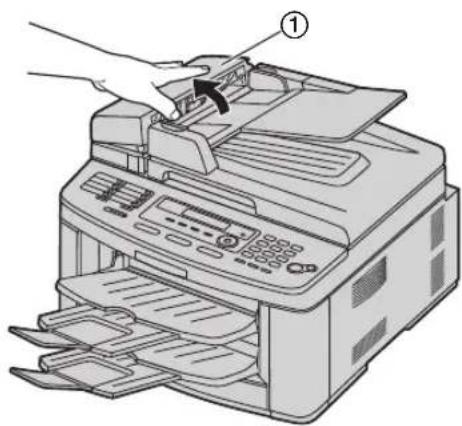
text_image
Diagram of a printer with labeled parts showing paper handling and page setup3 Press the ADF cover release button (①) and open the middle part (②) of the ADF cover.
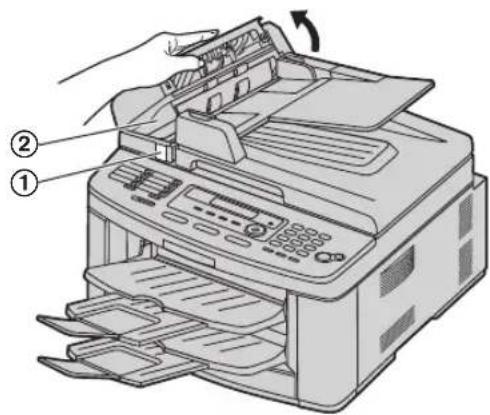
text_image
Diagram of a printer with labeled parts showing paper feeding and printing process4 Clean the document feeder rollers (①) with a cloth moistened with isopropyl rubbing alcohol, and let all parts dry thoroughly.
- Clean the rollers in the direction of the arrow to avoid the discharge brush (②) from being pulled.
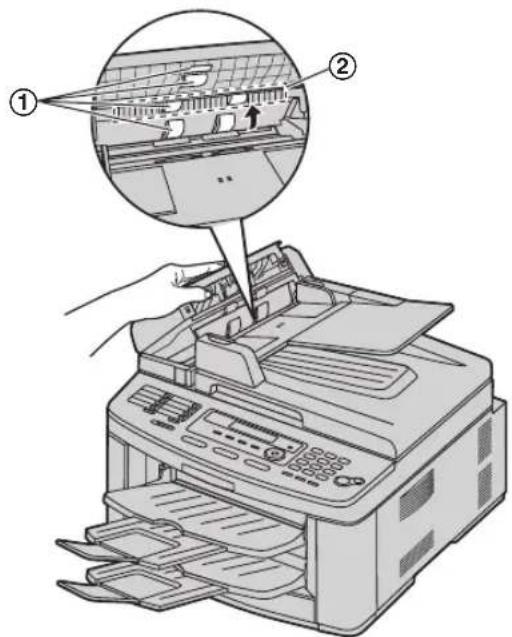
text_image
Diagram showing printer operation with labeled parts and magnified view of the printer's internal structure5 Close the ADF cover.
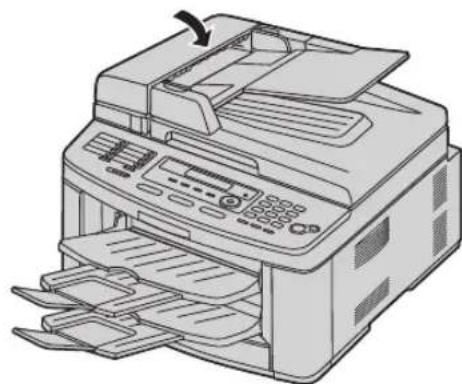
natural_image
Line drawing of a printer with paper sheets and control panel (no text or symbols)6 Re-connect the power cord.
14.1 Reference lists and reports
You can print out the following lists and reports for your reference.
- "SETUP LIST"
- "TEL NO. LIST"
- "JOURNAL REPORT"
- "BROADCAST LIST"
- "PRINTER TEST"
- If the test print has smudges, or blurred points or lines, clean the inside of the unit (page 83). If printing quality is still poor, replace the toner cartridge and drum unit.
- "CALLER ID LIST"
- "PCL FONT LIST"
- "ADDRESS LIST"
text_image
[MENU] [SET] [◀][▶]1 Press [MENU] repeatedly to display "PRINT REPORT".
2 Press [◀] or [▶] repeatedly to display the desired item.
3 Press [SET] to start printing. → [MENU]
14.2 Specifications
■ Applicable lines:
Public Switched Telephone Network
■ Document size:
Max. 216 mm (8 ^1 / 2 ") in width, Max. 600 mm (23 ^5 / 8 ") in length
■ Effective scanning width:
208 mm (8 ^3 /16")
■ Effective printing width:
Letter/Legal: 208 mm (8 ^3 /16")
A4: 202 mm (7 ^15 / _16 ")
■ Transmission time ^4 :
Approx. 4 s/page (ECM-MMR Memory transmission) ^4
■ Scanning density:
Scanning resolution:
Up to 600 × 1,200 dpi (Optical)
Up to 9,600 × 9,600 dpi (Interpolated)
Copy resolution:
Up to 600 × 600 dpi
Fax resolution:
Horizontal: 8 pels/mm (203 pels/inch)
Vertical: 3.85 lines/mm (98 lines/inch)-in standard resolution, 7.7 lines/mm (196 lines/inch)-in fine/photo resolution, 15.4 lines/mm (392 lines/inch)-in super fine resolution
■ Photo resolution:
64-level
Scanner type:
Color Contact Image Sensor
■ Printer type:
Laser Printer
■ Data compression system:
Modified Huffman (MH), Modified READ (MR), Modified Modified READ (MMR)
■ Modem speed:
33,600 / 31,200 / 28,800 / 26,400 / 24,000 / 21,600 / 19,200 / 16,800 / 14,400 / 12,000 / 9,600 / 7,200 / 4,800 / 2,400 bps; Automatic Fallback
■ Operating environment:
10 °C – 32.5 °C (50 °F – 90.5 °F), 20 % – 70 % RH (Relative Humidity)
■ Dimensions:
Approx. height 318 mm × width 440 mm × depth 445 mm ( 12^1/2 " × 17^5/16 " × 17^1/_2 ")
■ Mass (Weight):
Approx. 16 kg (35.3 lb.)
■ Power consumption:
Standby: Approx. 7.5 W
Preheat: Approx. 65 W
Copy: Approx. 340 W
Maximum: Approx. 900 W (When the fuser lamp turns on)
■ Power supply:
120 V AC, 60 Hz
■ Memory capacity
(for operation and storing memory): 32 MB
■ Fax memory capacity:
10 MB in total
Approx. 630 pages of memory reception (max. 255 pages per one reception)
Approx. 150 pages of memory transmission (Based on the ITU-T No. 1 Test Chart in standard resolution, without using the Error Correction Mode.)
■ Laser diode properties:
Laser output: Max. 5 mW
Wave length: 760 nm - 810 nm
Emission duration: Continuous
■ Print speed:
Letter: Approx. 22 ppm (pages per minute)
A4: Approx. 21 ppm (pages per minute)
■ Printing resolution:
600 × 600 dpi
*1 Transmission speed depends on the contents of the pages, resolution, telephone line conditions and capability of the other party's machine.
*2 Transmission speed is based on the ITU-T No. 1 Test Chart with original mode. If the capability of the other party's machine is inferior to your unit, the transmission time may be longer.
ITU-T No.1 Test Chart
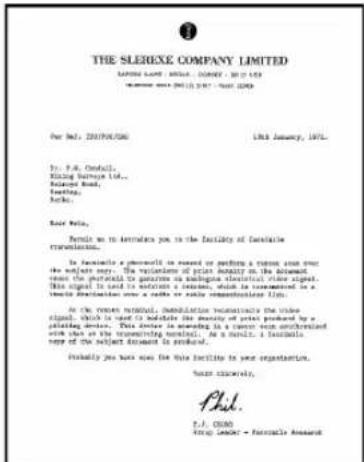
text_image
THE SLEREXE COMPANY LIMITED SBERG L. GRUSS, 2012, 1874 SBERG L. GRUSS, 2012, 1874, 1933 For M., 2012/06/20 Lfd. January, 1974. Mr. F.R. Ondall. Rising Bausa Ltd., Riscard Road, Kashira, Barko. Barko Resid. Results as to introduce you in the facility of facilities corporation. In functional a personnel is issued or performed a current issue that the subject may be the variations of patent accuracy in the aircraft since the personnel is transmitted to an engineering electrical line signal. This signal is used to determine a reservoir, which is transmitted in a system distribution over a radius or radius complementation line. As the current institution, the facilities are not only the value integral, which is used to indicate the quantity of patent produced by a printing device. This instrument is being used as a parent vessel embedded with each of the transmitting units. As a result, a facilities copy of the subject instrument is produced. Initially you have seen for this facility to your organization. Some companies, P.A.Note:
- Design and specifications are subject to change without notice.
●The pictures and illustrations in these instructions may vary slightly from the actual product. - The accuracy of the clock is approximately ±60 seconds a month.
Recording paper specifications
Recording paper / Transparency / Label size:
Letter: 216 mm × 279 mm (8 ^1 / _2 " × 11")
Legal: 216 mm × 356 mm (8 ^1 / _2 " × 14")
A4: 210 mm × 297 mm (8 ^1 / 4 " × 11 ^11 / 16 ")
Envelope size:
10: 105 mm × 241 mm (4 ^1 / 8 " × 9 ^1 / 2 ")
DL: 110 mm × 220 mm (4 ^5 / 16 " × 8 ^5 / 8 ")
Recording paper weight:
60 g/m² to 90 g/m² (16 lb. to 24 lb.)
Note for recording paper:
- We recommend that you test paper (especially special sizes and types of paper) on the unit before purchasing large quantities.
- Do not use the following types of paper:
– Paper with cotton and/or fiber content that is over 20 %, such as letterhead paper or paper used for resumes
- Extremely smooth or shiny paper, or paper that is highly textured
– Coated, damaged or wrinkled paper
– Paper with foreign objects attached, such as tabs or staples
– Paper which has dust, lint or oil stains - Paper that will melt, vaporize, discolor, scorch or emit dangerous fumes near 200^ (392 °F), such as vellum paper. These materials may transfer onto the fusing roller and cause damage.
- Moist paper
- Inkjet paper
- Some paper only accepts print on one side. Try using the other side of the paper if you are not happy with the print quality or if misfeeding occurs.
- For proper paper feeding and best print quality, we recommend using long-grained paper.
- Do not use paper of different types or thickness at the same time. This may cause paper jams.
- Avoid double-sided printing.
- Do not use paper printed from this unit for double-sided printing with other copiers or printers. This may cause paper jams.
- To avoid curling, do not open paper packs until you are ready to use the paper. Store unused paper in the original packaging, in a cool and dry location.
Toner life
Toner life depends on the amount of content in a received, copied or printed document. The following is the approximate relationship between image area and toner life for replacement toner cartridge (Model No. KX-FA87/KX-FA85). Toner life varies in actual usage.
5 % image area
Approx. 2,500 sheets (KX-FA87)/5,000 sheets (KX-FA85) of letter size paper can be printed.
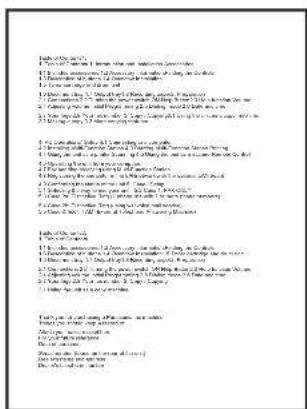
text_image
John C. Smith 1. You can't know if I have the most relevant members. 2. You can't know if you are doing so, but do it. 3. You can't know if you are doing so, but do it. 4. You can't know if you are doing so, but do it. 5. You can't know if you are doing so, but do it. 6. You can't know if you are doing so, but do it. 7. You can't know if you are doing so, but do it. 8. You can't know if you are doing so, but do it. 9. You can't know if you are doing so, but do it. 10. You can't know if you are doing so, but do it. 11. You can't know if you are doing so, but do it. 12. You can't know if you are doing so, but do it. 13. You can't know if you are doing so, but do it. 14. You can't know if you are doing so, but do it. 15. You can't know if you are doing so, but do it. 16. You can't know if you are doing so, but do it. 17. You can't know if you are doing so, but do it. 18. You can't know if you are doing so, but do it. 19. You can't know if you are doing so, but do it. 20. You can't know if you are doing so, but do it. 21. You can't know if you are doing so, but do it. 22. You can't know if you are doing so, but do it. 23. You can't know if you are doing so, but do it. 24. You can't know if you are doing so, but do it. 25. You can't know if you are doing so, but do it. 26. You can't know if you are doing so, but do it. 27. You can't know if you are doing so, but do it. 28. You can't know if you are doing so, but do it. 29. You can't know if you are doing so, but do it. 30. You can't know if you are doing so, but do it. 31. You can't know if you are doing so, but do it. 32. You can't know if you are doing so, but do it. 33. You can't know if you are doing so, but do it. 34. You can't know if you are doing so, but do it. 35. You can't know if you are doing so, but do it. 36. You can't know if you are doing so, but do it. 37. You can't know if you are doing so, but do it. 38. You can't know if you are doing so, but do it. 39. You can't know if you are doing so, but do it. 40. You can't know if you are doing so, but do it. 41. You can't know if you are doing so, but do it. 42. You can't know if you are doing so, but do it. 43. You can't know if you are doing so, but do it. 44. You can't know if you are doing so, but do it. 45. You can't know if you are doing so, but do it. 46. You can't know if you are doing so, but do it. 47. You can't know if you are doing so, but do it. 48. You can't know if you are doing so, but do it. 49. You can't know if you are doing so, but do it. 50. You can't know if you are doing so, but do it. 51. You can't know if you are doing so, but do it. 52. You can't know if you are doing so, but do it. 53. You can't know if you are doing so, but do it. 54. You can't know if you are doing so, but do it. 55. You can't know if you are doing so, but do it. 56. You can't know if you are doing so, but do it. 57. You can't know if you are doing so, but do it. 58. You can't know if you are doing so, but do it. 59. You can't know if you are doing so, but do it. 60. You can't know if you are doing so, but do it. 61. You can't know if you are doing so, but do it. 62. You can't know if you are doing so, but do it. 63. You can't know if you are doing so, but do it. 64. You can't know if you are doing so, but do it. 65. You can't know if you are doing so, but do it. 66. You can't know if you are doing so, but do it. 67. You can't know if you are doing so, but do it. 68. You can't know if you are doing so, but do it. 69. You can't know if you are doing so, but do it. 70. You can't know if you are doing so, but do it. 71. You can't know if you are doing so, but do it. 72. You can't know if you are doing so, but do it. 73. You can't know if you are doing so, but do it. 74. You can't know if you are doing so, but do it. 75. You can't know if you are doing so, but do it. 76. You can't know if you are doing so, but do it. 77. You can't know if you are doing so, but do it. 78. You can't know if you are doing so, but do it. 79. You can't know if you are doing so, but do it. 80. You can't know if you are doing so, but do it. 81. You can't know if you are doing so, but do it. 82. You can't know if you are doing so, but do it. 83. You can't know if you are doing so, but do it. 84. You can't know if you are doing so, but do it. 85. You can't know if you are doing so, but do it. 86. You can't know if you are doing so, but do it. 87. You can't know if you are doing so, but do it. 88. You can't know if you are doing so, but do it. 89. You can't know if you are doing so, but do it. 90. You can't know if you are doing so, but do it. 91. You can't know if you are doing so, but do it. 92. You can't know if you are doing so, but do it. 93. You can't know if you are doing so, but do it. 94. You can't know if you are doing so, but do it. 95. You can't know if you are doing so, but do it. 96. You can't know if you are doing so, but do it. 97. You can't know if you are doing so, but do it. 98. You can't know if you are doing so, but do it. 99. You can't know if you are doing so, but do it. 100. You can't know if you are doing so, but do it.10 % image area
Approx. 1,250 sheets (KX-FA87)/2,500 sheets (KX-FA85) of letter size paper can be printed.
text_image
Table 2. Patient 1. Scale of Gastro-1. In combination of clinical procedures. 2. In combination of surgical procedures. 3. 2. Sessness for the following: 2.0 mm. 4. 1. Sessness for the surgical procedure. 5. 1. Sessness for the surgical procedure. 6. 1. Sessness for the surgical procedure. 7. 1. Sessness for the surgical procedure. 8. 1. Sessness for the surgical procedure. 9. 1. Sessness for the surgical procedure. 10. 1. Sessness for the surgical procedure. 11. 1. Sessness for the surgical procedure. 12. 1. Sessness for the surgical procedure. 13. 1. Sessness for the surgical procedure. 14. 1. Sessness for the surgical procedure. 15. 1. Sessness for the surgical procedure. 16. 1. Sessness for the surgical procedure. 17. 1. Sessness for the surgical procedure. 18. 1. Sessness for the surgical procedure. 19. 1. Sessness for the surgical procedure. 20. 1. Sessness for the surgical procedure. 21. 1. Sessness for the surgical procedure. 22. 1. Sessness for the surgical procedure. 23. 1. Sessness for the surgical procedure. 24. 1. Sessness for the surgical procedure. 25. 1. Sessness for the surgical procedure. 26. 1. Sessness for the surgical procedure. 27. 1. Sessness for the surgical procedure. 28. 1. Sessness for the surgical procedure. 29. 1. Sessness for the surgical procedure. 30. 1. Sessness for the surgical procedure. 31. 1. Sessness for the surgical procedure. 32. 1. Sessness for the surgical procedure. 33. 1. Sessness for the surgical procedure. 34. 1. Sessness for the surgical procedure. 35. 1. Sessness for the surgical procedure. 36. 1. Sessness for the surgical procedure. 37. 1. Sessness for the surgical procedure. 38. 1. Sessness for the surgical procedure. 39. 1. Sessness for the surgical procedure. 40. 1. Sessness for the surgical procedure. 41. 1. Sessness for the surgical procedure. 42. 1. Sessness for the surgical procedure. 43. 1. Sessness for the surgical procedure. 44. 1. Sessness for the surgical procedure. 45. 1. Sessness for the surgical procedure. 46. 1. Sessness for the surgical procedure. 47. 1. Sessness for the surgical procedure. 48. 1. Sessness for the surgical procedure. 49. 1. Sessness for the surgical procedure. 50. 1. Sessness for the surgical procedure. 51. 1. Sessness for the surgical procedure. 52. 1. Sessness for the surgical procedure. 53. 1. Sessness for the surgical procedure. 54. 1. Sessness for the surgical procedure. 55. 1. Sessness for the surgical procedure. 56. 1. Sessness for the surgical procedure. 57. 1. Sessness for the surgical procedure. 58. 1. Sessness for the surgical procedure. 59. 1. Sessness for the surgical procedure. 60. 1. Sessness for the surgical procedure. 61. 1. Sessness for the surgical procedure. 62. 1. Sessness for the surgical procedure. 63. 1. Sessness for the surgical procedure. 64. 1. Sessness for the surgical procedure. 65. 1. Sessness for the surgical procedure. 66. 1. Sessness for the surgical procedure. 67. 1. Sessness for the surgical procedure. 68. 1. Sessness for the surgical procedure. 69. 1. Sessness for the surgical procedure. 70. 1. Sessness for the surgical procedure. 71. 1. Sessness for the surgical procedure. 72. 1. Sessness for the surgical procedure. 73. 1. Sessness for the surgical procedure. 74. 1. Sessness for the surgical procedure. 75. 1. Sessness for the surgical procedure. 76. 1. Sessness for the surgical procedure. 77. 1. Sessness for the surgical procedure. 78. 1. Sessness for the surgical procedure. 79. 1. Sessness for the surgical procedure. 80. 1. Sessness for the surgical procedure. 81. 1. Sessness for the surgical procedure. 82. 1. Sessness for the surgical procedure. 83. 1. Sessness for the surgical procedure. 84. 1. Sessness for the surgical procedure. 85. 1. Sessness for the surgical procedure. 86. 1. Sessness for the surgical procedure. 87. 1. Sessness for the surgical procedure. 88. 1. Sessness for the surgical procedure. 89. 1. Sessness for the surgical procedure. 90. 1. Sessness for the surgical procedure. 91. 1. Sessness for the surgical procedure. 92. 1. Sessness for the surgical procedure. 93. 1. Sessness for the surgical procedure. 94. 1. Sessness for the surgical procedure. 95. 1. Sessness for the surgical procedure. 96. 1. Sessness for the surgical procedure. 97. 1. Sessness for the surgical procedure. 98. 1. Sessness for the surgical procedure. 99. 1. Sessness for the surgical procedure. 100.15 % image area
Approx. 800 sheets (KX-FA87)/1,600 sheets (KX-FA85) of letter size paper can be printed.
text_image
Scanned text of a medical or laboratory report with numbered items and a grayscale image of a patient's ear.Note:
●The image area changes with the depth, thickness and size of the characters.
- If you turn on the toner save feature, the toner cartridge will last approx. 40 % longer.
Drum life
The drum unit is a consumable item and needs to be replaced regularly. There are various factors that determine the actual drum life, such as temperature, humidity, type of paper and how much toner you use for the number of sheets per print job. The maximum drum life is approx. 10,000 sheets. The actual number of sheets your drum will print may be significantly less than this estimate if your unit is often used for printing small number sheets per job. Because many of the factors that determine the actual drum life cannot be controlled, we cannot guarantee a minimum number of sheets that will be printed by your drum.
14.3 Information of copyrights and licenses
● This product uses a part of NetBSD kernel.
The use of a part of NetBSD kernel is based on the typical BSD style license below.
Copyright (c)
The Regents of the University of California. All rights reserved.
Redistribution and use in source and binary forms, with or without modification, are permitted provided that the following conditions are met:
- Redistributions of source code must retain the above copyright notice, this list of conditions and the following disclaimer.
- Redistributions in binary form must reproduce the above copyright notice, this list of conditions and the following disclaimer in the documentation and/or other materials provided with the distribution.
- All advertising materials mentioning features or use of this software must display the following acknowledgement:
This product includes software developed by the University of California, Berkeley and its contributors. - Neither the name of the University nor the names of its contributors may be used to endorse or promote products derived from this software without specific prior written permission.
THIS SOFTWARE IS PROVIDED BY THE REGENTS AND CONTRIBUTORS ``AS IS'' AND ANY EXPRESS OR IMPLIED WARRANTIES, INCLUDING, BUT NOT LIMITED TO, THE IMPLIED WARRANTIES OF MERCHANTABILITY AND FITNESS FOR A PARTICULAR PURPOSE ARE DISCLAIMED. IN NO EVENT SHALL THE REGENTS OR CONTRIBUTORS BE LIABLE FOR ANY DIRECT, INDIRECT, INCIDENTAL, SPECIAL, EXEMPLARY, OR CONSEQUENTIAL DAMAGES (INCLUDING, BUT NOT LIMITED TO, PROCUREMENT OF SUBSTITUTE GOODS OR SERVICES; LOSS OF USE, DATA, OR PROFITS; OR BUSINESS INTERRUPTION) HOWEVER CAUSED AND ON ANY THEORY OF LIABILITY, WHETHER IN CONTRACT, STRICT LIABILITY, OR TORT (INCLUDING NEGLIGENCE OR OTHERWISE) ARISING IN ANY WAY OUT OF THE USE OF THIS SOFTWARE, EVEN IF ADVISED OF THE POSSIBILITY OF SUCH DAMAGE.
However, parts of the NetBSD Kernel are provided with the following copyright notices.
Copyright (c) 1980, 1983, 1988, 1993 The Regents of the University of California. All rights reserved.
Copyright (c) 1980, 1986, 1989, 1993 The Regents of the University of California. All rights reserved.
Copyright (c) 1980, 1986, 1991, 1993 The Regents of the University of California. All rights reserved.
Copyright (c) 1980, 1986, 1993 The Regents of the University of California. All rights reserved.
Copyright (c) 1982, 1985, 1986, 1988, 1993, 1994 The Regents of the University of California. All rights reserved.
Copyright (c) 1982, 1986, 1988, 1990, 1993 The Regents of the University of California. All rights reserved.
Copyright (c) 1982, 1986, 1988, 1990, 1993, 1994, 1995 The Regents of the University of California. All rights reserved.
Copyright (c) 1982, 1986, 1988, 1990, 1993, 1995 The Regents of the University of California. All rights reserved.
Copyright (c) 1982, 1986, 1988, 1991, 1993 The Regents of the University of California. All rights reserved.
Copyright (c) 1982, 1986, 1988, 1993 The Regents of the University of California. All rights reserved.
Copyright (c) 1982, 1986, 1988, 1993, 1995 The Regents of the University of California. All rights reserved.
Copyright (c) 1982, 1986, 1989, 1991, 1993 The Regents of the University of California. All rights reserved.
Copyright (c) 1982, 1986, 1989, 1993 The Regents of the University of California. All rights reserved.
Copyright (c) 1982, 1986, 1990, 1991, 1993 The Regents of the University of California. All rights reserved.
Copyright (c) 1982, 1986, 1990, 1993 The Regents of the University of California. All rights reserved.
Copyright (c) 1982, 1986, 1990, 1993, 1994 The Regents of the University of California. All rights reserved.
Copyright (c) 1982, 1986, 1991, 1993 The Regents of the University of California. All rights reserved.
Copyright (c) 1982, 1986, 1991, 1993, 1994 The Regents of the University of California. All rights reserved.
Copyright (c) 1982, 1986, 1991, 1993, 1995 The Regents of the University of California. All rights reserved.
Copyright (c) 1982, 1986, 1993 The Regents of the University of California. All rights reserved.
Copyright (c) 1982, 1986, 1993, 1994 The Regents of the University of California. All rights reserved.
Copyright (c) 1982, 1986, 1993, 1994, 1995 The Regents of the University of California. All rights reserved.
Copyright (c) 1982, 1986, 1993, 1995 The Regents of the University of California. All rights reserved.
Copyright (c) 1982, 1988, 1991, 1993 The Regents of the University of California. All rights reserved.
Copyright (c) 1983, 1990, 1993 The Regents of the University of California. All rights reserved.
Copyright (c) 1983, 1993 The Regents of the University of California. All rights reserved.
Copyright (c) 1985, 1986, 1993 The Regents of the University of California. All rights reserved.
Copyright (c) 1985, 1986, 1993 The Regents of the University of California. All rights reserved.
Copyright (c) 1986, 1989, 1991, 1993 The Regents of the University of California. All rights reserved.
Copyright (c) 1986, 1993 The Regents of the University of California. All rights reserved.
Copyright (c) 1987, 1991, 1993 The Regents of the University of California. All rights reserved.
Copyright (c) 1987, 1993 The Regents of the University of California. All rights reserved.
Copyright (c) 1987, 1993 The Regents of the University of California. All rights reserved.
Copyright (c) 1988 Regents of the University of California. All rights reserved
Copyright (c) 1988 Stephen Deering.
Copyright (c) 1988 University of Utah.
Copyright (c) 1988, 1989, 1993 The Regents of the University of California. All rights reserved.
Copyright (c) 1988, 1991, 1993 The Regents of the University of California. All rights reserved.
Copyright (c) 1988, 1992, 1993 The Regents of the University of California. All rights reserved.
Copyright (c) 1988, 1993 The Regents of the University of California. All rights reserved.
Copyright (c) 1989 The Regents of the University of California. All rights reserved.
Copyright (c) 1989, 1991, 1993 The Regents of the University of California. All rights reserved.
Copyright (c) 1989, 1993 The Regents of the University of California. All rights reserved.
Copyright (c) 1989, 1993, 1994 The Regents of the University of California. All rights reserved.
Copyright (c) 1990, 1991, 1993 The Regents of the University of California. All rights reserved.
Copyright (c) 1990, 1993 The Regents of the University of California. All rights reserved.
Copyright (c) 1991, 1993 The Regents of the University of California. All rights reserved.
Copyright (c) 1991, 1993, 1994 The Regents of the University of California. All rights reserved.
Copyright (c) 1992 Regents of the University of California. All rights reserved.
Copyright (c) 1992, 1993 The Regents of the University of California. All rights reserved.
Copyright (c) 1993 The Regents of the University of California. All rights reserved.
Copyright (c) 1993 Adam Glass
Copyright (C) 1993 by Sun Microsystems, Inc. All rights reserved.
Copyright (c) 1994 Gordon W. Ross
Copyright (c) 1994 Winning Strategies, Inc. All rights reserved.
Copyright (c) 1995 The Regents of the University of California. All rights reserved.
Copyright (C) 1995, 1996, 1997, and 1998 WIDE Project. All rights reserved.
Copyright (c) 1996 The Regents of the University of California. All rights reserved.
Copyright (c) 1996 John S. Dyson All rights reserved.
Copyright (c) 1996 Matt Thomas. All rights reserved.
Copyright (c) 1996 Matthew R. Green. All rights reserved.
Copyright (c) 1996 Paul Kranenburg
Copyright (c) 1996, 1997, 1999, 2001 The NetBSD Foundation, Inc. All rights reserved.
Copyright (c) 1996, 2000 Christopher G. Demetriou. All rights reserved.
Copyright (c) 1996, 1999 by Internet Software Consortium.
Copyright (c) 1996-1999 by Internet Software Consortium.
Copyright (c) 1997 Jonathan Stone and Jason R. Thorpe. All rights reserved.
Copyright (c) 1997 Christos Zoulas. All rights reserved.
Copyright (c) 1997 Manuel Bouyer. All rights reserved.
Copyright (c) 1997, 1998 The NetBSD Foundation, Inc. All rights reserved.
Copyright (c) 1997, 1998, 1999, 2000 The NetBSD Foundation, Inc. All rights reserved.
Copyright (c) 1997, 1998, 1999, 2001 The NetBSD Foundation, Inc. All rights reserved.
Copyright (c) 1997, 1998, 1999, 2002 The NetBSD Foundation, Inc. All rights reserved.
Copyright (c) 1997, 1998, 2000, 2001 The NetBSD Foundation, Inc. All rights reserved.
Copyright (c) 1997, 1998, 2001 The NetBSD Foundation, Inc. All rights reserved.
Copyright (c) 1997,98 The NetBSD Foundation, Inc. All rights reserved.
Copyright (C) 1997-2000 Sony Computer Science Laboratories Inc. All rights reserved.
Copyright (c) 1997-2002 The NetBSD Foundation, Inc. All rights reserved.
Copyright (c) 1998 The NetBSD Foundation, Inc. All rights reserved.
Copyright (c) 1998 Todd C. Miller Todd.Miller@courtesan.com All rights reserved.
Copyright (c) 1998, 1999 The NetBSD Foundation, Inc. All rights reserved.
Copyright (c) 1998, 1999, 2000 The NetBSD Foundation, Inc. All rights reserved.
Copyright (c) 1998, 1999, 2000, 2001 The NetBSD Foundation, Inc. All rights reserved.
Copyright (c) 1998, 2000 The NetBSD Foundation, Inc. All rights reserved.
Copyright (c) 1998, 2000, 2001 The NetBSD Foundation, Inc. All rights reserved.
Copyright (c) 1999 The NetBSD Foundation, Inc. All rights reserved.
Copyright (C) 1999 WIDE Project. All rights reserved.
Copyright (c) 1999, 2000 Jason L. Wright (jason@thought.net) All rights reserved.
Copyright (c) 1999, 2000 The NetBSD Foundation, Inc. All rights reserved.
Copyright (c) 1999, 2000, 2001 The NetBSD Foundation, Inc. All rights reserved.
Copyright (c) 1999, 2001 The NetBSD Foundation, Inc. All rights reserved.
Copyright (c) 2000 The NetBSD Foundation, Inc. All rights reserved.
Copyright (c) 2000, 2001 The NetBSD Foundation, Inc. All rights reserved.
Copyright (c) 2000, 2001, 2002 The NetBSD Foundation, Inc. All rights reserved.
Copyright (c) 2001 The NetBSD Foundation, Inc. All rights reserved.
Copyright (c) 2002 The NetBSD Foundation, Inc. All rights reserved.
Copyright 1998 Massachusetts Institute of Technology. All rights reserved.
Copyright 2001 Wasabi Systems, Inc. All rights reserved.
Portions Copyright (c) 1993 by Digital Equipment Corporation.
Portions Copyright (c) 1995 by International Business Machines, Inc.
Copyright (c) 1983, 1989 The Regents of the University of California. All rights reserved.
Copyright (c) 1996 by Internet Software Consortium. All rights reserved.
Copyright (c) 1980, 1986, 1989 Regents of the University of California. All rights reserved.
Copyright (c) 1988 The Regents of the University of California. All rights reserved.
Copyright (c) 1992, 1993 The Regents of the University of California. All rights reserved.
Copyright (c) 1994 Christopher G. Demetriou. All rights reserved.
Copyright (c) 1997 The NetBSD Foundation, Inc. All rights reserved.
Copyright (c) 1999 The NetBSD Foundation, Inc. All rights reserved.
Copyright (c) 2001 The NetBSD Foundation, Inc. All rights reserved.
Copyright (c) 1996 Gardner Buchanan gbuchanan@shl.com All rights reserved.
Parts of the NetBSD Kernel are provided with the licenses that are slightly different from the above Berkeley-formed license. Please refer the source code of the NetBSD Kernel about the details.
The source code of the NetBSD Kernel is provided by the NetBSD CVS Repositories
(http://cvsweb.netbsd.org/bsdweb.cgi/), and this product includes parts of the source code in the following directories.
http://cvsweb.netbsd.org/bsdweb.cgi/src/sys/kern/
http://cvsweb.netbsd.org/bsdweb.cgi/src/sys/net/
http://cvsweb.netbsd.org/bsdweb.cgi/src/sys/netinet/
- This product contains Net-SNMP software and is using it based on the following license conditions.
---- Part 1: CMU/UCD copyright notice: (BSD like) ----
Copyright 1989, 1991, 1992 by Carnegie Mellon University
Derivative Work - 1996, 1998-2000
Copyright 1996, 1998-2000 The Regents of the University of California
All Rights Reserved
Permission to use, copy, modify and distribute this software and its documentation for any purpose and without fee is hereby granted, provided that the above copyright notice appears in all copies and that both that copyright notice and this permission notice appear in supporting documentation, and that the name of CMU and The Regents of the University of California not be used in advertising or publicity pertaining to distribution of the software without specific written permission.
CMU AND THE REGENTS OF THE UNIVERSITY OF CALIFORNIA DISCLAIM ALL WARRANTIES WITH REGARD TO THIS SOFTWARE, INCLUDING ALL IMPLIED WARRANTIES OF MERCHANTABILITY AND FITNESS. IN NO EVENT SHALL CMU OR THE REGENTS OF THE UNIVERSITY OF CALIFORNIA BE LIABLE FOR ANY SPECIAL, INDIRECT OR CONSEQUENTIAL DAMAGES OR ANY DAMAGES WHATSOEVER RESULTING FROM THE LOSS OF USE, DATA OR PROFITS, WHETHER IN AN ACTION OF CONTRACT, NEGLIGENCE OR OTHER TORTIOUS ACTION, ARISING OUT OF OR IN CONNECTION WITH THE USE OR PERFORMANCE OF THIS SOFTWARE.
---- Part 2: Networks Associates Technology, Inc copyright notice (BSD) ----
Copyright (c) 2001-2003, Networks Associates Technology, Inc. All rights reserved.
Redistribution and use in source and binary forms, with or without modification, are permitted provided that the following conditions are met:
* Redistributions of source code must retain the above copyright notice, this list of conditions and the following disclaimer.
* Redistributions in binary form must reproduce the above copyright notice, this list of conditions and the following disclaimer in the documentation and/or other materials provided with the distribution.
* Neither the name of the Networks Associates Technology, Inc nor the names of its contributors may be used to endorse or promote products derived from this software without specific prior written permission.
THIS SOFTWARE IS PROVIDED BY THE COPYRIGHT HOLDERS AND CONTRIBUTORS ``AS IS'' AND ANY EXPRESS OR IMPLIED WARRANTIES, INCLUDING, BUT NOT LIMITED TO, THE IMPLIED WARRANTIES OF MERCHANTABILITY AND FITNESS FOR A PARTICULAR PURPOSE ARE DISCLAIMED. IN NO EVENT SHALL THE COPYRIGHT HOLDERS OR CONTRIBUTORS BE LIABLE FOR ANY DIRECT, INDIRECT, INCIDENTAL, SPECIAL, EXEMPLARY, OR CONSEQUENTIAL DAMAGES (INCLUDING, BUT NOT LIMITED TO, PROCUREMENT OF SUBSTITUTE GOODS OR SERVICES; LOSS OF USE, DATA, OR PROFITS; OR BUSINESS INTERRUPTION) HOWEVER CAUSED AND ON ANY THEORY OF LIABILITY, WHETHER IN CONTRACT, STRICT LIABILITY, OR TORT (INCLUDING NEGLIGENCE OR OTHERWISE) ARISING IN ANY WAY OUT OF THE USE OF THIS SOFTWARE, EVEN IF ADVISED OF THE POSSIBILITY OF SUCH DAMAGE.
---- Part 3: Cambridge Broadband Ltd. copyright notice (BSD) ----
Portions of this code are copyright (c) 2001-2003, Cambridge Broadband Ltd. All rights reserved.
Redistribution and use in source and binary forms, with or without modification, are permitted provided that the following conditions are met:
* Redistributions of source code must retain the above copyright notice, this list of conditions and the following disclaimer.
* Redistributions in binary form must reproduce the above copyright notice, this list of conditions and the following disclaimer in the documentation and/or other materials provided with the distribution.
* The name of Cambridge Broadband Ltd. may not be used to endorse or promote products derived from this software without specific prior written permission.
THIS SOFTWARE IS PROVIDED BY THE COPYRIGHT HOLDER ``AS IS'' AND ANY EXPRESS OR IMPLIED WARRANTIES, INCLUDING, BUT NOT LIMITED TO, THE IMPLIED WARRANTIES OF MERCHANTABILITY AND FITNESS FOR A PARTICULAR PURPOSE ARE DISCLAIMED. IN NO EVENT SHALL THE COPYRIGHT HOLDER BE LIABLE FOR ANY DIRECT, INDIRECT, INCIDENTAL, SPECIAL, EXEMPLARY, OR CONSEQUENTIAL DAMAGES (INCLUDING, BUT NOT LIMITED TO, PROCUREMENT OF SUBSTITUTE GOODS OR SERVICES; LOSS OF USE, DATA, OR PROFITS; OR BUSINESS INTERRUPTION) HOWEVER CAUSED AND ON ANY THEORY OF LIABILITY, WHETHER IN CONTRACT, STRICT LIABILITY, OR TORT (INCLUDING NEGLIGENCE OR OTHERWISE) ARISING IN ANY WAY OUT OF THE USE OF THIS SOFTWARE, EVEN IF ADVISED OF THE POSSIBILITY OF SUCH DAMAGE.
---- Part 4: Sun Microsystems, Inc. copyright notice (BSD) ----
Copyright c 2003 Sun Microsystems, Inc., 4150 Network Circle, Santa Clara, California 95054, U.S.A. All rights reserved.
Use is subject to license terms below.
This distribution may include materials developed by third parties.
Sun, Sun Microsystems, the Sun logo and Solaris are trademarks or registered trademarks of Sun Microsystems, Inc. in the U.S. and other countries.
Redistribution and use in source and binary forms, with or without modification, are permitted provided that the following conditions are met:
* Redistributions of source code must retain the above copyright notice, this list of conditions and the following disclaimer.
* Redistributions in binary form must reproduce the above copyright notice, this list of conditions and the following disclaimer in the documentation and/or other materials provided with the distribution.
* Neither the name of the Sun Microsystems, Inc. nor the names of its contributors may be used to endorse or promote products derived from this software without specific prior written permission.
THIS SOFTWARE IS PROVIDED BY THE COPYRIGHT HOLDERS AND CONTRIBUTORS ``AS IS'' AND ANY EXPRESS OR IMPLIED WARRANTIES, INCLUDING, BUT NOT LIMITED TO, THE IMPLIED WARRANTIES OF MERCHANTABILITY AND FITNESS FOR A PARTICULAR PURPOSE ARE DISCLAIMED. IN NO EVENT SHALL THE COPYRIGHT HOLDERS OR CONTRIBUTORS BE LIABLE FOR ANY DIRECT, INDIRECT, INCIDENTAL, SPECIAL, EXEMPLARY, OR CONSEQUENTIAL
DAMAGES (INCLUDING, BUT NOT LIMITED TO, PROCUREMENT OF SUBSTITUTE GOODS OR SERVICES; LOSS OF USE, DATA, OR PROFITS; OR BUSINESS INTERRUPTION) HOWEVER CAUSED AND ON ANY THEORY OF LIABILITY, WHETHER IN CONTRACT, STRICT LIABILITY, OR TORT (INCLUDING NEGLIGENCE OR OTHERWISE) ARISING IN ANY WAY OUT OF THE USE OF THIS SOFTWARE, EVEN IF ADVISED OF THE POSSIBILITY OF SUCH DAMAGE.
Also this product contains software which includes following notices and licenses.
Copyright 1988, 1989 by Carnegie Mellon University
Copyright 1989 TGV, Incorporated
All Rights Reserved
Permission to use, copy, modify, and distribute this software and its documentation for any purpose and without fee is hereby granted, provided that the above copyright notice appear in all copies and that both that copyright notice and this permission notice appear in supporting documentation, and that the name of CMU and TGV not be used in advertising or publicity pertaining to distribution of the software without specific, written prior permission.
CMU AND TGV DISCLAIMS ALL WARRANTIES WITH REGARD TO THIS SOFTWARE, INCLUDING ALL IMPLIED WARRANTIES OF MERCHANTABILITY AND FITNESS, IN NO EVENT SHALL CMU OR TGV BE LIABLE FOR ANY SPECIAL, INDIRECT OR CONSEQUENTIAL DAMAGES OR ANY DAMAGES WHATSOEVER RESULTING FROM LOSS OF USE, DATA OR PROFITS, WHETHER IN AN ACTION OF CONTRACT, NEGLIGENCE OR OTHER TORTIOUS ACTION, ARISING OUT OF OR IN CONNECTION WITH THE USE OR PERFORMANCE OF THIS SOFTWARE.
- This product contains thttpd software that ACMELabs developed and is using it based on the following license conditions.
Copyright 1995,1998,1999,2000 by Jef Poskanzer jef@acme.com.
All rights reserved.
Redistribution and use in source and binary forms, with or without
modification, are permitted provided that the following conditions are met:
-
Redistributions of source code must retain the above copyright notice, this list of conditions and the following disclaimer.
-
Redistributions in binary form must reproduce the above copyright notice, this list of conditions and the following disclaimer in the documentation and/or other materials provided with the distribution.
THIS SOFTWARE IS PROVIDED BY THE AUTHOR AND CONTRIBUTORS ``AS IS'' AND ANY EXPRESS OR IMPLIED WARRANTIES, INCLUDING, BUT NOT LIMITED TO, THE IMPLIED WARRANTIES OF MERCHANTABILITY AND FITNESS FOR A PARTICULAR PURPOSE ARE DISCLAIMED. IN NO EVENT SHALL THE AUTHOR OR CONTRIBUTORS BE LIABLE FOR ANY DIRECT, INDIRECT, INCIDENTAL, SPECIAL, EXEMPLARY, OR CONSEQUENTIAL DAMAGES (INCLUDING, BUT NOT LIMITED TO, PROCUREMENT OF SUBSTITUTE GOODS OR SERVICES; LOSS OF USE, DATA, OR PROFITS; OR BUSINESS INTERRUPTION) HOWEVER CAUSED AND ON ANY THEORY OF LIABILITY, WHETHER IN CONTRACT, STRICT LIABILITY, OR TORT (INCLUDING NEGLIGENCE OR OTHERWISE) ARISING IN ANY WAY OUT OF THE USE OF THIS SOFTWARE, EVEN IF ADVISED OF THE POSSIBILITY OF SUCH DAMAGE.
However, parts of the thttpd software are provided with the following copyright notices.
Copyright 1995 by Jef Poskanzer jef@acme.com.
Copyright 1998 by Jef Poskanzer jef@acme.com.
Copyright 1999 by Jef Poskanzer jef@acme.com.
Copyright 1995,2000 by Jef Poskanzer jef@acme.com.
Copyright 1999,2000 by Jef Poskanzer jef@acme.com.
Copyright 1995,1998,2000 by Jef Poskanzer jef@acme.com.
- JPEG
This software is based in part on the work of the Independent JPEG Group.
15.1 Index
# #100 Quick setup: 51
101 Date and time: 19
102 Your logo: 20
103 Your fax number: 20
110 Language: 51
120 Dialing mode: 16
121 Flash time: 51
145 LCD display contrast: 51
155 Change password: 52
161 Ringer pattern: 52
210 FAX ring count: 52
216 Automatic Caller ID list: 47
226 Time adjustment: 52
380 Paper size in the paper input tray: 52
401 Confirmation report: 38, 54
402 Automatic journal report: 38, 54
403 Power save: 52
411 Overseas mode: 54
412 Delayed send: 54
413 ECM selection: 55
416 Connecting tone: 55
430 Distinctive Ring: 49
431 Fax ring pattern: 49
432 Auto reduction: 55
434 Fax activation code: 55
437 Memory reception alert: 55
438 Friendly reception: 55
441 Output tray setting for faxing: 56
442 PC fax setting: 56
443 PC fax reception: 21
459 Set fax features to default: 56
461 Default copy resolution: 57
463 Default operation mode: 52
464 Mode timer: 53
466 Output tray setting for copying: 57
467 Page layout hold: 57
468 Zoom hold: 57
469 Collate hold: 57
482 Toner save: 11, 53
493 Scan mode: 60
494 Scan parameter hold: 60
500 DHCP mode: 61
501 IP address: 61
502 Subnet mask: 61
503 Default gateway: 61
504 DNS server #1: 61
505 DNS server #2: 61
507 Machine name: 61
508 MAC address: 61
532 Approved users: 61
533 Auto IP: 61
534 HTTPD: 62
760 Input tray in PCL: 58
761 Output tray in PCL: 58
762 Number of copies in PCL: 58
763 Paper size in PCL: 58
764 Image reduction feature in PCL: 58
765 Recording paper direction in PCL: 58
766 A4 wide printing in PCL: 58
767 Line per page in PCL: 58
768 Font source in PCL: 58
769 Font number in PCL: 58
770 Font pitch/point in PCL: 59
771 Symbol set in PCL: 59
772 Line breaks in PCL: 59
773 Auto continue mode: 59
774 Data timeout: 59
A Accessories
Document tray: 11
Output tray: 12
Address list: 88
Answering machine: 44
Approved users (Feature #532): 61
Auto continue mode (Feature #773): 59
Auto document feeder: 17, 33, 38
Auto IP (Feature #533): 61
Auto reduction (Feature #432): 55
B Basic features: 51
Broadcast programming list: 88
Broadcast transmission: 40
C Caller ID
Calling back: 47
Storing: 48
Caller ID list (Feature #216): 47
Character entry: 64
Cleaning: 83, 86
Collate hold (Feature #469): 57
Confirmation report (Feature #401): 38, 54
Connecting tone (Feature #416): 55
Connections: 15
LAN: 15
USB: 22
Contrast hold (Feature #462): 52
Copy: 32
Collation: 36
Enlarge: 33
N in 1:35
Poster: 35
Proof set: 36
Quick ID: 34
Reduce: 33
Reserve: 36
Copy features: 57
D Data timeout (Feature #774): 59
Date and time (Feature #101): 19
Default copy resolution (Feature #461): 57
Default gateway (Feature #503): 61
Default operation mode (Feature #463): 52
Delayed transmission (Feature #412): 54
DHCP mode (Feature #500): 61
Dialing mode (Feature #120): 16
Directory: 38
Display
Contrast (Feature #145): 51
Error messages: 68
Distinctive Ring service (Feature #430): 49
DNS server #1 (Feature #504): 61
DNS server #2 (Feature #505): 61
Document size: 17
Drum life: 90
Drum unit: 9
E ECM selection (Feature #413): 55
Envelope: 27
Error messages: 67, 68
Extension telephone: 43
F Fax activation code (Feature #434): 55
Fax features: 54
Fax number (Feature #103): 20
FAX ONLY mode: 42
FAX ring count (Feature #210): 52
Flash time (Feature #121): 51
Friendly reception (Feature #438): 55
H Handset unit (optional): 66
Help: 18
Basic settings: 18
Caller ID: 18
Copier: 18
Directory: 18
Errors: 18
Fax sending/receiving: 18
Feature list: 18
Q and A: 18
Reports: 18
HTTPD (Feature #534): 62
I IP address (Feature #501): 61
J Jams
Document: 81
Recording paper: 78
Journal report (Feature #402): 38, 88
Junk fax prohibitor: 45
L Label: 27
LAN features: 61
Language (Feature #110): 51
Logo (Feature #102): 20
M MAC address (Feature #508): 61
Machine name (Feature #507): 61
Manual input tray: 26
Memory reception alert (Feature #437): 55
Mode timer (Feature #464): 53
Multi-Function Station software
Activating: 24
Installing: 22
Uninstalling: 23
N Navigator directory
Sending faxes: 39
Storing: 38
Network features: 63
OCR software: 30
One-touch dial
Sending faxes: 39
Storing: 38
Optional handset unit: 66
Output tray setting
Copy (Feature #466): 57
Fax (Feature #441): 56
Overseas mode (Feature #411): 54
P Page layout hold (Feature #467): 57
Paper size
Paper input tray (Feature #380): 52
Password (Feature #155): 52
PC fax reception (Feature #443): 21
PC fax setting (Feature #442): 56
PCL
A4 wide printing (Feature #766): 58
Font number (Feature #769): 58
Font pitch/point (Feature #770): 59
Font source (Feature #768): 58
Image reduction (Feature #764): 58
Input tray (Feature #760): 58
Line breaks (Feature #772): 59
Line per page (Feature #767): 58
Number of copies (Feature #762): 58
Output tray (Feature #761): 58
Paper size (Feature #763): 58
Recording paper direction (Feature #765): 58
Symbol set (Feature #771): 59
PCL font list: 88
PC print features: 58
Power failure: 76
Power save (Feature #403): 52
Printer test list: 88
Programming: 50
Pull scan: 31
Push scan: 29
Q Quick scan: 38
Quick setup (Feature #100): 51
R Receiving faxes
Automatically: 42
Manually: 43
Recording paper: 13
Recording paper size: 89
Redialing: 37, 39
Reports
Address: 88
Broadcast programming: 88
Broadcast sending: 41
Caller ID: 52, 88
Confirmation: 38, 54
Journal: 38, 88
PCL font: 88
Power down: 76
Printer test: 88
Setup: 88
Telephone number: 88
Reset fax features (Feature #459): 56
Resolution: 32, 37
Ringer pattern (Feature #161): 19, 52
Ring pattern for Distinctive Ring (Feature #431): 49
S Scan features: 60
Scan mode (Feature #493): 60
Scanner glass: 17, 32, 37
Scan parameter hold (Feature #494): 60
Sending faxes
Broadcast: 41
From memory: 38
Manually: 37
Navigator directory: 39
One-touch dial: 39
Set fax default (Feature #459): 56
Setup list: 88
Storing
Broadcast: 40
Navigator directory: 38
One-touch dial: 38
Subnet mask (Feature #502): 61
T Telephone number list: 88
TEL mode: 43
Time adjustment (Feature #226): 52
Toner cartridge: 9
Toner life: 90
Toner save (Feature #482): 11, 53
Transparency: 26
V Volume: 19
Z Zoom hold (Feature #468): 57